

16-KANAL-MONO-AUDIOÜBERTRAGUNGSSYSTEM
16-CHANNEL MONO AUDIO TRANSMISSION SYSTEM
SYSTÈME DE TRANSMISSION AUDIO MONO 16 CANAUX
SISTEMA DI TRASMISSIONE AUDIO MONO A 16 CANALI
863–865MHz
ATS-16R Best.-Nr. 24.4680
ATS-16T Best.-Nr. 24.4690
BEDIENUNGSANLEITUNG • INSTRUCTION MANUAL
MODE D’EMPLOI • ISTRUZIONI PER L’USO • GEBRUIKSAANWIJZING
MANUAL DE INSTRUCCIONES • INSTRUKCJA OBSŁUGI • HASZNÁLATI UTASÍTÁS
SIKKERHEDSOPLYSNINGER • SÄKERHETSFÖRESKRIFTER • TURVALLISUUDESTA

2
wwwwww..iimmggssttaaggeelliinnee..ccoomm
®
Bevor Sie einschalten ...
Wir wünschen Ihnen viel Spaß mit
Ihrem neuen Gerät von „img Stage
Line“. Bitte lesen Sie diese Bedienungsanleitung vor dem Gebrauch
gründlich durch und heben Sie sie
für ein späteres Nachlesen auf.
Der deutsche T ext beginnt auf Seite4.
Before you switch on ...
We wish you much pleasure with your
new “img Stage Line” unit. Please
read these operating instructions
carefully prior to operating the unit
and keep them for later use.
The English text starts on page 8.
Avant toute utilisation ...
Nous vous souhaitons beaucoup de
plaisir à utiliser cet appareil “img
Stage Line”. Veuillez lire entièrement
cette notice d’utilisation avant la mise
en service et conservez-la pour une
consultation ultérieure.
La version française commence à la
page 12.
Prima di accendere ...
Vi auguriamo buon divertimento con il
Vostro nuovo apparecchio “img Stage
Line”. Vi preghiamo di leggere attentamente le presenti istruzioni prima
della messa in funzione e di conservarle per un uso futuro.
Il testo italiano comincia a pagina 16.
Alvorens u inschakelt ...
Wij wensen u veel plezier met uw
nieuw toestel van “img Stage Line”.
Lees deze bedieningshandleiding
grondig door, alvorens het toestel in
gebruik te nemen, en bewaar ze voor
latere raadpleging.
De Nederlandse tekst begint op pagina 20.
Przed Uruchomieniem ...
Życzymy zadowolenia z nowego
produktu “img Stage Line”. Prosimy
o uważne przeczytanie poniższej
instrukcji przed użyciem urządzenia.
Tekst polski zaczyna się na stronie 28.
D
A
CH
F
B
CH
NL
B
GB
I
PL
Antes de la utilización … ...
Le deseamos una buena utilización
para su nuevo aparato “img Stage
Line”. Por favor, lea este manual de
instrucciones detalladamente antes
de hacer funcionar la unidad y guárdelo para una utilización posterior.
El texto en español empieza en la
página 24.
E
Mielőtt bekapcsolná ...
Reméljük, elégedett lesz az “img
Stage Line” új berendezésével. Kérjük, figyelmesen olvassa el a használati utasítást mielőtt üzembe helyezné a készüléket, és tartsa kéznél
azt a későbbi használat miatt.
A magyar nyelvű szöveg a 33. oldalon kezdődik.
H
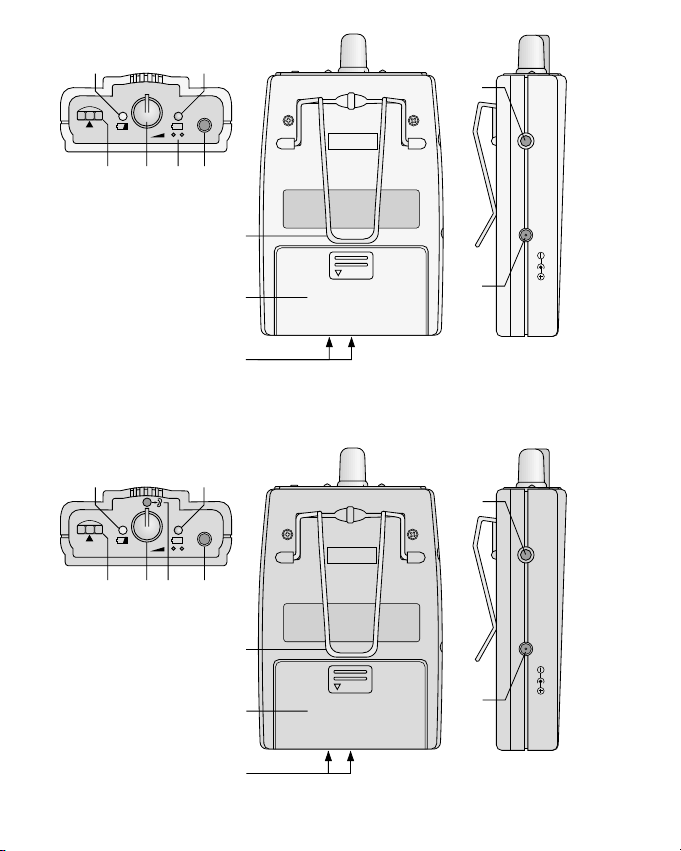
➀
0
1F
TX
CH.
PL MIC.
OFF
3
2
31456
OPEN
AUX IN DC IN 5V
7
8
9
10
11
0
1F
RX
CH.
PL EAR.
OFF
2
3145 6
OPEN
AUX OUT DC IN 5V
7
8
9
10
11
ATS-16T
➁
ATS-16R
Bitte klappen Sie die Seite 3 heraus. Sie
sehen dann immer die beschriebenen Bedienelemente und Anschlüsse.
1 Übersicht der Bedienelemente und
Anschlüsse
(Abb. 1: Sender, Abb. 2: Empfänger)
1 zweifarbige Betriebsanzeige:
leuchtet im Betrieb grün
beim Sender: zur Anzeige, dass ein
Funksignal gesendet wird;
beim Empfänger: wenn ein Funksig-
nal vom Sender empfangen wird;
wechselt sie auf Rot, sind die Akkus
oder Batterien fast erschöpft
2 rote Batteriestatus-Anzeige:
leuchtet, wenn die Akkus oder Batterien vollständig erschöpft sind
3 Drehrad zur Auswahl des Übertragungs-
kanals
4 Ein-/Ausschalter und Lautstärkeregler
5 am Sender:
internes Mikrofon; wird bei Anschluss
der Buchse MIC. (6) oder der Buchse
AUX IN (10) abgeschaltet
am Empfänger:
Öffnung zum Einstecken des Ohrhörers ET-16* (Akustikschlauch mit Ohrpassstück, leitet den Schall des internen Lautsprechers direkt zum Ohr)
6 am Sender:
3,5-mm-Klinkenbuchse MIC. zum Anschluss des mitgelieferten Krawattenmikrofons oder des Nackenmikrofons
ECM-16N*; bei Anschluss der Buchse
AUX IN (10) wird dieser Mikrofoneingang abgeschaltet
am Empfänger:
3,5-mm-Klinkenbuchse EAR. zum Anschluss des mitgelieferten Ohrhörers;
bei Anschluss der Buchse wird der
interne Lautsprecher abgeschaltet
7 Gürtelklemme
8 Batteriefachdeckel
9 Kontakte zum Aufladen der eingesetzten
Akkus über die Ladestation ATS-16PS*
oder den Ladekoffer ATS-36C*
10 am Sender:
Line-Pegel-Eingangsbuchse AUX IN
(3,5-mm-Klinke, mono) zum Anschluss
eines Audiogerätes (z.B. CD-Spieler)
am Empfänger:
Line-Pegel-Ausgangsbuchse AUX OUT
(3,5-mm-Klinke, stereo) zum Anschluss
eines Verstärkers
11 Buchse für den Anschluss eines Netz-
geräts mit einer Ausgangsspannung von
5V [Maße des Anschlusssteckers:
3,5 / 1,3 mm (Ø außen / innen), Innenkontakt = Pluspol]
a zur Stromversorgung (alternativ zum
Betrieb über Akkus oder Batterien)
b oder zum Aufladen von eingesetzten
Akkus
2 Wichtige Hinweise für den
Gebrauch
Das Gerät entspricht allen erforderlichen
Richtlinien der EU und ist deshalb mit
gekennzeichnet.
●
Das Gerät ist nur zur Verwendung im Innenbereich geeignet. Schützen Sie es vor
Feuchtigkeit und Hitze (zulässiger Einsatztemperaturbereich 0–40°C).
●
Verwenden Sie für die Reinigung nur ein
trockenes, weiches Tuch, niemals Chemikalien oder Wasser.
●
Setzen Sie immer zwei Akkus bzw. Batterien des gleichen Typs ein.
●
Nehmen Sie bei längerem Nichtgebrauch
(z. B. länger als eine Woche) die Akkus/
ACHTUNG: Auf keinen Fall ein Netzgerät anschließen, wenn sich nicht wiederaufladbare Batterien im Batteriefach befinden!
4
D
A
CH
*als Zubehör aus dem Programm von „img Stage Line“ erhältlich
Batterien heraus. So bleibt das Gerät bei
einem eventuellen Auslaufen der Akkus/
Batterien unbeschädigt.
●
Wird das Gerät zweckentfremdet, falsch
bedient oder nicht fachgerecht repariert,
kann keine Haftung für daraus resultierende Sach-/Personenschäden und keine Garantie für das Gerät übernommen werden.
3 Einsatzmöglichkeiten
Der Sender ATS-16T bildet in Verbindung mit
einem oder mehreren Empfänger/n ATS-16R
ein mobiles Funk-Übertragungssystem für
Sprache und Musik. Das System eignet sich
speziell für Anwendungen, bei denen das
Signal einer Tonquelle mehreren Personen
zugeführt werden soll, z. B. für Gruppenführungen oder mehrsprachige Vorträge. Für die
Funkübertragung stehen 16 Kanäle im Frequenzbereich 863 – 865 MHz zur Verfügung.
(Zur Nutzung mehrerer Kanäle gleichzeitig
siehe Hinweis in Kap. 7.)
3.1 Konformität und Zulassung
Hiermit erklärt MONACOR INTERNATIONAL,
dass sich der Sender ATS-16T in Übereinstimmung mit den grundlegenden Anforderungen und den übrigen einschlägigen Bestimmungen der Richtlinie 1995/ 5/ EG befindet. Die Konformitätserklärung kann im Internet über die Homepage von MONACOR
INTERNATIONAL (www.imgstageline.com)
abgerufen werden.
Das System ist für den Betrieb in den EU-
und EFTA-Staaten allgemein zugelassen und
anmelde- und gebührenfrei.
4 Stromversorgung
Der Sender und der Empfänger können über
Akkus, Batterien oder ein 5-V-Netzgerät gespeist werden.
4.1 Akkus oder Batterien
Zwei 1,2-V-NiMH-Akkus liegen jedem Gerät
bei. Zum bequemen und schnellen Aufladen
der Akkus sind als Zubehör erhältlich:
– die Ladestation ATS-16PS
(für das Aufladen der Akkus von bis zu
2 Sendern/Empfängern gleichzeitig)
– der Transport- und Ladekoffer ATS-36C
(für das Aufladen der Akkus von bis zu
36 Sendern/Empfängern gleichzeitig)
Ein (langsameres) Aufladen der eingesetzten
Akkus ist auch über die Buchse DC IN 5V
(11) möglich – siehe dazu Kap. 4.2.
Anstelle der Akkus können auch zwei 1,5-VMignon-Batterien (AA) verwendet werden.
Zum Einsetzen der Akkus/Batterien
1) Die markierte Fläche auf dem Batterie-
fachdeckel (8) leicht eindrücken und den
Deckel gleichzeitig nach unten abziehen.
2) Die Akkus/Batterien, so herum wie im
Fach aufgedruckt, einsetzen.
3) Den Deckel aufsetzen und einrasten.
4.2 Netzgerät
Ein Netzgerät mit einer Ausgangsspannung
von 5V über einen Kleinspannungsstecker
mit den Maßen 3,5/1,3mm (Ø außen/ innen)
an die Buchse DC IN 5V (11) anschließen.
Am Innenkontakt des Steckers muss sich der
Pluspol befinden.
Über ein an dieser Buchse angeschlossenes Netzgerät lassen sich auch eingesetzte
Akkus laden. Für die beiliegenden Akkus beträgt die Ladezeit ca. 10 Stunden.
ACHTUNG: Auf keinen Fall ein Netzgerät
an die Buchse DC IN 5V (11) anschließen,
wenn sich Batterien im Batteriefach befinden! Nicht wiederaufladbare Batterien können auslaufen oder explodieren.
Soll das Gerät endgültig aus dem Betrieb
genommen werden, übergeben Sie es zur
umweltgerechten Entsorgung einem örtlichen Recyclingbetrieb.
Werfen Sie verbrauchte Batterien/defekte Akkus
nicht in den Hausmüll, sondern geben Sie sie nur in
den Sondermüll (z.B. Sammelbehälter bei Ihrem Einzelhändler).
5
D
A
CH
5 Signalquelle wählen
Der Sender lässt sich mit einem Mikrofon betreiben, es kann jedoch auch ein Gerät mit
Line-Ausgangspegel angeschlossen werden.
a Mikrofonbetrieb:
– entweder das interne Mikrofon (5) ver-
wenden
– oder ein externes Mikrofon, das beilie-
gende Elektret-Krawattenmikrofon oder
das als Zubehör erhältliche Nackenmikrofon ECM-16N, an die Buchse MIC.
(6) anschließen. Bei Anschluss der
Buchse ist das interne Mikrofon abgeschaltet. Den Windschutz auf das Mikrofon aufsetzen und das Mikrofon am
Körper anbringen: das Krawattenmikrofon über seinen Halter an der Kleidung
(z.B. am Revers) festklemmen bzw. das
Nackenmikrofon um den Hals legen.
b Betrieb mit einem Audiogerät:
Den Ausgang des Audiogeräts (z. B. Kassetten- oder MD-Recorder, CD-Spieler)
über einen 3,5-mm-Klinkenstecker an die
Buchse AUX IN (10) anschließen. Bei Anschluss der Buchse werden sowohl das interne Mikrofon als auch ein externes Mikrofon an der Buchse MIC. (6) abgeschaltet.
6 Art der Tonwiedergabe wählen
Der Empfänger bietet unterschiedliche Möglichkeiten der Tonwiedergabe.
a über den internen Lautsprecher:
Der Schall des Lautsprechers kann entweder frei abgestrahlt oder über den als
Zubehör erhältlichen AkustikschlauchOhrhörer ET-16 direkt zum Ohr geleitet
werden. Den Akustikschlauch in die dafür
vorgesehene Öffnung (5) am Empfänger
stecken und das gelbe Passstück so tief
in das Ohr setzen, dass ein sicherer Halt
gewährleistet ist.
b über den beiliegenden Ohrhörer
(Modell ES-16, auch optional als Einzelartikel erhältlich):
Den Ohrhörer an die Buchse EAR. (6) anschließen und an der Ohrmuschel be-
festigen. Bei Anschluss der Buchse EAR.
ist der interne Lautsprecher abgeschaltet.
c über eine Verstärkeranlage:
Den Verstärker über einen 3,5-mm-Klinkenstecker an die Stereo-Buchse AUX
OUT (10) anschließen.
Hinweis: Der interne Lautsprecher bleibt
bei Anschluss der Buchse AUX OUT eingeschaltet. Soll er abgeschaltet werden,
einen 3,5-mm-Klinkenstecker in die Buchse EAR. (6) stecken.
7 Inbetriebnahme
1) Am Sender mit dem Drehrad (3) aus den
16 Kanälen (0 bis F) den Kanal auswählen, auf dem gesendet werden soll: Das
Rad so drehen, dass der Pfeil darunter auf
den gewünschten Kanal zeigt (so ist z. B.
in Abb. 1 der Kanal 0 eingestellt).
Das Drehrad (3) des Empfängers auf
den gleichen Kanal einstellen.
2) Die Geräte über ihre Klemmen (7) an der
Kleidung befestigen, z.B. am Gürtel.
Für die Befestigung der Geräte am Körper sind außerdem als Zubehör erhältlich:
– ATS-16BAG, Schutztasche, die über
eine Schlaufe am Gürtel befestigt werden kann
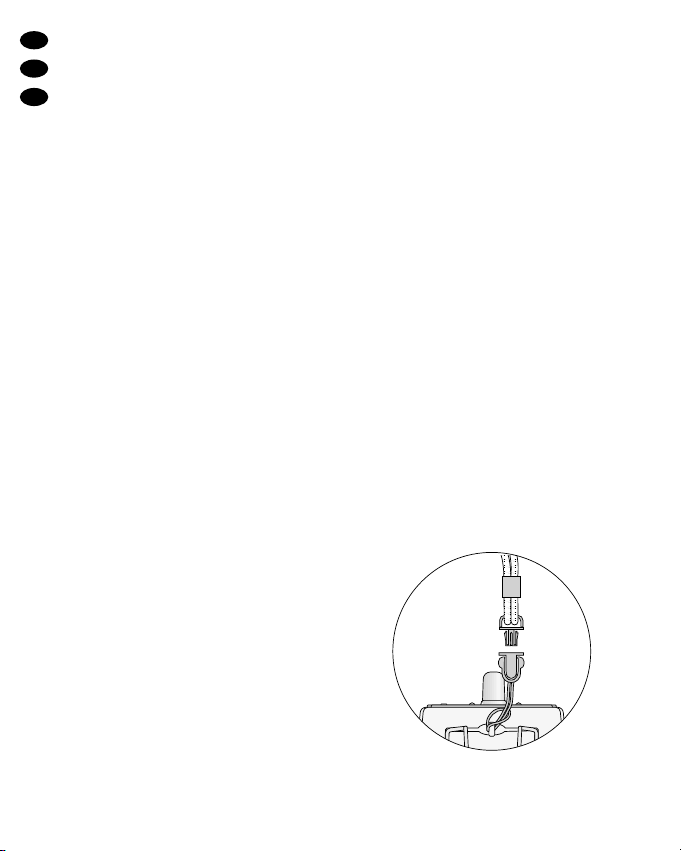
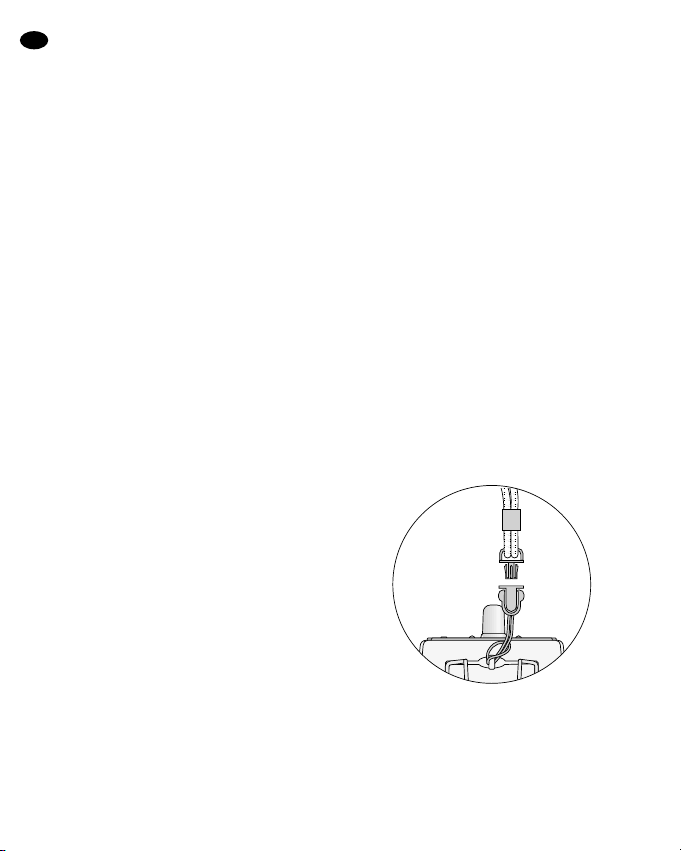
– ATS-16CORD, Hals-Tragekordel (zur
Befestigung am Gerät siehe Abb. 3)
3) Zum Einschalten der Geräte den Regler
(4) von der Aus-Position OFF (Linksanschlag) nach rechts aufdrehen:
6
D
A
CH
➂

Am Sender leuchtet die LED TX (1) grün
und signalisiert damit, dass ein Funksignal gesendet wird.
Am Empfänger leuchtet erst die rote LED
PL (2) kurz auf. Danach leuchtet die
LED RX (1) grün und signalisiert damit,
dass ein Funksignal vom Sender empfangen wird. (Leuchtet sie nicht, überprüfen, ob Sender und Empfänger auf
den gleichen Kanal eingestellt sind).
Wechselt die LED TX bzw. RX (1) auf Rot,
sind die Akkus/Batterien fast erschöpft
und sollten bald ersetzt werden. Erlischt
die LED TX bzw. RX und leuchtet stattdessen die LED PL (2), sind die Akkus /
Batterien endgültig erschöpft und müssen
aufgeladen bzw. ersetzt werden.
4) Mit dem Regler (4) am Sender die Lautstärke für das gesendete Audiosignal einstellen und am Empfänger die Wiedergabelautstärke einstellen.
5) Bei schlechtem oder gestörtem Empfang
überprüfen, ob
a auf einem anderen Übertragungskanal
der Empfang besser ist.
b der Abstand zwischen Sender und
Empfänger zu groß ist.
c der Empfang durch Gegenstände in
der Übertragungsstrecke gestört ist.
6) Zum Ausschalten der Geräte den Regler
(4) ganz nach links auf OFF drehen:
Am Sender leuchtet die LED PL für einige
Sekunden auf und erlischt dann ganz.
Am Empfänger blitzt die LED PL kurz auf.
Hinweis für den Mehrkanal-Betrieb
(Betrieb mehrerer ATS-16-Systeme gleichzeitig)
Es lassen sich 5 bis max. 8 Übertragungssysteme, die auf unterschiedlichen Kanälen
senden, gleichzeitig einsetzen. Die Anzahl
der Kanäle, die sich parallel nutzen lassen
hängt dabei von dem Abstand zwischen den
einzelnen Übertragungssystemen, von möglichen ortsgebundenen HF-Störquellen und
anderen örtlichen Gegebenheiten ab. Bei
Verwendung mehrerer Systeme die Kanäle in
aufsteigender Reihenfolge belegen (z. B. für
8 Systeme die Kanäle 0 – 7) und den räumlichen Abstand zwischen den Systemen möglichst groß halten.
8 Technische Daten
Art des Systems: . . . . . PLL-Mono-Funksystem für
Audio-Übertragung
Funkfrequenzbereich: . 863– 865MHz, aufgeteilt in
16 Kanäle
Reichweite: . . . . . . . . . min. 50 m
Rauschunterdrückung: Pilotton- und Noise-Squelch
Einsatztemperatur: . . . 0– 40° C
Stromversorgung
je Gerät: . . . . . . . . . . . über die zwei beiliegenden
1,2-V-NiMH-Akkus oder über
zwei 1,5-V-Mignon-Batterien
(AA) oder über +5V an der
Buchse DC IN 5V
Sender ATS-16T
Sendeleistung: . . . . . . ≤10mW (EIRP)
Audioanschlüsse
Mikrofon: . . . . . . . . . 3,5-mm-Klinke, mono
Line-Eingang: . . . . . 3,5-mm-Klinke, mono
Abmessungen: . . . . . . 66 x 111 x 35 mm
Gewicht: . . . . . . . . . . . 85 g (ohne Akkus)
Empfänger ATS-16R
Ohrhörer
ES-16 (liegt bei): . . . Mono-Ohrhörer, dynamisches
32-Ω-System mit 1,2-m-Kabel
und 3,5-mm-Klinkenstecker
ET-16 (optional): . . . Akustikschlauch mit Silikon-
Ohrpassstück, Länge 1m
Line-Ausgang: . . . . . . . 3,5-mm-Klinke, stereo
Abmessungen: . . . . . . 66 x 111 x 35 mm
Gewicht: . . . . . . . . . . . 100 g (ohne Akkus)
Änderungen vorbehalten.
7
D
A
CH
Diese Bedienungsanleitung ist urheberrechtlich für MONACOR®INTERNATIONALGmbH & Co. KG
geschützt. Eine Reproduktion für eigene kommerzielle Zwecke – auch auszugsweise – ist untersagt.

Please unfold page 3. Thus you will always
be able to see the operating elements and
connections described.
1 Operating Elements and Connec-
tions
(fig. 1: transmitter, fig. 2: receiver)
1 Two-colour power LED:
shows green during operation
on the transmitter: to indicate transmission of a radio signal;
on the receiver: to indicate reception
of a radio signal from the transmitter;
when it changes to red, the (rechargeable) batteries are almost exhausted
2 Red battery status LED
lights up when the (rechargeable) batteries are completely exhausted
3 Rotary wheel for selecting the transmis-
sion channel
4 Power switch and volume control
5 On the transmitter:
internal microphone; will be switched
off when the jack MIC. (6) or the jack
AUX IN (10) is connected
On the receiver:
opening for inserting the earphone
ET-16* (acoustic tube with earpiece,
will transmit the sound of the internal
speaker directly to your ear)
6 On the transmitter:
3.5mm jack MIC. for connecting the
supplied tie clip microphone or the neck
microphone ECM-16N*; this microphone input will be switched off when
the jack AUX IN (10) is connected
On the receiver:
3.5 mm jack EAR. for connecting the
supplied earphone; the internal speaker will be switched off when the jack is
connected
7 Belt clip
8 Battery compartment cover
9 Contacts for charging the inserted re-
chargeable batteries via the charging
station ATS-16PS* or the charging case
ATS-36C*
10 On the transmitter:
line level input jack AUX IN (3.5mm
jack, mono) for connecting an audio
unit (e.g. CD player)
On the receiver:
line level output jack AUX OUT(3.5mm
jack, stereo) for connecting an amplifier
11 Jack for connecting a power supply unit
with an output voltage of 5 V [dimensions of the connector plug: 3.5/ 1.3 mm
(Ø outside/inside), inner contact = positive pole]
a for power supply [as an alternative to
operation via (rechargeable) batteries]
b or for charging the inserted rechargea-
ble batteries
2 Important Notes
The unit corresponds to all required directives
of the EU and is therefore marked with .
●
The unit is suitable for indoor use only. Protect it against humidity and heat (admissible ambient temperature range 0–40°C).
●
For cleaning only use a dry, soft cloth;
never use chemicals or water.
●
Always insert two (rechargeable) batteries
of the same type.
●
If the unit is not used for a longer time (e.g.
for more than a week), remove the (rechargeable) batteries to prevent damage
to the unit in case of battery leakage.
ATTENTION: Never connect a power
supply unit with non-rechargeable batteries in the battery compartment!
8
GB
* available as an accessory from the “img Stage Line” range
●
No guarantee claims for the unit and no liability for any resulting personal damage or
material damage will be accepted if the unit
is used for other purposes than originally
intended, if it is not correctly operated or
not repaired in an expert way.
3 Applications
In combination with a receiver or several
receivers of the type ATS-16R, the transmitter ATS-16T creates a mobile wireless transmission system for speech and music. This
system is ideally suited for any application
where the signal of one audio source is transmitted to several people, e.g. for guided tours
or multilingual lectures. For wireless transmission, 16 channels in the frequency range
of 863 – 865MHz are available. (For simultaneous use of several channels see the note
in chapter 7.)
3.1 Conformity and Approval
Herewith, MONACOR INTERNATIONAL declare that the transmitter ATS-16T is in accordance with the basic requirements and
the other relevant regulations of the directive 1995/ 5/EC. The declaration of conformity can be found in the Internet via the
MONACOR INTERNATIONAL home page
(www.imgstageline.com).
The system is licence-free and generally
approved for operation in EU and EFTAcountries.
4 Power Supply
The transmitter and the receiver can be supplied with power via batteries, rechargeable
batteries, or a 5V power supply unit.
4.1 (Rechargeable) Batteries
Each unit is supplied with two 1.2VNiMH
rechargeable batteries. For fast and convenient charging of these batteries, the following
items are available as accessories:
– the charging station ATS-16PS
(for charging the batteries of up to 2 transmitters/receivers at the same time)
– the transport and charging case ATS-36C
(for charging the batteries of up to 36
transmitters/receivers at the same time)
A (slower) charging of the inserted batteries
is also possible via the jack DC IN 5V (11)
– see chapter 4.2.
Instead of the rechargeable batteries, two
1.5V AAbatteries may be used.
To insert the (rechargeable) batteries:
1) Slightly press the marked area on the bat-
tery compartment cover (8) while simultaneously pulling the cover downwards.
2) Insert the (rechargeable) batteries with
their positive and negative connections as
indicated in the compartment.
3) Replace the cover and lock it into place.
4.2 Power supply unit
Connect a power supply unit with an output
voltage of 5V via a low-voltage plug of the
dimensions 3.5/1.3 mm (Ø outside/inside) to
the jack DC IN 5V (11).The positive pole must
be at the inner contact of the plug.
Via a power supply unit connected to this
jack, inserted batteries can be charged. For
the rechargeable batteries supplied, the
charging time is approx. 10 hours.
ATTENTION: Never connect a power supply unit to the jack DC IN 5V (11) with nonrechargeable batteries in the battery compartment; they may leak or even explode!
If the unit is to be put out of operation definitively, take it to a local recycling plant for
a disposal which is not harmful to the environment.
Never throw exhausted batteries or defective rechargeable batteries into the household rubbish:
Always take them to a special waste disposal (e.g.
collecting container at your retailer).
9
GB
5 Selecting the Signal Source
The transmitter can be operated with a microphone, however, a unit with line output level
may also be connected.
a Microphone operation:
– Either use the internal microphone (5)
– or connect an external microphone, the
supplied electret tie clip microphone, or
the neck microphone ECM-16N available as an accessory to the jack MIC.
(6). When the jack is connected, the internal microphone will be switched off.
Place the windshield on the microphone
and attach the microphone to your
body: attach the tie clip microphone to
your clothes (e.g. lapel) via its clip or put
the neck microphone around your neck.
b Operation with an audio unit:
Connect the output of the audio unit (e.g.
cassette or MD recorder, CD player) via a
3.5mm plug to the jack AUX IN (10).
When connecting the jack, both the internal microphone and any external microphone connected to the jack MIC. (6) will
be switched off.
6 Selecting the Sound Reproduction
The receiver offers different ways to reproduce the sound.
a Via the internal speaker:
The sound of the speaker can either be
radiated freely or be directly transmitted to
your ear via the acoustic tube earphone
ET-16 available as an accessory. Place
the acoustic tube into the opening (5) provided on the receiver and insert the yellow
earpiece into your ear in such a way that a
tight fit is ensured.
b Via the supplied earphone
(model ES-16, also available as a separate item):
Connect the earphone to the jack EAR.
(6) and attach it to your ear. When connecting the jack EAR., the internal speaker will be switched off.
c Via an amplifier system:
Connect the amplifier via a 3.5mm plug to
the stereo jack AUX OUT(10).
Note: When connecting the jack AUX
OUT, the internal speaker is still switched
on. For switching it off, connect a 3.5 mm
plug to the jack EAR. (6).
7 Operation
1) With the rotary wheel (3) on the transmitter, select the channel for transmission
from the 16 channels (0 to F): Turn the
wheel in such a way that the arrow below
it will point to the desired channel (in fig. 1,
channel 0 is adjusted as an example).
Set the rotary wheel (3) on the receiver
to the same channel.
2) Attach the units to your clothes, e.g. your
belt, via their clips (7).
For attaching the units to your body,
the following items are available as additional accessories:
– ATS-16BAG, protective bag, to be at-
tached to your belt via a loop
– ATS-16CORD, neck cord (for attaching
it to the unit see fig. 3)
3) To switch on the units, turn the control (4)
clockwise from the position OFF (left stop):
On the transmitter, the LED TX (1) shows
green to indicate transmission of a
radio signal.
On the receiver, the red LED PL(2) shortly
lights up first. Then the LED RX (1)
10
GB
➂

shows green to indicate reception of a
radio signal from the transmitter. (If not,
check if the transmitter and receiver
have been adjusted to the same chan-
nel.)
When the LED TX or RX (1) changes to
red, the (rechargeable) batteries are
almost exhausted and should be replaced
soon. When the LED TX or RX is extinguished and the red LED PL (2) lights up
instead, the (rechargeable) batteries are
completely exhausted and must be
recharged or replaced.
4) With the control (4), adjust the volume for
the audio signal transmitted on the transmitter and the reproduction volume on the
receiver.
5) In case of poor or disturbed reception,
check if
a the reception can be improved by using
a different transmission channel.
b the transmitter and the receiver are too
far apart.
c the reception is disturbed by objects in
the transmission path.
6) To switch off the units, set the control (4)
to the left stop to OFF:
On the transmitter, the LED PL lights up
for a few seconds before it is completely extinguished.
On the receiver, the LED PLflashes shortly .
Note concerning multichannel operation
(Simultaneous operation of several ATS-16 systems)
It is possible to simultaneously operate 5 to
maximally 8 transmission systems transmitting on different channels. The number of
channels to be used in parallel depends on
the distance between the individual transmission systems, on any local RF interference
sources, and other local conditions. When
operating several systems, assign the channels in ascending order (e. g. for 8 systems,
use the channels 0–7) and keep the systems
as far apart as possible.
8 Specifications
Type of system: . . . . . . PLL mono wireless system for
audio transmission
Radio frequency range: 863 –865 MHz, divided into
16 channels
Range: . . . . . . . . . . . . min. 50 m
Noise suppression: . . . pilot tone and noise squelch
Ambient temperature: . 0 –40 °C
Power supply for
each unit: . . . . . . . . . . via the two supplied 1.2 V
NiMH rechargeable batteries
or via two 1.5V AA batteries or
via +5V at the jack DC IN 5V
Transmitter ATS-16T
Transmitting power: . . ≤ 10 mW (EIRP)
Audio connections
Microphone: . . . . . . 3.5mm jack, mono
Line input: . . . . . . . . 3.5 mm jack, mono
Dimensions: . . . . . . . . 66 x 111 x 35mm
Weight: . . . . . . . . . . . . 85g (without rechargeable
batteries)
Receiver ATS-16R
Earphone
ES-16 (supplied): . . mono earphone, dynamic
32Ωsystem with 1.2 m cable
and 3.5mm plug
ET-16 (optional): . . . acoustic tube with silicone
earpiece, length 1m
Line output: . . . . . . . . . 3.5mm jack, stereo
Dimensions: . . . . . . . . 66 x 111 x 35mm
Weight: . . . . . . . . . . . . 100g (without rechargeable
batteries)
Subject to technical modification.
11
GB
All rights reserved by MONACOR®INTERNATIONAL GmbH & Co. KG. No part of this instruction
manual may be reproduced in any form or by any means for any commercial use.
Ouvrez le présent livret page 3 de manière
à visualiser les éléments et branchements.
1 Eléments et branchements
(schéma 1 : émetteur, schéma 2 : récepteur)
1 LED, témoin de fonctionnement deux
couleurs :
brille en vert pendant le fonctionnement:
sur l’émetteur : pour indiquer la transmission d’un signal radio
sur le récepteur : pour indiquer qu’un
signal radio de l’émetteur est reçu
si elle passe en rouge, les accumulateurs
ou les batteries sont presque épuisés
2 LED rouge, témoin de l’état de la batterie :
brille lorsque les accumulateurs ou les
batteries sont complètement épuisés.
3 Molette pour sélectionner le canal de
transmission
4 Interrupteur Marche/Arrêt et réglage de
volume
5 Sur l’émetteur : microphone interne : est
déconnecté si la prise MIC. (6) ou la prise
AUX IN (10) est branchée
Sur le récepteur : ouverture pour placer
l’écouteur ET-16* (tube acoustique avec
embout pour l’oreille, dirige le son du hautparleur interne directement vers l’oreille)
6 Sur l’émetteur : prise jack 3,5 MIC. pour
brancher le microphone cravate livré ou
le microphone ECM-16N* à positionnement sur la nu-que ; cette entrée micro
est déconnectée si la prise AUX IN (10)
est branchée
Sur le récepteur : prise jack 3,5 femelle
EAR. pour brancher l’écouteur livré ; le
haut-parleur interne est déconnecté si la
prise est branchée
7 Pince de ceinture
8 Couvercle du compartiment batterie
9 Contacts pour charger les accumulateurs
insérés via la station de charge ATS16PS* ou le coffret de charge ATS-36C*
10 Sur l’émetteur: prise d’entrée niveau ligne
AUX IN (jack 3,5 mono) pour brancher un
appareil audio (par exemple lecteur CD)
Sur le récepteur : prise de sortie niveau
ligne AUX OUT (jack 3,5 stéréo), pour
brancher un amplificateur
11 Prise pour brancher un bloc secteur avec
une tension de sortie de 5V (dimensions
de la fiche : 3,5 / 1,3 mm (Ø extérieur/intérieur), contact intérieur = pôle plus)
a) pour l’alimentation (alternative au fonc-
tionnement via des accumulateurs ou
batteries)
b) ou pour charger les accumulateurs in-
sérés
2 Conseils importants d’utilisation
L’appareil répond à toutes les directives nécessaires de l’Union Européenne et porte
donc le symbole .
●
L’appareil n’est conçu que pour une utilisation en intérieur. Protégez-le de l’humidité
et de la chaleur (plage de température de
fonctionnement autorisée : 0–40°C).
●
Pour le nettoyer, utilisez uniquement un
chiffon sec et doux, en aucun cas de produits chimiques ou d’eau.
●
Placez toujours deux accumulateurs ou
batteries de même type.
●
En cas de non utilisation prolongée (p. ex.
supérieure à une semaine), retirez les
accumulateurs/batteries. On évite ainsi
que l’appareil ne soit endommagé si les
accumulateurs/batteries venaient à couler.
●
Nous déclinons toute responsabilité en cas
de dommages corporels ou matériels
résultants si l’appareil est utilisé dans un
but autre que celui pour lequel il a été
conçu, s’il n’est pas correctement utilisé ou
ATTENTION : En aucun cas, vous ne
devez relier un bloc secteur avec des
batteries non rechargeables dans le
compartiment batterie !
12
F
B
CH
* disponible comme accessoire dans la gamme “img Stage Line”

s’il n’est pas réparé par une personne
habilitée ; de même, la garantie deviendrait
caduque.
3 Possibilités d’utilisation
Combiné à un ou plusieurs récepteurs
ATS-16R, l’émetteur ATS-16T permet de
constituer un système de transmission mobile sans fil pour le discours et la musique. Le
système est particulièrement adapté à des
utilisations où le signal d’une source audio
doit être dirigé vers plusieurs personnes, par
exemple pour des visites guidées, conférences multilingues. Pour la transmission sans
fil, 16 canaux, dans la plage de fréquence
863–865MHz, sont disponibles. (V oir le conseil du chapitre 7 pour utiliser simultanément
plusieurs canaux).
3.1 Conformité et autorisation
Par la présente, MONACOR INTERNATIONAL déclare que l’émetteur ATS-16T se
trouve en conformité avec les exigences
fondamentales et les réglementations inhérentes à la directive 1995/5/ CE. Le certificat
de conformité peut être appelé via la page
d’accueil du site internet de MONACOR
INTERNATIONAL
(www.imgstageline.com ou
www.monacor.com).
Le système est autorisé dans l’Union
Européenne et les pays de l’A.E.L.E et ne
nécessite pas de déclaration.
4 Alimentation
L’émetteur et le récepteur sont alimentés par
des accumulateurs, batteries ou un bloc secteur 5V.
4.1 Accumulateurs ou batteries
Deux accumulateurs NiMH 1,2 V sont livrés
avec chaque appareil. Pour une charge rapide et confortable des accumulateurs, sont
disponibles en option :
– la station de charge ATS-16PS
(pour la charge des accumulateurs de 2
émetteurs/ récepteurs au plus simultanément)
– la valise de transport et de charge ATS-36C
(pour la charge des accumulateurs de 36
émetteurs/récepteurs au plus simultané-
ment)
Une charge (plus lente) des accumulateurs
insérés est également possible via la prise
DC IN 5V (11) – voir chapitre 4.2.
A la place des accumulateurs, il est également possible d’utiliser deux batteries 1,5 V
de type R6.
Pour insérer les accumulateurs/batteries :
1) Enfoncez légèrement la surface repérée
sur le couvercle du compartiment batterie
(8) et simultanément poussez le couvercle vers le bas.
2) Insérez les accumulateurs/batteries en
respectant les connexions plus et moins
comme indiqué dans le compartiment.
3) Replacez le couvercle et refermez.
4.2 Bloc secteur
Reliez un bloc secteur avec une tension de
sortie de 5V via une fiche alimentation aux
dimensions de 3,5/ 1,3 mm (Ø extérieur /intérieur) à la prise DC IN 5V (11). Le pôle plus
doit être au contact intérieur de la fiche.
Les accumulateurs insérés peuvent également être chargés via un bloc secteur relié
à cette prise. Pour les accumulateurs livrés,
la durée de charge est de 10 heures environ.
ATTENTION: En aucun cas vous ne devez
relier un bloc secteur à la prise DC IN 5 V
(11) si des batteries se trouvent dans le
compartiment batterie! Des batteries non
rechargeables pourraient couler ou exploser.
Lorsque l’appareil est définitivement retiré
du marché, vous devez le déposer dans
une usine de recyclage de proximité pour
contribuer à son élimination non polluante.
Ne jetez pas les batteries usagées/ accumulateurs
défectueux dans la poubelle domestique mais déposez-les dans un container spécifique ou reportez-les
à votre revendeur.
13
F
B
CH

5 Sélection de la source signal
L’émetteur peut fonctionner avec un microphone mais être également relié à un
appareil avec niveau de sortie ligne.
a) Fonctionnement avec un microphone :
soit utilisez le microphone interne (5)
soit reliez à la prise MIC. (6), un microphone externe, le microphone électret
cravate livré ou le microphone ECM-16N
à positionnement sur la nuque, disponible
en option. Si la prise est branchée, le
microphone interne est déconnecté. Placez la bonnette de protection anti-vent sur
le microphone, et placez le microphone
sur vous : fixez le micro cravate sur le
vêtement via sa pince (p.ex. au revers de
veste), ou placez le micro à positionnement sur la nuque, autour de la gorge.
b) Fonctionnement avec un appareil audio :
reliez la sortie de l’appareil audio (p. ex.
magnétophone ou enregistreur MD, lecteur CD) à la prise AUX IN (10) via une
fiche jack 3,5. Si la prise est connectée, le
microphone interne et tout microphone
externe branché à la prise MIC. (6) sont
déconnectés.
6 Sélection du type de restitution du
son
Le récepteur propose diverses possibilités de
restitution du son.
a) via le haut-parleur interne :
Le son du haut-parleur peut être diffusé
librement ou via l’écouteur tube acoustique ET-16 disponible en option, il peut
être dirigé directement vers l’oreille. Placez le tube acoustique dans l’ouverture
prévue (5) sur le récepteur, enfoncez
l’embout jaune dans l’oreille jusqu’à ce
qu’un bon maintien soit assuré.
b) via l’écouteur livré
(modèle ES-16, également disponible
comme accessoire séparé en option) :
Reliez l’écouteur à la prise EAR. (6) et
fixez l’oreillette. Le haut-parleur interne est
déconnecté si la prise EAR. est connectée.
c) via une installation d’amplificateur :
Reliez l’amplificateur via une fiche jack
3,5 mâle à la prise stéréo AUX OUT(10).
Conseil : Le haut-parleur interne reste allumé si la prise AUX OUT est connectée.
S’il doit être déconnecté, mettez une fiche
jack 3,5 mâle dans la prise EAR. (6).
7 Fonctionnement
1) Sur l’émetteur, avec la molette (3), sélectionnez parmi les 16 canaux de transmission (0 à F) le canal sur lequel l’émission
doit être effectuée : Tournez la molette
jusqu’à ce que la flèche en dessous
pointe le canal souhaité (p.ex. sur le
schéma 1, le canal 0 est réglé).
Réglez la molette (3) du récepteur sur
le même canal.
2) Fixez les appareils avec leurs pinces (7)
sur le vêtement, par exemple à la ceinture.
Pour la fixation des appareils sur le corps,
sont également disponibles en option :
– ATS-16BAG : sacoche de protection
pouvant être fixée à la ceinture via une
dragonne
– ATS-16CORD : cordelette tour de cou
(pour fixer à l’appareil, voir schéma 3)
3) Pour allumer les appareils, tournez le
réglage (4) de la position d’arrêt OFF
(butée de gauche) vers la droite:
Sur l’émetteur, la LED TX (1) brille en vert
et indique ainsi qu’un signal radio est
transmis.
14
F
B
CH
➂

Sur le récepteur, la LED rouge PL(2) brille
tout d’abord brièvement. Ensuite la
LED RX (1) brille en vert et indique
qu’un signal audio est reçu de l’émetteur. (Si elle ne brille pas, vérifiez si le
récepteur et l’émetteur sont réglés sur
le même canal).
Si la LED TX ou la LED RX (1) devient
rouge, les accumulateurs / batteries sont
presque épuisés et devraient être bientôt
remplacés. Lorsque la LED TX ou la LED
RX s’éteint, et que la LED PL (2) brille à la
place, les accumulateurs / batteries sont
définitivement épuisés et doivent être
rechargés ou remplacés.
4) Avec le réglage (4) sur l’émetteur, réglez le
volume pour le signal audio transmis et sur
le récepteur, réglez le volume de restitution.
5) Si la réception est mauvaise ou perturbée,
vérifiez si :
a) la réception est meilleure sur un autre
canal de transmission.
b) la distance entre l’émetteur et le récep-
teur est trop grande.
c) la réception est perturbée par des
objets se trouvant dans la zone de
transmission.
6) Pour éteindre les appareils, tournez le réglage (4) entièrement à gauche sur OFF :
Sur l’émetteur, la LED PL brille pendant
quelques secondes puis s’éteint totalement.
Sur le récepteur, la LED PL clignote
brièvement.
Conseil pour un fonctionnement multicanaux
(fonctionnement simultané de plusieurs systèmes ATS-16)
Il est possible d’utiliser simultanément de 5 à
8 systèmes de transmission au maximum,
émettant sur des canaux distincts. Le nombre
de canaux pouvant être utilisés en parallèle
dépend de la distance entre les systèmes de
transmission individuels, des sources HF pos-
sibles de perturbation générées par le lieu et
d’autres données de lieu. Si plusieurs systèmes sont utilisés, configurez les canaux dans
un ordre croissant (par exemple pour 8 systèmes, les canaux 0 à 7) et conservez la distance entre les systèmes la plus grande possible.
8 Caractéristiques techniques
Type de système : . . . . système PLL mono pour
transmission audio sans fil
Plage de fréquence
radio : . . . . . . . . . . . . . 863 –865 MHz, divisée en 16
canaux
Portée : . . . . . . . . . . . . min. 50 m
Elimination
interférences : . . . . . . . squelch et signal pilote
Température fonc. : . . . 0 –40 °C
Alimentation
par appareil : . . . . . . . . via les deux accumulateurs
NiMH 1,2V livrés ou via deux
batteries 1,5V de type R6 ou
via une tension +5V à la prise
DC IN 5V
Emetteur ATS-16T
Puissance émission : . ≤ 10mW (EIRP)
Branchements audio
Microphone : . . . . . . jack 3,5, mono
Entrée ligne : . . . . . jack 3,5, mono
Dimensions : . . . . . . . . 66 x 111 x 35 mm
Poids : . . . . . . . . . . . . . 85 g (sans accus)
Récepteur ATS-16R
Ecouteur
ES-16 (livré) : . . . . . écouteur mono, système
32Ωdynamique avec cordon
1,2m et fiche jack 3,5 mâle
ET-16 (en option) : . tube acoustique avec embout
en silicone, longueur 1m
Sortie ligne : . . . . . . . . jack 3,5 stéréo
Dimensions : . . . . . . . . 66 x 111 x 35 mm
Poids : . . . . . . . . . . . . . 100 g (sans accus)
Tout droit de modification réservé.
15
F
B
CH
Notice d'utilisation protégée par le copyright de MONACOR®INTERNATIONAL GmbH & Co. KG.
Toute reproduction même partielle à des fins commerciales est interdite.

Vi preghiamo di aprire completamente la
pagina 3. Così vedrete sempre gli elementi
di comando e i collegamenti descritti.
1 Elementi di comando e collega-
menti
(Fig. 1: Trasmettitore, fig. 2: Ricevitore)
1 Spia bicolore di funzionamento:
verde durante il funzionamento
sul trasmettitore: per indicare che
viene trasmesso un segnale radio
sul ricevitore: quando riceve un se-
gnale radio dal trasmettitore;
diventa rossa, se le batterie (ricaricabili
o non) sono quasi scariche
2 Spia rossa dello stato della batteria:
si accende quando le batterie (ricaricabili o non) sono completamente scariche
3 Manopola per scegliere il canale di tra-
smissione
4 Interruttore on/off e regolatore del volume
5 Sul trasmettitore:
Microfono interno; è disattivato in caso
di collegamento della presa MIC. (6) o
AUX IN (10)
sul ricevitore:
Apertura per inserire l’auricolare ET-16*
(tubo acustico con attacco per l’orecchio, porta il suono dell’altoparlante
interno direttamente all’orecchio)
6 Sul trasmettitore:
Presa jack 3,5 mm MIC per il collegamento del microfono cravatta in dotazione oppure del microfono con supporto per nuca ECM-16N*; se è
collegata la presa AUX IN (10), questo
ingresso per microfono è disattivato
sul ricevitore:
Presa jack 3,5mm EAR. per il collegamento dell’auricolare in dotazione; se è
collegata questa presa, l’altoparlante
interno è disattivato
7 Clip da cintura
8 Coperchio del vano batterie
9 Contatti per caricare le batterie ricari-
cabili tramite la stazione di carica ATS16PS* oppure tramite la valigetta di
carica ATS-36C*
10 Sul trasmettitore:
Ingresso Line AUX IN (presa jack
3,5 mm, mono) per il collegamento di
un apparecchio audio (p.es. lettore CD)
sul ricevitore:
Uscita Line AUX OUT (presa jack
3,5 mm, stereo) per il collegamento di
un amplificatore
11 Presa per il collegamento di un alimenta-
tore con tensione d’uscita di 5V [dimensioni spinotto: 3,5/1,3mm (Ø esterno/
interno), contatto interno = polo positivo]
a per l’alimentazione (in alternativa alle
batterie)
b oppure per caricare le batterie ricaricabili
2 Avvertenze importanti per l’impiego
L’apparecchio è conforme a tutte le direttive
richieste dell’UE e pertanto porta la sigla .
●
Lo strumento è previsto solo per l’uso
all’interno di locali. Proteggerlo dall’umidità
e dal calore (temperatura d’impiego ammessa fra 0 e 40°C).
●
Per la pulizia usare solo un panno morbido, asciutto; non impiegare in nessun
caso prodotti chimici o acqua.
●
Inserire sempre due batterie (ricaricabili o
non) dello stesso tipo.
●
Se lo strumento non viene utilizzato per un
tempo prolungato (p.es. oltre una settimana) conviene togliere le batterie per evitare che perdano, danneggiando lo strumento.
ATTENZIONE: Non collegare in nessun
caso un alimentatore se nel vano batterie
si trovano delle batterie non ricaricabili!
16
I
*disponibile come accessorio nel programma “img Stage Line”

●
Nel caso d’uso improprio, d’impiego scorretto o di riparazione non a regola d’arte
dell’apparecchio, non si assume nessuna
responsabilità per eventuali danni consequenziali a persone o a cose e non si assume nessuna garanzia per l’apparecchio.
3 Possibilità d’impiego
In combinazione con uno o più ricevitori ATS16R, il trasmettitore ATS-16T costituisce un
sistema mobile di trasmissione senza fili per
lingua parlata e per musica. Il sistema si
appresta in modo particolare per quelle applicazioni dove una sorgente sonora deve
essere portata e più persone, per esempio per
la guida di gruppi o per conferenze in più lingue. Per la trasmissione senza fili sono disponibili 16 canali nelle frequenze 863–865MHz.
(Per sfruttare più canali contemporaneamente
vedi la nota nel cap. 7.)
3.1 Conformità e omologazione
Con la presente, MONACOR INTERNATIONAL dichiara che il trasmettitore ATS-16T
è conforme ai requisiti di base e alle relative
norme della direttiva 1995/ 5/ CE. La dichiarazione di conformità può essere scaricata
in Internet dalla homepage di MONACOR
INTERNATIONAL(www.imgstageline.com).
Il sistema è omologato per il funziona-
mento negli stati UE e EFTAe non richiede
registrazione e tasse.
4 Alimentazione
Il trasmettitore e il ricevitore possono essere
alimentati con batterie, ricaricabili e non,
oppure con un alimentatore 5V.
4.1 Batterie ricaricabili e non
Sono in dotazione ad ogni apparecchio due
batterie ricaricabili 1,2 V al NiMH. Per ricaricare le batterie in modo comodo e rapido
sono disponibili come accessori:
– la stazione di carica ATS-16PS
(per ricaricare contemporaneamente le batterie di un massimo di 2 trasmettitori/ricevitori)
– la valigetta di trasporto e di ricarica
ATS-36C
(per ricaricare contemporaneamente le batterie di un massimo di 36 trasmettitori/rice-
vitori)
Una ricarica (più lenta) delle batterie montate
è possibile anche per mezzo della presa
DC IN 5V (11) – vedi cap. 4.2.
Al posto delle batterie ricaricabili si possono
utilizzare anche due batterie stilo 1,5V (AA).
Per inserire le batterie:
1) Premere leggermente sul punto marcato
del coperchio del vano batterie (8) e sfilare nello stesso tempo il coperchio verso
il basso.
2) Inserire le batterie come indicato nel vano
stesso.
3) Rimettere il coperchio e chiudere a scatto.
4.2 Alimentatore
Collegare un alimentatore con tensione d’uscita di 5V con la presa DC IN 5V (11), servendosi di uno spinotto per alimentazione DC
delle dimensioni 3,5/1,3mm (Ø esterno/
interno). Il polo positivo deve trovarsi sul contatto interno del connettore.
Attraverso un alimentatore collegato con
questa presa si possono anche caricare le
batterie montate. Per le batterie ricaricabili in
dotazione, la durata di carica è di 10 ore ca.
ATTENZIONE: Non collegare in nessun
caso un alimentatore con la presa DC IN 5V
(11) se nel vano batterie si trovano delle
batterie non ricaricabili! Le batterie non ricaricabili possono perdere o esplodere.
Se si desidera eliminare l’apparecchio definitivamente, consegnarlo per lo smaltimento ad un’istituzione locale per il riciclaggio.
Non gettare le batterie scariche o difettose nelle
immondizie di casa bensì negli appositi contenitori
(p.es. presso il vostro rivenditore).
17
I

5 Selezione della sorgente dei segnali
Il trasmettitore può essere comandato per
mezzo di un microfono, ma è possibile anche
il collegamento di un apparecchio con uscita
Line.
a Funzionamento con microfono:
– Utilizzare il microfono interno (5)
– oppure collegare con la presa MIC (6)
un microfono esterno, il microfono a
cravatta in dotazione o il microfono con
supporto per nuca ECM-16N, disponibile come accessorio. Se è collegata
questa presa, il microfono interno è
disattivato. Applicare la spugna antivento in dotazione sul microfono e fissare il microfono sul corpo: il microfono
a cravatta ai vestiti (p. es. al bavero)
per mezzo del suo clip; il microfono con
supporto per nuca intorno collo.
b Funzionamento con un apparecchio audio:
Collegare l’uscita dell’apparecchio audio
(p.es. registratore a cassette o MD, lettore
CD) con la presa AUX IN (10) servendosi
di un jack 3,5 mm. Se è collegata questa
presa, il microfono interno e anche un
microfono esterno collegato con la presa
MIC. (6) sono disattivati.
6 Selezione del tipo di riproduzione
audio
Il ricevitore offre diverse possibilità di riproduzione audio.
a tramite l’altoparlante interno:
Il suono dell’altoparlante può essere diffuso liberamente oppure può essere portato direttamente all’orecchio per mezzo
dell’auricolare a tubo acustico ET-16 disponibile come accessorio. Inserire il tubo
acustico nell’apposita apertura (5) sul
ricevitore e posizionare l’attacco giallo
dentro l’orecchio in modo da garantire una
tenuta sicura.
b tramite l’auricolare in dotazione
(modello ES-16, disponibile anche come
articolo singolo):
Collegare l’auricolare con la presa EAR.
(6) e fissarlo al padiglione dell’orecchio.
Se è collegata la presa EAR. l’altoparlante
interno è disattivato.
c tramite un impianto di amplificazione:
Collegare l’amplificatore con la presa stereo AUX OUT (10) servendosi di un jack
3,5mm.
N.B.: L’altoparlante interno rimane attivato se è collegata la presa AUX OUT. Per
disattivarlo inserire un jack 3,5 mm nella
presa EAR. (6).
7 Messa in funzione
1) Con la manopola (3) scegliere il canale per
la trasmissione fra i 16 canali disponibili (0
a F): girare la manopola in modo tale che la
freccia sottostante indichi il canale desiderato (p.es., in fig. 1 è impostato il canale 0).
Impostare lo stesso canale con la
manopola (3) del ricevitore.
2) Fissare gli apparecchi ai vestiti, p. es. alla
cintura, per mezzo del clip (7).
Per fissare gli apparecchi sul corpo
sono disponibili inoltre come accessori:
– ATS-16BAG, borsa protettiva che può
essere fissata alla cintura per mezzo di
un passante
– ATS-16CORD, tracolla (da fissare sul-
l’apparecchio, vedi fig. 3)
3) Per accendere gli apparecchi girare il
regolatore (4) dalla posizione OFF (tutto a
sinistra) a destra:
18
I
➂

Sul trasmettitore, il LED TX (1) si accende
di color verde segnalando in tal modo
che viene inviato un segnale radio.
Sul ricevitore si accende inizialmente il
LED rosso PL (2) per un breve tempo,
quindi il LED RX (1) si accende di color
verde segnalando in tal modo che
riceve un segnale radio dal trasmettitore. (Se non si accende occorre controllare se su trasmettitore e ricevitore è
impostato lo stesso canale).
Se i LED risp. TX e RX (1) diventano rossi,
vuol dire che le batterie sono quasi scariche e che dovrebbero essere sostituite. Se
si spegne il LED TX o RX e se si accende
invece il LED PL(2), vuol dire che le batterie sono scariche definitivamente e che
devono essere ricaricate o sostituite.
4) Con il regolatore (4), sul trasmettitore
impostare il volume per il segnale audio
inviato e sul ricevitore il volume per la
riproduzione.
5) In caso di ricezione cattiva o disturbata
controllare se
a la ricezione è migliore con un altro
canale di trasmissione.
b la distanza fra trasmettitore e ricevitore
è troppo grande.
c la ricezione è disturbata da oggetti
sulla via di trasmissione.
6) Per spegnere gli apparecchi, girare il
regolatore (4) tutto a sinistra su OFF:
Sul trasmettitore il LED PL si accende per
alcuni secondi e si spegne poi.
Sul ricevitore, il LED PL si presenta con
un breve lampo.
Note per il funzionamento multicanale
(funzionamento contemporaneo di più sistemi ATS-16)
Si possono usare contemporaneamente da
5 a 8 sistemi di trasmissione che utilizzano
canali differenti. Il numero di canali che si
possono impiegare nello stesso tempo dipende dalla distanza fra i singoli sistemi di
trasmissione, da possibili sorgenti locali di
interferenze HF e da altre circostanze locali.
Se si usano più sistemi, occupare i canali in
ordine crescente (p.es. per 8 sistemi i canali
0–7) e tenere i sistemi con la massima
distanza possibile.
8 Dati tecnici
Tipo del sistema: . . . . . Sistema radio PLL mono per
trasmissione audio
Gamma delle
radiofrequenze: . . . . . . 863–865 MHz, suddivisi in
16 canali
Portata: . . . . . . . . . . . . min. 50 m
Soppressione fruscio: . tono pilota e noise-squelch
Temperatura d’esercizio: 0– 40° C
Alimentazione
per ogni apparecchio: . con le due batterie ricaricabili
al NiMH 1,2V in dotazione
oppure con due batterie stilo
(AA) 1,5V oppure con +5V
alla presa DC IN 5V
Trasmettitore ATS-16T
Potenza di trasmissione: ≤ 10 mW (EIRP)
Collegamenti audio
Microfono: . . . . . . . . jack 3,5 mm, mono
Ingresso Line: . . . . . jack 3,5 mm, mono
Dimensioni: . . . . . . . . . 66 x 111 x 35 mm
Peso: . . . . . . . . . . . . . . 85 g (senza batterie)
Ricevitore ATS-16R
Auricolare
ES-16 (compreso): . auricolare mono, sistema
dinamico a 32Ωcon cavo di
1,2m e con jack 3,5mm
ET-16 (opzionale): . . tubo acustico con attacco in
silicone per l’orecchio,
lunghezza 1m
Uscita Line: . . . . . . . . . jack 3,5 mm, stereo
Dimensioni: . . . . . . . . . 66 x 111 x 35 mm
Peso: . . . . . . . . . . . . . . 100 g (senza batterie)
Con riserva di modifiche tecniche.
19
I
La MONACOR®INTERNATIONALGmbH & Co. KG si riserva ogni diritto di elaborazione in qualsiasi forma
delle presenti istruzioni per l’uso. La riproduzione – anche parziale – per propri scopi commerciali è vietata.

Vouw bladzijde 3 helemaal open, zodat u
steeds een overzicht hebt van de bedieningselementen en de aansluitingen.
1 Overzicht van de bedieningsele-
menten en aansluitingen
(Figuur 1: zender, figuur 2: ontvanger)
1 tweekleurige POWER-LED:
licht groen op tijdens het gebruik
bij de zender: om aan te geven dat
een radiosignaal wordt verzonden;
bij de ontvanger: om aan te geven
dat een radiosignaal van de zender
wordt ontvangen;
als de LED rood oplicht, zijn de accu’s
of batterijen bijna leeg
2 rode LED voor batterijstatus:
licht op, wanneer de accu’s of batterijen
volledig leeg zijn
3 Draaiknop om het transmissiekanaal te
selecteren
4 POWER-schakelaar en volumeregelaar
5 op de zender:
ingebouwde microfoon; wordt bij aansluiting op de jack MIC. (6) of de jack
AUX IN (10) uitgeschakeld
op de ontvanger:
jack om de oortelefoon ET-16* in te
pluggen (snoer met oortje, stuurt het
geluid van de ingebouwde luidspreker
direct naar het oor)
6 op de zender:
3,5 mm-jack MIC. voor aansluiting van
de bijgeleverde dasspeldmicrofoon of
de halsmicrofoon ECM-16N*; bij aansluiting op de jack AUX IN (10) wordt
deze microfooningang uitgeschakeld
op de ontvanger:
3,5mm-jack EAR. voor aansluiting van
de bijgeleverde oortelefoon; bij aansluiting op de jack wordt de ingebouwde luidspreker uitgeschakeld
7 Riemclip
8 Deksel van het batterijvakje
9 Contacten om de aangebrachte batterij
op te laden via het laadstation A TS-16PS*
of de laadkoffer ATS-36C*
10 op de zender:
lijnniveau-ingangsjack AUX IN (3,5mmjack, mono) om een audioapparaat
(b.v. cd-speler) aan te sluiten
op de ontvanger:
lijnniveau-uitgangsjack AUX OUT
(3,5 mm-jack, stereo) om een versterker aan te sluiten
11 Jack voor de aansluiting van een neta-
dapter met een uitgangsspanning van
5V [afmetingen van de aansluitstekker:
3,5/1,3mm (buiten-/binnen-Ø), binnencontact is = positieve pool]
a voor voedingsspanning (alternatief voor
gebruik met accu’s of batterijen)
b of voor het opladen van aangebrachte
accu’s
2 Belangrijke gebruiksvoorschriften
Het apparaat is in overeenstemming met alle
vereiste EU-Richtlijnen en is daarom gekenmerkt met .
●
Het apparaat is enkel geschikt voor gebruik
binnenshuis. Vermijd uitzonderlijk warme
plaatsen en plaatsen met een hoge vochtigheid (toegestaan omgevingstemperatuurbereik: 0–40°C).
●
Verwijder het stof met een droge, zachte
doek. Gebruik zeker geen chemicaliën of
water.
●
Vervang steeds beide accu’s resp. batterijen door exemplaren van hetzelfde type.
●
Indien u het toestel voor een langere periode (b.v. langer dan een week) niet
gebruikt, dient u de accu’s/ batterijen eruit
LET OP: Sluit in geen geval een netadapter aan, wanneer er zich niet-oplaadbare batterijen in het batterijvak bevinden!
20
NL
B
*als toebehoren uit het gamma van “img Stage Line” verkrijgbaar

te nemen. Zo blijft het apparaat onbeschadigd bij eventueel uitlopen van de accu’s/
batterijen.
●
In geval van ongeoorloofd gebruik, foutieve bediening of van herstelling door een
niet-gekwalificeerd persoon vervalt de
garantie en de verantwoordelijkheid voor
hieruit resulterende materiële of lichamelijke schade.
3 Toepassingen
De zender ATS-16T vormt in combinatie met
één of meerdere ontvangers ATS-16R een
mobiel radiotransmissiesysteem voor spraak
en muziek. Het systeem is bijzonder geschikt
voor toepassingen waarbij het signaal van
een geluidsbron naar meerdere personen
moet worden gestuurd, b.v. voor groepsrondleidingen of voordrachten in verschillende
talen. Voor de radiotransmissie staan er 16
kanalen in het frequentiebereik 863–865 MHz
ter beschikking. (Voor het gebruik van meerdere kanalen tegelijk raadpleegt u de aanwijzingen in hoofdstuk 7.)
3.1 Conformiteit en goedkeuring
Hiermee verklaart MONACOR INTERNATIONAL dat de zender ATS-16T in overeenstemming is met de basisvereisten en de
overige geldende bepalingen van de richtlijn
1995/5/ EG. De conformiteitsverklaring kan
op het internet via de website van MONACOR
INTERNATIONAL(www .imgstageline.de) worden gedownload.
Het gebruik van het system is algemeen toegelaten in de Lidstaten van de EU en de EFTA,
en is vrij van registratie en van taksen.
4 Voedingsspanning
De zender en de ontvanger kunnen via
accu’s, batterijen of een netadapter van 5 V
worden gevoed.
4.1 Accu’s of batterijen
Bij elk apparaat worden twee NIMH-accu’s
van 1,2 V geleverd. Om de accu’s comfortabel en snel op te laden, zijn als toebehoren
verkrijgbaar:
– het laadstation ATS-16PS
(voor het tegelijk opladen van de accu’s
van max. twee zenders/ontvangers)
– Transport- en laadkoffer ATS-36C
(voor het tegelijk opladen van de accu’s
van max. 36 zenders/ontvangers)
U kunt de gebruikte accu’s ook (langzamer)
opladen via de jack DC IN 5V (11) – zie hiervoor hoofdstuk 4.2.
In de plaats van accu’s kunt u ook twee mignon-batterijen van 1,5V (AA) gebruiken.
Om de accu’s/batterijen aan te brengen
1) Druk voorzichtig op het gemarkeerde
oppervlak van het batterijvakje (8) en
schuif het deksel tegelijk naar beneden los.
2) Breng de accu’s/batterijen aan zoals in
het vakje is voorgedrukt.
3) Plaats het deksel terug en vergrendel.
4.2 Netadapter
Sluit een netadapter met een uitgangsspanning van 5V via een laagspanningsstekker
[3,5/1,3mm (buiten-/binnen-Ø)] aan op de
jack DC IN 5V (11). Aan het binnencontact
van de stekker moet zich de positieve pool
bevinden.
Via een netadapter die op deze jack is
aangesloten, worden ook aangebrachte
accu’s opnieuw geladen. Voor de bijgeleverde accu’s bedraagt de laadtijd ca. 10 uur.
LET OP: Sluit in geen geval een netadapter
aan op de jack DC IN 5V (11), wanneer er
zich batterijen in het batterijvak bevinden!
Niet-oplaadbare batterijen kunnen uitlopen
of exploderen.
Wanneer het apparaat definitief uit bedrijf
wordt genomen, bezorg het dan voor verwerking aan een plaatselijk recyclagebedrijf.
Geef lege of defecte batterijen resp. accu’s niet met
het gewone huisvuil mee, maar verwijder ze als KGA
(bijvoorbeeld de inzamelbox in de gespecialiseerde
elektrozaak).
21
NL
B

5 De signaalbron kiezen
De zender kan met een microfoon worden
gebruikt, maar u kunt ook een apparaat met
lijnuitgangsniveau aansluiten.
a Gebruik met een microfoon:
– gebruik ofwel de ingebouwde micro-
foon (5)
– of sluit een externe microfoon, de bijge-
leverde electret-dasspeldmicrofoon of
de als toebehoren verkrijgbare halsmicrofoon ECM-16N aan op de jack
MIC. (6). Bij aansluiting op de jack
wordt de ingebouwde microfoon uitgeschakeld. Plaats het windscherm op de
microfoon en bevestig de microfoon:
de dasspeldmicrofoon klemt u op de
kleding vast (b.v. aan de revers) resp.
de halsmicrofoon hangt u om de nek.
b Gebruik met een audioapparaat:
Sluit de uitgang van het audioapparaat
(b.v. cassette- of MD-recorder, cd-speler)
via een 3,5 mm-stekker aan op de jack
AUX IN (10). Bij aansluiting op de jack
worden zowel de ingebouwde microfoon
als de externe microfoon op jack MIC. (6)
uitgeschakeld.
6 Het geluidssignaaltype kiezen
De ontvanger kan op verschillende manieren
geluid weergeven.
a via de ingebouwde luidspreker:
Het geluid van de luidspreker kan ofwel
vrij worden afgestraald of via de als toebehoren verkrijgbare oortelefoon ET-16 met
snoer direct naar het oor worden gestuurd.
Plug het snoer hiervoor in de voorziene
jack (5) op de ontvanger, en steek het gele
oorstuk in het oor tot het goed vastzit.
b via de bijgeleverde oortelefoon
(model ES-16, optioneel ook als detailartikel verkrijgbaar):
Sluit de oortelefoon aan op de jack EAR.
(6) en maak vast aan de oorschelp. Bij
aansluiting op de jack EAR. wordt de
ingebouwde luidspreker uitgeschakeld.
c via een versterkerinstallatie:
Sluit de versterker via een 3,5mm-stekker
aan op de stereojack AUX OUT(10).
Aanwijzing: De ingebouwde luidspreker
blijft bij aansluiting op de jack AUX OUT
ingeschakeld. Als u de jacks wilt uitschakelen, plugt u een 3,5 mm-stekker in de
jack EAR. (6).
7 Ingebruikneming
1) Selecteer met de draaiknop (3) op de zender uit de 16 kanalen (0 tot F) het kanaal
naar waar moet worden gezonden: draai
met de knop tot de pijl eronder het gewenste kanaal aanwijst (zo bijvoorbeeld is in
figuur 1 het kanaal 0 ingesteld).
Stel de draaiknop (3) van de ontvanger
in op hetzelfde kanaal.
2) Bevestig de apparaten met hun klemmen
(7) aan de kleding, b.v. aan de riem.
Voor de bevestiging van de apparaten
op het lichaam zijn bovendien volgende
toebehoren verkrijgbaar:
– ATS-16BAG, beschermtas die via een
lus aan de riem kan worden bevestigd
– ATS-16CORD, draagband (voor de be-
vestiging aan het apparaat rond de
nek, zie figuur 3)
3) Om de apparaten in te schakelen, draait u
de regelaar (4) vanuit de stand OFF (linker aanslag) naar rechts:
op de zender licht de LED TX (1) groen
op. Dit wijst erop dat er een radiosignaal wordt verzonden.
22
NL
B
➂

Op de ontvanger licht eerst de rode LED
PL (2) op. Daarna licht de LED RX (1)
groen op. Dit wijst erop dat er een
radiosignaal van de zender wordt ontvangen. (Als de LED niet oplicht, moet
u controleren of zender en ontvanger
op hetzelfde kanaal zijn ingesteld).
Als de LED TX resp. RX (1) rood wordt,
dan zijn de accu’s/batterijen bijna leeg en
moeten ze snel worden vervangen. Als de
LED TX resp. RX uitgaat en in de plaats
hiervan de LED PL (2) oplicht, dan zijn de
accu’s/ batterijen volledig leeg en moeten
ze worden opgeladen resp. vervangen.
4) Stel met de regelaar (4) op de zender het
volume voor het verzonden audiosignaal
in, terwijl u op de ontvanger het weergavevolume instelt.
5) Bij slechte of gestoorde ontvangst, controleert u of
a de ontvangst op een ander transmis-
siekanaal beter is.
b de afstand tussen de zender en ont-
vanger te groot is.
c de ontvangst door voorwerpen in de
transmissielijn verstoord is.
6) Om de apparaten uit te schakelen, draait
u de regelaar (4) helemaal naar links in de
stand OFF:
op de zender licht de LED PL gedurende
enkele seconden op, waarna ze volledig uitgaat.
Op de ontvanger knippert de LED PL kort
op.
Aanwijzing voor het gebruik van meerdere
kanalen
(Gebruik van meerdere ATS-16-systemen tegelijk)
U kunt tegelijk 5 tot max. 8 transmissiesystemen gebruiken die op verschillende kanalen
uitzenden. Het aantal kanalen dat u parallel
kunt gebruiken, hangt daarbij af van de
afstand tussen de afzonderlijke transmissiesystemen, van mogelijk lokale HF-storings-
bronnen en andere lokale omstandigheden.
Configureer de kanalen bij gebruik van meerdere systemen in stijgende volgorde (b.v.
voor 8 systemen de kanalen 0–7) en bewaar
een zo groot mogelijke fysieke afstand tussen de systemen.
8 Technische gegevens
Systeemtype: . . . . . . . PLL-monoradiosysteem voor
radiotransmissie
Radiofrequentiebereik: 863 –865 MHz, opgedeeld in
16 kanalen
Reikwijdte: . . . . . . . . . min. 50 m
Ruisonderdrukking: . . . piloottoon- en noise-squelch
Omgevingstemperatuur: 0 –40° C
Voedingsspanning
per apparaat: . . . . . . . via de twee bijgeleverde
NiMH-accu’s van 1,2V
of via wee mignonbatterijen
(AA) van 1,5V of via +5V
op de jack DC IN 5V
Zender ATS-16T
Zendvermogen: . . . . . . ≤ 10 mW (EIRP)
Audio-aansluitingen
Microfoon: . . . . . . . . 3,5 mm-jack, mono
Lijningang: . . . . . . . 3,5 mm-jack, mono
Afmetingen: . . . . . . . . . 66 x 111 x 35mm
Gewicht: . . . . . . . . . . . 85 g (zonder accu’s)
Ontvanger ATS-16R
Oortelefoon
ES-16 (bijgeleverd): mono-oortelefoon, dynamisch
32 Ω-systeem met kabel van
1,2m en 3,5mm-stekker
ET-16 (optioneel): . . snoer met oortje in silicone,
lengte 1m
Lijnuitgang: . . . . . . . . . 3,5 mm-jack, stereo
Afmetingen: . . . . . . . . . 66 x 111 x 35mm
Gewicht: . . . . . . . . . . . 100 g (zonder accu’s)
Wijzigingen voorbehouden.
23
NL
B
Deze gebruiksaanwijzing is auteursrechterlijk beschermd voor MONACOR®INTERNATIONAL GmbH &
Co. KG. Reproductie voor eigen commerciële doeleinden, ook bij wijze van uitzondering, is niet toegestaan.

Por favor, consulte la página 3 para ver
todos los elementos operativos y conexiones descritas.
1 Elementos operativos y conexiones
(diagrama 1: transmisor, diagrama 2: receptor)
1 LED de potencia bicolor:
Se ve verde durante el funcionamiento
En el transmisor: para indicar la
transmisión de una señal de radio;
En el receptor: para indicar la recepción de una señal de radio desde el
transmisor;
Cuando cambia a rojo, las pilas (recargables) están casi gastadas
2 LED del estado de las pilas rojo
Se enciende cuando las pilas (recargables) están completamente gastadas
3 Ruedecilla giratoria para seleccionar el
canal de transmisión
4 Interruptor de encendido y control de
volumen
5 en el transmisor: micrófono interno; se
apagará cuando el jack MIC. (6) o el jack
AUX IN (10) esté conectado
en el receptor: abertura para insertar el
auricular ET-16* (tubo acústico con tapón
para el oído, transmite el sonido del altavoz interno directamente a su oído)
6 en el transmisor: jack MIC. 3,5 mm para
conectar el micrófono de solapa entregado o el micrófono de nuca ECM-16N*;
esta entrada de micrófono se apagará
cuando el jack AUX IN (10) esté conectado
en el receptor: jack EAR. 3,5mm para
conectar el auricular entregado; el altavoz
interno se apagará cuando el jack esté
conectado
7 Clip de cinturón
8 Tapa para el compartimiento de las pilas
9 Contactos para cargar las pilas recar-
gables insertadas, mediante el cargador
ATS-16PS* o la maleta de transporte con
función de carga ATS-36C*
10 en el transmisor: jack de entrada de nivel
de línea AUX IN (3,5mm jack, mono)
para conectar una unidad audio (por
ejemplo un reproductor CD)
en el receptor: jack de salida de nivel de
línea AUX OUT (3,5mm jack, estéreo)
para conectar un amplificador
11 Jack para conectar una unidad de ali-
mentación con una salida de voltaje de
5 V [dimensiones del enchufe del conector: 3,5/1,3mm (Ø exterior/interior),
contacto interior = polo positivo]
a para alimentación [como una alterna-
tiva al funcionamiento mediante pilas
(recargables)]
b o para carga de las pilas recargables
insertadas
2 Notas importantes
Esta unidad corresponde a todas las Directivas requeridas de la UE y por ello está marcada con .
●
La unidad sólo está indicada para un uso
en interior. Protéjala contra la humedad y
el calor (rango de temperatura ambiente
admisible 0–40°C).
●
Para la limpieza use sólo un paño seco y
suave; no use nunca productos químicos o
agua).
●
Introduzca siempre dos pilas (recargables)
del mismo tipo.
●
Si la unidad no es utilizada durante mucho
tiempo (por ejemplo más de una semana)
saque las pilas (recargables) para prevenir
daños en la unidad en caso de escape de
las pilas.
●
No se aceptará ninguna reclamación para
la unidad ni se asumirá ninguna responsa-
ATENCIÓN:No conecte nunca una unidad de alimentación con pilas no-recargables en el compartimiento de las pilas.
24
E
* Disponible como accesorio de la gama “img Stage Line”

bilidad en caso de daños personales o
materiales si la unidad es utilizada para
fines distintos de los que fueron originalmente concebidos, si no es correctamente
utilizada o si no es reparada de manera
experta.
3 Usos
Combinado con un receptor o varios receptores del tipo ATS-16R, el transmisor ATS-16T
crea un sistema de transmisión móvil sin hilo
para habla y música. Este sistema es ideal
para cualquier aplicación donde la señal de
una fuente de audio se transmita a varias
personas, por ejemplo para guías turísticos o
conferencias multilingües. Para la transmisión sin hilo están disponibles 16 canales en
la gama de frecuencia de 863–865MHz.
(Para el uso simultáneo de varios canales
vea la nota en el capítulo 7.)
3.1 Conformidad y aprobación
Con la presente, MONACOR INTERNATIONAL declara que el transmisor ATS-16T es
acorde a los requisitos básicos y a las demás regulaciones pertinentes de la Directiva
1995/ 5/ EC. La declaración de conformidad
se puede encontrar en Internet mediante la
página web de MONACOR INTERNATIONAL (www.imgstageline.com).
El transmisor está libre de licencia y está
aprobado de manera general para el funcionamiento en la UE y en los países de la AELC.
4 Alimentación
El transmisor y el receptor pueden ser alimentados por pilas, pilas recargables, o una
unidad de alimentación de 5V.
4.1 Pilas (recargables)
Cada unidad se entrega con dos pilas recargables 1,2 V NiMH. Para una carga rápida y
adecuada de estas pilas, son necesarios los
siguientes productos como accesorio:
– la estación cargadora ATS-16PS
(para cargar las pilas de hasta 2 transmisores/receptores al mismo tiempo)
– la maleta de transporte cargadora A TS-36C
(para cargar las pilas de hasta 36 transmi-
sores/receptores al mismo tiempo)
También es posible una carga (más lenta) de
las pilas insertadas mediante el jack DC IN 5V
(11) – vea capítulo 4.2.
En vez de pilas recargables pueden usarse
dos pilas 1,5V AA.
Para insertar las pilas (recargables):
1) Presione ligeramente el área marcada en
la tapa del compartimiento de las pilas (8)
mientras tira la tapa hacia abajo.
2) Inserte las pilas (recargables) con sus
conexiones positivas y negativas como
indica en el compartimiento.
3) Vuelva a colocar la tapa y ajústela en su
sitio.
4.2 Unidad de alimentación
Conecte una unidad de alimentación con una
salida de voltaje de 5V mediante un
enchufe de bajo voltaje de dimensiones 3,5/
1,3mm (Ø exterior/ interior) al jack DC IN 5V
(11). El polo positivo debe estar en el contacto interno del enchufe.
Mediante una unidad de alimentación
conectada a este jack, las pilas insertadas
pueden ser cargadas. Para las pilas recargables entregadas, el tiempo de carga es de
10 horas aproximadamente.
ATENCIÓN: No conecte nunca una unidad
de alimentación al jack DC IN 5V (11) con
pilas no recargables en el compartimiento
de las pilas; ¡pueden tener un escape o
incluso explotar!
Si la unidad se retira del funcionamiento
definitivamente, llévela a una planta de
reciclaje local para su eliminación no
dañina para el medio ambiente.
No tire nunca las pilas gastadas a la basura doméstica:
llévelas siempre a una eliminación de residuos especial (por ejemplo a un container en su distribuidor).
25
E

5 Selección de la fuente de señal
El transmisor puede ser utilizado con un micrófono, sin embargo, también puede ser conectada una unidad con nivel de salida de línea.
a Utilización del micrófono:
– O bien utilice el micrófono interno (5)
– O bien conecte un micrófono externo,
el micrófono de solapa electret entregado o el micrófono de nuca ECM-16N
disponible como accesorio, al jack MIC.
(6). Cuando el jack está conectado, el
micrófono interno se apagará. Coloque
la protección para el viento al micrófono y sujete el micrófono a su cuerpo:
sujete el micrófono de solapa a su ropa
(por ejemplo en la solapa) mediante su
clip o ponga el micrófono de nuca alrededor de su cuello.
b Utilización con una unidad audio:
Conecte la salida de la unidad audio (por
ejemplo un cassette o un grabador minidisc, un reproductor CD...) mediante un
enchufe 3,5mm al jack AUX IN (10).
Cuando conecte el jack, tanto el micrófono interno como un micrófono externo
conectado al jack MIC. (6) se apagarán.
6 Seleccionando la reproducción de
sonido
El receptor ofrece diferentes maneras de
reproducir el sonido.
a a través del altavoz interno:
El sonido del altavoz puede o bien ser
radiado libremente o bien ser directamente
transmitido a su oído mediante el auricular
de tubo acústico ET-16 disponible como
accesorio. Coloque el tubo acústico en la
abertura (5) del receptor e inserte el tapón
para el oído amarillo en su oído de manera
que se asegure un buen ajuste.
b a través del auricular entregado
(modelo ES-16, también disponible como
artículo por separado):
Conecte el auricular al jack EAR. (6) y
sujételo a su oído. Cuando conecte el jack
EAR., el altavoz interno se apagará.
c a través de un sistema amplificador:
Conecte el amplificador a través de un
enchufe 3,5mm al jack estéreo AUX OUT
(10).
Nota: Cuando conecte el jack AUX OUT,
el altavoz interno continúa encendido. Para apagarlo, conecte un enchufe 3,5 mm
al jack EAR. (6).
7 Utilización
1) Con la ruedecilla giratoria (3) en el transmisor, seleccione el canal para la transmisión de entre los 16 canales (0 a F): Gire
la ruedecilla de manera que la flecha de
debajo apunte hacia el canal deseado (en
el diagrama 1 está ajustado el canal 0
como ejemplo).
Ponga la ruedecilla giratoria (3) en el
receptor en el mismo canal.
2) Sujete las unidades a su ropa, por ejemplo a su cinturón, mediante sus clips (7).
Para sujetar las unidades a su cuerpo,
están disponibles los siguientes artículos
como accesorio:
– ATS-16BAG, bolsa protectora, para
sujetarla a su cinturón mediante un lazo
– ATS-16CORD, cordón para el cuello
(para sujetarlo a la unidad vea el diagrama 3)
3) Para encender las unidades, gire el
control (4) desde la posición OFF (tope
izquierdo) en el sentido de las agujas del
reloj:
26
E
➂

En el transmisor, el LED TX (1) se ilumina
en verde para indicar la transmisión de
una señal de radio.
En el receptor, el LED PL (2) rojo se ilu-
mina brevemente al principio. Luego, el
LED RX (1) se ilumina en verde para
indicar la recepción de una señal de
radio desde el transmisor. (Si no, compruebe que el transmisor y el receptor
han sido ajustados en el mismo canal.)
Cuando el LED TX o RX (1) cambia a rojo,
las pilas (recargables) casi están gastadas y deberían ser remplazadas pronto.
Cuando el LED TX o RX se apaga y el
LED PL (2) rojo se enciende en su lugar,
las pilas (recargables) están completamente gastadas y deben ser recargadas o
remplazadas.
4) Con el control (4), ajuste el volumen para la
señal audio transmitida en el transmisor y
el volumen de reproducción en el receptor.
5) En caso de recepción pobre o interrumpida compruebe si:
a la recepción puede mejorarse usando
un canal de transmisión distinto.
b el transmisor y el receptor están colo-
cados demasiado lejos el uno del otro.
c la recepción se ve alterada por objetos
en la zona de transmisión.
6) Para apagar las unidades, tire el control
(4) hacia la izquierda hasta el máximo en
la posición OFF:
En el transmisor, el LED PL se ilumina
durante algunos segundos antes de que
se apague completamente. En el receptor,
el LED PL se ilumina brevemente.
Nota concerniente al uso de multicanales
(Funcionamiento simultáneo de varios sistemas ATS-16)
Es posible utilizar simultáneamente de 5 a 8
sistemas de transmisión como máximo funcionando en diferentes canales. El número
de canales a ser usados en paralelo depende
de la distancia entre los sistemas de transmisión individuales, de cualquier fuente de
interferencia fija de radio frecuencia, y otras
condiciones locales. Cuando utilice varios
sistemas, asigne los canales en orden ascendente (por ejemplo para 8 sistemas, use los
canales 0 – 7) y mantenga los sistemas tan
lejos como sea posible el uno del otro.
8 Características técnicas
Tipo de sistema: . . . . . PLL sistema sin hilo mono
para transmisión audio
Índice de
frecuencia radio: . . . . . 863 – 865 MHz, dividido en
16 canales
Alcance: . . . . . . . . . . . min. 50 m
Supresión de ruido: . . . tono piloto y noise squelch
Temperatura ambiente: 0 – 40 °C
Alimentación para
cada unidad: . . . . . . . . mediante las dos pilas 1,2 V
NiMH recargables entregadas
o mediante dos pilas 1,5V AA
o mediante +5V en el jack
DC IN 5V
Transmisor ATS-16T
Potencia de transmisión: ≤ 10 mW (EIRP)
Conexiones audio
Micrófono: . . . . . . . . 3,5 mm jack, mono
Entrada Línea: . . . . 3,5 mm jack, mono
Dimensiones: . . . . . . . 66 x 111 x 35mm
Peso: . . . . . . . . . . . . . . 85 g (sin pilas recargables)
Receptor ATS-16R
Auricular
ES-16 (entregado): . auricular mono, sistema diná-
mico 32Ωcon cable de 1,2 m
y enchufe de 3,5mm
ET-16 (opcional): . . tubo acústico con tapón para
el oído de silicona,
longitud 1m
Salida Línea: . . . . . . . . jack 3,5 mm, estéreo
Dimensiones: . . . . . . . 66 x 111 x 35mm
Peso: . . . . . . . . . . . . . . 100 g (sin pilas recargables)
Sujeto a modificaciones técnicas.
27
E
Manual de instrucciones protegido por el copyright de MONACOR®INTERNATIONALGmbH & Co. KG.
Toda reproducción mismo parcial para fines comerciales está prohibida.

Na stronie 3 znajdują się schematy elementów użytkowych i gniazd połączeniowych opisanych poniżej.
1 Elementy użytkowe i gniazda
połączeniowe
(ryc. 1: nadajnik, ryc. 2: odbiornik)
1 Wskaźnik pracy (dwukolorowy):
podczas pracy urządzenia świeci się
na zielono
na nadajniku: wskazuje nadawanie
sygnału radiowego;
na odbiorniku: wskazuje odbiór
sygnału radiowego z nadajnika;
jeśli wskaźnik świeci się na czerwono,
oznacza to, że baterie (akumulatorowe) są bliskie wyczerpania
2 Czerwony wskaźnik stanu naładowania
baterii
zapala się, gdy baterie (akumulatorowe) są całkowicie wyczerpane
3 Przełącznik umożliwiający wybór kanału
transmisyjnego
4 Włącznik zasilania i regulator poziomu
głośności
5 nadajnik:
wbudowany mikrofon; w razie podłączenia zewnętrznego mikrofonu do
gniazda MIC. (6) lub AUX IN (10), wbudowany mikrofon zostanie wyłączony
odbiornik:
otwór na słuchawkę ET-16* (rurka
akustyczna z końcówką wkładaną do
ucha, umożliwia transmisję dźwięku z
wbudowanego głośnika bezpośrednio
do ucha ludzkiego)
6 nadajnik:
gniazdo 3,5 mm MIC. umożliwia podłączenie mikrofonu krawatowego (w
komplecie) lub mikrofonu naszyjnego
ECM-16N*; w razie podłączenia urządzenia audio do gniazda AUX IN (10)
wejście mikrofonowe zostanie wyłączone
odbiornik
gniazdo 3,5 mm EAR. umożliwia podłączenie słuchawki (w komplecie);
wbudowany głośnik zostanie wyłączony w razie podłączenia słuchawki do
gniazda
7 Uchwyt na pasek
8 Pokrywa komory na baterie
9 Styki umożliwiające doładowanie baterii
akumulatorowych przez stację ładowania ATS-16PS* lub walizkę transportową
z funkcją ładowania ATS-36C*
10 nadajnik:
gniazdo wejściowe z poziomem liniowym AUX IN (gniazdo 3,5mm, mono)
umożliwia podłączenie urządzenia
audio (np. odtwarzacza CD)
odbiornik:
gniazdo wyjściowe z poziomem liniowym AUX OUT (gniazdo 3,5 mm, stereo) umożliwia podłączenie wzmacniacza
11 Gniazdo umożliwiające podłączenie za-
silacza z napięciem wyjściowym 5 V
prądu stałego [wymiary złącza: 3,5/
1,3 mm (Øzewnętrzna/wewnętrzna), styk
wewnętrzny = biegun dodatni]
a w celu zasilania [zamiast zasilania z
baterii (akumulatorowych)]
b w celu doładowania baterii akumula-
torowych
UWAGA: Gdy w komorze są zwykłe
baterie nie wolno podłączać zasilacza!
28
PL
* akcesoria dostępne w ofercie produktów “img Stage Line”

2 Bezpieczeństwo użytkowania
Urządzenie spełnia wymogi dyrektyw obowiązujących w Unii Europejskiej, posiada
więc oznakowanie .
●
Urządzenie przeznaczone jest do użytku
jedynie wewnątrz pomieszczeń. Należy
chronić je przed bezpośrednim kontaktem z wodą, przed działaniem wilgoci
oraz wysokiej temperatury (dopuszczalna
temperatura otoczenia pracy to 0– 40 ºC).
●
Do czyszczenia urządzenia należy używać
suchej, miękkiej tkaniny; nie wolno stosować wody, ani chemicznych środków czyszczących.
●
Zawsze należy używać dwóch baterii
(akumulatorowych) tego samego rodzaju.
●
Jeśli urządzenie nie jest używane przez
dłuższy czas (ponad tydzień), należy
wyjąć baterie (akumulatorowe). W razie
przecieku baterii urządzenie nie ulegnie
uszkodzeniu.
●
Producent ani dostawca nie ponoszą
odpowiedzialności za wynikłe szkody (uszkodzenie sprzętu lub obrażenia użytkownika), jeśli urządzenie było używane niezgodnie z przeznaczeniem, lub jeśli było
nieprawidłowo obsługiwane, bądź zostało
poddane nieautoryzowanej naprawie.
3 Zastosowanie
Nadajnik ATS-16T w połączeniu z odbiornikiem (lub kilkoma odbiornikami) ATS-16R
tworzy przenośny, bezprzewodowy system
monofoniczny do transmisji muzyki oraz
komunikatów słownych. System ten znajduje
idealne zastosowanie przy transmisji sygnału
z jednego źródła dźwięku dla grupy osób,
np. dla wycieczki lub dla słuchaczy wykładu.
Dla transmisji bezprzewodowej dostępnych
jest 16 kanałów o zakresie częstotliwości
863 –865 MHz (jednoczesne użycie kilku
kanałów – por. uwagi w rozdziale 7).
3.1 Normy i zezwolenia
Niniejszym firma MONACOR INTERNATIONAL oświadcza, że nadajnik ATS-16T spełnia
wymogi dyrektywy 1995/5/EC i jest zgodny
z zawartymi w niej przepisami. Deklarację
zgodności można znaleźć na stronie internetowej firmy MONACOR INTERNATIONAL
(www.imgstageline.com).
System nie wymaga zezwolenia i zo-
stał dopuszczony do użytkowania w krajach
należących do Unii Europejskiej oraz Europejskiego Stowarzyszenia Wolnego Handlu
(EFTA).
4 Zasilanie
Nadajnik oraz odbiornik można zasilać przez
baterie, baterie akumulatorowe, lub zasilacz 5 V.
4.1 Baterie (akumulatorowe)
W skład każdego urządzenia wchodzą po
dwie baterie akumulatorowe NiMH 1,2 V.
Następujące akcesoria usprawnią ładowanie baterii:
– stacja ładowania ATS-16PS
(umożliwia jednoczesne ładowanie baterii
dwóch nadajników/odbiorników)
– walizkę transportową z funkcją ładowania
ATS-36C
(umożliwia jednoczesne ładowanie baterii
do 36 nadajników/odbiorników)
Można również naładować baterie (wolniej)
przez gniazdo DC IN 5V (11) – por. rozdział 4.2.
Zamiast baterii akumulatmorowych można
również użyć dwóch baterii AA 1,5 V.
Jeśli urządzenie ma zostać ostatecznie
wycofane z użycia, należy przekazać je do
punktu utylizacji odpadów, aby uniknąć
zanieczyszczenia środowiska.
Nie należy wyrzucać do śmieci zużytych czy uszkodzonych baterii; należy przekazać je do specjalnego
punktu utylizacji odpadów (można też zwrócić baterie
dostawcy).
29
PL

Aby włożyć baterie (akumulatorowe) należy:
1) lekko nacisnąć oznaczone miejsce na
pokrywie komory na baterie (8), jednocześnie przesuwając pokrywę w dół.
2) umieścić baterie (akumulatorowe) w komorze, zgodnie ze wskazaniem rozmieszczenia biegunów.
3) założyć pokrywę i zablokować ją.
4.2 Zasilacz
Należy podłączyć zasilacz o napięciu wyjściowym DC 5 V do gniazda DC IN 5V (11)
za pomocą wtyku niskonapięciowego o
wymiarach 3,5/1,3 mm (Ø zewnętrzna/
wewnętrzna). Biegun dodatni ma się znajdować na wewnętrznym styku.
Baterie można ładować przez zasilacz
podłączony do tego gniazda. Czas ładowania dla baterii akumulatorowych wchodzących w skład kompletu wynosi około
10 godzin.
5 Wybór źródła sygnału
Nadajnik może pracować z mikrofonem lub
z urządzeniem audio z poziomem liniowym.
a praca z mikrofonem:
– można używać wbudowanego mikro-
fonu (5)
– lub podłączyć do gniazda MIC. (6)
zewnętrzny mikrofon, elektretowy mikrofon krawatowy wchodzący w skład
kompletu, bądź mikrofon naszyjny
ECM-16N dostępny jako wyposażenie
dodatkowe. Jeśli do gniazda jest podłączony mikrofon zewnętrzny, wbudowany mikrofon zostanie wyłączony.
Należy nałożyć na mikrofon osłonę
przeciwwietrzną i założyć mikrofon:
należy przyczepić mikrofon krawatowy
do ubrania użytkownika (np. do klapy
marynarki) za pomocą zacisku, lub
należy założyć mikrofon naszyjny na
kark użytkownika.
b praca z urządzeniem audio:
Należy podłączyć wyjście urządzenia
audio (np. magnetofon kasetowy, odtwarzacz MD, odtwarzacz CD) do gniazda
AUX IN (10) za pomocą wtyku 3,5mm.
Gdy do gniazda zostanie podłączone
urządzenie audio, nastąpi wyłączenie
zarówno wbudowanego mikrofonu, jak i
zewnętrznego mikrofonu podłączonego
do gniazda MIC. (6).
6 Wybór sposobu odtwarzania
dźwięku
Odbiornik daje kilka możliwości odtwarzania
dźwięku.
a przez wbudowany głośnik:
Dźwięk z głośnika może się swobodnie
rozchodzić, może także zostać przekazany bezpośrednio do ucha użytkownika
przez rurkę akustyczną z wkładką do
ucha ET-16, dostępną jako wyposażenie
dodatkowe. Należy umieścić rurkę akustyczną w otworze (5) znajdującym się
w odbiorniku, następnie włożyć żółtą
wkładkę do ucha użytkownika tak, aby
mocno przylegała.
b przez słuchawki (w komplecie)
(model ES-16, dostępny także oddzielnie, jako wyposażenie dodatkowe):
Należy podłączyć słuchawkę do gniazda
EAR. (6) i umieścić ją w uchu użytkownika. Gdy do gniazda EAR podłączona
zostanie słuchawka, zostanie wyłączony
wbudowany głośnik.
c przez system wzmacniający:
Należy podłączyć wzmacniacz do
gniazda stereofonicznego AUX OUT (10)
za pomocą wtyku 3,5 mm.
Uwaga: Wbudowany głośnik będzie nadal
włączony przy podłączaniu wzmacniacza
do gniazda AUX OUT. Aby wyłączyć wbudowany głośnik, należy podłączyć wtyk
3,5 mm do gniazda EAR. (6).
UWAGA: Do gniazda DC IN 5V (11) nie
wolno podłączać zasilacza gdy w komorze
są zwykłe baterie, ponieważ mógłby nastąpić wyciek lub eksplozja baterii!
30
PL

7 Obsługa
1) Za pomocą przełącznika (3) na nadajniku
należy wybrać spośród 16 kanałów kanał
do transmisji (od 0 do F): należy ustawić
przełącznik tak, aby strzałka pod nim
wskazywała na wybrany kanał (na ryc. 1,
przykładowo jest ustawiony kanał 0).
Należy ustawić przełącznik (3) na
odbiorniku na ten sam kanał.
2) Należy przyczepić urządzenia do ubrania,
np. do paska, za pomocą zacisków (7).
Jako wyposażenie dodatkowe, dostępne są następujące produkty służące
do przymocowania urządzeń:
– ATS-16BAG, pokrowiec, który można
przyczepić do paska
– ATS-16CORD, smycz (podłączenie do
urządzenia – por. ryc. 3)
3) Aby włączyć urządzenie, należy obrócić
regulator (4) z pozycji OFF (skrajna lewa
pozycja) zgodnie z kierunkiem wskazówek zegara:
Na nadajniku zapali się na zielono wskaź-
nik TX (1), wskazując transmisję
sygnału radiowego.
Na odbiorniku najpierw na krótko zapali
się czerwony wskaźnik PL (2). Następnie wskaźnik RX (1) zapali się na zielono, wskazując odbiór sygnału radiowego z nadajnika. (Jeśli się nie zapali,
należy sprawdzić, czy został ustawiony ten sam kanał w nadajniku i w
odbiorniku.)
Gdy wskaźnik TX lub RX (1) świeci się na
czerwono, oznacza to, że baterie (akumulatorowe) są prawie wyczerpane i
wkrótce należy je wymienić (naładować).
Gdy gaśnie wskaźnik TX lub RX a zapala
się czerwony wskaźnik PL (2), oznacza
to, że baterie (akumulatorowe) są całkowicie wyczerpane i należy je wymienić
(naładować).
4) Za pomocą regulatora (4) należy ustawić
żądany poziom głośności sygnału audio
transmitowanego z nadajnika, oraz poziom głośności odtwarzania odbiornika.
5) Jeśli jakość odbioru jest niska, lub występują zakłócenia, należy sprawdzić czy
a jakość odbioru ulegnie poprawie po
użyciu innego kanału transmisyjnego
b nadajnik nie jest zbyt oddalony od
odbiornika
c przyczyną zakłóceń odbioru mogą
być przedmioty znajdujące się na linii
transmisji.
6) Aby wyłączyć urządzenia, należy ustawić
regulator (4) w pozycji OFF (maksymalnie w lewo):
Na nadajniku zapali się na kilka sekund
wskaźnik PL, zanim całkowicie zgaśnie.
Na odbiorniku przez chwilę będzie mi-
gać wskaźnik PL.
Uwagi dotyczące pracy z wieloma
kanałami
(Jednoczesne użycie kilku systemów ATS-16)
Istnieje możliwość równoczesnego użycia
od 5 do 8 systemów transmisyjnych z nadawaniem na różnych kanałach. Ilość kanałów,
które mają być równolegle użyte, zależy od
odległości między poszczególnymi systemami transmisyjnymi, źródeł zakłóceń na
częstotliwościach radiowych, oraz innych
uwarunkowań. Aby używać jednocześnie
kilku systemów, należy kolejno przyporządkować kanały w porządku rosnącym (np. dla
8 systemów należy użyć kanałów 0 – 7) i
zapewnić, aby systemy były możliwie jak
najbardziej oddalone od siebie.
31
PL
➂

8 Dane techniczne
Typ systemu: . . . . . . . . bezprzewodowy system mono-
foniczny do transmisji dźwięku,
z pętlą fazową
Zakres często-
tliwości radiowej: . . . . . 863 –865 MHz, podzielone na
16 kanałów
Zasięg: . . . . . . . . . . . . min. 50 m
Tłumienie szumów: . . . . ton pilotujący i wyciszanie
szumów
Temperatura
otoczenia pracy: . . . . . 0 –40 °C
Zasilanie każdego
urządzenia: . . . . . . . . . dwie baterie akumulatorowe
NiMH 1,2V (w komplecie) lub
dwie baterie AA 1,5V, bądź
+5V na gnieździe DC IN 5V
Nadajnik ATS-16T
Moc nadawcza: . . . . . . ≤ 10 mW (EIRP)
Złącza audio
Mikrofon: . . . . . . . . gniazdo 3,5 mm, mono
Wejście liniowe: . . . . gniazdo 3,5mm, mono
Wymiary: . . . . . . . . . . 66 x 111 x 35 mm
Waga: . . . . . . . . . . . . . 85 g (bez baterii akumulatoro-
wych)
Odbiornik ATS-16R
Słuchawki
ES-16 (w komplecie): słuchawka monofoniczna,
dynamiczny system 32Ω,
kabel 1,2m, wtyk 3,5mm
ET-16 (wyposażenie
dodatkowe): . . . . . . rurka akustyczna z silikonową
wkładką do ucha, długość
1m
Wyjście liniowe: . . . . . . gniazdo 3,5 mm, stereo
Wymiary: . . . . . . . . . . 66 x 111 x 35 mm
Waga: . . . . . . . . . . . . . 100 g (bez baterii akumulatoro-
wych)
Z zastrzeżeniem możliwości zmian.
32
PL
Instrukcje obsługi są chronione prawem Copyright for MONACOR®INTERNATIONALGmbH & Co. KG.
Przetwarzanie całości lub części dla osobistych finansowych korzyści jest zabronione.

Kérjük, nyissa szét a lapot a 3. oldalon.
Így mindig láthatja a megjelölt működtető elemeket és csatlakozókat.
1 Működtető elemek és csatlako-
zások
(1. ábra: adókészülék, 2. ábra: vevőkészülék)
1 Kétszínű üzemkész állapotot jelző LED:
Zöld szín a működés folyamán
az adón: a rádiófrekvenciás jel
sugárzásának kijelzésére;
a vevőn: az adótól érkező rádiófrek-
venciás jel vételének kijelzésére;
Amikor pirosra vált, az akkumulátorok
majdnem kimerültek
2 Piros színű elemállapot jelző LED
világít, ha az akkumulátorok teljesen
kimerültek
3 Forgatótárcsa az átviteli csatorna
kiválasztására
4 Ki/be kapcsoló és hangerő szabályzó
5 az adókészüléken:
beépített mikrofon; kikapcsol, ha a
MIC. (6) csatlakozóra vagy az AUX IN
(10) csatlakozóra jelforrást csatlakoztat
a vevőkészüléken:
az ET-16* fülhallgató csatlakoztatására szolgáló nyílás (akusztikus cső
füldugóval, a beépített hangszóró
hangját közvetlenül a fülbe vezeti)
6 az adókészüléken:
MIC. 3,5 mm-es csatlakozó a tartozék
csíptetős mikrofon, vagy a rendelhető
ECM-16N* nyakpántos mikrofon csatlakoztatására; a mikrofonbemenet
kikapcsol, ha az AUX IN (10) csatlakozóra jelforrást csatlakoztat
a vevőkészüléken
EAR. 3,5 mm-es sztereo csatlakozó
(mono üzemmód) a tartozék fülhallgató csatlakoztatására; a beépített
hangszóró lekapcsolódik, ha a csatlakozóra fülhallgatót csatlakoztat
7 Övcsipesz
8 Elemtartó fedél
9 Érintkezők a készülékbe helyezett akku-
mulátorok töltésére az ATS-16PS* töltőkészüléken vagy az ATS-36C* töltőkofferen keresztül
10 az adókészüléken:
AUX IN (3,5 mm csatlakozó, mono)
vonalszintű bemenet egy audio berendezés csatlakoztatására (pl. CD játszó)
a vevőkészüléken:
AUX OUT (3,5mm csatlakozó, sztereo)
vonalszintű kimenet egy erősítőhöz
való csatlakoztatásra
11 Csatlakozó egy 5V [csatlakozó mére-
tek: 3,5/1,3mm (Ø külső/belső), belső
csatlakozó = pozitív pólus] kimeneti feszültségű tápegység csatlakoztatására
a a tápellátásra [alternatív megoldás-
ként az akkumulátoros (elemes) működés kiváltására]
b vagy a behelyezett akkumulátorok töl-
tésére
FIGYELEM: Soha ne csatlakoztassa a
tápegységet, amennyiben az elemtartóban akkumulátor helyett “nemtölthető” elem van!
33
H
* tartozékként rendelhető az “img Stage Line” kínálatából

2 Fontos megjegyzés
E berendezés valamennyi vonatkozó EU
elõírásnak megfelel, minek értelmében
elláttuk a emblémával.
●
A berendezés csak beltéri használatra
alkalmas. Óvja nedvességtõl és hõtõl (működési hőmérséklet tartomány 0–40°C).
●
Tisztításhoz csak száraz lágy törlőkendőt
használjon; sose használjon vegyszert
vagy vizet.
●
Mindig két azonos típusú elemet (akkumulátort) helyezzen a készülékbe.
●
Ha a készüléket hosszabb ideig nem
használja (pl. több mint egy hét), távolítsa
el az elemeket (akkumulátorokat) megelőzendő az elemszivárgásból adódó meghibásodást.
●
Nem rendeltetésszerű használat, hibás
kezelés valamint szakszerűtlen javítás
miatt fellépő esetleges károkért felelősséget nem vállalunk. A készülék kinyitása
esetén mindennemű garancia megszűnik.
3 Alkalmazás
Egy, vagy több ATS-16R típusú vevőkészülék és egy ATS-16T adókészülék együtt
egy beszéd vagy zenei célra alkalmas mobil
vezeték nélküli átviteli rendszert alkot. Ez a
rendszer ideálisan alkalmas bármely olyan
felhasználásra, ahol egy audio jelforrást jelét
több emberhez (vagy helyre) szeretnénk
továbbítani, pl. idegenvezetés vagy többnyelvű előadás. A vezeték nélküli átvitelre 16
csatorna áll rendelkezésre a 863–865 MHzes frekvenciasávban. (Több csatorna egyi-
dejű használatakor vegye figyelembe a
7. fejezetben található megjegyzést)
3.1 Megfelelõség és Jóváhagyás
A MONACOR INTERNATIONAL ezúton kijelenti, hogy az ATS-16T adó megfelel az
1995/5/EC direktíva alapvetõ követelményeinek és egyéb vonatkozó elõírásainak.
A megfelelõségi nyilatkozat megtalálható az
Interneten a MONACOR INTERNATIONAL
weboldalán (www.imgstageline.com).
E rendszer nem engedélyköteles és
általánosan jóváhagyott az EU és az EFTA
országokban.
4 Tápellátás
Az adó és vevőkészülék működhet elemekről, akkumulátorokról, vagy egy 5V-os
tápegységről.
4.1 Akkumulátoros működés
Minden berendezés két 1,2V-os NiMH akkumulátorral kerül szállításra. Az akkumulátorok gyors és kényelmes töltése a következő
berendezésekkel valósítható meg:
– ATS-16PS töltőkészülék
(2 adó/vevő akkumulátorának egyidejű
töltésére)
– ATS-36C töltő és hordkoffer
(36 adó/vevő akkumulátorának egyidejű
töltésére)
A behelyezett elemek (lassabb) töltése
lehetséges még a DC IN 5V (11) bemeneten
keresztül lásd a 4.2. fejezetet.
Az akkumulátorok behelyezése:
1) Finoman nyomja meg az elemtartó (8)
fedelét a megjelölt helyen, mialatt a
fedelet lefelé húzza.
2) Helyezze be az akkumulátorokat az
elemtartóba a jelzett pozitív és negatív
polaritásnak megfelelően.
3) Helyezze vissza a fedelet, és pattintsa a
helyére.
Az akkumulátorok helyett két 1,5 V-os AA
méretű elem is használható.
Ha a készüléket végérvényesen használaton
kívül helyezi, juttassa el azt a helyi újrahasznosító telepre a környezetkímélő ártalmatlanítás érdekében.
Soha ne dobja a kimerült elemeket vagy az elhasználódott akkumulátorokat a háztartási hulladék közé: Mindig
juttassa el egy speciális hulladékhasznosítóhoz (pl.
helyezze gyűjtőkonténerbe a kiskereskedőnél).
34
H

4.2 Tápegység
Csatlakoztassa az 5V kimeneti feszültségű
tápegység 3,5/1,3mm (Ø külső/belső)
méretű kisfeszültségű csatlakozó dugóját a
berendezés DC IN 5V (11) aljzatába. A pozitív
pólus a csatlakozó belső érintkezője.
Az aljzatba csatlakoztatott tápegységen
keresztül a készülékbe helyezett akkumulátorok tölthetők. A tartozék akkumulátorok esetén a töltési idő kb. 10 óra.
5 A jelforrás kiválasztása
Az adókészülék mikrofonnal működik, de
vonalszintű kimenettel rendelkező jelforrás
is csatlakoztatható hozzá.
a Mikrofonos működés
Használhatja a beépített mikrofont (5)
vagy csatlakoztasson egy külső mikrofont.
Erre alkalmas a tartozék elektret csíptetős
mikrofon, vagy a rendelhető ECM-16N
(nem tartozék) nyakpántos mikrofon,
melyet a MIC. (6) bemenetbe kell dugni.
Ha egy külső mikrofont csatlakoztat, a
beépített mikrofon kikapcsolódik. Hely-
ezze fel a szélárnyékoló szivacsot, majd
rögzítse a mikrofont: a csíptetős mikrofont
rögzítheti a ruhájára (pl. gallér) a csipes-
szel, vagy a nyakpántos mikrofont akassza
a nyakába.
b Működés egy vonalszintű berendezéssel
Csatlakoztassa az audio berendezés (pl.
kazettás magnó, MD rekorder, CD játszó)
kimenetét egy 3,5mm-es csatlakozóval
ellátott összekötő kábel segítségével az
adókészülék AUX IN (10) bemenetéhez.
A csatlakozó bedugásának pillanatában
mind a beépített mikrofon, mind a MIC.
(6) bemenetre csatlakoztatott külső
mikrofon lekapcsolódik.
6 A hang reprodukálásának kivá-
lasztása
A vevőkészülék különböző módokat kínál a
hang megszólaltatására:
a a beépített hangszórón keresztül
A hangszóró hangja hallgatható egyrészt
közvetlenül, másrészt az ET-16 (nem tartozék) akusztikus-cső fülhallgatón keresztül. Helyezze az akusztikus csövet a
vevőkészüléken elhelyezkedő nyílásba
(5), majd a sárga fülhallgatót a fülébe oly
módon, hogy az biztosan illeszkedjen.
b a tartozék fülhallgatón keresztül
(ES-16 modell, külön tartozékként is rendelhető)
Csatlakoztassa a fülhallgatót az EAR. (6)
csatlakozóba, majd helyezze el azt a
fülén. Ha a fülhallgatót az EAR. csatlakozóba csatlakoztatja, a beépített hangszóró lekapcsolódik.
c egy erősítő rendszeren keresztül
Csatlakoztassa az erősítő bemenetét egy
3,5 mm-es csatlakozóval ellátott összekötő kábel segítségével a vevőberendezés AUX OUT (10) kimenetéhez.
Megjegyzés: Ha az AUX OUT kimenetre
berendezést csatlakoztat, a beépített
hangszóró bekapcsolva marad. Ennek
kikapcsolásához dugjon egy 3,5 mm-es
mono jack dugót az EAR. (6) csatlakozóba.
7 Működés
1) Az adókészüléken lévő forgatótárcsával
(3) válassza ki a 16 rendelkezésre álló
átviteli csatorna (0 –F) közül az Ön által
kívánt csatornát: Csavarja a tárcsát a
kívánt csatorna számára, melyet a nyíllal
szemben olvashat le a tárcsáról (pl. az
1. ábrán a 0 csatorna van kiválasztva).
Állítsa a vevőkészüléken lévő for-
gatótárcsát (3) ugyan arra a csatornára
2) Rögzítse a készüléket a ruhájára, pl. az
övére az övcsipesszel (7).
FIGYELEM: Soha ne csatlakoztassa a
tápegységet a DC IN 5V (11) csatlakozóba,
amennyiben az elemtartóban akkumulátor
helyett “nem-tölthető” elem van; ez szivárgást, vagy akár robbanást is okozhat!
35
H

A berendezés testhez való rögzítéséhez
az alábbi termékek állnak rendelkezésre
(nem tartozék):
– ATS-16BAG, védőtáska, mely az övhöz
rögzíthető
– ATS-16CORD, nyakba akasztó zsinór
(a készülékhez való rögzítést lásd a
3. ábrán)
3) A berendezés bekapcsolásához csavarja
el a szabályzót (4) az óramutató járásának megfelelően az OFF pozícióból
(bal szélső állás):
Az adókészüléken a TX (1) LED zöld fénye
a rádiófrekvenciás jel átvitelét jelzi.
A vevőkészüléken a PL (2) LED piros
fénye először röviden felvillan. Aztán
az RX (1) LED zöld fénye az adókészülék által sugárzott rádiófrekvenciás
jel vételét jelzi. (Ha nincs vétel,
ellenőrizze, hogy az adó és vevőkés-
zülék azonos frekvencián működik-e.)
Amikor a TX vagy RX (1) LED piros színre
vált, az akkumulátorok (elemek) már
majdnem kimerültek, hamarosan ki kell
cserélni azokat. Amikor a TX vagy RX LED
kialszik és a piros PL LED (2) világít helyette az akkumulátorok (elemek) teljesen
kimerültek, és újra kell tölteni, vagy ki kell
cserélni azokat.
4) A szabályzóval (4), állítsa be az átvinni
kívánt audio jel hangerejét az adókészüléken és a visszajátszás hangerejét a
vevőkészüléken.
5) Gyenge vagy zavaros vétel esetén
ellenőrizze
a a vétel javítható-e másik átviteli csa-
torna használatával.
b az adó és vevőkészülék nincs-e túl
messze egymástól.
c nincs-e túl sok objektum a adó és
vevőkészülék között, melyek zavarják
a vételt.
6) A berendezés kikapcsolásához állítsa a
szabályzót (4) bal szélső OFF állásba:
Az adókészüléken a PL LED pár má-
sodpercig világítani fog, mielőtt teljesen kialudna.
A vevőkészüléken a PL LED röviden
felvillan.
Megjegyzések a többcsatornás működéhez
(Több ATS-16 rendszer egyidejű működtetése)
Lehetőség van egy helyen 5-től maximum
8 átviteli rendszer üzemeltetésére különböző átviteli csatornákon. A párhuzamosan
használható csatornák száma függ az egyes
átviteli csatornák közti különbségtől, a jelen
lévő RF zavarjelektől, és egyéb helyi adottságoktól. Ha több rendszert üzemeltet, a
csatorna hozzárendelése növekvő sorrendben történjen (pl. 8 rendszer esetén használja a 0 –7 csatornákat), és a berendezéseket tartsa a lehető legnagyobb távolságra
egymástól.
36
H
➂

8 Technikai adatok
Rendszer típusa: . . . . . PLL mono vezeték nélküli audio
átviteli rendszer
Vivőfrekvencia
tartomány: . . . . . . . . . 863 –865 MHz,
leosztva 16 csatornára
Hatótávolság: . . . . . . . min. 50 m
Zajelnyomás: . . . . . . . . pilotjel elnyomás és zajzár
Műk. Hőmérséklet tart.: 0–40 °C
Tápellátás mindkét
berendezésnek: . . . . . . a tartozék 2 db. 1,2V-os NiMH
akkumulátor vagy két
1,5V-os AA méretű elem (nem
tartozék) vagy +5V a DC IN 5V
csatlakozón keresztül
ATS-16T adókészülék
Adóteljesítmény: . . . . . ≤ 10 mW (EIRP)
Audio csatlakozás
Mikrofon: . . . . . . . . 3,5 mm jack, mono
Vonalszintű bemenet: 3,5mm jack, mono
Méretek: . . . . . . . . . . . 66 x 111 x 35 mm
Súly: . . . . . . . . . . . . . 85 g (akkumulátorok nélkül)
ATS-16R vevőkészülék
Fülhallgató
ES-16 (tartozék): . . . mono fülhallgató, dinamikus
32 Ω-os rendszer, 1,2m kábel
és 3,5mm-es csatlakozó dugó
ET-16 (nem tartozék): akusztikus cső szilikon füldu-
góval, hossz 1m
Vonalszintű kimenet: . . 3,5 mm jack, sztereo
Méretek: . . . . . . . . . . . 66 x 111 x 35 mm
Súly: . . . . . . . . . . . . . 100 g (akkumulátorok nélkül)
A technikai változtatások
jogát a gyártó fenntartja.
37
H
Minden jog fenntartva a MONACOR®INTERNATIONAL GmbH & Co. KG. által. Ezen használati utasítás
bármely része semmilyen okból és formában nem sokszorosítható bármilyen kereskedelmi célból.

Copyright©by MONACOR INTERNATIONAL GmbH & Co. KG, Bremen, Germany. All rights reserved. A-0480.99.02.04.2007
®
 Loading...