

IMG STAGE LINE ATS-12HT Operating Instructions Manual
Funkmikrofon
Bitte lesen Sie diese Bedienungsanleitung
vor dem Betrieb gründlich durch und heben
Sie sie für ein späteres Nachlesen auf.
1 Verwendungsmöglichkeiten
Dieses Handmikrofon mit Sender bildet in Ver bin dung mit einem oder meh reren Emp fän ger/n
ATS-10R oder ATS-16R ein drahtloses Audioüber tra gungs sys tem, z. B. für Gruppenführungen.
Konformität und Zulassung
Hiermit erklärt MONACOR INTERNATIONAL, dass
sich das Funkmikrofon ATS-12HT in Übereinstimmung mit den grundlegenden Anforderungen und
den übrigen einschlägigen Bestimmungen der Richtlinie 1999/5/ EG befindet. Das Funkmikrofon ist für
den Betrieb in den EU- und EFTA-Staaten allgemein
zugelassen und anmelde- und gebührenfrei.
2 Wichtige Hinweise für den Gebrauch
Das Mikrofon entspricht allen relevanten Richtlinien
der EU und ist deshalb mit gekennzeichnet.
G
Setzen Sie das Mikrofon nur im Innen bereich ein
und schützen Sie es vor Feuchtigkeit und Hitze
(zulässiger Einsatztemperaturbereich 0 – 40 °C).
G
Verwenden Sie zum Säubern nur ein trockenes,
weiches Tuch, niemals Wasser oder Chemikalien.
G
Um das Mikrofon vor Beschädigung durch auslaufende Batterien/Akkus zu schützen, nehmen Sie
diese bei längerem Nichtgebrauch heraus.
G
Wird das Mikrofon zweckentfremdet, falsch bedient
oder nicht fachgerecht repariert, kann keine Haftung für daraus resultierende Sach- oder Personenschäden und keine Garantie für das Mikrofon
übernommen werden.
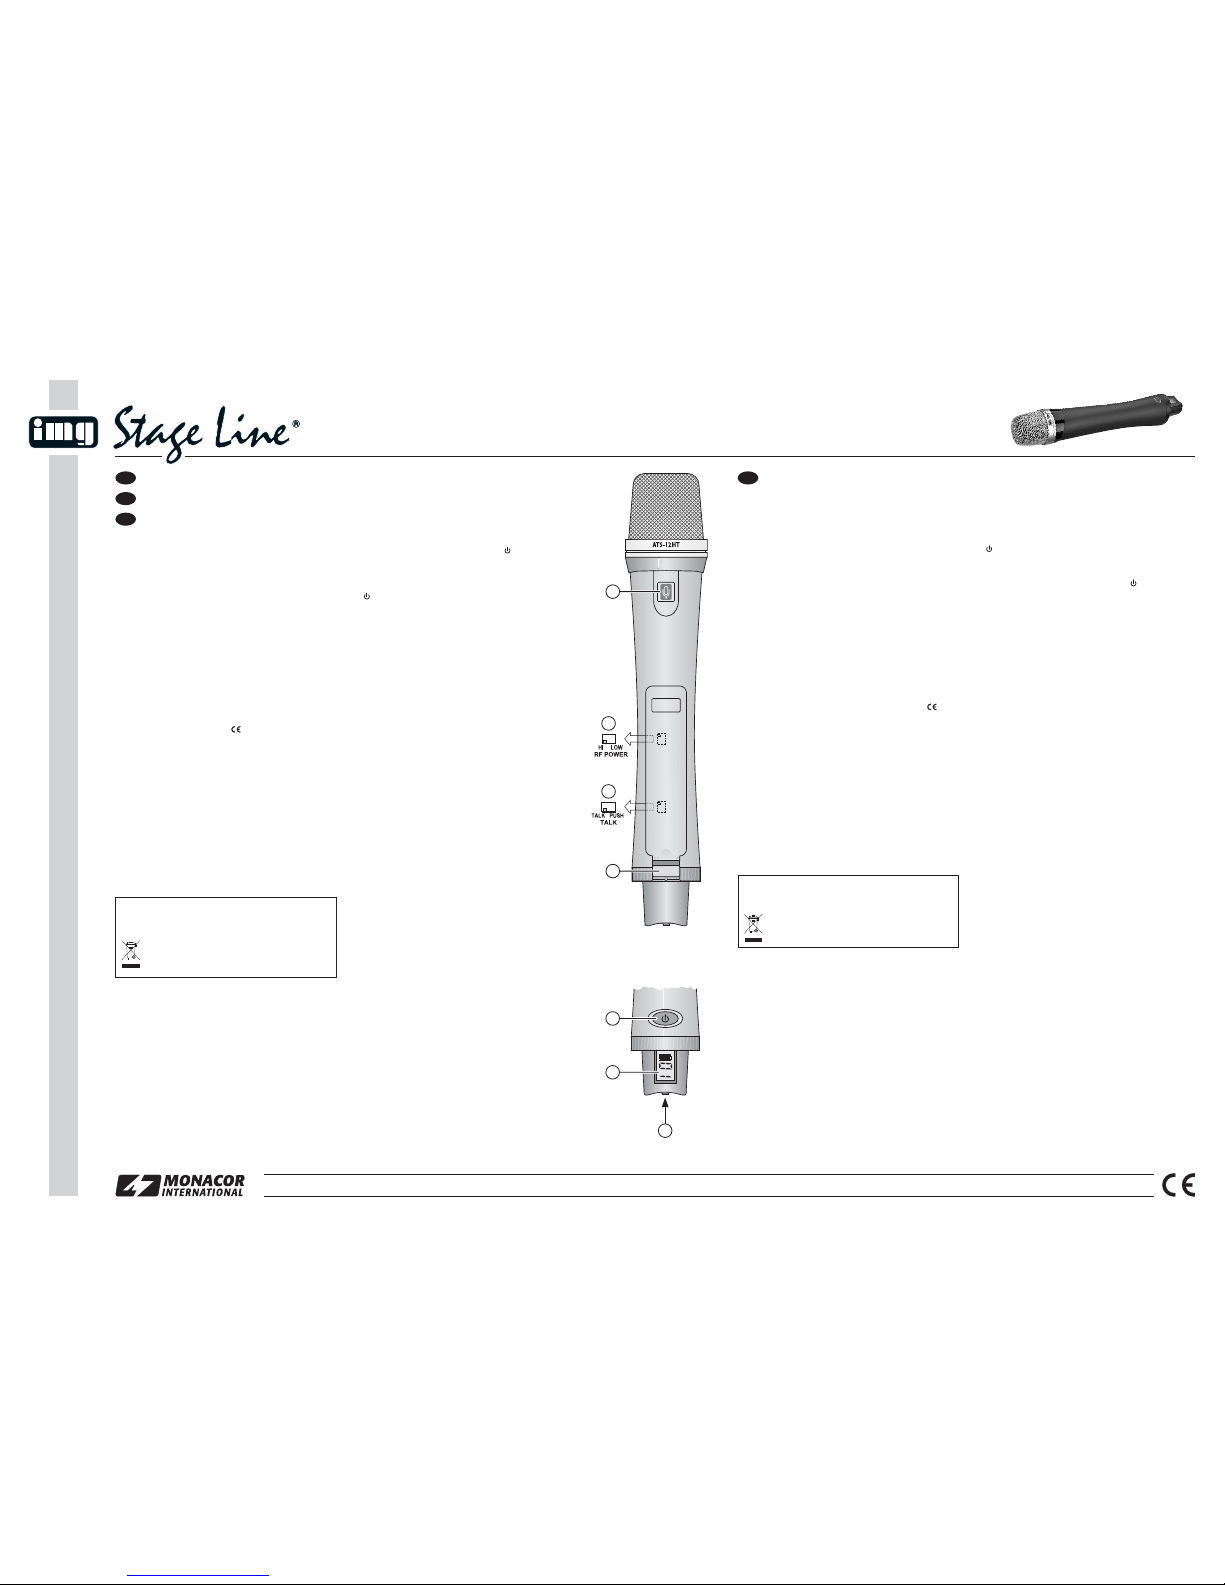
3 Voreinstellungen/ Stromversorgung
1) Den Riegel (4) des Batteriefachdeckels in Richtung Mikrofonkorb drücken, so dass der Deckel
ausrastet und abgenommen werden kann.
2) Die zwei Schalter im Batteriefach mithilfe eines
schmalen Gegenstands einstellen:
Mit dem Schalter RF POWER (2) die Sendeleistung ≤ 10 mW (HI) oder ≤ 1 mW (LOW) wählen; bei niedriger Leistung verringert sich der
Stromverbrauch, jedoch auch die Reichweite.
Mit dem Schalter TALK (3) die Funktion der
Sprechtaste (1) wählen: bei Position TALK dient
sie als Stummschalttaste, bei Position PUSH als
PTT-Taste (Push To Talk
Kap. 4, Punkt 3).
3) Zwei Batterien oder Akkus (Typ
Kap. 5), wie im
Fach aufgedruckt, einsetzen. Das Fach schließen.
Tipp: Für den Akku-Betrieb ist die Ladestation
IRS-200PS als Zubehör erhältlich.
4 Bedienung
1) Zum Ein-/Ausschalten die Taste (5) länger gedrückt halten. Das Display (6) zeigt im Betrieb den
eingestellten Kanal und den Batterieladezustand.
Dieser wird auch über die Beleuchtung der Taste
angezeigt (blau = ausreichend, rot = niedrig).
Die Displaybeleuchtung erlischt 10 s nach dem
Einschalten. Bei Drücken oder Kippen des Kanalwahlrads (7) wird sie für 10 s eingeschaltet.
2) Um einen anderen Kanal einzustellen, das Kanalwahlrad (7) so lange hineindrücken, bis die Kanalanzeige blinkt. Solange sie blinkt (10 s lang
nach Betätigung des Rads), ist die Einstellung
möglich: Mit jedem Kippen des Rads nach oben
wird ein Kanal höher gesprungen, mit jedem Kippen nach unten ein Kanal zurück. Zum schnellen
Durchlauf kann das Rad auch in der Kipp-Position
gehalten werden. Zum Bestätigen der Kanalwahl
das Rad kurz drücken.
Hinweis: Am Empfänger sind die Kanäle mit 0
bis F bezeichnet: Kanal 0 entspricht Kanal 01, ...
Kanal F entspricht Kanal 16.
3) Die Funktion der Sprechtaste (1) hängt von der
Position des Schalters TALK (3) ab:
Ist TALK gewählt, lässt sich mit der Taste die
Stummschaltung aktivieren (Taste leuchtet rot)
und deaktivieren (Taste leuchtet grün/Grundeinstellung nach jedem Einschalten).
Ist PUSH gewählt, dient die Taste als PTT-Taste:
Der Ton wird übertragen, solange sie gedrückt gehalten wird (Taste leuchtet grün). Wird sie gelöst,
ist die Funkübertragung beendet (Taste blinkt rot).
Bei schlechtem Empfang überprüfen, ob
– auf einem anderen Kanal der Empfang besser ist,
– der Abstand Mikrofon – Empfänger zu groß ist,
– sich Hindernisse in der Übertragungsstrecke be-
finden, die das Funksignal abschirmen können.
Bei gleichzeitiger Verwendung mehrerer ATS-Systeme auf ausreichenden räumlichen Abstand zwischen den einzelnen Systemen achten.
5 Technische Daten
Mikrofontyp: . . . . . Elektret/Nierencharakteristik
Funkfrequenzen: . 863 – 865 MHz (16 Kanäle)
Sendeleistung: . . . ≤ 10mW (HI) /≤ 1mW (LOW)
Reichweite: . . . . . . ca. 50 m
Stromversorgung: . 2 × Mignon-Batterie 1,5 V oder
2 × Mignon-NiMH-Akku 1,2 V
Betriebszeit: . . . . . > 12 h (HI) /> 15 h (LOW)
bei 1600-mAh-Akkus
Maße, Gewicht: . .
∅ 35 mm × 200 mm, 100 g
Änderungen vorbehalten.
Werfen Sie verbrauchte Batterien/Akkus nicht in den
Hausmüll, sondern geben Sie sie nur in den Sondermüll
(z. B. Sammelbehälter beim Fachhändler).
Soll das Mikrofon endgültig aus dem Betrieb
genommen werden, übergeben Sie es zur umweltgerechten Entsorgung einem örtlichen Recyclingbetrieb.
wwwwww..iimmggssttaaggeelliinnee..ccoomm
Copyright©by MONACOR INTERNATIONAL GmbH & Co. KG, Bremen, Germany. All rights reserved. A-1206.99.01.02.2011
®
Wireless Microphone
Please read these operating instructions carefully
prior to operation and keep them for later reference.
1 Applications
In combination with a receiver or several receivers of
the type ATS-10R or ATS-16R, this hand-held microphone with transmitter provides a wireless audio
transmission system, e. g. for guided tours.
Conformity and Approval
Herewith, MONACOR INTERNATIONAL declare that
the wireless microphone ATS-12HT is in accordance
with the basic requirements and the other relevant
regulations of the directive 1999/5/ EC. The wireless
microphone is licence-free and generally approved
for operation in EU and EFTA countries.
2 Important Notes
The microphone corresponds to all relevant directives of the EU and is therefore marked with .
G
The microphone is suitable for indoor use only.
Protect it against humidity and heat (admissible
ambient temperature range 0 – 40 °C).
G
For cleaning only use a dry, soft cloth; never use
chemicals or water.
G
To prevent damage to the microphone due to battery leakage, always remove the batteries when the
microphone is not in use for a longer period of time.
G
No guarantee claims for the microphone and no liability for any resulting personal damage or material
damage will be accepted if the microphone is used
for other purposes than originally intended, if it is not
correctly operated, or not repaired in an expert way.
3 Presets / Power Supply
1) Push the latch (4) of the battery compartment
cover towards the microphone head to unlock the
cover, then remove the cover.
2) Set the two switches in the battery compartment
by means of a narrow object:
With the switch RF POWER (2), select the
transmitting power ≤ 10 mW (HI) or ≤ 1mW (LOW);
at a low power, the power consumption will decrease; however, the range will also decrease.
With the switch TALK (3), select the function of
the talk button (1): in the position TALK it is used as
a mute button; in the position PUSH it is used as a
PTT button (Push-to-Talk
chapter 4, step 3).
3) Insert two (rechargeable) batteries (type
chapter 5) according to the marking inside the compartment. Close the compartment.
Hint: For operation with rechargeable batteries,
the charging station IRS-200PS is available as an
accessory.
4 Operation
1) To switch on/off the microphone, keep the button
(5) pressed for a while. When in operation, the
display (6) shows the channel currently set and the
battery status. The battery status is also indicated
via the illumination of the button (blue = sufficient, red = low).
The display illumination is extinguished 10 s
after switching on. When you press or tilt the channel selection wheel (7), it is switched on for 10 s.
2) To set another channel, press the channel selection wheel (7) until the channel indication starts
flashing. As long as it keeps flashing (for 10s after
using the wheel), it is possible to set the channel:
Each time you tilt the wheel upwards, the next
higher channel is set; each time you tilt it downwards, the next lower channel is set. For scanning
through the channels, tilt the wheel and keep it in
this position. To confirm the channel selection,
briefly press the wheel.
Note: On the receiver, the channels are marked
0 to F: channel 0 corresponds to channel 01, ...
channel F corresponds to channel 16.
3) The function of the talk button (1) depends on the
position of the switch TALK (3):
Position TALK to mute the sound (button lighting
in red) or to talk (button lighting in green/basic setting after switching on). Position PUSH: The button
is used as a PTT button: Sound is transmitted as
long as it is kept pressed (button lighting in green);
when it is released, the wireless transmission ends
(button flashing in red).
If the reception is poor, please check
– if the reception is better on a different channel.
– if the distance between the microphone and the re-
ceiver is too long.
– if the reception is disturbed by objects in the trans-
mission path which may shield the radio signal.
If several ATS systems are used at the same time,
make sure to keep a sufficient distance between the
individual systems.
5 Specifications
Type of microphone: electret/cardioid
Radio frequencies: . 863 – 865 MHz (16 channels)
Transmitting power: ≤ 10 mW (HI)/≤ 1 mW (LOW)
Range: . . . . . . . . . . 50 m approx.
Power supply: . . . . . 2 × 1.5 V battery of size AA or
2 × 1.2 V rechargeable NiMH
battery of size AA
Operating time: . . . . > 12 h (HI)/> 15 h (LOW)
for rech. batteries of 1600 mAh
Dimensions, weight:
∅ 35 mm × 200 mm, 100 g
Subject to technical modification.
Used batteries must not be placed in the household
waste; always take them to a special waste disposal,
e. g. collection container at your retailer.
If the microphone is to be put out of operation
definitively, take it to a local recycling plant for a
disposal which is not harmful to the environment.
1
4
2
3
5
6
7
ATS-12HT
Bestellnummer 25.3310
ATS-12HT
Bestellnummer 25.3310
D
A
CH
GB
Radiomicrofono
Vi preghiamo di leggere attentamente le presenti
istruzioni prima della messa in funzione e di conservarle per un uso futuro.
1 Possibilità dʼimpiego
Questo microfono a mano con trasmettitore costituisce, in collegamento con uno o più ricevitori ATS-10R
o ATS-16R, un sistema wireless di trasmissione audio,
p. es. per guide a gruppi di persone.
Conformità e omologazione
Con la presente, MONACOR INTERNATIONAL dichiara che il radiomicrofono ATS-12HT è conforme ai
requisiti fondamentali e alle restanti disposizioni in materia della direttiva 1999/5/CE. Il radiomicrofono è omologato per l'uso negli stati membri UE e EFTA e non
richiede né registrazione né pagamento di tasse.
2 Avvertenze importanti per lʼuso
Il microfono è conforme a tutte le direttive rilevanti
dell’UE e pertanto porta la sigla
.
G
Usare il microfono solo all’interno di locali e proteggerlo dall’umidità e dal calore (temperatura d’impiego ammessa fra 0 e 40 °C).
G
Per la pulizia usare solo un panno morbido,
asciutto; non impiegare in nessun caso acqua o
prodotti chimici.
G
Per proteggere il microfono da batterie che perdono, conviene toglierle in caso di non uso prolungato del microfono.
G
Nel caso dʼuso improprio, dʼimpiego scorretto o di
riparazione non a regola dʼarte del microfono, non
si assume nessuna responsabilità per eventuali
danni consequenziali a persone o a cose e non si
assume nessuna garanzia per il microfono.
3 Preimpostazioni/Alimentazione
1) Spostare la leva (4) del coperchio del vano batterie
in direzione del cestello del microfono in modo che
il coperchio si sblocchi e possa essere staccato.
2) Regolare i due switch nel vano batterie con lʼaiuto
di un oggetto stretto:
Con lo switch RF POWER (2) si sceglie la
potenza di trasmissione ≤ 10 mW (HI) oppure
≤ 1 mW (LOW); con potenza più bassa, si riduce
il consumo di corrente, ma anche la portata.
Con lo switch TALK (3) si sceglie la funzione del
tasto voce (1): nella posizione TALK serve come
tasto per la funzione di muto, nella posizione PUSH
come tasto
PTT (push to talk
Cap. 4, punto 3).
3) Inserire due batterie, ricaricabili o no (tipo
Cap. 5), come indicato nel vano batterie, e
chiudere il vano.
Un consiglio: Usando batterie ricaricabili, la stazione
di carica IRS-200PS è disponibile come opzione.
4 Funzionamento
1) Per accendere e spegnere tener permuto per un
poʼ il tasto (5). Il display (6) visualizza durante il
funzionamento il canale impostato e lo stato delle
batterie che è segnalato tramite lʼilluminazione del
tasto (blu = sufficiente, rosso = basso).
Lʼilluminazione del display si spegne passati
10 secondi dallʼaccensione. Premendo o inclinando
la ruota di scelta canale (7) si attiva per 10 secondi.
2) Per impostare un altro canale, premere indentro la
ruota di scelta canale (7) finché lʼindicazione del
canale inizia a lampeggiare. Mentre lampeggia
(per 10 s dopo lʼazionamento della ruota), è possibile lʼimpostazione: inclinando la ruota verso lʼalto,
si salta ogni volta a un canale superiore, inclinandola in senso opposto si ritorna di un canale. Per
scorrere i canali velocemente, è possibile tenere la
ruota in posizione inclinata. Per confermare la
scelta del canale premere brevemente la ruota.
Nota: Sul ricevitore, i canali sono contrassegnati
da 0 a F: il canale 0 corrisponde al canale 01, ... il
canale F al canale 16.
3) La funzione del tasto voce (1) dipende dalla posizione dello switch TALK (3):
Se è scelto TALK, con il tasto voce, la funzione di
muto può essere attivata (il tasto si accende di
rosso) e disattivata (il tasto si accende di verde/
impostazione base dopo ogni accensione).
Se è scelto PUSH, il tasto serve come tasto
PTT:
lʼaudio è trasmesso finché si tiene premuto il tasto
(il tasto si accende di verde). Se si lascia il tasto,
termina la trasmissione vie radio (il tasto lampeggia di rosso).
In caso di ricezione debole, controllare se
– con un altro canale, la ricezione migliora,
– la distanza fra microfono e ricevitore è troppo
grande,
– ci sono ostacoli fra microfono e ricevitore che pos-
sono schermare il segnale radio.
Se si usano più sistemi ATS contemporaneamente,
considerare una distanza locale sufficiente fra i singoli sistemi.
5 Dati tecnici
Tipo di microfono: elettrete /a cardioide
Radiofrequenze: . 863 – 865 MHz (16 canali)
Potenza di
trasmissione: . . . . ≤ 10 mW (HI)/≤ 1 mW (LOW)
Portata: . . . . . . . . ca. 50 m
Alimentazione: . . 2 × batterie stilo 1,5 V o
2 × ricaricabili stilo al NiMH 1,2 V
Durata : . . . . . . . . > 12 h (HI)/> 15 h (LOW)
con batt. ricaricabili 1600 mAh
Dimensioni, peso:
∅ 35 mm × 200 mm, 100 g
Con riserva di modifiche tecniche.
Non gettare le batterie scariche o difettose nelle immondizie di casa bensì negli appositi contenitori (p. es.
presso il vostro rivenditore).
Se si desidera eliminare il microfono definitivamente, consegnarlo per lo smaltimento ad unʼistituzione locale per il riciclaggio.
wwwwww..iimmggssttaaggeelliinnee..ccoomm
Copyright©by MONACOR INTERNATIONAL GmbH & Co. KG, Bremen, Germany. All rights reserved. A-1206.99.01.02.2011
®
1
4
2
3
5
6
7
ATS-12HT
Bestellnummer 25.3310
I
Mikrofon bezprzewodowy
Przed rozpoczęciem użytkowania proszę dokładnie
zapoznać się z niniejszą instrukcją i zachować ją do
wglądu.
1 Zastosowanie
W połączeniu z odbiornikami ATS-10R oraz ATS16R, niniejszy mikrofon doręczny z nadajnikiem, pozwala na stworzenie bezprzewodowego systemu
transmisji audio np. dla przewodników wycieczek.
Zgodność i zezwolenia
Niniejszym firma MONACOR INTERNATIONAL oświadcza,
że mikrofon bezprzewodowy ATS-12HT spełnia
wymagania dyrektywy 1995 / 5 / EC. Mikrofon nie wy-
maga zezwolenia i został dopuszczony do użytkowania w krajach UE oraz krajach należących do EFTA.
2 Środki bezpieczeństwa
Mikrofon spełnia wszystkie wymagania norm UE, dlatego został oznaczony symbolem .
G
Mikrofon przeznaczony jest do pracy wewnątrz pomieszczeń. Należy chronić go przed wysoką wilgotnością oraz działaniem wysokiej temperatury
(dopuszczalny zakres wynosi 0 – 40 °C).
G
Do czyszczenia używać suchej miękkiej ściereczki,
nie stosować środków chemicznych i wody.
G
Jeżeli urządzenie nie będzie przez dłuższy czas wykorzystywane, należy wyjąć z niego baterie aby zapobiec jego uszkodzeniu na skutek wylania baterii.
G
Producent ani dostawca nie ponoszą odpowiedzialności za wynikłe szkody bądź obrażenia użytkownika, jeżeli urządzenie było wykorzystywane niezgodnie z przeznaczeniem, nieprawidłowo obsługiwane lub naprawiane przez nieautoryzowany serwis.
3 Presety/Zasilanie
1) Wcisnąć blokadę (4) pokrywy komory bateryjnej w
stronę główki mikrofonu, następnie zdjąć pokrywę.
2) Za pomocą cienkiego przyrządu ustawić dwa
przełączniki w komorze bateryjnej:
Za pomocą przełącznika RF POWER (2), wybrać moc nadajnika ≤ 10 mW (HI) lub ≤ 1 mW
(LOW); mniejsza moc nadajnika zapewnia mniejszy pobór mocy, ale także mniejszy zasięg.
Za pomocą przełącznika TALK (3), wybrać
funkcję dla przycisku (1): w pozycji TALK służy do
wyciszania; w pozycji PUSH służy jako przycisk
PTT (Push-to-Talk
rozdz. 4, krok 3).
3) Włożyć dwie (akumulatorowe) baterie (typ
rozdz. 5) zgodnie z pokazaną polaryzacją. Zamknąć pokrywę.
Wskazówka: W przypadku pracy z bateriami akumulatorowymi, można korzystać ze stacji ładują-
cej IRS-200PS dostępnej jako wyposażenie dodatkowe.
4 Obsługa
1) Aby włączyć/wyłączyć mikrofon, przytrzymać wciśnięty przycisk (5). Podczas pracy, wyświetlacz
(6) pokazuje ustawiony kanał oraz stan baterii.
Stan baterii sygnalizowany jest także podświetleniem przycisku (niebieski = naładowane, czerwony = słabe).
Podświetlenie przycisku gaśnie 10 s po włączeniu. Zapala się ponownie na 10 s po wciśnięciu
przycisku lub wybraniu kanału pokrętłem (7).
2) Aby wybrać inny kanał, wcisnąć pokrętło wyboru
kanału (7) aż zacznie migać wskazanie kanału.
Tak długo jak wskazanie miga (10s po wciśnięciu),
możliwa jest zmiana kanału: Przesunięcie pokrętła
w górę powoduje wybór kolejnego kanału; przesunięcie w dół – poprzedniego kanału. Aby przejść
o kilka kanałów, przytrzymać pokrętło w danej pozycji. Aby zatwierdzić wybór kanału, wcisnąć na
krótko pokrętło.
Uwaga: na odbiorniku, kanału oznaczone są od 0
do F: kanał 0 odpowiada kanałowi 01, ... kanał F
– kanałowi 16.
3) Funkcja przycisku talk (1) zależy od ustawienia
przełącznika TALK (3):
W pozycji TALK – do wyciszania dźwięku (przycisk podświetlony na czerwono) lub do nadawania
komunikatu (przycisk podświetlony na zielono /
podstawowe ustawienie po włączeniu).
W pozycji PUSH: przycisk pracuje jako przycisk
PTT: nadawanie dźwięku jest możliwe tylko przy
wciśniętym przycisku (przycisk podświetlony na
zielono); po zwolnieniu przycisku nadawanie jest
przerywane (przycisk miga na czerwono).
Jeżeli odbiór sygnału jest zbyt słaby, sprawdzić czy
– poprawia się po zmianie kanału.
– odległość odbiornika od nadajnika nie jest zbyt
duża.
– transmisja nie jest zakłócana przez obiekty pomię-
dzy urządzeniami.
W przypadku równoczesnego wykorzystywania kilku
systemów ATS, upewnić się że pracują one w wystarczającej odległości od siebie.
5 Specyfikacja
Typ mikrofonu: . . . elektretowy/ kardioida
Zakres częstotliwości
pracy: . . . . . . . . . . 863 – 865 MHz (16 kanałów)
Moc nadajnika: . . . ≤ 10 mW (HI) / ≤ 1 mW (LOW)
Zasięg: . . . . . . . . . około 50m
Zasilanie: . . . . . . . 2 × 1,5 V baterie AA lub
2 × 1,2 V baterie akumulatorowe
NiMH AA
Czas pracy: . . . . . > 12h (HI)/ >15 h (LOW) z ba
te-
riami akumulatorowymi 1600 mAh
Wymiary, waga: . . ∅ 35 mm × 200 mm, 100 g
Z zastrzeżeniem możliwości zmian.
Zużyte baterie należy wyrzucać do specjalnie oznaczonych pojemników, nie do zwykłych koszy na śmieci.
Po całkowitym zakończeniu eksploatacji, urządzenie należy oddać do punktu recyklingu aby
zostało zutylizowane bez szkody dla środowiska.
PL
 Loading...