

Page 1
Quick Start
Manual
66R
i
ROTARY LASER LEVEL
QUICK START INSTRUCTION MANUAL
Page 2

Introduction
Purchase
Product
Identification
Validity
of this
manual
Congratulations on your purchase of an Imex i66R Rotary Laser.
These lasers have been designed for the professional and
incorporate the latest laser technology with a robust and
simple construction for years of trouble-free use.
This manual contains important safety directions as well as
instructions for setting up the product and operating it. Read
carefully through the User Manual before you switch on the
product.
The serial number of your i66R is indicated on the base of the
laser level. Please keep this recorded in your manual and
always refer to this information, should you need to contact
your Imex distributor.
Serial number:………………………………………………………
This manual applies to the Imex i66R laser and contains
instructions required to operate this laser at a basic level.
For more information: www.imexlasers.com
Table of contents
Chapter Page
1. Instrument Overview
1.1 I66R Laser Unit 2
1.2 Control Panel 2
1.3 Detector 3
2. Directions of Use
2.1 Set Up 4
2.2 Turning On/Off 4
2.3 Tilt Warning System 4
3. Detector 5
4. Batteries 5
5. Accuracy 6
5.1 Checking Accuracy 6
6. Care & Maintenance 7
7. Laser Specifications 7
- 1 -
Page 3
1. Instrument Overview
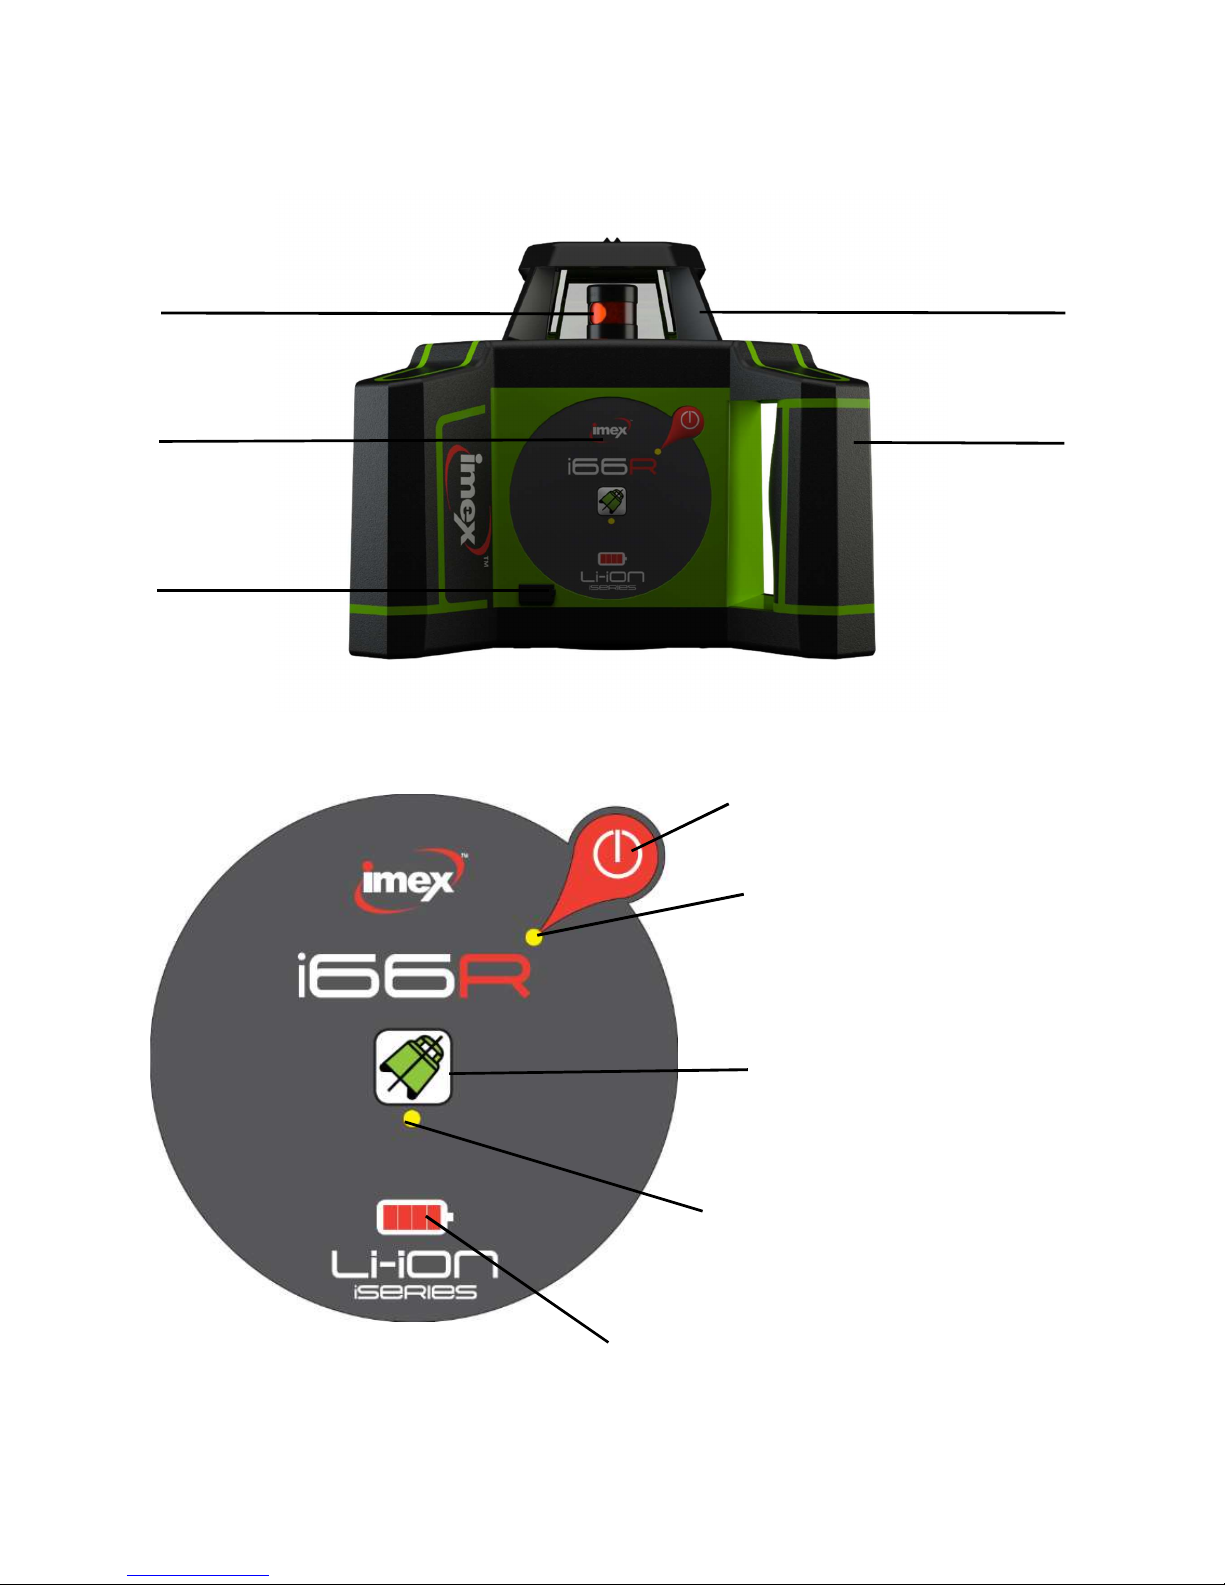
1.1 i66R Laser Unit
Rotary laser aperture Protective Lighthouse
Control Panel Handle
USB-C Port
1.2 Control Panel
d
a
b
a. Power
b. Power Indicator
c. Tilt Warning System
c
(TWS)
d. TWS Alarm
e. Battery Indicator
e
- 2 -
Page 4
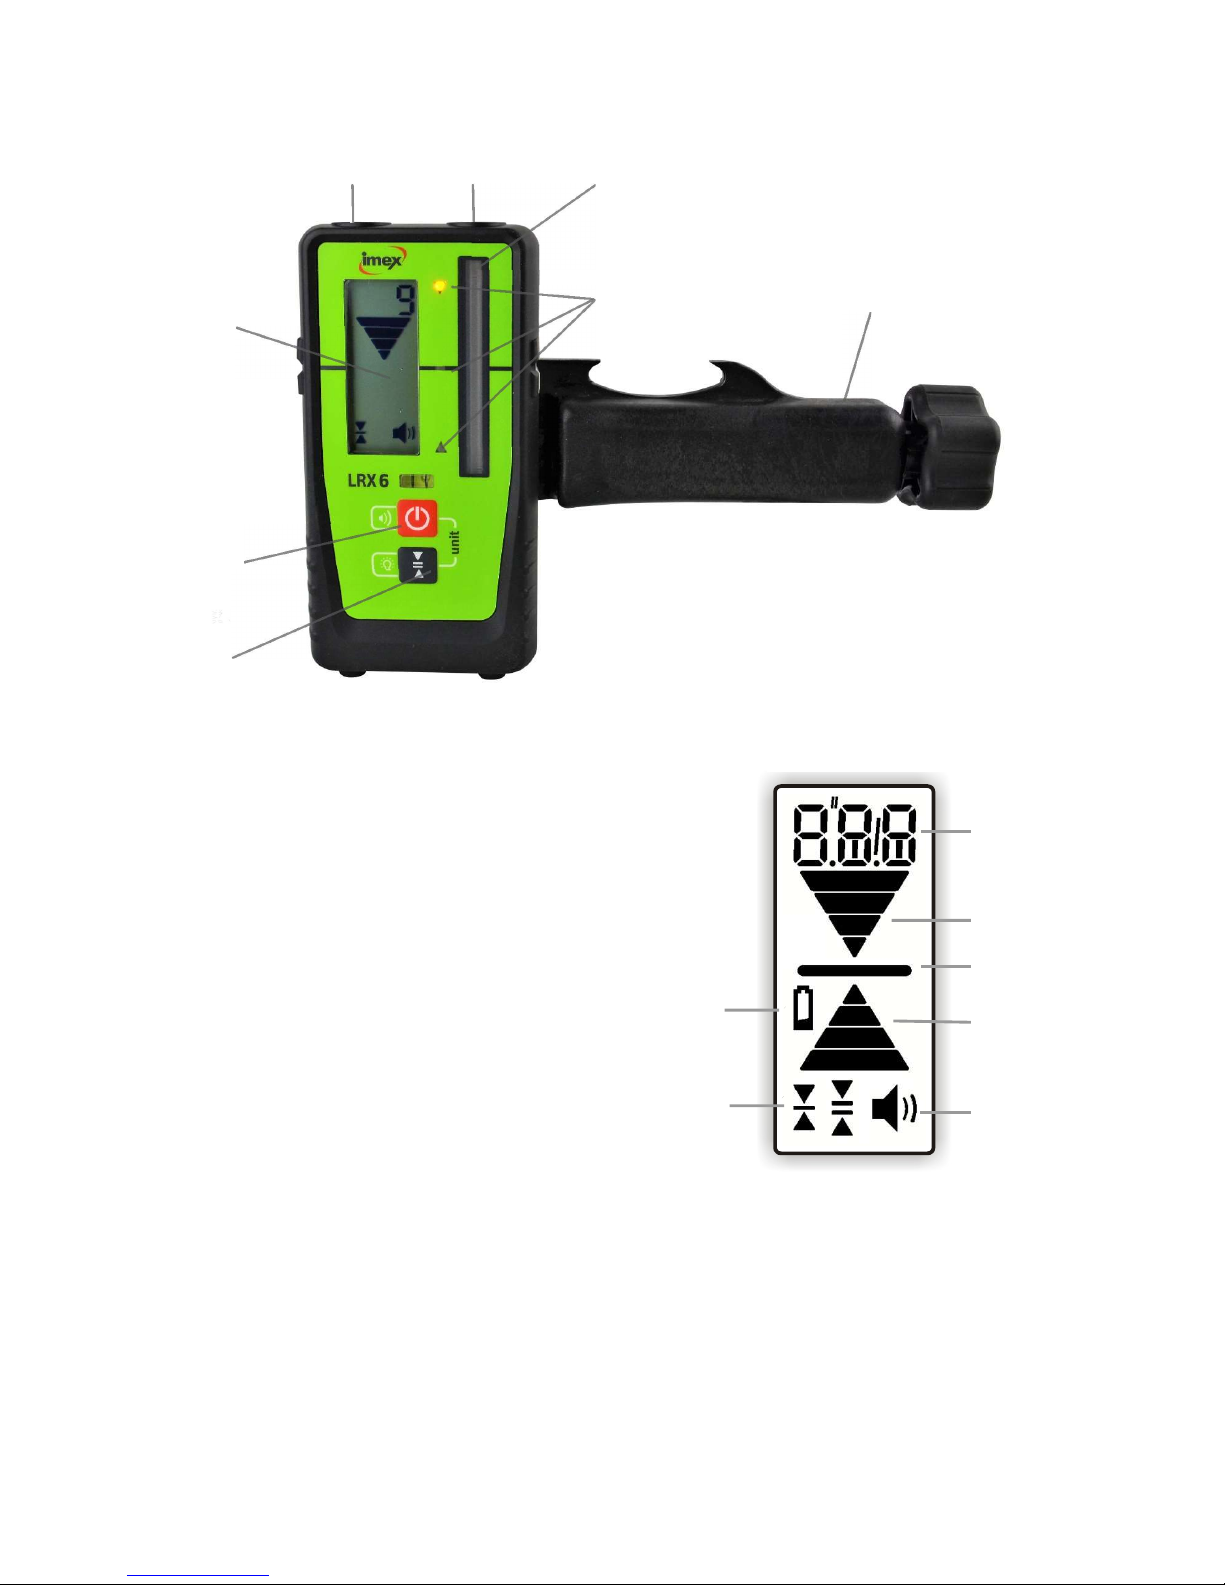
1.3 LRX6 Laser Detector
g
m. Battery Indicator
a a b
d
c
e
f
LCD Display
LRX6 Detector
a. Magnet
b. Laser Sensor Window
c. LCD Display
d. LED Grade Indicators
e. On/Off (Power) / Beeper
Volume
f. Accuracy (dead bands) /
Grade LEDs
g. Detector Clamp
m
l
h
i
j
i
k
Display
h. Numeric Digit Display
i. Grade Indication Arrows
j. On Grade Indicator
k. Beeper Volume Indicator
l. Accuracy Display
- 3 -
Page 5

2. Directions of Use
After turning on:
To prevent the possibility of the
is expected due to a knock or the laser being moved by a third party
the
and spinning
Press the
When activated the LED
When
interfered with,
light (d) will flash. The laser will
operator, before the laser will begin to spin again.
To reactivate TWS, press the TWS button again, and the laser
will re
RL/Datum point when unit re
2.1 Set Up
Location
Setting
up on a
Tripod
2.2 Turning On/Off
Turning on and
off
Keep the location clear of possible obstructions that could
block or reflect the laser beam.
Place the i66R on stable ground. Ground vibration and
extremely windy conditions can affect the operation.
When working in a very dusty environment place the 66R
up-wind so the dirt is blown away from the laser.
Attach the i66R securely to a tripod or mount on a stable
level surface.
If a tripod has chains, they should be slightly loose to allow
for thermal expansion during the day.
Secure the tripod on extremely windy days.
Press the power button (a) to turn on/off the 66R
If set within the 5° self-levelling range, the i66R will self-level,
once the unit has self-levelled the laser head will start to spin
emit a rotating laser beam.
If the unit is bumped or senses interference the laser head
will stop spinning and re-level. Once unit has re-levelled the
laser head will begin to spin again, emitting a level line
Warning - If the unit has been bumped or moved and the laser
recommences spinning the instrument may not be at the original
level position. Please recheck you RL/datum point.
2.3 Tilt Warning System (TWS)
Description
of (TWS)
Mode
TWS function can be used and will prevent the unit re-levelling
in the event of a knock or movement.
Using TWS
TWS button (c) (TWS on/off) to turn on the TWS.
(d) will light.
Mode
the TWS is activated on the i66R, if the unit is knocked or
the laser will stop spinning and the TWS indicator
-level and begin to spin again. It is advised to check
- 4 -
i66R giving a different reading than
then need to be reset by the
-levels.
Page 6

3. Detector
3.1 LRX6 Detector – Refer to page 5, LRX6 Manual and www.imexlasers.com.au
4. Batteries
General The i66R is supplied with a 9Ah 3.7 v Li-ion battery with
USB-C fast charge capability, a full battery has
approximately 40hours run time. The battery can be
charged in the unit by plugging the charger chord into the
USB-C port on the front to the laser or out the unit, by
plugging the charging chord directly into the USB-C port on
the battery.
Charging Please charge the battery prior to use. Full battery charge time
is approx. 3.5 hours
The charging temperature range is between 0°C and +40°C
The battery may feel warm whilst charging.
Please only charge with the Imex chargers supplied with the
unit.
When battery is charging, red battery charging indicator light
will light, when battery is fully charged green indicator light will
light.
Battery Placement When putting battery into the laser unit, please ensure
correct polarity of terminals. If battery is incorrectly inserted
into the laser level the battery will lock to prevent damage
to the laser and battery.
To unlock/re-set battery, insert battery into the laser with
correct polarity and charge for 5 minutes, the battery will
then re-set and return to previous charge level.
- 5 -
Page 7
5. Laser Accuracy
General
The Imex 66R is calibrated at point of manufacture
and re checked prior to despatch to ±2mm/ 30m.
It is the responsibility of the user to follow operating
instructions and to periodically check the accuracy of the
laser. If your 66R requires adjustment then please contact
your nearest dealer
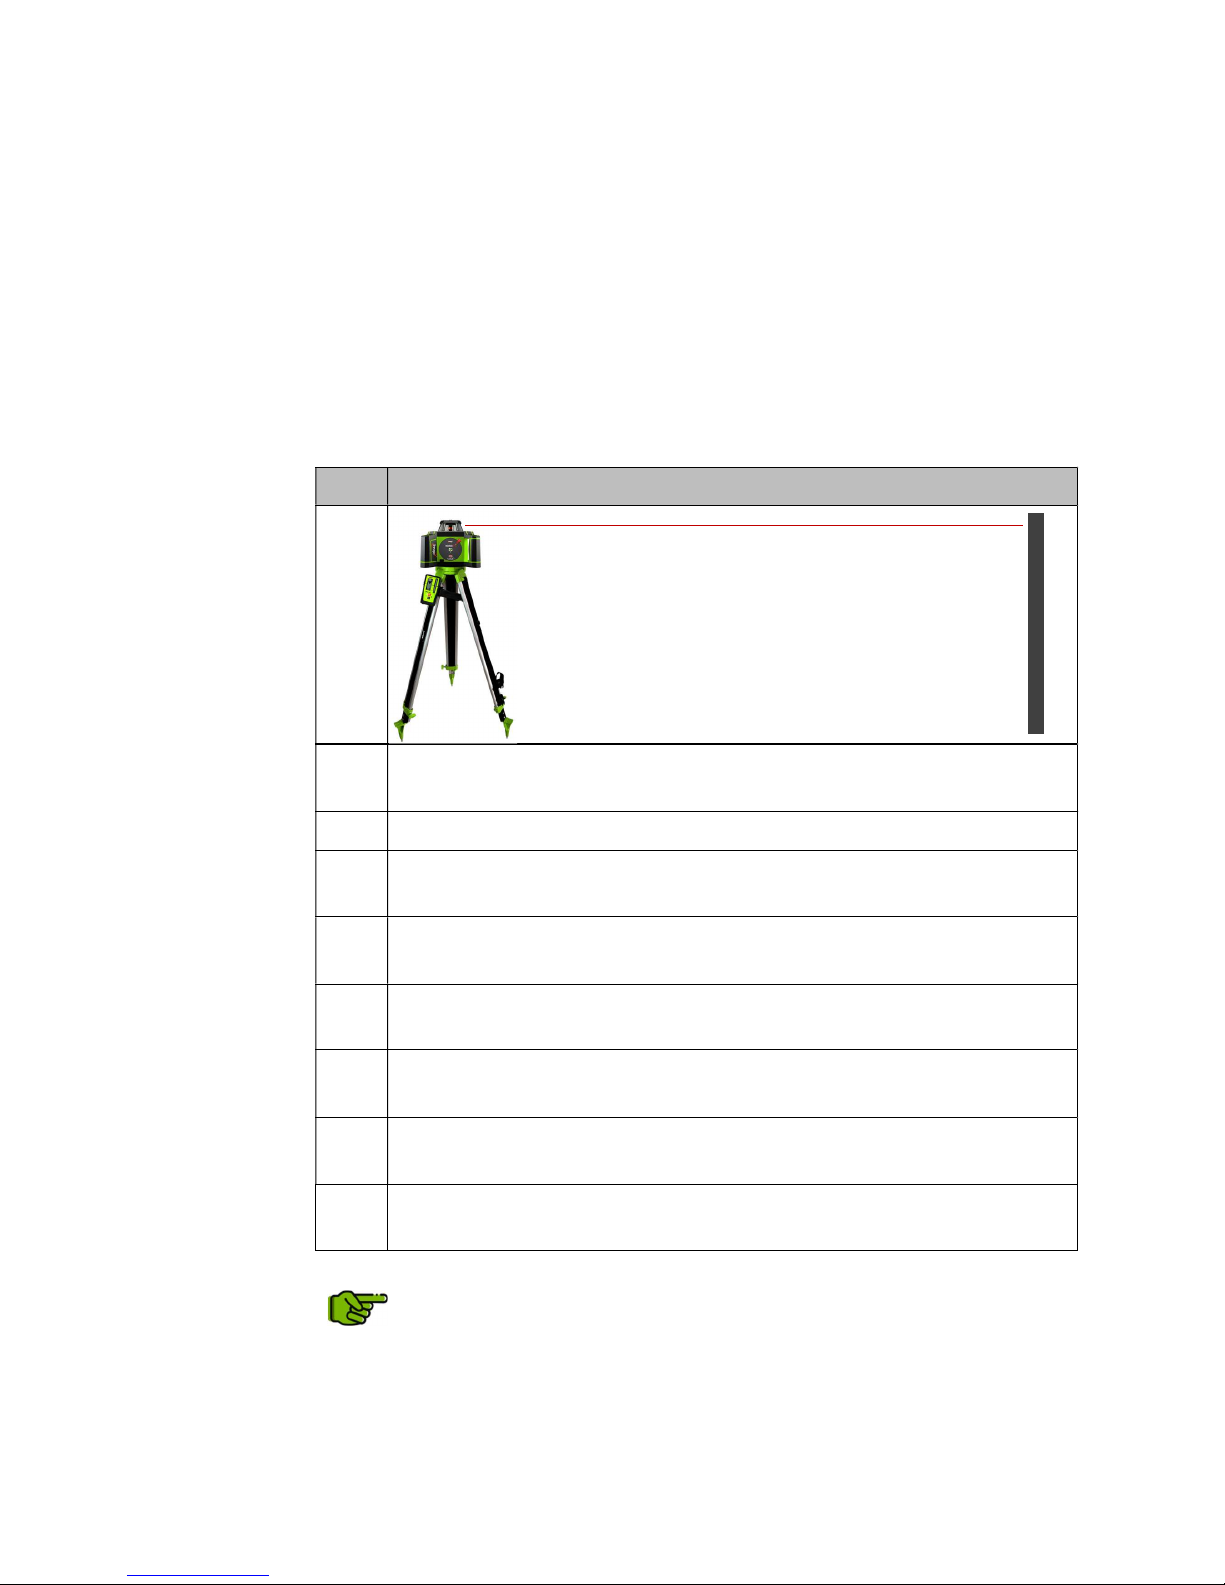
5.1 Checking the accuracy
Accuracy check
steps
Step Description
1.
2.
Align the first axis so that it is square to the wall. Allow the 66R to
self- level completely and it will begin to rotate.
30m
Place the i66R on a flat, level surface or
tripod approximately 30m from a wall.
3.
4.
5.
6.
7.
8.
9.
Mark the position of the beam on the wall. (centre of the point)
Very carefully rotate the laser on the tripod 180° and allow it to
rotate and self-level.
Mark the position of the beam on the wall. (centre of the point) if
different from the original mark.
Align the second axis so it is flat to the wall by carefully rotating the
laser on the tripod by 90°. Allow the 66R to self-level completely.
Mark the position of the beam on the wall. (centre of the point) if
different from the previous marks.
Very carefully rotate the laser on the tripod 180° and allow it to
rotate and self level.
Mark the position of the beam on the wall. (centre of the point) if
different from the previous marks.
The 66R is within accuracy if the four marks are within 2mm
from the centre (4mm max extreme edges) at 30m
- 6 -
Page 8

6 . Care and Maintenance
Specification
Transport When transporting the i66R always ensure that it is carried
in the original foam lined carry case.
Never transport the unit loose in your vehicle as the shock
and vibration will affect the accuracy and could knock it out
of calibration.
If the unit is to be transported overseas by sea or air it is
the operator’s responsibility to ensure the correct
procedures are adhered to for transporting batteries.
Storage Ensure the unit is stored within the recommended
temperatures of -10°C to +50°C After long periods of
storage check the charge of the batteries
Always clean the unit before storing. Even if the unit is in
regular use.
If the unit has been used in damp weather ensure it is dried
prior to placing it back in its carry case. It is important to
keep the carry case dry to prevent any ingress of moisture.
7 . Laser Specification
Operating Range 400m with detector
Accuracy
Self –levelling
range
Rotation Speed 600 rpm
Laser 635nm Class 2
IP Rating IP66
Power 9Ah 3.7v Li-ion Battery
Working time Approx 40 hours
Battery charger 240v AC, 5v USB-C Car Charger
Working
temperature
Unit weight 2.2kgs
2mm/30m
±
± 5°
-20°C - +50°C (-40°C - +70°C
storage)
© Copyright Imex Group International 2018
- 7 -
 Loading...