

IMEX ROTATING LASERS
OPERATING MANUAL
77R 88R and 88G


OPERATING MANUAL
ROTATING LASER
77R 88R and 88G
Introduction
Congratulations on your purchase of a quality Imex rotating
laser.
These lasers have been designed for the professional and
incorporate the latest laser technology with a robust and
simple construction for years of trouble-free use.
These instruments are suitable for all interior and exterior
general construction leveling applications and feature quick
set-up, excellent accuracy and ease of use.
The following operating manual has been designed to assist
you in getting the optimum performance from your
instrument. Please read carefully before using the
instrument, and observe all safety conditions.

OPERATING MANUAL
ROTATING LASER
77R 88R and 88G
Contents
1. About the Instrument – Functions 3
2. Basic Operation 5
3. Manual Grade Mode Operation 7
4. Scan Mode Operation – 88R & 88G 9
Page
5. Vertical Operation – 88R & 88G 10
6. Batteries 11
7. Checking Accuracy 12
8. Trouble Shooting 13
9. Warranty, Service and Care 14
10. Technical Specifications 15
11. Available Accessories 16
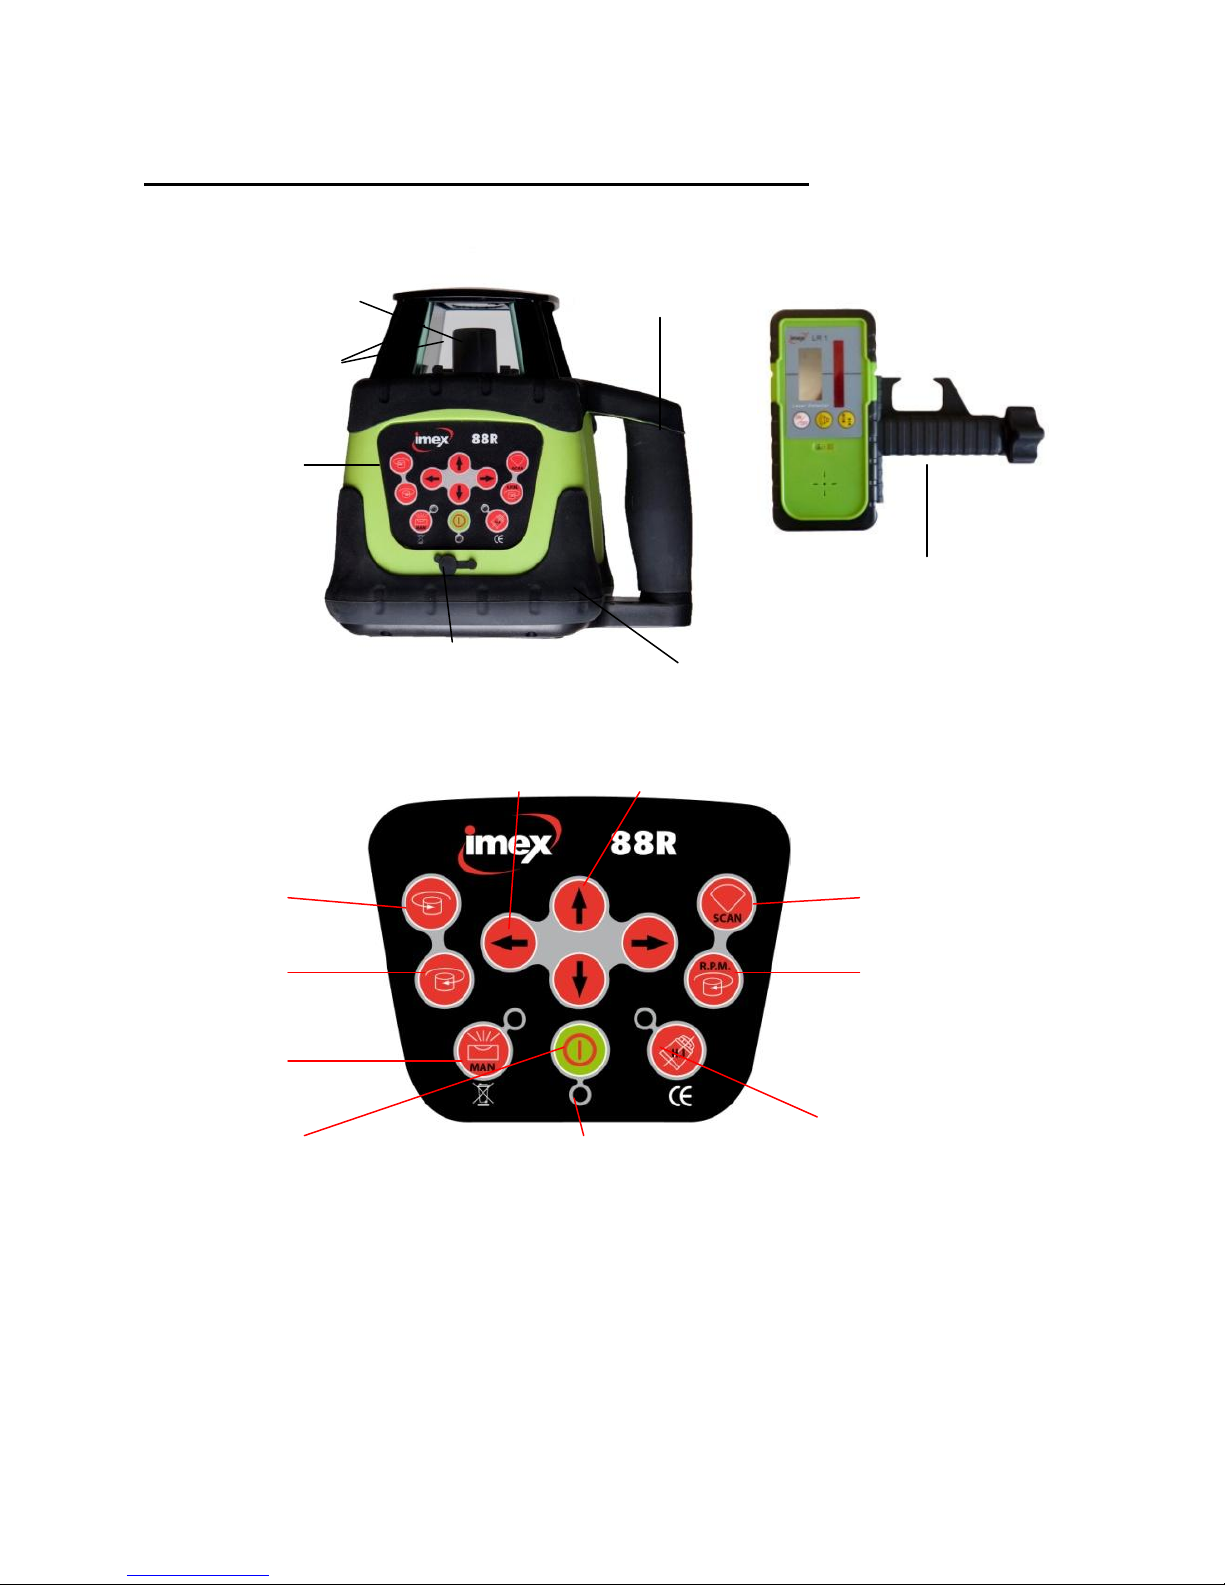
1. About the Instrument - Functions
a)
Left scan mode direction
f)
Out of level warning light
b)
Right scan mode direction
g)
Rotation speed control
c)
Manual/Automatic level setting
h)
Scan mode
d)
On/Off switch
i)
x-axis(88R and 88G only) grade slope
e)
On/Off light
j)
y-axis grade slope
1.1 Instrument Overview
Laser Module Handle Laser Detector
Beam
Windows
Control
Panel
Staff Bracket
Battery recharge outlet Rubber Sheathed base
1.2 Control Panel
i. j.
a. h.
b. g.
c.
d. e. f.
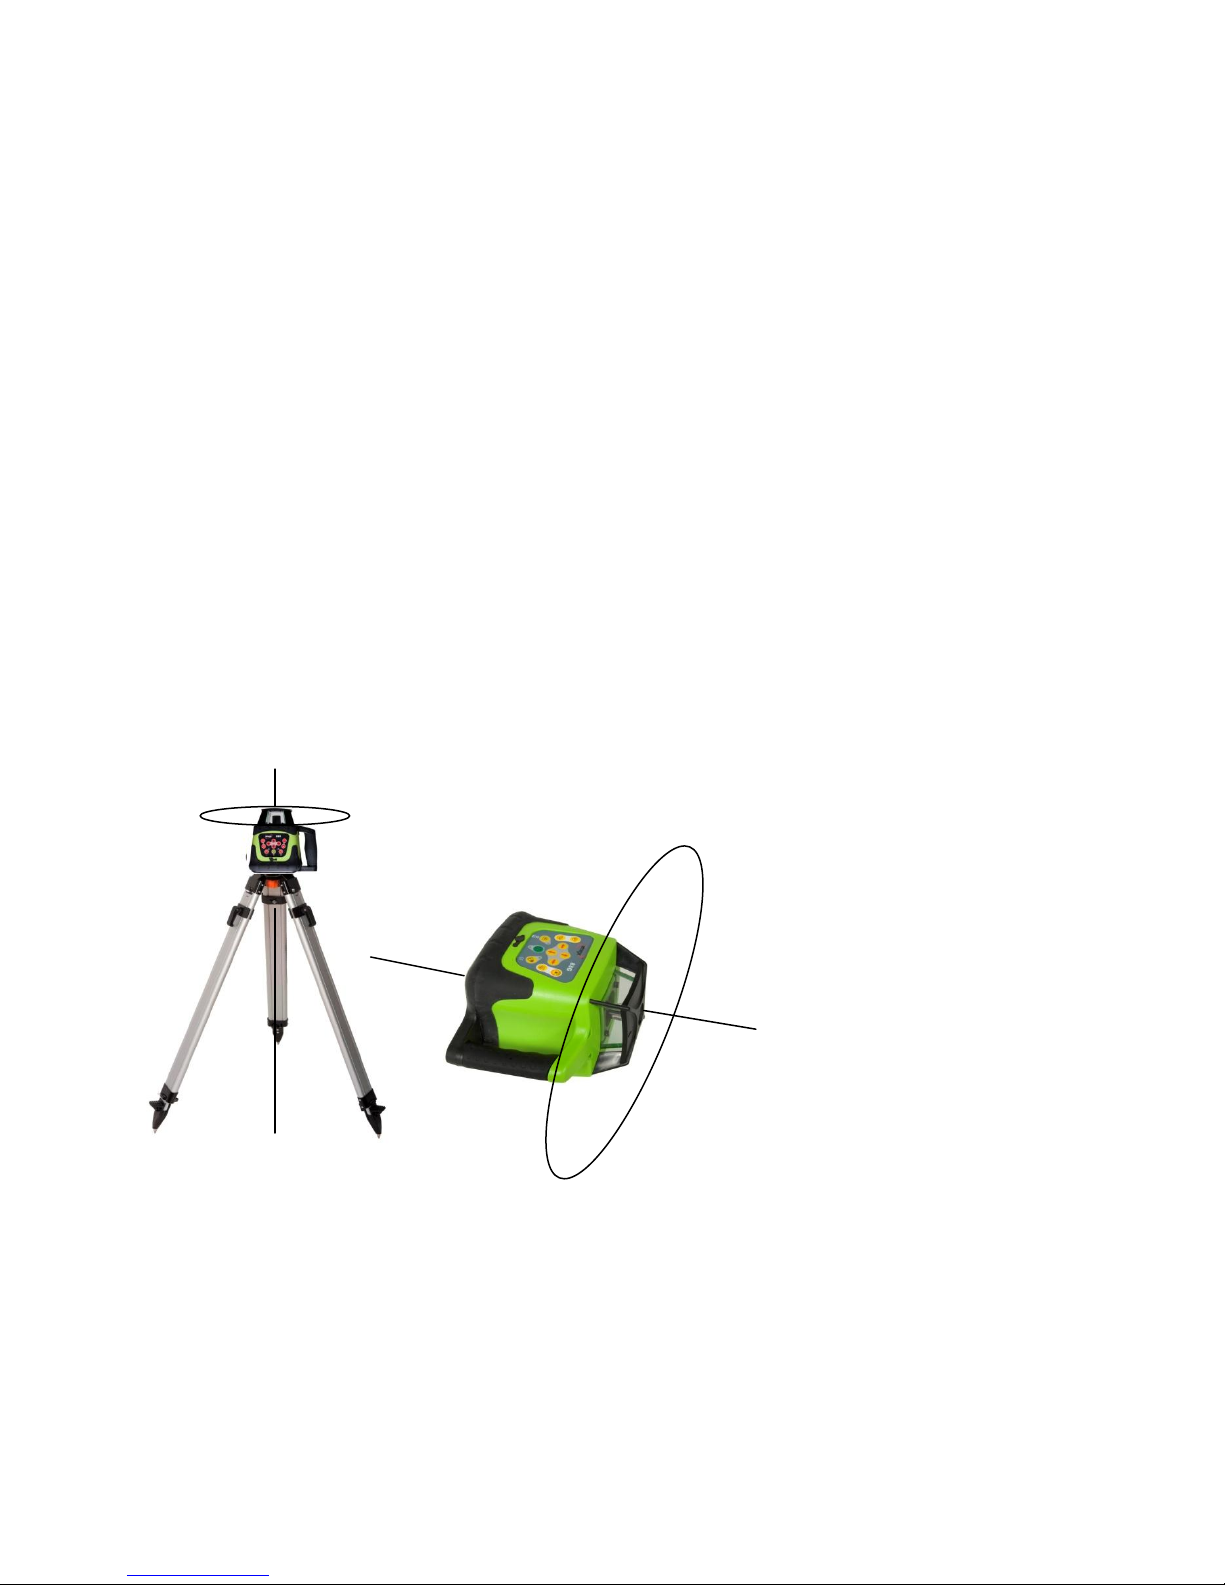
1.3 Function
The instrument is equipped with a semi-conductor diode with
wavelength of 635nm on the red beam models and 532 on
the green beam model. The laser beam is clearly visible, and
the laser module rotates freely to form a laser scanning
surface.
In the upright position, ideally placed on a standard
aluminium tripod the laser beam emits a horizontal line
which can be detected by the instruments receiver.
On the 88 models, if the unit is placed in a horizontal
position, the laser emits a vertical beam.
A plumb spot at 90º to the main beam is emitted from the
base and the top of the instrument.
Horizontal operation Vertical Operation
A remote control is provided which works on an infra-red
system up to 20m-30m from the instrument. The control
panel has the same functions as the control panel on the
instrument itself.

2. Basic Operation
2.1 Standard Set-up Leveling (see dia over page)
Place unit on tripod and roughly set up so that the
instrument is within 5% of level.
Switch the unit on (d).
The unit will then level itself and the diode will emit a beam
and commence spinning. The instrument will commence
spinning at its maximum speed of 600rpm.
If the unit is bumped or moved the laser will stop and the
out of level warning light (f) will flash. After the instrument
has re-leveled itself the laser will recommence spinning.
Warning – If the unit has been bumped or moved and the
unit recommences spinning, the instrument may not
automatically be at the original level. Re-check on a datum
point.
2.2 Rotation Speed
If a slower speed is required, i.e. for better visibility; press
the speed control button (g).
Speed will revert to 0rpm, press button again to get required
speed.
2.3 Receiver Set-up
Using the bracket included, mount this onto a staff or grade
rod.
Turn the receiver on and raise or lower the receiver on staff
until it makes a continuous beeping sound. This is the point
level of with the instrument.

2. Basic Operation cont:
The receiver has two settings; a course and a fine setting.
The band width and the audio volume can be adjusted using
the receiver’s buttons.
Standard Leveling Set-up
When set up the instrument will create a laser beam across
the entire work site to a radius of 250m and the receiver
will give a signal in all points within the instruments range

3. Manual Grade Operation
%
@10m
0.5%
1.0%
1.5%
2.0%
2.5%
3.0%
3.5%
4.0%
50mm
100mm
150mm
200mm
250mm
300mm
350mm
400mm
The instruments have an incorporated grade slope function
to 5º. For the 88R and 88G this is a dual direction in X and Y
axis.
This allows for the following tasks to be performed; Sloped
concrete slabs, drainage slope, ceiling and grid slopes,
fencing slopes.
For additional slope i.e. 10-15ºthe instrument can be set on
a domed tripod and used with the manual button on.
3.1 Manual Mode
For best results use the remote control. Set up the
instrument in the direction of slope required.
Turn on manual mode using button (c).
To adjust slope up or down on the X axis use the (i) buttons.
To adjust slope up or down on the Y axis use the (j)
buttons.
3.2 Setting a Slope
To set a slope as a percentage use the table
included for assistance.
To set a 1% fall;
-Position instrument at the
start of your run.
-Turn on manual mode.
-Measure out 10m from the
unit and get level right.
-When level is right move
receiver 100mm down you staff.
-Now use your slope button (i or j) on your remote to bring beam
down the middle of your receiver.

Manual Grade Operation cont:
Level setting
Slope setting
10m
3.3 Dual Grade Sloping – (88R & 88G only)
Used for areas where a fall is made simultaneously to a
point 90º to the other axis.
Ideally, site instrument to one corner of the worksite. Set Y
axis as shown. At 90º to the Y axis set the X axis in the same
manner. The grade is now set for both runs.
Y axis
Direction of slope
X axis Direction of slope

4. Scan Mode Operation (88R & 88G only)
The scan mode function allows the laser beam to emit
only in a restricted radius.
This function is useful for;
- Internal layout work where work is being carried out in
single runs or sections i.e. wall or ceilings
- On restricted sites internal or external where other laser or
electrical equipment may be in use
- On busy sites where eye safety with other workers may be
an OH & S issue
- On single long external runs i.e. pipe laying where full 360º
is not required
- Especially useful in vertical mode 180º operation
4.1 Operating the Scan
With the unit on, press the scan button (h). Set the width
required 0º, 10º, 45º, 90º or 180º by pressing the button
once for every scan width increment.
To change the direction or position of the scan use the left
spinning and right spinning buttons (a and b). Press either of
these buttons until the desired position is reached.

5. Vertical Function – 88R & 88G only
The vertical function allows for the instrument to be laid
horizontally and a vertical line is emitted.
This function is used for;
- Alignment of formwork or pipeline runs in external
situations
- Alignment of internal wall, floor and ceiling layout
- In conjunction with the plumb spot beam, which is
always 90º to the rotating beam, a set-up reference
point can be determined.
Alignment of internal wall, floor and ceiling layout
5.1 Using the Vertical Mode
Lay the instrument on a floor or board. Make sure the
instrument is approximately level ± 5º and turn on.
Instrument will level as in standard position.
All functions which can be carried out in standard
position can be performed in the vertical position i.e.
scanning, grade slope, vary speed etc.
5.2 External use with Receiver
The vertical beam can be picked up with the use of the
receiver in vertical position or 90º to normal position to
check formwork or pipeline alignment set up instrument
at the end of the run in a horizontal plane.

Determine datum point at end of run with the receiver.
Instrument is now set to give a straight laser beam over the
full length of the run.
Outdoor vertical function
6. Batteries
The instrument is powered by 4 DC4.8-6V Nimh
rechargeable batteries that allow for approximately 20
hours continuous use in standard conditions (20º-25º)
Alternatively you can use the alkaline battery pack supplied.
6.1 Battery Situation
The battery case is located on the base of the instrument. If
changing batteries; undo the cover by unscrewing centre nut,
replace batteries checking polarity.

6.2 Recharging Batteries
A low battery warning light is emitted from the On/Off
light (e) approximately four hours before recharge.
DO NOT OVER CHARGE BATTERIES!
DO NOT CHARGE ALKALINE BATTERIES!
Plug the charger provided into the recharging point on the
instrument, located immediately below the control panel.
The charger plugs into a standard 240V outlet.
6.3 Battery Charging Time
Standard full Charge time is approximately 7 hours.
However the instrument can be charged and used
simultaneously. In some instances a car charger
accessory kit is an advantage.
7. Checking Accuracy
Your Imex instrument has been pre-set and calibrated for
accuracy before dispatch and should perform within the
stated accuracy tolerance in standard conditions. However
if the instrument is knocked, poorly transported or
mistreated in any way the accuracy may be compromised
and unit may need re-calibration.
On commencement of a task it is advisable to carry out a
simple control check.
7.1 Level Checking – Horizontal
Place instrument approximately 30m from a blank wall
and with X1 axis square to the wall project a line onto the
wall and mark line with a fine pencil or similar.
Turn the instrument 180º to X2 and repeat

The value or the difference between the two points should
not exceed 3mm
Repeat the process on the Y axis
x1 Beam
X 2 x 1
X2 Beam 3mm
Rotate 180º max
30m
7.2 Plumb spot Horizontal check
- Place instrument on horizontal axis on tripod or
similar, 10m from a wall
- Mark the spot on the wall
- Turn unit 180º and repeat
The difference between the two points should not
exceed 5mm.
5mm
max
10m
If values exceeded these by 10% contact your local service
centre or 1800 669 110 to organise service and calibration.

8. Trouble Shooting
Problem
Possible Cause/Solution
Out of level
alert – unit won’t
self level
- Check that instrument is within 5ºof
level, before switching on
- Check that manual level switch is not on
- Check that unit hasn’t been bumped
or moved
Low battery light
flashing. No power,
unit won’t operate
- Re-charge batteries
- If batteries are fully charged and still
won’t operate, open battery terminals
and check terminals are clean and
polarity correct
- Batteries may need replacing if over
charged too often
Out of level and
battery light on.
Instrument not
working properly
- Environment and direct sunlight may
be too harsh and instrument can’t
operate without damaging the laser
- Place unit in shaded area and below
50ºC
Receiver not
working or
functioning properly
- Check receiver batteries. Change if
necessary
- Check that receiver is within working
range. 250m radius from unit
- Check that windows of the laser are
not obstructed and are clean and free
of dust
Remote Control not
working
- Check remote control batteries
- Check that remote is in working
range of the unit (20m outdoors 30m
Indoors)
- Check that instrument is turned on

9. Warranty Service and Care
9.1 Warranty
The Imex rotating laser range is covered with a 5 year
warranty as detailed on the warranty form. For registration
please visit: www.imexlasers.com
9.2 Service and Calibration
It is recommended that in general use, laser equipment
should be calibrated by a registered service centre every 12
months. For less frequent use 24 months is permissible.
9.3 Care of Instrument
For optimum results from your instrument care must be
taken to prevent damage. Laser instruments contain
sensitive optical assemblies and need to be treated
carefully.
- Storage – Store in an area away from direct sunlight and
under the storage temperature limit of 70°C
- Transport – Lasers are affected by vibration and shock;
never transport loose on the back of a vehicle.
- Cleaning – When working in a dusty environment always
clean instrument before packing away.
- If working in wet environment, completely dry unit with dry
cloth before packing away. To prevent damage to
instrument. Failure to do this will void warranty.

Model
77R Red Beam
Horizontal/Vertical
NO
Self-Levelling
Range
±50
Water proof
IP64
Accuracy
1.5mm @ 30m
Power
DC 4.8-6v (Ni-MH)
/ 4 ‘C’ cell alkaline
Working Distance
Dia 500m with included
detector
Working time between
charge
20 hours (Ni-MH)
60 hours (Alkaline)
Rotation Speeds
0, 60, 120, 300, 600 rpm
Low Battery Light
Yes, approx 1 hour
warning
Scan Mode
NO
Battery Charger
240V
Grade Slope
±50 (Y axis only)
Working Temperature
-200C - +500C
Plumb Spot
YES -accuracy ± 1mm @
2m
Detector
Double sided
operation fine &
course setting
Light Source
Red laser diode, 635nm
Unit Weight
2.2kgs
Remote Control
YES - Working range
approx 20m
Set Inclusions
Laser unit,
detector and
bracket Remote,
charger, Hard carry
case
Model
88R & 88G
Horizontal/Vertical
YES
Self-Levelling
Range
±50
Water proof
IP64
Accuracy
1.5mm @ 30m
Power
DC 4.8-6v (Ni-MH)
/ 4 ‘C’ cell alkaline
Working Distance
Dia 500m with included
detector
Working time between
charge
20 hours (Ni-MH)
60 hours (Alkaline)
Rotation Speeds
0, 60, 120, 300, 600 rpm
Low Battery Light
Yes, approx 1 hour
warning
Scan Mode
YES 10º,45º,90º,180º
Battery Charger
240V
Grade Slope
±50 (Y and Y axis)
Working Temperature
-200C - +500C
Plumb Spot
YES -accuracy ± 1mm @
2m
Detector
Double sided
operation fine &
course setting
Light Source
88R Red laser diode,
635nm, 88G Green laser
diode 532nm
Unit Weight
2.2kgs
Remote Control
YES - Working range
approx 20m
Set Inclusions
Laser unit,
detector and
bracket Remote,
charger, Hard carry
case
10. Technical Specifications


Copyright © International Measuring Equipment 2015
AU: T: 1800 669 110 E: info@imexlasers.com.au W: www.imexlasers.com.au
UK: T: +44 (0)115 9440399 E: sales@imextools.co.uk W: www.imextools.co.uk
 Loading...