

INSTRUCTION MANUAL
IMER U.S.A. inc.
MINUTEMAN MIXER
(1126608)
R
Machine serial N°
Part. number 3210929_R01 - 12/2012
IMER U.S.A. Inc.
221 Westhampton Place
Capitol Heights, MD
20743
Ph / 800.275.5463

Thank you for purchasing a MINUTEMAN Mixer from an IMER U.S.A. dealer. Your decision is an
intelligent one. No other mixer in the world today offers the features and value of the MINUTEMAN
Mixer.
At IMER U.S.A. we continually search for ways to better serve our customers. Should you have an idea or
thought to share with us regarding this Product we would appreciate hearing from you.
Our motto is "Tools and Services for the 21st Century".
We look forward to delivering the goods.
Thank you again for your purchase,
* After the initial set-up the MINUTEMAN Mixer can be knocked down or reassembled in
1 minute.
* Direct drive drum rotation, efficient and safe.
* Portable, the large 12" wheels make moving the MINUTEMAN a breeze around the
home or job site.
* Compact, the clever design allows the MINUTEMAN to fit into the trunk or hatchback
area of almost all cars.
* Finish, the high quality of paint and construction components ensure a piece of equipment
that you will be proud to own for years.
Mace T. Coleman, Jr.
President, IMER U.S.A. Inc.
221 Westhampton Place
Capitol Heights, MD
20743
Ph / 800.275.5463
S/N :
2

IMER U.S.A. Inc.
3
MINUTEMAN
TABLE OF CONTENTS
TECHNICAL DATA..................................................................................................... page 4
NOISE LEVEL ........................................................................................................... page 5
WIRING DIAGRAM....................................................................................................page 5
SAFETY NOTES........................................................................................................page 6
ASSEMBLY ...............................................................................................................page 7
MOVING THE MINUTEMAN................................................................................. page 9
SETTING UP THE MINUTEMAN .......................................................................... page 9
OPERATING THE MINUTEMAN .......................................................................... page10
MAINTENANCE AND CLEANING......................................................................... page10
ORDERING SPARE PARTS....................................................................................... page10
SPARE PARTS DIAGRAM......................................................................................... page11
WARRANTY ....................................................................................................... page14
IMER U.S.A. Inc.
4
MINUTEMAN
Product development and improvement is an ongoing process, therefore, specifications may change
without notice.
* Capacities based on usable volume.
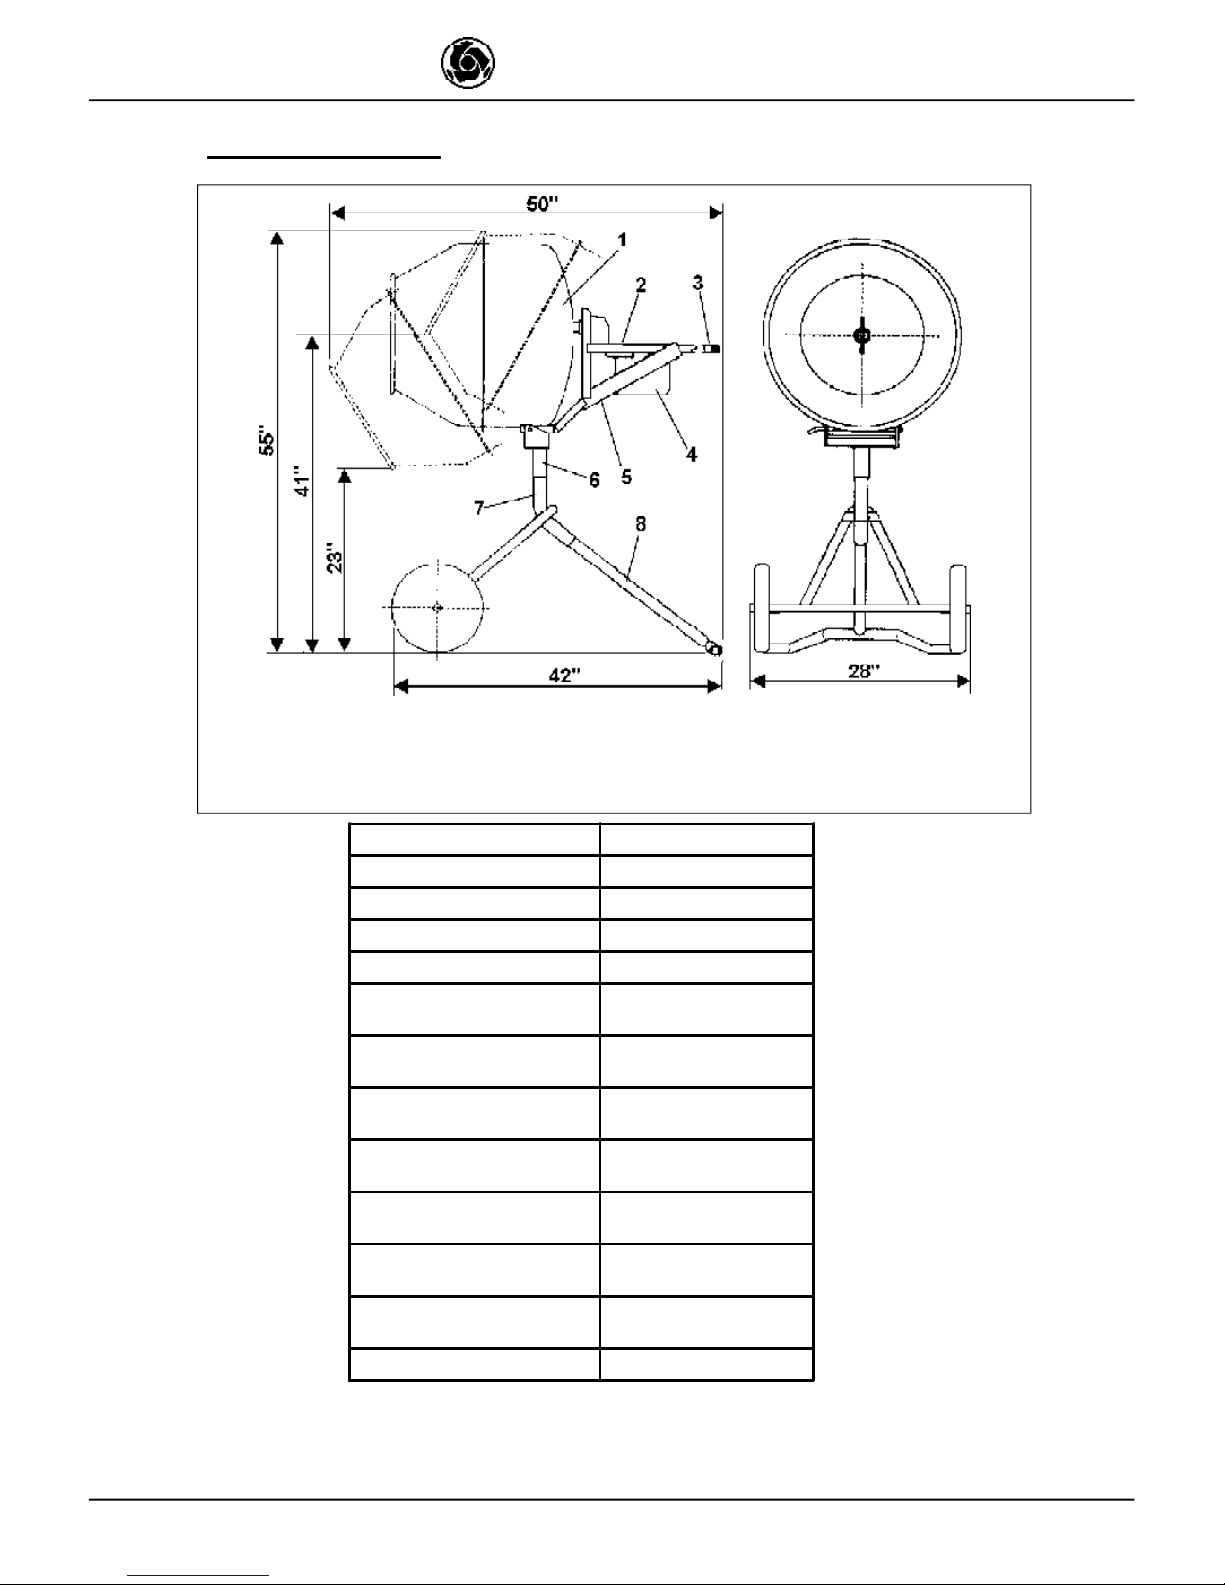
TECHNICAL DATA
1 MIXING DRUM 5 GEARBOX MOUNTING FRAME
2 ON/OFF SWITCH 6 SWIVEL BRACKET
3 DUMP HANDLE 7 MAIN FRAME
4 MOTOR AND GEARBOX DRIVE 8 T-BAR
Drum capacity 5 cubic feet
Batch Output 2.5 cubic feet, 225 lbs. *
Drum Diameter 24 inches
Discharge outlet height 23 inches
Wheels 12" x 2.5"
Single Phase electric motor 0.5 HP
Voltage 110 / 115 V
Hertz 60
Motor R.P.M. 3350
Nominal current 6.2 Amp
Operating dimensions 42" x 25" x 58"
Storage dimensions 25" x 25" x 25.5"
Weight 120 pounds
IMER U.S.A. Inc.
5
MINUTEMAN
The MINUTEMAN has a noise emission level of 65 decibels. It's very quiet, operate it anywhere.
NOISE LEVEL
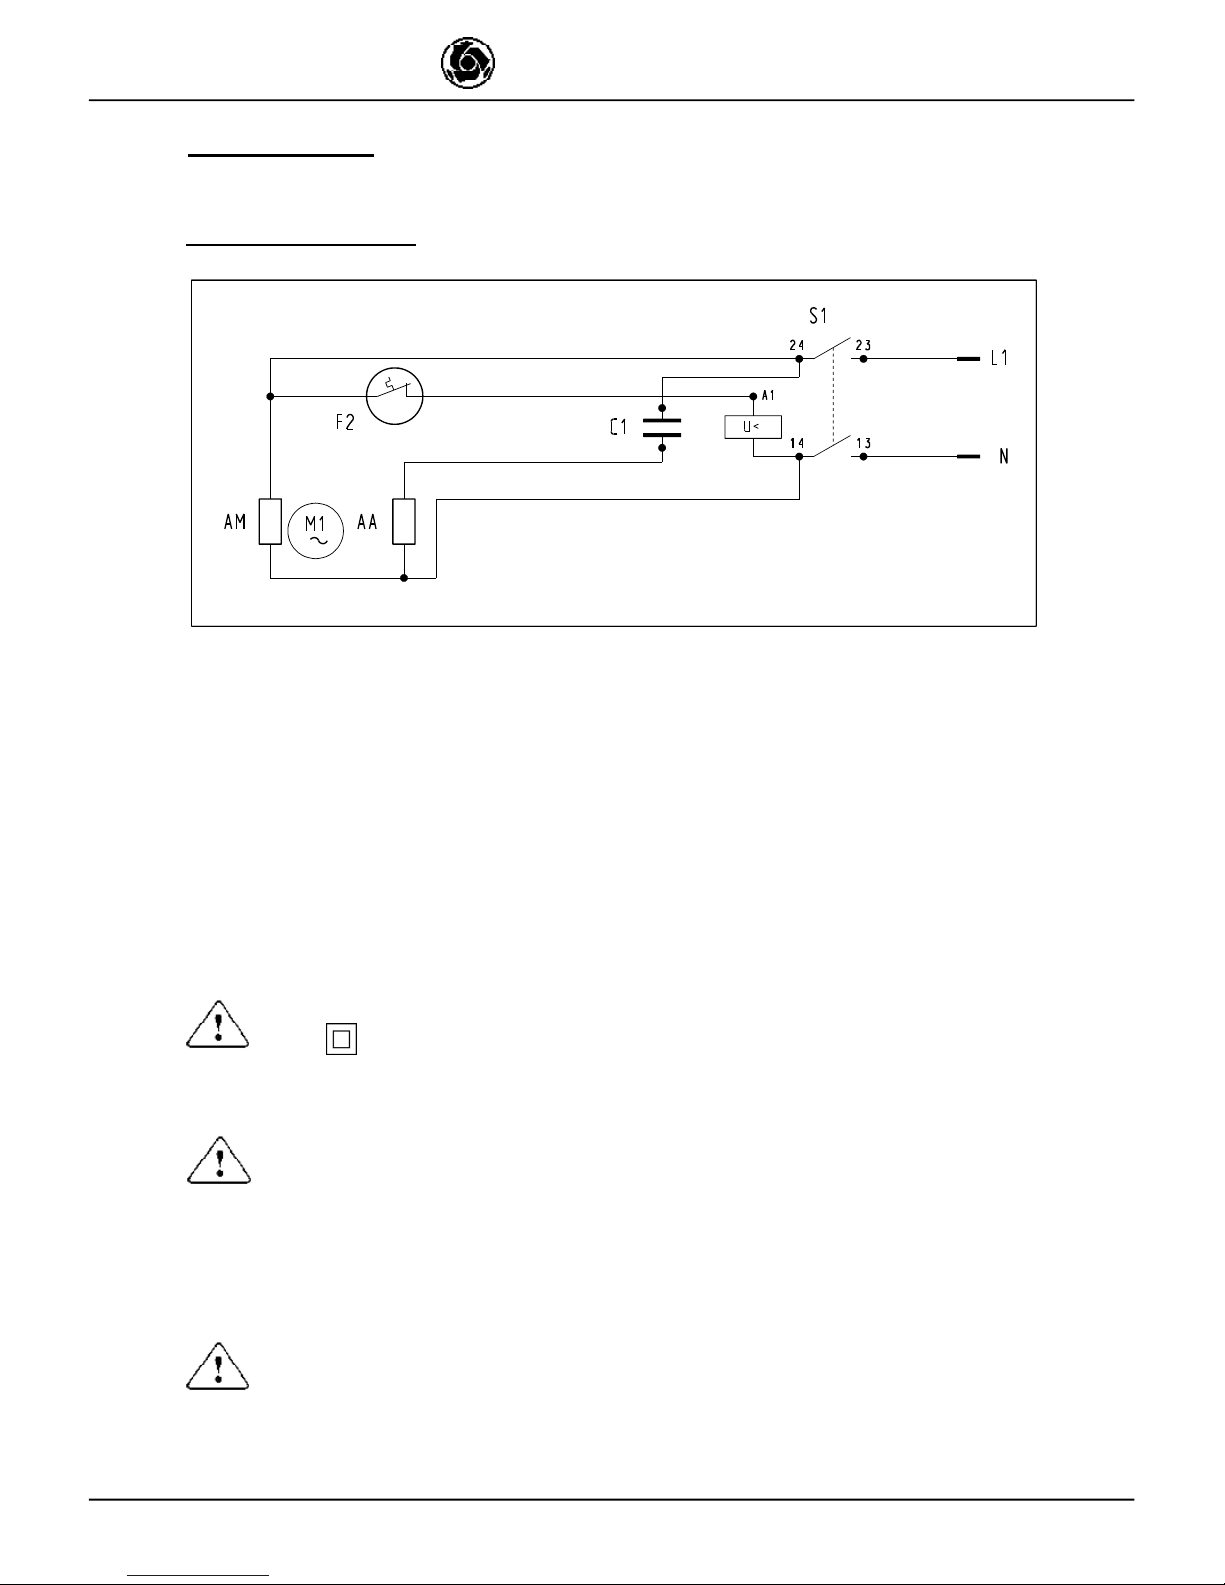
WIRING DIAGRAM
N
L1
S1
F2
C1
M1
AM
AA
Neutral wire
Phase wire
Stop and start button
Thermal protection for electric motor
Capacitor
Single phase motor
Motor winding
Motor winding
WARNING
Any type of electrical repair or trouble-shooting should only be performed
by an IMER dealer or a properly qualified electrical repair shop. For
assistance with any electrical difficulty, IMER U.S.A. is always directly
available @ 800.275.5463.
The MINUTEMAN motor is manufactured as a class II Double Insulation
type ( ), it does not require a ground wire.
CAUTION: when carrying out repairs, class II Double Insulation protection
will only be maintained if original insulating materials are used and provided
the specifications and insulating materials remain unmodified.

IMER U.S.A. Inc.
6
MINUTEMAN
Your MINUTEMAN mixer has been designed with safety in mind. However, as with any type of machinery,
some basic DO'S and DONT'S apply:
IMPORTANT !
READ THIS SECTION CAREFULLY !
Place your hand or hands in or around any part of
the drum while it is operating !
DO NOT
Place any tools or instruments in or around the drum
while it is operating !
DO NOT
DO NOT
Clean, assemble or work on the unit while it is plugged in !
Allow water to contact the motor or electrical connections at any time !
DO NOT
DO NOT
DO NOT
Operate the unit in or around water puddles.
DO NOT
Leave the machine unattended !
DO NOT
Operate the mixer on a surface that is not flat or is
uneven !
Always operate the MINUTEMAN on a level surface,
if placed on an incline the machine will fall over.
Allow other persons around the mixer while it is operating ! Keep children away
from your work area !
SAFETY NOTES
DO NOT
Operate the mixer while under the influence of alcohol or drugs !

IMER U.S.A. Inc.
7
MINUTEMAN
1
2
SAFETY NOTES
DO
Read all the instructions before operating the mixer.
DO
Use caution when assembling and transporting the mixer. Tie it down good in your vehicle.
DO
Keep the mixer clean and free of debris and mix build-up. After using, fill the drum with
water and run the MINUTEMAN for 10 minutes or so, most of the cement will break
loose from the drum.
DO
Keep all the moving parts lightly lubricated, WD-40 may be sprayed all around the machine
(wheel axles, swivel bracket, etc.).
DO
Periodically inspect your mixer for abnormal wear or damage. If something does not
seem right call your dealer or IMER USA direct @ 800.275.5463.
ASSEMBLY - Follow drawings 1 thru 6 -
DO
Wear the appropiate safety gear; hard hat ,gloves, goggles, ear protection and wear
tight clothing around the mixer. Loose clothing can cause injury should it become
entangled with the mixer.
Do not start and stop the mixer with material in the drum, this will damage the motor and
is not the best way to mix.
Always have the drum rotating when filling or discharging the mixer, this produces the
highest quality concrete.
DO NOT
Place the main frame (# 18 Drawing 1) on a
level surface as illustrated in this diagram.
Insert and secure the T-bar (# 20 Drawing 1)
into the main frame with the 3" hex head bolt
and nut, using the open wrench provided in the
assembly kit.
Slide the wheels (# 8 Drawing 1) onto the main
frame bar(# 18 Drawing 1) and anchor them in
place with the cotter pins (# 13 Drawing 1)which
are included in the assembly kit provided with
each MINUTEMAN mixer.

IMER U.S.A. Inc.
8
MINUTEMAN
Fit the gear-box frame and motor assembly (#
7 Drawing 1) into the swivel bracket (# 15
Drawing 1) with the anchor pin, (# 17 Drawing
1) slide the cotter pin through the anchor pin
hole (# 16 Drawing 1).
3
4
5 6
Mount the mixing drum (# 4 Drawing 1) onto
the gear-box shaft (# 29 Drawing 2) by aligning
the guide notch with the locating pin on the gear
shaft.Secure the drum to the gear-box shaft with
the T-handle bolt(# 5 Drawing 1) and washer (#
6 Drawing 1) provided in the assembly kit. Once
the T-bolt is tightened as much as possible by
hand, give it a whack or two with a hammer: no
more, no less.
ASSEMBLY
Secure the mixing blades (# 2 Drawing 1) to
the inner drum with the screws (# 1 Drawing 1)
and nuts (# 3 Drawing 1) provided in the assembly
kit.Assembly with the screws heads on the
outer drum.
Finally, insert tilting handle (# 10 Drawing 1) in
the handle mounting tube and lock using the
cotter pin provided in the assembly kit.
Slide the swivel bracket (# 15 Drawing 1) onto
the main frame upright. The gear-box and motor
assembly (# 7 Drawing 1) is mounted into this
swivel bracket.
5
629DRUM
DRIVE
SHAFT

IMER U.S.A. Inc.
9
MINUTEMAN
Drawing 6
Drawing 4
WRONG ASSEMBLY POSITION FOR
THE SWIVEL BRACKET
CORRECT ASSEMBLY POSITION FOR
THE SWIVEL BRACKET
CORRECT
DIRECTION
CAUTION - SET-UP IMPORTANT
Position the machine on a level surface
as illustrated in the drawing 6
(maximun allowable slope is 5 degrees,
as shown in drawing 6).
To complete the mixer set-up, before
loading the drum , make sure the mixer
can properly discharge into a wheelbarrow.
MOVING THE MINUTEMAN
WARNING
Always disconnect the power cord before
moving the mixer.
To roll the machine, hold the support leg and dump
handle and move as shown in Drawing 4.
WARNING
Do not attempt to move the mixer when
there is material in the drum, it must be
empty.
YES
NO
WRONG
DIRECTION

IMER U.S.A. Inc.
10
MINUTEMAN
1) Use a 2 prong, grounded, 110/115 volt, 60 Hz, power connection for safe operation. The line should be at
least 12 gauge.
2) To mix concrete, add water, concrete, and aggregate while the drum is rotating.
3) Discharge the mixed concrete by elevating the dump handle (# 10 Drawing 1) while the drum is rotating.
NOTE: When tilting the drum to discharge the concrete, do so slowly. It is important to
perform the discharge smoothly, this keeps the machine balanced and upright.
4) The ON/OFF switch in the motor of the MINUTEMAN mixer provides thermal protection to the motor in
the event of overheating. Should your motor shut off automatically, turn off the unit and unplug it for 15
minutes. This allows the motor to cool. After the cooling period, plug in the motor and press the start switch.
If the motor does not restart and continue to run, contact your local IMER products distributor, or call IMER
direct at 800.275.5463.
OPERATION
The MINUTEMAN Mixer requires very low maintenance. However, a few basic maintenance procedures
should be followed.
NOTE: Always unplug the mixer from its power source before any cleaning or
maintenance functions are performed.
1) Clean the mixer after each use and do not allow any concrete to build up on any portion of the mixer.
2) Essentially the gearbox is sealed for life. The quality of the gears and the lubricant are such that
changing the oil is not necessary. Should you want to change the oil, see your dealer or call IMER
U.S.A direct for instruction @ 800.275.5463.
3) Keep all moving parts lightly greased.
4) Keep the electric motor cooling fins clean and free of debris build-up.
5) Before storing the MINUTEMAN after a project is completed, spray n' wipe the entire machine with
WD-40.
NOTE: When spraying the mixer with water, do not direct the water onto the motor or
the ON/OFF switch assembly.
MAINTENANCE AND CLEANING
All orders for spare parts must include the following:
1) Type of machine.
2) Part number and drawing references of each part, see the parts list.
3) Serial number and year of manufacture recorded on the machine's
identification plate.
SPARE PARTS

IMER U.S.A. Inc.
11
MINUTEMAN
DRAWING #1 - FRAME AND DRUM ASSEMBLY
Ref. P.n. Description NOTE
1 2222193 SCREW TB M12 x 25
2 2250155 MIXING PADDLE
3 2223700 NUT 5588 M12 Z
4 2250719 DRUM
5 2222982 T - BOLT
6 2224428 WASHER 14X36X6
7 3210935 GEAR BOX FRAME
8 3206390 WHEEL
9 2235450 PLASTIC PLUG
10 3206148 DUMP HANDLE
12 3210947 I.D. PLATE
13 2226700 COTTER PIN
15 3210893 SWIVEL BRACKET
16 2226702 SPLIT-PIN 1.8/35
17 3210936 PIVOT AXLE
18 3206365 MAIN FRAME
19 2222148 BOLT M10X65 5737
20 2255749 T-BAR
21 2289740 WRENCH 17X19
22 2223650 NUT M10 5588
23 3206800 CIRCLIP M1455 ZA ø14

IMER U.S.A. Inc.
12
MINUTEMAN
DRAWING #2 MOTOR AND GEARBOX ASSEMBLY (110/1 15 V - 60Hz)
1
2
3
4
5
6
7
8
9
10
11
12
13
14
15
16
19
20
20
21
22
23
2425
26
27
29
30
3133
34
28
32
35
36
37
38
40
39
41
42

IMER U.S.A. Inc.
13
MINUTEMAN
DIAGRAM #2 MOTOR AND GEARBOX ASSEMBLY
COD. 3210492 (110 / 115 V - 60 Hz)
UP TO SERIAL
NUMBER:
RIF. P.n. Description Note
1 2222010 BOLT M6x25
2 2207405 OIL SEAL 55x40x10
3 2222012 BOLT M6x60
4 3210485 GEARBOX CASE-HALF
5 3210482 GEARBOX GASKET
6 2228360 SHEAR PIN Ø8x16
7 2229500 KEY 8x7x15
8 2204420 BEARING 6201
9 3210487 GEAR Z 81
10 2229249 KEY 5x5x12
11 3210483 PINION GEAR Z 9
12 32104 86 GEARBOX CA S E-HALF
13 3210904 FAN
14 3210911 ELECTRIC BOX COMPLETE (ALL COMPONENTS)
1005797 15 3210233 SWITC H
16 3210955 E LECTRICAL PLUG
19 32109 23 CAPAC ITOR 50µF 250 V
1005797 20 3233039 ELECTRIC BOX ASS'Y + SCREW + GASKET ONLY
21 3209214 GASKET
22 2223260 NUT M6
23 2224530 WASHER Ø6x12.5
24 2204550 BEARING 6205
25 32 10 479 GEAR Z 104
26 2204504 BEARING 6008
27 22 28 819 LOCATING PIN Ø6x12
28 3210494 MOTOR ASS'Y WITH CASE HALF
29 3210481 DRIVE SHAFT SPINDLE
30 32 10 496 RIGHT SIDE MOTOR COVER
31 3210495 LEFT SIDE MOTOR COVER
32 3210036 SCREW M5x16
33 32 10 587 RATING PLATE
35 3210906 STATOR
36 32 10 898 SPACE R WASHER
37 3210486 ROTOR
38 3210901 SCREW M5x22
39 3208982 BEARING 6202
40 3210488 INSULATING FLANGE
41 2207350 OIL SEAL 12x32x7
42 3210902 BEARING 6002

IMER U.S.A. Inc.
14
MINUTEMAN
221 Westhampton Place
Capitol Heights, MD
20743
Ph / 800.275.5463
U.S.A. INC.
IMER
EQUIPMENT WARRANTY
R
U.S.A. INC.
We warrant to the original purchaser that the IMER equipment described herein (the "equipment") shall be
free from defects in material and workmanship under normal use and service for which it was intended for
period of one (1) year from the date of purchase by the original purchaser.
Our obligation under this warranty is expressly limited to replacing or repairing, free of charge, F. O.B. our
designated service facility, such part of the equipment as our inspection shall disclose to be defective. Parts
such as engines, motors, pumps, valves, electric motors, etc. furnished by us, but not manufactured by us,
will carry only the warranty of the manufacturer. Transportation charges or duties shall be borne by purchaser.
This shall be the limit of our liability with respect to the quality of the equipment.
This warranty shall not apply to any equipment, or parts thereof, which has been damaged by reason of
accident, negligence, unreasonable use, faulty repairs, or which has not been maintained and operated in
accordance with our printed instructions for the equipment. Further, this warranty is void if the equipment, or
any of its components, is altered or modified in any way.
THIS WARRANTY IS EXPRESSLY IN LIEU OF ALL OTHER WARRANTIES,
EXPRESSED OR IMPLIED, INCLUDING ANY IMPLIED WARRANTY OF
MERCHANTABILITY OR FITNESS FOR A PARTICULAR PURPOSE.
We make no other warranty, representation or guarantee, nor is anyone authorized to make one on our
behalf. We shall not be liable for consequential damage of any kind, including loss or damage resulting,
directly or indirectly, from the use or loss of use of the machine. Without limiting the generality of the
foregoing, this exclusion from liability embraces the purchaser's expenses for downtime, damages for which
the purchaser may be liable to other person, damages to property, and injury or death of any persons.
This warranty shall not be deemed to cover maintenance parts, including but not limited to blades, belts,
hoses, hydraulic oil, or filters, for which we shall have no responsability or liability whatsoever.
HEADQUARTERS
 Loading...