

Page 1
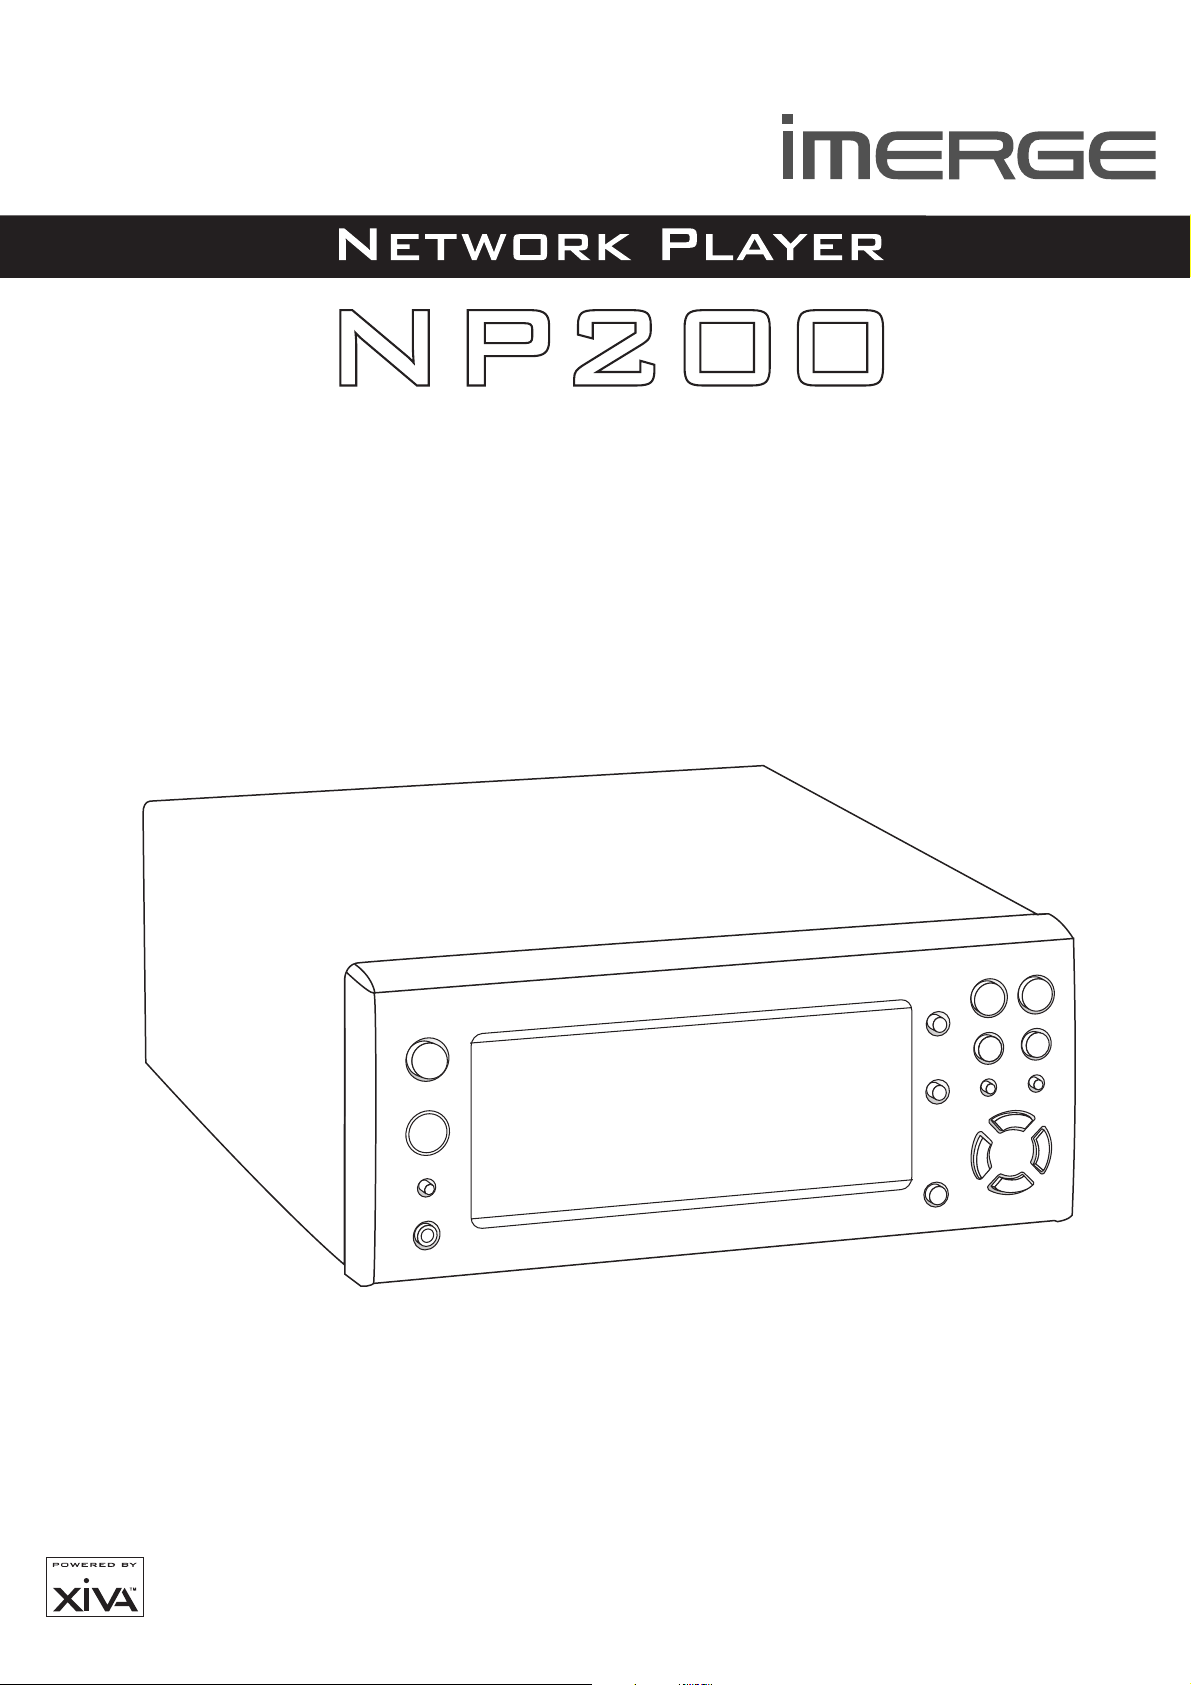
NETWORK AUDIO SYSTEM
USER GUIDE
Page 2
COPYRIGHT NOTICE
Copyright 2002 Imerge Ltd. All rights reserved.
The NP200 and this documentation are copyright
materials. No part of the SoundServer software or this
documentation may be reproduced, transmitted,
transcribed, stored in a retrieval system, or translated
into any language, or computer language, in any form or
by any means without prior written permission of
Imerge.
XiVA is a registered trademark of Imerge Ltd. All other
product names are trademarks or registered trademarks
of their respective owners.
Net-tune is a trademark of the Onkyo Corporation.
MPEG Layer-3 audio coding technology licensed from
Fraunhofer IIS and THOMSON multimedia.
The information in this guide is believed to be correct as
of the date of publication. However our policy is one of
continuous development and so the information in this
guide is subject to change without notice, and does not
represent a commitment on the part of Imerge.
This guide was designed and produced by Imerge Ltd.
XIVA™ NEW MEDIA BROUGHT TO LIFE
XiVA™ is a highly portable software framework that
powers next-generation media appliances. XiVA™
blends hard disk technology, advanced software design,
and embedded Internet technology to provide amazing
features. Audio, video, text, graphics, and all forms of
streaming new media are all brought to life through a
wealth of interactive user interface options. The next
generation media appliance is powered by XiVA™.
PRECAUTIONS
GENERAL PRECAUTIONS
When installing the equipment ensure that:
– the ventilation holes are not covered.
– air is allowed to circulate freely around the
equipment.
– it is placed on a vibration free surface.
– it will not be exposed to excessive heat, cold,
moisture or dust.
– it will not be exposed to direct sunlight.
– it will not be exposed to electrostatic discharges.
In addition, never place heavy objects on the equipment.
If a foreign object or water does enter the equipment,
contact your nearest dealer or service center.
Do not pull out the plug by pulling on the mains lead;
grasp the plug.
It is advisable when leaving the house, or during a
thunderstorm, to disconnect the equipment from the
mains supply.
WARNING:WARNING:
WARNING:
WARNING:WARNING:
TO REDUCE THE RISK OF FIRE OR ELECTRIC SHOCK, DO
NOT EXPOSE THIS APPLIANCE TO RAIN OR MOISTURE.
Do not remove the cover from the equipment. There are
no user serviceable parts inside, and opening the case
will invalidate your warranty.
Do not insert anything into the equipment through the
ventilation holes.
Do not handle the mains lead with wet hands.
To avoid overheating do not position the NP200 near
heat sources, and ensure that the ventilation holes are
not blocked.
WARNINGS
Do not expose the equipment to rain or moisture.
Do not remove the cover from the equipment.
Do not insert anything into the equipment through
the ventilation holes.
Do not cover the ventilation holes with any items such
as tablecloths, newspapers, curtains, etc.
Do not place naked flame sources, such as lighted
candles, on the equipment.
Do not handle the mains lead with wet hands.
Allow adequate ventilation. Leave a gap of 0.2m on
all sides of the unit.
Do not splash or spill water on the unit. Do not place
objects filled with liquid (such as vases) on the unit.
MAINS PRECAUTIONS
Your NP200 complies with the household power and
safety requirements in your area.
WARNING
BEFORE PLUGGING IN THE UNIT FOR THE FIRST TIME,BEFORE PLUGGING IN THE UNIT FOR THE FIRST TIME,
BEFORE PLUGGING IN THE UNIT FOR THE FIRST TIME,
BEFORE PLUGGING IN THE UNIT FOR THE FIRST TIME,BEFORE PLUGGING IN THE UNIT FOR THE FIRST TIME,
READ THE FOLLOWING SECTION CAREFULLY.READ THE FOLLOWING SECTION CAREFULLY.
READ THE FOLLOWING SECTION CAREFULLY.
READ THE FOLLOWING SECTION CAREFULLY.READ THE FOLLOWING SECTION CAREFULLY.
There is a voltage selector (2-position) on the rear panel
of this unit. Be sure to set the voltage selector to the
mains voltage of your area before using the unit.
IMPORTANT: (FOR UK VERSION ONLY)
This apparatus is fitted with an approved moulded 13
Amp plug. To change a fuse in this type of plug proceed
as follows:
1 Remove fuse cover and fuse.
2 Fix new fuse which should be a BS1362 5A,
A.S.T.A or BSI approved type.
3 Refit the fuse cover.
If the fitted plug is not suitable for your socket outlets, it
should be cut off and an appropriate plug fitted in its place.
If the mains plug contains a fuse, this should have a
value of 5A. If a plug without a fuse is used, the fuse at
the distribution board should not be greater than 5A.
NOTE: NOTE:
NOTE: The severed plug must be destroyed to avoid a
NOTE: NOTE:
possible shock hazard should it be inserted into a 13A
socket elsewhere.
COPYRIGHT NOTICE
This equipment must not be used for unauthorised
duplication of CDs or any other works protected by
copyright. No license to infringe copyright is granted
by the sale of this equipment.
Recording and playback of some material may require
permission. For further information refer to the
following:
– Copyright Act 1956
– Dramatic and Musical Performers Act 1958
– Performers Protection Acts 1963, and 1972
– Any subsequent statutory enactments and orders.
STANDBY BUTTONSTANDBY BUTTON
STANDBY BUTTON
STANDBY BUTTONSTANDBY BUTTON
When this button is pressed once, the power turns
and information will appear on the display. When
pressed again, the unit is in
Standby Standby
Standby indicator is lit; the apparatus is not
Standby Standby
disconnected from the AC mains supply in this mode.
1
OffOff
Off mode and the
OffOff
OnOn
On
OnOn
Page 3
MEMORY PRESERVATION
This unit does not require memory preservation
batteries. A built-in memory power backup system
preserves the contents of the memory during power
failures and even when the unit is unplugged. The unit
must be plugged in in order to charge the backup
system.
The memory preservation period after the unit has been
unplugged varies depending on climate and placement
of the unit. On average memory contents are protected
over a period of a few weeks after the last time the unit
has been unplugged. This period is shorter when the
unit is exposed to a highly humid climate.
IMPORTANT SAFETY
NOTICES
The serial number for this equipment is located on the
rear panel. Please write this serial number on your
enclosed warranty card and keep it in a secure area. This
is for your security.
U.S. MODEL
CAUTIONCAUTION
CAUTION: This product satisfies FCC regulations when
CAUTIONCAUTION
shielded cables and connectors are used to connect the
unit to other equipment. To prevent electromagnetic
interference with electric appliances such as radios and
televisions, use shielded cables and connectors for
connections.
NOTENOTE
NOTE: This equipment has been tested and found to
NOTENOTE
comply with the limits for a Class B digital device,
pursuant to Subpart J, Part 15 of the FCC rules. These
limits are designed to provide reasonable protection
against harmful interference in a residential installation.
This equipment generates, uses, and can radiate radio
frequency energy and, if not installed and used in
accordance with the instructions, may cause harmful
interference to radio communications. However, there is
no guarantee that interference will not occur in a
particular installation. If this equipment does cause
harmful interference to radio or television reception,
which can be determined by turning the equipment off
and on, the user is encouraged to try to correct the
interference by one or more of the following measures:
– Reorient or relocate the receiving antenna.
– Increase the separation between the equipment
and receiver.
– Connect the equipment into an outlet on a circuit
different from that to which the receiver is
connected.
– Consult the dealer or an experienced radio/TV
technician for help.
Changes or modifications may cause this unit to fail to
comply with Part 15 of the FCC Rules and may void
the user’s authority to operate the equipment.
CANADIAN MODEL
NOTE: NOTE:
NOTE: This Class B digital apparatus complies with
NOTE: NOTE:
Canadian ICES-003.
Cet appareil numérique de la Classe B est conforme à
la norme NMB-003 du Canada.
CAUTIONCAUTION
CAUTION: TO PREVENT ELECTRIC SHOCK, MATCH WIDE
CAUTIONCAUTION
BLADE OF PLUG TO WIDE SLOT, FULLY INSERT.
ATTENTIONATTENTION
ATTENTION: POUR ÉVITER LES CHOCS ÉLECTRIQUES,
ATTENTIONATTENTION
INTRODUIRE LA LAME LA PLUS LARGE DE LA FICHE DANS
LA BORNE CORRESPON-DANTE DE LA PRISE ET POUSSER
JUSQU’AU FOND.
EUROPEAN MODEL
NOTE:NOTE:
NOTE: This product has been designed and type-
NOTE:NOTE:
tested to comply with the limits set out in EN55013,
EN55020, EN60950, EN55022: 1998 CLASS B4,
EN55024: 1998, FCC RULES PART 15 SUBPART B CLASS
B. NS/N29 3548:1995 CLASS B
CAUTION:CAUTION:
CAUTION:
CAUTION:CAUTION:
“CAUTION-USE OF CONTROLS OR ADJUSTMENTS OR
PERFORMANCE OF PROCEDURE OTHER THAN THOSE
SPECIFIED HEREIN MAY RESULT IN HAZARDOUS
RADIATION EXPOSURE.”
CAUTION
Use of controls or adjustments or performance of
procedures other than those specified herein may
result in hazardous radiation exposure.
Alteration or modifications carried out without
appropriate authorization may invalidate the
user’s right to operate the equipment.
2
Page 4
IMPORTANT SAFETY INSTRUCTIONS
READ INSTRUCTIONSREAD INSTRUCTIONS
READ INSTRUCTIONS - All the safety and
READ INSTRUCTIONSREAD INSTRUCTIONS
operating instructions should be read before
the product is operated.
KEEP INSTRUCTIONSKEEP INSTRUCTIONS
KEEP INSTRUCTIONS - The safety and operating
KEEP INSTRUCTIONSKEEP INSTRUCTIONS
instructions should be kept for future reference.
HEED WARNINGSHEED WARNINGS
HEED WARNINGS - All warnings on the product
HEED WARNINGSHEED WARNINGS
and in the operating instructions should be
adhered to.
FOLLOW INSTRUCTIONSFOLLOW INSTRUCTIONS
FOLLOW INSTRUCTIONS - All operating and use
FOLLOW INSTRUCTIONSFOLLOW INSTRUCTIONS
instructions should be followed.
CLEANINGCLEANING
CLEANING - Unplug this product from the wall
CLEANINGCLEANING
outlet before cleaning. The product should
be cleaned only with a soft dry cloth. Never
clean with furniture wax, benzine, insecticides
or other volatile liquids since they may
corrode the cabinet.
ATTACHMENTSATTACHMENTS
ATTACHMENTS - Do not use attachments not
ATTACHMENTSATTACHMENTS
recommended by the product manufacturer
as they may cause hazards.
WATER AND MOISTUREWATER AND MOISTURE
WATER AND MOISTURE - Do not use this product
WATER AND MOISTUREWATER AND MOISTURE
near water - for example near a bathtub,
wash bowl, kitchen sink, or laundry tub; in a
wet basement; or near a swimming pool; and
the like.
ACCESSORIESACCESSORIES
ACCESSORIES - Do not place this product on an
ACCESSORIESACCESSORIES
unstable cart, stand, tripod, bracket, or table.
The product may fall, causing serious injury to
a child or adult, and serious damage to the
product. Use only with a cart, stand, tripod,
bracket or table recommended by the
manufacturer, or sold with the product. Any
mounting of the product should follow the
manufacturer’s instructions and should use a
mounting accessory recommended by the
manufacturer.
CARTCART
CART - A product and cart combination should be
CARTCART
moved with care. Quick stops, excessive force
and uneven surfaces may cause the product
and cart combination to overturn:
VENTILATION - VENTILATION -
VENTILATION - Slots and openings in the cabinet are
VENTILATION - VENTILATION -
provided for ventilation and to ensure reliable
operation of the product and to protect it from
overheating. Do not block any ventilation
openings. The openings should never be blocked
by placing the product on a bed, sofa, rug or
other similar surface. This product should not be
placed in a built-in installation such as a bookcase
or rack unless proper ventilation is provided.
Install in accordance with the manufacturer’s
instructions.
POWER SOURCESPOWER SOURCES
POWER SOURCES - This product should be
POWER SOURCESPOWER SOURCES
operated only from the type of power source
indicated on the marketing label. If you are
not sure of the type of power supply to your
home, consult your product dealer or local
power company.
LOCATIONLOCATION
LOCATION - The appliance should be installed in
LOCATIONLOCATION
a stable location.
NONUSE PERIODSNONUSE PERIODS
NONUSE PERIODS - The power cord of the
NONUSE PERIODSNONUSE PERIODS
appliance should be unplugged from the outlet
when left unused for a long period of time.
GROUNDING OR POLARIZATIONGROUNDING OR POLARIZATION
GROUNDING OR POLARIZATION - If this product is
GROUNDING OR POLARIZATIONGROUNDING OR POLARIZATION
equipped with a polarized alternating current
line plug (a plug having one blade wider than
the other), it will fit into the outlet only one
way. This is a safety feature. If you are unable
to insert the plug fully into the outlet, try
reversing the plug. If the plug does not fit into
the outlet, contact your electrician to replace
your obsolete outlet. Do not defeat the safety
purpose of the polarized plug.
If this product is equipped with a three-wire
grounding type plug, a plug having a third
(grounding) pin, it will only work in a
grounding type power outlet. This is a safety
feature. If you are unable to insert the plug
into the outlet, contact your electrician to
replace your obsolete outlet. Do not defeat
the safety purpose of the grounding type plug.
POWER CORD PROTECTIONPOWER CORD PROTECTION
POWER CORD PROTECTION - Power-supply cords
POWER CORD PROTECTIONPOWER CORD PROTECTION
should be protected from being walked on or
pinched particularly at plugs, convenience
receptacles, and the point where they exit
from the product.
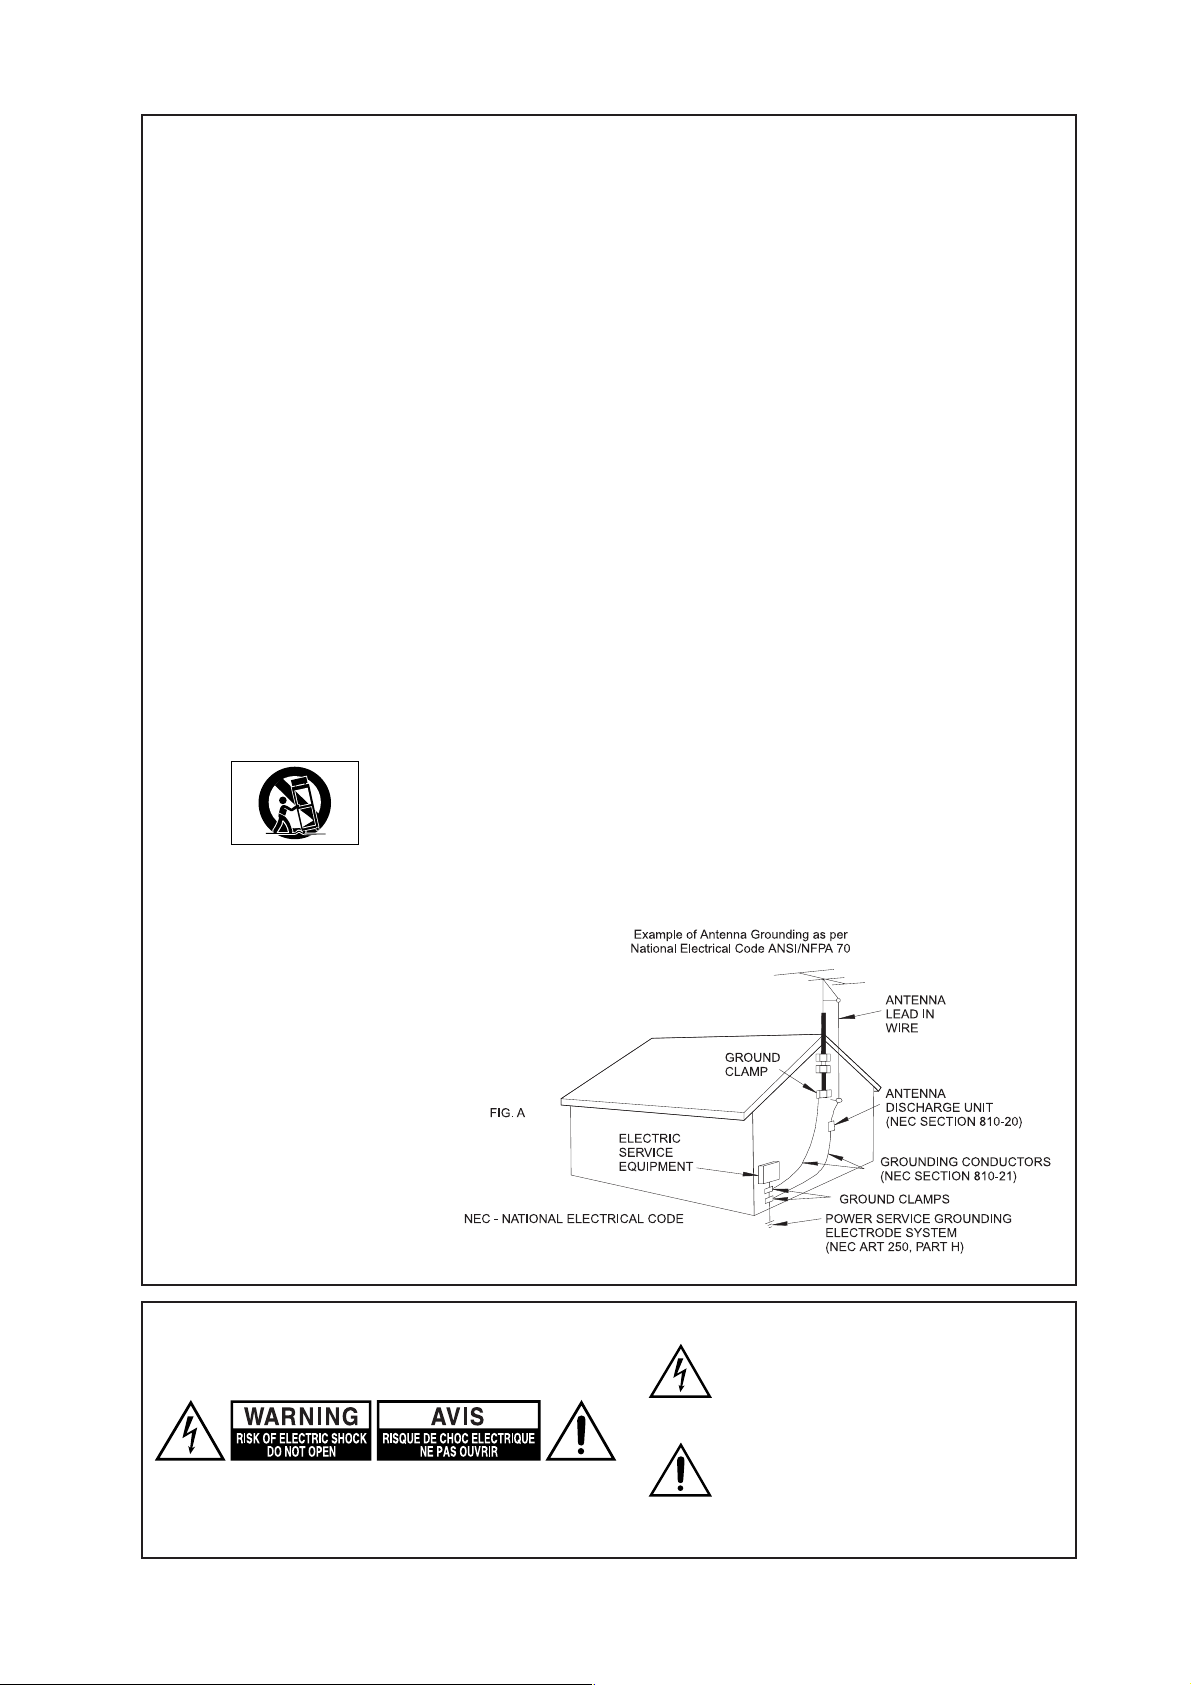
OUTDOOR ANTENNA GROUNDINGOUTDOOR ANTENNA GROUNDING
OUTDOOR ANTENNA GROUNDING - If an outside
OUTDOOR ANTENNA GROUNDINGOUTDOOR ANTENNA GROUNDING
antenna or cable system is connected to the
product be sure the antenna or cable system is
grounded so as to provide some protection
against voltage surges and built-up static
charges. Article 810 of the National Electric
Code. ANSI/NFPA70 provides information with
regard to proper grounding of the mast and
supporting structure, grounding of the lead-in
wire to an antenna discharge unit, connection
to grounding electrodes, and requirements for
the grounding electrode. See Figure A.
LIGHTNINGLIGHTNING
LIGHTNING - For added protection for this product
LIGHTNINGLIGHTNING
during a lightning storm, or when it is left
unattended and unused for long periods of
time, unplug it from the wall outlet and
disconnect the antenna or cable system. This
will prevent damage to the product due to
lightning and power-line surges.
POWER LINESPOWER LINES
POWER LINES - An outside antenna system should
POWER LINESPOWER LINES
not be located in the vicinity of overhead
power lines or other electric light or power
circuits, or where it can fall into such power
lines or circuits. When installing an outside
antenna system, extreme care should be taken
to keep from touching such power lines or
circuits as contact with them might be fatal.
OVERLOADINGOVERLOADING
OVERLOADING - Do not overload wall outlets,
OVERLOADINGOVERLOADING
extension cords or integral convenience
receptacles as this can result in a risk of fire
or electric shock.
OBJECT AND LIQUID ENTRYOBJECT AND LIQUID ENTRY
OBJECT AND LIQUID ENTRY - Never push
OBJECT AND LIQUID ENTRYOBJECT AND LIQUID ENTRY
objects of any kind into this product
through openings as they may touch
dangerous voltage points or short-out parts
that could result in a fire or electric shock.
Never spill liquid of any kind on the
product.
SERVICINGSERVICING
SERVICING - Do not attempt to service this
SERVICINGSERVICING
product yourself as opening or removing
covers may expose you to dangerous
voltage or other hazards. Refer all servicing
to qualified service personnel.
DAMAGE REQUIRING SERVICEDAMAGE REQUIRING SERVICE
DAMAGE REQUIRING SERVICE - Refer all
DAMAGE REQUIRING SERVICEDAMAGE REQUIRING SERVICE
servicing to qualified service personnel.
Servicing is required when the apparatus
has been damaged in any way, such as
power-supply cord or plug is damaged,
liquid has been spilled or objects have
fallen into the apparatus, the apparatus has
been exposed to rain or moisture, does not
operate normally, or has been dropped.
REPLACEMENT PARTSREPLACEMENT PARTS
REPLACEMENT PARTS - When replacement
REPLACEMENT PARTSREPLACEMENT PARTS
parts are required, be sure the service
technician has used replacement parts
specified by the manufacturer or have the
same characteristics as the original part.
Unauthorized substitutions may result in
fire, electric shock, or other hazards.
SAFETY CHECKSAFETY CHECK
SAFETY CHECK - Upon completion of any
SAFETY CHECKSAFETY CHECK
service or repairs to this product, ask the
service technician to perform safety checks
to determine that the product is in proper
operating condition.
WALL OR CEILING MOUNTINGWALL OR CEILING MOUNTING
WALL OR CEILING MOUNTING - The product
WALL OR CEILING MOUNTINGWALL OR CEILING MOUNTING
should not be mounted to a wall or ceiling.
HEATHEAT
HEAT - Do not install near any heat source
HEATHEAT
such as radiators, heat registers, stores, or
other apparatus (including amplifiers) that
produce heat.
The lightning flash with arrowhead symbol, within an
equilateral triangle, is intended to alert the user to the
presence of uninsulated “dangerous voltage” within
the product’s enclosure that may be of sufficient
magnitude to constitute a risk of electric shock to
persons.
The exclamation point within an equilateral triangle is
intended to alert the user to the presence of important
operating and maintenance (servicing) instructions in
the literature accompanying the appliance.
3
Page 5
INTRODUCTION
Welcome to the NP200 from Imerge. The NP200 is the
ideal companion to your SoundServer, enabling you to
access your entire music library from any room in your
home over a standard Ethernet network.
Extend your music collection
You can connect up to six NP200 Network Audio Systems
to your SoundServer, to provide access to your entire
music collection from any room in your home. Its
convenient four-line display provides similar information
to the SoundServer display, allowing you to select
albums and tracks, or search by artist or genre, using
either the front panel or the remote control supplied
with the NP200.
Minimum installation
The NP200 connects to the SoundServer via a single
Ethernet connection, making it straightforward to
extend your system, especially in houses where each
room already has Ethernet wiring.
CONTROLS AND CONNECTIONS
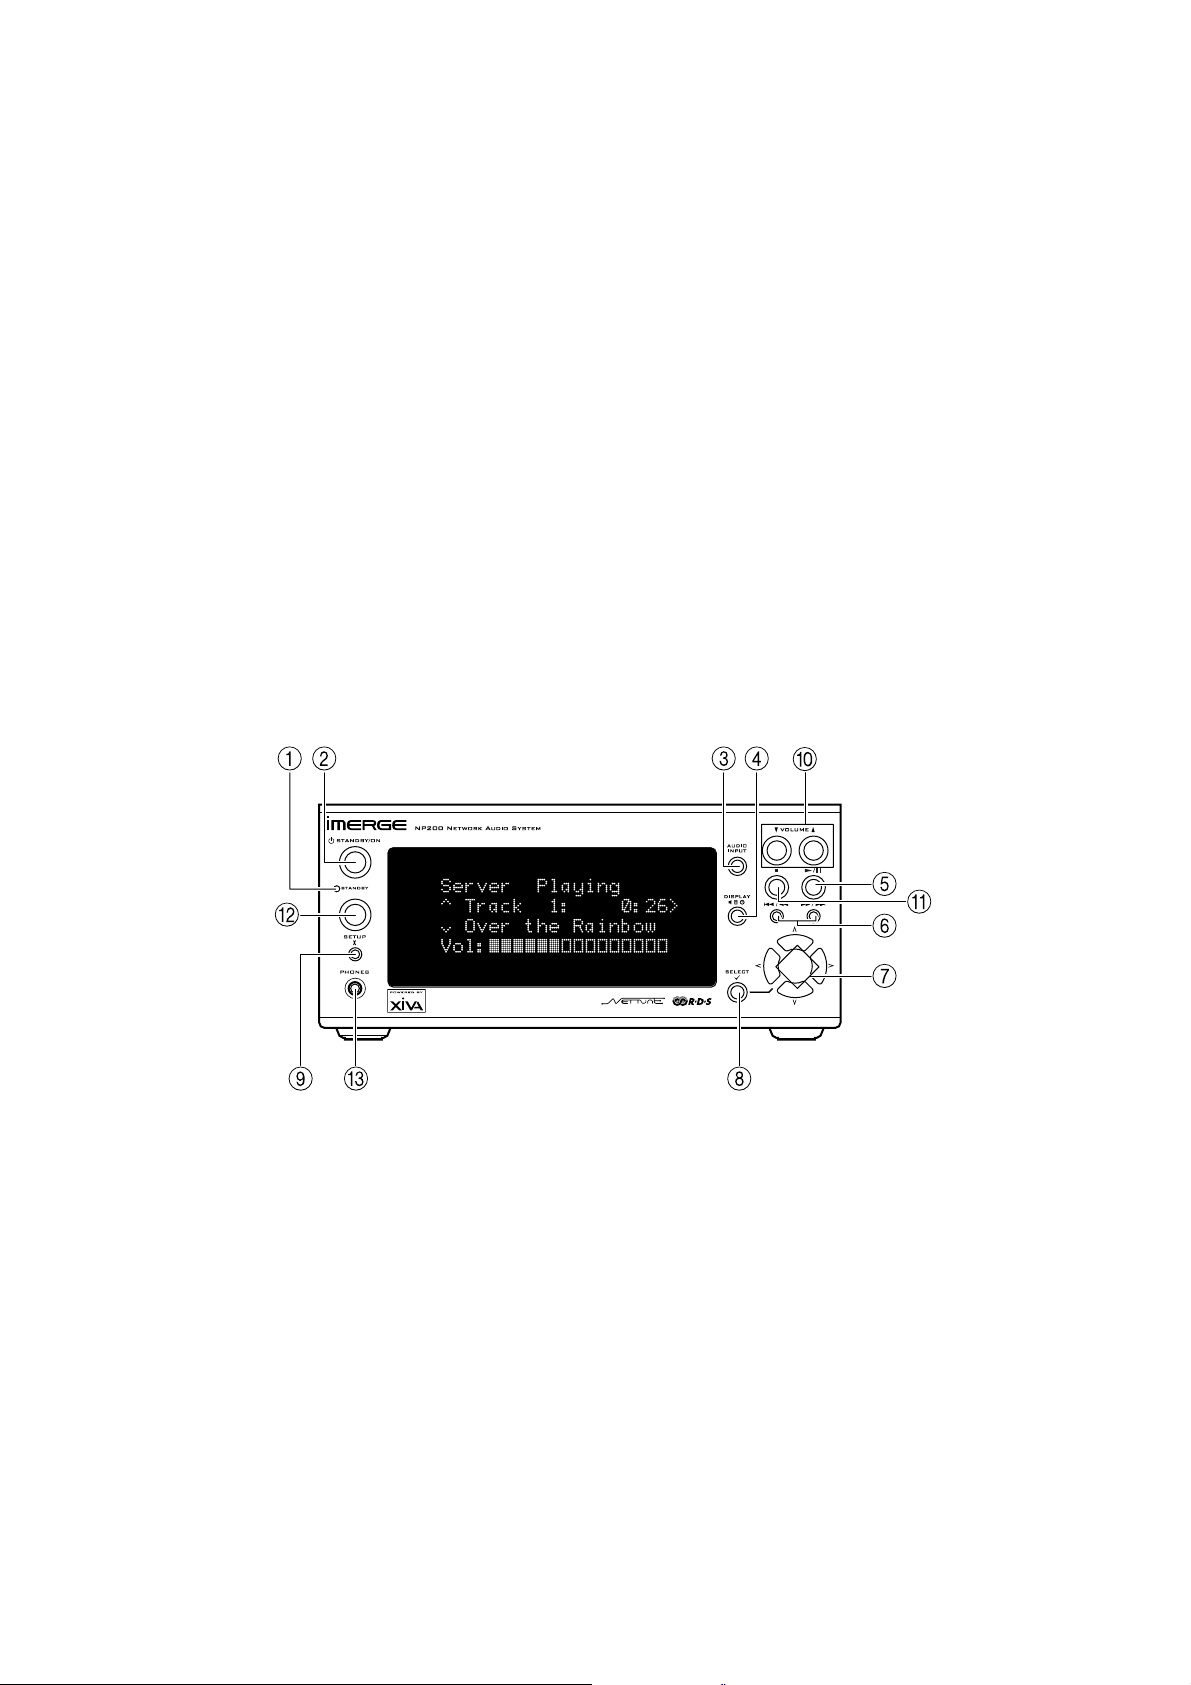
FRONT VIEW
A complete hi-fi system in a box
The NP200 includes a stereo power amplifier and
preamplifier, so all you need is a pair of loudspeakers to
create a complete hi-fi system in each room. Alternatively
it provides fixed and variable level analogue outputs,
and an optical digital output, allowing it to be connected
to an existing system such as an AV amplifier. The NP200
also includes an audio input, to allow you to connect a
source such as an MD player.
Built-in Internet, AM, and FM radio
The NP200 includes a built-in Internet radio, using
Imerge XiVA-Net to access lists of Internet radio stations
classified according to genre, subgenre, location, and
language. With the addition of suitable aerials the NP200
can also receive AM and FM stations, using RDS
information where available to display radio data such as
the FM station name.
Clock, timer, and alarm
Finally the NP200 includes a built-in clock, and
convenient timer and alarm features allow you to use it
as an alarm clock. A sleep feature can switch off your
music automatically after a delay.
1 STANDBY indicator
Lights when the NP200 is in Standby mode.
2 STANDBY/ON key
Switches the power mode between Standby and On.
3 AUDIO INPUT key
Changes the playback source.
4 DISPLAY key
Changes the displayed information.
5 Play/Pause key
Starts or pauses playback.
6 ”/¯ and ˘/’ Skip keys
Moves to the previous or next track. Holding down these
keys either fast-forwards or fast-rewinds the current
track.
7 Cursor Up/Down/Right/Left keys
Use these keys to navigate through settings, change a
value, or move to another menu.
8 SELECT key
Selects the currently displayed option.
9 SETUP key
Selects Setup mode which allows you to change the
NP200 configuration.
10 VOLUME keys
Decrease/increase the volume.
11 STOP key
Stops playback.
12 cREMOTE CONTROL SENSOR
Receives signals from the remote control.
13 aPHONES socket
Socket for connecting headphones.
4
Page 6
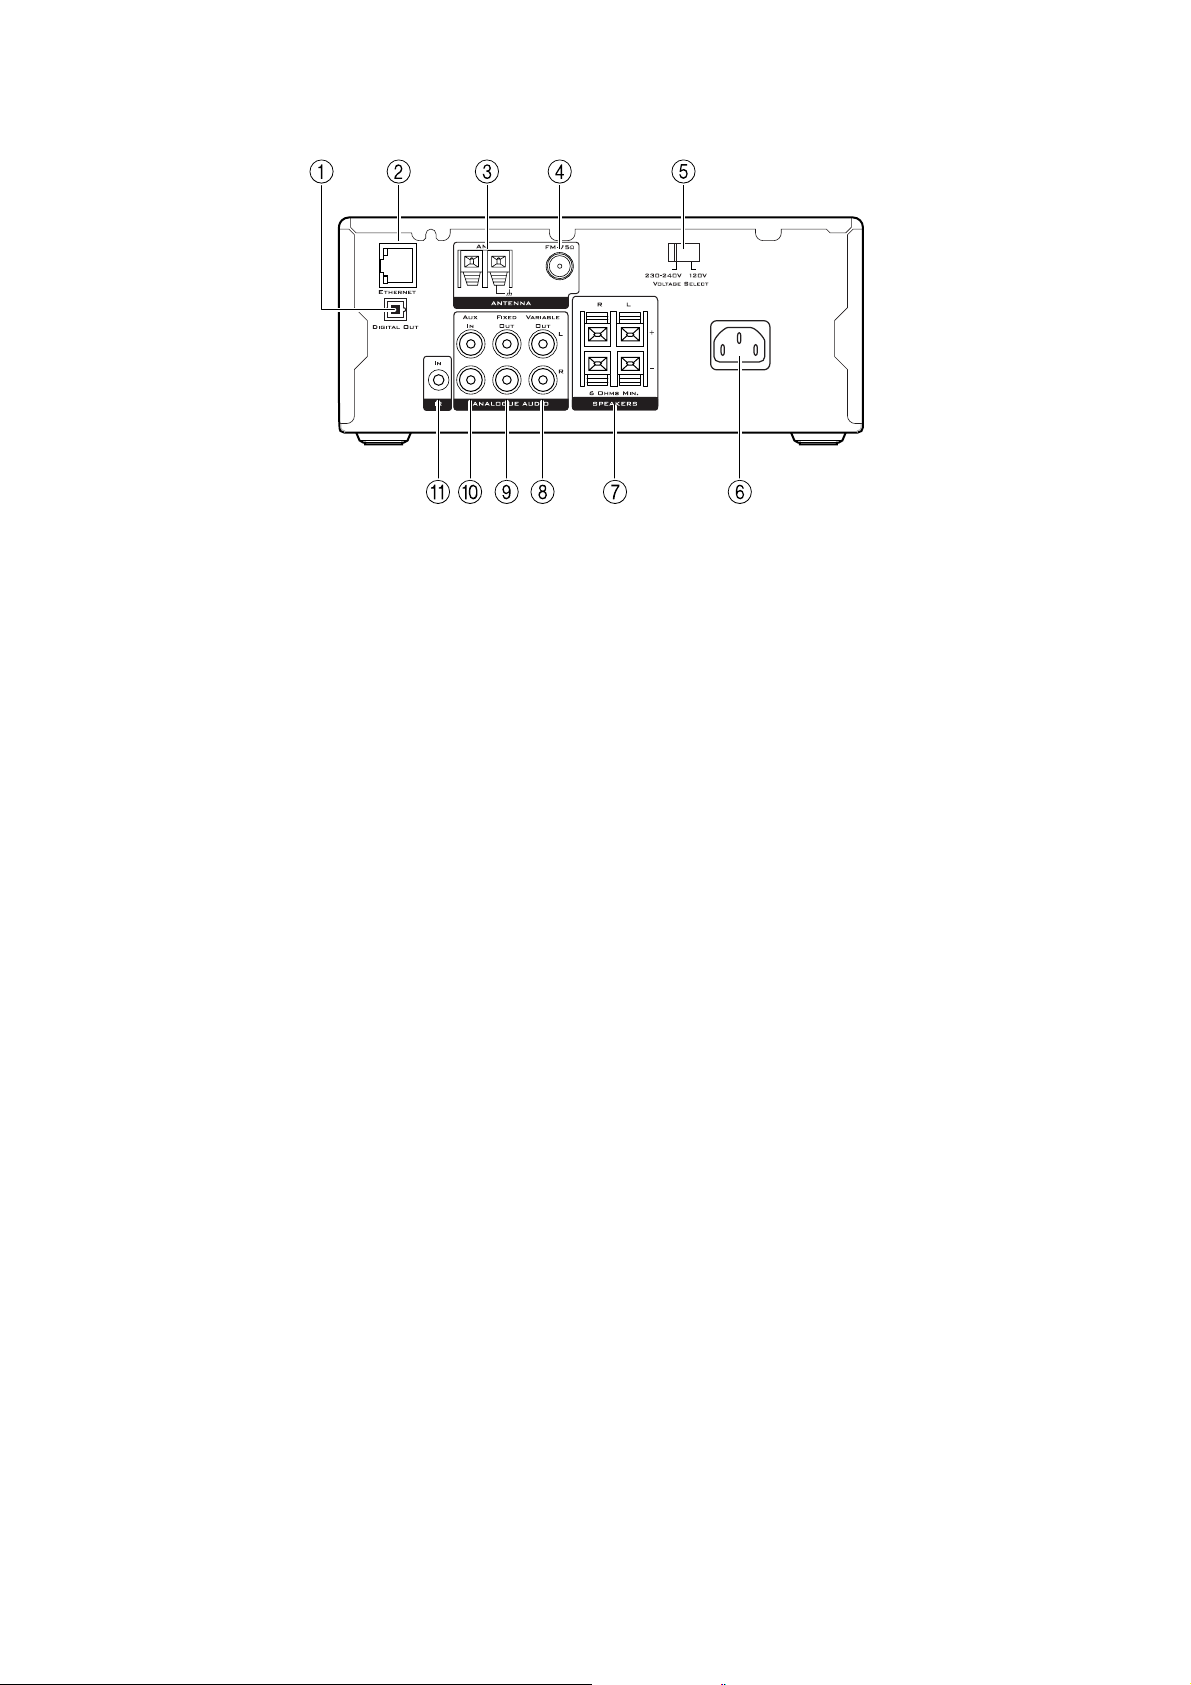
REAR VIEW
1 DIGITAL OUT
Digital optical audio output.
2 ETHERNET
Connects to a SoundServer and the Internet via an
Ethernet network.
3AM
Connects to the AM radio antenna.
4FM
Connects to the FM radio antenna.
5 MAINS VOLTAGE SELECTOR
Selects the mains voltage.
6 MAINS CONNECTOR
Connects to mains power.
7 SPEAKERS
Connect to the speakers.
8 VARIABLE OUTPUT
Line phono output to connect to an amplifier without
volume control.
9 FIXED OUT
Fixed-level line phono output.
10 AUX
Line phono input.
11 IR IN
Allows you to connect an external infra-red sensor, to
relay the remote control signals to the NP200 when
mounted in an inaccessible location, such as in a cabinet.
5
Page 7
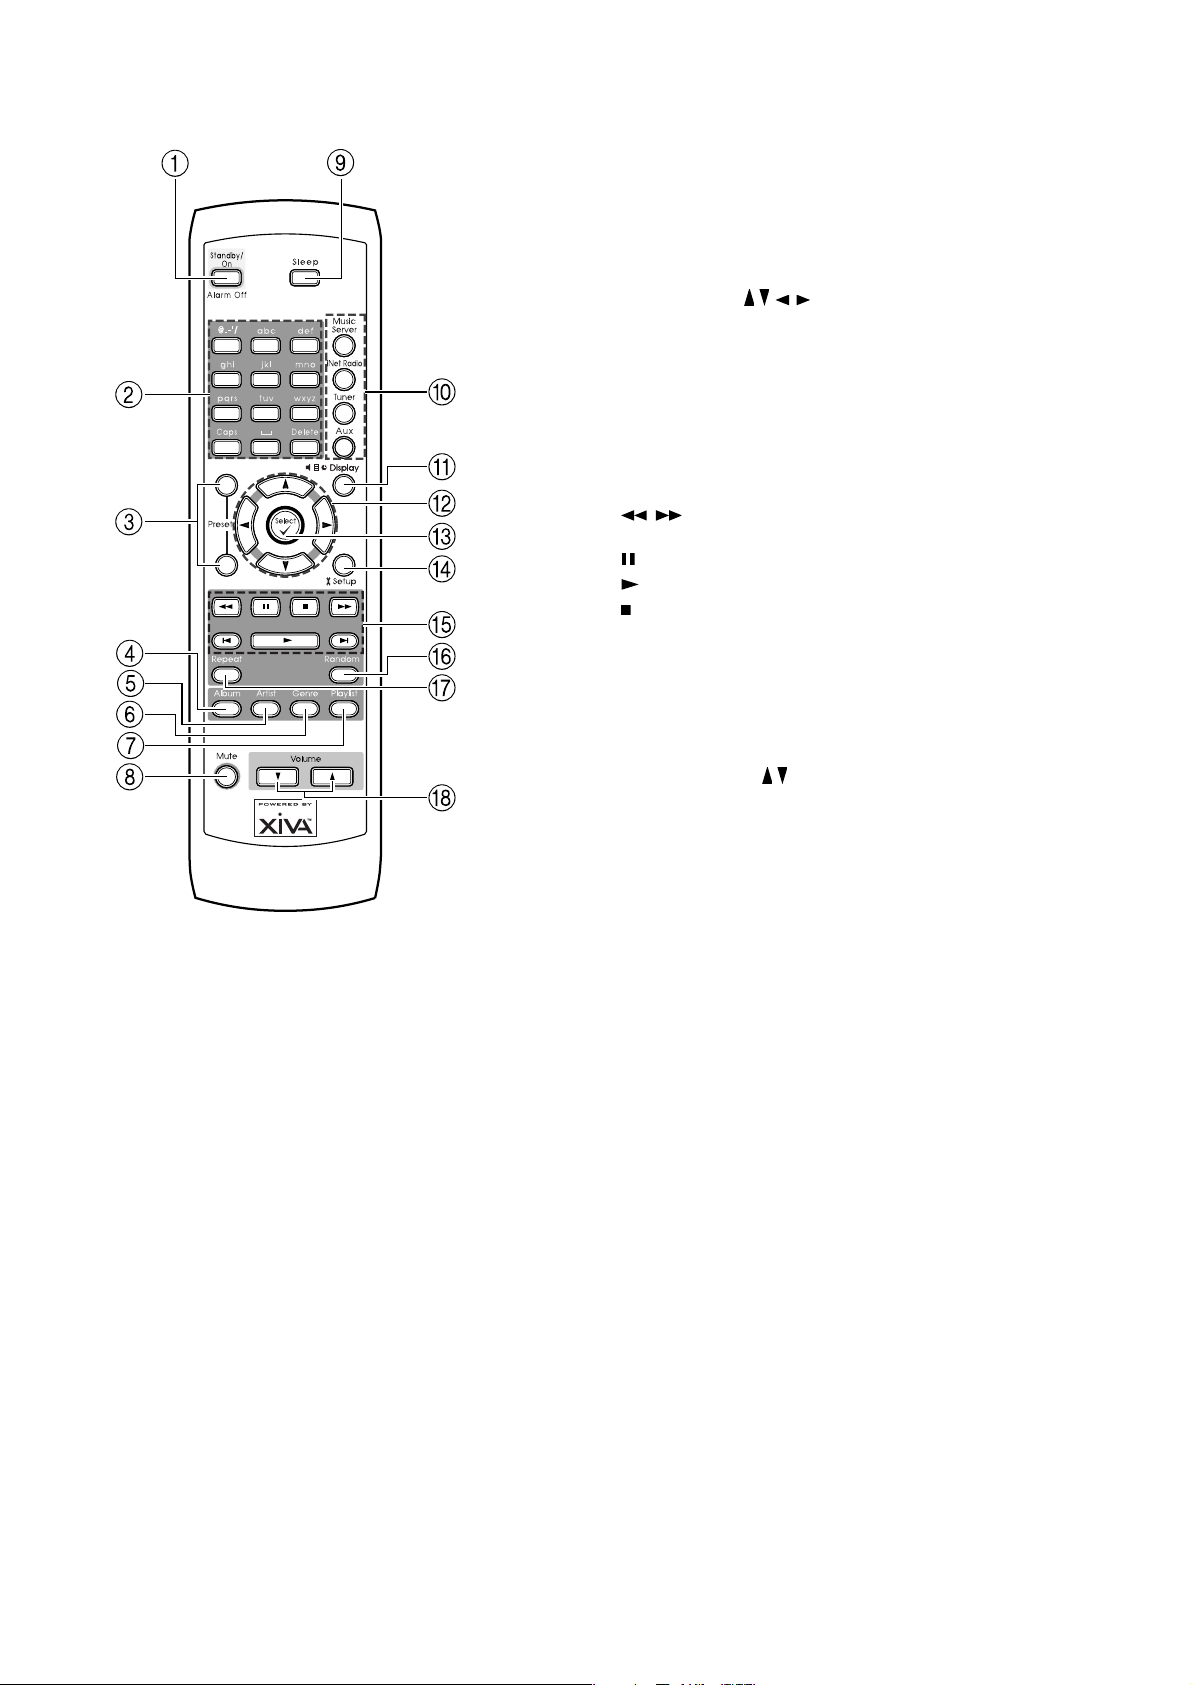
REMOTE CONTROL
10 MUSIC SERVER/iNetRADIO/TUNER/AUX
keys
Selects an input source. The
the SoundServer. The
and AM.
MUSIC SERVERMUSIC SERVER
MUSIC SERVER key selects
MUSIC SERVERMUSIC SERVER
TUNER TUNER
TUNER key toggles between FM
TUNER TUNER
11 DISPLAY key
Changes the display mode.
12 Cursor / / / keys
Locate a selection.
13 SELECT key
Selects the currently displayed option.
14 SETUP key
Selects Setup mode, which allows you to change the
NP200 configuration.
15 Operation keys
, keys Fast-rewinds or fast-forwards the
(Pause) key Pauses the playback.
(Play) key Starts playback.
(Stop) key Stops the playback.
”,’ keys Moves to the previous or next track.
current track.
16 RANDOM key
Plays the selected track list at random.
17 REPEAT key
Repeats the selected single track or track list.
1 STANDBY/ON key
Turns on the NP200 or places it in Standby mode. When
the NP200 is in Standby mode, you can use this key to
turn off the alarm.
2 Numeric keys
Selects one of the preset stations or the track you want
to play. When entering text, you use these keys to type
in letters and special characters.
3 PRESET Up/Down keys
Navigates through radio presets.
4 ALBUM key
Browses by Album when connected to a SoundServer.
5 ARTIST key
Browses by Artist when connected to a SoundServer.
6 GENRE key
Browses by Genre when connected to a SoundServer.
7 PLAYLIST key
Browses by Playlist when connected to a SoundServer.
8 MUTE key
Mutes or unmutes the sound.
9 SLEEP key
Sets the sleep function.
18 VOLUME / keys
Adjust the volume.
To change the remote control code
You can control up to three NP200s in the same location
by setting each of their remote controls to a separate
code.
• Hold the
and press the
• Release these keys simultaneously.
• Within 5 seconds after releasing the keys, enter
the appropriate mode (1, 2 or 3) using the
numeric keys.
The default code is 1 for both the remote control and
NP200.
After changing the remote control code, make sure that
the remote control code on the NP200 is set to the same
code as the remote control; see
control code to resolve conflicts
STANDBY STANDBY
STANDBY key on the remote control
STANDBY STANDBY
SELECT SELECT
SELECT key.
SELECT SELECT
Changing the remote
, page 18.
6
Page 8
CONNECTING YOUR
NP200
NoteNote
Note: You should ensure that the mains connection is
NoteNote
removed from the unit before making any of the
connections below.
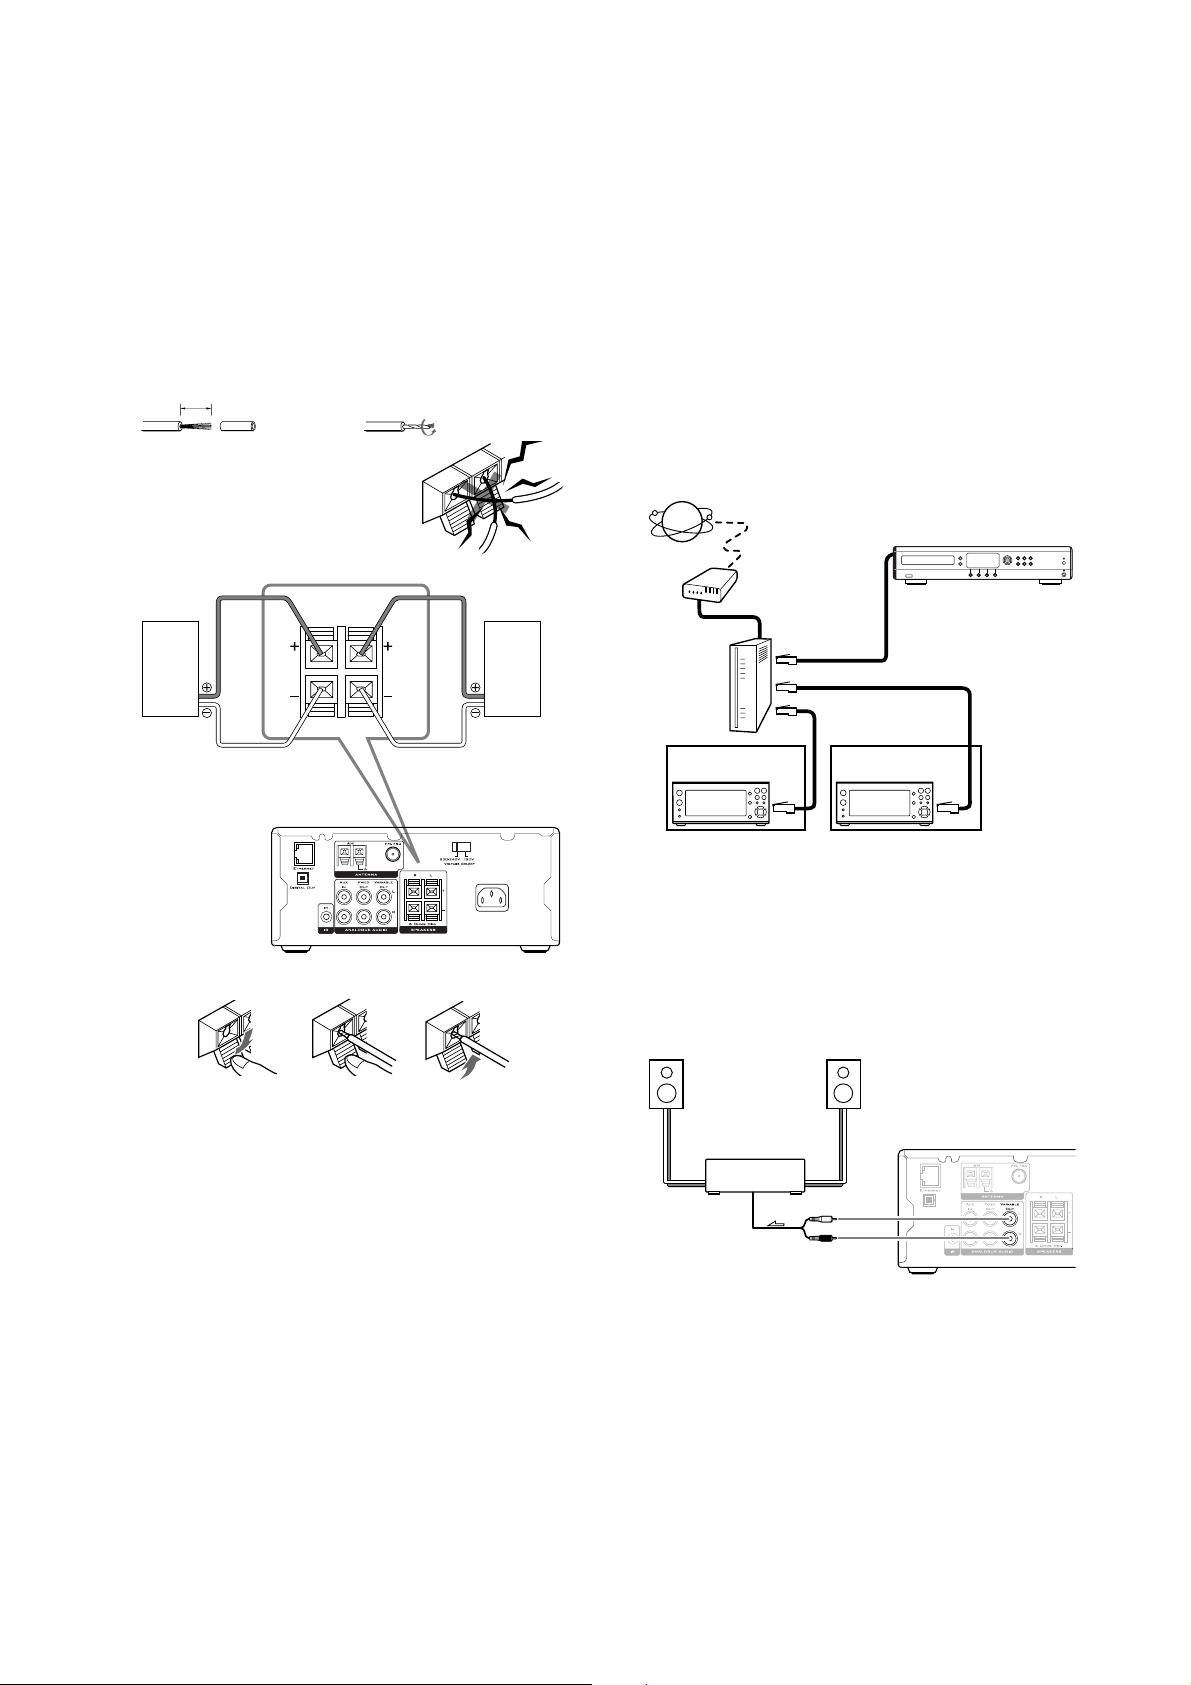
CONNECTING LOUDSPEAKERS
NoteNote
Note: The load impedence of each speaker must be at
NoteNote
least 6Ω.
1. Strip 15mm from 2. Twist the stripped
the end of each cord: end of the cord:
15mm
NoteNote
Note: To prevent damage to
NoteNote
circuits never short circuit the
positive (+) and negative (-)
speaker wires.
R
L
Right
Speaker
Left
Speaker
Router Router
Router – The router acts as a gateway between the
Router Router
devices on your network and the modem in order to
allow several devices to access the internet
simultaneously. The router may also provide additional
functionality which is reccommended for this
installation:
DHCP ServerDHCP Server
DHCP Server – A DHCP Sever enables devices on a
DHCP ServerDHCP Server
network to request network configuration information
automatically. Without a DHCP Server you will need to
manually configure each device with network settings you will need some knowledge of networking in order to
do this.
10/100BaseT switch10/100BaseT switch
10/100BaseT switch – the switch allows the devices on the
10/100BaseT switch10/100BaseT switch
network to communicate with each other. This function
is required in order for the NP200 to communicate with
the SoundServer.
These devices may also be provided separately.
Internet
SoundServer
Modem
To the WAN side
Router
To LAN side port
To LAN side port
NP200
SPEAKERS
(
)
6 OHMS MIN.
(1 (2 (3
• Press down the lever (1 .
• Insert the wire into the hole (2 .
• Release the lever to complete the connection (3 .
CONNECTING TO AN ETHERNET NETWORK
An Ethernet connection is required by your NP200 in
order to connect to a SoundServer and to be able to
access a high speed internet connection.
The diagram below shows the simplest configuration for
providing these connections.
Broadband ModemBroadband Modem
Broadband Modem – the modem in this configuration is
Broadband ModemBroadband Modem
a device for providing an internet connection via a high
speed leased line e.g. Cable modem, xDSL modem or
terminal adapter.
To access the Internet you typically need to make a
contract with an Internet Service Provider (ISP). Each ISP
has differing modem requirements and you should
contact them to determine which modem is required for
your internet connection.
NP200
Room 1
NP200
Room 2
If you do not have a DHCP Server available refer to the
Advanced Settings
chapter on page 17 for more
information on configuring you Ethernet Settings
manually.
CONNECTING THE NP200 TO A POWER
AMPLIFIER
• Connect the VARIABLE OUT socket to the input
of the power amplifier, using a phono lead:
Power
amplifier
signal
7
Page 9
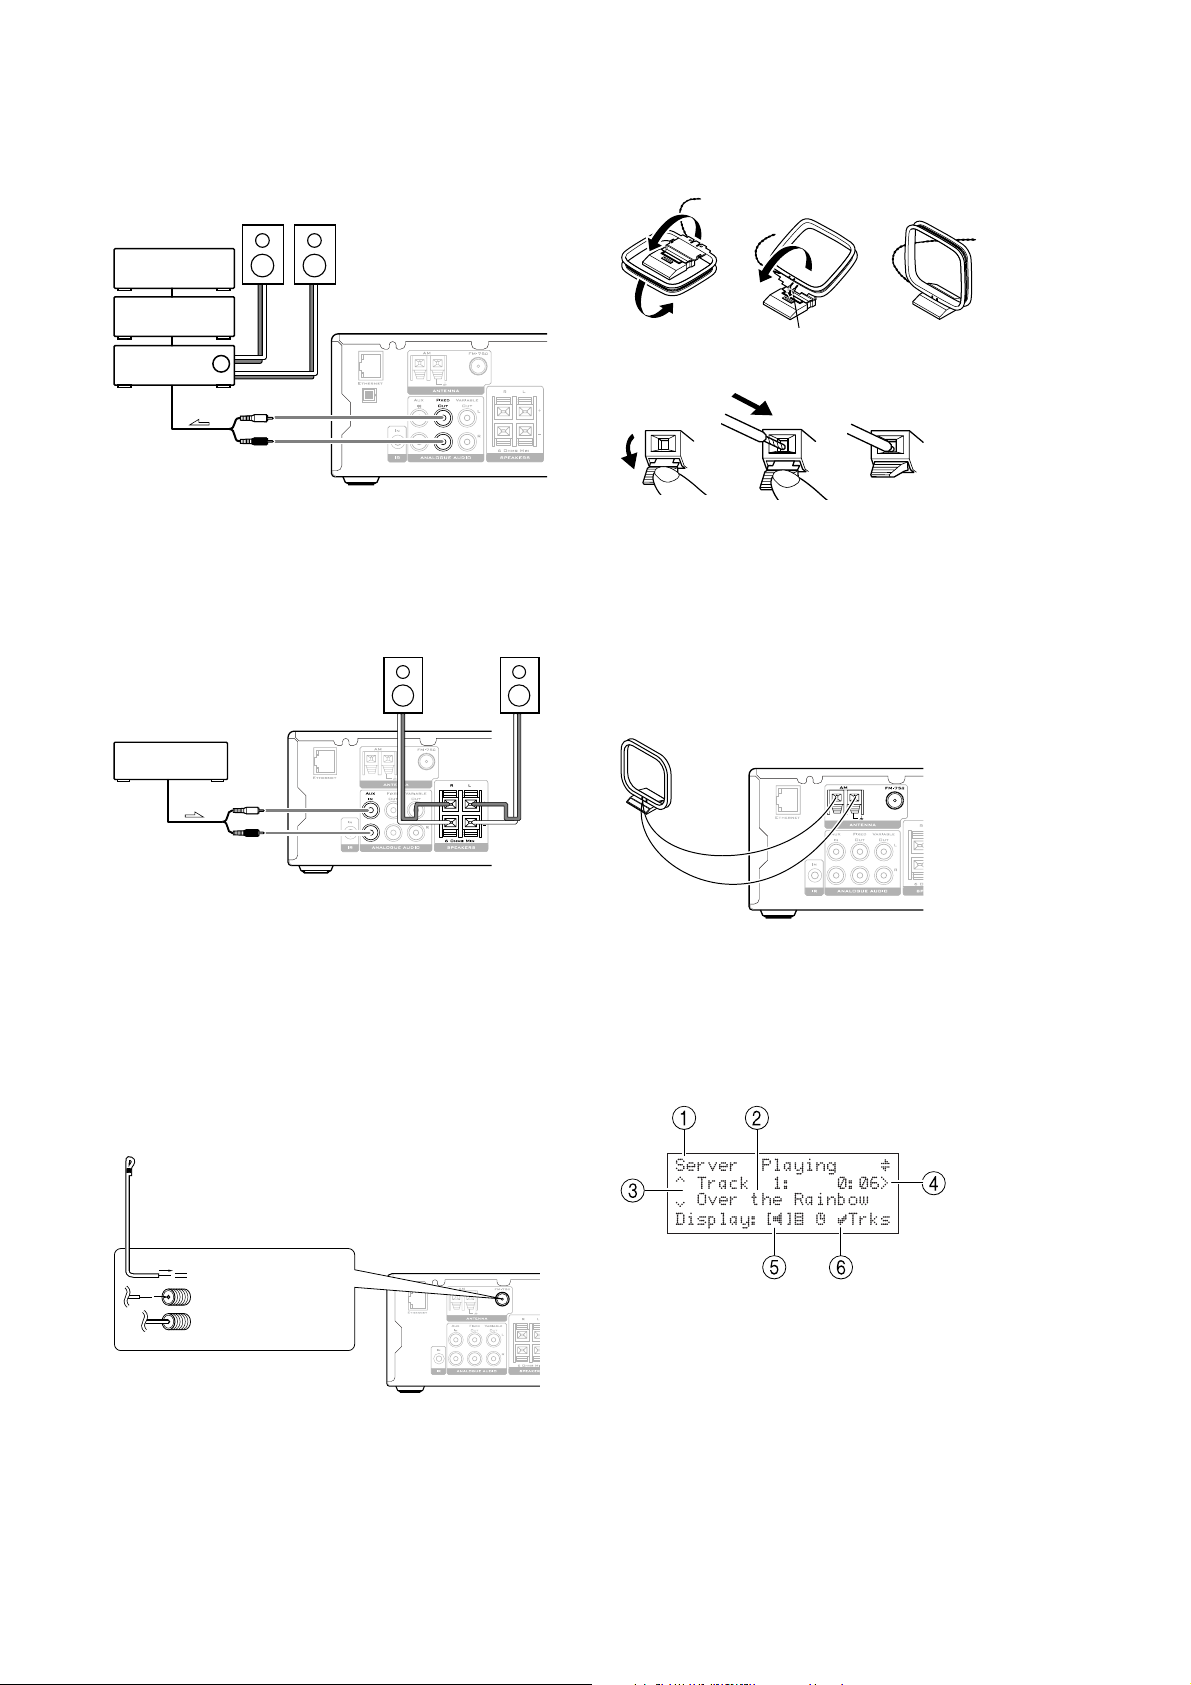
CONNECTING THE NP200 TO AN
INTEGRATED AMPLIFIER
• Connect the FIXED OUT sockets to the line input
of the integrated amplifier, using a phono lead:
CD recorder
CD player
Integrated
amplifier
signal
To connect the AM aerial
• Assemble the loop antenna as shown in the
illustration:
Insert into the hole.
• Connect it to the NP200 as follows:
CONNECTING A SOURCE TO THE NP200
You can connect an external source, such as a CD player,
to the NP200.
• Connect the line output from the source to the
AUX IN sockets on the NP200, using a phono
lead:
MiniDisc
signal
CONNECTING FM AND AM AERIALS
To use the NP200 to receive FM or AM radio you need to
connect appropriate aerials.
NoteNote
Note: refer to the
NoteNote
start of this guide for information relating to the use of
outdoor antennae.
To connect the FM aerial
The supplied FM antenna is for indoor use only.
• Move the antenna until the clearest signal is
received:
Important Safety Instructions
at the
(1 (2 (3
• Press down the lever (1 .
• Insert the wire into the hole (2 .
• Release the lever to complete the connection (3 .
The AM loop antenna is for indoor use only. Set it in the
direction and position where you receive the clearest
sound. Place the aerial as far away as possible from other
electrical devices such as TVs, PCs, power cords, and
speaker cables.
For better reception use an outdoor antenna, connected
to the left-hand connector.
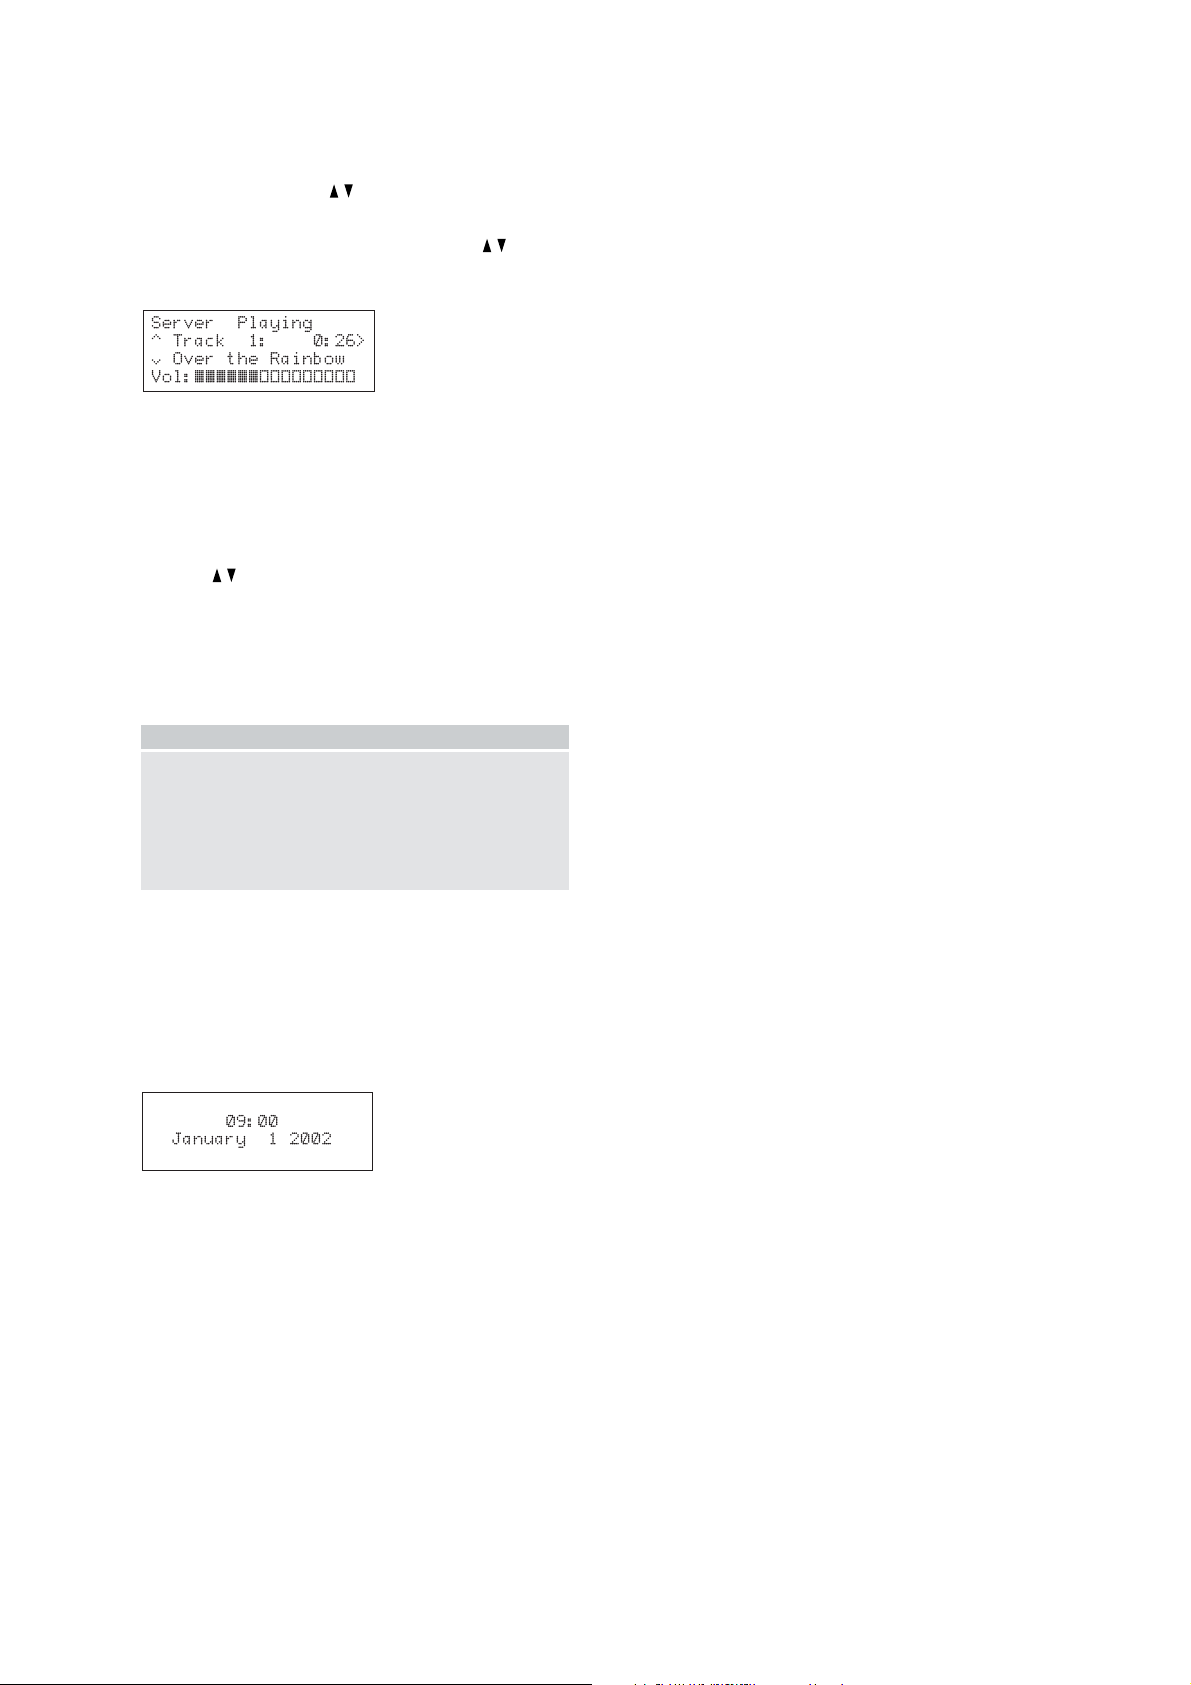
FRONT PANEL DISPLAY
The following diagram shows the key features of a
typical NP200 display:
Remove the insulation
at the tip of the cable,
and insert the cable
securely, fully to the
end of the exposed tip.
If reception is poor in your location use an outdoor FM
antenna to improve signal strength.
1 Indicates the title of the current screen.
2 Title of the current selection.
3 Indicates that you can use the a or v keys to
browse up and down the current menu list.
4 Indicates that you can press the } key to change
the time display.
5 Current display mode; changes between play,
browse, or clock mode.
6 Indicates that you can press the »
SELECTSELECT
SELECT key to
SELECTSELECT
browse by tracks.
8
Page 10
CHANGING THE VOLUME
To change the volume
• Use the
remote control.
The volume display appears when a
pressed and disappears after 2 seconds or immediately
any other key is pressed.
VOLUME VOLUME
VOLUME / keys on the NP200 or
VOLUME VOLUME
VOLUME VOLUME
VOLUME / key is
VOLUME VOLUME
To mute the sound
• Press the
MUTING MUTING
MUTING is displayed on the NP200.
MUTING MUTING
• Press the
on.
You can also turn the sound back on by pressing the
VOLUMEVOLUME
VOLUME / key.
VOLUMEVOLUME
MUTE MUTE
MUTE key on the remote control.
MUTE MUTE
MUTE MUTE
MUTE key again to turn the sound back
MUTE MUTE
SELECTING A SOURCE
To select a source
• Press the
the available input sources as follows:
Source Description
FM FM radio
AM AM radio
AUX Phono input; eg MiniDisc player.
SERVER SoundServer
iNet Radio Internet radio
AUDIO INPUT AUDIO INPUT
AUDIO INPUT key to switch between
AUDIO INPUT AUDIO INPUT
You can also select any source directly by pressing the
appropriate source key on the remote control.
• Press the
AM.
TUNER TUNER
TUNER key to toggle between FM and
TUNER TUNER
SWITCHING ON AND OFF
When power is connected to the NP200, the following
display appears:
• Press the
remote control to turn on the power.
STANDBYSTANDBY
STANDBY/
STANDBYSTANDBY
ON ON
ON key on the NP200 or
ON ON
9
Page 11
PLAYING MUSIC FROM
Server Ready
[S2000]
Press DISPLAY
Display:
Server [Playlists]
^ >Sarah's List
§ [1 of 4]
THE SOUNDSERVER
This chapter explains how to use the NP200 to browse
the music library on your SoundServer and play selected
tracks.
This chapter assumes you have set up an appropriate
Ethernet connection between the NP200 and your
SoundServer. For more information see
Ethernet network
, page 7.
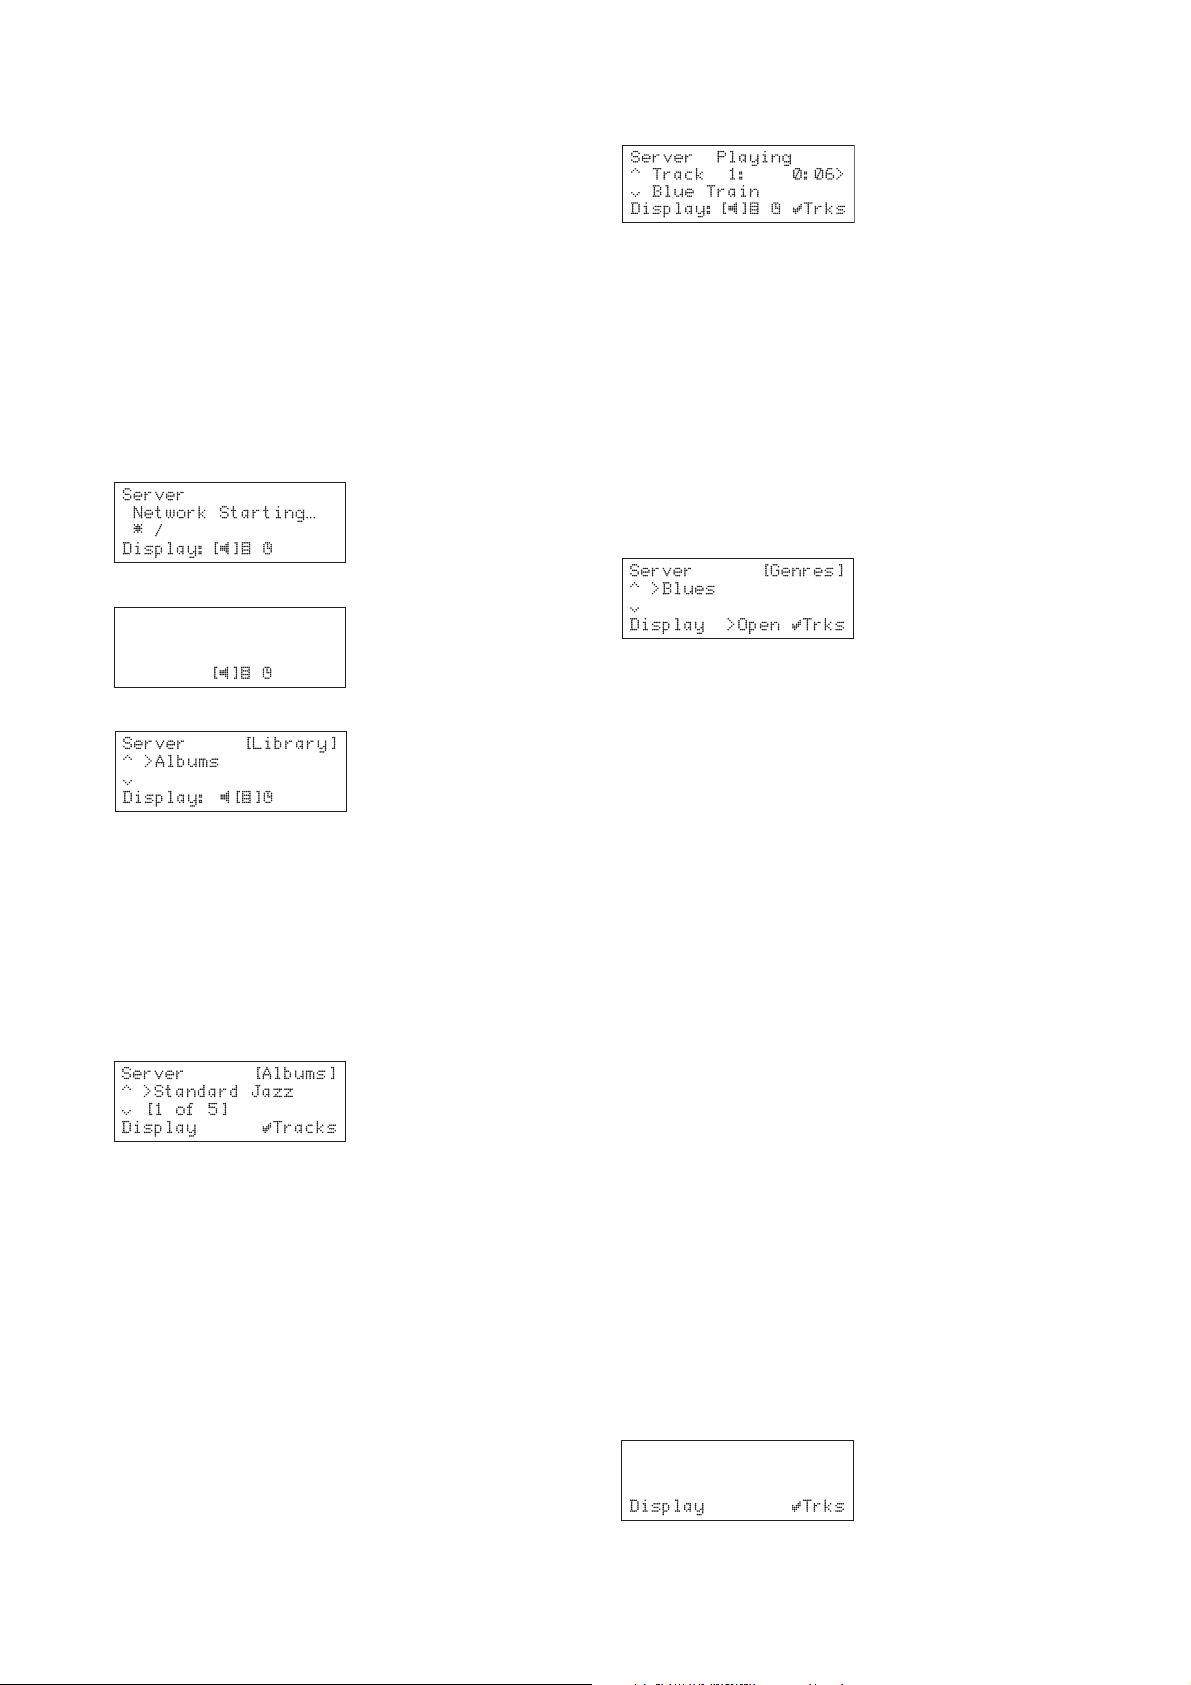
PLAYING MUSIC FROM THE LIBRARY
• Set the NP200 source to server, by pressing the
AUDIO INPUT AUDIO INPUT
AUDIO INPUT key on the front panel or the
AUDIO INPUT AUDIO INPUT
MUSIC SERVER MUSIC SERVER
MUSIC SERVER key on the remote control.
MUSIC SERVER MUSIC SERVER
The display shows:
After a short delay the display will show:
• Press the
To browse the library by album
Either:
• Use the a or v keys if necessary to highlight the
AlbumsAlbums
Albums option in the
AlbumsAlbums
• Press the »
Or:
• Press the
The display shows the albums available in your library:
• Press the a or v keys to step between albums or
press the appropriate letter on your remote
control to jump directly to that position in the
list.
• Press the »
currently selected album.
• Press the »
first track.
To select a particular track from this albumTo select a particular track from this album
To select a particular track from this album
To select a particular track from this albumTo select a particular track from this album
• Use the a or v keys to step between tracks, or
press a key on the remote control to jump to the
track number.
• Press the »
selected track.
DISPLAYDISPLAY
DISPLAY key to switch to browse mode:
DISPLAYDISPLAY
Library MenuLibrary Menu
Library Menu.
Library MenuLibrary Menu
SELECTSELECT
SELECT key to confirm your selection.
SELECTSELECT
ALBUM ALBUM
ALBUM key on the remote control.
ALBUM ALBUM
SELECT SELECT
SELECT key to display the tracks in the
SELECT SELECT
SELECT SELECT
SELECT key to start playing from the
SELECT SELECT
SELECT SELECT
SELECT key to play the currently
SELECT SELECT
Connecting to an
The display shows
• Press the »
tracks in this album.
PlayingPlaying
Playing:
PlayingPlaying
SELECT SELECT
SELECT key to return to browsing the
SELECT SELECT
To browse the library by artist or genre
Either:
• Use the a or v keys if necessary to highlight the
ArtistsArtists
Artists or
ArtistsArtists
• Press the »
Or:
• Press the
control.
The display shows the artists or genres available in your
library:
Artists and genres are displayed in alphabetical order.
• Press the a or v keys to step between artists or
genres, or press the appropriate letter on your
remote control to jump directly to the item in the
list beginning with that letter.
• Press the »
the selected artist or in the selected genre.
To select a particular albumTo select a particular album
To select a particular album
To select a particular albumTo select a particular album
• Press the }
currently selected artist or in the currently
selected genre.
• Use the a or v keys to step between albums.
• Press the »
selected album.
• Press the »
first track.
To select a particular track from this albumTo select a particular track from this album
To select a particular track from this album
To select a particular track from this albumTo select a particular track from this album
• Use the a or v keys to step between tracks, or
press a key on the remote control to jump to the
track number.
• Press the »
selected track.
Genres Genres
Genres option in the
Genres Genres
SELECT SELECT
SELECT key to confirm your selection.
SELECT SELECT
ARTIST ARTIST
ARTIST or
ARTIST ARTIST
SELECT SELECT
SELECT key to display the tracks by
SELECT SELECT
key to display a list of albums by the
SELECT SELECT
SELECT key to display the currently
SELECT SELECT
SELECT SELECT
SELECT key to start playing from the
SELECT SELECT
SELECT SELECT
SELECT key to play the currently
SELECT SELECT
GENREGENRE
GENRE key on your remote
GENREGENRE
Library Library
Library menu.
Library Library
To browse the library by playlist
Either:
• Use the a or v keys if necessary to highlight the
PlaylistsPlaylists
Playlists option in the
PlaylistsPlaylists
• Press the »
Or:
• Press the
The display shows the playlists you have defined:
SELECT SELECT
SELECT key to confirm your selection.
SELECT SELECT
PLAYLISTPLAYLIST
PLAYLIST key on your remote control.
PLAYLISTPLAYLIST
Library Library
Library menu.
Library Library
Note: Note:
Note: If you have not yet created any playlists the list will
Note: Note:
be empty.
10
Page 12
• Press the a or v keys to step between playlists,
or press the appropriate letter on your remote
control to jump directly to the item in the list
beginning with that letter.
• Press the »
SELECT SELECT
SELECT key to display the tracks in the
SELECT SELECT
currently selected playlist.
• Press the »
SELECT SELECT
SELECT key to start playing from the
SELECT SELECT
first track.
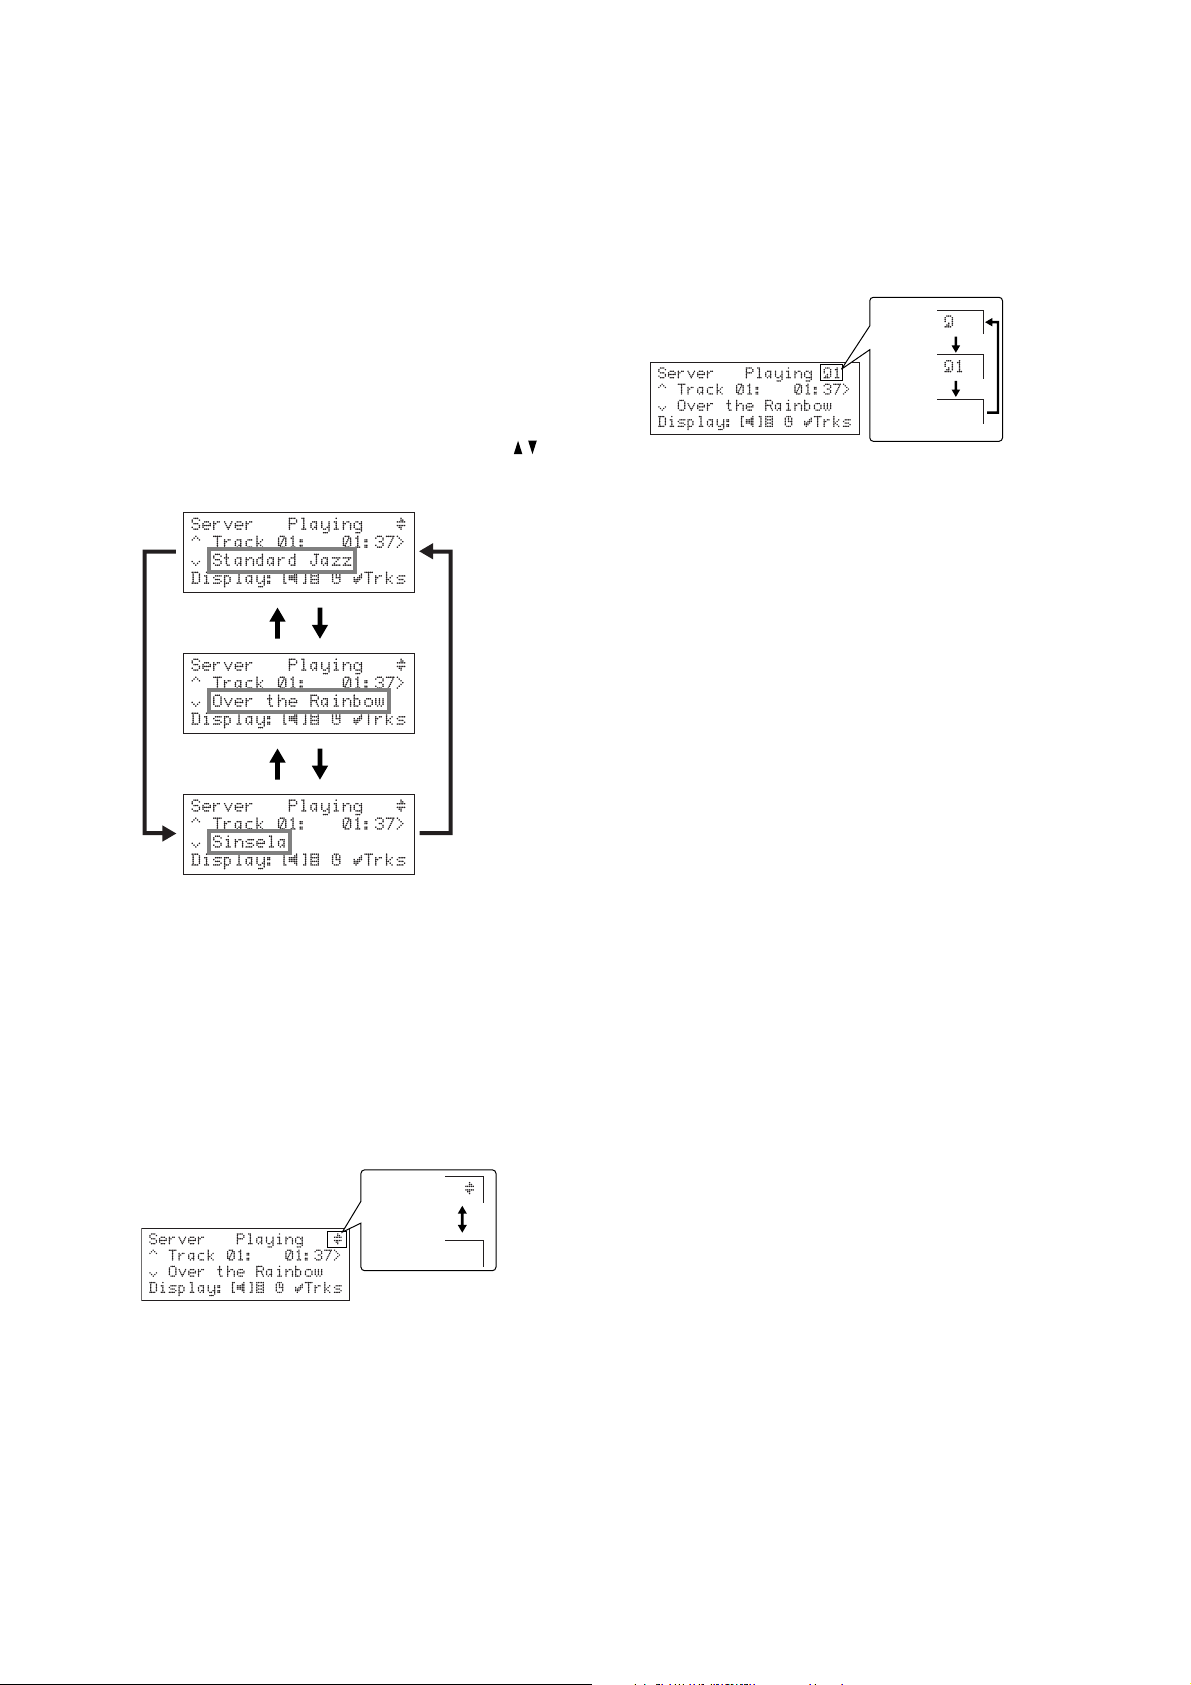
PLAYBACK INFORMATION
During playback the top line of the display shows
PlayingPlaying
Playing,
PlayingPlaying
playback status.
To change the displayed information
• While a track is playing, you can press the /
StoppedStopped
Stopped,
StoppedStopped
PausedPaused
Paused, or
PausedPaused
SeekingSeeking
Seeking to show the
SeekingSeeking
keys to change the display between showing
TitleTitle
Title,
TitleTitle
AlbumAlbum
Album, or
AlbumAlbum
ArtistArtist
Artist:
ArtistArtist
To repeat the current selection
• Press the
Pressing the
the selected album or tracklist. Pressing the REPEAT key
again will repeat the current track.
To exit from Repeat mode press the
Repeat OffRepeat Off
Repeat Off is diplayed:
Repeat OffRepeat Off
REPEAT REPEAT
REPEAT key on the remote control.
REPEAT REPEAT
REPEAT REPEAT
REPEAT key once will repeat all the tracks in
REPEAT REPEAT
REPEAT REPEAT
REPEAT key until
REPEAT REPEAT
Repeat
ALL tracks
Repeat
1 track
Repeat
OFF
• Press the } key to toggle the display between
showing the elapsed time for the current track,
and the remaining time for the current track.
RANDOM AND REPEAT PLAYBACK
You can play albums, artists, genres or playlists in a
random order to add variety to your music. You can also
play a selection repeatedly.
To randomise the current selection
• Press the
RANDOM RANDOM
Press
RANDOM again to disable random playback.
RANDOM RANDOM
RANDOM RANDOM
RANDOM key on your remote control.
RANDOM RANDOM
Random On
Random Off
11
Page 13
LISTENING TO RADIO
The NP200 lets you connect over the Ethernet to a wide
range of Internet radio stations, that broadcast music
and other programs in a variety of languages by
streaming audio over the Internet.
The NP200 uses the XiVA-Net Internet radio catalogue
from Imerge to let you search for radio stations by
Genre, SubGenre, Location, or Language.
With suitable aerials, the NP200 can also receive FM and
AM radio broadcasts. On FM the Radio Data System
displays the station name and other information.
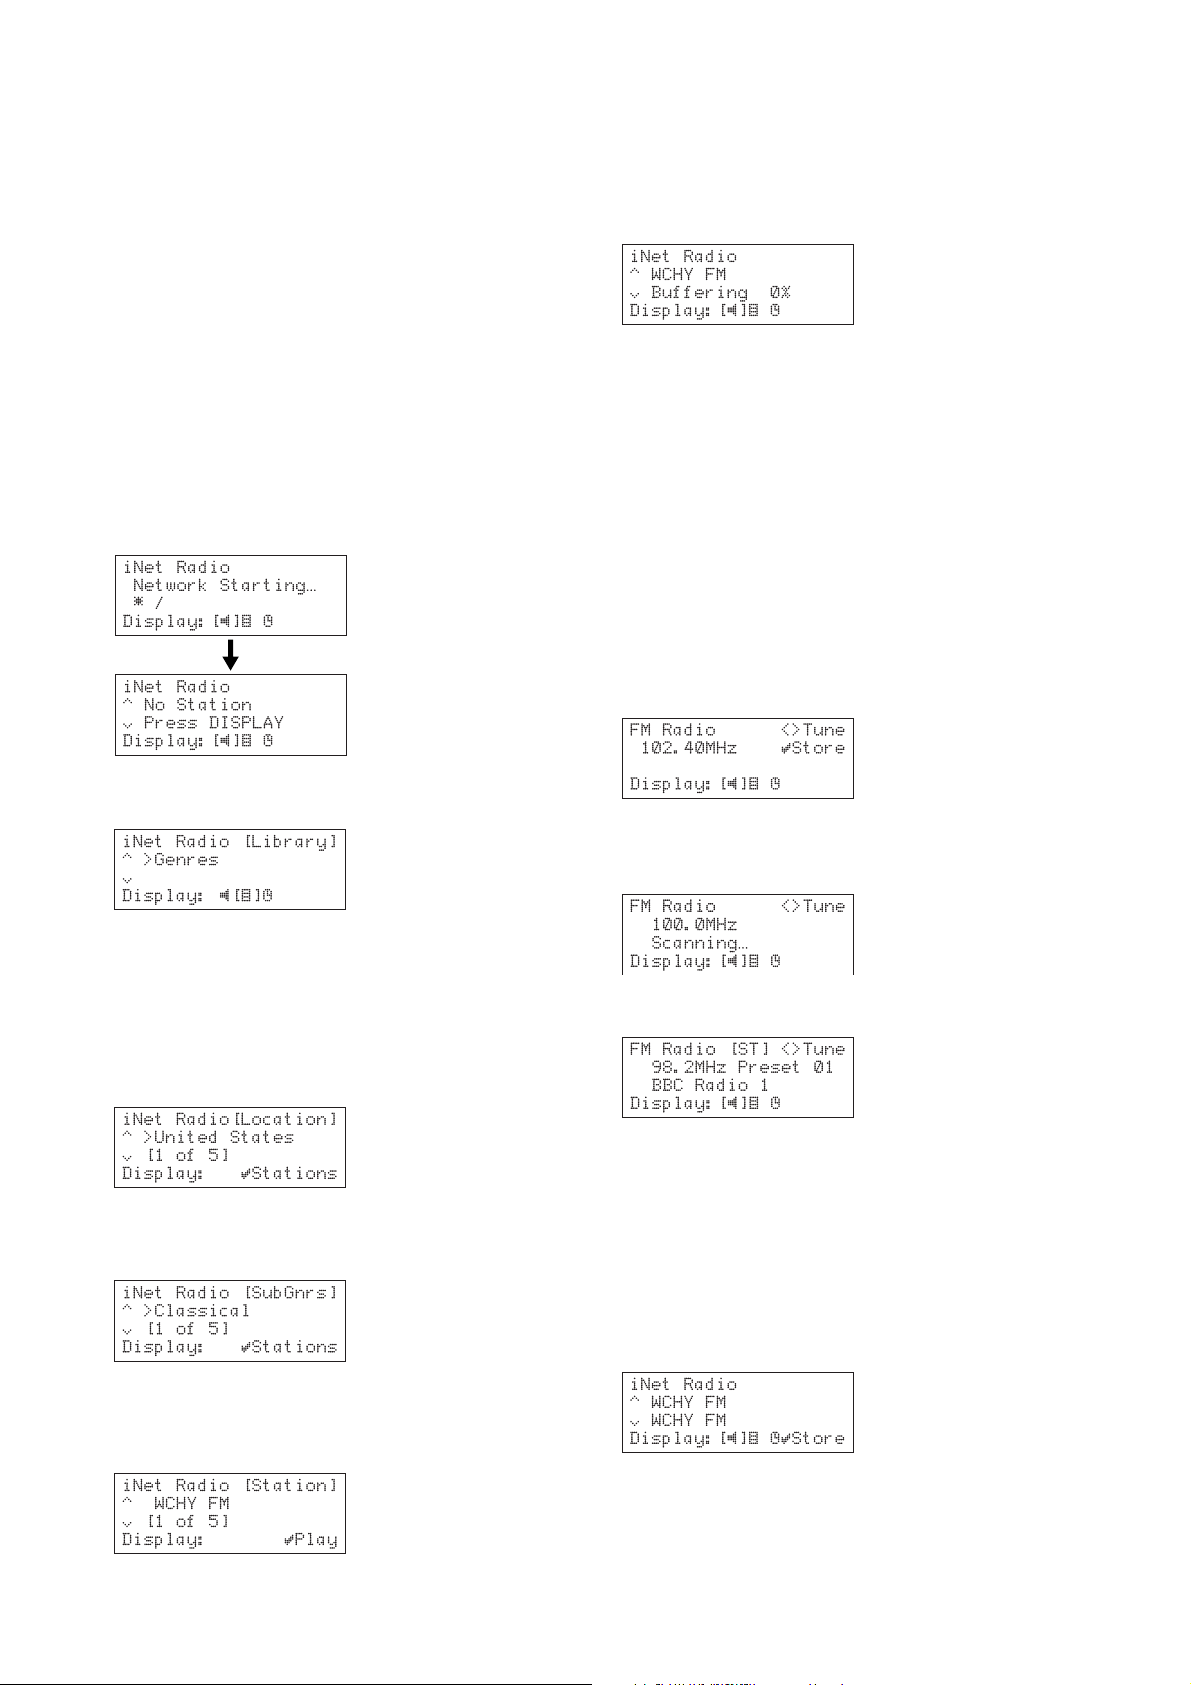
LISTENING TO INTERNET RADIO
• Press the
until the display shows iNet Radio.
Or:
• Press the
The display shows:
AUDIO INPUTAUDIO INPUT
AUDIO INPUT key on the front panel
AUDIO INPUTAUDIO INPUT
iNet RADIOiNet RADIO
iNet RADIO key on the remote control.
iNet RADIOiNet RADIO
• Press the a or v keys to step between stations.
• Press the »S
station.
There is a delay while the NP200 connects to the station
and buffers the data:
The station will then start to play.
If the Internet radio station service is not available the
display willl show
ELECT ELECT
ELECT key to play the selected
ELECT ELECT
Stream Access ErrorStream Access Error
Stream Access Error or
Stream Access ErrorStream Access Error
No StreamNo Stream
No Stream.
No StreamNo Stream
To change the displayed information
With some Internet radio stations you can display
information about the station using the a or v keys.
LISTENING TO FM/AM RADIO
To tune manually to a station
• Press the
shows
When using the remote control press the
until the display shows
• Press the { or } key to select the frequency of
the station you want to listen to:
AUDIO INPUTAUDIO INPUT
AUDIO INPUT key until the display
AUDIO INPUTAUDIO INPUT
FM RadioFM Radio
FM Radio or
FM RadioFM Radio
AM RadioAM Radio
AM Radio.
AM RadioAM Radio
FM RadioFM Radio
FM Radio or
FM RadioFM Radio
TUNER TUNER
TUNER key
TUNER TUNER
AM RadioAM Radio
AM Radio.
AM RadioAM Radio
• Press the
The display shows.
DISPLAY DISPLAY
DISPLAY key to browse for a station.
DISPLAY DISPLAY
To browse the stations by genre, location or
language
• Use the a or v keys if necessary to highlight the
GenresGenres
Genres,
GenresGenres
• Press the »
• Use the a or v keys to step between the items
you selected:
• Press the »
In the case of
menu:
• Use the a or v keys to step between sub genres,
and press the »S
The display then shows a list of Internet radio stations in
the sub genre, location, or language you selected:
LocationLocation
Location, or
LocationLocation
SELECTSELECT
SELECT key to confirm your selection.
SELECTSELECT
SELECTSELECT
SELECT key to select the current item.
SELECTSELECT
Genres Genres
Genres there is an additional
Genres Genres
LanguageLanguage
Language.
LanguageLanguage
Sub GenresSub Genres
Sub Genres
Sub GenresSub Genres
ELECT kELECT k
ELECT key to select one.
ELECT kELECT k
To scan for a station on FM
• Hold down the { or } key until the display shows
Scanning…Scanning…
Scanning….
Scanning…Scanning…
The radio will scan up or down in frequency and stop at
the next station:
DEFINING PRESET STATIONS
The NP200 allows you to save your favorite stations with
names, and select them again at any time. You can store
up to 40 FM and AM stations, and 20 Internet radio
stations.
NoteNote
Note: Preset stations are only retained for 2 weeks if you
NoteNote
disconnect the NP200 from the power.
To define a preset
• Tune to the station you want to save:
• Press the »
SELECTSELECT
SELECT key.
SELECTSELECT
12
Page 14
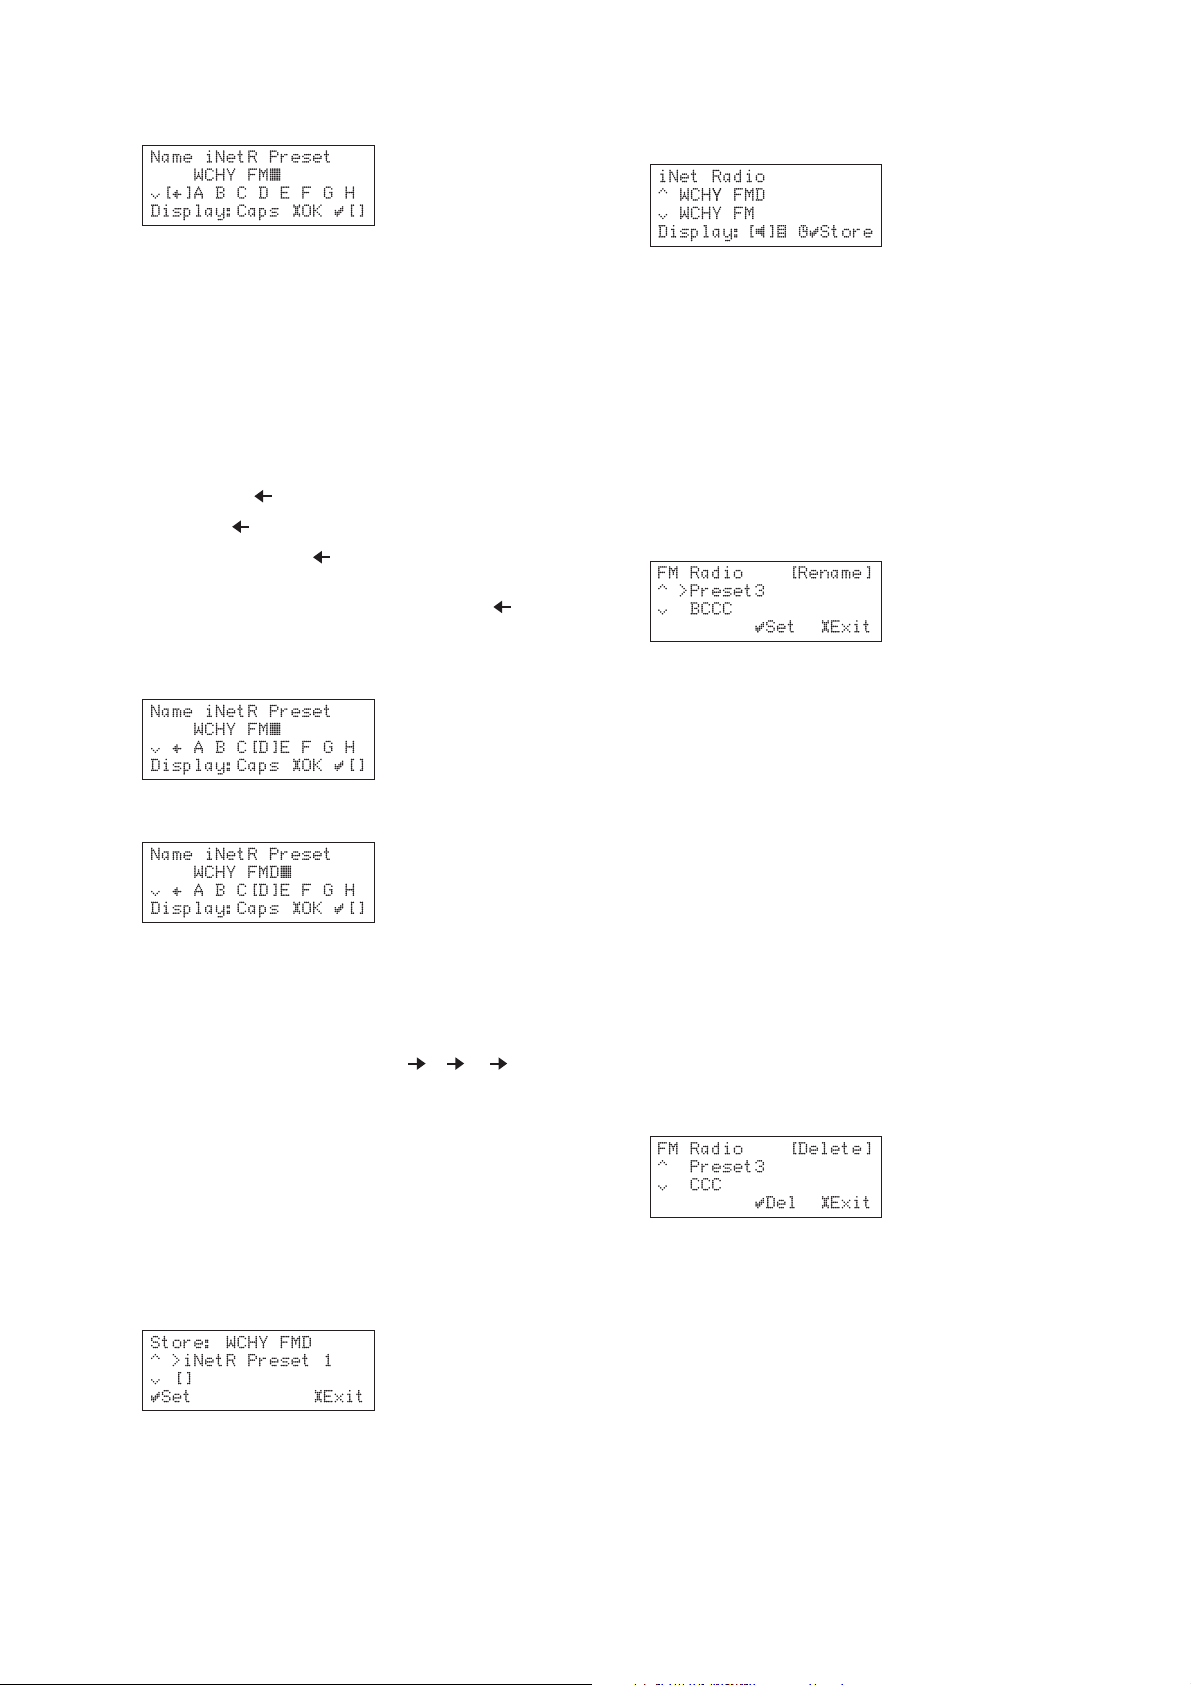
You are prompted to enter and edit the preset name:
The preset name will be shown on the third line of the
display:
With Internet radio and FM using RDS the preset name is
set to the station name, and you can press the £
key to use this as the preset name.
With AM radio, the preset name is initially blank and you
need to enter a name as described below.
SETUPSETUP
SETUP
SETUPSETUP
To edit the preset name
• Press the
characters to enter.
Each time you press the
cycles as follows:
Capital lettersCapital letters
Capital letters: ABCDEFGHIJKLMNOPQRSTUVWXYZ
Capital lettersCapital letters
Lower caseLower case
Lower case: abcdefghijklmnopqrstuvwxyz
Lower caseLower case
Numbers and symbolsNumbers and symbols
Numbers and symbols: 1234567890 !”$%&’()*+,-./
Numbers and symbolsNumbers and symbols
:;<=>?@[]^_’{|}
NoteNote
Note: Pressing the »
NoteNote
display deletes the last character.
• Select the next character using the {, }, a, and
v keys:
• Press the »
character:
DISPLAY DISPLAY
DISPLAY key to select which type of
DISPLAY DISPLAY
DISPLAY DISPLAY
DISPLAY key, the character type
DISPLAY DISPLAY
SELECTSELECT
SELECT key after selecting on the
SELECTSELECT
SELECTSELECT
SELECT key to enter the selected
SELECTSELECT
To enter characters using the remote control
You can also use the alphanumeric keys on your remote
control to enter characters.
Each time you press a numeric key on the remote control,
the key cycles through a number of assigned letters as
shown in the following example: A B C A….
You can press the numeric key
to enter a symbol.
When using the remote control press the
switch the character type.
11
1 on the remote control
11
CAPS CAPS
CAPS key to
CAPS CAPS
To save the preset
When you have finished entering the preset name:
• Press the £
The next available preset number is displayed, or Preset 1
if all the preset numbers are already in use:
SETUPSETUP
SETUP key to save the preset.
SETUPSETUP
Alternatively you can cancel the operation of saving a
preset at any time by pressing the *
Stop Stop
Stop key.
Stop Stop
To rename a preset
• Press the £
menus.
• Use the a and v keys to highlight
RadioRadio
Radio, or
RadioRadio
SELECTSELECT
»
SELECT key.
SELECTSELECT
• Use the a and v keys to highlight
and press the »
• Use the a and v keys to select the preset you
want to edit:
For each character you want to edit:
• Use the ” / ¯ and ˘/ ’ keys to select the
character to be replaced.
• Use the { and } keys to select the new character.
• Press the »
character.
After you have finished editing the name:
• Press the £
SETUPSETUP
SETUP key to display the Setup
SETUPSETUP
iNet RadioiNet Radio
iNet Radio, F
AM RadioAM Radio
AM Radio as appropriate, and press the
AM RadioAM Radio
SELECTSELECT
SELECT key.
SELECTSELECT
SELECTSELECT
SELECT key to enter the new
SELECTSELECT
SETUP SETUP
SETUP key.
SETUP SETUP
iNet RadioiNet Radio
Rename PresetRename Preset
Rename Preset
Rename PresetRename Preset
To delete a preset
• Press the £
menus.
• Use the a and v keys to highlight
RadioRadio
Radio, or
RadioRadio
SELECTSELECT
»
SELECT key.
SELECTSELECT
• Use the a and v keys to highlight
and press the »
• Use the a and v keys to select the preset you
want to delete:
• Press the »
The preset will be deleted.
• Press the £
display.
SETUPSETUP
SETUP key to display the Setup
SETUPSETUP
iNet RadioiNet Radio
iNet Radio, F
..
.
..
iNet RadioiNet Radio
Delete PresetDelete Preset
Delete Preset
Delete PresetDelete Preset
AM RadioAM Radio
AM Radio as appropriate, and press the
AM RadioAM Radio
SELECTSELECT
SELECT key
SELECTSELECT
SELECT SELECT
SELECT key.
SELECT SELECT
SETUPSETUP
SETUP key to return to the normal
SETUPSETUP
MM
M
MM
MM
M
MM
• Press the a or v key to display your desired
preset number.
• Press the »
SELECTSELECT
SELECT key to save the preset.
SELECTSELECT
13
Page 15
SELECTING PRESET STATIONS
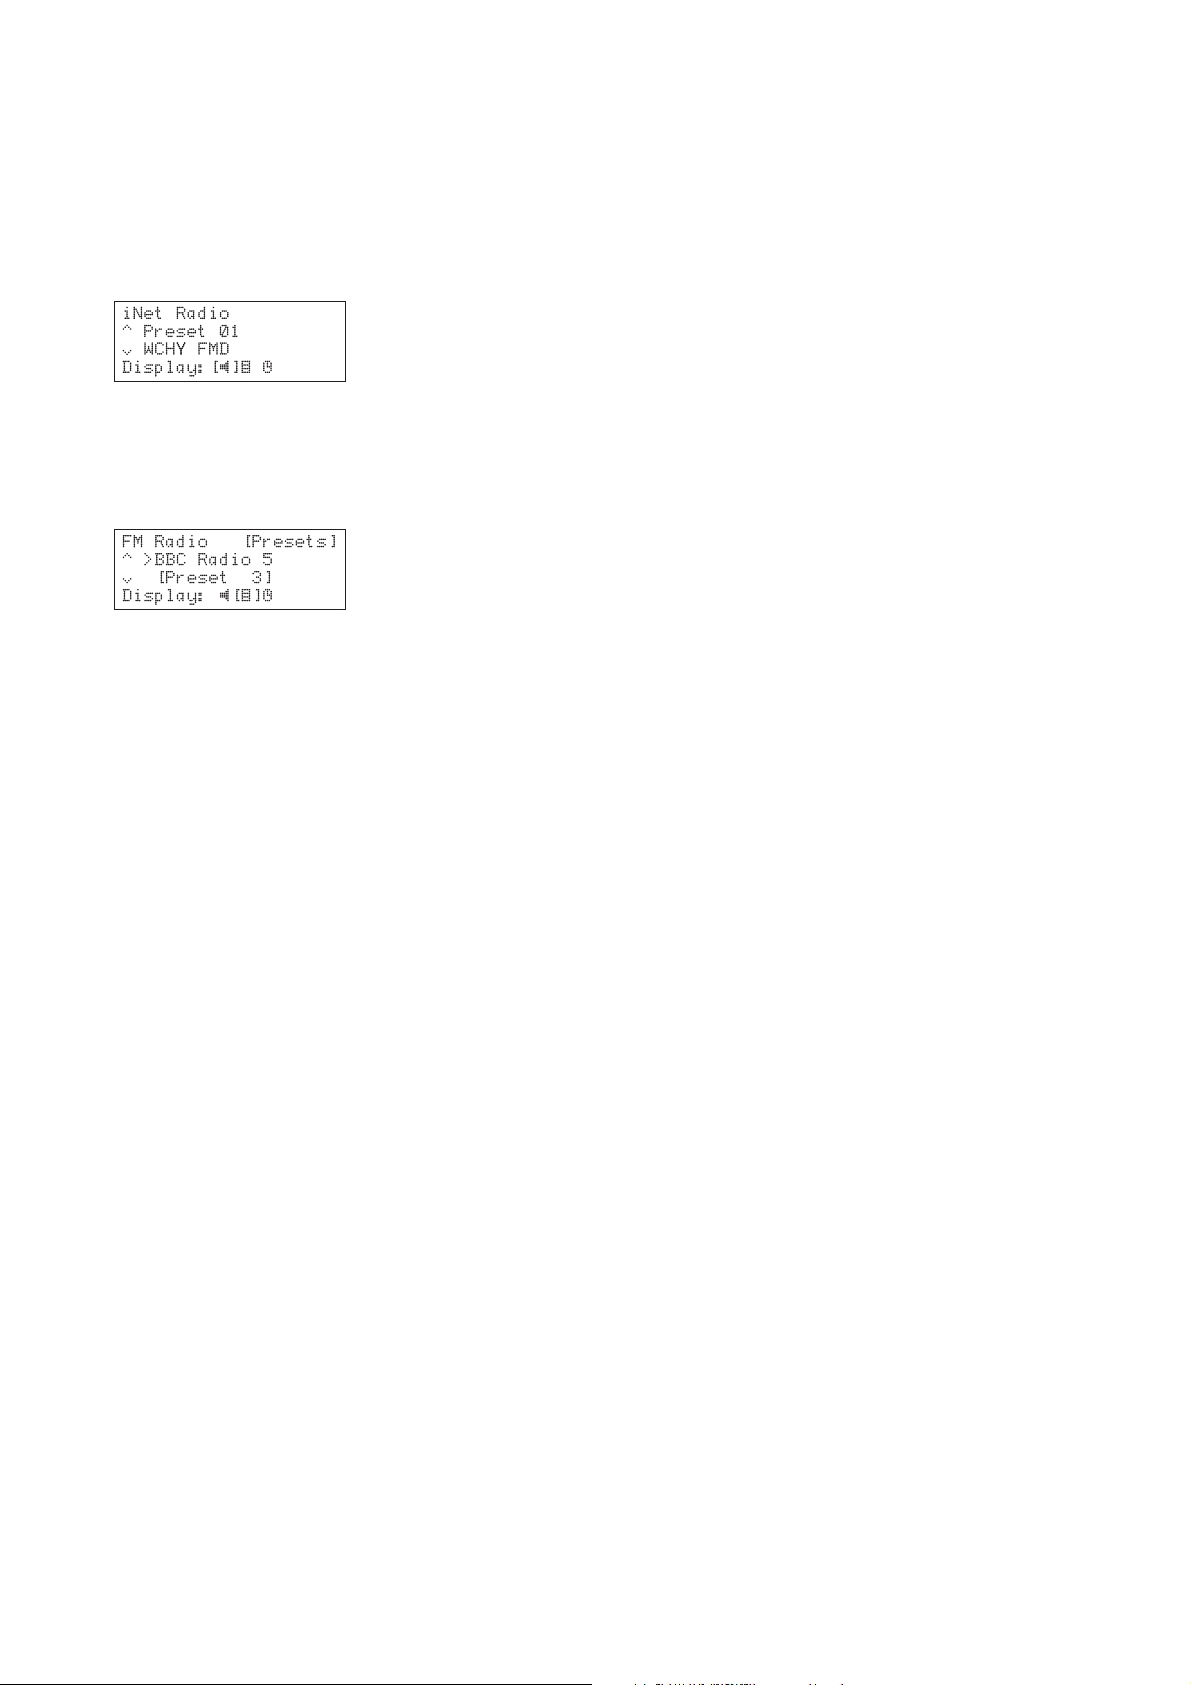
To select a preset station
• Press the
shows
required.
• Use the
to step between the available preset stations:
To select a preset station from the front
panel (FM or AM only)
• Press the
shows
• Press the
• Use the a or v keys to step between the
available preset stations.
AUDIO INPUTAUDIO INPUT
AUDIO INPUT key until the display
AUDIO INPUTAUDIO INPUT
iNet RadioiNet Radio
iNet Radio,
iNet RadioiNet Radio
Preset Preset
Preset A / V keys on the remote control
Preset Preset
AUDIO INPUTAUDIO INPUT
AUDIO INPUT key until the display
AUDIO INPUTAUDIO INPUT
FM RadioFM Radio
FM Radio or
FM RadioFM Radio
DISPLAY DISPLAY
DISPLAY key to switch to browse mode:
DISPLAY DISPLAY
FM RadioFM Radio
FM Radio, or
FM RadioFM Radio
AM RadioAM Radio
AM Radio as required.
AM RadioAM Radio
AM RadioAM Radio
AM Radio as
AM RadioAM Radio
14
Page 16
USING THE CLOCK AND
TIMER
The NP200 includes a built-in digital clock, that shows
the time and date.
You can also set an alarm, that will play a selected
SoundServer track or radio preset at a specified time. A
snooze feature allows you to postpone the alarm by 5
minutes.
Finally, a sleep timer automatically puts the NP200 to
standby after up to 90 minutes.
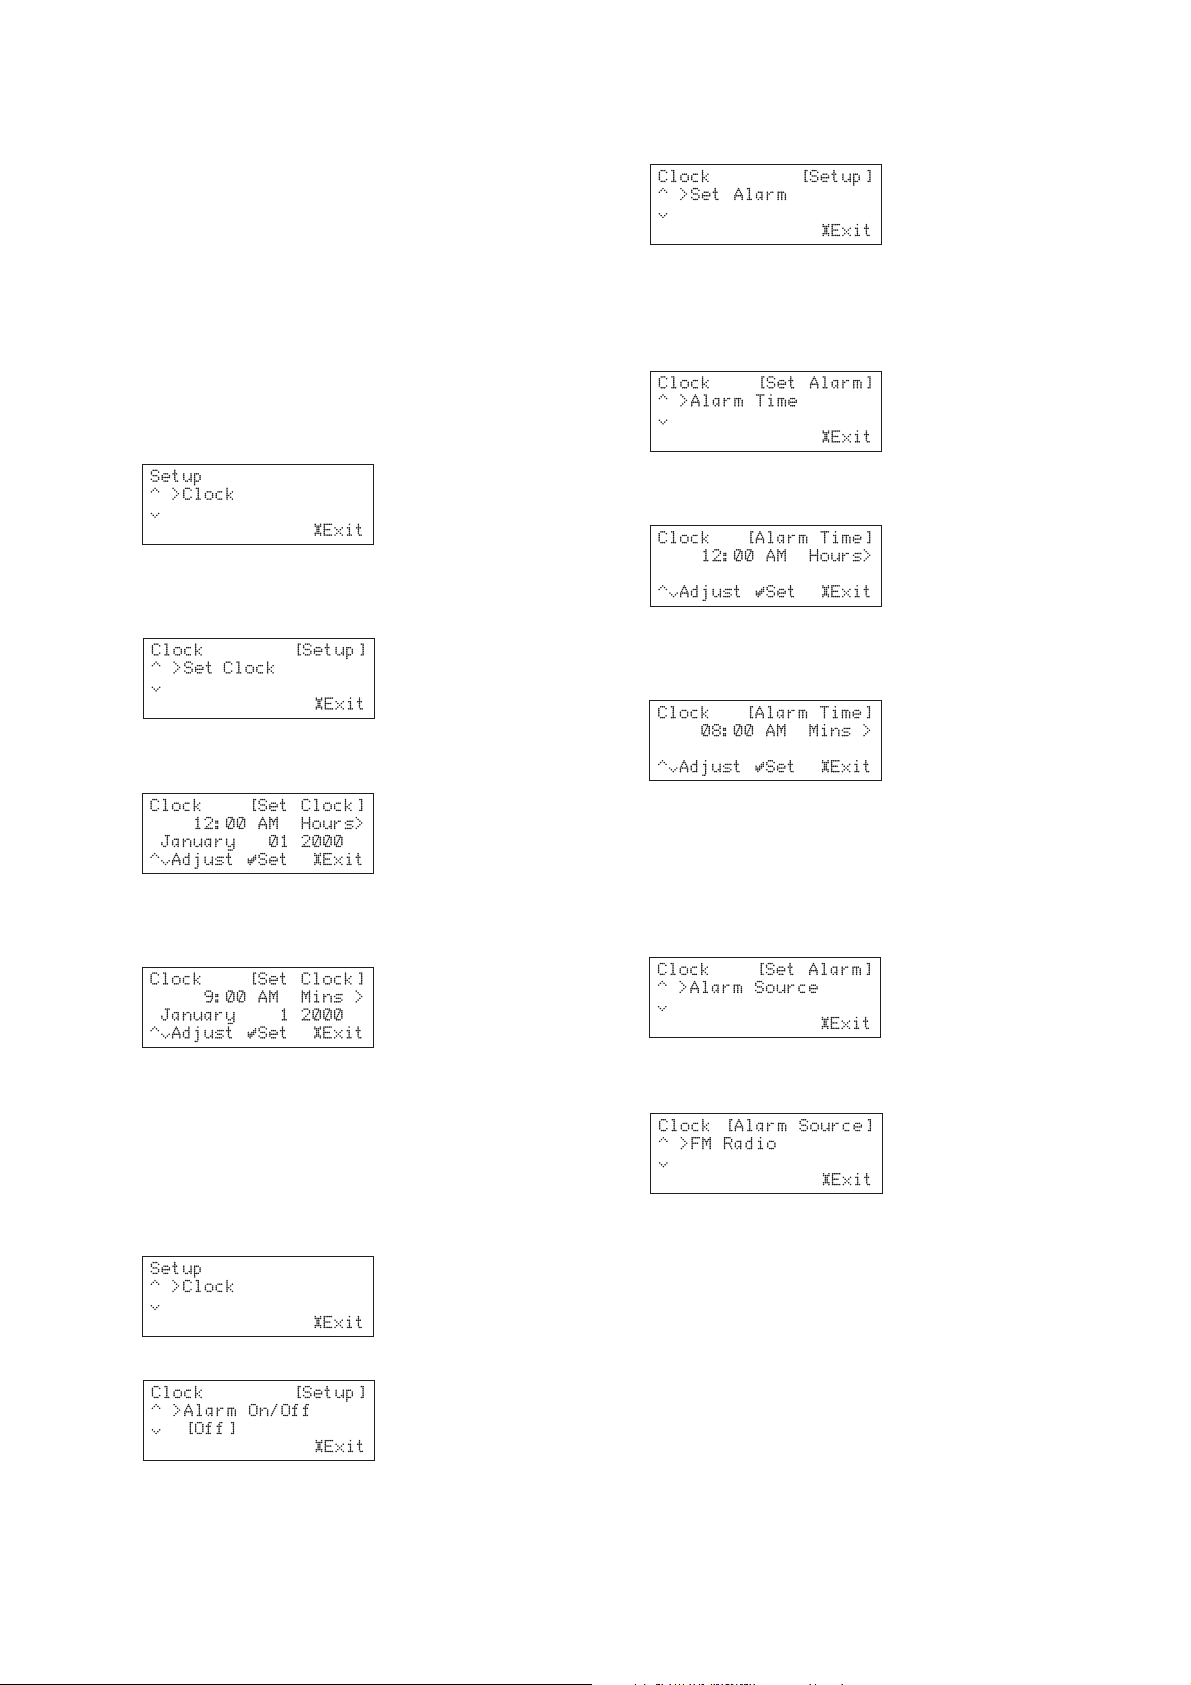
SETTING THE CLOCK
• Press the £
menus:
SETUP SETUP
SETUP key to display the Setup
SETUP SETUP
• Use the a and v keys to display the
option:
• Press the »
SELECT SELECT
SELECT key to select it.
SELECT SELECT
To set the alarm time
• Use the a and v keys to display the
option:
• Press the »
The display prompts you to set the hours:
SELECT SELECT
SELECT key to select it.
SELECT SELECT
Set AlarmSet Alarm
Set Alarm
Set AlarmSet Alarm
Alarm TimeAlarm Time
Alarm Time
Alarm TimeAlarm Time
• Press the »
• Press the a or v keys to display
display area:
• Press the »
The display prompts you to set the hours:
• Use the a and v keys to set the hours.
• Press the } key to enter a minute setting for the
clock:
• Use the same procedure to set the minutes, AM/
PM, month, day, and year.
• Press the »
• Press the £
menus.
SELECT SELECT
SELECT key.
SELECT SELECT
Set ClockSet Clock
Set Clock in the
Set ClockSet Clock
SELECT SELECT
SELECT key.
SELECT SELECT
SELECT SELECT
SELECT key to save the settings.
SELECT SELECT
SETUP SETUP
SETUP key to exit from the setup
SETUP SETUP
SETTING THE ALARM
• Press the £
• Press the »
SETUP SETUP
SETUP key to display the setup menus:
SETUP SETUP
SELECTSELECT
SELECT key:
SELECTSELECT
• Use the a and v keys to set the hours.
• Press the } key to enter a minute setting for the
clock:
• Use the same procedure to set the minutes and
AM/PM.
• Press the »
SELECT SELECT
SELECT key to save the settings.
SELECT SELECT
To set the alarm source
• Use the a and v keys to display the
Source Source
Source option:
Source Source
• Press the »
The display prompts you to select the playback source:
• Use the a and v keys to select from the
following options:
Internet radio stationInternet radio station
Internet radio station – by selecting this option you will
Internet radio stationInternet radio station
be prompted to select a preset station to use as the
alarm.
AM/FM radio stationAM/FM radio station
AM/FM radio station – by selecting this option you will
AM/FM radio stationAM/FM radio station
be prompted to select a preset station to use as the
alarm.
ServerServer
Server – you may select a particular track from the
ServerServer
SoundServer library to use as the alarm. Once this
option has been selected you will be prompted to locate
a track to play.
Once you have selected a radio preset or a SoundServer
track for an alarm source press the »
the settings.
SELECT SELECT
SELECT key to select it.
SELECT SELECT
AlarmAlarm
Alarm
AlarmAlarm
SELECTSELECT
SELECT key to save
SELECTSELECT
15
Page 17
NoteNote
Note: If your selected source is not available when the
NoteNote
alarm is activated the NP200 will use the last used FM or
AM radio station as the alarm source.
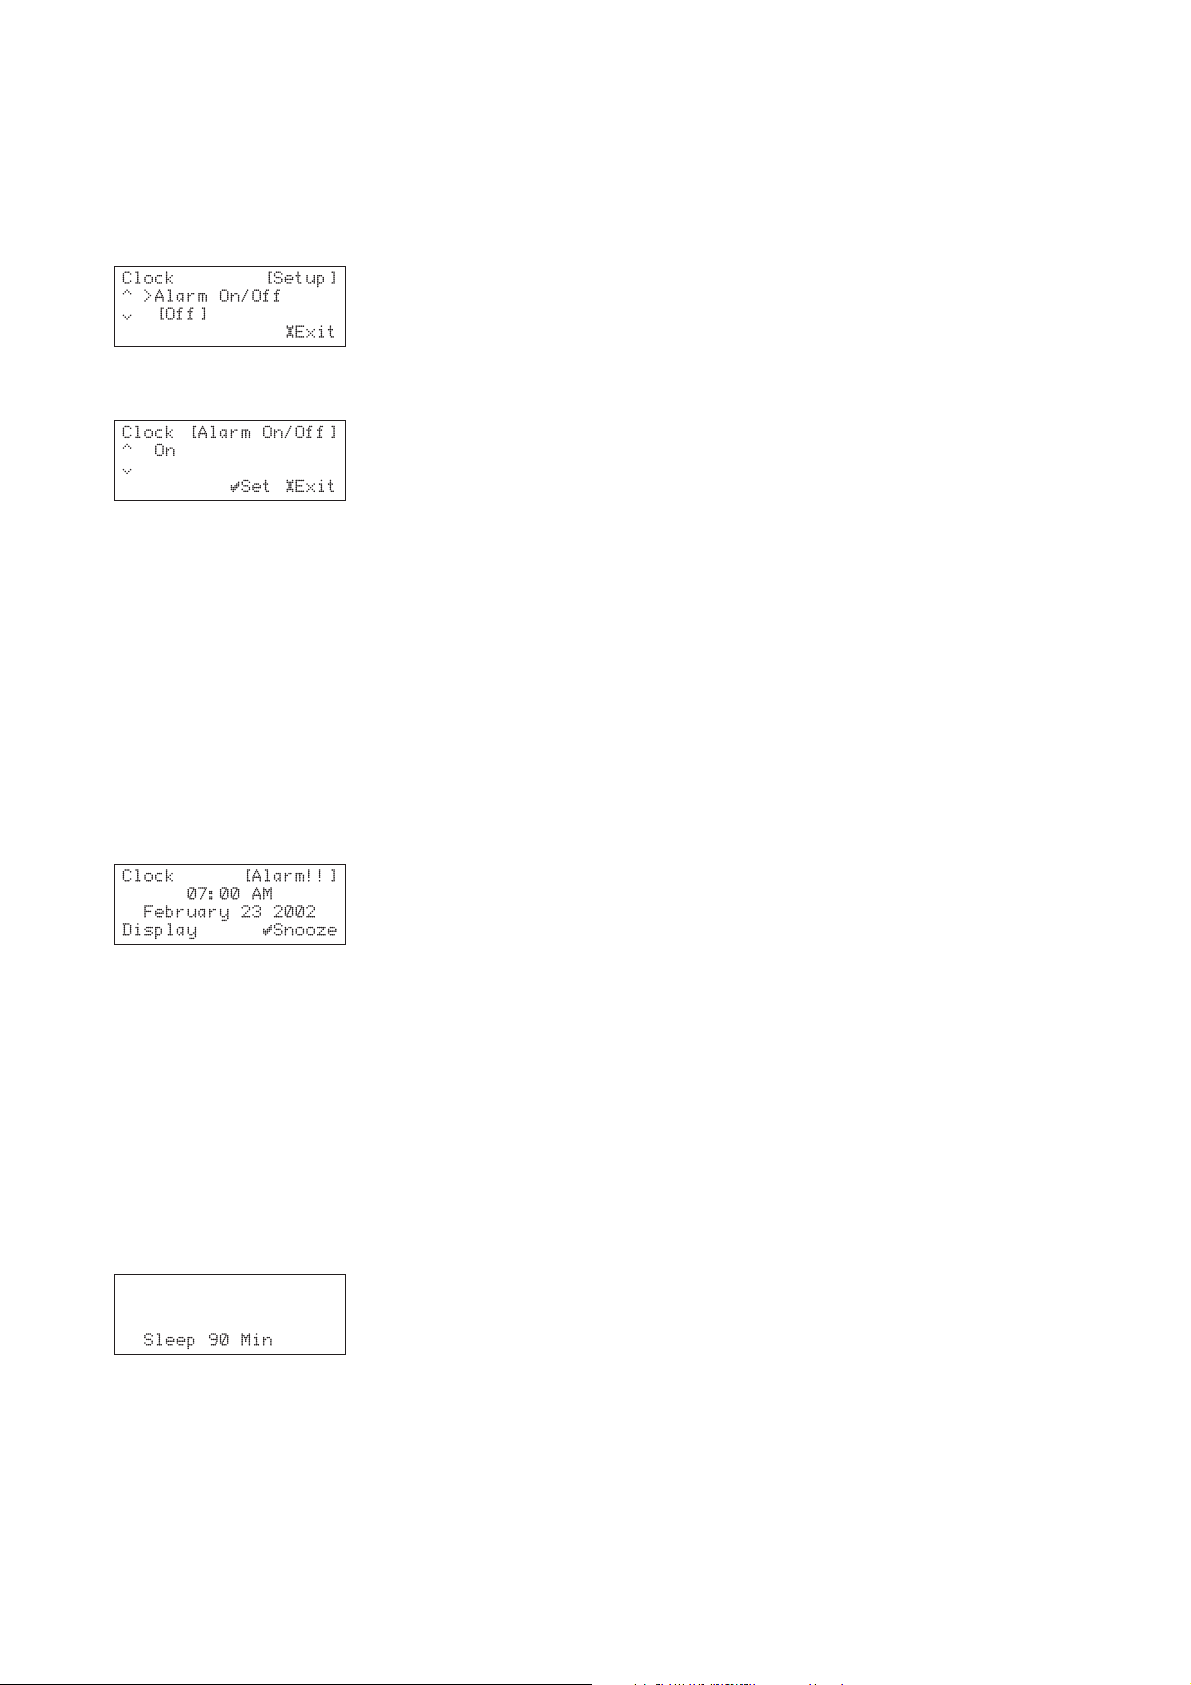
To turn on the alarm
• Use the a and v keys to display the
Off Off
Off option:
Off Off
Alarm On/Alarm On/
Alarm On/
Alarm On/Alarm On/
• Press the »
• Use the a and v keys to select
• Press the »
• Press the £
menus.
• Press the
Standby mode.
When the set time is reached the NP200 will be turned
on and start playing audio from the specified input
source.
If the NP200 is already switched on the alarm will not be
activated.
SELECT SELECT
SELECT key to select it.
SELECT SELECT
On On
OffOff
On or
Off:
On On
OffOff
SELECT SELECT
SELECT key to save the change.
SELECT SELECT
SETUPSETUP
SETUP key to exit from the main setup
SETUPSETUP
STANDBYSTANDBY
STANDBY/
STANDBYSTANDBY
ON ON
ON key on the NP200 to enter
ON ON
To select the snooze feature
When the alarm is active a snooze feature is available
which silences the alarm and sounds it again after 5
minutes:
• Press the »
feature.
SELECT SELECT
SELECT key to activate the snooze
SELECT SELECT
To cancel the alarm
• Press the
NP200 or remote control.
STANDBY STANDBY
STANDBY key or
STANDBY STANDBY
DISPLAY DISPLAY
DISPLAY key on the
DISPLAY DISPLAY
SLEEP TIMER
The sleep timer puts the NP200 into Standby mode when
the set time elapses.
• Press the
the time that must elapse before the NP200 is
put into Standby mode.
The display shows:
• Press the
steps of 10 minutes.
You can also use the a and v keys to change the time
setting in minutes.
While the sleep timer function is set,
the display.
• To disable the sleep timer setting, press the
key repeatedly until the display
SLEEP SLEEP
SLEEP key on the remote control to set
SLEEP SLEEP
SLEEP SLEEP
SLEEP key to reduce the sleep time in
SLEEP SLEEP
Sleep Sleep
Sleep appears in
Sleep Sleep
SLEEPSLEEP
SLEEP
SLEEP SLEEP
SLEEP disappears.
SLEEP SLEEP
SLEEPSLEEP
16
Page 18
ADVANCED SETTINGS
This chapter describes how to configure the NP200 for your network, and how to configure other options affecting its
operation.
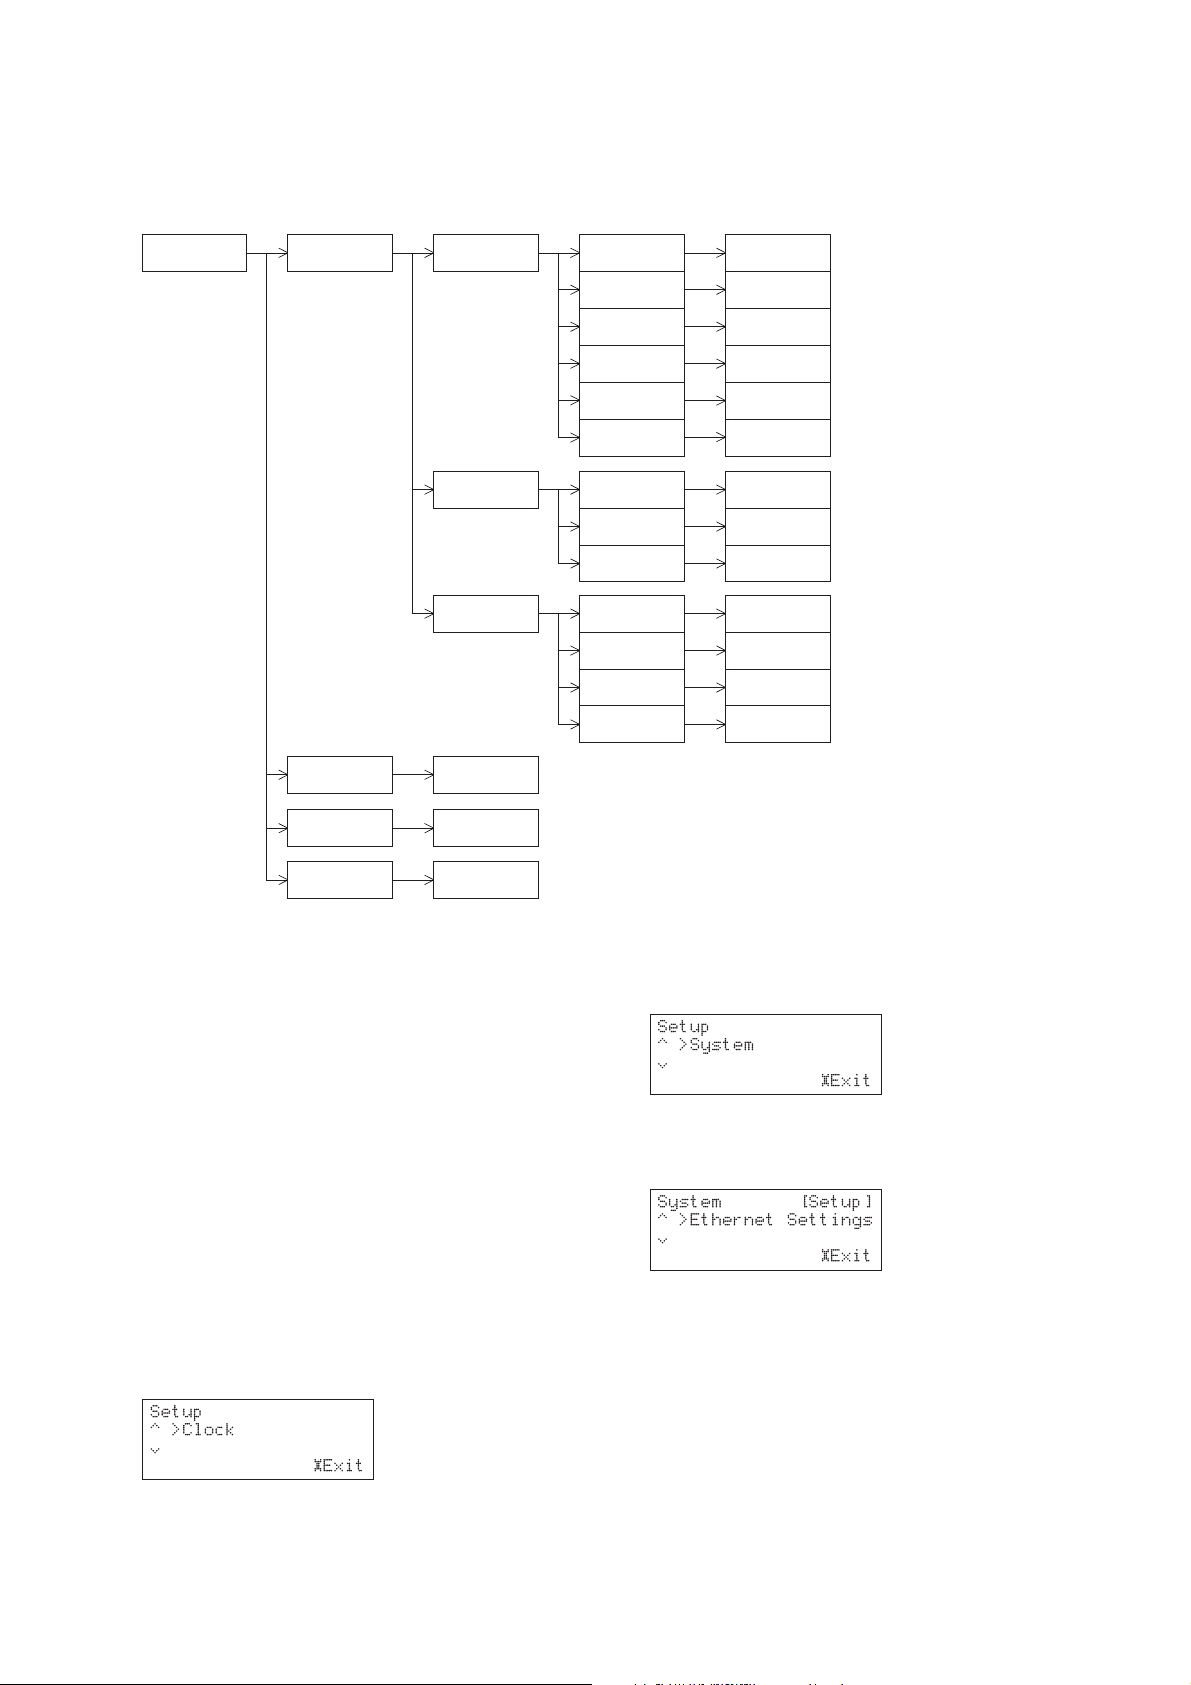
The following diagram shows a plan of the system menu options used to configure the NP200:
System Ethernet Setting IP Address
Proxy Setup
Client
Remote ID Select Remote ID
Display Standby
Specify Standby
mode
DHCP
IP Address
IP Mask
Gateway
IP DNS 1
IP DNS 2
Proxy On/Off
Port No
Proxy Address
Client Name
Wakeup on LAN
MAC address
Net-Tune port
Turn ON/OFF DHCP
Specify IP Address
Specify Net mask
Specify Gateway
address
Specify IP DNS 1
address
Specify IP DNS 2
address
Tur n On/Off Proxy
Specify Port number
Specify Proxy
Address
Specify Client name
Enable/Disable
Wakeup on LAN
Check MAC address
Specify Net-Tune
port number
FM/AM Freq Step
Specify AM/FM
Freq Step
NETWORK SETTINGS
Before you can use the NP200 to play music contained in
the music library on the SoundServer or listen to Internet
radio, you must correctly configure the network settings
so that it can connect to your network and the Internet.
It is strongly recommended that you use a broadband
connection and a router. Before setting up the NP200,
make sure that you are already using a router that
provides Internet access and that the NP200 is correctly
connected with your router or hub via Ethernet. For
more information on Internet connectivity, consult your
ISP (Internet Service Provider) or refer to the
documentation with your router.
After changing any settings it will take about two
seconds to write the setting to the NP200.
If you turn off the NP200 before a new setting has been
written, the setting will be lost.
To display the Ethernet Settings menus
• Press the £
menus:
SETUPSETUP
SETUP button to display the Setup
SETUPSETUP
• Use the a and v keys to display the system
option:
• Press the »
• Use the a and v keys to display the
SettingsSettings
Settings option:
SettingsSettings
• Press the »
SELECT SELECT
SELECT key to select it.
SELECT SELECT
SELECTSELECT
SELECT key to select it.
SELECTSELECT
EthernetEthernet
Ethernet
EthernetEthernet
IP ADDRESS
To specify the IP address automatically
If you have a DHCP server, it can assign an IP address
automatically to your NP200, avoiding the need for any
other configuration.
• Display the
described.
• Use the a and v keys to highlight
press the »
Ethernet SettingsEthernet Settings
Ethernet Settings menu as previously
Ethernet SettingsEthernet Settings
IP AddressIP Address
IP Address and
SELECTSELECT
SELECT key.
SELECTSELECT
IP AddressIP Address
17
Page 19
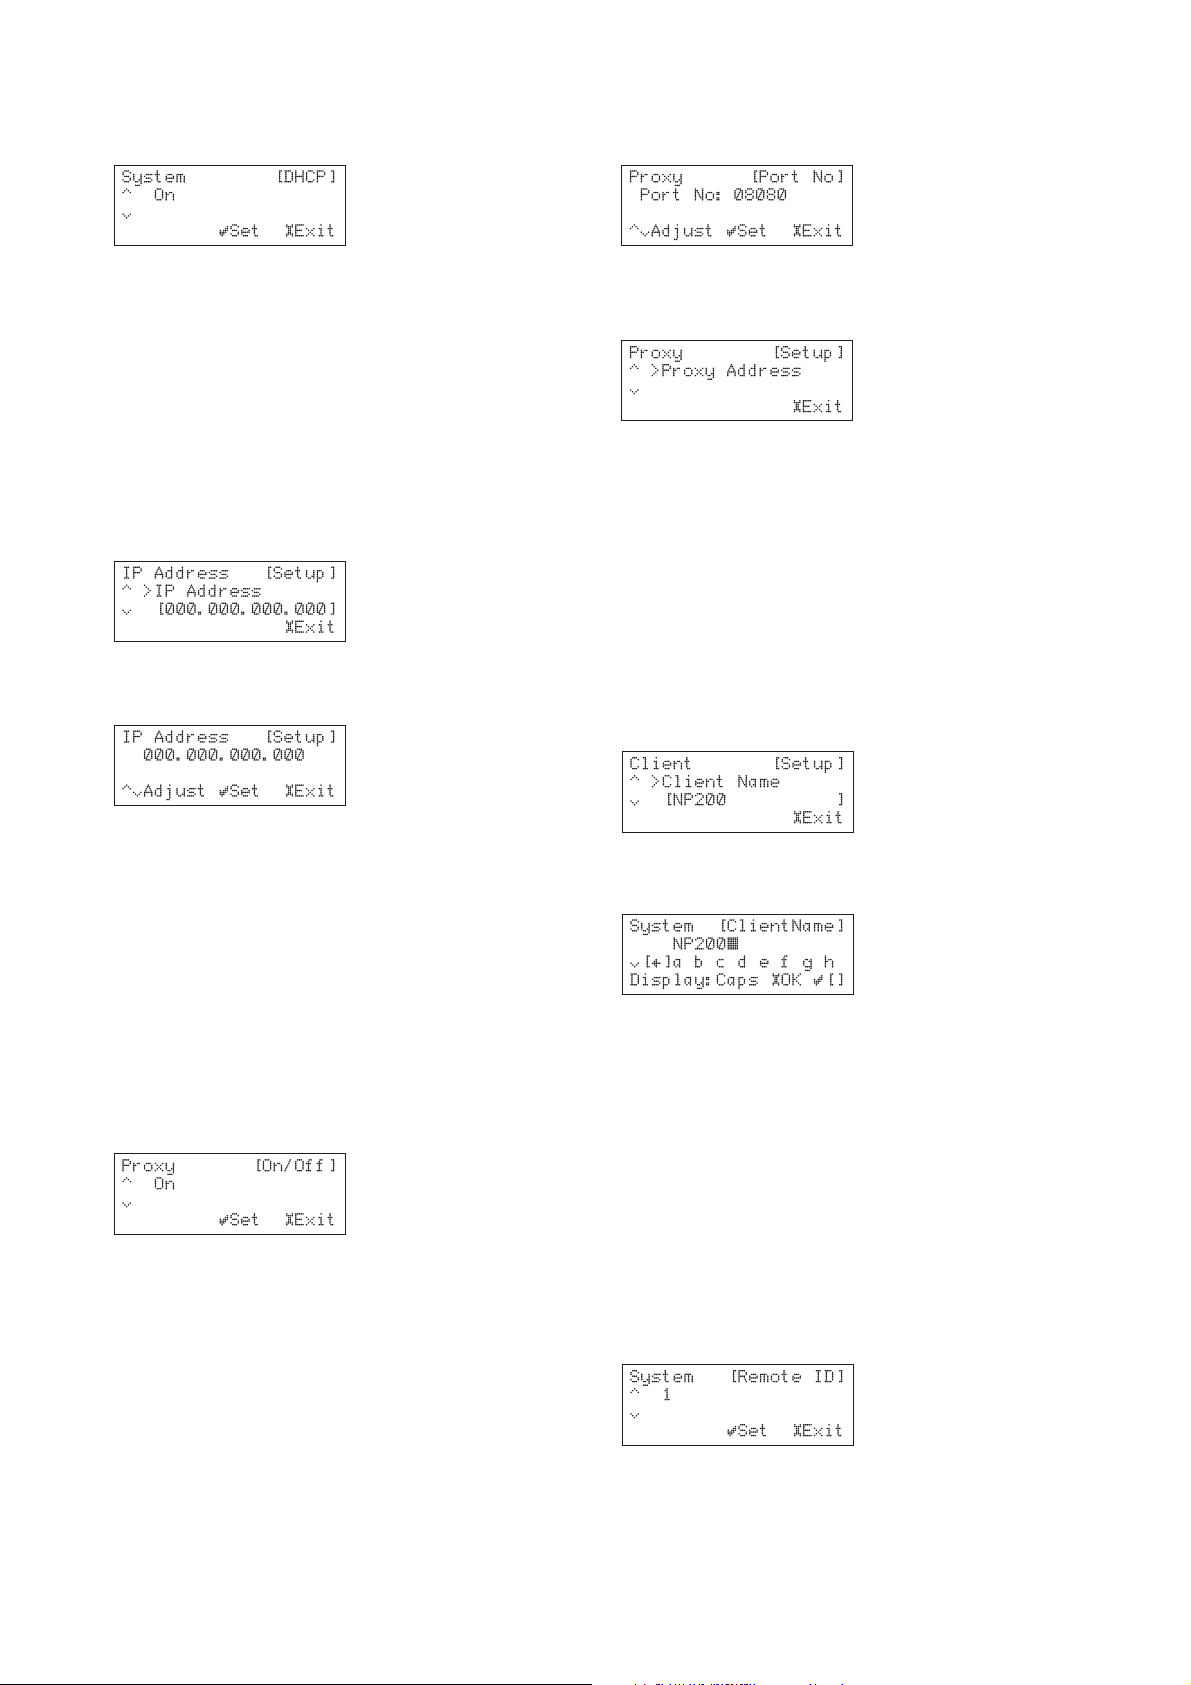
• Press the »
settings:
SELECTSELECT
SELECT key to configure the DHCP
SELECTSELECT
• Use the a, v, {, and } keys to enter the port
number:
• Use the a and v keys to select between
OffOff
Off.
OffOff
• Press the »
SELECTSELECT
SELECT key to confirm the setting.
SELECTSELECT
On On
On and
On On
To specify the IP address settings manually
If you do not have a DHCP server on your network you
will need to manually configure the IP address, IP mask,
gateway address, and DNS addresses using the
appropriate options on the
• Display the
described.
• Use the a and v keys to highlight
press the »
• Enter the IP address using the { and } keys to
select the digit to change and the a and v keys
to change the number:
• Press the »
setting.
The same procedure can be used to set the IP Mask,
gateway address, DNS1 address, and DNS2 address.
Ethernet SettingsEthernet Settings
Ethernet Settings menu as previously
Ethernet SettingsEthernet Settings
SELECTSELECT
SELECT key:
SELECTSELECT
SELECT SELECT
SELECT key to confirm the new
SELECT SELECT
IP AddressIP Address
IP Address menu.
IP AddressIP Address
IP AddressIP Address
IP Address and
IP AddressIP Address
PROXY SETTINGS
If your network uses a proxy server you should specify
the settings in the
• Display the
described.
• Use the a and v keys to highlight
and press the »
• Use the a and v keys to highlight
and press the »
• Use the a and v keys to select between
OffOff
Off.
OffOff
• Press the »
To specify proxy address and port number
• Display the
described.
• Use the a and v keys to highlight
and press the »
• Use the a and v keys to highlight
press the »
Proxy Setup Proxy Setup
Proxy Setup menu.
Proxy Setup Proxy Setup
Ethernet SettingsEthernet Settings
Ethernet Settings menu as previously
Ethernet SettingsEthernet Settings
Proxy SetupProxy Setup
Proxy Setup
SELECTSELECT
SELECT key.
SELECTSELECT
SELECTSELECT
SELECT key.
SELECTSELECT
SELECTSELECT
SELECT key to confirm the setting.
SELECTSELECT
Ethernet SettingsEthernet Settings
Ethernet Settings menu as previously
Ethernet SettingsEthernet Settings
SELECTSELECT
SELECT key.
SELECTSELECT
SELECTSELECT
SELECT key.
SELECTSELECT
Proxy SetupProxy Setup
Proxy On/OffProxy On/Off
Proxy On/Off
Proxy On/OffProxy On/Off
On On
On and
On On
Proxy SetupProxy Setup
Proxy Setup
Proxy SetupProxy Setup
Port NoPort No
Port No and
Port NoPort No
• Press the »
• Use the a and v keys to highlight
and press the »
• Enter the address and press the »
confirm the setting.
SELECTSELECT
SELECT key to confirm the setting.
SELECTSELECT
SELECTSELECT
SELECT key.
SELECTSELECT
SELECTSELECT
SELECT key to
SELECTSELECT
CLIENT SETTINGS
To change the client name
You can change the default name to identify the NP200
on the network.
• Display the
described.
• Use the a and v keys to highlight
press the »
• Use the a and v keys to highlight
and press the »
• Enter a name, such as
for radio presets; see
page 13:
• Press the »
Note:Note:
Note: Client names must be unique.
Note:Note:
Ethernet SettingsEthernet Settings
Ethernet Settings menu as previously
Ethernet SettingsEthernet Settings
SELECTSELECT
SELECT key.
SELECTSELECT
SELECTSELECT
SELECT key:
SELECTSELECT
BedroomBedroom
Bedroom, in same way as
BedroomBedroom
To edit the preset name
SELECT SELECT
SELECT key to confirm the name.
SELECT SELECT
CHANGING THE REMOTE CONTROL CODE
TO RESOLVE CONFLICTS
When you use multiple NP200s within the same infra-red
range, you can change the remote control code to avoid
multiple units operating simultaneously with one remote
control.
• Press the £
menus.
• Use the a and v keys to highlight
press the »
• Use the a and v keys to highlight
press the »
• Use the a and v keys to change the ID
• Press the »
• Press the £
menus.
18
SETUPSETUP
SETUP key to display the Setup
SETUPSETUP
SELECTSELECT
SELECT key.
SELECTSELECT
SELECTSELECT
SELECT key:
SELECTSELECT
SELECT SELECT
SELECT key to save the change.
SELECT SELECT
SETUP SETUP
SETUP key to exit from the Setup
SETUP SETUP
Proxy AddressProxy Address
Proxy Address
Proxy AddressProxy Address
ClientClient
Client and
ClientClient
Client NameClient Name
Client Name
Client NameClient Name
,
SystemSystem
System and
SystemSystem
Remote IDRemote ID
Remote ID and
Remote IDRemote ID
Page 20

NoteNote
Note: The ID should match the ID set for the remote
NoteNote
control; see
To change the remote control code
, page 6.
SETTING THE STANDBY DISPLAY
BRIGHTNESS
• Press the £
menus.
• Use the a and v keys to highlight
press the »
• Use the a and v keys to highlight
StandbyStandby
Standby and press the »
StandbyStandby
SETUPSETUP
SETUP key to display the Setup
SETUPSETUP
SystemSystem
System and
SELECTSELECT
SELECT key.
SELECTSELECT
SELECTSELECT
SELECT key.
SELECTSELECT
SystemSystem
DisplayDisplay
Display
DisplayDisplay
• Use the a and v keys to select between
DimDim
OffOff
Dim, or
Off.
DimDim
OffOff
• Press the »
• Press the £
menus.
SELECT SELECT
SELECT key to save the change.
SELECT SELECT
SETUP SETUP
SETUP key to exit from the Setup
SETUP SETUP
BrightBright
Bright,
BrightBright
CHANGING THE FM/AM FREQUENCY STEP
The FM/AM frequency step can be toggled between 50k/
9k steps and 100k/10k steps depending on the
configuration for your country.
Note:Note:
Note: Changing this option will delete any presets you
Note:Note:
have saved.
• Press the £
menus.
• Use the a and v keys to highlight
StepStep
Step and press the »
StepStep
• Use the a and v keys to change the frequency
step.
• Press the »
• Press the £
menus.
SETUPSETUP
SETUP key to display the Setup
SETUPSETUP
FM/AM FreqFM/AM Freq
FM/AM Freq
SELECTSELECT
SELECT key.
SELECTSELECT
SELECT SELECT
SELECT key to save the change.
SELECT SELECT
SETUP SETUP
SETUP key to exit from the Setup
SETUP SETUP
FM/AM FreqFM/AM Freq
19
Page 21

TROUBLESHOOTING
POWER
The unit will not switch onThe unit will not switch on
The unit will not switch on
The unit will not switch onThe unit will not switch on
• Make sure that power cable is plugged into the
AC outlet.
• Unplug the power cable from AC outlet, wait for
five seconds or more, then plug the cable in
again.
SPEAKERS
No sound is heard from the speakersNo sound is heard from the speakers
No sound is heard from the speakers
No sound is heard from the speakersNo sound is heard from the speakers
• Make sure the speakers are connected correctly
and the speaker cables’ core wires touch the
speaker connectors.
• Check to see if the volume level is set to
minimum.
• If the MUTING indicator is flashing, the sound is
muted. Cancel the muting function.
FM/AM TUNER
Noise is heard during broadcast, or too much white noiseNoise is heard during broadcast, or too much white noise
Noise is heard during broadcast, or too much white noise
Noise is heard during broadcast, or too much white noiseNoise is heard during broadcast, or too much white noise
is heard during an FM stereo broadcastis heard during an FM stereo broadcast
is heard during an FM stereo broadcast
is heard during an FM stereo broadcastis heard during an FM stereo broadcast
• Change the location of the antenna.
• Locate the unit further from the TV or computer.
• Driving cars nearby or flying aeroplanes could
cause noise.
• The broadcasting radio signal may be weak if a
concrete wall obstructs the signal path .
• Try setting FM mode to Mono.
• Noise may be heard when you operate the
remote control during AM reception.
• If nothing can improve the reception, install an
outdoor antenna.
ETHERNET NETWORK
The unit fails to activate the Internet radio or musicThe unit fails to activate the Internet radio or music
The unit fails to activate the Internet radio or music
The unit fails to activate the Internet radio or musicThe unit fails to activate the Internet radio or music
server featureserver feature
server feature
server featureserver feature
Your network is either not connected properly or not
configured properly.
• Check the connection between this unit and the
LAN side port of your router (gateway) .
• Make sure that the modem and router (gateway)
are correctly connected. Also, make sure that the
power is on.
The unit fails to obtain a station list from the InternetThe unit fails to obtain a station list from the Internet
The unit fails to obtain a station list from the Internet
The unit fails to obtain a station list from the InternetThe unit fails to obtain a station list from the Internet
The radio site is out of service or otherwise inaccessible
due to some other reason such as maintenance.
• Try to access the site after a while.
Selecting the Music Server source fails to play music orSelecting the Music Server source fails to play music or
Selecting the Music Server source fails to play music or
Selecting the Music Server source fails to play music orSelecting the Music Server source fails to play music or
fails to connect to the SoundServerfails to connect to the SoundServer
fails to connect to the SoundServer
fails to connect to the SoundServerfails to connect to the SoundServer
Your SoundServer is not turned on.
• Turn on your SoundServer.
No audio files on the SoundServer.
• Record CDs onto your SoundServer.
REMOTE CONTROL
The remote control does not function correctlyThe remote control does not function correctly
The remote control does not function correctly
The remote control does not function correctlyThe remote control does not function correctly
• Make sure that the batteries have been installed
with the correct polarity.
• Replace both batteries with new ones (Do not
mix different types of batteries or new and old
batteries).
• The distance between the remote control and
the remote control sensor may be too far. Or,
there may be an object between them.
• The remote control sensor on the unit may be
receiving a strong beam of light (inverter
fluorescent light or sunlight).
• Make sure to use the same REMOTE ID code both
for the remote control and NP200.
TIMER/ALARM
Timer playback does not workTimer playback does not work
Timer playback does not work
Timer playback does not workTimer playback does not work
• The clock must be set correctly. If the clock is not
set, timer playback does not work. Make sure you
program the current day and time.
• If you selected
is not available (for example, if the SoundServer
is in standby), the NP200 will automatically use
FM/AM radio as the alarm source.
Server Server
Server or
Server Server
iNetRadioiNetRadio
iNetRadio and the media
iNetRadioiNetRadio
20
Page 22

SPECIFICATIONS
GeneralGeneral
–
General
GeneralGeneral
Clock precision monthly error ±30 seconds (25°C/77°F)
Power supply ......................................... AC 120V, 60Hz
Power consumption ........................ 58 W (120V, 60Hz)
Standby power ......................................................... 8W
Dimensions .........205mm(W) x 91mm(H) x 279 mm(D)
Weight .................................................................. 3.9kg
Amplifier SectionAmplifier Section
–
Amplifier Section
Amplifier SectionAmplifier Section
••
• Power output
••
FTC ........ 15 watts per channel, min RMS, at 8 W, both
channels driven 1kHz, with no more than 0.1%
DIN ......................................... 2 x 17 watts at 6Ω, 1kHz
2 × 15 watts at 8Ω, 1kHz
Dynamic power output ................... 2 × 27 watts at 6Ω
2 × 24 watts at 8Ω
Total harmonic distortion ...........0.1% at rated power
IM distortion ................................0.6% at rated power
Damping factor .............................................. 30 at 8W
• Input Sensitivity and Impedance
TAPE/MD PLAY ........................................ 150mV, 50kΩ
LINE IN ...................................................... 150mV, 50kΩ
Frequency and response ....... 10 to 50,000Hz +0 /–3dB
Signal to noise ratio ............................... 100dB (IHF-A)
Muting ................................................................. –60dB
Tuner SectionTuner Section
–
Tuner Section
Tuner SectionTuner Section
• Tuning range
U.S. & Canadian models
FM: ............................87.50–108.00MHz(100kHz steps)
AM: .................................... 530–1710kHz (10kHz steps)
Other area models
FM: ..............................87.5–108.00 MHz (50kHz steps)
AM: ...................................... 522–1611kHz (9kHz steps)
• Usable sensitivity
FM:
Mono ......... 11.2dBf, 1.0µV (75Ω IHF), 0.9µV (75Ω DIN)
Stereo .....17.2dBf, 2.0µV (75 Ω IHF), 23.0µV (75Ω DIN)
AM .......................................................................... 30µV
• 50dB Quieting sensitivity
FM:
Mono ........................................... 17.2dBf, 2.0µV (75Ω)
Stereo ......................................... 37.2dBf, 20.0µV (75Ω)
• Capture ratio
FM ......................................................................... 2.0dB
• Image rejection ratio
FM:
U.S. & Canadian models ........................................ 40dB
Other area models ................................................ 85dB
AM .......................................................................... 40dB
• IF rejection ratio
FM .......................................................................... 90dB
AM .......................................................................... 40dB
• Signal to noise ratio
FM .......................... Mono 73dB, IHF; Stereo 67dB, IHF
AM .......................................................................... 40dB
• Selectivity
FM ........................ 50dB DIN (±300kHz at 40kHz Devi.)
AM Suppression Ratio ........................................... 50dB
• Harmonic distortion
FM:
Mono ...................................................................... 0.2%
Stereo .....................................................................0.3%
AM ......................................................................... 0.7 %
• Frequency response
FM .............................................. 30–15,000Hz (±1.5dB)
• Stereo separation
FM ............ 45dB at 1,000Hz, 30dB at 100 to 10,000Hz
• Stereo threshold
FM ................................................ 17.2dBf, 2.0µV (75Ω)
––
AccessoriesAccessories
–
Accessories
––
AccessoriesAccessories
Infrared remote control .............................................. 1
Batteries for the remote control ................................ 2
Antenna for receiving AM broadcasts ....................... 1
Antenna for receiving FM broadcasts ........................ 1
Note
The specifications and design of this product is subject
to change without notice.
21
Page 23

INDEXINDEX
INDEX
INDEXINDEX
AA
A
AA
ACCESSORIES 21
AERIALS, CONNECTING 8
ALARM, SETTING 15
AM AERIALS 8
CC
C
CC
CHARACTERS, ENTERING 13
CLIENT SETTINGS 18
CLOCK, SETTING 15
CONNECTIONS 5, 7
DD
D
DD
DISPLAY BRIGHTNESS, SETTING 19
EE
E
EE
ETHERNET NETWORK, CONNECTING 7
ETHERNET SETTINGS 17
FF
F
FF
FM AERIALS 8
connecting 8
FM/AM RADIO 12
changing frequency step 19
scanning 12
selecting preset 14
FRONT PANEL 4
display 8
II
I
II
INTERNET RADIO 12
selecting preset 14
IP ADDRESS, SPECIFYING 17
LL
L
LL
LIBRARY 10
browsing by album 10
browsing by artist or genre 10
LOUDSPEAKERS, CONNECTING 7
MM
M
MM
MUTING 8
NN
N
NN
NETWORK SETTINGS 17
PP
P
PP
PAUSE BUTTON 4
PLAY BUTTON 4
PLAYBACK INFORMATION 11
PLAYLISTS 10
POWER AMPLIFIER, CONNECTING 7
PREAMPLIFIER, CONNECTING 7
PRESET STATIONS 12, 14
RR
R
RR
RANDOMISE 11
REAR PANEL 5
REMOTE CONTROL 6
changing code 6, 18
REPEAT 11
SS
S
SS
SLEEP TIMER 16
SNOOZE FEATURE 16
SOURCES 8
selecting 9
SPECIFICATIONS 21
TT
T
TT
TRANSPORT BUTTONS
Pause 4
Play 4
TROUBLESHOOTING 20
VV
V
VV
VOLUME, CHANGING 8
22
 Loading...