

Networked Audio Video System
MediaServer / MediaPlayer
USER GUIDE
For detailed installation instructions visit the Support
section of the Imerge website at www.imerge.co.uk
COPYRIGHT NOTICE
Copyright 2008 Imerge Ltd. All rights reserved.
The MS1 XiVA™ software and this documentation are
copyright materials. No part of the MS1 XiVA software
or this documentation may be reproduced, transmitted,
transcribed, stored in a retrieval system, or translated
into any language, or computer language, in any form or
by any means without prior written permission of Imerge
Ltd.
XiVA™ is a registered trademark of Imerge Ltd. All other
product names are trademarks or registered trademarks
of their respective owners.
Cover art illustration from the XiVA™ on-line service
©2008 Muze Inc.
© 2008 All Media Guide, LLC
Content and technology provided by All Media Guide ®
Music recognition technology and related data are
provided by Gracenote and the Gracenote CDDB®
Music Recognition ServiceSM. Gracenote is the industry
standard in music recognition technology and related
content delivery. For more information go to www.
gracenote.com
CD and music-related data from Gracenote, Inc.,
copyright © 2000-2008 Gracenote. Gracenote Software,
copyright © 2000-2008 Gracenote. This product and
service may practice one or more of the following U.S.
Patents: #5,987,525; #6,061,680; #6,154,773, #6,161,132,
#6,230,192, #6,230,207, #6,240,459, #6,330,593, and
other patents issued or pending. Some services supplied
under license from Open Globe, Inc. for U.S. Patent:
#6,304,523.
Gracenote and CDDB are registered trademarks of
Gracenote. The Gracenote logo and logotype, and
the “Powered by Gracenote” logo are trademarks of
Gracenote.
MPEG Layer-3 audio coding technology licensed from
fraunhofer IIS and THOMSON multimedia.
The information in this guide is believed to be correct as
of the date of publication. However our policy is one of
continuous development and so the information in this
guide is subject to change without notice, and does not
represent a commitment on the part of Imerge Ltd.
This guide was designed and produced by Imerge Ltd.
PLEASE NOTE
Whilst we make every effort to ensure the accuracy
of our manuals, we cannot guarantee that they are
completely up to date, nor do we accept any liability in
this regard.
XiVA software undergoes a continuous process of
renement and development, and as a consequence, you
may nd parts of the documentation which no longer
reect the current state of the software.
If you feel there are signicant differences between
what is stated in this copy of the manual and what you
see on your screen, please visit http://www.imerge.co.uk
and download a pdf of the latest version of the manual.
LEGAL BIT
You should not use your Imerge system
to engage in any conduct or practice, or
commit any act, which constitutes an illegal
act under the laws of your local jurisdiction,
including, but not limited to, the laws
pertaining to copyright. In particular, you
agree not to copy or permit someone else
to copy a commercial CD/DVD onto your
Imerge system without the permission of
the copyright owner.
XIVA™ NEW MEDIA BROUGHT TO LIFE
XiVA™ is a highly portable software framework that
powers next-generation media appliances. XiVA™ blends
hard disk technology, advanced software design, and
embedded Internet technology to provide amazing
features; audio, video, text, graphics, and all forms of
streaming new media are all brought to life through a
wealth of interactive user interface options. The next
generation media appliance is powered by XiVA™.

CONGRATULATIONS
Congratulations and thank you for your excellent choice
of this high quality audio and video equipment. Your
new Imerge MS1 MediaServer / MediaPlayer is specically
designed to provide superb video and audio experiences.
Using an external storage device of a capacity to suit
your requirements, large libraries of DVDs and CDs can
be stored and replayed at the touch of a button.
All movies and music are accessed via intuitive screens,
the lists being presented in a variety of ways to match
the way you prefer to choose what to see and listen to.
Additional information about your movies and music
can be automatically downloaded from the internet to
enhance your watching and listening experience, and
media displays can be presented using this data.
As well as the obvious lists, like album name, artist or
track, CDs can be presented by cover art, by genre or era,
and movies can be presented by director or rating. You
can display all your movies’ cover art, and use that when
you want to play something, if that’s what you like.
When choosing music, you can set up playlists to group
your albums to suit your mood. Put all your mediæval
church music in one list in the order you like to hear
it. Or create a heavy metal playlist, and play it back in
randomised order. Build a list of pop classics to play
when you throw a party, or add classical instrumental
pieces to a list designed to play quietly in the
background for a dinner party.
Whatever you want to play, your MS1 is bound to please!
CONTENTS
PRECAUTIONS .................................................1
IMPORTANT SAFETY NOTICES ....................... 3
QUICK START GUIDE ...................................... 4
GUIDE D’INITIATION RAPIDE .........................6
KURZANLEITUNG ............................................8
GUIDA DI AVVIO RAPIDO ............................ 10
GUÍA RÁPIDA ................................................ 12
快速启动指南 .................................................14
THE MS1 MEDIASERVER / MEDIAPLAYER ... 16
RECORDING ..................................................26
THE DISC PLAYER.......................................... 27
THE AUDIO LIBRARY ....................................28
THE VIDEO LIBRARY ..................................... 35
SET UP INFORMATION .................................39
THE SETTINGS MENU ................................... 39
RESETTING THE SYSTEM .............................. 40
USE WITH A HOME COMPUTER .................. 41
SOFTWARE UPDATES ...................................43
TROUBLESHOOTING GUIDE ......................... 44
REMOTE CONTROL CODES .......................... 46
HARDWARE SPECIFICATIONS ......................51
TERMS & CONDITIONS ................................. 52
INDEX ............................................................63
MS1 MediaServer / MediaPlayer
USER GUIDE
PRECAUTIONS
GENERAL PRECAUTIONS
When installing the equipment ensure that:
it is not moved whilst in operation.•
the ventilation holes are not covered.•
air is allowed to circulate freely around the •
equipment.
it is placed on a vibration free surface.•
it will not be exposed to excessive heat, cold, •
moisture or dust.
it will not be exposed to direct sunlight.•
it will not be exposed to electrostatic discharges.•
it is not installed vertically or tilted.•
In addition, never place heavy objects on the equipment.
If a foreign object or water does enter the equipment,
switch off, then contact your dealer or service center.
It is advisable when leaving the house, or during a
thunderstorm, to disconnect the equipment from the
mains supply.
WARNINGS
TO REDUCE THE RISK OF FIRE OR ELECTRIC SHOCK, DO
NOT EXPOSE THIS APPLIANCE TO RAIN OR MOISTURE.
Do not remove the cover from the equipment. There
are no user serviceable parts inside, and opening the
case will invalidate your warranty.
Do not move whilst the product is running. Movement
can result in irrecoverable data loss and damage to the
hard disks. Allow at least one minute after shutdown
before moving to allow the hard disks to spin down.
Do not pull out the plug by pulling on the mains lead;
grasp the plug.
Do not insert anything into the equipment through
the ventilation holes.
Do not cover the ventilation holes on the front and
back of the product with any items such as tablecloths,
newspapers, curtains, etc. To avoid overheating do
not position the MS1 near or above heat sources, and
ensure that the ventilation holes are not blocked to
allow air to circulate through the product.
Do not place naked ame sources, such as lighted
candles, on the equipment.
Do not handle the mains lead with wet hands.
Do not splash or spill water on the unit. Do not place
objects lled with liquid (such as vases) on the unit.
CAUTION: This product contains a lithium battery.
Danger of explosion if battery is incorrectly replaced.
Battery must be replaced by qualied personnel only.
Removing the product lid will invalidate the warranty.
CD & DVD HANDLING PRECAUTIONS
Handle discs carefully so as not to damage or scratch •
the front side. Always keep the disc surface clean.
To protect the disc avoid placing it in the following •
locations:
In direct sunlight or near a source of heat like a heater.
In a place which is damp or dirty. In a place which could be exposed to rain, such -
as near a window.
Do not use a disc with a special shape•
For best performance when recording from a CD or •
DVD try to maintain a temperature of 35°C or less in
the room where the MS1 is located.
DTS Encoded Discs
CAUTION - when playing DTS encoded CDs excessive noise
will be heard on the analog outputs jacks of the MS1. To
avoid possible damage to the audio system you should
ensure that the correct connections are made to your
amplication system for replaying this type of disc.
MAINS PRECAUTIONS
Your MS1 complies with the household power and safety
requirements in your area.
IMPORTANT: (for UK version only)
This apparatus is tted with an approved moulded 13
amp plug. To change a fuse in this type of plug proceed
as follows:
Remove fuse cover and fuse.1.
Fix new fuse which should be a BS1362 5A, A.S.T.A 2.
or BSI approved type.
Ret the fuse cover.3.
If the tted plug is not suitable for your socket outlets, it
should be cut off and an appropriate plug tted in its place.
If the mains plug contains a fuse, this should have a
value of 5A. If a plug without a fuse is used, the fuse at
the distribution board should not be greater than 5A.
Note: The severed plug must be destroyed to avoid a
possible shock hazard should it be inserted into a 13A
socket elsewhere.
How to connect a plug
The wires in the mains lead are coloured in accordance
with the following code:
The BLUE wire must be connected to the terminal 1.
which is marked with the letter “N” or coloured
BLACK.
The BROWN wire must be connected to the terminal 2.
which is marked with the letter “L” or coloured RED.
The GREEN/YELLOW-GREEN wire must be connected 3.
to the terminal which is marked by the letter “E” or
by the safety earth symbol or coloured green or
green-and-yellow.
Before replacing the plug cover, make certain that the
cord grip is clamped over the sheath of the lead - not
simply over the three wires.
WARNING:
EN: The equipment must be provided with a proper AC
protective earth (PE) ground connection.
FI: Laite on liitettävä suojamaadoituskoskettimilla
varustettuun pistorasiaan.
NO: Apparatet må tilkoples jordet stikkontakt.
SE: Apparaten skall anslutas till jordat uttag.
COPYRIGHT NOTICE
This equipment must not be used for unauthorized
duplication of CDs, DVDs or any other works protected
by copyright. No license to infringe copyright is
granted by the sale of this equipment.
Recording and playback of some material may require
permission. For further information refer to the
following:
Copyright Act 1956•
Dramatic and Musical Performers Act 1958•
Performers Protection Acts 1963, and 1972•
Any subsequent statutory enactments and orders.•
CAUTION
When disposing of used batteries, please comply
with governmental regulations or environmental
regulations or environmental public instructions that
apply in your country or area.
© Copyright Imerge Ltd 2009
Page
1
2
USER GUIDE
© Copyright Imerge Ltd 2009
Page
MS1 MediaServer / MediaPlayer
IMPORTANT SAFETY INSTRUCTIONS
READ INSTRUCTIONS - All the safety and
operating instructions should be read before
the product is operated.
KEEP INSTRUCTIONS - The safety and operating
instructions should be kept for future
reference.
HEED WARNINGS - All warnings on the product
and in the operating instructions should be
followed.
FOLLOW INSTRUCTIONS - All operating and use
instructions should be followed.
CLEANING - Unplug this product from the
wall outlet before cleaning. The product
should be cleaned only with a soft dry cloth.
Never clean with furniture wax, benzine,
insecticides or other volatile liquids since they
may corrode the cabinet.
ATTACHMENTS - Do not use attachments not
recommended by the product manufacturer
as they may cause hazards.
WATER AND MOISTURE - Do not use this product
near water - for example near a bathtub,
wash bowl, kitchen sink, or laundry tub; in
a wet basement; or near a swimming pool;
and the like.
ACCESSORIES - Do not place this product on
an unstable cart, stand, tripod, bracket, or
table. The product may fall, causing serious
injury to a child or adult, and serious damage
to the product. Use only with a cart, stand,
tripod, bracket or table recommended by the
manufacturer, or sold with the product. Any
mounting of the product should follow the
manufacturer’s instructions and should use
a mounting accessory recommended by the
manufacturer.
CART - A product and cart combination should
be moved with care. Quick stops, excessive
force and uneven surfaces may cause the
product and cart combination to overturn:
VENTILATION - Slots and openings in the cabinet
are provided for ventilation and to ensure
reliable operation of the product and to
protect it from overheating. Do not block
any ventilation openings. The openings
should never be blocked by placing the
product on a bed, sofa, rug or other similar
surface. This product should not be placed
in a built-in installation such as a bookcase
or rack unless proper ventilation is provided.
Install in accordance with the manufacturer’s
instructions.
POWER SOURCES - This product should be
operated only from the type of power source
indicated on the marketing label. If you are
not sure of the type of power supply to your
home, consult your product dealer or local
power company.
LOCATION - The appliance should be installed in
a stable location.
NONUSE PERIODS - The power cord of the
appliance should be unplugged from the
outlet when left unused for a long period
of time.
GROUNDING OR POLARIZATION - If this product
is equipped with a polarized alternating
current line plug (a plug having one blade
wider than the other), it will t into the
outlet only one way. This is a safety feature.
If you are unable to insert the plug fully into
the outlet, try reversing the plug. If the plug
does not t into the outlet, contact your
electrician to replace your obsolete outlet.
Do not defeat the safety purpose of the
polarized plug. If this product is equipped
with a three-wire grounding type plug, a
plug having a third (grounding) pin, it will
only work in a grounding type power outlet.
This is a safety feature. If you are unable to
insert the plug into the outlet, contact your
electrician to replace your obsolete outlet.
Do not defeat the safety purpose of the
grounding type plug.
POWER CORD PROTECTION - Power-supply cords
should be protected from being walked on
or pinched particularly at plugs, convenience
receptacles, and the point where they exit
from the product.
OUTDOOR ANTENNA GROUNDING - If an outside
antenna or cable system is connected to the
product be sure the antenna or cable system
is grounded so as to provide some protection
against voltage surges and built-up static
charges. Article 810 of the National Electric
Code. ANSI/NFPA70 provides information
with regard to proper grounding of the mast
and supporting structure, grounding of the
lead-in wire to an antenna discharge unit,
connection to grounding electrodes, and
requirements for the grounding electrode.
See Figure A.
LIGHTNING - For added protection for this
product during a lightning storm, or when
it is left unattended and unused for long
periods of time, unplug it from the wall
outlet and disconnect the antenna or cable
system. This will prevent damage to the
product due to lightning and power-line
surges.
WALL OR CEILING MOUNTING - The product
should not be mounted to a wall or ceiling.
POWER LINES - An outside antenna system
should not be located in the vicinity of
overhead power lines or other electric light
or power circuits, or where it can fall into
such power lines or circuits. When installing
an outside antenna system, extreme care
should be taken to keep from touching such
power lines or circuits as contact with them
might be fatal.
OVERLOADING - Do not overload wall outlets,
extension cords or integral convenience
receptacles as this can result in a risk of re
or electric shock.
OBJECT AND LIQUID ENTRY - Never push
objects of any kind into this product through
openings as they may touch dangerous
voltage points or short-out parts that could
result in a re or electric shock. Never spill
liquid of any kind on the product.
SERVICING - Do not attempt to service this
product yourself as opening or removing
covers may expose you to dangerous voltage
or other hazards. Refer all servicing to
qualied service personnel.
DAMAGE REQUIRING SERVICE - Refer all
servicing to qualied service personnel.
Servicing is required when the apparatus has
been damaged in any way, such as power-
supply cord or plug is damaged, liquid has
been spilled or objects have fallen into the
apparatus, the apparatus has been exposed
to rain or moisture, does not operate
normally, or has been dropped.
REPLACEMENT PARTS - When replacement parts
are required, be sure the service technician
has used replacement parts specied by the
manufacturer or have the same characteristics
as the original part. Unauthorized
substitutions may result in re, electric shock,
or other hazards.
SAFETY CHECK - Upon completion of any
service or repairs to this product, ask the
service technician to perform safety checks
to determine that the product is in proper
operating condition.
HEAT - Do not install near any heat source such
as radiators, heat registers, stores, or other
apparatus (including ampliers) that produce
heat.
The lightning ash with arrowhead symbol, within an
equilateral triangle, is intended to alert the user to the
presence of uninsulated “dangerous voltage” within the
product’s enclosure that may be of sufcient magnitude to
constitute a risk of electric shock to persons.
The exclamation point within an equilateral triangle is
intended to alert the user to the presence of important
operating and maintenance (servicing) instructions in the
literature accompanying the appliance.
AUTOMATIC SHUTDOWN
This product contains sensors that continually monitor its operating temperature. Should the temperature exceed the
product’s maximum safe operating temperature then an automatic shutdown will be initiated. Notication of the
shutdown will be displayed on the TV user interface with a countdown before it is commenced.
Automatic shutdown is necessary to help prevent component damage through overheating. To prevent automatic
shutdown, ensure that the ambient temperature surrounding the product does not exceed 35°C. This can be achieved
by ensuring the product’s ventilation grills are not obstructed and, where the product is installed in an enclosure, there is
plenty of ventilation for air ow. The current operating temperature can be viewed in the System Information menu in
Settings.
3
USER GUIDE
© Copyright Imerge Ltd 2009
Page
MS1 MediaServer / MediaPlayer
IMPORTANT SAFETY NOTICES
The serial number for this equipment is located on the
rear panel. Please write this serial number down and
keep it in a secure place.
U.S. MODEL
NOTE: This equipment has been tested and found
to comply with the limits for a Class B digital device,
pursuant to Part 15 of the FCC Rules. These limits are
designed to provide reasonable protection against
harmful interference in a residential installation. This
equipment generates, uses and can radiate radio
frequency energy and, if not installed and used in
accordance with the instructions, may cause harmful
interference to radio communications. However, there
is no guarantee that interference will not occur in a
particular installation. If this equipment does cause
harmful interference to radio or television reception,
which can be determined by turning the equipment
off and on, the user is encouraged to try to correct
the interference by one or more of the following
measures:
-- Reorient or relocate the receiving antenna.
-- Increase the separation between the equipment and
receiver.
-- Connect the equipment into an outlet on a circuit
different from that to which the receiver is connected.
-- Consult the dealer or an experienced radio/TV
technician for help.
CAUTION: TO PREVENT ELECTRIC SHOCK, MATCH WIDE BLADE
OF PLUG TO WIDE SLOT, FULLY INSERT.
ATTENTION: POUR ÉVITER LES CHOCS ÉLECTRIQUES, INTRODUIRE
LA LAME LA PLUS LARGE DE LA FICHE DANS LA BORNE
CORRESPON-DANTE DE LA PRISE ET POUSSER JUSQU’AU FOND.
EUROPEAN MODEL
Note: The MS1 has been designed and type-tested
to comply with the limits set out in EN60950 part 1,
EN55022: 1998 CLASS A, EN55024: 1998, FCC RULES PART
15 SUBPART B CLASS B. AS/NZS 3548:1995 CLASS A.
CAUTION:
LASER SAFETY: This unit employs a LASER. Only a
qualied person should remove the cover or attempt to
service the device, due to possible eye injury.
“CAUTION-USE OF CONTROLS OR ADJUSTMENTS OR
PERFORMANCE OF PROCEDURE OTHER THAN THOSE SPECIFIED
HEREIN MAY RESULT IN HAZARDOUS RADIATION EXPOSURE.”
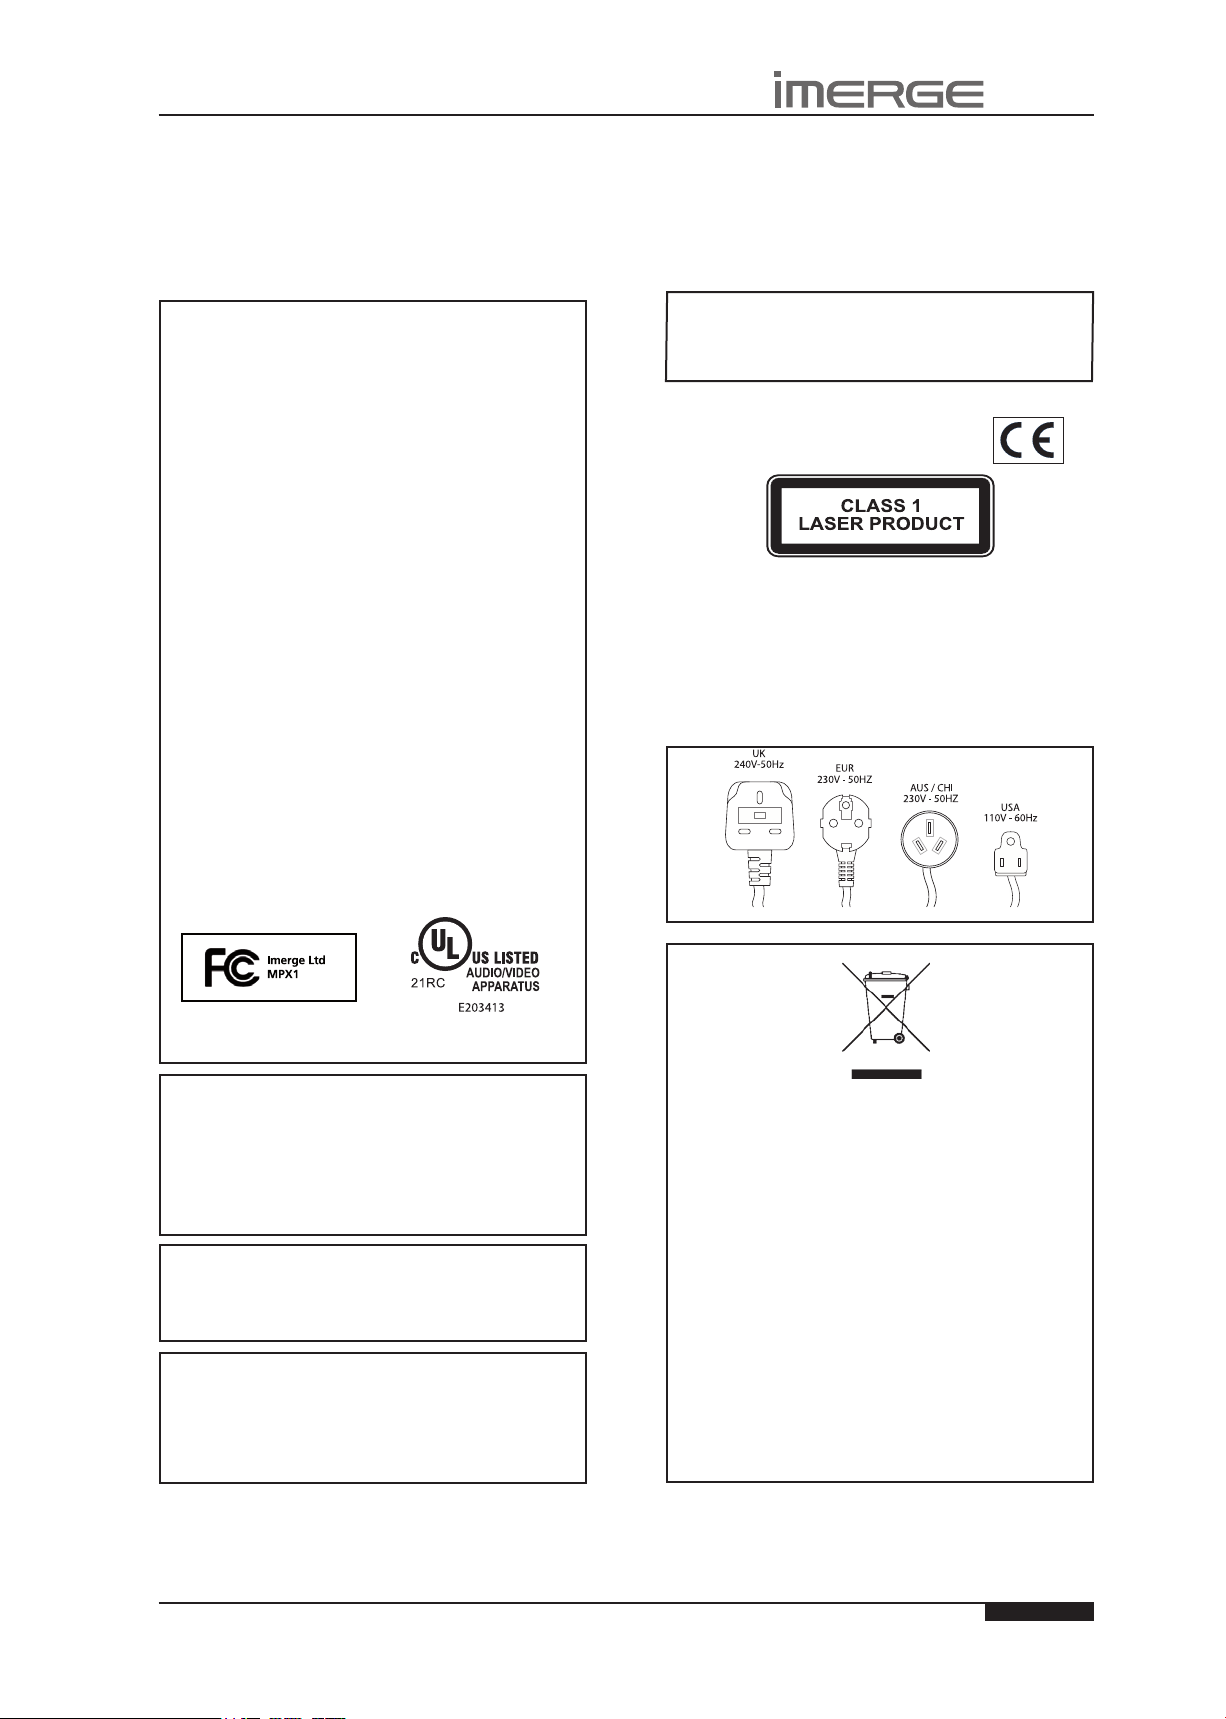
Use the correct power cord for your country:
Changes or modications may cause this unit to fail to
comply with Part 15 of the FCC Rules and may void the
user’s authority to operate the equipment.
CAUTION
Use of controls or adjustments or performance of •
procedures other than those specied herein may
result in hazardous radiation exposure.
The use of optical instruments with this product •
will increase eye hazard.
Information to User
Alteration or modications carried out without
appropriate authorization may invalidate the user’s
right to operate the equipment.
CANADIAN MODEL
Note: These Class A/B digital apparatus comply with
Canadian ICES-003.
Ces appareils numérique de la Classe A/B sont
conforme à la norme NMB-003 du Canada.
Waste electrical products must not be disposed of with
household waste. This equipment should be taken to
your local recycling centre for safe treatment.
Les produits électriques usagés ne doivent en aucun
cas être jetés avec les ordures ménagères. Cet appareil
doit être apporté à la déchetterie pour subir un
traitement adapté.
Elektrische Geräte dürfen nicht mit dem Hausmüll
entsorgt werden. Wenden Sie sich für eine
umweltgerechte Entsorgung dieser Geräte an Ihren
örtlichen Entsorgungsbetrieb.
I dispositivi elettrici non devono essere gettati insieme
ai riuti domestici. Tali apparecchiature devono essere
consegnate al centro di riciclaggio locale per il corretto
smaltimento.
Los dispositivos electrónicos no deben desecharse
junto con los residuos domésticos. Este tipo de
aparatos debe llevarse al centro de reciclaje más
cercano para su adecuado tratamiento.
Batteries And Accumulators (Placing on the Market) Regulations 2008
This product contains a 3V lithium button cell. This battery is not a consumer-replaceable component but can easily be
removed by trained service personnel. (Removing the product lid will invalidate the product warranty) The battery can be
accessed by removing the product lid; locating the button cell carrier on the main control board and releasing the retaining
catch on the button cell carrier.
4
USER GUIDE
© Copyright Imerge Ltd 2009
Page
MS1 MediaServer / MediaPlayer
QUICK START GUIDE
Your MS1 supports several different types of connection
to televisions, and automatically detects which is being
used when you power it on.
Please ensure all connected devices are switched on
before turning on your MS1.
SWITCHING ON AND OFF
To switch the unit on, press the ; button on the front
panel. The Power LED will change from red to green and
the TV User Interface will display the Home Page.
Your MS1 is designed to remain switched on
continuously. However, if you are not planning to use it
for an extended period, you may want to switch it off.
To switch off, press the •
panel. After a brief period, the unit will switch off
and the Power LED will go red.
;
button on the front
TV VERSUS ADMIN UI
Most of the time you’ll be browsing your libraries,
playing movies or albums, and the TV User Interface is
what you’ll become most familiar with.
However, some extra functions on your MS1 are only
accessible using the Admin or Remote User Interfaces,
including system conguration settings.
If you wish to use the Admin UI, highlight the ‚ Set Up
icon on the Home Page and press the O Select key. You
will be prompted for a PIN, which is 1234 by default. The
display will change to the Admin UI.
To return to the TV UI, from the Admin Main Menu,
M
press
UI.
Exit Admin. The display will revert to the TV
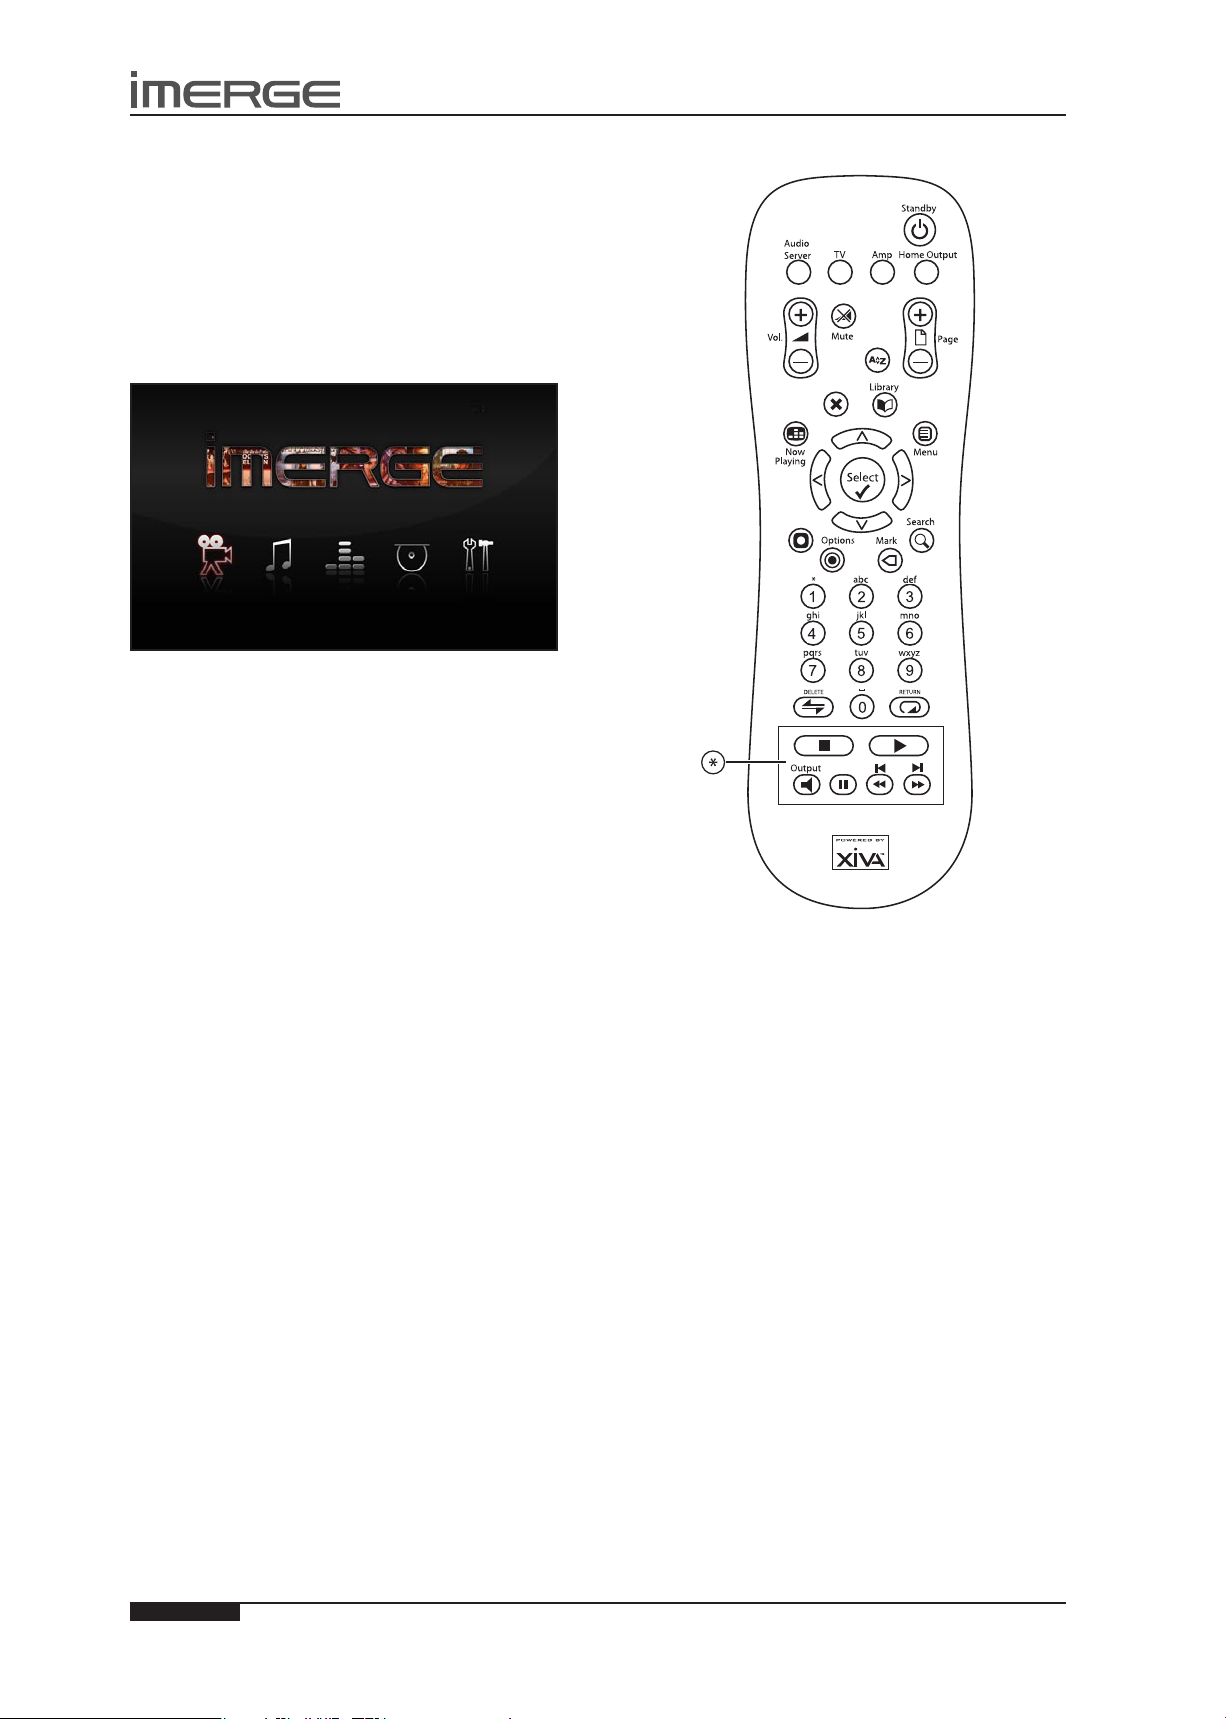
REMOTE CONTROL
Press the • J Menu key to display the Home Page.
Use the • S and T ,U and V keys to highlight
different items in any list.
Press the • OSelect key to select an item from a list.
Press the • P key whenever this symbol is displayed
on the TV screen to cancel, exit or delete the current
operation according to the information on screen.
Use the • S key repeatedly to select the current
navigation tab, and the U and V keys to move up
and down the tabs.
Press the • • Now Playing key to see details of the
album or movie which is currently being played.
THE DVD/CD PLAYER
Place a CD or DVD in the slot.•
From the Home Page, select Disc Player•
If your MS1 is connected to the internet, details of
the disc content will be looked up automatically and
displayed on the screen.
Press the • M Record key to start recording, or
Press the • OPlay key to play the disc.
The Recording display shows recording progress with
an indication of the time remaining to completion. The
Playback display shows the length of the track being
played and how long it has been playing.
PLAYING MUSIC FROM YOUR LIBRARY
Press the • J Menu key to display the Home Page.
Use the • S and T keys to highlight Audio Library
and press the OSelect key.
The Library menu lets you choose how you want •
to browse your music collection, for example by
Track, Album, Artist, Genre. Select the grouping you
prefer and press the OSelect key.
To play a piece of music, highlight it in the list and •
press the the OSelect key.
5
USER GUIDE
© Copyright Imerge Ltd 2009
Page
MS1 MediaServer / MediaPlayer
Playback Transport Keys (*)
To stop play, press the • g Stop key on the remote
control.
To pause play, press the • h Pause key.
Press the • e or f Skip key to skip to the next or
previous track.
Hold down the • c or d Seek key to seek forward
or backward within the current track.
Play resumes from the new position when you release
the key.
PLAYING MOVIES FROM YOUR LIBRARY
Press the • J Menu key to display the Home Page.
Use the • S and T keys to highlight Video Library
and press the OSelect key.
You can display the movies in your library in •
various ways, for example Movies, Artists, Directors
Ratings. Select the grouping you prefer and press
the OSelect key.
To play a movie, select it from the list and press the •
the OSelect key.
The transport keys (*) on the remote control work in
much the same way as they do when playing music, with
the following exceptions:
The • g Stop key pauses and resumes playback and
displays the Now Playing screen.
The • h Pause and e , f Skip keys have no
function.
The • • Now Playing key toggles the display
between the Now Playing screen and full screen
mode.
6
USER GUIDE
© Copyright Imerge Ltd 2009
Page
MS1 MediaServer / MediaPlayer
GUIDE D’INITIATION RAPIDE
Votre MS1 prend en charge plusieurs types de connexion
à des téléviseurs et détecte automatiquement ce qui est
utilisé lorsque vous le mettez en marche.
Veuillez vous assurer que tous les périphériques
connectés sont allumés avant de mettre votre MSI sous
tension
MISE SOUS TENSION ET HORS TENSION
Pour mettre l’unité sous tension, appuyez sur le bouton
; sur le panneau avant. Le LED d’alimentation passe
du rouge au vert et l’interface utilisateur du téléviseur
afche le menu principal.
Votre MediaServer est conçu pour rester sous tension de
manière continue. Toutefois, si vous prévoyez de ne pas
l’utiliser pendant une période prolongée, vous pouvez le
mettre hors tension.
Pour mettre l’unité hors tension, appuyez sur le •
bouton ; sur le panneau avant. Après un délai
court, l’unité s’éteint et le LED d’alimentation
devient rouge.
COMPARAISON DE L’INTERFACE
UTILISATEUR GRAPHIQUE À CELLE
D’INTERFACE UTILISATEUR ADMIN
La plupart du temps, vous parcourez vos bibliothèques,
lisez des lms et des albums et l’interface utilisateur
graphique est ce avec quoi vous vous familiarisez le plus.
Toutefois, certaines fonctions sur votre MS1 ne sont
accessibles qu’en utilisant l’interface utilisateur Admin.
Cela inclut modier les détails d’un lm ou d’un
morceau de musique ainsi que certains paramètres de
conguration du système.
Si vous désirez utiliser l’interface utilisateur Admin,
surlignez l’icône de Conguration dans le Menu principal
et appuyez sur la touche Select O. L’écran passe à
Admin. UI (interface d’administration).
Pour revenir à l’interface utilisateur graphique, appuyez
sur la touch
l’interface utilisateur graphique.
M
Exit Admin. L’écran repassera à
TÉLÉCOMMANDE
Appuyez sur la touche • J du Menu pour afcher le
menu principal.
Utilisez les touches • S et T, U et V pour surligner
les différents articles dans une liste quelconque.
Appuyez sur la touche• OSelect pour sélectionner un
article dans une liste.
Appuyez sur la touche • P chaque fois que ce
symbole s’afche sur l’écran de télévision pour
annuler, quitter ou supprimer le fonctionnement
actuel selon les informations afchées à l’écran.
Utilisez la touche • S à plusieurs reprises pour
sélectionner l’onglet de navigation actuelle et les
touches U et V pour vous déplacer de haut en bas
sur les onglets.
Appuyez sur la touche • • Now Playing pour voir les
détails de l’album ou du lm qui est actuellement
lu.
LE LECTEUR DVD/CD
Placez un CD ou DVD dans la fente. •
Dans le menu principal, sélectionnez Lecteur de •
disques.
Si votre MS1 est branché sur Internet, les détails du
contenu du disque sont automatiquement consultés et
afchés à l’écran.
Appuyez sur la touche • Enregistrer M pour
commencer l’enregistrement; ou
Appuyez sur la touche • de Lecture O pour lire le
disque.
L’écran de l’Enregistrement afche l’état de
l’enregistrement avec une indication du temps qu’il
reste pour son exécution. L’écran de Lecture afche la
longueur de la piste qui est en cours de lecture et depuis
combien de temps elle est lue.

7
USER GUIDE
© Copyright Imerge Ltd 2009
Page
MS1 MediaServer / MediaPlayer
LECTURE DE LA MUSIQUE DEPUIS VOTRE
BIBLIOTHÈQUE
Appuyez sur la touche • J du Menu pour afcher le
menu principal.
Utilisez les touches • S et T pour surligner la
Bibliothèque Audio et appuyez sur la touche
SelectO.
Le menu de la bibliothèque vous laisse choisir ce •
que vous voulez pour naviguer dans votre collection
de musique, par exemple par Piste, Album, Artiste
et Genre. Sélectionnez le groupement que vous
préférez et appuyez sur la touche Select O.
Pour jouer un morceau de musique, surlignez-le •
dans la liste et appuyez sur la touche Select O.
Touches de transport de lecture (*)
Pour arrêter la lecture, appuyer sur la touche • Arrêt
g sur la télécommande.
Pour faire une pause de lecture, appuyez sur la •
touche Pause h.
Appuyez sur la touche • Saut e ou f pour passer à
la piste suivante ou précédente.
Maintenez la touche • Recherche c ou d pour
chercher de la piste actuelle vers l’avant ou vers
l’arrière.
La lecture reprend à partir de sa nouvelle position
lorsque vous relâchez la touche.
LECTURE DES FILMS DEPUIS VOTRE
BIBLIOTHÈQUE
Appuyez sur la touche • J du Menu pour afcher le
menu principal.
Utilisez les touches • S et T pour surligner la
Bibliothèque Vidéo et appuyez sur la touche
SelectO.
Vos pouvez afcher les lms de votre bibliothèque •
de différentes façons, par exemple Films, Artistes,
Évaluations des directeurs. Sélectionnez le
groupement que vous préférez et appuyez sur la
touche Select O.
Pour lire un lm, surlignez-le dans la liste et •
appuyez sur la touche Select O.
Les touches de transport (*) sur la télécommande
fonctionnent de la même manière que pour la lecture de
musique avec les exceptions suivantes :
La touche • Arrêt g fait une pause et reprend la
lecture, et elle afche l’écran Lecture en cours.
Les touches • Pause h et Saut e , f n’ont pas de
fonctions.
La touche • Now Playing • fait basculer l’écran
entre celui de Lecture en Cours et le mode plein
écran.
8
USER GUIDE
© Copyright Imerge Ltd 2009
Page
MS1 MediaServer / MediaPlayer
KURZANLEITUNG
Ihre MS1 unterstützt verschiedene TV- Anschlüsse,
welche dann automatisch gefunden werden wenn Sie
die Anlage hochfahren.
Bitte beachten Sie dass alle angeschlossenen Apparate
eingeschaltet sind, bevor Sie die MS1 aufstarten.
EIN- UND AUSSCHALTEN
Um das Gerät einzuschalten, drücken Sie den ;-Knopf
auf der vorderen Bedienleiste des Geräts. Die LEDAnzeige wechselt von rot auf grün, und die TVBenutzerschnittstelle zeigt das Hauptmenü an.
Ihr MediaServer ist für den Dauerbetrieb ausgelegt.
Wenn Sie ihn jedoch über einen längeren Zeitraum nicht
verwenden wollen, können Sie Ihn ausschalten.
Zum Ausschalten drücken Sie den • ;-Knopf auf der
vorderen Bedienleiste des Geräts. Nach kurzer Zeit
schaltet sich das Gerät aus, und die LED leuchtet rot.
GRAPHISCHE OBERFLÄCHE UND
ADMINISTRATOROBERFLÄCHE
Wenn Sie durch Ihre Verzeichnisse blättern, Filme oder
Musik abspielen, sind Sie gewöhnlich am besten mit der
graphischen Oberäche vertraut.
Auf einige Funktionen auf Ihrem MS1 haben Sie
allerdings nur über die Admin UI (AdministratorBedienoberäche) Zugriff. Dazu gehören beispielsweise
das Editieren von Film- und Musikangaben und einige
Kongurationseinstellungen des Systems.
Wenn Sie die Admin UI verwenden möchten, markieren
Sie das Set Up-Symbol im Hauptmenü und drücken Sie
die OSelect-Taste. Die Anzeige wechselt zur Admin UI.
Um zur graphischen Oberäche zurückzukehren,
navigieren Sie über das Hauptmenü zu Set Up ->
Einstellungen -> Einstellungen der Bedienoberäche ->
Stil -> Stile und Auswahl TV User Interface. Wenn Sie
dies Speichern, schaltet die Anzeige auf die graphische
Oberäche um.
FERNBEDIENUNG
Drücken Sie die • J Menu-Taste, um ins Hauptmenü
zu gelangen.
Verwenden Sie die • S und T, U und V–Tasten,
um verschiedene Titel in einer beliebigen Liste zu
markieren.
Drücken Sie die • OSelect-Taste, um einen Titel in
einer Liste auszuwählen.
Drücken Sie die • P–Taste, wenn dieses Symbol
auf dem TV-Bildschirm angezeigt wird, um den
aktuellen Vorgang gemäß Bildschirmanzeige
abzubrechen, zu verlassen oder zu löschen.
Verwenden Sie die • S–Taste wiederholt, um das
aktuelle Navigationsregister auszuwählen und die
U und V–Tasten , um sich in den Registern nach
oben und unten zu bewegen.
Drücken Sie die • • Now Playing–Taste, um
Informationen zu dem gerade abgespielten Album
oder Film zu sehen.
DER DVD-/CD-PLAYER
Legen Sie eine CD oder DVD in den Einschub.•
Wählen Sie im Hauptmenü Disk-Lade •
Wenn Ihr MediaServer mit dem Internet verbunden ist,
werden Informationen zur Disk automatisch ermittelt
und auf dem Bildschirm angezeigt.
Drücken Sie die • M Record-Taste, um eine Aufnahme
zu starten oder
Drücken Sie die• O Select-Taste, um die Disk
abzuspielen.
Die Aufnahmedaten-Anzeige zeigt den
Aufnahmevorgang an und die verbleibende Zeit bis zum
Abschluss. Die Playback-Anzeige zeigt die Länge des
Titels an, der abgespielt wird, und wie lange er schon
läuft.
MUSIK AUS IHRER BIBLIOTHEK ABSPIELEN
Drücken Sie die • J Menu-Taste, um ins Hauptmenü
zu gelangen.
Verwenden Sie die • S und T–Tasten, um die
Audiobibliothek zu markieren und drücken Sie die
9
USER GUIDE
© Copyright Imerge Ltd 2009
Page
MS1 MediaServer / MediaPlayer
O Select-Taste.
Im Bibliothekmenü können Sie auswählen, wie •
Sie durch Ihre Musiksammlung blättern möchten,
beispielsweise nach Titel, Album, Künstler oder Stil.
Wählen sie die Ihre bevorzugte Gruppierung und
drücken Sie die O Select-Taste.
Um ein Musikstück abzuspielen, markieren Sie es in •
der Liste und drücken Sie die O Select-Taste.
Playback Transport-Tasten (*)
Um das Abspielen zu stoppen, drücken Sie die • g
Stop-Taste auf der Fernbedienung.
Um das Abspielen anzuhalten, drücken Sie die • h
Pause-Taste.
Drücken Sie die • e oder f Skip-Taste, um zum
nächsten oder vorherigen Titel zu springen.
Halten Sie die • c oder d Seek-Taste gedrückt,
um innerhalb des aktuellen Titels vorwärts oder
rückwärts zu suchen.
Der Abspielvorgang wird an der neuen Stelle fortgesetzt,
wenn Sie die Taste loslassen.
FILME AUS IHRER BIBLIOTHEK ABSPIELEN
Drücken Sie die • J Menu-Taste, um ins Hauptmenü
zu gelangen.
Verwenden Sie die • S und T–Tasten, um Video-
Library zu markieren und drücken Sie die O Select-
Taste.
Sie können die Filme in Ihrer Bibliothek •
auf verschiedene Art und Weise anzeigen,
beispielsweise Filme, Schauspieler, Regisseure
oder Bewertungen. Wählen Sie die bevorzugte
Gruppierung und drücken Sie die O Select-Taste.
Um einen Film abzuspielen, wählen Sie ihn aus der •
Liste aus und drücken Sie die O Select-Taste.
Die Transport -Tasten (*) auf der Fernbedienung
funktionieren wie beim Abspielen von Musik, jedoch mit
den folgenden Ausnahmen:
Die • g Stop-Taste hält das Playback an und setzt es
fort mit der Bildschirmanzeige Now Playing.
Die • h Pause- und e , f Skip-Tasten haben keine
Funktion.
Die • • Now Playing–Taste schaltet den
Display-Modus um zwischen Now Playing und
Vollbildschirm.
10
USER GUIDE
© Copyright Imerge Ltd 2009
Page
MS1 MediaServer / MediaPlayer
GUIDA DI AVVIO RAPIDO
Il MediaServer/MediaPlayer MS1 è dotato di vari tipi
di connessioni per il collegamento al televisore ed è
in grado di rilevare automaticamente la connessione
utilizzata quando viene acceso.
Assicurarsi che tutti gli apparecchi connessi siano già
accesi prima di accendere il MediaServer/MediaPlayer
MS1.
ACCENSIONE E SPEGNIMENTO
Per accendere l’apparecchio, premere il pulsante ; sul
pannello frontale. Il LED di alimentazione cambierà
colore da rosso a verde e l’interfaccia utente TV
visualizzerà il menu principale.
Il MediaServer è stato progettato per rimanere sempre
acceso. Ciononostante, se si prevede di non utilizzarlo
per un periodo di tempo prolungato, può essere
consigliabile spegnerlo.
Per spegnere l’apparecchio, premere il pulsante •
; sul pannello frontale. Dopo un breve periodo
l’apparecchio si spegne e il LED di alimentazione
rimane illuminato con luce rossa.
INTERFACCIA GRAFICA E INTERFACCIA
AMMINISTRATORE
Le attività più comuni comprendono la ricerca di titoli
nelle librerie, la visualizzazione di lmati o l’ascolto
di album. Queste attività sono realizzate mediante
l’interfaccia graca che sarà pertanto la più familiare.
Vi sono tuttavia alcune funzioni del MediaServer MS1
che sono accessibili solo dall’interfaccia Amministratore.
Queste attività comprendono la modica delle
informazioni relative a lmati e musica nonché alcune
congurazioni del sistema.
Per utilizzare l’interfaccia Amministratore, evidenziare
l’icona Set Up del menu Principale e premere il tasto di
OSelect. Questo permette di accedere all’interfaccia
Amministratore.
Per tornare all’interfaccia graca, dal menu principale,
aprire Set Up -> Impostazioni-> Impostazioni interfaccia
utente ->Stile e selezionare TV User Interface. Dopo
aver salvato le impostazioni, il display visualizzerà
nuovamente l’interfaccia graca.
TELECOMANDO
Premere il tasto • J Menu per visualizzare il menu
principale.
Servirsi dei tasti • S e T, U e V per evidenziare le
varie voci e opzioni dei menu.
Premere il tasto • OSelect per selezionare la voce
desiderata.
Premere il tasto • P quando questo simbolo è
visualizzato sullo schermo per annullare, uscire,
o eliminare l’operazione corrente, secondo le
istruzioni presentate a schermo.
Premere il tasto • S varie volte no a selezionare la
scheda di navigazione corrente, quindi i tasti U e V
per passare da una scheda all’altra.
Premere il tasto • • Now Playing per visualizzare
maggiori informazioni sull’album o sul lm
correntemente in riproduzione.
IL LETTORE DVD/CD
Inserire un CD o un DVD nello slot di caricamento.•
Nel menu principale, selezionare Vassoio dischi. •
Se il MediaServer è collegato a Internet, maggiori
dettagli sul contenuto del disco verranno ricercati
automaticamente e visualizzati sullo schermo.
Premere il tasto • M Record per avviare la
registrazione, oppure
Premere il tasto • OSelect per riprodurre il disco.
L’indicazione Registrazione indica l’avanzamento della
registrazione e fornisce una previsione del tempo
rimanente per il suo completamento. L’indicazione
Riproduzione indica la lunghezza totale della traccia
in riproduzione e la durata della riproduzione no al
momento.

11
USER GUIDE
© Copyright Imerge Ltd 2009
Page
MS1 MediaServer / MediaPlayer
RIPRODUZIONE DI MUSICA DALLA
LIBRERIA
Premere il tasto • J Menu per visualizzare il menu
principale.
Con i tasti • S e T evidenziare Libreria Audio e
premere il tasto OSelect.
Il menu della libreria fornisce varie opzioni per •
la visualizzazione della collezione musicale, ad
esempio ordinando i brani per traccia, album, artista
o genere. Selezionare l’ordinamento desiderato e
premere il tasto OSelect.
Per ascoltare un brano, evidenziarlo e premere il •
tasto OSelect.
Tasti di spostamento nella riproduzione (*)
Per arrestare la riproduzione, premere il tasto • g
Stop sul telecomando.
Per sospendere la riproduzione, premere il tasto • h
Pause.
Servirsi dei tasti • e o f Skip per passare al brano
successivo o precedente.
Mantenere premuti i tasti • c o d Seek per
effettuare la ricerca in avanti o all’indietro nel
brano corrente.
La riproduzione si riavvia dal punto raggiunto quando
viene rilasciato il tasto di ricerca.
RIPRODUZIONE DI FILM DALLA LIBRERIA
Premere il tasto • J Menu per visualizzare il menu
principale.
Con i tasti • S e T evidenziare Libreria Video e
premere il tasto OSelect.
È possibile visualizzare i lm della libreria in •
vari modi, ordinandoli ad esempio per titolo del
lm, artista, regista o valutazione. Selezionare
l’ordinamento desiderato e premere il tasto
OSelect.
Per visionare il lm desiderato, selezionarlo e •
premere il tasto OSelect.
I tasti di spostamento (*) del telecomando funzionano
in maniera analoga al loro funzionamento durante
la riproduzione di brani musicali, con le seguenti
differenze:
Il tasto • g Stop interrompe e riavvia la riproduzione
e visualizza la schermata In riproduzione.
I tasti • h Pause e e, f Skip non hanno alcuna
funzione.
Il tasto • • Now Playing passa dalla visualizzazione
della schermata In riproduzione alla visualizzazione
a schermo pieno e viceversa.

12
USER GUIDE
© Copyright Imerge Ltd 2009
Page
MS1 MediaServer / MediaPlayer
GUÍA RÁPIDA
Tu MS1 puede ser conectado a la TV una variedades de
conexiones, MS1 automáticamente descubre cual es
necesario al momento que se prende el equipo.
Asegura que todos los equipos conectados al MS1 estén
prendidos antes del MS1.
ENCENDIDO Y APAGADO
Para encender la unidad, pulse la tecla ; en el panel
frontal. El LED de potencia cambiará de rojo a verde
y en la interfaz de usuario de TV visualizará el menú
principal.
Su MediaServer está diseñado para permanecer
encendido de forma continua. No obstante, si no piensa
usarlo por un período de tiempo prolongado, puede
apagarlo, si así lo desea.
Para apagar, pulse la tecla • ; en el panel frontal.
Después de un periodo breve, la unidad se apagará
y el LED de potencia cambiará a rojo.
IU GRAFICA FRENTE A ADMIN
La mayor parte del tiempo Vd. estará navegando sus
bibliotecas, reproduciendo películas o álbumes, y se
familiziará con la interfaz gráca de Usuario.
Sin embargo, algunas funciones en su MS1 sólo son
accesibles desde la interfaz de Administrador. Estas
incluyen la edición de detalles de películas y música, y
algunos ajustes de conguración del sistema.
Si desea usar la interfaz de Administrador, destaque el
icono de Conguración en el Menú Principal y pulse
la tecla O Select. La pantalla cambiará y mostrará la
interfaz de Administrador.
Para volver a la interfaz gráca de Usuario, navegue
desde el Menú principal hasta Conguración -> Ajustes
-> Ajustes interfaz de usuario -> Estilo y seleccione TV
User Interface. Cuando guarda los cambios la pantalla
volverá a la interfaz gráca de Usuario.
MANDO A DISTANCIA
Pulse la tecla • J Menu para visualizar el menú
principal.
Use las teclas • S e T, U e V para destacar
diferentes entradas en una lista.
Pulse la tecla • OSelect para seleccionar una entrada
en una lista.
Pulse la tecla • P cada vez que este símbolo se
visualice en la pantalla para cancelar, salir o borrar
la operación actual según la información que esté
en pantalla.
Use la tecla • S repetidamente para seleccionar la
pestaña de navegación actual, y las teclas U e V
para subir o bajar las pestañas.
Pulse la tecla • • Now Playing para ver los detalles
del álbum o película que está siendo reproducida.
REPRODUCTOR DE DVD/CD
Ponga un CD o DVD en la ranura.•
Desde el menú principal, seleccione el reproductor •
de discos.
Si su MediaServer está conectado a Internet, la unidad
buscará información del contenido del disco de forma
automática y se mostrará en pantalla.
Pulse la tecla • M Record para comenzar la grabación,
o
Pulse la tecla • OPlay para reproducir el disco.
La pantalla de visualización de grabación muestra el
estado de la grabación con una indicación del tiempo
restante para completarla. La pantalla de visualización
de reproducción muestra la longitud de la pista actual y
cuanto tiempo lleva tocando.
REPRODUCCION DE MUSICA DESDE SU
BIBLIOTECA
Pulse la tecla • J Menu para visualizar el menú
principal.
Use las teclas • S y T para destacar la Biblioteca de
Audio y pulse la tecla OSelect.
El menú de la Biblioteca le permite elegir como •
desea navegar a través de su colección de música,

13
USER GUIDE
© Copyright Imerge Ltd 2009
Page
MS1 MediaServer / MediaPlayer
por ejemplo, por tema, álbum, artista, género.
Seleccione el grupo que desea y pulse la tecla
OSelect.
Para reproducir una pieza de música, destáquela en •
la lista y pulse la tecla OSelect.
Teclas de control de reproducción (*)
Para detener la reproducción, pulse la tecla • g Stop
en el mando a distancia.
Para pausar la reproducción, pulse la tecla • h Pause.
Pulse la tecla • e o f Skip para saltar a la pista
siguiente o anterior.
Mantenga la tecla • c o d Seek para buscar hacia
delante o atrás dentro de la pista actual.
La reproducción se reanuda desde la nueva posición al
soltar la tecla.
REPRODUCCION DE PELICULAS DESDE SU
BIBLIOTECA
Pulse la tecla • J Menu para visualizar el menú
principal.
Use las teclas • S e T para destacar la biblioteca de
vídeos (Video Library) y pulse la tecla OSelect.
Vd. puede visualizar las películas en su biblioteca •
de varias maneras, por ejemplo, películas, artistas,
directores, clasicaciones. Seleccione el grupo que
preere y pulse la tecla OSelect.
Para reproducir una película, selecciónela en la lista •
y pulse la tecla OSelect.
Las teclas de control (*) en el mando a distancia
funcionan casi en la misma forma que cuando
reproducen música, con las siguientes excepciones:
La tecla • g Stop pausa y reanuda la reproducción y
muestra la pantalla Now Playing.
Las teclas • h Pause y e, f Skip no tiene función.
La tecla • • Now Playing conmuta la pantalla de
visualización entre la pantalla En Curso y el modo
de pantalla completa.
14
USER GUIDE
© Copyright Imerge Ltd 2009
Page
MS1 MediaServer / MediaPlayer
快速启动指南
您的MS1支持多种不同类型的电视连接,并且在
启动后自动探测使用的连接是哪一类型。
在启动您的MS1前请确保所有连接设备都已打
开。
打开和关闭
启动接收器,请按在前面板上的Ф按钮。电源指
示灯将从红色变成绿色,电视用户界面也将显示
在主菜单上。
MS1的设计是适用于持续开启的情况下。然而,
如果您并不打算长时间开启它,您也许会想把它
关闭。
把它关闭请按前面板上的Ф按钮• ; 在短暂的
时间内接收器便会关闭,电源指示灯并会变
为红色。
图形用户界面(Graphical User Interface)
VS 管理用户界面(Admin UI)
大多数时间您浏览您的音视频库,播放电影或歌
集;图形用户界面(Graphical User Interface)
将会成为您的非常熟识的工具。
然而,某些在您的MS1上的功能只能透过使用管
理用户界面(Admin User Interface). 这些功能
包括编辑电影和音乐的细节,以及某些系统的配
置设置。
如果你希望使用管理用户界面,高亮主菜单中的
设置图标,并且按√选择键。那么,管理用户界
面将会呈现出来。
要重返图形用户界面,请到主菜单,导航至安
装->设置-> 用户界面设置-> 型及选择TV User
Interface。储存射之后,图形用户界面便会再
度显示出来。
遥控器
显示主菜单请按• J Menu(菜单键)。
使用 • S T U键和V 键高亮显示任何列表中的
不同项目。
选择列表中的一个项目请按• O Select(选择
键)。
根据电视屏幕上的信息,当• P 符号显示时请
按×键以便取消、离开或刪除当时的运作。
重复使用 • S 键以便选择当前使用的导航
标签,并使用U或V键来拣选上和下一个标
签。
要看当前播放的音乐专辑或电影的详细资•
料,请按 • Now Playing 现在播放键)。
DVD/CD 播放器
把 • CD 或 DVD 放在插槽中。
在主菜单中选择光盘播放器
如果您的MS1已和互联网连接,光盘的详细内容
便会自动被翻看,并且显示在电视屏幕上。
开始刻录请按 • M Record(刻录键),或
按 • OPlay(播放键)播放光盘。
Recording(刻录)显示刻录的进度,并且指示
剩余的时间。Playback (重播)显示播放中乐
曲的长度及已播放的时间。
在您的音频库选择音乐播放
显示主菜单请按 • J Menu(菜单键)。
使用• S键和T 键高亮显示音频库,然后按
O Select(选择键)。
音频库菜单让您选择您想如何浏览您的音乐•
珍藏,例如根据乐曲、专辑、艺术家、流派
选择您喜欢的组合,然后按 O Select(选择
键)。
高亮列表中的乐曲,然后按• O Select(选择
键)来播放该乐曲。

15
USER GUIDE
© Copyright Imerge Ltd 2009
Page
MS1 MediaServer / MediaPlayer
重播传送键 (*)
停止播放请按遥控器上的 • g Stop(停止键)
。
暂停播放请按• h Pause(暂停键)。
按 • e 或 f Skip (前后跳跃键)来跳跃到下一
首或上一首作品。
按下 • c 或 d Seek(查找键)向后或向前
查找播放中的作品。
当您释放该键时,乐曲会在新的位置继续播放。
在您的视频库选择电影播放
显示主菜单请按 • J Menu(菜单键)。
使用 • S 键和 T 键高亮显示视频库,然后按
O Select(选择键)。
视频库菜单让您选择您想如何浏览您的电影•
珍藏,例如根据电影、艺术家、导演、级别
选择您喜欢的作品,然后按 O Select(选择
键)。
高亮列表中的电影,然后按 • O Select(选择
键)来播放该电影。
遥控器上传送键 (*)的操作和播放音乐大致相
同,只有以下的区别:
• g Stop(停止键)用作暂停和继续重播,按
其并且显示 • Now Playing (现在播放)屏
幕。
• h Pause(暂停键)和 ≥ 或 ≤ Skip (前后
跳跃键)并没有任何用途。
• • Now Playing(现在播放键)切换 Now
Playing (现在播放)屏幕模式和全屏模式。
16
USER GUIDE
© Copyright Imerge Ltd 2009
Page
MS1 MediaServer / MediaPlayer
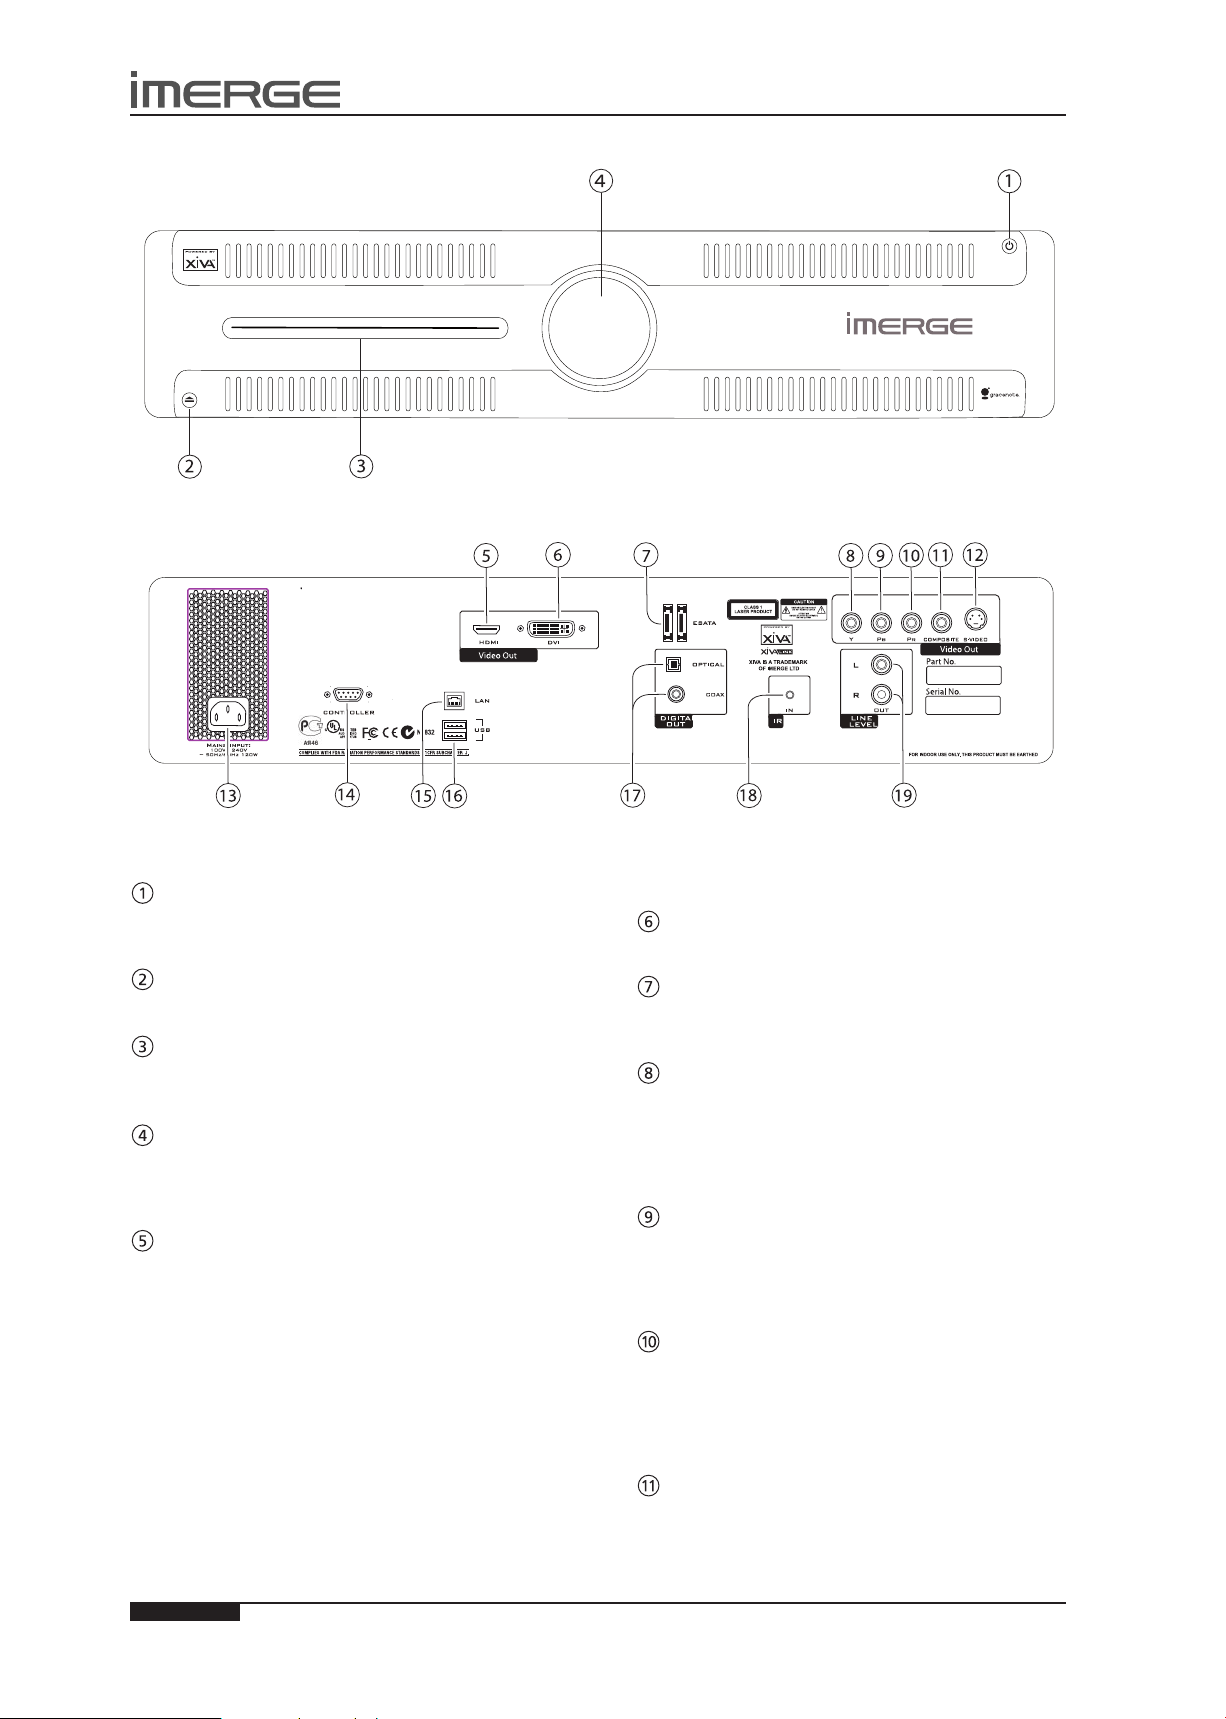
THE MS1 MEDIASERVER / MEDIAPLAYER
FRONT VIEW
REAR VIEW
STANDBY BUTTON
Press the Standby button to turn the MediaServer on;
press it again to turn the it off.
EJECT BUTTON
Pressing the EJECT button ejects the disc.
DISC PLAYER
CDs and DVDs should be inserted with the label side
facing up.
IR RECEIVE 1
The front panel Infrared Receive window allows
remote control information to be transmitted to the
MediaServer
VIDEO HDMI
Use the HDMI connector to connect your MediaServer to
a digital at-panel television or projector. HDMI Output
is usually connected to the main television in your home
used for viewing movies.
To take advantage of the Surround Sound Audio Format,
it is necessary to connect the audio output to a device
capable of decoding the surround sound signal.
If your digital TV can decode the signal, simply •
connect it to the HDMI socket on the back of the
MediaServer.
If your digital TV does not decode the signal, noise •
will be emitted by the TV’s speakers. In this case
you should mute the TV’s volume and connect an
amplier with this capability to the digital output
(17) of the MediaServer.
VIDEO DVI
This connector should not be used.
ESATA
Use one of these sockets to connect a XiVASafe XS1e
eSATA external storage unit.
PY COMPONENT VIDEO OUT
Connect the PY Component Video Out of the
MediaServer to the PY Component Video In of a suitable
TV to display the TV User Interface. You may also need
to switch the TV to the relevant AUX input to display the
picture.
PB COMPONENT VIDEO OUT
Connect the PB Component Video Out of the MediaServer
to the PB Component Video In of a suitable TV to display
the TV User Interface. You may also need to switch the TV
to the relevant AUX input to display the picture.
PR COMPONENT VIDEO OUT
Connect the PR Component Video Out of the
MediaServer to the PR Component Video In of a suitable
TV to display the TV User Interface. You may also need
to switch the TV to the relevant AUX input to display the
picture.
COMPOSITE VIDEO OUT
Connect the composite Video Out of the MediaServer
to the composite input of a suitable PAL or NTSC TV to
display the TV User Interface. You may also need to
switch the TV to the relevant AUX input to display the

17
USER GUIDE
© Copyright Imerge Ltd 2009
Page
MS1 MediaServer / MediaPlayer
picture.
S-VIDEO OUT
Connect the S-VIDEO output of the MediaServer to the
S-VIDEO input of a suitable PAL or NTSC TV to display the
TV User Interface. You may also need to switch the TV to
the relevant AUX input to display the picture.
MAINS
Connect the supplied mains lead to this connector to
provide power to the unit.
CONTROLLER
This connector should not be used.
LAN (ETHERNET)
The Ethernet port is used to connect the MediaServer to
a network or high speed Internet connection.
USB
Allows the MediaServer to communicate with supported
USB devices.
DIGITAL OUT
The digital optical output can be used to transmit high
quality audio to a device with a digital optical input
(D/A converter, A/V amplier etc.) using an optical bre
cable. The advantage of using the optical output is that
it has low signal loss and is completely isolated from the
ground loop.
By connecting the coaxial jack to a digital audio
component (D/A converter, A/V amplier etc.), digital
signals from the MediaServer can be transmitted directly
from the system without rst being converted to
analogue.
These outputs may not be used for making a digital copy
of your media.
IR RECEIVE 2
The IR Receive connection allows remote control
information to be carried from other devices directly into
the MediaServer.
ANALOGUE OUT
This analogue audio output should be connected to the
input jacks of a pre-amplier.
18
USER GUIDE
© Copyright Imerge Ltd 2009
Page
MS1 MediaServer / MediaPlayer
0
+
_
+
_
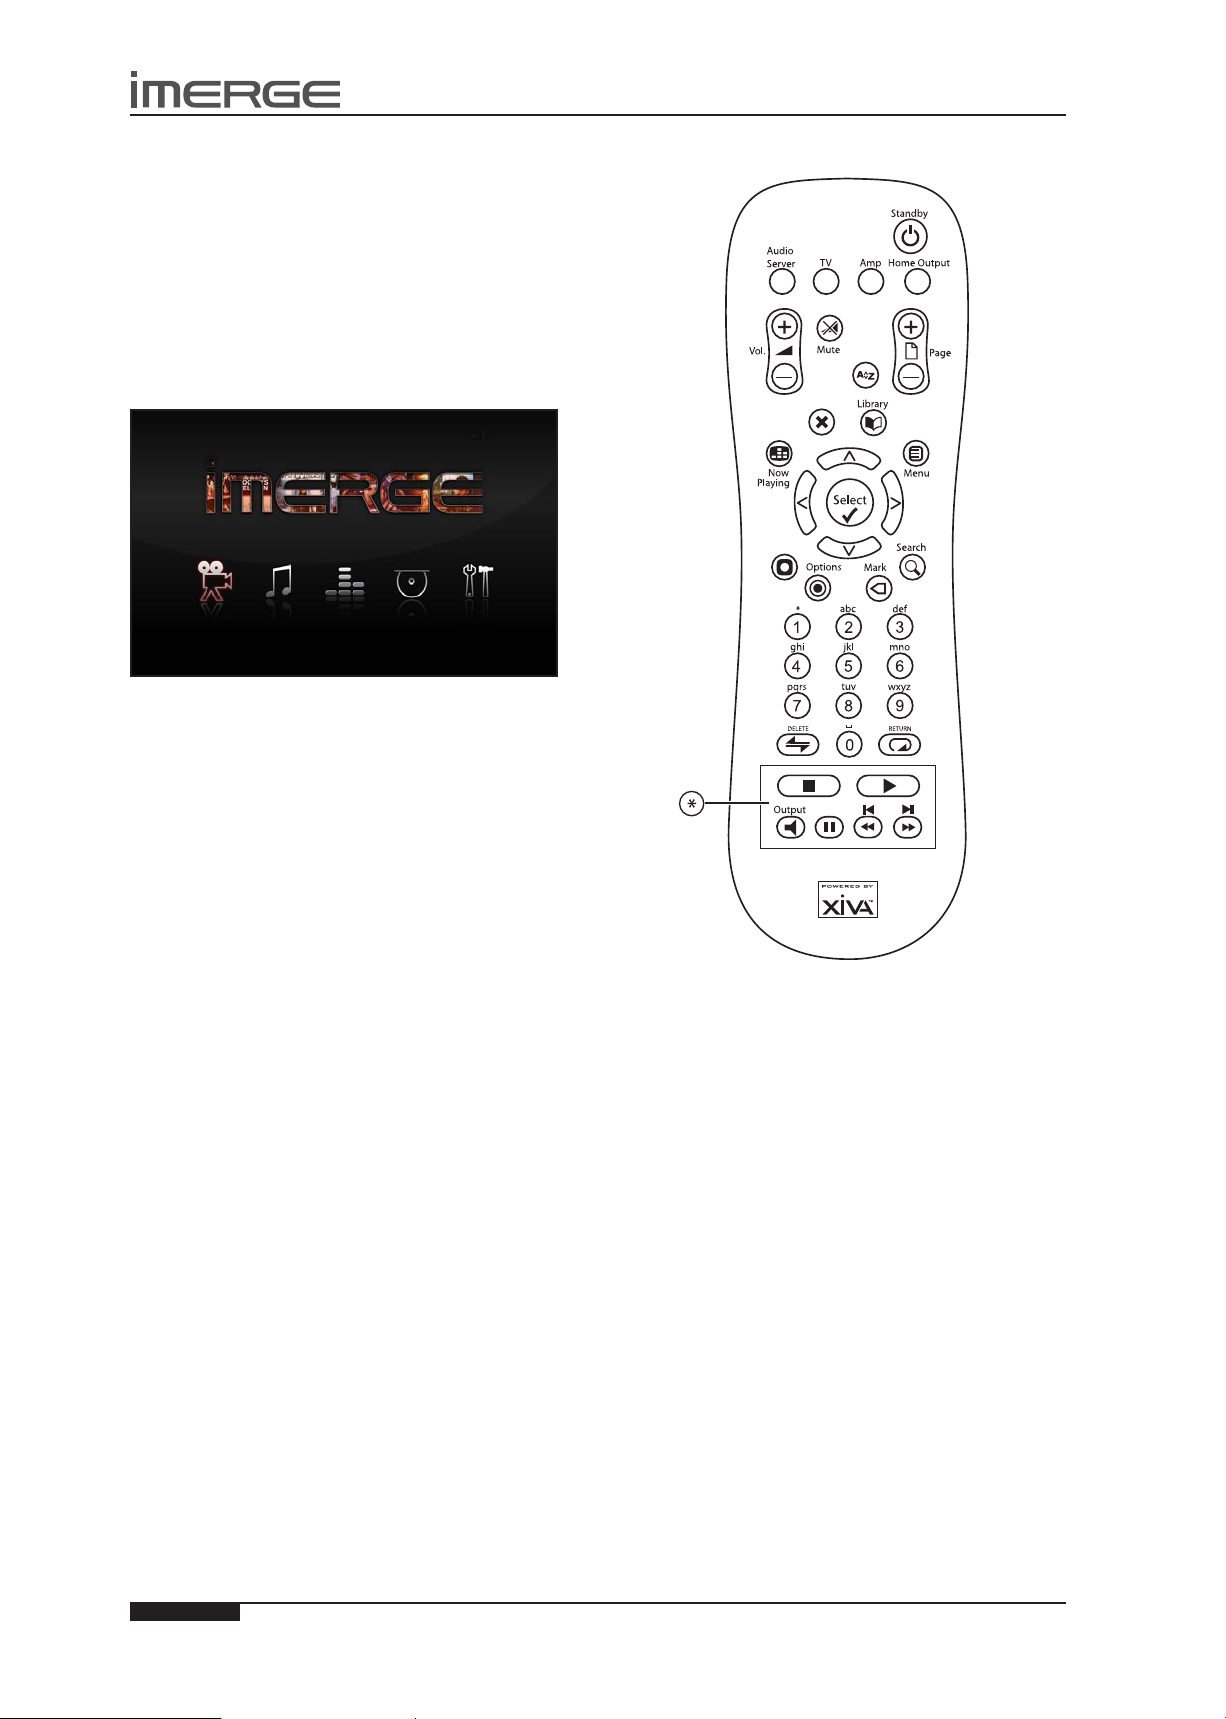
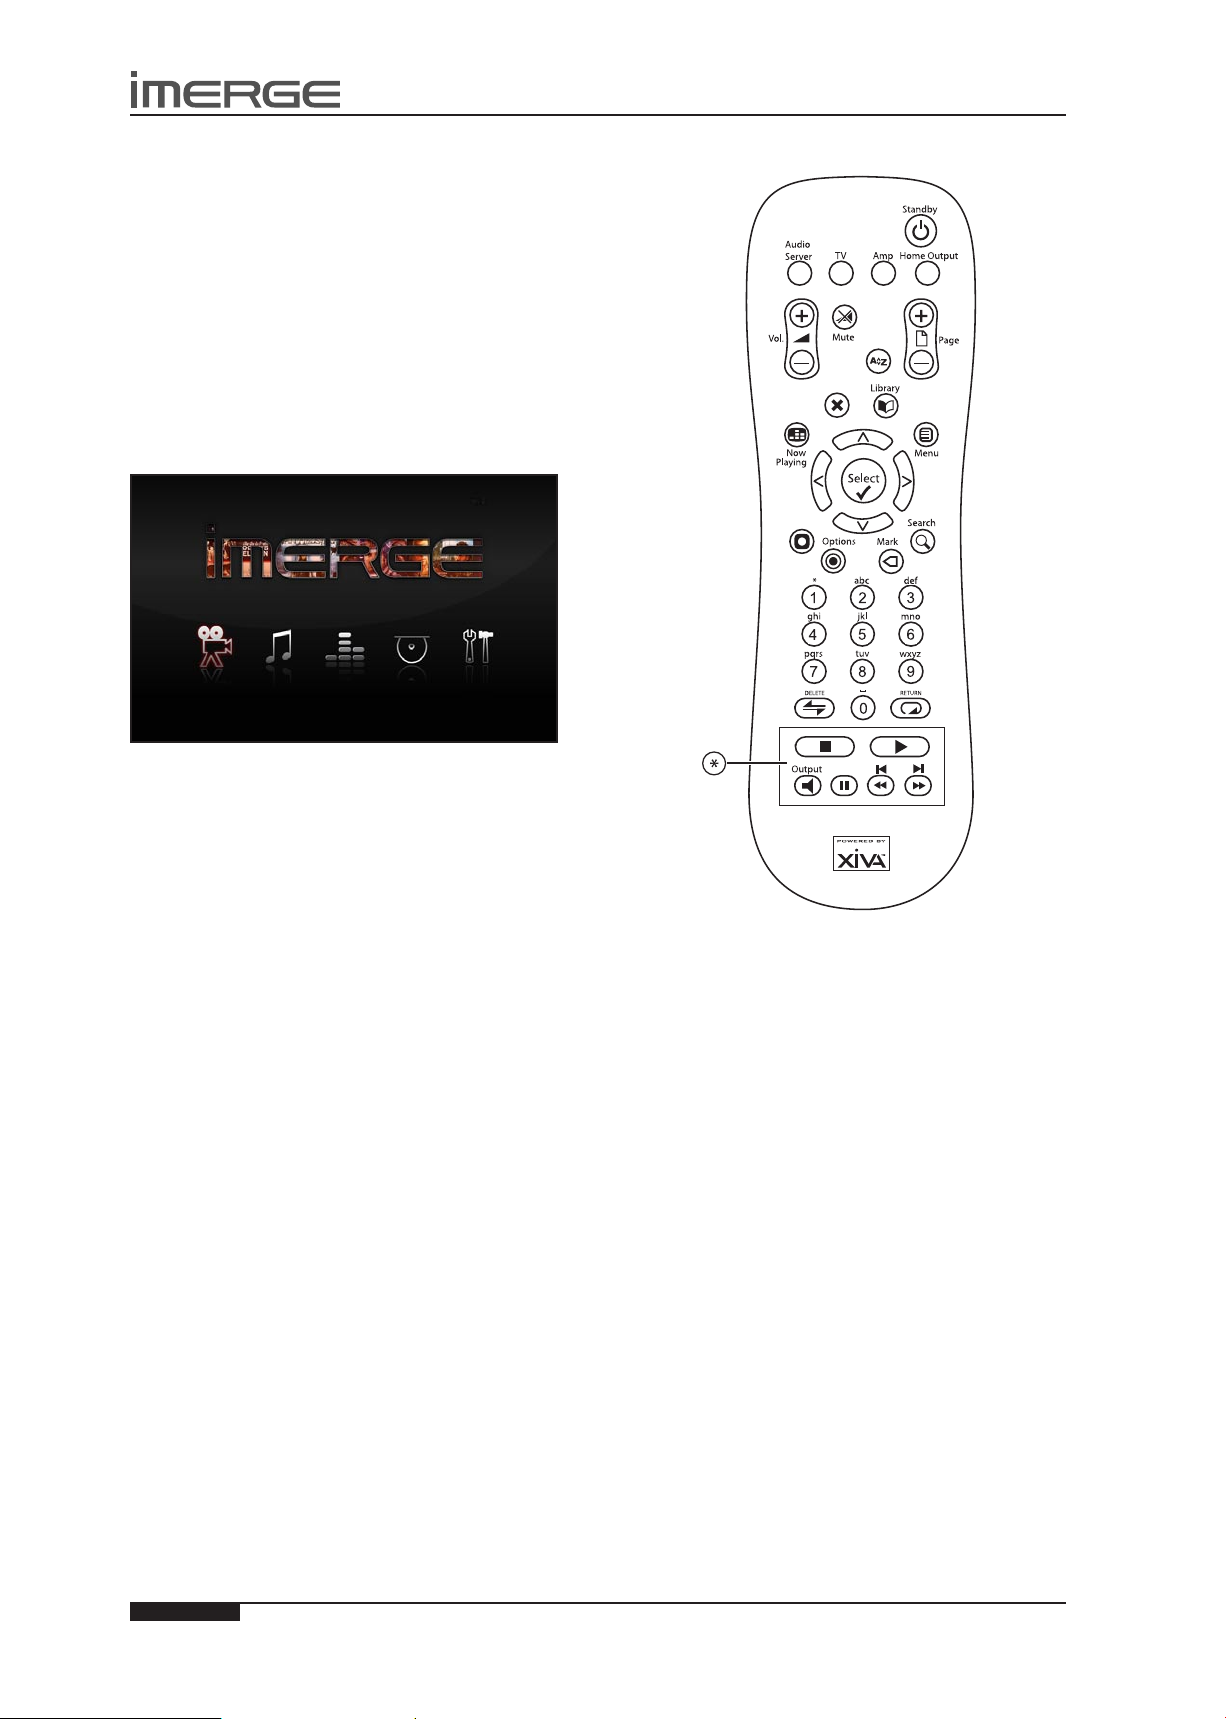
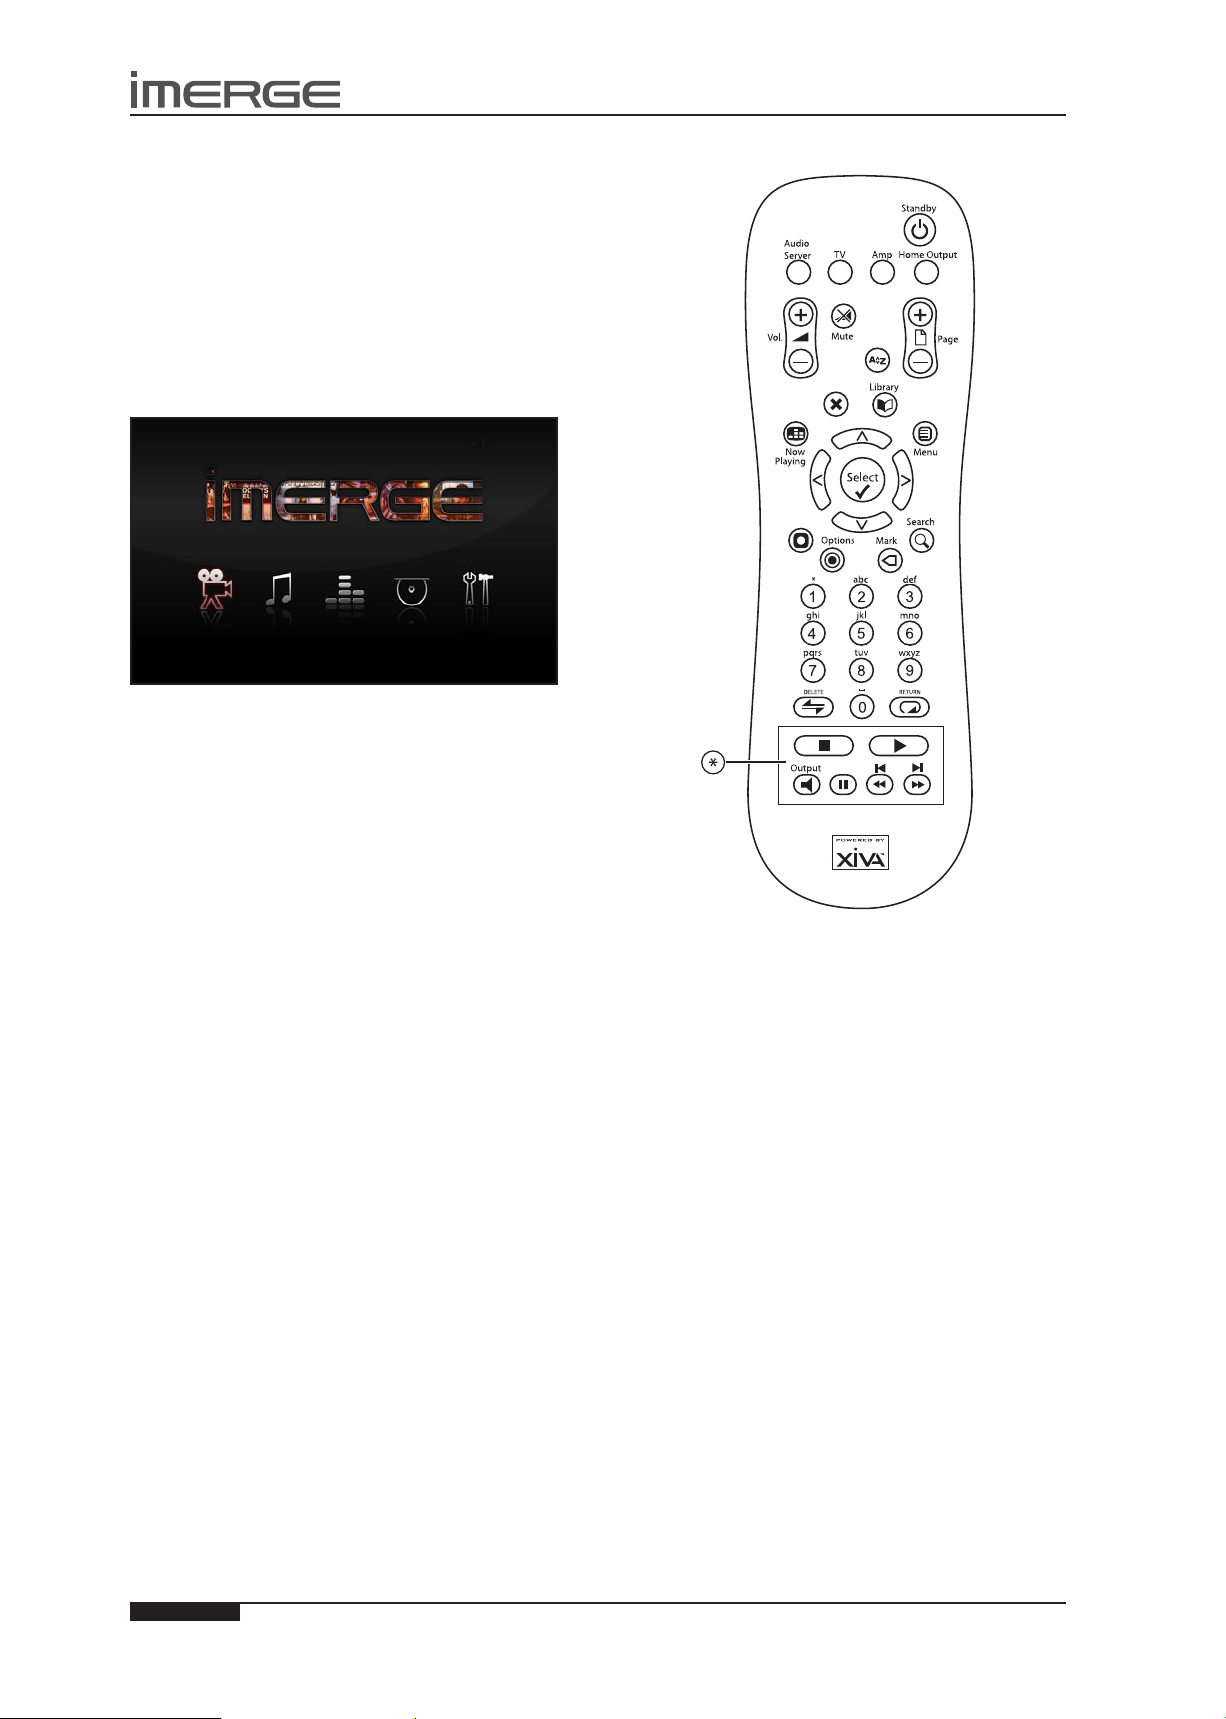
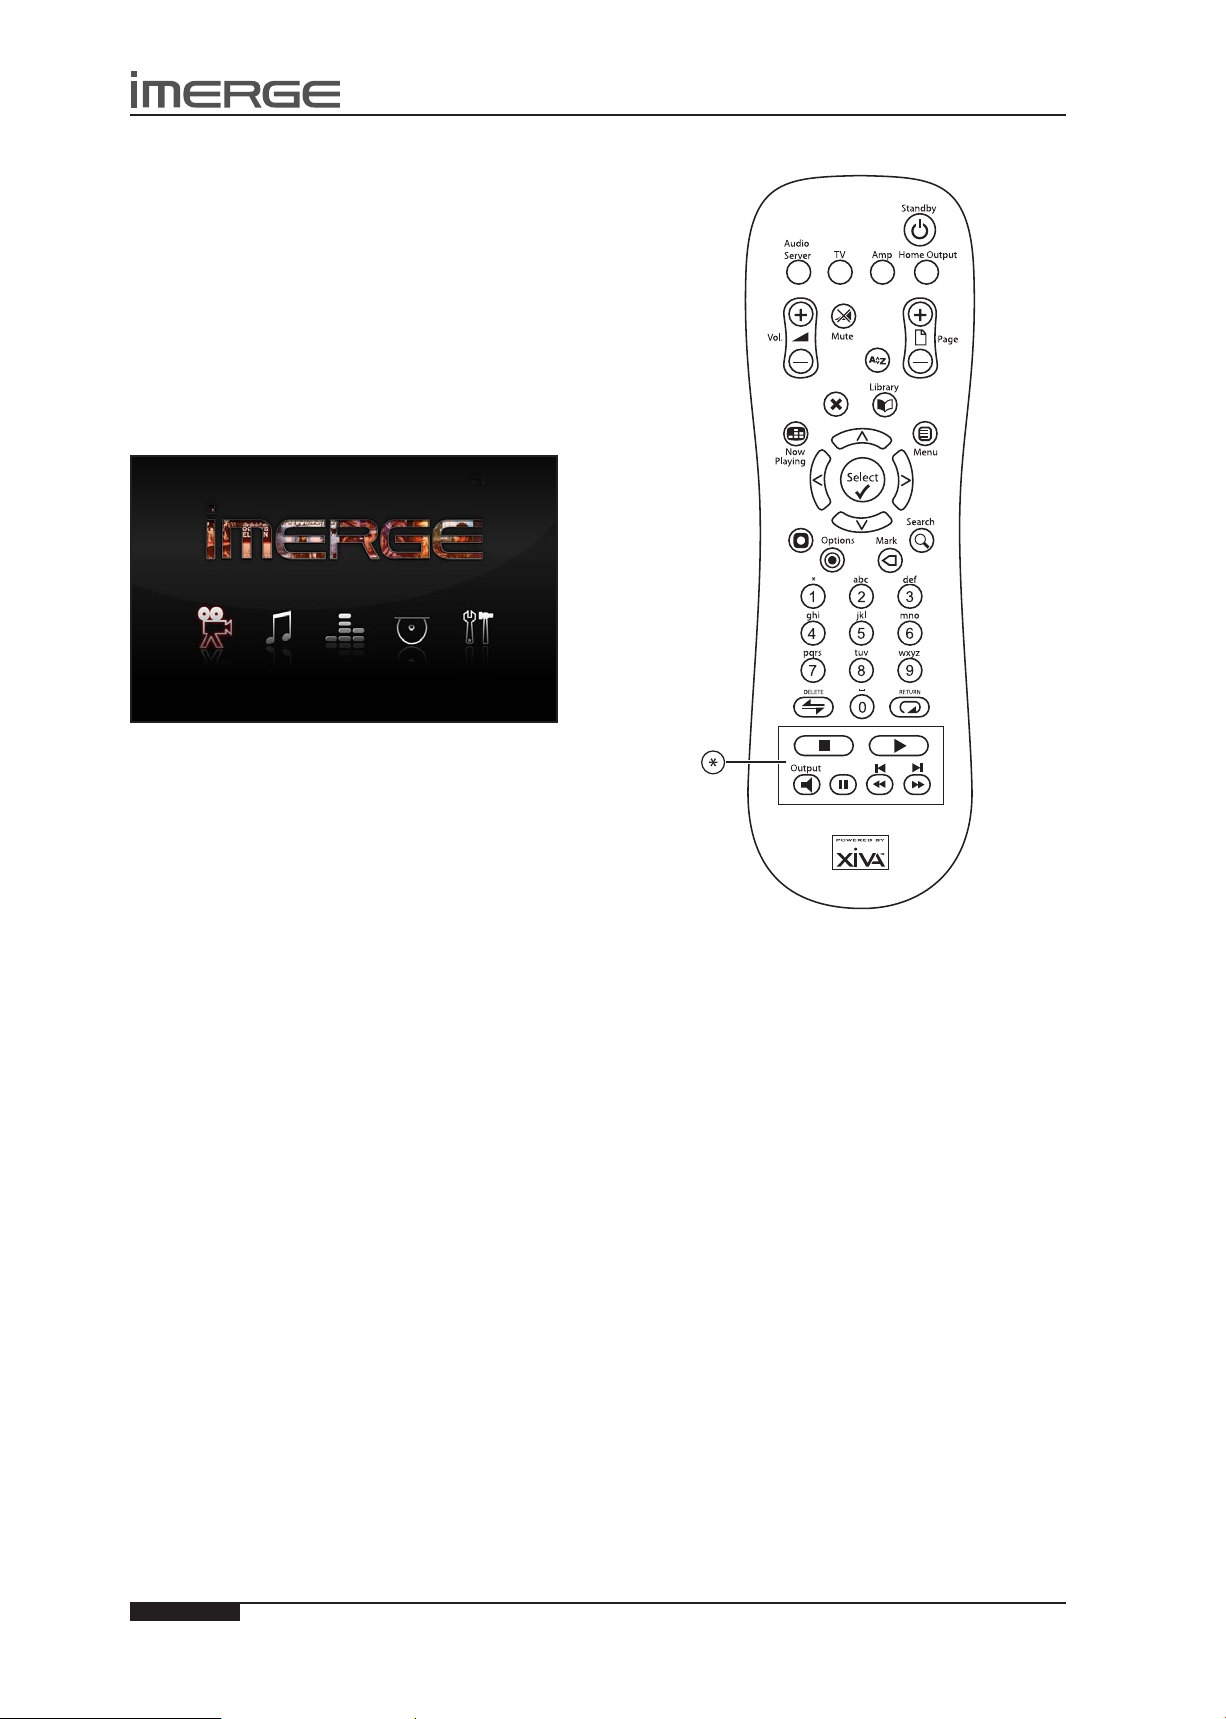
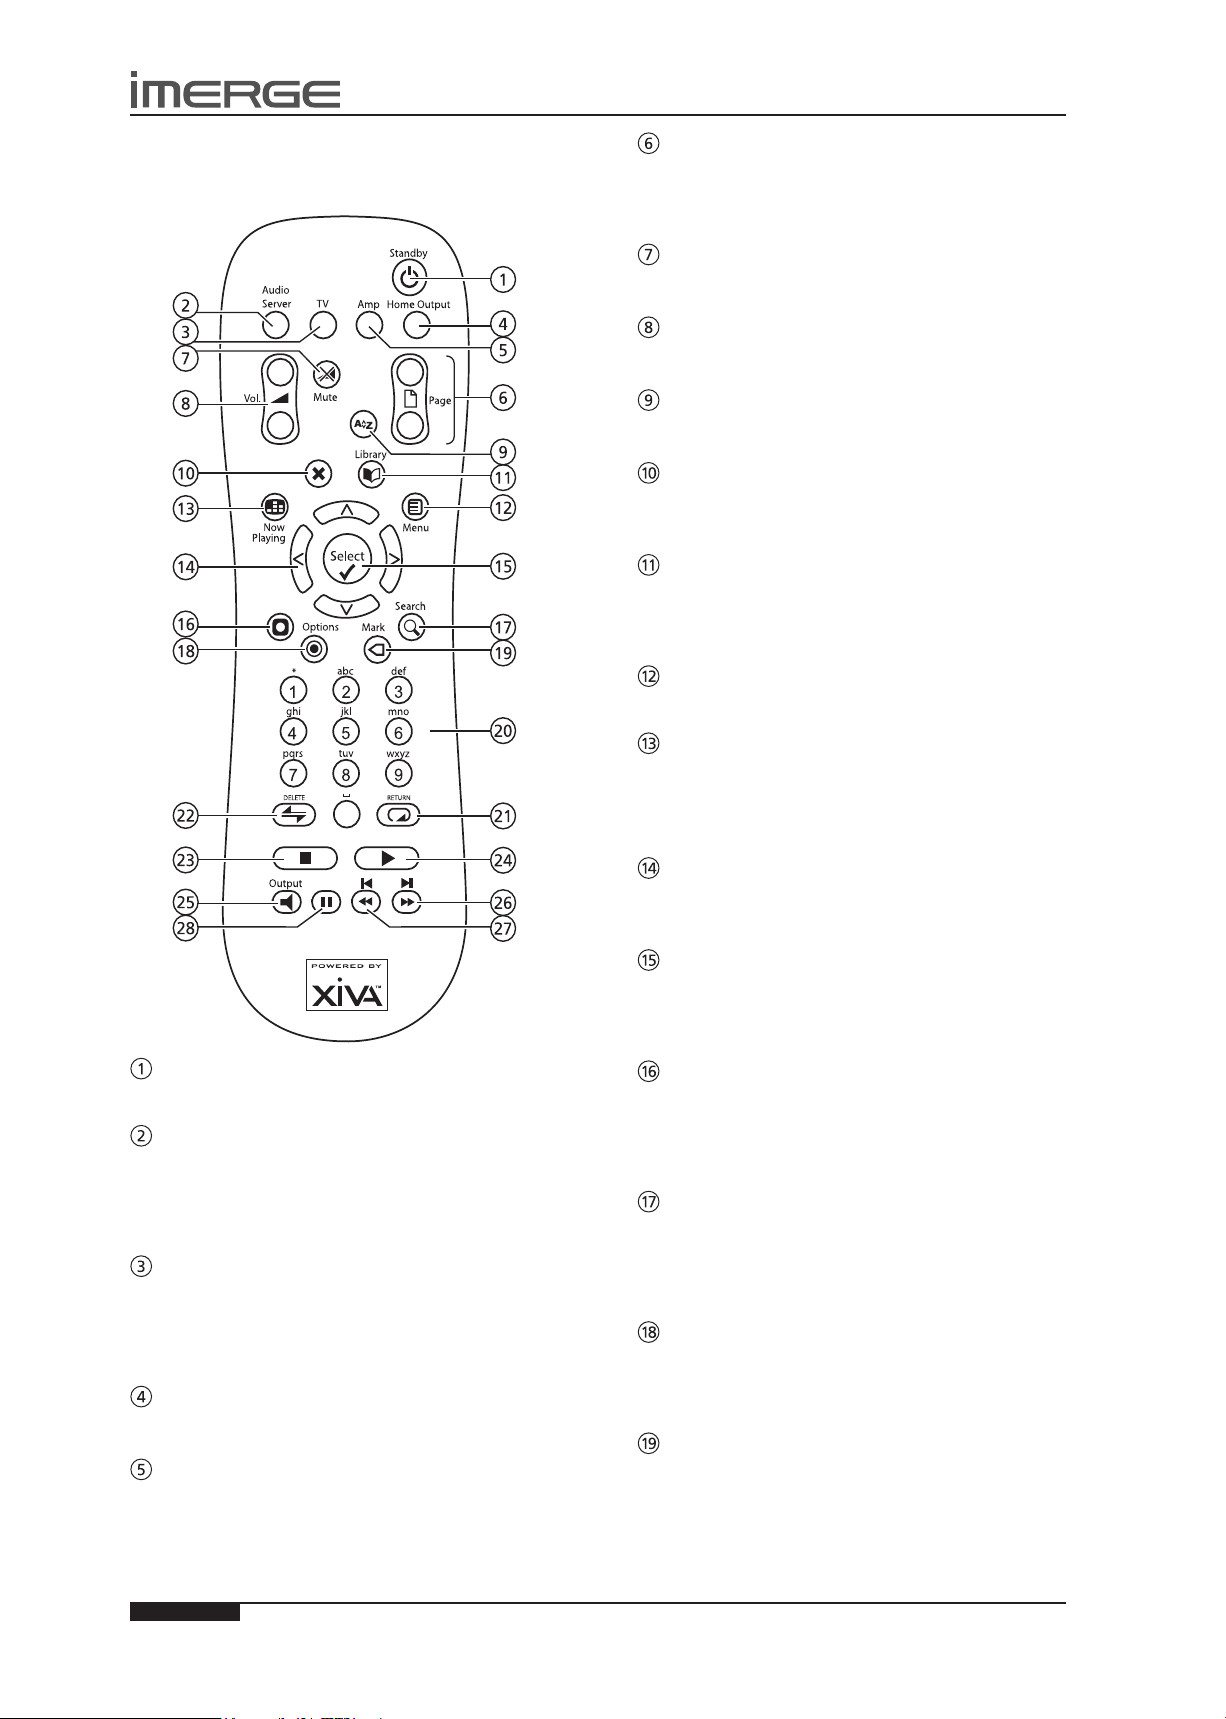
THE REMOTE CONTROL HANDSET
The following diagram explains the function of the keys
on your MediaServer remote control handset:
G
These keys are used to scroll through menus by page.
When editing text, these keys are used to change the
character set.
PAGE SCROLL keys
s MUTE key
This key is not used.
r VOLUME keys
These keys are not used.
[ ALPHABETIC SCROLL key
This key is not used.
P
The Cancel key is used to cancel an operation which you
no longer wish to continue.
CANCEL key
à LIBRARY key
The Library key is used to display either the Audio
Library or the Video Library, depending on which library
was most recently navigated.
J
Press this key to display the Home Page.
MENU key
;
This key is not used.
STANDBY key
AUDIO SERVER key
Press this key to select the MediaServer as the device to
be controlled. For more information about using this
key, see the section titled Conguring Your Remote to
Control Other Devices on page 19.
TV key
Press this key to select the TV as the device to be
controlled. For more information about using this
key, see the section titled Conguring Your Remote to
Control Other Devices on page 19.
HOME OUTPUT key
Press this key to select the Home Output.
AMP key
Press this key to select the Amp as the device to be
controlled. For more information about using this
key, see the section titled Conguring Your Remote to
Control Other Devices on page 19.
•
The Now Playing key is used to view the Now Playing
screen. In addition, when playing a movie, the Now
Playing key switches the display between the full screen
movie and the Now Playing screen.
NOW PLAYING key
NAVIGATION S,T,U,V keys
The navigation keys are used to move up, down, left or
right through the menu pages.
O
Select is used to activate the currently highlighted
option. When browsing the libraries this key will start
playback of the selected item.
The Action key performs different tasks depending on
the screen you are currently viewing. For example, on
most Audio Library screens, this key is used to add the
highlighted selection to a playlist.
The Search key can be used to search for items in the
media libraries. If pressing this key has no effect, then
the search function cannot be used on the current
screen.
Press this key on any library screen to view a list of
available options. If pressing this key has no effect, then
there are no options available on the current screen.
SELECT key
M
ACTION key
9
SEARCH key
ä
OPTIONS key
p MARK key
This key is used in the media libraries to select multiple
items and then perform an action on them collectively.
For more information about using the mark function
please refer to page 22 (Audio Library) and page 30
(Video Library).

19
USER GUIDE
© Copyright Imerge Ltd 2009
Page
MS1 MediaServer / MediaPlayer
NUMERIC (0 to 9) keys
The numeric keys can be used as follows:
In an Admin UI library you may jump to an item in •
the list that begins with one of the letters specied
at the top of each key.
In text entry mode these keys can be used as an •
alphanumeric key pad (similar to a mobile phone).
R
The Repeat key has the following functions:
The Shufe key has the following functions:
During playback the Stop key halts playback on the
currently selected output of the MediaServer.
REPEAT (RETURN) key
During music playback this key toggles the repeat •
play setting on the MediaServer.
In text entry mode this key can be used to perform •
a carriage return.
Q
SHUFFLE (DELETE) key
During music playback this key toggles the random •
play setting on the MediaServer.
In text entry mode this key can be used to delete •
characters.
g
STOP key
a
The Play key can be used to resume playback on the
currently selected output of the MediaServer.
Press this key to change the currently selected output.
When this key is pressed briey during playback, play
restarts at the beginning of the next track or chapter.
When the key is held for a longer period of time the
music or movie will fast forward at high speed.
When this key is pressed briey during playback, play
restarts at the beginning of the current track or chapter.
A second brief press moves to the beginning of the
previous track or chapter. When the key is held for a
longer period of time the music or movie will rewind at
high speed.
Press the pause key to interrupt playback temporarily.
PLAY key
N
OUTPUT key
c e
key
d f
key
h
PAUSE key

20
USER GUIDE
© Copyright Imerge Ltd 2009
Page
MS1 MediaServer / MediaPlayer
CONFIGURING YOUR REMOTE TO
CONTROL OTHER DEVICES
The TV and Amp keys on the remote control may be
individually congured to control a range of televisions
and ampliers from well known manufacturers.
Conguring the Remote to Control your
Television
Press the • TV and OSelect keys simultaneously; hold
them down for 1 second.
The TV key will remain lit for 20 seconds; the
conguration process must be completed during this
time.
Enter the 3 digit numeric code matching the •
manufacturer of your television from the list in
Remote Control Codes on page 41.
Press the • TV button again.
The TV key will blink twice to indicate that the
conguration has been accepted. If the TV key does not
blink, begin the process again, taking care to enter the
number exactly as printed in the list. If the television is
switched on during the conguration process, entering
the correct code will cause the television to go into
standby.
To congure the remote to control your amplier, follow
the above procedure, pressing the AMP key in place of
the TV key, and using the appropriate numeric code for
your amplier.
REMOTE CONTROL USE IN A MULTIROOM
SYSTEM
Your MediaServer remote control can be congured so
that every button press indicates to the system which
output is to be controlled. This means that whenever
infrared is received by the MediaServer the TV display
will automatically switch to controlling the appropriate
output.
Conguring the Remote with a Default Output
Press the • Audio Server and OSelect keys
simultaneously; hold them down for 1 second.
The Audio Server key will remain lit for 20 seconds; the
conguration process must be completed during this
time.
Enter the 3 digit code corresponding to the output •
you would like to control (valid congurations are
listed in Appendix A). For example, to set output 2
as your default output press:
0, 0, 2
Press the • Audio Server button again.
The Audio Server button will blink twice to indicate
that the conguration has been accepted. If the Audio
Server button does not blink twice begin the process
again, taking care to enter the number correctly.
Pressing any navigation key on the remote should
now cause the MediaServer to switch to the correct
output. The remote control can still be used to control a
different output in the normal way; pressing the Home
Output key will return it to controlling the default
output.
USING THE REMOTE TO QUICKLY FIND
WHAT YOU WANT
Scrolling
If you have a lot of media, nding the particular item
you want can be tedious so we’ve introduced the
concept of SpeedScrolling.
When presented with a list of items, if you press •
the U or V keys on the remote control, initially the
highlight will scroll fairly slowly up or down.
If you keep the button pressed, the list will switch to •
scrolling a page at a time.
Continue to keep it pressed, and the list will change •
to an alphabet, and the highlight will scroll through
that. This alphabet represents the initial letters of
the items in the list.
Once you’ve selected a letter, you can use the slow-•
then-fast scrolling to move through the list of all
the items that start with that letter.
Scrolling in the Admin User Interface
When navigating a list in the Admin User Interface you
can use any of several methods.
Use the •
item at a time.
Use the •
page at a time.
Press the key corresponding to the rst letter of the •
item you’re looking for. So if you were looking for
an item that started with the letter F, you’d press
the 3 key on the remote three times. The list will
jump to the rst entry starting with that letter.
Press the • [ Alphabetical Scroll key to open a
popup list showing the alphabet. This alphabet
represents the initial letters of the items in the list.
Use the above scroll keys to restrict the list to items
that start with one particular letter.
U
or V keys to move the highlight one
G
Page Scroll keys to step through the list a

21
USER GUIDE
© Copyright Imerge Ltd 2009
Page
MS1 MediaServer / MediaPlayer
SWITCHING ON AND OFF
To switch on, press the •
After a brief period, the unit will switch on, the
Power LED will glow green and the user interface
will display the Menu screen.
Your MediaServer is designed to remain switched on
continuously. However, if you are not planning to use it
for an extended period, you may want to switch it off.
To switch off, press the •
panel. After a brief period, the unit will switch off
and the Power LED will go red.
If the MediaServer is switched off, any connected
MediaPlayers will be disconnected, but can still play
DVDs and audio CDs using their slot loading drives.
If you are using a XiVASafe XS1e 1Tb external storage
unit which has its power switch in the middle (Auto)
position, it will power down along with the MS1 and
power up again when you switch the MS1 on.
Switching Off with the Remote Control
Use the • S and T keys to highlight the ‚ Set Up
icon and press the O Select key.
Use the • S and T keys to highlight the Shutdown
button.
Press the • Shutdown or Restart button, as required.
Note To switch the unit on again, use the ; button on
the front panel.
Emergency Shutdown of the MS1
Holding down the ; button on the front panel for 5
seconds will force the unit to shut down immediately.
This must only be performed if the unit becomes
unresponsive and cannot be shut down correctly. Data
corruption may occur as a result of improper shutdown.
Note: If you have any MediaPlayers connected, should
any one of the units in the networked system be
forcibly shut down, all the units in the system should be
restarted.
SHUTTING DOWN EXTERNAL STORAGE
XiVASafe XS1e (1Tb)
This unit does not require any special procedure to shut
down. If the power switch on the rear is set to the
middle (Auto) position, the XS1e will shut down when
the MS1 does, and power up when the MS1 is switched
back on.
If you need to power it down separately, simply turn it
off using the power switch on the rear.
Note: If you need to exchange one XS1e for another, you
must power the MS1 down whilst you do so.
XiVASafe XS3i (3Tb) and XS6i (6Tb)
These units must be shut down in a controlled fashion in
one of two ways.
Simplest is to use the front panel display on the XiVASafe
unit.
;
button on the front panel.
;
button on the front
Press the • button to enter the front panel menu.
Use the • and arrows to scroll the menu.
Note that the display can sometimes be rather slow to
respond to the buttons being pressed.
Scroll to • Reset/Shutdown and press
Scroll • down to Shutdown and press
Press to select • Yes and press
The XiVASafe unit will shut down.
To turn it back on, switch the single power button on the
rear of the unit off and then back on again. Note that
there are three power switches on the rear of the unit.
The one concerned in this case is on the left rear of the
unit as you look from the front. The other two control
the two individual power supply units, and must not be
touched.
The second way is by using your browser.
Enter the Admin IP address into the address panel •
of your browser in the format http://xxx.xxx.xxx.xxx.
Note that the XiVASafe unit has 2 IP addresses, one for
Admin purposes and one for your MediaServer to access
the libraries. When shutting down the XiVASafe unit,
you should use the Admin IP address.
Click Maintenance in the left-hand panel. You will •
be prompted to log in. The username is admin and
the password is en91n3.
Once you’re logged in, click Shutdown, and then •
Shutdown on the conrmation screen.
The XiVASafe unit will shut down. You should switch off
the main power switch on the rear of the unit once the
lights on the front have all gone off.
XiVASafe Emergency Shutdown
If you really have to shutdown as quickly as possible, use
the single switch on the back of the unit. As you look at
the front of the XiVASafe unit, this switch is at the left
rear of the unit. This initiates a controlled shutdown in
which any cached data is written to disk before the unit
powers down.
The other two power switches each control one of the
hot-swappable power supplies. They are simple on-off
switches, and using them to power the unit down will
cause any data held in memory to be lost.

22
USER GUIDE
© Copyright Imerge Ltd 2009
Page
MS1 MediaServer / MediaPlayer
USER INTERFACES
Your MS1 MediaServer / Client can play high quality audio or video from a networked external storage device or from its disc
slot. By combining a MediaServer with one or more Clients as shown below, you can direct different outputs to a number of
channels, providing entertainment throughout your home.
With unlimited external storage available, your MediaServer can store large libraries of DVDs and CDs, and play them back
at the touch of a button. Simple, intuitive, on-screen menus guide you to lists of media presented in a logical and helpful
manner.
Two separate video outputs allow you to watch a movie while still accessing the screens controlling the output. Note that
this secondary, controlling display, shows the Admin User Interface only, and even though there is an Exit Admin button on
the Main Menu, it doesn’t switch you to the TV User Interface.
GRAPHICAL USER INTERFACES
The equipment is provided with an advanced graphical user interface, which can be displayed on televisions throughout
your home and controlled using the supplied remote control or a correctly-programmed third-party device such as a Philips
Pronto™ or an iPhone™ or iTouch™ with Imerge Controller installed. In addition to the television user interface, the
equipment can also display especially constructed user interfaces on touch panel displays and computer screens. The user
interfaces are used to control the recording, cataloguing and playback of your music and movies.
The Video Screens
Your MediaServer has two video outputs (Digital and Analogue) through which a DVD can be played. Should you prefer, a
TV connected to the Analogue Out connections can be used to display the MediaServer’s TV User Interface in order to control
output on the Digital Out connection.

23
USER GUIDE
© Copyright Imerge Ltd 2009
Page
MS1 MediaServer / MediaPlayer
USER INTERFACES OVERVIEW
All the user interfaces operate in a similar fashion to
each other, and each is briey introduced in the next few
pages. The user interfaces are the same for both MS1
Server and Client
TV USER INTERFACE
Home Page
The main functions of the system are accessible via the
Home Page. The Home Page is the rst screen to be
displayed when your unit is switched on.
Alternatively:
From any screen of the TV User Interface, press the •
J
Menu key on your remote control.
The Home Page will be displayed.
for a PIN which is 1234 by default. The display will
change to the Admin UI. You can change the PIN from
the ‚ Set Up menu or using the Admin UI.
To return to the TV UI, from the Admin Main Menu,
M
press
Exit Admin.
Use the S,T,U and V keys on the remote control to
step through the options on any screen.
The Home Page options available are as follows:
� Video Library
The Video Library provides access to all of the movies
you record onto the external storage device attached to
your MediaServer.
„ Audio Library
The Audio Library provides access to all the music you
record onto the external storage device attached to your
MediaServer.
ˆ Now Playing
The Now Playing screen shows details of the album or
movie currently being played.
™ Disc Slot
The Disc Slot function is used to record or play DVDs and
CDs from the optical disc drive.
‚ Set Up
This option gives access to a number of extra functions,
including some conguration settings, via the Admin
User Interface.
For full details, please see SetUp Information on page 40.
The following options are available on the Set Up screen.
Settings
Allows you to change various attributes of the
installation, including TV settings, the language the UI
displays, recording settings and so on.
Look Up Media Details
If you have an Internet connection, you can use the
Look Up Media Details function to retrieve CD and DVD
details from the Internet.
On-line Update
Choosing this option will prompt the unit to check online
for any available software updates.
Shutdown / Restart
Shutdown or Restart the MS1.
RAID Information
This option has not yet been implemented.
TV VERSUS ADMIN UI
Most of the time you’ll be browsing your libraries,
playing movies or albums or recording new media,
and you will become most familiar with the TV User
Interface.
However, some extra functions, including some
conguration settings, are only accessible using the
Admin User Interface.
If you wish to use the Admin UI, highlight the ‚ Set Up
icon and press the O Select key. You will be prompted

USER GUIDE
MS1 MediaServer / MediaPlayer
THE REMOTE USER INTERFACE
Your MediaServer can display a user interface in the
Admin style on a computer connected to your home
network. This user interface is known as the Remote User
Interface.
The Remote User Interface gives you complete control
of your MediaServer using a keyboard and mouse rather
than the remote control. This can help make editing
items in the libraries easier and quicker and also allows
you to control your MediaServer from any computer
running on your home network.
Accessing the Remote User Interface
Using a computer on the network, open your •
browser and type the IP address or host name
of your MediaServer into the address bar (e.g.
http://192.168.0.1 or http://<hostname>).
Navigating the Remote User Interface
You will notice that the Remote User Interface is the
same as the Admin User Interface, with the addition
of some buttons. These buttons have been added to
allow you to perform actions normally executed with the
remote control, using a standard computer mouse.
When you rst connect to the Remote User Interface,
the Main Menu screen is displayed:
You will also notice that playback transport controls
are available on the left hand side of the Now Playing
screen:
You can initiate and control playback from the Remote
User Interface using these controls.
Note: If you make any changes to the Connection
Settings via the Remote User Interface, such as changing
the IP Address, you may need to reconnect using the
new connection details.
The screens of the Remote User Interface are like those
of the Admin User Interface with minor differences:
U
The •
and V buttons now appear wherever
there is a list that can be scrolled. You can use
your mouse to press these buttons when you
would usually use the U and V buttons on the
MediaServer remote control.
The functions of the main action keys on your •
MediaServer remote control, such as JMenu,
ä
Options, àLibrary and •Now Playing can be
accessed using buttons at the bottom of the screen.
When required to edit or enter text, the Remote •
User Interface will display the text entry screen
just as the TV User Interface does. However,
instead of using the alphanumeric keypad on your
MediaServer remote control, you can use your
computer keyboard to enter text and numbers.
CONTROL YOUR MS1 WITH YOUR iPhone™
OR iTouch™
You can control your MS1 using your iPhone™ or
iTouch™, using the Imerge Controller, which you can buy
from Apple through the iTunes Store.
Simply search for Imerge Controller.
Download the application and install it on your iPhone
or iTouch to give you instant control of your MS1 using
your iPhone or iTouch.
Once installed, go to iPod Settings and choose Imerge
Settings to insert the IP address of your MS1 and the
Output Zone you want to control.
Page
24
© Copyright Imerge Ltd 2009

MS1 MediaServer / MediaPlayer
RECORDING
You can make new recordings onto the MediaServer’s
external storage device by recording directly from CDs
and DVDs, using the disc slot.
Your MS1 can access the internet, using a broadband
internet connection, to automatically retrieve
information about the disc. CD information, such as
artist, album, track names and CD cover illustrations,
and DVD information, such as movie rating, director and
chapter titles are automatically downloaded and saved.
Note: In some countries the copying of material
protected by copyright law may require permission of
the copyright owners.
The system will only record unencrypted DVDs.
AUDIO RECORDING QUALITY
The system allows you to record music and store it in a
number of different formats:
MPEG-layer 3 (MP3)
You can record to MP3 at a number of different bit rates.
Higher bitrates give better quality but take up more
space on your MediaServer’s external storage device. By
default, the unit records music at 192Kb VBR MP3.
WAV (lossless uncompressed)
The WAV format is uncompressed, which gives the
highest possible quality, but takes up the most space.
Windows Media Audio (WMA)
WMA is a compression format similar to MP3. Again, the
higher the bitrate you choose, the better the quality and
the larger the resultant music les.
RECORDING SETTINGS
The units can be congured so that CDs & DVDs can be
recorded with minimal user interaction.
Press the •
Use the • S and T keys to highlight the ‚ Set Up
icon and press OSelect.
You will be prompted for a PIN, which is 1234 by default,
after which the display will switch to the Admin UI. The
PIN can be changed in the Admin UI.
Use the •
display the Set Up screen.
Choose User • Settings and press OSelect.
Choose • Recording Settings and press OSelect.
The Recording Settings screen is displayed:
J
Menu key to display the Home Page.
U
or V keys and press the OSelect key to
USER GUIDE
To enable fully automatic recording, the following
settings need to be congured:
Default Recording Quality
Choose between Uncompressed, MP3 128kb VBR, MP3
192kb VBR, MP3 320kb CBR, WMA 96kb and WMA 128kb
as the default recording quality for CDs.
Conrm Format
This option allows you to specify whether the unit
displays the Recording Quality options each time a CD is
recorded. By default this option is disabled.
Auto Record
Enable Auto Record so that each time you insert a disc
into the slot it will begin recording automatically.
Auto Record Eject
Enable the Auto Record Eject function to have discs
automatically ejected once recording has nished.
Note: Please ensure there are no obstructions in front of
the unit. If the slot is obstructed when the unit tries to
eject a disc, the drive can be damaged.
Your unit is now congured for automatic recording.
Place a CD or DVD in the slot.•
The unit will begin recording automatically. When the
recording is complete, the disc will be ejected from the
unit. To record another disc, simply place it in the slot.
The unit will automatically attempt to retrieve
information about the disc from the internet. If you do
not have an internet connection or if information is not
available for a particular disc, the movie or album will be
assigned a name such as Album 21, Artist 35 or Movie 7
etc. Accurate information can be entered manually at a
later time.
RECORDING A CD OR DVD
Place a CD or DVD in the slot.•
The Disc Drive screen will display information about the
disc you have inserted.
© Copyright Imerge Ltd 2009
Highlight the Record button and press •
O
Select.
Page
25

USER GUIDE
MS1 MediaServer / MediaPlayer
The Recording screen will display details of the disc in
the slot and recording progress.
When recording is nished, the status, displayed at
the top of the screen, will change from In Progress to
Completed. The movie or album will now be available in
the Audio Library or Video Library.
Press the • Eject button to remove the disc.
LOOK UP MEDIA DETAILS
If there is no internet connection when you record a disc,
you can use Look Up Media Details from the Admin UI
Main Menu later to retrieve any missing details from the
Internet.
Switch to the Admin UI as detailed above.•
U
Use the •
display the Set Up screen.
Use the •
Media Details option.
The Look Up Media Details screen is displayed:
or V keys and press the OSelect key to
U
or V keys again to select the Look Up
THE DISC PLAYER
Your MS1 can play CDs and DVDs directly from the disc
slot. It therefore functions not only as a music and video
system, but also as a CD and DVD player.
PLAYING A CD FROM THE DISC PLAYER
Place a CD in the disc slot.•
Press the •
display the Home Page.
Use the •
Press the •
The Disc Drive screen will display information about the
CD you have inserted.
Highlight the Play Disc button and press the •
O
The user interface will display the Now Playing screen
and the disc will play through the audio outputs.
J
Menu key on your remote control to
S
or T keys to select the Disc option.
O
Select key.
Select key.
Page
For more information about the Now Playing screen and
Press the •
M
Start key to begin.
playback controls see the sections beginning on page 30.
PLAYING A DVD FROM THE DISC PLAYER
Place a DVD in the disc slot.•
Press the •
display the Home Page.
Use the •
Press the •
The Disc Drive screen will display information about the
DVD you have inserted:
The television screen will automatically switch to display
the movie as opposed to the user interface. You can
return to the user interface at any time by pressing
the •Now Playing key on the remote control. For
more information about playing movies see the section
beginning on page 31.
26
J
Menu key on your remote control to
S
or T keys to select the Disc option.
O
Select key.
© Copyright Imerge Ltd 2009

MS1 MediaServer / MediaPlayer
USER GUIDE
THE AUDIO LIBRARY
The television user interface has been designed to allow easy navigation through the Audio Library and therefore give quick
and easy access to your complete music collection in a number of different ways. Each screen in the Audio Library is carefully
constructed to provide the most important information about the items you are viewing.
The illustration below shows how the Audio Library screens are structured and describes each part of the screen, the
information displayed and the functions available. The example shows the Albums screen for the album rodrigo y g abriella,
however, all navigation screens in the Audio Library are similar in construction.
© Copyright Imerge Ltd 2009
Page
27

28
USER GUIDE
© Copyright Imerge Ltd 2009
Page
MS1 MediaServer / MediaPlayer
PLAYING MUSIC IN THE AUDIO LIBRARY
In most screens you can use the S key repeatedly to
highlight the navigation tabs on the left-hand edge of
the screen, and then the U and V keys to select the tab
you require. If the tabs are not visible, press the P key
to return to the previous screen.
Displaying the Audio Library
S
Use the •
the Audio Library icon and press OSelect.
The Audio Library screen
Browsing the Audio Library
You can browse your Audio Library by Album, Artist,
Genre, Playlist, Year or Era. For most of these, the
procedure is sufciently similar that only one description
is necessary. We will describe browsing by Genre as a
typical example, and will highlight any differences as we
come to them. Browsing by Playlist will be dealt with
seperately.
Browsing the Audio Library by Genre
Use the •
in the Audio Library Menu.
Press the •
or T keys on the Home Page to highlight
U
or V keys to highlight the Genres option
O
Select key to display the Genres screen.
O
Press •
Select to play all the albums in this genre.
Alternatively, you can display all the artists, albums or
tracks that make up this genre, or add the genre to a
playlist.
Note that if you have drilled down to track level, for
example, and you play or add, you will only play or add
the chosen track, not any bigger grouping like album or
artist.
If you have a large collection, you can scroll rapidly •
through the list by holding down the U or V keys.
After a short while, the display will scroll a page at
a time.
If you’re scrolling a list and continue to hold •
down that key, the display will switch to a simple
alphabet, allowing you to select the rst letter
of the item you want. The display will then be
restricted to just those items that start with that
letter.
Browsing Playlists in the Audio Library
Playlists allow you to create your own selections of tracks
and save them to be played later when you want the
same selection. For more information about creating a
playlist refer to Creating a new Playlist on page 29.
From the Home Page, open the Audio Library.•
U
Use the •
option.
Press •
The TV screen will display the playlists in your Audio
Library:
or V keys to highlight the Playlists
O
Select to to show all playlists.
Use the •
genres.
Press the •
S, T, U
and V keys to step between
O
Select key to select a genre.
Note: If you have not yet created any playlists the list will
be empty and you will just see [Entire Library] listed.
Press the •
Press the •
begin playback immediately, or press Add Playlist
to add all tracks in the selected playlist to the Play
Queue.
U
or V keys to step between playlists
O
Play key on your remote control to
PLAYING THE ENTIRE LIBRARY
In addition to the ability to select individual items in the
Audio Library, you can also choose to play your entire
music collection with a single button press.
To Play the entire Library
From the Audio Library screen, select Playlists.•
U
Use the •
entitled [Entire Library] and press OPlay.
or V keys to highlight the playlist

29
USER GUIDE
© Copyright Imerge Ltd 2009
Page
MS1 MediaServer / MediaPlayer
THE PLAY QUEUE
Any item in your Audio Library can be selected for
playback in one of two ways:
Press the •
either Play Album to begin playback immediately or
Add album to add it to the Play Queue.
If you Play the album, anything being played at that •
time stops and the new selection is played immediately.
If you choose • Add album, the selected item is added
to the end of the play queue. For example, if you
are currently playing an album, the item you have
selected will not begin playing until that album has
nished.
Displaying the Play Queue
While music is playing, highlight the •
Playing tab and press OSelect.
O
Select key to see the details, then select
•
Now
You can change the name of the playlist by highlighting
it in the list of playlists and pressing the Edit Playlist
button.
Use the •
Queue option and press OSelect.
U, V
, U and V keys to highlight the Play
Removing Selections from the Play Queue
Use the •
would like to remove from the queue.
Use the •
Selection option and press OSelect.
U
or V keys to highlight the selection you
S
and T keys to highlight the Remove
Saving the Play Queue as a Playlist
You can save a play queue as a playlist so that you can
listen to the same collection of music at a later time.
Use the •
Queue option and press OSelect.
Your current play queue will now be available as a
playlist in the Audio Library. The name will be Play
Queue and then the date and time the playlist was
saved.
S
and T keys to highlight the Save Play

30
USER GUIDE
© Copyright Imerge Ltd 2009
Page
MS1 MediaServer / MediaPlayer
THE NOW PLAYING SCREEN (AUDIO)
The illustration below shows the Now Playing screen when music is playing from the Audio Library. Whenever you select an
item in the Audio Library for playback, this screen is displayed. You can also skip directly to the Now Playing screen at any
time you have music playing, by pressing the •Now Playing key on your remote control. However, if the last item selected
for playback was a movie from the Video Library, the •Now Playing key will take you to the video Now Playing screen.
To return from the Now Playing screen to a previous one, use the V key to step out of the transport controls cluster and
then use the Skey to highlight one of the tabs to the left of the screen.
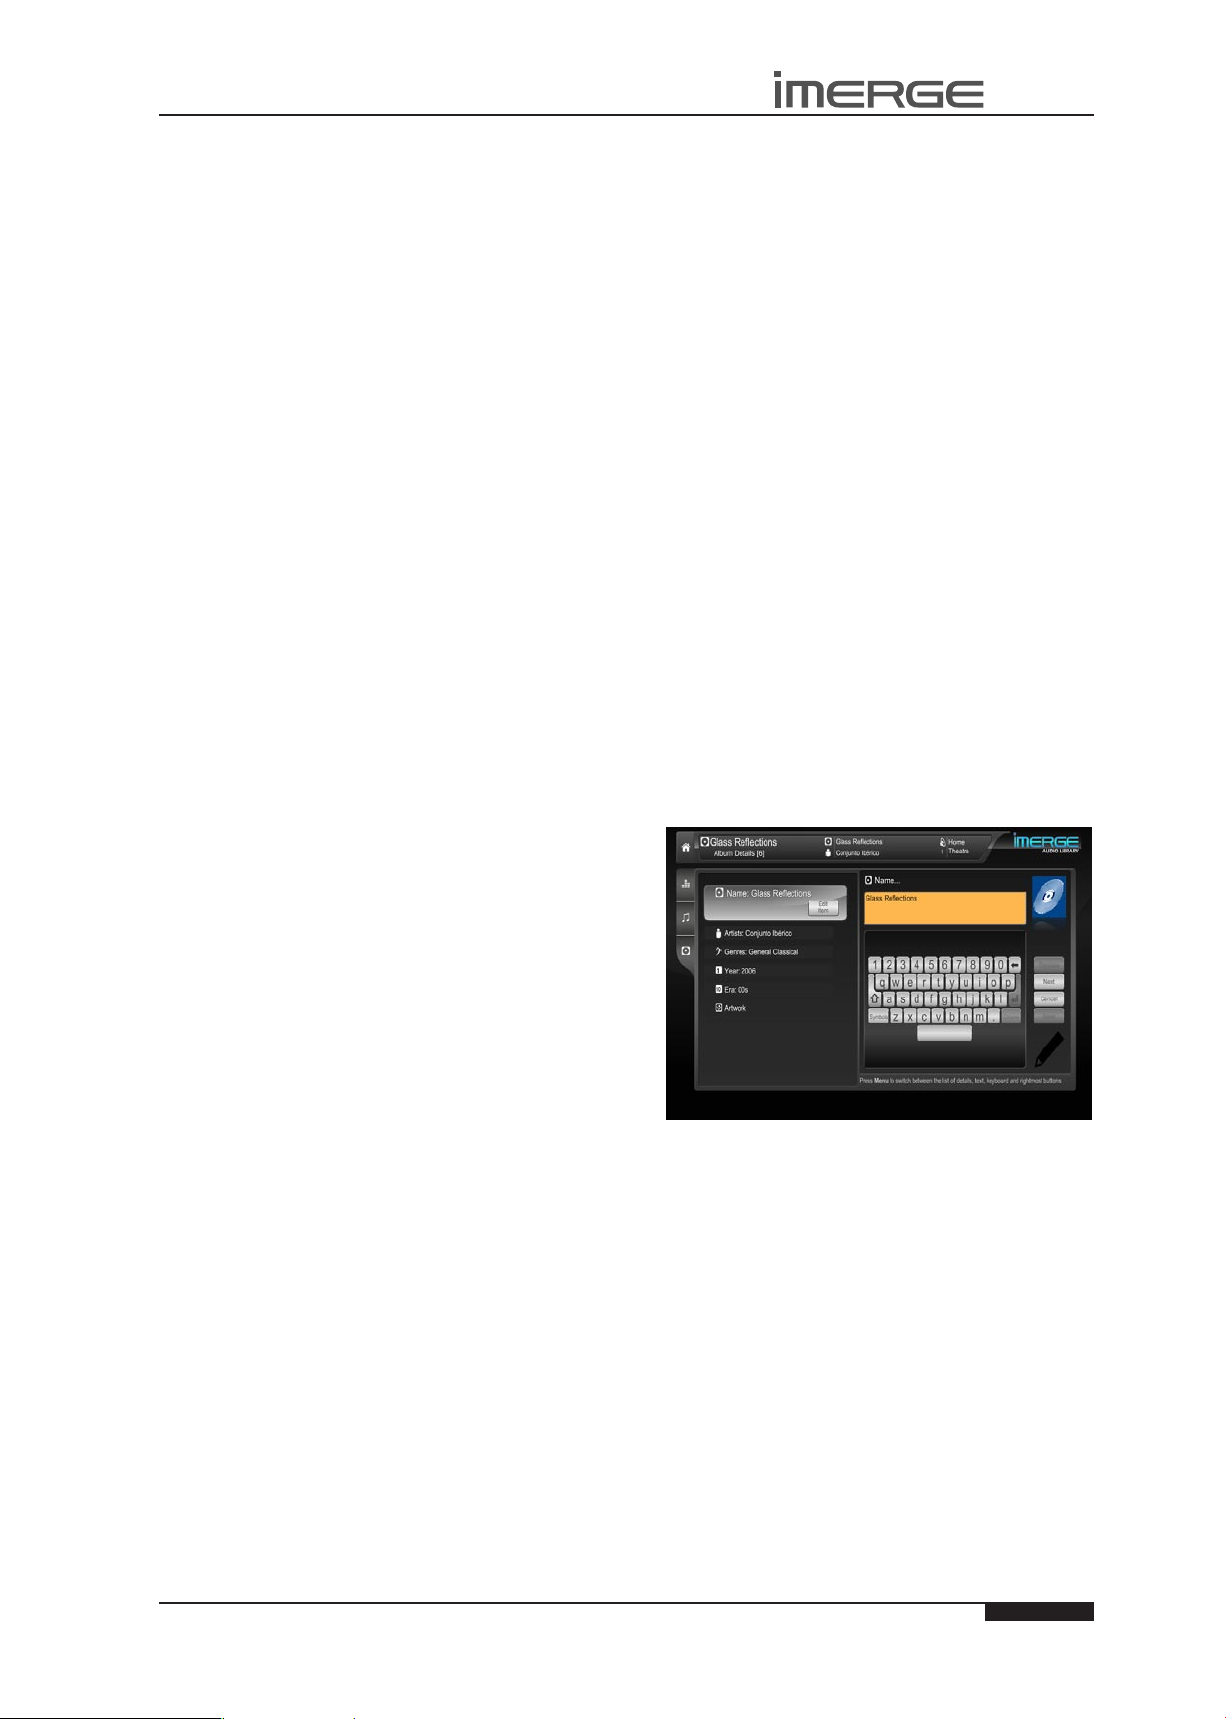
31
USER GUIDE
© Copyright Imerge Ltd 2009
Page
MS1 MediaServer / MediaPlayer
Controlling Audio Playback
Whether you are playing music from the Audio Library
or directly from the CD you can pause, stop and resume
playback as well as seek and skip tracks at any time.
To pause or stop play
Press the •
To resume play
Press the •
To skip to the next or previous track
Press the •
control.
To seek within a track
Hold down the •
control for a few seconds and release the key when
the seek begins.
Seek will begin at 4 times normal speed and x4 will be
displayed on the screen, along with the chapter number
and the time position.
To increase seek speed
Press and release the •
remote control again.
The seek speed will increase to 8 times normal speed and
the x4 on the screen will change to x8.
Repeat the above process to increase the speed further.
To resume normal speed playback
Press the •
Play resumes from the new position.
h
key to pause, g to stop play.
a
key on your remote control.
d f
a
e c
or
d f
key on your remote control.
key on your remote
e c
or
d f
key on your remote
e c
or
key on your
Shufe and repeat playback
You can play selections from the Audio Library in a
shufed order to add variety to your music. You can also
play selections repeatedly.
To shufe the playback order
Press the •
button and press OSelect to randomise the order of
the selections in the play queue.
Press the • Shufe button a second time to shufe
all of the tracks in the play queue. This will also
turn on repeat mode for continuous playback of all
tracks.
Press the • Shufe button a third time to disable
shufe.
To repeat the current selection
Press the •
button and press OSelect to repeat the currently
playing track.
Press the • Repeat button a second time to repeat the
entire play queue.
Press the • Repeat button a third time to disable
repeat.
The TV interface indicates whether shufe and repeat
are enabled.
V S
and T keys to highlight the Shufe
V S
and T keys to highlight the Repeat
LEAVING THE NOW PLAYING SCREEN
To navigate away from the Now Playing screen, either
press the J Menu key to return to the Home Page or use
the V key to step out of the transport controls cluster
and then use the Skey to highlight one of the tabs to
the left of the screen.
EDITING THE AUDIO LIBRARY
Your MediaServer labels the albums, artists and tracks
in your Audio Library with names which identify the
track you are listening to, and these help you locate
items when you are browsing through the Audio
Library.
If you have an Internet connection, the unit looks up
the CD information automatically from the Gracenote
Music Recognition Service. You can edit these names to
suit your own preferences.
If your MediaServer is on the same network as your
home computer, you can use your web browser to
access the Remote User Interface (see page 24) and
edit the details using that. This has the advantage
of allowing you to use your mouse and keyboard to
perform the editing.
Once any of these details has been changed, the album
will be ignored by the Look Up Album Details function,
so your changes will be retained permanently.
All editing operations are similar, so for an example,
we’ll discuss editing Album information.
Editing Album Information in the Audio
Library
Select • Audio Library and press the OSelect key.
Select • Albums and press the OSelect key.
Choose the album you want to edit from the list.•
Scroll to the• Edit Album button and press the
O
Select key
The following screen is displayed:
Use the •
attributes, text, keyboard and rightmost buttons.
Highlight the attribute you want to change and •
press the OEdit key.
Use the •
the keyboard and press the OSelect key.
When you’ve nished, highlight the •
and press the OSelect key.
If an album has several artists, or it could be classied
into multiple genres, press the
artist or genre, to separate them.
For example, suppose Gracenote returns a genre of
Indie for the album Cold Water Songs. To add extra
genres, edit the Genres attribute, scroll to the end of
the word Indie, then press the R Return key before
entering Indie Rock. Press R Return again and enter
Alt Country.
Note that on the Edit Album Details screen, multiple
J
Menu to switch between the list of
U, V, S
and T keys to select characters on
M
R Return key after each
Save button

32
USER GUIDE
© Copyright Imerge Ltd 2009
Page
MS1 MediaServer / MediaPlayer
genres are separated by a semi-colon, but when entering
them, you must use the R Return key, otherwise a new
genre consisting of all the words you entered will be
created.
When you have nished making changes to the album’s
details make sure you press the MSave key.
International Character Sets
Our user interfaces support a wide range of nonEuropean character sets, such as cyrillic and Chinese,
when used in the metadata. However, editing text
containing such characters can only be performed in the
Admin and Remote User Interfaces.
Selecting Album Artwork
Your MediaServer stores a number of generic cover art
images that can be applied to albums in your Audio
Library. You can also apply your own cover art or
artwork that has been downloaded from the Internet to
any item in the Audio Library.
If you were throwing a party, for instance, you could
make a playlist of all the music you might want to play,
so that you don’t have to think about choosing music to
play while the party is in full swing; your MS1 will just
keep playing whatever you’ve added to the playlist.
To create a new playlist, rst add all the albums you
want to the Play Queue - scroll down the list of albums
and for each one you want to queue up, press the Add
Album button.
Once you’ve built up your entire list, go back to the Now
Playing screen and press the Show button, which will
display the list of albums in the Play Queue.
Delete any unwanted selections, then Press the Save
Queue button to save the Play Queue as a playlist.
By default, the new playlist will be named Play Queue
with a datestamp, but you can change that. From the
list of playlists, select the new one and press Edit Playlist.
When you select Artwork as the attribute to edit, •
you’ll see a list of everything available on your MS1.
U, V, S
Use the •
Press the •
artwork with your chosen album. You will see the
thumbnail on the far right change to the newlyselected image.
Press the •
hand buttons and press the MSave key to save your
changes.
For information on uploading images from your
computer to the MS1, see the section entitled Importing
Files To Your MediaServer on page 36.
and T keys to scroll through it.
O
Select key to associate a piece of
J
Menu key to move across to the right-
PLAYLISTS
Just as you can display your music collection by Artist
or Genre, for example, you can also build your own
collections, called Playlists.
Use the J Menu key to switch between the left and
right panes and the buttons on the right. Enter the new
name and press the Save button to save it.
Admin User Interface Functions
A number of extra functions are accessible via the Admin
User Interface. To access these, select ‚ Set Up from the
Home Page. You will be prompted for a PIN, which, by
default, is 1234. The PIN can be changed in any user
interface. In the TV UI it’s available behind the ‚ Set Up
icon.
Deleting Items in the Audio Libraries
Deleting items can only be done via the Admin UI. To
delete an item, highlight it, then select äOptions and
nally select the Delete option.
For example, to delete a track in the Audio Library:
From the Admin UI Main Menu select• Audio Library.
Choose Tracks and then press the •
O
Select key.

33
USER GUIDE
© Copyright Imerge Ltd 2009
Page
MS1 MediaServer / MediaPlayer
Select the track you want to delete.•
Press the •
A conrmation screen will appear:
Press the •
Note: Any items you delete will be permanently erased
from your MediaServer’s external storage device.
Anything you delete by accident will need to be rerecorded.
ä
Options key and choose Delete track.
O
Yes key to conrm deletion of the track.
MARKING ITEMS IN THE AUDIO LIBRARY
The mark function can be used to select multiple items in
a list in the Audio Library. You can then perform a single
action on all the marked items rather than performing
the same action on each item individually.
For example:
To delete multiple albums from the Audio Library
On the Admin UI Main Menu select• Audio Library.
Highlight • Albums and press the OSelect key.
Highlight an album you wish to delete.•
Press the •
The mark symbol will appear next to the marked album:
p
Mark key.
Highlight an artist and press the •
A list of all the albums by the chosen artist is displayed.
Press the •
Press the •
Press the •
marked albums and press the OSelect key.
The mark function can also be used when adding
multiple Audio Library items to a Playlist.
The procedure is the same as for deleting multiple •
albums except that once you’ve marked the albums
you want to add to the playlist, you press the MAdd
To... key.
Note: If pressing the pMark key has no effect, then the
mark function is not available on the current screen.
ä
Options key and choose Mark all.
O
Select key.
ä
Options key again and choose Delete
O
Select key.
Now Playing Screen Options
There are a number of options available from the Now
Playing screen in the Admin UI when music is playing.
Press the •
control to display the Now Playing screen.
Press the •
The following screen is displayed:
•
Now Playing key on your remote
ä
Options key.
In the same way, mark the other albums you wish to
delete.
Press the •
marked albums and press the OSelect key.
If there are fewer than one hundred items in a list, you
also have the option to mark all of the items in a list,
without having to go through them individually.
For example:
To delete all the albums by a particular artist
On the Admin UI Main Mernu select• Audio Library.
Highlight • Artists and press the OSelect key.
ä
Options key and highlight Delete
Jump to album tracks
Use the •
Tracks.
Press the •
The tracklist for the currently playing album will be
displayed.
Jump to artist’s albums
Use the •
Albums.
Press the •
All albums by the currently playing artist will be
displayed.
Jump to genre’s artists
Use the •
Artists.
Press the •
All artists in the same genre as the currently playing
track will be displayed.
From this options screen, you also have the option to
edit album or track details. For instructions regarding
U
or V keys to select Jump to Album
O
Select key.
U
or V keys to select Jump to Artist’s
O
Select key.
U
or V keys to select Jump to Genre’s
O
Select key.
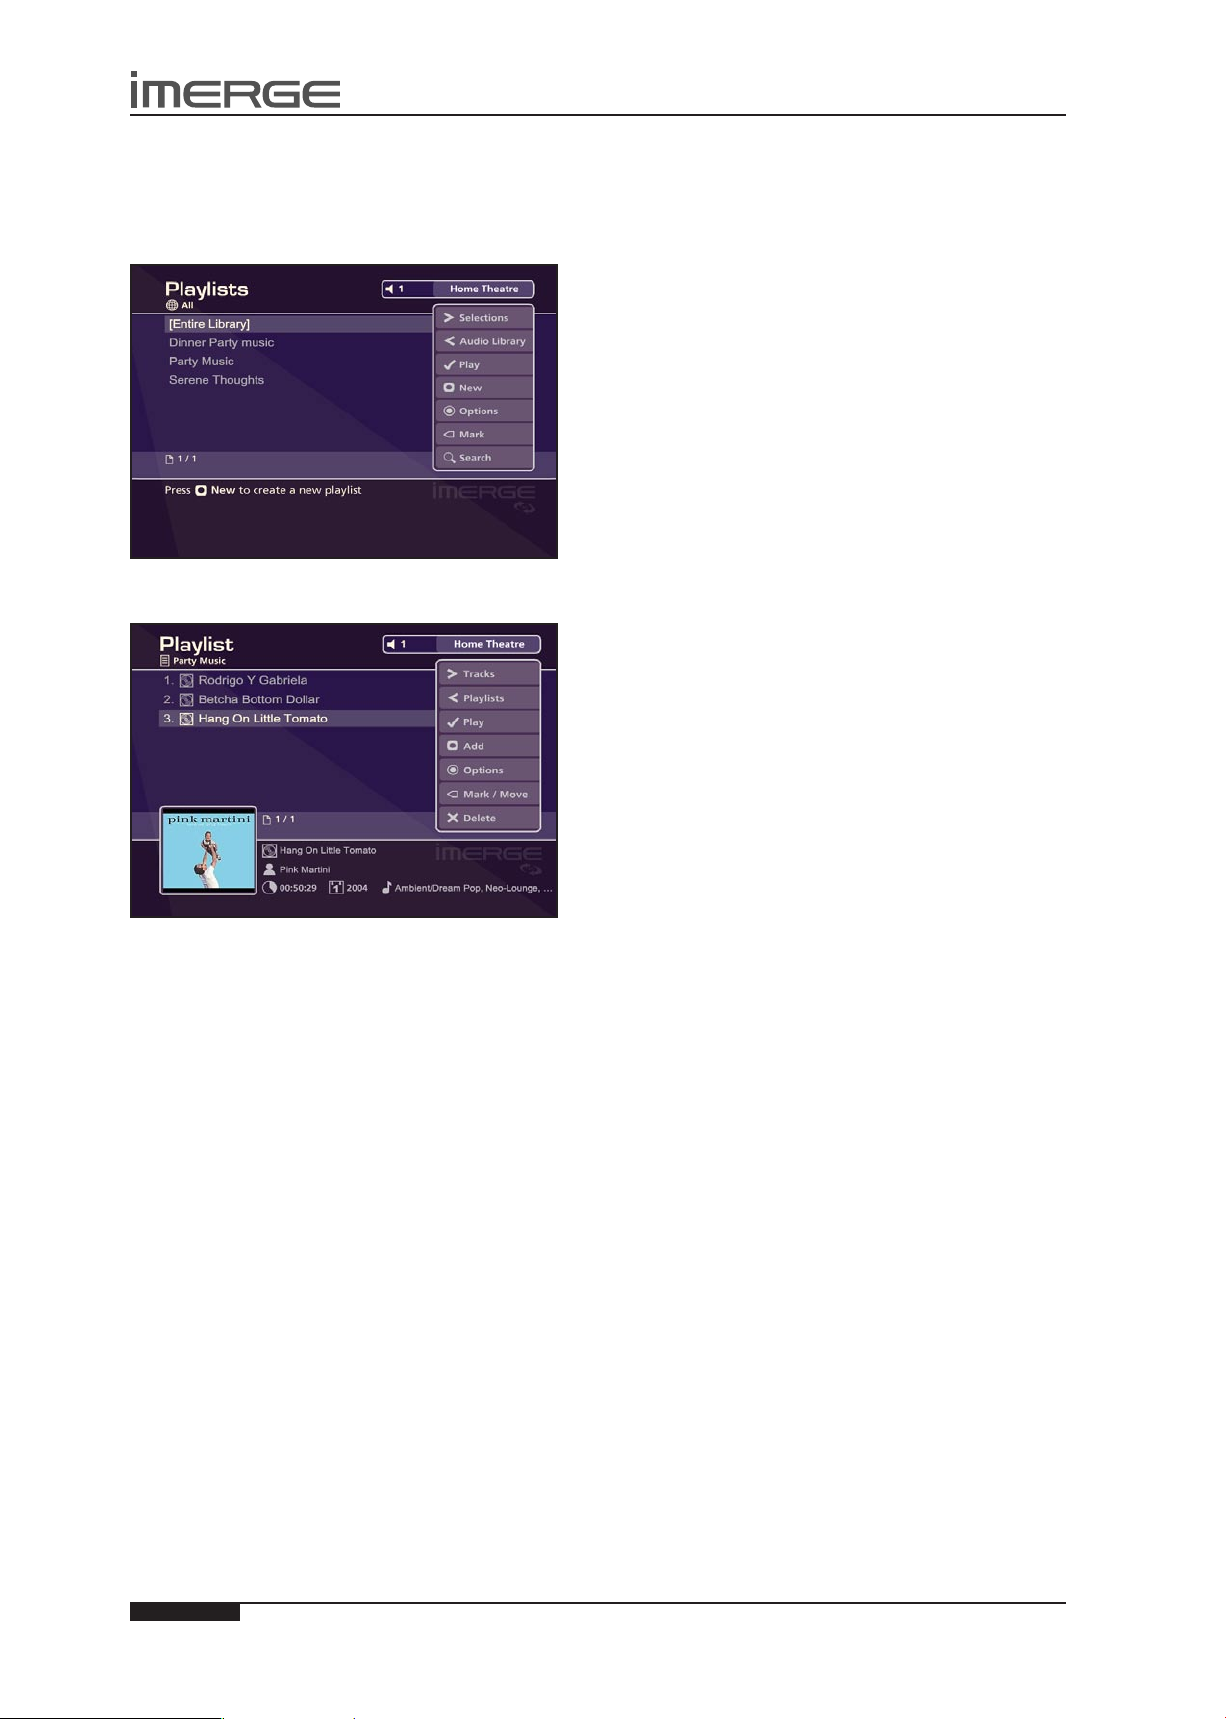
34
USER GUIDE
© Copyright Imerge Ltd 2009
Page
MS1 MediaServer / MediaPlayer
the use of these options, refer to the Editing the Audio
Library chapter on page 32.
EDITING PLAYLISTS
On the Admin UI Main Menu, select Audio Library, and
then Playlists.
To see the items that make up the playlist, choose
Selections.
To move an album up or down the list, click p Mark
twice. The little arrow will appear in outline for the rst
click, and solid white for the second. Then use the U or
V
keys to move the album.
To delete an entry from your playlist, click P Delete.
Returning to the TV User Interface
From the Admin UI • Main Menu, select Set Up, then
Settings.
Select • User Interface Settings, then Style.
Edit the • Style and select TV User Interface.
The unit will switch to the TV User Interface.
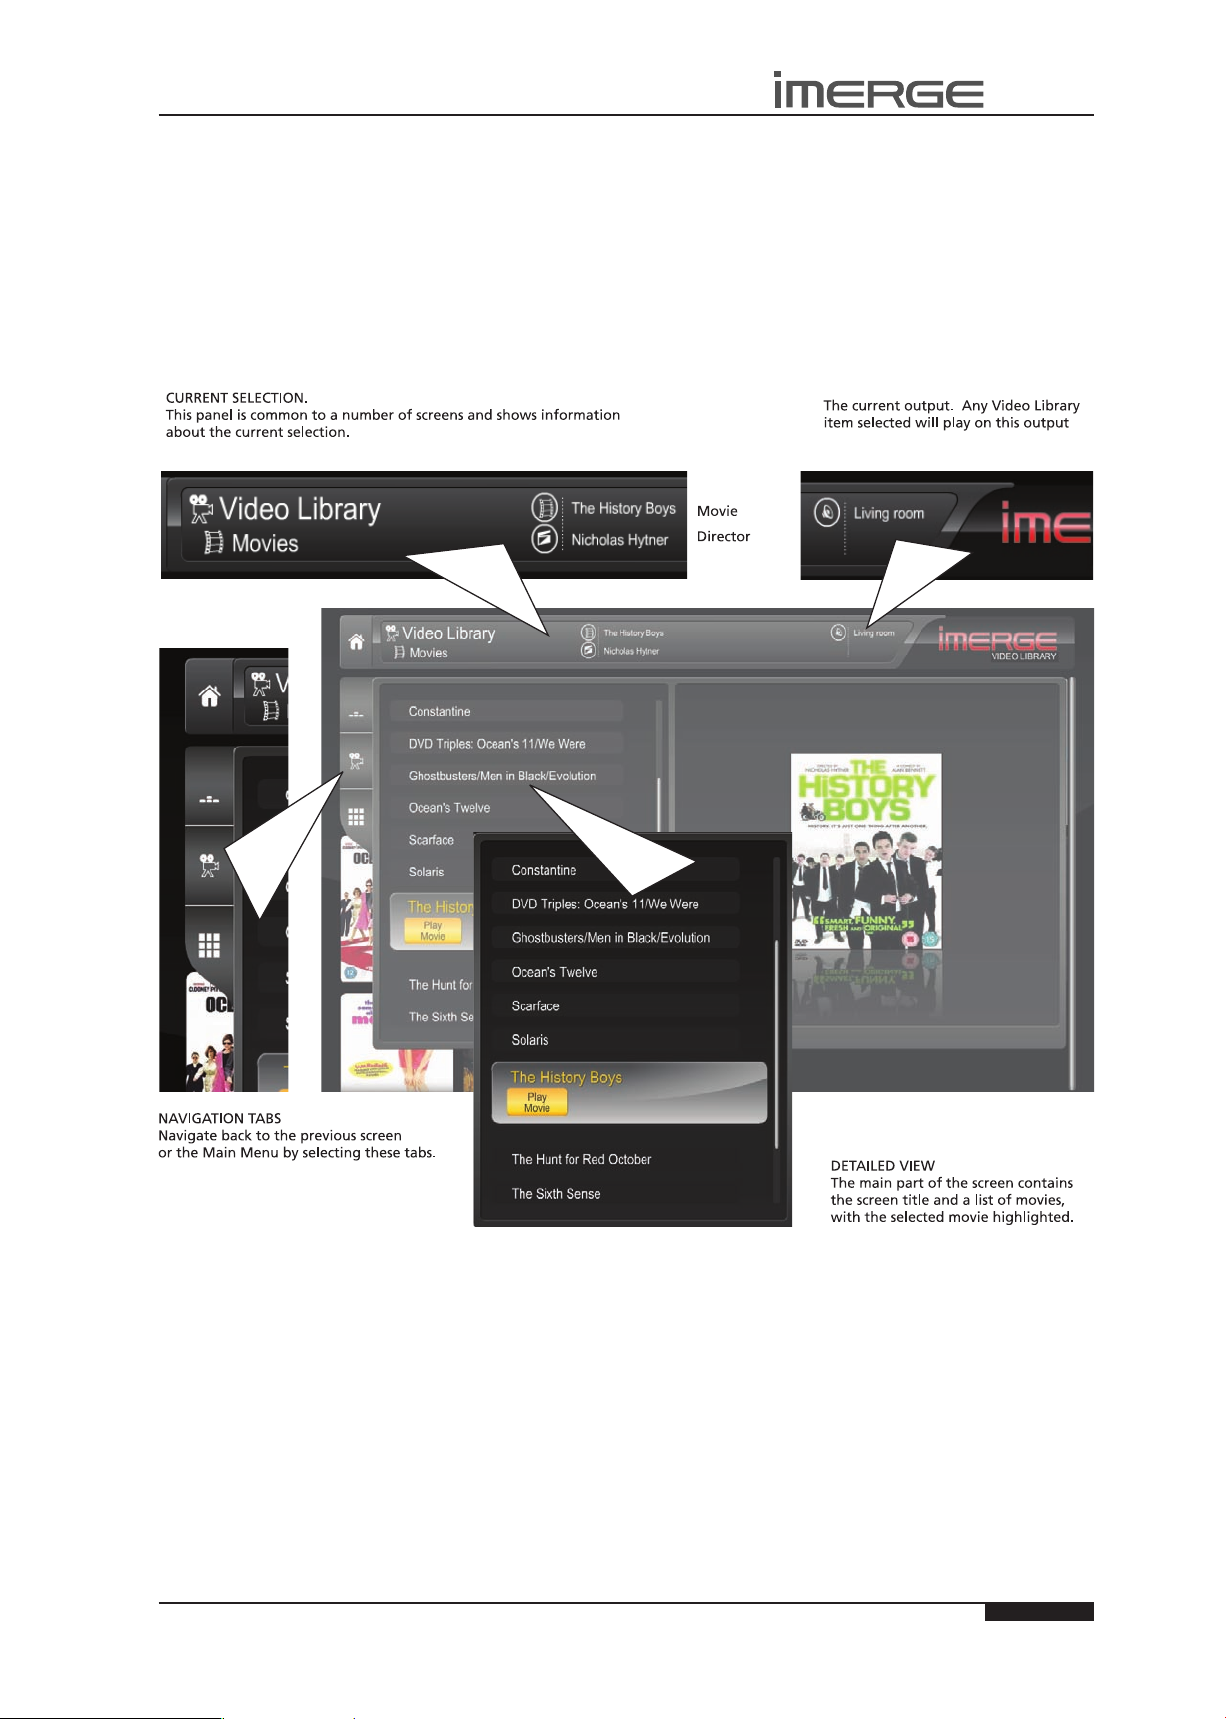
35
USER GUIDE
© Copyright Imerge Ltd 2009
Page
MS1 MediaServer / MediaPlayer
THE VIDEO LIBRARY
The TV User Interface has been designed to allow easy navigation through the Video Library and therefore give quick and
easy access to your complete movie collection in a number of different ways. Each screen in the Video Library is carefully
constructed to provide the most important information about the items you are viewing.
The illustration below shows how the Video Library screens are structured and describes each part of the screen, the
information displayed and the functions available. The example shows the Movies screen, but all navigation screens in the
Video Library are of similar design.

36
USER GUIDE
© Copyright Imerge Ltd 2009
Page
MS1 MediaServer / MediaPlayer
PLAYING MOVIES IN THE VIDEO LIBRARY
In most screens you can use the S key repeatedly to
highlight the navigation tabs on the left-hand edge of
the screen, and then the U and V keys to select the tab
you require. If the tabs are not visible, press the P key
to return to the previous screen.
Displaying the Video Library
Select.
J
Menu key on your remote control from
S
and T keys on the Home Page to
Press the •
any screen.
Use the •
highlight the ò Video Library icon and press
O
The Video Library screen is displayed:
Since several artists can star in a single movie, each
movie can appear a number of times in the display, once
for each starring artist.
Press the •
artists.
Use the •
which you can either play that movie, view more
detailed information about it or show all the movies
featuring your chosen artist.
S, T, U
O
and V keys to step between
Select key to select an artist, after
ADDITIONAL MOVIE INFORMATION
Having selected a movie from the list, highlight the
Show Info button and press the OSelect key.
You can view the movies in your library by name, artist,
director, rating, genre or year. Use the U and
highlight your choice and press the O
Select key.
V keys to
Browsing the Video Library
The movies are arranged in alphabetic order, left to right
and top to bottom.
U, V, S
Use the •
movie of choice.
Press the •
again to play it.
Press the •
O
S
and T keys to highlight your
Select key to select the movie and then
key to return to the Movies display.
Browsing the Video Library by Artist,
Director, Rating, Genre or Year
You can browse all these categories by following a
common procedure. For clarity and simplicity, we
will refer to Artists, but you should choose whichever
category suits you.
From the ò Video Library screen, use the U and V keys
to highlight your chosen category, in this case Artists.
Press the •
The TV screen will display your movies with the artist’s
name overlaid. Movies are listed in alphabetic order of
artist, from left to right and top to bottom.
O
Select key to display the Artists screen.
Use the J Menu key to skip between the movie list
and the scroll buttons on the right. Press the Hide Info
button to return to the previous view.
THE NOW PLAYING SCREEN (VIDEO)
When you’re playing a movie, you can display the Now
Playing screen by pressing the • Now Playing key on
the remote control. The screen is essentially the same
as that for audio (see page 30). When the button is
pressed, the movie stops and its details are displayed,
including the title, director and coverart.
Controlling Movie Playback
Whether you are playing a movie from the Video Library
or directly from the DVD, you can control playback using
the remote control. The controls are similar to those
available with a conventional DVD player.
When a DVD is selected for playback, the unit will
automatically switch to full screen mode. Depending
on the particular movie, the DVD menu options will
normally be displayed.
U, V, S
Use the •
menu structure.
Use the •
To pause play
Press the •
O
and T keys to navigate the DVD
Select key to make selections.
h
key on your remote control.

37
USER GUIDE
© Copyright Imerge Ltd 2009
Page
MS1 MediaServer / MediaPlayer
Playback will be paused but the unit will continue to
display the movie in full screen mode.
To stop play
Press the •
The unit will switch from full screen mode to display the
Now Playing screen with the movie minimized to the
movie window.
To resume play
Press the •
If the movie is stopped, pressing the a key will resume
playback from the same position. If the Now Playing
screen is displayed, the movie will resume in the movie
window. If the a key is pressed from any other screen
in the user interface, the unit will switch to full screen
mode and resume the movie from the same position.
To skip to the next or previous chapter
Press the •
control.
To seek forwards or backwards
Hold down the •
control for a few seconds and release the key when
the seek begins.
Seek will begin at 4 times normal speed and x4 will be
displayed on the screen, along with the chapter number
and the time position.
To increase seek speed
Press and release the •
remote control again.
The seek speed will increase to 8 times normal speed
andthe x4 on the screen will change to x8.
Repeat the above process to increase the speed further.
To resume normal speed playback
Press the •
Play resumes from the new position.
g
key on your remote control.
a
key on your remote control.
d f
a
e c
or
d f
key on your remote control.
key on your remote
e c
or
d f
key on your remote
e c
or
key on your
EDITING THE VIDEO LIBRARY
Your MediaServer labels the movies in your Video Library
with names which identify the movie you are watching,
and these help you locate items when you are browsing.
If you have an Internet connection, your MediaServer
reads the DVD information automatically from the
Internet. You can edit these names at any stage to suit
your own preferences.
If your MediaServer is on the same network as your
home computer, you can use your browser to access the
Remote User Interface (see page 24) and edit the details
using that. This has the advantage of allowing you to
use your mouse and keyboard to perform the editing.
Editing Movie Information in the Video
Library
Press the •
ò Video Library.
Press the •
the T key.
Use the •
you wish to edit.
Choose• Edit Movie Details and press the OSelect
key
J
Menu key on your remote and select the
U
or V keys to select Movies and press
U
or V keys again to highlight the movie
The following screen is displayed:
Use the •
want to change.
Press the•
Use the alphanumeric keypad to edit the text, or, •
where appropriate, use the U and V keys to select
a value and press the OOK key.
Use the •
attributes, text, keyboard and rightmost buttons.
When you have nished making changes to a movie’s
details make sure you press the MSave key.
For information about manually searching for movie
details, see the section titled Manual Look Up on page
26.
U
or V keys to select the attribute you
O
Edit key.
J
Menu to switch between the list of
Selecting Movie Artwork
Your MediaServer stores generic cover art that can be
applied to movies in your Video Library. You can also
apply your own cover art or artwork that has been
downloaded from the Internet to any item in the Video
Library.
Highlight the movie in your • Video Library to which
you would like to change the cover art image.
Press the•
Use the •
option and press the OEdit key.
The following screen, listing all of the cover art images
stored on your MediaServer, is displayed:
Use the •
images.
Press the •
artwork with your chosen movie. You will see the
thumbnail on the far right change to the newlyselected image.
O
Edit key.
U
and V keys to choose the Artwork
U
or V keys to scroll through the cover art
O
Select key to associate a piece of

USER GUIDE
MS1 MediaServer / MediaPlayer
Press the •
hand buttons.
Press the •
It is also possible to upload images from your PC to
your MediaServer and apply these to items in the media
libraries. For more information, refer to the section
titled Importing Files To Your MediaServer on page 36.
J
Menu key to move across to the right-
M
Save key to save your changes.
Admin User Interface Functions
A number of extra functions are accessible via the Admin
User Interface. To access these, select ‚ Set Up from
the Home Page. You will be prompted for a PIN, which
is 1234 by default, after which the Admin UI will be
displayed. The PIN can be changed in any user interface.
In the TV User Interface it’s available behind the ‚ Set
Up icon.
Deleting movies from the Video Library
Press the •
Video Library.
Use the •
press the T key.
Use the •
would like to delete.
Press the •
A conrmation screen will appear:
J
Menu key on your remote and choose
U
and V keys to choose Movies and then
U
and V keys again to select the movie you
ä
Options key and choose Delete Movie.
The mark symbol will appear next to the marked movie:
Place a mark symbol next to the other movies you wish
to delete.
Press the •
marked movies.
Press the •
If there are fewer than one hundred items in a list, you
also have the option to mark all of the items in a list,
without having to go through them individually.
ä
Options key and highlight Delete
O
Select key.
Press the •
movie.
Note: Any items you choose to delete will be
permanently erased from your MediaServer’s hard disk.
Anything you delete by accident will need to be rerecorded.
O
Yes key to conrm deletion of the
MARKING ITEMS IN THE VIDEO LIBRARY
The mark function can be used to select multiple items
within a list in the Video Library. You can then perform
a single action on all of the marked items rather than
repeating the same action on each item individually.
For example:
To delete multiple movies from the Video Library
Press the •
select Video Library.
Press the •
press the OSelect key to display the Movies list.
Use the •
wish to delete.
Press the •
J
Menu key on your remote control and
U
or V keys to highlight Movies and
U
or V keys again to highlight a movie you
p
Mark key.
Page
38
© Copyright Imerge Ltd 2009

MS1 MediaServer / MediaPlayer
USER GUIDE
SET UP INFORMATION
The Set Up menu provides access to a number of functions
not directly related to playing movies and music. From
the Home Page, press the ‚ Set Up icon. You will be
prompted for a PIN which is 1234 by default. See page 40
for information on changing the PIN. The Admin UI will
be displayed. Select the Set Up option.
Look Up Media Details
If your internet connection is down when you record a
disc, information like the title, artist and so on, will be
missing. This option allows you to look up missing data.
Online Update
Choose this option to check for a more recent version
of the XiVA software. If one is available, it will be
automatically downloaded and installed.
Shutdown / Restart
Shut down or restart the MS1.
RAID Information Not implemented yet.
THE SETTINGS MENU
The Settings menu contains important conguration
settings used by your unit. Many of these settings will be
congured when the unit is installed and are unlikely to
require subsequent amendment.
Conguring Settings
The table below contains a brief summary of the
conguration options available in the Settings menu.
The columns to the right headed For You and For Your
Installer indicate whether the setting in the left hand
column should ideally be amended by the user or the
installer. Users are advised not to attempt conguration
of any of the settings marked with a P in the User
column without rst consulting their dealer or installer.
A pdf of this manual may be downloaded from the
Support section at www.imerge.co.uk.
Accessing the Settings Menu
From the Admin UI Main Menu, select the • Set Up
screen, and from that, the Settings screen.
Setting Name Description For You For Your
Installer
Connection Settings How your unit accesses the Internet, or a home network.
Internet Access Choose the method your unit uses to access the Internet.
Edit Ethernet Settings Make changes to the Ethernet conguration of the unit.
View Assigned Ethernet Settings Display the current Ethernet conguration of your unit.
Display Settings This option contains settings for ensuring the user interface
displays correctly on your television set or touch panel.
Interface Style Congure the MediaServer to use either the TV or Admin UI.
User Interface Settings Change User Interface attributes, eg colour, screensaver. See
Changing the User Interface Colour on page 13.
System Information Contains important information about the system.
Reset System Reset the unit to factory default settings or choose to clear
all media from the libraries.
Software Update Settings The settings used by the unit to perform an online update.
Any alterations to these settings could render your unit
incapable of upgrading to the latest release of software.
CD Record Settings Change the way in which the unit records CDs. See the
section entitled Recording on page 14 for more information.
Output Conguration This option contains the Audio Format setting which allows
you to choose between Surround and Stereo sound output.
Network Playback Conguration This option allows the display of the network conguration
of any connected MS1 Clients.
Change the PIN The Admin UI is protected by a PIN. The default PIN is 1234
and can be changed; see page 40.
P O
P O
P O
O O
P O
O O
O O
O O
P O
P O
O O
O O
P O
O O
© Copyright Imerge Ltd 2009
Page
39

USER GUIDE
MS1 MediaServer / MediaPlayer
USE WITH A WIDESCREEN TV
The display on a widescreen TV can look unnaturally
wide. To correct this you will need to switch to the
Admin User Interface temporarily:
From the Home Page, click the • ‚ Set Up icon. You
will be prompted for a PIN which is 1234. The
display will switch to the Admin UI.
Visit• Set Up -> Settings -> User Interface Settings.
Change the • Scaling attribute to Anamorphic and
save your changes.
To return to the TV UI, change the Style attribute •
back to TV User Interface and save the change. The
display will revert to the TV UI.
SETTING THE PIN
To access the Admin UI, you need to enter a PIN, which is
1234 by default. Contact Support if you forget your PIN.
To change the PIN, highlight the ‚ Set Up icon on the
Home Page and press the O Select key. Scroll left until
you highlight the Change PIN button and press the O
Select key.
Enter your existing PIN to gain access, then type in the
new one. Save the new setting.
RESETTING THE SYSTEM
Should you decide you want to remove all the media
from your MediaServer’s external storage device, or to
revert all settings to their factory defaults, you can do so
via the Admin User Interface.
From the Admin UI Main Menu, select • Settings,
then System Information.
The System Information screen will be displayed.
RESETTING TO FACTORY DEFAULTS
If you reset the unit to the factory defaults, all personal
customisation, for instance, changes to the aspect ratio
of the display, will be removed. Once removed, this is
not recoverable, although there is nothing to stop you
reapplying the changes yourself.
CAUTION: this will reset all your network
settings, which may render your system
unuseable
Press • O Reset Defaults.
The unit will shut down and restart automatically.
Note that your PIN will not be reset by this process.
ERASING ALL MEDIA FROM THE UNIT
This can be achieved as follows:
CAUTION: This process will permanently
delete all your albums and videos and cannot
be reversed.
From the • Reset System screen, shown above, select
M Clear Content.
A Conrm screen will be displayed.
Press • M Reset System
The Reset System screen will be displayed.
Press • O Yes to conrm that you wish to proceed.
The Enter Password screen will be displayed.
Enter the System Password, which is • ResetMyMedia.
Note that the password is case-sensitive.
The unit will shut down and restart automatically, and all
audio and video media will be erased.
If you have a large amount of media on your
MediaServer, the erase-then-restart process can take
some time.
Page
40
© Copyright Imerge Ltd 2009
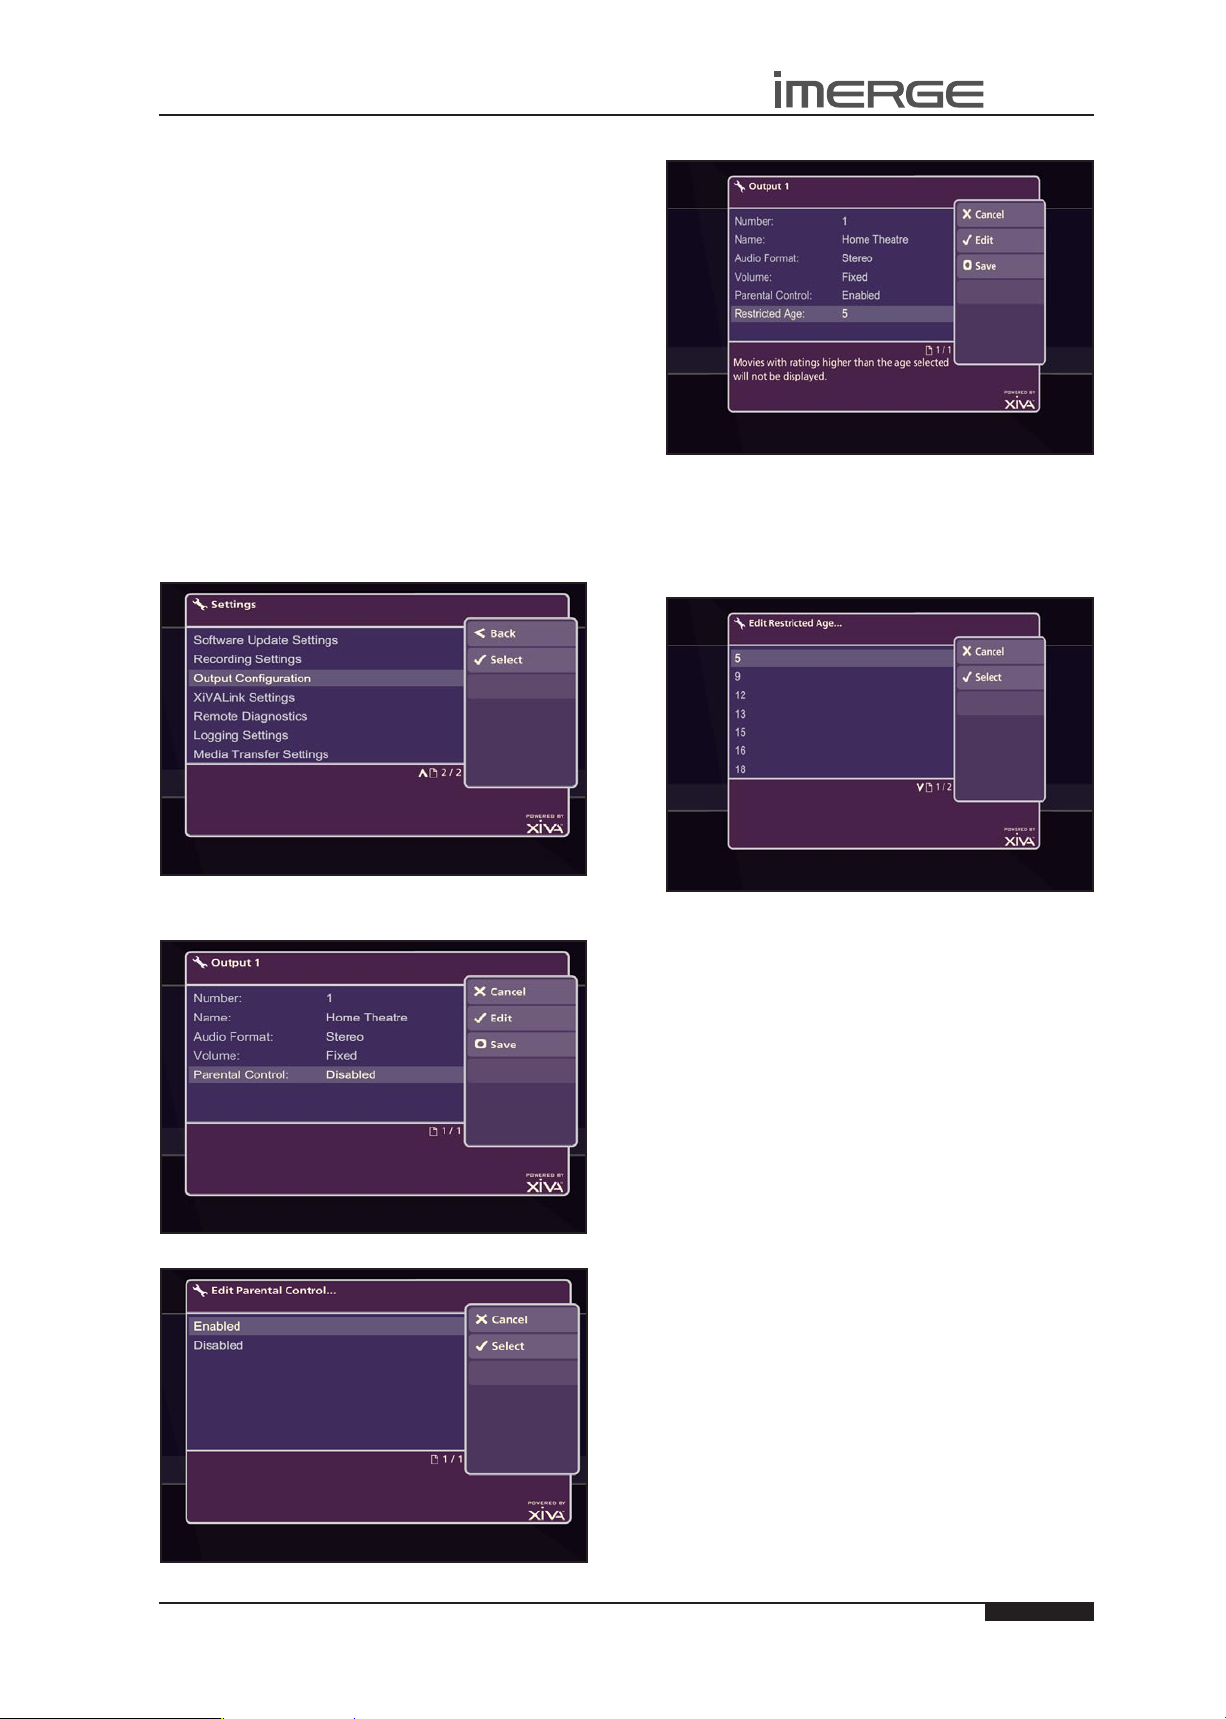
MS1 MediaServer / MediaPlayer
USER GUIDE
PARENTAL CONTROL
Parental Control is available on the MS1 and allows you
to restrict the movies that can be played on any Output,
based on the age rating of the movie.
Imerge has a large collection of movie ratings from
around the world and has amalgamated them into a
single table (see next page) , which we use as the basis
for our Parental Control system.
All you need to do is decide which age to choose as the
limit, and set your chosen Output to that age. After
that, only movies with ratings equivalent to that age or
less will be available on that Output.
Our simple system enables effortless implementation of
global movie ratings.
SETTING UP PARENTAL CONTROL
Parental Control is congured on the unit that controls
the Output you’re restricting, whether server or client.
On that unit, switch to the Admin User Interface and
select Set Up, then Settings.
Highlight Enabled and press OSelect.
You will see that a new option, Restricted Age, has
appeared at the bottom of the list of Output attributes.
This allows you to choose the age that will restrict the
movies available on this Output. Highlight Restricted
Age and press OSelect.
Highlight Output Conguration and press OSelect. On
the Output Conguration screen, press OSelect.
Highlight Parental Control and press OEdit.
Choose an age from the list and press OSelect.
Verify that your chosen age is displayed and press M
Save.
From now on, only movies with a rating equivalent to
that age and below will be available for playback on this
Output.
Unrated Videos
Any material which does not have a rating is
automatically included in the highest category, age 25,
which is not viewable with Parental Control enabled.
As some documentaries and educational material are
unrated, this can exclude material that you think should
be available.
If you want to permit viewing of unrated material on
an Output subject to Parental Control, there are two
possibilities.
Either
1. Edit the video details (see page 37)and change the
rating to a suitable value to permit viewing on that
Output.
or
2. Temporarily disable Parental Control
© Copyright Imerge Ltd 2009
Page
41
USER GUIDE
T TV-G U/A
SU:
Semua
Umur
Age
Limit
MS1 MediaServer / MediaPlayer
CategoryIIA IIA PG13 PG-13
Bimbingan
Orang Tua
Video Ratings Compared - by Age
A AA AL All CategoryI FSK-0 General GI I K Livre No
Age Ratings for different countries around the world
0
M/45G TV-C U U66 FSK-6 M/6 P77 7+8TV-C8+9PG PG TV-PG101011111212 12 12A B FSK-12 M/12 PG-12 UA1313 13/15 13+ A-13 BO:
2Uc4
14 14A M R-14 TV-14+ VM141515 15 15+ CategoryIIB IIB MA 15+ R-151616 16+ FSK-16 M/16 NC16 R16 S17A-17 DW: Dewasa NC-17 R1818 18 18+ 18A 18PA 18PL 18SG 18SX C CategoryIII FSK-18 III M/18 M18 R18 R-18 TV-18+ VM1821Adult R1825N/R NR
14
Page
42
© Copyright Imerge Ltd 2009

MS1 MediaServer / MediaPlayer
USER GUIDE
USE WITH A HOME COMPUTER
Your MediaServer has a number of advanced features
which can be accessed via a computer connected to your
home network.
MANUAL MEDIA TRANSFER
In addition to recording directly from the disc drive, it
is also possible to transfer music and cover art images
to and from your MediaServer, using a computer on
your home network. This feature allows you to transfer
music les from your MediaServer to a portable device
(for example, an Apple® iPod®) to allow you to listen to
your music collection while you are away from home.
Note: In some countries the copying of material
protected by copyright law may require permission of
the copyright owners.
TRANSFERRING MEDIA USING A PC
Provided that your MediaServer is correctly connected
to the network, it should be accessible by browsing the
network from your PC. Alternatively, open Windows
Explorer and type the IP address of your MediaServer
into the address bar. In the example below, the IP
address 172.20.30.173 has been entered:
double-click the appropriate icon.
A window showing the available contents of the
MediaServer external storage device will be displayed.
IMPORTING FILES TO YOUR MEDIASERVER
Double click on the folder entitled • Import. An
empty folder window will be displayed.
To Import Music Files
In a separate Explorer window, navigate to the •
location of the music les on your computer.
Use your mouse to select the les you wish to •
import and either drag or copy and paste them into
the Import window.
When you rst attempt to access your MediaServer on
your home network, a dialogue box will appear asking
you to enter a username and password:
The username and password required are as follows:
Username - • ms1
Password - • ms1
Note: The username and password are case sensitive.
TRANSFERRING MEDIA USING A MAC
If you are using a Macintosh computer you can create a
new network connection as follows:
Select • Go from the Finder menu and click Connect
to Server.
Click on the • Browse button in the Connect to Server
window.
Navigate to your MediaServer on the network and •
The les will appear briey in the Import window
but after a few seconds will disappear. These les
should now be accessible in the Audio Library of your
MediaServer.
Note: The currently supported audio le types for
import are WAV, WMA, MP3 and AAC. WMA Lossless
and DRM protected les are not supported. Any les of
an unsupported type that are dropped into the Import
folder will not be imported.
To Import Cover Art Files
Navigate to the location of the cover art les on •
your computer.
Use your mouse to select the les you wish to •
import and either drag or copy and paste them into
the Import folder.
Supported image formats are JPG and BMP. Files of
an unsupported type that are dropped into the Import
folder will not be imported.
The les will appear briey in the Import folder but after
a few seconds will disappear. These les will now be
available when selecting cover art for an album in the
Audio Library. Files will be resized automatically.
EXPORTING MEDIASERVER FILES
Double click on the folder entitled • MusicShare. A
window will be displayed containing a folder for
each artist present in the Audio Library of your
MediaServer.
Double click on the folder for an artist. A window •
will be displayed containing a folder for each album
by the chosen artist present in the Audio Library.
Double click on the folder for an album. A window •
will be displayed containing all the tracks within the
album and a JPEG le containing the cover art for
the album.
You now have read only access to these les and can
drag and drop them to a location on your PC. You can
© Copyright Imerge Ltd 2009
Page
43
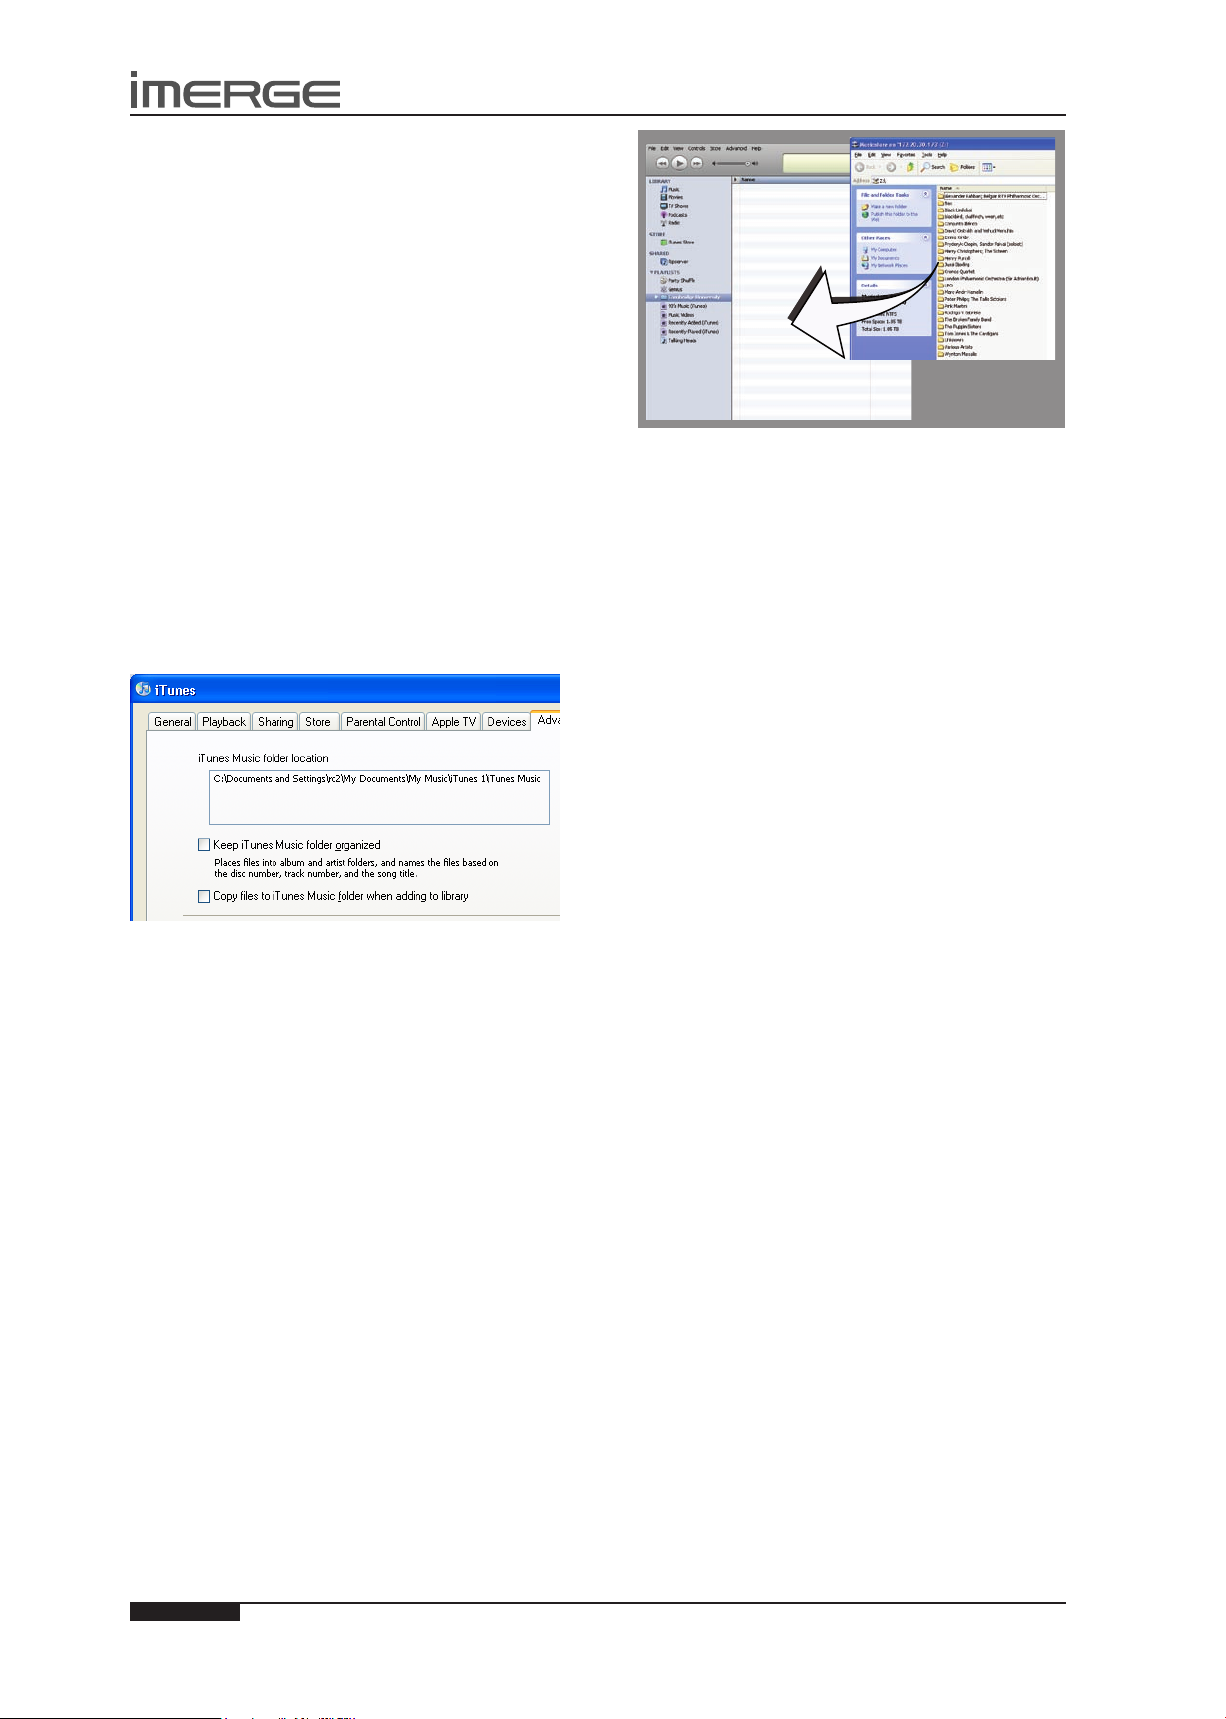
44
USER GUIDE
© Copyright Imerge Ltd 2009
Page
MS1 MediaServer / MediaPlayer
also copy music from your MediaServer directly to your
portable player.
Transferring Music to your Portable Player
using iTunes
The iTunes Media Player application is specically
designed to simplify the process of synchronizing your
music collection with an iPod portable player. Support
for other devices is limited; you should check that
your portable player is compatible before using this
application.
Note: These instructions refer to Apple iTunes version
7.1. Whilst most versions are supported, the user
interfaces may vary and therefore these instructions may
not always be accurate.
The Library source in iTunes shows all media les stored
on the local hard disk as well as media which has been
added from other networked drives. You can add the
music collection from your MediaServer to the Library as
follows:
Select the • Preferences option. This can be found
under the Edit menu on the Windows edition of
iTunes and under the iTunes menu on the Macintosh
version.
Select the • Advanced tab.
Ensure that the option labelled • Copy les to iTunes
Music folder when adding to library is unchecked.
Click the • OK button to conrm any changes.
If you are using a Windows PC:
Making sure you have • Library displayed in iTunes,
navigate in Windows Explorer to your MediaServer
on the network and open the MusicShare folder.
If you are using a Macintosh:
Pull down the • Go menu and click Connect to Server.
Enter the IP address of the MediaServer, for example •
smb://192.168.0.4
Open the MusicShare folder.•
On either PC or Mac
Select the music you want to transfer. You can •
transfer entire albums, or all the music by a
particular artist, by dragging the relevant folder
into the iTunes Library and releasing the mouse
button. To transfer the entire contents of your
Audio Library, drag the folder entitled Albums By
Artist into the iTunes Library.
Note: the import process may take some time depending
on the number of albums and the speed of your
computer.
Once the iTunes Library source has been updated with
the music from your MediaServer you can update your
iPod as follows:
Connect your iPod in the normal way.•
Click the • Browse button in the top right-hand
corner of the iTunes window.
Drag any item from the • Genre, Artist, Album lists
onto the iPod icon in the Source area.
The transfer process will begin shortly afterwards.
Updating the iTunes Library
If you have removed music from your MediaServer
or edited the names of any items in the library you
will need to update the iTunes Library to remove any
broken links. To do this, you should rst delete all the
MediaServer albums from the iTunes Library as follows:
Select the • View Options item from the View menu.
Check the • Grouping option, then click the OK
button to conrm your changes.
In the iTunes • Library click the new Grouping column
heading. The tracks located on your MediaServer
external storage device will be grouped together
using the label <-MediaServer_NAME (e.g.
<-ImergeMS1-1234).
Click on the rst track in the list with this grouping •
label then, holding down the Shift key, click the last
track.
Press the • Delete key to remove these tracks from
the iTunes Library.
Click • Yes to conrm your choice.
Repeat the import process described above to add back
the MediaServer information.
Note: iTunes does not support WMA les. If you
import WMA les into iTunes they will be automatically
converted to a format iTunes can play. This is AAC by
default, but you can change it in the Advanced pane of
iTunes Preferences.
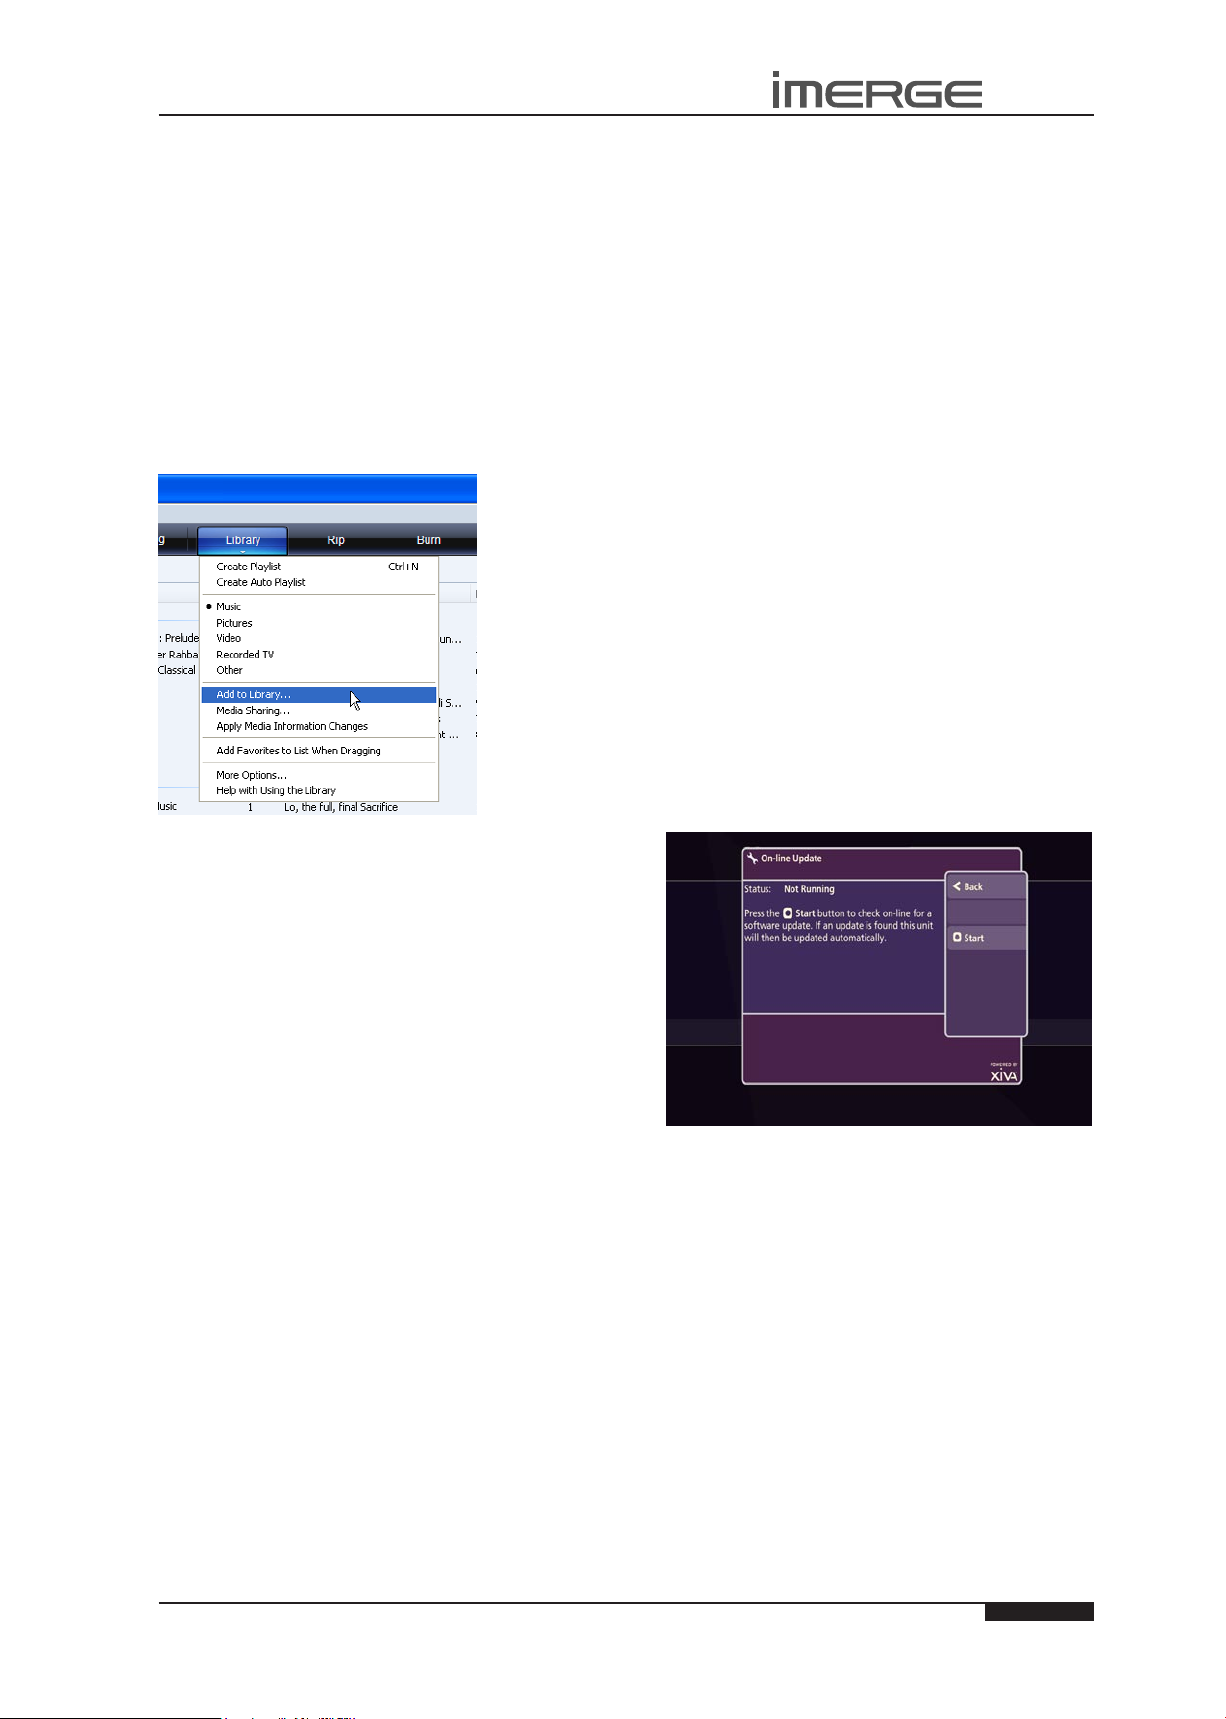
45
USER GUIDE
© Copyright Imerge Ltd 2009
Page
MS1 MediaServer / MediaPlayer
Transferring Music to your Portable Player
using Windows Media Player on a PC
It is also possible to use your PC and Windows Media
Player to transfer music from your MediaServer to your
portable device.
Note: These instructions refer to Windows Media Player
version 11. Whilst most versions are supported, the user
interfaces may vary and therefore these instructions may
not always be accurate.
Firstly, make sure you can navigate to your •
MediaServer and view the music in your MusicShare
folder.
Click on the • Library tab at the top of the screen to
display the Library. Click on Library again to display
the drop down menu.
Select • Add to Library, followed by Add. In the
Add Folder window that appears navigate to
your MediaServer on the network and select the
music you wish to transfer. You can transfer entire
albums, or all the music by a particular artist by
selecting the relevant folder and clicking OK. To
transfer the entire contents of your Audio Library,
select the folder entitled MusicShare.
When the process is complete and all of your music •
has been added, click on Close.
Once your Media Library has been updated with the
music from your MediaServer you can update your
portable player as follows:
Click the • Sync tab.
Drag any items you would like to copy from the •
Library into the Sync List on the right hand side of
the screen. To select all items in the Library, hold
the Ctrl key and press the A key.
Click the • Start Sync button in the bottom right hand
corner of the screen.
The transfer process will begin shortly afterwards.
SOFTWARE UPDATES
As part of a policy of ongoing development, Imerge
is constantly improving the system’s XiVA operating
software. To allow you to take advantage of these
improvements, the MS1 can download and install
software updates via the Internet.
Note: You may want to contact your dealer or installer
before attempting a software update.
CHECKING THE SOFTWARE VERSION
Before checking for available software updates, we
recommend you check the version of the XiVA software
currently running on your unit.
U
and V
U
and
Switch to the Admin UI Main Menu, use the •
V
keys to select the Set Up option and press the
O
Select key to display the Set Up screen.
Use the •
option and press the OSelect key.
Choose • System Information by using the U and V
keys and then pressing the OSelect key.
The software version is displayed on the System
Information screen.
U
and V keys again to select the Settings
CHECKING FOR SOFTWARE UPDATES
On the Admin UI Main Menu, use the •
keys to select the Set Up option and press the
O
Select key to display the Set Up screen.
Use the •
Update option and press the OSelect key.
The On-line Update screen is displayed:
To automatically check on-line for software updates, •
press the MStart key.
If a software update is available, your unit will
automatically download and install it. The unit will then
restart with the new software version installed.
U
and V keys again to select the On-line

USER GUIDE
DIGITAL SAFE
XiVA Digital Safe allows you to use your robust Imerge
storage as the perfect backup location for all your les,
aiding data recovery in the event of your PC or Mac hard
drive failing.
USING YOUR DIGITAL SAFE
Whichever XiVASafe storage unit, XS1e (1Tb), XS3i
(3Tb) or XS6i (6Tb) you have attached to your MS1
MediaServer, you can use the storage as a Digital Safe, in
which to save copies of those les you need to secure.
Accessing it is exactly the same as transferring media to
and from your MS1, as described on page 43. You’ll see
a share called Digital Safe listed along with the other
shares such as MusicShare and Import.
In a second Explorer (Finder) window, navigate to the
les you want to save, then simply drag the individual
les or groups of les across to your Digital Safe.
Alternatively, drag a whole folder hierarchy across
and drop it into your Digial Safe. This has the obvious
advantage that the organisation of your secure data is
the same as that on your personal computer, so it’s much
easier to nd, should the worst happen.
MS1 MediaServer / MediaPlayer
Page
46
© Copyright Imerge Ltd 2009

MS1 MediaServer / MediaPlayer
USER GUIDE
TROUBLESHOOTING GUIDE
This section provides information to help solve common
problems you may encounter with your system.
DISPLAY HELP
Although the unit’s video settings will be congured
correctly when installed, it is possible that subsequent
changes in your hardware conguration (for example,
the installation of a new television) may affect the
conguration and, in extreme circumstances, may cause
the user interface to be displayed incorrectly or not at
all.
Display Help exists for this situation; so that the unit’s
video settings can be re-congured using the remote
control without reference to the user interface.
Accessing Display Help
Press the following combination of six keys on your
remote control handset:
J
Menu , JMenu , 4 , 3 , 5 , 7
This key combination can be easily remembered as the
alphanumeric keys 4, 3, 5, 7 correspond to the letters H,
E, L, P, to spell the world help.
Depending on the nature of your conguration
problems, the user interface may display the Display
Help screen:
USE WITH A DIGITAL PROJECTOR
If you connect the video output to a digital projector,
you may nd that projector congures itself in a way
which conicts with the MS1 output. The output may
scroll rapidly with lots of short, white lines on a black
background.
To avoid this, leave the projector powered down for
about 20 seconds after the MS1 has been powered up. If
the display is showing this kind of disruption now, just
power the projector down and then back up again.
SURROUND SOUND
To take advantage of the MediaServer’s Surround Sound
Audio Format, it is necessary to connect the audio
output to a device capable of decoding the surround
sound signal.
If your digital TV can decode the signal, simply •
connect it to the HDMI socket on the back of the
MediaServer.
If your digital TV does not decode the signal, noise •
will be emitted by the TV’s speakers. In this case
you should mute the TV’s volume and connect an
amplier with this capability to the digital output
(16) of the MediaServer.
Note: If none of the above suggestions resolves your
conguration problem, please contact your dealer or
installer.
The options available via the Display Help screen are as
follows:
Return to the Default Video Set-Up
If you are experiencing problems with video display
on either output, try using this function to cure the
problem.
Press the • 0 key on your remote control to return to
the default video set-up.
This will cause the unit to restart with the video settings
re-set to their default values.
BLANK DISPLAY
If you select an item from the media libraries for
playback and the display goes blank, it may be due to
a missing or invalid library item. In the event that this
happens, try pressing the àLibrary key on the remote
control to return to the user interface. If this does not
resolve the problem, contact your dealer or installer.
MISSING AUDIO & VIDEO LIBRARIES
If the TV UI doesn’t appear on startup or if the Admin UI
Main Menu doesn’t show the Audio and Video Libraries,
then either the MS1 is congured as a MediaPlayer or it
has not detected the XiVASafe external storage device.
There are occasions when it can take a few minutes
to establish communication between the MS1 and a
XiVASafe external storage device, so in the rst instance,
it’s worth waiting for several minutes to see if the
problem corrects itself.
If not, you should contact your dealer or installer.
WARNING MESSAGES
There are some occasions on which the system may
display a warning message on the user interface.
Automatic Shutdown
The MS1 contains sensors that continually monitor its
operating temperature. Should the temperature exceed
its maximum safe operating temperature, an automatic
shutdown will be initiated to prevent component
damage and subsequent data loss.
The user interface will display the following warning
message:
© Copyright Imerge Ltd 2009
When the countdown is complete, the unit will
Page
47

USER GUIDE
MS1 MediaServer / MediaPlayer
automatically shutdown.
When the unit is next switched on, the following screen
will be displayed:
If you see either of these screens displayed on the user
interface, you should contact your dealer or installer as
soon as possible.
LOOK UP FAILURE
If you insert a disc and the unit fails to return movie
or album information from the Internet, there are a
number of checks you can perform to help diagnose the
problem.
Navigate to the • Connection Settings screen via the
following path: Admin UI Main Menu > Set Up >
Settings > Connection Settings.
Choose• View Assigned Ethernet Settings.
The user interface will display the following screen:
Click Log in using a different name• , and enter the
username ms1 and password ms1.
Click • OK and then Finish.
The window should show your music collection.
Press the •
screen.
Press the• MStart key to run a series of quick
diagnostic tests.
If any of the tests fail, check the relevant settings, or
the hardware involved. If you are unable to resolve the
issue, contact your dealer or installer.
ä
Test key to display the Ethernet Tests
UNABLE TO ACCESS MUSICSHARE
If you’re using Windows Vista and can’t get to the
MusicShare folder on your MS1, you’ll need to map
the MusicShare folder as a networked drive on your
computer.
Click the • Start button and select Computer.
Enter the path to the MusicShare on the MS1 in the •
format \\192.168.27.4\MusicShare.
To nd the IP address of your MS1, go to the Admin UI
Main Menu and visit Set Up > Settings > Connection
Settings > View Assigned Ethernet Settings.
48
Page
© Copyright Imerge Ltd 2009

MS1 MediaServer / MediaPlayer
USER GUIDE
REMOTE CONTROL CODES
HDD AUDIO
Output 1 001
Output 2 002
Output 3 003
Output 4 004
Output 5 005
TV
ADMIRAL 157, 146, 010, 125
ADYSON 111
AIWA 059
AKAI 001, 002, 003, 004, 005, 006,
007, 008, 151, 016, 009, 010,
011, 012, 013, 014, 015
AKURA 001, 002, 003, 004, 005, 006,
007, 008, 086, 018, 009, 010,
017, 013, 014, 015, 016
ALBA 017, 151
ALBIRAL 033
AMSTRAD 098, 105, 010, 047
ANITECH 001, 002, 003, 004, 005, 006,
007, 111, 008, 009, 013, 014,
015, 016
ARC EN CIEL 135, 139, 042
ARISTONA 031, 007, 146, 109, 154, 099
ARTHUR MARTIN 021, 118, 010, 120, 161, 011,
012, 121
ASA 157, 149, 146, 020, 022, 023,
095, 125, 132
ASORA 018
ATLANTIC 031, 041, 109, 119
AUCHAN 010
AUDIOSONIC 008, 086
AUSIND 021
AUTOVOX 031, 041, 020, 109, 074, 147,
022, 012
BAIRD 061, 036
BEKO 060, 001, 002, 003, 004, 005,
006, 007, 009, 013, 068, 014,
015, 016, 086
BESTAR 010, 086
BLAUPUNKT 085, 138, 143, 141, 087, 090,
091, 142, 119, 096
BOSCH 143
BRANDT 135, 107, 139, 042
BRANDT ELECTRONIQUE 107, 042
BRION VEGA 146, 147, 029, 148
BROTHER 008
BRUNS 108, 146
BSR 010, 158
BUSH 055, 010, 026, 158
CENTURY 146, 048, 097
CGE 138, 024, 010, 048, 158, 097,
077
CIE 098, 001, 002, 003, 004, 005,
006, 007, 009, 013, 014, 015,
016, 079
CIHAN 009
CLARIVOX 108, 033, 047
CLATRNIC 017
CLATRONIC 001 ,002, 003, 004, 005, 006,
007, 008, 009, 119, 013, 014,
015, 016, 158, 097, 018, 151
CONDOR 001, 002, 003, 004, 005, 006,
007, 031, 009, 119, 013, 014,
015, 016, 097, 018
CONIC 111
CONTEC 055, 102, 018
CONTINENTAL EDISON 135, 107, 139, 042
COSMOS 001, 002, 003, 004, 005, 006,
007, 009, 013, 014, 015, 016
CROSLEY 138, 146, 024, 081, 010
CROWN 001, 002, 003, 004, 005, 006,
007, 009, 013, 014, 015, 016,
039, 158, 097, 018, 086
CSESECTRONICS 017
DAEWOO 001, 002, 003, 004, 005, 006,
007, 009, 013, 014, 104, 015,
016, 133, 079
DANSAI 111, 008
DECCA 001, 002, 003, 004, 107, 005,
031, 006, 007, 043, 046, 009,
032, 057, 013, 014, 015, 016
DEGRAAF 063, 010
DIXI 007, 018
DYNATRON 007
DUAL 031, 092, 012
DUAL-TEC 089, 031, 158
DUMONT 146, 022, 025
ELBE 010, 033, 158, 159, 077, 160
ELBIT 001 ,002, 003, 004, 005, 006,
007, 009, 013, 014, 015, 016
ELCIT 146, 081, 158
ELECTROVENDA 001, 002, 003, 004, 005, 006,
007, 009, 013, 014, 015, 016
ELEKTA 008
ELEKTRONIKA 001, 002, 003, 004, 005, 006,
007, 009, 013, 014, 015, 016,
097
ELIN 001, 002, 003, 004, 005, 006,
007, 009, 013, 014, 015, 016
ELITE 143, 119, 017
ELMAN 158
ELTA 008, 010, 018
EMERSON 098, 001, 002, 003, 004, 005,
006, 007, 146, 009, 013, 014,
015, 016
ERRES 007, 154
ESC 001, 002, 003, 004, 005, 006,
007, 009, 013, 014, 015, 016
ETRON 010
EUROPHON 031, 158
EXPERT(F) 010
FENNER 018
© Copyright Imerge Ltd 2009
Page
49

50
USER GUIDE
© Copyright Imerge Ltd 2009
Page
MS1 MediaServer / MediaPlayer
FERGUSON 035, 106, 107, 136, 022, 044,
033
FIDELITY 031
FINLANDIA 061, 106, 132
FINLUX 157, 149, 021, 020, 022, 023,
043, 081, 010, 095, 032, 025,
026, 048, 158, 132
FIRST LINE 158
FISHER 055, 108, 146, 028, 081, 012,
058, 097, 127, 086
FORMENTI 001, 002, 003, 004, 005, 031,
006, 007, 021, 081, 009, 119,
013, 014, 015, 016
FRABA 058, 002, 003, 004, 005, 006,
007, 009, 013, 014, 015, 016
FRONTECH 111, 008, 010, 018
FUJITSU 165
FUJITSU GENERAL 088, 109, 010
FUNAI 008
GALAXIS 001, 002, 003, 004, 005, 006,
007, 009, 013, 014, 015, 016,
097
GALAXY 097
GALERIA 018
GBC 081, 010, 158, 018
GENAT CASIONO 010
GEC 031, 043, 081, 125, 072
GELOSO 081, 017, 158, 125, 018
GENERAL 018
GENERAL TECHNIC 018
GENEXXA 017
GOLDHAND 018
GOLDSTAR 001, 002, 003, 004, 005, 031,
006, 007, 111, 008, 009, 010,
013, 014, 015, 016, 027, 158,
018, 084, 116
GOODMANS 001, 002, 003, 004, 055, 005,
006, 007, 043, 009, 013, 014,
015, 016, 027, 079, 018, 151
GORENJE 097, 086
GPM 008, 017
GRAETZ 153, 073, 081, 011, 012, 121,
123, 124, 125
GRANADA 001, 002, 003, 004, 106, 055,
005, 031, 006, 007, 073, 043,
009, 154, 010, 032, 013, 014,
015, 016, 125
GRANDIN 010
GREAT WALL 156
GRUNDIG 085, 087, 091, 022, 073, 093,
094, 096, 076, 113, 130
HANSEATIC 055, 004, 031, 007, 081, 118,
119
HCM 001, 002, 003, 004, 005, 006,
007, 008, 009, 013, 014, 015,
016, 018
HIFI VOX 112, 135, 107, 139, 042, 059
HINARI 098, 055, 111, 008, 017, 018
HIT 146
HITACHI 062, 055, 157, 063, 031, 111,
042, 065, 081, 118, 010, 066,
120, 158, 125, 070, 040, 072
HYPER 031, 151
ICE 001, 002, 003, 004, 005, 006,
007, 008, 009, 017, 013, 014,
015, 016, 018, 151
IMPERIAL 001, 002, 003, 004, 034, 138,
143, 005, 006, 007, 146, 008,
024, 081, 009, 154, 119, 010,
013, 014, 015, 016, 121, 048,
158, 125, 097, 018, 077, 086,
114
INGELEN 153, 073, 081, 011, 012, 121,
123, 124, 125
INNO HIT 004, 031, 111, 027, 018
INTERFUNK 005, 007, 146, 042, 073, 081,
154, 012, 121, 123, 040
IRRADIO 111, 021, 027, 018, 116
ITC 158
ITS 008, 017, 018, 309, 151
ITT 153, 073, 117, 081, 011, 012,
121, 123, 124, 125, 126, 036,
079
JET POINT 152, 084
JVC 055, 163, 164, 151
KAIDO 010
KAISUI 017, 156
KAPSCH 109, 081, 010, 121, 125
KARCHER 001, 002, 003, 004, 005, 006,
007, 009, 013, 014, 015, 016,
097
KAWA 151
KENDO 010
KENNEDY 088, 089, 109, 092, 081, 125,
077
KINDO 010
KNEISSEL 001, 002, 003, 004, 005, 006,
007, 009, 013, 014, 016
KOERTING 085, 146, 086
KONKA 151
KORTING 146, 119
KRIESLER 031, 007, 146, 109, 154, 099
KUBA 081
KUBA ELECTRONIC 012
LENCO 001, 002, 003, 004, 005, 006,
007, 008, 009, 013, 014, 015,
016, 079
LENOIR 031
LIESENKOETTER 001, 002, 003, 004, 143, 005,
006, 007, 009, 013, 014, 015,
016
LIFETEC 001, 002, 003, 004, 005, 006,
007, 008, 009, 017, 013, 014,
015, 016, 079
LOEWE OPTA 001, 005, 006, 007, 146, 014
LOGIK 057
LOEWE 001, 002, 003, 004, 005, 006,
007, 146, 009, 032, 013, 014,
015, 016
LUMA 007, 109, 010, 161, 125
LUXOR 146, 073, 118, 010, 120, 161,
011, 012, 123, 126, 036, 049,
132, 114, 116
MAGNADYNE 146, 081, 158

51
USER GUIDE
© Copyright Imerge Ltd 2009
Page
MS1 MediaServer / MediaPlayer
MAGNAFON 031, 021
MAGNASONIC 001, 002, 003, 004, 005, 006,
007, 009, 013, 014, 015, 016
MARANTZ 001, 002, 003, 004, 103, 104,
005, 031, 006, 007, 146, 109,
009, 154, 013, 014, 015, 016,
099, 072, 155, 129
MARSHAL 017
MATSUI 098, 031, 043, 010, 057, 125,
018, 130
McMICHAEL 072
MEDION 001, 002, 003, 004, 005, 006,
007, 009, 013, 014, 015, 016
MEMOREX 008, 018
METZ 085, 036, 087, 091, 146, 096,
131
MINERVA 085, 087, 022, 073, 096
MITSUBISHI 001, 002, 003, 005, 055, 020,
004, 006, 087, 007, 146, 045,
009, 057, 013, 014, 015, 016
MIVAR 031, 030, 075, 032, 006
MTC 005, 081, 086
MULTITECH 031, 010, 097, 018
MURPHY 125
NAONIS 088, 089, 109, 010, 125
NATIONAL 080, 137, 144, 150, 145, 081,
082, 083
NEC 055, 020, 156
NECKERMANN 060, 166, 053, 001, 002, 003,
004, 085, 143, 056, 005, 031,
006, 091, 007, 146, 081, 118,
009, 119, 010, 096, 161, 013,
068, 014, 015, 016, 097
NEI 001, 002, 003, 004, 005, 006,
007, 009, 017, 047, 013, 014,
015, 016
NIKKAI 111, 043, 017
NISSAN 084
NOBLEX 127, 128
NOBLIKO 031, 021, 022
NOGAMATIC 135, 139, 042
NOKIA 153, 001, 002, 003, 004, 005,
006, 007, 149, 008, 073, 117,
081, 118, 009, 010, 120, 011,
012, 013, 014, 015, 016, 121,
123, 124, 125, 126, 036, 079,
132, 084, 114
NORDMENDE 034, 035, 106, 112, 135, 139,
037, 042, 147, 040
NORMN 001, 002, 003, 004, 005, 006,
007, 009, 013, 014, 015, 016
NOVA 095
OCEANIC 081, 118, 010, 012, 036
OKANO 001, 002, 003, 004, 005, 006,
007, 009, 013, 014, 015, 016,
097
ONCEAS 031
ONWA 008, 017, 151
ORAVA 001, 002, 003, 004, 005, 006,
007, 009, 013, 014, 015, 016
ORBITER 086
ORION 098, 001, 002, 003, 004, 005,
036, 006, 007, 111, 008, 009,
010, 017, 012, 013, 014, 015,
016, 018
OSAKI 043
OSIO 027
OSUME 102
OTTO VERSAND 153, 166, 053, 001, 002, 003,
004, 054, 035, 106, 055, 085,
063, 056, 137, 005, 006, 087,
091, 007, 145, 081, 118, 009,
119, 010, 096, 012, 013, 014,
015, 016, 158, 018, 086, 151,
318
P. TACTRON 009
PAEL 031, 021
PANASONIC 080, 137, 144, 150, 145, 081,
082, 083, 207, 131
PATHE CINEMA 031, 119, 033, 158
PATHE MARCONI 135, 139, 042
PERDIO 043
PHILCO 001, 002, 003, 004, 080, 138,
005, 006, 146, 024, 081, 009,
010, 013, 014, 015, 016, 048,
158, 097, 077
PHILIPS 001, 002, 003, 004, 103, 104,
005, 031, 006, 091, 007, 146,
042, 109, 009, 154, 013, 014,
015, 016, 099, 072, 155, 129,
115
PHILIPS(F) 001, 002, 003, 004, 005, 006,
007, 009, 154, 013, 014, 015,
016
PHOENIX 031, 021, 081, 119
PHONOLA 031, 007, 146, 109, 154, 099
PIONEER 007, 042
PRANDONI-PRINCE 021, 010, 125
PRIMA 111
PRINCE 021, 125
PROFEX 010, 018
PROTECH 007, 008
PYE 031, 007, 146, 109, 154, 099
QUASAR 021, 027
QUELLE 098, 153, 166, 053, 001, 002,
003, 004, 054, 106, 055, 085,
157, 138, 143, 056, 137, 088,
140, 141, 005
QUESTAR 001, 002, 003, 004, 005, 006,
007, 009, 154, 013, 014, 015,
016
RADIOLA 031, 007, 146, 109, 154, 099
RADIOMARELLI 146, 081, 045, 158
RADIOTONE 001, 002, 003, 004, 005, 006,
007, 008, 009, 013, 014, 015,
016, 018, 086
RANK 026
RANK/BUSH/MURPHY 078
RBM 026
REDIFUSION 045, 012, 125
REVOX 005
REX 088, 089, 109, 092, 010, 125

52
USER GUIDE
© Copyright Imerge Ltd 2009
Page
MS1 MediaServer / MediaPlayer
ROADSTAR 001, 002, 003, 004, 005, 006,
007, 009, 013, 014, 015, 016
ROBOTRON 108, 146
ROSITA 018
RTF 108, 146, 010, 017, 086
SABA 034, 035, 106, 112, 135, 107,
139, 146, 042, 081, 010, 032,
161, 125, 040
SAISHO 098, 031, 010, 057, 018, 309
SAKIO 008
SALORA 021, 081, 118, 119, 010, 120,
161, 011, 012, 121, 126, 036,
049, 132, 116
SAMBERS 021, 027
SAMPO 082
SAMSUNG 001, 002, 003, 004, 005, 031,
006, 007, 111, 008, 043, 009,
013, 014, 015, 016, 027, 097,
018, 127, 128, 152, 086, 084,
116
SANY 042
SANYO 153, 100, 101, 061, 055, 064,
108, 043, 095, 057, 058, 036,
102, 097, 086
SAOLRA 011
SBR 007, 154, 072
SCHAUB LORENZ 153, 073, 081, 011, 012, 121,
123, 124, 125
SCHNEIDER 001, 002, 003, 004, 088, 089,
005, 031, 006, 007, 146, 028,
109, 092, 081, 009, 154, 010,
017, 011, 012, 013, 014, 015,
016, 122, 158, 099, 151
SCHNEIDER(F) 154
SEG 058, 002, 003, 004, 005, 006,
108, 007, 111, 008, 009, 017,
013, 014, 015, 016, 158, 018
SEI 098
SEI SINUDYNE 146, 010, 012
SELECO 055, 088, 089, 041, 109, 092,
081, 010, 058, 125, 077
SENTRA 060, 010, 017, 068
SHARP 002, 055, 058, 102
SIAREM 055, 146, 081, 010, 058
SICATEL 033
SIEMENS 101, 001, 002, 003, 004, 085,
063, 138, 143, 141, 005, 006,
087, 090, 091, 007, 111, 142,
009, 119, 096, 013, 014, 015,
016, 102
SIERA 031, 007, 146, 109, 154, 099
SIESTA 086
SILVER 008, 017, 086
SINGER 001, 002, 003, 004, 005, 006,
007, 146, 081, 009, 013, 014,
015, 016, 077
SINUDYNE 098, 003, 146, 081
SMARAGD 130
SOLAVOX 010
SONOLOR 166, 010
SONOKO 007, 018
SONTEC 001, 002, 003, 004, 005, 007,
009, 013, 014, 015, 016
SONY 052, 053, 054, 055, 056, 057,
058
SPECTRA 079
STARLITE 018
STERN 088, 089, 041, 109, 010, 125
SUNSTAR 001, 002, 003, 004, 005, 006,
007, 009, 013, 014, 015, 016
SUPERTECH 001, 002, 003, 004, 005, 006,
007, 09, 010, 013, 014, 015, 016,
125, 018
TANDBERG 131
TANDY 031, 043, 017
TASHIKO 100, 055
TATUNG 031, 043, 046, 009, 057
TEC 001, 002, 003, 004, 089, 005,
031, 006, 007, 009, 010, 013,
014, 015, 016, 158, 079, 018
TECHNISAT 001, 002, 003, 004, 005, 006,
007, 009, 013, 014, 015, 016
TECNISON 018
TEKON 018, 084
TELEAVIA 135, 107, 139, 042, 040
TELEFUNKEN 034, 035, 106, 138, 136, 140,
037, 042, 040, 050
TELETENT 005
TELETECH 018
TELETON 088, 041, 109, 081, 010
TELEUNKEN 138
TELEVIDEON 031, 021, 081, 119, 206
TENSAI 001, 002, 003, 004, 005, 006,
007, 009, 119, 017, 013, 014,
015, 016, 158, 018
TENSON 018
TESLA 146
THOMSON 034, 035, 106, 112, 135, 107,
139, 042, 081, 040, 059
THORN 153, 060, 052, 062, 001, 002,
003, 004, 034, 106, 055, 064,
005, 006, 087, 149, 007, 065,
043, 044, 009, 154, 010, 095,
120, 057, 013, 068, 058, 014,
015, 016, 072, 113, 115
THORN-FERGUSON 107, 136, 008, 022, 044, 033
TOCOM 110
TOKYO 084
TOSHIBA 060, 055, 067, 068, 026, 077,
078
TOWADA 158
TRANS CONTINENTS 021, 125
TRISTAR 017
TRIUMPH 098, 111
UHER 001, 002, 003, 004, 005, 006,
007, 028, 041, 109, 074, 009,
119, 013, 014, 015, 016
ULTRAVOX 001, 002, 003, 004, 005, 031,
006, 007, 146, 081, 009, 010,
161, 013, 014, 015, 016
UNIVERSUM 157, 008, 027

53
USER GUIDE
© Copyright Imerge Ltd 2009
Page
MS1 MediaServer / MediaPlayer
UNIVOX 146, 033
VEGAVOX 048
VESTEL 001, 002, 003, 004, 005, 006,
007, 009, 047, 013, 014, 015,
016
VICTOR 163
VIDEOTON 042, 118, 158
VISION 001, 002, 003, 004, 005, 006,
007, 009, 119, 013, 014, 015,
016
VOXSON 146, 010, 125
WALTHAM 118
WATSON 001, 002, 003, 005, 143, 004,
006, 007, 009, 119, 017, 013,
014, 015, 016, 018
WATT RADIO 031, 081, 010, 033, 012
WEGA 055, 146
WEGA COLOR 162
WHITE WESTINGHOUSE 001, 002, 003, 004, 005, 031,
006, 007, 146, 009, 119, 013,
014, 015, 016
WINTERNITZ 059
YOKO 001, 002, 003, 004, 005, 031,
006, 007, 008, 009, 010, 017,
013, 014, 015, 016, 158, 097,
079, 018
ZANUSSI 088, 089, 041, 109, 010, 125
ZOPPAS 088, 089, 041, 109, 125
AMP
ADC 020
ADCOM 001, 002, 003
AIWA 014, 015, 018, 019, 087, 086
AKAI 033
AMC 016, 080, 081, 083
ANGSTROM 066
ARCAM 058
AUDIO ALCHEMY 027
AUDIO TECHNICA 026
AUDIOFILE 038
B & K 045, 046
CARVER 053, 011, 037, 038, 052, 031,
032, 010, 054
CINEMA SOUND 084, 026
CLARION 090
DENON 083, 084, 085, 095, 096, 091,
092, 097, 089
FISHER 022, 031
FOSGATE 005
GE 036
GOLDSTAR 035
HAFLER 039
HARMAN KAR 005, 125, 127, 103, 104, 098
HITACHI 021
INKEL 123
JVC 119, 120
KENWOOD 090, 099, 128, 105, 094, 121,
123, 122, 129, 106, 124, 031
KRELL 067, 063
KYOCERA 020
LEXICON 006
LINN 057
LUXMAN 042, 028, 008
LXI 036
MAGNAVOX 064
MARANTZ 053, 011, 012, 116, 055, 032,
059
MERIDIAN 060, 061
MITSUBISHI 130, 131
MONDIAL 068, 062
NAKAMICHI 118, 034, 107
NEC 030
ONKYO 100, 133, 024, 132, 108, 101,
102
OPTIMUS 090, 041
PANASONIC 013
PARASOUND 051
PHILIPS 059, 055
PIONEER 110, 111, 114, 117, 113, 115,
112, 109
RCA 025
REALISTIC 010, 036, 044, 095
SANSUI 116, 048, 056, 043
SANYO 022, 023
SCOTT 010
SHARP 090, 093, 094
SHERWOOD 014, 047, 048, 049, 050, 041
SONY 014, 070, 071, 072, 073, 160,
075, 076, 077, 078, 079
TEAC 007, 010, 134, 118
TECHNICS 030, 135, 136
THETA DIGITAL 065
TOSHIBA 109
WARDS 031
YAMAHA 126, 029, 025
ZENITH 017

54
USER GUIDE
© Copyright Imerge Ltd 2009
Page
MS1 MediaServer / MediaPlayer
HARDWARE SPECIFICATIONS
Note: the specication and design of these products are
subject to change without notice.
MS1
General
System..................................... Diskless MediaServer•
Power Requirements...... AC 110-240V ~50Hz/60Hz•
Power Consumption................................. 60W Max•
Current............................................................ 0.3 - 0.6A•
Weight...................................................... 10.6 Kg•
Dimensions... 95mm(H) x 430mm(W) x 325mm(D)•
Ambient operating temperature.................. 5-35°C•
Operating humidity... 10-90% RH (non-condensing)•
Video Outputs
S-Video Output
Connector............................................ S-VIDEO jack•
Output resolution................................ NTSC or PAL•
Composite video output
Connector................................................... RCA jack•
Output resolution................................ NTSC or PAL•
HDMI Output
Connector........................................ HDMI•
Output resolution................................. 480i-1080p•
Component Video Output (Y, Pr, Pb)
Connector.............................................. 3 x RCA jack•
Output resolution.................................... 480i-1080i•
Audio Outputs
Analogue Output
Output level................................................. 2V RMS•
Output impedance.......................................... 600• W
Connector................................................... RCA jack•
Digital Outputs
Optical output connector............................. Toslink•
Coaxial output level....................... 500mVp-p/75• W
Coaxial output connector.......................... RCA jack•
Analogue Audio Characteristics (typical)
Frequency response............ 20Hz to 20kHz ± 0.5dB•
S/N ratio (@1KHz)........................ 100dB (A weight)•
Dynamic range............................. better than 96dB•
Total harmonic distortion (@1kHz)............. 0.003%•
Channel separation (@1KHz)......................... 110dB•
Communications
Ethernet
Connector...... RJ45 (10 Base T/100 Base T) / 1000BT•
IR Input
Maximum input level........................................... 5V•
Connector............................................... 3.5mm jack•
USB 1.1/2.0 (2 connectors)
Connector.................................... Type A USB socket•
Accessories
Power cord.............................................................. 4•
Remote control unit............................................... 1•
AAA (R03P) dry cell batteries................................. 2•
Operating instructions........................................... 1•
XiVASAFE XS1e
General
System .................................... External disk storage•
Power Requirements ........ AC 100-240V ~50Hz/60Hz•
Power Consumption .................................... 60W Max•
Current .................................... ............................ 1.5A•
Weight ............................................................. 2.63 Kg•
Dimensions .... 172mm(H) x 91mm(W) x 200mm(D)•
Ambient operating temperature.................. 5-35°C•
Operating humidity... 5-80% RH (non-condensing)•
Disk Drives .............................................................. 2•
RAID Mode ............................................................. 6•
Capacity ................................................................ 1Tb•
Communications ............................................... eSATA•
Transfer Rate ........................................ up to 3Gbits/s•
XiVASAFE XS3i & XS6i
General
System .................................... External disk storage•
Power Requirements ........ AC 90-264V ~47Hz/63Hz•
Power Consumption ................................. 300W Max•
Power Supply .......................... 2 hot-swappable PSUs•
Weight ............................................................ 22.7 Kg•
Dimensions .... 89mm(H) x 483mm(W) x 495mm(D)•
Ambient operating temperature.................. 10-35°C•
Operating humidity... 20-90% RH (non-condensing)•
Disk Drives ............................................. 8 hard •
drives
RAID Mode ..................................................... RAID 6•
Capacity ....................................................... 3Tb / 6Tb•
Communications ....................................... Ethernet•
Transfer Rate ........................................ up to 3Gbits/s•
Cooling ..................................... 3 hot-swappable fans•

55
USER GUIDE
© Copyright Imerge Ltd 2009
Page
MS1 MediaServer / MediaPlayer
TERMS & CONDITIONS
XiVA™ SOFTWARE CUSTOMER SERVICE AGREEMENT
Your next-generation XiVA™ home media appliance (your
MediaServer) is powered by XiVA™ Software brought to you by
Imerge Limited (“Imerge”). This agreement explains the terms
and conditions that will apply to your use of XiVA™ Software.
Denitions in this Agreement
“Imerge” or “we” means Imerge Limited (company registration
number 03360764) whose registered ofce is at Bar Hill Business
Park, Saxon Way, Bar Hill, Cambridge CB23 8SL England, United
Kingdom;
“Software” means the XiVA™ Software on your MediaServer and
related XiVA™ accessory software.
“Service” means the use of XiVA™ Software related services
provided to you by Imerge, for example the registration service
via the Internet.
“You”, “your” and “yourself” means you, the person entering
into this agreement with Imerge;
“Registration Data” means your name, address, postcode and
telephone number (optional) or email address (optional).
Service Charges
You will be responsible for the interoperability between your
XiVA™ home media appliance (your MediaServer), your TV set
and the public telephone service and all related charges.
XiVA Software Privacy Policy
Imerge respects the privacy of your information and will handle
any personal information you might supply to us when you
register your equipment in accordance with the XiVA™ Software
Privacy Policy. A copy of this Privacy Policy is included as a part
of this document and forms part of these terms and conditions.
Please read it carefully.
Conditions of Use
You agree not to use the Software and/or Service in a way that
may reasonably be expected to interrupt, disturb or impair the
working of the XiVA™ Software Service. You will not insert or
knowingly or recklessly transmit, distribute, upload or otherwise
make available emails, software, data or les that contain a virus
or corrupt data; seek unauthorized entry into back ofce; hack
into any aspect of the Software or Service; knowingly corrupt
data; circumvent, or attempt to seek to circumvent, any of the
security safeguards of Imerge or any of its suppliers; make any
business use of the Service; or assist any third party to do any
of these things. By registering, you agree to these terms and
conditions.
Title to Software and Intellectual Property
Imerge retains title to and ownership of all the XiVA™ Software
and intellectual property rights in Imerge authorised products
and XiVA™ home media appliances and the Service. Imerge
also retains ownership of all Imerge copyrights and trademarks.
Except as expressly authorised by Imerge, you agree not to
copy, modify, reverse engineer, rent, lease, loan, sell, distribute,
sublicense, or create derivative works based on the XiVA™
Software, in whole or in part.
You agree not to access the XiVA™ Software Service by any
means other than through the interface provided by Imerge or
an Imerge Business Partner for use in accessing the Service.
Indemnity
Neither Imerge nor any of its directors, employees or other
representatives will be liable for damages arising out of or in
connection with the use of the Software. Save in respect of
liability for death or personal injury arising out of negligence,
Imerge hereby disclaim and exclude to the fullest extent
permitted by law all liability for any loss or damage whatsoever
and howsoever incurred including any consequential, special,
secondary or indirect loss or damage or any damage to goodwill
or prots or any loss of anticipated savings incurred by you,
whether arising in tort, contract or otherwise, and arising out
of or in relation to or in connection with your access to or use
of or inability to use the Service or any software or content
supplied to you in connection with the Service, or in connection
with any failure of performance, error, omission, interruption,
defect, delay in operation or transmission, computer virus or line
or system failure even if Imerge or its employees or agents are
advised of the possibility of such damages, losses or expenses.
Limitations of Imerge’s Liability
In no event will Imerge or its suppliers be liable to you or
any third party for any loss of prots, loss of data, loss of
revenue, loss of or loss of use of software, loss of or loss of
use of equipment, to which the MediaServer is connected,
business interruption, or other indirect, consequential, special,
or incidental damages of any nature arising from or relating
to your use of the Software, even if Imerge has been advised
of the possibility of such damages. You understand that these
limitations of Imerge’s and Imerge’s suppliers’ liability are a
fundamental term of this agreement.
Changes to the XiVA™ Software Service
Imerge reserves the right in its absolute discretion at any time
and without notice to users of the Software to add, remove,
amend or vary features of the Software or Service, temporarily
or permanently, or on notice to all users to discontinue the
Service altogether at any time in its discretion. You agree that
Imerge shall not be liable to you or to any third party for any
modication, suspension or discontinuance of the Service.
Imerge also reserves the right to change the terms and
conditions of this agreement. Such changes shall be effective
upon notication by Imerge. You are responsible for viewing
any new terms and continued use after notication will conrm
acceptance of such changes.
Invalidity
If any part of these terms and conditions are unenforceable
(including any provision in which we exclude our liability to
you) the enforceability of any other part of these terms and
conditions will not be affected.
Governing Law
These terms and conditions shall be governed by and interpreted
in accordance with the laws of England and Wales whose courts
shall have jurisdiction to resolve any disputes between us. The
ofcial text of this agreement shall be in English. In the event
any dispute concerning the construction or meaning of this
agreement, reference shall be made only to this agreement
as written in English and not to any translation into another
language. If any provision of these terms and conditions is
held by a court of competent jurisdiction to be contrary to the
law then such provisions shall be construed as far as possible to
reect the intention of the parties and the other provisions shall
remain in full force and effect.
Entire Agreement
These terms and conditions set out the whole of the agreement
relating to our supply of the Software and Service and shall
supersede any prior agreements or representations in respect
thereof. These terms and conditions cannot be varied except in
writing, which can be delivered by electronic mail by Imerge.
In particular nothing said by any sales person on behalf of
Imerge or an Imerge Business Partner should be understood
as a variation of these terms and conditions or an authorised
representation about the Service or the nature and quality of
items displayed thereon. Imerge shall have no liability for any
such representation being untrue or misleading.
No person other than the parties to this agreement shall have
the right to enforce any of its terms under the Contracts (Rights
of Third Parties) Act, 1999.
These terms do not relate to your purchase of the XiVA™ home
media appliance itself, which is governed by a separate warranty
agreement provided by Imerge’s Business Partner or their agent.
Assignment
You shall not assign any of your rights or obligations under these
terms and conditions without Imerge’s prior written consent.
Imerge shall have the right to assign or otherwise delegate all or
any of its rights or obligations under these terms and conditions
on notication to you.
Waiver
Imerge’s failure to exercise or enforce any of its rights under
these terms and conditions shall not constitute a waiver of any
such right.

56
USER GUIDE
© Copyright Imerge Ltd 2009
Page
MS1 MediaServer / MediaPlayer
Notices
Any and all notices to be given by either Imerge or you to
the other under these terms and conditions shall be deemed
sufciently given when sent by email or facsimile transmission
in each case addressed to you at the email address or facsimile
number you have given us or to Imerge at the email address or
facsimile number displayed at www.imerge.co.uk.
BY USING THE SERVICE, I CONFIRM THAT I HAVE READ AND
UNDERSTOOD THIS ENTIRE AGREEMENT AND I AGREE TO ALL
THE TERMS OF THIS AGREEMENT AS STATED ABOVE.
XiVA™ Software Service Privacy Policy
Please read the following to learn more about our XiVA™
Software Service privacy policy and data-protection practices.
Imerge values the privacy of its registered users. We are strongly
committed to protecting the privacy of users of our interactive
products and services as well as to respecting the Data Protection
Act 1998. Imerge will only collect and use personal information
about you as specied below in accordance with this Policy.
The XiVA™ Software Service Privacy Policy discloses our privacy
practices and contains detailed information about exactly how
your personal information will be treated:
Who are we?•
What information of yours do we collect?•
What do we do with the information we collect?•
Will Imerge share any of your personal information?•
How you can learn what personal information we have?•
What is the opt-out policy?•
What types of security procedures are in place to protect •
your information?
Will Imerge change its policy?•
Who are we?
Imerge Limited (Imerge) welcomes you as a XiVA™ Software
user. We developed your home media appliance (your
MediaServer) and it is ‘powered’ by our XiVA™ Software.
Our company headquarters are located in Cambridge, United
Kingdom and full details of how you can contact us can be found
at the end of this document. The provision of goods, services and
information to you may also involve our business partners and
other carefully selected third party companies.
What information of yours do we collect?
When you register with Imerge, we need certain information –
such as your name, address, postcode, and telephone number
or email address - in order to provide service to you. Once you
register with Imerge you are not anonymous to us. By submitting
your information you agree to the use of that information as set
out in this Policy. We may also use that information to let you
know of additional products and services about which you might
be interested.
In addition to the information you voluntarily provide by
registering, Imerge will also collect technical information from
your MediaServer on a regular basis, so that, in the event that
you contact technical support, we will have information available
to help diagnose technical issues. The le upload will take
place no more frequently than once every seven days and will
include the transfer of a number of small les pertaining to your
system’s performance. At no point will we gather any personal
information, and the information we do gather will identify
you to Imerge only, through the unique serial number of your
MediaServer. This information will be stored on our secure server
and will at no stage be made available to any third parties.
Please note that sending and receiving this information will
necessitate sending small amounts of data over your internet
connection. If you prefer to opt out of using this service, you
can do so by altering the relevant setting in the software user
interface.
What do we do with the information we collect?
We may use personal information collected about you to let
you know about new goods, services or offers that you might
nd interesting; or functionality changes and enhancements to
the Service, i.e. feature upgrades; or changes to our terms and
conditions of use.
Will Imerge share any of your personal information?
Personal data will be collected, processed by Imerge and
forwarded to the relevant Imerge Business Partner for the
purpose of providing related services, as described earlier.
However, Imerge will not trade, sell or rent your personal
information (such as name, address, phone number, or email
address) to third parties world-wide for targeted services
or marketing purposes without your consent. And, we also
protect your privacy by limiting employee access to the use of
customer data. We may provide aggregate statistics about our
sales, customers, music tastes, usage patterns and other site
information to reputable third parties, but these statistics will
not include any information that could personally identify you
unless we have your consent.
Imerge reserves the right to access and disclose individually
identiable information to comply with applicable laws and
lawful government requests, to operate its systems properly, or
to protect itself or its users.
How you can learn what personal information we have?
You may send us email at: support@imerge.co.uk or write to us
at our headquarters address given at the end of this document. A
nominal fee may apply to this request.
What is the opt-out policy?
You will be given an opportunity to select a level of privacy
associated with your use of the Service during the registration
process, to determine whether and under what conditions
information entered during the registration process or collected
subsequently may be shared with third parties. You can modify
your selection at a later date by revisiting the relevant page,
accessed via the menu screen – your changes will normally take
effect within 60 days of your re-registration – alternatively you
may send your request in writing to us at the address given at
the end of this document.
What types of security procedures are in place to protect your
information?
Imerge is committed to protecting the privacy of its customers
and we have taken extensive measures to ensure that the
information we gather from you will be secure and condential.
While we recognize that the Internet is not a completely
secure medium of communication, Imerge has taken steps to
safeguard the security of any information we collect from your
XiVA™ home media appliance by using Pretty Good Privacy
(PGP) technology which encrypts the information you input on
your system before it is transmitted to us. In addition, we have
strict security procedures covering the storage and disclosure of
your information in order to prevent unauthorized access and
to comply with the Data Protection Act 1998. This means that
sometimes we may ask you for proof of identity before disclosing
any personal information to you.
Will Imerge change its policy?
When you supply your registration data you consent to the
collection and use of your information by Imerge as described in
this policy. If we alter our Privacy Policy in any way we will notify
you and will post those changes on our website: www.imerge.
co.uk so you can be aware of anything that may affect you in the
way we collect, use or share information with others. If you do
not agree to the changes in the Policy, in such event you should
contact us promptly, in the absence of which the changes will be
deemed accepted by you. You will be responsible for viewing any
alterations to our Privacy Policy - a written copy can be requested
from any of our Imerge ofces.
Contacting us
If you have any questions or concerns about this Privacy Policy
or the operation of the Service, you can contact us by email at:
support@imerge.co.uk, or by writing to the: XiVA™ Software
Administrator, Imerge Limited, Unit 6, Bar Hill Business Park,
Saxon Way, Bar Hill, Cambridge CB23 8SL, England, United
Kingdom.

57
USER GUIDE
© Copyright Imerge Ltd 2009
Page
MS1 MediaServer / MediaPlayer
MICROSOFT END-USER LICENSE AGREEMENT
You have acquired a device (“DEVICE”) that includes •
software licensed by Imerge Ltd. from an afliate of
Microsoft Corporation (“MS”). Those installed software
products of MS origin, as well as associated media, printed
materials, and “online” or electronic documentation
(“SOFTWARE”) are protected by international intellectual
property laws and treaties. Manufacturer, MS and its
suppliers (including Microsoft Corporation) own the title,
copyright, and other intellectual property rights in the
SOFTWARE. The SOFTWARE is licensed, not sold. All rights
reserved.
This End User License Agreement (“EULA”) is valid and •
grants the end-user rights ONLY if the SOFTWARE is genuine
and a genuine Certicate of Authenticity for the SOFTWARE
is included. For more information on identifying whether
your software is genuine, please see http://www.microsoft.
com/piracy/howtotell.
IF YOU DO NOT AGREE TO THIS EULA, DO NOT USE THE •
DEVICE OR COPY THE SOFTWARE. INSTEAD, PROMPTLY
CONTACT YOUR DEALER. FOR INSTRUCTIONS ON RETURN
OF THE UNUSED DEVICE(S) FOR A REFUND. ANY USE OF THE
SOFTWARE, INCLUDING BUT NOT LIMITED TO USE ON THE
DEVICE, WILL CONSTITUTE YOUR AGREEMENT TO THIS EULA
(OR RATIFICATION OF ANY PREVIOUS CONSENT).
GRANT OF SOFTWARE LICENSE. This EULA grants you the •
following license:
You may use the SOFTWARE only on the DEVICE.•
Restricted Functionality. You are licensed to use the •
SOFTWARE to provide only the limited functionality
(specic tasks or processes) for which the DEVICE has
been designed and marketed by Imerge Ltd.. This license
specically prohibits any other use of the software programs
or functions, or inclusion of additional software programs
or functions that do not directly support the limited
functionality on the DEVICE. Notwithstanding the foregoing,
you may install or enable on a DEVICE, systems utilities,
resource management or similar software solely for the
purpose of administration, performance enhancement and/
or preventive maintenance of the DEVICE.
If you use the DEVICE to access or utilize the services or •
functionality of Microsoft Windows Server products (such
as Microsoft Windows Server 2003), or use the DEVICE
to permit workstation or computing devices to access or
utilize the services or functionality of Microsoft Windows
Server products, you may be required to obtain a Client
Access License for the DEVICE and/or each such workstation
or computing device. Please refer to the end user license
agreement for your Microsoft Windows Server product for
additional information.
NOT FAULT TOLERANT. THE SOFTWARE IS NOT FAULT •
TOLERANT. Imerge Ltd. HAS INDEPENDENTLY DETERMINED
HOW TO USE THE SOFTWARE IN THE DEVICE, AND MS HAS
RELIED UPON Imerge Ltd. TO CONDUCT SUFFICIENT TESTING TO
DETERMINE THAT THE SOFTWARE IS SUITABLE FOR SUCH USE.
NO WARRANTIES FOR THE SOFTWARE. THE SOFTWARE is •
provided “AS IS” and with all faults. THE ENTIRE RISK AS TO
SATISFACTORY QUALITY, PERFORMANCE, ACCURACY, AND
EFFORT (INCLUDING LACK OF NEGLIGENCE) IS WITH YOU.
ALSO, THERE IS NO WARRANTY AGAINST INTERFERENCE
WITH YOUR ENJOYMENT OF THE SOFTWARE OR AGAINST
INFRINGEMENT. IF YOU HAVE RECEIVED ANY WARRANTIES
REGARDING THE DEVICE OR THE SOFTWARE, THOSE
WARRANTIES DO NOT ORIGINATE FROM, AND ARE NOT
BINDING ON, MS.
No Liability for Certain Damages. EXCEPT AS PROHIBITED •
BY LAW, MS SHALL HAVE NO LIABILITY FOR ANY INDIRECT,
SPECIAL, CONSEQUENTIAL OR INCIDENTAL DAMAGES
ARISING FROM OR IN CONNECTION WITH THE USE OR
PERFORMANCE OF THE SOFTWARE. THIS LIMITATION
SHALL APPLY EVEN IF ANY REMEDY FAILS OF ITS ESSENTIAL
PURPOSE. IN NO EVENT SHALL MS BE LIABLE FOR ANY
AMOUNT IN EXCESS OF U.S. TWO HUNDRED FIFTY DOLLARS
(U.S.$250.00).
Restricted Uses. The SOFTWARE is not designed or intended •
for use or resale in hazardous environments requiring
fail-safe performance, such as in the operation of nuclear
facilities, aircraft navigation or communication systems,
air trafc control, or other devices or systems in which a
malfunction of the SOFTWARE would result in foreseeable
risk of injury or death to the operator of the device or
system, or to others.
Limitations on Reverse Engineering, Decompilation, and •
Disassembly. You may not reverse engineer, decompile, or
disassemble the SOFTWARE, except and only to the extent
that such activity is expressly permitted by applicable law
notwithstanding this limitation.
SOFTWARE as a Component of the DEVICE - Transfer. •
This license may not be shared, transferred to or used
concurrently on different computers. The SOFTWARE is
licensed with the DEVICE as a single integrated product and
may only be used with the DEVICE. If the SOFTWARE is not
accompanied by a DEVICE, you may not use the SOFTWARE.
You may permanently transfer all of your rights under this
EULA only as part of a permanent sale or transfer of the
DEVICE, provided you retain no copies of the SOFTWARE. If
the SOFTWARE is an upgrade, any transfer must also include
all prior versions of the SOFTWARE. This transfer must also
include the Certicate of Authenticity label. The transfer
may not be an indirect transfer, such as a consignment. Prior
to the transfer, the end user receiving the SOFTWARE must
agree to all the EULA terms.
Consent to Use of Data. You agree that MS, Microsoft •
Corporation and their afliates may collect and use technical
information gathered in any manner as part of product
support services related to the SOFTWARE. MS, Microsoft
Corporation and their afliates may use this information
solely to improve their products or to provide customized
services or technologies to you. MS, Microsoft Corporation
and their afliates may disclose this information to others,
but not in a form that personally identies you.
Internet-Based Services Components. The SOFTWARE may •
contain components that enable and facilitate the use
of certain Internet-based services. You acknowledge and
agree that MS, Microsoft Corporation or their afliates may
automatically check the version of the SOFTWARE and/or its
components that you are utilizing and may provide upgrades
or supplements to the SOFTWARE that may be automatically
downloaded to your DEVICE. Microsoft Corporation or their
afliates do not use these features to collect any information
that will be used to identify you or contact you. For more
information about these features, please see the privacy
statement at http://go.microsoft.com/fwlink/?LinkId=25243.
Links to Third Party Sites. You may link to third party sites •
through the use of the SOFTWARE. The third party sites are
not under the control of MS or Microsoft Corporation, and
MS or Microsoft are not responsible for the contents of any
third party sites, any links contained in third party sites, or
any changes or updates to third party sites. MS or Microsoft
Corporation is not responsible for webcasting or any other
form of transmission received from any third party sites. MS
or Microsoft Corporation are providing these links to third
party sites to you only as a convenience, and the inclusion of
any link does not imply an endorsement by MS or Microsoft
Corporation of the third party site.
Notice Regarding Security. To help protect against breaches •
of security and malicious software, periodically back up your
data and system information, use security features such as
rewalls, and install and use security updates.
No Rental/Commercial Hosting. You may not rent, lease, lend •
or provide commercial hosting services with the SOFTWARE
to others.
Separation of Components. The SOFTWARE is licensed as a •
single product. Its component parts may not be separated
for use on more than one computer.
Additional Software/Services. This EULA applies to updates, •
supplements, add-on components, product support services,
or Internet-based services components (“Supplemental
Components”), of the SOFTWARE that you may obtain
from Imerge Ltd., MS, Microsoft Corporation or their
subsidiaries after the date you obtain your initial copy of
the SOFTWARE, unless you accept updated terms or another
agreement governs. If other terms are not provided along
with such Supplemental Components and the Supplemental
Components are provided to you by MS, Microsoft
Corporation or their subsidiaries then you will be licensed
by such entity under the same terms and conditions of this
EULA, except that (i) MS, Microsoft Corporation or their
subsidiaries providing the Supplemental Components will be

58
USER GUIDE
© Copyright Imerge Ltd 2009
Page
MS1 MediaServer / MediaPlayer
the licensor with respect to such Supplemental Components
in lieu of “Imerge Ltd.” for the purposes of the EULA, and
(ii) TO THE MAXIMUM EXTENT PERMITTED BY APPLICABLE
LAW, THE SUPPLEMENTAL COMPONENTS AND ANY (IF
ANY) SUPPORT SERVICES RELATED TO THE SUPPLEMENTAL
COMPONENTS ARE PROVIDED AS IS AND WITH ALL FAULTS.
ALL OTHER DISCLAIMERS, LIMITATION OF DAMAGES,
AND SPECIAL PROVISIONS PROVIDED BELOW AND/OR
OTHERWISE WITH THE SOFTWARE SHALL APPLY TO SUCH
SUPPLEMENTAL COMPONENTS. MS, Microsoft Corporation
or their subsidiaries reserve the right to discontinue any
Internet-based services provided to you or made available to
you through the use of the SOFTWARE.
End User Proof of License. If you acquired the SOFTWARE on •
a DEVICE, or on a compact disc or other media, a genuine
Microsoft “Proof of License”/Certicate of Authenticity
label with a genuine copy of the SOFTWARE identies a
licensed copy of the SOFTWARE. To be valid, the label must
be afxed to the DEVICE, or appear on Imerge Ltd’s software
packaging. If you receive the label separately other than
from Imerge Ltd., it is invalid. You should keep the label on
the DEVICE or packaging to prove that you are licensed to
use the SOFTWARE.
Product Support. Product support for the SOFTWARE is not •
provided by MS, Microsoft Corporation, or their afliates
or subsidiaries. For product support, please refer to Imerge
Ltd. support number provided in the documentation for
the DEVICE. Should you have any questions concerning
this EULA, or if you desire to contact Imerge Ltd. for any
other reason, please refer to the address provided in the
documentation for the DEVICE.
Termination. Without prejudice to any other rights, Imerge •
Ltd. may terminate this EULA if you fail to comply with the
terms and conditions of this EULA. In such event, you must
destroy all copies of the SOFTWARE and all of its component
parts.
EXPORT RESTRICTIONS. You acknowledge that SOFTWARE •
is subject to U.S. and European Union export jurisdiction.
You agree to comply with all applicable international and
national laws that apply to the SOFTWARE, including the
U.S. Export Administration Regulations, as well as end-user,
end-use and destination restrictions issued by U.S. and other
governments. For additional information see http://www.
microsoft.com/exporting/.
MACROMEDIA FLASH RUN-TIME
DISTRIBUTION LICENSE
Publisher’s end-user license agreement shall contain, at a
minimum, the following limitations:
(1) no title to, or ownership rights in the Publisher
Product or any portion of the Publisher Product are
transferred;
(2) the end-user shall not reverse compile or disassemble
the Publisher Product.
GRACENOTE END-USER LICENSE
AGREEMENT
USE OF THIS PRODUCT IMPLIES ACCEPTANCE OF THE
TERMS BELOW.
Gracenote® MusicID® Terms of Use
This device contains software from Gracenote, Inc. of
Emeryville, California (“Gracenote”). The software from
Gracenote (the “Gracenote Software”) enables this
application to do online disc identication and obtain
music-related information, including name, artist, track,
and title information (“Gracenote Data”) from online
servers (“Gracenote Servers”) and to perform other
functions. You may use Gracenote Data only by means
of the intended End-User functions of this device.
You agree that you will use Gracenote Data, the
Gracenote Software, and Gracenote Servers for your
own personal non-commercial use only. You agree
not to assign, copy, transfer or transmit the Gracenote
Software or any Gracenote Data to any third party. YOU
AGREE NOT TO USE OR EXPLOIT GRACENOTE DATA,
THE GRACENOTE SOFTWARE, OR GRACENOTE SERVERS,
EXCEPT AS EXPRESSLY PERMITTED HEREIN.
You agree that your non-exclusive license to use the
Gracenote Data, the Gracenote Software, and Gracenote
Servers will terminate if you violate these restrictions.
If your license terminates, you agree to cease any and
all use of the Gracenote Data, the Gracenote Software,
and Gracenote Servers. Gracenote reserves all rights
in Gracenote Data, the Gracenote Software, and the
Gracenote Servers, including all ownership rights. Under
no circumstances will Gracenote become liable for any
payment to you for any information that you provide.
You agree that Gracenote, Inc. may enforce its rights
under this Agreement against you directly in its own
name.
The Gracenote MusicID Service uses a unique identier
to track queries for statistical purposes. The purpose
of a randomly assigned numeric identier is to allow
the Gracenote MusicID service to count queries without
knowing anything about who you are. For more
information, see the web page for the Gracenote Privacy
Policy for the Gracenote MusicID Service.
The Gracenote Software and each item of Gracenote
Data are licensed to you “AS IS.” Gracenote makes
no representations or warranties, express or implied,
regarding the accuracy of any Gracenote Data from in
the Gracenote Servers. Gracenote reserves the right to
delete data from the Gracenote Servers or to change
data categories for any cause that Gracenote deems
sufcient. No warranty is made that the Gracenote
Software or Gracenote Servers are error-free or that
functioning of Gracenote Software or Gracenote Servers
will be uninterrupted. Gracenote is not obligated to
provide you with new enhanced or additional data types
or categories that Gracenote may provide in the future
and is free to discontinue its online services at any time.
GRACENOTE DISCLAIMS ALL WARRANTIES EXPRESS OR
IMPLIED, INCLUDING, BUT NOT LIMITED TO, IMPLIED
WARRANTIES OF MERCHANTABILITY, FITNESS FOR A
PARTICULAR PURPOSE, TITLE, AND NON-INFRINGEMENT.
GRACENOTE DOES NOT WARRANT THE RESULTS THAT
WILL BE OBTAINED BY YOUR USE OF THE GRACENOTE
SOFTWARE OR ANY GRACENOTE SERVER. IN NO CASE
WILL GRACENOTE BE LIABLE FOR ANY CONSEQUENTIAL
OR INCIDENTAL DAMAGES OR FOR ANY LOST PROFITS
OR LOST REVENUES.
© Gracenote 2006 Version 2.2

59
USER GUIDE
© Copyright Imerge Ltd 2009
Page
MS1 MediaServer / MediaPlayer
NVIDIA SOFTWARE LICENSE AGREEMENT
This License For Customer Use of NVIDIA Software
(“LICENSE”) is the agreement which governs use of the
accompanying software of NVIDIA Corporation and its
subsidiaries (“NVIDIA”), including any associated printed
materials (“SOFTWARE”). By installing or otherwise
using the SOFTWARE, you agree to be bound by the
terms of this license (“LICENSE”). If you do not agree
to the terms of this LICENSE, do not download, install,
activate, or use the SOFTWARE.
RECITALS
The SOFTWARE is protected by copyright laws and
international copyright treaties, as well as other
intellectual property laws and treaties. The SOFTWARE
is not sold to the end user, and instead is only licensed
for use, strictly in accordance with this document. This
agreement sets forth the terms and conditions of the
LICENSE for use of the SOFTWARE.
1. DEFINITIONS
1.1 Customer.
Customer means the entity or individual that is the end
user of the SOFTWARE.
2. GRANT OF LICENSE
2.1 Rights and Limitations of Grant.
NVIDIA hereby grants Customer the following nonexclusive, non-transferable right to use the SOFTWARE,
with the following limitations:
2.1.1 Rights.
Customer may install and use one copy of the SOFTWARE
on a single computer, and except for making one backup copy of the Software, may not otherwise copy the
SOFTWARE. This LICENSE of SOFTWARE may not be
shared or used concurrently on different computers.
2.1.2 Limitations.
No Reverse Engineering. Customer may not reverse
engineer, decompile, or disassemble the SOFTWARE, nor
attempt in any other manner to obtain the source code.
No Separation of Components. The SOFTWARE is
licensed as a single product. Its component parts may
not be separated for use on more than one computer,
nor otherwise used separately from the other parts.
No Distribution. Customer may not distribute, rent or
lease the SOFTWARE to third parties.
3. TERMINATION
This LICENSE will automatically terminate if Customer
fails to comply with any of the terms and conditions
hereof. In such event, Customer must destroy all copies
of the SOFTWARE and all of its component parts.
4. COPYRIGHT
All title and copyrights in and to the SOFTWARE
(including but not limited to all images, photographs,
animations, video, audio, music, text, and other
information incorporated into the SOFTWARE), the
accompanying printed materials, and any copies of
the SOFTWARE, are owned by NVIDIA, or its suppliers.
The SOFTWARE is protected by copyright laws and
international treaty provisions. Accordingly, Customer
is required to treat the SOFTWARE like any other
copyrighted material, except as otherwise allowed
pursuant to this LICENSE and that it may make one copy
of the SOFTWARE solely for backup or archive purposes.
5. APPLICABLE LAW
This LICENSE shall be deemed to have been made in, and
shall be construed pursuant to, the laws of the State of
California.
6. DISCLAIMER OF WARRANTIES AND LIMITATION ON
LIABILITY; EXPORTS
6.1 No Warranties.
TO THE MAXIMUM EXTENT PERMITTED BY APPLICABLE
LAW, THE SOFTWARE IS PROVIDED “AS IS” AND
NVIDIA AND ITS SUPPLIERS DISCLAIM ALL CONDITIONS,
WARRANTIES, EITHER EXPRESS, IMPLIED, OR STATUTORY
INCLUDING, BUT NOT LIMITED TO,ANY EXPRESS OR
IMPLIED WARRANTIES OF TITLE, NON-INFRINGEMENT,
MERCHANTABILITY AND FITNESS FOR A PARTICULAR
PURPOSE.
6.2 No Liability for Damages.
TO THE MAXIMUM EXTENT PERMITTED BY APPLICABLE
LAW, IN NO EVENT SHALL NVIDIA OR ITS SUPPLIERS
BE LIABLE FOR ANY SPECIAL, INCIDENTAL, DIRECT,
INDIRECT, OR CONSEQUENTIAL DAMAGES WHATSOEVER
(INCLUDING, WITHOUT LIMITATION, DAMAGES FOR LOSS
OF BUSINESS PROFITS, BUSINESS INTERRUPTION, LOSS OF
BUSINESS INFORMATION, OR ANY OTHER PECUNIARY
LOSS) ARISING OUT OF THE USE OF OR INABILITY TO USE
THE SOFTWARE, EVEN IF NVIDIA HAS BEEN ADVISED OF
THE POSSIBILITY OF SUCH DAMAGES.
6.3 Export Laws.
Export and use of the SOFTWARE may be subject to
U.S. and foreign export control laws and regulations,
including prohibitions on use in the development or
production of nuclear, chemical or biological weapons,
or in missile technology programs as specied in the U.S.
Export Administration Regulations. By downloading,
installing, activating or using this SOFTWARE you conrm
that you will not export or re-export the SOFTWARE
without all required U.S. and foreign government
licenses. Customer will defend, indemnify, and hold
harmless NVIDIA from and against all nes, penalties,
liabilities, damages, costs and expenses incurred as a
result of any violation of such laws or regulations by
Customer or any of its agents or employees.
7. MISCELLANEOUS
The United Nations Convention on Contracts for the
International Sale of Goods is specically disclaimed. If
any provision of this LICENSE is inconsistent with, or
cannot be fully enforced under, the law, such provision
will be construed as limited to the extent necessary to be
consistent with and fully enforceable under the law. This
LICENSE is the nal, complete and exclusive agreement
between the parties relating to the subject matter
hereof, and supersedes all prior or contemporaneous
understandings and agreements relating to such subject
matter, whether oral or written. Customer agrees that it
will not ship, transfer or export the SOFTWARE into any
country, or use the SOFTWARE in any manner, prohibited
by the United States Bureau of Export Administration
or any export laws, restrictions or regulations, and that
Customer shall be solely responsible for the results of any
violation of such laws, restrictions or regulations arising
from Customer’s activities. This LICENSE may only be
modied in writing signed by an authorized ofcer of
NVIDIA.

60
USER GUIDE
© Copyright Imerge Ltd 2009
Page
MS1 MediaServer / MediaPlayer
SONIC SOLUTIONS END-USER LICENCE
AGREEMENT
THIS IS A CONTRACT, PLEASE READ IT CAREFULLY, BY
INSTALLING THIS SOFTWARE YOU ACCEPT ALL THE
TERMS AND CONDITIONS OF THIS AGREEMENT, YOU
WILL NOT BE ABLE TO USE THIS SOFTWARE UNLESS YOU
ACCEPT THIS AGREEMENT. BY USING THE SOFTWARE,
YOU ARE AGREEING TO BE BOUND BY THE TERMS OF
THIS LICENSE. IF YOU DO NOT AGREE TO ANY TERM
OR CONDITION, YOU MAY NOT INSTALL OR RUN THIS
SOFTWARE.
1. License.
Sonic Solutions, a California corporation, (“Sonic”)
hereby grants to the purchaser (hereafter “you”) a
personal, non-exclusive, non-transferable license (the
“License”), without the right to sublicense, to use the
application, installation, utility, system, upgrade or other
software accompanying this License, whether on disk,
in read only memory, or on any other media (the “Sonic
Software”), the related documentation and materials.
The Sonic Software is licensed for use in object code
form only, for your internal use and only on a specic
hardware system. The Sonic Software is licensed, not
sold, to you by Sonic. You own the media on which
the Sonic Software is recorded but Sonic and/or Sonic’s
licensor(s) retain title to the Sonic Software and to
any copies which this License authorizes you to make.
You acknowledge that Sonic and/or Sonic’s licensor(s)
(hereafter, collectively referred to as “Sonic”) retain all
other ownership rights connected with the Software,
including, without limitation, all copyrights, trademark
rights, and all other intellectual property rights. You
agree to refrain from any action which would diminish
such rights or would call them into question. You agree
that this License shall apply to any software provided
to you by Sonic or Sonic’s representative as replacement
or upgrade software to substitute for or to be used
in conjunction with the software accompanying this
License.
2. Permitted Uses and Restrictions.
This License allows you to install and use the Sonic
Software on a single Sonic-manufactured or Sonicapproved hardware system at a time. This License does
not allow the Sonic Software to exist on more than one
hardware system at a time. You may make one copy
of the Sonic Software in machine-readable form for
backup purposes only. The backup copy must include
all copyright notices and any other proprietary legends
contained on the original copy of the Sonic Software.
You may use the Sonic Software in a networked
environment and transmit the Sonic Software from one
hardware system to another over a network so long as
each hardware system which receives the Sonic Software
is the subject of a license for the Sonic Software it
receives. Except as permitted by applicable law and
this License, you may not decompile, reverse engineer,
disassemble, modify, rent, lease, loan, distribute, create
derivative works from the Sonic Software or publish
or transmit the Sonic Software over a network. You
may, however, transfer your rights under this License,
provided you transfer the related documentation, this
License, and a copy of the Sonic Software to a party
who agrees to accept the terms of this License and
destroy any other copies of the Sonic Software in your
possession. Your rights under this License will terminate
automatically without notice from Sonic if you fail to
comply with any term(s) of this License.
3. Limited Warranty on Media.
Sonic warrants the media on which the Sonic Software
is delivered to be free from defects in materials and
workmanship under normal use for a period of ninety
(90) days from the date of original purchase. Your
exclusive remedy under this paragraph shall be, at Sonic’s
option, a refund of the purchase price of the product
containing the Sonic Software or replacement of the
Sonic Software which is returned to Sonic or an Sonic
authorized representative.
THIS LIMITED WARRANTY AND ANY IMPLIED
WARRANTIES ON THE MEDIA INCLUDING THE IMPLIED
WARRANTIES OF MERCHANTABILITY AND FITNESS FOR
A PARTICULAR PURPOSE ARE LIMITED IN DURATION
TO NINETY (90) DAYS FROM THE DATE OF ORIGINAL
RETAIL PURCHASE. SOME JURISDICTIONS DO NOT
ALLOW LIMITATIONS ON HOW LONG AN IMPLIED
WARRANTY LASTS, SO THIS LIMITATION MAY NOT APPLY
TO YOU. THE LIMITED WARRANTY SET FORTH HEREIN
IS EXCLUSIVE AND IN LIEU OF ALL OTHERS, WHETHER
ORAL OR WRITTEN, EXPRESS, OR IMPLIED. SONIC
SPECIFICALLY DISCLAIMS ALL OTHER WARRANTIES. THIS
LIMITED WARRANTY GIVES YOU SPECIFIC LEGAL RIGHTS,
AND YOU MAY ALSO HAVE OTHER RIGHTS WHICH VARY
BY JURISDICTION.
4. Disclaimer of Warranty on Sonic Software.
You expressly acknowledge and agree that use of the
Sonic Software is at your sole risk. The Sonic Software is
provided “AS IS” and without warranty of any kind and
Sonic
EXPRESSLY DISCLAIMS ALL WARRANTIES, EXPRESS OR
IMPLIED, INCLUDING, BUT NOT LIMITED TO, THE IMPLIED
WARRANTIES OF MERCHANTABILITY AND FITNESS FOR
A PARTICULAR PURPOSE WITH RESPECT TO THE SONIC
SOFTWARE. SONIC DOES NOT WARRANT THAT THE
FUNCTIONS CONTAINED IN THE SONIC SOFTWARE WILL
MEET YOUR REQUIREMENTS, OR THAT THE OPERATION
OF THE SONIC SOFTWARE WILL BE UNINTERRUPTED OR
ERROR-FREE, OR THAT DEFECTS IN THE SONIC SOFTWARE
WILL BE CORRECTED. FURTHERMORE, SONIC DOES
NOT WARRANT OR MAKE ANY REPRESENTATIONS
REGARDING THE USE OR THE RESULTS OF THE USE OF
THE SONIC SOFTWARE OR RELATED DOCUMENTATION IN
TERMS OF THEIR CORRECTNESS, ACCURACY, RELIABILITY,
OR OTHERWISE. NO ORAL OR WRITTEN INFORMATION
OR ADVICE GIVEN BY SONIC OR AN SONIC AUTHORIZED
REPRESENTATIVE SHALL CREATE A WARRANTY OR IN
ANY WAY INCREASE THE SCOPE OF THIS WARRANTY.
SHOULD THE SONIC SOFTWARE PROVE DEFECTIVE,
YOU (AND NOT SONIC OR AN SONIC AUTHORIZED
REPRESENTATIVE) ASSUME THE ENTIRE COST OF ALL
NECESSARY SERVICING, REPAIR OR CORRECTION. SOME
JURISDICTIONS DO NOT ALLOW THE EXCLUSION OF
IMPLIED WARRANTIES, SO THE ABOVE EXCLUSION MAY
NOT APPLY TO YOU.
5. Limitation of Liability.
UNDER NO CIRCUMSTANCES, INCLUDING NEGLIGENCE,
SHALL SONIC BE LIABLE FOR ANY INCIDENTAL, SPECIAL,
INDIRECT, OR CONSEQUENTIAL DAMAGES ARISING OUT
OF OR RELATING TO THIS LICENSE. SOME JURISDICTIONS
DO NOT ALLOW THE LIMITATION OF INCIDENTAL OR
CONSEQUENTIAL DAMAGES SO THIS LIMITATION MAY
NOT APPLY TO YOU. In no event shall Sonic’s total
liability to you for all damages exceed the amount paid
for this to the Sonic Software.

61
USER GUIDE
© Copyright Imerge Ltd 2009
Page
MS1 MediaServer / MediaPlayer
6. Export Law Restrictions.
You agree that the Sonic Software will not be exported
outside the United States except as authorized by United
States law. You also agree that Sonic Software that has
been rightfully obtained outside of the United States
shall not be exported except as authorized by the laws
of the United States and of the jurisdiction in which the
Sonic Software was obtained.
7. Controlling Law and Severability.
This License shall be governed by the laws of the United
States and the State of California. If for any reason a
court of competent jurisdiction nds any provision, or
portion thereof, to be unenforceable, the remainder of
this License shall continue in full force and effect.
8. Complete Agreement.
This License constitutes the entire agreement between
the parties with respect to the use of the Sonic
Software and supersedes all prior or contemporaneous
understandings regarding such subject matter. No
amendment to or modication of this License will be
binding unless in writing and signed by Sonic.
9. Content providers are using the Microsoft digital
rights management technology for Windows Media
distributed with this software (“WM-DRM”) to protect
the integrity of their content (“Secure Content”) so
that their intellectual property, including copyright, in
such content is not misappropriated. Portions of this
software and other 3rd party applications use WM-DRM
to play Secure Content (“WM-DRM Software”). If the
WM-DRM Software’s security has been compromised,
owners of Secure Content (“Secure Content Owners”)
may request that Microsoft revoke the WM-DRM
Software’s right to copy, display and/or play Secure
Content. Revocation does not alter the WM-DRM
Software’s ability to play unprotected content. A list of
revoked WM-DRM Software is sent to your computer
whenever you download a license for Secure Content
from the Internet. Microsoft may, in conjunction with
such license, also download revocation lists onto your
computer on behalf of Secure Content Owners. Secure
Content Owners may also require you to upgrade some
of the WM-DRM components distributed with this
software (“WM-DRM Upgrades”) before accessing their
content. When you attempt to play such content, WMDRM Software built by Microsoft will notify you that
a WM-DRM Upgrade is required and then ask for your
consent before the WMDRM Upgrade is downloaded.
Non-Microsoft WM-DRM Software may do the same. If
you decline the upgrade, you will not be able to access
content that requires the WM-DRM Upgrade; however,
you will still be able to access unprotected content and
Secure Content that does not require the upgrade. WMDRM features that access the Internet, such as acquiring
new licenses and/or performing a required WM-DRM
Upgrade, can be switched off. When these features are
switched off, you will still be able to play Secure Content
if you have a valid license for such content already stored
on your computer.
OPEN SOURCE SOFTWARE LICENCE
AGREEMENT
Certain components of the software for the XiVA
powered MediaServers are subject to the GNU General
Public License or other so-called open source licenses
(“Open-Source Software”).
Open Source Software is not subject to the restrictions in
Section 6 (“Title to Software and Intellectual Property”),
and is subject to the GNU General Public License (“GPL”)
or other license terms, as applicable.
In compliance with the terms of the GPL, XiVA makes its
modications to Open Source Software that the XiVA
powered product uses, modies and distributes pursuant
to the GPL available to the public in source code form at
http://www.imerge.co.uk/lgpl/taglibport.zip.
You are free to use, modify and distribute Open Source
Software that is subject to the GPL so long as you comply
with the terms of the GPL available in the product
manual or at www.gnu.org/copyleft/gpl.html.
GNU GENERAL PUBLIC LICENSE
Version 2, June 1991
Copyright (C) 1989, 1991 Free Software Foundation, Inc.
51 Franklin Street, Fifth Floor, Boston, MA 02110-1301,
USA
Everyone is permitted to copy and distribute verbatim
copies of this license document, but changing it is not
allowed.
PREAMBLE
The licenses for most software are designed to take away
your freedom to share and change it. By contrast, the
GNU General Public License is intended to guarantee
your freedom to share and change free software—to
make sure the software is free for all its users. This
General Public License applies to most of the Free
Software Foundation’s software and to any other
program whose authors commit to using it. (Some other
Free Software Foundation software is covered by the
GNU Lesser General Public License instead.) You can
apply it to your programs, too.
When we speak of free software, we are referring to
freedom, not price. Our General Public Licenses are
designed to make sure that you have the freedom to
distribute copies of free software (and charge for this
service if you wish), that you receive source code or can
get it if you want it, that you can change the software or
use pieces of it in new free programs; and that you know
you can do these things.
To protect your rights, we need to make restrictions that
forbid anyone to deny you these rights or to ask you
to surrender the rights. These restrictions translate to
certain responsibilities for you if you distribute copies
of the software, or if you modify it. For example, if you
distribute copies of such a program, whether gratis or
for a fee, you must give the recipients all the rights that
you have. You must make sure that they, too, receive or
can get the source code. And you must show them these
terms so they know their rights.
We protect your rights with two steps: (1) copyright the
software, and (2) offer you this license which gives you
legal permission to copy, distribute and/or modify the
software.
Also, for each author’s protection and ours, we want
to make certain that everyone understands that there
is no warranty for this free software. If the software
is modied by someone else and passed on, we want
its recipients to know that what they have is not the
original, so that any problems introduced by others will
not reect on the original authors’ reputations.

62
USER GUIDE
© Copyright Imerge Ltd 2009
Page
MS1 MediaServer / MediaPlayer
Finally, any free program is threatened constantly
by software patents. We wish to avoid the danger
that redistributors of a free program will individually
obtain patent licenses, in effect making the program
proprietary. To prevent this, we have made it clear that
any patent must be licensed for everyone’s free use or
not licensed at all.
The precise terms and conditions for copying,
distribution and modication follow.
TERMS AND CONDITIONS FOR COPYING, DISTRIBUTION
AND MODIFICATION
0. This License applies to any program or other work
which contains a notice placed by the copyright holder
saying it may be distributed under the terms of this
General Public License. The “Program”, below, refers
to any such program or work, and a “work based
on the Program” means either the Program or any
derivative work under copyright law: that is to say, a
work containing the Program or a portion of it, either
verbatim or with modications and/or translated into
another language. (Hereinafter, translation is included
without limitation in the term “modication”.) Each
licensee is addressed as “you”.
Activities other than copying, distribution and
modication are not covered by this License; they are
outside its scope. The act of running the Program is not
restricted, and the output from the Program is covered
only if its contents constitute a work based on the
Program (independent of having been made by running
the Program). Whether that is true depends on what the
Program does.
1. You may copy and distribute verbatim copies of the
Program’s source code as you receive it, in any medium,
provided that you conspicuously and appropriately
publish on each copy an appropriate copyright notice
and disclaimer of warranty; keep intact all the notices
that refer to this License and to the absence of any
warranty; and give any other recipients of the Program
a copy of this License along with the Program. You may
charge a fee for the physical act of transferring a copy,
and you may at your option offer warranty protection in
exchange for a fee.
2. You may modify your copy or copies of the Program
or any portion of it, thus forming a work based on the
Program, and copy and distribute such modications or
work under the terms of Section 1 above, provided that
you also meet all of these conditions:
a) You must cause the modied les to carry prominent
notices stating that you changed the les and the date
of any change.
b) You must cause any work that you distribute or
publish, that in whole or in part contains or is derived
from the Program or any part thereof, to be licensed as
a whole at no charge to all third parties under the terms
of this License.
c) If the modied program normally reads commands
interactively when run, you must cause it, when started
running for such interactive use in the most ordinary
way, to print or display an announcement including an
appropriate copyright notice and a notice that there is
no warranty (or else, saying that you provide a warranty)
and that users may redistribute the program under these
conditions, and telling the user how to view a copy of
this License. (Exception: if the Program itself is interactive
but does not normally print such an announcement, your
work based on the Program is not required to print an
announcement.)
These requirements apply to the modied work as a
whole. If identiable sections of that work are not
derived from the Program, and can be reasonably
considered independent and separate works in
themselves, then this License, and its terms, do not apply
to those sections when you distribute them as separate
works. But when you distribute the same sections as part
of a whole which is a work based on the Program, the
distribution of the whole must be on the terms of this
License, whose permissions for other licensees extend
to the entire whole, and thus to each and every part
regardless of who wrote it.
Thus, it is not the intent of this section to claim rights
or contest your rights to work written entirely by you;
rather, the intent is to exercise the right to control the
distribution of derivative or collective works based on
the Program.
In addition, mere aggregation of another work not
based on the Program with the Program (or with a
work based on the Program) on a volume of a storage
or distribution medium does not bring the other work
under the scope of this License.
3. You may copy and distribute the Program (or a work
based on it, under Section 2) in object code or executable
form under the terms of Sections 1 and 2 above provided
that you also do one of the following:
a) Accompany it with the complete corresponding
machinereadable source code, which must be distributed
under the terms of Sections 1 and 2 above on a medium
customarily used for software interchange; or,
b) Accompany it with a written offer, valid for at least
three years, to give any third party, for a charge no
more than your cost of physically performing source
distribution, a complete machine-readable copy of the
corresponding source code, to be distributed under
the terms of Sections 1 and 2 above on a medium
customarily used for software interchange; or,
c) Accompany it with the information you received as
to the offer to distribute corresponding source code.
(This alternative is allowed only for noncommercial
distribution and only if you received the program in
object code or executable form with such an offer, in
accord with Subsection b above.)
The source code for a work means the preferred form
of the work for making modications to it. For an
executable work, complete source code means all
the source code for all modules it contains, plus any
associated interface denition les, plus the scripts used
to control compilation and installation of the executable.
However, as a special exception, the source code
distributed need not include anything that is normally
distributed (in either source or binary form) with the
major components (compiler, kernel, and so on) of the
operating system on which the executable runs, unless
that component itself accompanies the executable.
If distribution of executable or object code is made by
offering access to copy from a designated place, then
offering equivalent access to copy the source code from
the same place counts as distribution of the source code,
even though third parties are not compelled to copy the
source along with the object code.
4. You may not copy, modify, sublicense, or distribute the
Program except as expressly provided under this License.
Any attempt otherwise to copy, modify, sublicense or
distribute the Program is void, and will automatically
terminate your rights under this License. However,
parties who have received copies, or rights, from you
under this License will not have their licenses terminated
so long as such parties remain in full compliance.

63
USER GUIDE
© Copyright Imerge Ltd 2009
Page
MS1 MediaServer / MediaPlayer
5. You are not required to accept this License, since you
have not signed it. However, nothing else grants you
permission to modify or distribute the Program or its
derivative works. These actions are prohibited by law if
you do not accept this License. Therefore, by modifying
or distributing the Program (or any work based on the
Program), you indicate your acceptance of this License
to do so, and all its terms and conditions for copying,
distributing or modifying the Program or works based
on it.
6. Each time you redistribute the Program (or any work
based on the Program), the recipient automatically
receives a license from the original licensor to copy,
distribute or modify the Program subject to these
terms and conditions. You may not impose any further
restrictions on the recipients’ exercise of the rights
granted herein. You are not responsible for enforcing
compliance by third parties to this License.
7. If, as a consequence of a court judgment or allegation
of patent infringement or for any other reason (not
limited to patent issues), conditions are imposed on you
(whether by court order, agreement or otherwise) that
contradict the conditions of this License, they do not
excuse you from the conditions of this License. If you
cannot distribute so as to satisfy simultaneously your
obligations under this License and any other pertinent
obligations, then as a consequence you may not
distribute the Program at all. For example, if a patent
license would not permit royalty-free redistribution of
the Program by all those who receive copies directly or
indirectly through you, then the only way you could
satisfy both it and this License would be to refrain
entirely from distribution of the Program.
If any portion of this section is held invalid or
unenforceable under any particular circumstance,
the balance of the section is intended to apply and
the section as a whole is intended to apply in other
circumstances.
It is not the purpose of this section to induce you to
infringe any patents or other property right claims or
to contest validity of any such claims; this section has
the sole purpose of protecting the integrity of the free
software distribution system, which is implemented
by public license practices. Many people have made
generous contributions to the wide range of software
distributed through that system in reliance on consistent
application of that system; it is up to the author/donor
to decide if he or she is willing to distribute software
through any other system and a licensee cannot impose
that choice.
This section is intended to make thoroughly clear what is
believed to be a consequence of the rest of this License.
8. If the distribution and/or use of the Program is
restricted in certain countries either by patents or by
copyrighted interfaces, the original copyright holder
who places the Program under this License may add an
explicit geographical distribution limitation excluding
those countries, so that distribution is permitted only in
or among countries not thus excluded. In such case, this
License incorporates the limitation as if written in the
body of this License.
9. The Free Software Foundation may publish revised
and/or new versions of the General Public License from
time to time. Such new versions will be similar in spirit to
the present version, but may differ in detail to address
new problems or concerns.
Each version is given a distinguishing version number. If
the Program species a version number of this License
which applies to it and “any later version”, you have the
option of following the terms and conditions either of
that version or of any later version published by the Free
Software Foundation. If the Program does not specify
a version number of this License, you may choose any
version ever published by the Free Software Foundation.
10. If you wish to incorporate parts of the Program into
other free programs whose distribution conditions are
different, write to the author to ask for permission. For
software which is copyrighted by the Free Software
Foundation, write to the Free Software Foundation; we
sometimes make exceptions for this. Our decision will be
guided by the two goals of preserving the free status of
all derivatives of our free software and of promoting the
sharing and reuse of software generally.
NO WARRANTY
11. BECAUSE THE PROGRAM IS LICENSED FREE OF
CHARGE, THERE IS NO WARRANTY FOR THE PROGRAM,
TO THE EXTENT PERMITTED BY APPLICABLE LAW.
EXCEPT WHEN OTHERWISE STATED IN WRITING THE
COPYRIGHT HOLDERS AND/OR OTHER PARTIES PROVIDE
THE PROGRAM “AS IS” WITHOUT WARRANTY OF ANY
KIND, EITHER EXPRESSED OR IMPLIED, INCLUDING,
BUT NOT LIMITED TO, THE IMPLIED WARRANTIES OF
MERCHANTABILITY AND FITNESS FOR A PARTICULAR
PURPOSE. THE ENTIRE RISK AS TO THE QUALITY AND
PERFORMANCE OF THE PROGRAM IS WITH YOU.
SHOULD THE PROGRAM PROVE DEFECTIVE, YOU
ASSUME THE COST OF ALL NECESSARY SERVICING,
REPAIR OR CORRECTION.
12. IN NO EVENT UNLESS REQUIRED BY APPLICABLE
LAW OR AGREED TO IN WRITING WILL ANY COPYRIGHT
HOLDER, OR ANY OTHER PARTY WHO MAY MODIFY
AND/OR REDISTRIBUTE THE PROGRAM AS PERMITTED
ABOVE, BE LIABLE TO YOU FOR DAMAGES,
INCLUDING ANY GENERAL, SPECIAL, INCIDENTAL OR
CONSEQUENTIAL DAMAGES ARISING OUT OF THE
USE OR INABILITY TO USE THE PROGRAM (INCLUDING
BUT NOT LIMITED TO LOSS OF DATA OR DATA BEING
RENDERED INACCURATE OR LOSSES SUSTAINED BY YOU
OR THIRD PARTIES OR A FAILURE OF THE PROGRAM TO
OPERATE WITH ANY OTHER PROGRAMS), EVEN IF SUCH
HOLDER OR OTHER PARTY HAS BEEN ADVISED OF THE
POSSIBILITY OF SUCH DAMAGES.

64
USER GUIDE
© Copyright Imerge Ltd 2009
Page
MS1 MediaServer / MediaPlayer
AMG FLOW-DOWN LICENSE TERMS
(TERMS OF USE)
This application incorporates software and technology of
All Media Guide, LLC. (“AMG”). The AMG software and
technology (the “AMG Technology”) allows End Users
to access music-related data (“AMG Data”) over the
Internet and otherwise from proprietary AMG databases
(the “AMG Databases”) located on AMG servers
(the “AMG Servers”) and to perform other functions
(collectively with the AMG Technology, AMG Data, AMG
Databases and AMG Servers, the “AMG Services”).
AMG grants you a limited, non-exclusive, nontransferable, and non-sublicensable right and license
to access and use AMG Services only by means of the
intended End User functions of this application software.
You agree that you will use the AMG Services for your
own personal non-commercial use only. You agree not
to: (i) assign, copy, transfer or transmit the AMG Data
to any third party; (ii) use or exploit the AMG Services,
except as expressly permitted herein; (iii) decompile,
disassemble or reverse engineer the AMG Services or
any component thereof; (iii) remove any copyright,
trademark, trade names, logos or other intellectual
property notices in the AMG Services; or (vi) sell,
distribute, publish, disclose lease, license transfer or
otherwise use the AMG Services, or any portion thereof,
other than as expressly provided in these Terms of Use.
You agree that the license to use the AMG Services
granted herein will terminate if you violate these
restrictions. In addition, AMG may revoke or terminate
this license at any time in its sole discretion. If your
license terminates, you agree to cease any and all use of
the AMG Services. You agree to defend, indemnify and
hold harmless AMG and its afliates from all liabilities,
claims and expenses, including attorneys’ fees arising
from your breach of these Terms of Use.
AMG reserves all rights in the AMG Services, including
all ownership rights. You acknowledge that as between
you and AMG, all right, title and ownership to the AMG
Services and components thereof remain the exclusive
property of AMG, and nothing herein will be deemed
to grant you any ownership rights in the AMG Services.
You agree that AMG may enforce its rights under this
Agreement against you directly in its own name.
AMG reserves the right to delete data from the AMG
Databases or to change data categories for any cause
that AMG deems sufcient. No warranty is made that
the AMG Technology or AMG Servers are error-free or
that functioning of AMG Technology or AMG Servers
will be uninterrupted. AMG is not obligated to provide
you with any new, enhanced or additional data types or
categories that AMG may choose to provide in the future
and is free to discontinue its online services at any time,
without any obligation to you.
To the extent that you, the End User, provide any
information or original works of authorship to be added
to AMG Databases, you represent and warrant that you
are the sole author of such work(s) and further hereby
assign to AMG all rights of copyright therein, including
the right to register the copyright in such work(s) as part
of the AMG Database.
THE AMG SERVICES AND COMPONENTS THEREOF
ARE PROVIDED TO YOU “AS IS.” AMG MAKES NO
REPRESENTATIONS OR WARRANTIES, EXPRESS OR
IMPLIED, REGARDING THE ACCURACY OF THE AMG
SERVICES INCLUDING WITHOUT LIMITATION THE IMPLIED
WARRANTIES OF MERCHANTABILITY, FITNESS FOR A
PARTICULAR PURPOSE, TITLE AND NON-INFRINGEMENT.
AMG DOES NOT WARRANT, GUARANTEE OR MAKE
ANY REPRESENTATIONS REGARDING THE CORRECTNESS,
ACCURACY, RELIABILITY, CURRENTNESS OR THE RESULTS
THAT WILL BE OBTAINED BY YOUR USE OF THE AMG
SERVICES.
IN NO CASE WILL AMG OR ITS AFFILIATES BE LIABLE
TO YOU OR ANY THIRD PARTY FOR ANY INDIRECT,
CONSEQUENTIAL, INCIDENTAL SPECIAL, PUNITIVE
OR OTHER DAMAGES INCLUDING WITHOUT
LIMITATION ANY LOST PROFITS OR LOST REVENUES OR
INTERRUPTION WITH BUSINESS UNDER ANY THEORY
OF LAW, INCLUDING CONTRACT, TORT, NEGLIGENCE,
INDEMNITY, STRICT LIABILITY, PRODUCT LIABILITY,
OR OTHERWISE ARISING OUT OF OR IN ANY WAY
RELATED TO THE USE OF THE AMG SERVICES. IN NO
EVENT WILL AMG’S LIABILITY FOR DAMAGES WITH
RESPECT TO THE AMG SERVICES BE IN EXCESS OF TEN
DOLLARS REGARDLESS OF THE FORM OF THE CLAIM.
SOME JURISDICTIONS DO NOT ALLOW THE EXCLUSION
OF LIABILITY FOR INCIDENTAL OR CONSEQUENTIAL
DAMAGES, SO THE ABOVE EXCLUSION MAY NOT APPLY
TO YOU.

65
USER GUIDE
© Copyright Imerge Ltd 2009
Page
MS1 MediaServer / MediaPlayer
2 YEAR PRODUCT WARRANTY
Thank you for purchasing this Imerge product. We trust
you will enjoy using your MS1 for many years to come.
This product has undergone stringent testing during
manufacture and if, after reading the User Guide, you
believe that there is a problem with the product, please
contact the Imerge dealer who supplied it, as your dealer
will be able to advise how the problem can best be
corrected.
This guarantee applies provided the product is handled
properly for its intended use and in accordance with its
operating instructions.
This guarantee does not apply:
if the serial number or warranty sticker on the •
product has been altered, tampered with, removed
or made illegible;
if repairs or product modications and alterations •
have been executed by unauthorised service
organisations or persons;
if damage is caused by accidents including but not •
limited to lightning, water or re, misuse or neglect;
if the product has been incorrectly installed, •
resulting in damage to components;
to costs of shipment, transportation, or associated •
insurance costs, to or from an Imerge dealer or
Imerge Service Centre
These statements do not affect your statutory rights
as a consumer under applicable national legislation in
force, nor your consumer’s rights against the dealer from
whom you purchased the product.
Please do not return your product directly to Imerge, as
this will result in unnecessary delays in the repair process.
In order to avoid unnecessary inconvenience, we advise
you to read the user documentation carefully before
contacting your dealer. Should you have any questions,
which your dealer is unable to answer, please contact:
Imerge Customer Support Helpdesk:
http://www.imerge.co.uk
Imerge UK and International Helpdesk:
Phone: +44 (0) 870 0104880
Fax: +44 (0) 1954 783601
Email: support@imerge.co.uk
Product Registration
receive prompt technical support•
obtain product enhancements•
If you have not yet registered your equipment you can
do so online at www.imerge.co.uk/support; alternatively,
please use the form on the back cover of this manual.
TRADEMARK INFORMATION
All brand names, product names, and trademarks are the
sole property of their respective owners. Windows is a
registered trademark of Microsoft Corporation. Windows
95/98/Me/XP and Windows NT/2000 are trademarks of
Microsoft Corporation.
iTunes is a trademark of Apple Computer, Inc. Windows
MediaPlayer is a trademark of Microsoft Corporation.

Index
A
Annotated diagrams
MediaServer .. .. .. .. .. .. .. .. .. .. .. .. .. .. .. .. 16
Remote Control .. .. .. .. .. .. .. .. .. .. .. .. .. .. 18
Audio Library.. .. .. .. .. .. .. .. .. .. .. .. .. .. .. .. .. 28
Automatic shutdown .. .. .. .. .. .. .. .. .. .. .. .. 2, 47
B
Browser, using to control Server .. .. .. .. .. .. .. 25
Browsing
Audio Library .. .. .. .. .. .. .. .. .. .. .. .. .. .. .. 29
D
Deleting albums . .. .. .. .. .. .. .. .. .. .. .. .. .. .. .. 33
Deleting movies . .. .. .. .. .. .. .. .. .. .. .. .. .. .. .. 38
Digital Safe .. .. .. .. .. .. .. .. .. .. .. .. .. .. .. .. .. .. 46
Disposal.. .. .. .. .. .. .. .. .. .. .. .. .. .. .. .. .. .. .. .. .. 3
DTS Encoded discs.. .. .. .. .. .. .. .. .. .. .. .. .. .. .. 1
E
Erasing all media .. .. .. .. .. .. .. .. .. .. .. .. .. .. .. 40
Exporting media . .. .. .. .. .. .. .. .. .. .. .. .. .. .. .. 43
Using iTunes.. .. .. .. .. .. .. .. .. .. .. .. .. .. .. .. 44
Using Windows Media Player.. .. .. .. .. .. .. 44
F
FCC Compliance .. .. .. .. .. .. .. .. .. .. .. .. .. .. .. .. 3
H
Hardware specication .. .. .. .. .. .. .. .. .. .. .. .. 54
Movie Synopsis.. .. .. .. .. .. .. .. .. .. .. .. .. .. .. .. 36
Music Synchronisation .. .. .. .. .. .. .. .. .. .. .. .. 43
N
Now Playing Screen
Audio . .. .. .. .. .. .. .. .. .. .. .. .. .. .. .. .. .. .. .. 31
Video.. .. .. .. .. .. .. .. .. .. .. .. .. .. .. .. .. .. .. .. 36
O
Online Update . .. .. .. .. .. .. .. .. .. .. .. .. .. .. 23, 45
P
Parental Control . .. .. .. .. .. .. .. .. .. .. .. .. .. .. .. 41
PIN
Lost PIN .. .. .. .. .. .. .. .. .. .. .. .. .. .. .. .. .. .. 48
Setting the PIN . .. .. .. .. .. .. .. .. .. .. .. .. .. .. 40
Playback
Playing a CD.. .. .. .. .. .. .. .. .. .. .. .. .. .. .. .. 27
Playing a DVD . .. .. .. .. .. .. .. .. .. .. .. .. .. .. 27
Playing Movies . .. .. .. .. .. .. .. .. .. .. .. .. .. .. 36
R
Recording
Audio recording quality .. .. .. .. .. .. .. .. .. .. 26
Automatic recording.. .. .. .. .. .. .. .. .. .. .. .. 26
Remote Control.. .. .. .. .. .. .. .. .. .. .. .. .. .. .. .. 18
Controlling your TV .. .. .. .. .. .. .. .. .. .. .. .. 20
Switching on and off.. .. .. .. .. .. .. .. .. .. .. .. 21
Remote User Interface .. .. .. .. .. .. .. .. .. .. .. .. 25
Resetting the System .. .. .. .. .. .. .. .. .. .. .. .. .. 40
Resetting to Factory Defaults.. .. .. .. .. .. .. .. .. 40
I
Importing media . .. .. .. .. .. .. .. .. .. .. .. .. .. .. .. 43
L
Libraries
Audio Library .. .. .. .. .. .. .. .. .. .. .. .. .. .. .. 28
Deleting albums .. .. .. .. .. .. .. .. .. .. .. .. .. 33
Editing entries .. .. .. .. .. .. .. .. .. .. .. .. .. .. 32
Now Playing screen .. .. .. .. .. .. .. .. .. .. .. 31
Playing the entire library . .. .. .. .. .. .. .. .. 29
Playlists .. .. .. .. .. .. .. .. .. .. .. .. .. .. .. .. .. 30
Play Queue . .. .. .. .. .. .. .. .. .. .. .. .. .. .. .. 30
Video Library . .. .. .. .. .. .. .. .. .. .. .. .. .. .. .. 35
Deleting movies .. .. .. .. .. .. .. .. .. .. .. .. .. 38
Editing entries .. .. .. .. .. .. .. .. .. .. .. .. .. .. 37
Marking items .. .. .. .. .. .. .. .. .. .. .. .. .. .. 36
Now Playing screen .. .. .. .. .. .. .. .. .. .. .. 36
M
Media Transfer
TuneXchange . .. .. .. .. .. .. .. .. .. .. .. .. .. .. .. 43
S
Safety Precautions . .. .. .. .. .. .. .. .. .. .. .. .. .. .. .. 2
Software Updates.. .. .. .. .. .. .. .. .. .. .. .. .. .. .. 45
Checking for updates . .. .. .. .. .. .. .. .. .. .. .. 45
Checking the version . .. .. .. .. .. .. .. .. .. .. .. 45
Surround Sound . .. .. .. .. .. .. .. .. .. .. .. .. .. .. .. 47
Synchronising music collections .. .. .. .. .. .. .. 43
T
Terms & Conditions
AMG.. .. .. .. .. .. .. .. .. .. .. .. .. .. .. .. .. .. .. .. 64
Gracenote . .. .. .. .. .. .. .. .. .. .. .. .. .. .. .. .. .. 58
Macromedia .. .. .. .. .. .. .. .. .. .. .. .. .. .. .. .. 58
Microsoft . .. .. .. .. .. .. .. .. .. .. .. .. .. .. .. .. .. 57
NVidia .. .. .. .. .. .. .. .. .. .. .. .. .. .. .. .. .. .. .. 59
Open Source .. .. .. .. .. .. .. .. .. .. .. .. .. .. .. .. 61
Sonic .. .. .. .. .. .. .. .. .. .. .. .. .. .. .. .. .. .. .. .. 60
XiVA.. .. .. .. .. .. .. .. .. .. .. .. .. .. .. .. .. .. .. .. 55
Touch Panel User Interface.. .. .. .. .. .. .. .. .. .. 24
Trademark information .. .. .. .. .. .. .. .. .. .. .. .. 65
Troubleshooting . .. .. .. .. .. .. .. .. .. .. .. .. .. .. .. 47
Automatic Shutdown . .. .. .. .. .. .. .. .. .. .. .. 47
Display Help.. .. .. .. .. .. .. .. .. .. .. .. .. .. .. .. 47

Look Up failure .. .. .. .. .. .. .. .. .. .. .. .. .. .. 48
Surround Sound .. .. .. .. .. .. .. .. .. .. .. .. .. .. 47
Warning Messages.. .. .. .. .. .. .. .. .. .. .. .. .. 47
TuneXchange .. .. .. .. .. .. .. .. .. .. .. .. .. .. .. .. .. 43
TV Set-Up . .. .. .. .. .. .. .. .. .. .. .. .. .. .. .. .. .. .. 47
TV User Interface.. .. .. .. .. .. .. .. .. .. .. .. .. .. .. 23
U
User Interfaces
Remote user interface .. .. .. .. .. .. .. .. .. .. .. 25
Touch Panel user interface.. .. .. .. .. .. .. .. .. 24
TV user interface . .. .. .. .. .. .. .. .. .. .. .. .. .. 23
Use with a home computer .. .. .. .. .. .. .. .. .. .. 43
MAC .. .. .. .. .. .. .. .. .. .. .. .. .. .. .. .. .. .. .. .. 43
Windows.. .. .. .. .. .. .. .. .. .. .. .. .. .. .. .. .. .. 43
W
Warning Messages .. .. .. .. .. .. .. .. .. .. .. .. .. .. 47
Warranty . .. .. .. .. .. .. .. .. .. .. .. .. .. .. .. .. .. .. .. 65


Unit 6, Bar Hill Business Park, Saxon Way, Bar Hill, Cambridge, CB23 8SL, UK
Telephone: +44 (0)1954 783600, Fax: +44 (0)1954 783601
Email: info@imerge.co.uk, Web: http://www.imerge.co.uk
Imerge UK and International Helpdesk:
Telephone: +44 (0)870 0104880, Fax: +44 (0)1954 783601
Email: support@imerge.co.uk, Web: http://www.imerge.co.uk/support
Part No. PK00901-05
©Copyright Imerge Ltd 2009
 Loading...