

Page 1
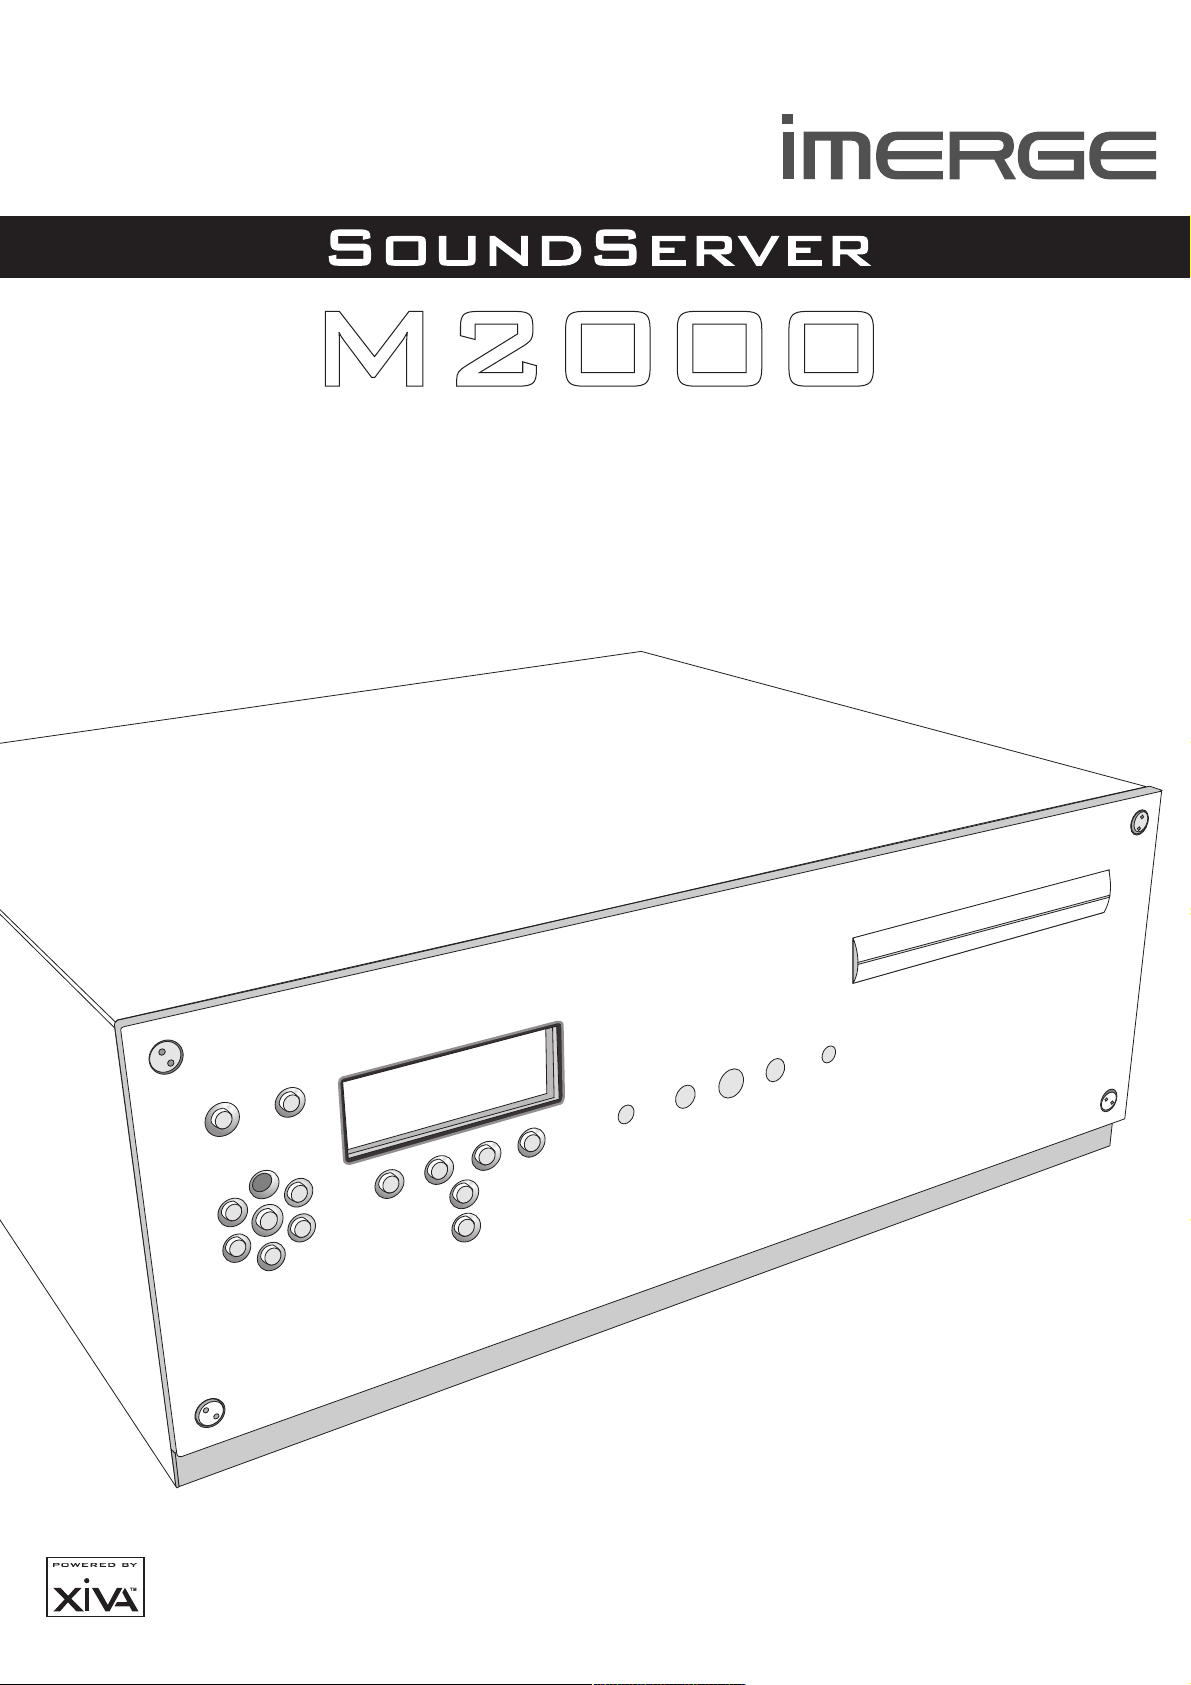
HARD DISK AUDIO SYSTEM
USER GUIDE
Page 2

COPYRIGHT NOTICE
Copyright 2003 Imerge Ltd. All rights reserved.
The SoundServer XiVA software and this
documentation are copyright materials. No part of the
SoundServer software or this documentation may be
reproduced, transmitted, transcribed, stored in a
retrieval system, or translated into any language, or
computer language, in any form or by any means
without prior written permission of Imerge.
XiVA is a registered trademark of Imerge Ltd. All other
product names are trademarks or registered trademarks
of their respective owners.
Cover art illustration from the XiVA on-line service
©2002 Muze Inc.
Music recognition technology and related data are
provided by Gracenote and the Gracenote CDDB
Recognition Service
SM
. Gracenote is the industry
standard in music recognition technology and related
content delivery. For more information go to
www.gracenote.com
®
Music
CD and music-related data from Gracenote CDDB® Music
Recognition ServiceSM © 2000, 2001, 2002 Gracenote.
Gracenote CDDB Client Software, © 2000, 2001, 2002
Gracenote CDDB Client Software, ©
Gracenote, U.S. Patents Numbers #5,987,525; #6,061,680;
Gracenote, U.S. Patents Numbers
#6,154,773, and other patents issued or pending.
#6,154,773, and other patents
CDDB is a registered trademark of Gracenote. The
CDDB is a registered trademark of G
Gracenote logo and logotype, the Gracenote CDDB logo
and logotype, and the Powered by Gracenote CDDB
trademark of G
logotype, the G
the Powered by G
logo are trademarks of Gracenote. Music Recognition
Service and MRS are service marks of Gracenote.
MPEG Layer-3 audio coding technology licensed from
Fraunhofer IIS and THOMSON multimedia.
TThe information in this guide is believed to be correct as
of the date of publication. However our policy is one of
continuous development and so the information in this
guide is subject to change without notice, and does not
represent a commitment on the part of Imerge.
This guide was designed and produced by Imerge Ltd.
XIVA NEW MEDIA BROUGHT TO LIFE
XiVA is a highly portable software framework that
powers next-generation media appliances. XiVA
blends hard disk technology, advanced software design,
and embedded Internet technology to provide amazing
features; audio, video, text, graphics, and all forms of
streaming new media are all brought to life through a
wealth of interactive user interface options. The next
generation media appliance is powered by XiVA.
Page 3
PRECAUTIONS
GENERAL PRECAUTIONS
When installing the equipment ensure that:
the ventilation holes are not covered.
air is allowed to circulate freely around the
equipment.
it is placed on a vibration free surface.
it will not be exposed to excessive heat, cold,
moisture or dust.
it will not be exposed to direct sunlight.
it will not be exposed to electrostatic discharges.
In addition, never place heavy objects on the equipment.
If a foreign object or water does enter the equipment,
contact your nearest dealer or service center.
It is advisable when leaving the house, or during a
thunderstorm, to disconnect the equipment from the
mains supply.
WARNINGS
TO REDUCE THE RISK OF FIRE OR ELECTRIC SHOCK,
DO NOT EXPOSE THIS APPLIANCE TO RAIN OR
MOISTURE.
Do not remove the cover from the equipment. There
are no user serviceable parts inside, and opening the
case will invalidate your warranty.
Do not pull out the plug by pulling on the mains
lead; grasp the plug.
Do not insert anything into the equipment through
the ventilation holes.
Do not cover the ventilation holes with any items
such as tablecloths, newspapers, curtains, etc. To
avoid overheating do not position the SoundServer
near heat sources, and ensure that the ventilation
holes are not blocked.
Do not place naked flame sources, such as lighted
candles, on the equipment.
Do not handle the mains lead with wet hands.
AAllow adequate ventilation. Leave a gap of 0.1m on
all sides of the unit.
Do not splash or spill water on the unit. Do not place
objects filled with liquid (such as vases) on the unit.
CAUTION: This product contains a lithium battery.
Danger of explosion if battery is incorrectly replaced.
Replace only with the same or equivalent type
R
recommended by Imerge. Dispose of batteries according
to the manufacturers instructions.
CD HANDLING PRECAUTIONS
Handle discs carefully so as not to damage or scratch the
front side. Always keep the disc surface clean.
To protect the disc avoid placing it in the following
locations:
In direct sunlight or near a source of heat like a
heater.
In a place which is damp or dirty.
In a place which could be exposed to rain, such
as near a window.
Do not use a disc with a special shape
DTS encoded discs
Caution - when playing DTS encoded CDs excessive noise
will be heard on the analogue outputs jacks of the
SoundServer. To avoid possible damage to the audio system
you should ensure that the correct connections are made to
your amplification system for replaying this type of disc.
MAINS PRECAUTIONS
Your SoundServer complies with the household power
and safety requirements in your area.
IMPORTANT: (for UK version only)
This apparatus is fitted with an approved moulded 13
amp plug. To change a fuse in this type of plug proceed
as follows:
1 R
1 Remove fuse cover and fuse.
2 Fix
2 Fix new fuse which should be a BS1362 5A, A.S.T.A or
BSI
BSI approved type.
3 Refit the fuse cover.
If the fitted plug is not suitable for your socket outlets, it
should be cut off and an appropriate plug fitted in its place.
If the mains plug contains a fuse, this should have a
value of 5A. If a plug without a fuse is used, the fuse at
the distribution board should not be greater than 5A.
NOTE: The severed plug must be destroyed to avoid a
possible shock hazard should it be inserted into a 13A
socket elsewhere.
contains a fuse, this
board should not be
plug must be destroyed
How to connect a plug
The wires in the mains lead are coloured in accordance
with the following code:
1 The BLUE wire must be connected to the terminal which
is marked with the letter N or coloured BLACK.
2 2 The BROWN wire must be connected to the terminal
which is marked with the letter L or coloured RED.
3 The GREEN/YELLOW-GREEN wire must be connected
to the terminal which is marked by the letter E or
by the safety earth symbol
green-and-yellow.
Before replacing the plug cover, make certain that the
cord grip is clamped over the sheath of the lead - not
simply over the three wires.
or coloured green or
COPYRIGHT NOTICE
This equipment must not be used for unauthorised
duplication of CDs or any other works protected by
copyright. No license to infringe copyright is granted
by the sale of this equipment.
Recording and playback of some material may
require permission. For further information refer to
the following:
Copyright Act 1956
Dramatic and Musical Performers Act 1958
Performers Protection Acts 1963, and 1972 Performers Protection Acts 1963, and 1972
Any subsequent statutory enactments and
Any subsequent statutory enactments and orders.
CAUTION
When disposing of used batteries, please comply with
governmental regulations or environmental
regulations or environmental public instructions that
apply in your country or area.
STANDBY BUTTON
When this button is pressed once, press the p
action key to enter Standby mode.
When the unit is in Standby mode the apparatus is
not disconnected from the AC mains supply.
disposing of used batteries, please comply
regulations or environmental
or environmental public instructions
in your country or area.
BUTTON
pressed once, press the
key to enter Standby mode.
the unit is in Standby mode the apparatus
from the AC mains supply.
1
Page 4
IMPORTANT SAFETY INSTRUCTIONS
READ INSTRUCTIONS - All the safety and
operating instructions should be read before
the product is operated.
KEEP INSTRUCTIONS - The safety and operating
instructions should be kept for future reference.
HEED WARNINGS - All warnings on the product
and in the operating instructions should be
adhered to.
FOLLOW INSTRUCTIONS - All operating and use
instructions should be followed.
CLEANING - Unplug this product from the wall
outlet before cleaning. The product should
be cleaned only with a soft dry cloth. Never
clean with furniture wax, benzine, insecticides
or other volatile liquids since they may
corrode the cabinet.
ATTACHMENTS - Do not use attachments not
recommended by the product manufacturer
as they may cause hazards.
WATER AND MOISTURE - Do not use this product
near water - for example near a bathtub,
wash bowl, kitchen sink, or laundry tub; in a
wet basement; or near a swimming pool; and
the like.
ACCESSORIES - Do not place this product on an
unstable cart, stand, tripod, bracket, or table.
The product may fall, causing serious injury to
a child or adult, and serious damage to the
product. Use only with a cart, stand, tripod,
bracket or table recommended by the
manufacturer, or sold with the product. Any
mounting of the product should follow the
manufacturers instructions and should use a
mounting accessory recommended by the
manufacturer.
CART - A product and cart combination should
be moved with care. Quick stops, excessive
force and uneven surfaces may cause the
product and cart combination to overturn:
VENTILATION - Slots and openings in the cabinet are
provided for ventilation and to ensure reliable
operation of the product and to protect it from
overheating. Do not block any ventilation
openings. The openings should never be
blocked by placing the product on a bed, sofa,
rug or other similar surface. This product should
not be placed in a built-in installation such as a
bookcase or rack unless proper ventilation is
provided. Install in accordance with the
manufacturers instructions.
POWER SOURCES - This product should be
operated only from the type of power source
indicated on the marketing label. If you are
not sure of the type of power supply to your
home, consult your product dealer or local
power company.
LOCATION - The appliance should be installed in
a stable location.
NONUSE PERIODS - The power cord of the
appliance should be unplugged from the outlet
when left unused for a long period of time.
GROUNDING OR POLARIZATION - If this product is
equipped with a polarized alternating current
line plug (a plug having one blade wider than
the other), it will fit into the outlet only one
way. This is a safety feature. If you are unable
to insert the plug fully into the outlet, try
reversing the plug. If the plug does not fit into
the outlet, contact your electrician to replace
your obsolete outlet. Do not defeat the safety
purpose of the polarized plug.
If this product is equipped with a three-wire
grounding type plug, a plug having a third
(grounding) pin, it will only work in a
grounding type power outlet. This is a safety
feature. If you are unable to insert the plug
into the outlet, contact your electrician to
replace your obsolete outlet. Do not defeat
the safety purpose of the grounding type plug.
POWER CORD PROTECTION - Power-supply cords
should be protected from being walked on or
pinched particularly at plugs, convenience
receptacles, and the point where they exit
from the product.
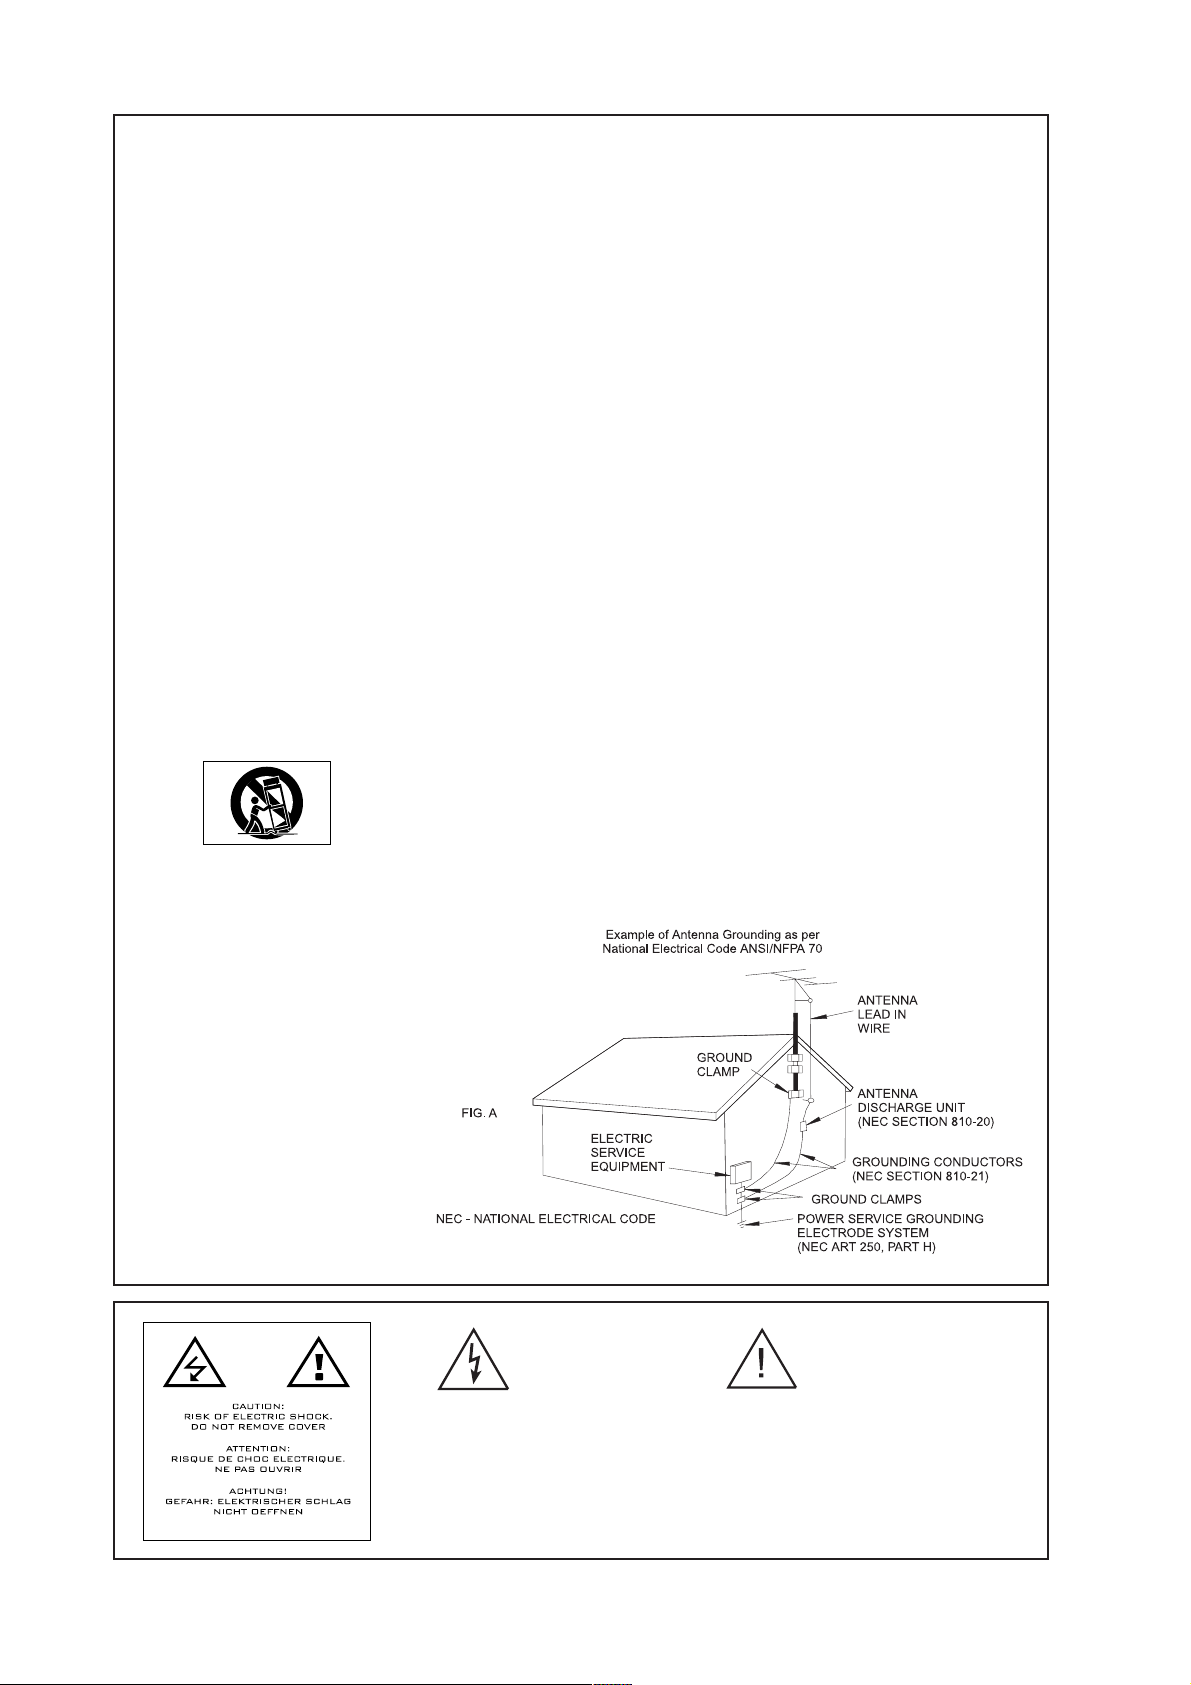
OUTDOOR ANTENNA GROUNDING - If an outside
antenna or cable system is connected to the
product be sure the antenna or cable system is
grounded so as to provide some protection
against voltage surges and built-up static
charges. Article 810 of the National Electric
Code. ANSI/NFPA70 provides information with
regard to proper grounding of the mast and
supporting structure, grounding of the lead-in
wire to an antenna discharge unit, connection
to grounding electrodes, and requirements for
the grounding electrode. See Figure A.
LIGHTNING - For added protection for this product
during a lightning storm, or when it is left
unattended and unused for long periods of
time, unplug it from the wall outlet and
disconnect the antenna or cable system. This
will prevent damage to the product due to
lightning and power-line surges.
POWER LINES - An outside antenna system should
not be located in the vicinity of overhead
power lines or other electric light or power
circuits, or where it can fall into such power
lines or circuits. When installing an outside
antenna system, extreme care should be taken
to keep from touching such power lines or
circuits as contact with them might be fatal.
If
the
work
when
long
light
into
a
- I
for
OVERLOADING - Do not overload wall outlets,
extension cords or integral convenience
receptacles as this can result in a risk of fire
or electric shock.
OBJECT AND LIQUID ENTRY - Never push
objects of any kind into this product
through openings as they may touch
dangerous voltage points or short-out parts
that could result in a fire or electric shock.
Never spill liquid of any kind on the
product.
SERVICING - Do not attempt to service this
product yourself as opening or removing
covers may expose you to dangerous
voltage or other hazards. Refer all
servicing to qualified service personnel.
DAMAGE REQUIRING SERVICE - Refer all
servicing to qualified service personnel.
Servicing is required when the apparatus
has been damaged in any way, such as
power-supply cord or plug is damaged,
liquid has been spilled or objects have
fallen into the apparatus, the apparatus has
been exposed to rain or moisture, does not
operate normally, or has been dropped.
REPLACEMENT PARTS - When replacement
parts are required, be sure the service
technician has used replacement parts
specified by the manufacturer or have the
same characteristics as the original part.
Unauthorized substitutions may result in
fire, electric shock, or other hazards.
SAFETY CHECK - Upon completion of any
service or repairs to this product, ask the
service technician to perform safety checks
to determine that the product is in proper
operating condition.
WALL OR CEILING MOUNTING - The product
should not be mounted to a wall or ceiling.
HEAT - Do not install near any heat source
such as radiators, heat registers, stores, or
other apparatus (including amplifiers) that
produce heat.
The lightning flash with arrowhead
symbol, within an equilateral triangle, is
intended to alert the user to the presence
of uninsulated dangerous voltage within
the products enclosure that may be of
sufficient magnitude to constitute a risk of
electric shock to persons.
2
The exclamation point within an
equilateral triangle is intended to alert the
user to the presence of important
operating and maintenance (servicing)
instructions in the literature accompanying
the appliance.
Page 5
IMPORTANT SAFETY
EUROPEAN MODEL
NOTICES
The serial number for this equipment is located on the
rear panel. Please write this serial number on your
rear
enclosed product registration form and keep it in a
secure area. This is for your security.
U.S. MODEL
CAUTION: This product satisfies FCC regulations when
shielded cables and connectors are used to connect the
unit to other equipment. To prevent electromagnetic
interference with electric appliances such as radios and
televisions, use shielded cables and connectors for
connections.
NOTE: This equipment has been tested and found to
comply with the limits for a Class B digital device,
pursuant to Subpart J, Part 15 of the FCC rules. These
limits are designed to provide reasonable protection
against harmful interference in a residential installation.
This equipment generates, uses, and can radiate radio
frequency energy and, if not installed and used in
accordance with the instructions, may cause harmful
interference to radio communications. However, there is
no guarantee that interference will not occur in a
particular installation. If this equipment does cause
harmful interference to radio or television reception,
which can be determined by turning the equipment off
and on, the user is encouraged to try to correct the
interference by one or more of the following measures:
Reorient or relocate the receiving antenna.
Increase the separation between the equipment
and receiver.
Connect the equipment into an outlet on a circuit
different from that to which the receiver is
connected.
Consult the dealer or an experienced radio/TV
technician for help.
Changes or modifications may cause this unit to fail
to comply with Part 15 of the FCC Rules and may void
the users authority to operate the equipment.
CAUTION
l l Use of controls or adjustments or performance of
procedures other than those specified herein may
result in hazardous radiation exposure.
l The use of optical instruments with this product
will increase eye hazard.
NOTE: This product has been designed and typetested to comply with the limits set out in EN55013,
EN55020, EN60950, EN55022: 1998 CLASS B4,
EN55024: 1998, FCC RULES PART 15 SUBPART B CLASS
B.
B. AS/NZS 3548:1995 CLASS B
CAUTION:
LASELASER SAFETY: This unit employs a LASER. Only a
qualified person should remove the cover or attempt to
service the device, due to possible eye injury.
CAUTION-USE OF CONTROLS OR ADJUSTMENTS OR
PERFORMANCE OF PROCEDURE OTHER THAN THOSE
SPECIFIED HEREIN MAY RESULT IN HAZARDOUS
RADIATION EXPOSURE.
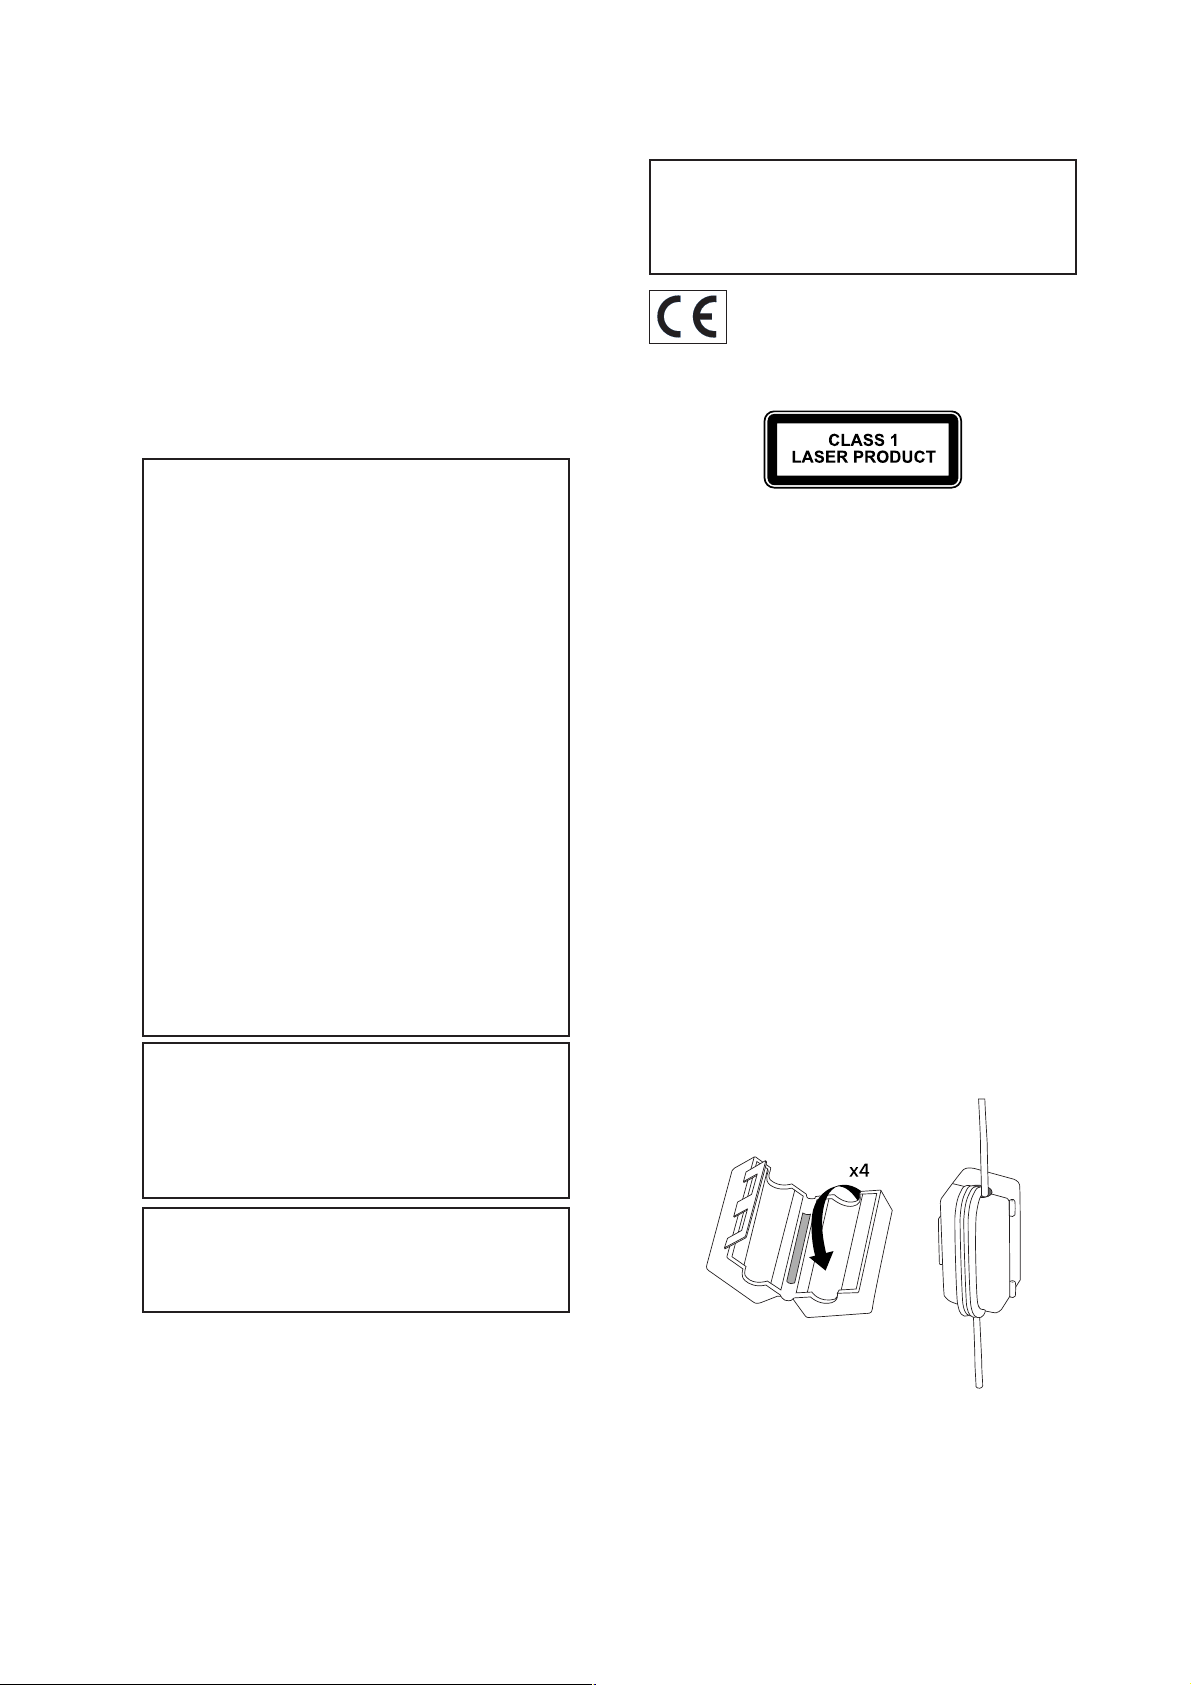
MODEM INTERFERENCE
In some installations interference from other items of
electrical equipment may cause problems with your
modem connection.
If you are experiencing this type of problem you can
ascertain if other items of equipment are at fault by
switching them off before connecting to the internet.
This situation may be improved in some cases by
attaching the supplied ferrite block to your modem
cable as follows:
Release the clasp on the side to open the ferrite
block.
Wrap the modem cable around one half of the block
four times ensuring that the cable is located in the
centre of the semicircular groove as illustrated
below.
Fold the two halves of the ferrite block together
again making sure that the clasp is firmly closed.
Information to User
Alteration or modifications carried out without
appropriate authorization may invalidate the users
right to operate the equipment.
3
Page 6

4
Page 7

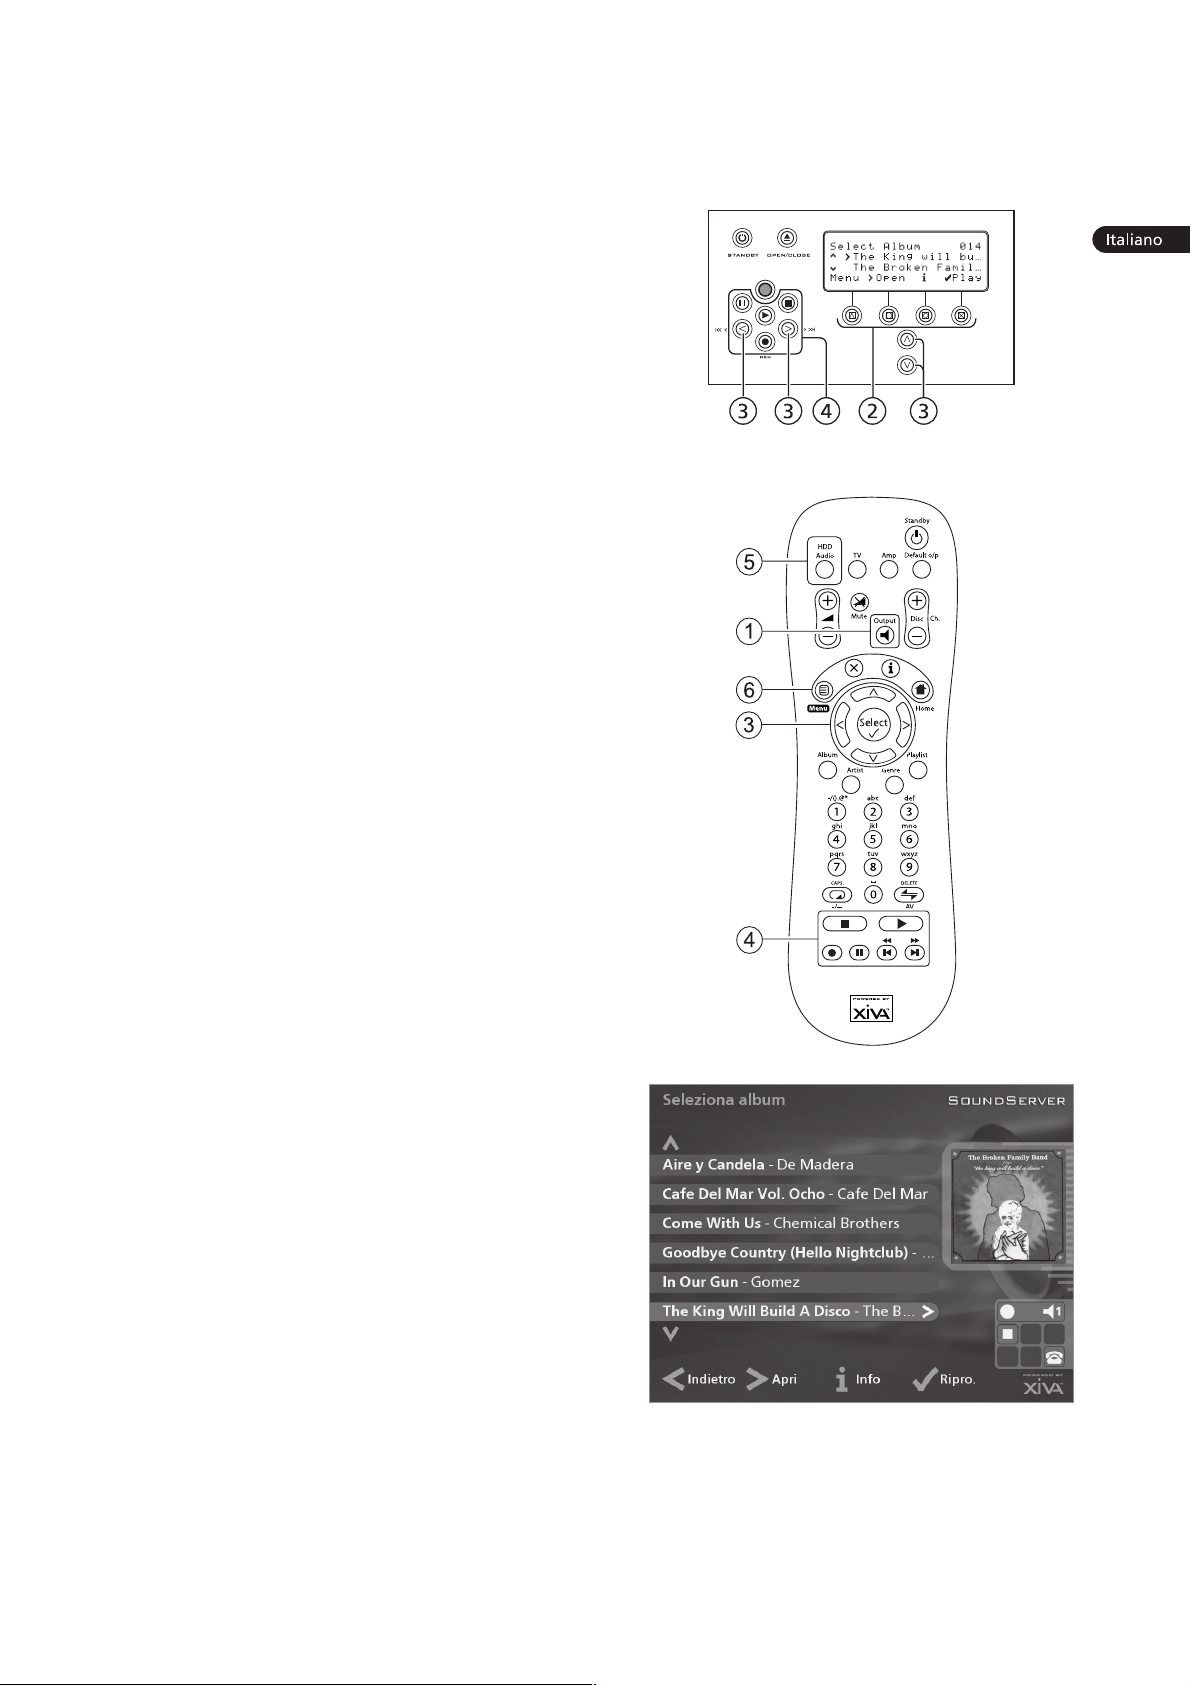
QUICK START GUIDE
CONTROLS
CONTROLS
1. Output button: Press this button
1. Output button: Press this button to display
information on the music currently
information on the music currently playing.
Press this button again to switch to the next
output on the SoundServer.
output on the SoundServer.
2. Front panel action keys: These
2. Front panel action keys: These four keys
correspond to the different actions
correspond to the different actions clearly visible
by reading the front panel display.
by reading the front panel display. For example,
in the display opposite, the 5Play
in the display opposite, the 5Play action key will
commence playback of the selected album. The
5 symbol indicates that you can also press the
p key on the remote control to commence
playback.
3. Navigation keys: Move up, down, left, and right
through the menu system. The button in the
centre of the remote control selects the currently
highlighted option.
4. Transport keys: Controls the playback of music
on the currently selected output. The kRecord
key is an action key used on some menu screens
to begin a recording or to modify a playlist.
5. HDD Audio button: Press this button to control
the SoundServer.
6. Remote control action keys:
Press the 1m key to display the main
menu at any time.
Press the 2 key whenever this symbol is
displayed on the TV screen or on the
front panel to cancel, exit or delete the
current operation according to the
information on screen.
Press the 3 key whenever this symbol is
displayed on the TV screen or on the
front panel to edit text information, or
confirm a new text entry according to the
information on screen.
Press the 4 key to return to the home
page of the current function. For
instance when browsing
instance when browsing the library press
this key to return to the
this key to return to the Library menu.
Fig. A - Front panel display A - Front panel display
RECORDING FROM A CD RECORDING FROM A CD
Press the OPEN/CLOSE key on the front panel to
open the CD tray.
Place a CD in the tray.
Push the OPEN/CLOSE key on the front panel.
The CD detected prompt is displayed.
Press the k Record action key to proceed.
The Please select Auto or Custom record display then
allows you to choose whether to do a quick (one touch)
record or specify individual record options.
Press the 5Auto action key to do a one touch
recording.
The display confirms when the recording is finished.
Note: You can play music from your music library while
you are recording a CD.
Fig. B - Remote Control
Fig. C - TV User Interface
5
Page 8
PLAYING MUSIC
Display the Main Menu by pressing the 1m
key on your SoundServer remote control, or the
Menu action key on the front panel. action key on the front panel.
The Main Menu will be displayed.
Press the 9 and 8 keys to highlight Library.
Press the 5Select action key.
The Library menu lets you choose how you want to
browse your music collection. You can browse items by
album, artist, genre, preset or playlist.
Press the 9 and 8 keys to step between
For example, if you select Albums you will see an
alphabetical list of your album titles.
To play music
Use the 9 and 8 keys to highlight the item you
Press the 7 key to view the contents of the
Press the 5Play action key.
To stop play
Press the b key on
To pause play
Press the c key on
To skip to the next or previous track
Press the gor f key on the front panel or your
To seek within a track
Hold down the e or d key on the front panel or
Play resumes from the new position when you release
the key.
Menu will be displayed.
the 9 and 8 keys to highlight
the 5Select action key.
menu lets you choose how you want
music collection. Y
genre, preset or playlist.
categories.
would like to play.
selected item.
the front panel or
the SoundServer
remote control.
the front panel or
your SoundServer
remote control.
SoundServer remote control.
your SoundServer remote control.
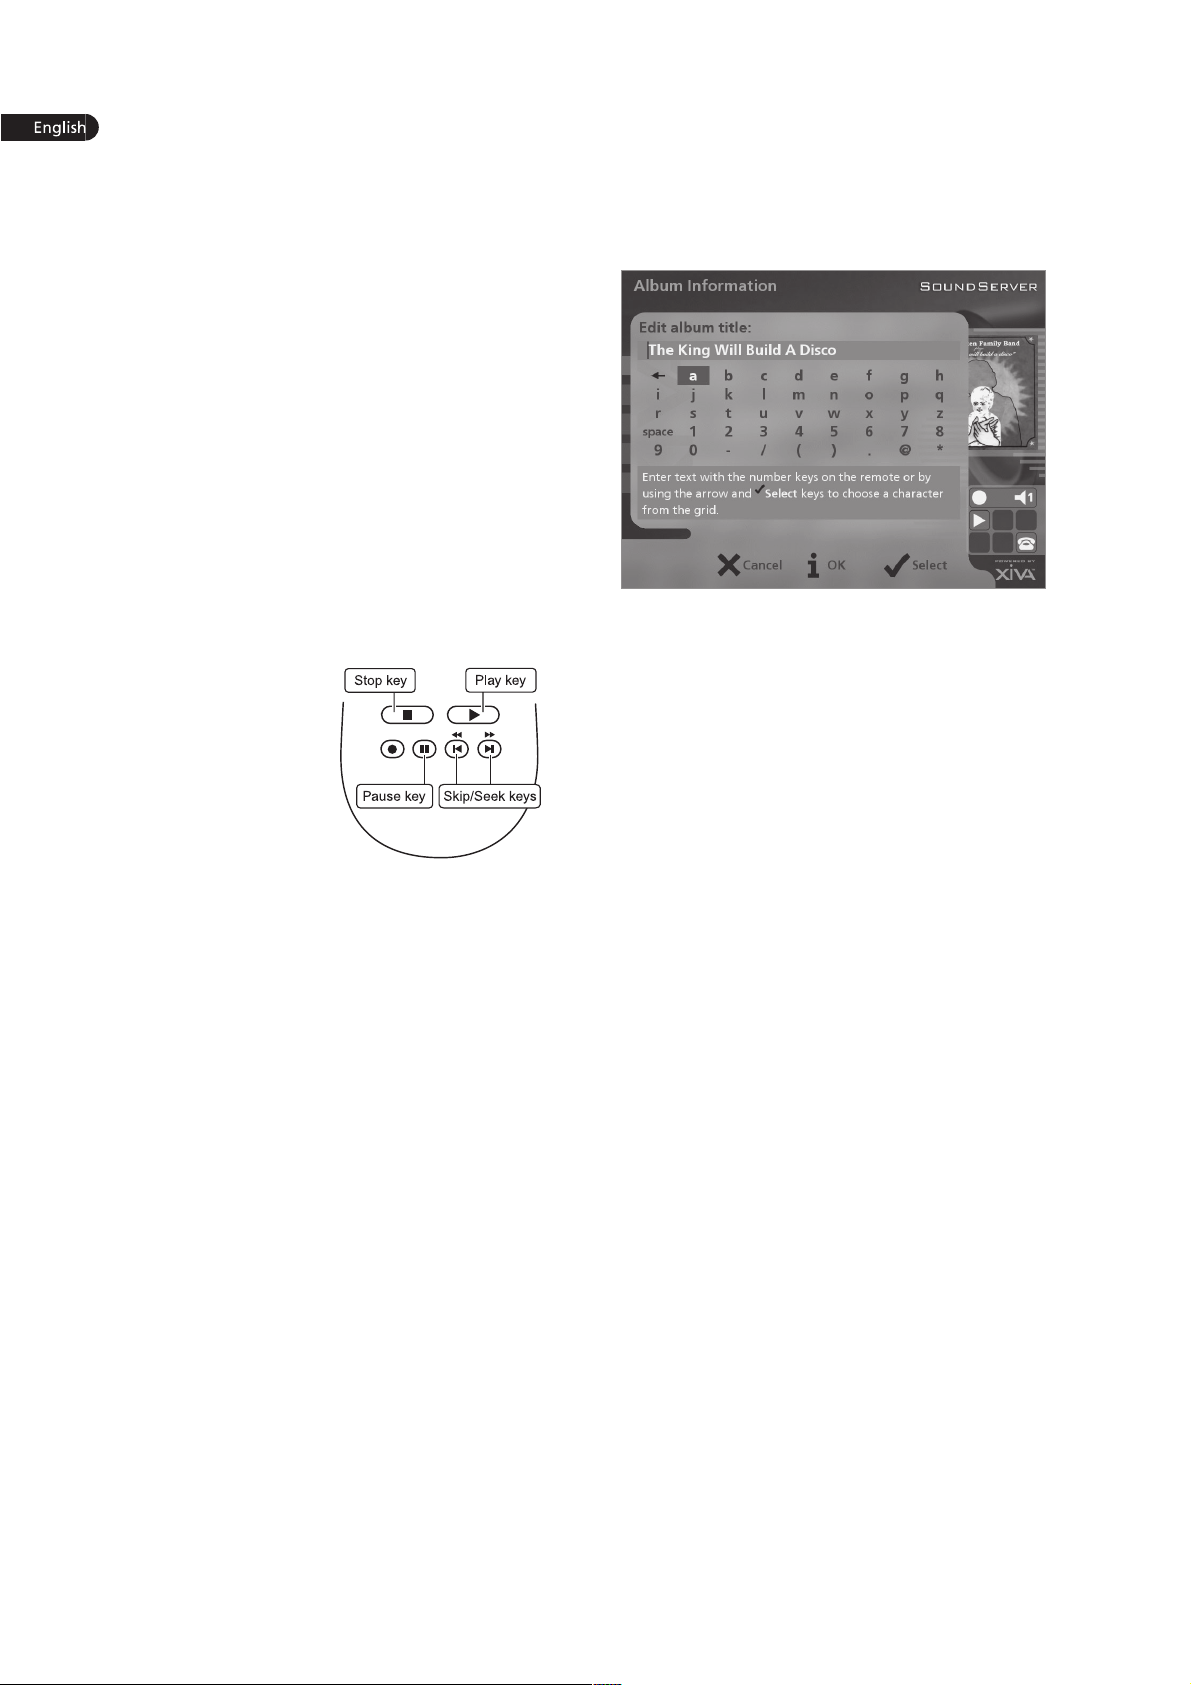
ENTERING TEXT
To enter text using the alphanumeric keypad
Press the 7 or 6 keys to move the cursor to the
required position.
Use the keys on the alphanumeric keypad to
enter a letter.
For example to enter S press the 7 key four times,
because S is the fourth letter on the 7 key.
Press the DELETE key on your SoundServer
remote control to delete letters.
Press the CAPS key on either the front panel or
your SoundServer remote control to switch
between upper-case and lower-case letters.
To select letters from a grid
Alternatively, the Grid provides a convenient way of
selecting letters:
Press the 8 key to move the cursor into the grid
area.
The currently selected letter is highlighted:
Use the 7,6,9 or 8 keys to move the cursor and
press the 5Select action key to enter each letter.
Use the CAPS key on either the front panel or
the SoundServer remote to switch between
upper and lower case letters.
If at any time you need to enter text in a different part
of the text field, or you want to return to entering text
using the alphanumeric keypad:
Press the 9 key repeatedly until the cursor
returns to the text field.
Finally, when you have finished entering the name:
Press the 3OK action key.
SWITCHING ON AND OFF
To switch to standby mode
Standby mode should be used when the SoundServer is
not being used for a short period of time. You can
safely remove the power from the SoundServer in this
mode.
Press the Standby key on the front panel or the
l Standby key on the remote control.
Press the 5Standby action key to enter standby.
To switch on from standby mode
Press the Standby key on the front panel or the
l Standby key on the remote control.
6
Page 9

CARTE DE DEMARRAGE RAPIDE
LES COMMANDES
1. Bouton Sortie : Appuyez sur ce bouton pour
afficher des informations sur la musique que
vous entendez. Appuyez une nouvelle fois sur
ce bouton pour passer sur la sortie suivante de
SoundServer.
2. Touches daction du panneau frontal : Ces quatre
touches correspondent aux diverses actions
clairement visibles sur lécran du panneau frontal.
Par exemple, dans lécran opposé, la touche
daction 5Lire (Play) commence la lecture de
lalbum sélectionné. Le symbole 5 indique que
vous pouvez également appuyer sur la touche
p de la télécommande pour commencer la
lecture.
3. Touches de navigation : Déplacez-vous vers le
haut, vers le bas, la gauche et la droite à laide
du système de menu. Le bouton au centre active
loption affichée en surbrillance.
4. Touches de transport : Elles contrôlent la lecture
de la musique sur la sortie sélectionnée. La touche
kEnregistrement est une touche daction utilisée
avec certains écrans de menu pour commencer un
enregistrement ou modifier une liste de lecture.
5. Bouton HDD Audio : Appuyez sur ce bouton
pour contrôler votre SoundServer.
6. Touches daction de la télécommande :
Appuyez sur la touche 1m pour afficher le
menu principal à tout moment.
Appuyez sur la touche 2 chaque fois que ce
symbole apparaît sur lécran TV ou sur le
panneau frontal pour annuler, quitter ou
supprimer lopération en cours selon les
informations affichées à lécran.
Appuyez sur la touche 3 chaque fois que ce
symbole apparaît sur lécran TV ou sur le panneau
frontal pour modifier un texte ou confirmer une
nouvelle saisie de texte selon les informations
affichées à lécran.
Appuyez sur la touche 4 pour revenir à la page
daccueil de la fonction courante. Par exemple,
après avoir consulté la bibliothèque, appuyez sur
cette touche pour revenir au menu Médiathèque.
ENREGISTREMENT À PARTIR DUN CD
Appuyez sur la touche Open/Close du panneau
avant pour ouvrir le tiroir à CD.
Placez un CD dans le tiroir.
Appuyez sur la touche Open/Close du panneau
avant.
Le message CD détecté apparaît.
Appuyez sur kEnreg. (Rec) pour continuer.
Laffichage Veuillez sélectionner Enregistrement auto ou
Enregistrement perso vous permet alors deffectuer un
enregistrement rapide (une seule fois) ou de spécifier
des options denregistrement personnalisé.
Appuyez sur 5Auto (touche daction) pour
effectuer un enregsitrement en une seule fois.
Un message saffiche lorsque lenregistrement est terminé.
Nota: Vous pouvez écouter de la musique depuis la
médiathèque tout en enregistrant un CD.
7
Fig. A - Ecran du panneau frontal
Fig. B - La Télécommande de SoundServer
Fig. C Interface utilisateur TV
Page 10
LECTURE DE MUSIQUE
Affichez le Menu principal en appuyant sur la
touche 1m de la télécommande de votre
SoundServer, ou bien sur Menu (touche daction)
du panneau avant.
Le Menu principal saffiche.
Appuyez sur les touches 9 et 8 pour
sélectionner Médiathèque.
Appuyez sur 5Sélect. (touches daction).
Le menu Médiathèque vous permet de choisir la façon
dont vous souhaitez parcourir votre collection de
musique. Vous pouvez parcourir les articles par album,
artiste, genre ou liste de lecture.
Appuyez sur les touches 9 et 8 pour évoluer
entre les catégories
Par example, si vous sélectionnez Albums, vous verrez
une liste alphabétique des titres de vos albums.
Pour lire de la musique
Utilisez les touches 9 et 8 pour mettre en
surbrillance lélément à lire.
Appuyez sur la touche 7 pour afficher le
contenu de lélément sélectionné.
Appuyez sur la touche daction 5Lire (Play).
Pour arrêter la lecture
Appuyez sur la
touche b du panneau
avant ou sur la
télécommande de
SoundServer.
Pour interrompre la lecture
momentanément
Appuyez sur la
touche c du panneau
avant ou de la télécommande de SoundServer.
Pour écouter la piste suivante ou précédente
Appuyez sur la touche gou f du panneau avant
ou de la télécommande de SoundServer.
Pour rechercher une partie de piste précise.
Appuyez sur la touche e ou d du panneau avant
ou de la télécommande de SoundServer et
maintenez-la enfoncée.
La lecture reprend à lemplacement atteint dès que vous
relâchez la touche.
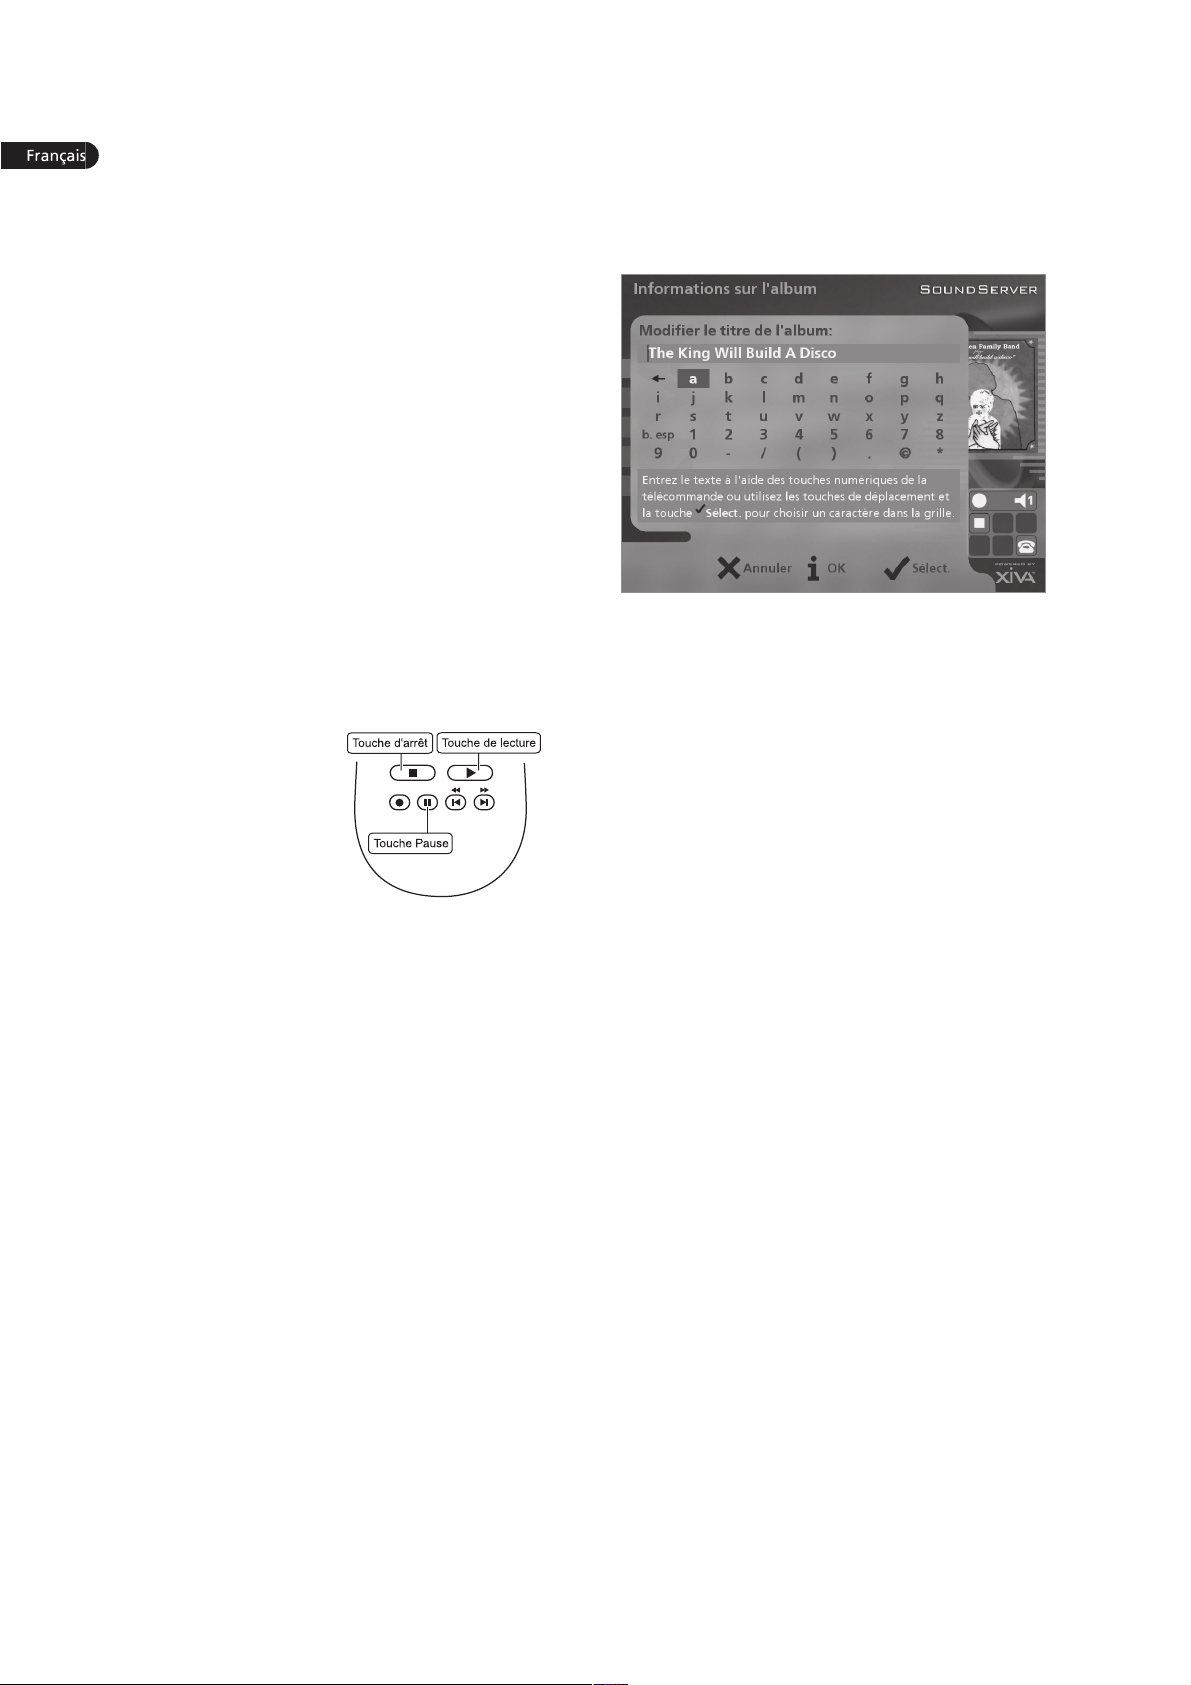
SAISIE DE TEXTE
Pour saisir du texte à laide du pavé alphanumérique
Appuyez sur les touches 7 ou 6 pour placer le
curseur à lendroit voulu.
Utilisez les touches du pavé alphanumérique
pour entrer une lettre.
Pour taper S, par exemple, appuyez sur la touche 7
quatre fois, S étant la quatrième lettre de la touche 7.
Appuyez sur la touche DELETE de la
télécommande de SoundServer pour supprimer
des lettres.
Appuyez sur la touche CAPS de la télécommande
de SoundServer pour alterner entre les
minuscules et les majuscules.
Pour sélectionner des lettres à partir de la grille
Loption Grille représente lautre façon de sélectionner
des lettres:
Appuyez sur la touche 8 pour placer le curseur
dans la grille.
La lettre séléctionnée saffiche en surbrillance:
A laide des touches 7,6,9 ou 8 déplacez le
curseur et appuyez sur la touche daction
5Sélect. pour saisir chaque lettre.
Appuyez sur la touche CAPS de la télécommande
de SoundServer pour alterner entre les
minuscules et les majuscules.
Si soudainement vous décidez de saisir du texte à un
autre endroit du champ de texte, ou si vous désirez de
nouveau saisir le texte à laide du pavé alphanumérique:
Appuyez plusieurs fois sur la touche 9, jusquà
ce que le curseur revienne dans le champ de
texte.
Lorsque vous avez terminé de saisir le nom:
Appuyez sur la touche daction 3OK.
ACTIVATION ET DESACTIVATION
Pour activer le mode Veille
Le mode Veille doit être utilisé lorsque SoundServer ne
fonctionne pas pendant un courte période. Vous pouvez
mettre SoundServer hors tension en toute sécurité
lorsque ce mode est activé.
Appuyez sur la touche Standby du panneau
avant our sur la touche l Standby de la
télécommande.
Appuyez sur la touche daction 5Veille (Stby)
pour passer en mode Veille.
Pour allumer lunité à partir du mode Veille
Appuyez sur la touche Standby du panneau
avant ou sur la touche l Standby de la
télécommande.
8
Page 11

KURZREFERENZ
DIE BEDIENELEMENTE
1. Output-Taste: Drücken Sie diese Taste, um
Informationen zur derzeit wiedergegebenen Musik
anzuzeigen. Drücken Sie diese Taste erneut, um zur
nächsten Ausgabe auf dem SoundServer zu
wechseln.
2. Aktionstasten auf der Gerätevorderseite: Diese
vier Tasten entsprechen den verschiedenen
Aktionen, die in der Anzeige auf der
Vorderseite zu sehen sind. In der Abbildung
daneben wird mit der Aktionstaste 5Wieder.
(Play) die Wiedergabe des ausgewählten
Albums gestartet. Das 5-Symbol zeigt an, dass
Sie die Wiedergabe auch mit der p-Taste
auf der Fernbedienung starten können.
3. Pfeiltasten: Mit diesen Tasten bewegen Sie sich
im Menüsystem nach oben, unten, links und
rechts. Mit der Taste in der Mitte können Sie die
derzeit markierte Option auswählen.
4. Navigationstasten: Mit diesen Tasten steuern
Sie die Musikwiedergabe am derzeit
ausgewählten Ausgang. Die k Aufnahme-Taste
ist eine Aktionstaste, mit der auf manchen
Menübildschirmen eine Aufnahme gestartet
oder eine Playliste geändert wird.
5. HDD Audio-Taste: Drücken Sie diese Taste, um
den SoundServer zu steuern.
6. Aktionstasten auf der Fernbedienung:
Mit der 1m-Taste können Sie jederzeit das
Hauptmenü anzeigen.
Drücken Sie die 2-Taste, wenn dieses Symbol auf
dem Fernsehbildschirm oder auf der Anzeige auf
der Vorderseite des Geräts angezeigt wird, um
den aktuellen Vorgang entsprechend den
Informationen auf dem Bildschirm abzubrechen,
zu beenden oder zu löschen.
Drücken Sie die 3-Taste, wenn dieses Symbol auf
dem Fernsehbildschirm oder auf der Anzeige auf
der Vorderseite des Geräts angezeigt wird, um
entsprechend den Informationen auf dem
Bildschirm Textinformationen zu bearbeiten oder
eine neue Texteingabe zu bestätigen.
Drücken Sie dies 4-Taste, um zur Startseite der
aktuellen Funktion zurückzukehren. Wenn Sie
beispielsweise die Bibliothek durchsuchen,
drücken Sie diese Taste, um zum Menü
Musikbibliothek zurückzukehren.
VON EINER CD AUFNEHMEN
Betätigen Sie die OPEN / CLOSE Taste auf der
Frontblende, um die CD-Schublade zu öffnen.
Die CD in die CD-Schublade legen.
Die Taste OPEN / CLOSE der Frontblende erneut
drücken.
Die Meldung CD erkannt wird angezeigt.
Die Aktiontaste kAufnah. (Rec) betätigen, um
weiter fortzufahren.
Das display Bitte Autoaufnahme oder Spezialaufnahme
wählen ermöglicht Ihnen dann zu wählen, eine schnelle
(One-Touch) Aufnahme durchzuführen oder Ihre
individuellen Aufnahmeoptionen zu spezifizieren.
Betätigen Sie die Taste 5Auto (Aktionstaste) zur
Durchführung einer schnellen (One-Touch)
Aufnahme.
Das Display zeigt an, wenn die Aufnahme abgeschlossen ist.
Hinweis: Sie können Musik aus der Musikbibliothek
wiedergeben, während Sie eine CD aufnehmen.
Abb. A - Anzeige auf der Vorderseite
Abb. B - Der Fernbedienung
Abb. C - TV-Benutzeroberfläche
9
Page 12

MUSIK ABSPIELEN
D a s Hauptmenü aufrufen, indem Sie die Taste
1m auf der Fernbedienung Ihres
SoundServers oder die Taste Menu (Aktionstaste)
auf der Frontblende.
Das Hauptmenü wird angezeigt.
Die Tasten 9 und 8 betätigen, um Musik zu
markieren.
Die Taste 5Wählen (Aktionstaste) betätigen.
Das Menü Bibliothek ermöglicht Ihnen die Auswahl der
Option, mit Hilfe derer Sie Ihre Musiksammlung
durchsuchen können. Sie können Musikstücke unter
Verwendung der Kategorien Alben, Künstlern, Genre
oder Playliste suchen.
Verwenden Sie die Tasten 9 und 8 zum
Wechseln zwischen den einzelnen Kategorien.
Wenn Sie z.B. Albums wählen, erscheint eine
alphabetische Liste der Titel Ihrer Alben.
Um Musik zu spielen
Markieren Sie mit den Tasten 9 und 8 den
Titel, das Album usw., das Sie wiedergeben
möchten.
Drücken Sie die 7-Taste, um den Inhalt des
ausgewählten Titels, Albums usw. anzuzeigen.
Drücken Sie die Aktionstaste 5Wieder.(Play) .
Um das Spielen der Musik
zu beenden
Drücken Sie auf der
Fernbedienung oder
auf der Vorderseite
des SoundServer die
Taste b.
So halten Sie die
Wiedergabe an
Drücken Sie auf der Fernbedienung oder auf der
Vorderseite des SoundServer die Taste c
So springen Sie zum nächsten oder vorherigen Titel
Drücken Sie auf der Fernbedienung oder auf der
Vorderseite des SoundServer die Taste g bzw. f.
So durchsuchen Sie einen Titel.
Halten Sie auf der Fernbedienung oder auf der
Vorderseite des SoundServer die Taste e bzw. d
gedrückt.
Die Wiedergabe wird von der Stelle aus fortgesetzt, an
der Sie Taste loslassen.
EINBEBEN VON TEXTEINGEBEN VON TEXT
So geben Sie Text über die alphanumerische Tastatur ein
Bewegen Sie den Cursor mit den Tasten 7 bzw.
6 an die gewünschte Stelle.
Geben Sie die Buchstaben über die
alphanumerische Tastatur ein.
Beispiel: Um ein S einzugeben, drücken Sie viermal die
Taste 7, da S der vierte Buchstabe auf der Taste 7 ist.
Drücken Sie auf der Fernbedienung die Taste
DELETE, um einen Buchstaben zu löschen.
Drücken Sie die CAPS-Taste am Gerät oder auf
der Fernbedienung, um zwischen Groß- und
Kleinschreibung zu wechseln.
So wählen Sie die Buchstaben aus dem Raster aus
Sie können die Buchstaben auch über die Option Raster
eingeben:
Drücken Sie die 8-Taste, um den Cursor in das
Raster zu bewegen.
Der aktuelle Buchstabe wird markiert:
Mit den Tasten 7,6,9 und 8 bewegen Sie den
Cursor. Drücken Sie die Aktionstaste 5Wählen,
um den gewünschten Buchstaben einzugeben.
Drücken Sie die CAPS-Taste am Gerät oder auf
der Fernbedienung, um zwischen Groß- und
Kleinschreibung zu wechseln.
Gehen Sie folgendermaßen vor, wenn Sie Text an einer
anderen Stelle im Textfeld oder wieder über die
alphanumerische Tastatur eingeben möchten:
Drücken Sie wiederholt die 9-Taste, bis der
Cursor in das Textfeld zurückgeht.
Geben Sie auf diese Art den gewünschten Namen
vollständig ein:
Drücken Sie die Aktionstaste 3OK action key.
EIN-UND AUSSCHALTEN DES GERÄTS
So aktivieren Sie den Standby-Modus
Den Standby-Modus sollten Sie aktivieren, wenn Sie den
SoundServer kürzere Zeit nicht nutzen. In diesem
Modus können Sie das Netzkabel sicher vom
SoundServer zu schalten.
Drücken Sie auf der Vorderseite des SoundServer
die Standby-Taste bzw. die lStandby-Taste auf
der Fernbedienung.
Drücken Sie die Aktionstaste 5Standby (Stby)
um den Standby-Modus zu aktivieren.
So schalten Sie das Gerät aud dem Standby-Modus ein
Drücken Sie auf der Vorderseite des SoundServer
die Standby-Taste bzw. die lStandby-Taste auf
der Fernbedienung.
10
Page 13
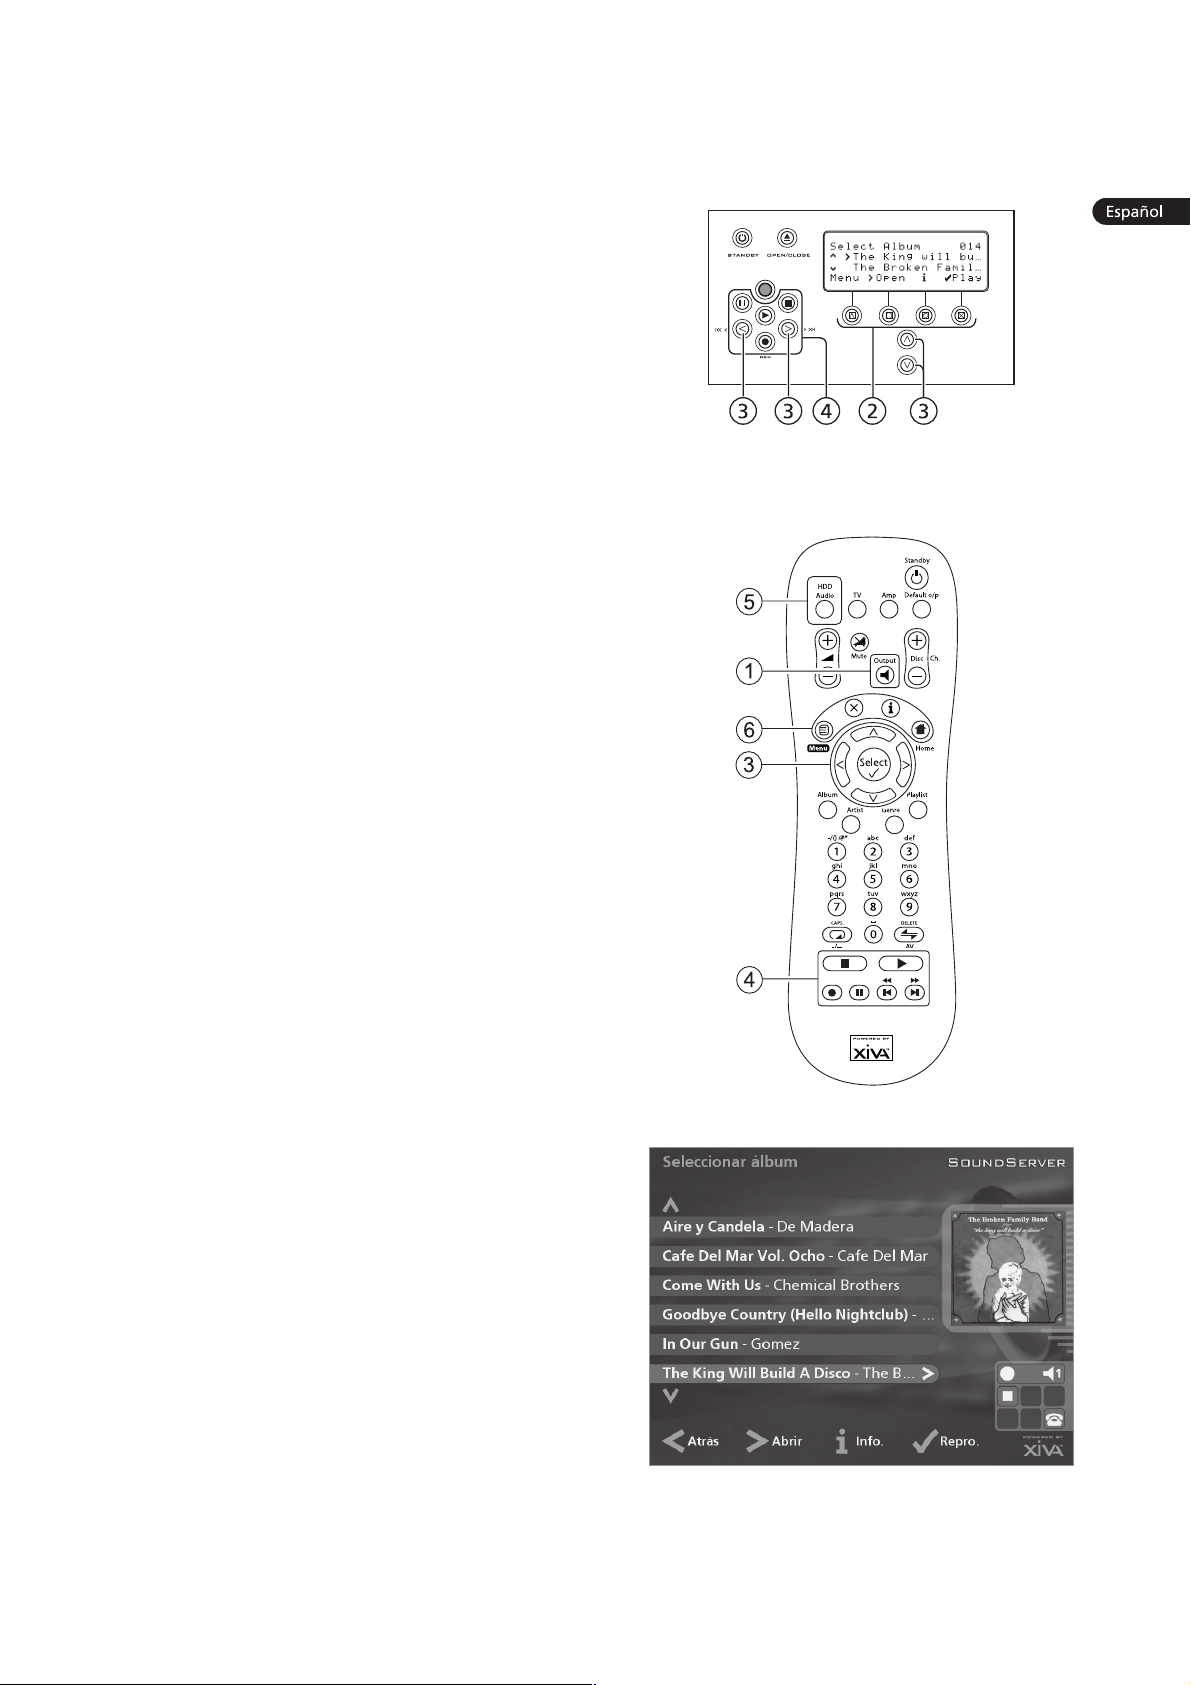
FICHA DE INICIO RÁPIDO
LOS CONTROLES
1. Botón Output: pulse este botón para mostrar la
información sobre la música que se está
reproduciendo. Vuelva a pulsar este botón para
conmutar a la salida siguiente de SoundServer.
2. Botones de acción del panel frontal: estos cuatro
botones corresponden a las acciones visibles en
la pantalla del panel frontal. Por ejemplo, en la
pantalla, el botón de acción 5Repro. (Play),
comenzará la reproducción del álbum
seleccionado. El símbolo 5 indica que también
puede pulsar el botón p del mando a
distancia para comenzar la reproducción.
3. Botones de navegación: permiten moverse
hacia arriba, abajo, a la izquierda y a la derecha
por el sistema de menús. El botón del centro
selecciona la opción resaltada.
4. Botones de transporte: controlan la
reproducción de la música en la salida
seleccionada. El botón de kGrabación es un
botón de acción utilizado en algunas pantallas
de menús para comenzar la grabación o
modificar una lista de reproducción.
5. Botón HDD Audio: pulse este botón para
controlar SoundServer.
6. Botones de acción del mando a distancia:
Pulse el botón 1m para mostrar el menú
principal cuando lo desee.
Pulse el botón 2 cuando este símbolo se
muestre en la pantalla de TV o en el panel
frontal para cancelar, salir o eliminar la tarea en
curso, según la información en pantalla.
Pulse el botón 3 cuando este símbolo se muestre
en la pantalla de TV o en el panel frontal para
editar información de texto o confirmar una
nueva entrada de texto según la información en
pantalla.
Pulse el botón 4 para volver a la página de
inicio de la función actual. Por ejemplo,
cuando explore la fonoteca, pulse este botón
para volver al menú Fonoteca.
GRABAR DESDE UN CD
Pulse la tecla de OPEN/CLOSE del panel frontal
para abrir la bandeja de CD.
Meta un CD en la bandeja.
Pulse la tecla de OPEN/CLOSE del panel frontal.
Se muestra el mensaje de detección de CD.
Pulse k Grabar (Rec) para proseguir.
La visualización Seleccione grabación automática (Auto)
o personalizada (Personal.) le permite elegir entre hacer
una grabación rápida (una pulsáción) o especificar
opciones de grabación individuales.
Pulse 5Auto (tecla de acción) para hacer una
grabación con una sola pulsáción.
El visualizador confirma cuando se finaliza la grabación.
Nota: Mientras graba un CD, puede escuchar música de
su fonoteca.
Fig. A - Pantalla del panel frontal
Fig. B - Mando al distancia del SoundServer
Fig. C - Interfaz de usuario de TV
11
Page 14
REPRODUCCIÓN DE MÚSICA
Visualice el Menú Principal pulsando la tecla de
1m del mando a distancia del SoundServer
o Menu (tecla de acción) del panel fronto.
Se visualizará el Menú Principal.
Pulse las teclas 9 y 8 para resalta Fonoteca.
Pulse 5Selecc. (tecla de acción).
El menú de Fonoteca le permite elegir la forma en que
desea explorar su colección musical. Puede explorar
artículos por álbum, artista, género o lista de
reproducción.
Pulse la tecla 9 y 8 para desplazarse entre las
categorías.
Por ejemplo, si selecciona Álbumes verá una lista
alfabética de sus títulos de álbumes.
Para reproducir música
Utilice los botones 9 y 8 para resaltar el
elemento que desee reproducir.
Pulse el botón 7 para ver el contenido del
elemento seleccionado.
Pulse el botón 5Repro. (Play)
Par detener la
reproducción
Pulse el botón b
en el panel
frontal o en el
mando a
distancia de
SoundServer.
Para hacer una pausa
Pulse el botón c en el panel frontal o en el
mando a distancia de SoundServer.
Para pasar a la pista siguiente o a la anterior
Pulse el botón g o f en el panel frontal o en el
mando a distancia de SoundServer.
Para hacer una búsqueda dentro de una pista
Mantenga pulsado el botón e o d en el panel
frontal o en el mando a distancia de
SoundServer.
La reproducción se reanuda a partir de la posición en la
que se suelta el botón.
INTRODUCCIÓN DE TEXTO
Para introducir texto mediante los botones
alfanuméricos
Pulse los botones 7 o 6 para colocar el cursor en
la posición requerida.
Use los botones alfanuméricos para introducir
una letra.
Por ejemplo, para introducir la letra S, pulse cuatro veces
el botón 7, ya que S es la cuarta letra correspondiente al
botón 7.
Pulse el botón DELETE del mando a distancia de
SoundServer .
Pulse el botón CAPS del panel frontal o del
mando a distancia de SoundServer para alternar
entre mayúsculas y minúsculas.
Para seleccionar letras en una malla
La opción Malla también permite seleccionar letras:
Pulse el botón 8 para colocar el cursor sobre la
malla.
La letra seleccionada actuelmente aparecerá resaltada:
Use los botones 7,6,9 o 8 para colocar el
cursor y pulse el botón de accion 5Selecc. para
introducir cada letra.
Pulse el botón CAPS del panel frontal o del
mando a distancia de SoundServer para alternar
entre mayúsculas y minúsculas.
Si quiere introducir texto en otra parte del campo de
texto, o si desea regresar al método de botones
alfanuméricos:
Pulse repetidamente el botón 9 hasta que el
cursor esté en el campo de texto.
Cuando haya introducido el nombre completo:
Pulse el botón de acción 3Aceptar (OK).
ENCENDIDO Y APAGADO
Para activar los modos de espera
El modo de espera debería usarse cuando se interrumpa
brevemente el uso de SoundServer. En este modo puede
desconectar SoundServer sin riesgo alguno.
Pulse el botón Standby del panel frontal o el
botón lStandby del mando a distancia.
Pulse el botón de acción 5Espera (Stby) para
activar el modo espera.
Para activar la unidad desde los modos de espera
Pulse el botón Standby del panel frontal o el
botón lStandby del mando a distancia.
12
Page 15
SCHEDA DAVVIAMENTO RAPIDO
I COMANDI
1. Pulsante Output: Premere questo pulsante per
visualizzare le informazioni sulla musica
attualmente in riproduzione. Premere
nuovamente questo pulsante per passare
alloutput successivo sul SoundServer.
2. Tasti dazione del pannello anteriore: Questi
quattro tasti corrispondono alle varie azioni
chiaramente visibili leggendo il display del
pannello anteriore. Ad esempio, nel display a
fianco, il tasto dazione 5Ripro. (Play) inizierà
la riproduzione dellalbum selezionato. Il
simbolo 5 indica che è anche possibile premere
il tasto p sul telecomando per iniziare la
riproduzione.
3. Tasti di navigazione: Consentono di spostarsi in
su, in giù, a sinistra ed a destra attraverso il
sistema menu. Il pulsante al centro seleziona
lopzione attualmente evidenziata.
4. Tasti di trasporto: Controlla la riproduzione di
musica sulloutput attualmente selezionato. Il
tasto kRegistra è un tasto dazione usato su
alcune schermate menu per iniziare a registrare
o a modificare una lista di riproduzione.
5. Pulsante HDD Audio: Premere questo pulsante
per controllare il SoundServer.
6. Tasti dazione del telecomando:
Premere il tasto 1m per visualizzare il
menu principale in qualsiasi momento.
Premere il tasto 2 ogniqualvolta sullo schermo
TV o sul pannello anteriore compare questo
simbolo per annullare, uscire o cancellare
loperazione attuale a seconda delle
informazioni contenute sullo schermo.
Premere il tasto 3 ogniqualvolta sullo schermo TV
o sul pannello anteriore compare questo simbolo
per modificare le informazioni di testo o per
confermare linserimento di un nuovo testo a
seconda delle informazioni contenute sullo
schermo.
Premere il tasto 4 per tornare alla home page
della funzione attuale. Ad esempio, quando si
sfoglia la libreria, premere questo tasto per
tornare al menu Libreria.
REGISTRAZIONE DA UN CD
Digitare il tasto OPEN/CLOSE sul pannello
anteriore per aprire il cassetto del CD.
Inserire un CD nel cassetto.
Springere il tasto OPEN/CLOSE sul pannello
anteriore.
Compare il prompt Rilevato CD.
Digitare il tasto k Registra (Rec) per continuare.
Il display Selezionare Registrazione automatica o
Registrazione personalizzata
effetuare una registrazione rapida conuna sola battuta,
o specificare scelte individuali di registrazione.
Digitare il tasto dazione 5Auto per effettuare
una registrazione con una sola battuta.
Il display conferma la fine della registrazione.
Nota: È possibile riprodurre della musica dalla libreria
musicale durante la registrazione di un CD.
permette di scegliere se
Fig. A Display del pannello anteriore
Fig. B - Telecomando del SoundServer
Fig. C Interfaccia utente TV
13
Page 16

SUONARE MUSICA
Visualizzare il Menu Principale digitando il tasto
1m sul telecomando del SoundServer, o il
tasto dazione Menu sul pannello anteriore.
Viene visualizzato il Menu Principale.
Digitare i tasti 9 e 8 per evidenziare Libreria.
Digitare il tasto dazione 5Scegli.
Il menu Libreria permette di scegliere come si vuole
sfogliare la propria collezione di brani musicali. Si
possono sfogliare le voci secondo lalbum, lartista, il
genere o lordine in cui diversi brani saranno suonati.
Digitare i tasti 9 e 8 per passare da una
categoria allaltra.
Ad esempio, se si seleziona Album si può vedere un
elenco in ordine alfabetico dei titoli degli album
disponibili .
Per suonare musica
Usare i tasti 9 ed 8 per evidenziare la voce che
si desidera riprodurre.
Premere il tasto 7 per visualizzare i contenuti
della voce selezionata.
Digitare il tasto dazione 5Ripro. (Play)
Per cessare di suonare
musica
Digitare il tasto b
sul pannello
anteriore o sul
telecomando del
SoundServer.
Per arrestare la
riproduzione
Digitare il tasto c
sul pannello anteriore o sul telecomando del
SoundServer.
Per ignorare la pista successive o precedentePer
ignorare la pista successive o precedente
Premere il tasto g oppure f sul pannello
anteriore o sul telecomando del SoundServer.
Per operare una ricerca allinterno di una pistaPer
operare una ricerca allinterno di una pista
Tenere premuto il tasto e oppure d sul pannello
anteriore o sul telecomando del SoundServer.
La riproduzione riprende dalla nuova posizione al
rilascio del tasto.
INSERIMENTO DI TESTO
Per inserire del testo usando la tastiera alfanumerica
Premere i tasti 7 oppure 6 per spostare il
cursore nella posizione desiderata.
Usare i tasti sulla tastiera alfanumerica per
inserire una lettera.
Ad esempio, per inserire S premere il tasto 7 per quattro
volte, poichè la S è la quarta lettera sul tasto 7.
Premere il tasto DELETE sul telecomando del
SoundServer per cancellare le lettere.
Premere il tasto CAPS sul pannello anteriore o
sul telecomando del SoundServer per passare
dalle lettere maiuscole alle minuscole e
viceversa.
Per selezionare le lettere da una griglia
In alternativa, lopzione Grid offre un modo comodo di
selezionare le lettere da una griglia:
Premere il tasto 8 per spostare il cursore
nellarea della griglia.
Si evidenzia la lettera selezionata attualmente:
Usare i tasti 7,6,9 oppure 8 per spostare il
cursore e premere il tasto dazione 5Scegli per
inserire ciascuna lettera.
Usare il tasto CAPS sul pannello anteriore o sul
telecomando del SoundServer per passare dalle
lettere maiuscole alle minuscole e viceversa.
Se in qualsiasi momento occorre inserire del testo in una
parte diversa del campo di testo, o se si desidera tornare
ad inserire del testo usando la tastiera alfanumerica:
Premere ripetutamente il tasto 9 fino a che il
cursore non torni al campo di testo.
Infine, quando si è terminato di inserire il nome:
Premere il tasto dazione 3OK.
ACCENSIONE E SPEGNIMENTO
Per commutare sul modo standby
Occorre usare il modo Standby quando non si intende
usare il SoundServer per un periodo di tempo breve. In
questo modo è possibile togliere lalimentazione dal
SoundServer in sicurezza.
Premere il tasto Standby sul pannello anteriore o
il tasto l Standby sul telecomando.
Premere il tasto dazione 5Standby per entrare
in standby.
Per accendere dal modo standby
Premere il tasto Standby sul pannello anteriore o
il tasto l Standby sul telecomando.
14
Page 17

INTRODUCTION
Congratulations on purchasing your SoundServer from
Imerge. The SoundServer is a revolutionary way of filling
your home with music.
Your SoundServer stores and catalogues your music
collection, allowing you to select any album or track at
the press of a key. You can browse through your albums
and tracks using convenient on-screen menus displayed
on your television, showing full album, track, and artist
names downloaded from the Gracenote CDDB Music
Recognition Service as well as album cover art illustration
from the XiVA on-line service. Your SoundServer also lets
you organise your music collection and create selections
for different occasions to suit your mood.
Incredible capacity
Your SoundServer is a hard disk based audio system
which can store hundreds of hours of music, all with the
convenience of instant access, at the touch of a key.
Convenient TV screen
Play music, record CDs, or organise your library using
convenient on-screen menus which show the full album,
artist, and track names, allowing you to select the one
you want with a few simple selections.
Internet access for track listings
Your SoundServer records the CDs from your music
collection at faster than real time. It then automatically
connects to the Gracenote CDDB Music Recognition
Service via the built-in modem or Ethernet connection.
This database provides album and track details for a
wide range of CDs. This information can be
downloaded and stored with each CD you record,
allowing you to select any item in your music collection
by album name, artist name, track name, or genre,
giving you total flexibility in the way you access and
control your music collection.
Create your own playlists
Your SoundServer allows you to compile personal
playlists and then automatically play tracks from the
playlist you have selected. Playlists let you customise
your SoundServer for each member of the family, or for
matching the music to the occasion or mood.
Instant access, irrespective of your music collection
Whether you select a track by title, album, artist, or
genre, your SoundServer locates it instantly and plays it
at the press of a key. All this is achieved with an
extremely simple and intuitive user interface, operated
using a few keys on the front panel or remote control.
SPECIFICATIONS
General
System................................ Hard Disk Audio Server
Power requirements....... AC 100-230V ~50Hz/60Hz
Power Consumption................................ 108W Max
Weight................................................... 12.5Kg Max
Dimensions............. 430 (W) x 374 (D) x166 (H) mm
Operating temperature............................... 10-35°C
Operating humidity... 5-95% RH (non-condensing)
Video Outputs
S-Video Output
Output level.......................... 1V luminescence 75Ω
Connector........................................... S-VIDEO jack
Composite video output
Output level....................................... 1V
p-p
Connector.................................................. RCA jack
VGA output
Output level.............................................. 1V
Connector........................................ 15 pin D-type F
Output resolution....................................... 800x600
Audio outputs
Analogue outputs (up to 16 pairs of outputs)
Output level........................................ 0.7V
Output impedance........................................... 10kΩ
Connector.................................................. RCA jack
Connector (12 and 16 output models)........ ¼ jack
Digital outputs (up to 4 outputs)
Coaxial digital output level.................. 0.5V
Coaxial digital output connector............... RCA jack
Audio inputs
Analogue inputs
Nominal input level............................. 0.7V
Input impedance.............................................. 10kΩ
Connector.................................................. RCA Jack
Coaxial Digital input
Maximum input level............................ 0.5V
Connector.................................................. RCA Jack
Analogue audio characteristics (typical)
Frequency response............ 20Hz to 20kHz ± 0.5dB
S/N ratio (@1KHz).......................................... ≅ 90dB
Total harmonic distortion (@1kHz)................. 0.004%
Channel separation (@1KHz)........................... 95dB
Communications
Modem
Connector.......................................... RJ11 (56kbit/s)
Ethernet
Connector..................... RJ45 (10 Base T/100 Base T)
Controller
Connector........................................ 9 pin D-type M
USB (2 connectors)
Connector................................... Type A USB socket
Accessories
Stereo RCA cable................................................... 1
Video cable............................................................ 1
Modem cable......................................................... 1
Power cord............................................................. 1
Remote control unit............................................... 1
AAA (R03P) dry cell batteries................................ 2
Operating instructions........................................... 1
Registration card ................................................... 1
Note
The specifications and design of this product is
subject to change without notice.
To be enabled in a future release of software
into 75Ω
RGB
p-p
/600Ω
RMS
/75Ω
RMS
/600Ω
RMS
/75Ω
RMS
15
Page 18

CONTROLS AND CONNECTIONS
FRONT VIEW
This section provides information on the controls and
connections available on yourSoundServer.
USB
Allows the SoundServer to communicate with supported
USB devices.
NAVIGATE LEFT / r / e button
The navigate left button allows you to move through
the menus shown on the display.
If the button is pressed briefly whilst the output screen is
displayed, play restarts at the beginning of the current
track. A second brief press moves to the beginning of
the previous track. When the button is held for a longer
period of time the music will rewind at high speed.
c PAUSE button
Press the pause button to interrupt playback
temporarily.
l STANDBY
Press the standby button to put your SoundServer into
standby mode, press again to switch your SoundServer
back on.
REMOTE SENSOR
This window receives signals transmitted from the
remote control unit.
OPEN/CLOSE button
Pressing the open/close button opens the disc tray.
Place a compact disc on the tray with the label side
facing up. Press the button again to close the tray.
b STOP button
Press the stop button to halt playback on the current
output.
j RECORD button
The record button is an action key - on some menu
screens you can use this button to begin a recording,
from the CD inside the unit. When managing playlists
this button is also used to create new playlists or add
tracks to an existing playlist.
NAVIGATE RIGHT / d / q button
The navigate right button allows you to move through
the menus shown on the display.
If the button is pressed briefly whilst the output screen is
displayed, play restarts at the beginning of the next
track. When the button is held for a longer period of
time the music will fast forward at high speed.
a PLAY button
Press the play button to resume playback if the music
has been stopped or paused.
ACTION buttons
Action buttons allow you to perform specific operations
dependent on the current menu screen. For more
information on using the action buttons see the chapter
called Using the SoundServer action keys p.22.
DISPLAY
The display shows information about the music available
on the unit, the status of the SoundServer (for instance
if the unit is currently playing), and the current
configuration of the unit.
NAVIGATE UP/DOWN buttons
The navigate up and down buttons allow you to move
through the menus shown on the display.
DISC TRAY
Insert a disc with the label side up.
16
Page 19

REAR VIEW
ANALOGUE OUT 1-8
The SoundServer is a multiroom device allowing you to
listen to different music in up to 16 different rooms all
at the same time (depending on your configuration).
Each analogue output should be connected to the input
jacks of a pre-amplifier. For more information see the
chapter called Using your SoundServer in a multiroom
system p.38.
CONTROLLER
The Controller port provides serial communication with
supported devices. For instance a multiroom control
system may communicate with the SoundServer using
the XiVA-Link protocol.
COMPOSITE VIDEO OUT
Connect the composite Video Out of the SoundServer to
the composite input of a suitable PAL/NTSC TV
(depending on the supplied configuration) to display
the TV User Interface. You may also need to switch the
TV to the relevant AUX input to display the picture.
S-VIDEO OUT
Connect the S-VIDEO output of the SoundServer to the
S-VIDEO input of a suitable PAL/NTSC TV (depending on
the supplied configuration) to display the TV User
Interface. You may also need to switch the TV to the
relevant AUX input to display the picture.
ETHERNET
The Ethernet port can be used to connect the
SoundServer to a high speed internet connection. It
may also be used by supported software applications to
communicate with the system. A shielded Ethernet
cable should be used in conjunction with this
connection.
MODEM
The Modem port can be used to connect the
SoundServer to a standard analogue telephone line for
internet access (using the supplied cable).
VGA
The VGA connector may be used to connect a VGA
monitor or a suitable Plasma screen for displaying the
TV User interface.
USB
Allows the SoundServer to communicate with supported
USB devices.
DIGITAL OUT - COAXIAL
By connecting this jack to a digital audio component (D/A
convertor, A/V amplifier etc.), digital signals from the
SoundServer can be transmitted directly from the system
without first being converted to analogue. This output
may not be used for making a digital copy of your
media.
DIGITAL IN - COAXIAL
High Quality recordings can be made onto the Hard Disk
of the SoundServer using a coaxial connection from a
suitable device (such as Minidisc or DAT).
ANALOGUE IN
Analogue sources (such as cassette or vinyl LP) may be
recorded onto the Hard Disk of the SoundServer using
this connection.
PS2
Allows the SoundServer to communicate with supported
PS2 devices.
MAINS
Connect the supplied mains lead to this connector to
provide power to the unit.
Note: only one video output may be enabled at any
time. See the chapter called Advanced Settings p.36 for
more information on selecting your video output.
To be enabled in a future release of software.
17
Page 20

REMOTE CONTROL
The remote control supplied with the SoundServer is a
Universal remote control. This means that other devices,
such as a television or amplifier, may be controlled using
this remote control. When you have selected to control
the television the TV button will light up each time you
press a button - similarly when the SoundServer is selected
the HDD Audio button will light and when the Amp is
selected the Amp button will light.
The following diagram explains the function of the keys
on your SoundServer remote control:
AMP button
Selects the Amp as the device to be controlled. For
more information on configuring this remote to control
your amplifier see the chapter called Configuring your
remote to control other devices p.20.
DISC/CH. buttons
Selects the next/previous album, playlist or preset on
your SoundServer. If you have the TV device selected
these buttons will select the next and previous channels.
o MUTE button
This button has no function on your SoundServer.
However, it may be configured to mute the volume on
your amplifier whilst the HDD Audio device is selected. For
more information see the chapter called Reassigning
volume control when using the SoundServer p.20. If the
TV or Amp device is selected, this button mutes the
volume of the TV/Amp.
nVOLUME buttons
These buttons have no function on your SoundServer.
However, they may be configured to control the volume
on your amplifier whilst the HDD Audio device is selected.
For more information see the chapter called Reassigning
volume control when using the SoundServer p.20. If the
TV or Amp device is selected these buttons control the
volume of the TV/Amp.
l STANDBY button
Places the SoundServer in/out of standby mode.
HDD Audio button
Selects the SoundServer as the device to be controlled.
TV button
Selects the TV as the device to be controlled. For more
information on configuring this remote to control your
television see the chapter called Configuring your
remote to control other devices p.20.
DEFAULT O/P button
Resets the TV user interface to controlling the default
output for the room where you are located. For more
information on multiroom use of the SoundServer see
the chapter called Using your SoundServer in a
multiroom system p.38. If the TV device is selected this
button will show/hide the on-screen clock.
- OUTPUT button
Press the output button to display what music is playing
on the currently selected output. Pressing the output
button for a second time will select the next output in
sequence.
2CANCEL button
The cancel button is an action key - on some menu
screens this is used to cancel an operation which you no
longer wish to continue. If the TV device is selected this
button will hide text services.
3 INFO button
The info button is an action key - on some menu screens
this is used to display additional information which may
not be currently displayed; on other menu screens it may
also be used to edit text on the screen. If the TV device
is selected this button displays text services.
4HOME button
The home button is an action key - it can be used to
return to the top page of a particular function. For
instance if you are browsing the music library and you
wish to look for a different album you may use the
home button to return to the main Library menu.
1mbutton
The menu button is an action key - pressing this key will
always return the TV screen and front panel to the Main
Menu. Use this button if you wish to start a new
operation.
NAVIGATION 9,8,6,7 buttons
The navigation buttons are used to move up, down, left
or right through the menu pages.
p button
Select is used to activate the currently highlighted
option. When browsing the library this button will start
playback of the selected item.
18
Page 21

ALBUM button
The album button can be used to jump to the album list
in the music library. If the TV device is selected this
button selects the red text service option.
PLAYLIST button
The playlist button can be used to jump to the playlist
list in the music library. If the TV device is selected this
button selects the blue text service option.
ARTIST button
The artist button can be used to jump to the artist list in
the music library. If the TV device is selected this button
selects the green text services option.
GENRE button
The genre button can be used to jump to the genre list
in the music library. If the TV device is selected this
button selects the yellow text services option.
NUMERIC (0 to 9) buttons
The numeric keys can be used as follows:
When browsing the track list these buttons allow
you specify the track you wish to play.
In the music library you may jump to an item in
the list that begins with one of the letters
specified at the top of each key.
When browsing the list of presets these buttons
allow you to jump to a preset number.
In text entry mode these keys can be used as an
alphanumeric key pad (similar to a mobile
phone).
If the TV device is selected the numeric buttons select
which channel you wish to view.
i RANDOM (DELETE) button
The random button has the following functions:
During playback this button toggles the random
play setting on the SoundServer.
In text entry mode this button can be used to
delete characters.
If the TV device is selected this button switches the TV
channel to the AV input.
h REPEAT (CAPS) button
The repeat button has the following functions:
During playback this button toggles the repeat
play setting on the SoundServer.
In text entry mode this button can be used to
toggle between upper-case and lower-case
letters.
If the TV device is selected this button switches the TV
between single digit and double digit channel selection.
b STOP button
During playback the stop button halts playback on the
currently selected output of the SoundServer.
a PLAY button
The play button can be used to resume playback on the
currently selected output of the SoundServer.
k RECORD button
The record button is an action key - on some menu
screens you can use this button to begin a recording
from the CD inside the unit; when managing playlists
this button is also used to create new playlists or add
tracks to an existing playlist.
df button
When this button is pressed briefly during playback, play
restarts at the beginning of the next track. When the
button is held for a longer period of time the music will
fast forward at high speed.
ge button
When this button is pressed briefly during playback, play
restarts at the beginning of the current track. A second
brief press moves to the beginning of the previous track.
When the button is held for a longer period of time the
music will rewind at high speed.
c PAUSE button
Press the pause button to interrupt playback
temporarily.
CONFIGURING YOUR REMOTE CONTROL
FOR USE WITH THE SOUNDSERVER
Before the remote control can be used, the HDD Audio
button must be configured to control one of the audio
outputs of your SoundServer.
To configure the remote to control your SoundServer
Press the HDD Audio and p buttons
simultaneously; hold them down for 1 second.
The HDD Audio button will remain lit for 20 seconds; the
configuration process must be completed during this time.
Enter the 3 digit code corresponding to the output
you would like to control (valid configurations are
listed in Appendix A). For example, to configure
your remote to control output 2 press:
0, 0, 2
Press the HDD Audio button again.
The HDD Audio button will blink twice to indicate that
the configuration has been accepted. If the HDD Audio
button does not blink twice begin the process again,
taking care to enter the number correctly.
If the SoundServer is switched on during the
configuration process the Enter Standby? prompt will
appear once configuration is complete; pressing any
navigation key on the remote should now cause the
SoundServer to switch to the correct output. In the
example above the status icons on the TV screen will
display the following:
The number inside the circle indicates which output of
your SoundServer the remote has been set to control by
default. For more information on using several remote
controls in a multiroom SoundServer installation see the
chapter called Using your SoundServer in a multiroom
system p.38.
Note: this process must be repeated if the batteries are
replaced in the remote control.
19
Page 22

CONFIGURING YOUR REMOTE TO
CONTROL OTHER DEVICES
The TV and Amp buttons on the SoundServer remote
control may be individually configured to control a
range of televisions and amplifiers from well known
manufacturers.
To configure the remote to control your
television
Press the TV and p buttons simultaneously;
hold them down for 1 second.
The TV button will remain lit for 20 seconds; the
configuration process must be completed during this time.
Enter the 3 digit numeric code matching the
manufacturer of your television from the list in
Appendix A.
Press the TV button again.
The TV button will blink twice to indicate that the
configuration has been accepted. If the TV button does
not blink begin the process again, taking care to enter the
number exactly as printed in the list. If the television is
switched on during the configuration process, entering the
correct code will cause the television to go into standby.
To configure the remote to control your
amplifier.
Press the Amp and p buttons
simultaneously; hold them down for 1 second.
The Amp button will remain lit for 20 seconds; the
configuration process must be completed during this time.
Enter the 3 digit numeric code matching the
manufacturer of your amplifier from the list in
Appendix A.
Press the Amp button again.
The Amp button will blink twice to indicate that the
configuration has been accepted. If the Amp button
does not blink begin the process again, taking care to
enter the number exactly as printed in the list. If the
amplifier is switched on during the configuration
process, entering the correct code will cause the
amplifier to go into standby.
Reassigning volume control when using the
SoundServer.
When the HDD Audio button is selected on your remote
control the n and o Mute buttons will have no effect on
the output level of your SoundServer . These buttons may
therefore be configured to control the volume on your
amplifier. To re-configure these keys:
Ensure that the Amp button is correctly
configured to control your amplifier (as
described above).
Press the HDD Audio and p buttons
simultaneously; hold them down for 1 second.
The HDD Audio button will remain lit for 20 seconds; the
configuration process must be completed during this time.
Press the o Mute
Press the n+ key
Press the Amp button
The HDD Audio button will blink twice to indicate that
the configuration has been accepted. If the HDD Audio
button does not blink begin the process again, taking
care to press the buttons in the correct sequence. The
n and o Mute keys should now control the amplifier
when the HDD Audio device is selected.
CONNECTING YOUR SOUNDSERVER
The diagram below illustrates the basic connections
required to use your SoundServer.
Note: Do not make any connections to the SoundServer
while the power supply is connected and switched on.
Connect the supplied telephone lead to a
standard analogue telephone socket. Connect
the other end of this cable to the socket marked
Modem on the back panel of the SoundServer.
Connect the red plug of the supplied audio lead
to the red Analogue Out 1 socket on the back of
the SoundServer. Connect the adjacent white
plug to the white Analogue Out 1 socket on the
SoundServer. Connect the other end of this cable
to the AUX or CD inputs on your amplifier. In
the same way connect the other Analogue Out
connectors to other amplifiers as appropriate.
Basic connections required for SoundServer operation
20
Page 23

Connect the yellow plug of the supplied TV lead to
the yellow Video Out socket of the SoundServer.
For the European TV lead* connect the Scart plug
to the ext. 1 or 2 socket on the rear of your TV. For
the non-European TV lead connect the yellow plug
to the video input on the rear of your TV.
Connect the supplied power cord to your mains
power supply.
Switch on your television. Select the appropriate
video channel to view the SoundServer TV User
Interface display.
* For Scart connection, the red and black plugs are not
required.
SWITCHING ON AND OFF
You can place your SoundServer in and out of standby
mode using the Standby button on the SoundServer
front panel and the l button on the remote control.
Standby mode should be used when the SoundServer is not
being used or you wish to remove the mains connection.
To enter standby mode
Press the Standby key on the front panel or the
l Standby key on the remote control.
The following prompt is displayed:
To switch on from standby mode
Press the Standby key on the front panel or the
l Standby key on the remote control.
TV SCREEN AND FRONT PANEL DISPLAY
The following diagram shows the key features of a
typical SoundServer TV screen and front panel display:
The front panel display shows:
Either:
Press the Stby action key on the front panel or
the p key on the remote control to switch
to standby.
After a short delay the TV screen shows:
1. Indicates the title of the current screen.
2. Title of the current selection, shown highlighted
on the TV screen.
3. Indicates that you can use the 9 or 8 keys to
browse up and down the current menu list.
4. Indicates that you can press the 7 key to look
inside the currently selected item, such as to
show the tracks in an album, or the albums by an
artist or in a genre.
5. Action keys available from the current menu for
selection or navigation.
Using the SoundServer action keys
The front panel of your SoundServer has four action
keys located underneath the main display. The function
of these keys changes depending on which menu you
are currently viewing. The available actions are shown
on the bottom line of the front panel display. In the
example above, the functions Menu, Open, Info, and
Play are available; next to each option is a symbol
indicating where a key on the SoundServer remote
control may be used instead of pressing the action key.
By default:
3 corresponds to an information action
2 corresponds to a cancel action
5 corresponds to a select action
The TV screen also displays these actions as well as other
actions available on the SoundServer remote control.
21
Page 24

SoundServer status icons
The TV display shows the current status of the
SoundServer using a series of icons as shown below:
1. Indicates the default output of the remote
currently in control of the TV user interface. The
bar to the right shows how long the user has
before the TV interface is available for other users
to access. A green circle indicates that infrared is
being received from the controlling remote. A
red circle indicates that infrared is being received
from a remote with a different default output
and will be rejected until the interface is available
again. A yellow circle indicates that infrared is
being received and no update is required on the
TV user interface. For information on using your
SoundServer in a multiroom environment see the
chapter called Using your SoundServer in a
multiroom system, p.38.
2. Shows which output the user interface is
currently controlling.
3. Indicates the playback status of the currently
selected output (e.g. play, stop, pause etc.)
4. Indicates whether repeat is enabled on the
current output.
5. Indicates whether random is enabled on the
current output.
6. When the handset is lifted the unit is connected
to the internet using the built-in modem; when
the handset is on top of the telephone the unit
is offline. If your SoundServer is set to connect
to the internet via a broadband ethernet
connection this symbol is not used.
7. Indicates that an audio CD is inside the CD tray.
REGISTERING YOUR
SOUNDSERVER
Before using your SoundServer you should spend some
time registering your purchase. This enables you to
receive technical support as well as software upgrades.
To register your SoundServer
When the welcome screen is first displayed, press
the p key on the remote control or the
Regstr action key on the front panel.
The following registration screen will be displayed:
The same information is also shown on the front panel
display.
Press the p key on your remote control or
the Cont. action key on the front panel to
display the first registration screen:
22
Page 25

To use the alphanumeric keypad
As part of the registration process you will need to enter
your name and address into the SoundServer. You can
do this using the following keys on the remote control:
Action How
Enter Text
Switch between
entering upper-case
or lower-case letters
Enter a space. Press the 0 key.
Use the alphanumeric keys on the
remote control. For example, to type
an S press the 7 key four times.
Press the action key labelled
CAPS
the
control.
h
key on the remote
Caps
or
To connect your SoundServer to an Internet
Account
The next sequence of screens helps you connect your
SoundServer to the Internet.
Press the Cont. action key on the front panel or
the p key on the remote to begin.
The following screen then allows you to select from a
range of options to set up your internet connection:
Delete a mistake
Move the cursor
within the text
Press the
control.
Press the 6 or 7 keys.
DELETE
i
key on the remote
Alternatively you can use the built-in alphanumeric grid
to enter details:
Press the 8 key to move the cursor onto the
grid, then use the 6, 7, 8, and 9 keys to
highlight characters, and the p key to
select them.
Use the 9 key repeatedly to move the cursor
back into the text entry box to return to normal
text entry mode.
When you have completed each entry:
Press the Next action key on the front panel or
the 3 button on the remote.
When you have entered your name and address details
you will be prompted to select your country:
Press the 9 or 8 keys to highlight your country
and press the p key on the remote or the
5 action key on the front panel.
Press the 8 or 9 keys to select between the
following options:
1. Using your existing Internet account
If you are already using a computer to connect to
the Internet via a telephone line, and you have
an existing Internet account, you may prefer to
use these account details for your SoundServer.
If you do not know your username, password,
and Internet account telephone number you may
be able to read these from your computers
settings; otherwise contact your Internet Service
Provider for assistance.
Note: AOL and Compuserve accounts are not
currently supported.
2. Do not connect to the Internet
You should use this option if you do not
presently have access to a telephone line (you
may set up a connection later).
3. Use Ethernet Internet connection.
Use this option to connect to a high speed,
broadband internet service via the Ethernet port.
Note: You will require additional networking
hardware for this type of connection. Contact
your dealer for further information.
4. Using the built-in Internet account
Your SoundServer will connect using a preinstalled internet account for your country.
Note: The built-in Internet account may not be
available for your country.
Press the 5 action key on the front panel or the
p key on the remote to select the option
you have chosen.
23
Page 26

If you have selected Use your existing Internet
Account, follow the on-screen instructions to
enter your account username, password, and the
telephone number of your service provider.
If you have selected Use Ethernet Internet
connection follow the on-screen instructions to
specify how your SoundServer obtains an
Ethernet IP address. If you select the Manual
option a series of screens will allow you to enter
an IP address, IP mask, Gateway, IP DNS1 and IP
DNS2.
If you have selected Use built-in Internet
Account, read the terms and conditions and press
the Accept action key on the front panel or the
p key on the remote control to continue.
The SoundServer will then attempt to connect to the
Internet to send your registration details to Imerge.
If you are using an Ethernet connection ensure that you
have connected your SoundServer to the appropriate
network device using a shielded Ethernet cable. If you
are not using an Ethernet connection check that you
have connected your SoundServer to a telephone line
using the cable supplied.
Press the Regstr action key on the front panel or
the p button on the remote control.
The following screen confirms that registration was
successful and your Internet account is operating
successfully:
Press the Cont action key on the front panel or
the p button on the remote control to
continue.
Registration is now complete and the Main Menu will be
displayed.
If the SoundServer is unable to successfully connect to
the Internet you will be given further details on how to
connect to the Internet later.
THE SOUNDSERVER
MAIN MENU
To display the Main Menu at any time during normal
operation:
Press the 1maction key.
The Main Menu will be displayed on the TV screen and
on the front panel display.
To select an option from the main menu
Press the 9 or 8 key on the front panel or
SoundServer remote control to step between the
main menu options.
The current option is shown highlighted.
Press the 5Select button to select the current
option.
The options are as follows:
Option Description
Connects to the Internet and registers your
Register
Library
CD
Output
Settings
Look Up
Disconnect
More information about each of these functions is given
in the following chapters.
24
SoundServer with Imerge. This option will
only be available if your SoundServer has
not been registered.
Allows you to select the music you want to
play by album, artist, genre, preset or
playlist. You may also edit the names of the
music stored on the Hard Disk.
Allows you to play a CD or record new
music to the Hard Disk.
Displays information about the music
currently playing and allows you to switch
to controlling a different output of the
SoundServer.
Allows you to configure your SoundServer
settings.
This option allows you to retrieve any
missing CD information from the Internet.
Interrupts all on-line processes using the
modem connection and releases the
telephone line.
Page 27

RECORDING MUSIC
Your SoundServer allows you to record music from CDs
and add it to the music library stored on the Hard Disk.
It is also able to access the internet, either through a
broadband connection (using the Ethernet port) or using
the built-in modem. Each time you record a CD the
SoundServer allows you to automatically retrieve the
album name, artist name, track names and music genre
using the Gracenote CDDB Music Recognition Service.
An album cover illustration is also often available from
the XiVA on-line service.
If you do not provide an Internet connection you can
label the CDs you record manually.
RECORDING FROM A CD
Press the OPEN/CLOSE key on the front panel to
open the CD tray.
Place a CD in the tray.
Push the OPEN/CLOSE key on the front panel.
The following prompt is automatically displayed:
To make an automatic (one-touch) CD recording
Press the 5Auto key.
An Auto recording will automatically look up the track
and artist information on the Gracenote CDDB Music
Recognition Service and the album cover illustration on
the XiVA on-line service, and then record all the tracks
on the album.
The quality of the recording is specified in the Settings
menu (under Default Recording Quality). For more
information on the settings menu see the chapter called
Advanced Settings p.36.
Once recording has begun your SoundServer will
connect to the Internet to retrieve the CD information:
Press the kRecord action key to record the
album onto the Hard Disk.
Note: If you already have a CD in the tray, select the CD
option from the Main Menu to display the contents of
the disc; press the kRec. CD to begin the recording
process.
The following display then allows you to choose whether
to do an auto (one-touch) recording of the entire CD, or a
custom recording which allows you to select the tracks
you want to record and the recording quality:
Once the search has been completed you will receive a
confirmation to tell you if the CD has been found.
Press the 5OK key to continue.
The following display shows the approximate progress
of the recording:
Once recording is complete the following screen confirms
how many tracks have been successfully recorded.
25
Page 28

To make a custom CD recording
The custom recording option lets you choose which
tracks to record, the sound quality of the recording, and
allows you to enter album information.
To make a custom recording:
Choose 3Custom from the Please select Auto or
Custom record screen.
A series of screens allow you to specify each of the
recording options.
Tracks
The tracks menu lets you specify which tracks you want
to record:
In each case the display shows the total remaining
recording time available at the specified recording quality.
Press the 5Select key to confirm your selection.
CD information
The CD information screen allows you to choose how to
enter the album name, artist name, genre and tracks:
If you select Enter Information Later you can download
the CD Information for all the CDs you have recorded by
choosing Look Up from the Main Menu at a later time.
If you select Manually enter now a series of menus
prompts you to enter the album name, artist name, and
track titles:
Initially all tracks are selected, as indicated by a 5 in
front of the track number.
Press the 5Select key to unselect or select the
highlighted track.
Press the 9 or 8 keys to step between tracks.
Press the 2None/All action key to unselect or
select all of the tracks respectively.
When you have specified which tracks you want to
record:
Press the 3 Next key.
Record Quality
The Record Quality menu allows you to specify the
recording quality:
Use the 9 or 8 keys to choose between
Maximum (no compression used) or one of the
MP3 compression options.
Note: The higher quality options use more space on your
SoundServer Hard Disk, so you will not be able to record
as many CDs.
Edit the album and artist name using the
alphanumeric keys on your SoundServer remote
control or by using the text grid on the front
panel.
For more information about entering and editing names
see the Chapter called Entering and editing names, p.35.
After entering the album name and artist name, you will
be prompted to select a genre:
Select a genre using the 9 and 8 keys.
Press the 5Select action key to confirm your
choice.
You will finally be prompted to enter the track titles.
Edit each track title in the usual way, and press
the 3Next key once each title is complete.
Once all the entries are complete recording will
commence automatically.
26
Page 29

If you select Automatically enter now your SoundServer
will attempt to retrieve the correct CD information from
both the Gracenote CDDB Service and the XiVA on-line
service. You will receive confirmation if this search has
been successful once the connection is complete. For
information about setting up the Internet connection
see Registering your SoundServer p.22.
If you do not have an Internet connection, or the CD is
not listed in the database, it will be given names such as
Album 35, Artist 21, and Track 1, Track 2 etc. and it will
be classified in genre Unclassifiable.
CD-Text Support
If the CD you have inserted contains CD-Text
information your SoundServer will use this information
to label the recording appropriately.
Listening to music while recording a CD
You can play music from your music library while you
are recording a CD.
If you are already playing music from the library
press the -Output action key to return to
displaying information about the track you are
playing.
If you are not already playing music from the
library or wish to change the music you are
listening to, press the 1m key on the
SoundServer remote control and select music as
normal.
For more information on selecting music for playback
see the following chapter called Playing Music.
At any time you can return to see the progress of your
recording by selecting CD from the Main Menu.
Note: During the recording process the update of the
TV display may be slightly slower.
PLAYING MUSIC
This chapter explains how to play music on your
SoundServer. It also explains how to search for a track
in a number of alternative ways.
PLAYING MUSIC FROM THE LIBRARY
Display the Main Menu by pressing the
1m action key on your SoundServer remote
control.
If necessary use the 9 or 8 keys to highlight
Library.
Press the 5Select key.
The Library menu will be displayed. This lets you choose
how you want to browse your music collection:
Option Description
Albums
Artists
Display a list of albums in the library sorted
alphabetically by album title.
Display your music library grouped by artist
name.
Genres Display your music library grouped by genre.
Playlist Display a complete list of custom playlists.
Edit Albums
Edit Playlists
Presets Display a complete list of preset 'stations'.
Edit the album title, artist name, genre or
track name of existing music in your library.
Use this option to create and edit custom
playlists.
Alternatively you can display the contents of a category
directly by pressing the ALBUM, ARTIST, GENRE, and
PLAYLIST keys on your SoundServer remote control.
To browse the library by album
Either:
Use the 9 or 8 keys if necessary to highlight the
Albums option in the Library Menu.
Press the 5Select action key to confirm your
selection.
or:
Press the ALBUM key on your SoundServer
remote control.
27
Page 30

The front panel display and TV screen both display the
albums available in your library:
Press the 9 or 8 keys to step between albums, or
press the appropriate letter on your SoundServer
remote control to jump directly to that position in
the list.
To play the entire album:
Press the 5Play action key to begin playback.
To select a particular track from this album:
Press the 7Open key to open the album and
display the tracks it contains.
Use the 9 or 8 keys to step between tracks, or
press a key on the alphanumeric keypad to jump
to that track number.
Press the 5Play action key to play the currently
selected track.
Press the 6 key to return to browsing by album.
To browse the library by artist
Either:
Use the 9 or 8 keys if necessary to highlight the
Artists option in the Library menu.
Press the 5Select action key to confirm your
selection.
or:
Press the ARTIST key on your SoundServer
remote control.
The front panel display and TV screen both display the
artists available in your library:
Artists are displayed in alphabetical order.
Press the 9 or 8 keys to step between artists, or
press the appropriate letter on your remote
control to jump directly to the item in the list
beginning with that letter.
To play all albums by the selected artist
Press the 5Play key to begin playback.
To play a particular album by the selected artist
Press the 7Open key to display all the available
albums by the selected artist.
Use the 9 or 8 keys to step between albums.
Either:
Press the 5Play action key to play the currently
selected album.
or:
Press the 7Open key again to select a track from
within this album.
or:
Press the 6 key to return to browsing by artist.
To browse the library by genre
Either:
Use the 9 or 8 keys if necessary to highlight the
Genres option in the Library menu.
Press the 5Select action key to confirm your
selection.
or:
Press the GENRE key on your SoundServer
remote control.
The front panel and TV screen both display the genres
available in your library:
Press the 9 or 8 keys to step between genres.
To play all albums in a selected genre
Press the 5Play key to begin playback.
To play a particular album from the selected genre
Press the 7Open key to display all the available
albums in the selected genre.
Use the 9 or 8 keys to step between albums.
Either:
Press the 5Play action key to play the currently
selected album.
or:
Press the 7Open key again to select a track from
within this album.
or:
Press the 6 key to return to browsing by genre.
28
Page 31

To browse the library by playlist
Playlists allow you to create your own selections of
tracks and save them with a name of your choice such as
Party Music. For more information about creating a
playlist see Creating a new Playlist p.32.
Either:
Use the 9 or 8 keys if necessary to highlight the
Playlists option in the Library menu.
Press the 5Select action key to confirm your
selection.
or:
Press the PLAYLIST key on your SoundServer
remote control.
The front panel and TV screen both display the Playlists
available in your library:
Note: If you have not yet created any playlists the list
will be empty.
Press the 9 or 8 keys to step between playlists,
or press the appropriate letter on your
SoundServer remote control to jump directly to
the item in the list beginning with that letter.
Press the 5Play key to begin playback.
To browse the library by preset
Presets are simple playlists that can be used in the same
way as a preset station on your radio tuner; for example,
you may have a preset which plays a random selection
from your entire music library. Presets can be
programmed into a simple multiroom controller system
where browsing of the music library is not possible. For
more information on programming presets see the
chapter called Storing a preset p.33.
Use the 9 or 8 keys if necessary to highlight the
Presets option in the Library menu.
Press the 5Select action key to confirm your
selection.
The front panel and TV screen both display the presets
available in your library:
Note: any preset which currently has no program will be
labelled [Empty].
Press the 9 or 8 keys to step between presets,
or press the appropriate number on your
SoundServer remote control to jump directly to
that preset number in the list.
Press the 5Play key to begin playback. Random
and repeat playback will automatically be
enabled for this selection.
Selecting items directly using your
SoundServer remote control.
You can select an album, artist, genre or playlist directly
by the first letter of its title using the alphanumeric
keypad on your SoundServer remote control.
To select an album, artist, genre or playlist by name
Display the appropriate library menu for the
item you want to find (e.g. Select Artist menu).
Press the alphanumeric keypad key
corresponding to the first letter of the item you
want to select.
For example to find the artist Santessa press the ARTIST
key to display the Select Artist menu, then press the 7
key four times because S is the fourth letter on the 7
key. The front panel and TV screen show the first artist
beginning with the letter S.
If there are several artists beginning with the letter S
press the 8 key to step through until you find the artist
you are looking for.
To select a track or preset by number
Display the list of tracks in an album or playlist,
or display the list of presets.
Press the key on the alphanumeric keypad
corresponding to the track number you want to
select.
Selecting an album by number
Each album you have recorded onto the Hard Disk of
your SoundServer is allocated a sequence number, from
zero upwards. If you know the number of the album
you want to listen to you can select it directly by
number using the alphanumeric keys on your
SoundServer remote control.
Press the ALBUM button to to display the albums
in your library.
Press the 0 key followed by the number of the
album.
29
Page 32

For example, to select album 27 press ALBUM,0,2,7.
The front panel displays:
Press the 3OK action key to finish entering the
album number.
Press the 5Play action key once again to begin
playing the album.
PLAYING MUSIC FROM A CD
Your SoundServer allows you to play a CD directly
without recording it to the Hard Disk first.
To play a disc:
Press the OPEN/CLOSE key on the front panel to
open the CD tray.
Place a CD in the tray with the label side facing
upwards.
Push the OPEN/CLOSE key on the front panel.
The following prompt is automatically displayed:
Alternatively if you already have a CD in the tray select
the CD option from the Main Menu.
Press the 5Play action key to begin playing the
CD.
PLAYBACK INFORMATION
The output screen
Whenever you select an item for playback the following
screen is displayed:
The front panel displays:
1. Indicates the title of the album.
2. Indicates the title of the artist.
3. Indicates the name of the track currently playing.
4. Displays either track time or time remaining for
the current track.
5. Indicates that random playback is enabled.
6. Indicates that repeat playback is enabled.
7. Indicates that the unit is playing from an item in
the Hard Disk library.
You can display the output screen at any time by
pressing the - Output key. The output key may also be
used to select a different output on the SoundServer; for
more information see the chapter called Using your
SoundServer in a multiroom system p.36.
To change the displayed information
You can choose what information is displayed on the TV
screen and front panel display whilst playing;
Press the 5Display action key to step between
the following four options:
Track name, track number, and elapsed time for the
current track:
Track name, track number, and time remaining for the
current track:
30
Page 33

Album name and track name:
Artist name and track name:
CONTROLLING PLAYBACK
Whether you are playing music from the library or
directly from the CD you can pause, stop and resume
playback as well as seek and skip tracks at any time.
To pause play
Press the c key on the front panel or your
SoundServer remote control.
To stop play
Press the b key on the front panel or your
SoundServer remote control.
To resume play
Press the a key on the front panel or your
SoundServer remote control.
To skip to the next or previous track
Press the gor f key on the front panel or your
SoundServer remote control.
The front panel display shows the number of each track
as you skip between them.
To seek within a track
Hold down the e or d key on the front panel or
your SoundServer remote control.
Play resumes from the new position when you release
the key.
Random and repeat playback
Your SoundServer lets you play albums, artists, genres or
playlists in a random order to add variety to your music.
You can also play a selection repeatedly.
To randomise the current selection
Press the i key on your SoundServer remote
control.
Press the i key again to disable random playback.
To repeat the current selection
Press the h key on your SoundServer remote
control.
Press the h key again to disable repeat playback.
The front panel and TV screen both indicate that
random and repeat are enabled.
31
Page 34

ORGANISING YOUR
MUSIC COLLECTION
This chapter describes the features built into your
SoundServer to help you organise the music in your music
library, including information about creating playlists of
your favourite tracks, programming preset stations,
deleting albums or tracks you no longer want to store, and
naming albums, tracks, and artists.
PLAYLISTS
Your SoundServer allows you to create your own selections
of tracks, called playlists, and identify them with a name of
your choice. For example, you could select your favourite
party tracks from a number of different albums and
include them in a playlist called Party Music. You can then
play your selection simply by choosing the appropriate
playlist from the Select Playlist menu.
Creating a new playlist
Display the Main Menu by pressing the
1m key on your SoundServer remote control.
Press the 9 or 8 key to highlight the Library
option and press the 5Select action key.
Press the 9 or 8 key to highlight the Edit
Playlists option and press the 5Select action key.
The existing playlists will be displayed:
For more information about entering names see the
chapter called Entering and editing names, p.35.
Press the 3OK action key to confirm the name
you have entered.
To select items for a playlist
Press the 9 or 8 key to highlight the Edit Tracks
option and press the 5Select action key.
You will then be prompted to select the items that you
want to include in the playlist:
Press the kAdd action key.
The Add Music Menu then lets you browse through the
music library to select the first item you want to add to
the playlist.
You can add whole albums, complete genres, all the
albums by a selected artist, another playlist, or individual
tracks. For more information on browsing the music
library refer to Playing Music from the Library p.27.
When you have located the album, genre, artist, playlist
or track you want to add:
Press the 5Add action key to add it to the playlist.
If you have not previously created a playlist this list will
be empty.
Press the k New key to create a new playlist.
The following menu then allows you to enter a
name for the playlist:
Enter a name for the playlist using the
alphanumeric keys on your SoundServer remote
control or using the grid.
Press the 5OK action key to continue.
When you have finished compiling the playlist:
Press the kDone action key to finish adding
tracks.
Press 5OK to confirm your action.
32
Page 35

The tracks you have added will be shown in the playlist:
Editing a Playlist
You can change a playlist at any stage by adding items,
deleting tracks, or changing position of tracks in the
playlist.
To add items to a playlist
Either:
Select the playlist you want to change from the
Select Playlist menu in the library.
Press the 3Info action key to display the Playlist
Information menu.
Use the 9 or 8 keys to highlight the Edit tracks
option and press the 5Select action key.
or:
Select Edit Playlists from the Library menu and
highlight the playlist you want to change.
Press the 5Select action key to open the playlist
for editing.
Use the 9 or 8 keys to highlight the Edit tracks
option and press the 5Select action key.
Once you have selected the appropriate playlist:
Press the kAdd action key to add new tracks,
and locate the item you want to add by
browsing through the music library.
To remove a track from a playlist.
Open the playlist as previously described.
Press the 9 or 8 keys to highlight the track you
want to remove.
Press the 2Remove action key to remove the
track.
Press the 5Remove action key to confirm your
choice.
To change the position of a track within a playlist.
Open the playlist as previously described.
Press the 9 or 8 keys to highlight the track you
want to change.
Press the 3Move action key to move the track.
Press the 9 or 8 keys to move the track up or
down as required.
Press the 5Store key to confirm the new track
position.
PRESETS
Presets are simple playlists that can be used in the same
way as a preset station on your radio tuner; for example,
you may have a preset which plays a random selection
from your entire music library. Although you can select
a preset for playback using the TV user interface presets
are more commonly used by simple multi-room control
systems and remote controls to trigger playback without
referring to the TV screen. For more information see the
chapter called Using your SoundServer in a Multiroom
System p.38.
Before a preset can be used a selection of music must be
assigned to that station as follows:
Storing a preset
Display the Main Menu by pressing the
1m key on your SoundServer remote control.
Press the 9 or 8 key to highlight the Library
option and press the 5Select action key.
Press the 9 or 8 key to highlight the Presets
option and press the 5Select action key.
The existing presets will be displayed:
If you have not previously stored a preset all the names
will be labelled [Empty].
Use the 9 or 8 keys to highlight the preset you
wish to program and press the 3 Info action key.
The following menu allows you to choose
whether you wish to rename the preset or reprogram it:
To select the music for a preset:
Press the 9 or 8 key to highlight the Set option
and press the 5Select action key.
You will be prompted to select an item from the library
to store as your preset. This may be a single track, an
album, all the tracks by an artist, all the tracks in a
33
Page 36

genre, a playlist or all the tracks stored on your
SoundServer. For more information on browsing the
music library refer to Playing Music from the Library p.27.
When you have located the album, genre, artist, playlist
or track you want to select:
Press the 5Set action key to store it as a preset.
Press the 5OK action key to continue.
Note: presets are not automatically updated when new
music is recorded onto your SoundServer. For example if
you have a preset which plays the Blues genre, when a
new Blues album is added the preset will not contain
those new tracks.
A name for your preset will be chosen automatically
according to the music selection you have made. To
change the name of your preset:
Display the Preset Information screen using the
method described previously.
Press the 9 or 8 key if necessary to highlight
the preset name and press the 3 Edit action key
to enter a new name.
Enter a name for the preset using the
alphanumeric keys on your SoundServer remote
control or using the grid.
For more information about entering names see the
chapter called Entering and editing names, p.35.
Press the 3OK action key to confirm the name
you have entered.
Clearing a preset
You can clear the contents of a preset at any time in
order to re-program it as follows:
Display the Main Menu by pressing the
1m key on your SoundServer remote control.
Press the 9 or 8 key to highlight the Library
option and press the 5Select action key.
Press the 9 or 8 key to highlight the Presets
option and press the 5Select action key.
Highlight the preset you wish to clear and press
the 2Clear action key.
Press the 5Clear action key to confirm your
choice.
You will receive confirmation once the operation is
complete. Press the 5OK action key to continue.
ALBUMS
Your SoundServer labels the albums, artists and tracks in
your music library with names which identify the track
you are listening to, and these help you locate items
when you are browsing through the library.
If you have an Internet connection, your SoundServer
reads the CD information automatically from the
Gracenote CDDB Music Recognition Service. You can
edit these names at any stage to suit your own
preferences.
To edit album information
Display the Main Menu by pressing the 1m
key on your SoundServer remote control.
Press the 9 or 8 key to highlight the Library
option and press the 5Select action key.
Either:
Press the 9 or 8 key to highlight the Edit
albums option and press the 5Select action key.
Select the album you want to edit and press the
5Select action key.
or:
Press the 9 or 8 key to highlight the Albums
option and press the 5Select action key.
Select the album you want to edit and press the
3Info action key.
The following menu allows you to choose information
to edit:
Select the item you want to edit and press the
3Edit action key.
See the following section called Entering and
Editing Names to enter a new name.
34
Page 37

Deleting albums, tracks or playlists
You can delete albums, tracks or playlists you no longer
want from your SoundServer library.
Display the Main Menu by pressing the
1m key on your SoundServer remote control.
Press the 9 or 8 key to highlight the Library
option and press the 5Select action key.
Press the 9 or 8 key to highlight either the Edit
Playlists or Edit Albums option and press the
5Select action key.
Locate the album, playlist or track you want to
delete.
Press the 2Delete action key to delete it.
ENTERING AND EDITING NAMES
You can enter a new name or edit an existing name on
your SoundServer using either of the following
methods:
To enter text using the alphanumeric keypad
Press the 7 or 6 keys to move the cursor to the
required position.
Use the keys on the alphanumeric keypad to
enter a letter.
For example to enter S press the 7 key four times,
because S is the fourth letter on the 7 key.
Press the DELETE key on your SoundServer
remote control to delete letters.
Press the CAPS key on either the front panel or
your SoundServer remote control to switch
between upper-case and lower-case letters.
To select letters from a grid
Alternatively, the Grid option provides a convenient way
of selecting letters from a grid:
If you are sure you want to delete the item, press
the 5Delete action key again to complete the
operation.
Note: This operation will permanently remove
information from your Hard Disk; you will need to rerecord the album if you delete tracks or albums
accidentally. However, deleting a playlist does not
remove any music from the Hard Disk - the original
albums are unaffected.
Press the 8 key to move the cursor into the grid
area.
The currently selected letter is highlighted:
Use the 7,6,9 or 8 keys to move the cursor and
press the 5Select action key to enter each letter.
Use the CAPS key on either the front panel or
the SoundServer remote to switch between
upper and lower case letters.
If at any time you need to enter text in a different part
of the text field, or you want to return to entering text
using the alphanumeric keypad:
Press the 9 key repeatedly until the cursor
returns to the text field.
Finally, when you have finished entering the name:
Press the 3OK action key.
35
Page 38

ADVANCED SETTINGS
This chapter describes the advanced settings that you
can access from your SoundServers Settings Menu.
Many of these settings were configured automatically
for you when you registered your SoundServer. The
settings should not need to be altered unless you want to
change the configuration of your system.
To display the Settings Menu
Display the Main Menu by pressing the 1m
key on your SoundServer remote control.
Press the 9 or 8 key to highlight the Settings
option on the Main Menu.
Press the 5Select action key to display the
Settings menu:
The following sections describes each of the options on
the Settings menu.
Registration Details
Displays the registration details you entered when you
registered your SoundServer, and allows you to edit
them:
Internet Account
Displays your Internet account details and allows you to
edit them:
If you chose the Use Built-in Internet Account option
when registering your SoundServer, the Internet account
details were set up automatically for you.
Terms and Conditions
Displays the sequence of terms and conditions screens
that were displayed during registration, and allows you
to decline or accept the following options:
Whether you want to receive information on
other Imerge products and services.
Whether you want to receive information about
music and other related products from reputable
organisations.
If you change your acceptance of any of these options
you should re-register to transmit your new preferences.
Default Recording Quality
Allows you to specify the recording quality used when
you record music using the Auto record option:
If you change any of these details you will be given the
opportunity to re-transmit your updated registration
information.
For each quality setting the screen shows the number of
hours of recording time available at that setting.
Language
Allows you to select the language for the TV user
interface - languages available are English, French,
German, Italian, and Spanish.
System Information
Shows the serial number, production date, and software
version number of your SoundServer. You may need to
quote these if you contact Imerge for technical support.
36
Page 39

System Settings
Provides a series of menus to allow you to change the
hardware configuration on your SoundServer:
The following table summarises the settings available on
each of the System Settings menus:
Option Description
Specifies whether your SoundServer
connects to the Internet via the built-in
Internet Access
Modem Settings
Ethernet Settings
Controller Settings
Video settings
Remote
Diagnostics
modem or using the Ethernet port. This
option also allows you to view the
currently assigned Gateway, DNS 1 and
DNS 2 addresses as well as configure
Proxy Server Settings if required.
Allows you to specify the following
settings when connecting to the
internet via the built-in modem:
number of connection retries, whether
to use tone or pulse dialling, and the
modem initialisation string. This option
also allows you to view the currently
assigned IP address, Gateway and the
Server IP address.
Allows you to specify how your
SoundServer obtains an IP address when
connected to an Ethernet network. The
Mode
option allows you to select
whether the IP address is set Manually,
by a DHCP Server on the network, or by
a BOOTP Server. If the
selected , u se the
Settings
option to specify an IP Address,
IP Mask and Gateway. If
BOOTP
is selected the IP address, IP Mask
and Gateway will be set automatically.
Once the Mode option has been set
correctly the assigned IP address, IP
Mask, and Gateway will be d isplayed as
well as the MAC address of the unit.
Specifies the settings for the
port on the rear panel of your
SoundServer. The
allows you to select whether the the
Controller port is used for
communication or for an external
infrared
receiver. If the
is selected use the
option to set the communication speed. If
Infra red
the
Infrared settings
support for other infra-red controllers.
Specifies whether the unit is configured
for PAL or NTSC use and which video
output should be used for displaying
the TV user interface.
video output may be selected.
Select this option if instructed to set up
your modem to receive incoming calls
from technical support staff.
option is selected use the
Manual
Manual Ethernet
DHCP
Controller
Controller Type
XiVA-Link
XiVA-Link
XiVA-Link settings
option to enable
Note:
only one
option is
or
option
option
Upgrade Unit
Select this option when supplied with a XiVA software
upgrade disk for your SoundServer.
37
Page 40

USING YOUR
SOUNDSERVER IN A
MULTIROOM SYSTEM
Your SoundServer is capable of playing different music
in several rooms simultaneously. This chapter explains
how the SoundServer can be integrated into a
multiroom environment and how users in different
rooms can access music from the library.
BASIC CONFIGURATION
When the SoundServer is not part of a larger multiroom
control system you can access the music library from
remote rooms by displaying the TV user interface in the
room where you are located. The TV display is able to
automatically switch to controlling the output
appropriate to your location by configuring the
SoundServer remote control with a default output.
More information about configuring your remote is
given in the section below.
The diagram below shows the connections required in a
basic multiroom configuration:
Composite Video Out is connected to an RF
Video distribution system to allow the TV user
interface to be viewed on all televisions around
the home.
Infrared remote control information is received
at a separate receiver eye placed in each room information from this device is then transmitted
via the RF Video distribution system to an
infrared emitter attached to the IR receiver on
the front of the SoundServer.
Analogue Out 1, 2, 3 & 4 are each connected to
the stereo input of an amplifier.
Multiroom Remote Control Use - TV Interface
Your SoundServer remote control can be configured so
that every button press indicates to the system which
output is to be controlled. This means that whenever
infrared is received by the SoundServer the TV display will
automatically switch to controlling the appropriate output.
To configure the remote with a default output
Press the HDD Audio and p buttons
simultaneously; hold them down for 1 second.
The HDD Audio button will remain lit for 20 seconds; the
configuration process must be completed during this time.
Enter the 3 digit code corresponding to the output
you would like to control (valid configurations are
listed in Appendix A). For example, to set output 2
as your default output press:
0, 0, 2
Press the HDD Audio button again.
The HDD Audio button will blink twice to indicate that
the configuration has been accepted. If the HDD Audio
button does not blink twice begin the process again,
taking care to enter the number correctly.
If the SoundServer is switched on during the
configuration process the Enter Standby? prompt will
appear once configuration is complete; pressing any
navigation key on the remote should now cause the
SoundServer to switch to the correct output. In the
example above the status icons will display the following:
The number inside the circle indicates the default output
of your remote. The bar to the right of this indicates
how long the user has before the TV user interface is
available for other users to access. The number next to
the loudspeaker symbol indicates which output this
remote is currently controlling.
38
Page 41

To change output using the remote control
The - Output button on the SoundServer remote control
allows you to display information about the music you
are currently listening to. It can also be used to select
another output to control as follows:
Press the - Output button on the SoundServer
remote control.
The following screen is displayed:
The output screen indicates what is playing on the
currently selected output.
Press the - Output button again to switch to the
next output.
Once the required output number is displayed,
press the 2Hide key to hide the output display.
In the previous example the status icons would now
show:
Any subsequent press on this remote will now control
output 3.
Press the Default o/p button at any stage to return to
controlling your default output. This button will also
automatically display the Library menu.
Multiroom Remote Control Use - Direct Media
Select
The basic configuration shown above shows one room
which does not have access to a television for displaying
the TV user interface. In this instance the SoundServer
remote control may be used in Direct Media Select
mode.
This mode may be used to select music from the library
and control playback (e.g. play, pause, stop etc.) using
simple infrared commands with no effect on the TV user
interface. To set your SoundServer remote control in
Direct Media Select mode follow the instructions in the
previous To configure the remote with a default output
section selecting a Direct Media Select output from the
settings listed in Appendix A.
To select music from the library using Direct Media Select
mode
An album, artist, genre or playlist may be selected for
playback using a sequence number. The following
examples show how to select music using this method:
Example 1: selecting an album by the number assigned
to it when it was recorded onto the unit:
Album, 5, Play
will play album number five.
Example 2: selecting an artist by its location in an
alphabetical list:
Artist, 7, 7, Play
will play all the tracks by artist number seventy-seven.
Example 3: selecting a genre by its location in an
alphabetical list:
Genre, 2, 2, Play
will select the 22nd genre (Rock) for playback.
Example 4: selecting a playlist by the number assigned
to it when it was created on the unit:
Playlist, 8, Play
will select playlist number eight.
The simple commands used to select your music without
reference to the TV User Interface may also be used by
other learning remote controls such as the Philips
Pronto, other compatible remote controls, and simple
multiroom control systems. The presets area of your
library is ideal for an application such as this, allowing
you to select from your current favourites at the touch
of a button.
A complete reference guide to programming these
controls is available from your local dealer or by
referring to the website listed in the following Getting
Help section.
Setting the output controlled from the front
panel
You can set which output is controlled by the front
panel controls as follows:
Display the Main Menu by pressing the Menu
action key on your SoundServer front panel.
Press the 9 or 8 keys if necessary to highlight
the Output option and press the 5Select action
key.
The following screen is displayed:
The output screen indicates what is playing on the
currently selected output.
Press the - action key to switch to the next
output.
Once the required output number is displayed,
press the 2Hide key to hide the output display.
The next time a key is pressed on the front panel the
user interface will automatically switch to controlling
this output.
MULTIROOM CONTROL SYSTEMS
Your SoundServer is also compatible with a number of
leading multiroom control systems. The Controller port
on the rear of the system uses a versatile protocol called
XiVA-Link which allows access to most of the
SoundServer functions remotely.
For information on the XiVA-Link protocol as well as the
latest information on supported systems please contact
your local dealer or refer to the website listed in the
following Getting help section.
39
Page 42

GETTING HELP
Your SoundServer has been designed to provide years of
trouble-free operation. If, however, you need technical
assistance above and beyond what is covered in this user
guide, we have established the following methods for
continued support:
Your dealer
Your local SoundServer dealer has the best
understanding of your particular system, product and
needs and should therefore be your first point of
contact. Specific guarantee and warranty coverage
details may also be obtained from your dealer.
Imerge website
The Imerge website contains comprehensive technical
information on your SoundServer as well as product
updates. The website also has the most up-to-dateinformation on how to contact Imerge directly.
www.imerge.co.uk/support
SoundServer product support
Our support helpdesks are available to assist our
customers with fault diagnosis and to advise how to
contact Imerge approved repair services. Our approved
Service Centres have up-to-date training and will
provide the highest level of service. Please be aware
that music stored on your SoundServer may be lost
during certain testing and repair procedures. We will
endeavour to protect against loss but Imerge and our
Service Centres will not be held responsible for loss of
music in any product returned for service or repair.
Contact your local dealer for further information on
data backup services.
Please do not return your product directly to Imerge, as
this will result in unnecessary delays in the repair
process.
Should you have any questions which your dealer is
unable to answer, please contact:
Imerge UK Helpdesk
Phone: +44 (0)870 0104880 (normal UK office hours)
Fax: +44 (0)1954 783601
E-mail: customer_support@imerge.co.uk
Imerge US Helpdesk
Phone: 1 703 331 5563
Fax: 1 703 331 0469
E-mail: supportusa_sras@imerge.co.uk
40
Page 43

APPENDIX A
TV
ANNEXE A
APÉNDICE A
ANHANG A
HDD AUDIO
Output 1 001
Output 2 002
Output 3 003
Output 4 004
Output 5 005
Output 6 006
Output 7 007
Output 8 008
Output 9 009
Output 10 010
Output 11 011
Output 12 012
Output 13 013
Output 14 014
Output 15 015
Output 16 016
Direct Media - o/p 1 101
Direct Media - o/p 2 102
Direct Media - o/p 3 103
Direct Media - o/p 4 104
Direct Media - o/p 5 105
Direct Media - o/p 6 106
Direct Media - o/p 7 107
Direct Media - o/p 8 108
Direct Media - o/p 9 109
Direct Media - o/p 10 110
Direct Media - o/p 11 111
Direct Media - o/p 12 112
Direct Media - o/p 13 113
Direct Media - o/p 14 114
Direct Media - o/p 15 115
Direct Media - o/p 16 116
ADMIRAL 157, 146, 010, 125
ADYSON 111
AIWA 059
AKAI 001, 002, 003, 004, 005, 006, 007,
008, 151, 016, 009, 010, 011, 012,
013, 014, 015
AKURA 001, 002, 003, 004, 005, 006, 007,
008, 086, 018, 009, 010, 017, 013,
014, 015, 016
ALBA 017, 151
ALBIRAL 033
AMSTRAD 098, 105, 010, 047
ANITECH 001, 002, 003, 004, 005, 006, 007,
111, 008, 009, 013, 014, 015, 016
ARC EN CIEL 135, 139, 042
ARISTONA 031, 007, 146, 109, 154, 099
ARTHUR MARTIN 021, 118, 010, 120, 161, 011, 012,
121
ASA 157, 149, 146, 020, 022, 023, 095,
125, 132
ASORA 018
ATLANTIC 031, 041, 109, 119
AUCHAN 010
AUDIOSONIC 008, 086
AUSIND 021
AUTOVOX 031, 041, 020, 109, 074, 147, 022,
012, 122, 148
BAIRD 061, 036
BEKO 060, 001, 002, 003, 004, 005, 006,
007, 009, 013, 068, 014, 015, 016,
086
BESTAR 010, 086
BLAUPUNKT 085, 138, 143, 141, 087, 090, 091,
142, 119, 096
BOSCH 143
BRANDT 135, 107, 139, 042
BRANDT ELECTRONIQUE 107, 042
BRION VEGA 146, 147, 029, 148
BROTHER 008
BRUNS 108, 146
BSR 010, 158
BUSH 055, 010, 026, 158
CENTURY 146, 048, 097
CGE 138, 024, 010, 048, 158, 097, 077
CIE 098, 001, 002, 003, 004, 005, 006,
007, 009, 013, 014, 015, 016, 079
CIHAN 009
CLARIVOX 108, 033, 047
CLATRNIC 017
CLATRONIC 001, 002, 003, 004, 005, 006, 007,
008, 009, 119, 013, 014, 015, 016,
158, 097, 018, 151
CONDOR 001, 002, 003, 004, 005, 006, 007,
031, 009, 119, 013, 014, 015, 016,
097, 018
CONIC 111
CONTEC 055, 102, 018
CONTINENTAL EDISON 135, 107, 139, 042
COSMOS 001, 002, 003, 004, 005, 006, 007,
009, 013, 014, 015, 016
41
Page 44

CROSLEY 138, 146, 024, 081, 010
CROWN 001, 002, 003, 004, 005, 006, 007,
009, 013, 014, 015, 016, 039, 158,
097, 018, 086
CSESECTRONICS 017
DAEWOO 001, 002, 003, 004, 005, 006, 007,
009, 013, 014, 104, 015, 016, 133,
079
DANSAI 111, 008
DECCA 001, 002, 003, 004, 107, 005, 031,
006, 007, 043, 046, 009, 032, 057,
013, 014, 015, 016
DEGRAAF 063, 010
DIXI 007, 018
DYNATRON 007
DUAL 031, 092, 012
DUAL-TEC 089, 031, 158
DUMONT 146, 022, 025
ELBE 010, 033, 158, 159, 077, 160
ELBIT 001, 002, 003, 004, 005, 006, 007,
009, 013, 014, 015, 016
ELCIT 146, 081, 158
ELECTROVENDA 001, 002, 003, 004, 005, 006, 007,
009, 013, 014, 015, 016
ELEKTA 008
ELEKTRONIKA 001, 002, 003, 004, 005, 006, 007,
009, 013, 014, 015, 016, 097
ELIN 001, 002, 003, 004, 005, 006, 007,
009, 013, 014, 015, 016
ELITE 143, 119, 017
ELMAN 158
ELTA 008, 010, 018
EMERSON 098, 001, 002, 003, 004, 005, 006,
007, 146, 009, 013, 014, 015, 016
ERRES 007, 154
ESC 001, 002, 003, 004, 005, 006, 007,
009, 013, 014, 015, 016
ETRON 010
EUROPHON 031, 158
EXPERT(F) 010
FENNER 018
FERGUSON 035, 106, 107, 136, 022, 044, 033
FIDELITY 031
FINLANDIA 061, 106, 132
FINLUX 157, 149, 021, 020, 022, 023, 043,
081, 010, 095, 032, 025, 026, 048,
158, 132
FIRST LINE 158
FISHER 055, 108, 146, 028, 081, 012, 058,
097, 127, 086
FORMENTI 001, 002, 003, 004, 005, 031, 006,
007, 021, 081, 009, 119, 013, 014,
015, 016
FRABA 058, 002, 003, 004, 005, 006, 007,
009, 013, 014, 015, 016
FRONTECH 111, 008, 010, 018
FUJITSU 165
FUJITSU GENERAL 088, 109, 010
FUNAI 008
GALAXIS 001, 002, 003, 004, 005, 006, 007,
009, 013, 014, 015, 016, 097
GALAXY 097
GALERIA 018
GBC 081, 010, 158, 018
GENAT CASIONO 010
GEC 031, 043, 081, 125, 072
GELOSO 081, 017, 158, 125, 018
GENERAL 018
GENERAL TECHNIC 018
GENEXXA 017
GOLDHAND 018
GOLDSTAR 001, 002, 003, 004, 005, 031, 006,
007, 111, 008, 009, 010, 013, 014,
015, 016, 027, 158, 018, 084, 116
GOODMANS 001, 002, 003, 004, 055, 005, 006,
007, 043, 009, 013, 014, 015, 016,
027, 079, 018, 151
GORENJE 097, 086
GPM 008, 017
GRAETZ 153, 073, 081, 011, 012, 121, 123,
124, 125
GRANADA 001, 002, 003, 004, 106, 055, 005,
031, 006, 007, 073, 043, 009, 154,
010, 032, 013, 014, 015, 016, 125
GRANDIN 010
GREAT WALL 156
GRUNDIG 085, 087, 091, 022, 073, 093, 094,
096, 076, 113, 130
HANSEATIC 055, 004, 031, 007, 081, 118, 119
HCM 001, 002, 003, 004, 005, 006, 007,
008, 009, 013, 014, 015, 016, 018
HIFI VOX 112, 135, 107, 139, 042, 059
HINARI 098, 055, 111, 008, 017, 018
HIT 146
HITACHI 062, 055, 157, 063, 031, 111, 042,
065, 081, 118, 010, 066, 120, 158,
125, 070, 040, 072
HYPER 031, 151
ICE 001, 002, 003, 004, 005, 006, 007,
008, 009, 017, 013, 014, 015, 016,
018, 151
IMPERIAL 001, 002, 003, 004, 034, 138, 143,
005, 006, 007, 146, 008, 024, 081,
009, 154, 119, 010, 013, 014, 015,
016, 121, 048, 158, 125, 097, 018,
077, 086, 114
INGELEN 153, 073, 081, 011, 012, 121, 123,
124, 125
INNO HIT 004, 031, 111, 027, 018
INTERFUNK 005, 007, 146, 042, 073, 081, 154,
012, 121, 123, 040
IRRADIO 111, 021, 027, 018, 116
ITC 158
ITS 008, 017, 018, 309, 151
ITT 153, 073, 117, 081, 011, 012, 121,
123, 124, 125, 126, 036, 079
JET POINT 152, 084
JVC 055, 163, 164, 151
KAIDO 010
KAISUI 017, 156
KAPSCH 109, 081, 010, 121, 125
KARCHER 001, 002, 003, 004, 005, 006, 007,
009, 013, 014, 015, 016, 097
KAWA 151
KENDO 010
KENNEDY 088, 089, 109, 092, 081, 125, 077
42
Page 45

KINDO 010
KNEISSEL 001, 002, 003, 004, 005, 006, 007,
009, 013, 014, 016
KOERTING 085, 146, 086
KONKA 151
KORTING 146, 119
KRIESLER 031, 007, 146, 109, 154, 099
KUBA 081
KUBA ELECTRONIC 012
LENCO 001, 002, 003, 004, 005, 006, 007,
008, 009, 013, 014, 015, 016, 079
LENOIR 031
LIESENKOETTER 001, 002, 003, 004, 143, 005, 006,
007, 009, 013, 014, 015, 016
LIFETEC 001, 002, 003, 004, 005, 006, 007,
008, 009, 017, 013, 014, 015, 016,
079
LOEWE OPTA 001, 005, 006, 007, 146, 014
LOGIK 057
LOEWE 001, 002, 003, 004, 005, 006, 007,
146, 009, 032, 013, 014, 015, 016
LUMA 007, 109, 010, 161, 125
LUXOR 146, 073, 118, 010, 120, 161, 011,
012, 123, 126, 036, 049, 132, 114,
116
MAGNADYNE 146, 081, 158
MAGNAFON 031, 021
MAGNASONIC 001, 002, 003, 004, 005, 006, 007,
009, 013, 014, 015, 016
MARANTZ 001, 002, 003, 004, 103, 104, 005,
031, 006, 007, 146, 109, 009, 154,
013, 014, 015, 016, 099, 072, 155,
129
MARSHAL 017
MATSUI 098, 031, 043, 010, 057, 125, 018,
130
McMICHAEL 072
MEDION 001, 002, 003, 004, 005, 006, 007,
009, 013, 014, 015, 016
MEMOREX 008, 018
METZ 085, 036, 087, 091, 146, 096, 131
MINERVA 085, 087, 022, 073, 096
MITSUBISHI 001, 002, 003, 005, 055, 020, 004,
006, 087, 007, 146, 045, 009, 057,
013, 014, 015, 016
MIVAR 031, 030, 075, 032, 006
MTC 005, 081, 086
MULTITECH 031, 010, 097, 018
MURPHY 125
NAONIS 088, 089, 109, 010, 125
NATIONAL 080, 137, 144, 150, 145, 081, 082,
083
NEC 055, 020, 156
NECKERMANN 060, 166, 053, 001, 002, 003, 004,
085, 143, 056, 005, 031, 006, 091,
007, 146, 081, 118, 009, 119, 010,
096, 161, 013, 068, 014, 015, 016,
097
NEI 001, 002, 003, 004, 005, 006, 007,
009, 017, 047, 013, 014, 015, 016
NIKKAI 111, 043, 017
NISSAN 084
NOBLEX 127, 128
NOBLIKO 031, 021, 022
NOGAMATIC 135, 139, 042
NOKIA 153, 001, 002, 003, 004, 005, 006,
007, 149, 008, 073, 117, 081, 118,
009, 010, 120, 011, 012, 013, 014,
015, 016, 121, 123, 124, 125, 126,
036, 079, 132, 084, 114
NORDMENDE 034, 035, 106, 112, 135, 139, 037,
042, 147, 040
NORMN 001, 002, 003, 004, 005, 006, 007,
009, 013, 014, 015, 016
NOVA 095
OCEANIC 081, 118, 010, 012, 036
OKANO 001, 002, 003, 004, 005, 006, 007,
009, 013, 014, 015, 016, 097
ONCEAS 031
ONWA 008, 017, 151
ORAVA 001, 002, 003, 004, 005, 006, 007,
009, 013, 014, 015, 016
ORBITER 086
ORION 098, 001, 002, 003, 004, 005, 036,
006, 007, 111, 008, 009, 010, 017,
012, 013, 014, 015, 016, 018
OSAKI 043
OSIO 027
OSUME 102
OTTO VERSAND 153, 166, 053, 001, 002, 003, 004,
054, 035, 106, 055, 085, 063, 056,
137, 005, 006, 087, 091, 007, 145,
081, 118, 009, 119, 010, 096, 012,
013, 014, 015, 016, 158, 018, 086,
151, 318
P.T ACTRON 009
PAEL 031, 021
PANASONIC 080, 137, 144, 150, 145, 081, 082,
083, 207, 131
PATHE CINEMA 031, 119, 033, 158
PATHE MARCONI 135, 139, 042
PERDIO 043
PHILCO 001, 002, 003, 004, 080, 138, 005,
006, 146, 024, 081, 009, 010, 013,
014, 015, 016, 048, 158, 097, 077
PHILIPS 001, 002, 003, 004, 103, 104, 005,
031, 006, 091, 007, 146, 042, 109,
009, 154, 013, 014, 015, 016, 099,
072, 155, 129, 115
PHILIPS(F) 001, 002, 003, 004, 005, 006, 007,
009, 154, 013, 014, 015, 016
PHOENIX 031, 021, 081, 119
PHONOLA 031, 007, 146, 109, 154, 099
PIONEER 007, 042
PRANDONI-PRINCE 021, 010, 125
PRIMA 111
PRINCE 021, 125
PROFEX 010, 018
PROTECH 007, 008
PYE 031, 007, 146, 109, 154, 099
QUASAR 021, 027
QUELLE 098, 153, 166, 053, 001, 002, 003,
004, 054, 106, 055, 085, 157, 138,
143, 056, 137, 088, 140, 141, 005
QUESTAR 001, 002, 003, 004, 005, 006, 007,
009, 154, 013, 014, 015, 016
RADIOLA 031, 007, 146, 109, 154, 099
43
Page 46

RADIOMARELLI 146, 081, 045, 158
RADIOTONE 001, 002, 003, 004, 005, 006, 007,
008, 009, 013, 014, 015, 016, 018,
086
RANK 026
RANK/BUSH/MURPHY 078
RBM 026
REDIFUSION 045, 012, 125
REVOX 005
REX 088, 089, 109, 092, 010, 125
ROADSTAR 001, 002, 003, 004, 005, 006, 007,
009, 013, 014, 015, 016
ROBOTRON 108, 146
ROSITA 018
RTF 108, 146, 010, 017, 086
SABA 034, 035, 106, 112, 135, 107, 139,
146, 042, 081, 010, 032, 161, 125,
040
SAISHO 098, 031, 010, 057, 018, 309
SAKIO 008
SALORA 021, 081, 118, 119, 010, 120, 161,
011, 012, 121, 126, 036, 049, 132,
116
SAMBERS 021, 027
SAMPO 082
SAMSUNG 001, 002, 003, 004, 005, 031, 006,
007, 111, 008, 043, 009, 013, 014,
015, 016, 027, 097, 018, 127, 128,
152, 086, 084, 116
SANY 042
SANYO 153, 100, 101, 061, 055, 064, 108,
043, 095, 057, 058, 036, 102, 097,
086
SAOLRA 011
SBR 007, 154, 072
SCHAUB LORENZ 153, 073, 081, 011, 012, 121, 123,
124, 125
SCHNEIDER 001, 002, 003, 004, 088, 089, 005,
031, 006, 007, 146, 028, 109, 092,
081, 009, 154, 010, 017, 011, 012,
013, 014, 015, 016, 122, 158, 099,
151
SCHNEIDER(F) 154
SEG 058, 002, 003, 004, 005, 006, 108,
007, 111, 008, 009, 017, 013, 014,
015, 016, 158, 018
SEI 098
SEI SINUDYNE 146, 010, 012
SELECO 055, 088, 089, 041, 109, 092, 081,
010, 058, 125, 077
SENTRA 060, 010, 017, 068
SHARP 002, 055, 058, 102
SIAREM 055, 146, 081, 010, 058
SICATEL 033
SIEMENS 101, 001, 002, 003, 004, 085, 063,
138, 143, 141, 005, 006, 087, 090,
091, 007, 111, 142, 009, 119, 096,
013, 014, 015, 016, 102
SIERA 031, 007, 146, 109, 154, 099
SIESTA 086
SILVER 008, 017, 086
SINGER 001, 002, 003, 004, 005, 006, 007,
146, 081, 009, 013, 014, 015, 016,
077
SINUDYNE 098, 003, 146, 081
SMARAGD 130
SOLAVOX 010
SONOLOR 166, 010
SONOKO 007, 018
SONTEC 001, 002, 003, 004, 005, 007, 009,
013, 014, 015, 016
SONY 052, 053, 054, 055, 056, 057, 058
SPECTRA 079
STARLITE 018
STERN 088, 089, 041, 109, 010, 125
SUNSTAR 001, 002, 003, 004, 005, 006, 007,
009, 013, 014, 015, 016
SUPERTECH 001, 002, 003, 004, 005, 006, 007,
09, 010, 013, 014, 015, 016, 125,
018
TANDBERG 131
TANDY 031, 043, 017
TASHIKO 100, 055
TATUNG 031, 043, 046, 009, 057
TEC 001, 002, 003, 004, 089, 005, 031,
006, 007, 009, 010, 013, 014, 015,
016, 158, 079, 018
TECHNISAT 001, 002, 003, 004, 005, 006, 007,
009, 013, 014, 015, 016
TECNISON 018
TEKON 018, 084
TELEAVIA 135, 107, 139, 042, 040
TELEFUNKEN 034, 035, 106, 138, 136, 140, 037,
042, 040, 050
TELETENT 005
TELETECH 018
TELETON 088, 041, 109, 081, 010
TELEUNKEN 138
TELEVIDEON 031, 021, 081, 119, 206
TENSAI 001, 002, 003, 004, 005, 006, 007,
009, 119, 017, 013, 014, 015, 016,
158, 018
TENSON 018
TESLA 146
THOMSON 034, 035, 106, 112, 135, 107, 139,
042, 081, 040, 059
THORN 153, 060, 052, 062, 001, 002, 003,
004, 034, 106, 055, 064, 005, 006,
087, 149, 007, 065, 043, 044, 009,
154, 010, 095, 120, 057, 013, 068,
058, 014, 015, 016, 072, 113, 115
THORN-FERGUSON 107, 136, 008, 022, 044, 033
TOCOM 110
TOKYO 084
TOSHIBA 060, 055, 067, 068, 026, 077, 078
TOWADA 158
TRANS CONTINENTS 021, 125
TRISTAR 017
TRIUMPH 098, 111
UHER 001, 002, 003, 004, 005, 006, 007,
028, 041, 109, 074, 009, 119, 013,
014, 015, 016
ULTRAVOX 001, 002, 003, 004, 005, 031, 006,
007, 146, 081, 009, 010, 161, 013,
014, 015, 016
UNIVERSUM 157, 008, 027
UNIVOX 146, 033
44
Page 47

VEGAVOX 048
VESTEL 001, 002, 003, 004, 005, 006, 007,
009, 047, 013, 014, 015, 016
VICTOR 163
VIDEOTON 042, 118, 158
VISION 001, 002, 003, 004, 005, 006, 007,
009, 119, 013, 014, 015, 016
VOXSON 146, 010, 125
WALTHAM 118
WATSON 001, 002, 003, 005, 143, 004, 006,
007, 009, 119, 017, 013, 014, 015,
016, 018
WATT RADIO 031, 081, 010, 033, 012
WEGA 055, 146
WEGA COLOR 162
WHITE WESTINGHOUSE 001, 002, 003, 004, 005, 031, 006,
007, 146, 009, 119, 013, 014, 015,
016
WINTERNITZ 059
YOKO 001, 002, 003, 004, 005, 031, 006,
007, 008, 009, 010, 017, 013, 014,
015, 016, 158, 097, 079, 018
ZANUSSI 088, 089, 041, 109, 010, 125
ZOPPAS 088, 089, 041, 109, 125
AMP
ADC 020
ADCOM 001, 002, 003
AIWA 014, 015, 018, 019, 087, 086
AKAI 033
AMC 016, 080, 081, 083
ANGSTROM 066
ARCAM 058
AUDIO ALCHEMY 027
AUDIO TECHNICA 026
AUDIOFILE 038
B & K 045, 046
CARVER 053, 011, 037, 038, 052, 031, 032,
010, 054
CINEMA SOUND 084, 026
CLARION 090
DENON 083, 084, 085, 095, 096, 091, 092,
097, 089
FISHER 022, 031
FOSGATE 005
GE 036
GOLDSTAR 035
HAFLER 039
HARMAN KAR 005, 125, 127, 103, 104, 098
HITACHI 021
INKEL 123
JVC 119, 120
KENWOOD 090, 099, 128, 105, 094, 121, 123,
122, 129, 106, 124, 031
KRELL 067, 063
KYOCERA 020
LEXICON 006
LINN 057
LUXMAN 042, 028, 008
LXI 036
MAGNAVOX 064
MARANTZ 053, 011, 012, 116, 055, 032, 059
MERIDIAN 060, 061
MITSUBISHI 130, 131
MONDIAL 068, 062
NAKAMICHI 118, 034, 107
NEC 030
ONKYO 100, 133, 024, 132, 108, 101, 102
OPTIMUS 090, 041
PANASONIC 013
PARASOUND 051
PHILIPS 059, 055
PIONEER 110, 111, 114, 117, 113, 115, 112,
109
RCA 025
REALISTIC 010, 036, 044, 095
SANSUI 116, 048, 056, 043
SANYO 022, 023
SCOTT 010
SHARP 090, 093, 094
SHERWOOD 014, 047, 048, 049, 050, 041
SONY 014, 070, 071, 072, 073, 160, 075,
076, 077, 078, 079
TEAC 007, 010, 134, 118
TECHNICS 030, 135, 136
THETA DIGITAL 065
TOSHIBA 109
WARDS 031
YAMAHA 126, 029, 025
ZENITH 017
45
Page 48

INDEX
A
ACCESSORIES 15
ACTION BUTTONS 16, 21
Cancel 18
Ho me 18
In fo 18
Me nu 18
Navigation 18
Re c 16
Se lect 1 8
ALBUM BUTTON 19, 27
ALBUMS, PL AYING 27
ALPHANUMERIC KEYPAD 10, 14, 35
ANALOGUE INPUT CONNECTION 17
ANALOGUE OUTPUT CONNECTION 17, 20
ARTIST BUTTON 19, 28
ARTISTS, PLAYING 28
AUTO RECORDING 25
B
BROWSING
Albums 27
Artists 28
Ge nres 28
Playlists 29
C
CANCEL BUTTON 18
CLEARING PRESETS 34
COMPOSITE TV CONNECTION 17, 21
CONFIGURING THE REMOTE 20
CONNECTIONS 17, 19
CONTROLLER CONNECTION 17, 37, 39
COVER ART ILLUSTRATION 25, 27
CUSTOM RECORDING 26
D
DEFAULT O/P BUTTON 18
DELETING
Albums 35
Playlists 35
Tracks 35
DIGITAL COAXIAL IN CONNECTION 17
DIGITAL COAXIAL OUT CONNECTION 17
DISPLAY
Front panel 16, 21
TV 21
E
EDITING
Albums 34
Artists 34
Playlists 33
Tracks 34
EDITING NAMES 35
Alphanumeric keypad 14, 23, 35
Grid 23, 35
ENTER TEXT 14, 23, 35
ETHERNET CONNECTION 17, 37
F
FRONT PANEL 16
Controls 16
Di spla y 21
G
GENRE BUTTON 19, 28
GENRES, PLAYING 28
GRID 23, 35
H
HDD AUDIO BUTTON 18
HOME BUTTON 18
I
INFO BUTTON 18
INFRARED SETTINGS 37
INTERNET CONNECTION 23, 36
IP ADDRESS 37
DHCP 37
manual 37
L
LANGUAGE 36
LOOK UP 24
M
MAIN MENU 24
MAINS CONNECTION 17, 21
MENU BU TTON 18
MODEM CONNECTION 17, 20, 37
MULTIROOM 38
Remote control 38
N
NAVIGATION BUTTONS 16, 18
O
OPEN/CLOSE BUTTON 16
OUTPUT 22, 39
OUTPUT BUTTON 18, 39
OUTPUT SCREEN 30, 39
P
PAUSE BUTTON 16, 19
PLAY BUTTON 16, 19
PLAYING MUSIC 27
Browse Albums 27
Browse Artists 28
Browse Genres 28
Browse Playlists 29
Browse Presets 29
From a CD 30
From the library 27
Select a track by number 29
Select a track from an album 28
Select album by number 29
Select by letter 29
PLAYLIST BUTTON 19, 29
PLAYLISTS
Adding items 32, 33
Changing item positions 33
Creating 32
Editing 33
Removing items 33
PLAYLISTS, PLAYING 29
PRESETS
Clearing 34
Selecting music 33
Storing 33
PROXY SERVER SETTINGS 37
PS2 CONNECTION 17
R
RANDOM 19, 22, 31
REAR PANEL 17
Connections 17, 19
REC BUTTON 19
RECORDING FORMATS 36
46
Page 49

RECORDING MUSIC 25
Auto re cord 25
Checking progress 27
Custom record 26
REGISTERING 22, 36
REMOTE CONTROL
Album 19
Am p 1 8
Artist 19
Cancel 18
Configuring 20
Default o/p 18, 39
Disc/Ch. 18
Ge nre 19
HDD audio 18
Ho me 18
In fo 18
Me nu 18
Multiroom 22, 38
Mute 18, 20
Navigation 18
Numeric keys 19
Output 18
Pause 19
Play 19
Playlist 19
Random (Delete) 19
Re cord 19
Repeat (Caps) 19
Se lect 1 8
Skip back 19
Skip forward 19
Standby 18
St op 19
TV 18
Volume 18, 20
REMOTE DIAGNOSTICS 37
REMOTE SENSOR 16
REPEAT 22, 31
REPEAT BUTTON 19
S
S-VIDEO OUT CONNECTION 17
SELECT BUTTON 18
SETTINGS 36
SKIP BACK 16, 19
SKIP FORWARD 16, 19
SPECIFICATIONS 15
STANDBY BUTTON 16, 18, 21
STANDBY MODE 21
STATUS ICON S 22
STOP BUTTON 16, 19
STORING PRESETS 33
SWITCH ON FROM STANDBY 21
SWITCH TO STANDBY 21
SYSTEM INFORMATION 36
SYSTEM SETTINGS 37
T
TRACK LISTINGS 26
Automatically enter now 27
CD tex t 27
Enter information later 26
Manually enter now 26
TRACKS, PLAYING 28
TRANSPORT BUTTONS
Pause 16, 31
Play 16, 31
Seek 31
Skip back 16, 31
Skip forward 16, 31
Stop 16, 31
TV COMPOSITE CONNECTION 17, 38
TV DISPLAY 21
TV S-VIDEO CONNECTION 17
U
USB CONNECTION 16, 17
V
VGA CONNECTION 17
VIDEO CONNECTION 17
VIDEO SETTINGS 37
NTSC 37
PAL 37
VOLUME CONTROL 18, 20
X
XIVA-LINK 17, 37
47
Page 50

©Copyright 2003 Imerge Ltd.
 Loading...