

IMC Armonia Quick Start Manual
MACHINE DESCRIPTION
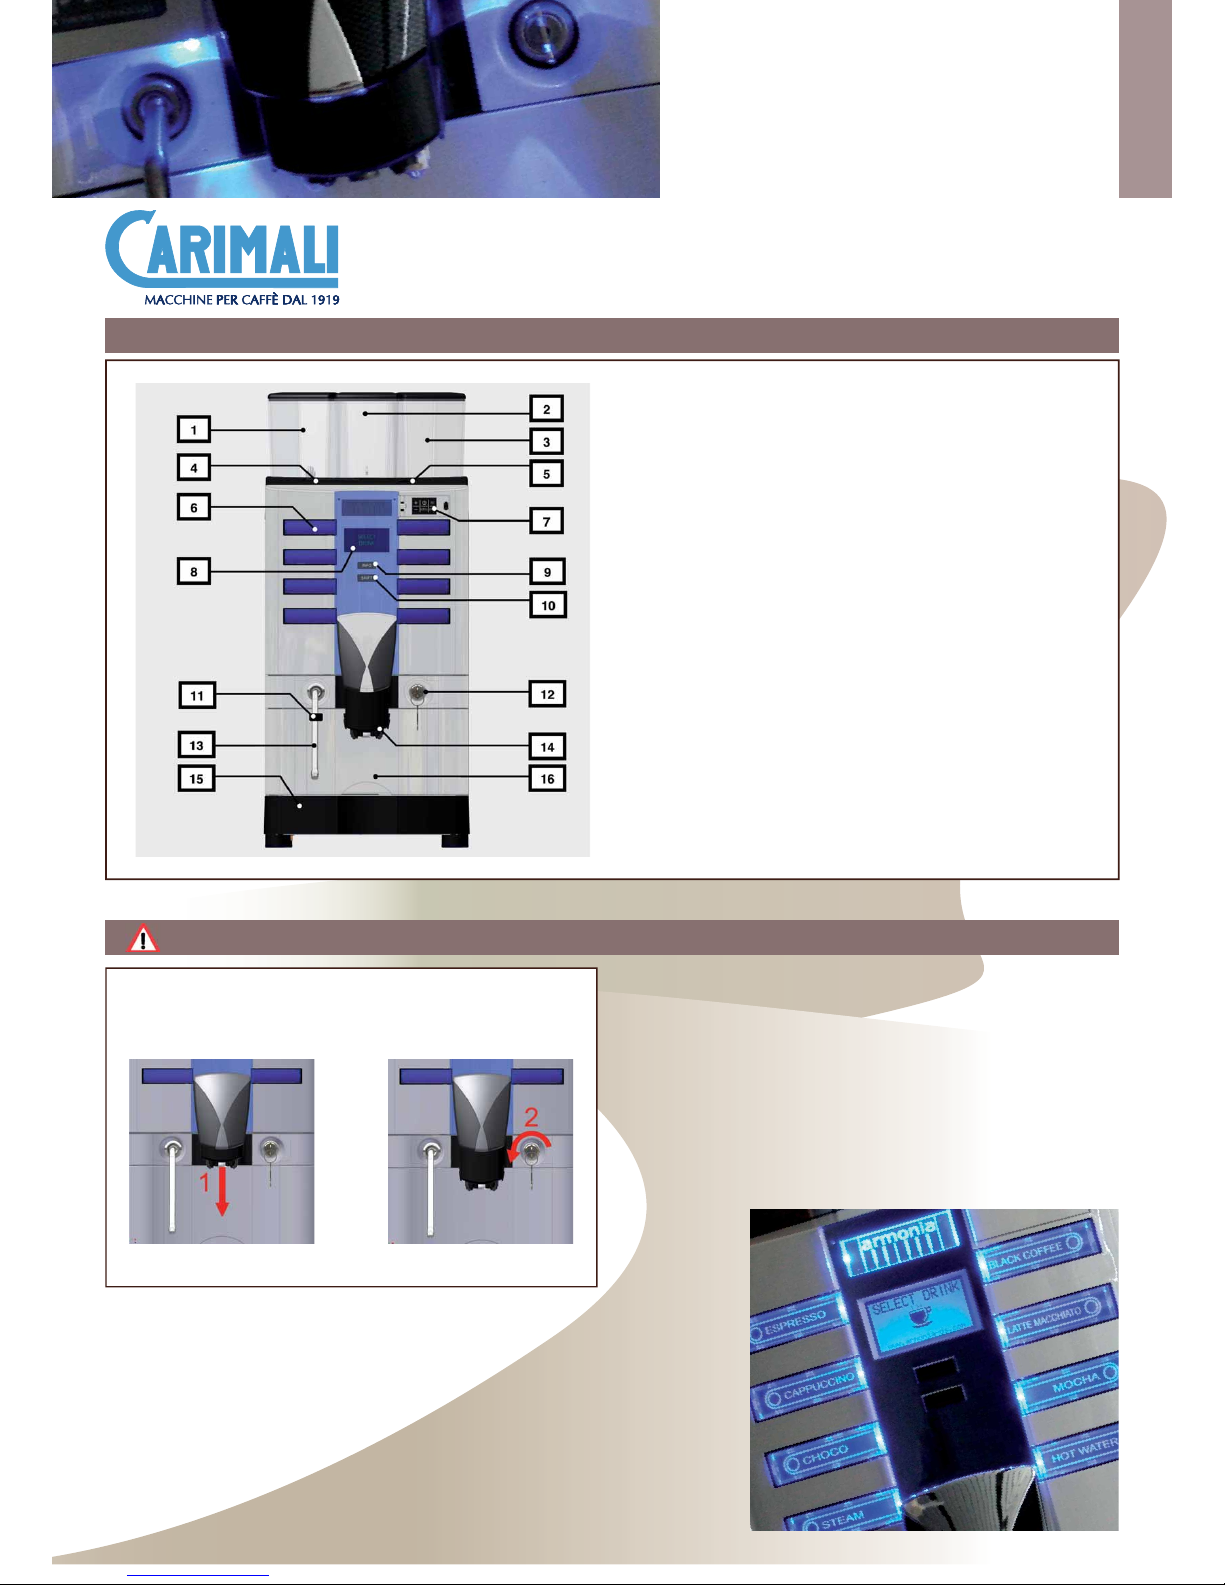
LEGEND
1. PRODUCT CANISTER
2. PRODUCT CANISTER / COFFEE HOPPER
3. COFFEE HOPPER
4. CARD READER
5. DECAFFEINATED DOOR
6. DOSE BUTTON
7. SERVICE KEYPAD
8. DISPLAY
9. INFO BUTTON
10. SHIFT BUTTON
11. RUBBER PROTECTION
12. DOOR LOCK
13. STEAM WAND
14. ADJUSTABLE DELIVERY OUTLETS
15. DRIP TRAY
16. GROUNDS BIN
QUICK START GUIDE
COFFEE MACHINES
Armonia
HOW TO OPEN THE MACHINE DOOR
A ) Pull down the coffee outlets
completely.
B) Turn the key and open the
machine door.

STARTING UP DISPENSING
Power on the machine by means the main switch underneath the machine
basement.
Fill in the required amount for daily consumption in order to keep coffee and
product always fresh.
Push the service keypad door to open it.
a
1
After checking that the machine door is closed and the ground bin and the drip tray are inserted, power on the machine by means of the main switch underneath the machine
basement (Fig.A). Push the service keypad door to open it ( Fig.B) and press the (ON/OFF) key to switch ON the machine ( Fig.C). (FOR SELF CONFIGURATION , press the ( ON/OFF ) key
before closing the machine front door. To switch OFF the machine, open the front door ).
Steam wand not available for machine in self confi guration.
b
2
When the boiler temperature
of 50°C (122°F) is reached, the
machine carries out a group
rinsing. The display shows:
When the set-up temperature is
reached, the keypad lights are on
and the display shows:
For machine confi guration
Standard or Self:
Press the (ON/OFF) key to switch
ON the machine.
c
G.AUTO CLEANING
SELECT DRINK
FILL IN BEAN HOPPER AND CANISTER
STEAM WAND USE AND CLEANING
1
COFFEE/CAPPUCCINO/CHOCO
DISPENSING
Adjust the coffee dispenser to the
correct height and place a cup
under it then press the desired
dose key.
For Waiters’ Card place the Smart
Card above the proper reader
before pressing the dose key.
The display shows:
HOT WATER DISPENSING
Adjust the hot water outlet to
the correct height and place a
cup under it, then press the hot
water key. Dispensing will be
automatically stopped once the
programmed dose is over. The
display shows:
Where “XXXXXXXX” indicates the
selected dose key name.
The fi lling up of the cup icon
indicates the amount of drink
being dispensed.
PLEASE NOTE:
• Pressing the same dose key
during dispensing can stop the
selected dose (not available for
Self confi guration).
• In case of a milk-based
dose, press once to stop milk
dispensing, and once again
to stop coffee dispensing; the
sequence depends on the type of
dispensing.
PLEASE NOTE:
• Pressing the same dose key
during dispensing may stop the
selected dose.
WARNING:
Hot water cannot be dispensed
simultaneously with steam.
XXXXXXXX
HOT WATER
3 4
1
DECAFFEINATED DISPENSING (not
available for Self confi guration)
Adjust the coffee dispenser to
the correct height and place
a cup under it , then open the
decaffeinated coffee door, the
display shows :
- Pour in the powdered coffee
- Close the decaffeinated door
- Press the desired dose key. The
display shows:
EXTRAMILK DISPENSING (only
LM machine, not available for
Self confi guration)
Press any milk-based key and
keep it pressed, after 2 seconds
foamed milk will start being
dispensed, the display shows:
The selected dose will be
dispensed without the activation
of the grinders.
PLEASE NOTE:
If the decaffeinated door is not
closed, or if the dose button is
not selected, the machine will
automatically cancel this function
after 20 seconds. The coffee
group will carry out a cleaning
cycle of the brewing chamber. The
display shows:
By releasing the pressed key,
dispensing will be stopped.
XXXXXXXX
EXTRA MILK
SELECT DRINK
1 2
Use the steam wand to foam or
heat any liquid into the jug by
handling the rubber protection.
Before using the steam wand
press the steam button to purge
the nozzle.
3
Press the steam button to stop the
delivery before removing the jug.
4 5
Clean the steam wand by means
of a cloth.
After using the steam wand press
the steam button to purge the
nozzle.
6
DO NOT leave the steam wand
into any liquid at any time.
WE STRONGLY RECOMMEND TO USE AND
CLEAN THE STEAM WAND AS ABOVE
SHOWN
 Loading...