

Page 1

Page 2

Page 3

Page 4

CONTENTS
1 - Introduction
2 - Safety Precautions
3 - Technical Information
4 - Pre-Installation Instructions
5 - Electrical Installation
6 - Diagrams and Assembly drawings
7 - Operating Instructions
8 - Fault Finding
9 - Maintenance and Servicing
10 - Spare Parts List
11 - Test Certificate and Serial Number
Page 5

1 - INTRODUCTION
1
Please read and understand this manual before you install the equipment.
We are very pleased that you specified this IMAX product.
When we designed the product our aim was that it should be to the entire satisfaction of the
user.
Therefore, and to ensure optimum performance and a long trouble free service life, IMAX
manufactured the Product to the highest engineering standards.
The design of the product is based on many years of experience in the field of Marine Lighting,
it is made to withstand the environmental conditions in both offshore and inshore.
In order to maintain the quality standard of the equipment, we strongly recommend to use
original IMAX spares whenever any part should be replaced, just to ensure and to prolong
service life and performance.
A spare parts list is attached to this manual.
Always quote Product Serial Number in case there is a need to contact IMAX B.V. regarding the
equipment.
Page 6

2
-
SAFETY PRECAUTIONS
2
To create a safe working environment and safety of the user, the instructions given hereunder must be
strictly adhered to :
ATTENTION : In order to prevent personal injury or damage to the searchlight, when unpacking or
manoeuvring the unit into its final position, suitable lifting points must be used.
!
Prevent rain, snow, condensation and water droplets from contacting the lamp as this may
cause bulb failure and possible shattering.
!
Quartz halogen bulbs run with a high pressure in excess of atmospheric.
Whilst the construction is inherently strong, there is a slight risk of the bulb shattering.
!
Never look directly into an illuminated searchlight as this may cause severe damage to eyesight. If it is
necessary to inspect a lamp whilst in operation, always wear suitable protective goggles.
!
Should it be necessary to examine the lamp with the front bezel removed, always use a protective shield
and wear goggles to ensure a safe working environment.
!
Searchlights get very hot. Never touch the unit when lit. Always allow it to cool down for 15 to 20
minutes after it has been switched off.
!
Never place anything on or cover the searchlight when in use.
!
Ensure the lamp has cooled sufficiently before removal.
!
If excessive force appears to be n
ecessary to remove the lamp, the equipment should be inspected by a
competent person or contact the manufacturer
!
When breaking a lamp for disposal, care must be taken to ensure the glass fragments are safely
contained. This operation must be performed out of doors in free air. In all circumstances refer to the
lamp manufacturer instructions packed with the lamp.
!
Due to the vast range of lamps available it may appear possible that more powerful lamps can be used
in the equipment than it was designed for. Even when the unit physically accept a higher wattage or
voltage lamp, this substitution is not recommended and it is dangerous. This action will also void any
warranties on the equipment.
Always refer to the lamp manufacturers technical data when dealin
g with lamps.
Page 7

3
3 - TECHNICAL INFORMATION
The searchlight IM490RC has the following features :
• All marine grade materials and fixings
• Parabolic silvered glass mirror/reflector
• Epoxy powder coatings
• Pan movement 360o
• Tilt movement +30o to –30o
• Pan speed 12o/sec
• Tilt speed 2.4o /sec
• Operating temp. –30o to +70o
• Remote focus facility (optional)
• Internal thermostatically controlled heater (75Watt)
• Toughened heat resistant front glass
Optical data for the IM490RC :
1000W T/H 2000W T/H
• Supply voltage 115/230V 115/230V
• Peak Beam Candle Power 2.098.000 cd 2.748.300 cd
• Range 1.448 mtr 1.657 mtr
• Divergence 5o – 8o 5o – 8o
• Operational temperature -30 to + 70o C -30 to + 70o C
In order that the searchlight operates correctly it is imperative that competent personnel are
responsible for the installation, operating and servicing of this equipment, Failure to adhere to
this advice may cause premature failure or incorrect operation of the searchlight, which may
damage the equipment or cause personal injury.
Page 8

4 - PRE-INSTALLATION INSTRUCTIONS
4
In case the equipment is to be stored for a relatively long period of time, care must be taken for
a clean and dry environment.
In case the unit has been in storage for several months it is advised to conduct a routine
maintenance check before it is installed in its definite position.
SAFETY :
Do not connect the searchlight to an electrical supply before being installed.
Please take care of a safe working environment to avoid damage and personal injury.
Page 9

5 – ELECTRICAL INSTALLATION
5
The electrical installation of the equipment should be performed by competent personnel
in accordance with current Electrical Installation Rules and Standards.
It is essential that full operating voltage is applied to the lampholder in order to obtain
maximum performance of the lightsource.
Method of Electrical Connection :
!! Disconnect the supply before working on the electrical system
!! The electrical supply must be properly fused
!! To obtain full voltage supply on the lampholder terminals, provisions must be
made in cables of a suitable diameter.
!!! THE EQUIPMENT MUST BE EARTHED
Page 10

6 - DIAGRAMS and Assembly drawings
6
Drawing number :
IM08095 - Wiring diagram, single panel control
IM08096 - Wiring diagram, single panel control + optional focus control
IM08097 - Wiring diagram, multi panel control with Electronic Interlocking
IM400-111 Outline Joystick Control Panel
General outline IM490RC
Page 11

7
7 - OPERATING INSTRUCTIONS
The searchlight is designed for use outdoors.
When in use never cover the searchlight or lay anything on it
because this will create a serious possibility of fire or other hazard.
The searchlight is electrical remote controlled by an 8-position joystick controlpanel.
Two movements, e.g. down and left, or up and right, can be performed simultaneously.
When the beam is in the required position release the joystick which will return in the centre
position.
As an optional extra the searchlight can be fitted with remote focus control.
To operate it push the button on the controlpanel.. The beam will move continuously from spot
to flood and reverse.
Release the push button when the required beam is achieved.
The thermostatically controlled heater in the motor unit must be permanently connected to the
supply voltage. The 75 Watt heater will automatically be switched off when the dew point
temperature is reached.
Any modification, addition of conversion of the equipment should not be undertaken without
consulting the Manufacturer.
To put the searchlight to work :
Please observe the following precautions.
! Be sure that the searchlight is isolated from the supply before changing the lamp
! The envelope of a lamp is made in glass or quartz, which materials are inherently fragile,
please bear this in mind when handling lamps.
! When handling lamps which have been taken from the packing material, eye protection
should be worn.
! Check the lampholder contacts to ensure that they are clean and free from dirt and/or
corrosion. Corroded areas must not be cleaned by sanding or filing because this will reduce the
conduction surface which in turn may cause the lamp to overheat.
! When fitting the lamp do not apply mechanical stress on the quartz bulb. Do not bend or twist
it.
! When the lamp warms up it must be able to expand. Mechanical stress must be avoided to
the fused quartz envelope.
! The lamps is provided with a protective jacket. Before that jacket is removed it is strongly
advised to wear suitable protection e.g. gloves with wrist protection, face mask.
! Do not touch the quartz envelope with bare hands. Fingerprints will makes the glass cloudy
and cause loss of light. Also it may cause recrystallisation thus weaken the bulb material. If the
bulb has been inadvertently touched fingerprints can be removed with methylated spirit and a
clean tissue. The bulb should then be wiped with distilled water.
ALWAYS WEAR MASK AND GLOVES WHEN HANDLING LAMPS
Page 12

FAULT FINDING
8
Test 1.
LAMP CIRCUIT.
Check condition of the lamp and lampholder . Replace if worn out.
If lamp is in good condition, check supply.
Junction box terminals 1 + 6 must read 230V *
Test 2
PAN and/or TILT CIRCUIT.
If one or more functions fail :
Open junction box at the back of the searchlight
Check whether supply voltage and movement commands arrive on terminals :
7 + 8 Permanent supply voltage 230 V *
6 + 2 Pan movement right
6 + 3 Pan movement left
6 + 4 Tilt movement up
6 + 5 Tilt movement down
If supply voltage and/or any of the commands fails, check control panel and connections between the control
panel and the searchlight. Restore if necessary.
When supply voltage and commands are correct, open searchlight motor housing from the bottom. Check input
230 V * and 24Vac output on the transformer.
Measure 24Vac input on terminals 1+2 on motor controller junction J3.
If 24Vac on the input is present, output v
oltage on terminals 3+4 for pan motor and 5+6 for tilt motor should read
24Vdc when energised according to above mentioned schedule in test 2. If no 24Vdc on the output replace the
motor controller.
If the 24Vdc is present, disconnect motor(s) and test separately.
Test 3.
LIMIT SWITCH CIRCUIT
With all four switches in the normally closed mode :
Motor controller junction J2 readings :
terminals 1+2 = ∞ Ω (
terminals 2+3 = 0 Ω ( Pan movement
terminals 2+4 = 0 Ω (
terminals 5+6 = ∞ Ω (
terminals 6+7 = 0 Ω ( Tilt movement
terminals 7+8 = 0 Ω (
Test 4.
HEATER ELEMENT
Junction box terminals 7+8 should read 230V* permanently.
To avoid condensation in the motorhousing it is important that the heater is continuously energised.
* or 110V in case
Page 13

9
9 - MAINTENANCE
To prolong the service life and to ensure the maximum
performance of the searchlight, we recommend the following
maintenance guidelines :
Dirt on front glass and/or mirror reflector will result in a
considerable loss of light. Before every voyage the equipment
should be checked on these points as well as on good working of
the lamp.
Periodical maintenance is recommended at least once every three months.
Before opening the searchlight for cleaning and/or inspection of the interior the supply
must be disconnected.
Procedure :
Remove front glass and bezel assembly
Inspect the lampholder, ensure that it is free from dirt and corrosion.
Inspect the lamp. The quartz envelope must be bright and clear.
Replace if necessary.
Check all seals and rubber mountings of the mirror reflector.
Replace if necessary.
Check earthing point for conductivity
Check small ventholes in the bottom to be open
Check lamp supply cable on wear and tear.
After the inspection : Clean frontglass inside and outside, and clean the mirror reflector
with a proprietary glass cleaner. Cleaning the mirror reflector does not harm the
silvering because the silver layer is on the back of the glass.
Finally : Test searchlight for full working for 20 odd minutes.
Page 14

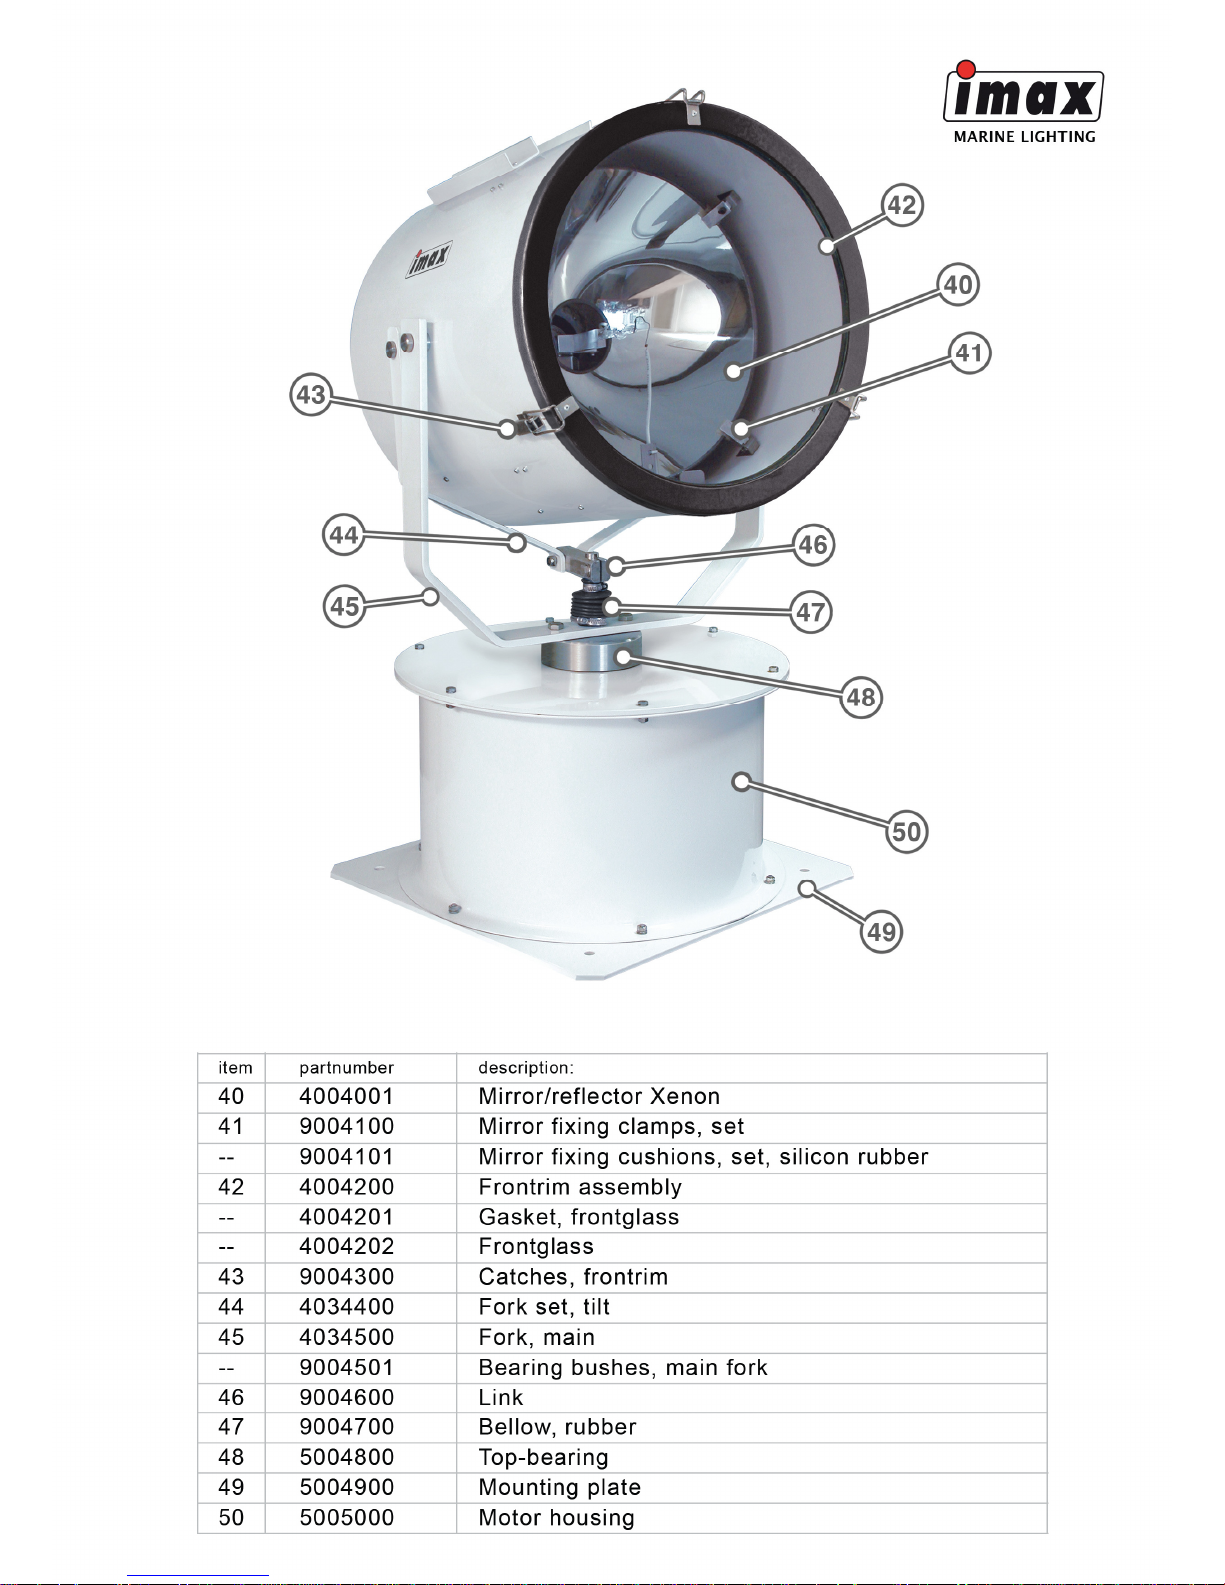
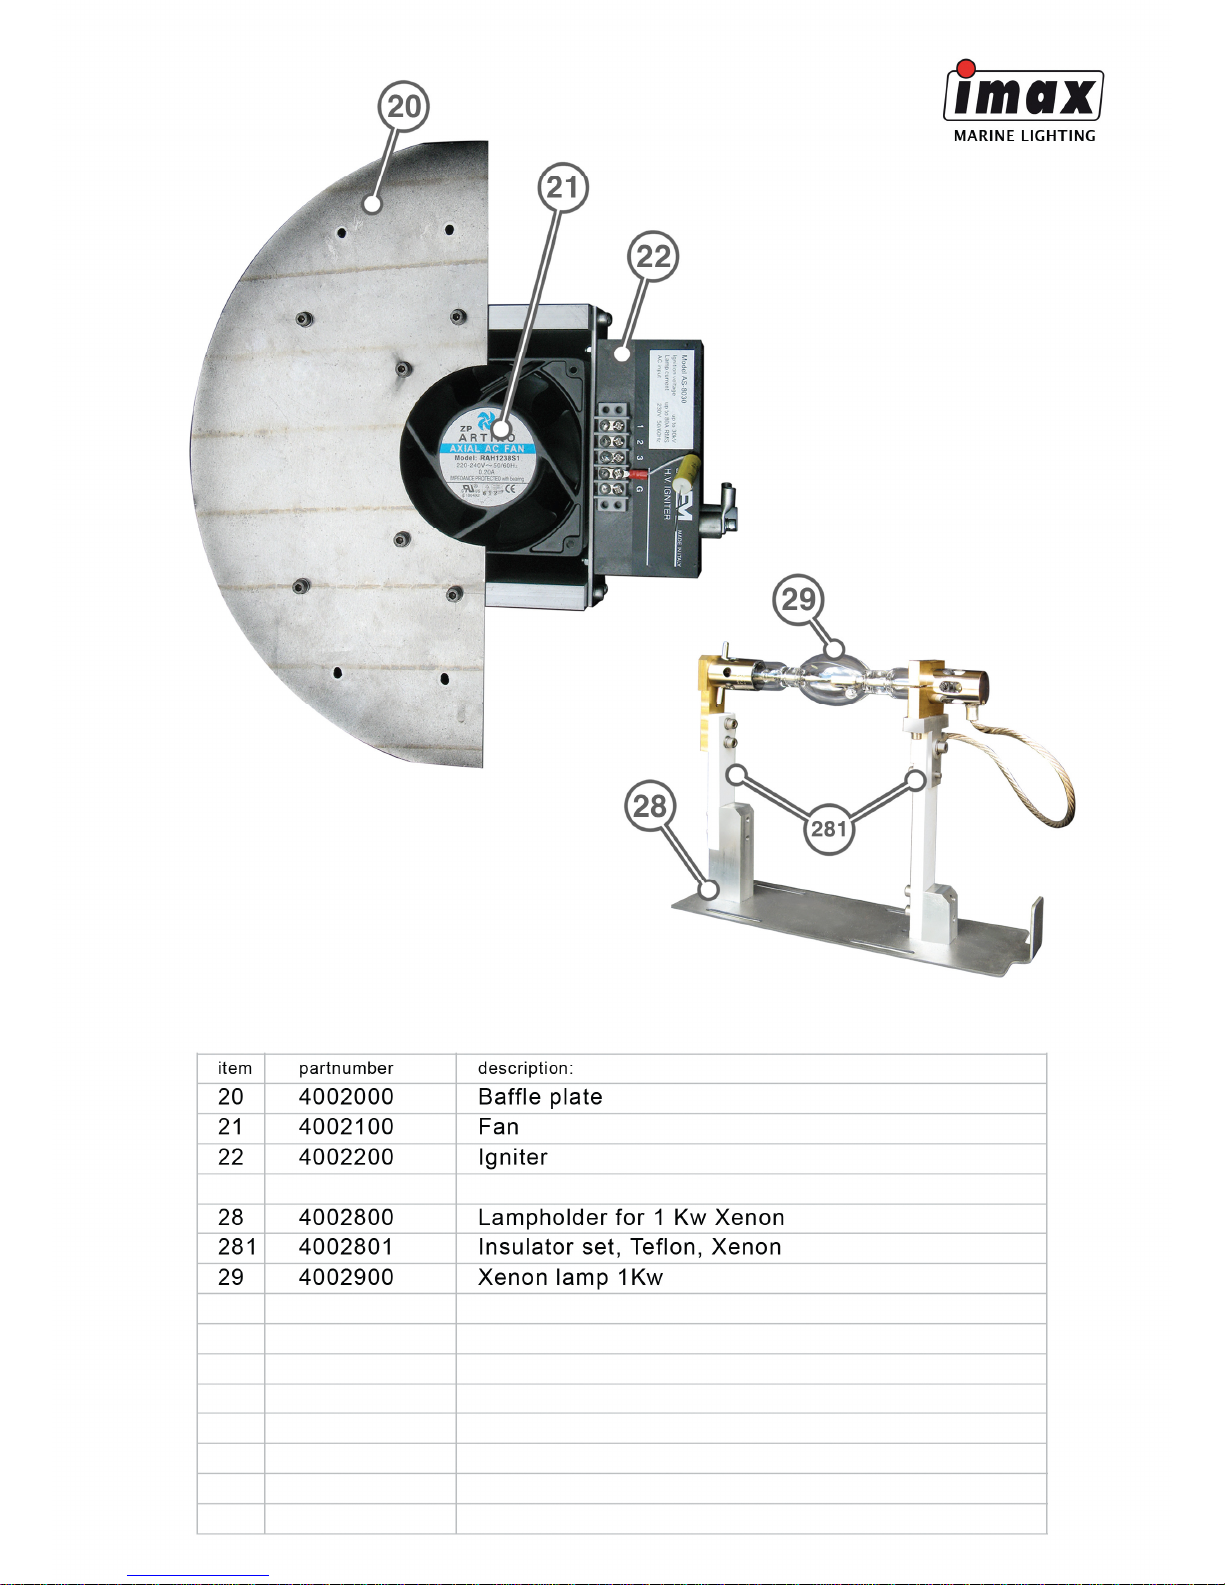
10
10 - SPARE PARTS LISTS
Page 15

Page 16

Page 17

Page 18

Page 19
Page 20

Page 21

Page 22
 Loading...