

Page 1
Filmscanner „IMAX IM0010“
Version 10/10
Best.-Nr. 77 69 40 °
Bestimmungsgemäße Verwendung
Mit der Auflösung von 1800 dpi und dem integrierten 5-Megapixel-Bildsensor werden die Vorlagen (Dia
oder Negativ-Film) ähnlich einer Digitalkamera abfotografiert. Der Anschluss an einen Computer (mit
Windows-Betriebssystem ab Windows XP) erfolgt über USB. Mit der beiliegenden Software können
Sie die Bilder komfortabel verwalten und nachbearbeiten.
Eine andere Verwendung als zuvor beschrieben, führt zur Beschädigung dieses Produktes, darüber
hinaus ist dies mit Gefahren, wie z.B. Kurzschluss, Brand, elektrischer Schlag etc., verbunden.
Dieses Produkt erfüllt die gesetzlichen, nationalen und europäischen Anforderungen. Alle enthaltenen
Firmennamen und Produktbezeichnungen sind Warenzeichen der jeweiligen Inhaber. Alle Rechte vorbehalten.
Lieferumfang
• Filmscanner
• USB-Kabel
• CD mit Treiber und Software
• Spezialpinsel
• Bedienungsanleitung
Sicherheitshinweise
Bei Schäden, die durch Nichtbeachten dieser Bedienungsanleitung verursacht
werden, erlischt die Gewährleistung/Garantie! Für Folgeschäden übernehmen wir
keine Haftung!
Bei Sach- oder Personenschäden, die durch unsachgemäße Handhabung oder
Nichtbeachten der Sicherheitshinweise verursacht werden, übernehmen wir keine
Haftung! In solchen Fällen erlischt die Gewährleistung/Garantie.
• Aus Sicherheits- und Zulassungsgründen (CE) ist das eigenmächtige Umbauen
und/oder Verändern des Produkts nicht gestattet.
• Das Produkt darf nicht feucht oder nass werden.
• Das Produkt ist kein Spielzeug, es gehört nicht in Kinderhände.
• Lassen Sie das Verpackungsmaterial nicht achtlos liegen, dieses könnte für Kinder zu
einem gefährlichen Spielzeug werden.
• Gehen Sie vorsichtig mit dem Produkt um, durch Stöße, Schläge oder dem Fall aus
bereits geringer Höhe wird es beschädigt.
Treiber- und Software-Installation, Anschluss an den Computer
• Installieren Sie zunächst die mitgelieferte Software. Legen Sie die CD in das entsprechende
Laufwerk Ihres Computers ein. Sofern die Software nicht automatisch startet, so starten Sie das
Programm „Autorun.exe“ im Hauptverzeichnis der CD.
•
Installieren Sie zuerst den Treiber und anschließend die „BlazePhoto“-Software. Wenn als
Betriebssystem mindestens Windows XP mit Service-Pack 2 (oder Windows Vista bzw. Windows 7)
auf Ihrem Computer läuft, so ist die Installation von „DirectX9.0“ NICHT erforderlich.
Folgen Sie allen Anweisungen. Möglicherweise ist nach der Installation ein Neustart erforderlich.
• Verbinden Sie die USB-Buchse des Filmscanners über das mitgelieferte USB-Kabel mit einem
USB2.0-Port Ihres Computers.
• Windows erkennt neue Hardware und schließt die Treiberinstallation ab.
Dias einlegen
• Öffnen Sie den Dia-Halter an der mit „OPEN“ beschrifteten
Stelle und klappen Sie die beiden Hälften auseinander.
• Schauen Sie durch das Dia gegen eine Lichtquelle, drehen Sie
es so, dass es nicht spiegelverkehrt ist
• Stellen Sie das Dia auf den Kopf (180° nach links oder rechts
drehen) und legen Sie es wie im Bild rechts gezeigt in den DiaHalter ein.
• Verschließen Sie den Dia-Halter wieder.
Negativ-Film einlegen
• Öffnen Sie den Negativ-Halter an der mit „OPEN“ beschrifteten
Stelle und klappen Sie die beiden Hälften auseinander.
• Schauen Sie durch das Negativ gegen eine Lichtquelle. Die
Nummern im Negativ-Film sollten nicht spiegelverkehrt sein.
• Stellen Sie den Negativfilm auf den Kopf (180° nach links oder
rechts drehen) und legen Sie ihn wie im Bild rechts gezeigt in
den Negativ-Halter ein.
• Verschließen Sie den Negativ-Halter wieder.
Dia-/Negativ-Halter in den Filmscanner einsetzen
Oben auf dem Halter ist eine kleine weiße Pfeilmarkierung. Diese Seite muss nach oben zeigen;
schieben Sie den entsprechenden Halter in den Filmscanner hinein (Öffnung an der rechten Seite), bis
das erste Bild einrastet.
쮕
BEDIENUNGSANLEITUNG www.conrad.com
Schieben Sie den Halter nicht in die Öffnung an der linken Seite, ziehen Sie den Halter
auch nicht wieder rechts aus dem Einschub heraus! Der Halter kann nur in einer Richtung
von rechts nach links durch den Filmscanner hindurchgeschoben werden.
Der Halter muss per Hand bewegt werden, im Filmscanner befindet sich kein
Transportmechanismus.
Software verwenden
Starten Sie die Software „BlazePhoto“ mit einem Doppelklick. Die folgende Beschreibung bezieht sich
auf die englischsprachige Software, möglicherweise steht die Software jedoch auch in anderen
Sprachen zur Verfügung bzw. die Software ändert sich bei neueren Versionen des Herstellers.
a) Bilder scannen
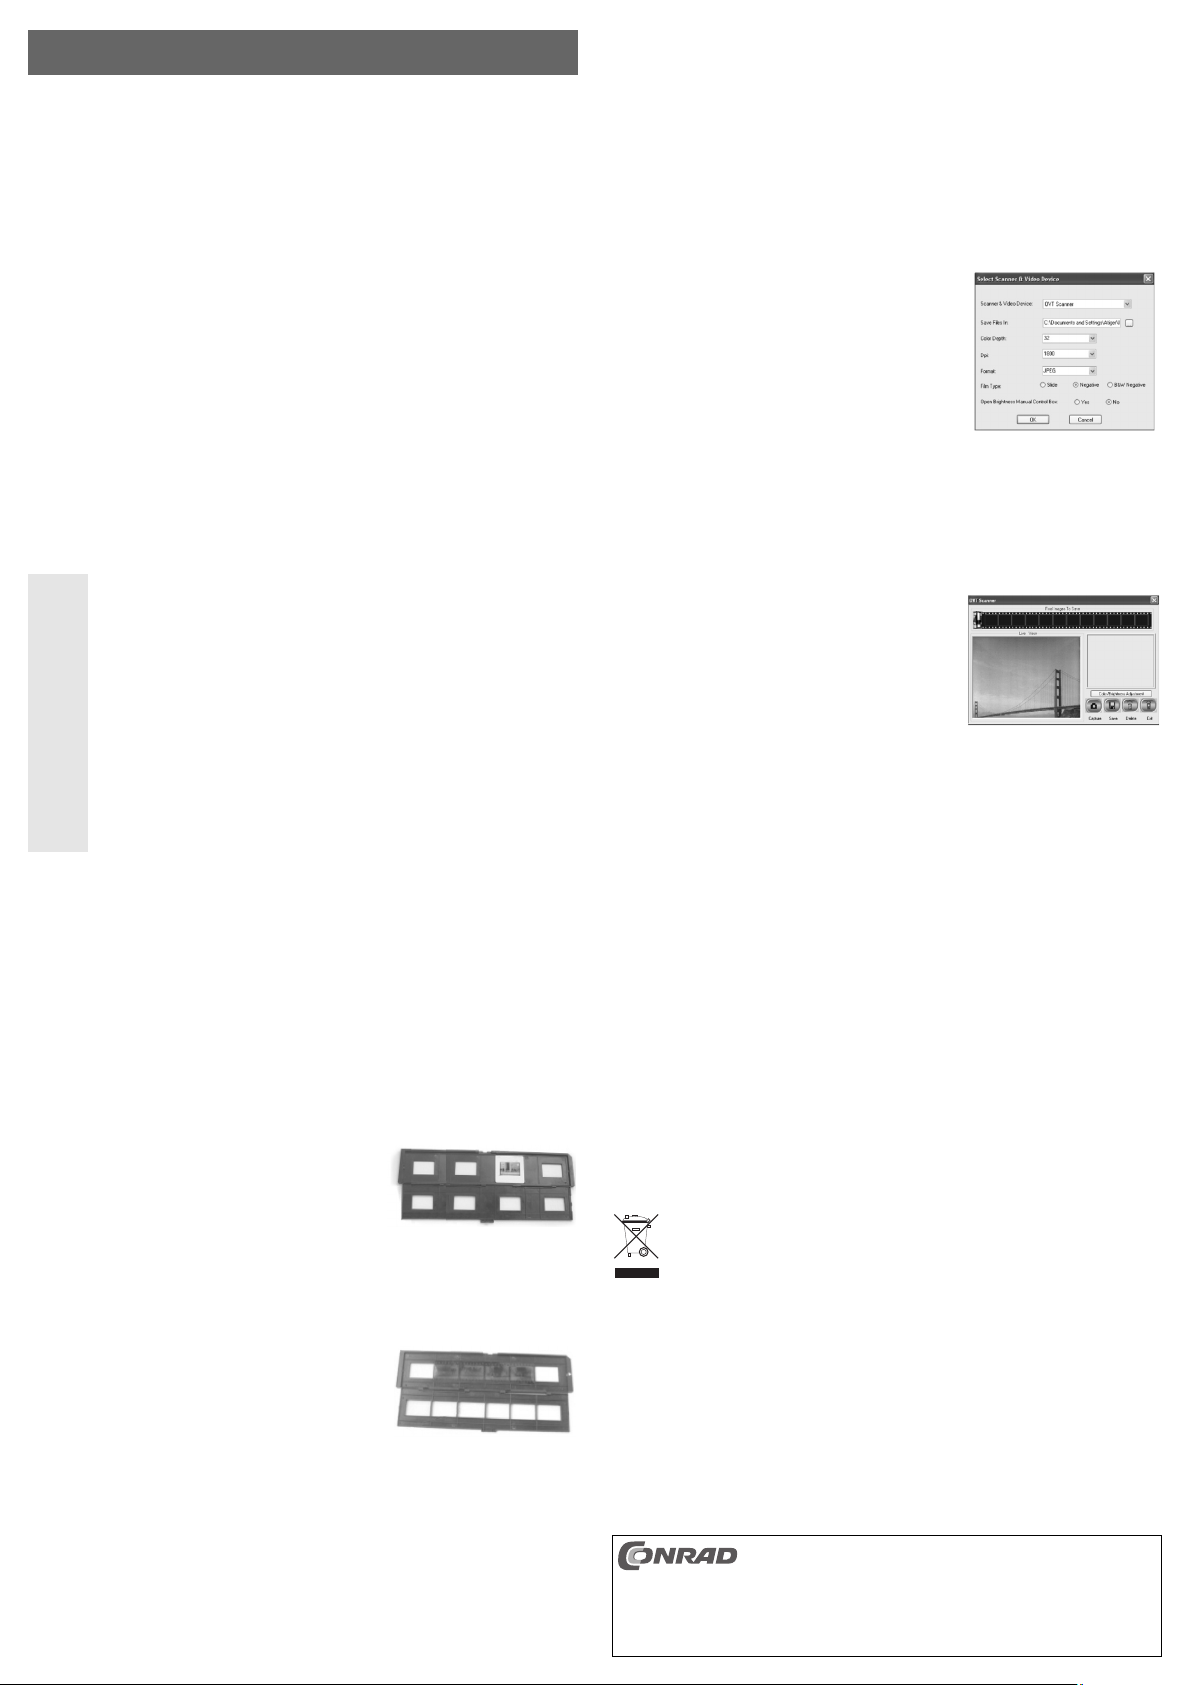
• Bei „Get Photo“ ist die Funktion „Acquire from Film Scanner“ zu wählen.
• Anschließend erscheint das Fenster der Scansoftware.
• Bei „Scanner & Video Device“ ist „OVT Scanner“ einzustellen,
falls nicht schon voreingestellt.
• Bei „Save Files in“ kann ein Pfad eingegeben werden, wo die
später gescannten Bilder gespeichert werden sollen.
• Die Einstellung „Color Depth“ ist die Farbtiefe (sollte auf 32bit
stehen bleiben; die Grafikkarte muss auch auf 32bit eingestellt
sein!). Die Einstellung „Dpi“ gibt die Auflösung vor. Der
Filmscanner hat eine optische Auflösung von 1800dpi; soll das
Bild vergrößert werden, so stellen Sie 3600dpi ein. Bei „Format“
kann vorgegeben werden, welches Dateiformat (z.B. „JPEG“)
für das Speichern der Bilder verwendet werden soll.
• Weiterhin ist noch bei „Film Type“ einzustellen, ob ein Dia (Einstellung „Slide“) oder ein Negativ
(„Negative“) im Filmscanner steckt.
• Bei der Einstellung „Open Brightness Manual Control Box“ kann gewählt werden, ob beim Scannen
ein Fenster für die Einstellung der Helligkeit angezeigt wird oder nicht. Bei „No“ (= nein) stellt der
Filmscanner die Helligkeit automatisch ein.
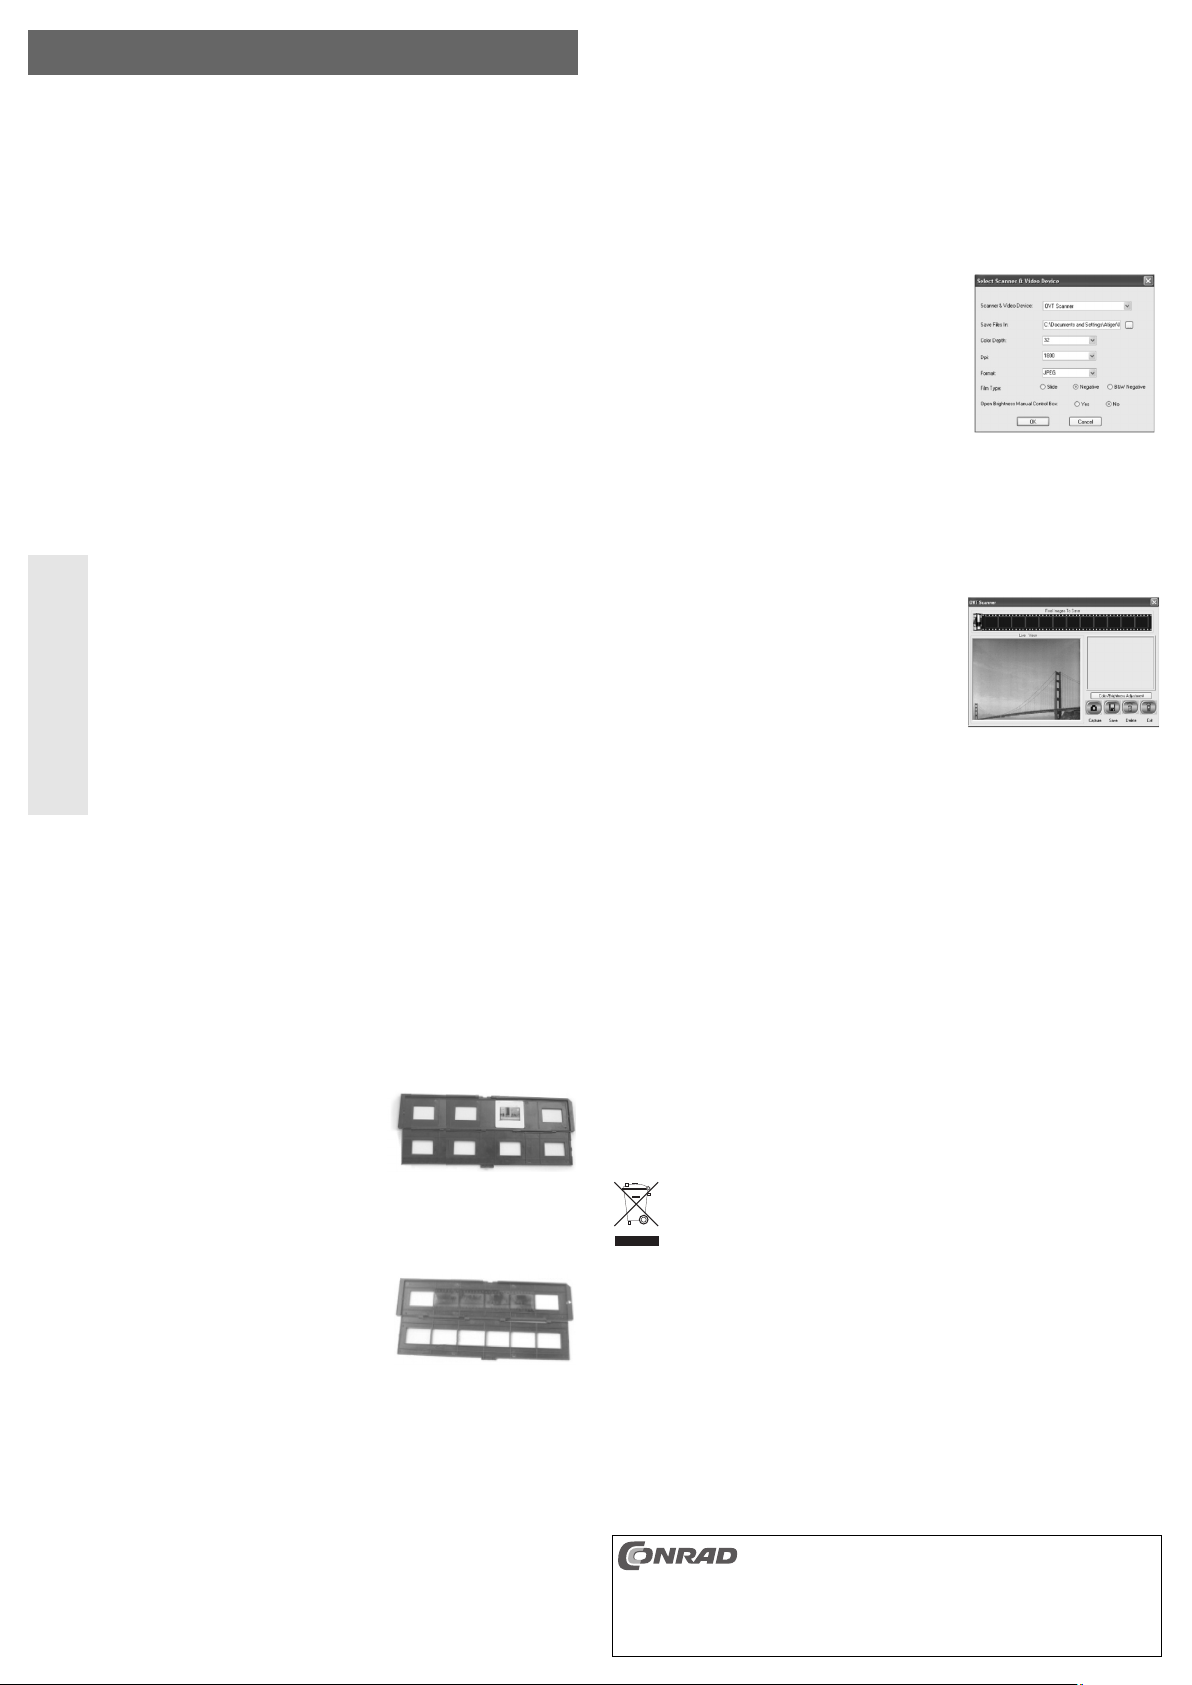
• Klicken Sie auf „OK“, dann erscheint das Vorschaubild des
eingelegten Dias oder Negativ-Films.
• Mit der Schaltfläche „Color/Brightness Adjustment“ kann die
Helligkeit und die Farbbalance eingestellt werden.
• Mit „Capture“ (oder einem Druck auf die „Copy“-Taste auf der
Oberseite des Filmscanners) wird das erste Bild ausgelesen.
Schieben Sie den Dia- bzw. Negativfilm-Halter um ein Bild
weiter nach links, bis er erneut einrastet.
Es können bis zu 12 Bilder in einem Durchgang ausgelesen werden. Bitte beachten Sie, dass die
Bilder erst dann gespeichert werden, wenn Sie auf „Save“ klicken.
Die Bilder werden nicht gespeichert, wenn Sie nur auf „Exit“ klicken! Hierbei wird das ScanVorschaufenster geschlossen, ohne die Bilder zu speichern!
Mit „Delete“ kann ein unerwünschtes Bild gelöscht werden (vorher das zu löschende Bild oben im
Filmstreifen anklicken).
• Zum Beenden der Scansoftware klicken Sie auf „Exit“. Vergessen Sie nicht, vorher die Bilder per
„Save“ zu speichern, sonst müssen Sie die Bilder erneut scannen.
Danach erscheinen alle Bilder in der Oberfläche der „BlazePhoto“-Software.
• Für die weitere Bearbeitung der Bilder können Sie die Funktionen der „BlazePhoto“-Software nutzen.
Selbstverständlich können auch viele andere Programme mit den JPG-Bildern umgehen, um diese
zu bearbeiten.
Reinigung
Staub kann mit einem langhaarigen, sauberen Pinsel und einem Staubsauger leicht entfernt werden.
Ein Druckluftspray ist eine Hilfe, Staub aus dem Dia- oder Negativ-Halter zu entfernen.
Über den mitgelieferten Spezialpinsel kann das Innere der Durchlichteinheit gereinigt werden.
Schieben Sie dazu die flache Seite des Spezialpinsels von der rechten Seite her vorsichtig in den
Filmscanner (weiche Seite nach unten) und bewegen Sie ihn hin und her, um Staubteilchen zu entfernen.
Die Außenseite des Filmscanners kann mit einem sauberen, trockenen Tuch abgewischt werden.
Entsorgung
Entsorgen Sie das Produkt am Ende seiner Lebensdauer gemäß den geltenden
gesetzlichen Bestimmungen.
Technische Daten
Optische Auflösung: ................1800dpi
CMOS-Sensor: ........................5 Megapixel
Durchlichteinheit:......................24 x 36mm
Anschluss:................................USB2.0
Abmessungen: ........................Ca. 90 x 165 x 90mm (B x H x T)
Gewicht: ..................................Ca. 325g
Diese Bedienungsanleitung ist eine Publikation der Conrad Electronic SE, Klaus-Conrad-Str. 1,
D-92240 Hirschau (www.conrad.com).
Alle Rechte einschließlich Übersetzung vorbehalten. Reproduktionen jeder Art, z. B. Fotokopie,
Mikroverfilmung, oder die Erfassung in elektronischen Datenverarbeitungsanlagen, bedürfen der
schriftlichen Genehmigung des Herausgebers. Nachdruck, auch auszugsweise, verboten.
Diese Bedienungsanleitung entspricht dem technischen Stand bei Drucklegung. Änderung in Technik
und Ausstattung vorbehalten.
© Copyright 2010 by Conrad Electronic SE.
Page 2
Film scanner „IMAX IM0010“
Version 10/10
Item-No. 77 69 40 °
Proper use according to manufacturer’s instructions
Similar to a digital camera, originals (slide films or negative films) are photographed with a resolution
of 1800 dpi and with the integrated 5-megapixel image sensor. The connection to a computer (with
Windows operating system min. Windows XP) takes place via USB. With the software enclosed you
can comfortably manage and edit the images.
Any other use than that described above may damage the product. Moreover, this may give rise to
hazards such as short-circuiting, fire, electric shock, etc.
This product complies with the applicable National and European requirements. All names of
companies and products are the trademarks of the respective owner. All rights reserved.
Package Contents
• Film scanner
• USB cable
• CD with driver and software
• Special brush
• Operating Instructions
Safety Instructions
The warranty will be void in the event of damage caused by failure to observe these
safety instructions! We do not assume any liability for any consequential damage!
Nor do we assume any liability for material and personal damage caused by
improper use or non-compliance with the safety instructions! The warranty will be
void in such cases.
• The unauthorised conversion and/or modification of the product is inadmissible because
of safety and approval reasons (CE).
• The product must not get damp or wet.
• The product is not a toy and should be kept out of the reach of children.
• Do not leave packing materials unattended. They may become dangerous playthings for
children.
• Handle the product with care, it can be damaged by impacts, blows, or accidental drops,
even from a low height.
Driver and software installation, connection to the computer
• First install the software provided. Place the CD in the appropriate drive of your computer. If the
installation program does not start automatically, start the program „Autorun.exe“ in the main
directory of the CD.
•
First install the driver and then the software „BlazePhoto“. If you have Windows XP (mininum
requirement) with service pack 2 (or Windows Vista or Windows 7) on your computer, the installation
of „DirectX9.0“ is NOT necessary.
Follow all of the instructions. A new start might become necessary after the installation.
• Connect the film scanner via the USB cable, enclosed, to a USB2.0 port on your computer.
• Windows recognises the new hardware and completes the driver installation.
Inserting the slides
• Open the slide holder at the point that is labelled with „OPEN“
and fold the two halves apart.
• Look through the slide holding it against a light source, rotate it
so that it is not mirror-inverted.
• Put the slide upside down (turn 180° to the left or right) and
insert it in the slide holder as shown on the right picture.
• Close the slide holder again.
Inserting a negative film
• Open the negative holder at the point that is labelled with
„OPEN“ and fold the two halves apart.
• Look at the negative by holding it against a light source. The
numbers in the negative film should not be mirror-inverted.
• Put the negative film upside down (turn 180° to the left or right)
and insert it in the negative holder as shown on the right picture.
• Close the negative holder again.
Inserting the slide/negative film holder in the film scanner
On the top of the holder there is a small white arrow marking. This side must point upwards; slide the
corresponding holder in the film scanner (aperture on the right side) until the first image clicks into
place.
OPERATING INSTRUCTIONS www.conrad.com
Do not slide the holder in the opening on the left side, and do not remove the holder from
the insertion on the right side either! The holder can only be slid through the film scanner
in one direction from right to left.
The holder has to be moved manually; there is no transport mechanism in the film
scanner.
Using the software
Start the software „BlazePhoto“ with a double-click. The following description refers to the software in
English language; however, the software might also be available in other languages or might be
modified in newer versions of the manufacturer.
a) Scanning images
• Under „Get Photo“ select the function „Acquire from film scanner“.
• Following that, the window of the scan software will appear.
• If not already preset, „OTV Scanner“ must be selected under
„Scanner & Video Device“.
• In „Save Files“ you can indicate a path where the images that
you will scan later on can be saved.
• The setting „Colour Depth“ is the depth of the colour (should
remain on 32bit; the graphic card must also be set to 32bit!). The
setting „Dpi“ defines the resolution. The film scanner has an
optical resolution of 1800dpi; if you wish to enlarge the image
set the resolution to 3600dpi. Under „Format“ you can choose
which file format (e.g. „JPEG“) shall be used for saving the
images.
• Furthermore, under „Film Type“ you have to select whether a slide (setting „Slide“) or a negative
(„Negative“) was inserted in the film scanner.
• In the setting „Open Brightness Manual Control Box“ you can choose whether or not a window for
the brightness adjustment is shown during the scanning. When „No“ is selected, the film scanner
sets the brightness automatically.
• If you click on „OK“, the preview image of the inserted slide or
negative film appears.
• With the button „Color/Brightness Adjustment“ the brightness
and the colour balance can be adjusted.
• With „Capture“ (or by pressing the „copy“ key on the upper side
of the film scanner) the first image will be read out.
Move the slide holder or the negative film holder forward by
one image to the left, until it clicks into place again.
Up to 12 images can be read out in one go. Please note that the images can only be saved if you
click on „Save“.
The images will not be saved if you only click on „Exit“! Hereby, the scan preview window will be
closed without saving the images!
With „Delete“ you can erase an image you don’t like (click on the image on the top of the film strip
that you wish to delete).
• To exit the scan software, click on „Exit“. Do not forget to save the images using „Save“ before exiting
the software, otherwise you will have to scan the images again.
Following that, all images appear on the surface of the „BlazePhoto“ software.
• For further editing of the images you may use the functions of the „BlazePhoto“ software. Of course,
there are several other programs that can handle and edit JPG images.
Cleaning
Dust can be removed easily using a clean, long-hair brush and a vacuum cleaner. A compressed air
spray may be used to remove dust from the slide holder or the negative film holder.
With the special brush included in the delivery the inside of the transparency unit can be cleaned. To
do this, carefully push the flat side of the special brush from the right side into the film scanner (soft
side downwards) and sway it to remove the dust particles.
The outer side of the film scanner can be cleaned with a clean, soft cloth.
Disposal
When disposing of an unserviceable product, do so in line with the relevant statutory
regulations.
Technical Data
Optical resolution: ....................1800dpi
CMOS sensor:..........................5 Megapixel
Transparency unit: ..................24 x 36mm
Connection:..............................USB2.0
Dimensions: ............................Approx. 90 x 165 x 90mm (W x L x H)
Weight: ....................................approx. 325g
These operating instructions are a publication by Conrad Electronic SE, Klaus-Conrad-Str. 1, D-92240
Hirschau (www.conrad.com).
All rights including translation reserved. Reproduction by any method, e.g. photocopy, microfilming, or
the capture in electronic data processing systems require the prior written approval by the editor.
Reprinting, also in part, is prohibited.
These operating instructions represent the technical status at the time of printing. Changes in
technology and equipment reserved.
© Copyright 2010 by Conrad Electronic SE. V3_1010_01/HD
 Loading...