

Page 1

Imation Swivel USB 2.0 Flash Drive
Imation Drive Manager Software
User’s Manual
Rev001
Page 2

Contents
Introduction .................................... ................................................. .......................... 3
Features ............................................................................................................................ 3
System Requirements..................................................................................................... 4
Handling and Operating Recommendations................................................................. 4
Driver Installation..................................................................................................... 5
Driver Installation for Windows 98/98SE....................................................................... 5
.
Drive Partitions and Security Function .................................................................. 8
.
Disclaimer................................................................................................................. 14
Imation Drive Manager.exe Interface .................................................................. 8
Partition Function .................................................................................................... 8
Security Function..................................................................................................... 9
Configuration Function ........................................................................................... 11
Login.exe Interface ................................................................................................. 12
- 2 -
Rev001
Page 3

Introduction
Thank you for your purchasing the Imation Swivel Flash Drive. This portable Plug & Play
USB Flash Drive enables you to exchange
computers with a USB
port. With high storage capacity and blazing fast speeds, this ultra
portable device is the best choice to replace floppy Drives, ZIP Drives and hard
addition, this USB Flash Drive includes a
the drive and set a se c ur e pa s swo rd p rot ect ed secure area for your personal data.
Features
• Ultra portable and secure removable mass storage for business and personal
use
• Full compliance with USB spec v2.0 and v1.1; true Plug & Play connection
a large amount of data easily between
Drives. In
program that enables you to create partitions on
• USB bus powered: Powered from USB port, no external power or battery
needed
• Multiple Operating Systems supported: No driver needed in
®
Windows
Kernel 2.4 or later. Only Windows
www.imation.com/support
ME, Windows® 2000, Windows® XP, Mac TM 9.x or later, Linux TM
®
98SE requires a driver. Go to http://
to download the Windows
®
98SE driver.
• Drive partitions and a password protected Security Area
• Shock resistant, noise-free and long term data retention
Note:
The read/write speed of the USB Flash Drive depends on the Flash memory type
inside the device and also on the computer’s system performance.
- 3 -
Rev001
Page 4
System Requirements
• Desktop or laptop computers with USB 1.1 or USB 2.0 port
• One of following operating systems
Windows 98SE (with downloadable driver)
Windows ME
Windows 2000
Windows XP
Mac OS 9.x or later
Linux Kernel 2.4 or later
Handling and Operating Recommendations
1. Do not use excessive force to insert the drive into the USB port. If it will not enter
the USB port, recheck to see that the drive is properly oriented before trying to
insert again.
2. Please keep this Flash Drive away from excessive heat, direct sunlight, and water.
Rev001
Do not bend, flex, or drop it.
3. To prevent data loss and fatal damage to the Flash Drive, do not remove it from
the USB port while data is being transferred. We recommend the user perform
the “Safely Remove Hardware” in the system tray at the bottom of the screen by
selecting “USB Mass Storage Device” before removing the Flash Drive.
4. Due to OS security control, in Windows 2000 or Windows XP you must be logged in
with local Administrator rights to run the Drive Partitions and Security Function.
(The programs named
If your account does not have Administrator rights, please contact your system
administrator for assistance.
5. In rare cases, when you re-start the computer and find your Flash Drive in Unlocked
mode (have the right to access Security Area), please unplug the USB 2.0 Flash
Drive and then plug back in, to make sure it is back to accessing the Public Area.
6. If you experience trouble with the operation of the software of your drive, please
check our web site at www.imation.com/flash
to see if there are any updates or FAQ’s that address your situation.
Imation Drive manager. exe
- 4 -
Login.exe
and
and click on support and downloads
).
Page 5
Driver Installation
To use this Flash Drive, it is not necessary for the user to install any drivers for any of
®
the following operating systems: Windows
or later, Linux
the Imation web site:
TM Kernel 2.4 or later. Only Windows® 98SE will need to install the driver from
http://www.imation.com/products/flash_devices/downloads.html
ME, Windows® 2000, Windows® XP, Mac
Driver Installation for Windows 98SE
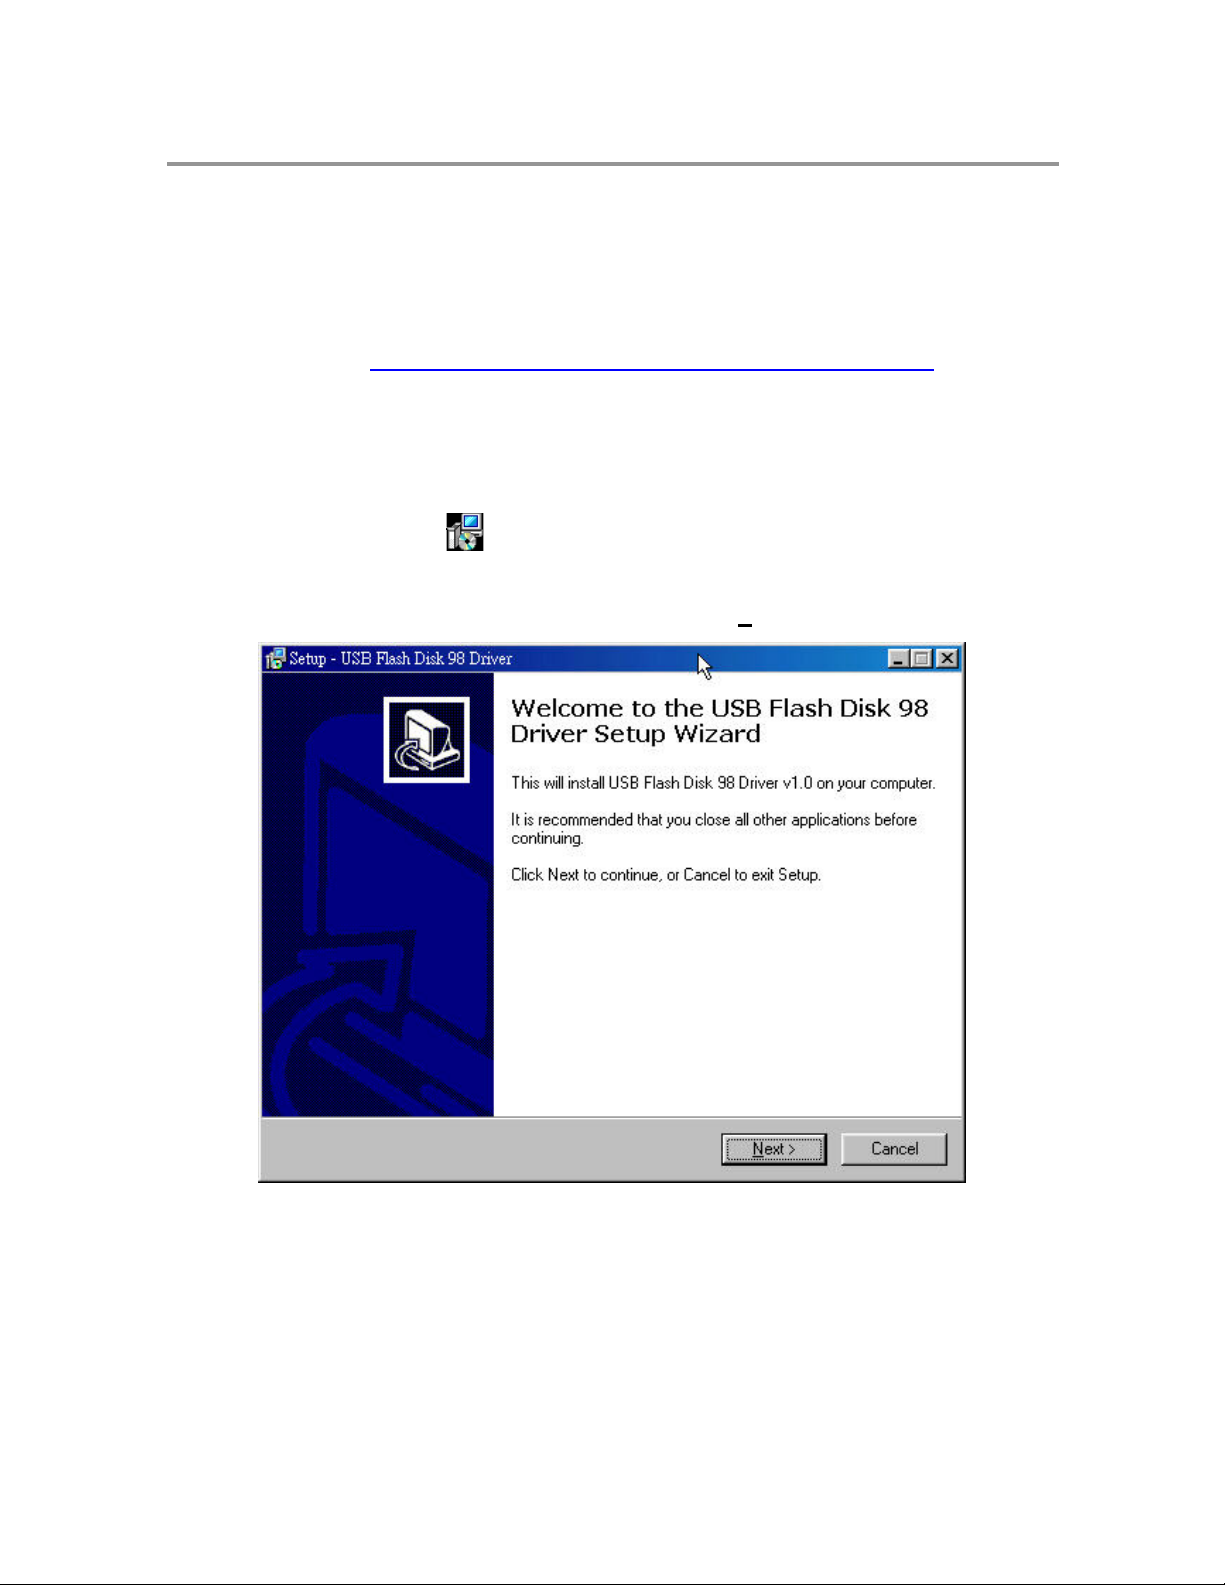
1. Execute setup.exe to install USB Flash Drive Windows 98SE driver. The icon is
shown as:
Setup.exe
2. The Setup Wizard will show up as below, please click Next >
to continue.
.
TM 9.x
Rev001
- 5 -
Page 6
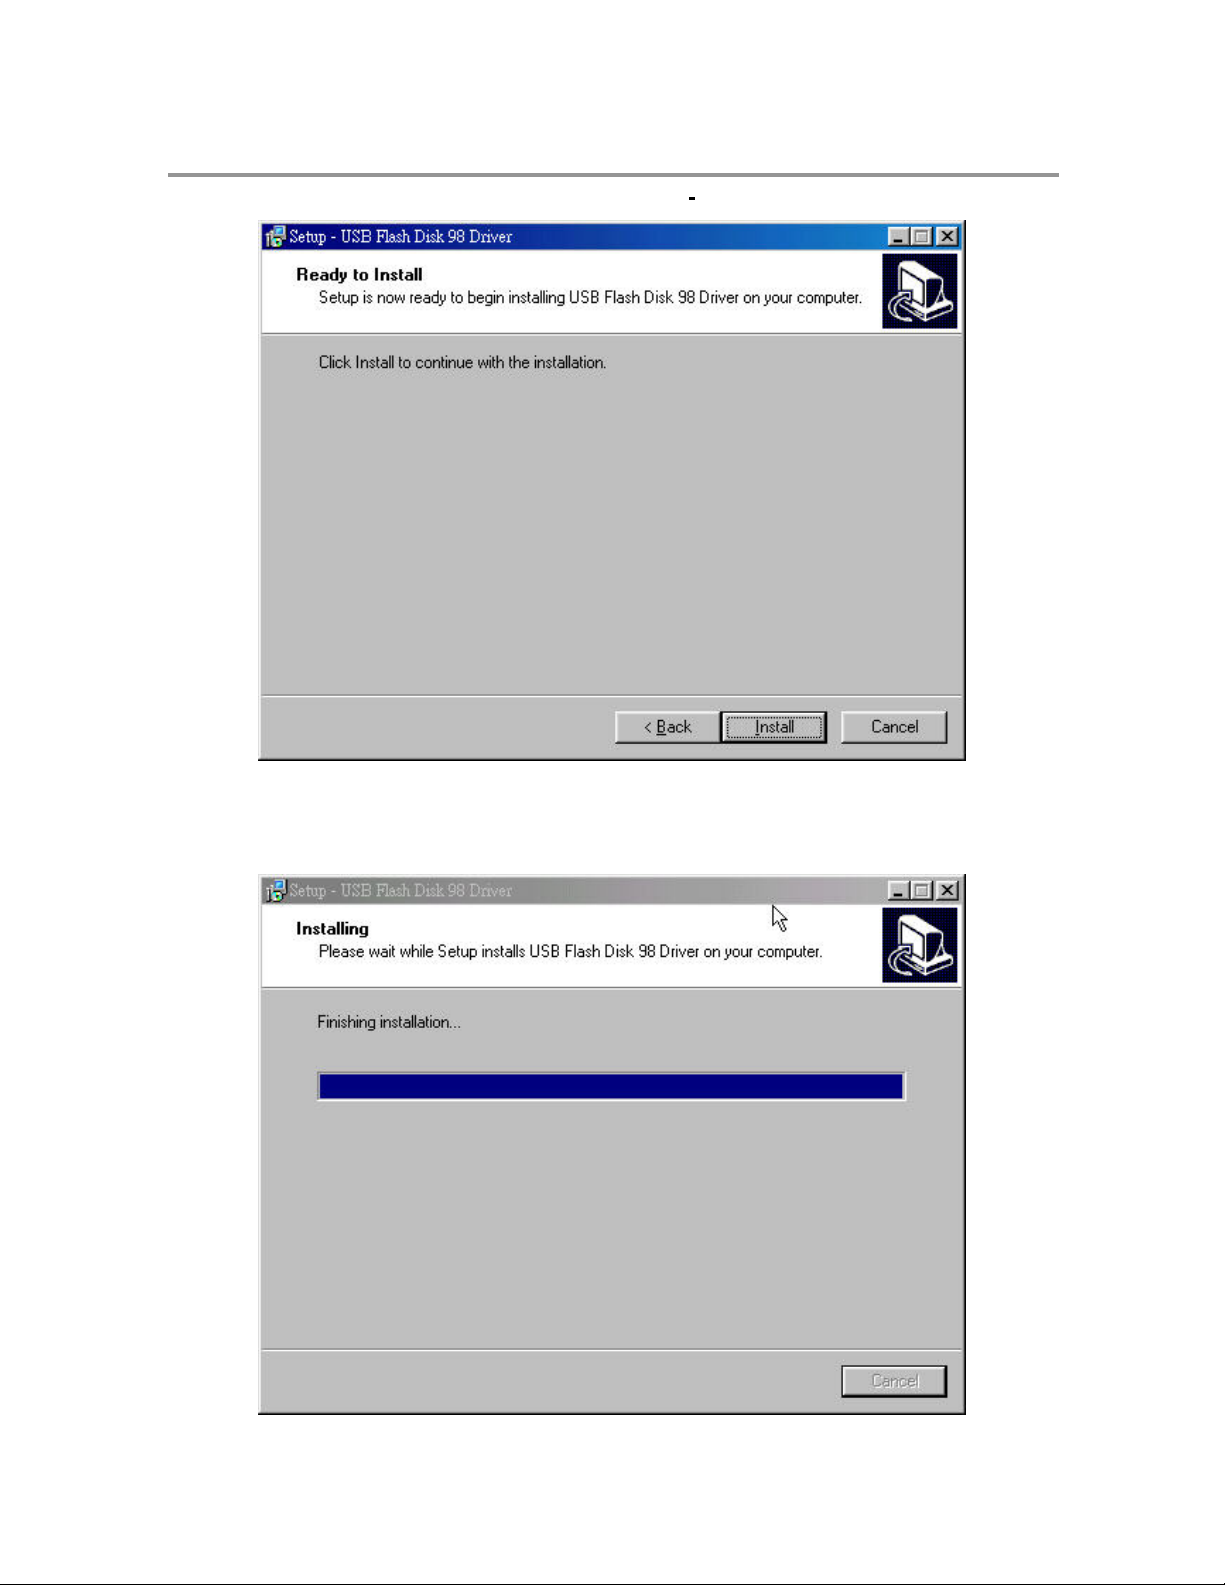
3. The program is now ready to install the driver. Please click Install
installation.
to continue the
4. Executing Setup.exe will guide you to install the USB Flash Drive Windows 98SE
driver on your computer.
Rev001
- 6 -
Page 7

5. Once the installation has completed, please click Finish
to exit Setup.
6. The following window will show up when driver installation has finished. Please
re-plugin USB Flash Drive to activate the driver.
- 7 -
Rev001
Page 8

Drive Partitions and Security Function
The Imation USB
Manager.exe” to
with a password check to secure your personal data. Also, if you have Windows 98SE,
you can configure this
Important. Before implementing, save
computer in a convenient location. “Imation Drive Manager.exe” will be removed from the
Flash Drive after the first implementation.
To run the utility program, just double click
is used to format/partition
Drive. If users enable the security function when
Manager.exe”, another program named “Login.exe” will be generated and placed in the first
partition of the Flash Drive.
interface used to access the Security
Imation Drive Manager.exe
Partition Function
Flash Drive includes a utility program named “Imation Drive
enable the user to partition the Flash Drive and/or to set Security Area
Flash Drive as an MS-DOS Startup Drive by this utility program.
“Imation Drive Manager.exe” to your host
Imation Drive Manager.exe.
the USB Flash Drive, set Security Area, and create MS-DOS Startup
performing “Imation Drive
To run “Login.exe”, just double click “
Area.
Imation Drive Manager.exe Interface
“Imation Drive Manager.exe”
Login.exe
”. Login.exe is the
1
1
1
8
8
8
2
2
2
9
9
9
6
6
6
1
0
1
0
1
0
4
4
4
5
5
5
3
3
3
7
7
7
1. Flash Drive Profile: Shows Vender Name, Product Name, assigned Drive letter,
and Drive capacity of this Flash Drive.
2. Public Area:
Rev001
Shows the Drive capacity of the public area. The minimum capacity of this
Page 9

area is 3MB.
- 8 -
3.
Security Area: Shows the drive capacity of th e security area. The minimum
capacity of security area is 3MB.
4. Capacity Scroll Bar:
between the public area
Users can drag the scroll bar to adjust the drive capacity
option in Security Function, c a n the Capacity
under Security Function below.)
5. Format Progress Bar: Shows the progress of formatting the drive.
6. START FORMAT:
Click this button to start formatting the drive. Note. Be sure you have
and security area. Only after enabling the PASSWORD
Slider Bar be dragged. (See more
a backup copy of any important information on the drive. All previous data stored on
the drive will be lost once this program starts.
7. CLOSE
8. PARTITION:
9. SECURITY:
10. CONFIGURATION: Click the configuration tab to switch to CONFIGURATION function.
:Click this button to exit the program.
Click the partition tab to switch to the PARTITION function.
Click the security tab to switch to the SECURITY function.
Note 1:
Capacity Slider Bar be dragged. Otherwise, the size of Security Area is set to zero.
Security Function
Rev001
Only after enabling the PASSWORD option in Security Function, can the
Page 10

1
1
1
1
1
1
- 9 -
Rev001
Page 11

11. PASSW ORD : After enabling the password option, the display windows of 12, 13
and 14 become valid to edit as shown in the following.
information, the capacity of
PARTITION function. In other words, if this
to set the capacity of the Security Area
the
1
2
1
2
1
2
1
3
1
3
1
3
Security Area will be allowed to be set in the
option is not enabled, users are not allowed
〈i.e. no Security Area〉.
After filling in the password
1
4
1
4
1
4
12. Enter Password: Users can set the password for Security Area. User can key in a
minimum of 6 characters to use as a password (16 characters maximum).
13. Verify Password: Type the password again as verification.
14. Hint: The optional Hint area is used to remind authorized users of the password. Note:
Since this hint will be visible to anyone that gains access to the drive, care should be taken to
make the hint usable only to authorized personnel and not assist an unauthorized individual from
guessing the password.. For improved security, leave the optional hint area blank.
Rev001
Page 12

- 10 -
Rev001
Page 13

Configuration Function
1
5
1
5
1
5
1
7
1
7
1
7
1
6
1
6
1
6
1
8
1
8
1
8
15. USB ZIP Boot: This function is only supported for Windows 98. After completing the
format, the Imation Flash
shown as “Removable Drive” in the system.
Drive will become an MS-DOS Startup Drive and be
16. USB HDD Boot: This function is only supported for Windows 98. After completing the
format, the
“Local Drive” in the
17. Quick Format:
Imation Flash Drive will become
system.
Selecting Quick Format will erase the internal FAT table, which is
referenced by operating systems. All data
will be
stored in the flash memory blocks until overwritten by new data .
18. Complete Format:
inaccessible by standard file access methods after completion, but the data is still
Complete Format will both erase the internal FAT table and physically
erase the flash memory blocks. The
partition Drive.
flash memory blocks
All data previously stored in the Flash Drive will be cleared
after completion. After selecting “Complete Format” the user must
an
MS-DOS Startup Drive and be shown as
previously stored in the Imation Flash Drive
Flash Drive will be formatted as a single public
from the
go to the Partition tab and click the Start Format button to create a single public partition.
Rev001
Page 14

- 11 -
Rev001
Page 15

Login.exe
Note 1:
Manager.exe is finished to activate these selected functions.
Note 2:
security function will be loaded into the USB Flash Drive. Otherwise, Login.exe will
not be generated.
Note 3:
not. For Windows 98SE, make sure the directory: \COMMAND\EBD exists. Otherwise,
you must create the directory, then copy and the n save boot files into this directory
before formatting USB Flash Drive as a Boot Drive.
Note 4:
run the program again with selecting “Quick Format” or “Complete Format”, all
the data previously stored in the Public Area and Security Area will be cleared when
the format is completed.
Login.exe Interface
Users are asked to re-plugin the USB Flash Drive after Imation Drive
If Security Function is enabled, the login program (Login.exe) for
If t h e USB Boot function fails, please check whether the boot files exist or
If users have set the Security Area from the Imation Drive Manager.exe and
The “Login.exe” is the interface for access t o the Security Area. Once the Security
Area has been implemented, users can run “Login.exe” to unlock and access the Security
Area. Once all the data processing has
secure
click the file shown below.
Rev001
their personal data in the Security Area. To run the “Lock.exe”, just double
Login.exe
Note:
Please notice that “Login.exe” is the only interface to access to Security Area if you
have set it. Without this program, you won’t be able to access the Security Area. If you
have deleted “Login.exe”, you can get the Imation Drive Manager.exe software from the
Imation Web site. You can also reset Security Area from “Format.exe”, but you will lose all
your data previously stored in the USB Flash Drive.
completed, users then select “Locked” to
Page 16

- 12 -
1.
2. Unlock: If the USB Flash Drive is in LOCKED mode, users can enter the password
5
5
5
6
6
6
Drive State:
State is LOCKED, users have access to the
UNLOCKED, users have access to the
then click the “Unlock” button to switch
In UNLOCK
Indicates drive mode of the USB Flash Drive. When the Drive
Security Area.
to UNLOCKED mode to access Security Area.
mode, the display is shown as below:
1
1
1
2
2
2
3
3
3
4
4
4
Public Area. When the Drive State is
3. Change Password:
changing password will pop up.
4. Close:
Click this button to close the program.
5. Enter Password:
Rev001
Enter th e password to gain access t o t h e Security Area.
by clicking the Change Password button, the window for
Page 17

6. Hint: Hint area is shown to remind users of the password.
- 13 -
Rev001
Page 18

9
9
9
7
7
7
1
0
1
0
1
0
8
8
8
7.
Cancel: Click this button to cancel the password change.
8.
Apply Change: Click this button to complete Change Password for the Security Area.
9.
New Password: Enter a new password here. The password must be a minimum of 6
characters. The recommendations on creating a secure password are located in the
previous section.
10.
Verify Password:
A password hint can be placed in the hint box. Be careful not to allow this hint to help
an unauthorized user guess the password. Using the hint box is optional.
Note 1:
below. Users can double-click this icon to open Login.exe or right click this icon to
access the options of “Login.exe”, “Change Password”.
Note2:
terminate and the icon will be removed from the system tray. If the user needs to
access the Security Area again, go to the Public Area of the flash drive to launch
Login.exe.
Re-type
the new password.
When executing Login.exe, u s er s can find its icon in the menu bar shown as
When users select “Lock” mentioned in NOTE 1, the Login.exe program will
Disclaimer
All the information in this document is subject to change without prior notice. The
manufacturer makes no
manual. The information contained in this manual is
the customers.
No part of this document may be reproduced or transmitted in any form by
any means without the express written
and product names used in this document are trademarks or registered trademarks of
their respective holders.
Rev001
representations or any warranties regarding the contents of this
provided for the general use by
permission of the manufacturer. All brand names
Page 19

© 2006 Imation Enterprises Corp. All rights reserved.
- 14 -
Rev001
 Loading...