

Page 1
memorex.com
MA3911MS
U
ser Guide
Please read these instructions completely,
before operating this product.
Please recycle.
Facilities may not exist in your area.
Name Here
I’ll Wake You Up
Mini Alarm
AUTION
C
ISK OF ELECTRIC SHOCK
R
O NOT OPEN
D
CAUTION: TO REDUCE THE RISK OF ELECTRIC SHOCK, DO NOT REMOVE COVER (OR BACK).
NO USER-SERVICEABLE PARTS INSIDE. REFER SERVICING TO QUALIFIED SERVICE PERSONNEL.
DANGEROUS VOLTAGE:The lightning flash with arrowhead symbol within an equilateral triangle
is intended to alert the user to the presence of uninsulated dangerous voltage within the product’s
enclosure that may be of sufficient magnitude to constitute a risk of electric shock to persons.
ATTENTION: The exclamation point within an equilateral triangle is intended to alert the user to
the presence of important operating and maintenance (servicing) instructions in the literature
accompanying the appliance.
FCC WARNING: This equipment may generate or use radio frequency energy. Changes or modifications to this
equipment may cause harmful interference unless the modifications are expressly approved in the instruction
manual. The user could lose the authority to operate this equipment if an unauthorized change or modification
is made.
ATTENTION: POUR ÉVITER LES CHOC ÉLECTRIQUES, INTRODUIRE LA LAME LA PLUS LARGE DE LA FICHE DANS LA
BORNE CORRESPONDANTE DE LA PRISES ET POUSSER JUSQU’AU FOND.
NOTE: This equipment has been tested and found to comply with the limits for a Class B digital device, pursuant to part 15
f the FCC Rules. These limits are designed to provide reasonable protection against harmful interference in a residential
o
nstallation. This equipment generates, uses and can radiate radio frequency energy and, if not installed and used in
i
ccordance with the instruc tions, may cause harmful inter ference to radio communications. However, there is no
a
uarantee that interference will not occur in a particular installation. If this equipment does cause harmful interference to
g
radio or television reception, which can be determined by turning the equipment off and on, the user is encouraged to try
to correct the interference by one or more of the following measures:
• Reorient or relocate the receiving antenna.
• Increase the separation between the equipment and receiver.
Connect the equipment into an outlet on a circuit different from that to which the receiver is connected.
•
Consult the dealer or an experienced radio/TV technician for help.
•
The rating information is located at the bottom of the apparatus.
•
WARNING: TO PREVENT FIRE OR SHOCK HAZARD, DO NOT EXPOSE THIS UNIT TO RAIN OR MOISTURE.
SURGE PROTECTORS: It is recommended to use a surge protector for AC connection. Lightning and power surges ARE
NOT covered under warranty for this product.
AC CONNECTION
nsert the small end of the AC adapter into the DC In jack 10 (located on the rear of the
I
unit). Connect the other end to a wall outlet having 120V AC, 60 Hz.
NOTES:
• Remove both the DC plug and the AC-IN plug to disconnect the AC adapter when
not in use.
Only use the supplied AC adapter which has the following specs: DC 5V Z
•
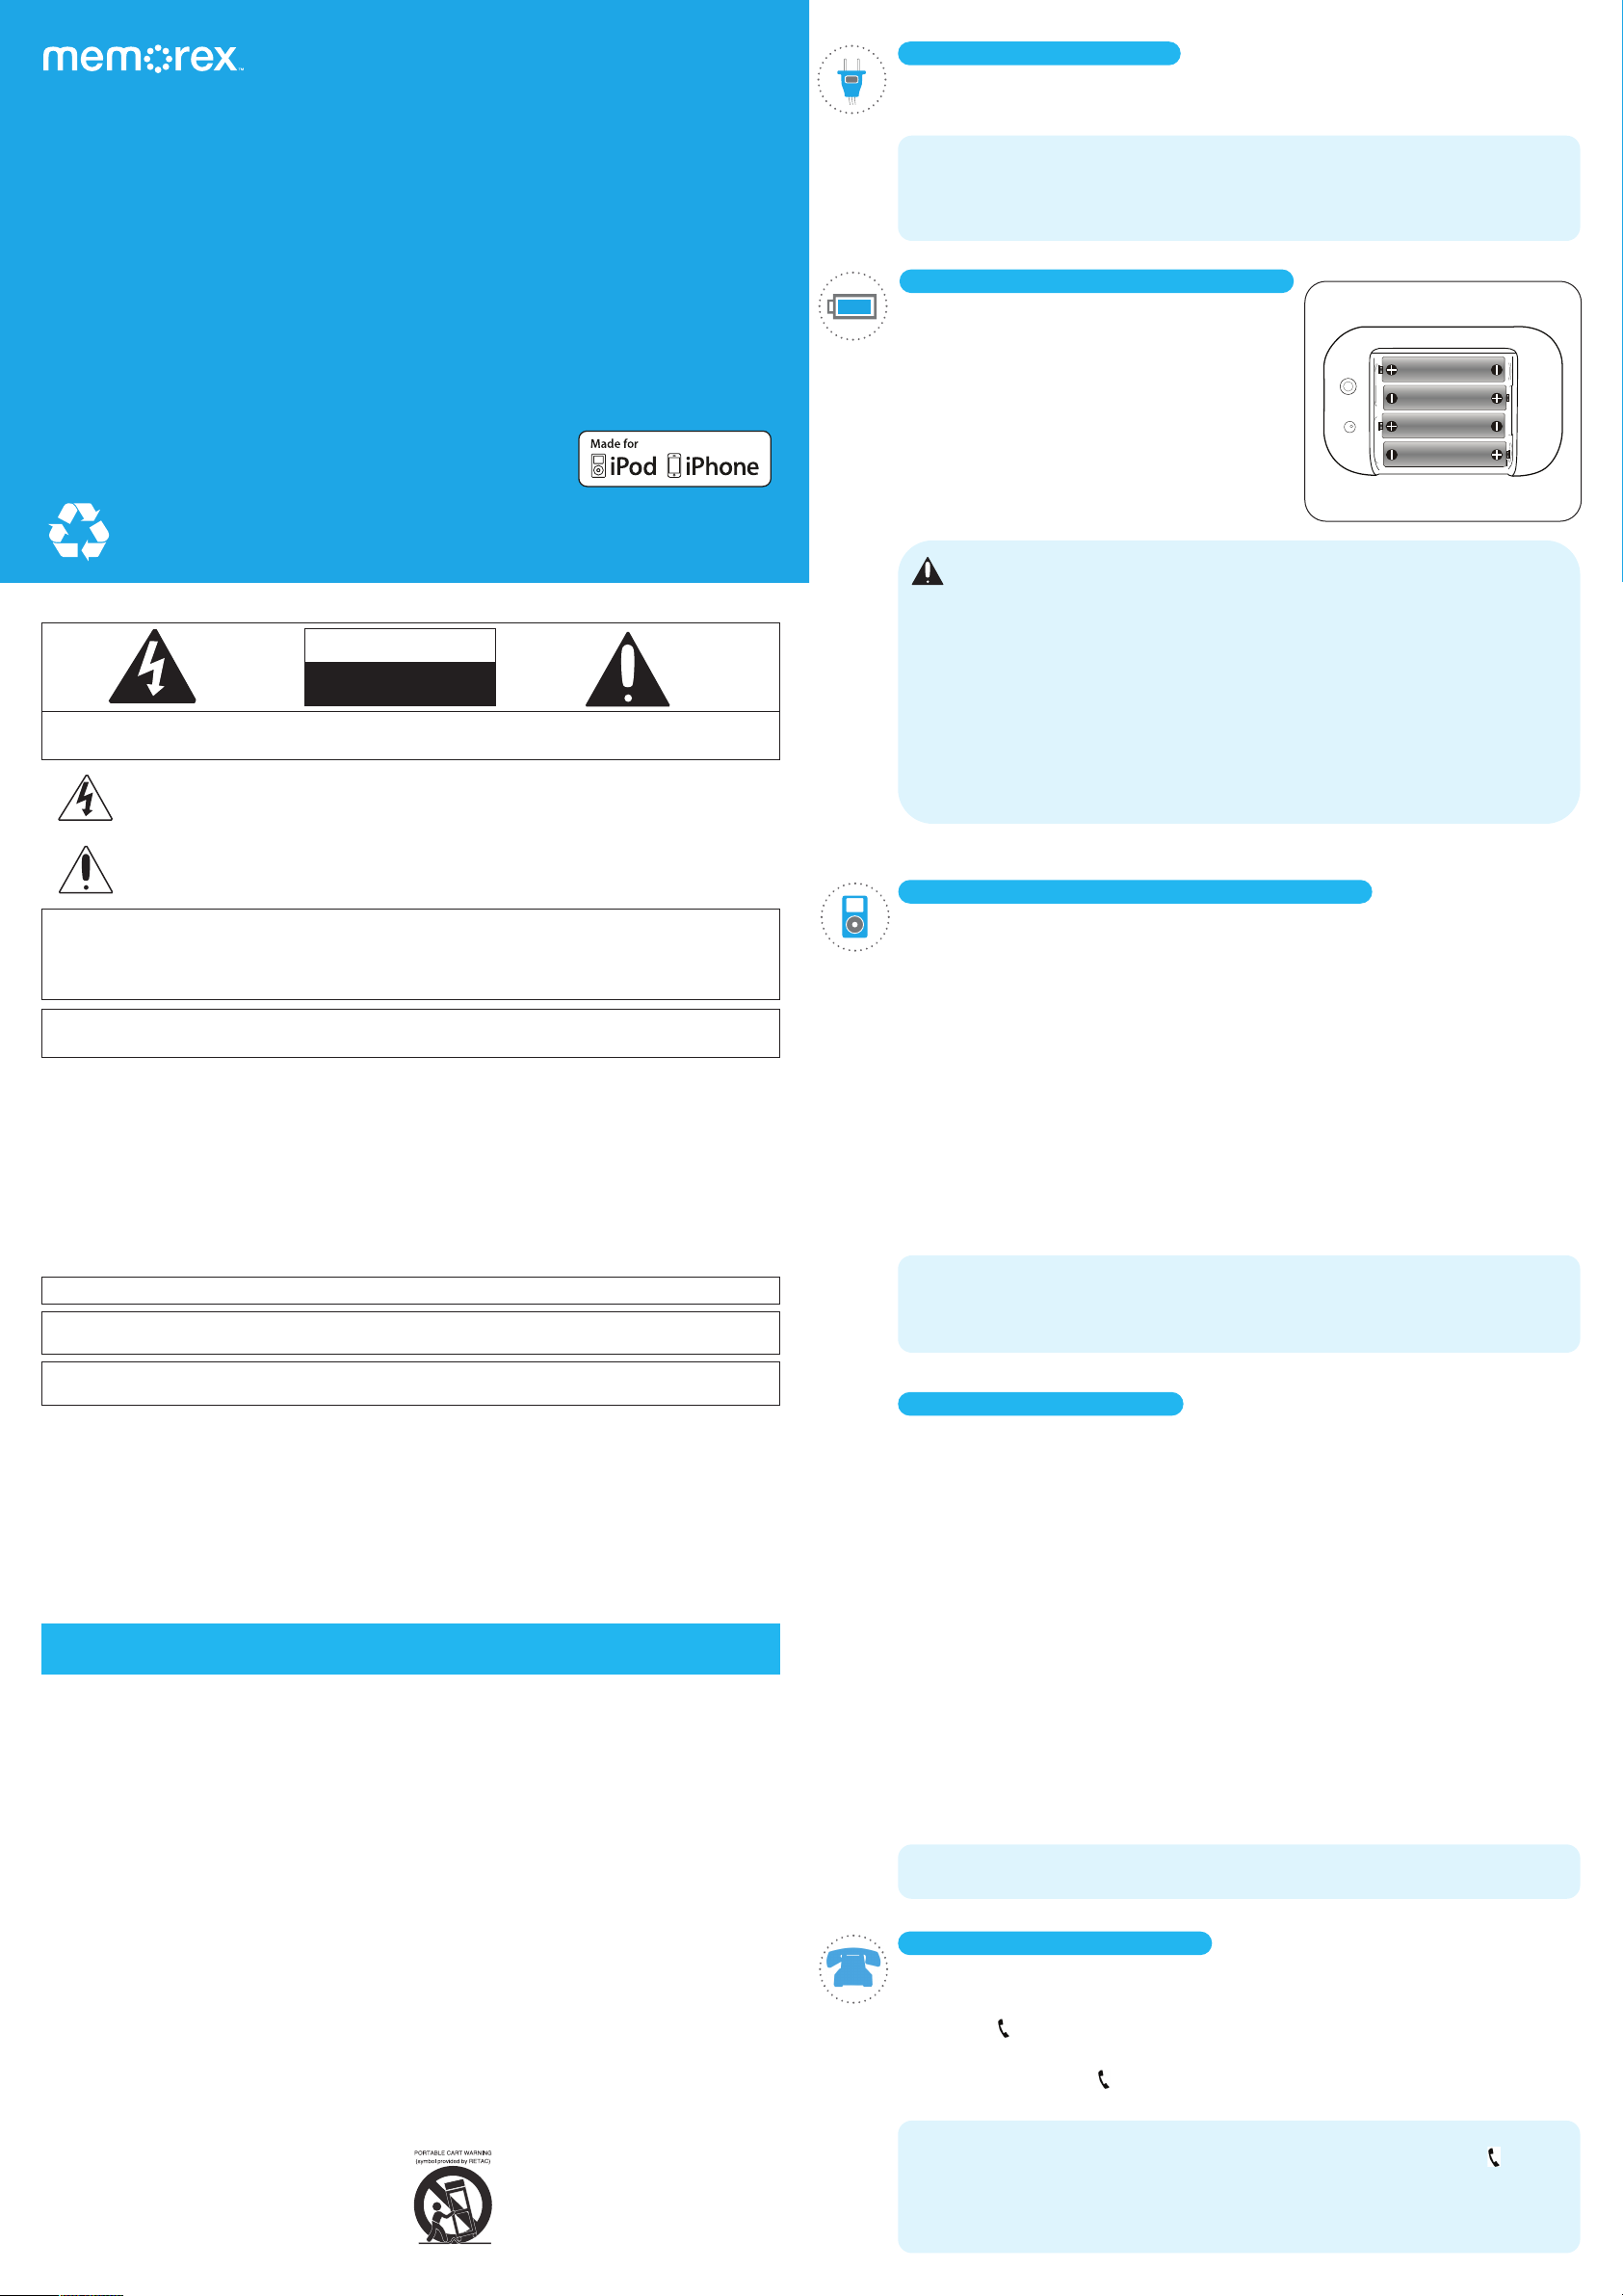
BATTERY INSTALLATION
You can also use batteries to power this unit as
follows:
1. Open the Battery Compartment
11 by sliding
the compartment cover off.
2. Install four (4) AA size batteries, paying attention
to the polarity diagram in the compartment.
3. Replace the Battery Compartment cover 11.
When the batteries are weak and need replacing,
he indicator will blink slowly.
t
BATTERY PRECAUTIONS
ollow these precautions when using batteries in this device:
F
1. Warning – Danger of explosion if battery is incorrectly replaced. Replace only with the same or equivalent
type.
. Use only the size and type of batteries specified.
2
. Be sure to follow the correct polarity when installing the batteries as indicated in the Battery Compartment.
3
A reversed battery may cause damage to the device.
. Do not mix different types of batteries together (e.g. Alkaline, Rechargeable and Carbon-zinc) or old batteries
4
ith fresh ones.
w
. If the device is not to be used for a long period of time, remove the batteries to prevent damage or injury
5
from possible battery leakage.
. Do not try to recharge a battery not intended to be recharged; it can overheat and rupture. (Follow battery
6
anufacturer’s directions.)
m
. Remove batteries promptly if consumed.
7
. Clean the battery contacts and also those of the device prior to battery installation.
8
PAIRING A BLUETOOTH MOBILE DEVICE
You can listen to your music from your Bluetooth enabled mobile device wirelessly
hrough this unit. When your phone rings, simply take the call with a touch of a
t
button. End the call by touching the same button, and return to enjoying your music!
Pair the mobile device as follows:
1. Turn on the speaker by pressing and holding the Power button
indicator lights and the beeps sound.
2. Turn your mobile device on and place it within 3 feet of the speaker.
3. Press and hold the Power button 4 until the indicator blinks blue and orange, then
release. The speaker is now in Pairing mode.
4. Enable the phone’s Bluetooth; refer to your mobile device for specific instructions,
but it is usually located in the Settings menu or similar location. After enabling,
this Memorex BlueTooth device will appear as an option. Select it on your mobile
device; the units will then pair with each other, two beeps will sound and the
orange indicator will light.
NOTES:
• If the mobile device requires a paring code, use “0000”.
• When using this unit as a phone, the sound will only be heard through the right
speaker to reduce echo.
4 until the Blue
This Class B digital apparatus complies with Canadian ICES-003.
Cet appareil numérique de la classe B est conforme à la norme NMB-003 du Canada.
Only use attachments/accessories specified by the manufacturer.
To be completely disconnected from the power input, the main plug of the AC/DC adapter shall be disconnected from the
electrical outlet. The main plug of the AC/DC adapter should not be obstructed OR should be easily accessed during
intended use.
Do not expose the product to dripping or splashing. Do not place liquid filled objects such as vases on the product.
The Bluetooth word mark and logos are owned by the Bluetooth SIG, Inc. and any use of such marks by Imation is under
license. Other trademarks and trade names are those of their respective owners.
IMPORTANT SAFETY INSTRUCTIONS
1. Read these Instructions.
2. Keep these Instructions.
3. Heed all Warnings.
4. Follow all instructions.
5. Do not use this apparatus near water.
6. Clean only with a dry cloth.
7. Do not block any of the ventilation openings. Install
in accordance with the manufacturer’s instructions.
8. Do not install near any heat sources such as
radiators, heat registers, stoves, or other apparatus
(including amplifiers) that produce heat.
9. Do not defeat the safety purpose of the polarized or
grounding-type plug. A polarized plug has two
blades with one wider than the other. A groundingtype plug has two blades and a third grounding
prong. The wide blade or the third prong are
provided for your safety. When the provided plug
does not fit into your outlet, consult an electrician
for replacement of the obsolete outlet.
10. Protect the power cord from being walked on or
pinched particularly at plugs, convenience
receptacles, and the point where they exit from the
apparatus.
11. Only use attachments/accessories specified by
the manufacturer.
12. Use only with a cart, stand, tripod, bracket, or table
specified by the manufacturer, or sold with the
apparatus. When a cart is used, use caution when
moving the cart/apparatus combination to avoid
injury from tip-over.
13. Unplug this apparatus during lightning storms or
when unused for long periods of time.
14. Refer all servicing to qualified service personnel.
Servicing is required when the apparatus has been
damaged in any way, such as power-supply cord or
plug is damaged, liquid has been spilled or objects
have fallen into the apparatus, the apparatus has been
exposed to rain or moisture, does not operate
normally, or has been dropped.
15. Do not expose this product to dripping or splashing. Do
not place objects filled with liquids, such as vases, on
this product.
16. Main plug is used as disconnect device and it should
remain readily operable during intended use. In order
to disconnect the apparatus from the mains
completely, the mains plug should be disconnected
from the mains socket outlet completely.
17. CAUTION: To reduce the risk of fire or explosion, do not
expose batteries to excessive heat such as sunshine,
fire or other heat sources.
LISTENING TO MUSIC
1. Turn your mobile device on and place it within 3 feet of the speaker.
2. Turn on the speaker by pressing and holding the Power button 4 until the Blue
indicator lights and the beeps sound. If the unit has recently been paired with the
mobile device, the unit will beep and the indicator wil turn orange indicating it is
paired. If you have not paired the mobile device or if the orange indicator does not
light, pair them as described in the Pairing a Bluetooth Device section above.
3. Play your music on your mobile device and the sound will be heard through this
unit.
4. The volume is controlled using the volume setting on your phone. You can also
raise or lower the volume using the Volume + 2 or – 1 button on the speaker.
Experiment for the best overall sound.
5. To pause the song playing, press the Power button 4. To resume playback, press
the Power button 4 again.
6. You can operate the mobile device using its own controls as per its owner’s
manual.
7. To turn off the unit, press and hold the Power button 4 until the indicator turns off
and a series of beeps sound.
NOTE: When the volume is at the maximum or minimum level and the Volume + 2
or – 1 button is pressed, the orange indicator will blink.
HANDLING PHONE CALLS
1. With the mobile device paired and the speaker on, when you receive a phone call,
the music will pause and you will hear your ring tone on this speaker.
2. Press the button to answer the call and you will utilize the speaker (and built-in
microphone) to take the call.
3. When done, press the button again to end the call.
NOTES:
• If the phone rings and you do not want to answer, press and hold the button 3
and the caller will go directly to voicemail and the music will continue.
• If the speaker is not paired or there is no input to the auxillary jack, for five minutes,
the unit will automatically power off.
Page 2
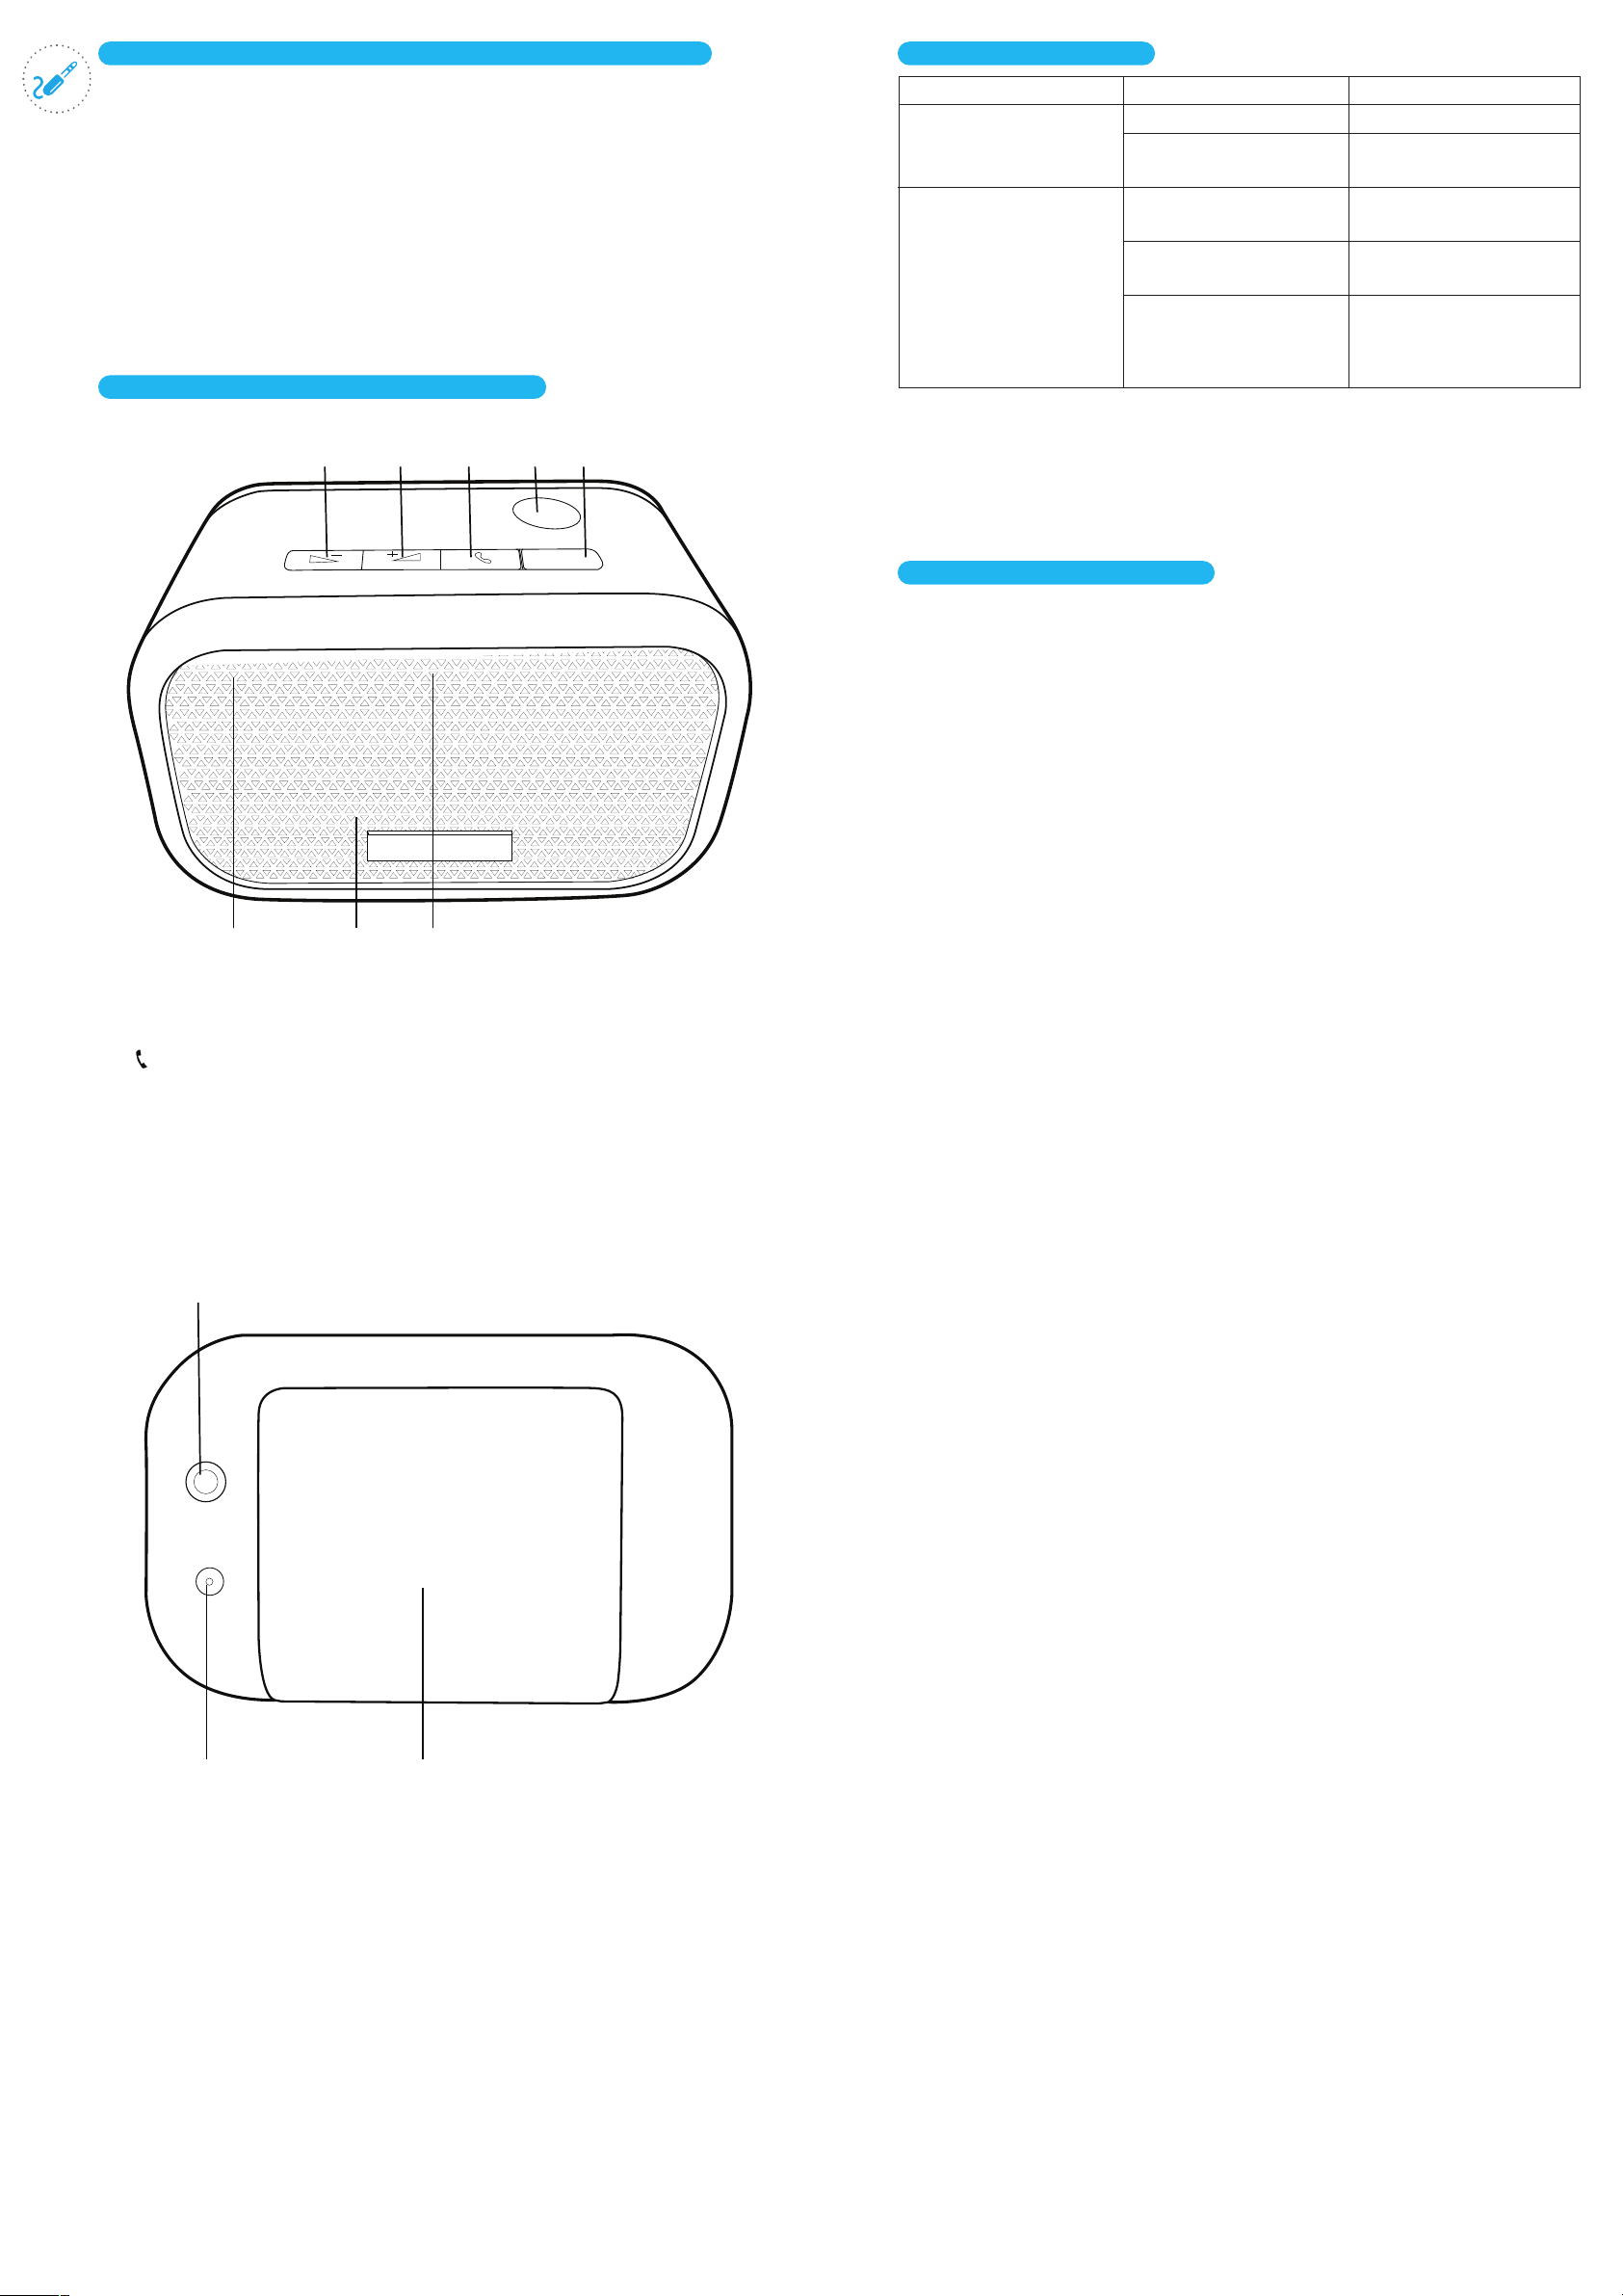
OPTIONAL CONNECTIONS: LINE IN JACK (REAR OF UNIT)
1 2 3 4 5
876
s
o
u
r
c
e
9
10 11
Insert one end of the audio cable (not included) into the LINE OUT jack on your
•
external audio unit and the other end into the Line In jack
unit. To listen to the external audio unit, turn this unit on by pressing and
holding the Power button 4 until the indicator lights and turn on the external
nit as well. Repeatedly press the Source button 5 to select LINE IN mode; the
u
indicator will light purple. The external audio unit’s output sound will be heard
through this unit’s speakers. If you wish to listen to the bluetooth mobile device,
press the Source button
lue if not paired).
b
OCATION OF CONTROLS
L
5 to select iPod mode; the indicator will light orange (or
9 on the rear of this
TROUBLESHOOTING
SYMPTOM
No sound.
Bluetooth mode:
no sound.
Volume is set to minimum.
ower is not on.
P
Batteries are weak or
dead.
Unit is in Aux mode.
Unit is not paired.
CAUSE
SOLUTION
Increase volume.
ress and hold the Power
P
button to turn the unit on.
Replace batteries.
Press the Source button to
elect correct mode.
s
Pair unit (see the Pairing
a Bluetooth Mobile
Device section).
SPECIFICATIONS
GENERAL:
Power Source........................................................................... DC 9V Adapter (Center Positive)
peaker.................................................................................................................................. 2 x 4 ohm
S
Output Power ........................................................................................................................... 2 x 1W
Weight.............................................................................................................................................5.5 oz
Dimensions....................................................................................4 (W) x 2.4 (D) x 2.5 (H) inches
1. Volume – Button
2. Volume + Button
3. Button
4. Power Button
5. Source Button
6. Microphone
7. Speaker
8. Indicator
pecifications are subject to change without notice.
S
For additional setup or operating assistance, please visit www.memorex.com
or consumer replaceable part(s), verify part number(s) then contact our parts and
F
accessories fulfillment center at: 1-800-379-8439
9. Line In Jack
10. DC In 5V Jack
(AC Adapter Part No. E18-00745-01*)
11. Battery Compartment
(Battery Compartment Cover Part No. P14-00262-01*)
*Fo r cons umer replaceable par t (s), verify part number ( s)
then contact our par ts and accessories fulfillment center at:
1-800-379-8439.
Imation Enterprises Corp.
1 Imation Way, Oakdale, MN 55128-3414 USA
www.memorex.com
© Imation Corp.
Memorex and the Memorex logo are trademarks of Imation Corp. and its affiliates.
code 1
code 2
Page 3

Guide d’utilisation
Veuillez lire ces directives au comlet
avant d’utiliser cet appareil.
Veuillez recycler.
De telles installations pourraient ne pas exister dans votre région
memorex.com
MA3911
MISE EN GARDE
RISQUE DE CHOC
ÉLECTRIQUE
NE PAS OUVRIR
MISE EN GARDE : POUR RÉDUIRE LES RISQUES DE CHOC ÉLECTRIQUE, NE PAS RETIRER LE COUVERCLE (OU
L’ARRIÈRE). AUCUNE PIÈCE À L’INTÉRIEUR NE PEUT ÊTRE RÉPARÉE PAR L’UTILISATEUR. CONFIEZ TOUTE
TENSION DANGEREUSE: L’éclair avec le symbole de la pointe de flèche dans un triangle équilatéral
est destiné à alerter l’utilisateur de la présence de tension dangereuse non isolée dans le boîtier du produit.
Elle peut être suffisamment importante pour constituer un risque de décharge électrique pour les
personnes à proximité.
ATTENTION: Le point d’exclamation dans un triangle équilatéral est destiné à alerter l’utilisateur de
la nécessité de respecter les consignes d’utilisation et de maintenance (réparation) fournies dans la
documentation qui accompagne l’appareil.
AVERTISSEMENT DE LA FCC : Cet appareil peut générer ou utiliser de l’énergie de radiofréquence. Tout changement ou
modification de cet appareil peut entraîner des interférences nuisibles à moins que les modifications ne soient expressément
approuvées dans le guide d’utilisation. L’utilisateur risque le retrait de l’autorisation d’utiliser cet équipement si une
modification ou un changement non autorisé est effectué.
ATTENTION: POUR ÉVITER LES CHOC ÉLECTRIQUES, INTRODUIRE LA LAME LA PLUS LARGE DE LA FICHE
DANS LA BORNE CORRESPONDANTE DE LA PRISES ET POUSSER JUSQU’AU FOND.
Cet appareil est conforme à la section 15 des règlements de la FCC. Le fonctionnement est soumis aux deux
conditions suivantes : (1) Ce dispositif n’est pas censé causer d’interférences nuisibles, et (2) ce dispositif doit
recevoir toute interférence, y compris celles pouvant causer un fonctionnement non désiré.
REMARQUE : Cet appareil a été testé et approuvé comme étant conforme aux limites préconisées pour un appareil numérique
de la classe B conformément à la section 15 des réglementations de la FCC. Ces limites sont conçues pour fournir une
bonne protection contre les interférences nuisibles dans une installation domestique. Cet appareil génère, utilise et peut
émettre de l’énergie de radiofréquence et, s’il n’est pas installé et utilisé conformément aux instructions, peut perturber
les communications radio. Cependant, il n’existe aucune garantie quant à l’absence d’interférences dans une installation
particulière. Si cet appareil cause des interférences nuisibles au niveau de la réception radio ou de la télévision, (ce qui peut
être vérifié en l’allumant et en l’éteignant), l’utilisateur doit essayer de remédier au problème en prenant les mesures suivantes :
t 3ÏPSJFOUF[PVSFQPTJUJPOOF[MBOUFOOFSÏDFQUSJDF
t "VHNFOUF[MBEJTUBODFRVJTÏQBSFMBQQBSFJMEVSÏDFQUFVS
t $POOFDUF[MBQQBSFJMËVOFQSJTFTVSVODJSDVJUEJGGÏSFOUEFDFMVJVUJMJTÏQBSMFSÏDFQUFVS
t $POTVMUF[MFSFWFOEFVSPVVOUFDIOJDJFOSBEJPUÏMÏWJTFVSFYQÏSJNFOUÏ
t -BQMBRVFTJHOBMÏUJRVFFTUBQQPTÏFTPVTMBQQBSFJM
AVERTISSEMENT : POUR ÉVITER TOUT RISQUE D’INCENDIE OU DE DÉCHARGE ÉLECTRIQUE,
N’EXPOSEZ PAS CET APPAREIL À LA PLUIE OU À L’HUMIDITÉ.
PARASURTENSEURS : Il est recommandé d’utiliser un parasurtenseur pour le branchement sur courant alternatif.
Les dégâts dus à la foudre et aux surtensions NE SONT PAS couverts par la garantie qui accompagne ce produit.
Cet appareil numérique de la Classe B est conforme à la norme NMB-003 du Canada.
Cet appareil numérique de la classe B est conforme à la norme NMB-003 du Canada.
Utilisez uniquement les fixations ou les accessoires recommandés par le fabricant.
Afin de couper complètement l’alimentation en entrée, la fiche secteur de l’adaptateur CA/CC doit être débranchée de
la prise électrique. La fiche principale de l’adaptateur CA/CC ne doit pas être obstruée OU doit demeurer facilement
accessible lorsque l’appareil est utilisé.
Veillez à ne pas exposer l’appareil à des gouttes de liquide ni à des éclaboussures. Aucun objet contenant du liquide,
comme un vase, ne doit être posé sur l’appareil.
La marque et les logos Bluetooth appartiennent à Bluetooth SIG, Inc. et ils sont utilisés par Imation sous licence. Les
autres marques de commerce et noms commerciaux appartiennent à leurs propriétaires respectifs.
RÉPARATION À UN TECHNICIEN QUALIFIÉ.
IMPORTANTES CONSIGNES DE SÉCURITÉ
1. Lisez ces consignes.
2. Conservez ces consignes.
3. Tenez compte de tous les avertissements.
4. Suivez toutes les consignes.
5. N’utilisez pas cet appareil à proximité de l’eau.
6. Nettoyez uniquement avec un chiffon sec.
7. Ne bouchez pas les orifices prévus pour la ventilation.
Installez conformément aux instructions du fabricant.
8. N’installez pas l’appareil à proximité de sources de
chaleur telles que les radiateurs, les grilles de chauffage,
les cuisinières ou d’autres appareils (y compris les
amplificateurs) qui génèrent de la chaleur.
9. Ne supprimez en aucun cas la fonctionnalité de sécurité
de la fiche polarisée ou avec mise à la terre. Une fiche
polarisée comporte deux lames avec une plus large que
l’autre. Une fiche avec mise à la terre a deux lames et
une troisième broche de mise à la terre. La lame large ou
la troisième broche ont été prévues pour votre sécurité.
Si vous ne parvenez pas à brancher la fiche fournie dans
votre prise, consultez un électricien afin qu’il remplace la
prise obsolète.
10. Protégez le cordon d’alimentation pour qu’il ne soit pas
piétiné ou pincé en particulier au niveau des fiches, des
prises de courant et à l’endroit où il sort de l’appareil.
11. Utilisez uniquement les fixations ou les accessoires
recommandés par le fabricant.
12. Utilisez uniquement avec un chariot, un pied, un trépied,
un support ou une table recommandé(e) par le fabricant
ou vendu(e) avec l’appareil. Si un chariot est utilisé,
déplacez prudemment les deux composantes chariot/
appareil afin d’éviter toute blessure causée par un
basculement.
13. Débranchez cet appareil pendant les orages ou si vous
prévoyez de ne pas l’utiliser pendant une longue période.
14. Confiez toute réparation à du personnel qualifié. Une
réparation est nécessaire si l’appareil a été endommagé
de quelconque manière, par ex. si le câble ou la fiche
d’alimentation est abîmé(e), ou du liquide a été renversé ou
si des objets sont tombés dans l’appareil, ou encore si ce
dernier a été exposé à la pluie ou à l’humidité, ne fonctionne
pas normalement, ou est tombé.
15. AVERTISSEMENT : Pour réduire le risque d’incendie ou de
choc électrique, n’exposez pas cet appareil à la pluie ni à
l’humidité. Aucun objet contenant du liquide, comme un
vase, ne doit être posé sur l’appareil.
16. La fiche secteur est utilisée comme dispositif de mise hors
tension et doit rester aisément accessible et fonctionnelle
à tout moment pendant l’utilisation prévue. Pour mettre
l’appareil totalement hors tension, retirez complètement la
fiche de la prise secteur.
17. MISE EN GARDE : Pour réduire le risque d’incendie ou
d’explosion, n’exposez pas les piles à une chaleur intense,
par exemple au soleil, au feu ou à d’autres sources de
chaleur.
BRANCHEMENT SUR SECTEUR
Branchez la petite fiche de l’adaptateur secteur sur le jack d’entrée CC 5 V (DC IN) at (situé
à l’arrière de l’appareil). Branchez l’autre extrémité sur une prise murale de 120 V CA, 60 Hz.
REMARQUES:
100-240V,50/60Hz
t %ÏCSBODIF[MBEBQUBUFVSTFDUFVSËMBGPJTEVKBDLEFOUSÏF$$FUEFMBQSJTFTFDUFVS
lorsqu’il n’est pas utilisé.
t 6UJMJTF[VOJRVFNFOUMBEBQUBUFVSTFDUFVSGPVSOJEPOUMFTTQÏDJGJDBUJPOTTPOU
les suivantes: 5 V CC Z
INSTALLATION DES PILES
Vous pouvez également utiliser des piles pour
alimenter cet appareil en procédant comme suit:
1. Ouvrez la trappe du compartiment des piles ak en
la glissant pour la dégager.
2. Installez quatre (4) piles AAA en veillant de respecter
la polarité du schéma dans le compartiment.
3. Replacez la trappe du compartiment des piles ak.
4. Avec les piles, l’appareil dispose d’une autonomie
de 6 heures pour la lecture de musique.
5. Le câble d’alimentation secteur doit être débranché de la prise jack secteur
correspondante à l’arrière de l’appareil pour que ce dernier s’alimente à partir des piles.
Lorsque les piles sont faibles et doivent être remplacées, l’indicateur clignote lentement.
REMARQUE: Pour évitez d’utiliser les piles, il est suggéré de brancher l’appareil sur le réseau
électrique le plus souvent possible.
PRÉCAUTIONS À PRENDRE AVEC LES PILES
Suivez ces instructions lorsque vous utilisez des piles dans cet appareil :
1. Avertissement - Danger d’explosion si la pile est mal remplacée. Remplacez uniquement avec des piles du
même type ou équivalentes.
2. Utilisez uniquement des piles de format et de type spécifiés.
3. Veillez à respecter la polarité indiquée dans le compartiment des piles lorsque vous les installez. Une pile
inversée peut causer des dommages à l’appareil.
4. N’utilisez pas simultanément des piles de types différents (par exemple alcalines, rechargeables ou
carbone-zinc) ou des piles usagées avec des neuves.
5. Si l’appareil ne doit pas être utilisé pendant une longue période de temps, retirez les piles pour éviter les
dommages ou les blessures en cas de fuite des piles.
6. Ne tentez pas de recharger une pile qui ne peut être rechargée ; elle risque de surchauffer et d’exploser.
(Respectez les instructions du fabricant des piles.)
7. Retirez immédiatement les piles usées.
8. Nettoyez les contacts de piles et ceux de l’appareil avant l’installation des piles.
PAIRAGE À UN PÉRIPHÉRIQUE BLUETOOTH ACTIVÉE
Vous pouvez écouter sans fil sur cet appareil la musique sur votre périphérique
Bluetooth mobile. Lorsque votre téléphone sonne, il vous suffit d’appuyer sur un bouton
pour répondre. Terminez l’appel en appuyant sur le même bouton et reprenez l’écoute
de votre musique!
Effectuer le pairage au périphérique mobile en procédant comme suit :
1. Mettez le haut-parleur en marche en appuyant sur l’interrupteur d’alimentation x
jusqu’à ce que l’indicateur bleu s’allume et que des tonalités se fassent entendre.
2. Mettez votre périphérique mobile en marche et placez-le à moins de 30 pieds (sans
obstruction) du haut-parleur.
3. Appuyez sur l’interrupteur d’alimentation jusqu’à ce l’indicateur clignote en bleu et
orange puis, relâchez la touche. Le haut-parleur est maintenant en mode de pairage.
4. Activez la fonction Bluetooth activée du périphérique mobile ; la commande se trouve
sur votre périphérique mobile, habituellement dans le menu de configuration ou un
emplacement similaire. Une fois la fonction Bluetooth activée, ce périphérique Memorex
apparaîtra comme une option. Sélectionnez-le sur votre périphérique mobile ; les deux
appareils se paireront l’un à l’autre, une tonalité se fera entendre et l’indicateur
orange s’allumera.
REMARQUES:
t 4JMFQÏSJQIÏSJRVFNPCJMFSFRVJFSUVODPEFEFQBJSBHFVUJMJTF[MFDPEFjx
t 4JMFQÏSJQIÏSJRVFBluetooth activée mobile n’arrive pas à se pairer avec l’appareil en 3
minutes, l’indicateur passera du noir au bleu.
t -PSTRVFWPVTVUJMJTF[MBQQBSFJMDPNNFUÏMÏQIPOFMFTPOÏNBOFVOJRVFNFOUEV
haut-parleur droit pour réduire l’écho.
ÉCOUTE DE LA MUSIQUE
1. Mettez votre périphérique mobile en marche et placez-le à moins de 30 pieds (sans
obstruction) du haut-parleur.
2. Mettez le haut-parleur en marche en appuyant sur l’interrupteur d’alimentation x
jusqu’à ce que l’indicateur bleu s’allume et qu’une tonalité se fasse entendre. Si
l’appareil a récemment été pairé avec le périphérique mobile, il émettra une tonalité et
l’indicateur passera au orange pour indiquer que le pairage a été effectué. Si vous
n’avez pas pairé le périphérique mobile ou si l’indicateur orange ne s’allume pas, pairez
les deux appareils en suivant les directives à la section Pairage à un périphérique
Bluetooth activée ci-dessus.
3. Démarrez la lecture de votre musique sur votre périphérique mobile et le son sera reproduit
par ce haut-parleur.
4. Le réglage du volume s’effectue à partir de la commande de volume sur le périphérique
mobile. Vous pouvez également hausser ou baisser le volume en utilisant la touche
Volume + v ou Volume - u sur le haut-parleur. Appréciez la meilleure reproduction
sonore qui soit.
5. Pour interrompre momentanément la lecture d’une chanson, appuyez sur l’interrupteur
d’alimentation x. Pour reprendre la lecture, appuyez de nouveau sur l’interrupteur
d’alimentation x.
6. Vous pouvez faire fonctionner le périphérique mobile en utilisant ses propres commandes
conformément au guide d’utilisation de l’appareil.
7. Pour mettre l’appareil hors tension, appuyez sur l’interrupteur d’alimentation x jusqu’à
ce que l’indicateur s’éteigne et qu’une série de tonalités se fassent entendre.
REMARQUE: Si le volume est réglé au niveau maximal ou minimal et que l’on appuie sur la
touche de hausse (Vol +) v ou de baisse du volume (Vol -) u, l’indicateur orange s’allumera.
TRAITEMENT DES APPELS
1. Lorsque le périphérique mobile est pairé et que le haut-parleur est en marche, à la
réception d’un appel, la musique s’interrompra et la sonnerie se fera entendre par
l’entremise du haut-parleur.
2. Appuyez sur le bouton
microphone intégré) pour prendre l’appel.
3. Une fois l’appel terminé, appuyez de nouveau sur le bouton
REMARQUE: Si le téléphone sonne et que vous ne désirez pas répondre, appuyez sur le
bouton
w et l’appelant n’obtiendra pas de réponse et la musique se poursuivra.
servant à répondre aux appels et utilisez le haut-parleur (et le
.
 Loading...