


Pocket PC Phone

Pocket PC Phone User Manual2
Pocket PC Phone User Manual 3
Please Read Before Proceeding
THIS DEVICE IS NOT CHARGED WHEN YOU TAKE IT OUT OF THE BOX.
DO NOT REMOVE THE BATTERY PACK WHEN THE DEVICE IS CHARGING.
WHEN INSERTING YOUR SIM CARD, MAKE SURE THE DEVICE IS POWERED OFF, AND
THAT THE SIM CARD SNAPS INTO THE SOCKET.
YOUR WARRANTY IS INVALIDATED IF YOU OPEN OR TAMPER WITH THE DEVICE’S OUTER
CASING.
EXPLOSIVE ATMOSPHERES
When in any area with a potentially explosive atmosphere or where ammable materials exist, the product
should be turned off and the user should obey all signs and instructions. Sparks in such areas could cause an
explosion or re resulting in bodily injury or even death. Users are advised not to use the equipment at refueling
points such as service or gas stations. Users are reminded of the need to observe restrictions on the use of radio
equipment in fuel depots, chemical plants or where blasting operations are in progress. Areas with a potentially
explosive atmosphere are often, but not always, clearly marked. These include fuelling areas, below deck on
boats, fuel or chemical transfer or storage facilities, and areas where the air contains chemicals or particles,
such as grain, dust, or metal powders.
PRIVACY RESTRICTIONS
Some countries require full disclosure of recorded telephone conversations, and stipulate that you must inform
the person with whom you are speaking that the conversation is being recorded. Always obey the relevant laws
and regulations of your country when using the recording feature of your Pocket PC Phone.

Pocket PC Phone User Manual 3
Important Safety Precautions
When using this product, the safety precautions below must be taken to offset possible legal
liabilities and damages.
n ELECTRICAL SAFETY
This product is intended for use when supplied with power from the battery. Other usage may be
dangerous and will invalidate any approval given to this product.
n SAFETY IN AIRCRAFTS
Due to the possible interference caused by this product to an aircraft's navigation system and
its communications network, using this product on board an airplane is against the law in most
countries.
n ENVIRONMENT RESTRICTIONS
Do no use this product at gas or refueling stations. The use of this product is also prohibited in fuel
storehouse, chemical plants, and locations containing explosives.
n ROAD SAFETY
Vehicle drivers in motion are not permitted to use telephony services with handheld devices,
except in the case of emergency. In some countries, using hand-free devices as an alternative
is allowed.
n INTERFERENCE WITH MEDICAL EQUIPMENT FUNCTIONS
This product may cause medical equipment to malfunction. The use of this device is forbidden in
most hospitals and medical clinics.
n NONIONIZING RADIATION
This product should be operated in the suggested normal condition only to ensure the radiative
performance and safety of the interference. As with other mobile radio transmitting equipment,
users are advised that for satisfactory operation of the equipment and for the safety of personnel,
it is recommended that no part of the human body be allowed to come too close to the antenna
during operation of the equipment.

Pocket PC Phone User Manual4
Pocket PC Phone User Manual 5
Contents
Chapter 1 Getting Started
1.1 Knowing Your Device ...................10
1.2 Inserting the SIM Card ...............12
1.3 Battery .........................................13
1.4 Accessories...................................15
Chapter 2 Knowing Your Pocket PC
Phone
2.1 Starting Up ...................................18
2.2 Entering Information ...................25
2.3 Phone Pad ....................................30
2.4 Writing on the Screen ..................33
2.5 Drawing on the Screen.................35
2.6 Recording a Message ...................36
2.7 Finding Information .....................38
Chapter 3 Using Your Pocket PC
Phone
3.1 About Your Pocket PC Phone .......42

Pocket PC Phone User Manual 5
3.2 Making a Call................................46
3.3 Smart Dialing ...............................49
3.4 Receiving a call ............................52
3.5 In-Call Options .............................53
3.6 Contacts Information...................55
3.7 Photo Contacts.............................57
3.8 Additional Dialing Information ....64
3.9 Securing Your Pocket PC Phone... 65
Chapter 4 Synchronizing Information
4.1 Using ActiveSync..........................68
4.2 Synchronizing Information ..........70
4.3 Infrared and Bluetooth
Connection ...................................73
4.4 ActiveSync Errors .........................74
Chapter 5 Personalizing Your MDA
Compact
5.1 Device Settings ............................76
5.2 Phone Settings .............................84

Pocket PC Phone User Manual6
Pocket PC Phone User Manual 7
Chapter 6 Getting Connected
6.1 About Connections .......................88
6.2 Connecting to the Internet ..........88
6.3 CSD Line Type ..............................90
6.4 Pocket Internet Explorer .............91
6.5 Network Cards Settings ...............92
6.6 Terminal Services Client ..............93
6.7 Bluetooth......................................94
6.8 Wireless Modem.........................100
Chapter 7 Using Outlook
7.1 Calendar .....................................106
7.2 Contacts .....................................108
7.3 Tasks ..........................................111
7.4 Notes ..........................................112
Chapter 8 Massaging Features
8.1 E-Mail and Text Messages..........116
8.2 MSN Messenger..........................121

Pocket PC Phone User Manual 7
8.3 MMS Messages ...........................121
Chapter 9 Applications
9.1 Pocket Word...............................132
9.2 Pocket Excel ...............................133
9.3 Windows Media Player...............134
9.4 Pictures ......................................135
9.5 Truefax .......................................139
9.6 MIDlet Manager .........................143
Chapter 10 Using Camera and Album
10.1 About Camera and Album ..........152
10.2 Camera .......................................153
10.3 Album ........................................165
Appendix A
Adding or Removing Programs ..........176
Managing Memory..............................178
Backing Up Files .................................180
Resetting Your Pocket PC Phone ......181

Pocket PC Phone User Manual8
Appendix B
Regulatory Agency IDs........................184
European Union Notice........................184
Important Health and Saftey
Information.........................................186
Troubleshooting..................................188
Specications 194
Index 195

Chapter 1
Getting Started
1.1 Knowing Your Device
1.2 Inserting the SIM Card
1.3 Battery
1.4 Accessories
Pocket PC Phone User Manual10
Pocket PC Phone User Manual 11
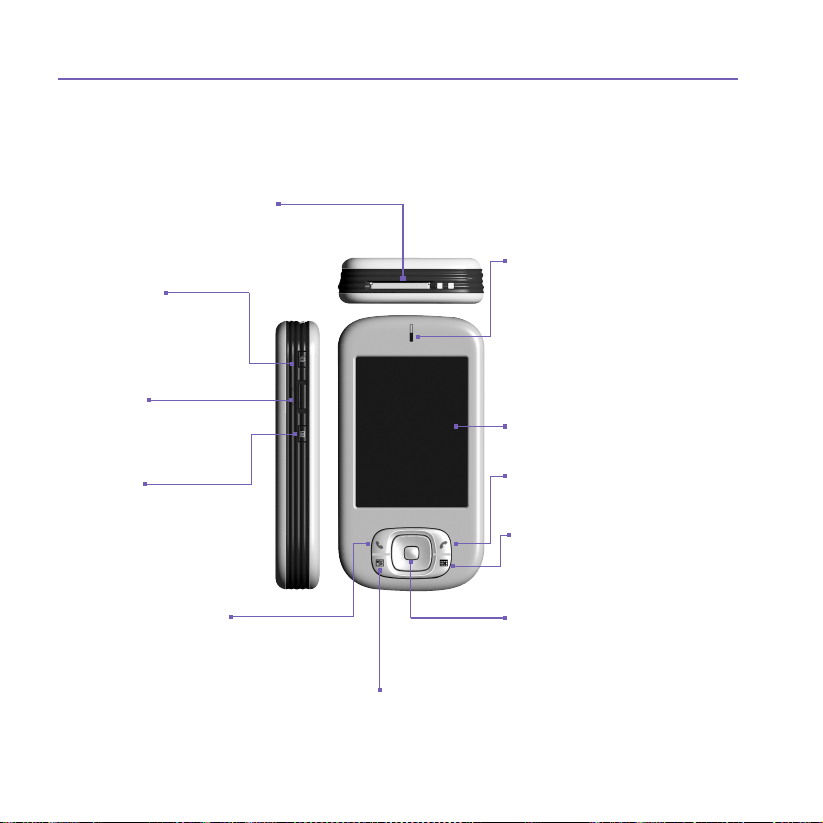
1.1 Knowing Your Device
Top View, Left-Side View, and Front View
MMC/SD or SDIO slot
Insert MMC card or a SDIO
Accessory here.
Camera
Press to launch Camera.
Press again to take a
picture.
Volume
Press UP/DOWN to adjust
the volume.
Record
Long press to record a
voice note.
Talk/Send
Press to answer an
incoming call or dial a
number.
Contacts
Press for quick access
to your contacts.
Notication LEDs
GSM standby, message,
GSM network status, PDA
notication, Bluetooth, power
notication and battery charge
status.
Touch Screen
End
Press to end a call.
Calendar
Press for quick access to your
calendar.
Navigation Pad
Press to move up/down
and left/right through any
of the drop-down menus
or program instructions;
select by pressing the Action
key on the center of the pad.

Pocket PC Phone User Manual 11
Right-Side View, Back View, and Bottom View
Car Antenna Connector
You can connect your phone to a car
antenna to utilize the superior reception
quality.
Stylus and Stylus Slot
Power Button/
Backlight
Press to turn ON/OFF your
device or backlight.
Infrared Port
Enables to exchange le(s)
or data with other devices
without cables or wires.
Soft Reset
Press here with stylus
to reset your device.
Mini USB Connector
Use this connector to
synchronise, transmit data or
recharge the battery.
Self-portrait
mirror
Camera Lens
Earphone Plug
Allows you to listen
to audio media
or use the phone
hands-free kit.
Microphone
Speak here when
receiving/making a
phone call or voice
recording.

Pocket PC Phone User Manual12
Pocket PC Phone User Manual 13
1.2 Inserting the SIM Card
1. Ensure the device is turned off.
2. Turn your device over and press the back cover lightly to slide out the back cover.
3. Switch the red battery lock to release the battery pack. Then, use your nger to lift up
the battery from the left side of the battery slot.
locked
unlocked
4. Insert the SIM card with its gold contacts face down. Its cut off corner should match the
cut off corner in the slot. If you wish to take the SIM card out, use the stylus to press into
the SIM card slot hole, and then lightly lift up the SIM card while pressing the left-most
side of the SIM card, and then slide it out.
Slide the SIM
card into the
SIM card slot.
Press lightly to
slide the SIM
card out.
Use the stylus to
press into the SIM
card slot hole.

Pocket PC Phone User Manual 13
5. Replace the battery by inserting the right side rst. Then, push back the red battery lock
into place to x the battery.
6. To replace the back cover, lay it on the back of the device, lining up the grips on the upper
side of the back cover with the slots on the side of the device. Finally, slide forward to
snap into place.
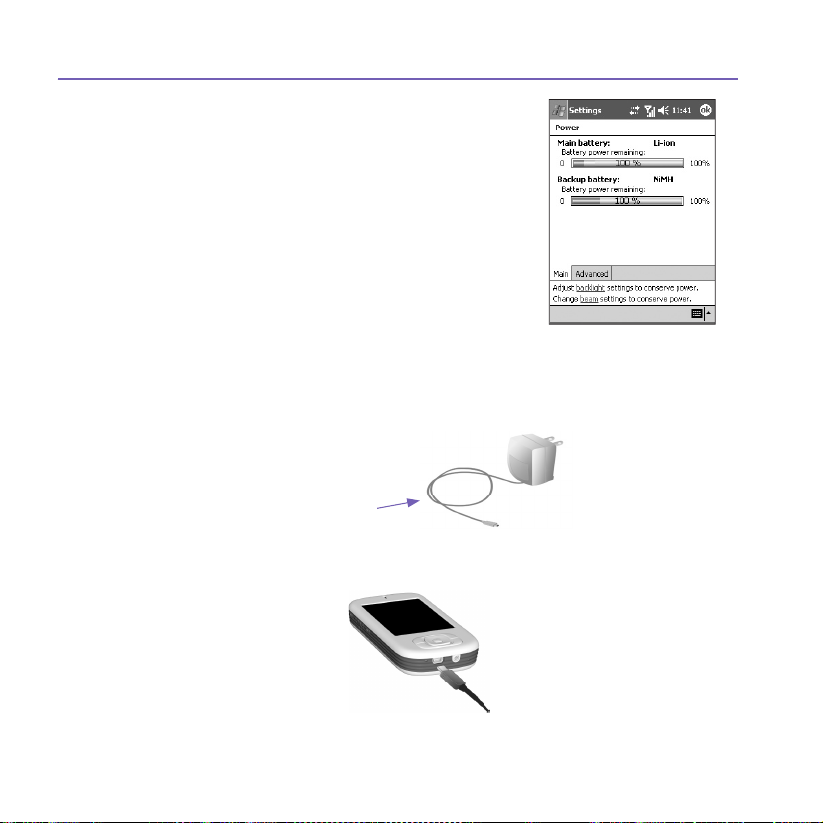
1.3 Battery
Your Pocket PC Phone contains a rechargeable Li-ion polymer battery. Battery life depends
on whether you are talking on the phone, using the PDA, or if the device is on standby.
Battery life estimates:
n Talk-time: 3 - 5 hrs.
n PDA: 11 hrs (approximate.).
n Standby: 190 hrs (approximate.).
n Data retention time: 72 hrs.
The above are based on using one function at a time. Battery life
may vary with switching between functions.
WARNING: To reduce the risk of re or burns, do not disassemble, crush, puncture, short
external contacts, heat above 60℃ (140℉), or dispose of in re or water. Replace only
with manufacturer specied batteries. Recycle or dispose of used batteries as stipulated
by local regulations.
Data retention
It is vital to keep your battery charged. This is because your Pocket PC Phone does not
have a hard drive, all data and any new programs you install are stored in the RAM. If the
battery completely drains, any data or new programs you installed will be erased. Only the
default programs that came with the device at the time of purchase will remain.
Pocket PC Phone User Manual14
Pocket PC Phone User Manual 15
To prevent this kind of data loss, a portion of the main
battery will keep your data safe for 72 hours if your
device runs out of power. An additional battery, the
internal backup battery, is designed to keep your data
safe when you remove the main battery. It will keep the
data safe for 30 minutes.
NOTE: Be sure to check that the internal backup battery
power remains at least at 50% OR ABOVE before you
remove the main battery by tapping the Start menu >
Settings > the System tab > Power.
Recharging your device
You can recharge your device in the following ways:
1. Connect your Pocket PC Phone directly to the AC adapter that is provided.
Plug the AC adapter
into an electrical outlet
2. You can also charge your Pocket PC Phone by plugging the Sync cable into
your PC's USB port.

Pocket PC Phone User Manual 15
When the battery is low
When the low-battery warning message appears, immediately save any data you are
working on, perform synchronization with your PC, and turn off your Pocket PC Phone. The
internal backup battery can only protect the data in case of battery or SIM card change.
Data retention in the case of shut down (low battery) is 72 hours.
1.4 Accessories
AC Adapter
The AC adapter allow you to recharge your Pocket PC Phone.
USB Cable
The optional USB cable allows you to synchronize with a PC .
Headset
The stereo handset has a volume control and a button where press once to pick up a
phone call and hold 2 seconds to end a phone call. During a phone call, press once to
switch between calls.

Pocket PC Phone User Manual16

Chapter 2
Knowing Your Pocket PC
2.1 Starting Up
2.2 Entering Information
2.3 Phone Pad
2.3 Writing on the Screen
2.4 Drawing on the Screen
2.5 Recording a Message
2.6 Finding Information

Pocket PC Phone User Manual18
Pocket PC Phone User Manual 19
2.1 Starting Up
Turning Your Pocket PC Phone On and Off
To turn your device on:
Press the Power Button on the right side of the device. (The Pocket PC Phone will power
up and, if this is the rst time it has powered up, will automatically begin the initiation/
calibration process. See below for further details.)
To turn your device off:
Press the Power Button on the right side of the device.
Note: Turning your device off doesn’t turn the phone off. To turn the phone off, select the
GSM icon and select "Turn on ight mode".
Screen tapping and calibration
When you rst start up your Pocket PC, you will be asked to calibrate the screen by tapping
the center of a cross with your stylus as it moves around the screen. This process ensures
that when you tap the screen with your stylus, the tapped item is activated.
Re-calibrate the screen
If your Pocket PC Phone does not accurately respond to screen taps, you will need to
re-calibrate it:
1. Tap the Start menu > Settings > the System tab > Screen.
2. Tap the Align Screen button on the General tab to re-calibrate the screen as described
above.
Note: When aligning the touch screen, tap the target rmly and accurately.

Screen Orientation
Pocket PC Phone User Manual 19
Portrait Mode
To switch the orientation of your touch screen between the Portrait mode or the Landscape
mode, select the Orientation options by tapping the lower right Screen Orientation icon
, tap once for Landscape (right-handed), another one for Landscape(left-handed). Or,
alternatively, you can tap the Start menu > Settings > the System tab > Screen. The
Portrait mode allows you to get a better view or a better operation of certain programs on
your Pocket PC, while Landscape may be optimal for viewing longer text les.
For easier reading of text in programs that support ClearType, tap the ClearType tab, and
then select Enable ClearType. To increase readability or see more content by adjusting
the size of text in programs that support it, tap the Text Size tab. Move the slider to make
text larger or smaller.
Landscape Mode
Tap on this icon to change screen orientation.
Pocket PC Phone User Manual20
Pocket PC Phone User Manual 21
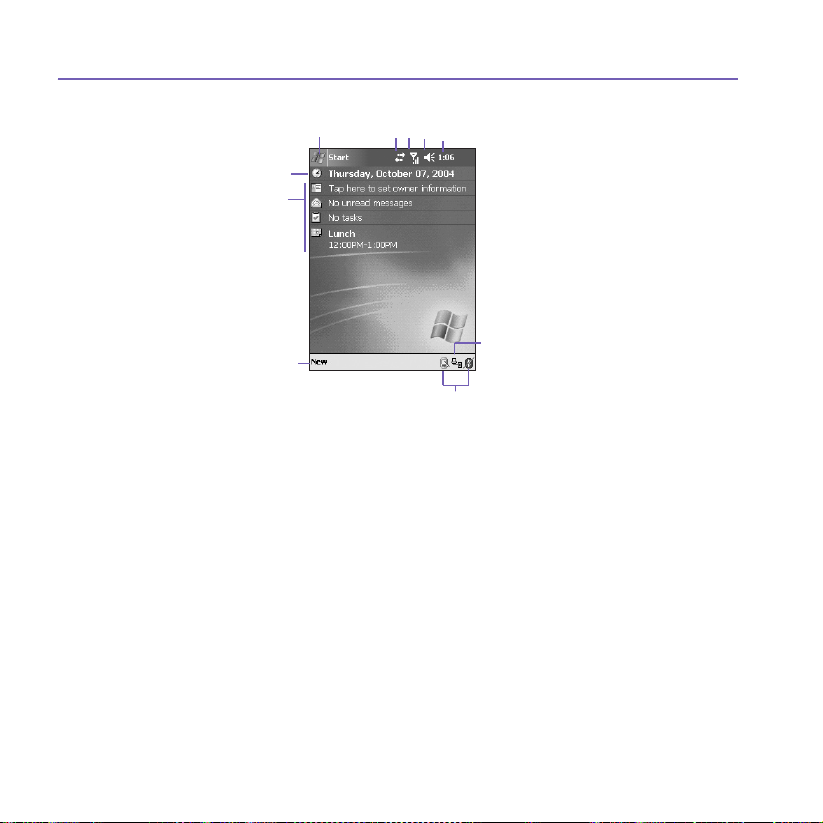
The Today screen
6
7
8
1
42
3
5
10
1. Tap to bring up a menu list of programs.
2. Tap to view call status information.
3. Tap to view network status and options.
4. Tap to change volume or mute all sounds.
5. Tap and hold to change time format.
6. Tap to change date and time.
7. Your day-at-a-glance reminders. Tap to open the related program.
8. Tap to create a new item.
9. Tap to disconnect ActiveSync, or turn ON/OFF Bluetooth.
10. Tap to change screen orientation.
Note: To go back to the Today screen when you are using other programs, just tap the
Start menu > Today.
Note: To customize the Today screen display, including the background image, tap
Start menu
information.
> Settings > the Personal tab > Today.
9
the
Please refer to Chapter 5 for more

Pocket PC Phone User Manual 21
Indicators
Your Pocket PC's status indicators are located at the top right of the Today screen. Some
common indicators are listed below. If you are not sure about the meaning of an indicator,
tap on it with your stylus and a dialog box will explain its function and allow you to change
the settings for that particular icon.
Indicators Meaning
/
/
/
/
Sounds are off / sounds are on.
Main battery with full strength/ No battery
Main battery low/ very low.
Backup battery is very low.
Indicates that Caller ID monitor program is not yet ready to receive
calls.
Data connection is active.
Indicates that your Pocket PC Phone is roaming in a different
network area.
Notication that one or more instant messages were received.
Notication that one or more mobile e-mail/text messages were
received.
Indicates the connection to your service provider/network operator is
on/off. (with signal strength)
Indicates that your Pocket PC Phone is synchronized with a PC.
Indicates that more notication icons need to be displayed. Tap the
icon to view all.

Pocket PC Phone User Manual22
Pocket PC Phone User Manual 23
Notications
Your Pocket PC Phone reminds you in a variety of ways when you have something to do or
when you have received an SMS message. For example, if you’ve set up an appointment
in Calendar, a task with a due date in Tasks, or an alarm in Clock, you will be notied in
any of the following ways:
n A message box appears on the screen.
n A sound, which you can specify, is played.
n A light ashes on your Pocket PC.
n The Pocket PC Phone vibrates.
To choose reminder types and sounds for your device, the Start menu > Settings > the
Personal tab > Sounds & Notications. The options you choose here apply throughout
the Pocket PC.
Pop-Up menus
Use pop-up menus to quickly perform an action on an item. To access a pop-up menu,
tap and hold the item that you want to perform the action on. When the menu appears,
tap the action you want to perform, or tap anywhere outside the menu to close it without
performing an action.
1. Tap and hold to display the pop-up menu.
2. Lift the stylus and tap the action you want.
3. Tap outside the menu to close it without performing an action.
Pocket PC Phone User Manual 23
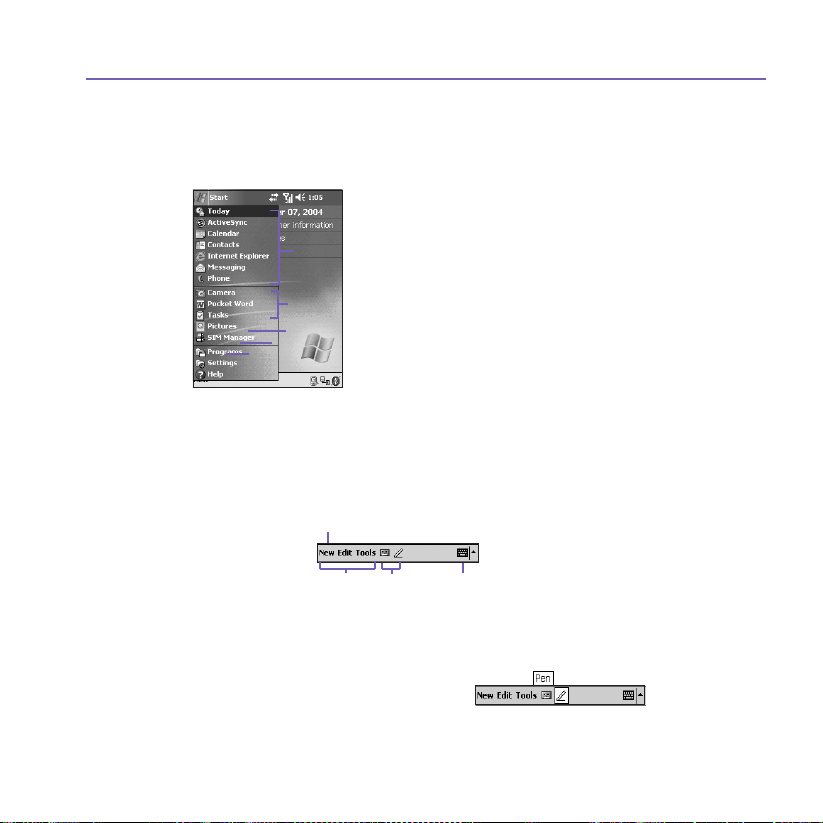
Navigation bar
The navigation bar, located at the top of the screen, displays active programs and current
time, and enables you to switch between programs and close screens.
1. Tap to switch to a program.
1
2
3
4
5
2. Tap to switch to a recently used program.
3. Tap to see more programs.
4. Tap to change device settings.
5. Tap to see a Help topic for the current screen.
Command bar
Use the command bar at the bottom of the screen to perform tasks in programs. The
command bar includes menu names, buttons, and the Input Panel button.
1
3
2
1. To create a new item in the current program, tap New.
2. Tap to select menu commands.
3. Tap to select button commands.
4. Tap to display the input panel.
4
To see the name of a button, tap and hold the stylus on the button. Drag the stylus off the
button so that the command is not carried out.

Pocket PC Phone User Manual24
Pocket PC Phone User Manual 25
Programs
You can switch from one program to another by selecting it from the Start menu.
To access a program, tap the Start menu > Programs, and then the program name. You
can also switch to some programs by pressing a program button on your device. For more
information about the Button settings, please see Chapter 5.
Icon Description
ActiveSync synchronizes information between your device and PC.
xBackup backs up your Pocket PC Phone les.
Contacts keeps track of your friends and colleagues.
Messaging sends and receives Email/SMS/MMS messages.
Pocket IE browses Web sites and downloads new programs and les.
SIM Tool Kit (STK) allows you to access information and other services offered by
your operator.
Phone makes/receives calls, and switches between calls.
Calculator performs basic arithmetic.
Wireless Modem uses your Pocket PC Phone as an external modem for a PC.
SIM Manager collects, organizes, and sorts the Contacts list stored on your SIM
card.
Calendar keeps track of your appointments and creates meeting requests.
Tasks keeps track of your tasks and reminds you of important events.
TrueFax sends and receives fax documents.

Icon Description
Windows Media plays sound or video les.
Pocket Excel creates, views, and edits Excel workbooks.
Pocket Word creates, views, and edits MS-Word documents.
MSN Messenger sends and receives instant messages.
Pictures collects, organizes, and sorts .jpg picture les.
Games such as Jawbreaker and Solitaire are included.
File Explorer views all the les on your Pocket PC.
Camera snaps photos or shoots video clips.
Album collects, organizes, and sorts .JPG/.BMP/.GIF les.
Photo Contacts inputs the image les according to your Contacts list and sets up
Caller ID.
Notes creates handwritten or typed notes, drawings, and recordings.
2.2 Entering Information
You can enter information on your device in the following ways:
Pocket PC Phone User Manual 25
n Synchronizing: Using ActiveSync, exchange information between your PC and device.
(For more information on ActiveSync, see Chapter 4).
n Typing: Using the Input Panel or the keyboard on the bottom of your device, enter typed
text into the device. You can do this by tapping keys on the screen soft keyboard, by pressing
the keyboard, or by using the handwriting recognition software.
Pocket PC Phone User Manual26
Pocket PC Phone User Manual 27
n Writing: Using the stylus, write directly on the screen.
n Drawing: Using the stylus, draw directly on the screen.
n Recording: Create a stand-alone recording or embed a recording into a document or
note.
Using the Input Panel
Tap to change
input panel options
Tap to select an
input panel
Tap to see the list
Tap to open the selected
input panel
of input panels
Use the input panel to enter information in any program on your device. You can either
type using the soft Keyboard or write using Letter Recognizer, Block Recognizer,
Transcriber, or Phone Pad. In any case, the characters appear as typed text on the
screen.
Using the Soft Keyboard
To show or hide the input panel, tap the Input Panel button . To see your choices, tap
the arrow next to the Input Panel button. Tap the arrow next to the Input Panel button
, and then Keyboard.
1. To type lowercase letters, tap the keys with the stylus. To type a single uppercase
letter or symbol, tap the Shift key. To tap multiple uppercase letters or symbols, tap the
CAP key. You can also tap and hold the stylus on the key and drag up to type a single
uppercase letter.
Pocket PC Phone User Manual 27
Tap to add the word if this
is the right one for you
2. To add a space, in addition to tapping the space bar, you can also tap and hold any key
and then drag the stylus to the right. To backspace one character, in stead of tapping
the backspace key, you can also tap and hold any key and then drag the stylus to the
left across at least two other characters.
3. To insert a carriage return, tap and hold the stylus anywhere on the keyboard and drag
down. When you use the input panel, your device anticipates the word you are typing
or writing and displays it above the input panel. When you tap the displayed word, it is
automatically inserted into your text at the insertion point. The more you use your device,
the more words it learns to anticipate.
Note: To change word suggestion options, such as the number of words suggested at one
time, tap the Start menu > Settings > the Personal tab > Input > the Word Completion
tab. For more information about Input settings, please see Chapter 5.
Using the Letter Recognizer
With the Letter Recognizer, you can write letters using the stylus just as you would on
paper.
1. Tap the arrow next to the Input Panel button , and then Letter Recognizer.
2. Write a letter in the box.

Pocket PC Phone User Manual28
Pocket PC Phone User Manual 29
When you write a letter, it is converted to typed text that appears on the screen. For specic
instructions on using Letter Recognizer, with Letter Recognizer open, tap the question
mark next to the writing area.
Using the Block Recognizer
With the Block Recognizer, you can input character strokes using the stylus that are
similar to those used on other devices.
1. Tap the arrow next to the Input Panel button , and then Block Recognizer.
2. Write a letter in the box.
When you write a letter, it is converted to typed text that appears on the screen. For
specic instructions on using Block Recognizer, tap the question mark next to the
writing area.
Switching to Transcriber
With Transcriber, you can write anywhere on the screen using the stylus just as you would
write on paper. Unlike Letter Recognizer and Block Recognizer, you can write a sentence
or more. Pause and let Transcriber change the written characters to typed characters.
1. Tap the arrow next to the Input Panel button, and then Transcriber.
2. Write anywhere on the screen.
For specic instructions on using Transcriber, open Transcriber open, and tap the question
mark in the lower right-hand corner of the screen.
To punctuate in Transcriber:
1. Tap the keyboard button on the tool bar.
2. Tap the desired punctuation.
3. Tap the keyboard button again to hide the keyboard.

Pocket PC Phone User Manual 29
To learn writing in Transcriber:
1. Tap on the tool bar.
2. A Letter Shapes Selector screen will appear:
n At the bottom of the screen, select the character you wish to explore.
n At the top of the screen, tap the picture of this character. It will slowly redraw, showing the
writing sequence.
n Select how often you write the character using that method.
When you nish the selecting all the letters, you can save these as a prole by tapping
File > Save, and enter a name for the prole.
Using Proles
Letter Shape Selector supports two proles: Master or Guest:
n Master is typically used by the Pocket PC's primary user. This prole is unaffected by any
Guest user settings.
n
Guest is for temporary device usage by another person.
Editing and selecting text
Each input program provides cursor keys to move through text and backspace so that you
can correct spelling, grammar or insert additional information. Alternatively, you can use
your stylus to make an insertion.
To select typed text, drag the stylus across the text you want to select. You can cut, copy,
and paste text by tapping and holding the selected words, and then tapping an editing
command on the pop-up menu, or by tapping the command on the Edit menu.
Pocket PC Phone User Manual30
Pocket PC Phone User Manual 31
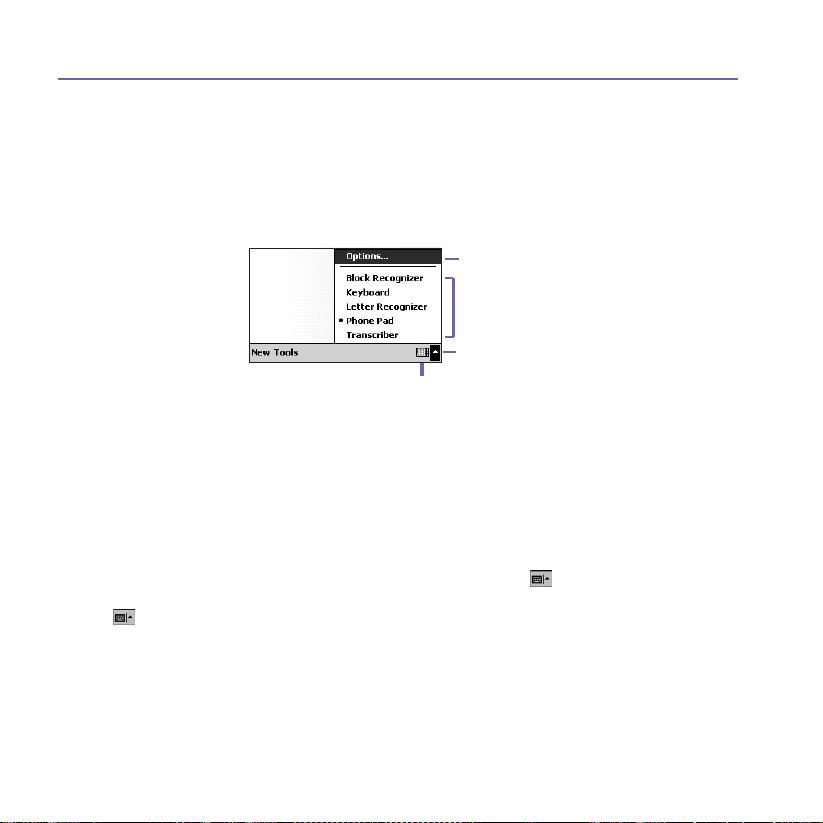
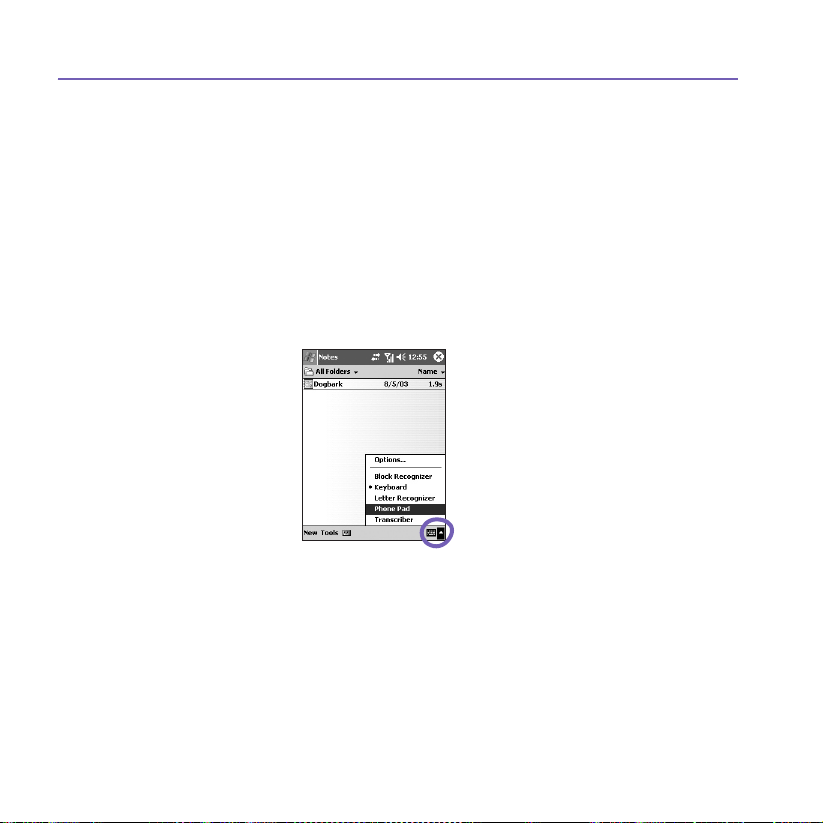
2.3 Phone Pad
Phone Pad is a Soft Input Panel (SIP) application that provides a exible alternate input
method. With it, you can easily switch among three input modes (T9, Multi-Tap, and
Numeric) plus a Symbols menu, with greater convenience.
Using Phone Pad
Phone Pad can be activated at any time, except when in the Today screen or when in
Camera mode. To use Phone Pad, tap-and-hold the Keyboard icon which is shown near
the lower right corner of your screen, next to the triangular-shaped menu icon. Then
select Phone Pad from the menu to open the Phone Pad input panel.
Using T9 to Input Text
By default, Phone Pad is in T9 mode. It is the easiest and most convenient way to input
text in English. As you press alphanumeric buttons on the Phone Pad input panel, T9
tries to automatically match the letters you have selected with the most likely completed
word.
To type a word: Simply tap on the numeric keypad.

Pocket PC Phone User Manual 31
To insert a word in the current application screen:
1. Tap any word in the wordlist.
2. Tap the space key.
3. Select a word and tap enter to insert the word.
To enter a number:
1. Tap and hold the number key on the Input panel.
2. Or, tap the button to switch to numeric mode.
Then tap the desired number(s).
To insert a tab: Tap and hold the space key.
To scroll the wordlist: Tap the left / right arrow keys.
To enter a capital: Tap the Shift key.
To add symbols:
1. Tap the 1 key to display the most frequently used
symbols on the screen.
2. Or, tap the sym key to see all the symbols. Then,
tap on the desired one(s) to enter to the wordlist
or application screen.
Using the Multi-Tap mode to Input Text
Unlike the T9 input mode, the Multi-Tap input mode will not search for all the possible
combinations of letters or try to guess at a partial word’s completion. You need to manually
enter all letters yourself to form words.
For example:
If you want to enter two consecutive “d” letters, tap the 3def key once, wait one second,
then tap again to enter the second “d.” Or, if you want to enter “e” into the Wordlist, you

Pocket PC Phone User Manual32
Pocket PC Phone User Manual 33
must tap the 3def key twice quickly so that the “e” will be recognized, or tap three times
quickly if you wish to enter the letter “f.”
Entering Numbers
When 123 is indicated as the input mode, each time you press a number button on the
input panel, the associated number will display in the Wordlist panel.
After you have entered the desired number(s), tap the Enter button to insert the number(s)
on the screen. Or, if you wish to add a space after the number(s) is displayed, tap the
Space button instead.
Phone Pad Options
This feature lets you select various options for Phone Pad. You can invoke the Phone
Pad options screen in the following ways:
n Tap and hold the opt/sym button in Phone Pad.
n Tap the triangular icon in the extreme lower right corner of the screen. A menu
containing the Options command opens. Select Options from the menu.
Select Phone Pad as the input method, and then tap the Options button.
n Select Start Menu > Settings > Personal Tab > Input.

Pocket PC Phone User Manual 33
The Phone Pad options available are:
n Turn on one-touch symbol entry
Check this box to select one symbol at a time.
n Auto-hide matching wordlist
Check this box to hide the word list after you
select a word.
n Turn on screen tap sound
Check this box to play a sound each time you tap
a key in Phone Pad.
n Automatically add a space after selecting a
word
Check this box to add a space automatically at
the end of every word, after entering a word.
n Enable pop-up menu for deleting user-dened
words
Check this option to display a pop-up menu
whenever you tap on a word that is in the user
database.
2.4 Writing on the Screen
In any program that accepts writing, such as Notes, and in the Notes tab in Calendar,
Contacts, and Tasks, you can use your stylus to write directly on the screen. Write as you
would on paper. You can edit and format what you have written and convert the information
into typed text at a later time.
Tap the pen button to switch to writing mode. This action displays lines on the screen
to help you write. Some programs that accept writing may not have the pen button. See
the manual for each particular program to nd out how to switch to writing mode.

Pocket PC Phone User Manual34
Pocket PC Phone User Manual 35
Selecting writing
If you want to edit or format writing, select the text rst.
1. Tap again to exit the writing mode. This helps to select the written text more easily.
2. Tap and hold the stylus next to the text you want to select until the insertion point
appears.
3. Without lifting, drag the stylus across the text you want to select.
If you accidentally write on the screen, tap Edit, Undo, and try again.
You can cut, copy, and paste written text in the same way you work with typed text: tap
and hold the selected words, and then tap an editing command on the pop-up menu, or
tap the command on the Edit menu.
Converting writing into text:
1. On the writing note, tap Tools and Recognize from the
menu bar.
2. If you want to convert only certain words, select them
before tapping Recognize on the Tools menu (or tap
and hold the selected words and then tap Recognize on
the pop up menu).
If a word is not recognized, it will be left as writing. And if the
conversion is incorrect, you can select different words from a
list of alternates, or return to the original writing.
Tap and hold the incorrect word (tap one word at a time), then
tap Alternates from the pop-up menu. A menu with a list of
alternate words appears. Tap the word you want to use, or
tap the writing at the top of the menu to return to the original
writing.
The writing is
converted into
typed text

Pocket PC Phone User Manual 35
Tips for good recognition:
1. Write neatly.
2. Write on the lines and draw descanters below the line. Write the cross of the “t” and
apostrophes below the top line so that they are not confused with the word above. Write
periods and commas above the bottom line.
3. For better recognition, use a zoom level of 150% or higher by tapping Tools > Zoom to
change the zoom level.
4. Write the letters of a word closely and leave big gaps between words so that the device
can easily tell where words begin and end.
5. Hyphenated words, foreign words that use special characters such as accents, and some
punctuation cannot be converted.
If you edit or add to a word after attempting to recognize it, the new writing will not be
included if you attempt to recognize it again.
2.5 Drawing on the Screen
You can draw on the screen in the same way that you write on the screen. The difference
between writing and drawing on the screen is how you select items and how they can be
edited. For example, selected drawings can be re-sized, while writing cannot.
To create a drawing:
Cross three ruled lines on your rst stroke. A drawing box appears. Subsequent strokes
in, or touching, the drawing box become part of the drawing. Drawings that do not cross
three ruled lines will be treated as writing.

Pocket PC Phone User Manual36
Pocket PC Phone User Manual 37
The drawing box indicates
the boundaries of the
drawing
Pen button
To select a drawing
If you want to edit or format a drawing, you must select it rst.
1. Tap and hold the stylus on the drawing until the selection handle appears. To select multiple
drawings, deselect the pen button and then drag to select the drawings you want.
2. You can cut, copy, and paste selected drawings by tapping and holding the selected drawing
and then tapping an editing command on the pop up menu, or by tapping the command on
the Edit menu. To re-size a drawing, make sure the Pen button is not selected, and drag
a selection handle.
To change the zoom level so it is easier to work or view your drawing, tap Tools and then
select a zoom level.
2.6 Recording a Message
In any program where you can write or draw on the screen, you can also quickly capture
thoughts, reminders, and phone numbers by recording a message. In Calendar, Tasks,
and Contacts, you can include a recording in the Notes tab.

Pocket PC Phone User Manual 37
In the Notes program, you can either create a stand-alone recording or include a recording
in a written note. If you want to include the recording in a note, open the note rst.
In the Messaging program, you can also add a recording to an E-mail message.
To create a recording:
1.
To add a recording to a note, open the note before recording.
> Notes.
2.
If there is no Record/Playback toolbar, tap
3. Hold your device’s microphone near your mouth or another sound source.
4. To start recording, tap . A beep will sound.
5. To stop recording, tap . Two beeps will sound. The new recording appears in the note
list or as an embedded icon.
6. To play a recording, tap in the open note or tap the recording in the note list.
Indicates an embedded
recording
.
Tap the Start menu > Programs
Tap to begin recording
Tap to show or hide
the Recording tool bar

Pocket PC Phone User Manual38
Pocket PC Phone User Manual 39
You can also invoke the
is the rst button from the top on the left side of your Pocket PC.
To quickly create a recording, hold down the Record button. When you hear the beep,
begin your recording. Release the button when you are nished.
The new recording is stored in the open note, or as a stand-alone recording, if no note
is opened.
Pulse Code Modulation (PCM) provides slightly better sound quality. However, PCM
recordings may take up to 50 times more storage space than Mobile Voice recordings.
PCM cannot be used to create recordings that are embedded in notes.
Record/Playback toolbar
by pressing the Record button, which
Change recording formats
In the note list, tap Tools > Options > the Global Input Options link (at the bottom of
the page).
Mobile Voice is a 2.4 KB audio codec (compressor/decompressor). It is the recommended
format because it provides good voice recording and takes up far less storage space than
PCM.
2.7 Finding Information
The Find feature on your Pocket PC Phone helps you quickly locate the information you
need.
1. Tap the Start menu > Programs > Find.
2. In Find, enter the le name, word, or other information you want to search for. If you have
looked for this item before, tap the Find arrow and select the item from the list.
3. To help narrow your search, select a data type under Type.

Pocket PC Phone User Manual 39
4. Tap Go. The My Documents folder and sub-folders are searched.
5. In the Results list, tap the item you want to open.
To quickly nd information that is taking up storage space on your device, select Larger
than 64 KB in Type.

Pocket PC Phone User Manual40

Chapter 3
Using Your Pocket PC Phone
3.1 About Your Pocket PC Phone
3.2 Making a Call
3.3 Smart Dialing
3.4 Receiving a Call
3.5 In-Call Options
3.6 Contacts Information
3.7 Photo Contacts
3.8 Additional Dialing Information
3.9 Securing Your Pocket PC Phone

Pocket PC Phone User Manual42
Pocket PC Phone User Manual 43
3.1 About Your Pocket PC Phone
Like a standard mobile phone, you can use your Pocket PC Phone to keep track of
calls and send SMS messages. You can also take notes while talking, dialing directly
from Contacts, and easily transfer contacts between your SIM card and the RAM of your
device.
The phone dialer screen
To access the Phone Dialer Screen, tap the Start menu > Phone, or press on your
Pocket PC Phone . From this screen, you can access Call History, Speed Dial, and Phone
Setting. Signal status information and icons that tell you about your call include:
1. Indicates the strength of the signal.
2. The contact name of the number you are
dialing is displayed here.
3. Touchscreen keypad.
4. Clear, copy, or paste numbers.
5. Tap to make a note during a call.
6. Tap to se lec t your con tac t from th e
Contacts list.
7. Tap to mute a call.
8. Tap to end a call.
9. Stores frequently-called numbers.
10. View all history including received, dialed
and missed calls.
1
2
3
4
5
6
7
10
9
8

Pocket PC Phone User Manual 43
The navigation pad and dialing
1
2
7
6
1. Phone Dialer Screen: Press to activate the Phone Dialer Screen.
Take a Call: Press to take an incoming call.
Speakerphone: During a call, press and hold to turn the speakerphone ON or OFF.
Dial: Press to dial a phone number.
2. Scroll Up: Press to scroll up through a list, or enter Call history.
3. End Call: Press to end a call or to end a GPRS connection.
4. Call History: After launching the Phone Dialer Screen, press to enter the Call
History feature.
5. Scroll Down: Press to scroll down through a list.
6. Action Key: Press to select a menu item, or to enter Speed Dial.
7. Speed Dial: After launching the Phone Dialer Screen, press to enter the Speed Dial
feature.
3
4
5

Pocket PC Phone User Manual44
Pocket PC Phone User Manual 45
Entering your PIN
Most SIM cards are preset with a PIN (Personal Identication Number). This PIN is
provided by your operator, which you need to enter whenever you use your device. (For
more information on installing your SIM card into your Pocket PC Phone , please see the
illustrations in the Quick Start Guide.)
1. Enter the preset PIN assigned by your operator.
2. Tap the Enter button.
If your PIN is entered incorrectly three times, the SIM card will be blocked. If this happens,
you can unblock it with the PIN Unblocking Key (PUK) from your operator.
Checking your connection
By default, your Pocket PC Phone will automatically connect to the your operator network
once you have inserted a SIM card and entered the required PIN code. The icon indicates
that you are connected to an operator network, or an afliated provider. A full strength signal
is indicated by . As the strength of the signal diminishes, so will the number of vertical
bars in the icon, with no bars indicating no signal.
LEGAL NOTICE: In many countries you are required by law to turn off your phone on
board an aircraft. Turning off the power of your Pocket PC Phone doesn't turn off the
phone function. You must turn on the Flight Mode in order to disconnect the connection
to the wireless network.

Pocket PC Phone User Manual 45
Turning on the Flight Mode
To turn OFF your wireless connection to an active network, you can switch your phone
connection mode to Flight mode. You can turn the Flight Mode On or Off while keeping
your Pocket PC Phone turned ON.
1. While using any program on your Pocket PC Phone , tap in the title bar at the top of
the phone’s display.
2. Tap the Turn on ight mode or Turn off ight mode option in the pop-up dialog box.
3. Select the Turn off ight mode to receive calls.
You can use any programs on your device during a call. To quickly switch back to the
Phone Dialer Screen, tap , or tap
the Start menu
> Phone.
Adjusting the phone volume:
1. During a call, tap or press the volume buttons on the side of your device.
2. You can select to adjust the phone volume (ring) or device volume (notication
levels and MP3) on the pop-up menu.
3. If you select Vibrate mode, will appear in the title bar at the top of the phone
display.
4. Turn off the volume by choosing the Off option.
To adjust the conversation phone volume, you must do it during a call. Adjusting the volume
at another time will affect the ring, notication, and MP3 sound levels.

Pocket PC Phone User Manual46
Pocket PC Phone User Manual 47
3.2 Making a Call
With your Pocket PC Phone , you can make a call from
the Dialer, Contacts, Speed Dial, Call History, and SIM
Manager.
Making a call from the Dialer
The most direct method is by using the Phone keypad.
1. Press to bring up the dialer screen.
2. Tap the number on the keypad, then tap the Talk button
or press .
Backspacing and deleting
If you tap a wrong number, you can back space by tapping
the back arrow key to erase individual numbers one at a
time. You can also delete all the numbers in the window by
tapping Edit > Clear from the Dialer screen.
Making a call from Contacts
You can make a call from Contacts in the following
ways:
n Press the Contacts button in the upper left corner of
your Pocket PC Phone .
n Find the contact, and then press the button twice
(Once to send to the dialer screen and once to call).
n Tap at the bottom of the Dialer screen. This will
invoke Contacts. Select a contact in the contact list,
and then press twice.

Pocket PC Phone User Manual 47
A pop-up number right after pressing the will call the Work Tel by default. However,
you can customize it so that the mobile number or E-mail is displayed instead.
Tap the w here to pop-up all the
n In the Contacts list, tap the w in the right column
next to the contact you want to customize. A pop-up
menu will display the phone numbers and E-mail
addresses for this contact with a dot next to the
priority number.
n In the pop-up menu select a priority. If you selected a
mobile number, m should now be in the right column
next to the contact.
n When pressing the Left or Right button on the
navigation pad, the number of the selected contact
on the screen will change, displaying the mobile
number, work number, or E-mail in turn.
phone numbers and E-mails for
this contact
Making a call from Call History:
1. In the Dialer screen mode, tap , or just press the Right button on the navigation
pad.
2. Find the call details by rst selecting the category it is led under. For example, if it is in All
calls, select All calls from the drop down menu in the top-left corner.
3. Use the navigation pad to nd the number and then tap or the icon to the left of the
number you wish to call.
Call History icons include:
Incoming calls. Outgoing calls. Missed calls.

Pocket PC Phone User Manual48
Pocket PC Phone User Manual 49
Making a call from Speed Dial
Create Speed Dial to call frequently-used numbers with a single tap. The number must
already exist in Contacts before you can create a Speed Dial entry.
1. From the Phone keypad, tap > New.
2. Tap the desired contact name and number.
3. In the Location eld, tap the Up/Down arrows to select an available location to assign as
the new Speed Dial entry. (The rst Speed Dial location is reserved for your voice mail).
By memorizing the position in the Speed Dial list of a number, you can dial the number by
pressing and holding its position number. By default the Location function will give you the
next available position in the Speed Dial setting screen. If you want to put a number in a
position that is already occupied, the new number will replace the number already there.
Tips for using Speed Dial
To create a Speed Dial entry from Contacts, tap and hold the contact name > Add to
Speed Dial > Up/Down arrows to select an available location to assign as the new speed
dial entry.
To delete a Speed Dial entry, go to the Speed Dial list, tap and hold the contact name in
the box to the right of the assigned speed dial number, and then tap Delete.
Checking your Voice Mail
By default, the rst Speed Dial location is your voice mailbox. When you insert your SIM
card into your Pocket PC Phone, it will automatically detect and set, by default, the voice
mailbox number of your service provider.

Pocket PC Phone User Manual 49
On the Phone Dialer screen, tap or press the Left button on the navigation pad,
select Voice Mail, and then press .
Making a call from SIM Manager
SIM Manager allows you to view the contents of your SIM card, transfer contacts to
Contacts on your Pocket PC Phone , and make a call from SIM.
1. Tap
the Start menu
load.
2. Tap and hold the name or phone number of the person you wish to call, and then select
Call from the pop-up menu.
> Programs > SIM Manager. Wait for your SIM card contents to
3.3 Smart Dialing
Smart Dialing is an application that makes it easy for you to dial a phone number on your
Pocket PC Phone Edition. Smart Dialing searches the Phonebook entries in both the SIM
card and Pocket Contacts, as well as numbers in Call History (Incoming, Outgoing, or
Missed). As soon as you start entering numbers, Smart Dialing starts looking for matches,
and lists them in the Smart Dialing window in the upper left area of your screen. Both
Portrait and Landscape orientations are supported.
Starting Smart Dialing
Smart Dialing starts running along with Microsoft Phone Dialer automatically, as soon as
you start dialing a number.
To open the Phone Dialer screen,
n Select Phone from the Start Menu,
n Or press the Talk button.

Pocket PC Phone User Manual50
Pocket PC Phone User Manual 51
Tap the rst digit of the number you want to dial. The Smart Dialing window will then
appear in the upper left area of the Phone screen.
How the matching numbers works
Smart Dialing starts looking for numbers that match the sequence you have entered
thus far. It looks for matches in your SIM card, Pocket Contacts, and Call History.
Matching is performed according to both the number and the letter associated with the
selected button on the keypad.
Each time you tap an additional digit or delete a digit, the search is renewed and the
result is re-displayed. The list may include phone numbers and/or Contact names
associated with matching number sequences.
Tap the Talk button to dial
Making a call or sending a text message
To browse the result after you tap in some digits,
n Tap or , located at right side of the result list.
n Or press up/down buttons on navigation pad.
The selected contact is higihlighted in gray.

Pocket PC Phone User Manual 51
To see more matched contacts, tap .
To call selected contact,
n Tap Talk button on the Phone pad.
n Or press Talk/Send button.
If a contact number has display, this contact has more than one phone numbers. To call
selected contact with a different phone number,
n Tap and hold the selected contact to display a pop-up menu, then tap on the
desire phone number to call.
n Or press Left/Right buttons on navigation pad to select desire phone
number, then tap Talk button on the Phone pad or press Talk/Send button to
call.
To send a text message to the selected contact, tap and hold the selected contact to
display a pop-up menu, then tap on the Send Text Message.
To view or edit selected contact's detailed information (only contacts stored in Contacts),
n Tap and hold the selected contact to display a pop-up menu, then tap on the
contact's name.
n Or press Action button.
Smart Dialing Options
This feature lets you select various options for Smart Dialing. You can invoke the Smart
Dialing Options screen by selecting Tools > Smart Dialing Options from the Phone
screen.

Pocket PC Phone User Manual52
Pocket PC Phone User Manual 53
Here are the list of Smart Dialing options:
Enable Smart Dialing Check this box to automatically enable Smart Dialing
Enable drag-scroll Check this box to scroll the list of matched items.
Enable double-click for
dialing
Display numbers in
standard format
Scroll unit Choose to scroll by One line, Half page, or One page.
each time you make a call.
Check this box to call a number from the list by tapping
twice on it.
Check this box to display numbers formatted with
standard characters such as hyphen, parantheses, and
space.
This option only affects and buttons.
3.4 Receiving a call
Answering an incoming call
When you receive a phone call, a message will appear, giving you an option to either
answer or ignore the incoming call.
1. Tap Answer, or press .
2. Tap Ignore or press to silence the phone and reject the call. This may route the call
to your voice mail, depending on your service provider.
Ending a call
Once an incoming or outgoing call is in progress, you can press , or tap on
the Dialer screen to hang up.

Pocket PC Phone User Manual 53
3.5 In-Call Options
Putting a call on hold
Your Pocket PC Phone noties you when you have another incoming call and gives you the
choice of rejecting or accepting the call. If you accept, you can choose to switch between
the two callers or set up a conference call between all three parties.
1. Tap Answer to take the 2nd call and put the 1st one on hold.
2. To end the 2nd call and go back to the 1
Swapping between calls
You can choose to switch between 2 callers by pressing .
Setting up conference calls:
1. Either put a call on hold, dial a 2nd number and wait for it to be picked up. Or, accept a 2nd
incoming call when you already have one in progress.
2. In the screen that appears tap .
3. If the conference connection is successful, the word Conference will appear at the top of
the Phone Dialer screen.
4. To add additional people to your conference call, tap enter the number, and then
tap to return and continue.
Making notes during a call
Regardless of whether you call from the Phone Dialer, Contacts, Call History, Speed
Dial or SIM Manager, you can take notes during a call. After you have nished the note,
it will be saved as an attachment to your call in one of the Call History folders.
st
one, tap or press .

Pocket PC Phone User Manual54
Pocket PC Phone User Manual 55
Writing a note:
1. During a call, just tap the icon at the bottom of the screen.
2. Use any of the input methods to record your note and then tap OK. You can nish your
note during or after the call.
Viewing a note:
1. In Call History list, tap and hold the desired number, then tap View Note in the pop-up
menu. The icon indicates a note.
2. Or, go to Notes, and then tap the name of the le in the list. (For more information, see
Chapter 2).
Turning on the speakerphone
Your device has a speakerphone allowing you to talk hands-free or let other people listen
to the conversation.
1. Wait until the phone is ringing.
2. Hold down until the speakerphone comes ON and the icon appears in the status
bar.
3. To turn OFF the speakerphone hold down again.
WARNING: To avoid damage to your hearing, do not leave your Pocket PC Phone on
speakerphone mode and hold it against your ear.
Muting a call
You can mute your microphone during a call so that you can hear the caller without being
heard. From the Phone Dialer keypad, tap to mute or un-mute a call.

Pocket PC Phone User Manual 55
3.6 Contacts Information
Contacts can be imported in the following ways:
n From your SIM card: Use your SIM card on your Pocket PC Phone and another device;
while using the other device you create one or more new contacts on the SIM card.
n From your Call History: New contact numbers can be found in incoming or missed calls.
Why import contacts?
n Backup your SIM numbers to your Pocket PC Phone .
n When setting Speed Dial numbers, it must be based on those contacts in Contacts, not
on the SIM card.
n Creating contacts in Contacts creates more detailed records.
n While using Photo Contacts, data of contacts fully mirror those in Contacts.
SIM Manager
Creating a SIM contact:
1. To open SIM Manager, tap
card contents to load.
2. After the SIM contents have loaded, tap New.
3. Fill in the Name and Phone details, tap Add.
Transferring contacts from SIM to Contacts:
On SIM Manager, tap Tools > Select All > Save to Contacts. Press and hold the center
of the navigation pad when a contact has been selected, or tap and hold a contact from
the list. Select Save to Contacts from the pop-up menu.
the Start menu
> Programs > SIM Manager. Wait for your SIM

Pocket PC Phone User Manual56
Pocket PC Phone User Manual 57
Saving your own numbers
You can choose to save your personal phone numbers in a separate screen in SIM
Manager.
1. Tap
the Start menu
Tools > List of Own Numbers.
2. Add a number to the screen, and then tap OK.
> Programs > SIM Manager >
Call History
Tap on the phone screen to view the call history list.
Adding a Phone number from Call History to Contacts:
1. Find the call details you want to add.
2. Press and hold the stylus or press and hold the center button of navigation pad. Select
Save to Contacts in the pop-up menu that appears.
3. In the Save to Contacts screen, add additional contact details and press the navigation
pad center or tap OK.
The call details in the Call History will then be amended and displayed under the name,
not the phone number, when the contact is created
.
Viewing calls details
Tap in the top left corner of the screen and then select a category from the drop down
menu. Calls are categorized as follows:

Pocket PC Phone User Manual 57
n All Calls: Displays all calls made to and from the phone in chronological order.
n Missed : Displays calls that were not answered.
n Outgoing Displays calls made from the phone.
n Incoming : Displays calls made to the phone.
n By Caller: List calls alphabetically by caller.
Viewing call duration:
Go to Call History, nd the call, and then tap once on the time called.
Deleting individual calls:
Tap and hold the stylus on the call to be deleted. Select delete from the pop-up menu.
Deleting all calls:
Tap Tools > Delete all Calls.
Limiting the size of Call History:
Tap > Tools > Call Timers and then the box under Delete call history items
older than. In the drop-down menu select a time period, then tap OK.
3.7 Photo Contacts
Photo Contacts make your Pocket PC Phone more fun and practical. It allows you to assign still or animated photos to the entries in your Contacts. When a person calls you (for
whom you have previously assigned a photo in Photo Contacts), that photo will appear
on your Pocket PC Phone ’s incoming call screen. Use the rich set of features to get the
photos displayed with the size, position, and animated template you want.

Pocket PC Phone User Manual58
Pocket PC Phone User Manual 59
Creating a new photo contact:
1. Tap
the Start menu
2. Select a contact from the list, or create a new one by tapping Edit > New. Photo Contacts
here fully mirror those in Contacts.
3. Tap Edit > Assign Photo...
4. Tap the eld next to Type to select the type of les you want listed, i.e., jpeg, bmp, gif or
all > next to Find in: to select the location of a le. You can use JPEG, BMP, still GIF, or
animated GIF les for your Photo Contacts.
5. Tap a picture le, then OK, and OK again until you return to the Photo Contacts screen.
You can see the photo at the bottom of the screen.
> Programs > Photo Contacts.
To preview and adjust settings:
In step 5 above, after you tap OK once you will arrive at the preview
and display settings screen. In Display Settings you can:
1. Add extra style by assigning a template to the photo A few sample Photo Contacts
templates (animated graphical templates that can frame your assigned photos) are
included in your Pocket PC Phone 's local storage in the \My Documents\Templates
folder.
2. Choose how you want the photo to t to the window.
3. Enlarge the photo if it is smaller than the window.
4. Choose a size and position for the picture.
5. View all of these changes by tapping Preview.

Pocket PC Phone User Manual 59
Toolbar Icons
The Toolbar provides a convenient way for you to select frequently-used commands. From
left to right, the functions of the icons on the Toolbar are:
Create a new Contact entry (same as New... on the Edit Menu).
Modify data for the selected Contact entry (same as Edit... on the Edit
Menu).
Delete the selected Contact entry (same as Delete on the Edit Menu).
Assign a Photo ID to a Contact entry (same as Assign Photo... on the
Edit Menu).
Remove a Photo ID assignment (same as Unassign Photo on the Edit
Menu).
Assign a ring tone to a Contact entry (same as Assign Ringtone... on
the Edit Menu).
Remove a ring tone assignment (same as Unassign Ringtone on the
Edit Menu).
Preview the current Photo/template assignment (same as Preview... on
the View Menu).
Invokes “Detailed View” for the current entry (same as Properties... on
the View Menu).
To assign a photo from the camera:
1. Tap
the Start menu
2. Select a contact from the list, or create a new one by tapping Edit, then New. Photo Contacts
here fully mirror those in Contacts.
3. Tap Edit then Assign Photo from Camera.
4. After you take the picture, you will be returned to the Display Settings and Preview
screen.
> Programs > Photo Contacts.

Pocket PC Phone User Manual60
Pocket PC Phone User Manual 61
To unassign a photo:
1. Tap
the Start menu
2. Select an existing contact entry that you want to remove.
3. Tap Edit > then Unassign Photo. Tap yes in the pop-up box.
> Programs > Photo Contacts.
To view your contacts by photo:
1. Tap
the Start menu
2. Tap the Dialer View icon. Or, tap View > Photo Dialer View.
> Programs > Photo Contacts.
In the Photo Dialer view mode, the View Menu contains three additional commands
that allow you to specify the size of the thumbnail images: Large Thumbnails, Normal
Thumbnails and Small Thumbnails. You can enter the Detailed View of Photo Contact
using any of these methods:
n Select the desired Contact entry > Properties... on the View Menu.
n Select the desired Contact entry > the Properties icon on the Toolbar.
n Select the desired Contact entry > the Action button on your Pocket PC Phone .
n Double-tap a Contact entry.
To disable the display of photos during incoming calls:
1. Tap
the Start menu
2. Tap Tools > Options. Uncheck the Display photo during incoming or waiting call box.
(Photo ID for each contact will still display in the Contacts list).
> Programs > Photo Contacts.

Pocket PC Phone User Manual 61
To manage your groups
You can create a new group, rename, delete, and assign and unassign a photo to a group
by tapping Tools > Manage group.
To assign a contact to a group:
1. Tap
the Start menu
Contacts.
2. Select a contact from the list, or create a new
one by tapping Edit, then New. Contacts
here fully mirror those in Contacts.
3. Tap Edit > Assign Group.
4. Select a group from the list, then tap OK.
> Programs > Photo
To unassign tap Unassign Group on the Edit menu.
Show Contact Names Only
When Show Contact Names Only is selected on the View menu, only the name of each
Contact entry (no phone number or other data) will be listed. The Photo ID (if any) will
still be displayed.

Pocket PC Phone User Manual62
Pocket PC Phone User Manual 63
Set Default Photos...
The Set Default Photos screen lets you assign, unassign, and preview default Photo
IDs to appear for these three situations:
Unknown
photo
This photo will display whenever the phone number of the incoming call
is not known to Caller ID because no phone number was “passed in”
to your Pocket PC Phone . This would occur if the person calling you
has blocked their phone number from being displayed to the receiver,
or has not enabled the broadcast of their Caller ID.
Not-found
photo
This option in the Set Default Photos screen lets you assign a generic
Photo ID to any incoming call from a person whose number is not found
in your Contacts. That is, the phone number of the incoming call is
known, but has no matching entry in your Contacts.
Default
photo
This photo will display when the incoming call is found to be from
a matching entry in your Contacts database, but so far there is no
individually-assigned Photo ID for either that individual Contact entry,
or for the Group it belongs to.
1. To select Set Default Photos, tap Tools > Set Default Photos.
2. Check a circle next to one of the categories, tap Assign.
3. Select a picture, assign settings.

Pocket PC Phone User Manual 63
Assign a Ring tone
This feature allows you to assign ring tones to your Contacts entries, or to the
phonebook entries on your SIM.
1. Tap the Start menu > Programs > Photo Contacts.
2. Select the desired contact from the list, or create a new one by tapping Edit >
NEW.
3. Tap Edit > Assign Ring tone, or tap the Assign Ring tone icon in the toolbar
4. Tap Find to list all sound les
5. Select a sound le, and tap OK to assign it as a ring tone to the selected contact.
.
.
To unassign a ring tone:
1. Tap the Start menu > Programs > Photo Contacts.
2. Select an existing contact entry that you want to remove.
3. Tap
Edit
> Unassign Ring tone, or tap the Unassign Ring tone icon in the toolbar.
Preview
This feature allows you to preview the Photo ID and ring tone you have assigned to a
contact.
1. Tap View > Preview, or tap the Preview icon in the toolbar
2. Select View > Play Ring tone during Preview to play the ring tone assigned
to the contact
.
.

Pocket PC Phone User Manual64
Pocket PC Phone User Manual 65
3.8 Additional Dialing Information
Making an emergency call
Enter the international emergency number 112, then tap or press .
Additional emergency numbers may be included on your SIM card. Contact your operator
for more information.
Making an international call:
1. Tap and hold the key until the + sign appears. The + replaces the international
prex of the country where you are calling.
2. Enter the full phone number you want to dial. It includes country code, area code (without
the leading zero), and phone number.
3. Tap or press .
SIM Tool Kit
This feature allows you to access a range of information services provided by your operator.
1. Tap
the Start menu
2. A List of services provided by your operator should appear on the page.
3.
To access a service, tap on any item in the list.
Be sure a SIM card is inserted in your phone when accessing SIM Tool Kit (STK).
> Programs > STK.

Pocket PC Phone User Manual 65
3.9 Securing Your Pocket PC Phone
You can customize the level of security you want to have on your Pocket PC Phone by
locking the keypad, the entire device, or the SIM card.
Locking the keypad
The keypad lock turns off the keypad functionality. This is a helpful feature if, for example,
your Pocket PC Phone is turned off and in your pocket, and you want to prevent accidental keypress.
1. Tap
the Start menu
2. Select Lock all buttons except Power button.
3. To unlock your keypad, tap Do not lock buttons.
Locking your Pocket PC Phone
Locking your Pocket PC Phone prevents access to personal data. When you enable this
feature, your Pocket PC Phone will automatically lock after a specied time of inactivity.
A screen will be displayed requiring your Pocket PC Phone "lock password" to be entered
before access is granted.
1. Tap
the Start menu
2. To enable this function, select how long your mobile device must be turned off before the
password is required for using the device, by tapping Prompt if device unused for.
3. Select the type of password you would like to use: Simple 4 digit or Strong alphanumeric.
A strong password must have at least 7 characters that are a combination of uppercase
and lowercase letters, numerals, and punctuation.
4. Enter the password, and if necessary, conrm the password.
NOTE: To unlock your Pocket PC Phone , uncheck Prompt if device unused for.
> Settings > System tab > Button Lock.
> Settings > Personal > Password.

Pocket PC Phone User Manual66
Locking the SIM card
You can protect your Pocket PC Phone from unauthorized use by assigning a PIN (Personal
Identication Number). Your rst PIN is assigned by your operator.
1. On the Pocket PC Phone keypad, tap Tools > Options > Phone tab.
2. Select Require PIN when phone is used.
3. To change the PIN at any time, tap Change PIN.

Chapter 4
Synchronizing Information
4.1 Using ActiveSync
4.2 Synchronizing Information
4.3 Infrared and Bluetooth Connection
4.4 ActiveSync Errors

Pocket PC Phone User Manual68
Pocket PC Phone User Manual 69
4.1 Using ActiveSync
With ActiveSync on both your PC and your Pocket PC Phone, you can exchange
information between a PC or server and your Pocket PC Phone. This process is called
"synchronization." To synchronize your Pocket PC Phone with your PC, you must install
ActiveSync on the PC. Using ActiveSync, you can:
n Synchronize information between your Pocket PC Phone and PC or server so that you
have the latest information in all locations.
n Change synchronization settings and synchronization schedule.
n Copy les between your Pocket PC Phone and PC.
n Back up and restore information saved on your Pocket PC Phone.
n Add and remove programs on your Pocket PC Phone.
By default, ActiveSync does not automatically synchronize all types of information. Use
ActiveSync options to turn synchronization on and off for specic information types.
You can synchronize information between your mobile device and a server if your company
is running Microsoft Exchange Server with Exchange ActiveSync.
Installing ActiveSync
Before you begin synchronization, install ActiveSync on your PC from the Application
CD. ActiveSync is already installed on your Pocket PC Phone.
Once ActiveSync is installed on your PC, you will be prompted to connect and create a
partnership with your Pocket PC Phone by using a cable, cradle, infrared, or Bluetooth
connection.

Pocket PC Phone User Manual 69
Connecting to a PC via a cable or cradle
Please see the Quick Start Guide for information about ActiveSync installation.
1.
Connect your Pocket PC Phone and PC via a cable or cradle to start synchronization.
2. Your rst synchronization will automatically begin when you nish the installation wizard.
After the rst synchronization, you will notice that your Outlook information now appears
on your Pocket PC Phone.
3. To disconnect, remove your Pocket PC Phone from the cradle or detach it from the
cable.
View connection status
Stop syn c
Synchronize via IR or change
synchronization settings
Connect and
synchronize
Connecting to a PC by Infrared
You can use an infrared connection to create a direct connection between your Pocket
PC Phone and another IR-enabled mobile device or PC quickly. This method is ideal
for quickly switching between multiple devices since there are no cables or adapters
to change. When creating a partnership, you must connect using infrared, a cable,
or a cradle connection.

Pocket PC Phone User Manual70
Pocket PC Phone User Manual 71
1. Set up an infrared connection. (Install and congure an infrared port on your PC according
to the manufacturer's instructions).
2. Switch to the infrared port on your desktop computer: On the File menu of the ActiveSync
on your PC, click Connection Settings. In the Allow serial cable or infrared connection
to this COM port list, select Infrared Port (IR).
3. Align the infrared ports on your PC and your Pocket PC Phone so that they are unobstructed and within close range.
4.
On your Pocket PC Phone, tap the Start menu > ActiveSync > Tools > Connect via
IR.
4.2 Synchronizing Information
This section provides an overview of the types of Outlook information you can synchronize.
By default, ActiveSync does not automatically synchronize all types of Outlook information.
Use ActiveSync options on your PC to turn synchronization on and off for specic
information types.
Synchronizing Outlook E-mail
After selecting Inbox for synchronization in ActiveSync, Outlook E-mail messages are
synchronized as part of the general synchronization process. During synchronization:
n Messages are copied from the Inbox folder on your PC or the Microsoft Exchange server to
the Inbox folder of the Outlook E-mail account on your device. You can only synchronize
information directly with an Exchange Server if your company is running Microsoft Mobile
Information Server 2002 or later. By default, you’ll receive messages from the last three
days only, the rst 100 lines of each new message, and le attachments of less than
100KB in size.
n Messages in the Outbox folder on your device are transferred to Exchange or Outlook
and then sent from those programs.
n The messages on the two computers are linked. When you delete a message on your
device, it’s deleted from your PC the next time you synchronize.
n Messages in subfolders in other E-mail folders in Outlook are synchronized only if they
have been selected for synchronization in ActiveSync.

Pocket PC Phone User Manual 71
For information on initiating Outlook E-mail synchronization or changing synchronization
settings, see ActiveSync Help on the PC or Connections Help. Text messages (SMS)
and Media messages (MMS) are not received through synchronization. Instead, they are
sent to your device via your service provider.
Synchronizing Calendar
n Calendar items stored on your Pocket PC Phone can be synchronized with calendar items
on your PC or Microsoft Exchange Server. You can only synchronize information directly
with an Exchange Server if your company is running Microsoft Mobile Information Server
2002 or later. Calendar synchronization is automatically selected in ActiveSync.
n Calendar items entered on one computer are copied to the other during synchronization.
Handwritten notes and drawings are saved as metales (pictures).
Synchronizing Contacts
n Contacts stored on your Pocket PC Phone can be synchronized with Outlook contacts
stored on your PC or with Mobile Information Server 2002 or later.
n New items entered in one location are copied to the other during synchronization.
Handwritten notes and drawings are saved as pictures when synchronizing with your
PC, but are removed when synchronizing with a server. For more information on
synchronization, see ActiveSync Help on the PC.

Pocket PC Phone User Manual72
Pocket PC Phone User Manual 73
Synchronizing Tasks
n Tasks stored on your device can be synchronized with Outlook on your PC. Task
synchronization is automatically selected in ActiveSync.
n New items entered on one computer are copied to the other during synchronization.
Handwritten notes and drawings are saved as metales (pictures). For more information
on synchronization, see ActiveSync Help on the PC.
Synchronizing Notes
Notes can be synchronized between your PC and Pocket PC Phone either through notes
synchronization or le synchronization. Notes synchronization synchronizes the notes on
your Pocket PC Phone with Outlook Notes on your PC. File synchronization synchronizes
all notes on your Pocket PC Phone with the My Documents folder on your PC.
To synchronize your notes through notes synchronization, rst select the Notes information
type for synchronization in ActiveSync. The next time you synchronize, all notes in My
Documents and its subfolder on your device will appear in Outlook Notes on your PC.
Notes that contain only text will appear as regular notes in Outlook on your PC, while
notes containing written text or drawings will appear in the device format. In addition, all
notes in the Notes group in Outlook on the PC will appear in Notes on the device.
To synchronize your notes as les, in ActiveSync, select the Files information type
for synchronization and clear the Notes information type. When you select Files, the
My Documents folder is created on your PC’s desktop. All .pwi les placed in the My
Documents folder on your device and all .doc les placed in the \My Documents folder
on your PC will be synchronized. Password-protected les cannot be synchronized.
ActiveSync converts documents during synchronization. For more information on
synchronization or le conversion, see ActiveSync Help on the PC.
NOTE: When you delete or change an item on either your PC or device, the item is changed
or deleted in the other location the next time you synchronize.
If you synchronize your notes using le synchronization and then later decide to use notes
synchronization, all of your notes will be synchronized with Outlook on your PC and will
no longer be stored in the My Documents folder.

Pocket PC Phone User Manual 73
4.3 Infrared and Bluetooth Connection
Infrared
You can use infrared (IR) to send and receive information and les between mobile devices.
If an IR port is installed on your PC, you can send and receive information and les between
your Pocket PC Phone and PC. On your Pocket PC Phone, tap the Start menu > Settings
> the Connections tab > Beam.
By default your device detects incoming infrared
you to accept them. If you do not want your Pocket PC Phone to detect or receive beams,
clear the Receive all incoming beams check box.
NOTE: If someone attempts to send you an IR beam from an older device, you may not
be prompted to accept it. In this case, before the beam is sent from the other device, tap
Receive an infrared beam at the bottom of the Beam screen.
Bluetooth
1. Make sure that your Pocket PC Phone is congured to receive incoming beams.
2. Make sure that your Pocket PC Phone is turned on, discoverable, and within 10 metres
(about 30 feet) of the other device beaming the information.
3. When prompted to receive an incoming beam, tap Yes to accept the beam.
For more information about Bluetooth and its settings, please see Chapter 6.
(IR)
and Bluetooth beams and prompts

Pocket PC Phone User Manual74
4.4 ActiveSync Errors
Whenever ActiveSync cannot successfully synchronize your information, it displays an
error on your Pocket PC Phone.
Viewing error information
Press the Action button when the error text is displayed. ActiveSync will then display
more information about the error that occurred.
Some types of errors can interfere with automatic synchronization. If you suspect that a
scheduled automatic synchronization has not occurred, you should attempt to manually
synchronize your information. Successfully completing manual synchronization will reset
automatic synchronization. For more information, see the Synchronizing Information
section of ActiveSync Help on your PC.

Chapter 5
Personalizing Your Pocket
PC Phone
5.1 Device Settings
5.2 Phone Settings

Pocket PC Phone User Manual76
Pocket PC Phone User Manual 77
5.1 Device Settings
You can adjust the device settings to suit the way you work. To see available options, tap
the Start menu > Settings > the Personal tab or System tab located at the bottom of
the screen.
The Personal tab
Icon Program
Button
Assigns an application program to a hardware button.
Input
Sets up the input portion of your device.
Menus
Customizes the menu appearance and enables a pop up menu from the New
button.
Owner Information
Displays your contact information.
Password
Limits access to your device.
Phone
Sets up the phone function of your wireless
feature.
Sounds & Notications
Sets the notication type, event and volume.
Today
Customizes the look and the information that appears on the Today screen.

The System tab
Icon Program
About
Displays important device information.
Add Ring Tone
To listen to and select new ring tones.
Backlight
Customizes the backlight and brightness for power saving purposes.
Button Lock
Enables you to lock the buttons on your device except Power button when device
is off.
Certicates
Displays the name of the certicate issuer and the expiration date.
Clock & Alarms
Changes the time and sets alarms.
Device information
Find information about version, hardware, identity, and call duration.
Keyboard
Allows you to customize the keyboard settings, e.g., to switch on/off the keyboard
backlight when a time limit is reached.
Memory
Displays the memory allocation status and current running programs.
Microphone AGC
Adjusts the volume automatically when you are recording.
Permanent Save
Saves contacts to permanent ash memory.
Power
Maximizes battery life.
Regional Settings
Customizes the region and relative format for the region you use.
Pocket PC Phone User Manual 77

Pocket PC Phone User Manual78
Pocket PC Phone User Manual 79
Icon Program
Remove Programs
Creates more memory by removing programs.
Screen
Re-calibrates the screen and enables/disables Clear Type feature.
Buttons
To customize the program hardware buttons to open your most frequently-used
programs:
1. Tap the Start menu > Settings > the Personal tab > Buttons > the Program Buttons
tab.
2. Under Select a button, tap the button you want to assign a program, and then select a
program from Assign a program.
Default settings:
1 - Contacts
3
2 - Calendar
3 - Camera
4 - Record
1
2
4
In the Up/Down Control tab, Delay before rst repeat changes the time elapsed before
scrolling begins. Repeat rate changes the time it takes to scroll from one item to the next.
Press and hold the Up/Down control to scroll through the items in a list to adjust.
Input
1. Tap the Start menu > Settings > the Personal tab > Input.
2. On the Input Method tab, select an input method and change desired options. On the Word
Completion tab, select the desired settings for word completion. On the Options tab, select
the desired options for writing and recording. These options apply to any program on the

Pocket PC Phone User Manual 79
device where you can record or write. These options do not apply to text you enter using
the input panel.
You can also change input options by tapping the arrow and Options.
Menus
Only 7 programs are allowed in the Start Menu. To add the programs you use most often
to the Start menu:
1. Tap the Start menu > Settings > the Personal tab > Menus.
2. Select the programs you want, then tap OK.
3. On the New Menu tab, you can select Turn on New button menu and then select the items
to appear on the menu. When you do this, an arrow appears next to New in the command
bar of certain programs such as Pocket Word, Pocket Excel, Contacts, Calendar and
Tasks. You can tap this arrow and then tap a new item to create.
You can create subfolders and shortcuts to appear under the Start menu. In ActiveSync
on your PC, click Explore > My Pocket PC Phone > Windows > Start Menu.
Owner Information
1. Tap the Start menu > Settings > the Personal tab > Owner Information.
2. On the Identication tab, enter your personal information.
On the Notes tab, enter any additional text you want to display when the device is turned
on, such as: "Reward if found."
On the Options tab, select Identication Information so that if you lose your device, it can
be returned to you.
Password
A strong password must have at least 7 characters that are a combination of uppercase
and lowercase letters, numerals, and punctuation.
1. Tap the Start menu > Settings > the Personal tab > Password.

Pocket PC Phone User Manual80
Pocket PC Phone User Manual 81
2. To enable this function, select how long your mobile device must be turned off before the
password is required for using the device by tapping Prompt if device unused for.
3. Select the type of passwo rd you would like to use: Simple 4 digi t or Stro ng
alphanumeric.
4. Enter the password and, if necessary, confirm the
password.
n If your device is congured to connect to a network, use a strong password
to help protect network security.
n If you forget your password, you must clear the memory before you can access
your device. This will erase all les and data you have created and programs
you have installed. For more information about clearing memory, please see
Appendix A.
n If you've used ActiveSync to create a backup le, all of your program data
can be restored. For more information on creating a backup le, also see
Appendix A.
Sounds and Notications
Turning off sounds and the notication light helps conserve battery power.
ring type and volume:
1. Tap the Start menu > Settings > the Personal tab > Sounds & Notications.
2. On the Sounds tab, you can select the desired actions.
3. On the Notications tab, you can customize how you are notied about different events.
Select the event name and then select the type of reminder. You can select a special sound,
a message, or a ashing light.
To change the
Today
Changing the background:
1. Tap the Start menu > Settings > the Personal tab > Today.

Pocket PC Phone User Manual 81
2. On the Appearance tab, select the desired theme for the background. To use your own
background, select Use this picture as the background then tap Browse to locate the
desired le.
3. Choose a folder and tap the le you want, then tap OK.
NOTE: The recommend picture size for the background is 240x320 pixels in jpeg le
format. To beam a favorite theme to a friend, select the desired theme, and tap Beam on
the Appearance tab
Customizing the displayed information:
1. Tap the Start menu > Settings > the Personal tab > Today > the Items tab.
2. Select the information you want displayed on the Today screen.
3. To customize the information further, select an information type, and then tap Options
(not available for all information types).
About
The Version tab displays important device information, including the amount of memory
installed. On the Device ID tab, you may need to change the device name if you are
unable to connect to a network because another device with the same name is already
connected.

Pocket PC Phone User Manual82
Pocket PC Phone User Manual 83
Backlight
Using the backlight on battery power substantially reduces battery life. Tap the Start menu
> Settings > the System tab > Backlight.
n Tap the Battery power tab to turn ON/OFF the backlight when using battery power.
n Tap the External power tab to turn ON/OFF the backlight when using external power.
n Tap the Brightness tab to adjust the brightness level.
Clock & Alarms
Tap the Start menu > Settings > the System tab > Clock & Alarms.
n If you visit a particular time zone often, select it as your Visiting time zone on the Time
tab so that you can quickly see the correct date and time.
n You can use your device as a travel alarm clock by setting a wake-up alarm on the Alarms
tab. Tap the alarm icon to select the type of alarm you want.
n To change the way the date or time is displayed on your Pocket PC Phone, go to Regional
Settings by tapping the Start menu > Settings > the System tab > Regional Settings.
Memory
You may need to stop a program if it becomes unstable or the program memory is low.
Tap the Start menu > Settings > the System tab > Memory.
n The Main tab displays the amount of memory the system has allocated to le and data
storage versus program storage. This tab also displays the amount of memory in use versus
the available memory. For information about making memory available, see Appendix A.

Pocket PC Phone User Manual 83
n The Storage Card tab displays how much memory is available on the storage card that
is inserted into your device. If you have more than one card inserted, tap the list box and
then the name of the storage card whose information you want to view.
n The Running Programs tab displays the list of currently active programs. You can stop a
program by selecting it in the list and then tapping Stop or just tap Stop All to stop all the
running programs.
You may need to stop a program if it becomes unstable or the program memory is low.
Power
Tap the Start menu > Settings > the System tab > Power.
n The Battery tab displays the amount of battery power remaining. Battery power depends
on the battery type and how the device is being used.
n On the Advanced tab, you can select options for turning off your device to conserve battery
power. To conserve the most power, select the option that turns off the device after 3 minutes
or less.
Permanent Save
You can choose to back up Contacts and Appointments, Tasks, and Connection Setting to non-volatile memory. Backing them up in this way means they will not be lost in the
event your device loses all power and you have to perform a full reset.
To back up to FlashROM:
1. Tap the Start menu > Settings > the System tab > Permanent Save.
2. Select the desired item by checking the boxes. Tap OK.
When you elect to back up Contacts and Appointments, your Pocket PC Phone will
automatically back up newly added contacts, appointments or tasks items. This will not
happen for connection settings if you add new connections you will need to back it up
manually.

Pocket PC Phone User Manual84
Pocket PC Phone User Manual 85
To restore to FlashROM:
1. Tap the Start menu > Settings > System tab > Permanent Save.
2. Select the desired item by checking the boxes > OK.
5.2 Phone Settings
You can easily view and change settings, such as the ring type and ring tone to be used
for incoming calls, and the keypad tone to be used when entering phone numbers. You
can also protect your phone from unauthorized use. There are two ways to change phone
settings:
n Tap the Start menu > Settings > the Personal tab > Phone.
n To change the phone settings from the Phone keypad, tap Tools > Options.
Ring type
You can change the way that you are notied of incoming calls. For example, you can
choose to be notied by a ring, a vibration, or a combination of both. Tap the Ring type
list, and select the desired option.
Ring tone
Tap the Ring tone list, then select the sound you want to use.
n To set .wav or .mid les as ring tones, use ActiveSync on your PC to copy the le to the
\Windows\Rings folder on your device. Select the sound from the Ring tone list.
n To download ring tones, you can make a connection to the Internet and then download
ring tones that are compatible with the .wav or .mid formats.

Pocket PC Phone User Manual 85
Add ring tone
Add Ring Tone allows you to quickly nd and display all the ring tones stored on your
device, gives you the option to listen, add, or remove them from the Phone Settings list
mentioned above.
1. To display all ring tones on your device, you can tap the Start menu > Settings > System
> Add Ring Tone. The program will automatically list and display all the .wav and .mid
les on your Pocket PC Phone.
2. After the ring tones have loaded, you can see that some are already selected. These ones
are presently listed in the phone settings.
3. To play a ring tone, select one by tapping it, and then tap play. If you don’t like the ring
tone, deselect it. This will add/remove the selected/deselected ring tones from the list in
your phone settings.
Keypad tone
You can change the tone you hear when entering a phone number on the keypad. If set to
Tones, the tone is heard continuously for as long as the number on the keypad is pressed.
If set to Beep, the tone is heard only for one or two seconds.
1. Tap the Keypad list, then select the option you want.
2. To prevent tones from being heard when entering a phone number, select Off.
Network
With network settings, you can view available networks, determine the order in which your
Pocket PC Phone accesses another network if the current one is unavailable, and specify
whether you want to change networks manually or automatically. The current network will
remain active until you change it, lose your signal, or change your SIM card.
n The network currently in use will be listed at the top of the screen.
n When your current network is unavailable, tap Select Network to select an alternate.

Pocket PC Phone User Manual86
Services
The Services tabs are primarily used to set options for incoming calls, such as Call
Forwarding, Call Waiting, and Caller ID. To change service settings from the phone dial
screen, tap Tools > Options > the Services tab > select a service > Get Settings.
Feature Function
Call Barring Blocks incoming and/or outgoing calls.
Caller ID Identies caller by displaying their name and/or phone number.
Call Forwarding Forwards all or selected incoming calls to a different number.
Call Waiting Noties of an incoming call while you are on the phone.
Voice Mail/SMS Shows the correct numbers in the phone settings.
More
On the More tab, you can access the settings for Automatic Pickup, and Broadcast
Channels.
You can choose to receive real time news and information such as trafc and weather
reports by enabling the Broadcast Channels. This service is dependent on your mobile
service operator.

Chapter 6
Getting Connected
6.1 About Connections
6.2 Connecting to the Internet
6.3 CSD Line Type
6.4 Pocket Internet Explorer
6.5 Network Cards Settings
6.5 Terminal Services Client
6.7 Bluetooth
6.8 Wireless Modem

Pocket PC Phone User Manual88
Pocket PC Phone User Manual 89
6.1 About Connections
This device is equipped with powerful networking functions that allow you to connect to
the Internet through a GPRS network or a Bluetooth modem. You can also use an external
modem with this device to access the Internet.
You can set up connections to the Internet and to a corporate network at work to browse
the Internet, send and receive E-mail, use instant messages, and synchronize with
ActiveSync.
Your Pocket PC Phone has two groups of connection settings: My ISP and My Work
Network. My ISP settings are used to connect to the Internet, and My Work Network
settings can be used to connect to any private network, such as a corporate network. Fill
in the settings and you are ready to connect to the Internet.
6.2 Connecting to the Internet
You can use My ISP settings to connect to the Internet and use different connection methods
to send and receive E-mail messages and surf the Internet.

Pocket PC Phone User Manual 89
Connect to the Internet via an ISP:
1.
Obtain the following information from your ISP (Internet Service Provider):
n ISP server phone number.
n User name.
n Password.
n Access point name. (Required for GPRS connection).
2. Tap the Start menu > Settings > the Connections tab > Connections.
3. To create a new connection in My ISP, tap Add a new modem connection, and follow the
instructions in the Make New Connection wizard.
4. Wireless connections can be made via a mobile phone network or GPRS. If you are using
a mobile phone network to connect, tap Cellular Line in the Select a modem list. If you
are using GPRS, tap Cellular Line (GPRS).
n To view additional information for any screen, tap .
n To start the connection, switch to Pocket Internet Explorer and browse to a Web
page. Your device will automatically connect.
To change modem connection settings, in either My ISP or My Work Network, tap Manage
existing connections. Select the desired modem connection, tap Settings, and follow
the instructions on the screen.
Connecting to a private network
1. Obtain the following information from your network administrator:
n Server phone number.
n User name.
n Password.
2. Tap the Start menu > Setting > the Connections tab > Connections.
3. In My Work Network, follow the instructions for each type of connection.
4. To start the connection, start using a related program. For example, switch to Pocket
Internet Explorer and browse to a Web page. Your device will automatically connect.

Pocket PC Phone User Manual90
Pocket PC Phone User Manual 91
6.3 CSD Line Type
This program allows you to choose the line type when you make a circuit switch data
connection.
To change a CSD Line type:
1. Tap the Start menu > Settings > Connections > CSD Line Type.
2. In Data rate, select a value. In Connection element, choose a type from that drop-down
menu. Tap OK.
NOTE: The default setting on your Pocket PC Phone is set for the most optimal use. Do
not change this setting unless you have trouble using the circuit switch data connection.
GPRS Settings
This program allow you to choose the GPRS setting method when you make a GPRS
connection. Choose between these two required authentication methods:
n PAP authentication: Password Authentication Protocol is a simple authentication
protocol used to authenticate a user to a remote access server of an ISP (Internet Service
Provider).
n CHAP authentication: Challenge Handshake Authentication Protocol is used to
negotiate the most secure form of encrypted authentication supported by both server
and client.
NOTE: Changing these settings may cause your data communications to no longer operate.
Please consult your service provider before altering these settings.

Pocket PC Phone User Manual 91
6.4 Pocket Internet Explorer
Once connected, you can use Pocket Internet Explorer to surf the Internet. While surng,
you can also download les and programs to be installed on your device from the Internet
or intranet.
favorites that are stored in the Mobile Favorites folder in Internet Explorer on the PC.
synchronize and download your favorite links from your PC, in your PC's ActiveSync,
select, Favorites in the Tools Menu > Options > Sync Options.
Browsing the Internet
Open the Pocket Internet Explorer screen by tapping the Start menu > Internet
Explorer.
During synchronization with your PC, download your favorite links and mobile
1. In the address bar that appears at the top of
the screen, enter the Web address you want to
connect to. Tap the down arrow to choose from
previously entered addresses.
2. Tap to go to the web address you entered.
3. Tap to go back to the previous page.
4. Tap to refresh the web page on the screen.
5. Tap to go back to the Home page.
6. Tap (the Favorites button), then tap the
favorite address you want to view. To add a
favorite link while using your Pocket PC Phone,
go to the page you want to add, tap and hold on
the page, and tap Add to Favorites on the pop-
up menu.
1
4 5 6
3
To
2

Pocket PC Phone User Manual92
Pocket PC Phone User Manual 93
6.5 Network Cards Settings
Use a network (Ethernet) card to connect directly to a network. Once connected, you can
view the Internet or intranet, or download e-mail. Make sure to purchase and congure a
network card that is compatible with your Pocket PC Phone.
To setup your network card:
1. Insert the network card into your Pocket PC Phone.
2. The rst time you insert the card. Network Settings will appear automatically. Or to change
later, tap the Start menu > Setting > the Connections tab > Network Cards.
3. To enter specic server information, tap the appropriate adapter.
To start a connection, insert the network card, and begin using a desired program.
To change network card settings:
1. Tap the Start menu > Setting > the Connections tab > Network Cards.
2. In the My network card connects to: drop-down box, tap either The Internet or Work.
If you are connecting to your ISP at home, tap The Internet. If you are connecting to a
private network such as a corporate network at work, tap Work.
3. Tap the appropriate adapter in the Tap an adapter to modify settings: box, the IP address
will now appear in the IP Address box on the IP Address tab.
4. To change TCP/IP settings if your ISP or private network does not use dynamically-assigned
IP addresses, tap Use specic IP address and enter the requested information. Contact
your ISP or network administrator to get the IP address, subnet mask, and/or default gateway
(if needed).
5. To change DNS and WINS settings if your ISP or private network does not use dynamically-
assigned IP addresses, tap the Name Servers tab and enter the requested information.
Servers that require an assigned IP address may also require a way to map computer
names to IP address. DNS and WINS are the resolution options supported on your Pocket
PC Phone.

Pocket PC Phone User Manual 93
6.6 Terminal Services Client
Using the Terminal Services Client, you can log onto a PC running Terminal Services
or Remote Desktop and use all of the programs available on that PC from your mobile
device. For example, instead of running Pocket Word, you can run the PC version of Word
and access all of the .doc les on that PC from your Pocket PC Phone.
Connecting to a Terminal Server
Start a remote connection to the server via a GPRS or Wireless LAN connection:
1. Tap the Start menu > Programs > Terminal Services Client.
2. To connect to a server you have previously connected to, in Recent Servers, tap a server.
To connect to a new server, enter the server’s name in the Server box. Select the Limit
size of server desktop to t on this screen check box only when using applications that
have been specically sized for use with the Pocket PC Phone.
3. Tap Connect.
NOTE: If the network administrator has congured Terminal Services Client to reconnect
to disconnected sessions, and you previously disconnected from a Terminal Server without
ending the session, the Terminal Services Client reconnects to that session.
Navigating within Terminal Services Client
Once connected to the server, the PC’s screen may more than ll your mobile device’s
screen. If scroll bars are displayed on the server’s screen, you will see more than one set of
scroll bars on your Pocket PC Phone: one to scroll information on the PC, and one to scroll
the PC display through the Terminal Services window in Terminal Services Client.
To ensure you are scrolling the PC display through Terminal Services Client, use the
ve directional buttons at the bottom of the Terminal Services Client screen. To better t

Pocket PC Phone User Manual94
Pocket PC Phone User Manual 95
information on your mobile device’s screen, select Limit size of server desktop to t on
this screen. For best effect, programs on the desktop computer should be maximized.
Disconnecting without ending a session
The following commands must be accessed from the Start menu in the Terminal Services
window used to access the PC’s commands. Do not use the Start menu on your Pocket
PC Phone.
1. In the Terminal Services window, tap Start > Shutdown.
2. Tap Disconnect.
If your administrator has congured Terminal Services Client to reconnect to disconnected
sessions, you will be reconnected to this session the next time you connect to this
server.
Disconnecting and ending a session:
1. In the Terminal Services Client window, tap Start > Shutdown.
2. Tap Log Off.
6.7 Bluetooth
Bluetooth is a short-range wireless communications technology. Devices with Bluetooth
capabilities can exchange information over a distance of about 10 metres without requiring
a physical connection.
Unlike infrared, you don't need to line up the devices to beam information with Bluetooth.
The devices only need to be within a range of about 10 metres. You can even beam
information to a device in a different room, as long as it's within range. The software included
with your Pocket PC Phone allows you to use Bluetooth in the following ways :

Pocket PC Phone User Manual 95
n Beam information, such as les, appointments, tasks, and contact cards,
between devices that have Bluetooth capabilities. For example, if you and a
co-worker each have a device with Bluetooth, you can beam items between
your devices, such as les, contact cards, appointments, tasks, and so forth.
n Create a dial-up modem connection between your device and a Bluetooth
phone. You can then use the Bluetooth phone as a modem.
To access to the Bluetooth settings screen :
1. To turn on/off the Bluetooth mode and create a new bond with other device, tap Start
menu > Settings > Connections tab >Bluetooth. Alternatively, you can also tap the small
icon for Bluetooth connection settins in the right lower corner on Today screen.
2. To add an extra layer of security when beaming information with others or to set a Bluetooth
syncronization tap Start menu > Settings > System tab > Bluetooth Settings.
Bluetooth modes
To turn on Bluetooth On
Check Turn on Bluetooth option.
To turn off Blue tooth Off
Uncheck Turn on Bluetooth option.
In this mode, you can neither send nor receive information by using Bluetooth. You might
want to turn the radio off at times in order to conserve battery power, or in situations where
radio use is prohibited, for example on airplanes and in hospitals.
By default the Bluetooth radio is turned off. If you turn it on, and then turn off your
device, the Bluetooth radio also turns off. When you turn on your device again, the
Bluetooth radio automatically turns on .

Pocket PC Phone User Manual96
Pocket PC Phone User Manual 97
NOTE: In a situation where Bluetooth is on but radio is off, it is not possible to turn on
radio. If you wish to turn on radio, turn off Bluetooth rst, and then turn on radio.
To make your device discoverable
Check Make this device discoverable to other devices option.
The Bluetooth radio is turned on, and all of the other Bluetooth devices within range (about
10 metres) can detect your device and attempt to beam information to it, establish a bond,
or use a Bluetooth service. In this mode, other devices can detect your device whether or
not a bond has been created; however, in order to receive a beam from another device,
you must accept it on your device.
Other Bluetooth devices can now detect your device and attempt to beam information to
it, establish a bond, or use a Bluetooth service. Note that to receive beamed information,
you must accept it on your device.
Selecting Discoverable also turns on your Bluetooth radio.
If you no longer want your device to be discoverable, uncheck Turn on Bluetooth option
or Make this device discoverable to other devices option to leave the radio on, but not
allow detection by other devices.
Bonds
A bond is a relationship that you create between your Pocket PC Phone and another
Bluetooth device in order to exchange information in a secure manner. Creating a bond
involves entering the same personal identication number (PIN) on the two devices you
want to bond. You need only create a bond once between two devices. Once a bond is
created, the devices recognize the bond and are able to exchange information without
your entering a PIN again.

Pocket PC Phone User Manual 97
a. To create a Bond:
You can create a bond between your device and another device that has Bluetooth. Once
you do this, Bluetooth doesn’t need to be in discoverable mode in order for you to beam
information between the two devices; the Bluetooth radio only needs to be turned on.
1. Make sure that the two devices are within 10 metres of one another and that Bluetooth is
in discoverable mode on both devices.
2. Tap Start menu > Settings > Connections tab.
3. Tap Bluetooth > Devices tab > New. Your device searches for other Bluetooth devices
and displays them in the list.
4. Tap the name of the other device in the list, and then Next.
5. In PIN, enter a PIN of between 1 and 16 characters and tap Next.
6. Enter the same PIN on the other device.
7. If you want, in Name, edit the name of the other device.
8. Tap Finish.
b. To accept a Bond:
1. Make sure that Bluetooth is turned on and in discoverable mode.
2. When prompted to bond with the other device, tap OK.
3. In PIN, enter a PIN of between 1 and 16 characters, and tap Next. You must enter the same
PIN that was entered on the device requesting the bond.
4. If you want, in Name, edit the name of the device requesting the bond.
5. Tap Finish.
The bond is created. You can now exchange information with the other device.

Pocket PC Phone User Manual98
Pocket PC Phone User Manual 99
c. To rename a Bond :
1. Tap Start menu > Settings > Connections tab.
2. Tap Bluetooth > Devices tab.
3. Tap the bond to rename.
4. In Name, enter a new name for the bond.
5. Tap Finish.
d. To delete a Bond :
1. Tap Start menu > Settings > Connections tab.
2. Tap Bluetooth > Devices tab.
3. Tap and hold the bond to delete.
4. Tap Delete.
Beaming Information with Bluetooth
1. Tap and hold an item to beam, such as an appointment in Calendar, a task in Tasks, a
contact card in Contacts, or a le in File Manager.
2. Tap Beam [type of item].
3. Tap the device to which you want to send the beam.
The item is beamed to the device you selected.
If the device that you want to beam to doesn’t appear in the list, make sure that it is
turned on, in discoverable mode, and within 10 metres of your device. Also, make sure
that your Bluetooth radio is turned on.

Pocket PC Phone User Manual 99
Receiving a Bluetooth Beam
1. Make sure that your device is congured to receive incoming beams and that Bluetooth
is in discoverable mode.
2. Make sure that your device is within 10 metres of the device beaming the information.
3. When prompted to receive an incoming beam, tap Yes.
The information is now stored on your device.
Using a Bluetooth Phone as a Modem
You can use a phone that has Bluetooth capabilities as a modem for your device. To do this,
you create a Bluetooth modem connection on your device and then send information to the
phone by using Bluetooth. The phone relays the information over the phone line and then
sends back to your device any information that you had requested over the connection.
Once you create a modem connection to the Bluetooth phone, you can reuse it whenever
you want to use the phone as a modem.
1. Make sure that the Bluetooth phone is turned on, that your device’s and the phone’s
Bluetooth radios are turned on, and that your device and the phone are within 10 metres
of one another.
2. If you have not already done so, create a Bluetooth phone connection by following
3. Tap Start menu > Settings > Connections tab.
4. Tap Connections > Add a new modem connection.
5. Enter a name for the connection.
6. In the Select a modem list, tap Bluetooth > Next.
7. Make sure that the phone is discoverable. Some phones may also need to be
pairable in order to accept a bonding request. For more information, see your phone
documentation.

Pocket PC Phone User Manual100
Pocket PC Phone User Manual 101
8. If the phone appears in the My Connections list, skip to step 14. If not, tap New and follow
the remaining steps.
9. In the list, tap the phone and then Next.
10. In PIN, enter a PIN of between 1 and 16 characters, and tap Next.
11. Enter the same PIN on the phone.
12. If you want, in Name, edit the name of the phone.
13. Tap Finish.
14. In the My Connections list, tap the phone, and then Next.
15. Enter the phone number to dial for this connection and tap Next.
16. In User name, Password, and Domain, enter the logon information for this connection
and tap Finish.
17. Start using the program that uses the Bluetooth phone connection; for example Inbox to
send and receive e-mail, or Internet Explorer to browse the Web.
6.8 Wireless Modem
This utility will simulate your device as a wireless modem, and let your PC/Notebook be
connected to a wireless network. Before creating a new modem via selected connection
type, you still need to install the drivers on your PC/Notebook. For more details about
the drivers installation and the minimum requirements of your PC/Notebook, please refer
to Application CD.
1. Tap Start menu > Programs > then tap Wireless Modem.
2. Select a connection type.
3. Connect your device via infrared to a note-book or PC, and then tap Start.
Before you press the Start button, please make sure your device is with a GPRS SIM
card and you have connected this device to your PC/Notebook by IrDA connection and
disabled the Activesync.
 Loading...