

i-mate I306SP User Manual

contents
Chapter 1.Getting to know your Device 07
1.1 Getting Started 10
1.2 Status Indicators 12
1.3 Entering Information 13
1.4 Lock/Unlock the device 14
1.5
Voice Recording 14
Chapter 2.Personalising your phone // 15
2.1 Home Screen 16
2.2 Ring Tone and Notification 16
2.3 General Settings 18
2.4 Security 22
Chapter 3.Using your phone /23
3.1 Making a Call 24
3.2 Receiving a Call 27
3.3 In-Call Options 28
3.4 Special Dialing Requirements 29
3.5 Additional Settings 29
Chapter 4.
Getting connected 32
4.1 Automatic setup of your data connections / /33
4.2 Beams //34
1
i-mat
e
™

I306SP
Chapter 5.Messaging //36
5.1 Text messaging /37
5.2 Email /41
5.3 Windows Live Message /50
Chapter 6.Synchronizing //57
6.1 Introduction to ActiveSync /58
6.2 Installing and Configuring ActiveSync /58
Chapter 7.Applications & Multimedia 69
7.1 Contacts //,70
7.2 Calendar ///72
7.3 Tasks ///76
7.4 Camera & Video Recorder /78
7.5 Using Pictures & Videos 82
7.6 Using Windows Media Player /86
7.7 Internet Explorer Mobile / 93 9
7.8 Viewing Slide Shows with PowerPoint Mobile /,98
7.9 Internet Sharing / ,99
7.10
File Explorer / 101
7.11 Adding more programs to your device 102
2
i-mate
™

Chapter 8.Maintaining you phone /103
8.1 Maintaining your phone 104
8.2 Resetting your Phone 105
8.3 Installing your SIM card 106
Appendix. Other Applications /107
A.1 Battery Information 108
A.2 PC Requirement to Run ActiveSync 4.5 109
A.3 Specifications 113
3
i-mat
e
™

I306SP
Copyright ® 2006 i-mate. All Rights reserved.
No part of this manual, including the product and software described in
it, may be reproduced, transmitted, stored in a retrieval system, or
translated into any language in any form, by any means, without prior
written permission from i-mate.
i-mate provides this publication “as is” without warranty of any kind. This
information could include technical inaccuracies or typographical
errors. i-mate may make improvements and/or changes in the product.
Information and specifications contained in this document are subject
to change at any time without notice.
The information contained in this document does not affect or change the
product specifications or warranties. i-mate is not liable for any damages
resulting from the use of this product.
IMPORTANT SAFETY INFORMATION
Please read the following information carefully before you start using your
device to avoid any damages caused by improper usage:
• The device is not charged when you take it out of the box. The battery
should be charged for at least 8 hours before first use. Do not remove
the battery while charging.
•Do not use batteries, which have not been specified by the manufacturer,
as this may cause leakage or rupture.
•Do not change the battery with an unspecified AC Adapter, as this may
cause damage to both the device and the battery.
4
i-mat
e
™

•When discarding the batteries, dispose of them in a proper manner,
according to the battery manufacturer’s instructions and your local laws.
•Power off the device and remove the battery before inserting the SIM
card. Make sure the SIM card snaps correctly into the SIM socket.
•Do not open or tamper with the device cover as it will void your warranty.
•Do not press hard on this product, as it may cause damage to the
screen or the internal components.
•Do not use the device at gas or refuelling stations, chemical plants and
places containing explosives or flammable materials.
•Do not strike, shake or heat the device in a way which may cause
battery leakage or rupture and damage to the device.
•Do not scratch the screen with hard objects.
•Do not clean the screen with chemical detergents. Only use cloths,
specifically designed for cleaning liquid displays, to wipe the screen.
•Do not expose the device to direct sunlight, or leave the device in a
humid environment, for extended periods
of time, as this may cause damage to the device and battery.
•Do not immerse the device in water.
•The device may interfere with the navigation and/ or communication
systems on aircraft. The use of the device on aircraft is prohibited by
laws in most countries.
•Use hands-free devices, if you need to use the telephony services, while
driving a vehicle.
5
i-mat
e
™

I306SP
Interference with Medical Equipment Functions
This product may cause medical equipment to malfunction. The use of
this device is forbidden in most hospitals and medical clinics.
Non-ionizing Radiation
This product should be operated in the suggested normal condition
only to ensure the radiative performance and safety of the interference. As
with other mobile radio transmitting equipment, users are advised that for
satisfactory operation of the equipment and for the safety of
personnel, it is recommended that no part of the human body be allowed to
come too close to the antenna during operation of the equipment.
Trademark Information
Microsoft, MS-DOS, Windows, Windows NT, Windows Server, Windows
Mobile, ActiveSync, Excel, Internet Explorer, MSN, Outlook, PowerPoint
and Word are either registered trademarks or trademarks of Microsoft
Corporation in the United States and/or other countries.
6
i-mat
e
™

Chapter
.
Getting to Know Your Devic
e
1.1 Getting Started
1.2 Status Indicators
1.3 Entering Information
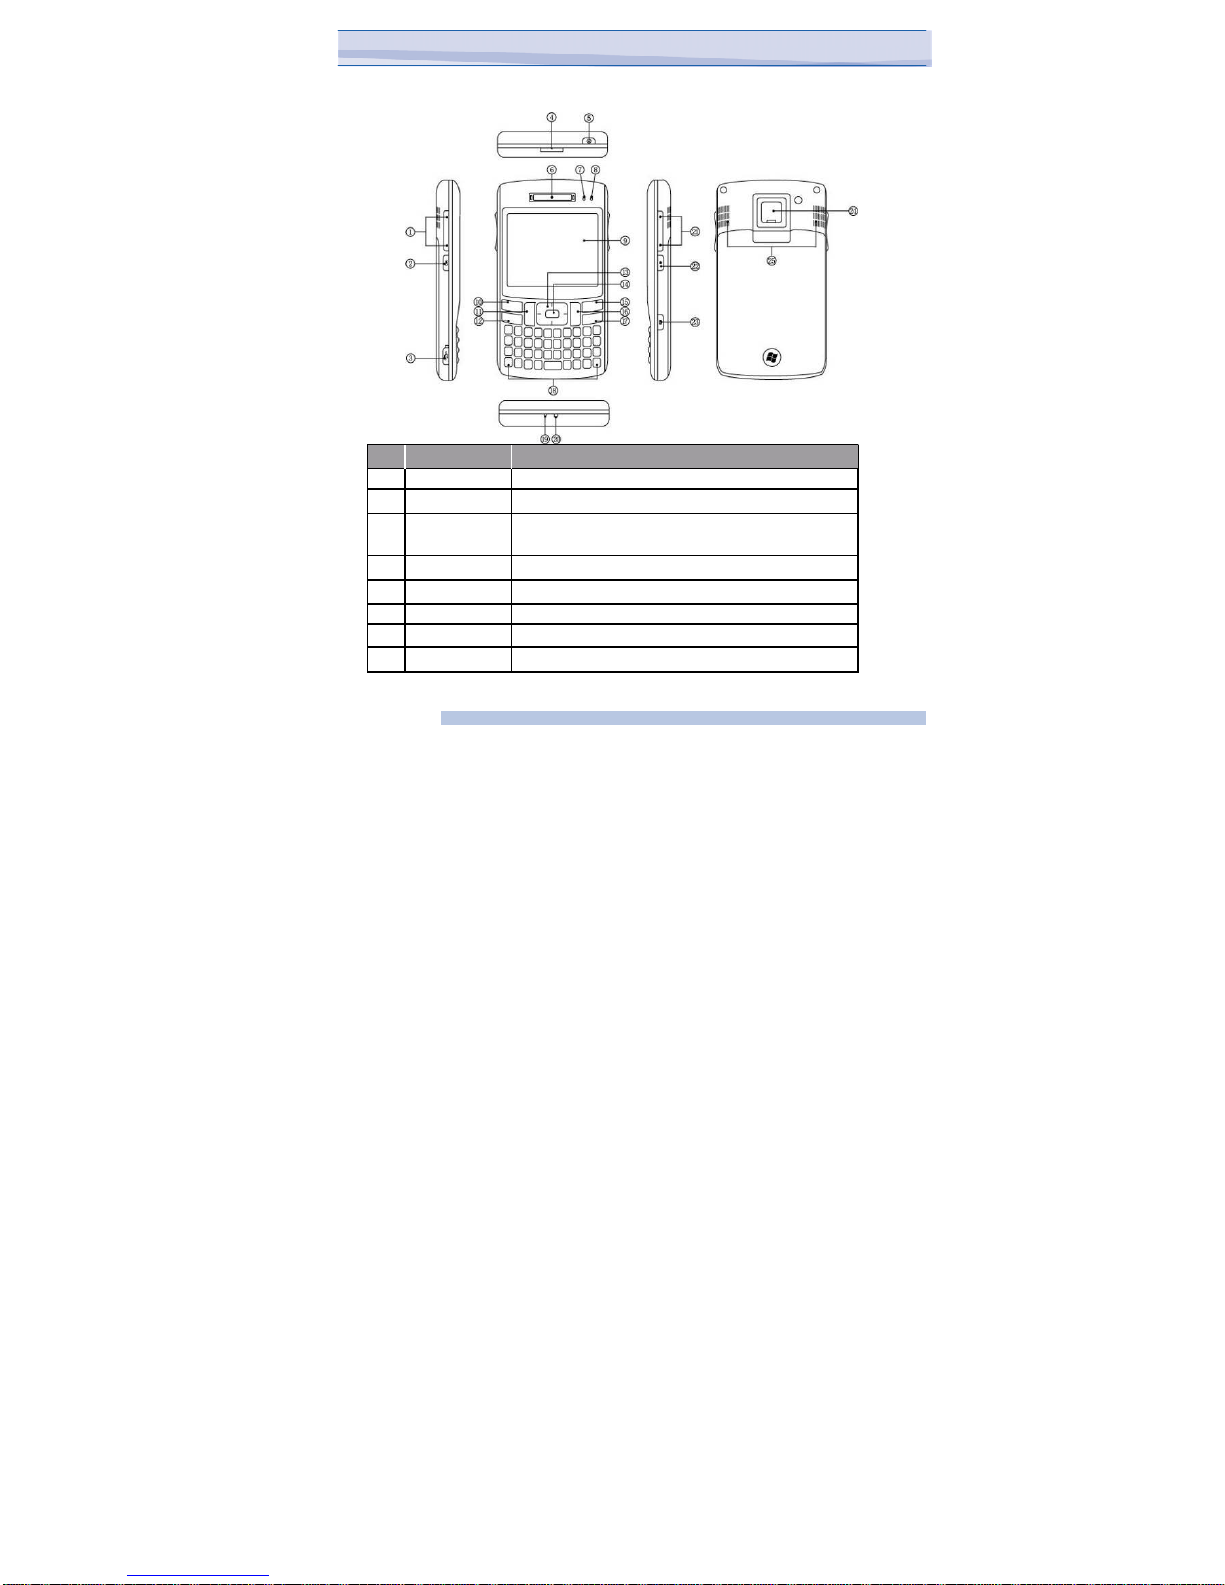
Device View
Item
F
unction
1.
Navigation Key
Press up, down ke
y
to focus your aim.
2.
OK Key Press OK key to make a selection.
3.
Mini-USB
Connector
Connects to the AC adapter or USB cable.
4.
T-Flash Card Slot
Lets you insert an external storage card.
5.
Power Key Power on or off the device.
6.
Ear Piece
For use during phone calls.
7.
Message LED Please refer to Notification LED section of this chapter.
8.
GSM/Battery LED Please refer to Notification LED section of this chapter.
8
i-mat
e
™
9
i-mat
e
™
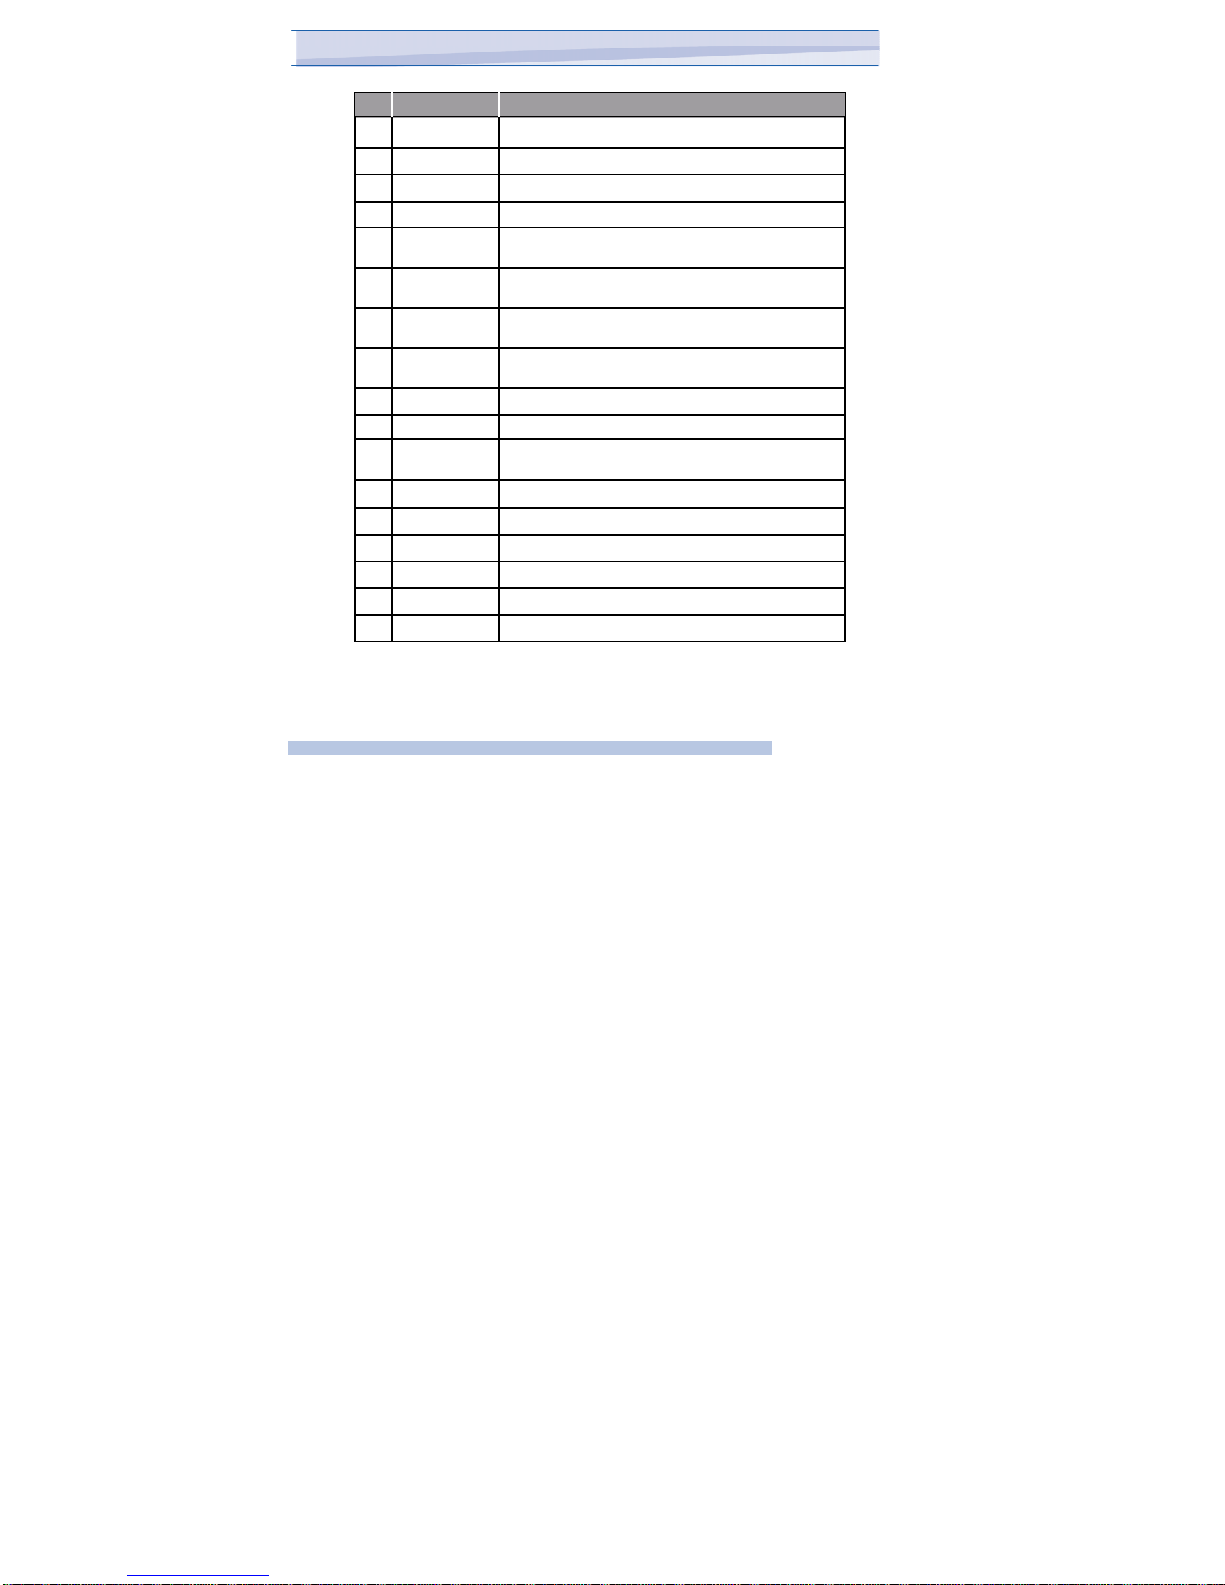
No.
Item
F
unction
9.
Display 2.5-inch TFT screen.
10.
Home Key Press to return to the Home screen.
11.
Left Soft Key Press to display your Start menu.
12.
TALK Key Press to answer an incoming call or dial a number.
13.
Navigation Pad Press this multi-directional control up, down, left, or right to
move through menus, program instructions.
14.
Centre Key Carry out the selection from the Navigation pad scrolling by
pressing the center button.
15.
Backspace Key Press to returned to a menu and delete characters the left of
the cursor.
16.
Right Soft Key Performs the command shown in the label above the
button.
17.
END Key Press to end the phone call.
18.
Keyboard You to type letters, numbers and symbols on your phone.
19.
Microphone Speak into the microphone when receiving or making a phone
call or voice recording.
20.
Reset Key Use this button to soft reset the device.
21.
Volume Controller Scroll up or down to adjust the volume.
22.
Start menu Key Press and hold on one second to display your Start menu.
23.
CAMERA Key Press to launch the camera. Press again to take a picture.
24.
Camera Lens Used for capturing photos and videos.
25.
External Speaker
Allows you to listen to audio media .
I306SP
Chapter 1. Getting to Know your Device
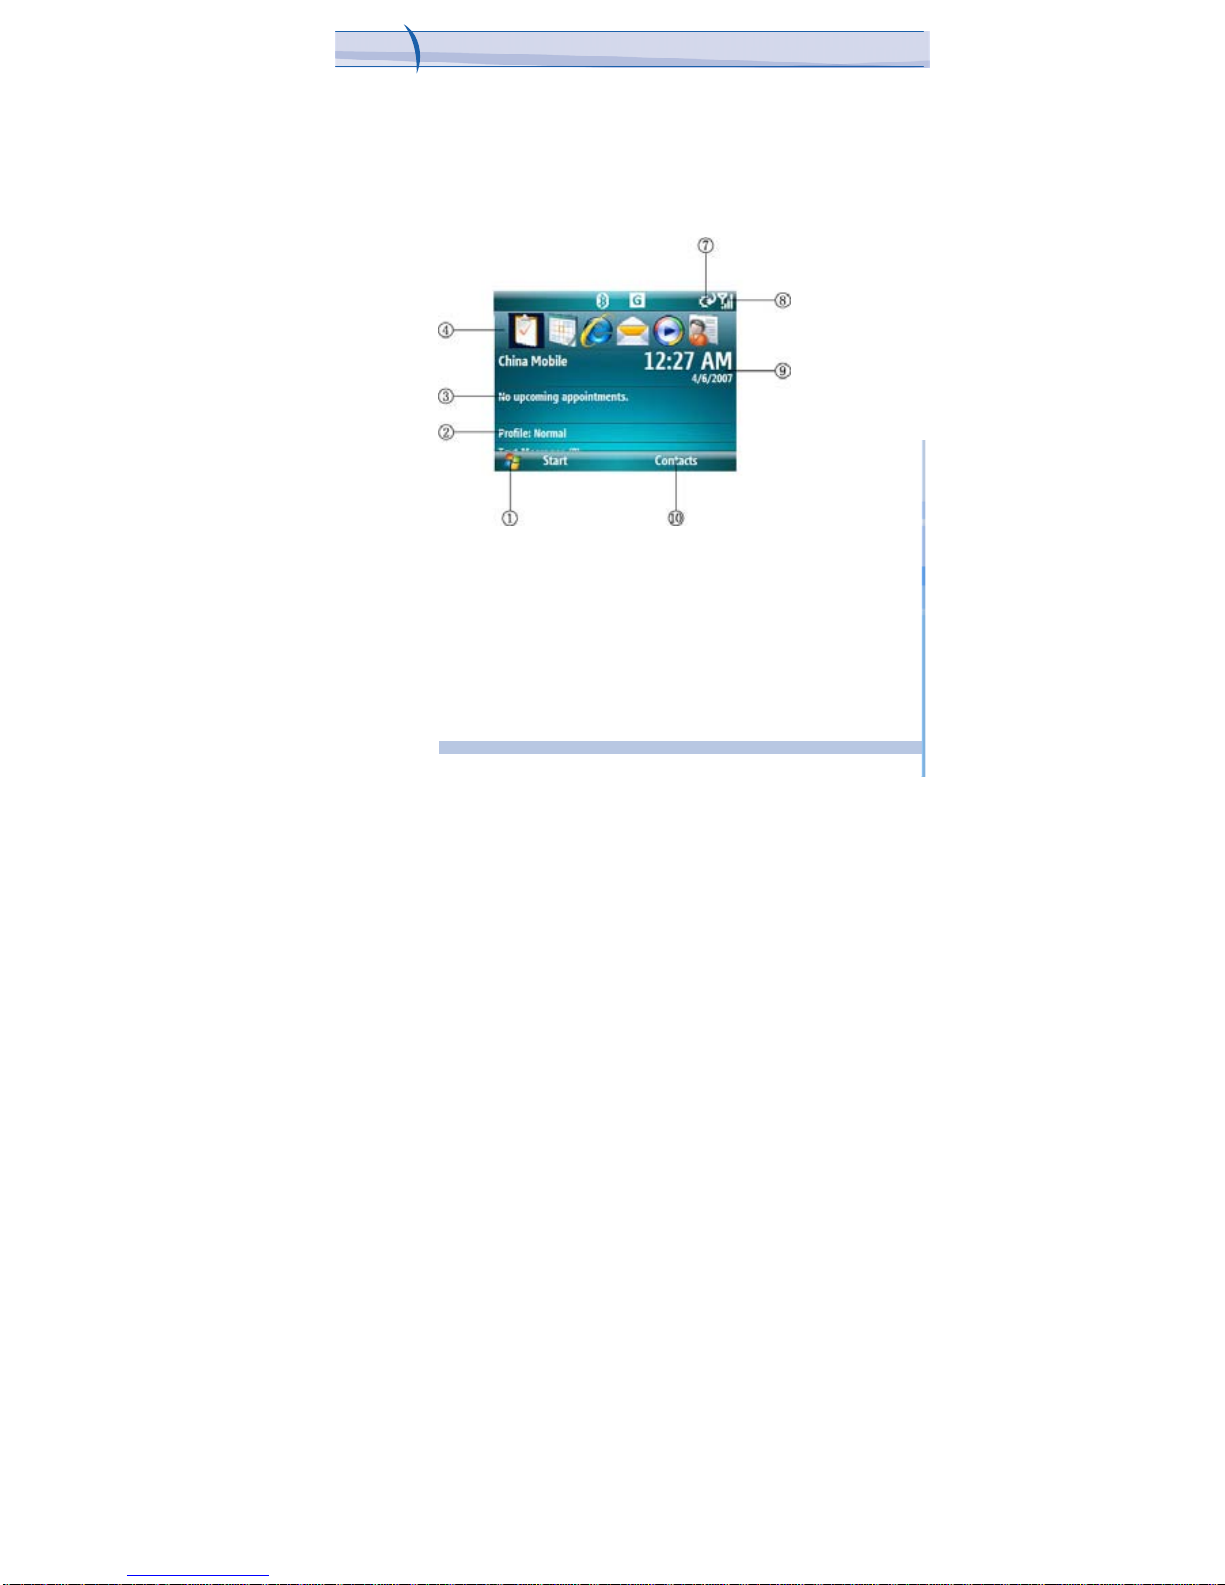
1 Getting Started
The Today screen displays important information, such as upcoming
appointments and status indicators. It displays a summary of information for
the day, shows you the system status and contains a list of shortcuts to
programs.
10
i-mat
e
™

1. Tap to open the Start menu.
2. Tap to view Profile status.
3. Your day at a glance with reminders. Tap to open the appointments.
4. Tap to quickly select a program you have recently used.
5. Indicates the battery status.
6. Indicates the radio signal strength. Tap to configure the phone settings.
7. Displays the current time and date.
8. Tap to open Contacts screen.
11
i-mat
e
™
I306SP
Chapter 1. Getting to Know your Device
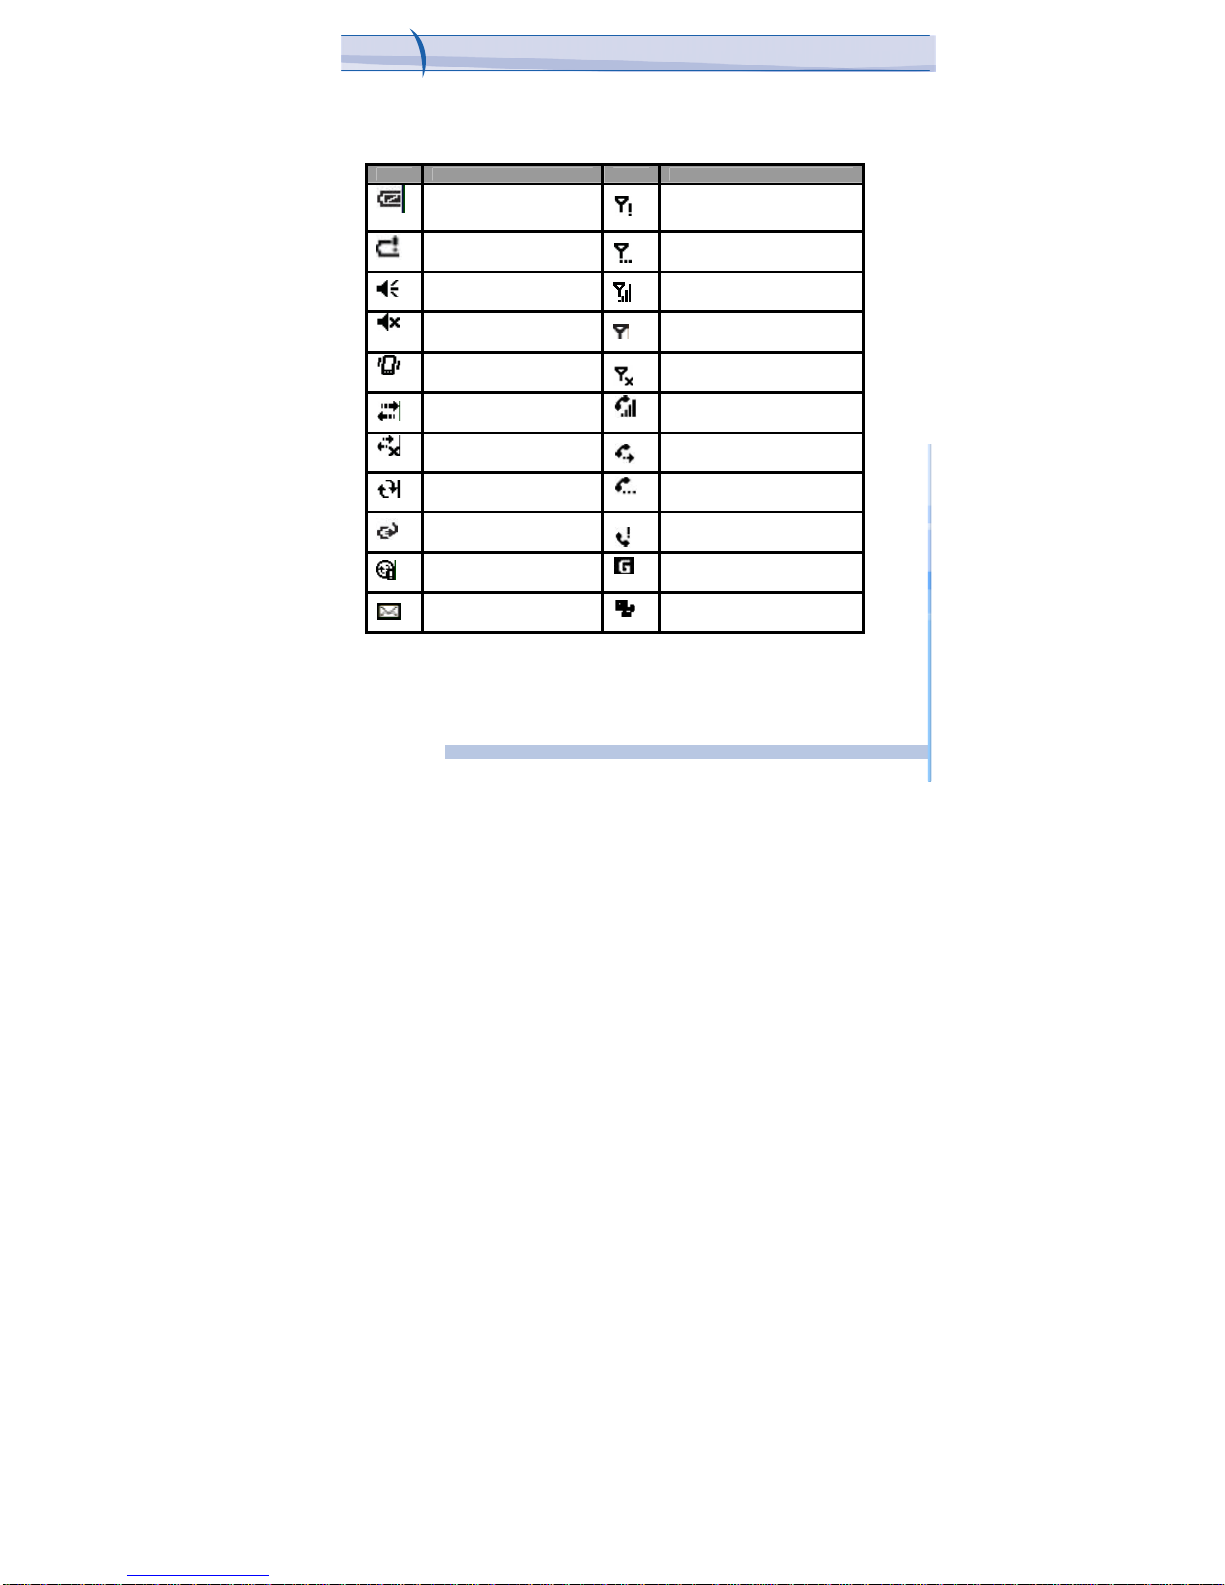
1.2
Status Indicators
Following are some of the status icons that you may see on your device.
Icon Description Icon Description
Indicates the battery
Is fully charged.
No phone service.
Indicates the battery is
Very low.
Searching for phone service.
Sound on.
Indicates maximum signal strength.
Sound off.
No signal.
Ringer in vibration mode.
Phone is turned off.
Connection is active.
Voice call in progress.
Connection is not active.
Calls are forwarded.
Synchronization in progress.
Call on hold.
Battery charging.
Missed call.
Synchronization error.
GPRS available.
New e-mail or text messages.
GPRS is in use.
12
i-mat
e
™
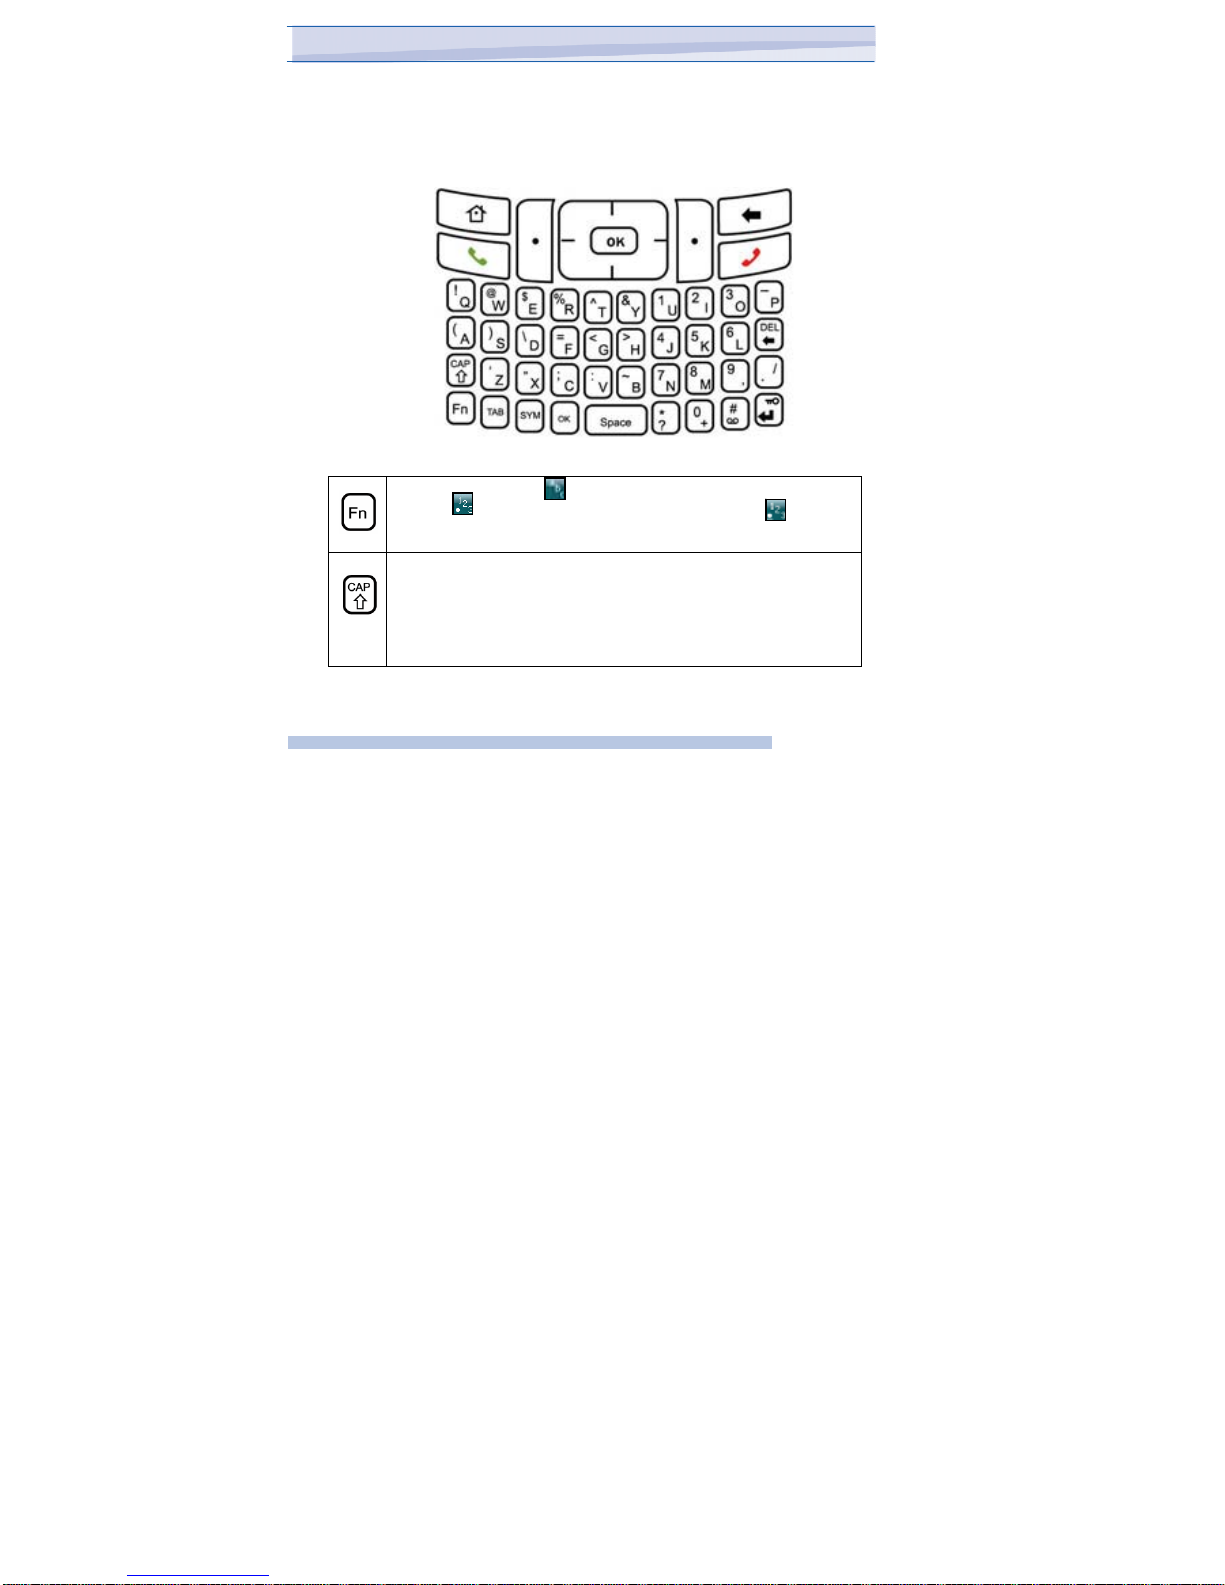
1.3 Hardware keyboard
Other than the on-screen keyboard, this device is equipped with a
hardware keyboard.
To enter capital letters and/or numbers using the hardware keyboard:
Press this key and the appears, you can then enter characters.
And the appears, you can then enter numbers. The appears,
you can then enter symbols. (输入错误)
Press this key once the first letter you enter is capitalized(for
example: Abc.)
Hold this key ,all letters you enter will be capitalized(for example:
ABC.) Press this key again to enter lower case letters.
13
i-mat
e
™

I306SP
Chapter 1. Getting to Know your Device
1.4 Lock/Unlock the device
Locking the device turns off keyboard functionality. This is a helpful
feature if, for example, the device is turned on and in your pocket, and you
want to prevent accidental key presses.
To lock the device, press the
key. Once the device is locked, the left
soft key label changes to Unlock. You can also tap the
key to unlock
the device.
1.5 Voice Recording
You can create a stand-alone recording (voice note) or you can add a
recording to a note. To create a voice note
1. Tap Start >more> Voice Notes.
2.Do one of the following:
z If you prefer to create a stand-alone voice recording, record
your voice in the notes list.
3.Tap the RECORD button and speak to the device’s microphone.
4.Tap the STOP button when finished.
5.Tap OK to return to the notes list if you are adding a voice
recording to a note.
14
i-mat
e
™

Chapter 2.
Personalising
your phone
2.1 Home Screen
2.2 Ring Tone and Notification
2.3 General Settings
2.4 Security
2.1 Home screen
The Home screen shows your upcoming appointments, active tasks, and
information about e-mail messages.
You can customize the items and background presented in the Today screen
on your device:
1. Tap Start >more>Settings >more > Home Screen.
2. Select the desired theme for the background image of the Home
screen. You can use one of your own pictures as the background image on
the Home screen selecting
3. Tap Done.
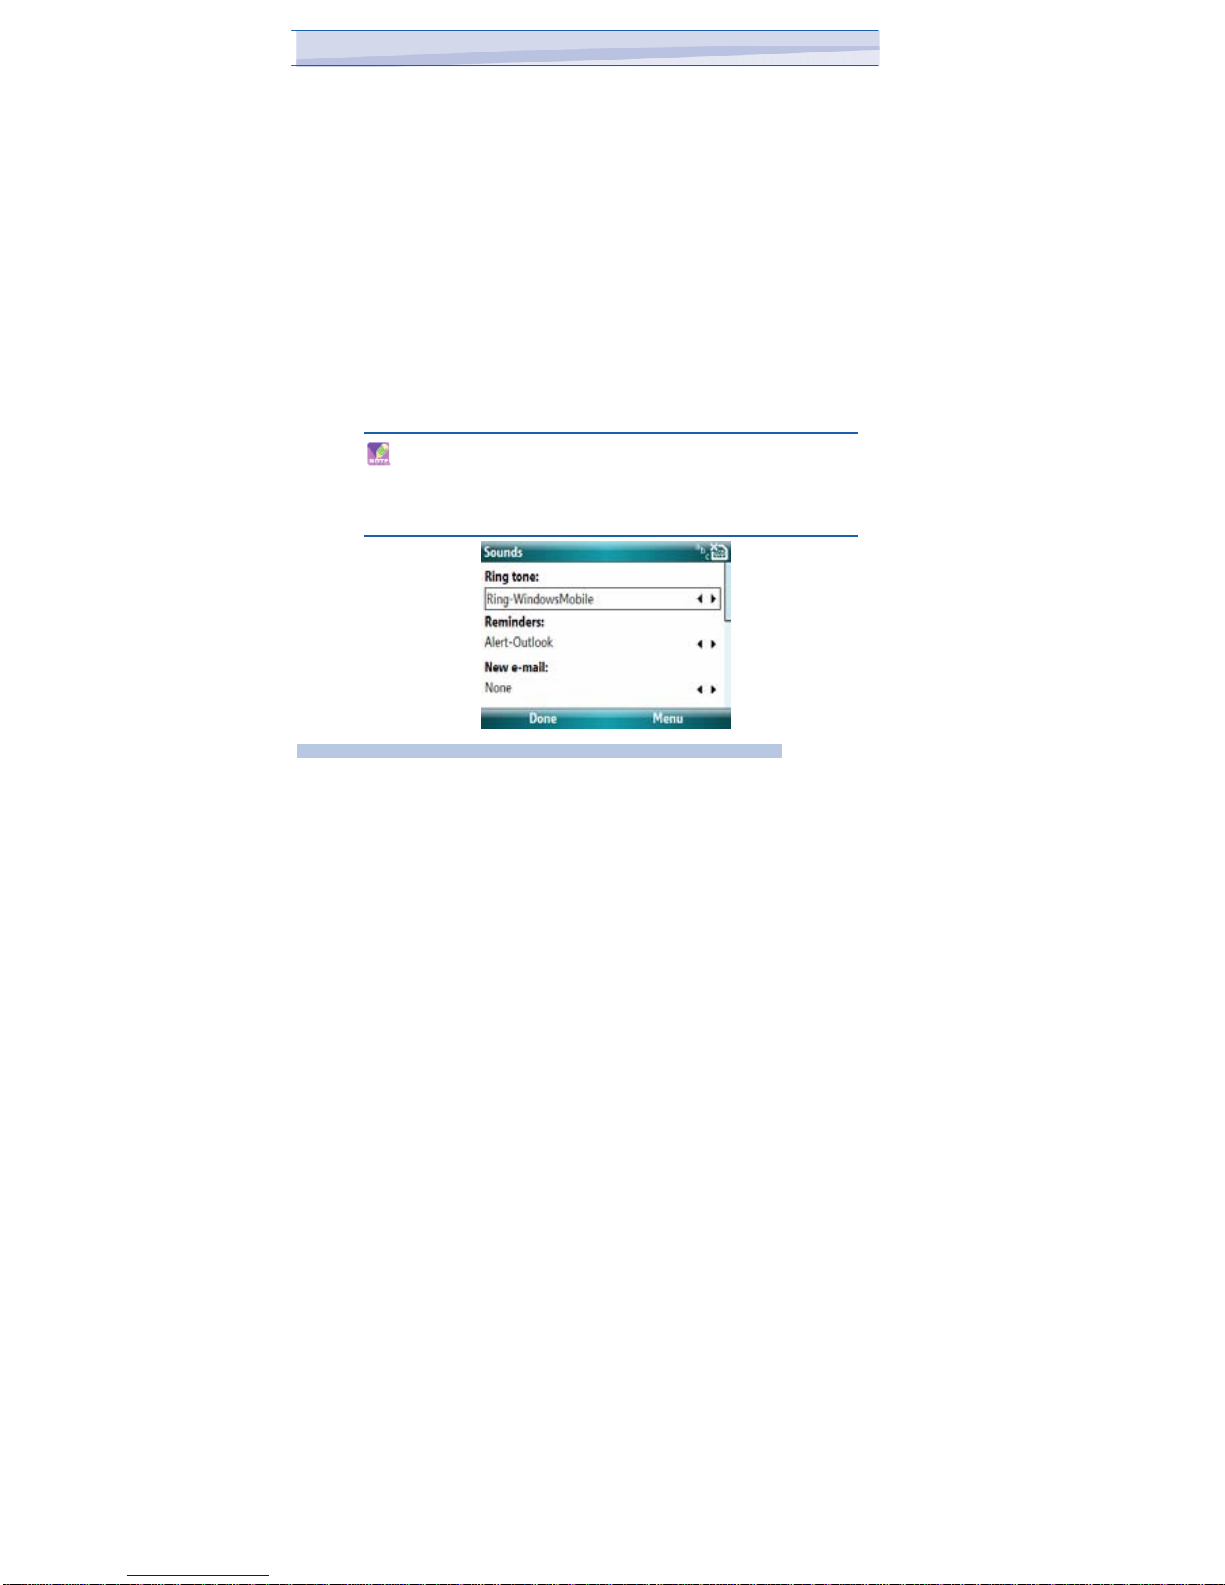
2.2 Ring Tone and Notifications
To change the ring tone
1. Tap Start >more>Settings >Sounds.
2. In the Ring tone list, tap the sound you want to use.
To use custom *.wav, *.mid, *.mp3, or *.wma files as ring tones,
use ActiveSync on your PC to copy the file to the /Windows/Rings
folder on your device. Then, select the sound from the Ring tone
list. For more information about copying files to your device, see
ActiveSync Help on your PC.
16
i-mat
e
™
I306SP
Chapter 2. Personalising your phone
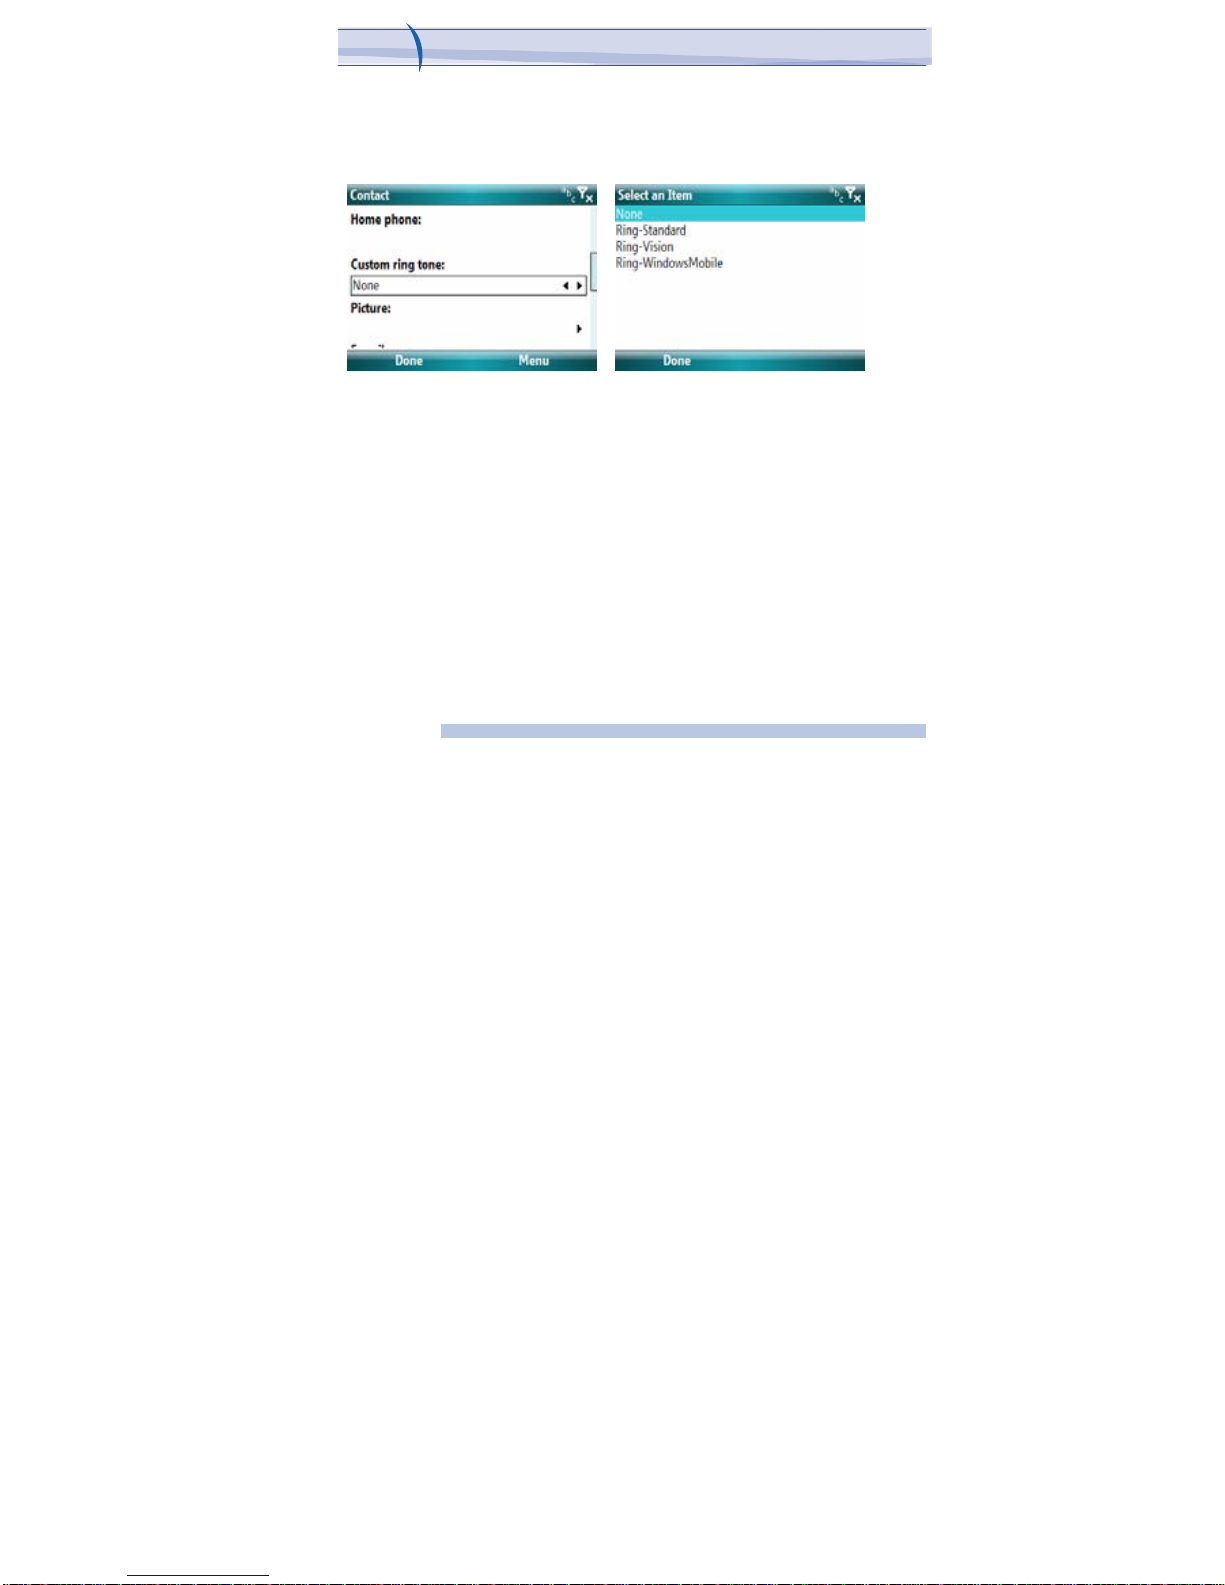
It is also possible to assign a specific Ring Tone for a Contact:
1. Go to Start > Contacts and Tap on the desired Contact.
2. Select Menu > Edit
3. In the Custom ring tone field, select a ring tone of your choice.
To change the ring type
You can change the way that you are notified of incoming calls. For
example, you can choose to be notified by a ring, a vibration, or a
combination of both.
To set an alarm
1. Tap Start >more> Settings > Clock & Alarms > Alarms .
2. Tap the day of the week for the alarm. You can select multiple
days by tapping each desired day.
3. Tap the Alarm time to open a clock and set the time for the alarm.
17
i-mat
e
™
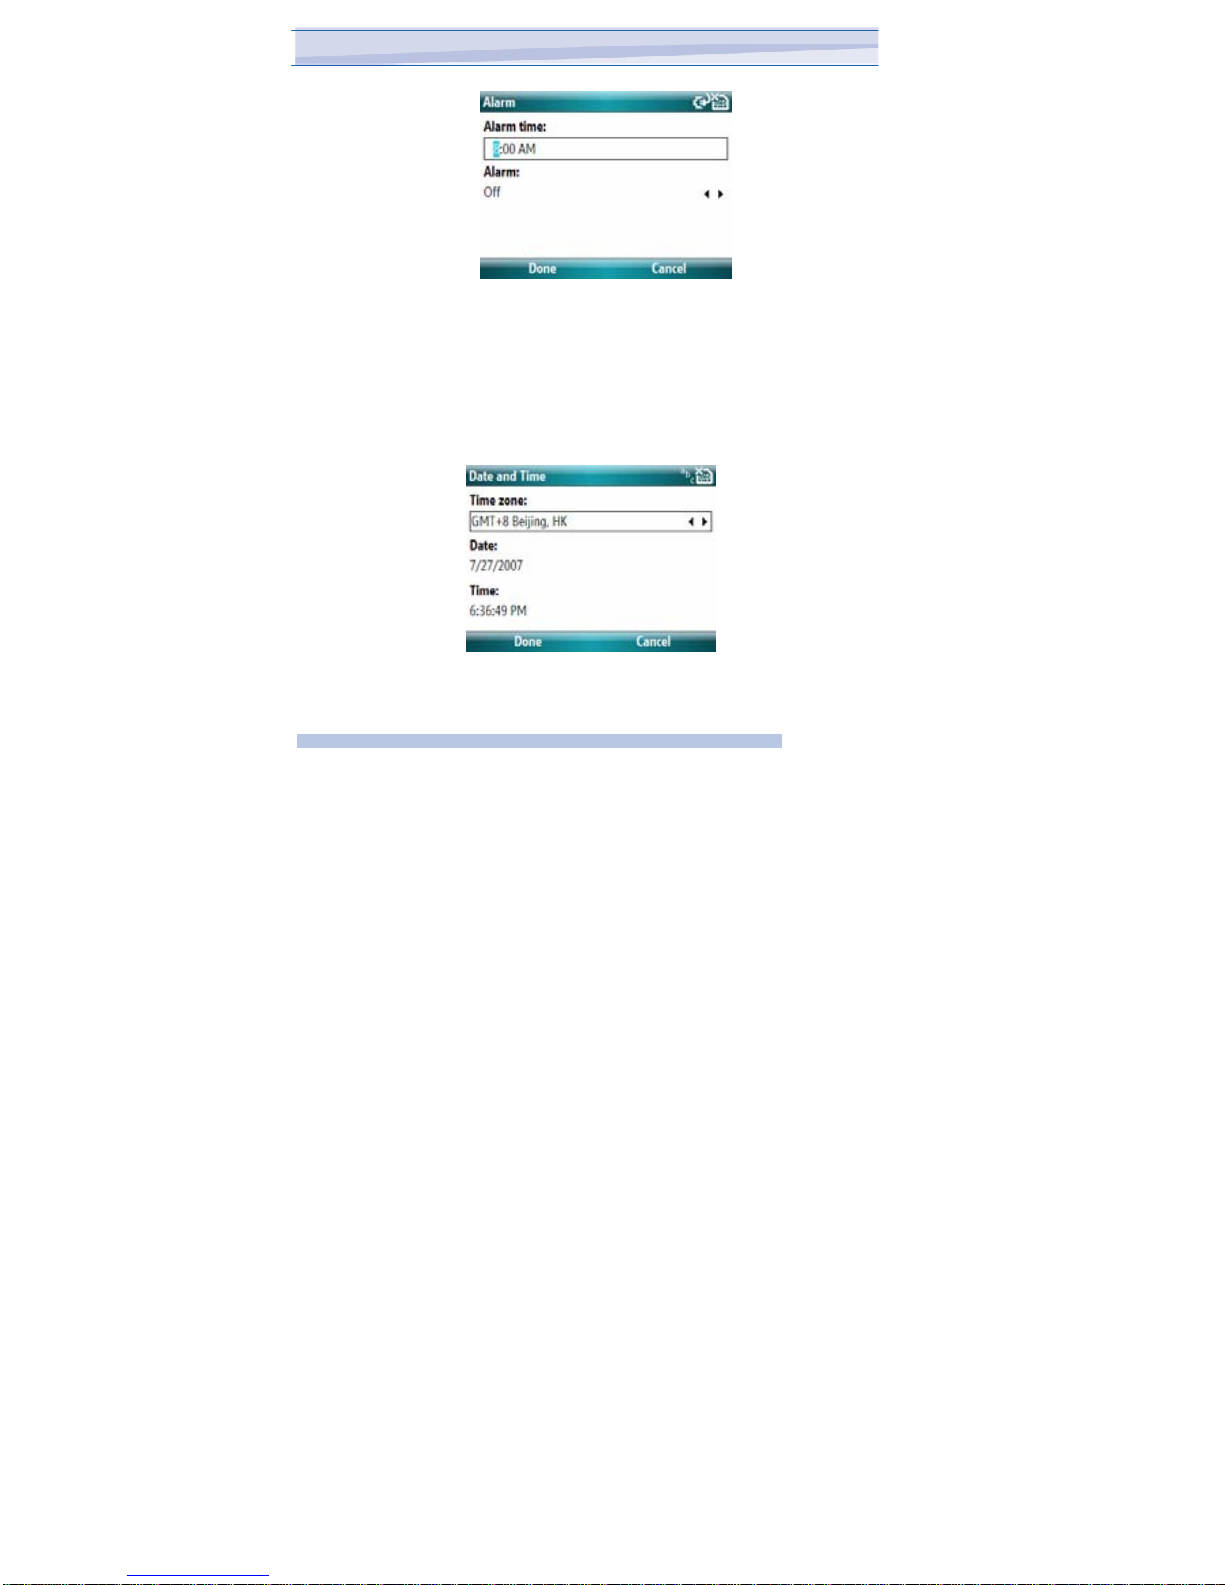
2.3
General Settings
To set the time and date
1. Tap Start > more> Settings > Clock & Alarms>Date and Time.
2. Select the correct time zone and change the date or time.
18
i-mat
e
™

I306SP
Chapter 2. Personalising your phone
To change language and regional settings
The style in which numbers, currency, dates, and times are displayed is
specified in regional settings.
1. Tap Start > more> Settings > More > Regional Settings.
2. Select your region and language.
3. The region you select determines which options will be available on
the other tabs.
4. To customize settings further, tap the appropriate tabs and select
the desired options.
19
i-mat
e
™
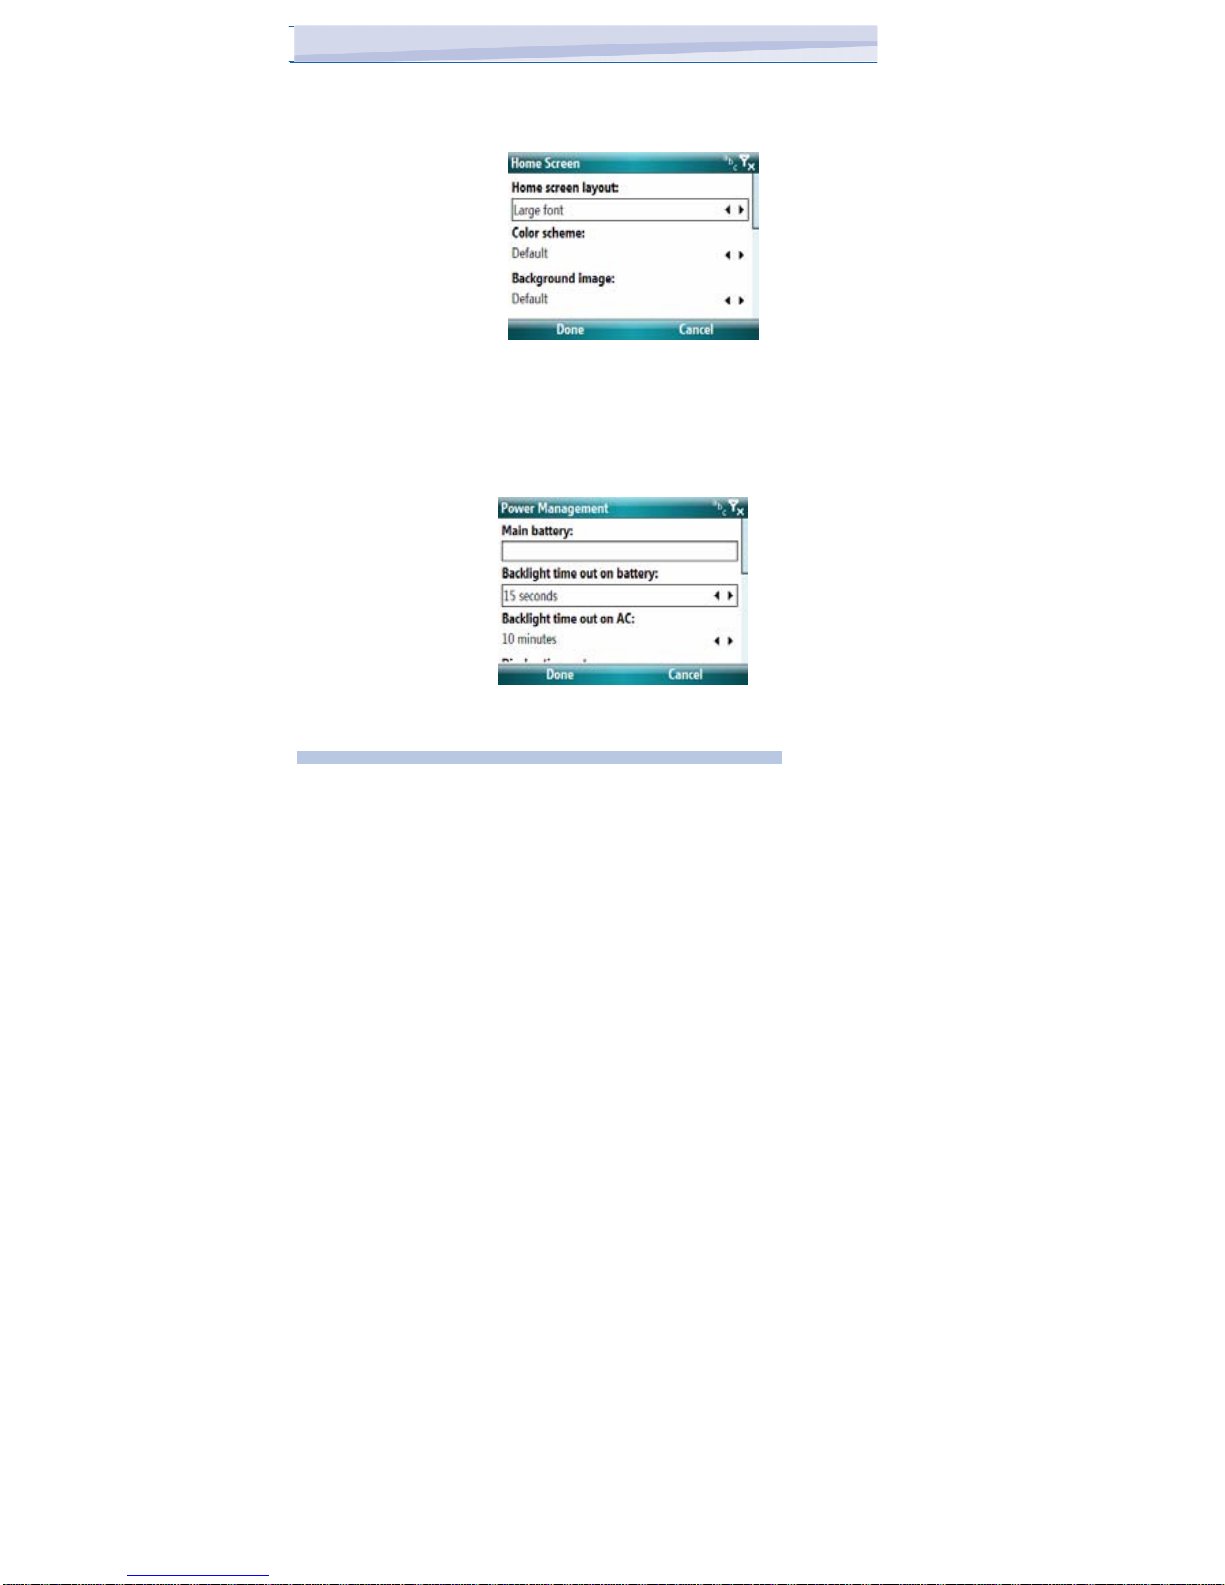
To increase the size of text on the screen
Tap Start >more> Settings > more> Home screen > Home screen layout >
Large font.
1. Tap Start >more> Settings > More > Power Management. On the
Advanced tab, you can specify when your device turns off to conserve battery
power. For optimum conservation, specify 3 minutes or less.
2. Use the AC adapter to plug your device into external power whenever
possible, especially when using a T-Flash card or when using a modem or
other peripherals.
3. Adjust the backlight settings.
20
i-mat
e
™

I306SP
Chapter 2. Personalising your phone
To set the backlight to dim after a time delay
Tap Start > more>Settings >more>Power Management..
To Remove Programs
In most cases, programs automatically close to free needed memory,
however, you can close programs manually, if you prefer.
1. Tap Start >more> Settings > More > Remove Programs .
2. In the Programs list, tap the program you want to close, and tap Menu.
21
i-mat
e
™

2.4 Security
To protect your device with a password
You can help keep your data more secure by requiring a password every
time the device is turned on.
1. Tap Start >more> Settings >More >Security > Device Lock.
2. Select the Prompt if device unused for check box, and select how long
your device must be turned off before a password is required. In the
Password type box, select the type of password you would like to use.
Enter the password and, if necessary, confirm the password. If your
device is configured to connect to a network, use a strong password to
help protect network security.
3. Tap Done. The next time the device is turned on, you will be
prompted to enter your password.
Each time a wrong password is entered, the time the device takes
to respond will get longer and longer until the device appears to be not
responding.
If you forget your password, you must follow the instructions in
your owner’s manual to clear memory before you can access your
device.
To change your password
1. Tap Start > more> Settings >more> security> Personal tab >
Lock. You will be prompted to enter your current password.
2. In the Password box, enter your new password.
3. On the Hint tab, enter a phrase that will help you remember your new
password, but doesn’t allow others to guess your password.The hint will be
displayed after the wrong password is entered four times.
4. Tap OK.
22
i-mat
e
™

Chapter 3.
Using your phone
3.1 Making a call
3.2 Receiving a call
3.3 In-Call Options
3.4 Special Dialing Requirements
3.5 Additional Settings
I306SP
Chapter 3. Using your Phone
3.1 Making a Call
Like a standard mobile phone, you can use your Smart Phone to make,
receive and keep track of calls. You can also take notes while talking, dial
directly from Contacts, and easily copy SIM contacts to Contacts on the
device.
If your PIN is entered incorrectly three times, the SIM card will be
blocked. If this happens, you can unblock it with the PUK (PIN
Unblocking Key) obtained from your wireless service provider.
You can make a call from Phone, Contacts, Speed Dial, Call History, and
SIM Manager.
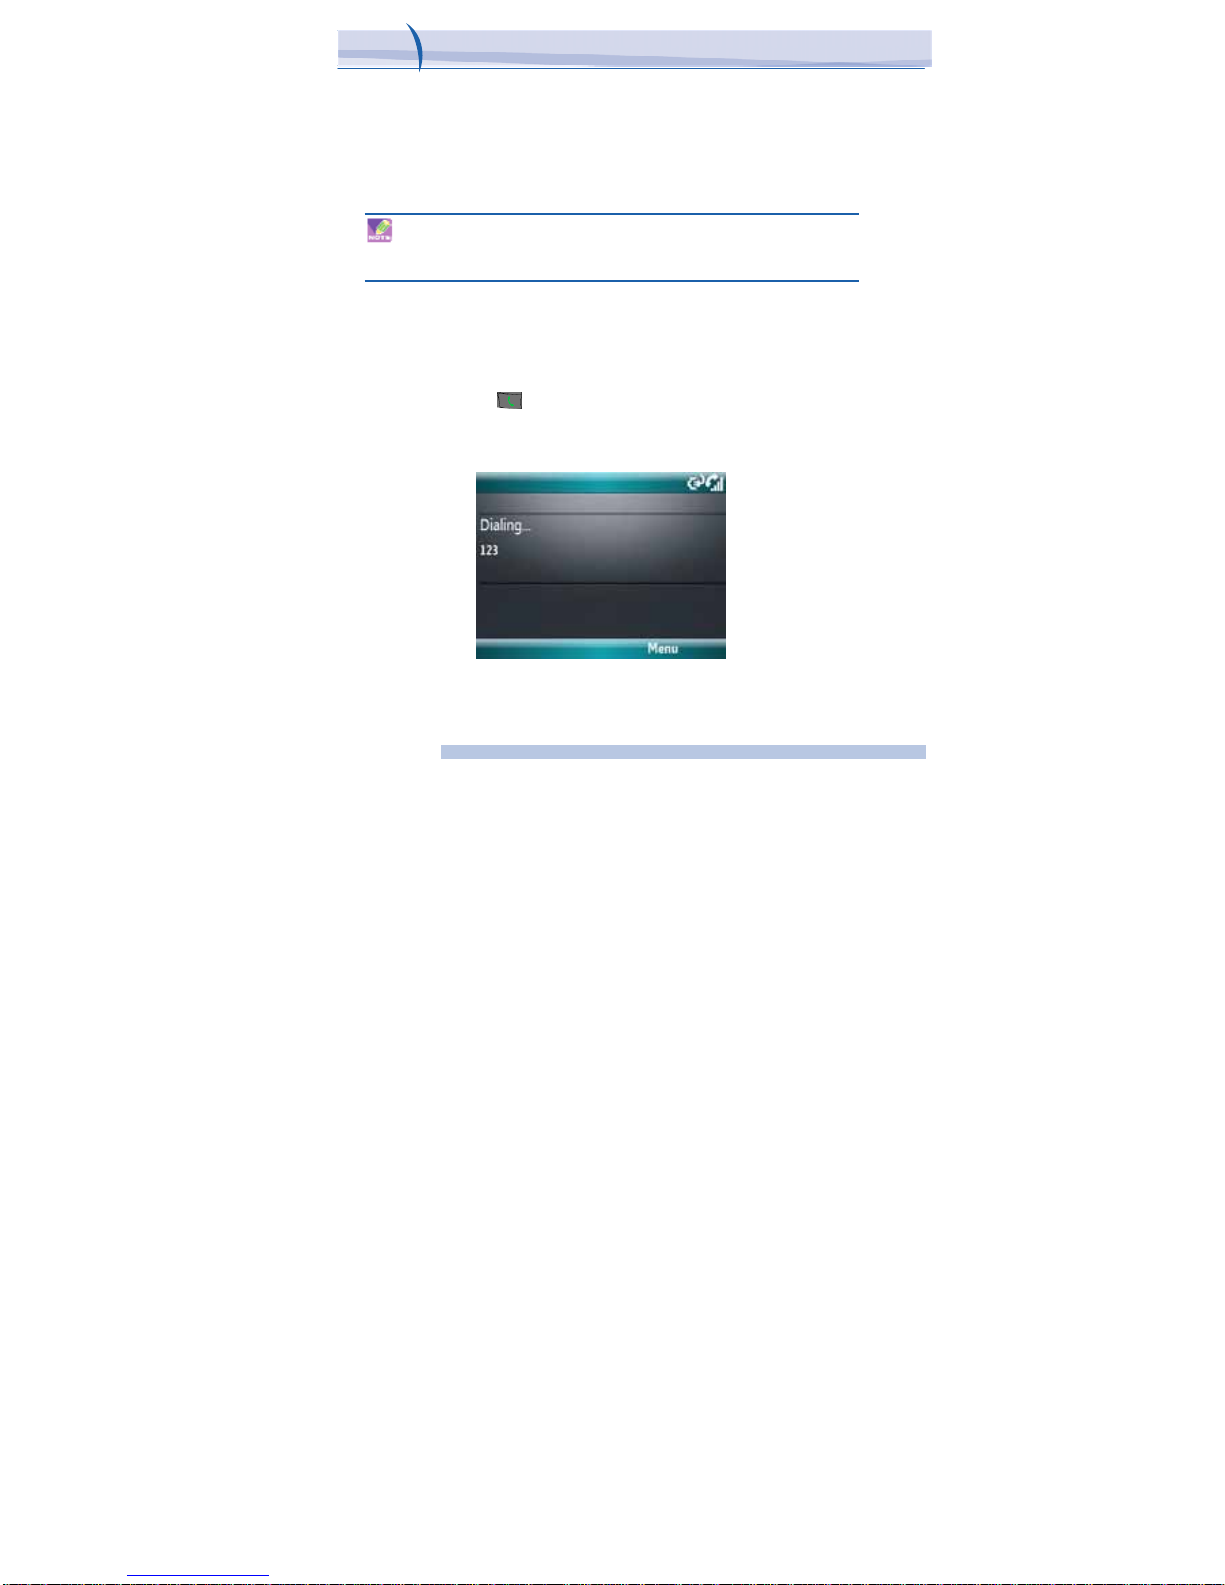
Make a call from Phone
On the Phone screen, tap the desired phone number, and tap the Talk
button. To open the Phone screen, do one of the following:
• Press the TALK
button .
Make a call from the Contacts application
• Tap Start > Contacts.
• Tap the desired contact, and press TALK
24
i-mat
e
™
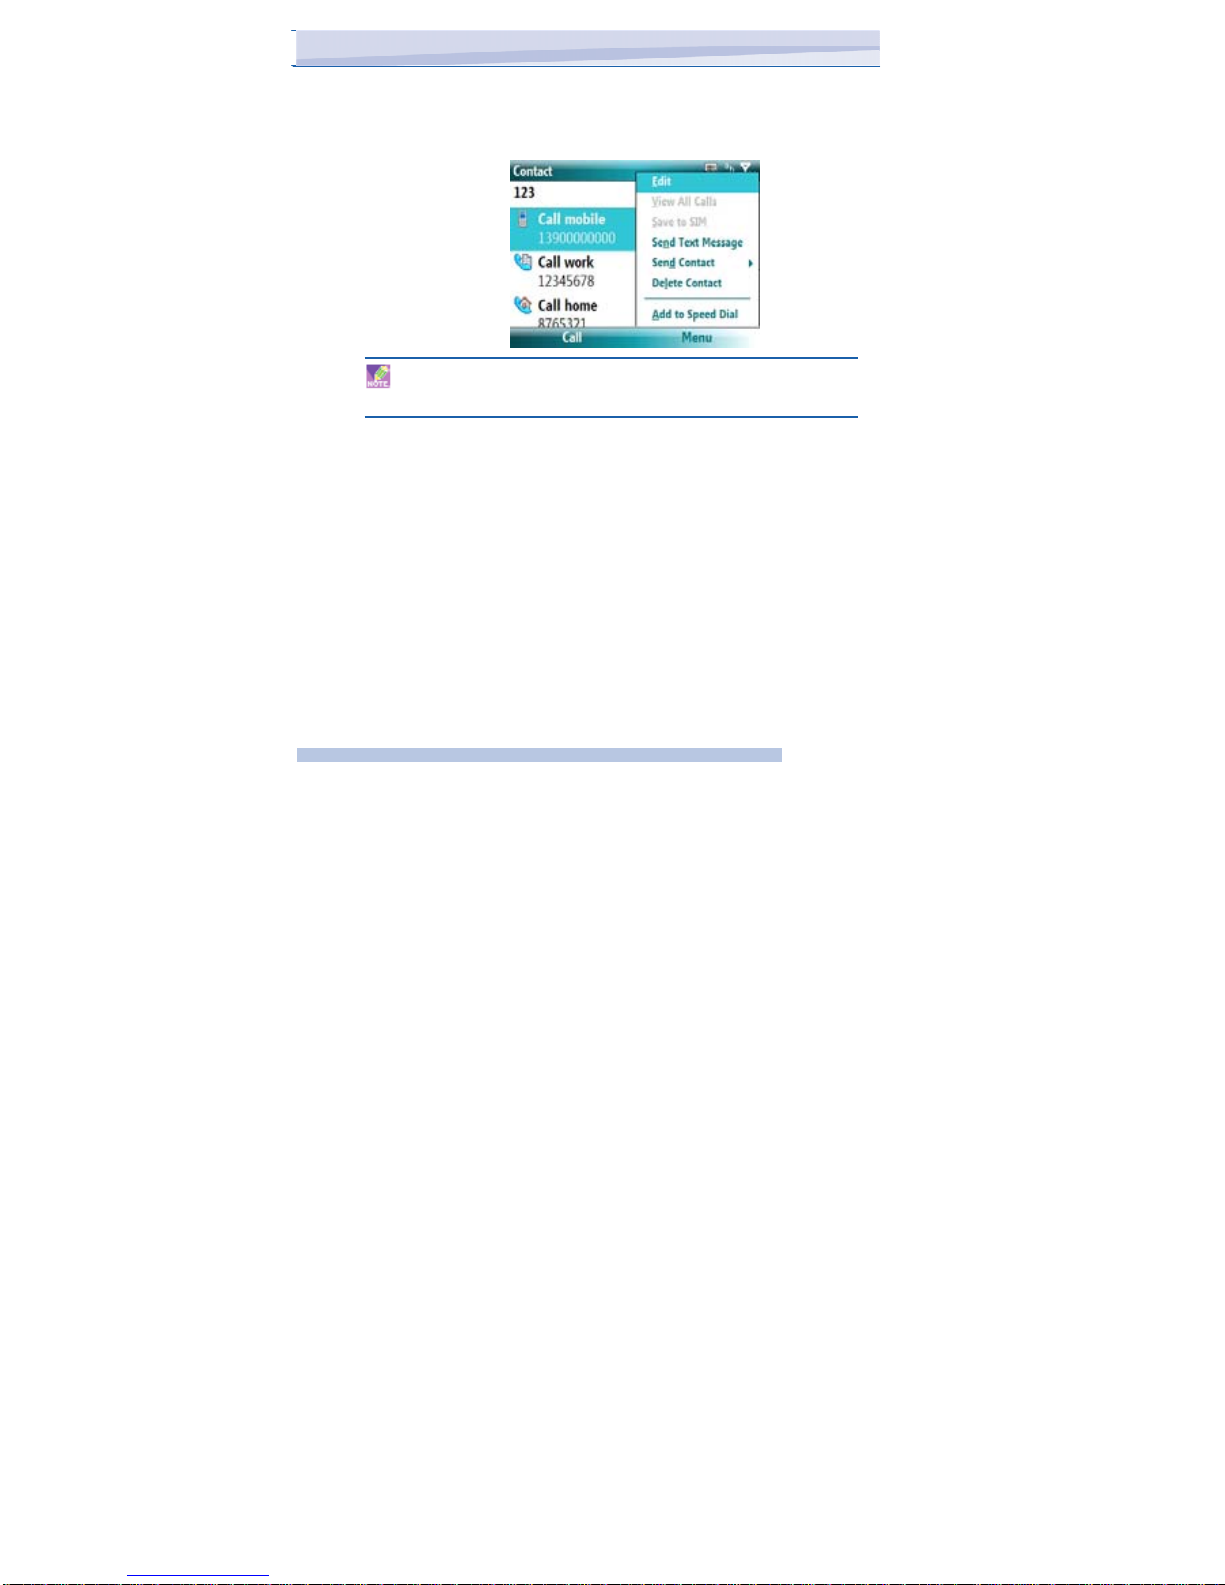
• You can also tap the desired contact in the contacts list, and tap
the phone number that you want to call. Or, tap the desired
contact, and on the shortcut menu, tap Call Work, Call Home, or
Call Mobile.
By default, the mobile telephone number (w) of a contact is
dialed when you make a call from Contacts. However, you
can specify that a different phone number is used instead.
1. Tap Start > Contacts.
2. Press NAVIGATION up or down to select the contact.
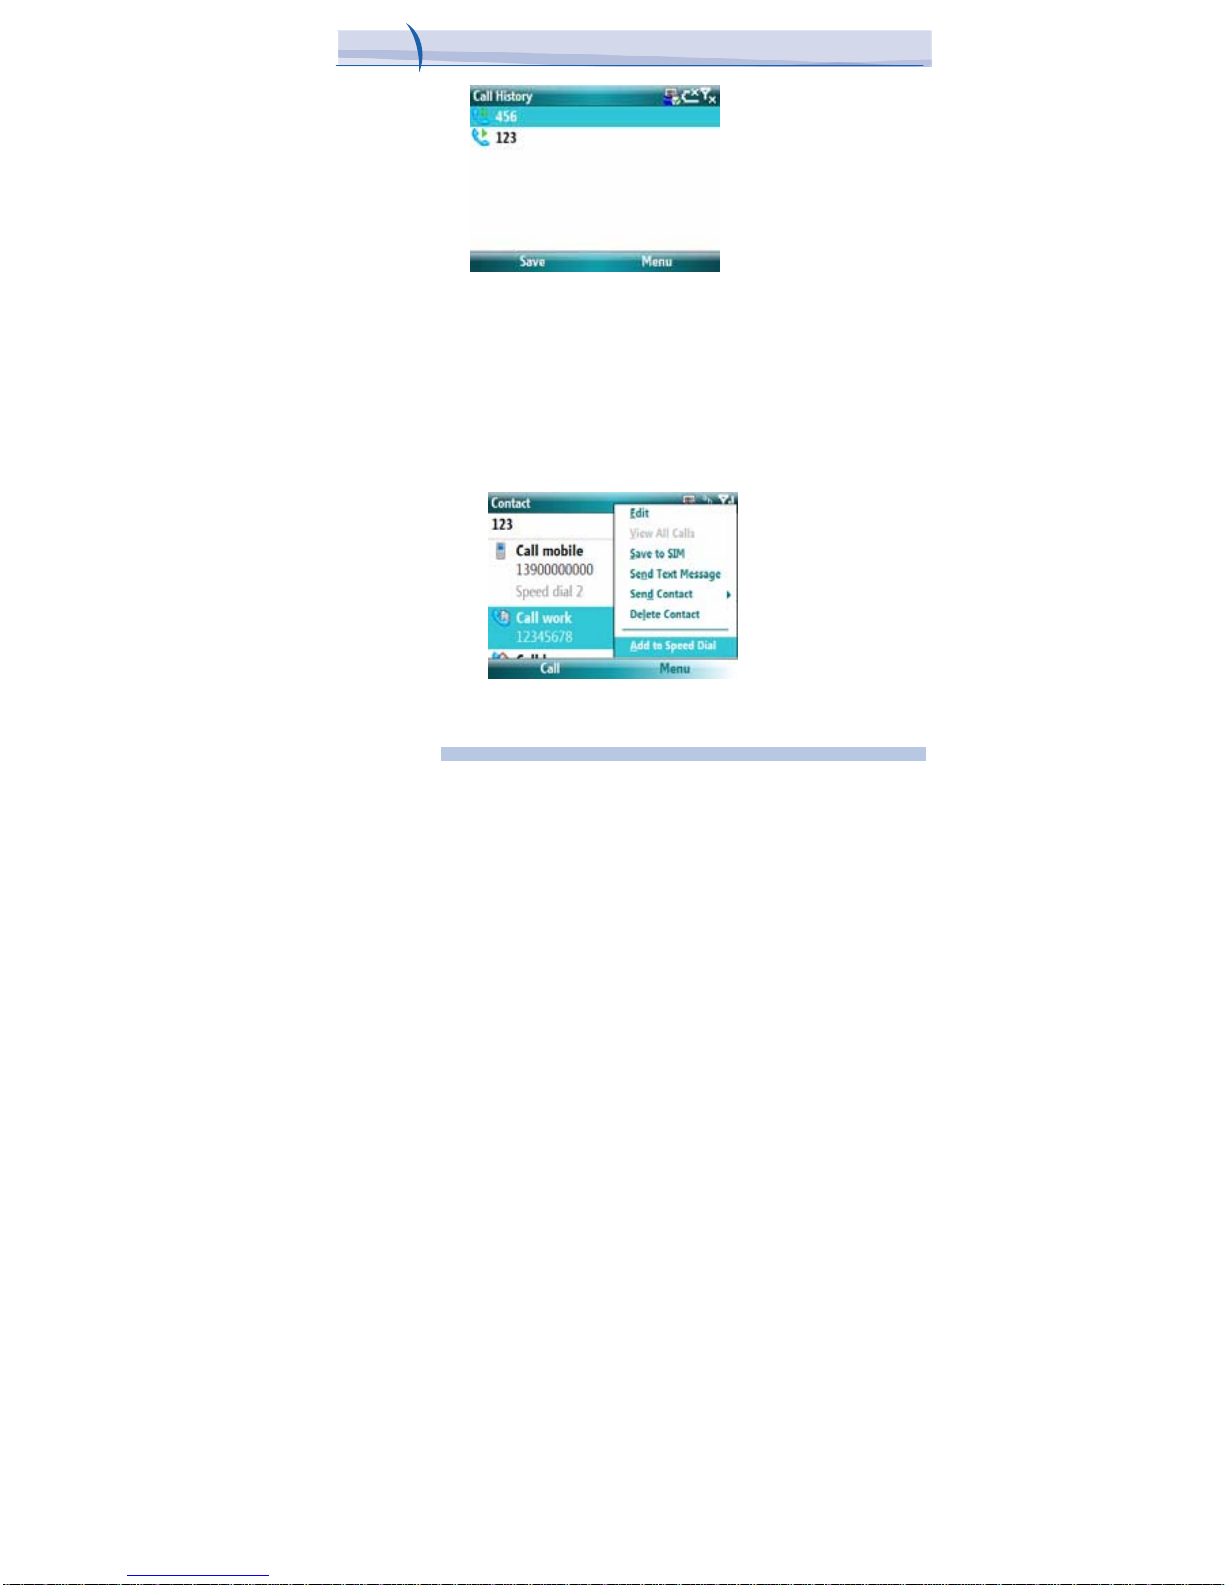
Make a call from Call History
1. Tap Start > Call History.
2. Scroll to the desired contact or phone number, and tap Call.
25
i-mat
e
™
I306SP
Chapter 3. Using your Phone
Make a call from Speed Dial
Use Speed Dial to call frequently-used numbers with a single tap. For
example, if you assign a contact to the location 2 in Speed Dial, you can
simply tap the Phone screen to dial the contact’s number. Before you can
create a Speed Dial entry, the number must already exist in Contacts. To
create a Speed Dial entry:
1. Go to Start > Contacts and Tap on the desired Contact.
2. Tap the phone number for which you want to create a Speed Dial.
Select Menu > Add to Speed Dial.
3. In the Custom ring tone field, select a ring tone of your choice.
26
i-mat
e
™

To create a Speed Dial entry from Contacts, tap the contact
name, tap Add to Speed Dial, and select an available location for the
new Speed Dial. To delete a Speed Dial entry, in the Speed Dial list,
Select the desired entry, and tap Delete.
Making an emergency call
To make an emergency call just enter the emergency phone number for
your location and press TALK.
You can
make calls to
emergency services under any circumstances,
even if
you have enabled the SIM PIN or locked the
device.
The ability to make emergency calls is depend on network
availability
3.2
Receiving a Call
When you receive a phone call, a message will appear, giving you the
option to either answer or ignore the incoming call.
1. To answer the call, tap Answer, or press TALK on the device.
2. To reject the call, tap Ignore, or press END on the device.
To end a call
Once an incoming or outgoing call is in progress, you can tap End or press
END on the device to hang up.
27
i-mat
e
™

I306SP
Chapter 3. Using your Phone
3.3 In Call Options
To put a call on hold
If this option is enabled, your device notifies you when you have another
incoming call, and gives you the choice of rejecting or accepting the call.
If you are already on a call and accept the new call, you can choose to
switch between the two callers, or set up a conference call between all
three parties.
1. Tap Answer to take the second call, and put the first one on hold.
2. To end the second call and return to the first call, tap End or press
END on your device.
3. To switch between calls, Tap Swap.
To set up a conference call
1. Either put a call on hold, and dial a second number; or, accept a
second incoming call when you already have one in progress.
2. Tap Conference.
Not all service providers support conference calling
Contact your service provider for details.
28
i-mat
e
™

3.4 Special Dialing Requirements
Insert a pause in a dialing sequence
Calls to certain networks may require a pause in between the dialed digits.
To do this,
1. Tap Start > Contacts
2. Click the contact in whose phone you want to insert a pause.
3. Select the phone number and add a ‘p’ character where you want to
insert a 3 second pause.
4. Select the phone number and add a ‘w’ character where you want to
insert a manual pause.
To resume dialing after reaching a manual pause, press TALK.
Insert an International Country Code
To make an international code, you must insert a country code at the
beginning of the dialing sequence for the phone number.
• Tap Fn on the Phone keypad until appears and then insert the rest
of the number.
3.5 Additional Settings
Phone services
Phone Services, such as Call Waiting, enable you to choose how to handle
all incoming calls on your device.
To choose the services
Tap Start > more> Settings > Phone .
Tap the service you want to use and tap Get Settings.
29
i-mat
e
™

I306SP
Chapter 3. Using your Phone
Networks
You can view available wireless networks, determine the order in
which your device accesses another network if the current one is
unavailable, and specify whether you want to change networks
manually or automatically. For more information about network
settings, see Help on your device.
To change phone network settings
1. Tap Start >more> Settings > Phone > More > Networks.
2. By default, your device displays the current network as offered
by your service provider. You can customize to set your preferred
network.
30
i-mat
e
™
 Loading...