

iMARC Pet Tag Engraver User Manual

Tigger
More than
2,000 tags
to choose from!
Pet Tag Engraver
USER MANUAL
MAX
Beware of Dog

Table of Contents
Machine Labels ..................................1
Getting Started ....................................2
Set-up ...................................................3
Holder Installation & Setup .................4
Engraving a Tag ..................................6
Engraving Text .....................................8
Engraving Clip Art ............................ 14
Engraved Tag Counts ...................... 15
Changing Engraving
Pressure & Languages .................... 16
International Characters ................. 17
Clip Art ............................................... 19
Software License Information ......... 21
Table of Contents
1
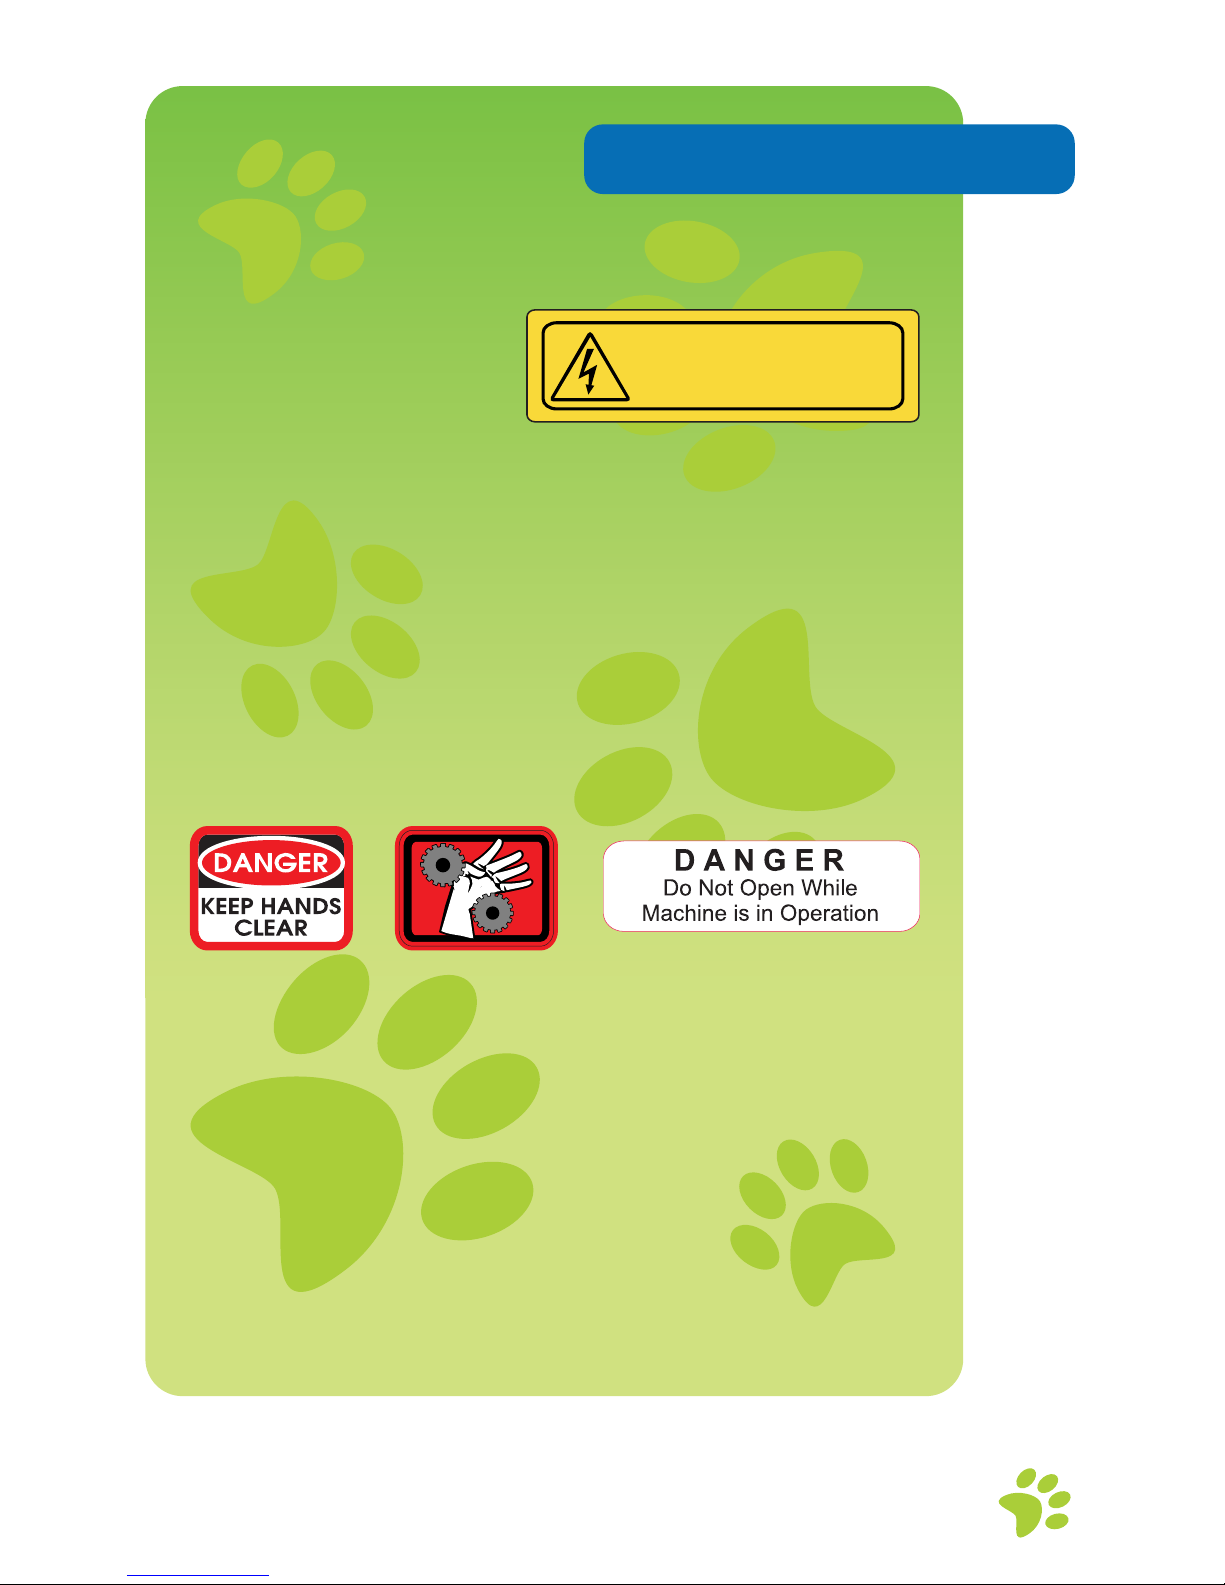
Machine Labels
100-240 VAC
50/60 Hz 1 Amp
The lightning bolt symbol refers to the hazardous
voltage inside the machine. Injury can occur.
Do not attempt to service the machine when
plugged into a power source.
100-240 volts
Frequency is 50/60 Hertz
1 Amp
These labels identify the hazards of opening the
machine while in use. Keep hands and clothing
away from moving parts inside the door to
prevent injury and mechanical hazards. Please
refer all servicing to qualied personnel.
2
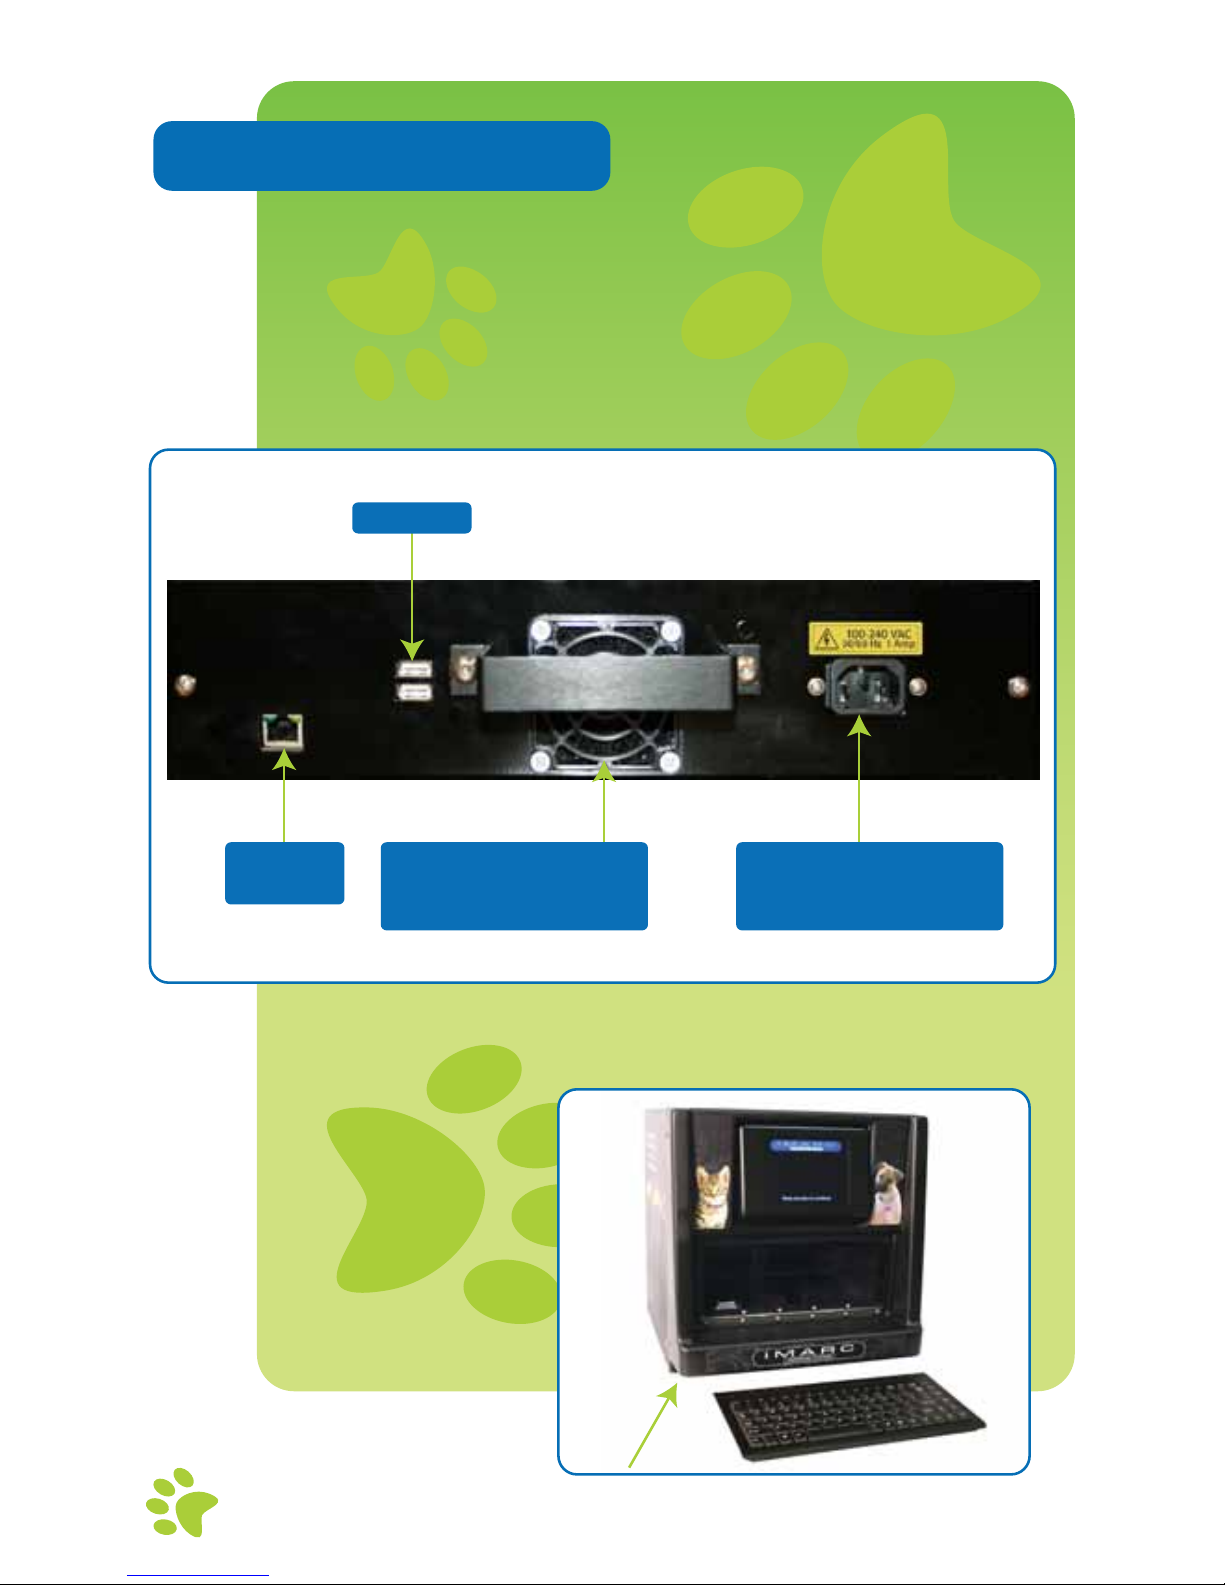
Electrical Receptacle
The power cord is
inserted here
USB Ports
Cooling Fan Cover
Easily removable for
access to the filter
Ethernet
Port
Getting Started
Before plugging in the iMARC, familiarize
yourself with the machine.
The On/
Off switch is
located on
the front of the
machine.
3
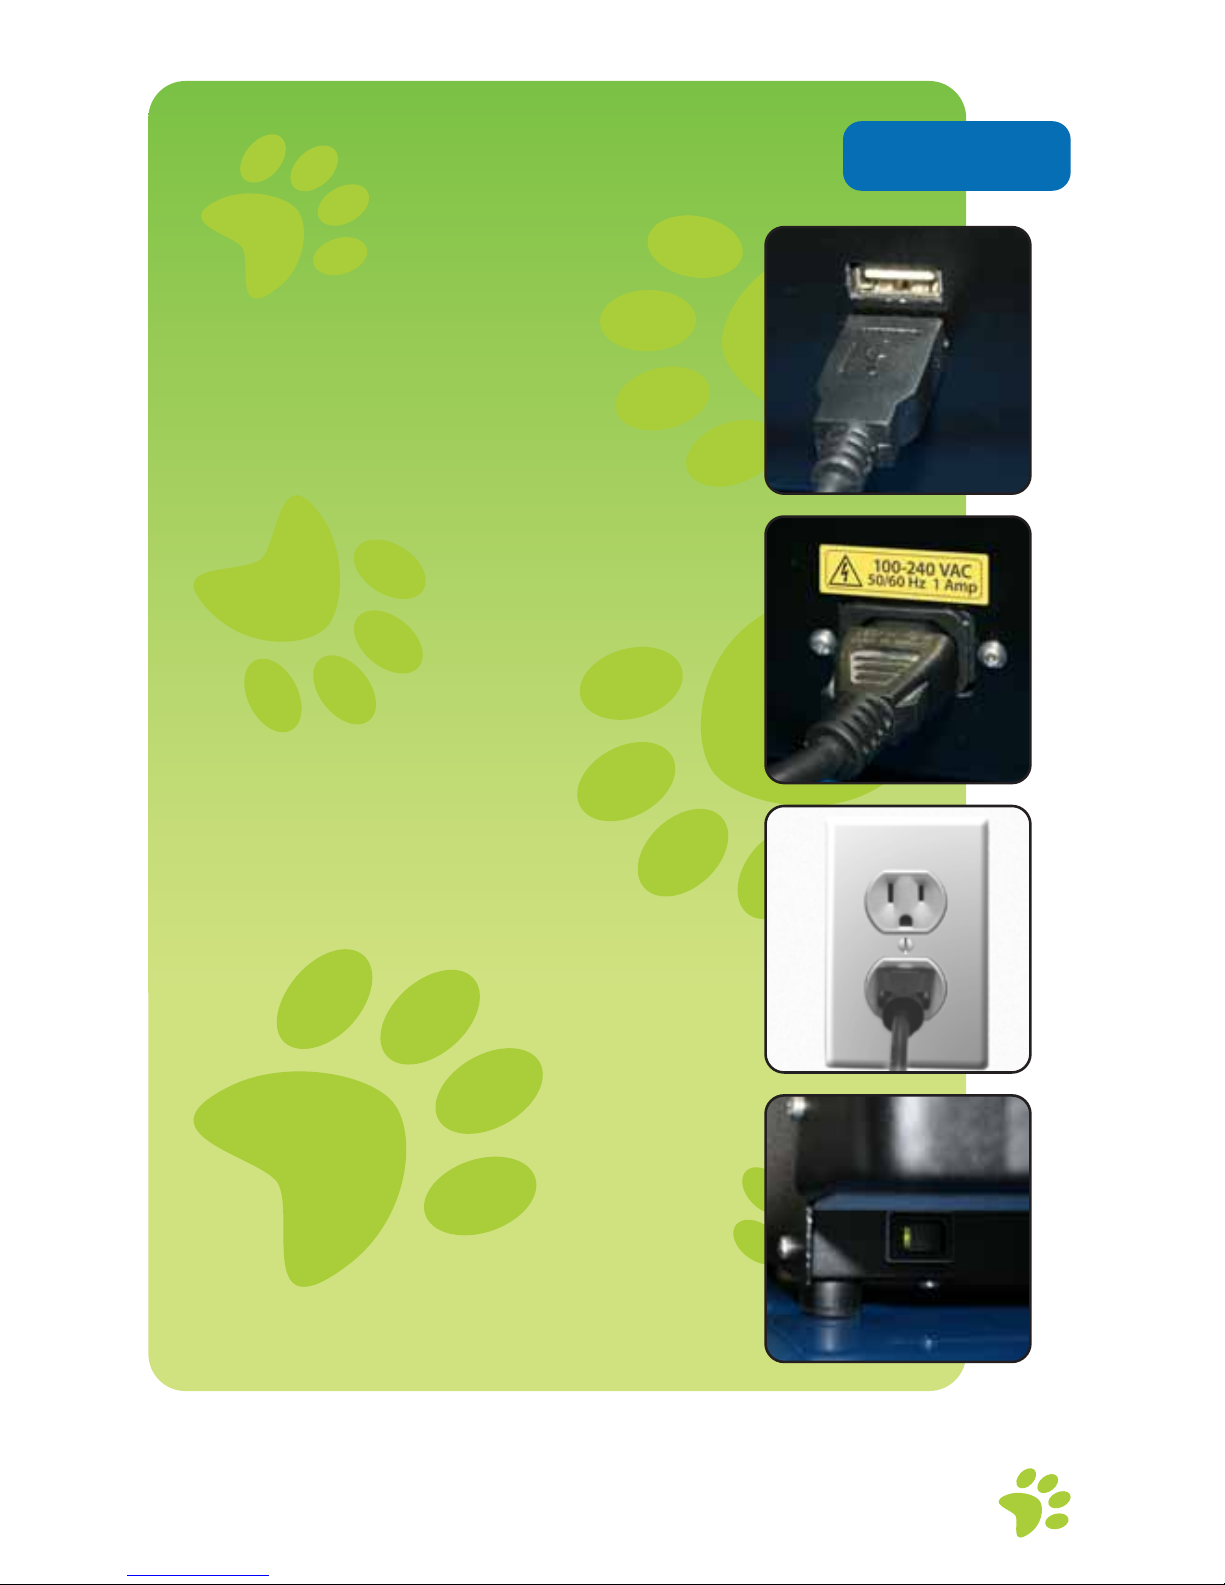
Setting up your iMARC is quick and easy.
Plug the keyboard into a USB port.
To power on the iMARC,
press the on/off switch.
Plug the power cord into the electric
receptacle.
Plug the cord into any standard (110
or 220 Volt) outlet, and switch on the
machine.
IMPORTANT: Earlier version iMARC machines must have the correct
voltage plugged in to them. Please follow the voltage requirement
label on machine for correct power needed.
Set-up
4
Holder Install & Setup
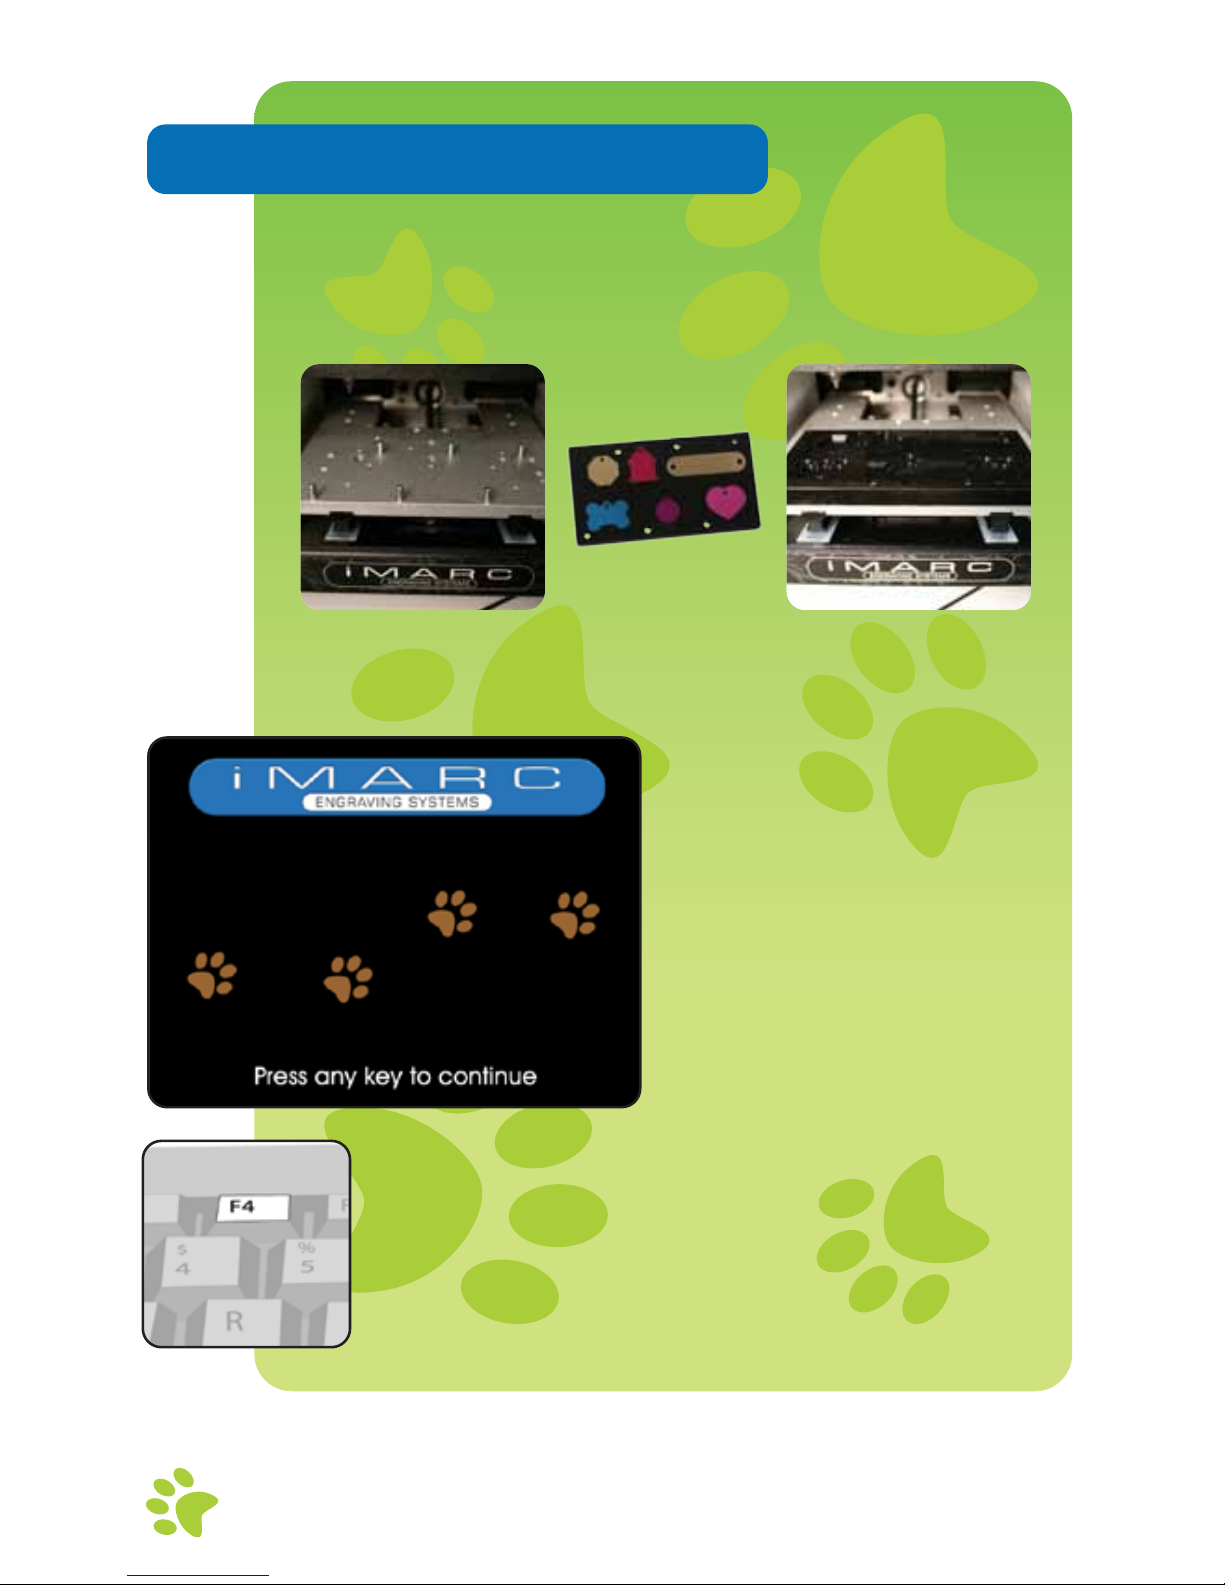
Once powered on, it is now time to install the
holders. Holders need to be installed on the
engraving table during HOLDER SETUP.
Engraving TableNo holders installed
Engraving TableWith holders installed
Tag Holder
This is the rst screen
you will see. This is the
INTRODUCTION SCREEN.
From the INTRODUCTION SCREEN, press F4
for holder setup.
Note: Holders can only be installed when you are in the HOLDER SETUP
screen. Attempting to install them at any other time could result in
damage to the holders or the machine.
5
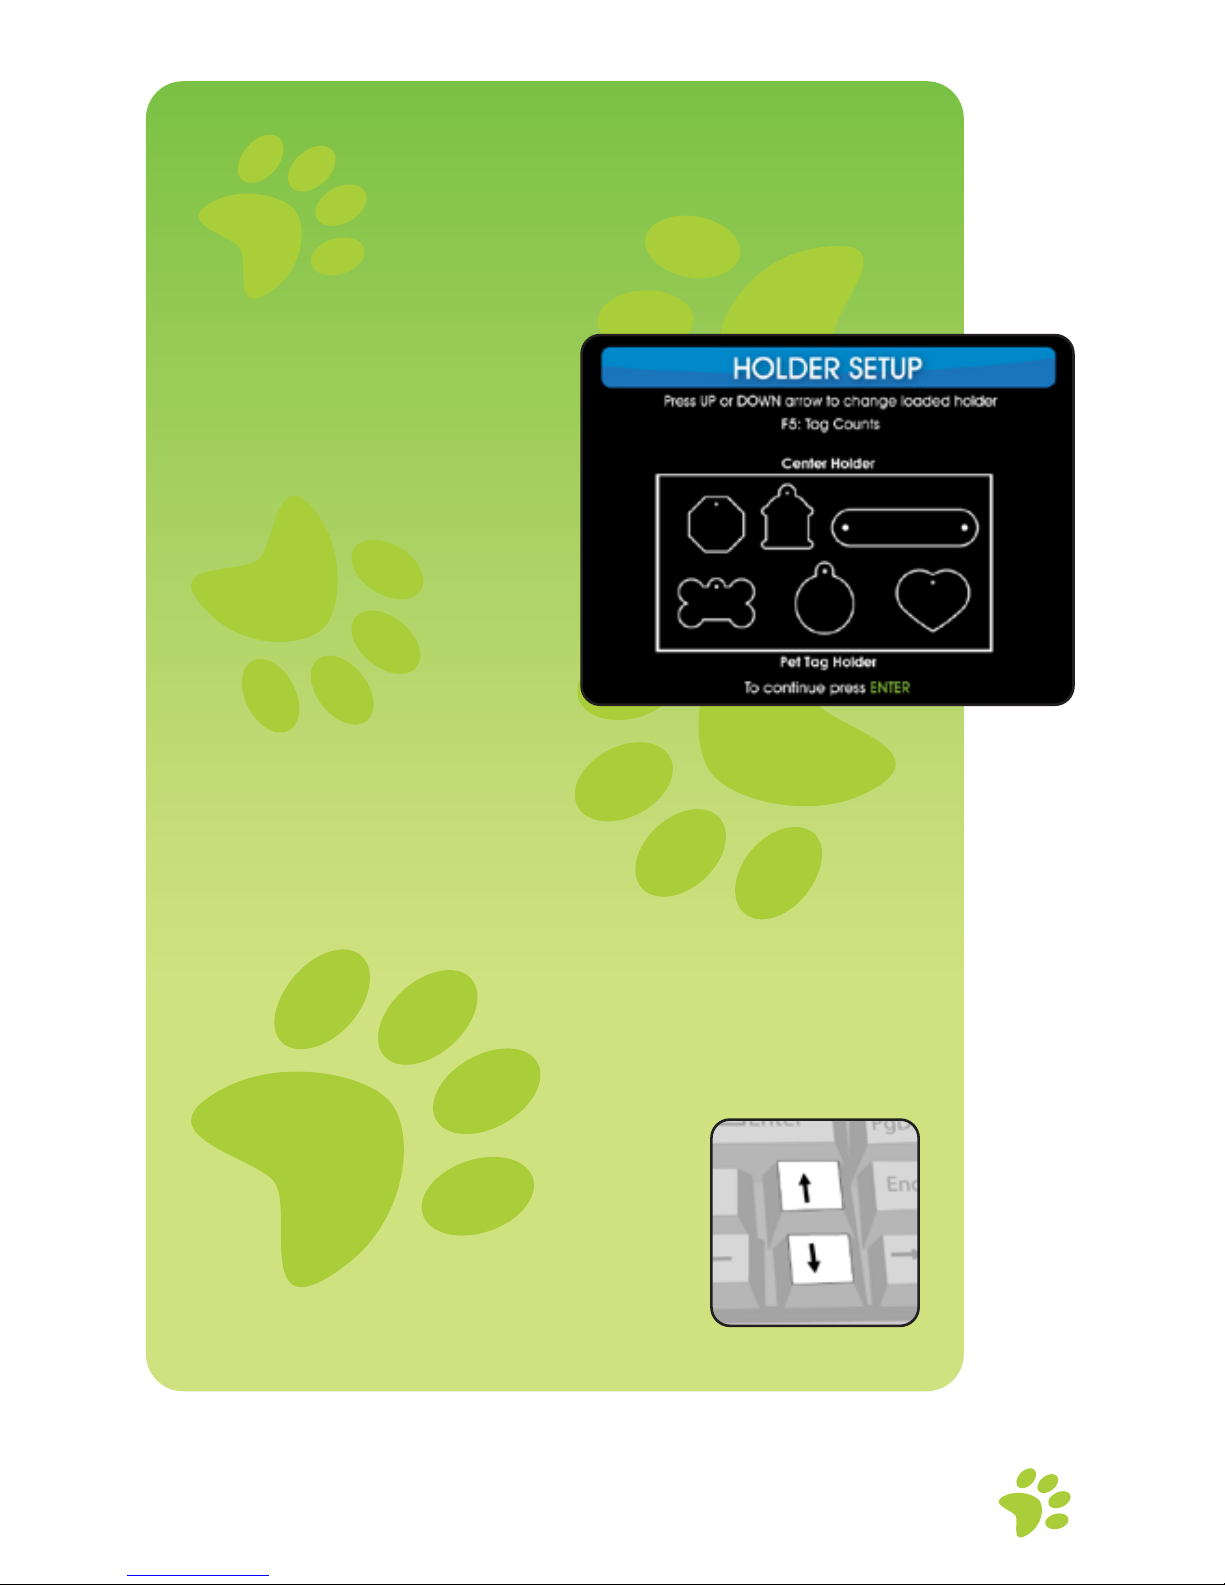
The holder setup is simple. Follow the
on screen instructions as well as the
steps on this page.
This is the HOLDER
SETUP screen.
Insert your holder on the engraving table.
Position the holes in the holder directly over
the pins in the engraving table, and move
the holders directly up and down over the
pins. It may be a snug t, so apply light
pressure as needed.
Press the up and down
arrow keys to select the
installed holder.
Then press ENTER.

6
Engraving a Tag
Engraving a tag is quick and easy.
Each step is clearly stated in the
on-screen instructions.
From the INTRODUCTION SCREEN,
press any key to get started.
Note: After a period without
keystrokes, the machine will reset to
this screen.
7
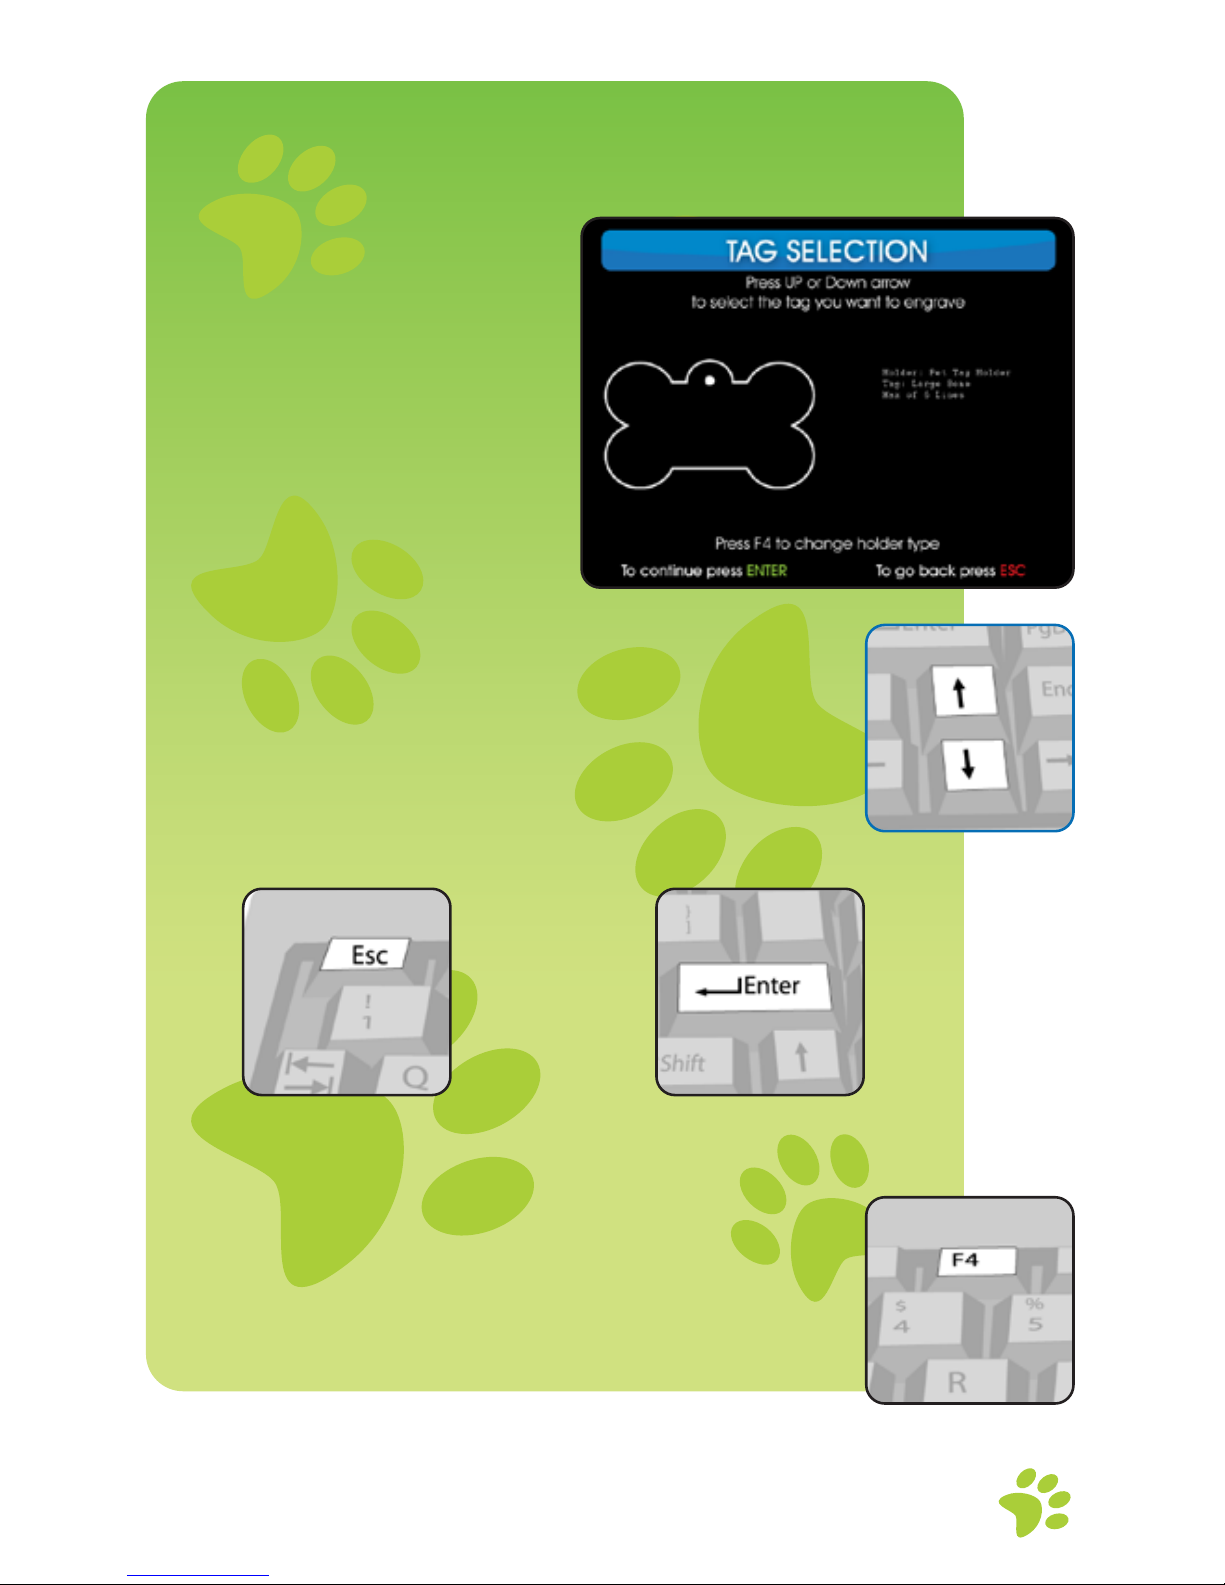
In the TAG SELECTION screen, use the up
and down arrow keys to scroll through the
available tags.
Note: If a specic tag does not appear on
the screen, press F4 to return to HOLDER
SETUP and install the correct holder.
(See pg. 4 for instructions)
Press Escape to
quit…
Press Enter to
Continue…

8
After selecting a tag,
choose the type style.
From the SELECT
FONT screen, choose
the desired type
style by pressing the
corresponding number
on the keyboard.
Note: Pressing ENTER
will select the “iMARC
BLOCK” type style.
Press Esc to return to the TAG
SELECTION screen.
8 For clip art.
9 For sample
or your logo.
Clip art and optional logo function
To engrave clip art onto iMARC tags, press “8”
and turn to page 14 for additional instructions. If
the iMARC has company logos stored in it, press
“9” to select the logo and enter the letter A on
the text entry screen to engrave it.
Engraving Text
9
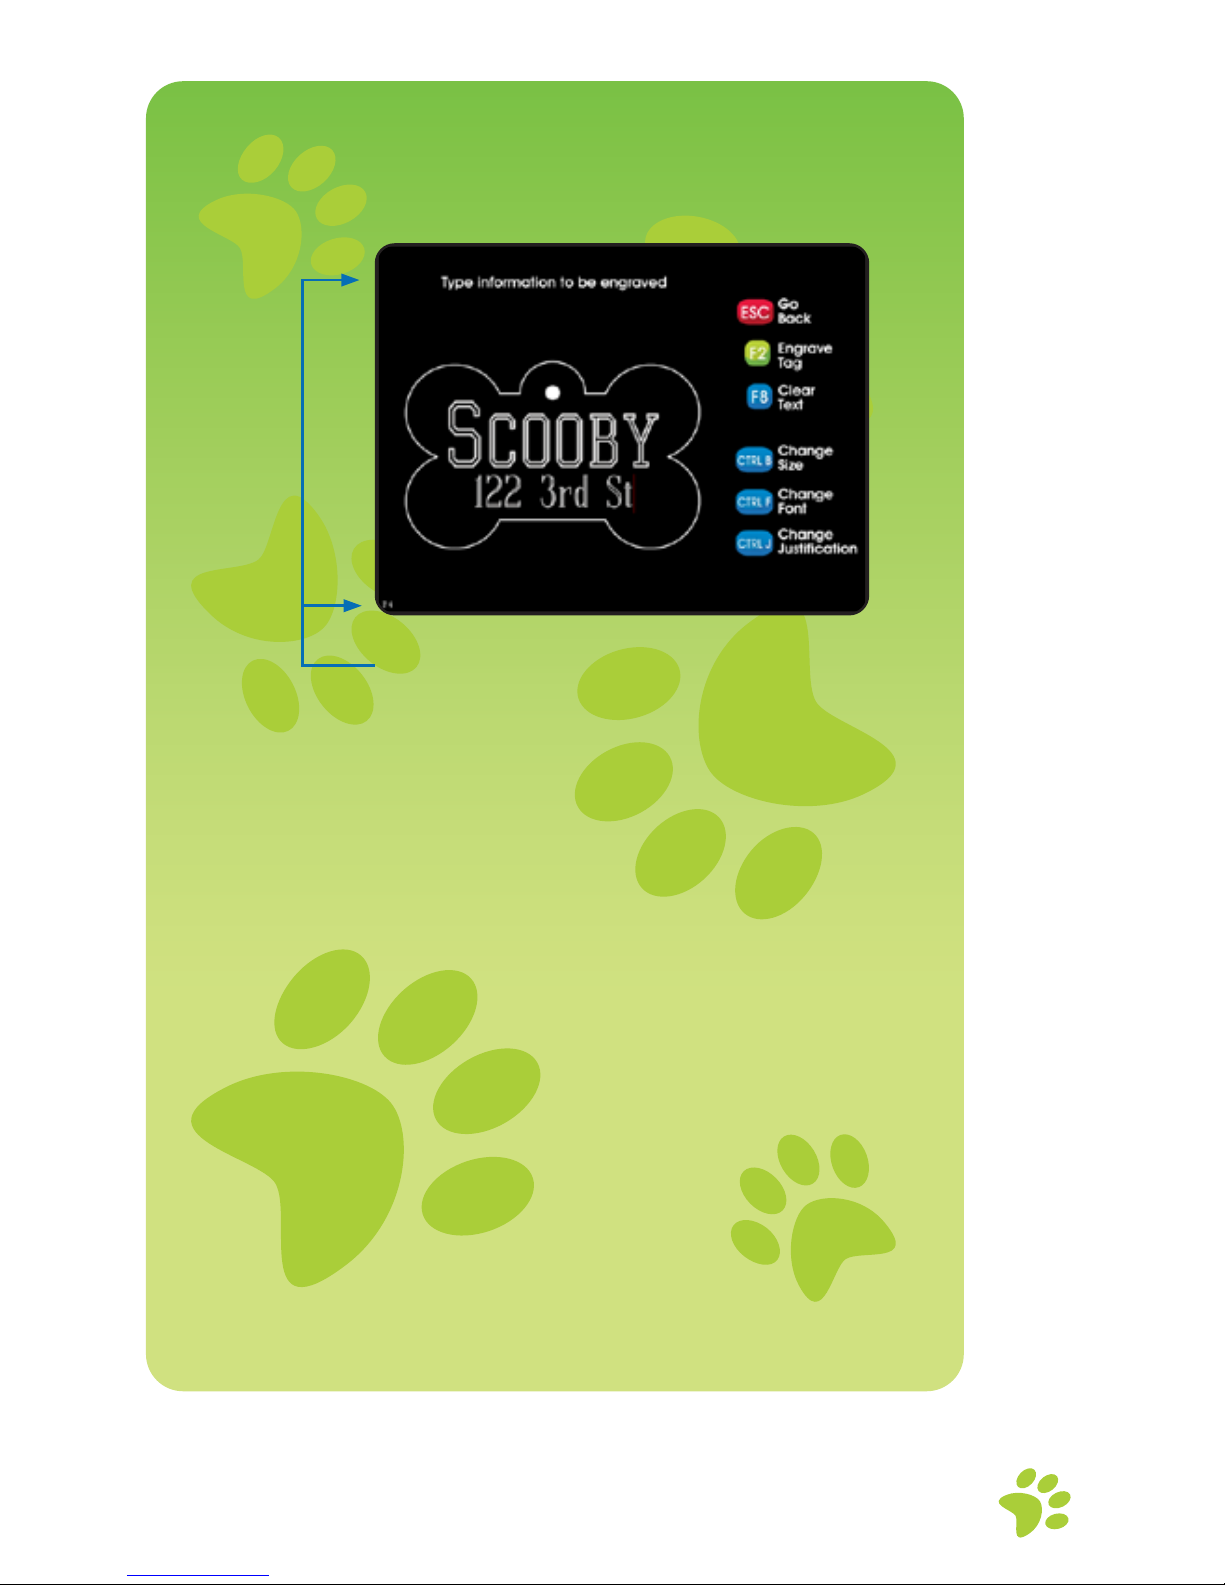
Once a type style is selected, it is time to type
in the information to be engraved.
Type in information it should appear on the
front of the tag. Keep in mind that iMARC will
automatically increase or decrease the type
size for optimum coverage. Press ENTER once
to go to the next line, twice to skip a line and
BACKSPACE to edit.
Note: Caps Lock is on
if CAPS shows in the
top left of the iMARC
screen. Engraving
Pressure Shown on
Bottom Left of Screen.

10
Press Ctrl + B to Change Font Size with cursor
on desired line.
Note: Ctrl + B increases the letter size when
two or more lines of text are on a tag. If only
one line is being engraved, the letter size will
be as large as possible to ll the tag.
Press Ctrl + F to cycle through Font Styles with
cursor on the desired line.
Press Ctrl + J to Change Justication
(centered, left, or right) with the cursor on
desired line.
Note: If the line of text to be justied is long
and extends to the maximum engraving
area on the tag, the Ctrl + J will not show any
visible changes as the text is already at the
left and right extents of the tag.
Press F2 when the text is correct.
Press Esc to go
back.
Press F8 to clear
your information
and start again.
Press F2 to insert
your tag in the
holder.
 Loading...