

imagistics ix2600 Owner's Manual

If You Need to Call Customer Service
Please complete the following information for future
reference:
Model Number: ix2600
Serial Number*:
Date of Purchase:
Place of Purchase:
* The serial number is on the back of the unit. Retain
this manual with your sales receipt as a permanent
record of your purchase, in the event of theft, fire or
warranty service.
i
Quick Reference Guide
Sending Faxes
Automatic Transmission
1
Place the original face up in the
ADF, or face down on the scanner
glass.
2
Enter the fax number using One
Touch, Speed Dial, Search or the
dial pad.
3
Press Send/Receive .
Sending a Cover Sheet
1
Place the original face up in the
ADF, or face down on the scanner
glass.
2
Press Features , 2 , 2 , 8 .
3
When
NEXT FAX ONLY
appears, press Enter/Yes .
4
Press or to select
ON
(or
OFF
), and then press Enter/Yes .
5
Press or to select a
comment, and then press
Enter/Yes .
6
Enter two digits to indicate the
number of pages being sent, and
then press
Enter/Yes .
7
Press 1 to select additional settings
—
OR
—Press 2 if you are ready to
fax.
8
Enter the fax number.
9
Press Send/Receive .
Transmission from ADF
You can send faxes in real time.
1
Place the original face up in the ADF,
or face down on the scanner glass.
2
Press Features , 2 , 2 , 6 .
3
Press or to select ON (or
OFF ), and then press Enter/Yes
— OR
—For the next transmission
only, press or to select
NEXT FAX ONLY , and then press
Enter/Yes .
4
For the next fax only, press
or to select
ON
(or
OFF
),
and then press
Enter/Yes .
5
Press 1 to select additional settings
—
OR
—Press 2 to fax.
6
Enter the fax number.
7
Press Send/Receive .
Receiving Faxes
Select Answer Mode
There are four Receive modes:
FAX ONLY
,
MANUAL,
FAX/TEL
and
TAM: ANSWER
MACH
. Press Answer Mode
until the LCD shows your
selection. After two seconds the
LCD returns to the Data and Time
prompt and shows the new Answer
mode.
QUICK REFERENCE GUIDE

ii
Storing Numbers
Storing One Touch Dial
Numbers
1
Press Features , 2 , 3 , 1 .
2
Press the One Touch key where
you want to store the number.
3
Enter a number (up to 20 digits),
and then press
Enter/Yes .
4
Enter a name (or leave it blank),
and then press
Enter/Yes .
5
Press Stop .
Storing Speed Dial Numbers
1
Press Features , 2 , 3, 2.
2
Enter a two-digit Speed Dial number,
and then press Enter/Yes.
3
Enter a number (up to 20 digits), and
then press Enter/Yes.
4
Enter a name (or leave it blank) , and
then press Enter/Yes.
5
Press Stop.
Dialing Operations
One Touch Dialing / Speed
Dialing
1
Place the original face up in the
ADF, or face down on the scanner
glass.
2
Press the One Touch key of the
number you want to call—OR—
Press Search/Speed Dial, press
#, and then press the two-digit
Speed Dial number.
3
Press Send/Receive.
Search/Speed Dial
1
Place the original face up in the
ADF, or face down on the scanner
glass.
2
Press Search/Speed Dial, and
then enter the first letter of the
name you’re looking for.
3
Press or to search the
memory.
4
Press Send/Receive, when the
LCD shows the name you want to
call.
Making Copies
Single Copy
1
Place the original face up in the
ADF, or face down on the scanner
glass.
2
Press Copy.
Sorting Multiple Copies
(Using the ADF)
1
Place the original face up in the
ADF.
2
Use the dial pad to enter the
number of copies you want (up to
99).
3
Press Options, press or
to select OPT: STACK/SORT,
and then press Enter/Yes.
4
Press or to select SORT,
and then press Enter/Yes.
5
Press Copy.
QUICK REFERENCE GUIDE

TABLE OF CONTENTS
iii
Table of Contents
1
Introduction..................................................................................... 1-1
Using This Manual..................................................................... 1-1
Finding Information............................................................. 1-1
Conventions Used in this Manual........................................ 1-1
ix2600 Control Panel Overview................................................. 1-2
About Your Machines ................................................................ 1-4
Custom Features .................................................................. 1-4
Do You Have Voice Mail on the Phone Line? ............... 1-4
Why Should There Be Trouble? ..................................... 1-4
How Can You Avoid Possible Problems? ...................... 1-4
Fax Tones and Handshake................................................... 1-4
ECM (Error Correction Mode)............................................ 1-5
2
Assembly and Connections............................................................. 2-1
Packing List................................................................................ 2-1
Choosing a Location................................................................... 2-2
Important Safety Instructions .............................................. 2-3
Release the Scanner Lock.................................................... 2-3
Assembly.................................................................................... 2-4
Installing the Drum Unit Assembly
(with Toner Cartridge) .................................................... 2-4
Paper........................................................................................... 2-5
Acceptable Paper ................................................................ 2-5
Paper Capacity of Paper Cassette........................................ 2-5
Paper Specification for the Cassette.................................... 2-5
Manual Feed Slot................................................................. 2-6
Loading Paper in the Paper Cassette ................................... 2-6
Manual Feed Slot................................................................. 2-7
Connecting the machine............................................................. 2-8
Connections................................................................................ 2-9
Connecting an External Telephone ..................................... 2-9
Connecting an External TAM
(Telephone Answering Machine) ................................... 2-9
Sequence ......................................................................... 2-9
Connections..................................................................... 2-9
Recording Outgoing Message (OGM) on External TAM
... 2-10
Special Line Considerations.............................................. 2-11
Two-Line Phone System............................................... 2-11

iv
Converting Telephone Wall Outlets ............................. 2-11
Installing machine, External Two-Line TAM, and
Two-Line Telephone ................................................ 2-12
Multi-Line Connections (PBX) ......................................... 2-13
If You are Installing the machine to Work with a PBX
:... 2-13
Custom Features on Your Phone Line............................... 2-13
3
On-Screen Programming................................................................ 3-1
User-Friendly Programming....................................................... 3-1
Feature Mode....................................................................... 3-1
Feature Selection Table ....................................................... 3-2
4
Initial Setup...................................................................................... 4-1
Getting Started............................................................................ 4-1
Setting Paper Size ............................................................... 4-1
Turning on Lower Cassette (Option)................................... 4-1
Setting Cassette Usage ........................................................ 4-2
Setting Date and Time......................................................... 4-2
Setting Machine ID.............................................................. 4-3
Entering Text................................................................... 4-4
Inserting Spaces .............................................................. 4-4
Making Corrections......................................................... 4-4
Repeating Letters ............................................................ 4-4
Special Characters and Symbols ................................... 4-4
Setting the Ring Volume ..................................................... 4-5
Setting the Beeper Volume.................................................. 4-5
Setting the Speaker Volume ................................................ 4-5
Memory Storage .................................................................. 4-5
Save Toner........................................................................... 4-5
Sleep Timer ......................................................................... 4-6
Setting Tone/Pulse Dialing Mode ....................................... 4-6
5
RX Settings ...................................................................................... 5-1
Answer Mode Settings ............................................................... 5-1
Select Your Answer Mode .................................................. 5-1
To Select or Change Your Answer Mode....................... 5-2
Setting Ring Count .............................................................. 5-2
Setting F/T Ring Time (For FAX/TEL Mode Only)........... 5-3
EXT. TEL. RX .................................................................... 5-3
Printing a Reduced Incoming Document (Auto Reduction)
.... 5-4
Setting the Print Density...................................................... 5-4

TABLE OF CONTENTS
v
Advanced Receiving Operations................................................ 5-5
Operation from Extension Telephone ................................. 5-5
For FAX/TEL Mode Only .............................................. 5-5
Changing the Fax Receive Code..................................... 5-5
Printing a Fax in Memory.................................................... 5-6
Polling.................................................................................. 5-6
Setting Up Polling Receive............................................. 5-6
Setting Up Sequential Polling Receive........................... 5-7
Canceling a Scheduled Job.................................................. 5-7
PC-FAX Receive Mode....................................................... 5-7
6
TX Settings....................................................................................... 6-1
Before You Begin....................................................................... 6-1
Sending Faxes Using Multiple Settings .............................. 6-1
Faxing from the ADF (Automatic Document Feeder) ........ 6-1
Faxing from the Scanner Glass............................................ 6-3
Manual Transmission .......................................................... 6-4
Automatic Transmission...................................................... 6-4
Manual and Automatic Fax Redial...................................... 6-4
Dual Access......................................................................... 6-4
Real Time Transmission...................................................... 6-5
Checking the Jobs Status..................................................... 6-5
Canceling a Job While Scanning the Original..................... 6-5
Canceling a Job in Memory................................................. 6-6
Basic Sending Operations .......................................................... 6-6
Contrast................................................................................ 6-6
Mode.................................................................................... 6-7
Composing Electronic Cover Sheet..................................... 6-7
Composing Your Own Comments.................................. 6-8
Cover Sheet for the Next Fax Only................................. 6-8
Always Send Cover Sheet............................................... 6-9
Using a Printed Cover Sheet........................................... 6-9
Advanced Sending Operations................................................. 6-10
Overseas Mode .................................................................. 6-10
Delayed Timer................................................................... 6-10
Delayed Send..................................................................... 6-10
Delayed Batch Transmission ........................................ 6-11
Setting Up for Polling Transmit ........................................ 6-11

vi
7
Auto Dial Numbers and Dialing Options ...................................... 7-1
Storing Numbers for Easy Dialing ............................................. 7-1
Storing One Touch Dial Numbers....................................... 7-1
Storing Speed Dial Numbers............................................... 7-2
Changing One Touch and Speed Dial Numbers.................. 7-2
Setting Up Groups for Broadcasting ................................... 7-2
Dialing Options .......................................................................... 7-3
Search .................................................................................. 7-3
Speed Dialing ...................................................................... 7-4
One Touch Dialing .............................................................. 7-4
Access Codes and Credit Card Numbers............................. 7-4
Broadcasting........................................................................ 7-5
Pause.................................................................................... 7-6
Fax Redial............................................................................ 7-6
Tone/Pulse ........................................................................... 7-6
8
Telephone Services .......................................................................... 8-1
Custom Feature........................................................................... 8-1
Unique Ring......................................................................... 8-1
What Does Your Telephone Company’s
“Unique Ring” Do? .................................................... 8-1
What Does ix2600’s “Unique Ring” Do?....................... 8-1
Do You Have Voice Mail?.............................................. 8-2
Before You Choose the Ring Pattern to Register ........... 8-2
Very Important .................................................................... 8-3
Registering the Unique Ring Pattern .............................. 8-3
Caller ID .............................................................................. 8-3
Viewing Caller ID List.................................................... 8-4
Clearing a Caller ID Stored in Memory.......................... 8-4
Printing Caller ID List..................................................... 8-4
9
Remote Fax Options........................................................................ 9-1
Fax Forwarding .......................................................................... 9-1
Programming a Fax Forwarding Number............................ 9-1
Setting Remote Retrieval............................................................ 9-2
Local Print ........................................................................... 9-2
Using R R Passcode............................................................. 9-3
Remote Commands ............................................................. 9-4
Retrieving Fax Messages..................................................... 9-5
Changing Fax Forwarding Number..................................... 9-5

TABLE OF CONTENTS
vii
10
Printing Reports............................................................................ 10-1
Machine Settings and Activity ................................................. 10-1
Customizing the Job Status Report.................................... 10-1
Setting the Journal Interval................................................ 10-1
Using the Reports Key....................................................... 10-2
11
Making Copies............................................................................... 11-1
Basic Copy Operations............................................................. 11-1
Making a Single Copy (Using the ADF)........................... 11-1
Making Multiple Copies (Using the ADF)........................ 11-1
Single or Multiple Copies (Using the Scanner Glass)....... 11-2
Out of Memory Message................................................... 11-2
Temporary Copy Settings......................................................... 11-3
Copying Using Multiple Settings ...................................... 11-3
Using Enlarge/Reduce Key ............................................... 11-3
Copy Contrast.................................................................... 11-4
Using the Options Key ...................................................... 11-5
Copy Mode (Type of Original).......................................... 11-5
Sorting Multiple Copies (Using the ADF) ........................ 11-5
Special Copy Options (Using the ADF)............................ 11-6
Special Copy Options (Using the Scanner Glass) ............. 11-6
2 in 1 ............................................................................. 11-6
4 in 1 ............................................................................ 11-6
Poster............................................................................. 11-7
Paper Type......................................................................... 11-8
Changing Default Copy Settings.............................................. 11-8
Copy Mode (Type of Original).......................................... 11-9
Copy Contrast.................................................................... 11-9
Paper Type......................................................................... 11-9
12
For DOS Users............................................................................... 12-1
How to Use the Machine with Your DOS
Application Software .................................................... 12-1
What Does the Remote Printer Console Do? .................... 12-1
Remote Printer Console Main Program........................ 12-1
Installing the Remote Printer Console............................... 12-2
Using the Remote Printer Console Main Program............ 12-3
Remote Printer Console..................................................... 12-4
Current Printer Status Information................................ 12-4
Printer Setup Category ...................................................... 12-4

viii
Print Setup Section........................................................ 12-4
Page Setup Section........................................................ 12-5
Font Configuration........................................................ 12-5
Other Configuration ...................................................... 12-6
Console Configuration Category .................................. 12-6
13
Using the Machine as a Printer.................................................... 13-1
Special Printing Features.......................................................... 13-1
Windows
®
Printing............................................................ 13-1
Popular Printer Emulation Support ................................... 13-1
Remote Printer Console Program for DOS ....................... 13-1
Bi-directional Parallel Interface......................................... 13-1
Enhanced Memory Management....................................... 13-1
Printing From Your PC ............................................................ 13-2
Multi-purpose Paper Cassette............................................ 13-2
Two-Sided Printing (Manual Duplexing).......................... 13-2
Front Output Bin................................................................ 13-3
Manual Feed Slot............................................................... 13-3
Loading One Sheet of Paper ......................................... 13-4
Loading More than One Sheet of Paper........................ 13-4
Printing on Thicker Paper and Card Stock.................... 13-5
Simultaneous Printing/Faxing .................................................. 13-6
Choosing Acceptable Paper...................................................... 13-6
Printer Operation Key .............................................................. 13-7
Reset Key........................................................................... 13-7
Printing the Internal Font List ........................................... 13-7
Printing the Print Configuration List................................. 13-7
Restoring Factory Default Settings ................................... 13-7
14
Printer Driver Settings ................................................................. 14-1
Using the ix2600 Printer Driver ............................................... 14-1
Features in the Printer Driver ................................................... 14-1
Basic Tab.................................................................................. 14-2
Paper Size .......................................................................... 14-3
Multiple Page..................................................................... 14-3
Border Line........................................................................ 14-3
Orientation......................................................................... 14-3
Copies................................................................................ 14-3
Collate................................................................................ 14-4
Media Type........................................................................ 14-4

TABLE OF CONTENTS
ix
Advanced Tab .......................................................................... 14-5
Print Quality (*1)............................................................... 14-5
Resolution ..................................................................... 14-5
Toner Save .................................................................... 14-5
Print Setting
(For Windows® 95/98/98SE/Me Users Only).......... 14-6
Duplex Printing (*2).......................................................... 14-6
Manual Duplex.............................................................. 14-6
Binding Offset............................................................... 14-6
Watermark (*3) ................................................................. 14-7
Print Watermark............................................................ 14-7
In background ............................................................... 14-7
Watermark Text ............................................................ 14-8
Watermark Bitmap........................................................ 14-8
Position ......................................................................... 14-8
Page Setting (*4) ............................................................... 14-9
Device Options (*5) ........................................................ 14-10
Quick Print Setup ............................................................ 14-11
Administrator
(For Windows® 95/98/98SE/Me Users Only) ............ 14-11
Print Date & Time ........................................................... 14-12
Accessories Tab...................................................................... 14-13
Paper Source Setting........................................................ 14-13
Default Source................................................................. 14-13
Available Options............................................................ 14-13
Features in the Printer Driver (For Windows® 2000/XP) ...... 14-14
General Tab ..................................................................... 14-14
Printing Preferences.................................................... 14-14
Layout Tab....................................................................... 14-15
*1 Orientation ............................................................. 14-15
*2 Pages Per Sheet...................................................... 14-16
Paper/Quality Tab............................................................ 14-16
*1 Paper Source .......................................................... 14-16
*2 Media ..................................................................... 14-17
Advanced Options....................................................... 14-17
*1 Paper /Output ......................................................... 14-17
*2 Graphic................................................................... 14-18
*3 Document Options ................................................. 14-18
Device Settings Tab......................................................... 14-19
Installable Options ...................................................... 14-19

x
15
Using the Windows®-Based Smart UI......................................... 15-1
Smart UI ................................................................................... 15-1
AutoLoad the Smart UI ..................................................... 15-1
How to Turn Off AutoLoad............................................... 15-2
Using the Scan Keys................................................................. 15-2
Using the Control Panel Keys .................................................. 15-2
Image Scan ........................................................................ 15-3
OCR Scan .......................................................................... 15-3
Scan to E-mail ................................................................... 15-3
Smart UI Features..................................................................... 15-4
Auto Configuration............................................................ 15-4
Scanning Operations.......................................................... 15-4
Copy Operations................................................................ 15-5
PC Fax Operation .............................................................. 15-5
Scanner Settings for Scan, Copy and PC Fax Buttons ...... 15-5
Global Settings .................................................................. 15-5
Setting Up the Scanner Configurations ............................. 15-6
To Access the Scanner Configuration Screen: .................. 15-6
Perform an Operation from the Control Center Screen..... 15-6
Scan to File............................................................................... 15-7
Scanner Settings ................................................................ 15-7
Destination Folder ............................................................. 15-8
Scan to E-mail .......................................................................... 15-8
Scanner Settings ................................................................ 15-9
E-mail Application ............................................................ 15-9
File Attachments................................................................ 15-9
Conversion Options......................................................... 15-10
Format ......................................................................... 15-10
Show QuickSend Menu .............................................. 15-10
QuickSend List............................................................ 15-10
Scan to Word Processor ......................................................... 15-11
Scanner Settings .............................................................. 15-11
Word Processor ............................................................... 15-12
User-Defined Button .............................................................. 15-13
Scanner Settings .............................................................. 15-13
Target Application........................................................... 15-13
Copy ....................................................................................... 15-14
Scanner Settings .............................................................. 15-14
Copy Settings................................................................... 15-14
Send a Fax .............................................................................. 15-15
Scanner Settings .............................................................. 15-15

TABLE OF CONTENTS
xi
Fax Settings ..................................................................... 15-15
16
Using ScanSoft™ PaperPort® and ScanSoft™ TextBridge®.... 16-1
Using ScanSoft™ PaperPort® and TextBridge®...................... 16-1
Viewing Items in ScanSoft™ PaperPort®......................... 16-2
Organizing Your Items in Folders..................................... 16-2
Links to Many Other Applications.................................... 16-3
Using ScanSoft™ TextBridge® OCR
(Converting Image Text to Text You Can Edit) ........... 16-3
Importing Items from Other Applications......................... 16-3
Exporting Items in Other Formats..................................... 16-4
Exporting an Image File................................................ 16-4
Accessing the Scanner....................................................... 16-4
Scanning an Image into Your PC ...................................... 16-5
Settings in the Scanner Window........................................ 16-5
Image............................................................................. 16-5
Contrast......................................................................... 16-6
Custom .......................................................................... 16-7
PreScanning an Image ....................................................... 16-8
17
Setting Up and Using PC-FAX .................................................... 17-1
Introduction .............................................................................. 17-1
Resource Manager............................................................. 17-1
Remote Setup ........................................................................... 17-2
PC FAX Sending...................................................................... 17-3
Setting Up User Information ............................................. 17-3
Setting Up Sending............................................................ 17-4
Outside Line Access.......................................................... 17-4
Include Header................................................................... 17-4
Address Book File ............................................................. 17-4
User interface..................................................................... 17-5
Simple Style.................................................................. 17-5
Facsimile Style.............................................................. 17-5
Setting Up Speed Dial.............................................................. 17-6
The Address Book ............................................................. 17-7
Setting Up a Member in the Address Book....................... 17-8
Setting Up a Group for Broadcasting ................................ 17-9
Editing Member Information............................................. 17-9
Deleting a Member or Group .......................................... 17-10
Exporting the Address Book ........................................... 17-10

xii
Importing to the Address Book ....................................... 17-11
Setting Up Cover Page .................................................... 17-12
To ................................................................................ 17-13
From............................................................................ 17-13
Comment..................................................................... 17-13
Select Cover Page Form.............................................. 17-13
Import BMP file.......................................................... 17-13
Count Cover Page ....................................................... 17-13
Sending a File as a PC-FAX Using the Simple Style...... 17-14
Sending a File as a PC-FAX Using the Facsimile Style . 17-15
Redial .......................................................................... 17-16
Setting Up PC-FAX Receiving .............................................. 17-16
Setting Up Your Machine................................................ 17-16
Running PC-FAX Receiving........................................... 17-16
Setting Up Your PC......................................................... 17-17
Viewing New PC-FAX Messages................................... 17-17
18
Optional Accessories ..................................................................... 18-1
Memory Board ......................................................................... 18-1
Installing the Optional Memory Board.............................. 18-1
Lower Cassette (Option) .......................................................... 18-4
19
Troubleshooting and Routine Maintenance ............................... 19-1
Troubleshooting........................................................................ 19-1
Error Messages .................................................................. 19-1
Original Jams and Paper Jams.................................................. 19-3
Original is Jammed in the top of the ADF Unit ................ 19-3
Original is Jammed inside the ADF Unit .......................... 19-3
Paper Jam........................................................................... 19-3
Paper is Jammed in the Paper Cassette ......................... 19-4
Paper is Jammed near the Drum Unit ........................... 19-5
Paper is Jammed in the Fuser Unit................................ 19-5
If You Are Having Difficulty with Your Machine............ 19-6
Packing and Shipping the Machine........................................ 19-12
Lock the Scanner Lock.................................................... 19-12
Routine Maintenance.............................................................. 19-15
Cleaning the Scanner....................................................... 19-15
Cleaning the Printer......................................................... 19-16
Cleaning the Drum Unit .................................................. 19-17
Replacing the Toner Cartridge ........................................ 19-17
How to Replace the Toner Cartridge............................... 19-18

TABLE OF CONTENTS
xiii
Replacing the Drum Unit................................................. 19-20
20
Important Information ................................................................. 20-1
Standard Telephone and FCC Notices ..................................... 20-1
Laser Safety....................................................................... 20-2
FDA Regulations .......................................................... 20-2
Federal Communications Commission (FCC)
Declaration of Conformity............................................ 20-3
Important....................................................................... 20-4
Important – About the Interface Cable ......................... 20-4
Warranty............................................................................ 20-4
International ENERGY STAR® Compliance Statement... 20-4
Important Safety Instructions................................................... 20-5
Trademarks............................................................................... 20-7
21
Glossary........................................................................................... G-1
22
Specifications ................................................................................... S-1
Product Description.................................................................... S-1
Fax.............................................................................................. S-1
Printer......................................................................................... S-2
Computer Requirements...................................................... S-3
Parallel Interface.................................................................. S-4
USB (Universal Serial Bus) Interface .................................S-4
Resident Fonts ..................................................................... S-5
Symbol Sets/Character Sets ............................................ S-5
23
Index..................................................................................................I-1
24
Remote Retrieval Access Card...................................................... R-1

xiv

INTRODUCTION
1 - 1
1
1
Introduction
Using This Manual
Thank you for purchasing an Imagistics ix2600. This machine has been
designed to be simple to use, with LCD screen prompts to guide you through
programming your machine. However, you can use your machine to its fullest
potential by taking a few minutes to read this manual.
Finding Information
All chapter headings and subheadings are listed in the Table of Contents. You
will be able to find information about a specific feature or operation by checking
the Index in the back of this manual.
Conventions Used in this Manual
Throughout this manual you’ll see special symbols alerting you to important
information, warnings, and actions to perform. For clarification, and to help you
choose the correct key presses, we’ve added illustrations of some of the LCD
messages.
boldface Bold typeface identifies a specific key on the machine control panel.
italics Italics typeface emphasize an important point, or refer you to related
topic.
bubble dot Bubble Dot typeface identifies the messages on the LCD of the
machine.
Additionally, your machine has a Reports key. Press Reports, 1 to print a
list of basic step instructions and explanations.
Warnings detail precautions you must take to avoid possible
personal injury.
Cautions specify procedures you must follow or avoid to prevent
possible damage to the machine.
Note
Notes tell you the proper response for a situation that may
occur.
FYI tips provide details about how the current operation
interacts with other features.
Improper Setup alerts you to devices and procedures that are
not compatible with the
machine.
1 - 2
INTRODUCTION
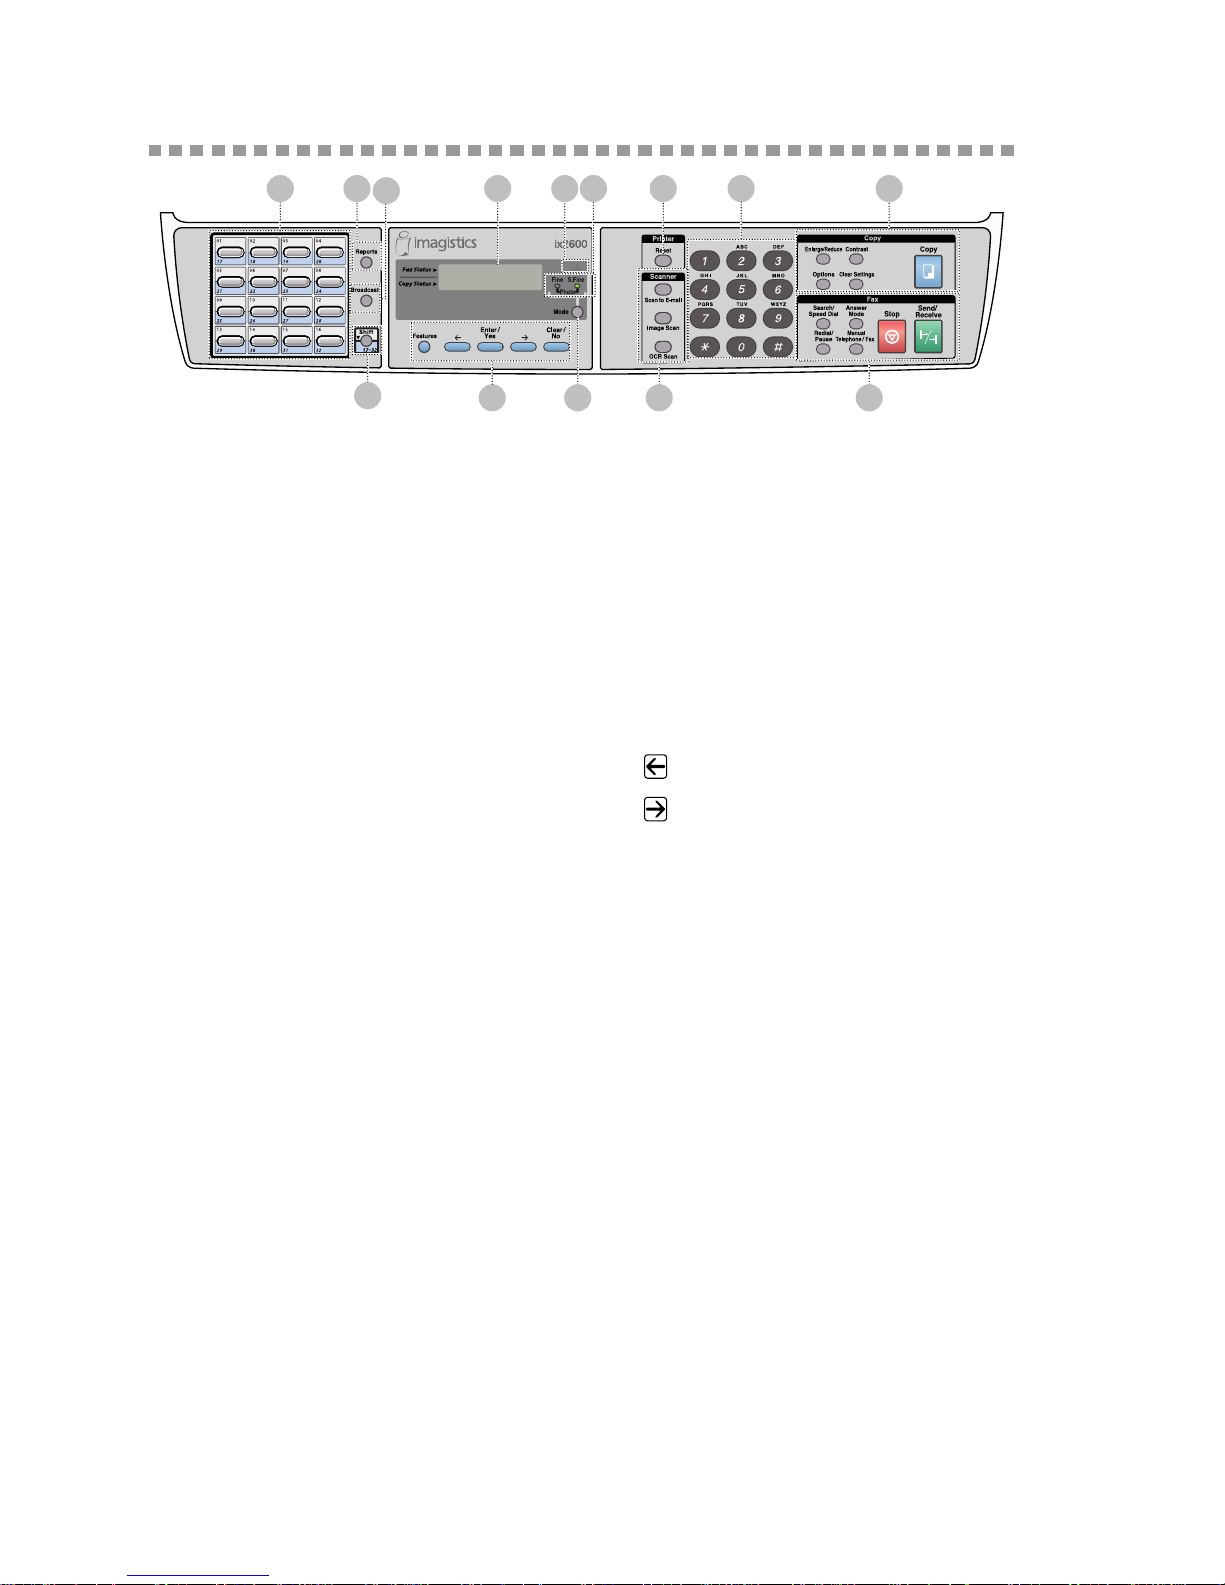
ix2600 Control Panel Overview
1One Touch Keys
These 16 keys give you instant access to
previously stored phone numbers.
2Reports
Access the Reports menu so you can
select reports to print:
Help List, Dialer Dial, Journal, Job
Status Report, Machine Settings List
and Order Form.
3Broadcast
Use this key when you want to send the
same fax to many different locations
(maximum of 182 locations at once).
4Shift
To access memory locations 17 through
32 in the One Touch keys hold down the
Shift key.
5LCD (Liquid Crystal Display)
LCD displays messages to help you set
up and operate your machine.
6Toner Empty Icon
The Toner icon flashes on and off when
toner is low, so you’ll know to order
another toner cartridge. You will be able
to print until the indicator stays on.
7Resolution Indicator Lights
These LEDs show the resolution mode
you selected.
8Mode
Sets the resolution when you send a fax.
9Programming Keys:
Features
Lets you access the menu and
programing mode.
(Left Arrow)
(Right Arrow)
Moves the LCD cursor through text and
options.
Enter/Yes
Stores a menu setting in the machine.
Also used for sending one fax to
multiple numbers.
Clear/No
Deletes entered data or backs up one
step in function procedure.
0Printer Key:
Reset
Clears data from the printer memory.
12 13
9 8 11 14
4
6 751 2 10
3

INTRODUCTION
1 - 3
AScanner Keys:
Scan to E-mail
Press this key to start scanning an
original into your E-mail application,
setting it up automatically as an
attachment.
Image Scan
Press this key to scan a color picture into
your graphics application for viewing
and editing.
OCR Scan
Press this key to start scanning a text
document. ScanSoft™ TextBridge
®
will convert it to editable text and
display it in your word processor
application for further editing.
BDial Pad
Dials phone and fax numbers, and can
be used as a keyboard for entering
information into the machine.
CCopy Keys
(Temporary Settings):
Enlarge/Reduce
Lets you reduce or enlarge copies
depending upon the ratio you select.
Contrast
Lets you make a copy that is lighter or
darker than the original.
Options
You can quickly and easily change your
temporary settings for each copy.
Clear Settings
Resets your temporary copy settings
back to the factory default settings. Use
this key when you do not want to wait
45 seconds for the temporary settings to
clear automatically.
Copy
Makes a copy.
DFacsimile Keys:
Search/Speed Dial
Lets you look up numbers stored in the
dialing memory. Also lets you dial
stored phone numbers by pressing a #
plus a two-digit number.
Answer Mode
Use to select how the machine will
handle incoming calls.
Redial/Pause
Redials the last number that was called.
Also inserts a pause in autodial
numbers.
Manual Telephone/Fax
Lets you dial fax numbers.
Stop
Stops a fax, cancels an operation, or
exits from menu mode.
Send/Receive
Starts an oeration, such as sending a fax.

1 - 4
INTRODUCTION
About Your Machines
If you’re a first-time machine user, fax operation might seem a little mysterious.
Soon, you’ll recognize the unusual fax tones on your phone line, and be able to
send and receive faxes easily.
Custom Features
Do You Have Voice Mail on the Phone Line?
If you have Voice Mail on the phone line on which you will install your new
machine, there is a strong possibility that Voice Mail and the machine will
conflict with each other while receiving incoming calls.
Why Should There Be Trouble?
Since both machines and Voice Mail pick up the line at the number of rings you
have set, each of them has the ability to keep the other from receiving calls. For
example, if your Voice Mail is set to answer after two rings and your machine
is set to answer after four, your Voice Mail will keep your machine from
receiving faxes. If you set Voice Mail and the machine to answer at the same
number of rings, there is no way of knowing which one will answer first. It is
important to remember that neither Voice Mail nor the machine can pass the call
back to the other after the call has been answered.
How Can You Avoid Possible Problems?
A very good way to avoid problems like the one mentioned previously is to get
a second phone number on your present phone line. Many people with Voice
Mail opt for this choice, which is called “Unique Ring”, and they are very
satisfied with it. For details about this type of custom service, please See
Unique
Ring
, page 8-1.
Another way to avoid possible problem is to replace your Voice Mail with an
answering machine. Your machine is designed to work in tandem with an
answering machine or TAM (telephone answering machine). (See
Connecting an
External TAM (Telephone Answering Machine)
, page 2-9.)
Fax Tones and Handshake
When someone is sending a fax, the machine sends fax calling tones (CNG
tones)—soft, intermittent beeps at 4-second intervals. You’ll hear them after
you dial and press Send/Receive; they continue for about 60 seconds after
dialing. During that time, the sending machine must begin the “handshake” with
the receiving machine. Each time you use automatic procedures to send a fax,
you are sending CNG tones over the phone line. You’ll soon learn to listen for
these soft beeps each time you answer a phone on your fax line, so you will
know if you are receiving a fax message.

INTRODUCTION
1 - 5
The receiving fax responds with fax receiving tones—loud, chirping sounds. A
receiving fax chirps for about 60 seconds over the phone line, and the LCD
shows RECEIVING. If your machine is set to the FAX mode, it will answer
every call automatically with fax receiving tones. Even if the other party hangs
up, your machine continues to send the “chirps” for about 60 seconds, and the
screen continues to show RECEIVING.
The fax “handshake” is the time in which the sending machine’s CNG tones and
the receiving machines “chirps” overlap. This must be for at least 2 to 4 seconds,
so the fax machines can understand how each is sending and receiving the fax.
The handshake cannot begin until the call is answered, and the CNG tones last
for only about 60 seconds after the number is dialed. Therefore, it’s important
for the receiving machine to answer the call in as few rings as possible.
ECM (Error Correction Mode)
ECM is a way for the machine to check the integrity of a fax transmission while
it is in progress. ECM transmissions are possible only between machines that
both have the ECM feature. If they do, you may send and receive fax messages
that are continuously checked for their integrity. Sufficient memory must be
available in your machine for this feature to work.
When you have an external telephone answering machine (TAM) on your fax
line, your TAM will determine the number of rings before the call is
answered. Pay special attention to the directions for connecting a TAM to your
machine in Chapter 2,
Assembly and Connections.

2 - 1
ASSEMBLY AND CONNECTIONS
2
2
Assembly and Connections
Packing List
Make sure you have the following items:
Whenever you transport the machine, use the packing materials that came with
your machine. If you do not pack the machine correctly, you may void
your warranty.
Paper Cassette
Owner’s
Manual
CD-ROM
Bi-directional
Parallel Cable
Telephone
Line Cord
Toner and
Drum Unit Assembly
Power Cord
Quick Setup
Guide
XP
User’s Guide
Cable Tie
Filter Core
For USB Cable

ASSEMBLY AND CONNECTIONS
2 - 2
Choosing a Location
Place your machine on a flat stable surface, such as a desk. Select a place that is
free of vibration and shocks. Place the machine near a telephone jack and a
standard, grounded power outlet. Choose a location where the temperature
remains between 50°F and 90.5°F (10°–32.5°C).
WARNING
■ Use caution when installing or modifying telephone lines. Never touch telephone
wires or terminals that are not insulated unless the telephone line has been
disconnected at the wall jack. Never install telephone wiring during a lightning storm.
Never install a telephone jack in a wet location unless the jack is specifically designed
for a wet location.
■ Lightning and power surges can damage this product! We recommend that you use a
quality surge protection device on the AC power line and on the telephone line, or
unplug the lines during a lightning storm.
■ For PLUG CABLE EQUIPMENT, the socket-outlet should be installed near the
equipment and should be easily accessible.
■ To reduce the risk of shock or fire, use only a No. 26 AWG or larger
telecommunication line cord.
Avoid placing your machine in a high-traffic area. Do not place near heaters,
air conditioners, water, chemicals, or refrigerators. Do not expose the machine
to direct sunlight, excessive heat, moisture, or dust. Do not connect your
machine to electrical outlets controlled by wall switches or automatic timers.
Disruption of power can wipe out information in the machine’s memory. Do
not connect your machine to electrical outlets on the same circuit as large
appliances or other equipment that might disrupt the power supply. Avoid
interference sources, such as speakers or the base units of cordless phones.
NO !
NO ! NO !
2 - 3
ASSEMBLY AND CONNECTIONS
Important Safety Instructions
When using your telephone equipment, basic safety precautions should always
be followed to reduce the risk of fire, electric shock and injury to persons,
including the following:
1
Do not use this product near appliances that use water, in a wet basement or near
a swimming pool.
2
Avoid using a telephone during an electrical storm. There may be a remote risk
of electric shock from lightning.
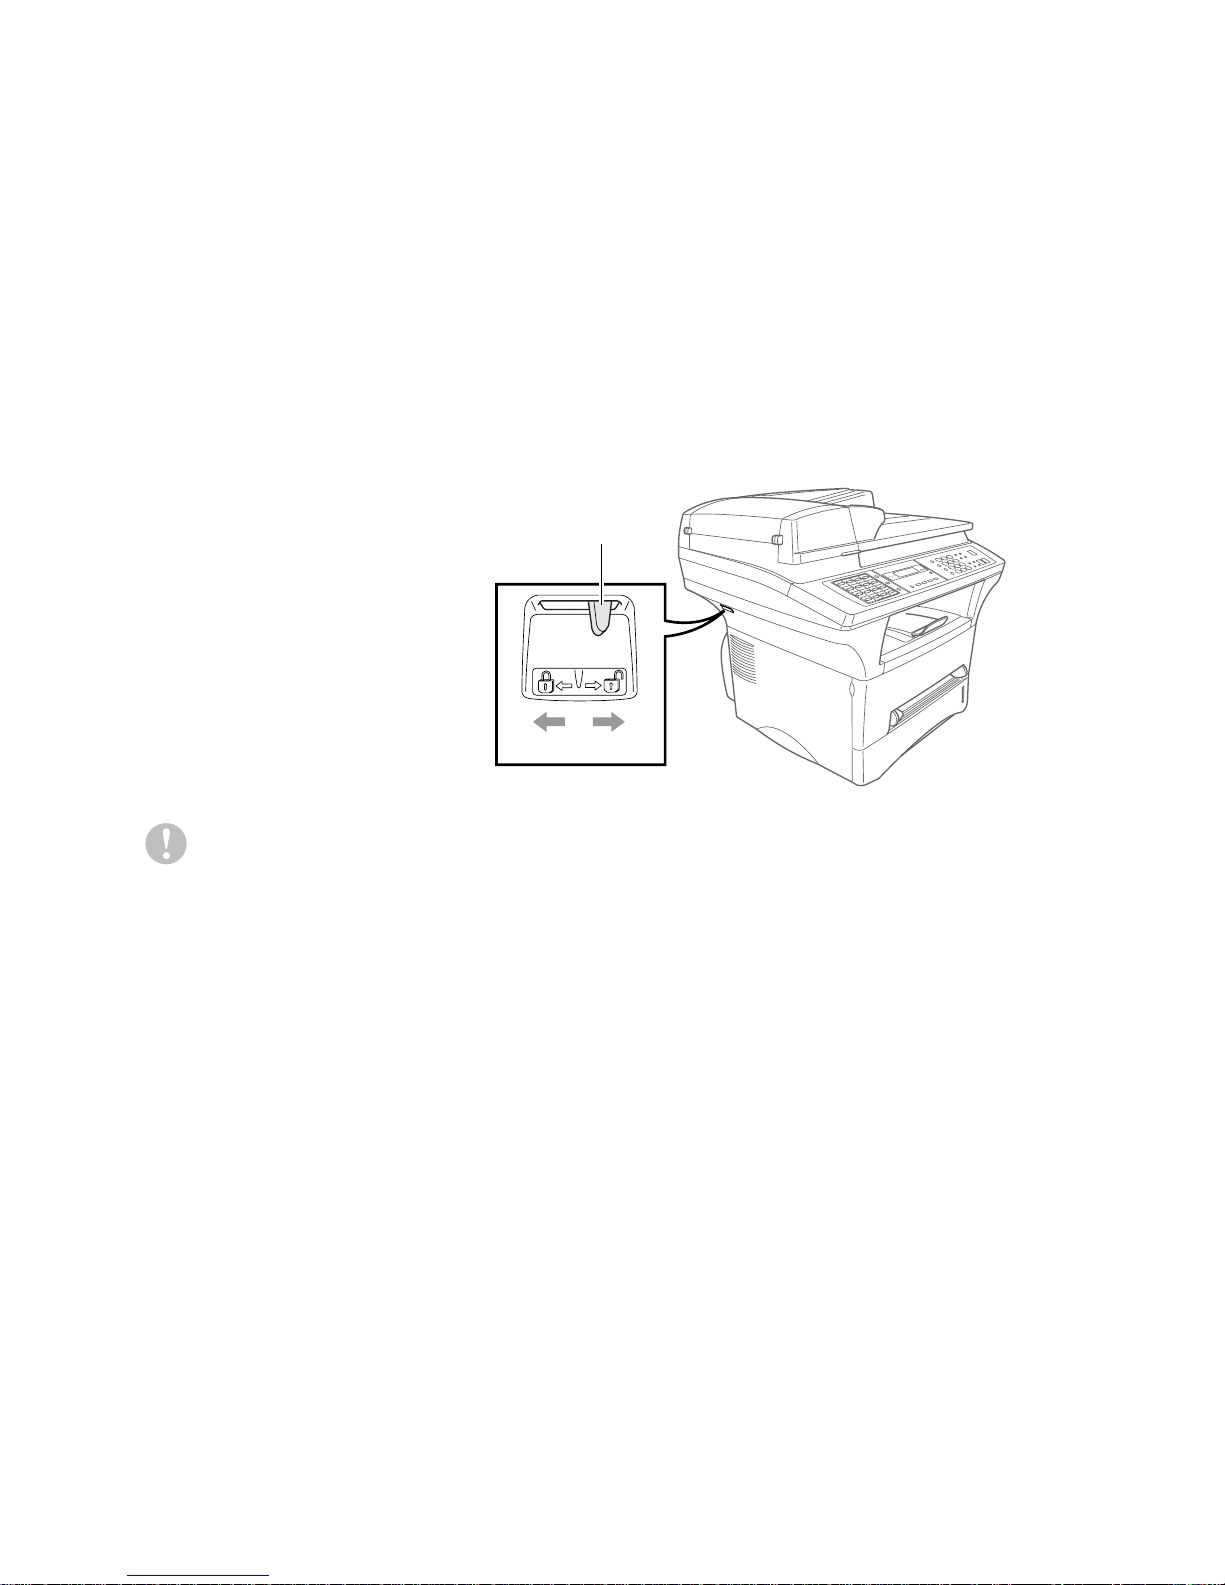
Release the Scanner Lock
Push the blue Scanner
Lock Lever up to
unlock the scanner.
This lever is located
on the rear left
underside of the
scanner cover.
Caution
If the message CHECK SCAN LOCK appears on the LCD, unlock the scanner
immediately, and then press Stop.
Lock Unlock
Scanner Lock Lever
ASSEMBLY AND CONNECTIONS
2 - 4
Assembly
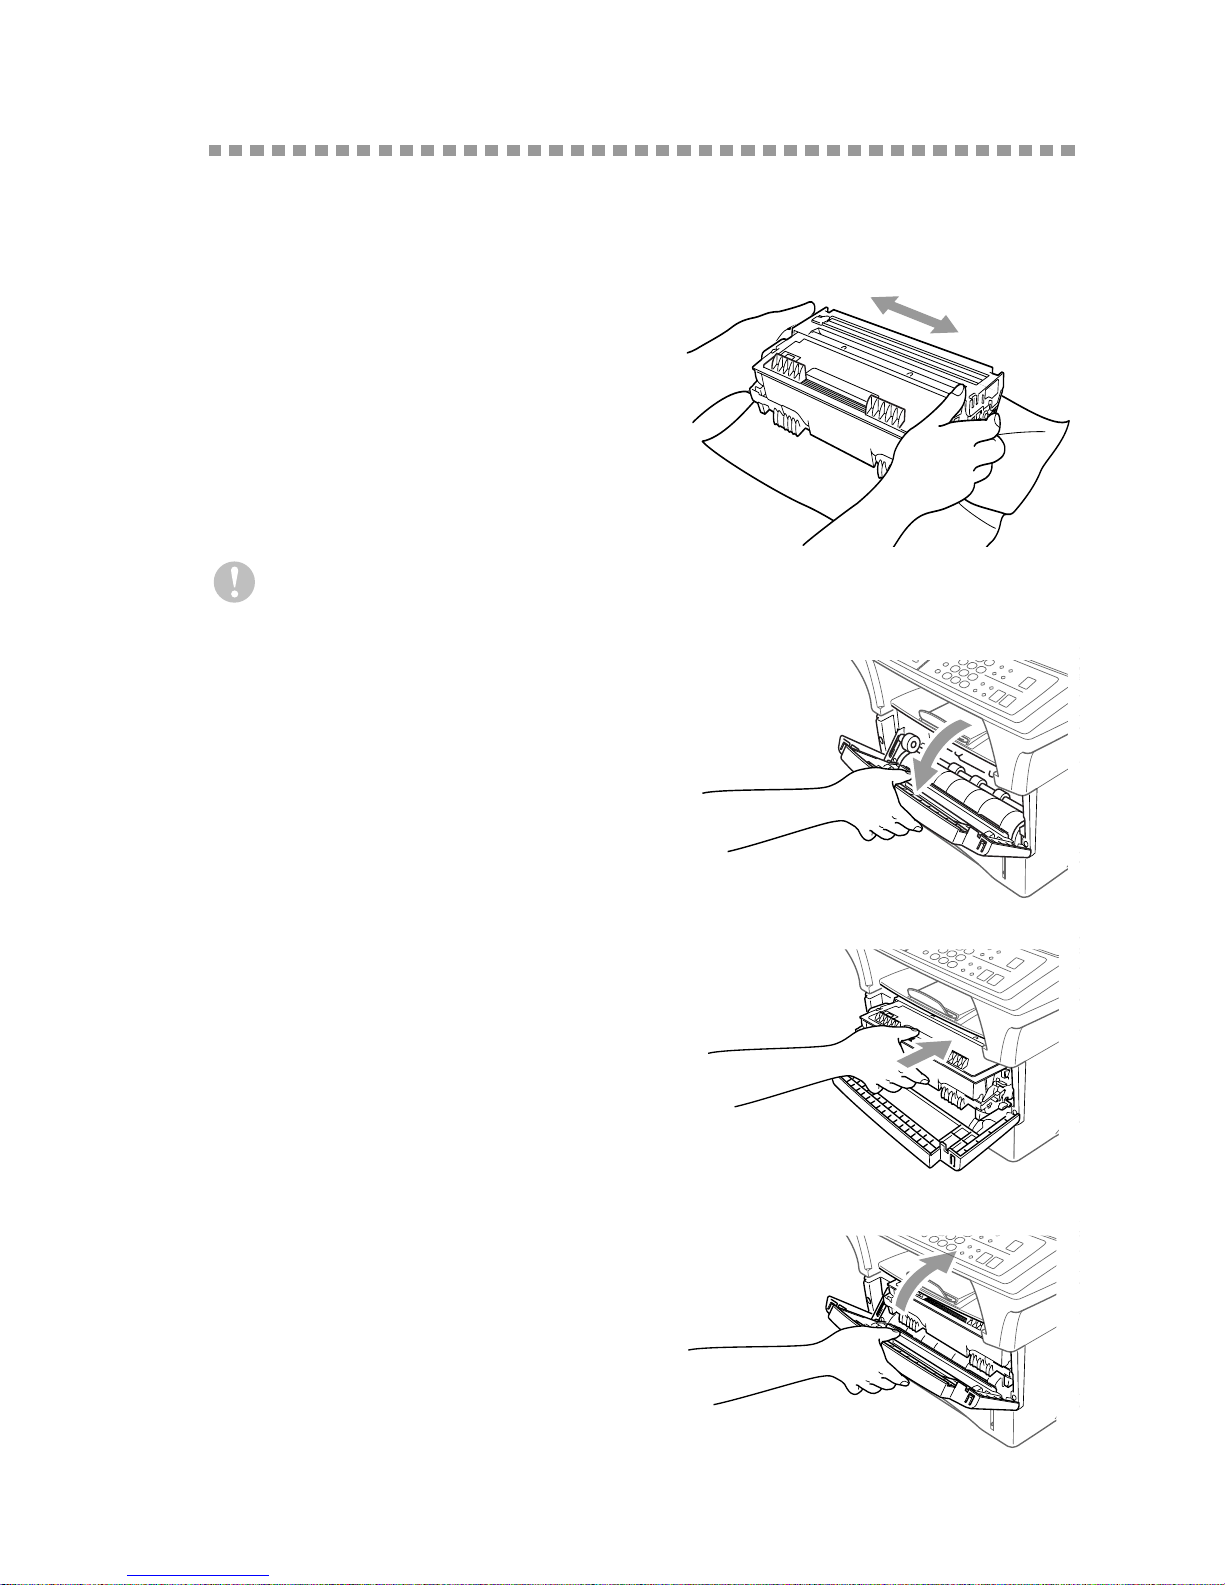
Installing the Drum Unit Assembly
(with Toner Cartridge)
1
Unpack the drum unit assembly
including the toner cartridge, and
gently rock it from side to side five or
six times to distribute the toner evenly
inside the cartridge.
2
Open the front cover of the machine.
3
Insert the drum unit assembly into the
machine.
4
Close the front cover.
To prevent damage to the drum, do not expose it to light for longer
than a few minutes.

2 - 5
ASSEMBLY AND CONNECTIONS
Paper
Acceptable Paper
Paper Capacity of Paper Cassette
Paper Specification for the Cassette
Paper Type Paper Size
Paper Cassette #1:
cut sheet
Letter, Legal, A4, A5, ISO B5, Executive, A6
Manual Feed
Slot:
cut sheet
envelopes
post cards
labels and
transparencies
Letter, Legal, A4, A5, B5 (JIS/ISO), Executive, A6,
2.75–8.5 × 4.57–14 inches (70–216 × 116–356 mm)
COM-10, Monarch, C5, DL
—
Letter, A4
We Recommend:
Cut sheet:
Labels:
Transparencies:
Imagistics 471-1 Letter
Imagistics 472-1 Legal
Avery laser label #5160
3M CG3300 for laser printers or equivalent
Paper Cassette #1:
Max. paper height is 1.06 inches (27 mm) (use the
guides) or approx. 250 sheets of 20 lb. (75 g/m
2
)
Letter/A4 paper, 10 transparencies.
Front Output Bin: Approx. 150 sheets of 20 lb. (75 g/m2)
Letter/A4 paper
Cut Sheet
Basis Weight: 16 to 28 lb. (60 to 105 g/m
2
)
Caliper: 0.003 to 0.005 inches. (0.08 to 0.13 mm)
Moisture Content: 4% to 6% by weight
ASSEMBLY AND CONNECTIONS
2 - 6
Manual Feed Slot
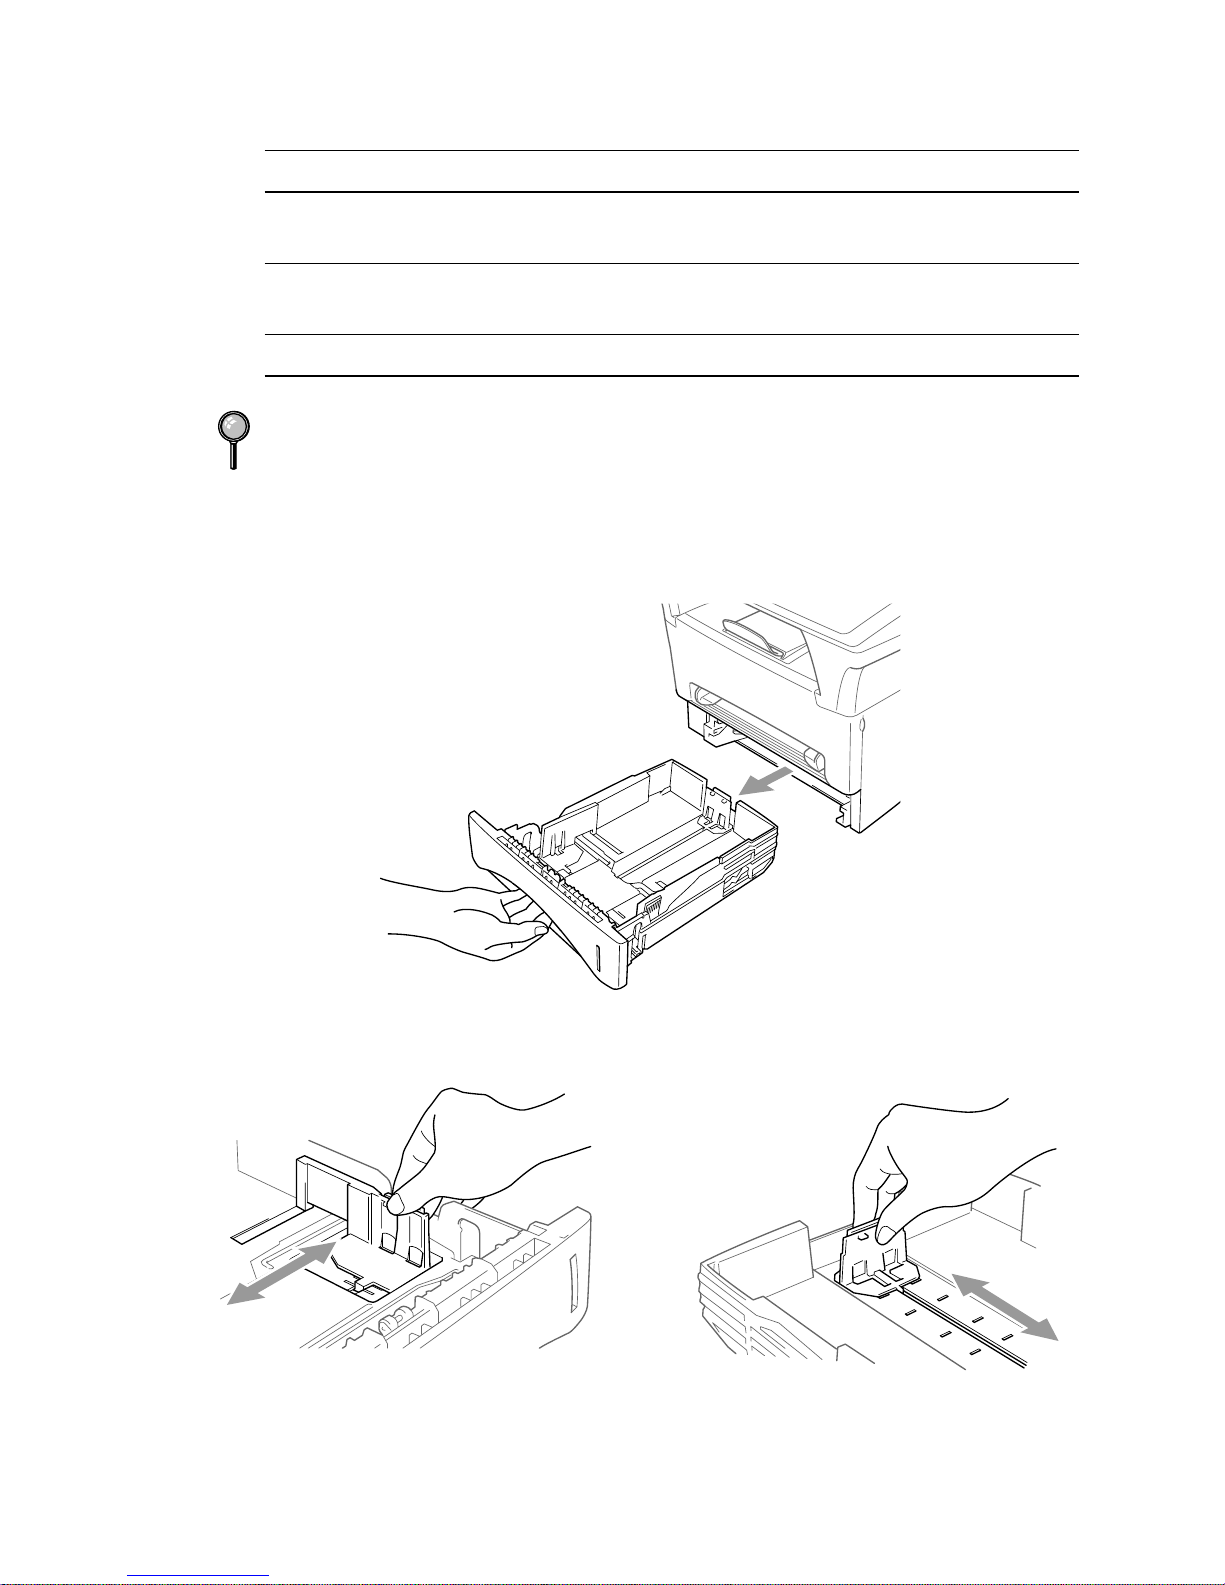
Loading Paper in the Paper Cassette
1
Pull the paper cassette completely out of the machine.
2
Slide the paper width and length adjusters to the position for the paper size you
are using.
Cut Sheet Envelopes
Basis Weight: 16 to 43 lb.
(60 to 161 g/m
2
)
20 to 24 lb.
(75 to 90 g/m2)
Caliper: 0.003 to 0.008 inches.
(0.08 to 0.2 mm)
0.003 to 0.005 inches.
(0.084 to 0.14 mm)
Moisture Content: 4% to 6% by weight 4% to 6% by weight
Fax messages can be received on Letter, Legal and A4 size paper.
If you use legal or A4, change the Paper Size setting: (Features, 1, 1)

2 - 7
ASSEMBLY AND CONNECTIONS
3
Fan the paper well. Load
paper in the paper cassette.
Press down on the paper to
flatten it in all four corners,
keeping the paper level
below the guide. The
cassette can hold up to 250
sheets of 20 lb (75g/m
2
)
paper.
4
Slide the paper cassette into the machine until it locks into place.
Manual Feed Slot
Use the manual feed slot to print or copy on envelopes, labels,
transparencies, card stock or thicker paper:
The manual feed slot is above the paper cassette. Load paper or envelopes one
at a time. You do not have to remove paper from the paper cassette.
You do not have to choose Manual Feed in the Setup dialog box of your printer
driver. Insert the sheet of paper for Portrait (vertical) or Landscape (horizontal),
with the side you wish to print on face up in the manual feed slot.
1
Align the paper at the center of the manual feed slot and insert the paper into the
manual feed slot until the front edge of the paper touches the paper feed roller.
2
Adjust the paper guides to the width of the paper.
Maximum
Paper
Height
Guide
Manual
Feed
Slot
ASSEMBLY AND CONNECTIONS
2 - 8
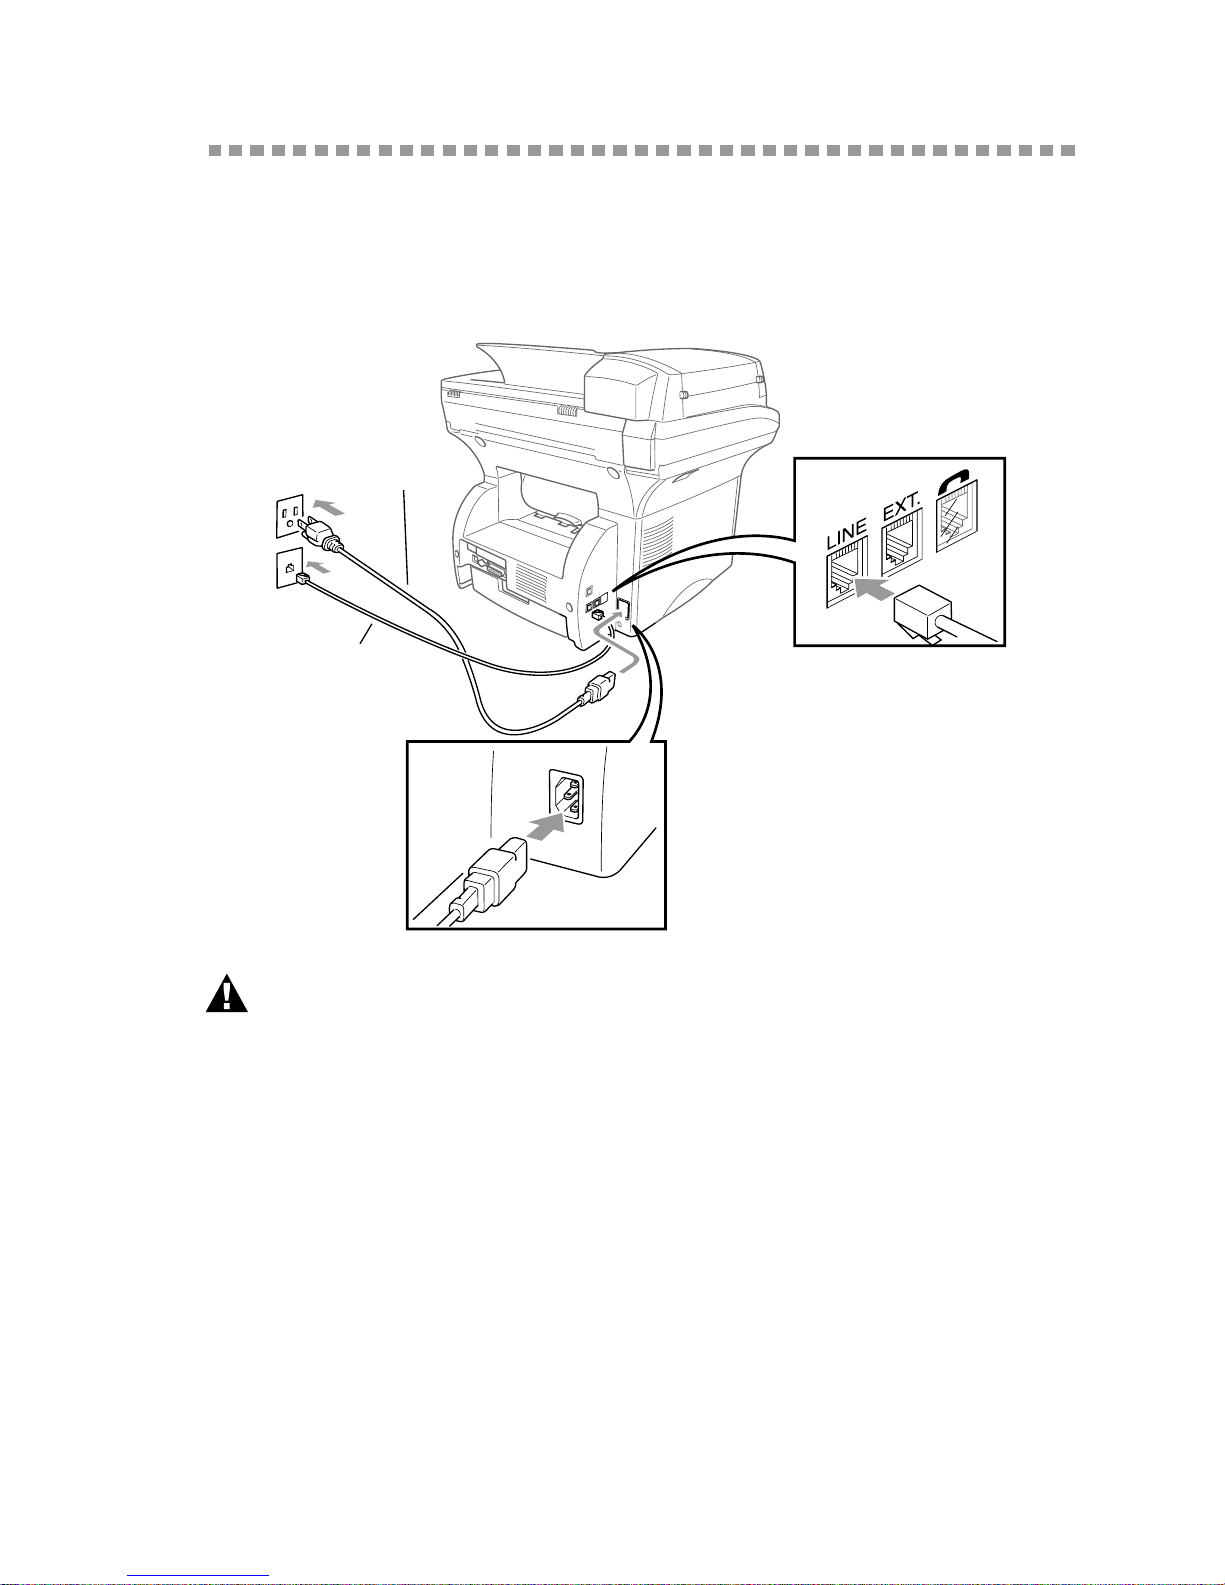
Connecting the machine
1
Connect the power cord.
2
Connect the telephone line cord.
Connect one end of the telephone line cord to the line jack on the machine and
the other end to a modular wall jack.
WARNING
■ The machine must be grounded using a 3-prong plug.
■ Since the machine is grounded through the power outlet, protect yourself from
potentially hazardous electrical conditions on the telephone line by keeping the
power to your machine on when you connect it to a telephone line. When you
want to move your machine, protect yourself by disconnecting the telephone
line first, and then the power cord.
■ Lightning and power surges can damage this product! We recommend that you
use a quality surge protection device on the AC power line as well as on the
telephone line, or unplug the lines during a lightning storm.
■ Do not touch the rollers at the paper exit.
Telephone
Line Cord
Power Cord

2 - 9
ASSEMBLY AND CONNECTIONS
Connections
Connecting an External Telephone
Although your machine does not have a handset, you can connect a separate
telephone (or telephone answering device) directly to the machine.
Connect the modular plug on the telephone’s line cord to the jack labeled EXT.
on the left side of the machine.
Whenever this phone (or TAM) is in use, the LCD shows TELEPHONE.
Connecting an External TAM
(Telephone Answering Machine)
Sequence
You might choose to connect an answering system. However, when you have an
external TAM on the same telephone line as the machine, the TAM answers all calls.
The machine “listens” for fax calling (CNG) tones. If it hears them, the machine takes
over the call and receives the fax. If it doesn’t hear CNG tones, the machine lets the
TAM continue playing your outgoing message so your caller can leave you a voice
message.
The TAM must answer within five rings (the recommended setting is two rings).
The machine cannot hear CNG tones until the TAM has answered the call, and
with five rings there are only 8–10 seconds of CNG tones left for the fax
“handshake.” Make sure you carefully follow the instructions in this manual for
recording your outgoing message. We do not recommend using the toll saver
feature on your external answering machine if it exceeds five rings.
Connections
The external TAM must be plugged into the left side of the machine in the jack labeled
EXT. Your machine cannot work properly if you plug the TAM into a wall jack.
If you do not receive all your faxes, you must reset your external TAM to four
rings.
If You Subscribe to your Telephone Company’s Unique Ring Service:
You may connect an external TAM to a separate wall jack only if you subscribe
to your telephone company’s Unique Ring service, have registered the
distinctive ring pattern on your machine, use that number as a fax number and
have set your machine’s Receive mode to MANUAL. The recommended
setting is three or four rings on the external TAM when you have the telephone
company’s Unique Ring service.
If You Do NOT Subscribe to Unique Ring Service:
You must plug your TAM into the EXT. jack of your machine. If your TAM is
plugged into a wall jack, both your machine and the TAM will try to control the
phone line. (See on page 2-10.)
 Loading...