

Page 1
www.imagistics.com
User's Guide
im7520
im6020
Copy Operations
®
Page 2

9
Replacing Toner Cartridges and Staples and Emptying Dust Boxes Chapter 9
Replacing Toner
Cartridges and Staples
and Emptying Dust Boxes
Page 3
9
Replacing Toner Cartridges and Staples and Emptying Dust Boxes
9-2 im7520/im6020
Replacing Toner Cartridges and Staples and Emptying Dust Boxes Chapter 9
9 Replacing Toner Cartridges and Staples
and Emptying Dust Boxes
9.1 Replacing the Toner Cartridge
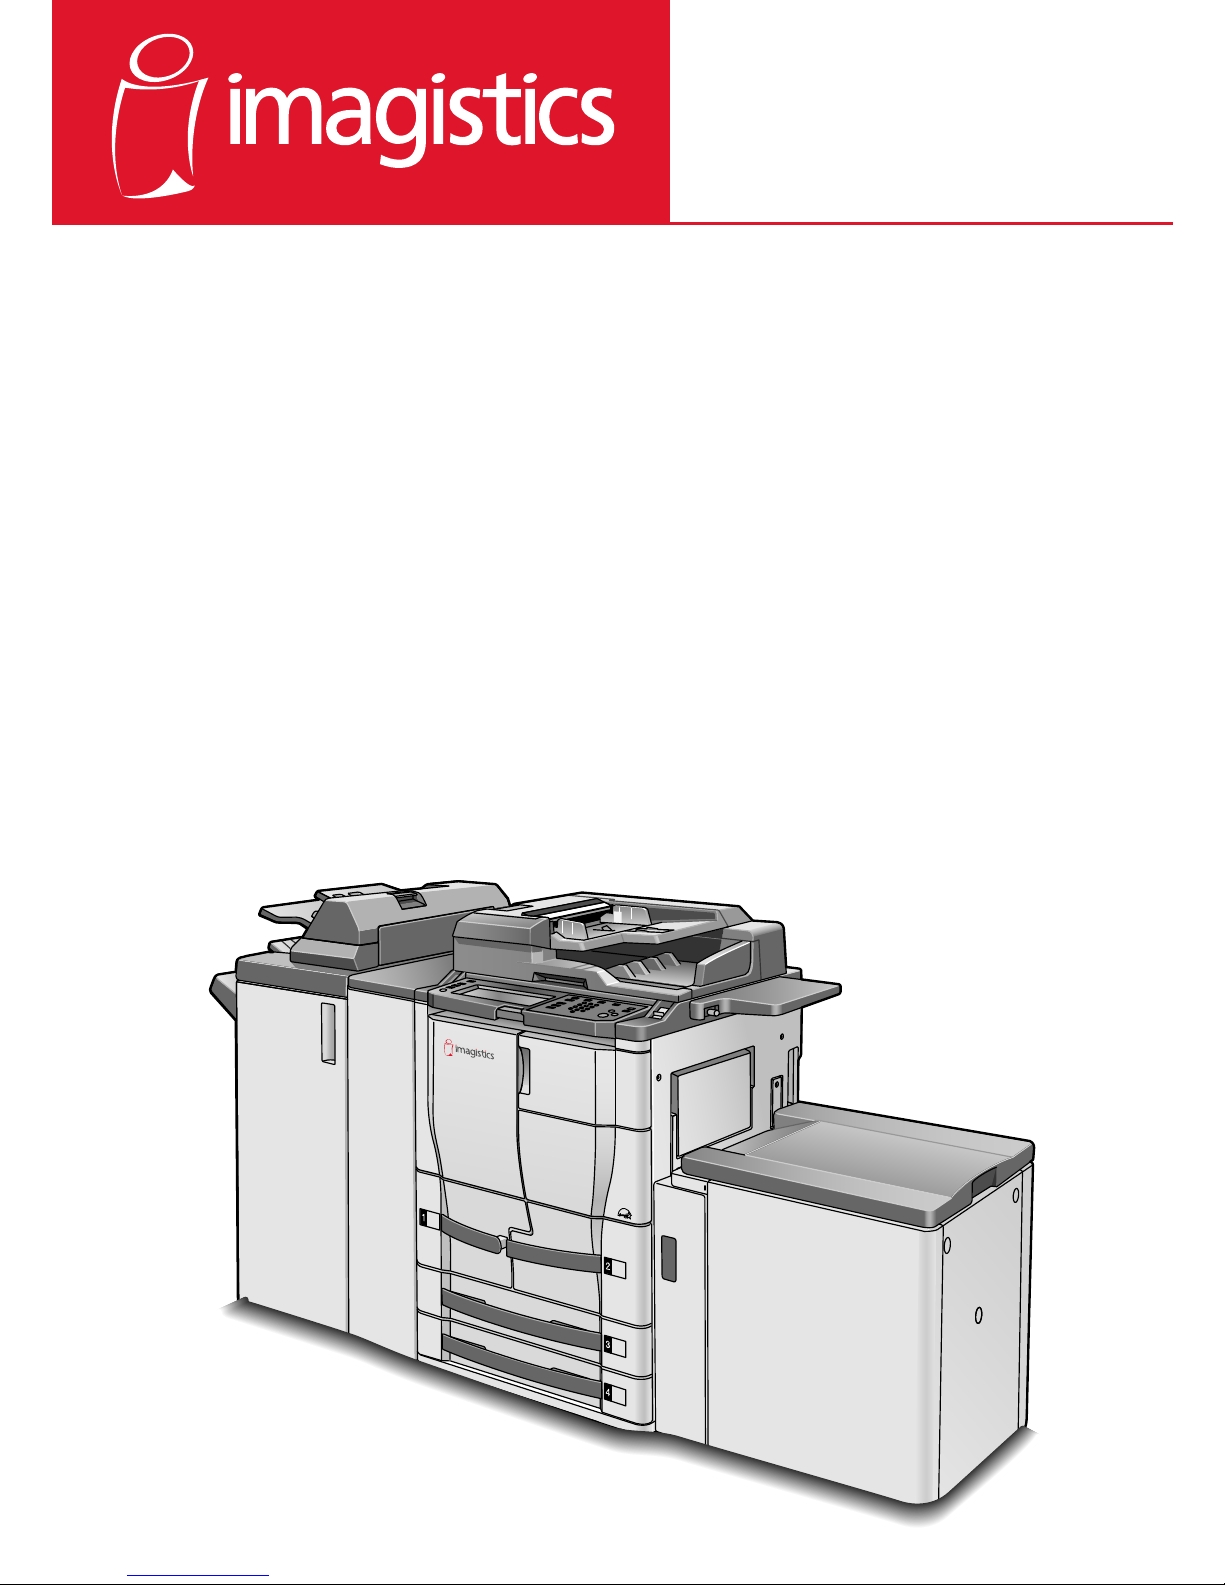
When the toner is about to run out, the warning message shown below appears. Replace the toner cartridge.
!
Detail
Some copies can be printed between the time that the message “Toner
Cartridge needs to be replaced.” appears until the time that the message
“Replace the Toner.” appears. However, it is recommended that the toner cartridge be replaced when the message “Toner Cartridge needs to be
replaced.” appears.
When the message“Replace the toner” appears, the machine is stopped.
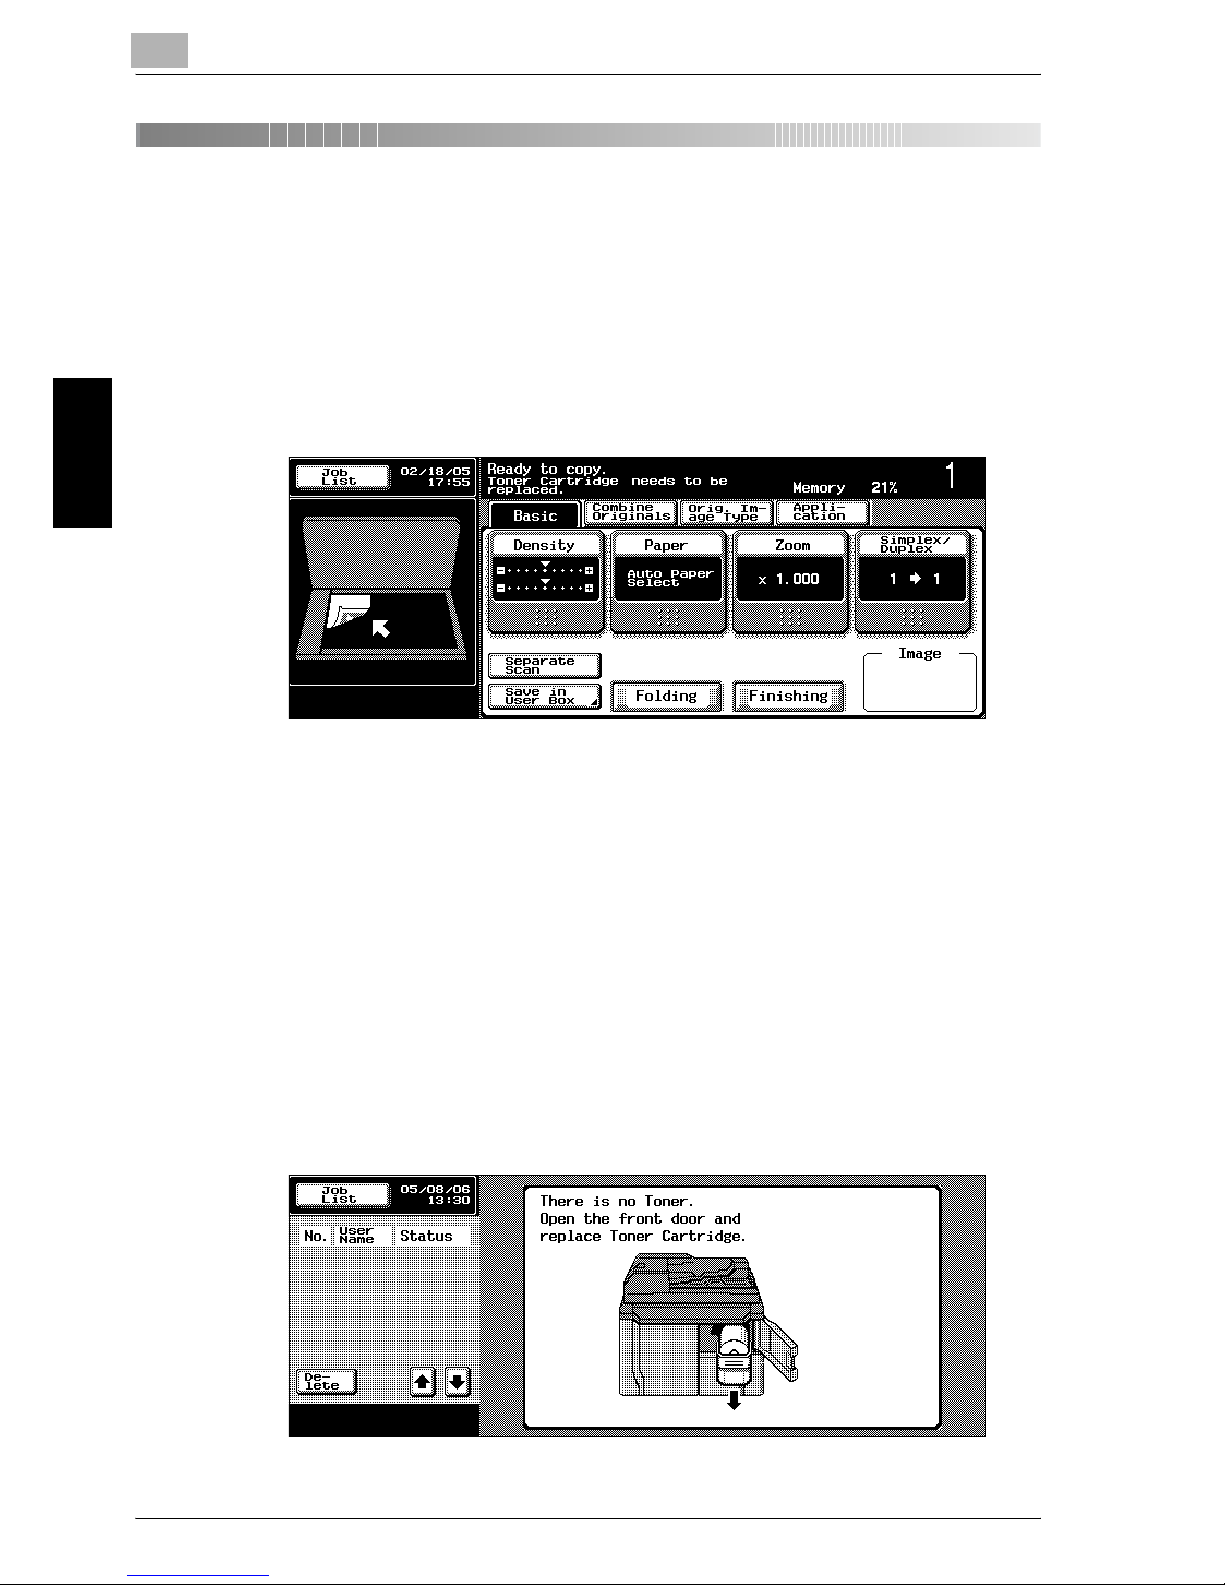
When the toner is empty, the warning message shown below appears and
copies can no longer be made.
Page 4
Replacing Toner Cartridges and Staples and Emptying Dust Boxes
9
im7520/im6020 9-3
Replacing Toner Cartridges and Staples and Emptying Dust Boxes Chapter 9
!
Detail
For details on replacing the toner cartridges, refer to “To replace the toner
cartridge” on page 9-4.
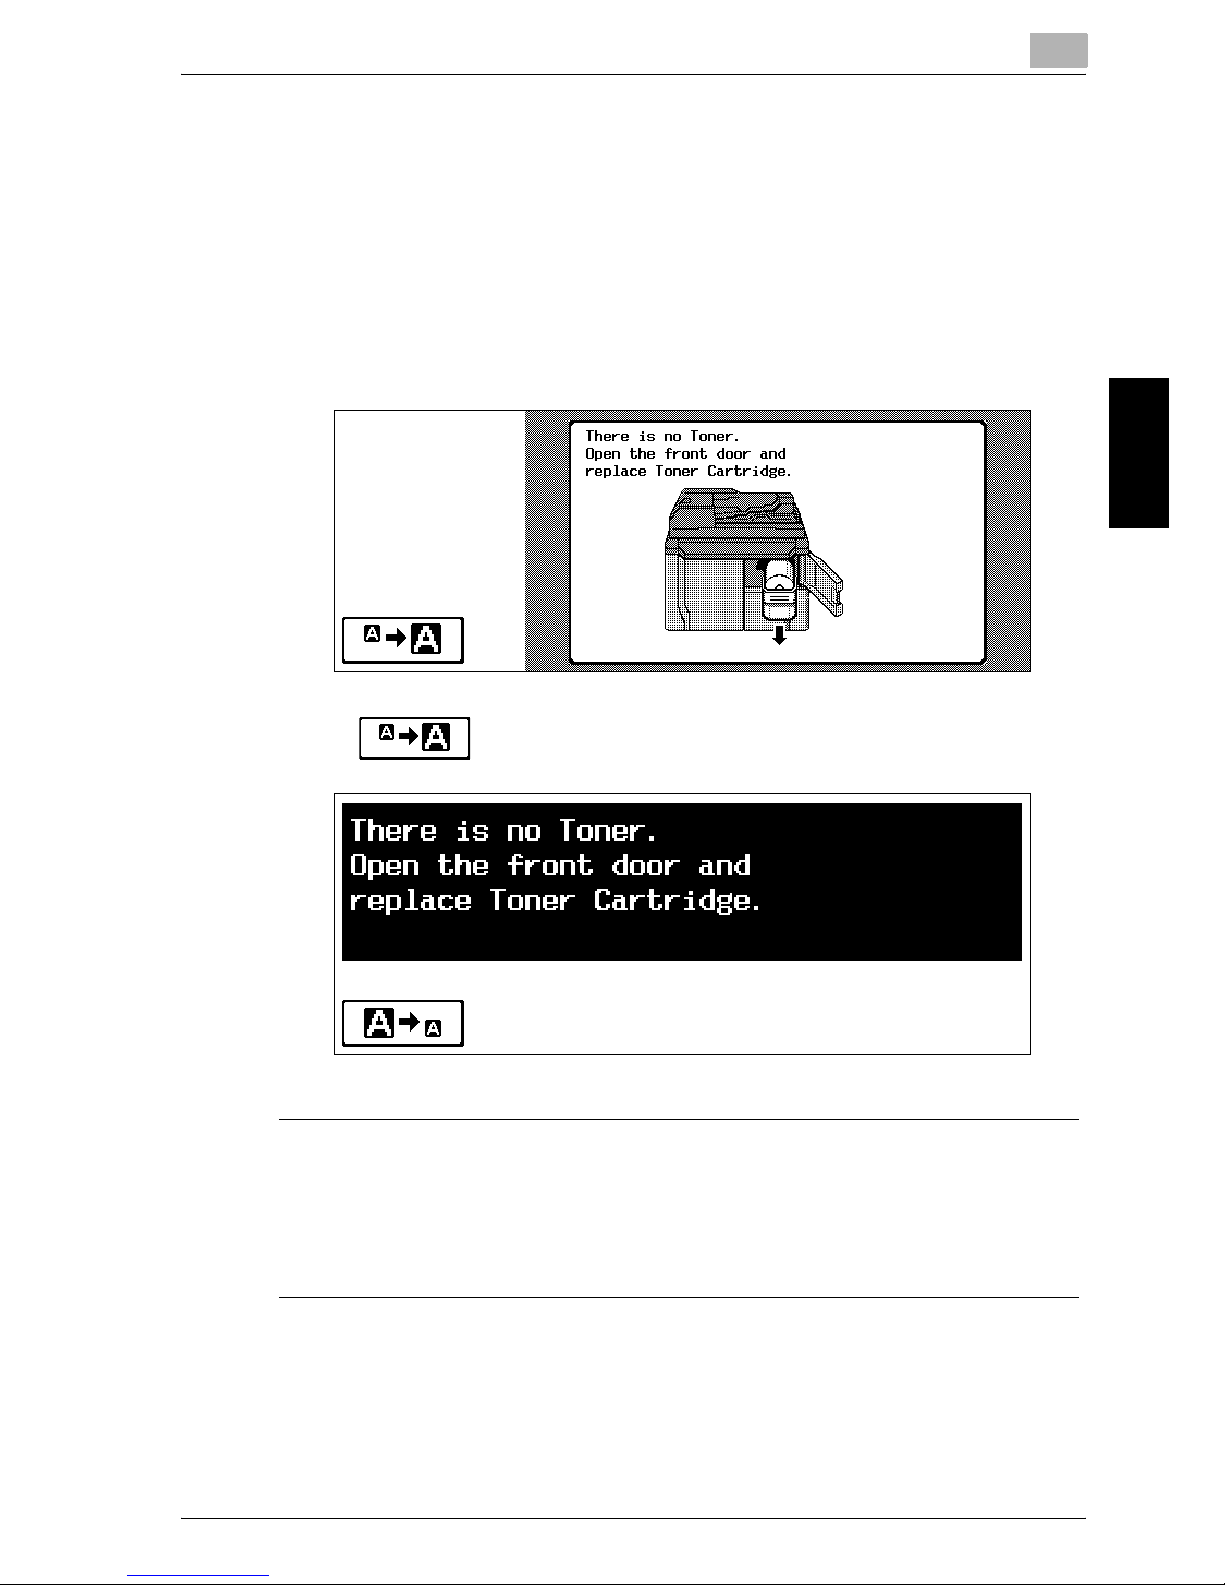
Display in Enlarge Display Mode
When the toner is empty, the screen shown below appears.
Touch to display the message enlarged.
7 WARNING
Handling toner and the toner cartridges
% Do not throw toner or the toner cartridge into a fire.
% Toner expelled from the fire may cause burns.
Page 5
9
Replacing Toner Cartridges and Staples and Emptying Dust Boxes
9-4 im7520/im6020
Replacing Toner Cartridges and Staples and Emptying Dust Boxes Chapter 9
7 CAUTION
Precautions for toner spills
% Be careful not to spill toner inside the machine or get toner on your
clothes or hands.
% If your hands become soiled with toner, immediately wash them with
soap and water.
% If toner gets in your eyes, immediately flush them with water, and then
seek professional medical attention.
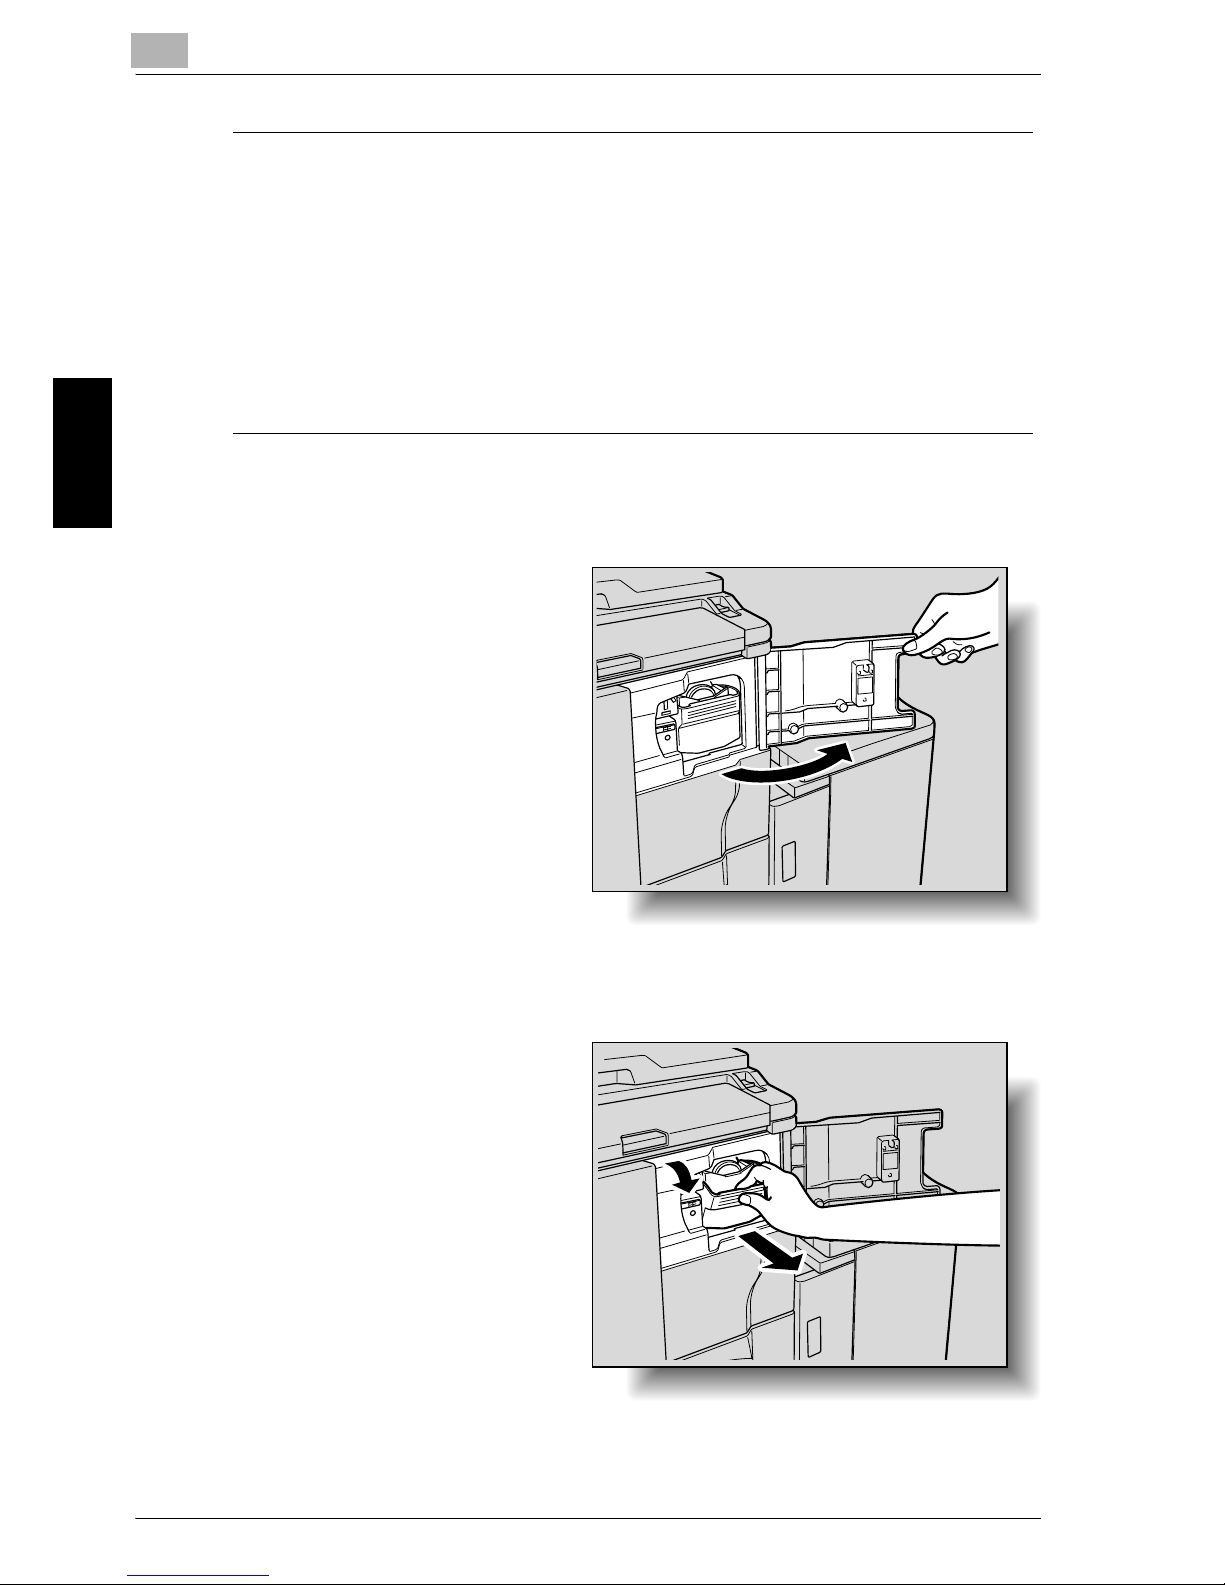
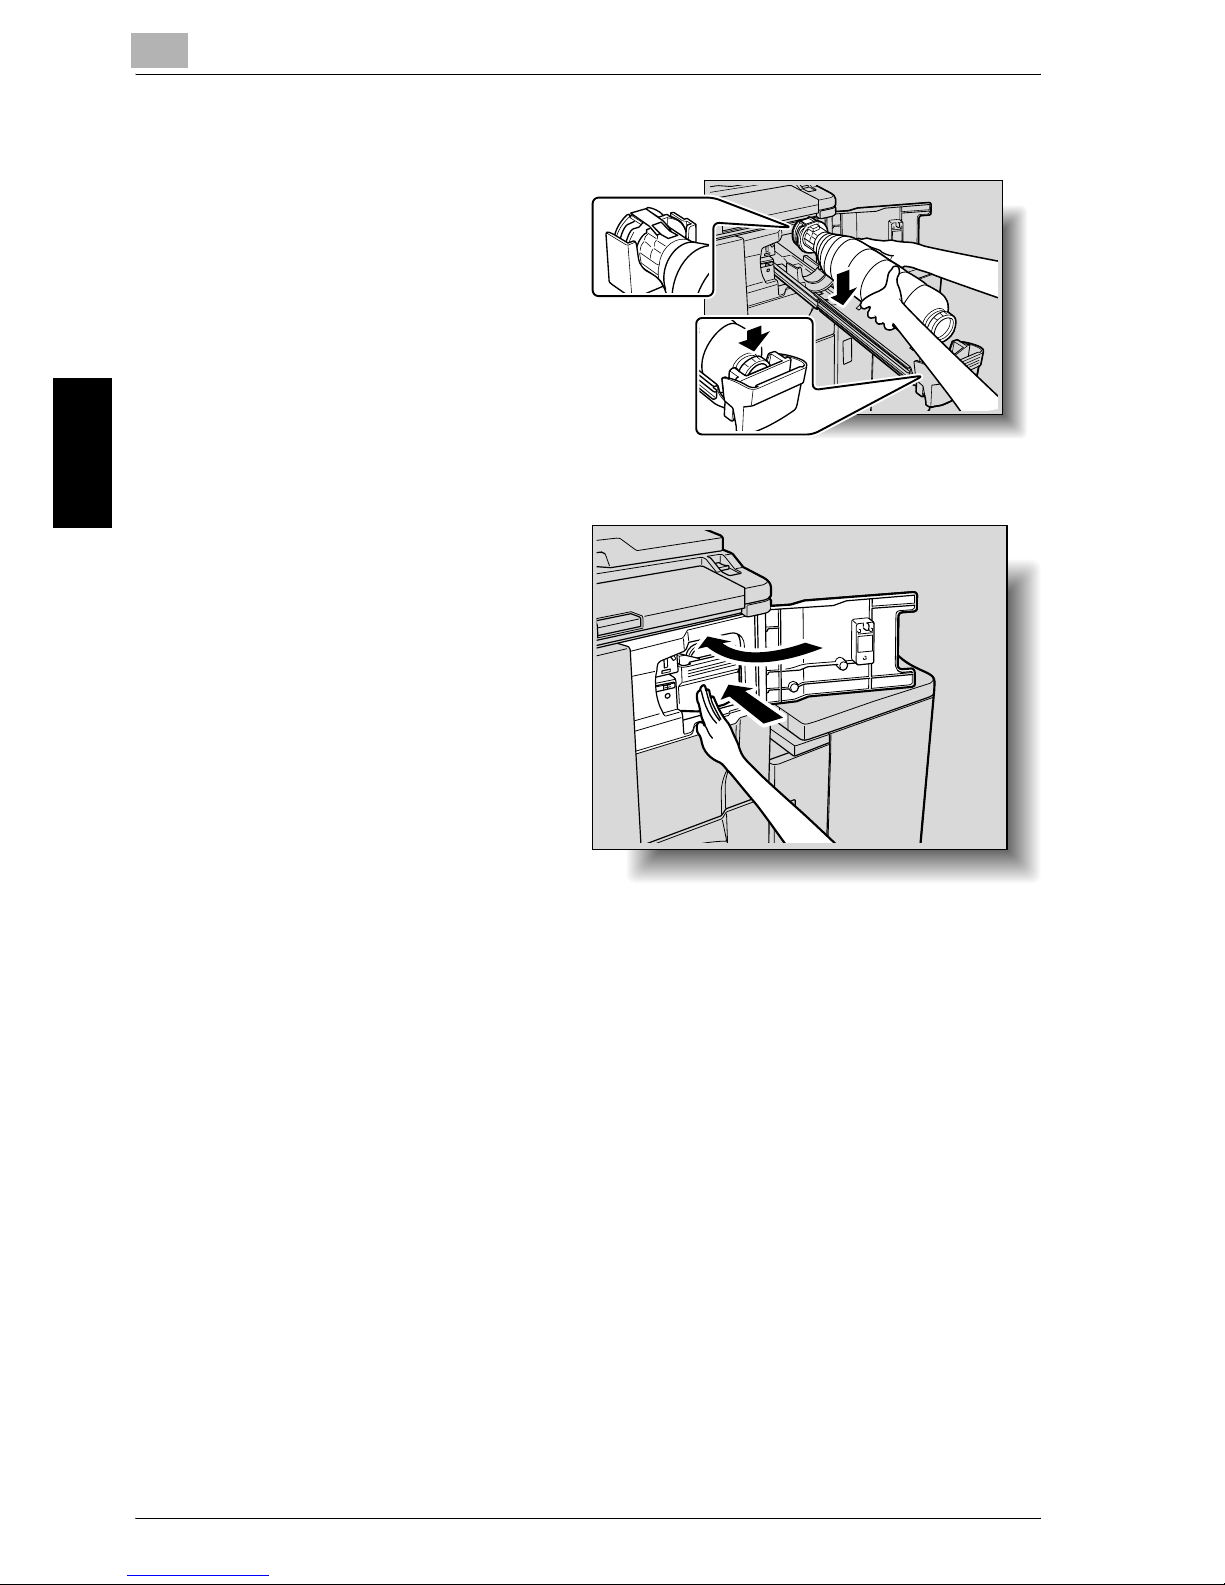
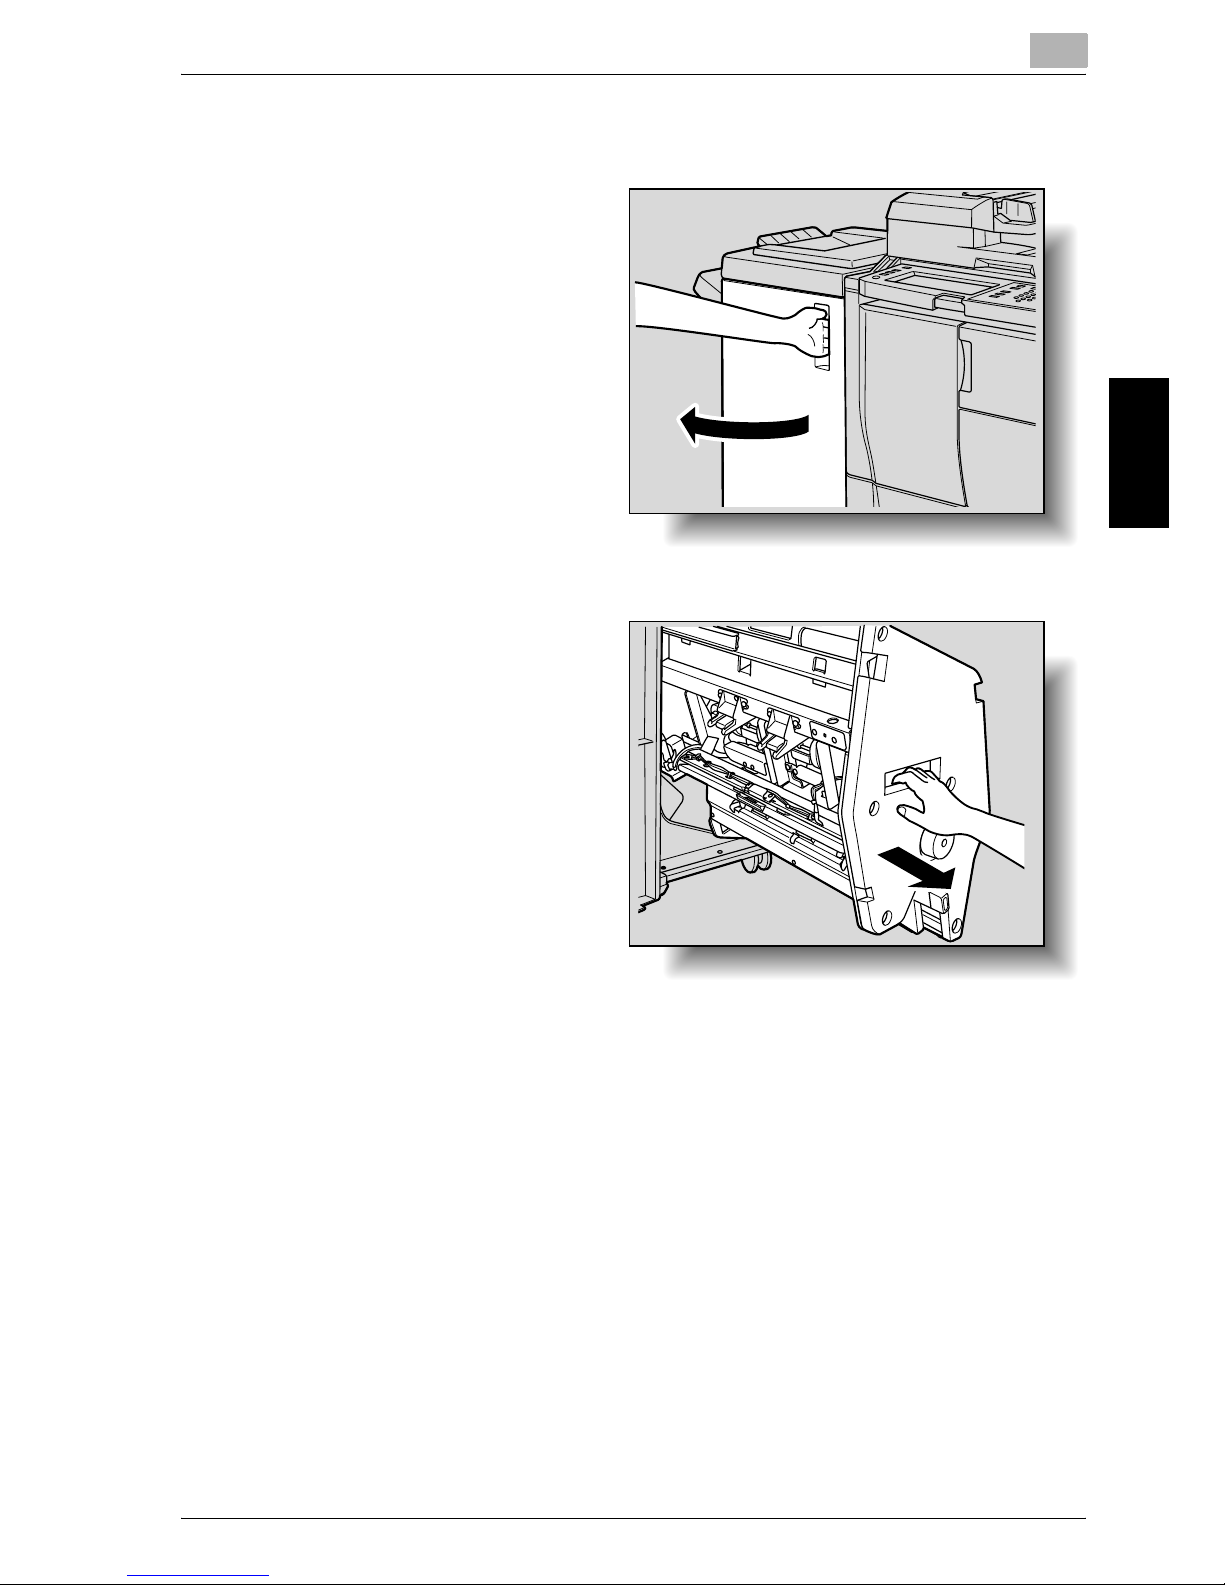
To replace the toner cartridge
1 Open the toner cartridge
door.
2 Pull out the cartridge holder.
While pulling the tonercartridge-securing lever
toward you, pull the cartridge holder out toward
you as far as possible.
Page 6

Replacing Toner Cartridges and Staples and Emptying Dust Boxes
9
im7520/im6020 9-5
Replacing Toner Cartridges and Staples and Emptying Dust Boxes Chapter 9
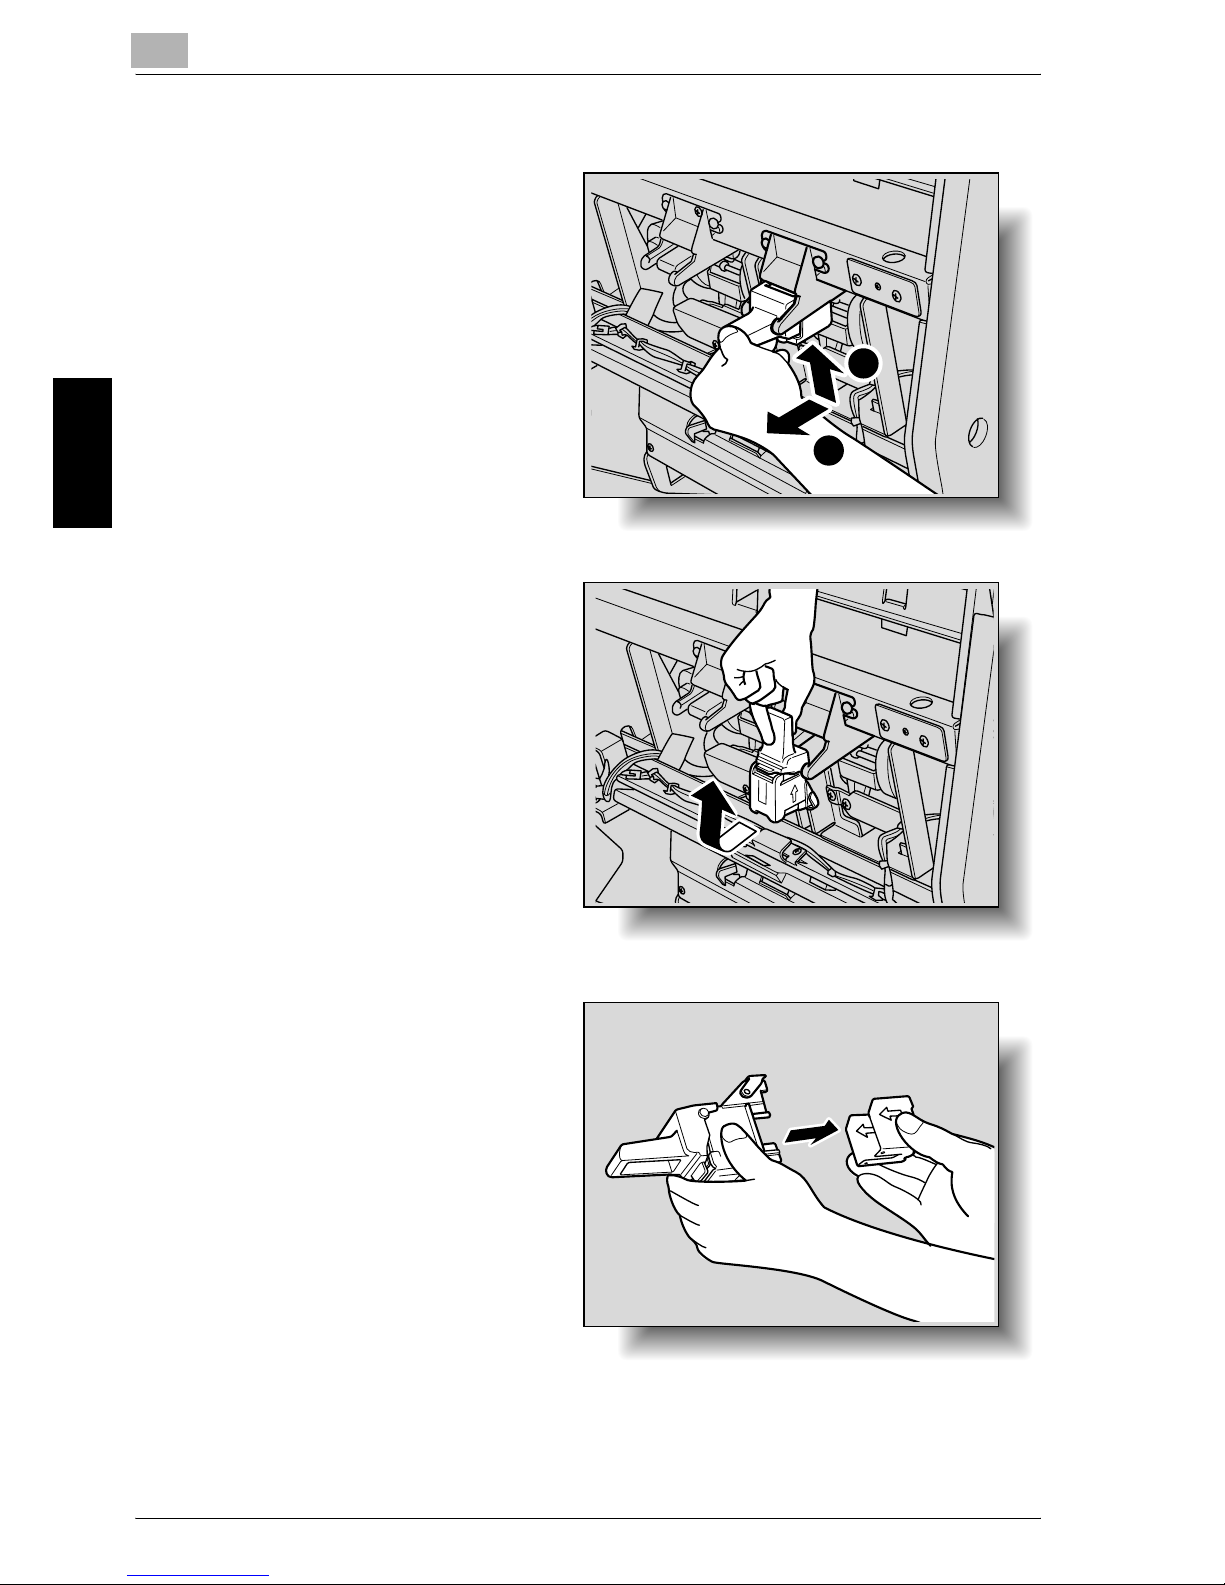
3 Pull up the used toner
cartridge to remove it.
4 Shake the new toner
cartridge by turning it
over about five times.
– The toner within the
toner cartridge may
have become compacted. If it has, be
sure to shake the
toner cartridge until
the toner is mostly
broken up before installing the cartridge.
5 Remove the cover from
the toner cartridge.
Page 7
9
Replacing Toner Cartridges and Staples and Emptying Dust Boxes
9-6 im7520/im6020
Replacing Toner Cartridges and Staples and Emptying Dust Boxes Chapter 9
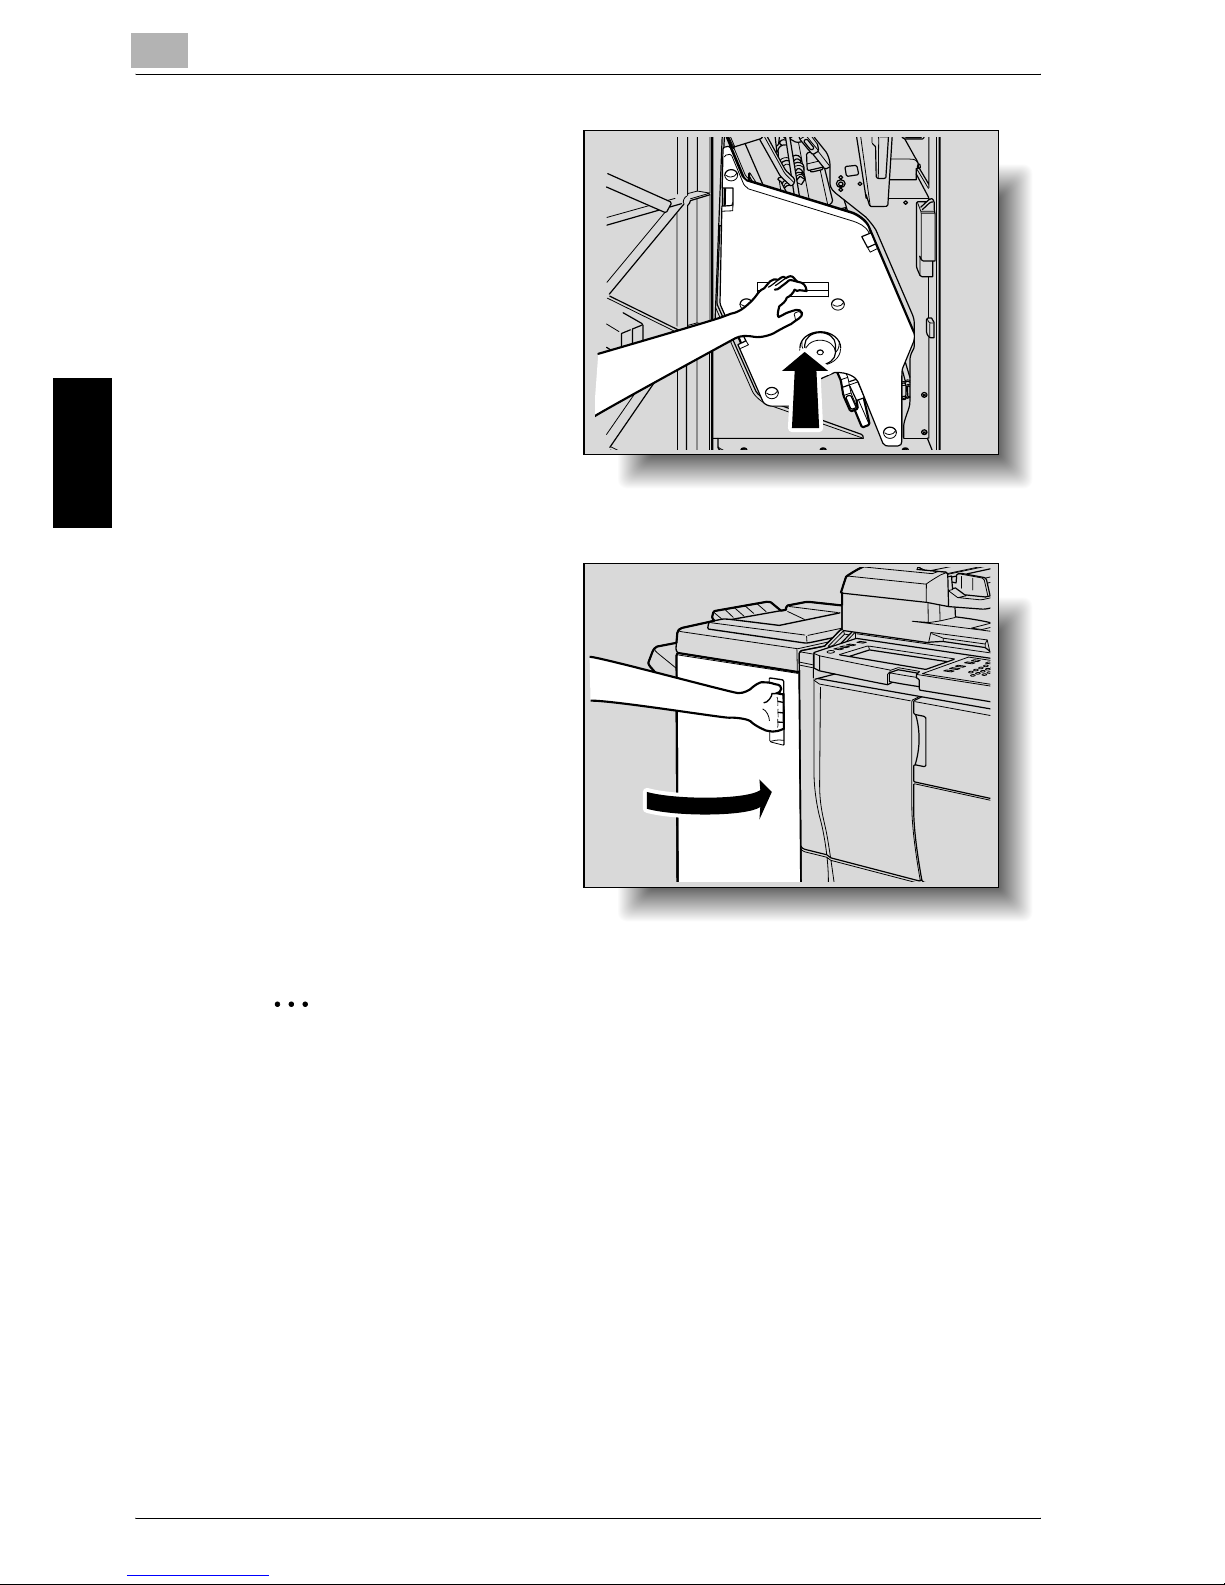
6 Install the toner cartridge, making sure that it is correctly oriented.
With the label at the end
of the toner cartridge
facing up, insert the bottom of the cartridge into
the slot in the cartridge
holder.
7 Return the cartridge
holder to its original position, and then close the
toner cartridge door.
Page 8
Replacing Toner Cartridges and Staples and Emptying Dust Boxes
9
im7520/im6020 9-7
Replacing Toner Cartridges and Staples and Emptying Dust Boxes Chapter 9
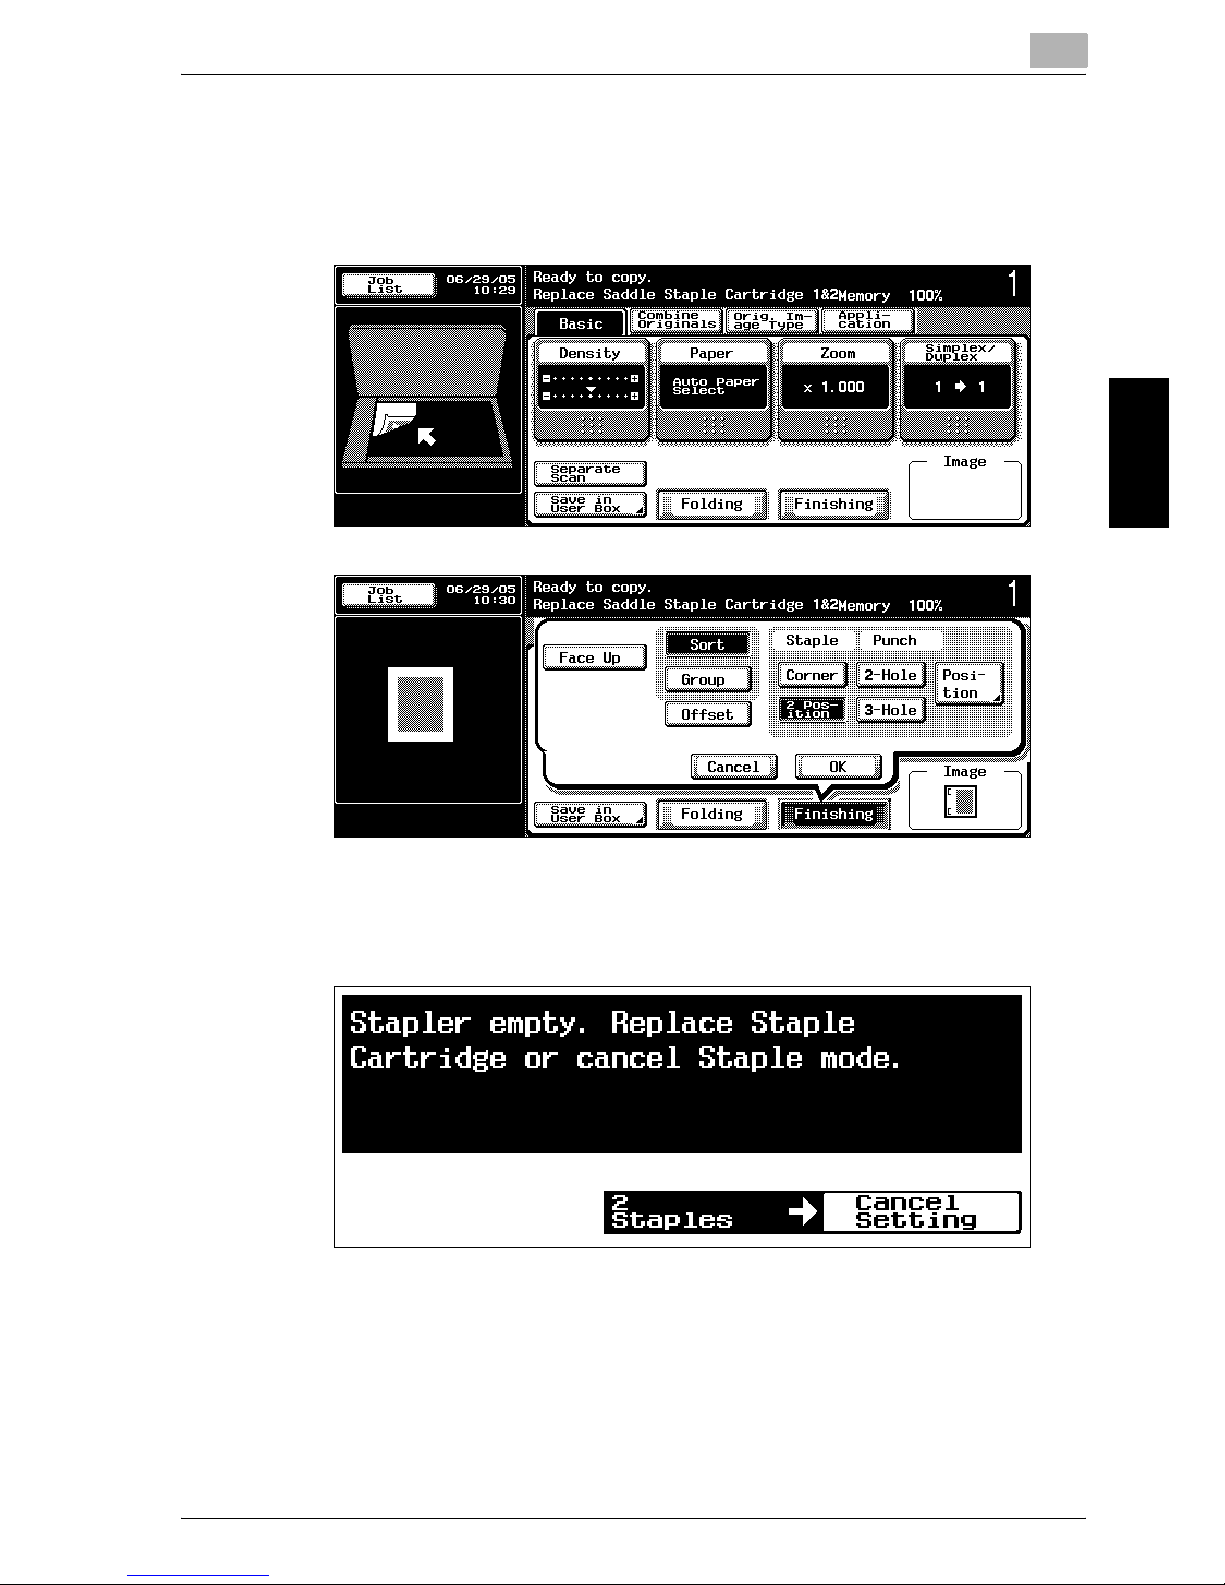
9.2 Replacing the Staples
When finisher 9202/9204 is installed and is about to run out of staples, the
message shown below appears.
Display in Enlarge Display Mode
Page 9
9
Replacing Toner Cartridges and Staples and Emptying Dust Boxes
9-8 im7520/im6020
Replacing Toner Cartridges and Staples and Emptying Dust Boxes Chapter 9
!
Detail
Be sure to replace the staple cartridge only after the message appears,
otherwise the machine may be damaged.
When staples run out in either of Saddle Staple Cartridge 1 or 2, the message “Replace Staple Cartridge 1” or “Replace Staple Cartridge 2” appears.
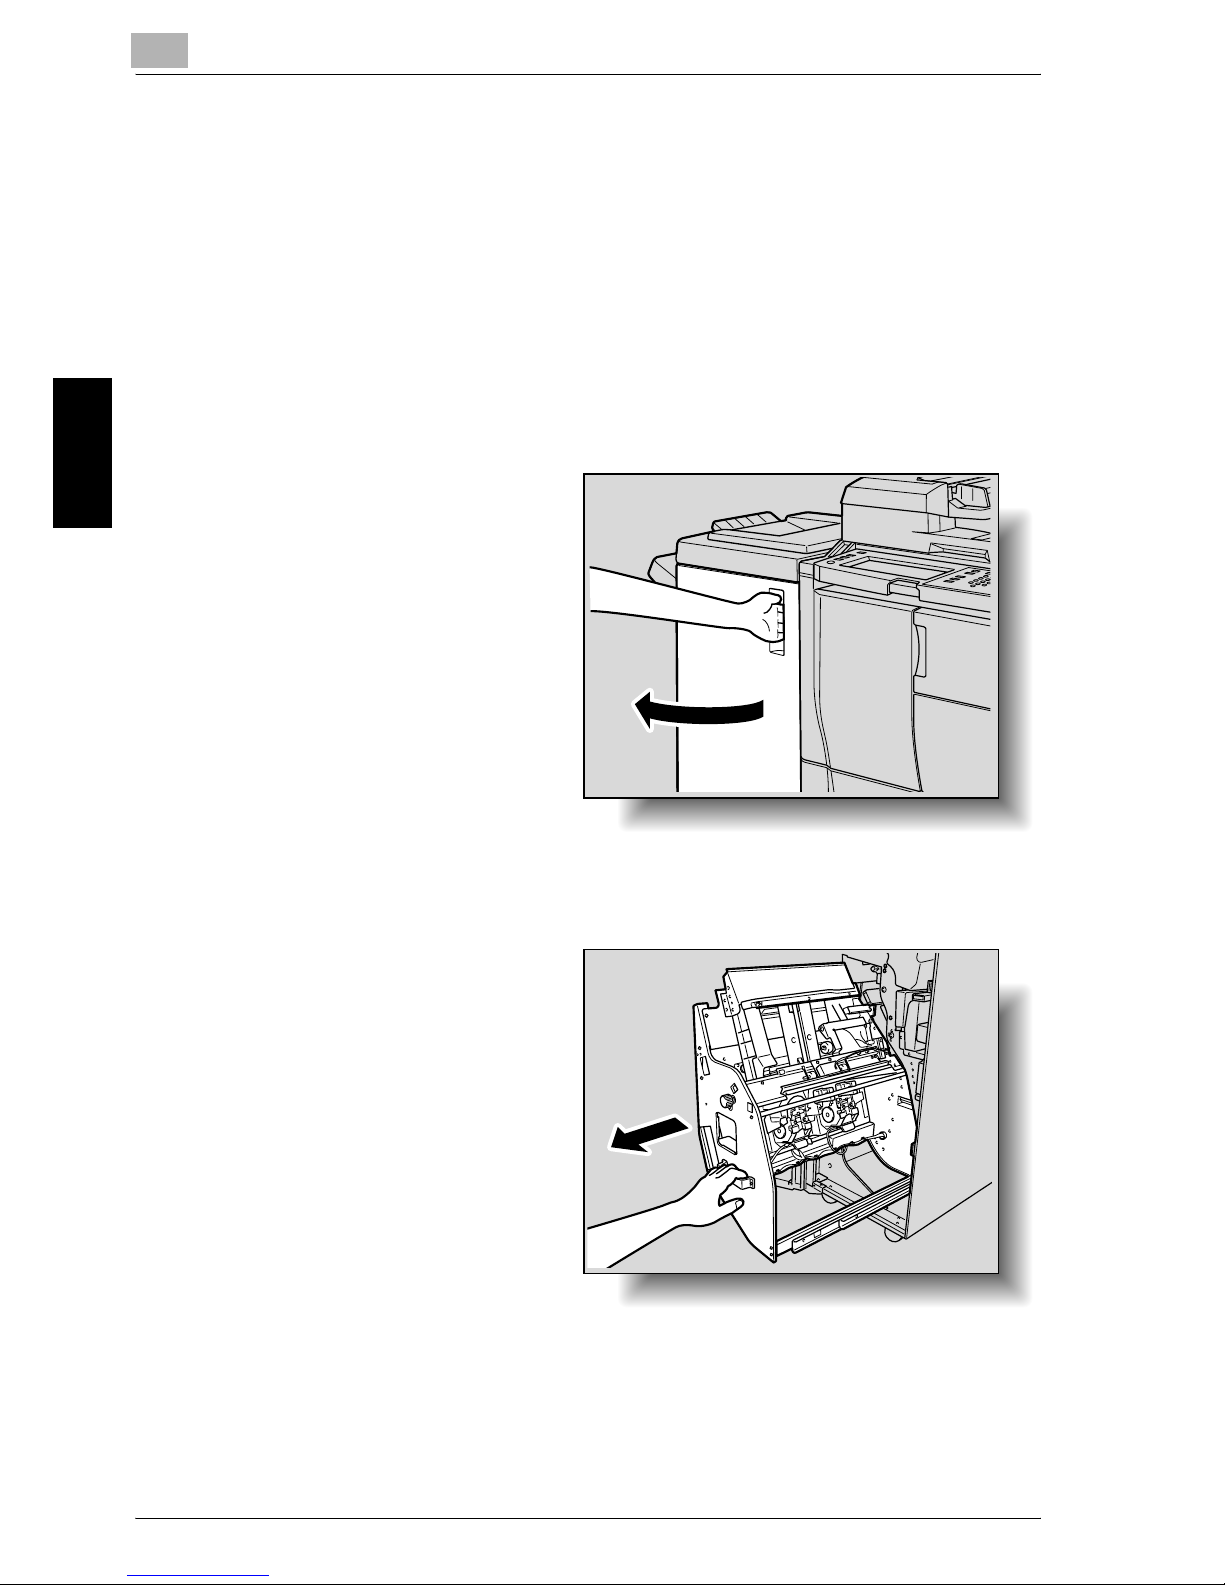
To replace the staple cartridge for finisher 9202
1 Open the finisher door.
2 Pull out the stacker unit.
– Hold the stacker unit
handle, and then
slowly pull out the
stacker unit as far as
possible.
Page 10

Replacing Toner Cartridges and Staples and Emptying Dust Boxes
9
im7520/im6020 9-9
Replacing Toner Cartridges and Staples and Emptying Dust Boxes Chapter 9
3 Remove the empty staple cartridge from the staple cartridge holder.
– Hold the lever on the
staple cartridge, and
then pull the cartridge down to remove it.
4 Install the new staple cartridge.
– Push up the staple
cartridge, and then
check that the cartridge is securely installed.
5 Return the stacker unit
to its original position.
Page 11
9
Replacing Toner Cartridges and Staples and Emptying Dust Boxes
9-10 im7520/im6020
Replacing Toner Cartridges and Staples and Emptying Dust Boxes Chapter 9
6 Close the finisher door.
Page 12
Replacing Toner Cartridges and Staples and Emptying Dust Boxes
9
im7520/im6020 9-11
Replacing Toner Cartridges and Staples and Emptying Dust Boxes Chapter 9
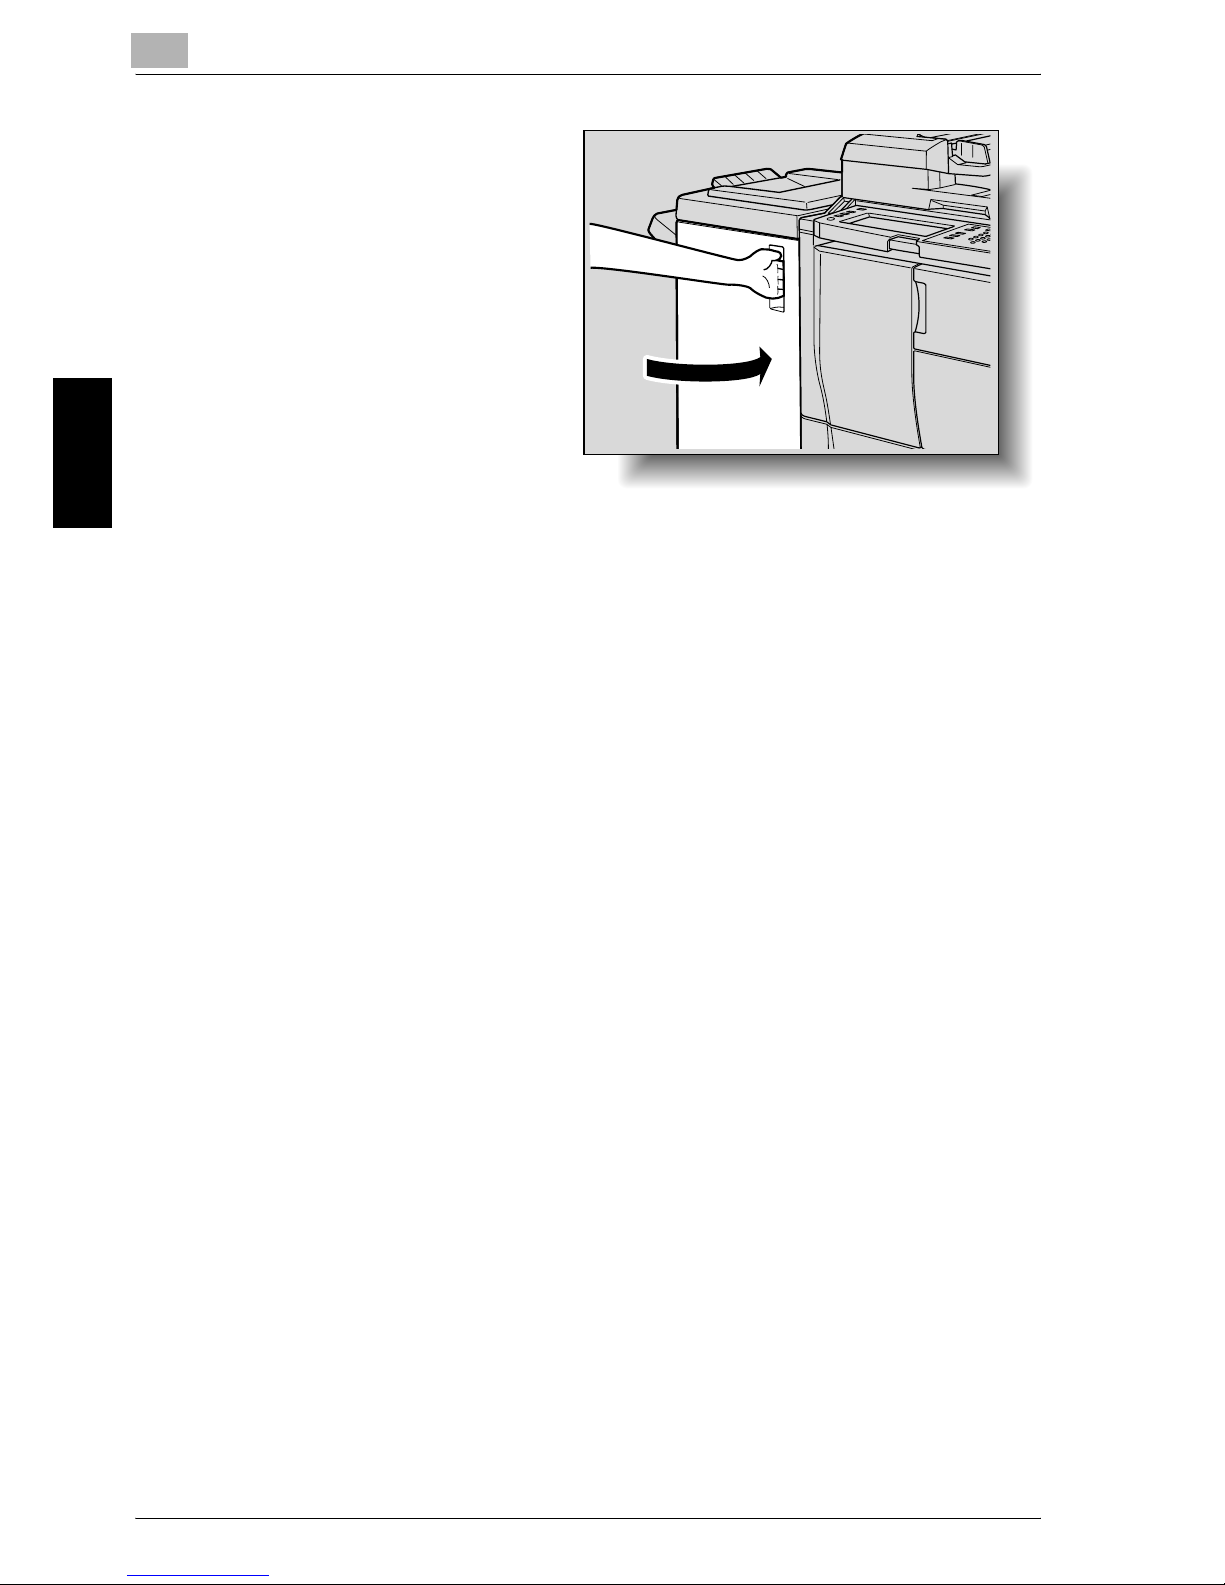
To replace the staple cartridge for finisher 9204
1 Open the finisher door.
2 Pull out the stacker unit.
– Hold the stacker unit
handle, and then
slowly pull out the
stacker unit as far as
possible.
Page 13
9
Replacing Toner Cartridges and Staples and Emptying Dust Boxes
9-12 im7520/im6020
Replacing Toner Cartridges and Staples and Emptying Dust Boxes Chapter 9
3 Remove the staple cartridge.
– While lifting the lever
on the staple cartridge, pull the cartridge toward you to
remove it.
– Remove the staple
cartridge by guiding
it along the rails.
4 Remove the empty car-
tridge case from the staple cartridge.
1
2
Page 14

Replacing Toner Cartridges and Staples and Emptying Dust Boxes
9
im7520/im6020 9-13
Replacing Toner Cartridges and Staples and Emptying Dust Boxes Chapter 9
5 Load the new cartridge
case into the staple cartridge.
– Align the side of the
staple cartridge
marked by the arrow
with the side of the
cartridge case
marked by the arrow,
and then fully insert
the staple cartridge.
– Carefully pull the seal
off the cartridge
case.
6 Install the staple cartridge.
– Place the staple car-
tridge on the rails,
and then guide it
back to its original
position.
– Push down the sta-
ple cartridge, and
then check that the
cartridge is securely
installed.
1
2
Page 15
9
Replacing Toner Cartridges and Staples and Emptying Dust Boxes
9-14 im7520/im6020
Replacing Toner Cartridges and Staples and Emptying Dust Boxes Chapter 9
7 Return the stacker unit
to its original position.
8 Close the finisher door.
2
Reminder
Do not remove the remaining staples, otherwise the machine will not be
able staple after the cartridge is replaced.
Page 16
Replacing Toner Cartridges and Staples and Emptying Dust Boxes
9
im7520/im6020 9-15
Replacing Toner Cartridges and Staples and Emptying Dust Boxes Chapter 9
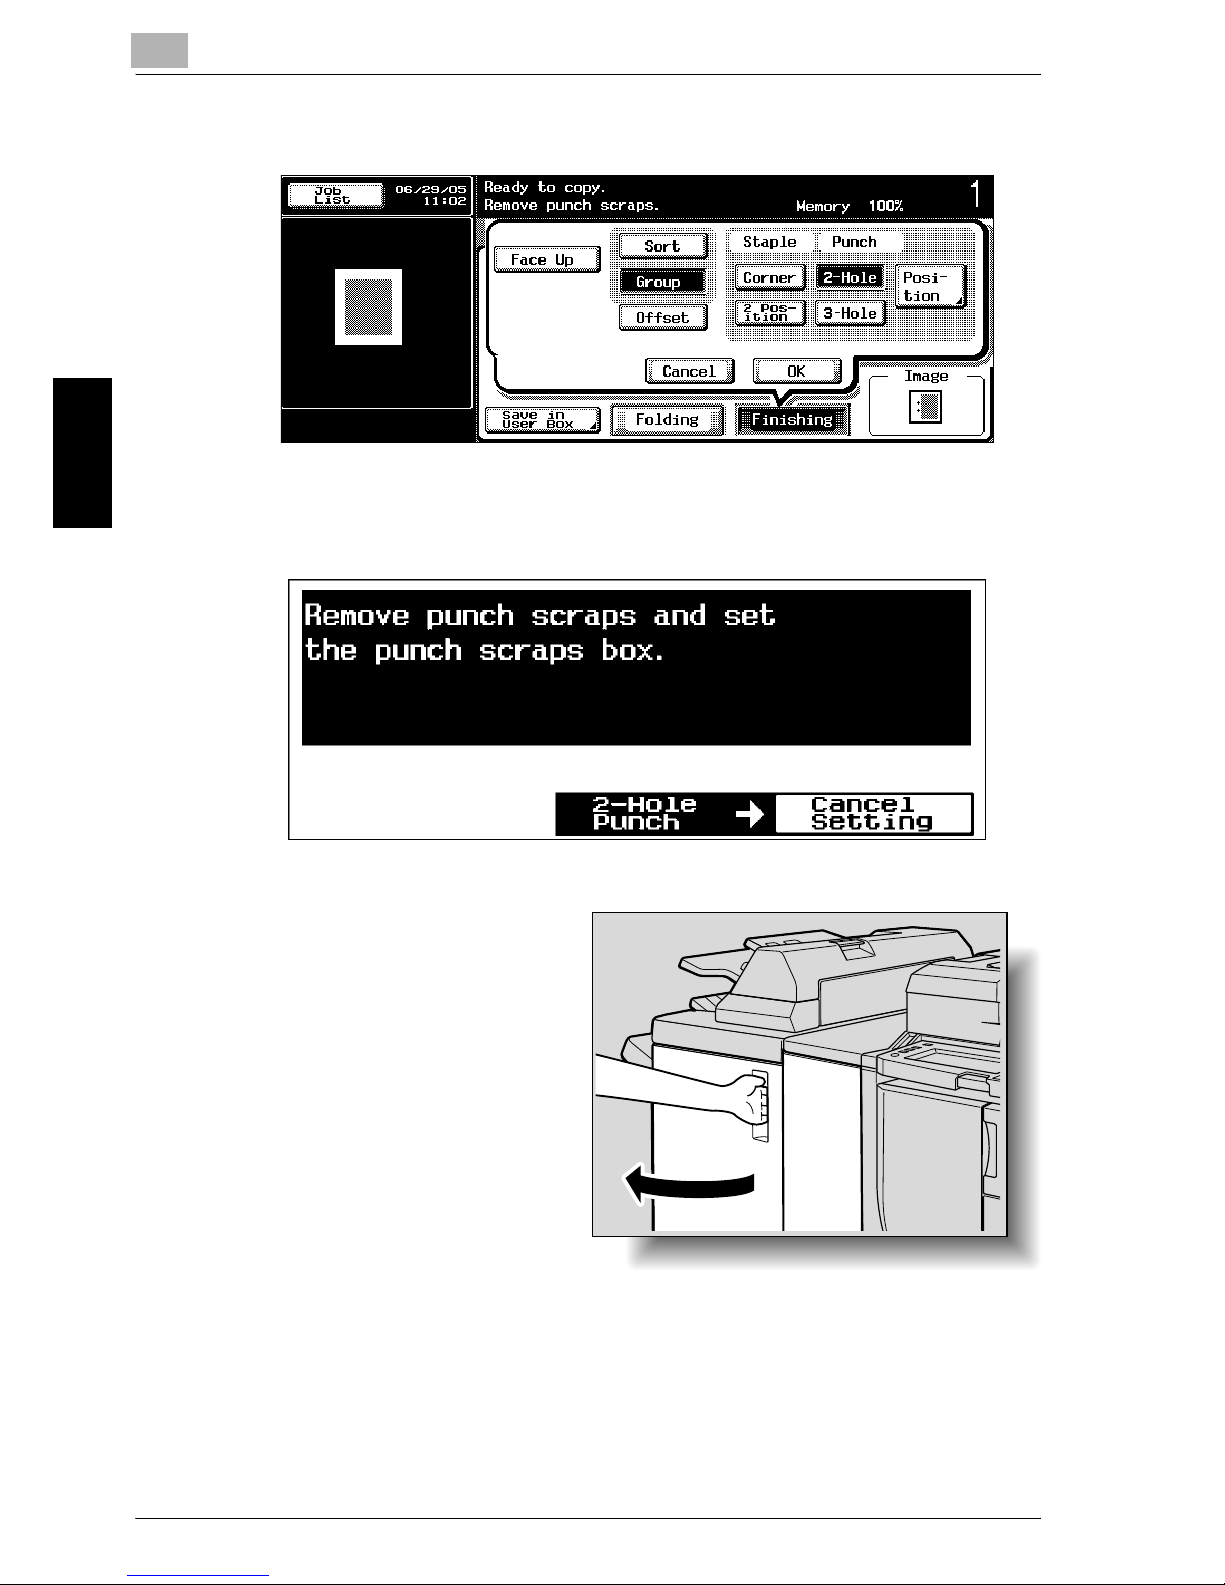
9.3 Emptying the Dust Boxes
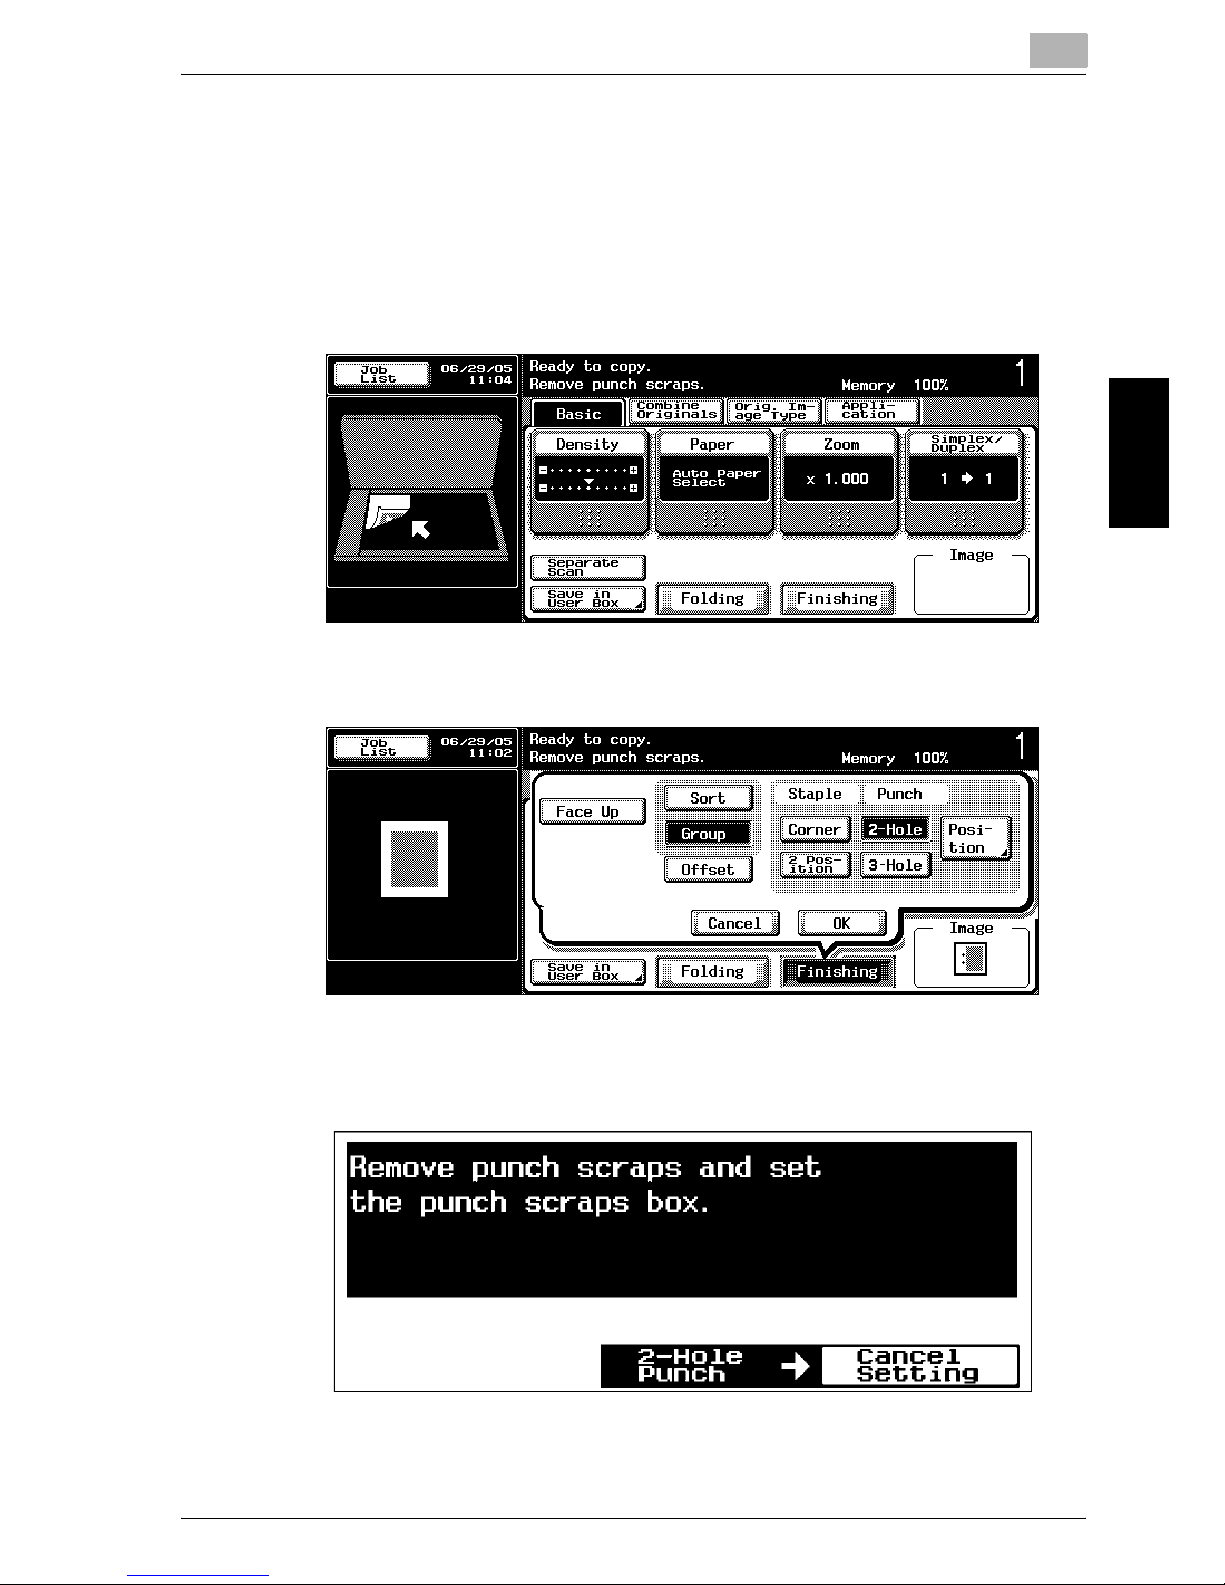
To empty the dust box of the punch kit
If the punch dust box in punch kit im9220010 installed on finisher 9202/9204
becomes full, the message shown below appears.
Display in Enlarge Display Mode
Page 17

9
Replacing Toner Cartridges and Staples and Emptying Dust Boxes
9-16 im7520/im6020
Replacing Toner Cartridges and Staples and Emptying Dust Boxes Chapter 9
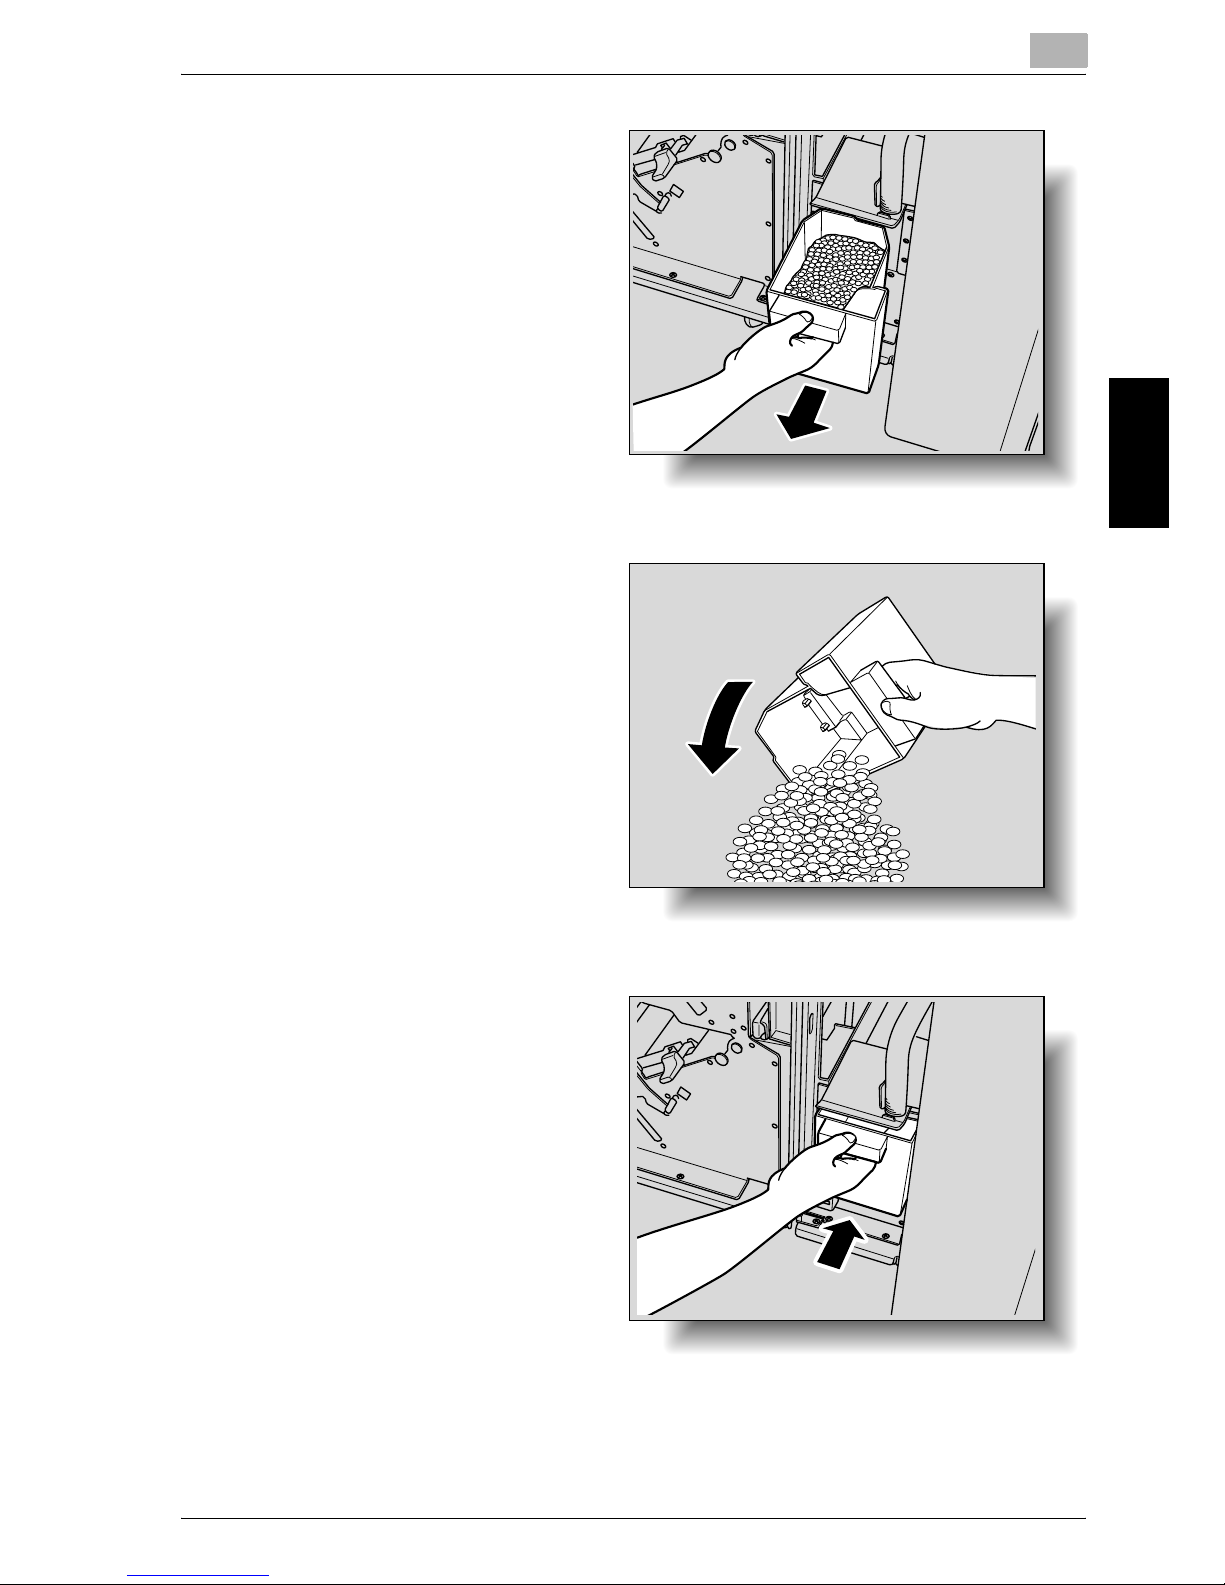
1 Open the finisher door.
2 Pull out the punch dust
box.
3 Empty the punch dust
box.
Page 18

Replacing Toner Cartridges and Staples and Emptying Dust Boxes
9
im7520/im6020 9-17
Replacing Toner Cartridges and Staples and Emptying Dust Boxes Chapter 9
4 Install the punch dust
box into its original position.
5 Close the finisher door.
To empty the dust box of the Z-folding unit
If the punch dust box in Z-folding unit 9263 installed on finisher 92029202/
9204 becomes full, the message shown below appears.
Page 19
9
Replacing Toner Cartridges and Staples and Emptying Dust Boxes
9-18 im7520/im6020
Replacing Toner Cartridges and Staples and Emptying Dust Boxes Chapter 9
Display in Enlarge Display Mode
1 Open the finisher door.
Page 20
Replacing Toner Cartridges and Staples and Emptying Dust Boxes
9
im7520/im6020 9-19
Replacing Toner Cartridges and Staples and Emptying Dust Boxes Chapter 9
2 Pull out the punch dust
box.
3 Empty the punch dust
box.
4 Install the punch dust
box into its original position.
Page 21

9
Replacing Toner Cartridges and Staples and Emptying Dust Boxes
9-20 im7520/im6020
Replacing Toner Cartridges and Staples and Emptying Dust Boxes Chapter 9
5 Close the finisher door.
Page 22

10
Care of the Machine Chapter 10
Care of the Machine
Page 23
10
Care of the Machine
10-2 im7520/im6020
Care of the Machine Chapter 10
10 Care of the Machine
10.1 Cleaning
This section describes the procedures for cleaning each part.
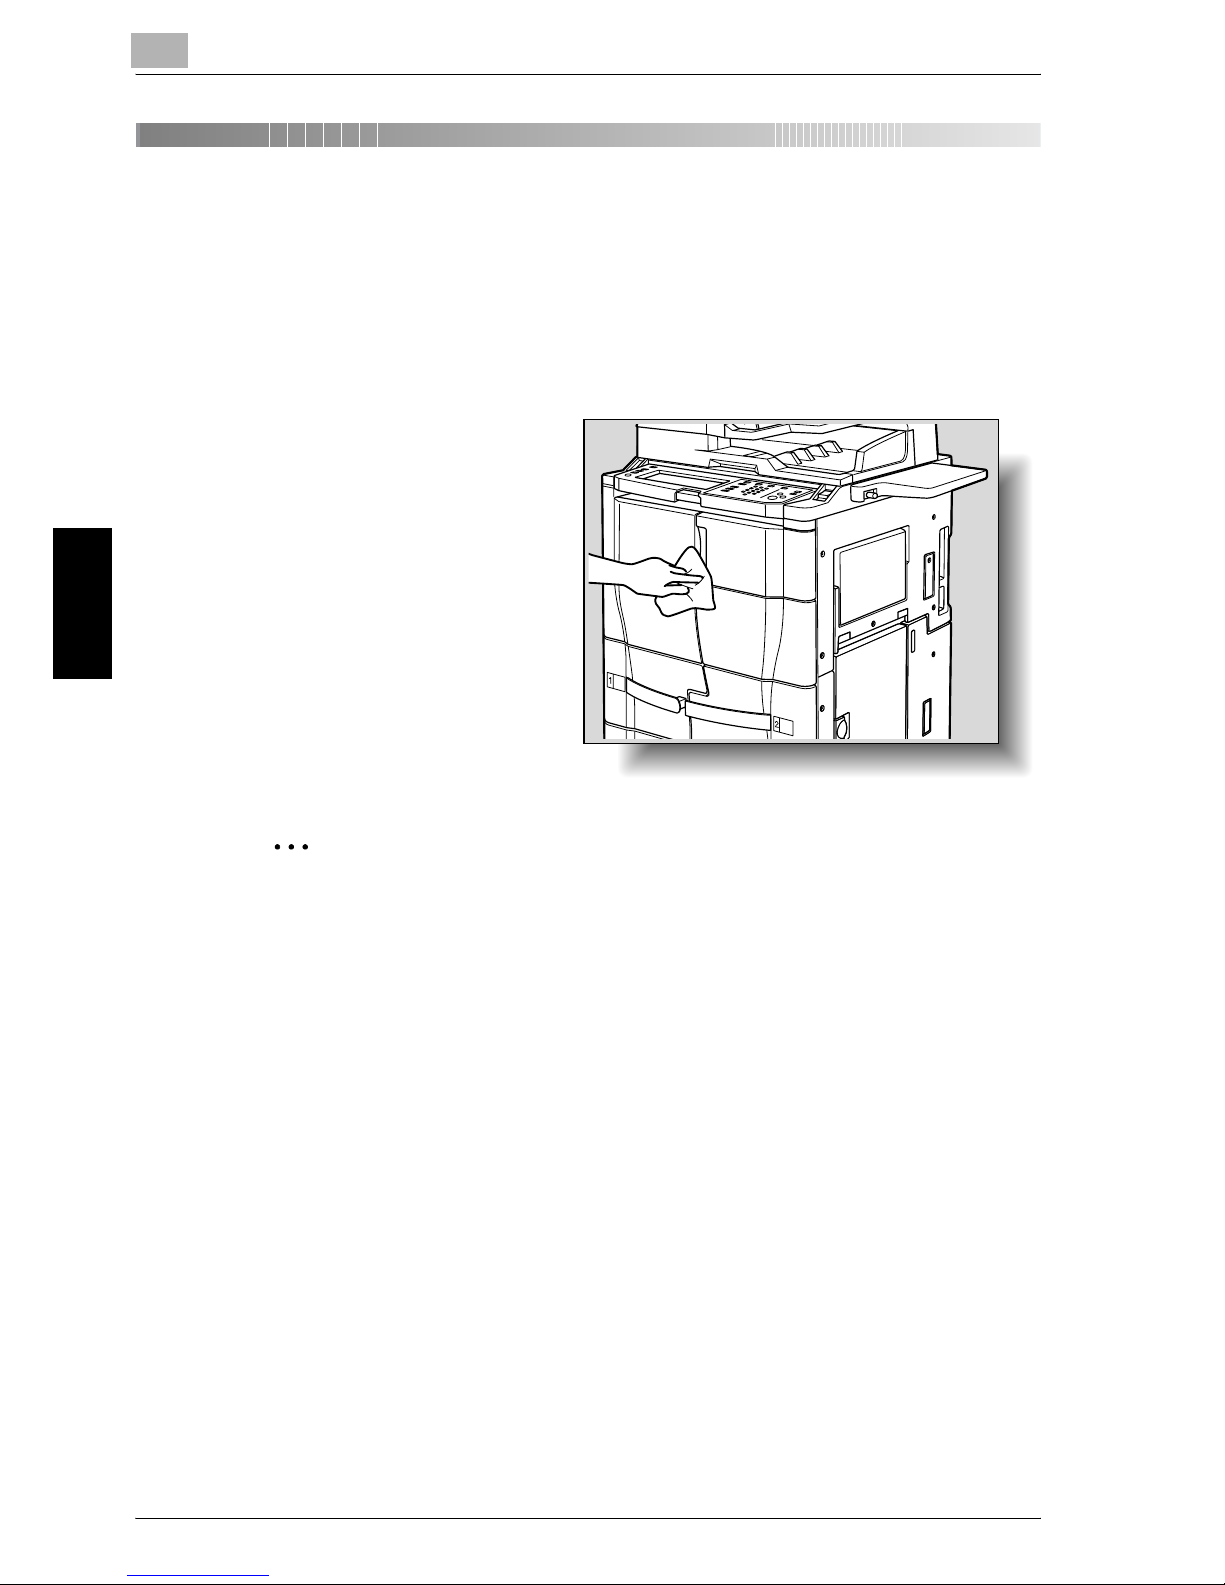
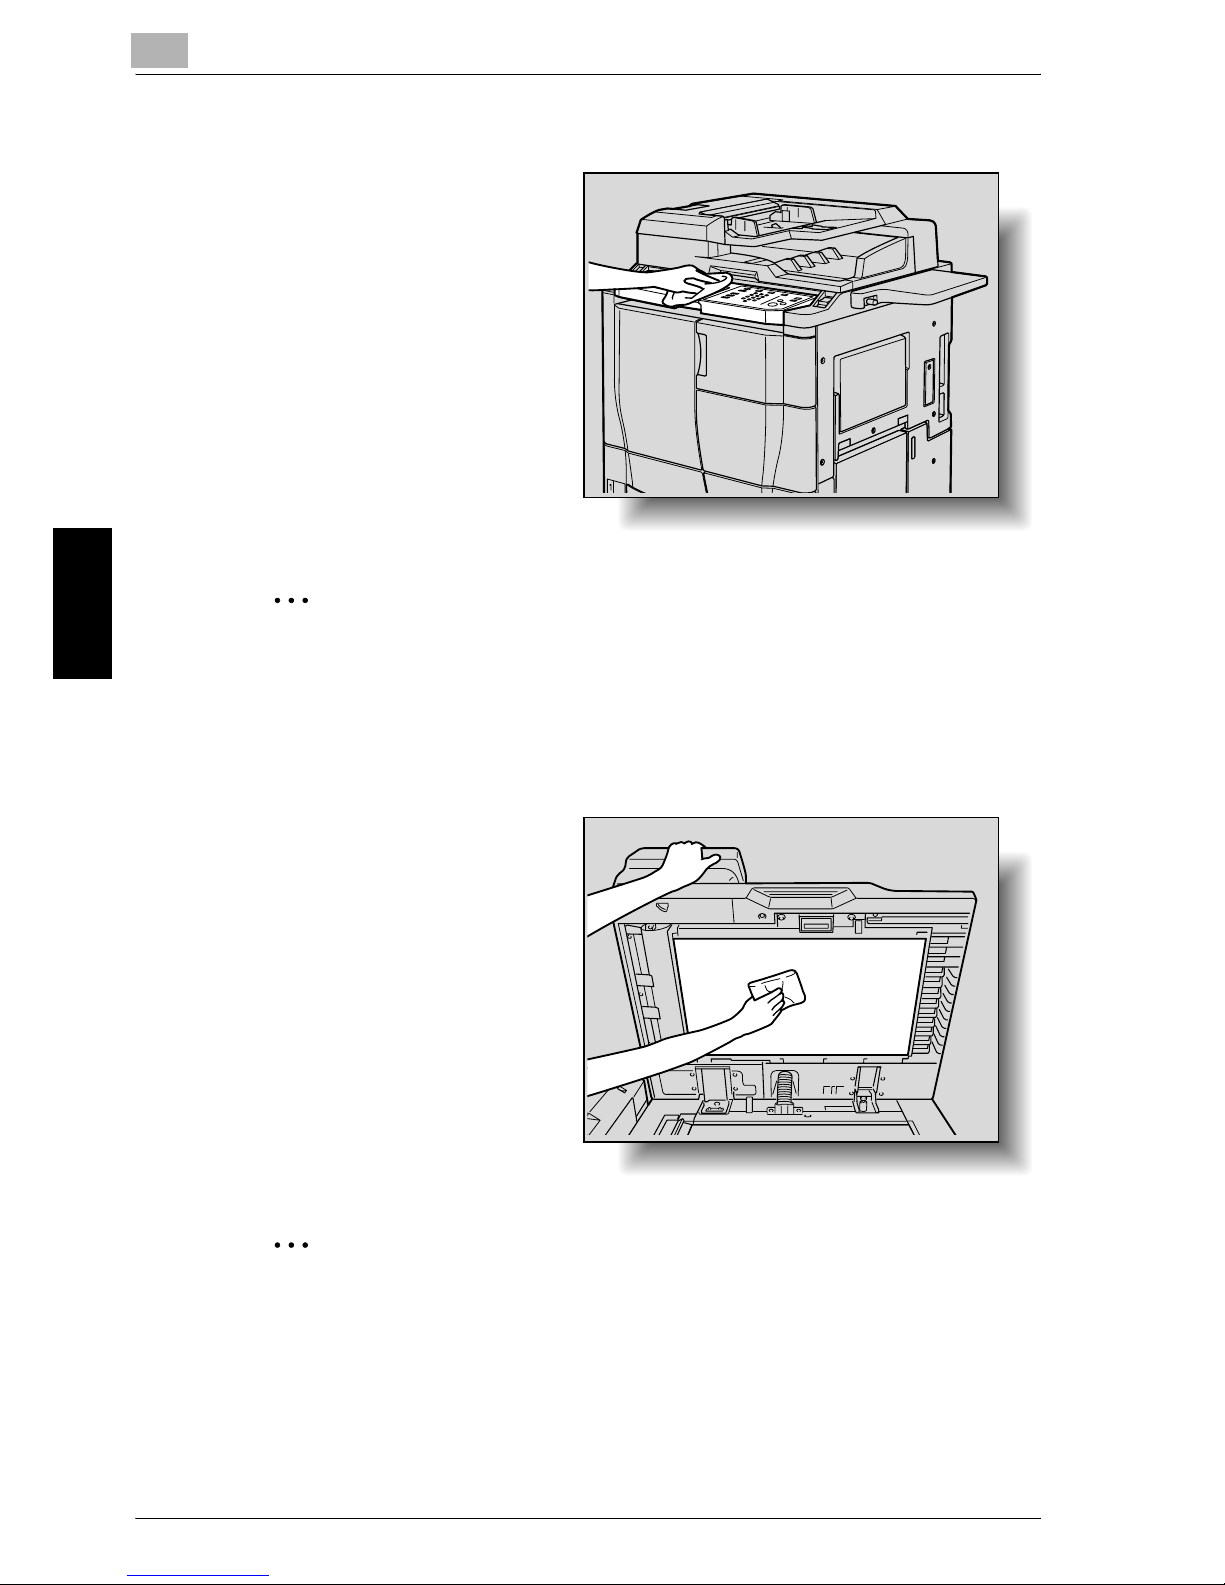
Main body
% Clean the surface of the
main body by wiping it
with a soft cloth dampened with a mild household detergent.
2
Reminder
Be sure to turn off the machine (set the power switch to “o”) before
cleaning it.
Never use solvents, such as benzene or thinner, to clean the main body.
Page 24
Care of the Machine
10
im7520/im6020 10-3
Care of the Machine Chapter 10
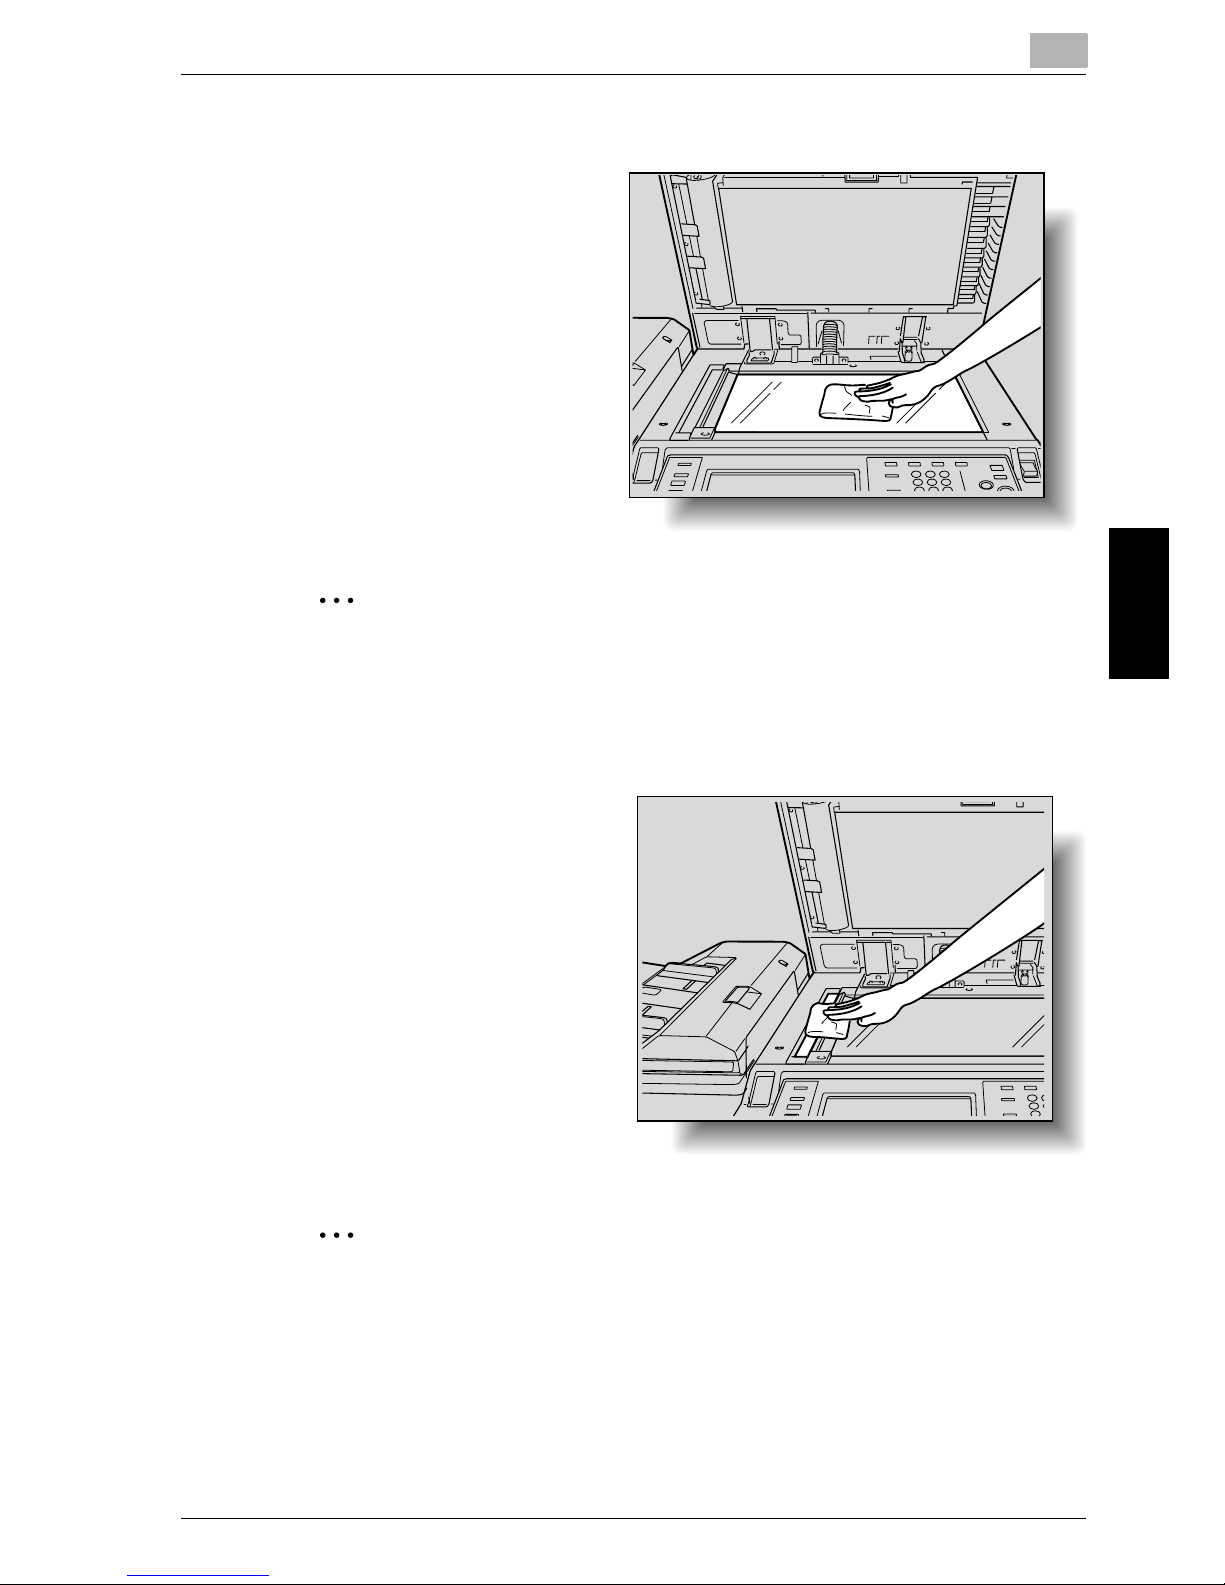
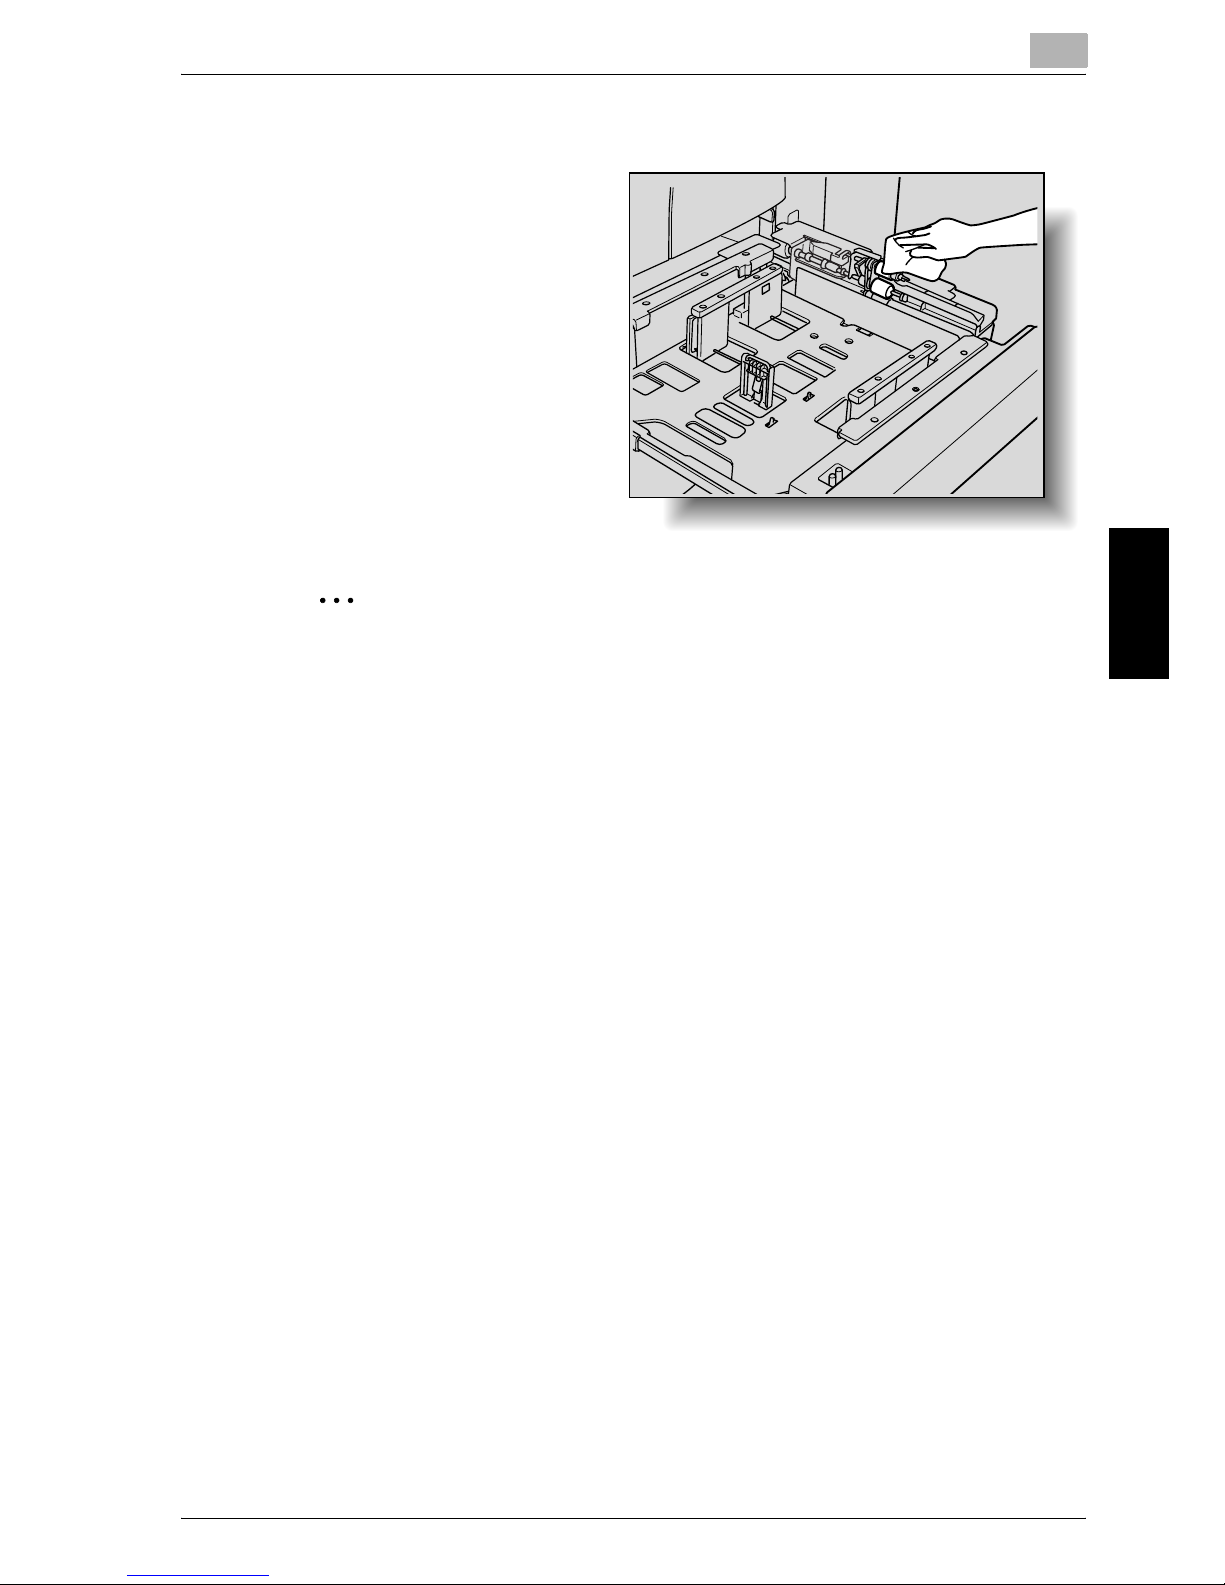
Original Glass
% Clean the surface of the
original glass by wiping it
with a soft, dry cloth.
2
Reminder
Never use solvents, such as benzene or thinner, to clean the original
glass.
Left Partition Glass
% Clean the left partition
glass by wiping it with a
soft, dry cloth.
2
Reminder
Never use solvents, such as benzene or thinner, to clean the left partition
glass.
Page 25
10
Care of the Machine
10-4 im7520/im6020
Care of the Machine Chapter 10
Control Panel
% Clean the control panel
by wiping it with a soft,
dry cloth.
2
Reminder
Pressing too hard on the control panel or the touch panel may damage
them. In addition, never use a mild household detergent, glass cleaner,
benzene or thinner to clean the control panel or touch panel.
ADF platen guide cover
% Clean the ADF platen
guide cover by wiping it
with a soft, dry cloth.
2
Reminder
Never use solvents, such as benzene or thinner, to clean the ADF platen
guide cover.
Page 26
Care of the Machine
10
im7520/im6020 10-5
Care of the Machine Chapter 10
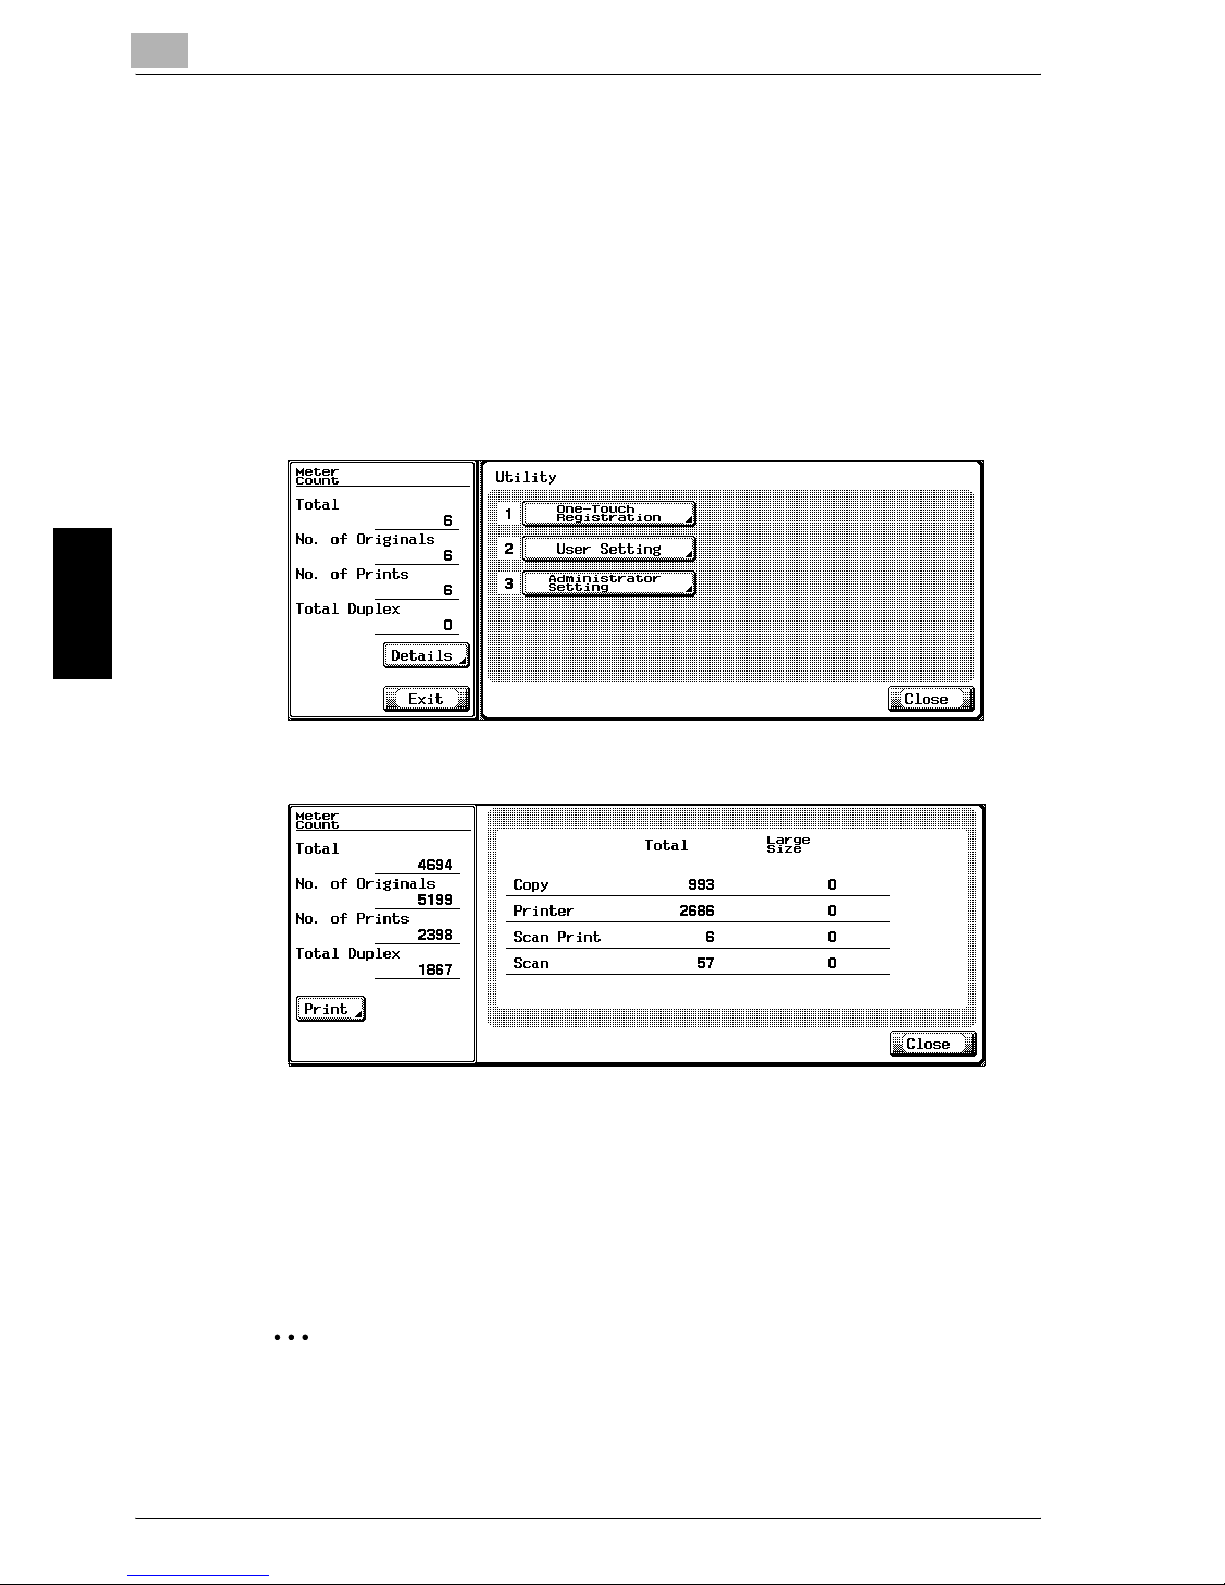
Paper Take-Up Roller
% Clean the paper take-up
rollers by wiping them
with a soft, dry cloth.
2
Reminder
Never use solvents, such as benzene or thinner, to clean the paper takeup roller.
Page 27
10
Care of the Machine
10-6 im7520/im6020
Care of the Machine Chapter 10
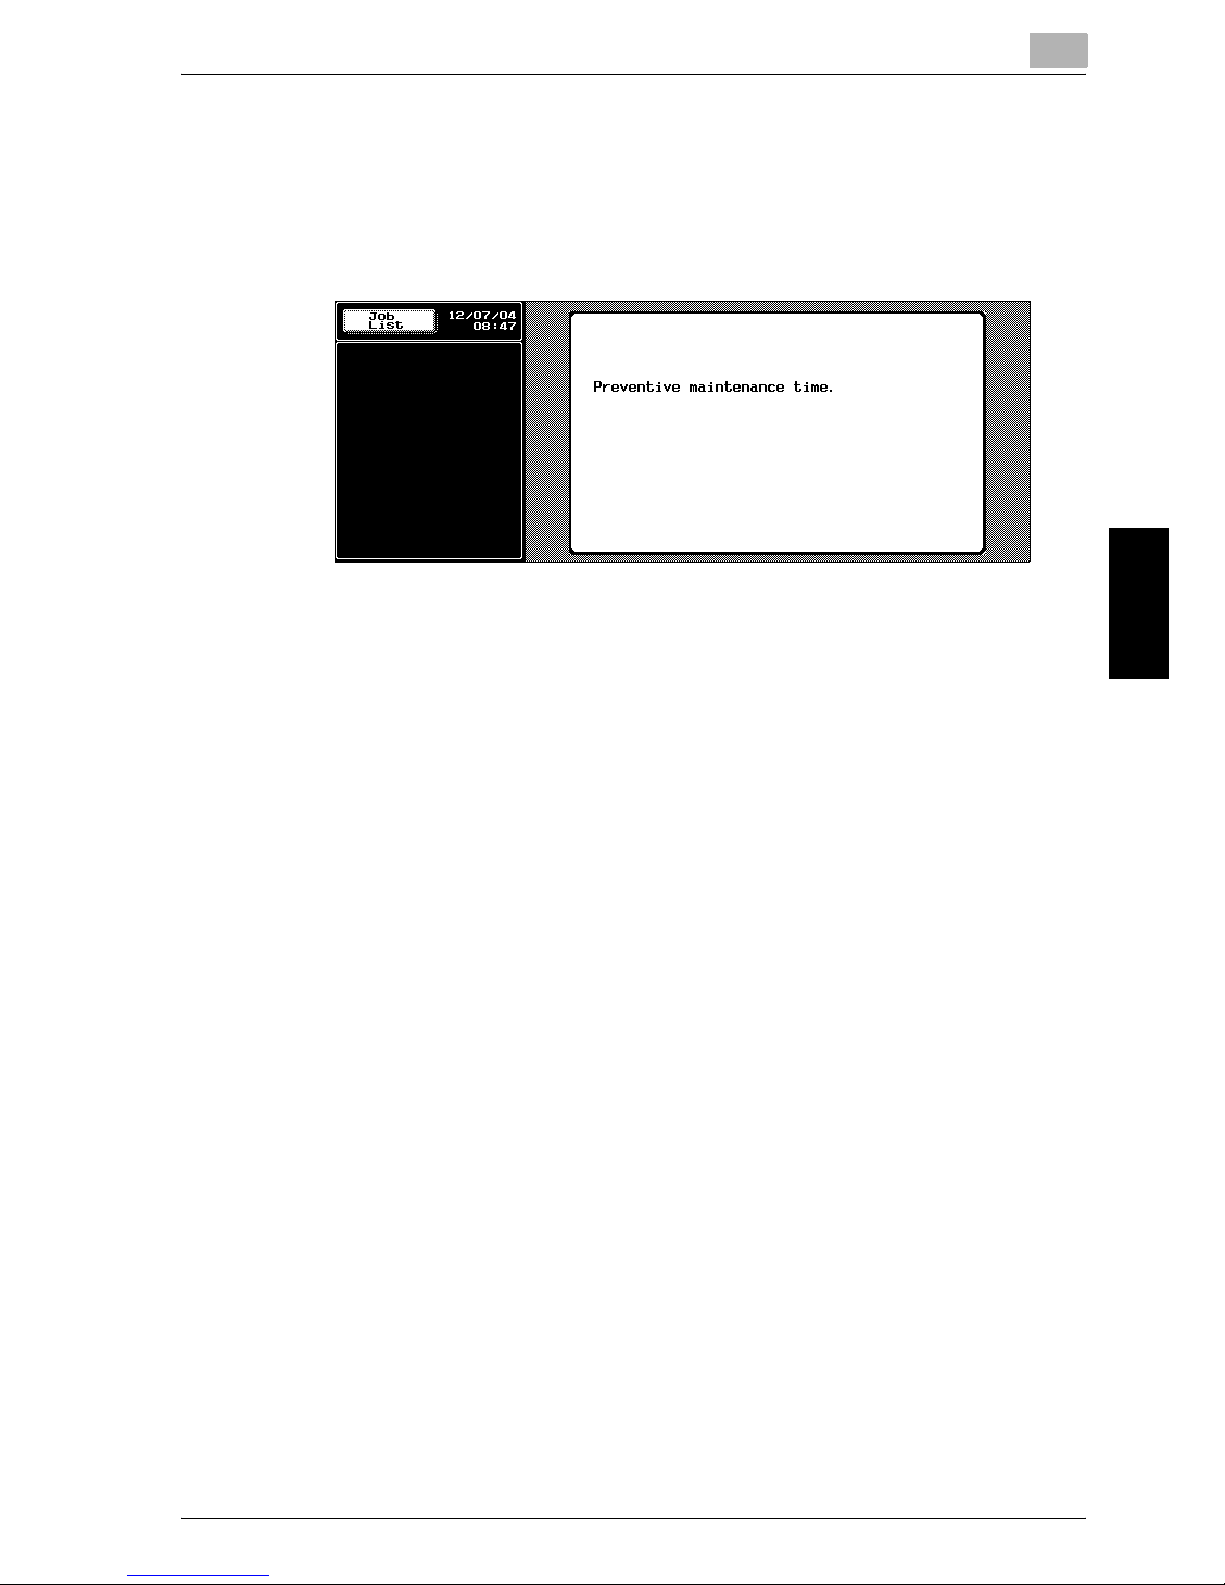
10.2 Viewing Counters (Meter Count)
The Meter Count screen can be displayed so that the total number of prints
since counting started can be viewed.
In addition, the list of counters can be printed.
To view the counters
1 Press the [Utility/Counter] key.
2 Touch [Details] in the sub display area.
The list of counters appears.
?
Can the list of counters be printed?
% To print the list of counters, touch [Print], select the paper size, and
then press the [Start] key.
3 Touch [Close].
The Basic screen appears again.
2
Note
The list of counters can be displayed even while the machine is copying
or printing.
Page 28
Care of the Machine
10
im7520/im6020 10-7
Care of the Machine Chapter 10
10.3 When the Message “Preventive maintenance time.”
Appears
If the message “Preventive maintenance time.” appears, contact your technical representative and request a periodic maintenance inspection.
Page 29

Page 30

11
Managing Jobs (Job List) Chapter 11
Managing Jobs (Job List)
Page 31

11
Managing Jobs (Job List)
11-2 im7520/im6020
Managing Jobs (Job List) Chapter 11
11 Managing Jobs (Job List)
11.1 Overview of the Job List Screen
Jobs
Specifying the desired copy settings, then pressing the [Start] key queues
the copy operation in this machine. This queued operation is called a job. In
the same way, operations for making scans and computer printouts are also
queued as jobs.
- Jobs that are being performed and the job log can be checked from the
Job List screen.
- Jobs are printed starting with the one at the top of the Current Jobs list.
- Jobs are numbered in the order that they were programmed and are
queued to be performed (printed).
2
Note
The job number identifies the job; it does not indicate the printing order.
In addition, the job number does not change until the job is deleted.
By using the “Increase Priority” function, the selected job can be moved
to the front of the queue so that it is printed first.
Multi-Job Feature
Queued jobs are managed by the machine.
- While one job is being printed, another job can be queued. A total of 78
jobs can be queued.
- When one job is finished being printed, the next queued print job auto-
matically begins.
Job List Screens
An overview of the Job List screens is provided below.
- From the Job List screen, the following tabs for various specific functions
can be displayed.
–Print:
Lists print jobs for copying and computer printing
–Scan:
Lists scanner transmission jobs
–RX: User Box
Lists print jobs saved in boxes
Page 32

Managing Jobs (Job List)
11
im7520/im6020 11-3
Managing Jobs (Job List) Chapter 11
The screen for each function listed above can be displayed from any other
Job List screen. However, if a different tab is selected while a job setting is
being changed, that setting is canceled.
- A Current Jobs list and a Job History list can be displayed for each func-
tion.
– Current Jobs:
Lists jobs that are queued and being performed, allowing you to check
the current status of the machine.
– Job History:
Lists jobs that have been completed, including jobs that were not performed due to an error, allowing you to check the history and results of
all jobs.
- The type of jobs to be displayed can be selected from the Current Jobs
list and Job History list. For example, the lists of stored jobs and active
jobs are displayed in the Current Jobs list on the Print tab, and the lists
of deleted jobs, completed jobs and all jobs are displayed in the Job History list. The types of jobs that can be selected differ depending on the
selected tab.
- The function of each button in the Job List screens is described below.
A selected button indicates which job list is currently displayed. [Held
Jobs], [Active Jobs], [Increase Priority], [Delete], and [Check Job] appear
in the Current Jobs list on the Print tab.
Page 33

11
Managing Jobs (Job List)
11-4 im7520/im6020
Managing Jobs (Job List) Chapter 11
Name Description
[Print] Displays the Print tab of the Job List screen.
[Scan] Displays the Scan tab of the Job List screen.
For more details, refer to the Network scanner volume
of the im7520/im6020 User’s Guide.
[RX/User Box] Displays the RX/User Box tab of the Job List screen.
For more details, refer to the Facsimile Operations of
the im7520/im6020 User’s Guide.
[Current Jobs] Switches from Job History to Current Jobs.
This lists the jobs that are currently being performed
and the jobs are queued (waiting) to be performed.
[Job History] Switches from Current Jobs to Job History.
This lists the completed jobs.
[Held Jobs]
[Active Jobs]
Specifies the type of jobs displayed in the Job List
screen.
Change the display mode by touching the appropriate
button.
The buttons that appear differ depending on the tab or
list (Current Jobs or Job History) that is displayed.
[Exit] Quits Job List mode and returns to the screen that was
displayed before [Job List] was touched.
[Delete] Deletes job selected in the Current Jobs list. For
details, refer to “To delete a job” on page 11-6.
[Increase Priority] Selects the next job to be printed after the current job
is finished. For details, refer to “To increase priority for
printing” on page 11-18.
The buttons that appear differ depending on the tab or
list (Current Jobs or Job History) that is displayed.
[Check Job] Displays screens for checking the settings for the job
selected in the Current Jobs list. For details, refer to
“To check the job settings” on page 11-8.
[Detail] Displays screens for checking the status, results, error
details, user name, queued time, completed time and
number of copies for jobs in the job lists. For details,
refer to “Displayed Information” on page 11-9.
[ ]/[ ] When there are more jobs than the five that can be
displayed at one time, touch these arrows to display
jobs higher or lower in the list (higher or lower in the
printing order).
Page 34

Managing Jobs (Job List)
11
im7520/im6020 11-5
Managing Jobs (Job List) Chapter 11
The following information is listed in the Print tab.
Item Name Description
No. Job identification number assigned when the job is queued.
User Name Displays the type (source) of the job. “COPY” is displayed for
copy jobs.
Status Displays the status of the job.
Original Name Displays the name of the file for print jobs sent from a compu-
ter.
If user authentication settings have been applied, the names
of original are not displayed.
The names of confidential original are not displayed for other
users.
Time Stored Displays the time that the job was queued.
# of Pgs. Displays the number of pages in the original.
# of Sets Displays the specified number of pages to be printed.
Result (Job History list only) Displays the result of the operation (Job Complete, Error
Cleared, Deleted by User, Mode cancelled from conflict)
Page 35

11
Managing Jobs (Job List)
11-6 im7520/im6020
Managing Jobs (Job List) Chapter 11
11.2 Performing Operations on Jobs
To delete a job
A queued job or job being printed (job in the Active Jobs list) can be deleted.
1 In the Basic screen, touch [Job List].
The Job List screen appears.
2 In the Print tab, display the job to be deleted.
– Jobs in the Job History list cannot be deleted.
3 Select the job to be deleted, and then touch [Delete].
– If the job to be deleted is not displayed, touch [ ] and [ ] until
the desired job is displayed.
– If an incorrect job was selected, select a different job or touch the
button for the selected job again to deselect it.
A message requesting confirmation to delete the job appears.
Page 36

Managing Jobs (Job List)
11
im7520/im6020 11-7
Managing Jobs (Job List) Chapter 11
4 Check the information that is displayed, and then touch [Yes].
– To quit deleting the job, touch [No].
The job is deleted from the Current Jobs list and the Job List screen
appears again.
5 Touch [Exit] or press the [Reset] key.
The screen that was displayed before [Job List] was touched appears
again.
2
Note
If user authentication settings have been applied and the machine is set
so that jobs cannot be deleted by other users, the job is not deleted.
Page 37

11
Managing Jobs (Job List)
11-8 im7520/im6020
Managing Jobs (Job List) Chapter 11
To check the job settings
Job settings for stored jobs, jobs being printed, jobs queued to be printed
and held jobs can be checked.
1 In the Basic screen, touch [Job List].
The Job List screen appears.
2 Display the list containing the job whose settings are to be checked.
3 Select the job whose settings are to be checked, and then touch
[Check Job].
– If an incorrect job was selected, select a different job or touch the
button for the selected job again to deselect it.
– The Check Job Details screen appears.
– The contents and number of Check Job Details screens differ de-
pending on the job that was selected.
– The number to the left of [←Back] indicates the number of the cur-
rently displayed screen/the total number of screens.
– To display the previous screen, touch [←Back]. To display the next
screen, touch [Fwd.→].
4 To finish checking the settings, touch [Close] or [Exit], or press the [Re-
set] key.
– To return to the Job List screen, touch [Close].
– To return to the Basic screen, touch [Exit] or press the [Reset] key.
Page 38

Managing Jobs (Job List)
11
im7520/im6020 11-9
Managing Jobs (Job List) Chapter 11
Displayed Information
The following information can be checked from the Job List screen.
- Print tab
Status (Receiving, Waiting, Printing, Printing Stopped, Print Error, Job
Stored, Deleting)
*1
, Result (Job complete, Error cleared, Deleted by User,
Deleted Due To Error)*2, Error Detail*2, Document Name, User Name,
Start Time, # of pgs., # of Sets, Output Tray
- Scan tab
Status (Transferring)
*1
, Result (Job complete, Error cleared, User
Delete,)
*2
, Error Detail*2, Address, Type, User Name, TX No., Time of
Storage, # of pgs., File Name, No. of Dest (number of jobs being sent/
number of specified recipients)
*3
- RX/User Box tab
Status (Receiving, Waiting, Printing, Printing Stopped, Print Error, Memory Storage)*1, Result (Job complete, Error cleared, User Delete, Deleted
Due To Error)
*2
, Error Detail*2, RX User Box (box number/box name), User
Name, Time Stored, # of pgs., # of Sets, Output Tray, File Name
*1
Displayed only for jobs in the Current Jobs list
*2
Displayed only for jobs in the Job History list
*3
Displayed only for Current Jobs transmitted to multiple recipients
Page 39

11
Managing Jobs (Job List)
11-10 im7520/im6020
Managing Jobs (Job List) Chapter 11
To check the job details
1 In the Basic screen, touch [Job List].
The Job List screen appears.
2 Display the list containing the job whose details are to be checked.
3 Select the job whose details are to be checked, and then touch [Detail].
– If an incorrect job was selected, select a different job or touch the
button for the selected job again to deselect it.
The Check Detail screen appears.
4 After the desired information has been checked, touch [Close] or [Exit]
or press the [Reset] key.
– To return to the Job List screen, touch [Close].
– To return to the Basic screen, touch [Exit] or press the [Reset] key.
!
Detail
To delete a queued job or job being performed, touch [Delete] in the
Check Detail screen.
Page 40

Managing Jobs (Job List)
11
im7520/im6020 11-11
Managing Jobs (Job List) Chapter 11
To display Current Jobs (Held Jobs and Active Jobs lists)
The lists of received print jobs for Copy mode and for computer printing is
displayed.
1 In the Basic screen, touch [Job List].
The Job List screen appears.
2 Touch [Held Jobs] or [Active Jobs] to display the desired list of jobs.
– Held Jobs: Displays only stored jobs
– Active Jobs: Displays only jobs that are being performed
The current list of jobs of the selected type is displayed.
!
Detail
For details on the function of each button, refer to “Job List Screens” on
page 11-2.
To print a single sample copy of a stored job, touch [Proof Print] in the
Held Jobs list. For more details, refer to “To print a sample copy of a
stored job” on page 11-13.
To print the stored job, touch [Release Held Job] in the Held Jobs list. For
more details, refer to “To print a stored job” on page 11-15.
To give priority for output to a job, touch [Increase Priority] in the Active
Jobs list. For more details, refer to “To increase priority for printing” on
page 11-18.
Page 41

11
Managing Jobs (Job List)
11-12 im7520/im6020
Managing Jobs (Job List) Chapter 11
To display Job History
1 In the Basic screen, touch [Job List].
The Check Job screen appears.
2 Touch [Job History].
The Job History screen appears.
3 Touch [Deleted Jobs], [Finished Jobs], or [Active Jobs] to display the
desired list of jobs.
– Deleted Jobs: Displays only jobs that were deleted before they
were finished
– Finished Jobs: Displays only jobs that were correctly completed
– Active Jobs: Displays all jobs
The history of jobs of the selected type is displayed.
Page 42

Managing Jobs (Job List)
11
im7520/im6020 11-13
Managing Jobs (Job List) Chapter 11
To print a sample copy of a stored job
A single copy of a stored job can be printed in order to be checked.
The Held Jobs list contains jobs such as those for which a proof copy was
being printed when the automatic panel reset operation was performed and
proof print jobs for data in the boxes.
1 Display the Held Jobs list in the Current Jobs list of the Print tab.
2 Touch [Release Held Job].
The Release Held Job screen appears.
3 From the job list, select the job whose sample copy is to be printed,
and then touch [Proof Print].
– If the job that you wish to proof is not displayed, touch [ ] and
[ ] until the desired job is displayed.
– If an incorrect job was selected, touch the button for the selected
job again to deselect it.
?
How is the printing of a sample copy stopped?
% Touch [Stop].
4 Touch [OK].
– After the single sample copy is printed, check the print result.
Page 43

11
Managing Jobs (Job List)
11-14 im7520/im6020
Managing Jobs (Job List) Chapter 11
– To exit the Release Held Job screen and return to the Active Jobs
list in the Current Jobs list, touch [Cancel].
!
Detail
To change the settings, touch [Change setting] in the Release Held Job
screen. For details, refer to “To print a stored job” below.
Page 44

Managing Jobs (Job List)
11
im7520/im6020 11-15
Managing Jobs (Job List) Chapter 11
To print a stored job
A job is removed from the Held Jobs list and printed. In addition, settings for
the stored job can be changed.
1 Display the Held Jobs list in the Current Jobs list of the Print tab.
2 Touch [Release Held Job].
The Release Held Job screen appears.
3 Select the job to be removed from the Held Jobs list.
– If the job to be removed from the Held Jobs list is not displayed,
touch [ ] and [ ] until the desired job is displayed.
– If an incorrect job was selected, select a different job or touch the
button for the selected job again to deselect it.
– To quit removing a stored job, touch [Cancel].
– To change the specified copy settings, continue with step 4.
– To continue without changing the specified copy settings, skip to
step 8.
4 Touch [Normal Print].
[Change Setting] appears.
Page 45

11
Managing Jobs (Job List)
11-16 im7520/im6020
Managing Jobs (Job List) Chapter 11
5 Touch [Change Setting].
The Change Setting screen appears.
6 Touch the button for the copy setting that you wish to change.
– To change a value, press the [C] (clear) key, and then use the key-
pad to type in the new value.
– To cancel changes to the settings, touch [Cancel].
The screen for the selected copy setting appears.
?
Can the copy settings be changed?
% The following copy settings can be specified after a sample copy is
printed.
# of Sets, 1-Sided/2-Sided, Finishing, Folding, Page Margin,
Stamp/Overlay, Cover Mode, Insert Sheet, Chapters
Page 46

Managing Jobs (Job List)
11
im7520/im6020 11-17
Managing Jobs (Job List) Chapter 11
7 The screen for the selected copy setting change the copy settings as
desired, and then touch [OK].
?
Is there more information about the settings?
% Refer to the appropriate section.
?
Can a sample copy be printed?
% For details on printing a sample copy, refer to “To print a sample
copy of a stored job” on page 11-13.
8 In the Release Held Job screen, touch [OK].
The stored job appears in the Active Jobs list and is printed.
?
How is the removal of a job from the Held Jobs list stopped?
% Touch [Cancel].
Page 47

11
Managing Jobs (Job List)
11-18 im7520/im6020
Managing Jobs (Job List) Chapter 11
To increase priority for printing
The next job to be printed after the current job being printed can be selected.
If an Administrator mode function was set so that the output priority of jobs
cannot be changed, [Increase Priority] does not appear and the output priority of the jobs cannot be specified.
If the job currently being printed can be interrupted, printing is interrupted
and printing of the job given priority begins. Printing of the interrupted job is
automatically restarted once printing for the job given priority is finished.
If the job currently being printed cannot be interrupted (a job has already
been interrupted or a job was already given priority), printing is interrupted
after printing for the current job is finished.
1 Display the Active Jobs list in the Current Jobs list of the Print tab.
2 Touch [Increase Priority].
The Increase Priority screen appears.
3 In the job list, touch the button for the job to be given priority to select
it, and then touch [OK].
– If the job to be given priority is not displayed, touch [ ] and [ ]
until the desired job is displayed.
– If an incorrect job was selected, select a different job or touch the
button for the selected job again to deselect it.
Page 48

Managing Jobs (Job List)
11
im7520/im6020 11-19
Managing Jobs (Job List) Chapter 11
The selected job moves to the top of the list and printing of the job begins.
?
How is the changing of the output priority stopped?
% Touch [Cancel].
Page 49

Page 50

12
Utility Chapter 12
Utility
Page 51

12
Utility
12-2 im7520/im6020
Utility Chapter 12
12 Utility
12.1 Overview of Utility Mode
List of Registration Information
This section describes the buttons available when the [Utility/Counter] key is
pressed.
2
Note
The buttons that appear in the screens differ depending on the specified
settings. For details on buttons marked with * or **, refer to page 12-37.
For details on displaying buttons marked with ***, contact your technical
representative.
Utility/Counter
One-Touch Registration (p. 12-11)
[1] Scan
(
p. 12-11
)
[1] Address
Book
[1] E-Mail
[2] FTP
[3] SMB
[4] User Box
[2] Group
[3] Program
[4] Subject/Text
(for E-mail)
[1] Subject
[2] Text
[3] User Box
(p. 12-11)
[1] Public/Personal User Box
User Setting
(p. 12-14)
[1]
System Set-
ting
(
p. 12-14
)
[1] Language
Selection
[2] Measurement
Unit Setting
[3] Paper Tray
Setting
[1] Paper Type Paper Type
Paper Size
[2] Auto Tray
Select Setting
Page 52

Utility
12
im7520/im6020 12-3
Utility Chapter 12
User Setting (Cont.)
[1]
System Set-
ting (Cont.)
[3] Paper Tray
Setting (Cont.)
[3] Auto Tray
Switch ON/OFF
[4] No Matching Paper in Tray Setting
[5] Print Lists
[4] Reset
Setting
[1] System
Auto Reset
[2] Auto Reset
[3] Job Reset When Account
is changed
When Original is
set on ADF
When NEXT
JOB is selected
Staple Setting
Original Set/
Bind Direction
Reset Data After
Job
[5]
LCD
Backlight
Setting
*
[6] Power Save
Setting*
Low Power
Mode Setting*
Sleep Mode
Setting*
[7] Output
Setting**
[1]
Print/Fax
Output Setting**
Print**
[2] Exit Tray
Setting**
[8] Data / Time
Setting**
[9]
Daylight Saving
Time Setting**
[0] Original Image Density
**
[2] Display Setting (p. 12-19)
[1] Sub Screen
Display ON/OFF
[2]
Scan Basic
Screen Default Seeing
Default Tab
Program
Default
Address Book
Default Index
Address Type
Symbol Display
[4] Copy Screen Copy Operat-
ing Screen
[3] Initial Setting
(p. 12-20)
Page 53

12
Utility
12-4 im7520/im6020
Utility Chapter 12
User Setting (Cont.) [4] Copier Set-
ting (
p. 12-21)
Auto Booklet ON
When Fold & Staple
Auto Zoom for
Combine/Booklet
Sort/Group
Auto Change
Auto
Zoom (Platen)*
Auto Zoom
(ADF)*
Select Tray
when APS OFF*
Select Tray for
Insert Sheet*
Exit Direction Of 1
Sheet (Platen)*
Tri-Fold Printed
Side Selection*
Print Jobs During
Copy Operation**
[5] Scanner Setting (p. 12-23)
Black Compression
Level
[6] Printer Setting (p. 12-23)
[1] Basic Setting PDL Setting
Number of
Sets
Original
Direction
Spool Print
Jobs in HDD
before RIP
A4/A3 ↔ LTR/
LGR Auto Switch
Banner Setting
Admin. Number
Text Density
[2] Paper
Setting
Paper Tray
Default Paper
Size
2-Sided Print
Bind Direction
Staple
Hole-Punch
Banner Paper
Tray
Page 54

Utility
12
im7520/im6020 12-5
Utility Chapter 12
User Setting (Cont.) [6] Printer Set-
ting (Cont.)
[3] PCL Setting [1] Typeface
[2] Symbol Set
[3] Font Size
[4] Line/Page
[5] CR/LF
Mapping
[4] PS Setting PS Error Print
[5] Print Reports Configuration
Page
Demo Page
PCL Font List
PS Font List
Administrator Setting
(p. 12-26)
[1] System Setting (p. 12-26)
[1] Power Save
Setting
Low Power
Mode Setting
Sleep Mode
Setting
Power Save
Key
[2] Output
Setting
[1] Print/Fax Output Settings
Print
[2] Exit Tray
Setting
[3] Date/Time
Setting
[4] Daylight Setting Time Setting
[5] Weekly
Timer Setting
[1] Weekly Timer
ON/OFF Setting
[2] Time
Setting
[3] Date Setting
[4] Select Time
for Power Save
[5]
Password for
Non-Business Hours
[6] Restrict User
Access
[1]
Restrict Access to
Saved Program Jobs
[2]
Delete Saved
Program Jobs
[3]
Restrict Access
to Job Settings
Changing Job
Priority
Deleting Other
User’s Jobs
Page 55

12
Utility
12-6 im7520/im6020
Utility Chapter 12
Administrator Setting
(Cont.)
[1] System Setting (Cont.)
[6] Restrict User
Access (Cont.)
[3]
Restrict Access
to Job Settings
(Cont.)
Registering and
Changing Addresses
Changing Zoom
Ratio
[7] Expert
Adjustment
[1] Original Image Density
[2] Erase Adjustment
Non Image Area
Erase
Non Image Area
Erase Setting
ADF Frame
Erase
[3] Printer
Adjustment
[1] Leading Edge
Adjustment
[2] Centering
[3]
Vertical
Adjustment***
[4] Horizontal
Adjustment***
[4] 2-Side Size
Adjustment
[5] Finisher
Adjustment
[1] Center
Staple Position
[2] Half-Fold
Position
[3] Punch Adjustment
[1] Punch Vertical Position
[2] Punch Horizontal Position
[3] Punch Unit
Vert. Position
[4] Punch Unit
Hor. Position
[5] Punch Resist
Loop Size
[4] Z-Fold Position Adjustment
[1] 1st Z-Folded
Position
[2] 2nd Z-Folded Position
[5] Tri-Fold
Position
[6] 2 Position
Staple
[7] Cover Sheet
Tray Size
[6] Scanner
Adjustment***
[1]
Leading Edge
Adjustment***
[2] Centering***
Page 56

Utility
12
im7520/im6020 12-7
Utility Chapter 12
[3] Vertical Adjustment***
[7] ADF
Centering***
Administrator Setting
(Cont.)
[1] System Setting (Cont.)
[8] List/Counter [1] Manage-
ment List
Job Settings
List
[2] Paper Size/
Type Counter
[9] LCD Backlight Setting
[0] Standard
Size Setting
Original Glass Original Size Detect
ADF Original
Size Detect
Original Glass
Small Size Detect
Original Size Detect Change 1 ***
Original Size Detect Change 2 ***
Original Size Detect Change 3 ***
Foolscap Size
Setting***
8K/16K Select
***
[2] Administrator/
Machine Setting
(p. 12-32)
[1] Administrator Registration
[2] Input Machine Address
[3] One-Touch
Registration
(p. 12-32)
[1] Scan [1] Address
Book
[1] E-Mail
[2] FTP
[3] SMB
[4] User Box
[2] Group
[3] Program
[4] Subject/
Text (for E-mail)
[1] Subject
[2] Text
[3] User Box [1] Public/Per-
sonal User Box
[4] One-Touch
Registration List
[1] Address
Book List
Page 57

12
Utility
12-8 im7520/im6020
Utility Chapter 12
[2] Group List
[3] Program
List
Administrator Setting
(Cont.)
[3] One-Touch
Registration
(Cont.)
[4] One-Touch
Registration List
(Cont.)
[4] E-Mail Subject/Text List
[4] User Authentication/Account
Track
(p. 12-33)
[1] General Settings
[2] User Authentication Setting
[1] Administrative Setting
User Name List
Default Function Permission
[2] User
Registration
[3] User
Counter
[3]
Account Track
Setting
[1] Account Track
Registration
[2] Account
Track Counter
[4] Print without
Authentication
[5] Counter List
[5] Network Setting (p. 12-35)
[1] Network Setting
[2] TCP/IP
Setting
[3] NetWare
Setting
[4] IPP Setting
[5] FTP Setting
[6] SMB Setting
[7] AppleTalk
Setting
[8] LDAP
Setting
[1] Enabling
LDAP
[2] Setting Up
LDAP
[9] E-Mail
Setting
[1] E-Mail TX
(SMTP)
[2] E-Mail RX
(POP)
[0] Detail
Setting
[1] Device
Setting
Page 58

Utility
12
im7520/im6020 12-9
Utility Chapter 12
[2] Time Adjustment Setting
[3] Status Notification Setting
[1] Notification
Address Setting
Administrator Setting
(Cont.)
[5] Network Setting (Cont.)
[0] Detail
Setting (Cont.)
[3] Status Notification Setting
(Cont.)
[2] Notification
Item Setting
[3] Notification
Time Setting
[4] PING Confirmation
[5] PSWC
Setting
[6] SLP Setting
[7] LPD Setting
[8] SNMP
Setting
[9] Prefix/Suffix
Setting
[1] ON/OFF
Setting
[6] Copier Setting (p. 12-35)
Auto Zoom
(Platen)
[2] Prefix/Suffix
Setting
Auto Zoom
(ADF)
Select Tray when
APS OFF
Select Tray for
Insert Sheet
Exit Direction Of
1 Sheet(Platen)
Tri-Fold Printed
Side Selection
Print Jobs During
Copy Operation
[7] Printer Setting (p. 12-36)
[1] Local I/F
Timeout
[8] System
Connection
(
p. 12-37
)
[1] IS OpenAPI
Setting
Access Setting
Port No.
Authentication
[9] Security Setting (p. 12-37)
[1] Administrator Password
[2] User Box
Admin. Setting
[3] Administrator
Security Level
[4] Security
Details
Password
Rules
Page 59

12
Utility
12-10 im7520/im6020
Utility Chapter 12
Manual Destination Input
Administrator Setting
(Cont.)
[9] Security Setting (Cont.)
[4] Security
Details (Cont.)
Print Data
Capture
[5] HDD Setting [1] Check HDD
Capacity
[2] Delete Unused User Box
[3]
Delete Secure
Print Documents
[5] Overwrite
All Data
[6] HDD Lock
Password
Page 60

Utility
12
im7520/im6020 12-11
Utility Chapter 12
12.2 Selecting a Destination Register
This section describes the main parameters and operations that can be performed after pressing the [Utility/Counter] key, then touching [1 One-Touch
Registration].
One-Touch Registration
2
Note
If user authentication has been set to “ON”, [1 One-Touch Registration]
does not appear when no user has logged on. However, after a user has
logged on, [1 One-Touch Registration] appears.
User Box
2
Note
[3 User Box] appears only if the hard disk drive is installed.
Parameter Description
Address Book Register recipients for scanning. For details, refer to the
Network Scanner Operations of the im7520/im6020 User’s
Guide.
Group
Program
Subject/Text (for E-mail)
Parameter Description
Public/Personal User Box Register recipients for boxes. For details, refer to the Box
Operations of the im7520/im6020 User’s Guide.
Page 61

12
Utility
12-12 im7520/im6020
Utility Chapter 12
Displaying the Destination Register Screen
The following procedure describes how to display the One-Touch Registration Screen.
1 Press the [Utility/Coun-
ter] key.
2 Touch [1 One-Touch Registration].
– An item can also be selected by pressing the key in the keypad for
the number beside the desired button.
For “One-Touch Registration” press the [1] key in the keypad.
The One-Touch Registration screen appears.
Utility/Counter
Page 62

Utility
12
im7520/im6020 12-13
Utility Chapter 12
2
Note
To quit specifying the Utility mode setting, touch [Exit] in the sub display
area or press the [Utility/Counter] key. Otherwise, cancel the Utility mode
by touching [Close] in each screen until the screen for the Copy, Scan or
Box mode appears.
Page 63

12
Utility
12-14 im7520/im6020
Utility Chapter 12
12.3 Specifying User Settings
This section describes the main parameters and operations that can be performed after pressing the [Utility/Counter] key, then touching [2 User Setting].
System Setting
Language Selection
Measurement Unit Setting
Paper Tray Setting
Description Settings (Default set-
tings are underlined.)
Select the language of the Touch Panel messages. English
/French/Spanish/
Japanese
Description Settings (Default set-
tings are underlined.)
Select one of the measurement units in which values are displayed
in the touch panel.
mm (Numerical Value)/
inch (Numerical Value)/
inch (Fraction)
Parameter Description Settings (Default set-
tings are underlined.)
Paper
Type
Paper
Type
Select one of the types for paper loaded
into each paper tray.
Normal
/ Thick Paper/
Thin Paper/ Custom 1/
Custom 2/
Custom 3/ Tab Paper/
Recycled/ Colored Paper/Special Paper/ Fine/
Label/ Letterhead
Paper Size Select one of the following sizes for pa-
per loaded into the tray 3 and 4.
• Standard Size 1: The size of standardsized paper is automatically detected.
• Standard Size 2: Select when loading
paper of the following sizes: A4 w , A5
v, F4.
• Custom Size: Select when using custom-sized paper.
• Oversized Paper: Select when paper
larger than a standard size is being
used.
Standard Size 1/
Standard Size 2/
Custom Size/
Oversized Paper
Page 64

Utility
12
im7520/im6020 12-15
Utility Chapter 12
2
Note
To load paper of a different size into the tray 1 and 2 and the LCT, contact
your technical representative.
Auto Tray Select Setting Select the paper trays that are selected
automatically when the “Auto Paper Select” setting is specified or when the automatic tray switching operation is
performed.
• Auto Tray Select: Specify the paper
trays that are selected automatically
with the “Auto Paper Select” setting.
• Tray Priority: Specify the order that
paper trays are selected when the automatic tray switching operation is
performed. The available paper trays
are those selected when the “Auto
Tray Select” setting is set.
-
Auto Tray Switch ON/
OFF
Select whether or not a paper tray loaded with paper of the same size is selected automatically when a paper tray
becomes empty while printing copies.
Allow/ Restrict
No Matching Paper in
Tray Setting
Select the operation that is performed
when there is no paper of the corresponding size in the specified paper tray.
• Stop Printing (Tray Fixed):
The machine stops operating.
• Switch Trays (Tray Priority):
Whether or not the specified paper
tray contains paper of the corresponding size is determined and, if it
does not, a different paper tray is selected if it contains paper of the corresponding size.
Stop Printing (Tray
Fixed)
/ Switch Trays (Tray
Priority)
Print Lists Select the paper tray used for printing
lists, such as the sales counter
Tray 1
/ Tray 2/ Tray 3/
Tray 4/ Bypass tray/ LCT
Parameter Description Settings (Default set-
tings are underlined.)
Page 65

12
Utility
12-16 im7520/im6020
Utility Chapter 12
Reset Setting
Parameter Description Settings (Default set-
tings are underlined.)
System Auto Reset Specify the desired length of time until
the automatic system reset operation is
performed.
• Priority Mode:
Select the setting for the mode that
the machine enters when the automatic system reset operation is performed.
• System Auto Reset Time:
Specify the setting for the desired
length of time until the automatic system reset operation is performed.
Priority mode:
Copy
/ Scan
System Auto Reset
Time:
OFF/ 1 to 9 minutes:
1 minute
Auto Reset Select the setting for the desired length
of time until the automatic panel reset
operation is performed for each mode.
Copy: OFF/ 1 to 9 minutes: 1 minute
Scan: OFF/ 1 to 9 minutes: 1 minute
Job
Reset
When account is
changed
Select whether or not the settings are reset when the user has changed.
This machine detects that the user has
changed when the optional key counter
has been removed or when the [Access]
key is pressed after entering user authentication and account track information.
Reset
/ Do Not Reset
When original is set
on ADF
Select whether or not the settings are reset when a document is loaded into the
ADF.
Reset/ Do Not Reset
When Next
Job is selected
Staple Setting:
Select whether the same Staple setting
from the previous job is set or the setting
is canceled when that job begins and the
settings for the next job can be specified.
ON/ OFF
Original Set/Bind Direction:
Select whether the same Original Direction and Margin settings from the previous job are set or the settings are
canceled when that job begins and the
settings for the next job can be specified.
ON/ OFF
Reset Data After Job:
Select whether the same settings for a
scan operation from the previous job are
set or the settings are canceled when
that job is completed and the settings for
the next job can be specified. (However,
even if “OFF” is selected, the destination
is cleared.)
ON
/ OFF
Page 66

Utility
12
im7520/im6020 12-17
Utility Chapter 12
2
Reminder
If “System Auto Reset” is set to “OFF”, the Enlarge Display mode is not
canceled. In addition, user authentication and account track are canceled after 1 minute even if “System Auto Reset” is set to “OFF”.
LCD Backlight Setting
2
Note
[LCD Backlight Setting] appears only if the “Administrator Security Level”
parameter (displayed from the Administrator Setting screen) is set to
“Level 1” or “Level 2”.
Power Save Setting
2
Note
[Power Save Setting] appears only if the “Administrator Security Level”
parameter (displayed from the Administrator Setting screen) is set to
“Level 1” or “Level 2”.
!
Detail
For details on the “Administrator Security Level” parameter, refer to “Security Setting” on page 12-37.
Description Settings (Default set-
tings are underlined.)
Adjust the brightness of the touch panel backlight to one of 16 levels. 1 ~ 16: 8
Parameter Description Settings (Default set-
tings are underlined.)
Low Power Mode Setting
Specify the desired length of time until
the machine enters Low Power mode.
1 to 240 minutes: 15
minutes
Sleep Mode Setting Specify the desired length of time until it
enters Sleep mode.
OFF/ 1 to 240 minutes:
90 minutes
Page 67

12
Utility
12-18 im7520/im6020
Utility Chapter 12
Output Setting
2
Note
[Output Setting], [Date/Time Setting], [Daylight Saving Time Setting] and
[Original Image Density] appear only if the “Administrator Security Level”
parameter (displayed from the Administrator Setting screen) is set to
“Level 2”.
[Print/Fax Output Setting] appears only if optional printer controller
im6020020 is installed.
The “Exit Tray Setting” parameter is available only if optional finisher
9202/9204 is installed.
Date/Time Setting
Daylight Savings Time Setting
Parameter Description Settings (Default set-
tings are underlined.)
Print/Fax Output Setting Specify settings for printing. For details, refer to the im6020020 Us-
er’s Guide.
Exit Tray Setting Specify the exit tray given priority with
each function (copying, printing and outputting reports).
Copy: Main Tray
/ Sub
Tray
Printer: Main Tray
/ Sub
Tray
Reports Print: Main Tray/
Sub Tray
Description Settings (Default set-
tings are underlined.)
Specify the date, time and time zone for the machine’s internal clock. Time Zone: -12:00 to
13:00 00:00
Description Settings (Default set-
tings are underlined.)
Specify whether or not the machine’s internal clock observes daylight saving time, and set the daylight saving time.
ON/ OFF
1 to 150 minutes: 60
minutes
Page 68

Utility
12
im7520/im6020 12-19
Utility Chapter 12
Original Image Density
Display Setting
Sub Screen Display ON/OFF
Scan Basic Screen Default Setting
Copy Screen
Description Settings (Default set-
tings are underlined.)
Specify the initial density of the quality of the document. A density
can be specified for each Orig. Image Type setting.
Text:
0 (light) to 5 (dark): 3
Text/Photo:
0 (light) to 5 (dark): 3
Dot Matrix Original:
0 (light) to 5 (dark): 2
Photo:
0 (light) to 5 (dark): 1
Description Settings (Default set-
tings are underlined.)
Display Type Sub Area
• Setting value:
An image of the selected setting is displayed.
• Job List:
A list of the jobs that are being performed is displayed.
Setting value
/ Job List
Parameter Description
Default Tab Specify settings for scanning. For details, refer to the Network Scan-
ner Operations of the im7520/im6020 User’s Guide.
Program Default
Address Book Default Index
Address Type Symbol
Display
Parameter Description Settings (Default set-
tings are underlined.)
Copy Operating Screen Select the screen that is displayed while
printing.
• ON: A copy job can be reserved by
touching [Program Next Job] in the
screen with the message “Now printing.”, which appears during printing.
• OFF: A copy job can be reserved
while the Basic screen in Copy mode
is displayed.
ON/ OFF
Page 69

12
Utility
12-20 im7520/im6020
Utility Chapter 12
Initial Setting
2
Reminder
To change the default settings for Scan mode , press the [Scan] key, enter Utility mode, and then select a setting for this parameter.
!
Detail
For details on the default settings and the factory default settings, refer
to “Automatically Canceling the Settings (Automatic Panel Reset)” on
page 2-27.
Description Settings (Default set-
tings are underlined.)
Specify the default settings for Copy mode.
The copy settings selected when the machine is turned on (the power switch is set to “n”) or the [Reset] key is pressed can be specified.
• Current Setting:
The settings specified from the touch panel before Utility mode
was entered are set as the default settings for Copy mode.
• Factory Default:
The factory default settings are set as the default settings for
Copy mode.
Current Setting/ Factory
Default
Page 70

Utility
12
im7520/im6020 12-21
Utility Chapter 12
Copier Setting
Parameter Description Settings (Default set-
tings are underlined.)
Auto Booklet ON When
Fold & Staple
Select whether or not the “Booklet”
function is selected automatically when
the “Fold & Staple” setting is selected.
Auto Select Booklet
/
OFF
Auto Zoom For Combine/Booklet
Select whether or not the preset zoom
ratios are automatically selected when
“Auto Paper Select” is set and a Combine Originals or Booklet setting is selected.
• Auto Display Zoom Ratio:
The following zoom ratios are set.
2 in 1, Booklet × 0.647
4 in 1 × 0.500
8 in 1 × 0.323
• OFF:
No zoom ratio is selected automatically.
Auto Display Zoom Ratio/ OFF
Sort/Group Auto Change Select whether or not the “Sort” setting
is automatically selected when 2 or more
copies are set to be printed in a single
job.
•ON:
When a document is loaded into the
ADF and the [Start] key is pressed, the
“Group” setting is automatically selected if the document consists of
only one page or the “Sort” setting is
automatically selected if the document consists of two or more pages.
• OFF:
The “Sort” and “Group” settings are
not selected automatically.
ON
/ OFF
Auto Zoom (Platen) Select whether or not the “Auto Zoom”
setting is selected when a paper tray is
selected (except when “Auto Paper Select” is set).
ON/ OFF
Auto Zoom (ADF) Select whether or not the “Auto Zoom”
setting is selected when a paper tray is
selected (except when “Auto Paper Select” is set).
ON
/ OFF
Select Tray when APS
OFF
Select which paper tray is selected when
the “Auto Paper Select” setting is canceled.
• Tray Before APS ON:
The paper tray that was being used
before the “Auto Paper Select” setting
was selected is selected.
• Default Tray:
The paper tray set as the default is selected.
Tray Before APS ON
/
Default Tray
Select Tray for Insert
Sheet
Select the default paper tray loaded with
paper for the cover pages and Insert
sheets.
Tray1/ Tray2
/ Tray3/
Tray4/ Bypass tray/ LCT/
PI
Page 71

12
Utility
12-22 im7520/im6020
Utility Chapter 12
2
Note
[Auto Booklet ON When Fold & Staple] is available only if optional finisher
9204 is installed.
[Auto Zoom(Platen)], [Auto Zoom(ADF)], [Select Tray when APS OFF],
[Select Tray for Insert Sheet], [Exit Direction Of 1 Sheet(Platen)] and [TriFold Printed Side Selection] appear only if the “Administrator Security
Level” parameter (displayed from the Administrator Setting screen) is set
to “Level 1” or “Level 2”.
[Tri-Fold Printed Side Selection] is available only if optional finisher 9204
is installed.
[Print Jobs During Copy Operation] appear only if the “Administrator Security Level” parameter (displayed from the Administrator Setting screen)
is set to “Level 2”.
!
Detail
For details on the “Administrator Security Level” parameter, refer to “Security Setting” on page 12-37.
Exit Direction Of 1
Sheet(Platen)
Select the orientation in which copies of
documents placed on the original glass
are fed out.
• Face Down: Copies are fed out printed side down.
• Face Up: Copies are fed out printed
side up.
Face Down
/ Face Up
Tri-Fold Printed Side Selection
Select whether the printed side is on the
inside or the outside when the page is
folded in three.
Outside
/ Inside
Print Jobs During Copy
Operation
Select whether or not print data can be
accepted for printing while a copy operation is being performed.
• Accept:
Print data can be accepted and printed.
• Receive Only:
Print data is printed after the copy operation is finished.
•Do Not Accept:
Print data is not received.
Accept
/ Receive Only/
Do Not Accept
Parameter Description Settings (Default set-
tings are underlined.)
Page 72

Utility
12
im7520/im6020 12-23
Utility Chapter 12
Scanner Setting
Printer Setting
2
Note
[Printer Setting] appears only if optional printer controller im6020020 is
installed.
Parameter Description
Black Compression
Level
Specify settings for scanning. For details, refer to the Network Scanner Operations of the im7520/im6020 User’s Guide.
Parameter Description
Basic Setting Specify settings for printing. For details, refer to the im6020020 Us-
er’s Guide.
Paper Setting
PCL Setting
PS Setting
Print Reports The Print function settings can be printed as a report. For details, re-
fer to the im6020020 User’s Guide.
Page 73

12
Utility
12-24 im7520/im6020
Utility Chapter 12
Displaying the User Setting Screen
The following procedure describes how to display the User Setting Screen.
1 Press the [Utility/Coun-
ter] key.
2 Touch [2 User Setting].
– An item can also be selected by pressing the key in the keypad for
the number beside the desired button.
For “2 User Setting”, press the [2] key in the keypad.
The User Setting screen appears.
Utility/Counter
Page 74

Utility
12
im7520/im6020 12-25
Utility Chapter 12
2
Note
To quit specifying the User mode setting, touch [Exit] in the sub display
area or press the [Utility/Counter] key. Otherwise, cancel the User mode
by touching [Close] in each screen until the screen for the Copy, Scan or
Box mode appears.
Page 75

12
Utility
12-26 im7520/im6020
Utility Chapter 12
12.4 Specifying Administrator Settings
This section describes the main parameters and operations that can be performed after pressing the [Utility/Counter] key, then touching [3 Administrator Setting].
System Setting
Power Save Setting
Output Setting
Parameter Description Settings (Default set-
tings are underlined.)
Low Power Mode Setting
Specify the desired length of time until
the machine enters Low Power mode.
1 to 240 minutes: 15
minutes
Sleep Mode Setting Specify the desired length of time until it
enters Sleep mode.
OFF/ 1 to 240 minutes:
90 minutes
Power Save Key Select which low power mode is entered
when the [Power Save] key is pressed.
•Low Power:
The touch panel goes off and the machine enters a mode where it conserves energy.
•Sleep:
Although the machine conserves
more energy in Sleep mode than in
Low Power mode, the machine must
warm up when Sleep mode is canceled, therefore taking more preparation time than Low Power mode.
Low Power
/ Sleep
Parameter Description Settings (Default set-
tings are underlined.)
Print/Fax Output Settings
Specify settings for printing. For details, refer to the im6020020 User’s Guide.
Exit Tray Setting Select the copy exit tray for each type of
job (copies, printouts and reports).
Copy: Main Tray
/ Sub
Tray
Printer: Main Tray
/ Sub
Tray
Reports Print: Main Tray/
Sub Tray
Page 76

Utility
12
im7520/im6020 12-27
Utility Chapter 12
2
Note
[Print/Fax Output Setting] appears only if optional printer controller
im6020020 is installed.
The “Exit Tray Setting” parameter is available only if optional finisher
9202/9204 is installed.
Date/Time Setting
Daylight Saving Time Setting
Weekly Timer Setting
Description Settings (Default set-
tings are underlined.)
Specify the date, time and time zone for the machine’s internal clock. Time Zone: -12:00 to
13:00 00:00
Description Settings (Default set-
tings are underlined.)
Select whether or not the machine’s internal clock observes daylight
saving time, and specify the daylight saving time.
ON/ OFF
Daylight Savings Time: 1
to 150 minutes: 60 minutes
Parameter Description Settings (Default set-
tings are underlined.)
Weekly Timer ON/OFF
Setting
Select whether or not the weekly timer is
used.
ON/ OFF
Time Setting Specify the time of each day that the ma-
chine is turned on/off by the timer.
–
Date Setting Specify the individual dates or the days
of the week that the machine is turned
on/off by the timer.
–
Select Time for Power
Save
Specify the time that the machine is
turned off/on when it has been turned on
by the weekly timer.
ON/ OFF
Password for Non-Business Hours
Select whether or not the machine can
be used after a password is entered
when the machine has been turned off
by the weekly timer.
ON/ OFF
Page 77

12
Utility
12-28 im7520/im6020
Utility Chapter 12
!
Detail
If the weekly timer has been set, leave the machine plugged into the electrical outlet even if the machine has been turned off.
If the weekly timer is set, correctly set the date and time.
Restrict User Access
Parameter Description Settings (Default set-
tings are underlined.)
Restrict Access to Saved
Program Jobs
Select the registered copy programs that
are prevented from being changed or
deleted.
–
Delete Saved Program
Jobs
Select the registered copy programs to
be delete.
–
Restrict
Access to
Job Settings
Changing
Job
Priority
Select whether or not to allow the print
priority of jobs to be changed.
Allow
/ Restrict
Deleting
Other
User’s
Jobs
Select whether or not jobs from other users can deleted when the user authentication settings have been specified.
Allow/ Restrict
Registering and
Changing
Addresses
Select whether or not to allow registered
recipients to be changed.
Allow
/ Restrict
Changing
Zoom
Ratio
Select whether or not to allow stored
zoom ratios to be changed.
Allow
/ Restrict
Page 78

Utility
12
im7520/im6020 12-29
Utility Chapter 12
Expert Adjustment
Parameter Description Settings (Default set-
tings are underlined.)
Original Image Density Specify the initial density of the quality of
the document. A density can be specified for each Orig. Image Type setting.
Text:
0 (light) to 5 (dark): 3
Text/Photo:
0 (light) to 5 (dark): 3
Dot Matrix Original:
0 (light) to 5 (dark): 2
Photo:
0 (light) to 5 (dark): 1
Erase Adjustment
Non Image Area
Erase
Specify the conditions for erasing the
area framing the document.
• Always: No limits are specified.
• Only When Auto size or ×1.0 is selected: The frame around the document is
erased only if the “Auto Zoom” or
“×1.0” Zoom settings are selected.
• Do Not Erase When ×1.0 is selected:
The frame around the document is
erased only if a Zoom setting other
than “×1.0” is selected.
Always
/ Only When Auto
size or ×1.0 is selected/
Do Not Erase When ×1.0
is selected
Non Image Area
Erase Setting
Select whether the areas framing documents are erased.
• Auto: The frame is erased automatically.
• Specify: Select the erasing method
and the document density. In addition, the density can be adjusted to
one of five levels.
Auto/ Specify
How to Erase:
Diagonal Erase/
Square Erase
Original Density:
1 (light) to 5 (dark):
3(Std.)
ADF Frame
Erase
Specify the frame width that is erased
when using the ADF.
0 to 5 mm: 3 mm
Printer Adjustment
Leading
Edge
Adjustment
The starting print position at the leading
edge of the paper (with respect to the
paper feed direction) can be adjusted in
0.1 mm increments. Adjustments can be
specified for each paper type.
Normal: –3.0 to 6.0 mm:
0.0 mm
Thick paper: –3.0 to 6.0
mm: 0.0 mm
Centering The starting print position at the left edge
of the paper (with respect to the paper
feed direction) can be adjusted in 0.1
mm increments.
–6.4 to 6.3 mm: 0.0 mm
Vertical
Adjustment
If the copy image is distorted (stretched or compressed), the paper
feed speed and printing speed can be synchronized to adjust the
copy image. For details on making this adjustment, contact your
technical representative.
Horizontal
Adjustment
If the copy image is distorted (stretched or compressed), the zoom
ratio in the transverse document feed direction can be adjusted. For
details on making this adjustment, contact your technical representative.
2nd-Side Size Adjustment
The 2nd-side size can be adjusted for
each tray.
Tray 1 to 4, Bypass, LCT
key: No Selection
/
–0.1%/ –0.2%/ –0.3%
Page 79

12
Utility
12-30 im7520/im6020
Utility Chapter 12
Finisher
Adjustment
Center
Staple
Position
The stapling position when printing with
the “Fold & Staple” function can be adjusted in 0.1 mm increments.
(9204)
–12.8 to 12.7 mm:
0.0 mm
Half-Fold
Position
The center folding position when printing
with the “Fold & Staple” function can be
adjusted in 0.1 mm increments.
(9204)
–12.8 to 12.7 mm:
0.0 mm
Punch Adjustment
Adjust the positions of the punched
holes.
• Punch Vertical Position: The vertical
position of the punched holes can be
adjusted in 0.1 mm increments for
each paper size. (im9220010)
• Punch Horizontal Position: The horizontal position of the punched holes
can be adjusted in 0.1 mm increments. (im9220010)
• Punch Unit Vert. Position: The vertical
position of the punched holes can be
adjusted in 0.1 mm increments for
each paper size. (9263)
• Punch Unit Hor. Position: The horizontal position of the punched holes
can be adjusted in 0.1 mm increments. (9263)
• Punch Resist Loop Size: The holepunching shift for double-sided printing and outputting cover pages can
be adjusted in 0.8 mm increments.
(im9220010, 9263)
Punch Vertical Position:
–5.0 to 5.0 mm: 0.0 mm
Punch Horizontal Position: –5.0 to 5.0 mm:
0.0 mm
Punch Unit Vert. Position: –5.0 to 5.0 mm:
0.0 mm
Punch Unit Hor. Position: –5.0 to 5.0 mm: 0.0
mm
Punch Regist Loop Size:
Machine (Reverse Output, ADU Output): –16.0
to 16.0 mm: 0.0 mm
PI (Uppre tray, Lower
tray): –16.0 to 16.0 mm:
0.0 mm
Z-Fold Position Adjustment
The folding position for zigzag folding (ZFold) can be adjusted for each paper
size.
• 1st Z-Folded Position: The position of
the first fold can be adjusted in 0.1
mm increments.
• 2nd Z-Folded Position: The position
of the second fold can be adjusted in
0.1 mm increments.
(9263 or im9220010+9263)
1st Z-Folded Position:
–12.8 to +12.7 mm:
0.0 mm
2nd Z-Folded Position:
–12.8 to +12.7 mm:
0.0 mm
Tri-Fold
Position
The folding positions when using the
“Tri-Fold” setting can be adjusted in 0.1
mm increments.
(9204 or im9220010+9263)
–12.8 to +12.7 mm:
0.0 mm
2 Position
Staple
The distance between the two staples
can be adjusted in 0.1 mm increments.
•Staple
• Corner Staple & Fold
(9204)
128 to 160 mm: 128 mm
Cover
Sheet Tray
Size
Adjust the cover sheet tray size if the paper cannot be detected correctly or if
one side of the cover sheet feeder is adjusted.
(9262)
—
Parameter Description Settings (Default set-
tings are underlined.)
Page 80

Utility
12
im7520/im6020 12-31
Utility Chapter 12
!
Detail
When im9220010 and 9263 are installed, adjustments can be made using
both the “Punch Adjustment” and “Z-Fold Position Adjustment” parameters. Contact your technical representative.
List/Counter
LCD Backlight Setting
Standard Size Setting
Scanner
Adjustment
Leading
Edge Adjustment
The starting scanning position (document feed direction) of the document can be adjusted. For details on making this adjustment, contact your technical representative.
Centering The starting scanning position (transverse document feed direction)
of the document can be adjusted. For details on making this adjustment, contact your technical representative.
Vertical
Adjustment
If the copy image is distorted (stretched or compressed), the zoom
ratio in the document feed direction for the scanner can be adjusted.
For details on making this adjustment, contact your technical representative.
ADF Centering If the center position cannot be automatically adjusted in the trans-
verse document feed direction, it can be adjusted manually. For details on making this adjustment, contact your technical
representative.
Parameter Description Settings (Default set-
tings are underlined.)
Parameter Description
Management List Job Settings List The machine settings can be printed.
Paper Size/Type Counter Store up to 9 combinations of paper sizes
and paper types to be counted.
Description Settings (Default settings are underlined.)
Adjust the brightness of the touch panel backlight to one of 16 levels.
1 to 16: 8
Parameter Description Settings (Default
settings are underlined.)
Original Glass Original Size Detect Specify the paper standards for
detecting paper from the original
glass.
AB series/ Inch series/
A series/ Full size
ADF Original Size Detect Specify the paper standards for
detecting paper in the ADF.
Page 81

12
Utility
12-32 im7520/im6020
Utility Chapter 12
!
Detail
The “Original Size Detection Change 3” parameter specifies the detection
of 8-1/2 × 14 and the Foolscap size.
The size selected for the “Foolscap Size Setting” parameter can be
changed.
Administrator/Machine Setting
One-Touch Registration
Original Glass Small Size Detect Specify the minimum size of paper
detected from the original glass.
A5w / B6w /
5-1/2 × 8-1/2w/ B5v/
A4
v/ 8-1/2 × 11v
Original Size Detection Change 1 The setting for detecting similar
original sizes can be changed.
A5
v / 5-1/2 × 8-1/2v
Original Size Detection Change 2 A4
w / 8-1/2 × 11w
Original Size Detection Change 3 8-1/2 × 14
w / 8 ×
13w
Foolscap Size Setting The Foolscap paper size can be changed. There are four
Foolscap sizes: 8-1/4 × 13w,8-1/8 × 13-1/4w,8-1/2 ×
13w,8 × 13w. For details, contact your technical representative.
8K/16K Select For details, contact your technical representative.
Parameter Description Settings (Default
settings are underlined.)
Parameter Description
Administrator Registration
Specify the administrator information displayed in the Service/Administrator Information screen of the Help screens and the From address for sending e-mail from the machine.
Input Machine Address Specify the name of the machine and its e-mail address. The regis-
tered address can be used as one of the From addresses for scan
jobs and for receiving e-mail to the machine’s box.
Parameter Description
Scan Specify settings for scanning. For details, refer to the Network Scan-
ner Operations of the im7520/im6020 User’s Guide.
User Box Specify settings for using the boxes. For details, refer to the Box Op-
erations of the im7520/im6020 User’s Guide.
One-Touch Registration
List
For details, refer to the Network Scanner Operations, Facsimile Operations and Box Operations of the im7520/im6020 User’s Guide.
Page 82

Utility
12
im7520/im6020 12-33
Utility Chapter 12
2
Note
[3 User Box] appears only if the hard disk drive is installed.
User Authentication/Account Track
General Settings
!
Detail
The “Public User Access” parameter is not available if “User Authentication” is set to “OFF” and “Synchronize User Authentication & Account
Track” is set to “Do Not Synchronize”.
The “Account Track Input Method” parameter is not available if “Account
Track” is set to “OFF”.
The “Synchronize User Authentication & Account Track” and “# of
Counters Assigned for Users ”parameters are not available if “User Authentication” is set to “OFF” and “Account Track” is set to “OFF”.
When “# of Counters Assigned for Users” is set to “50”, 950 accounts
can be registered.
Description Settings (Default set-
tings are underlined.)
Specify settings for user authentication and account track for controlling the use of this machine.
• User Authentication:
Select the user authentication method.
• Public User Access:
Select whether or not the machine can be used an unregistered
user.
• Account Track:
Select whether or not account track is used to control the machine.
• Account Track Input Method:
Select the account track authentication method.
• Synchronize User Authentication & Account Track:
Select whether or not user authentication and account track are
linked.
• # of Counters Assigned for Users:
Adjust the number of users and accounts that can be registered.
User Authentication:
OFF
/ ON (External Server)/ ON (MFP)
Public User Access:
Restrict
/ Allow
Account Track: OFF
/ ON
Account Track Input
Method:
Account Name & Password/ Password Only
Synchronize User
Authentication & Account Track:
Synchronize
/ Do Not
Synchronize
# of Counters Assigned
for Users: 1 to 999: 500
Page 83

12
Utility
12-34 im7520/im6020
Utility Chapter 12
User Authentication Setting
Account Track Setting
Print without Authentication
Counter List
!
Detail
[Counter List] does not appear if “Public User Access” is set to “OFF” and
“Account Track” is set to “OFF”.
Parameter Description Settings (Default set-
tings are underlined.)
Administrative Setting
User Name
List
Select whether or not a list of user
names is displayed in the user authentication screen.
ON/ OFF
Default
Function
Permission
Operations that are possible with this
machine can be limited when authenticating with an external server.
Copy: Allow
/ Restrict
Scan: Allow
/ Restrict
Print: Allow
/ Restrict
User Box: Allow
/ Restrict
User Registration Specify the password, printing permis-
sions, number of prints allowed, and
function permissions for each user of
this machine.
–
User Counter The copy, printer and scanner use for
each user can be checked.
–
Parameter Description
Account Track Registration
Specify the password, printing permissions, and number of prints allowed for each account using this machine.
Account Track Counter The copy, printer and scanner use for each account can be checked.
Description Settings (Default set-
tings are underlined.)
Select whether or not printing is permitted without specifying a user
or account. If printing is permitted, prints are counted for public users.
Allow/ Restrict
Description
The user and account track counters can be printed.
Page 84

Utility
12
im7520/im6020 12-35
Utility Chapter 12
Network Setting
Copier Setting
Parameter Description
Network Setting Specify settings for using the network. For details, refer to the Net-
work Scanner Operations of the im7520/im6020 User’s Guide.
TCP/IP Setting
NetWare Set
IPP Setting
FTP Setting
SMB Setting
AppleTalk Setting
LDAP Setting
E-Mail Setting
Detail Setting
Parameter Description Settings (Default set-
tings are underlined.)
Auto Zoom (Platen) Select whether or not the “Auto Zoom”
setting is automatically selected when a
paper drawer is selected (“Auto Paper
Select” is not selected) and a document
is detected on the original glass.
ON/ OFF
Auto Zoom (ADF) Select whether or not the “Auto Zoom”
setting is automatically selected when a
paper drawer is selected (“Auto Paper
Select” is not selected) and a document
is detected in the ADF.
ON
/ OFF
Select Tray when APS
OFF
Select which paper drawer is selected
when the “Auto Paper Select” setting is
canceled.
• Tray Before APS ON:
The paper drawer that was being
used before the “Auto Paper Select”
setting was selected is selected.
• Default Tray:
The paper drawer set as the default is
selected.
Tray Before APS ON
/
Default Tray
Select Tray for Insert
Sheet
Select the default paper drawer loaded
with paper for cover pages and insertion
pages.
Tray1/ Tray2
/ Tray3/
Tray4/ Bypass tray/ LCT/
PI
Page 85

12
Utility
12-36 im7520/im6020
Utility Chapter 12
2
Note
[Tri-Fold Printed Side Selection] is available only if optional finisher 9204
is installed.
Printer Setting
2
Note
[7 Printer Setting] appears only if optional printer controller im6020020 is
installed.
Exit Direction of 1 Sheet
(Platen)
Select the orientation in which copies of
documents placed on the original glass
are fed out.
• Face Down: Copies are fed out printed side down.
• Face Up: Copies are fed out printed
side up.
Face Down
/ Face Up
Tri-Fold Printed Side Selection
Select whether the printed side is on the
inside or the outside when the page is
folded in three.
Outside
/ Inside
Print Jobs During Copy
Operation
Select whether or not print data data can
be accepted for printing while a copy operation is being performed.
• Accept:
Print data can be accepted and printed.
• Receive Only:
Print data is printed after the copy operation is finished.
•Do Not Accept:
Print data is not received.
Accept
/ Receive Only/
Do Not Accept
Parameter Description Settings (Default set-
tings are underlined.)
Parameter Description
Local I/F Timeout Specify settings for printing. For details, refer to the im6020020 Us-
er’s Guide.
Page 86

Utility
12
im7520/im6020 12-37
Utility Chapter 12
System Connection
Security Setting
Administrator Password
User Box Admin. Setting
Administrator Security Level
Parameter Description
IS OpenAPI Setting Specify settings for using the network. For details, refer to the Net-
work Scanner Operations of the im7520/im6020 User’s Guide.
Description Settings (Default set-
tings are underlined.)
The administrator password used to specify the Administrator mode
settings can be changed.
12345678
Description
Specify settings for using boxes. For details, refer to the Box Operations of the im7520/im6020
User’s Guide.
Description Settings (Default set-
tings are underlined.)
Specify the range of Administrator mode parameters available to users.
•Level 1:
“LCD Backlight Setting”, “Power Save”, “Auto Zoom (Platen)”,
“Auto Zoom (ADF)”, “Select Tray when APS OFF”, “Select Tray for
Insert Sheet”, “Exit Direction Of 1 Sheet (Platen)”, and “Tri-Fold
Printed Side Selection” are available to users.
•Level 2:
“LCD Backlight Setting”, “Power Save”, “Output Setting”, “Date/
Time Setting”, “Daylight Savings Time Setting”, “Original Image
Density”, “Auto Zoom (Platen)”, “Auto Zoom (ADF)”, “Select Tray
when APS OFF”, “Select Tray for Insert Sheet”, “Exit Direction Of
1 Sheet (Platen)”, “Tri-Fold Printed Side Selection” and “Print
Jobs During Copy Operation” are available to users.
•Prohibit:
None of the parameters that are available to users with “Level 1”
or “Level 2” are available.
Level 1/Level 2/Prohibit
Page 87

12
Utility
12-38 im7520/im6020
Utility Chapter 12
Security Details
2
Note
[Print Data Capture] appears only if optional printer controller im6020020
is installed.
HDD Setting
Parameter Description Settings (Default set-
tings are underlined.)
Password Rules Select whether or not passwords are ap-
plied.
OFF
/ ON
Manual Destination Input Select whether or not a recipient can be
typed in manually in a recipient input
screen.
Allow
/ Restrict
Print Data Capture Select whether or not data for a print job can be captured. For de-
tails, refer to the im6020020 User’s Guide.
Parameter Description
Check HDD Capacity Specify settings for using boxes. For details, refer to the Box Oper-
ations of the im7520/im6020 User’s Guide.
Delete Unused User Box
Delete Secure Print Documents
Overwrite All Data
HDD Lock Password
Page 88

Utility
12
im7520/im6020 12-39
Utility Chapter 12
Displaying the Administrator Setting Screen
The following procedure describes how to display the Administrator Setting
Screen.
1 Press the [Utility/Coun-
ter] key.
2 Touch [3 Administrator Setting].
– An item can also be selected by pressing the key in the keypad for
the number beside the desired button.
For “Administrator Setting”, press the [3] key in the keypad.
Utility/Counter
Page 89

12
Utility
12-40 im7520/im6020
Utility Chapter 12
3 Type in the password, and then touch [OK].
For details on typing in text, refer to “Entering Text” on page 13-2.
The Administrator Setting screen appears.
2
Note
To quit specifying the Utility mode setting, touch [Exit] in the sub display
area or press the [Utility/Counter] key. Otherwise, touch [Close] in each
screen until the desired screen appears.
Page 90

Utility
12
im7520/im6020 12-41
Utility Chapter 12
12.5 Adjusting the Printer
Adjusting the Starting Print Position at the Leading Edge Position
The starting print position at the leading edge of each type of paper (with respect to the paper feed direction) can be adjusted.
Adjustments can be specified for each paper type.
0 The starting print position is adjusted during manufacturing of the ma-
chine. Normally, this position will not need to be adjusted.
1 Display the Administrator Setting screen.
– For details on displaying the Administrator Setting screen, refer to
“Displaying the Administrator Setting Screen” on page 12-39.
2 Touch [1 System Setting].
The System Setting screen appears.
3 Touch [7 Expert Adjustment].
The Expert Adjustment screen appears.
4 Touch [3 Printer Adjustment].
The Printer Adjustment screen appears.
5 Touch [1 Leading Edge Adjustment].
The Leading Edge Adjustment screen appears.
6 Touch the button for the paper type to be set.
7 Touch [Test Copy].
The Test Copy screen appears.
Page 91

12
Utility
12-42 im7520/im6020
Utility Chapter 12
8 Press the [Start] key.
A test pattern is printed.
9 Touch [Close].
The Leading Edge Adjustment screen appears again.
10 Check the distance (a)
from the starting print
position of the test pattern to the edge of the
paper.
11 If the desire print results are not achieved, change the adjustment
– To increase distance (a), touch [+].
– To reduce distance (a), touch [–].
– To scroll through the values quickly, touch [+] or [–] continuously.
12 Repeat steps 7 through 11 until the desired print results are achieved.
13 Touch [OK].
– To cancel changes to the settings, touch [Cancel].
The print position is adjusted.
2
Note
Enter the value by mm using the keypad. Refer to the conversion rate below. 1 in. = 25.4 mm
a
Page 92

Utility
12
im7520/im6020 12-43
Utility Chapter 12
Adjusting the Starting Print Position at the Left Edge
The starting print position at the left edge of the paper (with respect to the
paper feed direction) for each paper tray can be adjusted.
0 The starting print position is adjusted during manufacturing of the ma-
chine. Normally, this position will not need to be adjusted.
1 Display the Administrator Setting screen.
– For details on displaying the Administrator Setting screen, refer to
“Displaying the Administrator Setting Screen” on page 12-39.
2 Touch [1 System Setting].
The System Setting screen appears.
3 Touch [7 Expert Adjustment].
The Expert Adjustment screen appears.
4 Touch [3 Printer Adjustment].
The Printer Adjustment screen appears.
5 Touch [2 Centering].
The Centering screen appears.
6 Touch [Test Copy].
The Test Copy screen appears.
7 Press the [Start] key.
A test pattern is printed.
8 Touch [Close].
The Centering screen appears.
Page 93

12
Utility
12-44 im7520/im6020
Utility Chapter 12
9 Check the distances (b)
from the print position of
the test pattern to the
edge of the paper.
10 If the desire print results are not achieved, change the adjustment
value.
– To increase distance (b), touch [+].
– To reduce distance (b), touch [–].
– Each time [+] or [–] is touched, the value is increased or decreased
by one increment.
11 Repeat steps 6 through 10 until the desired print results are achieved.
12 Touch [OK].
– To cancel changes to the settings, touch [Cancel].
The print position is adjusted.
2
Note
Enter the value by mm using the keypad. Refer to the conversion rate below. 1 in. = 25.4 mm
b
Page 94

Utility
12
im7520/im6020 12-45
Utility Chapter 12
12.6 Adjusting the Finisher
!
Detail
For details on the “Fold & Staple” setting, refer to “To bind copies at the
center (“Fold & Staple”)” on page 3-68.
Adjusting the Center Stapling Position
The stapling position when printing with the “Fold & Staple” function can be
adjusted.
0 Use the “Fold & Staple” function to print a single sample copy, and then
perform the adjustment while checking the sample that was created.
1 Display the Administrator Setting screen.
– For details on displaying the Administrator Setting screen, refer to
“Displaying the Administrator Setting Screen” on page 12-39.
2 Touch [1 System Setting].
The System Setting screen appears.
3 Touch [7 Expert Adjustment].
The Expert Adjustment screen appears.
4 Touch [5 Finisher Adjustment].
The Finisher Adjustment screen appears.
5 Touch [1 Center Staple Position].
The Center Staple Position screen appears.
6 Touch the button for the paper size to be set.
Page 95

12
Utility
12-46 im7520/im6020
Utility Chapter 12
7 Touch [Test Copy].
The Test Copy screen appears.
8 Press the [Start] key.
The sample copy is printed.
9 Touch [Close].
The Center Staple Position screen appears again.
10 Compare the width of the left pages of the copy sample with the width
of the right pages to check for the center of the paper.
11 If the desire print results
are not achieved,
change the adjustment
value.
– If the staple position
is too far to the right
of the center of the
paper, touch [+] (between 0.1 mm and
12.7 mm).
– If the staple position
is too far to the left of
the center of the paper, touch [–] (between 0.1 mm and
12.8 mm).
– To scroll through the
values quickly, touch
[+] or [–] continuously.
12 Repeat steps 6 through 11 until the desired print results are achieved.
13 Touch [OK].
– To cancel changes to the settings, touch [Cancel] .
Page 96

Utility
12
im7520/im6020 12-47
Utility Chapter 12
2
Note
Enter the value by mm using the keypad. Refer to the conversion rate below. 1 in. = 25.4 mm
Adjusting the Half-Fold Position
The half-fold position when printing with the “Fold & Staple” function can be
adjusted.
0 Use the “Fold & Staple” function to print a single sample copy, and then
perform the adjustment while checking the sample that was created.
1 Display the Administrator Setting screen.
– For details on displaying the Administrator Setting screen, refer to
“Displaying the Administrator Setting Screen” on page 12-39.
2 Touch [1 System Setting].
The System Setting screen appears.
3 Touch [7 Expert Adjustment].
The Expert Adjustment screen appears.
4 Touch [5 Finisher Adjustment].
The Finisher Adjustment screen appears.
5 Touch [2 Half-Fold Position].
The Half-Fold Position screen appears.
6 Touch the button for the paper size to be set.
7 Touch [Test Copy].
The Test Copy screen appears.
Page 97

12
Utility
12-48 im7520/im6020
Utility Chapter 12
8 Press the [Start] key.
The test pattern is printed.
9 Touch [Close].
The Half-Fold Position screen appears again.
10 Compare the width of the left pages of the copy sample with the width
of the right pages to check for the center of the paper.
11 If the desire print results
are not achieved,
change the adjustment
value.
– If the folding position
is too far to the right
of the center of paper, touch [+] (between 0.1 mm and
12.7 mm).
– If the folding position
is too far to the left of
the center of paper,
touch [–] (between
0.1 mm and 12.8
mm).
– To scroll through the
values quickly, touch
[+] or [–] continuously.
12 Repeat steps 6 through 11 until the desired print results achieved.
13 Touch [OK].
– To cancel changes to the settings, touch [Cancel] .
Page 98

Utility
12
im7520/im6020 12-49
Utility Chapter 12
2
Note
Enter the value by mm using the keypad. Refer to the conversion rate below. 1 in. = 25.4 mm
Adjusting the Hole-Punching Positions (Punch Vertical Position)
When im9220010 is installed, the vertical position of the punched holes can
be adjusted.
0 Use the “Punch” function to print a single sample copy, and then perform
the adjustment while checking the sample that was created.
1 Display the Administrator Setting screen.
– For details on displaying the Administrator Setting screen, refer to
“Displaying the Administrator Setting Screen” on page 12-39.
2 Touch [1 System Setting].
The System Setting screen appears.
3 Touch [7 Expert Adjustment].
The Expert Adjustment screen appears.
4 Touch [5 Finisher Adjustment].
The Finisher Adjustment screen appears.
5 Touch [3 Punch Adjustment].
The Punch Adjustment screen appears.
6 Touch [1 Punch Vertical Position].
The Punch Vertical Position screen appears.
Page 99

12
Utility
12-50 im7520/im6020
Utility Chapter 12
7 Touch the button for the paper size to be set.
8 Touch [Test Copy].
The Test Copy screen appears.
9 Press the [Start] key.
The sample copy is printed.
10 Touch [Close].
The Punch Vertical Position screen appears again.
11 Check the sample copy for the punch positions and for the center of
the paper.
12 If the desire print results are not achieved, change the adjustment val-
ue.
– If the punch positions are too far above the center of the paper,
touch [+] (between 0.1 mm and 5.0 mm).
Page 100

Utility
12
im7520/im6020 12-51
Utility Chapter 12
– If the punch positions are too far below the center of the paper,
touch [–] (between –0.1 mm and –5.0 mm).
13 Repeat steps 7 through 12 until the desired print results are achieved.
14 Touch [OK].
– To cancel changes to the settings, touch [Cancel].
2
Note
Enter the value by mm using the keypad. Refer to the conversion rate below. 1 in. = 25.4 mm
When im9220010 and 9263 are installed, adjustments can be made using
both the “Punch Adjustment” and “Z-Fold Position Adjustment” parameters. Contact your technical representative.
 Loading...