

Page 1
Page 2

Page 3

This machine allows the user to perform various functions when it is equipped with
different options.
This booklet gives you a quick overview of the procedures to follow to use some of
the basic functions the machine offers.
For greater details, see Operator’s Manual, available separately.
Contents
◆It’s Easy!
Making a Copy Set/Stack of One Size ................................. 2
Using the Z-Fold Feature ..................................................... 4
Making Stapled Copy Sets/Stacks ....................................... 6
Stamping an Image on Copies............................................. 8
Storing an Image................................................................ 10
Control Panel Adjusting Dial ............................................... 12
◆What To Do?
Making Copies on Post Cards .............................................14
Making Copies from a Book ................................................16
◆Ecology
Making a Booklet .................................................................18
Saving Paper .......................................................................20
Saving Power Consumption ................................................. 22
◆Trouble!
Running out of Paper ...........................................................24
Paper Misfeed...................................................................... 26
Page 4
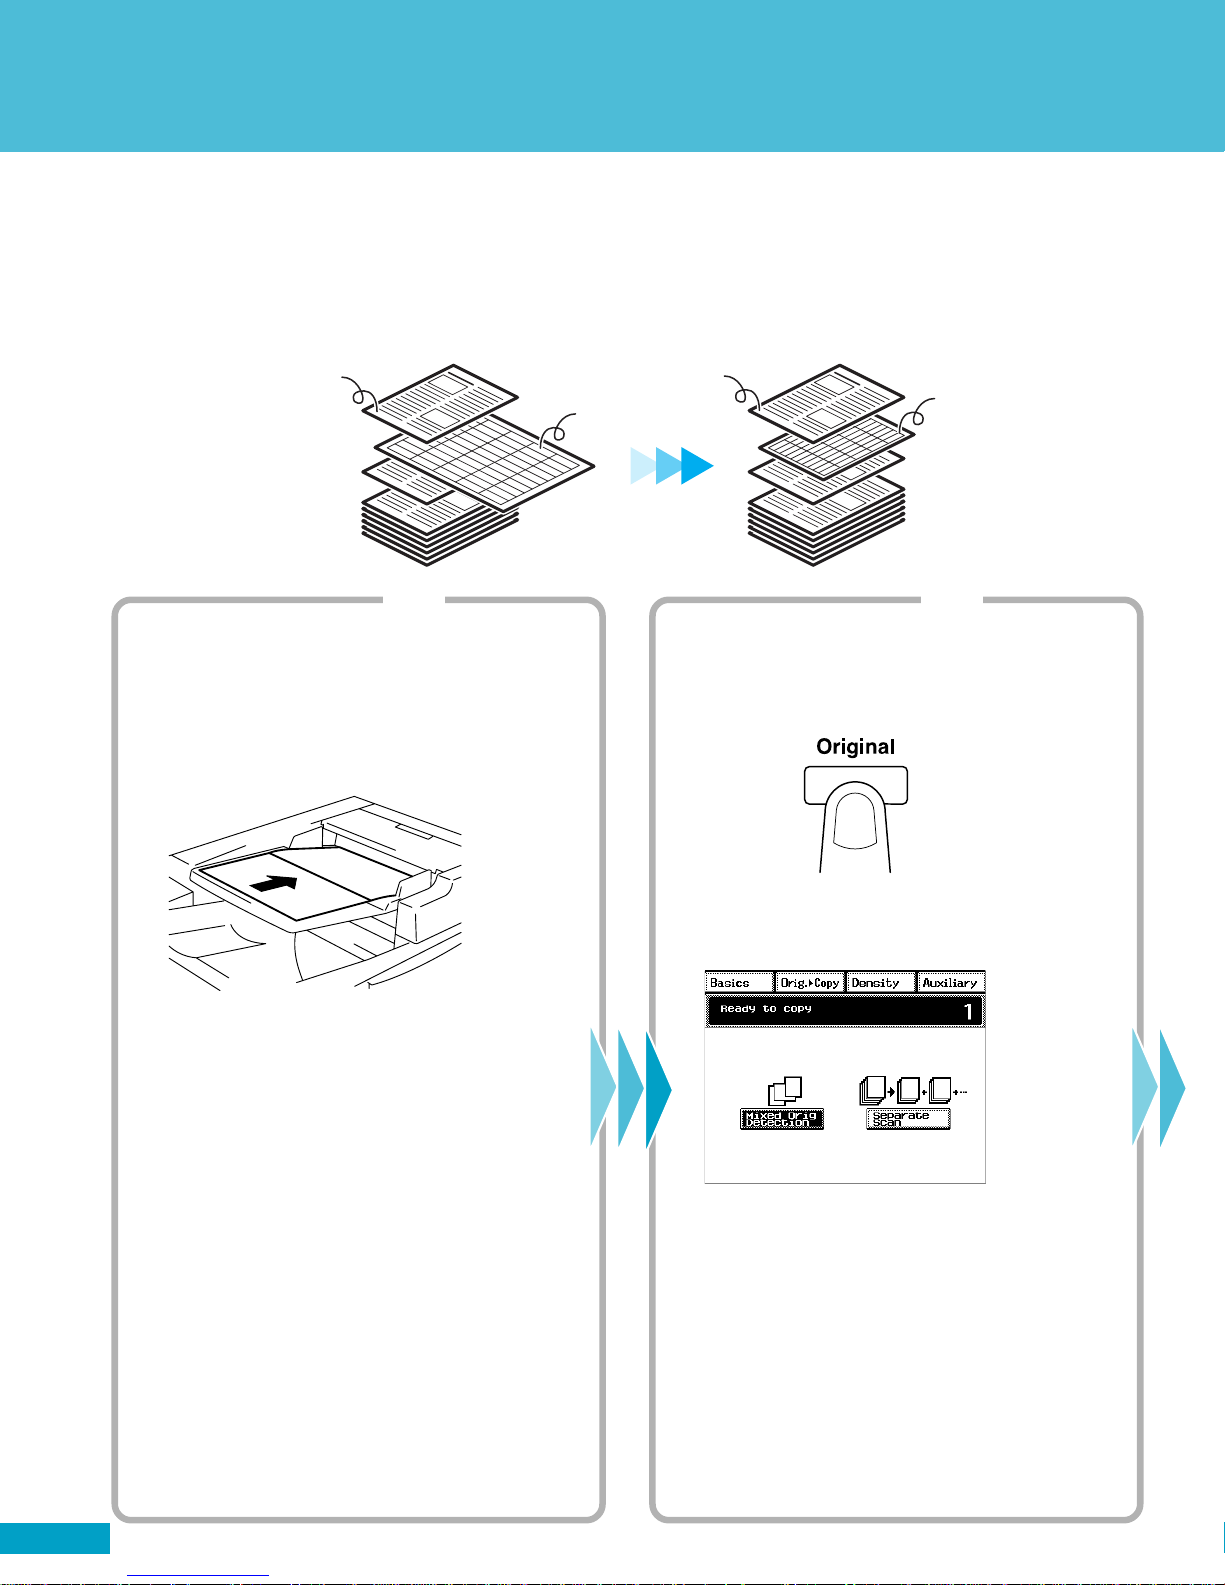
Make letter size copies f
Follow these instructions if you have a document that consists of Letter-size pages and
11x17-size pages and you would like a copy set in Letter size.
Letter
Originals
Step 1
Loading the originals
1. Load your originals.
You can load originals of varying sizes at one
time.
11x17
Letter
Letter
Copies
Step 2
Setting the Mixed Orig. Detection function
1. Press the Original key.
4002O081AA
4002O294CA
4002O147AD
2. Touch [Mixed Orig. Detection].
C4028P119CA
2
Page 5
❏ NOTE
· You will need an Electronic Document Handler mounted on your machine.
✍Useful Tip
· The machine can also automatically select the appropriate size of paper,
according to each original, and make full-size copies.
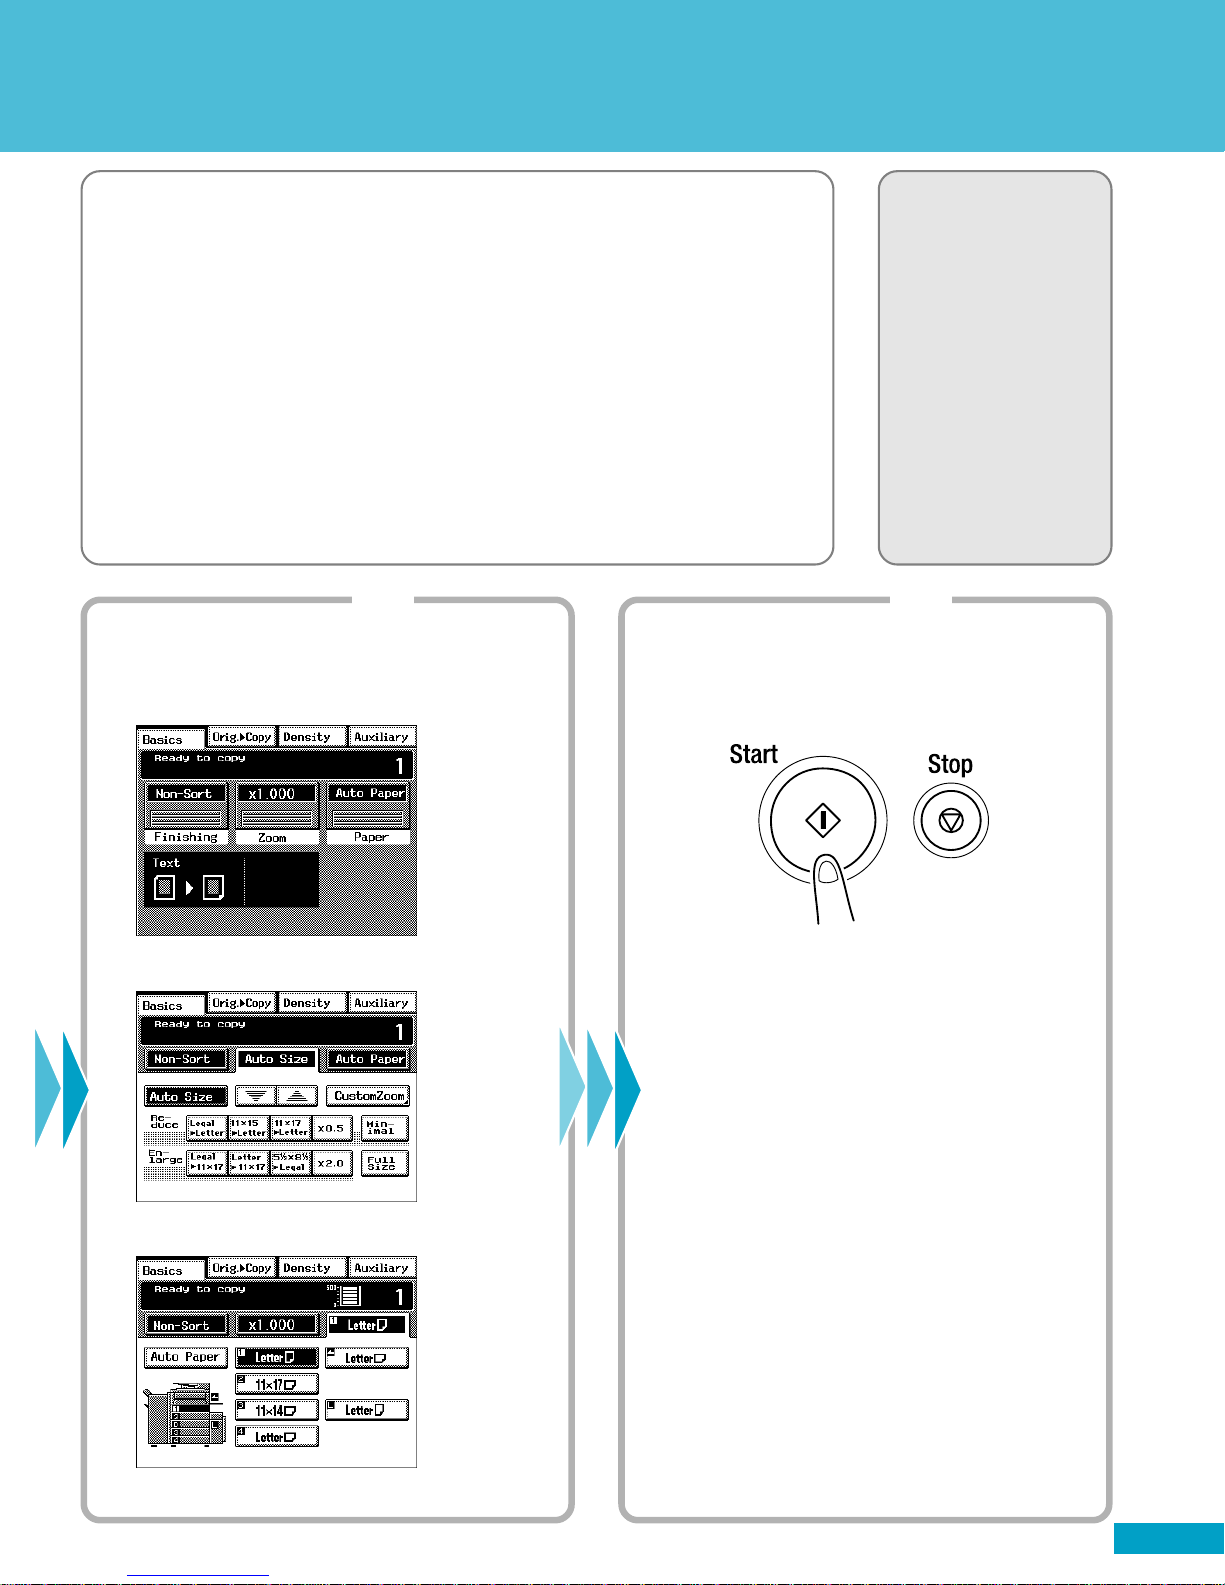
Step 3 Step 4
Operator’s Manual
Reference Pages:
Auto Paper☞p.3-9
Selecting the Zoom
☞p.3-14
Auto Size☞p.3-14
Mixed Orig. Detection
☞p.3-67
Making the Touch Panel settings
1. Touch [Zoom].
2. Touch [Auto Size].
3. Select the paper size.
Starting the copy cycle
1. Press the Start key.
C4028P006CA
4002O280CB
C4028P019EA
C4028P010EA
3
Page 6

Using the Z-Fold Feature
Use the Z-Fold feature to make your 11”x17” pages fit neatly into an 8.5”x11” Letter size
document.
Letter
Originals
Step 1
Loading the originals
1. Load your originals.
You can load originals of varying sizes at one
time.
11x17
Letter
Copies
11x17 Z-folded
Step 2
Setting the Mixed Orig. Detection function
1. Press the Original key.
4002O323AA
4002O294CA
4002O147AD
2. Touch [Mixed Orig. Detection].
C4028P119CA
4
Page 7
❏ NOTES
· You will need an Electronic Document Handler and a Finisher 9708
mounted on your machine.
· Make sure that [Auto Paper] is selected. If [Auto Paper] is not selected,
touch [Auto Paper] to highlight it.
✍Useful Tip
· You can also combine this function with Staple or Hole Punch.
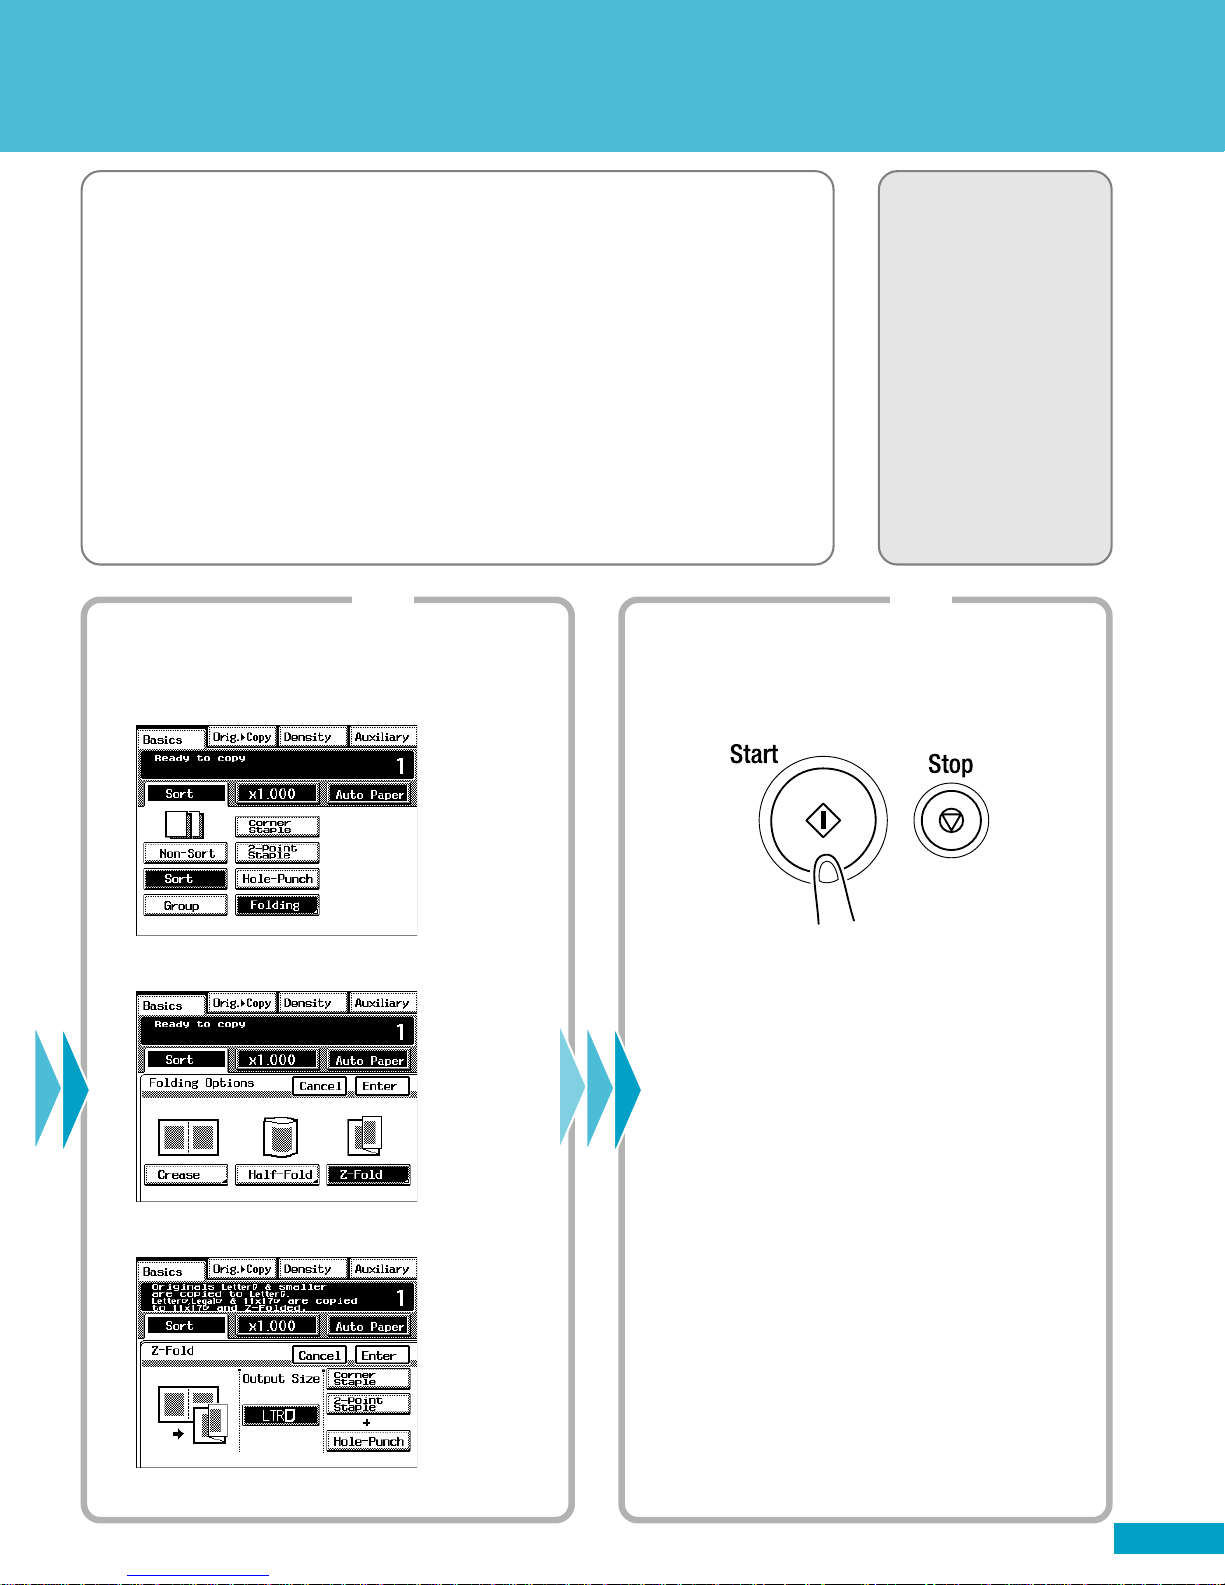
Step 3 Step 4
Operator’s Manual
Reference Pages:
Auto Paper☞p.3-9
Hole Punch☞p.3-23
Staple☞p.3-24
Folding☞p.3-28
Mixed Orig. Detection
☞p.3-67
Making the Touch Panel settings
1. Touch [Finishing] and then [Folding].
2. Touch [Z-Fold].
3. Touch [LTR] of Output Size.
Starting the copy cycle
1. Press the Start key.
C4028P044CA
4002O280CB
C4028P050CA
C4028P051EA
5
Page 8
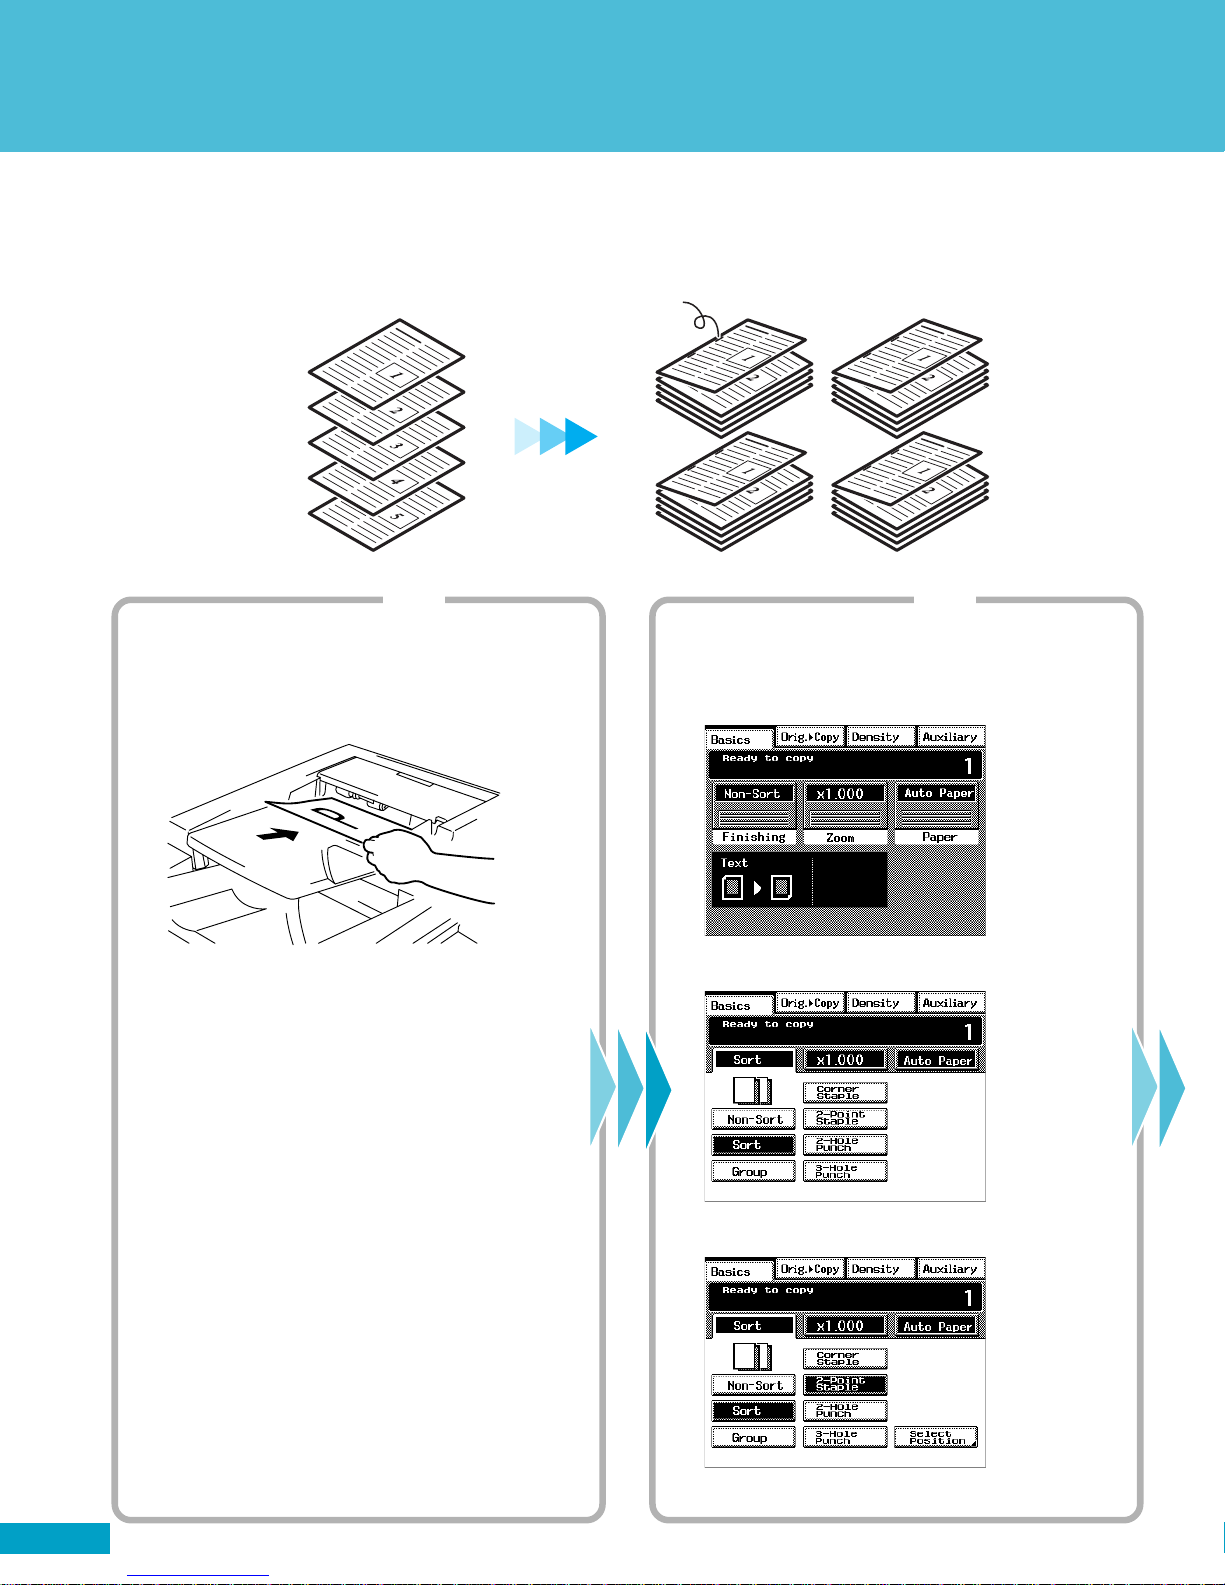
Making Stapled Copy Sets
When equiped with a Finisher, the im5520/im4720 can sort and/or staple copy sets.
Stapled
Step 1 Step 2
Loading the originals
1. Load your originals.
Copy SetsOriginals
4002O122AC
4002O082AA
Making the Touch Panel settings
1. Touch [Finishing].
C4028P006CA
2. Touch [Sort].
6
C4028P034EA
3. Touch [Corner Staple] or [2-Point Staple].
C4028P039EA
Page 9

❏ NOTE
· You will need an Electronic Document Handler and a Finisher or Mailbin
Finisher mounted on your machine.
✍Useful Tips
· The machine can also staple a copy set or stack which has previously
been removed from it.
· Holes can also be punched in your copy sets or stacks.
Hole Punch
4002O305CA
Step 3
Starting the copy cycle
1. Press the Start key.
Operator’s Manual
Reference Pages:
Finishing Function
☞p.3-20
Sort☞p.3-22
Hole Punch☞p.3-23
Staple☞p.3-24
Manual Staple☞p.3-26
4002O280CB
4002O077AB
7
Page 10
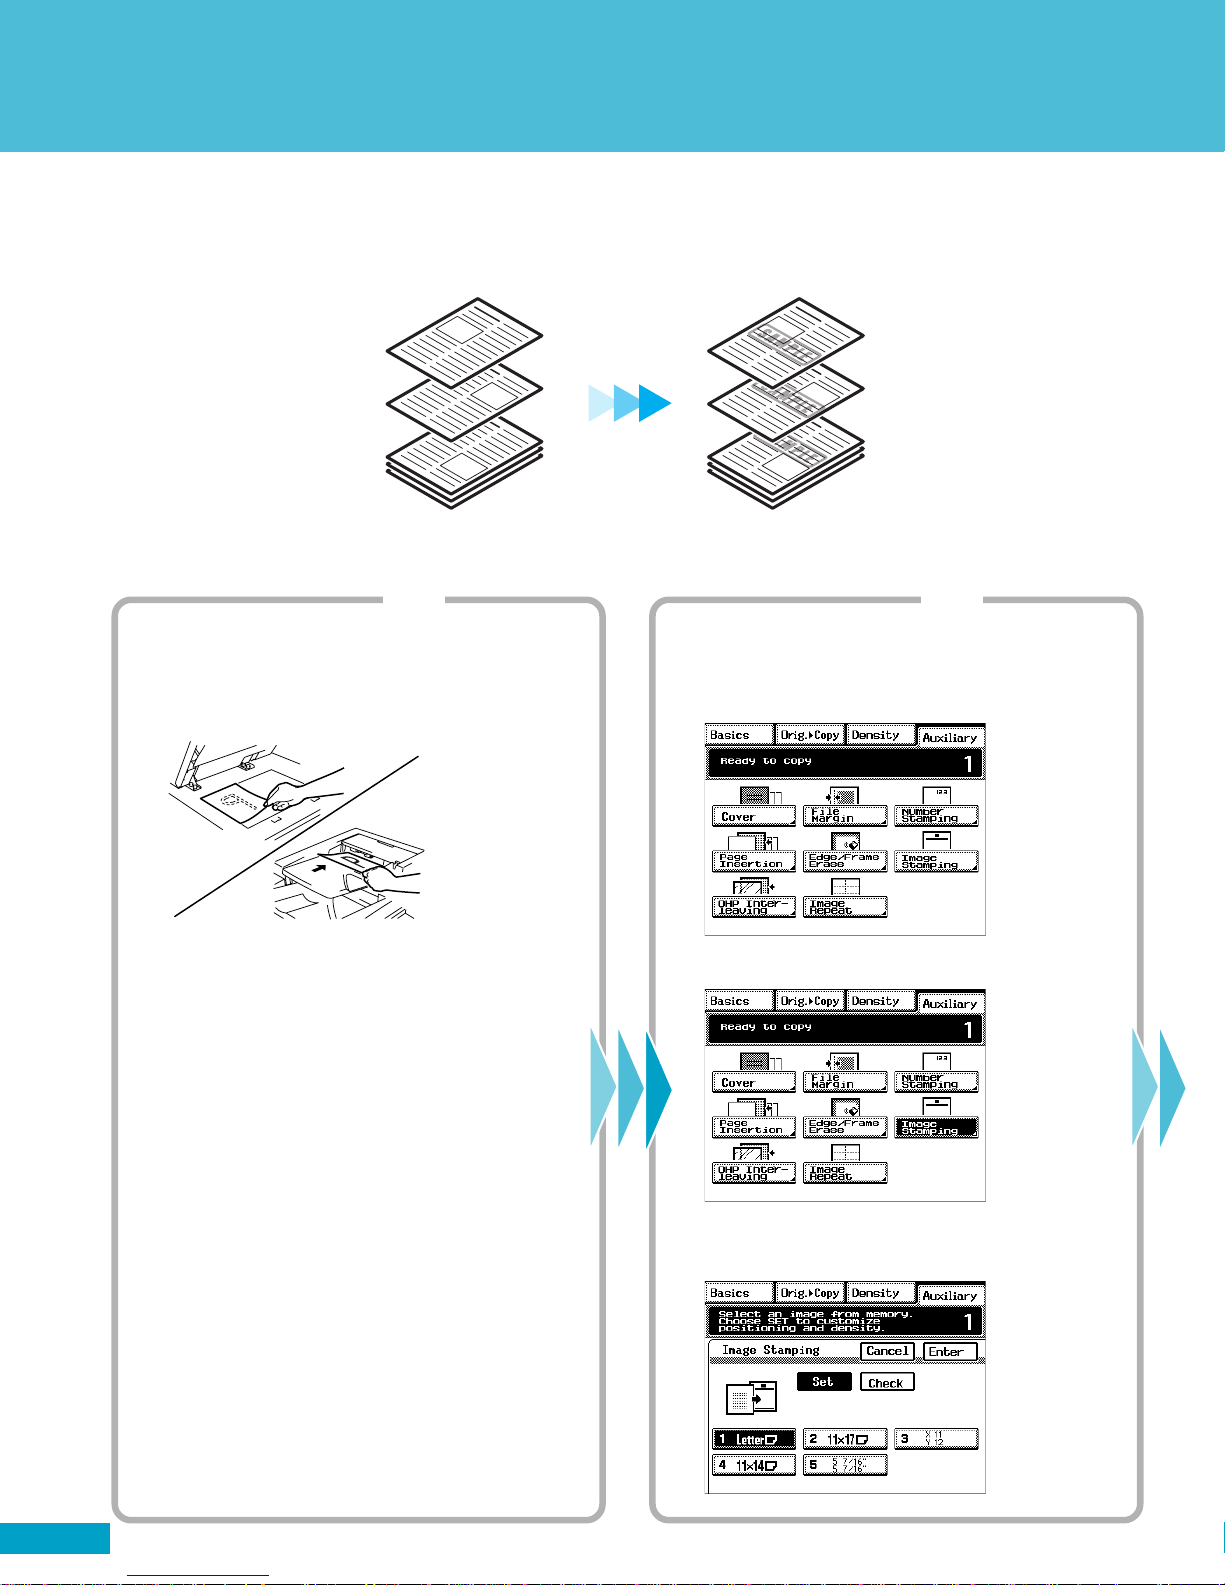
Stamping an Image on Copies
Characters or illustrations can be programmed into memory so that you can put them on
the finished copies like a stamp.
CopiesOriginals
4002O301CA
Step 1 Step 2
Placing the original(s)
1. Place the original(s).
Making the Touch Panel settings 1
1. Touch [Auxiliary].
C4028P002CA
4002O149AC
2. Touch [Image Stamping].
C4028P113CA
3. Touch [Set] and then the number key in which
your image has been stored.
8
C4028P116EA
Page 11

❏ NOTE
· You will need a Hard Disk Drive Kit and 32MB Memory mounted on
your machine.
✍Useful Tips
· Page number can be printed.
· Reference number can be printed.
· The date can also be printed.
Operator’s Manual
Reference Pages:
Image Memory Input
☞p.5-6
Number Stamping
☞p.3-60
Date☞p.3-61
Page☞p.3-62
Distribution☞p.3-63
Image Stamping
☞p.3-64
Step 3
Making the Touch Panel settings 2
1. Select the image stamping position.
2. Touch [Enter].
Step 4
Starting the copy cycle
1. Press the Start key.
C4028Q001CA
4002O280CB
C4028Q002CA
9
Page 12

Storing an Image
Image samples: Make a copy of the images “SAMPLE” and “REFERENCE” below and cut
them out. You can store them into memory and add them to your documents using the Image Stamping feature.
4002O306CA
Step 1 Step 2
Making the Touch Panel settings 1
1. Press the Utility key.
2. Touch [Job/Image/Scan Input].
3. Touch [Image Memory Input].
Placing the original
1. Place the original for the image to be stamped
on the Original Glass.
Make sure that it is placed in the direction
shown.
4002O282CA
4002O316AB
2. Select the direction of the image.
4003P142CA
4003P162CB
10
4003P152CA
Page 13

Image samples: Make a copy of the images “DRAFT” and “CONFIDENTIAL” below and cut
them out. You can store them into memory and add them to your documents using the Image Stamping feature.
4002O307CA
Step 3 Step 4
Making the Touch Panel settings 2
1. Touch [Input], then touch the desired image
number key, in which you want to store the
image. (The number marked with is
available for storing an image.)
4003P453EC
2. Touch [Auto Detect] and then [Enter].
Storing the image
1. Press the Start key.
4002O280CB
4003P455EB
11
Page 14

Control Panel Adjusting Dial
The surface of the control panel for this unit can be adjusted to different angles.
Turn the control panel adjusting dial until the control panel is at an angle where it can easily
be operated.
12
C4028U004AA
Page 15

13
Page 16

Making Copies on Post Cards
Save time and money by copying your data on the correct side of the postcards every time.
4002O302CA
Step 1 Step 2
Placing the original
1. Place your original face down on the Original
Glass. Make sure that it is placed in the
direction shown.
4002O300AB
2. Touch [Orig. Copy].
3. Touch [Original Direction] and select .
Loading post cards
1. Load the post cards in the Multi Bypass Tray.
Note the correct direction of the post card for
loading.
* Be sure to face up the post cards.
4002O303CB
Up to 20 post cards can be loaded.
When you have loaded your post cards, a
new screen will appear.
4. Touch [Enter].
14
C4028Q003CA
C4028P012EA
Page 17

❏ NOTE
· These pages give an example of making copies on 4x6 post cards.
For any other sizes, take measurements of the particular post card for
your own use.
✍Useful Tip
· When using the Multi Bypass Tray as the paper source, be sure to
place post cards face up on the tray.
Step 3 Step 4
Operator’s Manual
Reference Pages:
Manual Bypass☞p.3-11
Making the Touch Panel settings
1. Touch [Paper Type] and select [Card/Vellum].
C4028Q004EA
2. Touch [Enter].
3. Touch [Custom Size]. A new screen will appear.
4. Touch [X] and, using [ ] or [ ], show “6.”
C4028Q005EA
Starting the copy cycle
1. Press the Start key.
4002O280CB
This will produce a copy as shown below.
4002O304CA
5. Touch [Y] and, using [ ] or [ ], show “4.”
6. Touch [Enter].
15
Page 18

Making Copies from a Book
Use the Book feature to make copies from bound originals.
1st Page
2nd Page
Original Copy
Step 1 Step 2
Placing the original
1. Place the bound original on the Original Glass
in correct alignment with the book mark as
illustrated. (Make a copies in ascending order
of the original page.)
Book Mark
BOOK
1st Page
2nd Page
4002O087AA
Making the Touch Panel settings 1
1. Touch [Orig. Copy].
C4028P007CA
1155O697AA
2. Touch [Book].
C4028P061CA
3. Touch [Standard Book] or [Right Bound] and
touch [Separation]. Then, touch [Enter].
C4028P063CA
16
Page 19

✍Useful Tip
· You can use the erase function to erase shadows at the center and/or
edges that would otherwise appear on the copy.
Step 3 Step 4
Operator’s Manual
Reference Pages:
Select Book☞p.3-40
Making the Touch Panel settings 2
1. Touch [Double-Sided].
C4028Q006CA
2. Touch [Page arrange].
C4028P065CA
3. Select [Book-Order] and touch [Enter].
Starting the copy cycle
1. Press the Start key.
4002O280CB
2. If the message as shown below appears, turn
to next page and press the Start key again.
4003P242CA
3. Repeat step 2 until the last page is scanned.
Then touch [Finish] and press the Start key.
C4028P068CA
17
Page 20

Making a Booklet
Use the Booklet Creation, Crease and 2-Point Staple features to make copies and bind
them into a booklet.
Original
Step 1 Step 2
Loading the originals
1. Load your originals.
4002O122AC
Copy
4002O324AC
Making the Touch Panel settings 1
1. Touch [Orig. Copy].
C4028P007CA
2. Touch [4in1/Booklet].
18
C4028P055CA
3. Touch [Booklet Creation] and then touch
[Enter].
C4028P056CA
Page 21

❏ NOTE
· You will need an Electronic Document Handler and a Finisher 9708
mounted on your machine.
✍Useful Tip
· The paper size and zoom ratio can be set according to your need.
Step 3 Step 4
Operator’s Manual
Reference Pages:
Finishing Functions
☞p.3-20
Staple☞p.3-24
Selecting the Original
Copy Type☞p.3-36
Making the Touch Panel settings 1
1. Touch [Finishing] and then [Folding].
C4028Q008EA
2. Touch [Crease].
C4028Q009EA
3. Touch [2-Point Staple] and then [Enter].
Starting the copy cycle
1. Press the Start key.
4002O280CB
C4028Q010EA
19
Page 22

Saving Paper
Reduce paper consumption and save money by making 2-sided copies and 2in1 copies.
Originals
Step 1 Step 2
Loading the originals
1. Load your originals.
2-Sided Copies
2in1 Copies
4002O088AA
Making the Touch Panel settings 1
1. Touch [Orig. Copy].
C4028P007CA
20
4002O122AC
Page 23

❏ NOTE
· You will need an Electronic Document Handler mounted on your machine.
✍Useful Tip
· The use of 2-sided 2in1 or 1-sided 4in1 reduces paper consumption
by 75% and the use of 2-sided 4in1 reduces it by an outstanding 87.5%.
Originals
Operator’s Manual
Reference Pages:
Slecting the Original
Copy Type☞p.3-36
2-sided 2in1
Step 3 Step 4
Making the Touch Panel settings 2
Setting 1-sided 2in1 copy
1. Touch [Single-2in1].
Setting 2-sided copy
1. Touch [Double-Sided].
1-sided
4in1
C4028Q011EA
2-sided 4in1
4002O089AB
Starting the copy cycle
1. Press the Start key.
4002O280CB
C4028P054CA
21
Page 24

Saving Power Consumption
You want to shut down your machine when it is not in use.
You want to save power consumption from the energy-saving viewpoint.
This machine offers two power saving functions: Auto Shut Off and Energy Saver.
Auto Shut Off automatically shuts down the machine a given period of time after the last
operation.
Energy Saver keeps the machine in the standby state, instead of shutting it down completely.
Step 1 Step 2
Setting User’s Choice
1. Press the Utility key.
2. Touch [User’s Choice].
3. Touch [5/6].
4002O282CA
4003P168CA
Setting Energy Saver
1. Touch [Energy Save Mode].
4003P249CA
2. From the 10-Key Pad, enter the desired time
for the machine to enter the Energy Saver
mode.
4003P250CA
22
3. Touch [Enter].
4003P248CA
4003P251CA
Page 25

❏ NOTES
· The option of “Auto Shut Off” available on the screen will be changed
to “Sleep” if the machine is equipped with a Printer Controller.
· Sleep also keeps the machine in the standby state, instead of shutting
it down completely.
✍Useful Tips
· To cancel Sleep or Energy Saver, press any key on the control panel.
· Pressing the Energy Saver key on the control panel sets the machine
into the Energy Saver mode immediately.
Step 3
Setting Auto Shut Off
1. Touch [Auto Shut Off].
Operator’s Manual
Reference Pages:
Auto Shut OFF☞p.2-20
Sleep☞p.2-20
Energy Saver☞p.2-20
User’s Choice☞p.5-12
4003P252CA
2. From the 10-Key Pad, enter the desired time
to shut down the machine.
4003P253CB
3. Touch [Enter].
4003P254CB
23
Page 26

Running out of Paper
If a copy cycle stops in mid-operation, first check the display on the Touch Panel.
If the message “Replenish paper.” is shown, add paper according to the instructions given
on the label affixed to the locations shown in the diagram.
Locations of Label Giving Instructions on
How to Add Paper
* The illustration shows a system with a Large Capacity Cabinet.
24
C4028Q012AA
Page 27

❏ NOTE
· Make sure that paper is loaded no higher than the mark (Max. Level
Indicator).
Operator’s Manual
Reference Pages:
Adding paper☞p.6-2
25
Page 28

Paper Misfeed
When the message “Misfeed detected.” appears on the Touch Panel, remove the sheet of
misfed paper according to the instructions given on the label.
If any other message appears, refer to “Chapter 6 When a Message Appears” (p.6-1) of the
Operator’s Manual.
Locations of Label Showing
How to Clear a Misfeed
Electronic Document
Handler
Inside the Machine
Duplex Unit
Electronic Document
Handler
Large Capacity Cassette
* The illustration shows a system with a Large Capacity Cabinet.
26
C4028Q013AA
Page 29

❏ NOTE
· The locations of the label vary depending on the options mounted on
the machine.
Locations of Label Showing
How to Clear a Misfeed
Top Cover [FN1]
Operator’s Manual
Reference Pages:
When a Message
Appears☞p.6-1
Front Door [FN4]
Right Door [FN7]
4002O259AB
* The illustration shows the Finisher 9710.
27
Page 30

Page 31

 Loading...