

Page 1
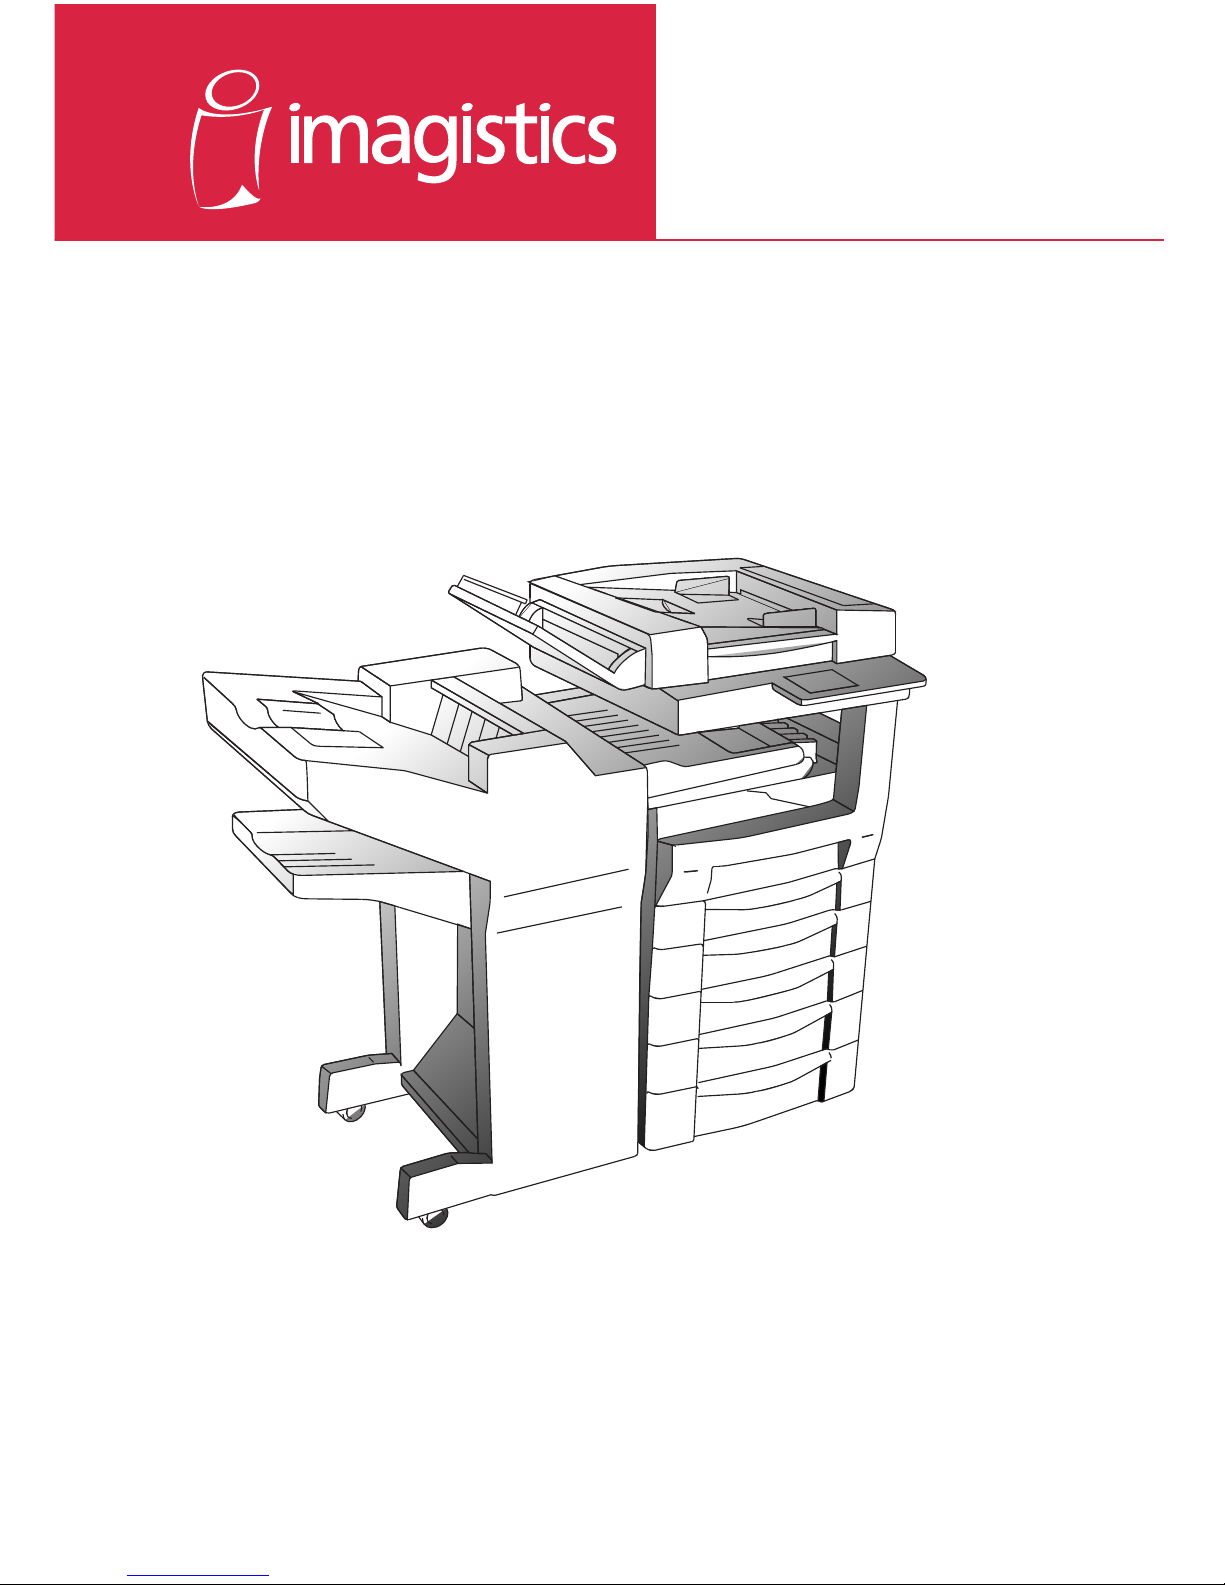
www.imagistics.com
Quick Reference Guide
For use with Imagistics and Pitney Bowes DL260/360 copier/printers.
DL260/360
Page 2

Contents
◆ Using Control Panel keys. . . . . . . . . . . . . . . . . . . . . 1
◆ Making Copies. . . . . . . . . . . . . . . . . . . . . . . . . . . . . 2
◆ Loading Paper . . . . . . . . . . . . . . . . . . . . . . . . . . . . . 8
◆ Replenishing the Toner . . . . . . . . . . . . . . . . . . . . . 16
◆ Replacing the Staple Cartridge . . . . . . . . . . . . . . . 18
◆ Clearing Misfed Paper . . . . . . . . . . . . . . . . . . . . . . 20
◆ Clearing a Staple Misfeed . . . . . . . . . . . . . . . . . . . 34
Page 3
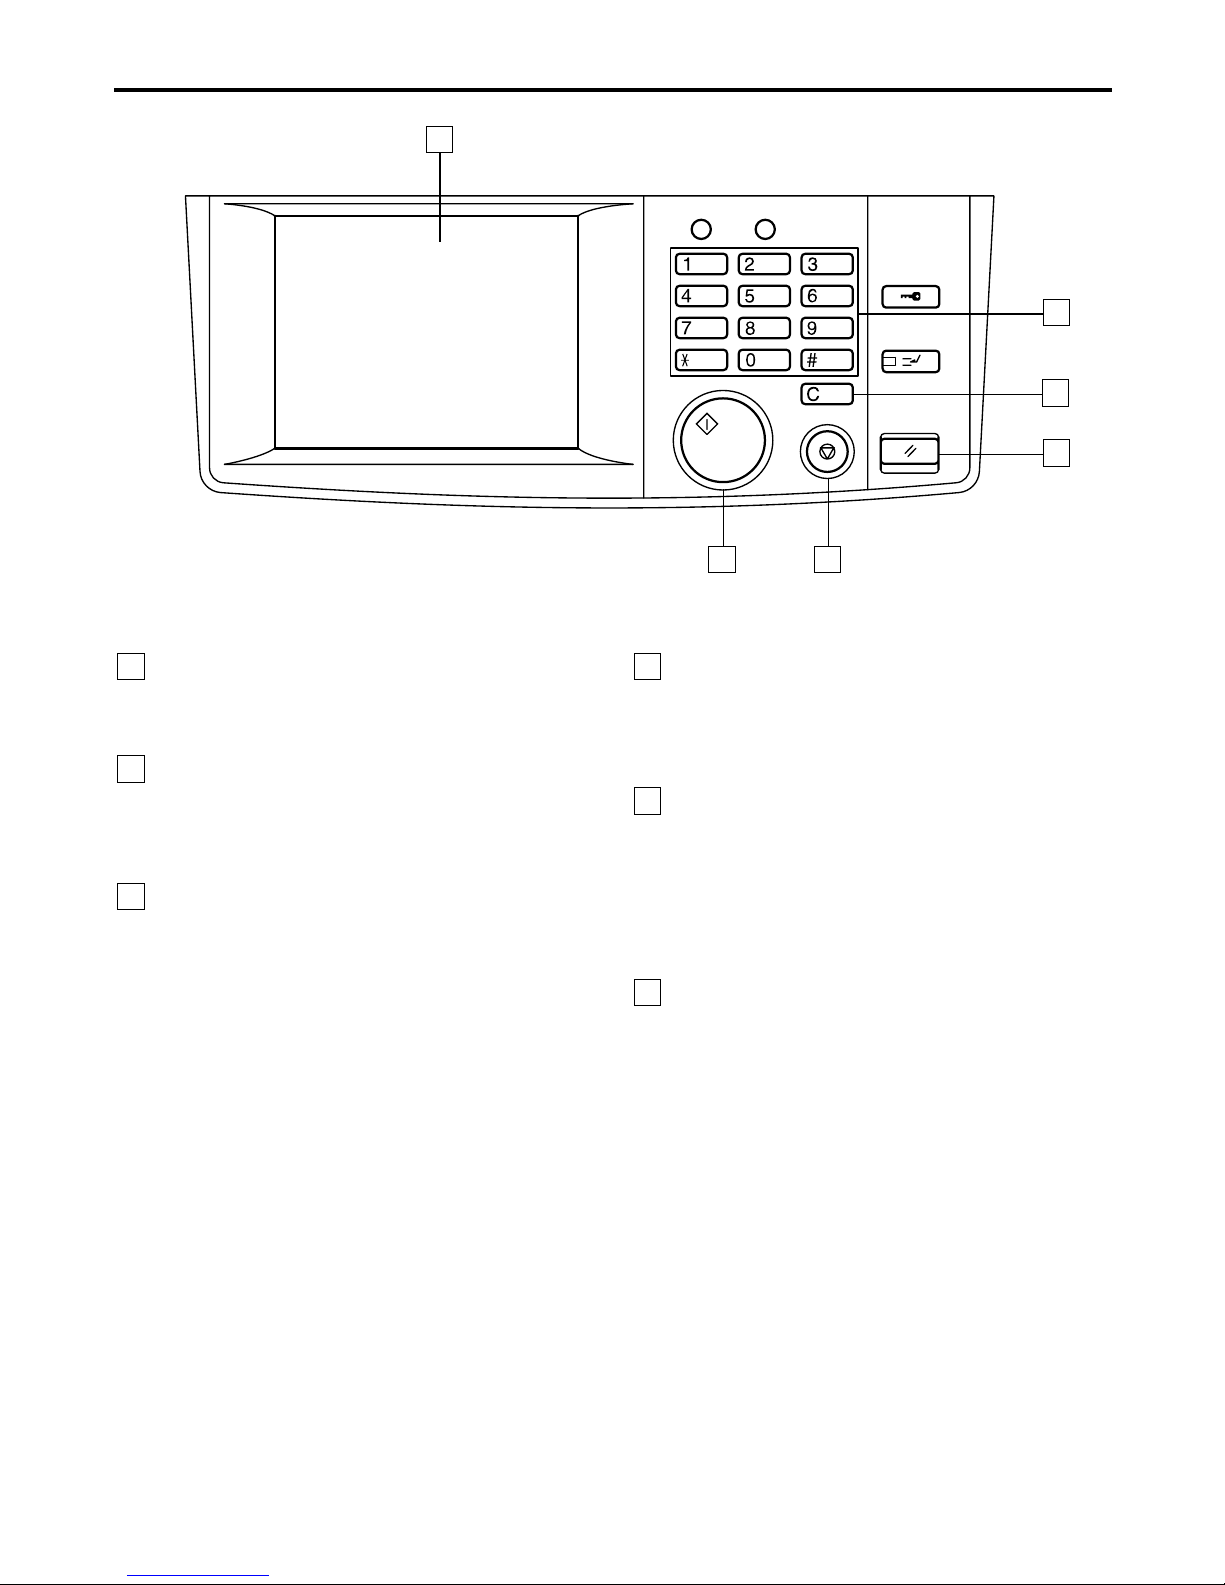
Using Control Panel Keys
1
2
3
4
1166O239DA
1
Touch Panel
•Shows various screens and messages.
2
10-key Pad
•Use to enter the num ber of cop ies to be
made and the various numeric values.
3
Clear Key
Press to :
•Reset the multi-copy entry to 1.
•Clear the sett ings ente red from t he
10-key Pad and the a ccess code ent ered.
•Clear the image data scanned.
6
4
Panel Reset Key
•Press to set the c opier into the initial
mode.
5
Stop Key
Press to :
•Stop a print cycle.
•Stop a scanning cycle.
6
Start Key
•Press to start the document scanning
sequence or print cycle.
•Lights up green to accept a print
command; lights up orange to reject
one.
5
1
Page 4
2
3
4
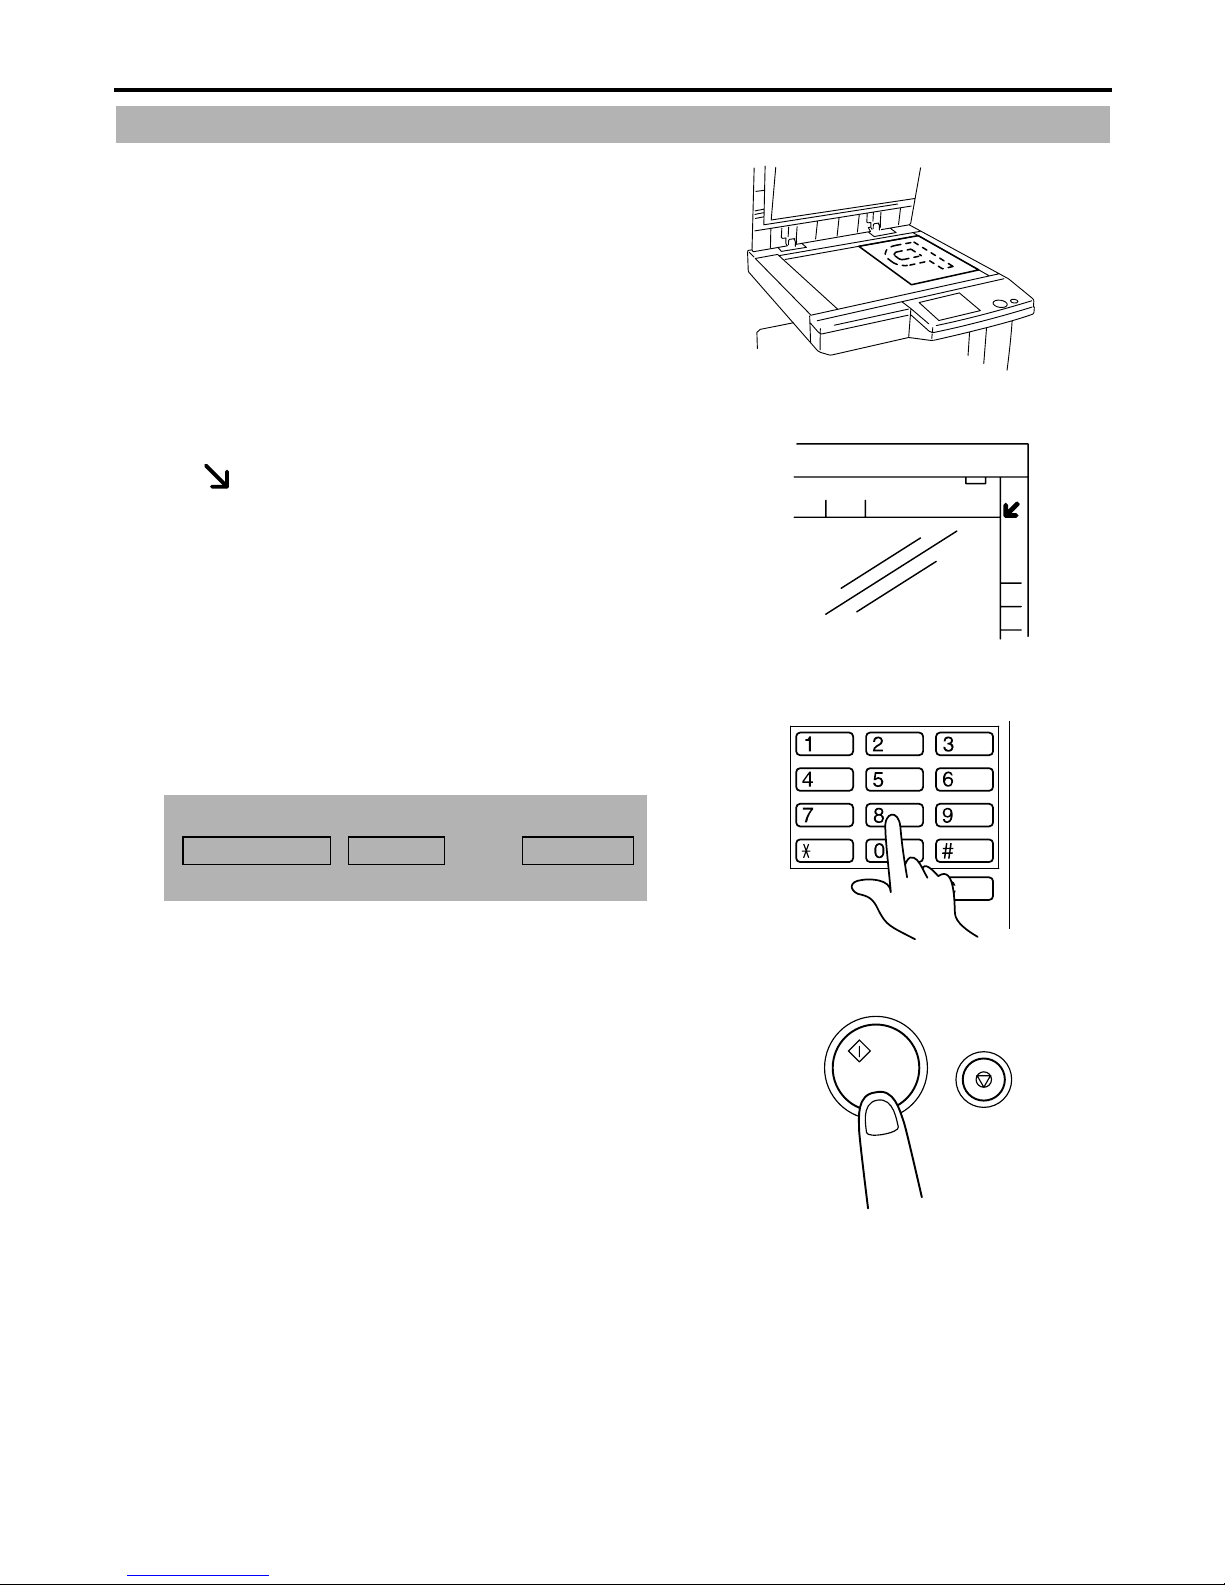
Making Copies
Placing Originals on the Glass
Raise the Original Cover or Document Feeder
1
and place the or igina l fa ce do wn o n the Gl ass.
Align the rear ri ght corner of the ori ginal with
the marker on the Width Scale of the
original glass . Gently lower the O riginal
Cover or Document Feeder.
1166O027AA
From the 10- Key Pad, se t t he desi red numbe r
of copies to be made.
If you want to use the auxiliary func tions, touch
Orig. Copy▼Density Auxiliary
Key and set the appropriate functions.
Press the Start key.
,, or the
1166O192AA
1166O030AA
1166O245DA
2
Page 5
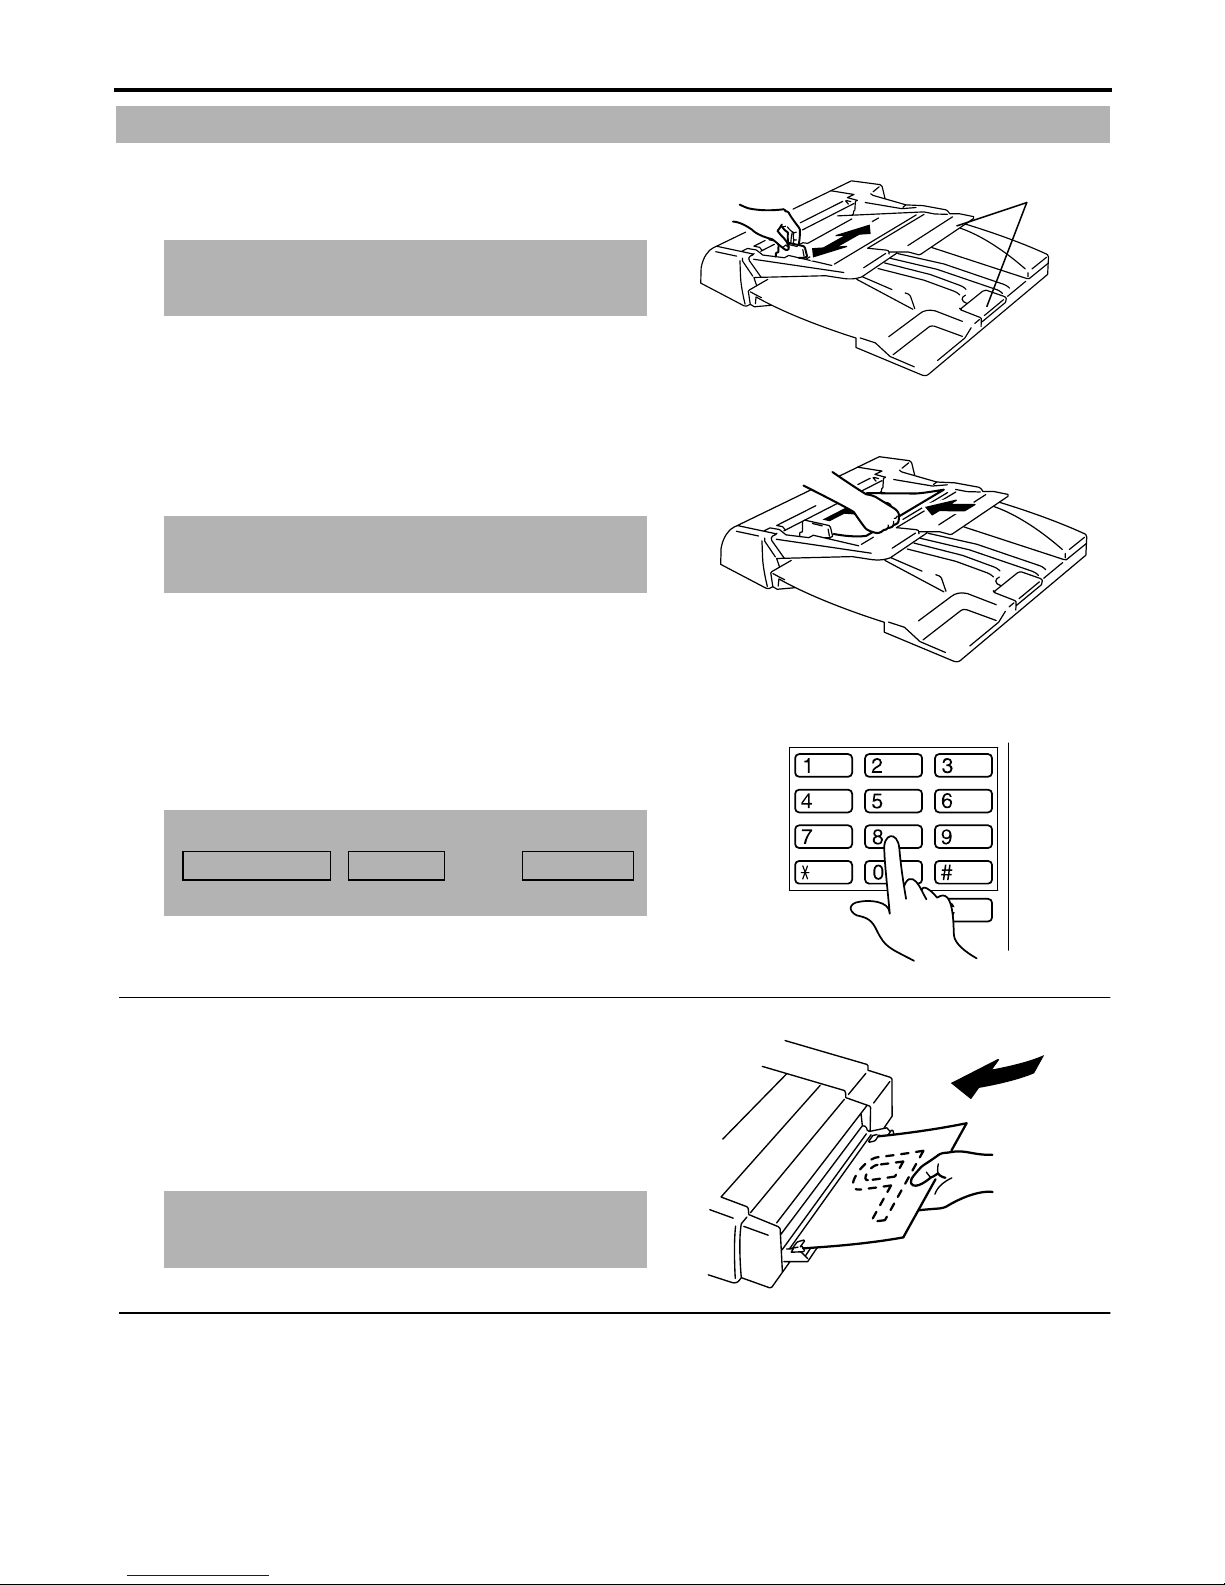
Using the Document Feeder
2
3
Slide the Docume nt Guide Pla te to the size of
1
the originals.
When using large size originals, flip up the
Extenders.
Load a neat stack of originals face up on the
Document Feed Tray.
Make sure that the top level of the original stack
does not exceed the ▼ marking.
Extender
1166O022AA
1166O024AC
From the 10- Key Pad, se t t he desi red numbe r
of copies to be made.
If you want to use the auxiliary func tions, touch
Orig. Copy▼Density Auxiliary
Key and set the appropriate functions.
,, or the
<Using the Single Automatic Document
Feeding Mode (SADF Mode)>
Open the Single Document Feed Tray, slide
the Guide Plate to the size of the ori g i nal an d
insert the original face down into the Tray.
The original is automatically taken up and the
copy cycle is started.
1166O030AA
1166O026AB
3
Page 6
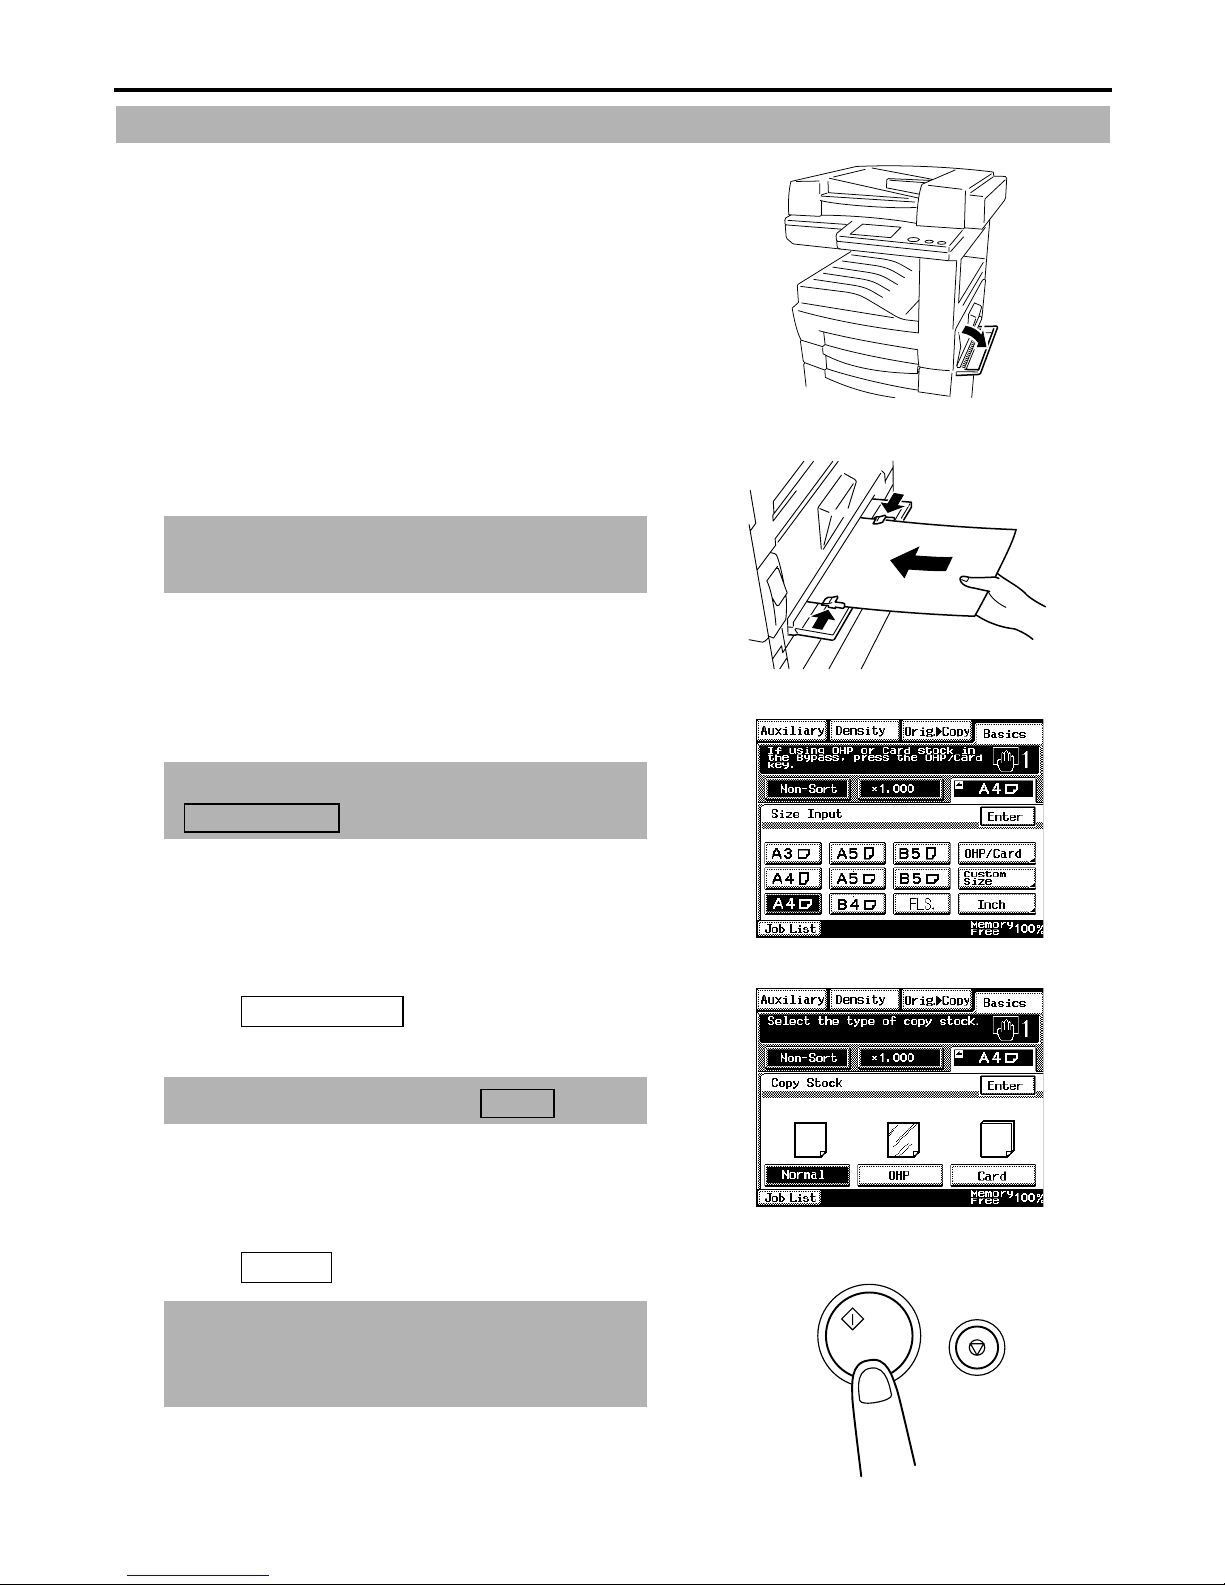
Using the Manual Bypass T ray (F or Metric Area)
2
3
4
5
Open the Manual Bypass Tray.
1
Slide the P aper Gui des to the siz e of the cop y
paper and insert a sheet of paper.
The paper will be copi ed on the sid e facing
down.
1166O193AA
116O032AB
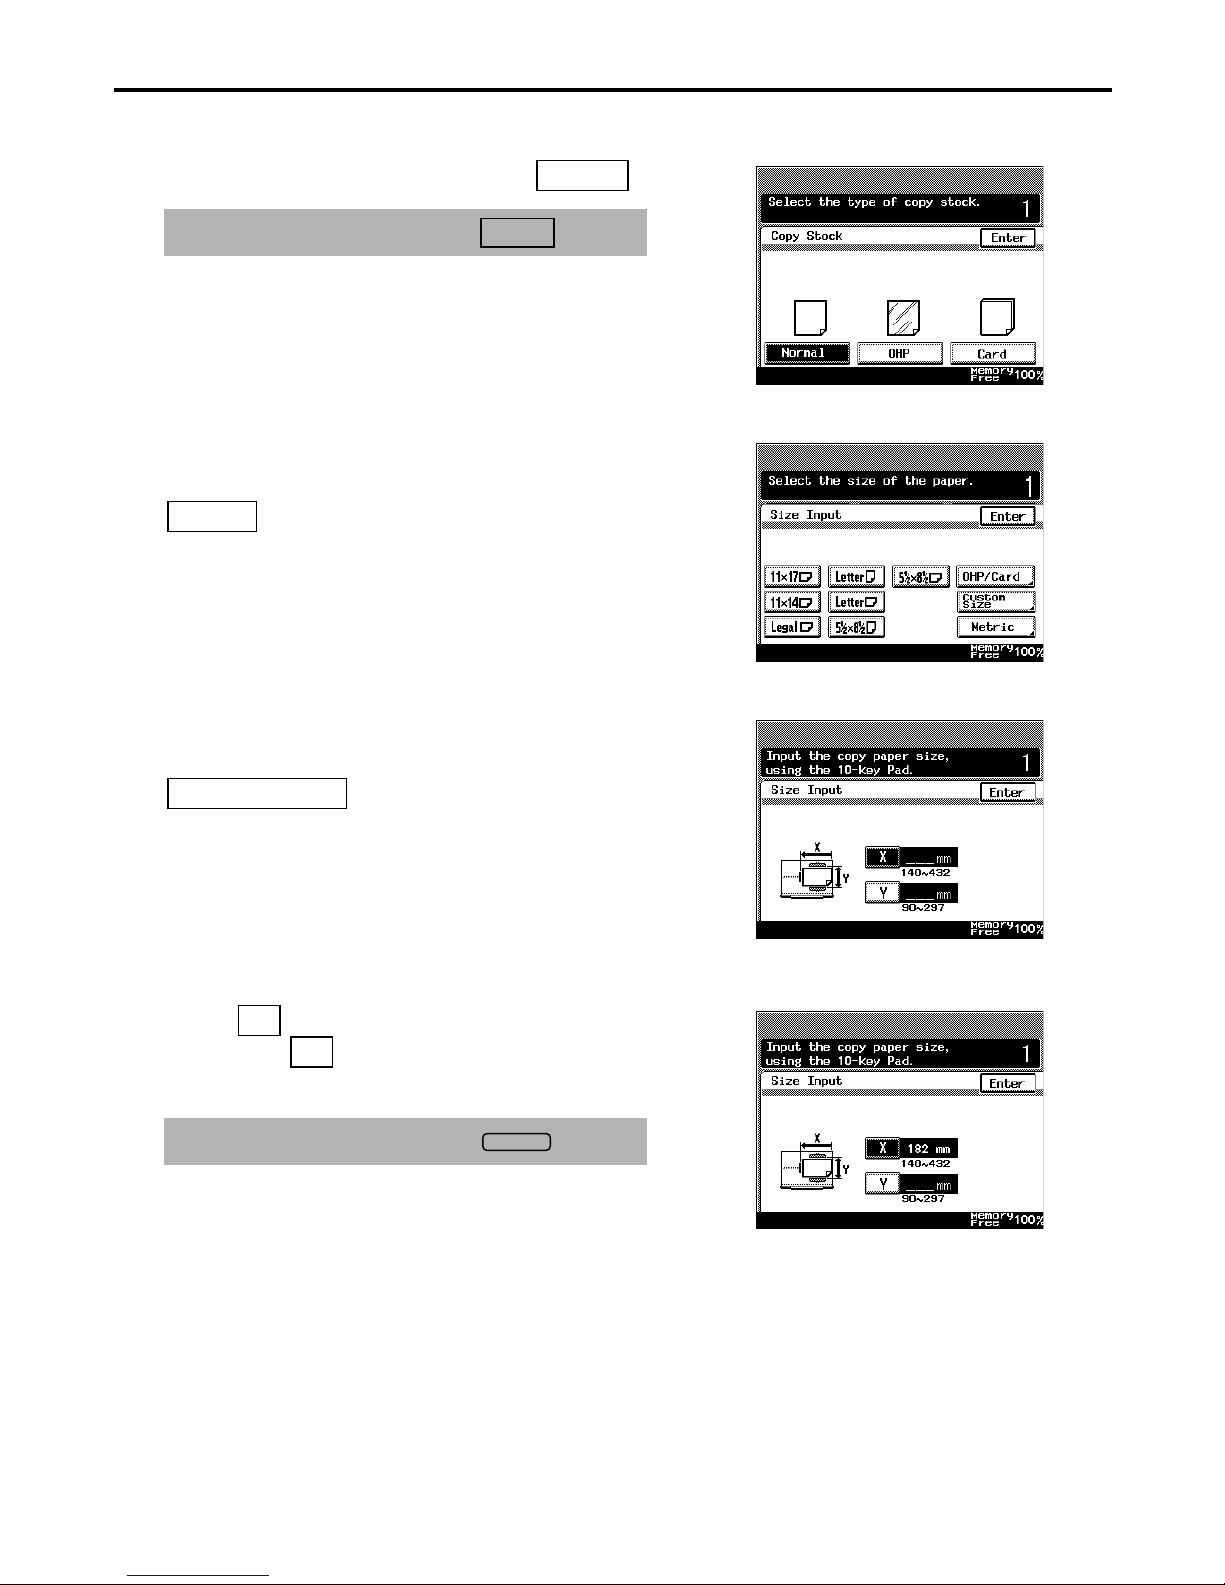
Select the desired copy paper size.
If the copy paper is a non-standard size, touch
Custom Size
Touch and select the type of
paper.
When you use labels, touch .
Touch and press the Start key.
OHP/Card
Enter
.
Card
1168P009DC
1168P010DC
The copier automatically starts the copy
cycle when the paper is inserted into the
Manual Bypass Tray after the first copy.
1166O245DA
4
Page 7
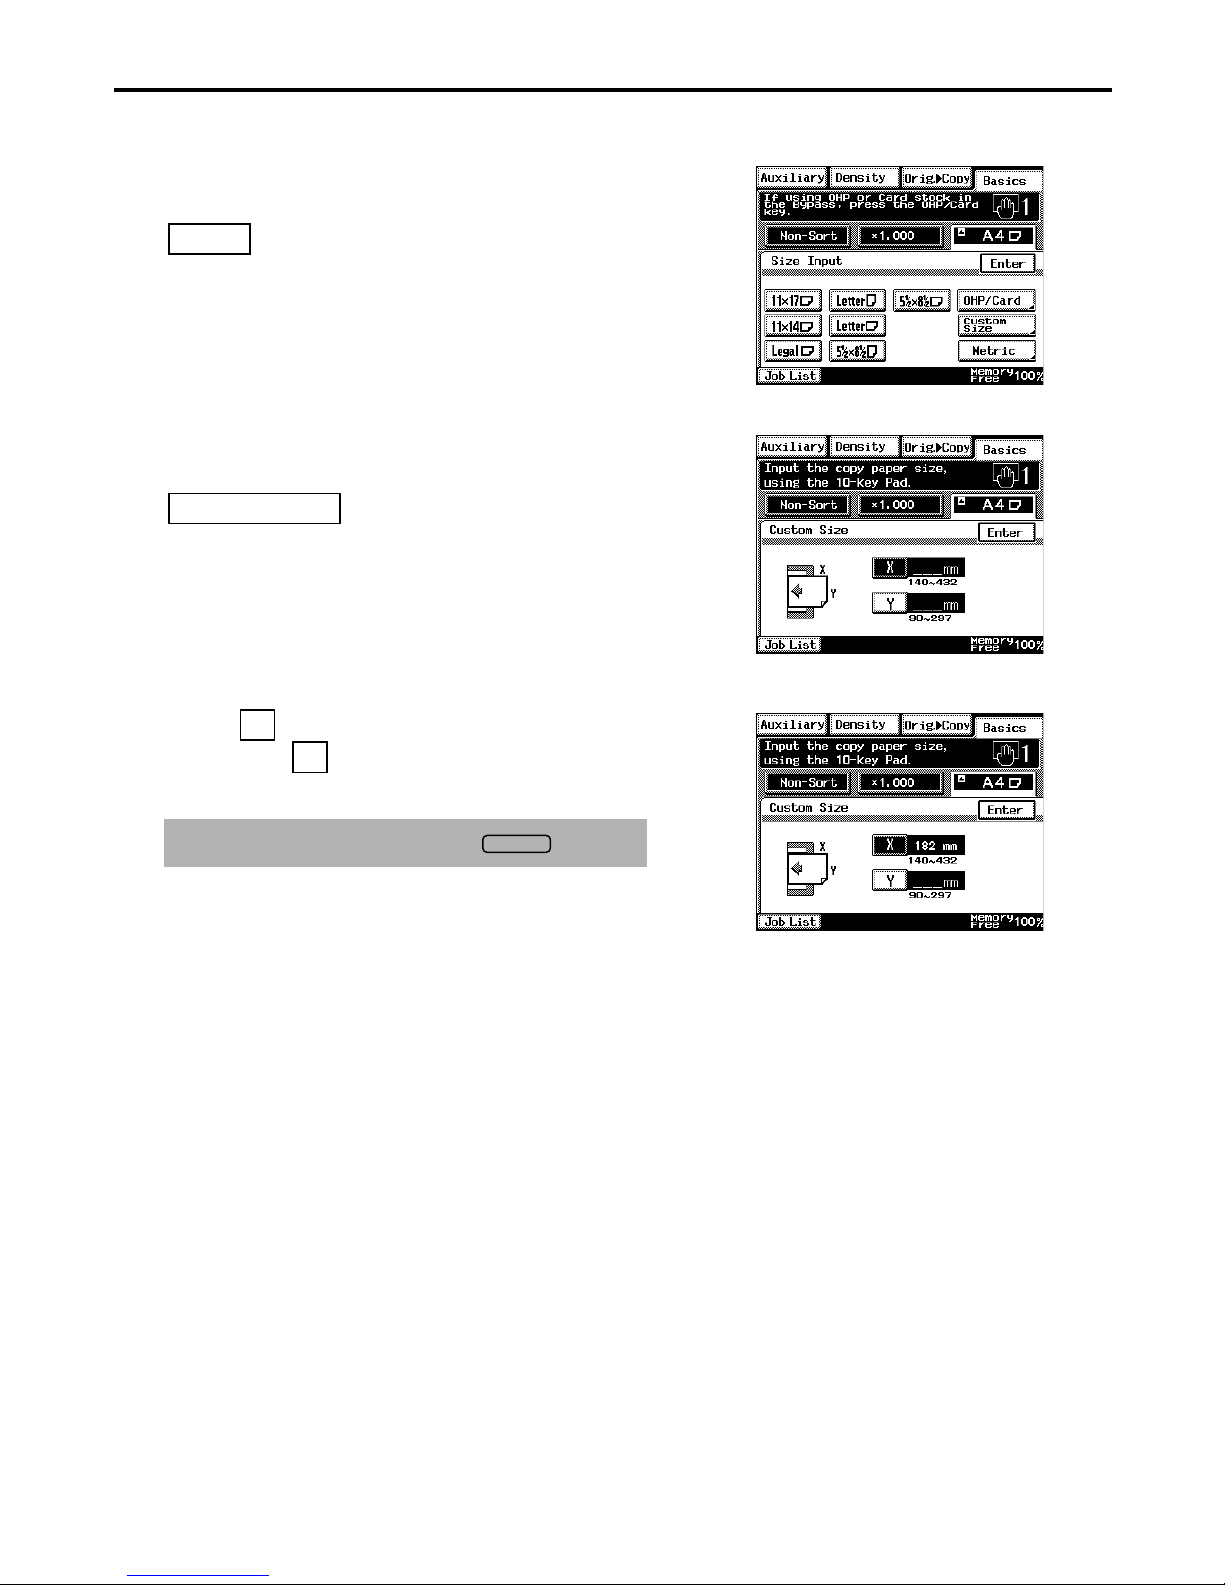
<Using Inch Size Paper>
2
When you want to use inch size paper, touch
1
<Using Nonstandard Size Paper>
1
Inch
hav e a screen t hat allo ws y ou to selec t an inch
paper size.
When you use a nonstanda rd size paper , touch
Custom Size
on the s creen gi ve n in st ep 3 and you
.
1168P012DC
1168P013DC
T o uch and ente r the si ze fr om the 1 0-k ey
Pad. Touch and enter the size from the
10-key Pad.
To correct a ratio, press the key.
X
Y
C
1168P014DC
5
Page 8

Using the Manual Bypass T ray (F or Inch Area)
2
3
4
5
Open the Manual Bypass Tray.
1
Slide the P aper Gui des to the siz e of the cop y
paper and insert a sheet of paper.
The paper will be copi ed on the sid e facing
down.
1166O193AA
116O032AB
Select the desired copy paper size.
If the copy paper is a non-standard size, touch
Custom Size
Touch and select the type of
paper.
When you use labels, touch .
Touch and press the Start key.
OHP/Card
Enter
.
Card
1170P009EC
1170P010EC
The copier automatically starts the copy
cycle when the paper is inserted into the
Manual Bypass Tray after the first copy.
1166O245DA
6
Page 9
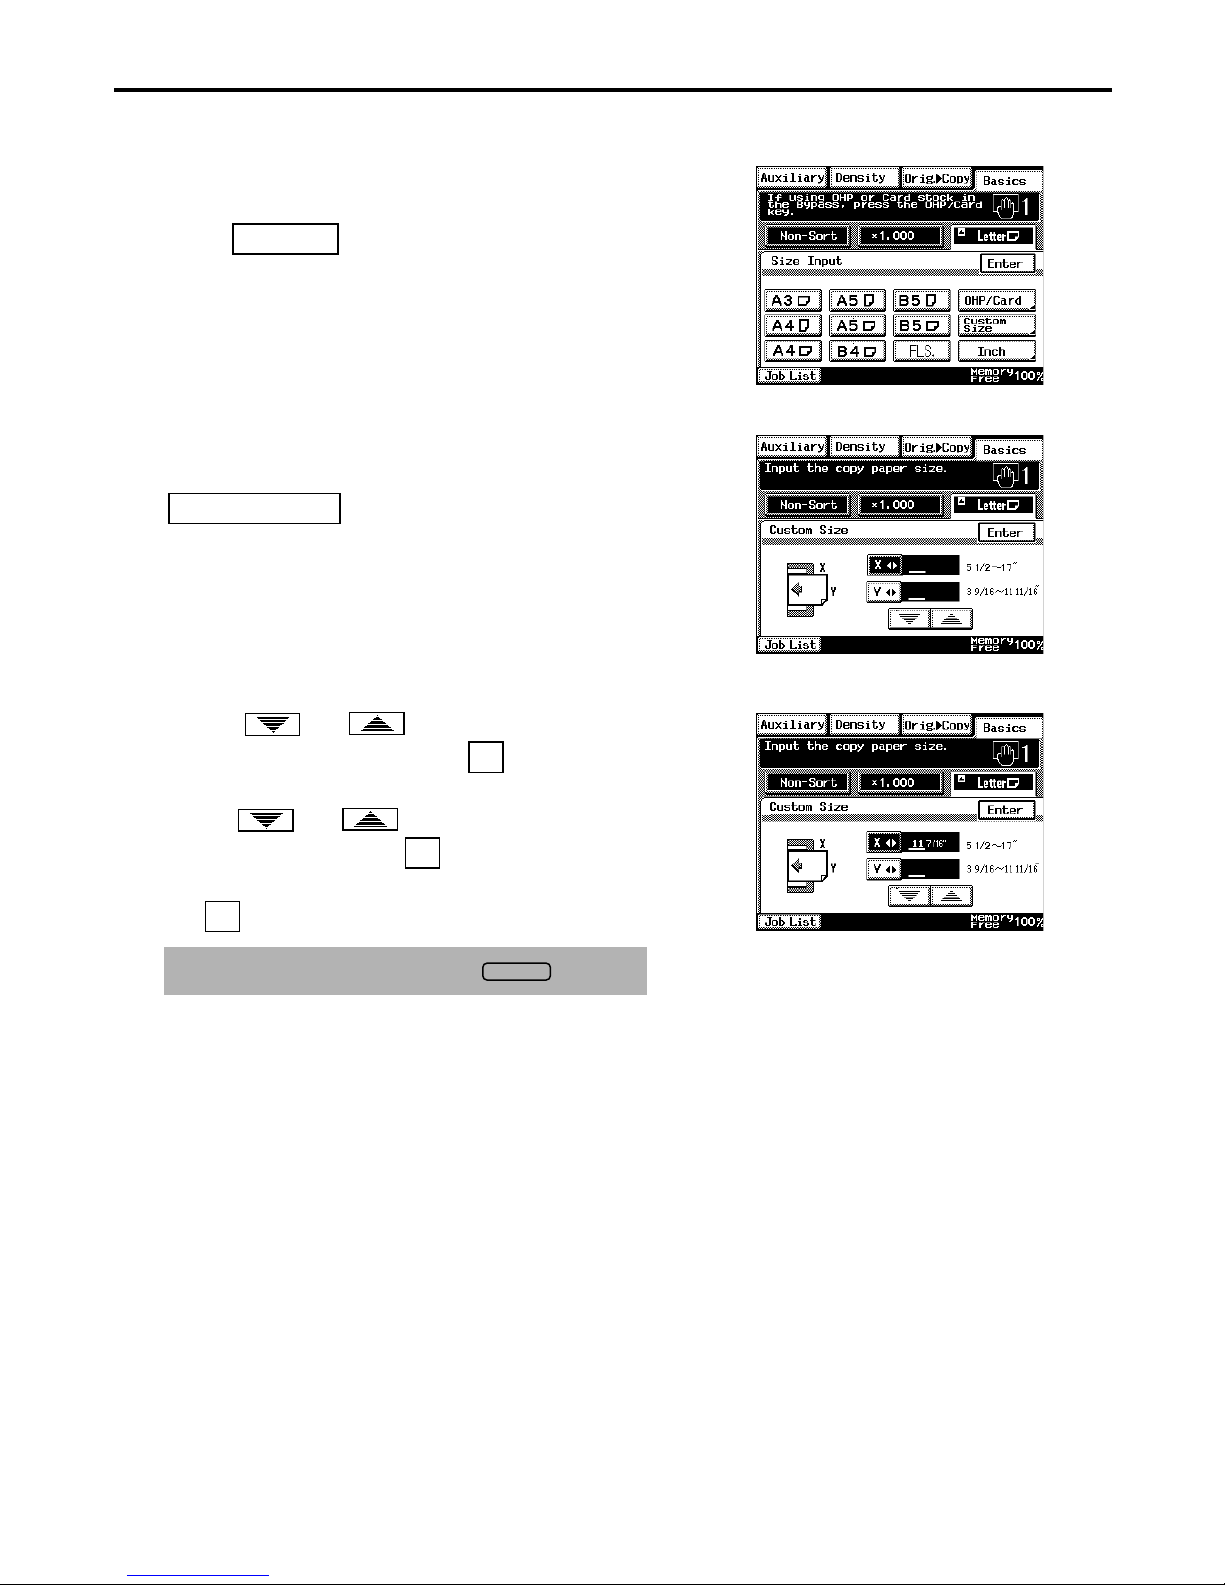
<Using Metr ic Siz e Paper >
2
When you want to use metric size paper,
1
touch on the screen given in step 3
and you hav e a screen that allo ws you to select
a metric paper size.
<Using Nonstandard Size Paper>
When you use a nonstanda rd size paper , touch
1
Custom Size
Touch or to set the whole
number for X and touch the key. The
underline moves to the right. Then
touch or to set the fractional
number and touch the key. Now the
value for X has been fi xed. Do the same
for .
To correct a ratio, press the key.
Metric
.
X
X
Y
C
1170P012EC
1170P013EC
1170P014EC
7
Page 10
2
3
4
5
Loading Paper
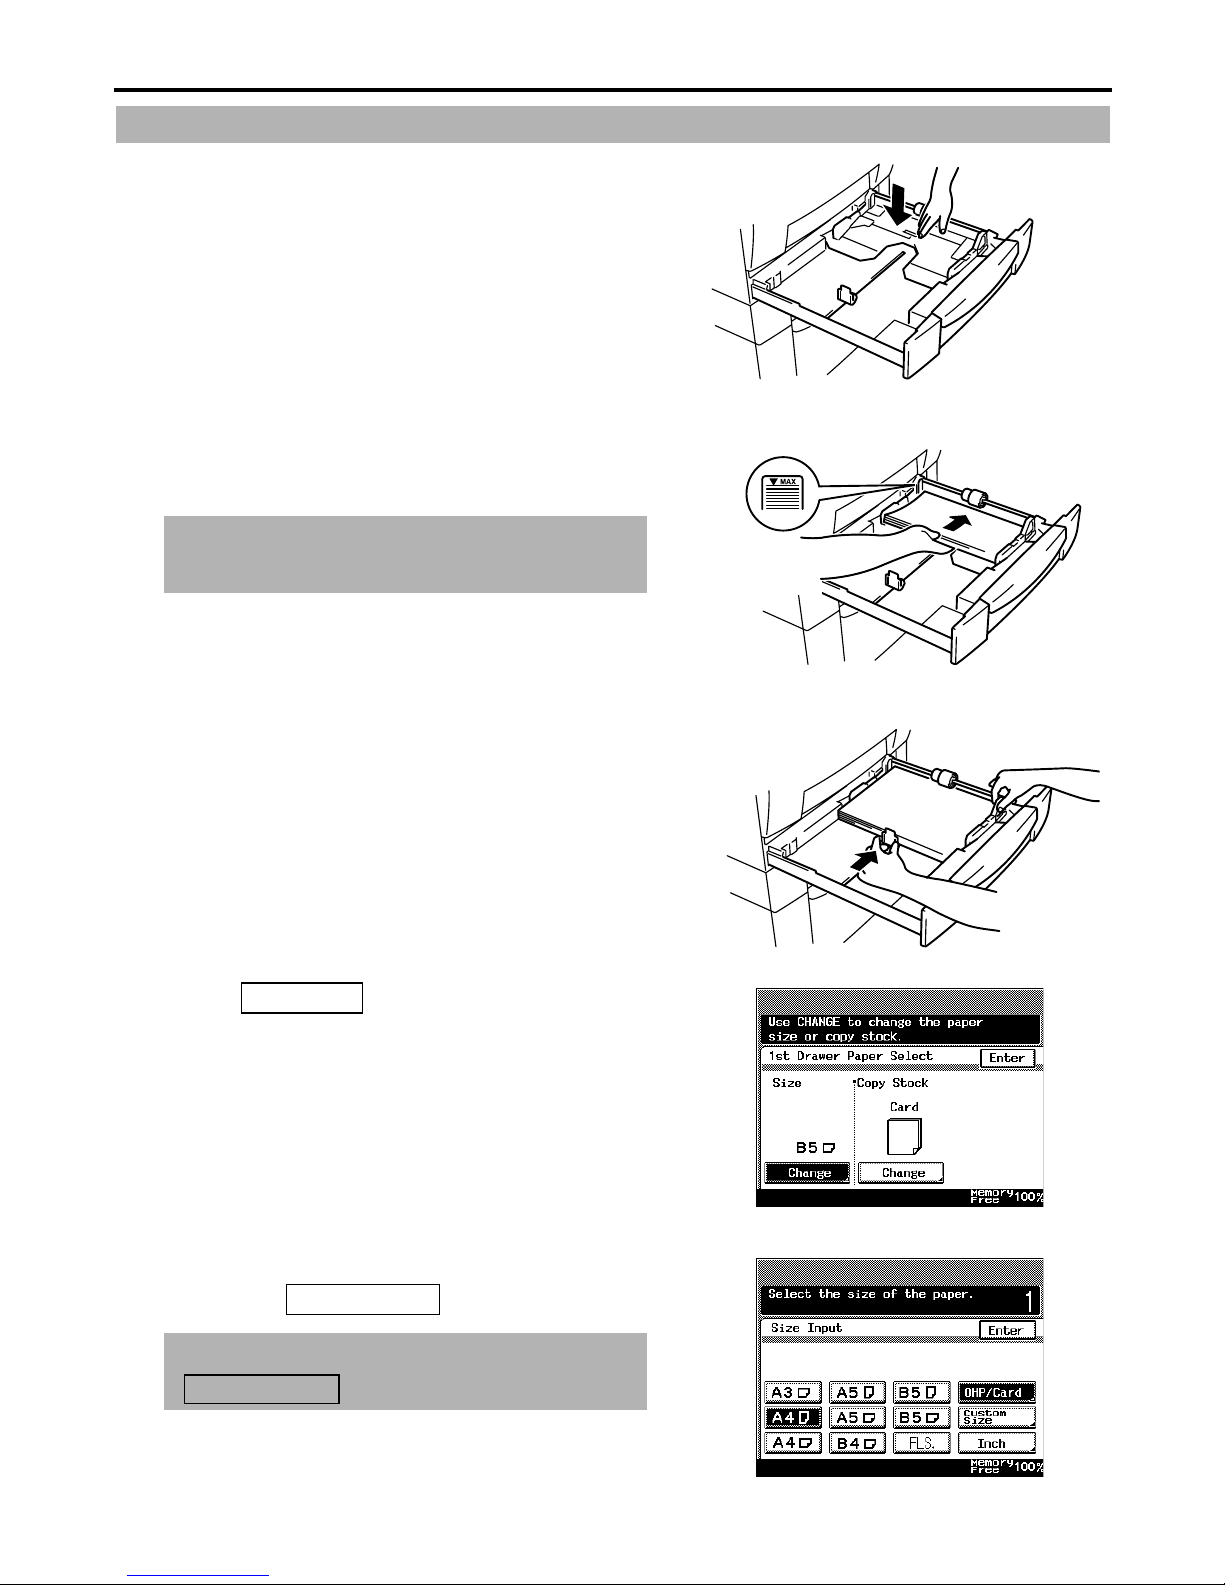
1st Drawer (For Metric Area)
Slide out the 1st Drawer. Press the Paper
1
Lifting Plate down until it locks.
Load the paper stack into the Drawer so that
its front side faces up.
The paper should be loaded no higher than the
▼ (Max. Level Indicator).
1166O078AA
Slide the Edge Guides to suit the paper size
and slide the Drawer back in.
Touch on the 1st Drawer Paper
Select screen.
Change
1168O079AA
1168O080AB
1168P155DC
Touch the key of the desired paper size and
then touc h .
If the copy paper is a non-standard size, touch
Custom Size
OHP/Card
.
1168P157DC
8
Page 11
Select the type of paper and touch .
2
6
Enter
When you use labels, touch .
<Using Inch Size Paper>
When you want to use inch size paper, touch
1
<Using Nonstandard Size Paper>
1
Inch
hav e a screen t hat allo ws y ou to selec t an inch
paper size.
When you use a nonstanda rd size paper , touch
Custom Size
5 and you have the following screen.
on the scree n given in st ep 5 and you
on the screen given in step
Card
1168P158CC
1168P159DB
T ouch and ente r the s ize from the 10-k ey
Pad. Touch and enter the size from the
10-key Pad.
To correct a ratio, press the key.
X
Y
C
1168P160DC
1168P161DC
9
Page 12

1st Drawer (For Inch Area)
2
3
4
5
Slide out the 1st Drawer. Press the Paper
1
Lifting Plate down until it locks.
Load the paper stack into the Drawer so that
its front side faces up.
The paper should be loaded no higher than the
▼ (Max. Level Indicator).
1166O078AA
1168O079AA
Slide the Edge Guides to suit the paper size
and slide the Drawer back in.
Touch on the 1st Drawer Paper
Select screen.
Touch the key of the desired paper size and
then touc h .
Change
OHP/Card
1168O080AB
1170P155EC
If the copy paper is a non-standard size, touch
Custom Size
.
1170P157EC
10
Page 13

Select the type of paper and touch .
2
6
Enter
When you use labels, touch .
<Using Metr ic Size Paper>
When you want to use metric size paper,
1
touch on the screen given in step 5
and you hav e a screen that allo ws you to select
a metric paper size.
<Using Nonstandard Size Paper>
When you use a nonstanda rd size paper , touch
1
5 and you have the following screen.
Metric
Custom Size
on the screen given in step
Card
1168P158CC
1170P159EB
Touch or to set the whole
number for X and touch the key. The
underline moves to the right. Then
touch or to set the fractional
number and touch the key. Now the
value for X has been fi xed. Do the same
Y
for .
To correct a ratio, press the key.
X
X
C
1170P160EC
1170P161EC
11
Page 14

2nd Drawer/Paper Feed Unit 9632
2
3
Slide out the drawer.
1
Load the paper stack into the Drawer so that
its front side faces up.
The paper should be loaded no higher than the
▼ (Max. Level Indicator).
1171U016AA
1171U017AA
Slid e the Drawer back i n.
1171U018AA
12
Page 15

Large Capacity Cabinet
2
3
4
Slide out the drawer.
1
Load the pa per st ack into the ri ght ha lf of the
drawer, front side face up. Press the leading
edge of the paper stack tightly up against the
right side of the Drawer.
The paper should be loaded no higher than the
▼ (Max. Level Indicator).
1166O088AA
1166O089AA
Load another paper stack into the left half of
the drawer, front side face up. Press the
leading edge of the paper stack tightly up
against the left side of the Drawer.
The paper should be loaded no higher than the
▼ (Max. Level Indicator).
Slid e the drawe r back in.
1166O090AA
1166O091AA
13
Page 16

Paper Feed Unit 9635
2
3
4
5
Slide out the drawer.
1
Press the Paper Lifting Plate down until it
locks.
1166O082AA
1166O083AA
Load the paper stack into the Drawer so that
its front side faces up.
The paper should be loaded no higher than the
▼ (Max. Level Indicator).
Pinch the tabs on th e Edge Guide and T railing
Edge Stop and slide them to the exact si ze of
the paper loaded.
Turn the Paper Setting Dial to the position
corresponding to the current paper size and
slide the Drawer back in.
Metric
1166O084AA
1166O085AB
Inch
14
1166O208DA
1166O209EB
Page 17

<When turning the Paper Setting Dial to “User
2
Set”>
Turning the Paper Setting Dial to “User Set”
1
accesses a scr een fr om whi ch you ca n choos e
an alternative paper size.
For Metric
1168P184DB
For Inch
1170P184EA
Touch the desired paper size and then touch
Enter
.
For Metric
1168P185DB
For Inch
1170P185EA
15
Page 18

2
3
4
5
Replenishing the Toner (418-0 Printpowder
Replacing the Toner Bottle (To reorder 418-0 Printpowder , call 1-800-462-6797)
Open the Toner Bottle Cover and gently pull
1
out the used Bottle.
If the Toner Bottle Cover is opened while the
Bottle is turning, the Bottle may be locked in
place, If this happens, close the Cover, wait for
the Bottle to stop, and try again.
1166O093AB
Sharply tap the new Toner Bottle against a
desk or other hard surface four to five times.
Then turn the Toner Bottle upside down and
tap it the same way again.
Shake the new Toner Bottle well and turn it
over lengthwise five times.
Make sure to carry out the procedure above to
agitate the toner well before installing the toner
bottle in case the toner has settled.
With the Se al on the Toner Bott le facing u p,
slowly peel off the S eal as illustrated .
Be careful, some toner may puff out from
the bottle.
1166O228AA
1166O095AA
1139O1390A
With the “UP” marking on top, insert and
push the Bott le in to posi tion. Cl ose the Toner
Bottle Cover.
Push the Bottle up to the black line on it.
1166O219AA
16
Page 19

Changing the Imaging Unit
2
3
4
Unlock and open the Right Door.
1
CAUTION
NEVER touch the elect ri ca l contacts
inside the right door and underneath the
Imaging Unit , as a n electr ostatic dischar ge
may damage the copier.
1166O158AA
Electrical Contacts
1166O264AB
Holding onto t he green h ooks at the fr ont an d
rear of the Imaging Unit, car efully pull out the
old Imaging Unit. Then, holding onto the
handle on the top side of the Imaging Unit,
take the Imaging Unit out of the copier.
Shake the new Imaging Unit horizontally.
Align the green labels on the new Imaging
Unit with those on the rails in the copier, then
slide the Imaging Unit into the copier.
Holding onto the green hooks of the Imaging
Unit, push the Imaging Unit all the way into
the copier until a click is heard. Close the
Right Door.
1166O0159AA
1166O254AA
1166O124AA
17
Page 20

2
3
4
5
Replacing the Staple Cartridge
Slide the Finisher away from the copier
1
Press and turn the knob and open the co v er at
the rear of the Finisher.
1166O165AA
Pull the Stapler Unit out of the well.
While pres sing do wn t he gree n le v er , pull out
the Staple Cartridge.
1166O126AB
1166O127AA
1166O128AA
Remove t he empty stapl e clip fr om the Staple
Cartridge.
1166O129AA
18
Page 21

Load a new staple clip into the Staple
9
6
Cartridge and carefully peel off the Seal.
Insert the new Staple Cartridge into the
7
Stapler Unit until it clicks into place.
Align the arrows and firmly push the Stapler
8
Unit down into the well.
1166O161AD
1166O130AB
Press and turn the Knob to lock the cover.
Slide the Fin isher back against the copier.
10
1166O131AB
1166O133AB
1166O176AA
19
Page 22

Clearing Misfed Paper
Misfeed Location Displays
Different procedur es are used to c lear a m isfed sheet of pa per de pending on the loc ation. Fi rst,
isolate the location, then clear the misfeed according to the procedure applicable to the
misfeed occurring at that particular location. Please refer to the corresponding pages.
Duplexing Document
☞p. 24
☞p. 32
Staple Unit
☞p. 34
Feeder
Automatic Document
Feeder ☞p. 26
Job Tray ☞p. 31
Shift Tray
Finisher/
Mailbin Finisher
☞p. 28
Copier
☞p. 22
Duplex Unit
Manual Bypass Tray
☞p. 21
1166P180BE
☞p. 33
20
Page 23

Manual Bypass Tray
2
3
Unlock and open the Right Door.
1
1166O158AA
CAUTION
NEVER touch the elect ri ca l contacts
inside the right door and underneath the
Imaging Unit , as a n electr ostatic dischar ge
may damage the copier.
Slowly and gently pull out the sheet of paper.
Close the Right Door.
Electrical Contacts
1166O264AB
1166O179AA
1166O125AA
21
Page 24

Copier
2
3
4
5
Open the right Side Panel and flip down the
1
transparent paper guide.
Slowly and gently pull out the sheet of paper.
1166O138AA
1166O139AA
If the copier is equipped with a Large
Capacity Cab inet, slo wly pull out the sheet of
paper while turning the green dial in the
direction of the arrow. Close the Side Panel.
Slide out the drawer being used and remove
the paper stack left in it.
Reload th e paper s tack in the d rawer a nd slide
the drawer back into the copier.
1166O140AA
1171U019AA
1171U020AA
22
Page 25

Unlock and open the Right Door.
9
6
CAUTION
NEVER touch the elect ri ca l contacts
inside the right door and underneath the
Imaging Unit , as a n electr ostatic dischar ge
may damage the copier.
Slowly and gently pull out the sheet of paper.
7
1166O158AA
Electrical Contacts
1166O264AB
CAUTION
The area around the Fusing Unit is very
hot. Do not touch anything but the paper
to prevent you from getting burned.
Open the Upper Right Door. Pull down the
8
lever and gently pull out the sheet of paper.
Push back the le ve r and close t he Upper Right
Door and then close the Right Door.
1166O231AA
1166O142AC
1166O125AA
23
Page 26

Duplexing Document Feeder
2
3
4
5
Open Misfeed Clearing Guide .
1
Unload the originals from the Duplexing
Document Feeder and gently pull out the
original.
Open Misfeed Clearing Guide and
gently pull out the original.
F1
1166O256AA
1166O144AB
F2
Raise the Dup l exing Document F eeder and
gently pull out the original.
Remove the paper on the Original Glass and
lower the Duplexing Document Feeder.
1166O145AB
1166O146AA
1166O147AA
24
Page 27

Close Misfeed Cleari ng Gu ide s and
6
7
F2
.
Reload the originals as instructed on the
Touch Panel.
F1
1166O148AA
1166O149AA
25
Page 28

Automatic Document Feeder
2
3
4
5
Open the Misfeed Clearing Guide.
1
Unload the originals fro m the Automatic
Document Feeder.
1166O151AA
1166O150AA
Raise the Auto matic Document Feeder an d
gently pull out the original.
Open the Document Feed Tray.
Pulling up the Document Feed Tray, gently
pull out the original.
1166O152AB
1166O153AB
1166O162AA
26
Page 29

Bring the tray and Misfeed Clearing Guide
6
back down.
Reload the originals as instructed on the
7
Touch Panel.
1166O163AA
1166O164AA
27
Page 30

Finisher and Mailbin Finisher
2
3
4
5
Slid e the Finis her/Mailbin Finisher away
1
from the copier.
Open the Transport Unit Cover.
1166165AA
1166O160AA
Remove the sheet of pape r and close the
Transport Unit Cover.
Open Misfeed Clearing Guide .
CAUTION
Metallic pa rts ins ide the Misfe ed Clear ing
Guide are very h ot. Do not t ouch
anything but the pa per to p revent y ou from
getting burned.
If “Hole Punch” has been set, turn the Hole
Punch Adjustment Dial ten times downward.
Remove the sheet of paper.
FN2
FN2
116O167AA
1166O168AA
1166O169AC
28
Page 31

Open Misfeed Clearing Guide and
9
6
remove the sheet of paper.
FN3
1166O171AA
Close Misfeed Cleari ng Gu ide
7
and .
Open Misfeed Clearing Guide .
8
Remove t he shee t of pap er and c lose M isfee d
Clearing Guide .
FN2
FN1
FN3
FN1
1166O172AA
1166O173AA
Open Misfeed Clearing Guide at
10
the right side of the Mailbin Finisher.
1166O174AA
FN4
1166O183AA
29
Page 32

Remove the sheet of paper.
11
1166O184AA
Raise Misfeed Clearing Guide and
12
remove the sheet of paper.
Close Misfeed Cleari ng Gu ide .
13
Slid e the Finis her/Mai lbin Fini sher back
against the copier.
FN5
FN4
1166O185AA
1166O176AA
30
Page 33

Job Tray
2
3
4
Unlock and open the Right Door.
1
1166O158AA
CAUTION
NEVER touch the elect ri ca l contacts
inside the right door and underneath the
Imaging Unit , as a n electr ostatic dischar ge
may damage the copier.
Open the Upper Right Door.
Open the Job Tray Cover and gently pull out
the sheet of paper.
Electrical Contacts
1166O264AB
1166O141AA
Close the Job Tray Door, close the Upper
Right Door and then close the Right Door.
1166O156AA
1166O125AA
31
Page 34

Shift Tray
2
3
4
Unlock and open the Right Door.
1
1166O158AA
CAUTION
NEVER touch the elect ri ca l contacts
inside the right door and underneath the
Imaging Unit , as a n electr ostatic dischar ge
may damage the copier.
Open the Upper Right Door.
Open the Shi ft T ray Cov er and ge ntly pull out
the sheet of paper.
Electrical Contacts
1166O264AB
1166O141AA
Clos e the Shift Tray Cover, clos e the Upper
Right Door and then close the Right Door.
1166O156AA
1166O125AA
32
Page 35

Duplex Unit
2
3
Open the Duplex Unit.
1
Slowly and gently pull out the sheet of paper.
1166O180AA
1166O181AA
Clos e the Dup lex Unit.
1166O182AB
33
Page 36

2
3
4
5
Clearing a Staple Misfeed
Slide the Finisher away from the copier
1
Press and turn the knob to open the cover at
the rear of the Finisher.
1166O165AA
Pull the Stapler Unit out of the well.
While pres sing do wn t he gree n le v er , pull out
the Staple Cartridge.
1166O126AB
1166O127AA
1166O128AA
Push up the gui de of the Staple Cartri dge and
pull out one staple sheet.
1166O177AA
34
Page 37

Return the guide back to its original position.
9
6
Insert the Stap le Cartrid ge into the Stapler
7
Unit until it clicks into place.
Align the arrows and firmly push the Stapler
8
Unit down into the well.
1166O178AA
1166O130AB
Press and turn the knob to lock the cover.
Open Misfeed Clearing Guide .
10
1166O131AB
1166O133AB
FN1
1166O173AA
35
Page 38

Remove t he shee t of pap er and c lose M isfee d
11
Clearing Guide .
Slid e the Finis her/Mai lbin Fini sher back
12
against the copier.
FN1
1166O174AA
1166O176AA
36
Page 39

The information contained in this
manual is subject to change without
notice to incorporate improvements
made to the products listed in this
manual.
©Imagistics International Inc. 2002
Printed in USA
Part Number: DL3600290
www.imagistics.com
Imagistics International Inc.
100 Oakview Drive
Trumbull, CT 06611
TM
www.imagistics.com
 Loading...