

Page 1
www.imagistics.com
Quick Reference Guide
For use with Imagistics and Pitney Bowes DF260/360 copier/printers.
DF260/360
Page 2

Contents
◆ Making Copies. . . . . . . . . . . . . . . . . . . . . . . . . . . . . 1
◆ Loading Paper . . . . . . . . . . . . . . . . . . . . . . . . . . . . . 5
◆ Paper Misfeed . . . . . . . . . . . . . . . . . . . . . . . . . . . . . 7
◆ Cleaning. . . . . . . . . . . . . . . . . . . . . . . . . . . . . . . . . . 9
◆ Description of Icons. . . . . . . . . . . . . . . . . . . . . . . . 11
Page 3
Making Copies
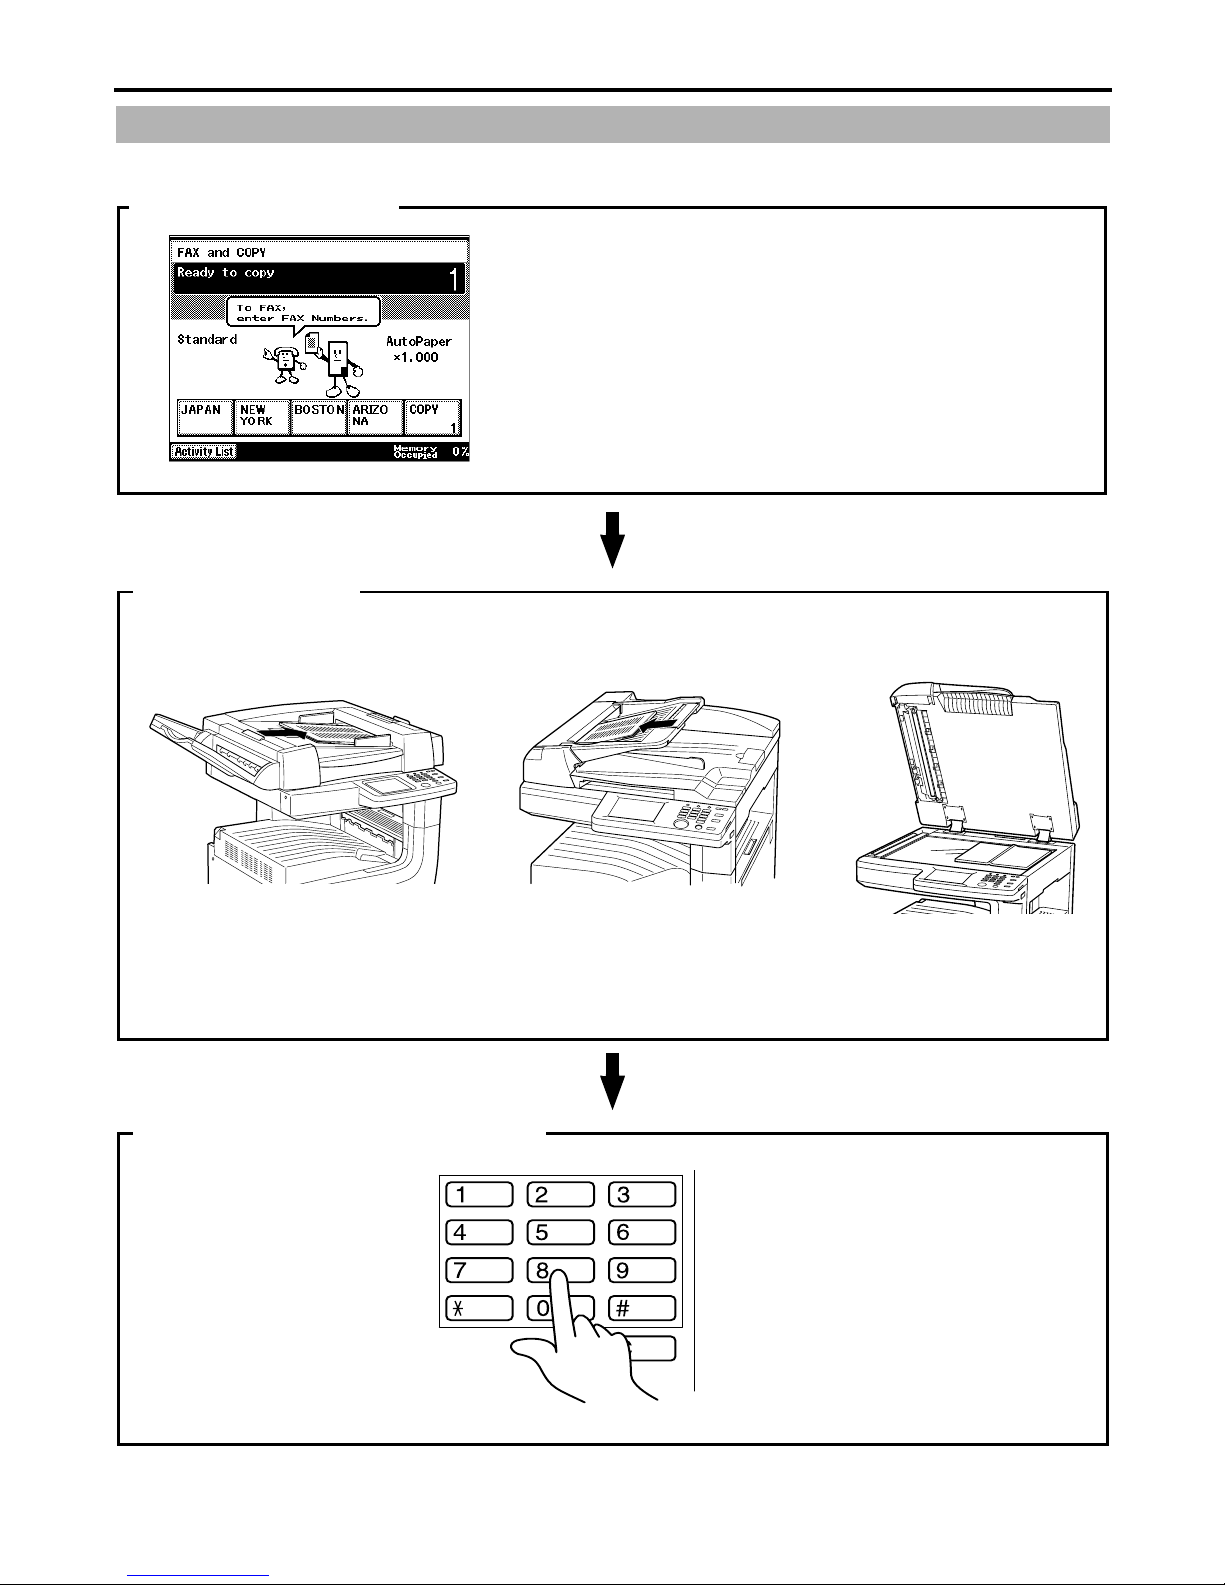
How to use the Auto-mode Screen
The Auto-mode Screen
The Auto-mode screen can be switched between
setting the number of copies and the facsimile
destination simply by entering the appropriate
numbers. When this screen is displayed, this
product can be used without selecting the
facsimile or copy screens.
1171P001EB
Load the Document
<Duplexing Document Feeder> <Automatic Document Feeder> <Document Scanner>
1166O341AA
Place the document to be
transmitted or copied face up.
Place the document to be
transmitted or copied face up.
Use the 10-key Pad to enter figures
1166O340AA
1166O030AA
1166O342AB
Plac e the document in the
top right-hand corner.
1
Page 4
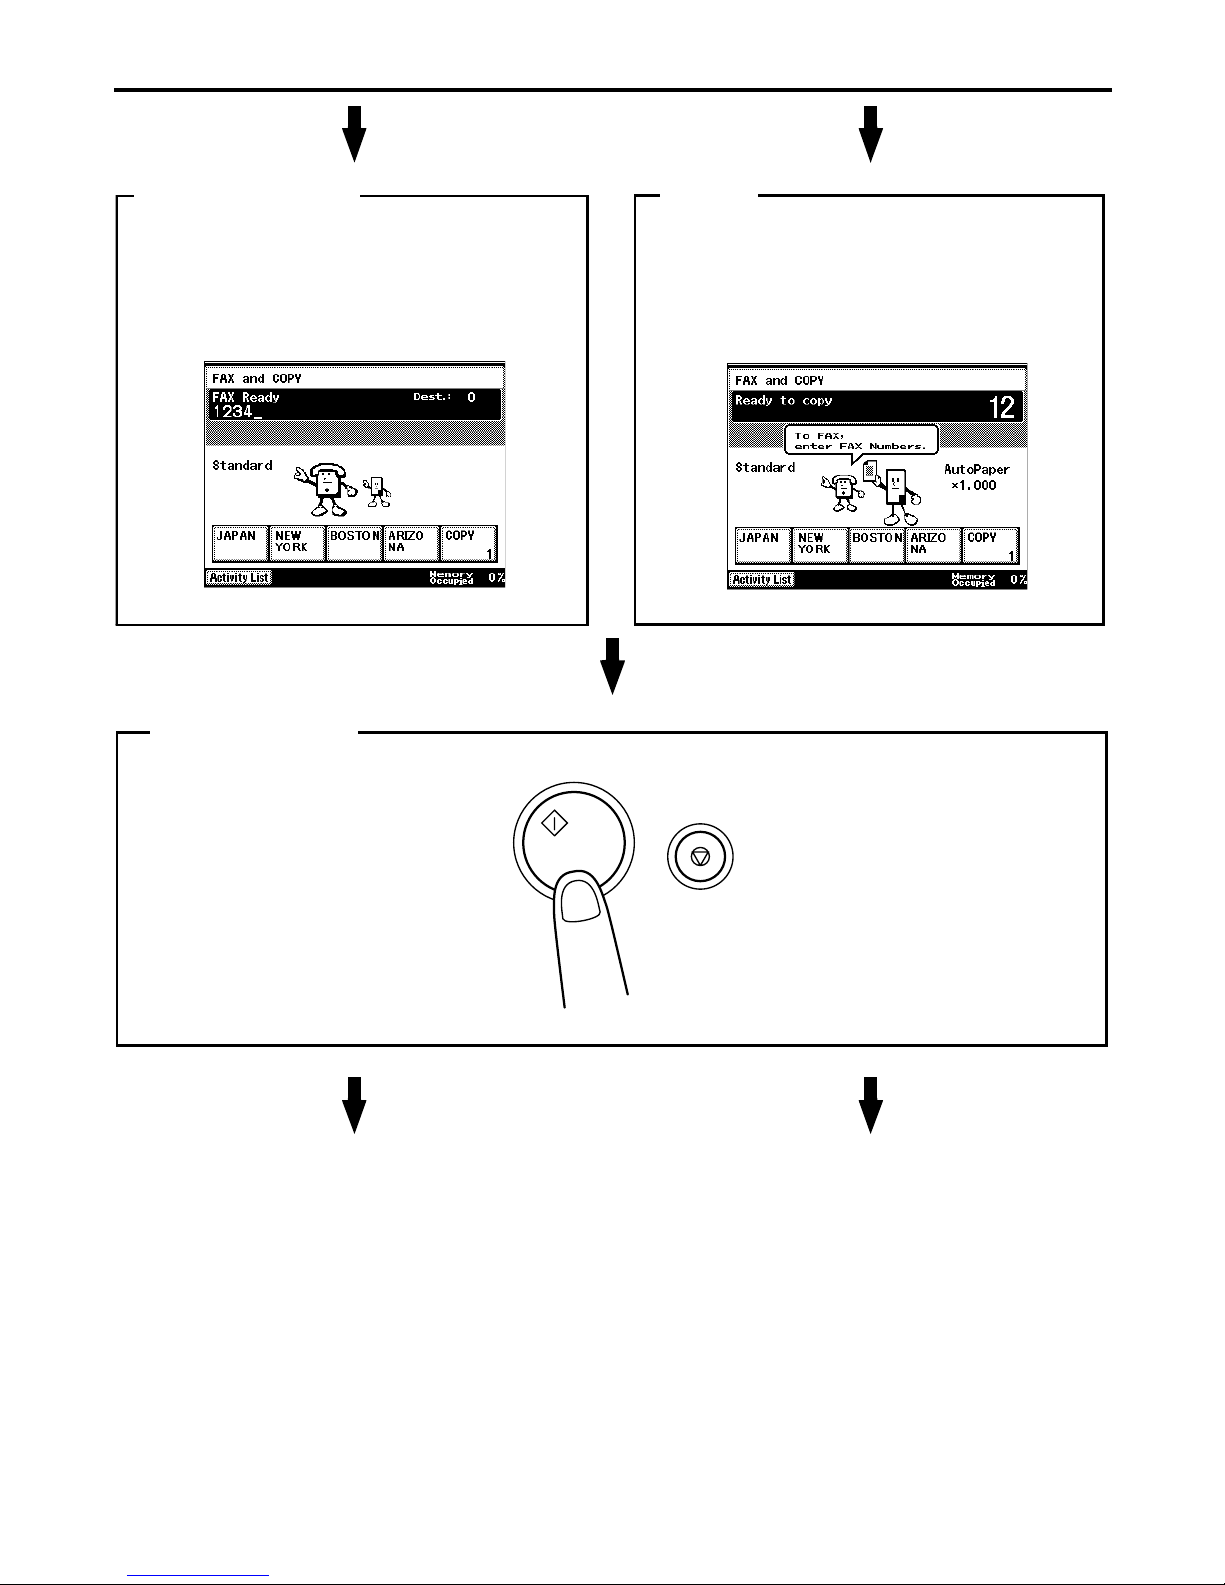
FAX transmission
• For DF360, enter a four-digit (or larger)
number starting from “0”.
• For DF26 0, ente r a thre e-digit (or l arger)
number.
Copying
• For DF360, enter a three-digit (or
smaller) number starting from “0”.
• For DF260, en ter a two-digit (or smaller)
number.
1171P288EA
Press the Start key
The fax is transmitted to the destination
dialed.
1171P380EA
Start
Stop
1166O245DA
The number of sets input are copied.
2
Page 5
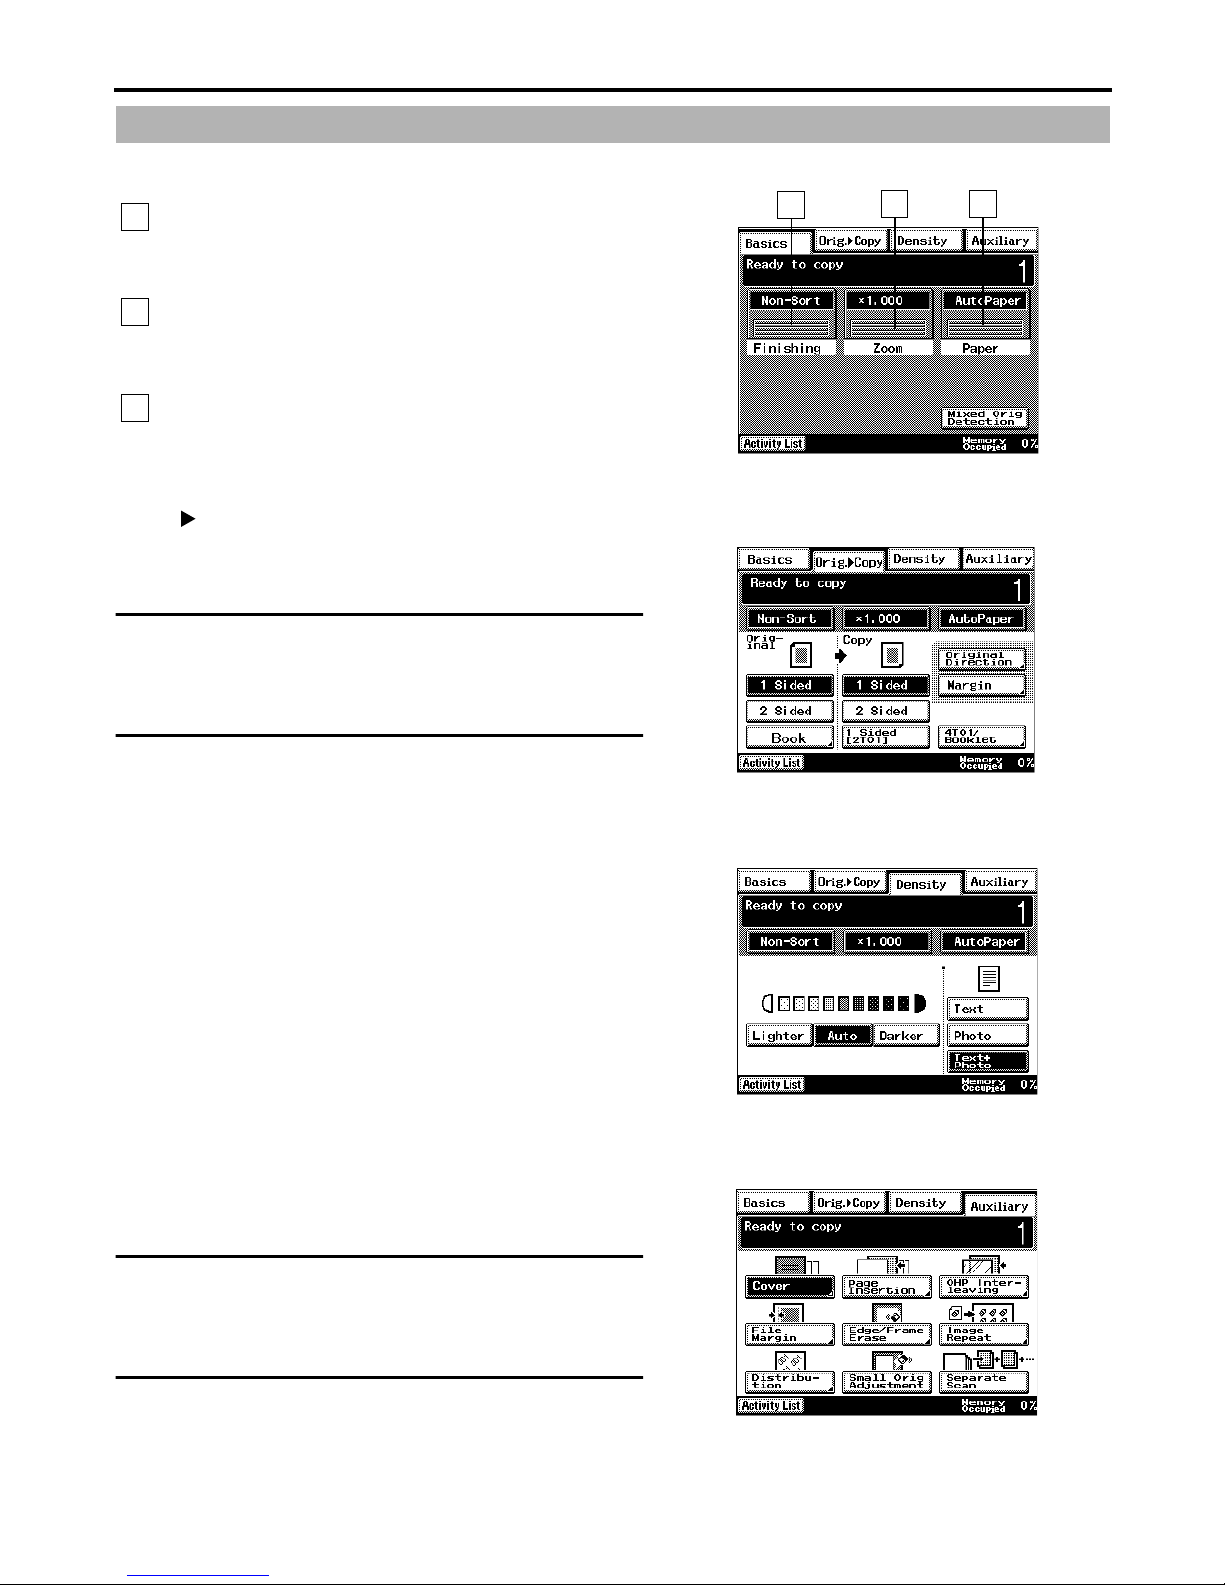
Copy Screen
t
Basic Scree n
1
Touch the Finish key to select the finishing
function for copying.
2
Touch the Zoom key to s et the zoo m ratio f or
copying.
3
Touch the Paper key to select the paper for
copying.
Orig. Copy
Select the type of copy to be made from the
document to be copied.
NOTE
The conte nts of the screen may var y dependin g
on the options installed.
1
2 3
1171P009EA
1171P065EB
Density
Set the exposure level for the optimum image
density.
1171P040EB
Auxiliary
Select an advanced copying function in addition
o the basic operations.
NOTE
The contents of the scren may vary depending
on the options installed.
1171P079EA
3
Page 6
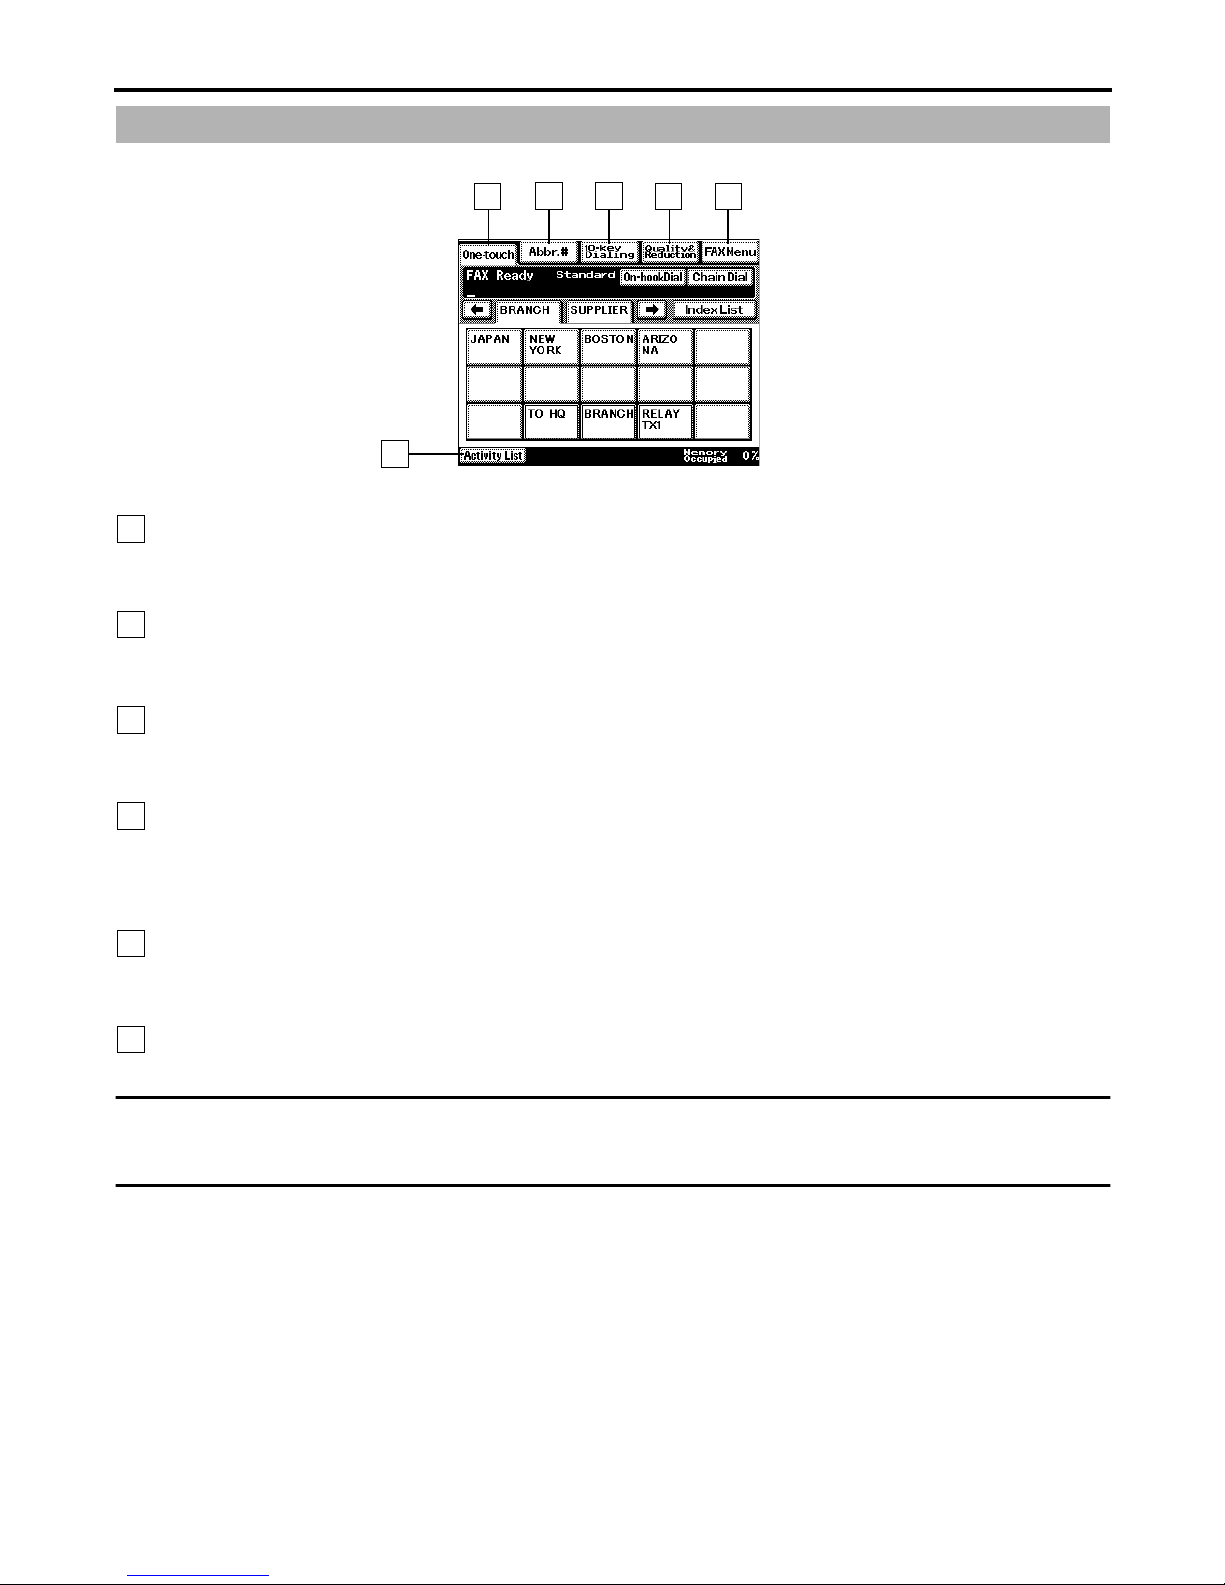
FAX Screen
1
2 5
3 4
6
1171P004EA
One-touch :
1
Autom aticall y dial a p reregis tered destination’s number by pressing the appropriate key.
2
Abbr. # :
Quickly dial a preregistered destination’s number by entering a three-digit number.
3
10-key Dialing :
Dial the destination’s num ber directly using th e 10-ke y pad.
4
Quality & Reduction :
Select advanced functions to ensure clear transmission and printing, and to accommodate for
differences in size.
5
FAX Menu :
Select a special transmission function in addition to the basic operations.
6
Activity List :
Inspect the status of recently transmitted or received communications.
NOTE
The contents of the screen may vary depending on the options installed.
4
Page 7
2
3
4
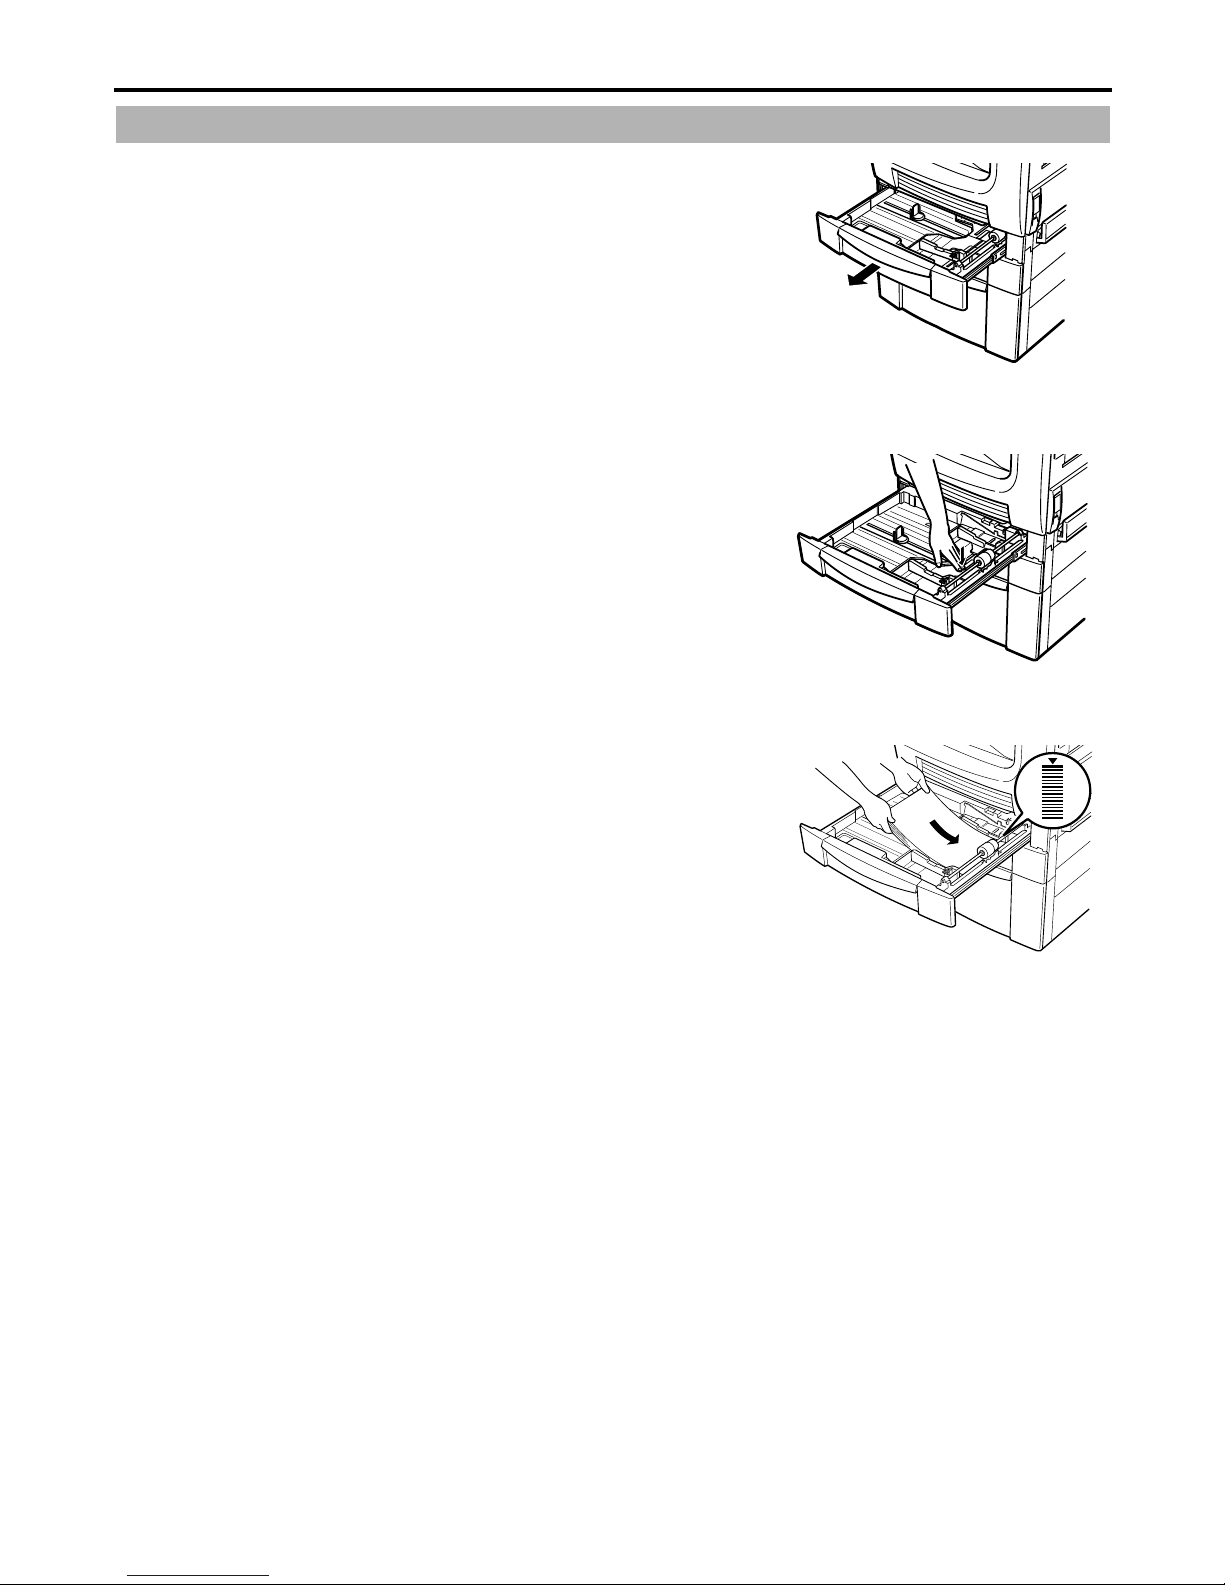
Loading Paper
Adding p aper
Pull out the paper drawer.
1
Push do wn on the paper sup port until i t locks.
(When Large Capacity Cabinet is used, this
step does not apply.)
1166O311AA
Load the paper into the drawer, aligning it
with the guide. Then push the paper drawer
back into place. (Make sure the paper stack
does not e xceed th e max pape r load “▼Max”
mark.)
Select the paper size .
Call your Tech. Rep. if changing the paper
size for the 9632 or Large Capacity Cabinet.
1166O312AA
1166O313AA
5
Page 8
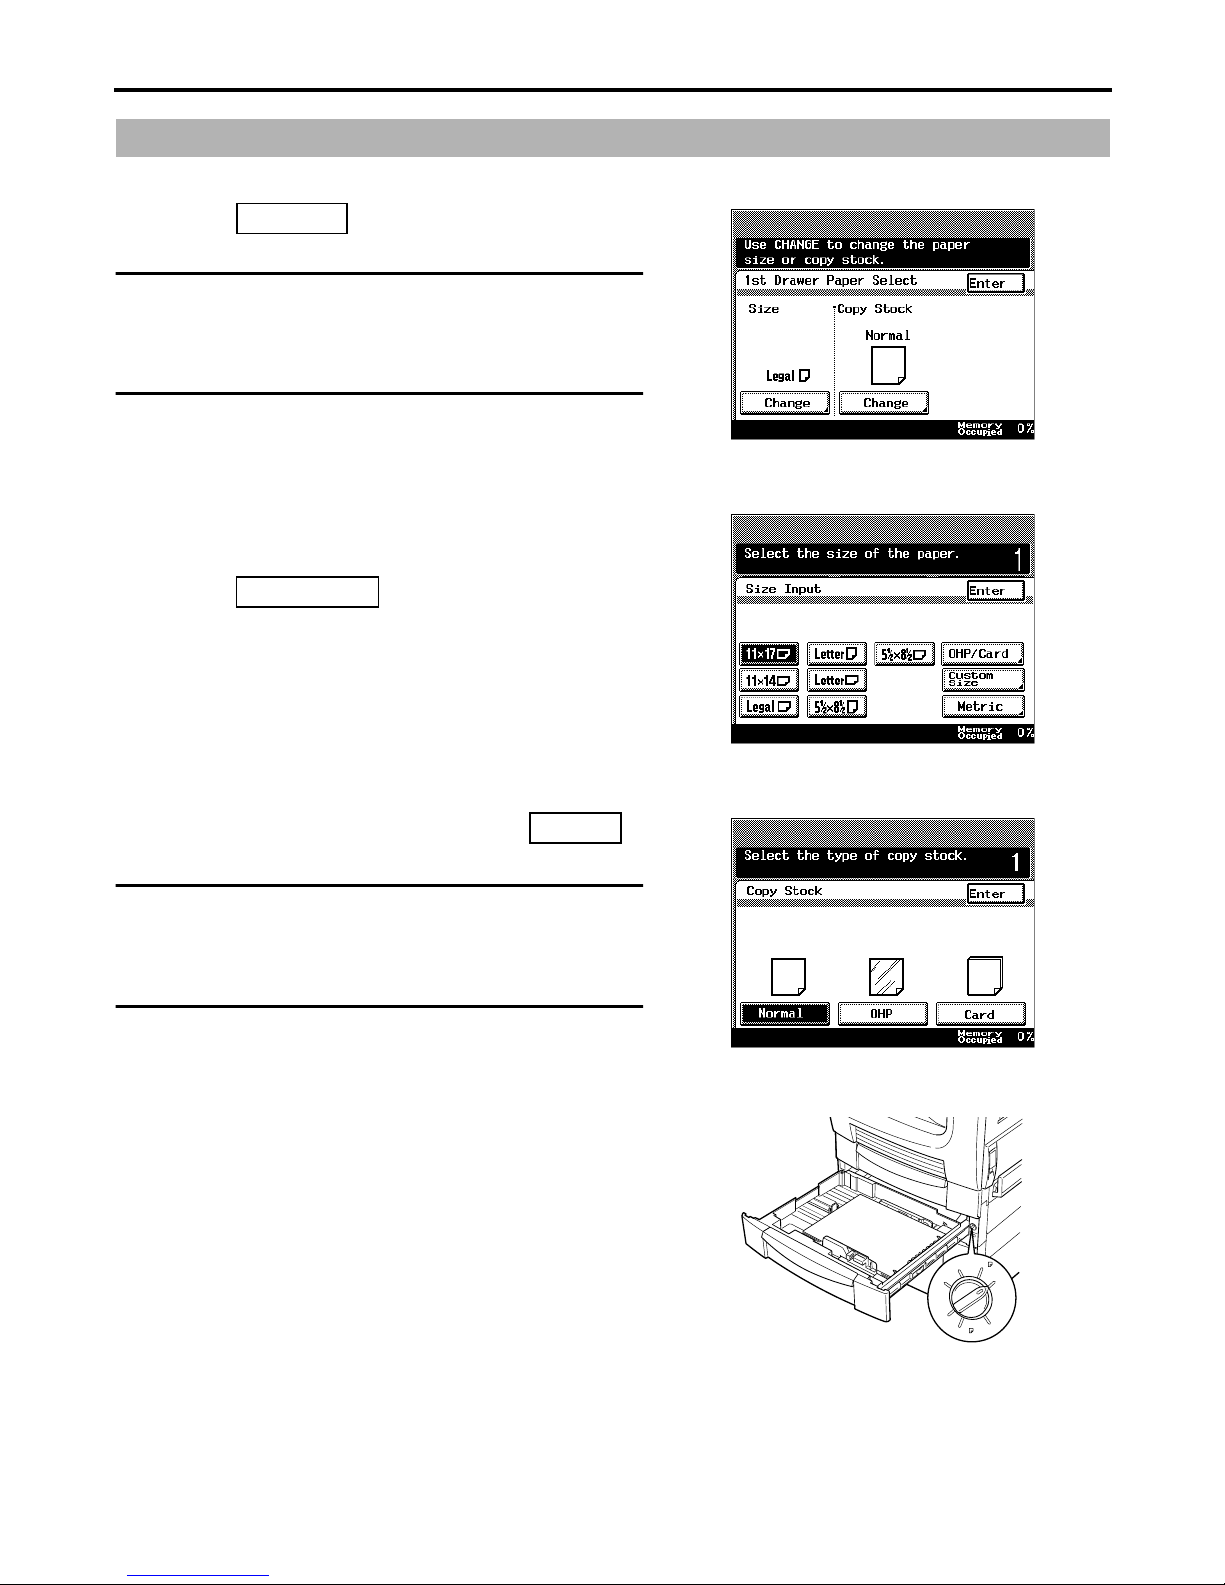
Set paper size and type
1
2
3
4
1
<1st Drawer>
Touch .
Change
Useful Tip
OHP paper or Card can be used for copying
when loaded in a Multi-purpose cassette.
Touch the key of the desired paper size.
Touch .
OHP/Card
1171P005EA
1171P006EA
Select the type of paper and touch
NOTE
The Card setting should be selected when
printing postcards or labels.
<Paper Feed Unit 9635>
Turn the dial t o the paper size that has been
loaded.
Enter
1171P007EA
LTR
LGL
11×17
User
set
5
1/2×8
1/2
LTR
11×14
1166O327AB
6
Page 9
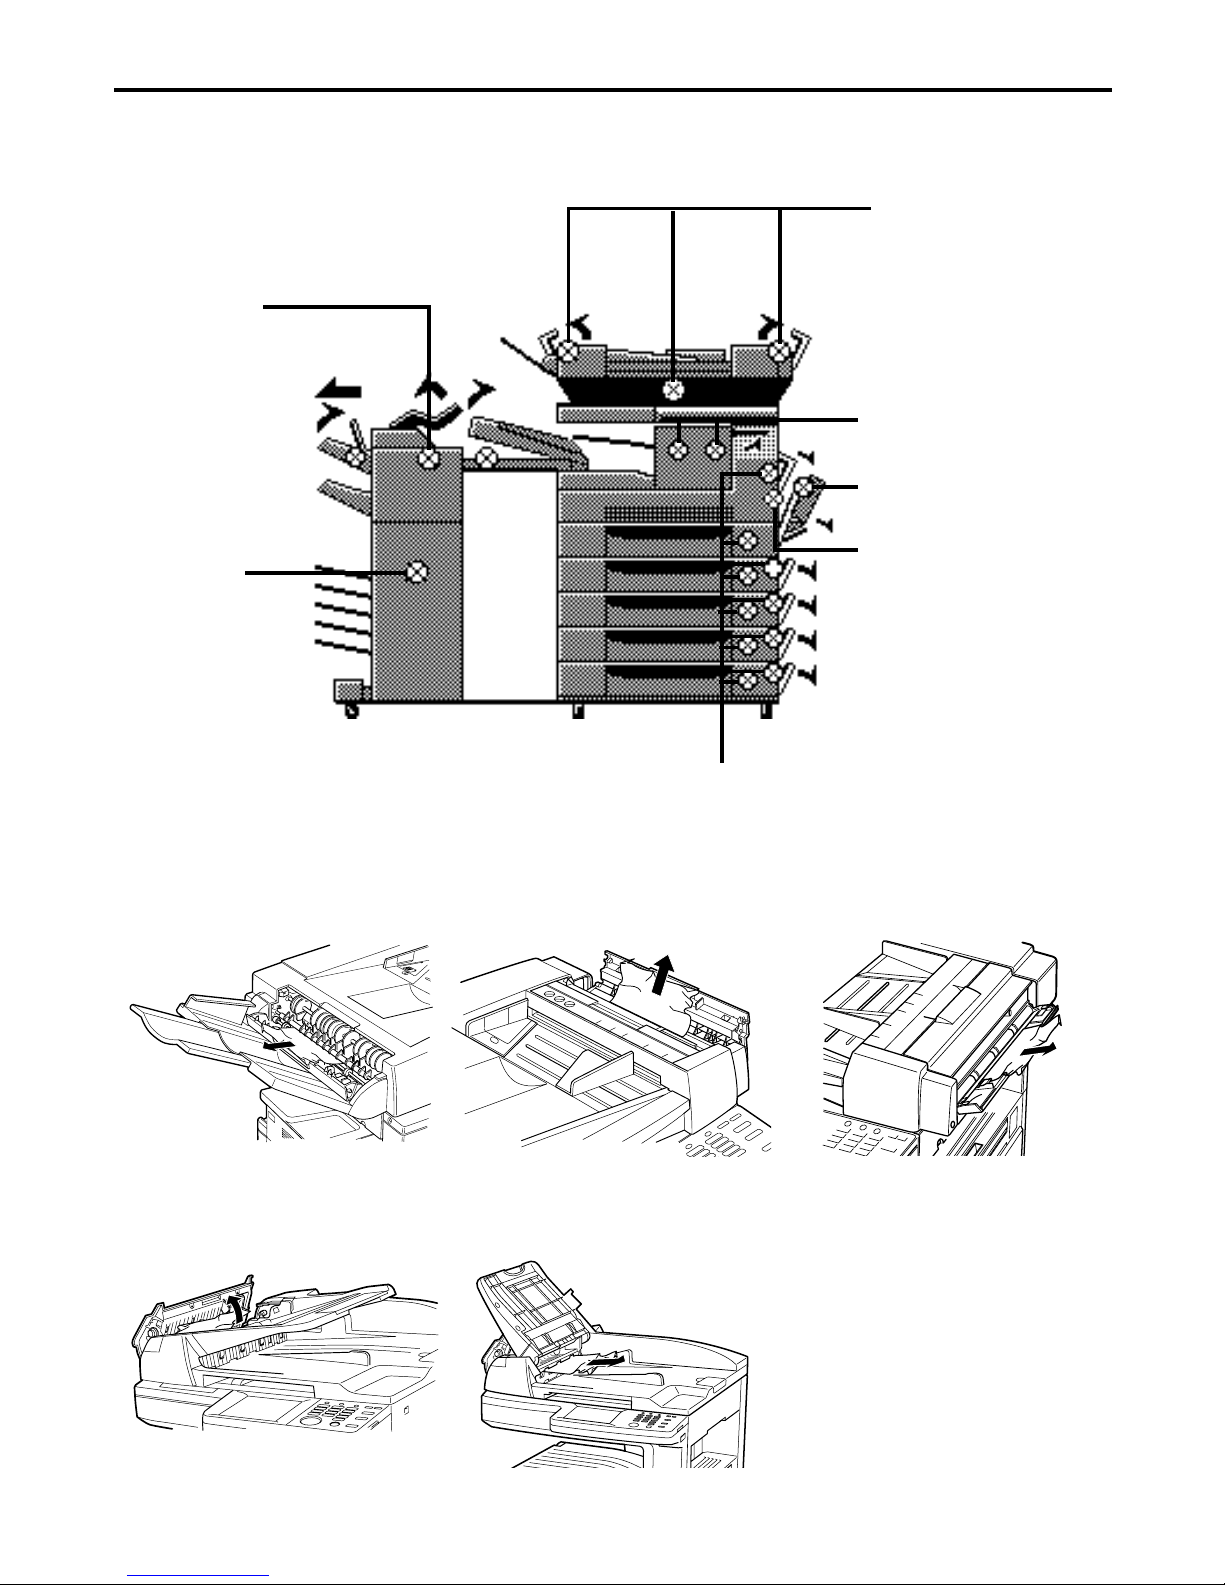
Paper Misfeed.
Determine the location of the misfed sheet of paper using the diagram on the display, then
remove the misfeed.
Duplexing Document
Feeder
Automatic Document
Staple Unit
Feeder
Job Tray
Shift Tray
Duplex Unit
Finisher/
Mailbin Finisher
Duplexing Document Feeder
Manual Bypass Tray
1166P180BE
Copier
1166O453AA
Automatic Document Feeder
1166O443AA
1166O450AA
1166O447AA
1166O456AA
7
Page 10
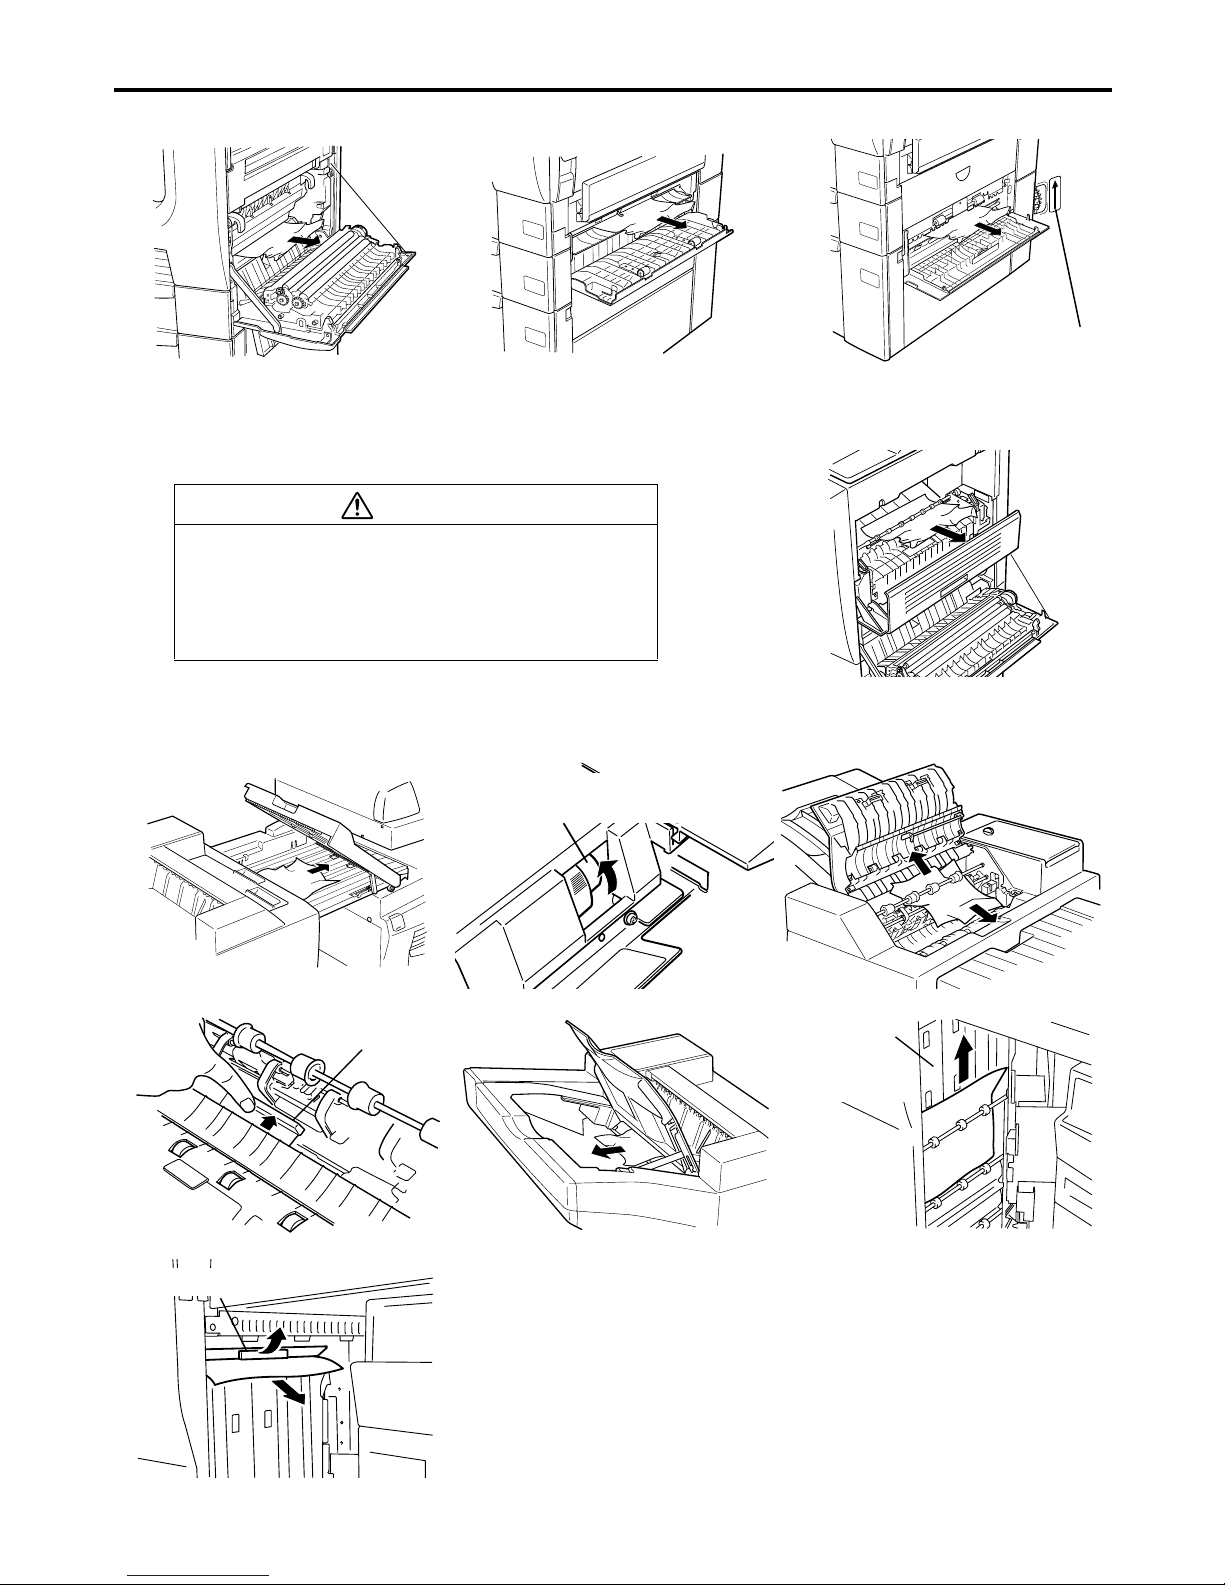
Side Cover
Turn the gear.
1166O458AA
Toner Fusing Unit Cover
CAUTION
The area around the Fusing Unit is very
hot. Do not touch anything other than the
misfed paper, otherwise you may burn
your fingers.
Finisher/Mailbin Finisher
1166O361AA
If the hole puncher is set,
turn the dial.
1166O462AA
1166O466AA
Open FN3
1166O481AA
Open FN5
1166O185AA
1166O479AA1166O476AA
1166O480AA
Right side
of the
M-Finisher
1166O484AA 1166O184AA
8
Page 11
1
2
3
4
Cleaning
• Use a soft coth dampened with water or a mild detergent. Be sure to wring the cloth out
thoroughly. Using benzene or other solvent may discolor or damage the finish.
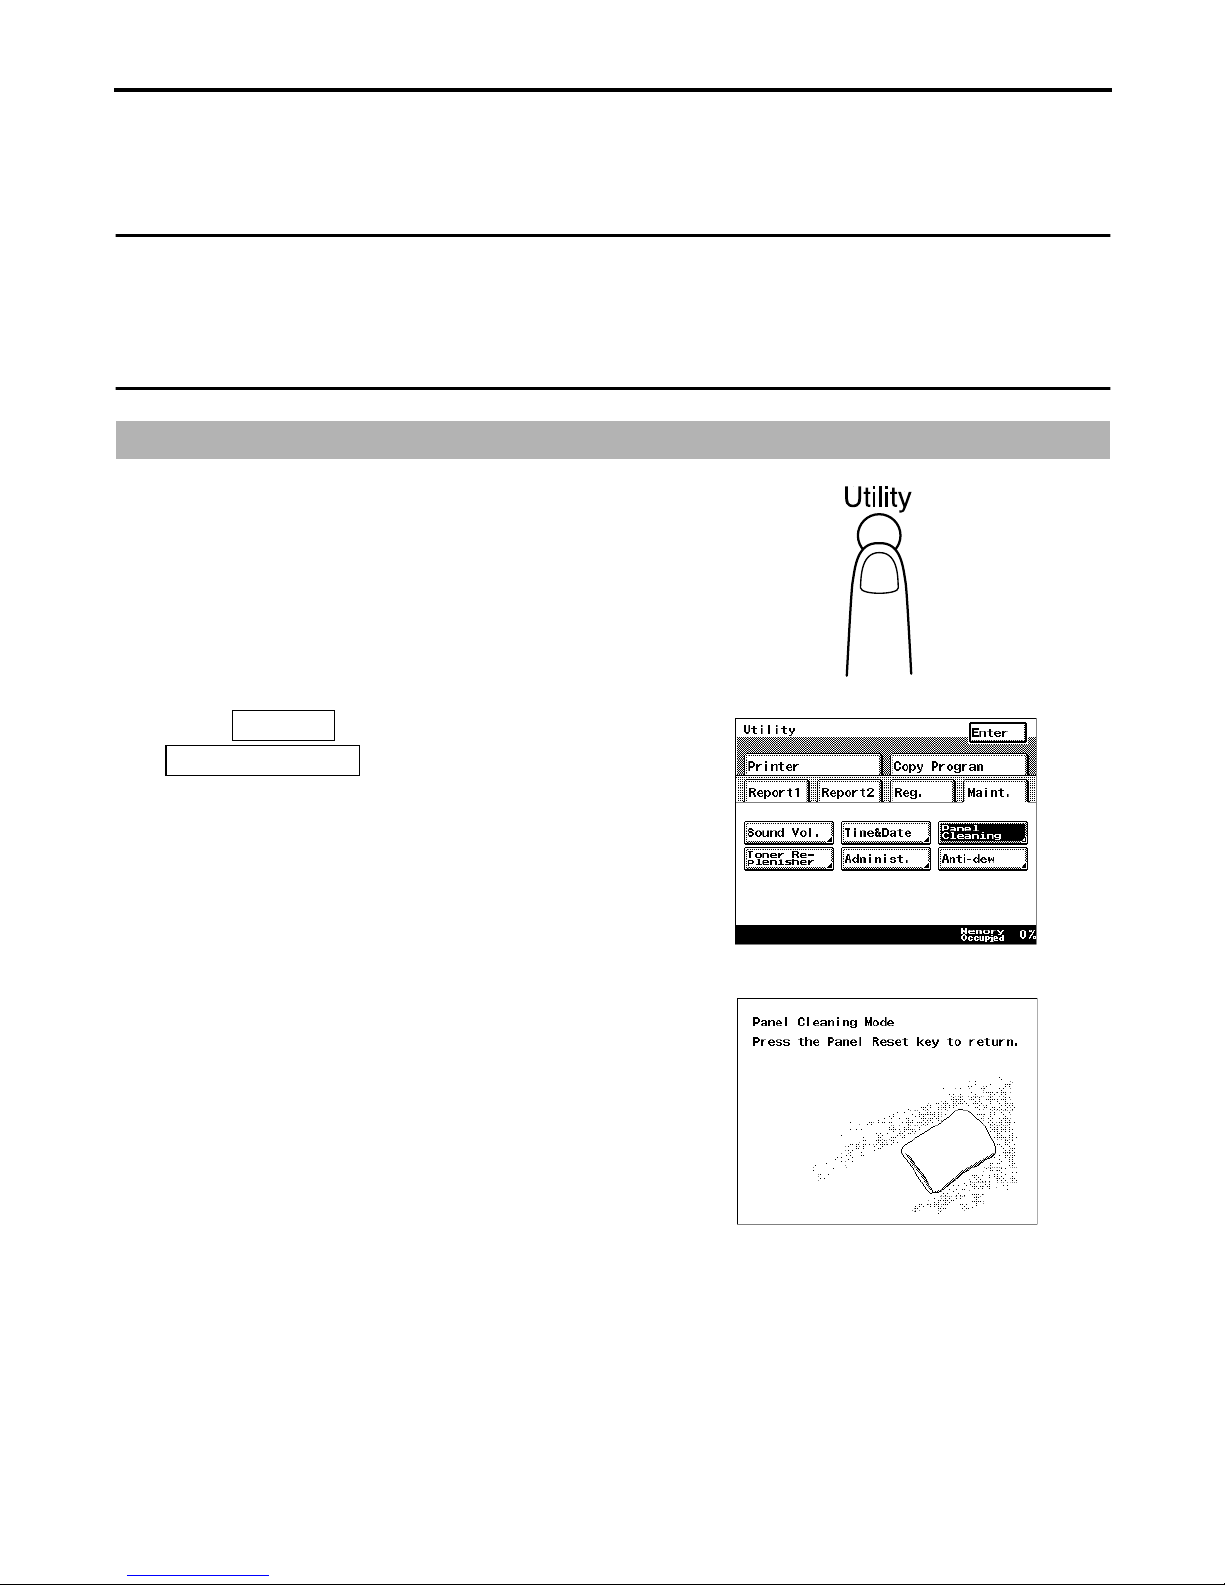
• The panel-cleaning screen should be selected on the touch panel before cleaning the touch
panel.
NOTE
The glass top of the document scanning area and the document feed rollers should be
cleaned often in order to maintain a high image quality, because they tend to become
covered with paper dust.
Cleanin g t he Touch Panel
Press the Utility key.
Select , and Touch
Panel Cleaning
Clean the touch panel while the Panel
Cleaning mode is displayed.
Maint.
.
1166O243EA
1171P392EA
1171P377EA
Press the Panel Reset after cleaning.
9
Page 12
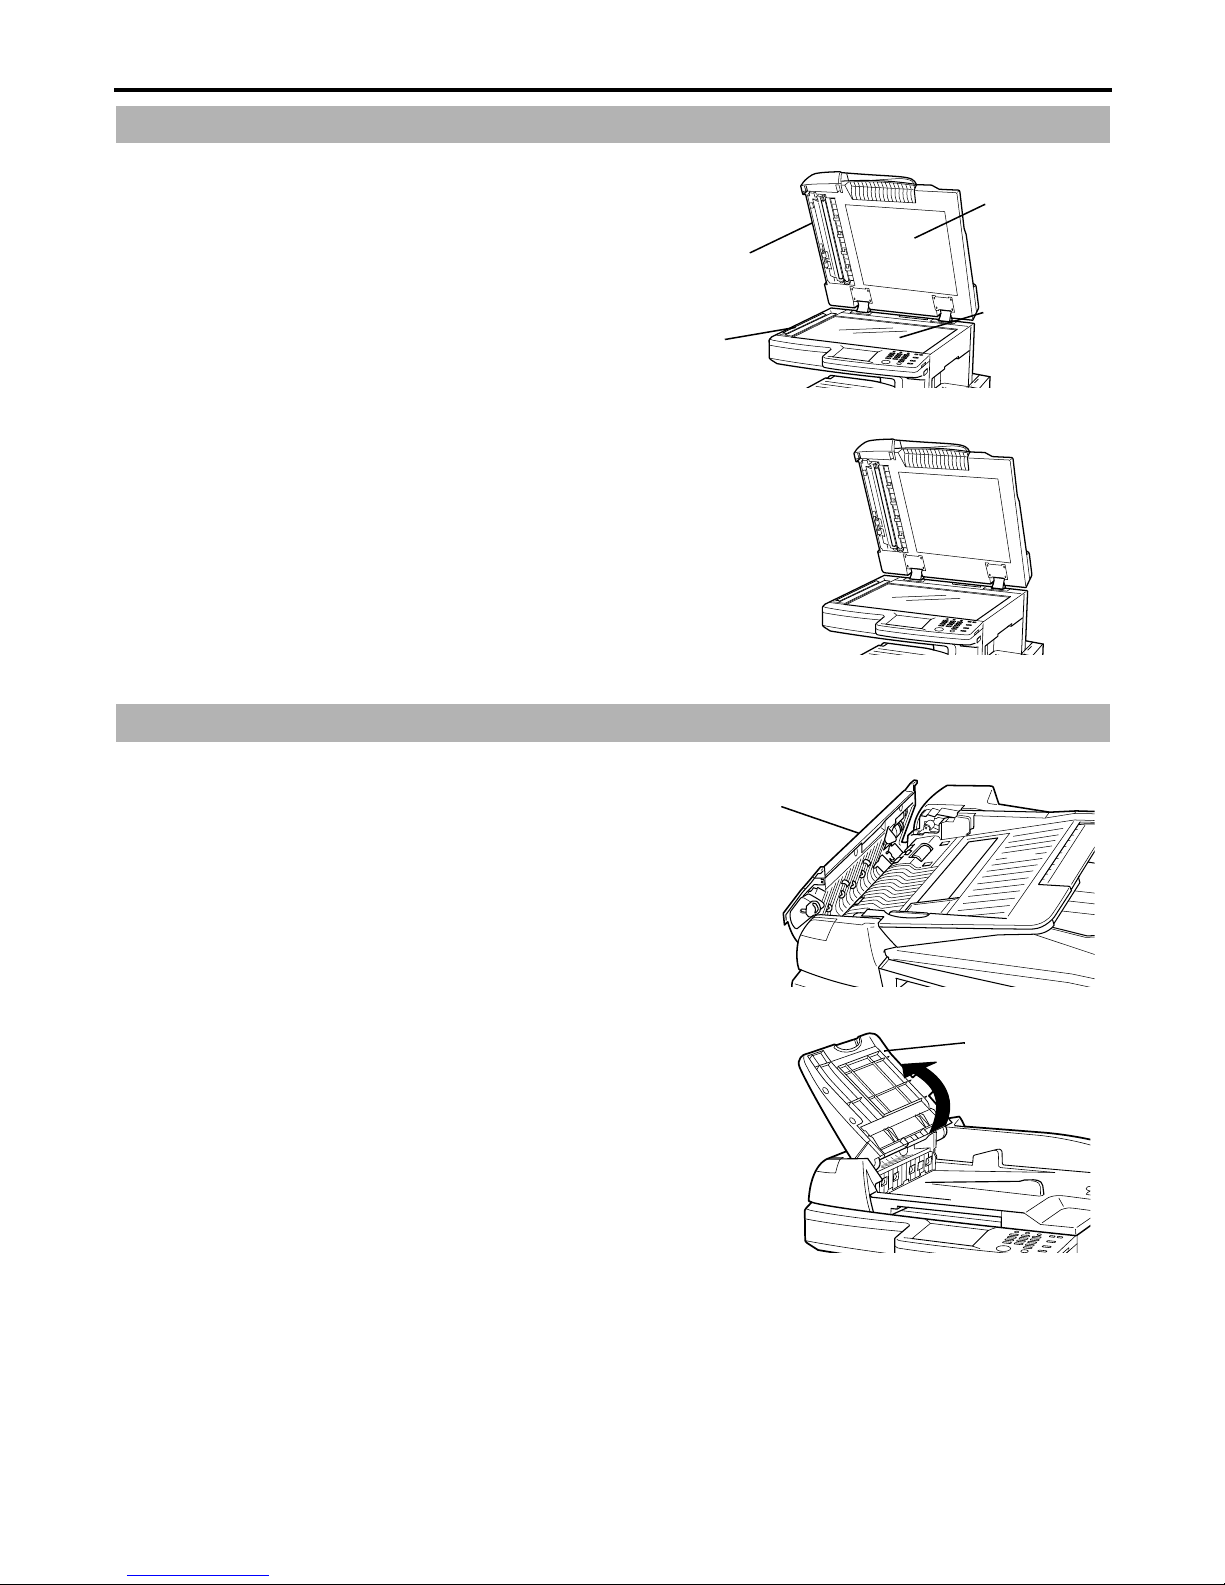
Cleaning the Document Scanning Area
1
2
3
4
1
2
3
4
Open the Document Cover.
Clean the document scanning ar ea, glass top,
and document pad.
Clean the white roller.
Close the Document Cover.
Document
Cover
Document
Scanning area
Document
Pad
Document
glass
1166O305AA
1166O305AA
Cleaning the Document Feed Rollers
Lift up on the Document Feeder Cover.
Clean the six rollers.
Lift up the Docu ment Feed Tray a nd clean the
four rollers.
Close the Feeder Cover and push down the
Document Feed Tray to its original position.
Document
Feeder
Cover
1166O440AA
Documment
Feed Tray
1166O441AA
10
Page 13
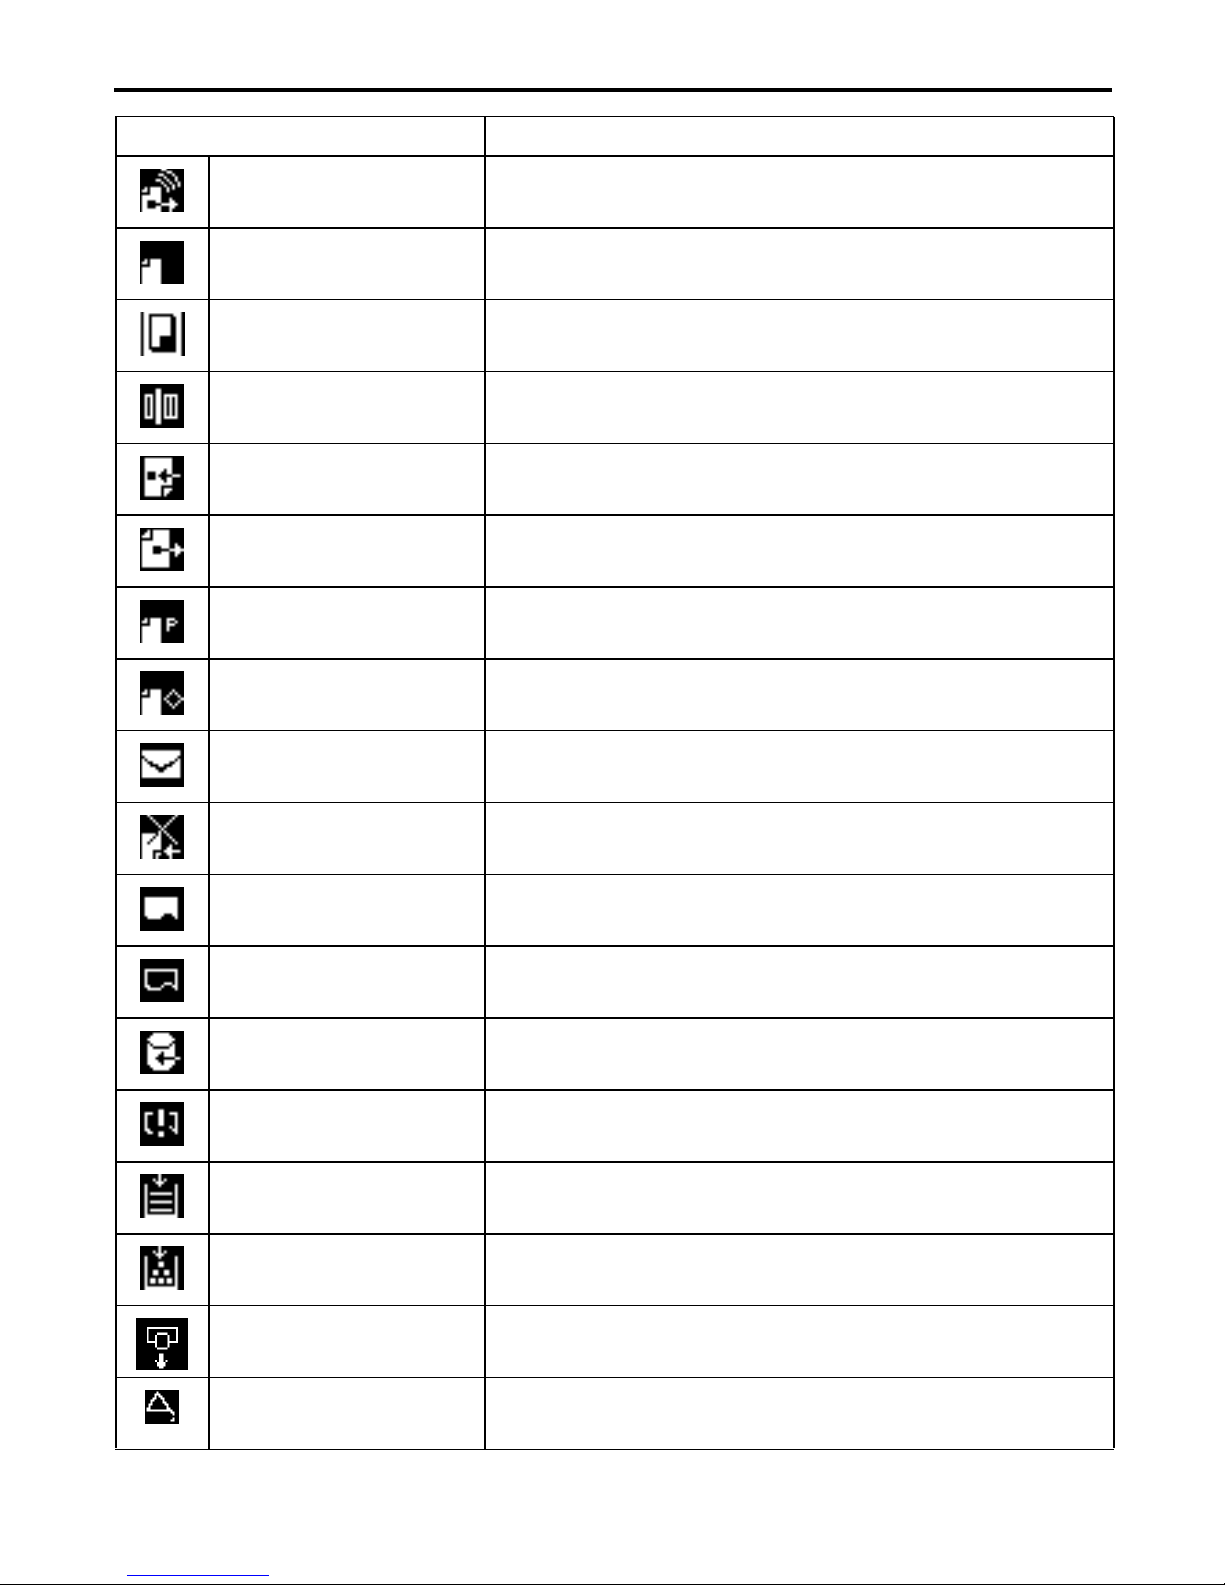
Description of Icons
Icons Description
Dialing Now dialing
Dial W ait Waiting to re-dial
Copying Now copying
Scanning Now scanning a document to transmit by FAX
Receiving Now receivin g a FAX
Sending Now s ending a FA X
Waiting for polling There is a document waiting for polling transmission.
Bulletin board A document is registered on the bulletin board.
Received document There is a received document in the mailbox.
Automatic reception
mode OFF
Printing Now printing
Waiting to print There is a document waiting to be printed.
Receiving PC data Now receiving data from the PC for printing
PC data in memory Data from the PC remains in printer memory.
No paper Resupply copy paper.
No toner Replace the toner bottle.
Manual reception mode is ON.
Replace drum The drum (imaging unit) needs to be replaced. Contact
Periodic inspection It is time for a periodic inspection of the machine.
your nearest service center.
11
Page 14

The information contained in this
manual is subject to change without
notice to incorporate improvements
made to the products listed in this
manual.
©Imagistics International Inc. 2002
Printed in USA
Part Number: DL3600300
www.imagistics.com
Imagistics International Inc.
100 Oakview Drive
Trumbull, CT 06611
TM
www.imagistics.com
 Loading...