

Page 1

www.imagistics.com
User's Guide
cm3520
Page 2

Introduction
Thank you for selecting an Imagistics solution for your document production and
management needs. The following information will help you get the most productive and reliable use out of your system.
Imagistics brand supplies are designed for Imagistics copiers, printers and fax
machines to ensure maximum product performance and quality. Substituting other
supplies may result in inferior image quality and machine malfunction. To order
supplies including toner, staples and paper, call the Imagistics Supply Line at 1800-462-6797. For faster service, please have your machine model and serial
number available before calling.
Should your cm3520 develop a problem that cannot be remedied by using the
maintenance or troubleshooting procedures outlined in this manual please contact
the Imagistics National Diagnostic Center at: 1-800-243-5556.
This manual contains details on the operation of the various functions of the
machine, precautions on its use, and basic troubleshooting procedures. In order to
ensure that this machine is used correctly and efficiently, carefully read this manual
before using the machine. After reading the manual, store it in the designated
holder so that it can easily be referred to when questions or problems arise during
operation.
The illustrations used in this manual may appear slightly different from views of the
actual equipment.
cm3520 i
Page 3

Contents
Introduction ................................................................................................. i
Contents ..................................................................................................... ii
Making Basic Copies............................................................................... xiv
Available Features .................................................................................. xvii
Selecting the print color ............................................................ xvii
Sorting copies ........................................................................... xvii
Stapling copies .......................................................................... xvii
Punching holes in copies .......................................................... xvii
Adjusting copies to the size of the paper ................................. xviii
Specifying separate horizontal and vertical zoom ratios .......... xviii
Automatically selecting the paper ............................................ xviii
Reserving bypass tray copying ................................................ xviii
Copying book documents ........................................................ xviii
Separately copying the pages of a page spread ........................ xix
Copying multiple document pages onto a single page .............. xix
Copying with a layout for center binding .................................... xix
Adjusting copies according to the image quality of the
original .......................................................................................xix
Copying a document containing various page sizes ...................xx
Printing a sample copy ................................................................xx
Interrupting a copy job ................................................................xx
Enlarging the touch panel screens ..............................................xx
Checking the copy settings .........................................................xx
Storing the scanned image in the memory .................................xx
Scanning the document in separate batches .............................xxi
Printing distribution numbers on copies ..................................... xxi
Making copies for filing ..............................................................xxi
Erasing sections of copies ......................................................... xxi
Adjusting the image to fit the paper size ................................... xxii
Repeating copy images ............................................................ xxii
Inserting paper between transparencies ................................... xxii
Copying booklet documents ..................................................... xxiii
Improving the copy color quality .............................................. xxiii
Copying with a background color ............................................. xxiii
Separating the colors of the copy ............................................ xxiii
Copying with reversed colors ................................................... xxiv
Enlarging the image and printing it on multiple pages ............. xxiv
Printing a mirror image of the document .................................. xxiv
Reducing the image and printing multiple copies on
one page ...................................................................................xxv
Managing copying .....................................................................xxv
Explanation of Basic Concepts and Symbols..................................... xxvi
“Width” and “Length” ................................................................ xxvi
Paper Orientation ..................................................................... xxvi
ii cm3520
Page 4

Explanation of Manual Conventions ...................................................xxvii
Energy Star
Trademarks and Registered Trademarks.............................................xxix
Legal Restrictions on Copying ..............................................................xxx
®
...........................................................................................xxix
What is an ENERGY STAR® Product? ....................................xxix
1 Installation and Operation Precautions
1.1 For Safe Use..................................................................................1-2
Warning and Precaution Symbols ..............................................1-2
Meaning of Symbols...................................................................1-2
WARNING ..................................................................................1-3
CAUTION ...................................................................................1-4
Precautions for Routine Use.......................................................1-5
USER INSTRUCTIONS FCC PART 15 - RADIO FREQUENCY
DEVICES (For U.S.A. Users) .....................................................1-5
INTERFERENCE-CAUSING EQUIPMENT STANDARD
(ICES-003 ISSUE 3) (For Canada Users) ..................................1-6
For Users in countries not subject to Class B regulations ..........1-6
LED Radiation Safety .................................................................1-6
Ozone Release...........................................................................1-6
1.2 Installation Precautions................................................................1-7
Installation Site ...........................................................................1-7
Power Source.............................................................................1-7
Space Requirements..................................................................1-8
1.3 Operation Precautions..................................................................1-9
Operating Environment...............................................................1-9
Proper Use .................................................................................1-9
Transporting the Machine.........................................................1-10
Care of Machine Supplies ........................................................1-10
Storage of Copies.....................................................................1-11
2 Before Making Copies
2.1 Components and Their Functions...............................................2-2
2.2 Part Names and Their Functions.................................................2-5
Outside of Machine.....................................................................2-5
Options .......................................................................................2-8
Inside of Machine .....................................................................2-11
Control Panel............................................................................2-12
Touch Panel .............................................................................2-14
Operating the Touch Panel.......................................................2-15
Supplies and Parts ...................................................................2-16
cm3520 iii
Page 5

2.3 Turning the Machine On and Off............................................... 2-17
Turning On the Machine .......................................................... 2-17
When the Machine Is Turned On............................................. 2-17
Queuing a Job During Warm-Up.............................................. 2-17
Panel Reset Timer ................................................................... 2-17
Power Save Mode.................................................................... 2-18
Recovering From Power Save Mode ....................................... 2-19
Sleep Mode.............................................................................. 2-19
Recovering From Sleep Mode ................................................. 2-19
Turning Off the Machine .......................................................... 2-20
When the Machine Is Turned Off............................................. 2-20
2.4 Using the Touch Panel............................................................... 2-21
Description of the Touch Panel................................................ 2-21
Default Settings........................................................................ 2-21
2.5 Adjusting the Angle of the Control Panel ................................ 2-23
To adjust the angle of the control panel................................... 2-24
2.6 Loading Paper Into the 1st Drawer ........................................... 2-26
2.7 Loading Paper Into the 2nd, 3rd or 4th Drawer ....................... 2-31
2.8 Loading Paper Into the Large-Capacity Paper Feed
Cabinet ........................................................................................ 2-33
2.9 Loading Paper Into the Bypass Tray ........................................ 2-35
2.10 Feeding the Document............................................................... 2-41
Loading the Document Into the Reverse Automatic
Document Feeder .................................................................... 2-41
Placing the Document On the Original Glass .......................... 2-44
3 Basic Copy Operations
3.1 Specifying the Number of Copies............................................... 3-2
To specify the number of copies................................................ 3-2
To change the setting for the number of copies......................... 3-3
3.2 Stopping Copying......................................................................... 3-4
3.3 Selecting a Color Setting............................................................. 3-5
Auto Color .................................................................................. 3-5
Full Color.................................................................................... 3-5
2 Color ....................................................................................... 3-5
Single Color ............................................................................... 3-5
Black .......................................................................................... 3-5
To select the Color setting ......................................................... 3-6
3.4 Selecting Output Settings............................................................ 3-8
Non Sorting (“Non Sort” Setting)................................................ 3-8
Sorting (“Sort” Setting) ............................................................... 3-8
iv cm3520
Page 6

Crisscross Sorting (Crisscross Feeding) ....................................3-9
Stapling (with finisher 9997 installed).......................................3-10
Stapling (with finisher 9996 installed).......................................3-10
Hole-Punching..........................................................................3-11
To specify Output settings........................................................3-12
3.5 Specifying a Zoom Setting.........................................................3-13
Automatic Scaling (“Auto Zoom” Setting) .................................3-13
Full Size (“×1.0” Setting)...........................................................3-13
Enlarging (Enlarge Settings).....................................................3-13
Reducing (Reduce Settings).....................................................3-13
Minimizing (“Minimal” Setting) ..................................................3-13
Zooming....................................................................................3-14
Custom Sizing (Manual Zoom Settings)...................................3-14
To select a Zoom setting ..........................................................3-14
To enter a Manual Zoom ratio ..................................................3-15
To store Manual Zoom ratios....................................................3-15
To recall a stored Manual Zoom ratio.......................................3-16
To specify different vertical and horizontal scaling proportions
(X/Y Zoom settings)..................................................................3-17
3.6 Selecting a Paper/Size Setting...................................................3-18
Automatic Paper Selection (“Auto Paper Select” Setting) ........3-18
Manual Paper Selection ...........................................................3-18
Bypass Tray Selection (Bypass Setting) ..................................3-18
Bypass Reserve Settings for Bypass Tray ...............................3-18
To select the paper drawer.......................................................3-19
To specify the size of the paper in the 1st drawer....................3-19
To specify the size of the paper in the bypass tray ..................3-21
To set a non-standard (custom) paper size..............................3-22
To store a non-standard (custom) paper size...........................3-23
To select a stored non-standard (custom) paper size ..............3-24
To specify the Bypass Reserve settings for the bypass tray....3-25
3.7 Selecting Original Settings ........................................................3-27
Single-Sided Original (“1” Setting)............................................3-27
Double-Sided Original (“2” Setting) ..........................................3-27
Books (“Book Copy” Settings) ..................................................3-27
Document Orientation (Original Direction Setting) ...................3-29
Document Binding Margin Position (Margin Setting)................3-31
Thick Documents (“Thick Original” Setting)..............................3-31
To specify Original settings ......................................................3-32
To specify Book Copy settings .................................................3-32
To specify conditions of the original .........................................3-35
3.8 Selecting Copy Settings.............................................................3-37
Single-Sided Copy (“1” Setting)................................................3-38
Double-Sided Copy (“2” Setting) ..............................................3-38
cm3520 v
Page 7

Single-Sided 2in1 Copy (“1-2in1” Setting) ............................... 3-38
Double-Sided 2in1 Copy (“2-2in1” Setting) .............................. 3-38
Single-Sided 4in1 Copy (“1-4in1” Setting) ............................... 3-39
Double-Sided 4in1 Copy (“2-4in1” Setting) .............................. 3-39
Booklet Copy (“Booklet” Setting).............................................. 3-40
Bound Booklet (“Bind” and “Center Erase” Settings) ............... 3-41
Conditions for Making Booklets ............................................... 3-42
Center-Erasing (“Center Erase” Setting).................................. 3-42
To specify Copy settings.......................................................... 3-43
To select the “Bind” setting ...................................................... 3-44
3.9 Selecting Photo/Density Settings ............................................. 3-45
Image Types ............................................................................ 3-45
Background Setting of “Density” Parameter (Manual) ............. 3-46
Background Setting of “Density” Parameter (“Auto”) ............... 3-46
Density Setting of “Density” Parameter.................................... 3-46
Text Enhancement Setting....................................................... 3-46
“Glossy” Setting ....................................................................... 3-47
Screen Pattern Settings ........................................................... 3-47
To select a Photo/Density setting ............................................ 3-47
To select a glossy finish (“Glossy” setting) .............................. 3-48
To select a Screen Pattern setting........................................... 3-49
4 Copy Paper
4.1 Paper Specifications .................................................................... 4-2
Paper Types............................................................................... 4-2
Paper Sizes................................................................................ 4-3
Paper Capacity .......................................................................... 4-4
4.2 Print Area ...................................................................................... 4-6
4.3 Paper Storage ............................................................................... 4-7
4.4 Automatically Selecting the Paper Source ................................ 4-8
Operating Conditions ................................................................. 4-8
Order for Selecting Another Paper Drawer................................ 4-8
4.5 Special Paper................................................................................ 4-9
5 Original Documents
5.1 Document Feeding....................................................................... 5-2
Document Feeding Methods...................................................... 5-2
Appropriate Document Types (Using the Reverse Automatic
Document Feeder) ..................................................................... 5-2
Document Precautions (Using the Reverse Automatic
Document Feeder) ..................................................................... 5-4
Appropriate Document Types (Using the Original Glass) .......... 5-4
Document Precautions (Using the Original Glass) .................... 5-5
vi cm3520
Page 8

Small-Sized Documents .............................................................5-5
Centering....................................................................................5-5
6 Additional Copy Operations
6.1 Blocking Document Scan Storage
(“Reprint OFF” Function) .............................................................6-2
To set the “Reprint OFF” function...............................................6-2
6.2 Copying Documents of Mixed Sizes
(“Mixed Original” Function).........................................................6-3
To copy documents of mixed sizes ............................................6-4
6.3 Printing Sample Copies (“Copy 1 Set” Function)......................6-6
To make a sample copy .............................................................6-6
6.4 Interrupting a Copy Job (Interrupt Mode)...................................6-8
To interrupt copying....................................................................6-8
6.5 Making Copies With an Account ...............................................6-10
Using the Volume Track Mode (E.K.C.) ...................................6-10
To make copies when accounts are specified..........................6-10
6.6 Setting the “Key Repeat Start/Interval” Function
(Accessibility Mode) ...................................................................6-12
6.7 Setting the “Enlarged Display Clear Check” Function
(Accessibility Mode) ...................................................................6-14
6.8 Checking the Settings ................................................................6-16
To check the settings................................................................6-16
To change the settings .............................................................6-18
7 Application Functions
7.1 Storing the Scanned Image in the Memory
(“Scan to Memory” Function) ......................................................7-2
To use the “Scan to Memory” function .......................................7-2
7.2 Scanning the Document in Separate Batches
(“Separate Scan” Function).........................................................7-3
To use the “Separate Scan” function..........................................7-4
7.3 Printing Distribution Numbers on Copies
(“Set Numbering” Function) ........................................................7-5
To use the “Set Numbering” function..........................................7-5
7.4 Making Copies for Filing (“File Margin” Function)....................7-8
To use the “File Margin” function................................................7-8
7.5 Erasing Sections of Copies (“Edge/Frame Erase”
Function)......................................................................................7-10
To use the “Edge/Frame Erase” function .................................7-11
cm3520 vii
Page 9

7.6 Adjusting the Document Image (“Image Adjustment”
Function) ..................................................................................... 7-15
To use the “Image Adjustment” function .................................. 7-16
7.7 Tiling Copy Images (“Image Repeat” Function)...................... 7-19
To use the “Image Repeat” function ........................................ 7-19
7.8 Inserting Paper Between Transparencies
(“OHP Interleave” Function)...................................................... 7-22
To use the “OHP Interleave” function ...................................... 7-22
7.9 Making Bound Booklets (“Booklet Original” Function).......... 7-24
To use the “Booklet Original” function...................................... 7-24
7.10 Improving Color Copy Quality (Color Image Adjustment
Parameters)................................................................................. 7-27
To adjust the “Brightness” parameter ...................................... 7-27
To adjust the “Contrast” parameter.......................................... 7-29
To adjust the “Saturation” parameter ....................................... 7-30
To adjust the “Sharpness” parameter ...................................... 7-31
To adjust the “Red” parameter................................................. 7-32
To adjust the “Green” parameter ............................................. 7-33
To adjust the “Blue” parameter ................................................ 7-34
To adjust the “Color Balance” parameter ................................. 7-35
To adjust the “Portrait” parameter............................................ 7-37
To adjust the “Hue” parameter................................................. 7-38
To adjust the “Copy Density” parameter .................................. 7-39
To make sample copies ........................................................... 7-40
7.11 Editing Images (Creation Functions)........................................ 7-41
To make settings for the “Background Color” function............. 7-41
To make settings for the “Color Separation” function .............. 7-43
To set the “Neg. Pos. Reverse” function.................................. 7-45
To make settings for the “Multi-Page Enlargement” function ... 7-46
To make settings for the “Mirror Image” function ..................... 7-52
Reducing the Document to Postcard Size and Printing Multiple
Copies on One Page (“Postcard” Function)............................. 7-55
To make settings for the “Postcard” function ........................... 7-55
8 Managing Jobs
8.1 Overview of Jobs.......................................................................... 8-2
Jobs ........................................................................................... 8-2
Multi-Job Feature ....................................................................... 8-2
Changing the Copy Settings for a Queued Job ......................... 8-3
Deleting a Queued Job .............................................................. 8-3
Canceling a Job Being Printed................................................... 8-3
viii cm3520
Page 10

8.2 Job Log Screens...........................................................................8-4
Active Jobs Screen.....................................................................8-4
Send List Screen ........................................................................8-6
Mode Check Screen...................................................................8-7
Print Log Screen.........................................................................8-8
Send Log Screen......................................................................8-10
8.3 Job Control Screens...................................................................8-11
Hold Job Screen.......................................................................8-11
To print stored data ..................................................................8-12
Locked Jobs Screen.................................................................8-13
To print a locked job .................................................................8-15
Increase Priority Screen ...........................................................8-16
To increase the (print) priority of a job......................................8-17
Combine Jobs Screen ..............................................................8-18
To combine jobs .......................................................................8-20
HDD Screen .............................................................................8-20
To print a job from the hard disk...............................................8-22
Reprint Screen..........................................................................8-23
To reprint a job saved in the memory.......................................8-24
9 Care of the Machine
9.1 Cleaning.........................................................................................9-2
Housing ......................................................................................9-2
Original Glass.............................................................................9-2
Control Panel..............................................................................9-3
Document Transfer Belt..............................................................9-3
Paper Take-Up Roller.................................................................9-4
Electrostatic Charger..................................................................9-5
10 Utility Mode Operations
10.1 Utility Screen ...............................................................................10-2
10.2 Programming/Recalling Copy Programs..................................10-4
Setting the “Reset Mode” Function...........................................10-4
Storing Copy Programs ............................................................10-5
Recalling a Copy Program........................................................10-7
10.3 Viewing Counters (“Counter List” Function) ...........................10-8
10.4 Specifying Default Settings (User’s Choice: 1 Functions)....10-10
Setting the “Key Click Sound” Function..................................10-10
Setting the “Power Save” Function.........................................10-11
Setting the “Sleep” Function...................................................10-13
Setting the “Account Change Auto Reset” Function...............10-15
cm3520 ix
Page 11

10.5 Specifying Default Settings (User’s Choice: 2 Functions) ... 10-16
Setting the “Language Select” Function................................. 10-16
Setting the “2in1, 4in1, Booklet Copy Zoom” Function .......... 10-17
Setting the “ACS Judgement Level Adjustment” Function ..... 10-18
Setting the “Intelligent Sorting” Function................................ 10-19
Setting the “Criss Cross” Function ......................................... 10-20
Setting the “Paper Type Select” Function .............................. 10-21
Setting the “Auto-select paper for small originals” Function .. 10-23
Setting the “4in1 Copy Order” Function ................................. 10-25
Setting the “Centering” Function ............................................ 10-26
Setting the “Priority Output Tray” Function ............................ 10-27
Setting the “Priority Device” Function .................................... 10-29
10.6 Viewing Part Maintenance Levels
(“Unit Life Indicator” Function)............................................... 10-30
10.7 Administrator Mode Operations.............................................. 10-31
10.8 Administrator Settings............................................................. 10-33
Setting the “Top Erase” Function ........................................... 10-33
Setting the “Disable Sleep Mode” Function ........................... 10-34
Setting the “Over Size Paper Selection” Function ................. 10-35
Setting the “Locked Jobs Auto Delete Time” Function........... 10-37
Setting the “Skip Volume Track (E.K.C.) Error” Function....... 10-39
Setting the “Access Lock” Function ....................................... 10-40
Setting the “Access Lock Release” Function ......................... 10-42
Setting the “User Authentication” Function ............................ 10-43
Setting the “LDAP Search” Function...................................... 10-46
Setting the “Box Function” Function....................................... 10-47
Setting the “Date & Time Setting” Function ........................... 10-48
Setting the “Reprint” Function ................................................ 10-50
Setting the “HDD Lock” Function ........................................... 10-52
Changing the Password for the Hard Disk............................. 10-55
Removing the Lock Setting for the Hard Disk........................ 10-57
Setting the “Administrator Code Change” Function ............... 10-59
Setting the “Panel Reset Timer” Function.............................. 10-61
Setting the “Add Prefix/Suffix” Function ................................. 10-63
Setting the “Prefix/Suffix Registration” Function .................... 10-65
10.9 Setting the “Gradation Adjustment” Function ...................... 10-67
10.10 Specifying Expert User Mode Functions................................ 10-69
Setting the “Thick Paper and OHP Film Image Density”
Function ................................................................................. 10-69
Setting the “Color Shift Correction (Bk)” Function.................. 10-70
Setting the “Color Shift Correction (C,M,Y)” Functions .......... 10-73
Setting the “Black Image Density Correction” Function ......... 10-77
Setting the “Stabilizer” Function............................................. 10-78
Setting the “PRT Area (Top Margin)” Function ...................... 10-80
x cm3520
Page 12

Setting the “PRT Area (Left Margin)” Function.......................10-82
Setting the “PRT Area (Dup. Left Margin)” Function ..............10-84
Setting the “Center Staple Position” Function ........................10-86
10.11 Supervising Machine Use (Volume Track (E.K.C.)
Functions)..................................................................................10-89
Setting the “Volume Track Mode (E.K.C.)” Function ..............10-89
Canceling Volume Track Mode (E.K.C.).................................10-91
Setting Up Volume Track (E.K.C.) Accounts
(“Volume Track Setting (E.K.C.) ” Function)...........................10-93
Viewing Volume Track Data (E.K.C.) Counters
(“Volume Track Data (E.K.C.)” Function) ...............................10-97
Printing Volume Track Data (E.K.C.) Counters ....................10-100
Clearing Volume Track Data (E.K.C.) Counters...................10-102
10.12 Viewing Toner Usage (“Toner Coverage” Function) ...........10-105
11 Touch Panel Messages
11.1 When the Message “Toner Cartridge (X) needs to be
replaced soon.” Appears............................................................11-2
Display in Enlarge Display Mode..............................................11-2
11.2 When the Message “Replace the Toner cartridge”
Appears........................................................................................11-4
Display in Enlarge Display Mode..............................................11-4
Replacing the Toner Cartridge .................................................11-7
11.3 When the Message “Replace Staple Cartridge.”
Appears......................................................................................11-11
Display in Enlarge Display Mode............................................11-11
Replacing the Staple Cartridge for 9997 ................................11-12
Replacing the Staple Cartridge for 9996 ................................11-15
11.4 When the Message “Misfeed detected.” Appears..................11-20
Locations of Paper Misfeeds ..................................................11-20
Locations of Paper Misfeeds in the Enlarge Display Mode ....11-21
Paper Misfeed/Staple Jam Indications ...................................11-22
Clearing a Paper Misfeed in the Bypass Tray ........................11-23
Clearing a Paper Misfeed in the Automatic Duplex Unit.........11-25
Clearing a Paper Misfeed in the 1st or 2nd Drawer................11-26
Clearing a Paper Misfeed in a Paper Drawer
(3rd or 4th Drawer) .................................................................11-27
Clearing a Paper Misfeed in the Large-Capacity Paper Feed
Cabinet ...................................................................................11-28
Clearing a Paper Misfeed in the Right-Side Door...................11-29
Clearing a Paper Misfeed in the Fusing Unit..........................11-33
Clearing a Paper Misfeed in the Reverse Automatic
Document Feeder...................................................................11-37
cm3520 xi
Page 13
Clearing a Paper Misfeed in Finisher 9997............................ 11-41
Clearing a Paper Misfeed in Finisher 9996............................ 11-46
11.5 When the Message “Staple mode cannot be used.”
Appears ..................................................................................... 11-50
Clearing Jammed Staples in Finisher 9997 ........................... 11-50
Clearing Jammed Staples in Finisher 9996 ........................... 11-53
11.6 When the Message “Remove Punch Scraps.” Appears ....... 11-59
Display in Enlarge Display Mode ........................................... 11-59
Emptying the Hole-Punch Waste Container .......................... 11-60
11.7 When the Inspection Mark “” Appears............................ 11-62
Display in Enlarge Display Mode ........................................... 11-63
11.8 When the Message “Malfunction detected.” Appears .......... 11-64
Display in Enlarge Display Mode ........................................... 11-64
11.9 When “The following units need to be replaced soon.”
Appears ..................................................................................... 11-66
Display in Enlarge Display Mode ........................................... 11-66
11.10 When the Message “Please replace XXXX.” Appears........... 11-68
Display in Enlarge Display Mode ........................................... 11-68
11.11 Main Messages and Their Remedies ...................................... 11-70
12 Troubleshooting
12.1 When the Print Quality Is Low................................................... 12-2
12.2 When the Machine Is Not Operating Correctly ........................ 12-5
13 Specifications
13.1 Specifications ............................................................................. 13-2
Copier cm3520......................................................................... 13-2
Automatic Duplex Unit 9991 .................................................... 13-3
Reverse Automatic Document Feeder 9990............................ 13-4
Paper Feed Cabinet 9993........................................................ 13-5
Paper Feed Cabinet 9994........................................................ 13-5
Paper Feed Cabinet 9992........................................................ 13-5
Finisher 9996 ........................................................................... 13-6
Finisher 9997 ........................................................................... 13-7
Job Separator CM3500010...................................................... 13-7
Punch Kit ................................................................................. 13-8
xii cm3520
Page 14

14 Appendix
14.1 Paper Size and Zoom Ratio Tables ...........................................14-2
Copy Paper Sizes.....................................................................14-2
Zoom Ratios .............................................................................14-3
14.2 Loading Documents for Specific Applications ........................14-6
Description of the Table............................................................14-6
Single-Sided Documents..........................................................14-7
Left-Bound Double-Sided Documents....................................14-13
Top-Bound Double-Sided Documents....................................14-19
14.3 Function Combination Table....................................................14-25
Function Combination Table...................................................14-25
15 Index
15.1 Index.............................................................................................15-2
cm3520 xiii
Page 15
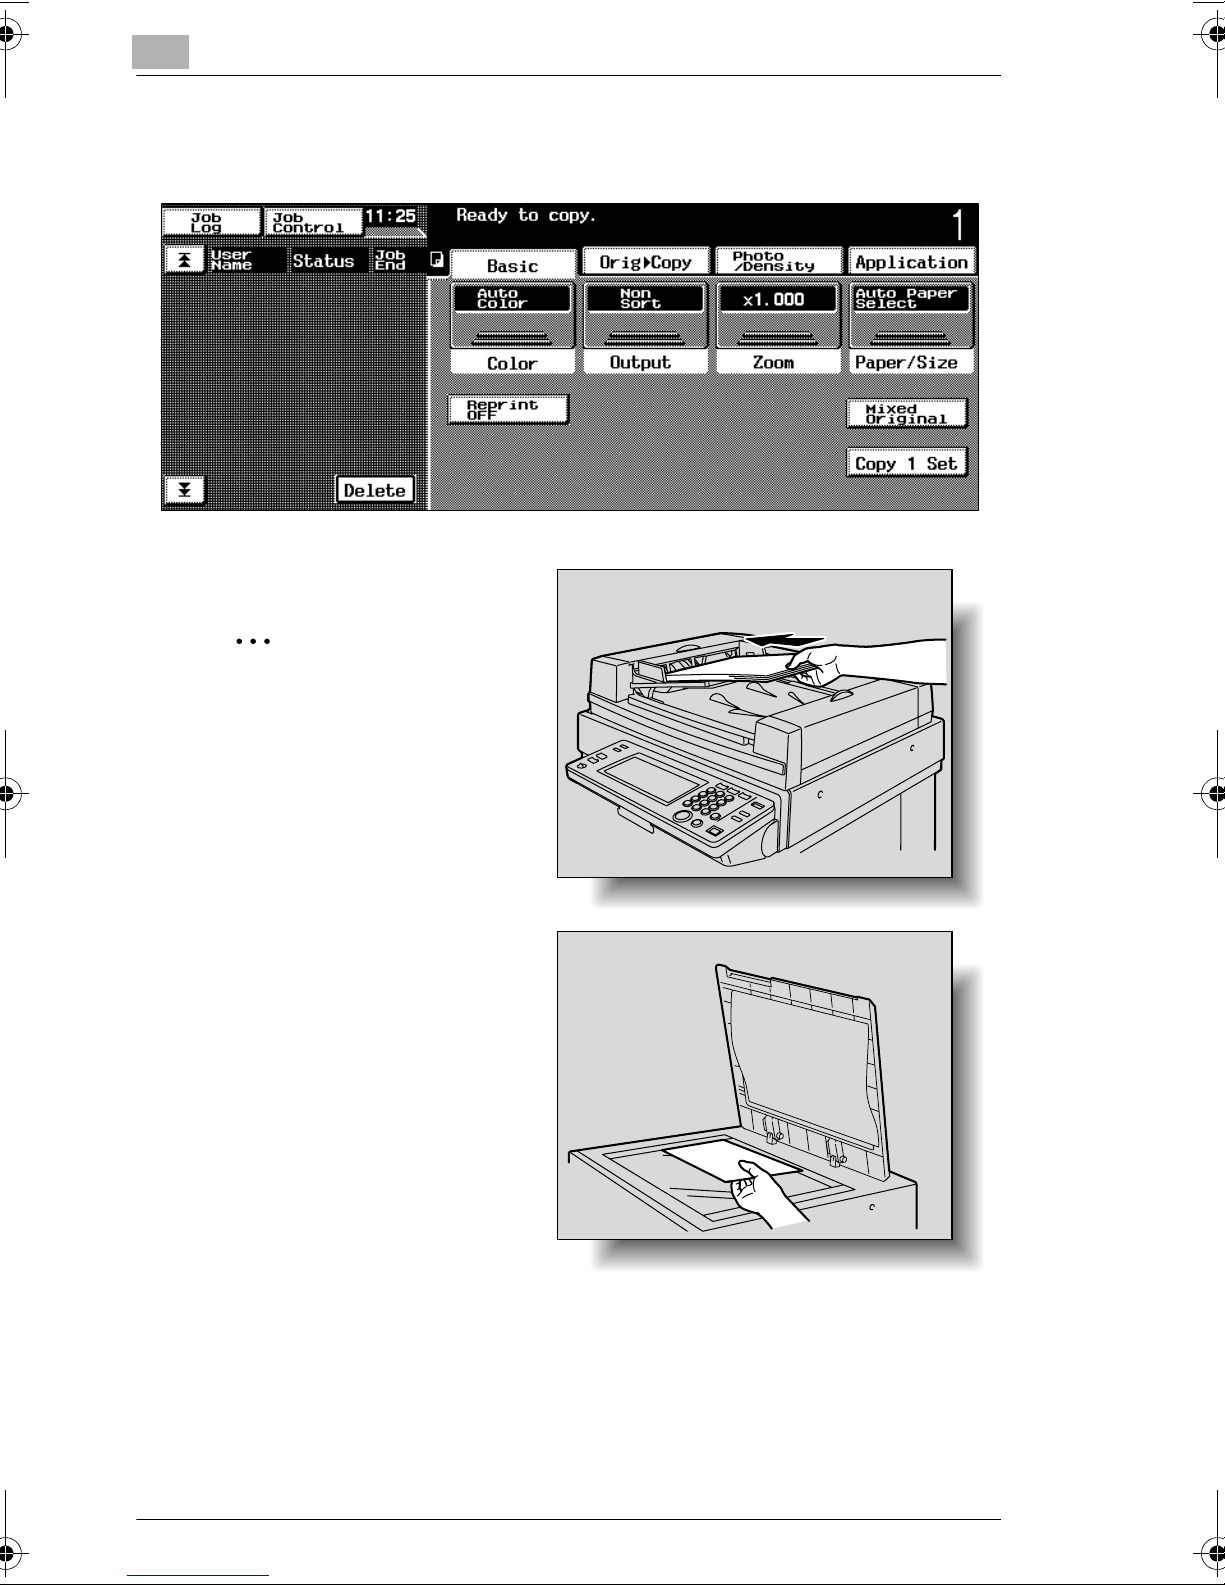
Making Basic Copies
The procedure for making basic copies is described below.
1 Load the document to be copied.
✎
Making Basic Copies
Reference
For details, refer to “Feeding
the Document” on page 2-41.
xiv cm3520
Page 16
Making Basic Copies
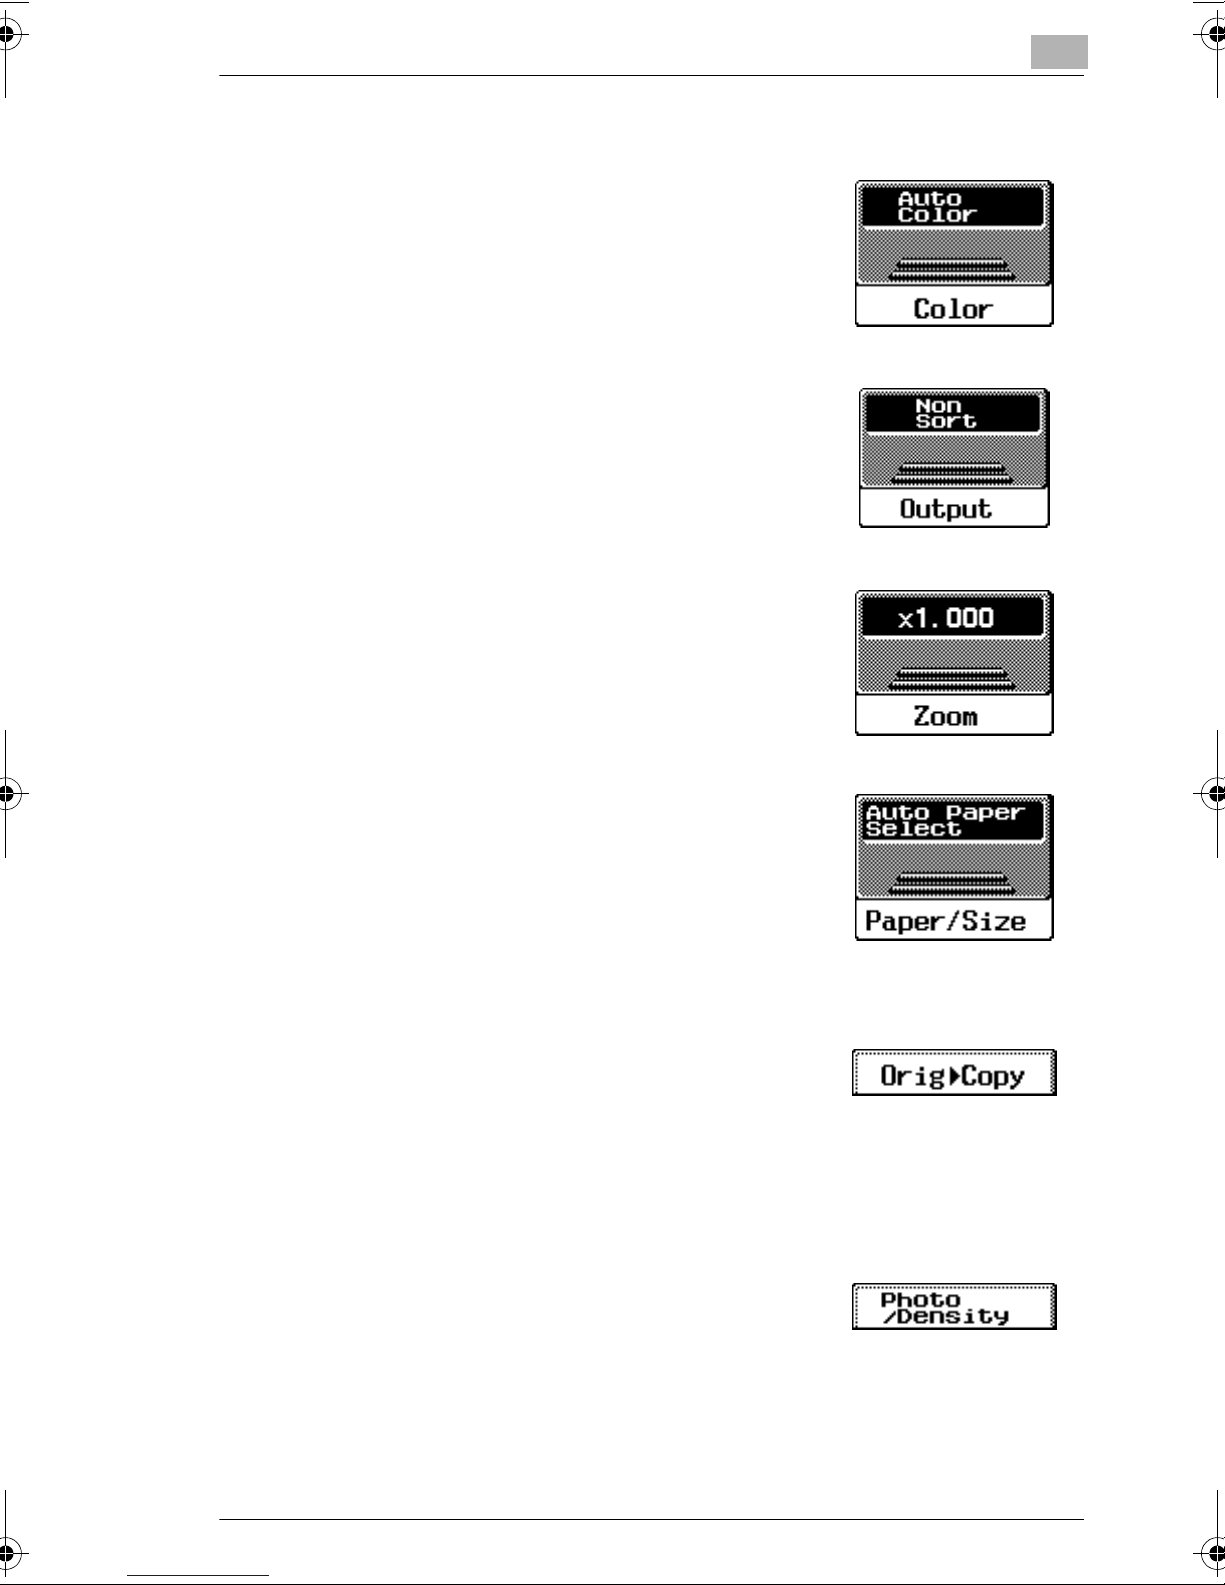
2 Specify the necessary settings.
❍ To specify a Color setting, touch [Color]. For
details, refer to “Selecting a Color Setting” on
page 3-5.
❍ To specify a Output setting, touch [Output]. For
details, refer to “Selecting Output Settings” on
page 3-8.
❍ To specify a Zoom setting, touch [Zoom]. For
details, refer to “Specifying a Zoom Setting” on
page 3-13.
❍ To specify the Paper/Size setting, touch [Paper/
Size]. For details, refer to “Selecting a Paper/
Size Setting” on page 3-18.
❍ To specify the Original and Copy settings, touch
[Orig Ö Copy]. For details, refer to “Selecting
Original Settings” on page 3-27 and “Selecting
Copy Settings” on page 3-37.
❍ To specify Photo/Density settings, touch [Photo/
Density]. For details, refer to “Selecting Photo/
Density Settings” on page 3-45.
cm3520 xv
Page 17

❍ To specify settings for the Application functions,
touch [Application]. For details, refer to
“Application Functions” on page 7-1.
3 Check the setting for the number of copies.
✎
Reference
For details, refer to “Specifying the Number of
Copies” on page 3-2.
4 Press the [Start] key.
Making Basic Copies
xvi cm3520
Page 18
Available Features
Available Features
Selecting the print color
The color used to print copies can be specified, for example, the copy can be
printed in full color or in a single color.
For details, refer to “Selecting a Color Setting” on page 3-5.
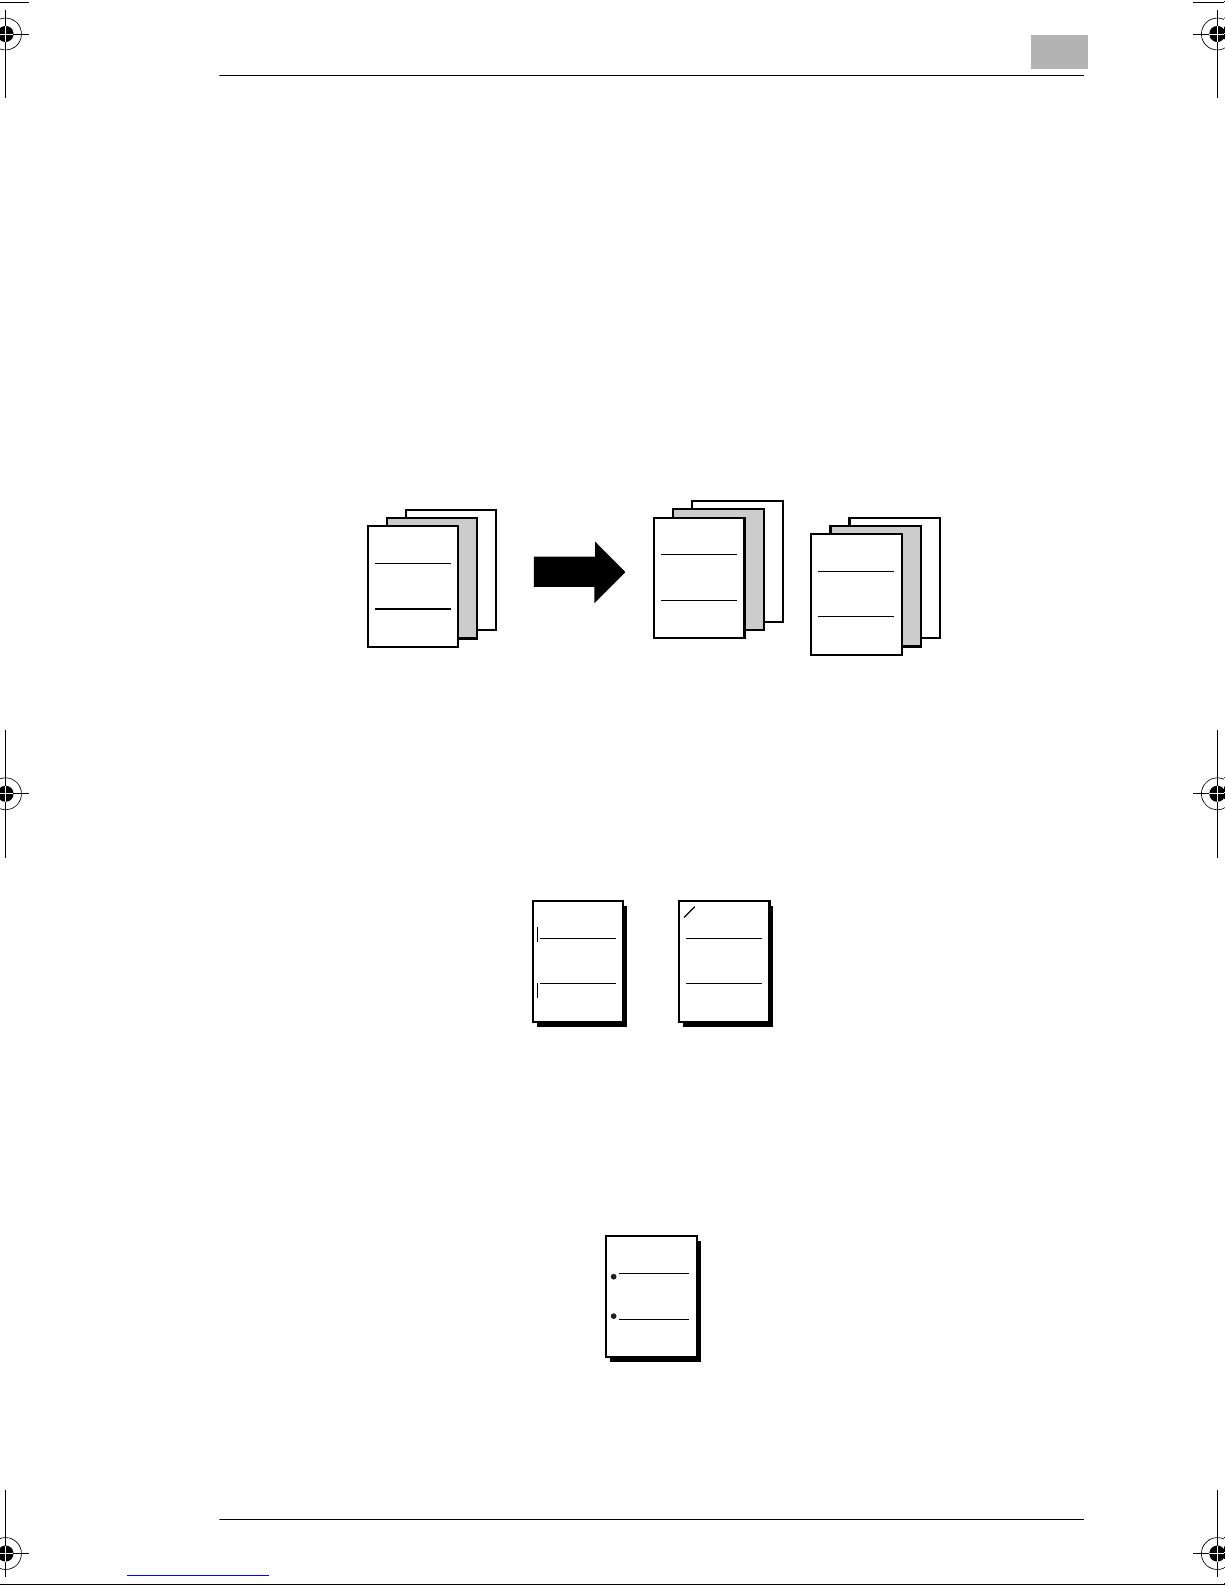
Sorting copies
While printing multiple copies, the copies can be divided into the separate sets.
For details, refer to “Sorting (“Sort” Setting)” on page 3-8.
ABC
Stapling copies
Copies can be stapled together before they are fed out.
For details, refer to “Stapling (with finisher 9997 installed)” on page 3-10.
For details, refer to “Stapling (with finisher 9996 installed)” on page 3-10.
ABC
ABC
ABC ABC
Punching holes in copies
Holes for filing can be punched in the copies
For details, refer to “Hole-Punching” on page 3-11.
cm3520 xvii
ABC
Page 19
Available Features
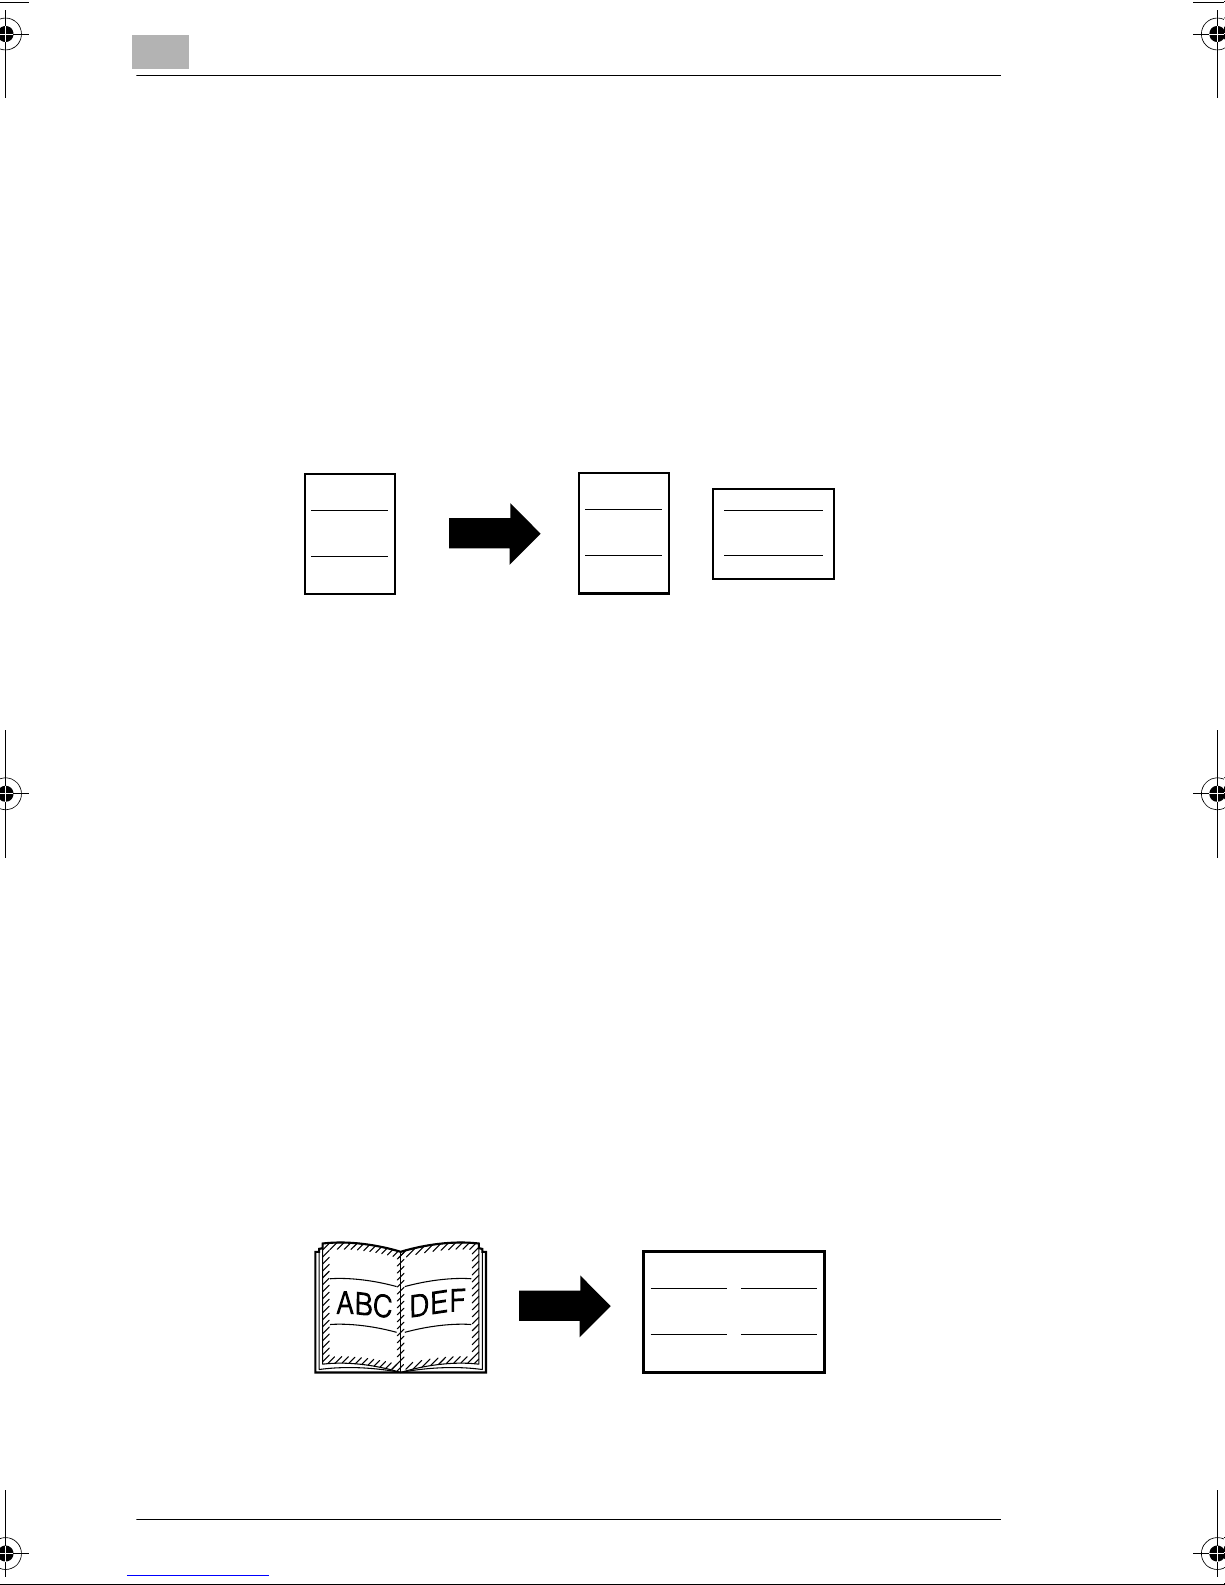
Adjusting copies to the size of the paper
The most appropriate zoom ratio can automatically be selected based on the size
of the loaded document and the specified paper size.
For details, refer to “Automatic Scaling (“Auto Zoom” Setting)” on page 3-13.
Specifying separate horizontal and vertical zoom ratios
By specifying separate horizontal and vertical zoom ratios, copies of the document
can be resized as desired.
For details, refer to “Custom Sizing (Manual Zoom Settings)” on page 3-14.
ABC
Automatically selecting the paper
The most appropriate paper size can automatically be selected based on the size
of the loaded document and the specified zoom ratio.
For details, refer to “Automatic Paper Selection (“Auto Paper Select” Setting)” on
page 3-18.
Reserving bypass tray copying
If paper of the appropriate size is not loaded into the bypass tray, copying can begin
with the previously scanned document after the appropriate paper is loaded into the
bypass tray.
For details, refer to “Bypass Reserve Settings for Bypass Tray” on page 3-18.
Copying book documents
ABC
ABC
When copying documents such as books, copies can be printed with the area along
the binding or around the text erased.
For details, refer to “Books (“Book Copy” Settings)” on page 3-27.
xviii cm3520
ABC DEF
Page 20
Available Features
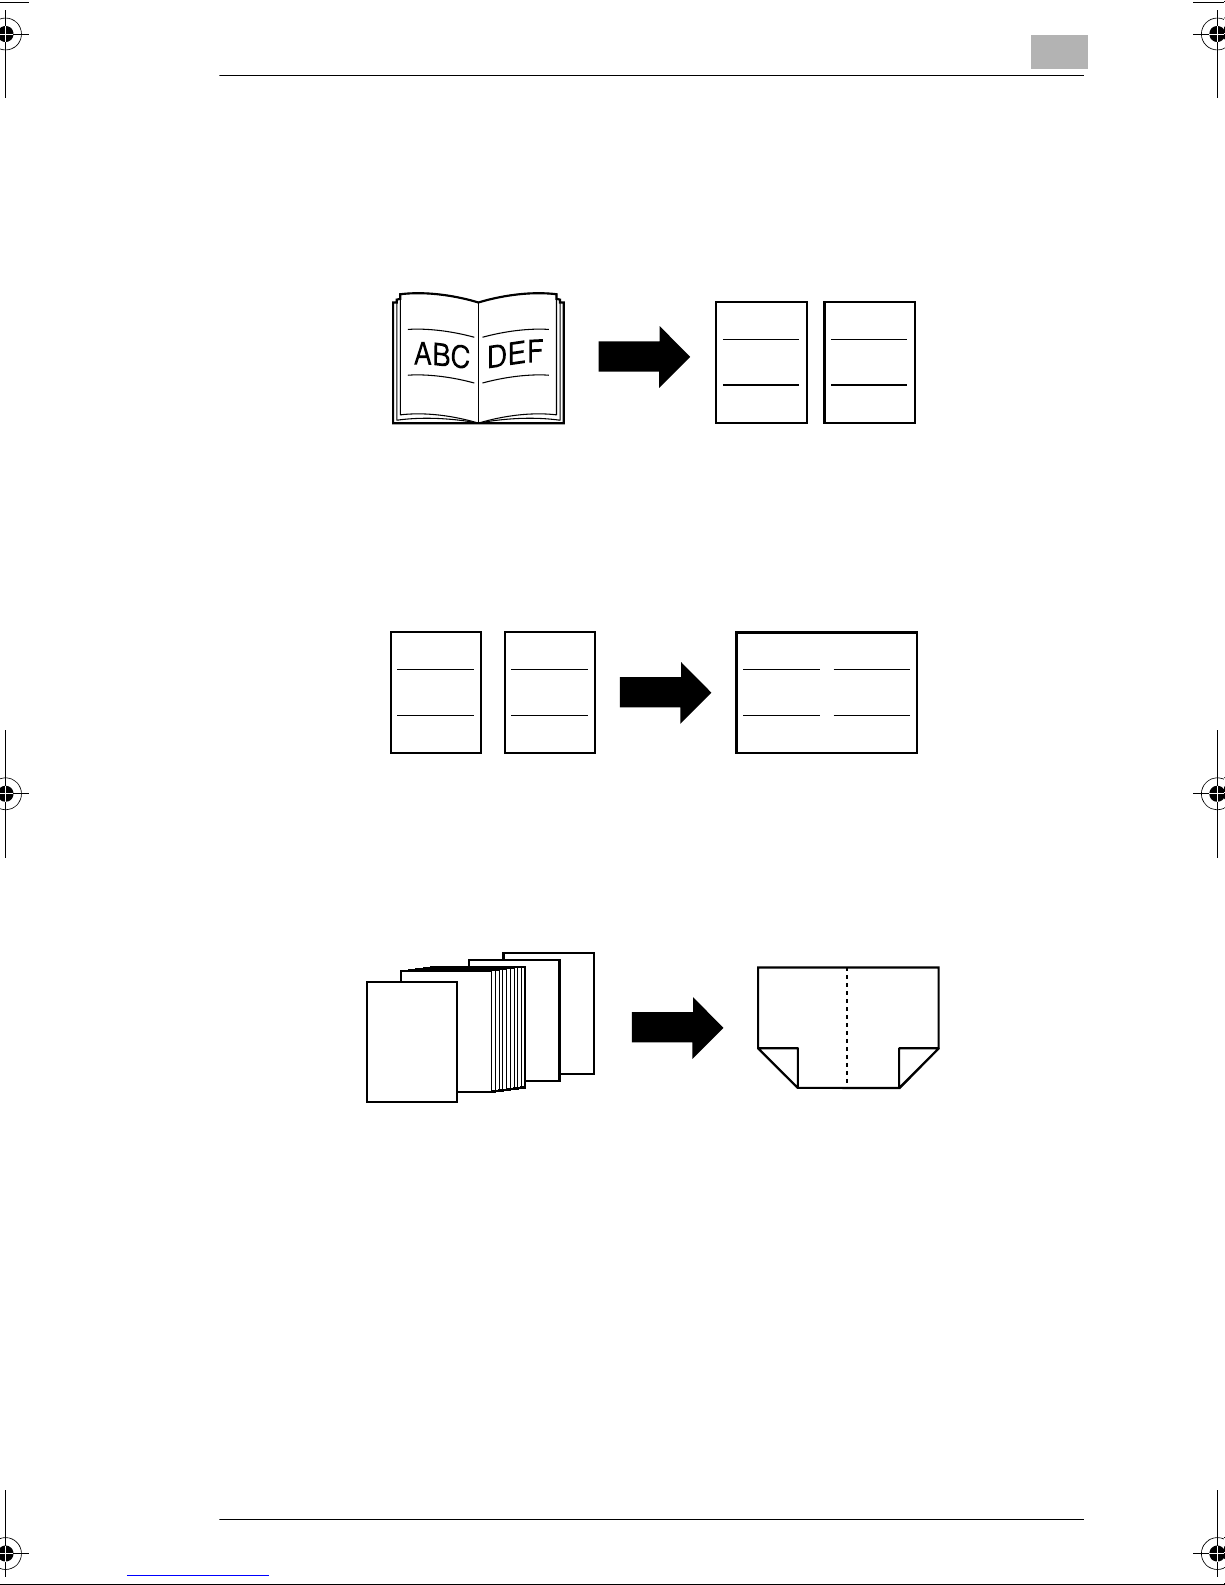
Separately copying the pages of a page spread
The two pages of a page spread, such as an open book, can be copied onto
separate pages.
For details, refer to “Books (“Book Copy” Settings)” on page 3-27.
ABC DEF
Copying multiple document pages onto a single page
Multiple pages of the document can be printed together on a single copy.
For details, refer to “Selecting Copy Settings” on page 3-37.
ABC DEF ABC DEF
Copying with a layout for center binding
Copies can be made with the pages arranged for binding at the center.
For details, refer to “Booklet Copy (“Booklet” Setting)” on page 3-40.
12
11
2
1
11
12 1
Adjusting copies according to the image quality of the original
The copies can be adjusted according to the image quality of the document.
For details, refer to “Selecting Photo/Density Settings” on page 3-45.
2
cm3520 xix
Page 21
Available Features
Copying a document containing various page sizes
A document with various page sizes can be scanned and copied together.
For details, refer to “Copying Documents of Mixed Sizes (“Mixed Original”
Function)” on page 6-3.
ABCABC
Printing a sample copy
Before printing a large number of copies, a sample copy can be printed so that it
can be checked.
For details, refer to “Printing Sample Copies (“Copy 1 Set” Function)” on page 6-6.
Interrupting a copy job
The copy job being printed can be interrupted in order for a different copy job to be
printed.
For details, refer to “Interrupting a Copy Job (Interrupt Mode)” on page 6-8.
Enlarging the touch panel screens
The touch panel screens can be enlarged in order to simplify the operations for
making copies.
For details, refer to “Enlarge Display Mode User’s Guide”.
Checking the copy settings
Screens showing the current copy settings can be displayed. From these screens,
the copy settings can also be changed.
For details, refer to “Checking the Settings” on page 6-16.
Storing the scanned image in the memory
The scanned document can be stored in the memory and deleted only when it is
printed.
For details, refer to “Storing the Scanned Image in the Memory (“Scan to Memory”
Function)” on page 7-2.
xx cm3520
Page 22

Available Features
Scanning the document in separate batches
A document can be divided and scanned in a number of batches. In addition, the
document pages can be alternately loaded onto the original glass or into the
reverse automatic document feeder.
For details, refer to “Scanning the Document in Separate Batches (“Separate Scan”
Function)” on page 7-3.
Printing distribution numbers on copies
Each copy set can be printed with a distribution number in the background.
For details, refer to “Printing Distribution Numbers on Copies (“Set Numbering”
Function)” on page 7-5.
GHI
DEF
ABC
Making copies for filing
Copies can be printed with a file margin so they can easily be stored in filing
binders.
For details, refer to “Making Copies for Filing (“File Margin” Function)” on page 7-8.
GHI
DEF
ABC
Erasing sections of copies
Areas such as the unclean-looking frames around copies can be erased.
ABC
GHI
DEF
ABC
ABC
DEF
DEF
GHI
GHI
For details, refer to “Erasing Sections of Copies (“Edge/Frame Erase” Function)” on
page 7-10.
cm3520 xxi
ABCABC
Page 23
Available Features
DEF
ABC
Adjusting the image to fit the paper size
If the document size is different from the paper size, the document image can be
enlarged to fill the paper.
For details, refer to “Adjusting the Document Image (“Image Adjustment” Function)”
on page 7-15.
ABC
Repeating copy images
A document image can be repeatedly printed on a single sheet of paper.
For details, refer to “Tiling Copy Images (“Image Repeat” Function)” on page 7-19.
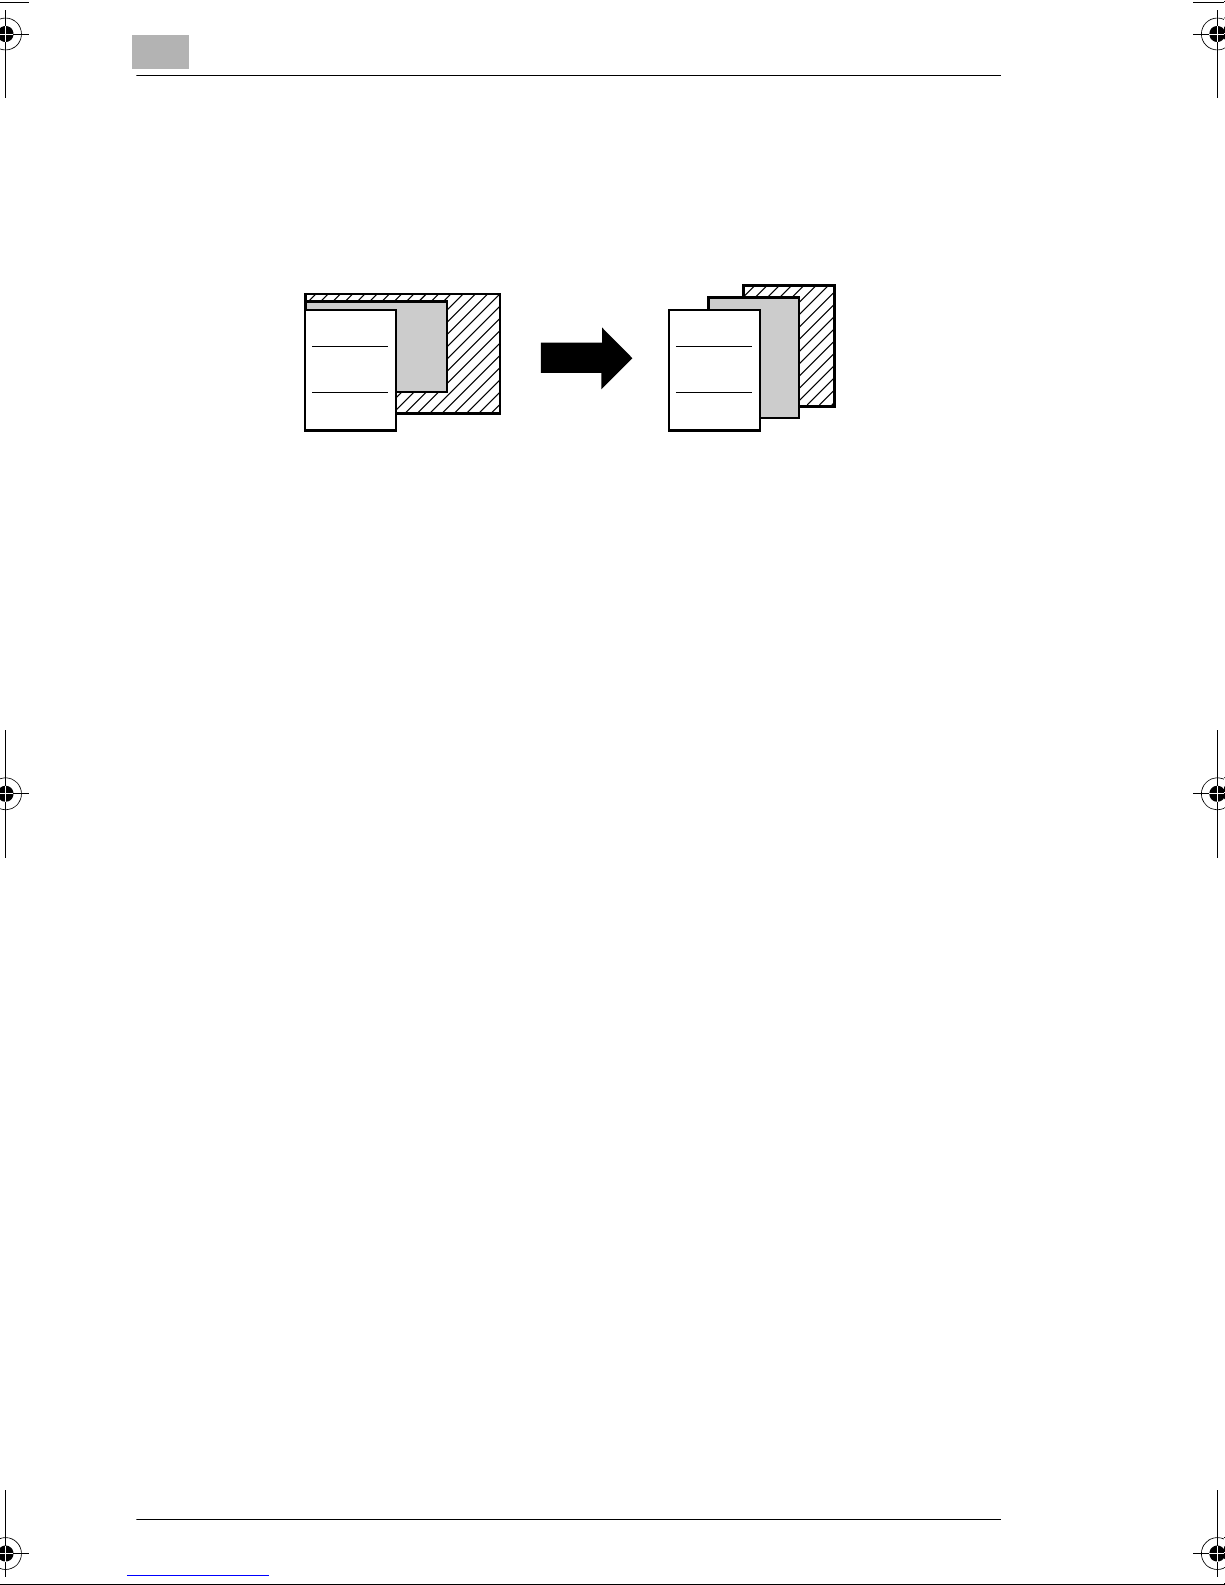
Inserting paper between transparencies
After each overhead transparency copy is printed, a page can be added to the stack
as an overleaf.
ABC
For details, refer to “Inserting Paper Between Transparencies (“OHP Interleave”
Function)” on page 7-22.
DEF
ABC
xxii cm3520
DEF
ABC
Page 24
Available Features
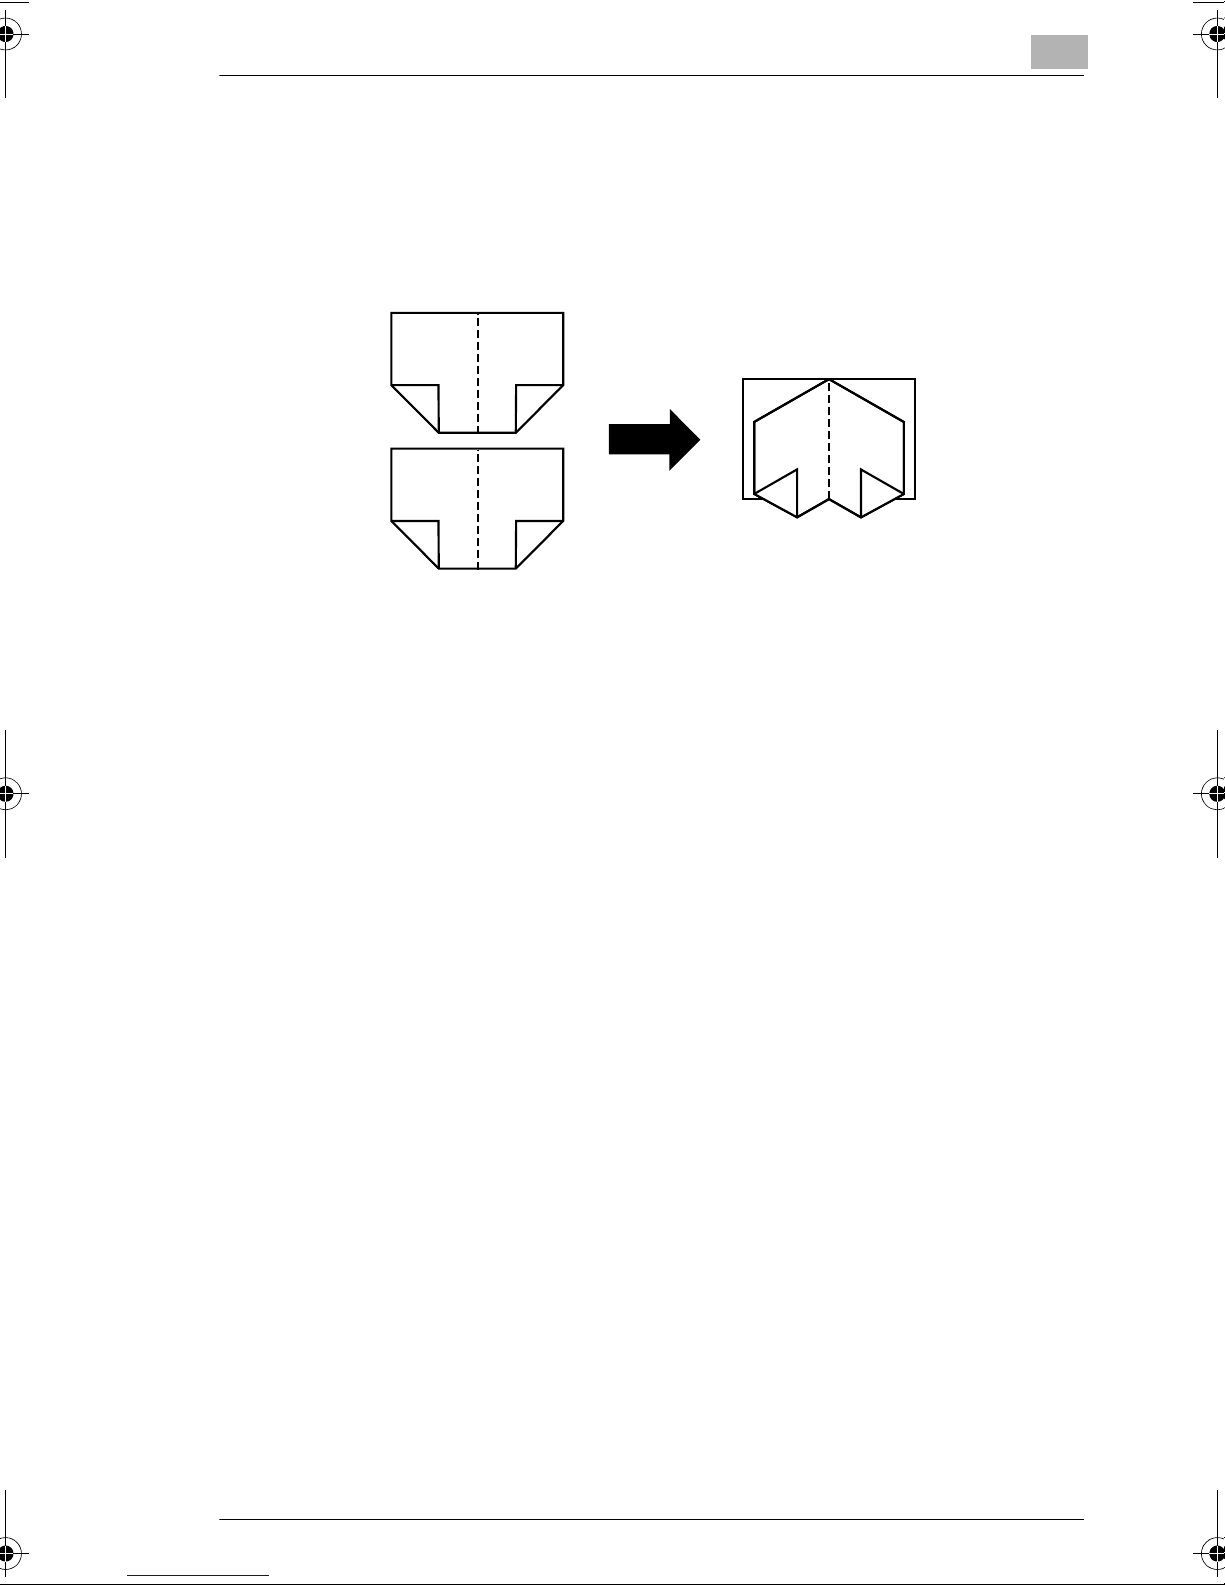
Copying booklet documents
Booklets with the staples removed can be copied and bound at the center to make
booklet copies.
For details, refer to “Making Bound Booklets (“Booklet Original” Function)” on
page 7-24.
2
7
8
1
2
4
7
5
4
5
3
1
4
6
6
3
Improving the copy color quality
By making various color adjustments, you can adjust the quality of color copies as
desired.
For details, refer to “Improving Color Copy Quality (Color Image Adjustment
Parameters)” on page 7-27.
Copying with a background color
A document can be copied using one of the 18 colors available as the color of the
background (blank areas).
For details, refer to “To make settings for the “Background Color” function” on
page 7-41.
Separating the colors of the copy
A document can be copied with its colors separated into cyan (C), magenta (M),
yellow (Y) and black (Bk). In addition, copies of the separated colors can be printed
in just black.
For details, refer to “To make settings for the “Color Separation” function” on
page 7-43.
cm3520 xxiii
Page 25
Available Features
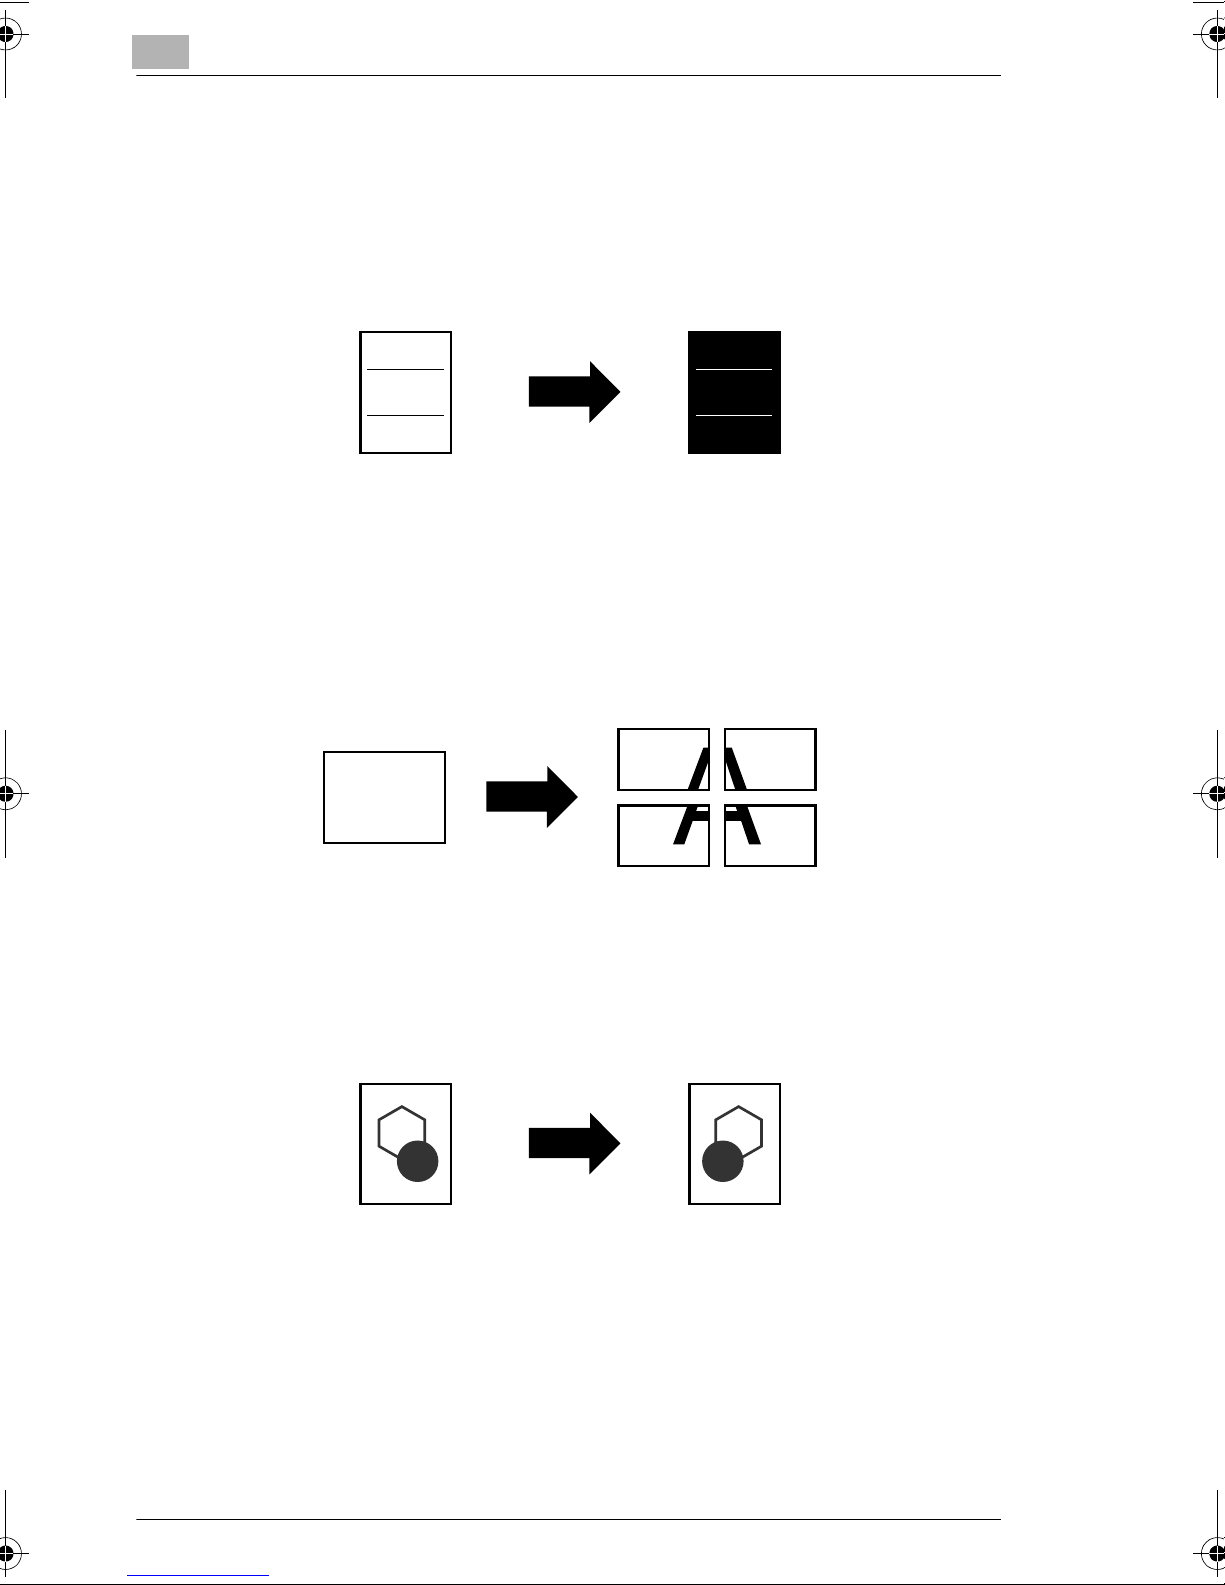
Copying with reversed colors
A document can be copied with the light- and dark-colored areas or the colors of
the image inversed. This allows you to make a copy of a positive image from color
or B/W negative films.
For details, refer to “To set the “Neg. Pos. Reverse” function” on page 7-45.
ABCABC
Enlarging the image and printing it on multiple pages
A single document page can be automatically split into parts with each part printed
enlarged.
For details, refer to “To make settings for the “Multi-Page Enlargement” function” on
page 7-46.
A
Printing a mirror image of the document
A copy can be printed in the mirror image of the original document.
For details, refer to “To make settings for the “Mirror Image” function” on page 7-52.
xxiv cm3520
Page 26
Available Features
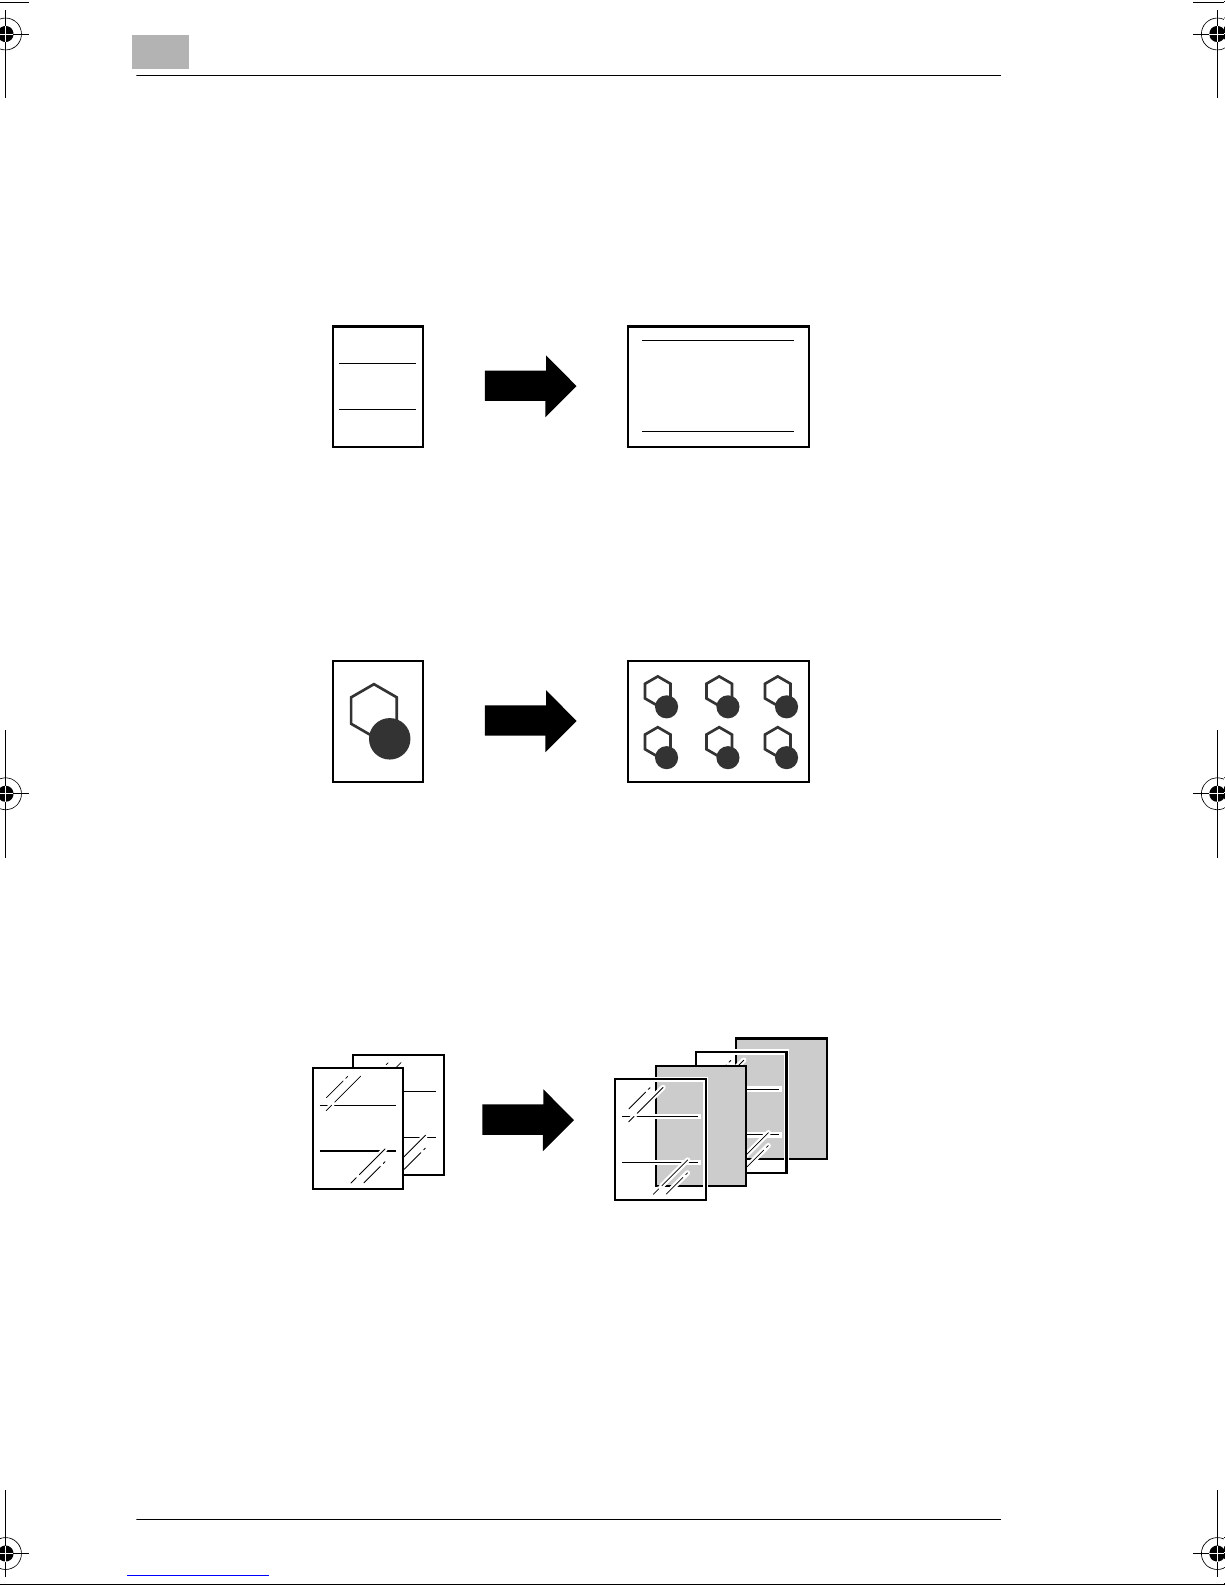
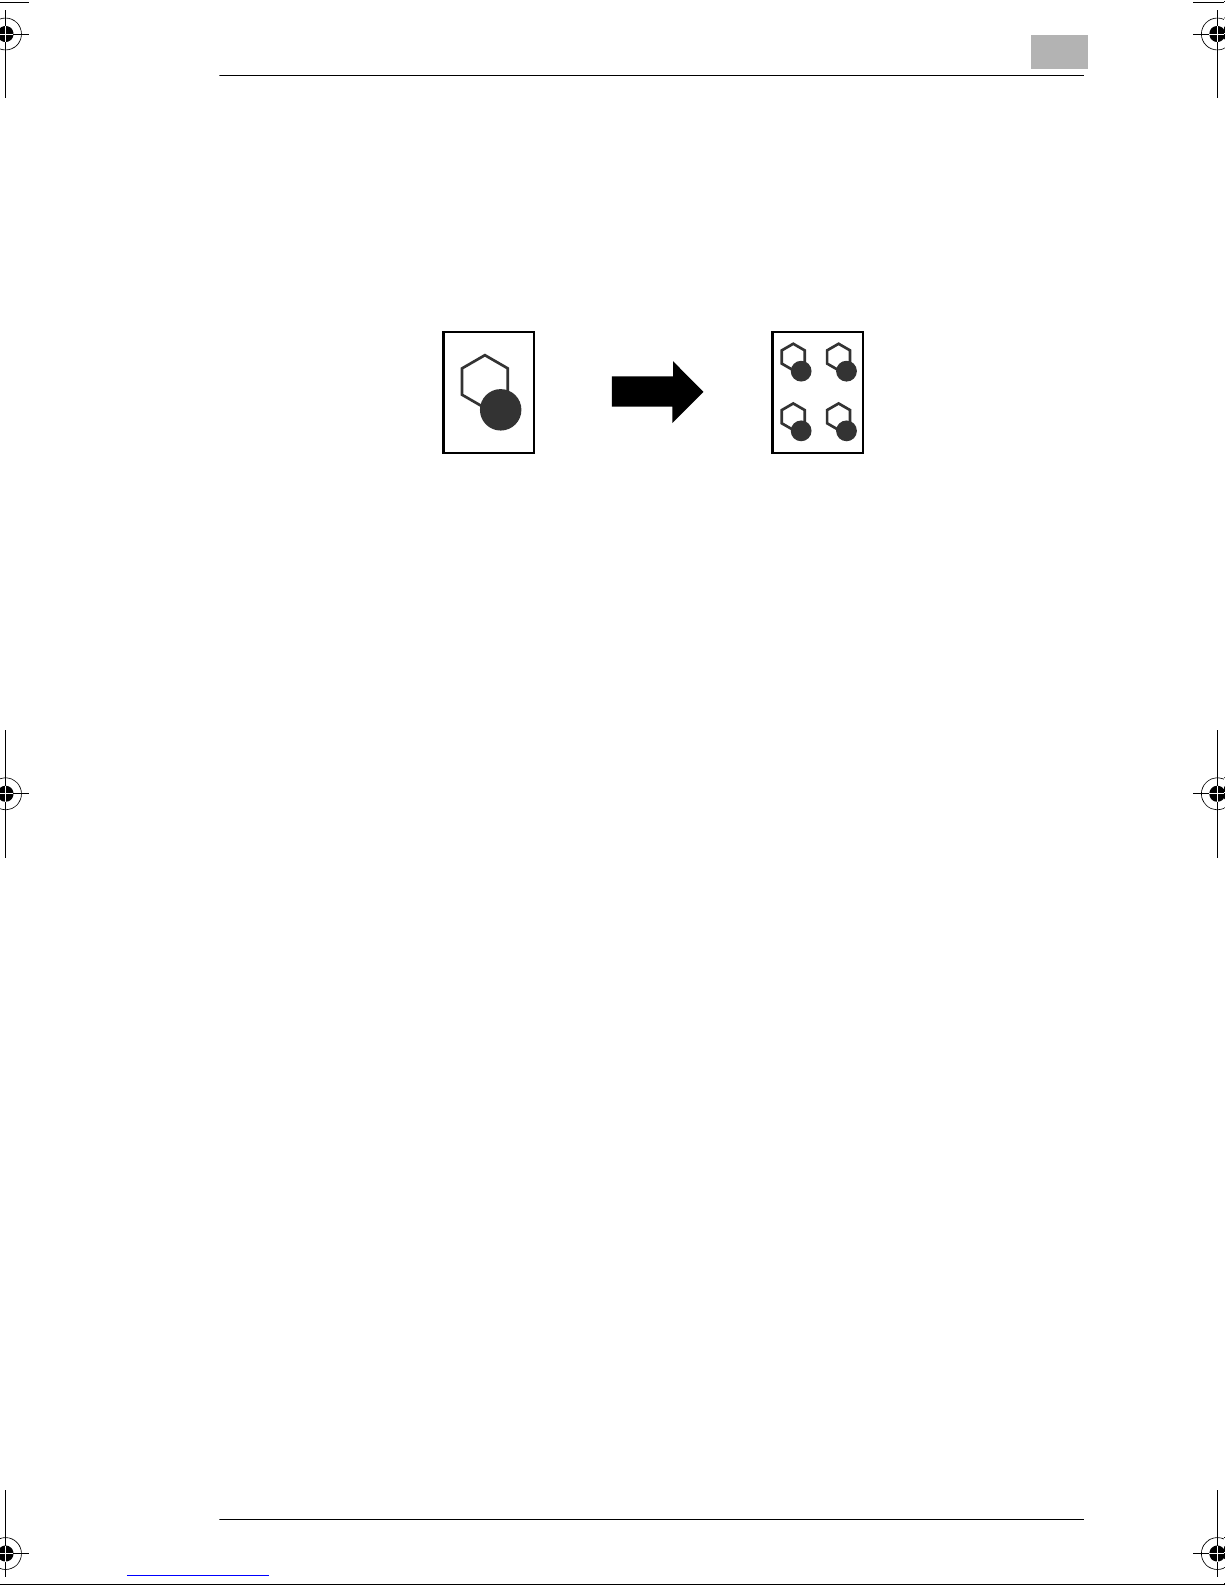
Reducing the image and printing multiple copies on one page
The document image can be reduced to postcard size, and four copies can be
printed on a single sheet of paper.
For details, refer to “Reducing the Document to Postcard Size and Printing Multiple
Copies on One Page (“Postcard” Function)” on page 7-55.
Managing copying
The print status of copy jobs can be checked and the jobs can be managed.
For details, refer to “Overview of Jobs” on page 8-2.
cm3520 xxv
Page 27
Explanation of Basic Concepts and Symbols
Explanation of Basic Concepts and Symbols
The use of words and symbols in this manual are explained below.
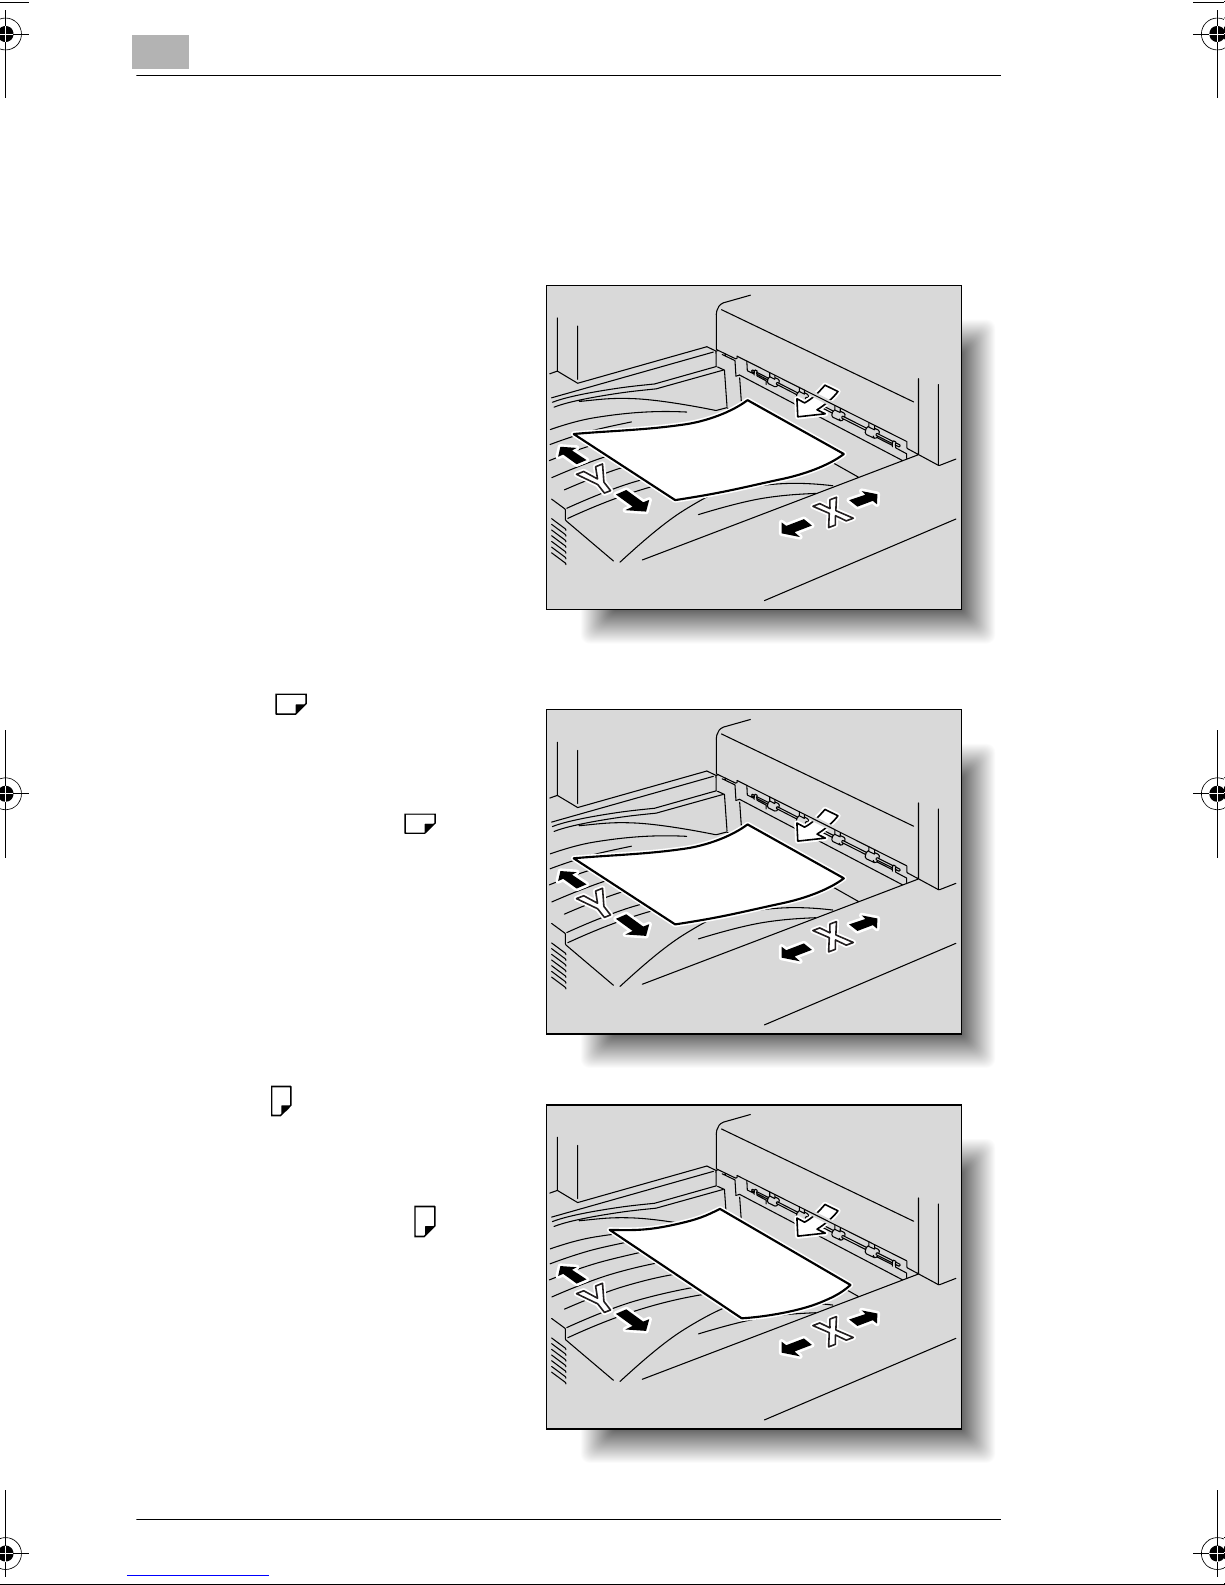
“Width” and “Length”
Whenever paper dimensions are
mentioned in this manual, the first
value always refers to the width of
the paper (shown as “Y” in the
illustration) and the second to the
length (shown as “X”).
Paper Orientation
Lengthwise ( )
If the width (Y) of the paper is shorter
than the length (X), the paper has a
vertical or portrait orientation,
indicated by either “L” or .
Crosswise ( )
If the width (Y) of the paper is longer
than the length (X), the paper has a
horizontal or landscape orientation,
indicated by either “C” or .
xxvi cm3520
Page 28
Explanation of Manual Conventions
Explanation of Manual Conventions
WARNING
➜ Failure to observe instructions highlighted in this manner may result in fatal or
critical injuries.
➜ Observe all warnings in order to ensure safe use of the machine.
CAUTION
➜ Failure to observe instructions highlighted in this manner may result in serious
injuries or property damage.
➜ Observe all cautions in order to ensure safe use of the machine.
✎
Reminder!
Text highlighted in this manner indicates operation precautions. Carefully read
and observe this type of information.
✎
Additional Information
Text highlighted in this manner provides more detailed information concerning
the operating procedure.
✎
Hint
This includes reference and supplemental information concerning operating
procedures and other text. We recommend that this information be read
carefully.
✎
Reference
Text highlighted in this manner indicates sections containing additional
information. If necessary, refer to the indicated sections.
cm3520 xxvii
Page 29

Explanation of Manual Conventions
✎
Condition
Text highlighted in this manner provides information concerning the combining
of functions.
[ ] key
The names of keys on the control panel are written as shown above.
xxviii cm3520
Page 30
Energy Star®
Energy Star
®
As an ENERGY STAR® Partner, we have determined that this machine meets the
®
ENERGY STAR
Guidelines for energy efficiency.
What is an ENERGY STAR® Product?
An ENERGY STAR
switch to a “low-power mode” after a period of inactivity. An ENERGY STAR
®
product has a special feature that allows it to automatically
®
product uses energy more efficiently, saves you money on utility bills and helps
protect the environment.
Trademarks and Registered Trademarks
Imagistics® and the Imagistics logo are trademarks of Imagistics International Inc.,
registered in the U.S. Patent and Trademark Office and/or other jurisdictions.
cm3520 xxix
Page 31

Legal Restrictions on Copying
Legal Restrictions on Copying
Certain types of documents must never be copied with the purpose or intent to pass
copies of such documents off as the originals.
The following is not a complete list, but is meant to be used as a guide to
responsible copying.
<Financial Instruments>
G Personal checks
G Travelers checks
G Money orders
G Certificates of deposit
G Bonds or other certificates of indebtedness
G Stock certificates
<Legal Documents>
G Food stamps
G Postage stamps (canceled or uncanceled)
G Checks or drafts drawn by government agencies
G Internal revenue stamps (canceled or uncanceled)
G Passports
G Immigration papers
G Motor vehicle licenses and titles
G House and property titles and deeds
<General>
G Identification cards, badges, or insignias
G Copyrighted works without permission of the copyright owner
In addition, it is prohibited under any circumstances
to copy domestic or foreign
currencies, or works of art without permission of the copyright owner.
When in doubt about the nature of a document, consult with legal counsel.
xxx cm3520
Page 32
1Installation and
Operation
Precautions
Installation and Operation Precautions Chapter 1
1
Page 33
1
1.1 For Safe Use
1.1 For Safe Use
This section contains detailed instructions on the operation and maintenance of this
machine. To achieve optimum utility of this device, all operators should carefully
read and follow the instructions in this manual. Please keep this manual in a handy
place near the machine.
Please read the next section before using this device. It contains important information related to user
safety and preventing equipment problems.
Make sure you observe all of the precautions listed in this manual.
* Ver07
Please note that some parts of the contents of this section may not correspond with the purchased
product.
Warning and Precaution Symbols
WARNING:
Installation and Operation Precautions Chapter 1
Meaning of Symbols
CAUTION:
Ignoring this warning could cause serious injury or even death.
Ignoring this caution could cause injury or damage to property.
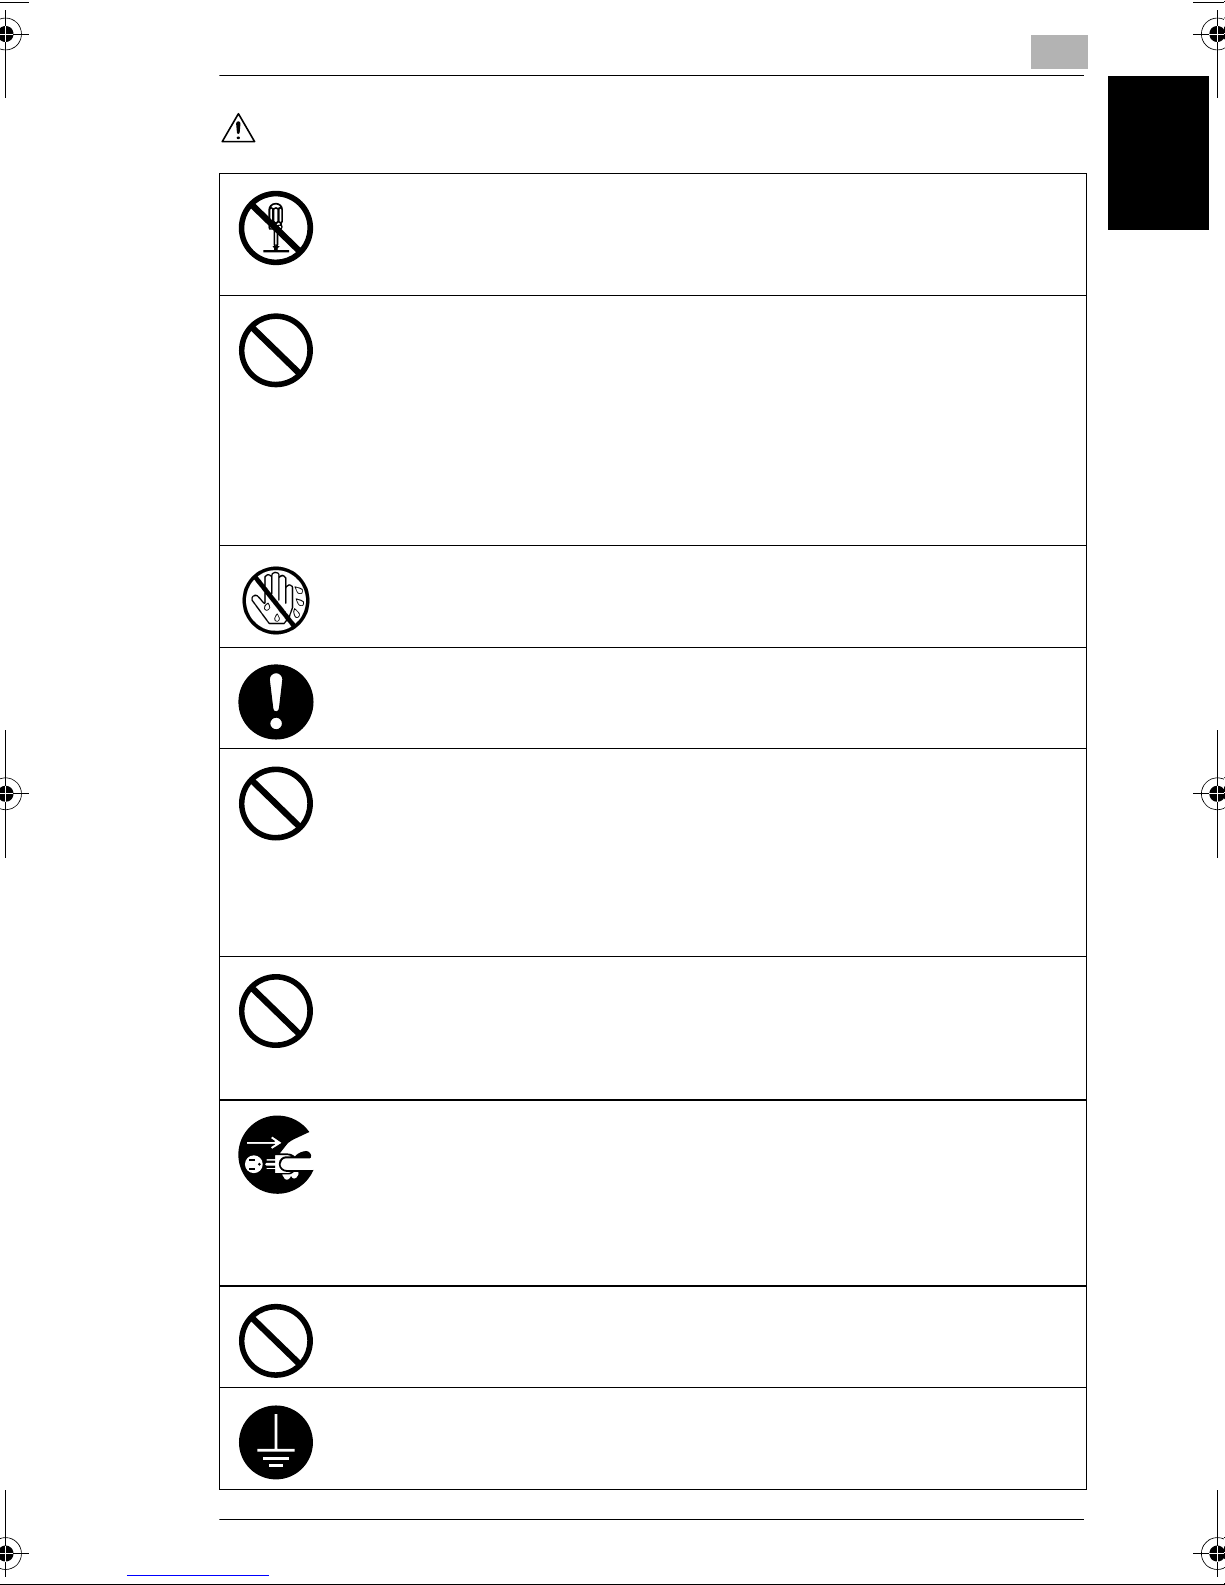
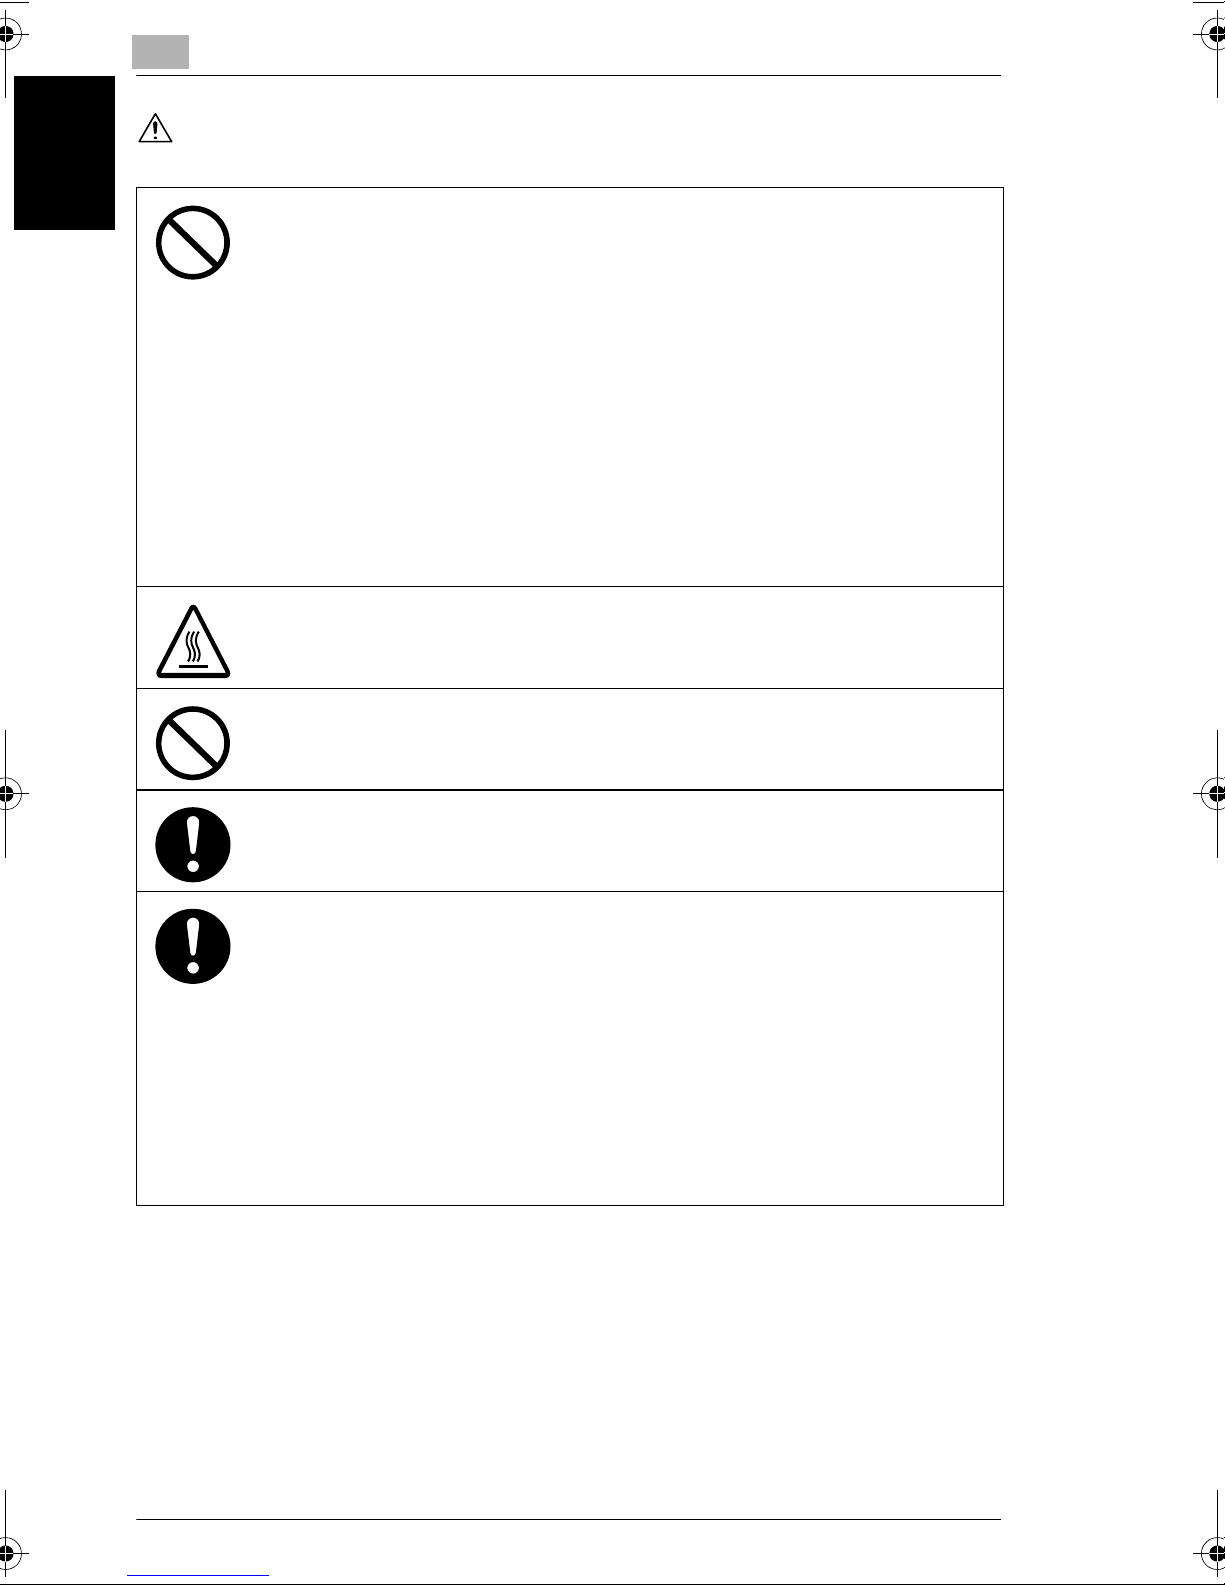
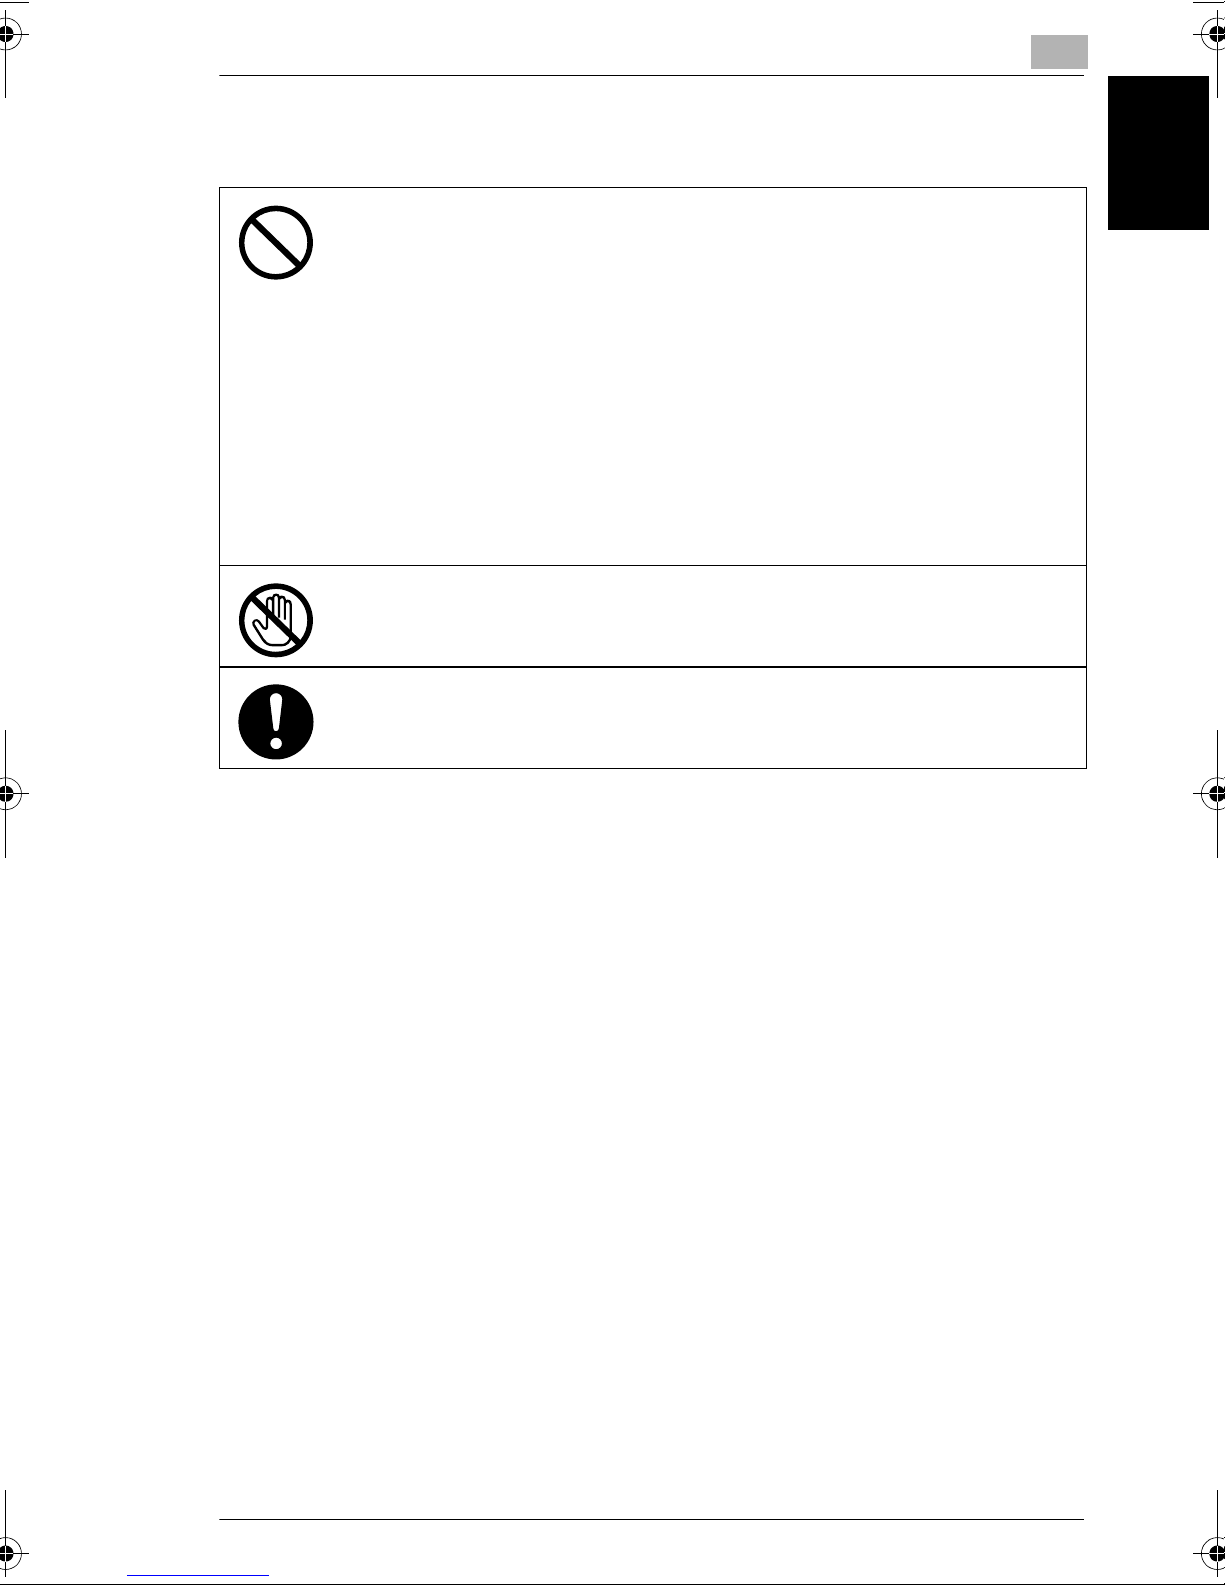
A triangle indicates a danger against which you should take precaution.
This symbol warns against cause burns.
A diagonal line indicates a prohibited course of action.
This symbol warns against dismantling the device.
A black circle indicates an imperative course of action.
This symbol indicates you must unplug the device.
1-2 cm3520
Page 34
1.1 For Safe Use
WARNING
• Do not modify this product, as a fire, electrical shock, or breakdown could result. If the
• Do not attempt to remove the covers and panels which have been fixed to the product.
• Use only the power cord supplied in the package. If a power cord is not supplied, only
• Use the power cord supplied in the package only for this machine and NEVER use it
• Use only the specified power source voltage. Failure to do that could result in a fire
• Do not use a multiple outlet adapter to connect any other appliances or machines.
Do not unplug and plug in the power cord with a wet hand, as an electrical shock could
result.
1
product employs a laser, the laser beam source could cause blindness.
Some products have a high-voltage part or a laser beam source inside that could
cause an electrical shock or blindness.
use the power cord and plug that is specified in POWER CORD INSTRUCTION.
Failure to use this cord could result in a fire or electrical shock.
for any other product. Failure to observe this precaution could result in a fire or
electrical shock.
or electrical shock.
Use of a power outlet for more than the marked current value could result in a fire or
electrical shock.
Plug the power cord all the way into the power outlet. Failure to do this could result in a
fire or electrical shock.
• Do not scratch, abrade, place a heavy object on, heat, twist, bend, pull on, or damage
the power cord. Use of a damaged power cord (exposed core wire, broken wire, etc.)
could result in a fire or breakdown.
Should any of these conditions be found, immediately turn OFF the power switch,
unplug the power cord from the power outlet, and then call your authorized service
representative.
• Do not use an extension cord, in principle. Use of an extension cord could cause a
fire or electrical shock. Contact your authorized service representative if an extension
cord is required.
Do not place a flower vase or other container that contains water, or metal clips or other
small metallic objects on this product. Spilled water or metallic objects dropped inside
the product could result in a fire, electrical shock, or breakdown.
Should a piece of metal, water, or any other similar foreign matter get inside the product,
immediately turn OFF the power switch, unplug the power cord from the power outlet,
and then call your authorized service representative.
• Do not keep using this product, if this product becomes inordinately hot or emits
smoke, or unusual odor or noise. Immediately turn OFF the power switch, unplug the
power cord from the power outlet, and then call your authorized service
representative. If you keep on using it as is, a fire or electrical shock could result.
• Do not keep using this product, if this product has been dropped or its cover
damaged. Immediately turn OFF the power switch, unplug the power cord from the
power outlet, and then call your authorized service representative. If you keep on
using it as is, a fire or electrical shock could result.
Installation and Operation Precautions Chapter 1
Do not throw the toner cartridge or toner into an open flame. The hot toner may scatter
and cause burns or other damage.
Connect the power cord to an electrical outlet that is equipped with a grounding terminal.
cm3520 1-3
Page 35
1
CAUTION
1.1 For Safe Use
• Do not use flammable sprays, liquids, or gases near this product, as a fire could
result.
• Do not leave a toner unit or drum unit in a place within easy reach of children.
Licking or ingesting any of these things could injure your health.
• Do not let any object plug the ventilation holes of this product. Heat could accumulate
inside the product, resulting in a fire or malfunction.
• Do not install this product at a site that is exposed to direct sunlight, or near an air
conditioner or heating apparatus. The resultant temperature changes inside the
product could cause a malfunction, fire, or electrical shock.
• Do not place the product in a dusty place, or a site exposed to soot or steam, near a
kitchen table, bath, or a humidifier. A fire, electrical shock, or breakdown could result.
• Do not place this product on an unstable or tilted bench, or in a location subject to a
lot of vibration and shock. It could drop or fall, causing personal injury or mechanical
breakdown.
• After installing this product, mount it on a secure base. If the unit moves or falls, it may
cause personal injury.
• Do not store toner units and PC drum units near a floppy disk or watch that are
susceptible to magnetism. They could cause these products to malfunction.
The inside of this product has areas subject to high temperature, which may cause
burns. When checking the inside of the unit for malfunctions such as a paper misfeed,
do not touch the locations (around the fusing unit, etc.) which are indicated by a
“CAUTION HOT” caution label.
Installation and Operation Precautions Chapter 1
Do not place any objects around the power plug as the power plug may be difficult to pull
out when an emergency occurs.
The socket-outlet shall be installed near the machine and shall be easily accessible as
the power plug may be difficult to pull out when an emergency occurs.
• Always use this product in a well ventilated location. Operating the product in a poorly
ventilated room for an extended period of time could injure your health. Ventilate the
room at regular intervals.
• Whenever moving this product, be sure to disconnect the power cord and other
cables. Failure to do this could damage the cord or cable, resulting in a fire, electrical
shock, or breakdown.
• When moving this product, always hold it by the locations specified in the User’s
Guide or other documents. If the unit falls it may cause severe personal injury. The
product may also be damaged or malfunction.
• Remove the power plug from the outlet more than one time a year and clean the area
between the plug terminals. Dust that accumulates between the plug terminals may
cause a fire.
• When unplugging the power cord, be sure to hold onto the plug. Pulling on the power
cord could damage the cord, resulting in a fire or electrical shock.
1-4 cm3520
Page 36
1.1 For Safe Use
Precautions for Routine Use
• Do not store toner units, PC drum units, and other supplies and consumables in a
place subject to direct sunlight and high temperature and humidity, as poor image
quality and malfunction could result.
• Do not attempt to replace the toner unit and PC drum unit in a place exposed to direct
sunlight. If the PC drum is exposed to intense light, poor image quality could result.
• Do not unpack a toner unit or PC drum unit until the very time of use. Do not leave an
unpacked unit standing. Install it immediately or poor image quality could result.
• Do not keep toner units and PC drum units in an upright position or upside down, as
poor image quality could result.
• Do not throw or drop a toner unit or PC drum unit as poor image quality could result.
• Do not use this product in an area where ammonia or other gases or chemicals are
present. Failure to do so may shorten the service life of the product, cause damage
or decrease performance.
• Do not use this product in an environment with a temperature outside the range
specified in the User’s Guide, as a breakdown or malfunction could result.
• Do not attempt to feed stapled paper, carbon paper or aluminum foil through this
product, as a malfunction or fire could result.
Do not touch or scratch the surface of the toner unit developing roller and the PC drum,
as poor image quality could result.
1
Use the supplies and consumables recommended by the dealer. Use of any supply or
consumable not recommended could result in poor image quality and breakdown.
USER INSTRUCTIONS FCC PART 15 - RADIO FREQUENCY DEVICES
(For U.S.A. Users)
NOTE: This equipment has been tested and found to comply with the limits for a
Class A digital device, pursuant to Part 15 of the FCC Rules.
These limits are designed to provide reasonable protection against harmful
interference when the equipment is operated in a commercial environment. This
equipment generates, uses and can radiate radio frequency energy and, if not
installed and used in accordance with the instruction manual, may cause harmful
interference to radio communications. Operation of this equipment in a residential
area is likely to cause harmful interference in which case the user will be required
to correct the interference at his own expense.
WARNING: The design and production of this unit conform to FCC regulations, and
any changes or modifications must be registered with the FCC and are subject to
FCC control. Any changes made by the purchaser or user without first contacting
the manufacturer will be subject to penalty under FCC regulations.
Installation and Operation Precautions Chapter 1
This device must be used with a shielded network (10 Base-T/100 Base-TX) cable
and a shielded parallel cable. The use of non-shielded cables is likely to result in
interference with radio communications and is prohibited under FCC rules.
cm3520 1-5
Page 37

1
INTERFERENCE-CAUSING EQUIPMENT STANDARD (ICES-003 ISSUE 3) (For
Canada Users)
This Class A digital apparatus complies with Canadian ICES-003.
Cet appareil numérique de la classe A est conforme à la norme NMB-003 du
Canada.
For Users in countries not subject to Class B regulations
WARNING
This is a Class A product. In a domestic environment this product may cause radio
interference in which case the user may be required to take adequate measures.
This device must be used with a shielded network (10 Base-T/100 Base-TX) cable
and a shielded parallel cable. The use of non-shielded cables is likely to result in
interference with radio communications and is prohibited under FCC rules.
LED Radiation Safety
1.1 For Safe Use
This product is a copier which operates by means of a LED (light emitting diodes)
exposure system. There is no possibility of danger from the LED optical radiation,
because the LED optical radiation level does not exceed the accessible radiation
Installation and Operation Precautions Chapter 1
limit of class 1 under all conditions of operation, maintenance, service and failure.
Ozone Release
Locate the machine in a Well Ventilated Room
A negligible amount of ozone is generated during normal operation of this machine.
An unpleasant odor may, however, be created in poorly ventilated rooms during
extensive machine operations. For a comfortable, healthy and safe operating
environment, it is recommended that the room be well ventilated.
Placer l’appareil dans une pièce largement ventilée
Une quantité d’ozone négligable est dégagée pendant le fonctionnement de
l’appareil quand celui-ci est utilisé normalement. Cependant, une odeur
désagréable peut être ressentie dans les pièces dont l’aération est insuffisante et
lorsque une utilisation prolongée de l’appareil est effectuée. Pour avoir la certitude
de travailler dans un environnment réunissant des conditions de confort, santé et
de sécurité, il est préférable de bien aérer la pièce ou se trouve l’appareil.
1-6 cm3520
Page 38

1.2 Installation Precautions
1
1.2 Installation Precautions
Installation Site
To ensure utmost safety and prevent possible malfunctions, install the machine in
a location that meets the following requirements.
- A location away from curtains, etc. that may catch fire and burn easily
- A location that is not exposed to water or other liquids
- A location free from direct sunlight
- A location out of the direct airflow of an air conditioner or heater, and not
exposed to extremely high or low temperatures
- A well-ventilated location
- A location that is not exposed to high humidity
- A location that is not extremely dusty
- A location not subjected to undue vibrations
- A stable and level location
- A location where ammonia or other organic gases are not generated
- A location that does not put the operator in the direct airflow of exhaust from the
machine
- A location that is not near any kind of heating devices
Power Source
The power source requirements are as follows.
G Voltage fluctuation: Maximum ±10% (at 120-127 V AC)
G Frequency fluctuation: Maximum ±3 Hz (at 60 Hz)
❍ Use a power source with as little voltage or frequency fluctuations as possible.
Installation and Operation Precautions Chapter 1
cm3520 1-7
Page 39
1
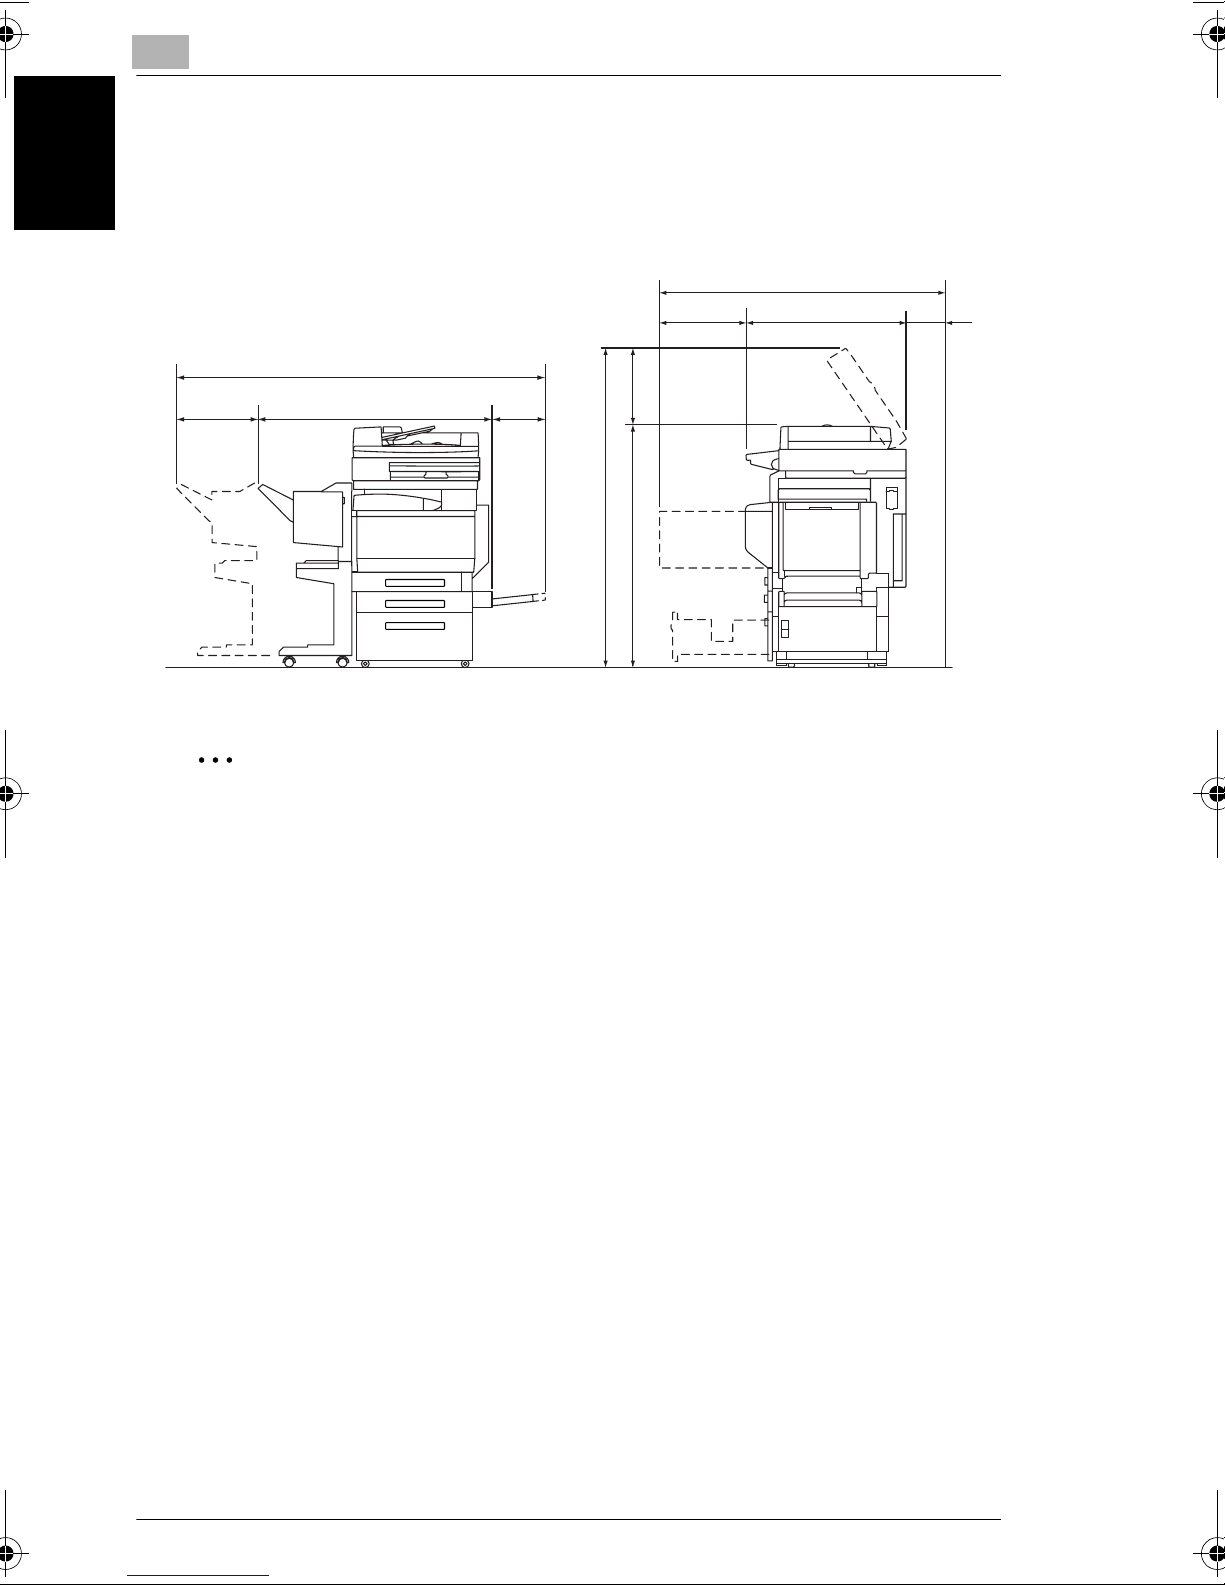
Space Requirements
To ensure easy machine operation, supply replacement and maintenance, adhere
to the recommended space requirements detailed below.
74-3/4
1.2 Installation Precautions
49-1/4
16-1/2 28-3/4
4
11-1/4
Installation and Operation Precautions Chapter 1
✎
Reminder!
Be sure to allow a clearance of 4 in. or more at the back of the machine for the
ventilation duct.
51-1/4
12-1/4
14
60
45-3/4
Unit: inch
1-8 cm3520
Page 40

1.3 Operation Precautions
1
1.3 Operation Precautions
Operating Environment
The environmental requirements for correct operation of the machine are as
follows.
G Temperature: 50°F (10°C) to 86°F (30°C) with fluctuations of no more than 18°F
(10°C) within an hour
G Humidity: 15% to 85% with fluctuations of no more than 20% within an hour
Proper Use
To ensure the optimum performance of the machine, follow the precautions listed
below.
- Never place heavy objects on the original glass or subject it to shocks.
- Never open any machine doors or turn off the machine while it is making copies;
otherwise, a paper jam will occur.
- Never bring any magnetized object or use flammable sprays or liquids near the
machine.
✚ Always make sure that the power plug is completely plugged into the electrical
outlet.
- Always make sure that the machine’s power plug is visible and not hidden by
the machine.
✚ Always unplug the machine from the electrical outlet if the unit is not to be used
for a long period of time.
✚ Always provide good ventilation when making a large number of continuous
copies.
Installation and Operation Precautions Chapter 1
cm3520 1-9
Page 41
1
CAUTION
If the ventilation duct on the back side of the machine is blocked, the inside
of the machine will accumulate heat, resulting in a malfunction or fire.
➜ Be sure to allow a clearance of 4 in. (100 mm) or more at the back of the
machine for the ventilation duct.
CAUTION
The area around the fusing unit is extremely hot.
➜ Be careful not to touch any parts around the fusing unit, other than those
indicated in this manual, in order to reduce the risk of burns. Be especially
careful not to touch parts marked with warning labels, and their surrounding
areas.
1.3 Operation Precautions
➜ If you get burnt, immediately cool the skin under cold water, and then seek
Installation and Operation Precautions Chapter 1
professional medical advice.
Transporting the Machine
If you need to transport the machine over a long distance, consult your technical
representative.
Care of Machine Supplies
Use the following precautions when handling the machine supplies (toner cartridge,
paper, etc.).
✚ Store the supplies in a location that meets the following requirements.
Free from direct sunlight
Away from any heating apparatus
Not subjected to high humidity
Not extremely dusty
✚ Store in a sealed plastic bag in a cool, dark place paper that has been removed
from its wrapper but not loaded into the machine.
- Only use toner that has been manufactured specifically for this machine. Never
use other types of toner.
- Keep all supplies out of the reach of children.
1-10 cm3520
Page 42
1.3 Operation Precautions
CAUTION
Precautions for handling toner:
➜ Be careful not to spill toner inside the machine or get toner on your clothes or
hands.
➜ If your hands become soiled with toner, immediately wash them with soap and
water.
➜ If toner gets in your eyes, immediately flush them with water, and then seek
professional medical advice.
Storage of Copies
1
✚ Copies that are to be kept for a long time should be kept where they are not
exposed to light in order to prevent them from fading.
- Adhesive that contains solvent (e.g., spray glue) may dissolve the toner on
copies.
- Color copies have a thicker layer of toner than normal black-and-white copies.
Therefore, when a color copy is folded, the toner at the fold may peel off.
Installation and Operation Precautions Chapter 1
cm3520 1-11
Page 43

1
1.3 Operation Precautions
Installation and Operation Precautions Chapter 1
1-12 cm3520
Page 44
2Before Making
Copies
Before Making Copies Chapter 2
2
Page 45
2
2.1 Components and Their Functions
2.1 Components and Their Functions
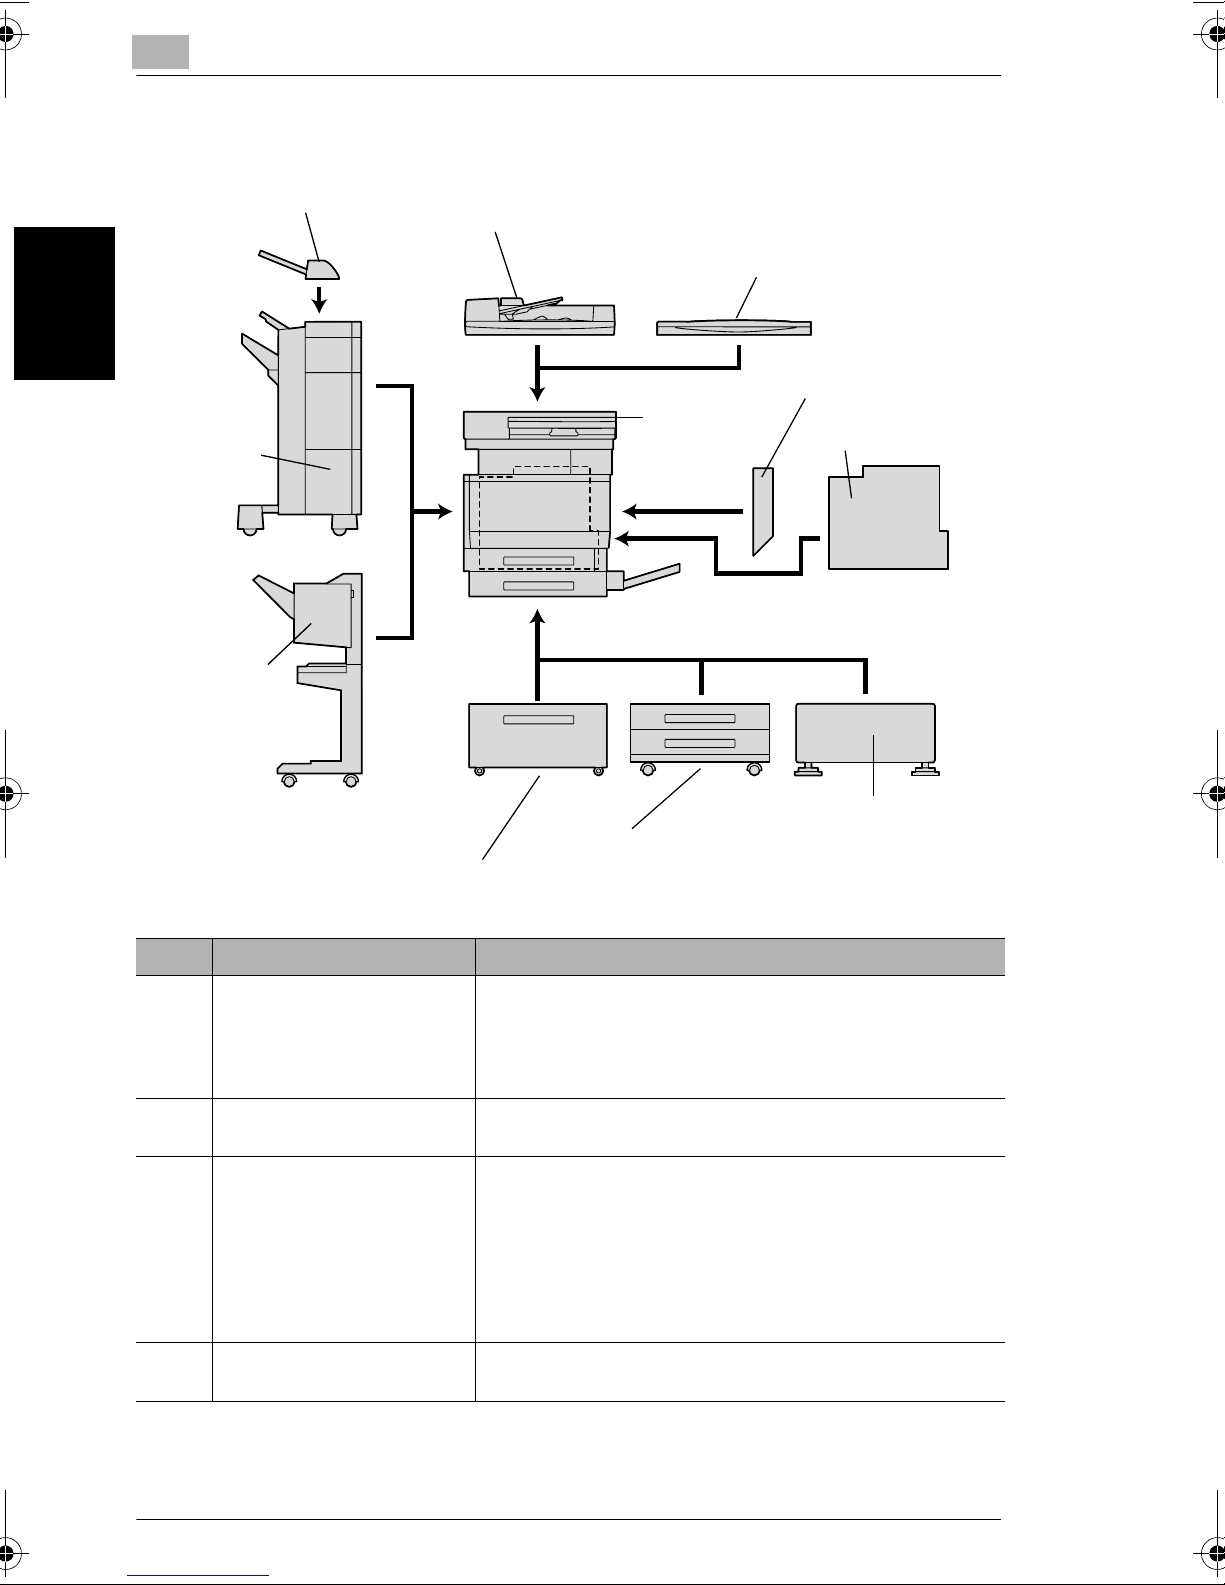
9 Job Separator
8 Finisher
9997
7 Finisher
Before Making Copies Chapter 2
9996
1 Reverse Automatic
Document Feeder
2 Original Cover
3 Automatic Duplex
Unit
10 Main unit
16 Image Controller
4Desk
5 Single/double Paper Feed Cabinet
6 Large-capacity Paper Feed Cabinet
No. Part Name Description
1 Reverse Automatic
Document Feeder 9990
(optional)
2 Original Cover CM3500020
(optional)
3 Automatic Duplex Unit
9991 (optional)
4 Desk 9995 (optional) Using the desk allows this machine to be set up on the floor.
Automatically feeds one document sheet at a time for
scanning, and automatically turns over double-sided
documents for scanning
Referred to as the “reverse automatic document feeder”
throughout the manual.
Presses down on the loaded document to keep it in place
Referred to as the “original cover” throughout the manual.
Turns over printed pages, allowing double-sided pages to be
printed automatically
• If image controller 9998 and the automatic duplex unit are
installed, the memory must be expanded. If the optional
expanded memory unit is not installed, automatic doublesided copying cannot be performed.
Referred to as the “automatic duplex unit” throughout the
manual.
Referred to as the “desk” throughout the manual.
2-2 cm3520
Page 46
2.1 Components and Their Functions
No. Part Name Description
2
5 Paper Feed Cabinet 9993
(optional)
Paper Feed Cabinet 9994
(optional)
6 Paper Feed Cabinet 9992
(optional)
7 Finisher 9996 (optional) Finishes printed pages according to the selected Output
8 Finisher 9997 (optional) Finishes printed pages according to the selected Output
Paper feed cabinet 9993 is equipped with a single paper
drawer. The top drawer can be loaded with 500 sheets of
paper, and the bottom drawer can be used as storage.
Referred to as the “single paper feed cabinet” throughout the
manual.
Paper feed cabinet 9994 is equipped with two paper drawers.
Both the top and the bottom drawers can be loaded with 500
sheets of paper.
Referred to as the “double paper feed cabinet” throughout the
manual.
Equipped with a large-capacity paper drawer that can supply
2,500 sheets of paper
Referred to as the “large-capacity paper feed cabinet”
throughout the manual.
setting (sorting, stapling, hole-punching or binding), then feeds
out the pages
Referred to as the “finisher” throughout the manual.
• Hole-punching is only available if the optional punch kit is
installed onto finisher 9996.
In order to install the finisher, the main unit must be installed
on the desk, on the large-capacity paper feed cabinet, or on
the single paper feed cabinet or the double paper feed
cabinet.
setting (sorting or stapling), then feeds out the pages
• In order to install the finisher, the main unit must be installed
on the desk, on the large-capacity paper feed cabinet, or on
the single paper feed cabinet or the double paper feed
cabinet.
Before Making Copies Chapter 2
9 Job Separator CM3500010
(optional)
10 Main unit The document is scanned by the scanner section, and the
11 Punch Kit CM3100010
(optional)*
12 Expanded Memory Unit
CM3500030 (optional)*
13 Hard Disk CM3500040
(optional)*
14 Printer controller* Internal printer controller that allows the machine to be used as
If finisher 9997 is installed, the number of copy output trays can
be increased.
Referred to as the “job separator” throughout the manual.
scanned image is printed by the printer section.
Referred to as the “main unit” throughout the manual.
Allows hole-punching to be used if installed onto finisher 9996
Referred to as the “punch kit” throughout the manual.
Increases the memory of the machine to 512 MB (256 MB
standard memory + 256 MB expanded memory unit)
By expanding the memory, the number of pages that can be
stored in the memory can be increased.
Referred to as the “expanded memory unit” throughout the
manual.
Allows more pages to be stored.
In addition, by installing Hard Disk CM3500040 and the
expanded memory unit, the “Set Numbering” function can be
used.
Referred to as the “hard disk” throughout the manual.
both a color printer and a color scanner configured into a
computer network
For more details, refer to the cm3520 Printer Controller User’s
Guide.
cm3520 2-3
Page 47
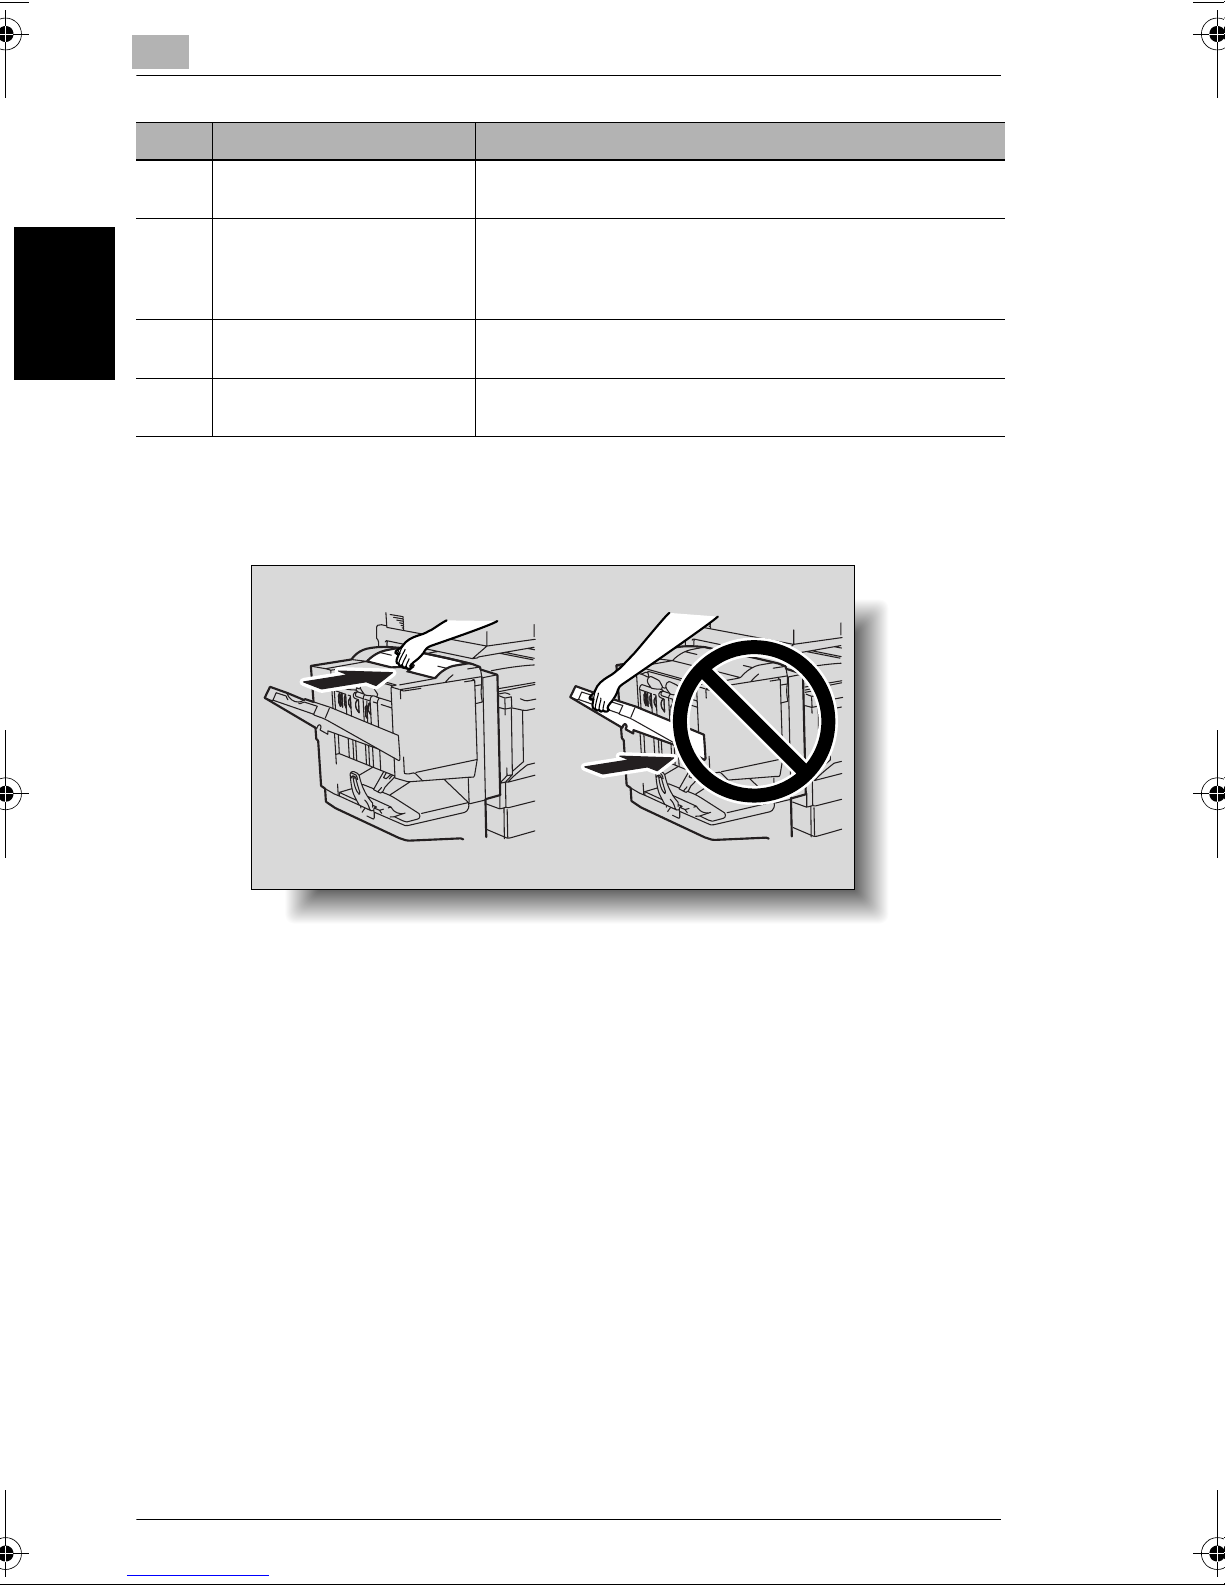
2
No. Part Name Description
2.1 Components and Their Functions
15 Local Interface Kit
CM3500050 (optional)*
16 Image Controller
9998(optional) *
17 Video Interface Kit
CM3500050 (optional)*
18 Dehumidifier Heater 1C
(optional)*
* Parts marked with an asterisk (*) are internal options and therefore are not shown in the illustration.
Used for making a parallel connection between this machine
and the computer
External image controller that allows the machine to be used
as both a color printer and a color scanner configured into a
computer network
For details, refer to the manual for the image controller.
Used for connecting the image controller 9998 to this machine
Installed in the paper feed cabinet or desk to prevent humidity
from collecting in the paper.
Precautions for using the finisher
G When moving the finisher, do not grab the paper output tray.
Before Making Copies Chapter 2
2-4 cm3520
Page 48
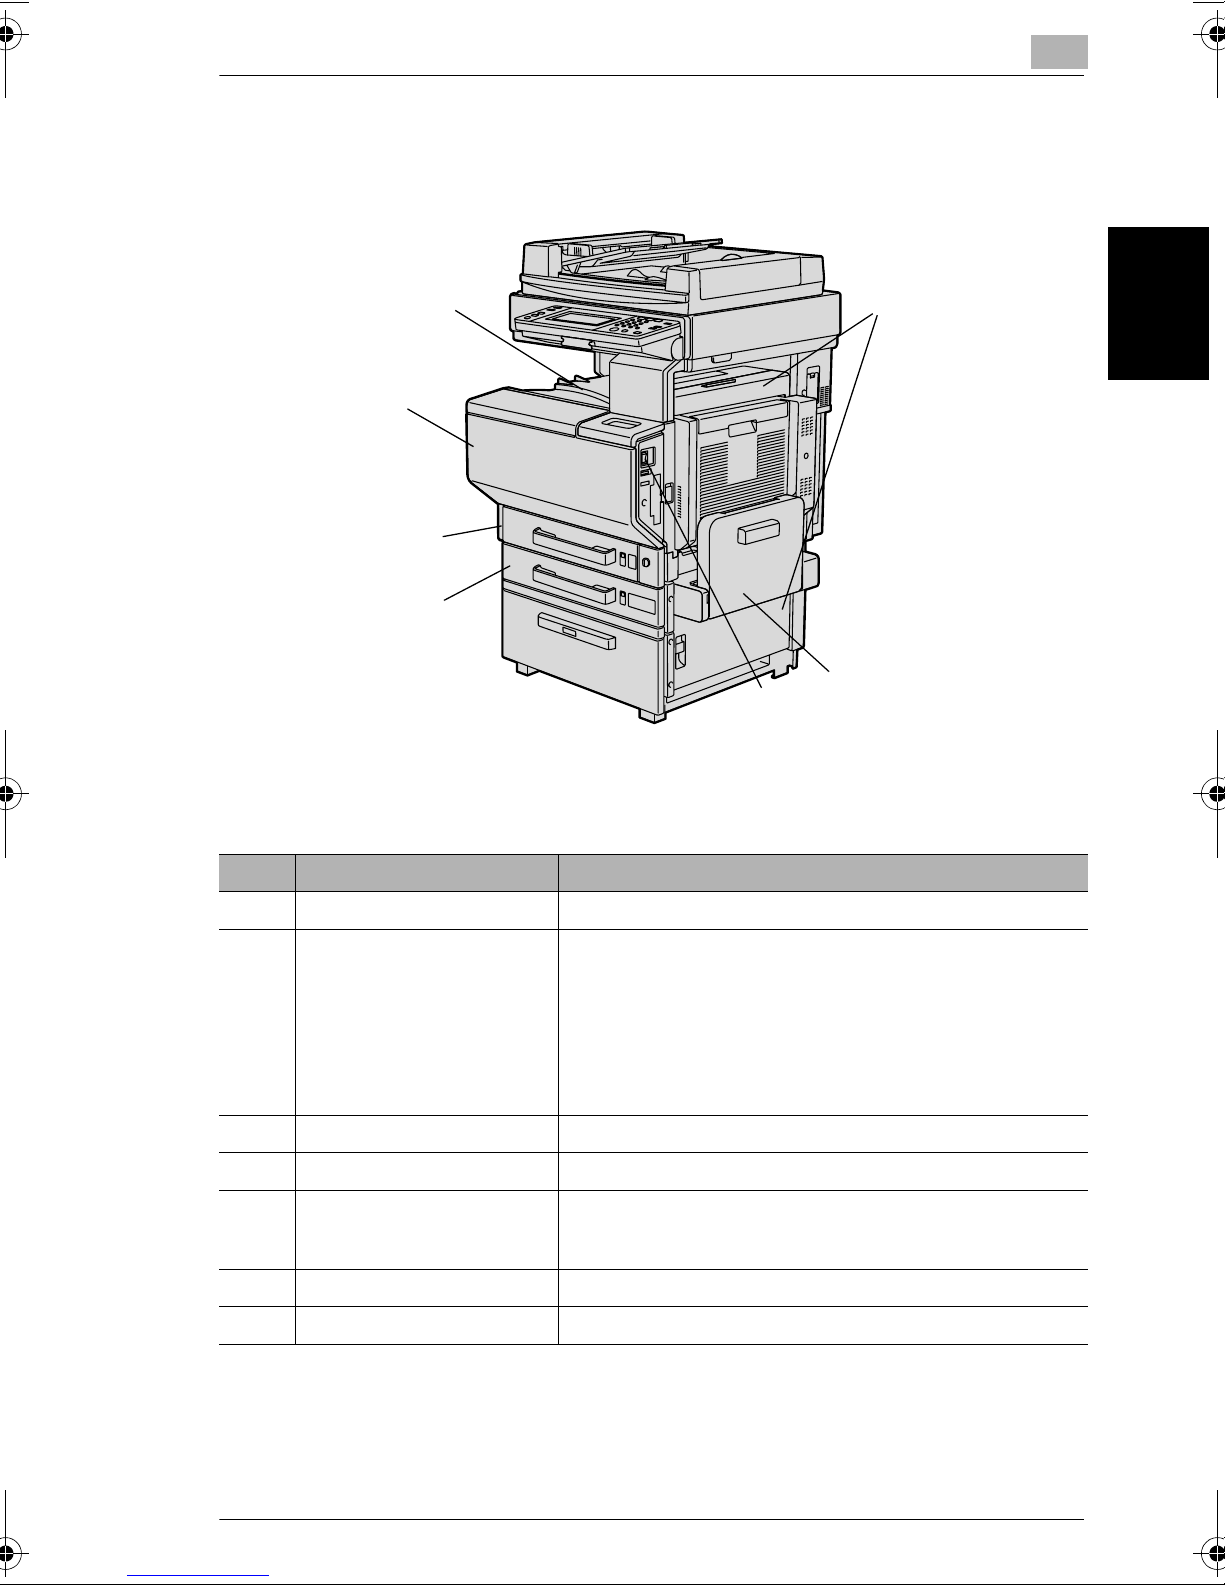
2.2 Part Names and Their Functions
2.2 Part Names and Their Functions
Outside of Machine
2
7 Copy output tray
1 Right-side door
6 Front door
5 1st drawer
4 2nd drawer
2 Multiple bypass tray
3 Power switch
* The illustration above shows the reverse automatic document feeder and largecapacity paper feed cabinet installed.
No. Part Name Description
Before Making Copies Chapter 2
1 Right-side door Opened when clearing misfeeds
2 Multiple bypass tray Used when printing onto paper with a size not loaded into a
paper drawer or onto thick paper, overhead projector
transparencies, postcards, envelopes or label sheets
Holds up to 150 sheets of plain paper, 20 overhead projector
transparencies, postcards, label sheets or sheets of thick
paper, or 10 envelopes.
Referred to as the “bypass tray” throughout the manual. (See
p. 2-35.)
3 Power switch Used to turn the machine on and off. (See p. 2-17)
4 2nd drawer Holds up to 500 sheets of paper (See p. 2-31)
5 1st drawer Holds up to 250 sheets of paper
The paper size can be adjusted freely.
Media other than plain paper can be loaded. (See p. 2-26)
6 Front door Opened when replacing a toner cartridge (See p. 11-7)
7 Copy output tray Collects printed pages
cm3520 2-5
Page 49
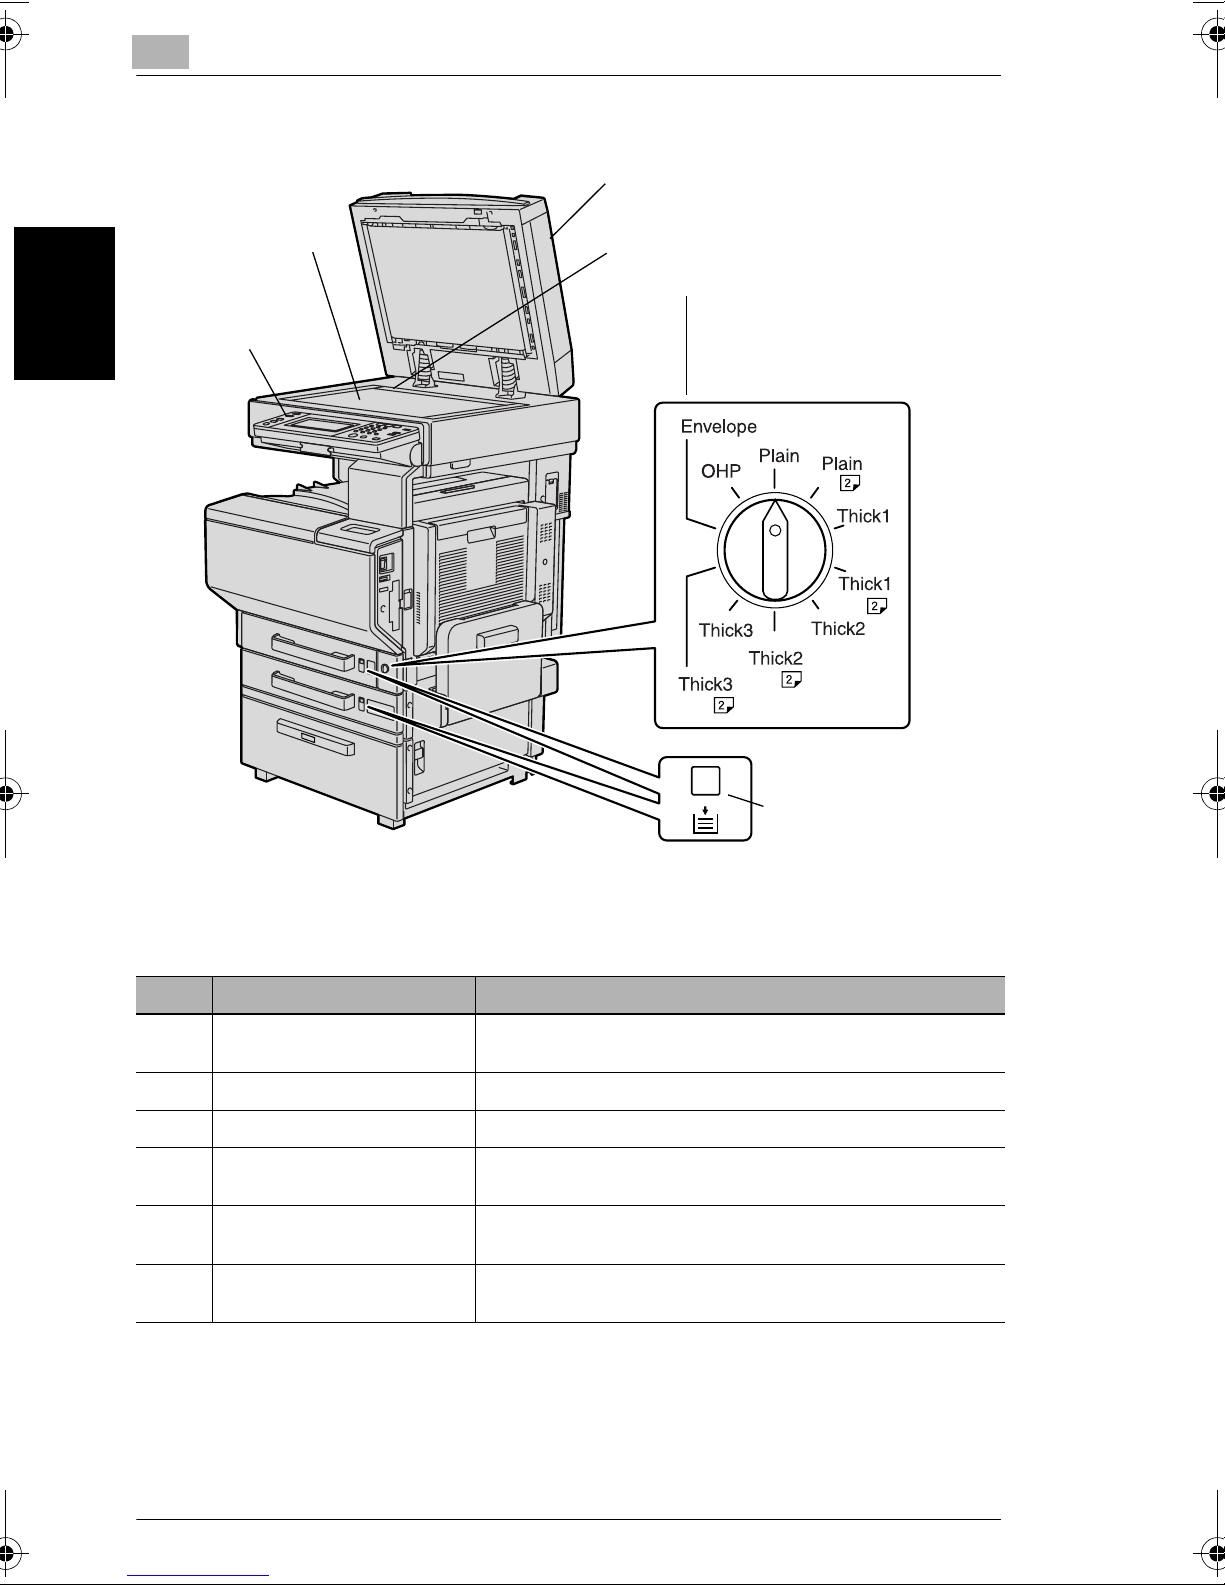
2
2.2 Part Names and Their Functions
8 Reverse automatic document feeder
12 Control panel
Before Making Copies Chapter 2
13 Original glass
9 Document scales
10 Media type selection dial
11 1st/2nd drawer
paper-empty indicator
* The illustration above shows the reverse automatic document feeder and largecapacity paper feed cabinet installed.
No. Part Name Description
8 Reverse automatic document
feeder (optional)
9 Document scales Used to align the document (See p. 2-44)
10 Media type selection dial Used to specify the type of paper loaded into the 1st drawer
11 1st/2nd drawer paper-empty
indicator
12 Control panel Used to start copying or to specify various settings (See
13 Original glass Place a document on the glass so that it can be scanned. (See
When a document is loaded, it is automatically fed in and
scanned one page at a time.
Indicates the amount of paper remaining
When the indicator is completely red, the paper is empty.
p. 2-12)
p. 2-44)
2-6 cm3520
Page 50
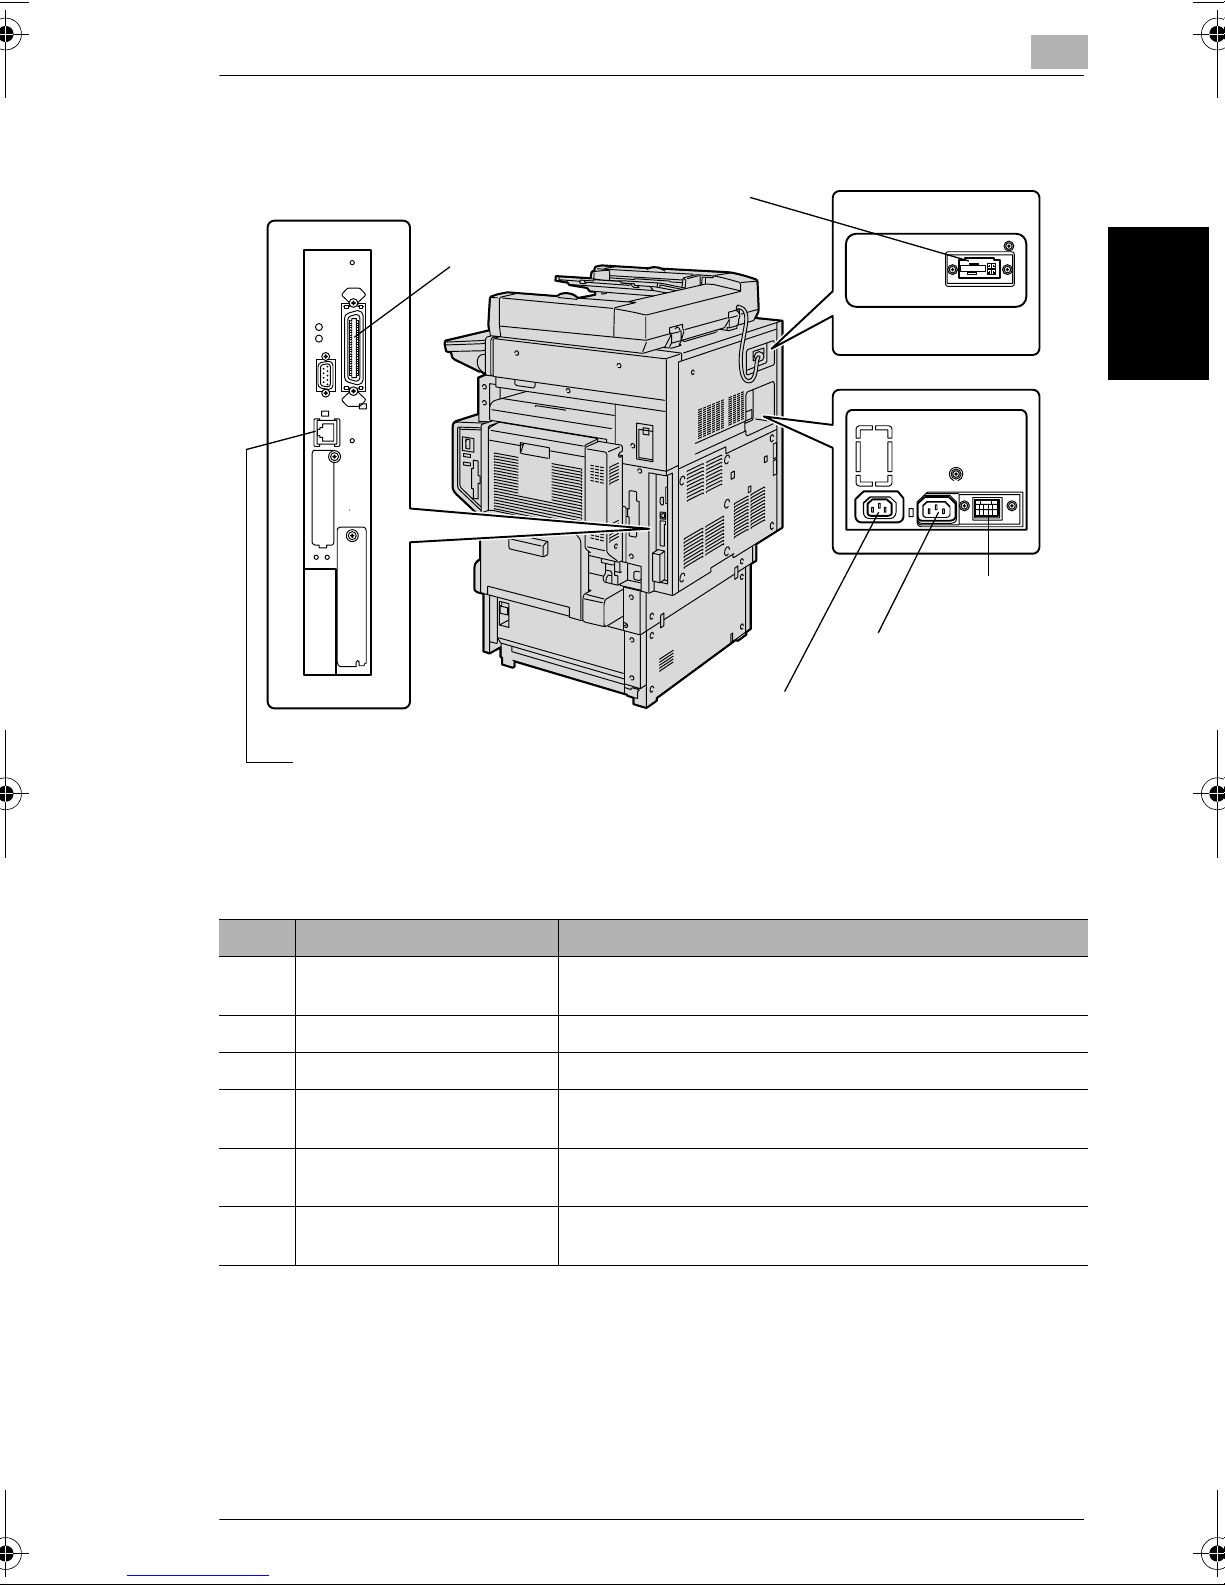
2.2 Part Names and Their Functions
14 Reverse automatic document feeder connector
19 Parallel interface connector
18 Network connector
15 Finisher
connector
16 Power
cord connector
17 Power connector
for the external image
controller
2
Before Making Copies Chapter 2
*The illustration above shows the reverse automatic document feeder and largecapacity paper feed cabinet installed.
No. Part Name Description
14 Reverse automatic document
feeder connector
15 Finisher connector Used for connecting the finisher hookup cord
16 Power cord connector Used for connecting the power cord
17 Power connector for the
external image controller
18 Network connector Used for connecting the network cable when this machine is
19 Parallel interface connector
(optional)
Used for connecting the reverse automatic document feeder
hookup cord
Used for connecting the external image controller’s power cord
used for network printing and network scanning
Used for connecting a parallel cable from the computer
cm3520 2-7
Page 51
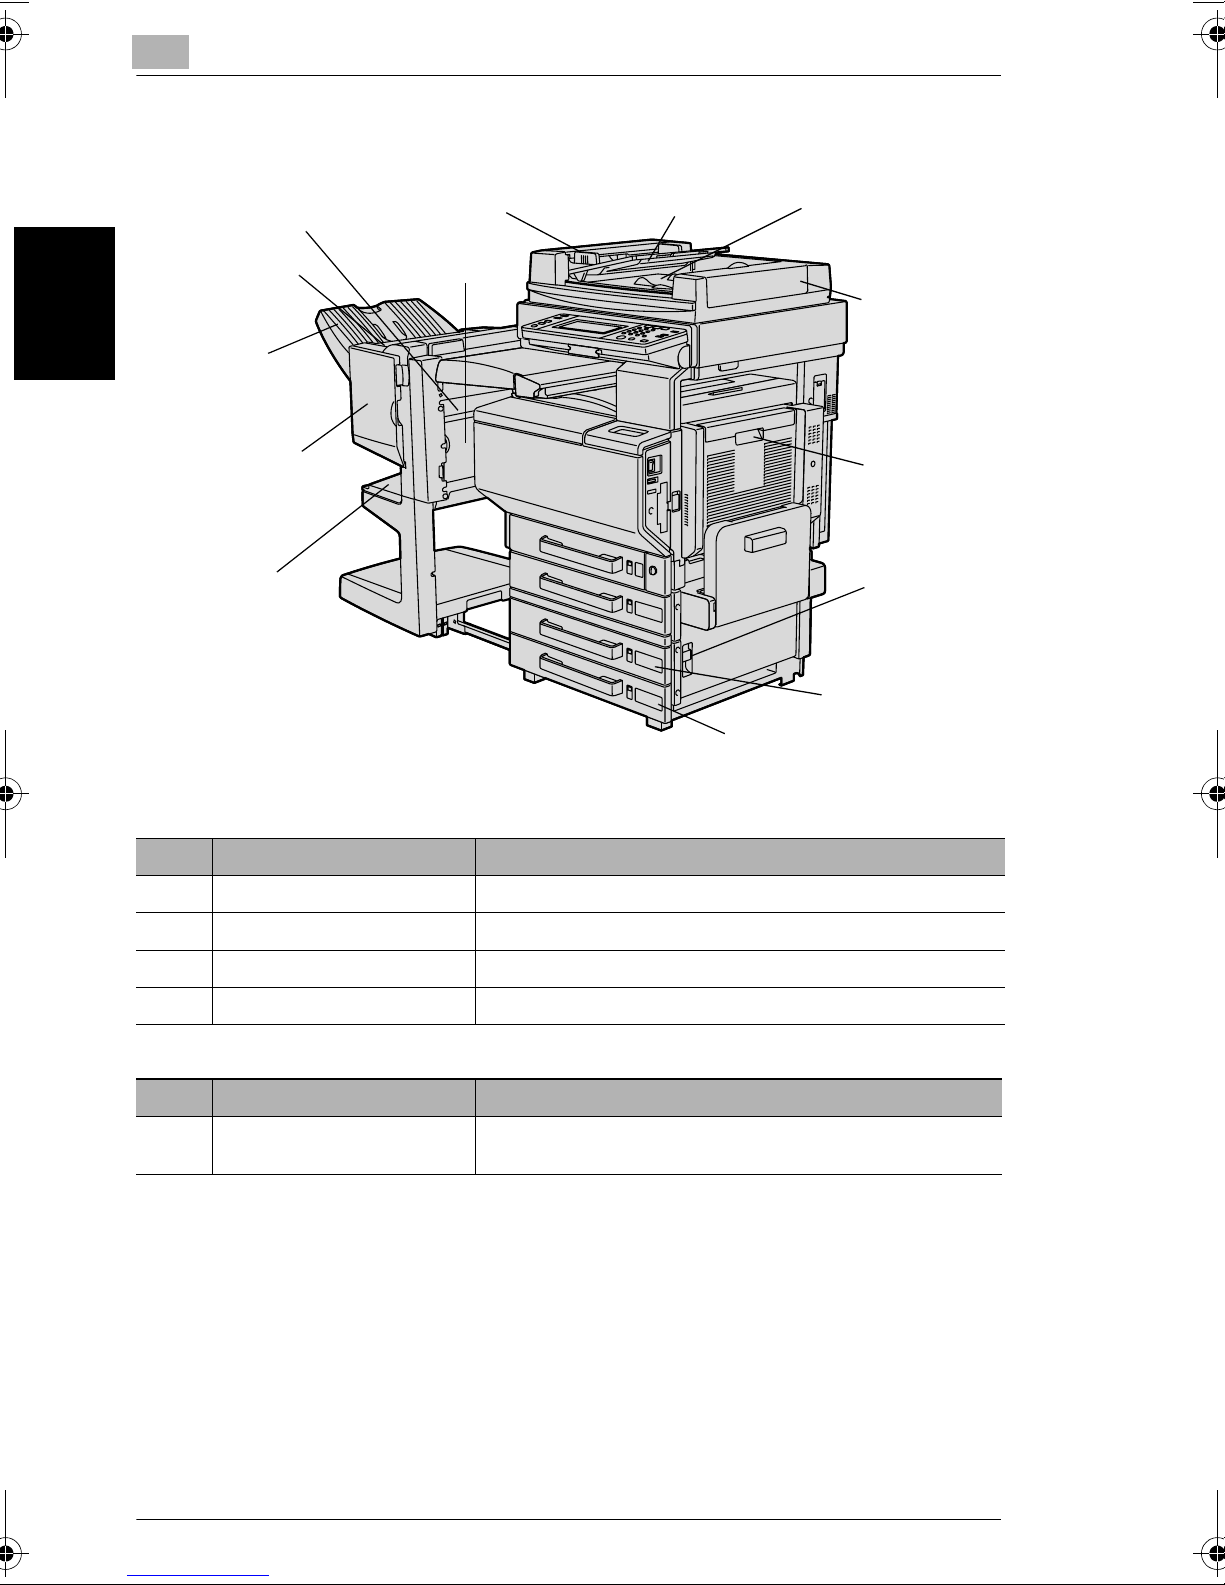
2
Options
2.2 Part Names and Their Functions
12 Upper door
11 Paper output
tray
10 Front door
9 Lower paper
output tray
Before Making Copies Chapter 2
13 Feed guide
1 Adjustable
document guide
14 Transport
guide
2 Document
feed tray 3 Document
output tray
4 Misfeedclearing
cover
5 Automatic
duplex unit
door
6 Right-side
door release
lever
7 3rd drawer
8 Storage drawer/
4th drawer
Reverse Automatic Document Feeder
No. Part Name Description
1 Adjustable document guide Adjust to the width of the document. (See p. 2-41)
2 Document feed tray Load the documents to be copied face up. (See p. 2-41)
3 Document output tray Collects documents that have been scanned
4 Misfeed-clearing cover Opened when clearing a misfed document
Automatic Duplex Unit
No. Part Name Description
5 Automatic duplex unit door Opened when clearing a paper misfeed within the automatic
duplex unit
2-8 cm3520
Page 52
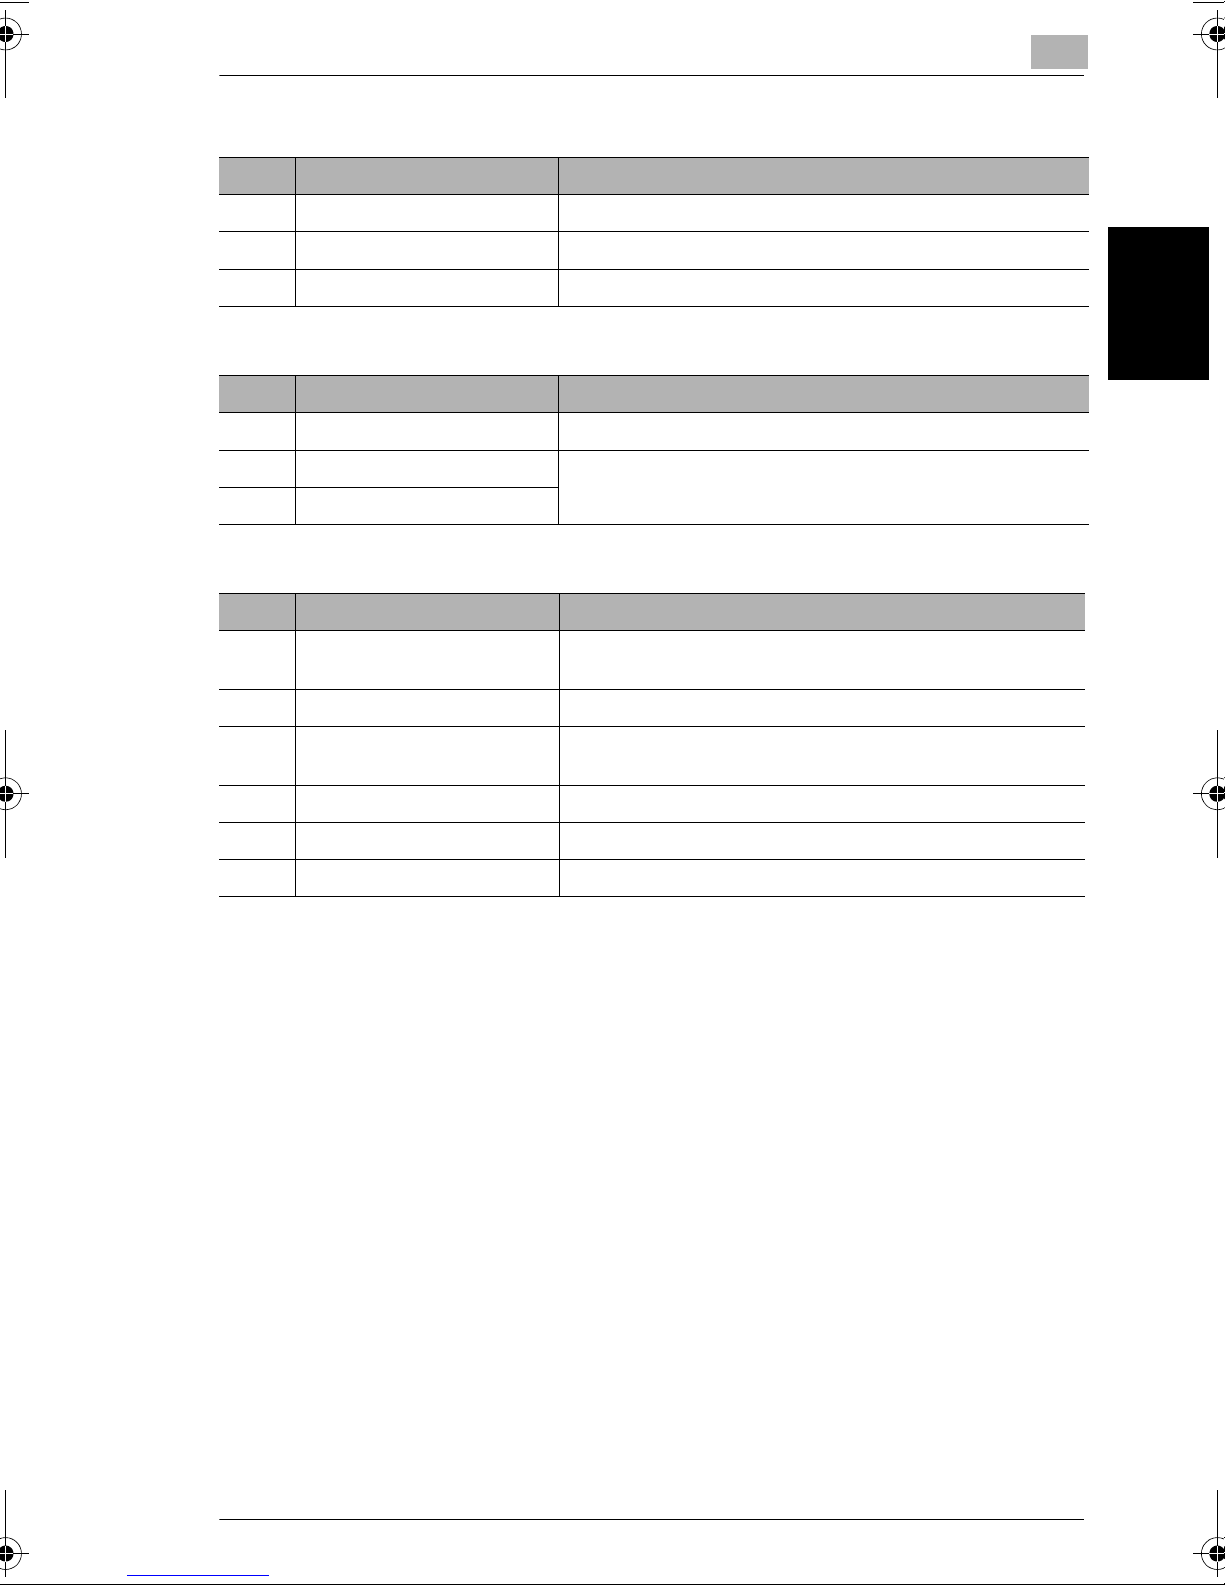
2.2 Part Names and Their Functions
Single Paper Feed Cabinet
No. Part Name Description
6 Right-side door release lever Used when clearing paper misfeeds
7 3rd drawer Holds up to 500 sheets of paper
8 Storage drawer Can be used to store paper
Double Paper Feed Cabinet
No. Part Name Description
6 Right-side door release lever Used when clearing paper misfeeds
7 3rd drawer Each holds up to 500 sheets of paper.
8 4th drawer
Finisher 9996
No. Part Name Description
2
9 Lower paper output tray
(bound paper tray)
10 Front door Opened when replacing the staple cartridge
11 Paper output tray
(elevated tray)
12 Upper door Opened when clearing paper misfeeds within the finisher
13 Feed guide Opened when clearing paper misfeeds within the finisher
14 Transport guide Opened when clearing paper misfeeds within the finisher
Collects copies that were bound
Collects copies
Before Making Copies Chapter 2
cm3520 2-9
Page 53
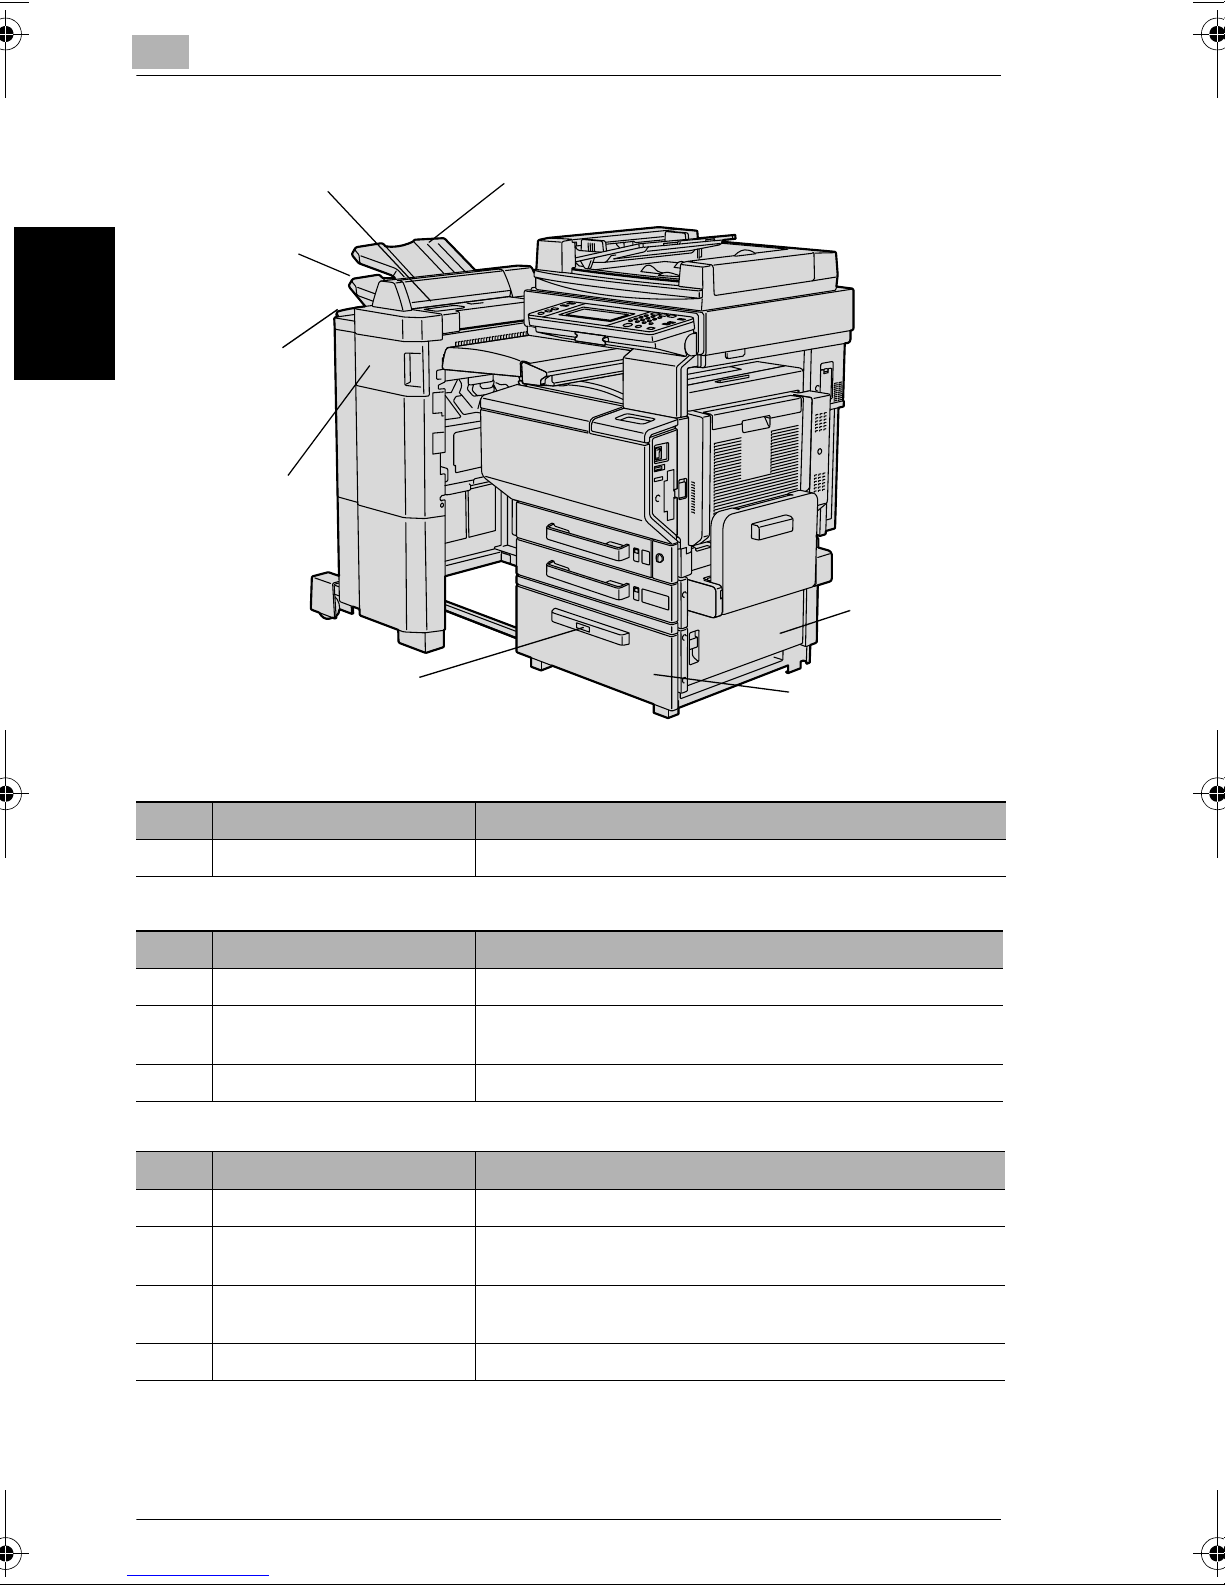
2
2.2 Part Names and Their Functions
21 Primary paper output tray
20 Secondary
paper
output tray
Before Making Copies Chapter 2
19 Front
door
22 Upper cover
18 Drawer release
button
15 Job separator
16 Rightside door
17 Large-capacity
paper feed cabinet
Job Separator
No. Part Name Description
15 Job separator (optional) Collects printed pages
Large-capacity Paper Feed Cabinet
No. Part Name Description
16 Right-side door Opened when clearing paper misfeeds
17 Large-capacity paper feed
cabinet
18 Drawer release button Press to open the drawer.
Holds up to 2,500 sheets of paper
Finisher 9997
No. Part Name Description
19 Front door Opened when clearing paper misfeeds within the finisher
20 Secondary paper output tray
(sorted copies)
21 Primary paper output tray
(non sorted copies)
Collects copies that are sorted
Collects copies that are not sorted (made with the “Non Sort”
setting)
22 Upper cover Opened when clearing paper misfeeds within the finisher
2-10 cm3520
Page 54
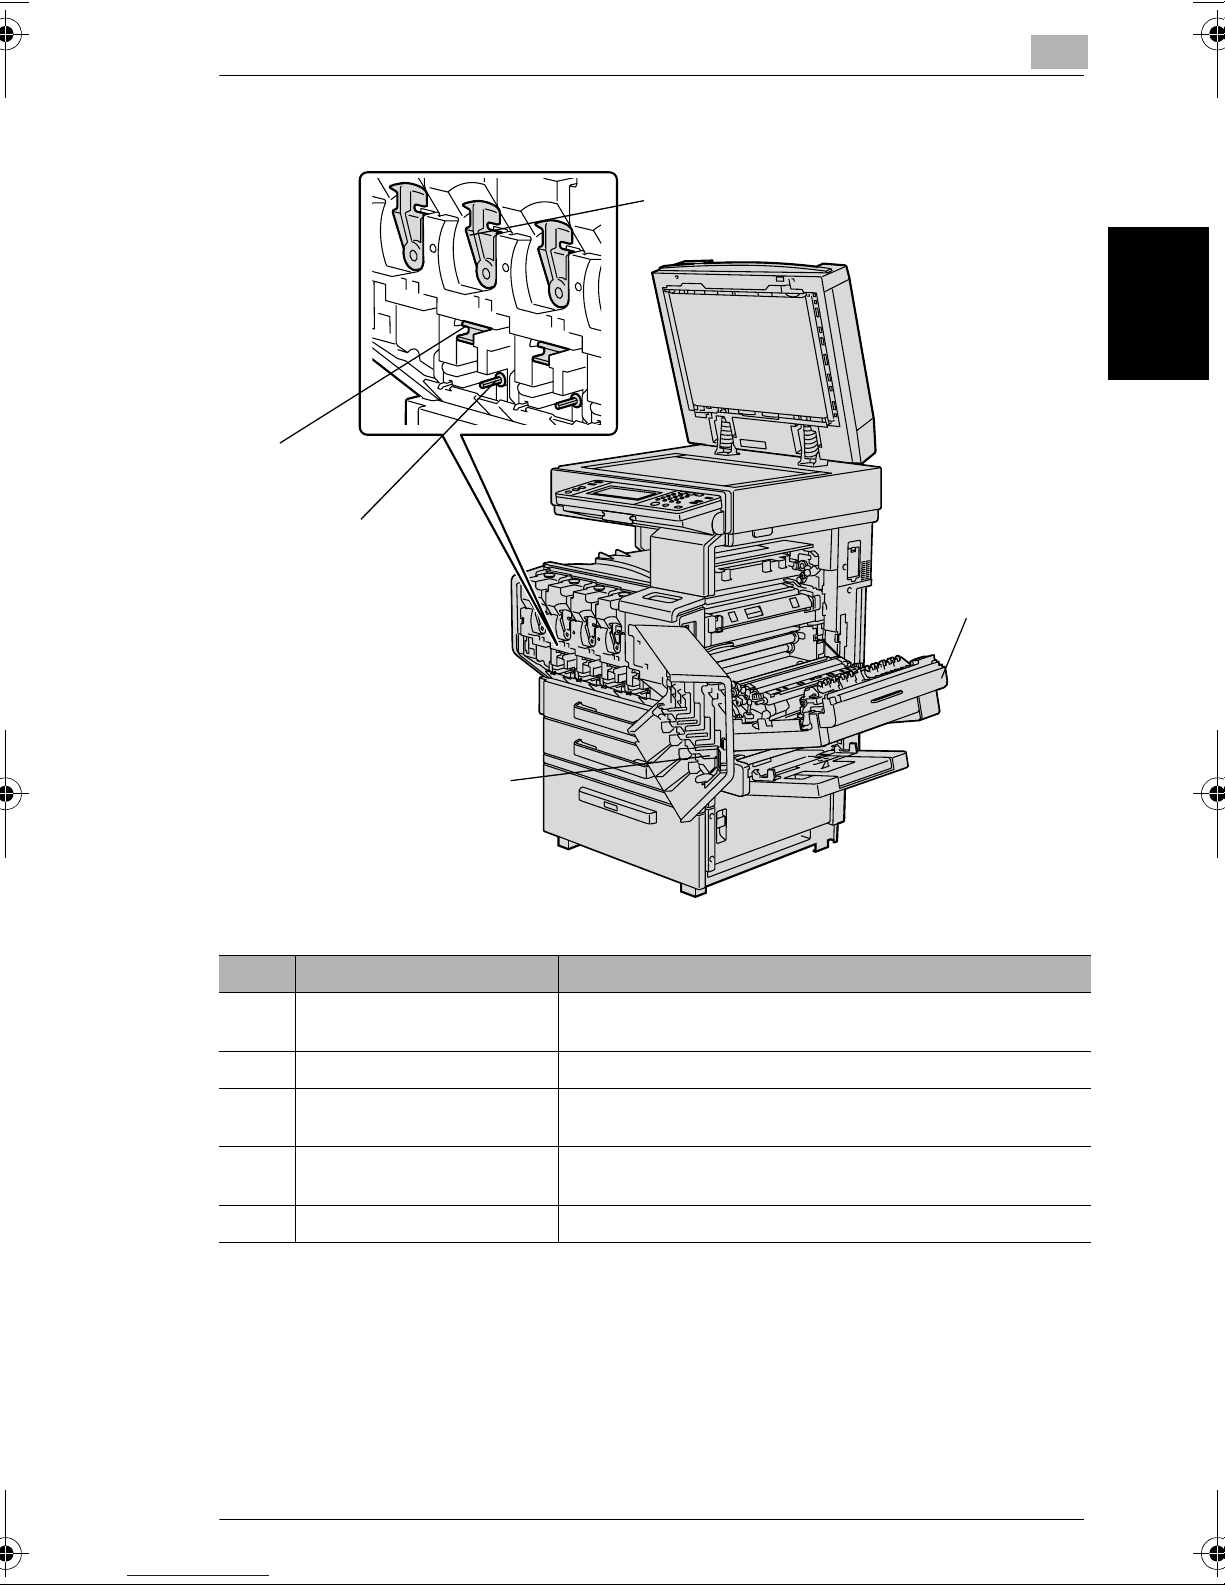
2.2 Part Names and Their Functions
Inside of Machine
5 Imaging-unitsecuring lever
4 Chargercleaning tool
2
1 Toner-cartridge-securing
lever
2 Right-side
door
3LEDcleaning tool
No. Part Name Description
1 Toner-cartridge-securing
lever
2 Right-side door Opened when replacing the fusing unit or clearing misfeeds
3 LED-cleaning tool Used to clean the surface of the LED unit, for example, when
4 Charger-cleaning tool Used to clean the electrostatic charger wire, for example, when
5 Imaging-unit-securing lever Used when installing and replacing the imaging units
Used when installing and replacing the toner cartridges
replacing the image transfer belt unit
incorrect copies are produced
Before Making Copies Chapter 2
cm3520 2-11
Page 55
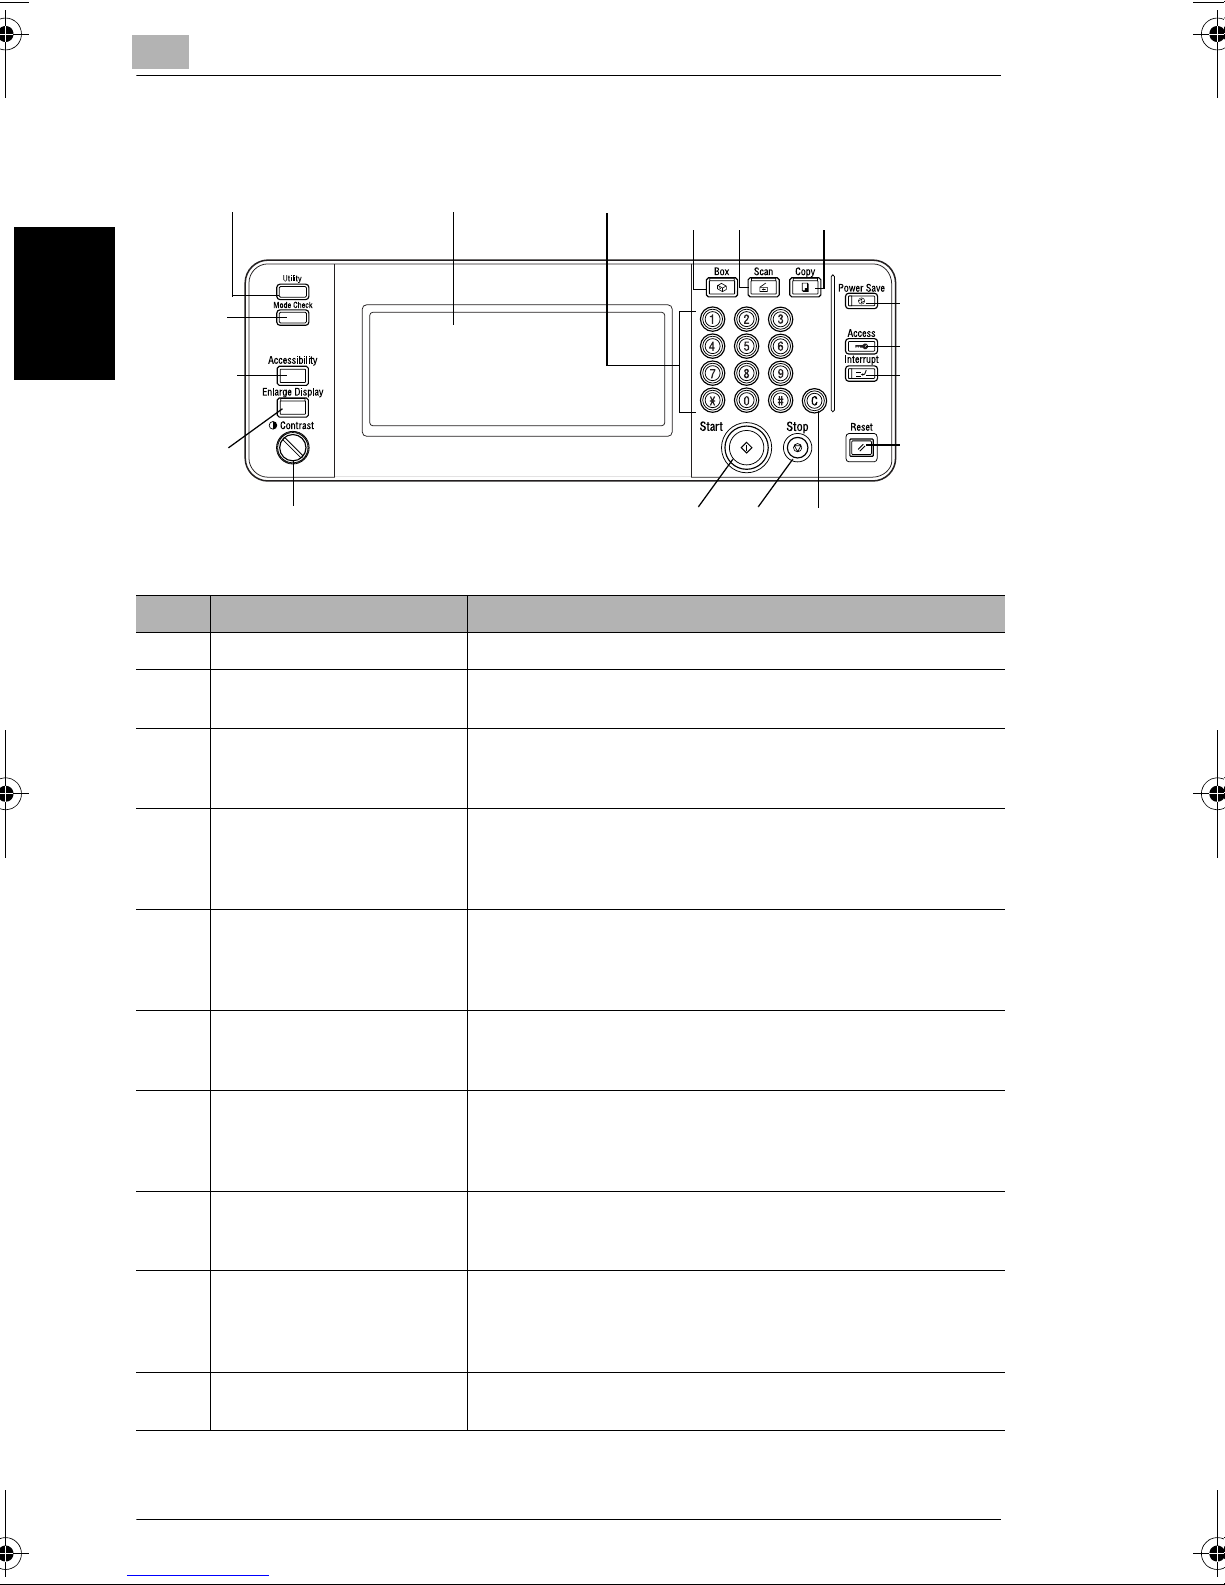
2
Control Panel
2.2 Part Names and Their Functions
1 [Utility] key 2 Touch panel 3 Keypad 4 [Box]
17 [Mode
Check] key
16 [Accessi
bility] key
15 [Enlarge
Display]
key
No. Part Name Description
1 [Utility] key Press to display the Utility screen.
Before Making Copies Chapter 2
2 Touch panel • Displays various screens and messages.
3 Keypad • Use to type in the number of copies to be produced.
14 Contrast dial
5 [Scan]
key
13 [Start]
key
• Specify the various settings by directly touching the panel.
• Use to type in the zoom ratio.
• Use to type in the various settings.
key
12 [Stop]
key
6[Copy]
key
7[Power
Save] key
8 [Access]
key
9 [Interrupt]
key
10 [Reset]
key
11 [C] (clear)
key
4 [Box] key • Press to enter Box mode.
• Box mode is only available if the optional hard disk
(CM3500040) is installed. For details, refer to the cm3520
Printer Controller User’s Guide.
5 [Scan] key Press to enter Scan mode. While the machine is in Scan mode,
the indicator on the [Scan] key lights up in green. For details on
the Scan mode, refer to the cm3520 Printer Controller User’s
Guide.
6 [Copy] key Press to enter Copy mode. (As a default, the machine is in Copy
mode.) While the machine is in Copy mode, the indicator on the
[Copy] key lights up in green.
7 [Power Save] key Press to enter Power Save mode. While the machine is in
Power Save mode, the indicator on the [Power Save] key lights
up in green and the touch panel goes off. To cancel Power Save
mode, press the [Power Save] key again.
8 [Access] key If Copy Track mode has been set, press this key after entering
the account number and access code in order to use this
machine.
9 [Interrupt] key Press to enter Interrupt mode. While the machine is in Interrupt
mode, the indicator on the [Interrupt] key lights up in green and
the message “Now in Interrupt mode.” appears on the touch
panel. To cancel Interrupt mode, press the [Interrupt] key again.
10 [Reset] key Press to clear all settings (except programmed settings) entered
in the control panel and touch panel.
2-12 cm3520
Page 56
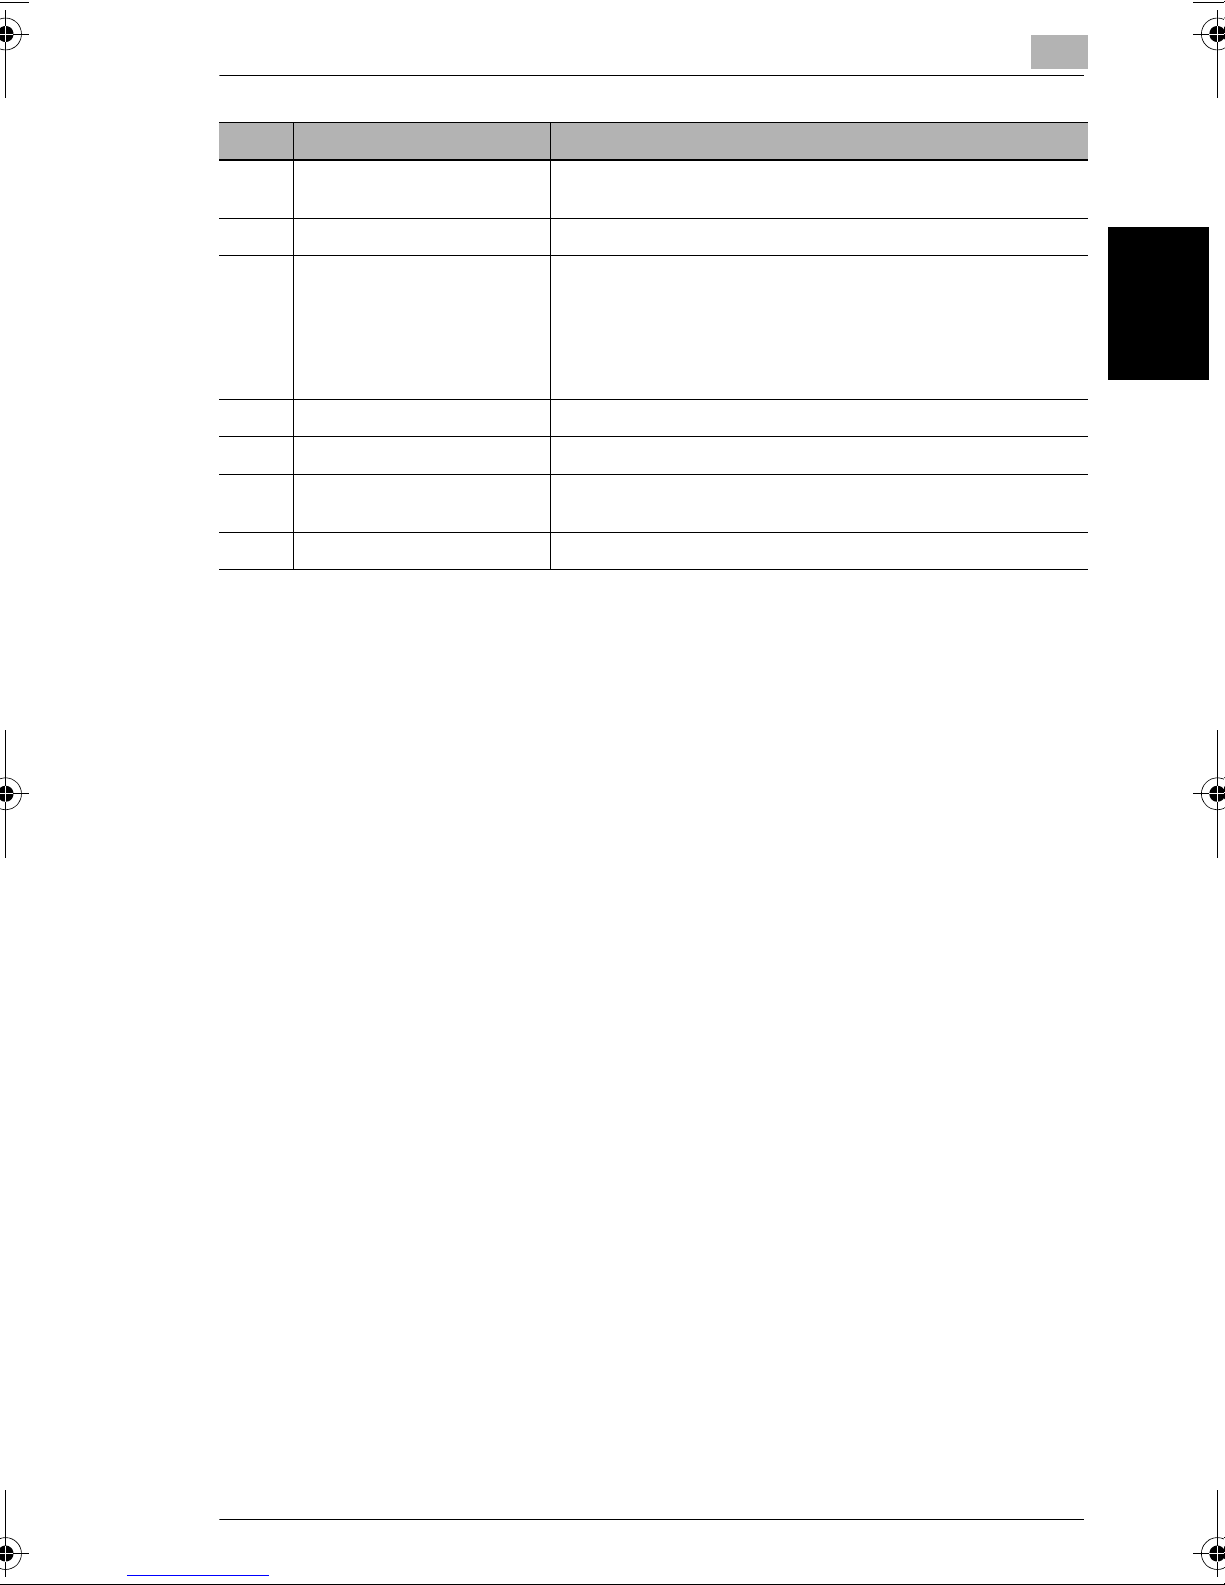
2.2 Part Names and Their Functions
No. Part Name Description
11 [C] (clear) key Press to erase a value (such as the number of copies, a zoom
ratio, or a size) entered using the keypad.
12 [Stop] key Press the [Stop] key during copying to stop the copy operation.
13 [Start] key • Press to start copying. When this machine is ready to begin
copying, the indicator on the [Start] key lights up in green. If
the indicator on the [Start] key lights up in orange, copying
cannot begin.
• Press to restart a stopped job. For details on jobs, refer to
“Overview of Jobs” on page 8-2.
14 Contrast dial Use to adjust the contrast of the touch panel.
15 [Enlarge Display] key Press to enter Enlarge Display mode.
16 [Accessibility] key Press to display the screen for specifying user accessibility
functions.
17 [Mode Check] key Press to display screens showing the specified settings.
2
Before Making Copies Chapter 2
cm3520 2-13
Page 57
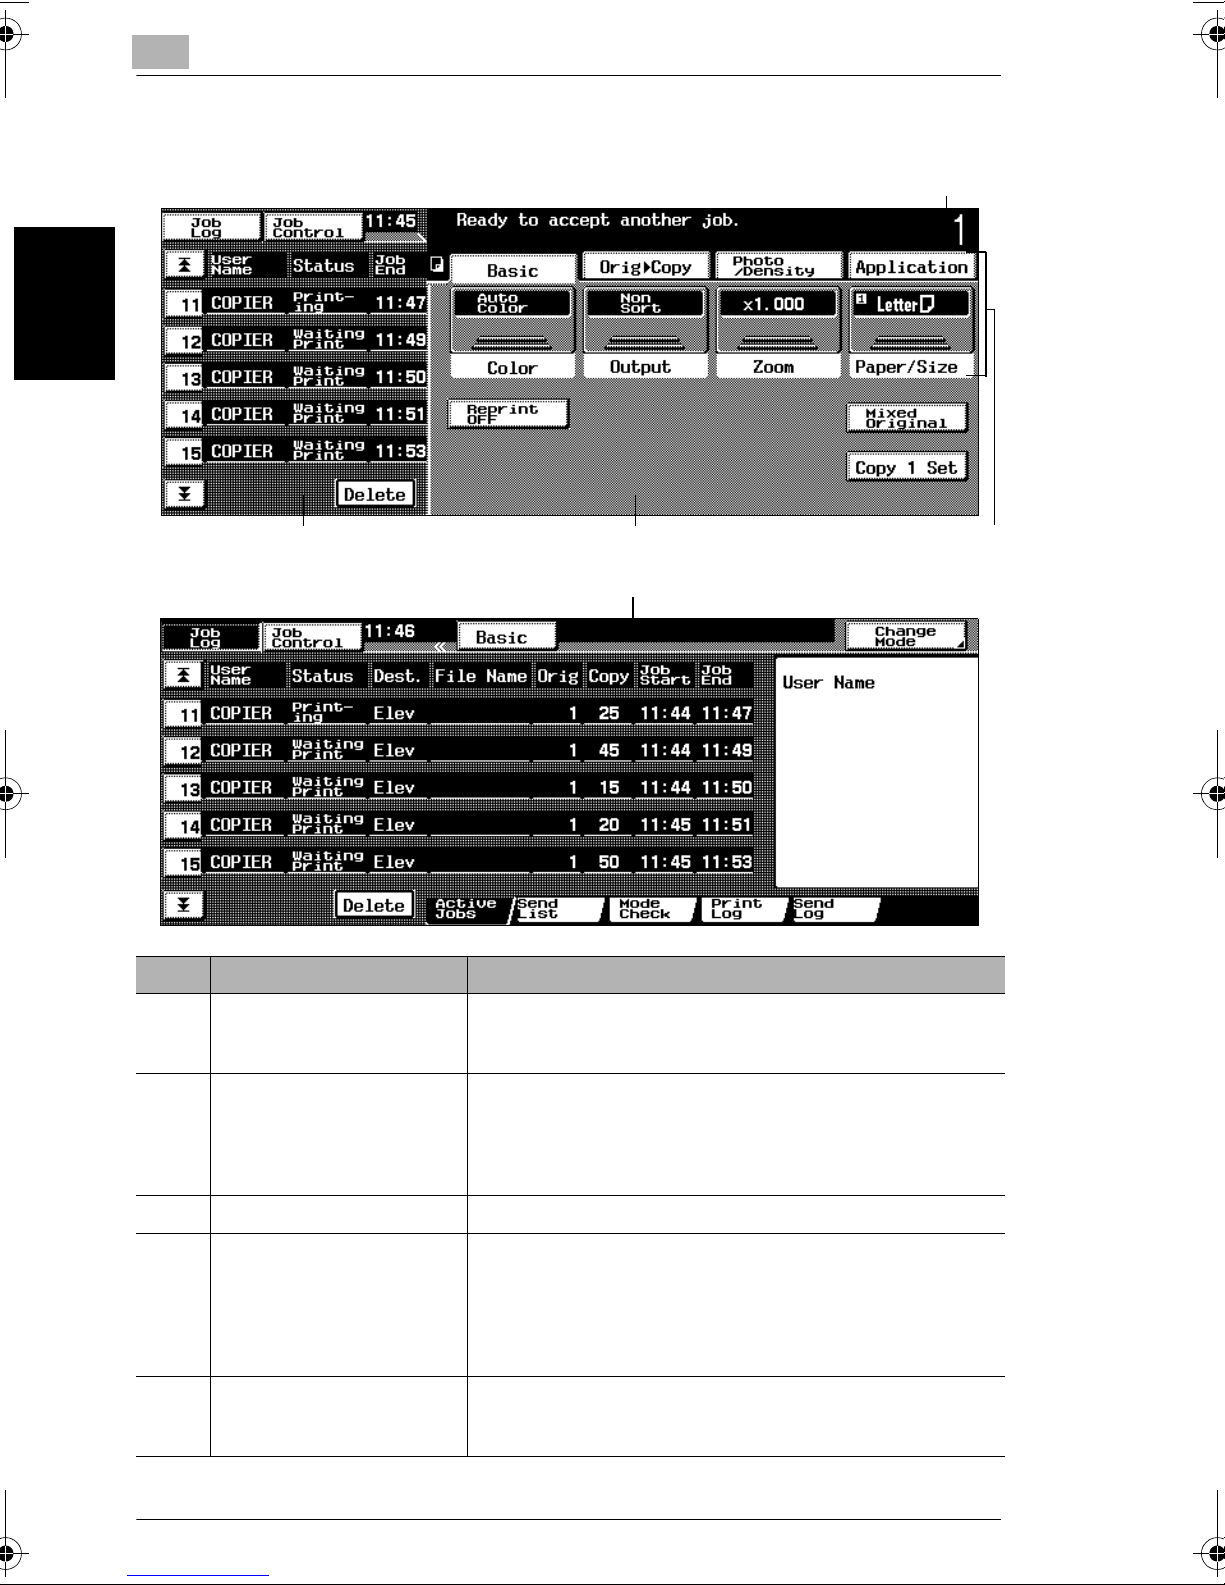
2
Touch Panel
2.2 Part Names and Their Functions
1 Message display
Before Making Copies Chapter 2
No. Item Name Description
1 Message display The current machine status, operating instructions, warnings
2 Functions/Mode setting
4 Job display
display
3 Settings display
2 Functions/Mode
setting display
5 Job Log screen
and precautions, and other data including the number of copies
selected are displayed here.
Tabs and keys for selecting screens containing various
functions are displayed.
Touch a tab to display the corresponding screen.
The current settings appear on the [Color], [Output], [Zoom] or
[Paper/Size] keys.
3 Settings display The current settings are shown as messages and icons.
4 Job display • Jobs currently being performed or waiting to be performed
5 Job Log screens • In addition to the job display, various functions for checking
2-14 cm3520
are displayed.
• The current sending/receiving status is shown as an icon.
• Touch [Job Log] or [Job Control] to display either the Job Log
or the Job Control screen.
• For details on jobs, refer to “Overview of Jobs” on page 8-2.
and controlling jobs are available.
• To return to the Basic screen, touch [Basic].
Page 58
2.2 Part Names and Their Functions
Operating the Touch Panel
To activate a function or to select a setting, lightly touch the desired function or
setting shown on the touch panel.
CAUTION
Be careful not to damage the touch panel.
➜ Never push down on the touch panel with force, and never use a hard or pointed
object to make a selection in the touch panel.
2
Before Making Copies Chapter 2
cm3520 2-15
Page 59
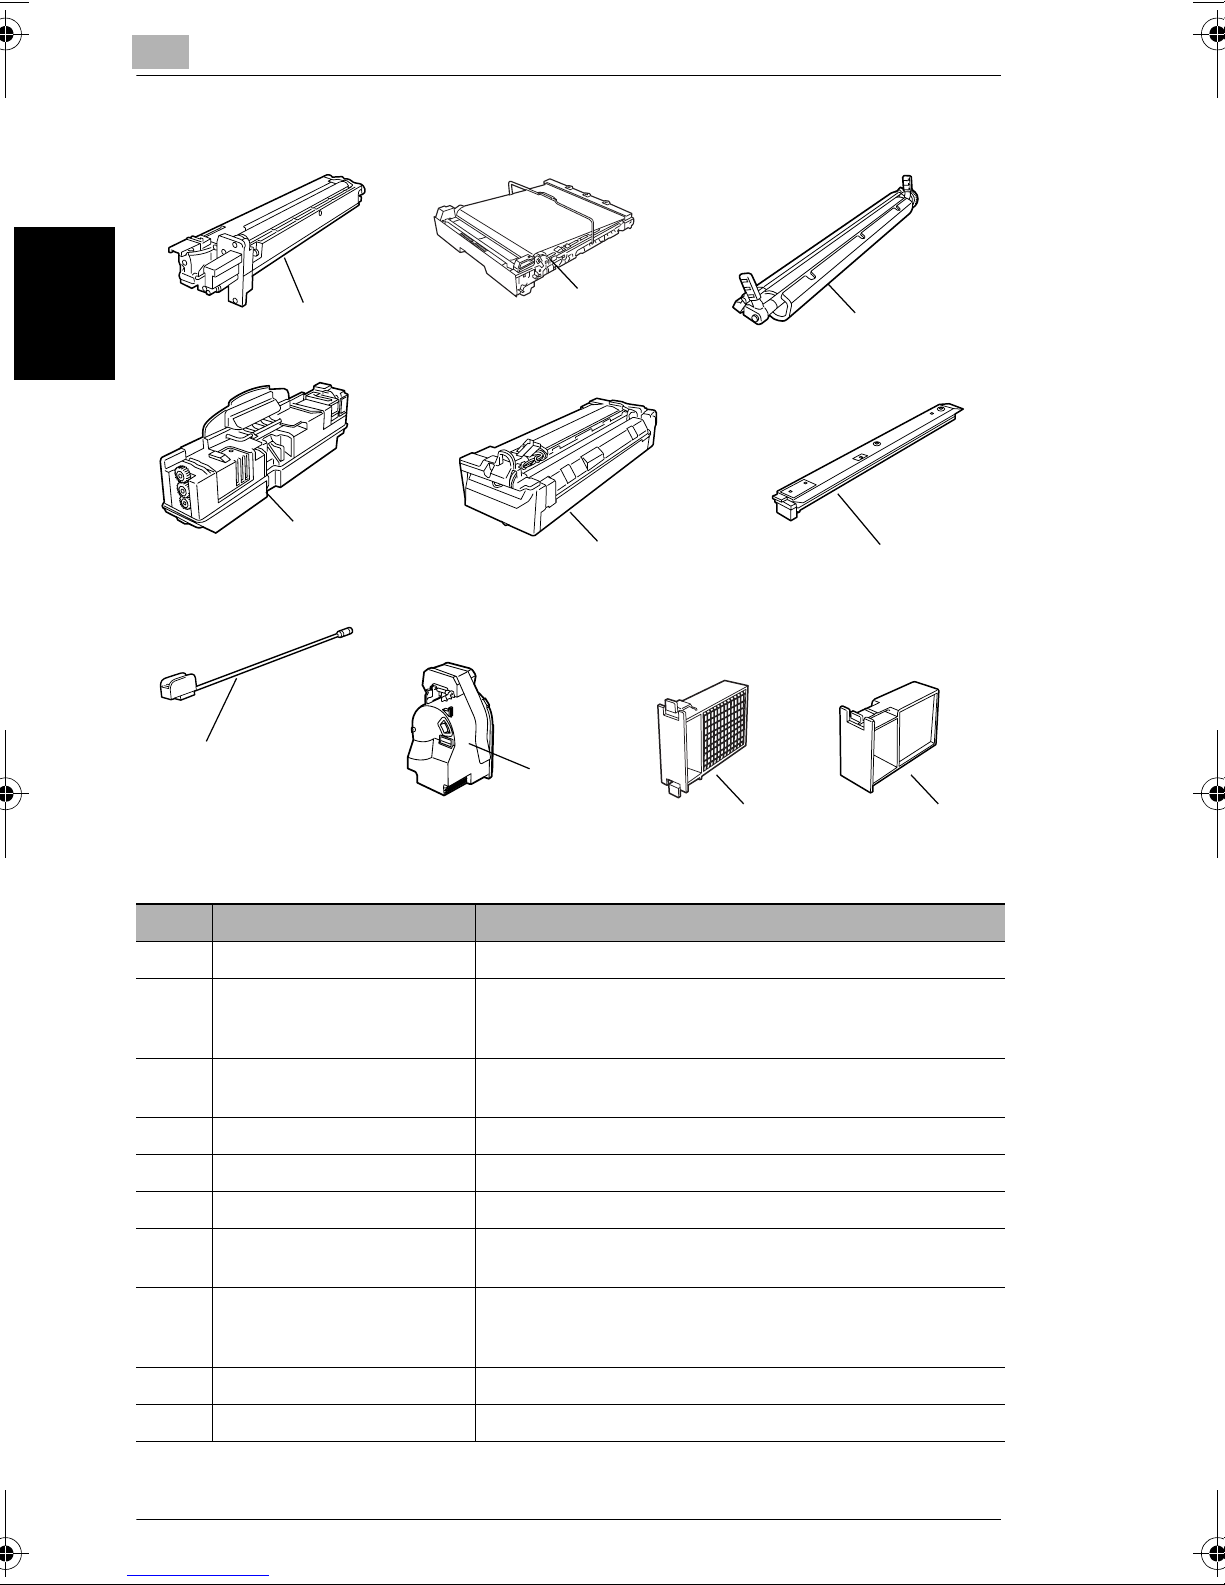
2
Supplies and Parts
1 Imaging unit
2.2 Part Names and Their Functions
2 Image transfer
belt unit
3 Image transfer
roller unit
Before Making Copies Chapter 2
7 LED-cleaning
tool
No. Part Name Description
1 Imaging unit Generates the copy image
2 Image transfer belt unit Layers onto the image transfer belt each of the single colors of
3 Image transfer roller unit Transfers onto the paper a full-color image generated by the
4 Waste-toner
bottle
5 Fusing unit
6Dust remover
8 Toner
cartridge
9 Ozone filter 10 Filter
the image generated by the imaging unit in order to create a
full-color image
image transfer belt unit
4 Waste-toner bottle Collects waste toner
5 Fusing unit Fuses the transferred toner to the paper
6 Dust remover Collects the dust generated in the machine
7 LED-cleaning tool Used to clean the surface of the LED unit, for example, when
8 Toner cartridge There are four toner cartridges: cyan (C), magenta (M), yellow
9 Ozone filter Collects the ozone generated in the machine
10 Filter Collects the toner dust generated in the machine
2-16 cm3520
replacing the image transfer belt unit
(Y) and black (Bk). The combination of the four toners
generates full-color images.
Page 60
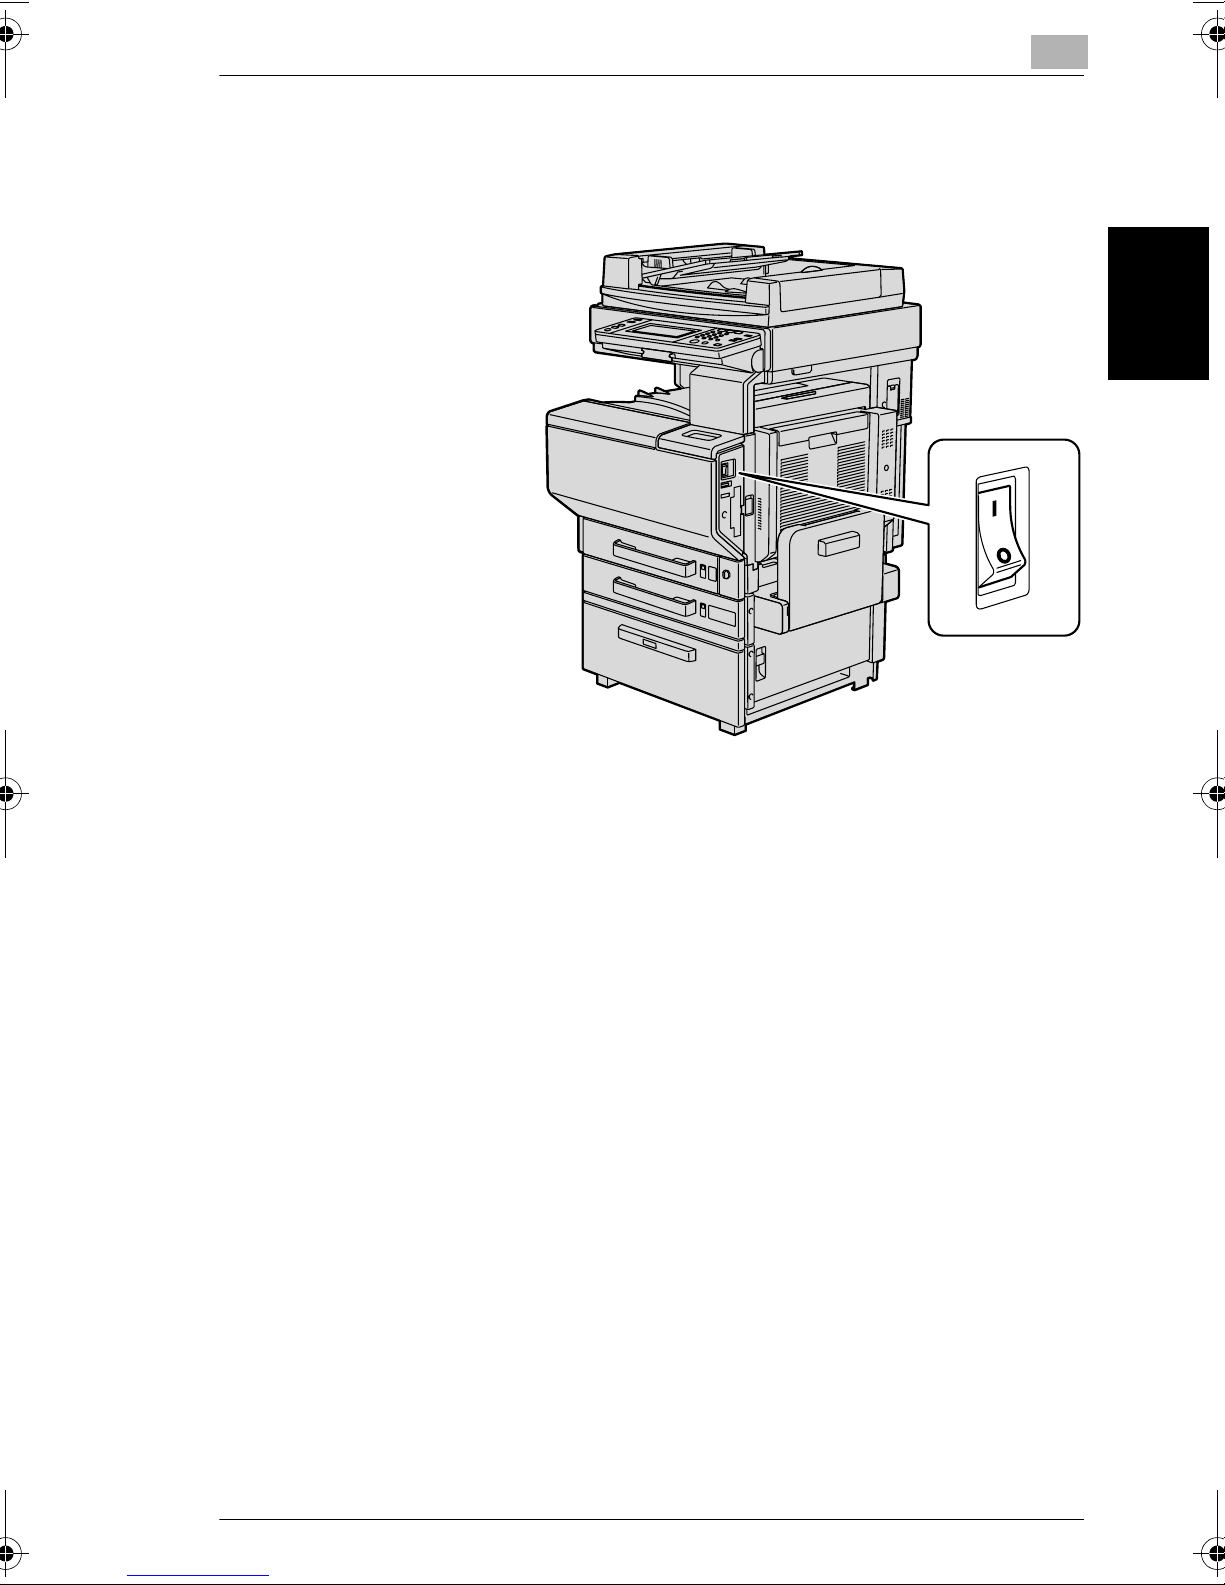
2.3 Turning the Machine On and Off
2.3 Turning the Machine On and Off
Turning On the Machine
➜ Set the power switch to
[I].
2
When the Machine Is Turned On
1 The indicator on the [Start] key lights up in orange.
A screen indicating that the machine is starting up appears.
2 After a few seconds, the message “Now warming up. Ready to scan.” appears
on the touch panel, and the indicator on the [Start] key lights up in green. A job
can now be queued.
Queuing a Job During Warm-Up
➜ A job can be queued while the machine warms up after it is turned on. After the
machine has finished warming up (after about 99 seconds at normal room
temperature (73.4 °F)), the scanned image is printed.
Panel Reset Timer
Before Making Copies Chapter 2
G If no operation is performed for the specified length of time, if the optional key
counter is removed, settings that have not been programmed in the machine,
such as the number of copies, are cleared and all modes and functions return
to their default settings.
G This is the panel reset timer operation.
G As the factory default, the panel reset timer operation is performed after 1
minute.
cm3520 2-17
Page 61
2
2.3 Turning the Machine On and Off
✎
Reference
For details on the default settings, refer to “Default Settings” on page 2-21.
G The time until the panel reset timer operation is performed, and whether or not
it is performed can be set from Administrator mode. For details, refer to “Setting
the “Panel Reset Timer” Function” on page 10-61.
G Whether or not the panel reset timer operation is performed when there is a
change of users can be set with one of the User’s Choice: 1 functions.
For details, refer to “Setting the “Account Change Auto Reset” Function” on
page 10-15.
Power Save Mode
If no operation is performed for the specified length of time or if the [Power Save]
key is pressed, the touch panel goes off and the machine enters a mode where it
conserves power.
This is the Power Save mode.
Before Making Copies Chapter 2
The machine can receive jobs even while it is in Power Save mode.
As the factory default, the machine enters Power Save mode after 15 minutes.
✎
Additional Information
The machine may enter Sleep mode from Power Save mode.
As the factory default, the machine enters Power Save mode if no operation is
performed for 15 minutes, and then the machine enters Sleep mode after 30
minutes have elapsed.
✎
Reference
The length of time after the last operation until the machine enters Power Save
mode can be specified using the “Power Save” function on the User’s Choice:
1 screen. For details, refer to “Setting the “Power Save” Function” on
page 10-11.
2-18 cm3520
Page 62
2.3 Turning the Machine On and Off
Recovering From Power Save Mode
2
1 Press the [Start] key. (The Power Save mode can also be canceled by pressing
any key on the operation panel or by touching the touch panel.)
2 The touch panel comes on again, and then after the machine has finished
warming up, it is ready to begin printing.
Sleep Mode
If no operation is performed for the specified length of time, it automatically enters
Sleep mode.
As the factory default, the machine enters Sleep mode after 30 minutes.
The length of time after the last operation until the machine enters Sleep mode can
be specified using the “Sleep” function on the User’s Choice: 1 screen. For details,
refer to “Setting the “Sleep” Function” on page 10-13.
Recovering From Sleep Mode
1 Press the [Start] key. (The Sleep mode can also be canceled by pressing any
key on the operation panel or by touching the touch panel.)
2 The touch panel comes on again, and then after the machine has finished
warming up, it is ready to begin printing (after about 99 seconds at normal room
temperature (73.4 °F)).
Before Making Copies Chapter 2
cm3520 2-19
Page 63
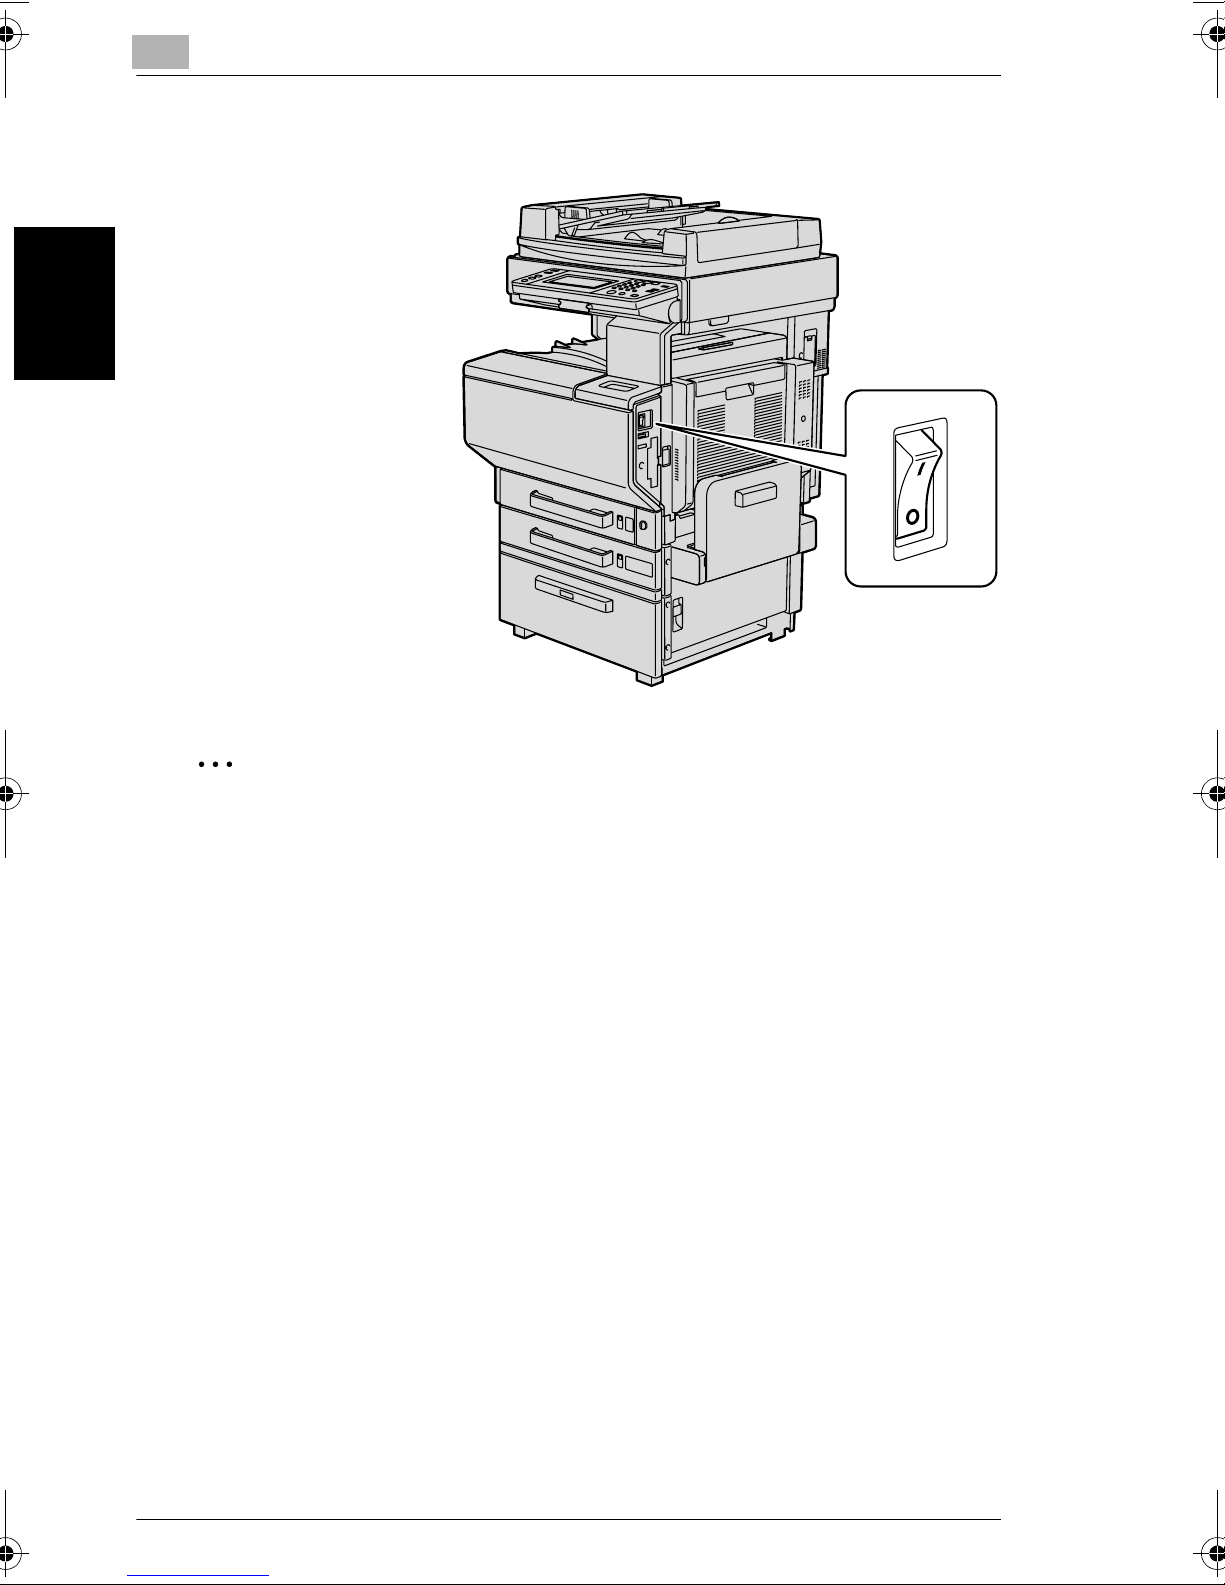
2
Turning Off the Machine
1 Touch [Job Log] to check
that no jobs are queued.
2 If any copies or printouts
remain in the output tray,
remove them.
3 Set the power switch to
[O].
2.3 Turning the Machine On and Off
Before Making Copies Chapter 2
✎
Reminder!
Do not turn off the machine while it is making copies or printing, otherwise a
paper misfeed may occur.
Do not turn off the machine while it is scanning or sending or receiving data,
otherwise all scanned data or transmission data will be deleted.
Do not turn off the machine while a queued job or stored data is waiting to be
printed, otherwise the jobs will be deleted.
When the Machine Is Turned Off
G The following are deleted.
❍ Settings that are not programmed, such as the number of copies
❍ Jobs queued to be printed
❍ Jobs stored in the memory
❍ Jobs saved with the “Reprint” function
G Stored zoom ratios, programmed Copy mode settings, Utility mode settings and
the data in the User Box are not erased.
2-20 cm3520
Page 64
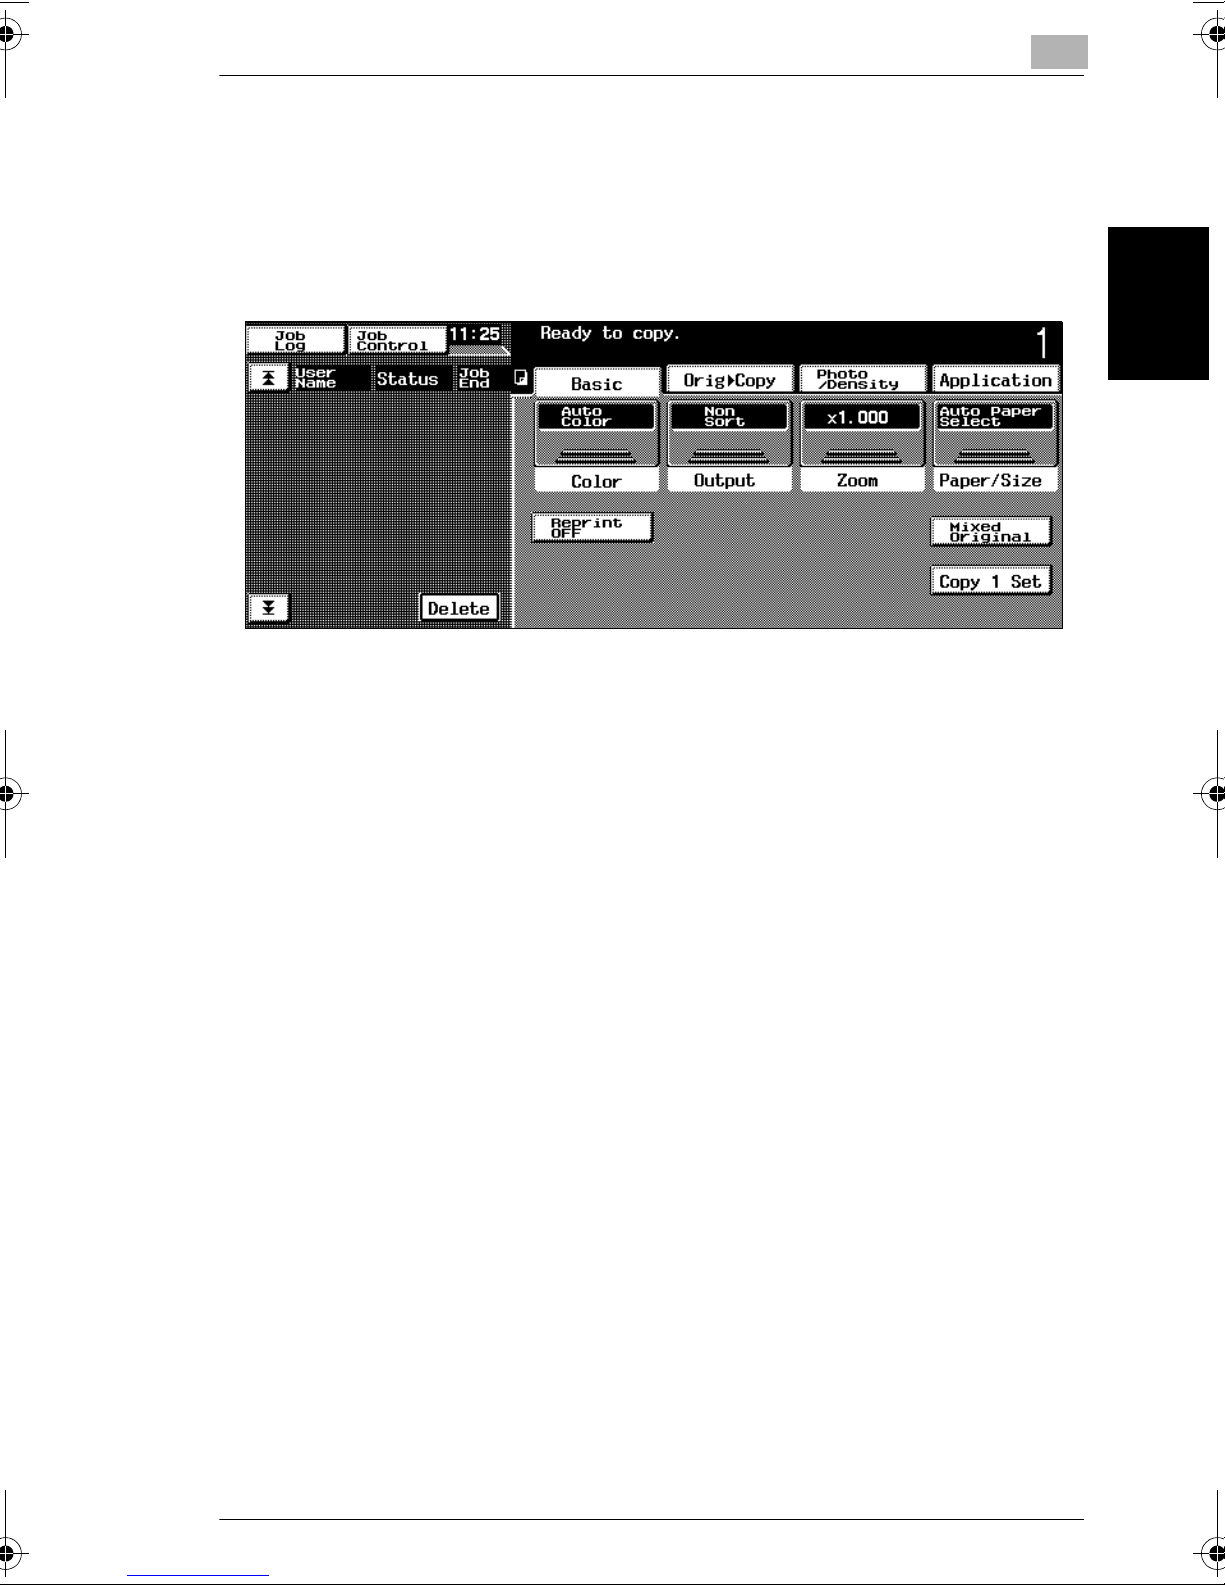
2.4 Using the Touch Panel
2
2.4 Using the Touch Panel
Description of the Touch Panel
The screen that appears when this machine is turned on (the power switch is set to
“I”) is the Basic screen.
The Basic screen uses graphics and messages to show the currently selected
settings, the modes and functions that can be selected, and the status of the
machine.
Default Settings
The default settings are those that are selected immediately after the machine is
turned on (the power switch is set to “I”) and before any mode or function is
changed, and that are selected when the [Reset] key is pressed to reset all
functions and modes. The default settings serve as a reference for all operations
that are to be made.
The default settings when this machine is purchased are listed below.
• Number of copies: 1 • Margin: None specified
• Color: Auto Color • Thick Original: Off
• Output: Non Sort • Photo/Density: Text & Photo
• Zoom: × 1.000 (Full Size) • Screen Pattern: Gradation
• Paper/Size: Auto Paper Select • Background density: Standard
Before Making Copies Chapter 2
• Mixed Original: Off • Copy density: Standard
• Copy 1 Set: Off • Glossy: Off
• Original: 1 (single-sided) • Application: All off
• Copy: 1 (single-sided) • Color Image Adjustment: Standard
• Original Direction: None specified • Creation: All off
cm3520 2-21
Page 65

2
2.4 Using the Touch Panel
✎
Hint
The language of the displays in the touch panel can be changed using the
“Language Select” function on the User’s Choice: 2 screen. For details, refer to
“Setting the “Language Select” Function” on page 10-16.
The default settings that the machine resets all functions to can be specified
using the Utility mode. For details, refer to “Setting the “Reset Mode” Function”
on page 10-4.
Before Making Copies Chapter 2
2-22 cm3520
Page 66
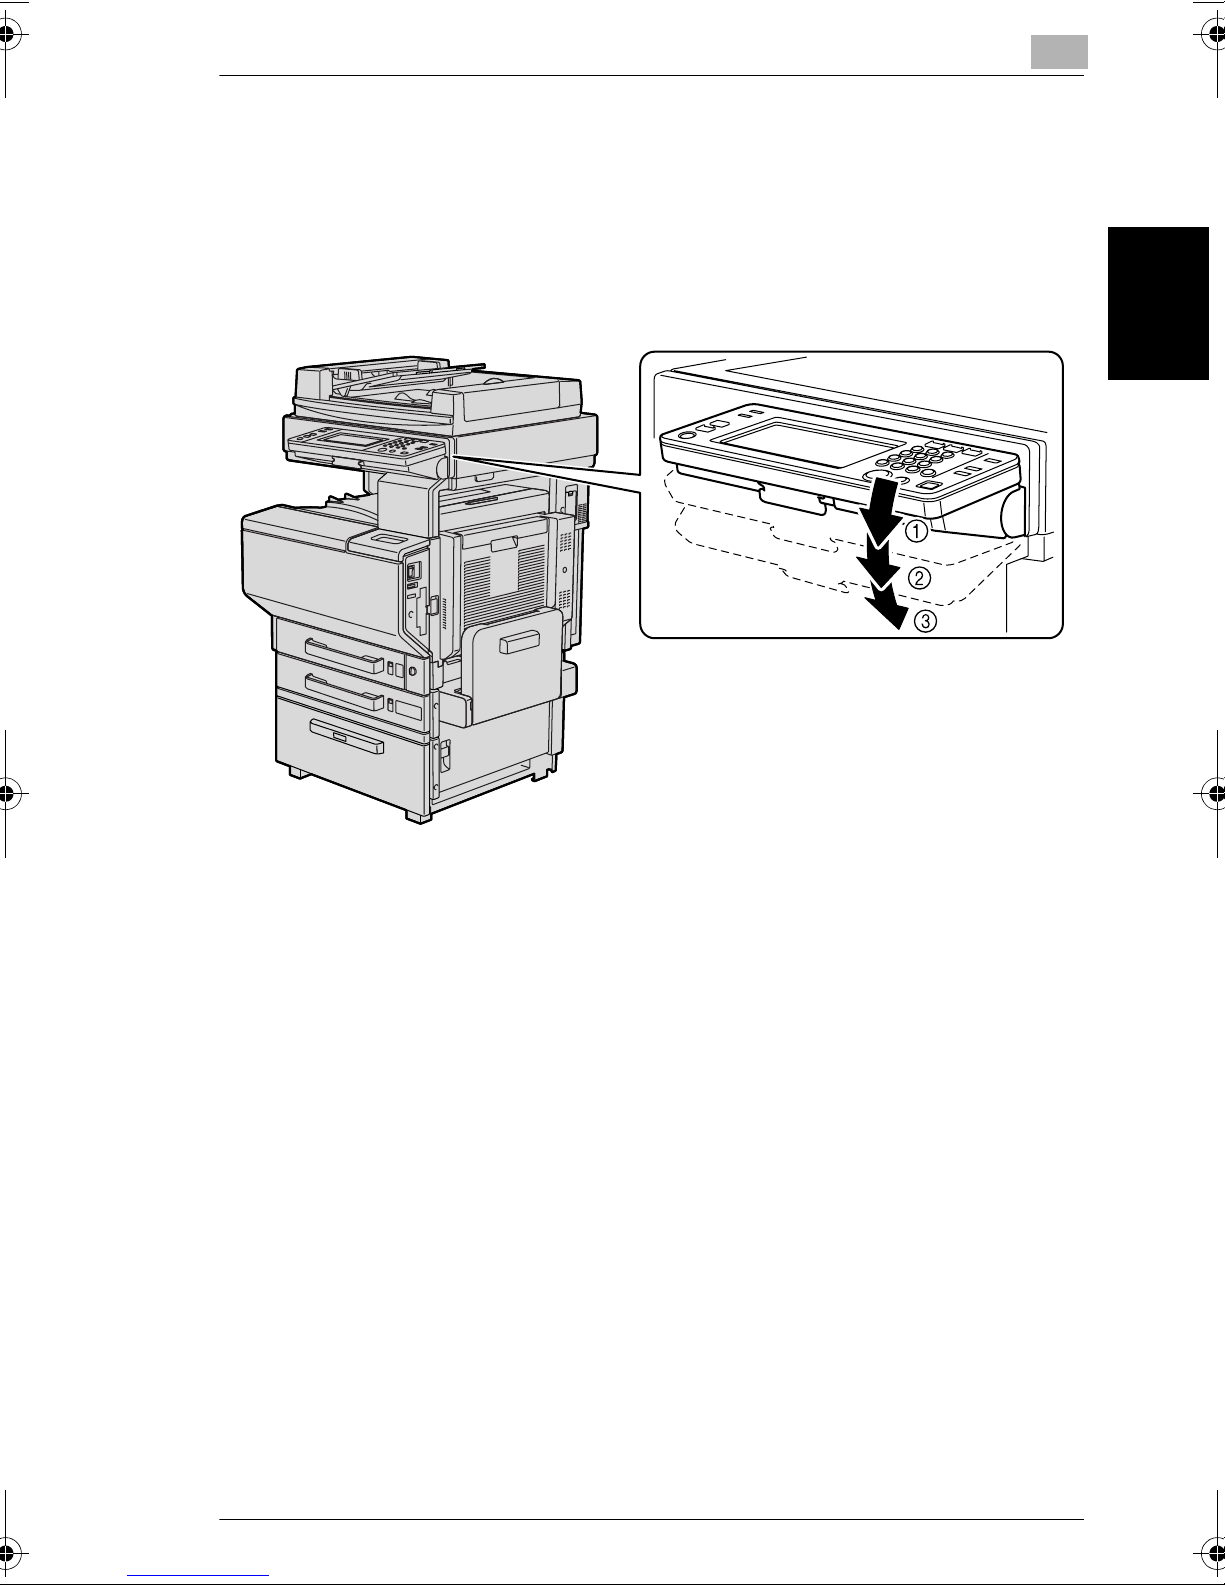
2.5 Adjusting the Angle of the Control Panel
2.5 Adjusting the Angle of the Control Panel
The control panel can be adjusted to any of three angles.
Adjust the control panel to the angle that allows for easy operation.
2
➀ Upper position (base position)
➁ Middle position
➂ Lower position
Before Making Copies Chapter 2
cm3520 2-23
Page 67
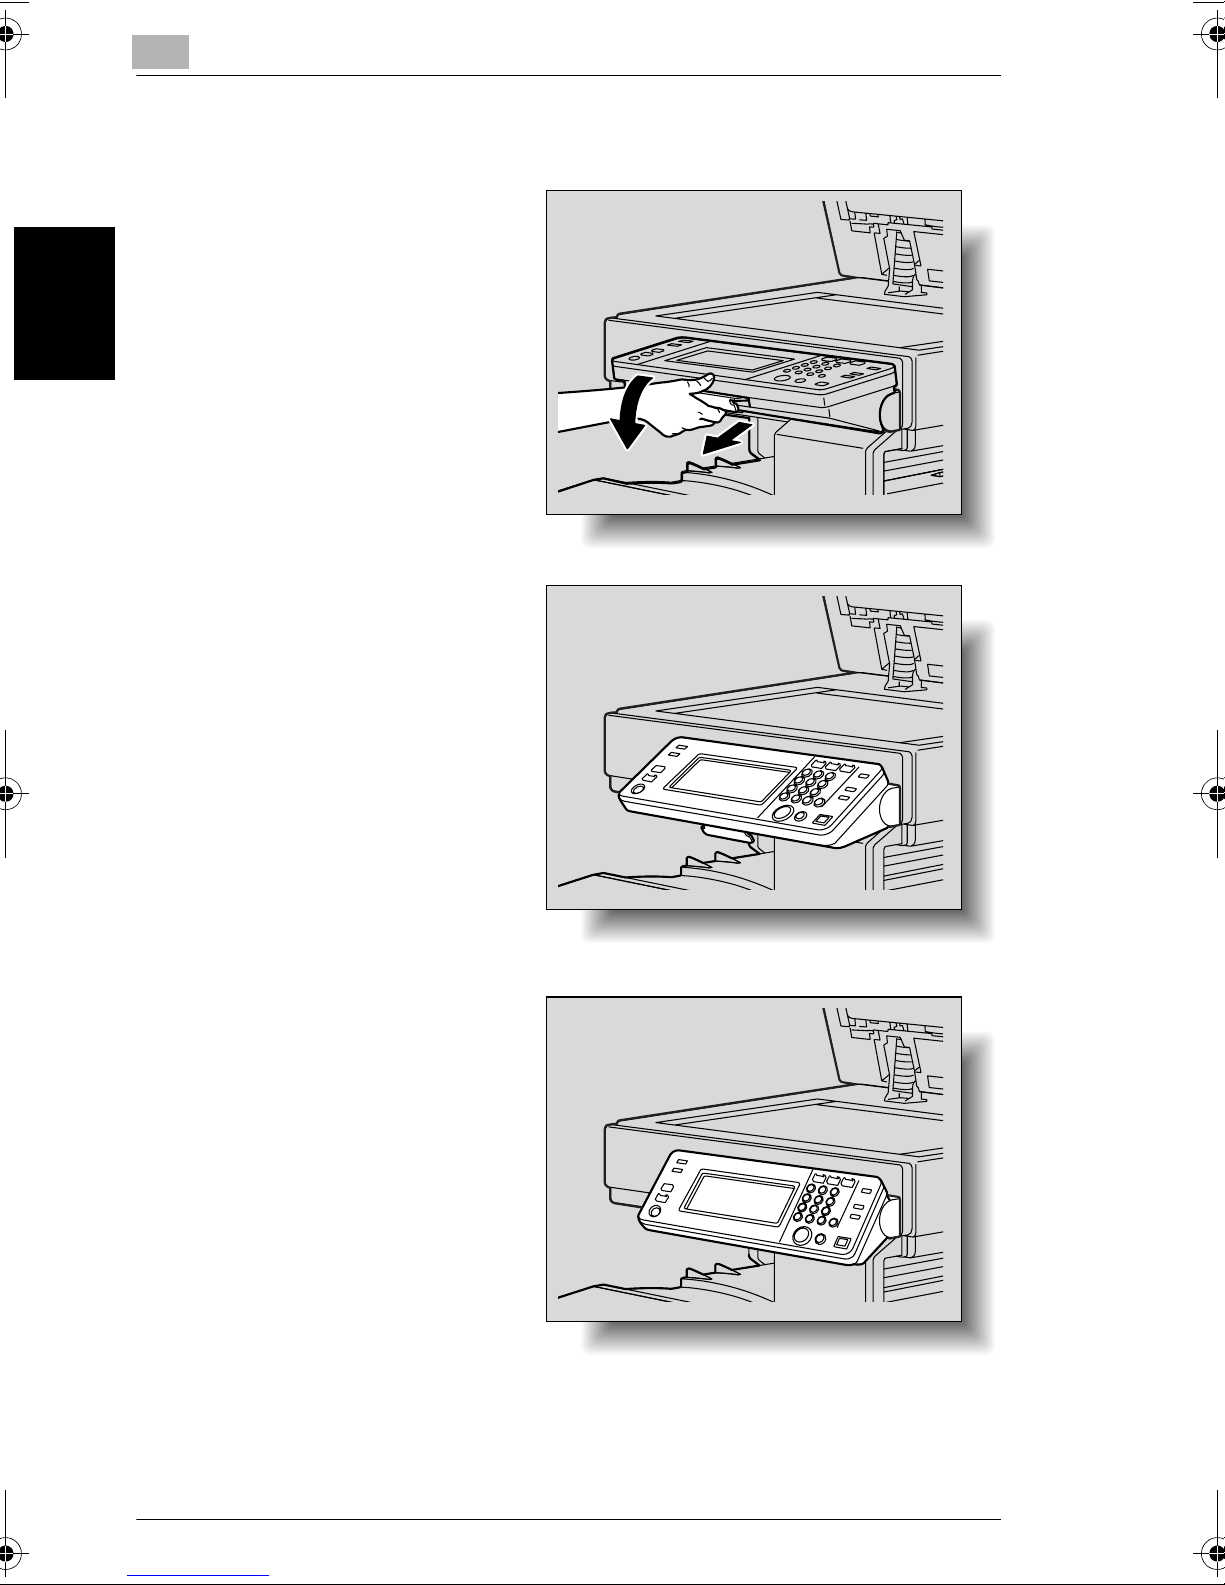
2
To adjust the angle of the control panel
2.5 Adjusting the Angle of the Control Panel
1 Pull the control panel release
lever toward you, and then push
down on the control panel.
The angle of the control panel
stops at the middle position.
Before Making Copies Chapter 2
2 To adjust the control panel to an
even steeper angle, pull the
control panel release lever
toward you, and then push down
on the control panel.
The angle of the control panel
stops at the lower position.
2-24 cm3520
Page 68
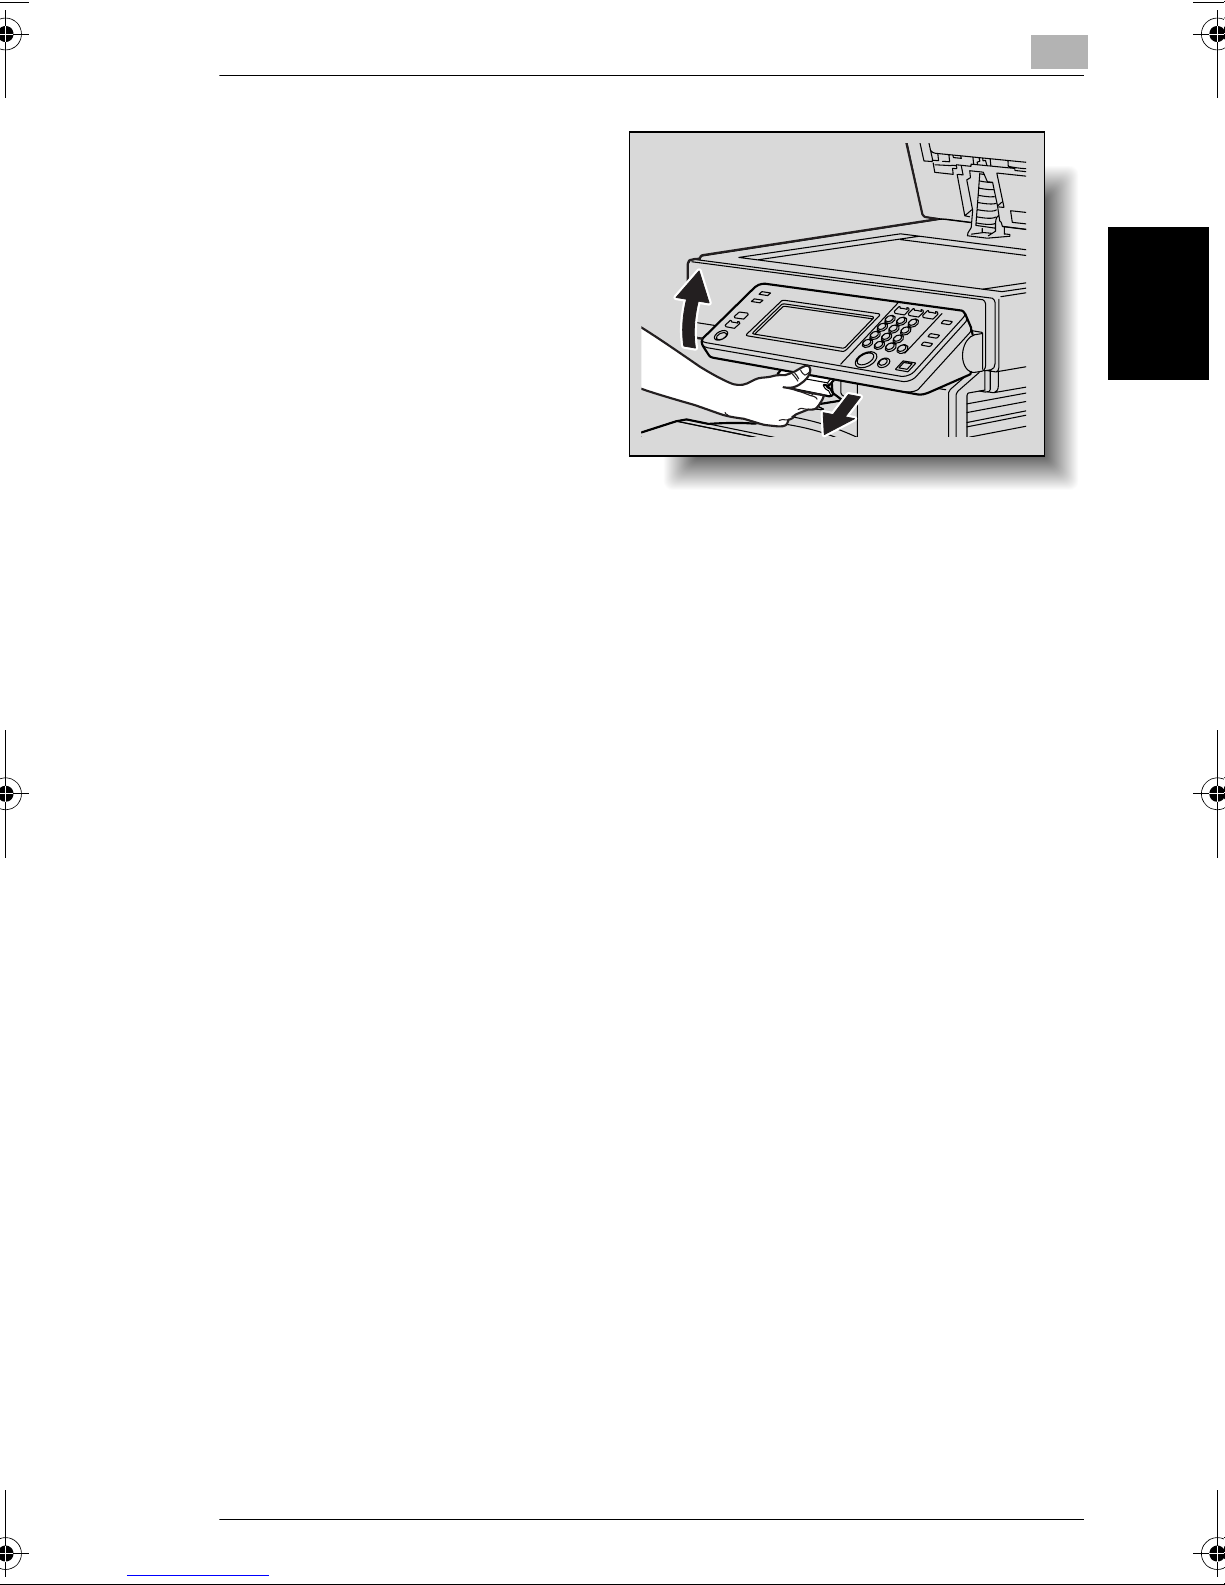
2.5 Adjusting the Angle of the Control Panel
3 To return the control panel to the
upper position, pull the control
panel release lever toward you,
and then pull up on the control
panel.
2
Before Making Copies Chapter 2
cm3520 2-25
Page 69
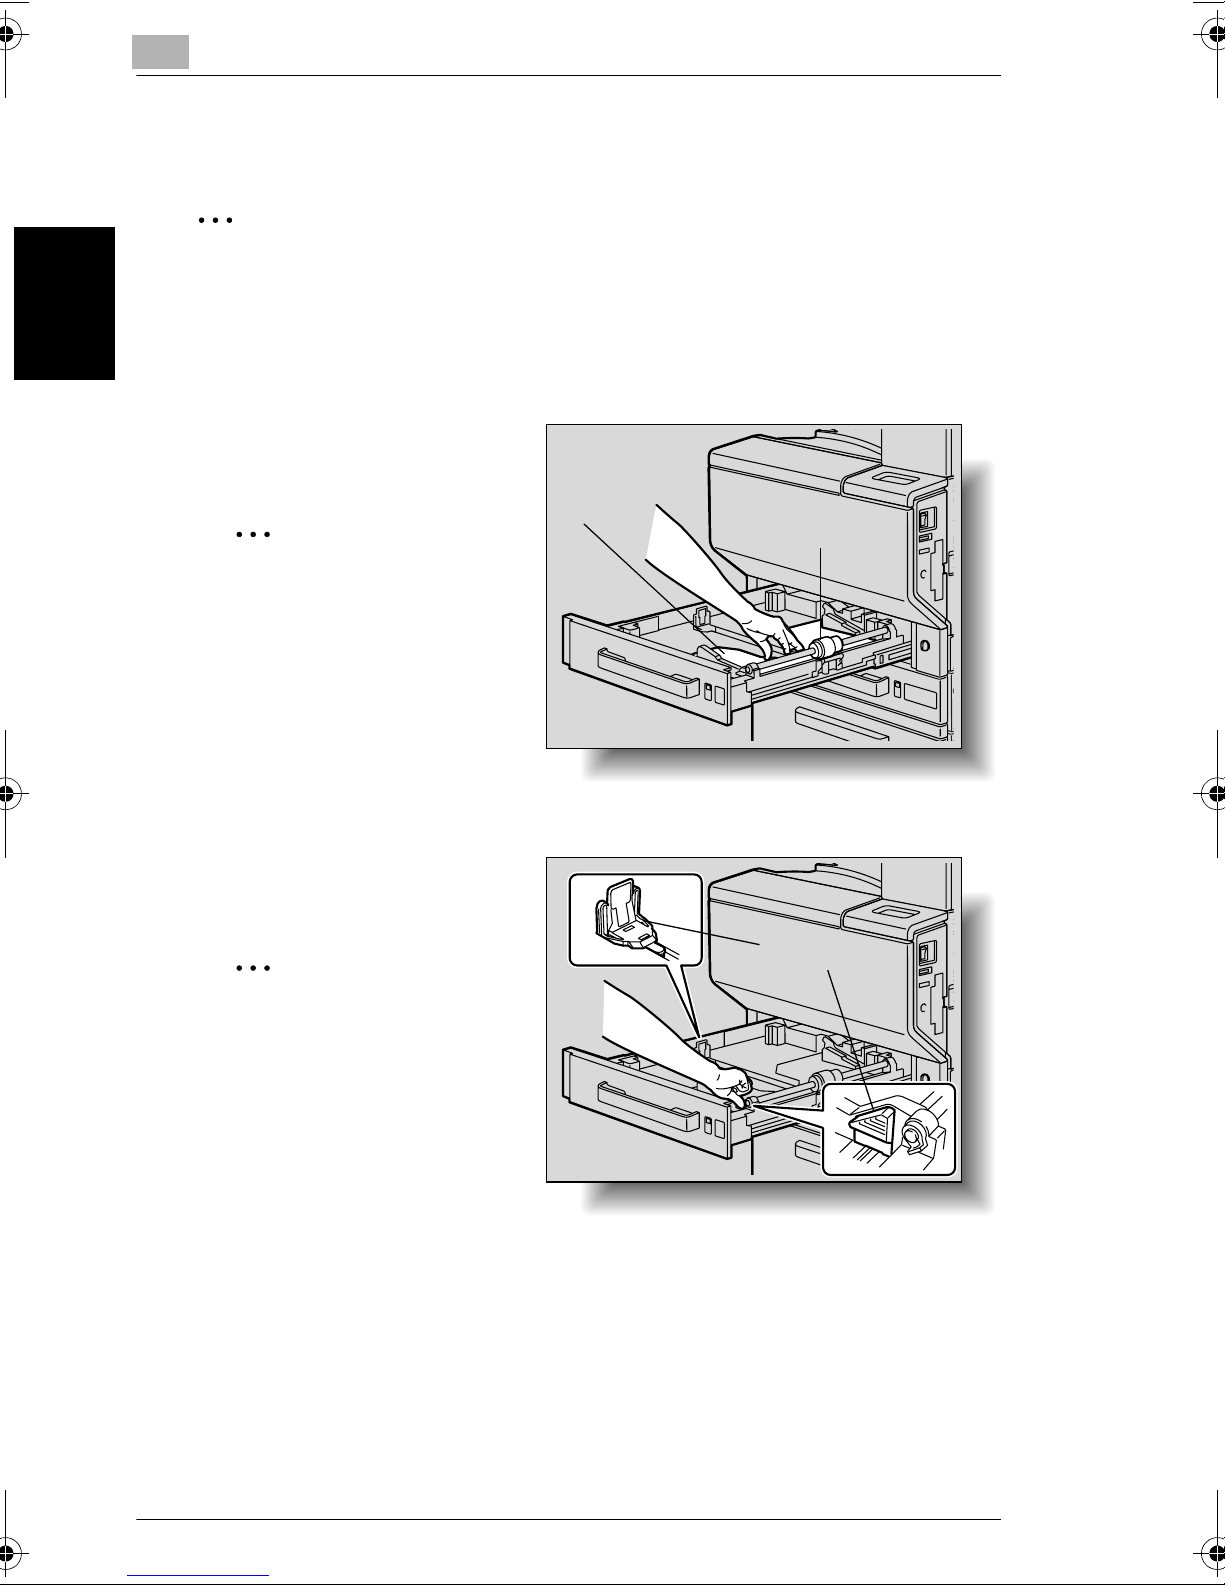
2
2.6 Loading Paper Into the 1st Drawer
2.6 Loading Paper Into the 1st Drawer
✎
Reference
For details on specifying the paper size for the 1st drawer, refer to “To specify
the size of the paper in the 1st drawer” on page 3-19.
1 Pull out the paper drawer for the 1st drawer.
2 Press down on the paper-lifting
plate until it locks into place.
Paper-lifting
✎
Reminder!
Be careful not to touch the
surface of the paper take-up
roller with your hands.
Before Making Copies Chapter 2
plate
Paper take-up roller
3 Slide the lateral guides to fit the
size of paper to be loaded.
✎
Hint
For paper of a non-standard
size, first load the paper, and
then adjust the lateral guides
to the size of the loaded
paper.
Lateral guide
2-26 cm3520
Page 70
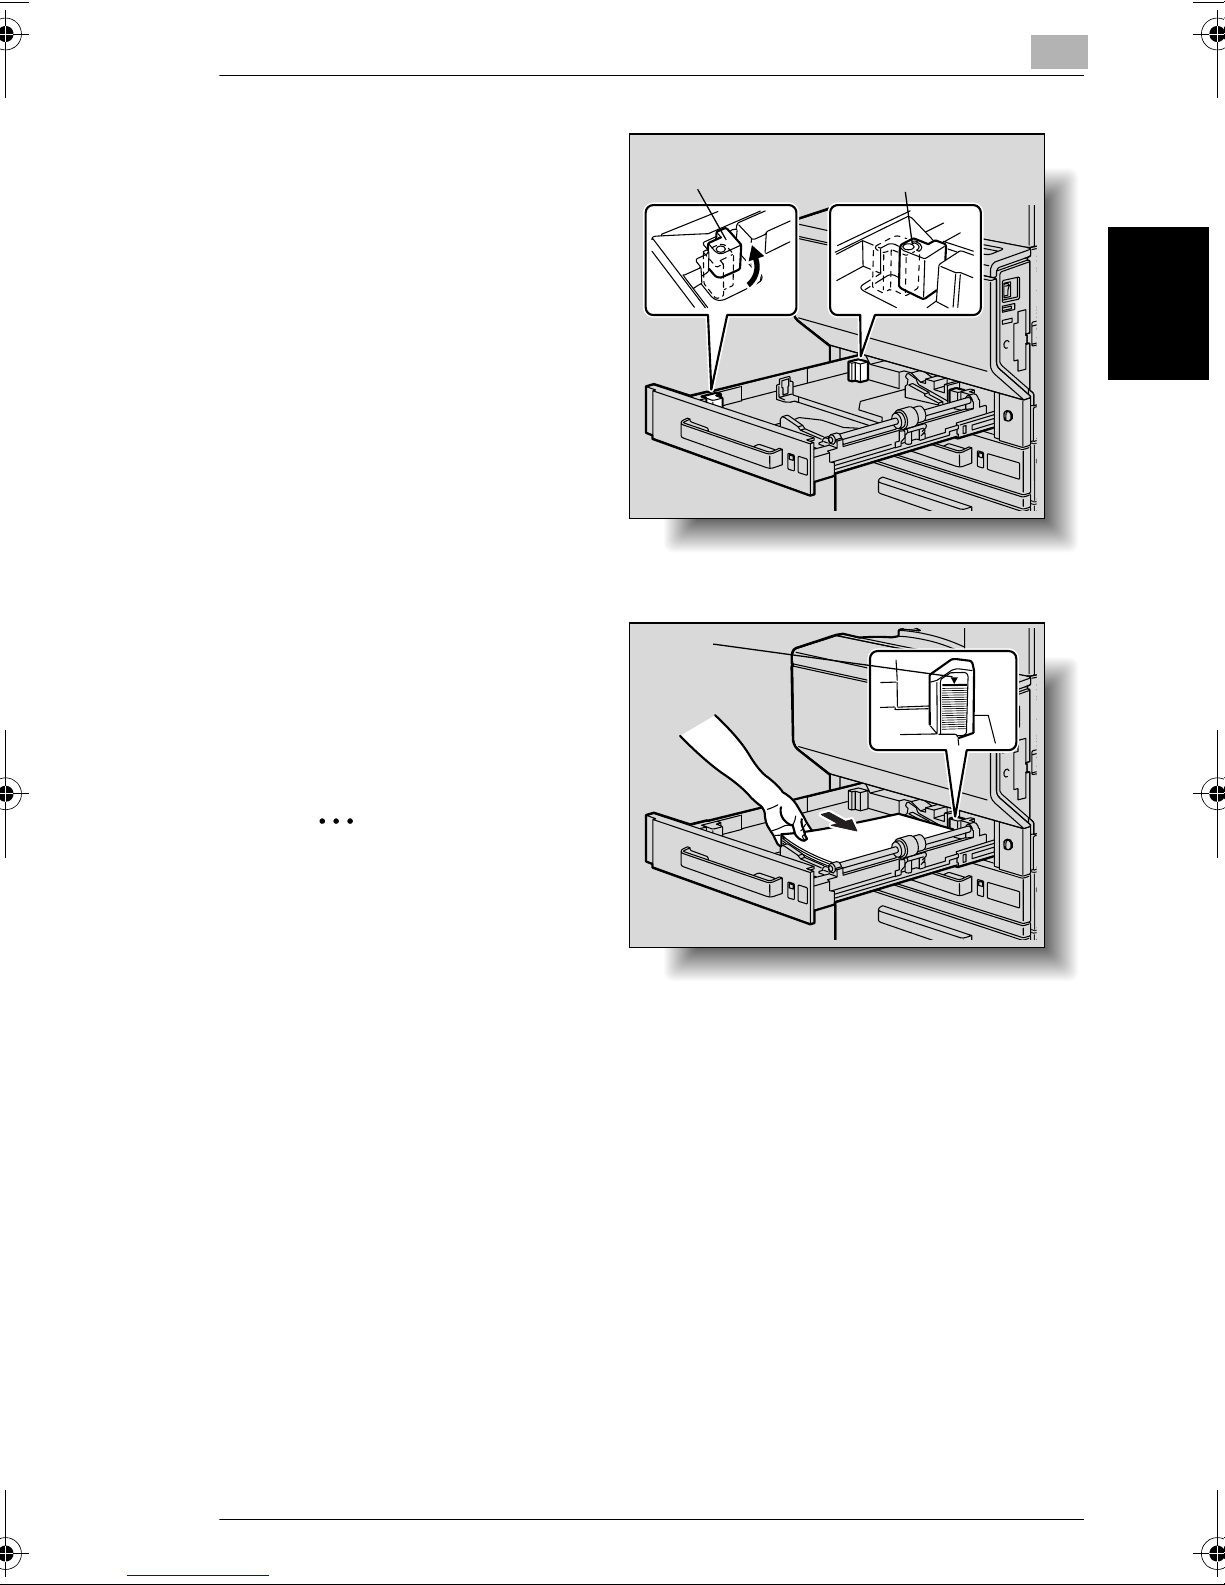
2.6 Loading Paper Into the 1st Drawer
2
4 For Over Size Paper, adjust the
trailing-edge guides as shown in
the illustration.
5 Load the paper into the drawer
so that the side of the paper to be
printed on (the side facing up
when the package was
unwrapped) faces up.
Trailing-edge
guide
▼ mark
Trailing-edge
guide
Before Making Copies Chapter 2
✎
Reminder!
If the paper is curled, flatten it
before loading it.
Do not load so many pages
that the top of the stack is
higher than the
No more than 20 sheets of paper other than plain paper can be loaded.
M mark.
cm3520 2-27
Page 71
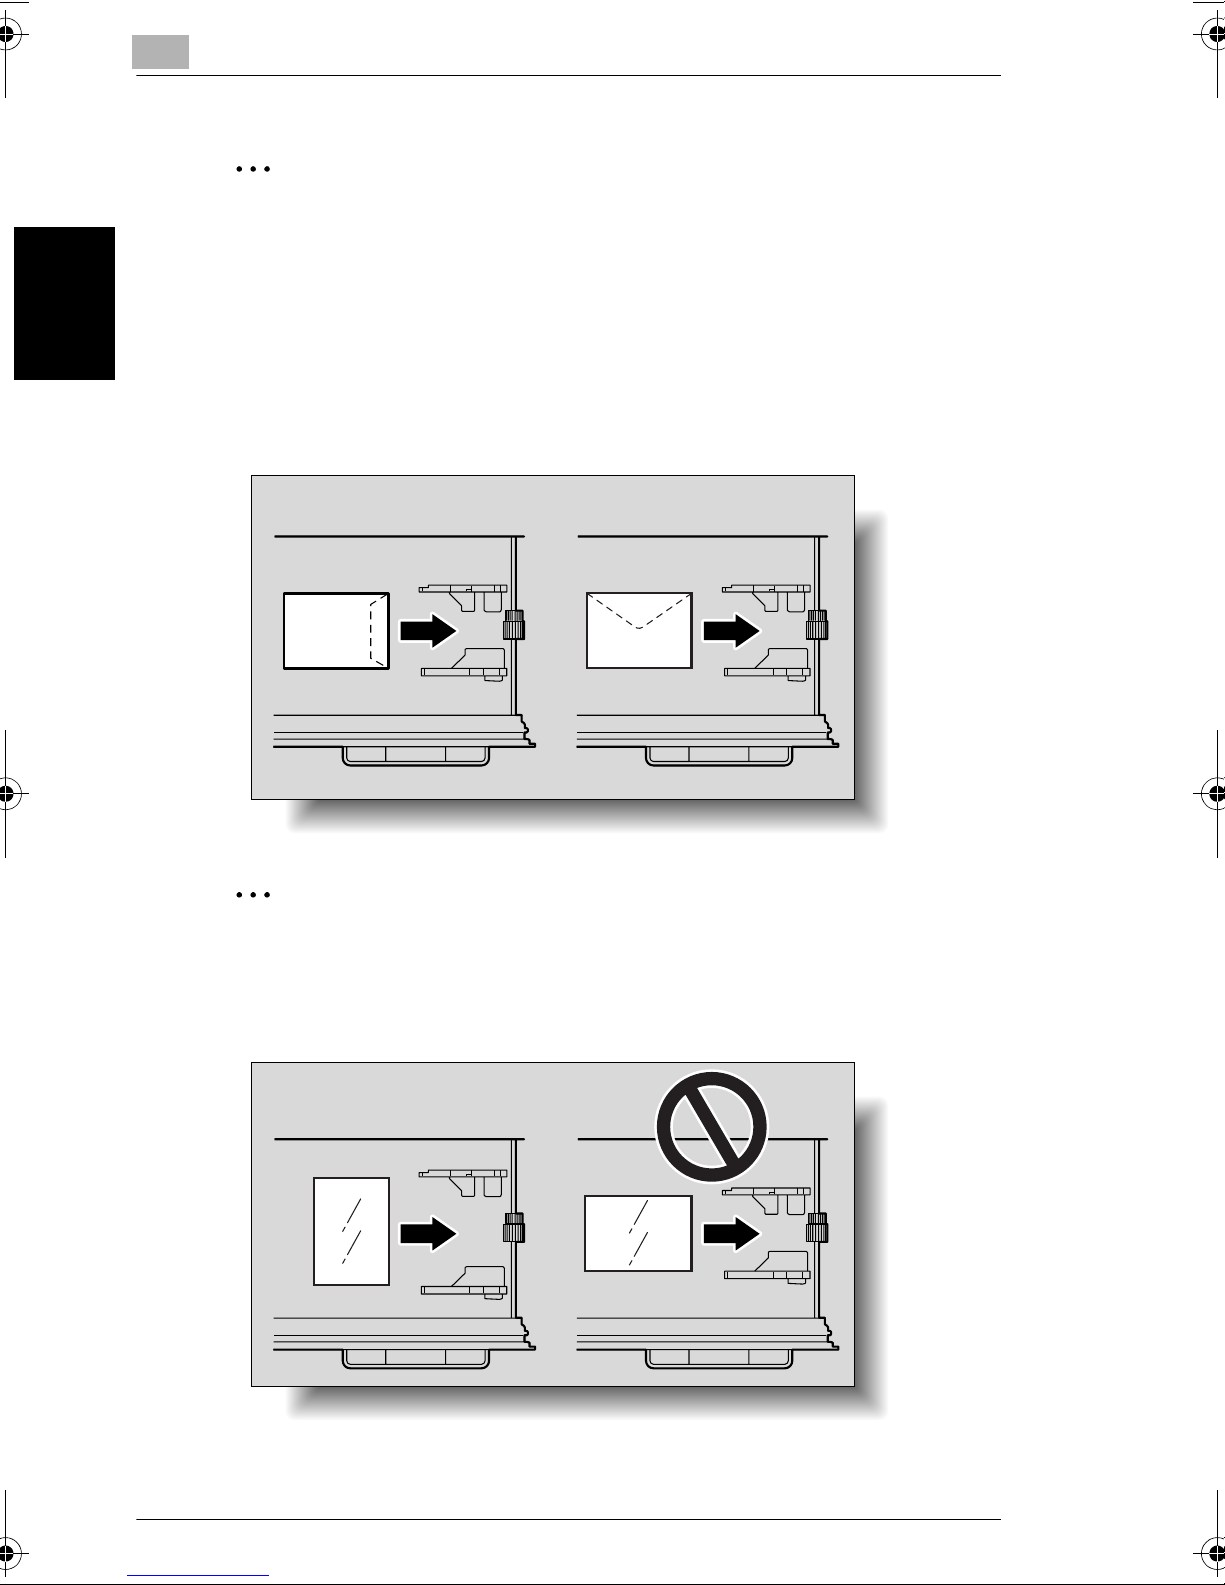
2
2.6 Loading Paper Into the 1st Drawer
✎
Reminder!
Before loading envelopes, press them down to make sure that all air is
removed, and make sure that the folds of the flaps are firmly pressed,
otherwise the envelopes may become wrinkled or a paper misfeed may
occur.
When loading envelopes, load them with the flap side down, as shown in the
illustration. If the envelopes are loaded with the flap side up, a paper misfeed
may occur. The flap side of envelopes cannot be printed on.
Before Making Copies Chapter 2
✎
Reminder!
When loading overhead projector transparencies, load them with the longer
side as the leading edge, as shown. Do not load overhead projector
transparencies lengthwise.
Crosswise Lengthwise
2-28 cm3520
Page 72
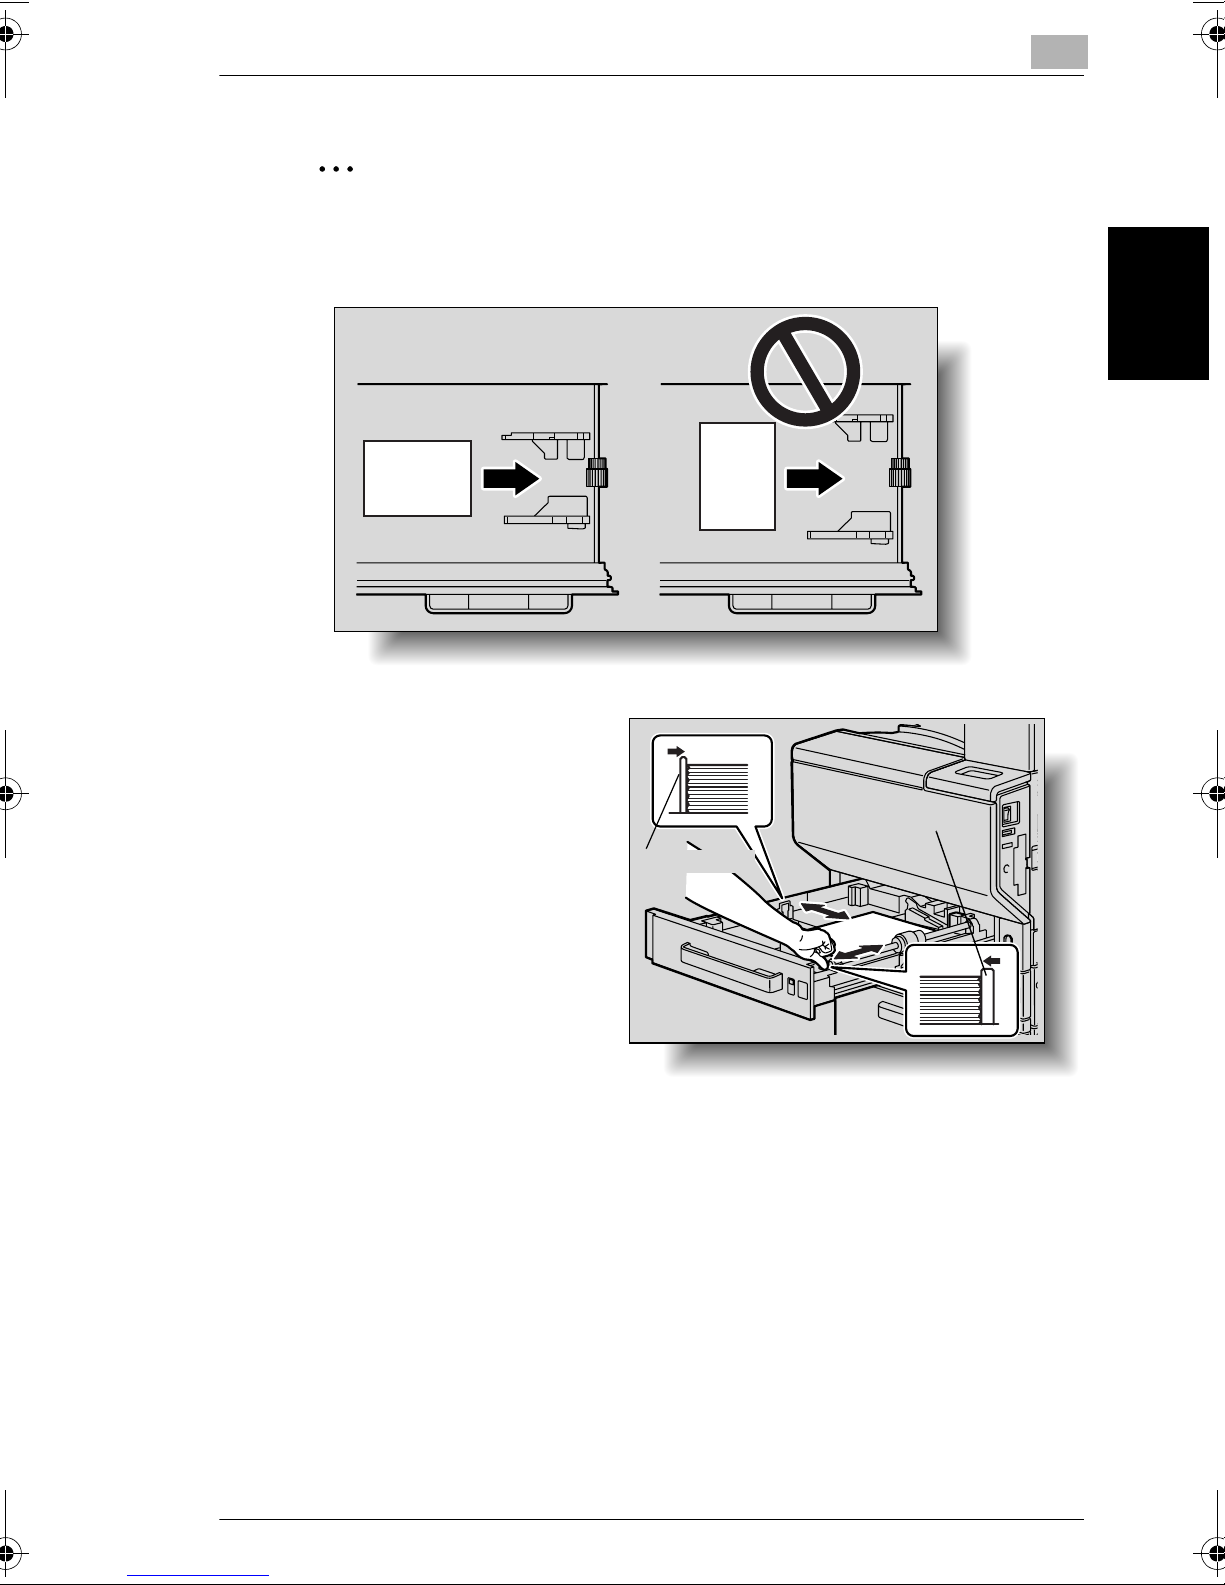
2.6 Loading Paper Into the 1st Drawer
✎
Reminder!
When loading postcards, load them with the shorter side as the leading
edge, as shown. Do not load postcards crosswise.
2
CrosswiseLengthwise
6 If paper of a non-standard size
has been loaded, slide the lateral
guides against the edges of the
loaded paper.
7 Close the paper drawer for the
1st drawer.
Before Making Copies Chapter 2
Lateral guide
Lateral guide
cm3520 2-29
Page 73
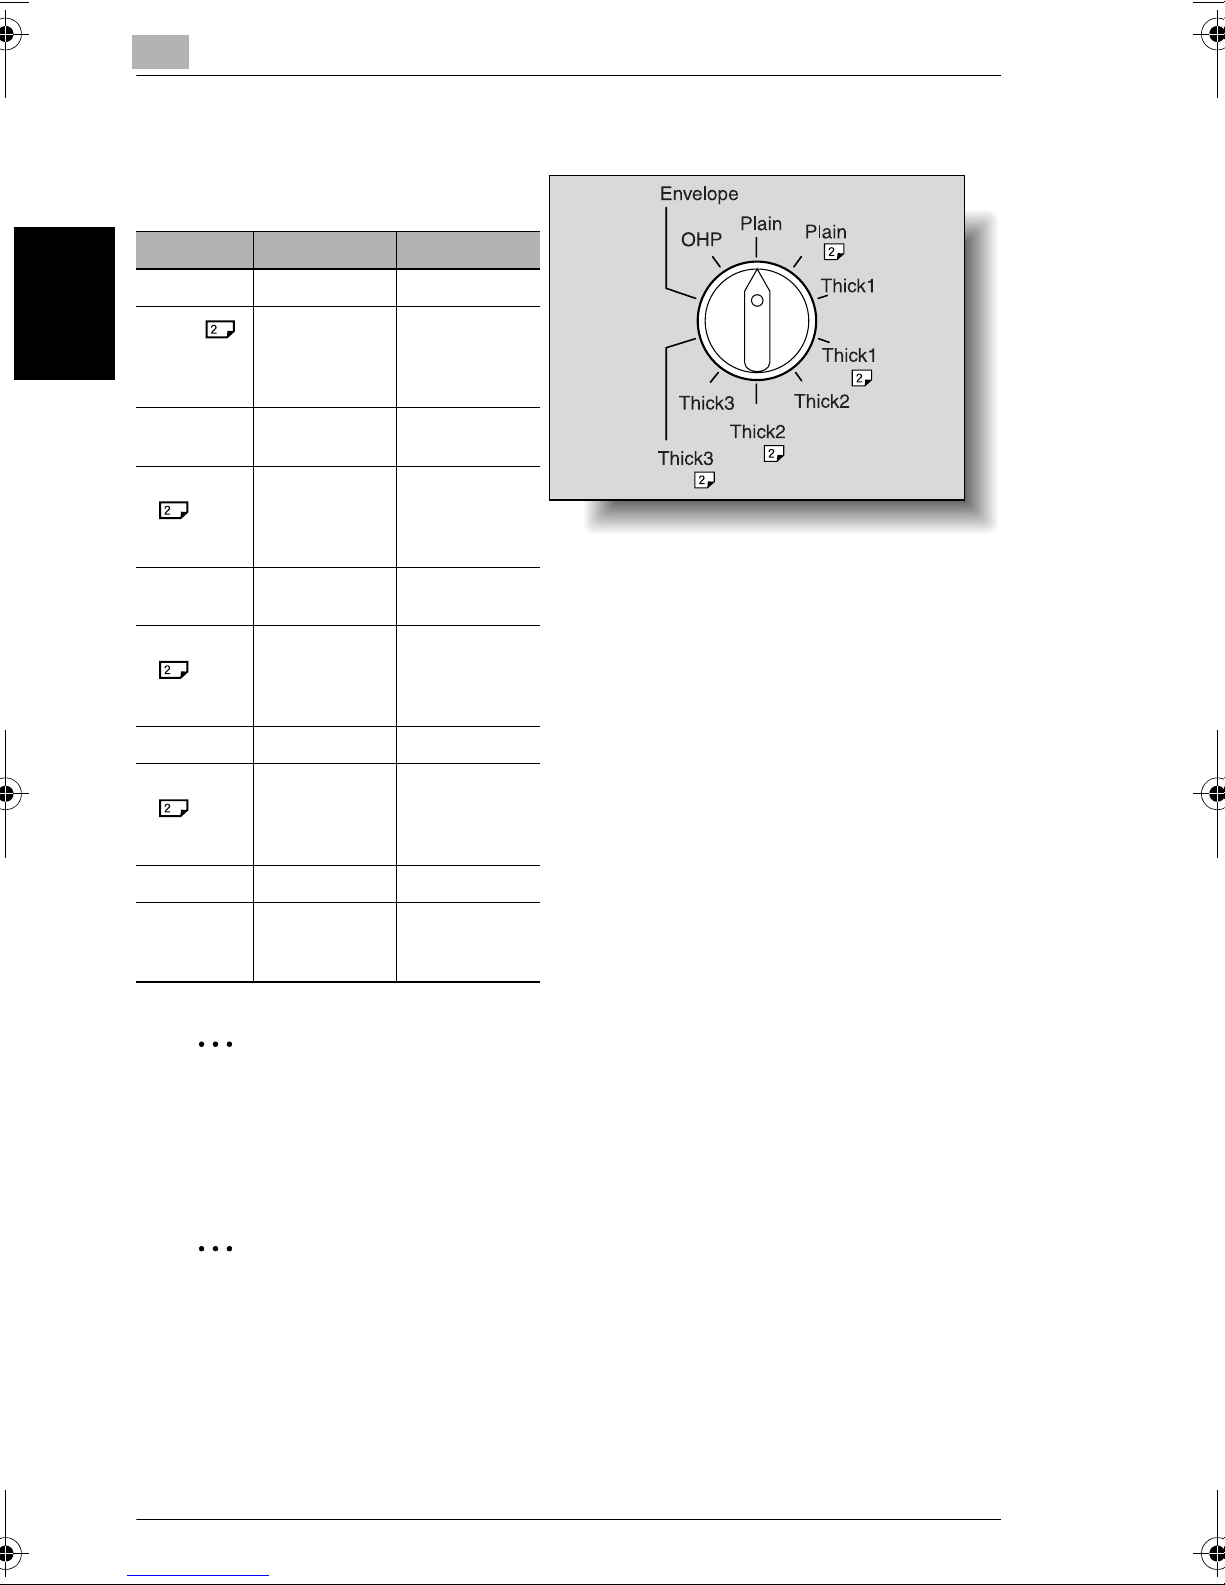
2
2.6 Loading Paper Into the 1st Drawer
8 Turn the media type selection dial to the setting for the type of paper loaded.
Setting Paper Type Notes
Plain Plain Paper
Plain Second side of
Thick1 Thick paper 1 When using
Thick1 Second side of
Thick2 Thick paper 2 When using
Thick2 Second side of
Before Making Copies Chapter 2
Thick3 Thick paper 3
Thick3 Second side of
Envelope Envelopes
a double-sided
copy on plain
paper
a double-sided
copy on thick
paper 1
a double-sided
copy on thick
paper 2
a double-sided
copy on thick
paper 3
During manual
double-sided
copying
label sheets
During manual
double-sided
copying
postcards
During manual
double-sided
copying
During manual
double-sided
copying
OHP Overhead
projector
transparencies
✎
Hint
To print on the back side of previously printed plain paper or thick paper (using
manual double-sided copying), set the media type selection dial to the setting
appropriate for the paper type when copying onto the second side.
✎
Reference
For details on paper types, refer to “Paper Specifications” on page 4-2.
2-30 cm3520
Page 74
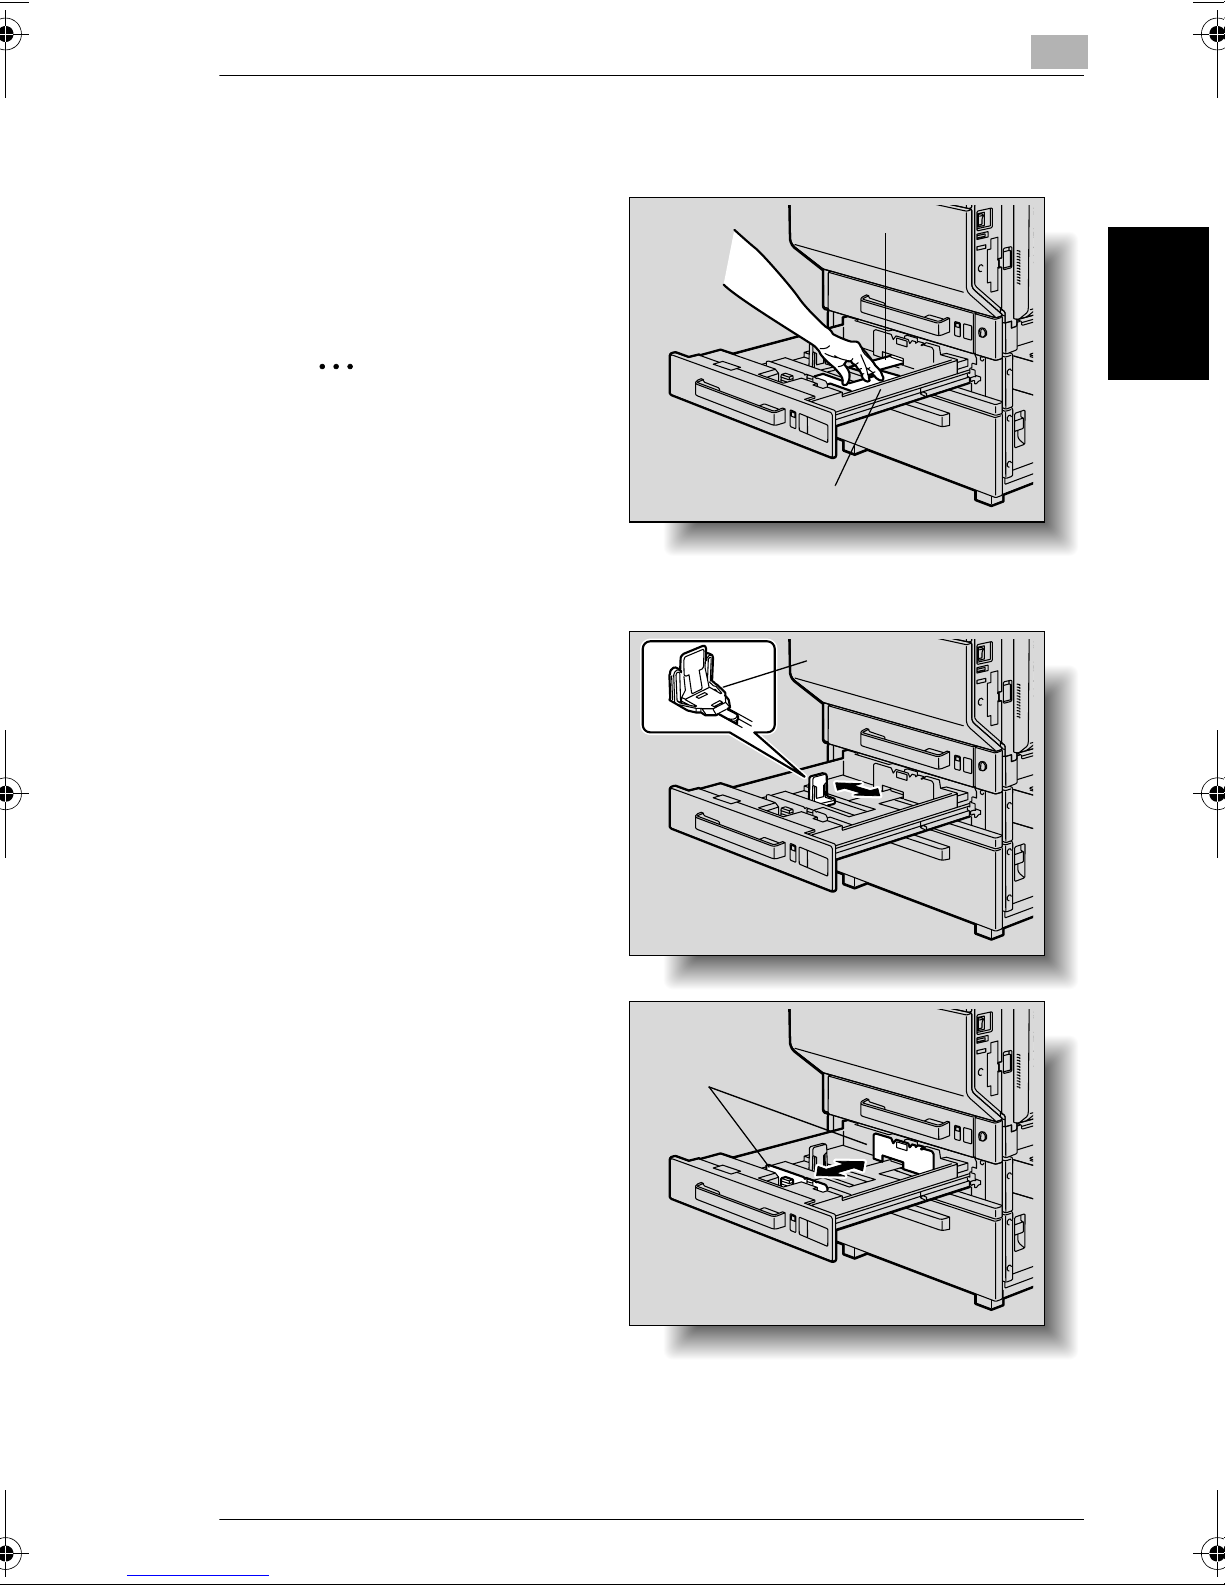
2.7 Loading Paper Into the 2nd, 3rd or 4th Drawer
2.7 Loading Paper Into the 2nd, 3rd or 4th Drawer
1 Pull out the paper drawer.
Paper-lifting plate
2 Press down on the paper-lifting
plate until it locks into place.
✎
Reminder!
Be careful not to touch the
film.
Film
3 Slide the lateral guides to fit the
size of paper to be loaded.
Lateral guide
2
Before Making Copies Chapter 2
cm3520 2-31
Lateral guide
Page 75
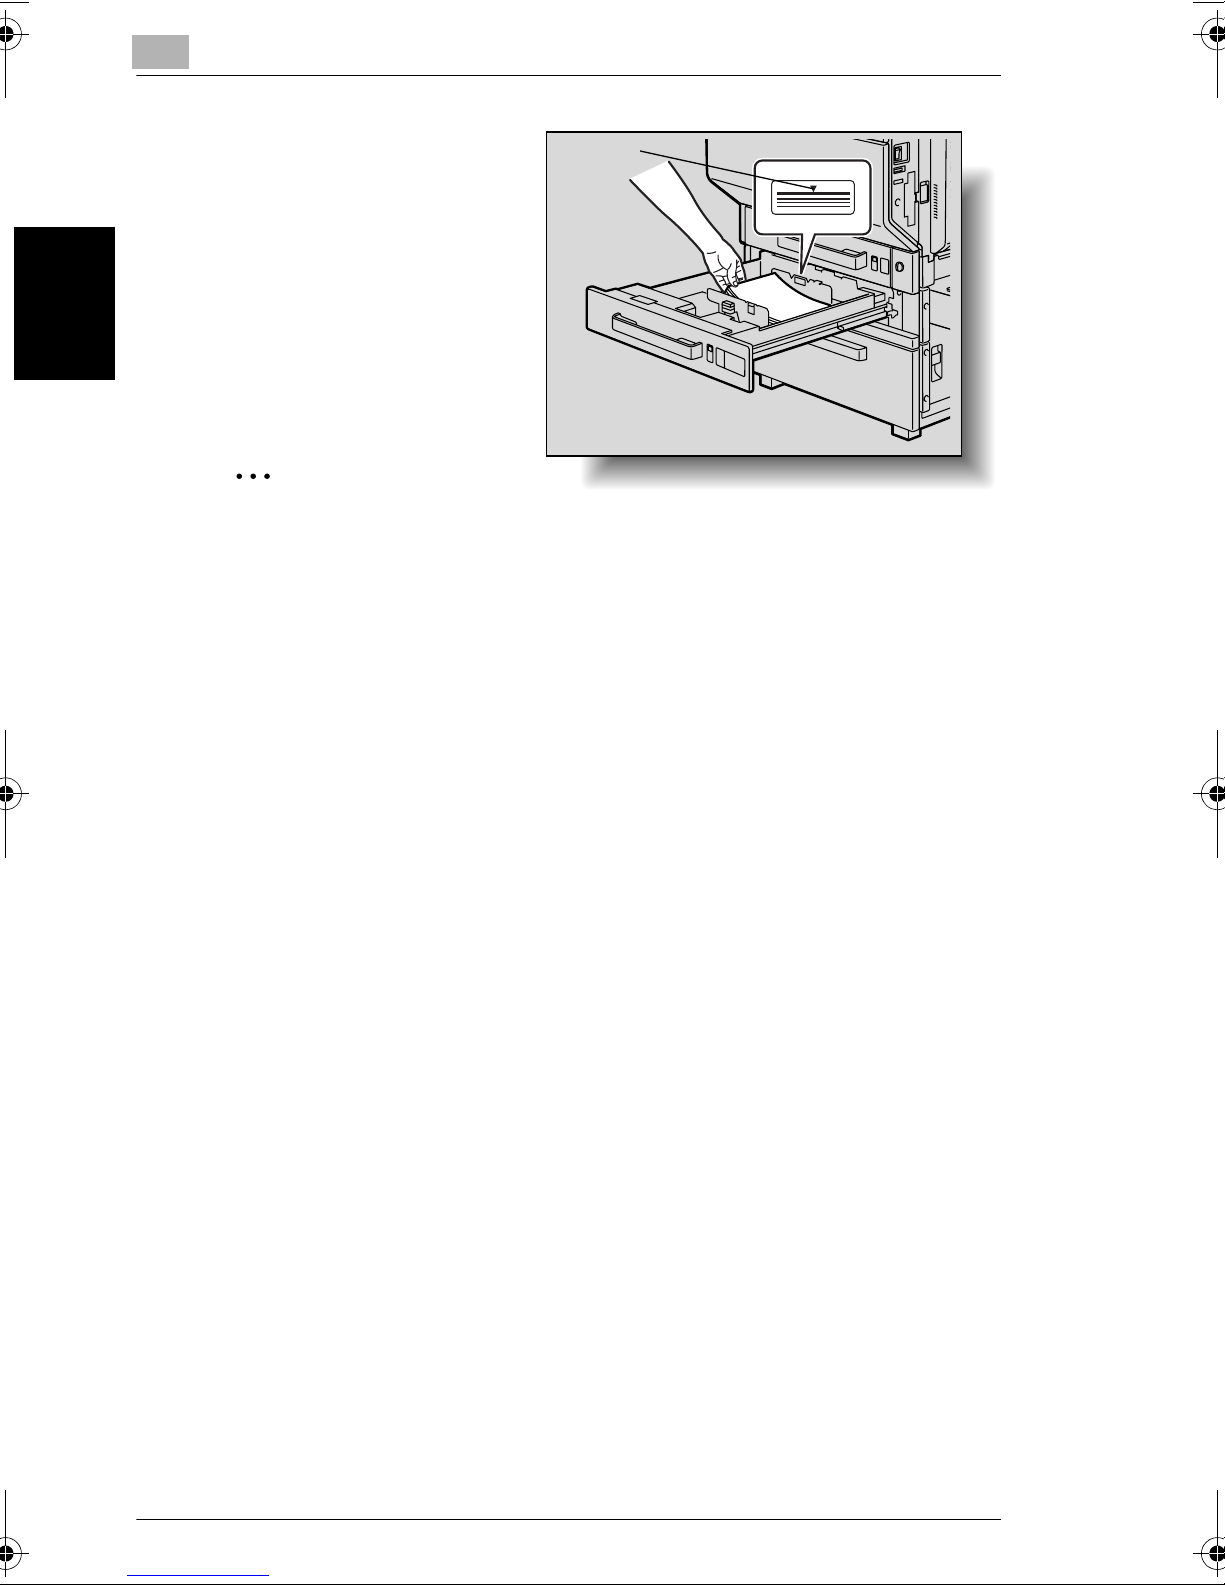
2
2.7 Loading Paper Into the 2nd, 3rd or 4th Drawer
4 Load the paper into the drawer
so that the side of the paper to be
printed on (the side facing up
when the package was
unwrapped) faces up.
✎
Reminder!
If the paper is curled, flatten it before loading it.
Do not load so many pages that the top of the stack is higher than the ▼
mark.
Before Making Copies Chapter 2
Paper other than plain paper cannot be fed from the 2nd, 3rd or 4th drawer.
If you wish to make copies onto paper other than plain paper, feed it through
the bypass tray or the 1st drawer.
▼ mark
5 Close the paper drawer.
2-32 cm3520
Page 76
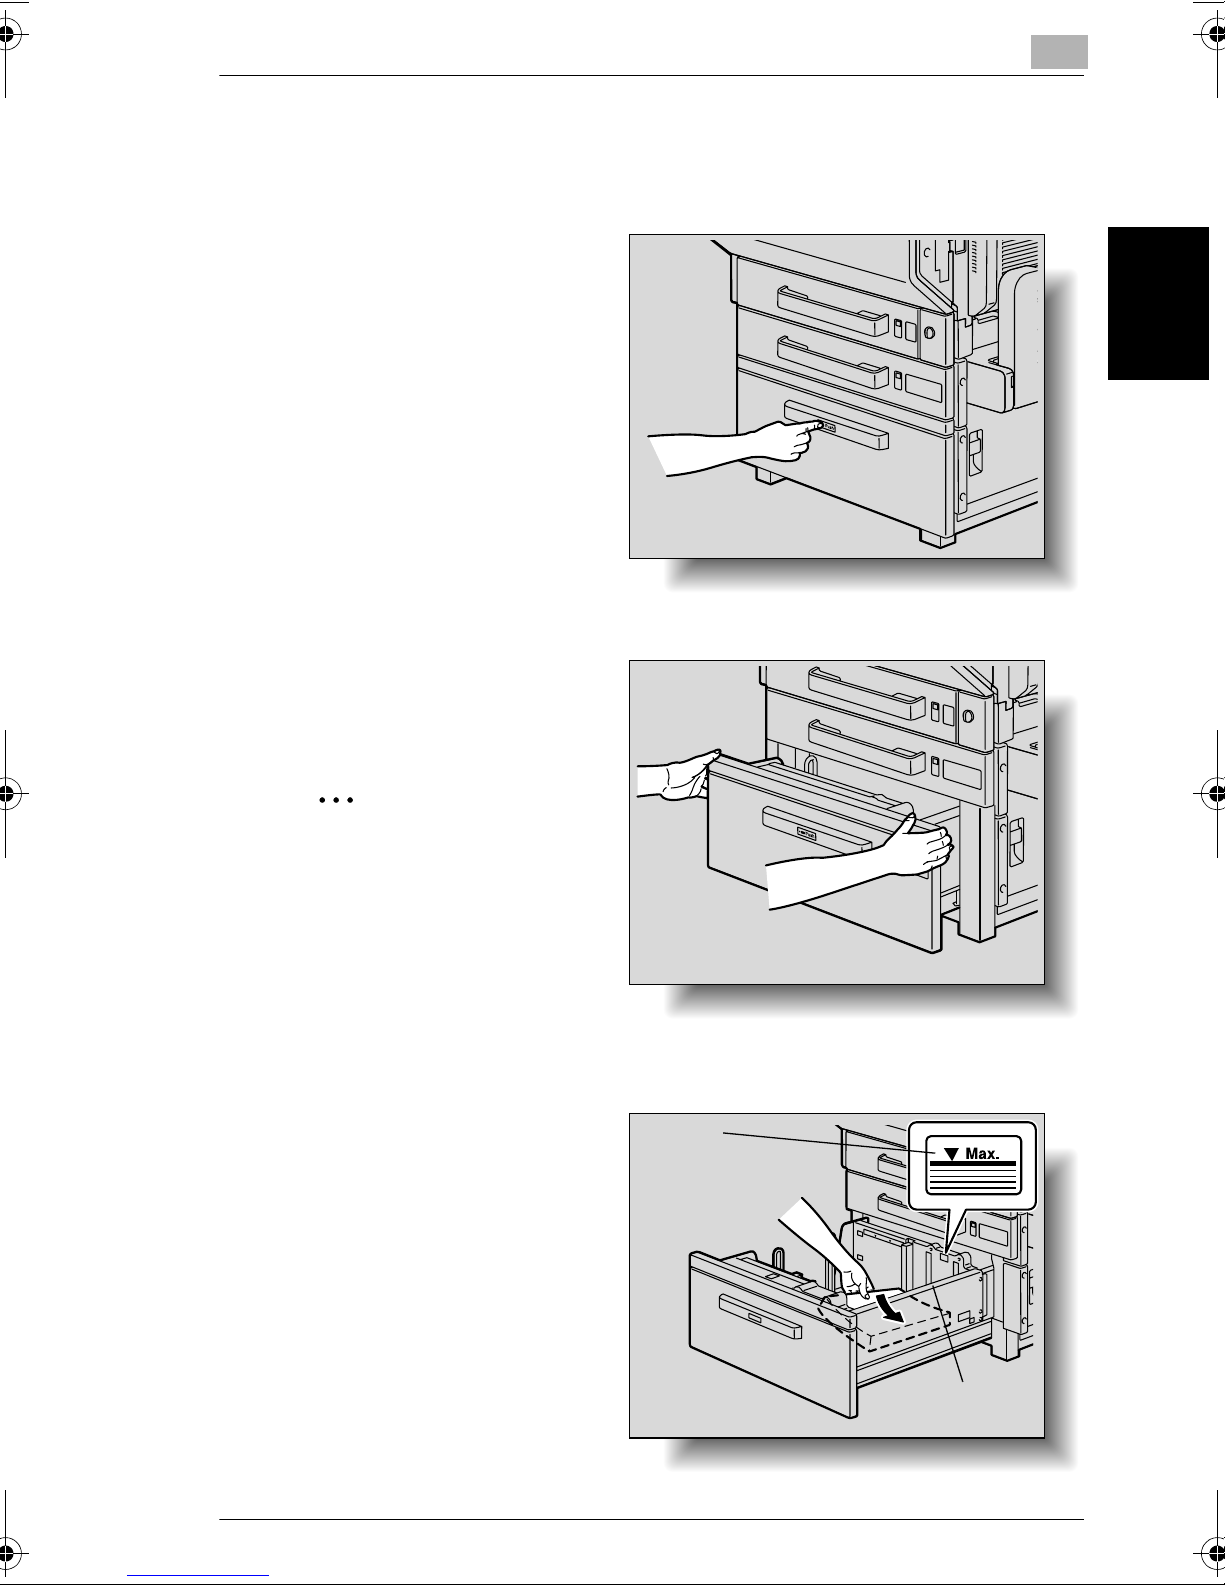
2.8 Loading Paper Into the Large-Capacity Paper Feed Cabinet
2
2.8 Loading Paper Into the Large-Capacity Paper Feed
Cabinet
1 Press the drawer release button.
2 Pull out the paper drawer for the
large-capacity paper feed
cabinet.
✎
Reminder!
If the machine is turned off,
the paper drawer for the
large-capacity paper feed
cabinet cannot be pulled out,
even after the drawer release
button is pressed. Be sure to
first turn on the machine.
3 Load the paper into the right side
of the paper drawer for the largecapacity paper feed cabinet so
that the side of the paper to be
printed on (the side facing up
when the package was
unwrapped) faces up.
Before Making Copies Chapter 2
▼ mark
cm3520 2-33
Film
Page 77
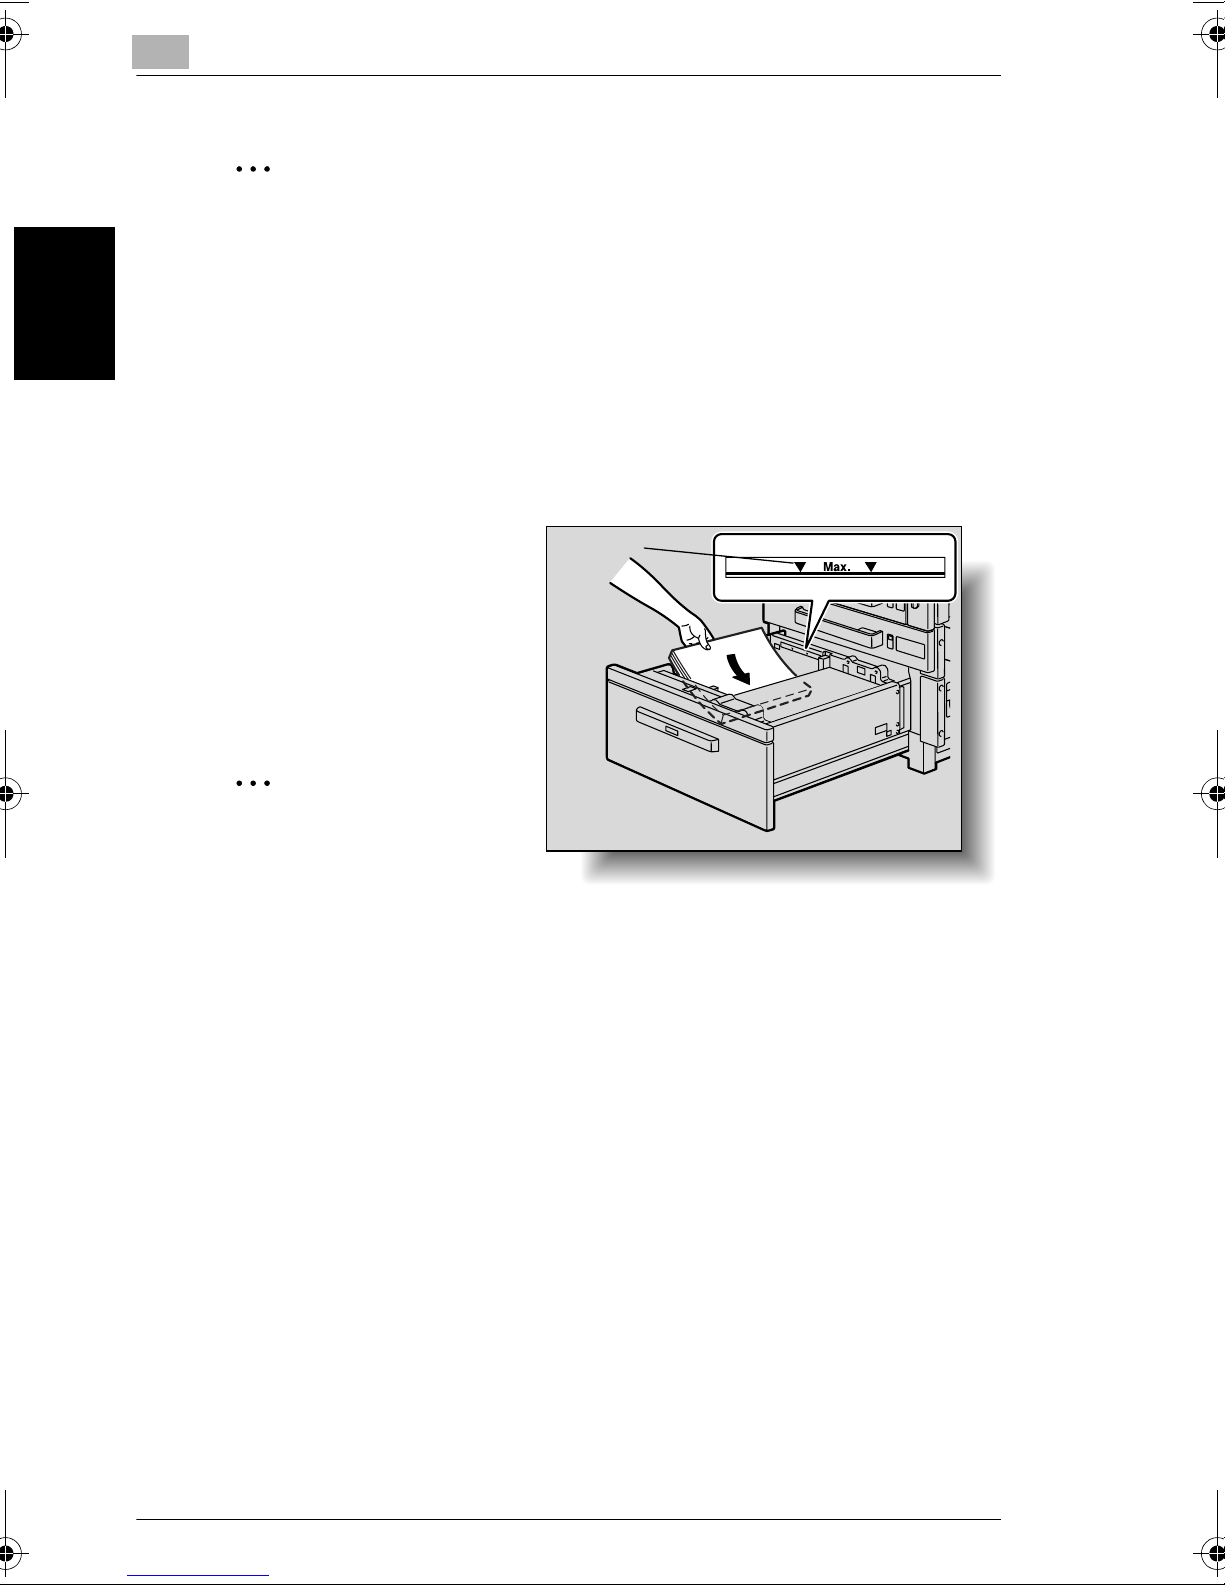
2
2.8 Loading Paper Into the Large-Capacity Paper Feed Cabinet
✎
Reminder!
Be careful not to touch the film.
If the paper is curled, flatten it before loading it.
Do not load so many pages that the top of the stack is higher than the ▼
mark.
Paper other than plain paper cannot be fed from the large-capacity paper
feed cabinet. If you wish to make copies onto paper other than plain paper,
feed it through the bypass tray or the 1st drawer.
4 Load the paper into the left side
of the paper drawer for the largecapacity paper feed cabinet so
that the side of the paper to be
printed on (the side facing up
Before Making Copies Chapter 2
when the package was
unwrapped) faces up.
✎
Reminder!
If the paper is curled, flatten it
before loading it.
Do not load so many pages that the top of the stack is higher than the ▼
mark.
Paper other than plain paper cannot be fed from the large-capacity paper
feed cabinet. If you wish to make copies onto paper other than plain paper,
feed it through the bypass tray or the 1st drawer.
▼ mark
5 Close the paper drawer of the large-capacity paper feed cabinet.
2-34 cm3520
Page 78
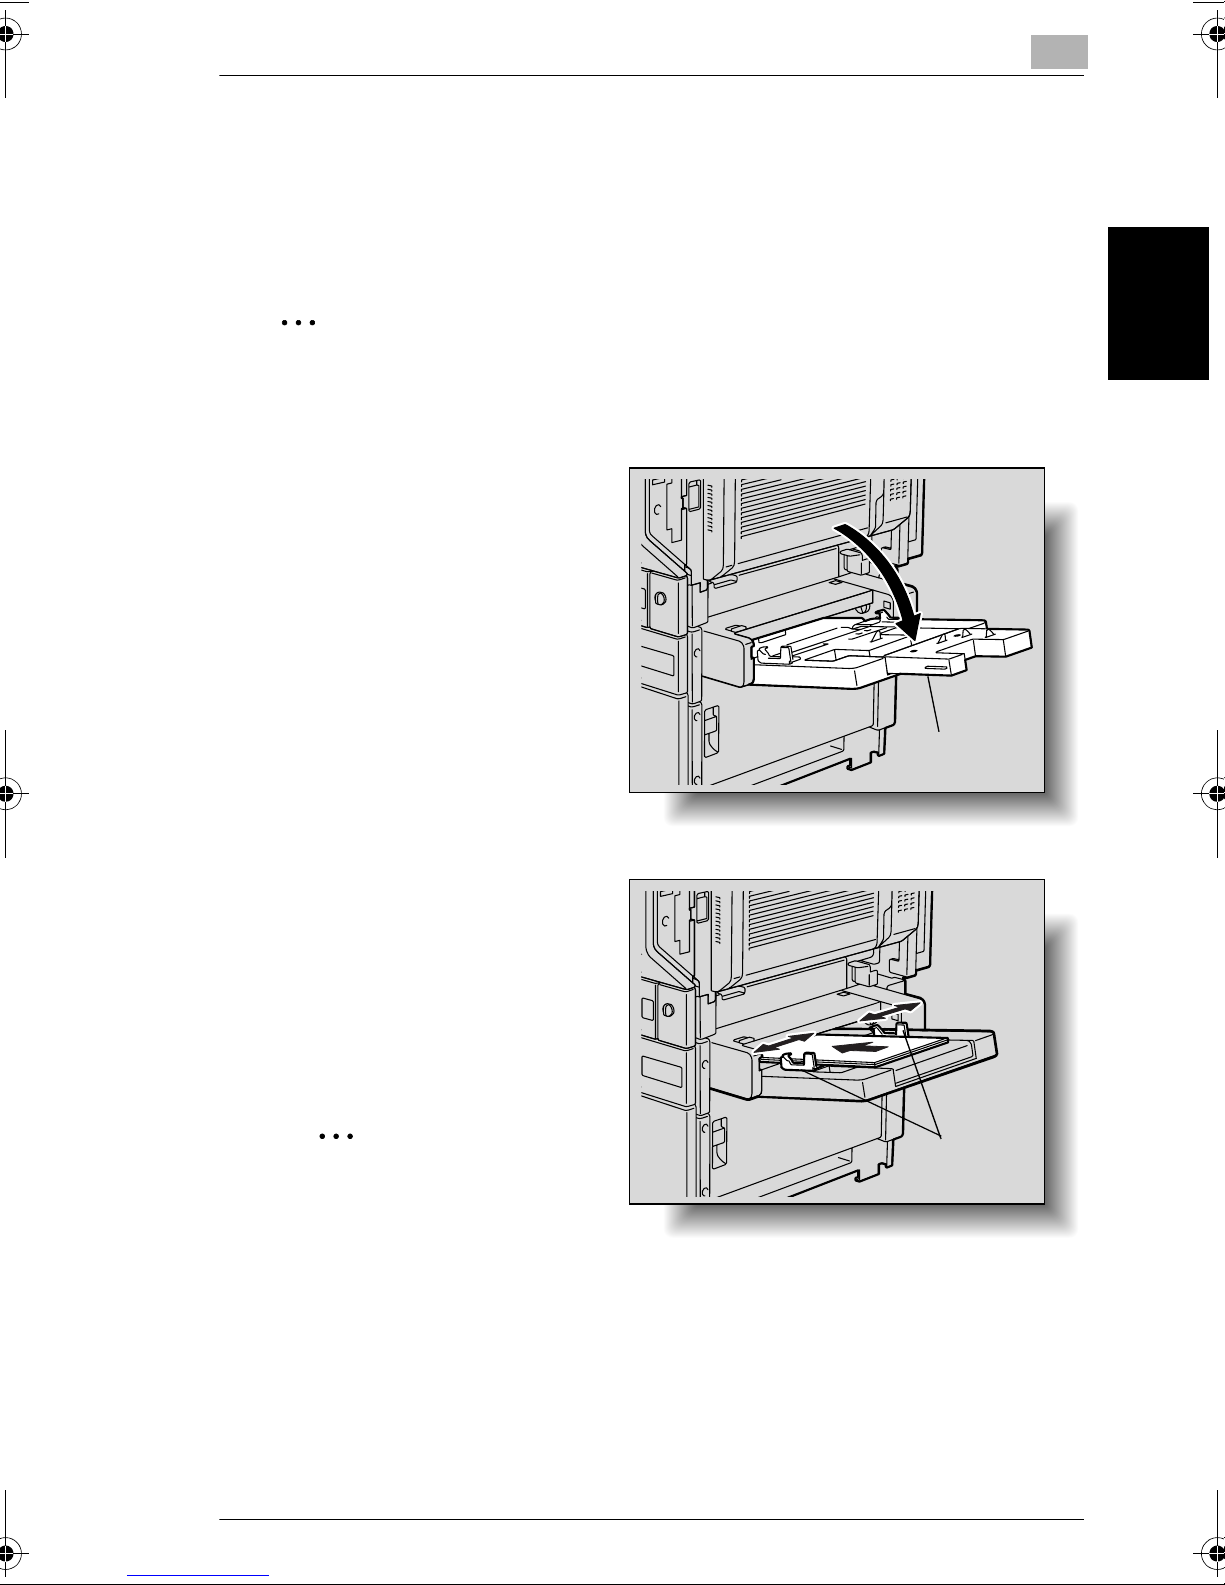
2.9 Loading Paper Into the Bypass Tray
2
2.9 Loading Paper Into the Bypass Tray
Paper can be fed manually through the bypass tray if you wish to copy onto paper
that is not loaded into a paper drawer, or if you wish to copy onto thick paper,
postcards, envelopes, overhead projector transparencies or label sheets.
✎
Reference
For details on specifying the paper size for the bypass tray, refer to “To specify
the size of the paper in the bypass tray” on page 3-21.
1 Open the bypass tray.
❍ When loading large-sized
paper, open the tray
extension.
2 With the side to be printed on
facing down, insert the paper as
much as possible into the feed
slot.
3 Adjust the lateral guides to fit the
size of the paper.
✎
Reminder!
Do not load so many pages
that the top of the stack is
higher than the ▼ mark.
Before Making Copies Chapter 2
Tray
extension
Lateral guide
Push the lateral guides firmly up against the edges of the paper.
If the paper is curled, flatten it before loading it.
cm3520 2-35
Page 79
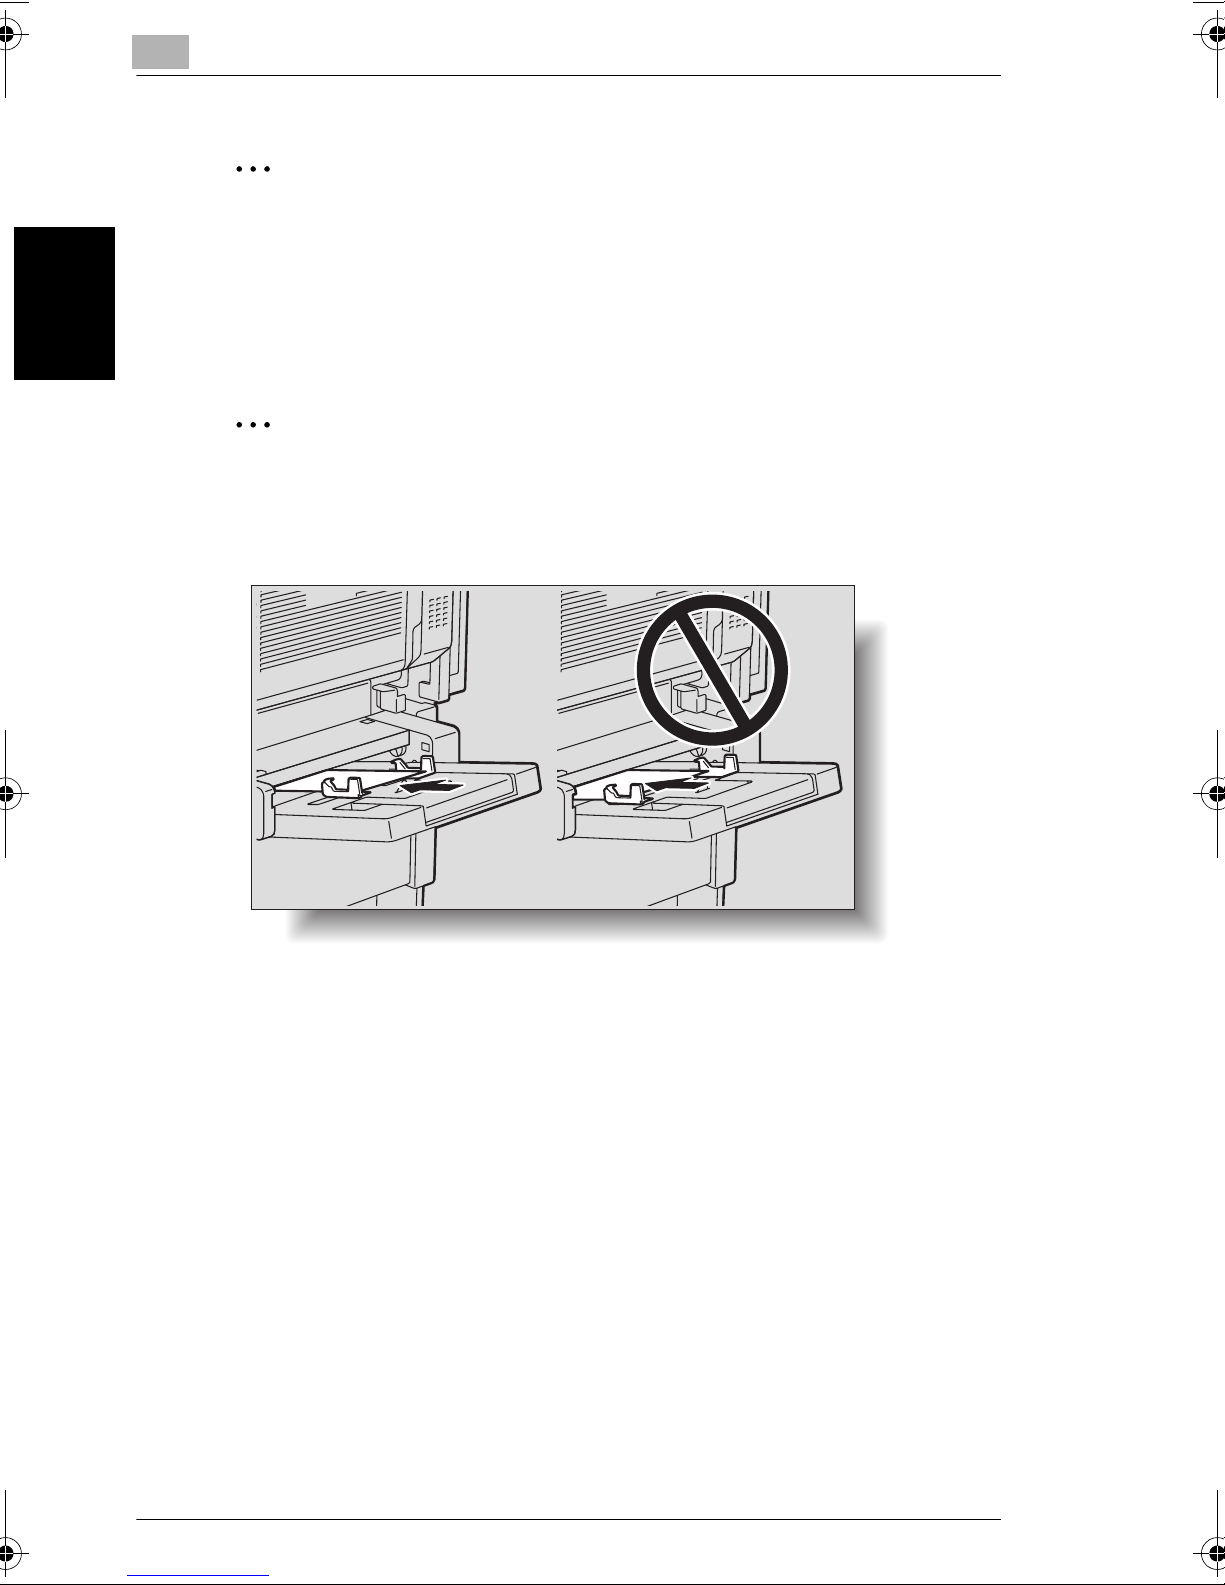
2
2.9 Loading Paper Into the Bypass Tray
✎
Additional Information
When making manual double-sided copies, load the paper into the bypass
tray so that the second side (the blank side) faces down.
The image will be printed on the surface of the paper facing down when the
paper is loaded into the bypass tray.
✎
Reminder!
Do not load more than 20 postcards into the bypass tray.
Do not load postcards crosswise.
Before Making Copies Chapter 2
2-36 cm3520
Page 80
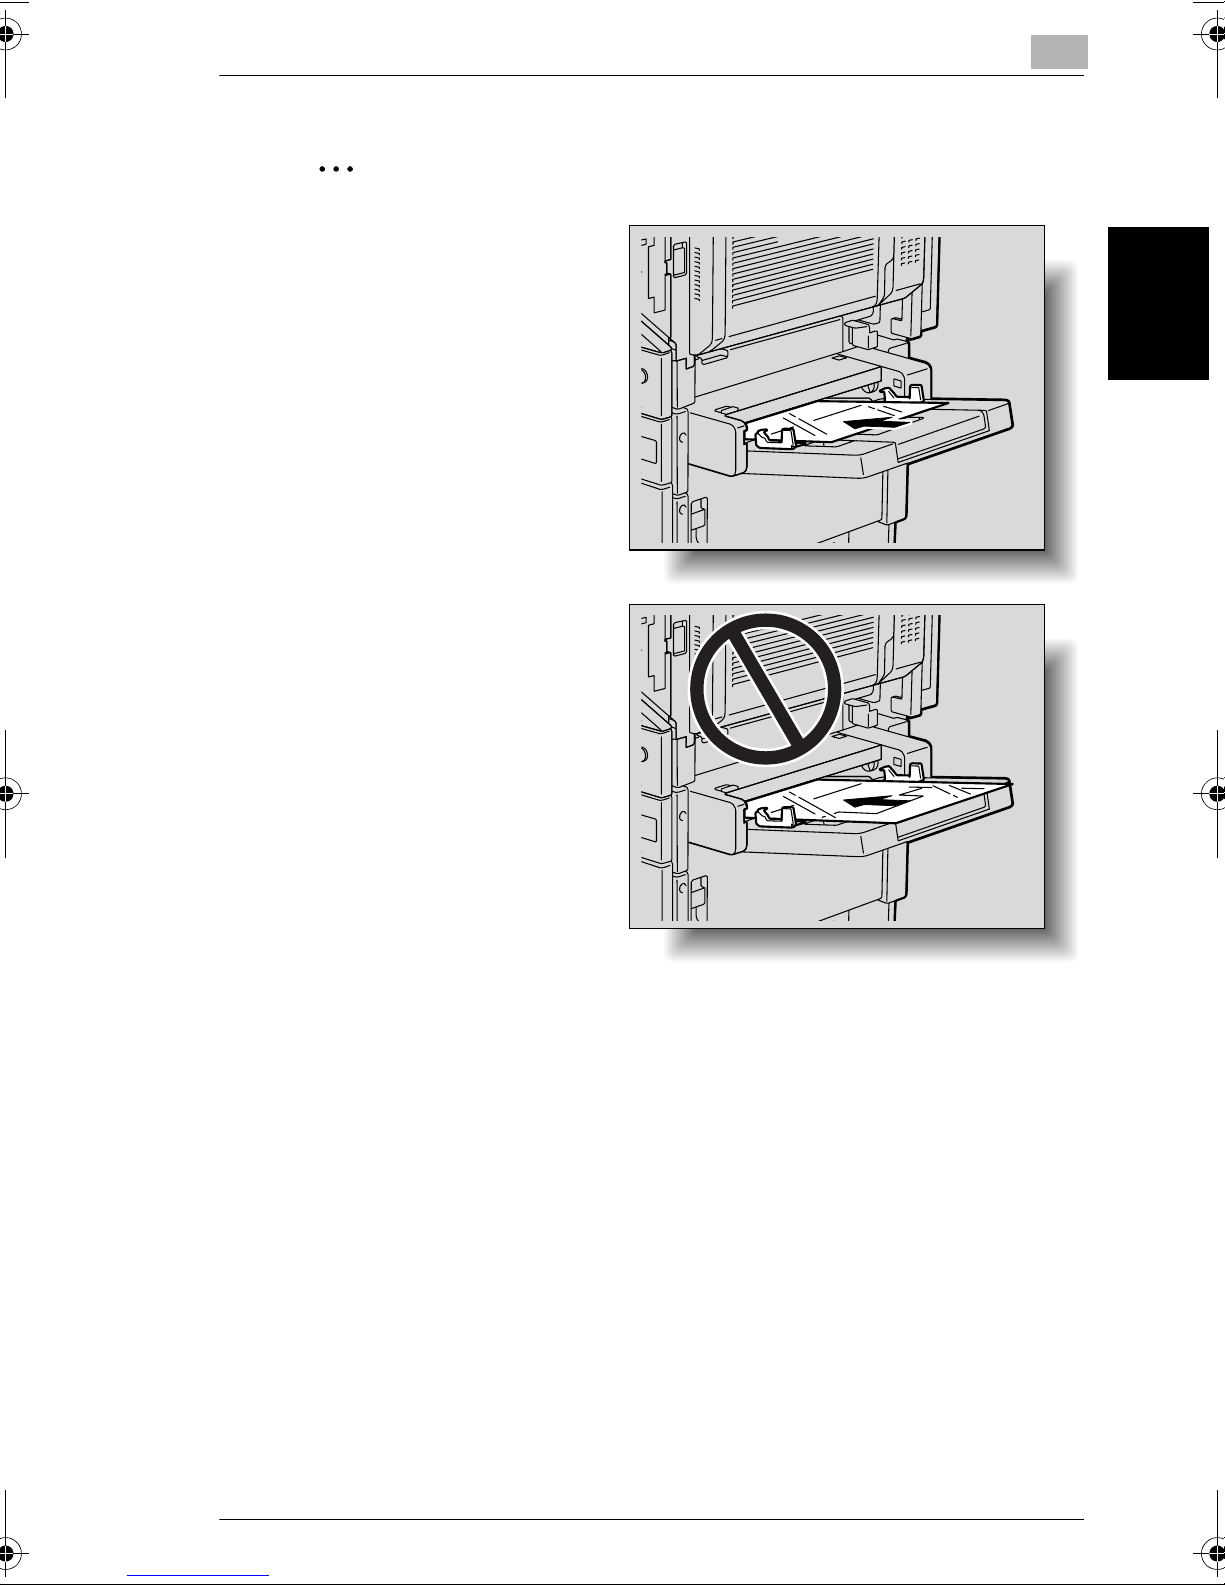
2.9 Loading Paper Into the Bypass Tray
✎
Reminder!
Do not load more than 20
overhead projector
transparencies into the
bypass tray.
When loading overhead
projector transparencies,
load them with the longer
side as the leading edge, as
shown. Do not load overhead
projector transparencies
lengthwise.
2
Before Making Copies Chapter 2
cm3520 2-37
Page 81
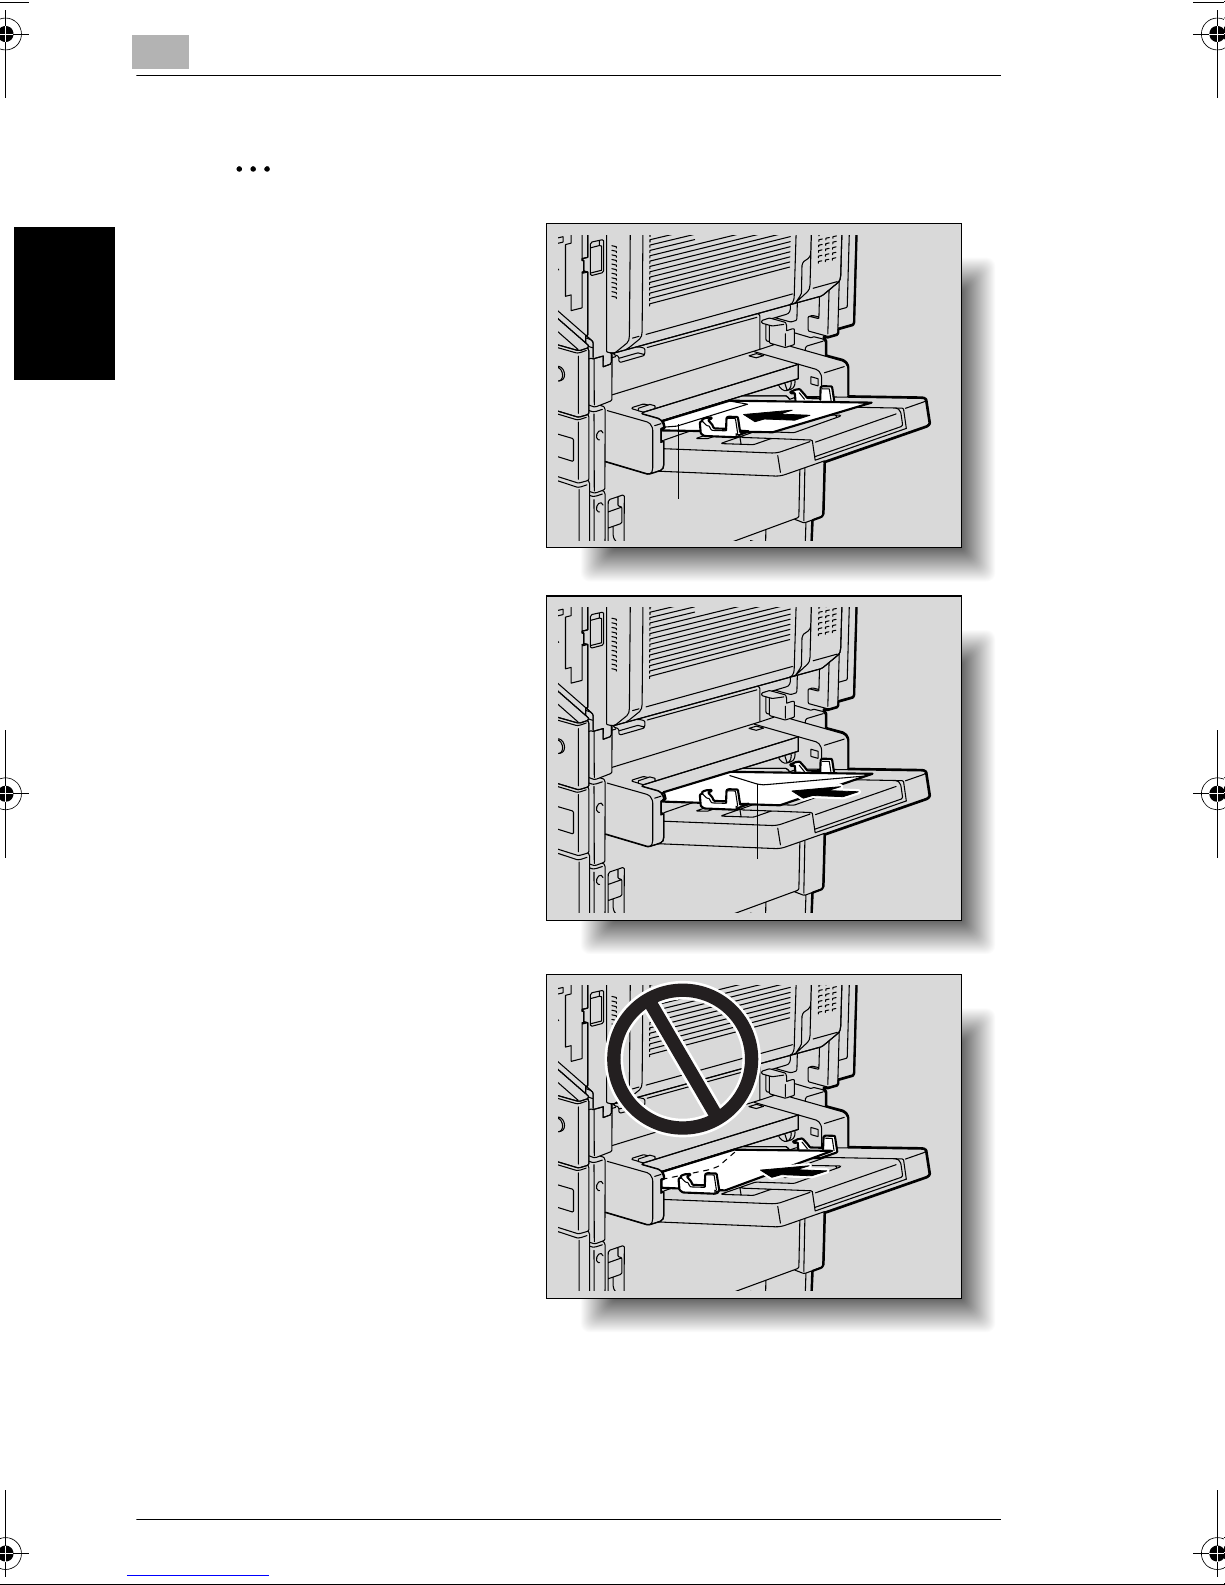
2
Before Making Copies Chapter 2
✎
Reminder!
Do not load more than 10
envelopes into the bypass
tray.
Before loading envelopes,
press them down to make
sure that all air is removed,
and make sure that the folds
of the flaps are firmly
pressed, otherwise the
envelopes may become
wrinkled or a paper misfeed
may occur.
When loading envelopes,
load them with the flap side
up, as shown in the
illustration. If the envelopes
are loaded with the flap side
down, a paper misfeed may
occur. The flap side of
envelopes cannot be printed
on.
2.9 Loading Paper Into the Bypass Tray
Flap side
Flap side
2-38 cm3520
Page 82
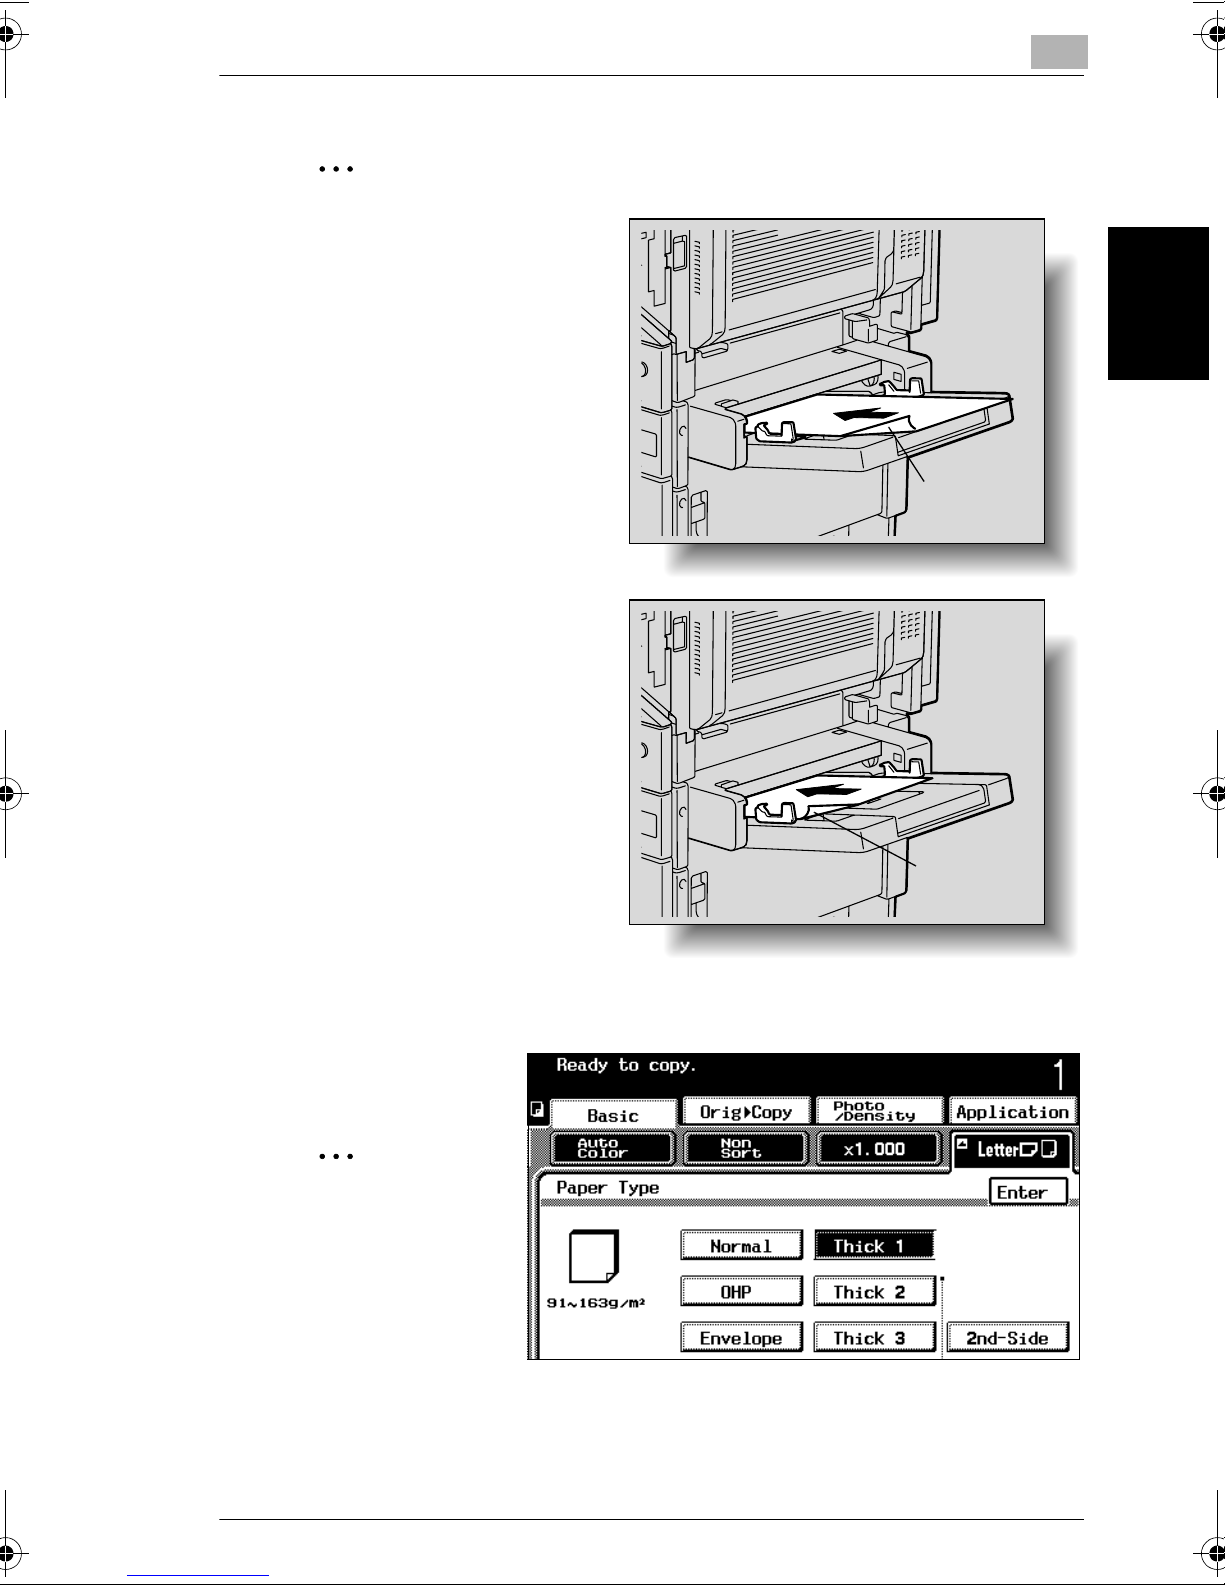
2.9 Loading Paper Into the Bypass Tray
✎
Reminder!
Do not load more than 20
label sheets into the bypass
tray.
2
Side to be
printed on
4 Select the appropriate
paper type settings.
✎
Hint
If postcards are
loaded, set the
media type
selection dial to
“Thick2”.
Before Making Copies Chapter 2
Side to be
printed on
If label sheets are
loaded, set the media type selection dial to “Thick1”.
cm3520 2-39
Page 83

2
2.9 Loading Paper Into the Bypass Tray
To print on the back side of previously printed plain paper or thick paper
(using manual double-sided copying), select the appropriate paper type
setting, and then touch [2nd-Side].
✎
Reference
For details on selecting the paper size, refer to “Selecting a Paper/Size
Setting” on page 3-18.
For details on paper types, refer to “Paper Specifications” on page 4-2.
Before Making Copies Chapter 2
2-40 cm3520
Page 84
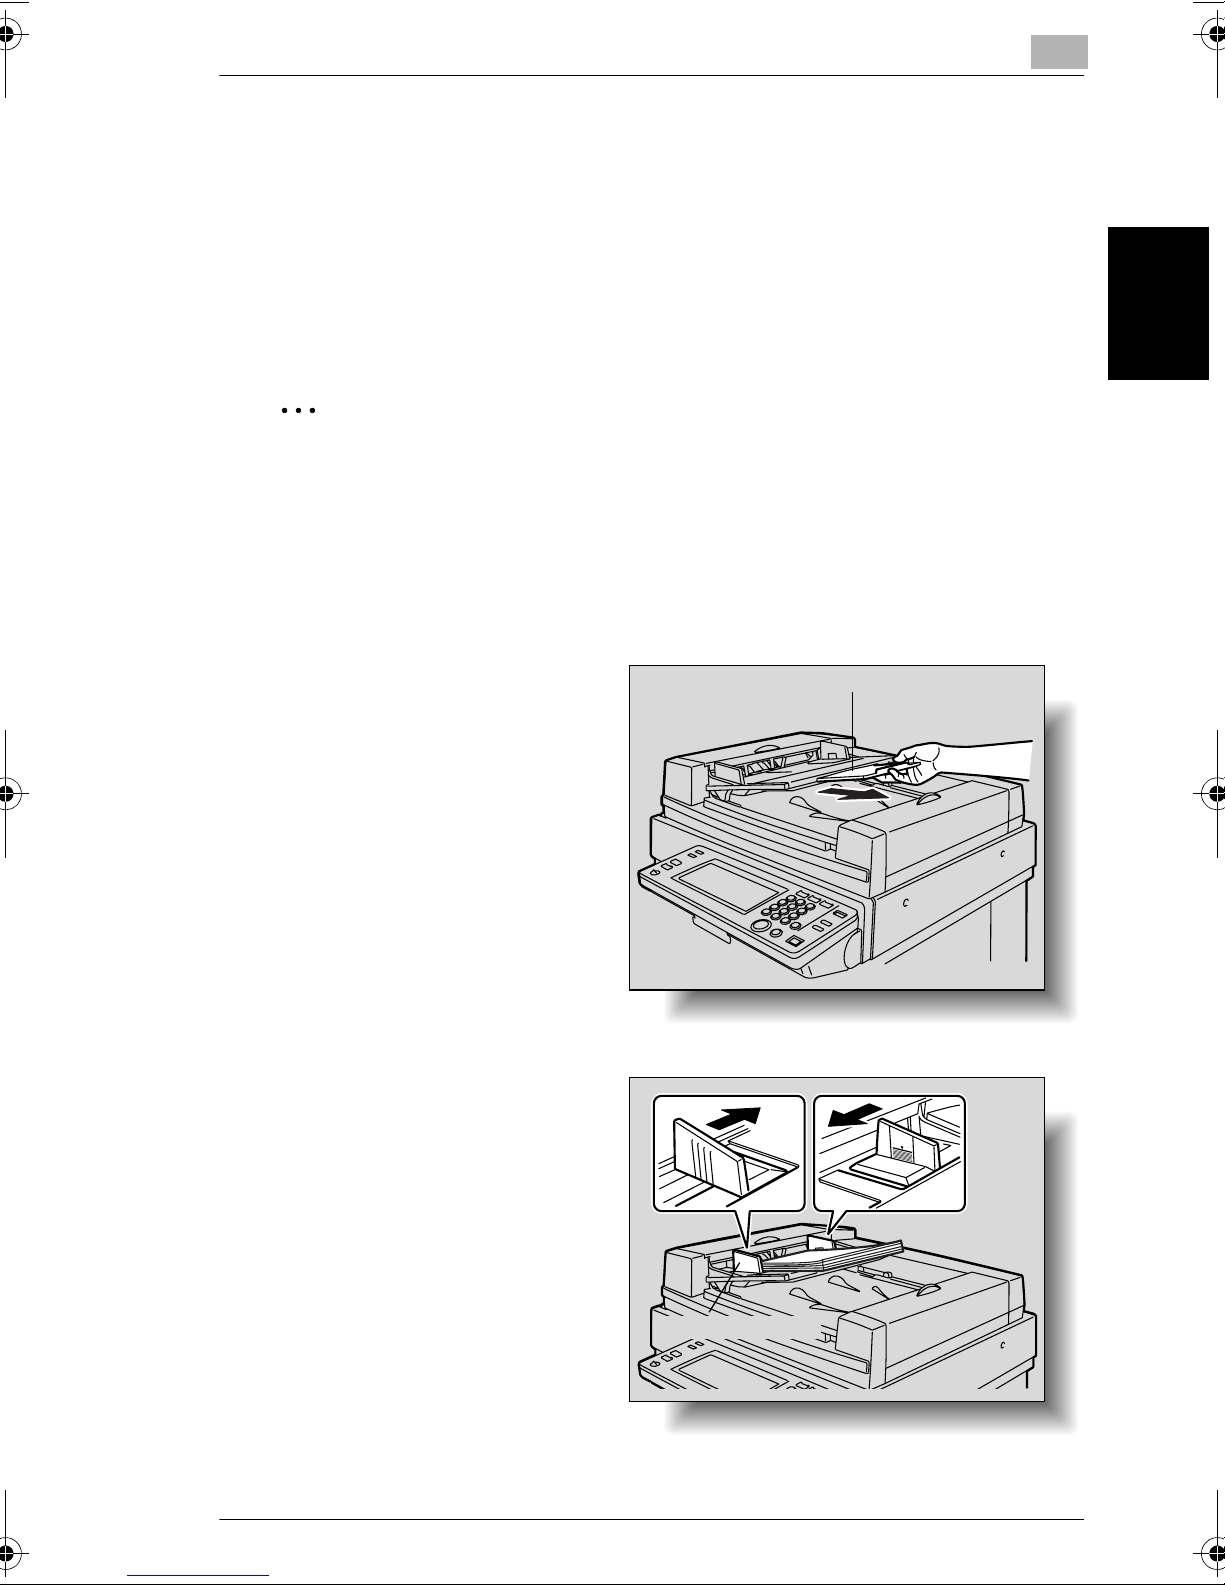
2.10 Feeding the Document
2
2.10 Feeding the Document
Loading the Document Into the Reverse Automatic Document Feeder
The reverse automatic document feeder automatically feeds in, scans, then feeds
out each page of a multi-page document, one page at a time. The correct type of
document must be loaded in order for the reverse automatic document feeder to
function properly.
✎
Reference
For details on the correct types of documents that can be loaded, refer to
“Appropriate Document Types (Using the Reverse Automatic Document
Feeder)” on page 5-2.
For details on loading documents with mixed paper sizes, refer to “Copying
Documents of Mixed Sizes (“Mixed Original” Function)” on page 6-3.
1 Slide the adjustable document
guides to fit the size of the
document.
❍ If large-sized documents are
to be loaded, pull out the
document support.
2 Load the document pages to be
copied face up into the document
feed tray.
❍ Load the document pages so
that the top of the document
is toward the rear or the right
side of the machine.
Document support
Before Making Copies Chapter 2
cm3520 2-41
Document guide
Page 85
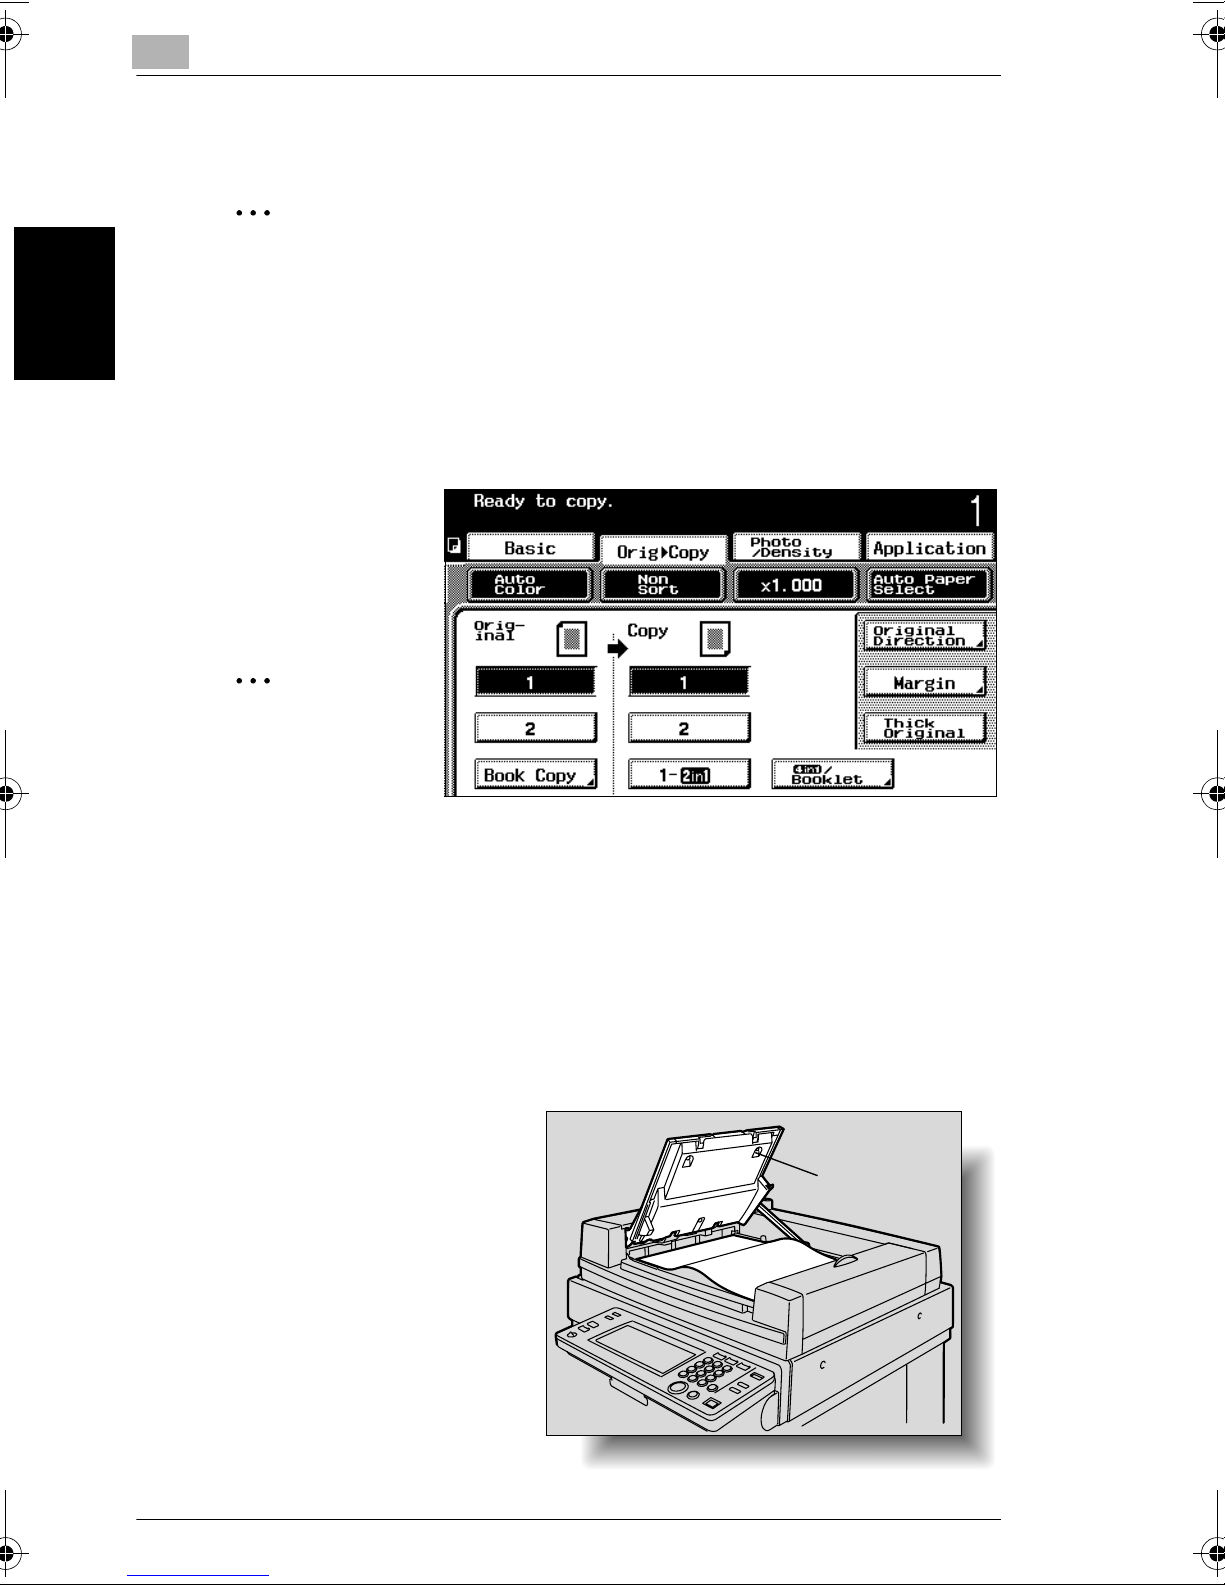
2
2.10 Feeding the Document
3 Adjust the document guides to the size of the document.
✎
Reminder!
Be sure to load the document correctly, otherwise the pages may not be fed
in straight.
4 Touch [Orig Ö Copy].
The Original Ö Copy screen appears.
5 To specify the Original
Direction, Margin or
Thick Original settings,
touch the appropriate
key.
Before Making Copies Chapter 2
✎
Reference
For details on
specifying the
Original Direction,
Margin or Thick
Original settings, refer to “Selecting Original Settings” on page 3-27.
6 Select the desired copy settings, and then press the [Start] key.
7 The pages of the document are fed in, starting with the topmost page.
8 After each page is scanned, it is fed out into the document output tray.
9 When removing large-sized
documents, carefully lift up the
document feed tray (of the
reverse automatic document
feeder) as far as possible.
Document
feed tray
10 Remove all document pages
from the document output tray.
2-42 cm3520
Page 86
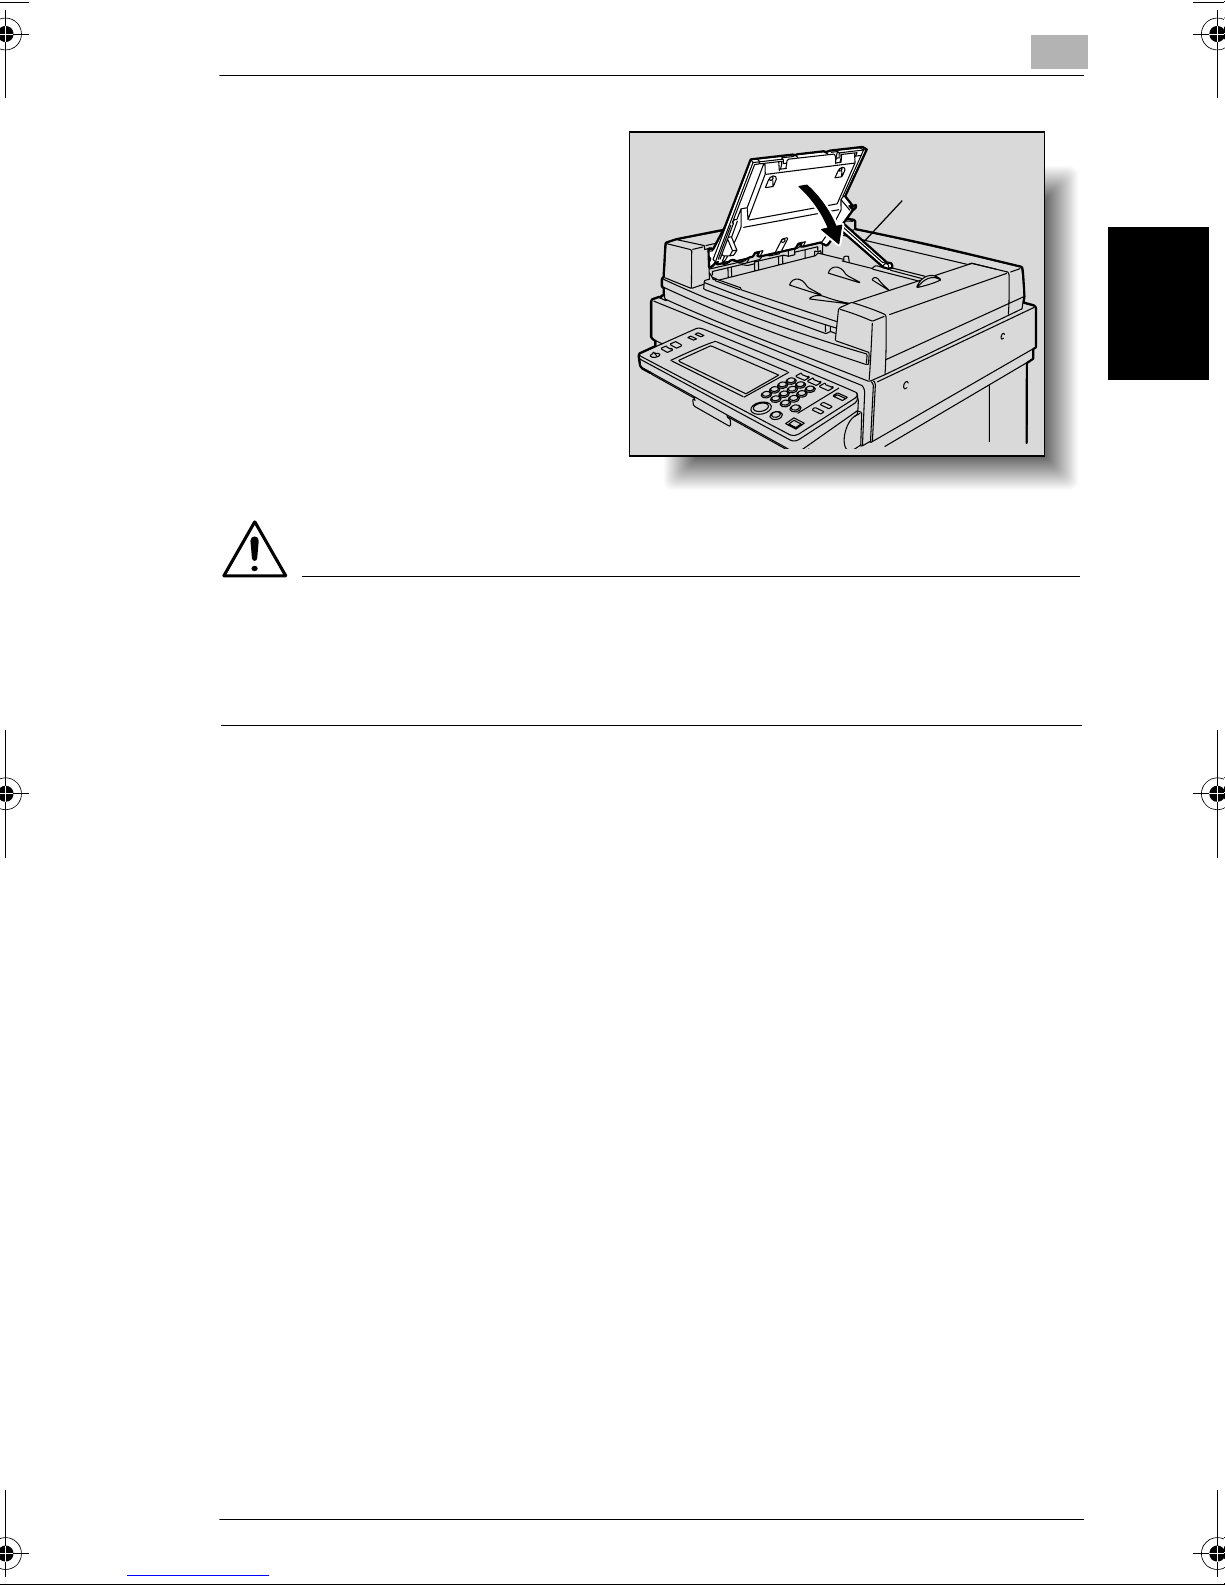
2.10 Feeding the Document
11 Carefully lower the document
feed tray.
CAUTION
2
Lever
Do not press on the lever at the rear of the machine
➜ When closing the document feed tray, otherwise the document feed tray may
close quickly and pinch your hand.
Before Making Copies Chapter 2
cm3520 2-43
Page 87
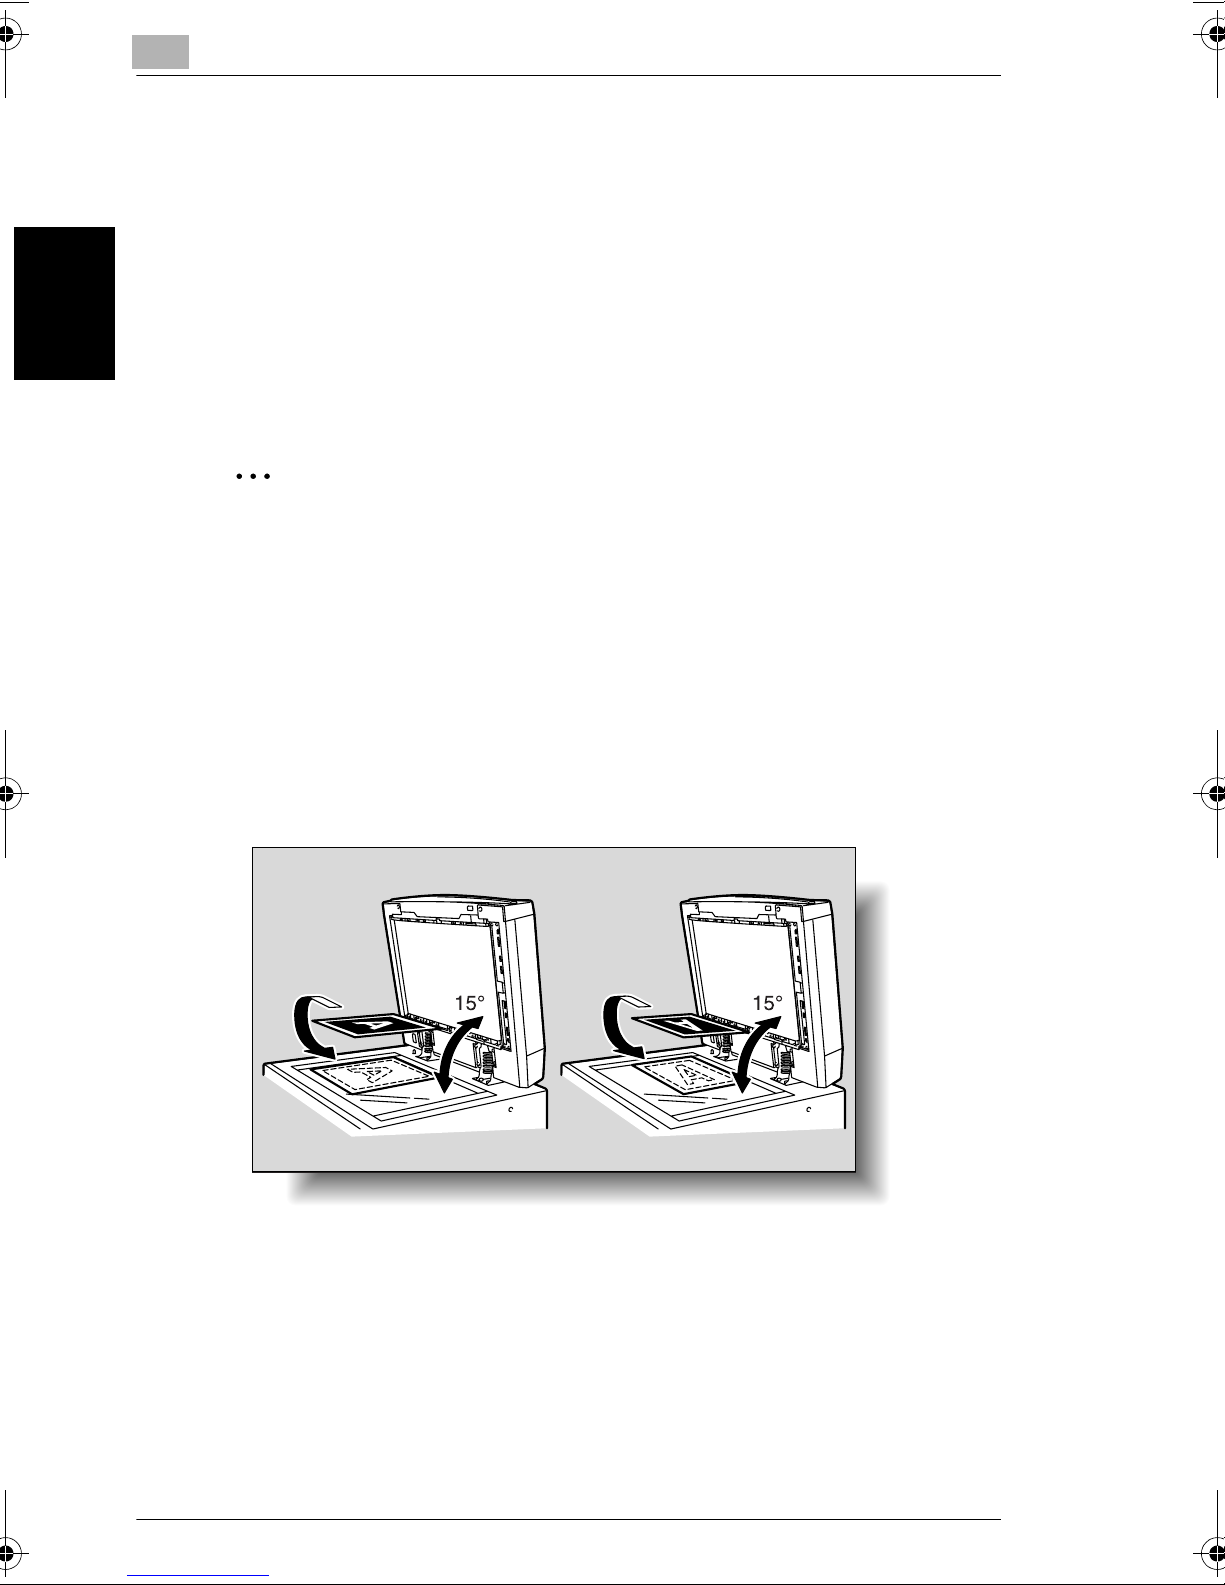
2
Placing the Document On the Original Glass
Place the document directly on the original glass for it to be scanned. Each page of
the document must be positioned manually (i.e., the previous one must be removed
and the next one placed on the original glass).
This method works best with books and other documents that cannot be fed
through the reverse automatic document feeder.
2.10 Feeding the Document
1 Lift open the original cover, or the reverse automatic document feeder if it is
installed.
✎
Condition
When placing the document on the original glass, be sure to lift open the
original cover, or the reverse automatic document feeder if it is installed, 15°
or more.
If the document is placed on the original glass without lifting the original
cover or reverse automatic document feeder 15° or more, the correct
Before Making Copies Chapter 2
document size will not be detected.
2 Position the document face down onto the original glass.
❍ Load the document pages so that the top of the document is toward the rear
or the left side of the machine.
When loaded crosswise: When loaded lengthwise:
2-44 cm3520
Page 88
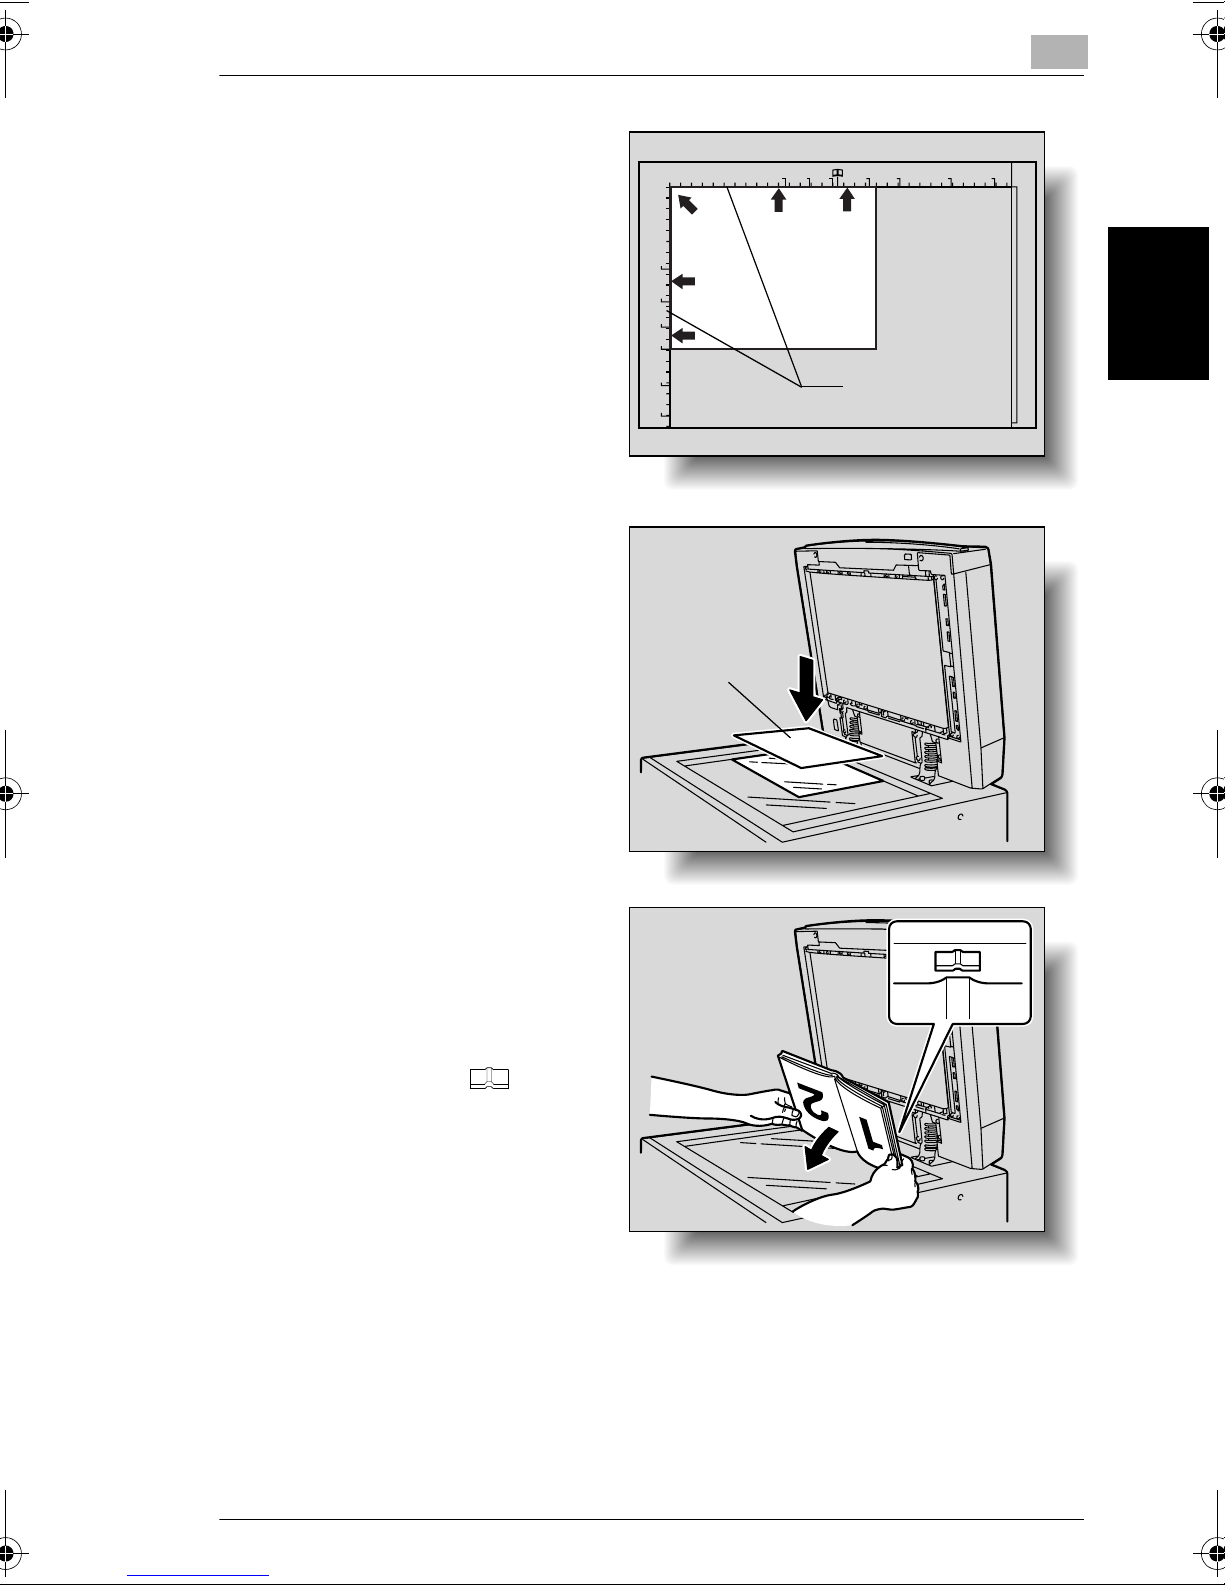
2.10 Feeding the Document
3 Align the document with the
document scales.
❍ For transparent or
translucent documents, place
a blank sheet of paper of the
same size as the document
over the document.
Blank sheet
2
Document scale
Before Making Copies Chapter 2
❍ For bound documents spread
over two facing pages, such
as a book or magazine,
position the top of the
document toward the back of
the machine with the binding
aligned with the mark in
the top document scale, as
shown.
cm3520 2-45
Page 89
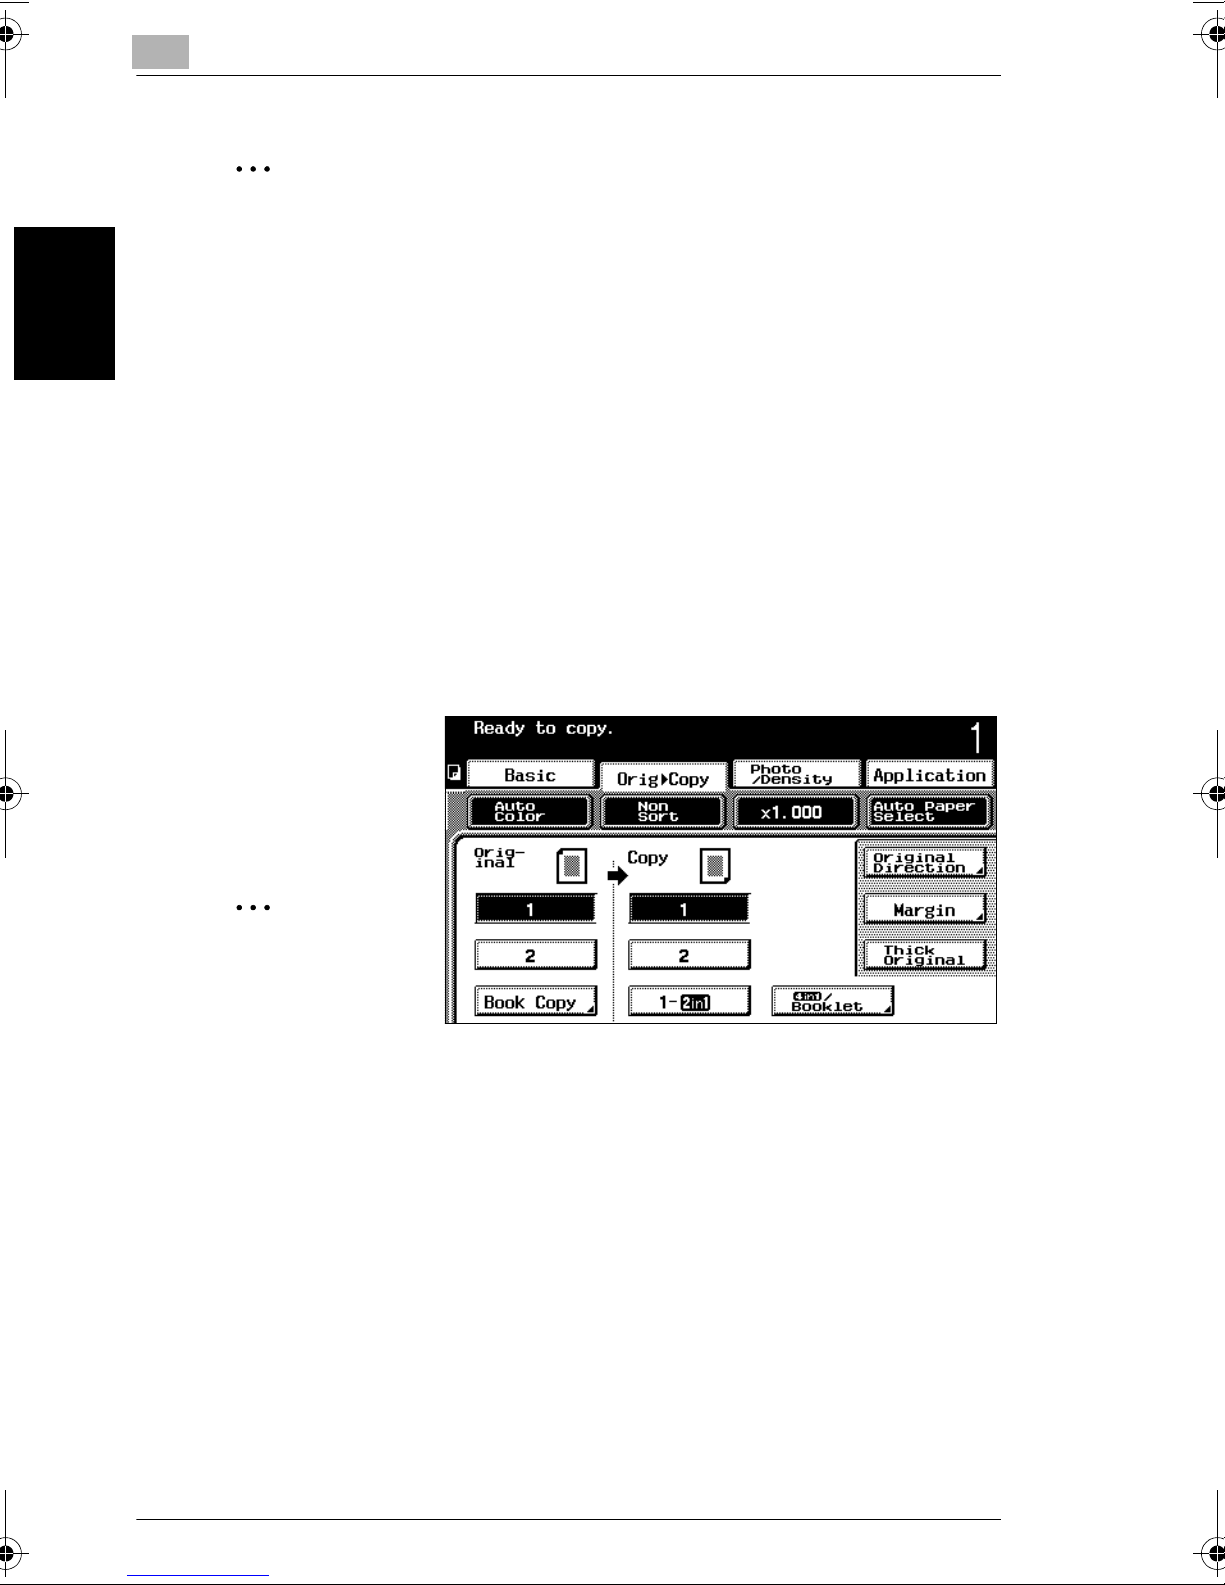
2
2.10 Feeding the Document
✎
Reminder!
Do not place objects weighing more than 4-1/2 lb on the original glass. In
addition, do not press down extremely hard on a document placed on the
original glass, otherwise the original glass may be damaged.
For thick books or large objects, make the copy without closing the original
cover or reverse automatic document feeder. When a document is being
scanned with the original cover or reverse automatic document feeder open,
do not look directly at the light that may shine through the original glass.
Although the light that shines through the original glass is bright, it is not a
laser beam and, therefore, is not as dangerous.
4 Touch [Orig Ö Copy].
❍ When making copies from a page spread, such as an open book or
magazine, touch [Book Copy].
The Original Ö Copy screen appears.
Before Making Copies Chapter 2
5 To specify the Original
Direction, Margin or
Thick Original settings,
touch the appropriate
key.
✎
Reference
For details on
specifying the
Original Direction,
Margin or Thick
Original settings, refer to “Selecting Original Settings” on page 3-27.
2-46 cm3520
Page 90
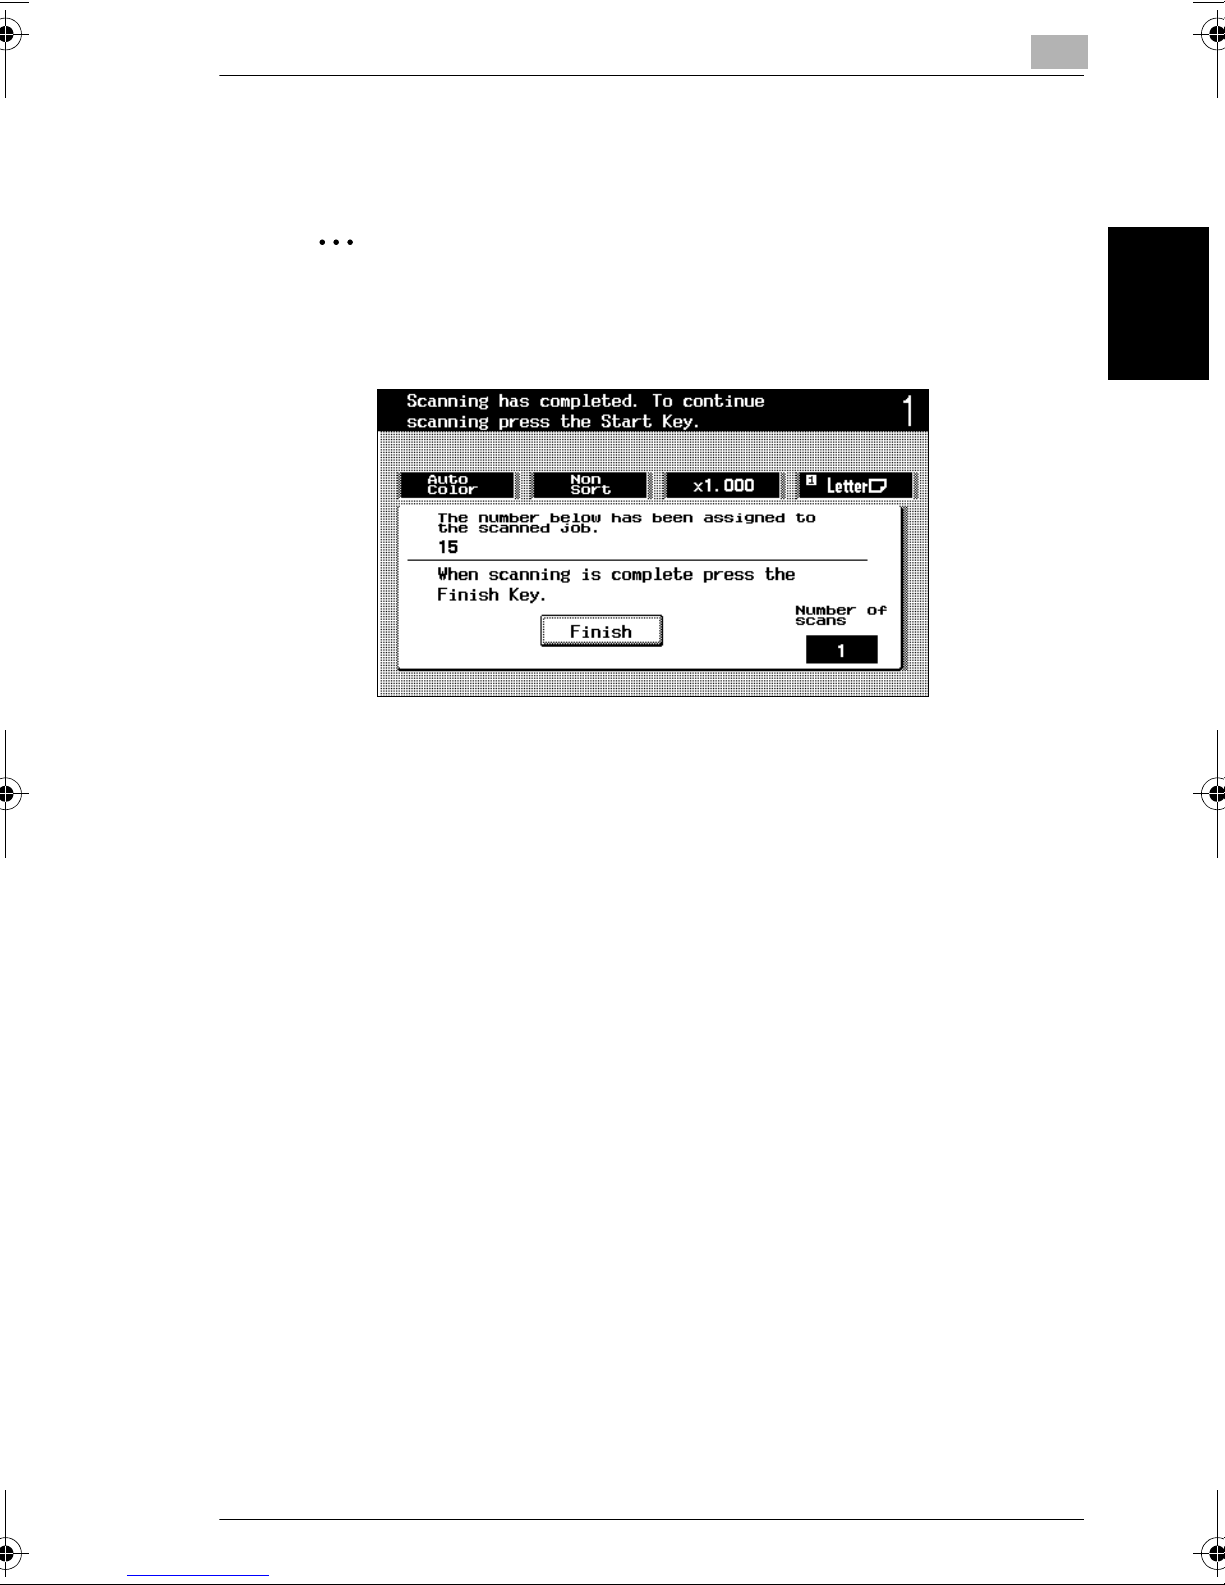
2.10 Feeding the Document
6 Select the desired copy settings, and then press the [Start] key.
Scanning of the document begins.
✎
Additional Information
When using a setting where multiple document pages are to be scanned,
such as when making 2in1 copies, the message shown below appears after
step 6.
2
To continue scanning, remove the document, position the next page of the
document on the original glass, and then press the [Start] key.
After all pages of the document have been scanned, touch [Finish], and then
press the [Start] key.
The copy job is queued for printing.
7 Lift open the original cover, or the reverse automatic document feeder if it is
installed, and then remove the document.
8 Close the original cover, or the reverse automatic document feeder if it is
installed.
Before Making Copies Chapter 2
cm3520 2-47
Page 91

2
2.10 Feeding the Document
Before Making Copies Chapter 2
2-48 cm3520
Page 92
3Basic Copy
Operations
3
Basic Copy Operations Chapter 3
Page 93
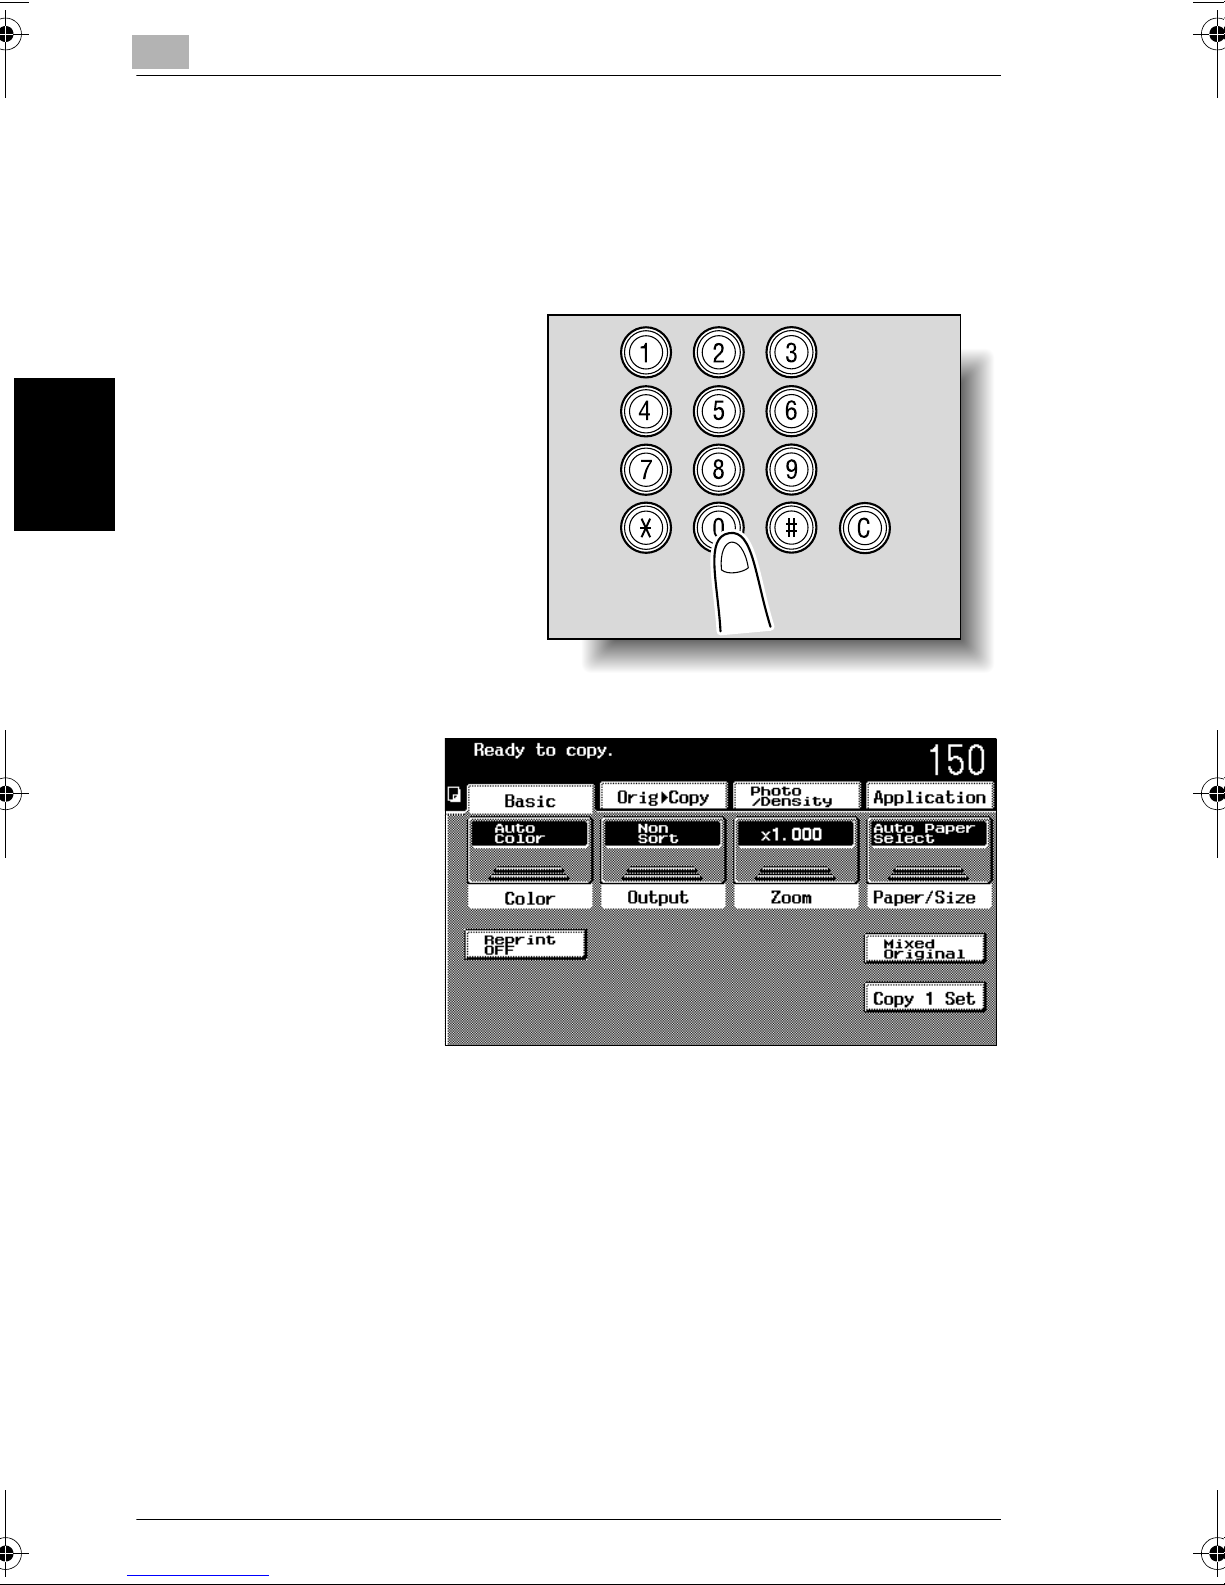
3
3.1 Specifying the Number of Copies
3.1 Specifying the Number of Copies
The following procedures describe how to specify and change the setting for the
number of copies.
To specify the number of copies
➜ Using the keypad, specify the
desired number of copies.
The specified number
of copies appears in the
touch panel.
Basic Copy Operations Chapter 3
3-2 cm3520
Page 94
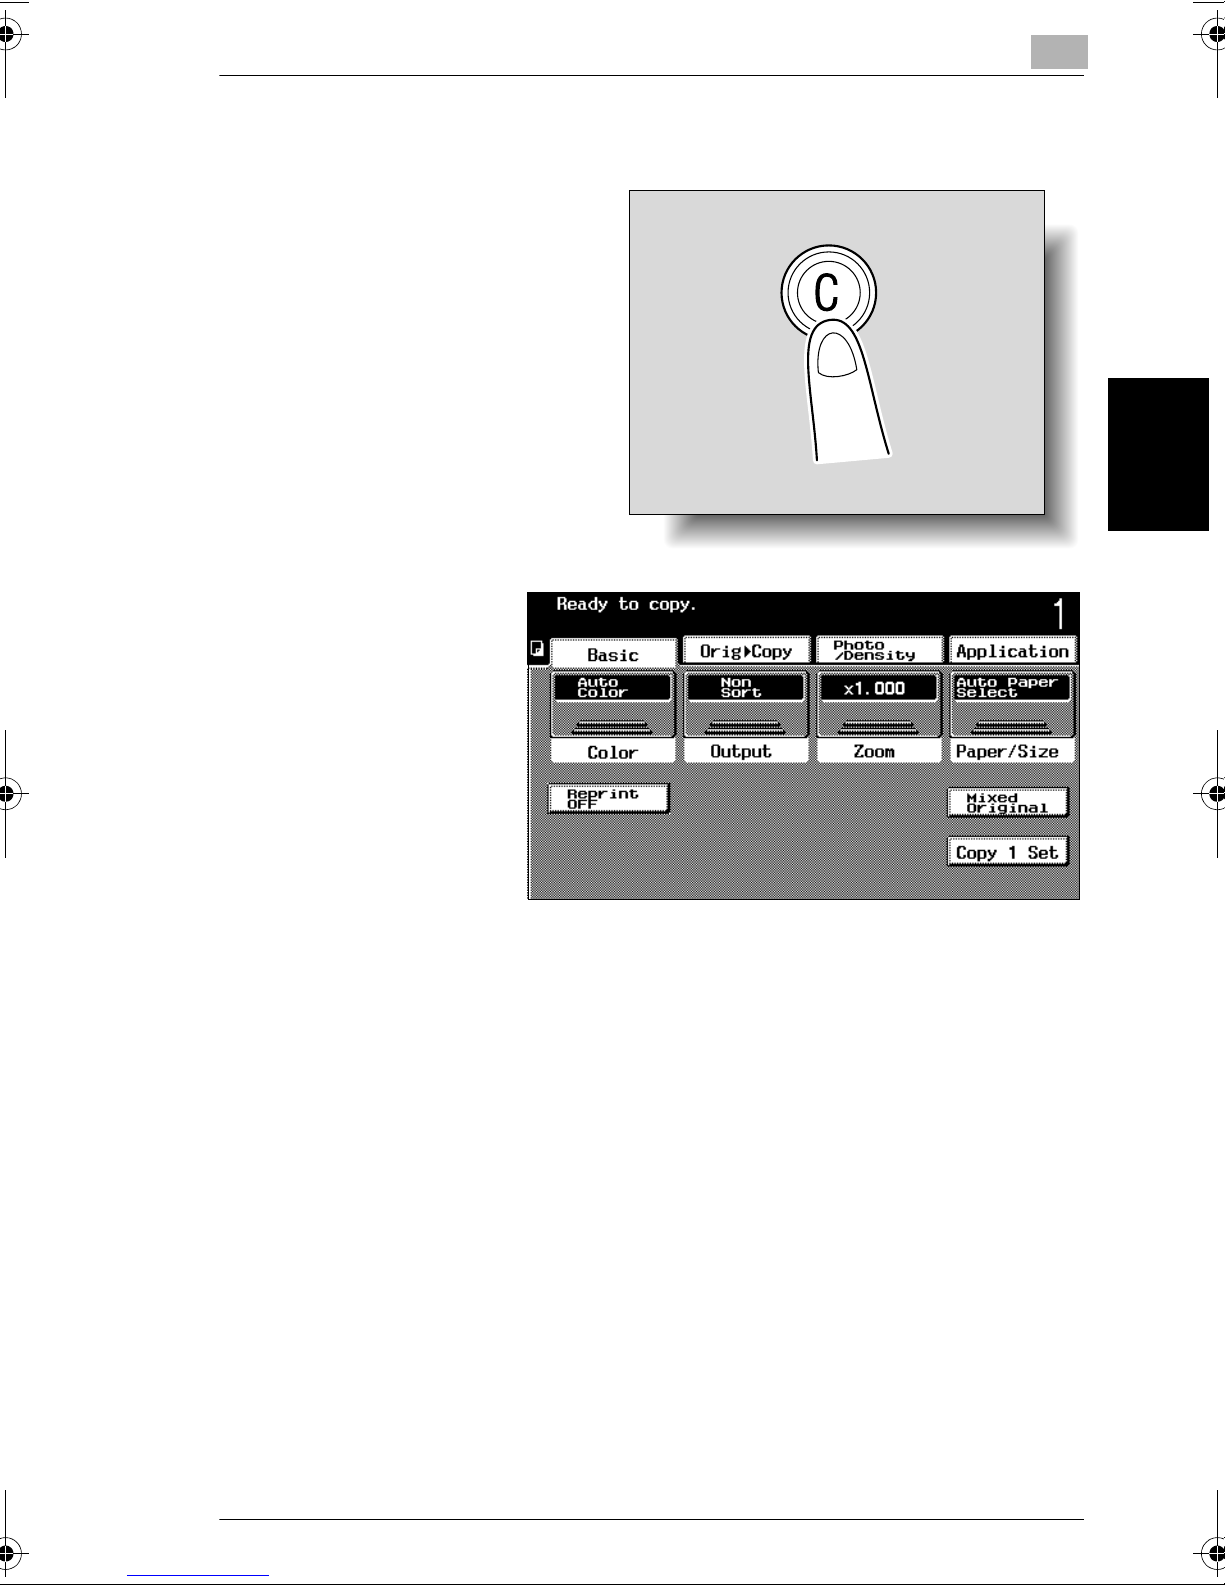
3.1 Specifying the Number of Copies
To change the setting for the number of copies
1 Press the [C] (clear) key.
The specified number
of copies is cleared,
and the setting for the
number of copies,
shown in the touch
panel, is reset to “1”.
3
2 Using the keypad, specify the desired number of copies.
The specified number of copies appears in the touch panel.
Basic Copy Operations Chapter 3
cm3520 3-3
Page 95
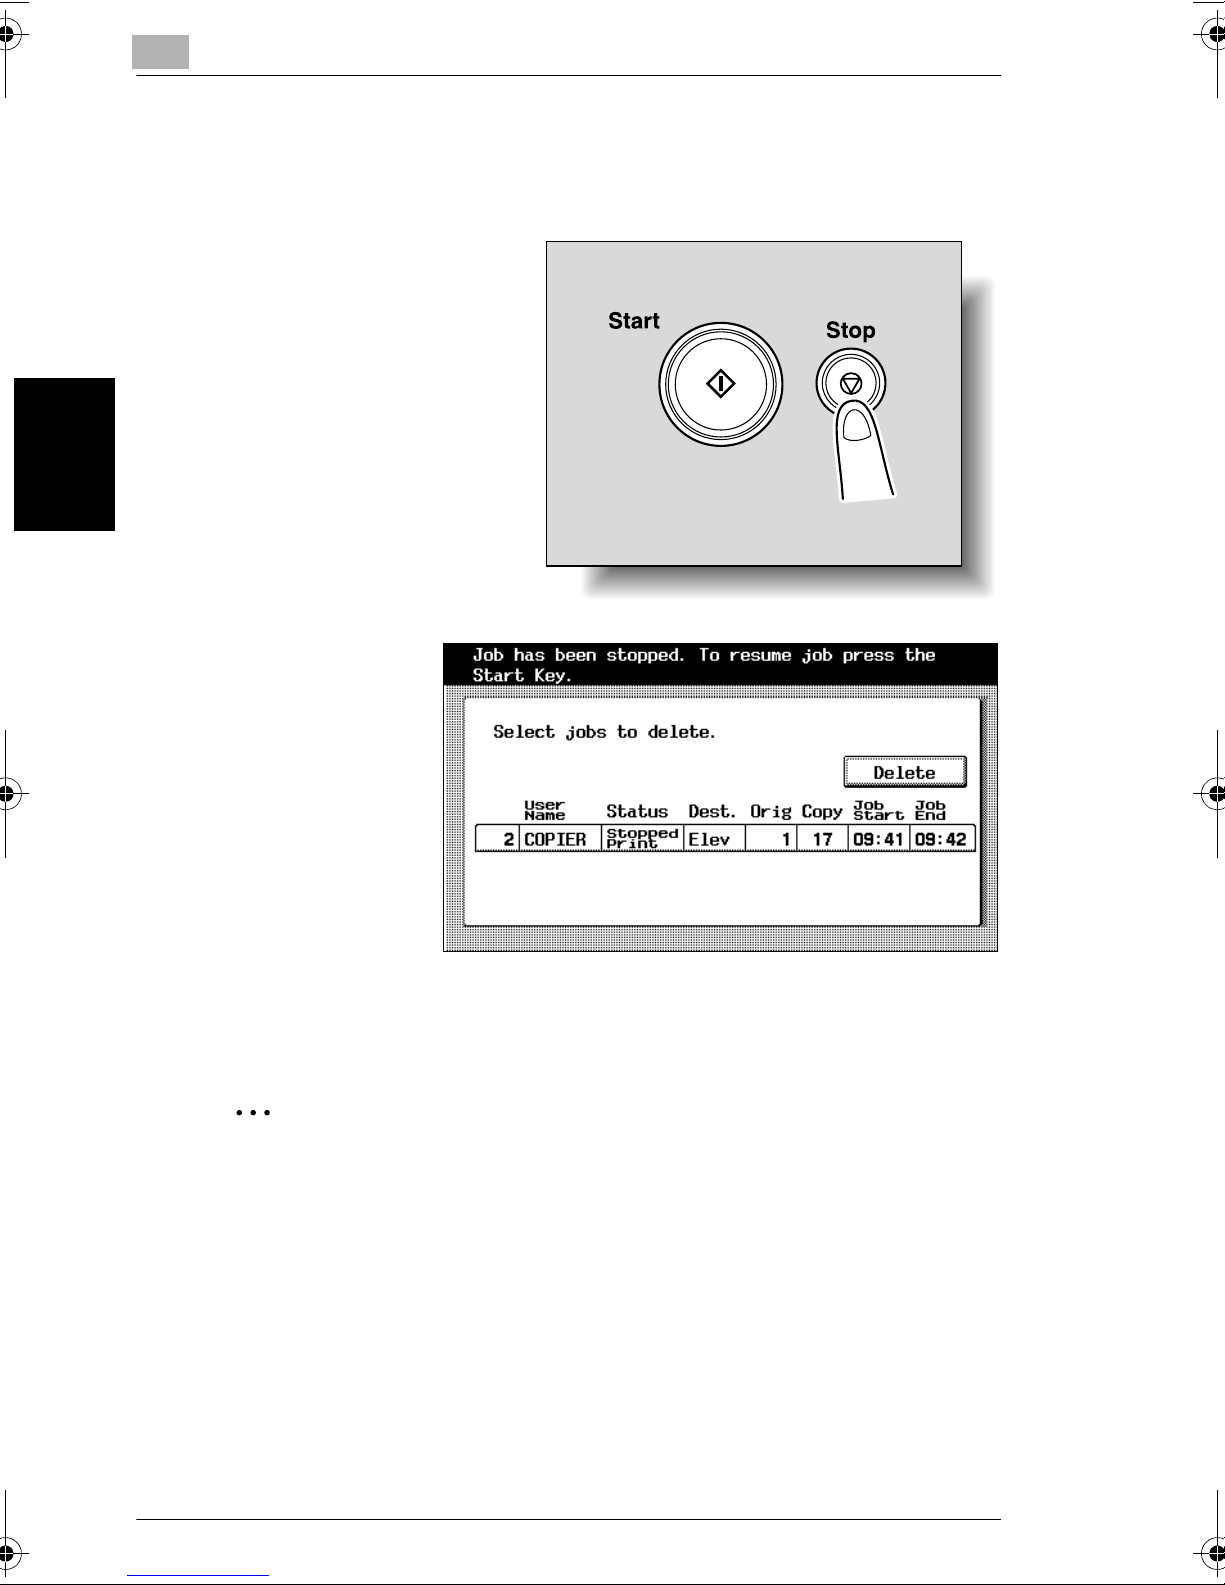
3
3.2 Stopping Copying
3.2 Stopping Copying
The following procedure describes how to stop printing a copy job.
1 Press the [Stop] key while a job is
being printed.
Printing stops.
A screen for deleting
jobs appears.
Basic Copy Operations Chapter 3
If a document is being scanned for a job, scanning stops when the [Stop] key is
pressed.
✎
Hint
To continue the stopped job, press the [Start] key.
All stopped jobs continue.
2 To delete a stopped job, select in the job display the job that you wish to delete,
and then touch [Delete].
The message “Job has been done improperly. Check the log.” appears, and the
selected job is deleted.
3 Touch [Enter].
3-4 cm3520
Page 96
3.3 Selecting a Color Setting
3
3.3 Selecting a Color Setting
Various Color settings are available for making copies.
The following Color settings are available.
Auto Color
The scanned document is determined to be either in color or in black and white, and
then the appropriate Color setting for the document is automatically selected.
If the document was determined to be in color, a copy is made with the “Full Color”
setting.
If the document was determined to be in black and white, a copy is made with the
“Black” setting.
✎
Hint
The level for determining whether a document is in color or in black and white
when making copies with the “Auto Color” setting can be adjusted using the
“ACS Judgement Level Adjustment” function on the User’s Choice: 2 screen.
For more details, refer to “Setting the “ACS Judgement Level Adjustment”
Function” on page 10-18.
Full Color
The scanned document is copied in full color.
2 Color
All areas of the document determined to be in color are copied with the specified
color, and all areas determined to be black are copied in black.
The colors that can be used for the areas printed in color are: red, green, blue, cyan,
magenta and yellow.
Single Color
Copies are printed in the specified color, regardless of the whether the scanned
document is in color or black and white.
The color used for producing the copy can be set to one of the 20 available.
Black
Copies of the scanned document are printed only in black.
Basic Copy Operations Chapter 3
cm3520 3-5
Page 97
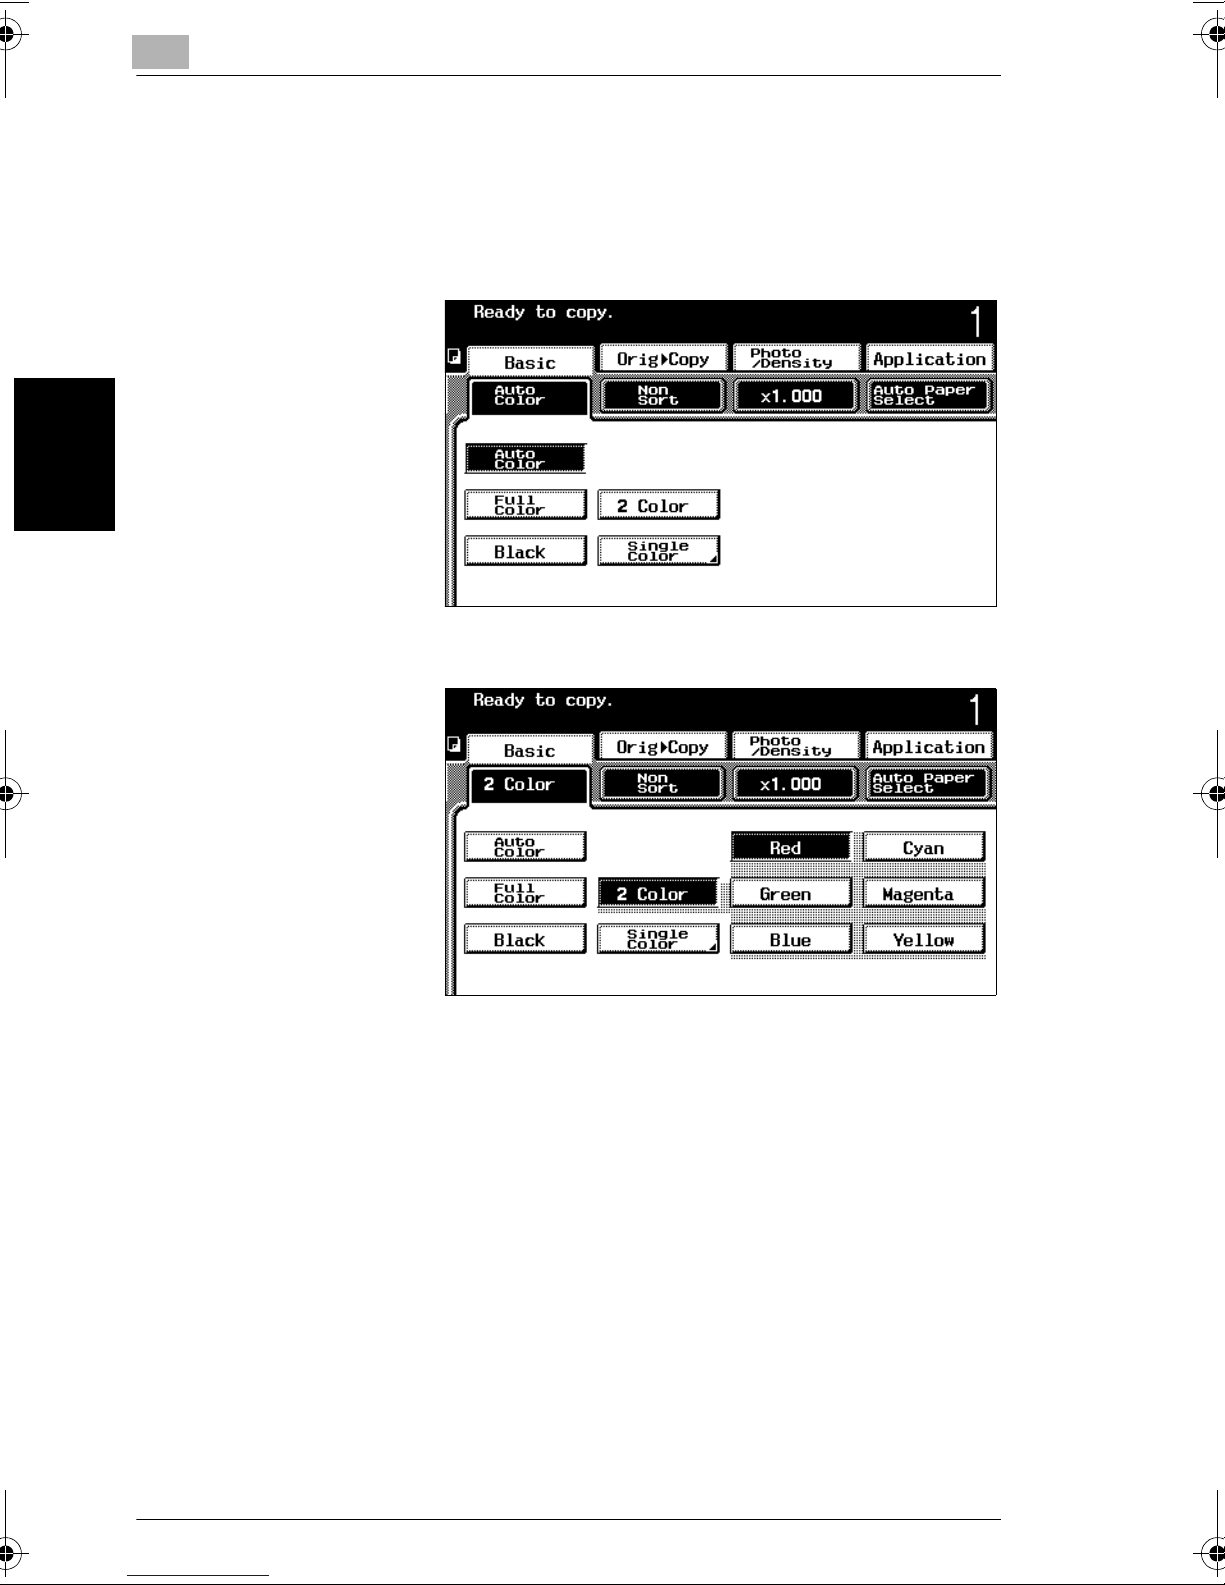
3
To select the Color setting
1 Touch [Color].
A screen appears, showing the available Color settings.
2 Select the desired
Color setting.
3.3 Selecting a Color Setting
3 To produce two-color
copies, touch [2 Color],
and then touch the key
for the color to be used
for the areas printed in
Basic Copy Operations Chapter 3
color.
4 To produce one-color copies, touch [Single Color].
❍ In the Single Color 1 or Single Color 2 screens, touch the key for the desired
color.
❍ To change how color gradations in the document are reproduced, touch
[Solid].
3-6 cm3520
Page 98
3.3 Selecting a Color Setting
✎
Additional Information
When the “Single Color” setting is selected, the following two methods for
reproducing gradations in documents are available.
Relative luminosity: The document will be copied using monocolor
concentration variations to express color differences (color shading that can
be seen with the eye) and gradation levels. This enables the color of
markers, the blue lines in graphing paper and the red of stamps to be
distinctly reproduced in copies. This method is selected as the factory
default.
Average brightness: The document will be copied using monocolor
concentration variations to only express gradation levels, regardless of the
color differences in the original document. This is useful for producing
monocolor copies of documents containing gradation differences, such as
magazines and newspapers, and for offsetting the yellow tint in documents
that have yellowed. To select this method, touch [Solid].
3
5 Touch [Enter].
Basic Copy Operations Chapter 3
cm3520 3-7
Page 99

3
3.4 Selecting Output Settings
3.4 Selecting Output Settings
Various settings for sorting and finishing copies are available.
✎
Reference
The Output settings can be used together with other functions. For details, refer
to the “Function Combination Table” on page 14-25.
The following copy sorting and finishing methods are available.
✎
Condition
The “1 Staple” and “2 Staples” settings are available only if the optional finisher
9996 is installed.
The “Hole-Punch” setting is available only if the punch kit is attached to the
optional finisher 9996.
The “1 Staple” setting is available only if the optional finisher 9997 is installed.
Non Sorting (“Non Sort” Setting)
The copies are fed out and stacked on top of each other as they are printed.
Basic Copy Operations Chapter 3
Sorting (“Sort” Setting)
The copies are automatically divided into separate sets with each set containing a
copy of each page.
✎
Additional Information
The machine can be set to automatically select the “Sort” or “Non Sort” setting
according to the number of pages in the document when it is loaded into the
reverse automatic document feeder.
If the “Intelligent Sorting” function is set to “Yes”, the “Non Sort” setting is
automatically selected if the document consists of only one page, and the “Sort”
setting is automatically selected if the document consists of 2 or more pages.
For details, refer to “Setting the “Intelligent Sorting” Function” on page 10-19.
3-8 cm3520
Page 100
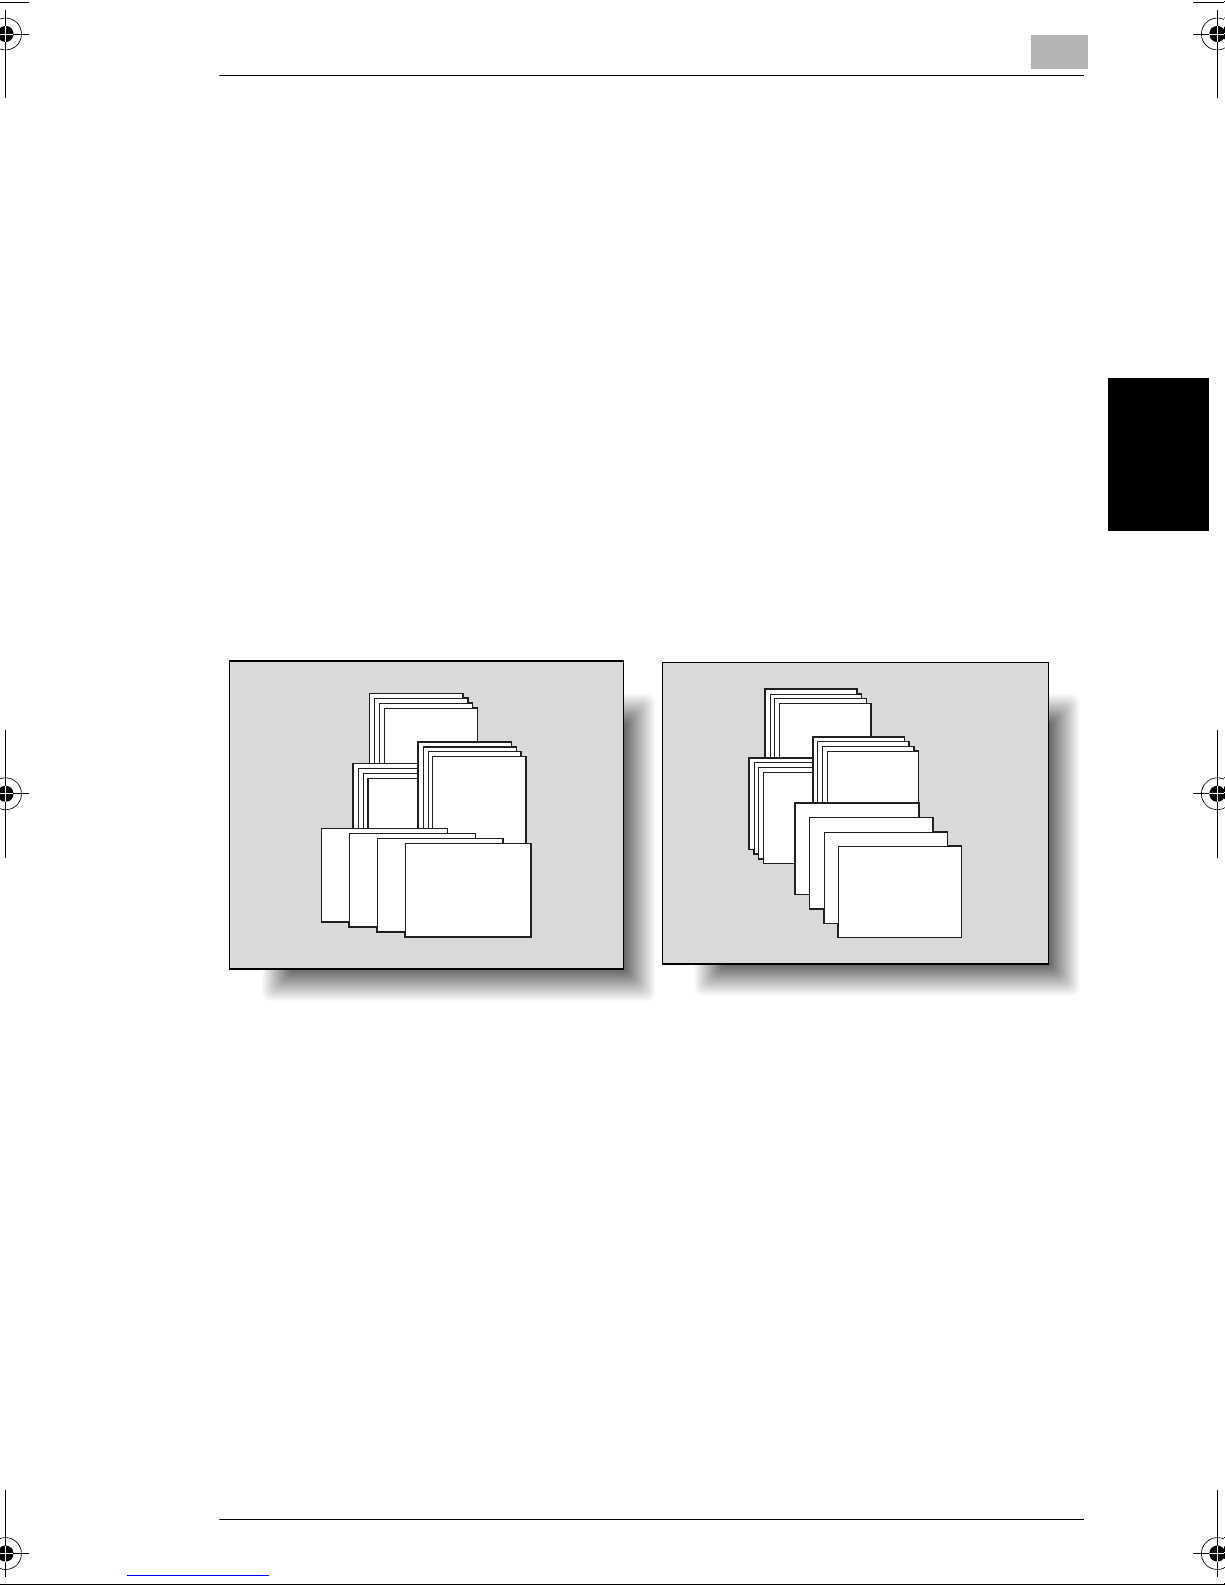
3.4 Selecting Output Settings
Crisscross Sorting (Crisscross Feeding)
If no finisher is installed and all of the following conditions are met, printed copies
can be fed out and sorted in an alternating crisscross pattern.
G Letter- or 5-1/2 × 8-1/2-size paper is used.
G Paper of the same size and type is loaded with the portrait orientation in one
paper drawer and with the landscape orientation in another drawer.
G “Auto Paper Select” must be selected as the Paper/Size setting.
G The “Mixed Original” function must not be used.
G The reverse automatic document feeder must be used.
G The “Criss Cross” function on the User’s Choice: 2 screen must be set to “Yes”.
(Refer to “Setting the “Criss Cross” Function” on page 10-20.)
Depending on whether the “Sort” or the “Non Sort” setting is selected, the way that
the pages are separated is different, as shown below.
Example: When four copies of a four-page document are printed
3
1
1
4
2
3
1
1
Not sorted
1
1
4
1
3
2
Sorted
Basic Copy Operations Chapter 3
1
cm3520 3-9
 Loading...