

Page 1
www.imagistics.com
C650
Operating Manual
For use with Imagistics and Pitney Bowes C650 copiers.
Page 2

Safety Notes
Chapter
This chapter explains about the operating environment, conditions, and precautions for use.
1
1
1
Installing The Copier p.2
Installation Site
Power Source
Grounding
Space Requirements
2
2
Precautions For Use
Operating Environment
Safety Precautions
Moving the Copier
p.3
1
Page 3
Safety Notes
Chapter
1
Installing the Copier
To ensure utmost safety and prevent possible malfunctions of the copier, install it in a location which meets the following
requirements.
• Place the copier in an uncrowded, well ventilated area. This copier
generates ozone and is equipped with an ozone filter. We recommend that the copier be placed in a room no smaller than 1000
cubic feet with a minimum of .5 air exchanges per hour.
• Keep copier away from direct sunlight.
• Keep copier away from ammonia vapors.
• Keep copier away from heating devices or air conditioners.
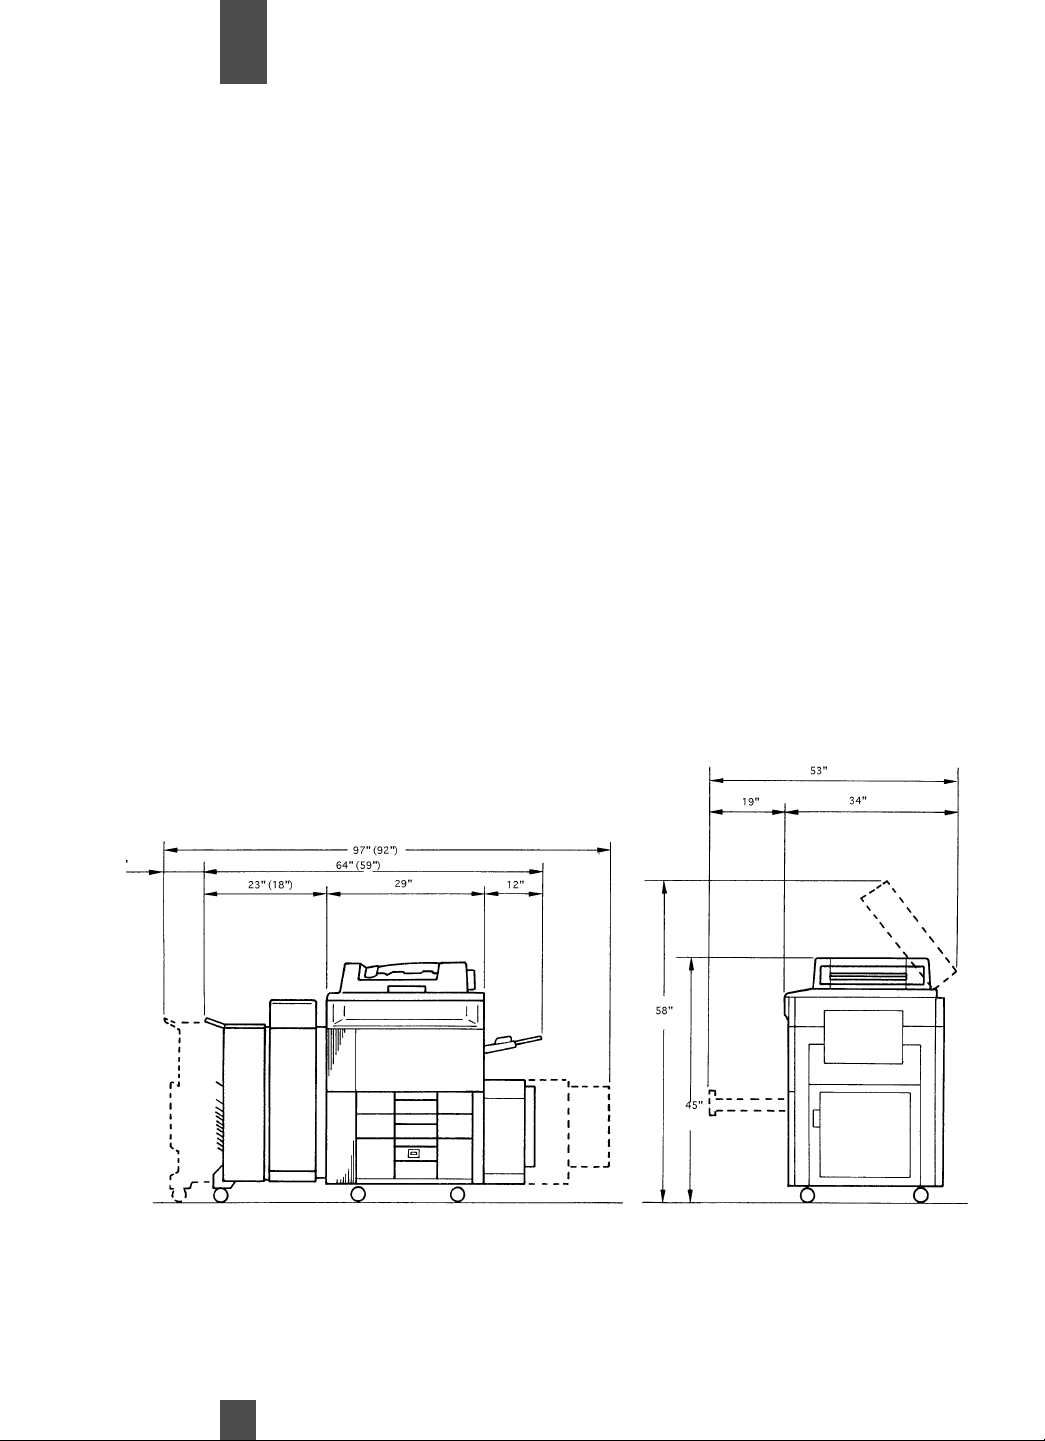
Space Requirements
To ensure easy copier operation, supply replacement, and service maintenance, adhere to the recommended space
requirement detailed below. Allow a clearance of 6” or more at the back of the copier to provide space for ventilation.
Note: Dimensions shown are for the copier system equipped with a Multi Position Sorter/Stapler or Stacker/Stapler.
Dimensions in parentheses are for systems equipped with a standard Sorter Stapler.
2
Page 4

Safety Notes
Chapter
1
Operating Environment
The operating environment requirements of the copier are as follows.
Temperature: 10° C - 30° C (50° F -86° F)
Humidity: 15% to 85%
Safety precautions
When operating this copier, follow a few simple safety precautions.
• Keep loose clothing, hair and jewelry away from the moving parts of the
machine.
• Do not touch fuser components. These surfaces are hot and may cause
burns.
• Do not remove any covers fastened with screws. High voltage may be present.
• Do not attempt to repair the copier. Call your Imagistics Customer Service
Representative for repairs.
• Place the copier in an uncrowded, well ventilated area. This copier generates
ozone and is equipped with an ozone filter. We recommend that the copier
be placed in a room no smaller than 1000 cubic feet with a minimum of .5 air
exchanges per hour.
Moving the Copier
If you need to transport the copier over a long distance, consult your Technical Representative
3
Page 5

1
Safety NotesChapter
4
Page 6

Overview
Chapter
This chapter gives you a brief description of the system and preliminary information about peripherals and options.
2
1 Types of Copies p.6
1
2 Copier and Peripherals p.8
2
3 Copier Parts and Accessories p.10
3
4 Control Panel Keys and Indicators p.16
4
5 Using the Touch Panel p.18
5
Main Display Screen
How the Screen is Organized
Operating the Touch Panel
6 Turning ON/OFF, Initial Mode p.20
6
Turning ON and OFF
Initial Mode
7 Auxiliary Functions p.21
7
•Panel Resetting
•Auto Panel Reset
•Auto Copy Start
•Energy Saver
•Interrupt
•Mode Check
•Access Number
5
Page 7
3
2
1
3
2
1
3
2
1
3
2
1
3
2
1
3
2
1
3
2
1
1
1
1
2
2
2
3
3
3
Overview
AA
B
B
A
A
B
A
AB
B
A A B
3
2
1
1
Chapter
2
Types of Copies
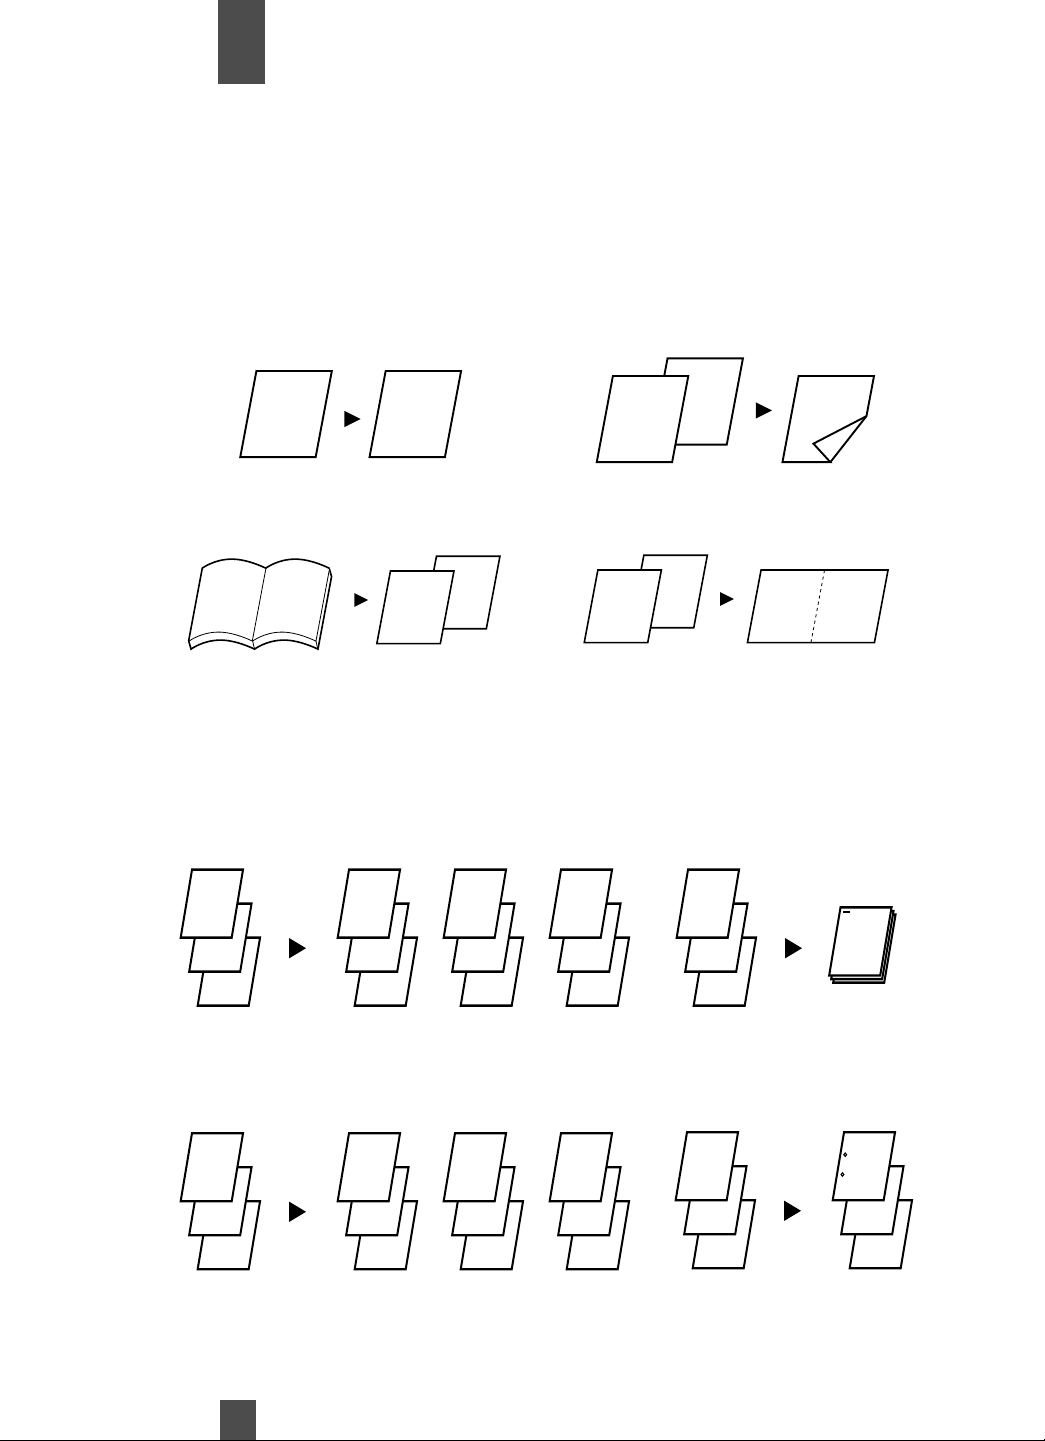
With the required peripherals, the copier is capable of producing the types of copies illustrated below.
To run these types of copies, turn to the pages indicated with the copy function.
Originals ➧ Copies p. 42
1 ➧1
Book ➧1
Sort p. 48
Sort
1 ➧2
2 in 1
Sort and Staple
Group
6
Hole Punch
Page 8
Overview
Chapter
2
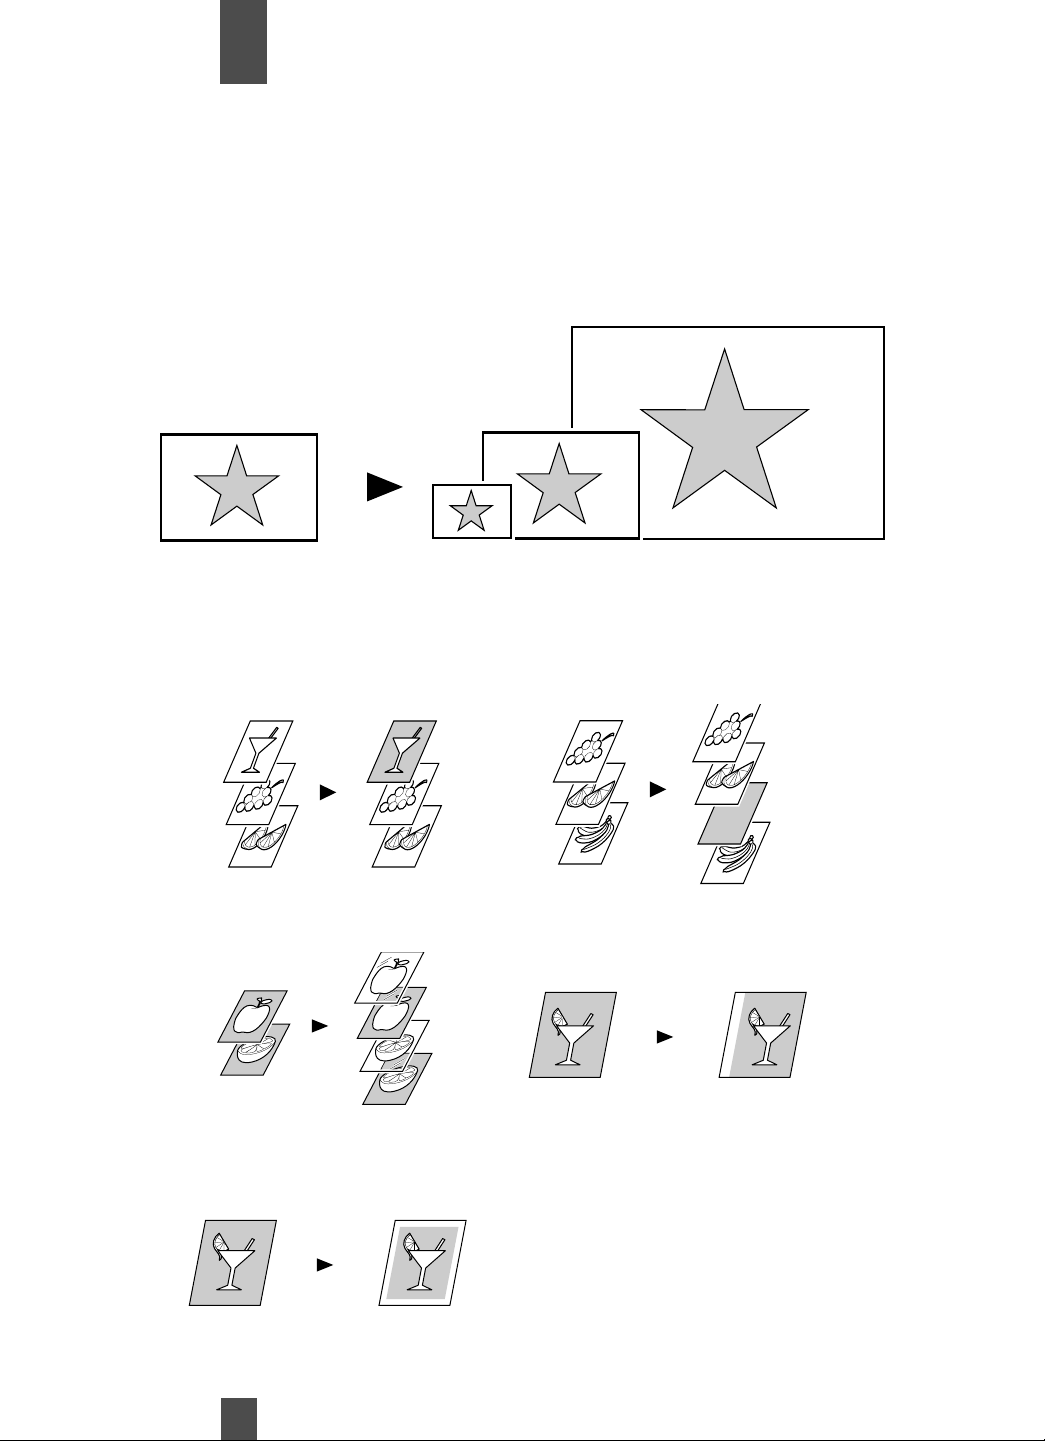
Zoom Ratio p. 36
Reduce, Full Size, Enlarge
Auxiliary Functions p. 58
Cover p. 58
Transparency Interleaving p. 68
Erase p. 74
Page Insertion p. 58
Create Margin p. 72
7
Page 9
Chapter
Overview
2
Copier and Peripherals
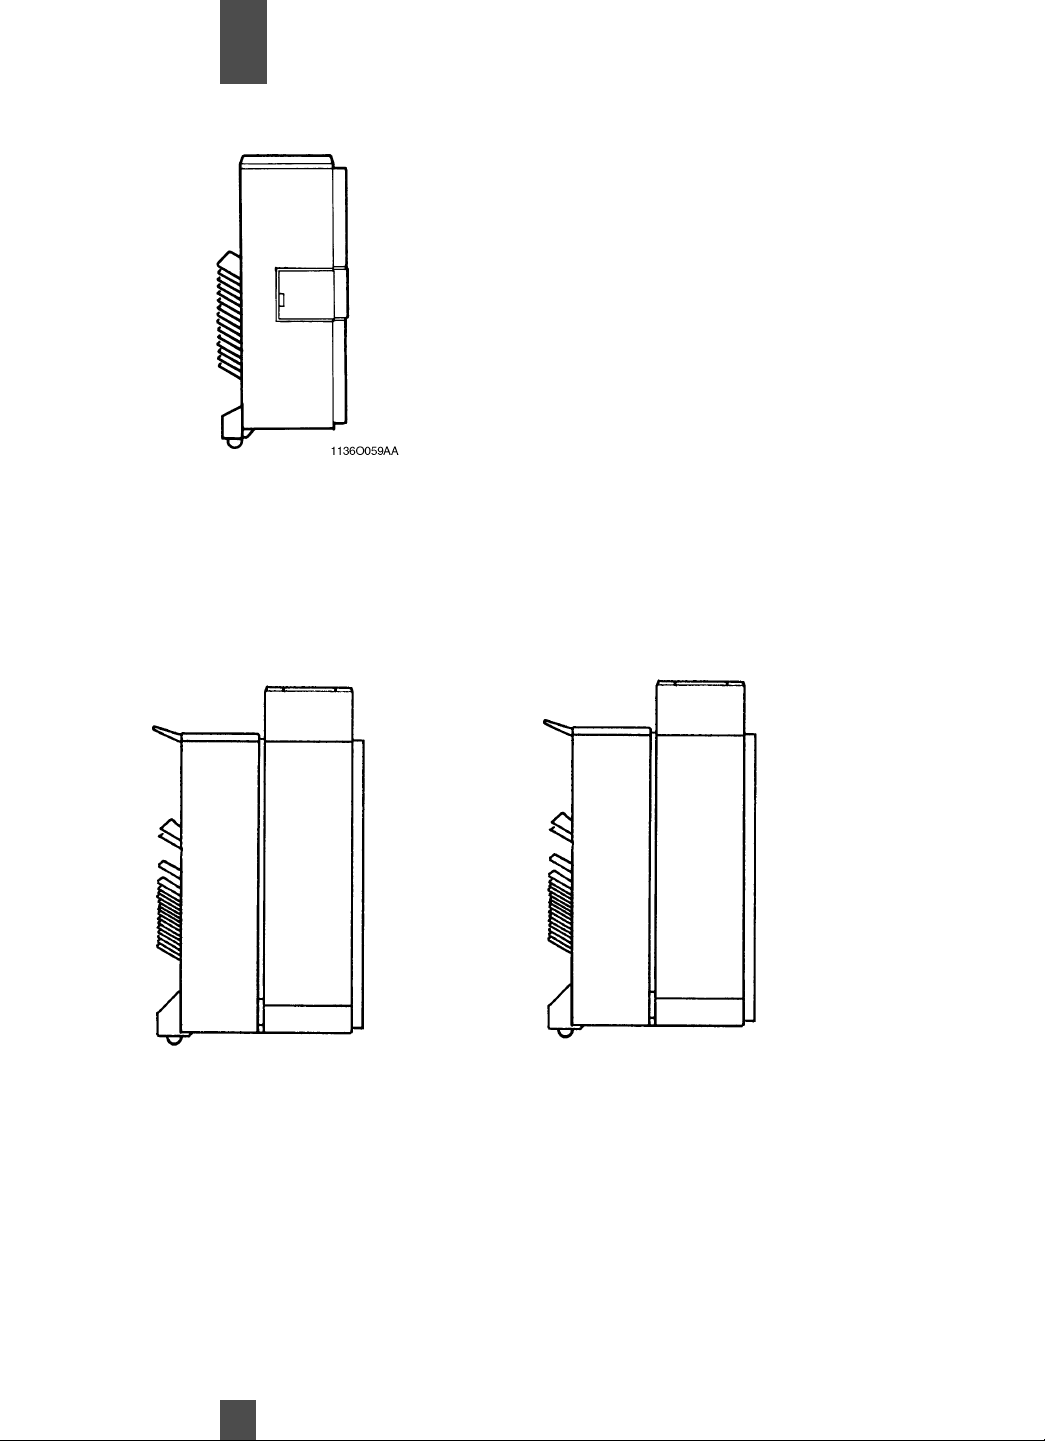
Staple Sorter 9771 <Option>
For sorting or grouping copies into
up to 20 copy sets or stacks.
Automatically staples, and/or punches holes in, copy sets or stacks that
are sorted or batched.
20 Bin Multi Position Sorter/
Stapler 9773 <Option>
For sorting or grouping copies into
up to 20 copy sets or stacks.
Provides three stapling options and
either a two or three hole punch
function.
8
Stacker/ Stapler 9775 <Option>
For sorting or grouping 20 or more copy
sets or stacks. Provides three stapling
options and either a two or three hole
punch function.
Provides SmartFinish™ high volume copying
when used with the 9761 Universal Document
Handler.
Page 10

Overview
Chapter
2
Copier and Peripherals
Reversing Automatic Document Feeder
(RADF) 9760 <Option>
Feeds originals one at a time.
Turns over the original when making copies
from two sided originals.
Universal Document Handler
(UDH) 9761 <Option>
Capable of automatically reloading a set of originals
for re-copying. Provides SmartFinish™ high
volume copying when used with the 9775 stacker.
Provides the same reversing function as the 9760.
Large Capacity Cassette
9765 <Option>
Holds up to 3,400
sheets of paper
(21 lbs.).
9
Page 11
Overview
2
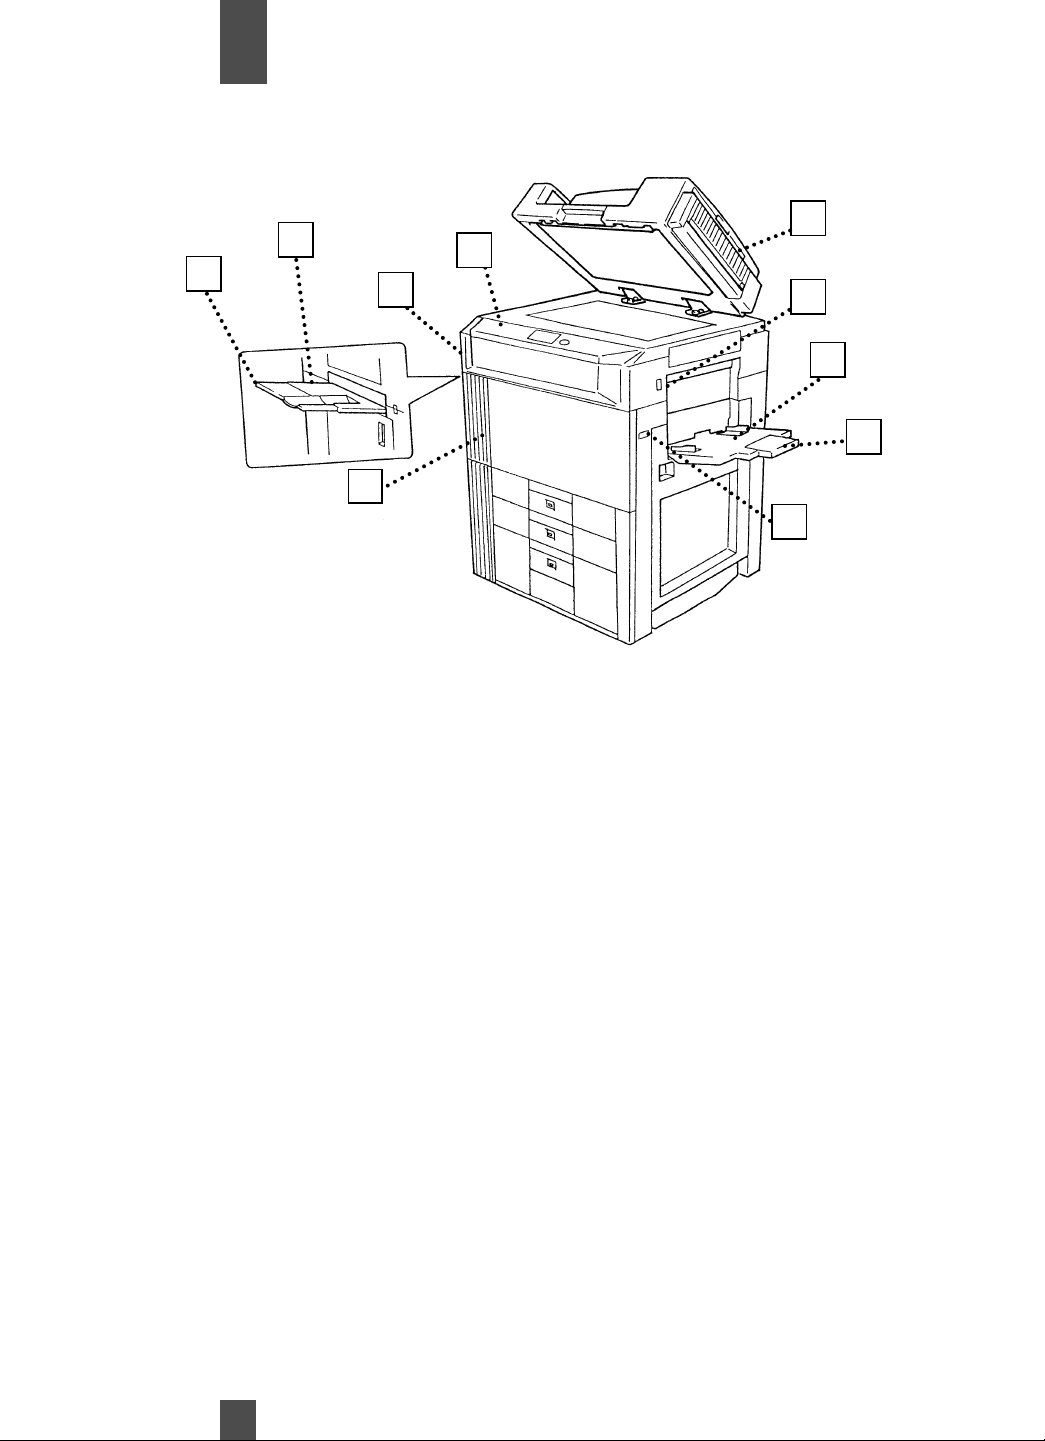
Copier Parts and Accessories (Outside)
2
1
4
3
5
10
6
7
8
9
1
Exit Tray Extender : Slide this extended out when makings copies on large-
1
size paper.
2
Exit Tray : Holds copies fed out of the copier.
2
3
Front Door : Open to clear paper misfeed. p. 116
3
: Closing the front Door after a misfeed has been cleared
will turn the misfeed warning message on the control
panel OFF.
4
Upper Front Door : Open to add toner. p. 110
4
5
Control Panel : Use to start a copy cycle or to make copy job settings.
5
See Control Panel Keys and Touch Panel. p. 16
6
Power Switch : Use to turn the copier ON and OFF. p. 20
6
7
Multi Bypass Tray : Use for manual feeding of copy paper into the copier.
7
p.33
8
Extender : Slide the Extender out to make copies on large-size copy
8
paper.
9
Total Counter : Shows the total number of copies made.
9
10
Single Feed Tray : For feeding single sheet originals. p. 30
10
10
Page 12
Overview
2
Copier Parts and Accessories (Outside)
11
12
16
11
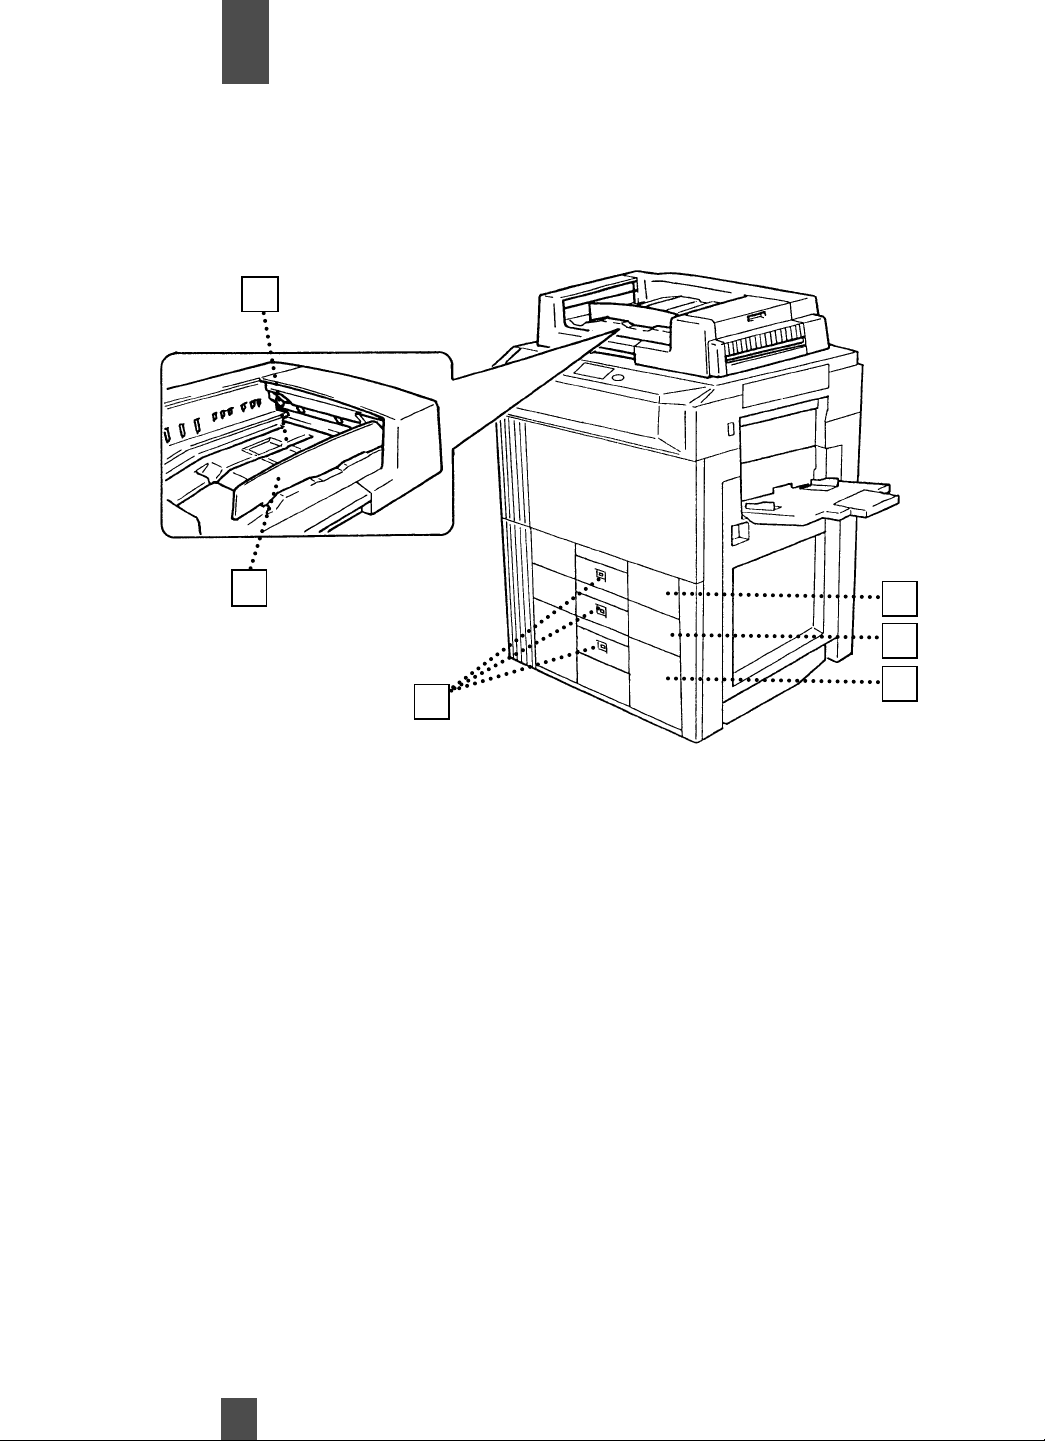
Document Feed Tray : Load originals face up on this tray.
11
12
Document Guide Plate : Adjust to fit the size of the originals.
12
13
First Drawer : Holds up to 550 sheets of copy paper.
13
14
Second Drawer : Holds up to 550 sheets of copy paper. p.107 It can
14
accommodate paper of different sizes.
15
Third Drawer : Holds up to 2,700 sheets of copy paper.
15
16
Paper Descent Key : Press before sliding the Drawer out of the copier.
16
13
14
15
11
Page 13
Overview
Chapter
2
Copier Parts and Accessories (Options)
4
3
2
5
6
1
7
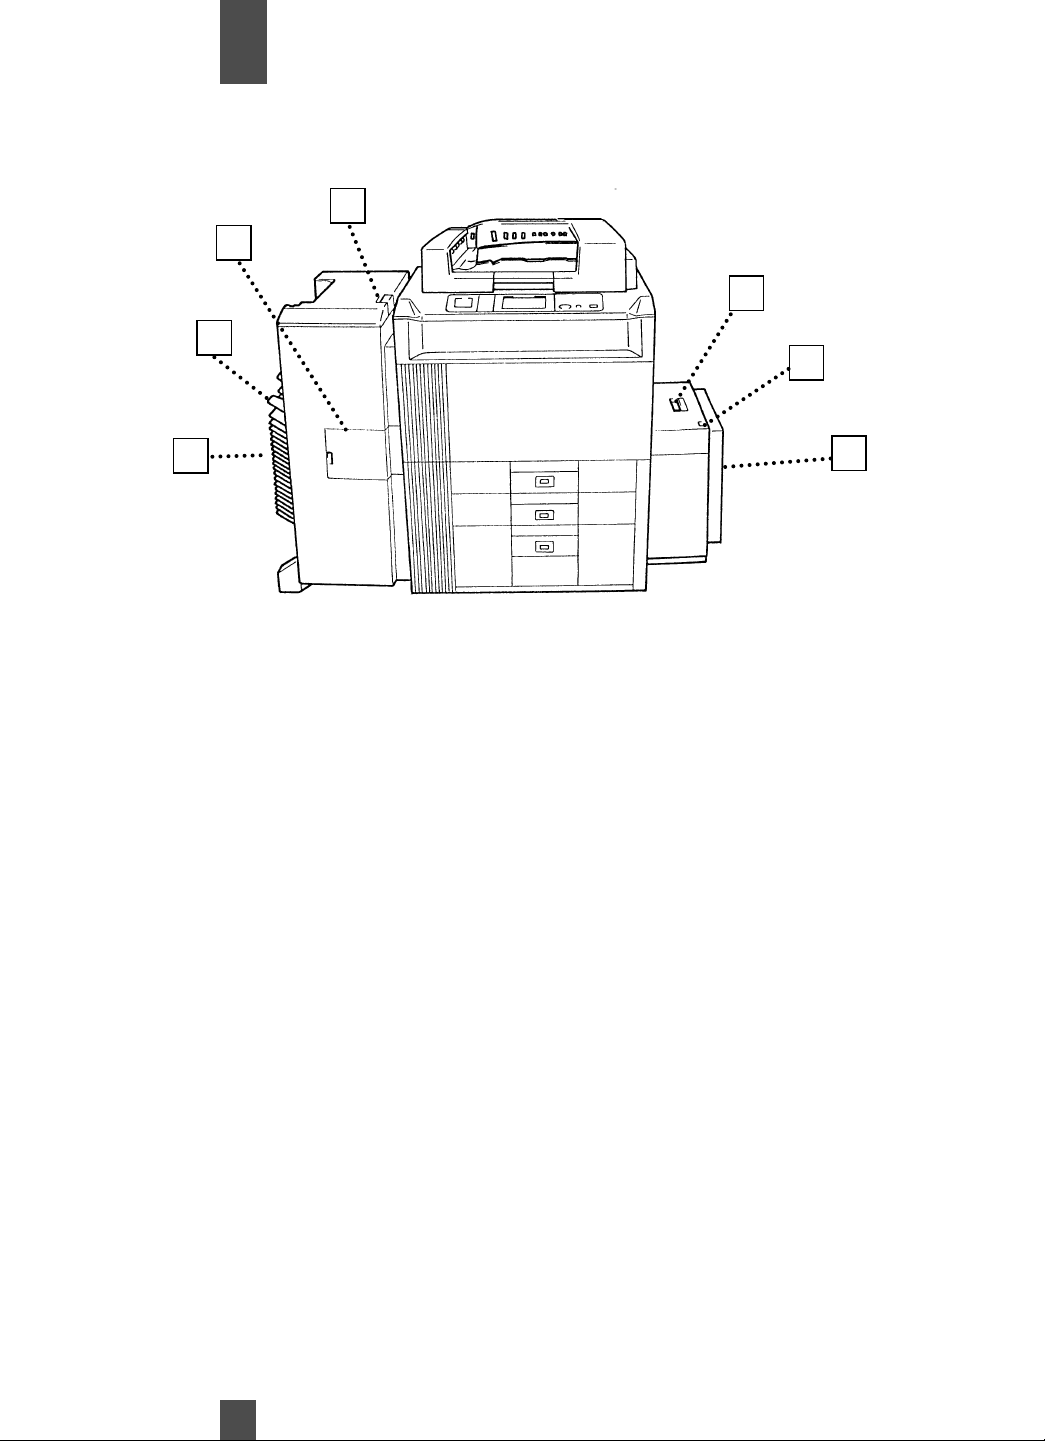
20- Bin Sorter/Stapler
1
Sort Bins (1st to 20th) : Hold sorted or batched copies, each capable of
1
holding up to 50 sheets.
2
Non-Sort Bin : Holds up to 100 copies fed out in the Non-Sort mode.
2
3
Staple Cover: : Open to replace staples cartridge.
3
4
Lock Release : Press to unlock the Sorter from the copier for clearing a
4
misfed sheet of paper or other service job.
Large Capacity Cassette
5
Lock Release Lever : Use to unlock the Cassette when clearing a misfed
5
sheet of paper or other service job.
6
Paper Plate Descent Key : Press to lower the paper plate.
6
7
Cassette Door : Open to add paper or clear a misfed sheet of paper.
7
12
Page 14
Overview
Chapter
2
Copier Parts and Accessories (Options)
11
10
9
8
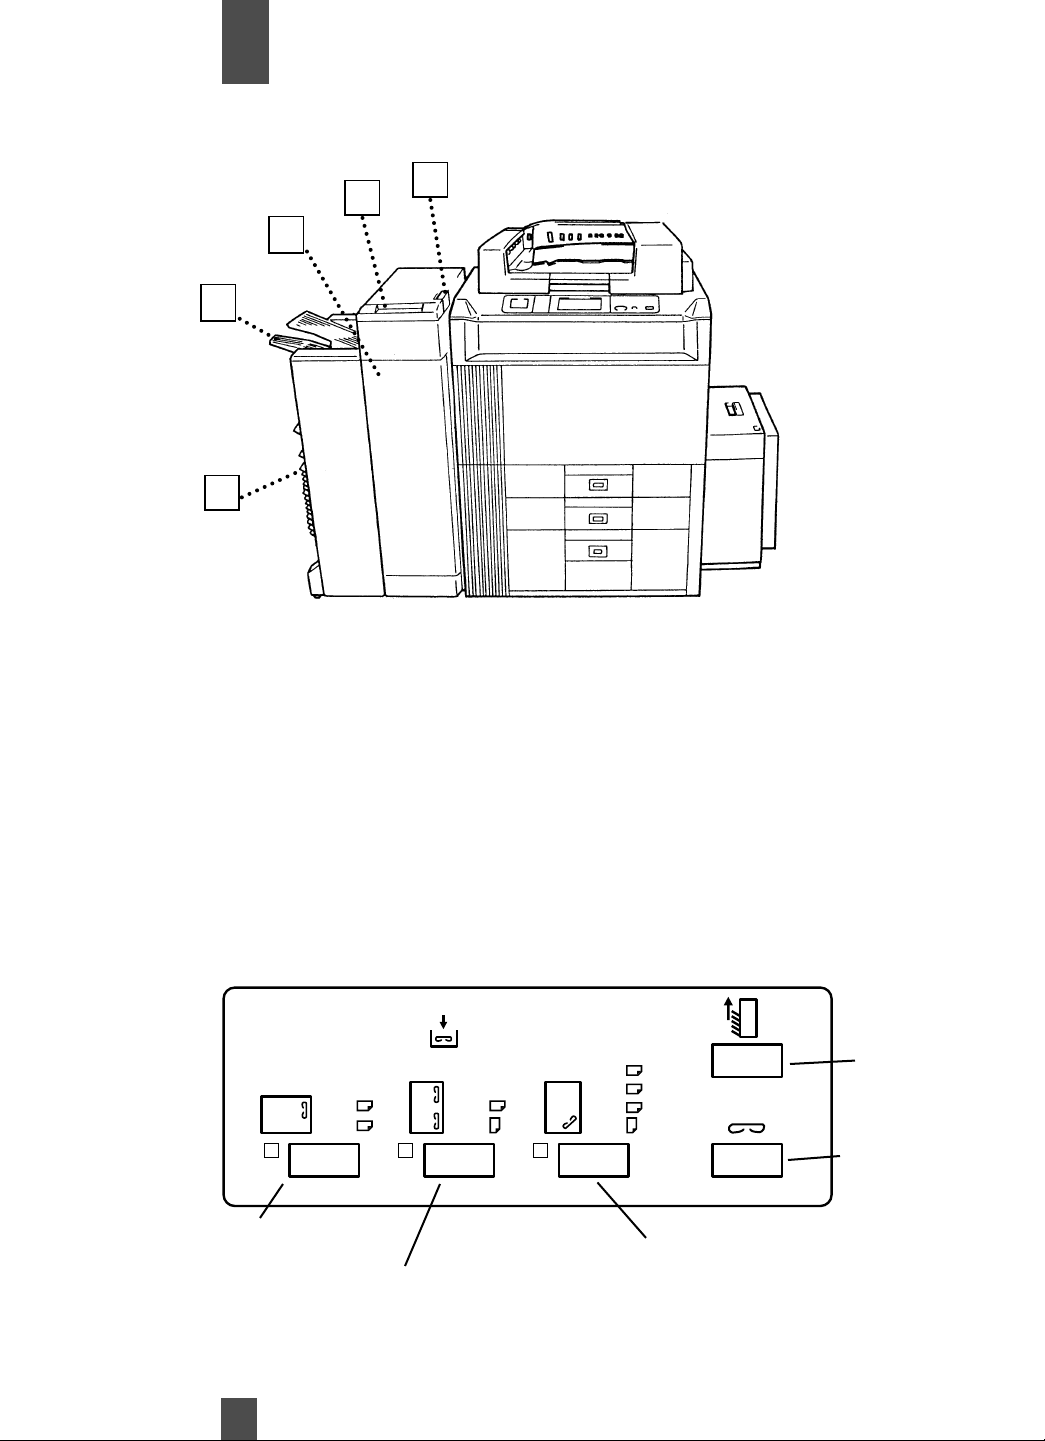
12
20- Bin Staple/Sorter/Stacker
8
Sort Bins (1st to 20th) : Hold sorted or batched copies, each capable of
8
holding up to 50 sheets.
9
Non-Sort Bin : Holds up to 100 copies fed out in the Non-Sort mode.
9
10
Sorter Door : Open to replace staples cartridge.
10
11
Sorter Panel* : Used to select manual stapling options. p. 54
11
12
Lock Release : Press to unlock the Sorter from the copier for clearing a
12
misfed sheet of paper or other service job.
*
Top Staple Key
13
LGL.
LTR.
2 Point Staple Key
11x17
LTR.
11x17
LGL.
LTR.
LTR.
Top Slant Staple Key
Bin Key
Manual Staple
Key
Page 15
Overview
Chapter
2
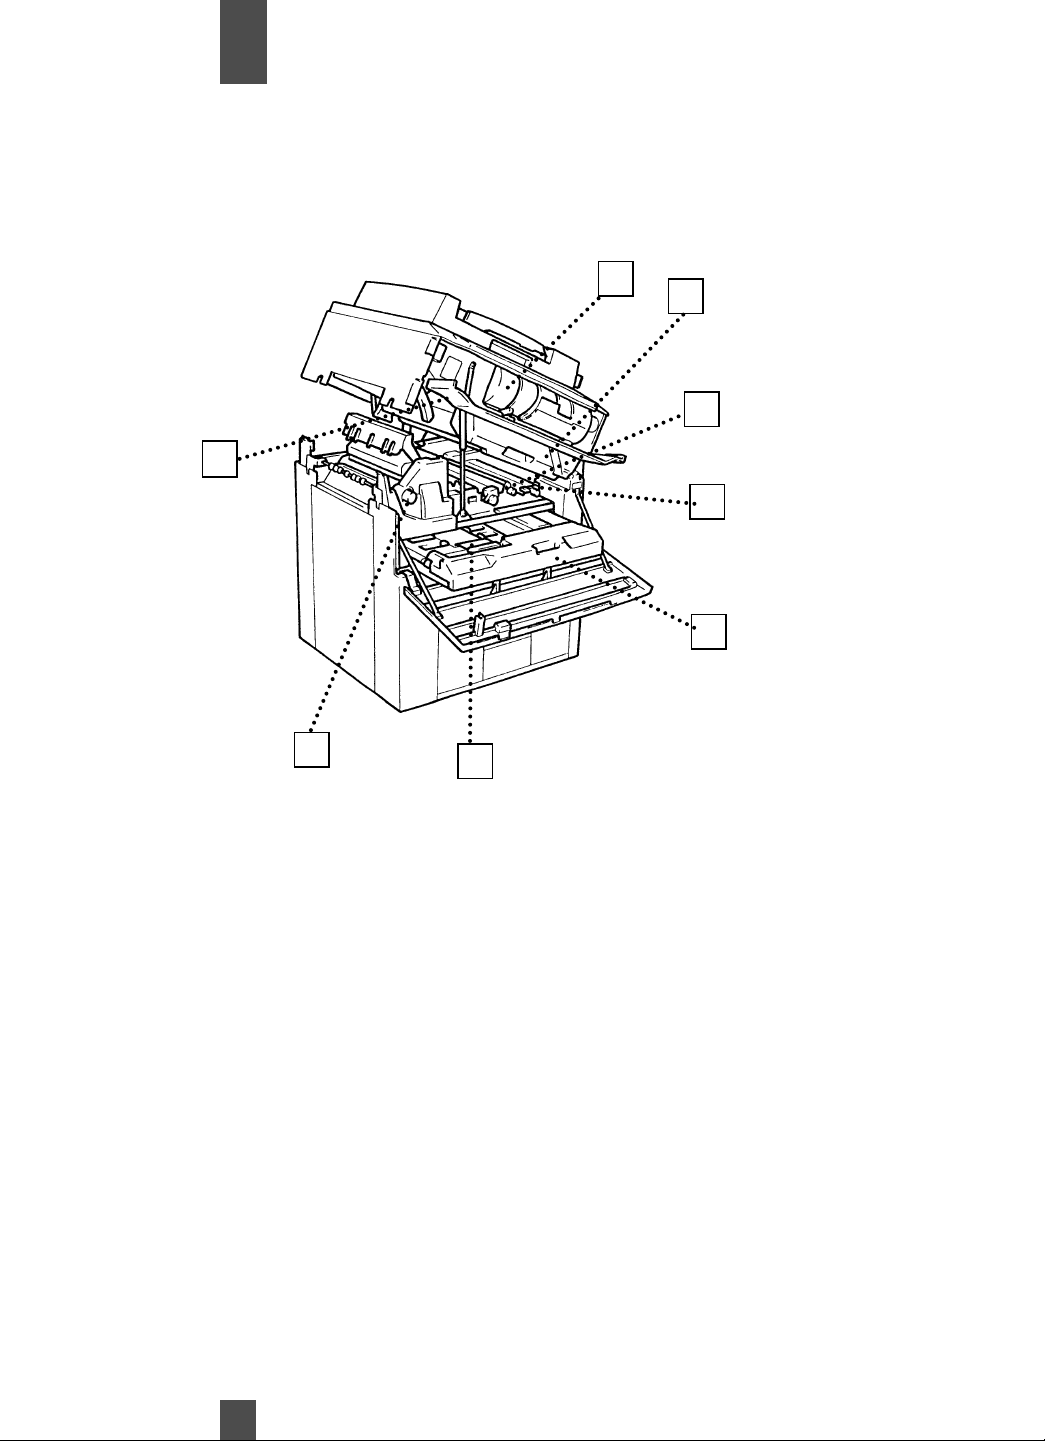
Copier Parts and Accessories (Inside)
2
1
8
1
Unlocking Lever : Turn clockwise to swing open the Upper Half of the copier to
1
clear a paper misfeed.
2
Toner Bottle : Contains Printpowder™ Toner. Replace when empty. p.110
2
3
Toner Bottle Holder : Swing open to replace Toner Bottle.
3
7
3
4
5
6
4
Misfeed removal : Use to clear misfed paper. p.117
4
knobs M2, M4
5
Misfeed removal : Use to clear misfed paper. p.117
5
guide plate M3
6
Duplex Unit D1 : Turns over 1-sided copies for making 2-sided copies. p.120
6
7
Misfeed removal : Use to clear misfed paper. p.120
7
guide plate D2
8
Misfeed removal : Use to clear misfed paper. p.117
8
knobs M2, M4
14
Page 16

Chapter
Overview
2
15
Page 17
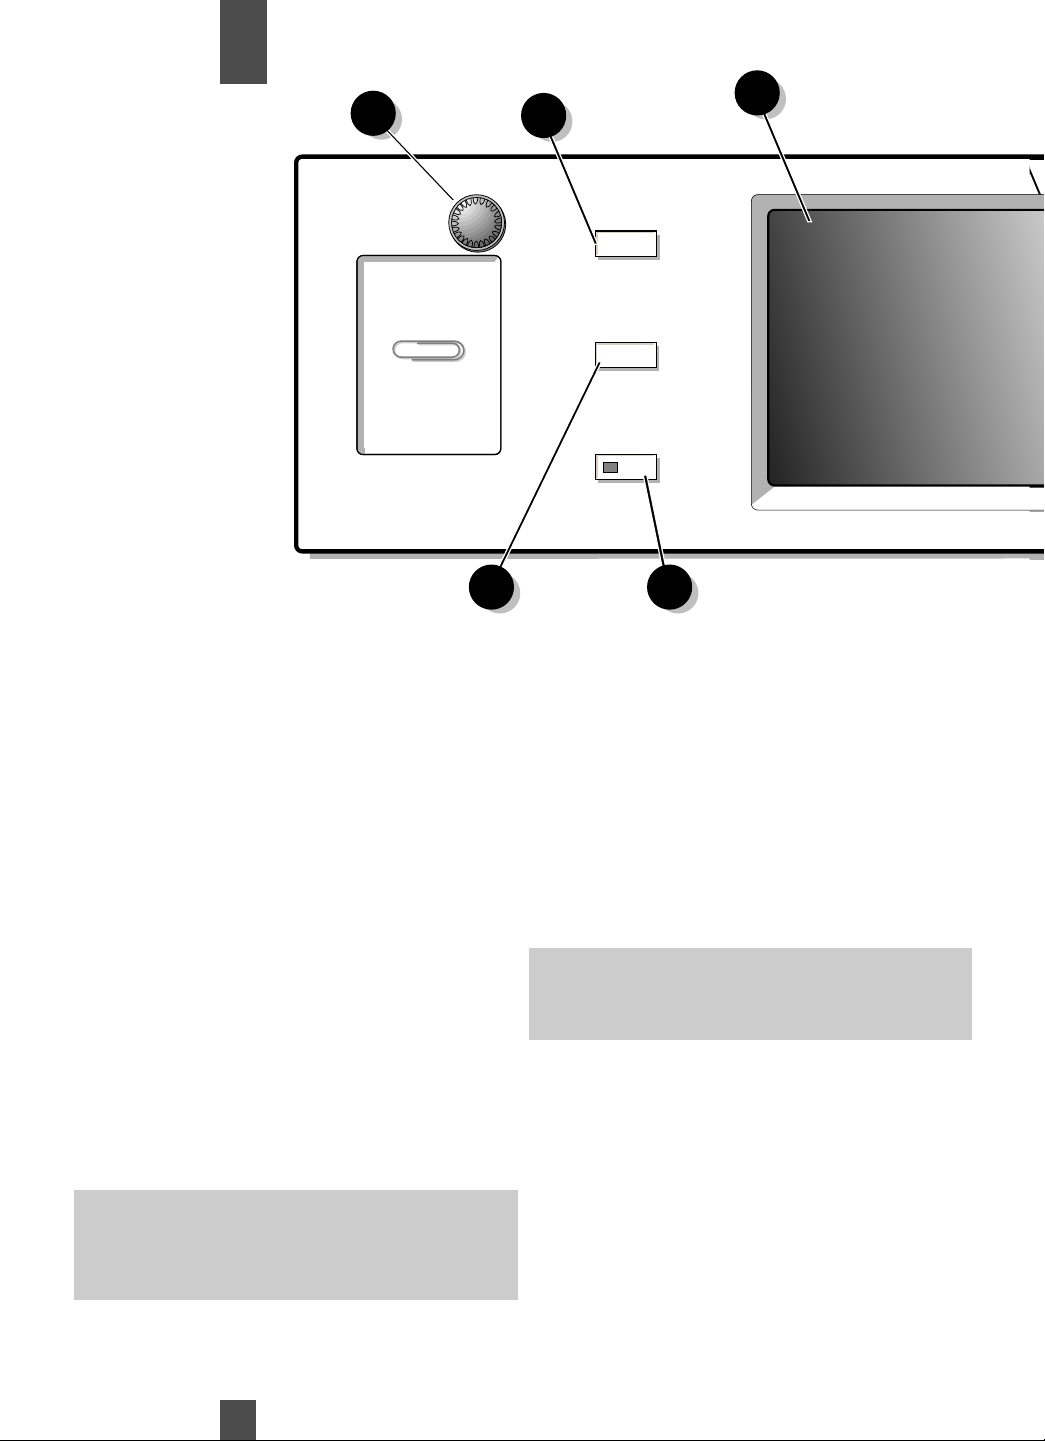
Job Presets
Review Settings
Programming
1
10
13
11 12
Chapter
Overview
2
1
1
2
2
3
3
4
4
5
5
Note: It does not, however, clear the con-
Touch Panel
•Shows various screens and
messages. p. 18
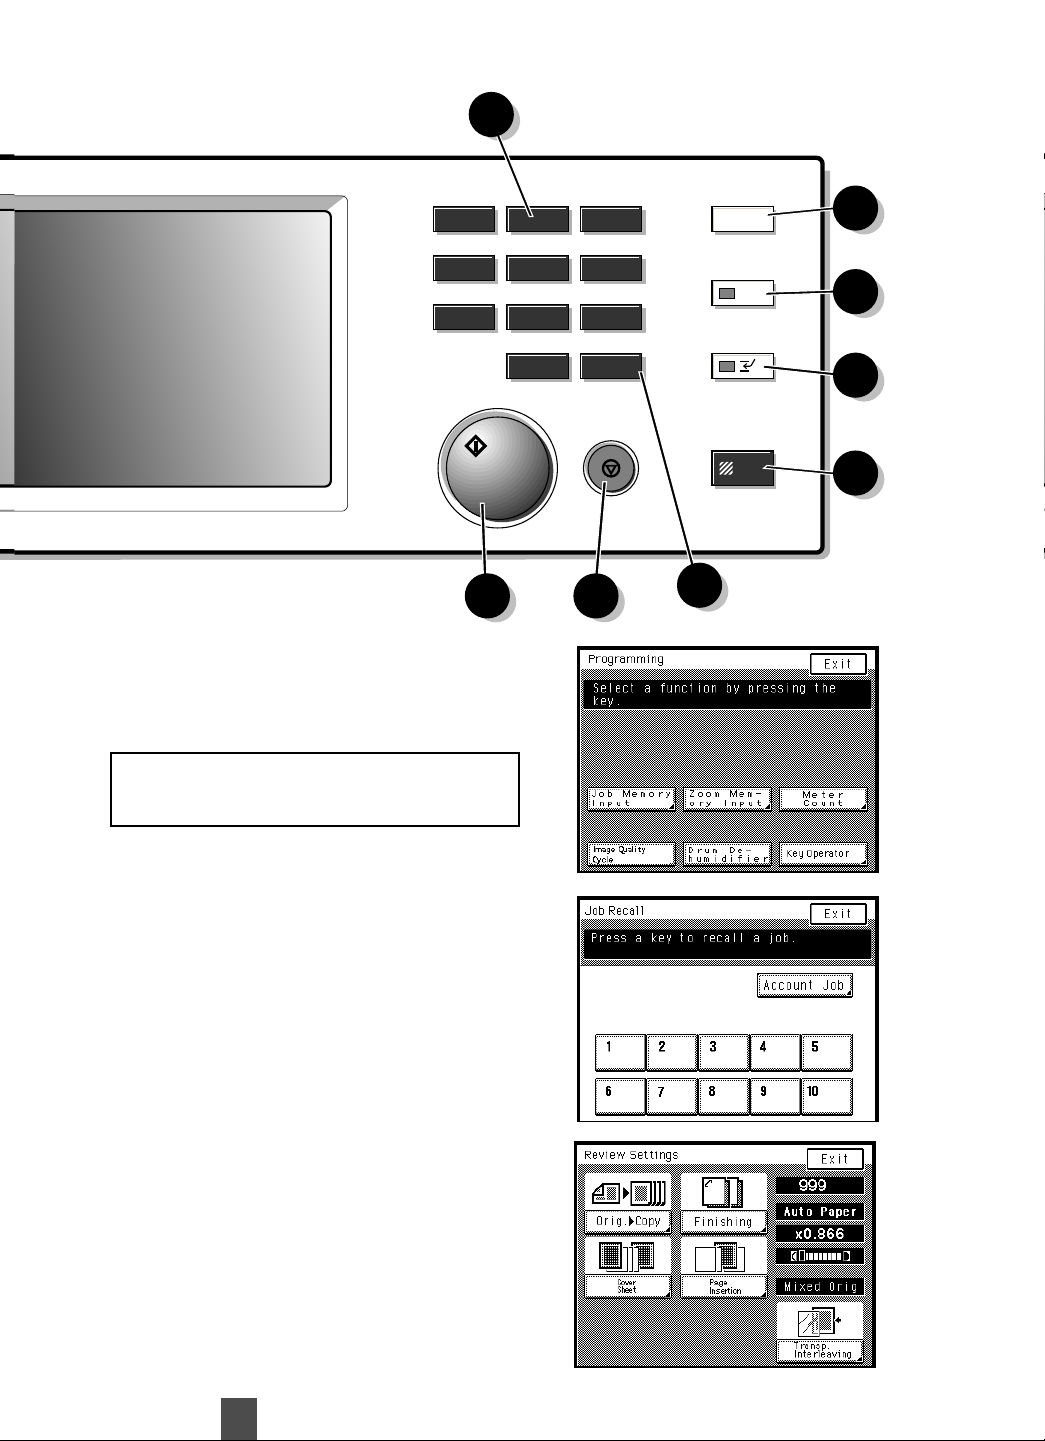
Print Key
•Press to start copy cycle. p.25
•If pressed while the copier is warming
up, it enables the Auto Copy Start
Function. p.21
Clear Key
Press to:
•Reset the, multi-copy entry 1. p.25
•Clear zoom ratio entered when setting
one form the 10-Key Pad. p.38
Stop Key
•Press to stop a multi-copy cycle. p.25
Reset Key
•Press to set the copier into the initial
mode, clearing all settings made previously on the control panel. p.21
tents of the zoom and job program
memory and the settings made immedi
ately before the Interrupt mode.
6
6
7
7
8
8
Note: This key becomes valid only when
9
9
Interrupt Key p. 22
•Press to interrupt a current job with a
different one.
•Press it again to return to the previous
job.
Energy Saver Key
•Press to set the copier into the
Energy Saver mode. p.21
Access Mode Key
•Press to enter the access number
p.22
Copy Track of the Administrator mode
available through the Key Operator
function is set.
10-Key Pad
Use to enter :
•The number of copies to be made. p.25
•The zoom ratio to be used. p. 38
•The number of originals.
16
Page 18
1
4
7
2
5
8
0
3
6
9
C
Print
Reset
Clear
Stop
Interrupt
Energy Saver
Access
2 4
3
5
6
7
8
9
Control Panel Keys and Indicators
10
10
11
11
12
12
13
13
Programming Key p.77
•Press to show the Programming menu.
Programming
•Job Memory Input •Toner Replenisher
•Zoom Memory Input •Drum Dehumidifier
•Meter Count •Key Operator
Job Presets Key
•Press to show the Job Presets screen,
on which you can recall or check a
copy job program previously stored in
memory.
See Recalling a Job from Memory p. 81
Review Settings Key
•Press to show the Review Settings
screen. From this screen, you can
access the setting screen of a
particular function and change or
cancel the setting a necessary.
See Review Settings p. 22
Display Contrast Knob
•Turn to adjust the brightness of the
Touch Panel
17
Page 19

Overview
Chapter
2
Using the Touch Panel
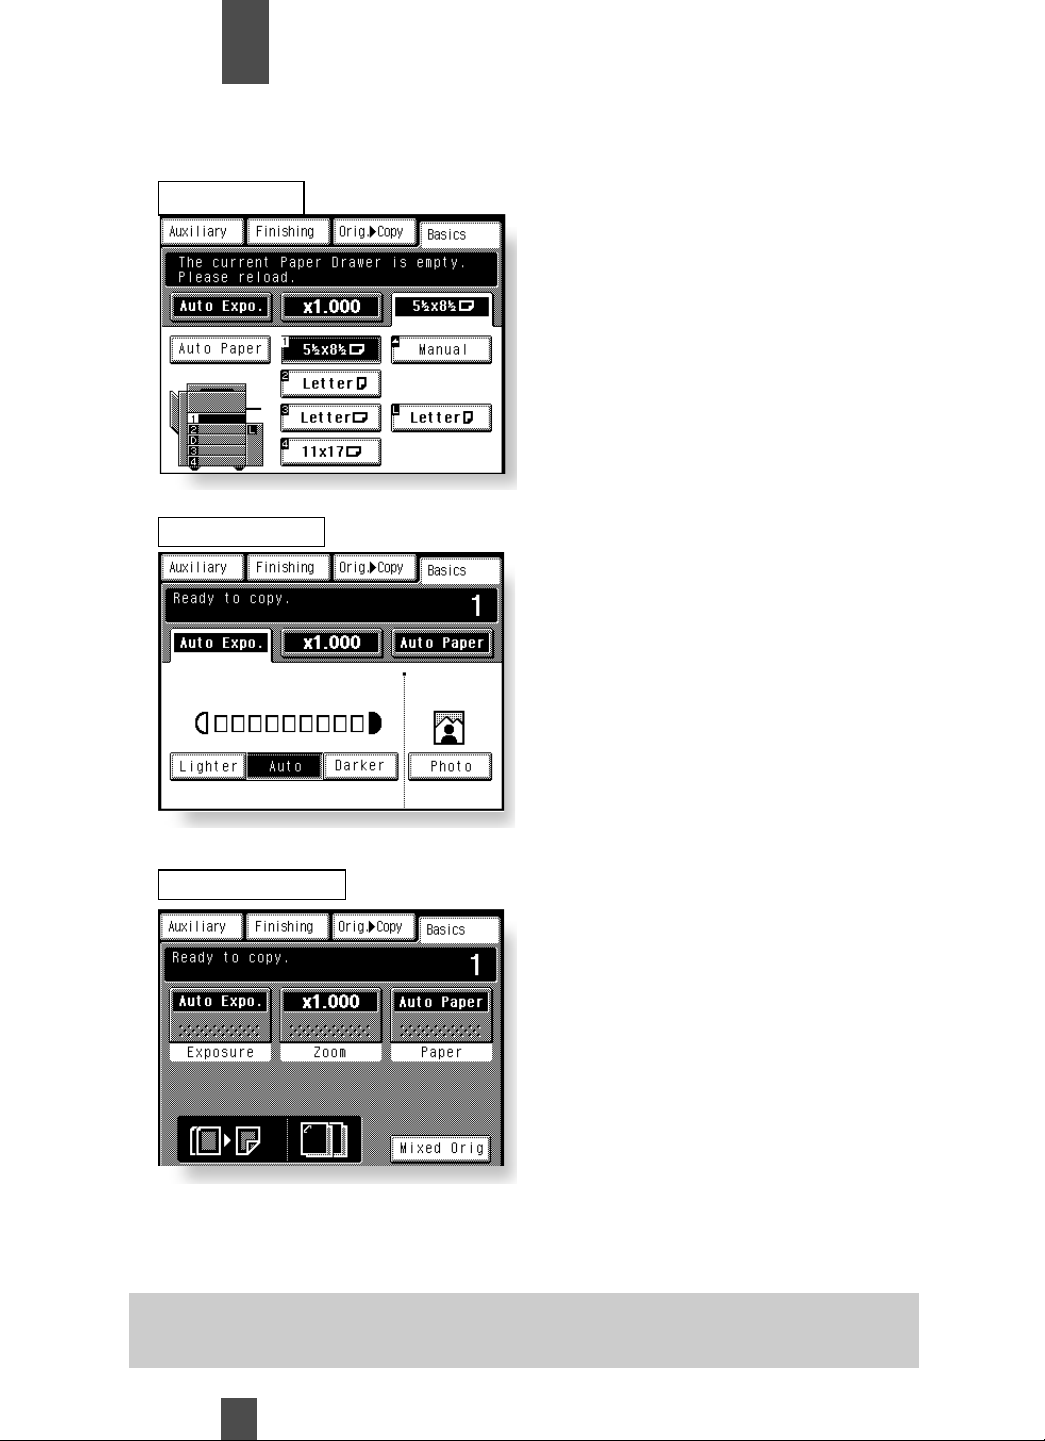
When you turn ON the Power Switch the Basic screen as shown below appears on the Touch Panel. It displays messages,
graphics, currently set functions, available functions to choose from, and the copier status.
How the Screen is Organized
1
Supplementary Function Keys
1
2
Message Display
2
4
Set Function Display
4
1
Supplementary Function Keys
1
Example: Auxiliary Function
18
3
Basic Function/Key
3
The Auxiliary, Finishing, Original to.
Copy, and Basis keys are displayed.
When any of these supplementary
function screen appears.
*Touching Basics returns you to the
Basic screen.
Page 20
Overview
Chapter
2
Using the Touch Panel....
2
Message Display
2
3
Basic Function/Key
3
Shows the current copier status,
operating instructions, precautions, and other data including the
number of copies selected.
Example: Add Paper
Shows the basic function keys
and the corresponding functions
currently selected for use.
Touching a basic function screen.
*The inside of the key is darkened
when selected.
Example: Exposure
4
Set Function Display
4
Shows graphic representation of the
settings currently made for
Orig.
➧
Copy and Finishing.
*When you want to check for more
details of the set functions, press the
Review Settings key. p. 22
Example: Orig
➧
Copy : 1 ➧2
Finishing : sort-and-staple
Operating the Touch Panel
Touch the keys on the display lightly to make selections. When setting features with up/down arrow keys
like zoom , touch and hold your finger on the key to scroll through the selections.
Note: To avoid damage to the touch screen display, do not press hard on the glass or use sharp or pointed
objects to press it.
19
Page 21
Overview
Chapter
3
Turning ON /OFF
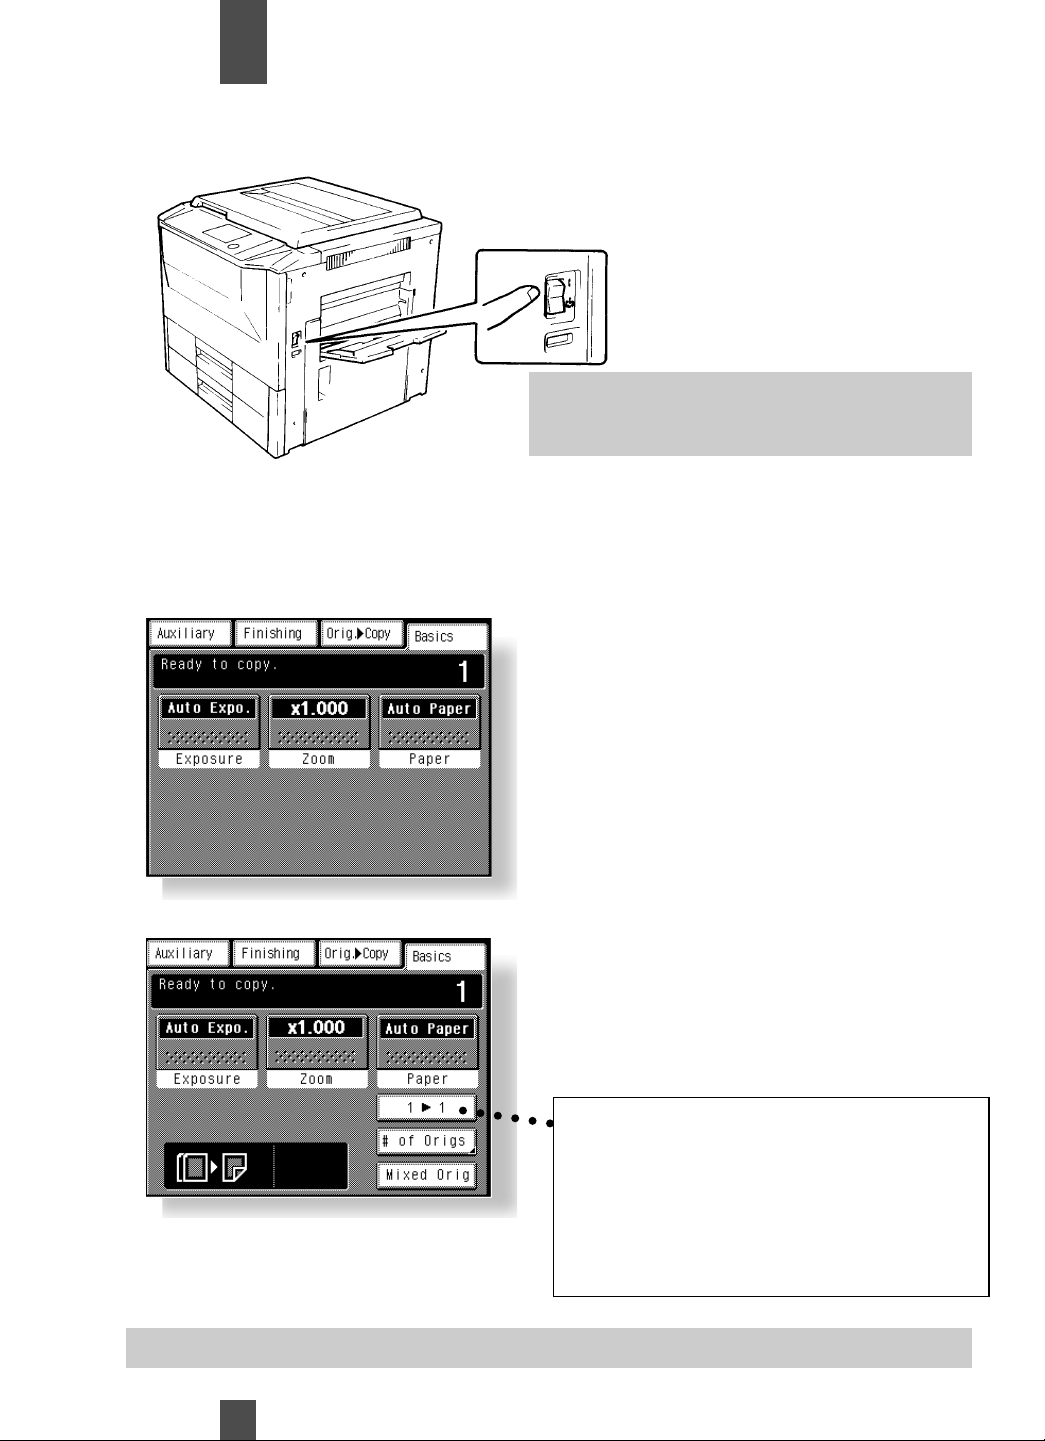
• Turning the copier ON
Press the Power Switch to the 1 (ON)
position.
• Turning the copier OFF
Press the Power Switch to the (OFF)
position.
Note: If the auto power switch-OFF function is
enabled, the copier will automatically shut
down after a given period of time.
Initial Mode
When the power switch is turned ON, the Basic screen appears on the Touch Panel. The settings
on this screen are called the initial mode, serving as the reference for all panel settings to be later
made.
Number of copies selected : 1
Exposure : Auto
Zoom : x1.000
Paper : Auto Paper
Finishing : Non-Sort
Original
➧
Copy : 1 ➧1
The settings of the initial mode vary depending on which options or option are mounted
on your copier.
Number of copies selected : 1
Exposure : Auto
Zoom : x1.000
Paper : Auto Paper
Finishing : Non-Sort
Original Copy : 1
When the copier is equipped with a
Reversing Automatic Document Feeder
(RADF) and Duplex Unit,
➧
2 (sided)copy mode can be pro-
the 1
Example: When the Automatic
Document Feeder and Duplex Unit
are mounted.
Useful Tip: The Key Operator function can be used to change the settings of initial mode.
grammed as the default mode to save
paper.
Touch this key if you want to make 1
➧
2
➧
1
20
Page 22

Overview
Chapter
3
Auxiliary Functions
Panel Resetting
The Normal Mode (Reset) key resets all
control panel settings to default settings
including the number of copies and zoom
ratio.
If a document feeder is used,
an original left on the glass will be
ejected out of the unit.
Useful Tip:
To avoid miscopy, press the Reset key
before making any settings for your
copy job.
Auto Power-OFF
The Auto-Power OFF function shuts
down the copier a given period time after
the copier has been last used.
Useful Tip: The time for the copier to
enter the Auto Power-OFF mode can be
selected from 1 to 120 min. The Auto
Power OFF function can even be disabled .
For details, see Key Operator. p.92
Energy Saver
If the copier is shut down when it is not
in use, it takes the copier some time to
Auto Panel Reset
If no key on the control panel is pressed
within 60 sec. after a copy cycle has been
completed copying settings made, the Auto
Panel Reset function is activated to return
the copier to the default settings.
complete the warm-up cycle. Instead of
turning the copier OFF, it’s a good idea
to use the energy saver mode which will
minimize the time for the copier to complete the warm-up cycle to about 30 sec.
To see the copier into the Energy Saver
mode, you need only to press the Energy
Save r ky. Or, a given period of time
after the copier has been toucher last, it
automatically enters the Energy Saver
mode, The initial setting is 15 min.
Useful Tip: The time for the copier to
enter the Auto Panel Reset Function can
be changed to 30 sec. p. 90
Auto Copy Start
If you load originals in the document feeder
and press the Start Key while the copier is
warming up after it has been turned ON, the
Auto Copy Start function allows that copy
process to be started as soon as the copier
completes warming up.
To cancel the Energy Saver mode, press
any key on the control panel.
Useful Tip: The time for the copier to
enter the Energy Saver mode can be
selected from 1 to 120 min.
For details, see Key Operator. p.90
Note: The copier is automatically shut
down if the Auto Power-OFF function is
activated while it is in the Energy Saver
mode.
21
Page 23
Overview
Chapter
2
Auxiliary Functions
Interrupt
The Interrupt function allows you to interrupt
a current job and run a different one.
Pressing the Interrupt key once sets the
copier into the copier leave the Interrupt
mode, returning to the previous settings.
Useful Tips
• If the current job involves 2-sided
copying, Cover function, Page Insertion
or Transparency Interleavings, the
copier rejects an Interrupt cycle.
•If the Current job involves a finishing
function other than Non-Sort, Non-Sort
is automatically selected at the same
time when Interrupt function is invoked.
Notes:
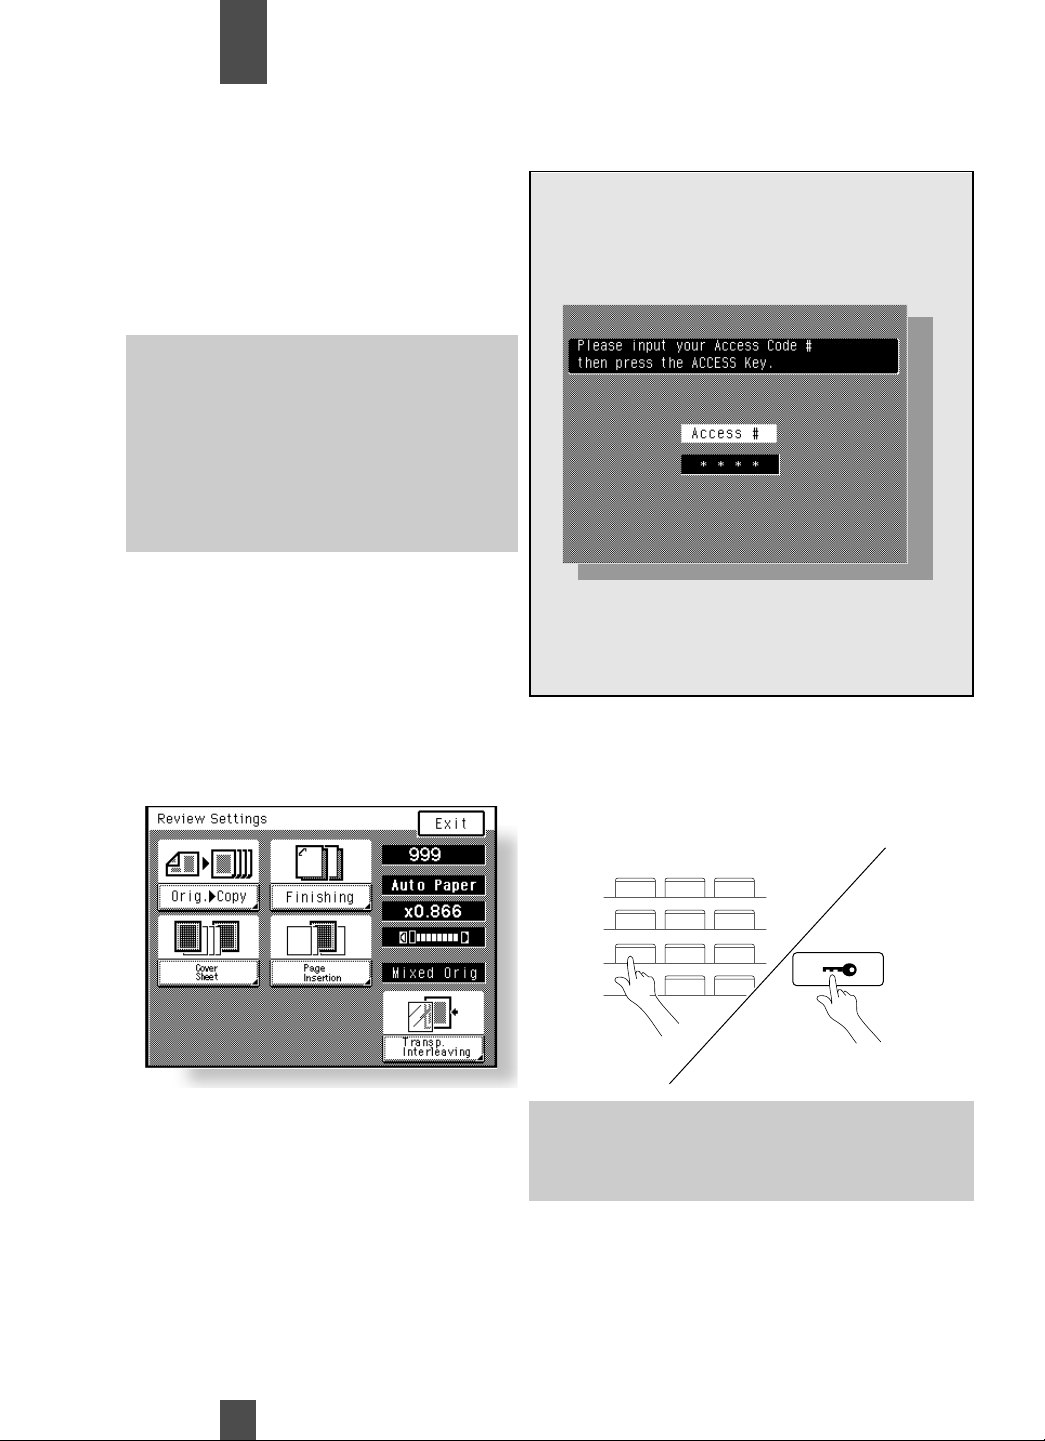
•If an access number has been programmed, a
copy cycle can be initiated only after the
access number has been input to the copier.
<”Access #”Prompt Screen>
Mode Check
The Interrupt function allow you to interrupt
a current job and run a different one.
Pressing the Interrupt key once sets the
copier into the copier leave the Interrupt
mode, returning to the previous settings.
•When you touch EXIT after having checked
the currently set function set functions, the
Basic screen reappears.
•Before you can use this function, you must
first turn “ON” the “Copy Track”function of the
Administrator Mode available from The Key
Operator function. p. 92
Entering the Access Number
1
1
From the 10-key Pad, entered the 4-digit
access number and press the Access
Mode Key.
•To change a certain function, touch the
corresponding key and then make the
necessary change.
Notes:
To correct the 4-digit access number entered,
first press the Clear key, then enter the new
number.
Access Number
If an access number has been programmed,
it allows only particular persons to use the
or supervisor to keep track of the number of
copies make by a particular department
22
2
3
2
3
123
456
789
0C
1134P438DA
When the initial screen reappears, you can
now start a copy cycle.
When the copy cycle is completed, press
the Access Mode key again.
Page 24

Making Copies
Chapter
This chapter shows you how to make copies.
The “Basic Copying Overview” offers quick, at a-a-glance on instructions for making copies. Each step is keyed to
page number with a more detailed description.
3
Basic Copying Overview p.24
Placing Originals p.26
Manual Bypass Copying p.33
Basic Functions p.36
Copy Paper Size
Zoom Ratio
Image Density
Original ➧Copy Type p.44
•1 ➧1 •1 ➧2 [2 in 1]
•1
➧
2 •1 [2 in 1] ➧1
•2
➧
1 •2 [2 in 1] ➧1
•2
➧
2 •Book ➧1
➧
•1
[2 in 1] •Book ➧2
Finishing Mode p.50
•Non-Sort
•Sort
•Sort Staple
•Batch
•Hole Punch
•Manual Staple
•Auto Dual Function
Auxiliary Functions p.62
•Cover
•Auto Original Count
•Page Insertion
•Transparency Interleaving
•Create Margin
•Edge/Frame Erase
23
Page 25
Making Copies
Chapter
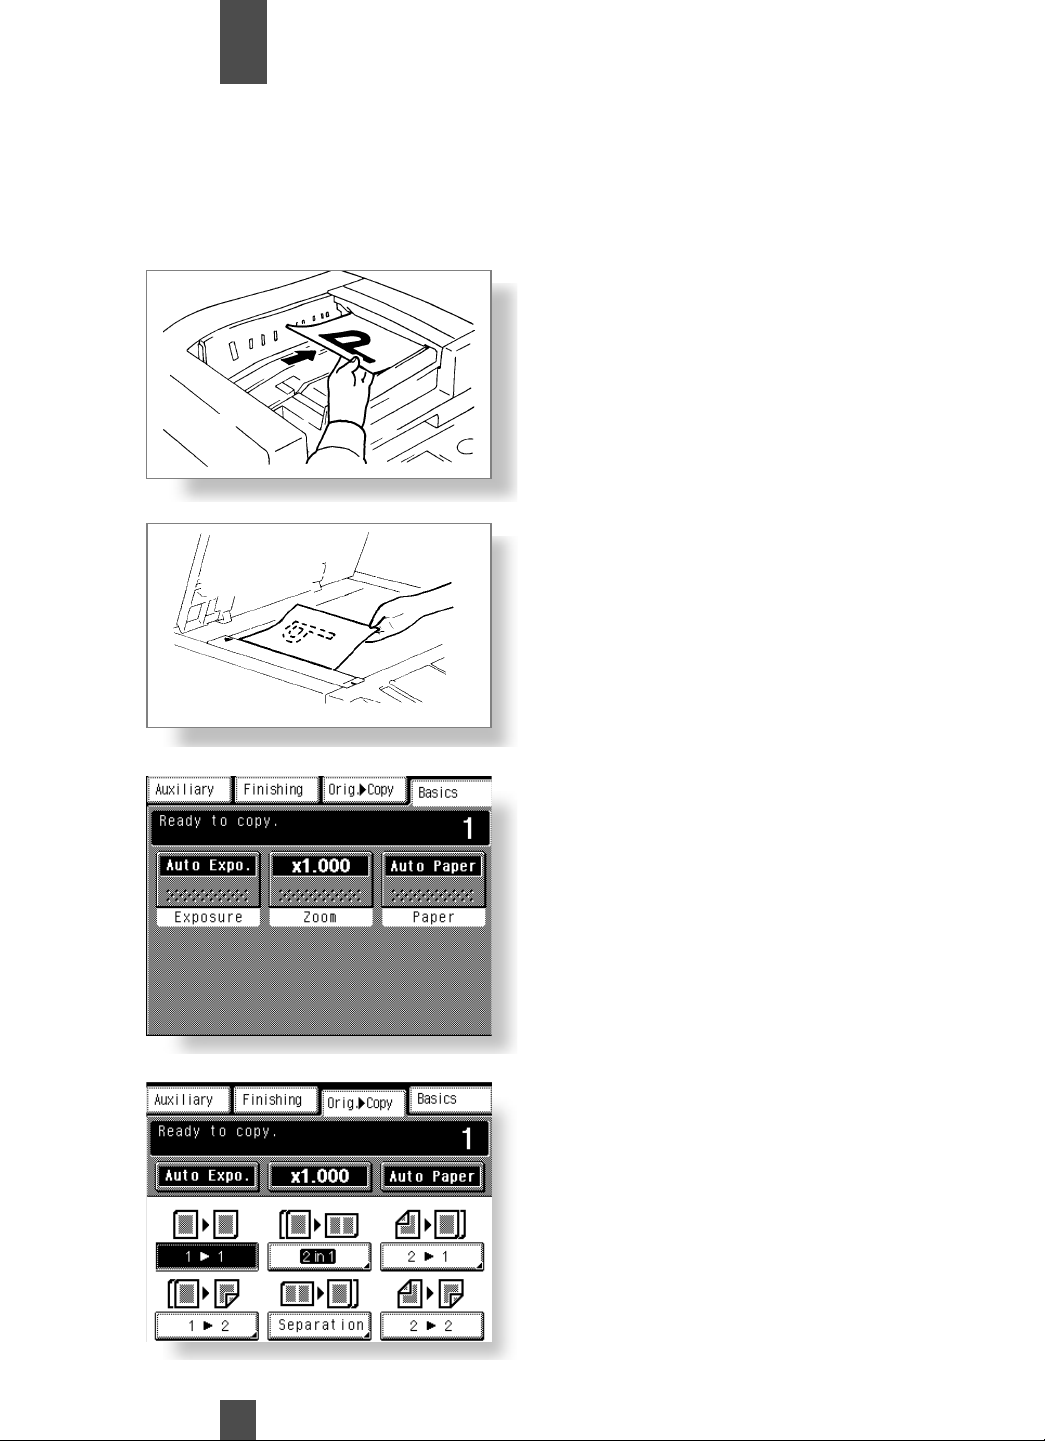
To make full-size (x100) copies of the original.place the original in position (step 1), set the number
of copies to be made (step 8), and press the Print Key (step 9). This will allow you to make full-size
copies on paper of the same size as the original*.
(*When Auto Paper, full size, and Auto Exposure are selected in the initial mode.)
Additional selections you make on the Touch Panel will change the exposure level, zoom ratio, the
type of copy and so so on.
3
Placing the Original
•Load the originals face up on the
document feeder. (p.26)
or.....
•Raise the Original Cover and place
the original face down on the Original
Glass.
Selecting the basic functions
2.
Touch Paper p.36
3.
Touch Zoom p. 38
4.
Touch Exposure p.42
•To change the
copy paper size
•To change zoom
ratio
•To change expo
sure level
Selecting the original ➧ copy type
5. Touch Original ➧ Copy
•To make copies
from a book
•To save copy
paper
24
Page 26
Making Copies
Chapter
3
Selecting the finishing type
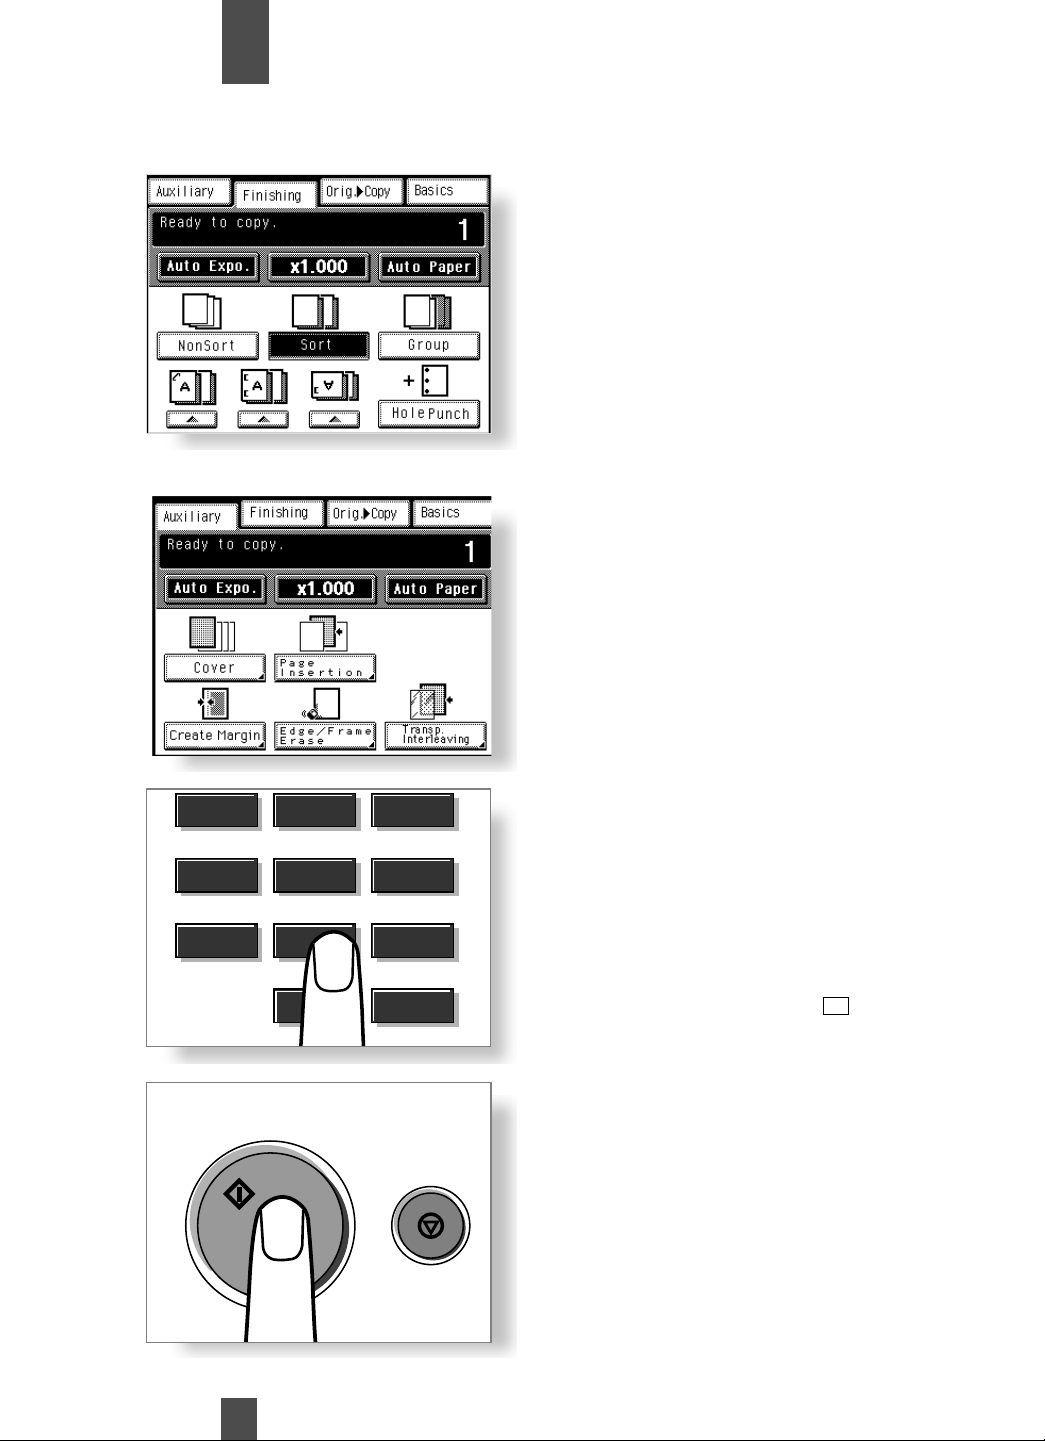
Selecting the auxiliary functions
6.
Touch Finishing p.50
7.
Touch Auxiliary p.62
•To sort copies
•To staple copies
•To punch holes
in copies
•To make a file,
margin on the
copy
1
4
7
Print
8.
2
5
8
0
3
6
9
C
Clear
Stop
Setting the number
of copies.
9.
Press the Print key
•From the 10-key
Pad, set the
desired number
of copies to be
made.
*If you have
entered an incorrect number,
press the clear
key, then enter
C
the correct number.
•
When you press
the Print Key, the
copier starts the
copy cycle .
•To stop the copy
cycle, press the
Stop key.
25
Page 27

Making Copies
Chapter
3
Using the Document Feeder (RADF or UDH)
The Automatic/Duplexing Document Feeder automatically feeds in sheet originals placed on the
Document Feed Tray one by one. After the copy cycle has been completed, it automatically ejects the
original onto the Document Exit Tray.
Some originals may not be suitable for reliable operation of the Document Feeder.
Originals Suitable for the Document Feeder (RADF or UDH)
Type of Originals: Sheets (Plain paper)
Normal mode
•1-Sided Original (weighing 13-1/4 to 29-1/4 lbs.)
•2-Sided Original (weighing 16 to 24 lbs.)
•Mixed Original Detection mode (weighing 16 to 24)lbs.)
Original Size: 1-Sided Original, 2-Sided Original, Mixed Original Detection Mode
11" X17", Legal L, Letter L, Letter C, Foolscap(5-1/2" X 8-1/2") L,
5-1/2" X 8-1/2" (Except for Mixed Original Detection Mode)
2-in-1 (Dual Original Scanning) mode : Letter C
* Lightweight Original
For a lightweight original, place it directly onto the Original Glass or make copies
using the SADF Mode. (Single Automatic Document Feeding Mode). p. 32
26
Page 28
Making Copies
Chapter
3
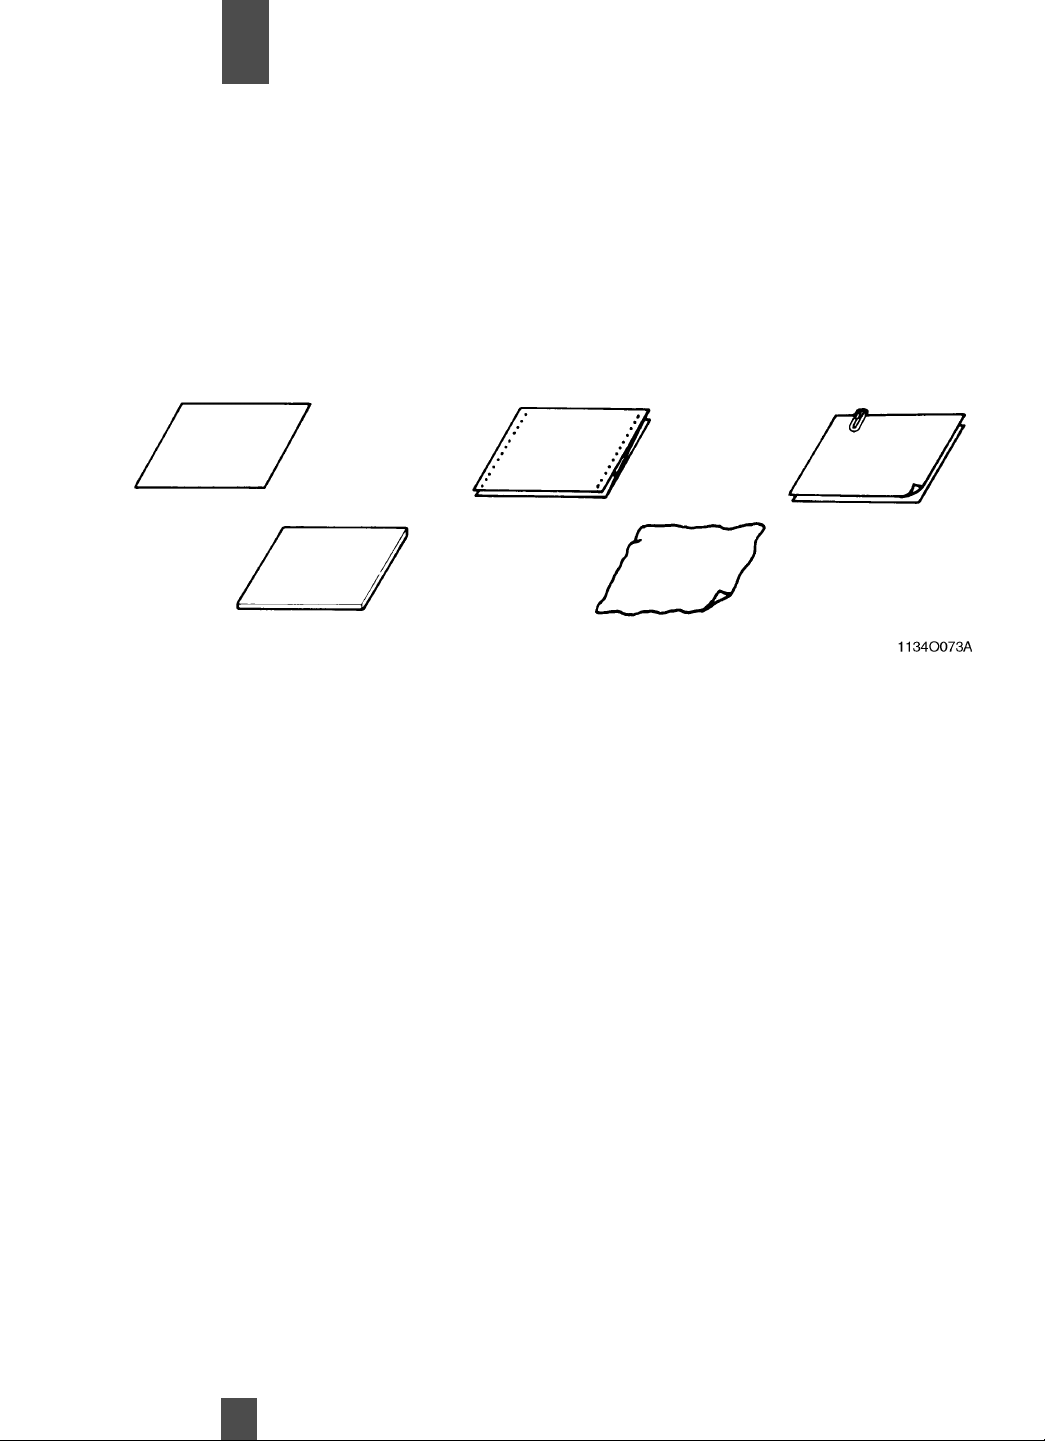
Originals Not Suitable
•Typing paper, paraffin paper, and other thin paper
•Thick paper
•Originals greater than 11" X17" or smaller than 5-1/2" X8-1/2"
•Transparencies, translucent paper
•Wrinkled, dog-eared, curled, or torn originals
•Clipped or stapled originals
•Carbon-backed originals
Typing paper,
paraffin paper,
and other thin
paper
Thick paper
*For any of these types of originals, place the original manually on the Original
Glass to make a copy. p. 31
Continuous
forms
Stapled
originals
Wrinkled or
dog-eared
originals
27
Page 29
Making Copies
Chapter
3
Loading the Originals
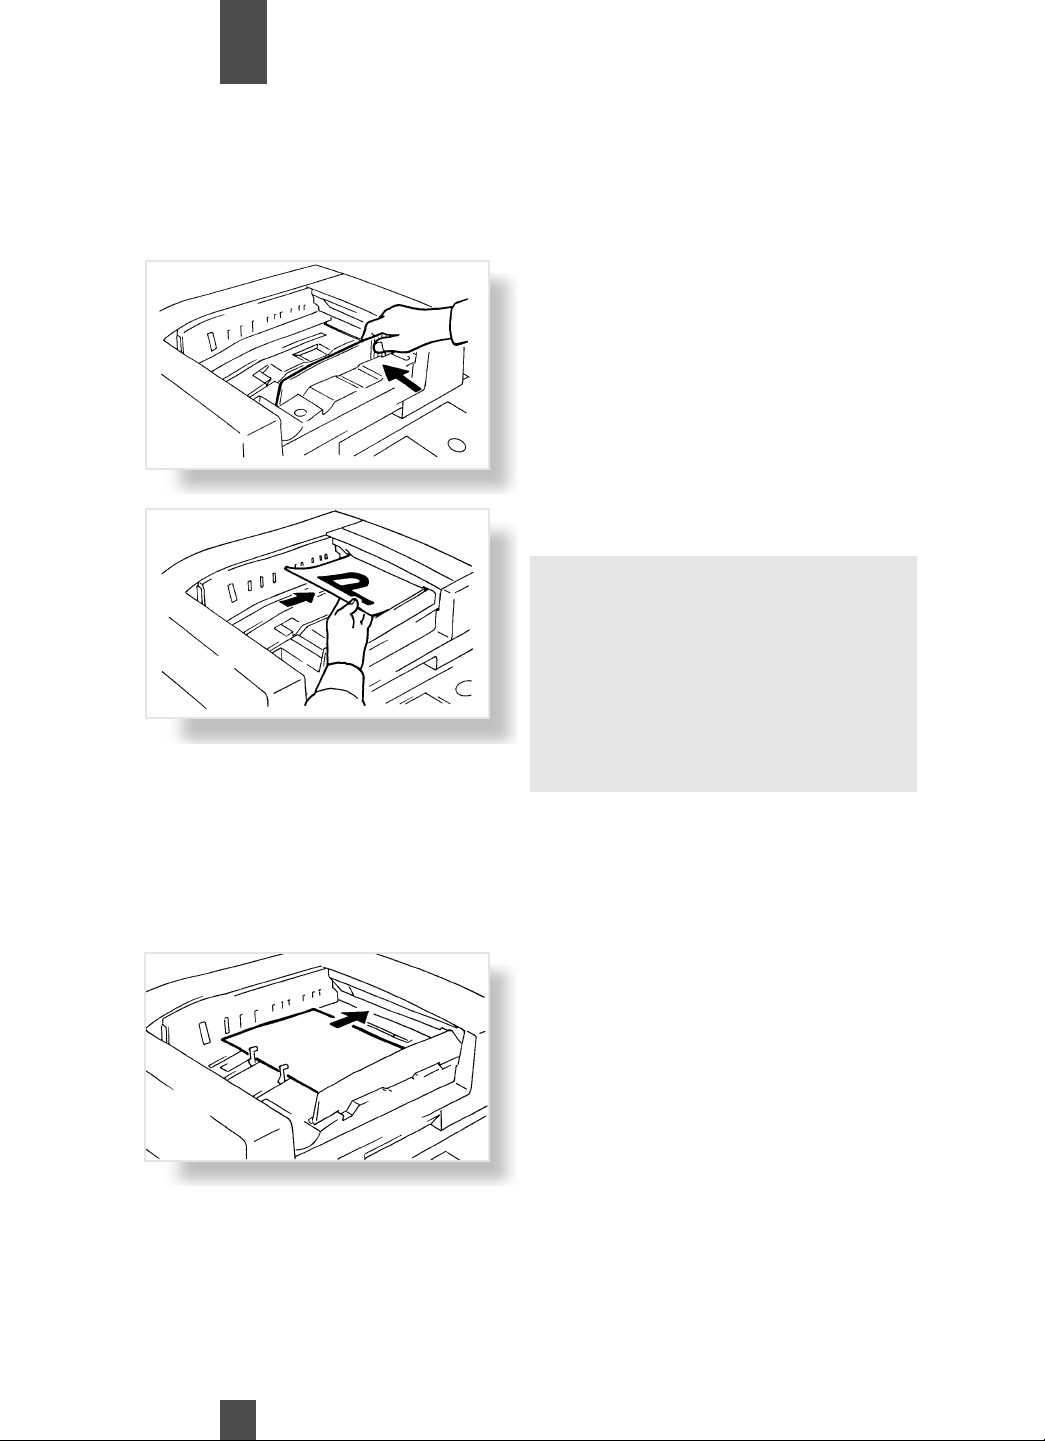
Use the instructions below to insure proper handling of the originals.
1
2
1
2
Slide the Document Guide to
the size of the originals.
Load a neat stack of originals face up
on the Document Feed Tray.
Note:
• The maximum number of originals that can
be loaded Letter or smaller :Up to 60
11”x17” or legal :Up to 30
• Make sure that the top level of the original
stack does not exceed the ▼ marking.
• Make sure the Document Guide Plate
touches the edges of the original stack.
If it’s not pressed snugly against the
original stack, skewed feeding could result.
SmartFinish™
Using the Sorter/Stapler/Stacker and the Universal Document Handler, the copier can reload the originals and continue
copying more than 20 sets.
28
When the copier finishes making
and sorting copies into 20 sets,
the stack of originals is loaded
back into the document feeder to
continue making the additional
sets of copies needed.
Page 30
Making Copies
Chapter
3
Using the Mixed Original Detection Mode
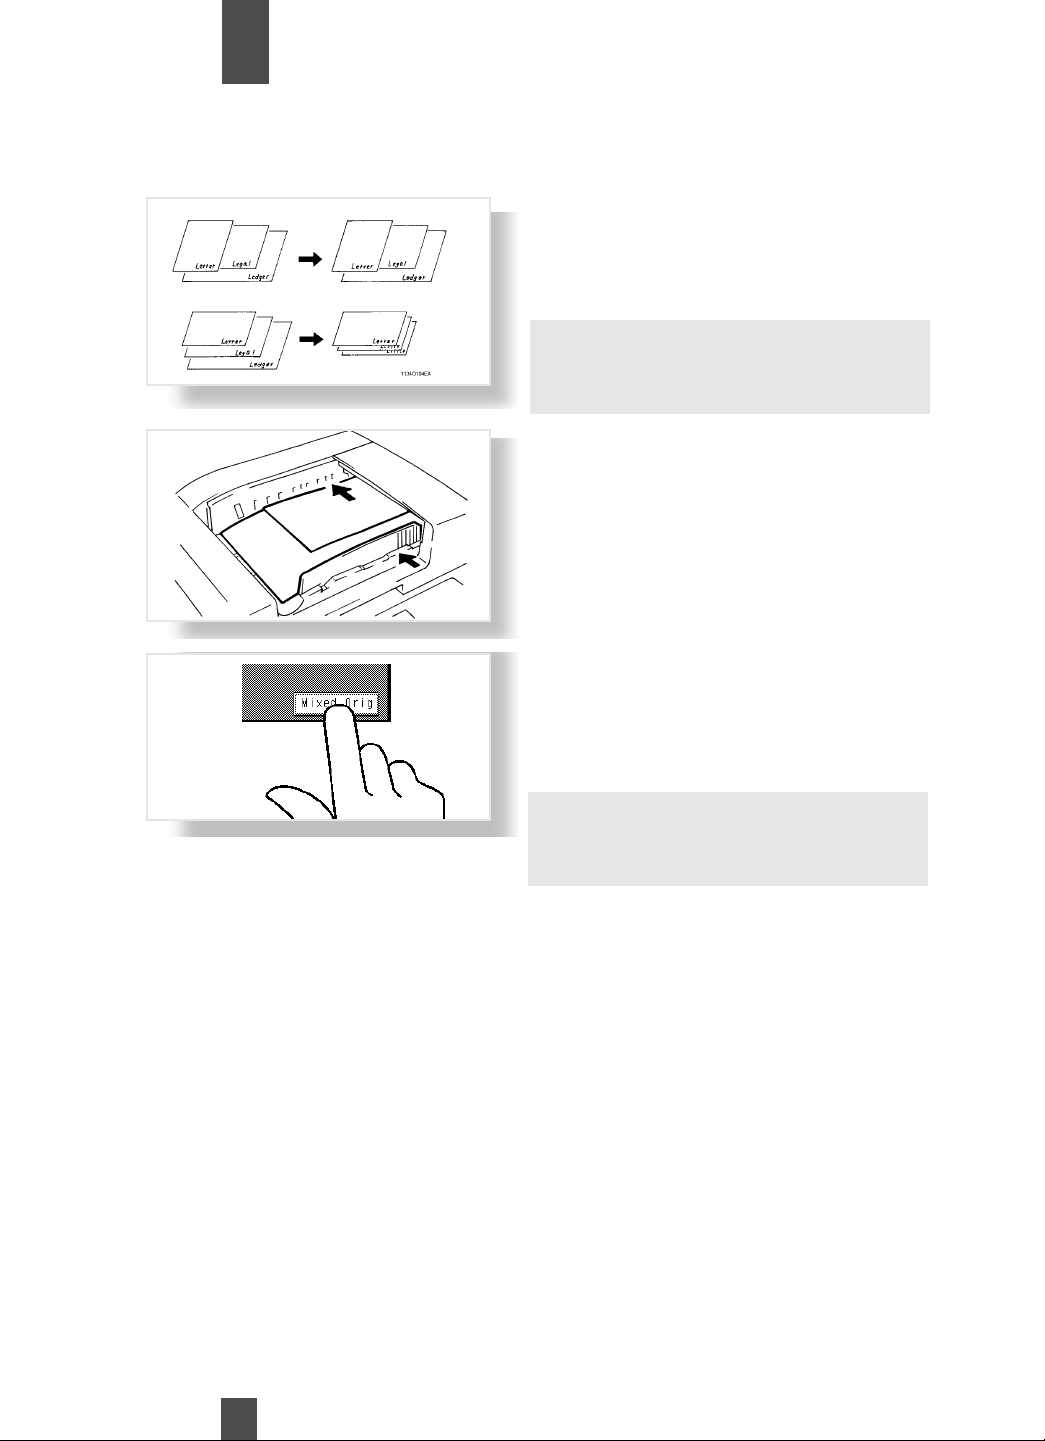
Use the Mixed Original Detection mode
to make copies automatically from originals of assorted sizes loaded in the
RADF/UDH. If Auto Size is selected,
you can make copies of the same size.
Note:
• The copier cannot staple copies of
different sizes made in the Mixed Original
Detection mode.
1
2
1
2
Load the stack of originals so that the
rear edge of each original is pressed
against the rear Document Guide
Plate. Then, slide the front Document
Guide Plate against the front edges of
the originals with the greatest width.
Touch Mixed Original.
Useful Tip:
•The Mixed Original Detection mode can be
set as a default through the Key Operator
function. p. 88
29
Page 31
Making Copies
Chapter
3
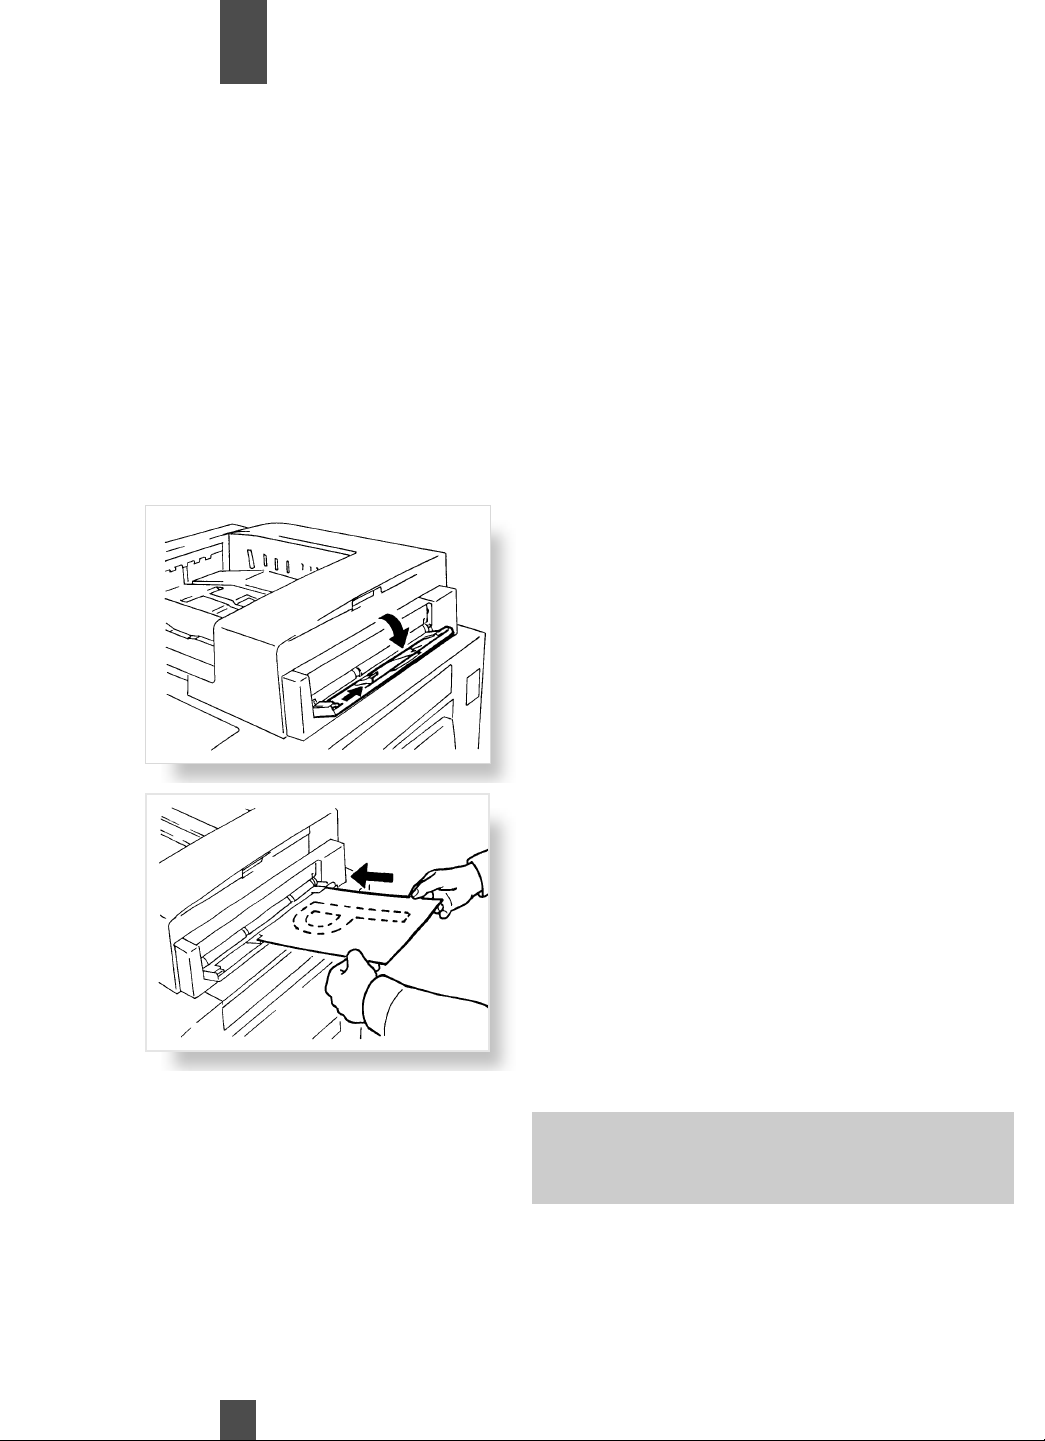
Using the Single Automatic Document Feeding Mode (SADF Mode)
In SADF mode, load your originals one by one onto the Automatic/Duplexing Document Feeder to make a copy or copies.
Loading the original, automatically starts the copy cycle.
•Originals available for the SADF Mode.
Type : Plain paper
Thickness : 9-1/4 to 53-1/4 lbs.
Size : 11” X 17” to 5-1/2” X 8-1/2”(Invoice)
•The following features cannot be selected in the SADF Mode.
➧
2-sided original
2-sided original
Dual Original Scanning Mode (2 in 1 Mode), Cover Mode, Sort and Staple
Mode, Page Insertion Mode, Transparency Mode, Book, 2-in-1 Separation
Mode and Manual Staple.
1-sided copy
➧
2-sided copy
1
2
1
2
Open the Single Feed Tray
and slide the Guide Plate to
the size of the original.
Make sure that the Print Key
is lit green and place the original face down on the
Document Feed Tray.
3
4
3
4
The original is automatically taken up
and the copy cycle is started.
When the Print Key lights up green
again, load the next original.
30
Notes:
•Be sure to place one original at a time.
•Be sure to flatten any folded or curled originals.
Page 32
Making Copies
Chapter
3
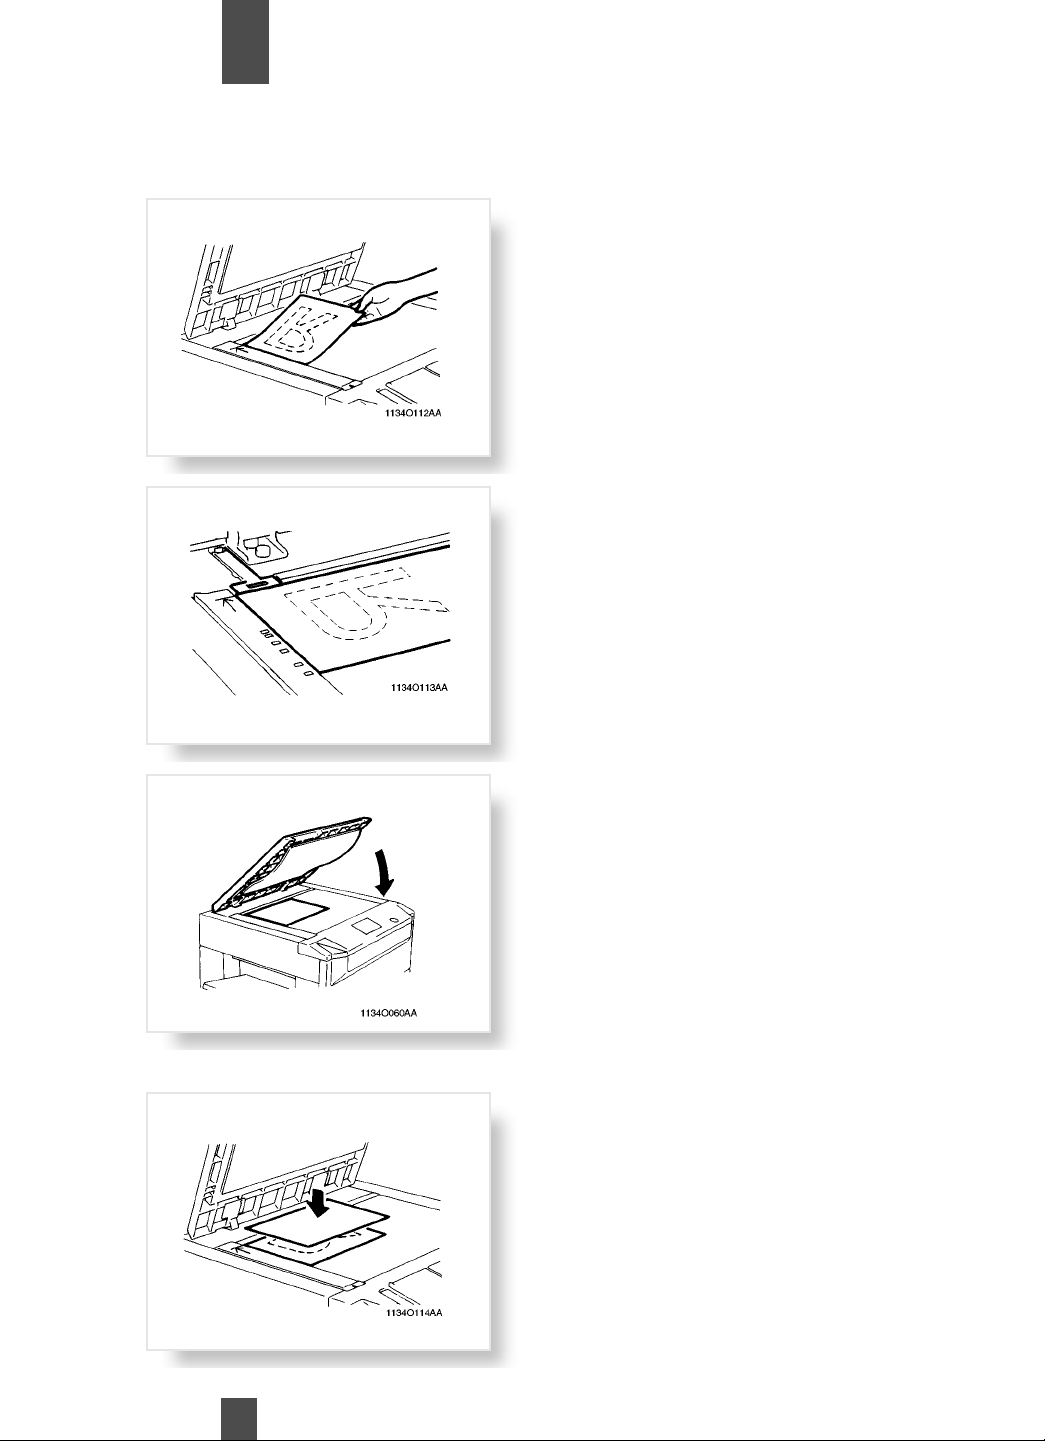
Placing Originals on the Original Glass
Use the instructions below to insure proper handling of the original.
Sheet Originals
1
1
Raise the Original Cover and
place the original face down
on the Original Glass.
2
3
2
3
Align the rear left corner of
the original with the marker
on the Original Width Scale.
Then, press the rear edge of
the original up against the
Original Positioning Plate at
the rear side of the Original
Glass.
Gently lower the Original Cover.
Highly Transparent Originals
1
1
(Using transparencies and translucent
paper for the original)
•Place the original in the same
way as the sheet originals.
•Place a blank sheet of paper
of the same size as the origi nal
over the original.
31
Page 33
Making Copies
Chapter
3
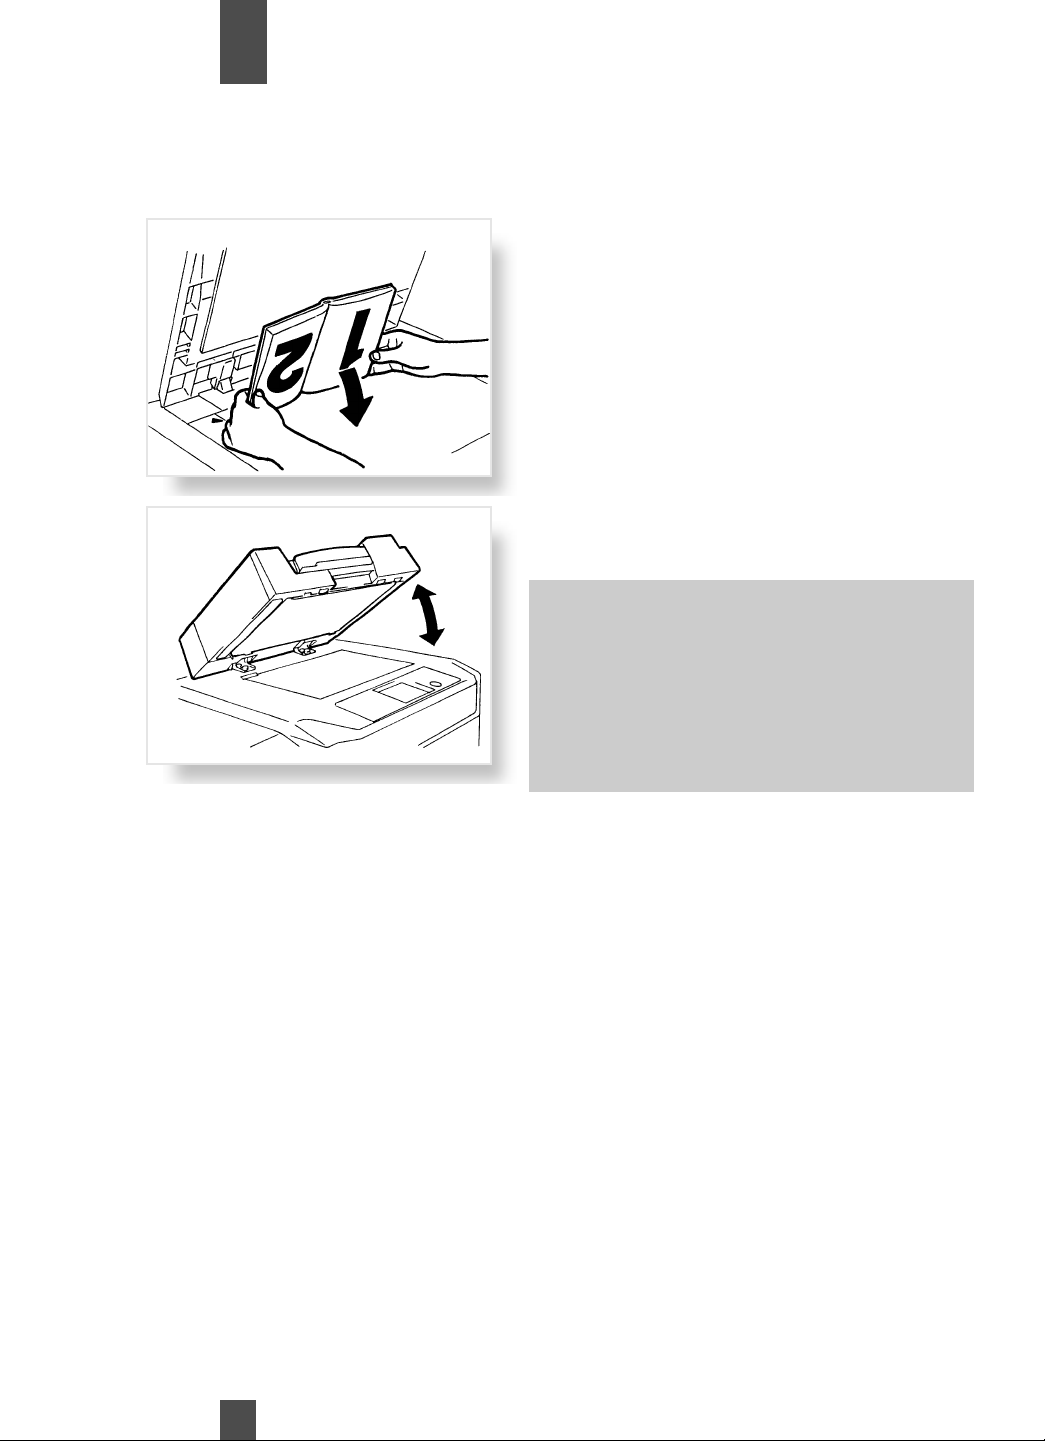
Making Copies from A Book Using Book Copy Mode
(“Book” refers to an open bound original.)
1
2
1
2
Place the open book so that
its top edge is at the rear of
the copier.
Gently lower the Original
Cover.
Notes:
•If the book is thick, make a copy with
the Original Cover raised.
•Not positioning the open book properly
will result in copies with pages in
incorrect order.
•Do not look directly at the Original Glass
surface as a strong beam of light is
emitted.
32
Instructions for Original Placement
•Be sure to raise the Original Cover 15° or
more before placing the original. If the
Original Cover is raised to an angle less
than 15°, the copier may fail to select the
correct copy paper size or zoom ratio.
•Do not place an original weighing more
than 6-1/2 lbs. on the Original Glass.
•When placing an open book, do not press
the book hard on the Original Glass, as
trouble could result.
Page 34
Making Copies
Chapter
3
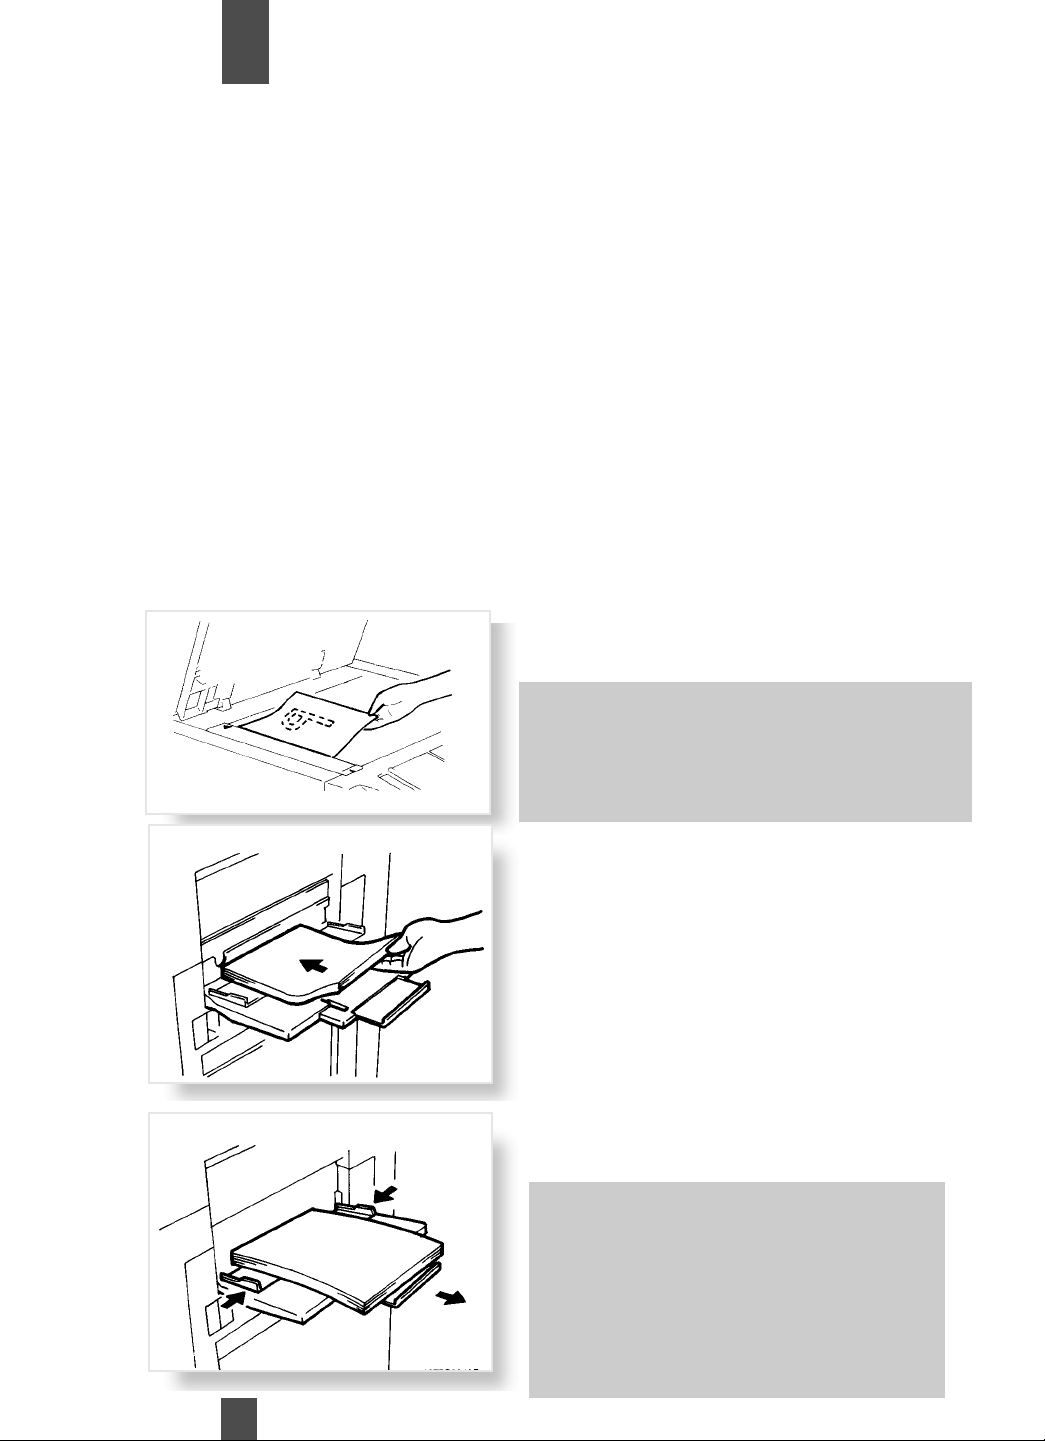
Manual Bypass Copying
Use the Manual Bypass to make copies on paper not loaded in any drawer, or to copy onto transparencies,
translucent paper, or any other special paper. When using the Multi Bypass Tray, you can load multiple sheets
of copy paper.
Paper that can be used for Manual Bypass copying:
Type of
Paper
Paper
Size
Capacity
Manual Bypass Copying:
When paper size is not input.
1
1
Plain paper (weighing 16 to 24 lbs.)
Heavyweight paper (weighing 24 to 42 lbs.)
Transparencies, translucent paper.
5-1/2" 8-1/2"L to 11" 17"L
Width : 4" to 11-3/4"
Length : 5-1/2" to 17", 5-1/2"
Plain Paper, recycled paper, Up to 50 sheets
Plain Paper (once-copied paper) Up to 20 sheets
Thick paper, transparencies, translucent paper Up to20 sheets
Place the original on the Original Glass
and make the control panel settings.
Note: The following functions cannot be
selected for Manual Bypass if paper size is not
input: Auto Size, Auto paper,Book, Finishing
(other than non-sort), 2-sided copying, Marginby-Reduction, Erase, 2in1 Separation and
Mixed Original Detection.
2
3
2
3
Swing down the Multi
Bypass Tray and slide the
Paper Guide Plate to the
size of the copy paper.
Place a neat stack of copy
paper on the Table and insert it
into the copier until it stops.
Note:
•Before inserting, fan the paper
stack well if you are using transparen-
cies or translucent paper.
•Correct any curl if you are using
heavyweight paper.
•When using once-copied paper, load
the paper stack so that the blank side
faces up.
33
Page 35
Making Copies
Chapter
Manual Bypass Copying:
When paper size is input.
3
1
2
3
1
2
3
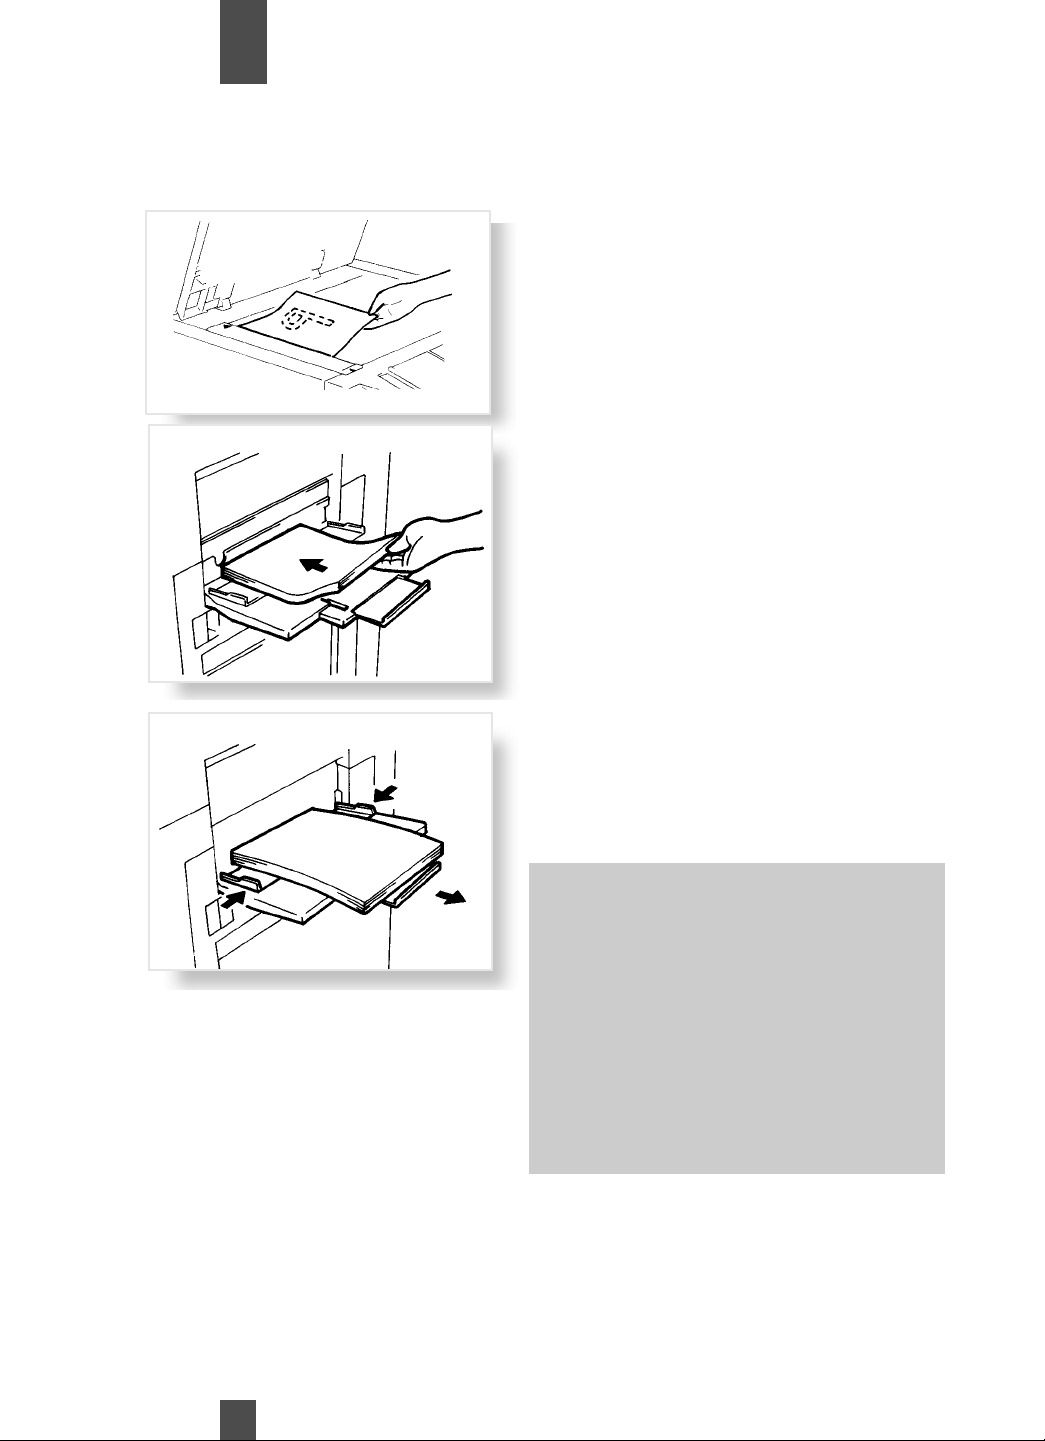
Place the original on the Original Glass
and make the control panel settings.
Swing down the Multi
Bypass Tray and slide the
Paper Guide Plate to the
size of the copy paper.
Place a neat stack of copy
paper on the Table and insert it
into the copier until it stops.
34
Note:
•Before inserting, fan the paper
stack well if you are using transparen-
cies or translucent paper.
•Correct any curl if you are using
heavyweight paper.
•When using once-copied paper, load
the paper stack so that the blank side
faces up.
• When copying on thick paper, trans-
parencies, or translucent paper, the
following functions should not be used;
1 ➧2, Batch, Sort Staple, Hole Punch.
Page 36
Chapter
Making Copies
3
4
5
4
5
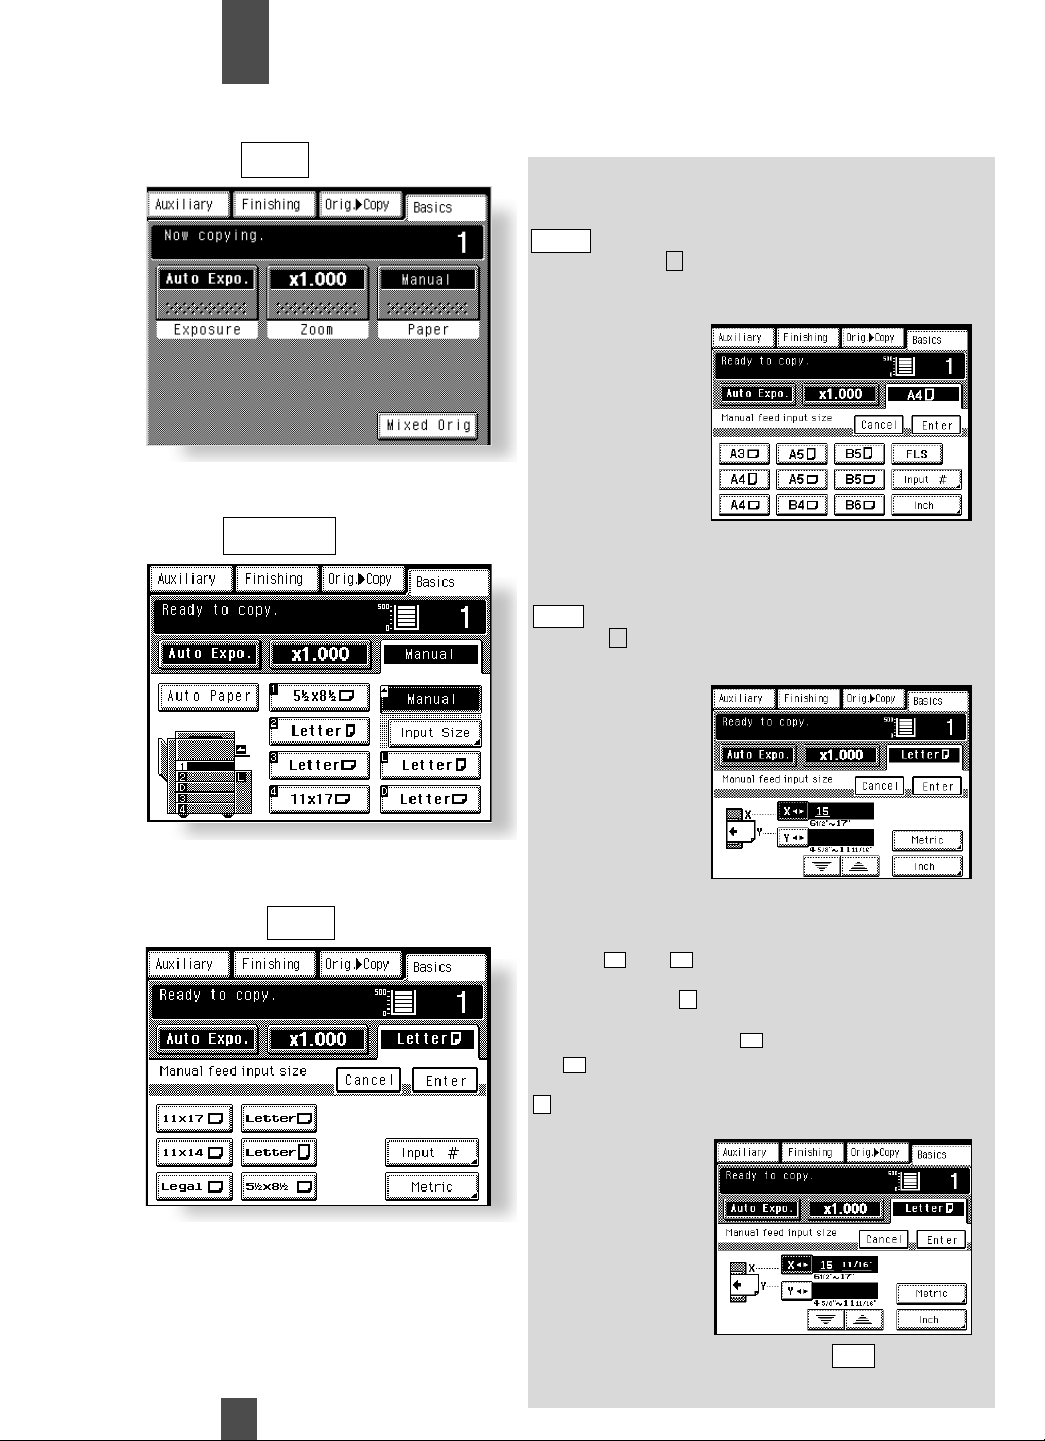
Touch .
Touch .
Paper
Input Size
Useful Tip:
When you want to use
metric size paper,Touch
Metric
on the screen
given in step , and you
have screen that allows
you to select a metric
paper size.
When you use nonstandard size paper,Touch
Input #
on the screen given
in step , and you have
the following screen.
6
6
6
6
Select the desired paper size
and touch .
Enter
35
▼
▼
▼
X
▼
Enter
Touch or to set
the whole number for X
and touch the key.
The underline moves to
the right. Then touch
or to set the fractional number and touch the
key. Now the value for
X
X has been fixed.
Do the same for Y, then touch .
Page 37
Making Copies
Chapter
3
Basic Functions
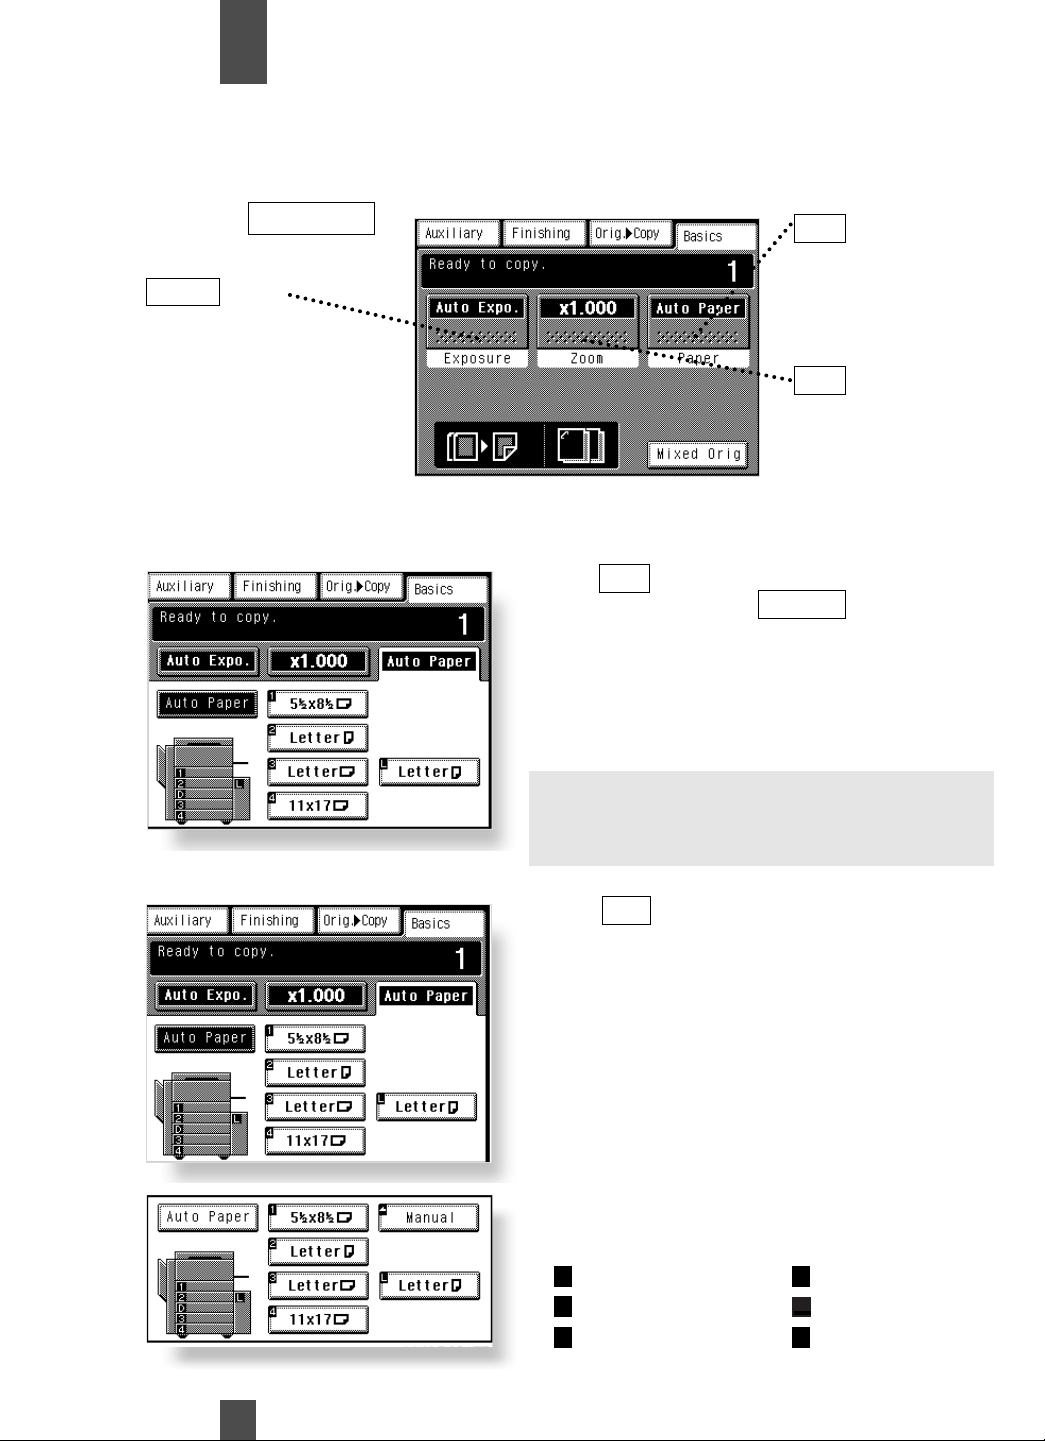
In the following pages, we explain how to make the basic settings (copy paper, zoom ratio,
and exposure level) to make copies.
Exposure
Touch this key to show a
screen which allows you to
select the image density of
the copy.
Copy Paper Size
Auto Paper
1
1
Basic Screen
Key:
Paper
Key:
Touch this key to show
a screen which allows
you to select the paper
size.
Key:
Zoom
Touch this key to show
a screen which allows
you to select the zoom
ratio.
Touch on the Basic
screen and then touch
In the Auto Paper mode, the
copier automatically selects
the paper of the optimum
size according to the size of
the original being used and
zoom ratio selected for use.
Useful Tip
This mode is efficient when you want to make
copies on paper of the same size as your originals
automatically.
Paper
Auto Paper
1
2
1
2
Manual Selection
36
Touch on the Basic
screen, and the Touch Panel
shows which drawer holds
which copy paper size.
Touch the desired paper size
key.
Paper
1
1st Drawer
2nd Drawer
2
3rd Drawer
3
4
L
4th Drawer
➡
Manual
Large Capacity
Cassette
Page 38
Making Copies
Chapter
3
Basic Functions
Auto Drawer Switching
If the drawer currently selected for
use runs out of paper and there is
another drawer loaded with paper of
the same size and in the same direction, the copier automatically selects
that second drawer to continue copying.
Special Paper Setting
Useful Tips
If all drawers are loaded with the same size
paper, Auto Drawer Switching can make up to
3,850 copies (20 lbs.)without interruption.
If a Large Capacity Cassette is used, 7,250
copies can be made without interruption.
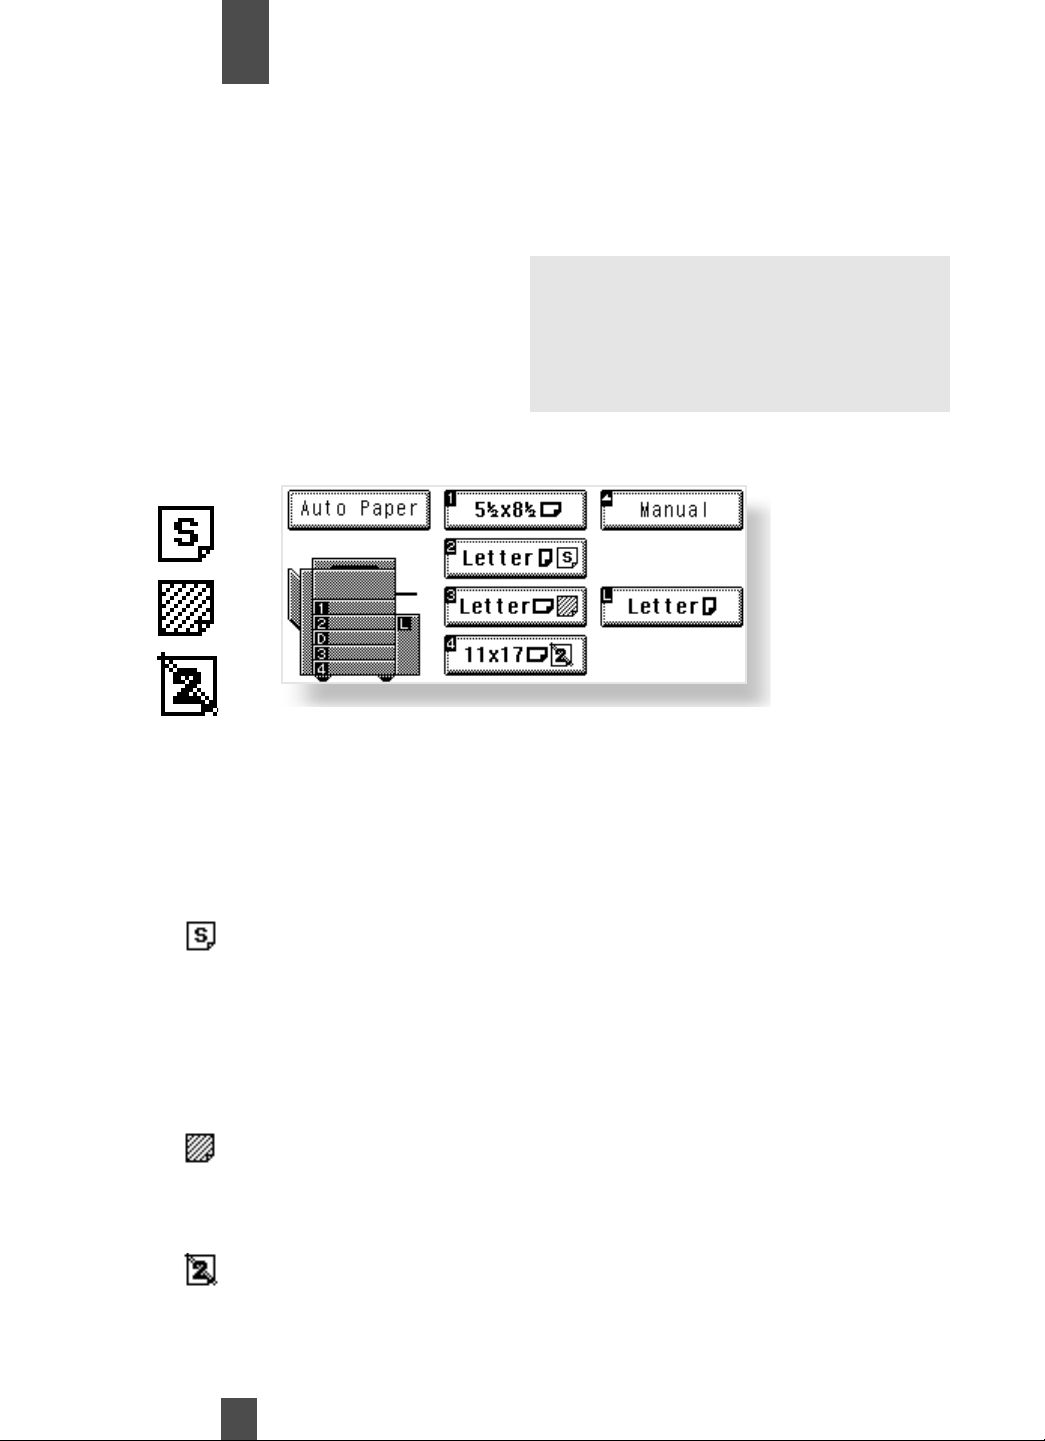
If one of the symbols shown above appears on the paper select key on the
Touch Panel, it means that drawer has been designated for special paper.
The copier provides three different types of special paper setting, each
having specific purposes as detailed below. The setting can be made
by using Key Operator. p. 91
: Recycled paper
When this setting is made, the Display asks you whether or not to use
that particular drawer as a possible candidate in the Auto Paper mode.
You may be using both recycled as well as plain paper loaded in your
copier. If, for example, you make this setting for the drawer loaded
with recycled paper, the copier does not select that particular drawer in
the Auto Paper mode. This allows you to make copies on plain paper
first.
: Special paper (inserts)
This setting precludes both Auto Paper mode and Automatic Drawer
Switching. Make this setting for the paper for inserts (e.g.,colored
paper), preventing that paper from being used for other purposes.
: Disabling 2-sided copying
This setting precludes 2-sided copying.
37
Page 39
Making Copies
Chapter
3
Zoom Ratio
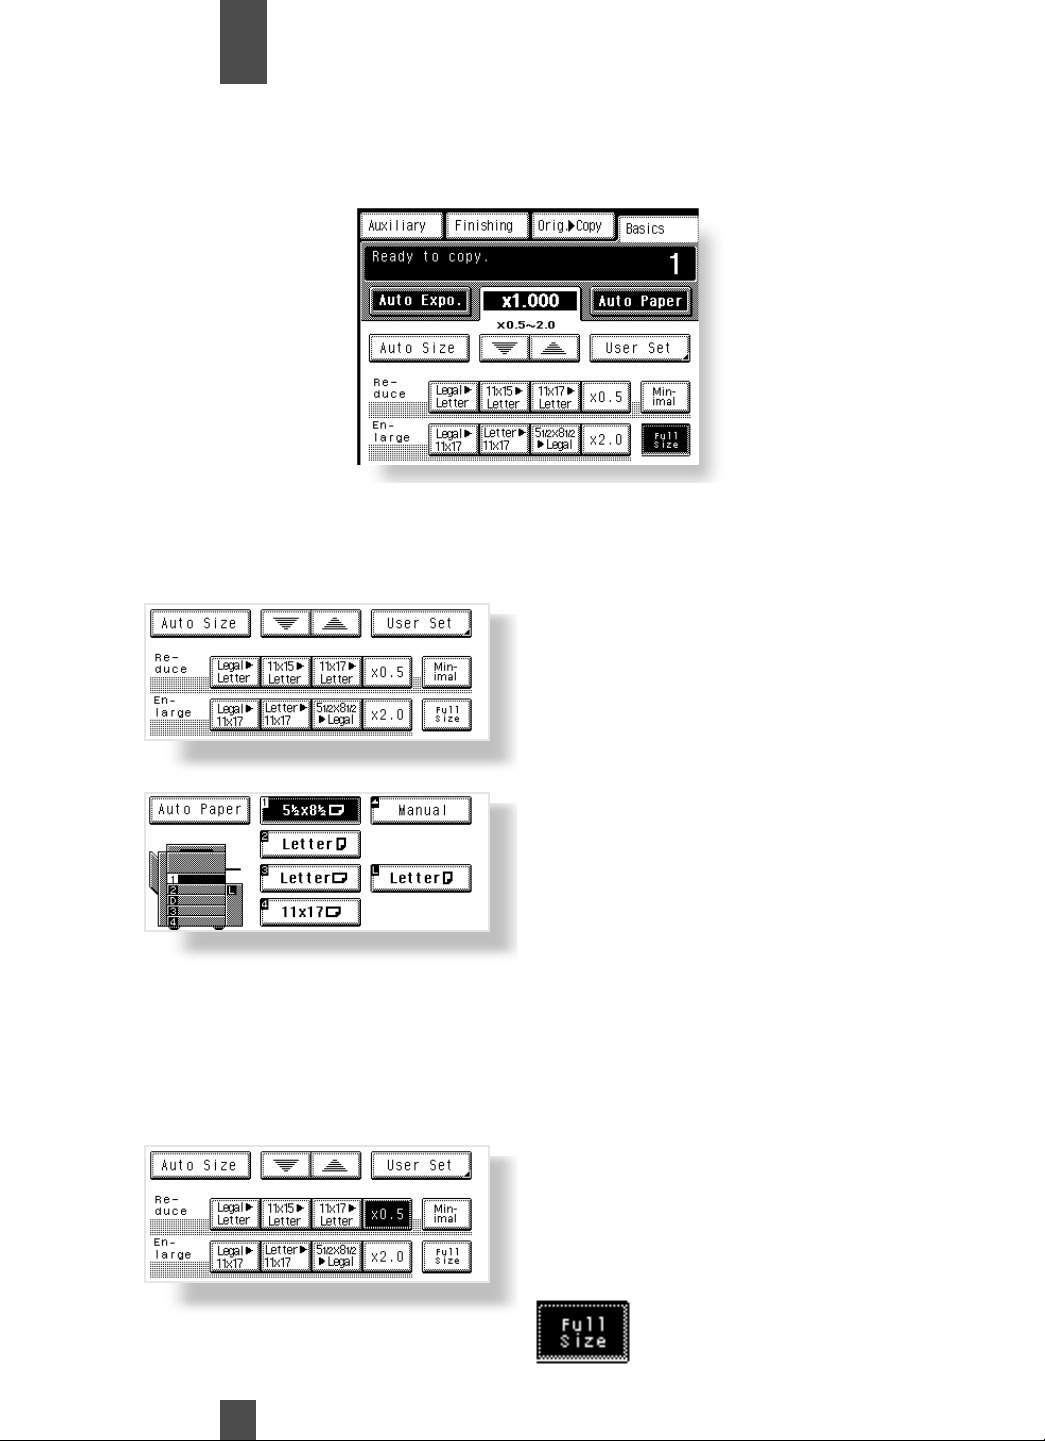
When you touch Zoom on the Touch Panel, a screen appears that allows you to set the zoom ratio.
There are six different ways to set the zoom ratio.
Auto Size
In the Auto Size mode, the copier automatically selects the zoom ratio according
to the size of the original being used and the copy paper size selected for use.
1
1
1
2
1
2
Touch Auto Size
to set the copier to the Auto
Size mode.
Select the paper size.
(Copy Paper Size, p.36)
Selecting Fixed Zoom Ratios
The copier provides most frequently used zoom ratios.
Touch the appropriate
original-to- copy-size representation key. You have four
reduction and four enlargement ratios.
38
When you touch Full Size
100% (x1.000) is selected.
Page 40
Making Copies
Chapter
3
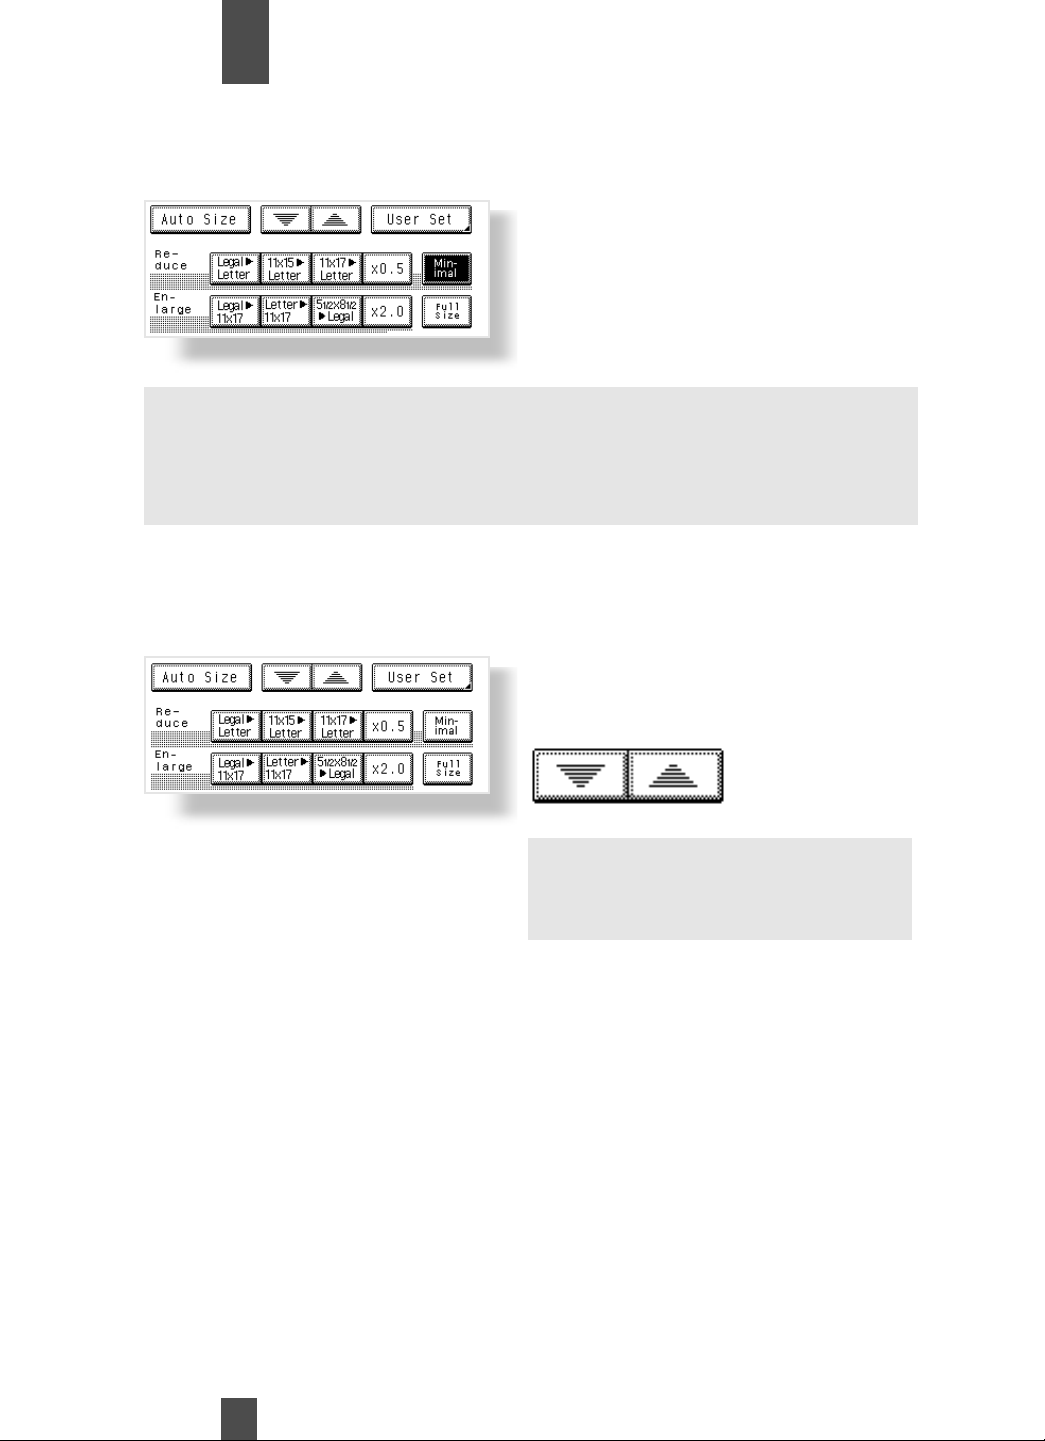
Minimal Reduction
This function lets you make a copy slightly reduced in image size from that of the
original.
1
1
1
1
Touch Minimal
to set the copier to 93%
(x 0.930)
Useful Tip:
The Minimal Reduction feature is handy for making a copy, without losing any
portion of the original image, from an original which has an image area
covering its entire surface.
A ratio of 0.930 has been factory-programmed in Minimal. The ratio can be
changed by following the instructions on page 86.
Using Zoom Up/Down Keys
The up/down arrow keys change the zoom ratio shown in 0.001 increments.
Hold your finger on the key to change the ratio quickly.
Touch and hold the up or
down arrow key until the
desired ratio is set.
39
Useful Tip:
To save time, first select the fixed
zoom ratio nearest to the target ratio
before using the arrow key.
Page 41
Making Copies
Chapter
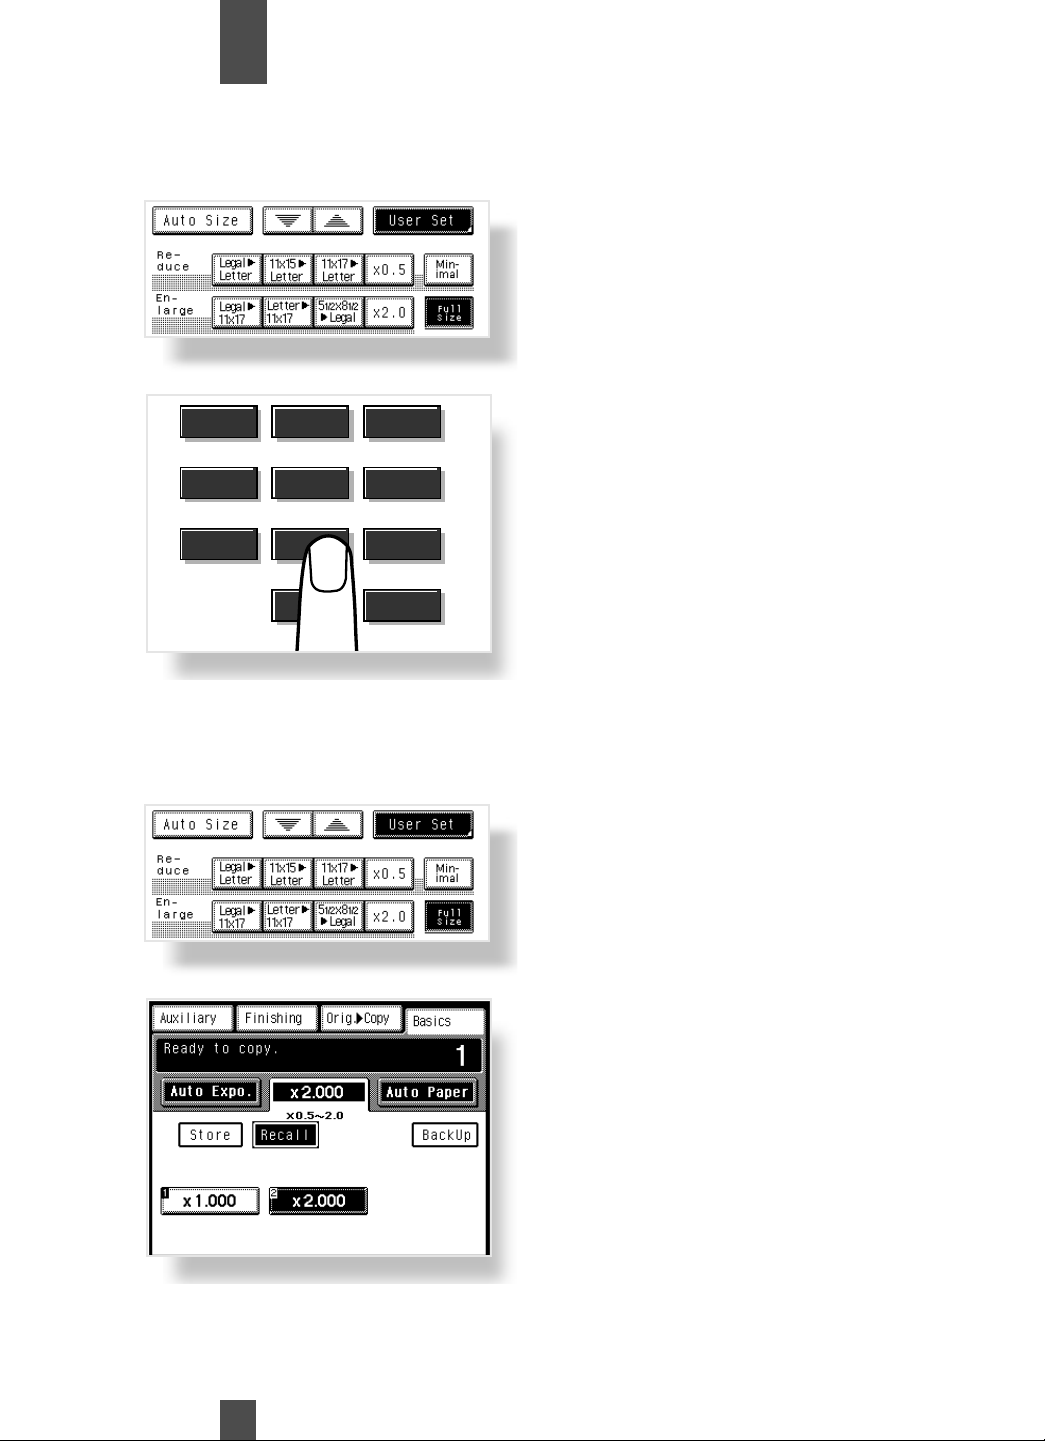
Using the 10 Key Pad
You can enter the zoom ratio by using the 10 Key Pad.
3
1
1
2
2
Touch User Set
1
4
7
Calling up a Ratio from Memory
You can store some of the most frequently used zoom ratios in memory and recall
them later as necessary.
2
5
8
0
3
6
9
C
Clear
Enter the desired zoom ratio
from the 10 Key Pad.
Press the Clear key and reenter if you make a mistake.
1
1
2
2
Touch User Set
Select one of the two
previously stored ratios.
40
Page 42
Making Copies
Chapter
3
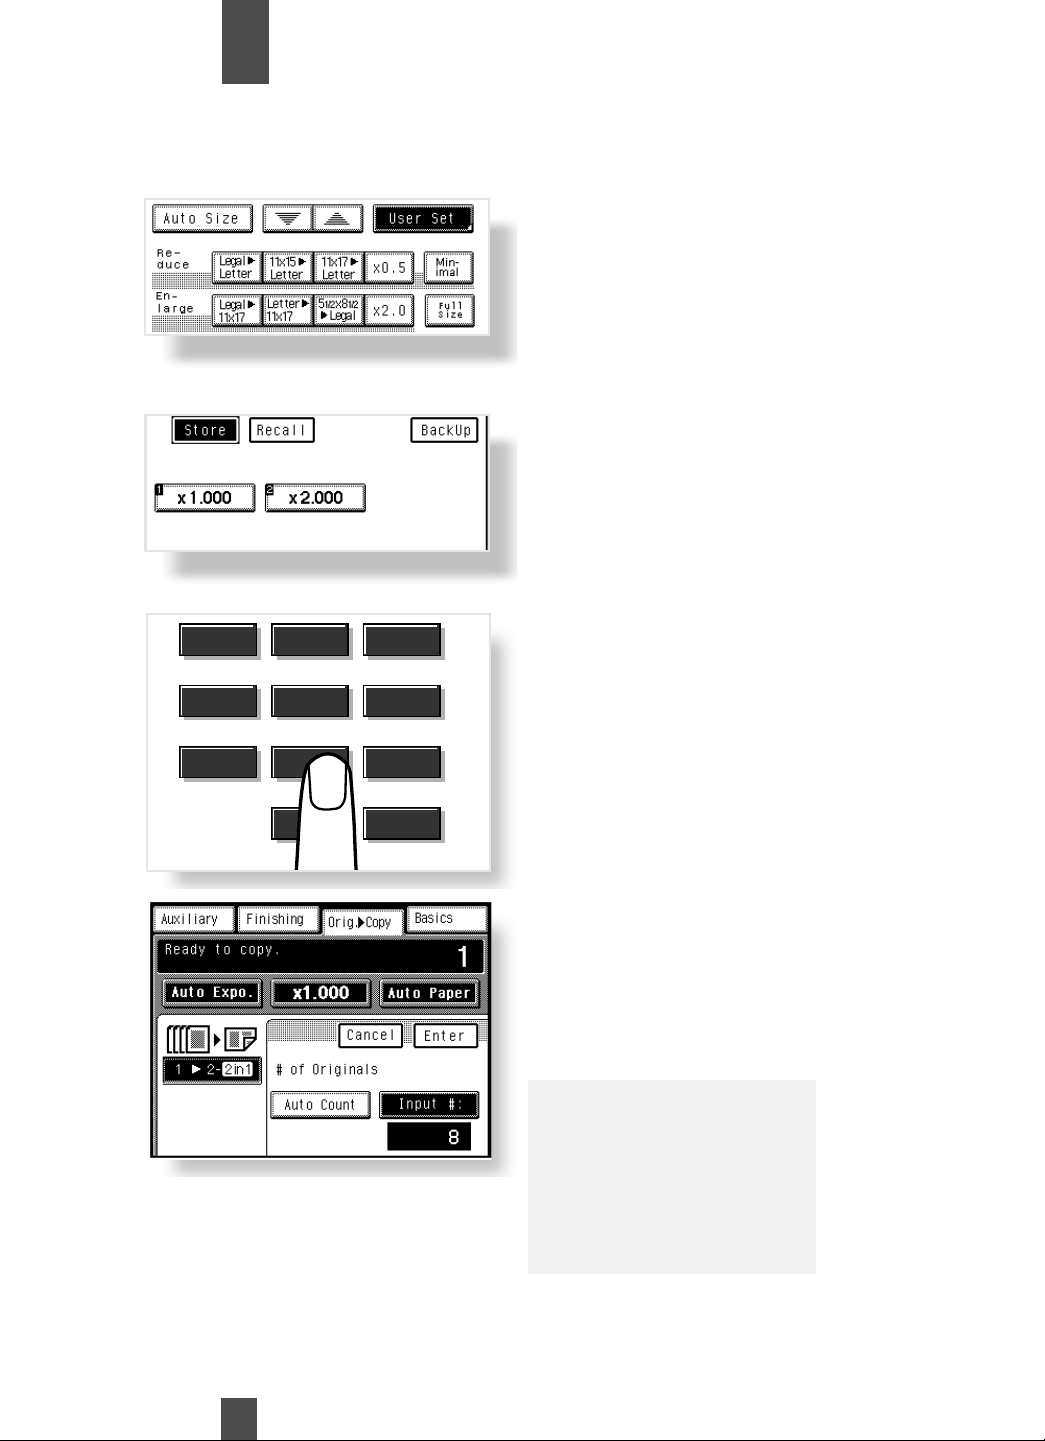
Storing A Ratio in Memory
1
2
3
1
2
3
Touch User Set
Touch Store
1
4
7
2
5
8
3
6
9
Enter the desired zoom ratio
using the 10 Key Pad.
Press the Clear key and reenter if you make a mistake.
4
4
0
C
Clear
Touch memory location key
1 or 2 in which to store the
set zoom ratio.
When the key is touched,
the ratio is shown on the
key, indicating that it has
been stored in memory.
NOTES:
When a new ratio is stored,
the old one is erased.
The custom zoom ratios
may be stored in memory by
using the Programming
feature. p. 86
41
Page 43
Making Copies
Chapter
3
Image Density
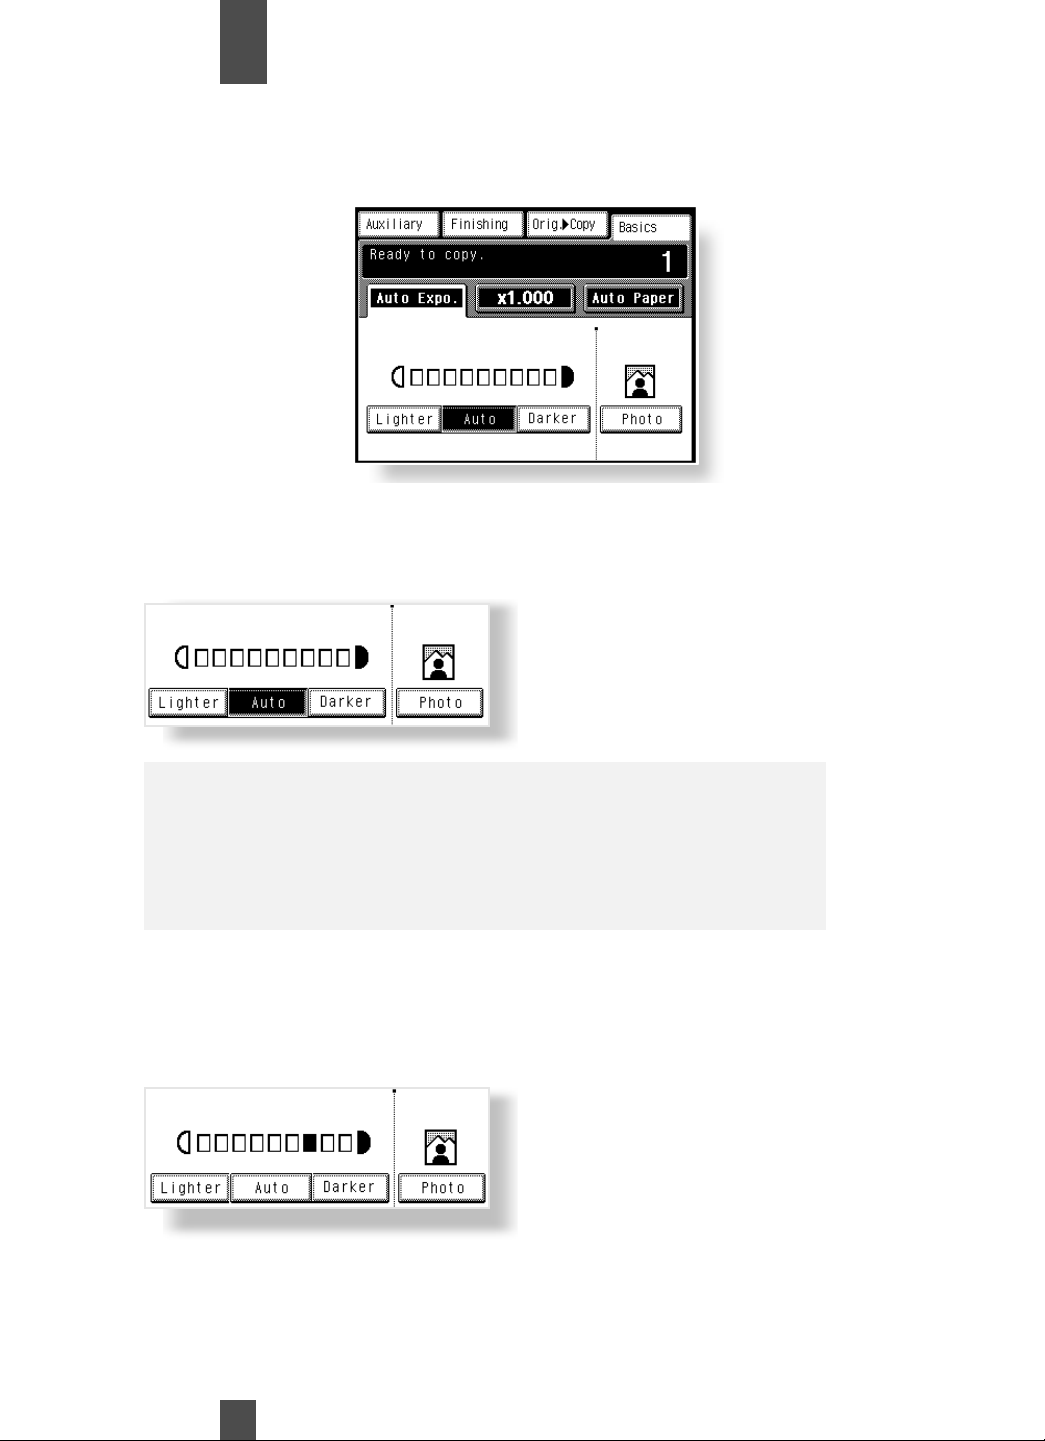
When you touch Exposure on the Touch Panel, a screen appears that allows you to set the exposure level or image
density. You have a choice of three different ways to adjust the exposure level: Auto Exposure, Manual Exposure, or
Photo mode. Select the appropriate mode according to your particular needs.
Auto Exposure
In the Auto Exposure mode, the copier automatically adjusts the exposure level for the optimum copy image density.
1
1
1
1
Touch Auto
The Auto key is highlighted
indicating the copier is set to
the Auto Exposure mode.
Useful Tips
The exposure level in the Auto Exposure mode can be made either
darker or lighter by using the Key Operator feature. p. 89
The copier has been factory-set to automatically select the Auto
Exposure mode. The Key Operator feature can be used to change
this default setting to the Manual Exposure mode. p. 89
Manual Exposure
In the Manual Exposure mode, you can vary the exposure level in nine steps.
Touch Lighter or Darker
to adjust the image density.
42
Page 44
Making Copies
Chapter
3
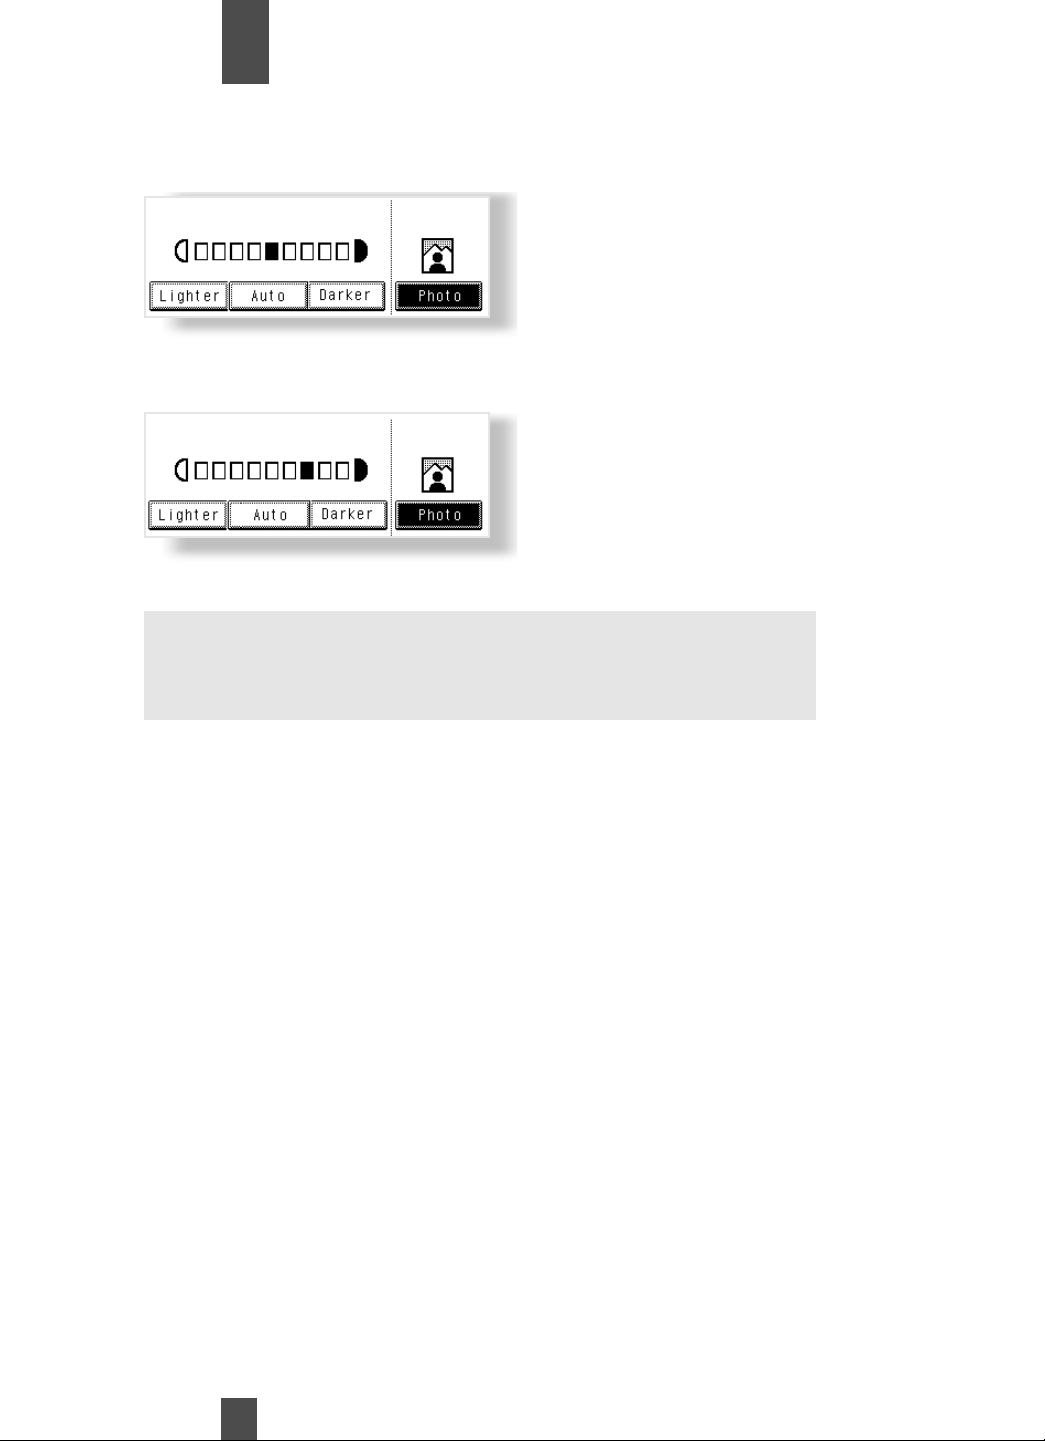
Photo
The copier can make a faithful reproduction of an original having a halftone image such
as photos. The image density of the photo may be varied in nine steps.
1
2
1
2
Touch Photo
Touch Lighter or Darker
to adjust the image density.
NOTE:
When making copies in the Photo Mode, Auto Exposure does not
operate. Select the desired exposure level in the Manual Exposure
Mode.
43
Page 45
Making Copies
Chapter
3
Selecting the Original ➧ Copy Type
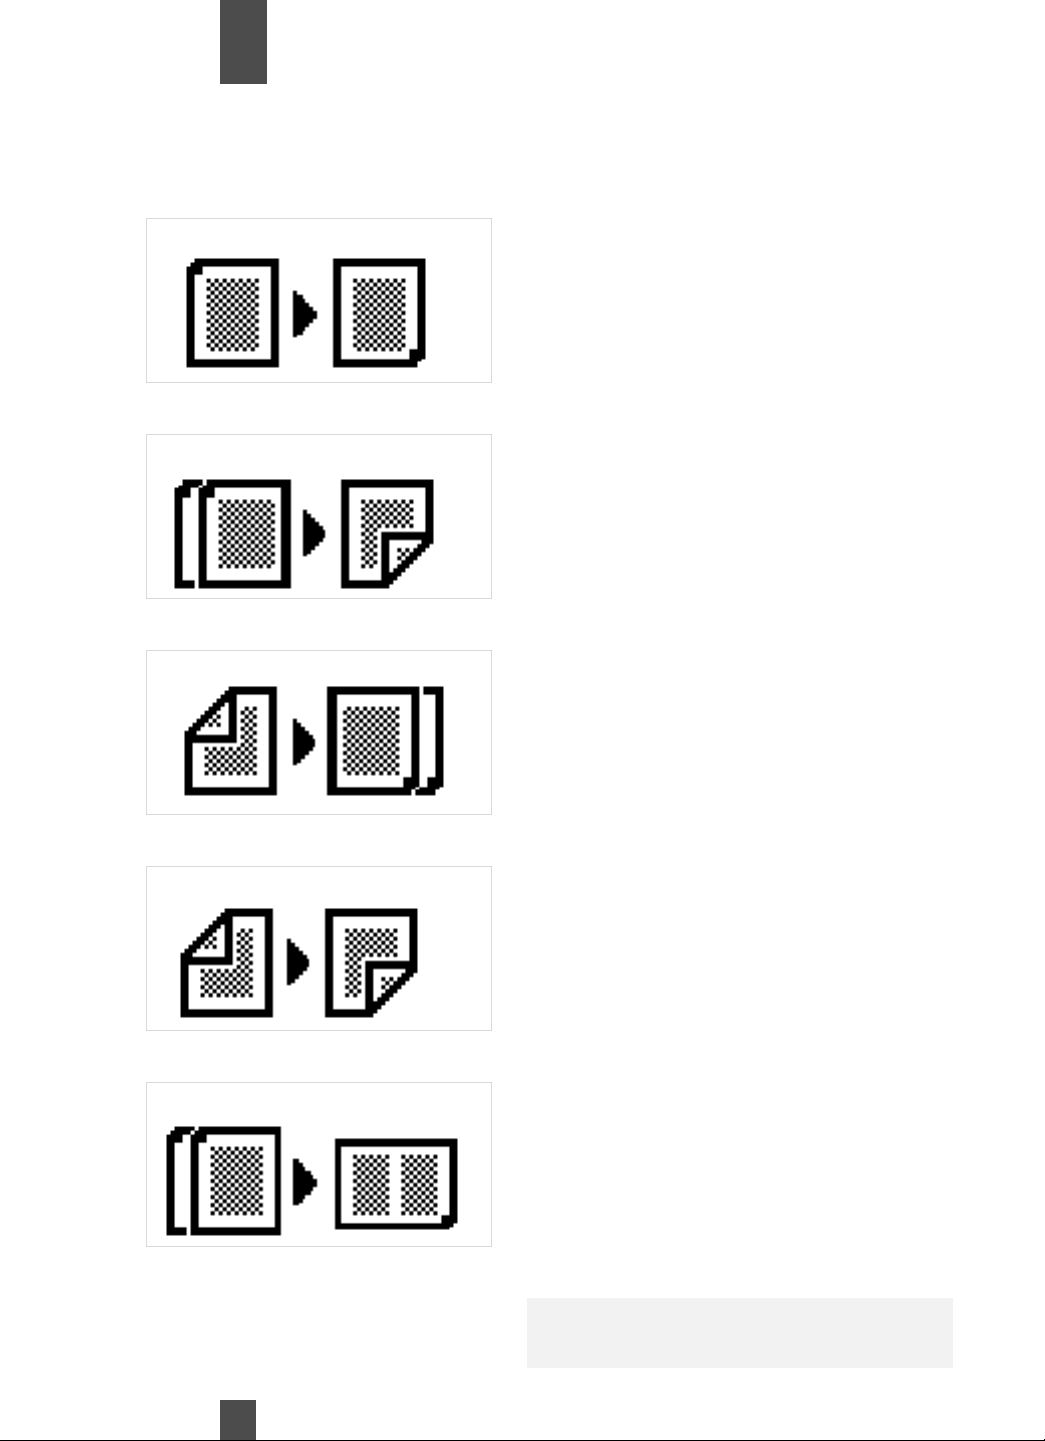
In the following pages, let's look at how we should make the settings for the type of copy we want to make from the type
of original we have.
When you touch Orig
➧
Copy on the Touch Panel, a screen appears that allows you to set the orig. copy type.
1➧1
1➧2
2➧1
Original Copy
Original Copy
Original Copy
Select 1➧1 to make 1-sided copies from
1-sided originals.
When a Duplex Unit is installed.
Select 1
1-sided originals.
Two originals can be copied onto one
copy.
When a Reversing Automatic Document
Feeder (RADF) or a Universal Document
Handler (UDH) is installed.
Select 2
2-sided originals.
➧
2 to make 2-sided copies from
➧
1 to make 1-sided copies from
2➧2
1➧
[2in1]
Original Copy
Original Copy
44
When a Reversing Automatic Document
Feeder (RADF) or a Universal Document
Handler (UDHr and Duplex Unit are
installed.
Select 2
2-sided originals.
When aReversing Automatic Document
Feeder (RADF) or a Universal Document
Handler (UDH is installed.
Select 1
through reduction, from two 1-sided
originals side-by-side.
This uses half the copy paper as regular
copying.
Note: The size of the original should be
Letter crosswise for 2-in-1.
➧
2 to make 2-sided copies from
➧
[2in1] to make a 1-sided copy,
Page 46
Making Copies
Chapter
1➧2 [2in1] (Accessed through 2 in 1)
Originals Copy
1 [2in1] ➧1 (Accessed through Separation)
Originals Copies
3
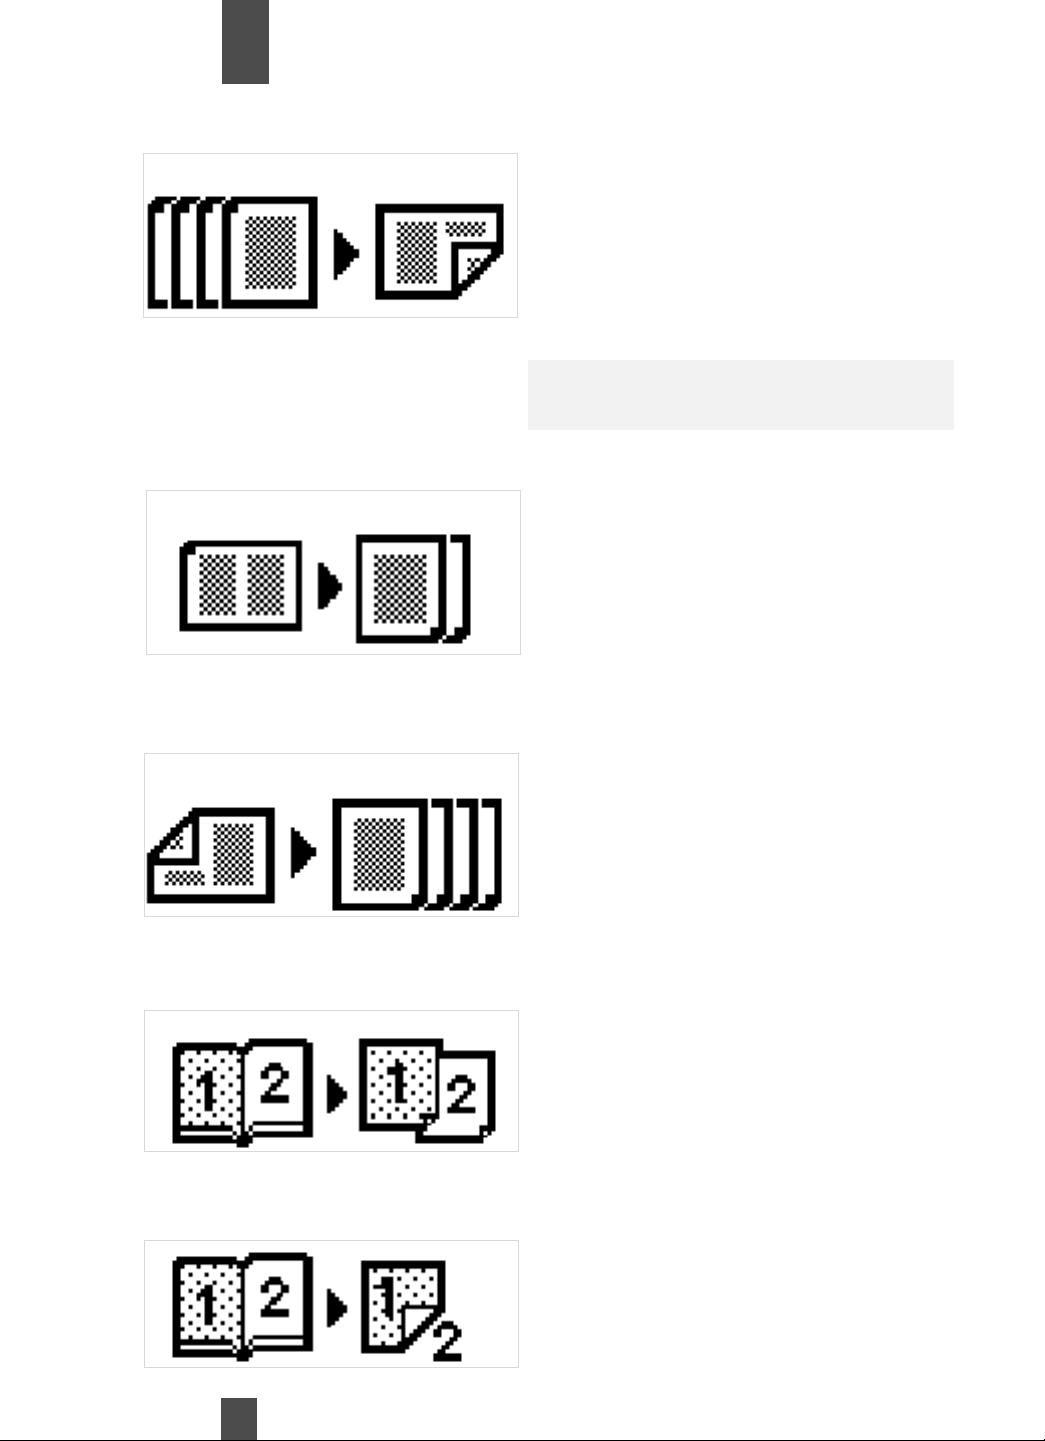
When an RADF/UDH
and Duplex Unit are installed.
Select 1
copy, through reduction, from four
1-sided originals. Each pair of originals
will be placed side-by-side on either side
of the copy.
This uses a quarter the copy paper as
regular copying.
Note: The size of the original should be
Letter crosswise for 2-in-1.
Only when an RADF/UDH is installed.
Select 1-[2in1]
page-by-page copies of a 1-sided
original which is the result of 2-in-1
copying.
You need twice as many sheets of copy
paper as the original.
➧
2 [2in1] to make a 2-sided
➧
1 to make 1-sided
2 [2in1] ➧1 (Accessed through Separation)
Originals Copies
Book ➧1 (Accessed through Book Copy via Separation)
Originals Copies
Book ➧2 (Accessed through Book Copy via Separation)
Originals Copies
Only when an RADF/UDH is installed.
Select 2-[2in1]
page-by-page copies of a 2-sided
original which is the result of 2-in-1
copying.
You need four times as many sheets of
copy paper as the original.
Select Book ➧1 to make 1-sided
page-by-page copies of an open book.
Select Book ➧2 to make a 2-sided copy
of an open book. Each page of the open
book will be copied onto one side of the
copy.
➧
1 to make 1-sided
45
Page 47
Making Copies
Chapter
3
Selecting the Original ➧ Copy Type
1
2
1
2
Touch
Touch the key corresponding
to the desired original copy
type.
Original ➧Copy.
NOTE:
When you make copies from
a book, select the correct
key according to whether
the book is bound on the left
or on the right (R-Book).
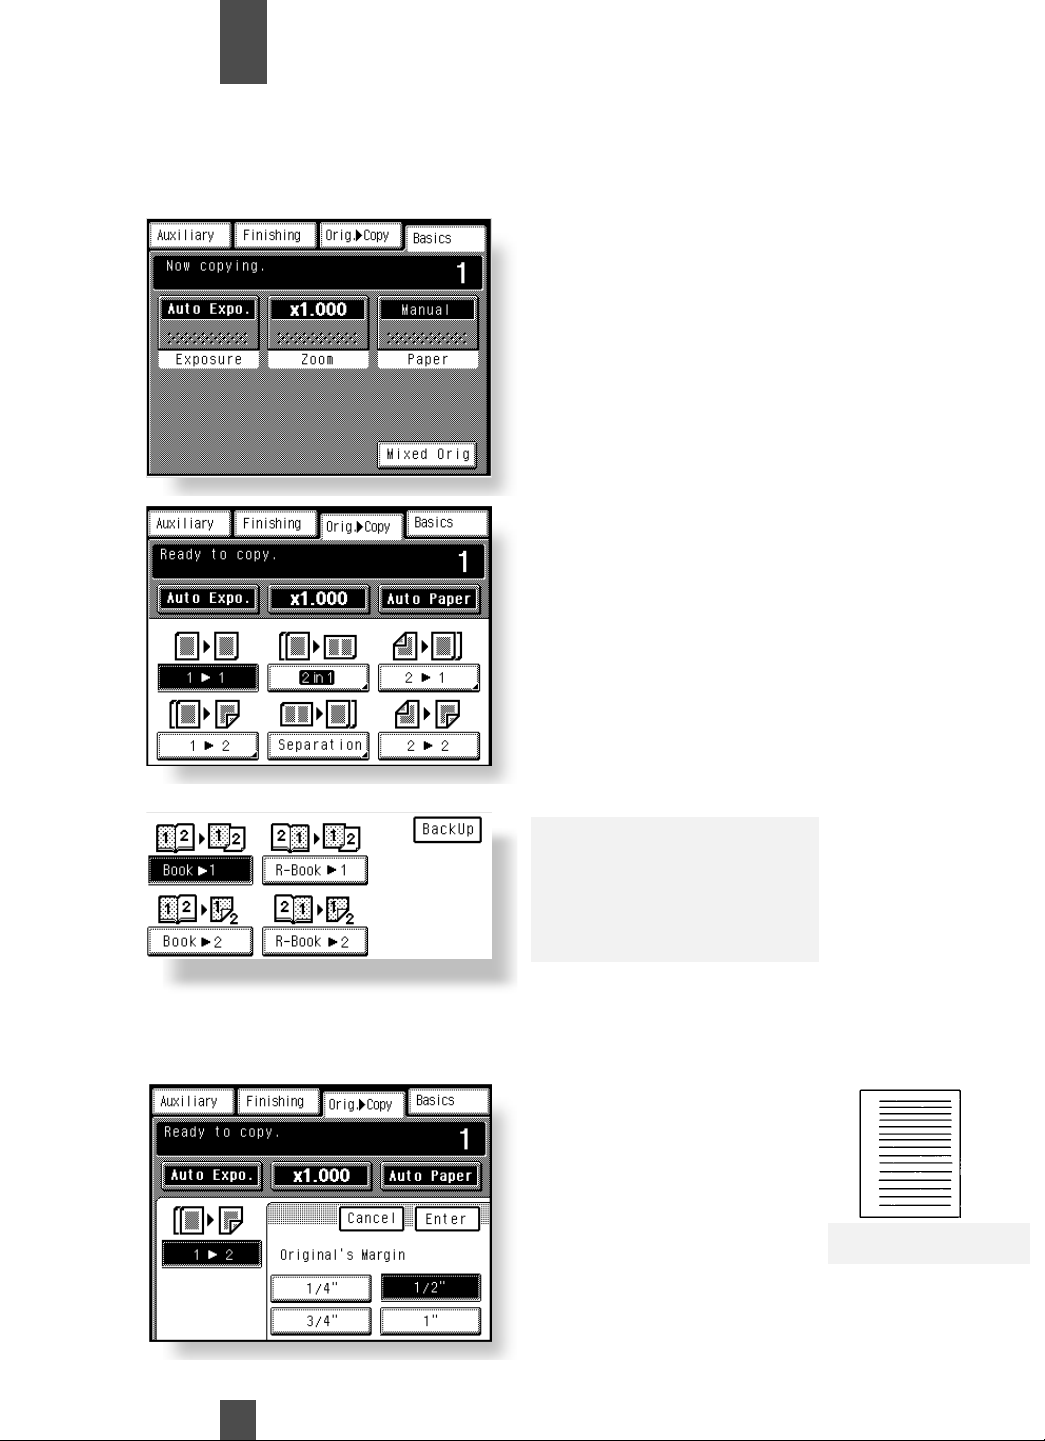
Margin Key When Using 1 ➧ 2 or 2 ➧ 1
If you are copying an original with a margin, the Margin feature will maintain the position of the margin on your copies.
• Check your original for a
margin.
• Touch Margin
• Select the margin width
(1/4", 1/2", 3/4" or 1")
from the display.
• Touch Enter
Original with mar-
46
Page 48
Making Copies
Chapter
3
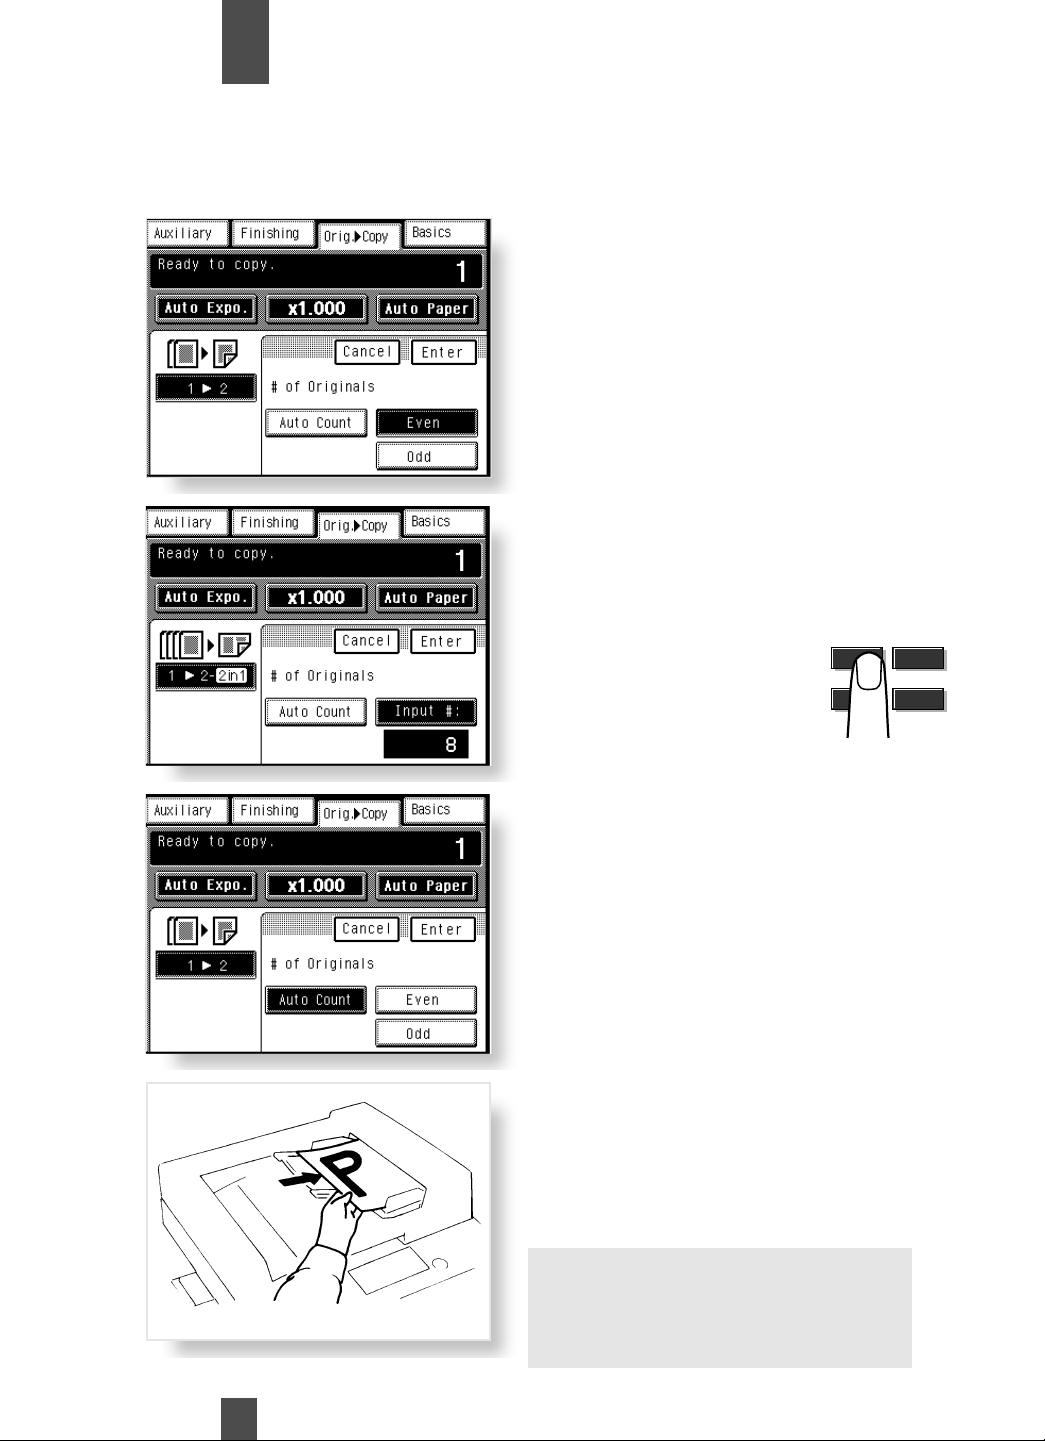
# of Origs key
When making copies using
if you have an odd or even number of originals . This will maintain the correct copy order of your document.
1➧2, 1➧[2in1] or 1➧2 [2in1]
If you know the number of
originals, you can indicate
that you have odd or even
number:
• Touch # of Origs.
• Select Even or ODD
• Touch Enter.
Or.....
If you know the number of
originals, you can enter the
number using the 10 Key
Pad:
• Touch Input #.
, you must enter the number of originals or indicate
• Enter the number of
originals using the 10 keypad. (Maximum 61)
• Touch Enter.
Or....
If you don’t know the number of originals, the document feeder can count the
originals.
• Touch Auto Count.
• Load originals into the
document feeder.
• Press the Print key.
The feeder will feed and
count the originals but no
copies will be made.
• When the feeder has
counted the originals, load
them back into the feeder.
Press the Print key to make
copies.
8
9
0
C
Clear
47
Useful Tip:
If the copier is equipped with a
Universal Document Handler, the originals will be reloaded into the feeder
after the Auto Count cycle.
Page 49
Making Copies
Chapter
3
Loading Originals
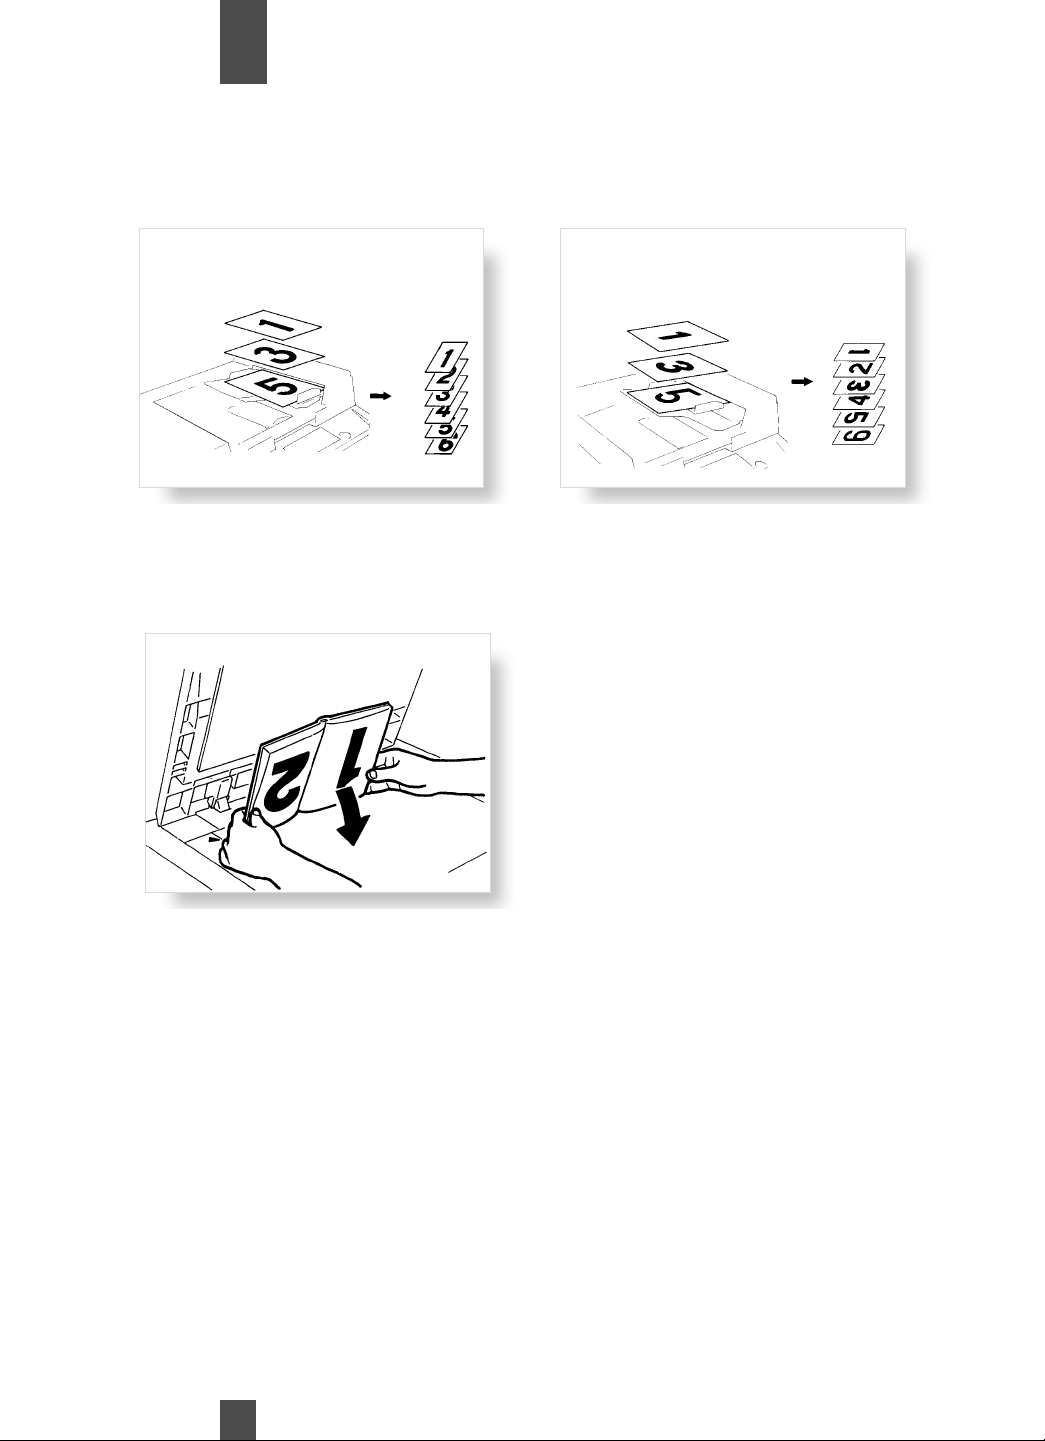
Use the following procedure when loading originals to make 1-sided copies from 2-sided originals(
Load the originals crosswise. If the originals are loaded lengthwise, the directions of the copy images will be
mixed up.
2 ➧1
).
Correct:
2- Sided Originals
Loaded Crosswise
1- Sided Copies
When Copying Books
Use the following procedure when copying books.
• Ensure that the top edge of
the book is at the rear side.
• Make copies in descending
order of page.
• When Book Copy is
selected, the zoom ratio is
automatically set to x1.000.
Select the desired zoom ratio
and copy paper size.
Incorrect:
2- Sided Originals
Loaded Lengthwise
1- Sided Copies
• Key Operator allows you to
program a default zoom ratio,
paper size, margin setting,
and erase setting. p. 91
2-in-1 Copying Precautions
• When the 2-in-1 function is selected, the copier automatically selects a reduction ratio. You can however make a full-size copy.
• If the Frame + Center Erase function is selected, you can eliminate shadows
that may appear along the edges and down the center of the copy.
• The Key Operator feature allows you to program a default zoom ratio, paper
size, margin setting, and erase setting. p. 91
48
Page 50

Making Copies
Chapter
3
2-in-1 Separation Copying Precautions
• When the 2-in-1 separation function is selected, the copier automatically selects
an enlargement ratio. You can however make a full-size copy.
• The Key Operator feature allows you to program a default zoom ratio, paper
size, margin setting, and erase setting. p. 91
49
Page 51
Making Copies
Chapter
3
Finishing Mode
In the following, we explain about different finishing functions and setting procedures.
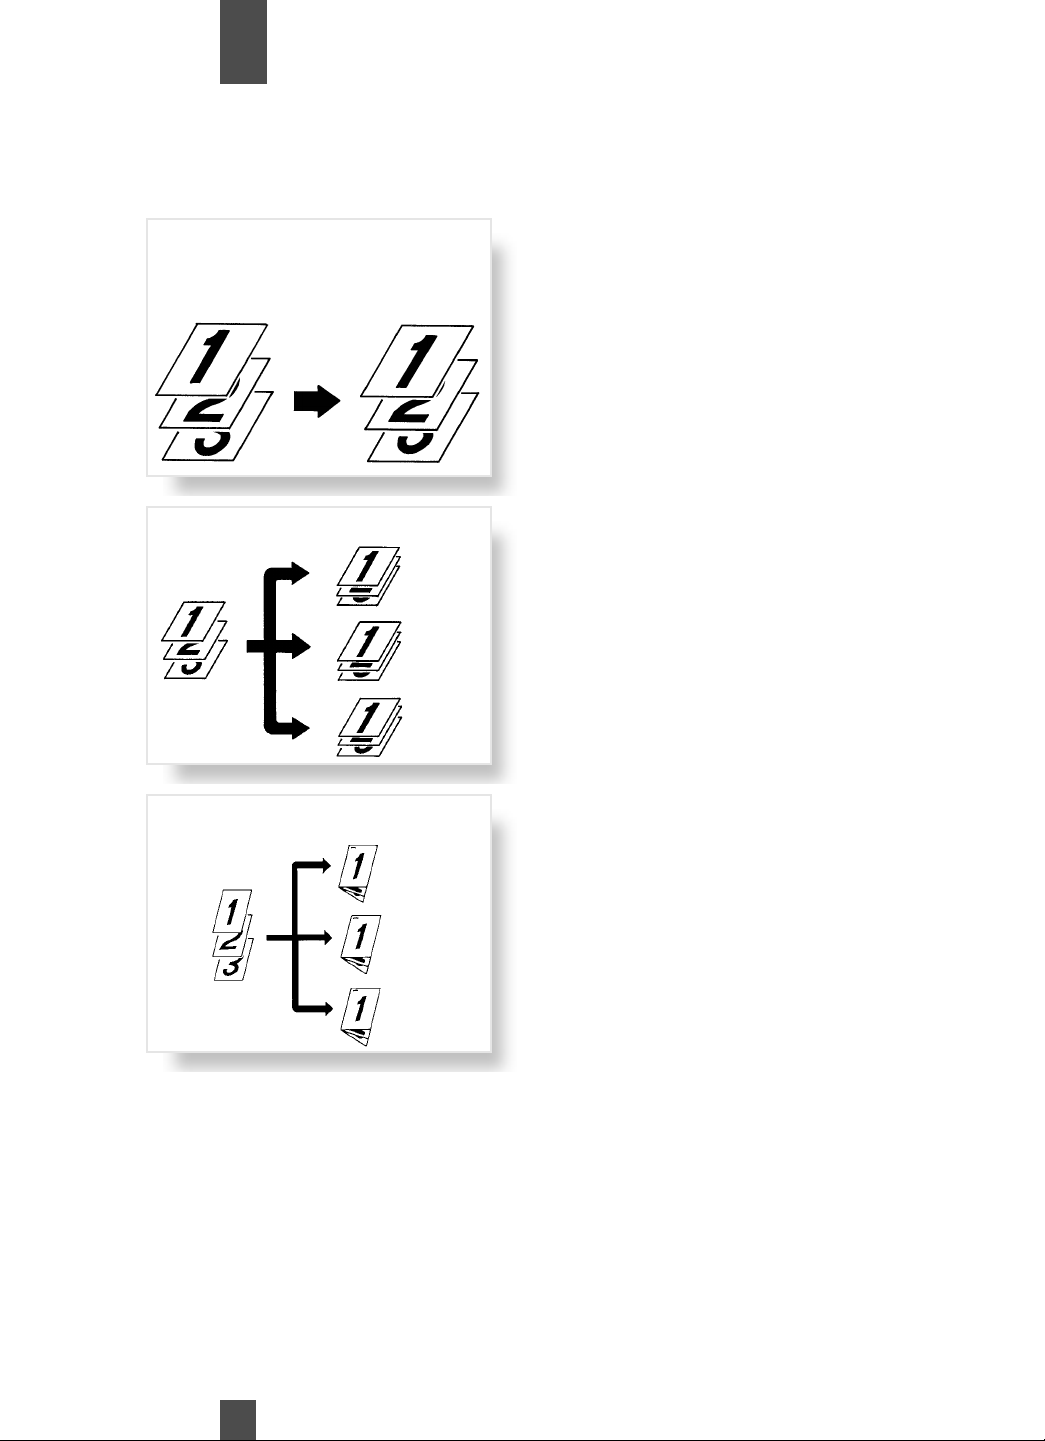
When Finishing is touched on the Touch Panel, a screen appears that allows you to set a particular finishing function.
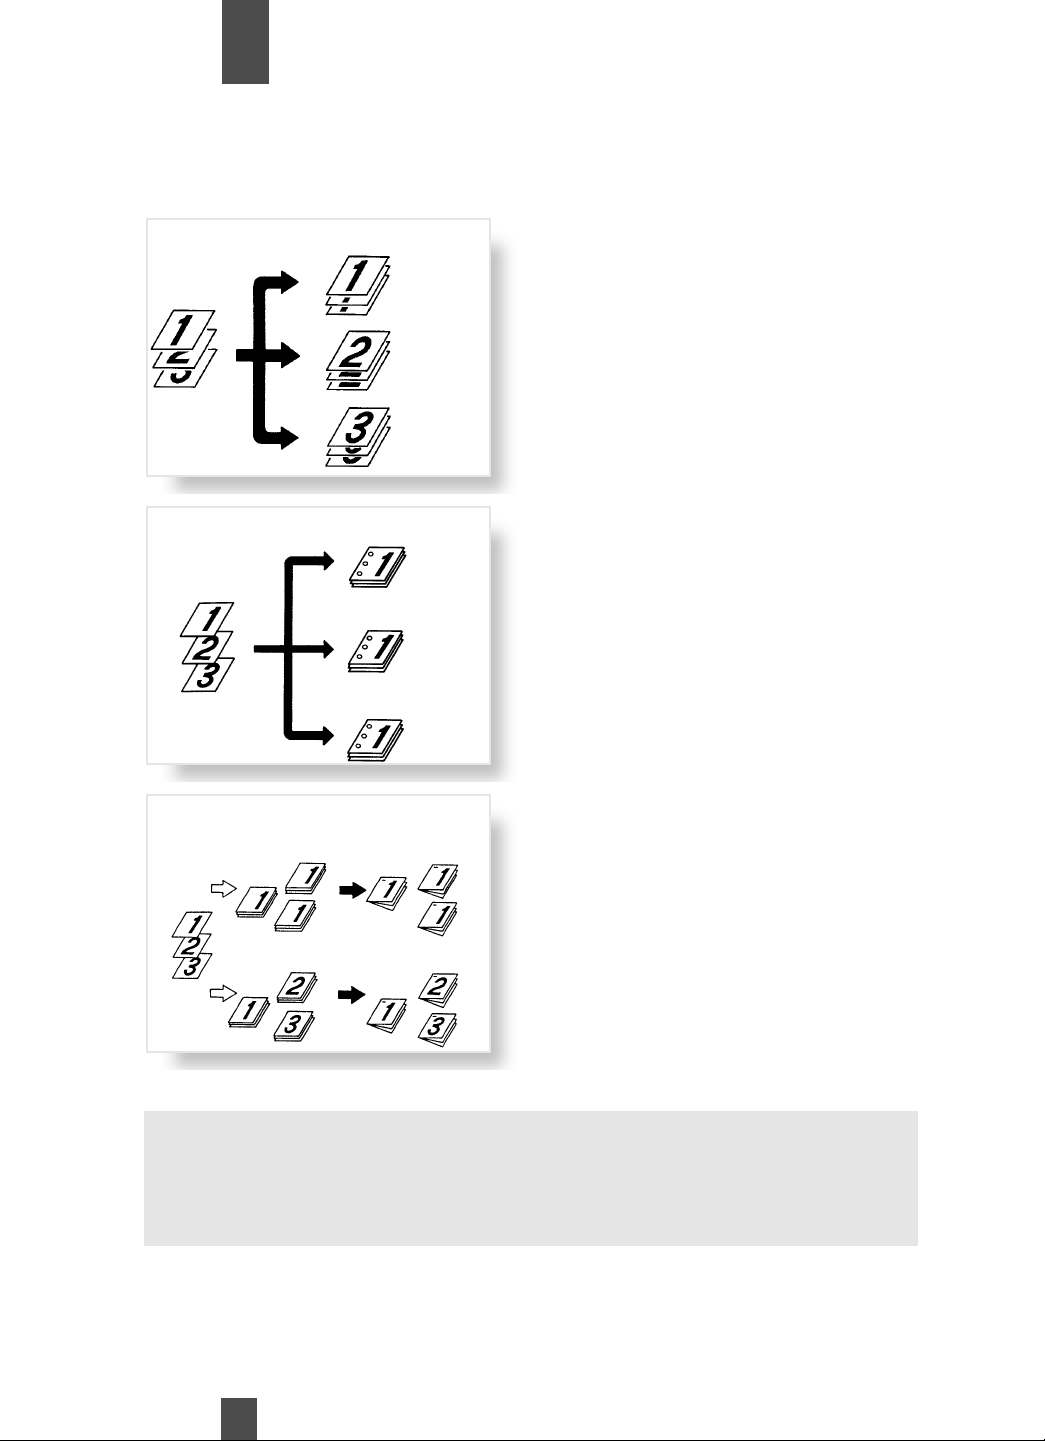
Non-Sort
Originals Copies
Sort Copies
Originals
1st Bin
2nd Bin
3rd Bin
Sort Staple Copies
Originals
1st Bin
2nd Bin
3rd Bin
All copies are fed out without being sorted, Batched,
stapled, or punched.
This function is effective
when making multiple copies
from multiple originals.
Copies are sorted into complete sets of the originals.
A Sorter/Stapler or
Sorter/Stapler/Stacker must
be installed.
This function is effective
when making multiple copies
from multiple originals.
Copies are sorted into complete sets of the originals
and then stapled.
A Sorter/Stapler or
Sorter/Stapler/Stacker must
be installed.
50
See page 53 for staple position options when using a
multi position stapler.
Page 52
Making Copies
Chapter
3
Finishing Mode
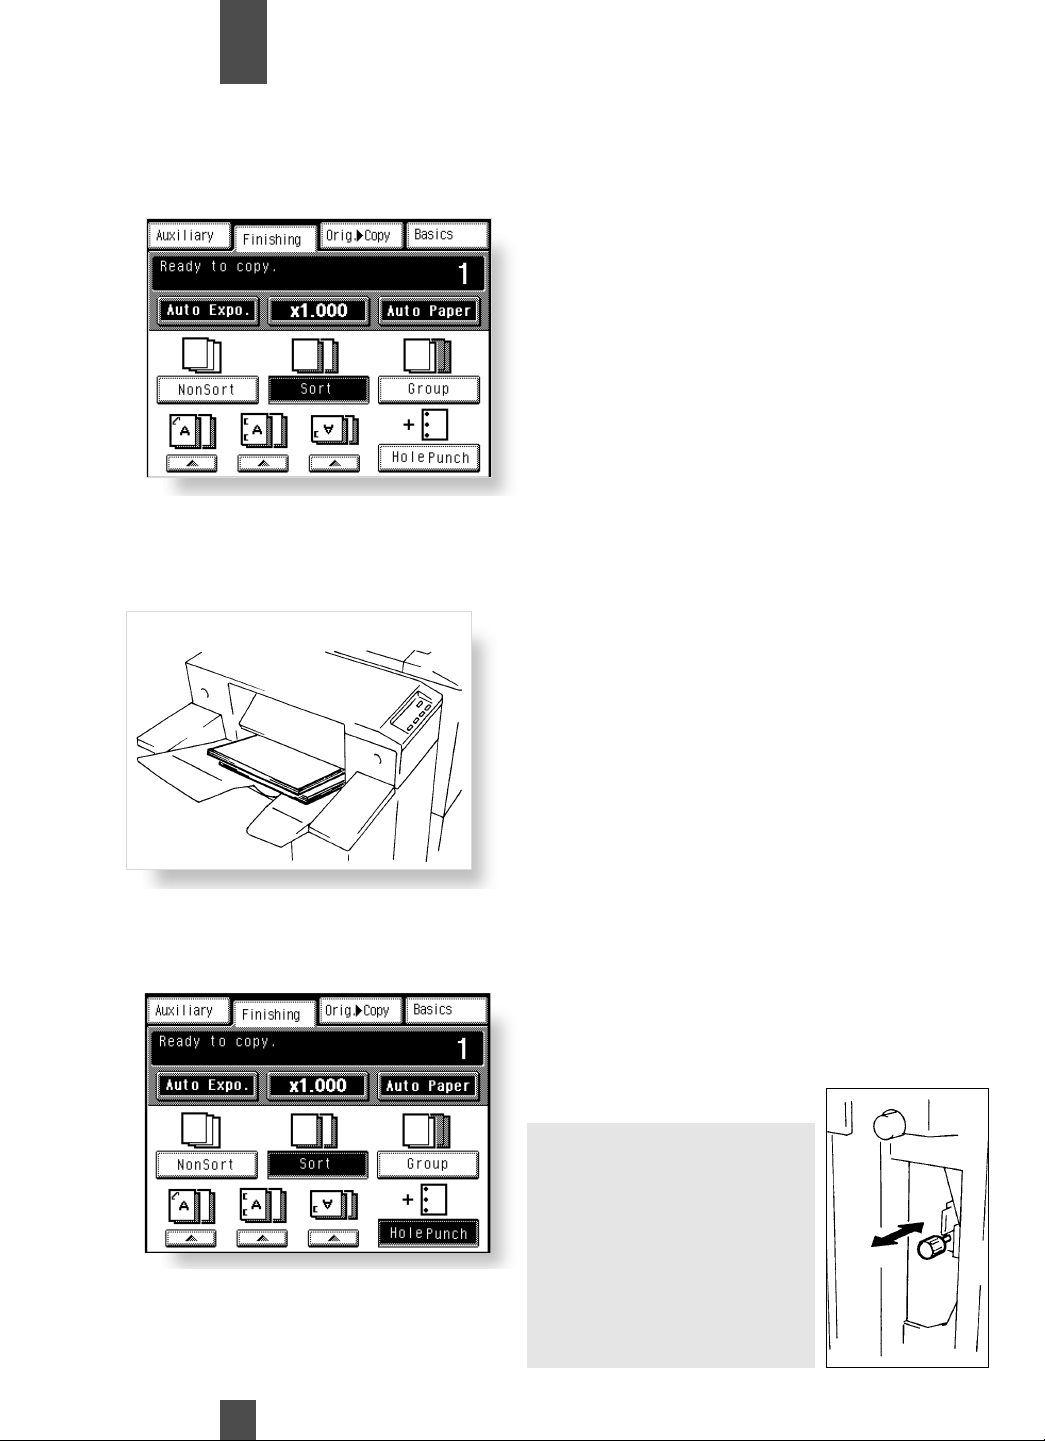
Batch Copies
Originals
Hole Punch Copies
Originals
Manual Staple
Copies Sorting or Batching
Originals
1st Bin
2nd Bin
3rd Bin
1st Bin
2nd Bin
3rd Bin
The copies made from each
single original are separated
into Batches. Each Batch
contains the same number
of copies.
A Sorter/Stapler or
Sorter/Stapler/Stacker must
be installed.
Holes are punched in the
copy sets or stacks for filing.
It can be combined with
Non-Sort, Sort, Sort Staple,
or Batch.
A Sorter/Stapler or
Sorter/Stapler/Stacker must
be installed.
This function allows you to
staple copy sets already
made in the Sort mode or
copy stacks made in the
Batch mode.
A Sorter/Stapler or
Sorter/Stapler/Stacker must
be installed.
Useful Tip:
The copier has been factory-set to automatically select Non-Sort in the initial
mode. Also, the copier automatically switches between Sort and Non-Sort
depending on the number of originals loaded in the document feeder and the
number of copies to be made. The Key Operator feature can be used to
change these default settings. pp. 89, 90
51
Page 53
Making Copies
Chapter
3
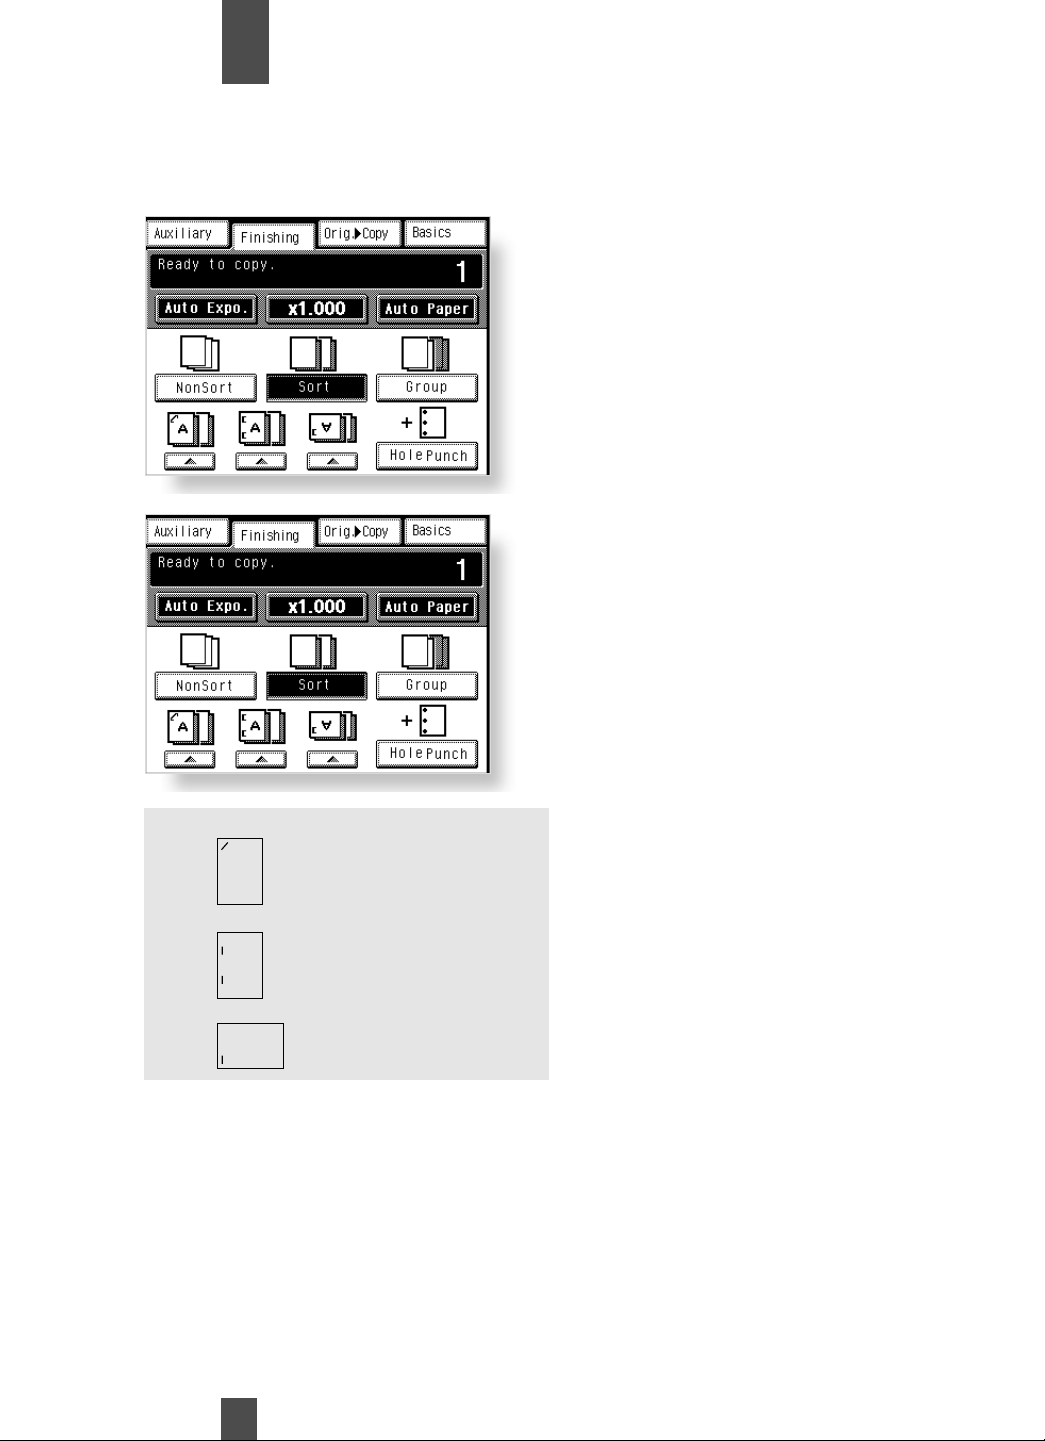
Selecting the Finishing Function
Follow the procedures below to select the desired finishing finishing function.
1
1
Select the desired finishing
function key.
SmartFinish™
Using the Sorter/Stapler/Stacker and the Universal Document Handler, the copier can sort and stack 20 copy sets then
reload the originals and continue copying additional sets.
When sorting copies into more than
20 sets, the sorter will pause after
completing the first 20 sets.
The copy sets will be stacked in the
Non-Sort Bin.
(Copy sets will be off-set for easier
separation.)
The originals are reloaded into the
feeder and copying resumes.
Do not remove copies until they
have all been transferred to the
Non-Sort Bin.
Hole Punch
To punch 2 or 3 holes in copies. This feature can be combined with any of the other finishing modes.
1
1
52
• Touch the desired finishing
function key. Then select
Hole Punch
• Load the originals as
shown on p. 59
Note:
The number of holes (2 or 3)
can be selected by sliding
Knob “S3” out or in.
Knob “S3” is located inside
the sorter door.
Pull out for 2 Holes
Push in for 3 Holes
The number of holes is displayed on the touch screen.
Page 54
Making Copies
A
A
A
11" x 17"L, LegalL,
LetterL, LetterC
11" x 17"L, LetterC
LegalL, LetterL
Chapter
3
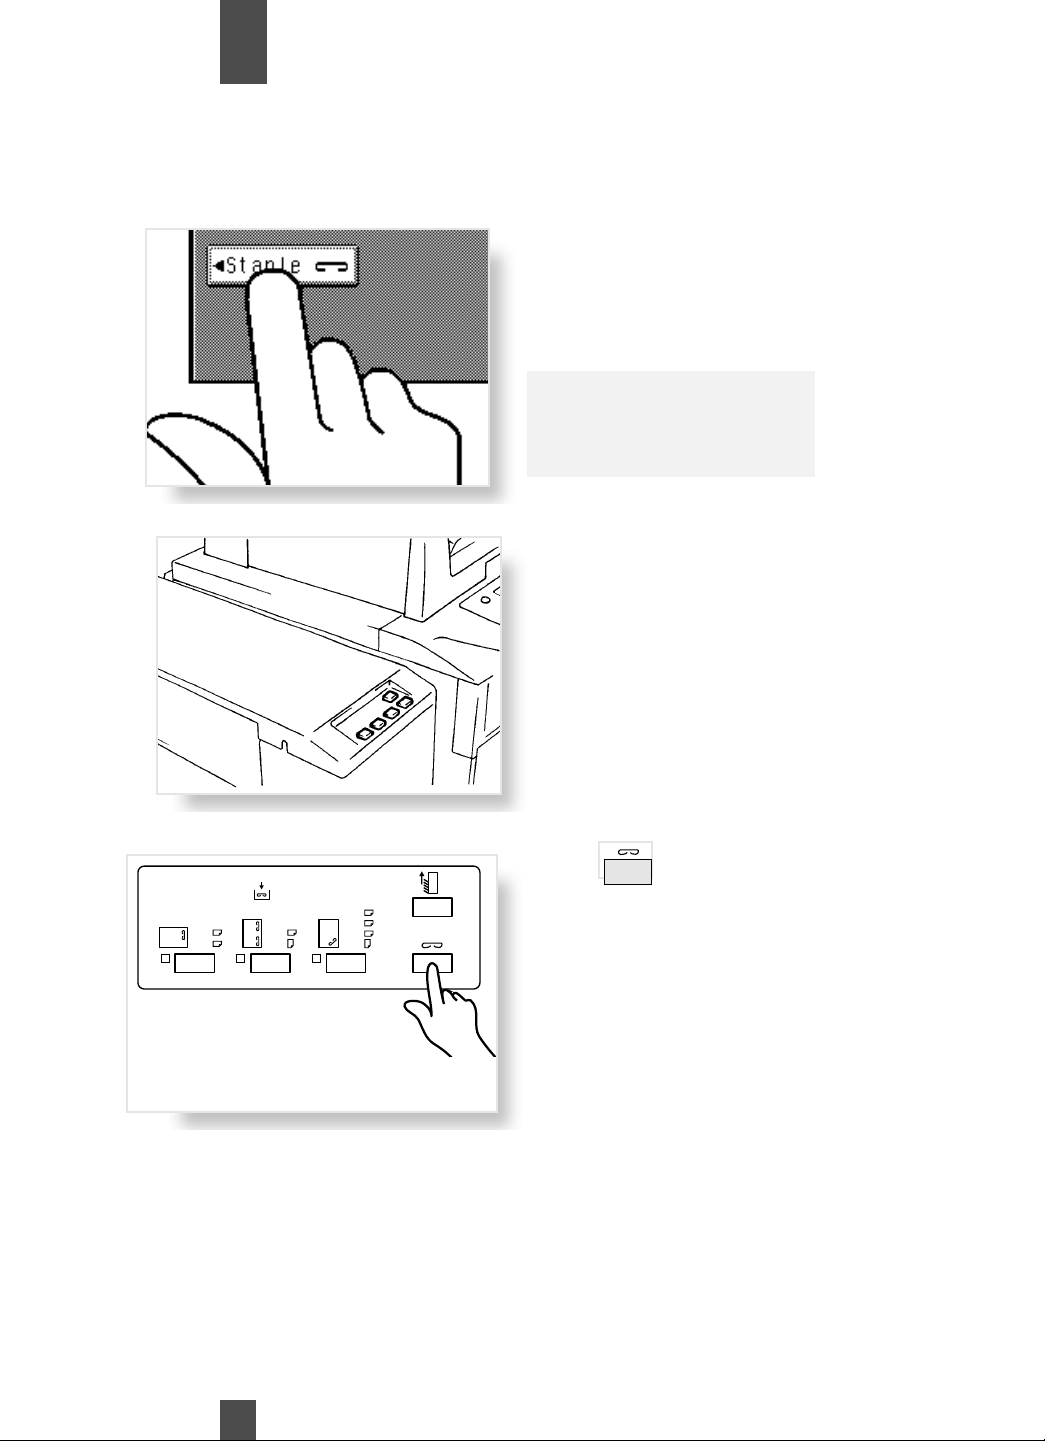
Sort and Staple
Follow the procedures below to select the desired finishing finishing function.
1
1
1
1
When a Sorter/Stapler is
used:
• Touch Sort Staple
• Load the originals as
shown on p. 58
When a Multi-Position
Sorter/Stapler or Sorter/Stapler
/Stacker is used:
• Select one of the staple
positions.*
• Load the originals as shown
on p. 58
* Selecting one of the staple
options automatically sets the
copier to the Sort mode.
These three staple options are available.
SmartFinish™
Using the Sorter/Stapler/Stacker and the Universal Document Handler, the copier can sort staple and stack 20 copy sets
then reload the originals and continue copying additional sets.
When sorting and stapling copies into more than 20 sets, the sorter will pause after
completing the first 20 sets.
The stapled copy sets will be stacked in the Non-Sort Bin.
The originals are then reloaded into the feeder and copying resumes.
Do not remove copies until they have all been transferred to the Non-Sort Bin.
53
Page 55
Making Copies
Chapter
3
Manual Staple
To staple copy sets made in Sort or copy sets made in Batch.
1
1
1
1
When a Sorter/Stapler is
used:
After copies have been fed
into the Sorter Bins, touch
Staple on the display panel.
NOTES:
Copies made in Non-Sort
cannot be stapled manually.
When a Multi-Position
Sorter/Stapler or Sorter/Stapler
/Stacker is used:
• Select one of the staple
positions from the Sorter Panel.
• Check that the copies are fed
into the sorter bin(s)
2
2
LGL.
LTR.
1161O149EA
54
11x17
LTR.
11x17
LGL.
LTR.
LTR.
Press
to staple the copy
stack.
Do not remove copies until they
have all been stapled and transferred to the Non-Sort Bin.
Page 56
Making Copies
Chapter
3
Using the Manual Staple Function
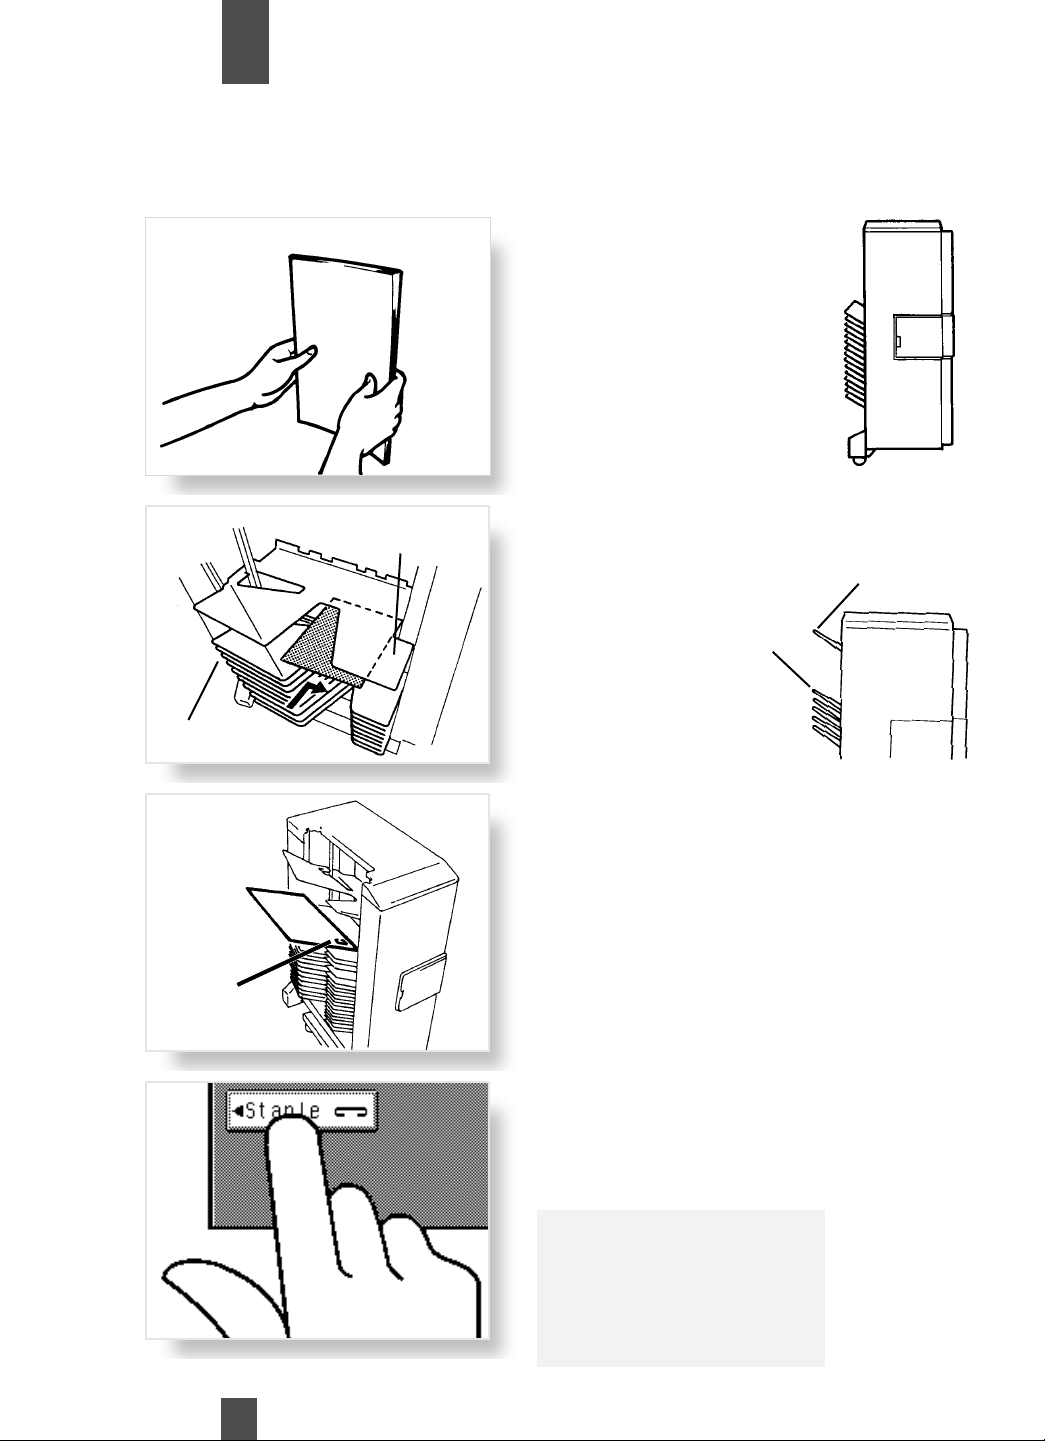
The 20 Bin Sorter Stapler can be used as an automatic stapler even if no copies have been made.
1
2
1
2
Sort
Bins
Non-Sort
Bin
When using a 20 Bin Sorter
Stapler:
• Align the sheets of paper
neatly.
Insert the paper stack onto
the 1st Bin facing up.
Non-Sort Bin
1st Bin
Make sure of the stapling
position and press the paper
stack against the bracket.
3
3
Stapling
position
Touch Staple.
The paper stack in the
Sorter Bin will be stapled
together.
Useful Tips:
• Up to 50 sheets of plain
paper can be stapled.
• Never attempt to reach for
the stapling position.
This can be dangerous.
55
Page 57
Making Copies
A
A
A
11" x 17"L, LegalL,
LetterL, LetterC
11" x 17"L, LetterC
LegalL, LetterL
Chapter
3
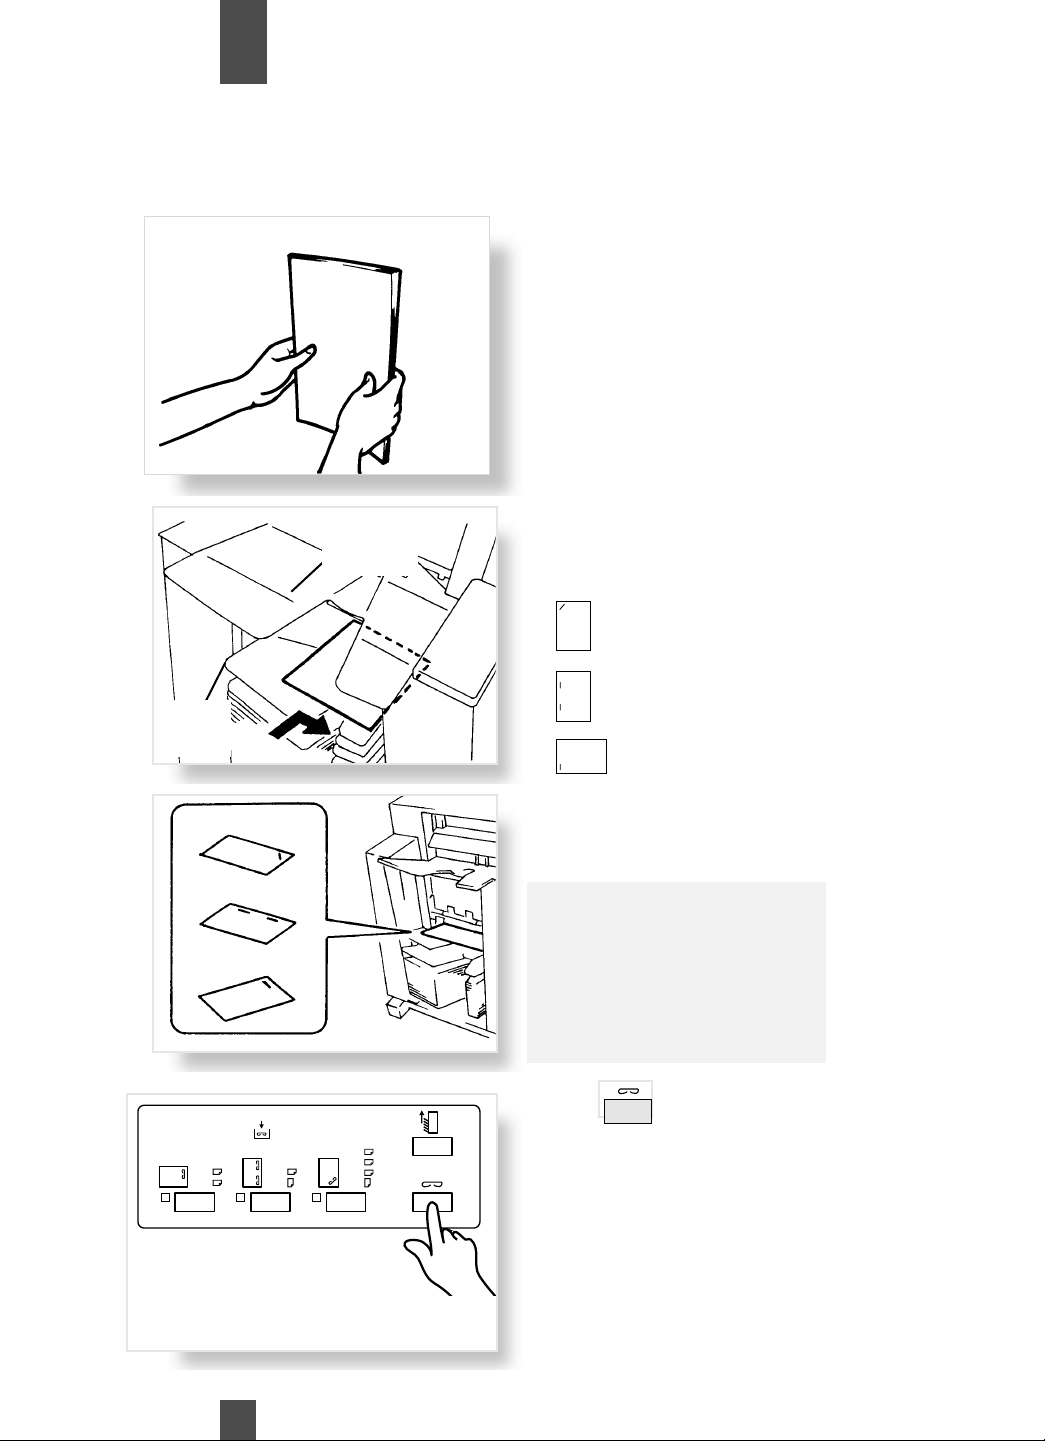
Using the Manual Staple Function
The Multi-Position Sorter/Stapler or Sorter/Stapler/Stacker can be used as an automatic stapler
even if no copies have been made.
1
2
1
2
1st Sort
Bins
Top Slant Staple
Non-Sort
Bin
When using a
Sorter/Stapler or
Sorter/Stapler/Stacker
• Align the sheets of paper
neatly.
(Up to 50 sheets of plain
paper can be stapled.)
Insert the paper stack onto
the 1st Sort Bin facing up.
Make sure of the stapling
position and press the paper
stack against the bracket.
Multi-Position
3
3
1161O149EA
3 Point Staple
Top Staple
LGL.
LTR.
56
11x17
LTR.
11x17
LGL.
LTR.
LTR.
Useful Tips:
• Up to 50 sheets of plain
paper can be stapled.
• Never attempt to reach for
the stapling position.
This can be dangerous.
Press
to staple the copy
stack.
Do not remove copies until
they have all been stapled
and transferred to the NonSort Bin.
Page 58
Making Copies
Chapter
3
Precautions When Using a Sorter/Stapler
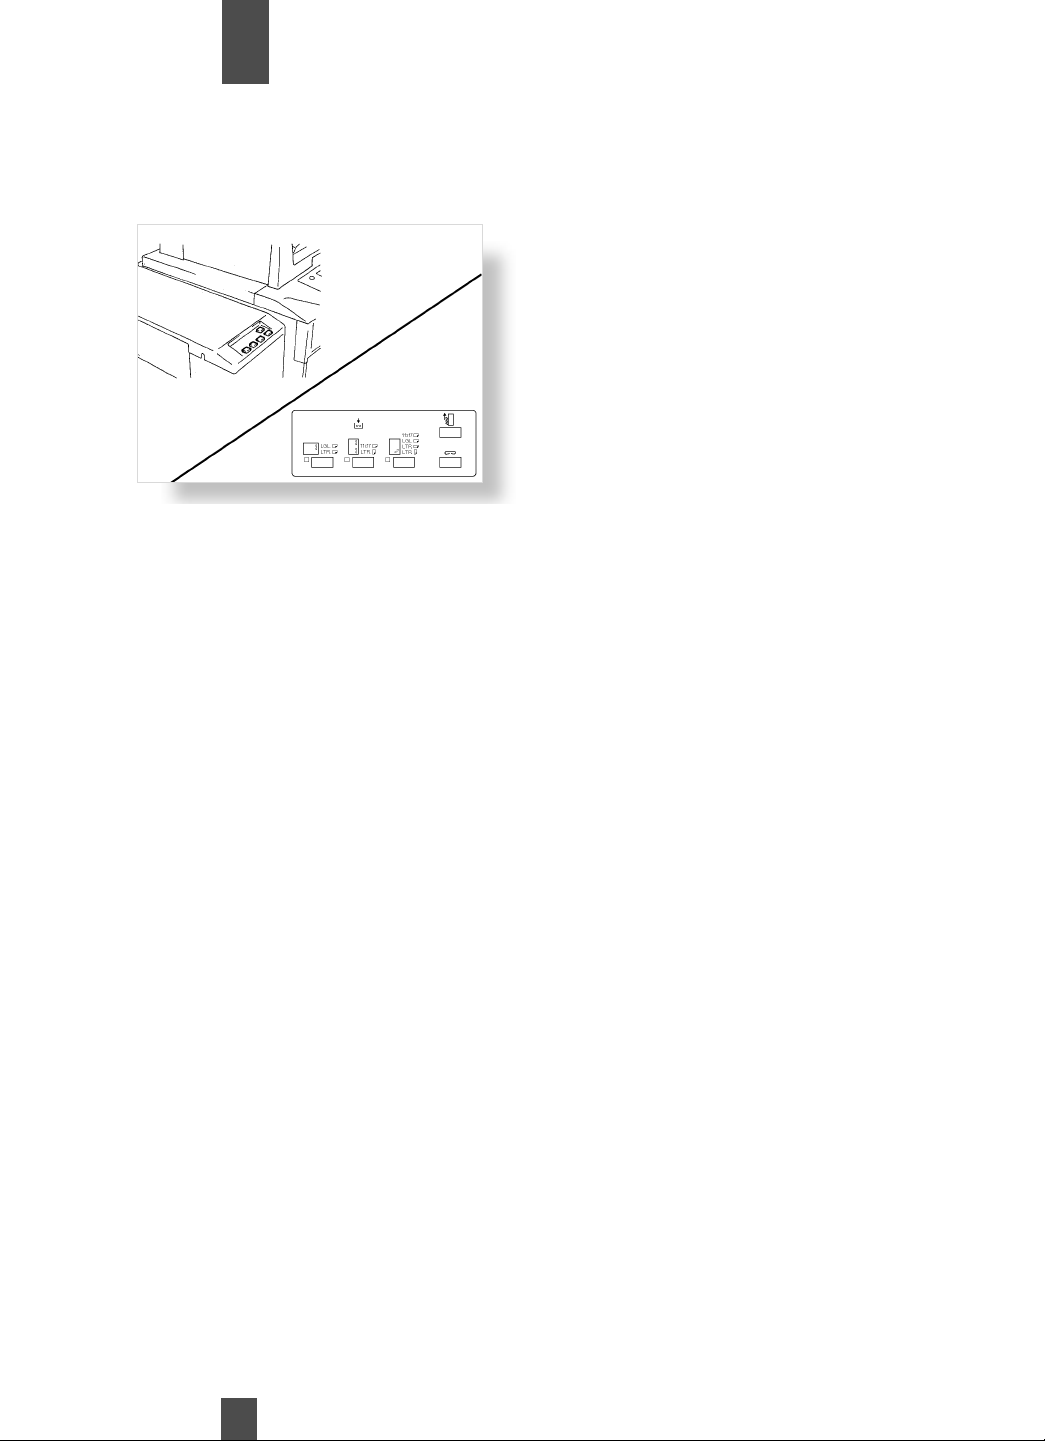
Follow the instructions below when removing copies from the Sorter .
• If a copy cycle is run without
using a document feeder, press
the Bin key on the Sorter Panel
to raise the bins upward.
• Pressing the Reset key on the
control panel of the copier will
also raise the bins.
• If a copy cycle is run with a document feeder and a Sorter/Stapler or
Multi-Position Sorter/Stapler, The Sorter Bins will return to their home
position when the copy cycle is complete.
57
Page 59
Making Copies
Chapter
3
Instructions for Loading Originals When Using the Finishing Mode
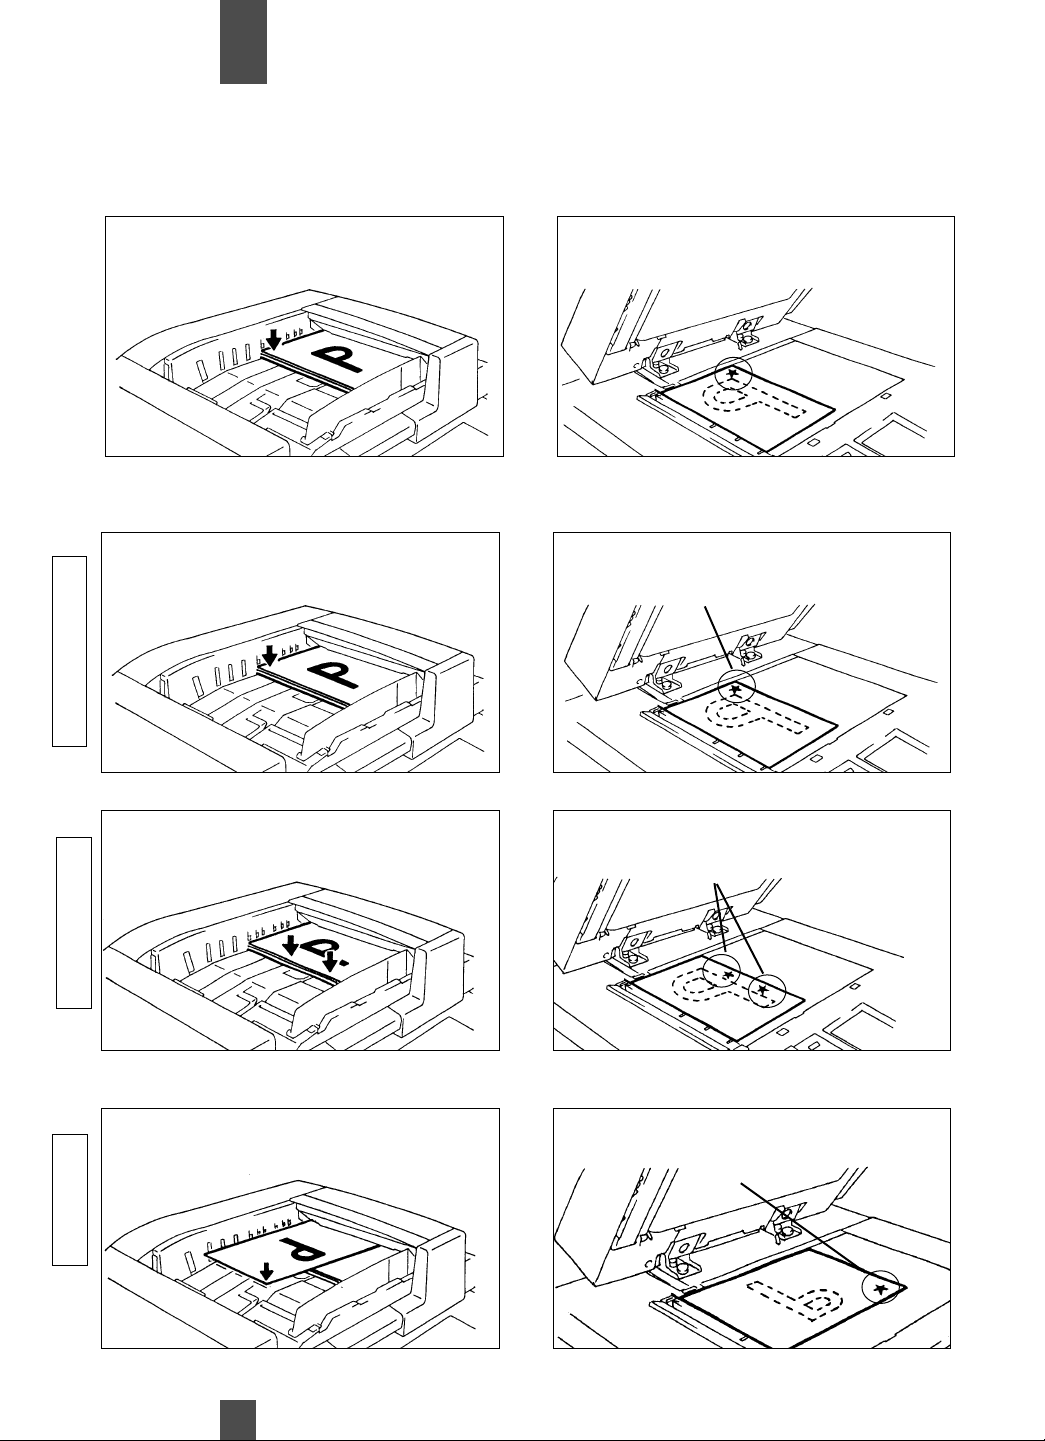
Note the correct direction of the originals if the copies are to be stapled either in Sort Staple or Manual Staple Mode.
When a Sorter/Stapler is installed:
Using the document feeder
Stapling Position
Placing the original on the glass
Stapling Position
When a Multi-Position Sorter/Stapler or Sorter/Stapler Stacker is installed:
Using the document feeder
Stapling Position
Placing the original on the glass
Stapling Position
Top Slant Staple
Using the document feeder
2 Point Staple
Using the document feeder
Top Staple
Stapling Positions
Stapling Position
Placing the original on the glass
Stapling Positions
Placing the original on the glass
Stapling Position
58
Page 60
Making Copies
Chapter
3
Instructions for Loading Originals When Using the Finishing Mode
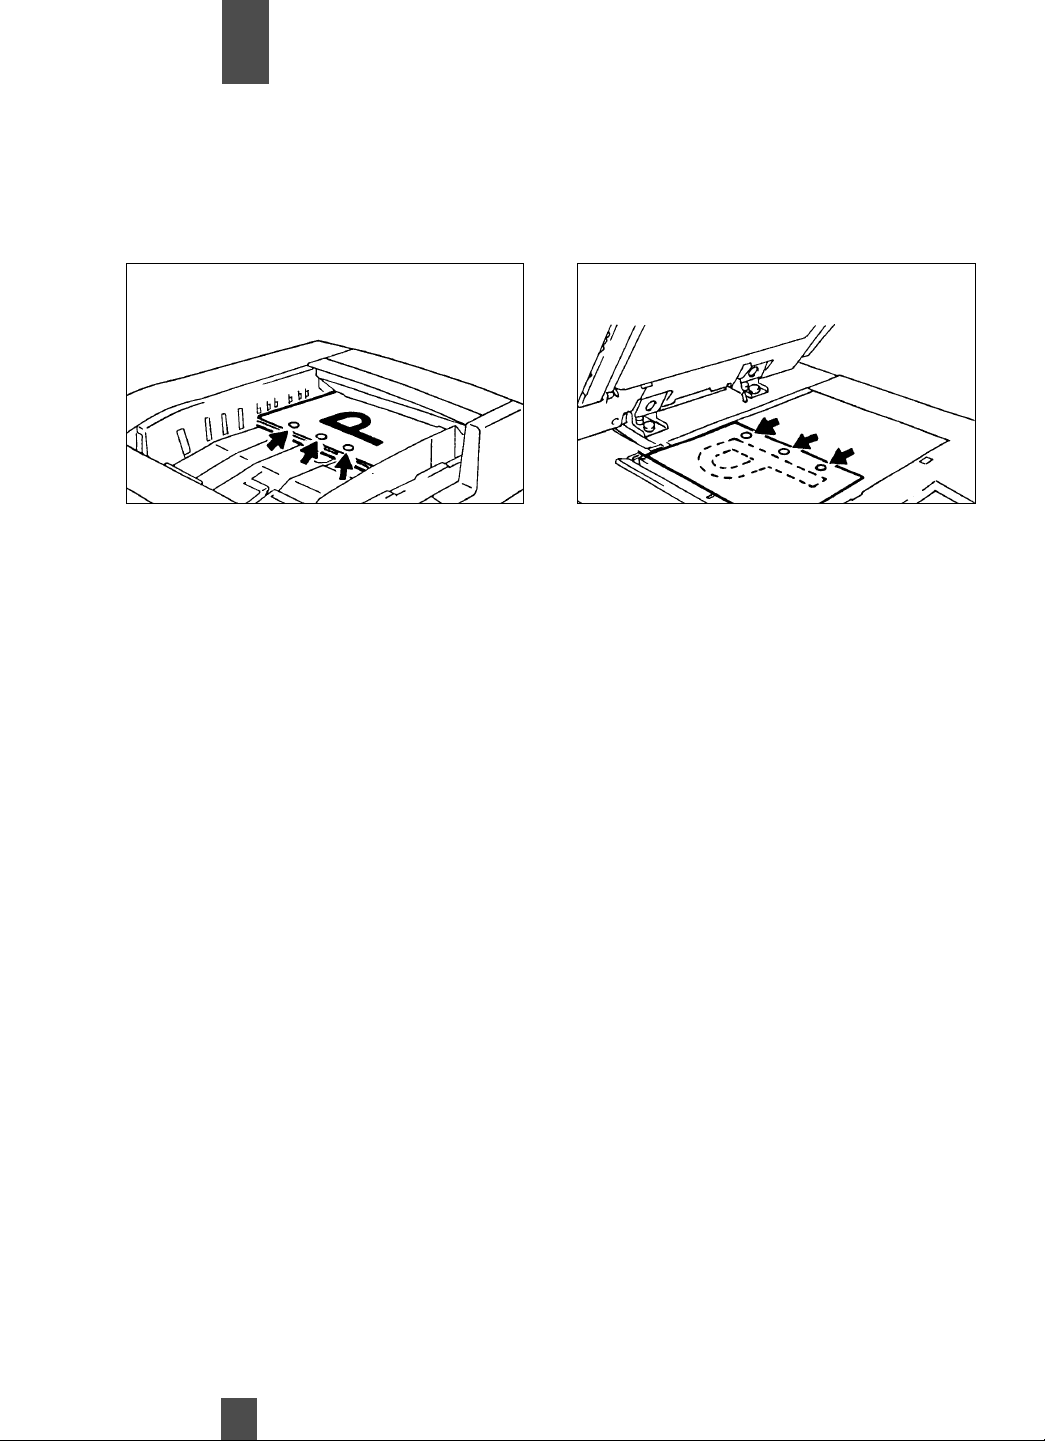
Note the correct direction of the originals if the copies are to be hole punched in any of the Finishing Modes.
When a Multi-Position Sorter/Stapler or Sorter/Stapler Stacker is installed:
Using the document feeder
Hole Punch Position
Placing the original on the glass
Hole Punch Position
59
Page 61
Making Copies
Chapter
3
Auto Dual Function
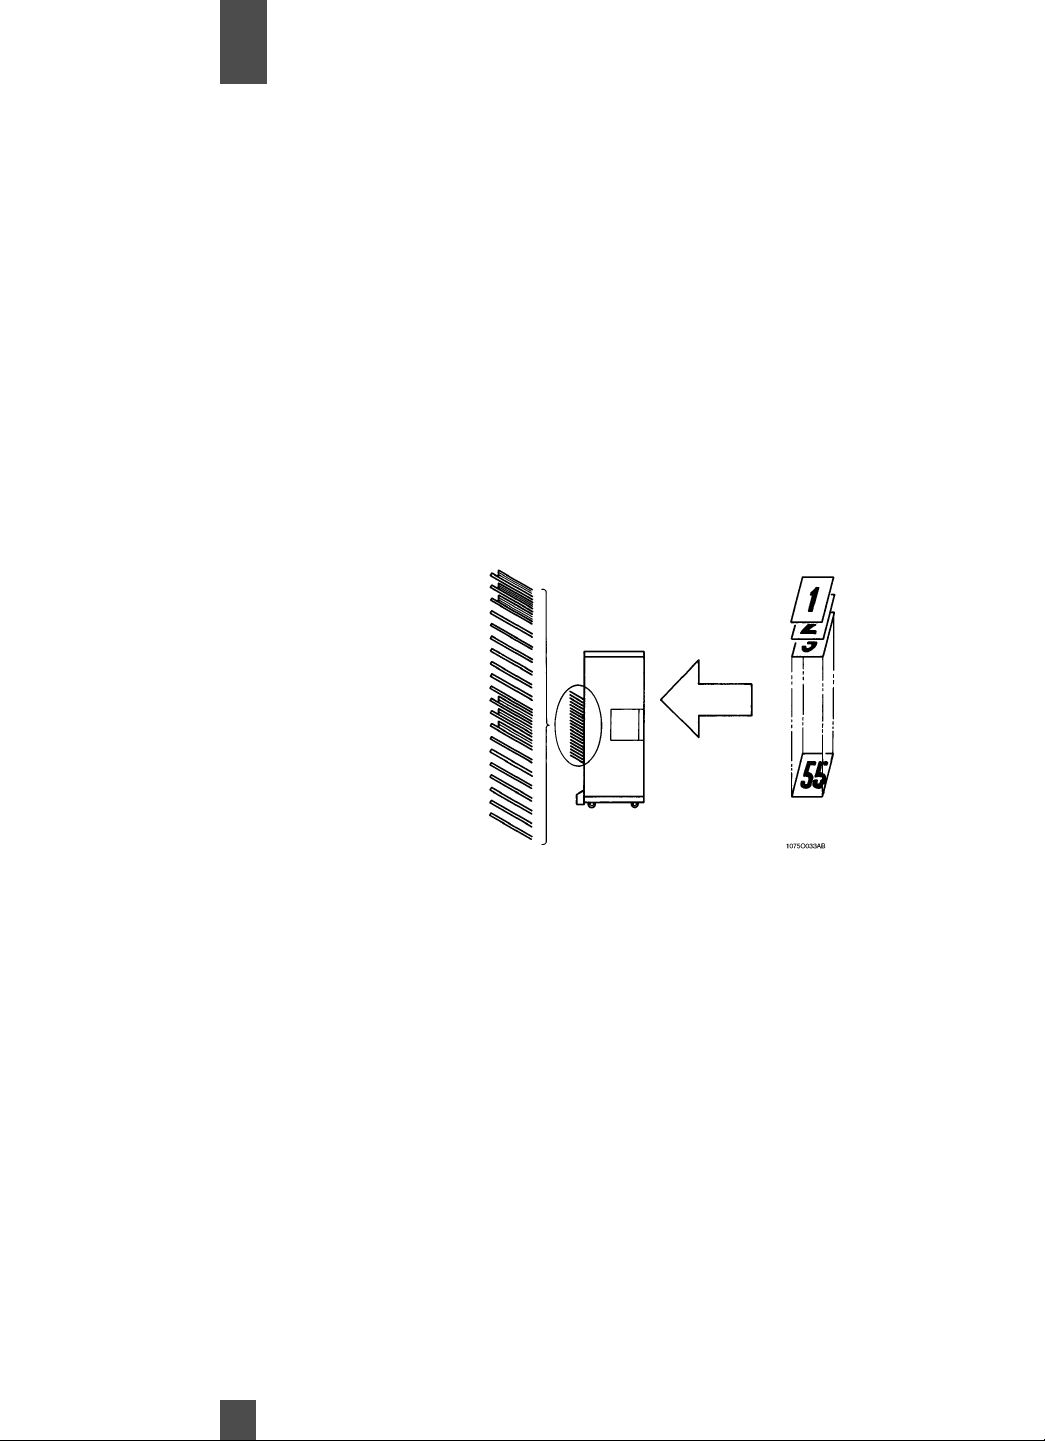
Each of the Sort Bins holds up to 50 sheets of paper. The Auto Dual function, however, allows sorting of copies of up to
100 originals under certain conditions.
Auto Dual Function in the Sort Mode
When 10 or less copies are made from an original set consisting of more than 50 pages in Sort Mode, the Auto Dual
function is automatically activated to allow the Sorter/Stapler to continue sorting copies using the 11th to 20th Bins.
If the number of copies selected exceeds 10, the copy cycle stops at the 50th original.
Example: Making 3 copy sets of a 55-page
original set using a 20-Bin Sorter/Stapler
Each of the top three bins
contains 50 sorted copies.
Each of the 11th to 13th Bins
contains 5 sorted copies.
To have a complete set from the originals, place the copies from the
11th Bin on top of those from the 1st Bin. In the same way,place the
copies from the 12th Bin on top of those from the 2nd Bin,and so on.
Auto Dual Function in the Sort Staple Mode
When 10 or fewer copies are made from an original set consisting of more than 51 originals in Sort Staple Mode and Auto Dual is activated, Sort Staple is automatically switched
to Sort (no stapling takes place).
60
Page 62
Making Copies
Chapter
3
Auto Dual Function in the Batch Mode
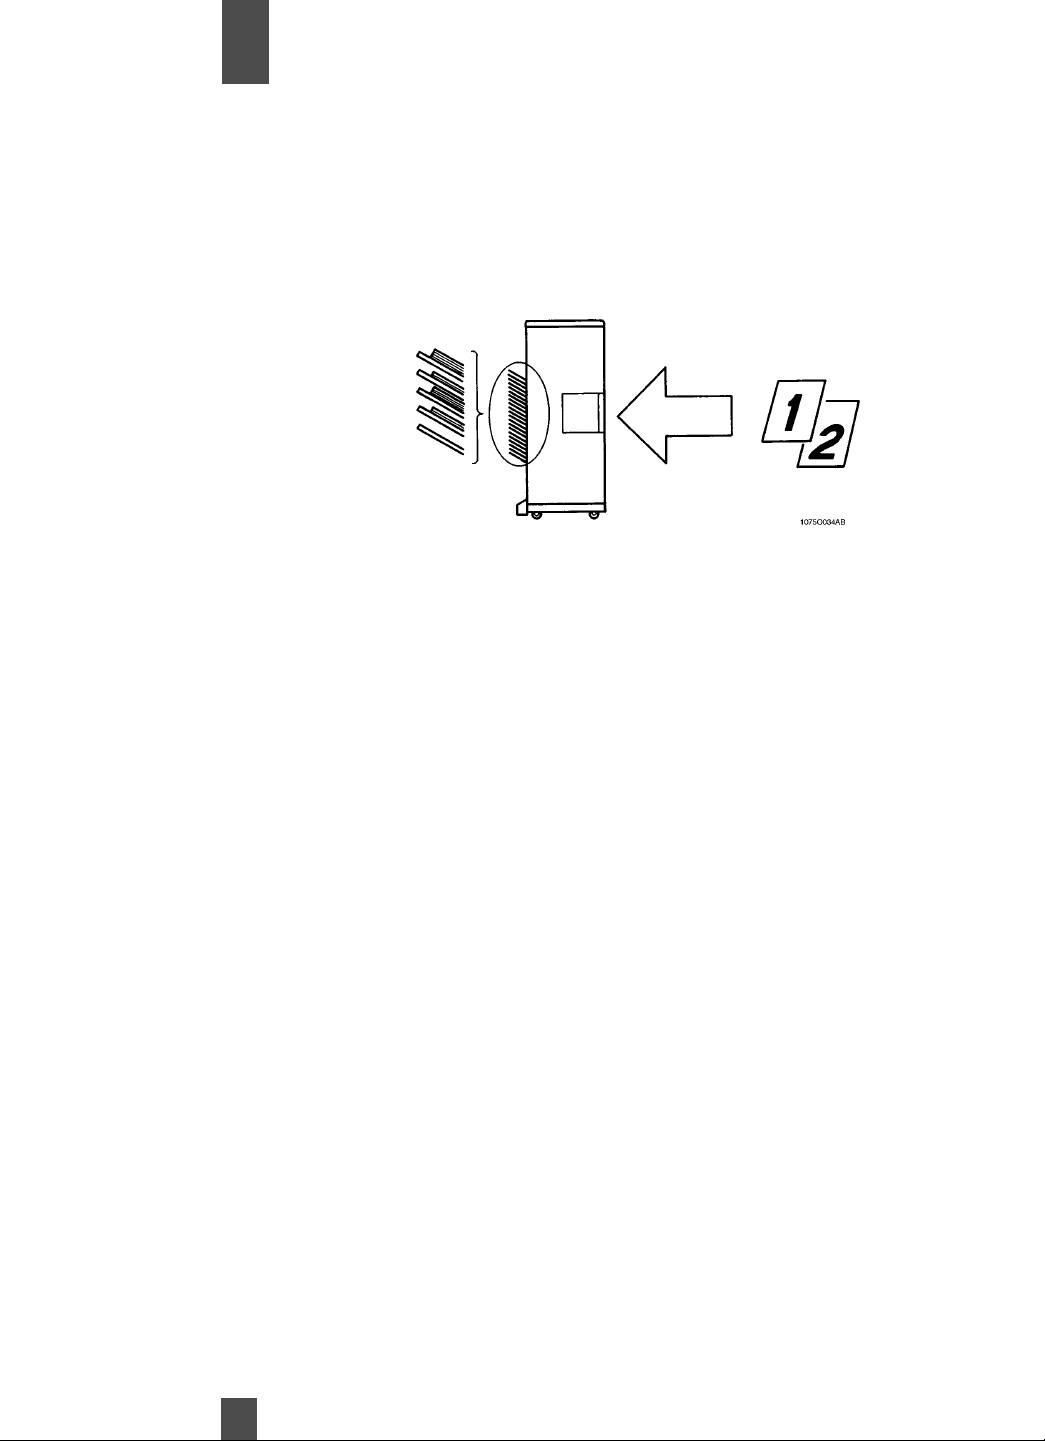
When more than 51 copies are to be Batched together into one Batch, the Sorter or Staple Sorter uses the subsequent bin
to continue Batching the copies.
Example: Using a 20-Bin Staple Sorter to separate
copies made from 2 different originals into two
Batches when each Batch contains 60 copies.
Copies of 1st original
1st Bin: 50
2nd Bin: 10
Copies of 2nd original
3rd Bin: 50
4th Bin: 10
Auto Dual Function in the Non-Sort Mode
The capacity of the Non-Sort Bin (*1st Bin) is 100 in Non-Sort. If more than 100
copies are made in Non-Sort,the Sorter uses the 1st, 2nd, and subsequent bins
to hold those excess copies.
To Make More Than 20 Copy Sets in Sort Mode:
The maximum number of copy sets that can be sorted in a single copy run in Sort
Mode is 20. If you need more copy sets than that, do this: first, enter the number
of copy sets you need from the 10-Key Pad and press the Print Key. When the
copier finishes making and sorting 20 copy sets, it temporarily stops. You now
remove the copy sets from the bins, then load your originals again and press the
Print Key. The copier resumes the copy job where it left off.
61
Page 63
Making Copies
Chapter
3
Auxiliary Functions
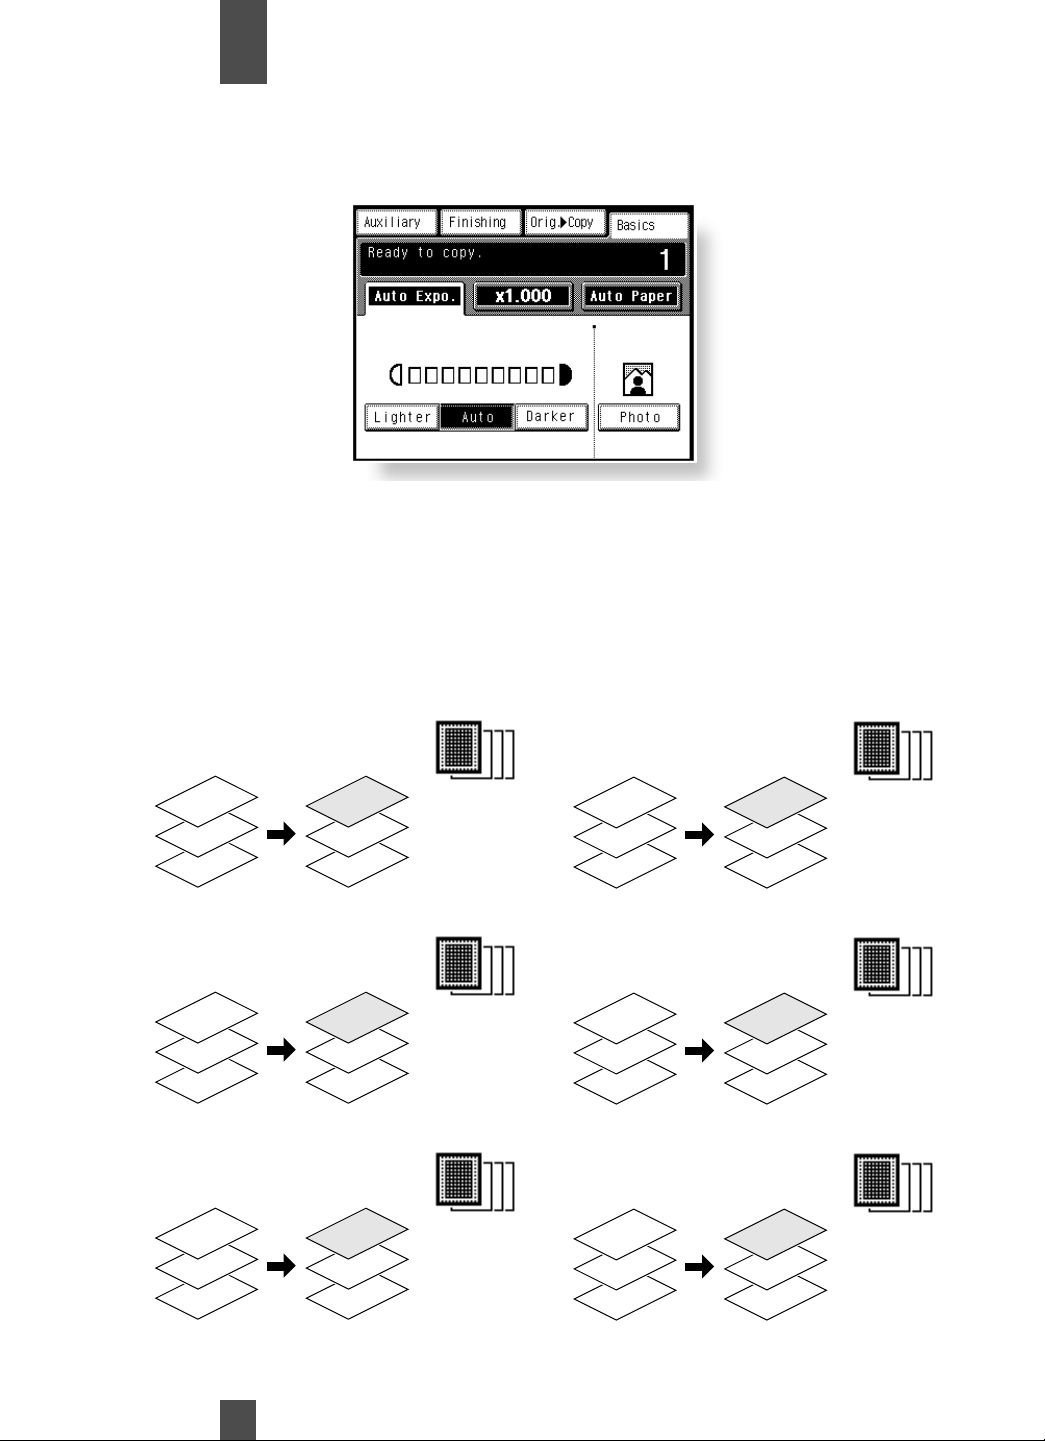
These pages explain about convenient functions offered as the Auxiliary functions and how to set these features.
When the Auxiliary key on the Touch Panel is touched, the Auxiliary function menu screen appears.
Cover
The Cover mode lets you make a front cover or a front and back cover for a copy set
by copying the first page or the first and last page of an original set on different
paper from the normal copy paper, such as colored paper.
There are six different Cover functions available. Select the appropriate one according to your need. The Cover key is shown only when the copier is equipped with a
document feeder.
Front Cover: Copied
Back Cover: None
1
2
3
Front Cover: Copied
Back Cover: Blank
1
2
3
Front Cover: Copied
Back Cover: Copied
1
2
3
1
2
3
1
2
3
1
2
3
1149O039AA
1149O039AA
1149O039AA
Front Cover: Blank
Back Cover: None
1
2
3
Front Cover: Blank
Back Cover: Blank
1
2
3
Front Cover: Blank
Back Cover: Copied
1
2
3
1
2
3
1149O039AA
1
2
3
1149O039AA
1
2
3
1149O039AA
62
Page 64
Making Copies
Chapter
3
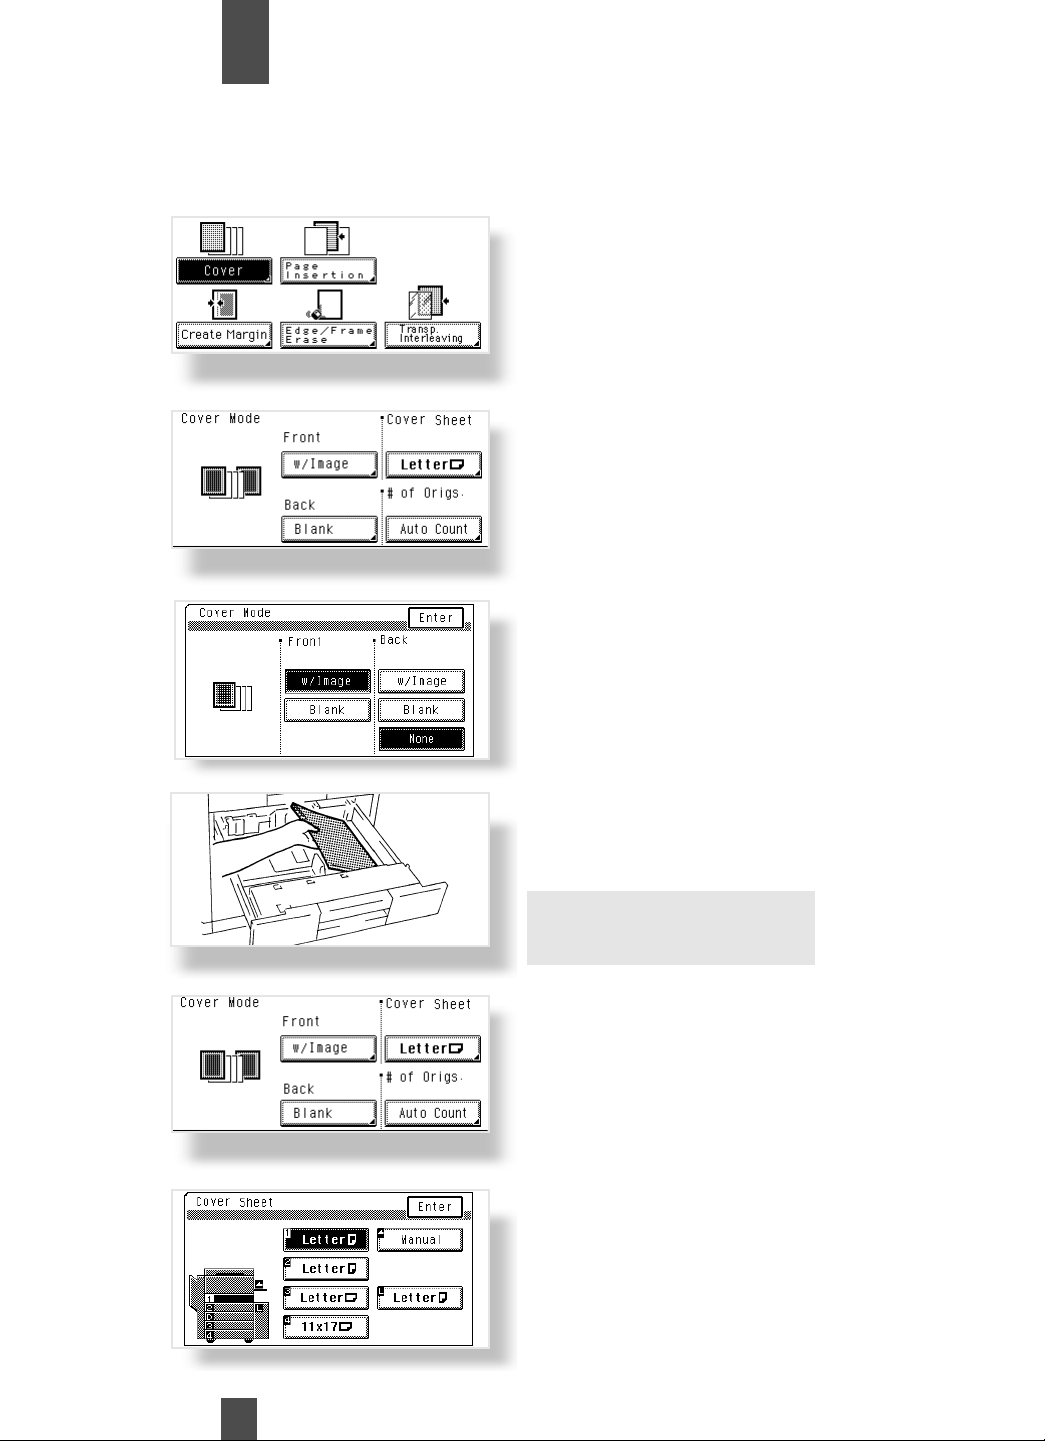
Using the Cover Mode
1
2
3
1
2
3
Touch Cover
Touch the key for front and
back.
Touch Select the appropriate
function (W/Image, Blank, or
None) for Front and Back.
Touch Enter to confirm
selection.
4
5
6
4
5
6
Load the paper for the cover
(e.g., colored paper) in the
drawer.
You can use the MultiBypass Tray as the source
of the paper for the cover.
Touch the key for Cover
Sheet.
Select the drawer in which
paper for the cover has
been loaded in step 5.
Touch Enter to confirm
selection.
63
Page 65
Making Copies
Chapter
3
Using the Cover Mode
7
8
7
8
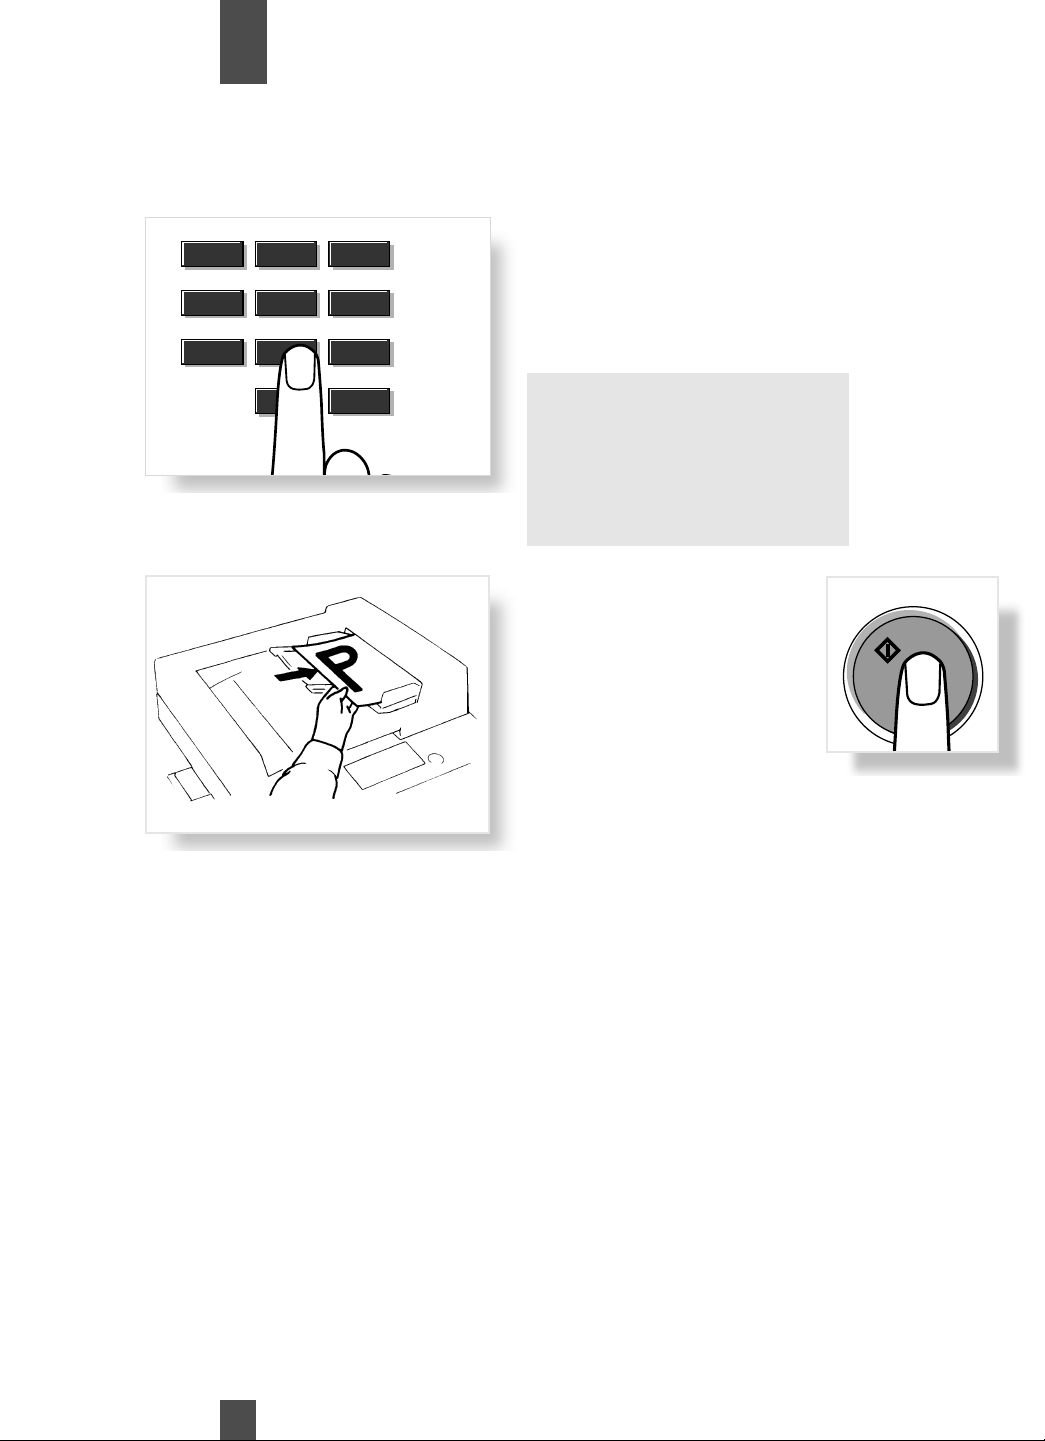
Count the number of your
1
4
7
2
5
8
0
3
6
9
C
Clear
originals and enter that number from the 10-Key Pad.
Touch Enter when you have
keyed in the number.
Note:
The maximum number of originals that can be entered is 60.
Useful Tip:
To save time, use the Auto
Count feature found on page 61
Load your originals into the
document feeder and press
the Print Key.
Print
64
Page 66
Making Copies
Chapter
3
Auxiliary Functions
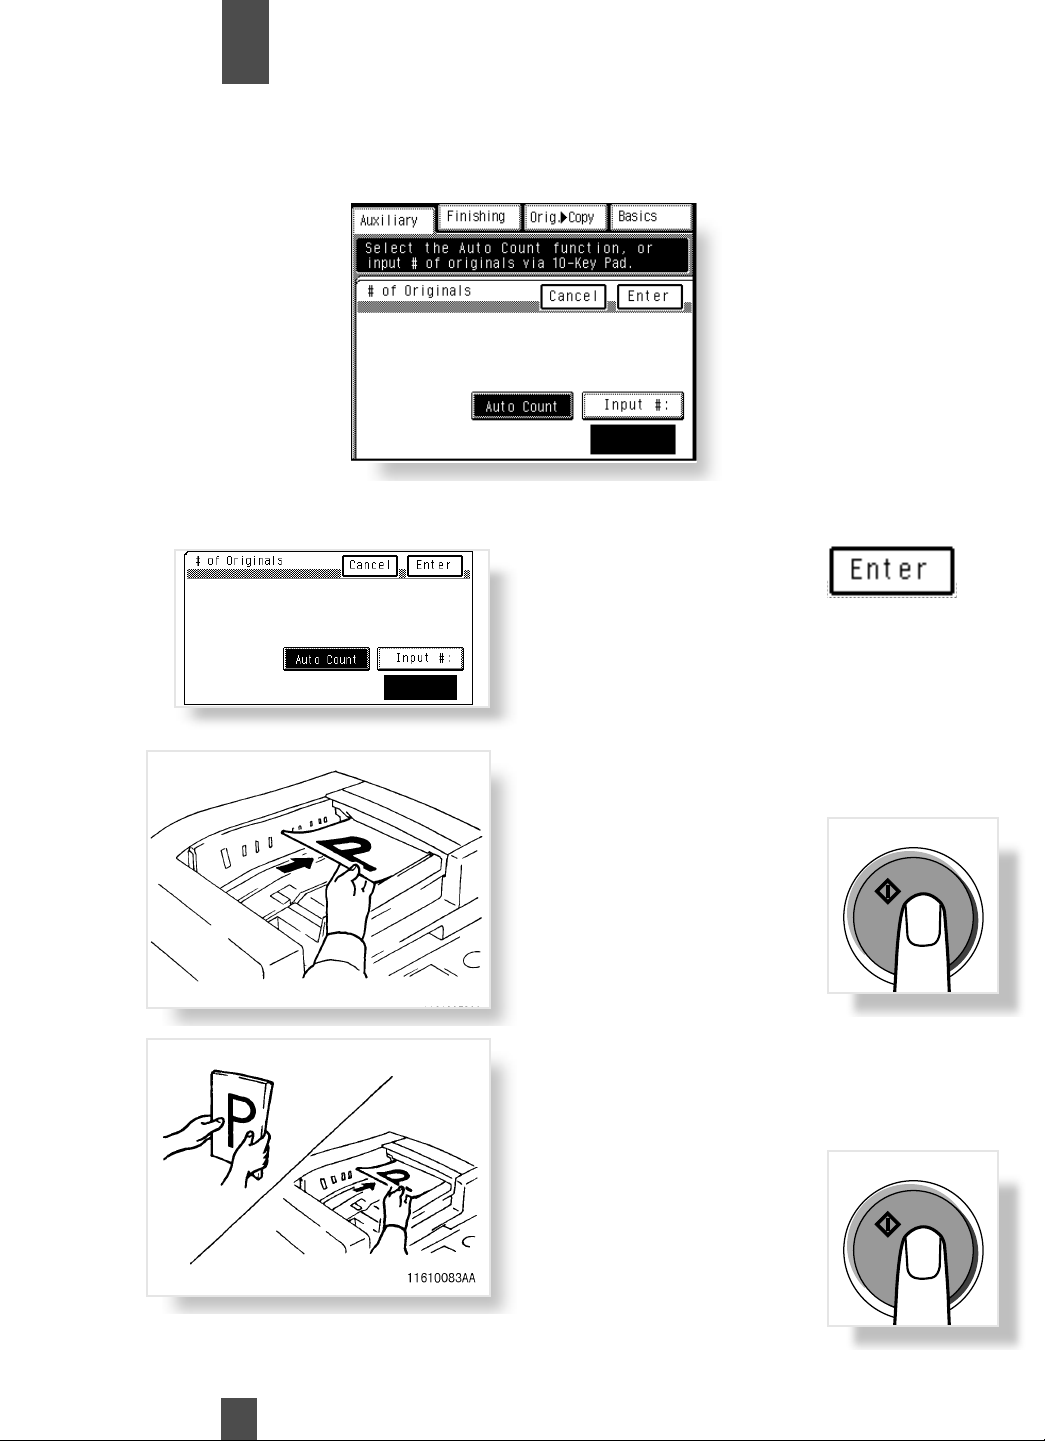
The copier offers a feature that automatically counts the number of originals.
Access this feature by selecting Auto Count. from the #of Originals screen.
2
3
2
3
1
1
Touch Auto Count.
Touch Enter to confirm.
Load your originals into the
document feeder.
Press the Print key to start
the original count sequence.
The document feeder will
feed and count the number
of originals. (No copies are
made.)
Unload the originals ejected
onto the Document Exit Tray
and reload them onto the
Document Feed Tray.
Print
65
Press the Print key to start
the copy cycle.
Print
Page 67
Making Copies
Chapter
3
Page Insertion
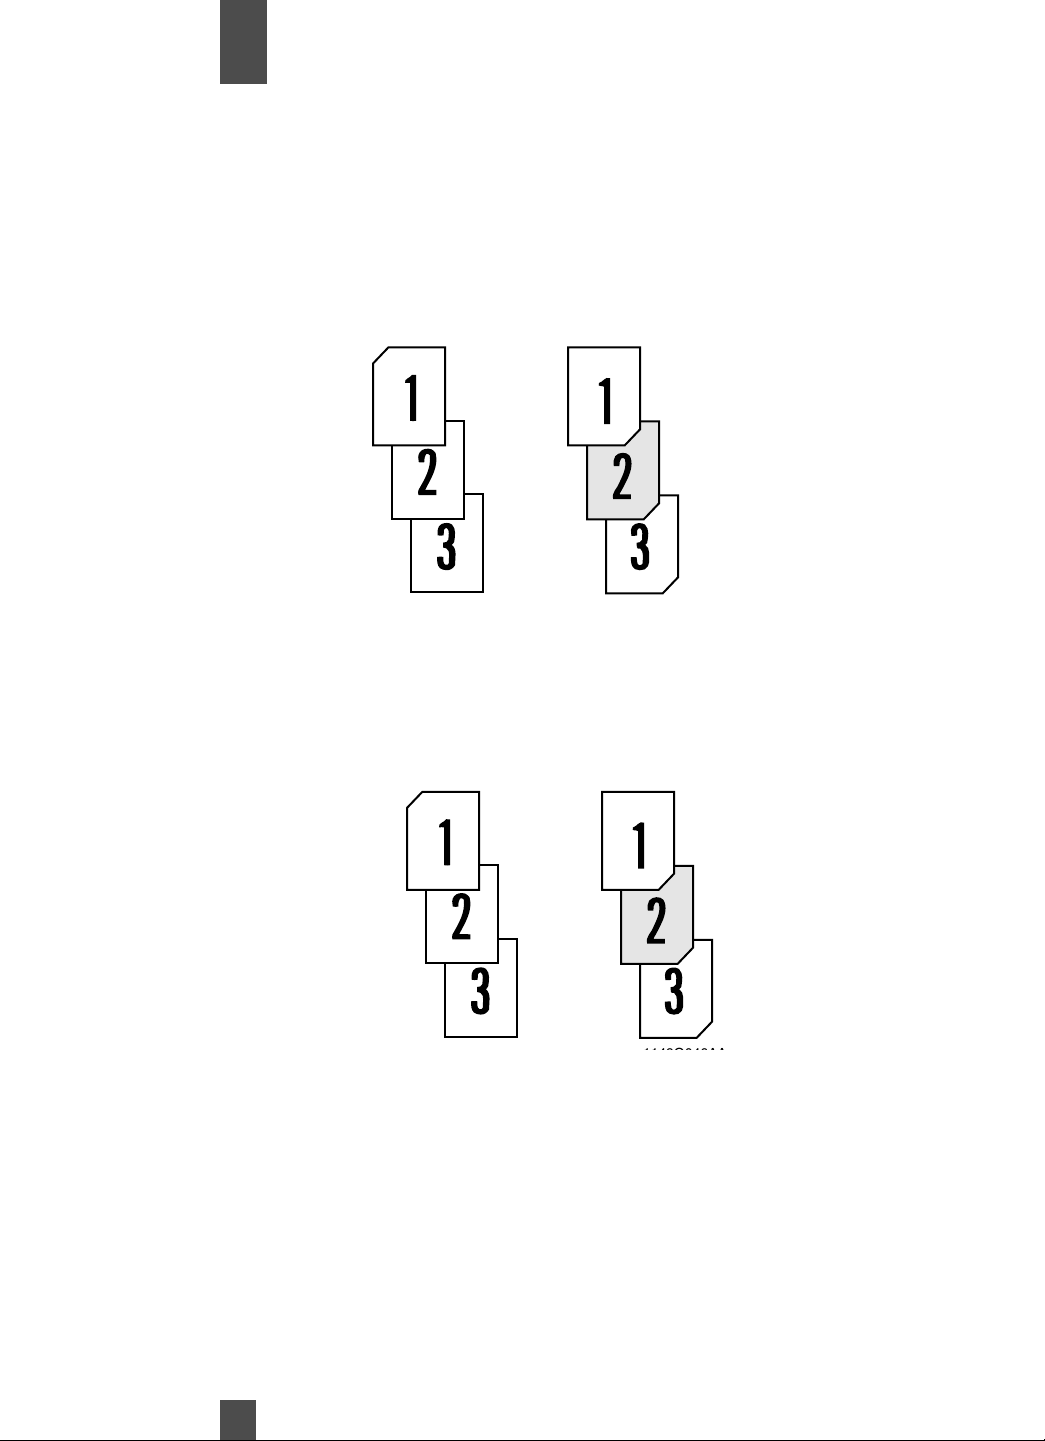
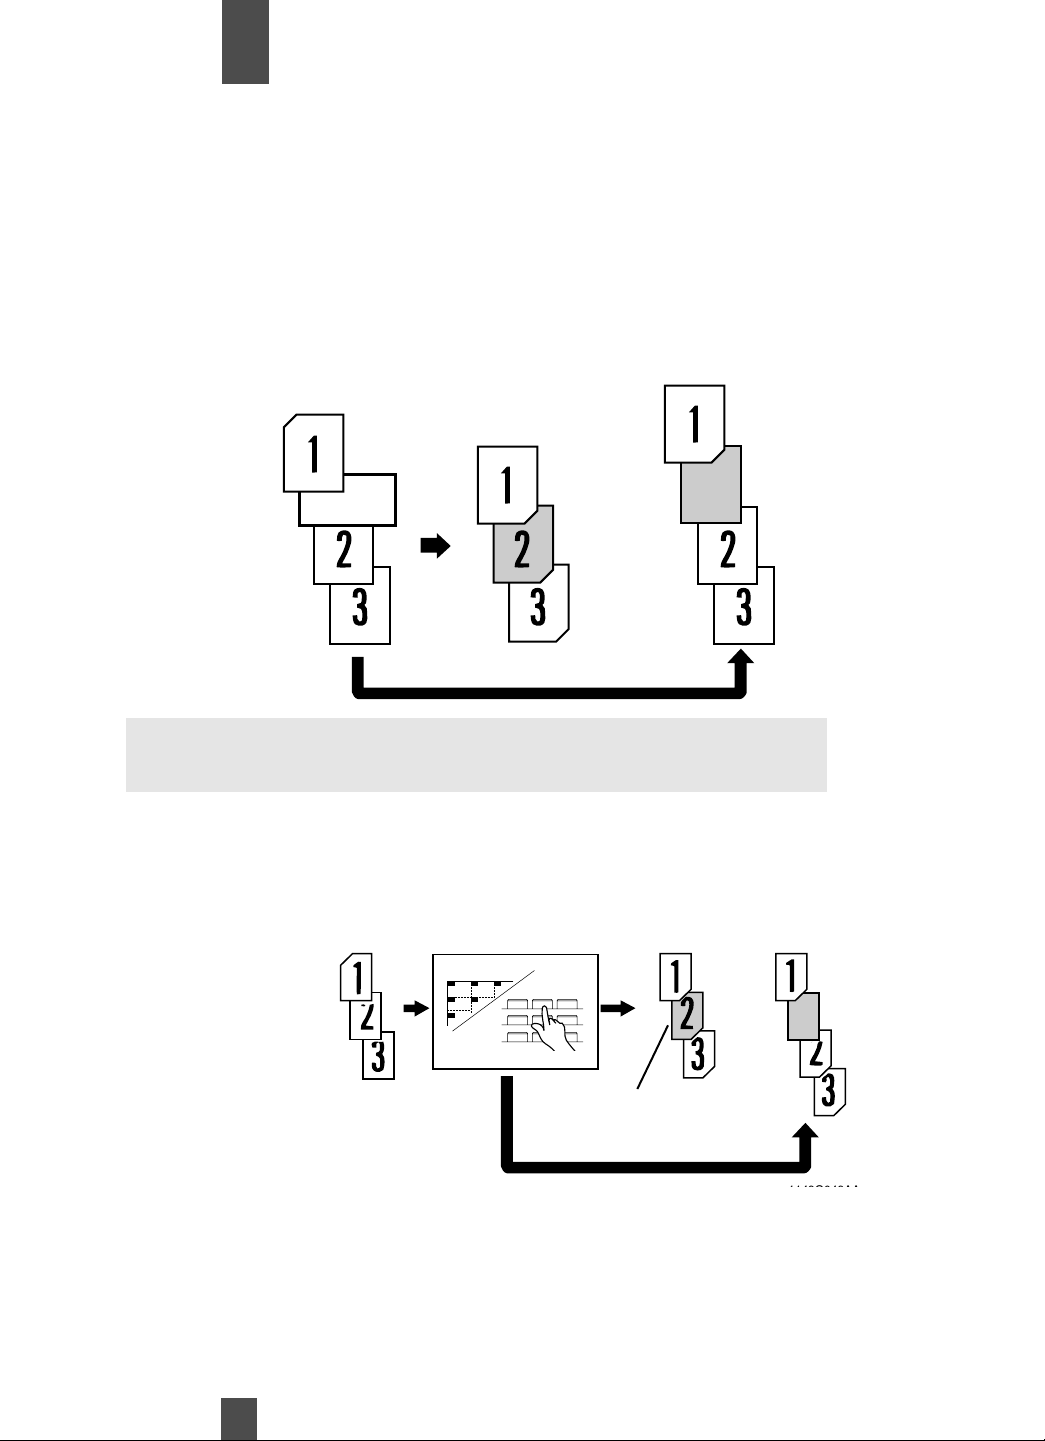
Page Insertion allows you to insert a special sheet of paper (e.g., colored paper) into the copy set. The insert page can
be copied on or left blank . *The Page Insertion key is shown only when the copier is equipped with a document feeder.
Page Insertion: Copied Insert
A copy is made on the special
insert paper
(e.g., colored paper).
Original Set Copy Set
\
Page 2 specified
for insert
Page Insertion: Non-Copied Insert
The copier inserts a blank
insert between 2 pages
(e.g., colored paper).
Original Set Copy Set
Page 2 specified
for insert.
The insert is placed
between pages 1 and 2
\
66
Page 68
Making Copies
Chapter
3
Specifying the Insert Location
In the Page Insertion mode, you must specify where to place an insert. Two ways are available to specify the insert
places, either ADF Detection or 10-Key Input.
ADF Detection: (automatic detection)
To specify the location where you want the copier to place the insert, place an
odd sized piece of paper in your originals. If you want to copy on the special
insert paper, the “marker sheet” should be placed before the original that you
are copying onto the insert.
Original Set Copy Set
Copy Set
Non-Copied Insert
Insert Marker
between pages
1 and 2
Copied Insert
Note:
ADF Detection cannot be used when the Mixed Original Detection
mode is on. See page 27
10 Key Input
Using the 10-Key Pad, define the places for inserts. p. 66
Up to 20 places can be defined.
Original Set Copy Set Copy Set
1 2 3
2
6 7
11
123
456
789
Copied Insert
Non-Copied
Insert
67
Page 69
Making Copies
Chapter
Using Page Insertion
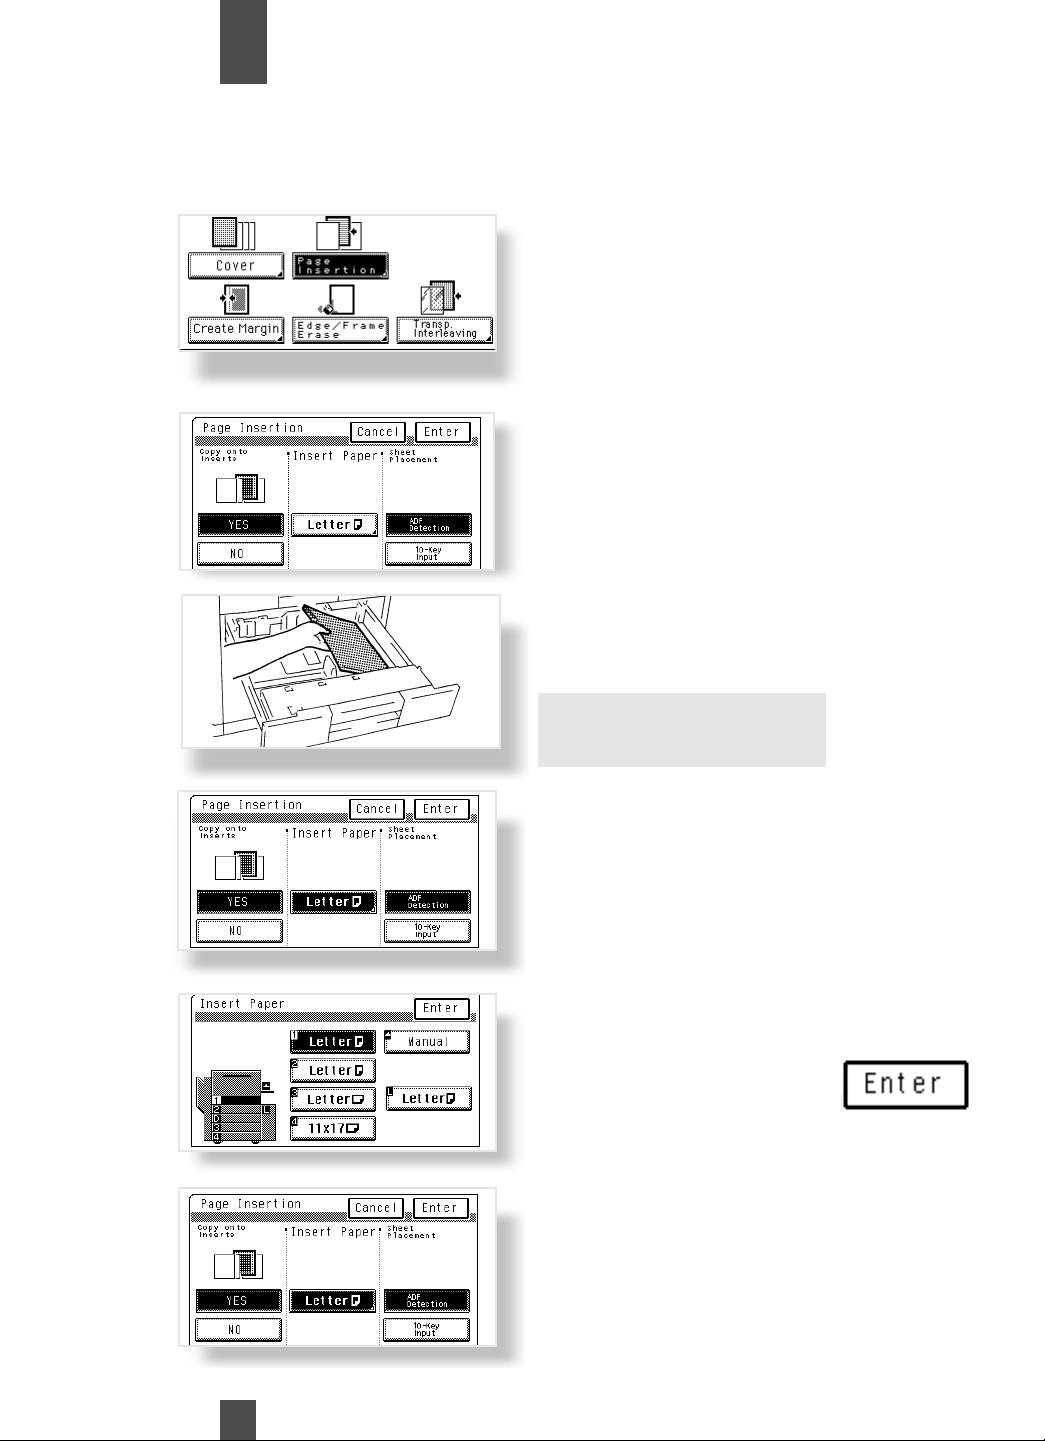
Follow the steps below when using the Page Insertion feature in the ADF Detection mode.
3
1
2
3
1
2
3
Touch Page Insertion.
Touch Yes to copy onto the
inserts, touch No for blank
inserts. (Non Copied)
Load the paper for the
inserts (e.g., colored paper)
in the drawer.
You can use the MultiBypass Tray as the source
of the paper for the inserts.
4
5
6
4
5
6
Touch the paper size key for
the Insert Paper.
Select the paper source
where the Inserts are loaded.
Touch Enter to confirm.
Touch ADF Detection.
68
Page 70
Making Copies
Chapter
3
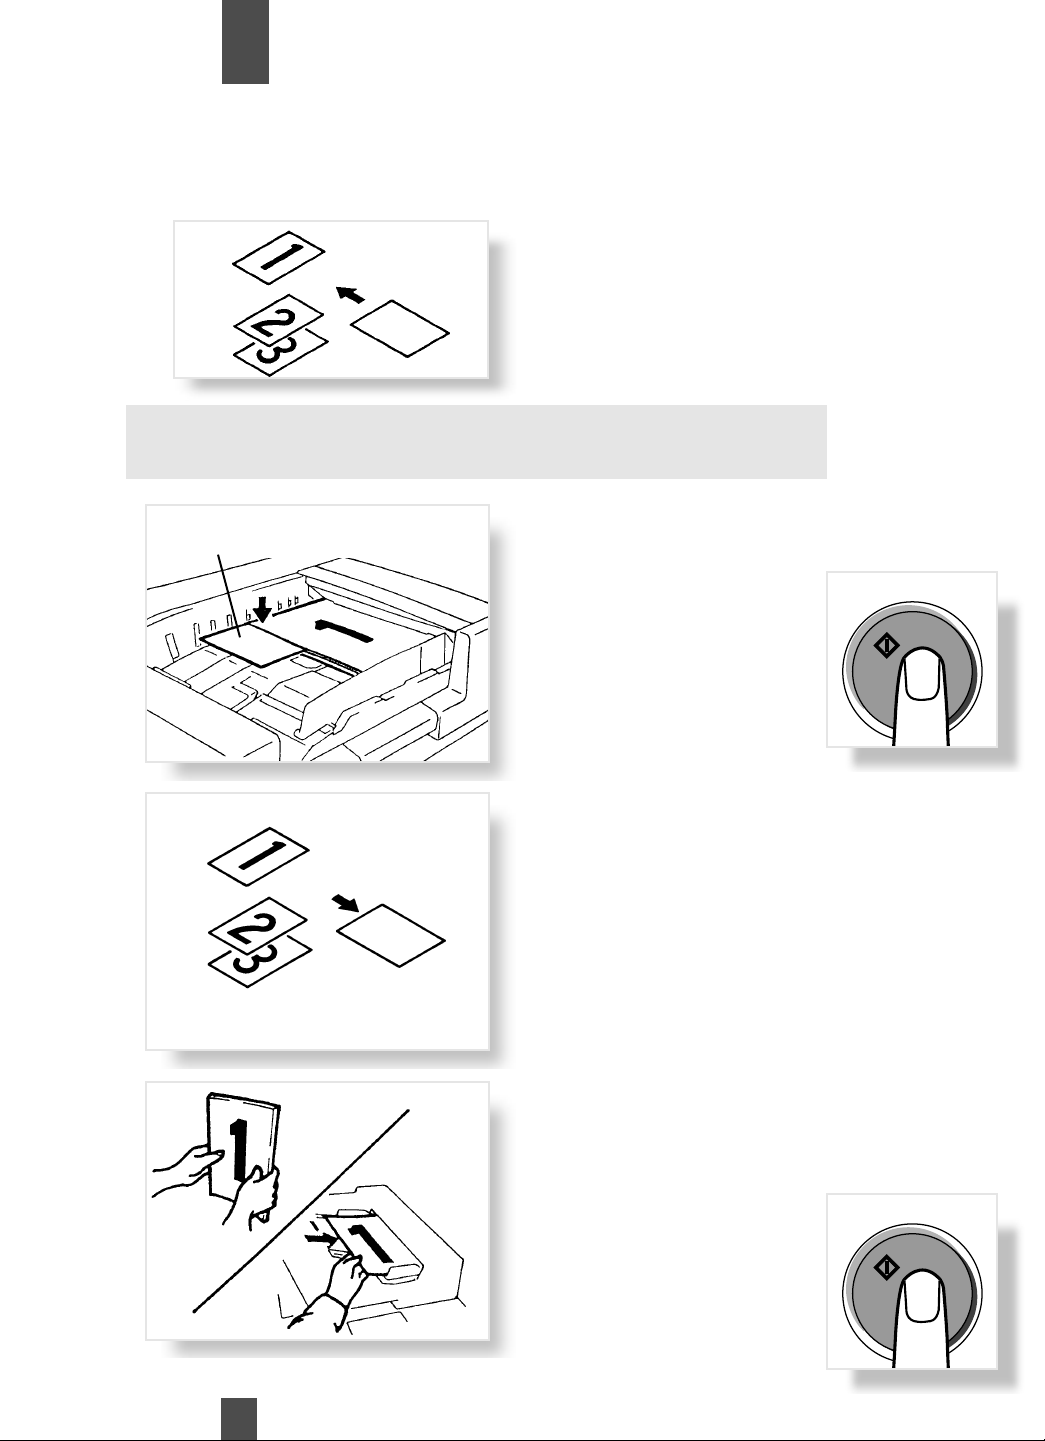
Using Page Insertion
Follow the steps below when using the Page Insertion feature in the ADF Detection mode.
7
7
* The insert marker sheets must be a different size or loaded in a
different direction than your originals. The copier will recognize the
difference between the originals and the insert markers.
8
9
8
9
Insert Marker
Place insert marker sheets*
in your originals where you
would like the inserts to
appear in your copies.
Refer to the diagram on
page 67 for location instructions.
Load your originals with the
insert markers into the document feeder.
Press the Print key to start
the original count sequence.
The document feeder will
feed and count the number
of originals. (No copies are
made.)
Remove the insert markers
from the originals after they
have gone through the
feeder.
Print
10
10
Load the originals back into
the Document Feed Tray.
Press the Print key to start
the copy cycle.
Print
69
Page 71
Making Copies
Chapter
Using Page Insertion
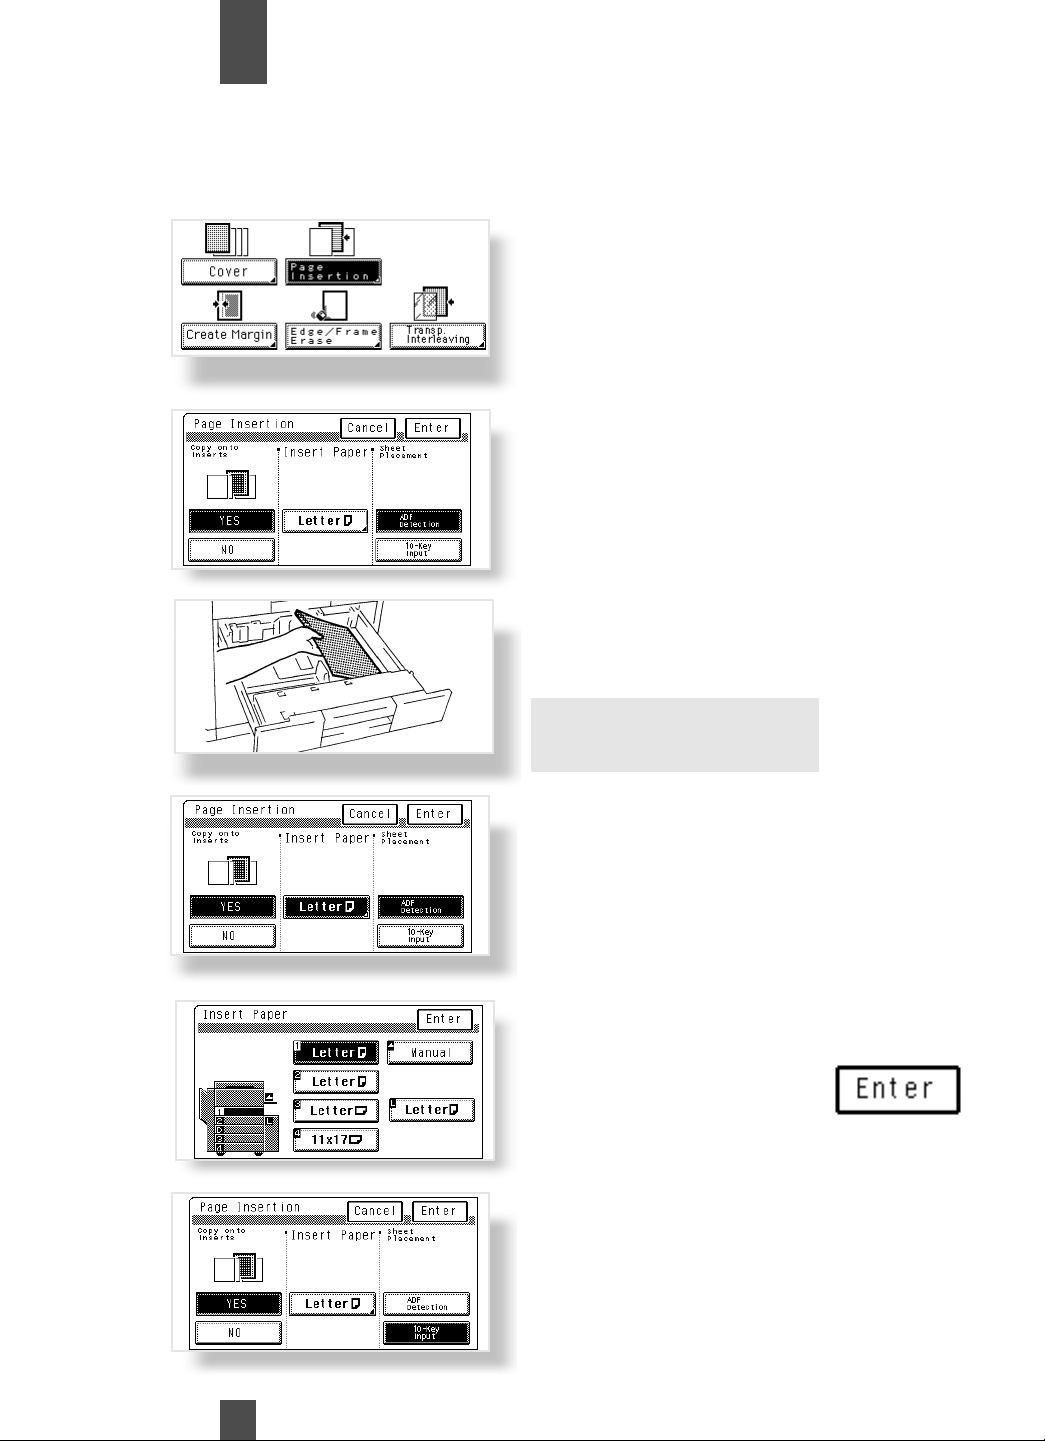
Follow the steps below when using the Page Insertion feature in the 10 Key Input mode
3
1
2
3
1
2
3
Touch Page Insertion.
Touch Yes to copy onto the
inserts, touch No for blank
inserts. (Non Copied)
Load the paper for the
inserts (e.g., colored paper)
in the drawer.
You can use the MultiBypass Tray as the source
of the paper for the inserts.
4
5
6
4
5
6
Touch the paper size key for
the Insert Paper.
Select the paper source
where the Inserts are loaded.
Touch Enter to confirm.
Touch 10 Key Input.
70
Page 72
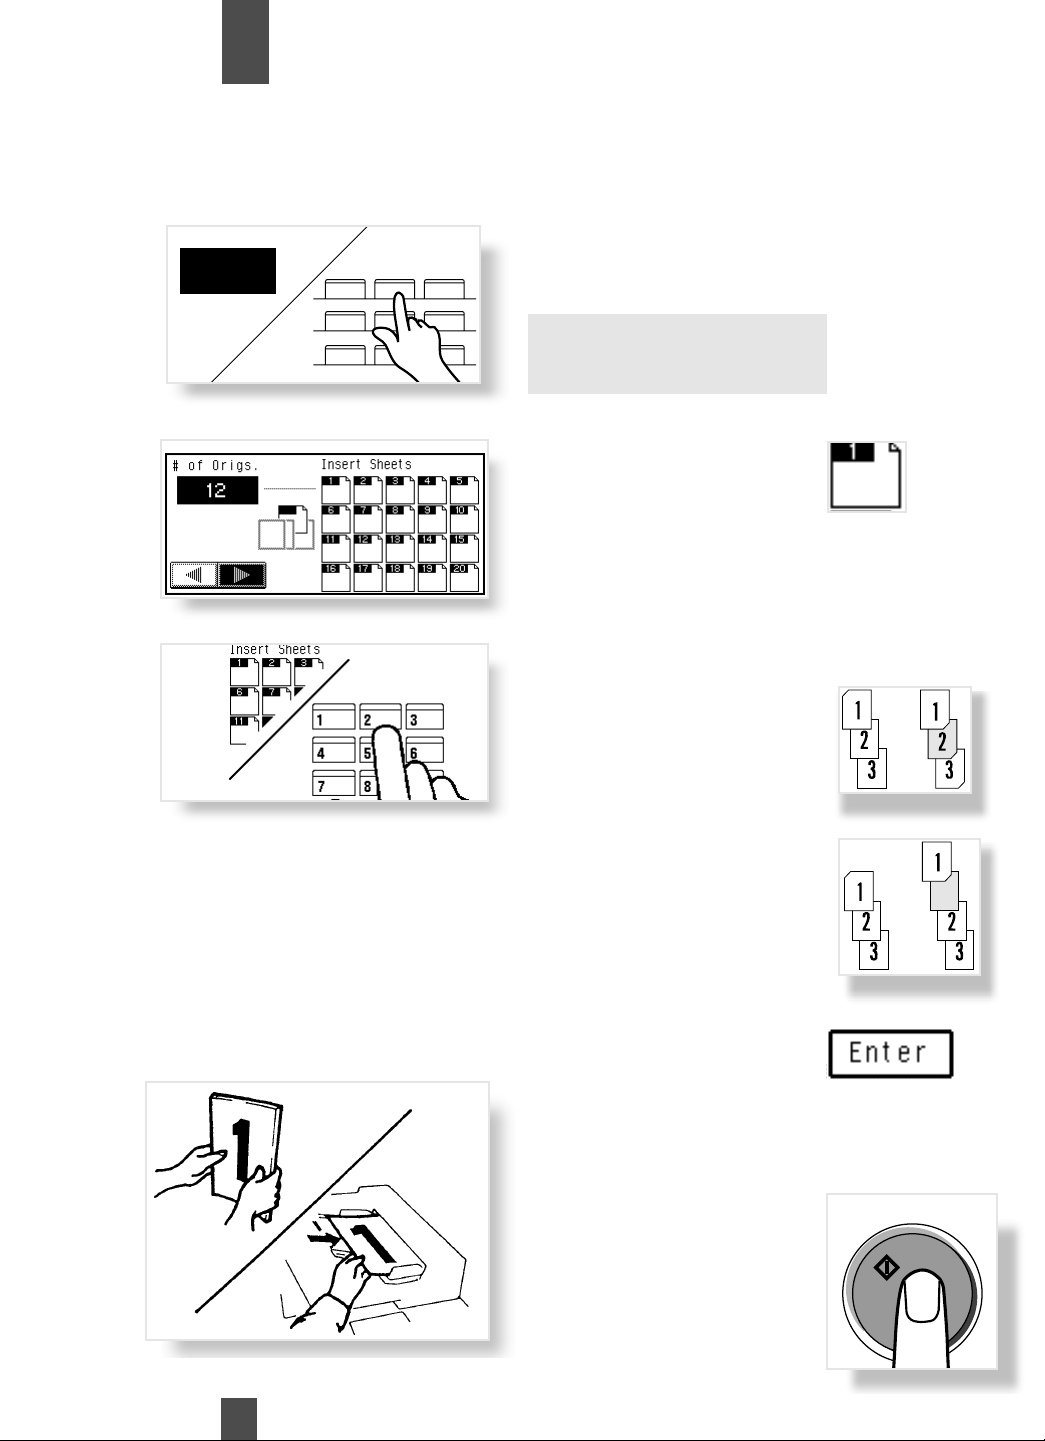
Making Copies
Chapter
3
Using Page Insertion
Follow the steps below when using the Page Insertion feature in the 10 Key Input mode
8
9
7
8
9
7
12
123
456
789
Enter the number of originals from the 10 Key Pad
The maximum number of
originals allowed is 60.
Use the arrow keys to move
the cursor to position number 1 of the Insert Sheets.
Use the 10 Key Pad to enter
the location of the first insert.
\
Example: For a copied insert
on copy 2, enter “2”
10
10
For a non-copied insert
before copy 2, enter “2”
To place more inserts, repeat
steps 8 and 9 for Insert
Sheets positions 2 through
20.
Press Enter when done.
Load the originals into the
Document Feed Tray.
Press the Print key to start
the copy cycle.
\
Print
71
Page 73
Making Copies
Chapter
3
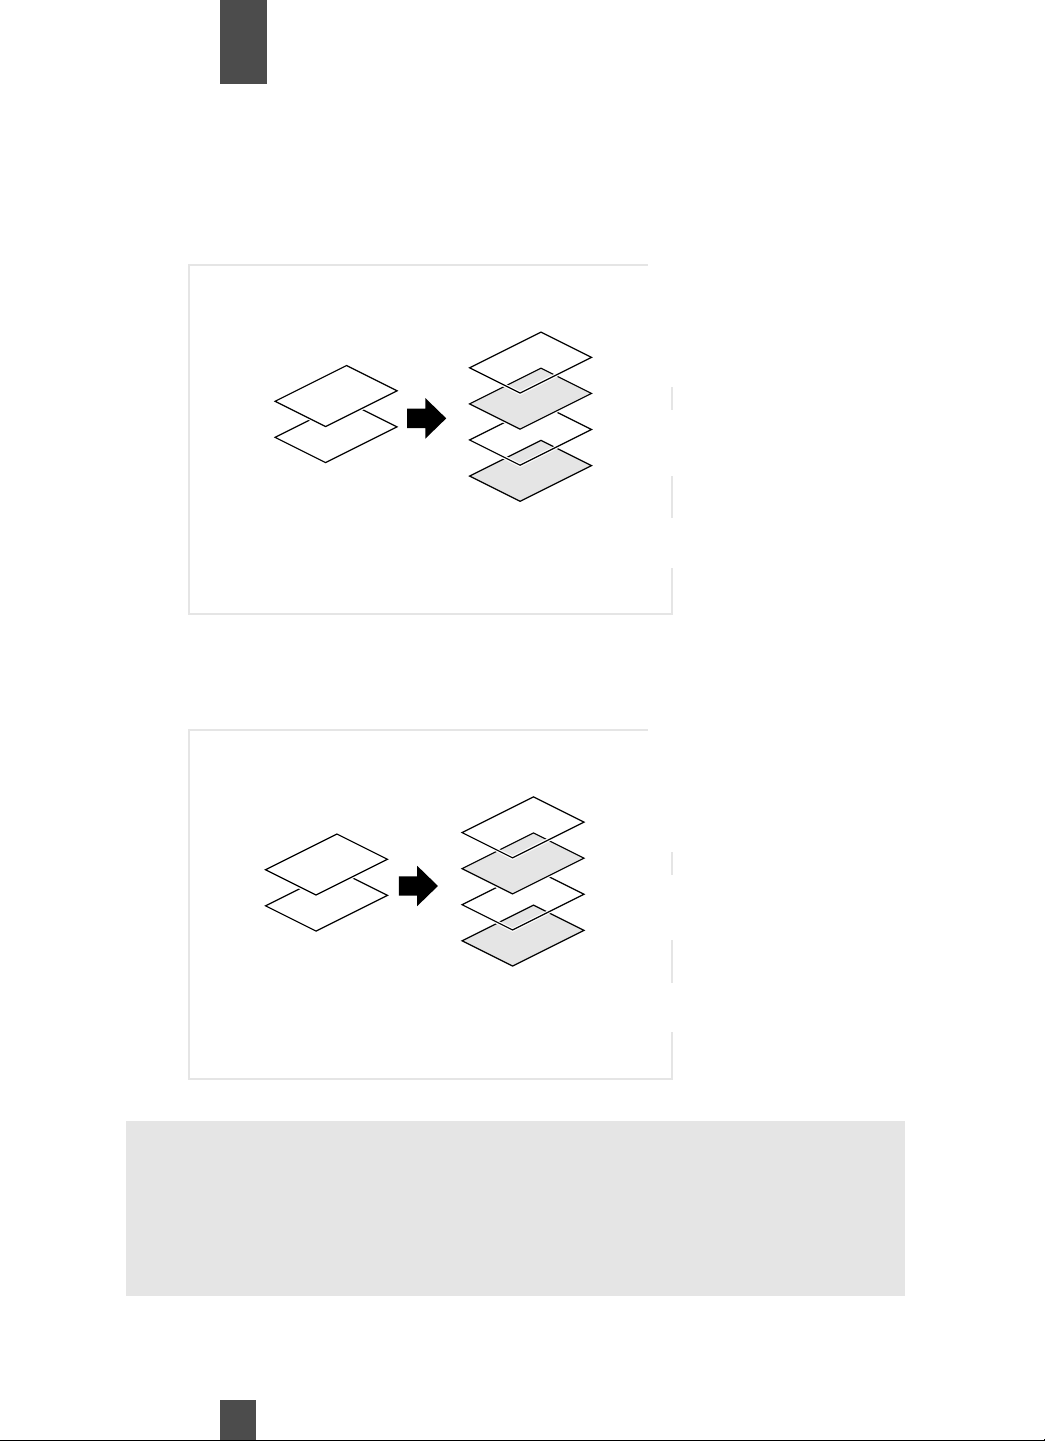
Transparency Interleaving
When you make copies on transparencies, the Transparency Interleaving function inserts copied or non-copied interleaves
after each transparency. Four interleaving functions are available.
Single Copy
Copied Interleaves
Original Set Copy Set
1
2
Single Copy
Non-Copied Interleaves
Original Set Copy Set
1
1
2
2
1
The copier copies onto the
transparencies and, after
each transparency, copies
the same image onto a sheet
of paper.
Copied
Interleaves
1149O063AA
The copier copies onto the
transparencies and, after
each transparency, inserts a
blank sheet of paper.
1
2
Notes:
• Transparency Interleaving can be available only when Letter lengthwise or
Letter crosswise paper is loaded in any paper source.
• For Multiple Copy, the copier should be equipped with a 20-Bin Staple
Sorter.
• For obvious reasons,Transparency Interleaving precludes 2-sided copying.
72
2
1149O064AA
Non-Copied
Interleaves
Page 74
Making Copies
Chapter
3
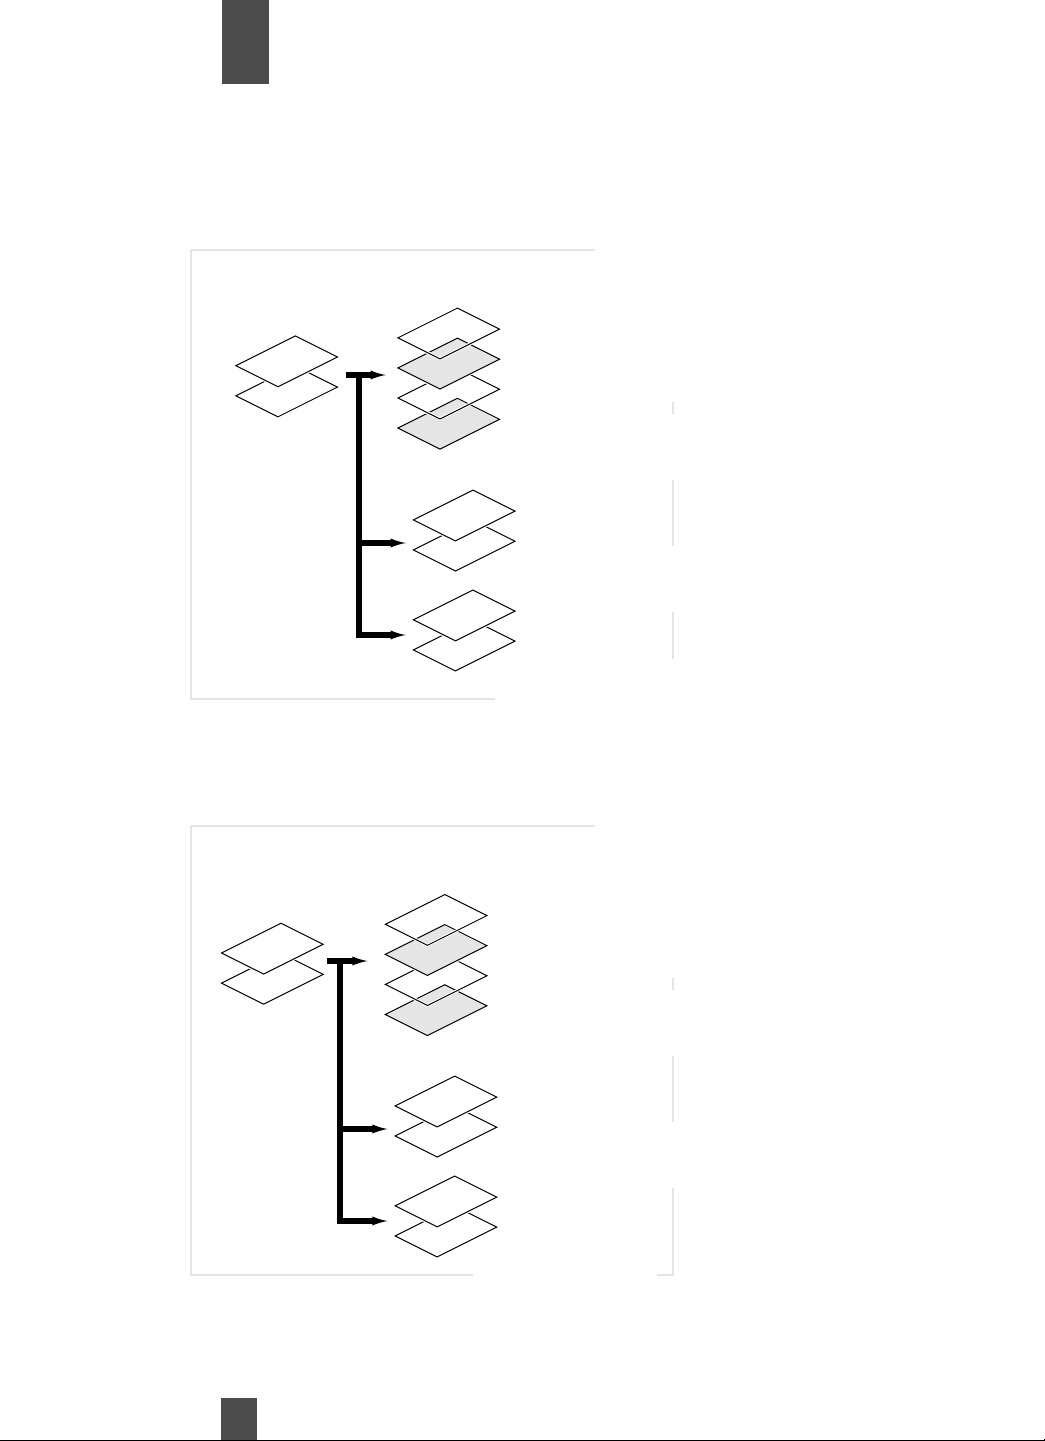
Transparency Interleaving
Multiple Copy
Copied Interleaves
Original Set Copy Set
1
2
Multiple Copy
Non-Copied Interleaves
Original Set Copy Set
1
2
1
2
1
1
2
2
The copier copies onto the transparencies and, after each transparency, copies the same image
onto a sheet of paper.
Additional sets can be made at the
same time.
Copied
Interleaves
1
2
Extra Copies
(2 sets)
1
2
1149O065AA
The copier copies onto the transparencies and, after each transparency, inserts a blank sheet of
paper.
Additional sets can be made at the
same time.
Copied
Interleaves
73
1
2
1
2
Extra Copies
(2 sets)
1149O066AA
Page 75
Making Copies
Chapter
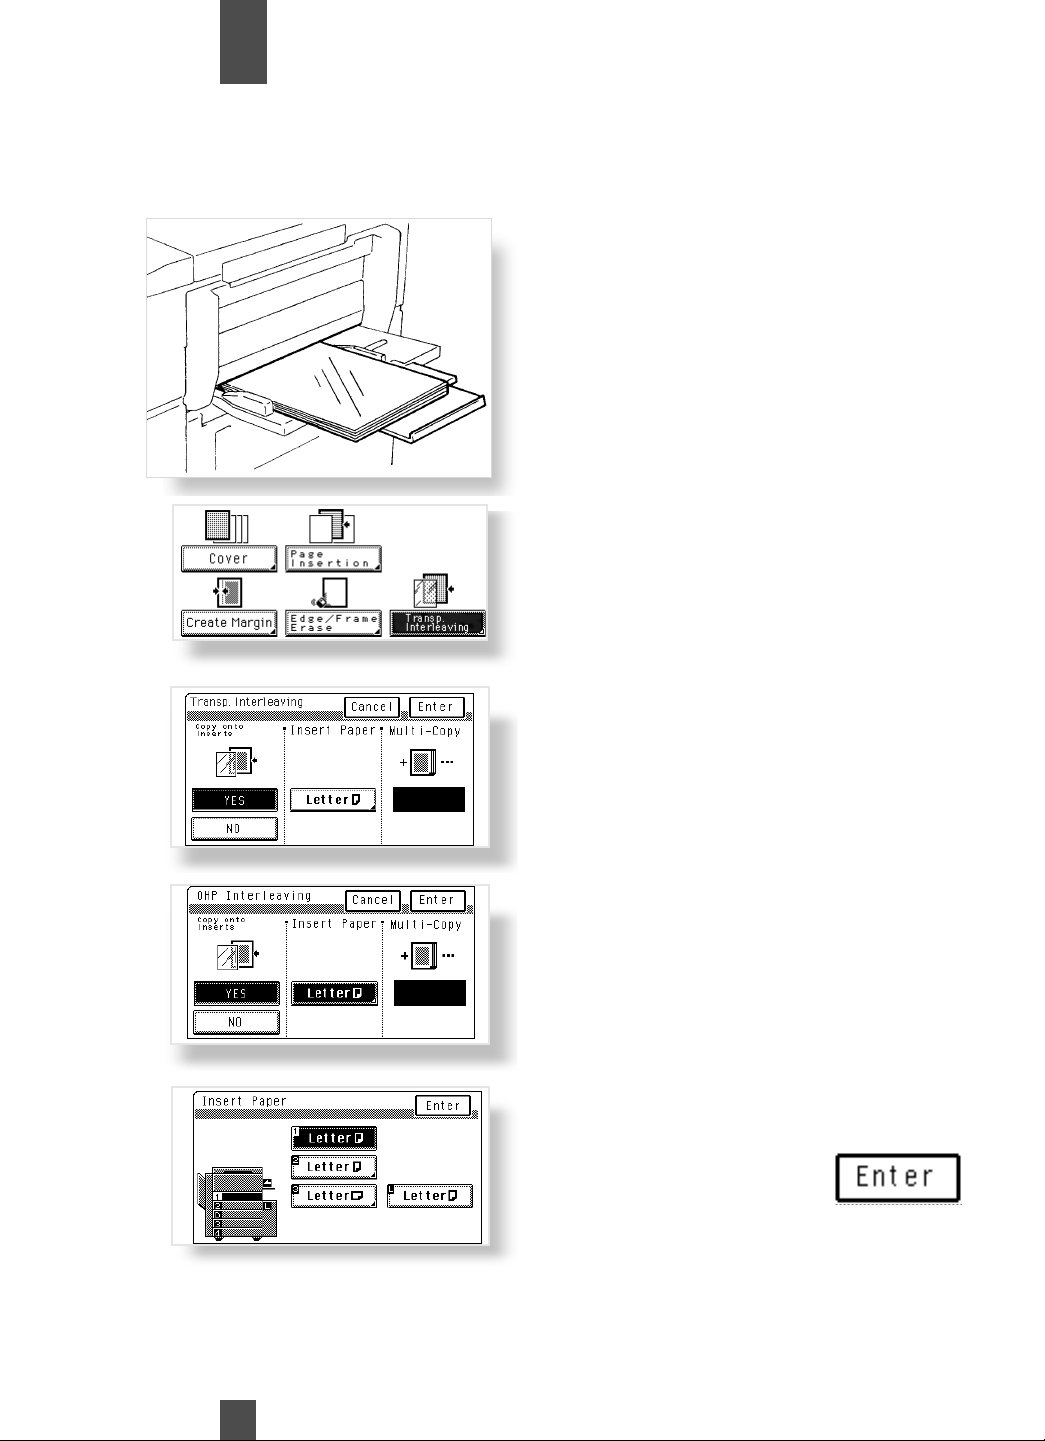
Transparency Interleaving
Follow the instructions below when using Transparency Interleaving.
3
2
3
1
2
3
1
Load OHP (Over Head
Projector) transparencies
onto the Multi Bypass
Tray.(Up to 20 sheets of
OHP transparencies can be
placed on the tray.)
Touch Transp. Interleaving
Select Yes to copy onto the
interleaves or No for blank
interleaves
4
5
4
5
Touch the paper size key for
the Insert Paper.
Select the paper source
where the Inserts are loaded.
Touch Enter to confirm.
74
Page 76
Making Copies
Chapter
3
Transparency Interleaving
Follow the instructions below when using Transparency Interleaving.
6
7
8
6
7
8
Print
7
45
78
Stop
Enter the number of copy
sets to make using the 10
Key Pad.
Touch Enter to confirm.
Load the originals into the
document feeder.
Note:
If you make each copy
through the Original Glass,
start with the last page of the
set.
See "Placing Originals" p. 30
Press the Print Key to start
the copy cycle.
75
Page 77
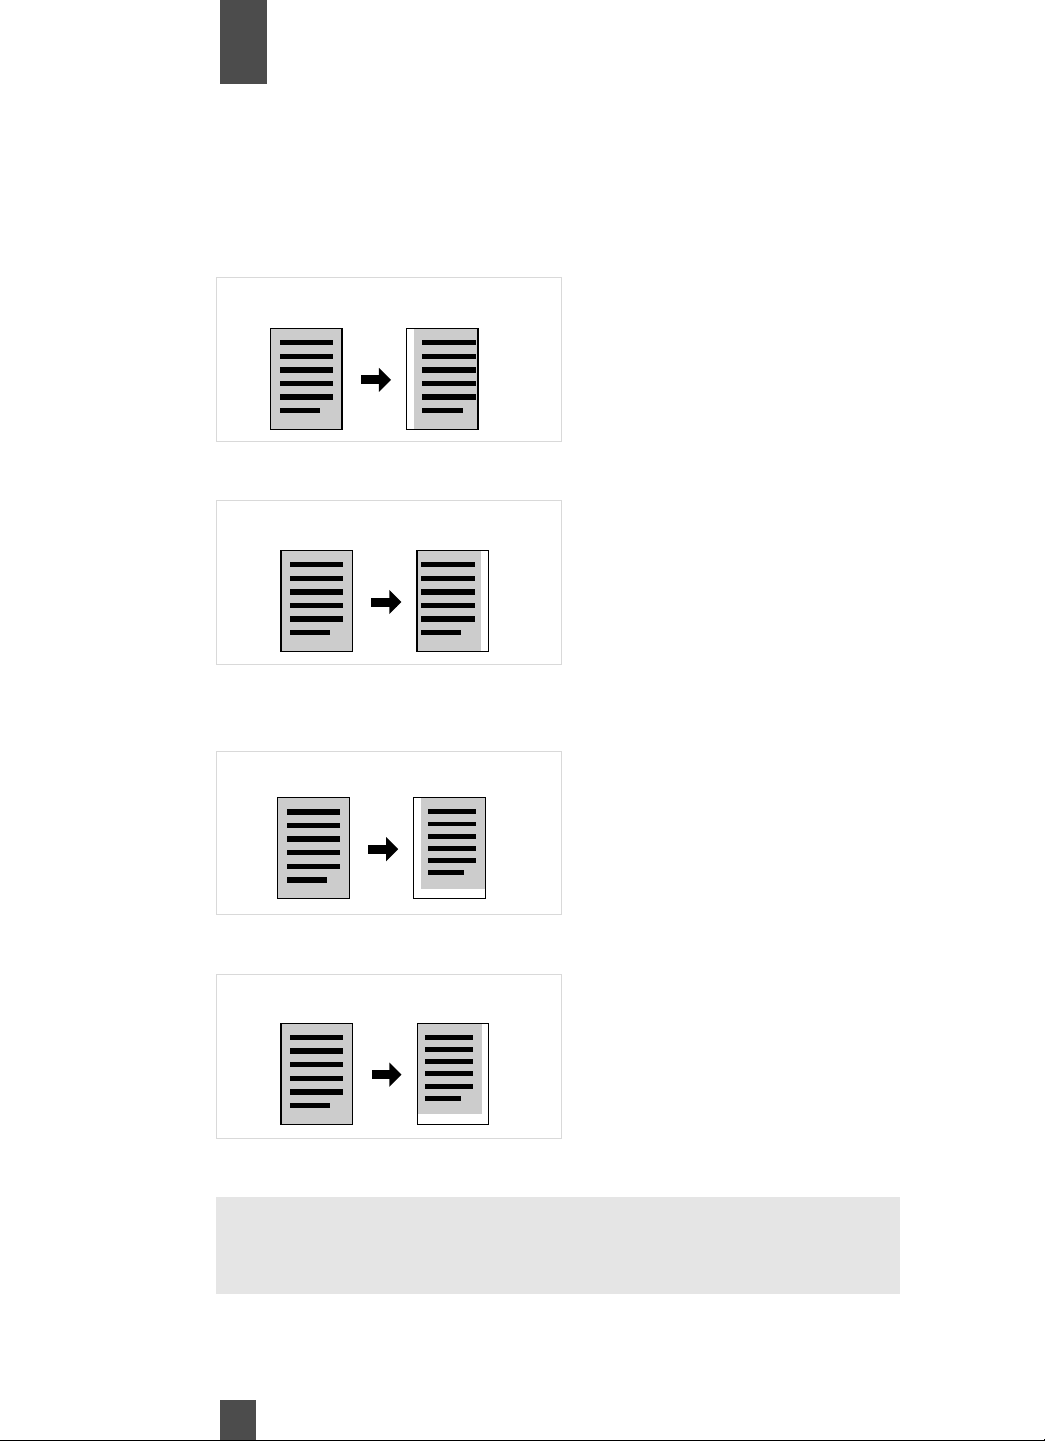
Making Copies
Chapter
3
Create Margin
The copier can create up to a 1” margin along the edge of a copy by shifting or reducing the image. The margin is convenient when you are placing the copies into a three ring binder or folder. Four margin locations options are available.
Shift-for-Margin
Original Copy
The copied image is shifted
in the crosswise direction to
create a margin along the
left edge of the copy.
The margin width can be
either; 1/4", 1/2", 3/4", or 1".
Original Copy
Shift-for-Margin
Original Copy
Original Copy
The copied image is shifted
in the crosswise direction to
create a margin along the
right edge of the copy.
The margin width can be
either; 1/4", 1/2", 3/4", or 1".
The copied image is
reduced to create a margin
along the left edge of the
copy.
The margin width can be
either; 1/4", 1/2", 3/4", or 1".
The copied image is
reduced to create a margin
along the right edge of the
copy.
The margin width can be
either; 1/4", 1/2", 3/4", or 1".
Note:
If the original image covers the entire surface of the original,
Margin-by-Reduction will ensure a copy with no lost image along the
edges.
76
Page 78
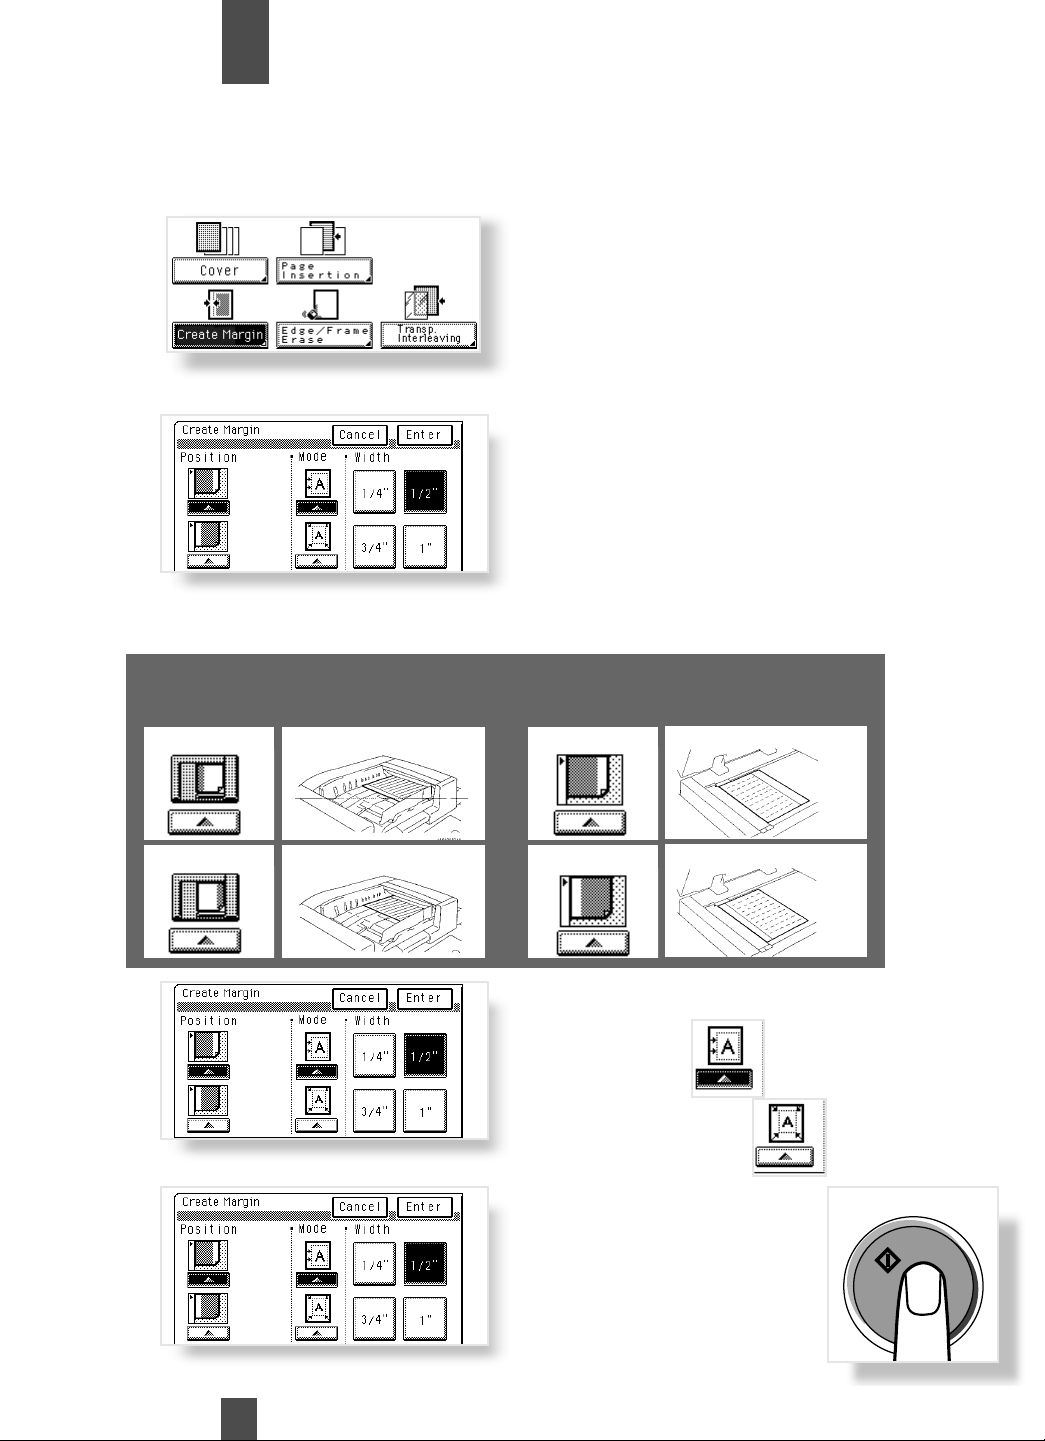
Making Copies
Chapter
3
Create Margin
Follow the instructions below when using Create Margin.
Touch Create Margin.
Place originals on the Glass
or in the Document Feeder.
(The controls on the display
will change slightly if you are
using the feeder)
Select the “Position” of the
margin.
Use the diagrams below to
determine the correct
Position Key.
2
1
2
1
Loading the Originals in Create Margin Mode
Using the Document feeder
Position
Left
Original Placement
Margin on the left
Using the Glass
Position
Left
Original Placement
Margin on the right
3
4
3
4
Right Margin on the right
77
Right Margin on the left
Select the “Mode” to create
the margin.
Shift-for-Margin
or
Margin-by-Reduction
Select the “Width” of the
margin.
Touch Enter to confirm
selections.
Press Print to start the copy
cycle.
Print
Page 79
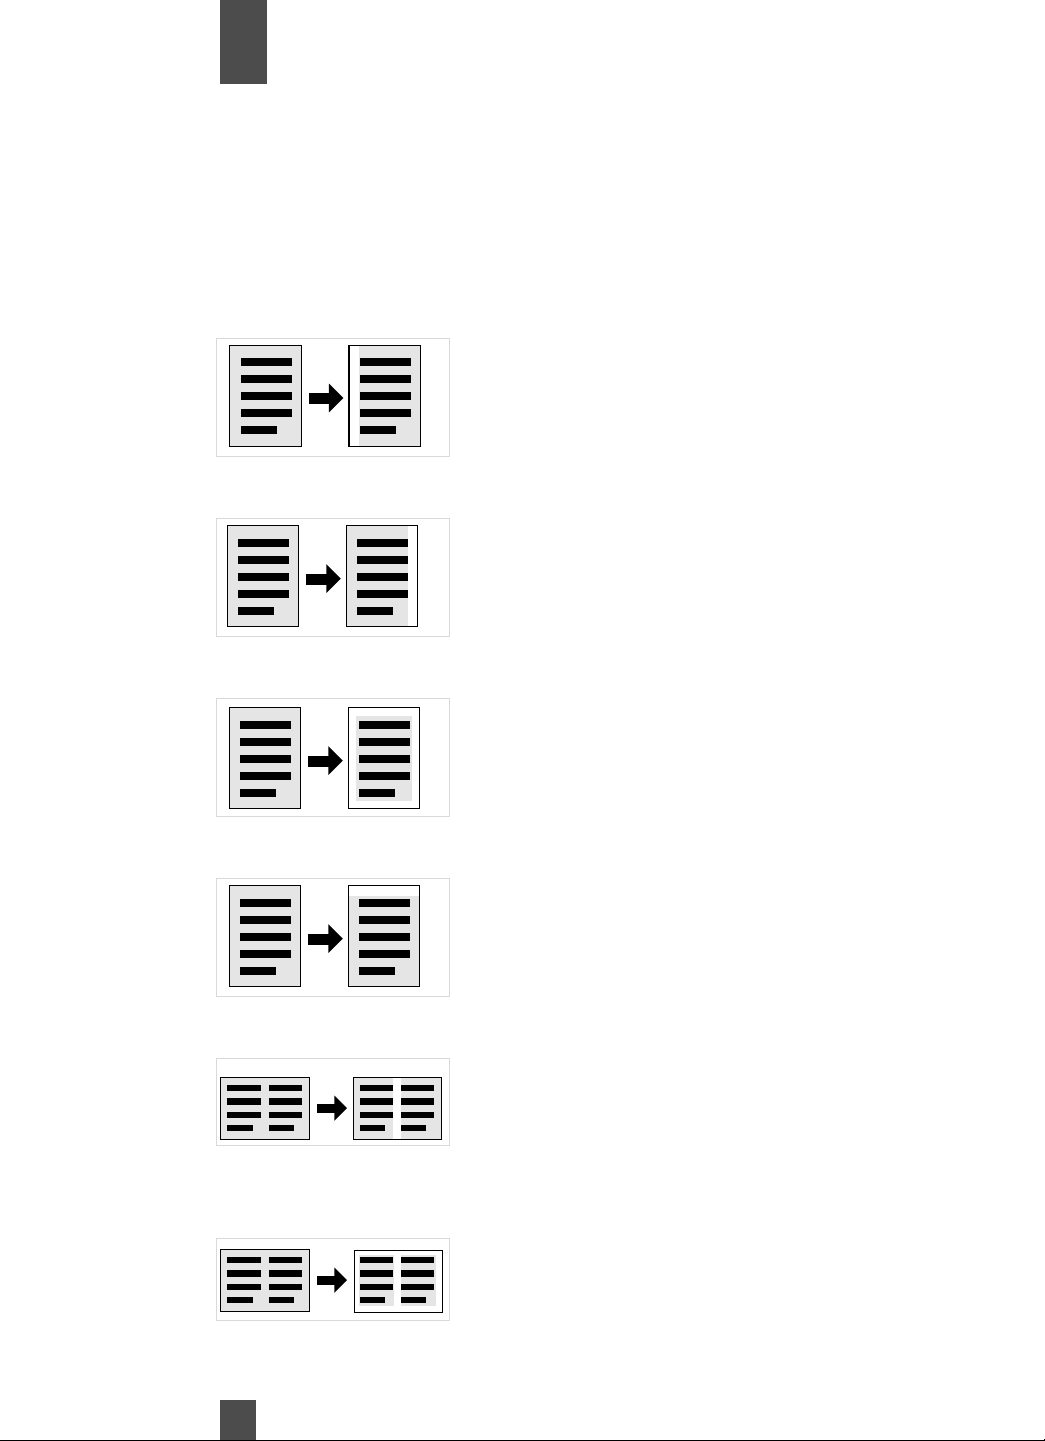
Making Copies
Chapter
3
Edge/Frame Erase
The copier erases a margin of a set width along the four edges,one edge, or at the center to erase shadows or other
unwanted images. This feature is effective in erasing the communications record on a document received by fax.
One of six different functions can be selected.
The erase width can be 1/4", 1/2", 3/4",or 1". The erase width for the Top Edge is 1/2" only.
For Frame Erase, the width of only the left and right edges can be varied and the erase width for the top edge is
fixed to 1/2".
Left Edge Erase
Erases an area of the original equivalent to a given margin from the left
edge of the copy.
Right Erase
Erases an area of the original equivalent to a given margin from the right
edge of the copy.
Frame Erase
Top Edge Erase
Center Erase
Frame + Center Erase
Erases a given width along the four
edges.
Erases an area of the original equivalent to 1/2" from the top edge of the
copy.
Erases a given width down the center.
Erases a given width along the four
edges and down the center.
78
Page 80
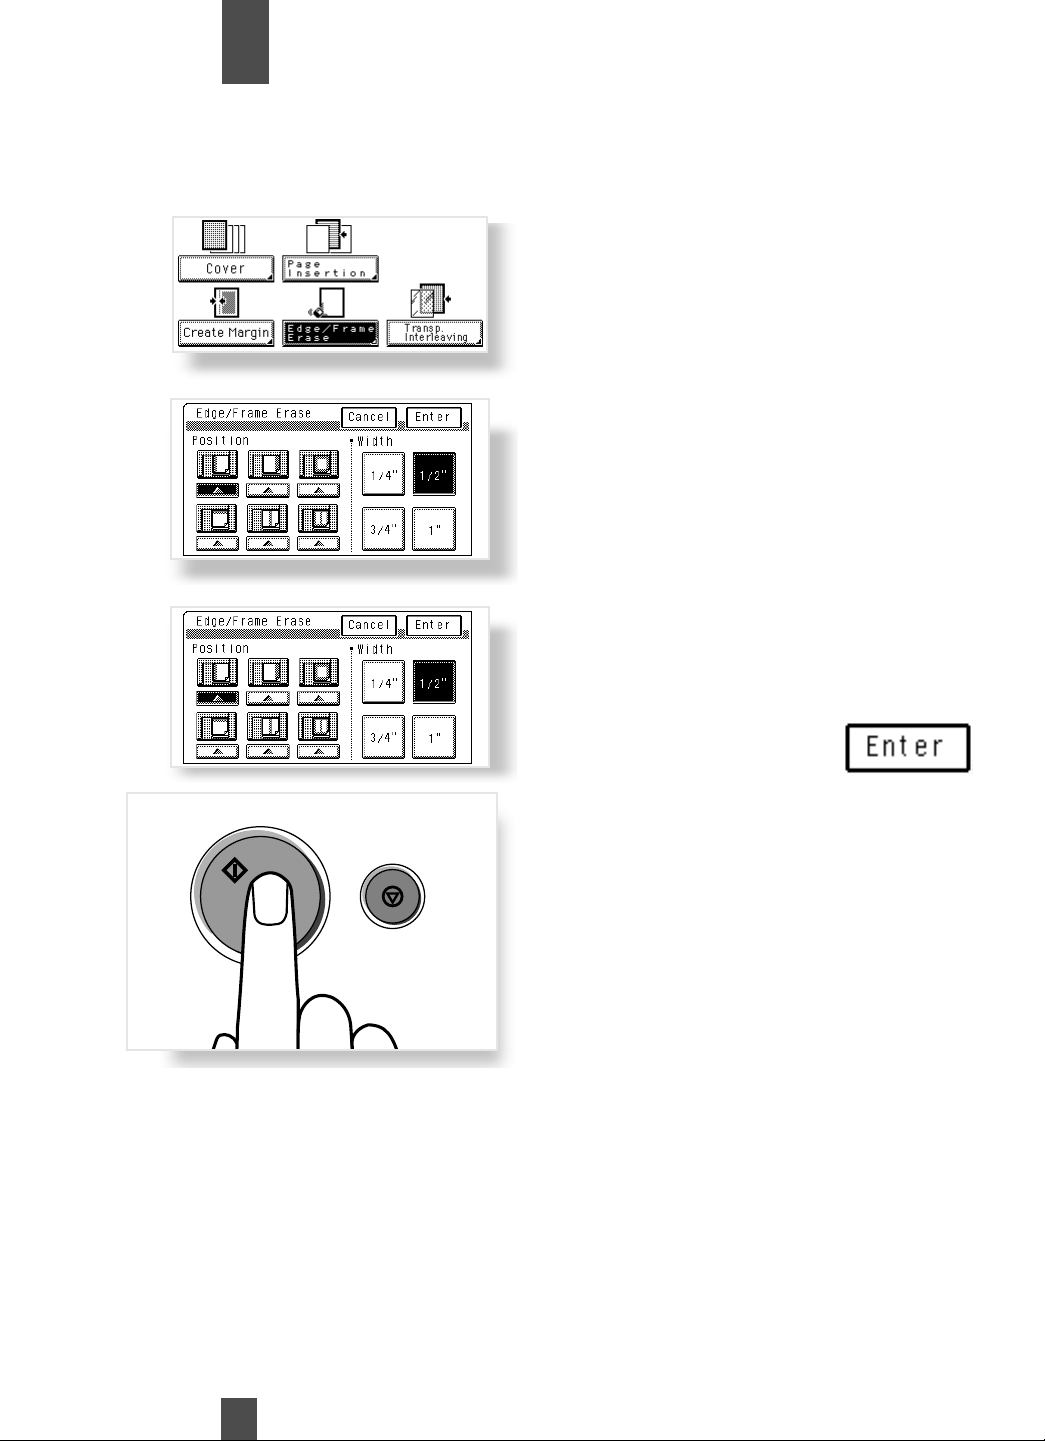
Making Copies
Chapter
3
Edge/Frame Erase
Follow the instructions below when using the Edge /Frame Erase feature.
1
2
3
1
2
3
Touch Edge/Frame Erase.
Place the original(s) on the
Glass or in the document
feeder.
See page 80 for positioning
instructions.
Select the erase function
from the “Position” options.
See page 80 for positioning
instructions.
Select the erase width.
Remember, this is the width
of the area that will be
erased on the copy.
Touch Enter to confirm.
4
4
Print
Press the Print key to start
the copy cycle.
Stop
79
Page 81
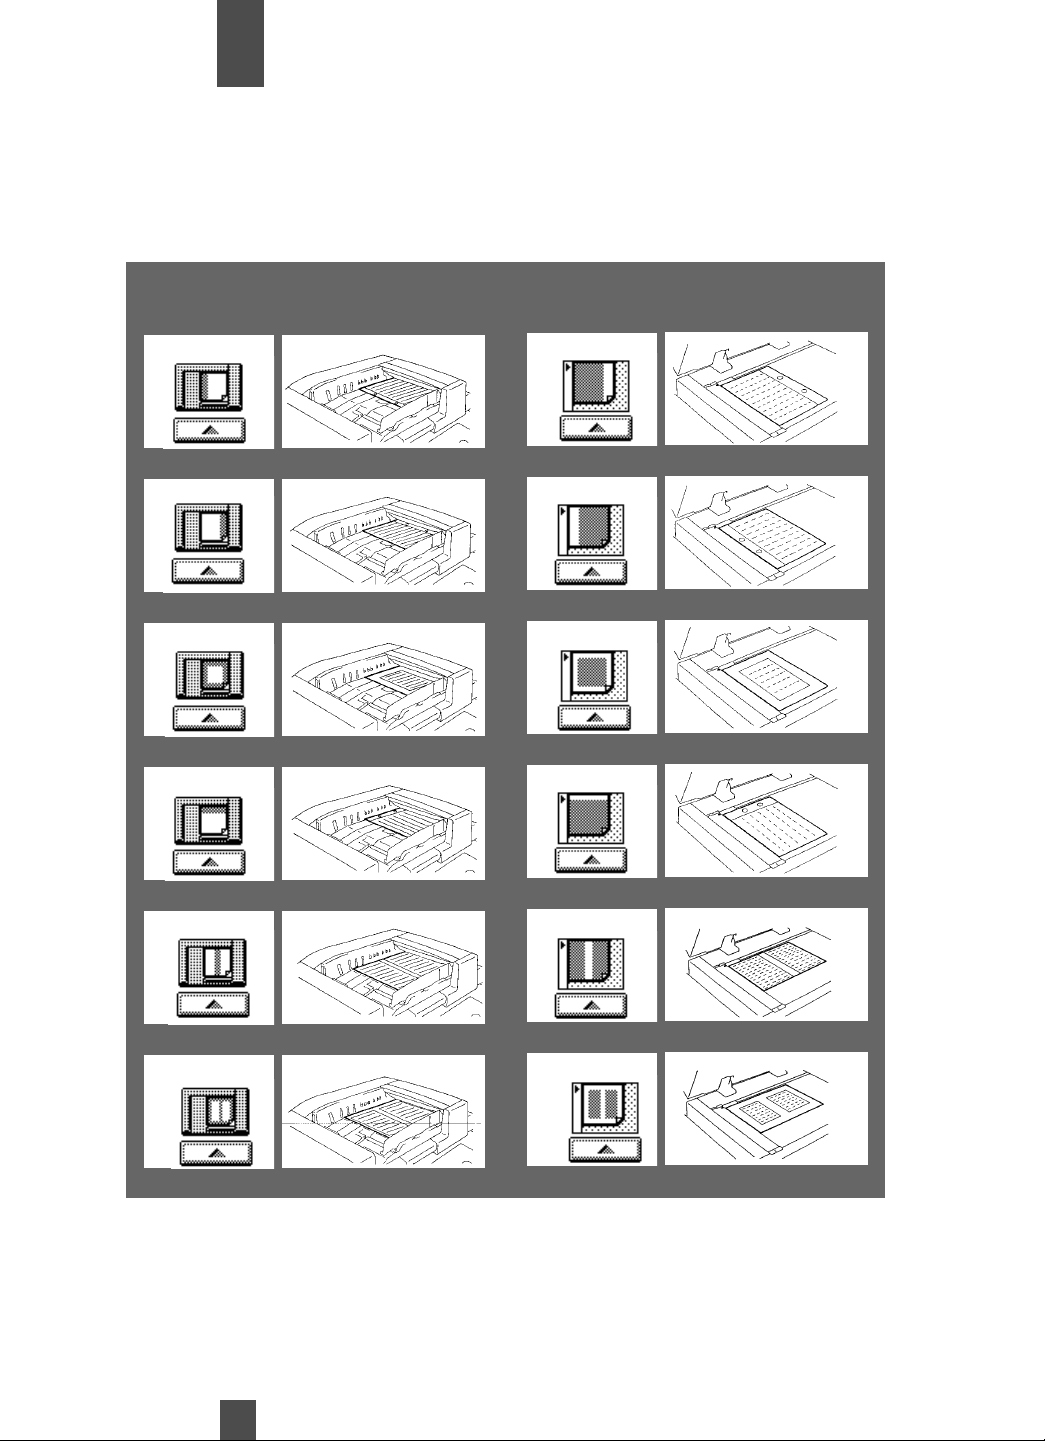
Making Copies
Chapter
3
Edge/Frame Erase
Follow the instructions below when using the Edge /Frame Erase feature.
Loading the Originals for Edge/Frame Erase
Using the Document feeder
Erase Function
Left Edge Erase
Right Edge Erase
Frame Erase
Top Edge Erase
Original Placement
Using the Glass
Erase Function
Left Edge Erase
Right Edge Erase
Frame Erase
Top Edge Erase
Original Placement
Center Erase
Frame + Center
Erase
80
Center Erase
Frame + Center
Erase
Page 82

Using the Programming Mode
Chapter
This chapter explains about the features available through the Programming mode.
4
Job Memory Input and Job Presets p.82
• Job Memory Input
• Recalling A Job from Memory
Zoom Memory Input p.86
Meter Count, Image Quality Cycle, and Drum Dehumidifier p.87
Key Operator p.88
• Key Operator Functions
• Making the Key Operator Settings
• Copy Track Function
81
Page 83
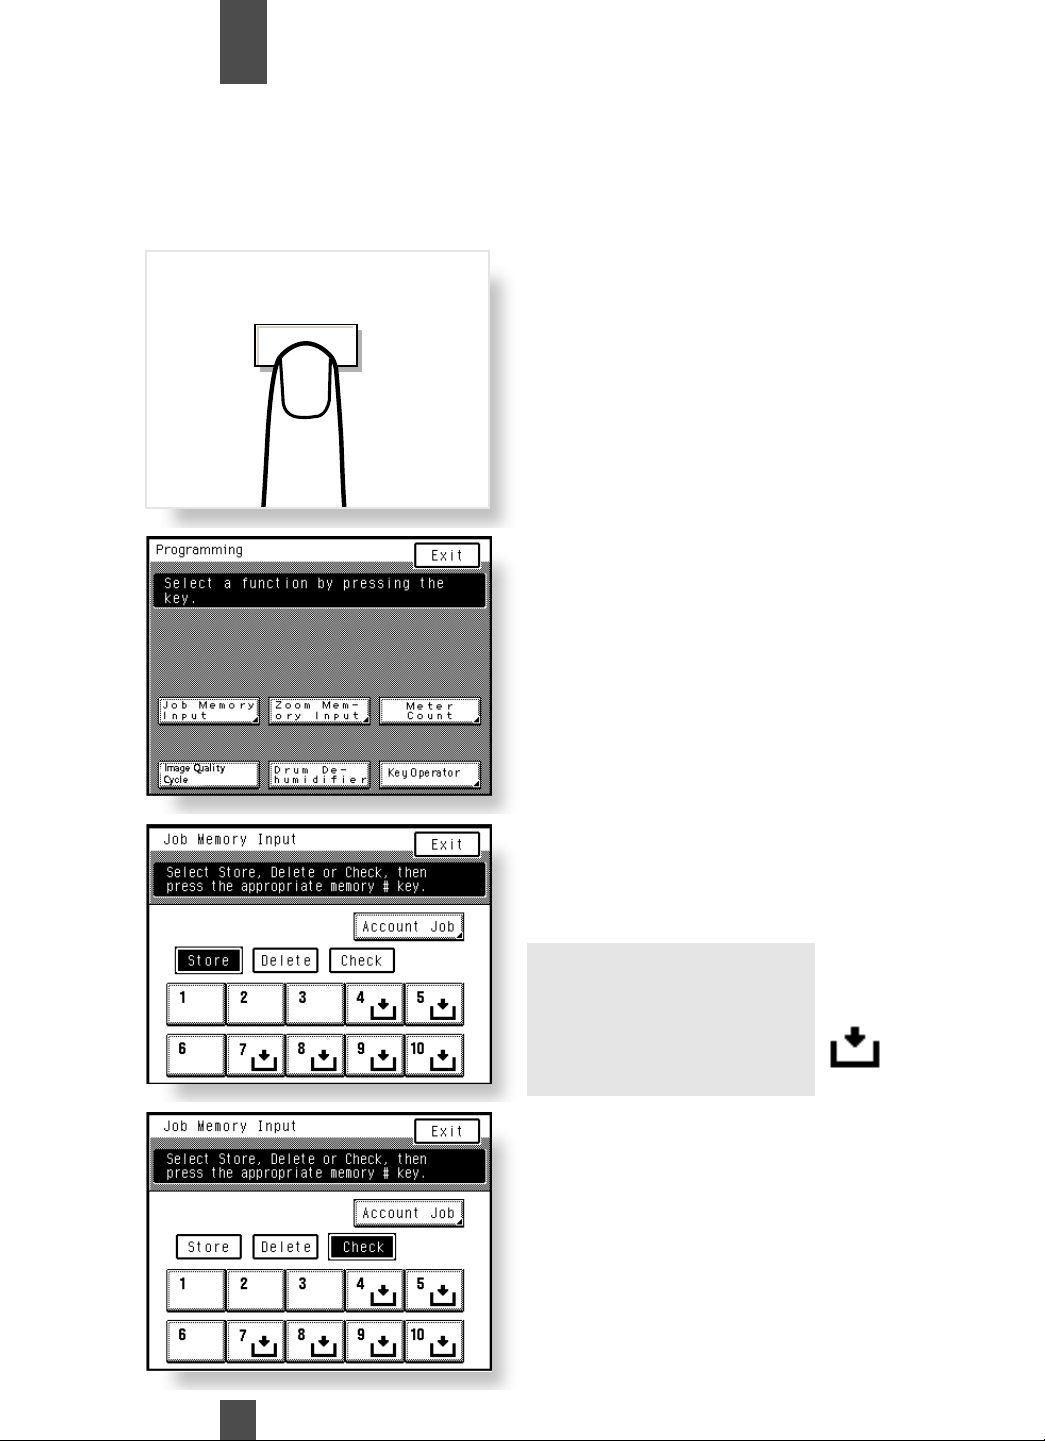
Using the Programming Mode
Chapter
4
Job Memory Input
Up to 10 different, frequently used copying job programs can be stored in memory and recalled later as necessary.
If "100 Accounts" or "1000 Accounts" is selected for "Copy Track" of Administrator Mode under Key Operator, five more
jobs can be stored in memory for each account (only for account #1 to #10),in addition to the ordinary jobs.
Storing a Job
1
1
Programming
• Set up the job you want to
store in memory.
• Touch the Programming
key.
2
3
4
2
3
4
Touch Job Memory Input.
Touch Account Job.
if you want to store a job in
Account Job Memory.
Select any one of the 10 job
number keys (1-10).
For Account Job, select any
key from 1-5.
Note:
You can only store a job
under the keys marked with
the input symbol. Job number keys without this symbol
have jobs stored in them.
To check for the details of
the job stored, touch Check
then Touch the job number
key.
82
Page 84
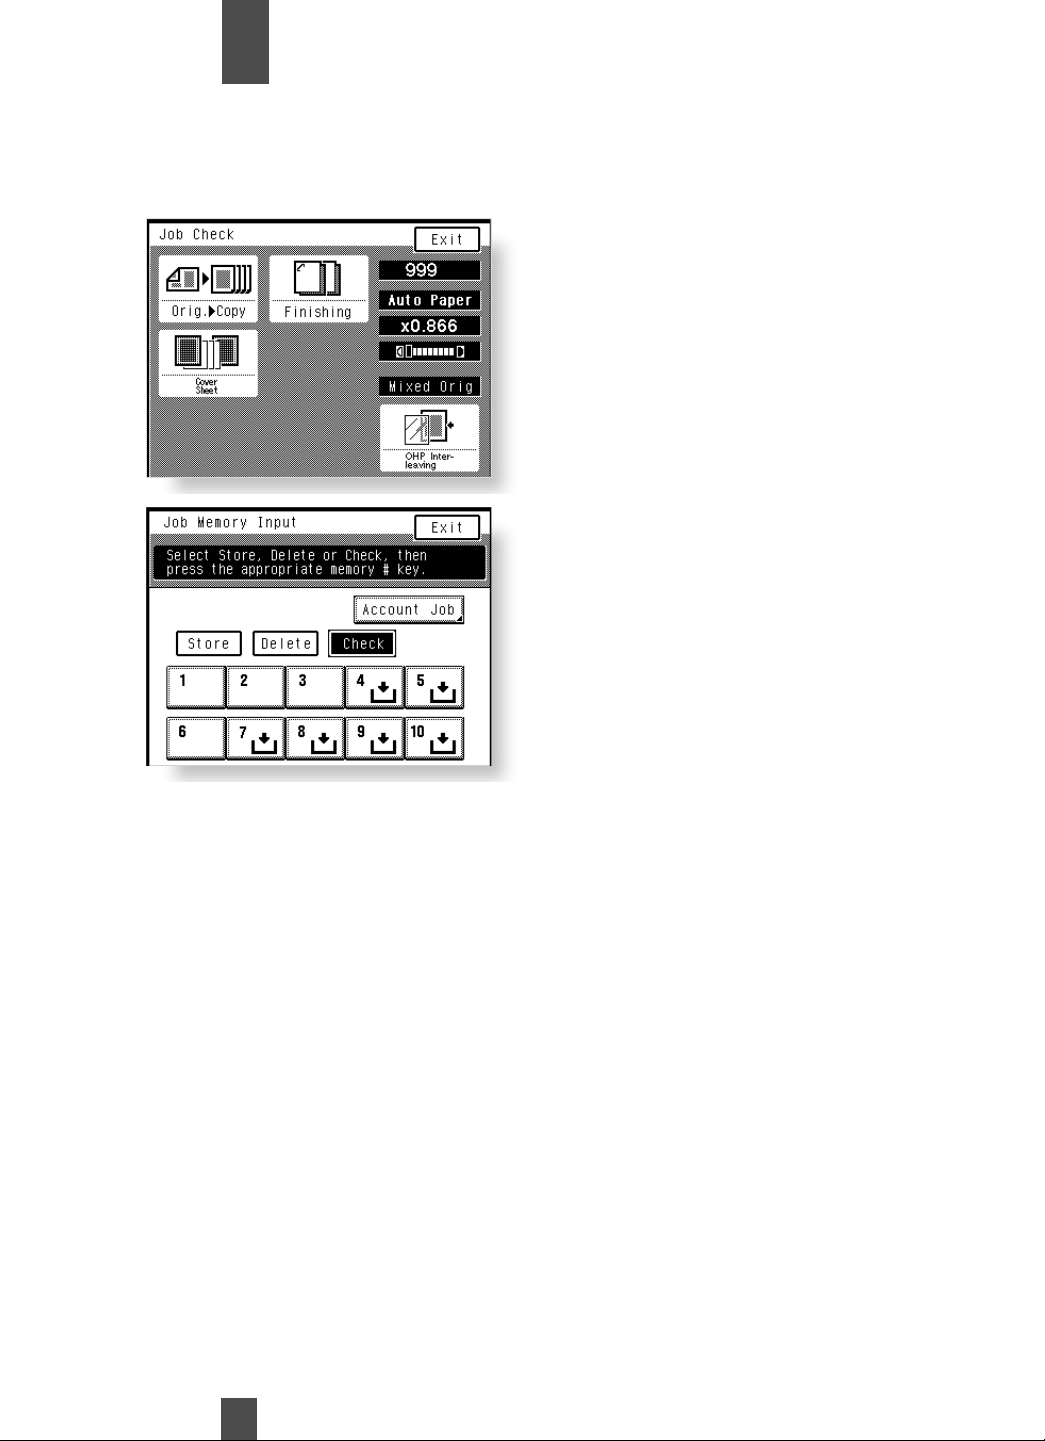
Using the Programming Mode
Chapter
Job Memory Input
4
5
6
5
6
The job settings will appear
on the display.
Touch Exit to return to the
Job Memory Input screen.
Touch Exit to return to the
Basic screen.
83
Page 85
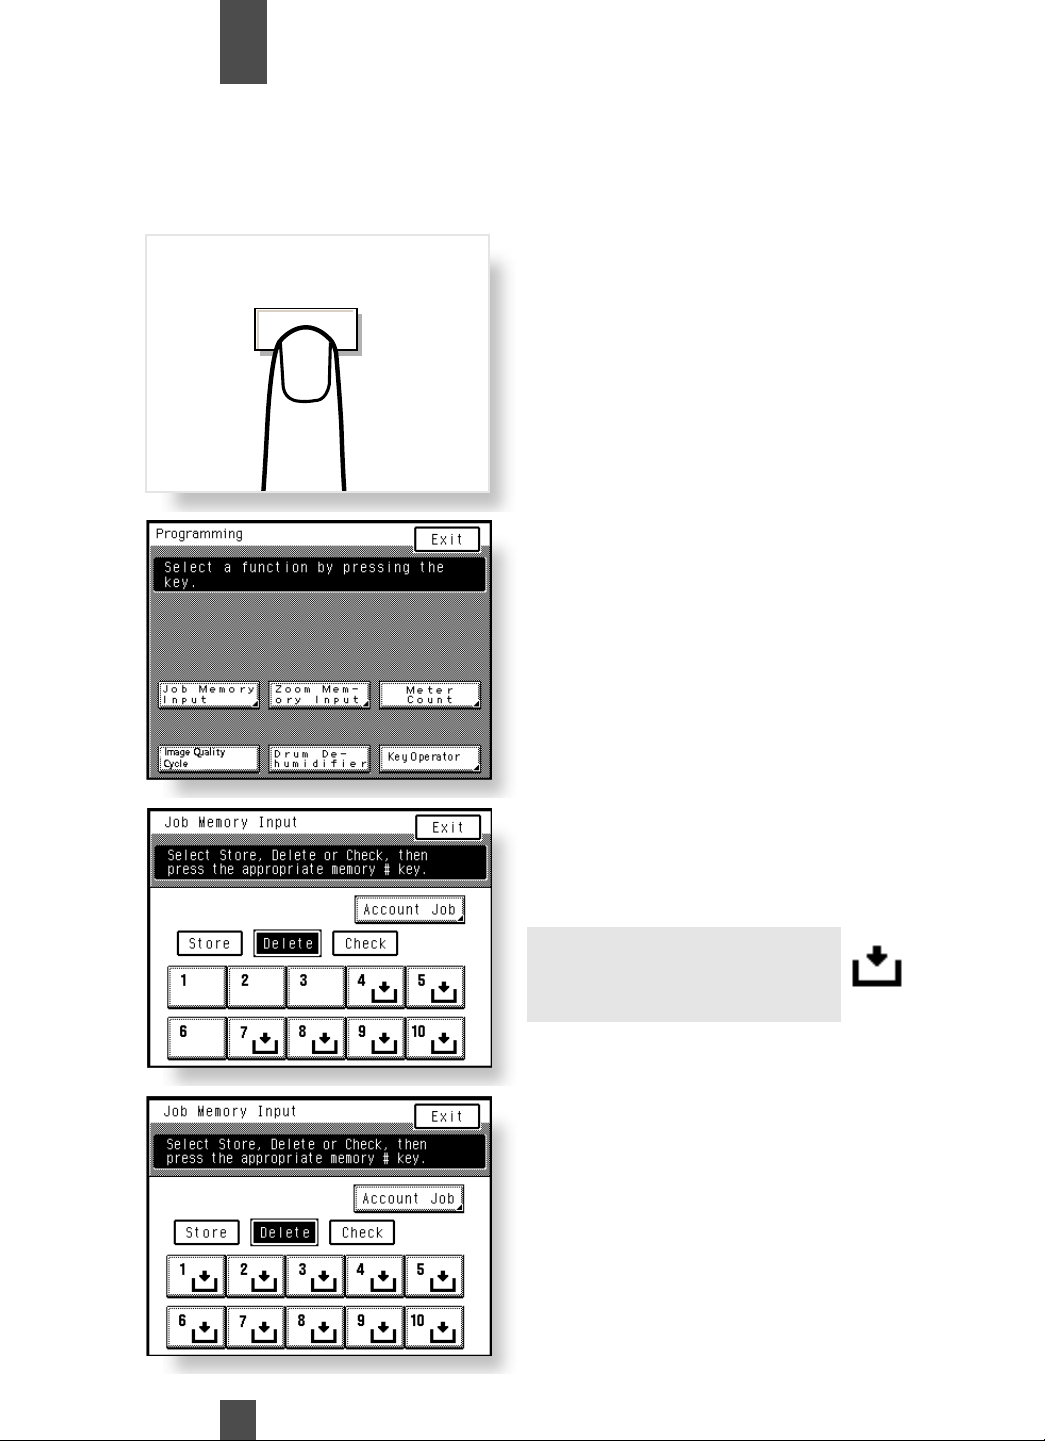
Using the Programming Mode
Chapter
4
Job Memory Input
If all of the job number keys in the Job Memory Input screen have jobs stored under them, you may wish to delete one of
the jobs. Follow the instructions below to delete a previously stored job.
Deleting a Job
1
1
2
3
2
3
Touch the Programming
key.
Programming
Touch Job Memory Input.
Touch Account Job.
if you want to delete a job in
Account Job Memory.
Touch Delete.
Then touch the job number
key you want to delete the
job from.
4
4
Note:
Keys with the job input symbol
do not have jobs assigned to
them.
Touch Exit to return to the
Basic Screen.
84
Page 86
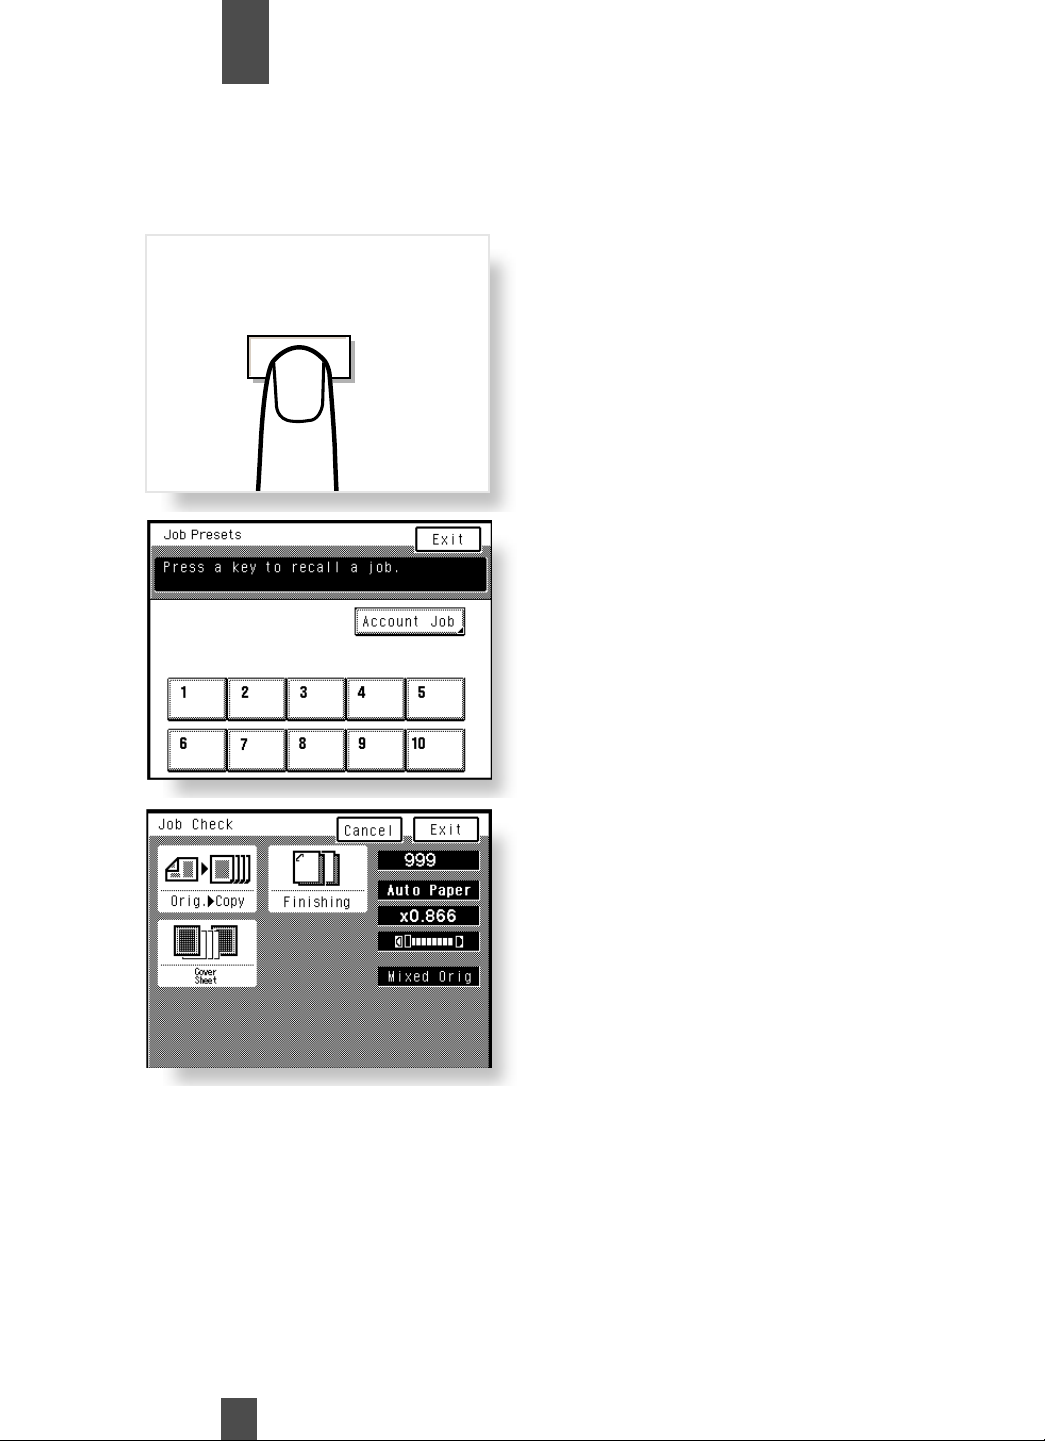
Using the Programming Mode
Chapter
4
Job Memory Input
Recalling a Job from Memory
1
1
2
3
2
3
Touch the Job Presets
key.
Job Presets
Touch the number key in
which the desired job has
been stored.
If you want to recall a job
from Account Job memory,
Touch Account Job
and then the number key.
Check the settings made
and then Touch Exit.
The copier is set up for
these settings and the Basic
screen reappears.
85
If the Job Preset is not what
you want, Touch Cancel
The Job Presets screen will
return.
Page 87
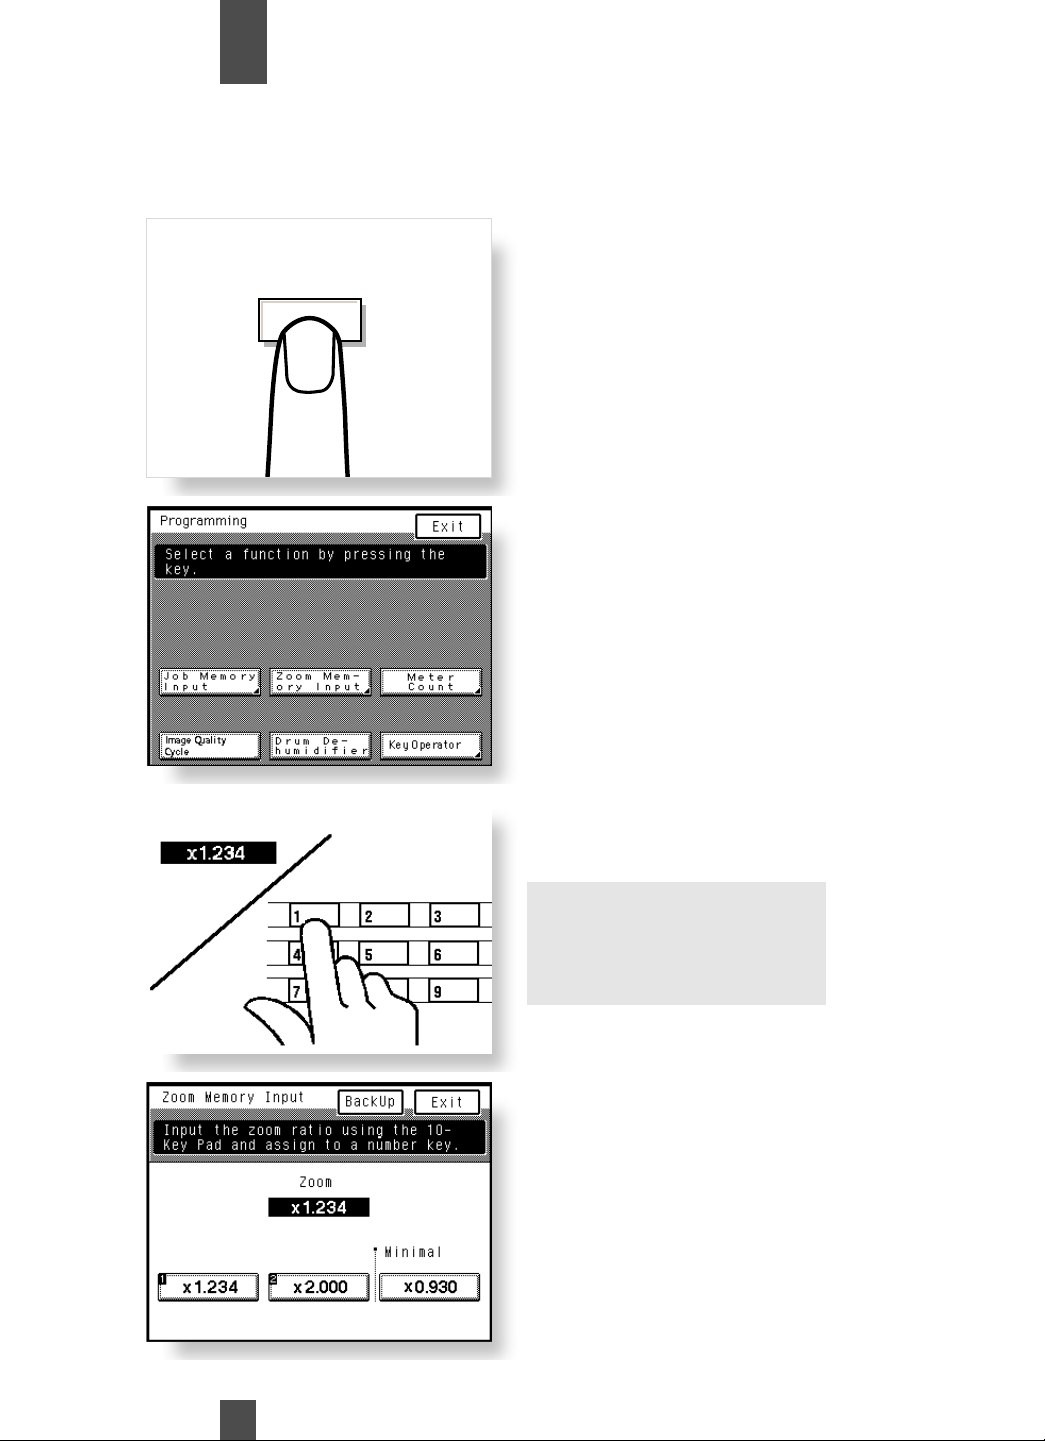
Using the Programming Mode
Chapter
4
Zoom Memory Input
Up to two different, frequently used zoom ratios can be stored in memory so you can use them later whenever necessary.
For the Minimal ratio, X0.930 has been factory-set, but that can be changed as necessary.
Deleting a Job
1
1
Programming
Press the Programming key.
2
3
4
2
3
4
Touch Zoom Memory Input.
Using the 10-Key Pad, enter
the desired zoom ratio.
Notes:
The zoom ratio can range
from X0.500 to X2.000.
The Minimal ratio can range
between X0.900 and X0.999.
Touch the desired number
key in which you want to
store the zoom ratio, either
1 or 2.
86
Touch Exit when finished.
Page 88

Using the Programming Mode
Chapter
4
Meter Count, Image Quality Cycle and Drum Dehumidifier
Meter Count
Touching Meter Count allows you to check the total count of each of the
following five counters.
Total Counter: Shows the total number of copies made since the installation of
the copier.
Size Counter: Shows the number of copies made on copy paper of a preset
size. (The size will be set by your Technical Representative.)
2-Sided Total: Shows the number of 2-sided copies.
2-Sided Size: Shows the number of copies made on copy paper of a pre set
size (the same size as set for Size Counter).
# of Active Accounts: Shows the number of copies made by the active
accounts.
Image Quality Cycle
Touching Image Quality Cycle sets the copier into the auxiliary toner
replenishing mode.
The copier tends to exhaust the supply of toner rapidly when making a number
of copies from an original with dark solid areas such as a photo. As a result, the
image density of the copy will become lighter. If this happens, use Image
Quality Cycle to regain the normal image density quickly
Notes:
• Do not turn OFF the Power Switch or open the Front Door while the copier is
replenishing toner.
• Toner is not replenished if the image density is sufficiently high.
• The toner replenishing sequence ends automatically.
Drum Dehumidifier
Touch Drum Dehumidifier to activate the Drum Dehumidifier function.
During times of high humidity or when there are sudden rapid changes in
humidity (especially when you are using a heater in winter),condensation can
form on the surface of the PC(Photoconductor) Drum,resulting in blotchy copies.
In such instances, use Drum Dehumidifier to dry the surface of the PC Drum.
87
Page 89
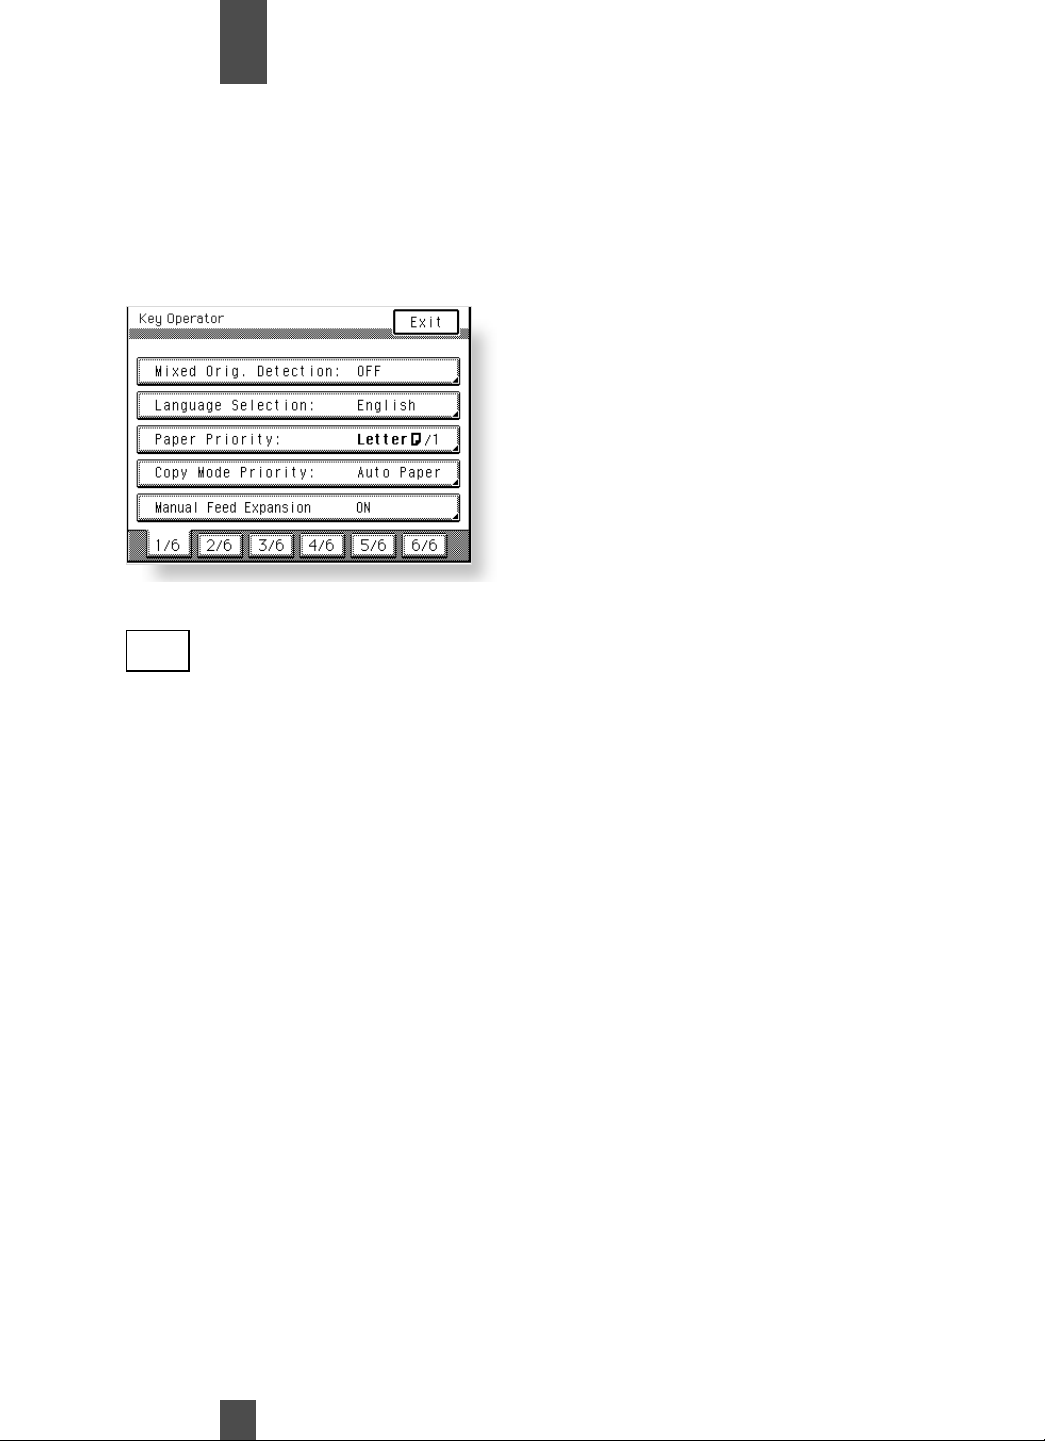
Using the Programming Mode
Chapter
4
Key Operator
The copier has been set so that the most frequently used settings are automatically selected in the initial mode.
The Key Operator feature allows you to select the default settings which are automatically selected
in the initial mode according to your own needs. By setting defaults that are most frequently used, time and effort to
make extra settings will be eliminated when the copier is turned ON or when the control panel is reset to the normal
mode.
A listing of Key Operator
functions is given in six
pages of menu, from
1/6 to 6/6
To show the listing of each
page, touch the desired
page number key at the bottom of the Touch Panel.
1/6
Mixed Orig. Detection:
Select whether to enable ("ON") the Mixed Original
Detection mode or not ("OFF") when power is turned ON or
when the control panel is reset.
The initial setting is "OFF."
Language Selection:
Select the language of the Touch Panel messages, either
English or French.
The initial setting is English.
Paper Priority
Specify the paper source selected automatically.
Copy Mode Priority
Specify the default mode selected automatically when power
is turned ON or panel reset, either "Auto Paper," "Auto Size,"
or "Manual."
The initial setting is "Auto Paper."
Manual Feed Expansion
Select whether to enable (ON) the size input for manual
bypass paper or not (OFF). When the function is turned
"ON," Auto Paper, Auto size, Finishing, 2-sided Copying,
Margin-by-Reduction, Erase, 1[2in1] ➧ 1, and 2 [2in1] ➧ 1
can be used.
88
Page 90

Using the Programming Mode
Chapter
4
Key Operator
2/6
Expo. Mode Priority
Specify the default exposure mode selected automatically
when power is turned ON or panel reset, either "Auto" or
"Manual."
The initial setting is "Auto."
Expo. Level Priority:
Auto; Select the default exposure level in the Auto Exposure
mode, either
"Lighter," "Normal," or "Darker."
The initial setting is "Normal."
Manual; Set the default exposure level in the Manual
Exposure mode.
The initial setting is "Normal."
Manual Expo. Adjust:
Determine the default exposure-level-adjusting-increments
in the Manual Exposure mode, as optimized by the type of
original.
"Mode 1":
For users who frequently use originals with halftone
images, such as photos.
"Mode 2":
For users who use a wide range of types of originals.
"Mode 3":
For users who frequently use originals with a colored
background or light text.
The initial setting is "Mode 1."
Finishing Priority:
Select the default finishing type when the copier is
equipped with a Sorter or Staple Sorter, either "Non-Sort,"
"Sort,"
"Batch," "Sort Staple," "Non-Sort + Hole Punch," "Sort +
Hole Punch,"
"Batch + Hole Punch," or "Sort Staple + Hole Punch."
89
Page 91

Using the Programming Mode
Chapter
4
Key Operator
3/6
4/6
Auto Panel Reset:
Select the time it takes the auto panel reset function
to be activated from among "30 sec.," "1 min.," "2 min.," "3 min.,"
or "5 min.," or not activate the function at all ("No Reset").
The initial setting is "1 min."
Energy Saver Mode:
Set the time it takes the copier to enter the Energy
Saver mode, from 1 to 240 min. (in 1-min. increments).
The initial setting is "15 min."
Drum Dehumidifier:
Select whether to allow ["ON (Auto)"] the copier to
enter into the Drum Dehumidifier mode automatically after it has been
turned ON, or not ("OFF").
The initial setting is "OFF."
Counter Removal:
Select whether to reset the panel ("ON") or not ("OFF")
when the Plug-In Counter is pulled out of the copier or a magnetic
card is pulled out of the Data Controller.
Intelligent Sort:
Select whether to turn "ON" or "OFF" the function that
automatically switches between Sort and Non-Sort, selecting Non-Sort
if only a single original is loaded and Sort if two or more originals
are loaded in the document feeder.
The initial setting is "ON."
Confirmation Beep:
Select whether to turn "ON" or "OFF" the beep that
sounds each time a key on the Touch Panel is touched.
The initial setting is "ON."
Original Thickness:
(This function cannot be used for this copier.)
Smaller Originals:
Select whether to enable ("ON") a copy cycle or not
("OFF") when it is initiated by pressing the Print key with no originals
placed on the Original Glass or with an original smaller than the
detectable size placed on the Original Glass in the Auto Paper mode.
If "ON" is selected, the copy cycle is run using the
paper loaded in the default paper source. If "OFF" is selected, a
warning message appears to instruct the user to select paper.
The initial setting is "ON.”
90
Page 92

Chapter
4
Key Operator
Using the Programming Mode
5/6
Custom 2 in 1:
Several settings can be stored in memory that are automatically recalled when
the 2-in-1 copy is selected. Functions that can be set are "Paper," "Zoom,"
"Margin," and "Erase."
• When a "Paper" size is selected, that size is automatically
selected when the 2-in-1 copy is set. "Auto Paper" is among the choices of paper
size. The initial setting is "Auto Paper."
• When a "Zoom" ratio is selected, that ratio is automatically
selected when the 2-in-1 copy is set. "Auto Size" is among the choices
of zoom ratio. The initial setting is " X 0.707."
• When a "Margin" setting is made, that setting is automatically selected when the
2-in-1 copy is set. The initial setting is no margin.
• When an "Erase" setting is made, that setting is automatically
selected when the 2-in-1 copy is set. The initial setting is no erase.
Custom 2 in1 Separation:
Several settings can be stored in memory that are automatically recalled when
the 2-in-1 separation copy is selected. Functions that can be set are "Paper,"
"Zoom," "Margin," and "Erase."
• When a "Paper" size is selected, that size is automatically selected when the
2-in-1 separation copy is set. "Auto Paper" is among the choices of paper size.
The initial setting is "Auto Paper."
• When a "Zoom" ratio is selected, that ratio is automatically selected when the
2-in-1 separation copy is set. "Auto Size" is among the choices of zoom ratio.
The initial setting is " X 1.414."
• When a "Margin" setting is made, that setting is automatically selected when the
2-in-1 separation copy is set. The initial setting is no margin.
• When an "Erase" setting is made, that setting is automatically selected when
the 2-in-1 separation copy is set. The initial setting is no erase.
Custom Book Copy:
Several settings can be stored in memory that are automatically recalled when
Book copy is selected. Functions that can be set are "Paper," "Zoom," "Margin,"
and "Erase."
• When a "Paper" size is selected, that size is automatically selected when Book
copy is set. "Auto Paper" is among the choices of paper size. The initial setting is
the paper in the 1st Drawer.
• When a "Zoom" ratio is selected, that ratio is automatically selected when Book
copy is set. The initial setting is "X 1.000."
• When a "Margin" setting is made, that setting is automatically selected when
Book copy is set. The initial setting is no margin.
• When an "Erase" setting is made, that setting is automatically selected when
Book copy is set. The initial setting is no erase.
Special Paper:
Used to set up a drawer when using special paper. See page 37
91
Page 93

Using the Programming Mode
Chapter
4
Key Operator
6/6
Orig.Copy Default:
Select the type of Orig.Copy setting selected
automatically when the copier is turned ON or panel reset.
The initial setting is 1 1.
When the copier is equipped with a Duplex Unit, the
initial setting is 12. Consult your Technical Representative if
you want to set 11 for Orig.Copy Default.
Auto Power-OFF Mode:
Select the time it takes the Auto Power-OFF function
to be activated, from 1 min. to 240 min. in 1-min. increments. Auto
Power- OFF shuts down the copier a given period of time after the
last operation.
The initial setting is 90 min.
Consult your Technical Representative if you want to
disable this function.
Original on Glass:
Select whether to turn "ON" or "OFF" the beep that
sounds when you attempt to load an original in the document feeder
with another one left on the glass.
Administrator Mode:
This mode is used only by the administrator of your
copier. When Administrator Mode is selected, the copier prompts you
to enter your "Admin. #" (administrator number). The following functions
can be set only when the correct administrator number is entered. The
administrator number is set by the Technical Representative. For
more details, consult your Technical Representative.
Copy Track :
This function allows the administrator to keep track
of the number of copies made by each account.
Select either "OFF," "100 Accounts," or "1000 Accounts."
The initial setting is "OFF."
When "100
ID #: You can program or change your access number (for a max. of 100
accounts).
Limit: You can limit the maximum number of copies that can
be made.
Total: Displays the count of the Total Counter.You can also clear the counter.
Size: Displays the count of the Size Counter. You can also clear the counter.
When "1000
Total: Displays the count of the Total Counter. You can also clear the counter.
Accounts" is selected:
Accounts" is selected:
92
Page 94

Using the Programming Mode
Chapter
4
Key Operator
6/6
Max. Copy Sets:
Determine the number of copies or copy sets that can be set using the 10-Key
Pad.
The initial setting is "OFF."
User Help
(This function cannot be used by this copier.)
93
Page 95
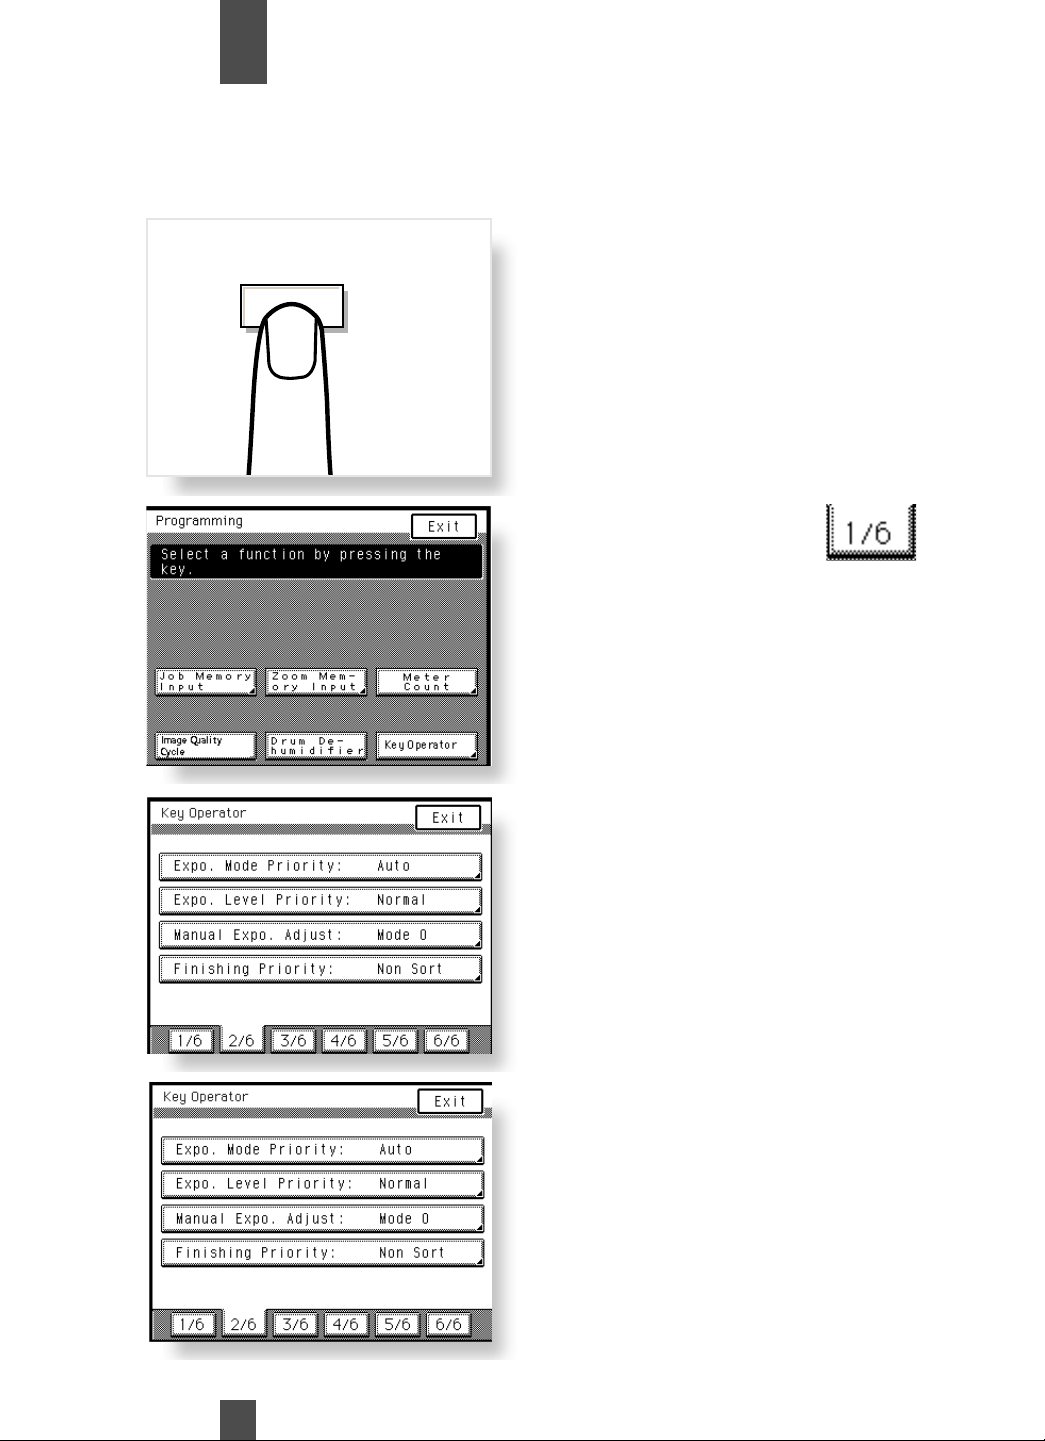
Using the Programming Mode
Chapter
4
Key Operator
Follow the instructions below to access the Key Operator functions.
1
2
3
1
2
3
Programming
Press the Programming
key.
Touch Key Operator.
Page 1/6 of the Key
Operator menu will appear.
Select the key of the page
number on which the
desired Key Operator function is listed.
For example, to change
Finishing Priority from NonSort to Sort, touch 2/6
4
4
Touch the key of the desired
Key Operator function.
For example, touch
Finishing Priority
94
Page 96
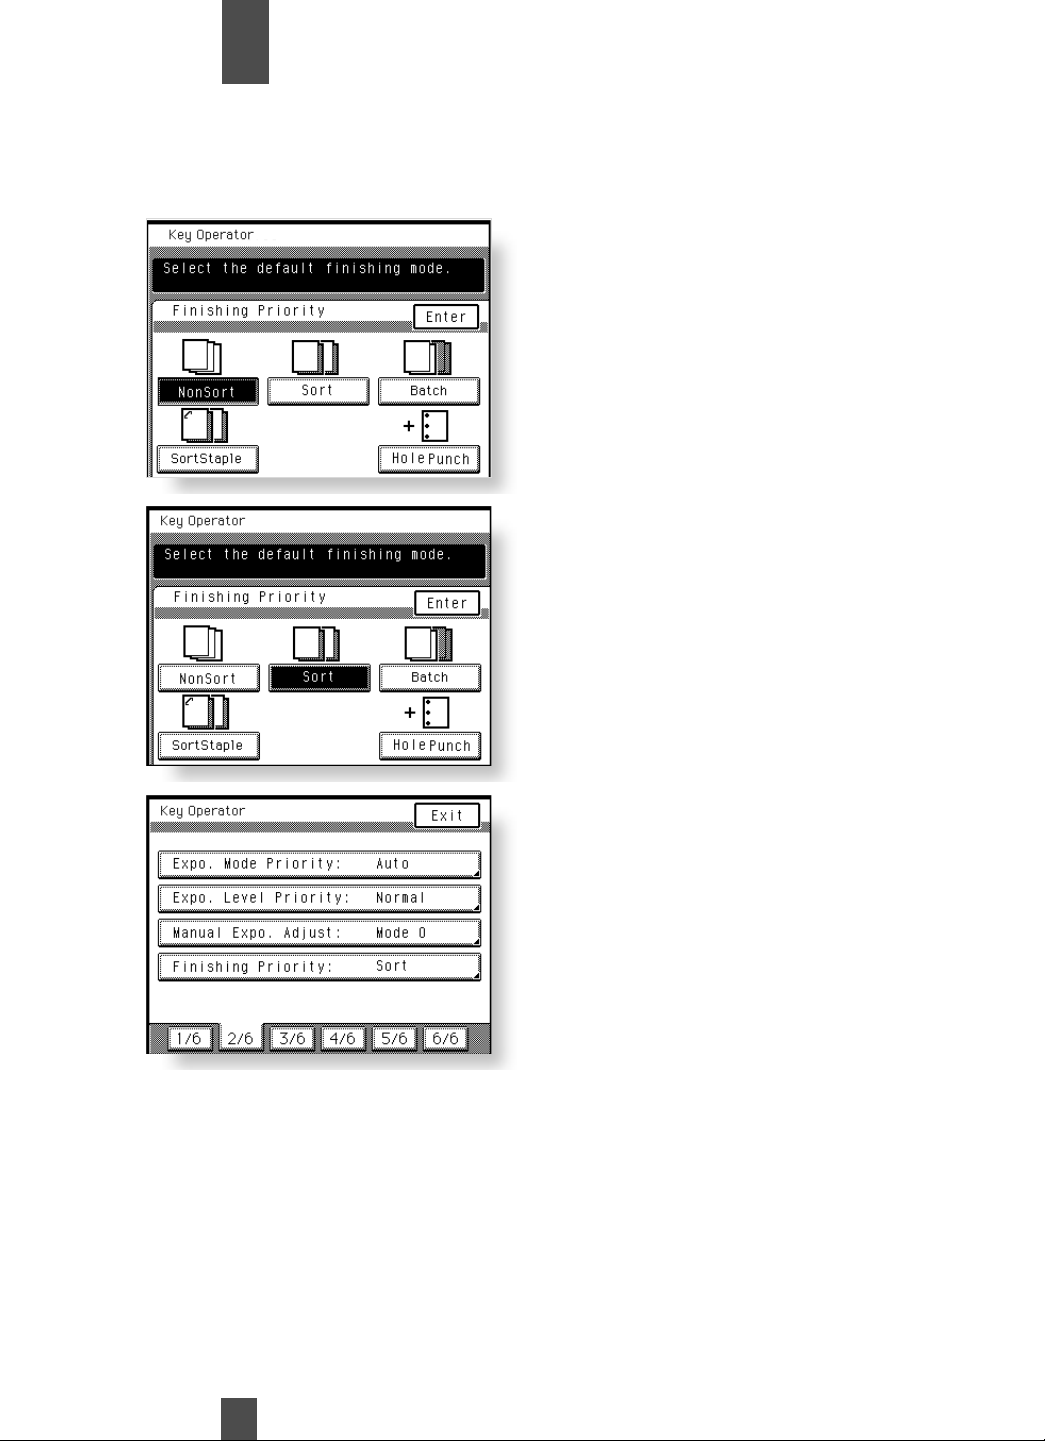
Using the Programming Mode
Chapter
Key Operator
Follow the instructions below to access the Key Operator functions.
4
5
6
7
5
6
7
The following screen
appears, on which
Non-Sort is highlighted,
indicating that it is selected.
Touch Sort.
Touch Enter to confirm
selection.
(Repeat steps 3 through 6 to
make additional selection)
Touch Exit.
95
Page 97
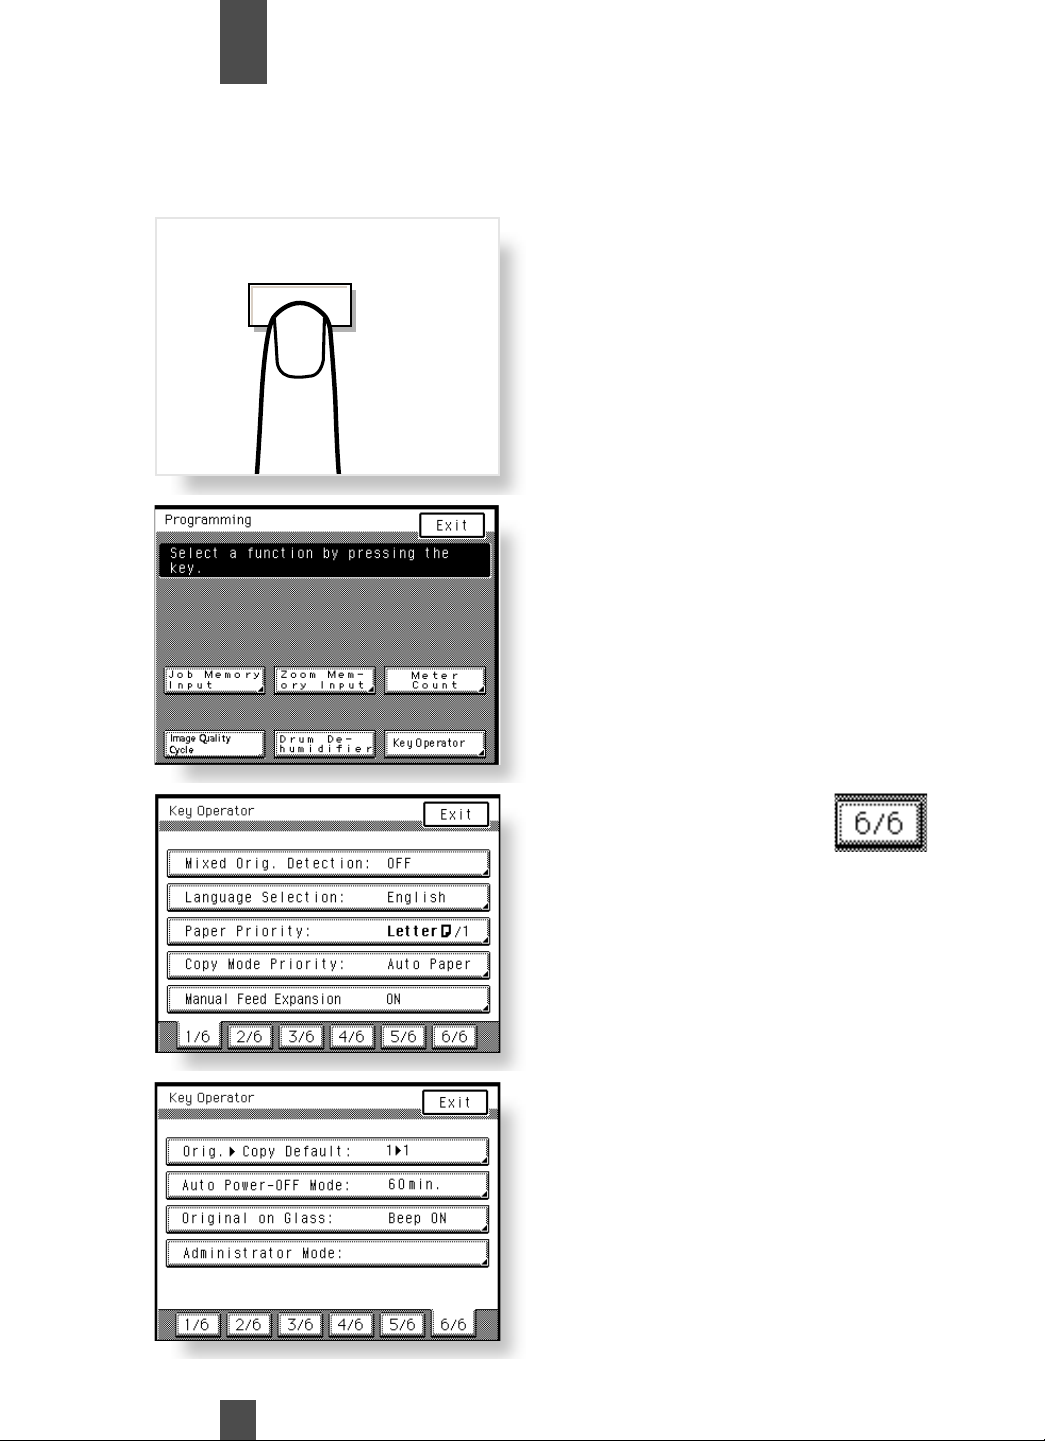
Using the Programming Mode
Chapter
Key Operator
Follow the instructions below to access the Copy Track feature.
The administrator of the copier should make the setting, either “100 Accounts” or “1000 Accounts”
4
1
2
3
1
2
3
Programming
Press the Programming
key.
Touch Key Operator.
Select page 6/6
4
4
Touch
Administrator Mode
96
Page 98
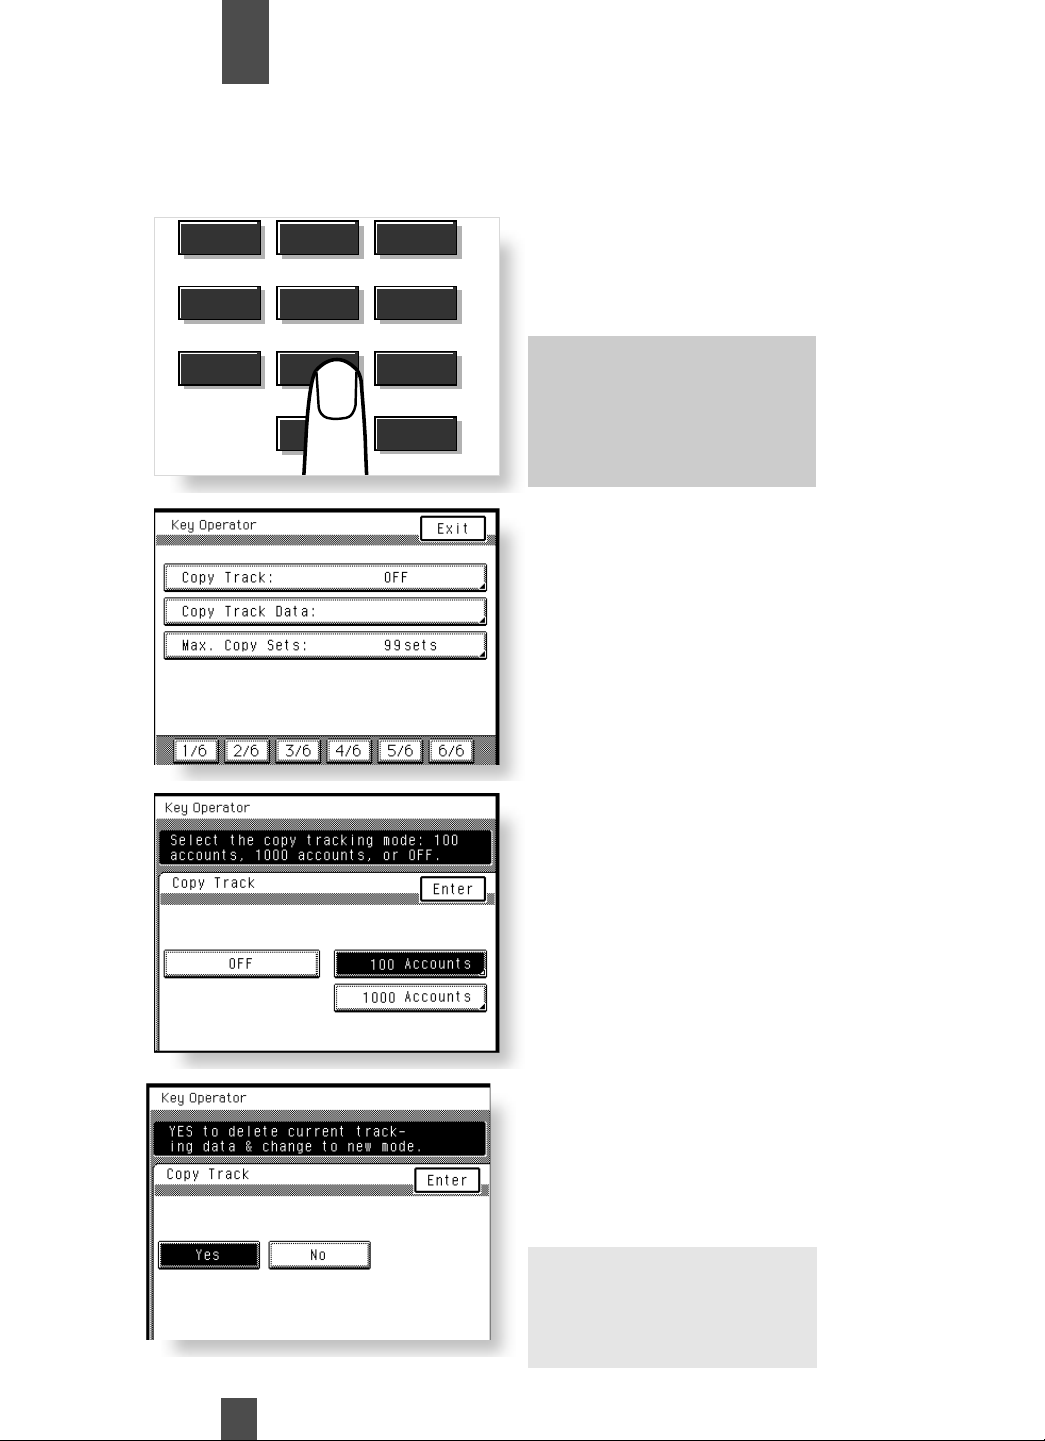
Using the Programming Mode
Chapter
4
Key Operator
Follow the instructions below to access the Copy Track feature.
5
5
6
6
7
7
1
4
7
2
5
8
0
3
6
9
C
Clear
Enter the administrator number using the 10 Key-Pad.
NOTE: Your Imagistics
Service Representative will
program your administrator
number when the machine
is installed.
It is important not to forget
your number.
Touch Copy Track.
Select 100 accounts or 1000
accounts.
8
8
Initialize the Copy Track
function by pressing Yes.
This will delete all previous
Copy Track data.
Press Enter then Exit when
finished.
Note:
When “100 Accounts” is
selected, enter the ID # for
each account. See page 98.
97
Page 99
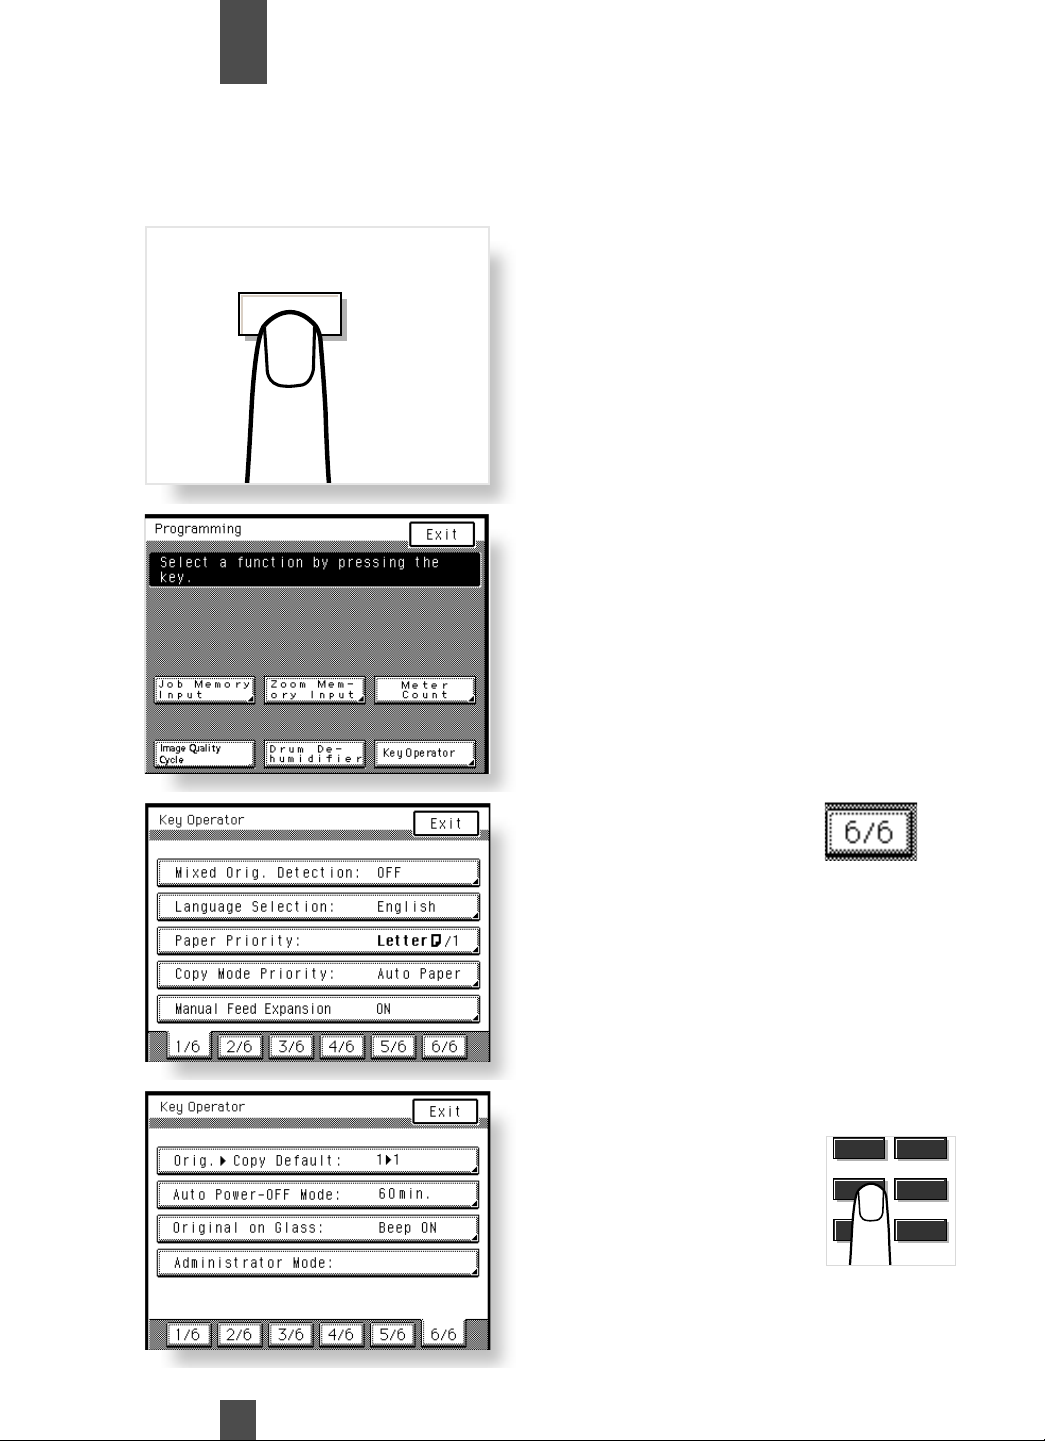
Using the Programming Mode
Chapter
4
Key Operator
Follow the instructions below to program ID numbers when 100 Accounts has been selected.
1
2
3
1
2
3
Programming
Press the Programming
key.
Touch Key Operator.
Select page 6/6
4
4
98
Touch Administrator Mode
• Enter the administrator
number using the 10 KeyPad.
5
8
0
6
9
C
Clear
Page 100
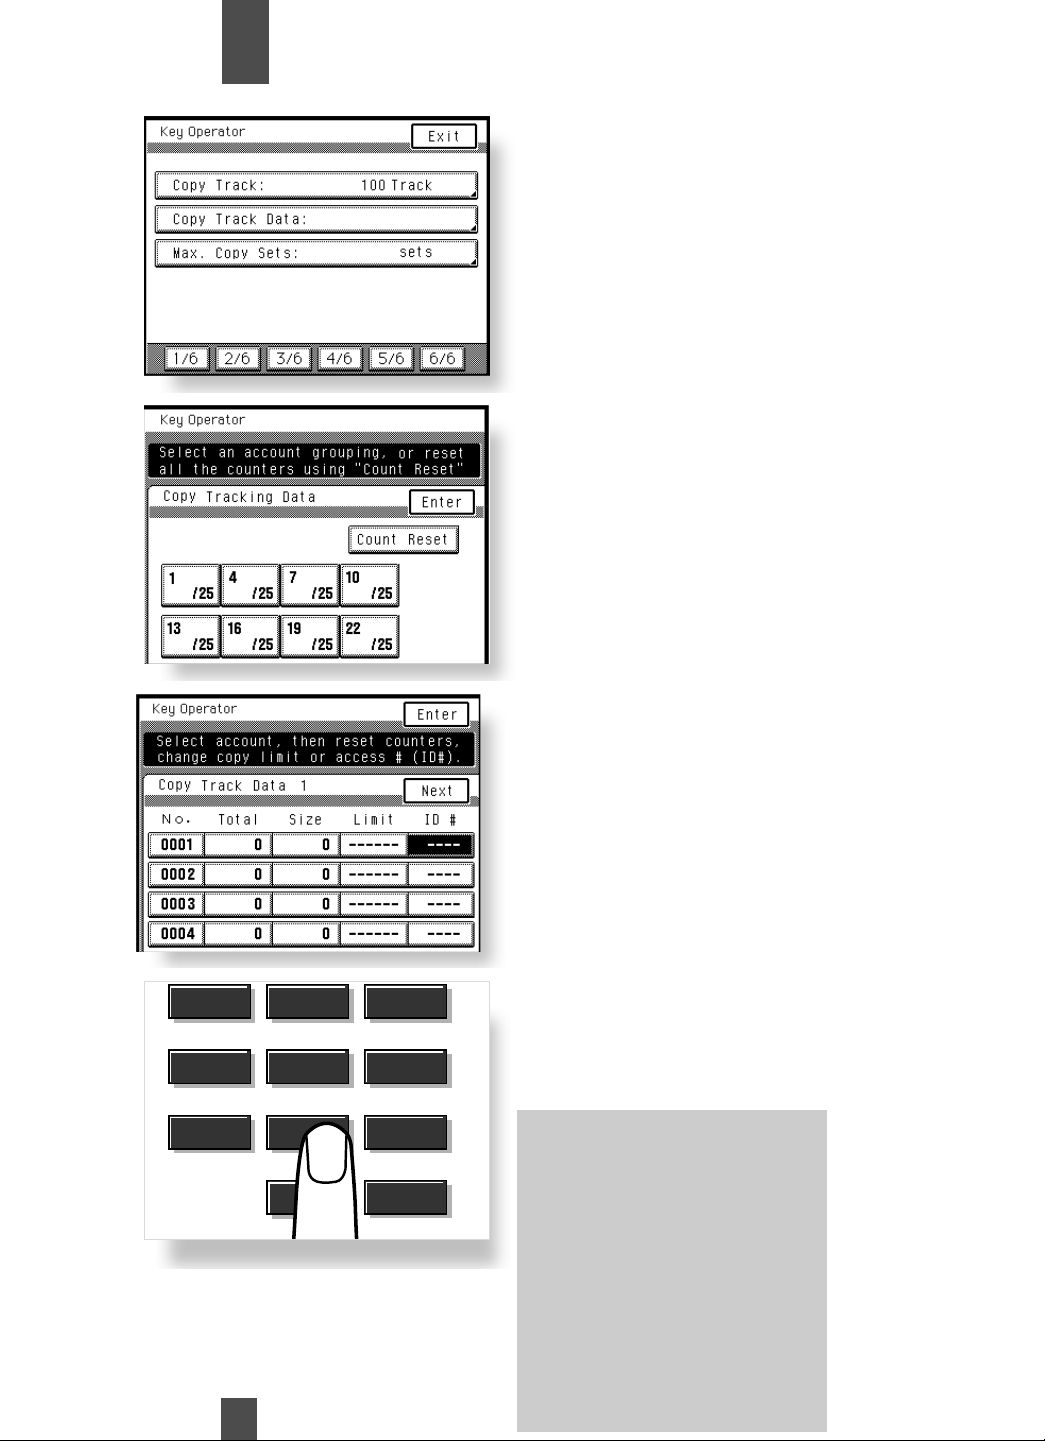
5
6
5
6
Chapter
Using the Programming Mode
4
Touch Copy Track Data.
Select the page number
where the target account is
shown.
8
8
7
7
Touch the ID # key of the
target account.
1
4
7
2
5
8
0
3
6
9
C
Clear
Key in the ID # using the 10
Key-Pad. Touch Enter to confirm.
(Touch Enter again then Exit to
return to the main screen.)
NOTE:
• The ID number should be a
4-digit number.
• If you want to program an ID
number for other accounts,
repeat steps 7 through 9.
• If a new ID number is programmed, the old one is
erased.
• If a new ID number entered
already exists for another
account, the entry is rejected.
Enter a different ID number.
99
 Loading...