

Page 1
www.imagistics.com
C140/145
Operating Manual
For use with Imagistics and Pitney Bowes C140/145 copiers.
Page 2
As an ENERGY STAR partner, Imagistics has determined that this model
meets the ENERGY STAR guidelines for energy efficiency.
* ENERGY STAR is a U.S. registered mark.
If you should need service...
Should your Copier develop a problem that cannot be remedied by using the
maintenance or troubleshooting procedures outlined in this manual please contact your Imagistics Customer Service Representative at 1-800-243-5556.
Page 3
Please read the instruction handbook before using the copier.
Keep it close to the copier for easy reference.
The sections of this handbook and parts of the copier marked
with symbols are safety warnings meant to protect the user,
other individuals and surrounding objects, and ensure correct
and safe usage of the copier. The symbols and their meanings
are indicated below.
DANGER: Indicates that serious injury or even death will
very possibly result from insufficient attention to or incorrect
compliance with the related points.
WARNING: Indicates that serious injury or even death
may result from insufficient attention to or incorrect compliance
with the related points.
CAUTION: Indicates that personal injury or mechanical
damage may result from insufficient attention to or incorrect
compliance with the related points.
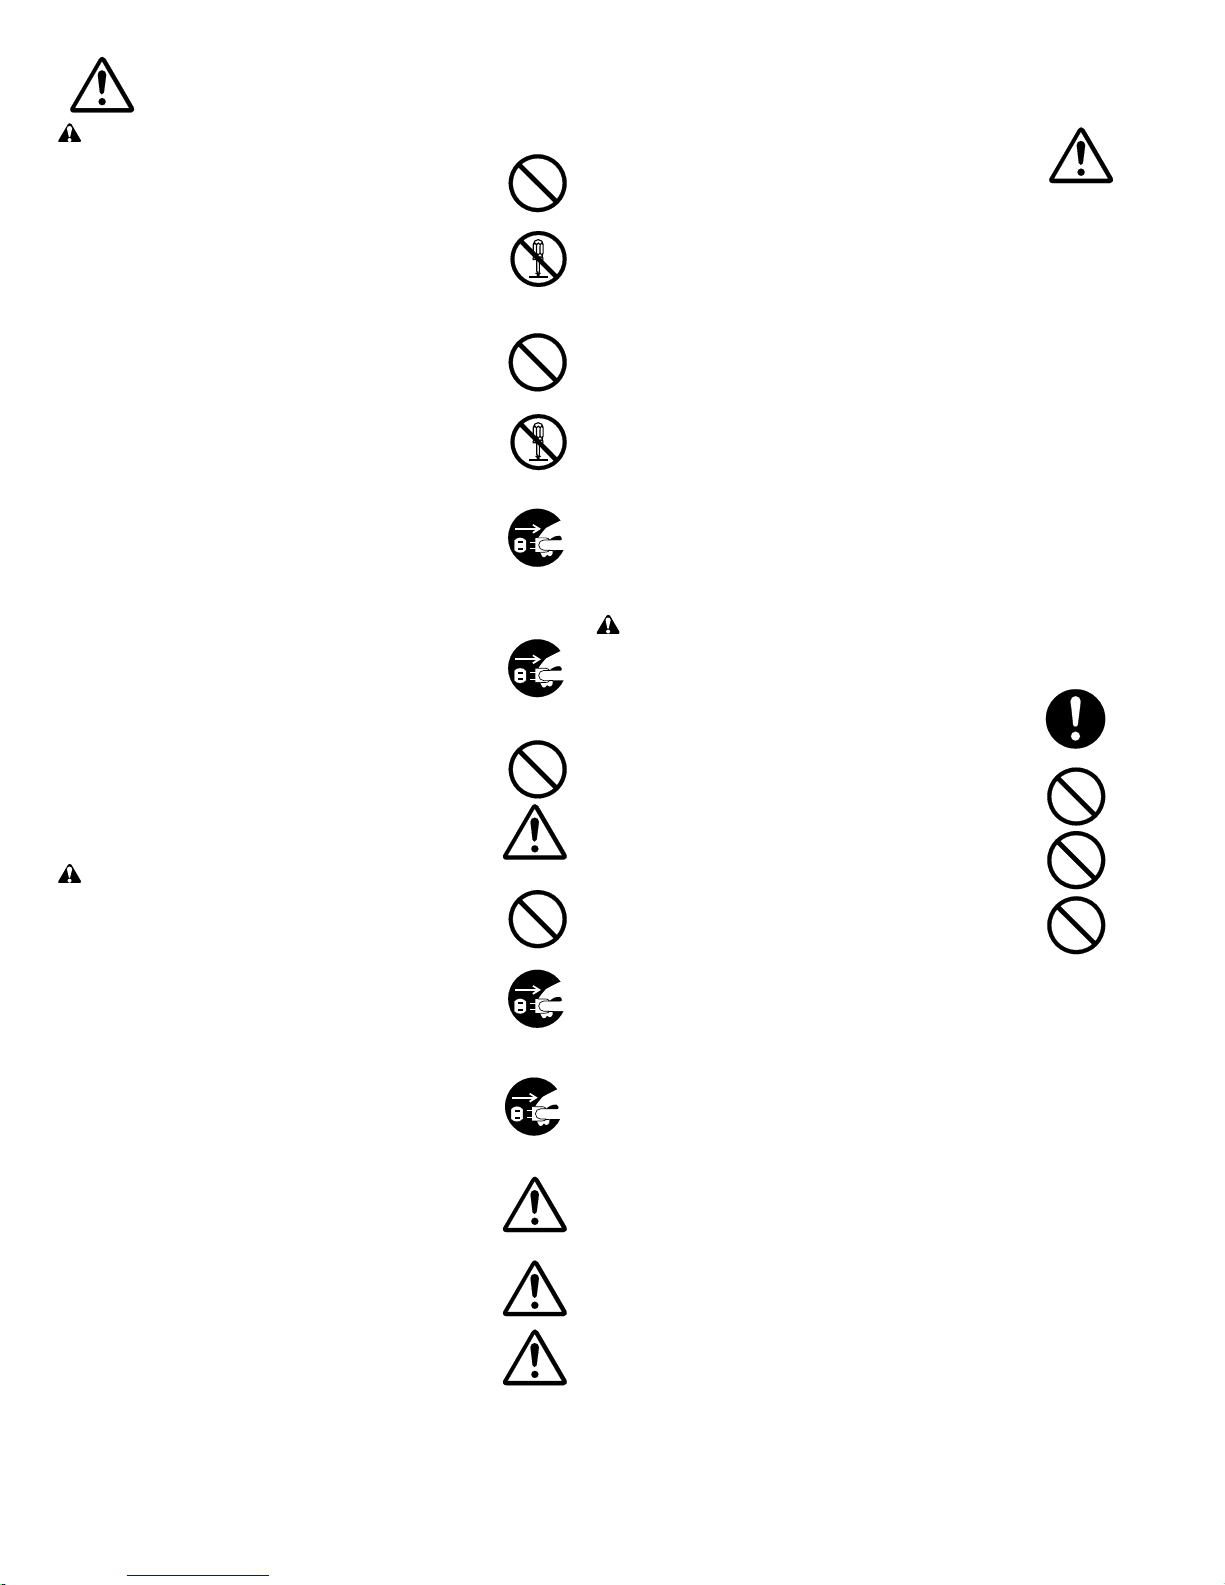
Symbols
symbol indicates that the related section includes safety
The
warnings. Specific points of attention are indicated inside the
symbol.
......... [General warning]
......... [Warning of danger of electrical shock]
......... [Warning of high temperature]
symbol indicates that the related section includes
The
information on prohibited actions. Specifics of the prohibited
action are indicated inside the symbol.
......... [Warning of prohibited action]
......... [Disassembly prohibited]
● symbol indicates that the related section includes
The
information on actions which must be performed. Specifics of
the required action are indicated inside the symbol.
......... [Alert of required action]
......... [Remove the power plug from the outlet]
......... [Always connect the copier to an outlet with a
ground connection]
Page 4

Contents:
Caution Labels ...................................................................................................... 2
Installation Precautions ....................................................................................... 3
Precautions for Use ............................................................................................. 4
Names of Parts .............................................................................................................. 6
(1) Main body ..................................................................................................................... 7
(2) Automatic Document Feeder (ADF).............................................................................. 7
(3) Operation panel ............................................................................................................ 8
Set-up............................................................................................................................. 10
(1) Checking the accessories ........................................................................................... 10
(2) Installing the accessories............................................................................................ 10
(3) Loading paper into the drawer .................................................................................... 16
Originals ........................................................................................................................ 18
Basic Operation ........................................................................................................... 20
● Basic copying procedure .............................................................................................. 20
Copying Modes ............................................................................................................ 22
(1) Making enlarged or reduced copies............................................................................ 22
1
Fixed Magnification mode ........................................................................................ 22
2
Zoom mode.............................................................................................................. 23
(2) Copying from photographs <Photo Original mode> ................................................... 24
(3) Using the bypass slot.................................................................................................. 24
(4) Auto Shut-Off function ................................................................................................. 26
(5) Auto Pre-Heat mode ................................................................................................... 27
(6) Auto Start mode .......................................................................................................... 27
Adjusting the Default Settings ................................................................................. 28
(1) Auto/Manual Exposure mode selection ...................................................................... 28
(2) Manual Exposure level ............................................................................................... 29
(3) Auto Exposure level .................................................................................................... 30
(4) Auto Shut-Off function ON/OFF .................................................................................. 31
(5) Auto Shut-Off time ...................................................................................................... 33
(6) Auto Pre-Heat time ..................................................................................................... 36
(7) Auto Pre-Heat recovery time....................................................................................... 38
(8) Auto Clear time ........................................................................................................... 40
(9) Thick Paper mode....................................................................................................... 43
Adding Supplies........................................................................................................... 44
Replacing the toner cartridge ........................................................................................... 44
Ordering Supplies ............................................................................................................ 47
Troubleshooting ........................................................................................................... 48
Cleaning the Copier.................................................................................................... 56
● Cleaning the ADF and the platen ................................................................................. 56
Specifications ............................................................................................................... 57
1
Page 5
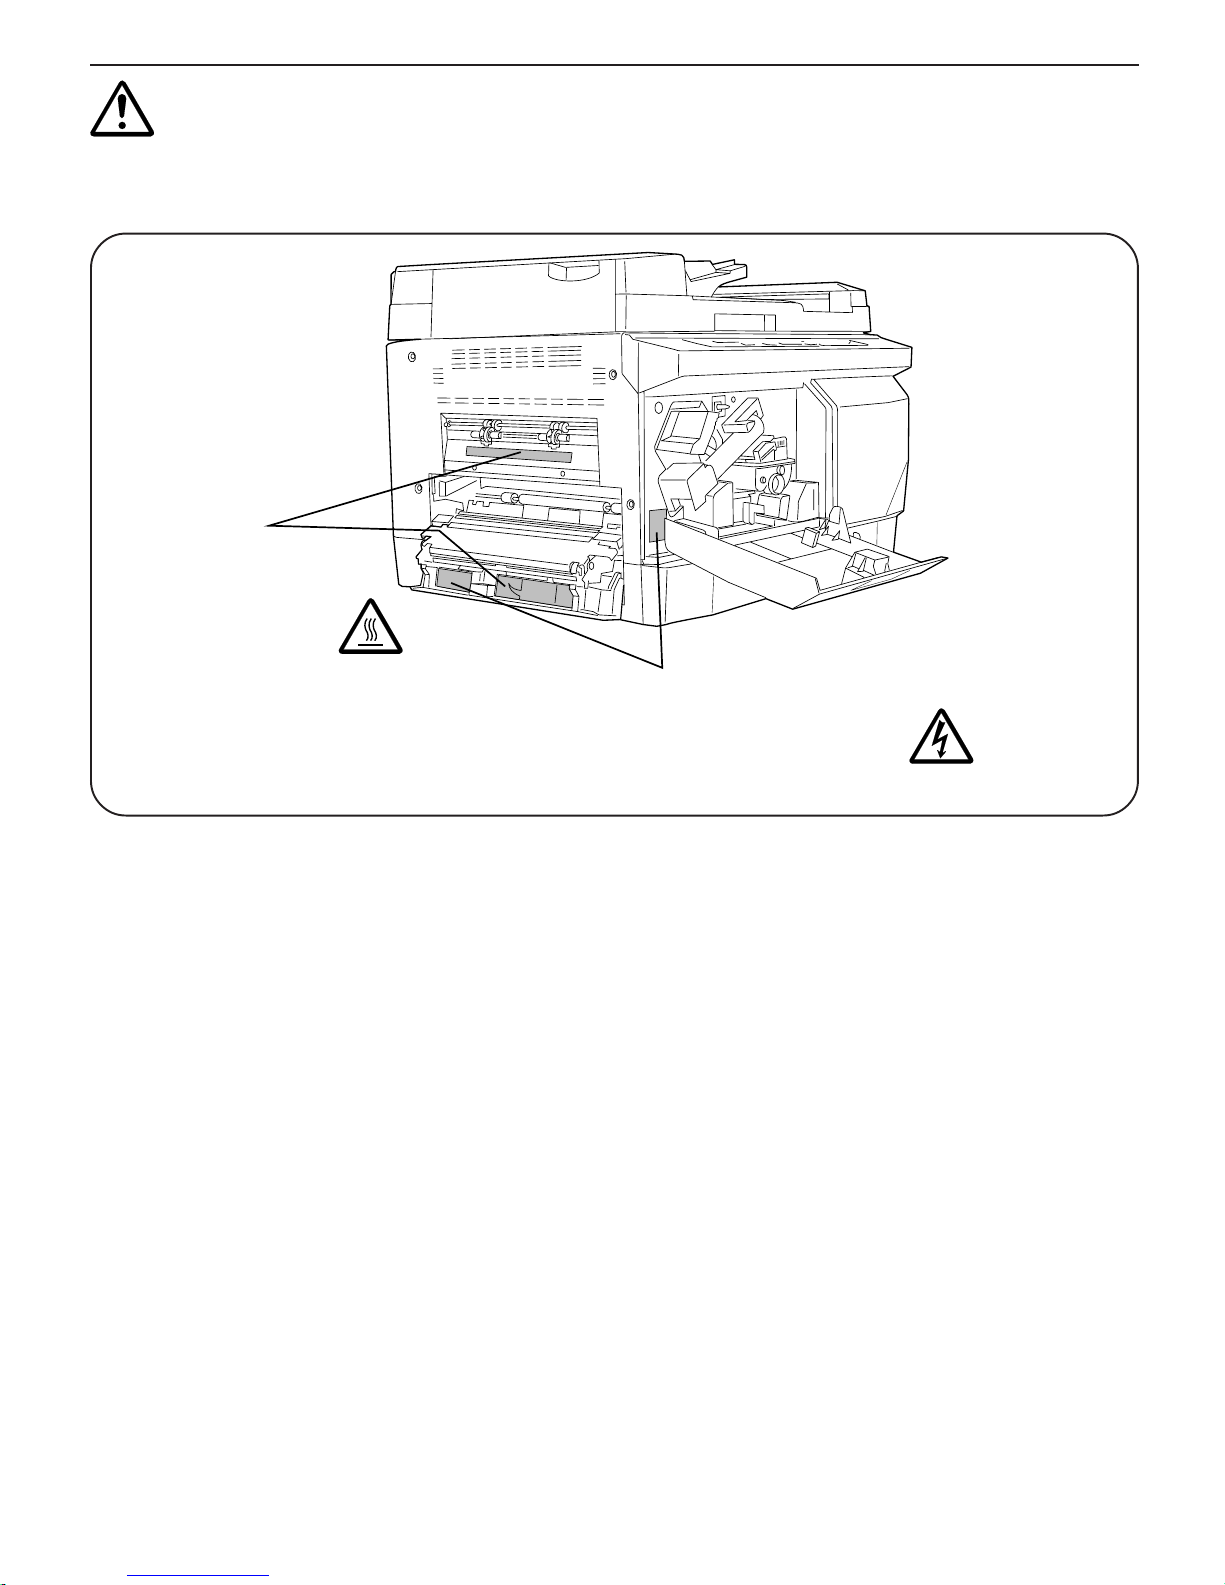
CAUTION LABELS
High voltage and high temperature caution labels have been attached to the copier at the following locations for safety purposes.
Use cautionwhen removing a paper jam or when replacing toner.
Label 1, 2
High temperature
inside. Do not touch
parts in this area,
because there is a
danger of getting
burned. ...................
Label 3, 4
High voltage inside. NEVER
touch parts in this area,
because there is a danger of
electric shock. .........................
NOTE: DO NOT remove these labels.
2
Page 6

Installation Precautions
■ Environment
CAUTION
Avoid placing the copier on or in locations which are
•
unstable or not level. These locations may cause the
copier to fall down or fall over. This can cause personal
injury or damage to the copier. ......................................
Avoid locations with high humidity, dust and dirt ...........
•
•
Avoid locations near radiators, heaters, or other heat
sources, or locations near flammable items, to avoid
the danger of fire. ..........................................................
To keep the copier cool and facilitate changing of parts
•
and maintenance, allow adequate space, especially
around the rear cover, to allow proper ventilattion.
Rear:
≥
315/16"
Left:
≥
1113/16"
Right:
≥
315/16"
■ Power supply/Grounding
Caution
DO NOT use a power supply with a voltage other than
•
that specified. Avoid multiple connections in the same
outlet. These types of situations present a danger of
fire or electrical shock. ...................................................
Plug the power cord securely into the outlet. If metallic
•
objects come in contact with the prongs on the plug, it
may cause a fire or electric shock. ................................
Always connect the copier to an outlet with a ground
•
connection to avoid the danger of fire or electrical
shock in case of an electric short. If an earth
connection is not possible, contact your service
representative. ...............................................................
Other precautions
Connect the power plug to the closest outlet possible
•
to the copier.
•
The power supply cord is used as the main disconnect
device. Ensure that the socket/outlet is located/
installed near the equipment and is easily accessible.
Front:
≥
393/8"
Other precautions
Adverse environmental conditions may affect the safe
•
operation and performance of the copier. Install in an
air-conditioned room (recommended room
temperature: around 68°F, humidity: around 65%RH)
and avoid the following locations when selecting a site
for the copier.
.
Avoid locations near a window or with exposure to
direct sunlight.
.
Avoid locations with vibrations.
.
Avoid locations with drastic temperature fluctuations.
.
Avoid locations with direct exposure to hot or cold air.
.
Avoid poorly ventilated locations.
Handling of plastic bags
Caution
Keep the plastic bags that are used with the copier
•
away from children. The plastic may cling to their nose
and mouth and cause suffocation. ................................
3
Page 7
PRECAUTIONS FOR USE
WARNING
• DO NOT place metallic objects or containers with
water on or near the copier. This type of situation
presents a danger of fire or electrical shock should
they fall inside. ..............................................................
• DO NOT remove any of the covers from the copier .....
• DO NOT damage, break or attempt to repair the power
cord. DO NOT place heavy objects on the cord, pull it,
bend it unnecessarily or cause any other type of
damage.
These conditions present a danger of fire or electrical
shock. ...........................................................................
NEVER attempt to repair or disassemble the copier or its
•
parts as there is a danger of fire or electrical shock. .......
• If the copier becomes excessively hot, smoke appears
from the copier, there is an odd smell, or any other
abnormal situation occurs, there is a danger of fire or
electrical shock. Turn the main switch OFF (
immediately, remove the power plug from the outlet
and contact your service representative. ......................
• If anything harmful (paper clips, water, other fluids,
etc.) falls into the copier, turn the main switch OFF (O)
immediately. Next, remove the power plug from the
outlet to avoid the danger of fire or electrical shock.
Then contact your service representative. ....................
• DO NOT remove or connect the power plug with wet
hands, as there is a danger of electrical shock. ............
• ALWAYS contact your service representative for
maintenance or repair of internal parts. ........................
CAUTION
• DO NOT pull the power cord when removing it from
the outlet. ALWAYS grasp the power plug when
removing the power cord from the outlet. .....................
• ALWAYS remove the power plug from the outlet when
moving the copier. If the power cord is damaged, there
is a danger of fire or electrical shock. ...........................
• If the copier will not be used for a short period of time
(overnight, etc.), turn the main switch OFF (
If it will not be used for an extended period of time
(vacations, etc.), remove the power plug from the
outlet for safety purposes during the time the copier is
not in use. .....................................................................
• ALWAYS hold the designated parts only when lifting or
moving the copier..........................................................
• For safety purposes, ALWAYS remove the power plug
from the outlet when performing cleaning operations. ..
O
)
O
).
Other precautions
• DO NOT place heavy objects on the copier or cause
other damage to the copier.
• DO NOT open the front cover, turn off the main switch,
or pull out the power plug during copying.
• During copying, a small amount ozone is released.
This is not a health concern but the odor may be
unpleasant. Make sure the room has adequate
ventilation.
• When lifting or moving the copier, contact your service
representative.
• Do not touch electrical parts, such as connectors or
printed circuit boards. They could be damaged by
static electricity.
• DO NOT attempt to perform any operations not
explained in this handbook.
Cautions when handling supplies
CAUTION
• Avoid inhalation, ingestion, skin or eye contact. If
ingestion occurs, dilute stomach contents thoroughly
with water and seek medical treatment. If skin contact
occurs, wash with soap and water. If contact with eyes
occurs, flush thoroughly with water and seek medical
treatment. ......................................................................
• Prolonged inhalation of excessive dusts may cause
lung damage. Use of this product, as intended, does
not results in inhalation of excessive dusts. ..................
• Do not incinerate toner and toner containers.
Dangerous sparks may cause burns. ...........................
• Keep away from children. .............................................
Other precautions
• Always read the safety instructions which are included
in the box or printed on the container when handling
consumables.
• Dispose of the toner or toner containers in accordance
with Federal, State and Local rules and regulations.
• Store consumables in a cool, dark location.
• If the copier will not be used for an extended period of
time, remove the paper from the cassette, return it to
its original package and reseal it.
• DO NOT leave the document feeder open as there is a
danger of personal injury. .............................................
4
Page 8

Copier Supplies: Models C140/145
The supplies listed below have all been designed especially for Imagistics
copiers to ensure maximum product performance and quality. Substituting
other supplies may result in inferior copy quality and machine malfunction.
Ordering supplies is quick and easy.
Call the Imagistics Copier Supply Line 1-800-462-6797.
Description/Order Number How much to Description
keep on hand
Printpowder Toner 1 Carton Contains 1 toner c artridges
420-0 per carton
Copier Paper (8 1/2” x 14”) 2 Cartons Contains 5,000 sheets
471-1 per carton (10 reams)
Copier Paper (8 1/2 x 14) 1 Carton Contains 3,000 sheets
462-1 per carton (6 reams)
3-Hole Punched 1 Carton Contains 5,000 sheets
Copy Paper (8 1/2” x 11”) per carton (10 reams)
471-9
Transparencies 1 Box Contains 100 sheets
257-9 per carton
Copier Label Sheets 1 Box Contains 100 sheets
556-1 per carton (33 labels per
sheet)
Developer 1 Carton Contains 1 bottle per carton
420-4*
* Note: This item can only be installed by an Imagistics Customer Service
Representative and should be kept should on hand for preventative
maintenance.
5
Page 9
C140/145 Parts
6
**Model C140
Page 10

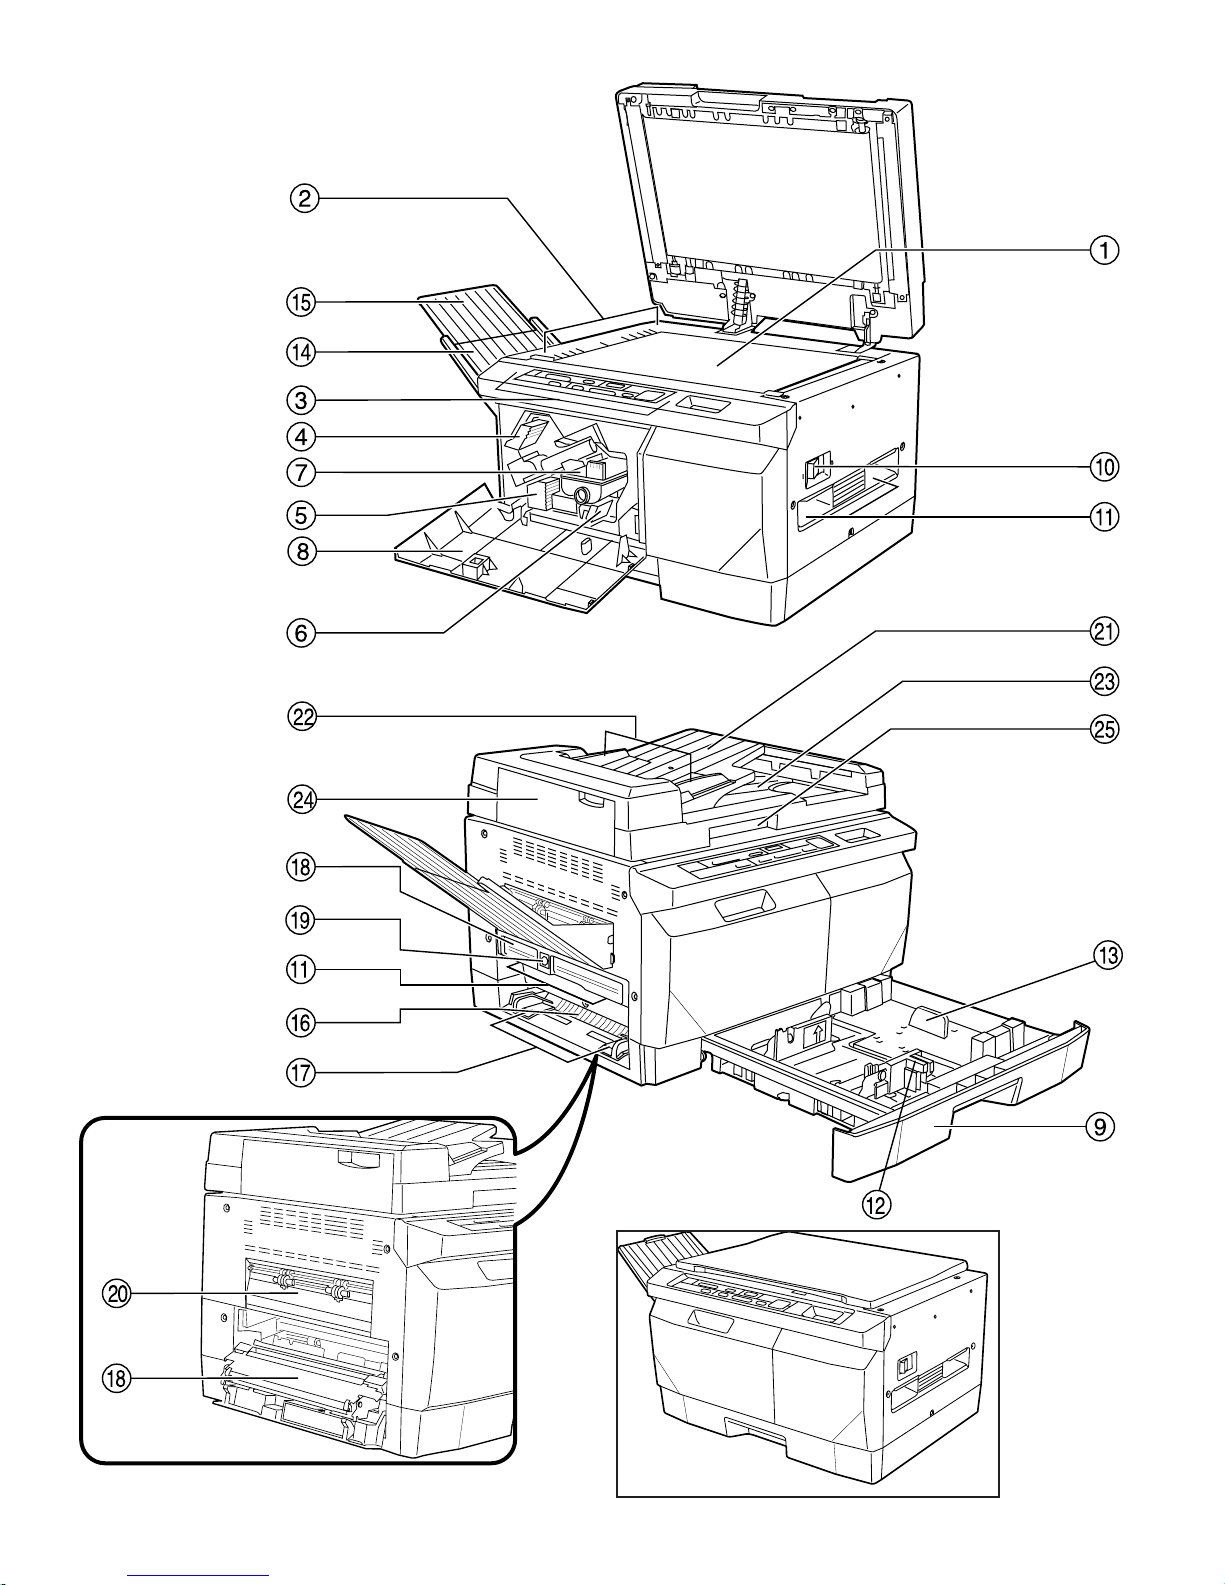
(1) Main body
# Platen/ Original Glass
$ Original size indicator lines (Align all
originals to be copied with these lines.)
% Operation panel (Use to carry out copying
operations.)
& Drum unit
5 Developing unit
(Developing unit release lever(Operate when
replacing the developing unit.)
) Toner cartridge
* Front cover (Open when replacing the toner
cartridge, the developing unit or the drum unit.)
+ Drawer (Up to 250 sheets of copy paper can be
loaded in this drawer.)
, Main switch (Turn this switch ON ( | ) in order
to use the copier.)
- Copier moving handles (Lift here when
moving the copier.)
. Width guide
/ Length guide
0 Copy tray (Finished copies are ejected here.)
1 Copy tray extension (Extend when making
large-size copies such as 8 1/2” x 14” size.)
2 Bypass slot (Feed small-size or special copy
paper here.)
3 Slider (Adjust to fit the width of the copy paper
that is inserted into the bypass slot.)
4 Paper feed cover (Open when removing
jammed paper.)
5 Paper feed cover release button
6 Ejection section cover (Open when
removing jammed paper that cannot be removed
from inside the paper feed cover.)
(2) Automatic Document Feeder (ADF)*
7 Original table (Set originals to be copied here.
A maximum of 20 originals can be set at one
time.)
8 Original insert guides (Adjust to match the
width of the originals to be copied.)
9 Upper cover (Originals that have been copied
are ejected and stacked here.)
: ADF cover (Open if an original jams in the
original feed section.)
; ADF handle (Use this handle when opening
the DF.)
* C145 only.
** C140 shown with platen cover.
7
Page 11
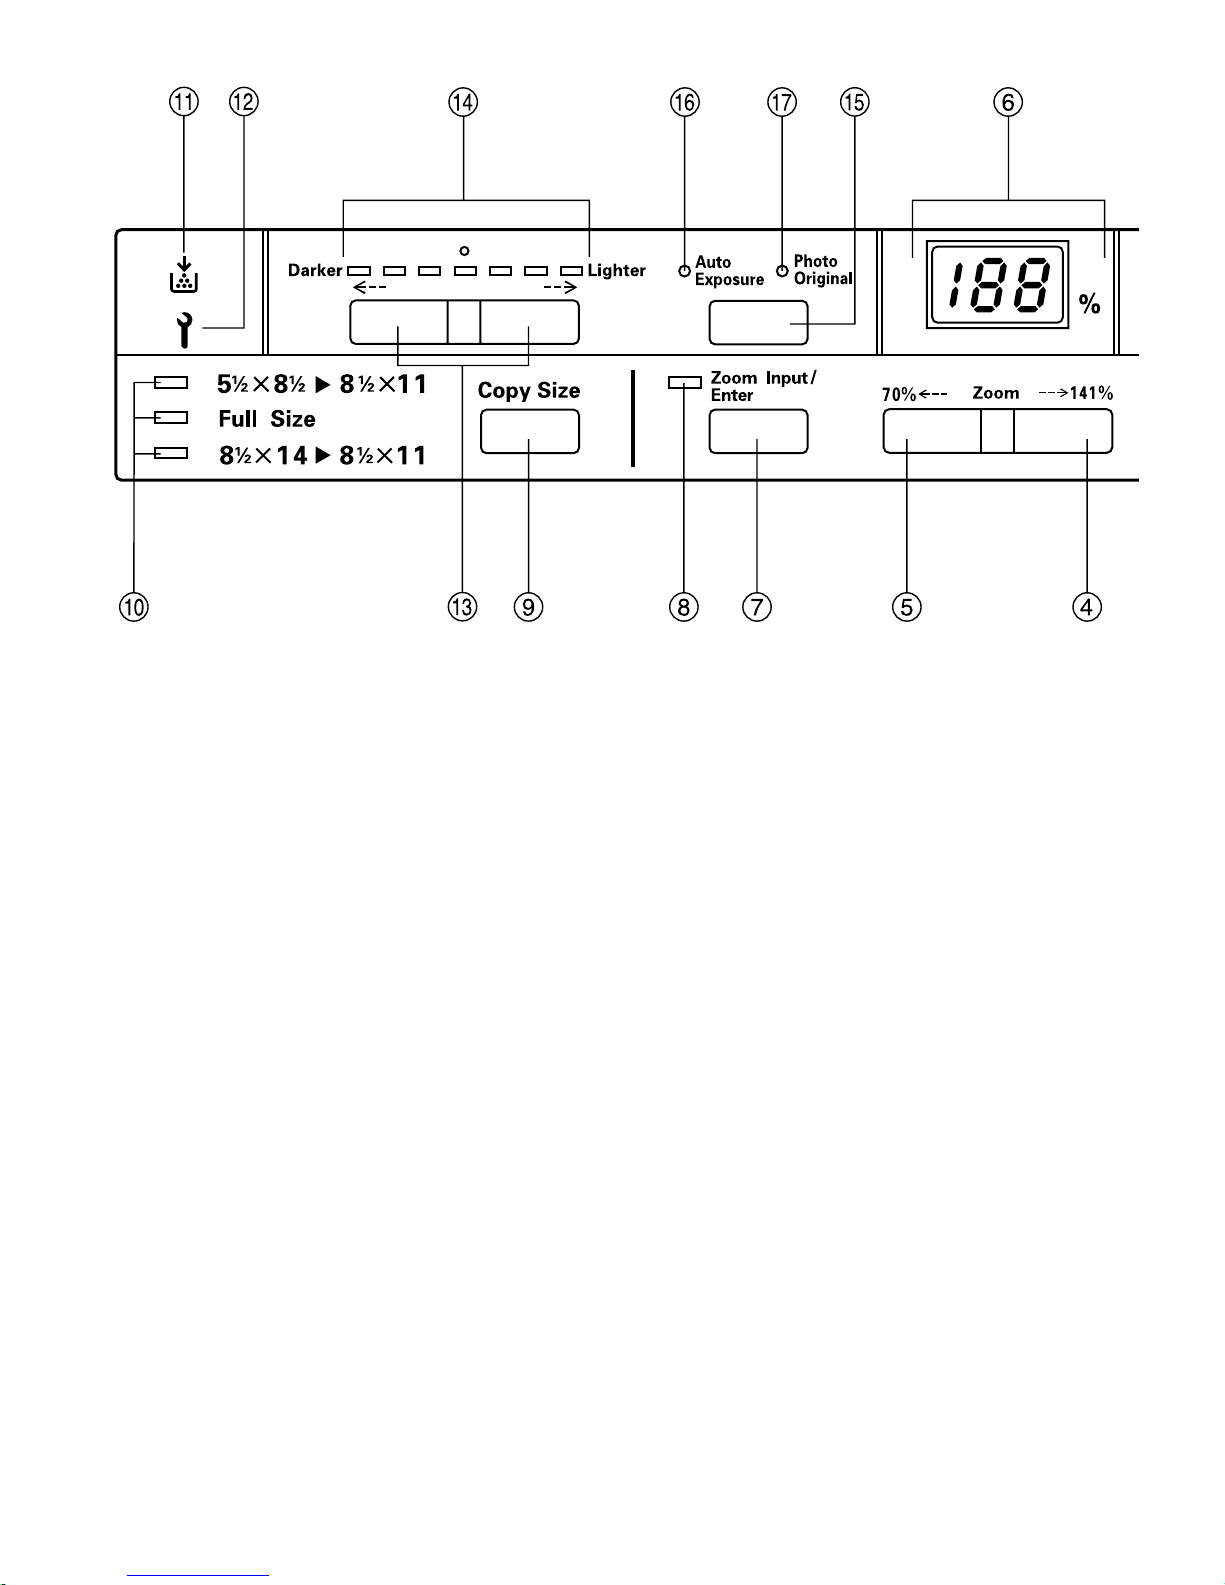
(3) Operation panel
+10 Quantity +1
1 Print key
(Press to start copying.)
2 Print indicator
(Lit green when the copier is ready to start copying.)
3 Stop/Clear key
(Press to stop copying or when changing the number of copies to
be made.)
4 Copy Quantity / Zoom Up key
(Press to set the one’s digit in the number of copies to be made or
to increase the indicated copy magnification ratio. Press the Zoom
Input / Enter key to switch between setting the number of copies
and setting the copy magnification.)
5 Copy Quantity / Zoom Down key
(Press to set the ten’s digit in the number of copies to be made or
to decrease the indicated copy magnification ratio. Press the
Zoom Input / Enter key to switch between setting the number of
copies and setting the copy magnification.)
6 Copy Quantity/Magnification display
(Displays the number of copies to be made or the presently
selected copy magnification ratio.)
7 Zoom Input / Enter key
(Press to switch the Copy Quantity/Magnification display between
the number of copies and the copy magnification. If this key is
pressed when the Zoom Input indicator is lit, the presently
selected copy magnification ratio will be displayed.)
8 Zoom Input indicator
(Lit when the Zoom mode is selected and a copy magnification
ratio other than 100% is set.)
9 Copy Size key (Refer to page 22.)
10 Copy Size indicators
(Indicate the presently selected copy magnification ratio. Full Size
is the standard mode and the Full Size indicator is lit in this mode.)
11 Add Toner Indicator
(When lit, there is insufficient toner in the copier. Replace the
toner cartridge. Refer to page 44.)
12 Call Service for Drum and Developer
(When this indicator begins to flash, it’s almost time to replace the
developing unit and the drum unit. When the indicator stops
flashing and remains lit, both units must be replaced.)
13 Copy Exposure Adjustment keys (Refer to page 20.)
14 Copy Exposure indicators
(The seven exposure indicators display 19 levels of copy
exposure. Refer to page 21.)
15 Auto Exposure / Photo Original key
(Press to switch between the Automatic Exposure mode, the
Manual Exposure mode and the Photo Original mode. The
selected mode will change each time this key is pressed. Refer to
pages 21 and 24.)
16 Auto Exposure indicator
(Press the Auto Exposure / Photo Original key to light this
indicator in order to copy in the Auto Exposure mode.)
17 Photo Original indicator
(Lit when the Photo Original mode is selected.)
18 Original set indicator
(Lit green when originals are set properly on the original table.
Flashes green when originals are not set properly and flashes red
when an original has jammed in the ADF.)
8
Page 12
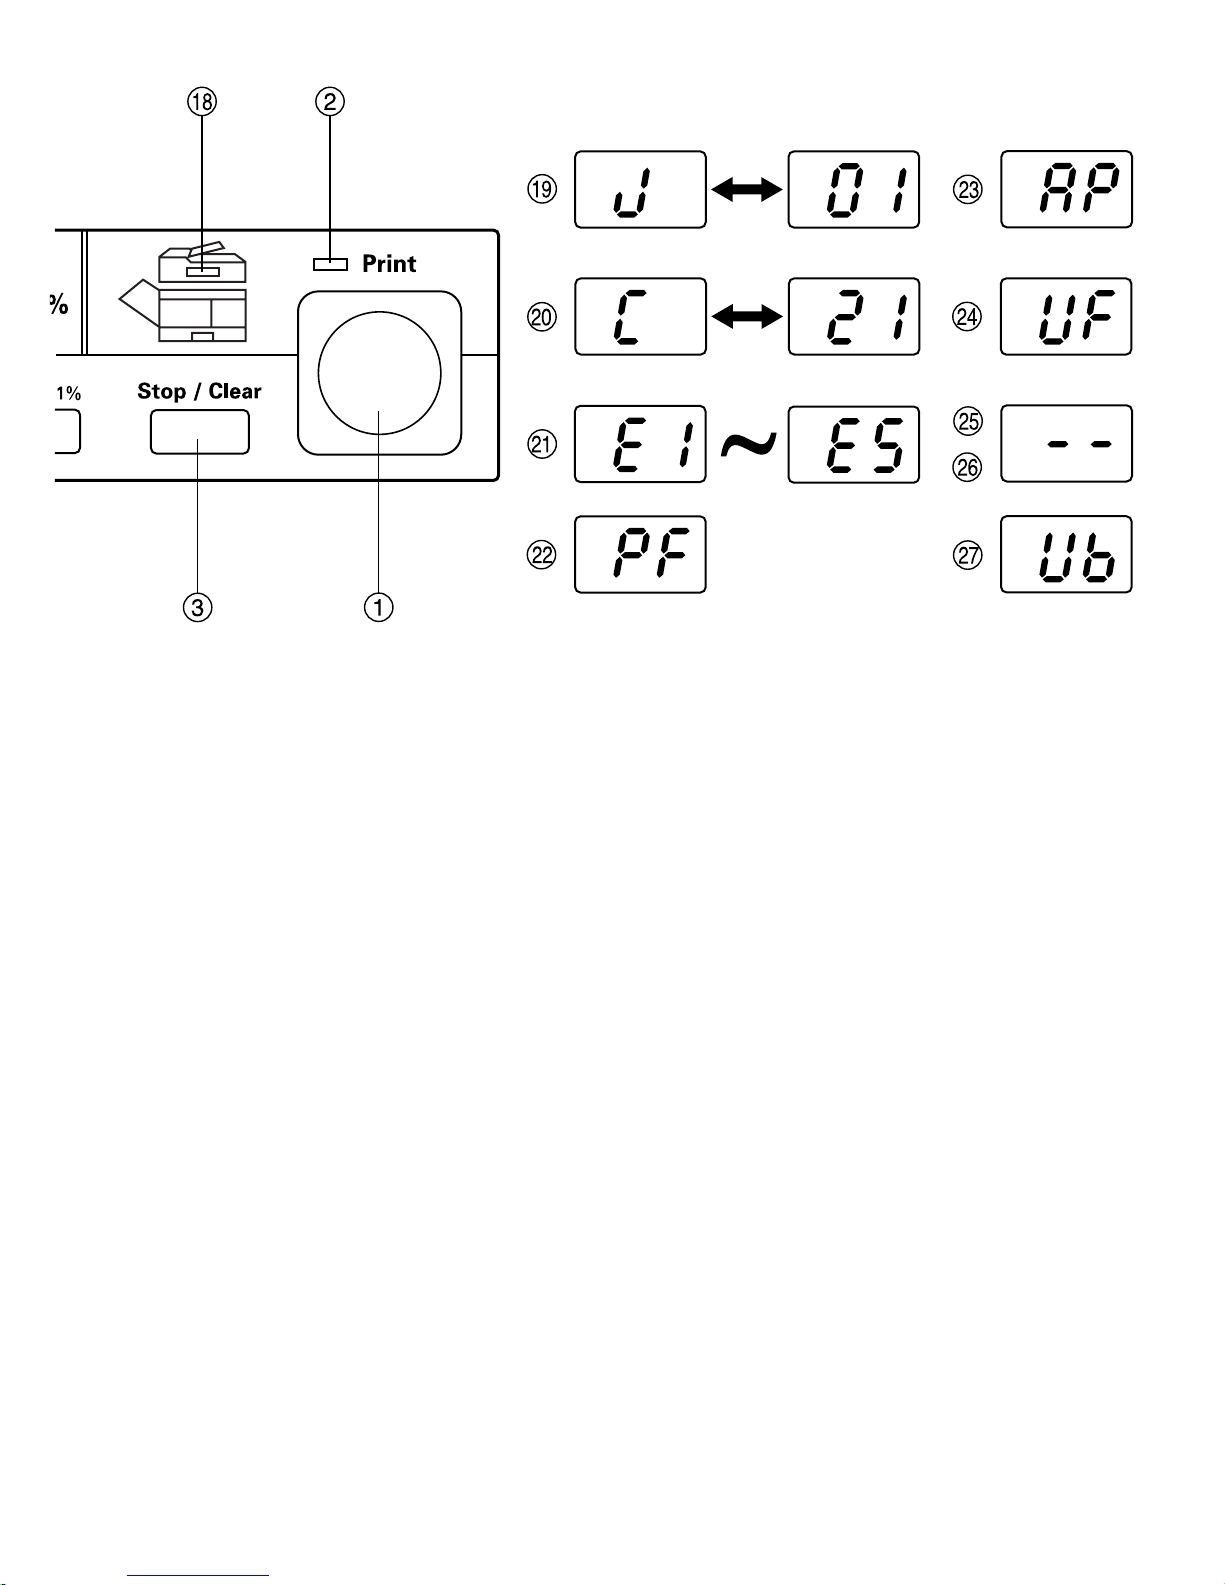
-
Indications on the Copy Quantity/Magnification
display
-
19 “J” and a number are flashing alternately
(There is a paper jam. Refer to page 50 and remove the jammed
paper.)
20 “C” and a number are flashing alternately
(Contact your service representative.)
21 “E1” - “E5” appears
(The copier is in the management mode which allows
configuration of various default settings.)
E1: Auto Shut-Off function ON/OFF (Page 31)
E2: Auto Shut-Off time (Page 33)
E3: Auto Pre-Heat time (Page 36)
E4: Auto Pre-Heat recovery time (Page 38)
E5: Auto Clear time (Page 40)
22 “PF” is flashing
(There is no paper in the drawer or there is a paper jam. Load
paper or remove the jammed paper. Refer to pages 16 and 49.)
23 “AP” is flashing
(The copier is replenishing the toner supply. Wait until toner
replenishment is completed.)
24 “UF” is flashing
(The developing unit or the toner cartridge is not installed. Install
the developing unit or the toner cartridge, as required.)
25 “
--
” appears
(The Auto Pre-Heat mode has engaged and the copier is in an
energy saving mode.)
26 “
--
” is flashing
(The copier is warming up in order to prepare the developing unit.
Wait until warm-up is completed.)
27 “Ub" is flashing
Drum and developer need replacing. Call service.
● Initial mode
When the main switch is turned ON ( | ) and warm-up is completed,
the copier will automatically select “Full Size” for making copies of the
same size as the original, the number of copies to be made will be
set at “1”, and the copy exposure will be at the middle setting.
* To verify the present default settings, first turn the main switch OFF
O
) and then back ON ( | ) again.
(
● Auto Clear function
About 90 seconds after copying stops, the copier will automatically
return the operation panel to the same standard default settings as
those that appear after warm-up. (Exception: The exposure mode will
not change.) Copies can continued to be made with the same copy
mode, number of copies, and copy exposure setting if copying is
started before the Auto Clear function engages.
* It is possible to change the amount of time before the Auto Clear
function engages or it can be turned OFF. (Refer to “(8) Auto Clear
time” page 40.)
9
Page 13
C140/145 Set-Up Instructions:
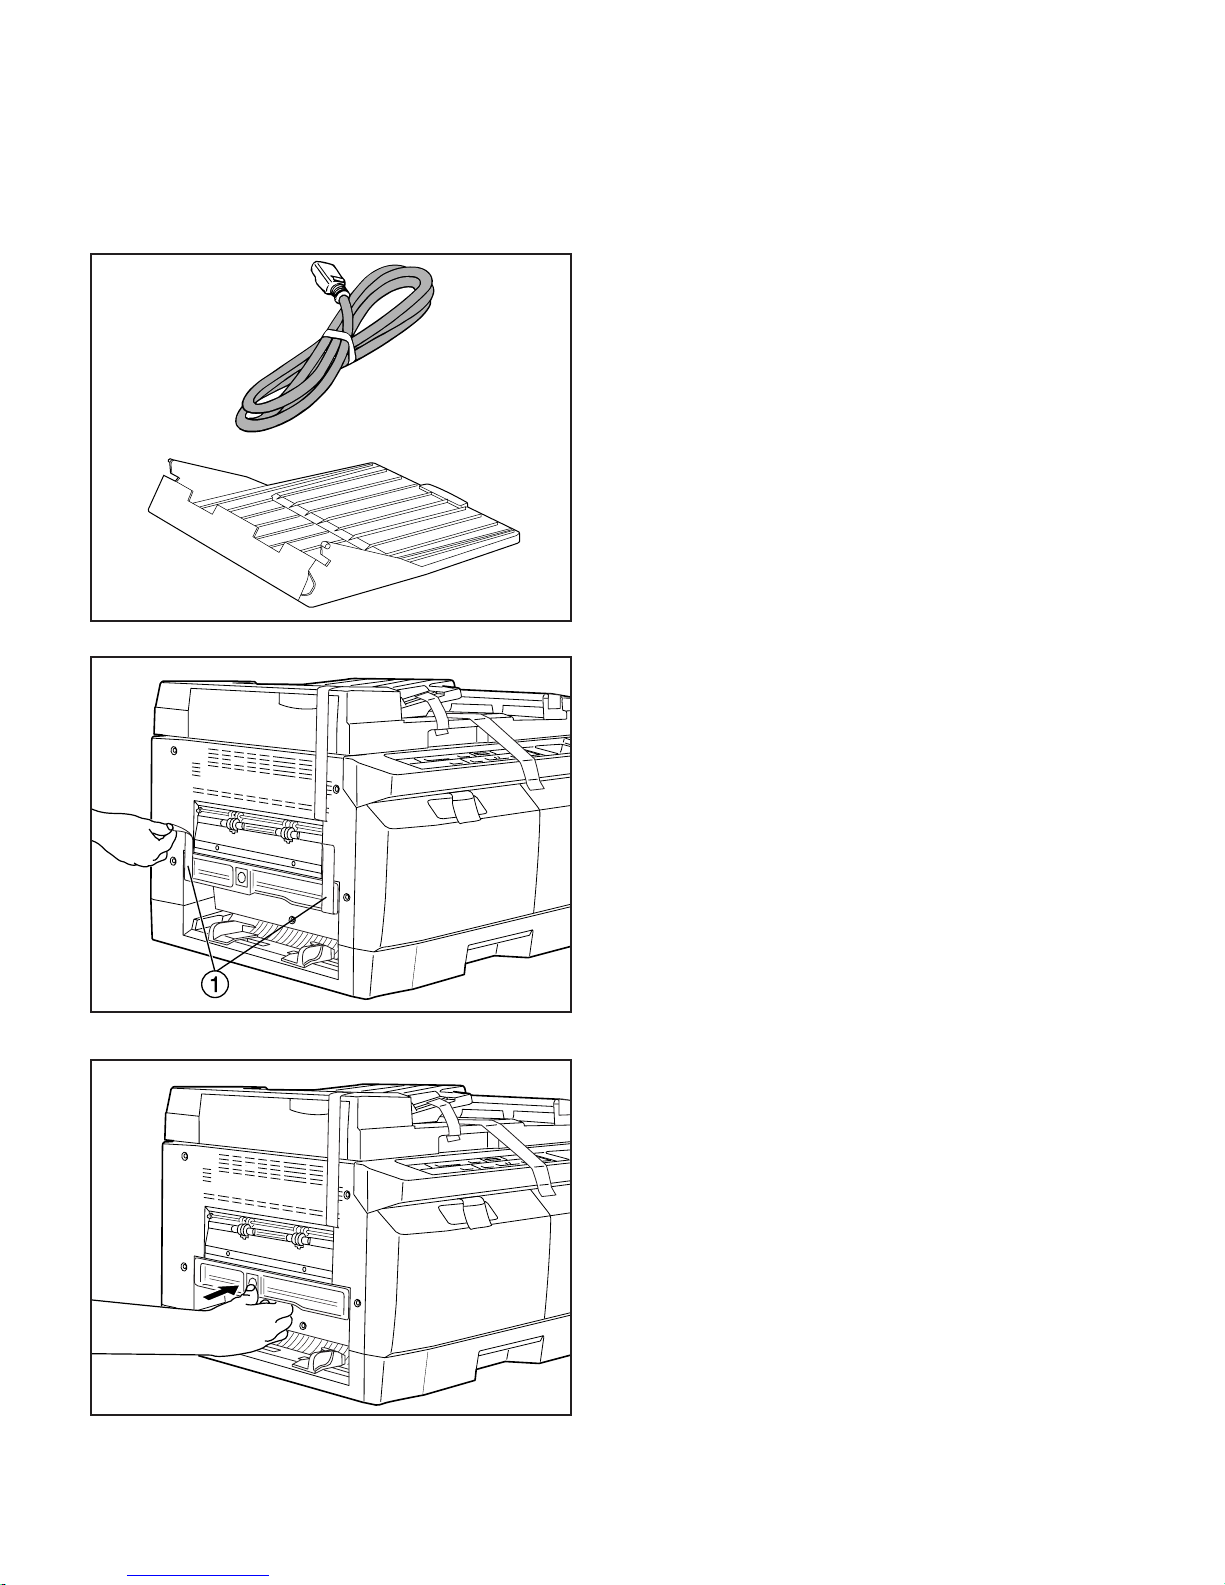
(1) Checking the accessories
1
2
Prior to installation, make sure that none of the
accessories listed below are missing.
1 Power cord
2 Copy tray
(2) Installing the accessories
1. Remove the 2 pieces of tape (1) that are holding
down the paper feed cover.
10
2. Press the paper feed cover release button to
open the paper feed cover, and then close the
cover once again.
Page 14
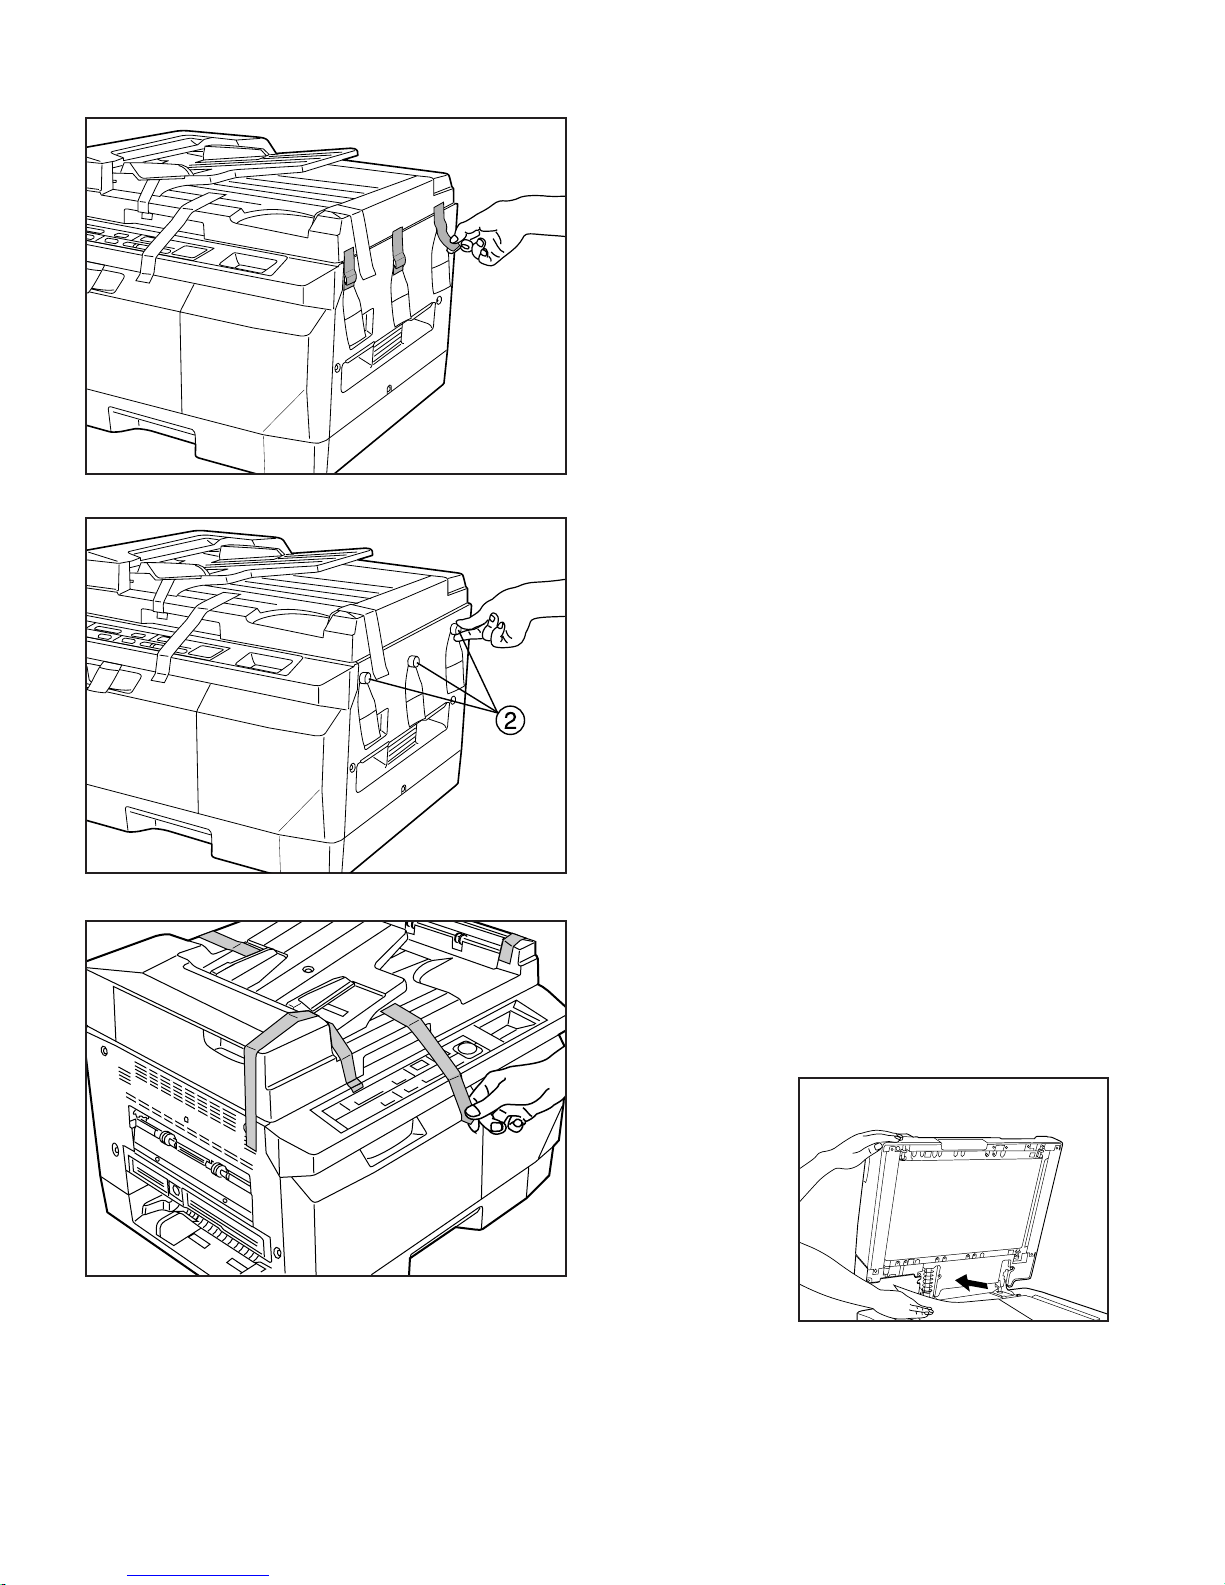
3. Remove the tape covering the 3 screws on the
right side of the copier.
4. Unscrew the 3 yellow screws (2) by hand and
remove them from the copier.
5. Remove the 5 pieces of tape that hold down the
ADF.
6. Open the ADF
and remove the
paper that is on the
platen/glass.
Note: If you have any questions about setting up your copier or would like your
Imagistics Service Representative to set-up your copier, call: 1-(800) 243-5556
(There is a 1 hour service charge for on site set-up.)
11
Page 15
7. Install the copy tray by inserting the 2 pins at the
end of each side of the copy tray into the holes
on each side of the ejection slot located on the
left
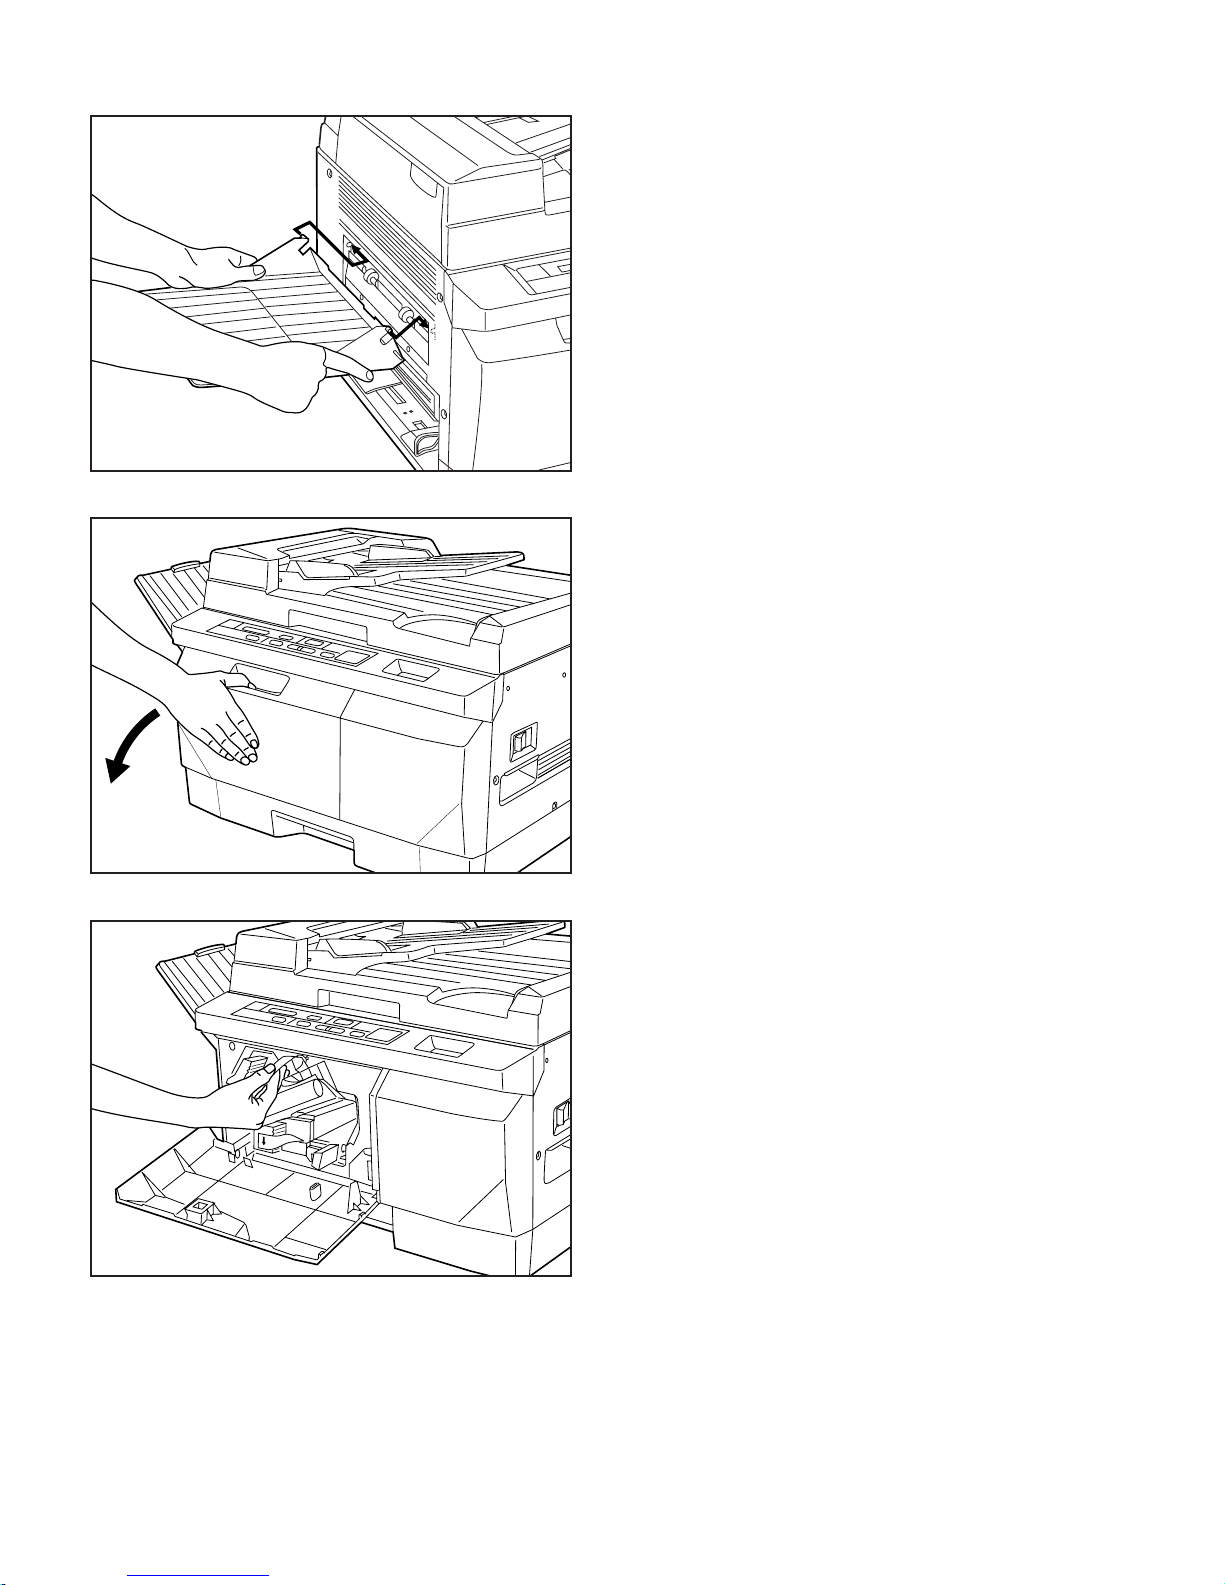
8. Open the front cover.
Important!
The surface of the drum unit (red) is extremely
sensitive to light. BE SURE to close the front cover
as soon as possible after set-up is completed.
12
9. Remove the tape holding the yellow screw
inside the copier.
Page 16
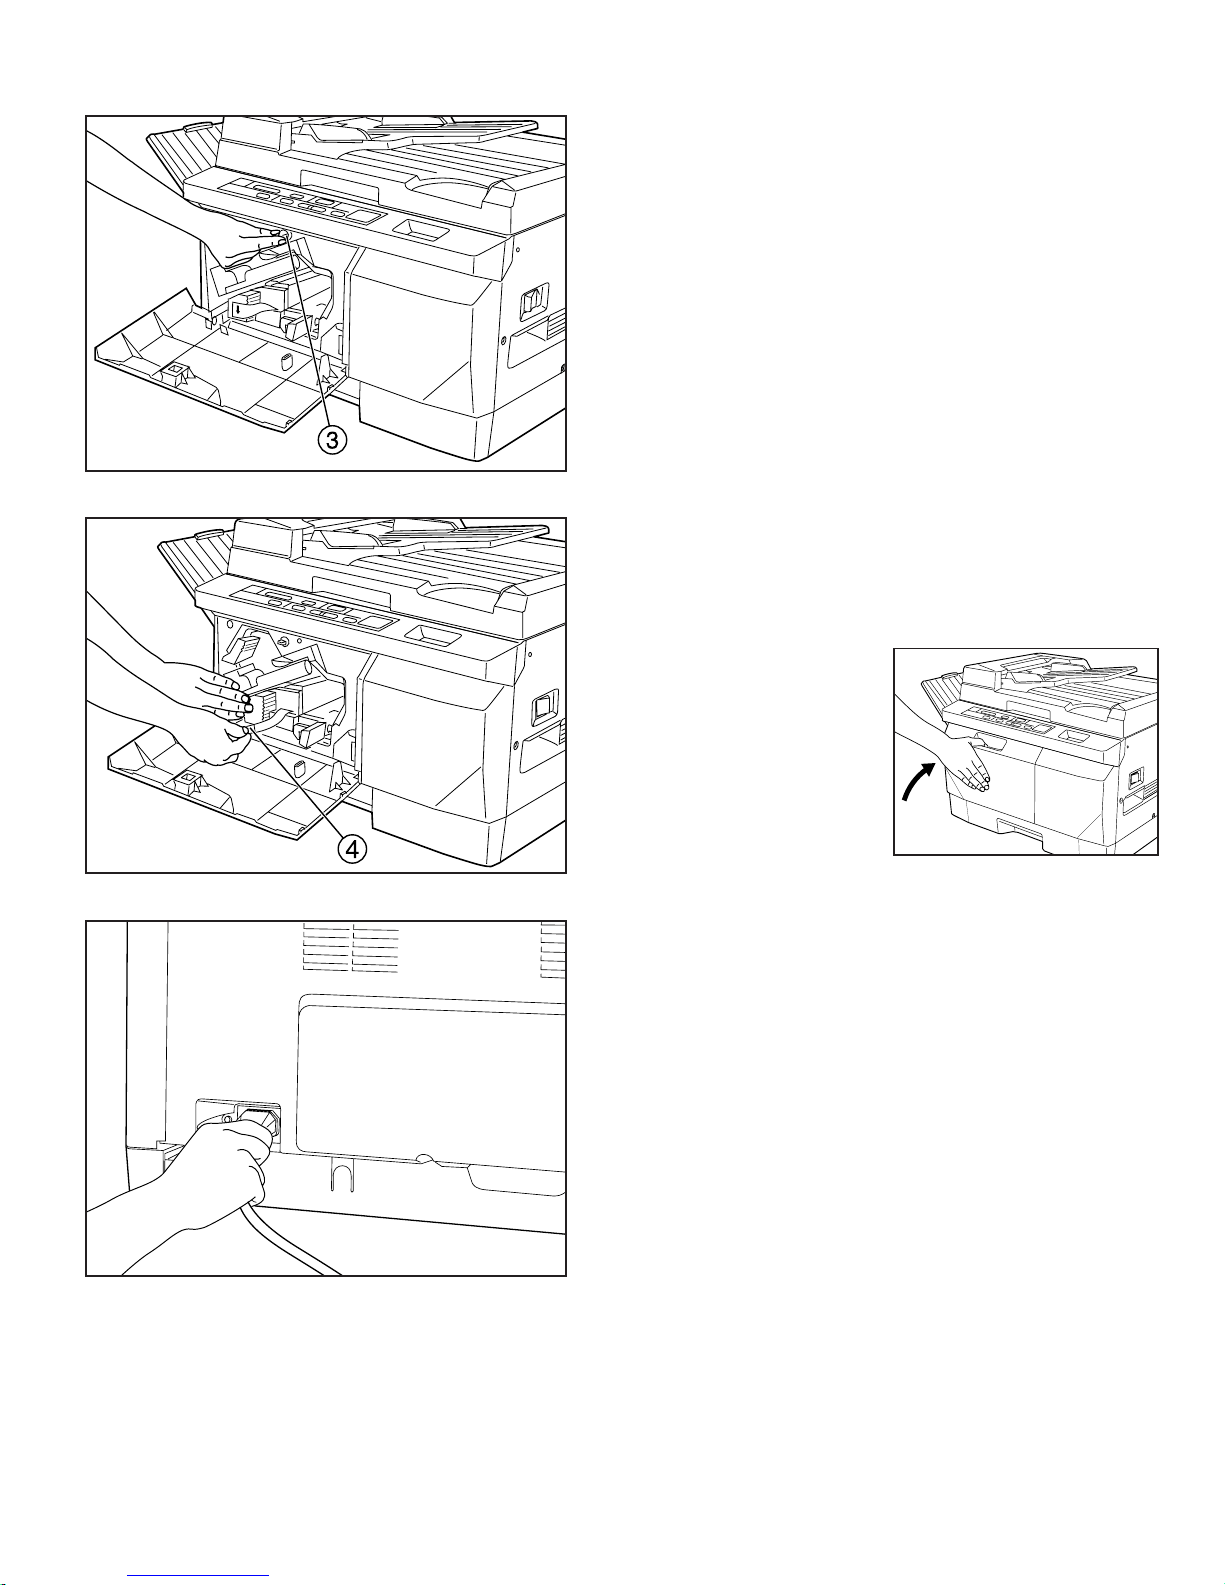
10. Unscrew the yellow screw % by hand and
remove it from the copier.
11. Remove the protective spacer from the front
of the developing unit. Next, hold the unit
(marked with c) with one hand and pull the
seal & towards you to remove it.
12. Close the front cover.
13. Plug one end of the power cord into the back
of the copier and the other into a wall outlet.
.
13
Page 17
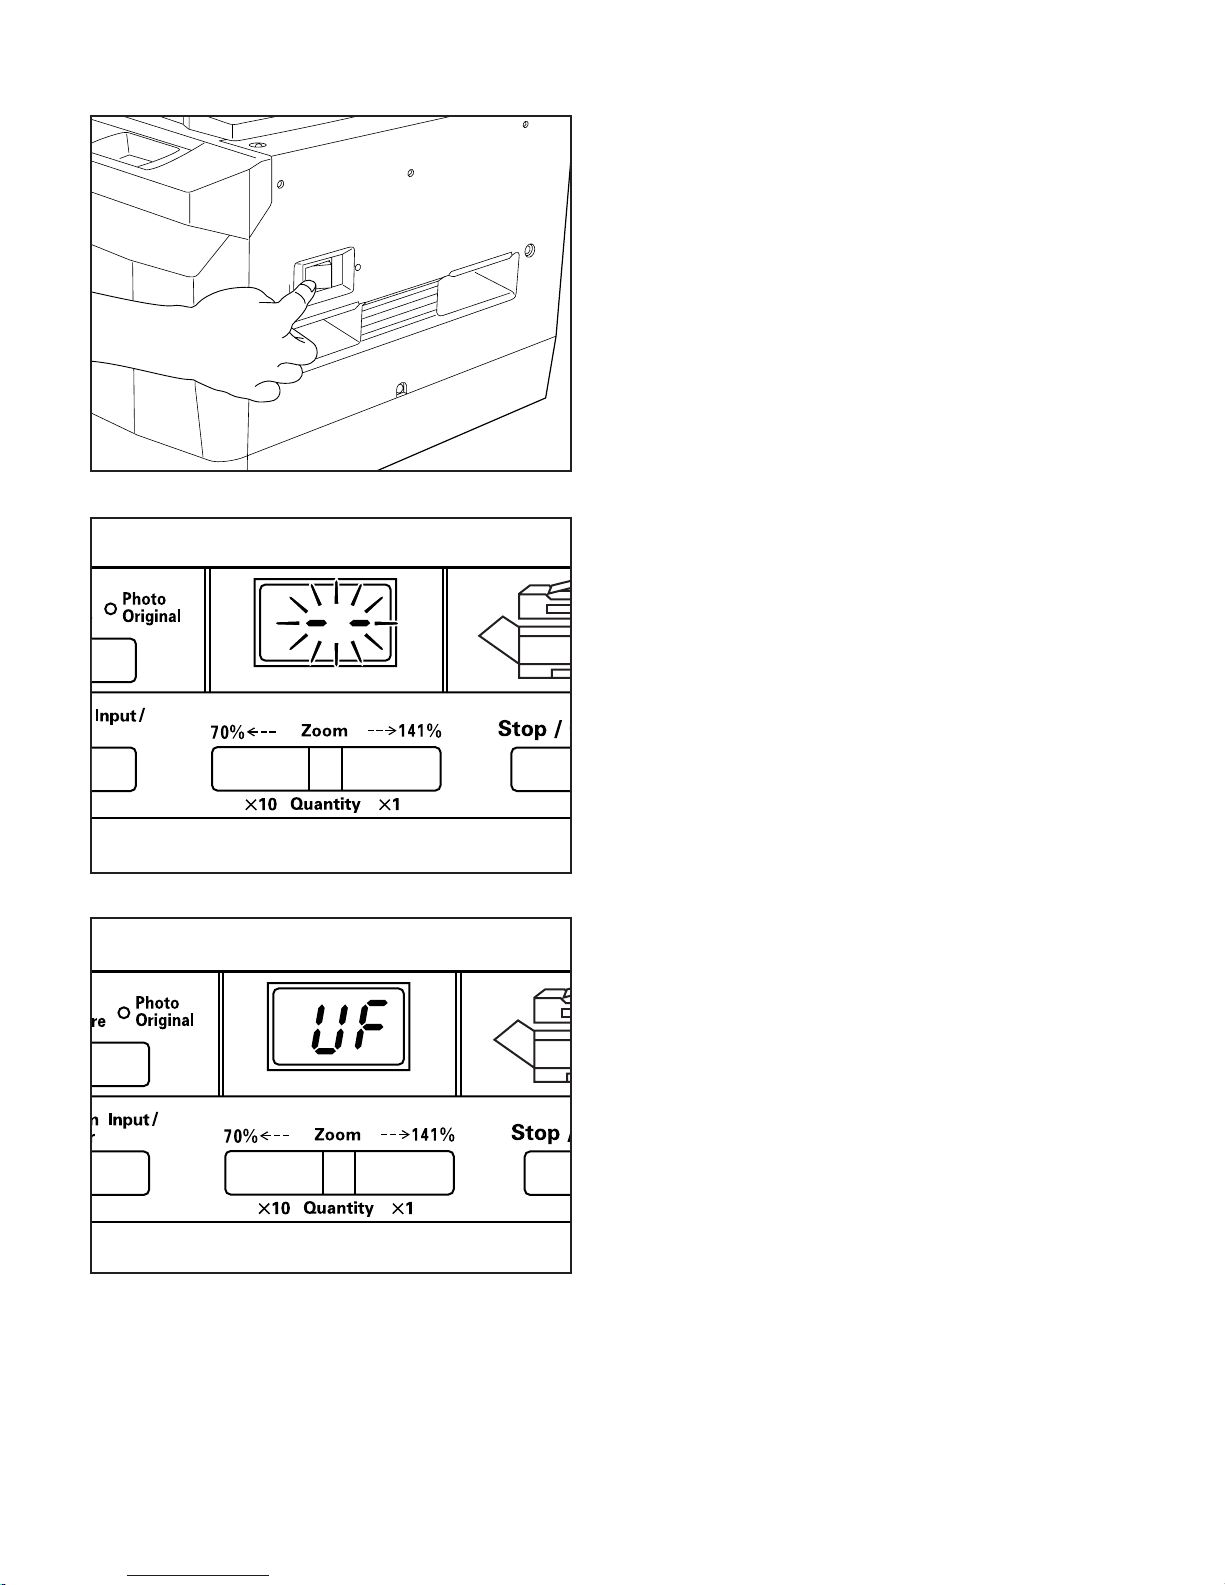
14. Turn the main switch ON ( | ).
* The copier will begin an initialization process in
order to prepare the developing unit. “--” will flash
on the Copy Quantity/Magnification display. Wait
until the initialization process is completed.
Important!
DO NOT install the toner cartridge until after the
initialization process is completed.
* Once “UF” appears on the Copy Quantity/Magni-
fication display, the initialization process is com-
plete and the toner cartridge may be installed.
14
Page 18

15. Open the front cover.
16. Remove the toner cartridge (packaged sepa-
rately) from its package and shake it back and
forth 4 or 5 times as shown in the illustration.
Hold the cartridge on end and tap the side sev-
eral times with your palm. This will loosen any
toner stuck to the inside wall of the cartridge.
Flip the cartridge over and repeat.
17. With the surface marked with a 4 facing up,
align the toner cartridge with the guide rails and
push it all the way into the copier.
18. Close the front cover.
NOTE
DO NOT throw away the copier packing cases and
packing material. Store them in an appropriate
place for use whenever moving the copier.
15
Page 19
(3) Loading paper into the drawer
Up to 250 sheets of standard copy paper (20 lb. /
75 g/m2) can be loaded in the drawer.
The drawer can be freely adjusted to hold any
standard size of paper between 51/2" x 81/2" and
81/2" x 14".
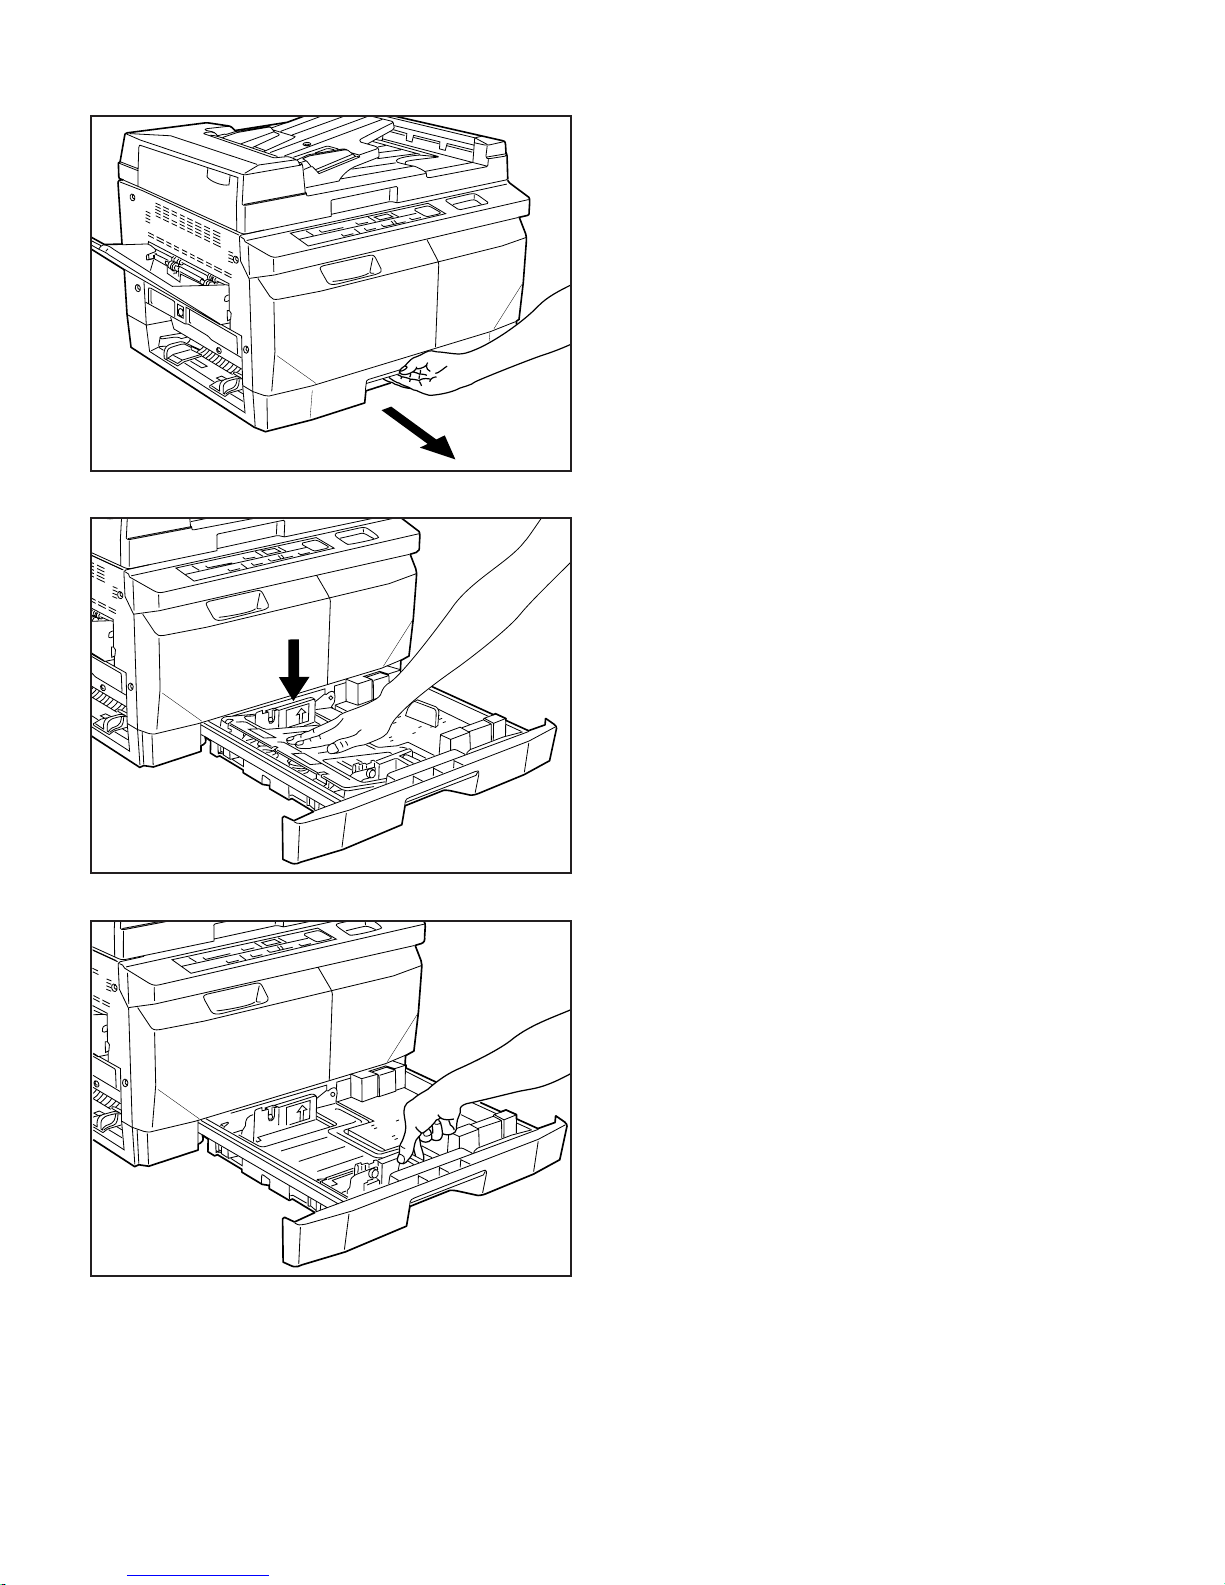
1. Pull the drawer all the way out of the copier.
2. Push down on the bottom plate to lock it into
place.
16
3. Adjust the width guide to fit the width of the copy
paper to be loaded.
* Press down on the knob to move the width
guide.
Page 20

4. Insert the length guide into the hole that corre-
sponds to the length of the copy paper to be
loaded.
5. Flip through the copy paper to be loaded in
order to separate the sheets.
6. Load the copy paper so that one end is aligned
with the left side of the drawer and the other side
is under the claws.
7. Close the paper drawer.
17
Page 21

Placing Originals:
Imagistics Model C145 copiers are equiped
with an Automatic Document Feeder (ADF).
Originals placed in the
ADF will be automatically fed one sheet at
a time onto the platen for copying once the
Print key is pressed.
Model C140 copiers are equiped with a
platen cover only. See step 4 on the next
page for placing originals on the copy
glass.
1 Originals acceptable for use with the Feeder
• Only standard plain paper originals may be used
• Acceptable weight: 14 lb. - 32 lb.
• Acceptable sizes: between 5 1/2" x 8 1/2" - 8 1/2" x 14"
• Acceptable number: 30 sheets (30 lb.: maximum 14 sheets, 32 lb.: maximum 13 sheets)
• Acceptable types: Standard plain paper, Letterhead, Heat-sensitive (thermal) paper, Recycled
paper
2 Important!
DO NOT use different size originals together.
DO NOT use the following as originals:
• Originals that are curled, wrinkled or folded
• Originals with clips or staples
• Carbon paper or other originals that have a slippery surface on either side
• OHP or other transparent films
• Originals with punched holes or perforations
• Originals that are not rectangular, that are wet or that have adhesive tape or glue on them
18
Page 22

3 Loading the originals
1. Adjust the original insert guides to match the
width of original(s) to be copied.
2. Arrange the originals in order and set them face
up on the original table.
* If the originals are set properly, the Original set
indicator on the operation panel will light green.
* If there is a gap between the original insert
guides and the original(s), adjust the insert once
more to match the width of original(s).
4 Copying from books and magazines, etc.
When copying from an original which cannot be fed
through the ADF (books, magazines, etc.), lift open
the ADF and set the original directly on the platen.
For model C140, raise platen cover and place
original face down on the glass.
CAUTION
DO NOT leave the document feeder open as there is a
danger of personal injury.
19
Page 23

Basic Copying
1 2
1. Turn the main switch ON ( | ). 2. The copier will warm-up.
During warm-up, the Print indicator will remain out.
The Print indicator will light green when the copier is ready.
5
5. Selecting the paper size
Load paper of the same size as the original into the drawer.
6
6. Adjusting the copy exposure
A. If one of the Copy Exposure indicators is lit, the copier is in the
Manual Exposure mode and the exposure setting can be manually
adjusted with the Copy Exposure Adjustment keys. Press the
appropriate key to move Copy Exposure indicator to the right to make
copies lighter and to the left the make them darker.
* Adjustment of the copy exposure for the Manual Exposure mode is
7 8
-A
possible. (Refer to “(2) Manual Exposure level”, page 30.)
7. Setting the number of copies
Set the number of copies to be made by pressing the Copy Quantity /
Zoom Down key to set the ten’s digit and the Copy Quantity / Zoom Up
key to set the one’s digit. It is possible to make up to 99 copies at one
time.
* To change the setting, press the Stop/Clear key to return the number
of copies to “1”.
20
8. Starting to copy
Press the Print key. Copying is possible when the Print indicator is lit
green.
* Copying is ONLY possible when the Print indicator is lit green.
Page 24

3
4
3. Loading the originals
Adjust the original insert guides to fit the width of original(s) to be
copied, arrange the originals in order and set them face up on the
original table. (Refer to page 18.)
* If there is a gap between the original insert guides and the original(s),
adjust the guides once more to match the width of original(s).
6
-B
B. If the Auto Exposure indicator is lit, the copier is in the Auto Exposure
mode.
* If the Auto Exposure indicator is not lit, press the Auto Exposure /
Photo Original key until it is.
* Adjustment of the copy exposure for the Auto Exposure mode is
possible. (Refer to “(3) Auto Exposure level”, page 30.)
4. Selecting the copy mode
(Refer to pages 22, 23, 24, 25.)
Select one of the modes of this copier.
6
-C
C. Under most circumstances, the seven exposure indicators provide
an adequate range of exposure adjustments (19 levels of copy
exposure), but the exposure can be made even lighter or darker if
necessary. To make the exposure darker still, press the exposure
adjustment key on the left and hold it down until the exposure indicator
furthest left begins to blink. At this time the exposure indicator furthest
right will light steadily. Moving this exposure indicator to the left will
make copies come out darker. Follow a similar procedure with the key
furthest to the right to make copies come out lighter.
9
9. After copying
Finished copies will be ejected and stacked on the copy tray. Pull out
the copy tray extension when making large-size copies such 8 1/2" x 14"
size or larger.
* DO NOT change or remove originals before copying is finished.
* The maximum number of copies that can be stacked on the copy tray
is 100. Remove all copies from the copy tray once the number of
stacked copies reaches 100.
CAUTION
If the copier will not be used for a short period of time
)
(
. If it will not be
(overnight, etc.), turn the main switch OFF
used for an extended period of time (vacations, etc.), remove
the power plug from the outlet for safety purposes during the
time the copier is not in use.
O
21
Page 25

Copying Modes:
Making enlarged or reduced copies.
1:
Fixed Magnification mode
Reduction to 78% or enlargement to 129% is pos-
sible in this mode.
1. Place the originals to be copied on the original
glass or in the ADF.
* If there is a gap between the original insert
guides and the original(s), adjust the guides
once more to match the width of original(s).
2. Press the Copy Size key to light the desired
Copy Size indicator.
* Press the Zoom Input / Enter key to have the
selected copy magnification ratio shown on the
Copy Quantity/Magnification display.
22
Page 26

2:
Zoom mode
Any copy magnification ratio, in 1% increments,
between 70% - 141% can be selected.
1. Place the originals to be copied on the original
glass or in the ADF.
2. Press the Zoom Input / Enter key. “100%” will
appear on the Copy Quantity/Magnification dis-
play.
3. To increase the copy magnification ratio, press
the Copy Quantity / Zoom Up key until the de-
sired ratio appears on the display. To decrease
the magnification ratio, press the Copy Quantity /
Zoom Down key.
The Zoom Input indicator will light.
* Press the Stop/Clear key to reset the ratio
to “100%”.
4. Once the desired copy magnification ratio is
displayed, press the Zoom Input / Enter key once
again. The Copy Quantity/Magnification display
will change to allow input of the number of copies
to be made.
* Copies can be made at the selected magnifica-
tion ratio as long as the Zoom Input indicator is
lit.
23
Page 27

(2) Copying from photographs
<Photo Original mode>
Use this mode to reproduce the subtle halftones of
a photograph, etc.
1. Press the Auto Exposure / Photo Original key to
light the Photo Original indicator.
* Use the Exposure Adjustment keys to adjust the
copy exposure.
(3) Using the bypass slot
Use the bypass slot when copying onto small-size
or special copy paper that cannot be loaded into
the drawer.
* Only one copy at a time can be made with the
bypass slot.
* Only paper between the sizes of 5 1/2" x 8 1/2" -
8 1/2" x 14" can be used with the bypass slot.
DO NOT use paper outside this range.
* Acceptable types of copy paper: Standard paper,
Special paper (OHP transparencies, recycled
paper)
* Acceptable weight: 16 lb. - 32 lb.
* Refer to “Thick Paper mode”, page 43, when
using thick paper (24 lb. - 32 lb.).
24
Page 28

1. Set the originals to be copied on the original
table.
* If there is a gap between the original insert
guides and the original(s), adjust the guides
once more to match the width of original(s).
2. Select the desired copy magnification ratio and
copy exposure level.
3. Adjust the slider to fit the width of the copy pa-
per.
4. Slide the copy paper all the way into the bypass
slot until it stops. Copying will start automatically.
There is no need to press the Print key.
* Only one sheet of copy paper can be set at a
time in the bypass slot. NEVER attempt to set
more than one sheet of copy paper at a time.
* When copying from more than one original, set
the next piece of copy paper in the bypass slot
after the first original has been copied.
25
Page 29

(4) Auto Shut-Off function
In order to make copies once the Auto Shut-Off
function has engaged, simply turn the main switch
back ON ( | ). The factory default setting for the
Auto Shut-Off function to engage is 30 minutes.
● Auto shut-off function
If no operation is performed on the copier for a
specific period of time (15 min. - 240 min.), the
Auto Shut-Off function will engage and the copier
will automatically turn the main switch OFF (O).
As the average copier normally spends more time
waiting to copy than it does in actually making
copies, the energy spent during this waiting period
is often greater than that spent during actual copy-
ing.
By automatically turning the main switch OFF (O),
the copier reduces the energy spent during such
waiting time as well as protecting from any time the
power is inadvertently left ON at night and, in that
way, it also saves money.
If you generally make copies quite often during the
day, we recommend that you set the time before
the Auto Shut-Off function engages to a longer
period of time. If you only use the copier a few
times a day, we recommend that you set that time
to a shorter period.
* Refer to page 31 to turn the Auto Shut-Off func-
tion OFF. Refer to page 33 to set the amount of
time before the Auto Shut-Off function engages.
26
Page 30

(5) Auto Pre-Heat mode
If no operation is performed on the copier for a
determined period of time (between 5 minutes and
45 minutes), the copier will automatically enter the
Auto Pre-Heat mode. In this case, “--” will appear
on the Copy Quantity/Magnification display and the
rest of indicators on the operation panel will go out.
* To recover from the Auto Pre-Heat mode, press
any key on the operation panel. The copier will
begin to warm up.
* Refer to page 36 to set the amount of time before
the Auto Pre-Heat mode engages.
(6) Auto Start mode
If an original is set and the Print key is pressed
during warm-up, copying will start automatically
once warm-up is completed.
* The Print indicator will continue flashing until
copying starts.
27
Page 31

Adjusting the default settings:
(1) Auto/Manual Exposure mode selection
Follow this procedure to change the default copy exposure setting from the
Auto Exposure mode to the Manual Exposure mode or vice-versa.
1. Hold down the Auto Exposure / Photo Original key until all of the Copy
Exposure indicators begin to flash (about 10 seconds).
* Once the Copy Exposure indicators flash 3 times, the default setting has
changed.
*
About 5 seconds after the Auto Exposure / Photo Original key is held down,
the Auto Exposure indicator and one of the Copy Exposure indicators will
flash. BE SURE to keep the Auto Exposure / Photo Original key held down
until ALL of the Copy Exposure indicators begin to flash.
* Follow this procedure to change the default copy exposure setting from the
Auto Exposure mode to the Manual Exposure mode or vice-versa.
28
Page 32

(2) Manual Exposure level
Follow this procedure to adjust the copy exposure when copies are too dark
or too light overall in the Manual Exposure mode.
1. Hold down the left Copy Exposure Adjustment key until one of the Copy
Exposure indicators begins to flash (about 5 seconds).
2.
Use the Copy Exposure Adjustment keys to adjust the copy exposure.
Press the appropriate key to move the lit Copy Exposure indicator to the
right to make copies lighter and to the left the make them darker.
29
Page 33

* To cancel the Manual Exposure level adjustment procedure, press the
Stop/Clear key. The settings will be left unchanged and the copier will
again be able to make copies.
3. Press the Print key. The Manual Exposure level setting is completed.
(3) Auto Exposure level
Follow this procedure to adjust the copy exposure when copies are too dark
or too light overall in the Auto Exposure mode.
30
1. Hold down the Auto Exposure / Photo Original key until the Auto Exposure
indicator and one of the Copy Exposure indicators begin to flash (about 5
seconds).
Page 34

2. Use the Copy Exposure Adjustment keys to adjust the copy exposure.
Press the appropriate key to move the lit Copy Exposure indicator to the
right to make copies lighter and to the left the make them darker.
* To cancel the Auto Exposure level adjustment procedure, press the Stop/
Clear key. The settings will be left unchanged and the copier will again be
able to make copies.
3. Press the Print key. The Auto Exposure level setting is completed.
(4) Auto Shut-Off function ON/OFF
Follow this procedure to turn the Auto Shut-Off function – which automatically turns the main switch OFF if no operation is performed on the copier for
a specific period of time – ON or OFF.
31
Page 35

* If the Auto Shut-Off function engages at times inconvenient to your copy
work, it is recommended that you first change the setting to increase the
length of time before it engages. If it continues to be an inconvenience, turn
the Auto Shut-Off function OFF.
1.
Hold down the right Copy Exposure Adjustment key for about 5 seconds.
* “--” will begin to flash on the Copy Quantity/Magnification display.
Press the Copy Quantity / Zoom Up key once. “E1” will appear on the
2.
Copy Quantity/Magnification display.
3. Press the Print key. The copier will enter the Auto Shut-Off ON/OFF
setting mode.
32
4.
Use the Copy Quantity / Zoom Up key or the Copy Quantity / Zoom Down
key to turn the Auto Shut-Off function ON or OFF, as desired. To turn the
Auto Shut-Off function OFF, press the Copy Quantity / Zoom Up key and
to turn the Auto Shut-Off function ON, press the Copy Quantity / Zoom
Down key.
Page 36

* The numbers “01” or “02” will appear on the Copy Quantity/Magnification
display. Selecting “01” will turn the Auto Shut-Off function ON and selecting
“02” will turn the Auto Shut-Off function OFF.
* If a mistake in input is made, press the Stop/Clear key. “--” will appear on
the Copy Quantity/Magnification display.
5. Press the Print key. The Auto Shut-Off ON/OFF setting is completed.
(5) Auto Shut-Off time
Follow this procedure to set the amount of time before the Auto Shut-Off
function engages. This setting can be changed, in 15 minute increments, to
any time between 15 minutes and 240 minutes. The factory default setting is
30 minutes.
* If you generally make copies quite often during the day, we recommend
that you set the time before the Auto Shut-Off function engages to a longer
period of time. If you only use the copier a few times a day, we recommend
that you set that time to a shorter period.
33
Page 37

1. Hold down the right Copy Exposure Adjustment key for about 5 seconds.
* “--” will begin to flash on the Copy Quantity/Magnification display.
2. Press the Copy Quantity / Zoom Up key twice. “E2” will appear on the
Copy Quantity/Magnification display.
3. Press the Print key. The copier will enter the Auto Shut-Off time setting
mode.
34
4. Use the Copy Quantity / Zoom Up key and the Copy Quantity / Zoom
Down key to select the desired time period. To increase the time period,
press the Copy Quantity / Zoom Up key and to decrease the time period,
press the Copy Quantity / Zoom Down key.
The time period will be indicated by the numbers “01” through “16” on the
Copy Quantity/Magnification display.
Page 38

* The numbers “01” through “16” correspond to the following time periods:
01: 15 min. 02: 30 min.
03: 45 min. 04: 60 min.
05: 75 min. 06: 90 min.
07: 105 min. 08: 120 min.
09: 135 min. 10: 150 min.
11: 165 min. 12: 180 min.
13: 195 min. 14: 210 min.
15: 225 min. 16: 240 min.
* If a mistake in input is made, press the Stop/Clear key. “--” will appear on
the Copy Quantity/Magnification display.
5.
Press the Print key. The Auto Shut-Off time setting is completed.
35
Page 39

(6) Auto Pre-Heat time
Follow this procedure to set the amount of time before the Auto Pre-Heat
mode automatically engages. This setting can be changed, in 5 minute
increments, to any time between 5 minutes and 45 minutes. (Factory default:
15 minutes)
1. Hold down the right Copy Exposure Adjustment key for about 5 seconds.
* “
--
” will begin to flash on the Copy Quantity/Magnification display.
2. Press the Copy Quantity / Zoom Up key 3 times. “E3” will appear on the
Copy Quantity/Magnification display.
3. Press the Print key. The copier will enter the Auto Pre-Heat time setting
mode.
36
Page 40

4. Use the Copy Quantity / Zoom Up key and the Copy Quantity / Zoom Down
key to select the desired time period. To increase the time period, press the
Copy Quantity / Zoom Up key and to decrease the time period, press the
Copy Quantity / Zoom Down key.
The time period will be indicated by the numbers “01” through “09” on the
Copy Quantity/Magnification display.
* The numbers “01” through “09” correspond to the following time periods:
01: 5 min. 02: 10 min.
03: 15 min. 04: 20 min.
05: 25 min. 06: 30 min.
07: 35 min. 08: 40 min.
09: 45 min.
* If a mistake in input is made, press the Stop/Clear key. “
the Copy Quantity/Magnification display.
--
” will appear on
37
Page 41

5. Press the Print key. The Auto Pre-Heat time setting is completed.
(7) Auto Pre-Heat recovery time
Follow this procedure to set the amount of time for the copier to recover from
the Auto Pre-Heat mode.The factory default setting is 20 seconds.
• 10 seconds (Time Saving): Warm-up time will be reduced, but energy
savings will not be as great.
• 20 seconds (Energy Saving): Energy saving will be increased, but it will
take longer for the copier to warm up.
1. Hold down the right Copy Exposure Adjustment key for about 5 seconds.
* “--” will begin to flash on the Copy Quantity/Magnification display.
38
Page 42

2. Press the Copy Quantity / Zoom Up key 4 times. “E4” will appear on the
Copy Quantity/Magnification display.
3.
Press the Print key. The copier will enter the Auto Pre-Heat recovery time
setting mode.
4. Use the Copy Quantity / Zoom Up key and the Copy Quantity / Zoom
Down key to select the desired time period. To increase the time period,
press the Copy Quantity / Zoom Up key and to decrease the time period,
press the Copy Quantity / Zoom Down key.
* The numbers “01” or “02” will appear on the Copy Quantity/Magnification
display. “01” corresponds to a 10 second recovery time and “02”
corresponds to a 20 second recovery time.
* If a mistake in input is made, press the Stop/Clear key. “--” will appear on
the Copy Quantity/Magnification display.
5. Press the Print key. The Auto Pre-Heat recovery time setting is completed.
39
Page 43

(8) Auto Clear time
Follow this procedure to set the amount of time before the Auto Clear
function engages. This setting can be changed, in 30 second increments, to
any time between 30 seconds and 270 seconds or it can be turned OFF.The
factory default setting is 90 seconds.
1. Hold down the right Copy Exposure Adjustment key for about 5 seconds.
* “
--
” will begin to flash on the Copy Quantity/Magnification display.
2. Press the Copy Quantity / Zoom Up key 5 times. “E5” will appear on the
Copy Quantity/Magnification display.
40
Page 44

3. Press the Print key. The copier will enter the Auto Clear time setting mode.
4. Use the Copy Quantity / Zoom Up key and the Copy Quantity / Zoom Down
key to select the desired time period. To increase the time period, press the
Copy Quantity / Zoom Up key and to decrease the time period, press the
Copy Quantity / Zoom Down key.
The time period will be indicated by the numbers “01” through “09” on the
Copy Quantity/Magnification display.
* The numbers “01” through “09” correspond to the following time periods:
01: 30 sec. 02: 60 sec.
03: 90 sec. 04: 120 sec.
05: 150 sec. 06: 180 sec.
07: 210 sec. 08: 240 sec.
09: 270 sec.
*
If the time period is set to “00”, the Auto Clear function will be turned OFF
and will not engage.
41
Page 45

* If a mistake in input is made, press the Stop/Clear key. “--” will appear on
the Copy Quantity/Magnification display.
5. Press the Print key. The Auto Clear time setting is completed.
42
Page 46

(9) Thick Paper mode
When using the bypass slot and copying onto thick paper (Bond paper)
(
24 - 32 lbs. [
the Thick Paper mode. DO NOT attempt to feed thick paper from the drawer.
1. Hold down the Zoom Input / Enter key for approximately 5 seconds. “H”
will appear on the Copy Quantity/Magnification display.
2. Copying will start automatically once the paper is inserted into the bypass
slot.
* The copier will remain, and copying is possible, in this mode until the
Auto Clear function engages.
90 g/m2 - 120 g/m2]), carry out the following procedure to select
If the Auto Clear function is turned OFF, the Thick Paper mode will be
cleared in approximately 90 seconds. The Thick Paper mode may also be
cleared by pressing the Stop/Clear key.
43
Page 47

Adding Toner:
(1) Replacing the toner cartridge
When the Add Toner indicator lights, there is insufficient toner in the copier.
Replace the toner cartridge.
* Once the Add Toner indicator lights, continuous copying is not possible. In
this case, a maximum of approximately 20 copies can be made one at a
time and, thereafter, copying will be impossible. Therefore, it is
recommended that the toner cartridge be replaced as soon as possible.
1. Open the front cover.
44
Page 48

2. Grasp the handle of the old toner cartridge (marked with a) and pull the
toner cartridge out slightly.
a
3. Use both hands and pull the toner cartridge all the way out of the copier.
CAUTION
Do not incinerate toner and toner containers.
4. Shake the new toner cartridge back and forth 4 or 5 times as shown in the
illustration.
Hold the cartridge on end and tap the side
several times with your palm. This will
loosen any toner stuck to the inside wall of
the cartridge. Flip the cartridge over and
repeat.
45
Page 49

5. With the surface marked with a 4 facing up, align the toner cartridge with
the guide rails and push it all the way into the copier.
6. Close the front cover.
46
Page 50

47
Page 51

Troubleshooting:
If you experience trouble, follow the instructions in the following pages. If the problem persists, contact your Imagistics service
representative at 1-(800)-243-5556.
Nothing lights on the operation panel...
● The power plug is not connected to an outlet.
Connect the plug securely to an outlet.
● The power plug is not connected to the power
receptacle on the copier.
● The main switch is OFF (O).
● The front cover or the paper feed cover is open.
Connect the plug securely to the power receptacle on the
copier.
Turn the main switch ON ( | ).
48
Close the front cover or the paper feed cover securely.
Page 52

No copies are made when the Print key is pressed...
● “PF” is flashing on the Copy Quantity/Magnification display
There is no paper in the drawer.
Load paper, reinsert the drawer and press the Print key.
● “PF” is flashing on the Copy Quantity/Magnification display
There is a paper jam.
Open the paper feed cover and remove the jammed paper.
Then, close the paper feed cover and press the Print key.
● The Add Toner indicator is lit
There is insufficient toner in the copier.
● “UF” is flashing on the Copy Quantity/Magnification display
The toner cartridge is not installed.
Replace the toner cartridge. (Refer to page 58.)
Install the developing unit or the toner cartridge, as required.
● “Ub” is flashing on the Copy Quantity/Magnification display
Replace drum and developer.
Call Imagistics Technical Support at 1-(800)-243-5556
49
Page 53

If paper jams..
Warning
High voltage is present in the charger section. Use caution when working in this area, as there is a danger of electrical shock.
Caution
The fusing unit inside the copier is extremely hot. Use caution when working in this area to avoid injury.
● “J” and a number are flashing alternately on the Copy Quantity/Magnification display
There is a paper jam. Carry out the following procedure to remove the jammed paper.
* The surface of the drum unit (red) is extremely sensitive to light. BE SURE to close the front cover as soon as possible after the operation is
completed.
1. Push the paper feed cover release button 1 to unlock the paper
feed cover.
2. Open the paper feed cover.
4. Remove the copy tray from the copier.
5. Open the ejection section cover.
3. Remove the jammed paper without tearing it.
* Even if the jammed paper is visible from the ejection section
side of the copier, try to remove it from the paper feed side
whenever possible.
* If you were able to remove the jammed paper, proceed to step
9 on the following page. If the jammed paper cannot be
removed easily, proceed to step 4.
50
CAUTION
The fusing unit is extremely hot. Use caution in this area
to avoid burns.
Page 54

6. Remove the jammed paper without tearing it.
8. Replace the copy tray in its original position on the copier.
7. Close the ejection section cover.
9. Close the paper feed cover.
51
Page 55

The Original Indicator begins to flash
● The Original set indicator is flashing red
An original has jammed in the ADF. Carry out the following procedure to remove the jammed original.
1 Jam in the feed section of the ADF 2 Jam in the ejection section of the ADF
1. Being careful not to tear them, remove all originals from the
original table.
* If you have any difficulty removing any of the originals,
proceed to step 2.
2. Open the ADF cover and, being careful not to tear them,
remove all originals from the original table.
* If you have any difficulty removing any of the originals,
proceed to step 3.
1. Lift up the ADF slightly.
2. With the ADF slightly raised, remove the jammed original from
the ejection section.
3. Lift up the ADF and remove all originals from under the DF
cover.
52
Page 56

● The Original set indicator is flashing green
If there are any originals on the original table when the main
switch is turned ON ( | ), the Original set indicator will flash
green.
When to contact your service representative...
In order to make copies from those originals, first remove
them from the original table and then set them on the original
table once again.
● “C” and a number are flashing alternately on
the Copy Quantity/Magnification display
1. Turn the main switch OFF (
O
).
2. Contact your service representative.
53
Page 57

Trouble with the copy quality
● Copies are blank
The originals were not set face up on the original table.
● Copies are too light
The Add Toner indicator is lit.
Reset the originals face up on the original table.
Replace the toner cartridge. (Refer to page 58)
● Copies are too light
The copy exposure setting is not appropriate.
● Copies are too dark
The copy exposure setting is not appropriate.
● There are wrinkles in the copies
The copy paper is wet, or is too thin or too thick.
Press the left Exposure Adjustment key to make the copies
darker or perform either the “Auto Exposure level” or the
“Manual Exposure level” adjustment procedure, as appropriate.
Press the right Exposure Adjustment key to make the copies
lighter or perform either the “Auto Exposure level” or the
“Manual Exposure level” adjustment procedure, as appropriate.
54
Load new paper of the prescribed weight.
Page 58

● There are uncopied (white) areas in the copies
The copy paper is wet.
● Copies are not straight
The original was not set straight.
Load new paper. (Refer to page 26)
Adjust the original insert guides to match the width of
original(s) to be copied.
● Copies are not straight (Paper fed from the
drawer)
The width guide is not set to fit the width of the copy paper.
● Copies are not straight (Paper fed into the
bypass slot)
The slider is not set to fit the width of the copy paper.
Adjust the width guide to fit the width of the copy paper.
Adjust the slider to fit the width of the copy paper.
● Copies are dirty
The platen or the DF conveyor belt is dirty.
Clean the platen and/or the white conveyor belt under the
ADF with a soft cloth. (Refer to page 90.)
55
Page 59

Cleaning the Copier:
CAUTION
For safety purposes, ALWAYS remove the power plug from the
outlet when performing cleaning operations.
● Cleaning the ADF and the platen
Lift open the ADF and wipe the white conveyor belt with a soft cloth moistened with alcohol or mild detergent.
Clean the platen in the same manner.
* NEVER use thinner or other solvents.
Page 60

Specifications:
Type .............................................. Desktop
Original table .............................. Stationary
Copying system ......................... Indirect electrostatic system
Originals ...................................... Sheets, books, three dimensional objects, Maximum original size: 8 1/2" x 14"
Copy size..................................... 8 1/2" x 14", 8 1/2" x 11", 5 1/2" x 8 1/2"
Copy speed ................................. Same size: 8 1/2" x 11" - 14 copies/min., 5 1/2" x 8 1/2" - 14 copies/min., 8 1/2" x 14" - 12 copies/min.
Warm-up time ............................. Within 30 sec. (room temperature: 68°F, humidity: 65%RH),
First copy speed ........................ Within 5.8 sec. (8 1/2" x 11", same size copying, Manual Exposure mode)
Copy magnification ratio ......... Adjustable magnification: 70% - 141% (1% increments), Fixed magnification: 78%, 129%
Paper feed system .................... Automatic drawer feed (1 drawer: 250 sheet capacity [75 g/m2]), Bypass slot
Copy paper ................................. Drawer: Standard plain paper (75 g/m2)
Continuous copying .................. 1 - 99 copies
Exposure system ....................... Slit exposure with moving optical scanner
Light source ................................ Halogen lamp (230 W)
Developing system.................... Dry process
Toner replenishment system .. Automatic replenishment from toner cartridge
Fixing system ............................. Heat roller
Cleaning system ........................ Blade
Photoconductor .......................... OPC
Functions and modes ............... Auto Exposure mode, Photo Original mode, Fixed Magnification mode, Auto Pre-Heat mode, Auto Clear function,
Power source ............................. AC 120V, 60Hz, 10.7 A (Average)
Power consumption .................. Maximum rated power consumption 1260 W
Dimensions (W) x (D) x (H) .... 20
Weight .......................................... Approx. 63.8 lbs. (29 kg)
Occupied space (W) x (D) ...... 30 5/16" x 18 5/16"
Standard accessories .............. Copy tray, power cord
Margin: 0.5 - 5.5 mm
Auto Pre-heat mode: Within 20 sec. (room temperature: 68°F, humidity: 65%RH, in the energy saving setting)
* Drawer capacity is applicable for paper recommended by our company.
Bypass slot: Standard plain paper (60 g/m2 - 120 g/m2), Special paper (OHP transparencies, recycled paper)
Zoom mode, Auto Start function, Auto Shut-Off function, Trouble Detection function
1/4" x 18 5/16" x 15 15/16"
(515 mm x 465 mm x 405 mm)
(770 mm x 465 mm)
(Specifications are subject to change without notice.)
57
Page 61

This equipment has been tested and found to comply with the limits for a Class A digital device,
pursuant to Part 15 of the FCC Rules. These limits are designed to provide reasonable protec-
tion against harmful interference when the equipment is operated in a commercial environment.
This equipment generates, uses, and can radiate radio frequency energy and, if not installed
and used in accordance with the instruction manual, may cause harmful interference to radio
communications. Operation of this equipment in a residential area is likely to cause harmful
interference in which case the user will be required to correct the interference at his own ex-
pense.
CAUTION – The changes or modifications not expressly approved by the party responsible for
compliance could void the user's authority to operate the equipment.
* The above warning is valid only in the United States of America.
CAUTION!
The power plug is the main isolation device! Other switches
on the equipment are only functional switches and are not
suitable for isolating the equipment from the power source.
ATTENTION!
Le débranchement de la fiche secteur est le seul moyen de
mettre l'appareil hors tension. Les interrupteurs sur
l'appareil ne sont que des interrupteurs de fonctionnement :
ils ne mettent pas l'appareil hors tension.
Page 62

TM
www.imagistics.com
www.imagistics.com
Imagistics International Inc.
100 Oakview Drive
Trumbull, CT 06611
©Imagistics International Inc. 2002
Printed in USA
Part Number: C14000010
The information contained in this
manual is subject to change without
notice to incorporate improvements
made to the products listed in this
manual.
 Loading...