

Imaginova Starry Night Pro 5.0 User’s Guide, Starry Night Pro 5.0 User Manual
284 Richmond St. E.
Suite 300
Toronto, ON
M5A 1P4, Canada
www.starrynight.com
©2004 Imaginova Corp.
All rights reserved. Starry Night and Imaginova are
trademarks of Imaginova Corp.
Microsoft and Windows are trademarks of Microsoft
Corporation. Apple, Macintosh, Mac, and QuickTime
are registered trademarks of Apple Computer, Inc.
OpenGL® is a registered trademark owned by Silicon
Graphics, Inc.
Printed in Canada.

Table of Contents
Getting Started
Welcome ..................................................................... 7
Outline Of This User’s Guide ..................................... 8
Starry Night Companion ............................................. 9
Special Fonts ............................................................... 9
Installing Starry Night Pro 5.0 .................................... 9
Running Starry Night Pro 5.0 ................................... 12
Registering ................................................................ 12
Data Updates ............................................................. 13
Setting Your Home Location .................................... 14
Starry Night For the First Time................................. 15
Getting Help .............................................................. 15
Program Updates....................................................... 16
Starry Night Website................................................. 16
Basics
10 Important Features ............................................... 17
Using The Controls ................................................... 18
Changing Your Viewing Direction ........................... 20
Changing The Date And Time .................................. 20
Identifying Objects In The Sky ................................. 21
Labeling Objects ....................................................... 22
Displaying Constellation Figures.............................. 22
Finding Objects ......................................................... 23
Zooming In On Objects............................................. 24
Learning More About Objects .................................. 27
Printing Star Charts ................................................... 27
Tool Selection Control .............................................. 28
Appearance of the Sky
Sky Contextual Menu................................................ 31
Options Pane ............................................................. 32
Light .......................................................................... 33
Changing the Horizon ............................................... 35
Displaying Celestial Objects ..................................... 36

4 Starry Night Pro 5.0 User’s Guide
Labeling Celestial Objects ........................................ 37
Celestial Object Display Options .............................. 38
Star Display Options ................................................. 39
Star Brightness, Contrast & Colour .......................... 41
Planet Display Options.............................................. 42
Comet, Asteroid & Satellite Display Options........... 44
Messier/Bright NGC/User Images Display Options. 44
Milky Way Display Options ..................................... 45
Tully Database Display Options ............................... 45
Selecting Filaments and Groups ............................... 46
Other Object Display Options ................................... 47
Label Options ............................................................ 47
Constellations............................................................ 48
Guides 1 (Co-ordinate Systems) ............................... 50
Guides 2 (Display Options)....................................... 52
Field of View Indicators 1
(Creating an Equipment List).................................... 54
Field of View Indicators 2
(Displaying Indicators) ............................................. 56
Flip ............................................................................ 58
Heads-Up Display (HUD) Options ........................... 58
OpenGL Options ....................................................... 59
Number Formats ....................................................... 60
White Sky Mode ....................................................... 61
Night Vision Mode.................................................... 61
Full Screen Mode ...................................................... 62
Saving Your Settings ................................................ 62
Sky Data
SkyGuide................................................................... 66
SkyCalendar .............................................................. 67
DVD Movies ............................................................. 70
LiveSky Pane ............................................................ 71
Status Info ................................................................. 72
Downloading Photographic Images .......................... 75
Online Telescope Imaging ........................................ 76
Object Databases
Introduction to Databases.......................................... 78
Databases 1 (Solar System)....................................... 78
Databases 2 (Stars).................................................... 79
Databases 3 (Deep Space)......................................... 80
Databases 4 (Other)................................................... 81
Database Updates ...................................................... 83
Find Pane Info........................................................... 85
Object Contextual Menu ........................................... 86
Info Pane ................................................................... 88

LiveSky.com Object Database .................................. 94
Bending Space & Time
Time Flow ................................................................. 98
Time Flow Modes ..................................................... 99
Local and Celestial Paths ........................................ 100
Changing Your Viewing Location .......................... 102
Changing Elevation................................................. 104
Location Mode ........................................................ 106
Orientation .............................................................. 107
Orbits....................................................................... 108
Spaceship Mode ...................................................... 110
Piloting the Spaceship ............................................. 111
Special Tools
Telescope Control ................................................... 114
Observation Planner ................................................ 116
Graph....................................................................... 119
Ephemeris Generator............................................... 121
Working With Files
What is a Starry Night Pro 5.0 File? ....................... 124
File Features ............................................................ 124
The Favourites Menu .............................................. 125
Creating Files - An Example................................... 126
Multiple Windows................................................... 127
Exporting Images .................................................... 128
Making Movies ....................................................... 129
Movie Compression Settings .................................. 130
Playing Back QuickTime Movies ........................... 131
Making QuickTime Virtual Reality Files ............... 131
Quicktime VR Movie Settings ................................ 132
Exporting Sky Data................................................. 132
Adding Your Own Data
Adding Log Entries ................................................. 135
Adding Calendar Events ......................................... 137
Adding Objects 1 (Solar System Objects) .............. 139
Adding Objects 2 (Multiple Solar System Objects) 146
Adding Objects 3 (Stars)......................................... 146
Adding Objects 4 (Databases)................................. 147
User Images............................................................. 148
Modifying Images ................................................... 152
Custom Horizons..................................................... 152
Photorealistic Horizons ........................................... 153
Customizing the Favourites Menu .......................... 153
Custom Asterisms ................................................... 155
Backing Up Custom Data ....................................... 155
5

6 Starry Night Pro 5.0 User’s Guide
Frequently Asked Questions
QuickTime .............................................................. 159
Registration Number ............................................... 160
Installation............................................................... 161
Support .................................................................... 161
Updates/Upgrades ................................................... 161
General Run-Time Problems .................................. 162
OpenGL................................................................... 162
Time & Date............................................................ 163
Viewing Location.................................................... 165
Internet Database & Digitized Sky Survey ............. 166
Printing & Making Movies ..................................... 166
Telescopes ............................................................... 167
Constellations & The Zodiac .................................. 167
Solar System Bodies ............................................... 168
Stars......................................................................... 169
Keyboard Shortcuts ...................................... 171
Index..................................................................... 173

Chapter 1
Getting Started
Welcome
The invention of desktop astronomy software has
been the most exciting new development in the
astronomy hobby in years, perhaps since that
night four centuries ago when Galileo pointed the
newly invented telescope at the heavens for the
first time! Starry Night Pro 5.0 is the premier
astronomy software package on the market,
putting more power and knowledge in your hands
than even the world’s pre-eminent astronomers
had just a few years ago.
You can see how the sky will look tonight,
tomorrow, or far into the past or future. You can
view the stars as they appear from your own
backyard, from a country on the other side of the
world, or from another planet. You can witness a
total eclipse from the Moon, watch the Sun set
from the surface of Mars, or even ride a comet.
You are limited only by your curiosity.
This guide is designed to help you harness the
full power of Starry Night Pro 5.0. Enjoy the
ride!

8 Starry Night Pro 5.0 User’s Guide
Outline Of This User’s Guide
All users of Starry Night Pro 5.0 should
read chapters 1 and 2 of this User’s Guide
to get a basic grasp of how to use the
program. After this, you may want to
explore the program on your own and only
refer to the User’s Guide if you have
questions about a specific feature.
Alternately, you may wish to read the
entire User’s Guide. Below is a brief
summary of each chapter in the User’s
Guide.
Chapter 1: “Getting Started
to get Starry Night Pro 5.0 up and running
for the first time.
Chapter 2: “Basics
frequently used features in the program.
Chapter 3: “Appearance of the Sky
you how to modify the onscreen
appearance of Starry Night Pro 5.0.
Chapter 4: “Sky Data
more information about astronomy and the
sky in general.
Chapter 5: “Object Databases
the different types of celestial objects
included in Starry Night Pro 5.0 and the
information you can learn about each
object.
” covers the most
” tells you how
” shows
” shows you to get
” describes
simulations to demonstrate astronomical
concepts.
Chapter 7: “Special Tools
of Starry Night Pro 5.0’s astronomy tools
that go beyond displaying the sky. Some
examples are telescope control and
observation planning and logging.
Chapter 8: “Working With Files
you how to save files, capture colour
images and make QuickTime videos using
Starry Night Pro 5.0.
Chapter 9: “Adding Your Own Data
teaches you how to expand the vast library
of data that is built into Starry Night Pro
5.0. You will learn how to create your own
constellation sets, add custom images, and
even build your own databases!
Appendix A: “Frequently Asked
Questions” answers the questions most
commonly asked by users of Starry Night
Pro 5.0.
Appendix B: “Keyboard Shortcuts
handy reference table listing the Windows
and Mac keyboard shortcuts for the
features in Starry Night Pro 5.0.
” describes some
” teaches
”
” is a
Chapter 6: “Bending Space & Time
a detailed look at the features of Starry
Night Pro 5.0 that let you visit other
locations in the universe, view the sky
from dates in the past or future, and
modify the speed at which time in Starry
Night Pro 5.0 moves forward. This section
will be particularly useful for educators
who plan to use Starry Night Pro 5.0
” takes

Getting Started 9
Starry Night Companion
This User’s Guide will teach you how to
use Starry Night Pro 5.0. The second book
included with your package, Starry Night
Companion, is a guide to learning more
about astronomy and the night sky. This
200 page book, written by astronomer
John Mosley, is your tour guide to the universe and will help you appreciate what
you see when you are outdoors looking up
at the night sky.
You can access an electronic version of
Starry Night Companion by choosing
Help->Companion Book from the main
menu.
Quick Start User Card
This handy reference card walks you
through the installation process and offers
tips on how to use the most common
Starry Night functions.
Special Fonts
Two special fonts are used throughout this
User’s Guide:
1) Command Font: This font is used to
indicate a button, clickable area,
keystroke, or menu choice.
Examples:
1 Click the Online Info button.
2 Press the Ctrl-Alt-Delete keys.
3 Choose File->Open from the menu.
2) File Font: This font indicates a
folder or file, either on your hard drive or
the Starry Night Pro 5.0 CD. File and
folder names are always enclosed in
quotations.
Examples:
1 Locate the “satellites.txt” file
on the CD.
2 Your preferences are saved in the
“Starry Night Pro 5.0
\Sky Data\Prefs” folder.
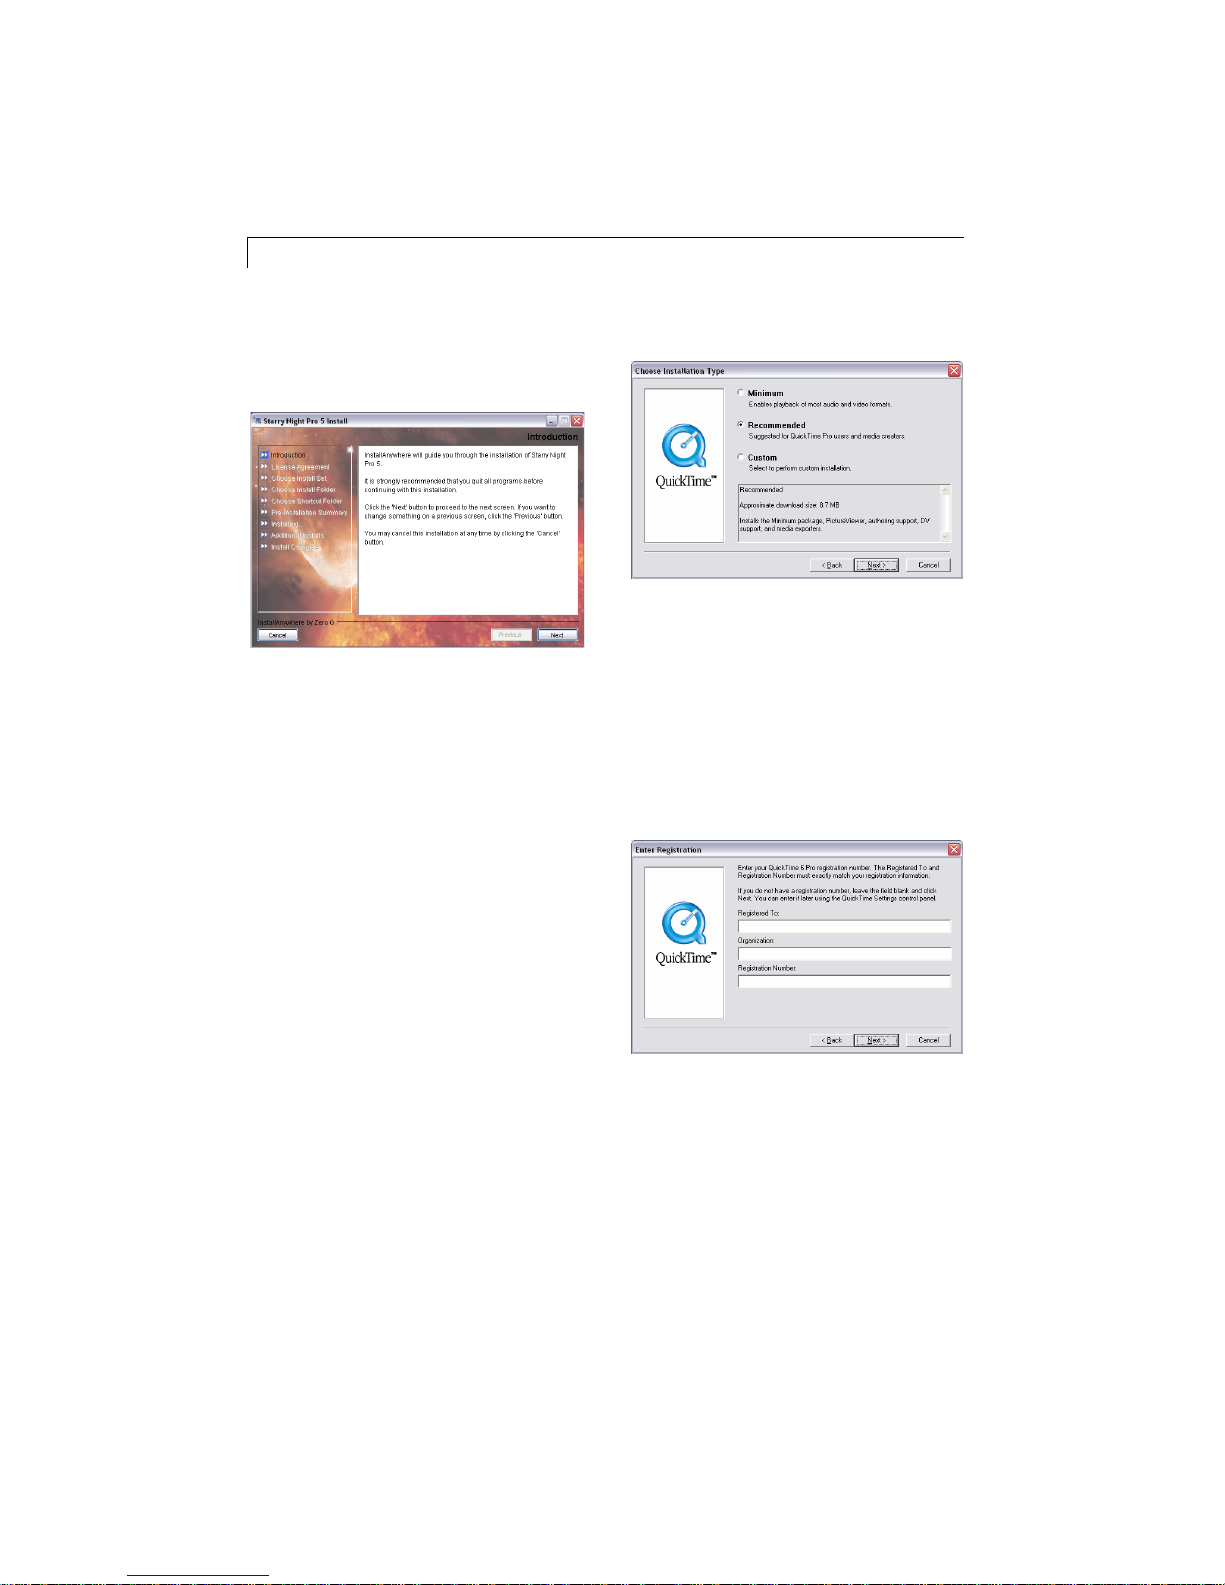
Installing Starry Night Pro 5.0
Starry Night Pro 5.0 comes on three CD’s
that include both the Windows and
Macintosh versions. To run Starry Night
Pro 5.0, you need to install two programs:
Starry Night Pro 5.0 and QuickTime.
QuickTime is a tool for manipulating
graphics files and constructing and
viewing animation sequences. Starry
Night Pro 5.0 will not run if QuickTime
(version 6.5 or later) is not installed. To
install Starry Night Pro 5.0 and
QuickTime, follow the installation
instructions below.
Note: If you already have QuickTime
(version 6.5 or later) on your computer,
you do not need to install it again. If you
have an older version of QuickTime,
install the newer version of QuickTime
from the Starry Night Pro 5.0 CD. It will
automatically overwrite your older
version.
10 Starry Night Pro 5.0 User’s Guide
Windows:
Insert disc 1 in the CD-ROM drive.
1
2 A window will pop up onscreen with
instructions on installing Starry Night
Pro 5.0. Follow the instructions that
appear and insert the next disc when
prompted. The “Full Install” option
will install extra star data, with stars as
dim as magnitude 16 (these stars are
not visible in your sky without a
telescope) and the Principal Galaxy
Catalog (PGC) with 980, 000 galaxies
as dim as magnitude 18. The “Minimal
Install” option will not install these
dimmer stars and galaxies, and will
save about 300 MB of hard disk space.
The “Custom Install” option allows you
to select which extra data to install.
work unless you choose this option.
4 During the installation process, a
window may open which allows you to
enter a QuickTime registration number.
This number is only for a more
advanced version of QuickTime that is
not included with Starry Night. Leave
this screen blank and hit the Next
button. Do NOT enter your name or
Starry Night registration number.
3 At the end of the installation, the Starry
Night installer launches an application
to install QuickTime. Follow the
instructions that appear onscreen. You
will be asked to select an installation
option for QuickTime. Choose the
“Recommended Install” option.
Certain Starry Night features will not
Getting Started 11
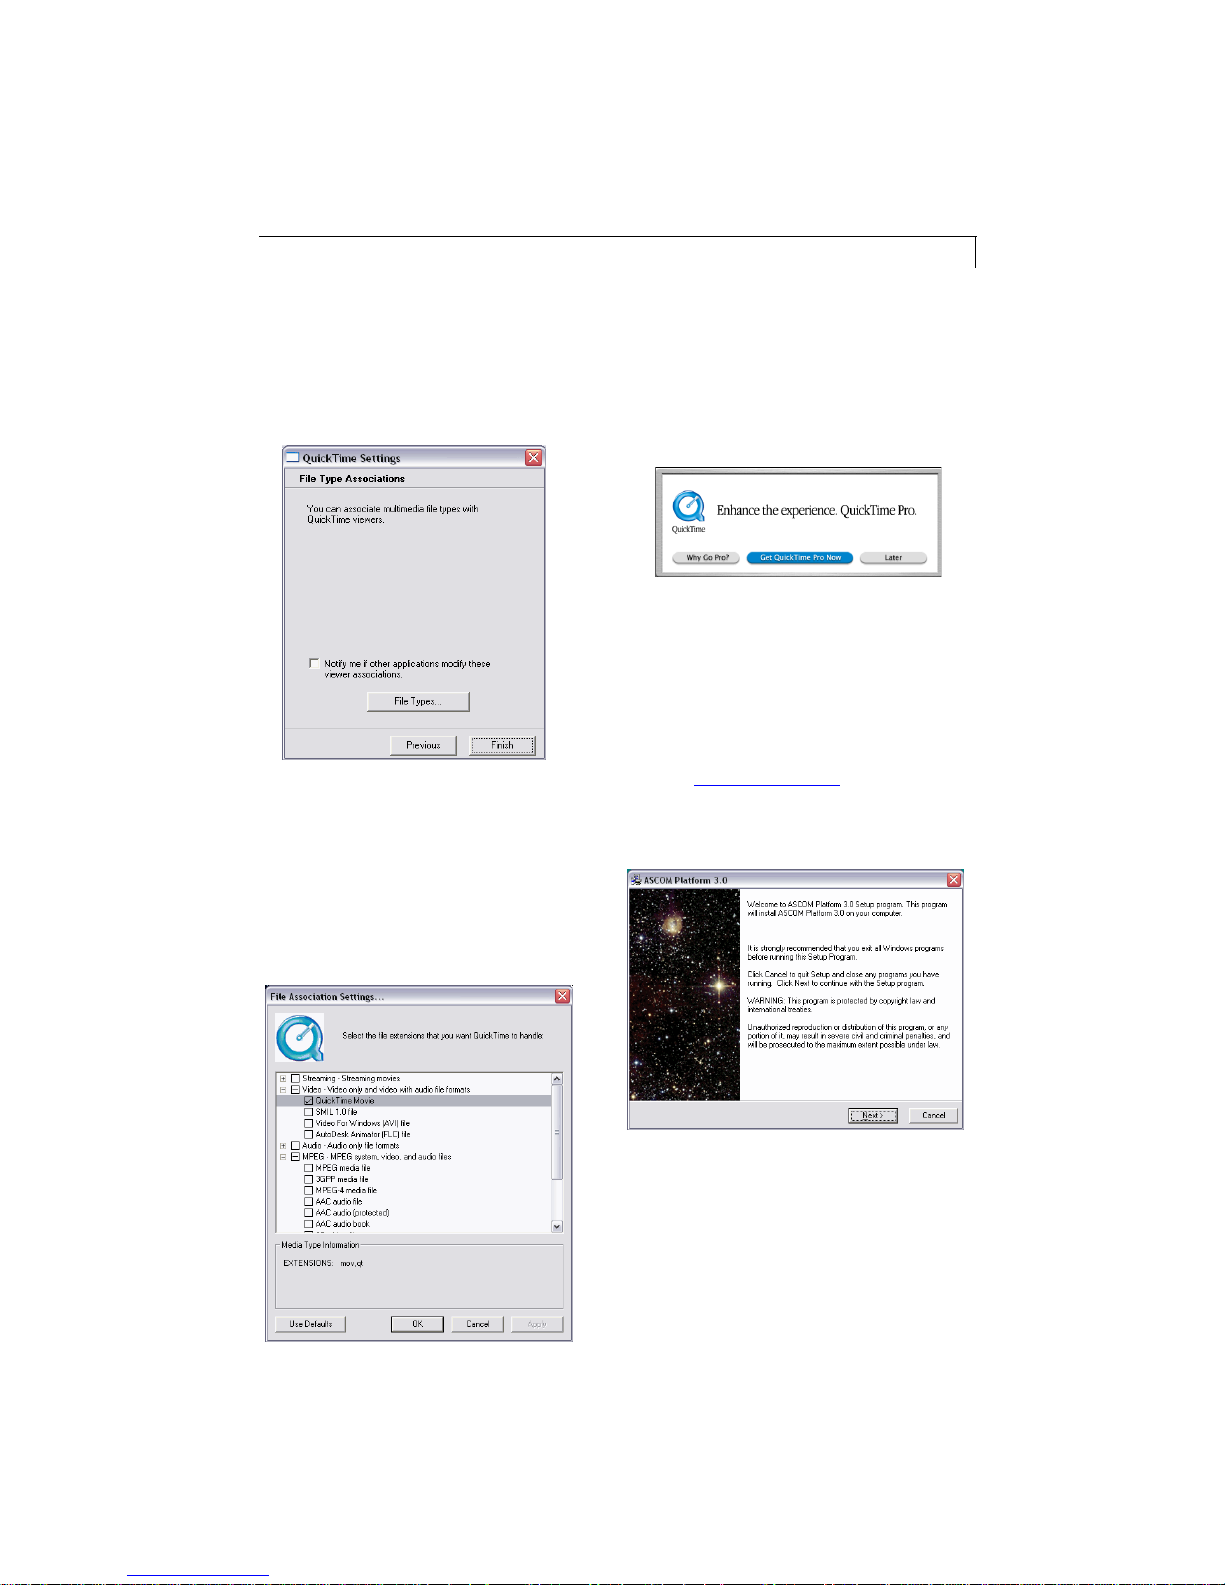
5 At one point in the installation process,
there will be a screen titled "File Type
Associations". Press the File Types
button to edit the associations.
6 Make sure that only the box marked
"Quick Time Movie" is checked under
the Video category. This will associate
.mov files correctly with QuickTime.
Other movie file types (for example,
mpeg or avi files) will not be affected.
Tip: The first time you enlarge an image
or play a movie, you may see the Get
QuickTime Pro window. Click Later. You
do not need to upgrade to QuickTime Pro
to see multimedia files in Starry Night.
7 Following the QuickTime installation,
the Starry Night installer launches an
application to install telescope control.
If you have a motorized telescope you
wish to control with Starry Night Pro
5.0, follow the onscreen instructions.
See “Telescope Control
” on page 114
for more information on telescope
control.
.
8 Starry Night Pro 5.0 includes a
standalone DVD disc (“SkyTheater”),
which contains short movies about
astronomy. You can play the DVD disc
on your computer DVD-ROM drive or
your home DVD player.
12 Starry Night Pro 5.0 User’s Guide
Macintosh: To install Starry Night Pro 5.0
for the Macintosh, follow these steps.
1 Insert disc 1 into the CD-ROM drive
and double-click on the Starry Night
Pro 5.0 installation icon. Insert the next
discs when prompted. The “Full
Install” option will install extra star
data, with stars as dim as magnitude 16
(these stars are not visible in your sky
without a telescope) and the Principal
Galaxy Catalog (PGC) with 980, 000
galaxies as dim as magnitude 18. The
“Minimal Install” option will not install
these dimmer stars and galaxies, and
will save about 300 MB of hard disk
space. The “Custom Install” option
allows you to select which extra data to
install.
Tip: Macintosh users do not need to install
a separate driver for telescope control, it
is packaged into the main Starry Night Pro
5.0 installer.
Macintosh: Double-click the Starry Night
Pro 5.0 icon in the Applications folder, or
click the icon on your dock.
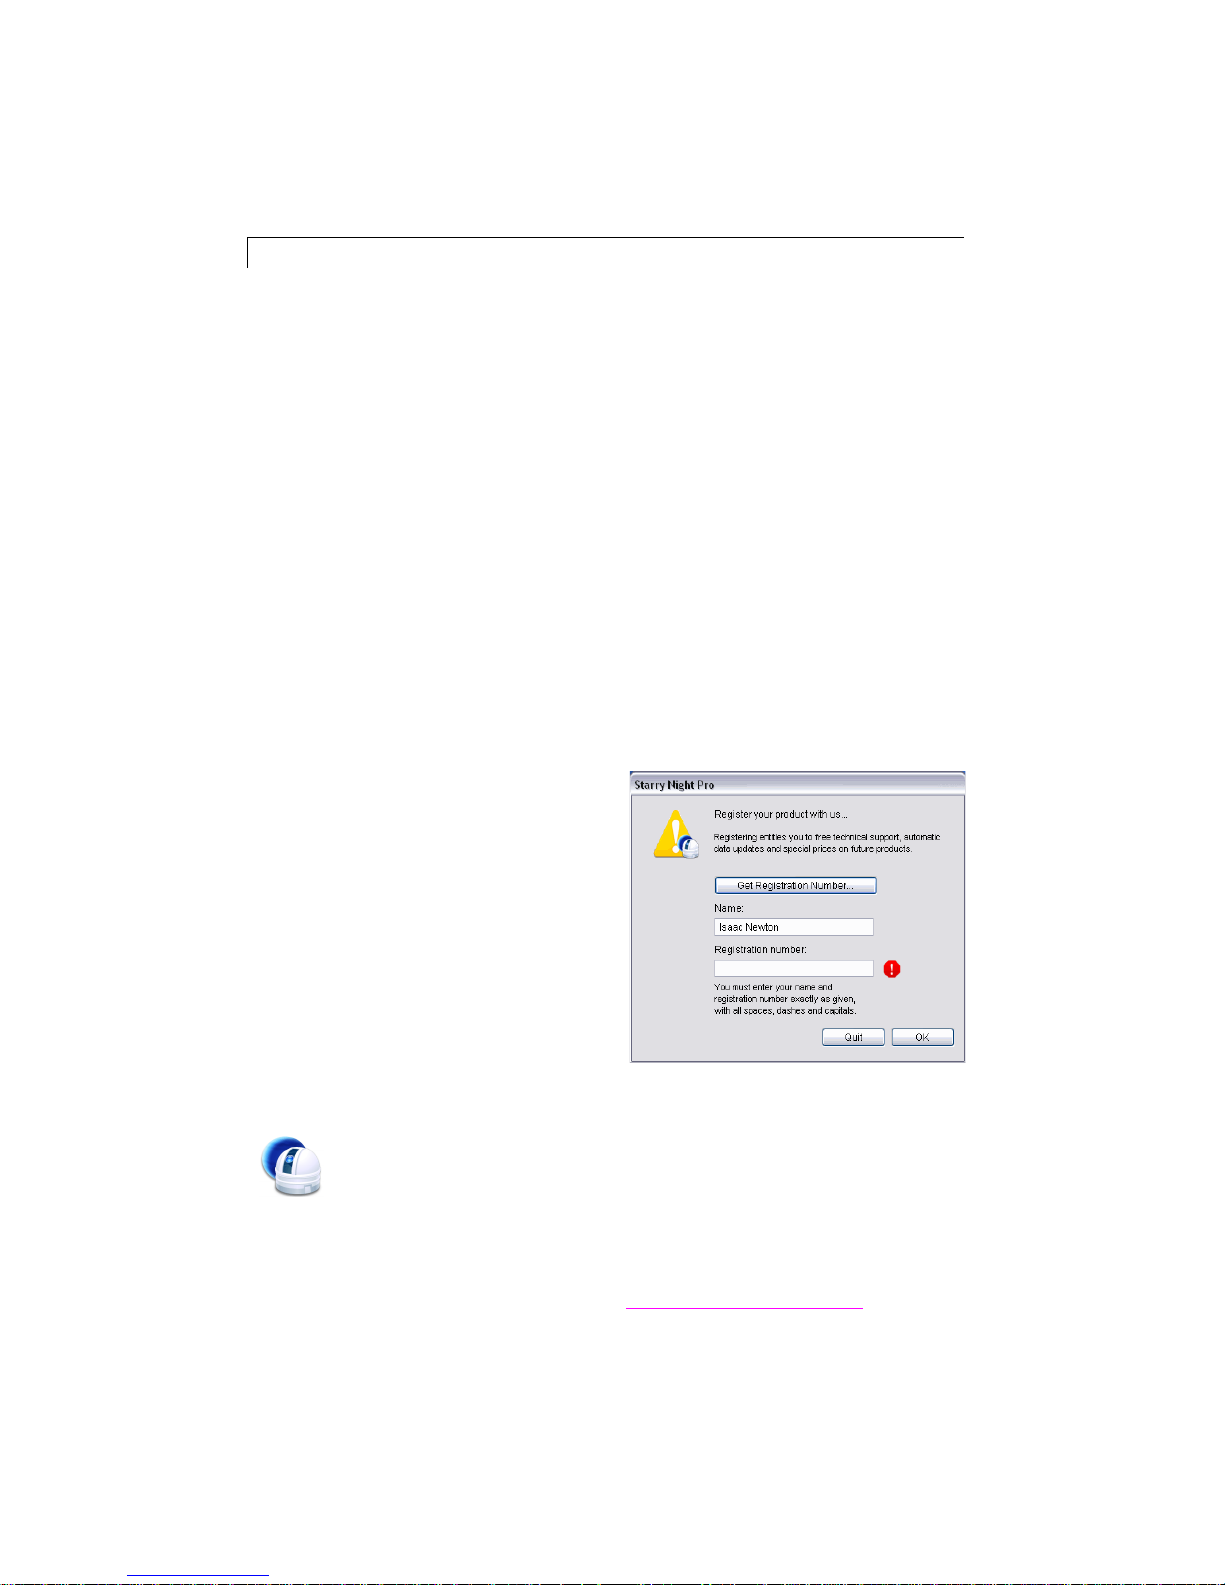
Registering
When you run Starry Night Pro 5.0 for the
first time, you will be prompted to enter
your name and registration number. To get
your unique registration number, click Get
Registration Number. For this to work,
you must have an active Internet connection. If you do not have an active Internet
connection, you can still click OK and the
program will operate normally—but you
will not be able to download the periodic
data updates, such as new comets, upcom-
ing events and tours
.
2 Starry Night Pro 5.0 includes a
standalone DVD disc (“SkyTheater”),
which contains short movies about
astronomy. You can play the DVD disc
on your computer DVD-ROM drive or
your home DVD player.
Running Starry Night Pro 5.0
Once you have installed Starry
Night Pro 5.0, you can run the
program as follows:
Windows: Double-click the Starry Night
Pro 5.0 icon on your desktop, or select it
from your start menu.
Registering makes it possible for us to
notify you of any upgrades, bug fixes, or
plug-ins as they become available. You
may also be eligible for reduced upgrade
prices to other astronomy software
programs. You can update your
registration information at any time in the
future by visiting
www.starrynight.com/register
.

Getting Started 13
Tip: You can retrieve your registration
number at any time by choosing
Registration from the Help menu
(Windows) or the Starry Night Pro 5.0
menu (Macintosh).
After you have typed in your name and
registration number, press OK to begin
Starry Night Pro 5.0.
Data Updates
The first time you run Starry Night Pro
5.0, a window will pop up that asks if you
wish to update your data files.
If you press Update Files, Starry Night Pro
5.0 will attempt to connect to our website
and download updated data files.
Downloading these files ensures that any
new comets, asteroids, satellites, calendar
events or tours are added to the program. If
you do not want to download updated data
files at this time, just press Cancel to skip
this process. You can update these data
files at any time in the future by choosing
LiveSky->
Update Comets/Asteroids/Satellites from
the menu. See “Database Updates
page 83 for more information on updating
data files.
” on
Only registered users can download the
updated data files. If you did not register
Starry Night Pro 5.0, the following
window will appear onscreen when you
try to download new data files:
Click Open Registration Dialog to obtain
your registration number and proceed with
updating your data files or click Cancel
File Update to continue without
downloading.
Note: Updating data files is not the same
as updating the program itself. To ensure
that you are running the latest version of
Starry Night Pro 5.0, see
“Program Updates
” on page 16.
14 Starry Night Pro 5.0 User’s Guide
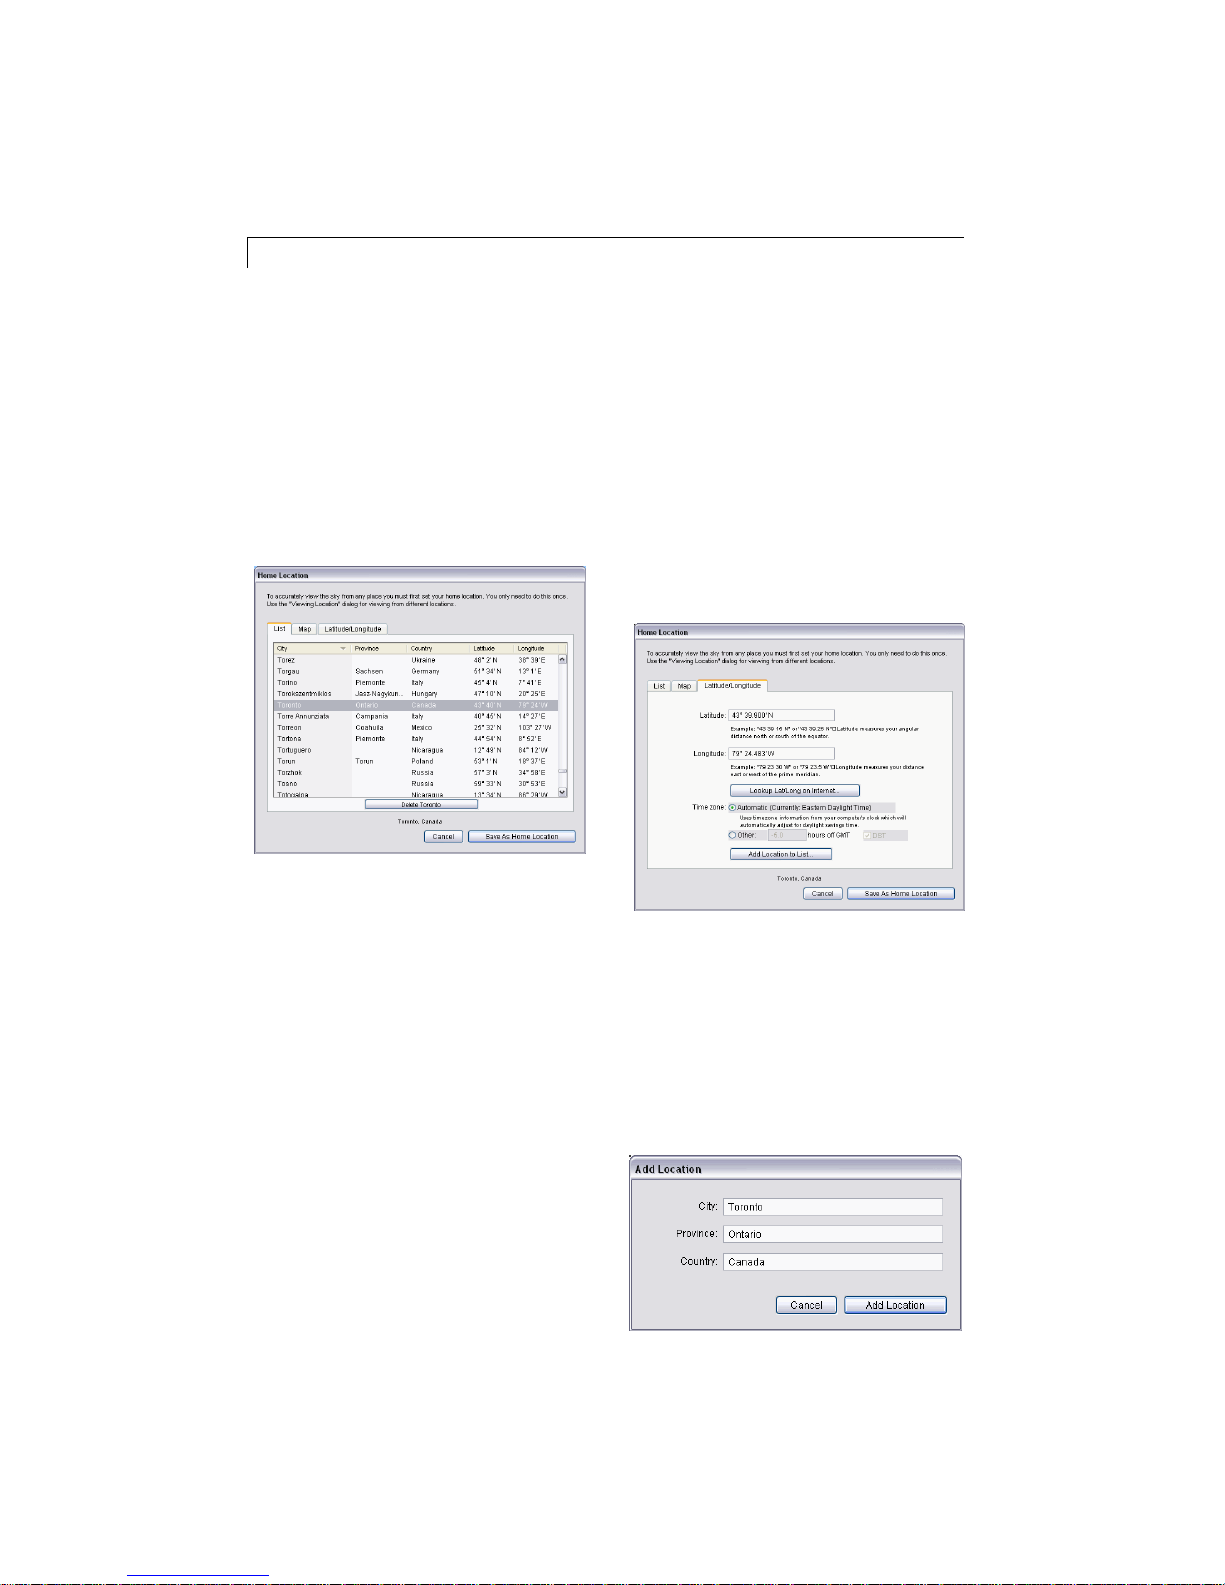
Setting Your Home Location
The first time Starry Night Pro 5.0 runs, a
dialog box opens that asks you to set your
home location. Once you have done this,
you do not need to change your home
location unless you move.
1 Click the List tab. This displays a huge
database of cities throughout the world.
2 Use the scrollbar on the right to look
through the list. If your home city is
listed, click on its name to highlight
this city and press the Save As Home
Location button. If your city is not
listed, proceed to step 3.
Tip: A list of astronomical observatories is
included in the location list. To see this
list, click on the Province column heading
and scroll down to “Observatories”.
minutes.You must also enter the correct
time zone. Time zones are calculated
according to the time difference from
London, England. For example, all
communities on Eastern Standard Time
are 5 hours behind London, so you
would enter “-5 h” if you are on
Eastern Standard Time. If you do not
know your latitude, longitude, or time
zone, click Lookup Lat/Long on Internet
for Internet resources that will help you
find this information.
4 Once you have entered your co-
ordinates, click the Add Location to List
button. This will open a window where
you can enter your city, province/state
and country. Press the Add Location
button once you have entered this
information., then press the Save As
Home Location button.
3 Click the Latitude/Longitude tab. Type
in the name of your location and enter
your latitude and longitude. You can
enter these values in degrees, degrees
& minutes, or degrees, minutes &
seconds. Starry Night Pro 5.0 will
convert your values to degrees and
Getting Started 15
Tip: If you ever move and need to change
your location (or if you initially enter your
home location incorrectly), choose
Set Home Location from the File menu
(Windows) or the Starry Night Pro 5.0
menu (Macintosh) to enter a new home
location.
Starry Night For the First Time
After you have entered your home
location, the main screen of Starry Night
Pro 5.0 appears. This window shows what
you would see if you stepped outside at the
current time, and looked south from your
home location. Direction markers along
the horizon help you orient yourself. If you
open the program at night, you see a starfilled night sky. If you open the program
during the day, you see a daytime scene
with blue sky and sunshine. A horizon is
shown to give you some perspective.
The current time is shown in the upper left
corner of the screen.
The next chapter will show you how to use
them and become more comfortable with
the program.
Getting Help
Hopefully this User’s Guide will help you
master Starry Night Pro 5.0! But if you
still have questions, there are plenty of
places to turn for help.
Contextual Help: Hold
the cursor over any of
Starry Night’s
controls, and a text
box will pop up that
describes the function
of that control.
Info Icon: Whenever you see this icon
beside one of the controls in Starry
Night Pro 5.0, click the icon to see a short
description of that control.
Electronic Manual: Choosing
Help->User’s Guide from the menu opens
the PDF version of this manual.
Note: The current date and time are
calculated from your computer’s clock. If
your computer’s clock is incorrect, Starry
Night Pro 5.0 may show night when it is
day outside, or vice versa. See
“Time & Date
” on page 163 if you do not
know how to change your computer’s
clock settings.
Most of the controls in Starry Night Pro
5.0 will probably look unfamiliar to you.
Tech Support Website: A list of frequently
asked questions is included in Appendix
A: “Frequently Asked Questions
”. An
up-to-date version of this FAQ is available
online by choosing Help->Online Help from
the menu. Any new bugs or other issues
regarding Starry Night Pro 5.0 will be
covered in this FAQ.

16 Starry Night Pro 5.0 User’s Guide
Discussion List: The Starry Night
Discussion List is a newsgroup that allows
you to ask questions and share tips with
other owners of Starry Night Pro 5.0. At
press time, the Discussion List had more
than 6000 members, so it is an excellent
resource. Sign up for this list at http://
www.starrynight.com/support/
discussion_lists.html
Contact Technical Support: You can
contact our technical support staff at http://
www.starrynight.com/support/ for help
with your problems.
Program Updates
Starry Night Pro 5.0 is updated on a fairly
regular basis. Updates may add new
features, or may fix bugs in the existing
program. To find out if you are running the
latest version, choose About Starry Night
Pro 5.0 from the Starry Night Pro 5.0
menu (Macintosh) or the Help menu
(Windows). A new window will open, and
this window will have your version
number in the bottom left corner.
running the most up-to-date version of
Starry Night Pro 5.0.
Starry Night Website
More information about Starry Night Pro
5.0 and other astronomy programs is
available at our website,
www.starrynight.com
.
Once you know your current version
number, choose
LiveSky->Check For Program Updates from
the menu. This will take you to the updates
section of our website. If any updates are
available, instructions for downloading
and installing these updates will be
provided. We recommend that you check
for program updates soon after you install
the program, to ensure that you are

Chapter 2
Basics
It is impossible to cover all of the features of
Starry Night Pro 5.0 in one short chapter.
However, you will use certain features much
more than others. This chapter will show you
how to use the 10 most important features in
Starry Night Pro 5.0. Once you have read this
chapter, you will be able to use Starry Night Pro
5.0 effectively as a guide to the night sky.
10 Important Features
Here are the 10 tasks you will learn to perform
with Starry Night Pro 5.0 in this chapter:
1 Use the controls.
2 Change your viewing direction.
3 Change the date and time.
4 Identify objects in the sky.
5 Label objects.
6 Display constellation figures.
7 Find objects.
8 Zoom in on objects.
9 Learn more about any object.
10 Print star charts.

18 Starry Night Pro 5.0 User’s Guide
Using The Controls
All of the controls in Starry Night Pro 5.0
are in three areas of the screen: the toolbar,
the side panes, and the menu. There is
more than one way to access many of the
features in Starry Night Pro 5.0 - for
example, you may be able to access a
feature through the main menu and
through the side panes.
Tip: If some of the controls described in
this section appear to be missing from
your version of Starry Night Pro 5.0, you
may not have installed QuickTime
correctly. Reinstall QuickTime and be sure
to choose the “Recommended Install”
option, and you should then see all of the
controls. See
“Installing Starry Night Pro 5.0
” on
page 9 for more information.
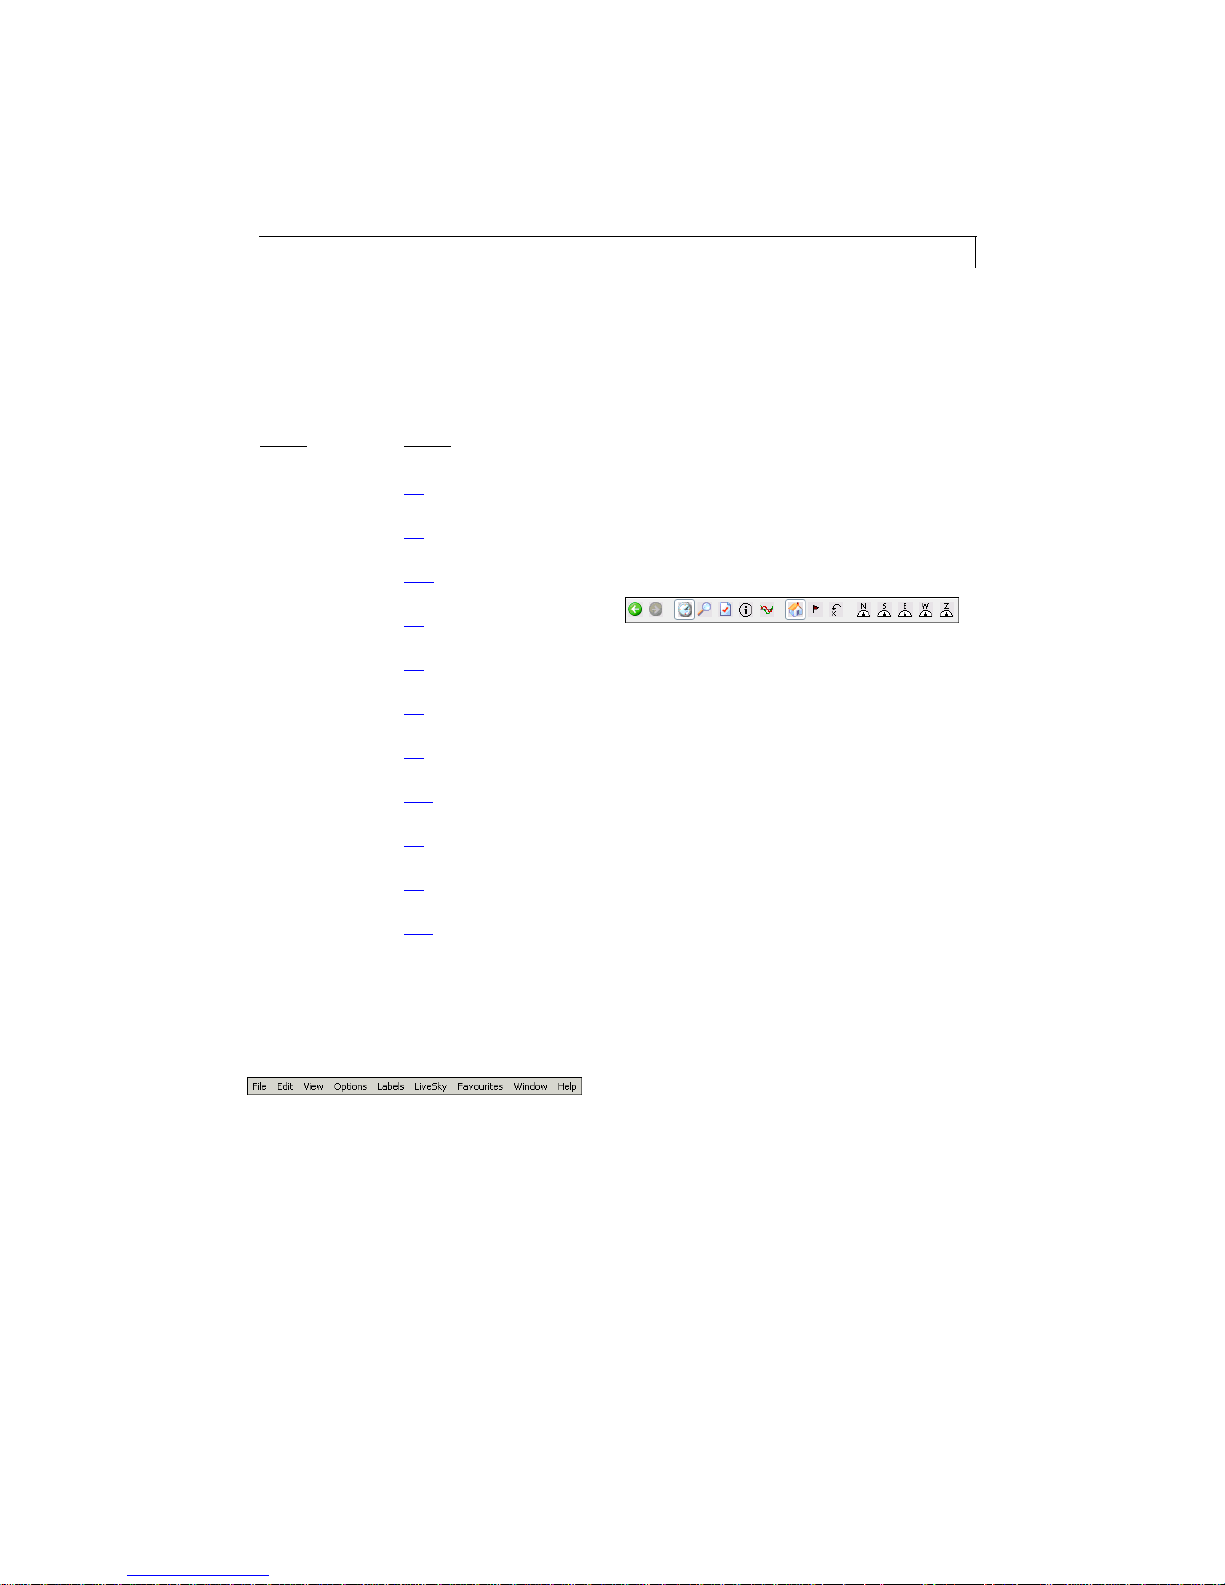
Toolbar: The toolbar is the strip of buttons
which runs just above the main window.
The toolbar has the following controls
(each set of controls is explained in a later
section):
Tool Selection
Tip: Clicking the blue pin button on
the toolbal will display a menu with
all the log entries you have added to Starry
Night Pro 5.0. See “Adding Log Entries
”
on page 135 for more information on
observing logs.
Side Panes: These panes are along the left
side of the screen.
Clicking on a pane causes the pane to slide
out, revealing a set of controls. Each pane
opens to a default width. However, by
clicking along the right edge of the pane
and dragging the mouse, you can make the
pane narrower or wider.
Within a pane, you can expand or collapse
various
layers by using these buttons:
Expand layer (Windows).
Expand layer (Macintosh).
Collapse layer (Windows).
Collapse layer (Macintosh).
You can hide the toolbar by choosing
View->Hide Toolbar from the main menu.
Time and Date
Time Flow Rate
Viewing Location
Gaze
Zoom (FOV)
Layer
(expanded)
La
Layer
(collapsed)
Pane
Basics 19
Each of the side panes controls an
important function in Starry Night Pro 5.0,
and is explained in detail in a later section.
Pane Page
Find
Options
Favourites
Status
Info
SkyGuide
SkyCalendar
Planner
LiveSky
FOV
Telescope
85
32
125
72
88
66
67
116
71
56
114
Button Bar (Windows only): On
Windows, the button bar provides an
additional set of controls. The button bar is
located under the menu, just above the
toolbar. It contains a set of buttons for
some of the most commonly used
functions in the program. Point the cursor
at one of the buttons, and a text tip will
pop up that describes the button’s
function.
Tip: You can hide the button bar at any
time by selecting View->Hide Buttonbar in
the menu. If you prefer to hide the button
bar, you can still access all of its controls
through the other menus and tools. You
can also turn off the text tips for the button
bar by choosing Preferences from the File
menu (Windows) or the
Starry Night Pro 5.0 menu (Macintosh),
choosing General from the dropbox in the
upper left corner of the Preferences dialog
box, and unchecking the “Show button
help on scroll over” box.
Menu: The menu runs across the top of the
screen, above the toolbar. Clicking on an
item in the menu expands the menu to
reveal additional options.
20 Starry Night Pro 5.0 User’s Guide
Changing Your Viewing Direction
By default, Starry Night Pro 5.0 always
opens with your view facing south,
looking slightly above the horizon. You
can then adjust this view to look in any
direction.
Tip: If you would prefer that Starry Night
Pro 5.0 open with your view facing in a
direction other than south, choose
Preferences from the File menu (Windows)
or the Starry Night Pro 5.0 menu
(Macintosh), choose General from the
dropbox in the upper left corner of the
Preferences dialog box, and adjust the
“Default Viewing Direction” ring slider.
You can also adjust the default altitude
(how high above the horizon you are
looking).
The default cursor icon in Starry
Night Pro 5.0 is a hand. When you
hold the mouse button down, you will see
the hand close, as if it is “grabbing” part of
the sky. If you hold the mouse button
down and drag the mouse, your view shifts
in the direction that you moved the mouse.
The compass icon in the upper right corner
of the screen shows the direction in which
you are viewing. You can also use the
compass points marked along the horizon
to find your viewing direction.
above the horizon, you may see a red
marker. This marker identifies the
zenith,
the point in the sky that is directly above
your head. If you are located in space, you
can also look straight down to see a
marker for the
nadir, the point directly
beneath your feet. If you are located on
Earth or another planet, you are limited in
how far down you can look. You are able
to look only slightly below the horizon,
and cannot see the nadir. If you wish, you
can turn off the markers for the zenith and
nadir by choosing Preferences from the
File menu (Windows) or the
Starry Night Pro 5.0 menu (Macintosh),
choosing General from the dropbox in the
upper left corner of the Preferences dialog
box, and unchecking the “Show zenith and
nadir while scrolling” box.
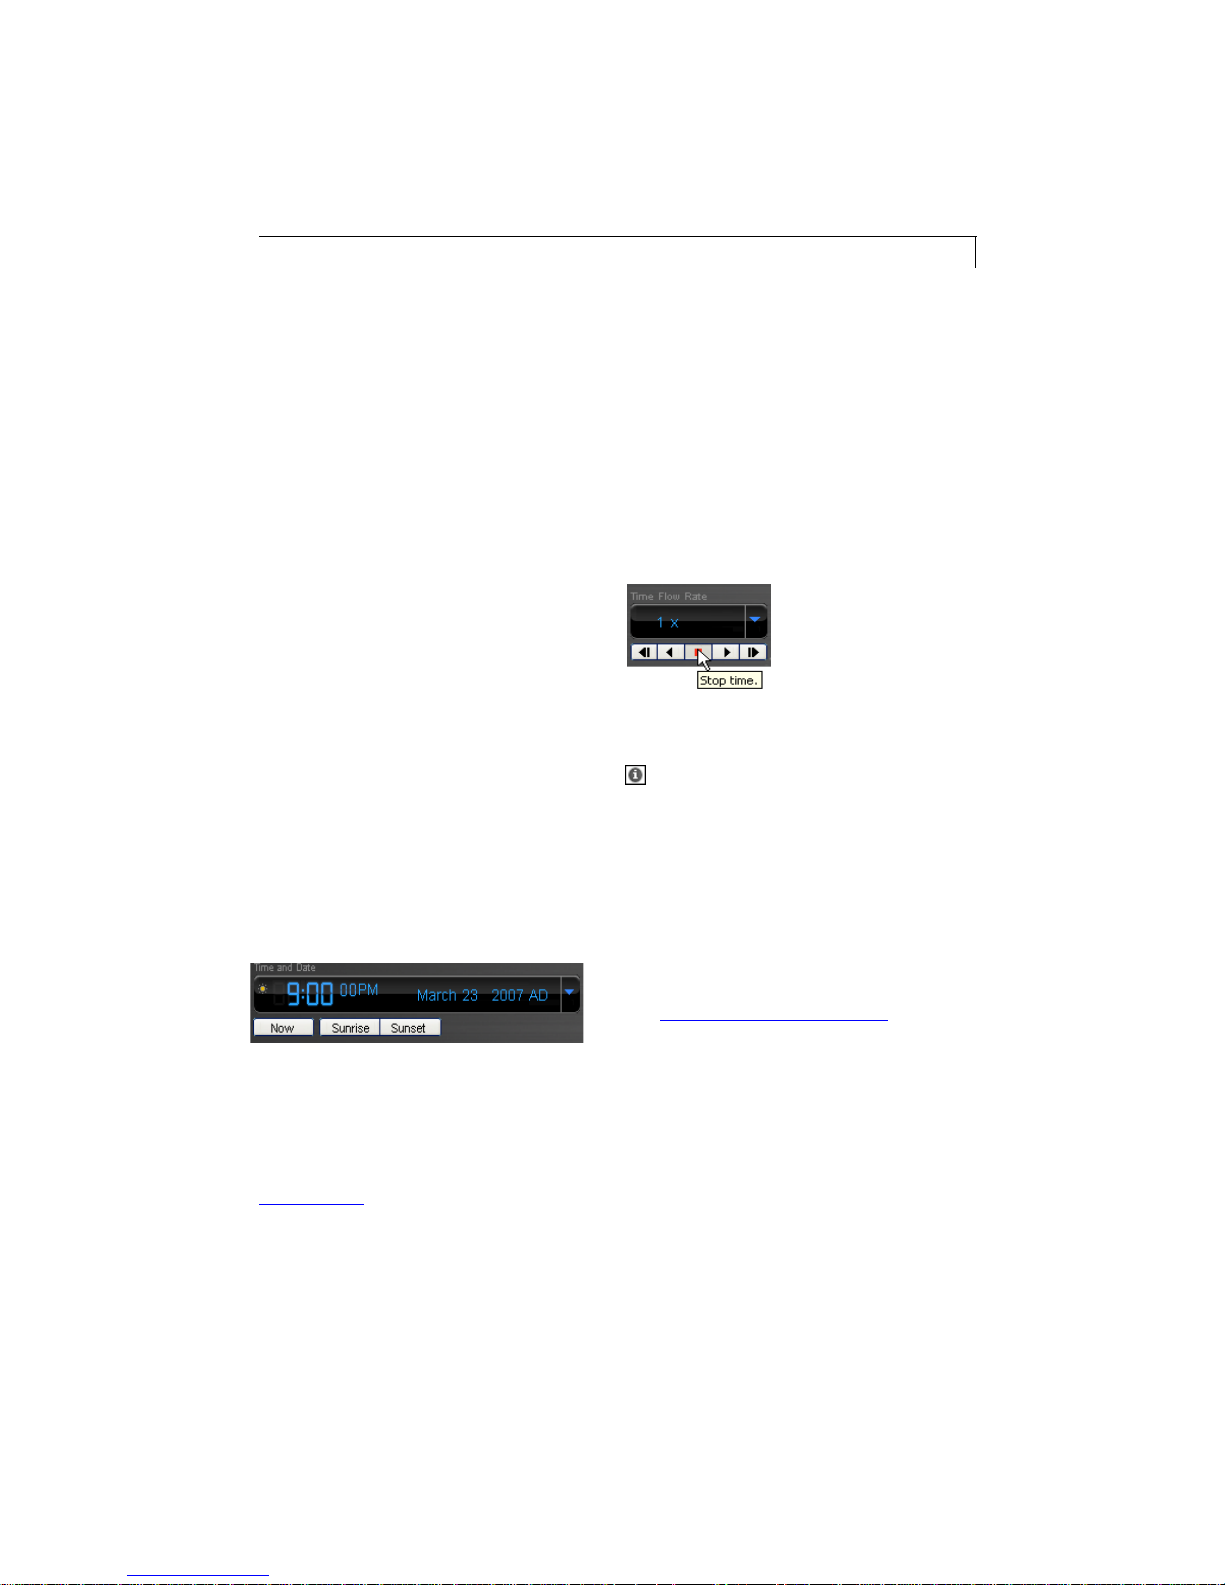
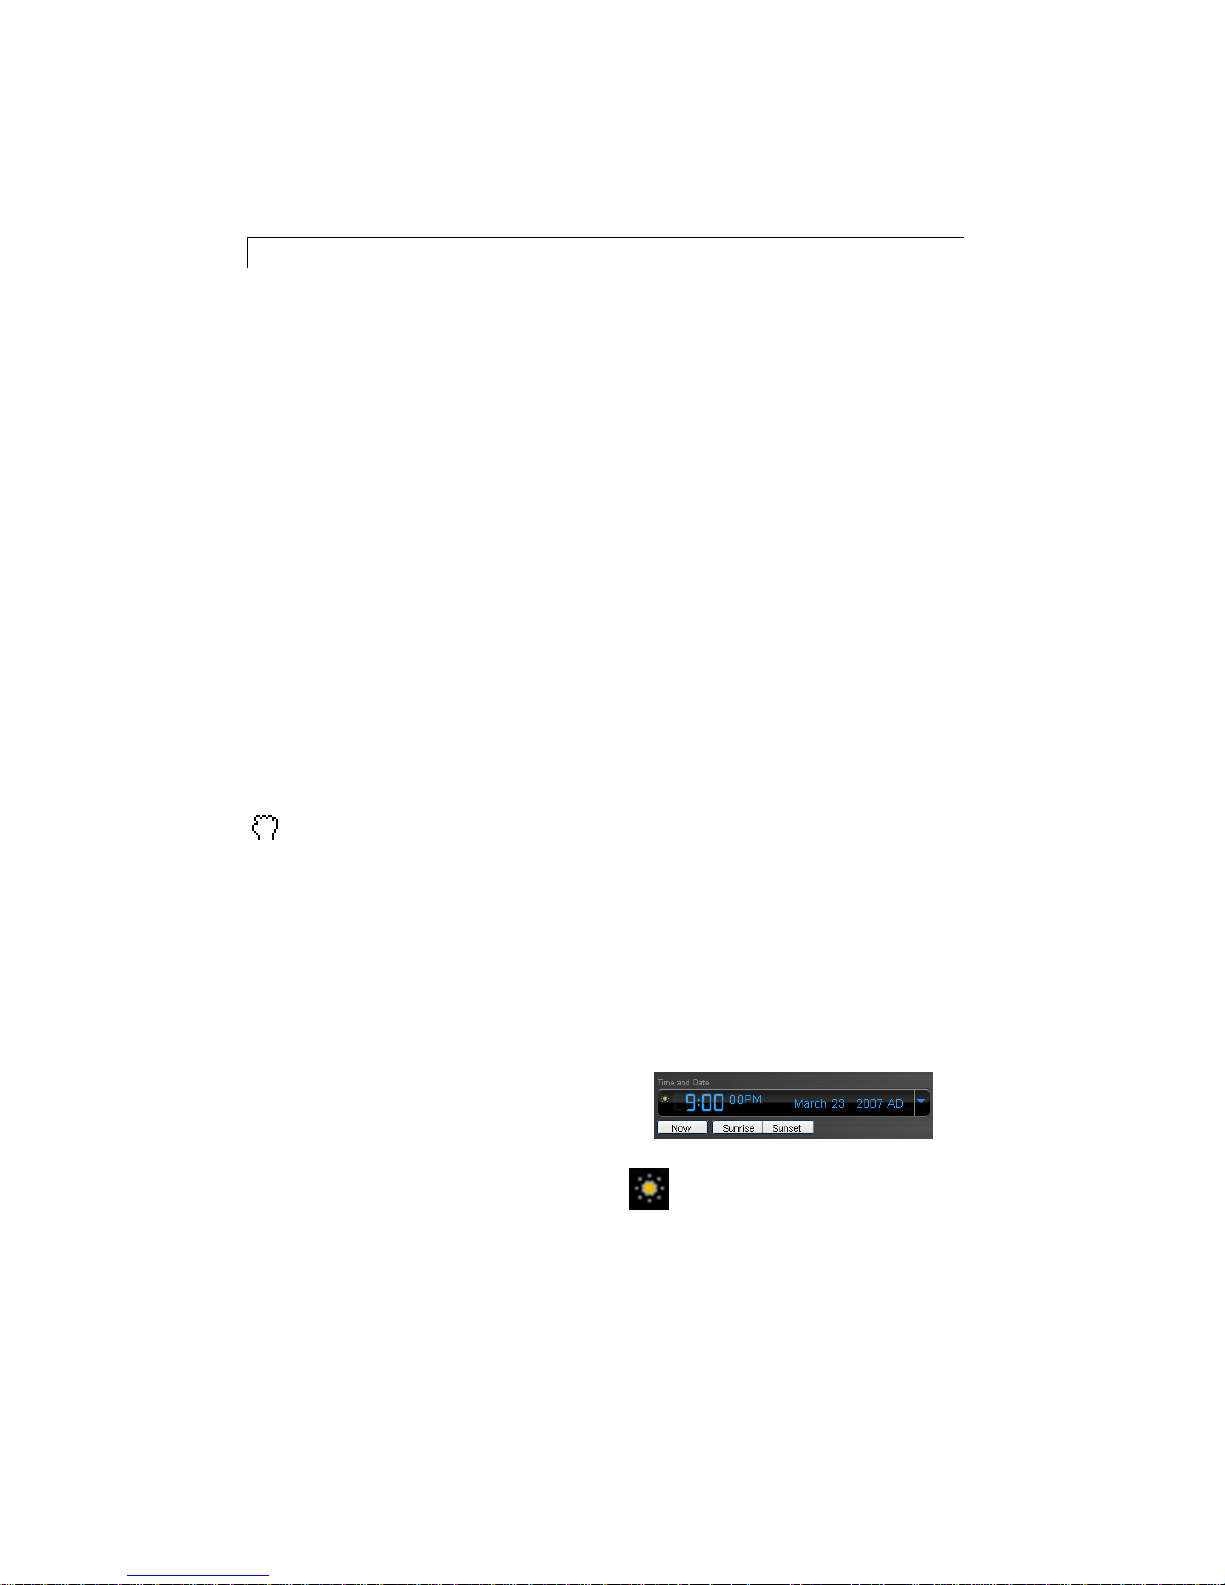
Changing The Date And Time
When you open Starry Night Pro 5.0, you
may see a bright blue sunny sky, a dark
sky filled with stars, or a twilight realm
with only a few bright stars showing. This
is because Starry Night Pro 5.0 always
opens showing the sky at the current date
and time. The date and time are shown in
the upper left corner of the toolbar.
Tip: You can configure Starry Night Pro
5.0 to display scroll bars along the edges
of the window by selecting
View->Show Scroll Bars from the menu.
You can then use these scroll bars in place
of the hand to adjust your viewing
direction.
Zenith and Nadir Markers: If you adjust
your view so that you are looking high
Tip: A small icon of the Sun
appears to the left of the time in the
toolbar. If Daylight Saving Time is
turned on, this icon is lit up. Starry Night
Pro 5.0 uses your computer clock to
determine if Daylight Saving Time should

Basics 21
be turned on. Click on the icon to turn on
or off Daylight Saving Time.
See “How does Daylight Saving Time
work in Starry Night?” on page 164 for
more information on Daylight Saving
Time.
To change the date or time, just click on it.
The date or time will light up, and you can
type in a new value.
If Starry Night Pro 5.0 is showing a
daytime scene, try changing the time so
that it is night. If you already see a night
scene, change the time so that it is day.
Starry Night Pro 5.0 allows you to set the
date from anywhere between 99 999 BC
and 99 999 AD.
Tip: As you are working through the rest
of the features in this chapter, you will
probably want to set the time in Starry
Night Pro 5.0 so that the sky is dark. In the
day, only the Sun will be visible onscreen,
and it will be difficult to use some of the
features.
Special Times:
Immediately to the
right of the time
display in the toolbar is
a pull-down menu that
lets you quickly change
the time to one of
several key times.
sunset, moonrise or moonset. You can also
change to
Sun is highest in the sky, or
solar noon, the time at which the
moon transit,
the time at which the Moon is highest in
the sky.
Moon Calendar: Clicking the
SkyCalendar pane will open a pane
showing a calendar with moon phase
information. See “SkyCalendar
” on
page 67 for more information on the
Calendar.
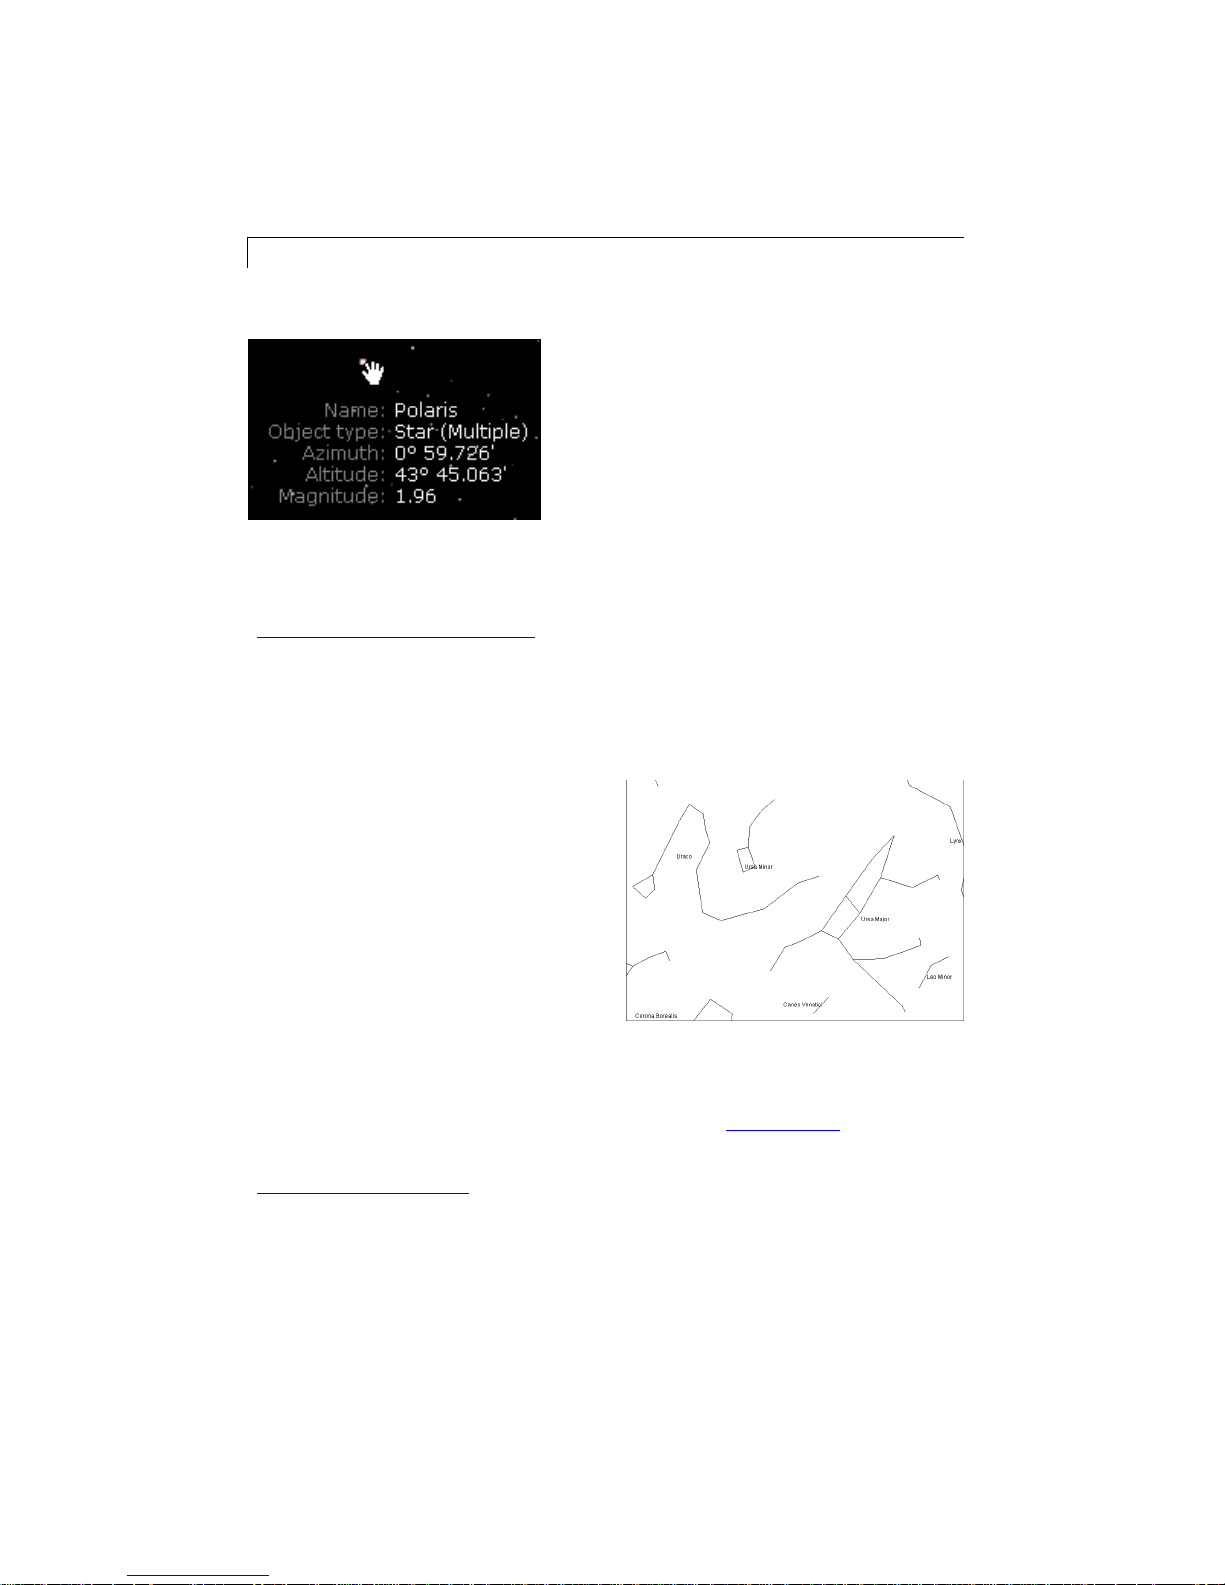
Identifying Objects In The Sky
If you point the cursor at any object shown
onscreen, information about the object will
automatically appear. This is Starry Night
Pro 5.0’s
Heads-Up Display (HUD).
Displayed are the object’s name, the
constellation it is in, and its distance (if
known) from Earth. This makes it easy to
identify any of the points of light
displayed onscreen.
You can reset the time to the current time
by pressing Now or set the time to sunrise,
22 Starry Night Pro 5.0 User’s Guide
You can choose which information fields
are displayed when you point the cursor at
an object. See
“Heads-Up Display (HUD) Options
page 58 for more details.
Labeling Objects
The Heads-Up Display is great for finding
out what a specific object is, but it’s not
much help if you want a quick overview of
all of the brighter objects onscreen. The
best way to quickly identify all bright
objects is to choose
Labels->Show All Labels from the menu.
This labels the brightest objects in each
category (stars, constellations, planets,
deep space objects). You can turn these
labels off again by choosing
Labels->Hide All Labels.
” on
Displaying Constellation Figures
For thousands of years, stargazers have
joined the brighter stars together into
patterns that we call constellations.
Astronomers currently recognize 88
constellations, which together cover the
entire sky. Knowing which constellation
an object is in is the first step to finding the
object.
You can turn on the stick figures for the
constellations by choosing
View->Constellations->Astronomical from
the main menu. Choosing this option again
will remove the figures. Use the Labels
menu to turn on/off the constellation
labels.
Starry Night Pro 5.0 offers much more
precise control over object labels. You can
label only certain types of objects,
increase/decrease the number of labels, or
label only the objects that you select. See
“Labeling Celestial Objects
for more information.
” on page 37
Many more options exist for displaying
the constellations. These options are
outlined in “Constellations
” on page 48.
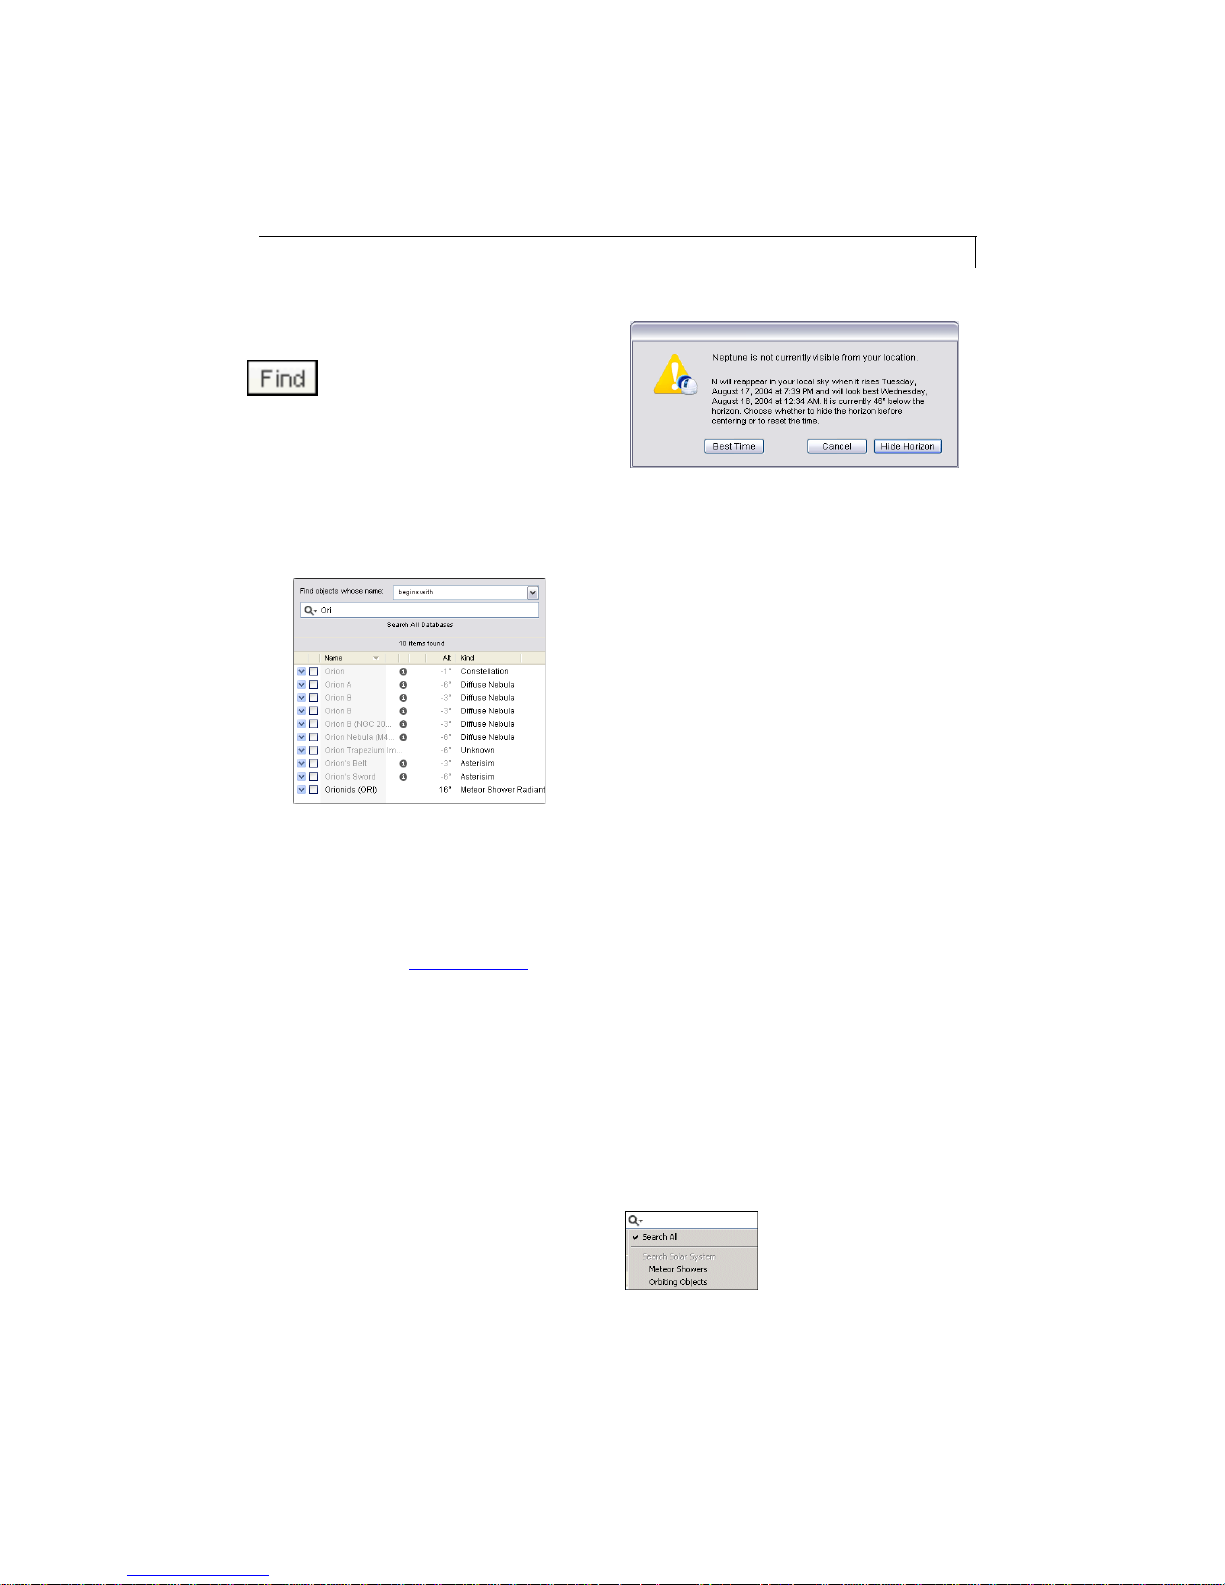
Finding Objects
If you are interested in finding a
specific object, such as a planet
or a bright new comet, open the
Find side pane. Click in the text box at the
top of this pane and type in the first few
letters of the object you are looking for. As
you type, Starry Night Pro 5.0 displays a
list of objects that match your name.
Once the object that you are looking for
appears in the list, double-click on its
name, and Starry Night Pro 5.0 will centre
on the object. Several information fields
are listed beside each object in the list of
found objects. See “Find Pane Info
” on
page 85 to learn what these fields mean.
Tip: The object you are searching for may
be hidden beneath the horizon. If this is the
case, Starry Night Pro 5.0 will offer you
the option of hiding the horizon or
advancing the time forward to a time when
the object will be above the horizon.
Objects below the horizon are greyed out.
Basics 23
Panning To Found Objects: By default,
Starry Night Pro 5.0 slowly pans to objects
that you have double-clicked on in the
Find pane. This feature is handy because it
allows you to see where the new object is
relative to your current view. If you choose
Preferences from the File menu (Windows)
or the Starry Night Pro 5.0 menu
(Macintosh) and choose Responsiveness
from the dropbox in the upper left corner
of the Preferences dialog box, you will see
a slider and checkbox named “Pan to
found objects”. Adjusting the slider
changes the speed at which Starry Night
Pro 5.0 pans to found objects. Unchecking
the box disables the panning feature
completely, so that your view changes
instantly to the “found” object as soon as
you double-click on it.
Tip: If you hit the space bar during a pan,
the program immediately takes you
directly to the object. If something catches
your eye and you want to stop the pan,
press the Esc key.
Searching Specific Databases: By default,
Starry Night Pro 5.0 searches all of its
object databases when you use the Find
pane.
If you wish, you can
choose to search in only
a specific database, by
clicking the arrow on
the left side of the textbox in the Find

24 Starry Night Pro 5.0 User’s Guide
pane, and choosing the appropriate
database from the menu that appears.
“Object Databases
” on page 77 describes
each of the object databases included in
Starry Night Pro 5.0.
Enhanced Find: By default Starry Night
Pro 5.0 searches for objects whose name
begins with the first letters typed in the
text box at the top of the Find pane.
Clicking on the dropbox that reads “begin
with’ opens a menu with additional search
options. You can customize your search by
selecting to find objects that exactly
match, contain or end with the letters you
entered in the text box.
Solar System Object List: If you clear the
text box at the top of the Find pane, the list
of items found is replaced by a list of solar
system objects.
Click the symbol to the left
of an object’s name to
expand the list to include all other objects
that orbit this object.
For example,
clicking on this
symbol for Mars
will expand the list to include the moons
of Mars. Clicking again collapses the list
and hides Mars’s moons. You can doubleclick on any object in this list to centre on
the object in Starry Night Pro 5.0’s main
window.
Zooming In On Objects
Now that you know how to find objects,
you will probably want to know how to
zoom in for close-up views of spectacular
objects such as Saturn and the Andromeda
Galaxy.
The amount of sky that you can see is
called the
field of view. If it was possible
to see the entire hemisphere of sky that is
above the horizon at any time, you would
have a 180° field of view. Of course, this is
impossible. Including some peripheral
vision, the human eye can see
approximately a 100° field of view. If you
look through binoculars, the area you see
is a much smaller piece of the sky, which
means binoculars have a correspondingly
smaller field of view (usually 5° to 7° ).
Telescopes have an even smaller field of
view than binoculars.
Starry Night Pro 5.0 opens with a 100°
field of view. We call this the normal field
of view, since it approximates a view of
the sky that you would see with your own
eyes. Along the top right corner of the

Basics 25
toolbar is a set of zoom buttons which
adjusts your field of view.
Clicking the zoom button on
the right zooms in (reduces
your field of view), while clicking the
button on the left zooms out (increases
your field of view). Clicking the left zoom
button and holding your mouse button
restores your field of view to 100°. It is
important to remember that when you
zoom in on objects, you are not in fact
changing your location. Think of zooming
as looking through a more and more
powerful telescope, while your feet remain
firmly planted.
Note: You can also use the Magnification
tool to adjust your field of view. See
“Magnification Tool
” on page 28 for more
information on the Magnification tool.
Your exact field of
view is always listed
in the Zoom control of
the toolbar. If you
click on the arrow to
the right of the Zoom
display, a pull-down
menu opens which
allows you to choose
from several preset
fields of view.
Note: When you zoom in to a very small
field of view, your field of view will be
shown in
arcminutes. If you zoom in even
closer, your field of view will be shown in
arcseconds. One arcminute is 1/60 of a
degree, and one arcsecond is 1/60 of an
arcminute. The smallest field of view
which Starry Night Pro 5.0 can display is 1
arcsecond.
The compass image in
the upper right corner
(visible only when you
are using the field of
view controls or changing your viewing
direction) provides an excellent graphical
interpretation of the field of view. This
image shows how large a patch of sky is
being displayed in your current view. As
you zoom in, the patch of sky shrinks. As
you zoom out, the patch of sky expands.
The compass image also shows your
viewing direction.
Tip: To hide the compass, open the
Options pane, expand the Guides layer
and uncheck the “Show compass indicator
while scrolling” box.
Maximum Zoom Out: By default, you are
unable to zoom out past the standard view
of 100°. To zoom out to see an even larger
field of view, choose Preferences from the
File menu (Windows) or the
Starry Night Pro 5.0 menu (Macintosh),
choose General from the dropbox in the
upper left corner of the Preferences dialog
box, and check the box marked “Allow
Maximum Zoom Out”. Then continue
zooming out using the left zoom button
until you have a circular field of view of
180°, which is the entire hemisphere of
sky that is above the horizon at any one
time. This is the view of the sky that most
planispheres (handheld circular star
charts) represent.

26 Starry Night Pro 5.0 User’s Guide
Changing the Zoom Step: If you choose
Preferences from the File menu
(Windows) or the Starry Night Pro 5.0
menu (Macintosh) and choose
Responsiveness from the dropbox in the
upper left corner of the Preferences dialog
box, you will see a slider named “Zoom
Step”. This slider adjusts the rate at which
Starry Night Pro 5.0 increases and
decreases your magnification when you
use the Zoom buttons. By setting this
slider farther to the right, you will zoom in
or out faster, because each zoom step will
be larger.
Angular Separation: Angular separation
provides another way of understanding
fields of view and angles in the sky. If you
point at an object and click and hold the
left mouse button and then drag the mouse
to a second object, a line appears which
connects the two objects. The
separation
between the two objects is
displayed, along with the direction of the
line and the actual distance between the
two objects (if known).
angular
The angular separation measures how far
apart in the sky two celestial bodies
appear. The entire sky is divided into 360°,
so an object which is directly in front of
you and an object directly behind you in
the sky have an angular separation of
180°. If you measure the angular
separation between two objects on
opposite sides of your screen, you should
find that it is very close to the field of view
that Starry Night Pro 5.0 is showing. Note
that the angular separation of two objects
has no connection to how far apart these
objects really are: two bodies which
appear side by side in the sky may be
hundreds of light years apart!
Example: Magnifying Jupiter
1Open the
“Jupiter”.
2 Double-click on Jupiter’s name in the
list to centre on Jupiter. If a dialog box
shows that Jupiter is beneath the horizon,
choose the
3 If Starry Night Pro 5.0 is displaying a
daylight sky, choose
from the menu to turn off daylight.
4 Click the “+” zoom button to slowly
zoom in on Jupiter. As you zoom in, Starry
Night Pro 5.0 automatically shows dimmer
stars. Once your field of view reaches
about 30 arcminutes, Jupiter will start to
look like a ball instead of a point.
Find pane and type in
Hide Horizon option.
View->Hide Daylight
5 Continue clicking the “+” zoom button
all the way until your field of view is about
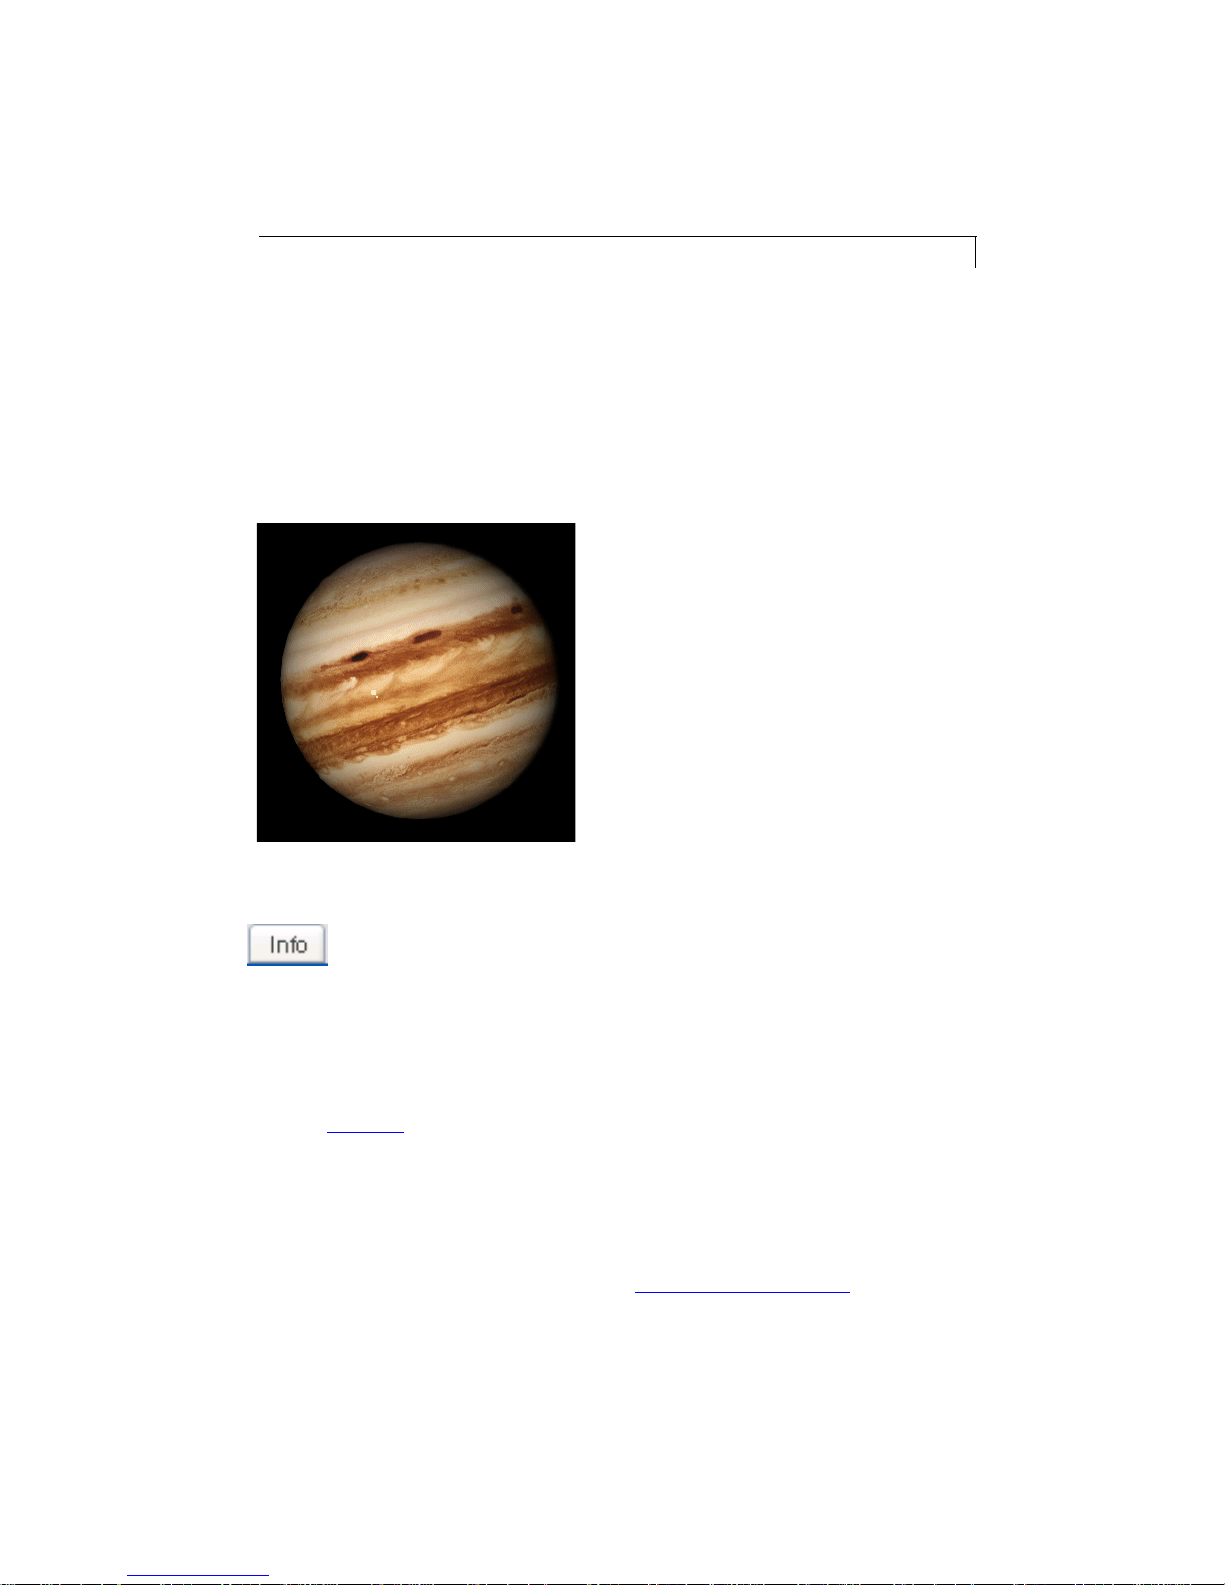
Basics 27
6 arcminutes. Note that Jupiter will still not
fill the screen.
6 Press the “+” zoom button to continue
zooming in on Jupiter. Once you reach a
field of view of about 35 arcseconds, Jupiter should fill the screen.
7 Click the “-” zoom button and hold your
mouse button down to restore your field of
view to 100
°.
Learning More About Objects
For any object displayed
onscreen in Starry Night Pro
5.0, you can double-click on
the object to learn more about it. Doubleclicking will open the Info pane, which has
information on the object organized into
different categories. All of the information
fields in the Info pane are described in
detail in “Info Pane
” on page 88.
Tip: Right-clicking (Ctrl-click on the Mac)
on any object onscreen will open a
contextual menu of options. Select Show
Info from this menu to open the Info pane
and learn more about the object.
Printing Star Charts
Starry Night Pro 5.0 has a special set of
print settings which make printing
informative, legible charts a snap. You can
then take these charts outside to help with
your stargazing.
Centre on the area of sky you are
interested in, and use the zoom buttons to
set the correct field of view for your
printed chart. For example, if you want a
chart that shows the entire sky, centre on
the zenith, and set your field of view to
180°. Remember that the appearance of
the sky is time-sensitive, so make sure to
set the time in Starry Night Pro 5.0 to the
time that you plan to go outside to
observe!
Once you have set the time, viewing
direction and field of view, select
File->Print from the menu. You will get a
full-page printout of the area shown
onscreen.
Print Settings: If you choose
Preferences->General from the File menu
(Windows) or the Starry Night Pro 5.0
menu (Macintosh), you will see the
options “Use print settings when printing”
and “Use current settings when printing”.
These options control the appearance of
your printed chart: how many stars are
shown, how many objects are labelled, etc.
“Use print settings” will print star charts
using Starry Night Pro 5.0’s special print
settings file, while “Use current settings”
will print charts using the same settings
that you currently have onscreen. You can
also create custom print settings. See
“Customizing Print Settings
” on page 62
for more information.
28 Starry Night Pro 5.0 User’s Guide
Tip: If you choose
Options->Presets->Print Settings from the
menu, Starry Night Pro 5.0 will apply its
special print settings to your screen view.
This allows you to see how a star chart
printed with these settings would look.
Tip: If you are interested in viewing a dim
object, and it is not labeled on the printed
chart you make, select it on the screen by
pointing the cursor at the object and
clicking on it. Its name should then appear
on screen with an arrow pointing to the
object. This is known as “selecting” an
object. See “Labeling Select Objects
” on
page 37 for more information on selecting
objects. If you print a new chart, the
selected object will now be labelled.
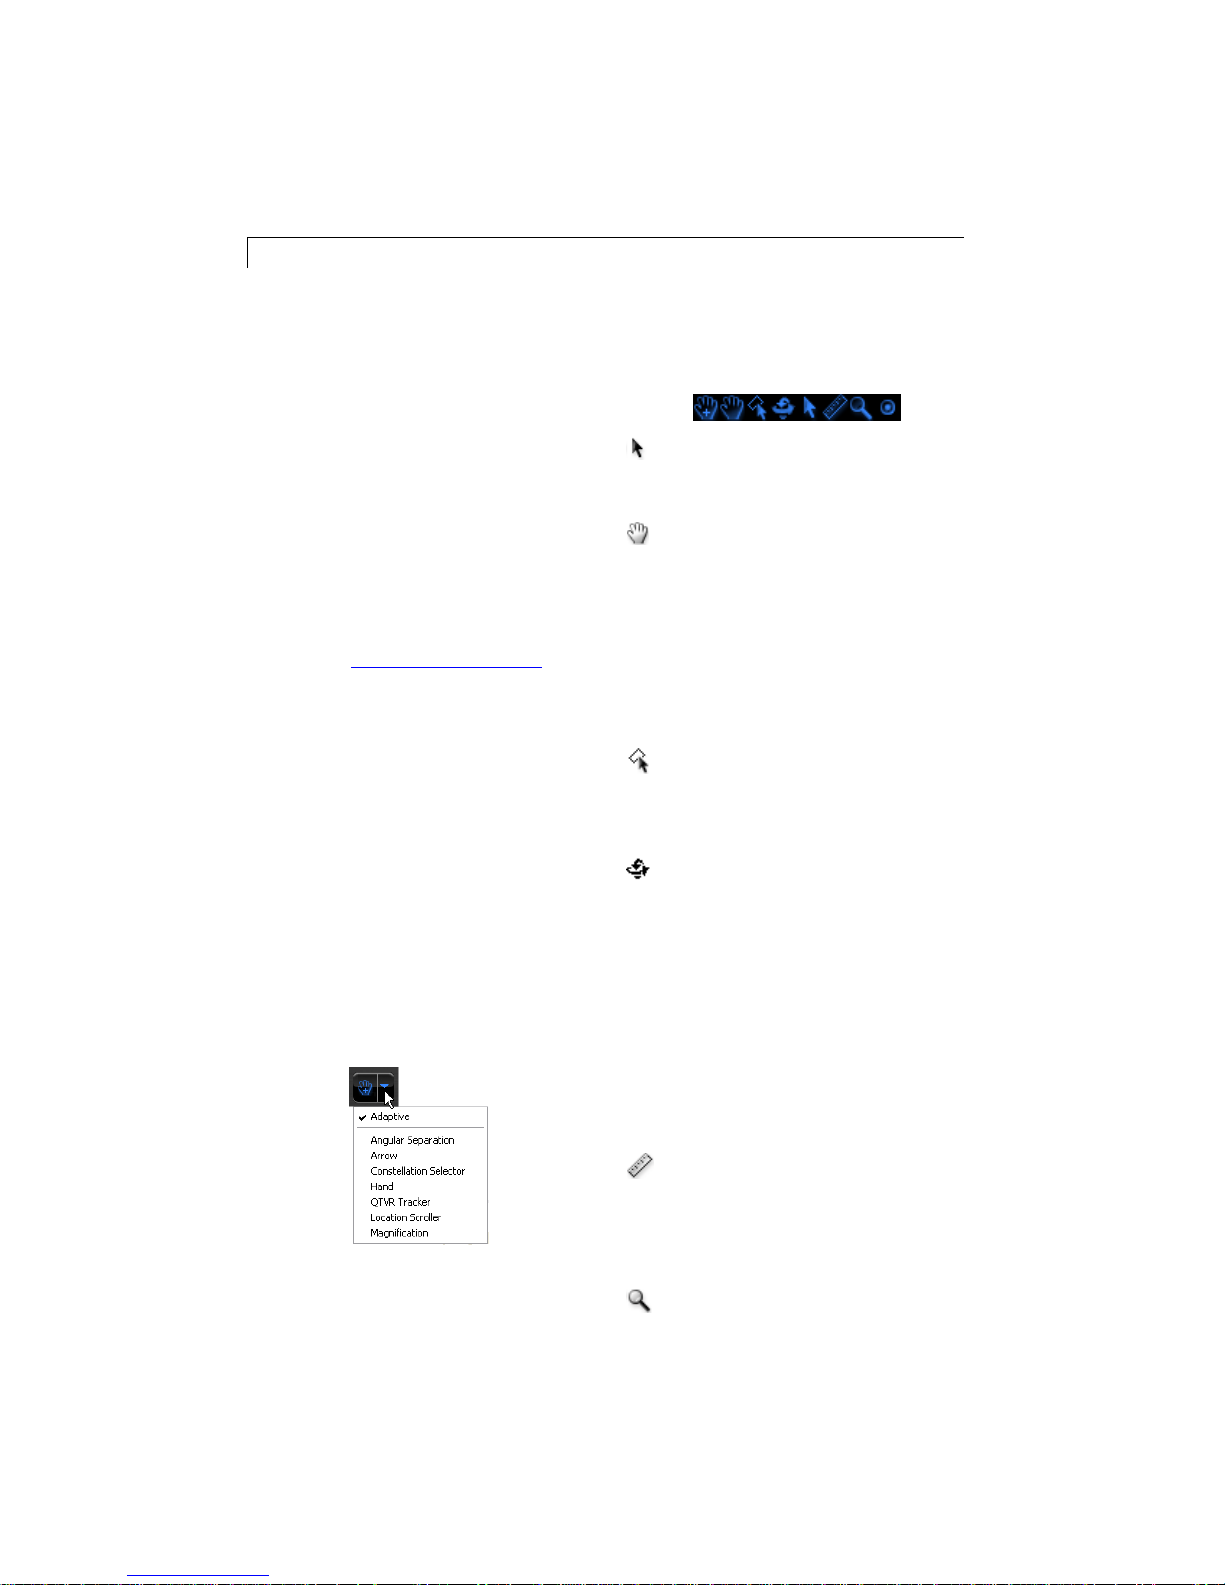
Tool Selection Control
Now that you know about some of the
major features in Starry Night Pro 5.0,
we’ll take a quick look at the Tool
Selection Control. This control (in the
upper left corner of the toolbar, to the left
of the time controls) alters the
functionality of the cursor, giving you
easier access to a variety of the program’s
features.
replaces the mouse pointer on your
computer screen.
Arrow Tool: Highlights objects in the
sky. To select multiple objects, press the
Shift key while making selections.
Hand Tool: Changes the direction in
which you are viewing. Use this tool to
drag the sky to the left or right, up or
down, until you reach the area you want to
see.
Tip: When using any other tool, you can
temporarily switch to the Hand tool by
holding down the keyboard’s space bar.
Constellation Tool: Selects
constellations. Choose this tool and click
anywhere in the sky to select the
constellation that contains that point.
Location Scroller: Changes the latitude
and longitude from which you are
observing. Dragging up or down adjusts
your latitude, while dragging left or right
adjusts your longitude. For example, while
viewing from Earth, you can use this tool
to quickly travel anywhere on the Earth’s
surface.
The Tool drop down menu contains a
number of selections. To use a tool, click
on its name. When selected, the tool’s icon
Tip: This tool is particularly useful when
you’ve lifted off into space and want to
adjust your view of the planet below you.
Angular Separation Tool: Displays the
angular separation between two objects, as
seen from your current viewing position.
Select the tool, click on one object, and
drag to another.
Magnification Tool: Magnifies your
current view. Select the tool and click

anywhere in the window to zoom in that
direction. To magnify a specific area of the
sky, hold down the mouse button and drag
to encompass the area you want
magnified.
Tip: Holding down the Ctrl key (Windows)
or the Option key (Macintosh) while using
the Zoom tool zooms you back out.
QTVR Tracker Tool: Changes your
viewing direction. Unlike the hand tool,
you don’t drag the sky around. When you
hold down the mouse button, the cursor
changes from a bull's eye icon to an arrow
icon that points in the direction you move
the mouse. The sky will move in the direction you are moving the cursor, and moves
faster the further you move the cursor with
the mouse button down. If a line appears in
front of the arrow cursor, it means you
have reached the limit of scrolling in that
direction. The QTVR tool is a fast way of
moving around the sky.
Basics 29
Adaptive Hand Tool: By default, the
adaptive hand tool is selected. This tool
allows you to change your viewing
direction. However, unlike the regular
Hand Tool, the adaptive hand tool can
change to other tools automatically. For
example, it will change to a selection tool
when you point to a selectable object, a
location scroller when viewing from space
or an angular separation tool when you
click-hold on an object and drag to
another.

30 Starry Night Pro 5.0 User’s Guide
 Loading...