

Page 1
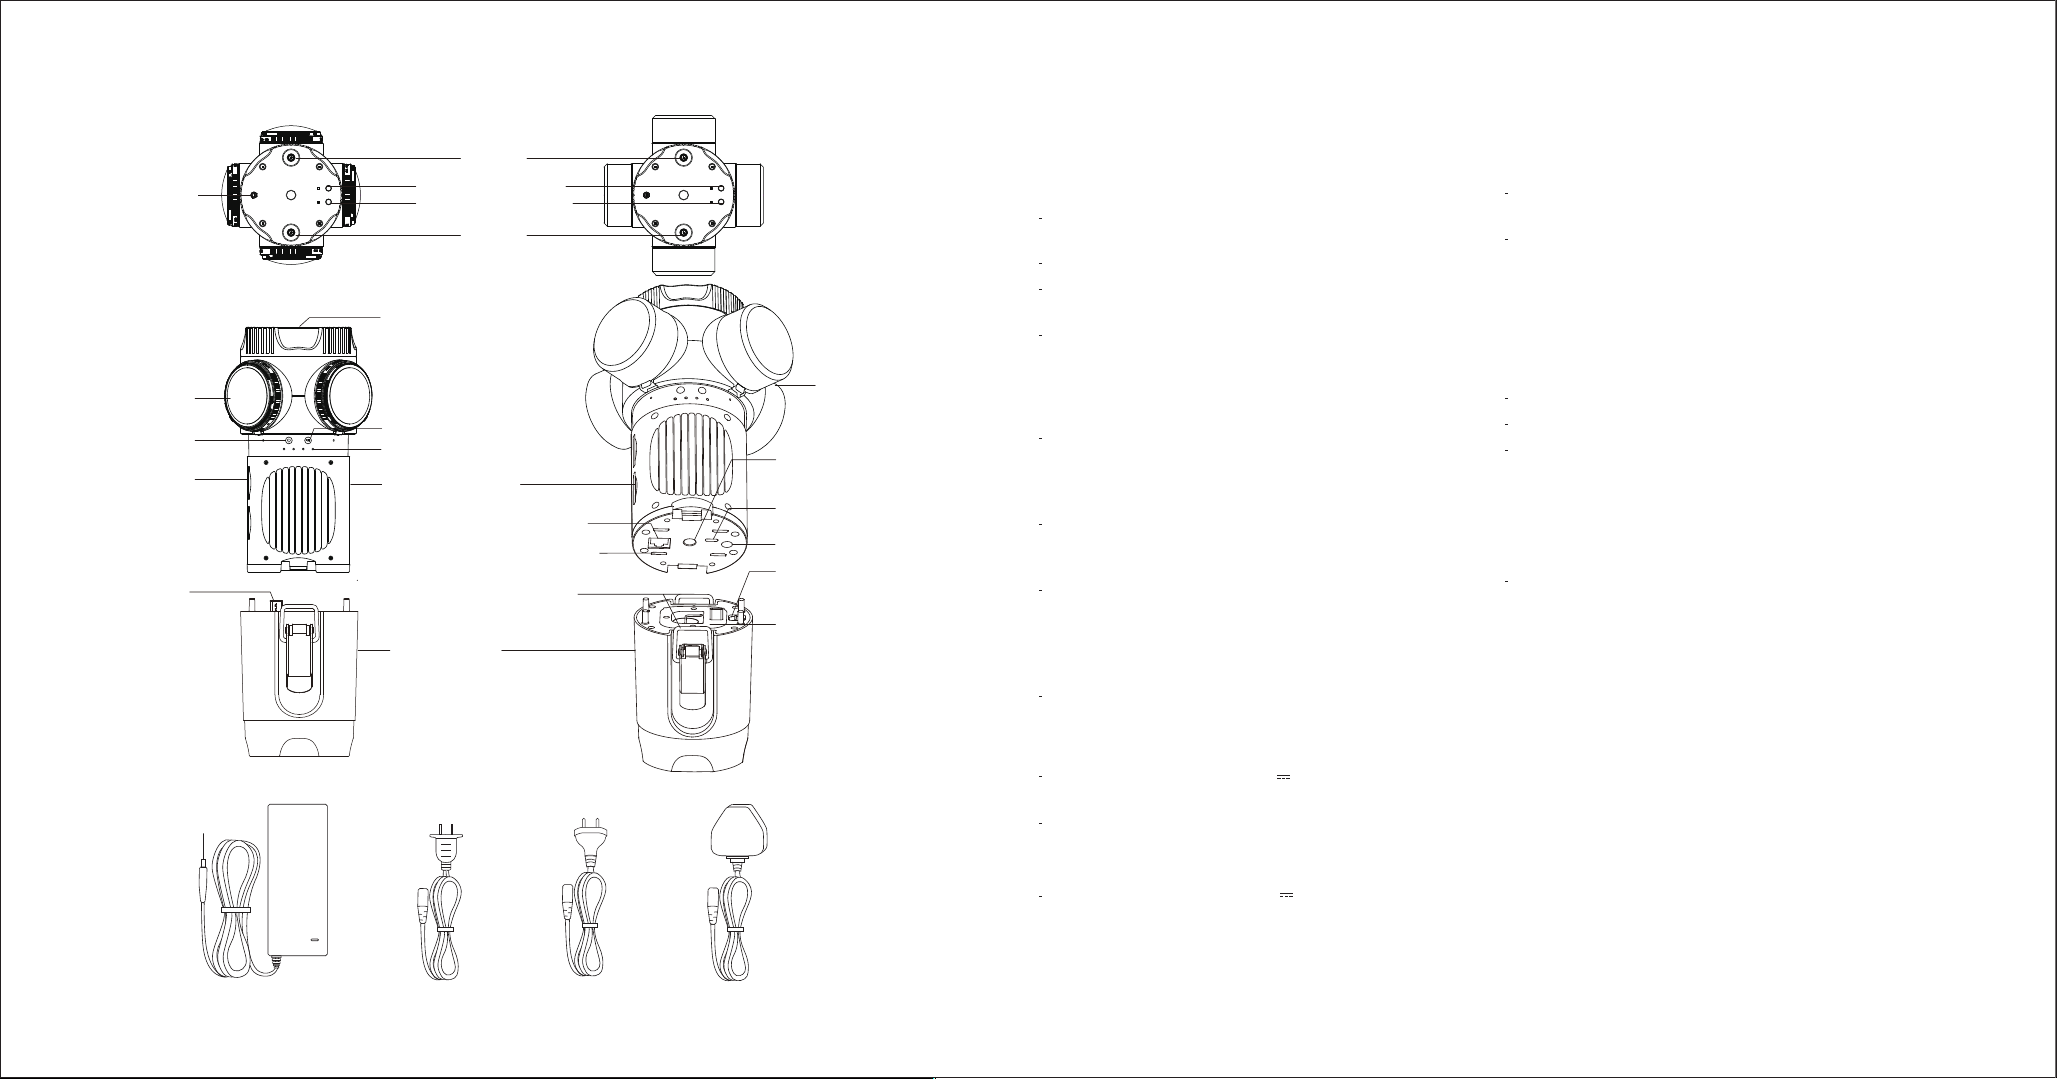
PRODUCT INTRODUCTION
23. Mic Socket
01. Fisheye lens
02. Power button
03. SD card slot
14. USB Type-C
power plug
24. DC power plug
A B C D
19. Wi-Fi
20. Wi-Fi On/Off button
21. GPS On/Off button
22. GPS
04. 3/8" Tripod mount hole (top)
05. Record button
06. LED indicator
07. Main camera unit
08. Ethernet port
09. Mini HDMI port
16. Safety latch
15. Battery unit
10. Lens cover
11. 3/8" Tripod mount hole
(bottom)
12. USB Type-C power socket
13. DC power adapter socket
17. Battery cell holder lock
18. Battery cell holder
THREE WAYS TO TURN ON Z CAM S1x Pro
AC/DC power adapter
Connect the appropriate AC power cable (26, 27 or 28) to AC/DC
power adapter (25).
Connect the AC power cable to the power outlet.
Connect the DC power plug (24) of the power adapter to the DC
power adapter socket (13) of Z CAM S1x Pro.
Note that Z CAM S1x Pro will be turned on whenever the DC power
adapter socket (13) is connected to power source.
Battery Unit
Insert four 18650 standard lithium ion rechargeable battery cells
(not included) to the Battery cell holder (18). Pay attention to the
polar direction and make sure that the battery cells are fully
charged.
Insert Battery cell holder (18) into Battery unit (15). Pay attention
to the right direction. Then slide the Battery cell holder lock (17) to
lock position.
Attach Battery unit (15) to the Main camera unit (07). Pay attention
to the right direction and make sure that USB Type-C power plug
(14) is properly plugged into the USB Type-C power socket (12).
Then pull up the Safety latch (16) , mount it onto the Main camera
unit (07) and lock it properly.
Press and hold Power button (02) to turn on Z CAM S1x Pro.
External power source
Connect other DC power source (12V 3A) to the DC power
adapter socket (13) of Z CAM S1x Pro.
Note that Z CAM S1x Pro will be turned on whenever the DC power
adapter socket (13) is connected to power source.
Or
Connect other DC power source (7.4V 3A) to the USB Type-C
power socket (12). Press and hold Power button (02) to turn on
Z CAM S1x Pro.
BEFORE RECORDING
Make sure that all four SD cards are properly inserted into the SD
card slots A, B, C & D (03).
It is recommended to use SANDISK EXTREME PRO® SDXC™ UHS-I
MEMORY CARDS or compatibles. Note that Z CAM S1x Pro
supports SDXC™ memory cards up to 128GB capacity.
RECORDING
Press and hold Record button (05) to start recording.
To stop recording, press and hold Record button (05).
Recorded video image files are stored in the corresponding SD
cards.
TURN OFF Z CAM S1x Pro
While Z CAM S1x Pro is turned on, press and hold Power button
(02) to turn o.
LED INDICATOR STATUS
All green : When Z CAM S1x Pro is turned on with all SD cards
properly inserted.
All red : When Z CAM S1x Pro is turned on but without SD
cards.
Flashing green : When Z CAM S1x Pro is recording, LED indicator
will flash once every second.
Flashing red : When SD card memory is full, LED indicator
will flash every 500ms.
Flashing red (rapid) : When Z CAM S1x Pro is overheated, LED indicator
will flash every 200ms.
25. AC/DC power adapter
AC power cable
26.
US plug
27.
AC power cable
EU plug
28.
AC power cable
UK plug
Page 2

FCC caution
Federal Communication Commission (FCC) Radiation Exposure Statement
When using the product, maintain a distance of 20cm from the body to ensure compliance
with RF exposure requirements.
FCC statements:
This device complies with part 15 of the FCC rules. Operation is subject to the
following two conditions: (1) this device may not cause harmful interference, and
(2) this device must accept any interference received, including interference that
may cause undesired operation.
NOTE: The manufacturer is not responsible for any radio or TV interference
caused by unauthorized modifications or changes to this equipment. Such
modifications or changes could void the user’s authority to operate the
equipment.
NOTE: This equipment has been tested and found to comply with the limits for a
Class B digital device, pursuant to part 15 of the FCC Rules. These limits are
designed to provide reasonable protection against harmful interference in a
residential installation. This equipment generates uses and can radiate radio
frequency energy and, if not installed and used in accordance with the
instructions, may cause harmful interference to radio communications. However,
there is no guarantee that interference will not occur in a particular installation.
If this equipment does cause harmful interference to radio or television reception,
which can be determined by turning the equipment off and on, the user is
encouraged to try to correct the interference by one or more of the following
measures:
‐ Reorient or relocate the receiving antenna.
‐ Increase the separation between the equipment and receiver.
‐Connect the equipment into an outlet on a circuit different from that to which
the receiver is connected.
‐Consult the dealer or an experienced radio/TV technician for help.
 Loading...