

Page 1
Z CAM K1 Pro K2501
QUICK USER GUIDE
HOW TO TURN ON Z CAM K1 PRO
AC/DC Power Adapter
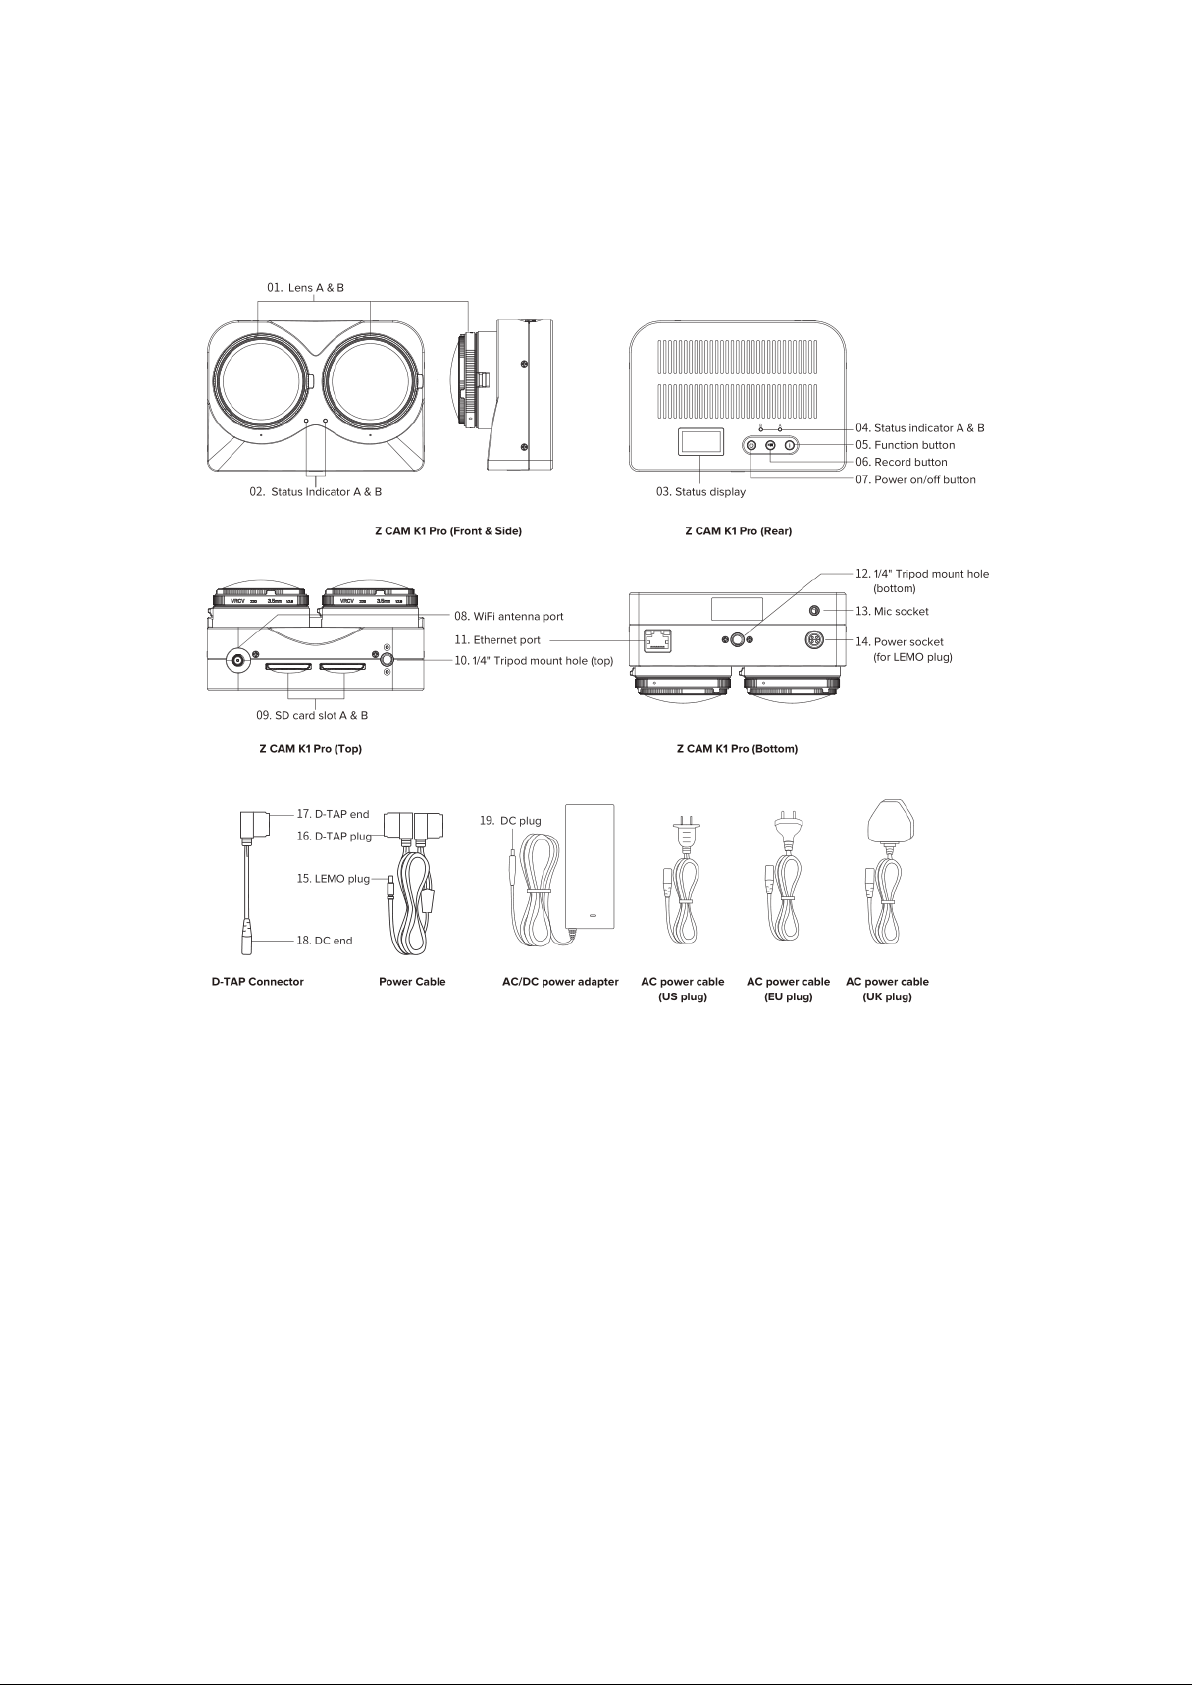
- Connect power cable (15. LEMO plug) to power socket (14) of Z CAM K1
Pro
camera unit.
- Connect D-TAP connector (17. D-TAP end) to power cable (16. D-TAP plug).
- Connect D-TAP connector (18. DC end) to AC/DC power adapter (19. DC
plug).
Plug in appropriate AC power cable to AC/DC power adapter, then connect
to power outlet.
Page 2

- Z CAM K1 Pro will then be turned on
External Batter
- Connect power cable (15. LEMO plug) to power socket of Z CAM K1 Pro
camera unit.
- Connect power cable (16. D-TAP plug) to external battery D-TAP socket.
- Z CAM K1 Pro will then be turned on
BEFORE RECORDING
- Insert two SD cards in SD card slots A & B (09) according to the direction
indicated.
- It is highly recommended to use SANDISK EXTREME PRO® SDXC™
UHS-IMEMORY CARDS. (Note that Z CAM K1 Pro supports SDXC™
memory cards up to 128GB capacity.)
- Always use Z CAM Controller to format the SD cards on board before
Recording
RECORDING
- Press and hold record button (06) to start recording.
- To stop recording, press and hold record button (06).
- Recorded video image files are stored on the corresponding SD cards.
VIDEO STITCHING
- Connect Z CAM K1 Pro to PC through the ethernet port (11).
- Download and install Z CAM Controller from www.z-cam.com .
- Open Z CAM Controller and select Z CAM K1 Pro.
- Use Downloader from Tools to dow nl oad v ideo files accordingly.
- Use Z CAM WonderStitch from Tools and follow on screen instructions to
stitch
LED INDICATOR STATUS
All green : When Z CAM K1 Pro is turned on with all SD cards
Page 3

properly inserted.
All red : When Z CAM K1 Pro is turned on but without SD
cards.
Flashing green : When Z CAM K1 Pro is recording, LED indicator
will flash once every second.
Flashing red : When SD card memory is full, LED indicator
will flash every 500ms.
Flashing red (rapid) : When Z CAM K1 Pro is overheated, LED indicator
will flash every 200ms.
WARRANTY TERMS & CONDITIONS
Z CAM K1 Pro (the “Product”) is warrantied against defects in material and
workmanship by this warranty statement. The Warranty Period is one (1) year
from the day of original retail purchase.
During the Warranty Period, Shenzhen ImagineVision Technology Limited
(“IMVT”) will, at no charge, repair the Product or replace the Product with a
functionally equivalent Product, as determined by its customer support if it is
defective. Note that IMVT will not bear any transportation or delivery charges
of the Product to the designated repair centre or collection point.
Warranty repair or replacement does not extend the original Warranty Period
of the Product.
‐ This Warranty is not assignable or transferable, and applied to the original
purchase customer onl y.
‐ This Warranty does not apply to the Product that have been misused,
abused, accidentally damaged, or have its serial
number altered/r em ov ed.
‐ This Warranty does not apply to any defect or damage caused, directly or
Page 4

indirectly, by unauthorized personnel using unauthorized replacement
parts
and/or services.
LED INDICATOR STATUS
Federal Communication Commission (FCC) Radiation Exposure Statement
When using the product, maintain a distance of 20cm from the body to ensure
compliance with RF exposure requirements.
FCC CAUTION
Federal Communication Commission (FCC) Radiation Exposure Statement
When using the product, maintain a distance of 20cm from the body to ensure
compliance with RF exposure requirements.
FCC statements:
This device complies w i th part 15 of the FCC rules. Operation is subject to the
following two conditions:
1. this device may not cause harmful interference, and
2. this device must accept any interference received, including interference
that may cause undesired operation.
NOTE: The manufacturer is not responsible for any radio or TV interference
caused by unauthorized modifications
or changes to this equipment. Such modifications or changes could void the
user’s authority to operate the equipment.
NOTE: This equipment has been tested and found to comply with the limits for
a Class B digital device, pursuant to part 15 of the FCC Rules. These limits
are designed to provide reasonable protection against harmful interference in
a residential installation. This equipment generates uses and can radiate radio
frequency energy and, if not installed and used in accordance with the
Page 5

instructions, may cause harmful interference to radio communications.
However, there is no guarantee that interference will not occur in a particular
installation. If this equipment does cause harmful interference to radio or
television reception, which can be determined by turning the equipment off
and on, the user is encouraged to try to correct the interference by one or
more of the following measures:
‐ Reorient or relocate the receiving antenna.
‐ Increase the separation between the equipment and receiver.
‐Connect the equipment into an outlet on a circuit different from that to which
the receiver is connected.
‐Consult the dealer or an experienced radio/TV technici an for hel p.
 Loading...