

Page 1

Installation Guide
Nexio® NLE Gateway
November 2014
Page 2

Nexio® NLE Gateway Installation Guide
Publication Information
© 2014 Imagine Communications Corp.
Proprietary and Confidential.
Imagine Communications considers this document and its contents to be proprietary and confidential.
Except for making a reasonable number of copies for your own internal use, you may not reproduce this
publication, or any part thereof, in any form, by any method, for any purpose, or in any language other
than English without the written consent of Imagine Communications. All others uses are illegal.
This publication is designed to assist in the use of the product as it exists on the date of publication of
this manual, and may not reflect the product at the current time or an unknown time in the future. This
publication does not in any way warrant description accuracy or guarantee the use for the product to
which it refers. Imagine Communications reserves the right, without notice to make such changes in
equipment, design, specifications, components, or documentation as progress may warrant to improve
the performance of the product.
Trademarks
Microsoft® and Windows® are registered trademarks of Microsoft Corporation. Adobe® and Adobe
Premiere® are registered trademarks of Adobe Corporation. Apple® and Apple Final Cut Pro® are
registered trademarks of Apple Corporation. All other trademarks and trade names are the property of
their respective companies.
Microsoft® and Windows® are registered trademarks of Microsoft Corporation. All other trademarks and
trade names are the property of their respective companies.
Contact Information
Imagine Communications has office locations around the world. For domestic and international location
and contact information, visit our Contact page
(http://www.imaginecommunications.com/company/contact-us.aspx).
Support Contact Information
For domestic and international support contact information see:
Support Contacts (http://www.imaginecommunications.com/services/customer-care.aspx)
eCustomer Portal (http://support.imaginecommunications.com)
Academy Training (http://www.imaginecommunicationsacademy.com)
© 2014 Imagine Communications Corp. Proprietary and Confidential. November 2014 | Page 2
Page 3

Nexio® NLE Gateway
Installation Guide Contents
Contents
Chapter 1 Overview .............................................................................................. 5
Document Roadmap ................................................................................................................................. 5
System Requirements ............................................................................................................................... 6
Hardware .............................................................................................................................................. 6
Software ............................................................................................................................................... 7
Physical Connectivity ................................................................................................................................ 8
NXH1UNLE ............................................................................................................................................ 8
NXH1UNLG ........................................................................................................................................... 9
Chapter 2 Configuring the NLE Gateway Hardware ............................................. 10
Confirm Network Connections ............................................................................................................... 10
Physical Connections .......................................................................................................................... 10
IP Addresses ....................................................................................................................................... 11
Switch Settings ................................................................................................................................... 13
Configuring the Intel NIC Cards .............................................................................................................. 13
Configuring the NVIDIA NICs .................................................................................................................. 22
Configuring the Chelsio Adapter ............................................................................................................ 29
Configuring Farad Storage ...................................................................................................................... 30
Upgrading an FCP Integration Gateway to an NLE Gateway .................................................................. 31
Chapter 3 Configuring the NLE Gateway Software .............................................. 32
Installing the LLM and CIFServer Application ......................................................................................... 32
Updating the CIFServer Application ....................................................................................................... 32
Using Nexio Config .................................................................................................................................. 33
Installing the MB Server Service ............................................................................................................. 33
Installing the PostgreSQL Database ........................................................................................................ 33
Unattended Batch Installation ........................................................................................................... 34
Configuring the CIFServer Application ................................................................................................... 34
Launching the LLM and CIFServer .......................................................................................................... 34
Setting up the System ........................................................................................................................ 35
Configure Logging ............................................................................................................................... 37
© 2014 Imagine Communications Corp. Proprietary and Confidential. November 2014 | Page 3
Page 4

Nexio® NLE Gateway
Installation Guide Contents
Chapter 4 Installing the Mac NLE Client Plug-ins ................................................. 39
Connecting the Client Workstation to the NLE Gateway ....................................................................... 39
Connecting to the Gateway Server .................................................................................................... 39
Using the Nexio NLE Plug-in Suite for Mac Installer ............................................................................... 40
Using the Nexio LXF Export Plug-in for Mac Installer ............................................................................. 42
Launching LXF Export ......................................................................................................................... 43
Setting System Preferences .................................................................................................................... 45
General Tab ........................................................................................................................................ 47
Database Tab ...................................................................................................................................... 47
Table Columns Tab ............................................................................................................................. 48
NRCS Tab ............................................................................................................................................ 48
Final Cut Pro 7 Tab ............................................................................................................................. 49
Chapter 5 Installing the PC NLE Client Plug-Ins .................................................... 50
Mapping Your Network Drive ................................................................................................................. 50
Running the Nexio Adobe Plug-in Suite for Windows Installer .............................................................. 51
Chapter 6 Specifications ...................................................................................... 53
Supported Codecs................................................................................................................................... 53
Client Support ......................................................................................................................................... 54
Client Workstations per NLE Gateway ................................................................................................... 54
Video Streams Per Gateway ................................................................................................................... 55
© 2014 Imagine Communications Corp. Proprietary and Confidential. November 2014 | Page 4
Page 5

Nexio® NLE Gateway Chapter 1
Document
Audience
Contents
Nexio® NLE Gateway
Installation Guide
Installation Professionals
How to configure the Nexio NX1011
hardware device as a Nexio NLE
gateway.
How to connect a Nexio NLE gateway to
a Nexio SAN.
How to install the NLE software plug-ins
onto the client workstations (PCs and
Macs).
Nexio® NLE Gateway User
Guide
End Users
How to access media on the Nexio SAN
and export edited media using the NLE
software plug-ins on the client
workstations.
Nexio® NLE Gateway 3.0
Software Release Notes
Installation Professionals
Lists and describes all software versions
that are associated with the current
release of the Nexio NLE Gateway 3.0
software release. It also lists new features
and known issues.
Nexio® 7.5 Software
Installation Guide
Installation Professionals
How to install common Nexio
components.
Nexio Config Users Guide
Installation Professionals
How to configure common Nexio
Components.
Nexio Player® User Guide
Installation Professionals
and End Users
How to install and use the Nexio Player
software application on client PC
workstations.
Nexio® NX1011 Series
Hardware Guide
Installation Professionals
and End Users
How to install and use the Nexio NX1011
hardware device.
Chapter 1
Installation Guide Overview
Overview
Document Roadmap
This table describes all of the documents written in support of the Nexio® NLE Gateway product suite.
© 2014 Imagine Communications Corp. Proprietary and Confidential. November 2014 | Page 5
Page 6

Nexio® NLE Gateway Chapter 1
Installation Guide Overview
System Requirements
Hardware
The Nexio® NLE Gateway system includes the following hardware:
Nexio server system with external SBOD or Farad storage
Nexio NLE Gateway, a 1 RU Nexio server with external storage.
Gigabit or 10-Gigabit Ethernet switches.
Gigabit Ethernet category 6 cabling.
Customer provided client workstations. (Intel-based Mac Pro, MacBook Pro or iMac computers or
Windows PC).
© 2014 Imagine Communications Corp. Proprietary and Confidential. November 2014 | Page 6
Page 7

Nexio® NLE Gateway Chapter 1
Software
Installed on
PostgreSQL
Nexio NLE Gateway
Nexio CIFServer
Nexio NLE Gateway
Nexio MB Server
Nexio NLE Gateway
Software
Installed on
Nexio FTP Server
Nexio MGX for Premiere Pro
Nexio Player
Windows workstation running
Premiere Pro
Nexio Export
Windows workstation running
Premiere Pro
Software
Installed on
Nexio Browser
Each Mac client workstation
running FCP7, FCPX or Premiere
Pro.
Nexio Preference
Each Mac client workstation
running FCP7, FCPX or Premiere
Pro.
Nexio Export
Each Mac client workstation
running FCP7, FCPX or Premiere
Pro.
FCP7 Specific
Specific plug-ins supporting FCP7.
Installation Guide Overview
Software
Nexio NLE gateway Software
Windows Workstations
Mac Workstations
© 2014 Imagine Communications Corp. Proprietary and Confidential. November 2014 | Page 7
Page 8
Nexio® NLE Gateway Chapter 1
Installation Guide Overview
Physical Connectivity
The NLE Gateway platform has two models. The NXH1UNLE model features gigabit Ethernet. The
NXH1UNLE model features 10-gigabit Ethernet.
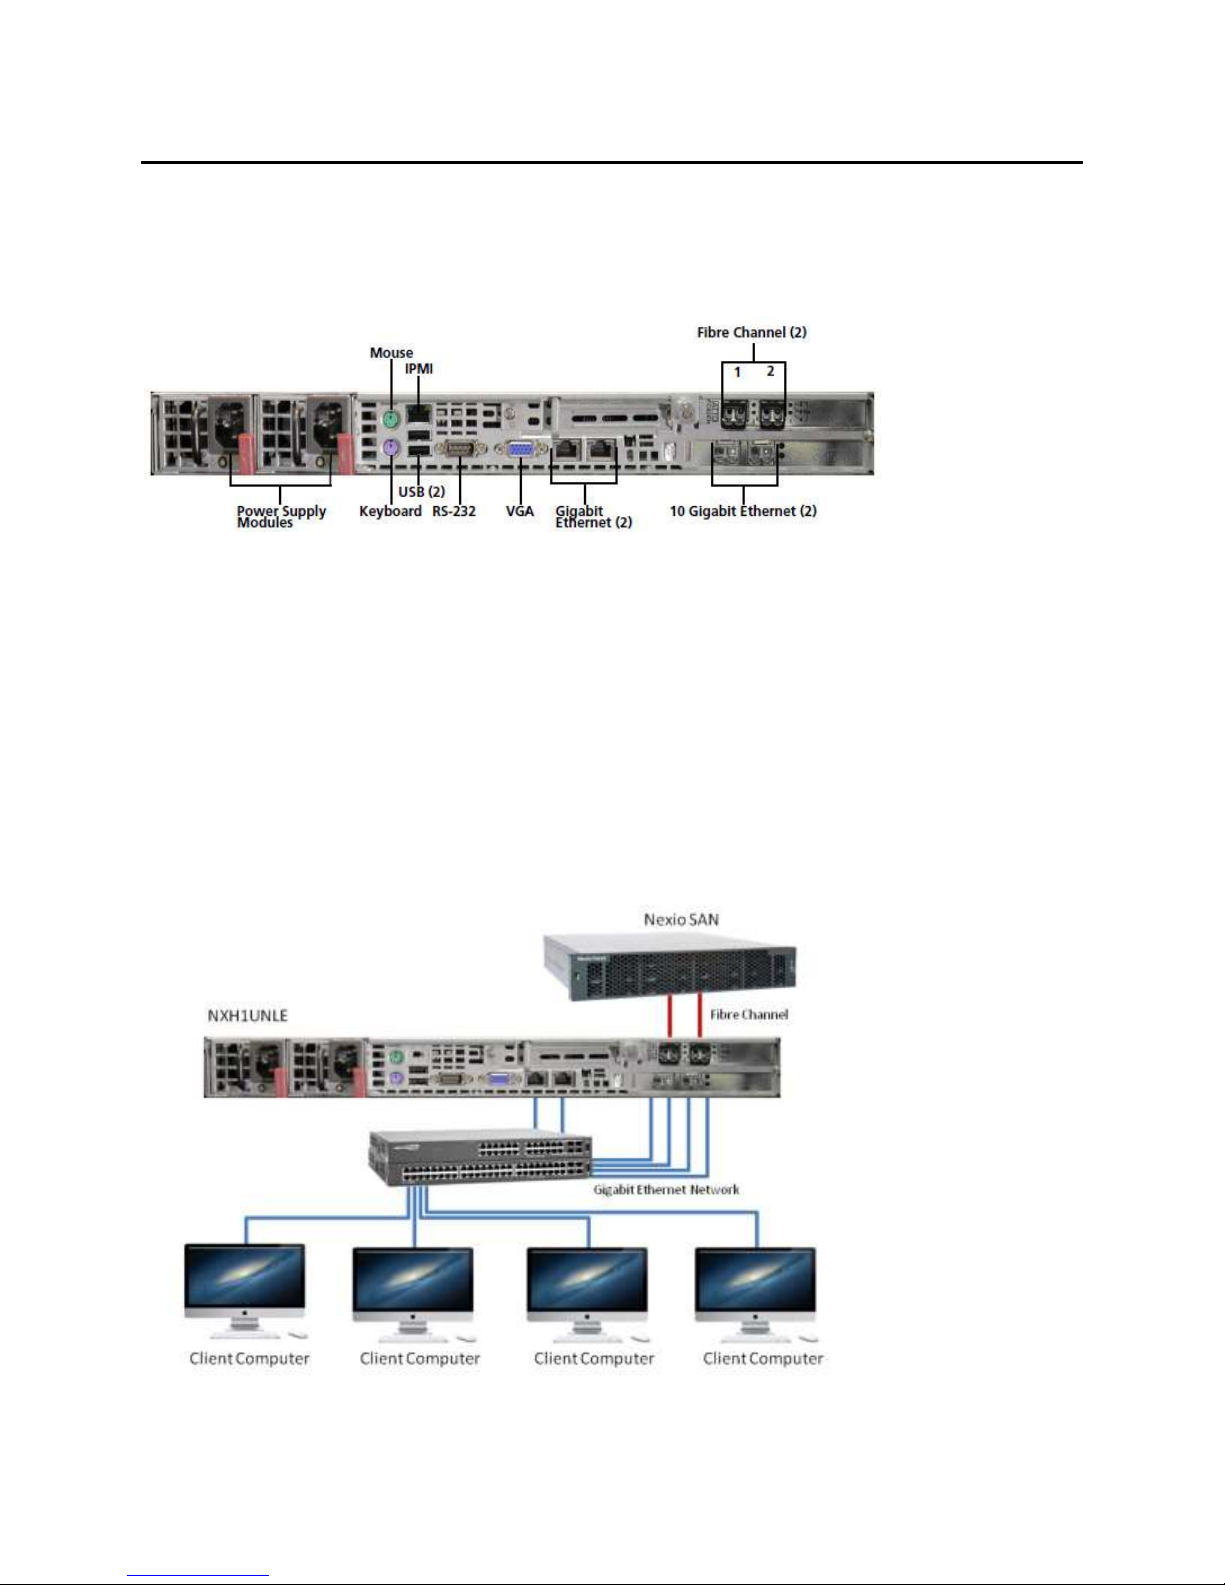
NXH1UNLE
Model NXH1UNLE contains the following:
2 motherboard Ethernet network ports.
4 gigabit Ethernet network ports.
2 fibre channel ports.
The client workstation's connection to the Nexio NLE gateway depends on the hardware platform. The
NXH1UNLE quad Ethernet ports connect to a gigabit Ethernet switch. This switch also interfaces to the
client workstations. Here is a sample network with an NXH1UNLE
© 2014 Imagine Communications Corp. Proprietary and Confidential. November 2014 | Page 8
Page 9
Nexio® NLE Gateway Chapter 1
Installation Guide Overview
Note. When connecting more than 4 client workstations to the NLE Gateway, do not map more than
two workstations to any one Ethernet port or IP Address.
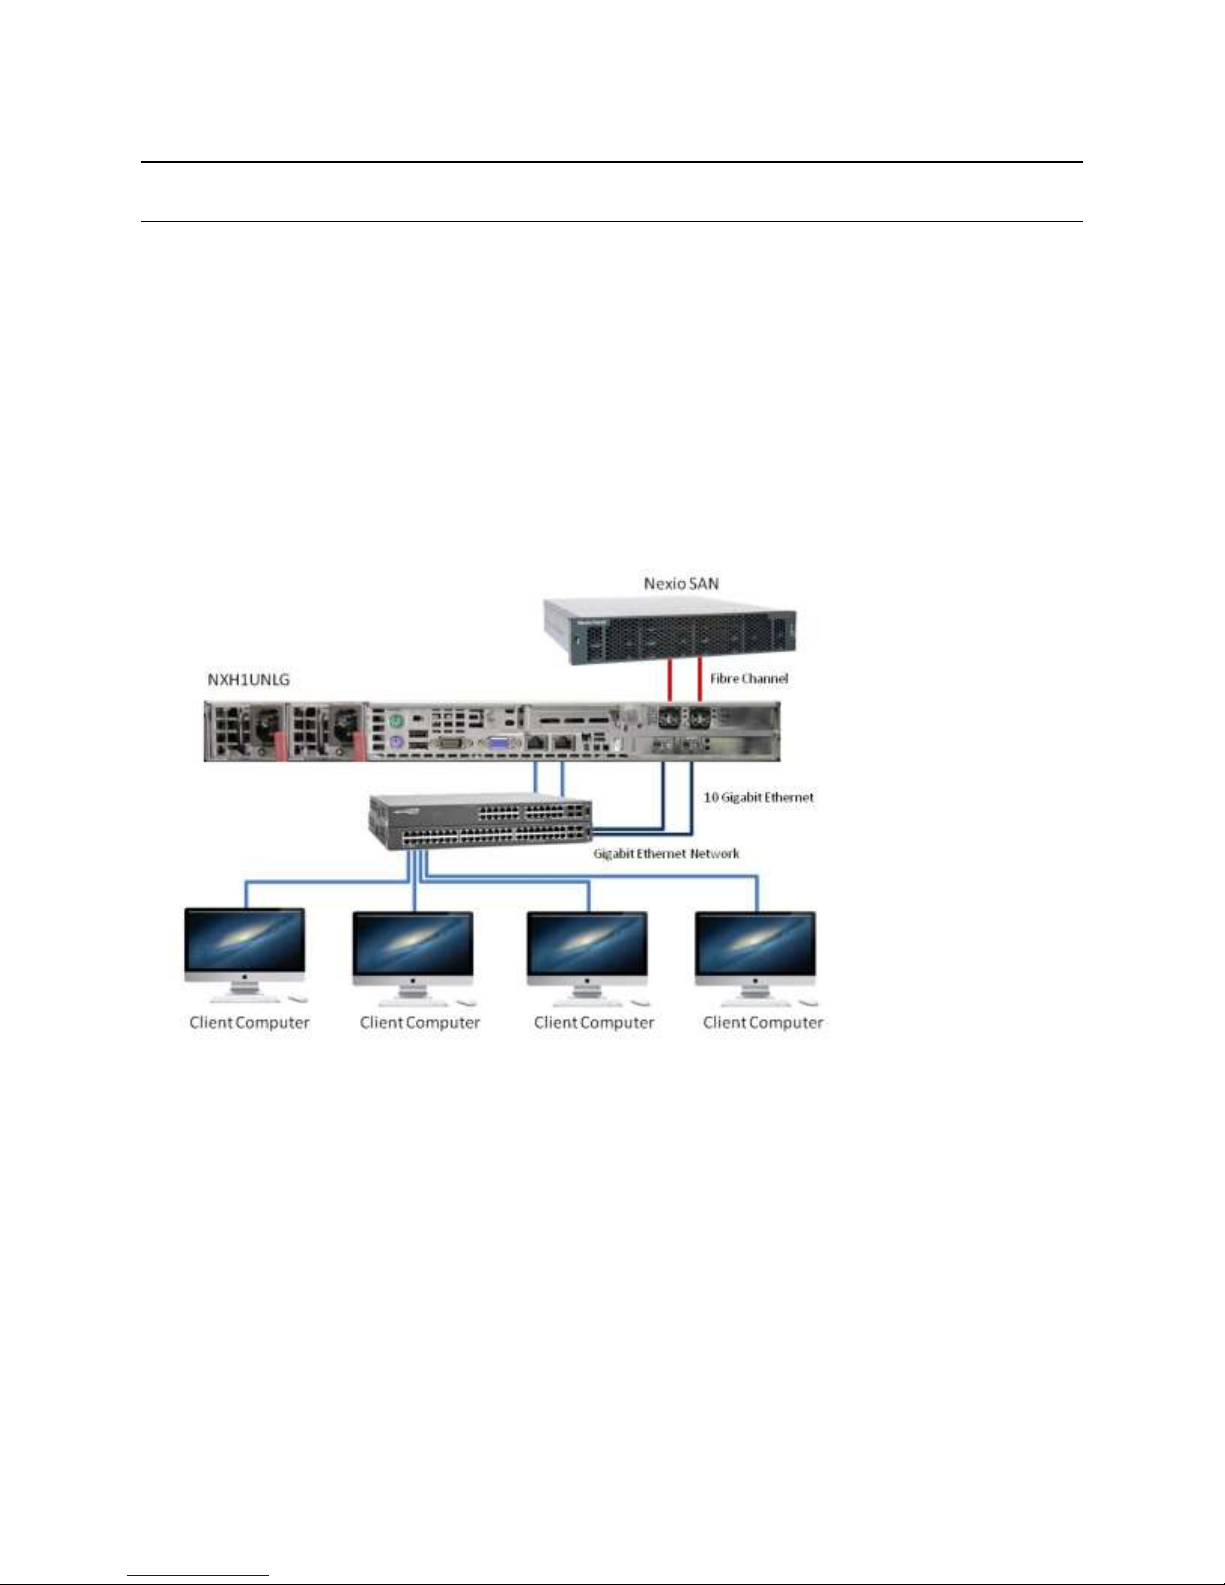
NXH1UNLG
NXH1UNLG contains the following:
2 motherboard Ethernet network ports.
2 10 gigabit Ethernet network ports.
2 fibre channel ports.
The NXH1UNLG dual 10-Gigabit Ethernet ports connect to a 10-Gigabit Ethernet switch. It also interfaces
to the client workstations via Gigabit Ethernet. Here is a sample network with an NXH1UNLG.
© 2014 Imagine Communications Corp. Proprietary and Confidential. November 2014 | Page 9
Page 10

Nexio® NLE Gateway Chapter 2
Chapter 2
Installation Guide Configuring the NLE Gateway Hardware
Configuring the NLE Gateway
Hardware
This chapter describes how to configure a Nexio NLE gateway hardware device. Here is a summary list of
configuration tasks you must perform.
Use the Nexio Config software tool to configure your NLE Gateway.
Confirm Network Connections including the following:
Physical connections.
IP Addresses.
Switch Settings.
Configuring the Intel NIC Cards
Configuring the Chelsio Adapter
Configuring Farad Storage
Upgrading an FCP Integration Gateway to an NLE Gateway
Confirm Network Connections
Physical Connections
Physical Ethernet infrastructures can be developed using three networks. The infrastructure must be
built up so that a single failure does not compromise both physical connections of any pair listed here:
UDP SAN1and UDP SAN2
Network switch A and B
Network switch C and D
Physical Ethernet infrastructures can be built using one of the following methods:
1. In a case where the infrastructure has stand-alone switches, you should use separate switches for
each of the networks. If you need more than one switch per network, the switches supporting that
network must be connected via backplane UniStack stacking cables.
2. In a case where the infrastructure has one enterprise class switch, you can use multiple blades or
separate blades (or blade sets) for each of the networks.
3. In a case where the infrastructure has enterprise class switches with multiple blades, you should
separate each of the networks, one on each switch. In this case, blade usage does not matter, but
try to use the same blade numbers on each switch for easy identification.
In case 3, you can achieve an additional layer of recovery by populating each switch with enough blades
to support all the networks, as though you were building with a single switch (same as case 2). To do
© 2014 Imagine Communications Corp. Proprietary and Confidential. November 2014 | Page 10
Page 11

Nexio® NLE Gateway Chapter 2
IP Term
Definition
IP address
Decimal notation such as 172.16.252.1
Octet
Generic name for the four parts of the IP address.
Each IP address must have four octets.
Subnet Mask
The part of the IP address that forms the network
ID.
Network ID
The part of the address defined by the subnet
mask. For example, a subnet mask of
255.255.255.0 means that the Netowork ID of the
IP address is above 172.16.252.0.
Host ID
The ID outside the subnet mask. In this case 1.
LSB8
The final octet of the IP address. In this case 1.
172.26.252.1
172.26.253.1
172.26.254.1
172.26.255.1
Installation Guide Configuring the NLE Gateway Hardware
this, connect the networks as described in case 3, leaving enough spare connectors on the alternate
switch to allow support of all cables from its partner. If one switch fails or goes down for maintenance,
the connections can be moved to the empty jacks on the alternate switch, to restore full redundancy
IP Addresses
The following definitions apply:
The IP addresses on a Nexio system must conform to the following rule. The difference between the
LSB8 of the Nexio NLE gateway NICs A and B, NICs C and D, and client NICs 1 and 2 must be equal
regardless of subnet mask.
IP Rule Stated as a Formula:
(LSB8 NIC A) minus (LSB8 NIC B) must equal (LSB8 NIC1) minus (LSB8 NIC 2)
Also,
(LSB NIC C) minus (LSB8 NIC D) must equal (LSB8 NIC1) minus LSB8 NIC 2)
The easiest way to follow this rule is to use class C networks and assign different Network IDs to each
NIC on a Nexio Media Host and use the same Host ID among the NICs.
Class C Network Example
Nexio Media Host node 1, use these IP addresses:
Nexio Media Host node 2, use these IP addresses:
© 2014 Imagine Communications Corp. Proprietary and Confidential. November 2014 | Page 11
Page 12

Nexio® NLE Gateway Chapter 2
172.26.252.2
172.26.253.2
172.26.254.2
172.26.255.2
172.26.252.21
172.26.253.21
172.26.254.22
172.26.255.22
172.26.252.1
172.26.252.129
172.26.253.1
172.26.253.129
172.26.252.2
172.26.252.130
172.26.253.2
172.26.253.130
172.26.252.21
172.26.253.149
172.26.254.22
172.26.255.150
Installation Guide Configuring the NLE Gateway Hardware
Client node 21, use these IP addresses:
Client node 22, use these IP addresses:
Fractional Class C Network Example
This network has a 25 bit subnet mask of 255.255.255.128. The LSB8 difference equals 128.
Nexio Media Host node 1, use these IP addresses:
Nexio Media Host node 2, use these IP addresses:
Client node 21, use these IP addresses:
Client node 22, use these IP addresses:
© 2014 Imagine Communications Corp. Proprietary and Confidential. November 2014 | Page 12
Page 13
Nexio® NLE Gateway Chapter 2
Installation Guide Configuring the NLE Gateway Hardware
Switch Settings
The switches must be set up with appropriate VLANs assigned to the ports to support the six networks
involved. IP forwarding should be enabled to allow house networks to access the server system for
command, control, and diagnostics.
All ports must have auto-negotiate settings enabled when running adapters at 1000 Mbps or 1 GB.
Configuring the Intel NIC Cards
Intel Network Interface Controllers (NICs) are used in all Nexio Media Host servers.
Note. You must configure the NICS for each of the four quad adapter ports.
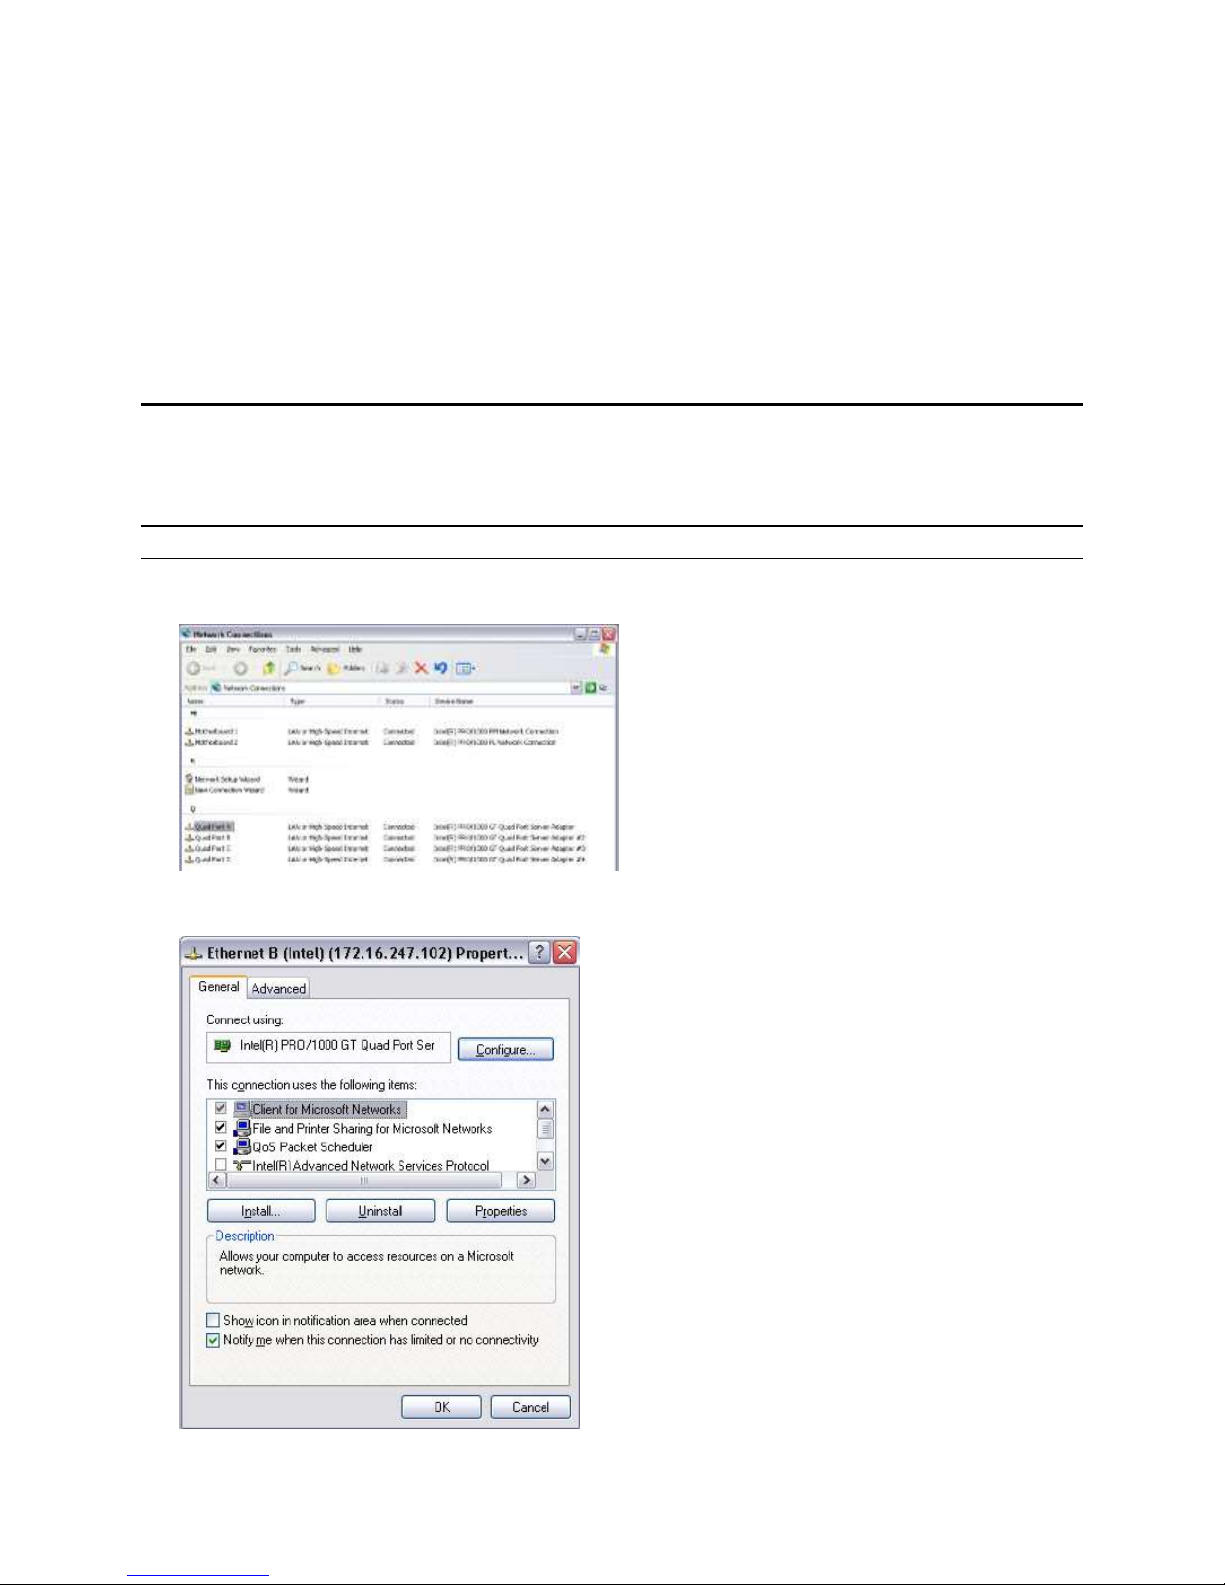
1. From the desktop of the Nexio Media Host device, right-click My Network Places. Then click
Properties. The Network Connections dialog displays.
2. Right-click the device for the port you are configuring, then click Properties. The dialog for that
device displays.
© 2014 Imagine Communications Corp. Proprietary and Confidential. November 2014 | Page 13
Page 14
Nexio® NLE Gateway Chapter 2
Installation Guide Configuring the NLE Gateway Hardware
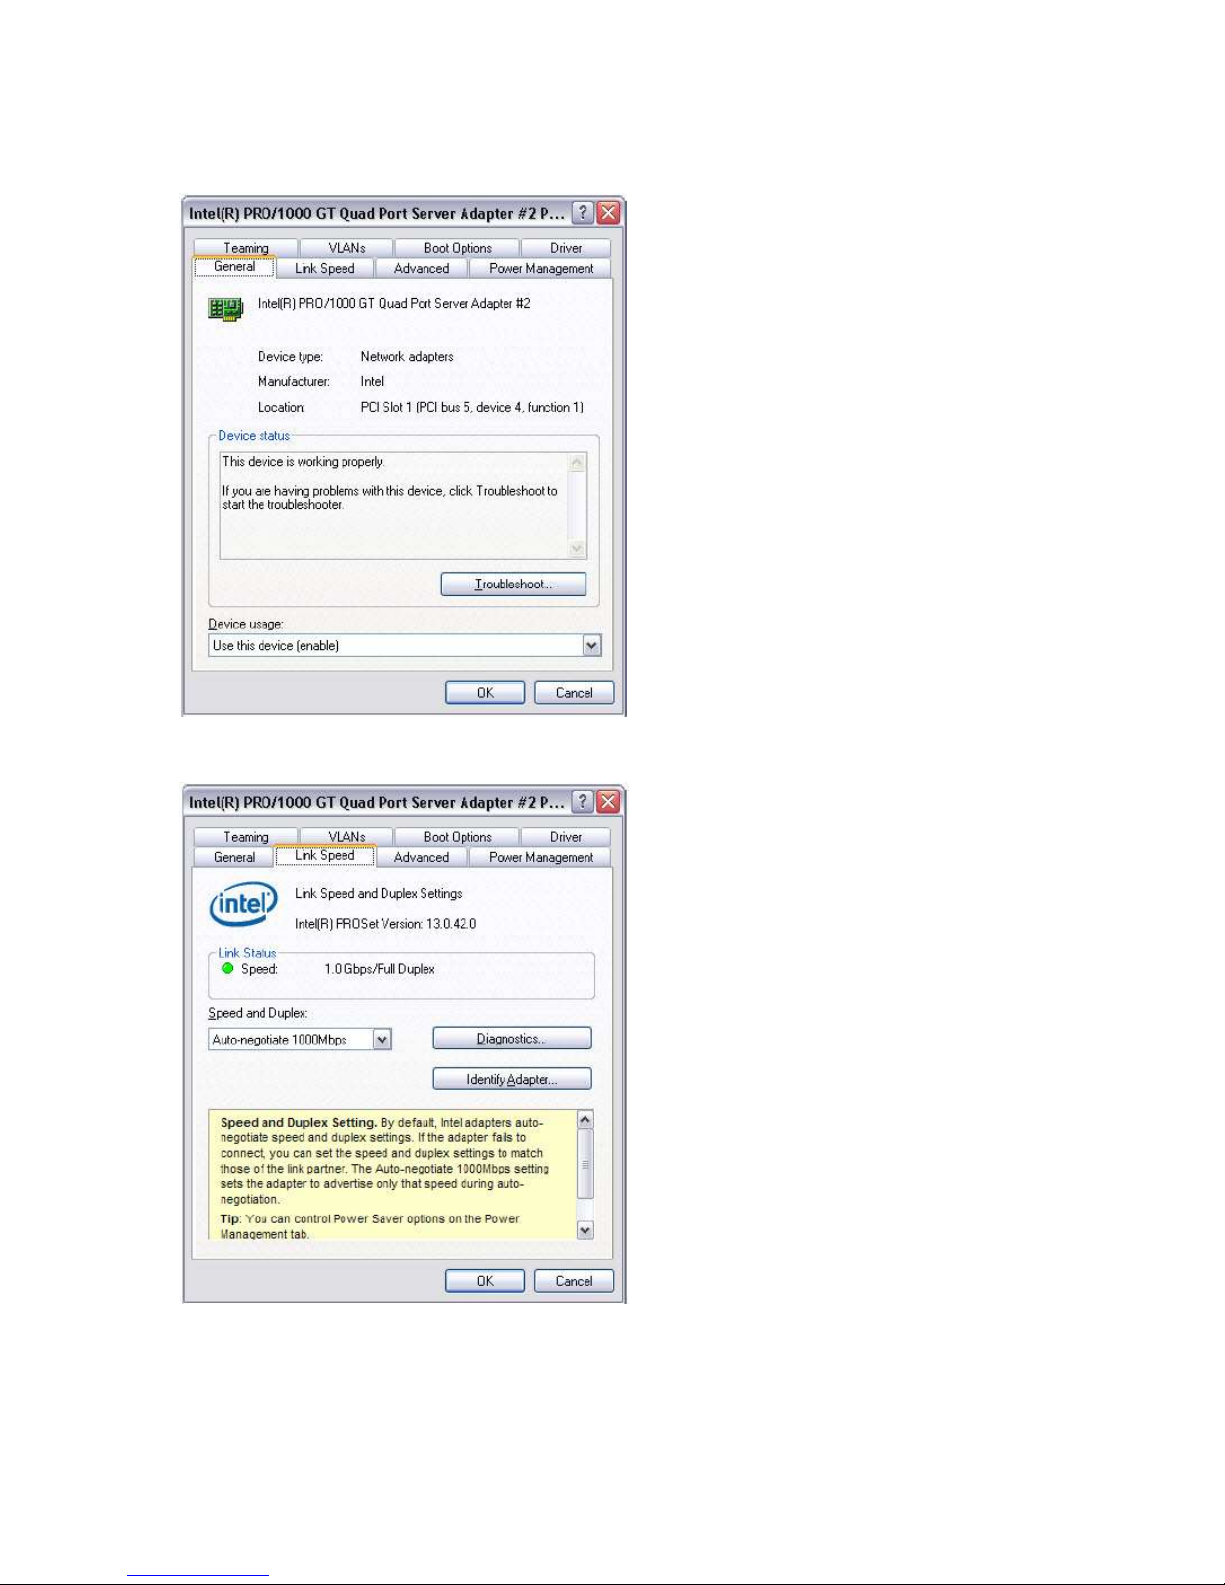
3. Click Configure to display the Intel Quad Port Server Adapter Properties dialog.
4. On the General tab, in the Device usage list, select Use this device (enable). Select the Link Speed
tab.
© 2014 Imagine Communications Corp. Proprietary and Confidential. November 2014 | Page 14
Page 15
Nexio® NLE Gateway Chapter 2
Installation Guide Configuring the NLE Gateway Hardware
5. On the Link Speed tab, verify that the Speed indicator is green and shows 1.0 Gbps/Full Duplex. In
the Speed and Duplex list, select Auto-negotiate 1000 Mbps. Select the Advanced tab.
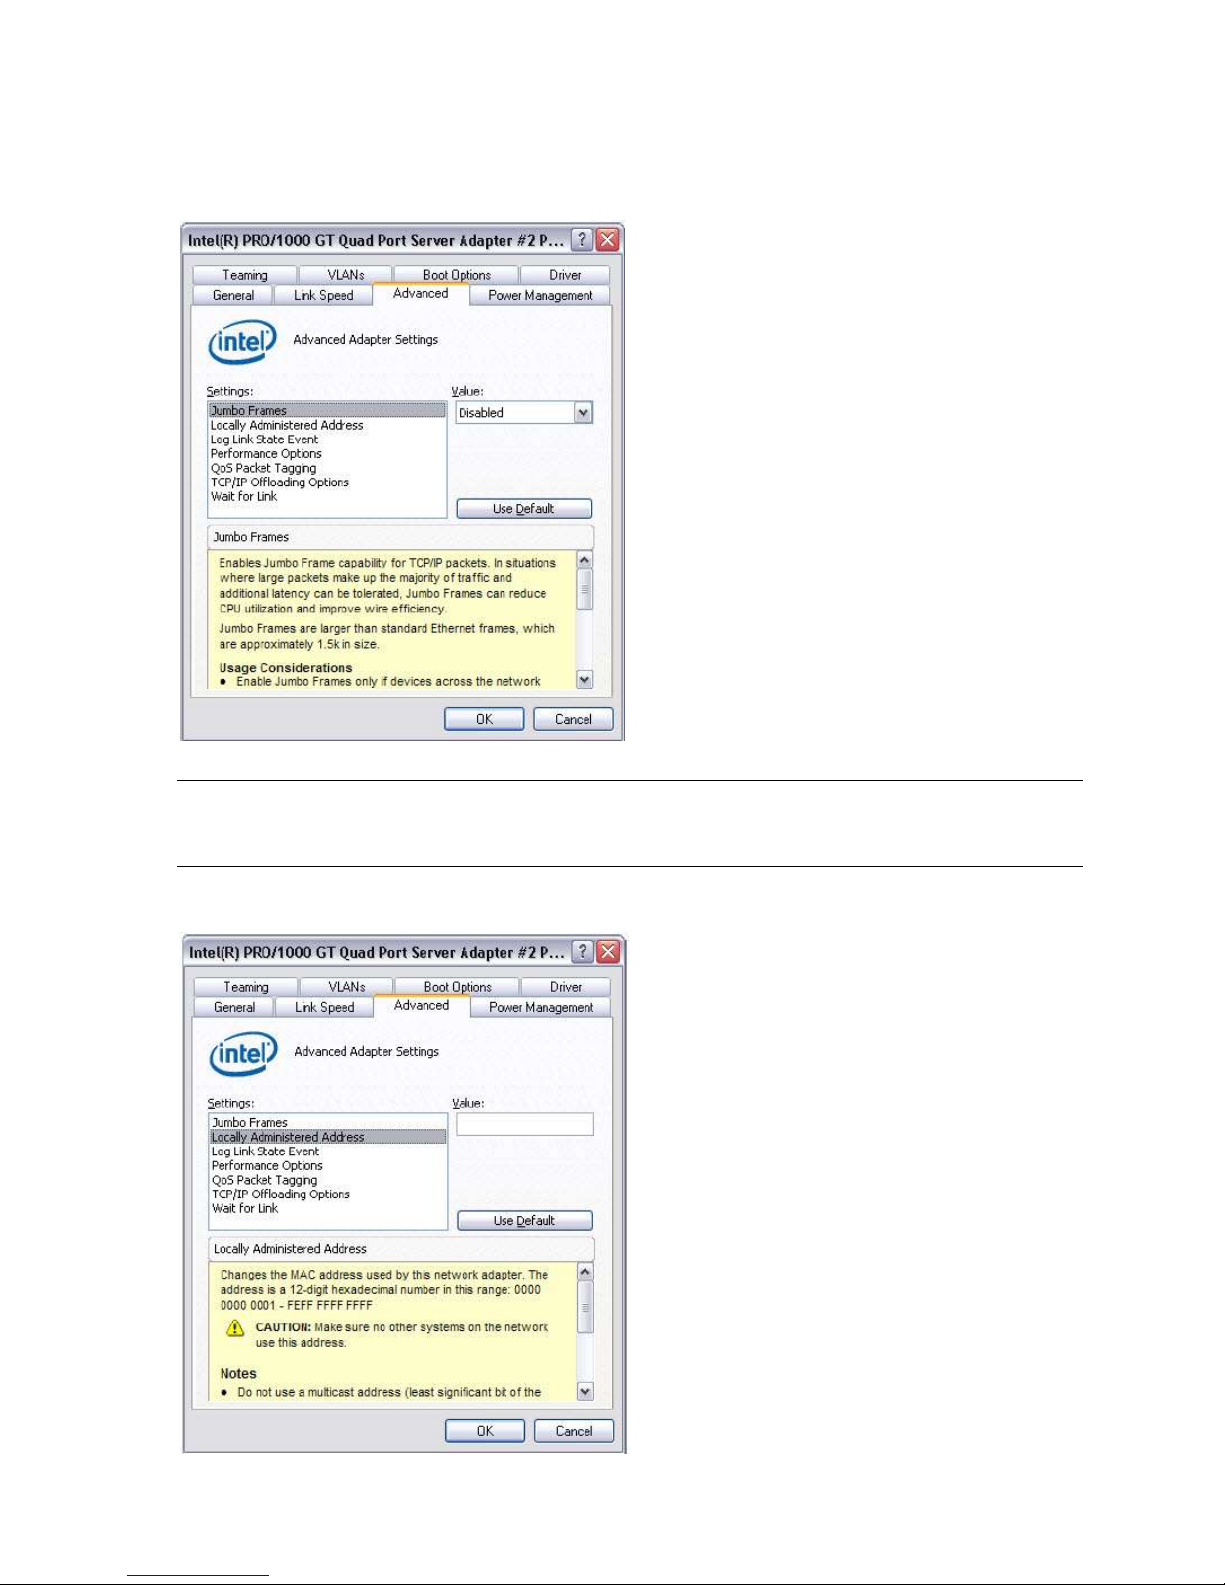
6. On the Advanced tab, in the Settings list, click Jumbo Frames. In the Value list, select Disabled.
Note. Jumbo Frame can be used if the customer's infrastructure supports them. The customer is
responsible for configuring the correct Jumbo Frame size. If you are not sure about Jumbo Frame
support, select Disabled.
7. On the Advanced tab, in the Settings list, click Locally Administered Address. Leave the Value box
blank.
© 2014 Imagine Communications Corp. Proprietary and Confidential. November 2014 | Page 15
Page 16
Nexio® NLE Gateway Chapter 2
Installation Guide Configuring the NLE Gateway Hardware
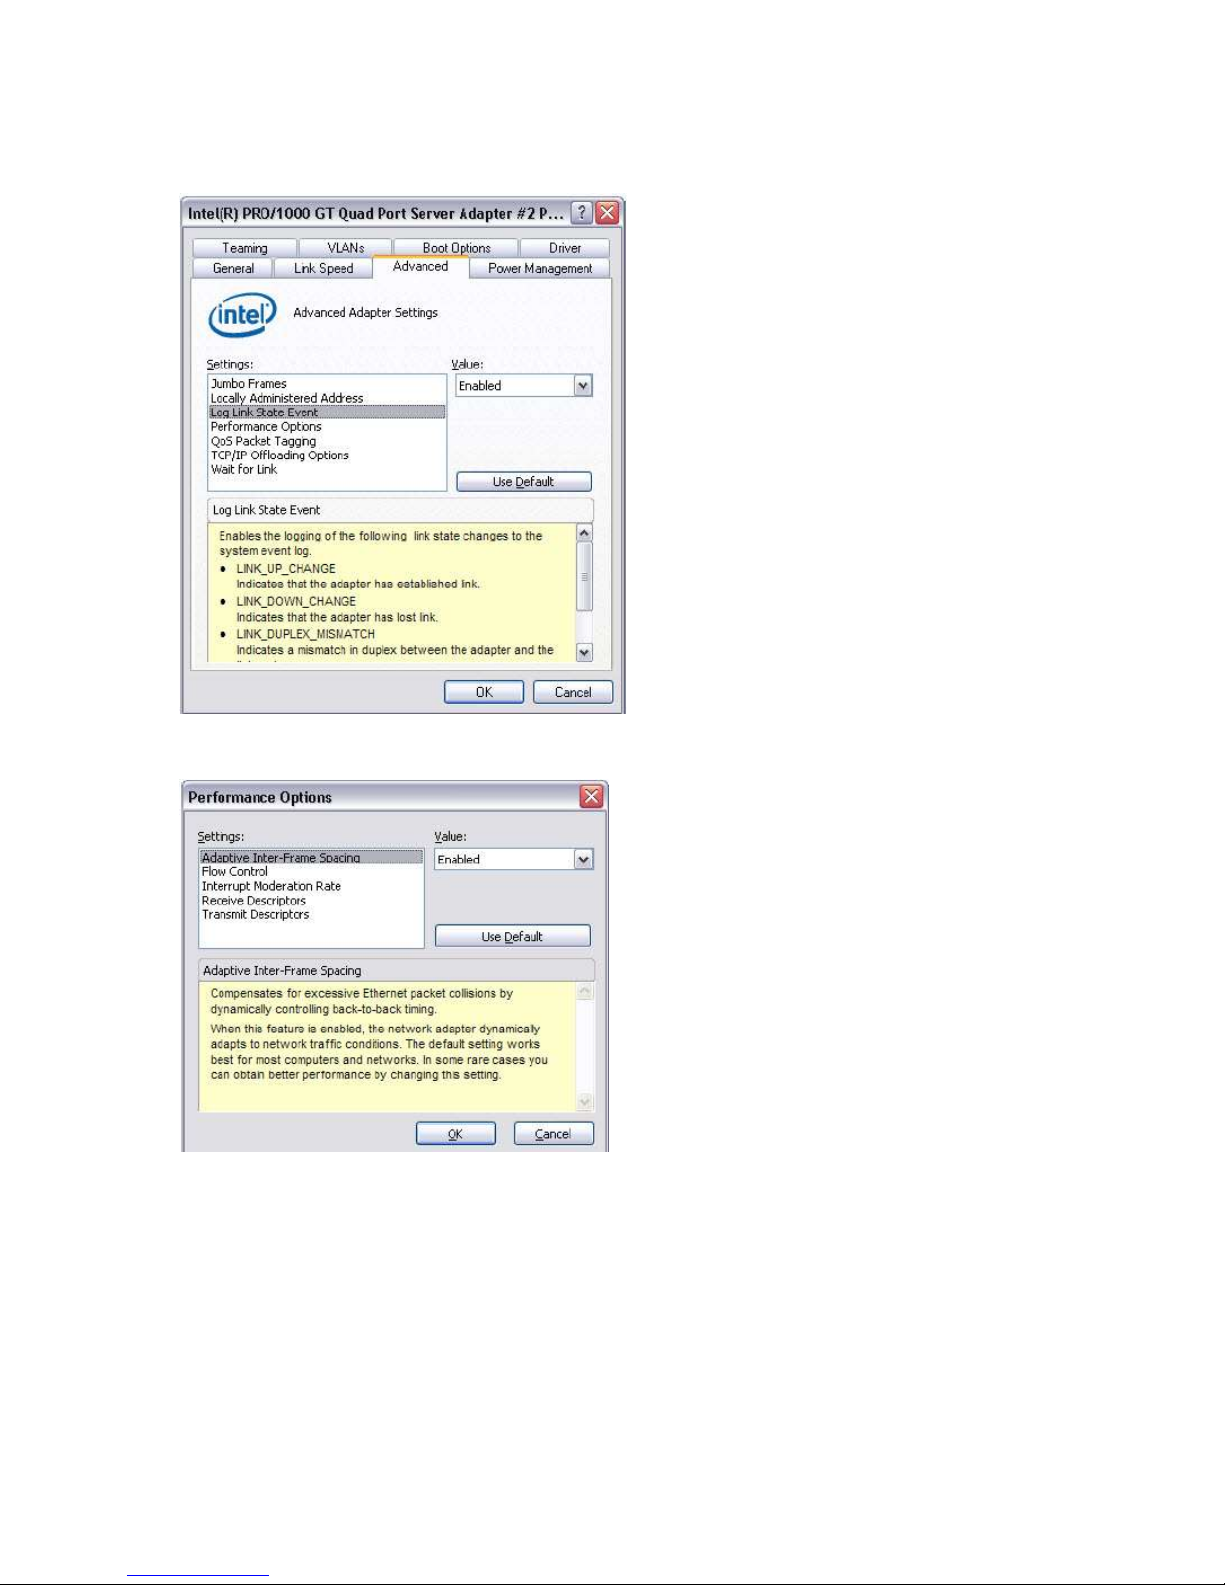
8. On the Advanced tab, in the Settings list, click Log Link State Event, select Enabled in the Value list.
9. On the Advanced tab, in the Settings list, click Performance Options, then click Properties. The
Performance Options dialog displays.
© 2014 Imagine Communications Corp. Proprietary and Confidential. November 2014 | Page 16
Page 17
Nexio® NLE Gateway Chapter 2
Installation Guide Configuring the NLE Gateway Hardware
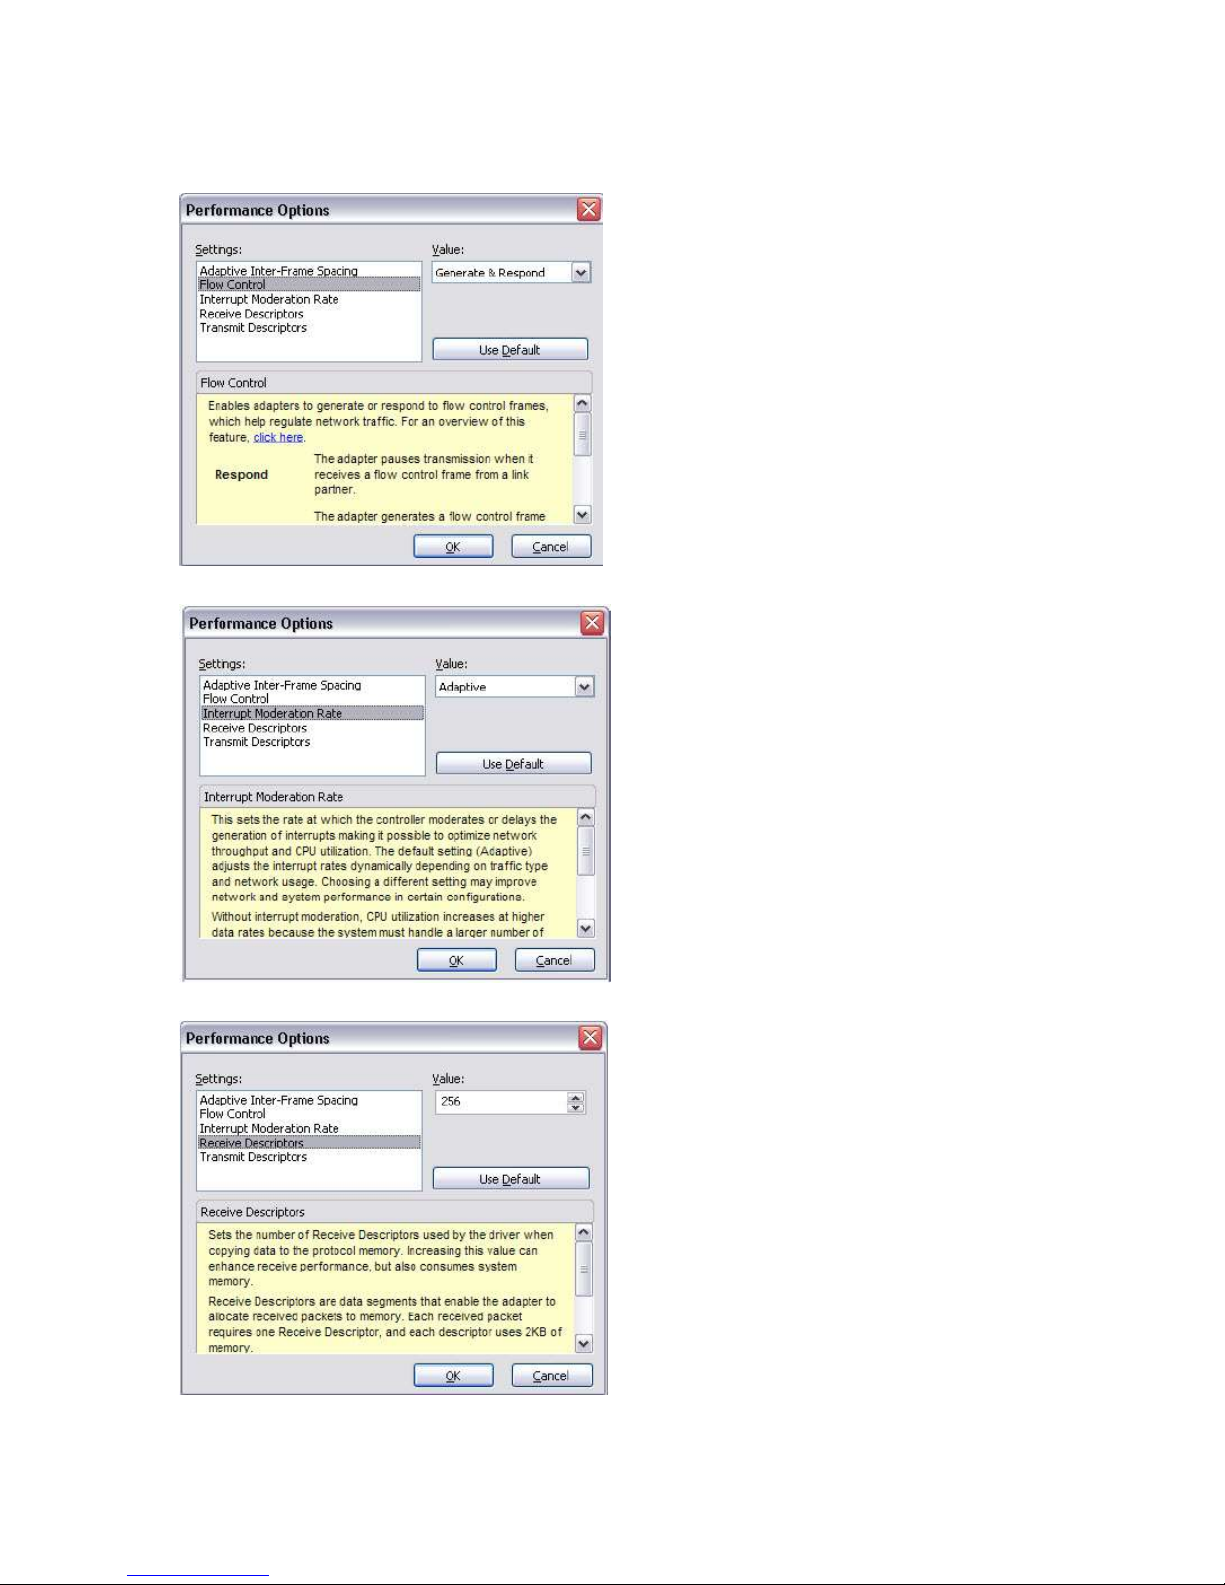
10. In the Settings list, click Adaptive Inter-Frame Spacing, then select Enabled in the Value list.
11. In the Settings list, click Flow Control. Then select Generate & Respond in the Value list.
12. In the Settings list, click Interrupt Moderation Rate. Then select Adaptive in the Value list.
© 2014 Imagine Communications Corp. Proprietary and Confidential. November 2014 | Page 17
Page 18
Nexio® NLE Gateway Chapter 2
Installation Guide Configuring the NLE Gateway Hardware
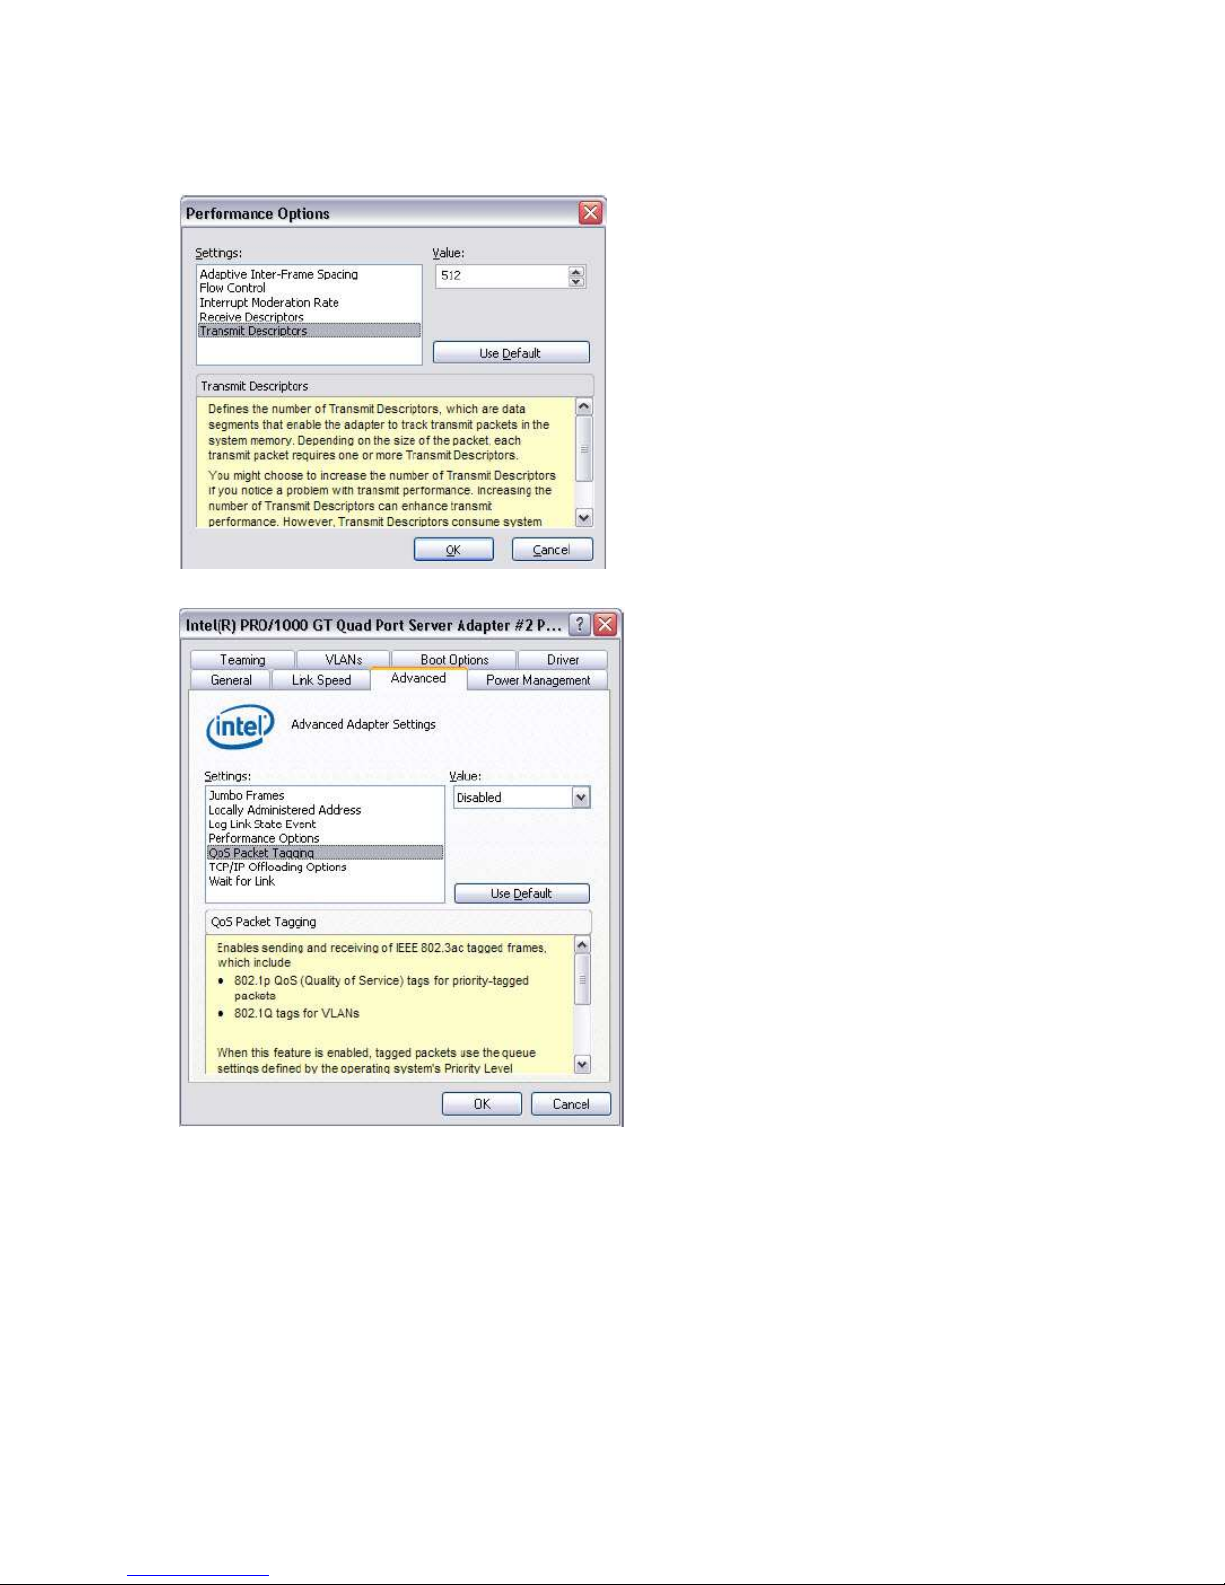
13. In the Settings list, click Receive Descriptors. Then select 256 in the Value list.
14. In the Settings list, click Transmit Descriptors. Then select 512 in the Value list and click OK.
© 2014 Imagine Communications Corp. Proprietary and Confidential. November 2014 | Page 18
Page 19
Nexio® NLE Gateway Chapter 2
Installation Guide Configuring the NLE Gateway Hardware
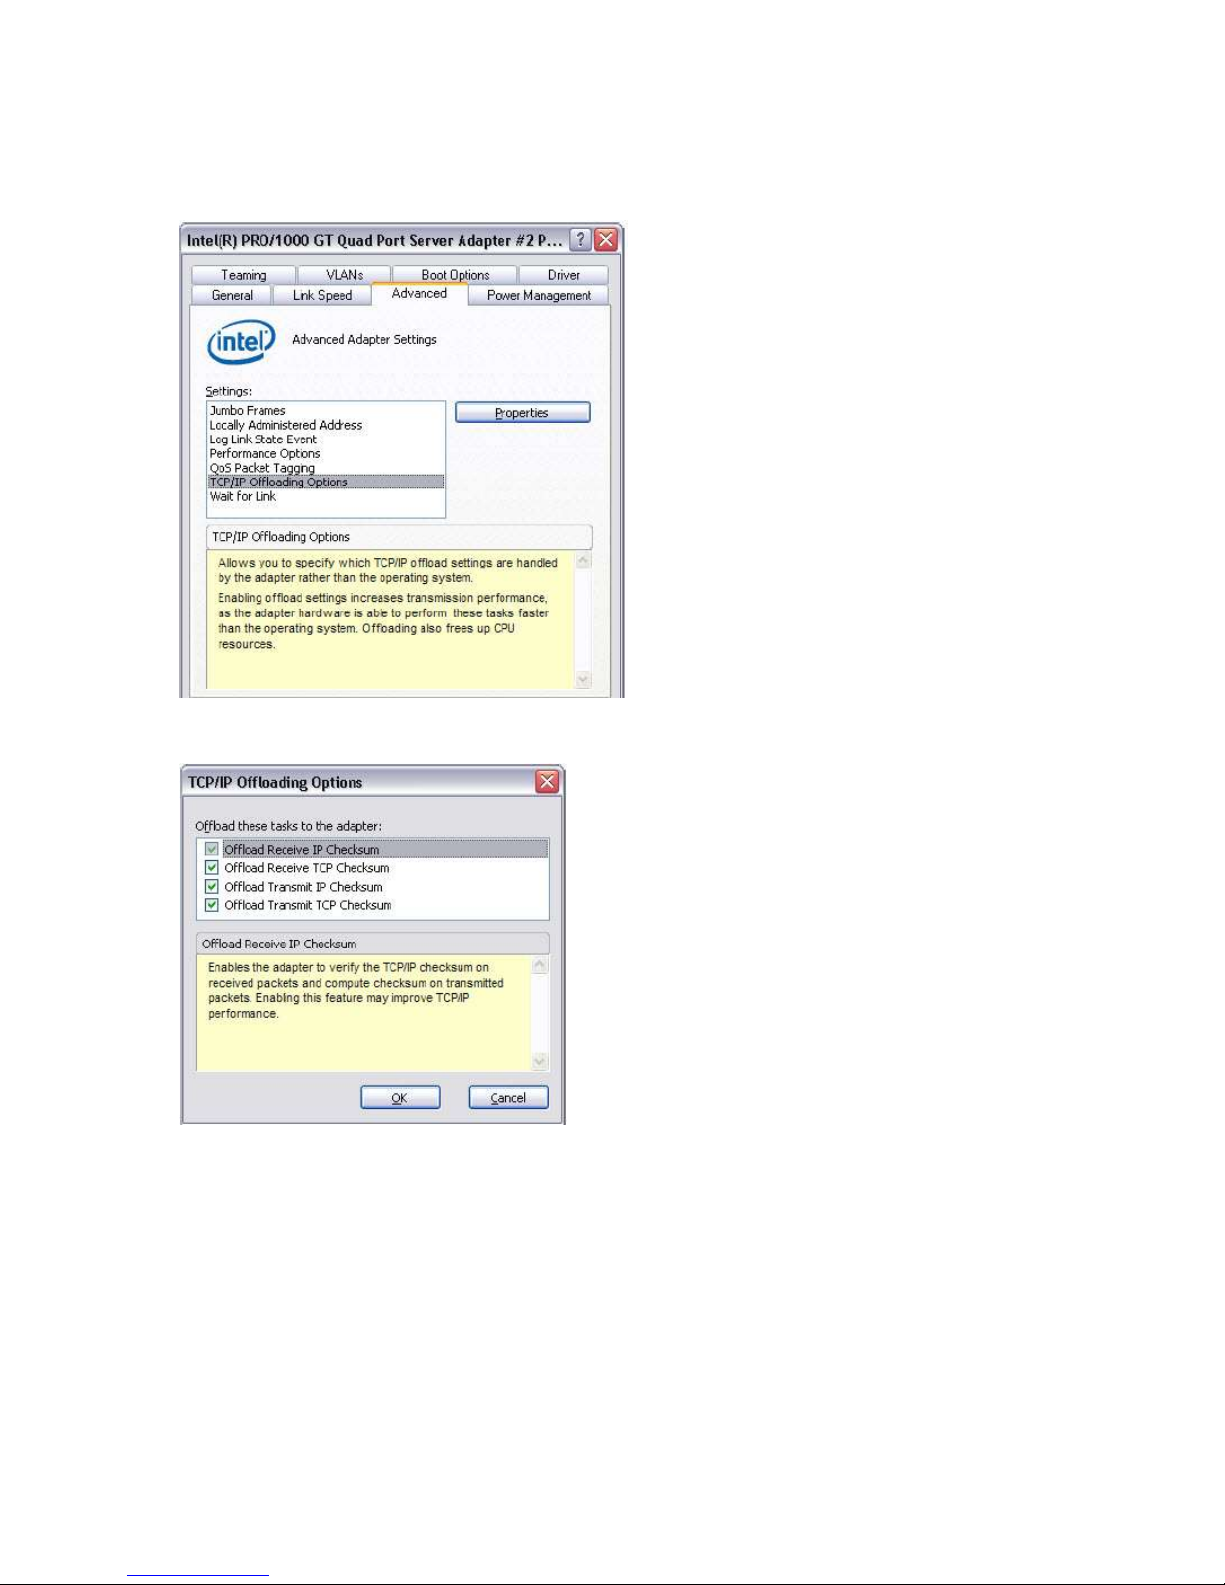
15. On the Advanced tab, in the Settings list, click QoS Packet Tagging. Then select Disabled in the
Value list.
16. On the Advanced tab, in the Settings list, click TCP/IP Offloading Options. Then click Properties. The
TCP/IP Offloading Options dialog displays.
17. Check the following boxes:
Offload Receive IP Checksum
Offload Receive TCP Checksum
Offload Transmit IP Checksum
Offload Transmit TCP Checksum
© 2014 Imagine Communications Corp. Proprietary and Confidential. November 2014 | Page 19
Page 20
Nexio® NLE Gateway Chapter 2
Installation Guide Configuring the NLE Gateway Hardware
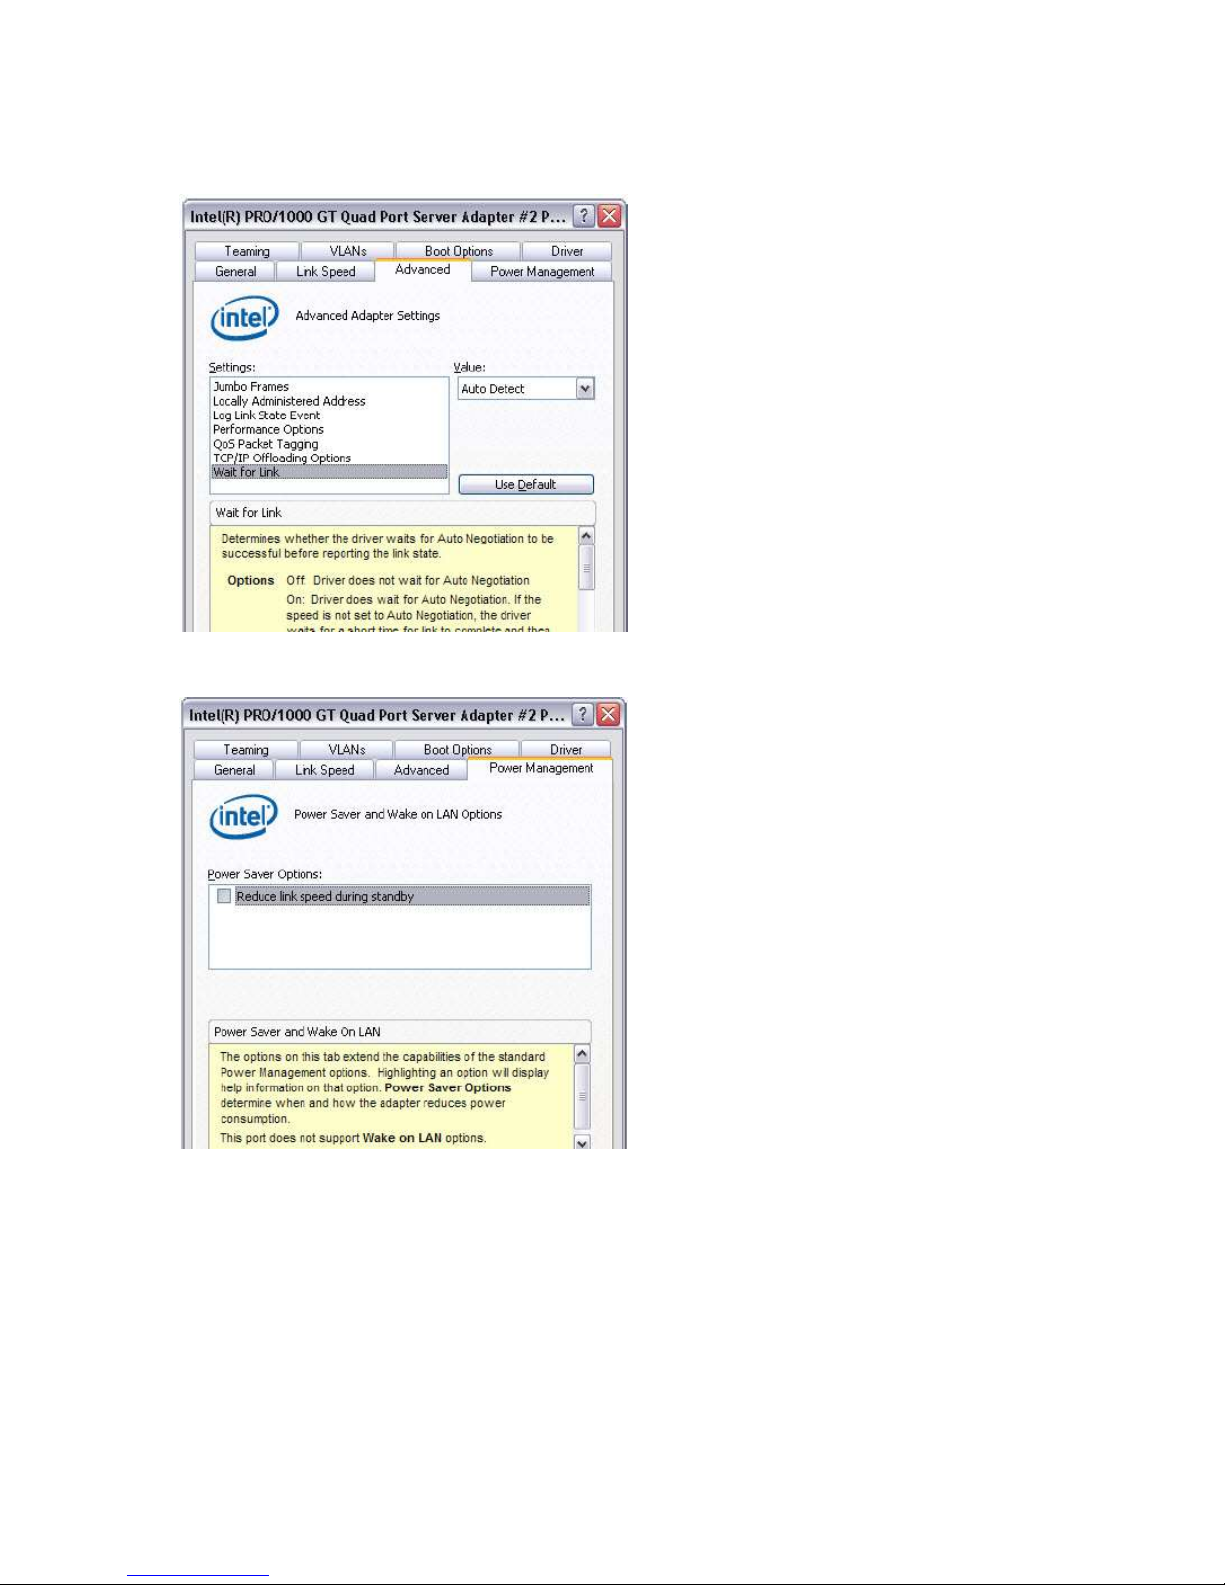
18. Click OK. The Advanced tab displays.
19. On the Advanced tab, in the Settings list, click Wait for Link. Then select Auto Detect in the Value
list. Select the Power Management tab.
© 2014 Imagine Communications Corp. Proprietary and Confidential. November 2014 | Page 20
Page 21
Nexio® NLE Gateway Chapter 2
Installation Guide Configuring the NLE Gateway Hardware
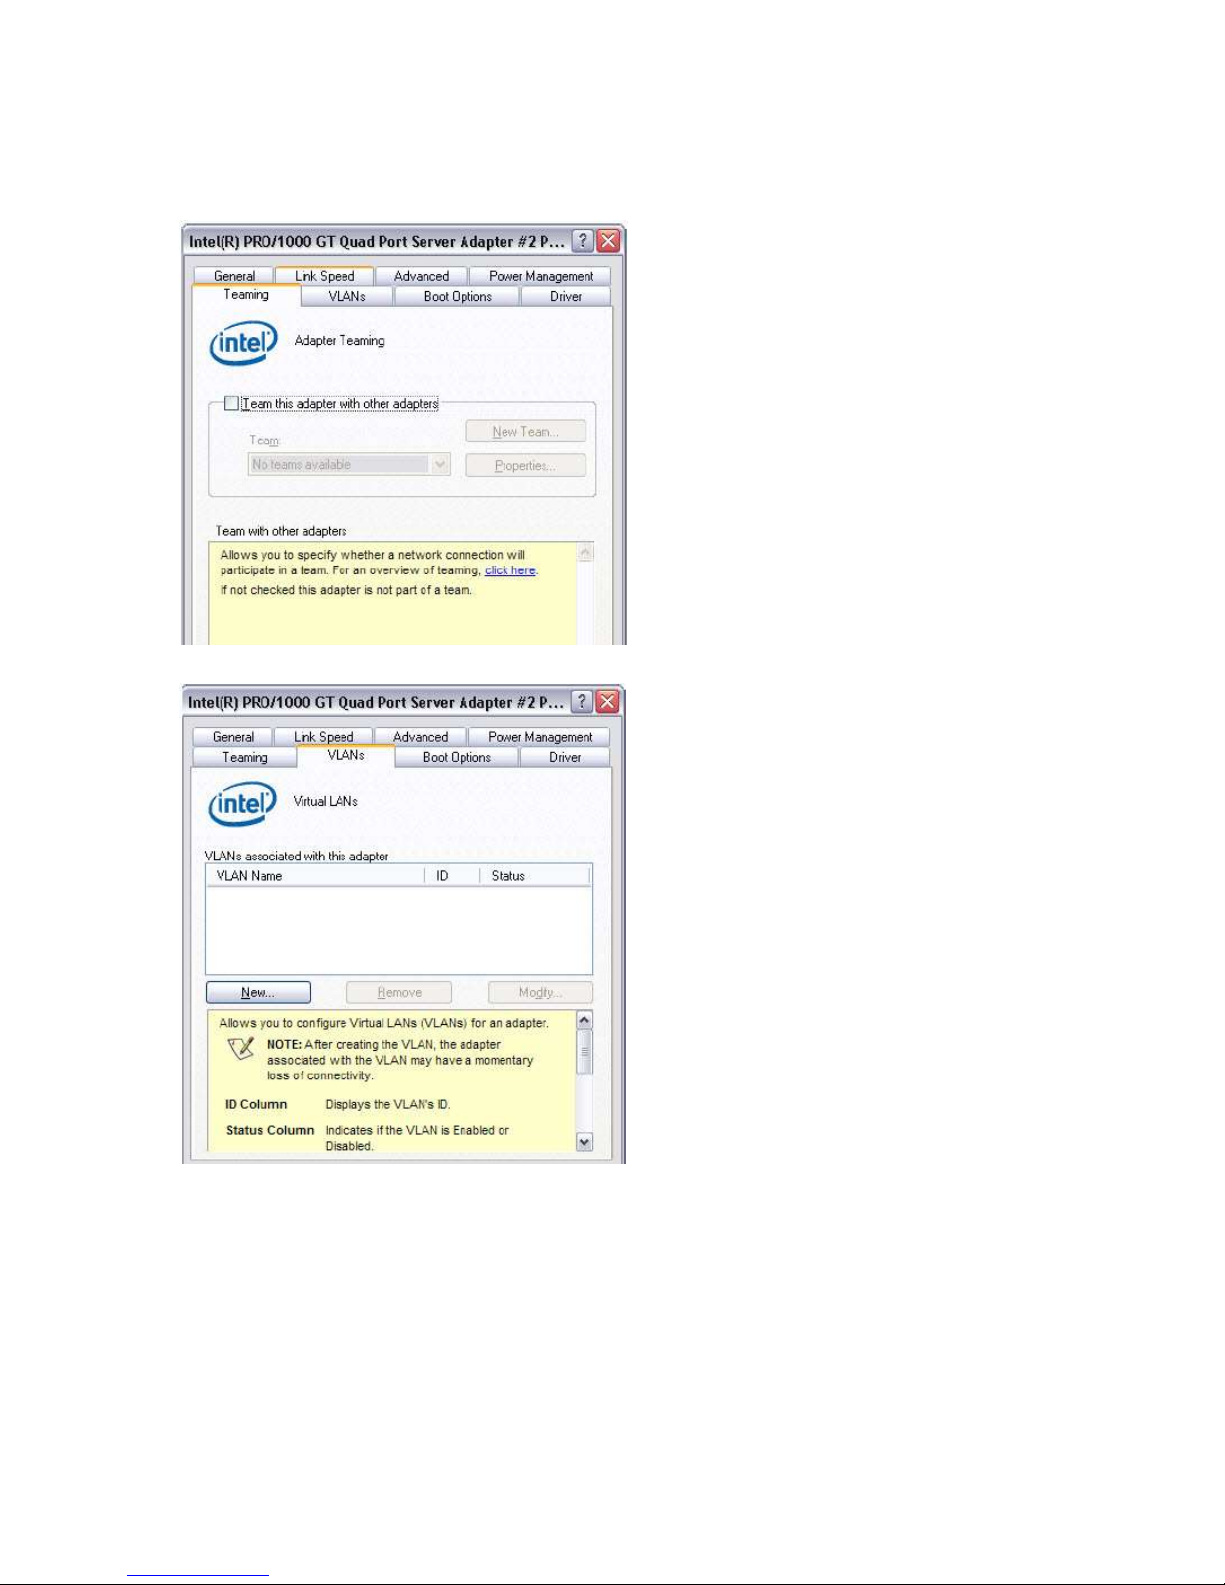
20. On the Power Management tab, check the Reduce link speed during standby. Select the Teaming
tab.
21. Clear the Team this adapter with other adapters box. Select the VLANs tab.
© 2014 Imagine Communications Corp. Proprietary and Confidential. November 2014 | Page 21
Page 22
Nexio® NLE Gateway Chapter 2
Installation Guide Configuring the NLE Gateway Hardware
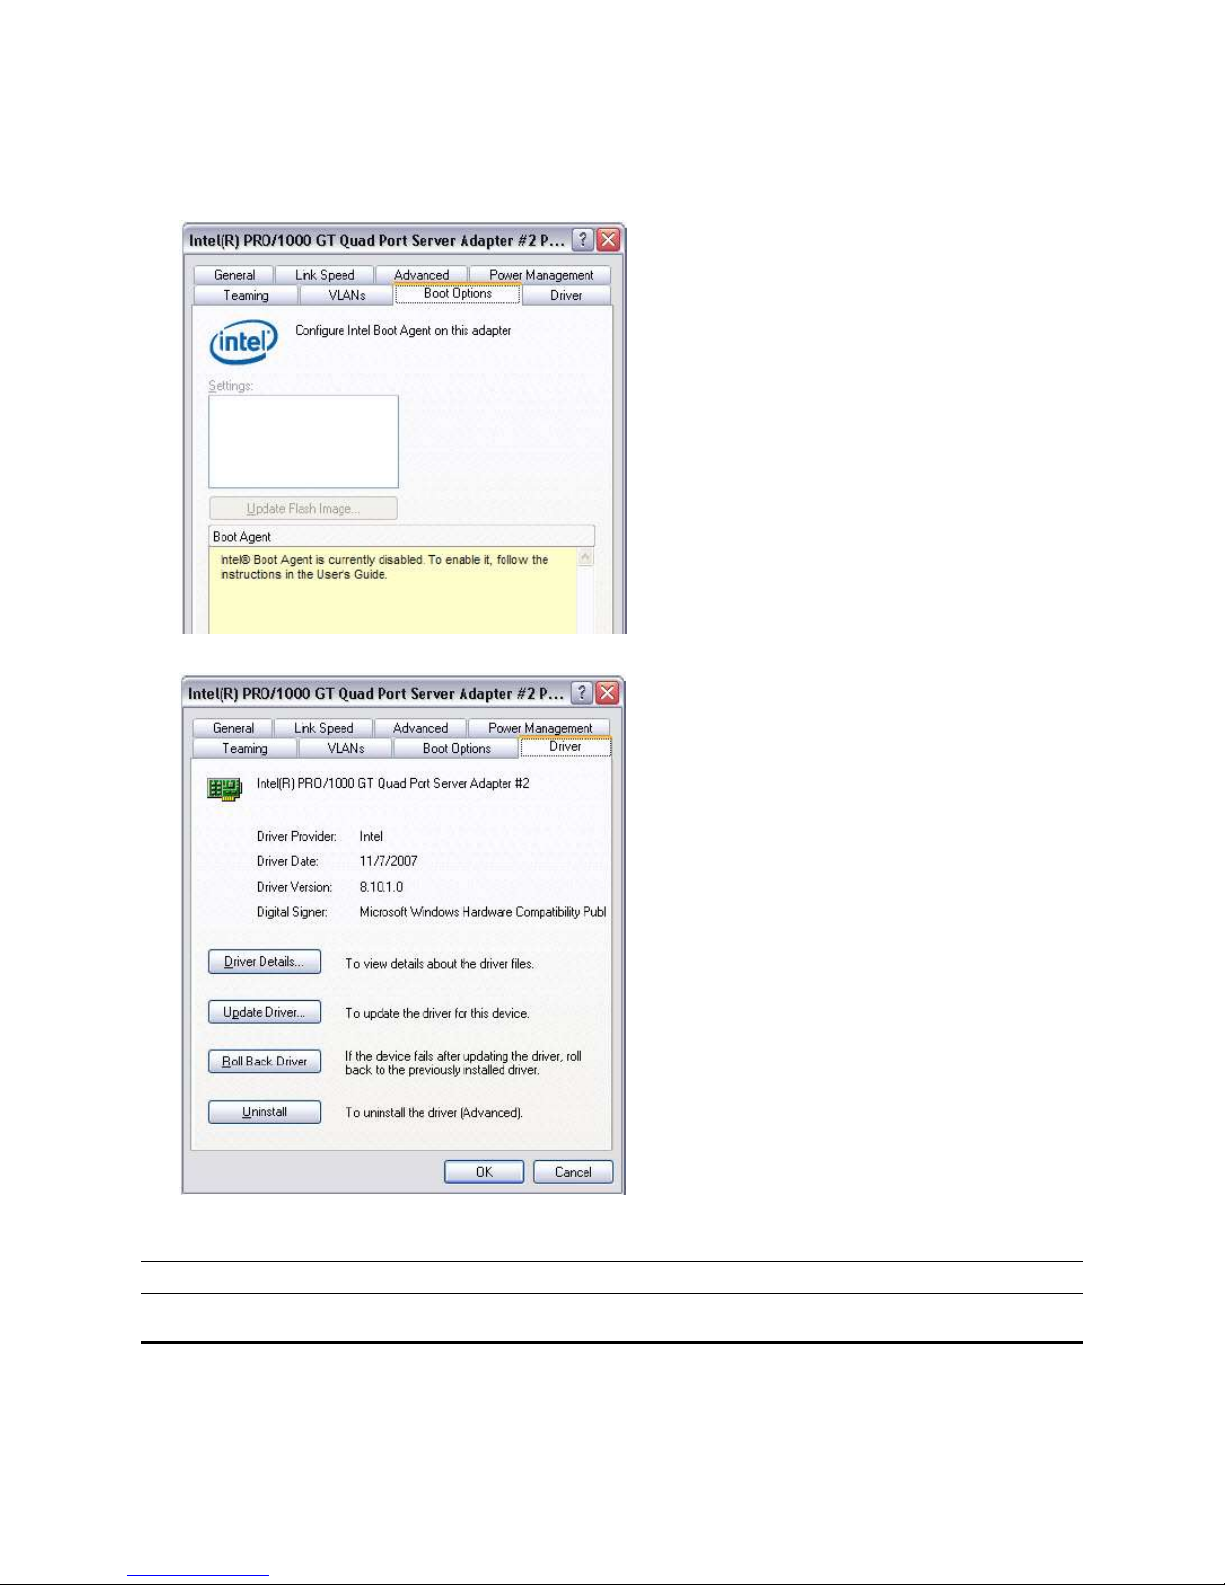
22. Make sure that there are no VLANs listed in the table. If any VLANs are listed, click each one and
then click Remove. Select the Boot Options tab.
23. Make sure that the Boot Agent is currently disabled. Select the Driver tab.
24. Verify that the Driver Version is 8.10.1.0 or above. If the Driver Version is lower than 8.10.1.0,
download the most recent Driver from the Intel website.
Note: You must follow this entire process for each of the four quad adapter ports.
Configuring the NVIDIA NICs
This section describes how to configure the NVIDIA Network Interface Controller settings.
© 2014 Imagine Communications Corp. Proprietary and Confidential. November 2014 | Page 22
Page 23
Nexio® NLE Gateway Chapter 2
Installation Guide Configuring the NLE Gateway Hardware
Note. You must repeat this procedure for each of the NVIDIA NICs
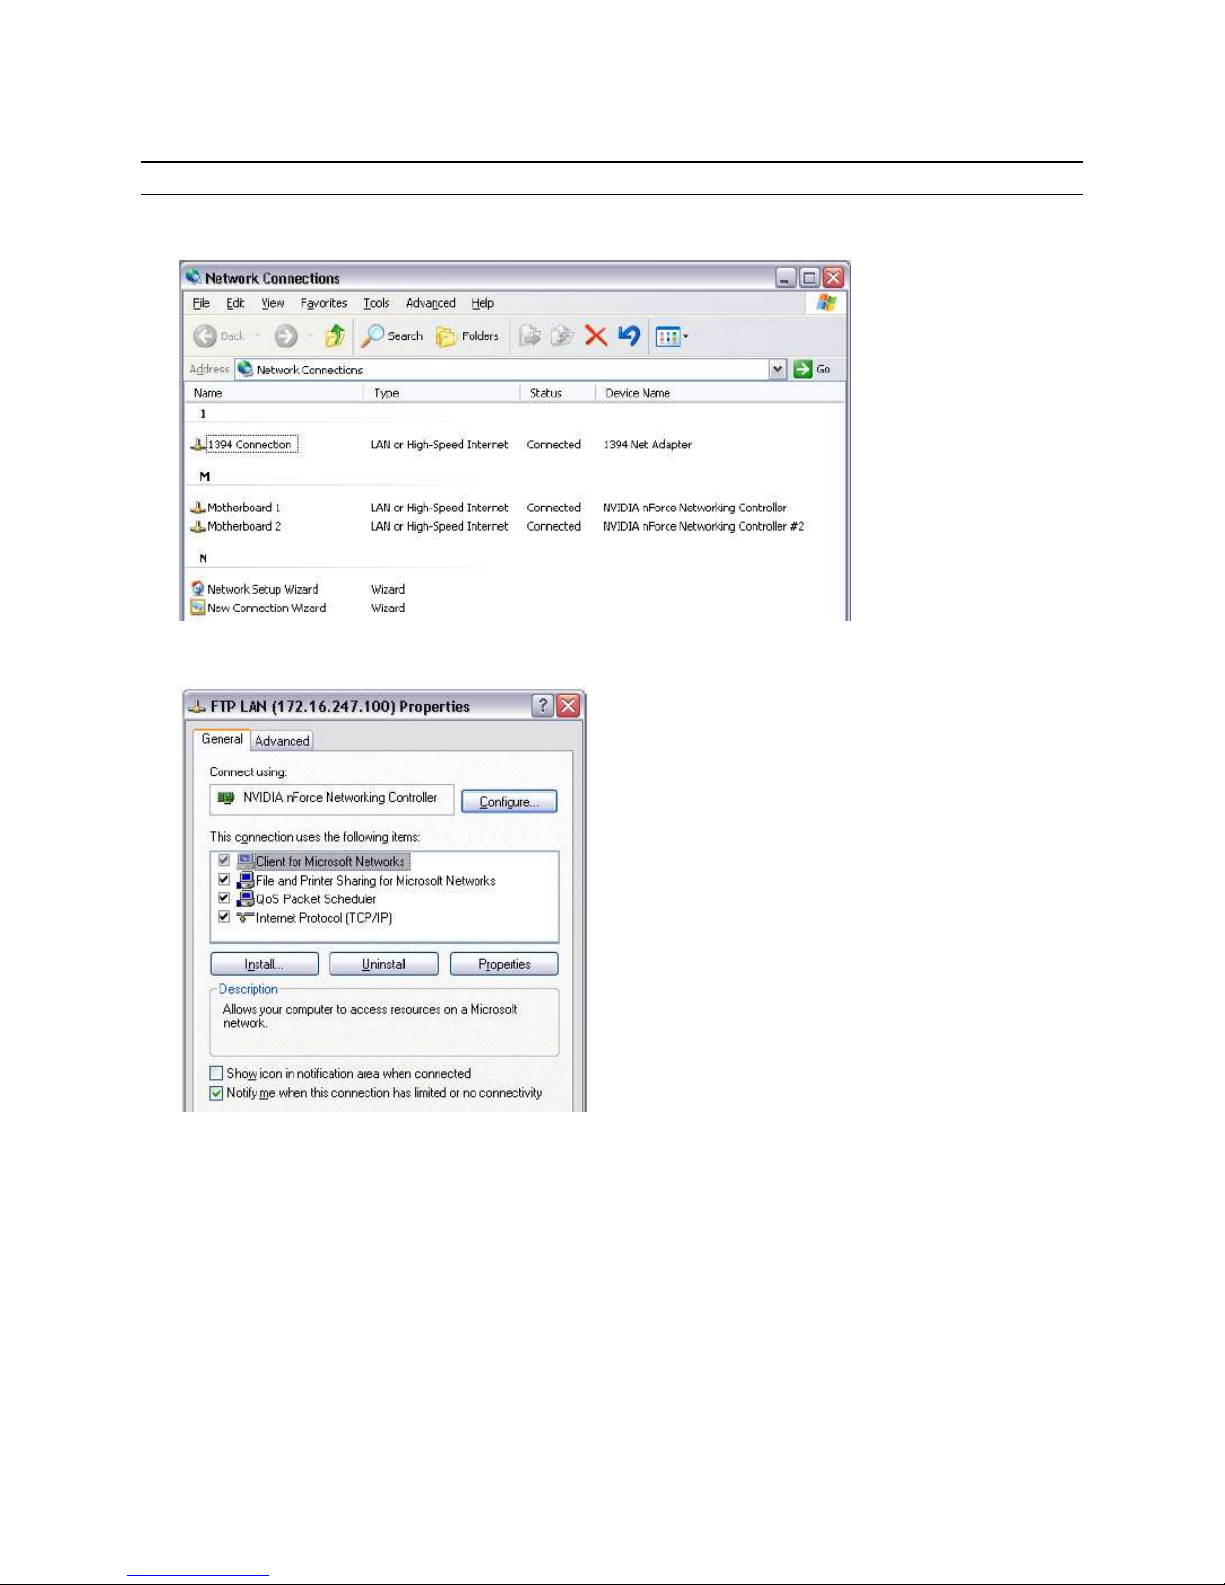
1. From the desktop of the Nexio Media Host device, right-click My Network Places, then click
Properties. The Network Connections dialog displays.
2. Right-click the appropriate device, then click Properties. The Properties dialog for the device
displays.
© 2014 Imagine Communications Corp. Proprietary and Confidential. November 2014 | Page 23
Page 24
Nexio® NLE Gateway Chapter 2
Installation Guide Configuring the NLE Gateway Hardware
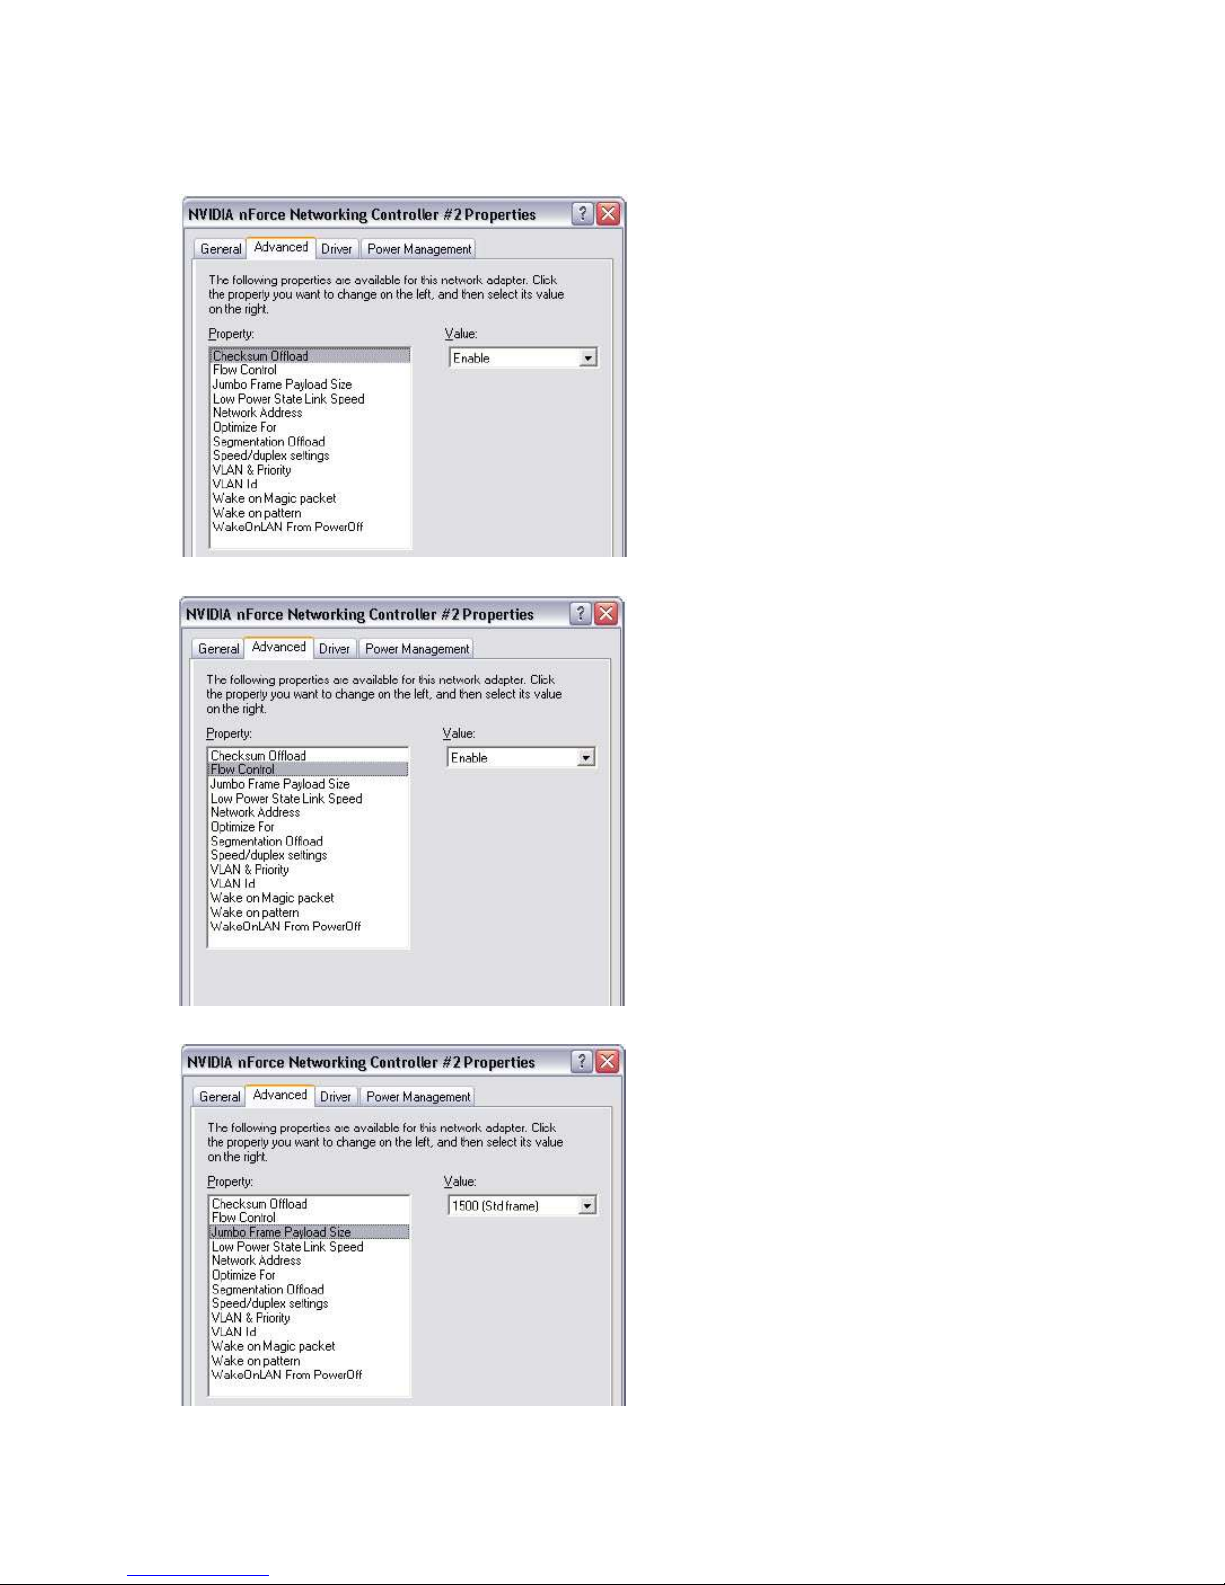
3. Click Configure. The NVIDIA Properties dialog displays the General tab. Select the Advanced tab.
4. In the Property list, click Checksum Offload. then select Enable in the Value list.
5. In the Property list, click Flow Control. then select Enable in the Value list.
© 2014 Imagine Communications Corp. Proprietary and Confidential. November 2014 | Page 24
Page 25
Nexio® NLE Gateway Chapter 2
Installation Guide Configuring the NLE Gateway Hardware
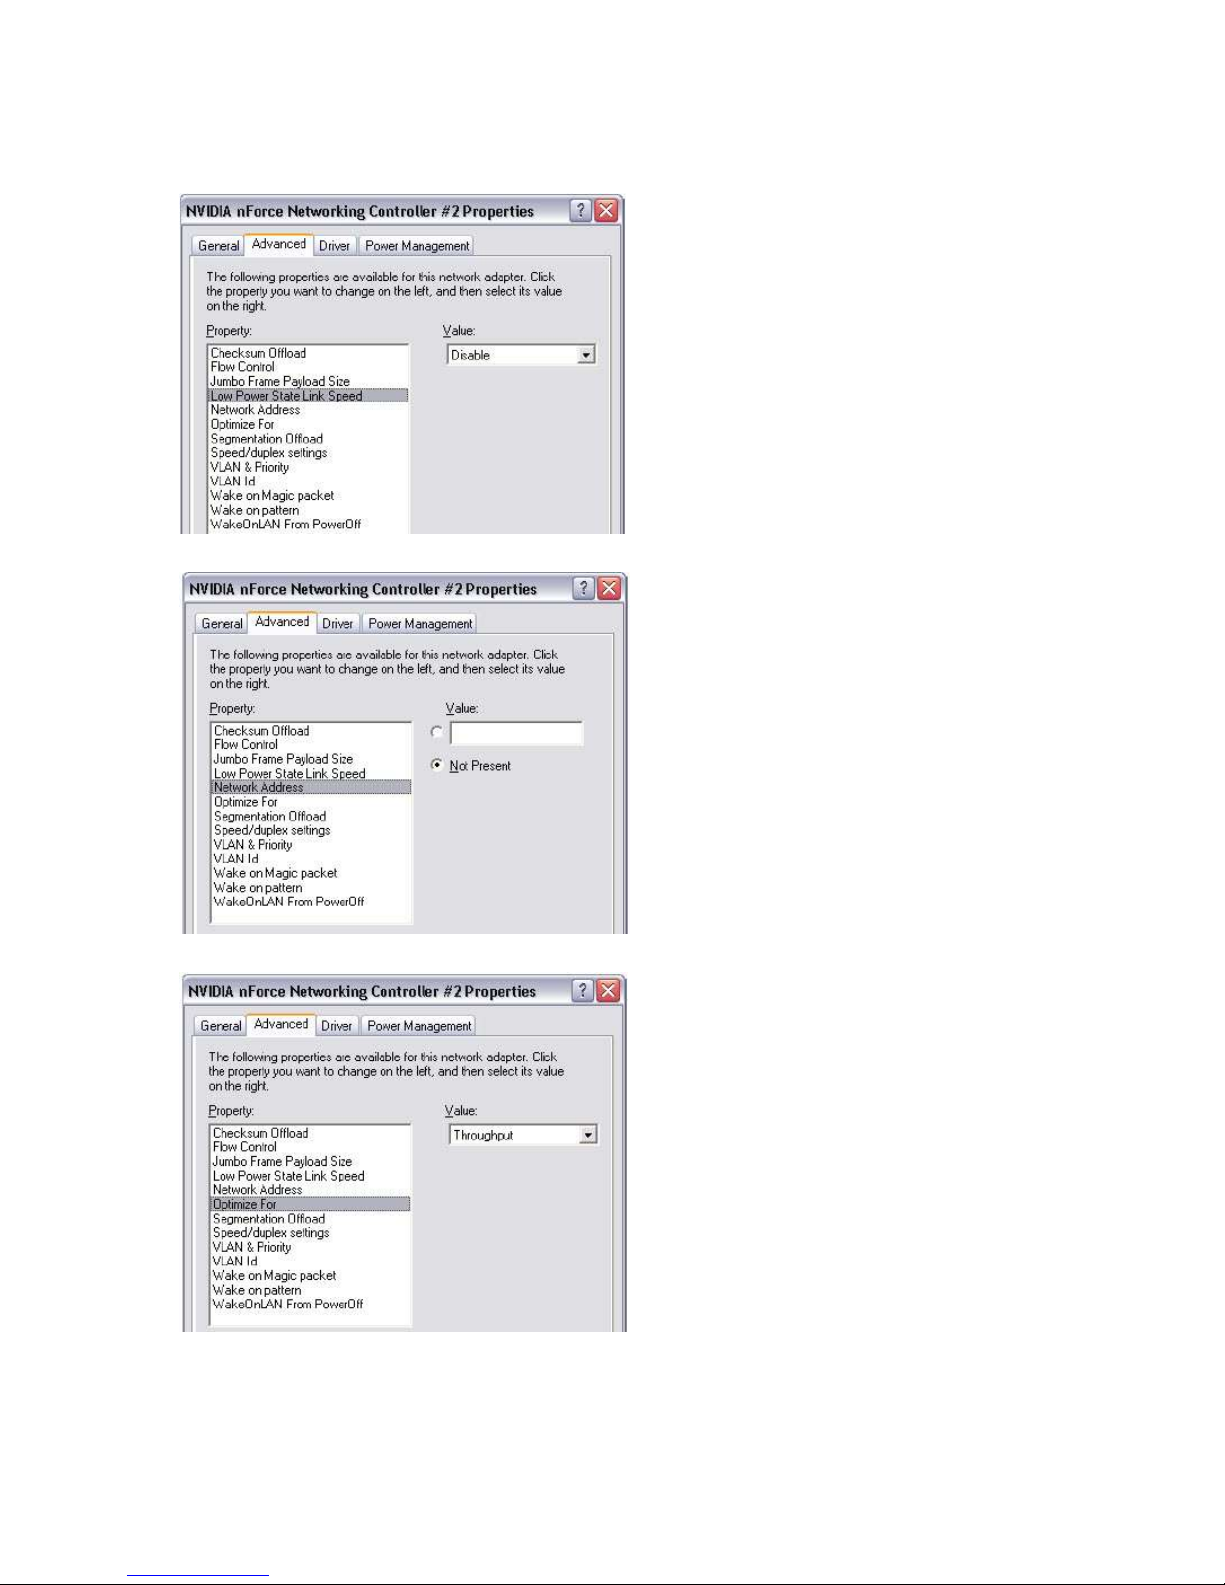
6. In the Property list, click Jumbo Frame Payload Size. Then select 1500 (Std frame) in the Value list.
7. In the Property list, click Low Power State Link Speed. Then select Disable in the Value list.
8. In the Property list, click the Not Present button.
© 2014 Imagine Communications Corp. Proprietary and Confidential. November 2014 | Page 25
Page 26
Nexio® NLE Gateway Chapter 2
Installation Guide Configuring the NLE Gateway Hardware
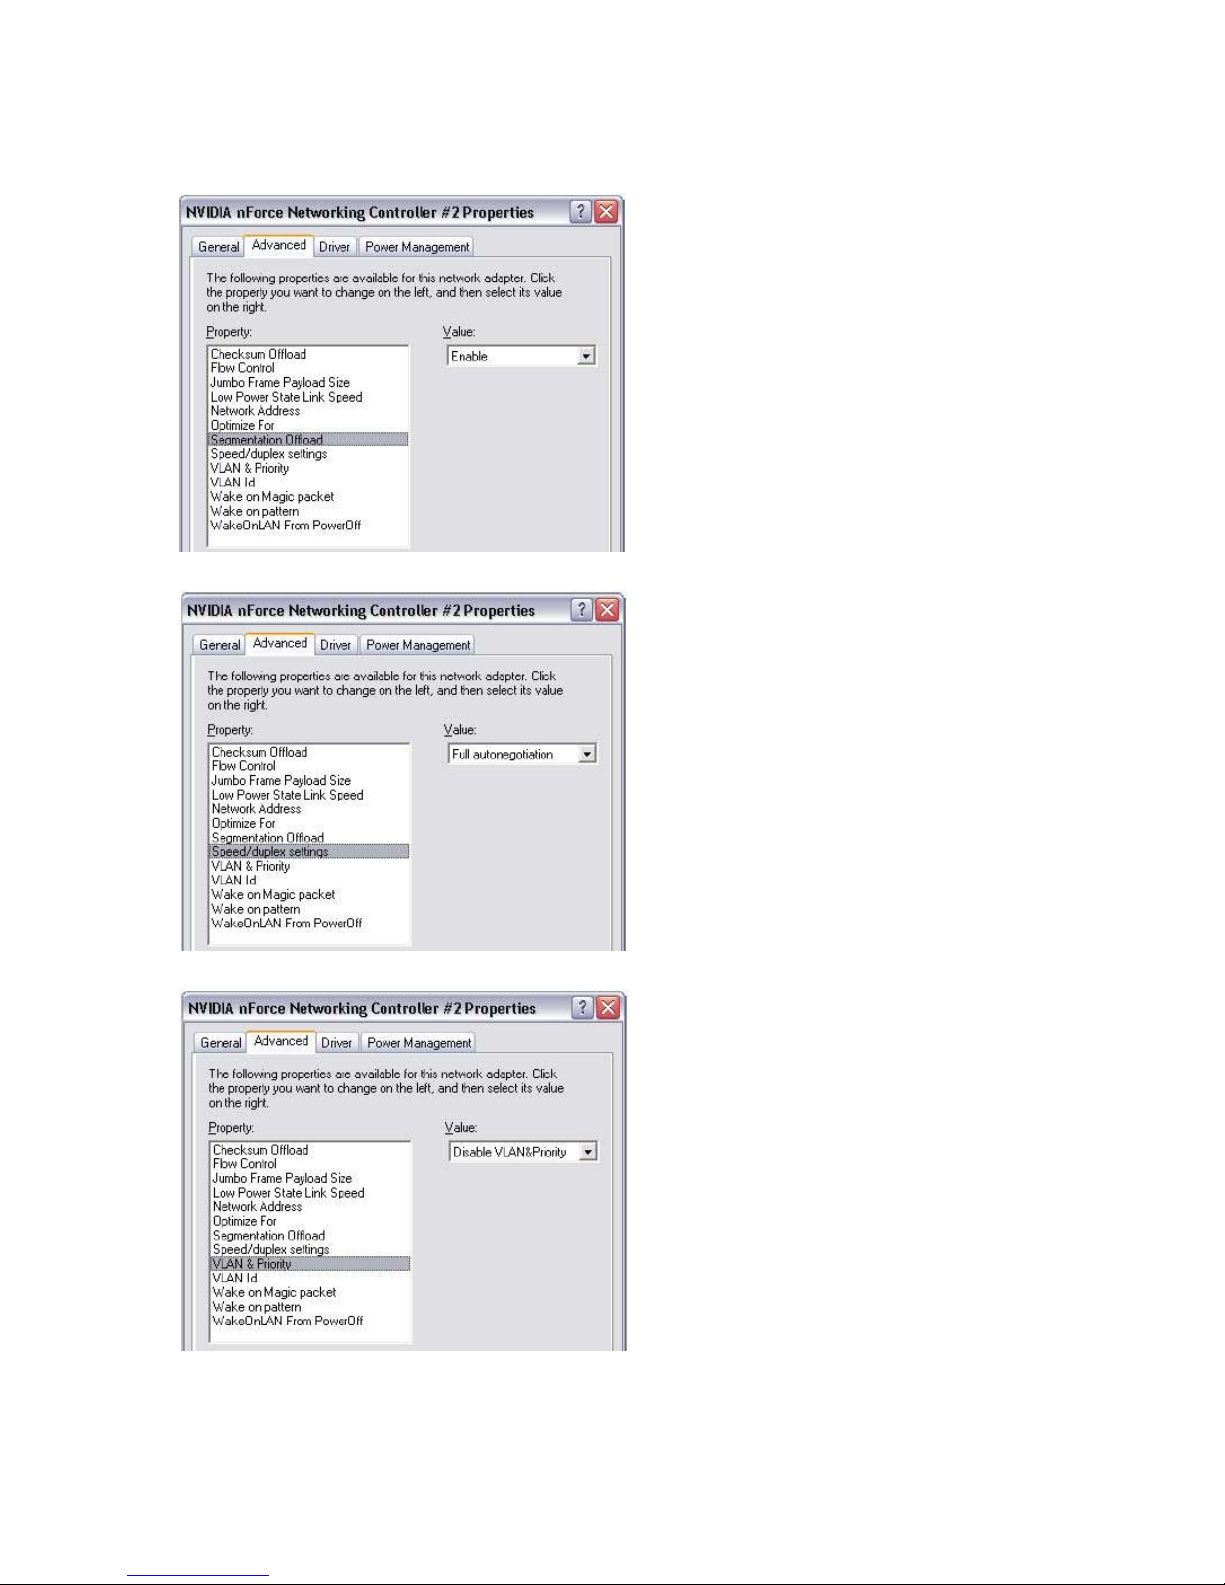
9. In the Property list, click Optimize For. Then select Throughput in the Value list.
10. In the Property list, click Segmentation Offload. Then select Enable in the Value list.
11. In the Property list, click Speed/duplex settings. Then select Full Autonegotiation in the Value list.
© 2014 Imagine Communications Corp. Proprietary and Confidential. November 2014 | Page 26
Page 27
Nexio® NLE Gateway Chapter 2
Installation Guide Configuring the NLE Gateway Hardware
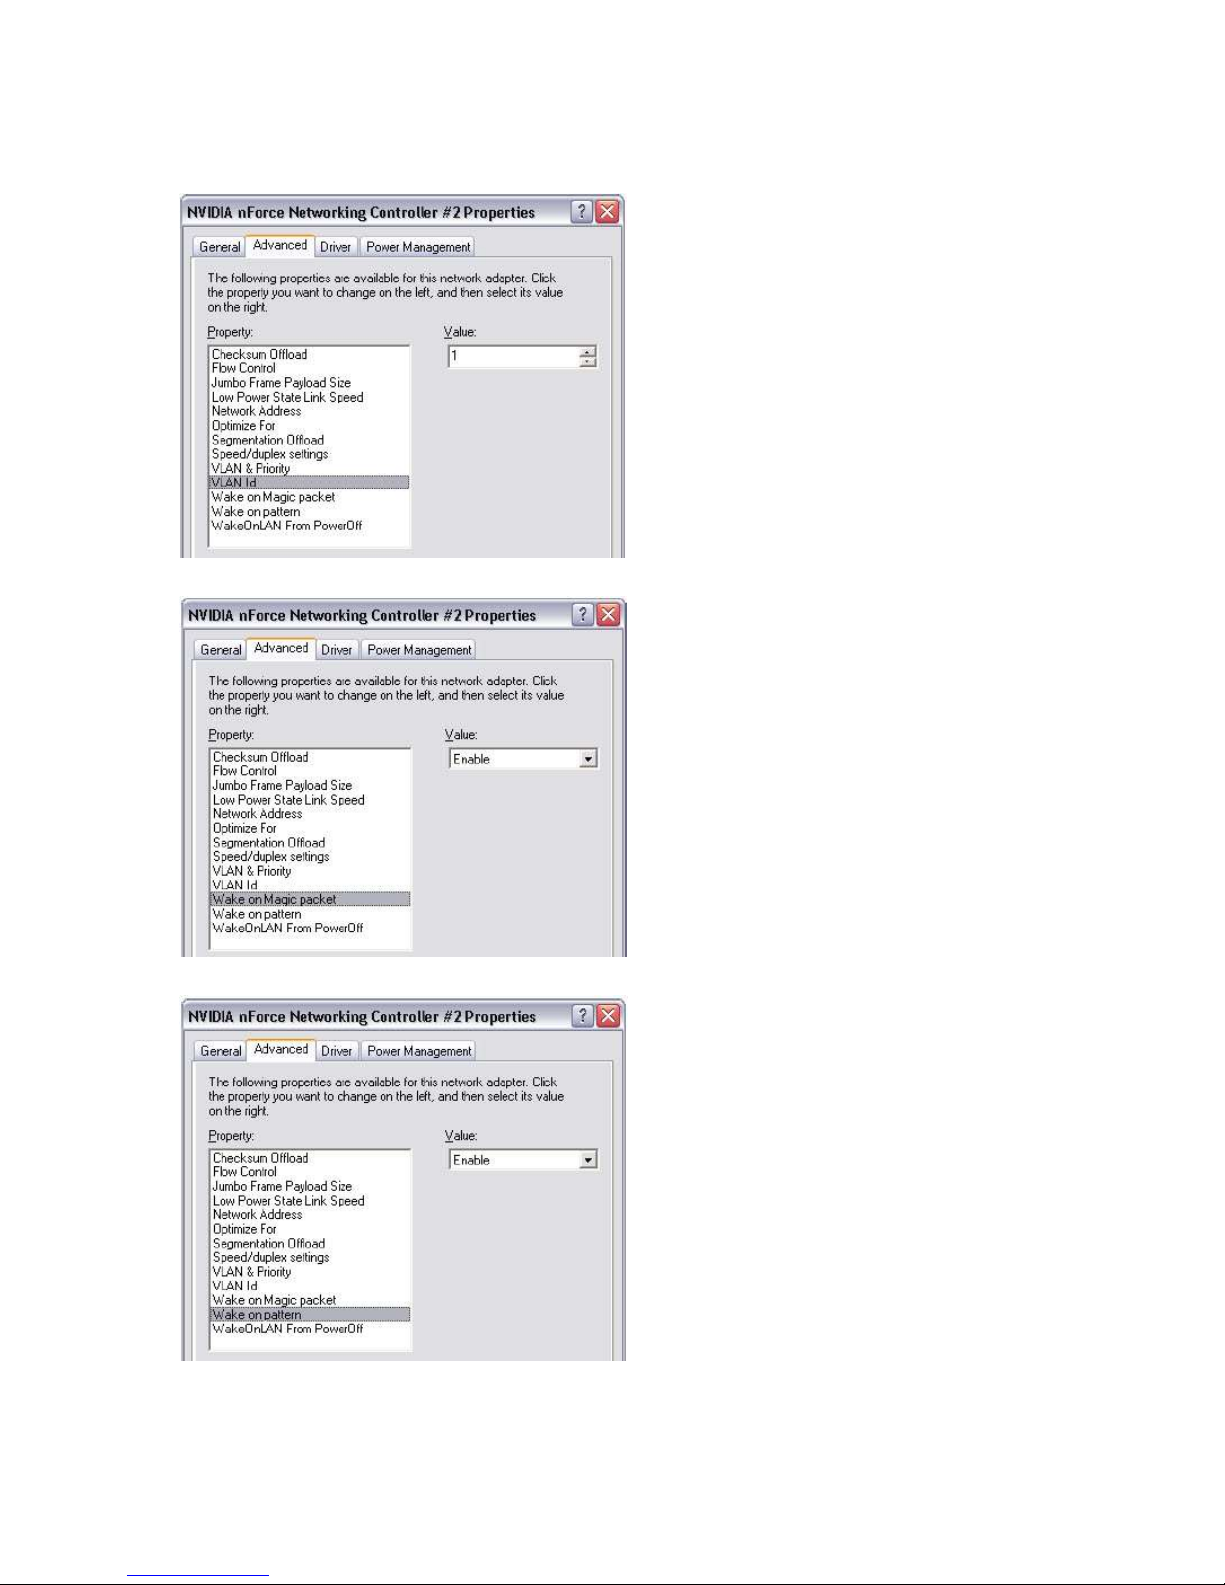
12. In the Property list, click VLAN & Priority. Then select Disable VLAN & Priority in the Value list.
13. In the Property list, click VLAN ID. Then select 1 in the Value list.
14. In the Property list, click Wake on Magic packet. Then select Enable in the Value list.
© 2014 Imagine Communications Corp. Proprietary and Confidential. November 2014 | Page 27
Page 28
Nexio® NLE Gateway Chapter 2
Installation Guide Configuring the NLE Gateway Hardware
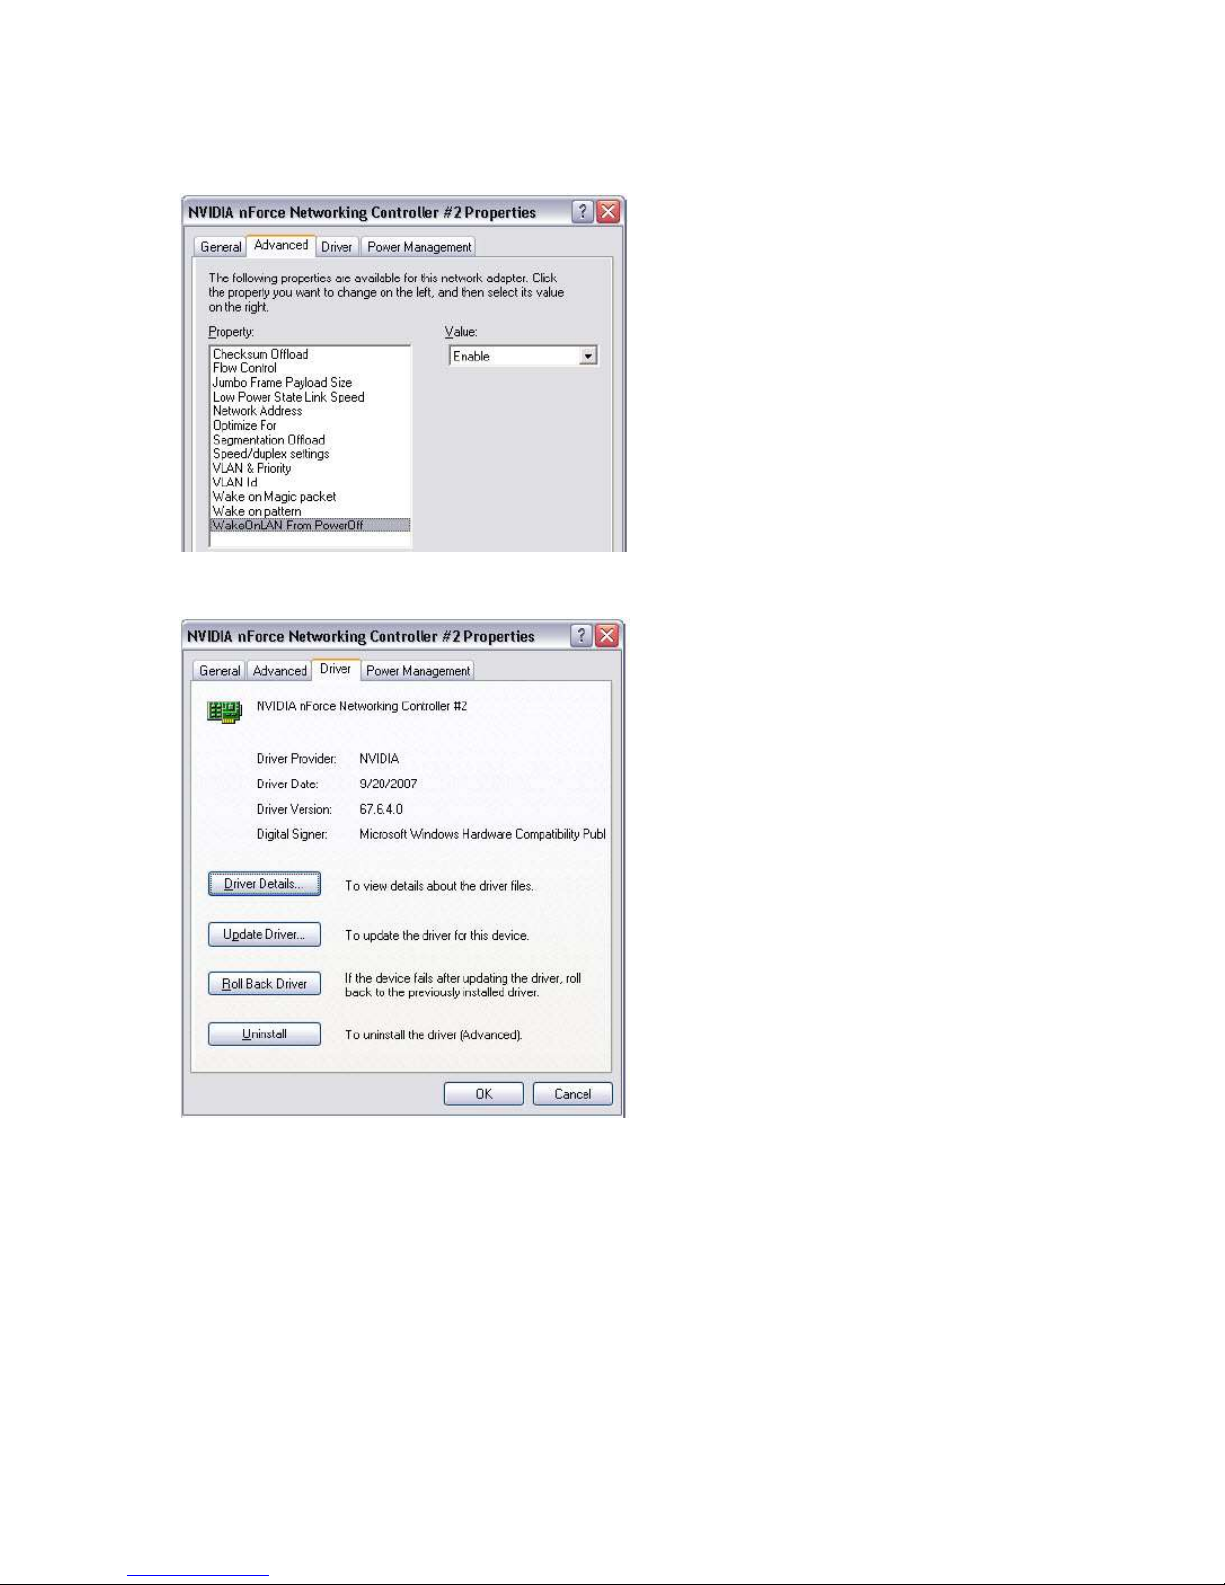
15. In the Property list, click Wake on pattern. Then select Enable in the Value list.
16. In the Property list, click Wake on pattern. Then select Enable in the Value list. Select the Driver
tab.
© 2014 Imagine Communications Corp. Proprietary and Confidential. November 2014 | Page 28
Page 29
Nexio® NLE Gateway Chapter 2
Installation Guide Configuring the NLE Gateway Hardware
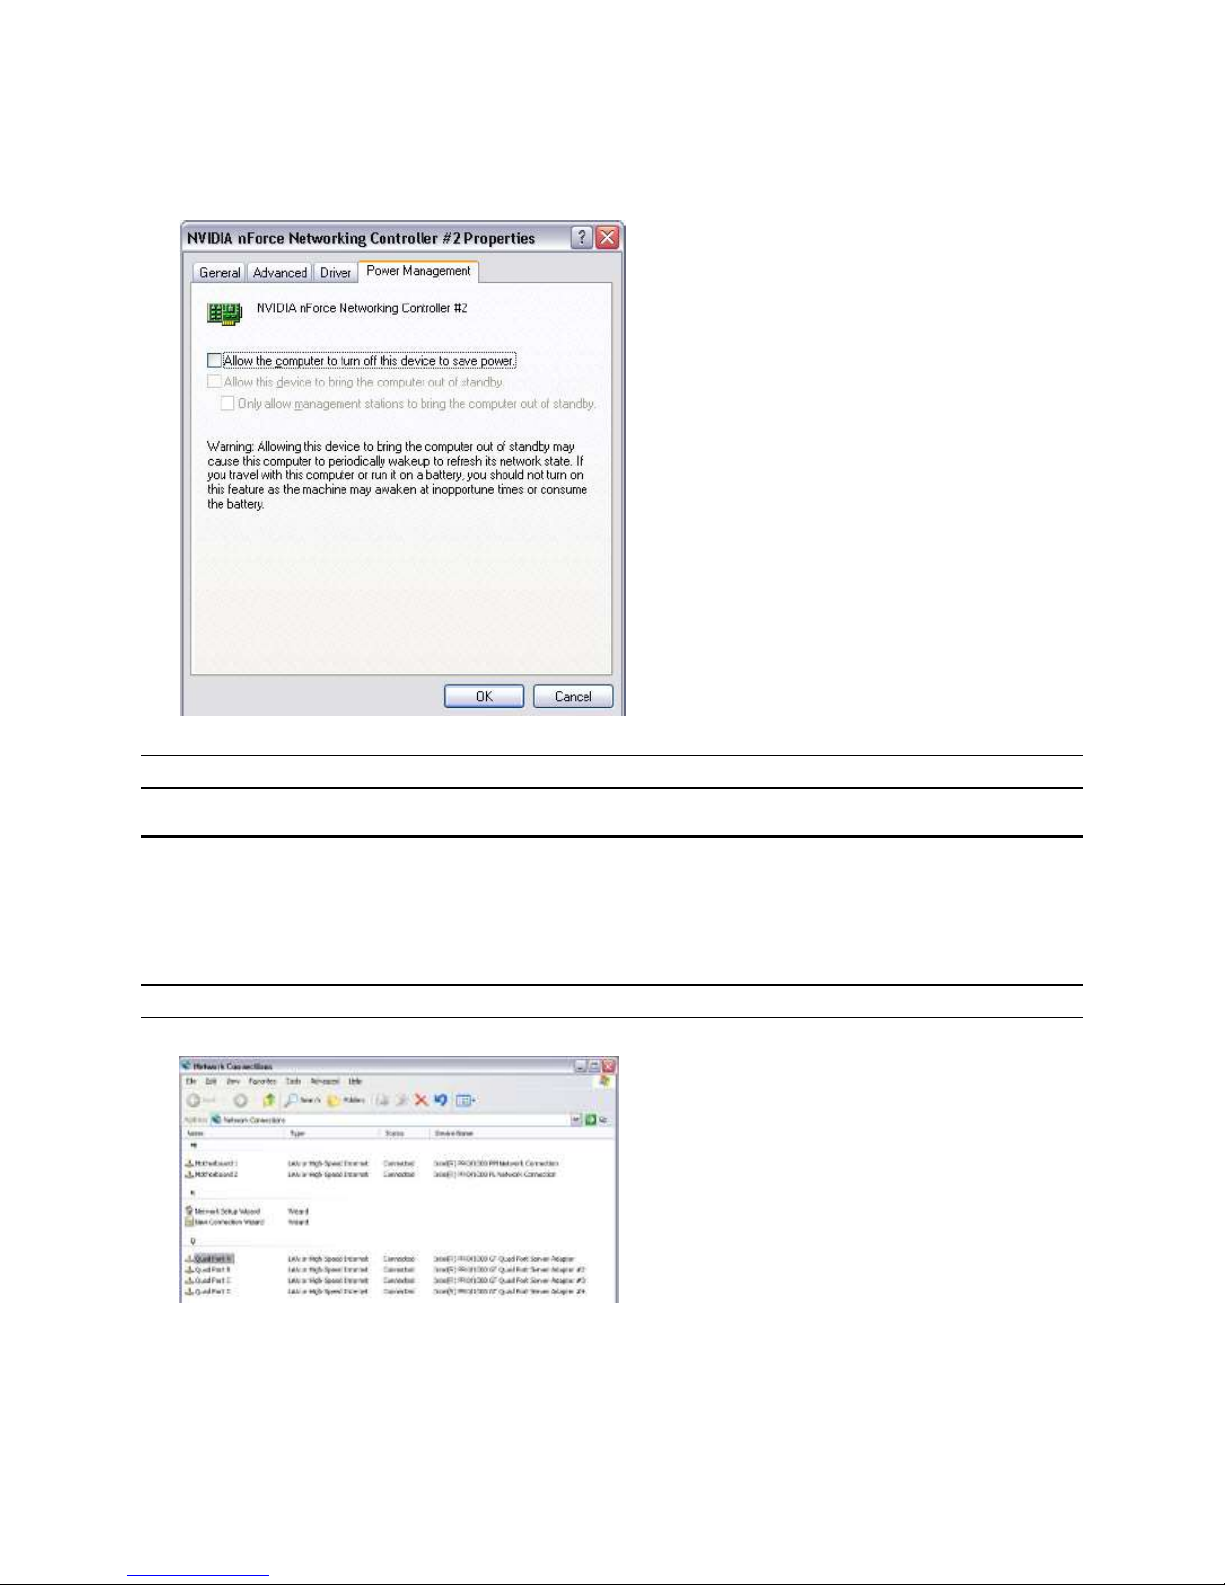
17. Verify that the driver version is 67.6.4.0 or above. If the driver version is lower, download the most
recent driver from the NVIDIA website. Select the Power Management tab.
18. Clear the Allow the computer to turn off this device to save power checkbox. Click OK.
Note. You must repeat this procedure for each of the NVIDIA NICs
Configuring the Chelsio Adapter
You must configure the Chelsio Dual Port Server IP addresses if you are installing a 10 Gigabit Ethernet
system.
Note. You will repeat this process for all Chelsio adapters.
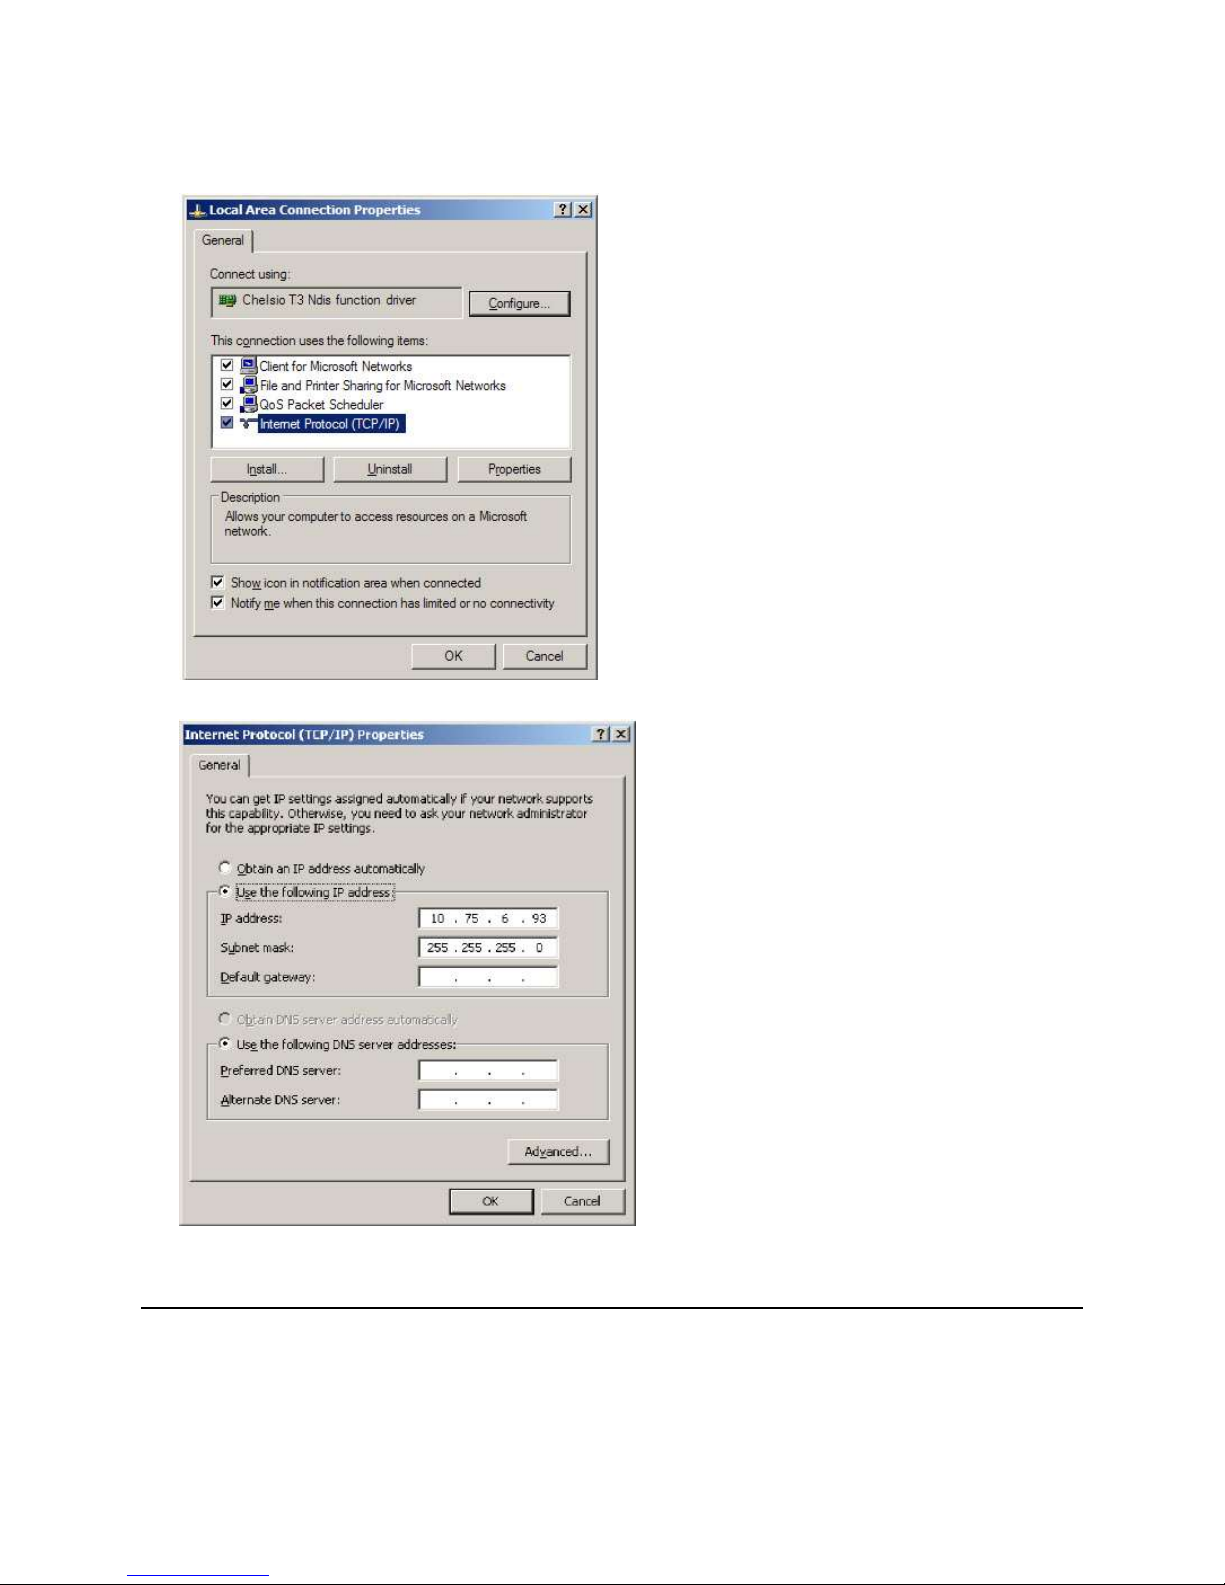
1. On the desktop of your server, click the My Network Places icon. Select Properties.
The Network Connections window displays. The Chelsio adapters are labeled Local Area Connection
by default.
© 2014 Imagine Communications Corp. Proprietary and Confidential. November 2014 | Page 29
Page 30
Nexio® NLE Gateway Chapter 2
Installation Guide Configuring the NLE Gateway Hardware
2. Right-click Local Area Connection and select Properties.
3. From the General tab, select Internet Protocol (TCP/IP), then click Properties.
4. Select Use the following IP address and enter the IP address and Subnet mask. Click OK.
Configuring Farad Storage
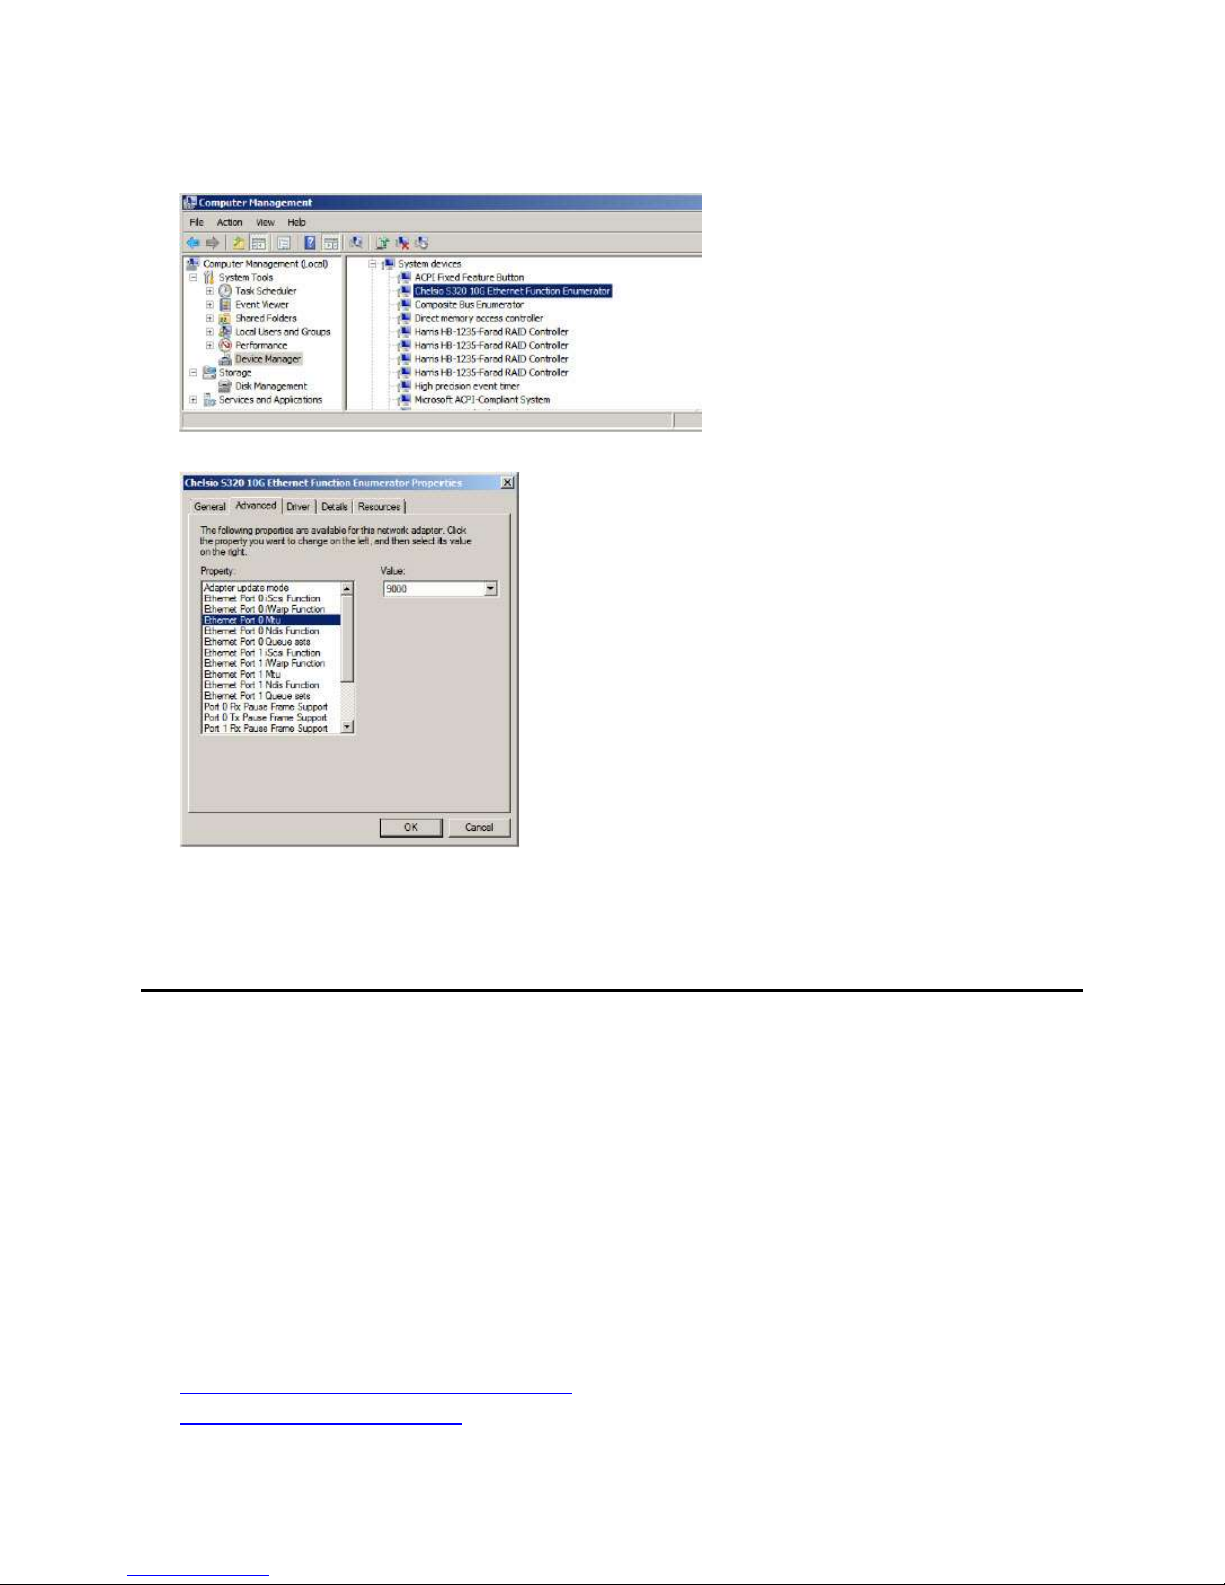
If your system uses Nexio Farad servers for storage and Jumbo Frames are enabled, you must follow this
procedure to change the Ethernet Mtu property for port 0 and port 1.
© 2014 Imagine Communications Corp. Proprietary and Confidential. November 2014 | Page 30
Page 31
Nexio® NLE Gateway Chapter 2
Installation Guide Configuring the NLE Gateway Hardware
1. From the desktop of your server, right-click My Computer, click Manage, then click Device Manager.
2. Under System devices, right-click on Chelsio 10G Ethernet Function Enumerator, select Properties.
3. From the Advanced tab, select Ethernet Port 0 Mtu in the Property list. Set the value to 9000.
Repeat this step for Ethernet Port1 Mtu.
4. Click OK.
Upgrading an FCP Integration Gateway to an
NLE Gateway
The previous generation product, FCP Integration Gateway, can be upgraded to include the features of
the newer NLE Gateway. These instructions presume that the FCP Integration Gateway is already
installed and properly configured. The following hardware is supported for upgrade:
NX1011FCP-GE
NX1011FCP-10G
NX1010FCP
You must perform the following configuration tasks:
Installing the LLM and CIFServer Application
Installing the MB Server Service
© 2014 Imagine Communications Corp. Proprietary and Confidential. November 2014 | Page 31
Page 32

Nexio® NLE Gateway Chapter 3
Chapter 3
Installation Guide Configuring the NLE Gateway Software
Configuring the NLE Gateway
Software
Installing the LLM and CIFServer Application
Both the LLM and CIFServer are distributed as part of the Nexio Software Release package.
1. Download the latest Nexio Software Release package. If you cannot upgrade your system to the
latest Nexio Software Release due to compatibility issues, you must use at least version 6.7.1. or
higher. See the next section on updating CIFServer to get the proper version installed for the NLE
Gateway.
Note: Refer to the Nexio 7.x Software Installation Guide for more information
2. Run Nexio Setup and select NX1011FCP as the platform type.
3. Choose the applicable storage type.
4. Accept the default selections and click Install Selected Applications.
5. Reboot when prompted.
Updating the CIFServer Application
The CIFServer version supplied with the Nexio Software Installation may need to be upgraded. Three
versions of CIFServer are supported with the NLE Gateway:
Version 2.2.25 or higher must be used with Nexio 6.7.1
Version 2.3.11 or higher must be used with Nexio 7.x
To Install the CIFServer
1. Download the proper version of the CIFServer application.
2. Copy the CIFServer.exe file locally, and place in the C:\VR folder.
3. Accept overwriting the file.
Confirm Registry Settings
Make sure the following registry value is set correctly for the CIFServer versions listed here:
[HKEY_CURRENT_USER\Software\Harris\CIFServer\Settings]
For CIFServer 2.2.26; set the registry value to "DBConnection"="DSN=nxdb;"
For CIFServer 2.3.11; set the registry value to "DBConnection"="DSN=nxdb64;"
© 2014 Imagine Communications Corp. Proprietary and Confidential. November 2014 | Page 32
Page 33
Nexio® NLE Gateway Chapter 3
Installation Guide Configuring the NLE Gateway Software
Using Nexio Config
You must use the Nexio Config software application to configure the core Nexio components of the NLE
Gateway to allow it to connect properly to the Nexio SAN environment.
Installing the MB Server Service
MB Server is a service that supports the NLE plug-ins. It provides MediaBase metadata to the various
metadata fields within the export plug-ins. MB Server communicates directly to the LLM so that multiple
client applications do not have to connect directly to the LLM
1. Download the latest MB Server installer
2. Run the MB Server Install.exe file.
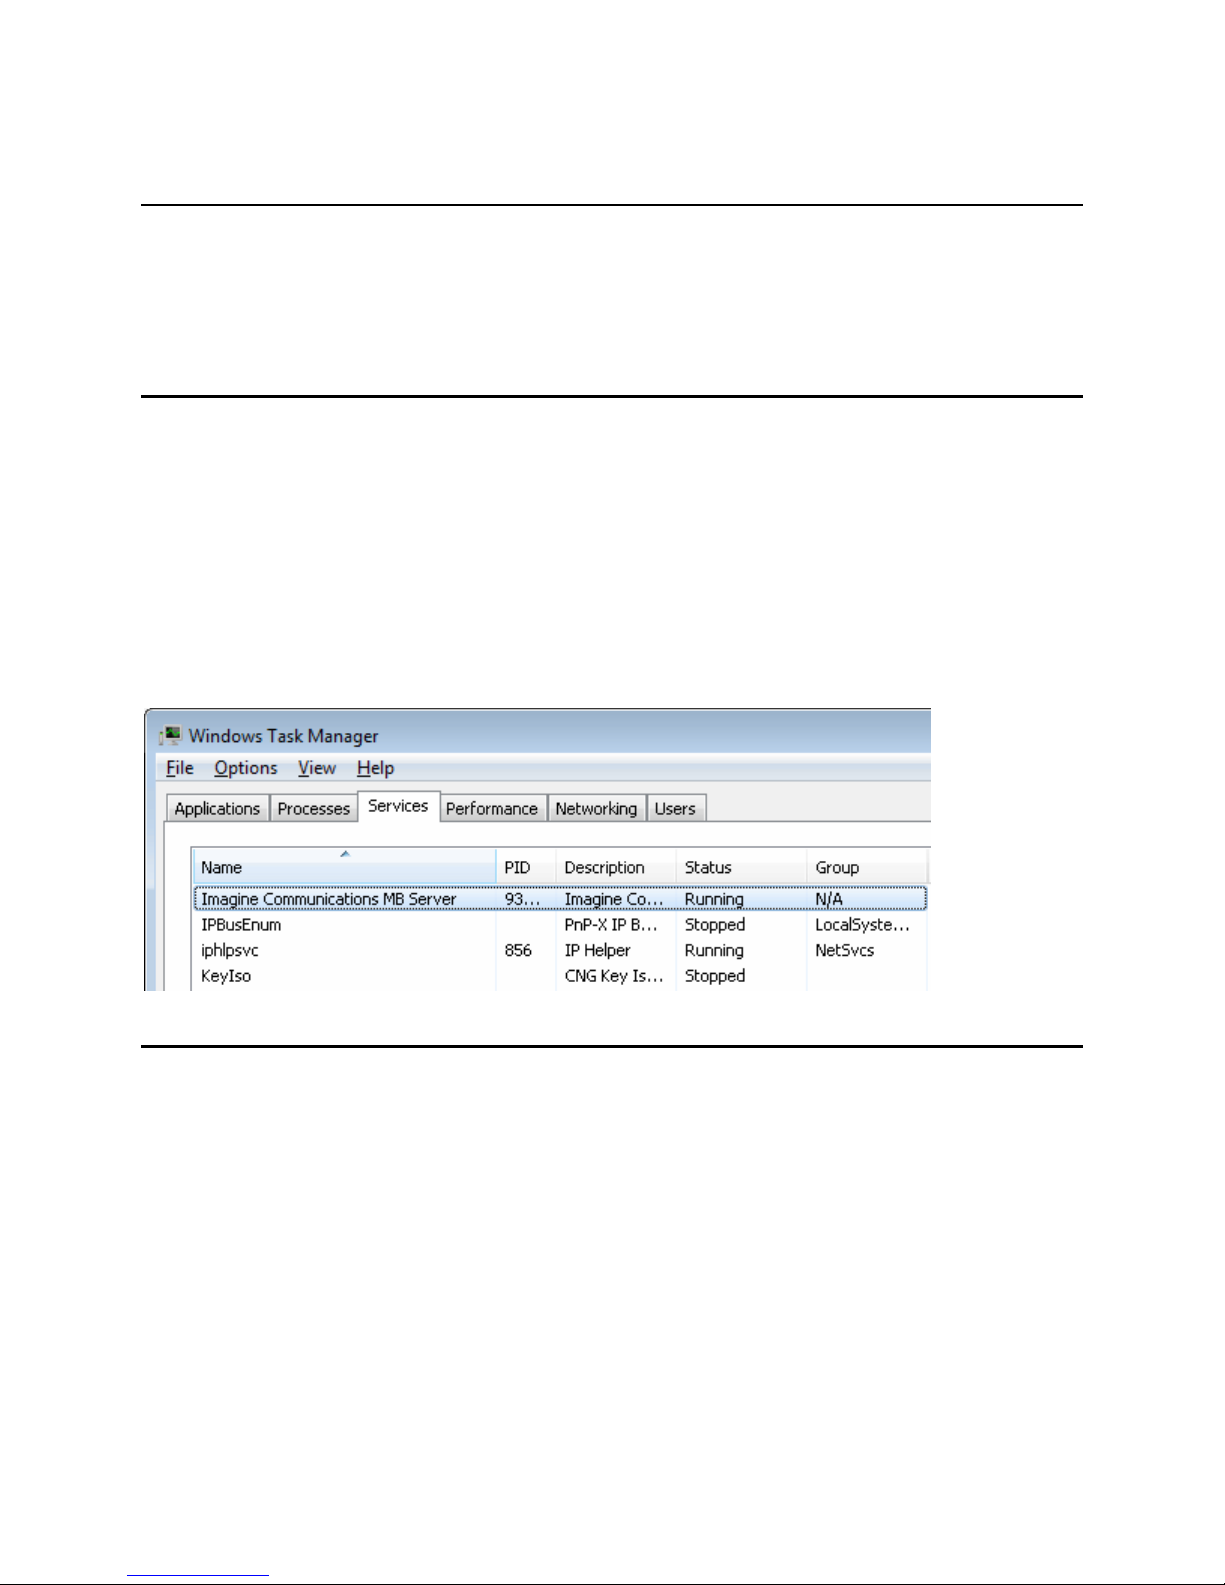
3. Confirm that the MB Server service is running. Open the Windows Task Manager and select the
Services tab. Look for Imagine Communications MB Server. Confirm that the status shows Running.
Installing the PostgreSQL Database
PostgreSQL is an open source relational database system that is a required component of the Nexio NLE
Gateway software system. PostgreSQL must be installed on your NLE Gateway device. Here is a
summary list of the tasks you must perform to configure PostgreSQL.
Download and install the InstallPostGreSQLForCIFS batch installer
Historically, Nexio CIFS has been deployed to the field as a pre-imaged server. The following describes
the procedure needed to install CIFS dependencies including PostGreSQL 9.3.0, CIFS/nxdb database,
tables and views, database drivers and operating system configuration modifications for servers that are
not distributed with a pre-installed environment.
© 2014 Imagine Communications Corp. Proprietary and Confidential. November 2014 | Page 33
Page 34

Nexio® NLE Gateway Chapter 3
Installation Guide Configuring the NLE Gateway Software
Unattended Batch Installation
An unattended batch installation uses pre-existing installation packages that expose parameters to a
shell script or command file. It is a "forward only" command sequence that executes a variety of tasks. It
is not a formal installation package that manages each component. You can run this to install and
configure all services and settings the Nexio CIFS service depends on.
Run Unattended Batch Installation
1. Extract files from InstallPostGreSQLForCIFS.zip.
2. Double-click InstallPostGreSQLForCIFS.cmd to install
3. The installation process initiates and will run for approximately 00:03:20.
4. Reboot the system
Configuring the CIFServer Application
Once the NLE gateway device is connected to and configured with the Nexio SAN, you should verify that
the LLM and CIFServer applications are running.
Note. The LLM and CIFServer applications must be running properly before you can connect a client
workstation to the NLE Gateway.
Launching the LLM and CIFServer
On the desktop of the NLE gateway server, double-click the CIFServer shortcut icon.
This will launch the LLM and the CIFServer application.
Verify that the all of the server nodes in your Nexio system are displayed in the LLM UI. Also, make sure
the logical disks display according to your Nexio system configuration.
Note. CIFServer can be run in rebuild mode. This should only be done when instructed by an Imagine
Communications support representative. To do this, run CIFServer in a command line and adding –r. Or,
create a separate shortcut with the following target: C:\VR\CIFServer.exe –r.
© 2014 Imagine Communications Corp. Proprietary and Confidential. November 2014 | Page 34
Page 35
Nexio® NLE Gateway Chapter 3
Installation Guide Configuring the NLE Gateway Software
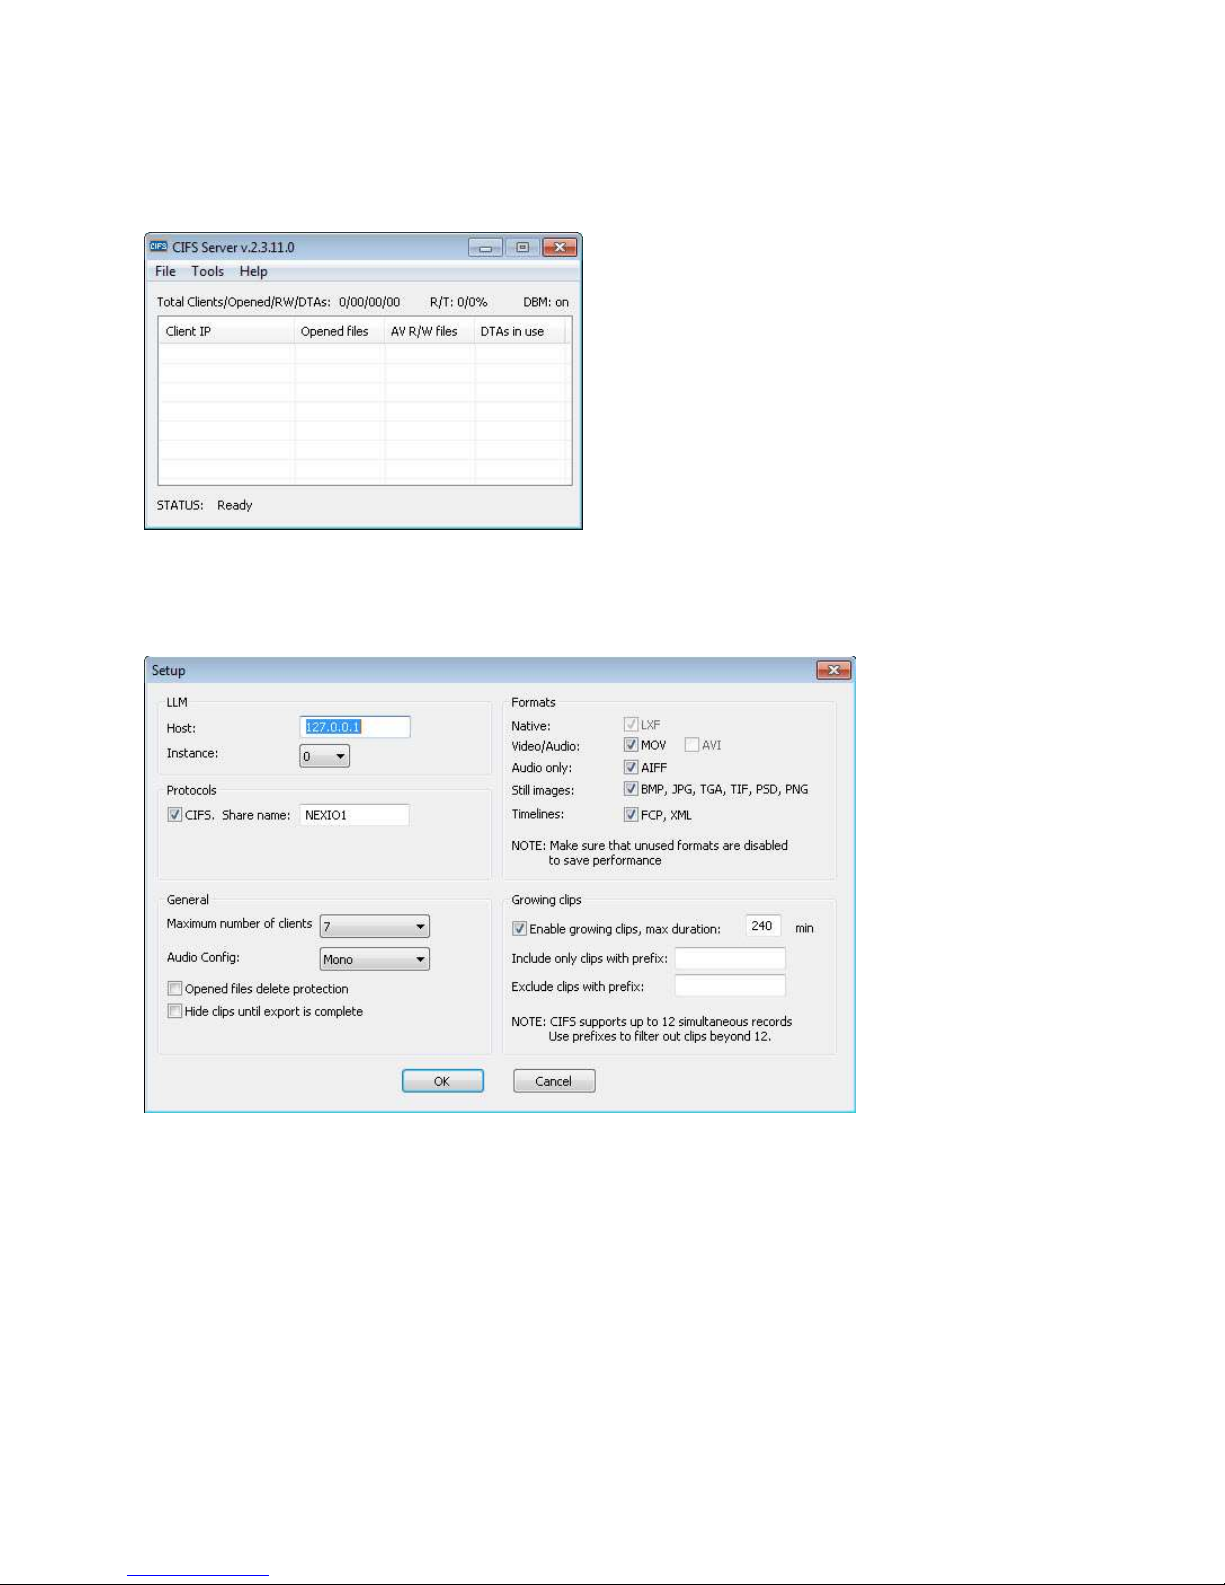
The CIFServer Application will show Status: Ready once it has indexed the database and is ready to
accept client connections.
Setting up the System
From the CIFServer Tools menu, navigate to Tools > Setup to display the System Setup window.
© 2014 Imagine Communications Corp. Proprietary and Confidential. November 2014 | Page 35
Page 36

Nexio® NLE Gateway Chapter 3
Control
Definition
LLM Host
This field should show 127.0.0.1.
Instance
This is typically set to 0. Certain configurations involving
multiple LLMs like AMP Share will have this set higher
CIFS Share name
Must be enabled. Enter a unique name for your client
computer.
FTP
Not used. Make sure this check box is clear.
Maximum number of
clients
This is typically set to 7. However, a lower number of clients
can be set which will deny addition connections.
Audio Config
This setting is only used when you copy MOV files directly
into the MOV folder through Finder or Windows Explorer.
Stereo - Your MOV file was exported from the NLE with
mixed Stereo and audio channels.
Mono - Your MOV file was exported from the NLE with
discreet mono audio channels.
Opened files delete
protection
Files being accessed in the NLE or QuickTime Player are
protected from deletion by other machines connected to the
Nexio network.
Hide clips until export is
complete
Each clip export must be complete before it can be played
back.
Formats
Select the file formats you want to display through the NLE
Gateway. To enhance performance, you should disable
formats that are not used.
Enable growing clips, max
duration
Allows growing clips to display through the NLE Gateway.
Specify a duration for growing clips. (default = 360 minutes)
Allow only clips with
prefix
You can define a prefix that will limit the number of growing
clips that are available to the NLE.
Exclude clips with prefix
You can define a prefix that will exclude growing clips that
are available to NLE.
Installation Guide Configuring the NLE Gateway Software
© 2014 Imagine Communications Corp. Proprietary and Confidential. November 2014 | Page 36
Page 37
Nexio® NLE Gateway Chapter 3
Installation Guide Configuring the NLE Gateway Software
Configure Logging
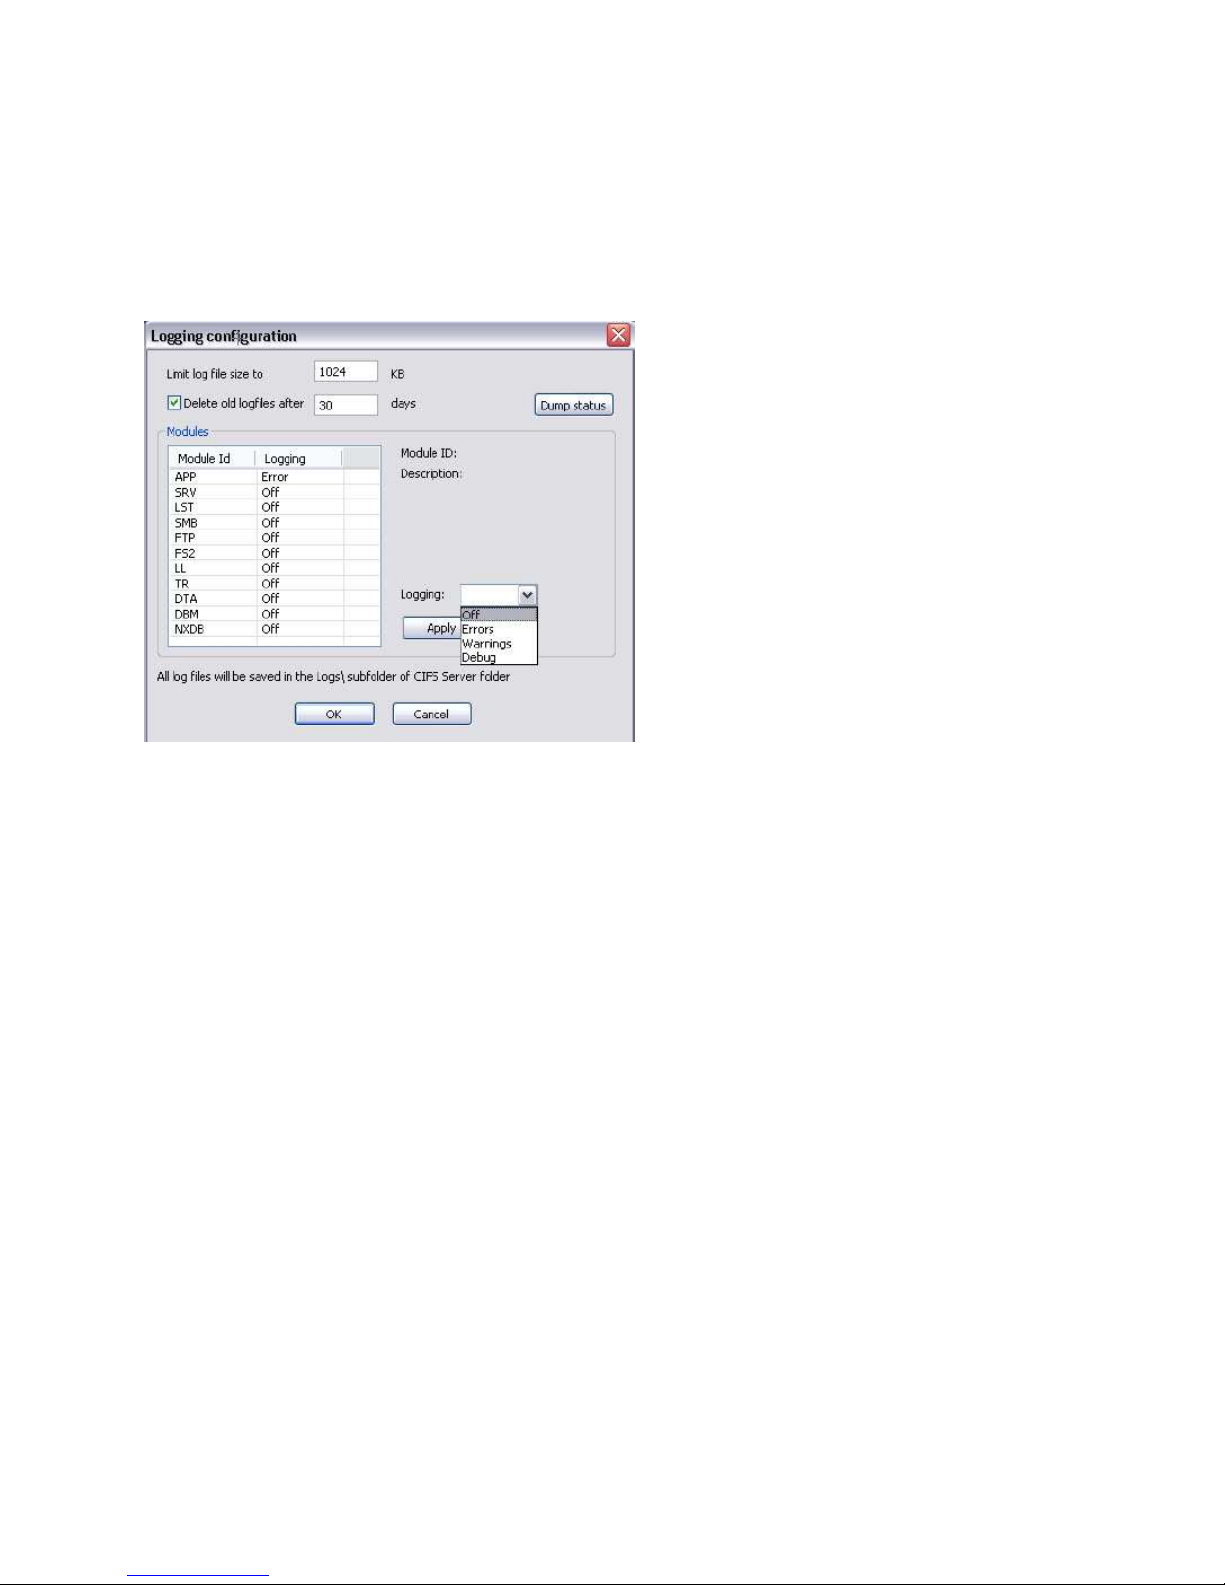
From the CIFServer Tools menu, navigate to Tools > Logging to display the Login Configuration window.
This window allows you to set logging options that you can use to diagnose system issues and
performance.
Logging Levels
Off - No activity is logged.
Errors - Logs serious errors.
Warnings - Logs serious errors, minor errors and warnings.
Debug - Logs serious errors, minor errors, warnings and diagnostic data.
© 2014 Imagine Communications Corp. Proprietary and Confidential. November 2014 | Page 37
Page 38

Nexio® NLE Gateway Chapter 3
Module
Function
APP
Monitors user interface and configuration diagnostics.
SRV
Monitors connections and disconnections from clients
to the gateway.
LST
Monitors the listening device which waits for new
connections from clients to the gateway.
SMB
Monitors data transfers between the gateway and
clients.
FTP
Monitors FTP connections. (Not used.)
FS2
Monitors the opening and closing of files between
clients and the gateway.
LL
Monitors communication between the CIFServer
application and the LLM.
TR
Monitors data transfer diagnostics between the
gateway and clients.
DTA
Monitors the conversion of data from various formats
to the Nexio format.
DBM
Monitors the database management processes on the
gateway.
NXDB
Monitors the connection between the CIFServer
application and the PostgreSQL database.
Installation Guide Configuring the NLE Gateway Software
© 2014 Imagine Communications Corp. Proprietary and Confidential. November 2014 | Page 38
Page 39
Nexio® NLE Gateway Chapter 4
Chapter 4
Installation Guide Installing the Mac NLE Client Plug-ins
Installing the Mac NLE Client Plug-ins
You must install the Mac NLE client plug-in software onto each of your Mac NLE client workstations.
Note. The LLM and CIFServer applications must be running properly on the before you can successfully
connect a client workstation to the Nexio NLE gateway server.
Connecting the Client Workstation to the NLE
Gateway
Here is a summary list of tasks you will perform to connect your Mac client workstation to the Nexio NLE
gateway device:
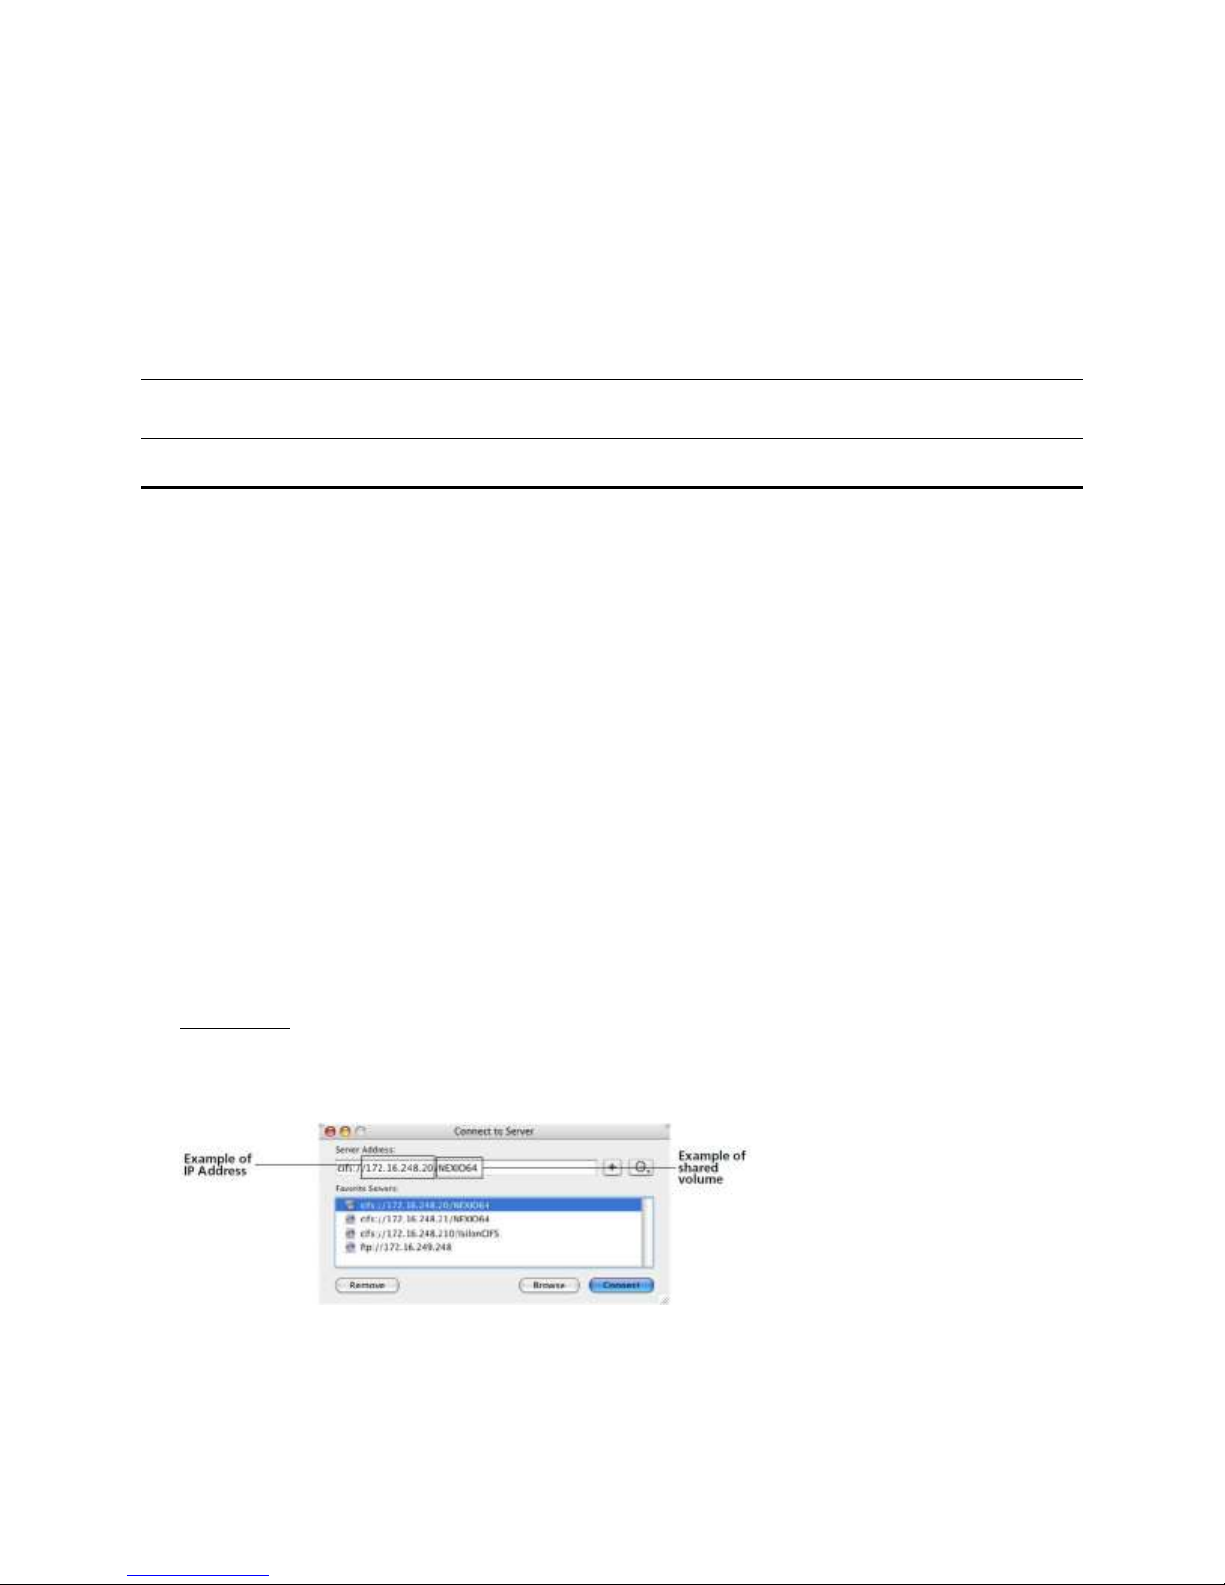
Use the Connect to Server window on your Mac to identify address of your server on the network.
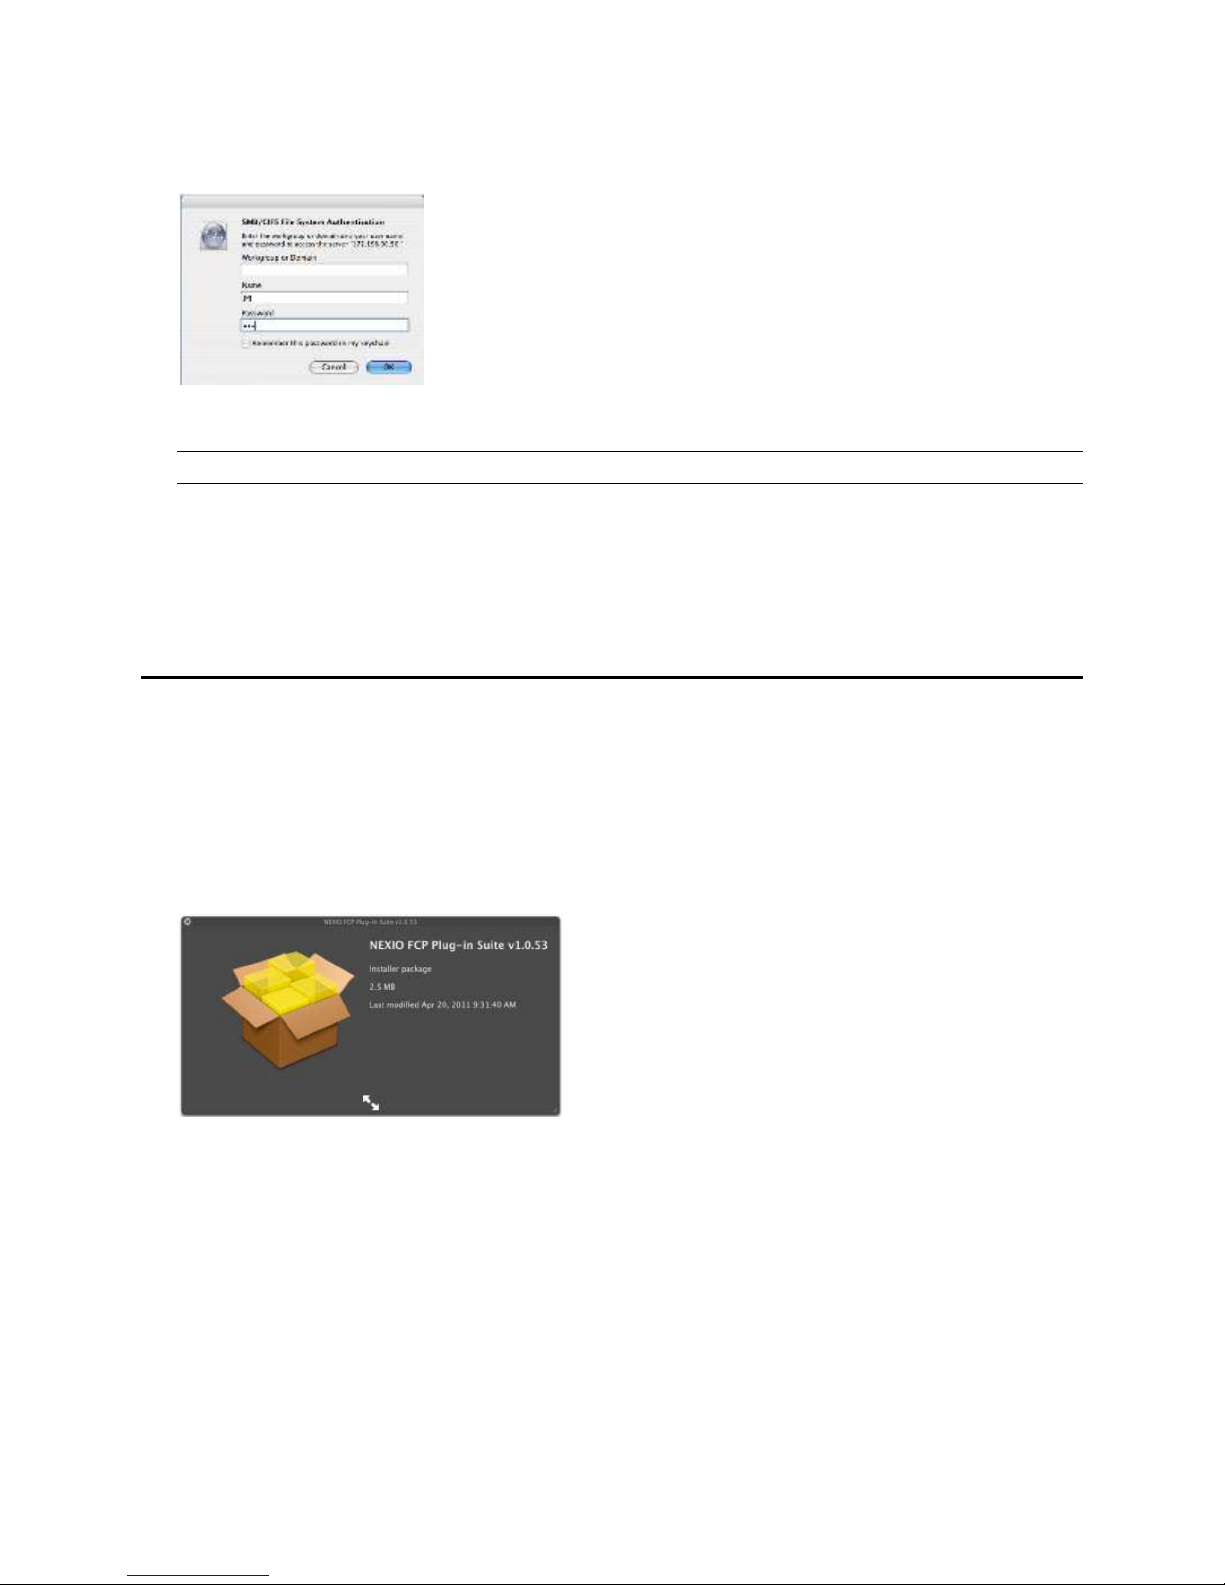
Use the System Authentication window to enter your login credentials for the Nexio server system.
Connecting to the Gateway Server
1. From the Apple Go menu select Connect to Server. (You can also use the Apple Key + K shortcut.)
Type your server address using this format:
cifs://[the IP address of your NLE Gateway]/[name of your CIFShare]
OR use the Name Service share name
cifs://[NAME]/[SHARE]
For Example: if the IP address of your CIFServer is 172.16.248.20 and your name service name is
NEXIO1, then you will enter the address as follows:
cifs://172.16.248.20/NEXIO1
© 2014 Imagine Communications Corp. Proprietary and Confidential. November 2014 | Page 39
Page 40
Nexio® NLE Gateway Chapter 4
Installation Guide Installing the Mac NLE Client Plug-ins
2. Click Connect. The System Authentication window displays.
3. Enter your Nexio server system username and password. You do not need to enter a Workgroup or
Domain value.
Note. Nexio user accounts are created and managed in applications like NXOS and Velocity.
4. You can select Remember the password in my keychain if you expect the user credentials will be re-
used by the current Mac user.
5. Click OK.
The shared drive displays showing 4 folders: AIFF, LXF, MOV and Timelines (stills).
Using the Nexio NLE Plug-in Suite for Mac
Installer
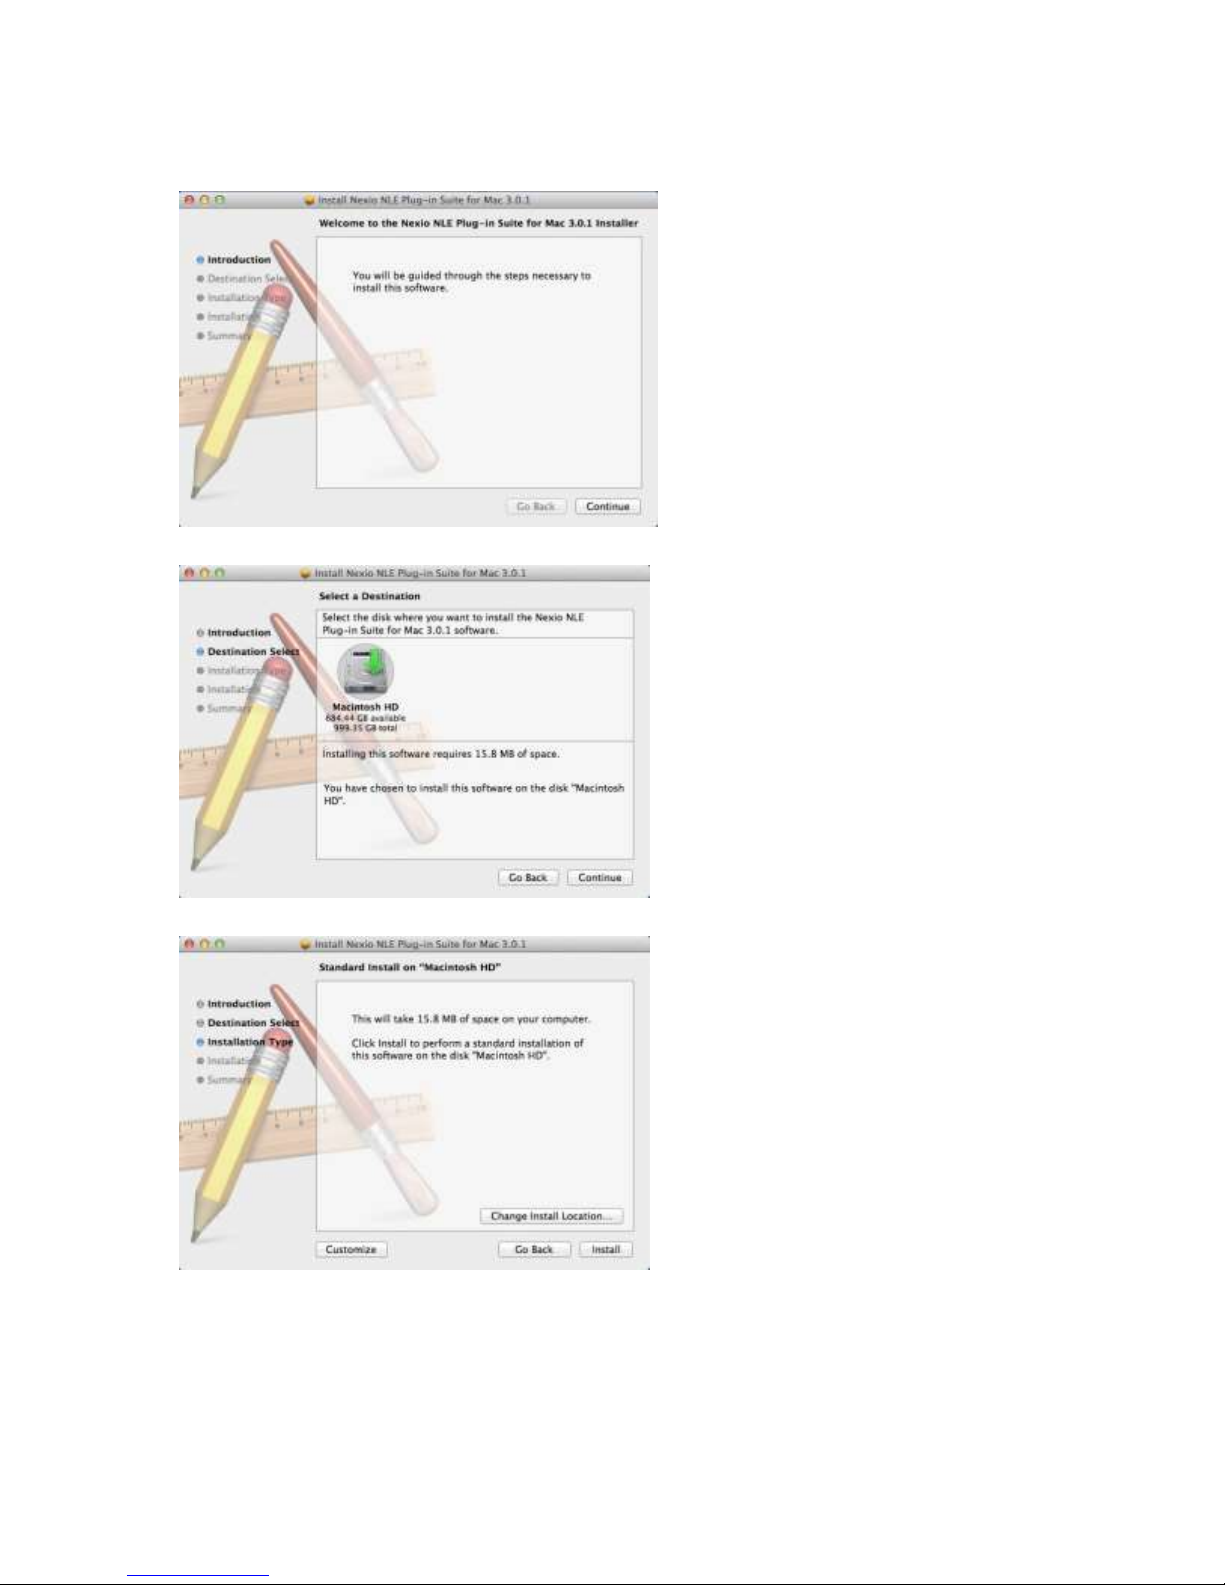
1. Locate the Nexio NLE Plug-in suite for Mac. It is available for download on the ICC software portal.
2. Double-click on the Nexio FCP Plug-in Suite.mpkg installer.
© 2014 Imagine Communications Corp. Proprietary and Confidential. November 2014 | Page 40
Page 41
Nexio® NLE Gateway Chapter 4
Installation Guide Installing the Mac NLE Client Plug-ins
The Welcome window displays.
3. Click Continue. The next window directs you to Select a Destination.
4. Click Continue. Follow instructions on the screen to change your install location.
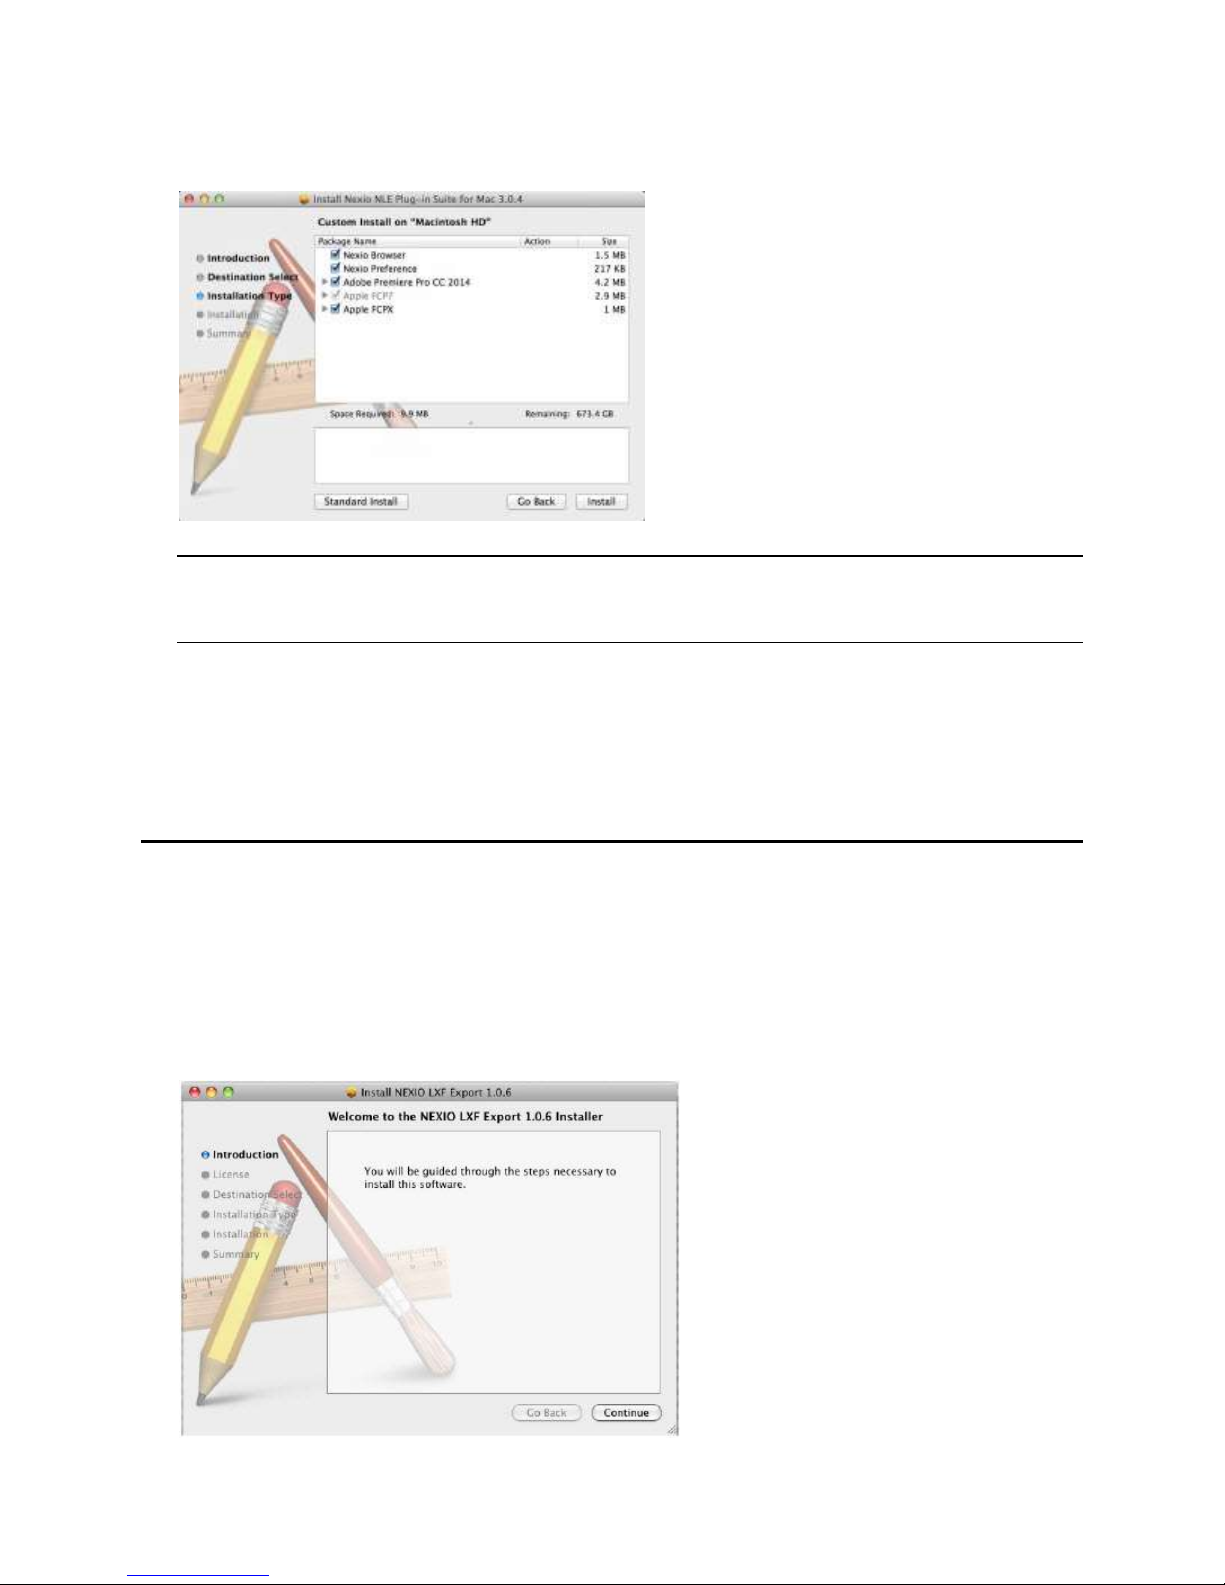
If you click Install, the Nexio Browse and Nexio Export software packages will install. If you click
Customize, the Custom Install window displays. Here you can use the checkboxes to select the
software you want to install.
© 2014 Imagine Communications Corp. Proprietary and Confidential. November 2014 | Page 41
Page 42
Nexio® NLE Gateway Chapter 4
Installation Guide Installing the Mac NLE Client Plug-ins
Note. The installer auto-detects if a specific NLE application is already installed on the system and
will default to installing plug-ins for them all. If you want to exclude a plug-in for a specific
application, you can un-check the appropriate box.
You must install Nexio Browser and Nexio Preference with Nexio NLE Gateway regardless of the
supported NLE applications.
If a Nexio NLE Gateway is not connected to the NLE client, it is still possible to utilize the FTP export
plug-ins which connect via the Nexio FTP Server.
5. Click Install.
Using the Nexio LXF Export Plug-in for Mac
Installer
Download the Nexio LXF Export plug-in from the ICC software portal.
1. Locate the Nexio LXF Export.pkg icon on the installation media and double-click it to launch the
installer. The LXF Export Welcome window displays.
© 2014 Imagine Communications Corp. Proprietary and Confidential. November 2014 | Page 42
Page 43
Nexio® NLE Gateway Chapter 4
Installation Guide Installing the Mac NLE Client Plug-ins
2. Click Continue to display the License Agreement window.
3. Read the software license agreement carefully. Click Continue and then Agree to continue with the
installation. The Install window displays.
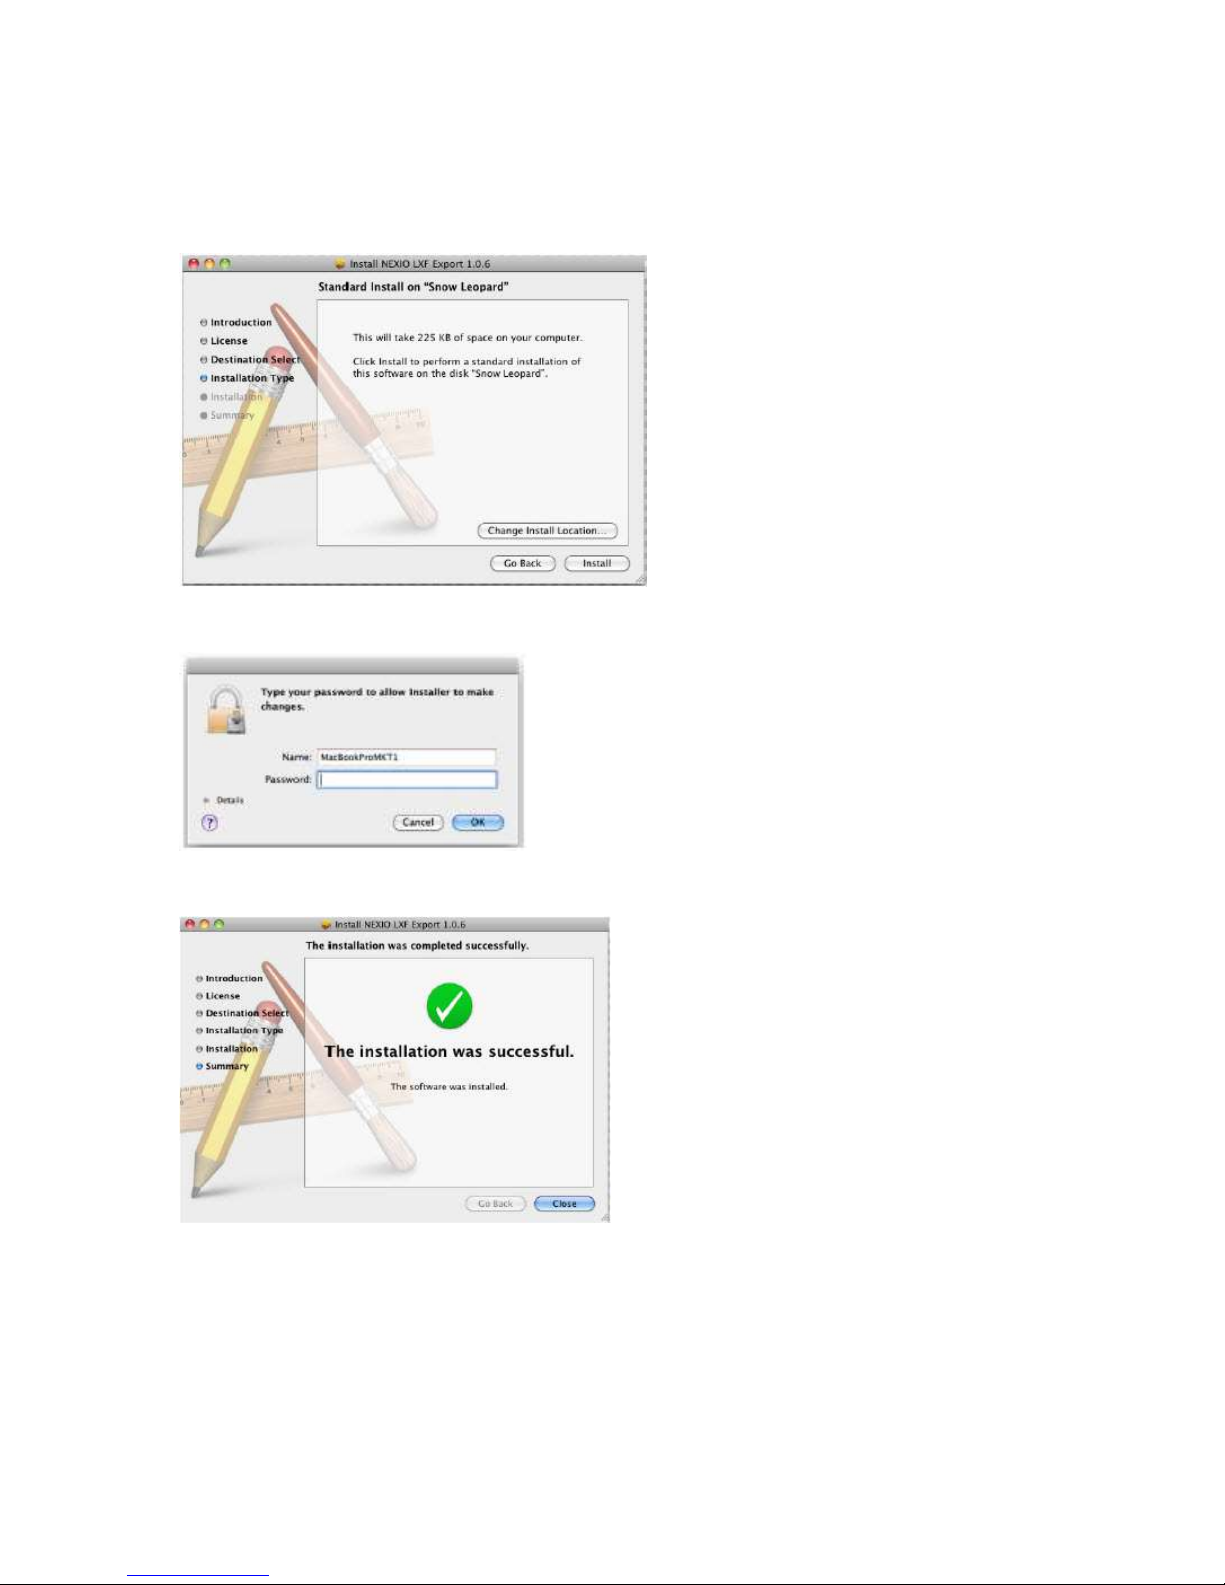
4. Click Install or click Change Install Location to choose a different installation location. The password
pop-up displays.
5. Enter the name and password for an administrator account for the Mac. Click OK. The Installation
Complete window displays.
6. Click Close to complete the installation.
Launching LXF Export
Once the installation is complete, Nexio LXF Export will display in the Export menu of Final Cut Pro.
Follow these steps to create an LXF file for import into the Nexio SAN.
© 2014 Imagine Communications Corp. Proprietary and Confidential. November 2014 | Page 43
Page 44
Nexio® NLE Gateway Chapter 4
Installation Guide Installing the Mac NLE Client Plug-ins
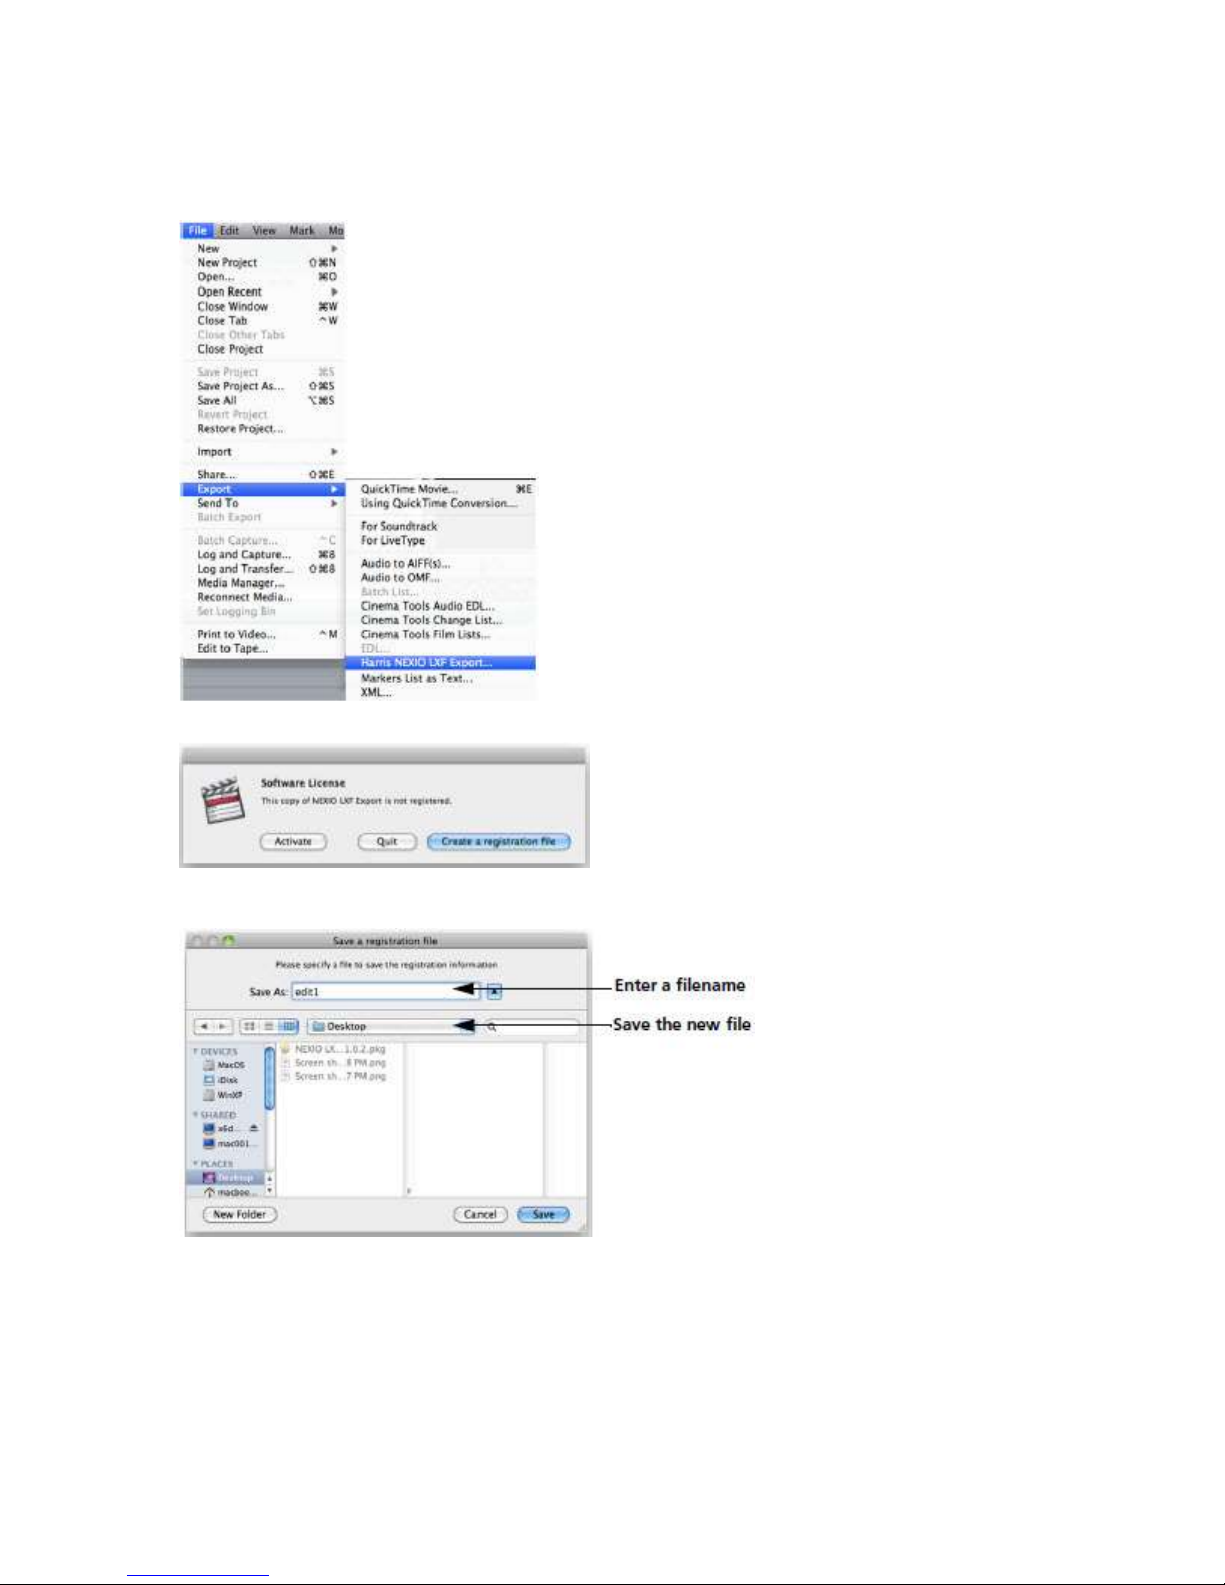
1. When you have completed your edit in FCP, from the File menu, navigate to Export > Nexio LXF
Export.
2. The first time you launch the Nexio LXF Export plug-in, you will be asked to register your software.
Click Create a registration file to begin the registration process. Once you choose to create a
registration file, you will be prompted for a filename and location.
3. Enter a name in the Save As field. (Activation files are specific to the computer on which you are
generating the registration file.) Browse to a convenient file location and click Save.
Use email to send a copy of your *.keym file that was generated to Imagine Communications
Customer Support. Be sure to include your company name, sales order number, and the version of
the application you are registering. Imagine Customer Service will send you the *.valm activation
files with the same name as the system you are registering.
© 2014 Imagine Communications Corp. Proprietary and Confidential. November 2014 | Page 44
Page 45
Nexio® NLE Gateway Chapter 4
Installation Guide Installing the Mac NLE Client Plug-ins
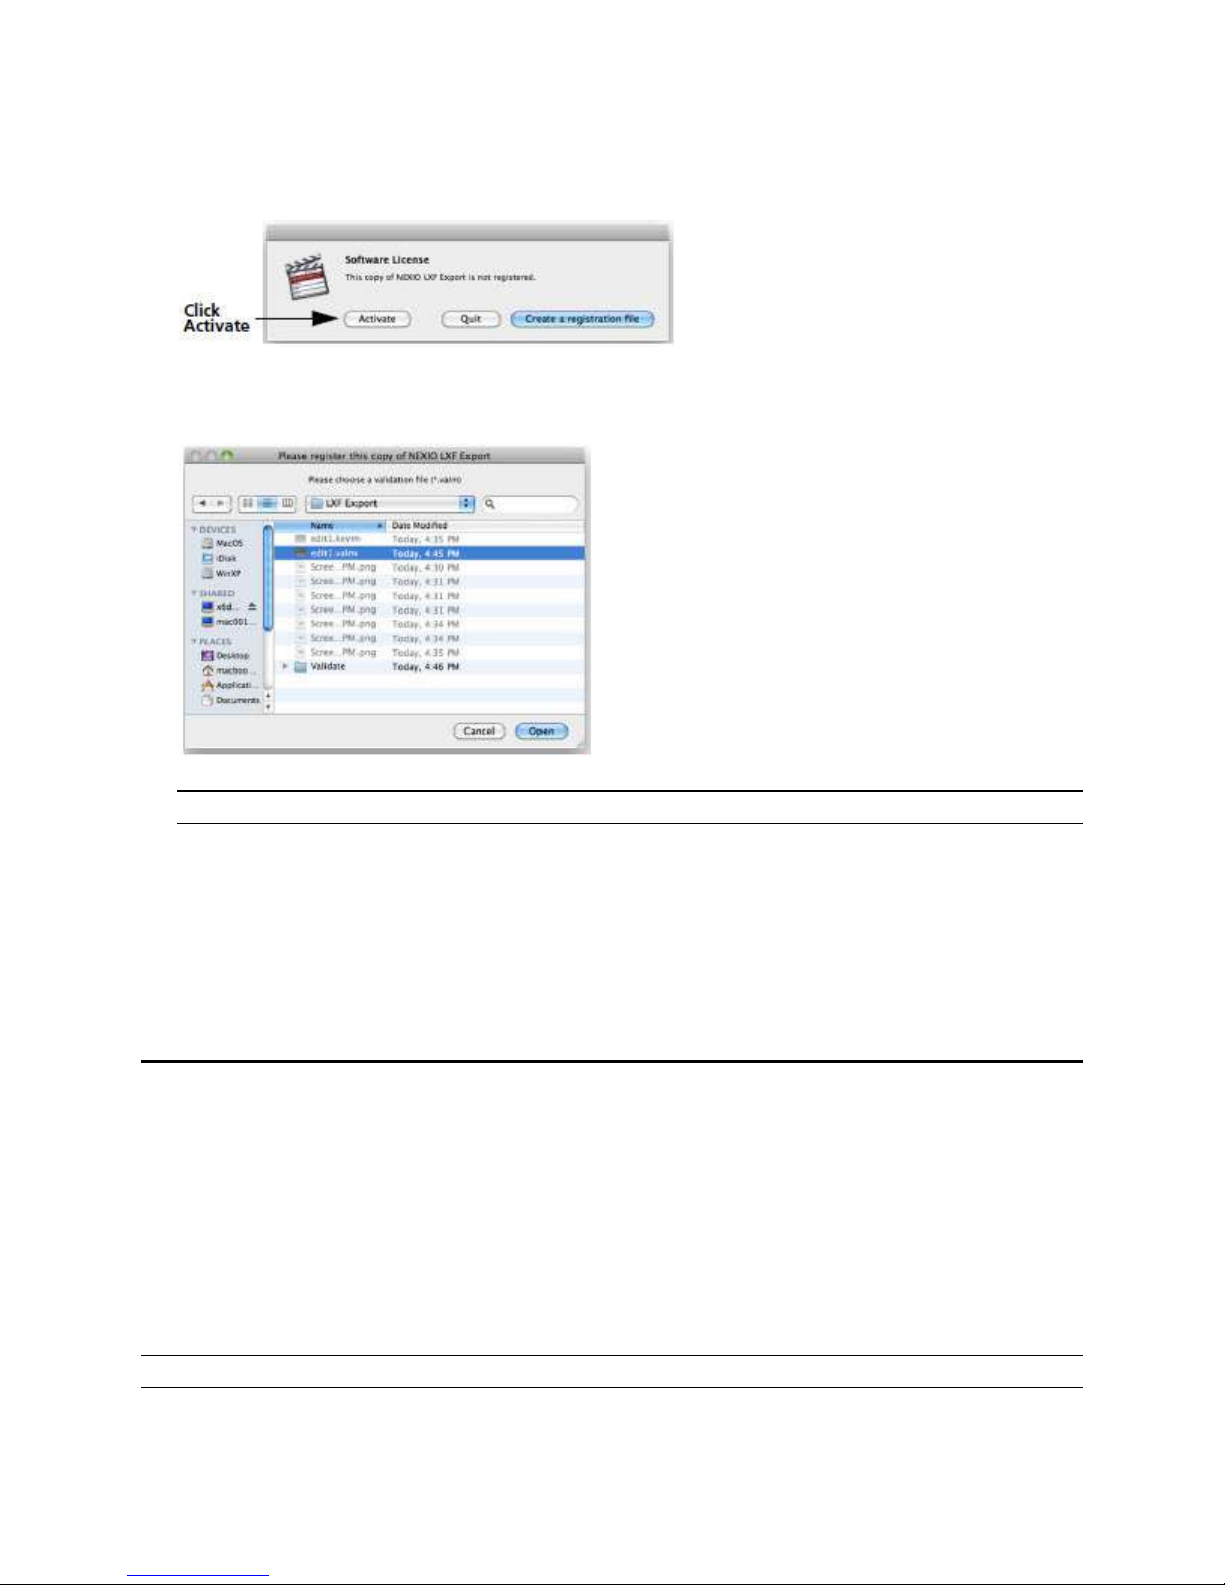
4. Once you receive the *.valm file, from the File menu in FCP, navigate to Export > Nexio LXF Export
to launch the activation screen.
5. Click Activate. The validation window displays.
Once the activation file is accepted, the LXF Export plug-in will load. You will not need to repeat the
activation process unless you remove and re-install the LXF Export plug-in.
Enter or browse to a location where you will save the LXF files.
Note. You only need to enter this location the first time the plug-in is loaded.
6. The ID field will populate with the project name followed by the sequence name. Alternatively, you
can type in another name in the ID field.
The Agency, Description, and User Fields 1-4 may also be used, but they are not required.
7. Once your information is entered, click OK to create the final LXF file.
When you have created the file, you can transfer the LXF file to a Nexio SAN using the FTP Server.
Setting System Preferences
Once the NLE client plug-ins are installed, you must set the Nexio System Preferences on your Mac
workstation. You will need the following information:
The IP Address of your Nexio Media Gateway database.
The network path to your Nexio SAN MOV file on your Nexio Media Gateway.
The NLE application that you will use. (Adobe Premier, Apple FCP7, or FCPX)
You must also create a directory on your local Mac system to store media files locally.
Note. You must log in using an administrator account to set system preferences.
© 2014 Imagine Communications Corp. Proprietary and Confidential. November 2014 | Page 45
Page 46
Nexio® NLE Gateway Chapter 4
Installation Guide Installing the Mac NLE Client Plug-ins
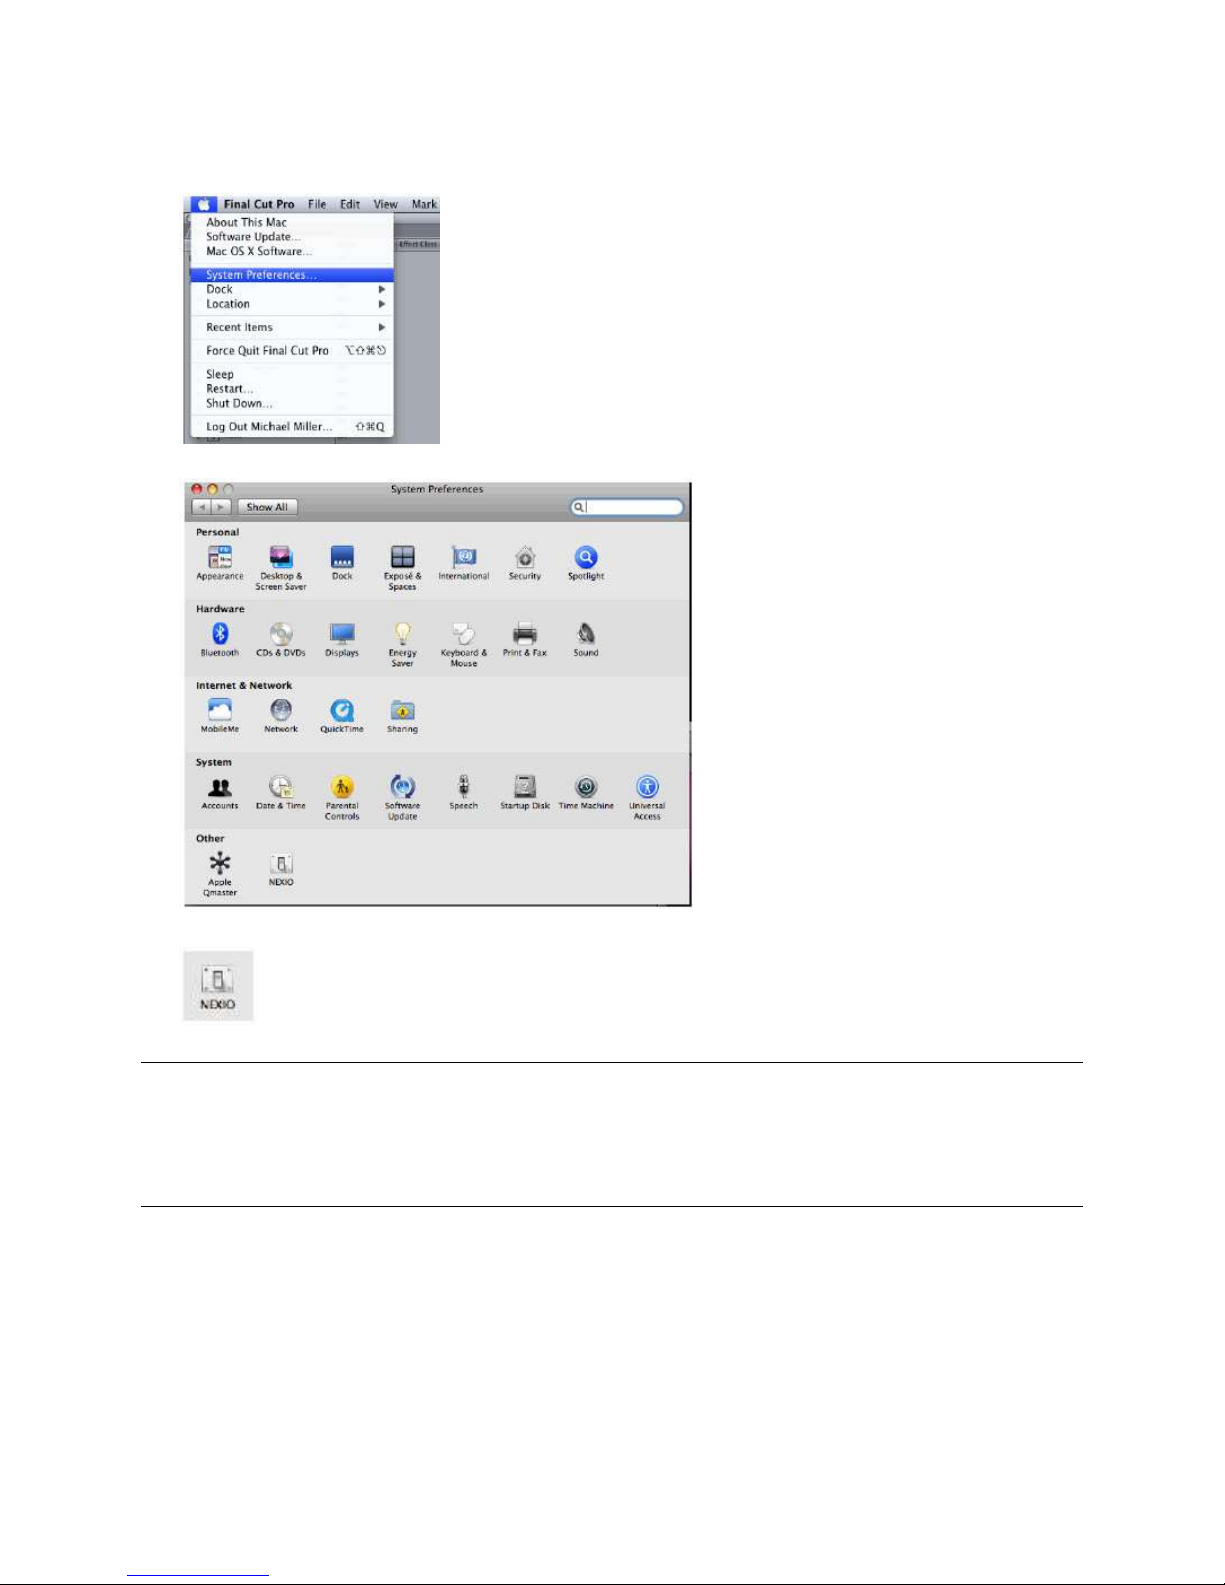
1. Click the Apple icon and select System Preferences from the drop-down menu.
The System Preferences window displays.
2. Click on the Nexio icon.
The Nexio Preferences window displays.
Note. You must select Click the lock to make changes and enter the required user credentials.
The Mac OS allows you to set system preferences on a per-user level or on a system-wide level. Both
levels can co-exist on the system. The Nexio FCP plug-in supports both levels. Use the System
Configuration checkbox to set configuration levels in a way that best supports your installation and
workflow.
© 2014 Imagine Communications Corp. Proprietary and Confidential. November 2014 | Page 46
Page 47
Nexio® NLE Gateway Chapter 4
Installation Guide Installing the Mac NLE Client Plug-ins
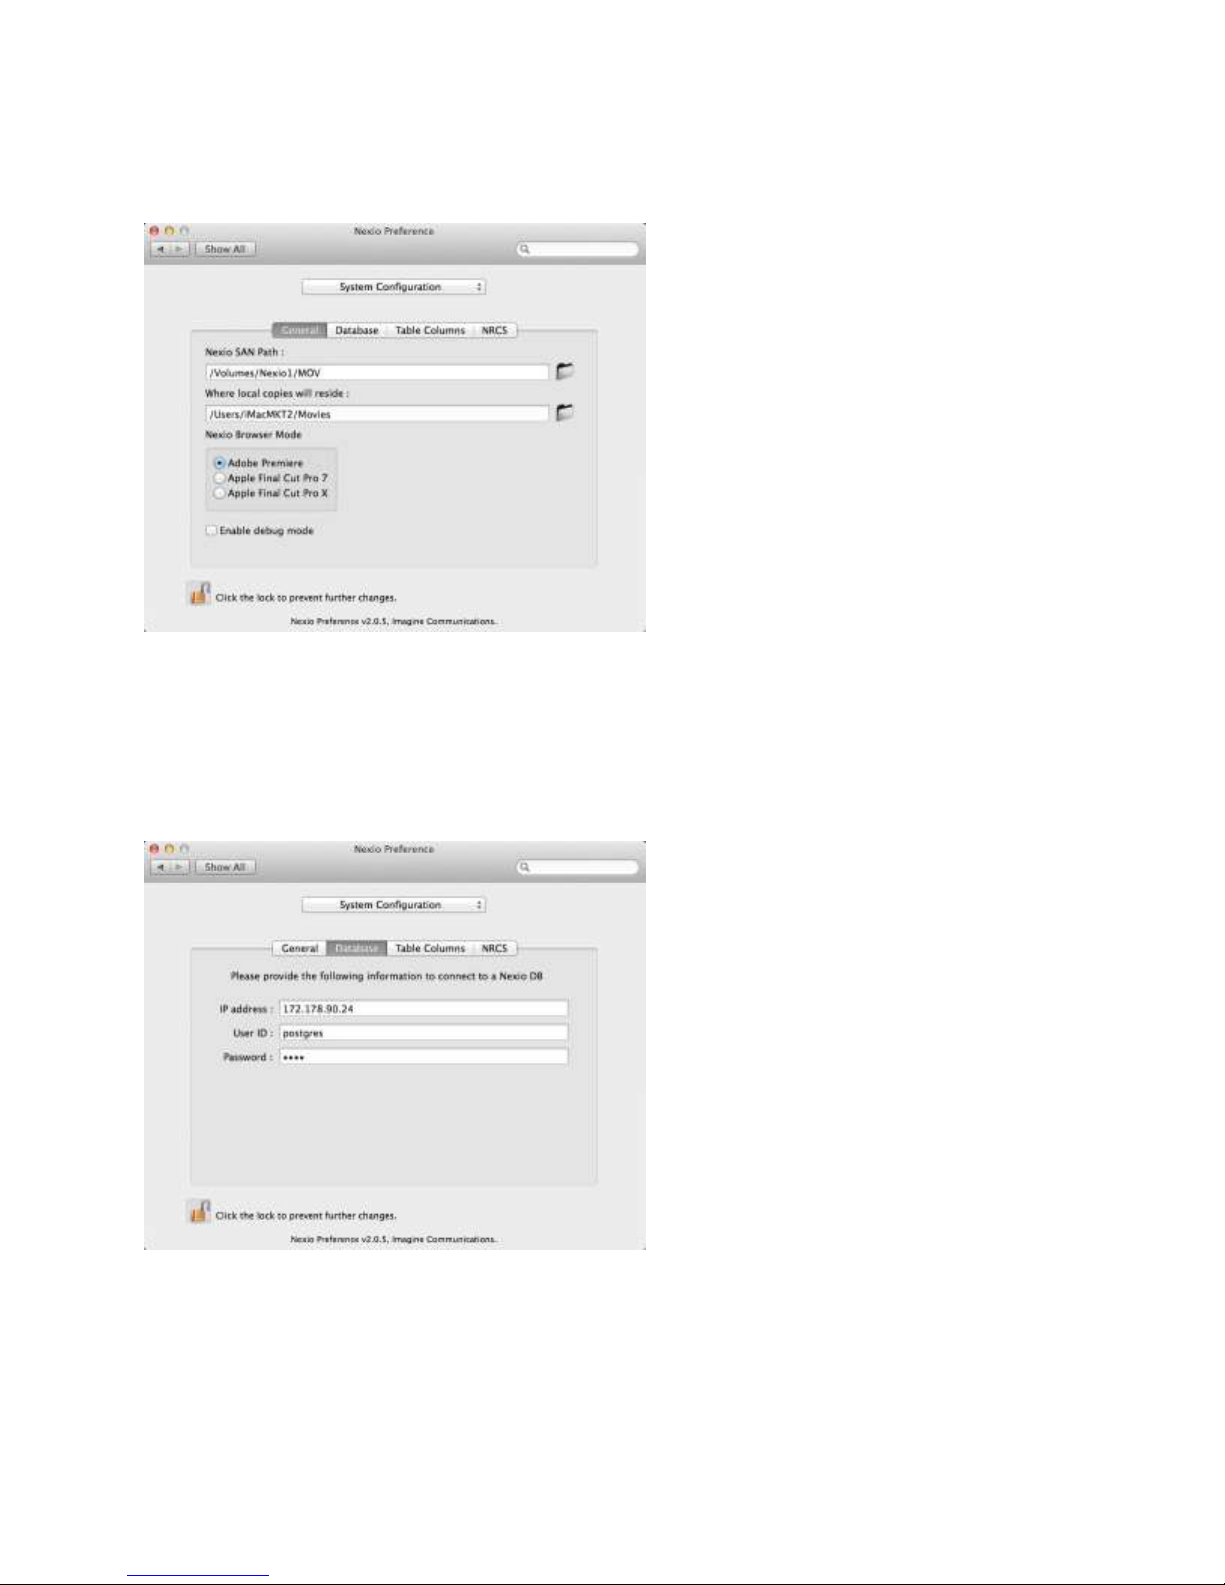
General Tab
Nexio SAN Path. Enter the network path to your Nexio SAN MOV file on your Nexio gateway.
Where local copies will reside. Enter the location on your Mac workstation where local copies of
your files can reside.
Nexio Browser Mode. Select the NLE application that will be used on the client.
Database Tab
Set your database preferences on the Database tab.
IP Address. Enter the IP Address of your Nexio NLE gateway. This is the same IP Address that you
entered to connect your Mac workstation to the Nexio NLE gateway.
User ID. enter postgres
Password. Enter nxdb
© 2014 Imagine Communications Corp. Proprietary and Confidential. November 2014 | Page 47
Page 48
Nexio® NLE Gateway Chapter 4
Installation Guide Installing the Mac NLE Client Plug-ins
Use the Nexio Sync DB look-up slider to set the time interval frequency. This controls the time it takes
for the sync to show duration updates for growing clips.
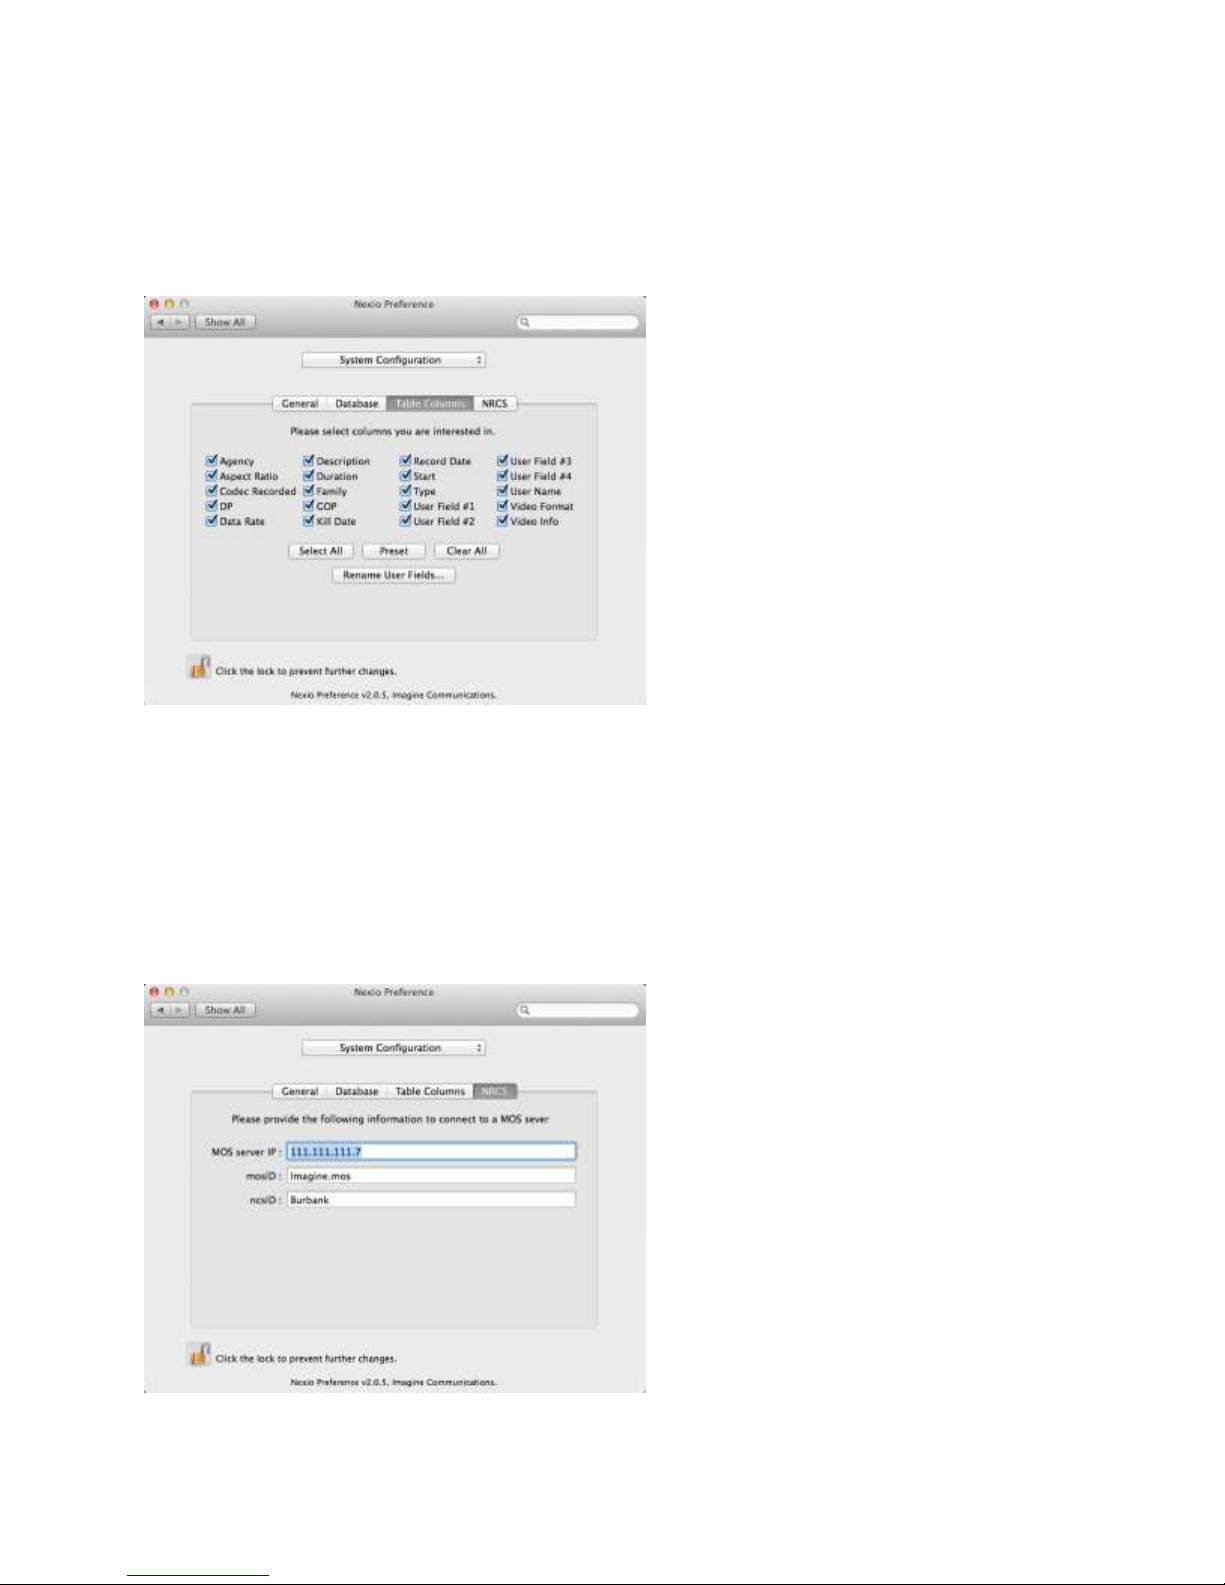
Table Columns Tab
Use the check boxes to select the metadata fields that you want to display in your MediaBase. As an
option, you can rename MediaBase User Fields by using the Rename User Fields button. (User Fields are
user-defined metadata fields. They must be set up in your Nexio MediaBase before they will display in
your FCP application.)
NRCS Tab
The NRCS tab controls the connection of the NRCS tool. This is typically used with a MOS enabled
newsroom computer system.
MOS server IP. Set the IP address of the MOS server
mosID. Set the mosID used by the MOS server
© 2014 Imagine Communications Corp. Proprietary and Confidential. November 2014 | Page 48
Page 49
Nexio® NLE Gateway Chapter 4
Installation Guide Installing the Mac NLE Client Plug-ins
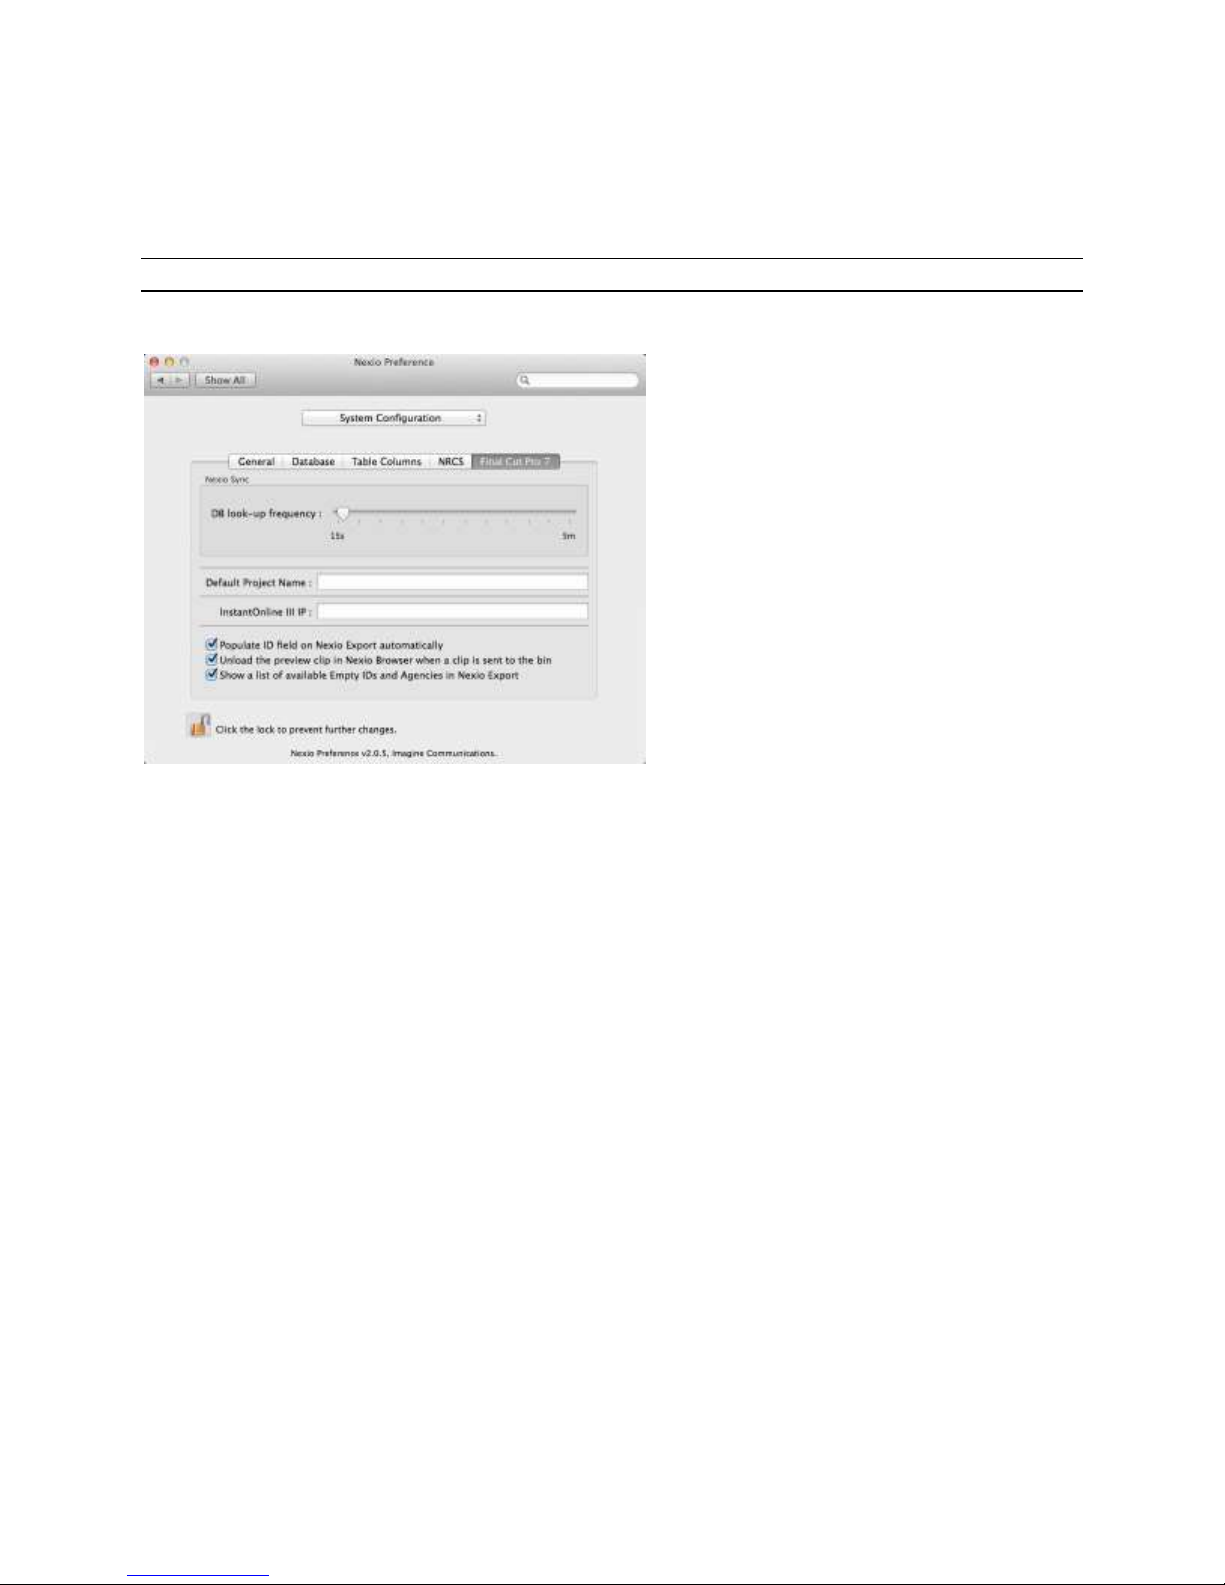
nscID. Set the nscID used by the MOS server
Final Cut Pro 7 Tab
Note. The Final Cut Pro 7 tab is only visible when it is selected on the General tab.
Nexio Sync DB look-up frequency. Set the time in interval when Nexio Sync will initiate an update
Default Project Name. Set the name of the Project that will be used by default
Instant Online IP. If you are using InstantOnline, enter its IP Address. (You must also have the
InstantOnline plug-in.)
Populate ID field on Nexio Export automatically. Enable to have an ID name entered automatically
Unload the preview clip in Nexio Browser when clip is sent to the bin. Enable to ensure clip used is
Project no longer being left open in the browser preview window
Show a list of available Empty IDs and Agencies in Nexio Export. Enable to show drop down lists
Once all settings are made, click the red button (upper left corner) of the Nexio Preference window to
save your settings and exit the Nexio Preferences window. Alternatively, clicking the back button or the
Show All button will also apply the settings.
© 2014 Imagine Communications Corp. Proprietary and Confidential. November 2014 | Page 49
Page 50
Nexio® NLE Gateway Chapter 5
Chapter 5
Installation Guide Installing the PC NLE Client Plug-Ins
Installing the PC NLE Client Plug-Ins
You must install the PC NLE client plug-in software onto each of your client Windows NLE workstations.
You can download the plug-in from the ICC software portal
Note. The LLM and CIFServer applications must be running properly before you can connect a client
workstation to the Nexio NLE gateway.
Here is a summary list of tasks you will perform to connect your Windows client workstation to the
Nexio NLE gateway device.
Map your network drive to your NLE Gateway and CIFServer.
Run the Nexio Adobe Plug-in Suite for Windows Installer.
Mapping Your Network Drive
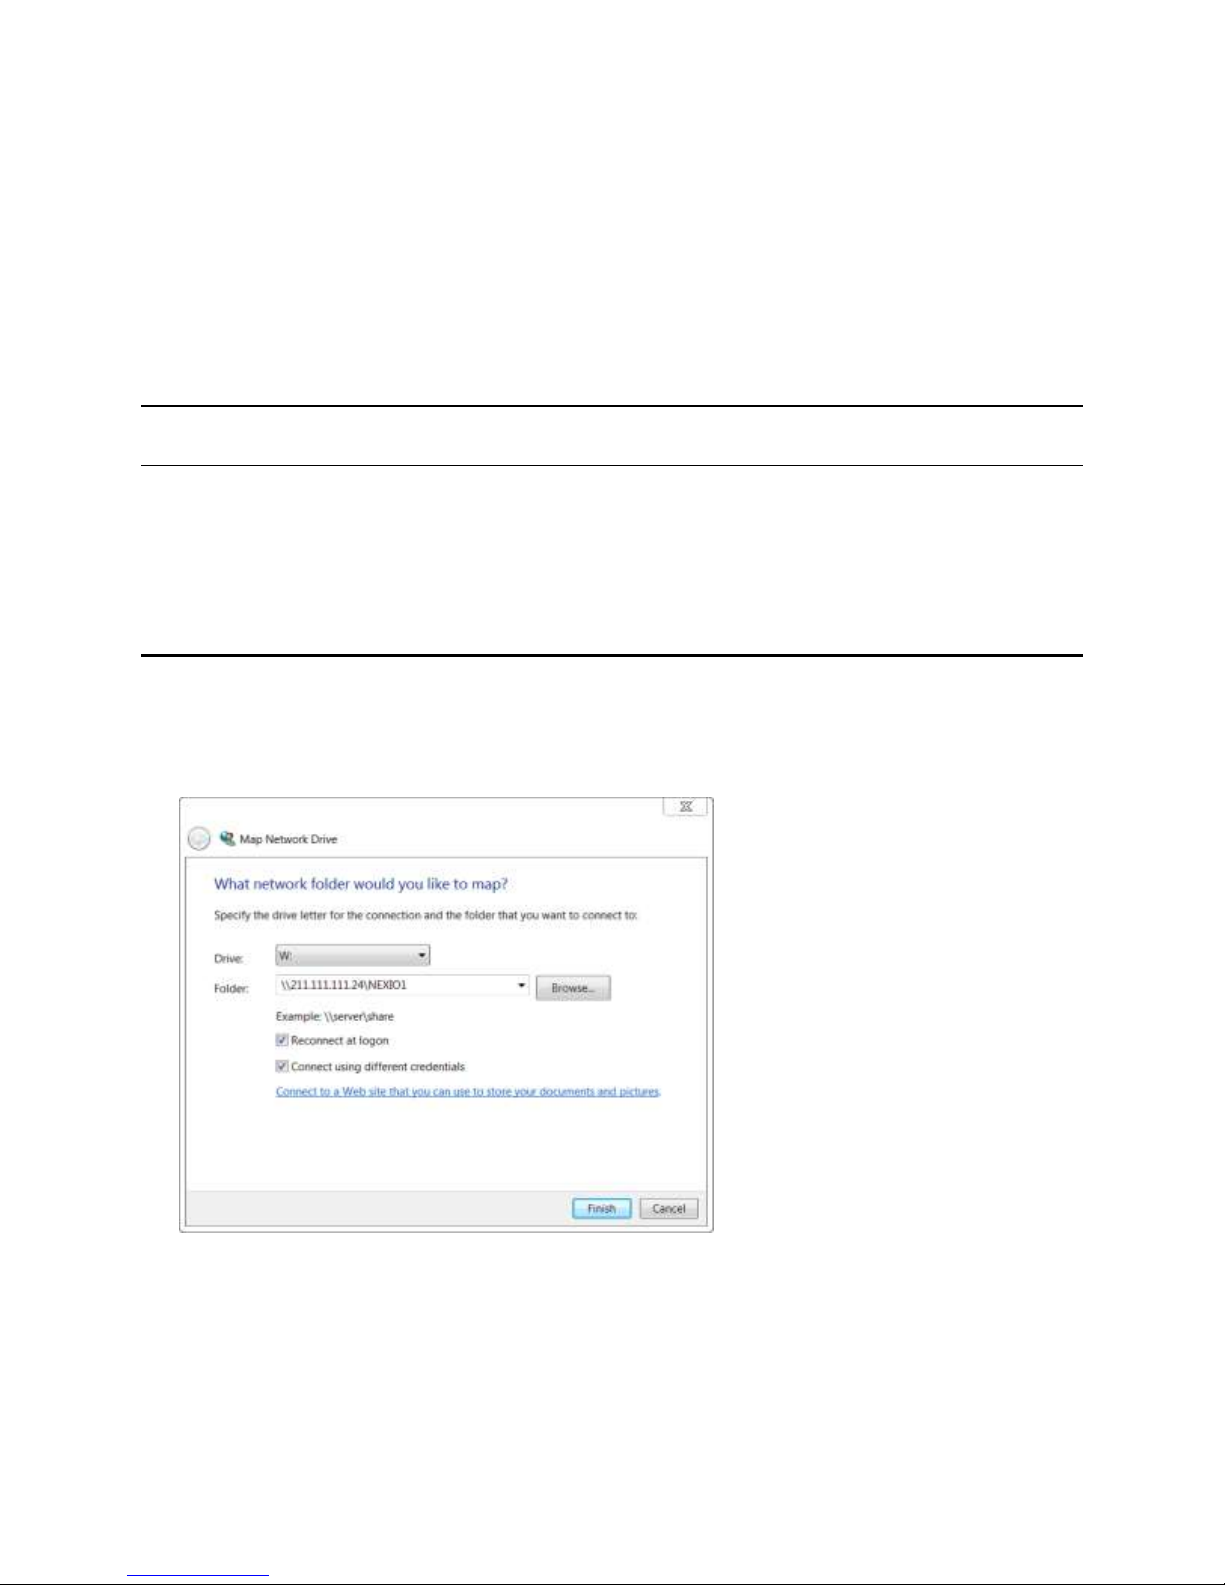
1. From a Windows Explorer window, go to Tools > Map Network Drive. The Windows Network Drive
dialog displays.
2. Choose a drive letter.
3. Type the path of the NLE Gateway along with the CIFS network share name
Type your server address using this format:
\\[the IP address of your NLE Gateway]\[name of your CIFS share]
OR use the Name Service share name
\\[NAME]\[SHARE]
© 2014 Imagine Communications Corp. Proprietary and Confidential. November 2014 | Page 50
Page 51
Nexio® NLE Gateway Chapter 5
Installation Guide Installing the PC NLE Client Plug-Ins
For Example: if the IP address of the NLE Gateway is 211.111.111.24 and the CIFS share name is
NEXIO1, then you will enter the address as follows:
\\211.111.111.24\NEXIO1
4. Select Reconnect at logon. This allows Windows to connect to the
5. NLE Gateway automatically when Windows 7 starts.
6. Select Connect using different credentials.
7. Click Finish.
8. When the Windows Security screen appears, enter a Nexio user name and password.
Note. Nexio users are created and managed in applications like NXOS and Velocity
9. Select Remember my credentials if the user credentials are expected to be re-used by the current
Windows user
10. Click OK. The shared drive displays showing 5 folders: AIFF, LXF, MOV, Stills, and Timelines.
Running the Nexio Adobe Plug-in Suite for
Windows Installer
The following procedure will install the export plug-ins for Adobe Premiere Pro on your Windows PC
platform. For instructions on installing and operation the Nexio Player application, please see the Nexio
Player User Guide.
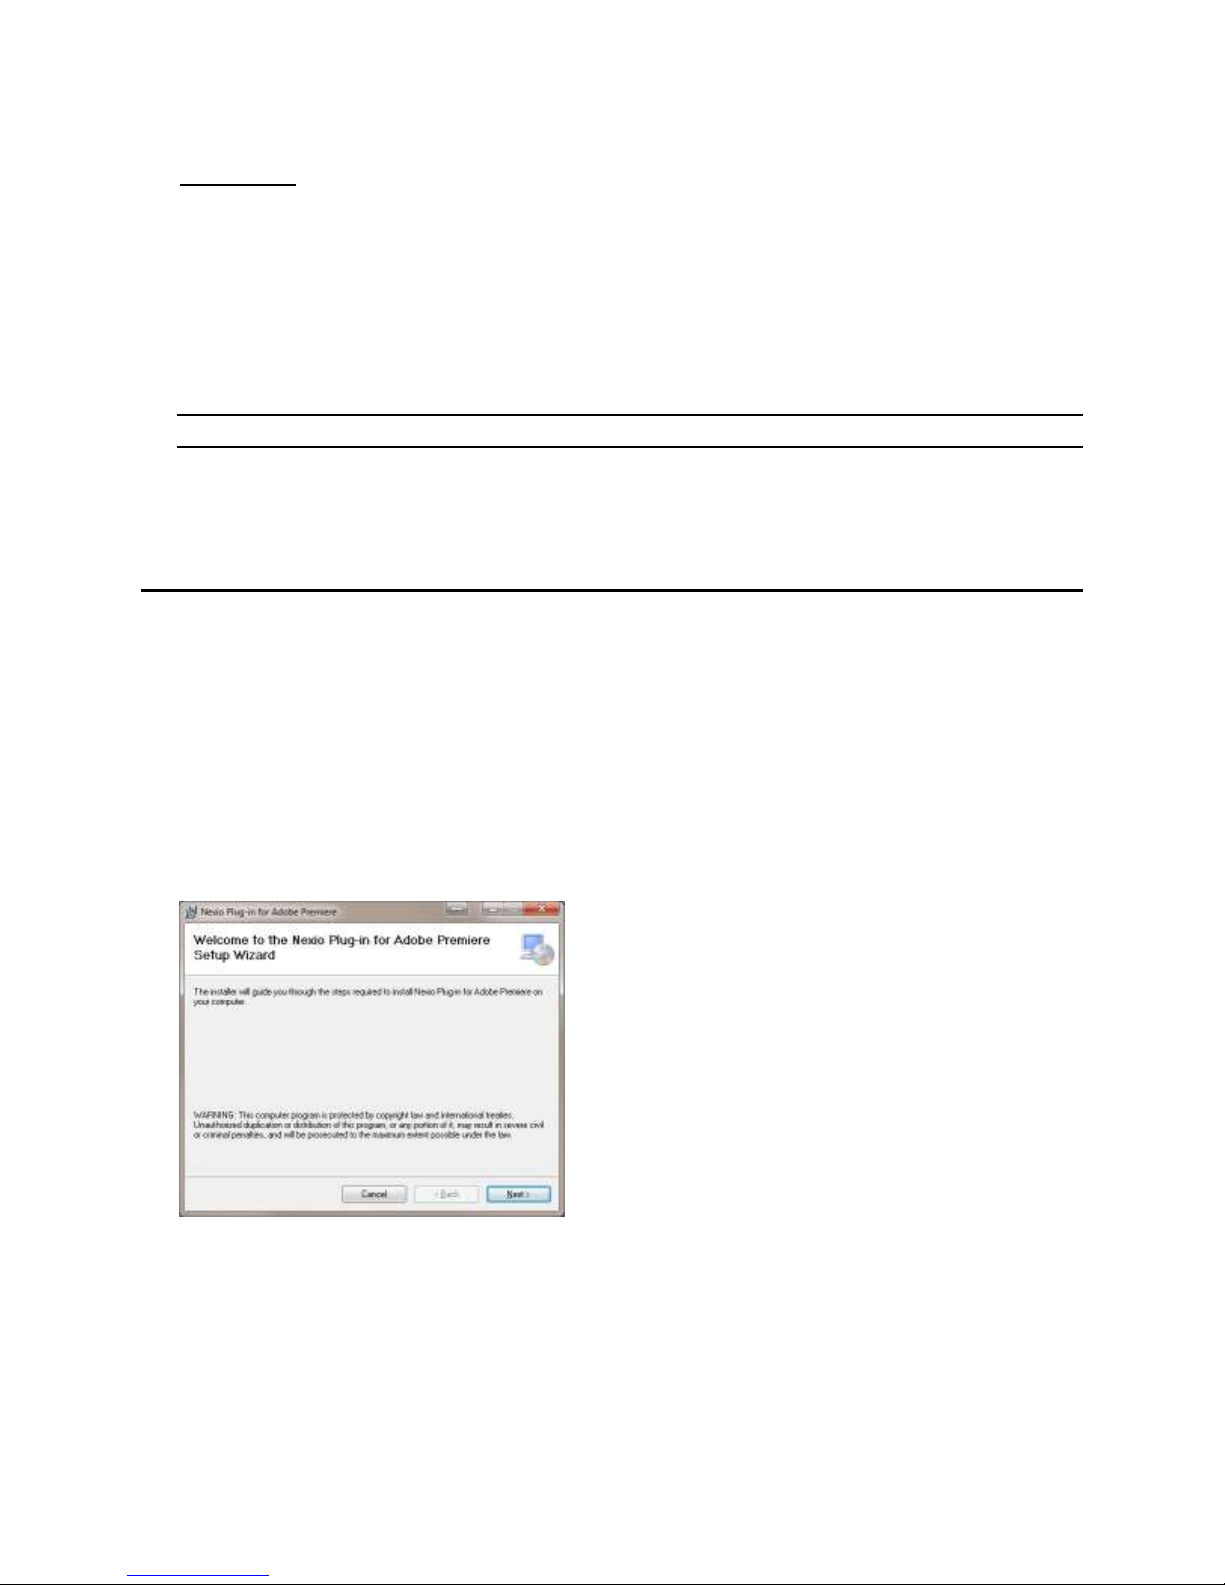
Locate the NexioPluginForPremiere.msi file. This is available for download on the ICC software portal.
1. Run the installer.
© 2014 Imagine Communications Corp. Proprietary and Confidential. November 2014 | Page 51
Page 52
Nexio® NLE Gateway Chapter 5
Installation Guide Installing the PC NLE Client Plug-Ins
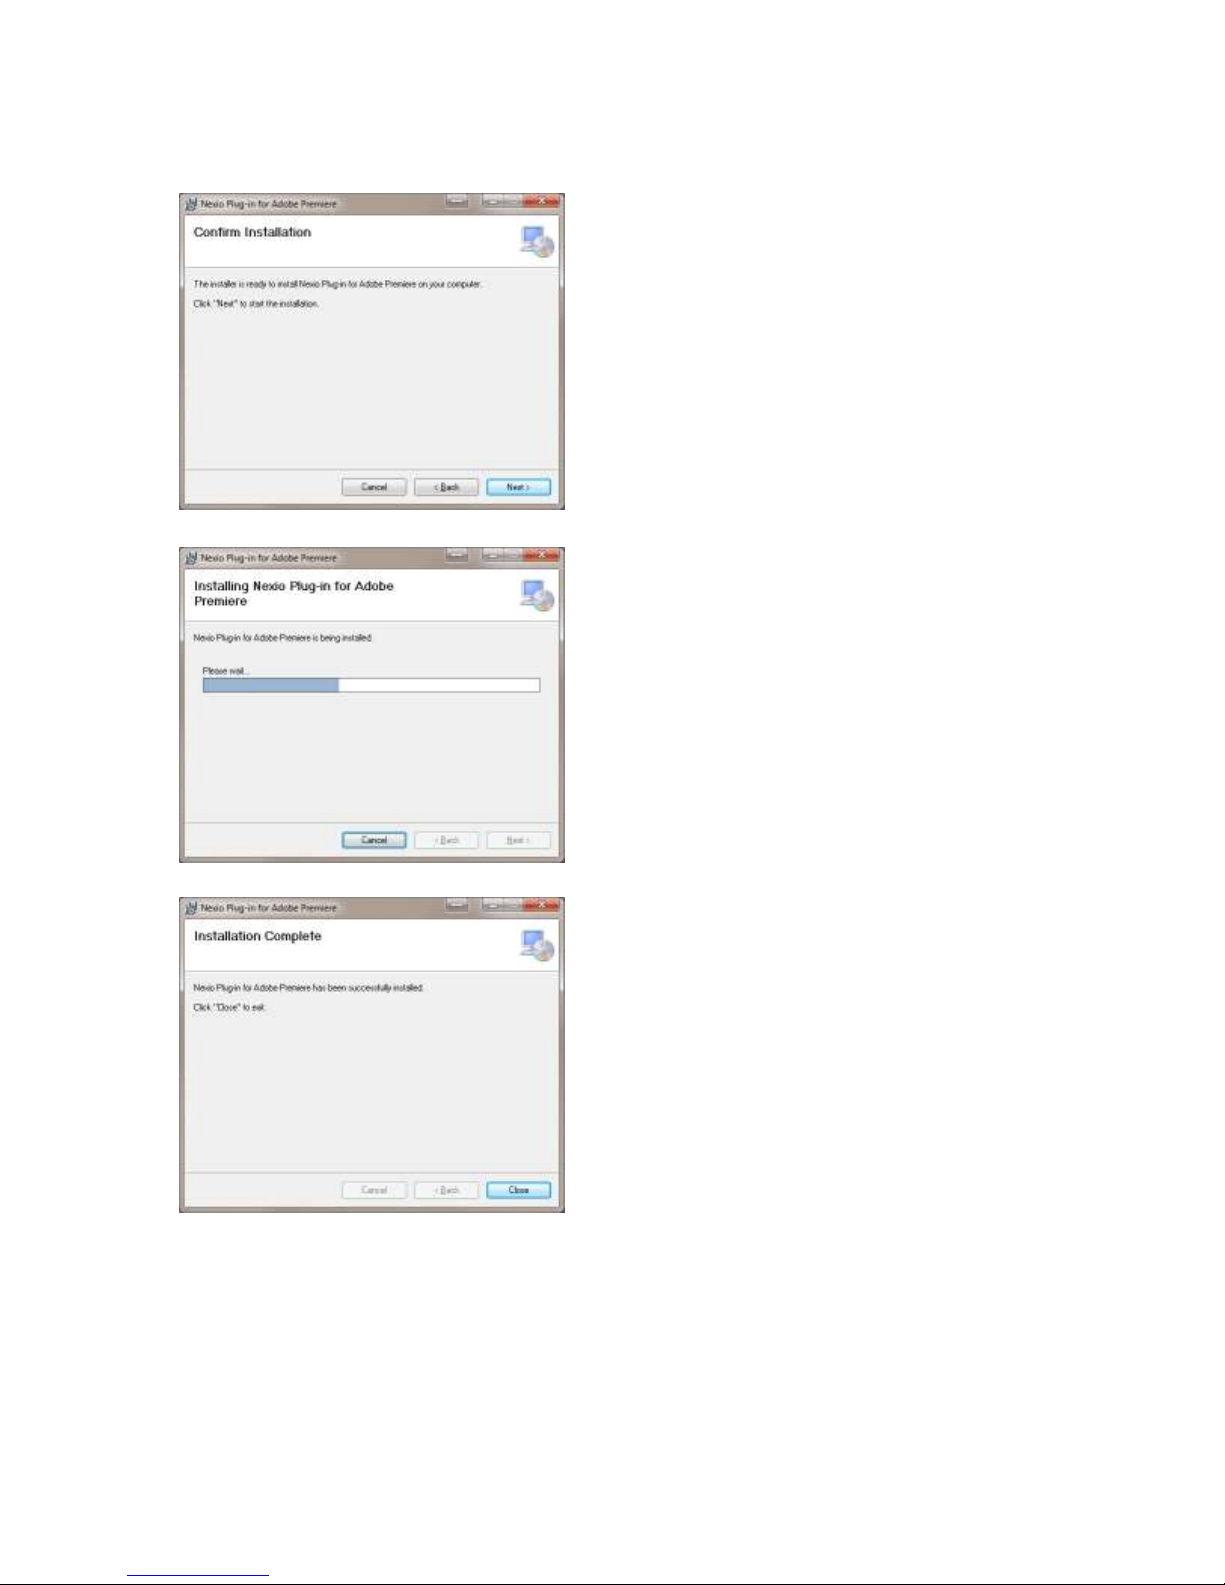
2. On the Welcome screen, click Next.
3. Click Next to confirm and initiate installation.
The installation progress displays.
4. Click Close to exit the completed installation.
© 2014 Imagine Communications Corp. Proprietary and Confidential. November 2014 | Page 52
Page 53
Nexio® NLE Gateway Chapter 6
Video Formats
Apple FCP X
Adobe Premiere
Pro
Required 3rd Party
Codec
IMX
X X
IMX2DV/DVCPRO
X X
DVCPRO50 X X
DVCPRO HD X X
XCAM HD X X
XDCAM EX X X
XDCAM HD422
X X
AVC-Intra
X*
X**
*Calibrated {Q}
AVC-Intra Encode
or via Compressor
**FTP export only
DNxHD
X*
X**
*Avid Codecs LE,
Export via
Compressor
**Custom export
preset
Video Formats
Apple FCP X
Adobe Premiere
Pro
PNG X X
TIF
X
X
TGA X X
BMP X X
JPEG X X
Chapter 6
Installation Guide Specifications
Specifications
Supported Codecs
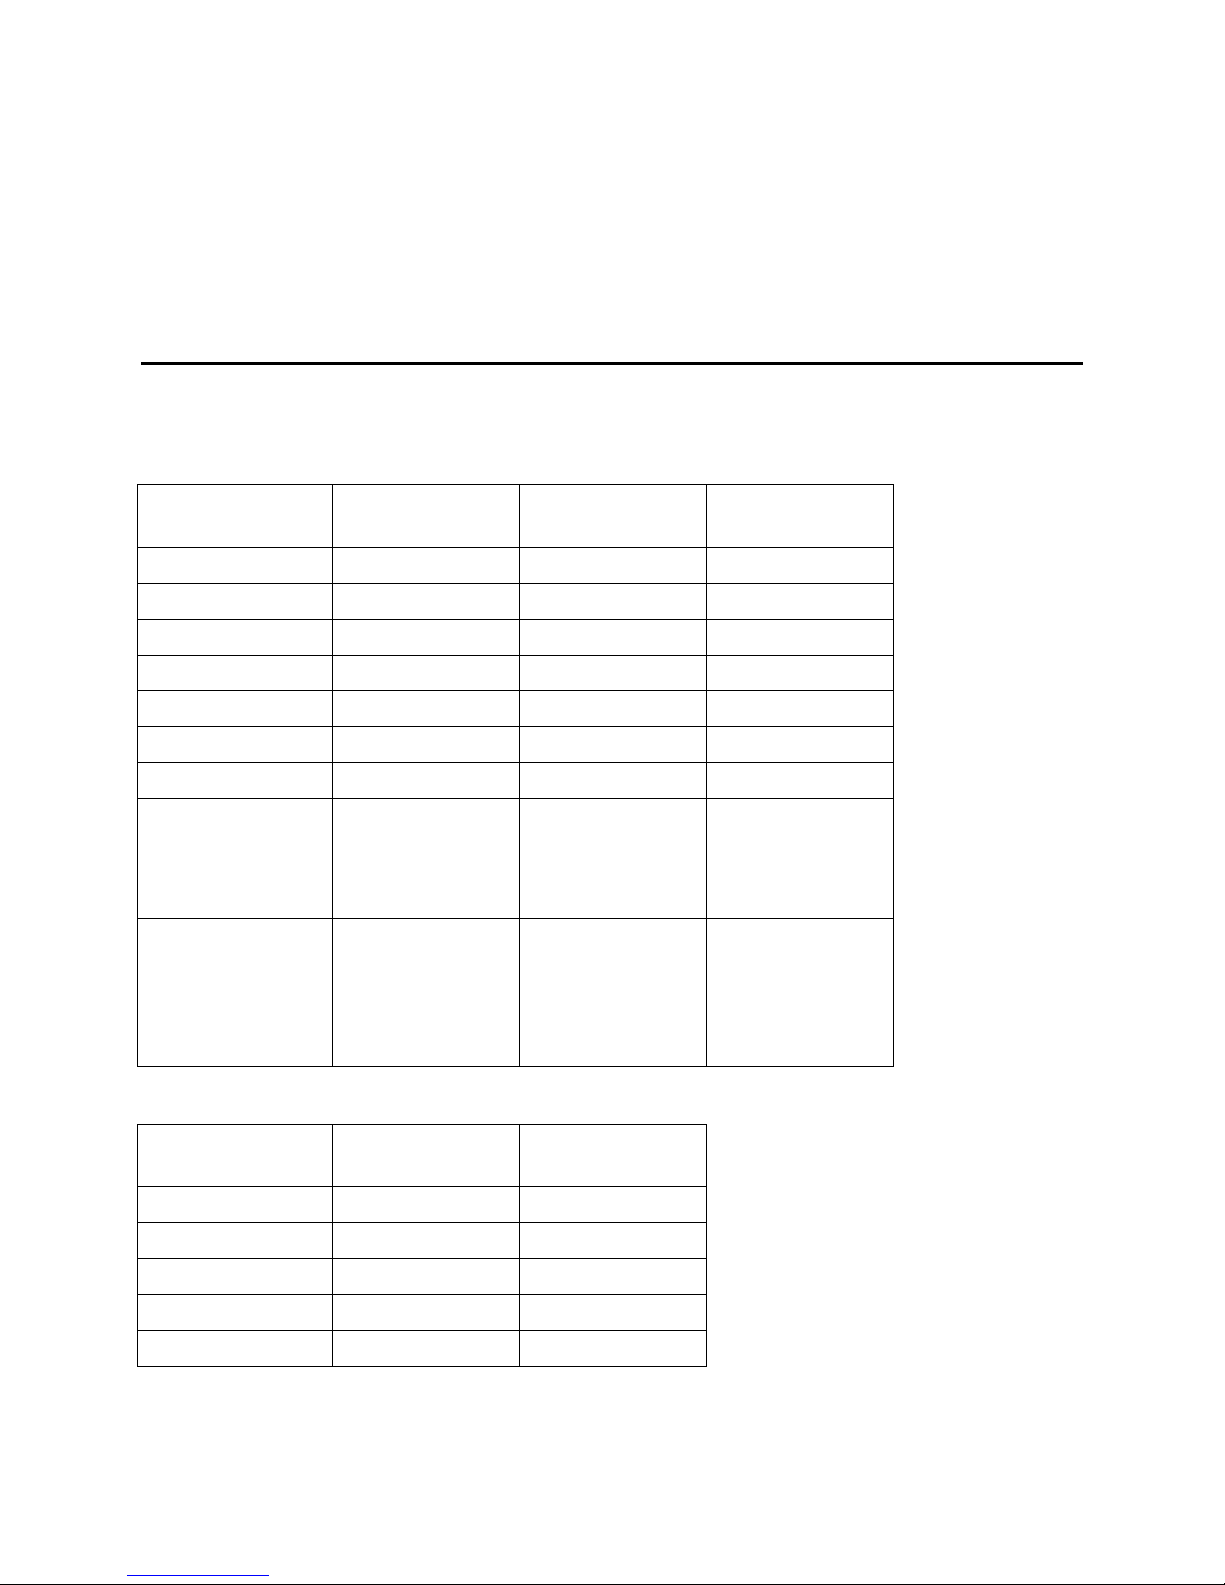
These tables show codecs that are supported with NLEs connected to the Nexio gateway.
© 2014 Imagine Communications Corp. Proprietary and Confidential. November 2014 | Page 53
Page 54

Nexio® NLE Gateway Chapter 6
Operating Format
Mac Clients
Windows Clients
IMX (30/40/50)
7
4
XDCAM HD (35)
7 4 XDCAM EX (35)
7 4 DV25
7 4 DVCPRO 50
7
4
DVCPROHD (100)
4 with Gigabit
7 with 10Gigabit
4
AVC-Intra 50
7
4
AVC-Intra 100
4 with Gigabit
7 with 10Gigabit
4
DNxHD 120/145
4 with Gigabit
7 with 10Gigabit
3 with Gigabit
7 with 10Gigabit
DNxHD 185/220
4 with Gigabit
7 with 10Gigabit
3 with Gigabit
7 with 10Gigabit
Installation Guide Specifications
Client Support
The Nexio to NLE interface via CIFS has been qualified with the following clients:
Mac OSX 10.7, 10.8, 10.9
FCP version 7.03
FCPX
Premiere Pro CC2014
Windows 7 Professional/ Ultimate 64-bit SP-1
Premiere Pro CC2014
QuickTime 7.7.4
Client Workstations per NLE Gateway
These guidelines are recommended when connecting client workstations to the NLE gateway. These
numbers assume about 4 real-time video streams per client.
Note. Although it may be possible to increase the number of clients connected by lowering the number
of streams per client, this practice is not recommended.
© 2014 Imagine Communications Corp. Proprietary and Confidential. November 2014 | Page 54
Page 55
Nexio® NLE Gateway Chapter 6
Installation Guide Specifications
Video Streams Per Gateway
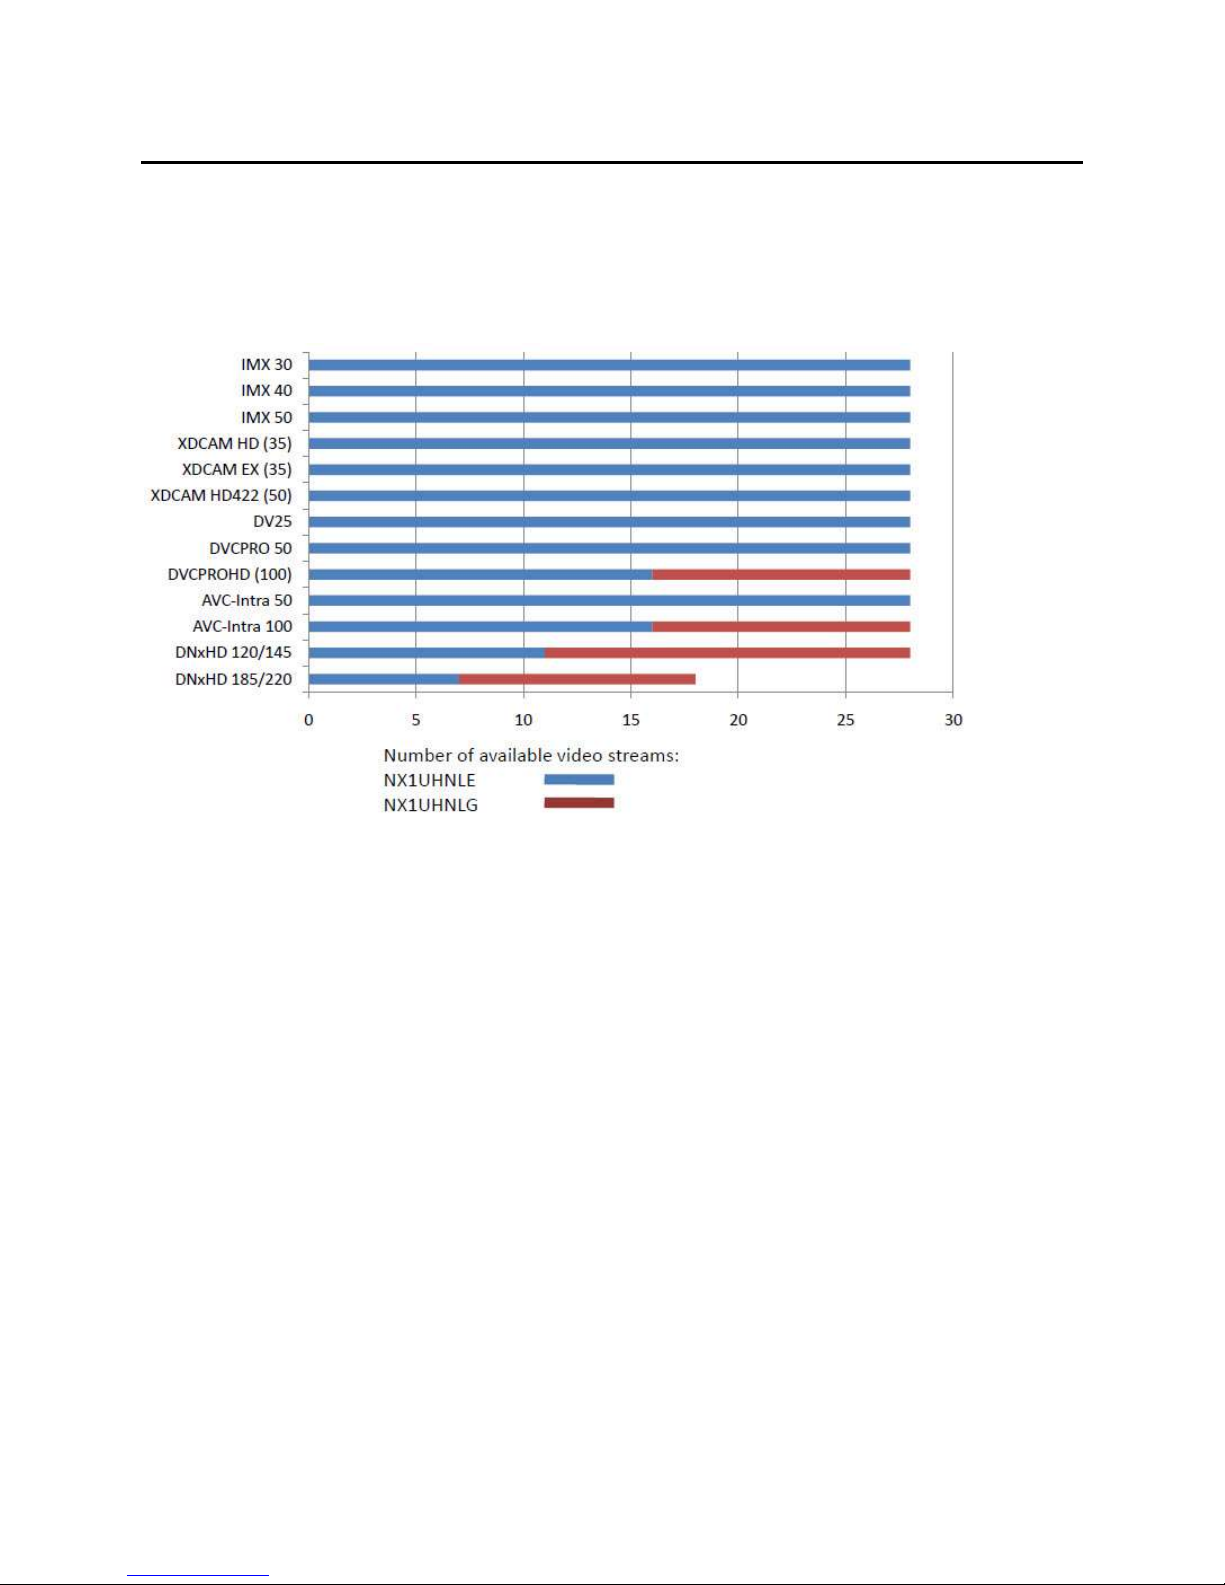
This chart shows the total number of video streams that can pass through a single NLE gateway to the
attached client workstations. The total number of streams is affected by bit rate, the number of clients
workstations connected, and the operating system.
This chart shows the total number of video streams that can pass through a single NLE gateway to the
attached client workstations. The total number of streams is affected by bit rate, the number of clients
workstations connected, and the operating system.
© 2014 Imagine Communications Corp. Proprietary and Confidential. November 2014 | Page 55
 Loading...