


DVD Player Installation Guide
Introduction .............................................................................2
Installing DVD Player..................................................................3
T echnical details ....................................................................... 8
Troubleshooting ........................................................................9
Installationsanleitung für »DVD-Player«
Einleitung ............................................................................. 10
Installation von »DVD-Player« ..................................................... 11
Technische Einzelheiten ............................................................ 17
Fehlersuche .......................................................................... 18
Guide d’installation de DVD Player
Introduction ........................................................................... 20
Installation de DVD Player.......................................................... 21
Détails techniques ................................................................... 26
Dépannage ........................................................................... 27
- 1 -

DVD Player Installation Guide
Introduction
Thank you for buying DVD Player. W e hope you’ll enjoy the experience of digital cinema on
your computer.
DVD is the emerging standard for digital home cinema, carrying multiple video formats, foreignlanguage support and navigable menus. This is done with MPEG2 compression, giving optimal
file reduction without compromising quality.
You can play DVD on your PC, but there’s no need to stop there. Send the soundtrack to your
Dolby Pro Logic decoder, or your Dolby Digital AC-3 system for 6 speaker surround sound;
send the video to your TV or monitor, as a composite or S-Video signal. DVD Player can be the
heart of your digital home cinema system.
Now with the backing of all major film studios, DVD also has a large and rapidly growing library
of titles. All you have to do is enjoy them.
This installation guide explains how to install and set up DVD Player. For further information,
such as how to use the application software, start the DVD Player Home Page on the CD-ROM
and click Documentation, or refer to the read_me.htm file in the ReadmeWin9x folder.
Before you continue
Minimum system requirements are a Pentium P133 PC or equivalent, with 16 MB RAM,
a DVD-ROM drive, and Windows 95 or 98.
If you want to use DVD Player, you must have your VGA graphics adapter, DVD Player and
monitor connected before switching on your computer, as shown on page 6.
Note that you can only change the region code on DVD Player five times. After the fifth time,
DVD Player must be returned to VideoLogic to be reset. There is a support charge for this service.
Installation method
The Installer on the DVD Player CD-ROM installs the drivers and other software, and we strongly
recommend using it. If you want to install the software using Windows Plug and Play, refer to
the read_me.htm file in the ReadmeWin9x folder on the DVD Player CD-ROM.
- 2 -
DVD Player Installation Guide
Installing DVD Player
Before installing DVD Player
While running Windows, insert the DVD Player CD-ROM into your drive. If your system autoruns CD-ROMs, the installer will start. If not, run the file \autorun.exe on the CD-ROM.
Follow the on-screen instructions to prepare your computer for installing DVD Player.
When asked if you want to shut down your computer, click Yes. Leave the CD-ROM in the drive.
Installing DVD Player
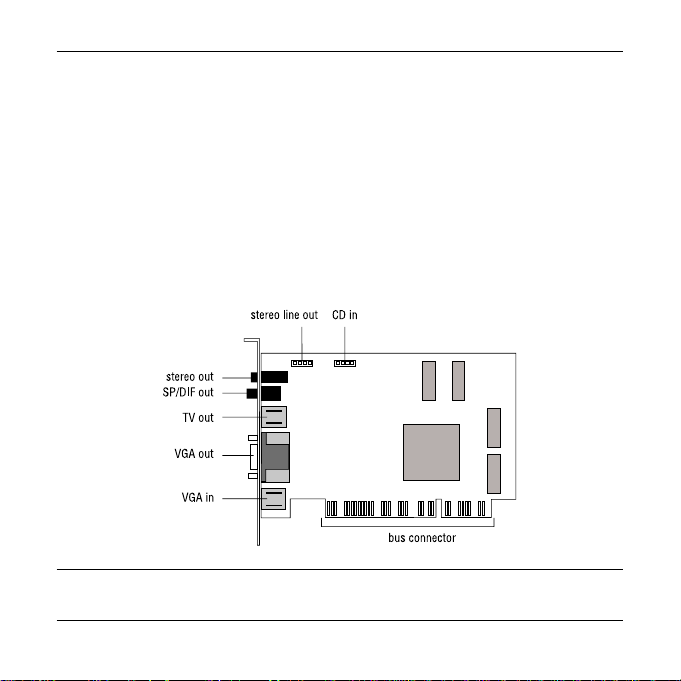
The following diagram shows the connectors on DVD Player.
Warning: Always switch off your computer before removing the cover and observe the warnings
specified in the manufacturer’s documentation.
- 3 -
DVD Player Installation Guide
1. Switch off your computer, monitor, and any hardware devices connected to your computer.
2. Switch off the plug at the wall socket, but leave the power cable connected so that your
computer is grounded.
3. Disconnect your monitor from your computer.
4. Remove the computer’s cover .
5. If you want to install a DVD drive, do so now.
6. Locate a spare PCI bus expansion slot and remove the slot cover. Keep the screw, you will
need it later.
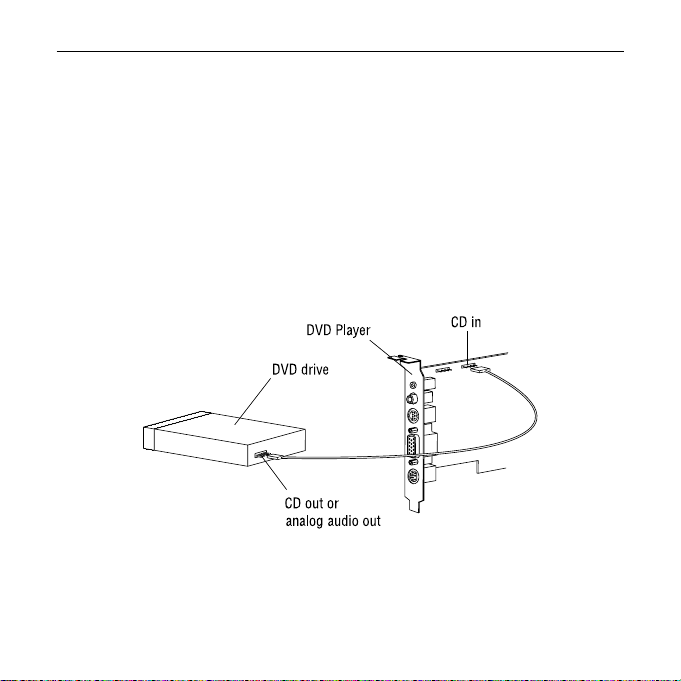
7. Connect your DVD drive’s CD out or analog audio out socket to DVD Player’s CD in socket,
as shown below.
- 4 -
DVD Player Installation Guide
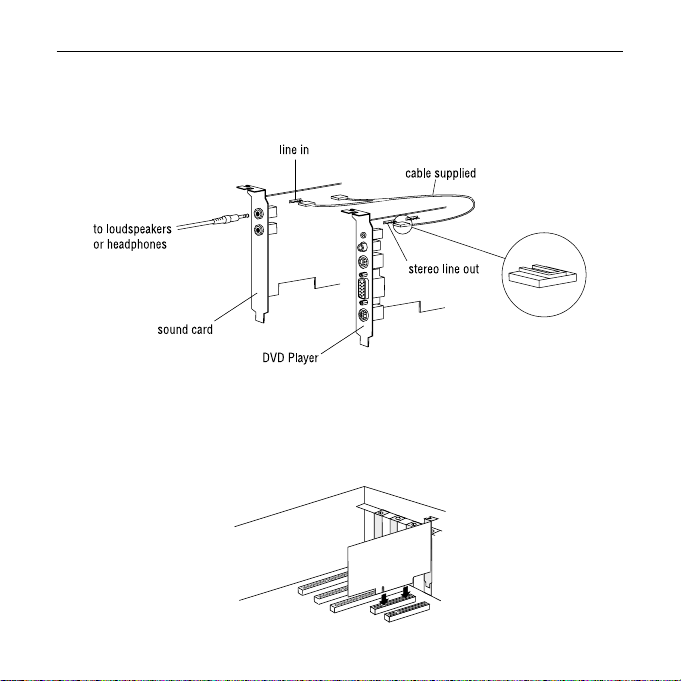
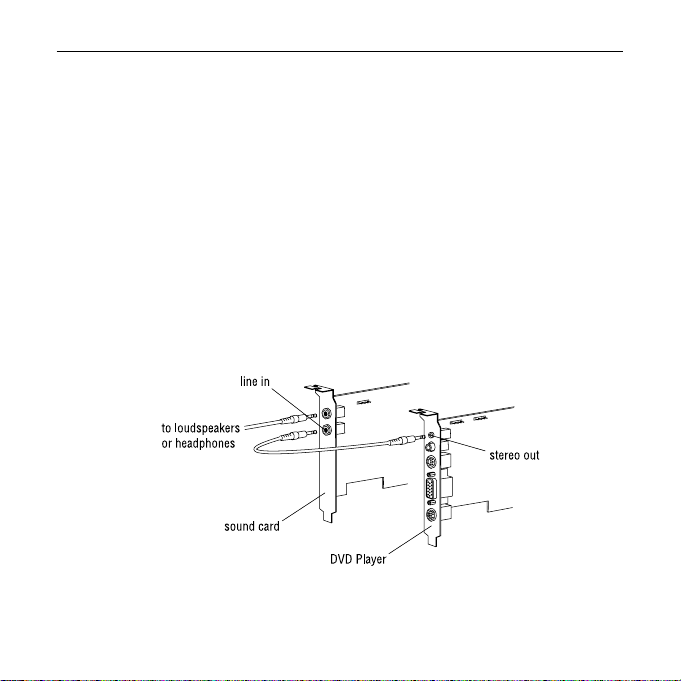
8. If you want to connect DVD Player to your sound card using the internal audio cable,
do so now, as shown below. You can alternatively connect DVD Player to your sound card
using the external audio socket, as shown on page 7.
9. Touch the bare metal chassis of your computer with the back of your hand to discharge any
static that may have built up on you or your clothes.
10. Align DVD Player with the slot you have chosen. Firmly press the card into the slot, as
shown in the diagram below. You will need to use some pressure to push the card into
position, but do not use excessive force.
- 5 -
DVD Player Installation Guide
11. Secure DVD Player using the screw that you removed previously, and replace the PC’s cover .
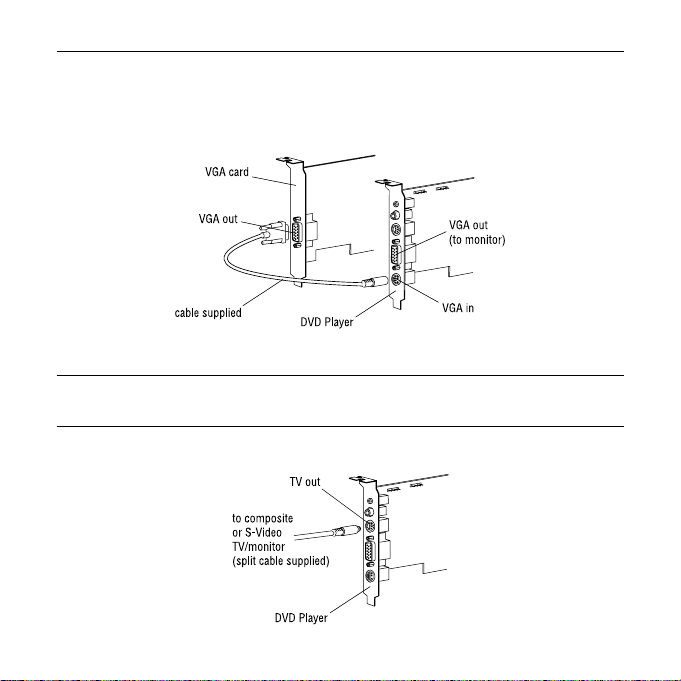
12. Connect your VGA graphics adapter’s VGA out socket to DVD Player’s VGA in socket using
the VGA cable, as shown below.
13. Connect your monitor to DVD Player’s VGA out socket.
Note: If you want to use DVD Player, you must have your VGA graphics adapter, DVD Player
and monitor connected before switching on your computer.
14. If you want to connect a TV/monitor to DVD Player, do so now, as shown below.
- 6 -
DVD Player Installation Guide
15. Switch on your computer and monitor.
16. When your desktop is available, the installer should start. If not, make sure the CD-ROM is in
the CD-ROM drive, and run the file autorun.exe in the root directory of the CD-ROM.
17. Follow the on-screen instructions to install the DVD Player application.
When asked if you want to Install the DVD Player applications or Change the
•
region code, make sure Install the DVD Player applications is selected.
When asked to set your region code, set the code according to the on-screen diagram.
•
When asked to auto-calibrate, click Yes. Y our screen will flicker for a few seconds,
•
after which auto-calibrate should be successful. If not, read the instructions for calibrating
DVD Player in the Using DVD Player section of the online documentation on the CD-ROM.
18. After installing the application, the DVD Player Home Page is displayed.
If you didn’t connect DVD Player to your sound card using the internal audio cable,
you can connect it using the external audio socket, as shown below.
DVD Player is now ready to use. Refer to the DVD Player Home Page to install other utilities
or demos from the CD-ROM, and for further instructions on how to use DVD Player.
- 7 -
DVD Player Installation Guide
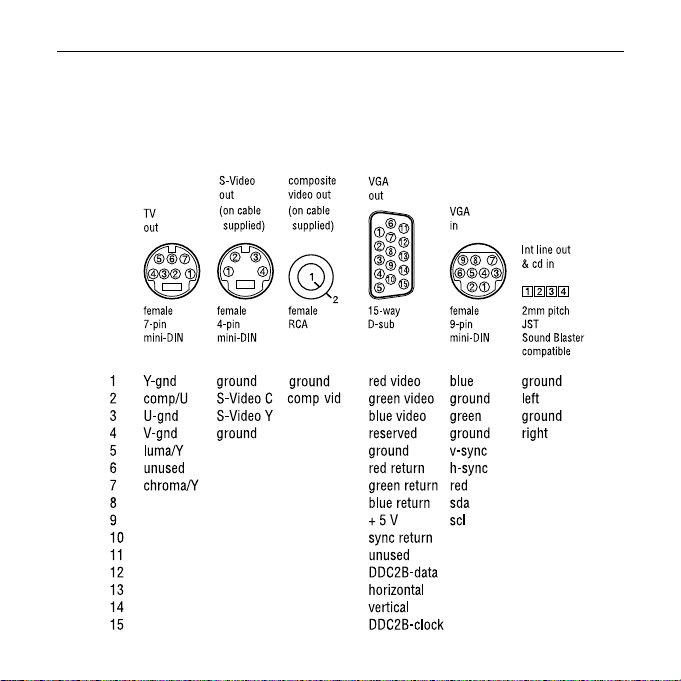
T echnical details
This section shows DVD Player’s socket pin-outs.
SP/DIF is a standard RCA phono jack connector. Stereo out is a 3.5mm audio jack connector.
- 8 -

DVD Player Installation Guide
Troubleshooting
This section deals with problems you may have with DVD Player. For further information, start
the DVD Player Home Page on the CD-ROM, click Documentation, and click Troubleshooting.
After installing the drivers and application correctly, my computer crashes when I switch it on.
The memory used by DVD Player may be allocated incorrectly. Start your computer in Safe
mode, by pressing F8 while it is starting up, and selecting Safe mode (usually option 3) from
the Windows startup menu. When your computer has restarted, if you know how to change
memory ranges, do so now, otherwise refer to the online documentation for more details.
When I try to run the DVD Player application, my computer hangs.
There may be an IRQ conflict. Click Start, point to Settings and click Control Panel. Double-click
the System icon, and click the Device Manager tab. If, under Sound, video and game controllers,
there is an exclamation mark next to DVD Player, then double-click DVD Player, and, in the
General tab, under Device Status, follow the instructions for using the hardware troubleshooter.
When I try to run the DVD Player application, I get an MCI driver error message saying that
another drive instance may be in use, or that the device could not be loaded.
You may have installed DVD Player without connecting the VGA cables. Shut your computer
down, connect the cable as shown on page 6, and restart your computer.
I can’t get audio.
First, connect your speakers or headphones directly to your sound card: if you get sound, then
the problem is with DVD Player. Start the DVD Player application, and press CTRL-O
(the letter O). Click the Settings tab, and make sure your audio settings are correct.
I can’t get video.
On the DVD Player application, press F5 to switch between TV and monitor mode. Make sure
you have connected the correct cables as shown on page 6. For a TV/monitor, in the DVD Player
application, press CTRL-O (the letter O), click the Settings tab, and make sure your TV settings
are correct.
- 9 -

Installationsanleitung für »DVD-Player«
Einleitung
Vielen Dank, daß Sie sich für »DVD-Player« entschieden haben. Wir hoffen, daß Ihnen das digitale
Kino auf Ihrem Computer gefallen wird.
DVD ist der neue Standard für das digitale Heimkino, mit mehreren Videoformaten, mit
Unterstützung für Fremdsprachen und Menüs zur einfacheren Navigation. All dies geschieht mit Hilfe
der MPEG2-Komprimierung, die eine optimale Reduzierung der Dateigröße ermöglicht, ohne daß die
Bildqualität leidet.
Sie können DVDs auf Ihrem PC abspielen, aber das ist noch lange nicht alles. Sie können den Ton
über Ihren Dolby-Pro-Logic-Decoder abspielen oder aber als Surround-Sound mit 6 Lautsprechern
über Ihr Dolby-Digital-AC-3-System. Sie können das Videosignal über Ihren Fernseher (TV) oder
Monitor wiedergeben, d.h. als Composite-Videosignal (BAS-Signal) oder als S-Videosignal. »DVDPlayer« kann somit zum Herzstück Ihres digitalen Heimkinosystems werden.
Durch die Unterstützung der wichtigsten Filmstudios wächst die große Anzahl der auf DVD-Platten
erhältlichen Filmtitel tagtäglich. Sie können sich also zurücklehnen und die Filme jetzt in aller Ruhe
genießen.
In dieser Installationsanleitung wird erläutert, wie »DVD-Player« installiert wird. Um nähere
Informationen zu erhalten, z.B. über die Bedienung der Software, müssen Sie die DVD-PlayerHomepage auf der CD-ROM starten und auf «Dokumentation» klicken oder die Datei
«LIESMICH.HTM» im Ordner «Liesmich\Win9x» öffnen.
Bevor Sie fortfahren
Systemanforderungen: PC mit Pentium-Prozessor 133 MHz (Min.) oder Äquivalent, 16 MB RAM,
DVD-ROM-Laufwerk und Windows 95 oder 98.
Wenn Sie »DVD-Player« benutzen wollen, müssen Sie Ihre VGA-Grafikkarte, das DVD-ROM-Laufwerk
und den Monitor angeschlossen haben, bevor Sie den Computer einschalten; siehe Seite 14.
Beachten Sie bitte daß der Ländercode nur fünf mal verändert werden kann. Nach dem füften mal
muß der DVD Player für die Zurücksetzung an VideoLogic gesendet werden. Dafür wird eine
Gebühr verrechnet.
- 10 -

Installationsanleitung für »DVD-Player«
Installation von »DVD-Player«
Das Installationsprogramm auf der DVD-Player-CD-ROM installiert die T reiber und ermöglicht den
Zugriff auf andere Software, und wir empfehlen Ihnen deshalb dringend, dieses
Installationsprogramm zu benutzen. Wenn Sie die Software mit Hilfe der Plug&Play-Funktion
von Windows installieren wollen, ziehen Sie die Datei «READ_ME.HTM» zu Rate, die sich im
Ordner «Readmes\Win9x» auf der DVD-Player-CD-ROM befindet.
Bevor Sie »DVD-Player« installieren:
Legen Sie die DVD-Player-CD-ROM in Ihr CD-ROM-Laufwerk ein, nachdem Windows geladen
worden ist. Wenn Ihr System CD-ROMs automatisch liest, wird das Installationsprogramm
automatisch gestartet. Wenn dies nicht der Fall sein sollte, rufen Sie die Datei «AUTORUN.EXE»
auf, die sich auf der CD-ROM befindet.
Befolgen Sie die auf dem Bildschirm erscheinenden Anweisungen zur Vorbereitung Ihres
Computers auf die Installation von »DVD-Player«.
Klicken Sie auf «Ja», wenn Sie gefragt werden, ob der Computer heruntergefahren werden soll.
Lassen Sie die CD-ROM im Laufwerk.
»DVD-Player« installieren
Die folgende Schemazeichnung zeigt die Anschlüsse von »DVD-Player«.
Stereoausgang - Miniklinkenbuchse
SP/DIF-Ausgangsbuchse
Videoausgang
VGA-Ausgang
VGA-Eingang
Stereoausgang CD-Eingang
PCI-Buchsenleiste
- 11 -

Installationsanleitung für »DVD-Player«
1. Schalten Sie Ihren Computer, Monitor sowie alle angeschlossenen Peripheriegeräte aus.
2. Ziehen Sie alle Netzkabel ab.
3. Ziehen Sie das Monitorkabel vom Computer ab.
4. Entfernen Sie den Gehäusedeckel des Computers.
5. Falls Sie ein DVD-ROM-Laufwerk installieren wollen, erledigen Sie dies zuerst.
6. Suchen Sie einen freien PCI-Erweiterungssteckplatz und entfernen Sie die kleine
Abdeckplatte aus dem Gehäuse. Bewahren Sie die Schraube auf, denn diese wird später
wieder benötigt.
7. Schließen Sie den CD-Ausgang (CD out) des DVD-ROM-Laufwerks bzw. den
Analogausgang (Audio out) an den CD-Eingang (CD in) von »DVD-Player« an; siehe
folgende Abbildung.
DVD-Player
DVD-ROM-Laufwerk
CD-Ausgang oder
Analogaudioausgang
8. Wenn Sie »DVD-Player« über das interne Audiokabel an Ihre Audiokarte anschließen wollen,
erledigen Sie dies bitte jetzt; siehe folgende Abbildung. Sie können »DVD-Player« aber auch
über die externe Audiobuchse an Ihre Audiokarte anschließen; siehe Abbildung auf Seite 16.
CD-Eingang
- 12 -

Installationsanleitung für »DVD-Player«
Stereoeingang
mitgeliefertes Kabel
Lautsprecher- und
Kopfhörerausgang
Stereoausgang
Audiokarte
DVD-Player
9. Berühren Sie den Metallrahmen hinten an Ihrem PC, um Ihren Körper und Ihre Kleidung
elektrostatisch zu entladen.
10. Setzen Sie »DVD-Player« in den ausgewählten Steckplatz ein und drücken Sie die Karte
vorsichtig in den Schlitz; siehe nachstehende Schemazeichnung. Hierzu ist möglicherweise
ein gewisser Kraftaufwand erforderlich; drücken Sie aber nicht zu stark, denn dies kann einen
Schaden hervorrufen.
11. Befestigen Sie »DVD-Player« mit der zuvor entfernten Schraube, setzen Sie den
Gehäusedeckel auf und befestigen Sie diesen am Computerrahmen.
- 13 -

Installationsanleitung für »DVD-Player«
12. Verwenden Sie das mitgelieferte Kabel, um den VGA-Ausgang (15-polige Sub-D-Stiftleiste)
auf Ihrer VGA-Grafikkarte mit dem VGA-Eingang (9-polige Mini-DIN-Buchse) von »DVDPlayer« zu verbinden; siehe folgende Abbildung.
VGA-Karte
VGA-Ausgang
Kabel (mitgeliefert)
DVD-Player
VGA-Ausgang
(zum Monitor)
VGA-Eingang
13. Schließen Sie das VGA-Kabel Ihres Monitors an den VGA-Ausgang (15-polige Sub-DStiftleiste) von »DVD-Player« an.
Hinweis: Wenn Sie »DVD-Player« benutzen wollen, müssen Sie die VGA-Grafikkarte, »DVDPlayer« und den Monitor vorschriftsmäßig angeschlossen haben, bevor Sie Ihren Computer
einschalten.
- 14 -

Installationsanleitung für »DVD-Player«
14. Wenn Sie »DVD-Player« an einen Fernseher (TV) anschließen wollen, benutzen Sie dazu das
mitgelieferte Videokabel; siehe folgende Abbildung.
Videoausgang
Composite-Video oder
S-Videosignal für Fernseher
(mitgeliefertes Adapterkabel)
DVD-Player
15. Schließen Sie die Netzkabel wieder an und schalten Sie Ihren Computer und Monitor ein.
16. Sobald Ihr Desktop erscheint, müßte das Installationsprogramm automatisch starten. Wenn dies
nicht der Fall sein sollte, überprüfen Sie bitte, ob sich die CD-ROM noch im CD-ROM-Laufwerk
befindet und rufen Sie die Datei «AUTORUN.EXE» auf, die sich im Stammverzeichnis der CDROM befindet.
17. Befolgen Sie die auf dem Bildschirm erscheinenden Anweisungen zur Installation der DVDPlayer-Anwendung.
• Wenn Sie gefragt werden, ob die DVD-Player-Anwendung installiert oder die Länderkennung
geändert werden soll, müssen Sie darauf achten, daß die DVD-Player-Anwendung zur
Installation ausgewählt worden ist.
• Wenn Sie gefragt werden, ob die Länderkennung geändert werden soll, müssen Sie diese
festlegen, wobei das auf dem Bildschirm erscheinende Diagramm hilft.
• Wenn Sie gefragt werden, ob die Kalibrierung automatisch erfolgen soll, klicken Sie auf
«Ja». Der Bildschirm kann dann einige Sekunden lang flackern, wonach die automatische
Kalibrierung erfolgreich abgeschlossen sein sollte. Wenn dies nicht der Fall sein sollte, lesen
Sie bitte den Abschnitt der Bedienungsanleitung in der Online-Dokumentation auf der CDROM durch, wo das Kalibrieren von »DVD-Player« beschrieben wird.
- 15 -

Installationsanleitung für »DVD-Player«
18. Nach Abschluß der Installation erscheint die DVD-Player-Homepage auf dem Bildschirm.
Falls Sie »DVD-Player« nicht über das interne Audiokabel mit Ihrer Audiokarte verbunden
haben, können Sie die Verbindung jetzt auch über die externen Anschlußbuchsen herstellen;
siehe folgende Abbildung.
»DVD-Player« ist somit einsatzbereit. Zur Installation anderer Dienst- und Demoprogramme
ziehen Sie bitte die DVD-Player-Homepage auf der CD-ROM zu Rate; dort finden Sie auch
Anweisungen zur Bedienung von »DVD-Player«.
Stereoeingang
Lautsprecher- und
Kopfhörerausgang
Audiokarte
DVD-Player
Stereoausgang
- 16 -

Installationsanleitung für »DVD-Player«
T echnische Einzelheiten
In diesem Abschnitt sind die Anschlußbuchsen von » DVD-Player« abgebildet, d.h. einschließlich
der Stiftbelegungen.
»SP/DIF« ist eine Standard-Cinch-Buchse. »Stereo out« ist eine Miniklinkenbuchse (3,5 mm) für
das Audiosignal.
S-Video-
Composite
ausgang
Videoausgang
7-polige
Mini-DIN-
Buchse
1 Masse Y Masse Masse Videosignal Rot Blau Masse
2 Composite/U S-Video C Composite- Videosignal Grün Masse linker Kanal
3 Masse U S-Video Y Video Videosignal Blau Grün Masse
4 Masse V Masse vorbehalten Masse rechter Kanal
5 Luminanz/Y Masse V-Sync
6 nicht belegt Masse Rot H-Sync
7 Chrominanz/Y Masse Grün Rot
8 Masse Blau SDA
9 + 5 V SCL
10 Masse Sync
11 nicht belegt
12 DDC2B-Daten
13 H-Sync
14 V-Sync
15 DDC2B-Taktgeber
(am mitgelieferten Kabel)
4-polige
Mini-DIN-
Buchse
Videoausgang
(am mitgelieferten Kabel)
CinchBuchse
VGAAusgang
15-polige
D-Sub-
Stiftleiste
VGAEingang
9-polige
Mini-DIN-
Buchse
Interner
Stereoausgang &
CD-Eingang
2 mm Stiftabstand JST
SoundBlaster-
kompatibel
- 17 -

Installationsanleitung für »DVD-Player«
Fehlersuche
In diesem Abschnitt werden Probleme behandelt, die in Verbindung mit »DVD-Player« auftreten
können. Nähere Einzelheiten sind auf der DVD-Player-Homepage zu finden, die sich auf der CDROM befindet; klicken Sie dazu erst auf «Dokumentation» und dann auf «Fehlersuche».
Nach erfolgreicher Installation der Treiber und der Anwendung stürzt mein Computer beim
Hochfahren ab!
Möglicherweise ist der von »DVD-Player« benutzte Speicher nicht richtig zugewiesen. Starten Sie
Ihren Computer im abgesicherten Modus, d.h. drücken Sie «F8», wenn der Computer gestartet
wird, und wählen Sie «Abgesicherter Modus» (normalerweise Option 3) aus dem Startmenü von
Windows. Ändern Sie die Speicherzuweisung nach erfolgreichem Start des Computers, falls Sie
wissen, wie dies erledigt wird. Anderenfalls müssen Sie die Online-Dokumentation zu Rate
ziehen, die nähere Einzelheiten darüber enthält.
Mein Computer hängt sich auf, sobald ich die DVD-Player-Anwendung aufrufe!
Möglicherweise besteht ein IRQ-Konflikt. Klicken Sie auf «Start», wählen Sie «Einstellungen»
und klicken Sie dann auf «Systemsteuerung». Doppelklicken Sie auf das Systemsymbol und
klicken Sie anschließend auf das Register «Geräte-Manager». Wenn sich in «Audio-, Video- und
Game-Controller» neben «DVD-Player» ein Ausrufezeichen befindet, doppelklicken Sie auf «DVDPlayer» und befolgen Sie die Anweisungen zur Verwendung des Ratgebers für Konflikte, die
unter «Gerätestatus» im Register «Allgemein» zu finden sind.
Wenn ich versuche, die DVD-Player-Anwendung zu starten, erscheint eine MCI-GeräteFehlermeldung, die besagt, daß möglicherweise eine andere Laufwerkinstanz benutzt wird
oder daß das Gerät nicht geladen werden konnte!
Möglicherweise haben Sie »DVD-Player« installiert, ohne die VGA-Kabel anzuschließen. Fahren
Sie Ihren Computer herunter, schalten Sie ihn aus und schließen Sie das Kabel an, wie dies auf
Seite 14 gezeigt wird. Schalten Sie Ihren Computer wieder ein und fahren Sie ihn hoch.
- 18 -

Installationsanleitung für »DVD-Player«
Ich höre keinen Ton!
Schließen Sie zuerst Ihre Lautsprecher bzw. Ihren Kopfhörer direkt an Ihre Audiokarte an. Wenn
Sie dann Ton erhalten, liegt das Problem an »DVD-Player«. Starten Sie die DVD-PlayerAnwendung und drücken Sie «Strg+O» (Buchstabe O). Klicken Sie auf das Register
«Einstellungen» und überprüfen Sie Ihre Audio-Einstellungen.
Ich erhalte kein Bild!
Drücken Sie «F5» in der DVD-Player-Anwendung, um abwechselnd den TV- und Monitormodus
zu wählen. Überprüfen Sie, daß die Kabel so angeschlossen sind, wie auf Seite 14 gezeigt wird.
Drücken Sie «Strg+O» (Buchstabe O) in der DVD-Player-Anwendung für «TV», klicken Sie auf
das Register «Einstellungen» und überprüfen Sie, daß Ihre TV-Einstellungen richtig sind.
- 19 -

Guide d’installation de DVD Player
Introduction
Merci d’avoir acheté pour DVD Player . Nous espérons que l’expérience du cinéma numérique sur
votre ordinateur vous procurera bien du plaisir.
DVD est le standard en devenir du cinéma numérique privé. Il comporte plusieurs formats vidéo,
prend en charge les langues étrangères et les menus. Il utilise la compression MPEG2, qui offre
une réduction optimale des fichiers sans en compromettre la qualité.
Vous pouvez naturellement lire des DVD sur votre PC, mais les fonctionnalités de DVD Player ne
s’arrêtent pas là. Vous pouvez par exemple envoyer la bande sonore sur votre décodeur Dolby
Pro Logic ou sur votre système Dolby Digital AC-3 pour obtenir un son “ surround ” sur 6 hautparleurs ; vous pouvez aussi envoyer le signal vidéo vers votre téléviseur ou votre moniteur sous
la forme d’un signal composite ou S-Video. DVD Player peut ainsi devenir le centre de contrôle
de votre système cinéma numérique privé.
Soutenu aujourd’hui par tous les grands studios de cinéma, le DVD offre aussi une vaste
bibliothèque de titres qui s’étoffe rapidement. A vous maintenant d’en profiter.
Ce guide d’installation explique comment installer et configurer DVD Player. Pour plus
d’informations sur l’utilisation de l’application DVD Player, par exemple, ouvrez la Page d’accueil
de DVD Player sur le cédérom et cliquez sur Documentation, ou référez-vous au fichier
lisezmoi.htm dans le dossier Lisezmoi\Win9x.
Avant de continuer
La configuration minimale requise est un PC Pentium P133 ou équivalent, avec 16 Mo RAM, un
lecteur de DVD-ROM et Windows 95 ou 98.
Si vous souhaitez utiliser DVD Player, votre carte VGA, la carte DVD Player et le moniteur doivent
être connectés avant la mise sous tension de l’ordinateur, comme illustré en page 24.
Notez que vous pouvez changer le code de region de DVD Player cinq fois au maximum. Apres
la cinquieme fois, DVD Player doit etre renvoyé a VideoLogic pour etre reinitialisé.
- 20 -

Guide d’installation de DVD Player
Installation de DVD Player
Le Programme d’installation contenu sur le cédérom DVD Player installant les pilotes et autres
logiciels ; nous recommandons vivement de l’utiliser. Si vous souhaitez installer le logiciel avec
Windows Plug & Play, référez-vous au fichier lisezmoi.htm dans le répertoire Lisezmoi\Win9x du
cédérom DVD Player.
Avant d’installer DVD Player
Sous Windows, introduisez le cédérom DVD Player dans le lecteur. Si votre système est
configuré pour l’exécution automatique des cédéroms, le programme d’installation démarre.
Sinon, exécutez le fichier \autorun.exe qui se trouve sur le cédérom.
Suivez les instructions sur l’écran pour préparer votre ordinateur à l’installation de DVD Player.
Lorsque le système vous propose d’arrêter l’ordinateur, cliquez sur Oui. Laissez le cédérom dans
le lecteur.
Installation de DVD Player
Le diagramme ci-dessous montre les connecteurs de la carte DVD Player.
entrée CD
connecteur de bus
- 21 -
sortie stéréo
sortie SP/DIF
sortie TV
sortie VGA
entrée VGA
sortie de ligne stéréo

Guide d’installation de DVD Player
1. Mettez hors tension votre ordinateur, le moniteur et tout autre périphérique connecté à
l’ordinateur.
2. Débranchez la fiche de la prise murale, mais laissez le cordon d’alimentation branché sur
l’ordinateur pour mettre celui-ci à la masse.
3. Déconnectez le moniteur de l’ordinateur.
4. Retirez le capot de l’ordinateur.
5. Si vous souhaitez installer un lecteur DVD, faites-le maintenant.
6. Trouvez un connecteur d’extension PCI disponible et retirez la cache correspondante.
Conservez la vis, vous en aurez besoin plus tard.
7. Connectez la sortie CD ou la sortie audio analogique de votre lecteur DVD au connecteur
d’entrée CD de DVD Player, comme illustré ci-dessous.
DVD Player
lecteur DVD
sortie CD ou sortie
audio analogique
- 22 -
entrée CD

Guide d’installation de DVD Player
8. Si vous souhaitez raccorder DVD Player à votre carte son via le câble audio interne, faites-le
maintenant, comme illustré ci-dessous. Ou bien, vous pouvez raccorder DVD Player à votre
carte à l’aide de la prise audio externe, comme illustré en page 25.
vers les haut-parleurs
ou le casque
carte son
9. Touchez la partie nue du châssis métallique de votre ordinateur avec le dos de la main pour
vous décharger de toute électricité statique que vous pourriez avoir accumulée sur vous ou
sur vos vêtements.
10. Alignez la carte DVD Player sur le connecteur choisi. Enfoncement fermement la carte dans
le connecteur, comme illustré dans le diagramme ci-dessous. V ous devez exercer une certaine
pression pour mettre la carte en place, mais n’appuyez pas de manière excessive.
entrée de ligne
câble fourni
sortie de ligne stéréo
DVD Player
- 23 -

Guide d’installation de DVD Player
11. Fixez la carte DVD Player avec la vis que vous avez retirée précédemment et remettez en place
le capot du PC.
12. Connectez la sortie VGA de votre carte graphique VGA au connecteur d’entrée VGA de DVD
Player à l’aide du câble fourni, comme illustré ci-dessous.
carte VGA
sortie VGA
câble fourni
DVD Player
sortie VGA
(vers moniteur)
entrée VGA
13. Connectez votre moniteur au connecteur de sortie VGA de DVD Player.
Note : Si vous souhaitez utiliser DVD Player, votre carte VGA, la carte DVD Player et le moniteur
doivent être connectés avant la mise sous tension de l’ordinateur.
14. Si vous souhaitez raccorder un téléviseur/moniteur à DVD Player, faites-le maintenant,
comme illustré ci-dessous.
sortie TV
vers TV/moniteur
composite ou S-Vidéo
(câble à fiche
multiple fourni)
DVD Player
- 24 -

Guide d’installation de DVD Player
15. Mettez votre ordinateur et le moniteur sous tension.
16. Lorsque votre bureau est disponible, le programme d’installation devrait démarrer. Sinon,
assurez-vous que le cédérom se trouve dans le lecteur de cédérom et exécutez le fichier
autorun.exe qui se trouve dans le répertoire racine du cédérom.
17. Suivez les instructions sur l’écran pour installer l’application DVD Player.
Lorsque le programme demande si vous souhaitez installer les applications DVD Player ou
•
changer le code de région, veillez à sélectionner Installer les applications DVD Player.
Lorsque le programme vous demande de définir votre code de région code, choisissez le
•
code en fonction des régions indiquées sur le diagramme à l’écran.
Lorsque le programme vous propose un calibrage automatique, cliquez sur Oui. Votre écran
•
clignotera pendant quelques secondes, après quoi le calibrage automatique devrait avoir
réussi. Si tel n’est pas le cas, lisez les instructions sur le calibrage de DVD Player dans la
section Utilisation de DVD Player de la documentation en ligne qui se trouve sur le cédérom.
18. Lorsque vous avez installé l’application, la Page d’accueil de DVD Player s’affiche.
Si vous n’avez pas raccordé DVD Player à votre carte son avec le câble audio interne, vous
pouvez le connecter via la prise audio externe, comme illustré ci-dessous.
entrée de ligne
vers les haut-parleurs ou
le casque
carte son
DVD Player
La carte DVD Player est maintenant prête à l’emploi. Référez-vous à la Page d’accueil de DVD
Player pour installer les autres utilitaires ou démonstrations depuis le cédérom ainsi que pour
obtenir d’autres instructions sur l’utilisation de DVD Player.
- 25 -
sortie stéréo

Guide d’installation de DVD Player
Détails techniques
Cette section illustre le brochage des connecteurs de DVD Player.
SP/DIF est un jack phono RCA standard. La sortie stéréo est un jack audio 3,5 mm.
sortie
TV
sortie
S-Vidéo
(sur câble
fourni)
sortie vidéo
composite
(sur câble
fourni)
sortie
VGA
entrée
VGA
sortie ligne int &
entrée CD
mini-DIN
femelle 7
broches
mini-DIN
femelle 4
broches
RCA
femelle
sub-D 15
broches
mini-DIN
femelle 9
broches
JST 2 mm
d’écart,
compatible
Sound Blaster
1 terre-Y terre terre vidéo rouge bleu terre
2 comp/U S-Vidéo C vid comp vidéo vert terre gauche
3 terre-U S-Vidéo Y vidéo bleu vert terre
4 terre-V terre réservé terre droite
5 lumin/Y terre sync V
6 inutilisé retour rouge sync H
7 chromin/Y retour vert rouge
8 retour bleu do n
9 + 5 V hor
10 retour sync
11 inutilisé
12 données DDC2B
13 horizontal
14 vertical
15 horloge DDC2B
- 26 -

Guide d’installation de DVD Player
Dépannage
Cette section traite des problèmes que vous pourriez avoir avec DVD Player. Pour plus
d’informations, ouvrez la Page d’accueil de DVD Player sur le cédérom, cliquez sur
Documentation, puis cliquez sur Dépannage.
Après que j’ai installé correctement les pilotes et l’application, mon ordinateur se bloque
lorsque je le mets sous tension.
Il se peut que la mémoire utilisée par DVD Player soit incorrectement allouée. Faites démarrer
votre ordinateur en mode Sans échec, en appuyant sur F8 en cours de démarrage et en
sélectionnant le mode Sans échec (généralement l’option 3) dans le menu de démarrage de
Windows. Lorsque votre ordinateur a redémarré, si vous savez comment modifier les plages
d’adresses mémoire, faites-le maintenant ; sinon, référez-vous à la documentation en ligne pour
plus de détails.
Lorsque je tente d’exécuter l’application DVD Player, mon ordinateur se bloque.
Il se peut qu’il y ait un conflit d’IRQ. Cliquez sur Démarrer, choisissez Paramètres et cliquez sur
Panneau de configuration. Cliquez deux fois sur l’icône Système et cliquez sur l’onglet
Gestionnaire de périphériques. Si, sous les rubriques Son, Moniteur et Contrôleurs de jeu, un
point d’exclamation apparaît face à DVD Player, cliquez deux fois sur DVD Player et, dans l’onglet
Général, sous Etat du périphérique, suivez les instructions de dépannage du matériel.
Lorsque je tente d’exécuter l’application DVD Player, j’obtiens un message d’erreur du pilote
MCI indiquant qu’une autre instance du lecteur est peut-être en cours, ou que le périphérique
n’a pas pu être chargé.
Vous avez peut-être installé DVD Player sans raccorder les câbles VGA. Mettez l’ordinateur hors
tension, connectez le câble comme illustré en page 24 et faites redémarrer l’ordinateur.
- 27 -

Guide d’installation de DVD Player
Je n’obtiens pas de son.
Premièrement, raccordez vos haut-parleurs ou votre casque directement à la carte son : si vous
entendez un son, le problème vient de DVD Player. Faites démarrer l’application DVD Player et
appuyez sur CTRL-O (lettre O). Cliquez sur Paramètres et assurez-vous que vos paramètres audio
sont corrects.
Je n’ai pas d’image.
Dans l’application DVD Player, appuyez sur F5 pour basculer entre le mode TV et le mode
moniteur. Assurez-vous que vous avez raccordé les câbles corrects comme illustré en page 24.
Pour un téléviseur/moniteur, dans l’application DVD Player, appuyez sur CTRL-O (lettre O),
cliquez sur l’onglet Paramètres et assurez-vous que les paramètres du téléviseur sont corrects.
- 28 -
 Loading...