

Imagenation PXD1000 Quick Start Manual

Imagenation
PXD1000
Quick Star t Guide
Hardware Installation . . . . . . . . . . . . . . . . . . . . . . . . . . . . . . . 2
Software Installation . . . . . . . . . . . . . . . . . . . . . . . . . . . . . . . 3
Installation for Windows 2000 / XP . . . . . . . . . . . . . . . . 3
Installation for Windows NT 4.0 . . . . . . . . . . . . . . . . . . . 4
Installation for Windows 98 / Me . . . . . . . . . . . . . . . . . . 4
Viewing Live Video (ViewPXD) . . . . . . . . . . . . . . . . . . . . . . . 5
Camera Configuration Utility (ConfigPXD) . . . . . . . . . . . . . . 5
Sample Programs . . . . . . . . . . . . . . . . . . . . . . . . . . . . . . . . . . 5
Drivers and Device Management . . . . . . . . . . . . . . . . . . . . . . 6
Device Manager Listing . . . . . . . . . . . . . . . . . . . . . . . . 6
WDM and Legacy Driver Issues . . . . . . . . . . . . . . . . . . 6
Cleanup of Previous Installations . . . . . . . . . . . . . . . . . 7
Imagenation PXD1000 Frame Grabber
by
CyberOptics Semiconductor
Copyright © 2003
922-0081-00
Contents
PXD1000 Quick Start GuidePage 2
Hardware Installation
1. Turn off your computer and unplug it.
2. Remove the computer’s cover to access the PCI bus sockets.
3. Locate an unused PCI socket on the motherboard and remove its cover plate.
4. Using anti-static precautions, remove the PXD1000 from its anti-static bag.
Note: (See Chapter 2, PXD1000 User’s Guide, for anti-static precautions.)
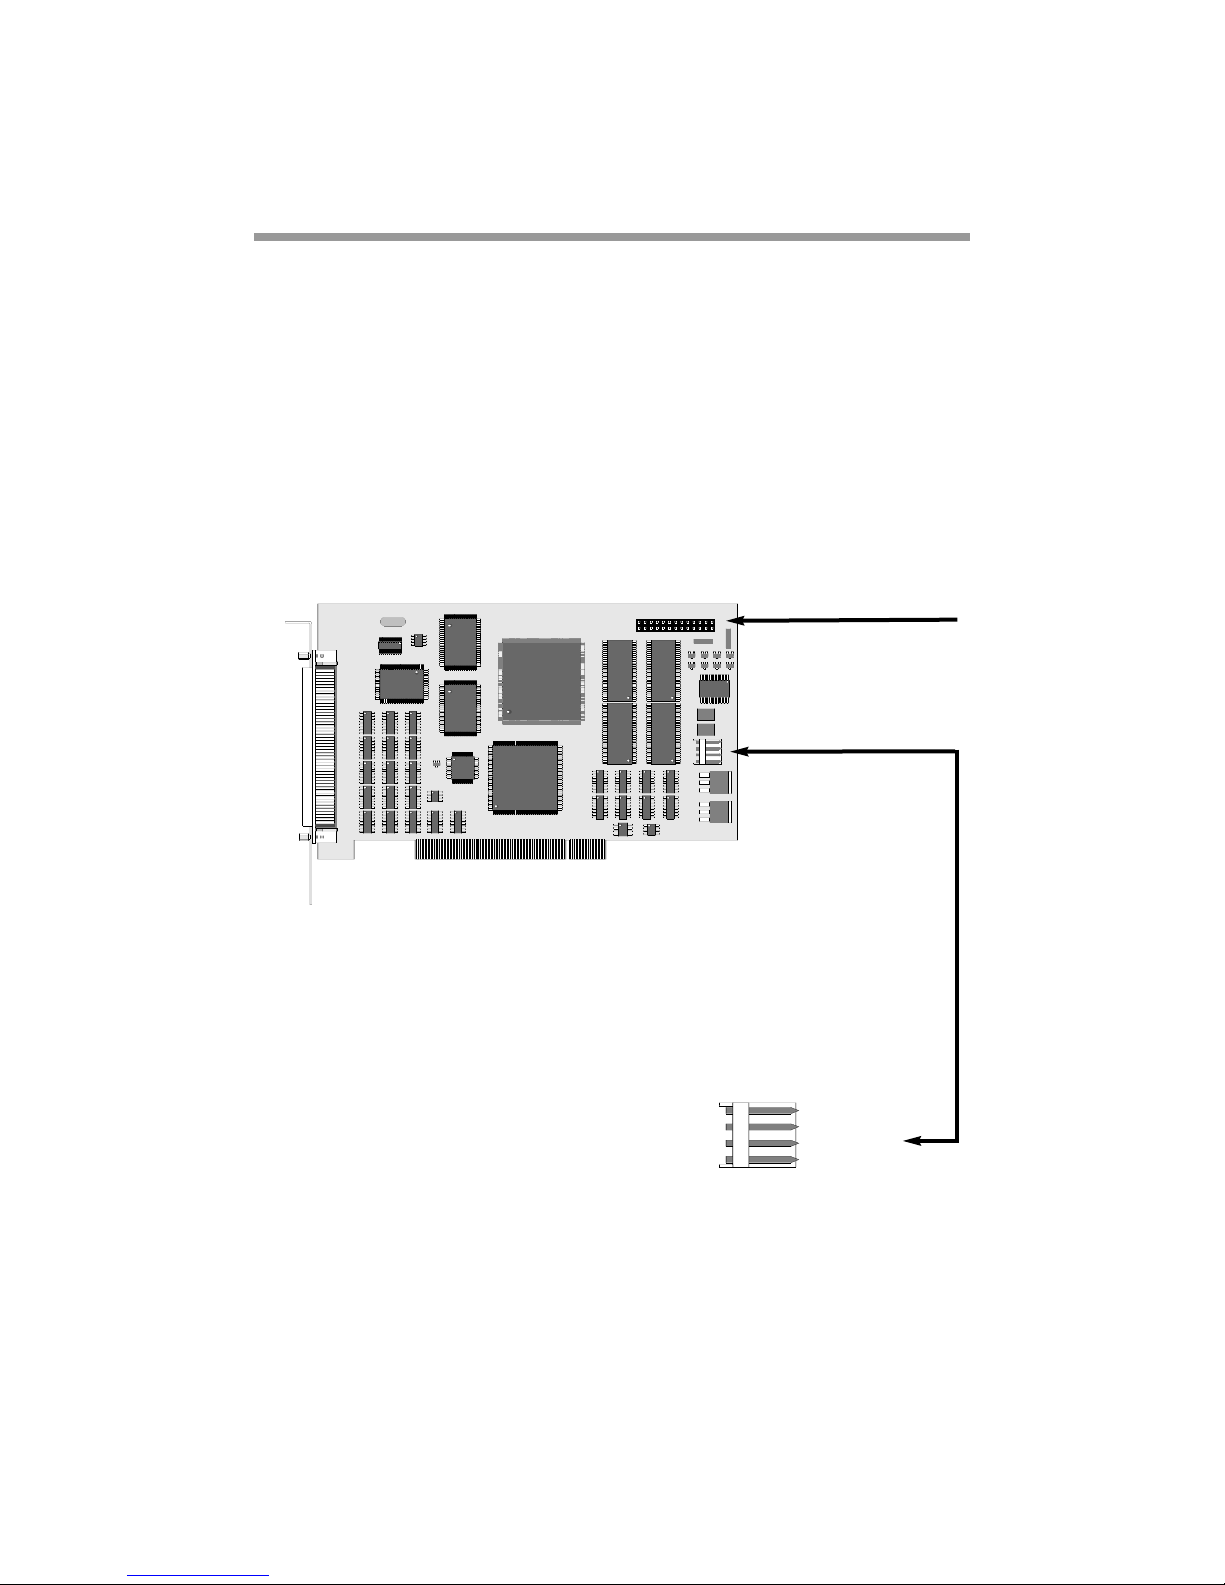
5. Optional: If you plan to use the PXD1000 for setting triggers, switches, etc., attach the I/O
ribbon cable to the JP5 connector on the PXD1000 card (Figure 1).
WARNING: Connecting the ribbon cable incorrectly can damage the board.
The red side of the ribbon cable should face away from the back
plane of the PXD1000 and line up with pin #1 (see Figure 1).
6. Insert the PXD1000 card into a PCI slot. Make sure it is seated securely.
7. Attach the back plane of the PXD1000 to the back panel of the computer.
8. Optional: If you are using the I/O ribbon cable, attach the loose end of the cable (the end
with the back plane) to an unused slot or an unused parallel port punch out.
9. Attach a power connector (supplied with your
PXD1000) from your PC’s power supply to the
J1 connector (Figure 1). The pinout of J1 is shown
in Figure 2. On the cable from your PC’s power
supply the +5 volt supply may be a red wire,
+12 volt may be yellow and Ground black.
10. Replace the cover to your computer case.
11. Plug in your computer. (You’d be surprised how many people forget this step.)
12. Attach a camera cable to the PXD1000 at the camera connector on the back plane.
Note: (See Chapter 4, PXD1000 User’s Guide, if you need to create a cable for
your camera.)
Figure 1: PXD1000 showing JP5 and J1
Figure 2: J1 pinout
J1
1
+5V
Ground
Ground
+12V
F2
F1
J1
JP5
1
J2
E20.000
1
JP5 Pin 1 red edge of cable
J1 power connector

PXD1000 Quick Start Guide Page 3
Software Installation
The software installation process differs from one Windows system to another. Since Windows
NT is NOT a Plug-and-Play system, it’s installation simply involves running the SETUP program
from the CD. Installation on the other NT-style systems (2000/XP) and the 9x systems (98/Me)
involves the Hardware Wizard and the SETUPprogram. The step-by-step instructions for each
system are listed below.
To perform the following installations, you will need one of two items:
1. The latest PXD1000 CD (version 2.0 or later)
2. The installation package from the Imagenation website
(www.imagenation.com/dnpages/pxd_files.html)
Installation for Windows 2000 / XP
1. After installing the PXD1000, turn on your computer, and let the operating system boot.
2. If you have a PXD1000 CD, insert it into your CD-ROM reader.
3. When the Hardware Wizard comes up and asks for a path to the driver, let it search the CD,
or give it the path to the installation file you downloaded from the Imagenation website.
4. Windows XP ONLY: Windows XP will find two INF files on the CD in different directories
and will ask you which one to use. They are both the same; select either one.
5. Windows 2000 and XP will both finish the driver loading process and request a reboot. You
will see a DOS window entitled InfClean. InfClean is an auxiliary program we created to
erase INF files left by previous installations of the PXD1000. It ensures a clean installation of
this latest version of software. See “Cleanup of Previous Installations” on Page 7 for a more
detailed explanation of InfClean.
6. Select “Yes” to the reboot request, and reboot your computer.
7. After your system reboots, the Hardware Wizard will run again. When you let it search for a
suitable driver, it will find the INF that was installed to your hard drive in step 3 or 4. You
will not need to reboot again.
8. Run the SETUP.EXE program from the PXD1000 CD or from the file that you downloaded
from the Imagenation website. The SETUP program installs the rest of the software: DLLs,
camera configuration files, and samples. You do not need to reboot after running SETUP.
9. Your PXD1000 is now ready to use.
 Loading...