

Page 1
IMPORTANT - Write your unique personal CD serial number here:
(locate your serial number on the CD case)
Page 2

Information in this document is subject to change without notice and
does not represent a commitment on the part of Image Line Software.
The software described in this document is furnished under a license
agreement or nondisclosure agreement. The software may be used or
copied only in accordance of the terms of the agreement. It is illegal to
copy this software on any medium except as specifically allowed in the
agreement. No part of this document may be reproduced or transmitted
in any form or by any means, electronic or mechanical, including
photocopying and recording, for any purpose without the express written
permission of Image Line Software.
Copyright © 2002-2005 Image Line Software. All rights reserved.
FL Studio Copyright © 2005 Image Line Software. All rights reserved.
FL Studio and Fruityloops are registered trademarks of Image Line
Software. Other company and product names are trademarks of their
respective owners.
Image Line Software is a division of Image Line BVBA.
Visit Image Line Software at
http://www.image-line.com
Visit FL Studio on the web at
http://www.flstudio.com/.
Page 3

TTAABBLLEE OOFF CCOONNTTEENNTTSS
TABLE OF CONTENTS .............................................................................................................................3
FOR FRUITYLOOPS 3.x and FL STUDIO v4.x USERS......................................................................... 5
INSTALL INSTRUCTIONS........................................................................................................................ 6
FIRST RUN................................................................................................................................................... 7
MAKE SOME NOISE.................................................................................................................................. 8
HELP! ............................................................................................................................................................ 9
GET THE "GETTING STARTED" LOOPS ............................................................................................9
THE STEP SEQUENCER ......................................................................................................................... 10
TWEAKING THE CHANNELS ............................................................................................................... 12
TWEAKING THE NOTES........................................................................................................................ 18
THE PLAYLIST (from Patterns to Songs) .............................................................................................. 22
GENERATORS (from Samples to Synths)............................................................................................... 25
INTRODUCING THE TS404 .................................................................................................................... 40
MIXING & EFFECTS ...............................................................................................................................44
RECORDING WITH LIVE TWEAKING............................................................................................... 52
THE EVENT EDITOR............................................................................................................................... 55
THE PIANO ROLL....................................................................................................................................60
AUDIO TRACKS .......................................................................................................................................65
INTEGRATED WAVE EDITOR.............................................................................................................. 67
THE BEATSLICER ...................................................................................................................................68
Page 4
SHARING YOUR WORK ......................................................................................................................... 71
EXTERNAL CONTROLLERS................................................................................................................. 73
CREDITS..................................................................................................................................................... 80
INDEX .........................................................................................................................................................81
Lemon Boy is in the house: Yo, whassup! Having
problems? Before you panic and start spamming the FL
Studio Tech Support, look for me. I'll pop up here and
there with answers to common problems that might save
you (and the FL Studio staff) some trouble.
Page 5

FFOORR FFRRUUIITTYYLLOOOOPPSS 33..xx aanndd FFLL SSTTUUDDIIOO vv44..xx UUSSEERRSS
This guide is current to Version 5 of FL Studio. If you were the proud owner of one of the FruityLoops 3
versions (good for you!) or FL Studio v4 (even better), then read on to see what's new in this version.
1. FL Studio Name. Since version 4, the name of the product changes to FL Studio. FL Studio contains
all the stuff you know from FruityLoops 3.x and much more!
2. Mixer. The effects window from FruityLoops 3.x is now a full-blown mixer with 64 insert tracks, 4
send tracks, per-track equalizer, balance controls and disk recording. You can also create complex
mixer setups by routing the insert tracks to each other!
3. Playlist. New Piano Roll style showing the correct pattern lengths, supporting live mode pattern
mixing and brand new audio tracks are some of the improvements integrated in the new Playlist
window.
4. Per-Pattern Grid Length. In previous releases, the Step Sequencer had one fixed length for the entire
project. Now you can adjust the sequencing grid for each individual pattern!
5. New in this version …. Check out the new generators and effects in this release! Check out the
WhatsNew.doc in the main FL Studio directory for a brief run down of what else is new
5
Page 6

IINNSSTTAALLLL IINNSSTTRRUUCCTTIIOONNSS
There are two ways to purchase FL Studio: on line, or in a box with a CD and this printed manual. The
installation differs slightly in each of those cases. Read here what to do:
A. If you bought your copy of FL Studio in a box, here's what you do.
1. Run the CD. Insert the install CD-ROM that comes with your box in your CD-ROM drive. If you
have auto-run enabled, you will see the CD menu automatically appear. Otherwise, right-click your
CD-ROM drive icon in Windows Explorer and select Autorun.
2. Start the Installation. Select the FL Studio installation link. The installation window appears. Follow
the instructions on screen.
3. The Serial Number. During the installation you will be asked for you serial number. You can find it
printed on your CD-ROM case. Write it down for further use and make a backup of this number.
4. Register On-line. After you complete the installation successfully you can register on-line to gain
access to the extra FL Studio website features and community. Go back to the CD-ROM menu (reload
as described in step 1 if needed), and click on the link called “Click here to register to the FL Studio
community” or go to this link
5. In case of problems. Please consult our F.A.Q. section on our website www.flstudio.com. Useful
information about known issues can be found there.
B. If you bought your copy of FL Studio on line, here's what you do.
6. Download and Install the Demo. Download and install the demo version of FL Studio. It is
recommended NOT to install over previous releases of FL Studio/FruityLoops.
7. Apply for a Regcode. Go to
received by e-mail after your purchase. Click the button below to your regcode to pop-up.
8. Wait for the E-Mail. The FL Studio team will send you an e-mail with a link. Make sure your email
account can accept emails coming from us (domain: e-officedirect.com). Please follow all instructions
carefully.
9. Run the Program. Restart FL Studio if it is running and you will be able to save your projects.
10. Bookmark the Web Site. The FL Studio web site is an awesome resource. Check back at
http://www.flstudio.com/ often to see what's up.
11. Read this Guide. As soon as you start FL Studio, you'll be confronted with strange dialog boxes and
messages. Proceed to the next section of this guide to find out what to do next. Also check the
extensive on-line help that comes with FL Studio.
http://www.flstudio.com/FLBoxRegistration.
www.flstudio.com/register and enter your username and password you
6
Page 7

FFIIRRSSTT RRUUNN
OK, so you just finished the installation and started FL Studio. Read this section for an explanation of what
you're seeing.
1. The System Settings Screen. When you first run FL Studio, you may be confronted with a dialog box
like the one below (if not, use F10 to bring it up now). You just have to use the select boxes to choose
your sound card and MIDI drivers. At first, you may be looking at the MIDI screen, but for now the
most important one is the Audio screen, shown below.
Click Here
Then Here
2. Select an Output Driver from the list in the pull-down menu. If you don't know which one to pick,
just leave it as it is. Later on if you have sound problems, you can come back to this screen (by
pressing F10) and experiment with the other options.
3. The DirectSound Streaming Buffer. Most of the stuff on this screen you don’t need to know about,
but you should know what the Buffer Length does. Basically, if you make this buffer long, you are less
likely to get choppy sound but changes you make to a playing loop will take longer to kick in. If you
make it short, you are more likely to get choppy sound but changes will kick in faster. You want it
short, but depending on your computer, you may need to come back to this screen later (F10) and
make it longer. If you have a combination of a fast computer and a good sound card, you may be able
to get the latency as low as 10ms. For a SoundBlaster Live, you can probably go as low as 30ms. The
7
Page 8
Use Polling option can also improve latencies for some operating systems (keep it turned on if you use
Windows 95 or 98, but try switching it off in Windows 2000 to see if it brings better performance).
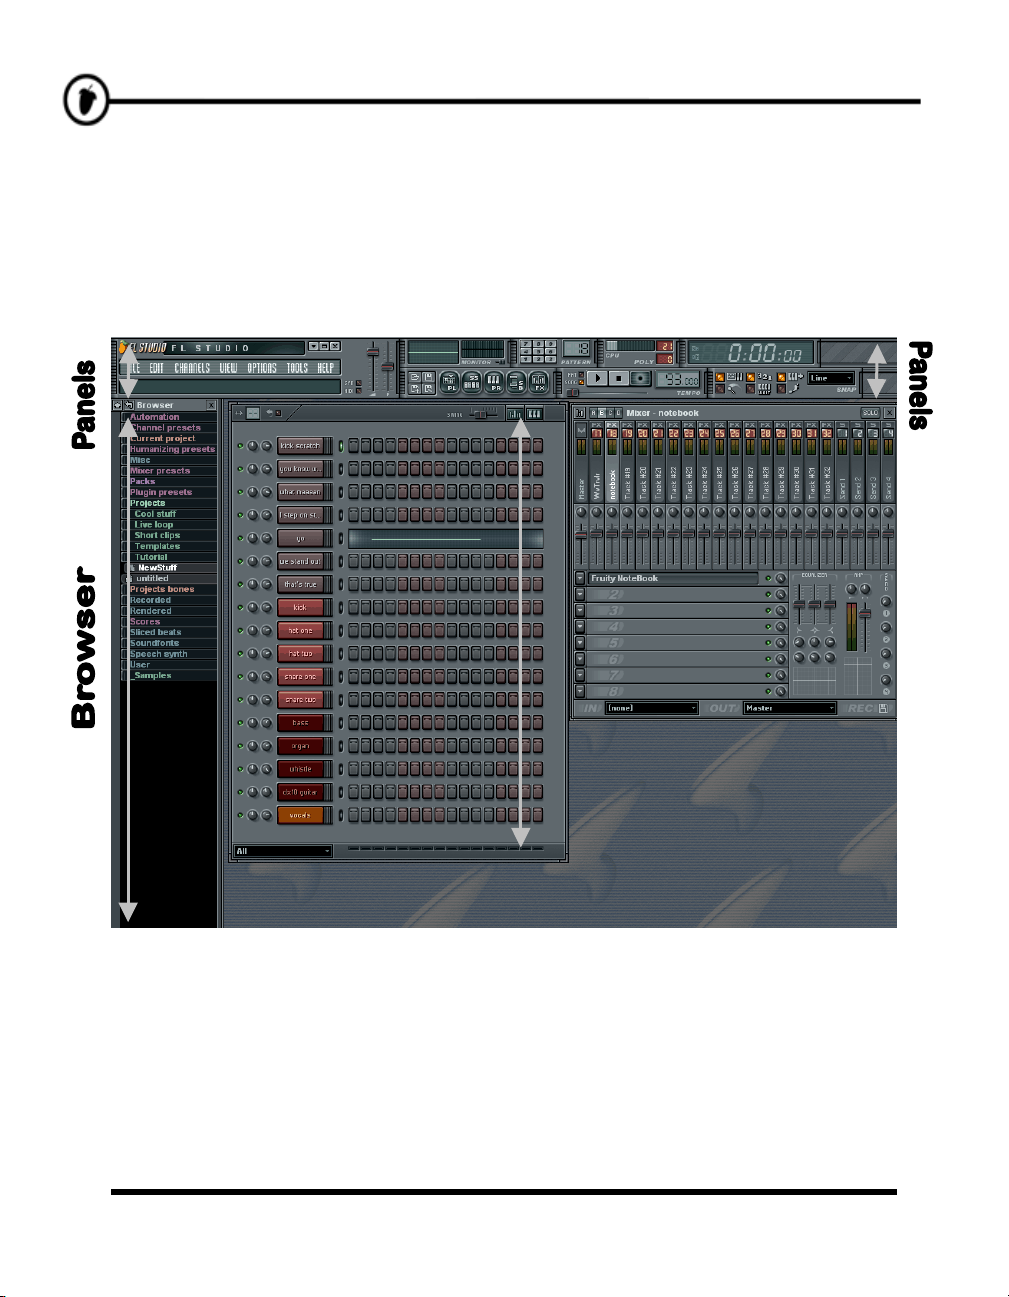
4. The Main Screen. After you close the Environment Settings window, you'll be looking at a screen
like the one below. FL Studio is all about windows within windows. So you're looking at the outer
Main Window with its Tool Panels at the top. Then within that you're looking at the Browser (left)
and the Step Sequencer (right). The panels might be arranged differently for you, but that doesn’t
matter.
Step
Sequencer
MMAAKKEE SSOOMMEE NNOOIISSEE
Press the Play Switch. This is the button on the Transport panel (next to the stop and record buttons).
You'll hear the FL Studio 3 demo song. If this is not the first time you've run FL Studio, you'll have to
reload this demo. Select Open from the File menu in the top left and double click the file NewStuff.flp in
the Loops directory.
8
Page 9
HHEELLPP!!
This booklet is just supposed to get you up and running quickly. It is not meant to be a reference manual
for everything FL Studio can do (that would take a multi-volume encyclopedia!). Fortunately, there's a ton
of info out there on what FL Studio does. Here's how to get it.
1. The Hint Bar. This is located on the Main Window just under the Menu Bar (see the previous page, in
2. On-line Help. FL Studio also comes with a massive on-line help reference. Just use the Help Menu
3. Tutorial Loops. Click File >Open and surf to the Tutorials directory. These loops contain notes on
4. The Web Site. FL Studio comes with a massive web site at http://www.flstudio.com/. The site has a
the top left). You can mouse over any of the controls anywhere in FL Studio and this panel will
display a short description of what that control does. The Hint Bar also shows you the Shortcut Key
that will activate the same function. This is displayed on the right. Pressing this shortcut key has the
same effect as pressing the corresponding button.
and select Contents. This help also features context-sensitivity – select a window and press F1 on your
keyboard. The reference automatically displays the help you are looking for.
how to do various things in FL Studio.
support section that includes a FAQ and a Discussion Forum, Online Tutorials, Video Tutorials
(soon), Song Exchange section and the Samplefusion samples site. Check these to see if anyone has
answered your questions already. If not, feel free to post your own question on the discussion forums.
GGEETT TTHHEE ""GGEETTTTIINNGG SSTTAARRTTEEDD"" LLOOOOPPSS
To use this guide effectively, you should find and load the "Getting Started" loops that were included in the
FL Studio package. Go to the File menu (above the Hint Bar) and click on Open. Alternatively, click on
the File Open Icon below the Hint Bar. Either method will get you a file dialog box open on the Loops
Directory. From here, double-click the Tutorials Subdirectory, and then the Getting Started
Subdirectory and you will see the Getting Started Loops. Load up the first one (GettingStarted1.flp),
press Play and move on to the next section!
HEY! Don't skip that step. This guide
will work a lot better if you're looking at
the example loops while you read…
9
Page 10
TTHHEE SSTTEEPP SSEEQQUUEENNCCEERR
When you start FL Studio for the first time, you'll see the Step Sequencer window (see the “First Run”
section). This is where you lay out your drum and melody patterns for your songs.
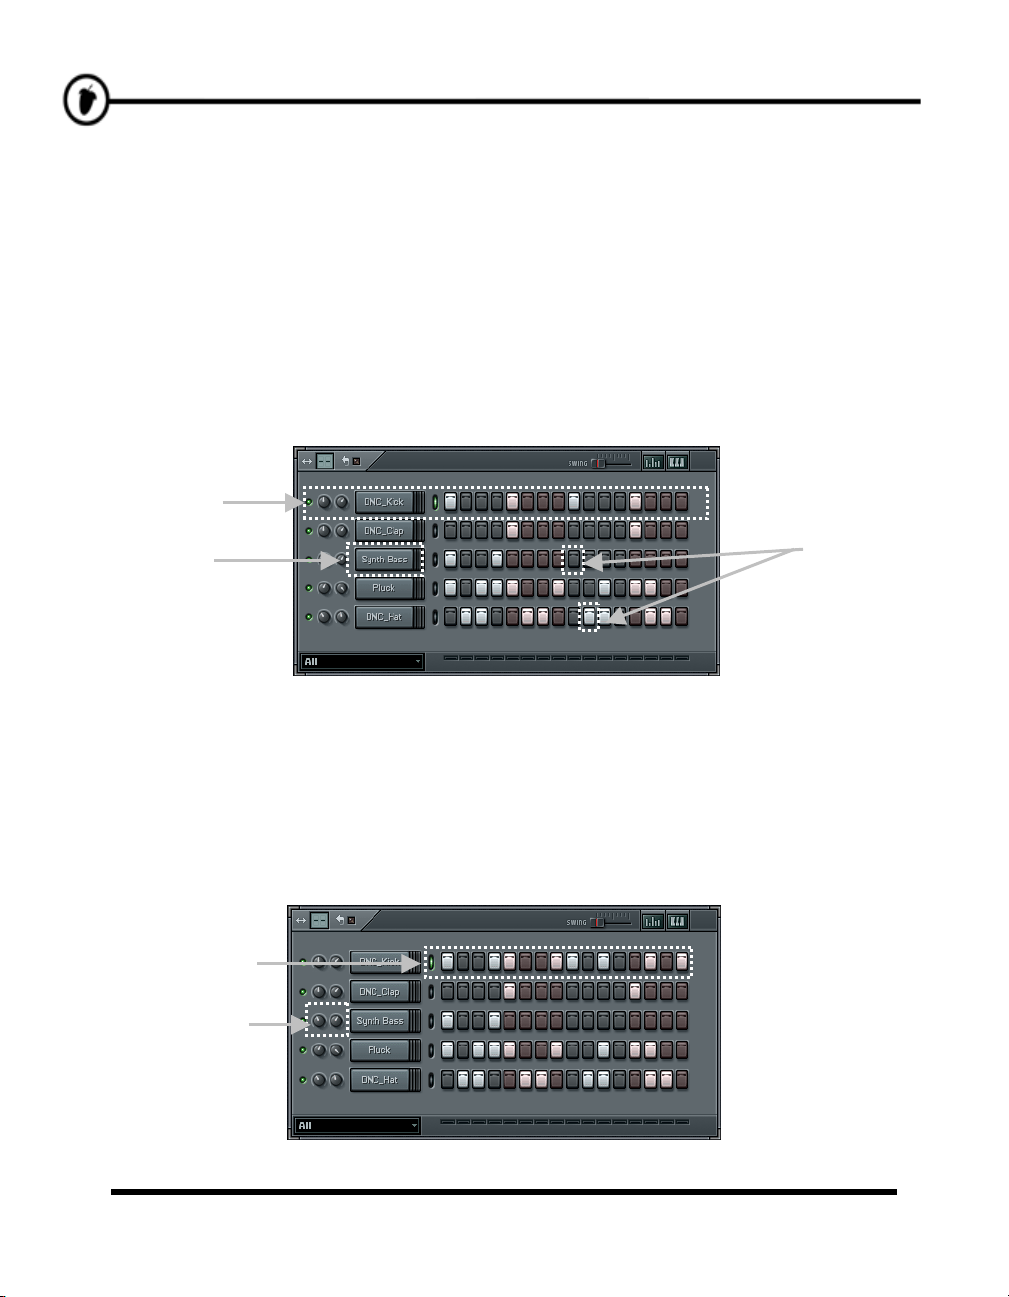
1. What is it For? This is where you find channels, and dots. The channels are laid out horizontally
(see below) and each one contains a single sound. Each channel has 16 dots. If you're musically
inclined, these dots represent 16
are the four beats of a basic drum loop. (The layout below is from GettingStarted1.flp. You should
have this loop loaded now.)
A Channel
A Channel
Name
2. What Dots are For? Clicking on a dot lights it up and tells FL Studio to trigger the channel (play the
sound loaded into that channel) at that point in the loop. For instance, the 1
the DNC_Kick channel are lit up, telling FL Studio to play the kick drum sound four times during the
loop (if you are thinking of groups of four dots as a single beat, FL Studio will play the sound at the
start of each beat.) Try changing the pattern of dots in the DNC_Kick channel. (If you need to turn a
dot off, right-click it.) Once you've got the dots to light up like the picture below, press the play
switch to hear what you've created.
th
notes. If not, think of each group of four dots as one beat, so 16 dots
Some
Dots
st
, 5th, 9th, and 13th dots in
10
Suggested
Changes
Channel
Controls
Page 11
TThhee SStteepp SSeeqquueenncceerr
3. Play with the Channel Controls. After you've set up the pattern, try playing with the Channel
Controls on the left. The two round knobs (wheels) control the volume and pan of a single channel,
and the green light switches the channel on and off (panning is like the balance control on your stereo;
turning this knob moves the sound from left to right in the stereo field). If you want to reset a wheel to
it's default position, right-click on it and select reset.
4. Make Your Own Beat. Don't like the beat above? Good, make your own! In the next sections, we'll
teach you how to load in new samples, set up melodies, and change the sound of each channel (and
even each dot) using Plugin Effects.
Don't Save! If you create a masterpiece and you want
to keep it, at least save it under a new name. We need
you to keep GettingStarted1.flp around so we can use
it to explain some of the more advanced features later.
11
Page 12
p
TTWWEEAAKKIINNGG TTHHEE CCHHAANNNNEELLSS
In this section, we'll show you how to modify the sound of the loops you create by tweaking the sound
sample on each channel. FL Studio supports so much of this kind of tweaking that it's possible for two
people to create loops that sound totally different using exactly the same samples (technically, each channel
contains a Generator, which could be sample-based or could be a synthesizer plugin. More on that later,
though).
Wait! What's a "sample"? A sample is a little piece of sound stored
in a disk file. Each channel in FL Studio uses a single sample,
usually containing a single note (like a snare drum hit or a single
bass note), but they can also contain entire beats or tunes. Samples
are usually ".wav" file types, but FL Studio supports ".xi" sound files
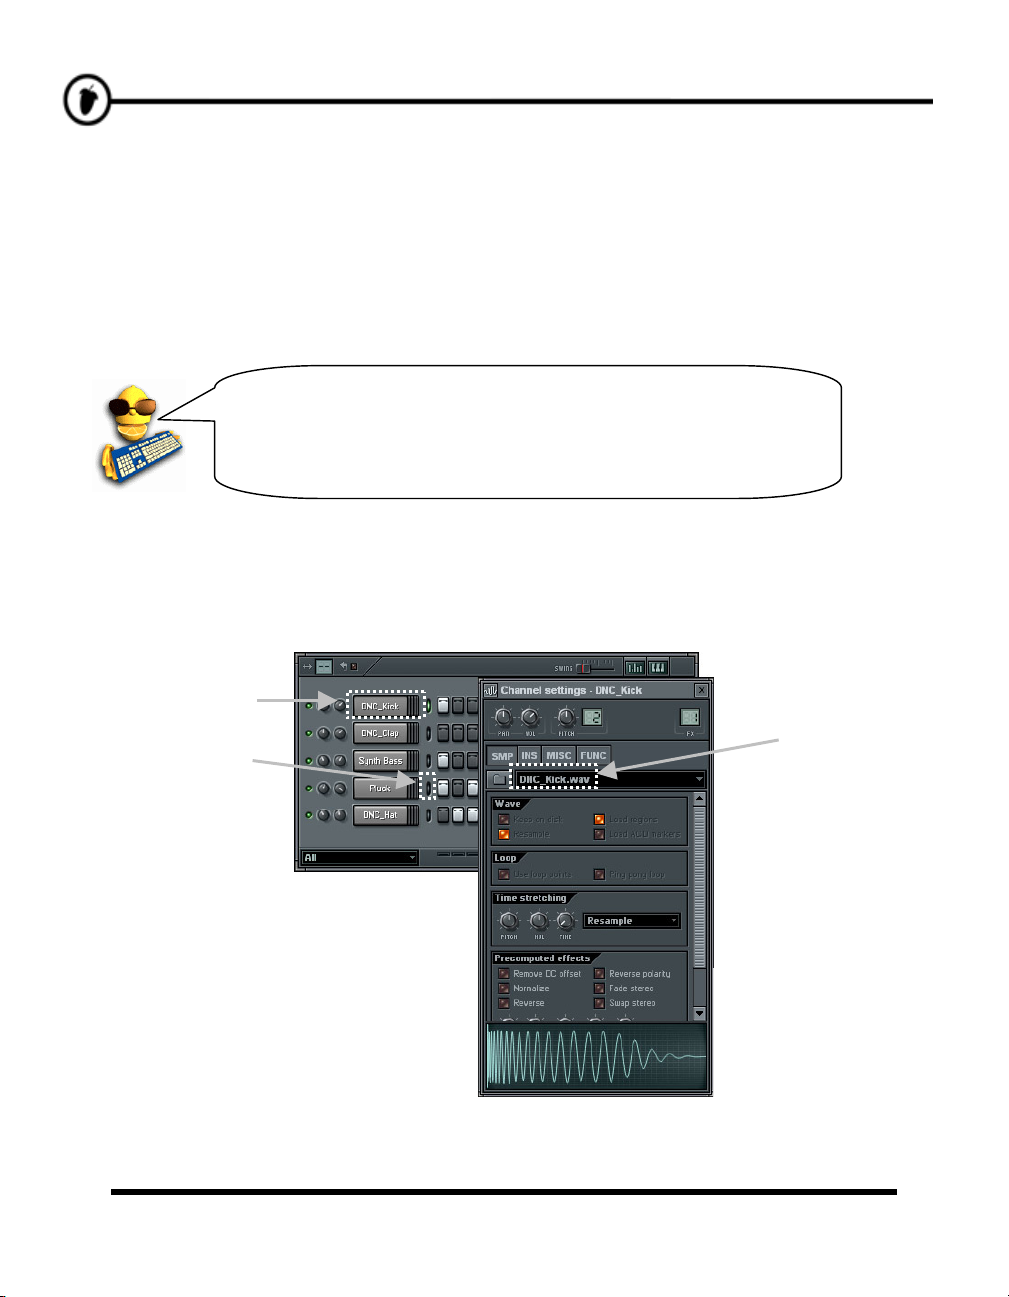
1. Open the Channel Settings Dialog. OK, let's get going and modify the kick drum sample. Load up
the original version of GettingStarted1.flp again and click on the name "DNC_Kick" to bring up the
Channel Settings window for that channel (shown in the picture below).
Click
Here
le
Channel
Sam
File Name
Selector
12
Page 13
TTwweeaakkiinngg tthhee CChhaannnneellss
2. Load a New Sample. The first thing you can do is change the sample being used on the channel. The
sample file name is shown on the picture above. Clicking on the file icon to the left will open a
browser on the directory containing the file "DNC_Kick.wav" along with a number of other kick drum
samples. As you click on them, FL Studio will automatically play the sounds for you. Try opening
some of these other samples and listening to the effect a new kick drum has on the sound of the loop.
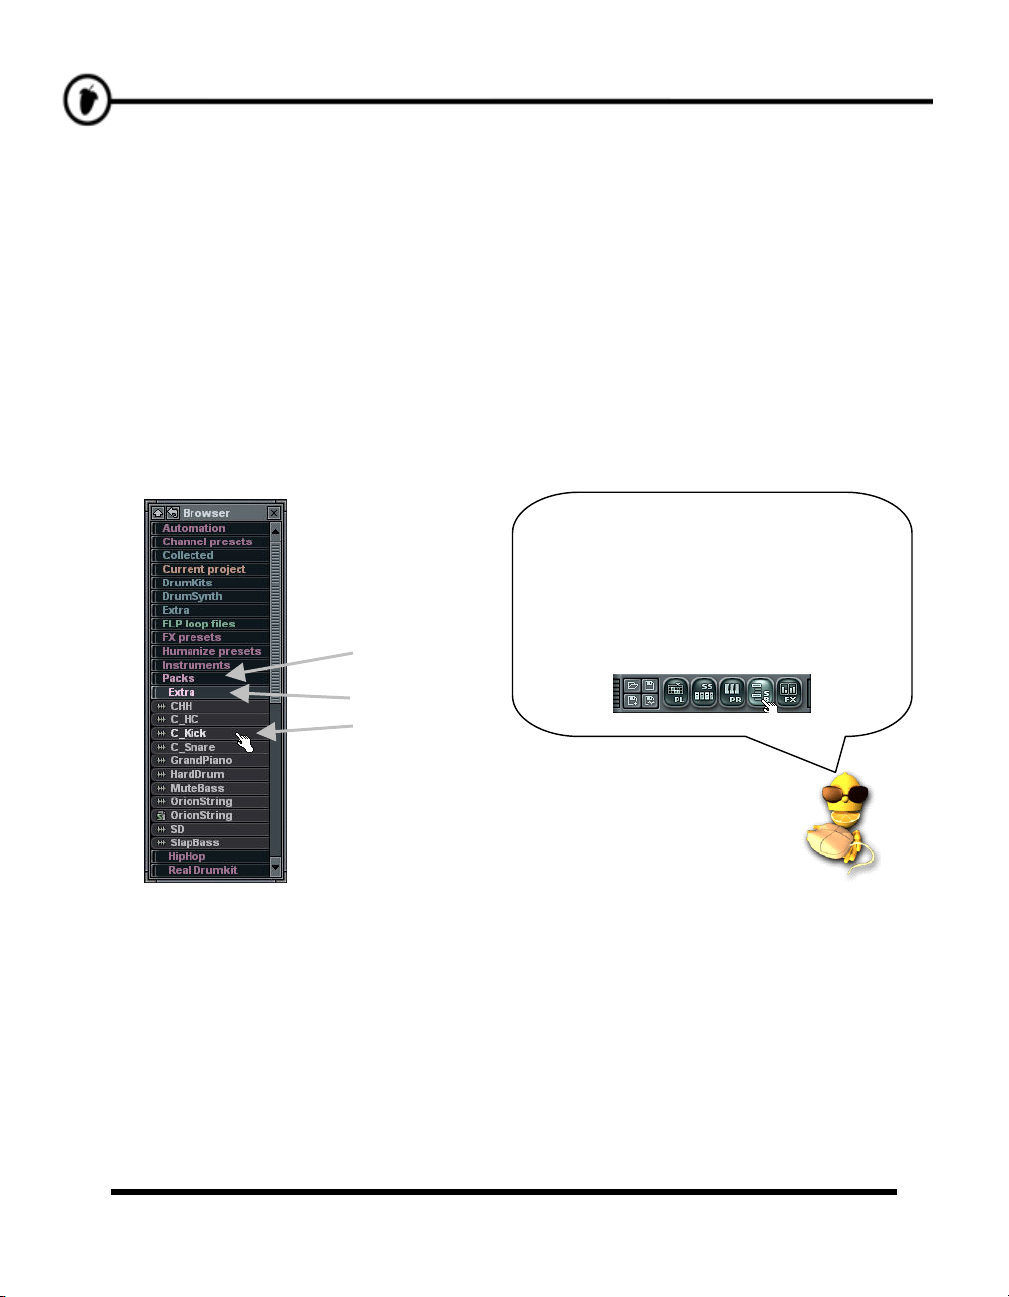
3. Check out the Browser. Another way to load samples is to use the Browser (that's the other window
you see when you first opened FL Studio in the "First Run" section above.) This is a special browser
for selecting and loading samples, loops and presets files. To find the DNC_Kick sound, click on
Packs, and then Dance. Left-clicking on a sample will play it, right clicking will open it into the
selected channel, and you can also drag and drop into the step sequencer. (You select a channel by
clicking on the green Channel Selector light to the right of the channel name as shown above.)
Click Here
Lost the Browser? No problem. The five
big buttons on the tool bar shown below
will open and close various windows for
you, including the Browser and the Step
Sequencer. (Don't worry about those
other windows for now, all will become
clear in the fullness of time…)
Then Here
Then Here
13
Page 14
V
TTwweeaakkiinngg tthhee CChhaannnneellss
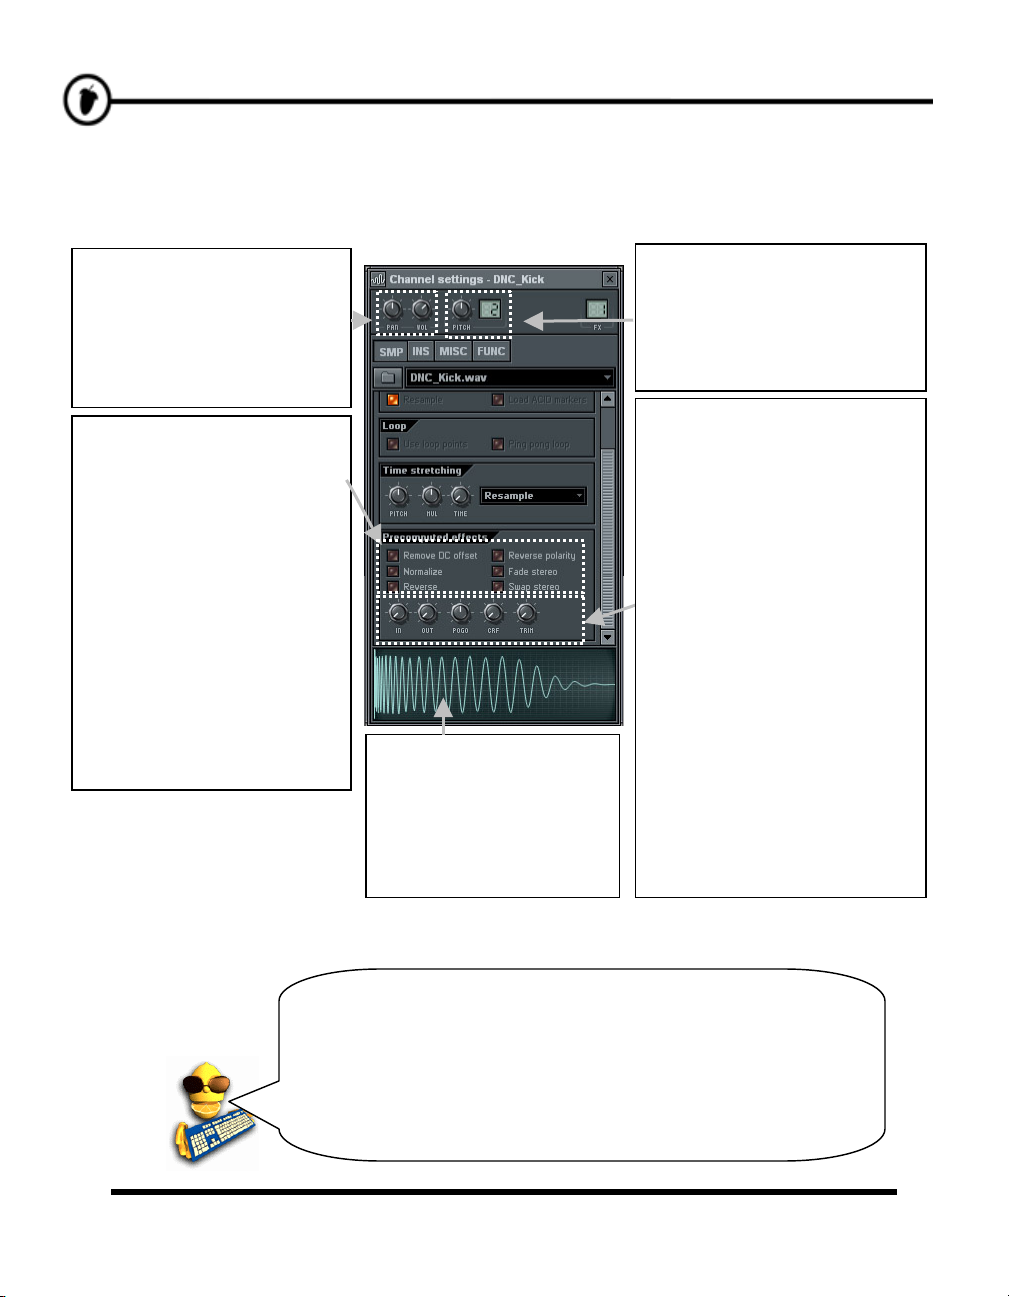
4. Play with the Sample Effects. Ok, at this point the best advice is to start the loop, then play with the
controls in the sample (SMP) panel of the Channel Settings Dialog and listen to the difference in
sound. Here's a short description of what some of them do. For more info see the on-line help.
ol, Pan: These are the
volume and panning wheels
that also appear on the main
screen for each channel.
Turning these will make the
wheels on the main screen
turn as well.
Remove DC Offset: Use this
option to fix “vertical” offset in
the samples (see Wave View
below).
Reverse Polarity: "Flips" the
waveform vertically.
Normalize: Maximizes the
sample volume without
distortion.
Fade Stereo: Creates a stereo
fade from the left to the right
channel of the sample.
Reverse: Reverses the
sample.
Swap Stereo: Switches left
and right channel of the
sample.
Wave View Window:
Shows the shape of the
sound sample. Click here to
hear the sample with all the
effects . Also a drag and
drop window for loading
samples.
Pitch: The wheel changes the
pitch of the sample (speeds it up
or slows it down). The number
indicates how far the pitch wheel
can stretch. Move it by clicking
and dragging.
Fade In (IN): Applies a quick
fade in to the sample (turn
maximum to left to disable).
Fade Out (OUT): Applies a
quick fade out to the sample
(turn maximum to left to
disable).
Pitch bend (POGO): Applies
pitch bend to the sample. Useful
with drum samples.
Crossfade Loop (CRF): Allows
you to crossfade the sample for
the creation of smooth loop
sections (turn maximum to left to
disable).
Trim Threshold (TRIM): FL
Studio trims the silence at the
end of the samples, as this frees
up RAM and does not alter the
resulting sound. This control
allows you to raise the volume
threshold below which FL Studio
detects "silence".
14
Can't hear the difference? If you press a button or turn a wheel
and you can't hear any difference in the sound, try making the
same change on another channel. For example, sometimes a
change that doesn't affect a kick drum much will make a huge
difference to the sound of a snare. If you still can't hear the
difference, stop the loop from playing and listen the sounds
separately by clicking on the wave view window. You might be
able to hear the effect better without the other instruments.
Page 15
o
eadphones)
g
p
TTwweeaakkiinngg tthhee CChhaannnneellss
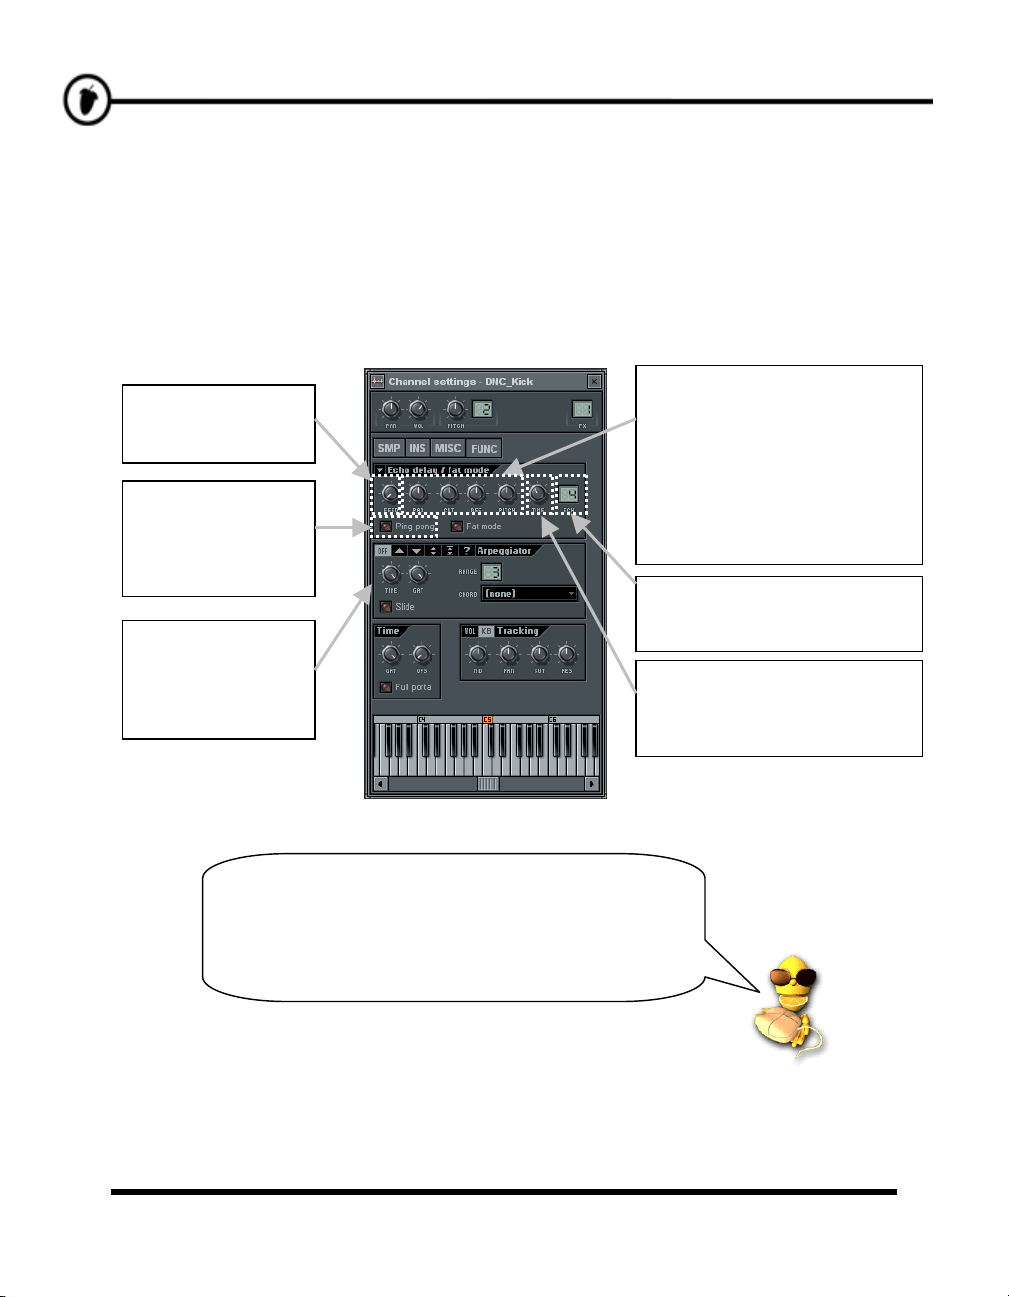
5. Add Some Echo. Go back to GettingStarted1.flp, open the DNC_Kick channel settings and click the
FUNC tab to get the view shown below. The controls in the top section (Echo delay / fat mode) can be
used to set up a cool echo effect for a single instrument. Start by turning up the FEED about a quarter
of the way, and listen to what happens to the kick drum sound… Try playing with the other controls to
change the sound of the echo… You can also toggle between various echo and “fat” modes by clicking
the title bar of the Echo Delay section (the default is Classic Echo). More on these different effects can
be found in the on-line manual…
Feed: Echo volume
(sets how quickly
the echo dies out).
Ping Pong: Makes
the echo flip back
and forth from left to
right (sounds cool
n h
.
Arpeggiator: This
gets explained in
the Generators
section of this
uide.
Pan, Cut, and Res do the
same job as on the sample
panel, but the effects build up
as the echo dies out.
Pitch controls the pitch of the
echo. If you turn this wheel
right, the echo will get higher as
it dies out.
Ech: Number of times the
instrument will echo before it
s.
sto
Time: Controls the amount of
time (in dots) between each
echo. Maximum delay time is
16 dots.
Getting Echo Time Just Right: The "Time" control is
fine-grained to get you just the exact echo you want.
But if you want to echo on the beat, you will have to
look at the Hint Bar while you turn the dial. If you want
the echo every three dots, just turn the dial until the
hint bar shows "3:00".
15
Page 16

TTwweeaakkiinngg tthhee CChhaannnneellss
6. Play With the Instrument Settings. Ok, let's take a quick look at the INS panel before we move on.
(There's also stuff you should read about in the MISC panel too, but you can get that info from the
On-line Help.) Click on the INS tab and you'll get to the Instrument Settings. Here you can add
Envelopes and LFO to your sample for the Volume, Pan, Cutoff, Resonance, and Pitch settings.
Indicator Light
Set Middle Note
LFO
Effect Selector
Envelope
7. What's an Envelope? An envelope causes a particular parameter to rise, and then fall over the life of
the sound. The most classic thing to do is to have a Volume Envelope that makes the sound rise then
fall in volume. But you can also put an envelope on Pitch, Cutoff, and Resonance. You can get more
info on what all the parameters mean in the On-line Help, but Delay (DEL) sets how much time
passes before you hear the sound, Attack (ATT) sets the fade-in at the beginning, Hold (HOLD) sets
how long the sound lasts at full volume, and Decay (DEC), Sustain (SUS), and Release (REL) control
how the sound fades away. Play with the wheels and watch the graph change.
8. What's LFO? LFO stands for Low Frequency Oscillation. It makes a particular effect oscillate up
and down during the life of the sound. Again, more info is available in the On-Line Help, but Amount
(AMT) sets how much the effect oscillates, Speed (SPD) sets how quickly it oscillates, Delay (DEL)
sets how much time passes before the oscillation starts, and Attack (ATT) sets how quickly the
oscillation ramps up to it's full amount. Play with the knobs and watch the graph change.
16
Page 17
TTwweeaakkiinngg tthhee CChhaannnneellss
9. How do I Use Them? Use the Effect Selector (see diagram above) to choose the effect, and then turn
the knobs on either the Envelope or the LFO. To turn the Envelope on and off for each effect, click on
the Indicator Light. To turn off the LFO, reset the Amount (AMT) to the middle (knob pointing
straight up.)
10. Why Can't I Hear the Effect? Well, if you're still on the Kick Drum from GettingStarted1.flp, it's
going to be pretty hard to hear any LFO effect, although the Envelope might make a difference. These
effects are more audible on longer samples. To hear the effects better, go to the Instrument Settings for
the Ins_Round sample and play with the settings now.
Now we're cookin' with gas!
17
Page 18
p
TTWWEEAAKKIINNGG TTHHEE NNOOTTEESS
By now you're familiar with many of the ways FL Studio lets you tweak and shape your sounds. In this
section, we'll show you how some of those effects can be applied to each dot separately. We'll also show
you how to program melodies.
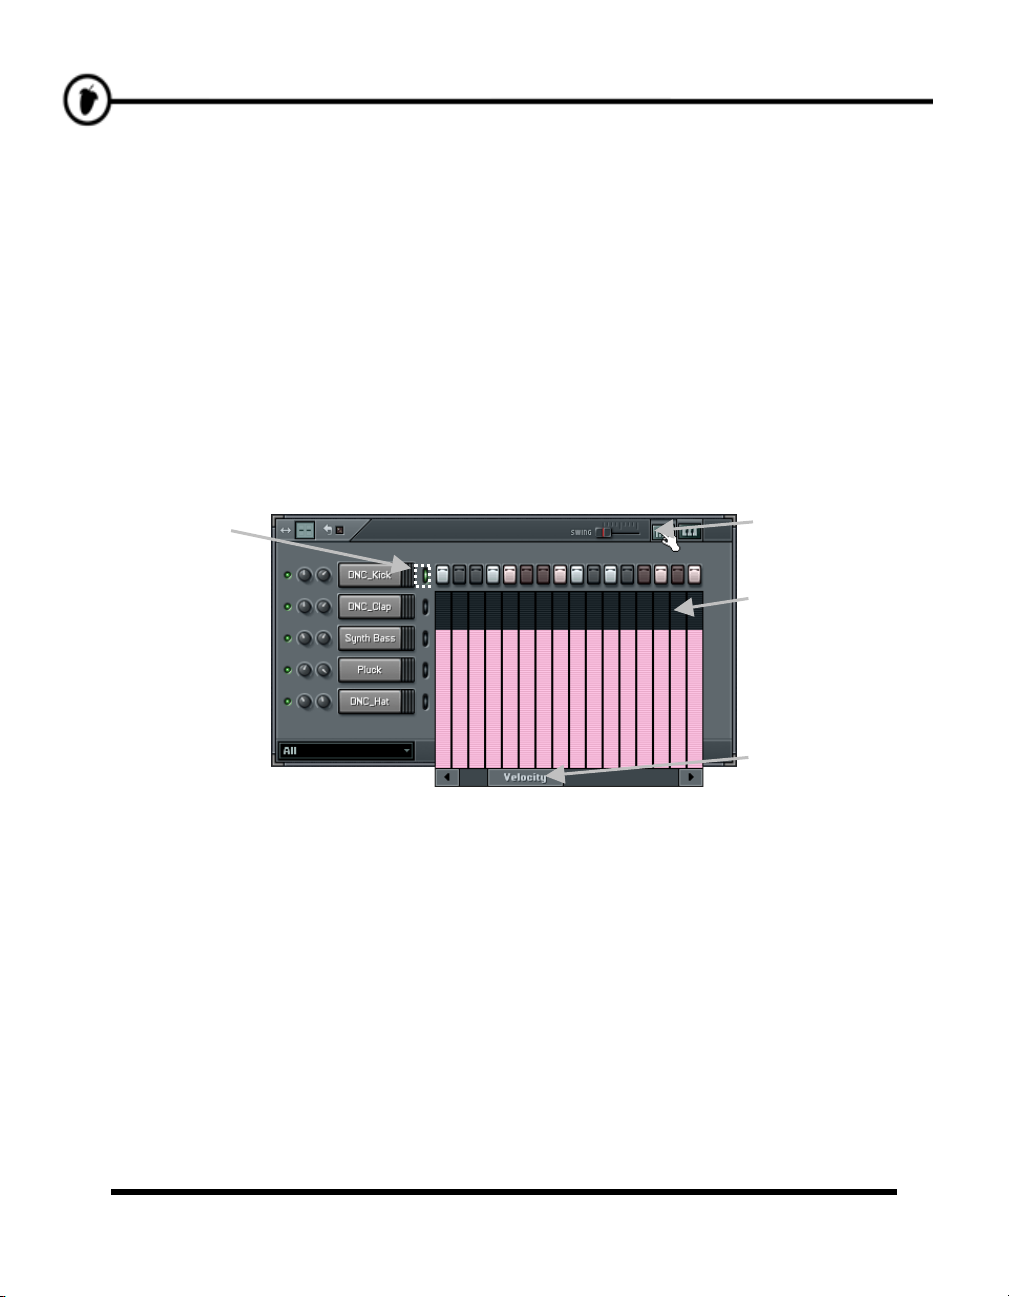
1. Check out the Graph Editor. The easiest thing to wrap your mind around is probably the Graph
Editor utility. First, select a channel to edit by clicking on the channel name, or by clicking on the
green Channel Selector light to the right of the channel name. Then press the button that makes the
graph editor pop up as shown below. (Make sure you've loaded up the original version of
GettingStarted1.flp first.)
Channel
Selector
h Editor
Gra
Button
Graph Editor
Effect Selector
2. Check out the Effects. Try clicking-and-dragging the Effect Selector to see which of the various
effects are available. You should find Pan, Velocity (another name for Volume), Filter Cut, Filter
Res, Pitch, and Shift. Most of these effects were discussed previously, in the "Tweaking the
Channels" section. The difference here is that you can also tweak the value of these effects for each
separate dot. Each bar on the graph sets the effect value for the single note above (or below) it.
GettingStarted1.flp already has some tweaking in it. Check out the Volume tweaks in the CHH
channel and the Cutoff tweaks in the Ins_Square and Ins_Round channels.
18
Page 19
TTwweeaakkiinngg tthhee NNootteess
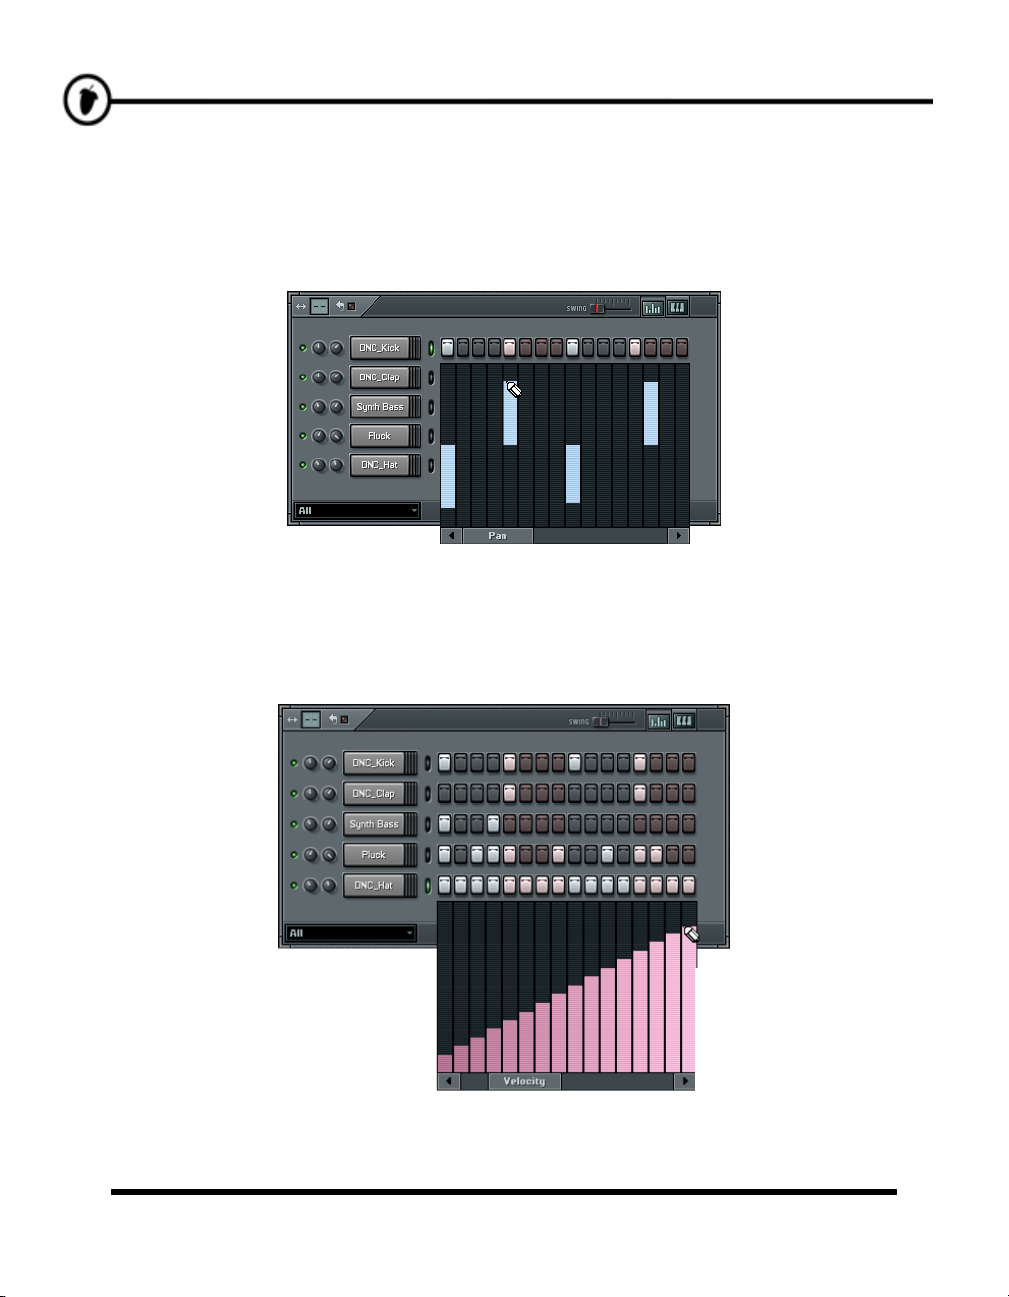
3. Panning the Kick Drum. Try setting the pan effect as shown below for GettingStarted1.flp. The
pan graph centers in the middle. You can set pan values by clicking inside the bar for each note at the
desired level. After you have set up the view shown below, you should hear the kick drum flipping
back and forth from one speaker to the other. This sounds really cool if you combine it with the 3-dot
echo you added in the previous section…
4. Try the Velocity. You can get instruments to fade in and out over a pattern using the velocity graph.
Try this effect on a channel as shown below. This graph does not center in the middle like pan, but
goes from zero to maximum, with zero at the bottom. Volume slides like this can sound extra cool
when combined with Cutoff and Resonance slides. (Hint: to make a smooth line in the graph editor,
right-click on the first bar, then drag the mouse to the right to set the values of all the bars at once.)
19
Page 20

y
TTwweeaakkiinngg tthhee NNootteess
5. Play with the Other Effects. Try to get a feel for the other effects on the graph editor. Filter Cut and
Filter Res can be used to add or subtract values to the main cutoff and resonance wheels in the INS
panel of the channel settings dialog box. (See the "Tweaking the Channels" section.) Pitch makes the
sample higher or lower, like the pitch wheel in the channel settings dialog box. Shift can be used to
push a dot closer to the dot beside it (you more musical types can use this to groove a beat).
6. Check out the Melody. When you play GettingStarted1.flp, that synth melody you hear is being
played on the Ins_Round channel. To see the notes of the melody, click the Keyboard Editor button
with the Ins_Round channel selected as shown below. What you see now is a vertical piano keyboard
for each dot on the screen. Hopefully, you have some keyboard skills. (If not, it's time for some
lessons!) You can change each note by left-clicking one of the buttons on the keyboard. Right-click
turns the note off. When the loop is not playing, clicking a note will also play that note.
Ke
board
Editor Button
Channel
Selector
Keyboard
Editor
7. Change the Melody. Now go ahead and change the melody! You can make it sound how you want,
but below is a suggestion for those who like a note of tension in their music (you can find this melody
in GettingStarted2.flp). You can use the keyboard editor on any sample - synth, bass, guitar, even
drums. Have fun!
20
Page 21
TTwweeaakkiinngg tthhee NNootteess
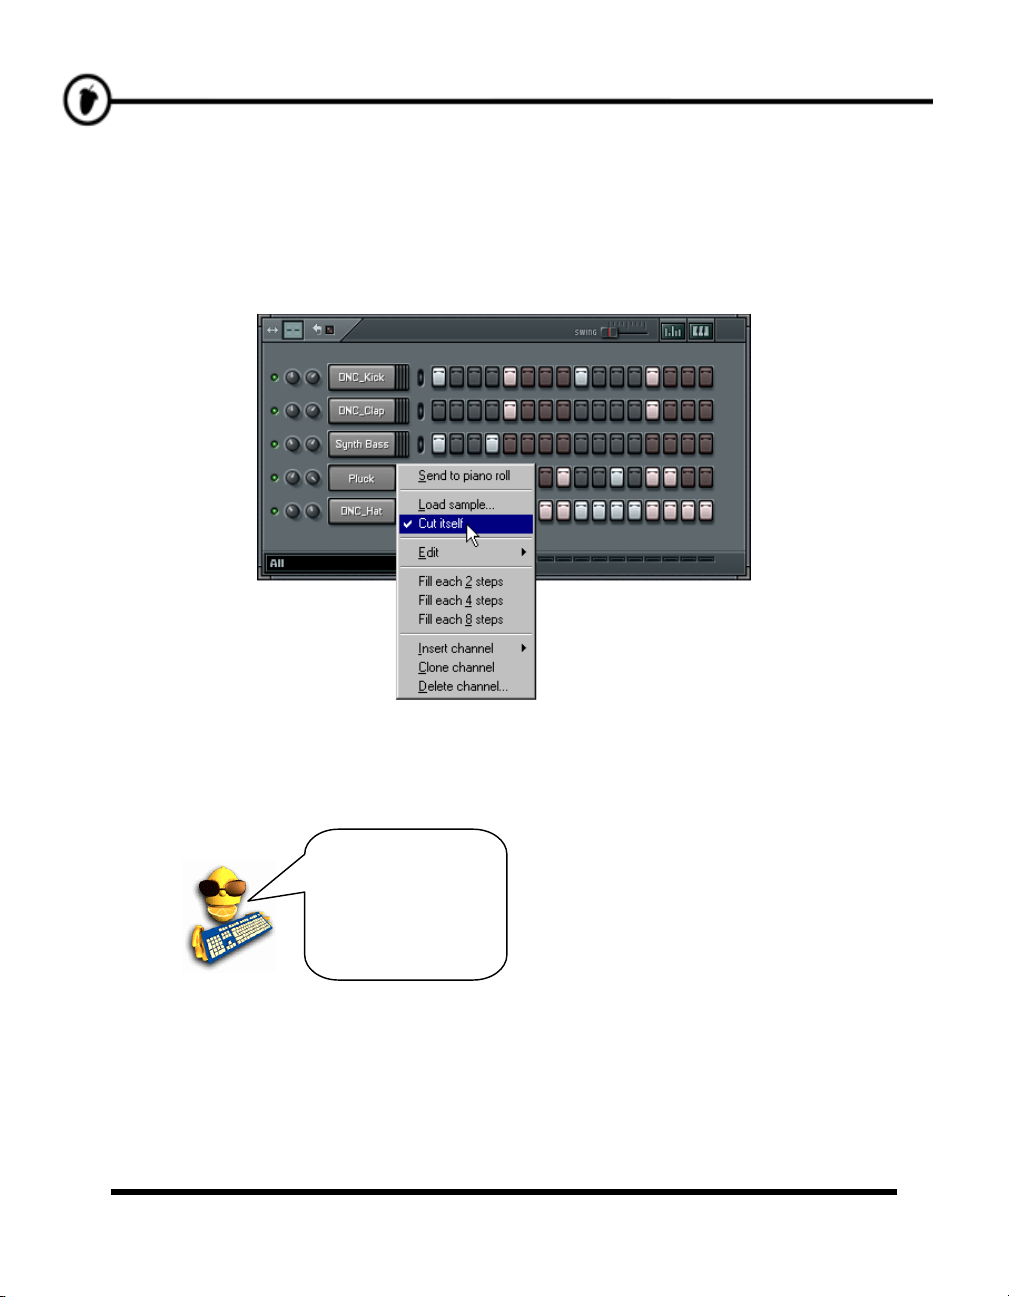
8. Super Important Tip. When you want to make a melody out of long samples, you often need to set it
up so that each note cuts off the previous one. You can do this most easily by right-clicking the
Channel Name in the Step Sequencer and selecting Cut Itself from the pop up menu. Notice that the
Ins_Round channel has this option selected. Try deselecting it, but be warned - the results can be
nasty!
Big News! You
can now undo the
last tweak! Do it
from the Edit Menu
or with ctrl-z.
21
Page 22
y
p
ars
TTHHEE PPLLAAYYLLIISSTT ((ffrroomm PPaatttteerrnnss ttoo SSoonnggss))
Now you've seen the basics of what can be done with sampled sounds in a single pattern. In this section
we'll show you how to program more than one pattern and link them together into a longer loop. Load up
GettingStarted2.flp and read on…
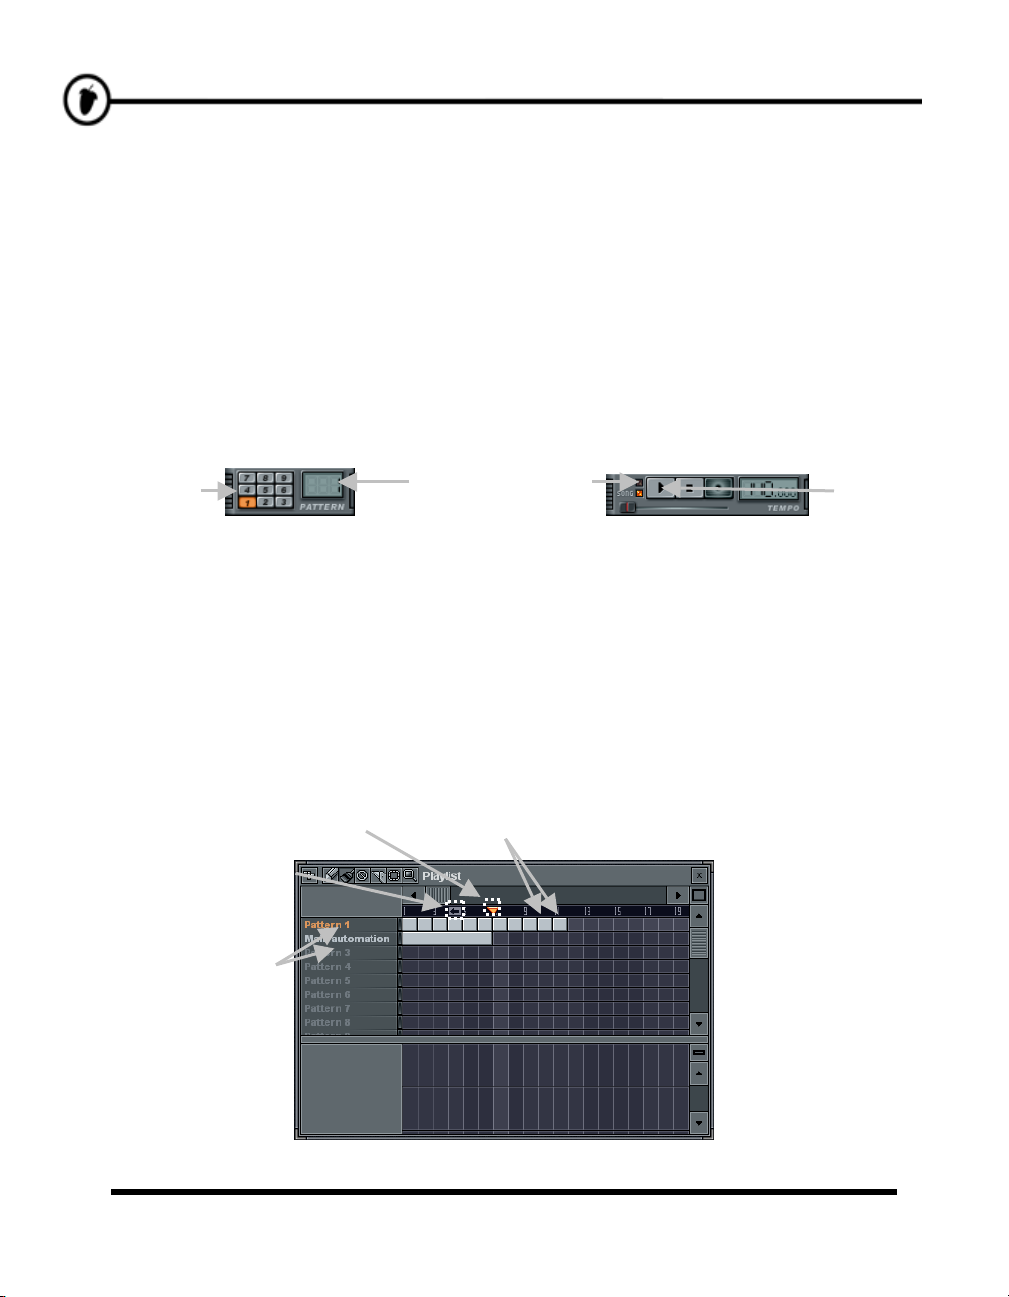
1. Check out the Pattern Selector. FL Studio lets you create hundreds of different patterns. In the
previous sections, we've just been working with pattern 1, but we can access the other patterns either
by changing the number in the Pattern Number box. Use your mouse to drag in the Pattern Selector
or use numeric ‘1’ till ‘9’ or ‘+’ and ‘-‘). You’ll find these controls somewhere on the tool bar at the
top of the main FL Studio window.
QuickPad
(sometimes
disabled)
2. Check out the Playlist. This screen can be opened using the button under the hint bar, or by hitting
F5, or by right-clicking the song/pat button on the main screen (see above). Try it and you should get
a new window that looks something like below. This window is somewhat similar to the pattern view,
except that the dots operate on whole patterns rather than single channels, and the bar lengths here vary
to reflect the pattern length. Notice that GettingStarted2.flp consists of pattern 1 repeated 11 times
and pattern 2 once at the beginning. Make sure Song is selected and press Play. You should see the
Play Indicator on the playlist start to move, and hear the patterns it is playing. When it comes to the
end of the dots, it jumps back to the Loop Point and continues playing. Try moving the loop point
(right-click where you want it to go) and see what happens. (If you press the Pat button, FL Studio will
just repeatedly play the current pattern in the Step Sequencer.)
Loo
Play Indicator
Point
Pattern
Selector
Song/Pat
Button
B
Pla
Indicator
22
Patterns
(right-click to
rename)
Page 23
TThhee PPllaayylliisstt
3. What's the Point? Now you can assemble a number of patterns together to make a song. This lets you
alter melodies, change beats, insert fills, and reuse some of the early parts of the song later. Many
composers use a separate block of patterns for drums, bass, lead, etc. so they can work on them
separately at first, and then piece the song together in the Playlist.
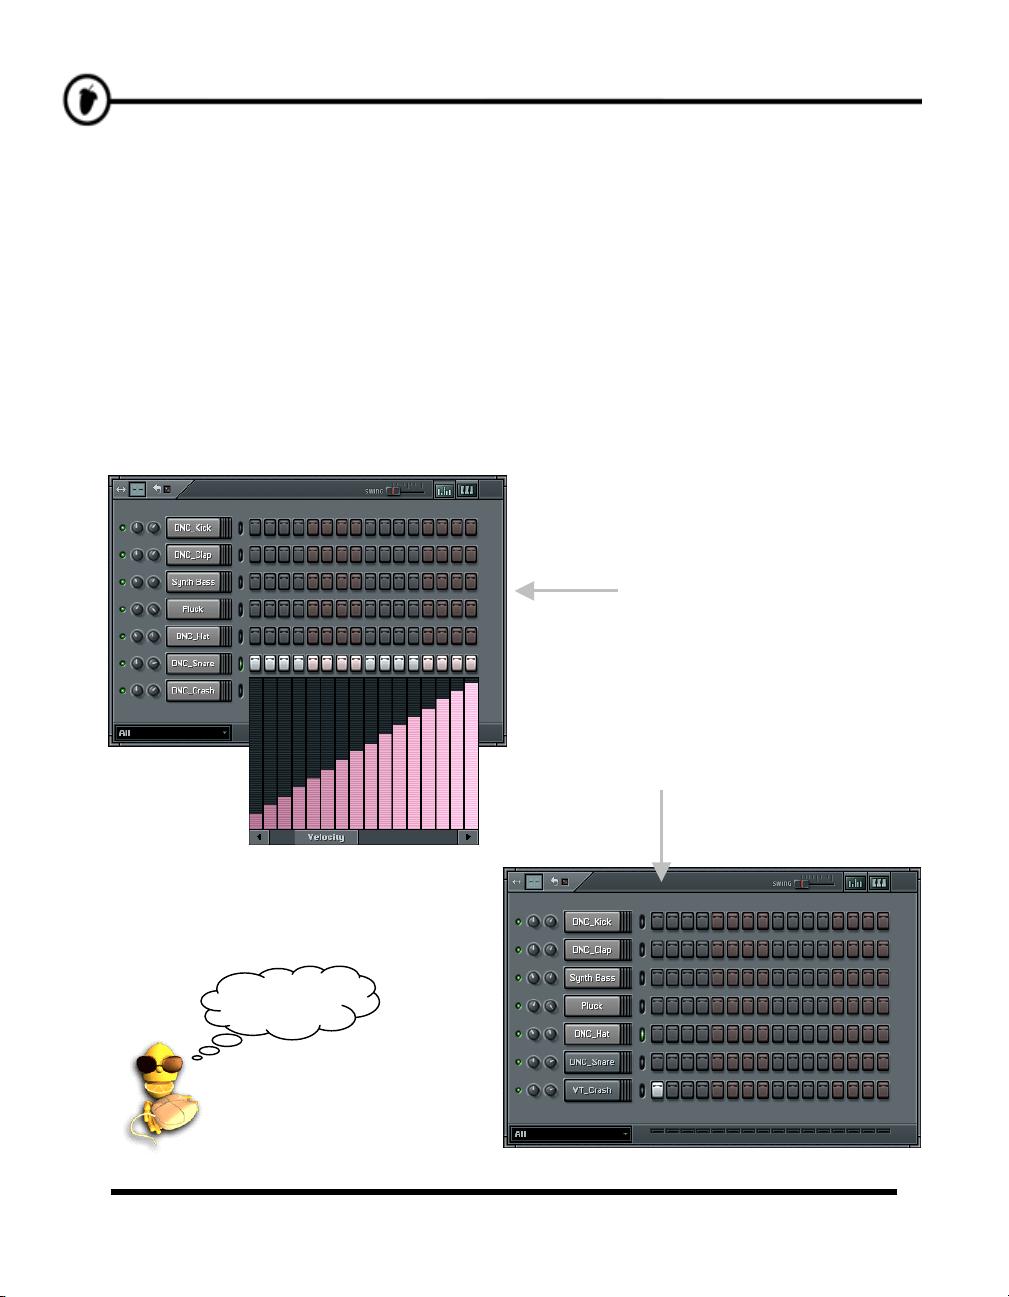
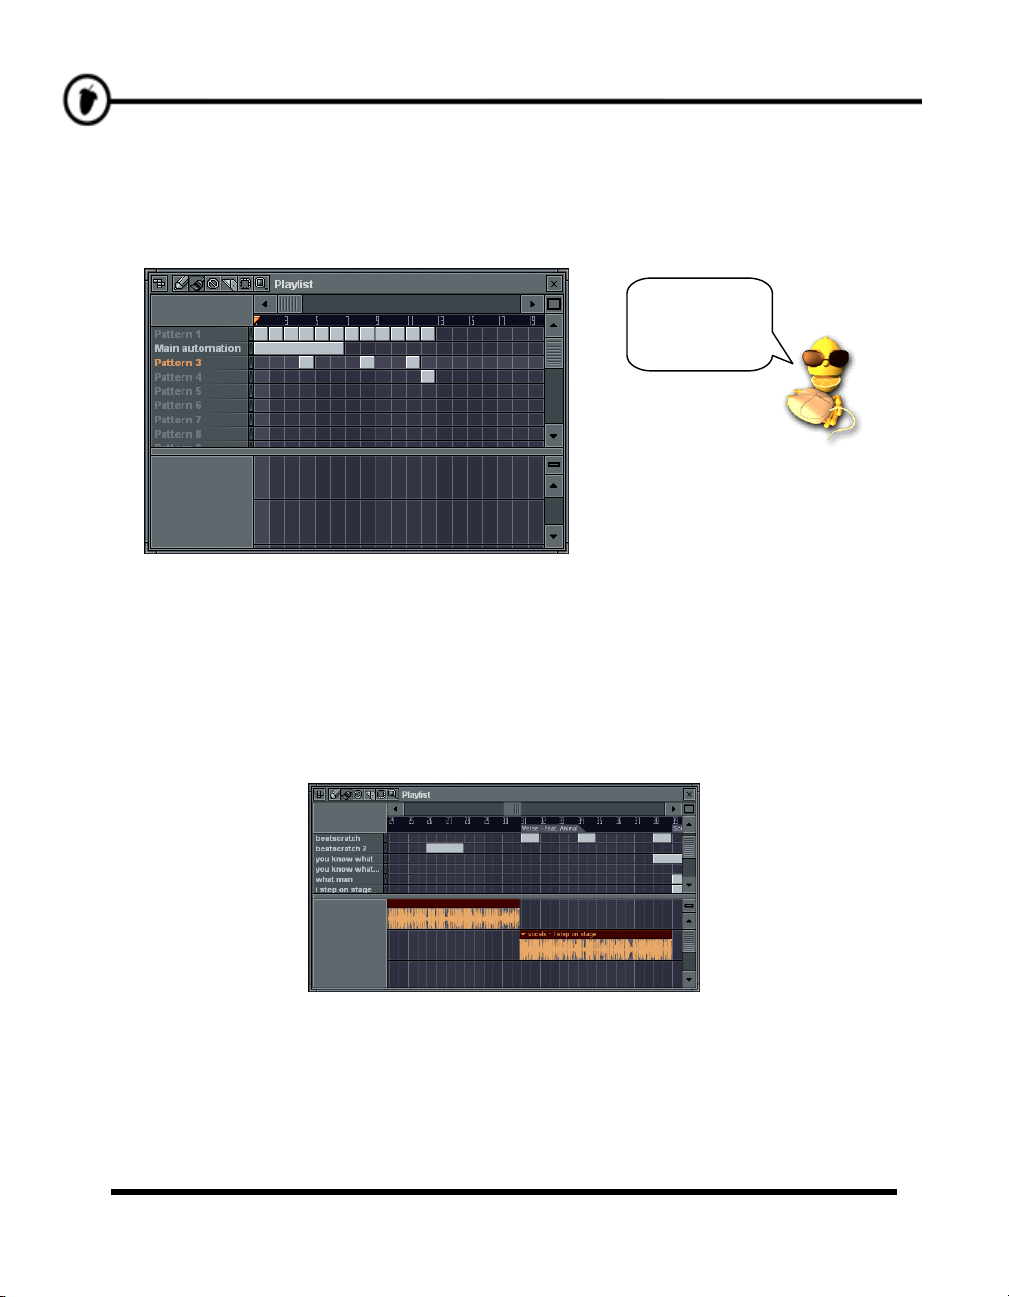
4. Add Fill Patterns to GettingStarted2.flp. Here's a simple example. Select pattern 3 using the
Pattern Selector and then lay it out as shown in the first picture below using the DNC_Snare found in
Packs > Dance. Press the Pat button to hear this pattern play. Then repeat and lay out pattern 4 using
the VT_Crash sample found in Packs > Basic >Vintage or DNC_Crash sample found in Packs >
Dance (You will have to add two new channels for this by clicking and dragging from the sample
browser or by using the channel menu.)
Pattern 3
Pattern 4
Big deal…
23
Page 24
TThhee PPllaayylliisstt
5. Using the Fill in the Song.
Yeah, big deal. But now lay out the Playlist as shown below, and hopefully you'll begin to get the
idea. Note that you need one extra dot for Pattern 1 and you need to move the Loop Point to the
second bar (Right-Click to do that.) You can find the finished product in GettingStarted3.flp.
Groovy.
6. What is in Pattern 2? By now you probably checked out pattern 2 and discovered that it seems to be
empty and still appears to be long in the playlist. All will be revealed eventually (but you could
experiment with removing the pattern from the playlist to see what difference it makes…). We’ll talk
about what pattern 2 does in the section on Live Recording. For now, just enjoy the ride!
7. What is the Empty Area Below? This feature in FL Studio (Producer edition only) – is for audio
tracks and automation envelopes. Audio tracks give you the freedom to see and edit your samples right
in the Playlist. A good example of using audio tracks is the startup project itself. Open NewStuff.flp
and check the audio tracks area:
Each track can hold unlimited number of waves (unlike patterns, where each line is a specific pattern).
Each wave is actually held in an Audio Clip channel (double click a wave to see its properties). To add a
new instance of a wave, just click in an empty place inside the tracks.
Try moving the waves or cutting them with the slice tool. You can find more tutorial projects explaining
how to use them and also plenty of information in the on-line help (focus FL Studio and press F1).
See more info in the chapter Audio Tracks. You can apply automation envelopes (eg. to fade in/out an
audio clip) on top of these audio clips.
24
Page 25
GGEENNEERRAATTOORRSS ((ffrroomm SSaammpplleess ttoo SSyynntthhss))
Up until now we've only been playing with Sample Channels. But FL Studio also supports channels that
contain sounds made in real time by software synthesizers like Wasp, SimSynth Live, and the TS404. To
use the proper terminology, every Channel contains a Generator, which could either be a sample, a
synthesizer plugin, or some other type of sound generator in combination with the effects in the Channel
Settings dialog. The combination of these Generators with the sample channels gives FL Studio a major
power boost!
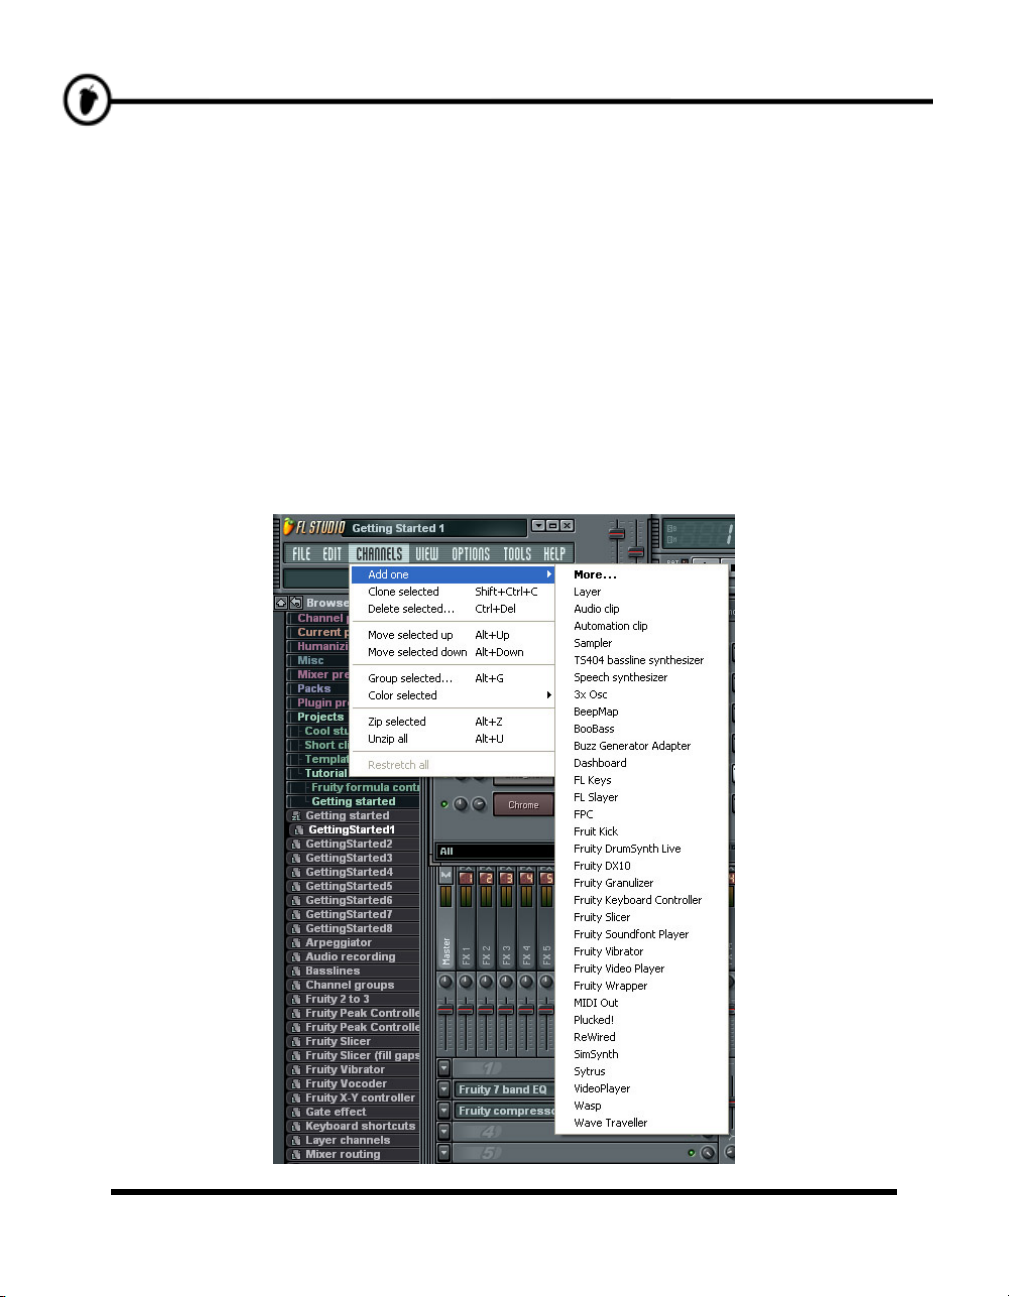
1. Adding a Synthesizer Channel. To add a channel containing a synthesizer Generator, click on
Channels > Add One as shown below and select one of the many available like TS404, 3xOsc,
BeepMap, BooBass, Buzz Generator Adapter
Fruity DrumSynth Live, Fruity DX10, Fruity SoundFont Player, Plucked!, SimSynth, Wasp and
many others (the list of generators is growing with each release!).
(not included in boxed editions), FPC, Fruit Kick,
25
Page 26
GGeenneerraattoorrss
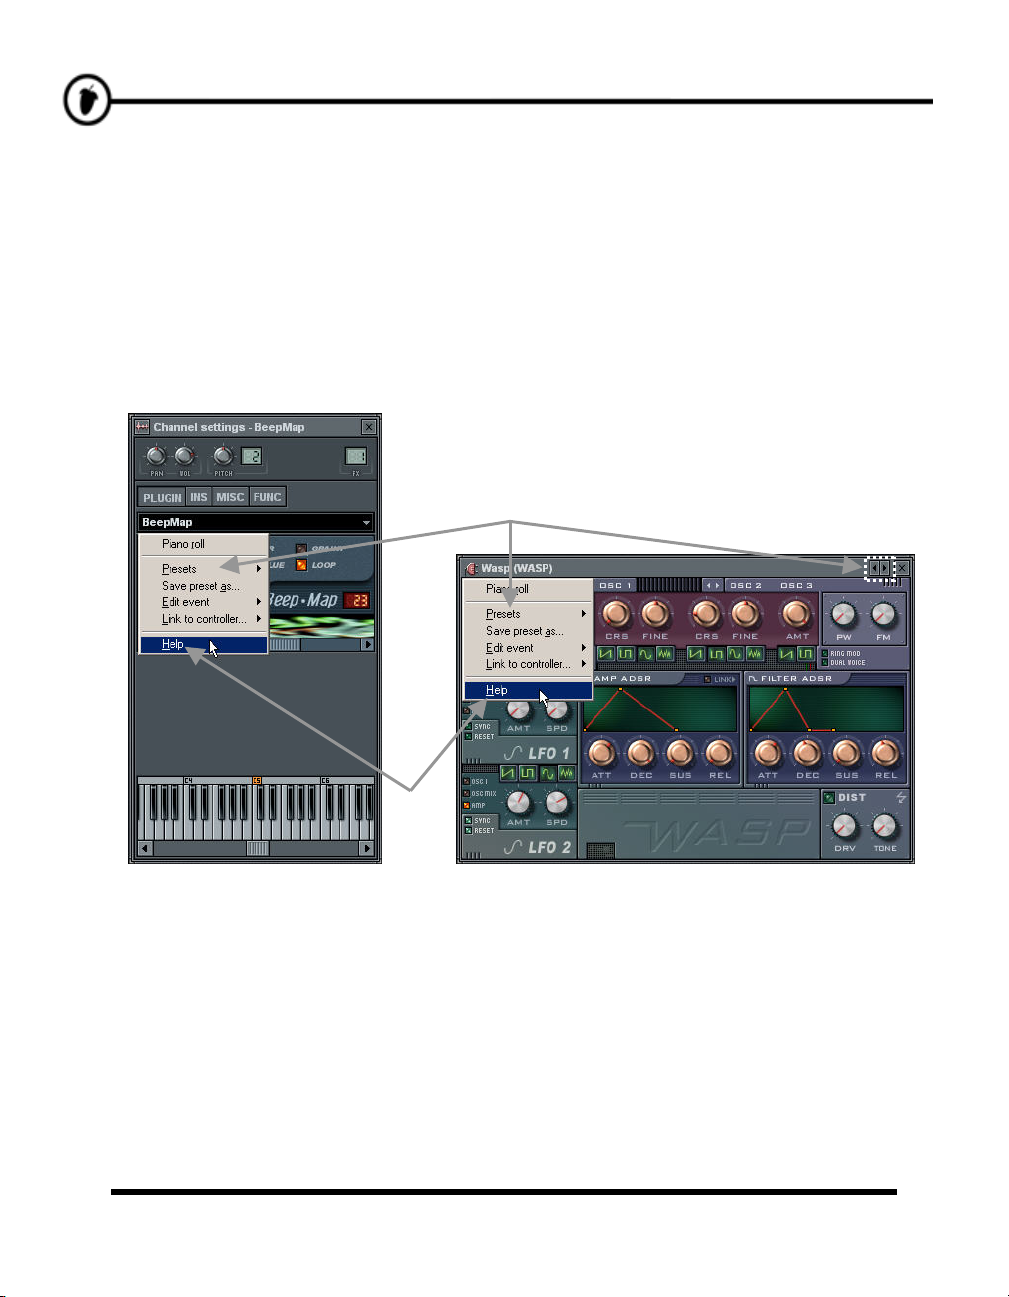
2. What to Expect. The new channel will appear in the Step Sequencer and the Generator's
Configuration Screen will appear (except for the TS404). If the Configuration Screen is small, it will
appear inside a Channel Settings window (3xOsc, BeepMap, Fruit Kick, Fruity SoundFont Player,
Plucked!,…). Otherwise, it will appear as a standalone window (BooBass, Buzz Generator, FPC,
Fruity DrumSynth Live, Fruity DX10, SimSynth Live, Wasp, …).
3. How Do I Use 'Em? We will review the TS404 in detail in the next section, and much of what you
learn there will be applicable to the other synths. But it's important for you to know that most of these
Generators have their own help available. If the Configuration Screen for the Generator is embedded
in a Channel Settings window, click on the channel name. If it's in a standalone window, click on the
corner of the dialog.
Preset Sounds
Help
4. Preset Sounds. Many of the synthesizer generators (BeepMap, Buzz Generator, Fruit Kick, Fruity
DrumSynth Live, Fruity DX10, SimSynth Live, Wasp,…) have preset sounds available. In most cases,
you can get to them from the Presets section of the menu shown above, or by clicking on the little
arrows in the top right (see picture above).
5. The Channel Settings. All these generators have a Channel Settings window that you get by clicking
on the Channel Name, just like for Sample Generator Channels. But since each generator is different,
they may not all have the same panels as the Sample Generators do. For instance, the TS404 has the
SMP, MISC, and FUNC panels, while the BeepMap has INS, MISC, and FUNC.
26
Page 27

GGeenneerraattoorrss
6. What do these Generators Do? OK, here's the skinny on some of the Generator. For more info on
the TS404, see the next chapter. For more info on everything else, see the On-Line Help.
Please note that some of these Generators need to be purchased additionally. If you haven’t bought
them, you’ll only have the demo version of the Generator that will allow you to listen to its sounds, but
these channels will not be saved in your FL Studio project.
a. TS404. We get into this in more detail later, but it's a techno machine for creating synth lines and
bass lines, which sound similar to the classic TB-303 machine.
b. 3xOsc. This is a very plain generator that allows you to mix three Oscillators, each of which
generates a tone. The sounds on their own are not exciting, but they are good raw material to be
combined with INS panel effects and other plugin effects (explained in a later chapter).
c. BeepMap. This is a weird one. Takes a bitmap image file and turns it into a sound, with strange
and wonderful results. This is the same kind of synth that Aphex Twin used to embed an image of
himself in a track that shows up when the track is put through a spectrum analyzer.
d. BooBass. A handy little bass generator from the guy who brought you SimSynth.
27
Page 28

GGeenneerraattoorrss
e. Buzz Generator Adapter. Buzz has a bunch of cool, buzzing synth sounds that you can pick
from (Rectal Anarchy is shown below). A few “Buzz Machines” come free with FL Studio, but
you can find lots more on line at
For licensing purposes, this generator is not included in the boxed versions of our software.
f. Dashboard. Allows you to create your own MIDI and Internal Controller interfaces (check the
on-line help to see what internal controllers are about).
g. Fruit Kick. A kick drum generator.
www.BuzzMachines.com.
28
Page 29

GGeenneerraattoorrss
h. Fruity DrumSynth Live. A Drum Synthesizer plugin that lets you define drum hits and control
them via a keyboard.
i. Fruity DX10. An 8-voice polyphonic (that means 8 notes at once) FM Synthesizer. This one’s
designed to give high quality sounds without eating up too much CPU.
j. Fruity Granulizer. This one helps you get cool, choppy sounds out of your samples, like when
the “Funk Soul Bruvva” sample slows down in Fatboy Slim’s “Rockefeller Skank”.
29
Page 30

GGeenneerraattoorrss
k. Fruity Slicer. This one lets you slice up a beat and then play back individual drum hits using the
keyboard. You can make cool breaks really quickly with this tool. (More on how this works in the
BeatSlicer section below.)
l. Fruity SoundFont Player. An advanced sample generator that works with the SoundFont2
collection.
m. Fruity Vibrator. You can add vibes to your songs using any Force Feedback (.ffe) file. These
files can be created using Microsoft Force Editor tool in the DirectX Developer SDK.
30
Page 31

GGeenneerraattoorrss
n. Plucked! A synthesizer that specializes in stringed instrument sounds like guitars, harps,
mandolins, etc.
o. SimSynth Live. A fully functional digital synthesizer. Use this baby to create phat-sounding
analog sounds for your dance and trance tracks.
p. Wasp. Another full digital synthesizer. This one is better for creating fast, buzzing, techno-
oriented sounds (hence the name).
31
Page 32

GGeenneerraattoorrss
q. WaveTraveller. Create realistic scratches with a full control over the smallest details!
r. Layer. This isn’t really a Generator, but it’s cool. It lets you create a master channel to control a
bunch of other channels at once.
s. MIDI Out. This one isn’t a Generator either. It lets you send a MIDI controller signal to an
external (or internal) MIDI device.
t. FL Keys. FL Keys is a realistic piano simulator with optimized CPU and memory usage.
With the help of several additional modules included in FL Studio, FL Keys can also operate as
Rhodes & Roto Organ (note: additional modules might be available from
www.flstudio.com).
32
Page 33

GGeenneerraattoorrss
u. FL Slayer. FL Slayer is a realistic electric guitar simulation originally developed by reFX. It uses
a hybrid synthesis similar to physical modeling. The simulator is equipped with a high quality amp
section and effects rack enabling you to recreate the complete electric guitar sound without
additional plugins.
v. Sytrus. Sytrus is a versatile synthesizer combining Frequency Modulation (FM), Ring Modulation
(RM), plucked string modeling and subtracting synthesis, and featuring a powerful envelope
editor. The synth includes a powerful editable unison mode and a comprehensive effects section.
33
Page 34

GGeenneerraattoorrss
w. Fruity Keyboard Controller. Fruity Keyboard Controller is a very useful internal controller
plugin, which allows you to map notes and their velocity to any property that can be automated
within FL Studio & the loaded plugins.
This plugin allows you to quickly implement Pattern Controlled Filtering (PCF), or accurate
semitone-to-semitone slides for plugins, which do not support natively such features (VSTi and
DXi plugins).
x. Speech Synthesizer . This is a wizard to add synthesized speech lines to your song (see p.39).
y. Fruity Pad Controller. Hook up any midi controller or use the pianoroll or step-sequencer to
trigger our multi velocity layered drum machine to create realistic and convincing drums.
z. VideoPlayer. Syncs video to the song position for perfect video scoring.
7. Even More Generators! With the Fruity Wrapper you can now add any VSTi or DXi plugin
synthesizer you download or buy. From the Channels menu select Add One > More. This will
produce a list of the available plugins as shown below. You can select any of the plugins under the
Fruity Generator Plugins heading by double-clicking them. The “F” in the box beside the plugin
name marks it as a “Favorite” and will make it appear directly in the Add One menu.
34
Page 35

GGeenneerraattoorrss
8. VST and DXi Plugins. You’ll notice the Fruity Wrapper in the above list. This generator is only to
be used for VST and DXi synth plugins, which are listed under the obvious headings in the above
picture. But you don’t need to open it on its own – if you double-click on one of the VST Plugins, it
will automatically open a Fruity Wrapper for you. A VST plugin synth, confusingly called the mda
DX10, is also available as freeware.
Some of the additional Fruity Generators come in Fruity / VSTi / DXi version. This way these
generators can also be used natively in other music host programs.
Please check our website at
http://www.flstudio.com/ for more information about this issue.
DX10
9. The Other VST Plugins. I know what you’re thinking – what about all the other VST Plugins in the
list? VST plugins are either synthesizers or effects (FX), and most of the ones you have to start with
are FX (we explain how to use the FX in the Mixing & Effects section below). Unfortunately, there is
just no reliable way for FL Studio to tell the difference between FX and synth plugins, so you’ll just
have to remember which is which. If you try to open a VST Plugin and all you get is an error message
and the empty wrapper shown below, then it was probably an FX plugin.
DreamStation is
an example of a
DXi plugin
35
Page 36

GGeenneerraattoorrss
10. Do I have to register? Some of these products are made by FL Studio partners, so yes in some cases
you do have to register them to unlock their full capabilities. Go to
information on where to send your hard-earned cash.
11. Where Can I Get More? There are literally hundreds of synth plugins out there to download. Some
of them are free, and some you have to pay for. Search the web and
deals. A place you should definitely bookmark is
plugin you could possibly want (new VST Plugins should go in the FLStudio4 > Plugins > VST
directory on your hard drive).
Don't deny yourself, dude! You need all
these generators. Save up your
squeegee money and buy them ASAP.
http://www.flstudio.com/ for more
http://www.flstudio.com/ for good
www.kvr-vst.com - a huge sites with every VST
36
Page 37

+
GGeenneerraattoorrss
12. The Arpeggiator. Now that we've introduced the Synth generators, we can finally tell you what the
Arpeggiator section in the Channel Settings window is for. Open one of the synth channels
(SimSynth Live, for instance) and go to the FUNC panel of the channel settings box. Now click the
up arrow and select a chord. Now go to a new pattern and place a single SimSynth note and press
play. Instead of a single note, you get a repeating arpeggio. Cool, huh? Read more about this in the
on-line help.
Direction of
Arpeggio
Speed,
Duration, etc.
Octave Range
and Repeat
Chord Selection
me… me… me… ∗
∗ me… me… me… +
37
Page 38

GGeenneerraattoorrss
13. Static Synthesizer Sounds. FL Studio also contains static support for the standalone version of
SimSynth and a drum sound synthesizer named DrumSynth. If you own either of these pieces of
software, FL Studio can read their output files into a normal Sample Channel. It is not as flexible as a
real synthesizer in FL Studio, but this way you can get the phat sounds of SimSynth without the huge
processing load of a real-time synth. DrumSynth is free from
SimSynth at www.flstudio.com. You should find some presets for both synths in the Browser.
www.mda-vst.com and you can get
SimSynth
38
DrumSynth
Page 39

GGeenneerraattoorrss
14. Speech! Yep, you read that right. You can have a conversation with FL Studio using the built in
support for speech synthesis. The easiest way to access this feature is to look under “speech” in the
sample browser, and drag one of the files there onto the step sequencer. You’ll get a dialog that looks
like the one below. All you have to do is replace the text, choose a personality, style, rate (speed), and
pitch. Click the “listen” button to hear what it will sound like. When you’re done, press the check mark
and a sampler channel will be added. You can also drag a speech file into a Granulizer, Fruity
Scratcher, or Fruity Slicer channel. Have fun.
You might have to spell some words funny to make it sound
ok… Also, you can make it sing by putting the number of
semitones you want the pitch to rise on each word in
brackets after it. Try typing “all your(2) base(3) are(2)
beelong to us” in the dialog above (use a monotone style.)
39
Page 40

IINNTTRROODDUUCCIINNGG TTHHEE TTSS440044
The TS404 was originally a standalone synthesizer designed to perform like the classic TB303 bass-line
sequencer that gives modern techno it's unique sound. The 404 is not intended to be an exact replica of that
classic machine, but it will still lend a unique techno flavor to your compositions.
1. Add a TS404 Channel. First of all, load up GettingStarted1.flp. Then add a TS404 channel as
shown in the previous section.
2. Copy the Notes from Ins_Round. That's right, we're going to replace the Ins_Round sample with the
TS404. First, use the keyboard editor to program the TS404 notes as shown, then click on the
Channel Mute light to turn off the Ins_Round channel and play the result. You may want to turn up
the TS404 Channel a little bit too.
Mute This
Channel
Turn Up
the TS404
Umm… I liked it
better before…
40
Add the
Notes
Page 41

IInnttrroodduucciinngg tthhee TTSS440044
3. Not Too Impressive Yet! OK, so that doesn't sound too good. That's because you're using the TS404
default settings. Click on the channel name to bring up the TS404 Channel Settings Dialog as shown
below, click the TS404 tab and tweak the controls however you want (one possibility is shown below,
with some of the changes pointed out). Our own version can be found in GettingStarted4.flp
(actually, you may have to tweak your own version a bit more than what we’ve shown here to make it
sound exactly like GettingStarted4.flp).
Click the
TS404 Tab
Change the
That's a little
better…
FX Track
explain this later)
(We'll
Change the
Oscillator
Shapes
Make the Notes
Decay Slower
Make the Sound
Trashier
Last Thing to Do:
Turn these wheels
slowly while the song
plays…
You're a Techno god.
41
Page 42

p
(
2
,
IInnttrroodduucciinngg tthhee TTSS440044
4. Understanding the Controls. Like with the other channel settings, this stuff is explained further in
the on-line manual. But for now, here's a brief overview of what the main controls do. There are also
lots of other interesting controls you can get to by clicking the MISC, FUNC, and SMP tabs. Have fun,
and try to get a feel for it…
The oscillators: You
can have two slightly
different sounds playing
at once. Click on the
little pictures for different
waveforms. Set the
octave by turning the
CRS wheel.
The Envelope: Attack,
decay, release, sustain,
etc. (Check out the little
icture!)
The Filters: Cutoff and
Resonance. Try the
buttons too
Distortion: Turn up both
wheels for a nastier
sound.
Lo1
etc).
Oscillator mixing: Turn
the MIX wheel to hear
more or less of oscillator
1 and 2.
LFO: Low frequency
oscillation. This function
slowly turns a parameter
such as the CUToff up
and down. Try turning
up the amount (AMT)
and the speed (SPD).
Then try playing with the
buttons to make the
RESonance, tuning
(OSC) and pitch width
(PW) oscillate.
42
Page 43

IInnttrroodduucciinngg tthhee TTSS440044
5. Pitch-bending the 404. One last thing. You can bend the notes on the TS404 to make some really
cool synth lines. The TS404 also has a Pitch Bend Line at the top of its keyboard as most of the other
synths (but not all of them support it!). If you click on the Pitch Bend Line, the current note will slide
into the next one. Go back to GettingStarted4.flp and try setting up the keyboard as shown below.
The finished result is in GettingStarted5.flp. Actually, as of version 3.5, this sort of melody is better
done using the Piano Roll. More on that in a future chapter…
New Notes
Pitch Bend
Line
Can't click off the pitch-bend line?
Try right and left clicking. One of em's
gotta work!
43
Page 44

MMIIXXIINNGG && EEFFFFEECCTTSS
IMPORTANT REMARK: This guide is a general Getting Started guide for all existing FL Studio Editions. Some features however,
are not available in some editions. The FL Studio Fruityloops Edition doesn’t have the Track Adjustments & Mixer sliders
capabilities. Please check our site
www.flstudio.com for upgrade conditions.
One great addition to FL Studio Producer Edition is the new Mixer window (previously called Effects
Tracks window). You can mix up more than 69 tracks and even make links between them to create
complex mixing chains… But wait, let’s start from the very beginning.
The Mixer window’s best feature is that you can add cool effects to your channels. The effects you can add
range from simple things like a volume control to more advanced effects such as chorus, reverb, phaser,
delay, flange, and EQ among others (you can also add generators, notebooks, controllers, monitors and all
kinds of other goodies here too). Remember when we told you to change the FX Track in the TS404
Channel Settings? Well now we're gonna explain what that was all about.
1. Open the Mixer Window. Guess what? The GettingStarted Loops were using Mixer Effects all
along! Load up one of them and bring up the Mixer screen by pressing F9 or by going to View >
Mixer. You'll get a window like the one below…
FX Tracks
FX Plugins
Track
Adjustments
2. What You're Lookin' At. Along the top are the FX Tracks. You have one Master Track, 64
Regular Tracks, and 4 Send Tracks. The wheel with the slider below each track is their volume and
stereo balance control (just like on a real mixer pult!).
The insert tracks are displayed 16 at once, but you can switch which 16 tracks you see (click and
A/B/C/D switches at the top of the window). The Master Track is selected by default. Each track has
room for eight FX Plugins. The Getting Started Loops use the Fruity 7 Band EQ plugin in the Master
Track, and the Fruity Delay and Fruity Reverb plugins in Track 2. Try changing the track to find the
other plugins.
44
Page 45

MMiixxiinngg && EEffffeeccttss
The Track Adjustments panels show some properties each track has. The volume and stereo balance
settings are the same like the one below each track (the other ones are added for convenience, as you
see them all, no matter the selected track). The other things on the track adjustments panel are
equalizer, stereo “width” knob and a decibel meter (shows the output volume of the track).
3. Turn Plugins On and Off / Mixing Wet and Dry. Click on the green LED next to each plugin slot to
turn it on and off. Try this with the loop running to hear the difference. You can also tweak the knob
next to the LED to mix a “dry” (without effect) and “wet” (with the effect) sound.
4. Select Plugins. If you want to add new plugins, click on the arrow where you want to add the plugin
and then choose from the Favorites List or choose Select to choose from the entire list and configure
your favorites.
Click
Here
45
Page 46

g
MMiixxiinngg && EEffffeeccttss
5. Tweak the Plugins. Right-click the plugin to open and close its Plugin Settings screen. Some plugins
have a plain interface like the Fruity Fast Dist shown below. Others have fancier looking controls.
Most plugins come with their own help as shown below, so we won't go into how to use the controls
here. But for now, why not play with them to see what they do?
Left OR Ri
Click This Bar
ht
6. Sending Sound to the Plugins. Now we can finally explain what the box in the top right of the
Channel Settings does. Any effects placed in the Master FX Track will be applied to all the sounds in
the song. But effects in the numbered Regular FX Tracks will only be applied to the Samples and
Synths, which have selected that FX Track in their Channel Settings Dialog. So, in
GettingStarted5.flp, the Ins_Round and TS404 Channels are sending their sound to FX Track 2,
where Fruity Reverb and Delay will be applied. The other channels are sending to FX Track 1
(default), which contains no effects.
Sending to
FX Track 2
46
Effects
have
presets
too…
Click
Here for
Help
Page 47

MMiixxiinngg && EEffffeeccttss
7. What are the Send Tracks For? There are 4 special Send Tracks that take their input from other FX
Tracks, rather than from Generator Channels. Suppose you want to put the same Fruity Reverb on
Guitar and Drums, but you want to add Fruity Delay to the guitar and EQ to the drums. Easy. Send
the drums to Regular FX Track 2 where you put the EQ. Send the guitar to Regular FX Track 3 where
you put the Fruity Delay. Then put the Reverb in Send Track 1 and turn the Send 1 wheel on Regular
FX Tracks 2 and 3 to send the output of these tracks to Send Track 1. Now you have the same reverb
applied to both guitar and drums, but you only had to use a single reverb plugin.
The send wheels are placed in the Tracks Adjustments panel for each track.
This FX Track
Sends its Output
to Send Track 2
8. Changing Plugins Order. The order in which you add effects plugins has a huge impact on the way
the final output sounds. Plugins are like guitar stomp boxes. On each FX track, the first plugin in the
list is applied first, and then the output of that plugin is fed to the second, and so on. To make it easier
to experiment with effects order, FL Studio has a simple function to move an effect up or down in the
effects chain. It's on the effects menu shown below (Move Up and Move Down.)
47
Page 48

MMiixxiinngg && EEffffeeccttss
9. What do the Plugins Do? Like we mentioned, you can get on-line help for all of the FL Studio
Plugins, but here's a quick rundown on what they all do…
Buzz Effect Adapter. This adapter lets you load in any Buzz Machine effect. FL Studio comes with a
bunch installed already, but you can get more at
www.BuzzMachines.com.
Fruity 7 Band EQ. Equalizes your sound (just like on your Dad's stereo at home.)
Fruity Balance. Lets you change the pan and volume while live recording.
Fruity Bass Boost. Boost that bass for a super-phat sound.
Fruity Big Clock. Pops up a huge timer to tell you how long the song’s been playing.
Fruity Blood Overdrive. Use this to distort channels.
Fruity Center. Use for real time DC offset removal.
Fruity Chorus. Adds a smooth chorus effect.
Fruity Compressor. Use this to flatten out the dynamics of the sound. Apparently Fatboy Slim uses
massive compression to get his drums to sound the way they do…
Fruity DB Meter. Pops up a big levels meter.
Fruity Delay. Use for a true echo (not just repeated samples like the channel echo).
Fruity Delay 2. The next generation Fruity Delay. Adds panning and other effects.
Fruity Fast LP. Use for low pass filtering that's CPU friendly (cutoff and resonance).
Fruity Fast Dist. A great little distortion effect that uses almost no CPU.
Fruity Filter. More cutoff and resonance filtering that’s not so CPU friendly.
Fruity Flanger. If you have to ask, you haven't heard it yet. Real popular among guitar players, this
LFO-type effect can add a cool feel to any song.
Fruity Flangus. A very useful effect, which allows you to enrich the stereo panorama of your
instruments, add high quality chorus and simulate unison synthesis.
Fruity Formula Controller. This is a fancy internal controller that you can link to other wheels and
sliders inside FL Studio. Wait until the Live Recording section for more info...
48
Page 49

MMiixxiinngg && EEffffeeccttss
Fruity Free Filter. Yet another filter - a classical 12db instead of a state variable filter like the Fruity
Filter (whatever the hell that means.)
Fruity HTML Notebook. Add some notes to your loop in html format, or add your own web page!
Fruity LSD. Enables FL Studio to access the DirectMusic Software Synthesizer bundled with DirectX
8. Note that you must have DirectX 8.0 or later installed on your machine. The LSD acts like an
external MIDI device, which can be controlled from a MIDI Out Generator Channel (see section on
Generators above).
Fruity Mute 2. Use this to mute (silence) channels while live recording.
Fruity Notebook. Keep your song notes here! This is the plugin used in the Tutorial Loops that came
with your package.
Fruity PanOMatic. Useful for panning the sound back and forth smoothly.
Fruity Parametric EQ. A parametric equalizer built for FL Studio. Regular equalizers only let you set
the levels for preset frequency bands, but with a parametric equalizer you choose the frequency bands
to equalize.
Fruity Peak Controller. This is another internal controller. More on controllers in the Live Recording
section below.
Fruity Phase Inverter. Use to reverse the stereo phase (left and right).
Fruity Phaser. Like the Flanger, but even cooler.
Fruity Reeverb. Use for a much nicer reverb than you can get on the Channel Settings dialog.
Fruity Scratcher. Load up a sample and scratch the hell out of it. This plugin is actually more like a
generator, since it produces sound on its own rather than modifying a channel.
Fruity Send. Place this plugin between two other plugins to split the signal and send it to one of the
four Send FX channels.
Fruity Soft Clipper. This is a CPU friendly soft limiter filter. It allows you to avoid clipping and
distortion by applying soft compression to the input signal.
Fruity Spectroman. Pops up a spectrum analyzer so you can view the spectral distribution of the
sounds in your track.
Fruity Stereo Enhancer. Adds some really nice stereo separation and other effects.
49
Page 50

MMiixxiinngg && EEffffeeccttss
Fruity Vocoder. An advanced vocoder with a wide range of adjustable parameters and zero latency
(i.e. the vocoded sounds are not “late”). This effect uses quite a lot of CPU with slower machines but
has unique precision and features.
Fruity WaveShaper. Is a wave distortion effect which maps input to output values using flexible
spline-based graph.
Fruity X-Y Controller. Yet another internal controller you’ll learn more about in the Live Recording
section below.
10. Preset Effects. If a plugin has built in presets you can access them through the presets section of the
effects menu as seen above, or by using the little arrows like with the synthesizer plugins. You can
create your own presets by clicking save preset. When you do this, FL Studio saves the positions of all
the plugin controls so that you can get that exact sound back again later. If you save your presets in the
directory FL Studio suggests, then it will appear on the menu under presets.
11. Getting New Plugins. We gave you a great selection of FX Plugins with your FL Studio Package. But
people are always creating new ones, and you can find many of them on the web. Some are free and
some cost money. Surf the web to see what you can find! The on-line reference (press F1 in FL
Studio) contains in-depth step-by-step guides on how to install and use such third party plugins.
12. CPU Considerations. "WOW!! I can use as many plugins as I want?!?" Actually, no you can’t. Each
plugin you use takes up a certain amount of your computers power. Some take more power than others.
The number of plugins you can use before your computer starts grinding and running out of breath
depends directly on your CPU speed (you know, that Megahertz thing) and also somewhat on the
amount of memory you have. There is no formula for how many plugins you can use, but if the sound
starts breaking up after you add a plugin, it’s a good sign that you’ve gone a few plugins too far. Don't
forget about the Send Channels, though. They can help you cut down on the total number of plugins.
Also don’t forget that adjusting the Buffer Length can often solve your CPU problems (see the “What
are You Lookin’ At?” section).
50
Page 51

MMiixxiinngg && EEffffeeccttss
51
Page 52

RREECCOORRDDIINNGG WWIITTHH LLIIVVEE TTWWEEAAKKIINNG
Load up GettingStarted1.flp, open the Channel Settings for Ins_Round, and click on the INS tab. Now
start the loop and watch the cutoff wheel. Hey! It moves while the song is playing! What's up with that?
That, my friend, is what we call Live Recording and it's the key to making your songs come alive…
Click the INS Tab
G
Watch this
Wheel Move!
1. Choose an Automation Pattern. OK, this is important. Finally, we can tell you what Pattern 2 does
in GettingStarted1.flp. It's where the Live Recording data is stored that moves the Ins_Round and
Ins_Square cutoff wheels. The only way to not tie yourself completely in knots over where you stored
your Live Recording data is to always have one pattern where you do your entire Live Recording.
For this song, it happens to be pattern 2. Then you need to place that pattern in the Playlist at the
beginning of the song to play back the live tweaking. As you learn more about what you are doing,
you can break out of this mold, but you need to start simple.
52
Remember to Select the Right
Pattern During Live Recording!
Page 53

RREECCOORRDDIINNGG WWIITTHH LLIIVVEE TTWWEEAAKKIINNGG
2. Record Some Live Tweaking. The easiest thing to do is load up GettingStarted5.flp - the one with
the TS404 in it. Open the Channel Settings Dialog, start the song, and practice playing with the CUT
and RES wheels of the TS404. When you think you've got something groovy, make sure you've
selected pattern 2 (the Main Automation pattern), then press the Record Switch shown below. You
may hear a three-tick countdown first, depending on whether the 321-countdown light is on (see
below). Then start the song and work your magic. The song will play once and then stop. Turn
recording off and press Play. You've just done your first Live Recording session!
Song Mode Count in
Record Switch
3. Set the Buffer Length low. You may have noticed that there is a short delay between your tweaking
and FL Studio's response. That's controlled by the buffer length (hit F10 and select the Audio tab).
The lower you set this slider, the faster FL Studio will respond. But don't set it too low, or the sound
will be choppy (see the "What are You Lookin' At?" section).
4. Important Note. When you've got the Recording Switch on and the loop is playing, moving a wheel
will erase over all the previously recorded tweaks from that point in the song until the end. This can be
frustrating, so often it's best to get the recording approximately the way you want it and then make
further changes in the Event Editor described in the next section.
5. What can be Recorded? Most wheels and sliders are recordable, including those that control Plugins.
But some controls aren't recordable. The quickest way to tell what's recordable is to mouse over a
control and look for the red dots in the Hint Bar. If these dots appear, then you can record that control.
Description
Plugins. You can do live tweaking
recording on most Plugins, but not all of
them. Experiment to find out.
Red Dots
53
Page 54

LemonBoy's Live Tweaking Recording Advice…
* Always, always, always check the pattern selector before you start
recording!!!
* Try to get your song laid out the way you want it before you start live
recording. Once you have events recorded, it is difficult to change the
layout of the playlist in a way that will still sound good.
* Always save a backup copy of your loop before you start any live
recording. That way if you mess things up or change your mind, you can
go back to the clean copy.
* Save your loop frequently during live recording. If you accidentally tweak
something and erase some events, you can always go back to the previous
version.
* Get yourself an External MIDI Controller to make your life easier (See the
section on External Controllers for more info!)
RREECCOORRDDIINNGG WWIITTHH LLIIVVEE TTWWEEAAKKIINNGG
54
Page 55

TTHHEE EEVVEENNTT EEDDIITTOORR
Unless you're a real pro, and you have a buffer length of zero milliseconds, you'll probably find that the live
recordings don't always sound exactly perfect. That's where the event editor comes in. Each time you
move a wheel during a recording session, the new setting is stored as an "event" for that wheel at that
moment in the loop. With the event editor, you have complete control over how the sound is tweaked
during playback.
1. Record Some Live Tweaking on a Particular Wheel. The cutoff on the TS-404, for instance. Let's
assume you already did that in the previous section. If you prefer you can look at the event editor for
the INS Cutoff Wheel in GettingStarted1.flp for either the Ins_Round or Ins_Square sample.
2. Stop FL Studio and Open the Event Editor. Right-click on the wheel you modified, and select Edit
Events from the pop-up menu. The screen you are looking at now is a lot like the Graph Editor
described earlier. One difference is that this graph controls the level of a single wheel or slider at a
particular point in the song. (OK, it's actually more complicated than that. Remember how we told
you to keep all your live recording in a single pattern (Pattern 2) and place this pattern once at the
beginning of a song? If you do that, then the bars in the Event Editor will match the bars in the
Playlist. If you don't do that, you're on your own!) The other main difference is that this graph is used
to set Events (bright vertical lines corresponding to the value of the wheel you are setting) that persist
until the next event.
Edit mode
selection
Play Indicator
Edit menu
Vertical/
Horizontal
Zoom
(click + drag)
Events
(Each sets the level
until the next event)
55
Page 56

TThhee EEvveenntt EEddiittoorr
3. Event Editor Modes. The event editor has several modes, which are explained below.
a. Draw Mode. In this mode, the mouse pointer looks like a pencil
. You can add new single
events by left clicking in the main window. You can also left-click and drag to draw multiple
events, or right-click and drag to draw a line of events.
b. Brush Mode. This mode (
) is very similar to Draw mode, but ignores snap distance the
mouse.
c. Delete Mode. Click on the delete symbol
to change to this mode. You can delete events by
clicking on them, or click and drag to delete a series of events (the events are the bright vertical
lines on the main window.)
d. Smooth Mode. Click on the smoothing (interpolation) symbol
to change to this mode. You
can click and drag to highlight a region. When you let go of the mouse button, the events will be
smoothed out, instead of looking choppy. Try it! You can also turn on Auto-Smoothing from the
edit menu, so that events you draw in Draw Mode are automatically smoothed out.
e. Select Mode. Click on the select symbol
to change to this mode. When you click and drag,
you will see a red region highlighted on the Play Indicator Bar. You can also right-click on the
Play Indicator Bar in any mode to expand the highlighted region. You can cut and zoom to this
region from the Edit Menu.
f. Zoom Mode. The zoom mode -
allows you to select an area in the event editor an
automatically zoom fit to that area.
4. Miscellaneous Facts. Here's some stuff you should know about the Event Editor.
a. Undo. There is a limited form of undo available for the Event Editor. Use CTRL-Z to undo the
last action.
b. Setting the Initial Event. You will notice that after live recording, the wheel you recorded
sometimes doesn't start in a sensible place when you play back the loop. This can be fixed by
turning the wheel to a good start position, and then right clicking the wheel and selecting Init
Events With This Position. This sets the very first event so that the wheel will always start where
you want it.
c. Getting a Feel for It. It takes some practice to master the event editor, and to be able to get a song
to sound exactly the way you want it, but it's definitely worth it. Keep practicing until you get it
right!
56
Page 57

TThhee EEvveenntt EEddiittoorr
d. Live Recording Defeats Static Tweaking. If a wheel has some events recorded on it, you can no
longer just set it anywhere you want and expect it to stay there. You have to go through the Event
Editor or start a new live recording session to change it.
5. Introducing the Event LFO. Earlier on, we explained how to use the LFO (Low Frequency
Oscillation) controls on TS404 channels (it's also available for Sample Channels on the INS panel).
But it's sometimes hard to control exactly how this oscillation is going to fit with the song. That
problem is solved with the Event LFO, which lets you simulate the perfect oscillation inside the event
editor.
6. Using the Event LFO. Open the event editor for some control (perhaps the Channel Settings INS
Panel Cutoff for Ins_Round in GettingStarted1.flp). Make sure you're on the right pattern in the
pattern selector (pattern 2 for GettingStarted1.flp). Now select an area to oscillate using Select Mode
or by right-clicking on the Play Indicator Bar. Now hit ctrl-l or select LFO from the Tools Menu.
This will pop up the LFO Settings window and immediately apply the LFO to the selected area. See
below for an example.
7. Play with the Main LFO Settings. Notice the dialog has three sections. If you play with the controls
in the Start and Shape sections, you should be able to create all kinds of cool effects. In the Start
section, you can alter the value (height), range (depth), and speed (length) of the waves. In the Shape
section you can alter the shape of the wave (sine wave, saw-tooth, or square) and the phase (basically
moves the waves left and right.)
57
Page 58

TThhee EEvveenntt EEddiittoorr
horizontal position
8. What About the End Section? If you want to make the LFO change as it progresses, turn on the End
section by pressing the red button. Once the light is on, you can modify the parameters for the
beginning (left) and end (right) of the LFO, and FL Studio will smoothly morph the settings from start
to end. This lets you create really cool changing LFO effects like below. In the picture, a square wave
LFO starts at bar 2 and ends at bar 4. As the LFO progresses, the speed increases and the value and
range decrease from their Start to their End values.
58
Page 59

TThhee EEvveenntt EEddiittoorr
9. What is in the Edit Menu? In the Edit Menu you can delete all events (Edit > Delete All), select all
events (Edit > Select All), and change the color and look of the editor (Settings). You can also turn
Snap on and off. Use Snap to make sure your highlighting and event placement is always right on a
beat or bar. The grain of Snap can be changed on the main toolbar (see below). Try the different
settings to see how it effects highlighting and event placement. The finest grain is Tick, which will
cause you to snap to extremely fine-grained locations between notes. If you select Auto, then FL
Studio will decide for you where the best snap location is.
Snap Toolbar
Time for more tips
* You can undo an LFO with Ctrl-Z.
* If you record tempo changes, the delay line for the TS-404 will
automatically be reset at every change. The delay lines for the
sample channels will not, but the delay length will change with the
tempo, making it sound a little weird at first.
59
Page 60

g
TTHHEE PPIIAANNOO RROOLLLL
You may have already realized that there are some things that the Step Sequencer doesn't do very well. It
gets tricky to use when you have melodies that are longer than 1 bar. It's also tricky if you want to use a
single-note sample to play chords. Finally, it's nice to be able to slide notes like on the TS404, but you
can't do that with any other type of channel. The Piano Roll solves all of those problems!
1. Open the Piano Roll. Load up GettingStarted6.flp and select pattern 3. Notice that the Step
Sequencer view is very different. That's because the Ins_Round and Ins_Square channels contains
Piano Roll data instead of normal dots. You can open the Piano Roll for any, channel either by right-
clicking the channel name or by left-clicking the Mini Piano Roll. Open it for the Ins_Round
channel.
Ri
ht Click Here
(Channel Name)
Left Click Here
(Mini Piano Roll)
2. What You're Looking At. First thing to notice is that this screen looks a little like the Event Editor.
See the Play Indicator Bar, the Edit Mode Buttons, and the Edit Menu Button? But the "events" in
the Piano Roll are notes to be played at the given location, rather than level settings for various FL
Studio controls. Each horizontal green line shows where a note should start and end, and the Piano
Keyboard on the left shows the pitch of each note. The note labeled below is a C5 (C in the 5
octave), which will start on the second beat of the first bar and play for 3/4 of a beat.
60
th
Page 61

3.
Edit Menu
Edit Mode
Buttons
Play
Indicator
Zoom
Display
Mode
C5
4. Important Advice. Before we go any further, here's a tip. Make sure you always keep your Piano
Roll patterns separate from your regular patterns. You'll just avoid a lot of confusion that way.
5. What Kinds of Channels Can Have Piano Rolls? You can have a Piano Roll for any type of
Generator. But there's something you should know about Sample Channels. You can use the Piano
Roll on any Sample Channel, but it will always work best when you are using Looped Samples.
Ins_Round, for instance, contains loop points that let the sample play over and over again to create a
smooth sound that lasts as long as you want. If you don't have a looped sample, you can still use the
Piano Roll, but your notes may not actually last as long as you wanted them to.
61
Page 62

g
j
Usin
Loop
Points
Man, this thing
ust keeps
gettin' better!
Loop
Points
6. Basic Piano Roll Editing. Here's a run-down of how to edit your melody line.
a. Entering Notes. To enter a note, make sure you're in Draw Mode by clicking the Draw Mode
Button (see the Event Editor section) or the Paint Mode Button, click on the canvas, and drag the
note to where you want it to start. If the loop is not playing, you should hear the note you are
entering as you drag it around. The length of the note will match the length of the last note you
placed. To change the length, grab the right hand side of the green bar and drag it.
b. Note Snap. You may find the note snaps to a place you didn't want it to go. If so, change the
Snap Level on the main toolbar the same way as you did for the Event Editor (see previous
section). Sometimes you just can't get the note length to snap where you want no matter what you
do. In this case, shrink the note to the left as far as you can and then drag it out to the right again.
This often fixes the problem.
c. Note Color. See the row of 4 colored buttons under the Edit Mode Buttons? These let you select
the color of the notes you enter. This may seem foolish right now, but color-coding can really
help you out when you're trying to make sense of the notes you entered. Plus, the Edit Menu lets
you Select By Color so you can Delete or Copy and Paste only those notes.
d. Deleting Notes. Two options here - either right click the note you want to delete or go into
Delete mode with the Delete Mode Button (see the Event Editor Section).
e. Undoing Changes. Like the Event Editor, there is a limited undo available from the Edit Menu
or by pressing Ctrl-Z.
62
Page 63

pping
f. Cutting, Copying and Pasting Notes. Go into Select Mode with the Select Mode Button (see
Event Editor section) and click and drag to highlight some notes. Then use the Cut, Copy and
Paste options in the Edit Menu or use Ctrl-C, Ctrl-X, and Ctrl-V. Pasting can get a little tricky,
though. The notes will paste to their identical locations in the first bar that is currently displayed
on the screen. So to paste from bar 1 to bar 2, select the notes in bar 1 and hit Ctrl-C to copy, then
scroll over to bar 2 and hit Ctrl-V. If the notes don't appear, they probably went into bar 1. Press
Ctrl-Z to undo and try again.
7. Chords and Harmonies. One of the really nice features of the Piano Roll is that you can have notes
sound on top of each other to create chords and harmonies. Here, we're getting into sophisticated stuff
that you need some kind of musical intuition for, but FL Studio does make life a little easier by giving
you a Chord option on the Edit Menu. Select the type of chord you want, and then go into Draw
Mode. You can now drop entire chords onto the canvas. GettingStarted7.flp is an example of a
melody with harmonies. The picture below is a snapshot from that project:
Overla
Notes
8. Pitch-Bending Notes. This is really cool. If you click on the Slide Icon in the top left just under the
Edit Menu Button, you can insert pitch-bending notes (also called Slide Notes). To see how this
feature works, place a long note on the canvas, and then place a slide note above or below it. Make
sure the two notes overlap. The long note will play until it reaches the slide portion. Then the pitch
will rise towards the Slide Note and stay there until it reaches the end of the original note. The longer
the Slide Note, the longer the slide. In GettingStarted8.flp, we've added another Ins_Round Piano
Roll in pattern 4 that uses slides. Check it out.
63
Page 64

Slide
Icon
Note
Starts
Slides
Up
Slides
Down
Event
Select
Then
Stops
9. Tweaking the Notes. Remember the Graph Editor from way back in the Step Sequencer section? It
let you individually change Volume, Cutoff, Resonance and so on for each note. The Piano Roll has a
similar function, laid out in the bottom part of the Piano Roll Editor. Every time you enter a note, you
get a spike in the bottom graph that shows the level of the parameter selected by the drop down box on
the left (labeled Event Select above). After you enter the notes, you can change the values of any of
the parameters by grabbing the top of the spikes and dragging them. GettingStarted8.flp has volume
tweaks in the Piano Rolls for both pattern 3 and 4. You can set Velocity, Pan, Cutoff, Resonance, and
Pitch. As an added bonus, you can also use this graph as the Event Editor for Channel Pan, Pitch, and
Volume. NOTE: You can also change a note’s properties by double-clicking it.
10. Importing MIDI Tunes. In the File Menu under MIDI, you'll find two methods of importing MIDI
sound files directly into the Piano Roll Editor. There are tons of MIDI files for various popular
melodies floating around out there. Now you can suck them directly into FL Studio and use them in
your songs. How cool is that?
64
Page 65

AAUUDDIIOO TTRRAACCKKSS
IMPORTANT REMARK:
are not available in some editions. The FL Studio Fruityloops Edition doesn’t have Audio Track or the Integrated Wave Editor
capabilities. Please check our site
FL Studio Producer Edition let you work with Audio Tracks and automation envelopes.
Audio /
Automation
Switch
Audio tracks
Automation
Tracks
The bottom section of the playlist contains the audio/automation.
The bottom section of the playlist contains the audio/automation tracks (9). The tracks provide the user
with an easy visual way to place, arrange and edit a set of audio clips and parameter automation splines,
with an intuitive preview of the data held in the clips (waveforms/automation splines - see the picture). It is
also possible to cut and split clips in multiple pieces and arrange the pieces independently on the audio
tracks.
Each clip available in the tracks view is in fact an instance of the Audio Clip generator or the Automation
Clip.
Audio clips: are a special version of the Sampler channels.
Automation clips: are a dedicated internal controller plugin.
Each clip channel you add in the Step Sequencer becomes available in the tracks view and vice versa dropping samples on the audio tracks generates an Audio Clip channel (unless a channel exists with the
same sample).
The audio tracks provide you with an easy visual way to arrange a set of large audio clips, while seeing the
This guide is a general Getting Started guide for all existing FL Studio Editions. Some features however,
www.flstudio.com for upgrade conditions.
65
Page 66

waveform preview inside the tracks. You can cut and split the audio clips in multiple pieces and arrange the
pieces independently on the audio tracks.
Each audio clip, available in the audio tracks, is in fact an instance of the Audio Clip generator.
Each Audio Clip channel you add in the Step Sequencer becomes available in the audio tracks and vice
versa - dropping samples on the audio tracks generates an Audio Clip channel (unless a channel exists with
the same sample).
To place an audio clip, switch to draw or paint mode and left-click in an audio track (if no Audio Clip
channels exist, you will see a dialog where you can browse for a sample to be used).
Paint mode allows you to draw multiple instances of the audio clip at once (hold the mouse button and
drag).
To erase an audio clip, click it with your right mouse button or use the left mouse button in erase mode.
To switch an audio clip instance to play another Audio Clip channel, open the clip menu (left-click the
arrow in the top left corner of the clip) and from the Select Channel menu, pick an Audio Clip channel to
switch to.
To open the Channel Settings of the channel associated with the audio clip instance, open the clip menu and
select Channel Settings.
From the clip menu, select Preview to listen to the audio clip sample (hit the Stop button in the Transport
panel to stop the preview).
Automation clips can automate any editable parameter over the complete song (instead of pattern based
automation). A common use of these automation clips is to make a fade-in/out for an audio clip by
automating its volume.
However, the use of automation clips has a much bigger scope than controlling the clips volume. Feel free
to experiment with its use.
Use the appropriate switch to switch between Audio clips handling and Automation clips handling.
66
Page 67

IINNTTEEGGRRAATTEEDD WWAAVVEE EEDDIITTOORR
IMPORTANT REMARK:
are not available in some editions. The FL Studio Fruityloops Edition doesn’t have Audio Track or the Integrated Wave Editor
capabilities. Please check our site
This guide is a general Getting Started guide for all existing FL Studio Editions. Some features however,
www.flstudio.com for upgrade conditions.
FL Studio Producer Edition includes an integrated wave editor, which allows you to edit samples quickly
and effortlessly without having to use external applications.
The editor allows you to do all basic operations over the samples, such as fade in/out, record normalize
volume etc. You can edit any sample by opening its Channel Settings and pressing CTRL+E, or by opening
the Channel Settings menu and selecting the Edit command.
67
Page 68

TTHHEE BBEEAATTSSLLIICCEERR
In yet another awesome FL Studio team-up, you can now import beats sliced up into separate drum hits
using the BeatSlicer. This is really handy if you're into break beats. Here's how you do it…
1. Select Import→Beat to Slice from the File menu.
2. Select a Beat. The first thing you'll be asked to do is select a wav file to slice. Make sure it's at least a
1 bar (1 pattern long) beat. You can slice a file that's not a beat, but it won't work very well…
3. Decide where to put the sliced beat. Next you will be asked to choose the directory for the sliced
beat. This is where the separate wave files (each containing one drum hit) will be put. FL Studio
already has a default directory you can use, called “Sliced Beats”.
4. Decide How You Want the Beat? You will get the dialog box shown below. You have the choice of:
a) using a single sampler channel for each slice of the beat (“Sampler Channels”); b) using a Layer to
group the channels (“Layered Sampler Channels”); or c) putting the whole beat in a single channel
using the Fruity Slicer (“Slicer Channel”).
68
Page 69

5. To Merge or Not To Merge. Final question - do you want to merge the beat with the current project?
If so, click off the light on the above dialog that says “Start New Project”. The beat will be inserted
into the first pattern of your song. Because of this, you should probably insert a blank pattern at the
start of the song before you slice. You can do this with ctrl-insert in the Playlist.
6. Save Your Changes. If you start a new project, you will be asked whether to save the current one (if
it was altered since last save).
7. The Final Result. On the next page is a picture of what a sliced beat (using the “Sampler Channels”
option) looks like in FL Studio. Note that if you choose to start a new project, the tempo is
automatically chosen to match the tempo of the original beat. Also, since no beat ever quite fits exactly
onto the notes, FL Studio has used the shift function (see the graph editor pane) to match the beats
exactly. Now rearrange the beat for funky breaks!
8. Don’t forget about the Fruity Slicer Plugin that we told you about in the Generators section. It’s
another handy way to use the FL Studio/BeatSlicer team-up without going through the elaborate
process detailed here.
69
Page 70

y
Importing ReBirth RB-338 Songs. You might have noticed
this option in the Import Menu... This feature allows you to
open a ReBirth song, configure it to FL Studio Format, and
listen in FL Studio. Of course, it's not a perfect conversion see the pop-up window for details about what parts of the
song might not be converted properly. The playlist and
pattern layout also needs some explaining. The first 32
patterns are TB303 #1. The next 32 are TB303 #2. Then
you have 32 patterns for the TR808 and another 32 for the
TR909 for a total of 128 patterns. Of course most of these
will probably be blank for any given song, so your song ends
up prett
spread out, but it's all there if you hunt for it.
70
Page 71

SSHHAARRIINNGG YYOOUURR WWOORRKK
So now you’re done with your song – you probably want to bring it out of FL Studio so you can put it on a
CD, post it on the Internet, or edit it in another program. The Export function exists for this purpose. Here's
how to use it.
1. Export to Wav or MP3. This option is available from the File menu. Whether you choose Wav or
MP3, you will be asked to specify the name of the file and then the dialog below will appear. There's a
lot to choose from here, and we're not gonna go into it. If you want an explanation of every button, go
to the on-line help under File Formats. It's all there. If you want to just get your song rendered, leave
the settings the way they are (trust us - we picked the defaults for a reason!)
Dude! That looks
complicated…
2. Should I Use Wav or MP3? Wav is a raw sound file format. Huge files, excellent sound quality
(expect to use about 10 MB per minute depending on Depth). Wav files are suitable for burning onto
CD. MP3 is a compressed format. Smaller files, but sound quality may be slightly compromised
(expect to use about 1 MB per minute depending on Bit Rate). If you want to share files on the
Internet, MP3 is the way to go.
3. Should I Use "Background Rendering?" Rendering can take a long time and hogs the CPU,
especially if you choose the high-quality options in the Quality section of the window above. But if
you click on Background Rendering, FL Studio will iconify itself and continue to render unobtrusively
in the background. It takes longer, though.
71
Page 72

SShhaarriinngg YYoouurr WWoorrk
k
4. Exporting to a Zipped Loop Package. This feature is useful if you want to transmit your FL Studio
files over the web. It takes your FL Studio file, plus all the samples used in that files, and puts them
into one zip file.
5. Project Bones and Project Data Files. These options let you save a lot of the information about your
track. The Project Bones option saves a file with all your presets, automation information, and so on
to be loaded later. Project Data Files saves all the samples and other raw data you used to a single
location on your hard drive.
6. Where Can I Put My Songs? There are a number of places on the web where artists can place their
music in MP3 format for free.
amateur looper to get buried there in all the high-profile commercial stuff.
www.mp3.com is probably the best-known site, but it's easy for an
www.sectionz.com is an
option if you are more interested in feedback from other musicians who use FL Studio. The site is a
musical community with people like you reviewing every song that is placed on the site. It's a great
way to get feedback. If you don't like either of these options, you can always create your own site
using one of the many free hosting services out there. Good luck!
Now go get that
record deal!
72
Page 73

EEXXTTEERRNNAALL CCOONNTTRROOLLLLEERRS
An External MIDI Controller is kind of like a big fancy joystick to control the wheels and switches in FL
Studio. The main difference is that you have to tell FL Studio ahead of time what you want each knob on
the controller to do (a minor inconvenience for the luxury of changing both cutoff and resonance at the
same time!) Each knob on the controller can be linked to a different wheel or slider on FL Studio. If you
have a controller, this section will tell you how to make it work with FL Studio. If you don't have one, get
one! First we'll introduce a few of the more popular controllers, and then we'll tell you how to set them up.
1. A Few Examples of MIDI Controllers.
a. The PhatBoy. The PhatBoy is one of the most affordable (hence most popular) MIDI controllers,
made by KeyFax at
people will ever need (you've only got two hands!).
www.keyfax.com. It's small, with only 13 knobs, but that's as big as most
S
Who you
callin' phat?
73
Page 74
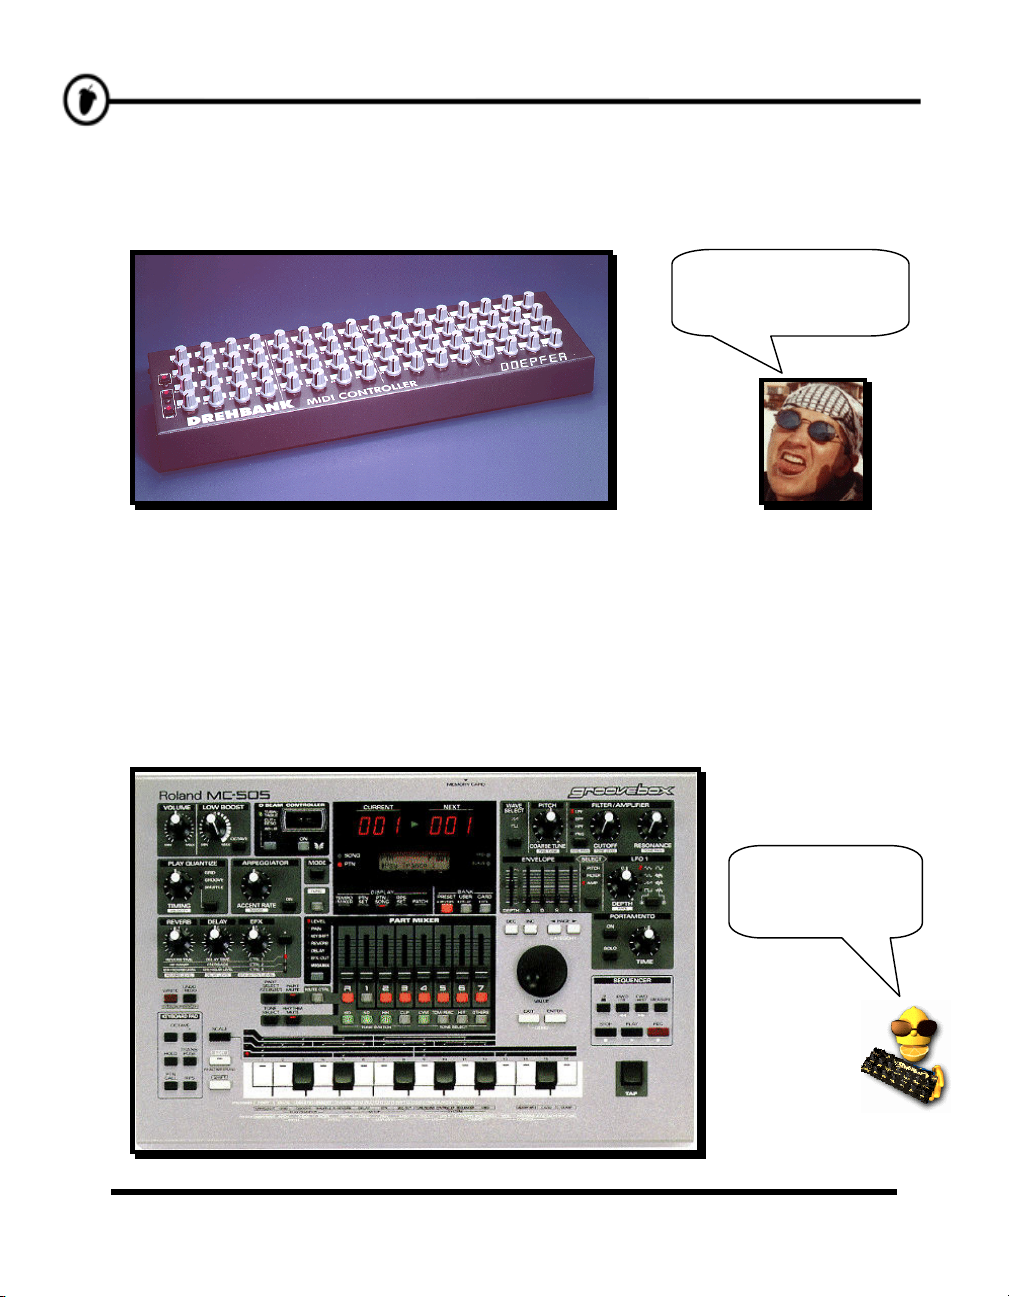
TThhee PPhhaattBBooyy aanndd OOtthheerr CCoonnttrroolllleerrss
b. The DrehBank. Another popular choice is the DrehBank from Doepfer at
www.doepfer.de.
This baby gives you 64 knobs instead of 13!
Only I may own a
Drehbank. They are
not for manual writers!
The Boss
c. Other Controllers.
The Korg MicroKONTROL, Edirol PCR-50 and MC-505 by Roland (
www.rolandgroove.com)
are some of the many other controllers that can be used with FL Studio. The MC-505 is a lot more
than a MIDI controller. It's a hardware synthesizer and sequencer specially built to replicate
classic techno sounds like the TB-303, TR-808 and TR-909. But it also has full MIDI controller
capabilities, so you can link some of the knobs to FL Studio controls.
Whoa! Talk about
bringin' a gun to a
knife fight!
74
Page 75

2. Setting Up Your Controller.
a. Get a MIDI Cable and Plug in your Controller. Look on the back of your computer. If you see
two or three round, 5-pin connectors labeled "MIDI", then you're in business. If not, look for a 15pin trapezoidal joystick port. If you have the round connectors, you need a cable to go from
"MIDI Out" on your controller to "MIDI In" on your computer. If you only have a game
controller connection, you'll need a special cable that has two round MIDI plugs at one end and a
trapezoidal plug at the other. Both these types of cables should be available at any music store
specializing in keyboards and synthesizers (but if you ask for them in a computer store, you may
just get blank looks.)
b. Turn on the Controller and Start Up FL Studio. If you have a PhatBoy, make sure the power
switch is set to mode "III". If you have a DrehBank, hold down the "Bank 1" button when you
plug in the power cable. For the MC-505, make sure the MIDI mode is set to MODE 2 (Shift 12,
Edit TxRx = Mode2). Try turning the knobs on your controller. If everything is ok, you should
see a little red "Midi" light flash beside the Hint Bar of FL Studio every time you turn a knob. If
that works, great! You can skip steps c to e. If not, read on my friend.
TThhee PPhhaattBBooyy aanndd OOtthheerr CCoonnttrroolllleerrss
The Little
Red Light
c. Enable MIDI Remote Control. Check the Options menu to see if there is a check mark beside
MIDI Remote Control. If not, click on it and see if you get the light now. If not, read on.
hERETIC
Sam: Yo, check it out. I need a cable with
MIDI connections on one end and a joystick
plug on the other.
Computer Store Guy: What's mee dee?
75
Page 76

A
TThhee PPhhaattBBooyy aanndd OOtthheerr CCoonnttrroolllleerrss
d. Set Your MIDI Input Device. If the light is still not coming on when you turn knobs on your
controller, go into MIDI Settings (from the Options menu or by hitting F10). Check out the
Remote Control Input box. If you see the word "none" there, then you've got to select an input.
Typically, you will be presented with a number of choices, and you'll just have to try them all to
figure out which one is right.
re you
ready to
rock?
e. Troubleshooting Checklist. If the red light is still not coming on when you turn the knobs on
your controller, here's a list of things you should check.
* Did you select the correct PhatBoy
or DrehBank mode in step b?
* Did you enable "MIDI Remote Control" in step c?
* Did you select the correct MIDI input in step d?
* Are your MIDI In and Out cables reversed?
* Did you plug the controller into a power outlet?
If your Midi controller seizes up on ya… Try
this as a last resort: quit Fruity, then select
Programs > FL Studio > Advanced > Reset
settings from the Windows Start menu. Then
relaunch Fruity and try again…
Jaha
3. Linking a wheel to Your Controller. OK, load up any loop you have that uses the TS-404 channel.
GettingStarted4.flp might be a good one to start with.
a. Right-click on the Control You Want to Link to the MIDI Device. In this case, we're trying
the main volume control on a TS404. Now click on Link to MIDI Controller, to pop up the
Remote Controlling Settings window.
76
Page 77

TThhee PPhhaattBBooyy aanndd OOtthheerr CCoonnttrroolllleerrss
b. Turn a Knob on Your Controller. You should see the Channel and Controller numbers
change. Now click OK, and turn the same knob. You should see the volume control turn back
and forth and hear the volume of the instrument change. You're in business!
c. Set the Buffer Length as Low as You Can. Earlier, we explained the buffer length slider (get to
it by hitting F10 and clicking the Audio tab). This slider determines the delay time between you
turning a knob and the sound of FL Studio changing. So you want to set it low. But if you set it
too low, the sound will become choppy. So try to find a happy medium. If you can't get it low
enough to do what you want, then I guess you need a faster computer. Sorry, dude.
4. Which Controls Can I Link? Pretty much all of them, actually. For reference, though, it's the same
set of controls that can be changed in Live Recording. Again, if you want to know whether a control
can be linked externally and live recorded, mouse over it and look for the two red dots in the Hint Bar.
77
Page 78

TThhee PPhhaattBBooyy aanndd OOtthheerr CCoonnttrroolllleerrss
5. What About Internal Controllers? Finally, we can tell you about the Internal Controller Plugins
listed in the Effects section (the Formula Controller, Peak Controller, and X-Y Controller). These are
plugins with controllers, which can set other controls. Did you follow that? Let’s take the Fruity X-Y
Controller as an example. Open the plugins window (F9) and put a Fruity X-Y Controller on the
master FX track.
78
a. The Fruity X-Y Controller lets you control two wheels at once by linking one wheel to its X
(horizontal) dimension and one wheel to its Y (vertical) dimension. Then you can grab the circle
in the main window and as you pull it around, it changes both controls that it is linked to. It’s
particularly handy for controlling cutoff and resonance at the same time. Load up
GettingStarted7.flp again, re-install the Fruity X-Y Controller as in step 5 and open the INS panel
of the Ins_Round channel. Then right-click the Cutoff and select Link to External Controller.
Page 79

TThhee PPhhaattBBooyy aanndd OOtthheerr CCoonnttrroolllleerrss
b. Link the Cutoff wheel to the X value of the internal controller, as shown above. Now link the
Resonance wheel to the Y value. Then open up the Fruity X-Y Controller window, start the loop,
and drag the circle around to listen to the Cutoff and Resonance changing at the same time. Cool,
huh?
Well, that’s it. Have fun!
Don’t forget there’s more
help available inside
FLStudio and on line at
www.FLStudio.com.
79
Page 80

CCRREEDDIITTSS
Programming and Graphics
Additional Help / SDK Translation
Didier Dambrin (gol)
Frédéric Vanmol
TS404& Wasp Engine
Richard Hoffmann
SimSynth 1 & 2 Renderers
David Billen
DrumSynth Renderer
Paul Kellet
BeatSlicer Engine
Peter Segerdahl
Speech Engine
SoftVoice
A big round of applause for the
FLStudio team!
Web Site
Jean-Marie Cannie
Frank Van Biesen
Getting Started Guide
Sam Scott
Tutorials, Help, Manuals
Frank Bongers (The original LemonBoy!)
Robert Conde (Jaha, Doo-D-Rox)
Sam Scott (hERETIC, Burton Coggles)
Stanislav Vasilev (mmlabs)
Image-Line Staff
Jean-Marie Cannie
Frank Van Biesen
Ief Goossens
Miroslav Krajcovic
(More complete credits and
thanks in the product itself.)
80
Page 81

IINNDDEEXX
3
321 countdown, 52
3xOsc, 25, 26, 27
compression, 48
countdown, 52
cut itself, 21
cutoff & resonance, 14, 15, 16, 18, 19, 20, 42,
48, 51, 52, 54, 56, 63, 69, 74, 75
A
amount (AMT), 16, 17, 42
Aphex Twin, 27
arpeggiator, 15, 37
attack (ATT), 14, 16, 42
Audio Settings, 7, 52, 73
automation, 24, 48, 49, 50, 51, 52, 56, 68, 73
auto-smoothing, 55
B
background rendering, 67
balance, 11, 48
bass, 20, 23, 27, 40, 48
BeatSlicer, 30, 39, 64, 65
BeepMap, 25, 26, 27
bit rate, 67
BooBass, 25, 26, 27
browser, 8, 13, 23, 38, 39
buffer length, 7, 50, 52, 54, 73
Buzz Effects, 48
Buzz Generators, 25, 26, 28
BuzzMachines.com, 28, 48
C
channel selector light, 13, 18
channel settings, 12, 14, 15, 20, 25, 26, 37, 41,
42, 44, 46, 49, 51, 52, 56
func panel, 15, 27, 37, 42
instrument panel, 16, 20, 27, 51, 54, 56, 74
misc panel, 16, 27, 42
sample panel, 14, 27, 42
choppy sound, 7, 29
chords, 37, 59, 62
chorus, 44, 48
D
decay (DEC), 14, 16, 42
delay (DEL), 16
delay (echo), 15, 16, 19, 42, 44, 46, 47, 48, 52,
73
depth, 56, 67
DirectMusic Software Synthesizer, 49
DirectSound streaming buffer, 7
DirectX, 30, 49
discussion forum, 9
distortion, 14, 42, 48, 49
Doepfer.de, 70
dots, 10, 11, 18, 19, 20, 22, 24, 52, 59, 73
DreamStation, 35
DrehBank, 70, 71, 72
DrumSynth, 38
E
echo (delay), 15, 16, 19, 42, 44, 46, 47, 48, 52,
73
envelope, 16, 17, 42
environment settings, 7, 8
Equalizer, 44, 47, 48, 49
event editor, 52, 54, 55, 56, 59, 61, 62, 63
events (initial), 55
export, 67, 68
F
FAQ, 9
fat mode, 15
Fatboy Slim, 29, 48
feed, 15
filters, 18, 20, 48, 49
fit, 14
81
Page 82

flanger, 44, 48, 49
Force Feedback File, 30
IInnddeexx
internal controllers, 4, 48,
49, 50, 74, 75
Fruit Kick, 25, 26, 28
Fruity DrumSynth Live, 25, 26, 29
Fruity DX10, 25, 26, 29
Fruity effects, 11, 27, 35, 44, 74
Fruity Granulizer, 29, 39
Fruity Scratcher, 39, 49
Fruity Send, 49
Fruity Slicer, 30, 39, 64, 65
Fruity Soft Clipper, 49
J
Jaha, 72
K
keyboard editor, 20, 40
Keyfax.com, 69
kvr-vst.com, 36
Fruity SoundFont Player, 25, 26, 30
Fruity Vibrator, 30
Fruity Wrapper, 34, 35
Fruity X-Y Controller, 50, 74, 75
FruityLoops.com, 2, 6, 9, 35, 36, 38, 75
fx 1, 14
fx 3, 14
FX Tracks, 5, 44, 46, 47
G
L
layer channel, 32, 33, 34, 64
Lemon Boy, 4, 8, 9, 11, 12, 13, 14, 15, 17, 21,
23, 24, 36, 37, 39, 40, 41, 42, 43, 52, 53, 58,
60, 64, 66, 67, 68, 69, 70, 72, 75, 76
LFO, 16, 17, 42, 48, 56, 57
live recording, 48, 49, 54, 55, 56
loop point, 22, 24, 60
Getting Started Loops, 9, 44
GettingStarted1.flp, 9, 10, 12, 15, 17, 18, 19,
20, 40, 51, 54, 56
GettingStarted2.flp, 20, 22, 23
GettingStarted3.flp, 24
GettingStarted4.flp, 41, 43, 73
GettingStarted5.flp, 43, 46, 52
GettingStarted6.flp, 59
GettingStarted7.flp, 62, 74
GettingStarted8.flp, 62, 63
graph editor, 18, 19, 20, 54, 63, 65
H
hERETIC, 71
hint bar, 9, 22, 52, 71, 73
hold, 16
HTML Notebook, 49
I
import, 63, 64, 66
initial event, 55
installation, 74
82
M
main window, 8, 9, 55, 74
MC-505, 70, 71
mda DX10, 35
menu bar, 9
MIDI
cables, 71
controllers, 32, 69, 70, 71, 72, 73
drivers, 7
files, 63
MIDI Out channel, 32, 49, 71
settings, 72
MP3, 67, 68
mp3.com, 68
mute, 40, 49
N
NewStuff.flp, 8
notebooks, 49
O
on-line help, 9, 14, 16, 27, 37, 48, 67
Page 83

oscillator (OSC), 27,
42
oscillators, 42
IInnddeexx
shift, 18, 20, 65, 71
shortcuts, 9, 22
SimSynth
Live, 25, 26, 31, 37
P
pan, 11, 14, 15, 16, 18, 19, 48, 49, 63
pat/song, 22, 23
pattern selector, 22, 23, 56
phase inversion, 49
phaser, 44, 49
PhatBoy, 69, 71, 72
piano roll, 5, 43, 59, 60, 61, 62, 63
ping pong, 15
pitch, 14, 15, 16, 18, 20, 39, 43, 59, 62, 63
pitch bend (slide), 19, 43, 59, 62
pitch width (PW), 42
play indicator, 22, 55, 56, 59
play switch, 8, 10
playlist, 22, 23, 24, 51, 54, 65
Plucked!, 25, 26, 31
plugin, 12, 25, 29, 34, 35, 36, 44, 45, 46, 47, 49,
50, 65, 74
polling, 8
presets, 26, 38, 49, 50, 68
project bones, 68
project data files, 68
standalone, 38
sine fx, 14
slide (pitch bend), 19, 43, 59, 62
snap to grid, 58, 61
song/pat, 22, 23
SoundBlaster, 7
SoundFonts, 25, 26, 30
spectrum analyzer, 27, 49
Speech Synthesizer, 39
speed (SPD), 16, 42
speed (tempo), 65
step sequencer, 8, 10, 13, 21, 22, 26, 39, 59, 63
stereo delay, 14
sustain (SUS), 16, 42
synth channels, 37
T
TB-303, 27, 66, 70
tempo, 65
tick, 52, 58
tool bar, 22, 58, 61
TR-808, 66, 70
TR-909, 66, 70
R
ReBirth, 66
release (REL), 16, 42
remote control input, 72
resonance & cutoff, 14, 15, 16, 18, 19, 20, 42,
48, 51, 52, 54, 56, 63, 69, 74, 75
reverb, 14, 44, 46, 47, 49
troubleshooting, 72
TS-404, 25, 26, 27, 40, 41, 43, 44, 46, 52, 54, 56,
59, 73
tutorials, 9, 49
U
undo, 21, 55, 58, 61, 62
RolandGroove.com, 70
V
S
s.del, 14
sample browser, 13, 23, 38, 39
velocity (volume), 18, 19, 63
volume, 8, 9, 11, 14, 16, 18, 19, 44, 48, 63, 73
VST plugin, 35, 36
samples, 3, 12, 13, 14, 16, 17, 20, 21, 23, 25, 26,
29, 30, 38, 39, 40, 46, 48, 49, 54, 56, 59, 60,
68
SectionZ.net, 68
W
Wasp, 25, 26, 31
wav
83
Page 84

export to wav, 67
files, 64
Windows, 8
www.mda-vst.com, 38
IInnddeexx
Z
zipped loop packages, 68
zoom, 54, 55, 60
Please don’t forget to consult the extended and detailed
online help that comes with your FL Studio.
Just push F1 to call the context sensitive online help.
This guide is only intended to get you started.
If you are in need of more details, the online help will tell
you everything you need to know about the FL Studio
features, the generators and its effects.
If you have troubles getting started with FL Studio and
your hardware, just try the ‘Setup Wizard’ in the online
help.
Don’t forget that our website
a lot of information. You will find interactive tutorials,
video tutorials, F.A.Q section, technical support forum
and a lively FL Studio community.
Be a part of this community and register your version at
our site.
www.FLStudio.com contains
84
 Loading...