

Tel (02) 9420 5766 Fax: (02) 9420 5677
GS & GS Deluxe
Dental Systems
Manual
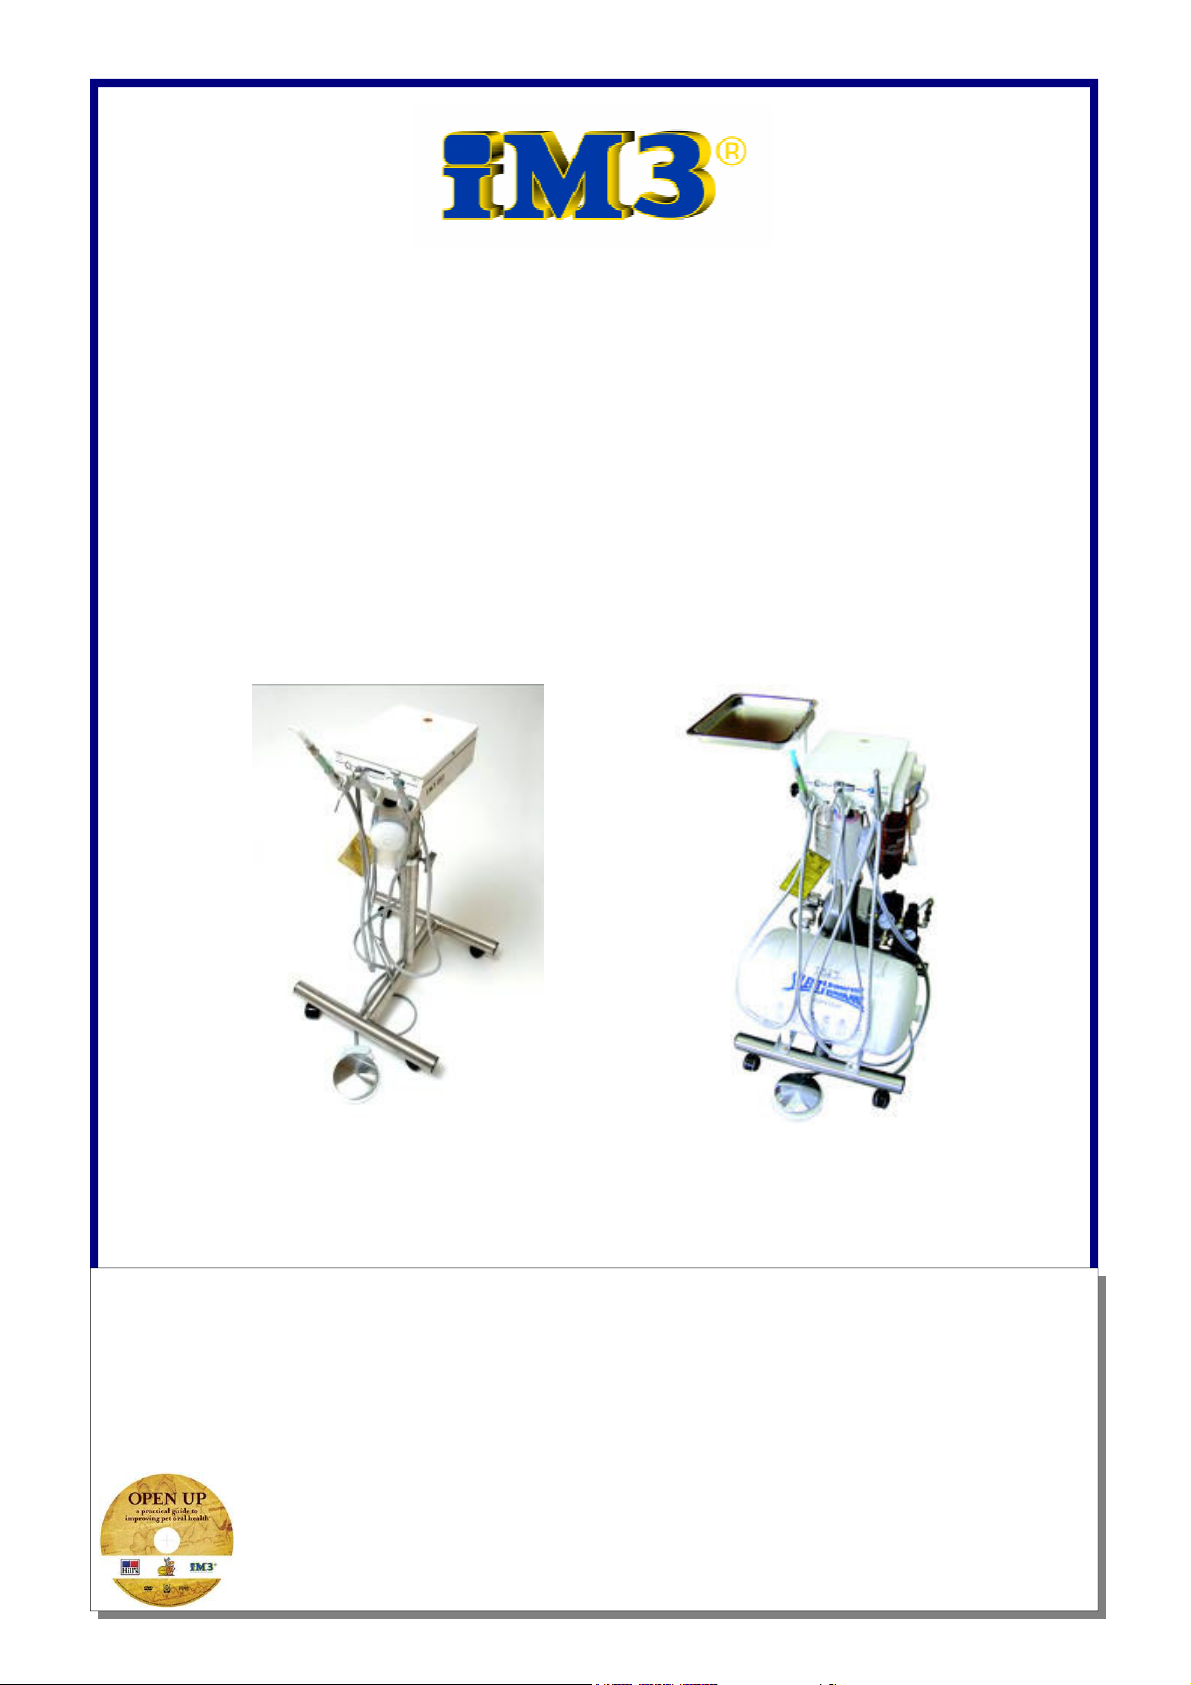
iM3 GS
iM3 GS Dental unit with S/S stand GS Deluxe with Compressor
iM3 Inc iM3 Pty Ltd
12119 NE 99th Street Suite 2060 9/31-33 Chaplin Drive
Vancouver WA 98682 USA Lane Cove NSW 2066 Australia
Tel (360) 254 2981 Fax (360) 254 2940
Web Site: www.im3vet.com
E-Mail: inquiries@im3vet.com
Contact iM3 or your Distributor for your free Veterinary dental DVD
“Open Up”

TABLE OF CONTENTS
Table of contents 2
iM3 GS Unique Design Features.................................................................................................. 3
iM3 GS Control Panel Guide........................................................................................................ 4
iM3 GS Deluxe Control Panel Guide…………………………………………………………... 5
Rear of iM3 GS & GS Deluxe…………….…………………………………………………….. 6
Getting Started ………………………………………………………………………………….. 7-8
iM3 Distilled Water and CLS Enviro Solution Supply.............................................................. 9
Ultrasonic Scaler Coolant Outlet................................................................................................. 10
iM3 Filtration System.................................................................................................................... 10
CLS Flushing System..................................................................................................................... 10&21
3 Way Air Water Syringe.............................................................................................................. 11
iM3 Low Speed Handpiece and Attachments............................................................................ 12-14
iM3 High Speed Handpiece ........................................................................................................ 15
High Speed Handpiece Fiber Optics Bulb Replacement............................................................ 16
2
iM3 Dental System Bur Kits and Rodent Kits………................................................................ 17
Handpiece Pressure Adjustment.................................................................................................. 18
Handpiece Lubrication................................................................................................................. 19
Handpiece Sterilization and the need to Flush HP Air Lines ………...................................... 20-21
Handpiece Maintenance............................................................................................................... 22
Silent Hurricane Compressor and Motor ...................................................................................
Operating Instructions..............................................................................................................
Identifying Air Leaks.................................................................................................................
Compressor Component Details……………………………………………………………...
Adjusting Regulator Pressure...................................................................................................
Silent Hurricane Compressor Maintenance................................................................................ 26
Trouble Shooting;
Cartridge Toggle switches ……………………………………………………………………
High Speed Handpiece ……….................................................................................................
Low Speed Handpiece ..............................................................................................................
23
23
24
25
27
28
28
iM3 Operator Safety
Im3 Dental equipment should be operated by a qualified person—for animal use only
For operator safety, it is recommended that safety goggles
or visor, face mask and surgical gloves be worn
during all procedures.
Visit Our Web Site: www.im3vet.com

Unique Design Features
3
iM3 Dental Systems are designed with unique and practical features to make your work
even more satisfying and productive. Please note; some features listed below, may be
optional depending on the system you purchase.
Control Top
The Corian® top is a non-porous work surface which is easy to sanitize. It incorporates a groove
around the edge to prevent burs falling on the floor during procedures. The control box is made from
powder coated aluminum that won’t warp or deteriorate with age.
Color Coded System
All supply lines on iM3 dental systems are color coded to simplify service and
maintenance requirements.
Maintenance Instructions
All maintenance instructions are conveniently printed on the card hanging from the unit, or printed
on the back of the dental machine ensuring the system is kept in perfect working order.
Power Board
A four socket electric power board is conveniently located on the side of the control panel, featuring
an IEC female socket. (Optional on the GS, standard on the Deluxe)
Adjustable Stainless Steel Stand
The iM3 stand is made from high quality stainless steel and is height adjustable for work and ease
of storage. (Optional on the GS, standard on the Deluxe)
Wall Arm
An air operated approx 54”/1.50m long arm is available
Ultrasonic Scaler Coolant Outlet
The ultrasonic scaler coolant outlet is mounted conveniently on the rear of the control box, to allow
the use of the water or system to supply the coolant to your ultrasonic dental scaler.
CLS Enviro System
CLS Enviro System is an ingenious occupational health and patient safety system. CLS is designed
to help reduce the risk of atmospheric pollution and the transfer of viruses, such as FIV from patient
to patient and reduce unpleasant mouth odors. (Optional on the GS, standard on the Deluxe)
Flush System—Optional on the GS, standard on the GS Deluxe
The Flush System enables CLS at a press of a button, to enter the HS air line. The foot control
pedal is depressed after pressing the flush button, pushing the CLS into the head of the handpiece,
helping to sanitize the turbine and head of the handpiece. Excess CLS is caught in the small
collection bottle mounted underneath the control box after flushing the exhaust air line.
Particle Filters and Bacterial Filters
Particle filters and bacterial filters are installed on all iM3 dental systems to help reduce particles
entering the water supply and reduce unpleasant environmental odors from the HP exhaust collection bottles.
Options
Stainless Steel Instrument Tray
Height adjustable and mounts on the rear of the unit, standard on the Deluxe.
Oil Free Silent Hurricane Compressor
Mounts underneath the unit on the stainless steel stand—supplying air wherever the unit is to be
used, and is considered more convenient than a noisy compressor which is usually situated in another room and requires a length of air line. iM3’s has produced an Oil free compressor - low maintenance, oil free air.
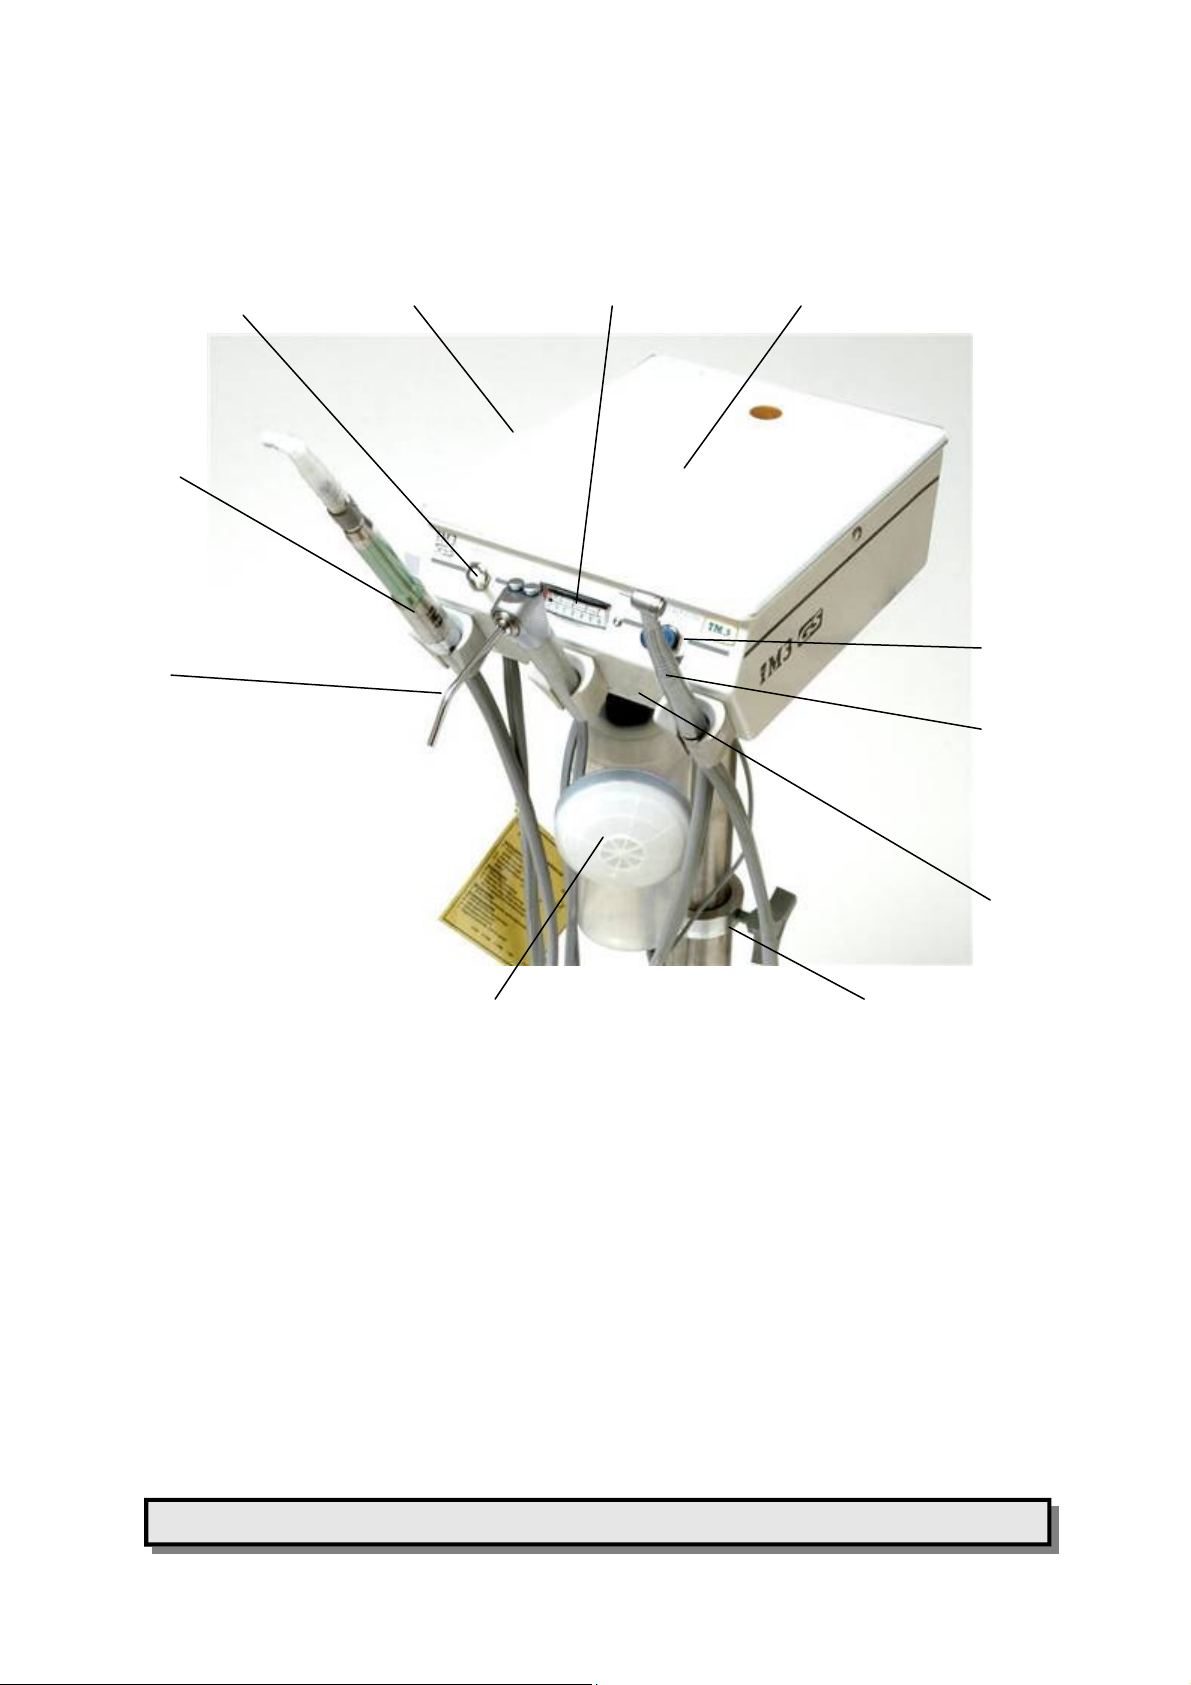
iM3 GS Control Panel
4
(D)
(E)
(C)
(G)
(A) (B)
(H)
(I)
(F)
(K)
(A) Corian ® Work Surface with Bur groove around the edge, to prevent them falling on the floor.
(B) Amber coolant reservoir with particle filter. The amber bottle allows the use of CLS, which is
light sensitive (contains chlorhexadine) or distilled water. Located at the back of the unit.
(C) Handpiece Selector switch, selects either the Low speed or the High Speed Handpiece.
(D) Low Speed Handpiece – used for polishing, low speed cutting, orthopedics – 20,000 RPM.
(E) 3 way syringe – air, water, or mist when both buttons are pressed together. When used
with CLS it will help sanitize the mouth and reduce mouth odour during procedures.
(F) Provision for CLS handpiece flush system. (standard on the GS Deluxe)
(G) Pressure gauge for checking handpiece pressure.
(H) Coolant Flow Control – regulates the amount of liquid to the high speed bur.
(I) High Speed Handpiece for high speed cutting,also available with Fibre Optics.
(J) Choice of Stand – Air operated long reach wall arm & Stainless Steel height adjustable floor
stand.
(K) Exhaust collection bottle for high and low speed handpieces
(J)
iM3 is a licensed trademark of iM3 Inc. Corian ® is a registered trademark of the
DUPONT Company
iM3 Dental Systems
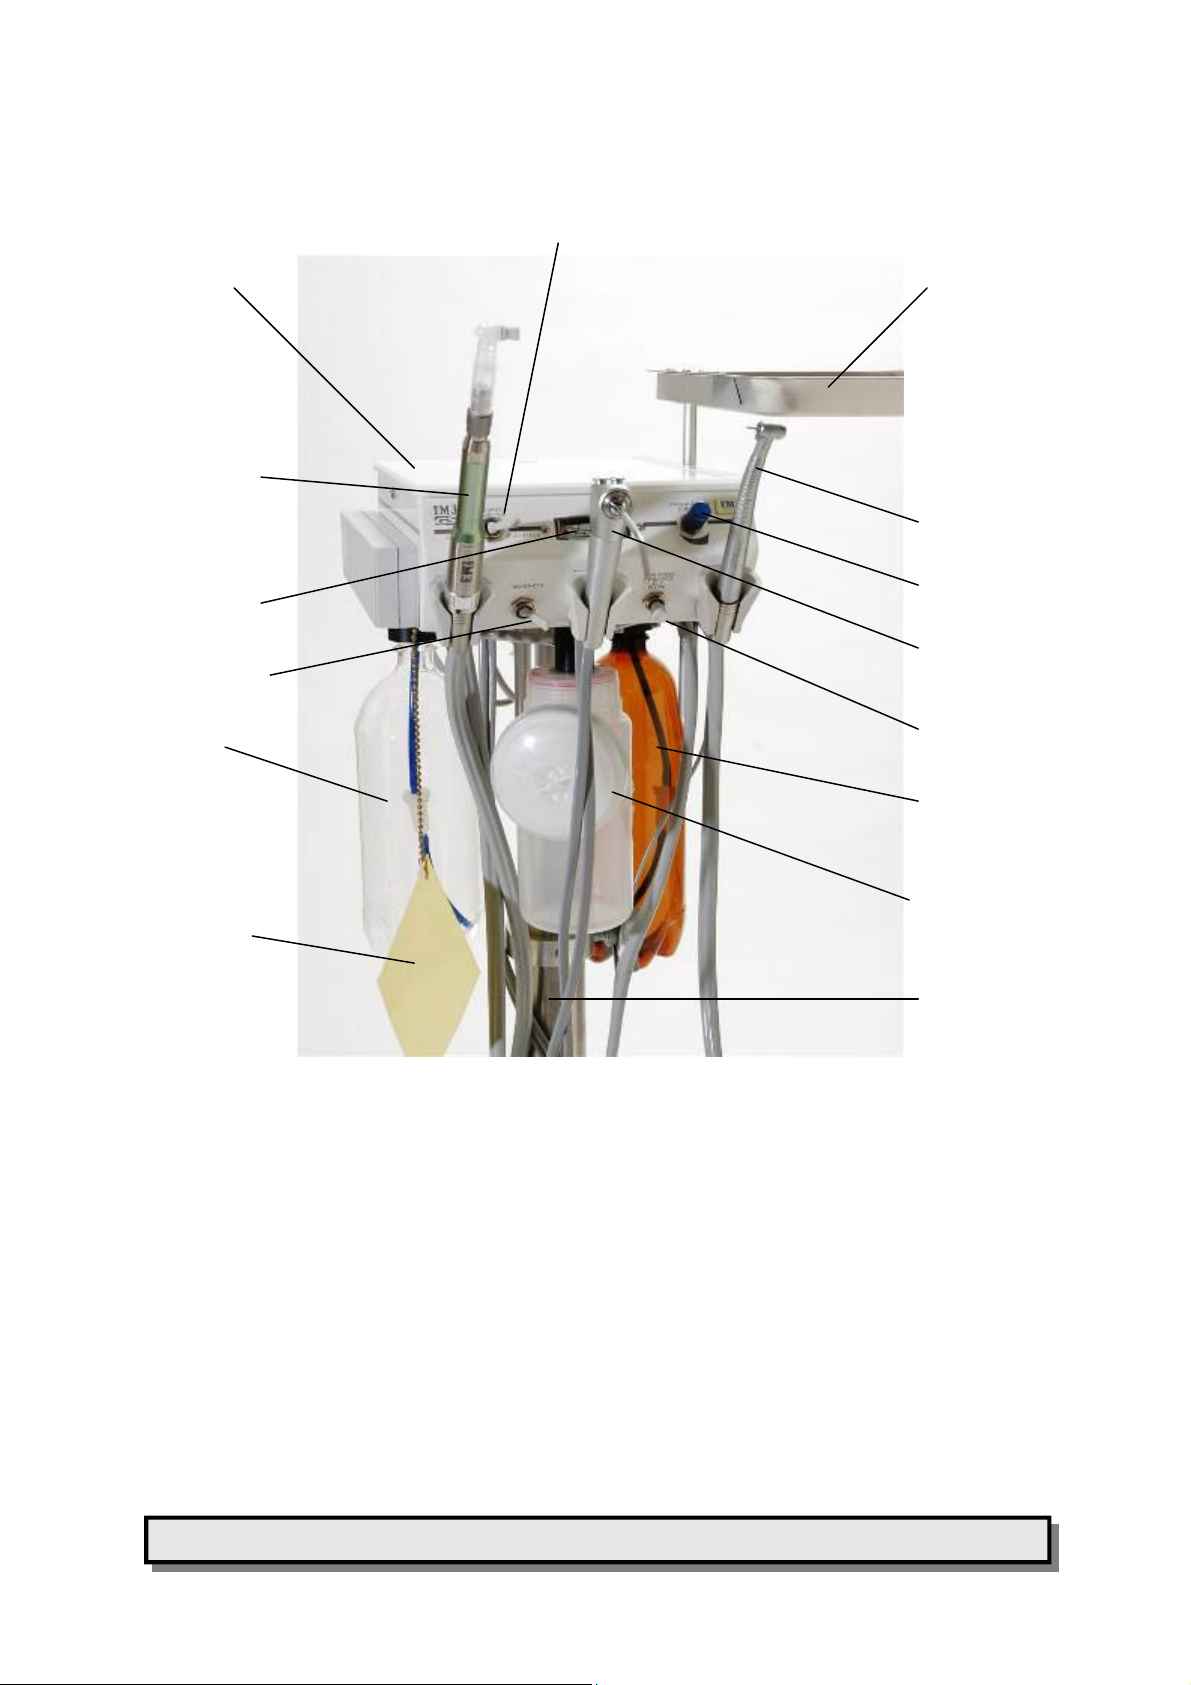
iM3 GS Deluxe Control Panel
C
5
B
A
O
C
D
I
H
G
E
L
F
K
M
N
J
(A) Corian ® Work Surface with Bur groove around the edge, to prevent them falling on the floor.
(B) Clear coolant reservoir with particle filter.
(C) Handpiece Selector switch for the selection of low speed or High Speed Handpiece.
(D) Low Speed Handpiece – used for polishing, and low speed cutting – 20,000 RPM.
(E) 3 way syringe – air, water, or mist when both buttons are pressed together. When used
with CLS it will help sanitize the mouth and mask mouth odours.
(F) High speed CLS handpiece flush system.
(G) Pressure gauge for setting handpiece pressure.
(H) Coolant Flow Control – regulates the amount of liquid to the high speed bur.
(I) High Speed Handpiece – for high speed cutting – also available with Fibre Optics.
(J) Choice of Stand – Wall mounted air activated arm and Stainless Steel Height adjustable
stand.
(K) The amber bottle allows the use of CLS, which is light sensitive (contains chlorhexadine)
(L) Water/CLS selector toggle.
(M) Exhaust bottle for High and Low speed handpieces and CLS flush.
(N) Maintenance Instructions. New GS machines have the maintenance printed on the back of
the machine.
(O) Height adjustable Stainless Steel instrument tray
iM3 Dental Systems

REAR OF iM3 GS & Deluxe
(1) Coolant Bottle
Pressure Switch
6
(2) Ultra Sonic Cool-
ant Outlet
(4) PET Pressure Coolant Bottle
amber (GS Deluxe only)
(1) With the coolant bottle pressure switch in the “ON”
position, the bottle will be pressurized to 35PSI (approx. 2.5 bar) to supply water/CLS to the 3
way syringe and the High Speed Handpiece. It must be switched to the off position to release the
pressure before re filling the bottle.
(2) Ultra Sonic Coolant outlet – This will supply pressurized water/CLS to your ultrasonic dental
scaler – A male fitting can be supplied by iM3 for your ultrasonic scaler water line. DO NOT use
any coolant other than distilled water or CLS – any other solution may cause a blockage and will
void your warranty.
(3) Either a clear or amber (if CLS is to be used) PET pressure bottle is supplied, a used soft
drink bottle may be used in an emergency situation, a new un-used bottle from iM3 is
recommended to avoid splitting if using a pre used bottle.
(4) Amber coolant bottle for the use of CLS in the GS Deluxe. The user can switch between water
and CLS (page 5 (L)).
(3) PET Pressure Coolant Bottle
(amber on GS clear on GS
Deluxe)
iM3 Dental Systems

7
Getting Started
1. Attach all four castor wheels to the stainless steel base.
2. Loosen the stand height adjustment knob and lift the dental control box to working height.
Tighten the stand height adjustment knob to secure.
3. Screw on the high speed handpiece and low speed waste collection container under the
control panel, located behind the 3 way syringe grey cabling.
4. Fill the clear plastic water bottle at the back of the machine with distilled water and screw into
the holder with the blue tubing, Do not over tighten.
5. Fill the amber plastic bottle with the CLS Concentrate Solution (8.5oz or 250 ml) and
dilute with distilled water (25.4oz or 750ml) to make a 33.82 oz or 1 litre solution. Screw the
bottle into the holder with the green tubing. Do not over tighten.
6. Place the 3 way air/water syringe in its handpiece holder—center position.
7. Connect the handpieces by screwing them to the grey handpiece air/water line and place in
correct handpiece holder labeled on the dental system. Page 5 (D) and (I)
8. Connect quick disconnect line (grey plastic), to open/close compressor outlet tap (See page
28),
9. Plug the unit into an electrical outlet and turn power board ON.
iM3 Dental Systems

8
for compressor pressure adjustment instructions. The pressure is set at the iM3 factory.
11 Turn on the compressor and allow to pressurize, (see page 24.).
12. Make sure your compressor is set to deliver the correct working pressure. The air pressure
regulator gauge should read 80 psi (5.5Bar). If adjustment is required, please see page 27
13. Place the foot control pedal on the floor in front of the unit. The foot pedal operates the High
and Low speed handpieces when depressed.
14. Check handpiece operation:
a) Select HS on the Toggle, Remove High Speed Handpiece from holder and depress
handpiece foot control pedal—handpiece should now operate. Page 5 (C)
b) Select LS and Remove Low Speed Handpiece from holder and depress handpiece foot
control pedal—handpiece should now operate. Page 5 (C)
15. Adjust individual handpiece pressure if required, (see page 19). Each handpiece—Low
speed and high speed has a specific pressure requirement.
16. Pressurize water system by moving the water system switch to ON, located on the back of
the control panel. (see page 6)
Important. When filling distilled water and/or CLS Enviro bottles de-pressurize the
water system, (see page 10.). Check water and air supply to the 3 way air water syringe.
Depress the right hand button for air and left hand button for water or both together for
mist.
17. Water volume. Remove high speed handpiece, from holder and depress foot control pedal.
Adjust water spray volume to a fine mist by rotating the flow control knob. (see page 5 “H”)
Getting Started
Please observe manufacturers handpiece maintenance instructions for
handpiece longevity.
iM3 Dental Systems

iM3 Distilled Water and CLS Enviro Solution Supply
Each iM3 dental system is supplied with an amber or clear water bottle which should be filled only
with distilled water to assist in preventing mineral or bacteria build up in the handpieces. This water
bottle supplies the high speed handpieces, 3 way air water syringe and ultra sonic scaler coolant
outlet .
The CLS Enviro Solution supply and water system allows you to choose between distilled water or
CLS Solution at the flick of a switch, depending on the dental procedure you wish to perform. The
CLS solution contains chlorhexidine which is light sensitive and should be kept in the amber bottle
provided.
The coolant system for your iM3 dental system, has been preset at 25 psi.
Refilling Coolant Bottles
To refill the distilled water or CLS solution, flip the pressure switch on your dental system to OFF depressurizing the system. After the system has been depressurized, unscrew the bottle and refill
with either distilled water or CLS Solution. After filling the coolant bottle screw it back into the holder
and flip the pressure switch to ON, repressurizing the system. DO NOT OVERTIGHTEN THE BOTTLES.
Please Note: When the day’s dental procedures are complete, flip the ON/OFF pressure switch to
the OFF position, depressurizing the coolant bottles for storage.
Cleaning
Bottles maybe sterilized with ethylene oxide or by chemical sterilization.
9
On / Off pressure
switch
CLS Solution in
Amber bottle
Ultrasonic Scaler
coolant outlet
Distilled water in
clear bottle
Here’s what Dr Jeanie Hawkins, DVM, Diplomat AVDC had to
say about CLS Solution and the Auto Flush System…..
“Having CLS Solution at my fingertips to flush periodontal pockets is a real plus.
iM3® is the only Company to address the problem of cleaning the airlines and high
speed handpieces of scalers by using a moment button to release CLS Solution
into the airline.”
iM3 Dental Systems

10
iM3 Filtration System
Water and CLS Enviro Solution Supply
Inline filters in the supply bottles help prevent particles from entering the system and
blocking handpieces. These filters are located in the distilled water and CLS Enviro bottles.
The inline filters will need to be checked and replaced if they appear dirty.
The use of distilled water is mandatory in the water bottles, as local water may clog the
system and can corrode the brass valves in the system, apart from the risk of a bacterial
build up.
Note: Failure to use distilled water will void
the warranty.
V
O
I
D
iM3 CLS Flush System
The turbine in most high speed handpieces continues to revolve for a few seconds after use
and acts as a miniature centrifugal pump, sucking back air and water containing mouth
viruses and bacteria into the head of the handpiece. The CLS flushing system can help to
control this by supplying a quantity of CLS Solution into the air line of the high speed handpiece head, helping to sanitize the air line and handpiece.
To activate the flush, remove the High Speed Handpiece from its holder and press the CLS
flush button (Page 5 “F”) for one second. This will inject 1-2cc of CLS Solution into the air
line. Press the foot pedal, holding the handpiece away from yourself and the dental system,
as the CLS Solution is forced through the head of the handpiece under pressure. Excess
CLS Solution will return down the exhaust line and be collected in the handpiece exhaust
collection container.
CLS Solution should remain soaking in the handpiece for 2 minutes, prior to reactivating the
handpiece.
Note: The CLS flush system will never replace autoclaving of handpieces inbetween patients to ensure complete sterilization—see page 22
Note: The use of other chlorhexidine solutions may cause crystal deposits
in handpieces and valves. Use of such solutions will void the warranty.
Do not dilute CLS beyond the recommended label instructions, as it may
result in crystal deposits forming and block handpieces and valves. Chlorine
in water will cause chlorhexidine to flocculate—use only distilled water.
iM3 Dental Systems
11
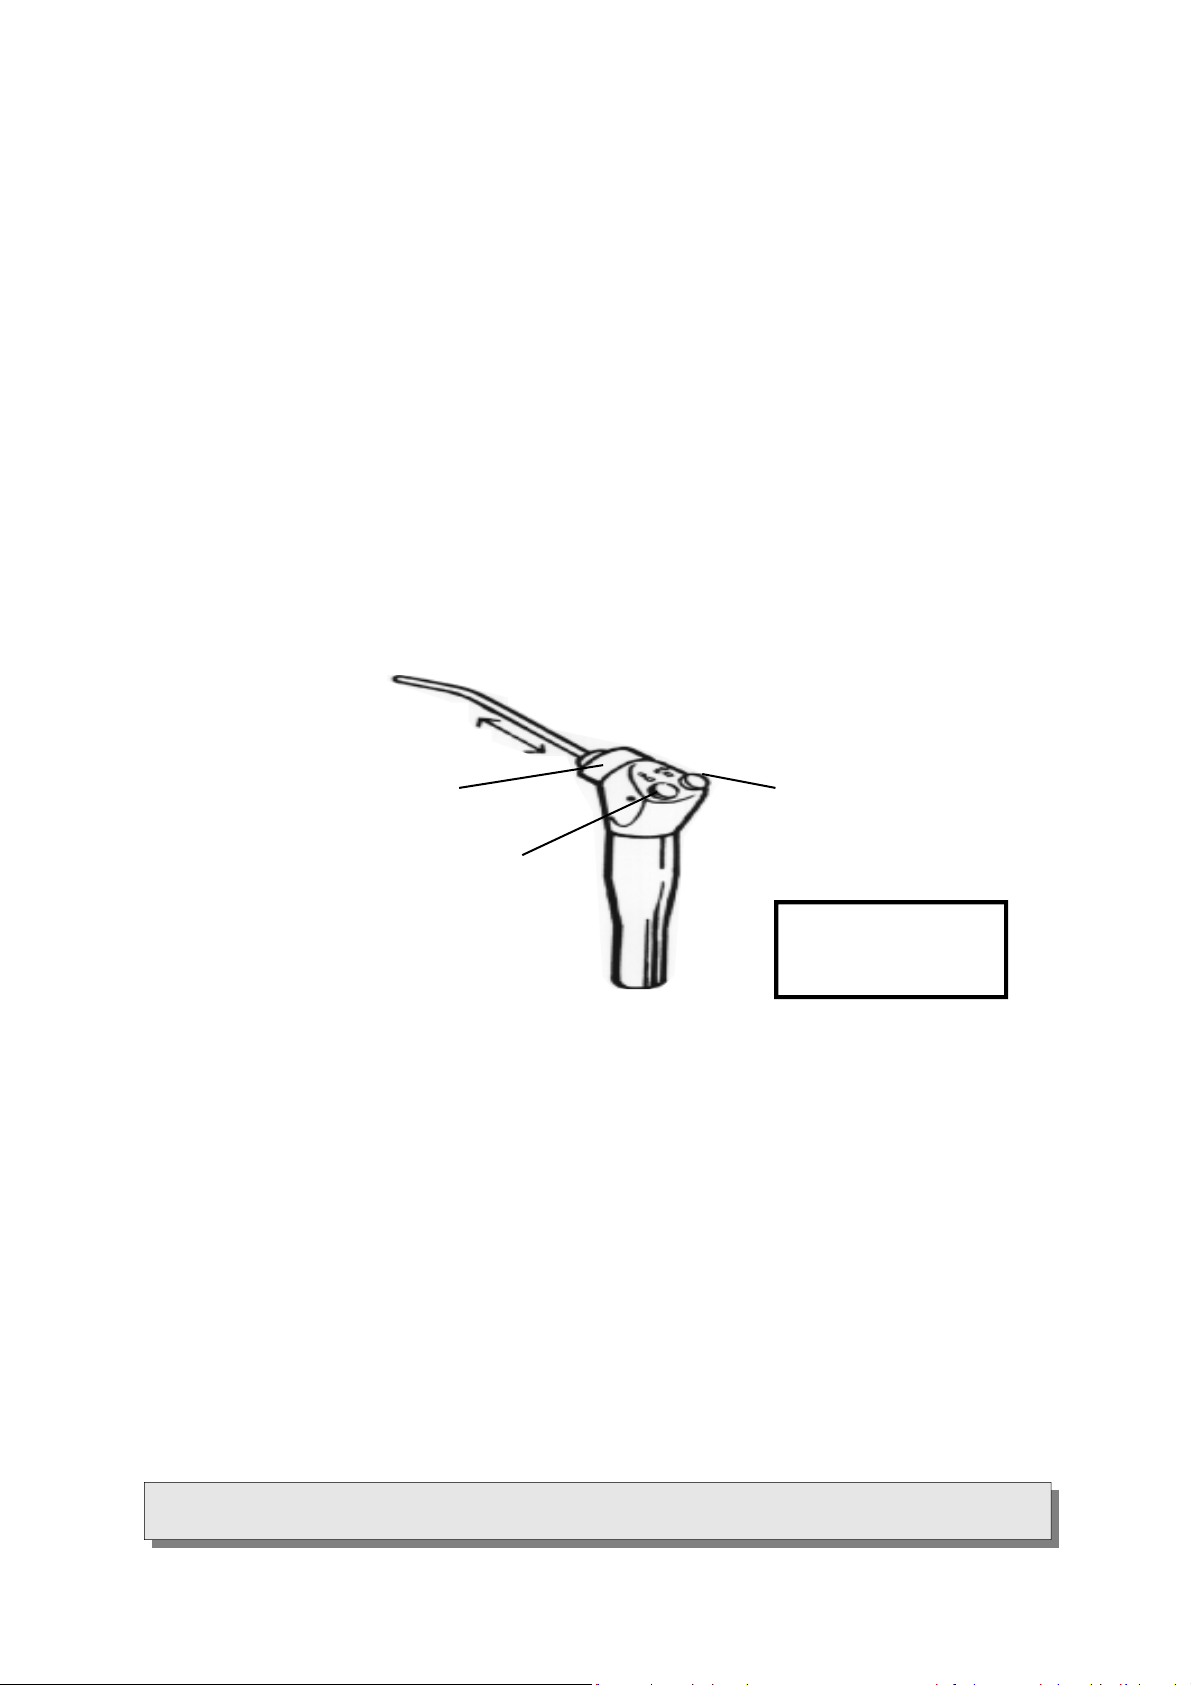
3 Way Air/Water Syringe
Right-hand button for air (a) and the left-hand button for water (b) and both for a fine mist
(a & b).
The 3 Way Syringe is ideal for flushing away debris during prophys or drying areas during
endodontic procedures.
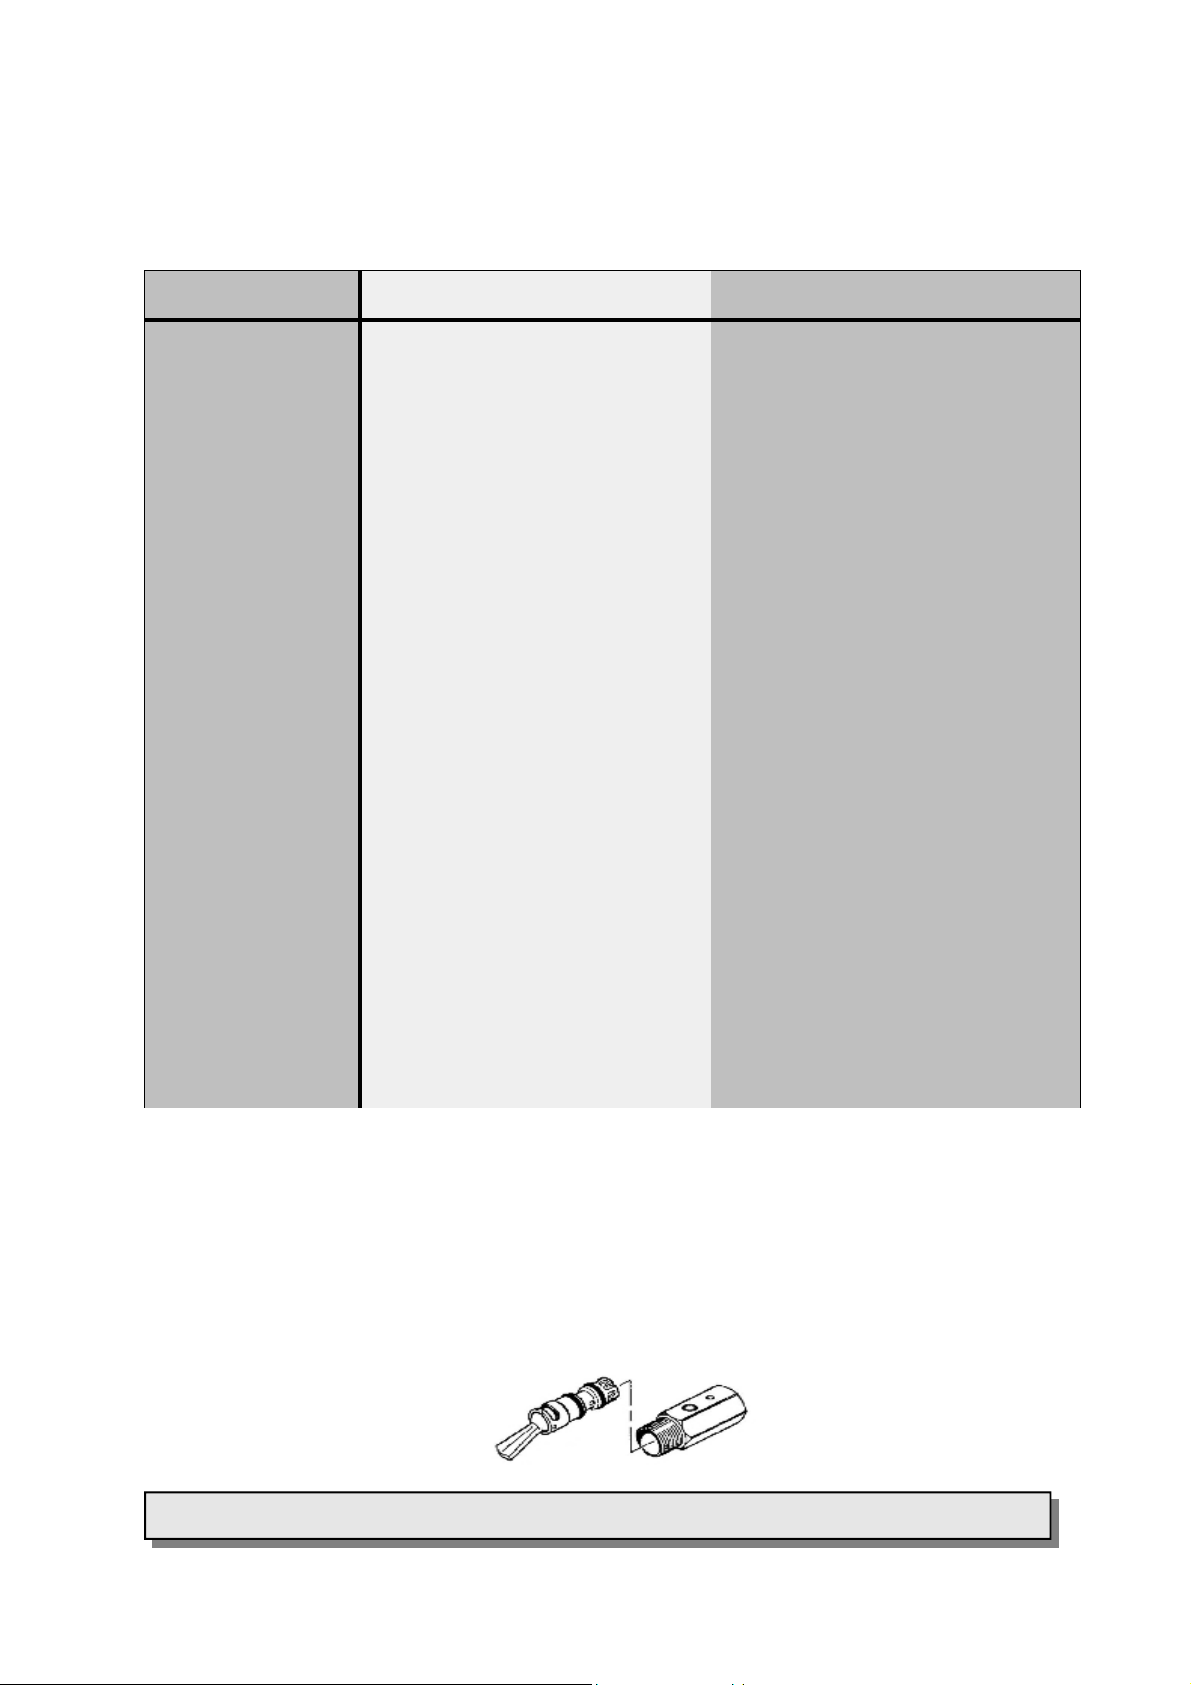
Tip Removal
The tip of the 3 Way Syringe may be removed for cleaning and autoclaving.
Simply depress the outer ring housing (c) and remove the tip. (See diagram below).
(c)
(b)
(a)
(a) Air
(b) Water
(c) Outer Ring Housing
Ultrasonic Scaler Coolant Outlet
The Ultra Sonic coolant outlet is located on the back of the control box.Page 6 #2
This outlet provides coolant under pressure for an ultrasonic scaler. Water or CLS can be
selected on the GS Deluxe.
iM3 Dental Systems

12
iM3 Advantage Low Speed Handpiece
The low speed handpiece features include a light weight balanced profile and
smooth swivel action. Its vane type power system is quiet and virtually vibration
free. The motor accommodates both doriot or ISO heads and its powerful torque is
suitable for all low speed procedures.
iM3 low speed handpieces feature a 5 blade turbine for greater torque, not found on
other LS handpieces. iM3 5BT
Operation Recommendations
Air pressure The dental unit air pressure
should be adjusted to be
tween 35-50 psi (normally 40
psi). See page 19
Lubrication To assure optimal
performance and life the
handpiece should be
lubricated daily with Triflow®
Teflon lubricant. Instructions
for lubrication are found on page
20.
Air supply Moist or dirty air from the
compressor can cause damage.
Check the regulator filter regularly. If dirt or moisture is present, replace the regulator filter
and bleed the system, to remove
water or oil.
Installation Instructions
1. Preset the air pressure between 35 and 45
psi, normally 40 psi (see page 19)
2. Connect the low speed handpiece to the
grey handpiece line
3. Fit the 4:1 green straight nose cone. Attach
the Blue R&R oscillating prophy head
4. Depress the foot control fully to operate the
low speed handpiece
Note: Polishing should be carried out at 5,000 rpm or less. This can be
accomplished by running the motor at full revs (20,000 Rpm) and use a 4:1 re-
duction head (green ), to achieve 5,000 revs, maintaining torque.
iM3 Dental Systems

iM3 Low Speed Handpiece Attachments
(1) 4:1 Advantage Straight Nose Cone Attachment Green Band
The reducing head is designed for polishing (prophy). The speed of the polishing
cup or brushes should be maintained at less than 5,000 r.p.m. The reducing
attachment therefore allows the motor speed and torque to be maintained while
reducing the polishing speed.
(2) 1:1 Straight Nose Cone Attachment Blue Band
For (HP burs) and the use with the iM3 rodent kit.
This includes a soft tissue protector with diamond
bur and diamond disc.
(3) Diamond Saw Attachment
This saw blade may be single or double sided
and operates in the 1:1 attachment blue band
straight nose cone on the low speed handpiece.
It should always be used with a guard.
(4) R&R Blue Oscillating Prophy Cups
iM3 disposable oscillating prophy head. For use
On a 4:1 (green band) straight nose cone (SNC).
Won’t trap muzzle hair, or generate excessive heat.
(iM3 preferred choice - Code L7465)
(5) Prophy Paste
iM3 recommends the use of iM3 R&R individual tub
prophy paste. The paste contains no fluoride or flavor oils.
It is a medium grit suitable for use with the R&R prophy cups.
13
iM3 Dental Systems

14
Advantage Low Speed Motor and 4:1 straight Nose Cone
Fitting R&R Prophy Cups (L7465)
Place the R&R prophy angle over the
chuck housing on the Green 4:1 SNC
making sure the slot in the R&R lines
up with the small screw in the side of
the chuck housing.
See picture to right.
iM3 Blue 1:1 straight Nose Cone L6860
See operating instructions supplied with iM3 low speed handpiece
Placing HP burs or doriot attachments in the iM3 low speed handpiece fitted with a 1:1
straight blue nose cone.
1. Hold the handpiece and depress the chuck housing ring by gently twisting and
pressing it toward the body of the handpiece ¼ turn to the right.
2. Place the HP bur or doriot attachment fully into the chuck housing .
3. Return the ring to its original, “locked” position by twisting ¼ turn to the left.
Removing Handpiece Bur or Doriot Attachment (R&R prophy head)
1. Holding the handpiece in your hand, depress the chuck housing ring toward the body of
the handpiece while twisting ¼ turn right to open the chuck.
2. Push-pull the handpiece bur and remove from the chuck. Pushing the bur in before
pulling out will aid in removal of the bur. Leave the chuck housing ring in the locked posi-
Chuck Housing Ring
pictured in the locked
position.
Oil Hole
iM3 Dental Systems
Turn to the
left to lock
SNC 1:1 with
HP Bur fitted
Turn to the
right to unlock
High Speed Handpiece
Push Button and Flip Top Mid West Handpieces.
The High Speed Handpiece is designed to operate at pressures between 30-35 psi at the
handpiece and at speeds of up to 350,000 rpm. A very light touch is necessary as
handpieces operates with very low torque and high speed. Pressure on the handpiece of
30gms (1ounce) or more, will cause the bur to stall.
Note: All handpieces should be lubricated prior to use.
15
Bur Replacement - Push Button (standard)
1. Press firmly on back of cap.
2. Gently insert the bur.
3. Release the back of cap
4. To remove bur repeat above—pushing bur in first
while depressing the pushbutton, then pull out.
1.
Bur Replacement - Flip Top MidWest (optional)
1. Lift flip bar up until it stays open (past midway)
2. Insert FG Bur all the way.
3 . Lower flip bar to lock bur in place.
4. To remove bur, repeat as above pushing bur in first
before pulling out.
Note: picture shows flip bar in the “open position”
Keep the lever in the closed position at all times during use.
1.
!!! WARNING !!!
♦ Do not use excessive force while inserting and locking bur.
♦ Never operate Handpiece without a bur in the chuck.
♦ Air pressure must not exceed 35 psi.
♦ Autoclave according to instructions. Do not exceed a temperature of 275
♦ Check bur is lock securely in place, before use.
♦ Do not use bent or distorted burs.
♦ Lubricate daily, (see page 19).
♦ Always insert the burs to the full length of the chuck.
♦ When removing burs always push in before pulling out.
o
F (135oC).
iM3 Dental Systems
16
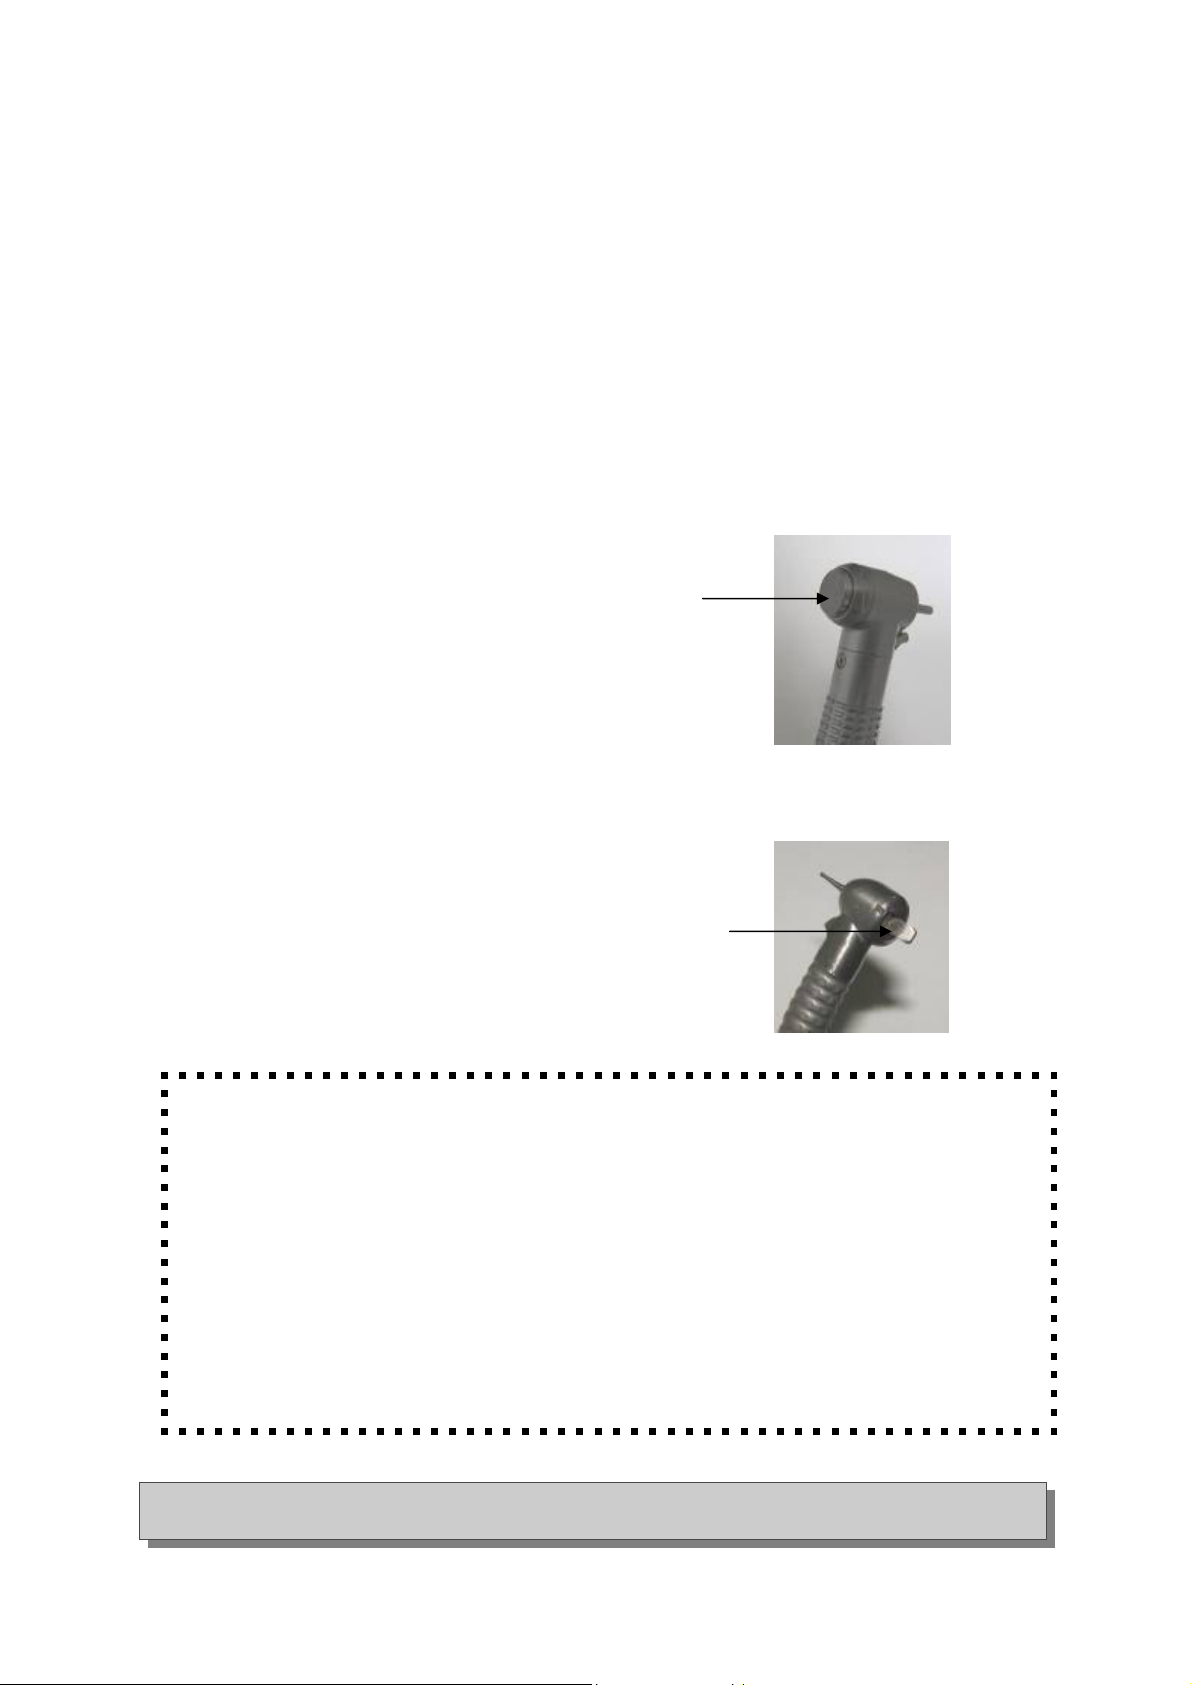
High Speed Handpiece Fiber Optic Bulb Replacement
Fiber Optics offers the advantage of a bright light directly over the work surface. The bulb
switches on and off automatically when the foot control is depressed. Fibre optic lights in
the high speed drill is an option on both the GS and GS deluxe dental units.
Bulb Replacement
1. Disconnect power source.
2. Unscrew the connector and remove handpiece from hose.
3. Slide the handpiece connector nut back over the gray hose to expose the
bulb housing. (See Fig 1).
4. Slide the bulb all the way out from bulb housing and remove
from the power cable. (See Fig 2).
5. Insert new bulb into the power cable and slide it back into the bulb
housing. Slide over the connector nut and screw back
onto the handpiece. (See Fig 3).
FIGURE 1.
FIGURE 2.
FIGURE 3.
Connector Nut
Power Cable
iM3 Dental Systems
17
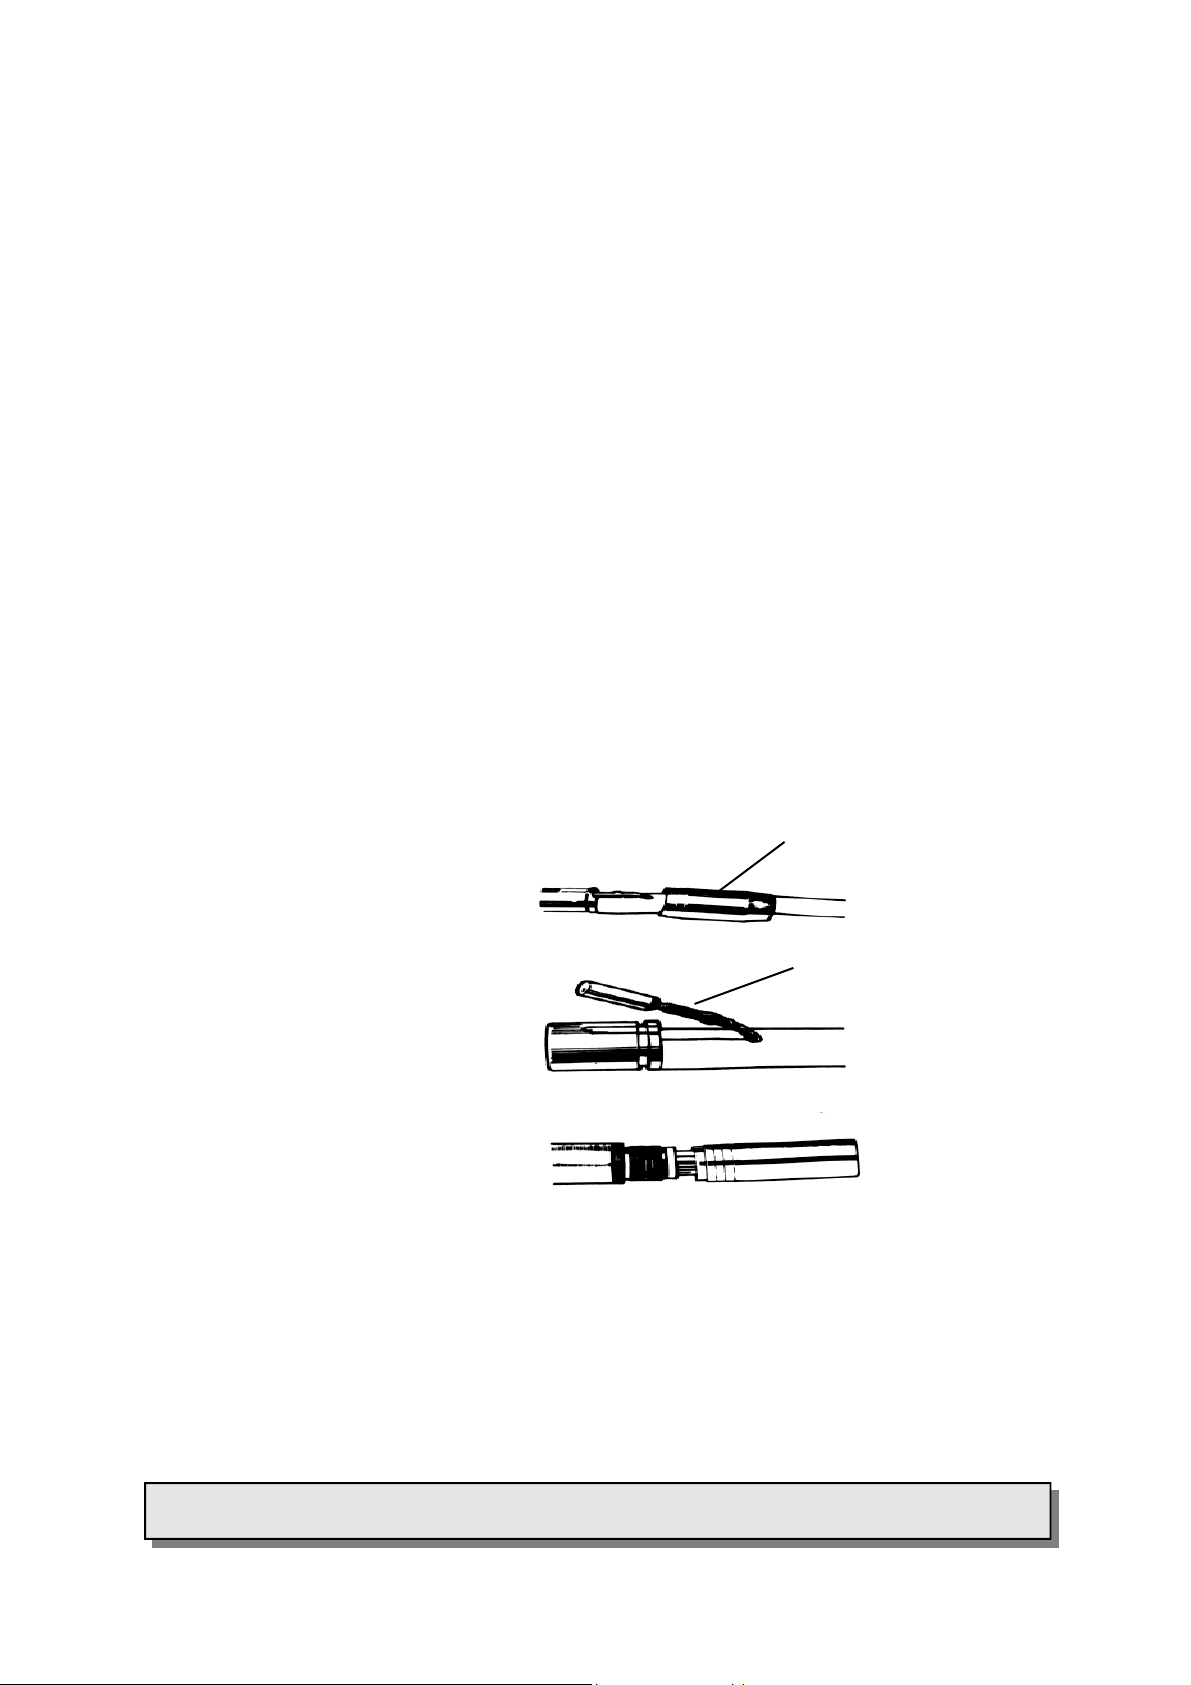
iiiiM3 Autoclavable Bur Kits
There are three Bur Kits in the iM3 range, the F.G. Dog (Friction Grip), F.G. Cats, and H.P.
(Handpiece Burs). Each kit contains 10 burs of various sizes and applications. Each bur
has been selected by a specialist Veterinary Dentist. Each iM3 Bur Kit comes complete
with a suggested application guide. Each bur carries individual re-order codes and can be
ordered in packs of five. The blue holder is autoclavable and prevents the burs from falling
out.
Feline FG Bur kit
(Order code) D7530
The iM3 Rabbit/Rodent Soft tissue kit comes complete with Long diamond bur and soft
tissue protector and diamond disc with safety shield. Complete Kit (optional)
Code: AUS D2245 & US D9245
The soft tissue kit should be used on an iM3 1:1 straight nose cone - Blue
Canine FG Bur kit
(Order code) D7510
HP Bur kit
(Order code) D7540
iM3 Dental Systems
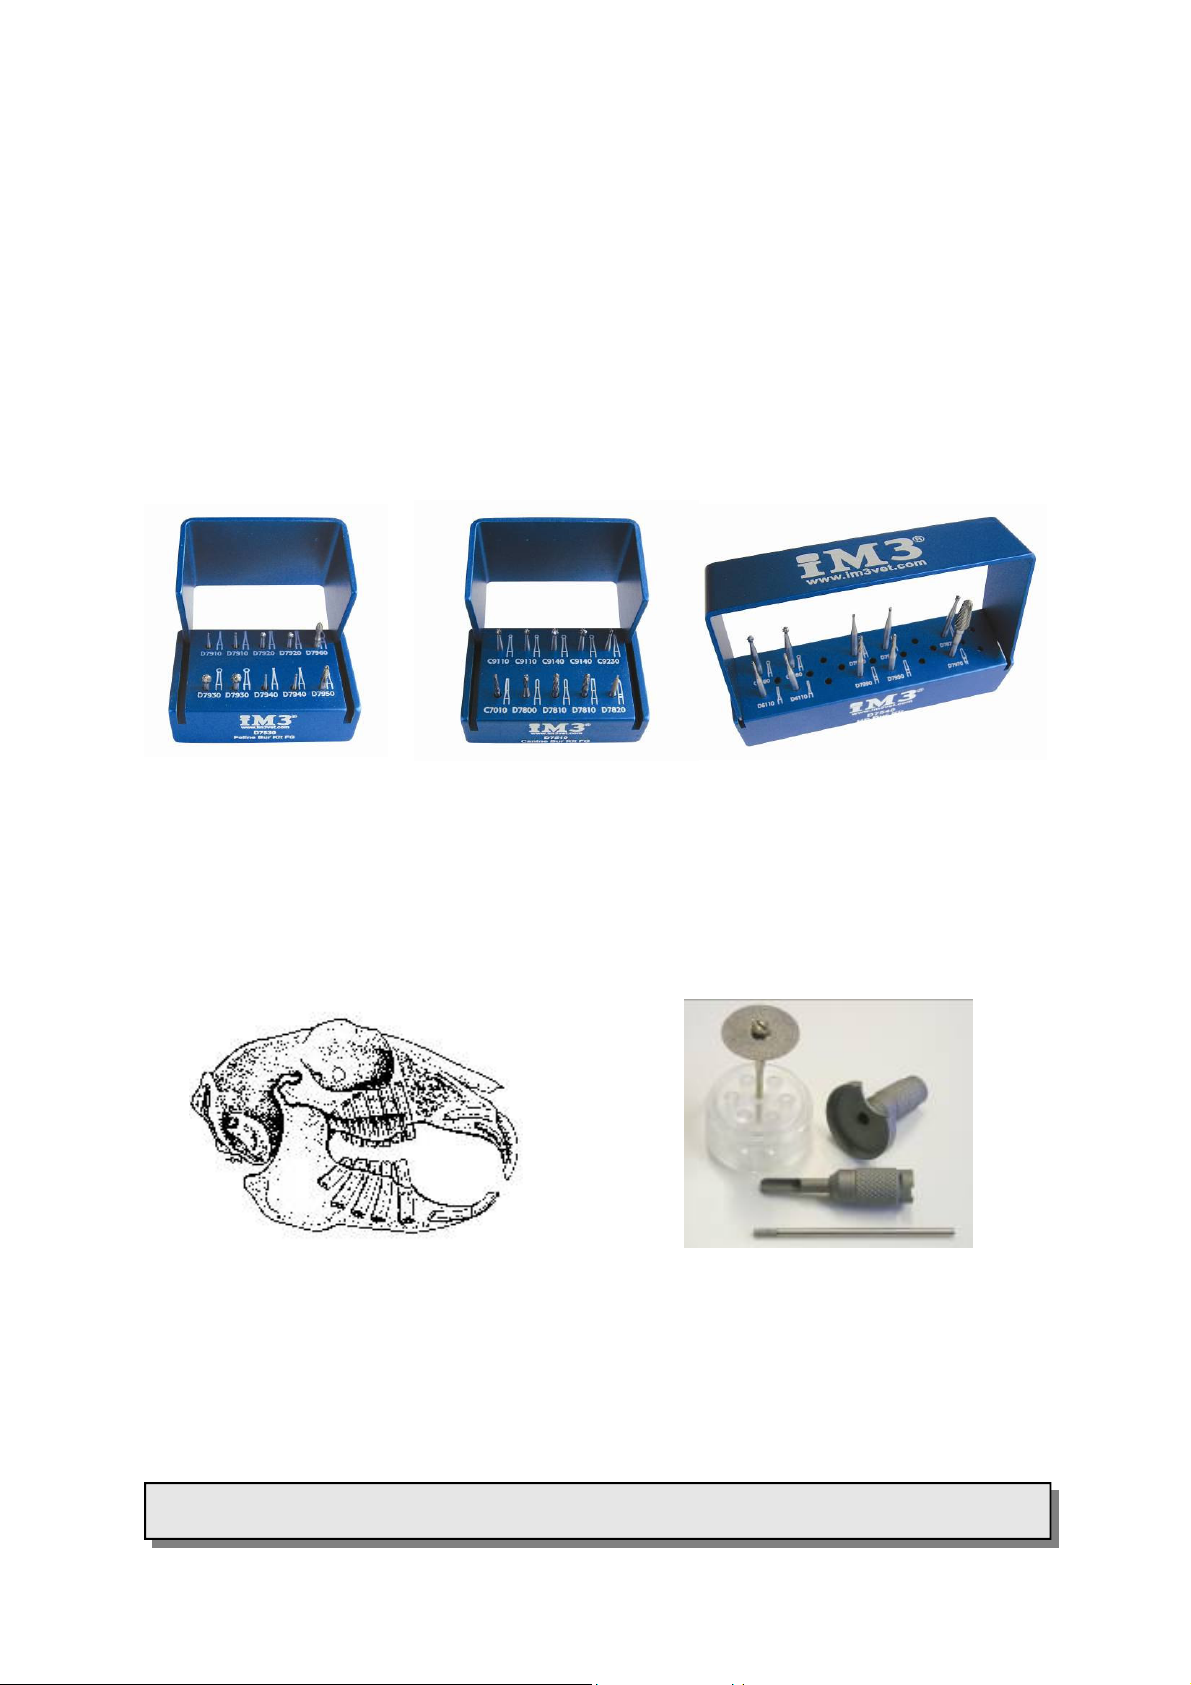
iM3 Handpiece Pressure Adjustment
Handpiece Pressure Adjustment
Each Handpiece should be set to a specific pressure. The Handpiece Pressure Adjustment is located
underneath and to the rear of each Handpiece holder, and is a small knurled knob.
Turn your unit on and select the Handpiece (high or low speed) to be adjusted, remove from a holder
and depress the foot pedal. Turn the adjustment knob until the desired pressure is displayed on the
handpiece pressure gauge pictured below.
Low speed handpiece holder
PRESSURE IS READ
ON THE HANDPIECE
PRESSURE GAUGE
Low speed pressure
adjuster
3 way syringe
holder
Low Speed Handpiece
35-45 p.s.i.* (normally 40 p.s.i.)
High Speed Handpiece
30-35 p.s.i.* (normally 35 p.s.i.)
NOTE: Check that the pressure on the Compressor Regulator is set at 70 p.s.i. or 5 BAR.
18
iM3 Dental Systems

Lubrication of Handpieces
All handpieces should be lubricated regularly. We
recommend the use of Triflow Teflon Lubricant® before
or after use, however check with the handpiece
manufacturers recommendations. The foot pedal
should be depressed for 5-10 seconds after oiling to ensure
the lubricant will reach the turbines and
working portions of the handpiece.
The lubricant is placed in the smaller of the 2 large holes, (a).
“Air entry hole” at the base of the handpiece.
(a) Air entry hole (smaller of the 2 large holes)
OIL here
19
Water intake hole
Chip air hole
(b) Exhaust hole
Maintenance instructions are printed on
the back of the dental machine
NOTE:
DON’T FORGET TO DEPRESS
THE FOOT CONTROL AFTER
OILING TO ENSURE LUBRICANT
REACHES THE TURBINES.
iM3 Dental Systems

20
Sterilization
HIGH SPEED HANDPIECE
Handpieces should be thoroughly cleaned to remove any foreign particles, eg; blood, saliva
etc. Make sure that the turbine cartridge and head cavity are clean before autoclaving. If
autoclaved with bloody particles in the turbine housing, autoclaving will cause particles to
be scorched and damage to the turbine may result.
The exterior of the handpiece may be cleaned with any good surgical disinfectant. Be sure
to rinse and dry thoroughly. Lubricate handpiece turbine with Triflow Teflon Lubricant.
Note: The neoprene washer or connections gasket should be removed prior to autoclaving.
After autoclaving, re-lubricate when handpiece is cool.
Do not allow handpiece to sit in autoclave bag overnight.
LOW SPEED HANDPIECE
Prepare handpiece and attachments for sterilization by carefully cleaning the exterior
surface. Thoroughly scrub, rinse and clean away any residual solution and particles.
Remove moisture with a towel or use air from the 3 way air water syringe.
1. Prior to sterilization, lubricate the handpiece using Triflow Teflon Lubricant.
HANDPIECES: Apply oil through the handpiece air inlet tube. (see page 19)
ATTACHMENT: Remove attachment from handpiece and oil through both end openings.
Note: After lubricating items, assemble and operate for a few seconds to expel excess lubricant.
2. Seal items in sterilization tubing bags. Make sure to remove bur from handpiece prior to sealing.
3. Place handpiece or attachments in sterilization trays of dry heat sterilizer or steam autoclave. Do
not exceed temperatures of 275°F or 135°C. Sterilize according to manufacturers instructions.
4. After sterilization cycle is completed, allow handpieces and attachments to cool down then
lubricate handpiece and attachments thoroughly. Make sure to use a different container after
sterilization cycle, to prevent recontaminating.
Note: Lubricate handpieces using Triflow® Teflon Lubricant after cooling down, do not
allow handpiece to sit in sealing bag overnight or for a long period. Immediately operate
handpiece as described in the following step.
5. After lubricating items, insert bur into handpieces and operate for a few seconds to
remove excess lubricant.
Do not autoclave the high speed handpiece with a bur in the chuck.
iM3 Dental Systems

21
The Need to Flush HP Air Lines
A BBC Panorama television program highlighted some very disturbing facts relating to Human Dentistry
and the HIV virus (FIV and FeLV behave in a similar fashion).
NOTE – Universities store their research FIV virus in glycerine, the main ingredient in Prophy Paste.
1. High Speed Hand Piece Turbines still spin after the drive air has stopped (foot taken off the foot control) and act as a centrifugal pump and suck back air and water plus debris into the turbines.
2. The human aids virus can live in debris in Dental Hand Pieces for as long as 2 months.
3. An article in the British Medical Journal “the Lancet” showed that HIV Virus may live in the striations in
Stainless Steel hand instruments.
4. Dr Leigh West-Hyde from Davis University in California said in the Manual of Small Animal Dentistry
“one drop of saliva may contain up to 600,000 Bacteria” “a Spoon Excavator of dental Plaque may contain an average of 200 million Bacteria”. “The under surface of a fingernail can harbor residual blood
and bacteria for up to 5 days when gloves are not routinely worn”.
5. Autoclaving is the only sure way to sterilize Dental Instruments and Hand Pieces.
6. Feline aids virus is being reported in an increasing number of cats – up to 30% of the sick population.
7. Prophy heads washed under the tap after use still showed signs of blood coming from the drive mechanism (TV program).
iM3 has developed a new solution and method of dispensing it into the air and water lines of Veterinary
Dental Units. It may also be used in the water system of Ultrasonic Scalers.
CLS is designed to mask the smell coming from animal’s mouths, drilling of tooth enamel and bone. It will
reduce bur cutting time by up to 10% and improve bur life.
A 0.12%Chlorhexadine (CHX) has been added as a preservative as the solution contains Glycerine. The
CHX at 0.12% is the strength recommended by most veterinary dental experts for use in the mouth with
animals. The CLS solution uses distilled water and will not clog valves, block HP, or lines in Dental System, whether air driven or ultrasonic.
The new delivery and flushing system is designed to deliver CLS solution to the HP. There are certain
instances where CHX should not be used, in the ear etc. In this instance the system is then switched back
to the standard water supply, or for prolonged periods in cats, as they are sensitive to CHX, always pack
the back of the throat to prevent debris or solution going down the throat.
Flushing with CLS is through the HP air lines (not water lines as normal) a moment switch is held of 1
second, approximately 1ml of CLS solution then enters the HP air lines. The HP is removed from its
holder and the foot control pushed. This will flush the CLS through the HP, any orifices in the HP head
and then return the bulk of the solution through the exhaust line to the collection bottle.
For complete bacterial removal, dismantling and autoclaving is the only sure method. Remember one new
Prophy cup per patient, we recommend R & R oscillating prophy heads.
The Glycerine in the CLS solution will also aid in the lubrication of the turbines. Tri flo Teflon lubricant
should still be used for lubrication.
iM3 Dental Systems

Handpiece Maintenance
All Handpieces have a working life which can be extended by maintaining the
correct operating pressures and speeds as well as adequate lubrication.
The working life of most Handpieces turbines is 12 months, however, this will
depend upon the degree of care taken and the amount of use.
Preventative maintenance will ensure a working Handpiece at all times.
Handpiece Daily Weekly Monthly Yearly
22
iM3 Low
Speed
Handpiece
Oil in smaller of
2 big holes.
Depress the
foot pedal for
10 seconds to
ensure the oil
reaches the
Turbine
(page 19)
iM3 High
Speed
Handpiece—
as per the instructions for
the Low speed
above.
Oil AM or PM
before or after
use.
2 drops
Use Triflow®
Teflon Lubricant.
Oil AM or PM
before or after
use.
2 drops
Oil with Triflow®
Teflon Lubricant.
Replace turbine
Replace turbine
and ‘o’ rings
and sealing
gasket. If worn
and ‘o’ rings
and sealing
gasket. If worn
Prophy Head
R&R Oscillating
Dispose of prophy
head between patients to prevent
cross contanimation
iM3 Dental Systems

23
Silent Hurricane Compressor
Oil Free
The compressor is perhaps the most crucial part of any dental system as it supplies the
valuable air needed to run handpieces and pressurize the water and cooling system.
The regulator/pressure gauge should be set to read 70 p.s.i./5 BAR. The tank pressure
gauge should read 110 p.s.i./7.5 BAR. See page 27
Operating the Silent Hurricane Oil Free Compressor
1. Connect the unit to the appropriate voltage.
2. Check that the air tank on/off valve is closed. See page 24.
3. Switch unit on at the mains (power outlet).
4. Turn unit on at switch situated on top of the pressure switch. See page 24.
6. Motor should now run and will stop running when 110 p.s.i./7.5 BAR. has been reached.
7. Connect the grey air line from dental unit to the compressor and turn air tank valve to
the ON position. See page 28
Identifying Air Leaks
To ensure the Silent Hurricane Compressor Motor is not subjected to higher than normal
operating temperatures, each iM3 Dental unit should be checked for air leaks at regular
intervals, the easiest way to check for air leaks is to pump the compressor tank up to 110
p.s.i./7.5 BAR. and turn the motor off. Make sure the air line to the dental head is
connected and the tank valve left in the open position with the pressure switch for the water
bottles also turned on.
Once the tank has been pumped to 110 p.s.i./7.5 BAR., check the pressure in the tank 10
minutes later. If the pressure has dropped more than 10% during that time then the unit is
leaking air which should be identified and remedied to ensure the compressor motor does
not overheat due to excessive running caused by the air leak.
Model: Silent Huricane Oil Free compressor
Voltage: 220-240 50Hz
900W
Maximum operating Pressure 110psi (770KPa)
Manufactured By: iM3 Pty Ltd, Sydney Australia.
iM3 Dental Systems

iM3 Silent Hurricane Oil Free Compressor
Circuit breaker located on the side of Black electrical box.
Push to Reset
Air to dental machine ON/
Compressor ON/OFF
pressure switch
I = On
O = Off
OFF tap is on when in line
with outlet
Pictured in Off/closed position
24
Oil Free Compressor motor
under cover
Air inlet filter
Rubber air line
Non return
valve
Black electrical box
with circuit breaker
Outlet pressure regulator
Regulator pressure
gauge
Regulator drain bowl
Air tank pressure
gauge
Compressor air tank
Maintenance Instructions
Tank drain under
middle of tank see
P.26
iM3 Dental Systems

25
Silent Hurricane Compressor
Adjusting Regulator Air Pressure
With the Dental Unit pressurised and air lines turned ON, the black knob on top of the
regulator is pulled up from the locked to the free position to adjust air pressure (see picture
page 26). Depress the black knob after setting to lock pressure adjustment.
The regulator gauge registers working or air line pressure which may be increased by
turning clockwise and lowered by turning anti clockwise.
The pressure air line gauge will register the working pressure, which should be
70 p.s.i./ 5BAR..
Warning
Unit starts automatically. Isolate power supply and relieve air
pressure by opening tank ON/OFF valve prior to commencing
non electrical service tasks.
This appliance is not intended for use by persons (including children) with re-
duced physical, sensory or mental capabilities, or lack of experience and
knowledge, unless they have been given supervision or instruction concern-
ing use of the appliance by a person responsible for their safety.
.
Danger
High voltage used on this equipment.
Isolate from mains before removing any covers, which should
only be carried out by a qualified electrician .
Ensure power outlet is adequately rated for this unit.
iM3 Dental Systems

Silent Hurricane Oil Free Compressor Maintenance
Feature Daily Weekly Monthly Yearly
26
Silent
Hurricane
Compressor
Regulator Auto Drain
Filter
Regulator Air Pressure
To drain condensation,
first reduce air pressure
in tank to 10psi by
opening air ON/OFF
valve. Drain moisture
from main compressor
tank by opening the
valve in the bottom of
the white tank slowly to
prevent the moisture
from spraying.
Automatic,
when tank
drained of
moisture
Check that
correct air
pressure is
being
delivered.
Replace regulator
See Adjusting Regulator Air Pressure on Page 24.
Change air inlet
filter on compressor motor.
filter.
Contact iM3 for your yearly compressor service kit.
Compressor air regulator adjustment knob
Air ON / OFF (valve pictured
in ON or open position)
Air inlet quick disconnect line, supplying air
to dental machine
Compressor tank drain, located under white air tank—open slowly
iM3 Dental Systems
Handpiece Trouble Shooting
High Speed Handpiece
PROBLEM CAUSE SOLUTION
27
No Water Flow in
Handpiece
Mineral
Accumulation
Use of Chlorhexidine 1. Most brands of Chlorhex will de-
1. Compressor not ON.
2. Water Flow Control not ON (P4E).
3. Water/CLS Bottle Empty.
4. Check for a ‘kink’ in the water line.
5. Check if 3 way syringe has Water.
6. Use of tap water, blocking water
valves.
7. Low regulator pressure.
1. Use of tap water - mineral or
chemical action blockage will
usually take 3-4 years to occur.
2. Verdigrease (Green Slime) build
up in brass water valves due to
chemical reaction with tap water.
posit out of solution and block
valves, etc. CLS is designed to
be used in its diluted strength
without depositing.
NOTE: Do not dilute CLS beyond
its label recommendations or it
could result in deposits.
2. Chlorine in tap water will cause a
flocculation and block filters and
valves
1. Turn compressor ON and check
that ON/ OFF tap is in the ON
position.
2. Turn water control to ON.
3. Fill water/CLS Bottle(s).
4. Check lines and pressure.
5. If yes, lack of water must be in the
valves or the handpiece. The 3 way
syringe is the quickest way to check
for water.
6. Valves will need replacing.
7. Check regulator is set at 70 PSI.
1. Pass a fine wire through the water
intake hole. Pass another fine
wire through the hole in the
handpiece head. Pass the wire as
far as possible each way. ‘Blow out’
the loosened mineral deposits.
2. Replace valves.
1. Contact your local Official Service
Center.
2. Contact your local Official Service
Center. Use only distilled water
Cartridge Toggle
Toggle switches become floppy
All iM3 dental units use a unique cartridge system for the toggle switches. The toggles are used to
pressurize the water/CLS bottles and select the low or high speed handpiece. When the o-rings become worn you simply push the cartridge in and turn a 1/4 turn anti clockwise. The cartridge can then
be removed from the valve casing. To install a new toggle, locate the desired position, push and rotate
a 1/4 turn clockwise. New toggles can be ordered from iM3 and installed by the user. Toggles can be
installed in the 12, 3, 6 and 9 o'clock positions. If the toggle is in the wrong position simply remove and
reposition. View this procedure on the iM3 website http://www.compad.com.au/cms/im3vet/pages/
iM_elite_film/222
iM3 Dental Systems

Handpiece Trouble Shooting
Low Speed Handpiece
PROBLEM CAUSE SOLUTION
28
Handpiece
won’t run
Low Speed Handpiece - Straight Nose Cone
PROBLEM CAUSE SOLUTION
1. No or low air pressure.
2. Air line improperly sealed.
3. Inferior oil; too much or excess
more commonly too little oil or
water in the turbine.
4. Broken drive head.
Note new handpieces require a
“Run in time” this can be up to 20
hours of use
1. Check the air line to be sure
the air is turned on and the
line is unobstructed.
2. Reconnect air line to
handpiece making sure the
gasket is fully contracted.
3. See lubrication instructions
on page 19.
4. Contact your local official
Service Centre.
If the motor stops spinning
place a fine screw driver down
the nose and rotate shaft.
Chuck Difficult to
Open or Close
iM3 Inc iM3 Pty Ltd
12119 NE 99th Street Suite 2060 9/31-33 Chaplin Drive
Vancouver WA 98682 USA Lane Cove NSW 2066 Australia
Tel (360) 254 2981 Fax (360) 254 2940 Tel (02) 9420 5766 Fax (02) 9420 5677
1. Chuck housing screw missing.
2. Improper lubrication.
1. Replace chuck housing
screw, contact your local
official iM3 Service Centre.
2. See lubrication instructions, on page 19.
www.im3vet.com
 Loading...