

ILY DaisyChian Quick Start Guide
Daisy Chain Series Quick Start Guide
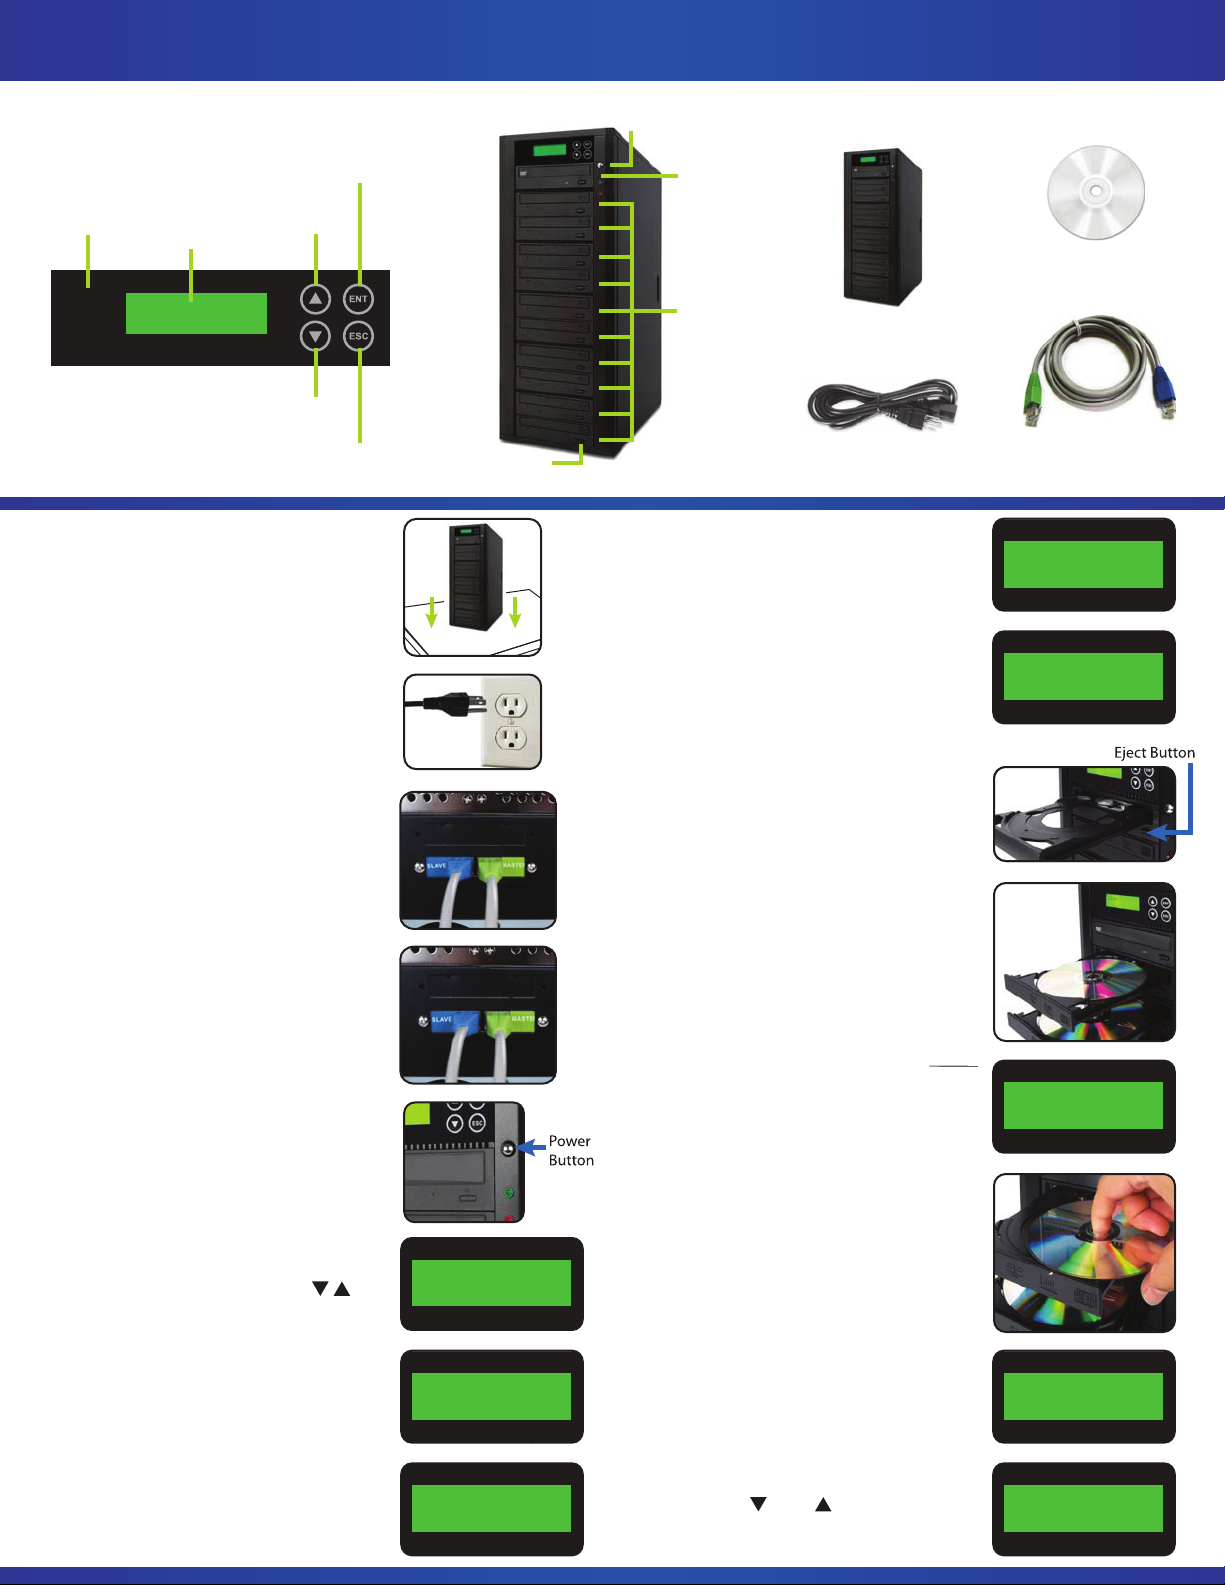
DVD/CD Duplicator Controls:
ENT (Enter)
Button
Scroll Button
Control Panel
LCD Screen
(Up/Next)
Power
Button
DVD/CD
Reader
Package Contents:
Manual
Daisy Chain
Duplicator Manual
Scroll Button
(Down/Back)
ESC (Escape)
Button
Step 1
Remove unit from box and place upright
on a flat surface. Save packing material
for storage and transport.
Step 2
Connect the AC Power cord to all of
the units and plug the other end into an
AC wall outlet.
Step 3
Connect the Green end of the RJ-45 link
cable to the “MASTER” port (sender port)
of the first duplicator tower (back).
Eject
Button
DVD/CD
Writer
Daisy Chain
Duplicator
AC Power Cord
Step 7
Turn ON towers (see Step 5). The LCD
screen will display the total number of
drives detected and the number of towers
detected. When the LCD screen shows "1.
Copy," the units are ready for use.
(Note: The LCD screen shown here is an example
of three 10-target towers linked properly together.
Step 8
To begin the copying process, press the
eject button on the top drive of the first
tower (DVD/CD Reader/Writer Drive). When
the tray opens, place the Master Disc in the
tray and press the eject (close) button to
close the tray.
RJ-45 Link Cable
Total Burner Q’ty 30
Total 3 Stations
1. Copy
Step 4
Connect the Blue end of the RJ-45 link
cable to the “SLAVE” port (receiver port)
of the second duplicator tower (back).
Note: Repeat Steps 3 & 4 if more towers are present
starting with the second duplicator tower.
Step 5
Turn the duplicator towers ON by pressing
the power button located on the front of
each duplicator tower.
Step 6
In order to Set up or Link the Daisy Chain
Duplicators you must first set the link
position by using the arrow keys
select "12. Link Setup'" from the display
menu options. Press ENT. Then press ENT
again when the screen prompts "1. Set
My Position." Using the arrow keys, select
"First" for the first tower and "Last" for the
second tower. Press ENT to confirm selection, then press ESC to return to the main
menu. Turn OFF all towers.
Note: When connecting three or more towers use
“First” for the first tower, “Last” for the last tower
and “Middle” for all of the towers in between.
[Set Up]
12. Link Set Up
[Link Set Up]
1. Set My Position
[Set My Position]
==>First
Step 9
Press the eject button on all writer drives,
on all towers. Place blank recordable CD
or DVD discs in the trays and press the
eject (close) button to close the trays.
(DVD/CD write drives must be loaded with blank
recordable DVD/CD discs. )
Step 10
After completing Steps 8 & 9, the copy
process will automatically begin.
(Copying status will be displayed on the LCD Screen.)
Step 11
Upon completion of the copy process, the
completed discs will automatically be
ejected. Remove all completed discs and
repeat steps 8-10 to continue the copying
process as necessary.
Selecting Source (Optional)
To select between hard drive and reader
drive as the source, select "8. Select
Source" from the main menu and press
ENT. Use the and arrow to toggle
between HDD and ROM.
1. Copy 01:56
30 Discs Detected
[Set Up]
8. Select Source
Source [HDD]==>
HDD: Hitachi 160GB
 Loading...