

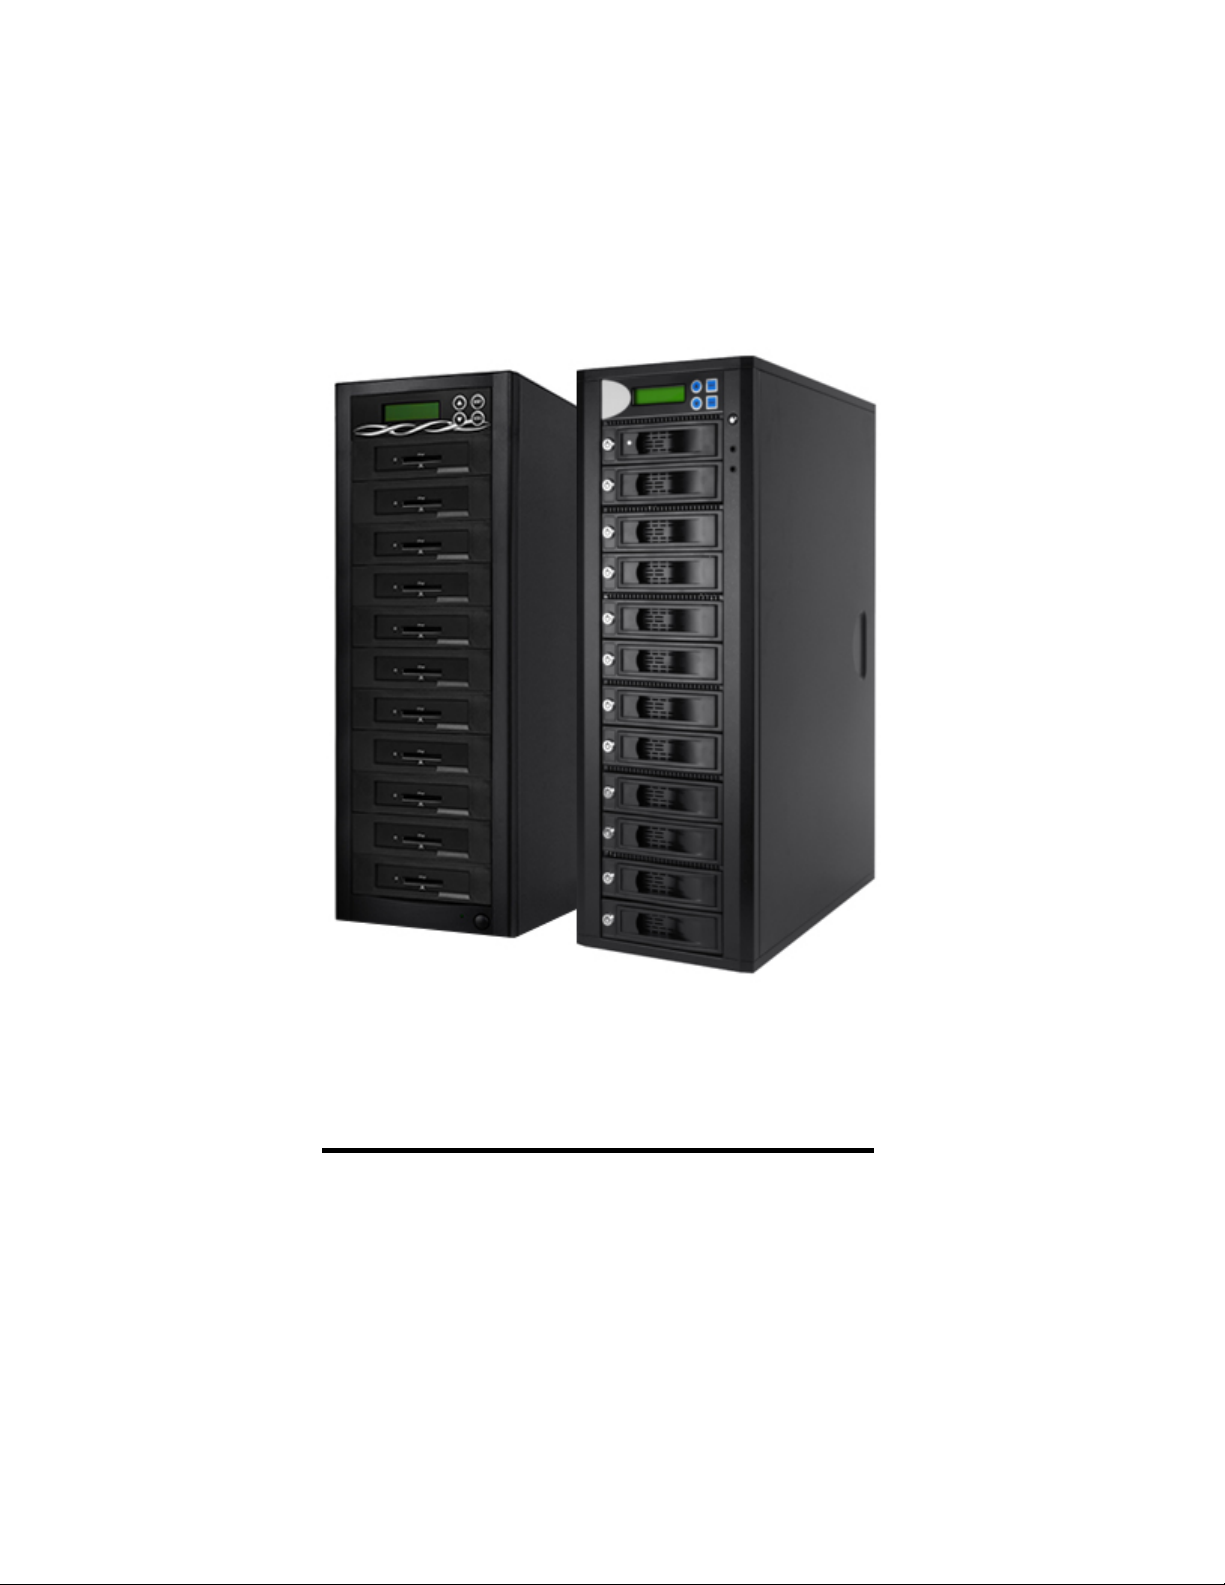
CFast / HDD Duplicator
User’s Manual
Version 3.0

Table of Contents
Chapter 1 Introduction ............................................................. 3
Chapter 2 Control Panel ......................................................... 3
Chapter 3 Functions ................................................................ 4
3.1 Copy HDD ......................................................................... 6
3.2 Async Copy HDD .............................................................. 6
3.3 Compare HDD .................................................................. 7
3.4 Async Compare ................................................................ 7
3.5 PreScan Source ................................................................ 7
3.6 ReScan BUS ..................................................................... 8
3.7 Source Size ...................................................................... 8
3.8 Secure Erase .................................................................... 8
3.9 Overwrite .............
3.10 Setup .............................................................................. 10
3.10.01 Language ............................................................ 10
3.10.02 Copy Size ........................................................... 10
3.10.03 Startup Menu ...................................................... 10
3.10.04 Auto Compare .................................................... 11
3.10.05 Button Sound ..................................................... 11
3.10.06 Device Info ......................................................... 12
3.10.07 System Info ........................................................ 12
3.10.08 Fast Copy .......................................................... 12
3.10.09 Auto Start Drive ................................................. 12
3.10.10 Auto Start Timer ................................................. 12
3.10.11 Tolerance Size ................................................... 13
3.10.12 BootTime Delay ................................................. 13
3.10.13 Quick Compare .................................................. 13
............................................................. 9
3.10.14 Copy with size (1-1Duplicator Only) 13
3.11 Adv Setup ...................................................................... 15
3.11.01 Read Error Skip ................................................. 15
3.11.02 Update Firmware ............................................... 15
3.11.03 Compare Firmware ............................................ 16
.................

3.11.04 Quick Erase HDD ............................................... 16
3.11.05 Full Erase HDD .................................................. 16
3.11.06 H/W Diagnostic .................................................. 17
3.11.07 Load Default ...................................................... 17
3.11.08 Copy HPA ........................................................... 18
3.11.09 Burn In ............................................................... 18
Chapter 4 Basic Troubleshooting .......................................... 19
4.1 LCD .............................................................................. 19
4.2 Error Message ............................................................. 19
4.3 Hard Disk ..................................................................... 19
4.4 Keys ............................................................................. 19
4.5 Firmware Upgrade ......................................................
4.6 Startup/Shutdown ........................................................ 19
4.7 About Copy HPA .......................................................... 19
Appendix A Error Messages List ............................................... 19
Appendix B Firmware Update Via HDD .................................... 20
. 19
SATA HDD Duplicate Controller Manual
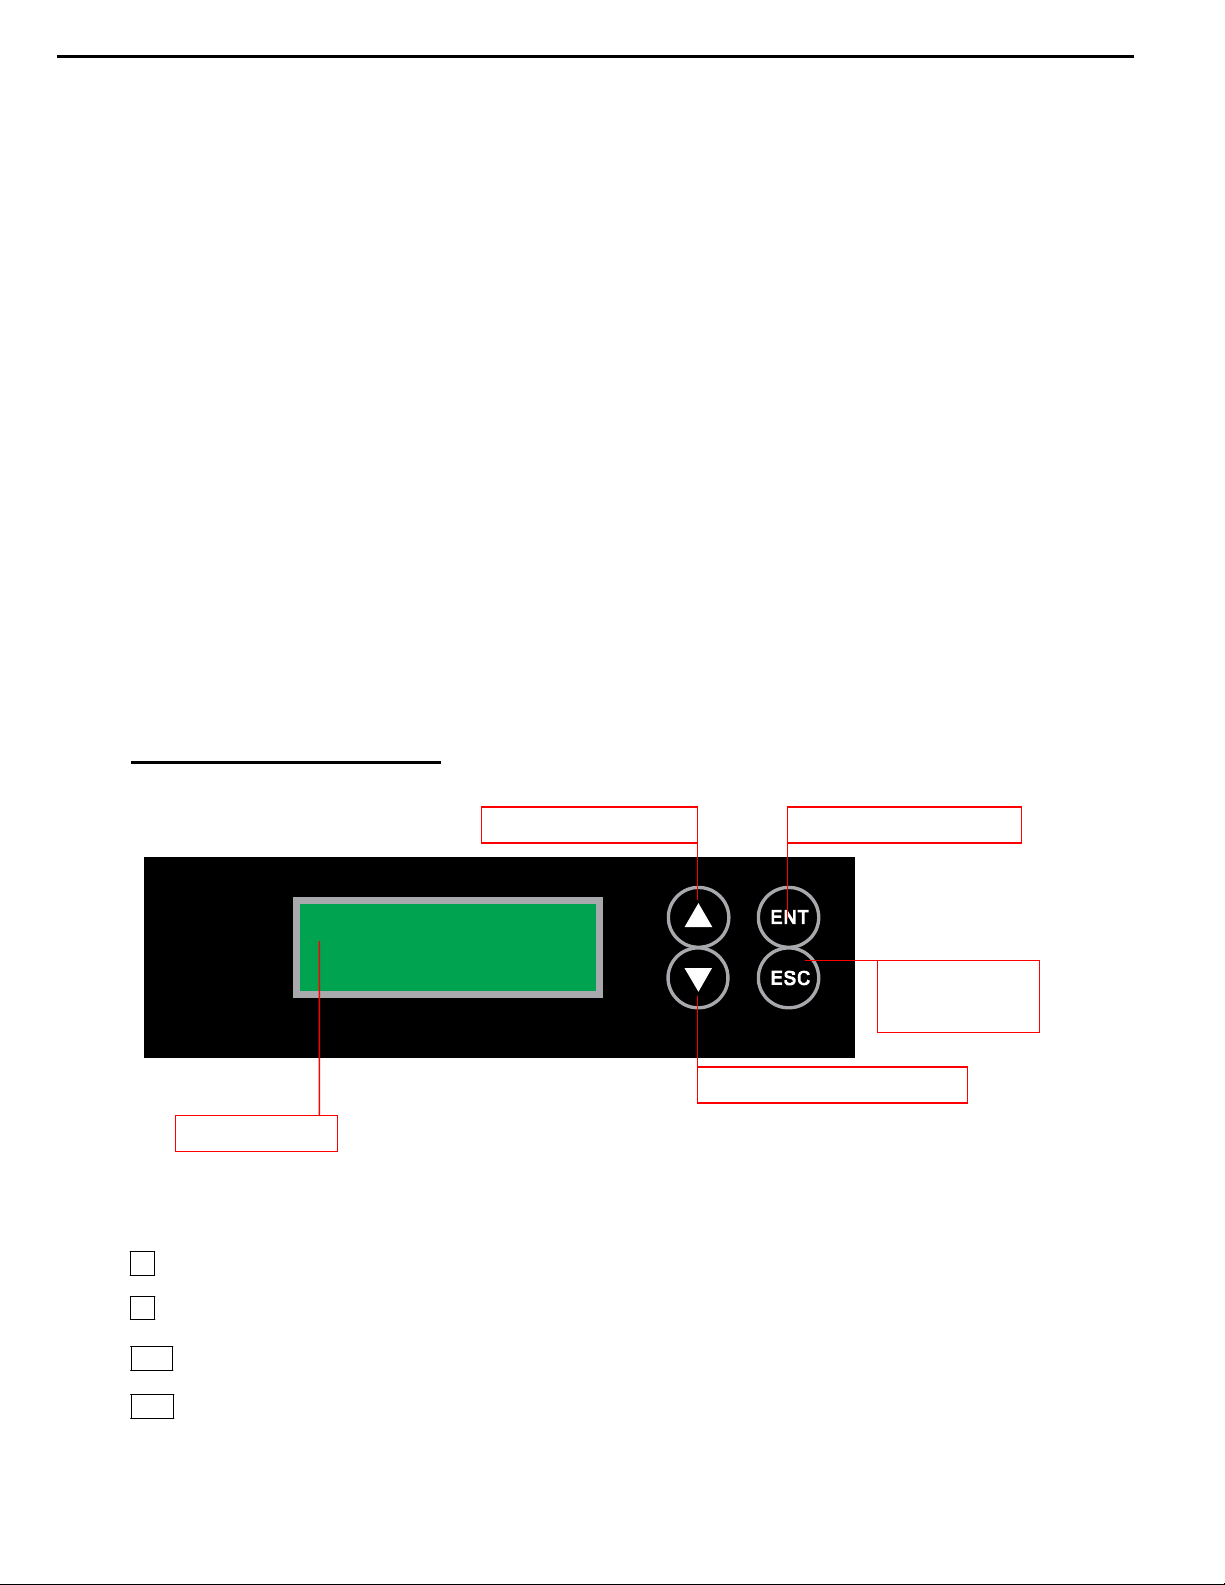
LCD Screen
Scroll Button (UP)
ENT Button (ENTER)
Scroll Button (DOWN)
ESC Button
(ESCAPE)
Chapter 1 Introduction
Thank you for purchasing the new standalone CFast / Hard Disc Drive (HDD) duplicator. This
duplicator is specifically engineered to backup CFast / HDD without a computer or software.
User-friendly interface with easy-to-use four-button control panel, the 2-line backlit LCD
displays real-time operation status and instructions. The CFast / HDD duplicator provides a
fast and reliable duplication solution from a single master source to multiple targets simultaneously.The SATA CFast / HDD Duplicator models are available in multiple target sizes.
The CFast / HDD duplicator is designed to help you get more done in less time.
CFast duplicator and HDD duplicator have the same user interface and functions. In this
manual we will only refer to HDD duplicator, but all functions will apply to CFast duplciator as
well.
(HDD represents both CFast and HDD in this manual and in the LCD interface. )
Chapter 2 Control panel
LCD Front Panel Overview:
Control Buttons: There are 4 control buttons: ▲ ▼ ENT ESC
▲ : Up, Backward: To navigate backward in the menu.
▼ : Down, Forward: To navigate forward in the menu.
ENT : Enter, OK: Execute the function.
ESC : Escape, Cancel: Go back to the previous level in the menu.
3
SATA HDD Duplicate Controller Manual
1. Copy HDD
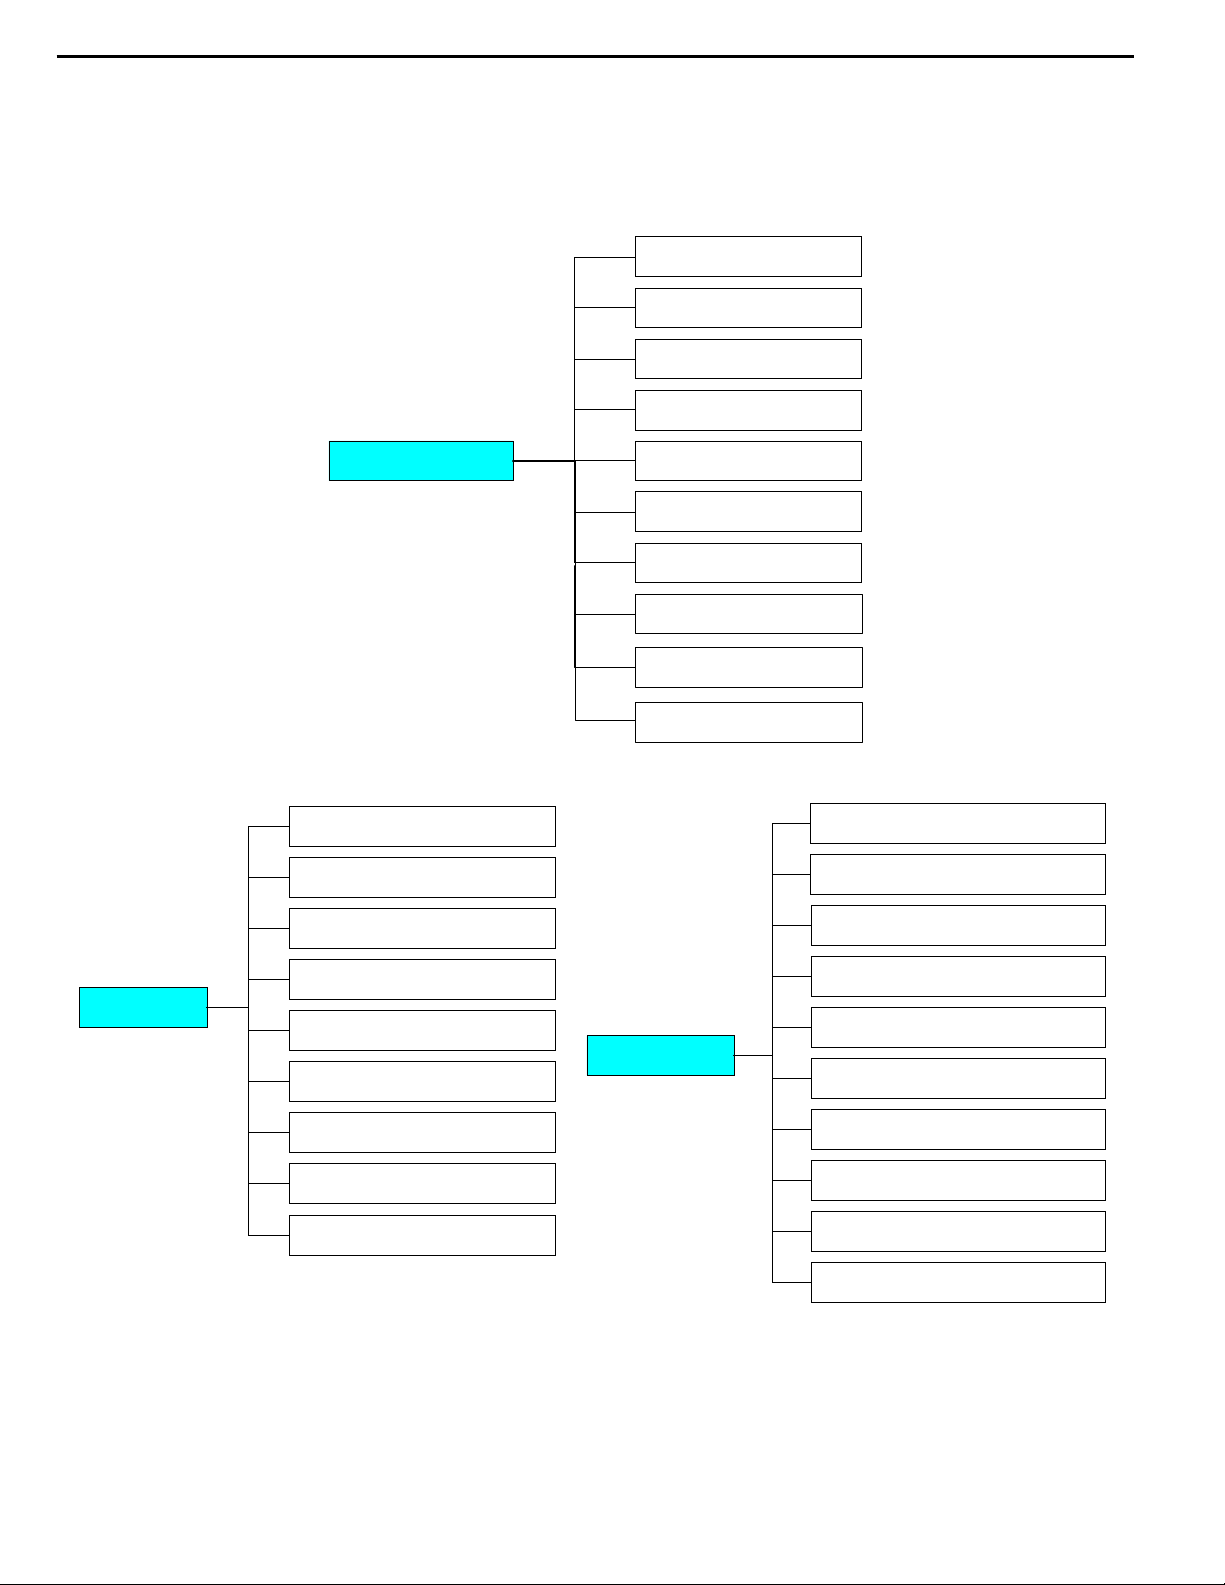
Chapter 3 Functions
The HDD duplicator has 8 main functions in total, with the 9th (Adv Setup) being a hidden system
function that only appears when the ESC key is pressed for 2 seconds until there is a beep.
1-1 HDD duplicator functions are listed in
the following chart. Please skip this
section if you have a multiple target
duplicator.
2. Compare HDD
3. PreScan HDD
4. ReScan BUS
8.
Setup
Functions
8-01. Language
8-02. Copy Size
8-03. Startup Menu
8-04. Auto Compare
8-05. Copy With Size
8-06. Button Sound
ntroller 5. Source Size
6. Secure Erase
7.Over Write
8 Setup
9. USB Mode
10. Adv Setup
9-01. Detect HDD Delay
9-02. Read Error Skip
9-03. Update Firmware
9-04. Compare Firmware
9-05. Quick Erase HDD
9. Adv Setup
9-06. H/W Diagnostic
8-07. Device Info
8-08. System Info
8-09 Fast Copy
9-07. Load Default
9-08. Link Option
9-09. USB Auto-Link
9-10. Copy HPA
4
SATA HDD Duplicate Controller Manual
Multiple target HDD duplicator functions are listed in the following chart.
1. Copy HDD
2. Async Copy HDD
3. Compare HDD
4. Async Compare
Functions
10-01. Language
10-02. Copy Size
10-03. Startup Menu 11-01. Read Error Skip
10-04. Auto Compare 11-02. Update Firmware
10-05. Button Sound 11-03. Compare Firmware
10-06. Device Info 11-04. Quick Erase HDD
5. PreScan Source
6. ReScan BUS
7. Source Size
8. Secure Erase
9. Overwrite
10. Setup
11. Adv Setup
10. Setup 10-07. System Info 11. Adv Setup 11-05. Full Erase HDD
10-08. Fast Copy 11-06. H/W Diagnostic
10-09. Auto Start Drive 11-07. Load Default
10-10. Auto Start Timer 11-08. Copy HPA
10-11. Tolerance Size 11-09. Burn In
10-12. BootTime Delay
10-13. Qui
If you have any questions regarding the LCD display info during use, please refer to Appendix A.
In this manual we use 1-11 HDD duplicators as sample and provide following detailed description
of each function.
ck Compare
5

SATA HDD Duplicate Controller Manual
3.1 Copy HDD
Copy HDD copies data directly from the source hard disk to the target hard disk. Please make
sure that the capacity of the target hard disk is equal or larger than the source hard disk.
Choose option 1 from the menu:
1. Copy HDD
HDD:11 232.9GB
Press ENT to begin copy. The system will auto-detect the hard disks and show the following
copying info on the LCD.
Copy-36MB/s 0%
232.9GB 00:00:00
The LCD will show the following info during the copying process: elapsed time, completed
percentage. The copy speed, capacity and time will vary depending on the source hard disk. Once
the copying process is complete the LCD will display the following results.
Copy HDD
OK: 11 Fail: 0
3.2 Async Copy HDD
This option allows when the replication process can increase the extra hard disk devices.
Choose option 2 from the menu:
2. Async Copy HDD
HDD:10 232.9GB
Press ENT. Before the start of the reproduction, if the ARS-2061F to detect the eigth hard drive
capacity is less than source, then the LCD will show the corresponding channel number.
8
Space Not Enough
And then automatically copies. The LCD will display the following info.
Acpy-36MB/s 0%
232.9GB 00:00:00
If the replication process to continue to add additional hard disk device, LCD will only show the last
completed percentage.
Once the copying process is complete the LCD will display the following results.
Async Copy HDD
OK: 11 Fail: 0
6

SATA HDD Duplicate Controller Manual
3.3 Compare
Compare HDD is used to see if the data on a source hard disk is identical to the target hard disk
after the Copy HD operation.
Choose option 3 from the menu:
3. Compare HDD
HDD: 11 232.9GB
Press ENT to begin the comparison. The LCD will display the following info.
Comp-23MB/s 0%
232.9GB 00:00:00
Once the comparison is complete the LCD will display the following info as well as the amount of
data on the source hard disk.
Compare OK:11
Fail: 0 Diff: 0
Attention: This is Function 2 of 1-1 HDD DUPLICATOR.
3.4 Async Compare
This option allows the comparison process can increase the extra hard disk devices.
Choose option 4 from the menu:
4. Async Compare
HDD: 11 232.9GB
Press ENT to begin the async comparison. The LCD will display the following info.
ACmp-23MB/s 0%
232.9GB 00:00:00
If the comparison process to continue to add additional hard disk device, LCD will only show the
last completed percentage.
Once the copying process is complete the LCD will display the following results.
Compare OK:11
Fail: 0 Diff: 0
3.5 PreScan Source
PreScan Source is used to check if the source hard disk can be accessed properly. It also tests
the read speed.
Choose option 5 from the menu:
5. PreScan Source
HDD : 11 232.9GB
Press ENT to begin scan. The LCD will display the following info
Scan-90MB/s 1%
230.6GB 00:00:27
7

SATA HDD Duplicate Controller Manual
Once the scan is complete, the LCD will display the corresponding results
PreScan OK!
Attention: This is Function 3 of 1-1 HDD DUPLICATOR.
3.6 ReScan Bus
Choose option 6 from the menu:
6. ReScan BUS
Press ENT to re-scan hardware. The LCD will display the following info.
Re-Scan BUS NOW?
Yes
When the scan is complete the LCD will display the following info.
Bus re- scan OK!
Attention: This is Function 4 of 1-1 HDD DUPLICATOR.
3.7 Source Size
Source Size is used to show the capacity message of the source hard disk.
Choose option 7 from the menu:
7. Source Size
Press ENT and the LCD will show the following info.
HDD:Hitachi
Size:232.9GB
Then press ENT and the LCD will show the data's size info.
HDD:Hitachi
Data:200.9GB
Attention: This is Function 5 of 1-1 HDD DUPLICATOR.
3.8 Secure Erase
Secure Erase is used to do data-erase operations to the hard drive by command order from HDD
itself. This function will erase all HDD with 00 character in the
be careful when use it.
Choose option 8 from the menu:
8. Secure Erase
8
tray (included Source tray), please

SATA HDD Duplicate Controller Manual
Press ENT to access option. By default it is set to No. Use the Up and Down arrow keys to choose
Yes.
Wipe all data.
Continue? No
Press ENT and the LCD will show the following info.
In Process
Elapsed 01:00
3.9 Overwrite
Overwrite is used to do data-erase operations to the hard drive by command order from controller
itself. There are 3 sub-options: One pass (all 00 character), 3 pass (00, ff, random character) and
7 pass 5220.22-M (f6,00, ff, random, 00,ff,random c
the tray (included Source tray), please be careful when use it.
haracter).This function will erase all HDD in
Choose option 9 from the menu:
9. Overwrite
Press ENT to access option. By default it is One pass Use the Up and Down arrow keys to choose
other options.
9-01. Overwrite
One pass
Press ENT to access option. By default it is set to No. Use the Up and Down arrow keys to choose
Yes.
Wipe all data.
Continue? No
Press ENT and the LCD will show the following info.
In Process
Elapsed 01:00
9

SATA HDD Duplicate Controller Manual
3.10 Set up
Setup allows various system settings to be changed. There are 13 sub-options: Language, Copy
Size, Startup Menu, Auto Compare, Button Sound, Device Info, System Info, Fast Copy, Auto Start
Drive, Auto Start Timer, Tolerance Size, BootTime Delay and Quick Compare.
Choose option 8 from the menu:
10. Setup
Attention: This is Function 6 of 1-1 HDD Duplicator.
3.10.1 Language
This option is used to select the system's language support. By default this is set to English. Press
ENT to change the Language settings.
Language
English
3.10.2 Copy Size
This option is used to specify the size of the source hard disk for simplifying further copying
operations.
10-02. Setup
Copy Size
Press ENT and the LCD will display a detailed list of options as shown below
Copy Size
100%~1% (*MB)
Use the Up and Down arrow keys to choose different copy sizes. The system will offer their
corresponding percentages so the user can specify the amount to copy from the source hard disk.
Press ENT to confirm and save the changes.
3.10.3 Startup Menu
This option allows you to set an option other than "Setup" to be displayed as the first available
option on the menu every time you start the system.
10-03. Setup
Startup Menu
Press ENT then use the Up and Down arrow keys to choose other options. By default the first
menu option is Copy HDD.
10

Startup Menu
1. Copy HDD
3.10.4 Auto Compare
This option automatically compares the source hard disk with the target hard disk after a copy
operation is completed.
8-04. Setup
Auto Compare
Press ENT to access option. By default it is set to Off. Use the Up and Down arrow keys to choose
On.
Auto Compare
Off
3.10.5 Button Sound
This option is used to control the sound of a button when you press it.
10-05. Setup
Button Sound
Press ENT and the LCD will display the following info. Use the Up and Down arrow keys to choose
whether button sound is on or off.
Button Sound
On
Attention: This is Function 6.6 of 1-1 HDD DUPLICATOR.
3.10.6 Device Info
This option is used to display the details of all hard disks connected to the copy controller.
10-06. Setup
Device Info
Press ENT and the LCD will display each hard disk' information in order as shown below.
0 Source CH: 0
Hitachi 232.9GB
Attention: This is Function 6.7 of 1-1 HDD DUPLICATOR.
11

SATA HDD Duplicate Controller Manual
3.10.7 System Info
This option displays system information.
10-07. Setup
System Info
Attention: This is Function 6.8 of 1-1 HDD DUPLICATOR.
3.10.8 Fast Copy
This option displays Fast Copy.
10-08. Setup
Fast Copy
Press ENT and the LCD will display the following info. Use the Up and Down arrow keys to choose
whether fast copy is on or off. (This function currently only effective in FAT, FAT32, NTFS, HFS,
Ext2 and Ext3 partitions.)
Fast Copy
On
Attenti
on: This is Function 8 of 1-1 HDD DUPLICATOR, currently does not support HFS.
3. 10.9 Auto Start Drive
This option is used to display to copy automatically once you insert HDD on target port.
10-09. Setup
Auto Start Drive
Press ENT to enter the following figure. The default is Off. Use the Up and Down arrow keys to
choose 1-11.
Auto Start Drive
Off
3.10.10 Auto Start Timer
This option is used to display to copy automatically once you insert HDD on target port.
10-10. Setup
Auto Start Timer
Press ENT to enter the following figure. The default is Off. Use the Up and Down arrow keys to
choose 5 Sec-50 Sec.
Auto Start Timer
Off
12

SATA HDD Duplicate Controller Manual
3.10.11 Tolerance Size
This option is used to do to ensure that when the target is smaller than the source can not be
performed when the copy.
10-11. Setup
Tolerance Size
Press ENT to enter the following figure. The default is Off. Use the Up and Down arrow keys to
choose 1%~100% of source.
Tolerance Size
1% ( 4.7GB)
3.10.12 BootTime Delay
This option is used to to set boot delay time.
10-12. Setup
BootTime Delay
Press ENT to enter the following figure
choose 0~99 sec.
. The default is 5 sec. Use the Up and Down arrow keys to
BootTime Delay
5 sec
3.10.13 Quick Compare
This option is used to set the size of each comparison unit.
10-13. Setup
Quick Compare
Press ENT to enter the following figure. The default is Off. Use the Up and Down arrow keys to
choose 1 Byte/1K/10K/100K/1MB/10MB/100 Mbytes. (In order to improve the accuracy of pure
data can maintain the default settings.)
Quick Compare
Off
3.10.14 Copy with Size
This option is used to set the source hard disk with the target hard disk the same capacity after a
copy operation.
(for 1-1 Duplicator Only)
10
-13. Setup
Copy with Size
13

SATA HDD Duplicate Controller Manual
Press ENT to enter the following figure. The default is Off. Use the Up and Down arrow keys to
choose On.
Copy with Size
Off
Attention: This is Function for 1-11 HDD Duplicator only.
14

SATA HDD Duplicate Controller Manual
3.11 Adv Setup
Adv Setup offers expert users access to more advanced system settings. It has 9 sub-options:
Read Error Skip, Upadate Firmare, Compare Firmware, Quick Erase HDD, Full Erase HDD, H/W
Diagnostic, Load Default, Copy HPA and Burn In.To access this option, hold down the ESC key for
two seconds until it appears.
11. Adv Setup
3.11.1 Read Error Skip
This function sets the system to ignore any errors during the copying process. Normally if there is
an error during copying a warning is displayed on the LCD. By using this function, users can also
copy a HDD with errors.
11-01. Adv Setup
Read Error Skip
Press ENT to enter the following screen. By default this option is set to OFF. Use the up and down
buttons to enable or disable this option.
Read Error Skip
Off
3.11.2 Update Firmware
This function is used to update the system's firmware. Please get the firmware from the distributor
or reseller of HDD duplicator and th
Shut down the HDD cloner. Restart the system and insert the CD with the latest version of the
firmware into the DVD-ROM.
Press ENT and the system will begin scanning for a new firmware version. If found, this will be
displayed on the LCD as shown below.
Press ENT again to begin updating. If the upgrade is successful the system will restart
automatically.
Searching F/W ...
Please Wait ...
en write it on to a blank CD.
11-02. Adv Setup
Update Firmware
Upate F/W X.XX
To X.XX -> Yes
15

SATA HDD Duplicate Controller Manual
3.11.3 Compare Firmware
This function is used to compare the current system firmware version with the new version the user
is upgrading to. This ensures that the downloaded firmware is the latest version. The message
"Last update F/W" indicates that it is the latest version.
11-04.Adv Setup
Compare Firmware
Searching F/W ...
Please Wait ...
Last update F/W
OK!
3.11.4 Quick Erase HDD
This function is used to quickly erase all data on the HDD. Please backup any important data
before using this function.
11-04.Adv Setup
Quick Erase HDD
Press ENT to enter the following screen. Use the Up and Down buttons to select the HDD to
erase.
Quick Erase HDD
ALL/Target CH:*
Press ENT again and the LCD will prompt you to confirm the erase operation.
All data will be
lost,Erase? No
Attention: This is Function 9.5 of 1-1 HDD DUPLICATOR.
3.11.5 Full Erase HDD
This function is used to full erase all data on the HDD. Please backup any important data before
using this function.
11-05.Adv Setup
Full Erase HDD
Press ENT to enter the following screen. Use the Up and Down buttons to select the HDD to
erase.
Quick Erase HDD
ALL/Target CH:*
Press ENT again and the LCD will prompt you to confirm the erase operation.
All data will be
lost,Erase? No
Attention: The operation may take a long time, and 1-1 HDD DUPLICATOR does not have this
function.
16

SATA HDD Duplicate Controller Manual
3.11.6 H/W Diagnostic
Press ENT to enter the following screen. This function is used to check that the system is
operating normally.
11-06.Adv Setup
H/W Diagnostic
Press ENT again to enter the following screen. The LCD will cycle through the test categories as
they are performed. The LCD display is tested first, the control panel is tested next (requires
manual operation), then followed by the system's internal diagnostics, hardware connection test
then the R
verify that the system is operating normally.
Press ENT and the system will begin the tests as shown below.
AM and SD Flash test. All test results are shown on the LCD. This is a simple way to
LCD Test Start Button Test → SDRAM Test:
8192Kbytes OK
Test IDE 0/1
OK
Once the system diagnostics have been completed the "Test finished" message will appear on the
LCD.
FlashTest: OK Test finished
3.11.7 Load Default
Press ESC to return to the main menu then use the ENT button to select. This function resets all
settings to their
illegal operation.
Press ENT to enter the following screen. Use the Up and Down buttons to confirm reset to factory
defaults.
If Load Default OK, this will be displayed on the LCD as shown below.
factory default. This function helps the system recover from errors caused by an
11-07.Adv Setup
Load Default
Load Default
Config? Yes
Load Default
Ok
Attention: This is Function 9.7 of 1-1 HDD DUPLICATOR.
17

SATA HDD Duplicate Controller Manual
3.11.8 Copy HPA
If this function is set to "ON", the system will completely copy the data in a source HDD's host
protected area.
11-08. Adv Setup
Copy HPA
The default is "OFF". Use the ENT, Up and Down buttons to change this to "On".
USB Auto-Link
OFF
Attention: This is Function 9.10 of 1-1 HDD DUPLICATOR.
3.11.9 Burn In
This function is used to burn test the system reliability.
11-09. Adv Setup
Burn In
Press ENT to enter the following screen.
Burn In Mode
Copy
Use the Up and Down buttons to choose Compare, Async Copy & Cmp and Async Compare, then
press ENT to confirm.
Attention: 1-1 HDD DUPLICATOR does not have this function.
& Compare
18

SATA HDD Duplicate Controller Manual
Chapter 4 Troubleshooting
4.1 LCD
If the LCD blank after the device is turned on, check that the power cable is properly connected
and that the power supply is on.
4.2 Error Message
When the system is running a copy operation or hardware diagnostics, if the operation is manually
terminated by pressing ESC an error message will be shown by the LCD. This may lead to an
illegal operation and cause the device to stop reminding. If this happens, the device must be
restarted.
4.3 Hard Disk
If unable to read the hard disk please check that the data and power cables are properly
connected.
4.4 Keys
If pressing the keys on the front panel produces no response from the system, the keys may have
malfunctioned. Please check the control panel to see if the wiring has come loose.
4.5 Firmware Upgrade
The device can be updated to new versions of firmware through CD/DVD-ROM. If unable to
update the firmware, check that the firmware was downloaded correctly. A failed firmware upgrade
may cause the duplicator to become inoperable. If the system is working normally, do not attempt
this operation. If the system is already experiencing problems, please contact your
distributor for repairs.
4.6 Startup/Shutdown
Do not suddenly turn off the power while the system is performing an operation. After shutting
down normally, wait a moment (usually around 2 seconds) before starting the system again so it
can run its self-diagnostics.
4.7 About Copy HPA
The HPA (Host Protected Area) is a hidden data region defined in ATA/ATAPI-4. This area is not
u
sually accessible to software. The SATA HDD Duplicate Controller supports the copying of data
from this hidden area.
19

SATA HDD Duplicate Controller Manual
Appendix A LCD Messages
1. Normal Conditions:
All data will be lost, erase?.................All data on the disc will be lost. Confirm the erasing of data.
Analyzing.....................................................................................................Analyze the source disc.
Audio Disc!!! Can’t compare!................................... The system cannot compare the audio discs.
Cannot read TOC...................................................... The system cannot read the contents of disc.
Check Target Please Wait ..............................................The system is ch
Detect Drives.....................................................Detect what drives are connected with the system.
DVD-RW does not Support the Func............................. .. DVD-RW doesn’t support this function.
Erase Finished...................................................................... The erasing of data comes to an end.
Erasing disc..................................................................The system is erasing the data on the disc.
Fail to get Drive Info!..................................................... The drive information cannot be obtained.
Fail to get Src Disc Info!.........................
Hold ESC to exit....................................................... Press ESC for a second to terminate the test.
Identical................................................................................ The comparison results are the same.
Initialize SDRAM.......................................................................Initialize the memory of the system.
Load Default Config?......................................................Do you want to load the default settings?
No Erasable Disc in DVD-RW!!.........................The disc on the DVD-RW device is not rewritable.
Preparing................................................................................... The system is preparing to record.
Press a Key to Eject Fail Disc.........................Press any key to eject the failed disc after copying.
Press a Key to Eject Good Disc...................... Press any ket to eject the good disc after copying.
Read disc error ..........................................................During comparison the disc cannot be read.
Save new config Fail!....................................... The new setting of configuration cannot be saved.
Source Disc Empty!!!...............
Source Disc Not Ready........................................................... Source disc is not ready to be read.
Source Drive Not Ready..............................................................Source drive is not ready to read.
Src&Tgt can’t in the same channel...............................................................................................
..............................During comparison the source and target discs cannot be in the same channel.
Target Disc Not Empty!!!................................................................... The target disc still has data.
Target Disc N
Target Drive Not Ready.................................................................Target drive is not ready to write.
Target overflow...................................... The target disc hasn’t enough capacity to store new data.
TOC not match............................................................... The comparison results are not the same.
User Abort!......................................................................................Cancel the job during operation.
ot Ready................................................... Target disc is not ready to be written into.
..................................... The source disc doesn’t contain any data.
........ The information of source disc cannot be obtained.
ecking the target device.
2. Connecting with a HDD:
All data will be lost, format?...........................................................................................................
..........................................All data on the hard disk will be lost. Confirm the formatting of hard disk.
Delete Image in Partition xx?.............................Confirm the deleting of data image in partition xx.
Format HDD?...................................................................... Ask if you want to format the hard disk.
Format HDD OK! ................................................The Formatting of hard disk has been completed.
HDD not Format!..............................................................The hard disk hasn’t been formatt
HDD too small ..................................................................... The capacity of hard disk is too small.
HDD too small to handle image!.....................................................................................................
............................The hard disk hasn’t enough capacity to store the data image (at least 5Gbytes).
Image Exists Overwrite?..................................................................................................................
..................................There is a data image in the current partition. Confirm the overwriting of data.
20
ed yet.

SATA HDD Duplicate Controller Manual
Image load Fail..............................The image isn’t successfully loaded from DVD to the hard disk.
Image load OK.................................. The image is successfully loaded from DVD to the hard disk
No Image in Partition xx.......................................................There is no data image in partition xx.
No Valid HDD!.......................................................................... The system cannot find a hard disk.
Partition Damage.....................................................................................The partition is damaged.
Select HD First!....................................................................... Select a formatted hard disk at first.
Verify Disk or Partition?............................
Verify Hard Disk Fail!...................................................... The hard disk is not verified successfully.
. Do you want to verify the hard disk or just a partition?
3. Audio Editing:
Burn or Move to partition?..............................................................................................................
..................................Do you want to directly copy the data into disc or move them to the partition.
Can’t edit HDD.......................................... The hard disk cannot be edited as a source audio disc.
Close all disc’s session?...................................................... Confir
Continue edit next Disc?................................. Ask if you want to continue the music disc editing.
End edit disc and burn?........................................ Finish the music disc editing and start to copy.
Erase selected Tracks?............................................... Abort the selected tracks and delete them.
Ins empty disc Continue?.................... Do you want to insert a blank disc and continue copying?
Insert next disc...................................................................................... Insert the next audio disc.
NO AUDIO t
Sessions were closed already! ............................. The disc sessions have already been closed.
Target Overflow Re-Select..............................................................................................................
..........................The disc capacity is not enough to store the selected tracks. Please select again.
Tgt overflow, del last trk?....................................................................................................... The
disc capacity is not enou
rack in this disc.................................................. The source disc has no audio track.
gh to store the selected tracks. So, do you want to delete the last track?
m the closing of disc sessions.
4. Firmware Update:
Check Sum Error!...................................................................... The udpated firmware has errors.
Flash ROM fail!................................................................. Data cannot be written into Flash ROM.
Invalid firmware ............................................................ The disc doesn’t contain a valid firmware.
Last update F/W Fail!.................................................... The firmware is not updated successfully.
Last update F/W OK!........................................................... The firmware is updated successfully.
Searching F/W ......................................................... The system is searching for a valid firmware.
Source can’t be Hard Disk!............................During comparison the source cannot be hard disk.
21
 Loading...