

Athena
User’s Manual
Version 1.0e
1 to 3 targets
1 to 7 targets
1 to 11 targets
CD/DVD Duplicator Controller

1. INTRODUCTION
2. Features
3. Specifications
4. Hardware Installation Guide
5. LCD Front Control Panel
6. Menu Overview
1. Copy
2. Test
3. Copy & Verify
4. Copy & compare
5. Verify
6. Compare Disc
7. Burn Speed
8. Select Source
9. Audio Track Edit
9.1 Select and Copy Track …………………………………………………………11
9.2 Close Disc …………………………………………………………12
9.3 Disc Info …………………………………………………………12
10. Utility
10.1 Prescan …………………………………………………………12
10.2 Quick Erase …………………………………………………………13
10.3 Full Erase …………………………………………………………13
10.4 Eject All Disc …………………………………………………………13
10.5 Disc Info …………………………………………………………13
10.6 Drive Info …………………………………………………………13
10.7 System Info …………………………………………………………14
10.8 Update BIOS …………………………………………………………14
11. Setup
11.1 Power On Time …………………………………………………………14
11.2 Auto Start …………………………………………………………15
11.3 Startup Menu …………………………………………………………15
11.4 Write Method …………………………………………………………15
11.5 Button Beep …………………………………………………………15
11.6 Read Error Skip …………………………………………………………15
11.7 Eject on Start …………………………………………………………16
11.8 Boot Password …………………………………………………………16
11.9 Setup Password …………………………………………………………16
11.10 Clear Setup …………………………………………………………17
12. Image Manager
12.1 Select Image …………………………………………………………17
12.2 Disc to Image …………………………………………………………18
12.3 Reader Speed …………………………………………………………18
12.4 Image Info …………………………………………………………18
12.5 Rename Image …………………………………………………………19
12.6 Delete Image …………………………………………………………19
12.7 HDD Info …………………………………………………………20
12.8 Format HDD …………………………………………………………20
7. About HDD Manager
CONTENTS
…………………………………………..………………
…………………………………………..………………
…………………………………………..………………3
…………………………………………..………………4
……………………………………………..……………4
……………………………………………..……………5
……………………………………………..……………7
……………………………………………..……………7
……………………………………………..……………8
…………………………………………..………………8
………………………………………………..…………9
………………………………………………..…………9
…………………………………………………………10
…………………………………………………………10
…………………………………………………………11
…………………………………………………………12
…………………………………………………………14
…………………………………………………………17
…………………………………………………………20
2
2
1

1. INTRODUCTION
The Athena series duplicator functions both as stand-alone CD/DVD Disc Duplicator Controller, and supports up
to 11 CD/DVD discs. There is up to 12 IDE ports on the controller each of which is independent from one
another. This gives the controller the ability to control several CD/DVD devices at once. There is no need for the
drives to be of the same brand and/or speed. The controller can support up to 11 discs duplicating
simultaneously at a maximum of 56x CD writing and 16X DVD writing speeds.
This easy-to-use operating control panel consists of an LCD screen and 4 control buttons. All operating
information, such as the function list, instructions, operating status, or error message(s), is displayed in real time
on the screen.
The built-in Hard Drive allows users to load several CD/DVD Master Source Discs onto the HDD as source disc
images. This reduces the risk of damaging the Source Disc that result from heavy duplicating jobs. A forceful
HDD management system dynamically assigns HDD partitions to each CD/DVD disc image loaded onto the
HDD accordingly. This ideal HDD manager will ensure a flexible and efficient HDD management process.
2. FEATURES
• 1 to 3/ 1 to 7 / 1 to 11 IDE-to-IDE CD\DVD Disc Duplicator Controller
• Auto-detect IDE devices
• 2x16 LCD display and 4 control buttons
• Supports up to max 56x CD duplication, 16x DVD duplication
• Offers flexibility in setting different duplication speeds depending on Disc writers
• Easy to select Drive as the Master Reading Source
• Support for an IDE Hard Drive Device. Source CD or DVD disc can be loaded onto the
Hard Drive as disc images
• Customizable Hard Drive Partitioning. Create a Hard Drive partitioning name for easy
storage
• Support for Audio Track editing. Combine audio tracks into one customized CD
• Special PreScan feature evaluates master source disc before copying
• Support System Startup Password Protection. Prevent unauthorized use of duplicator
systems
2

• Support Setup Password Protection protects custom settings on duplicating systems
• Support for copying simulation prevents failures caused by defective blank discs or
damaged source discs
• Support for Verification function ensures copied disc’s readability
• Support Counter Function
• Supports all major disc types
• Auto detect source disc
• Can set beep button on or off
• Firmware is easily upgradeable. Simply place a CD in any drive and in a matter of
seconds the firmware is automatically updated
• CD/DVD Rewriteable Drive Firmware upgradeable through the controller
3. SPECIFICATION
Power Voltage: 5V+-5%
Current: 0.7A Max
Environment Working Temperature 0C~75C
Storage Temperature -20 C~85 C
Humidity Working Humidity 20%~80%
Storage Humidity 5%~95%
Dimension Length 176 mm
Height 42 mm
Width 146 mm
Model
Max Burn CD
SPEED
Max Burn DVD
SPEED
Buffer Memory
Size
Total IDE Port
Number
Athena CD3 56X N/A 32 MB 4
Athena CD7 56X N/A 32 MB 8
Athena CD11 56X N/A 64 MB 12
Athena DVD3 56X 16X 32 MB 4
Athena DVD7 56X 16X 64 MB 8
Athena DVD11 56X 16X 128 MB 12
3
the
set
drive
it
and
will automatically
rest of the WRITERS will be set as
then
Source
be set as Writer and
4. HARDWARE INSTALLATION GUIDE
The following are the basic operation guidelines on how to set IDE devices as Optical READER,
WRITERS, or Hard Drives. The system auto detects the drives then assigns Drive numbers.
READER WRITER HDD System Setting Information
1 Installed Installed No When machine is turned on, the system will detect and assign
READER drive as Source Reader. Then it will automatically be
as Drive #1. WRITERS will be set by sequence after the READER
drive, starting from Drive #2, Drive #3, etc.
2 No Installed No When machine is turned on, the system will assign the WRITER
connected to Port #1 of the controller as the Source Reader and set
as Drive #1. The rest of the WRITERS will then be set as Writers
numbered on a sequence beginning from Drive #2 and so on.
3 No Installed Installed When machine is turned on, the system will assign the WRITER drive
connected to HDD, the Source Reader function. It
assign Drive #1. Then, the
Writers, and numbered on a sequence beginning from Drive #2,
to Drive #3, etc.
4 Installed Installed Installed When all Drives are installed, assure that the READER drive is
connected to the HDD. The READER will be set as the
Reader and as Drive #1. WRITERS will
numbered in order from Drive #2, Drive #3, etc.
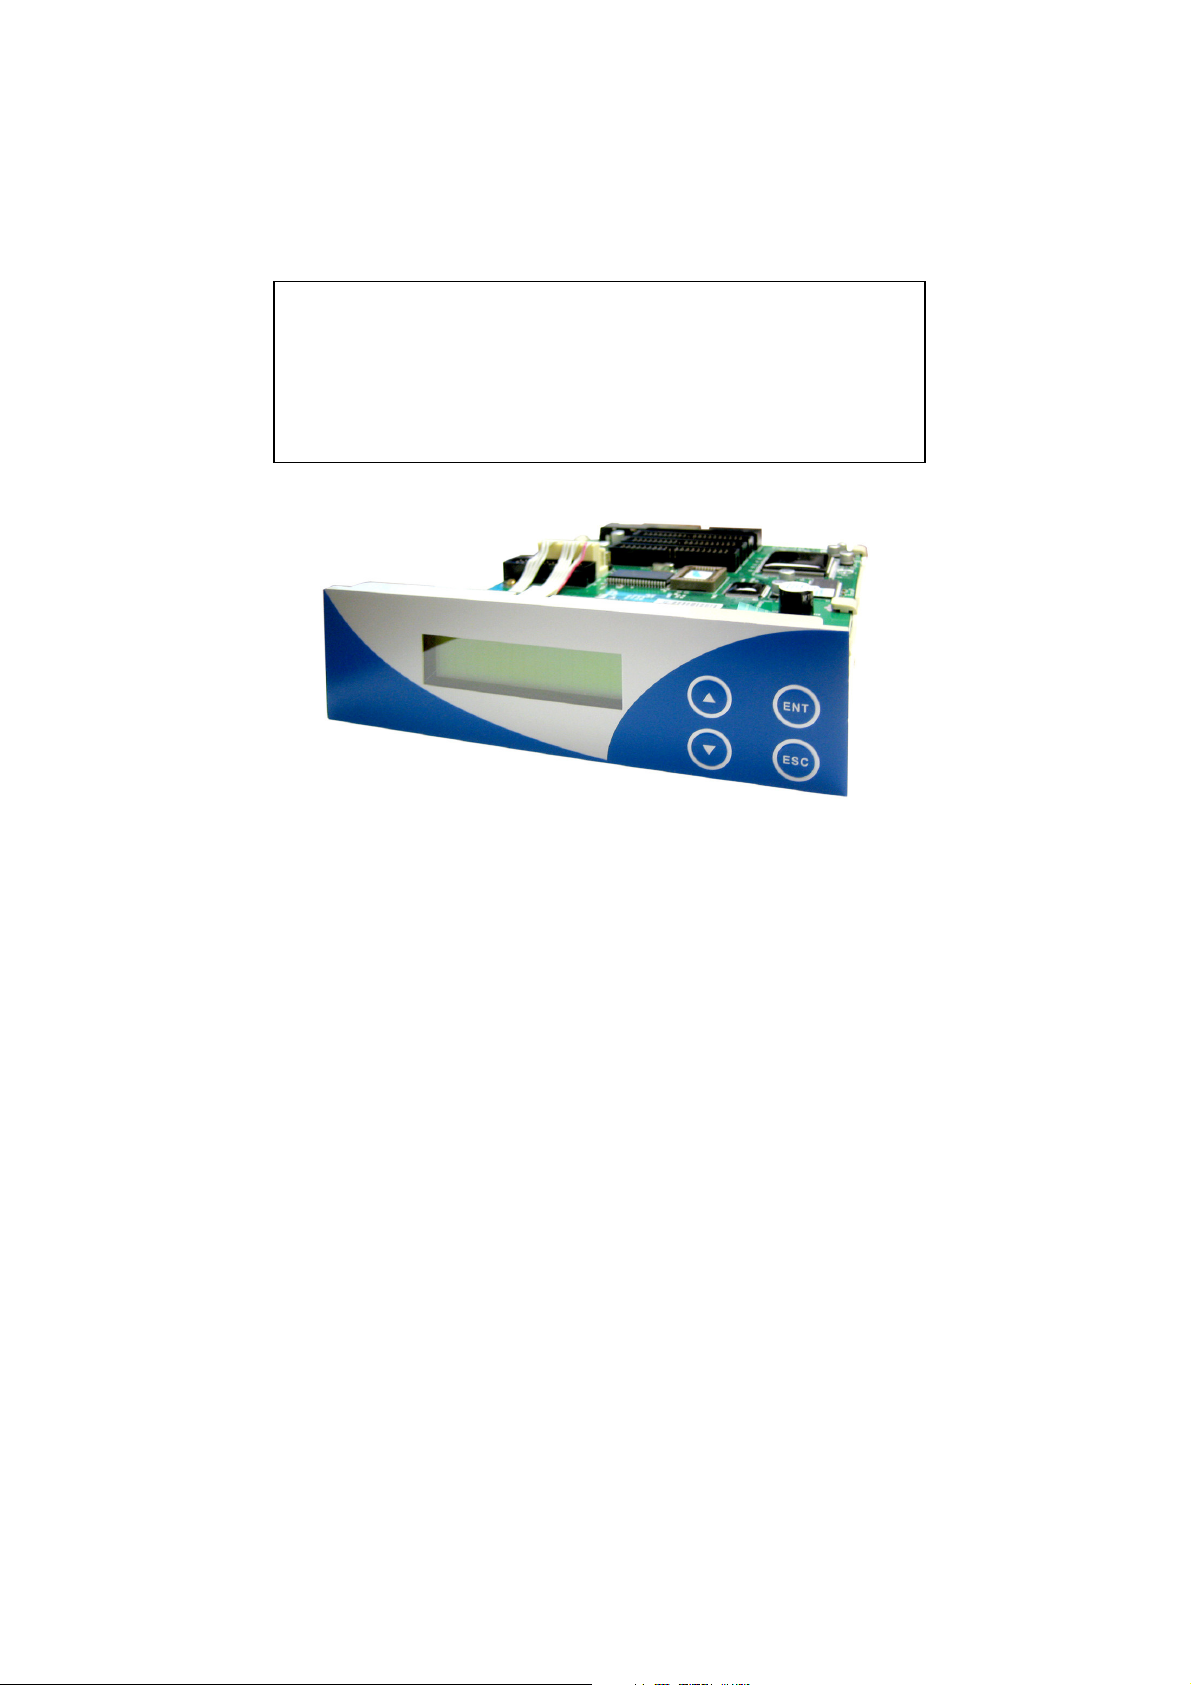
5. LCD FRONT CONTROL PANEL
1. Control Buttons
There are 4 control buttons: , , ENT and ESC
: UP; backward; used to navigate backward in the menu
: Down; forward; used to navigate forward in the menu
ENT : OK, Enter, Execute the function
ESC : Escape, Used to go back to previous function
2. LCD Display
The LCD display is a 2x16 Mono LCD screen. The system displays function information, messages, and
instructions on the LCD.
4

Comparison process to ensure data
6. MENU OVERVIEW
1
2
3 COPY&VERIFY
4 COPY&COMPARE
5
6 COMPARE DISK
7 SET BURN SPEED
8 SELECT SOURCE
9
10
TRACK EDIT
10.1 Pre-scan
10.2 Quick Erase
10.3 Full Erase
10.4 Eject All Disc
10.5 Disc Info.
10.6 Drive Info.
10.7 System Info.
10.8 Update BIOS
COPY
TEST
VERIFY
UTILITY
Allows making a CD/DVD copy. Before the use of this function,
assure that the correct reading source and blank discs are placed. The
system will automatically display how many blank discs are detected.
When the system is ready press ENT to execute CD/DVD copies.
This functions process is the same as above, except it will not record
to the recordable disc. The purpose of this process is to ensure an
error-free duplication.
Creates copies and is followed by a Verification process to
automatically ensure data correctness.
Creates copies and is followed by a
correctness.
Enables the use of Disc Readability Check. This operation will check
all master and copied discs’ readability to confirm that all the copies
are readable.
Used to make a bit-by-bit Comparison between the Master Reading
Source and all the copied discs inside the writer trays. It assures that
the copies have the same information as the Master Reading Source.
Enables to select Duplication Speed for three different disc types,
(CDs, audio CDs, and DVDs).
Used to set the Master Reading Source as Optical Drive or Hard Drive
Disk.
Makes Audio Tracking Selection. It combines audio tracks from
various CDs into a single customized audio CD.
Confirms whether or not the Master Source Disc can be properly
duplicated.
Quick erase re-writable discs’ data.
Full erase re-writable discs’ data.
Ejects all discs in writer tray, including master source disc.
Checks disc’s basic information such as disc type, data length, and
available space.
Checks the duplicator’s major component information, such as the
manufacturer, Writer or Reader model numbers and versions.
Provides the duplicator’s information, such as the Controller model
number, Buffer memory capacity, and Firmware version.
As manufacturer’s certified update CD is inserted, this feature
instantly updates duplicator’s software.
5

Allows choosing whether the duplicator system will eject the disc on
to perform various Hard Drive related operations.
11
SET UP
11.1 Power On Time
11.2 Auto Start
11.3 Startup Menu
11.4 Write Method
11.5 Button Beep
11.6 SkipReadError
11.7 Eject on Start
11.8 Boot Password
11.9 Setup Password
11.10 Clear Setup
IMAGE MANAGER
12
12.1 Select Image
12.2 Disc -> Image
12.3 Reader Speed
12.4 Image Info.
12.5 Rename Image
12.6 Delete Image
12.7 HDD Info.
12.8 Format HDD
6
After the system power is turned on, the system’s warm up time can
be set from 5 sec to 255 sec.
This feature allows the duplicator to automatically execute copying,
once recordable disks are inserted to the master source disc and
writer trays. The setting can be turned off or the amount of seconds
can be set to (1~99). To execute this function, the operation mode
has to be set to COPY, TEST, VERIFY, COPMARE,
COPY&VERIFY, COPY&COMPARE.
The function in the menu which will be shown first can be selected
when the duplicator is turned on.
CD duplication mode can be selected among “DAO”, “SAO”, and
“TAO”. The default mode is “DAO,” which means Disc at Once.
Gives the option to hear a beep as you press a button.
Gives the option to stop duplication process when an error has
occurred or simply continue the process.
startup.
Allows setting or changing the password at start up.
Allows setting or changing the password for Setup.
Resets all of the operations back to manufacturer’s default.
Demonstrates how
If duplicator does not have HDD installed, the system menu will not
show this function.
Used to select an Image file as a Source to be copied to the discs.
Used to copy a Source Disc to HDD to save as an Image file.
The following function (12.2 Disc -> Image function), will allow
you to set the Reading Speed of the master source disc.
Checks the image file information and file size.
This function renames the HDD image partition’s name.
Deletes an image file in HDD. If the file is selected as the source
file, you will not be able to delete it unless you go back to 12.1 to reselect the image.
Checks the information in HDD, such as the number of discs stored
on the HDD and the amount of space left in the HDD.
This feature will allow you to format the HDD. However, if HDD
image was selected as the source you will not be able to format it.

1. COPY
The following operation shows how to copy a Master Reading Source to a blank CD/DVD disc.
If you would like to make Disc-to-Disc copies, make sure the Master Reading Source is set as
the READER.
a. Turn on the duplicator before you start copying and make sure the correct reading source and blank disks
have been set.
b. The system will automatically display how many blank discs were detected.
c. When the system is ready to copy, press ENT to execute CD/DVD copies.
d. When the system starts the copying process, it will start loading the disc. It will then analyze the discs, and
then start copying. During the copying process, the LCD screen will display the Master Source Disc’s data
size and copying progress.
e. When the copying is finished, the Writer Trays will automatically eject.
1. Copy 79:45
7 discs detected
analyzing
source disc
• Note 2: If your duplicator has a HDD installed and you would like to make Hard Drive-to-Disc copies,
refer to 12.1.1 HDD Image Manger for more information
Press ENT to load disc and
execute copying
Copy 79:45
Analyze Disc…
Copying
Start
Copy 79:45
Loading Disc
Copy 79:45
10% 08:00
Finished
and Eject
discs
2. TEST
a. This function is similar to the COPY process with the exception of the writing on the recordable disks.
b. Press or to navigate the function menu to 2. Test and press ENT
c. The system will auto detect the numbers of blank disc and start to simulate the COPY process. However,
there is no data that will be written onto the blank disc.
d. The purpose of this process is to ensure an error free duplication.
2. Test 79:45
7 discs detected
Analyzing
source disc
Press ENT to load disc
and execute copying
simulation
Test 79:45
Analyze Disc…
Start
Simulation
Test 79:45
Loading Disc
Test 79:45
10% 08:00
Finished
and Eject
discs
7

3. COPY&VERIFY
This operation will start the copying process and will be followed by a Verification process to
ensure data’s correctness. Therefore, the duplicator will not eject discs until verification is
complete.
a. This operation will copy the Master Source onto Blank CD/DVD discs. Before the use this function, assure
that the correct reading source and blank disks have been set.
b. The system will automatically display how many blank discs were detected.
c. When the system is ready to copy, press ENT to execute CD/DVD copying.
d. When the system starts the copying process it will start loading the disk. It will then analyze the disks,
then start copying. During the copying process, the LCD screen will display the Master Source
Disc’s data size and copying progress.
e. When finished, the system will continue a verification to make a disc Readability check.
f. When the verification is complete, the Writer Trays will automatically eject the completed discs.
3.Copy&Verify
7 discs detected
Analyzing
source disc
Press ENT to load discs
Copy&Verify79:45
Analyze Disc…
Start
Copying
Copy&Verify
Loading Disc
Copy 79:45
10% 08:00
Copying finished and
start verification
• The verification process makes a Disc Readability Check. This operation will check the master disc and the
copied discs’ readability to make sure all of the copies are readable.
Verify 79:45
45% 35:45
100%finished
and Eject discs
4. COPY&COMPARE
This operation will start the copying process and will continue with a Comparison process to
ensure data correctness. Therefore, the duplicator will not eject discs until a disc Comparison
is complete.
a. This operation will directly copy the Master Source onto a blank CD/DVD disc. Before the use of this menu,
make sure you have put the correct reading source and blank discs.
b. The system will automatically display how many blank discs are detected.
c. When the system is ready to copy, just place ENT to execute CD/DVD copies.
d. When the system starts the copying process, it will start loading the disk. It will then analyze the disks, and
then start copying. During the copying process the LCD screen will display the Master Source Disc’s data size
and copying progress.
e. When finished, the system will continue with the Comparison process to ensure the discs have the same
information as the master source.
f. When the Comparison is complete, the Writer Trays will eject the discs.
8

4.Copy&Compare
7 discs detected
Analyzing
source disc
Copying finished and
start Comparison
•
The
Compare Disc function serves as a bit-by-bit Comparison between Master Reading Source and the copied
discs inside the writer trays. This operation ensures that all of the copies are completely identical to the Master
Reading Source.
Press ENT to load discs
Copy&Compare79:45
Analyze Disc…
Compare 79:45
45% 35:45
copying
Copy&Compare
Loading Disc
Start
100% finished and
Eject discs
Copy 79:45
10% 08:00
5. VERIFY
This function will check the master disc and the copied discs’ readability to ensure that all of
the copies are readable.
a. Place master source disc and all copied discs into the duplicator.
b. Press ENT. The duplicator will automatically start loading the disc, analyze the source disc and begin
verification.
c. When verification is complete, the duplicator writer trays will automatically eject.
7 disc detected
Analyzing
source disc
Press ENT to load discs
Verify 79:45
Analyze Disc…
verification
Start
Verify 79:45 5.Verify
Loading Disc
Verify 79:45
45% 35:45
100%Finished
and eject discs
6. COMPARE DISC
Use this function to make a bit-by-bit Comparison between Master Reading Source and the
copied discs inside the writer tray. This operation is used to ensure all of the copies have the
same information as the Master Reading Source.
a. Put master source disc and all copied discs into the duplicator.
b. Press ENT. The duplicator will automatically start loading the disc, analyzing the source disc and start the
Comparison function.
c. When the Comparison process is complete, the duplicator writer trays will automatically eject.
7 discs detected
9
Press ENT to load discs
Compare 79:45 6.Compare
Loading Disc

Analyzing
source disc
Compare 79:45
Analyze Disc…
Start
Comparison
Compare 79:45
45% 35:45
100%Finished and
eject disc
• Note : You can ONLY use the compare function when duplicating DATA discs
7. SELECT SPEED
This operation allows you to adjust and select the Duplication Speed for the three different
disc types: CD, Audio CD, and DVD.
a. Press , to navigate the menu. 7. SELECT SPEED, and press ENT
b. You will see three disc types: CD, Audio CD, and DVD. Press , to select a disc type and
press ENT to confirm your selection.
c. Press , to select the burning speed.
,
,
Press ENT &
[Burn Speed]
Audio CD = 40
[Burn Speed]
DVD = 8
,
[Burn Speed] 7.Set Burn Speed
CD = 52
Press ENT
Press ENT
Press ENT
Setting Audio
CD burning
speed
Setting DVD
burning speed
Setting normal data
CD burning speed
Note: This is only available
on DVD duplicators
8. SELECT SOURCE
Use this function to set an Optical Drive or Hard Drive Disk as the Master Reading Source.
a. Move to 8. Select Source and press ENT.
b. Press , to select either HDD or an Optical Drive with assigned number as the reading source.
Press
ENT
move ,
to select
• Note: If HDD was selected as Source, then follow 12.1 Select Image ‘s instructions to be familiar
with how to select image files as your reading source.
• Note: Each Optical Drive will be assigned a Drive # according to their installation sequence. If there isn’t,
then Drive #1 is automatically set as the Reading Source.
Source Drive ==> 8.Select Source
HDD:ST380021A
Source Drive ==>
D#1:DVD-ROM
Press ENT to
finished setting
10

9. AUDIO TRACK EDIT
This process will guide you on how to select audio tracks from various audio CDs and
combine them into one customized Audio CD.
9.1 Select and Copy Track:
a. Move, to 9.Audio Track Edit menu.
9.Track Edit
b. Insert an Audio CD with music tracks in the Reading drive and Insert ONLY ONE Blank CD-R disc into one
of the writers.
c. As soon as both audio CD and blank CD-R are recognized, the following message will appear “ready to
press ENT” on duplicator LCD screen.
d. Navigate the menu by pressing , to find the desired track number and then press ENT to confirm the
selection. Repeat the process to choose the tracks that will be copied to the disk. The letter “a, b, c, d…”
will appear on top of each selected track.
[Track Edit]
1. Copy Track
move , and press
ENT to select tracks
e. Once the tracks have been selected, press to move cursor to the end of the “OK” display. And press ENT
to confirm and submit your selection.
f. Once you submit selection, “Copying Audio Tracks…” will appear on your LCD screen. It will display the
track number, total number of the current tracks and the position that is copying.
Track 02 06:14
Copy…… 03:14
g. Once the Copying Audio Tracks process is complete, copied CD will be displayed. It reveals the total tracks
on the CD, total time used and total time remaining.
Track Used 20:53
04 Free 59:25
h. You will need to finalize, as indicated on 9.2 before playing back. If you choose NOT to finalize, you can go
back to the first step to continue the process. If you choose to finalize, use “9.2 Close Disc”.
•
Note: Once you finished copy Audio Track, you will NEED to perform “9.2 Close Disc” function for your
audio CD. If you do not, your audio CD will NOT play.
Press ENT
c d e
7 8 9 10 OK
a b c
1 2 3 4 5 6 7
Press ENT to start burning
11

9.2 Close Disc
Use this process to make a CD-R/CD-RW disc become a playable Audio CD.
a. Select 9. Track Edit and press ENT
9.Track Edit
b. Move to select 2. Close Disc and press ENT to start close disc process.
c. When Close Disc is processing, you will see “o”, “O” blinking on the screen.
d. When the process is done, writer will automatically eject the disc, and you will see “_” on the screen.
[Track Edit]
2.Close Disc
Press ENT
Finalizing Disc…
Close finished and
eject disc
9.3 Disc Info.
This feature allows you to check your disc status, such as available capacity.
a. Move to 9. Track Edit, and press ENT
b. Select 3. Disc Info, and press ENT
[Track Edit] [ 1 ] 79:59
3. Disc Info.
Press ENT
CD-R Use 27:53
10. UTILITY
This function group includes several Disc related functions. You can press ENT and press the
up or down button to select the desired function.
10.1 Prescan
This feature will check whether or not the Master Source Disc can be duplicated.
a. Select Utility and press ENT
10. Utility
b. Select 1. Pre-scan and press ENT
[Utility]
1.Prescan
12
Press ENT
Prescan 76:24 Prescan 76:24
20% 15:30
100%
Finished!

10.2 Quick Erase
This operation erases re-writable discs in the Writer Tray. When it has finished erasing, the
tray will automatically eject.
The duplicator can erase different types of re-writable discs simultaneously. You can place
the re-writable disc you wish to erase in any tray.
[Utility]
2. Quick Erase
• Note: If you see “O” “o” blinking, Erasing is in process. If you see “F” “f” blinking, DVD+RW Disc
Formatting is in process.
insert re-writable discs and
press ENT
Quick Erase Disc
_ O _ _ _ O _ o
Erasing done
and eject discs
10.3 Full Erase
This operation will erase re-writable discs in the Writer Tray. It is timelier than Quick Erase
function. When finished, the writer will automatically eject the trays.
[Utility]
3. Full Erase
Insert re-writable disc and
press ENT
Full Erase Disc
_ O _ _ _ o _ _
Erasing
finished and eject
discs
10.4 Eject All Discs
Ejects disks, including master source disc and discs in writer trays.
[Utility]
4. Eject All Disc
Press ENTEject all discs
10.5 Disc Info
This feature checks disc’s basic information, such as the disc type, data length, and available
capacity.
[Utility] [ 1 ] 79:59
5. Disc Info.
press ENT
CD-R Use 27:53
10.6 Drive Info
This feature checks the duplicator’s major component information, such as its manufacturer,
Writer or Reader model number and version.
a. Press ENT and then press up or down to check each Drive’s model number and information.
b. The duplicator will assign each drive a number from 1 to 8. #1 is the Reader, #2~#8 are writers.
13

[Utility]
6. Drive Info.
Press ENT
[#1]Port8.0 3.38
CD-ROM Max 52X
press ,to select
different Drives
10.7 System Info
This feature provides information about the duplicator, such as the controller model number,
RAM capacity, and Firmware version.
[Setup] P727DVD 64MB
7. System Info.
press ENT
Ver:1.00
10.8 Update BIOS
When manufacturer’s certified update CD is inserted, this operation will automatically update
your duplicator’s software.
a. Turn on the duplicator select 10. Utility, and press ENT
b. Insert an updated CD to any Drive.
c. Select 8. Update BIOS and press ENT
d. The system will then start executing the firmware update. When finished, the updated CD will automatically
eject.
e. In 2 sec, the system will re-boot. The new firmware update is complete.
[Setup] Upgrade BIOS
8. Update BIOS
Upgrade BIOS
Identify Disc
New BIOS updated
Restart System!
Insert update CD press ENT
Start update…. Start update….
Writing 5%
System re-boot
Waiting Disc…
100%
eject
Pass
CD
11. SETUP
Use this function group to change the manufacturer’s default setting.
11.1 Power On Time
You can set the system warm up time from 5 sec to 255 sec after system power on.
a. Select 11. Set Up and press ENT
b. Select 1. Power On Time and press ENT
c. Press , to increase or decrease the seconds.
14

[Setup]
1. Power On Time
press ENT
Power On Delay
15 seconds
press , to set
seconds
11.2 Auto Start
This operation allows the duplicator to automatically execute copying once source disc is
placed in the master source drive and recordable discs in any of the writer trays. You
can disable or turn on the auto start function with the time (1-99 seconds) it would take to
activate this feature. To execute this function, you must set the operation mode from COPY,
TEST, VERIFY, COMPARE, COPY & VERIFY, COPY&COMPARE to auto start copying.
[Setup]
2. Auto Start
• Note: If you set the function off, the LCD screen will not show how many blank discs are detected in
writer trays.
press ENT
Auto Start
3 seconds
press , to set
seconds
11.3 Startup Menu
3.1.1 You can select which function in the menu to see first when the duplicator is turned on.
[Setup]
3. Startup Menu
press ENT
[Startup Menu]
1. Copy Disc
move , to select
function
11.4 Write Method
You can select which mode to duplicate CD from “DAO”, “SAO”, and “TAO”. The default
mode is “DAO” (Disc at Once). Unless it is clearly understood what such terms represent, we
strongly recommend users to set it as “Disc at Once”.=]]]]]]]]]]]]]]]]]]]]]]]]]]]]]]]
[Setup]
4. Write Method
press
ENT
Write Method
DAO
move , to select
11.5 Button Beep
Choose whether or not to hear a beep when you press a button.
[Setup]
5. Button Beep
press
ENT
Button Beep
ON
move , to select
ON/OFF
11.6 Read Error Skip
Choose to stop the duplicating process when error has occurred
.
15

[Setup]
6. ReadErrorSkip
press
ENT
11.7 Eject on Start
You can choose whether or not to eject the disc when powering up the system.
[Setup] 7.Eject On Start
7. Eject On Start
press
ENT
11.8 Boot Password
You can setup the boot password to prevent anyone from using duplicating system.
[Setup]
8. Boot Password
press
ENT
If you select Disable, you will go back to:
[Setup]
5. Boot Password
If you select Enable, you will need to choose a password:
Boot Password
==> _
Use , to select the character you want.
Press ENT to go to the next position.
There are a total of 6 positions for the password. To enable the password, set all 6 positions.
An empty space is acceptable.
Press ESC to cancel the process. The duplicating system will then ask for password when the unit is
restarted.
11.9 Setup Password
You can enable the setup password to prevent anyone from changing the setting of the
duplicating system.
[Setup]
8. Setup Password
16
press
ENT
Skip Read Error
ON
Eject All
Boot Password
Disable
Setup Password
Disable
move , to select
ON/OFF
move , to select
Eject All/No Eject/
Eject Target/Eject Source
move , to select
Disable/Enable
move , to select
Disable/Enable

If you select Disable, you will go back to:
[Setup]
5. Boot Password
If you select Enable, you will need to choose a password:
Boot Password
==> _
Use , to select the character you want.
Press ENT will go to the next position.
There are total of 6 positions for the password. To enable the password set all 6 positions.
An empty space is ENT.
Press ESC to cancel the process.
The duplicating system will ask for password when 11 Setup is entered.
11.10 Clear All
Reset the operations back to manufacturer’s default settings.
[Setup]
10. Clear Setup
press ENT , clear all settings made and return back to
manufacturer’s default setting
12. IMAGE MANAGER (For Duplicator with HDD Installed)
This function shows how to perform various Hard Drive related operations. The system menu
will not show this function if your duplicator does not have an HDD installed. Please refer to
12.8 ABOUT HDD MANAGER for more information about the special function and
advantages about this feature.
12.1 Select Image
This function shows how to select an Image file as a Source that can be copied to discs. This
function is required when a copy is made from your HDD to blank discs. Please refer to 12.1.1
for instructions on how to make Hard Drive-to-Disc Copies.
[Image Manager] [Select Image]
1.Select Image
press
ENT
A001 DVD 4469M
move , to
select and press
ENT to confirm
17

Make Hard Drive-to-Disc Copies
a. Make sure Hard Drive is set to Master Reading Source. When it is finished select the image then HDD will
automatically be set as the Reading Source.
b. Return to the main menu and press the up or down buttons to select 1. Copy function.
c. Insert blank discs into writer trays. (If there is a disc in the Reader tray, it will not be read).
d. Press ENT to start copying. If 11.2 Auto Start, is selected when a blank disc is placed in any of the writer
trays, the duplicator will automatically begin the copying process.
e. When completed trays will eject.
• Note: Once an HDD Image is selected, the HDD will automatically be set as the Reading Source. If you
wish to make Disc –to- Disc Copies, you must go back to 8. Select Source to select the CD/DVD-ROM as
the Reading Source.
12.2 Disc => Image
This function shows you how to load the master source disc onto the Hard Drive and save it
as an image file.
a. Place Master Source Disc into any Drive.
b. Select 12.2 Disc -> Image and press ENT
[Image Manager] [Disc ==> A001] [Disc ==> A001]
2.Disc => Image
• Note: The source disc can be placed in any Reader or any Writer Drive.
12.3 Reader Speed
When you wish to perform this function, 12.2 Disc -> Image, set the Reading Speed from the
reading master source disc.
[Image Manager]
3.Reader Speed
• Note: this function is ONLY available when loading the Source Disc to an HDD
12.4 Image Info
This function checks all image file information such as the Image file number, Disc type, and
its file size.
[Image Manager] [Image Info.]
4. Image Info.
press ENT
press
ENT
10% 446MB
** The source disc loaded to HDD as image file A001.
A001 DVD 4469MB
100%
Finished!
18

A001 DVD
3875MB
[Image Info]
[image info]
A003 CD 65:28
3.875GB DVD disc image
file A001
CD disc image with 65 min
28 sec, file name A003
12.5 Rename Image
This function allows you to rename an image file in HDD. This will help organize the image.
[Image Manager] 001 [A001 ]
6.Delete Image
press ENT
DVD 4469M
Select the image file you
would like to rename
press ENT
[Edit Image Name]
[A001 ]
Use , to select the character you want.
Press ENT to go to the next position.
There are total of 8 characters for the image name.
Empty Space will confirm the name change.
[Edit Name Change] [A001 ]
[NewName ] OK ?
Press ESC to cancel the whole process.
press ENT
=>[NewName ]
12.6 Delete Image
This function allows you to delete an image file in HDD. If the file is selected as source file
you will not be able to delete it unless you go back to 12.1 to re-select another image as
source.
[Image Manager]
5.Delete Image
press ENT to
confirm
press ENT
[DELETE Image] A003 DVD 4372M
A003 DVD 4372M
[DELETE Image]
A001 DVD 4469M
press ENT and execute
delete
Select the image file you
would like to delete
DELETE Complete!
19

12.7 HDD Info.
This function checks all information of HDD, such as how many discs are stored and the
HDD’s available space.
[Image Manager] Used: 0CD 7DVD
6. HDD Info.
press ENT
Free: 41CD 8DVD
12.8 Format HDD
This feature formats the HDD. However, you will be unable to format the HDD if the HDD
image was selected as Reading Source. You must go to 8. Select Source to select the Optical
Drive as Reading Source.
[Image Manager] Caution:
7. Format HDD
press ENT to
confirm format
press ENT
[Format HDD] [Format HDD ]
Confirm Again?
Format HDD?
press ENT to
confirm and start
executing f
Complete!
7. ABOUT HDD MANAGER
Our duplicator uses rational and dynamic HDD management technology. The traditional
method of formatting an HDD requires you to choose the number of partitions designated for
DVDs and CDs before formatting your hard drive. The problem is that you might not be able
to predict how many DVDs or CDs you will load onto your hard drive. Many incomplete
partitions can be created, mainly with new DVD disks constantly coming out, such as the
double- layer DVD. You need an intelligent and more dynamic way to manage your HDD
and our HDD manager can do that for you!
Our Dynamic HDD Manager consists of the following special features:
I. Auto Detect Disc Capacity and Dynamically Assign Partitions
1. When you first format the built-in HDD, our duplicator will automatically divide the HDD into 1GB
partitions. A DVD or CD partition does not have to be selected in the beginning.
2.
You can check HDD information in function 12.6 HDD Info. The Hard Drive’s capacity is presented in
terms of how many DVD or CD discs you can load. For example, if your built-in HDD is 40GB, then the
system will show the HDD available capacity:
0G 5GB = 8
or
40GB / 1 GB = 40
8 DVD
40 CD
20

• Note: DVD is calculated by 5GB, and CD is calculated by 1GB
3. Every time a source disc is loaded, the duplicator will auto detect the disc capacity and assign correct
partitions for it. For example, if you load a 4GB double-layer DVD disc into HDD as a disc image, the
system will automatically detect and assign 4 partitions for it.
4. Dynamic calculated and display HDD capacity. The duplicator will present built-in HDD capacity
information dynamically depending on your loaded source disc’s capacity. For instance, before loading a
4GB DVD disc as source disc image, the HDD information shows the HDD capacity that is available for
loading 5 DVD’s or 26 CD’s. However, after loading a 4GB DVD, the system will re-calculate the total
available partitions and display how many DVD or CD discs you can load as disc image the next time.
Before load 4GB DVD HDD info:
Used: 2 DVD 3CD
Free: 5 DVD 26 CD
Note: DVD indicates 5GB partition
and CD indicate 1GB partition
After load 4GB DVD HDD info:
Used: 3 DVD 3CD
Free: 4 DVD 22 CD
II. Smart Image File Management:
1. When Discs are loaded into HDD as stored disc images, the system will assign a file name to the image file,
beginning from A001~.
• Note: Each time a new disc image is loaded, the system will automatically search and assign the
lowest number as the file name. For example, if there are no deleted files, the file name will be assigned
in sequence beginning from A001. However, if there is a deleted file, such as A003, then the file name will
be held. The next time there is a new disc image stored, the lowest number of A003 will be assigned as
this new disc image’s file name.
2. You are allowed to delete an image file by executing 12.5 delete image. Once an image file is deleted, the
name of the file will be left empty and held for a future loaded image file. The existing file name will not be
changed or moved ahead due to the deletion.
3. Use 12. 4 Image Info function to check image file information. The image information will display the image
file name, Disc type and file size.
[
image info]
A001 DVD 3875MB
Or
[
image info]
A003 CD 65:28
3.875GB DVD disc
image file A001
CD disc image with 65 min
28 sec, file A003
21
 Loading...