

Page 1
EN
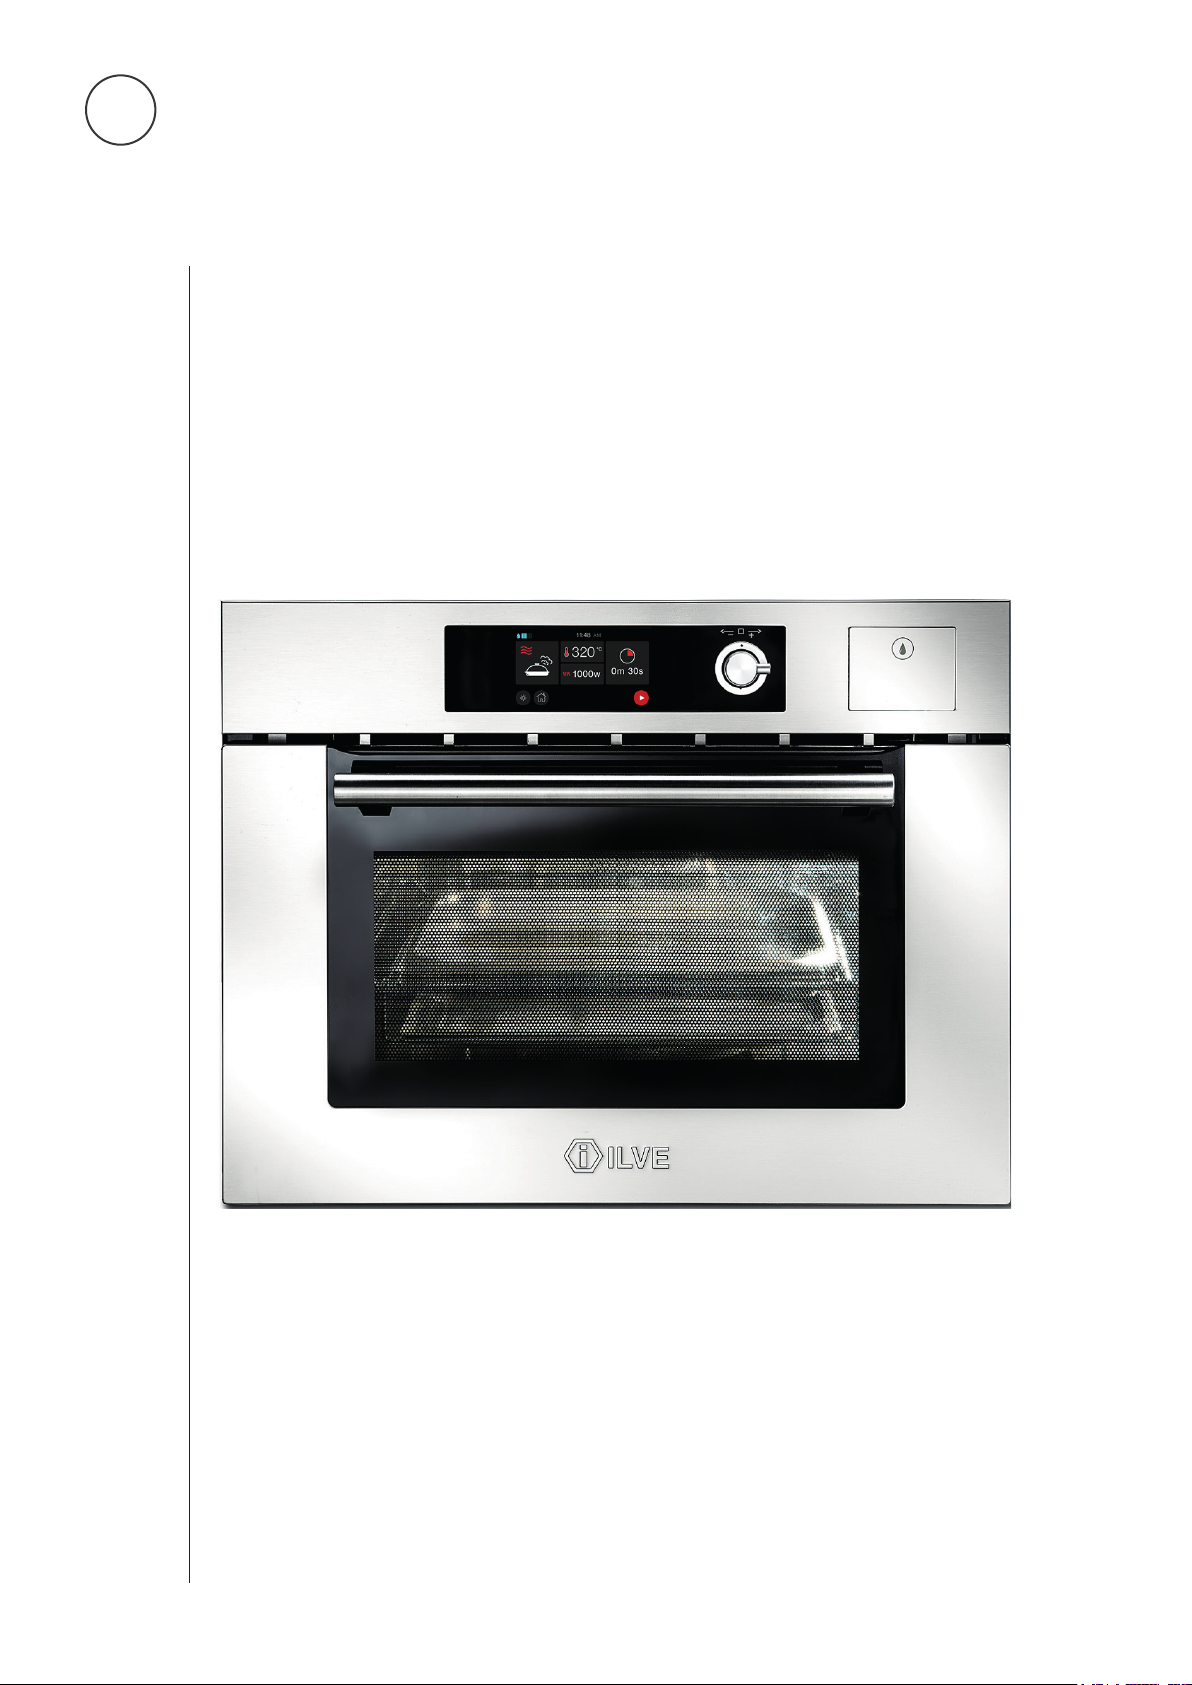
ULTRACOMBI
Tri-mode oven
hot air - steam - microwave
INSTALLATION,
USER AND MAINTENANCE INSTRUCTIONS
cod. EI33960050000EN
11/2018
Page 2

INDEX
IMPORTANT SAFETY WARNINGS
3
ELECTRICAL CONNECTIONS
13
INSTALLATION INSTRUCTIONS
15
PRODUCT DESCRIPTION
16
Supplied Accessories
17
Cooking Accessories
19
INSTRUCTIONS FOR USE
21
Display TFT:
21
Icon legend
21
First start of the oven
22
Settings
23
Screen lock
24
Turning the oven on and off
25
Setting the cooking function
26
Functions listi
27
Setting the cooking function
28
Cooking process
29
Cooking function setting
30
Cookware / Material
31
Steam cooking
32
CLEANING - CARE - MAINTENANCE
33
Cleaning
34
Emptying and Washing the tank
38
PROBLEM SOLVING
39
Error messages
39
2
Page 3

IMPORTANT SAFETY WARNINGS
Appliances’ data
CAUTION
1
As well as being shown on the cover, the data plate is applied to the oven door frame and is visible with the door
open.
These warnings refer to different types of appliances. Pay
attention in properly identifying the type you own (see the
data plate).
These warnings are valid for the countries mentioned in
the plate.
Before using the cooker, read carefully the following instructions and keep in a safe place for future reference.
This multifunction oven complies with current statutory safety standards. Inappropriate use can, however, lead to
personal injury and material damage.
I.L.V.E. SpA cannot be held liable for any damages cau-
INTENDED USE
sed by failure to observe these instructions for safety and
warnings.
NOTE: This oven has been designed to defrost, reheat and
2
cook foodstuff in domestic households and residential environments. The multifunction oven is intended exclusively
for residential use and must always be operated for its
intended purpose: it must not be modied or tampered
with in any way.
Any other usage is not allowed and could be dangerous.
It is not intended for use outdoors.
Persons who lack physical, sensory or mental abilities or
experience with the multifunction appliance , so that they
cannot safely operate it, should not use it without supervision or instruction by a responsible person.
It is important that they recognise and understand the
dangerous consequences of incorrect operation of the
appliance.
3
Page 4
IMPORTANT SAFETY WARNINGS
3
PRECAUTIONS TO AVOID POSSIBLE EXPOSURE TO EXCESSIVE MICROWAVE ENERGY
Do not attempt to operate this oven with the door open
since open-door operation can result in harmful exposure
to microwave energy. It is important not to damage or
tamper with the safety interlocks
Do not place any object between the oven front and the
door or allow soil or cleaner residue to accumulate on the
sealing surfaces.
4
WARNING: Do not operate the oven if it is damaged. It is
particularly important that the oven door closes properly
and that there is no damage to the (1) door (bent), (2)
hinges and latches (broken or loosened), (3) door seals
and sealing surfaces. If the door and the sealing gaskets
are damaged, the oven shall not be used until repaired
by a properly qualied service technician ( trained by the
manufacturer or by the Customer Service ).
5
WARNING: It is dangerous for anyone without suitable training to perform maintenance and repair operations requiring removal of any casing or barrier against exposure
to microwaves. During installation, maintenance and repair work, the appliance must be disconnected from the
mains electricity supply. Never open the casing of the appliance. Tampering with electrical connections or components and mechanical parts is highly dangerous to the
user and can cause operational faults.
ATTENTION: Do not heat liquids or other foods in sealed
6
containers, jars or bottles because they could explode.
This appliance must be used only in a domestic hou-
7
sehold. The mains supply must be tted with all devices
required
4
Page 5
IMPORTANT SAFETY WARNINGS
by the statutory rules of installation.
When the oven is operated in microwave mode it is inten-
8
ded to heat food and drinks. Do not use the microwa-
ve mode for drying owers, herbs, bread, rolls or other
ammable materials like sponges, slippers, cushions or
pads lled with cherry kernels, wheat grain, lavender or
gel, such as those used in aromatherapy. When heated,
these pads could catch re and cause injury by burning
even after they have been removed from the oven.
9
If smoke is observed do not open the oven door: swi-
CHILDREN
10
tch the appliance off and disconnect it from the mains
electricity supply. Do not open the door until the smoke
has dispersed to stie any ames.
- Activate the system lock to ensure that children cannot
switch on the multifunction oven inadvertently
- Supervise the children if they are in close vicinity to the
multifunction oven. Do not allow them to play with the
appliance.
-Danger of suffocation.
Packaging, e.g. plastic wrappings, must be kept out of
the reach of babies and children. Whilst playing, children
could become entangled in packaging or pull it over their
head and suffocate. Keep children away from this kind of
materials.
-Danger of burning.
Children’s skin is far more sensitive to high temperatures
than that of adults. The door surface, the control panel
and the ventilation openings get hot. Make sure that children do not attempt to open the door when the appliance is in operation. Keep children well away from the appliance until it has cooled down and there is no danger
of burning.
5
Page 6
IMPORTANT SAFETY WARNINGS
Danger of injury.
The door can support a maximum weight of 8 kg. Do not
let children sit on the door, lean against it or swing on it.
They could injure themselves
ATTENTION. Accessible parts may get very hot during operation.
Children under 8 years of age must be kept away from
the appliance unless they are constantly supervised.
The appliance may be used by children 8 years and older and by persons who lack physical, sensory or mental
abilities or experience with the multifunction appliance ,
11
12
with supervision or instruction by a responsible person. It is
important that they recognise and understand the dangerous consequences of incorrect operation of the appliance. Children must not play with the appliance. Children must not be allowed to clean the oven unsupervised
ATTENTION: when the appliance is operated in combination mode children should use it under adult supervision,
because of the high temperatures that will develop.
Do not attempt to operate the oven with the door open,
tampering with the safety interlock switches. Do not operate the oven if any kind of objects get trapped between
the door and the oven front plate. Always keep the inner
side of the door clean(J) using a damp cloth and non
abrasive cleaners. Don’t let food residues accumulate
between the mating surfaces of the door and the oven
13
front plate.
Do not operate the oven if the mains supply cable or the
plug are damaged, because this could cause an electric
shock. If the mains supply cable is damaged, it must be
replaced by the manufacturer’s customer service or by a
qualied person, in order to avoid any risk.
6
Page 7
IMPORTANT SAFETY WARNINGS
14
15
16
17
To avoid overheating and the following risk of a re, it is
recommended to attend the oven when cooking foodstuff in disposable containers made of plastic, cardboard
or other ammable material, or when small quantities of
food are reheated
Do not put very cold dishes or food directly onto the inner
door glass when it is hot: the thermal shock could make it
crack.
When the oven is operated in “Microwave only” mode,
it must not be preheated without a food load inside the
cavity, nor shall it be turned on empty, because arcing
could be generated.
Before starting the oven, make sure that the utensils and
containers are suited for microwave operation ( see the
18
19
20
relevant page: “Containers for different cooking modes”).
The appliance gets hot during use. Do not touch the heating elements inside the oven cavity.
When reheating liquids ( water, coffee, milk , etc.) it is possible that, due to “delayed boiling”, the liquid reaches a
temperature higher than the boiling point, so that – when
removing the container- it can form eruptive bubbles and
cause injuries to the user. To avoid this, always place a
glass or plastic utensil ( e.g. a spoon) into the cup or container. Care should be taken when handling the container.
Do not reheat liquors or spirits, nor big quantities of oil, be-
cause they could catch re.
21
After reheating baby milk or food ( in bottles or jars) shake or stir thoroughly and check the temperature to avoid
scalding. The temperature of the container is not an in-
7
Page 8
IMPORTANT SAFETY WARNINGS
dication of the temperature of the food or liquid in it. It is
recommended to stir and shake the food also in order
to ensure a uniform temperature. When using commercially available baby bottle sterilisers, always check that
the containers are lled with the correct quantity of water
indicated by the manufacturer.
22
23
24
Do not use steam cleaners to clean the inside of the appliance.
Do not use abrasive cleaners or sharp metal tools to clean the door glass. They could scratch the glass surface
and result in cracking it.
All microwave ovens are tested and certied in compliance with the latest safety and electromagnetic compatibility standards . However, as a precaution, manufacturers
of pace-maker devices recommend to keep a minimum
distance of 20- 30 cm between an operating microwave oven and the pace-maker, in order to avoid any interference to the pace-maker device. If for any reason
there should be a suspect of interference, immediately
switch the microwave operation off and contact the manufacturer of the pace-maker.
25
26
In case of overheating of the appliance ( prolonged use,
use without load, etc.) the oven could be switched off by
a safety thermostat. After cooling down the oven will resume its regular operation.
When the appliance is operating, the door and the accessible surfaces may become hot.
8
Page 9
IMPORTANT SAFETY WARNINGS
27
28
29
Do not cook or reheat eggs in their shells using microwave
power, because they could explode even after the cooking has ended.
For safety reasons, this multifunction oven may only be
used when it has been built in. This is necessary to ensure
that all electrical components are shielded.
This multifunction oven must not be used in a non-stationary location (e.g. on a ship).
Oils and grease could easily catch re if overheated.
Always supervise the appliance when using oils and grease. Never attempt to extinguish with water burning oils
and grease. Switch off the appliance and stie the ames carefully using a lid or with a special re-safe blan-
30
31
ket. Flammable objects situated in the vicinity of the oven
may start burning if exposed to high temperatures. Do not
use the appliance to heat the ambient.
Plastic cutlery or dishes not suited for microwave energy
could melt due to the high temperatures reached, and
may burn and damage the oven. Only use dishes suited
for use with microwave power. Follow the directions provided by the manufacturer: when using plastic dishes inside
the oven, plase make sure that they resist to heat and
steam. If they are not, they could melt or be damaged.
Be aware that cooking, reheating and defrosting times
when using microwave power are often considerably
shorter than when using conventional functions. Too long
heating times lead to food desiccation and a possible
combustion.
9
Page 10
IMPORTANT SAFETY WARNINGS
Cleaning
32
• The appliance must be cleaned regularly and any
food residues must be removed. Failing to clean the
oven may cause deterioration of the surfaces. This can
have a negative effect on the durability of the appliance and cause possible risk situations. Clean the oven
interior, inside of the door and door seal as soon as the
oven has cooled down.
• Clean the front of the appliance and the door sealing
surfaces with a soft cloth with warm water and a cleaning agent.
• To clean metal surfaces, use a usual cleaning agent.
• Clean stubborn dirt with a special oven cleaner.
• Clean all accessories after each use and let them dry.
Use a soft cloth with warm water and a cleaning agent.
Lamp
33
WARNING!
Before you change the lamp:
Ensure the appliance is switched off before replacing the
lamp to avoid the possibility of electric shock.
CAUTION: The lamp and the lamp glass cover can be hot.
Put a soft cloth on the bottom of the interior of the appliance. It prevents damage to the lamp glass cover and
the cavity. Always use the same lamp type.
Replacing the lamp
Turn the lamp glass cover counterclockwise to remove it.
- Clean the glass cover.
- Replace the lamp with a suitable 25W Halogen lamp.
- Re-install the glass cover.
During installation, maintenance and repair work, the appliance must be disconnected from the mains electricity
supply
10
Page 11
IMPORTANT SAFETY WARNINGS
34
35
Steam cooking
Do not operate the oven if the glass lamp cover has been
removed. Steam could reach electrically live parts and
cause a short-circuit; also electrical components could
get damaged.
If the multifunction oven is installed behind a furniture panel (e.g. a door), ensure that the door is never closed whilst
the appliance is in use. Heat and moisture can build up
behind a closed furniture panel and cause subsequent
damage to the multifunction oven, the housing unit and
the oor. Do not close the door until the appliance has
cooled down completely.
WARNING! Danger of burning.
-The multifunction oven becomes hot when in use. You
could burn yourself on the heating elements, oven interior, cooked food, oven accessories or hot steam. Wear
oven gloves when placing food in the oven or removing it
and when adjusting oven shelves etc. in a hot oven. Take
care when putting cooking containers into the oven or
removing them not to spill the contents.
-Do not open the oven door during steam cooking. Hot
steam may come out, there is a risk of getting burnt or to
damage the appliance.
- Never line the interior of the oven cavity with e.g. foil or
lm. Do not put containers, pans and pots directly on the
bottom of the cavity.
11
Page 12
DISPOSAL OF THE PACKAGING MATERIAL
The packaging is intended to protect the appliance from
damage during transportation.
The packaging materials are easily recyclable because they have been selected according to environmental
friendly criteria.
Recycling them reduces the need for raw materials and
reduces the volume of waste.
Electrical and electronic appliances often contain valuable materials. They also contain materials which, if
handled or disposed of incorrectly, could be potentially
hazardous to human health and to the environment. They
are, however, essential for the correct functioning of your
appliance. Please do not therefore dispose of it with your
household waste.
Please dispose of it at your local
community waste collection /
recycling centre or contact your
Dealer for advice.
Ensure that it presents no danger to
children while being stored for disposal.
12
Page 13
ELECTRICAL CONNECTIONS
ATTENTION
Rules for installation
The instructions below are intended for the skilled technician who will install the appliance, regulate it and perform
technical maintenance and who will ensure that these
operations are carried out in the most correct way possible, in compliance with the regulations in force.
Important: the appliance must be disconnected from
the electric socket before performing all regulating or
maintenance operations.
• Installation must be carried out in a workmanlike manner, fully complying with the legislation in force regarding
electrical installations. Otherwise, the manufacturer di-
sclaims any responsibility. You will nd your appliance’s
wiring diagram in this booklet.
• The appliances are prepared for connection to the voltage shown on the data plate.
ATTENTION
• Before connecting the appliance to the mains check
that:
-the electromagnetic switch or the socket are able to
support the appliance’s load (see dataplate);
-the power supply system must have an efcient grounding system.
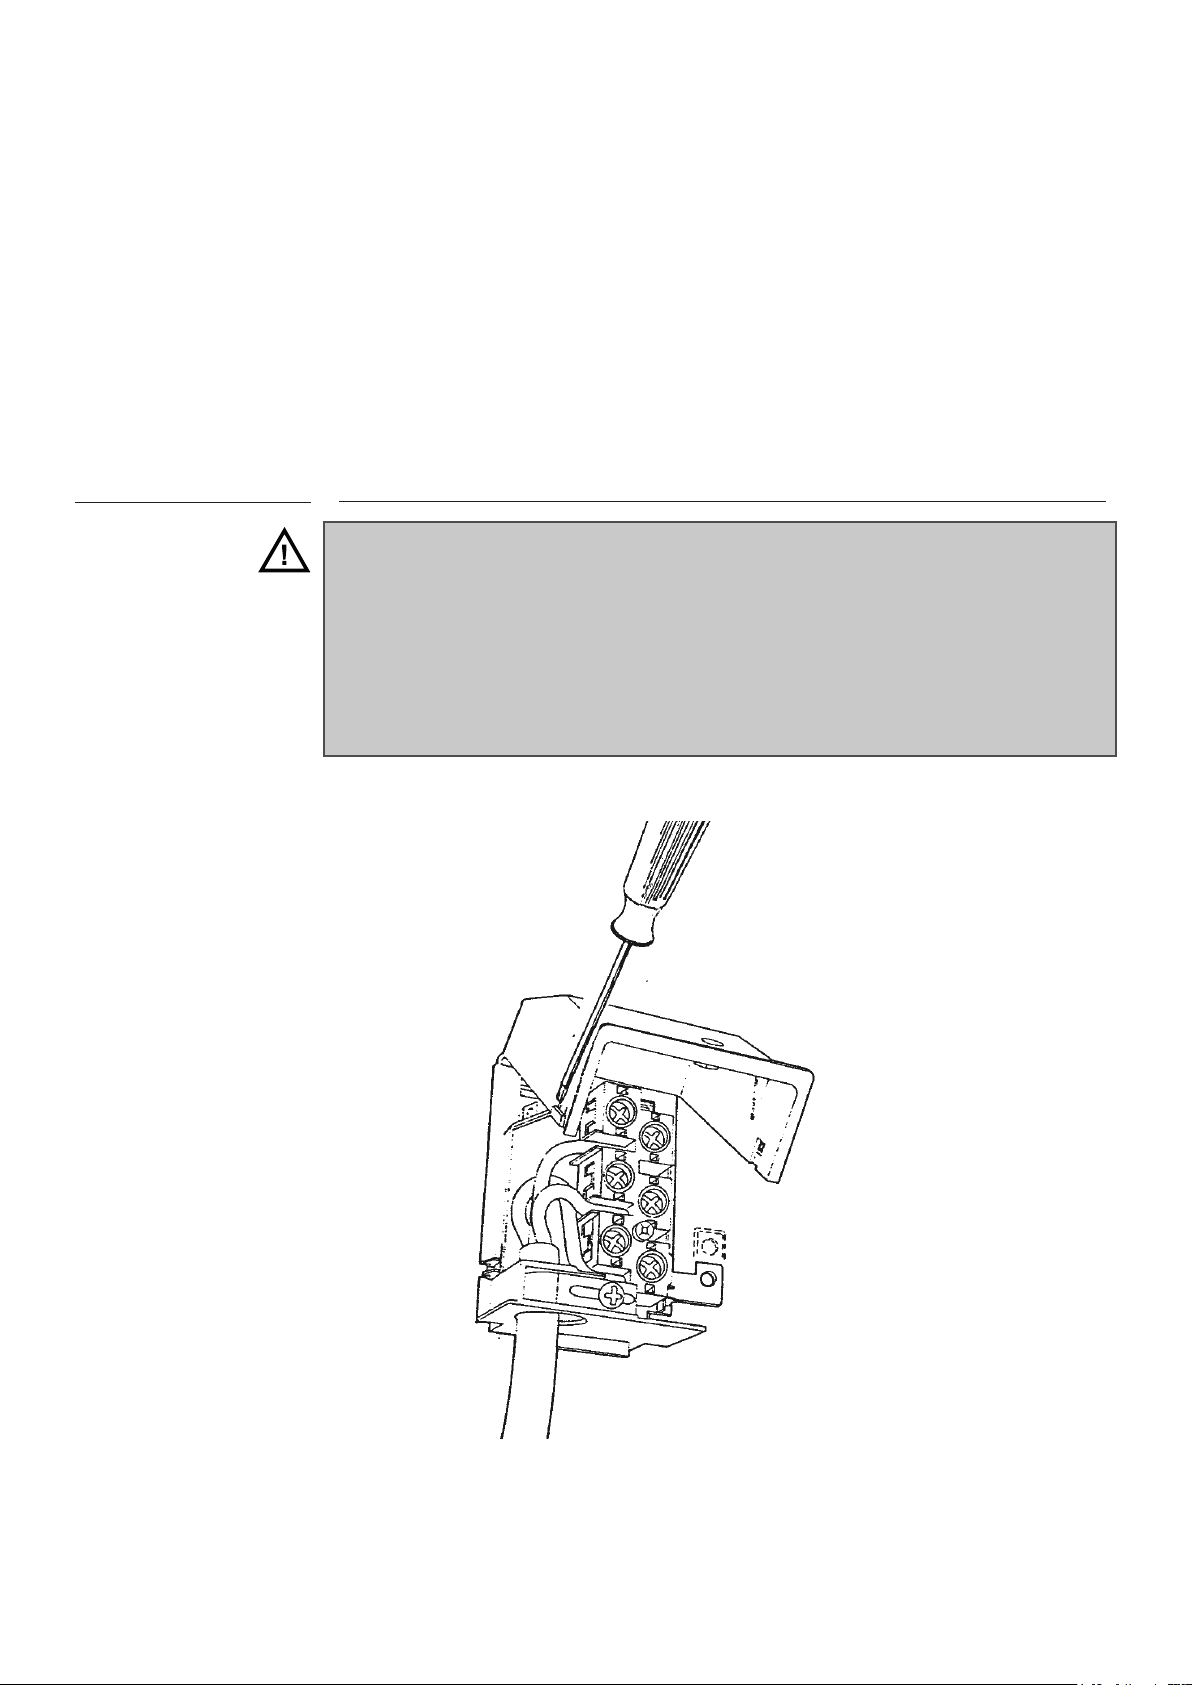
The appliance is supplied with a cable but without a plug:
the connection must be made taking into account that
the green-yellow cable is the ground conductor and
it must never be interrupted. The socket must be visible
and easily reachable so that the appliance can easily
be disconnected. For direct connection to the mains, it is
necessary that:
-the relief valve and domestic system can support the
equipment’s load (see data plate)
13
Page 14
ELECTRICAL CONNECTIONS
-the socket or omnipolar switch, with a minimum 3 mm
contact opening, must be easily reachable once the appliance has been installed.
- means for disconnection must be incorporated in the
xed wiring in accordance with the wiring rules
ATTENTION
The yellow-green ground wire must never be interrupted
even by the switch. The power cable should be positioned so that it does not come into contact with surfaces
that have a temperature of 50 °C higher than the environment. In case replacement of the power cable is necessary, contact the customer service.
14
Page 15
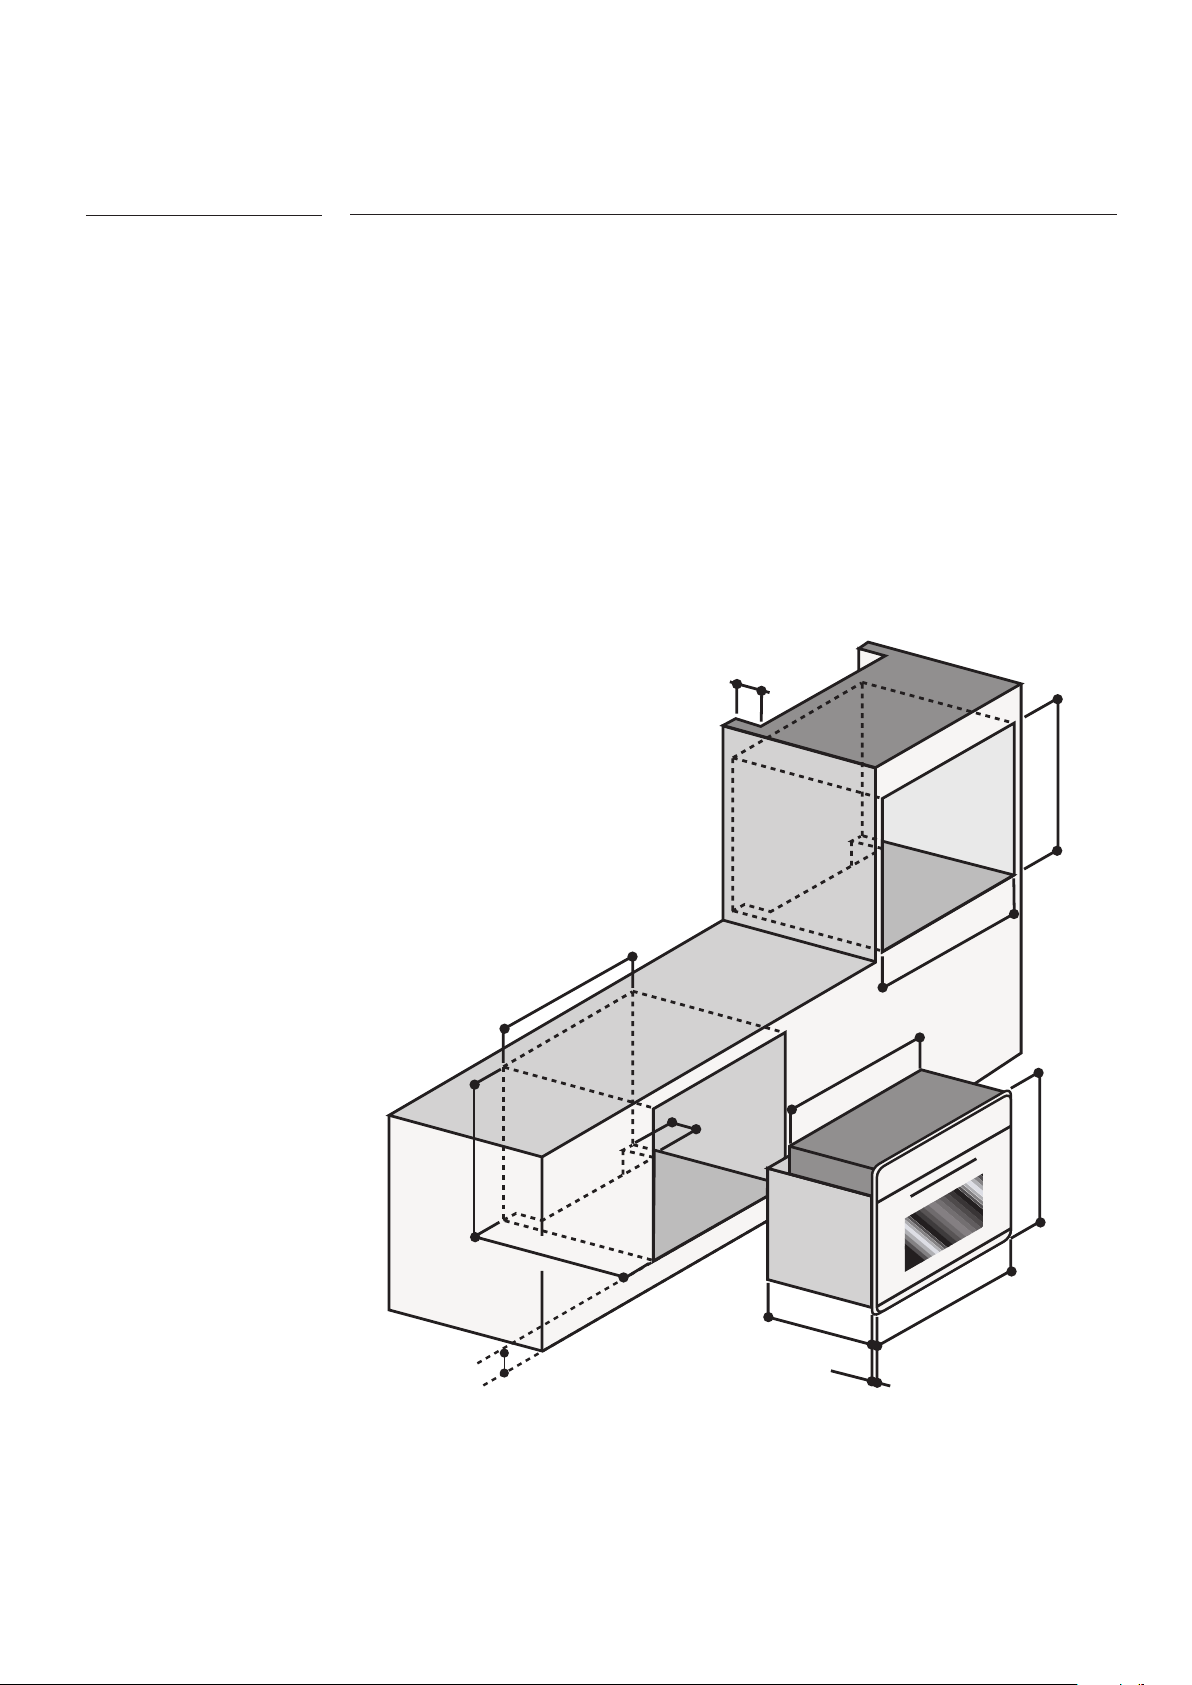
INSTALLATION INSTRUCTIONS
Oven data
Important points
The serial plate is positioned on one side of the front plate of the oven, and is visible
opening the door; it shows all data necessary for the installation, e.g. model number
nominal voltage and power input.
First check the dimensions of the furniture opening: they must be exactly equal to those
shown in the picture. Make sure that the laminated surfaces or veneered panels be
manufactured using heat-resistant glue. If they are not, they could get warped or de
tach especially in the narrowest parts of the furniture.
Also check that the oor of the built-in niche must be solid and able to carry the weight
of the appliance.
All screws and bits needed to fasten the oven in the furniture are supplied with the
product.
All dimensions are indicated in mm.
80
450
450
60
5
570
min. 100
80
557
5
50
22
560
9
5
455
6
15
Page 16
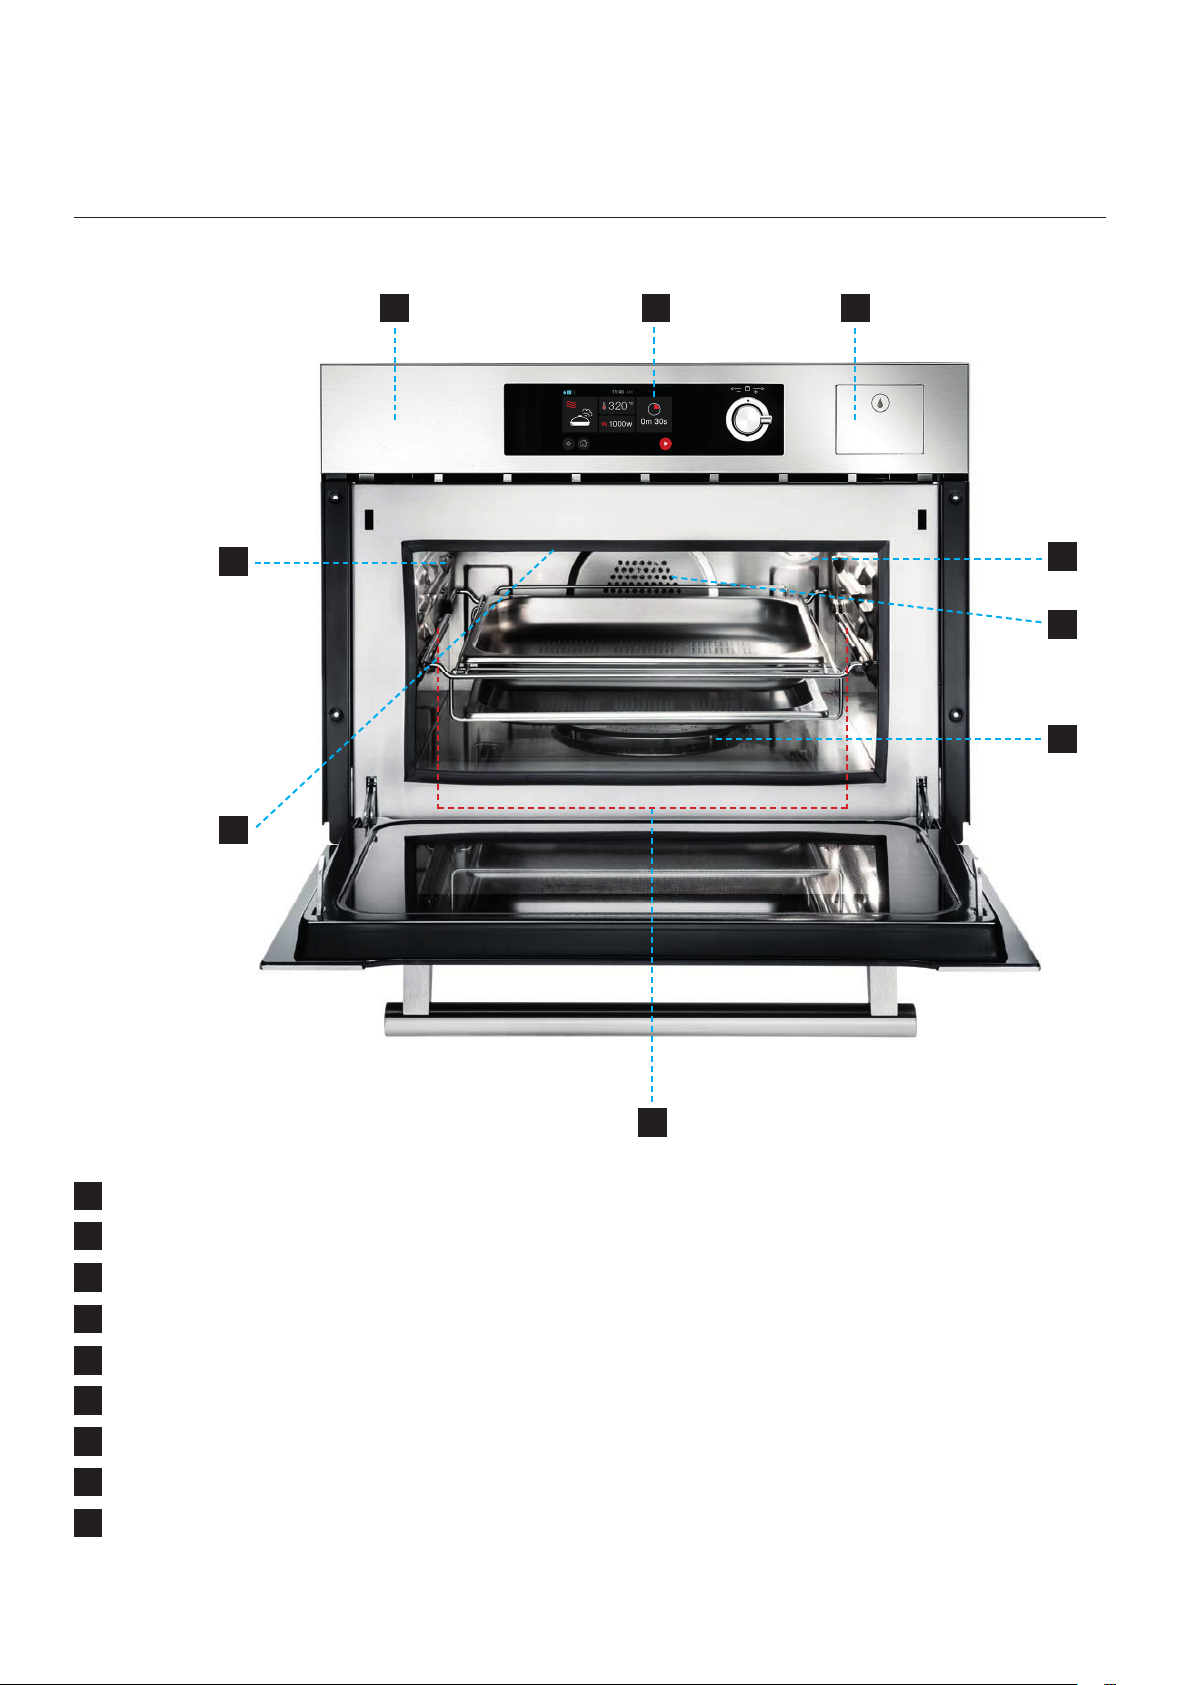
PRODUCT DESCRIPTION
1 2
4
5
3
6
7
8
Control panel
1
TFT touch Display
2
Drawer for water load
3
Food probe socket
4
Grill heater
5
Oven lamp
6
Convection heater and fan
7
Boiler with lid
8
Rack supports
9
9
16
Page 17
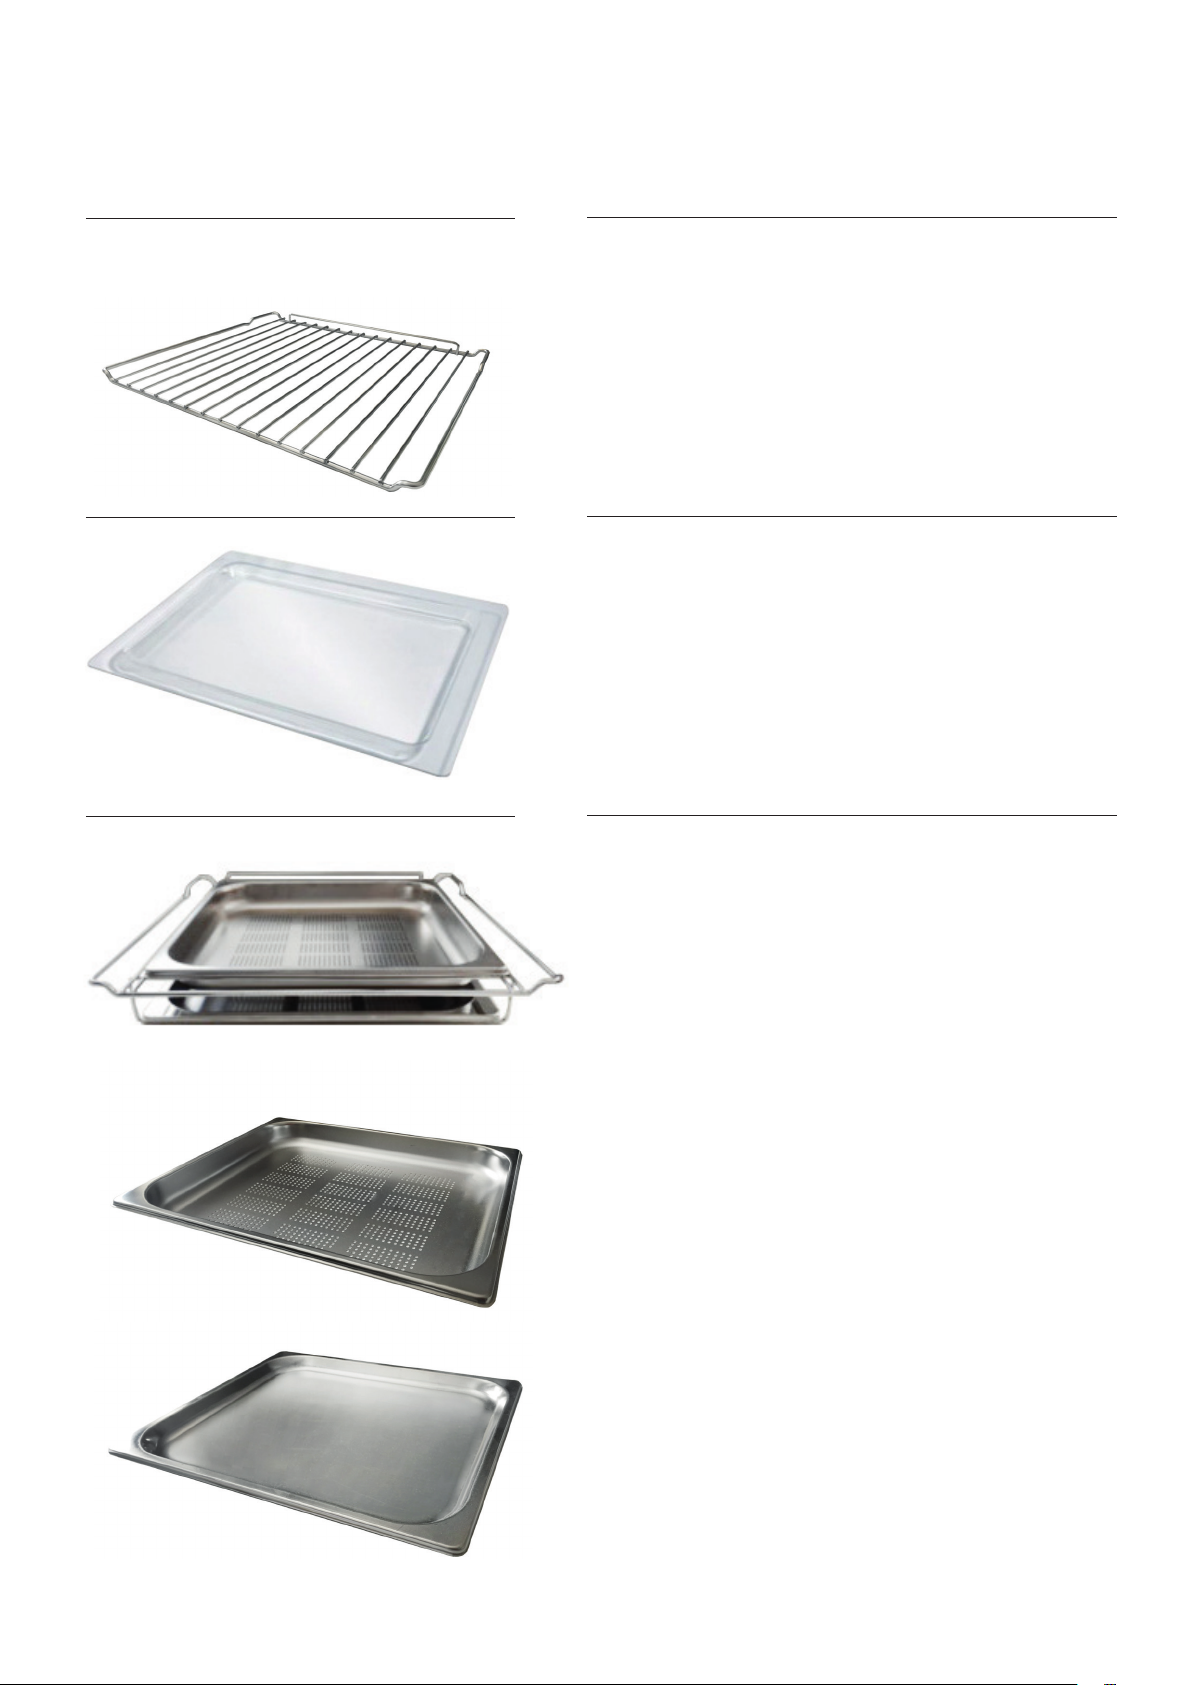
PRODUCT DESCRIPTION
- Supplied accessories
Wire rack
For cookware, trays and roasting
Pyrex glass tray
For microwave cooking and drip pan use
Steam cooking set
Wire frame supporting 2 dedicated trays:
- perforated tray, allows steam to reach the food completely
- shallow tray, to collect condensation water dripping down
17
Page 18
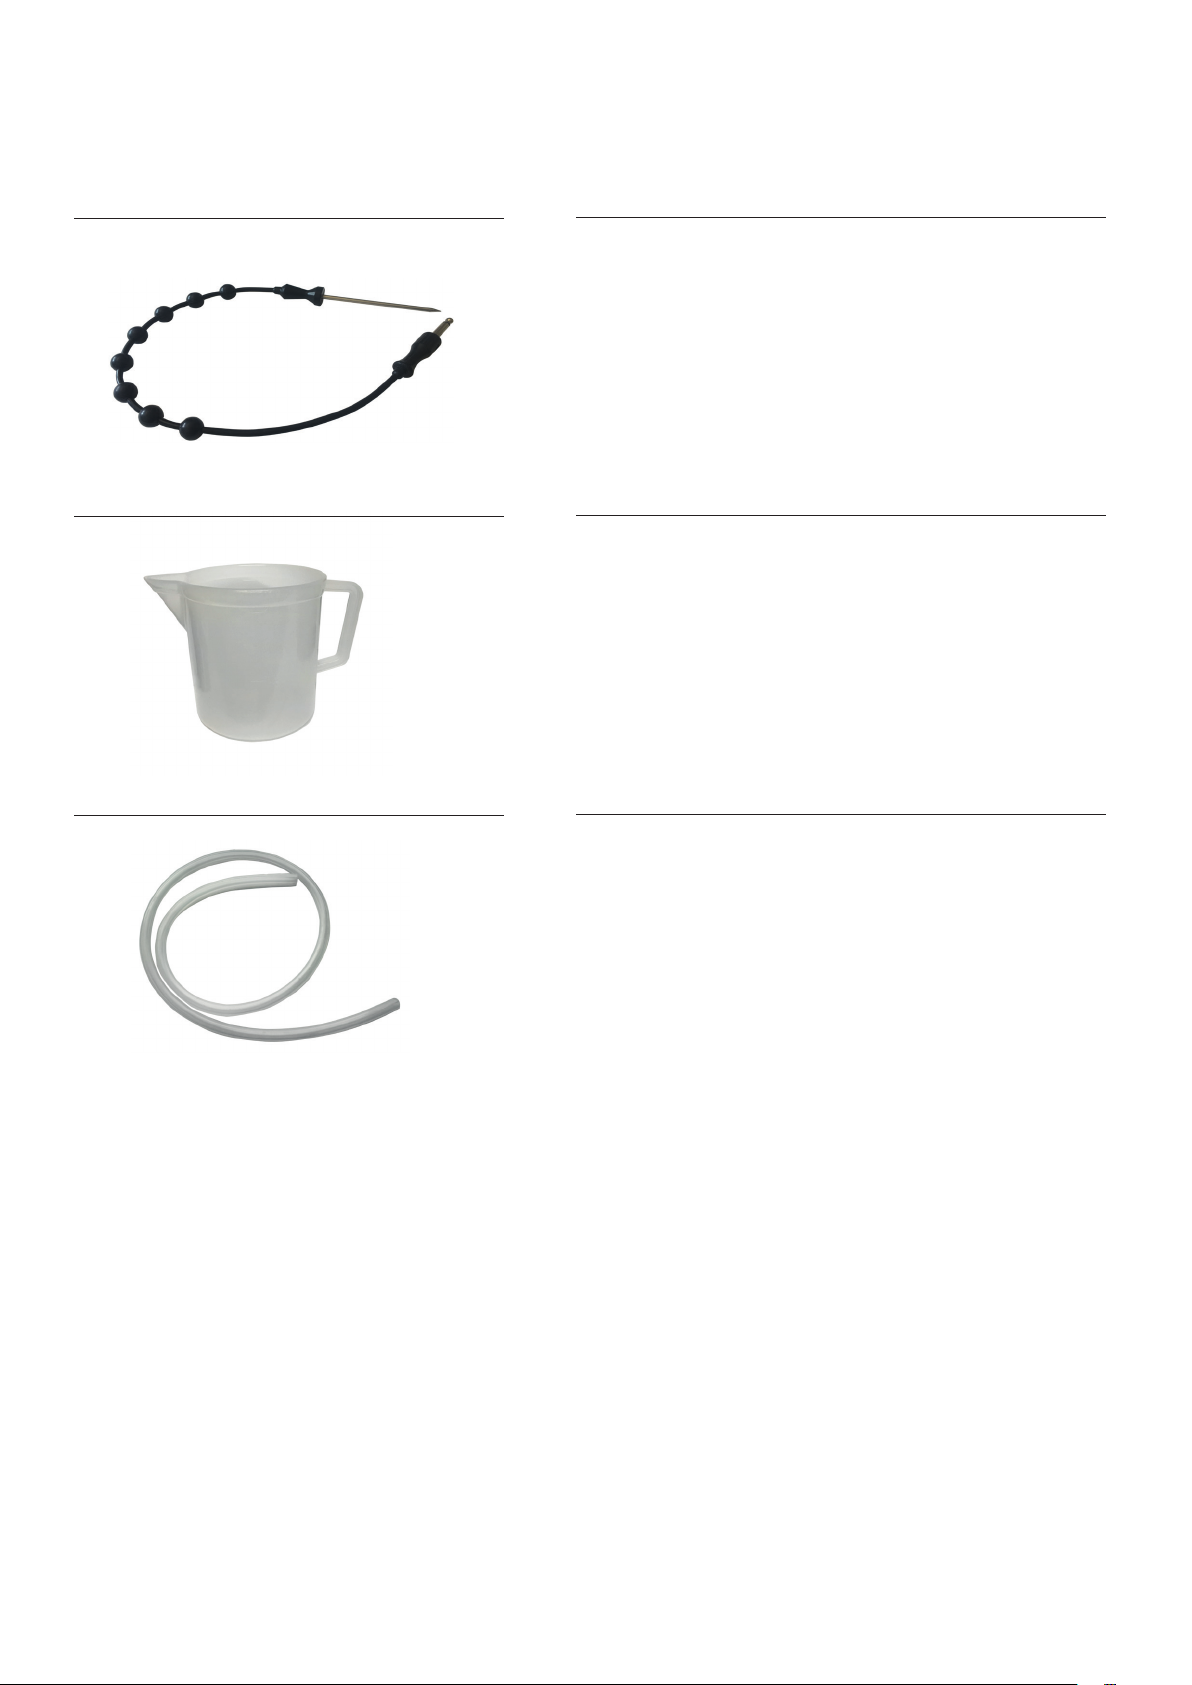
PRODUCT DESCRIPTION
- Supplied accessories
Food probe
To reheat and cook food selecting core temperature
Jug
To ll the water tank for steam cooking and to collect the
water when emptying the tank
Silicon pipe
To be used with the jug when emptying the tank
18
Page 19
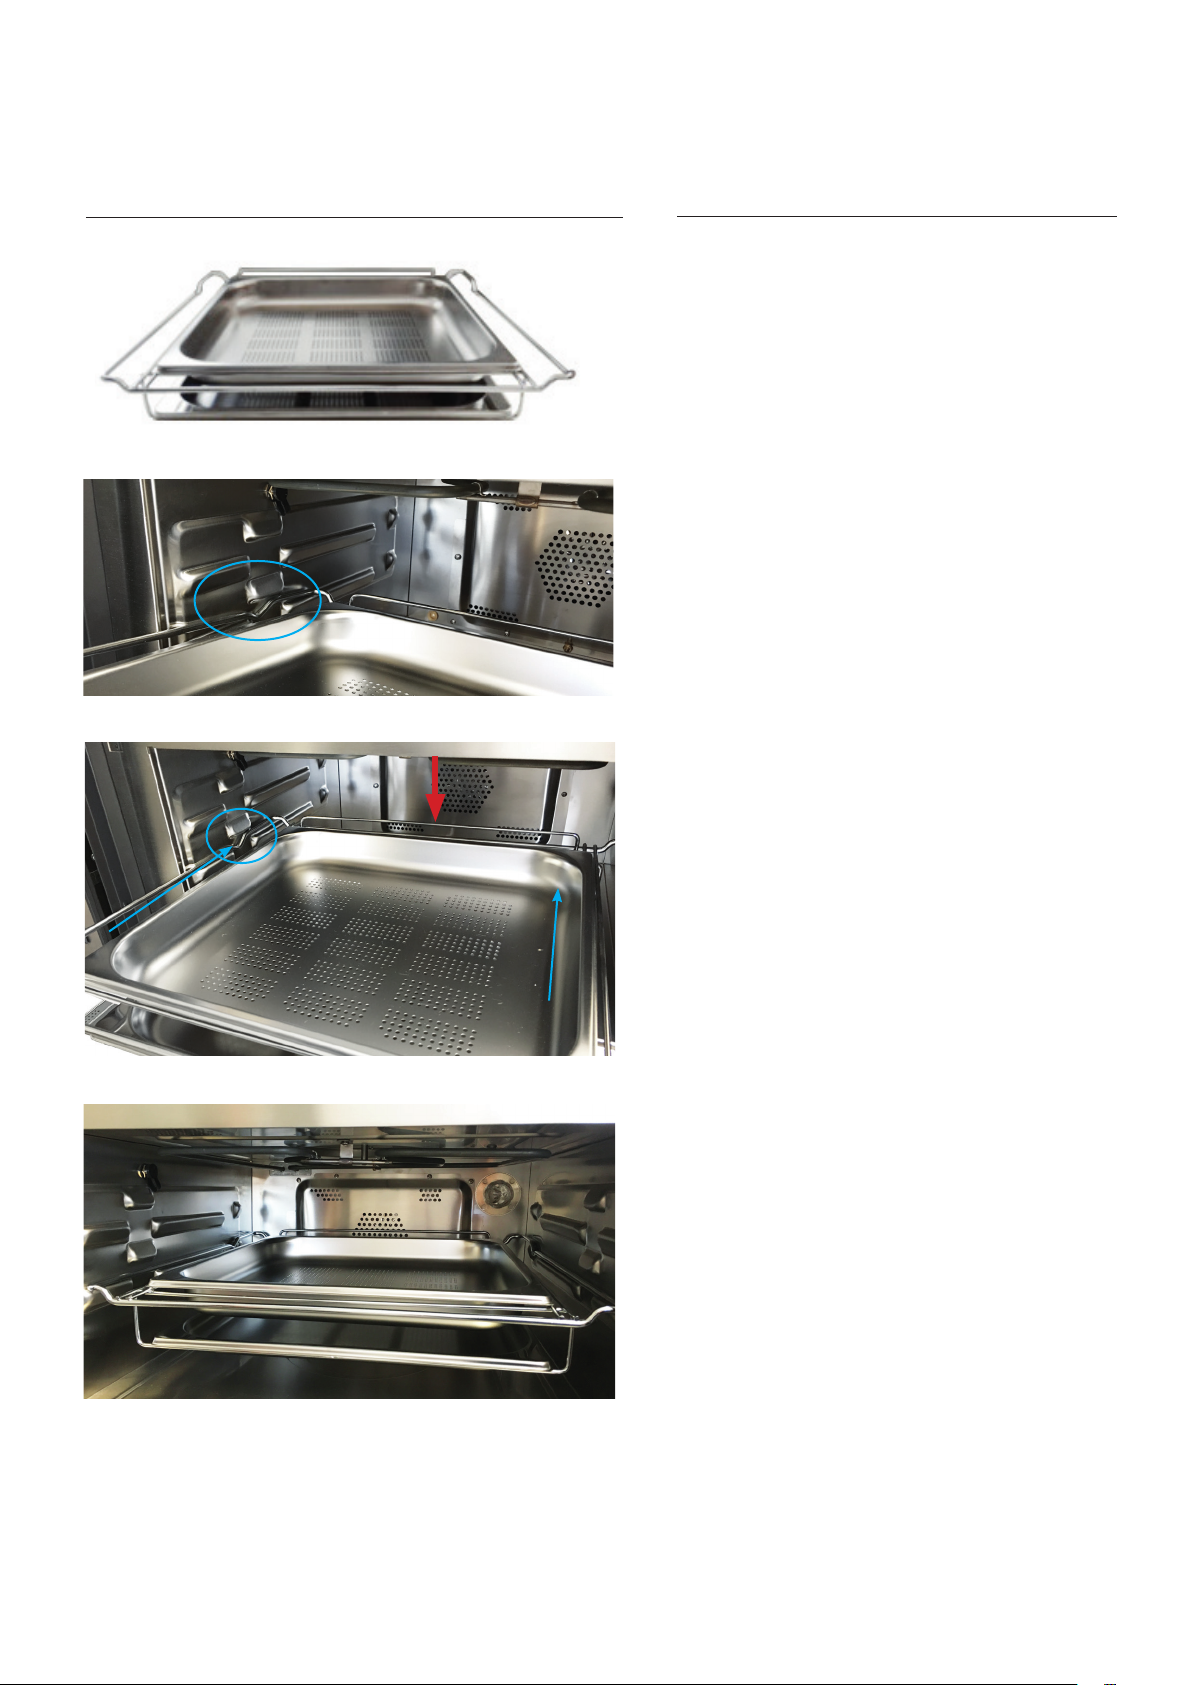
PRODUCT DESCRIPTION
- Cooking Accessories
Baking tray (if applicable):
Insert the baking tray in the wire frame as
shown.
Lift the outer part of the frame and push it into
the cavity to slide beyond the corner.
NOTE: the barrier indicated by the red arrowmust be oriented upwards and shows the back
side of the frame.
Frame with baking trays fully inserted
19
Page 20
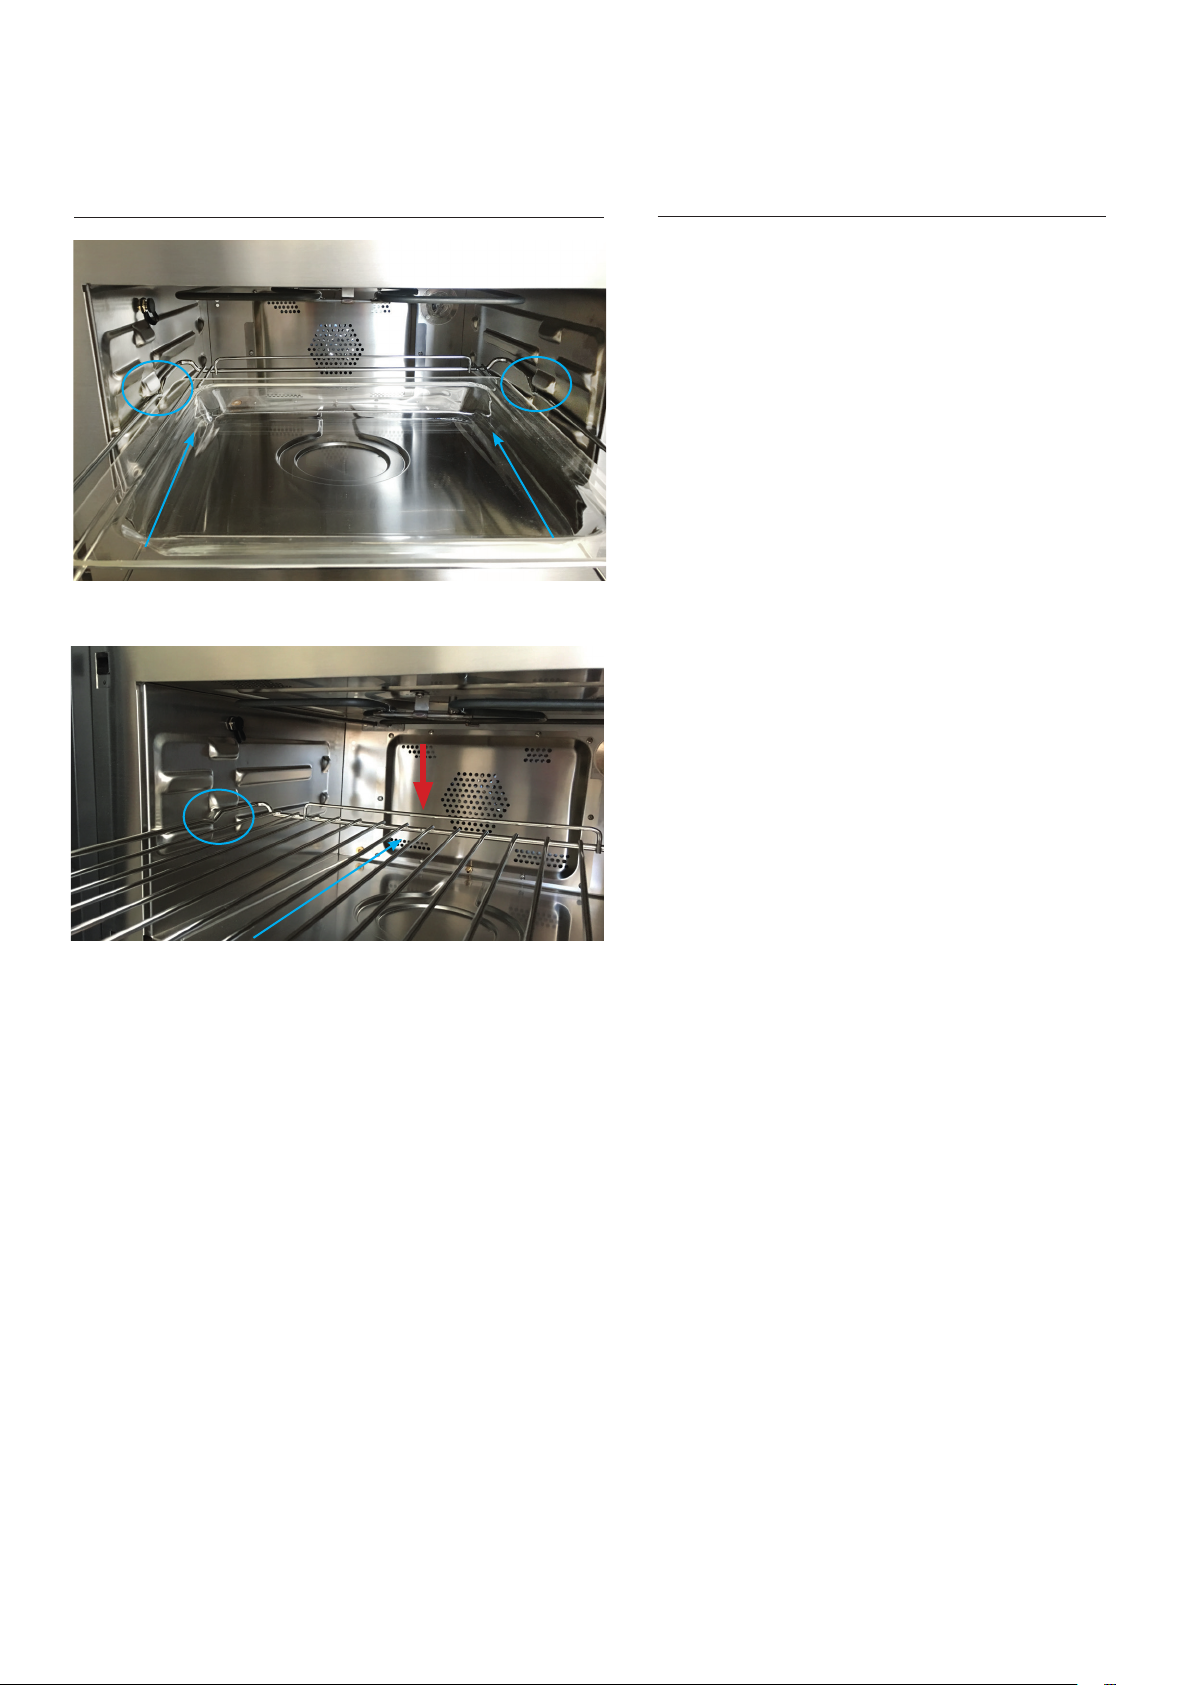
PRODUCT DESCRIPTION
- Cooking Accessories
Pyrex glass tray
When using the glass tray put it on the upper
part of the frame (the lower tray is not necessary). Insert the frame as seen before
Wire rack
Lift the outer part of the rack and push it into
the cavity to slide beyond the corner.
Select the desired level suitable for the cooking
function
NOTE: the barrier indicated by the red arrowmust be oriented upwards and shows the back
side of the rack.
20
Page 21
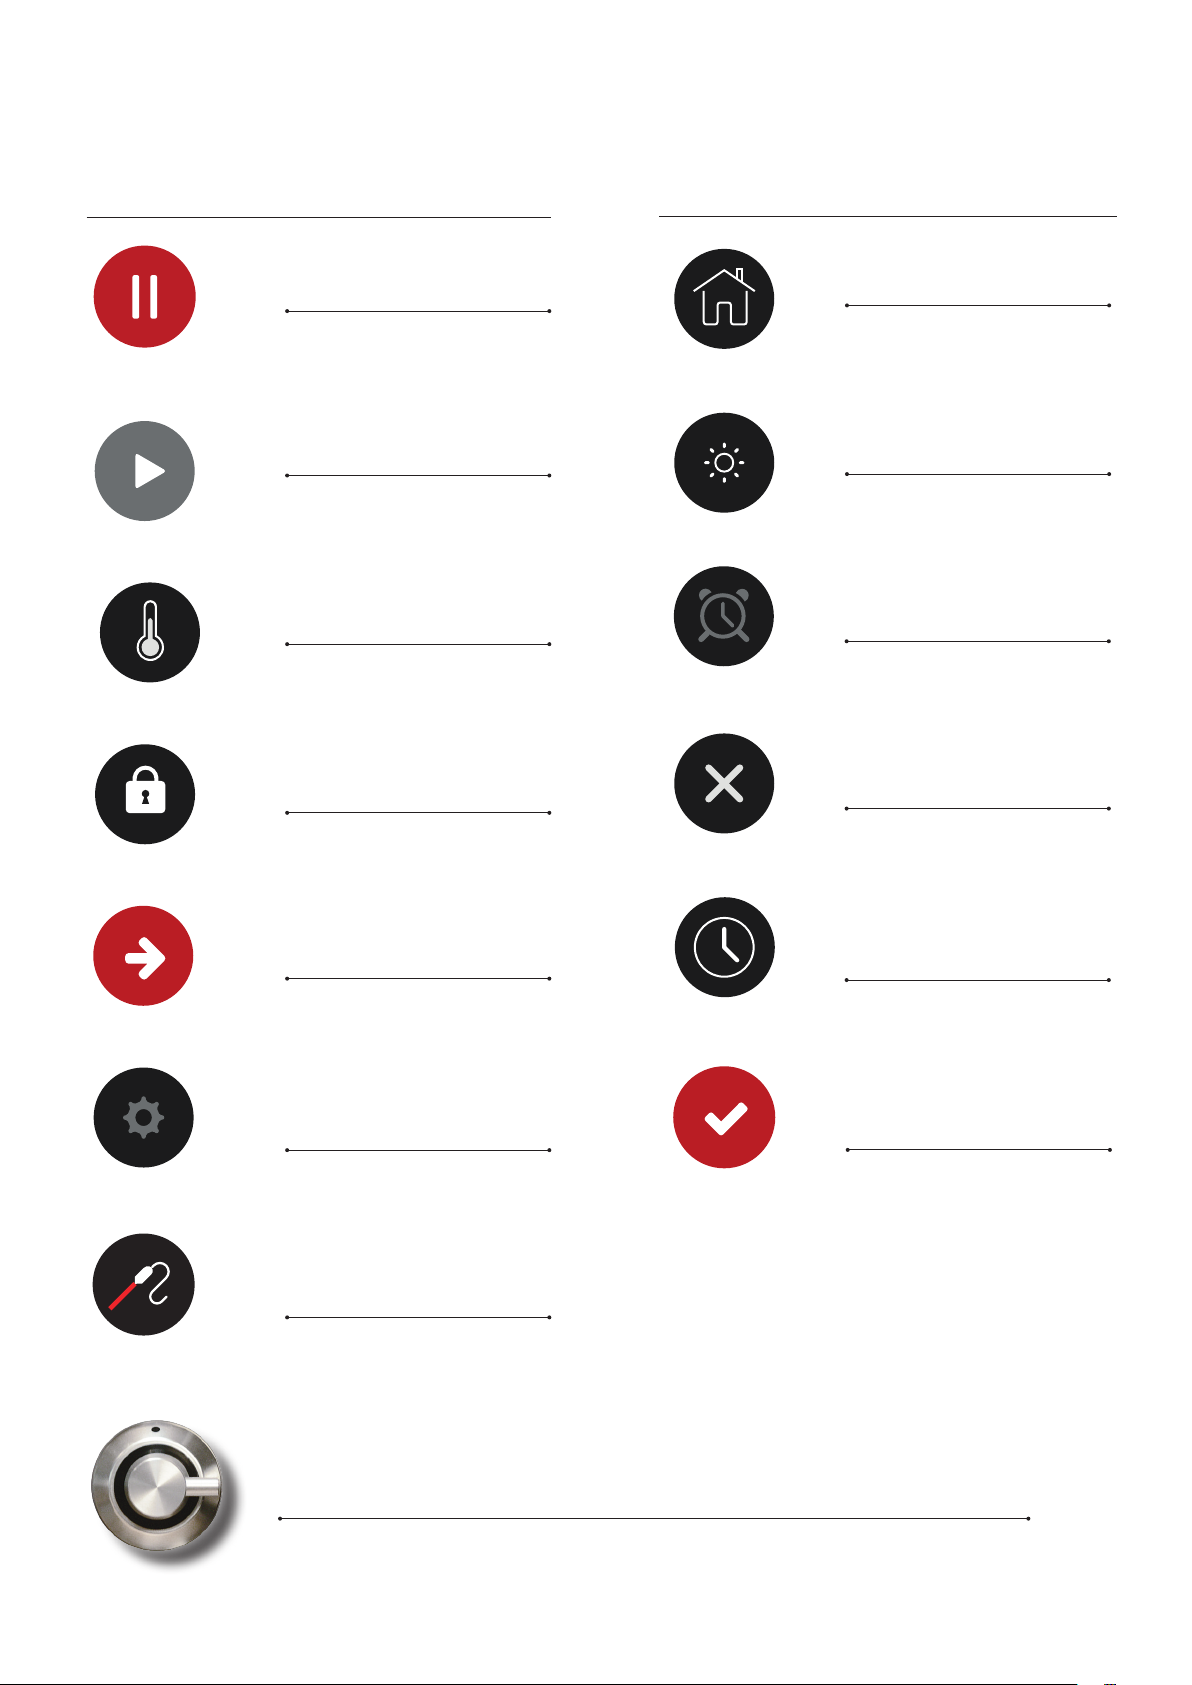
INSTRUCTIONS FOR USE
- Display TFT touch
-
Icon legend
Pause
Start
°C - °F
Screen lock
Home
Light
Timer
Exit - Terminate
Conrm and go to next step
Settings
Meat probe
Knob present in some models.
(It allows to set and conrm the functions of the TFT in addition to the Touch display)
Clock
Setting conrmation
21
Page 22
INSTRUCTIONS FOR USE
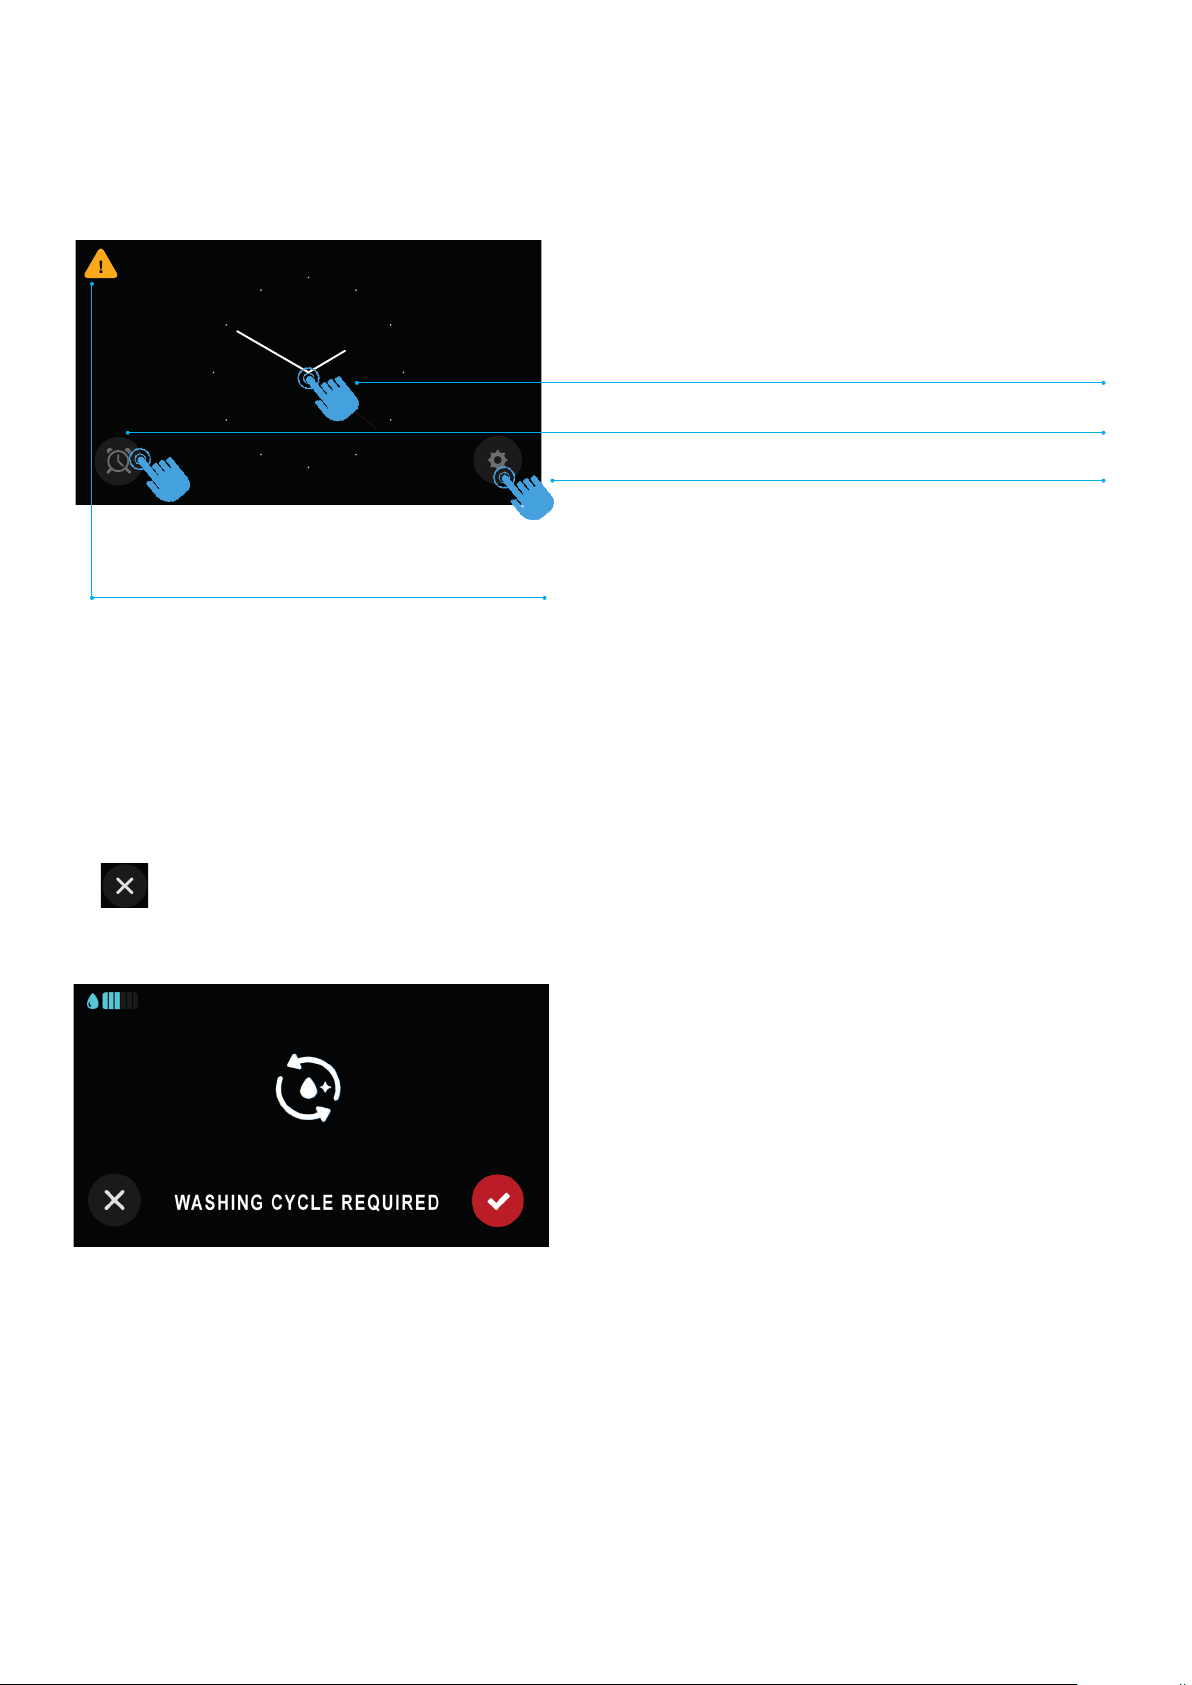
– First start of the oven
PM
Warning at rst power - on: washing cycle required
(does not prevent operation if not performed)*
Home: display homepage.
3 options
Allows you to proceed to the screen setting of the cavity
Allows you to set the timer
Gives you direct access to the settings
NOTE:
The yellow triangle will disappear:
A - if the tank is lled with some water and completely emptied. Open the door and touch the triangle to start
* (If the washing / emptying operation is not performed, the oven will operate regularly but when switched off the
yellow triangle will remain visible).
B - With reference to the picture below, that appears touching the yellow triangle opening the door, by pushing the
in the left corner.
(the triangle will reappear after the power has been shut off)
22
Page 23
INSTRUCTIONS FOR USE
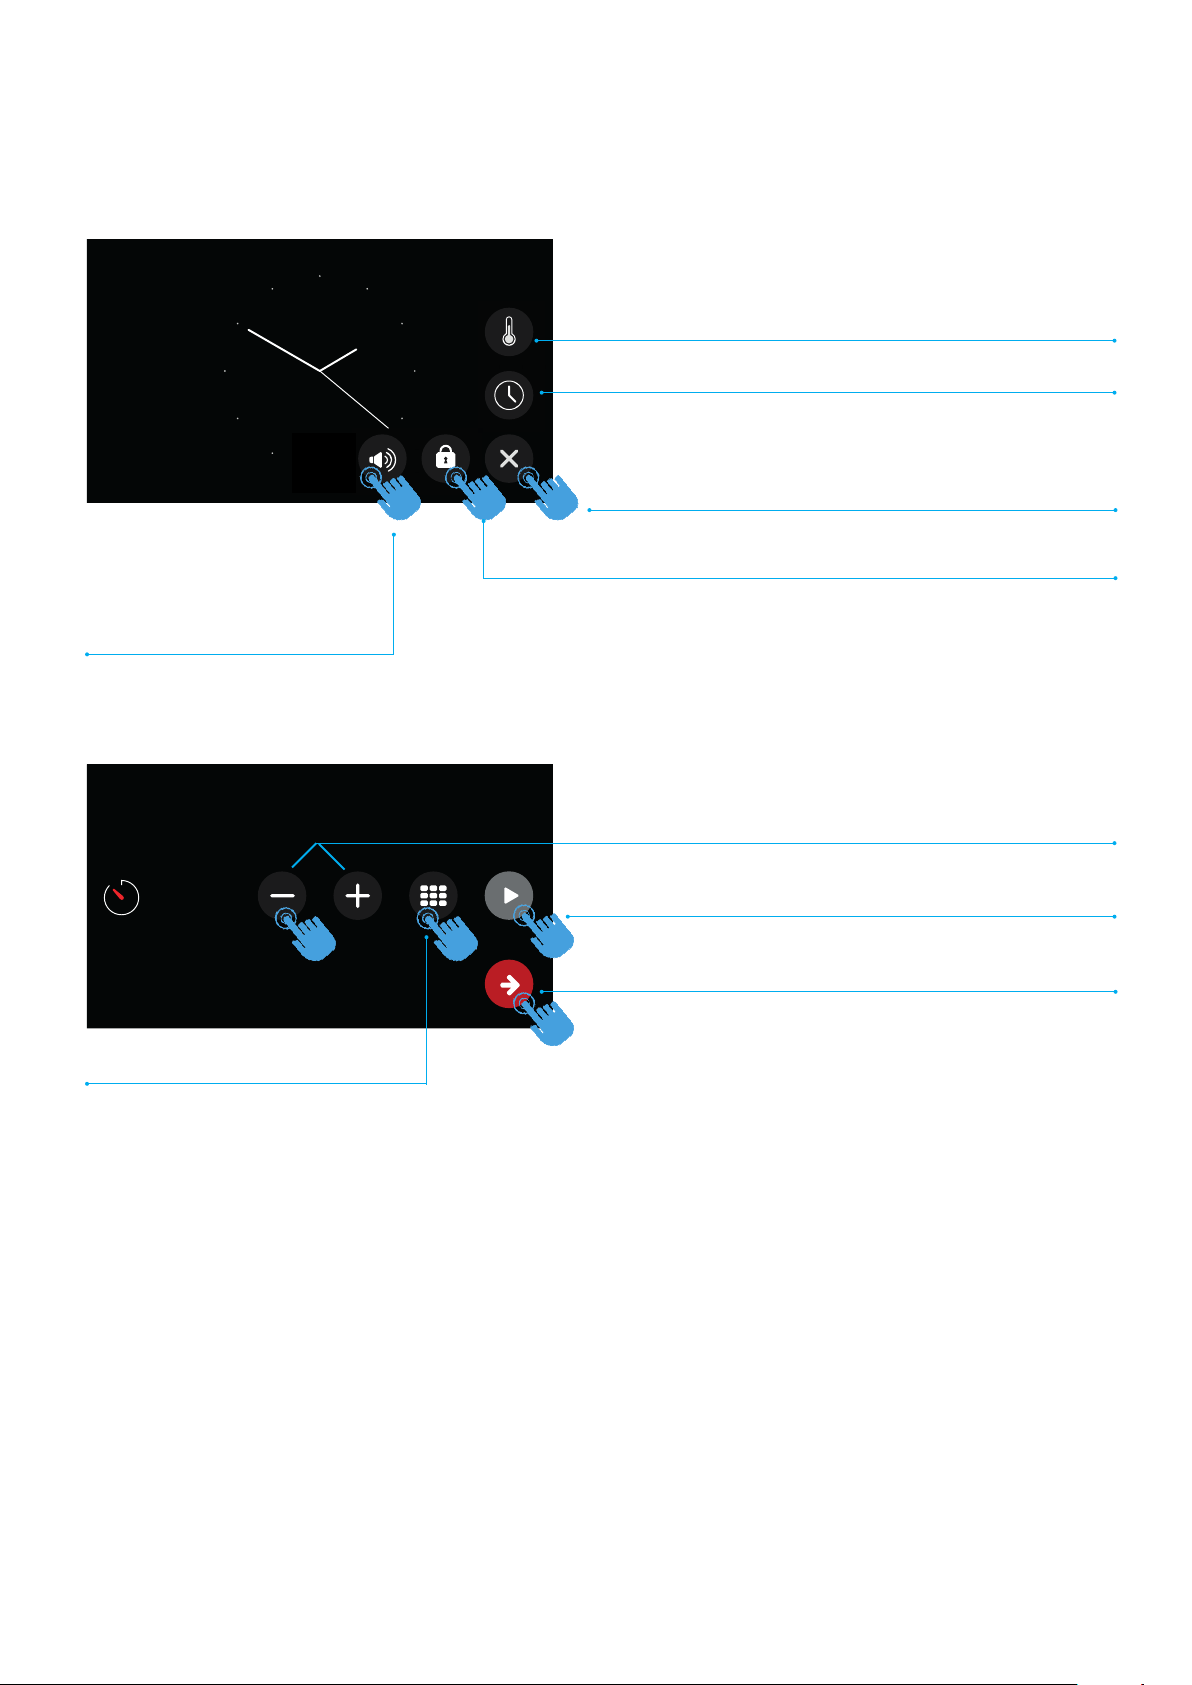
– Settings
Allows you to set the volume of
the beep and choose a sound
when touching the display
Settings
Choice of degree scale (°C or °F).
Time settings.
Exit the settings page.
Screen lock
10m
Numeric keyboard
Setting a timer
11:48 AM
Increase or decrease the time.
Conrm once you have set the desired time. An audible
signal will indicate the end.
Conrm and return to the home page.
23
Page 24
INSTRUCTIONS FOR USE
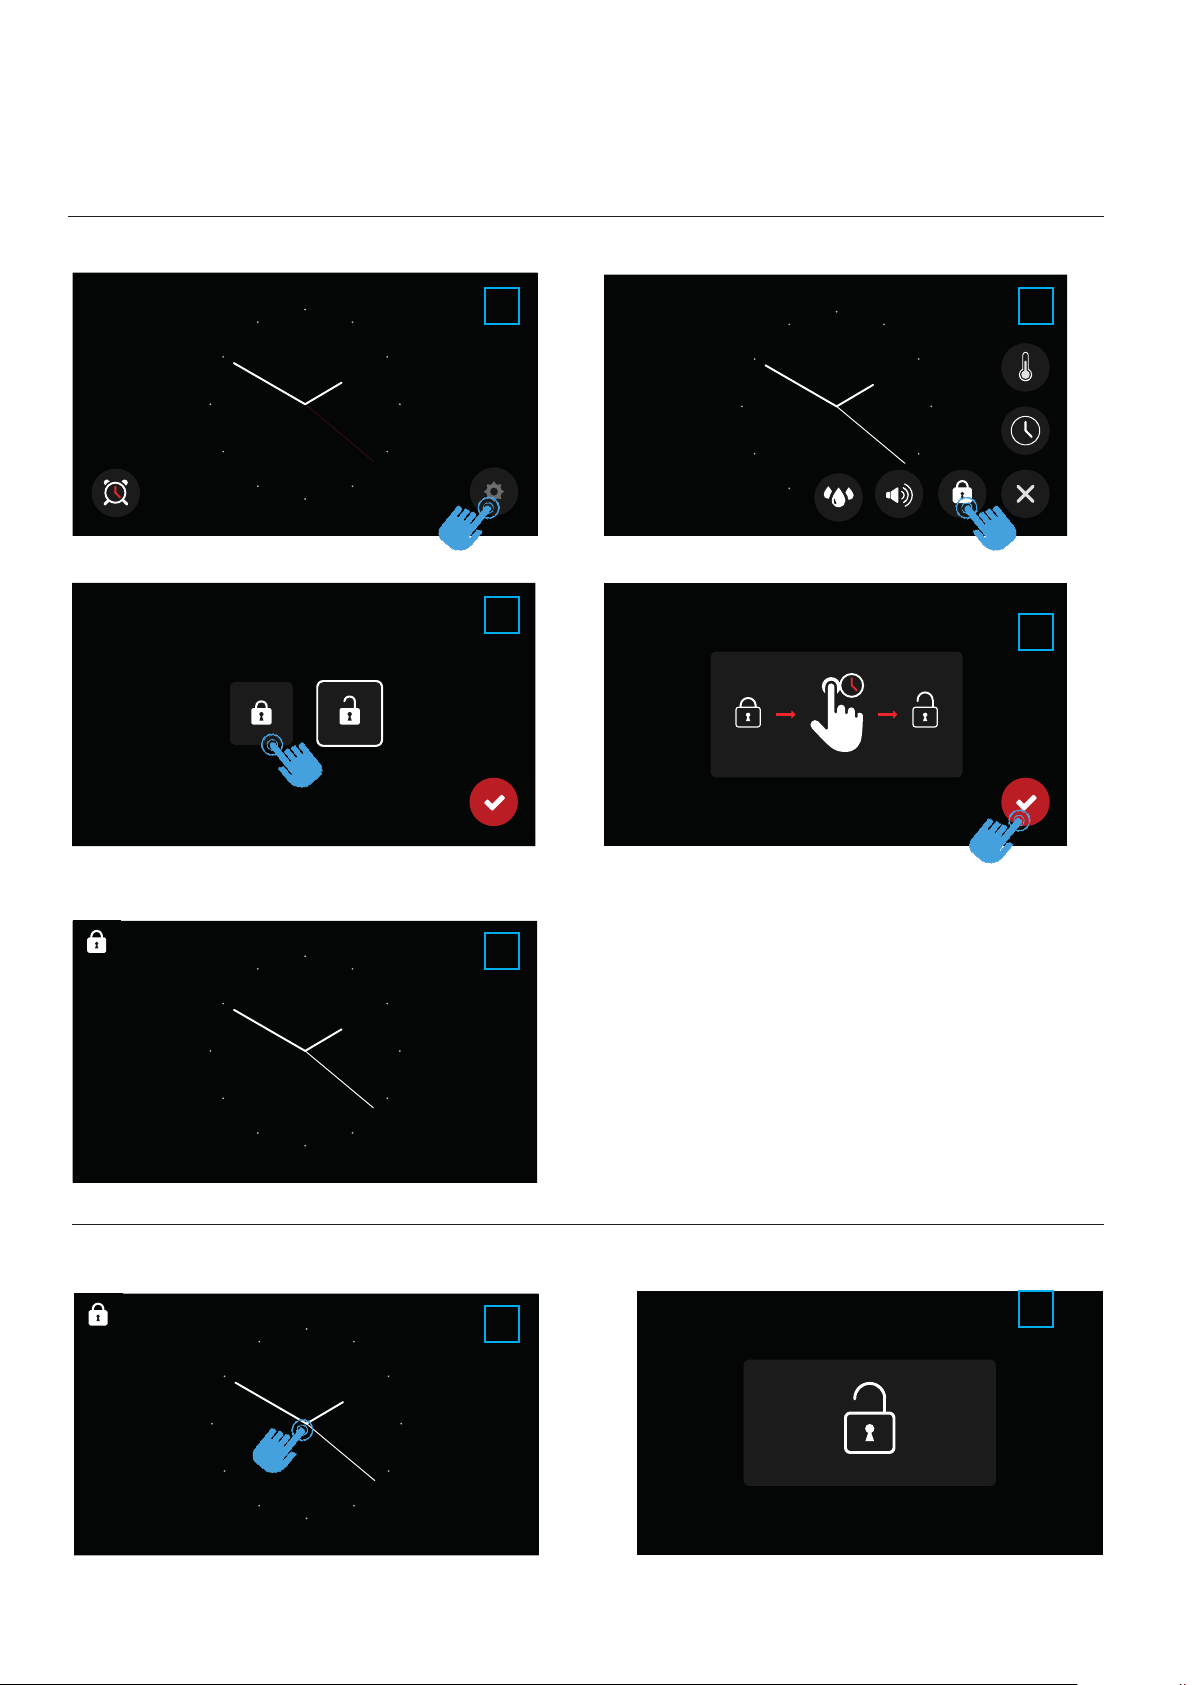
– Display TFT touch: Screen lock
Turn on screen lock
Enter the settings
- Choose closed Lock
- Conrm
PM
1
3
2
Choose Lock Screen
4
Give conrmation
Locked screen
Turn off Screen lock
5
1
2
Turn off Screen lock
24
Page 25
INSTRUCTIONS FOR USE
– Turning the oven on and off
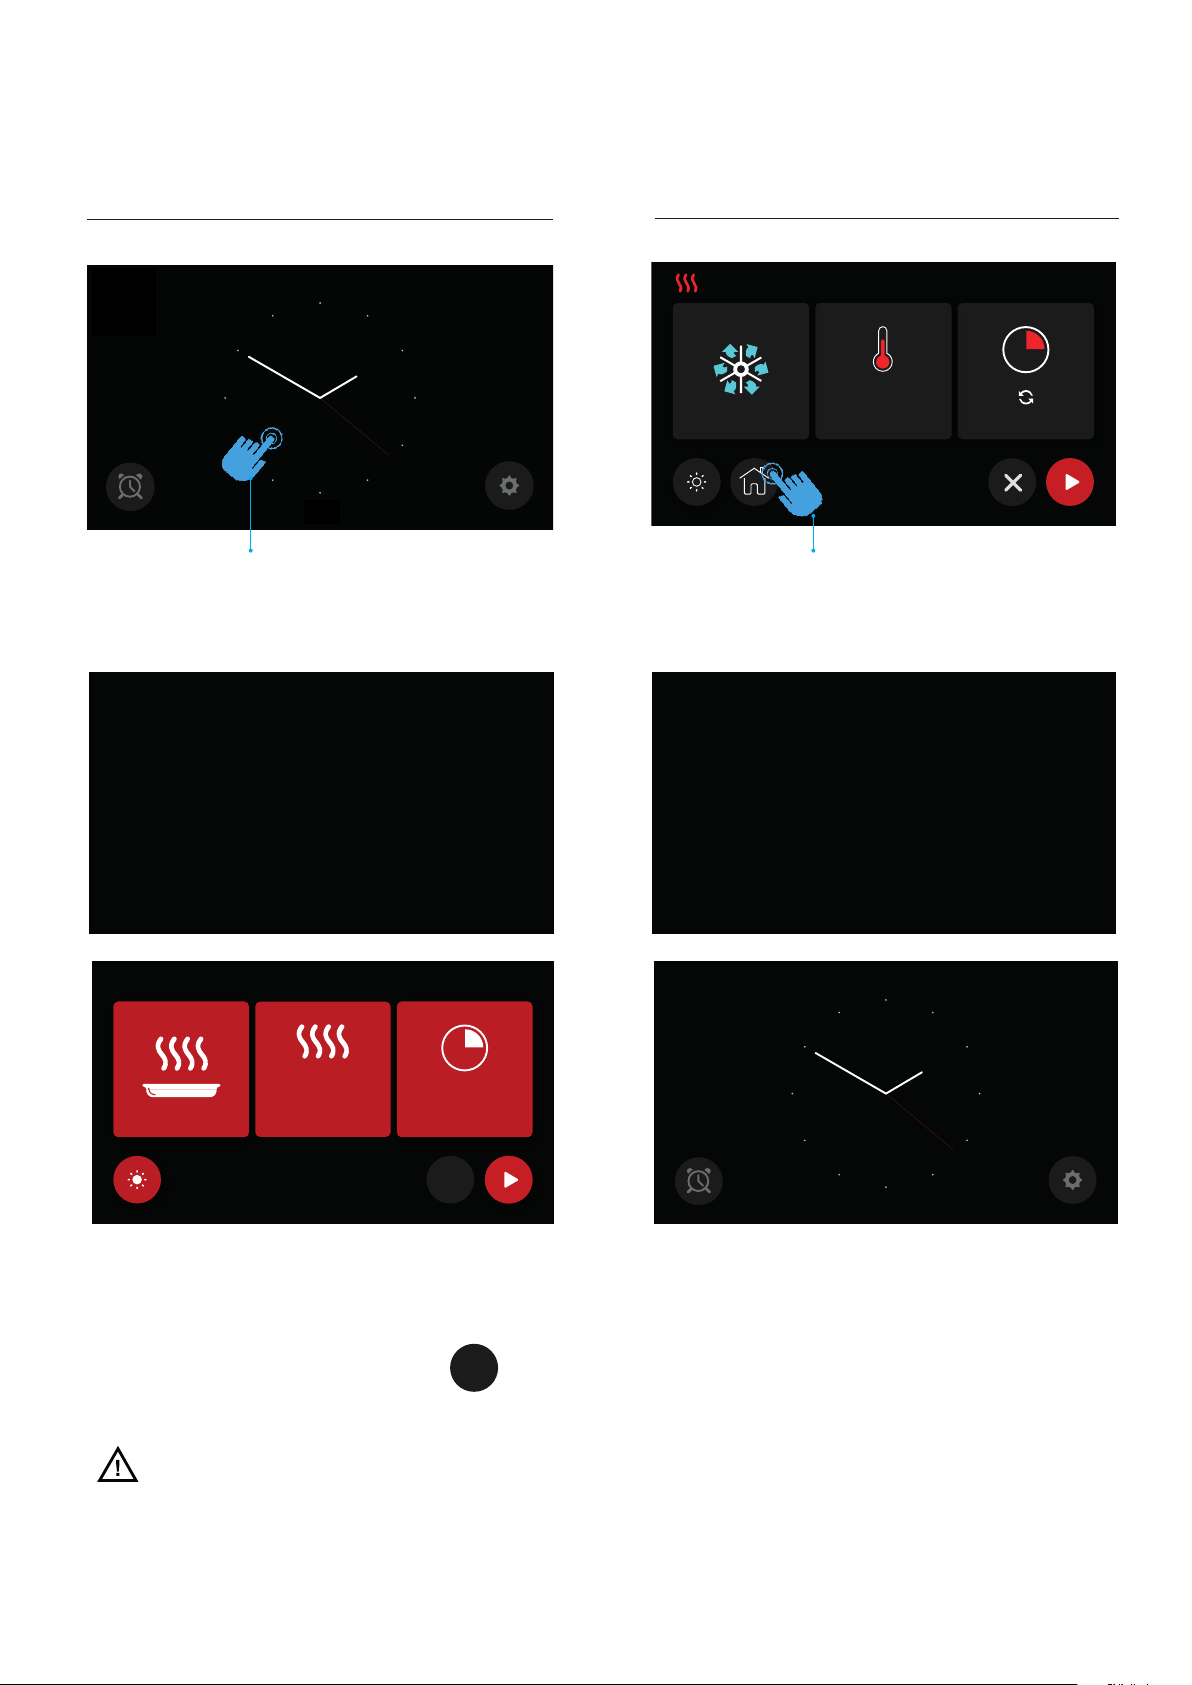
QUICK START ON/FUNCTION COOKING END/OFF
PM
11:4 8 AM
°C
220
By touching any point of the TFT display the oven is
turned on (ON state) showing this display and emitting 3 acoustic signals. Immediately the microwave
function is activated.
ON OFF
11:4 8 AM
1000w
30s
At the end of any cooking process it is possible to
go back to the initial home page pushing the HOME
button. A long signal is emitted the display shows the
OFF state.
+30"
The microwave function is activated with a default
setting of 30s at full power (1000W). This is useful, for
example, to reheat a cup of coffee. By pushing the
start button the oven will start. It is possible to increase the heating time in 30” steps pushing
Be sure to put some food or liquid into the
oven cavity before starting the microwave:
The oven can suffer damage when using microwave
energy if it is empty or incorrectly loaded. For this reason please do not use the microwave function when
the oven is empty.
+30"
PM
Immediately after the display will show again the time
of day clock. It is possible to turn the oven on again
following the previous procedure (QUICK START/ON)
25
Page 26
INSTRUCTIONS FOR USE
– Cooking functions
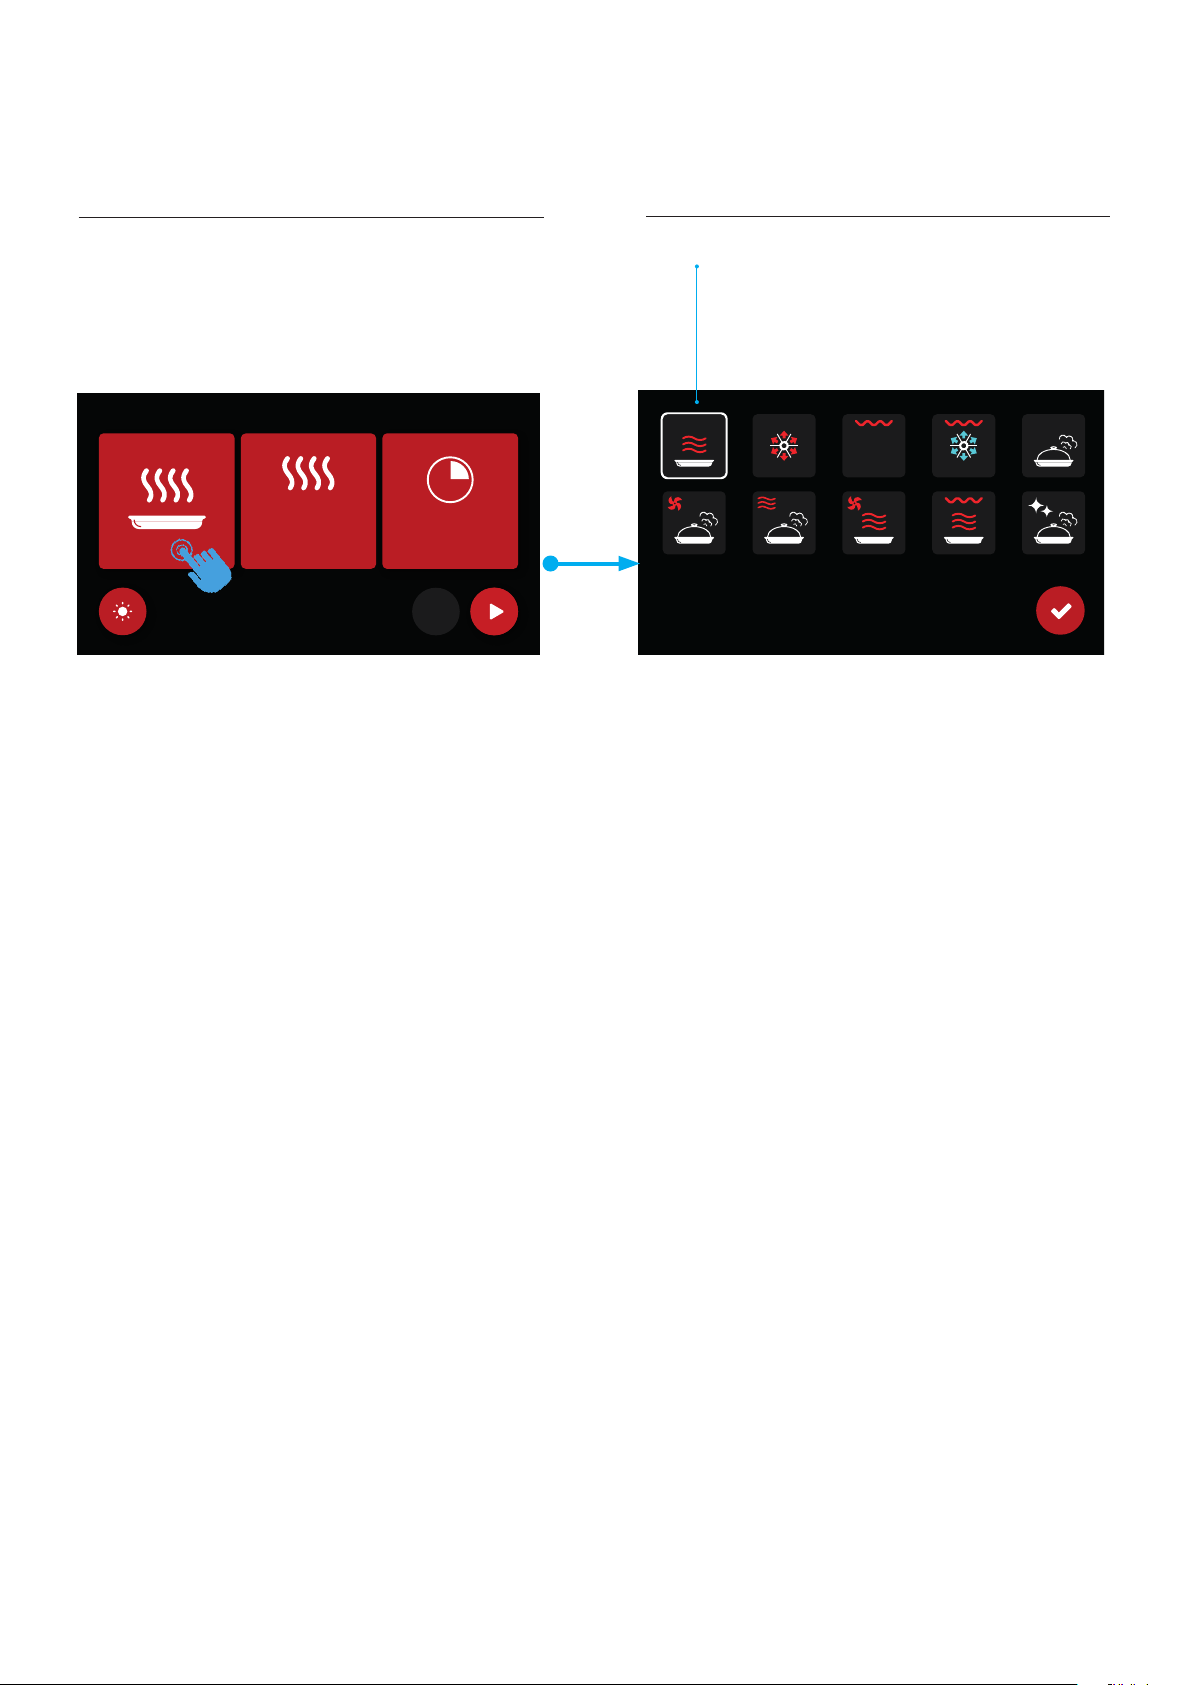
After turning the oven on, if another function is desired, touching the microwave icon the full selection
of the available cooking modes will appear. Choose
the function touching the relevant icon.
11:4 8 AM
1000w
30s
+30"
The white frame shows the last operating mode
26
Page 27
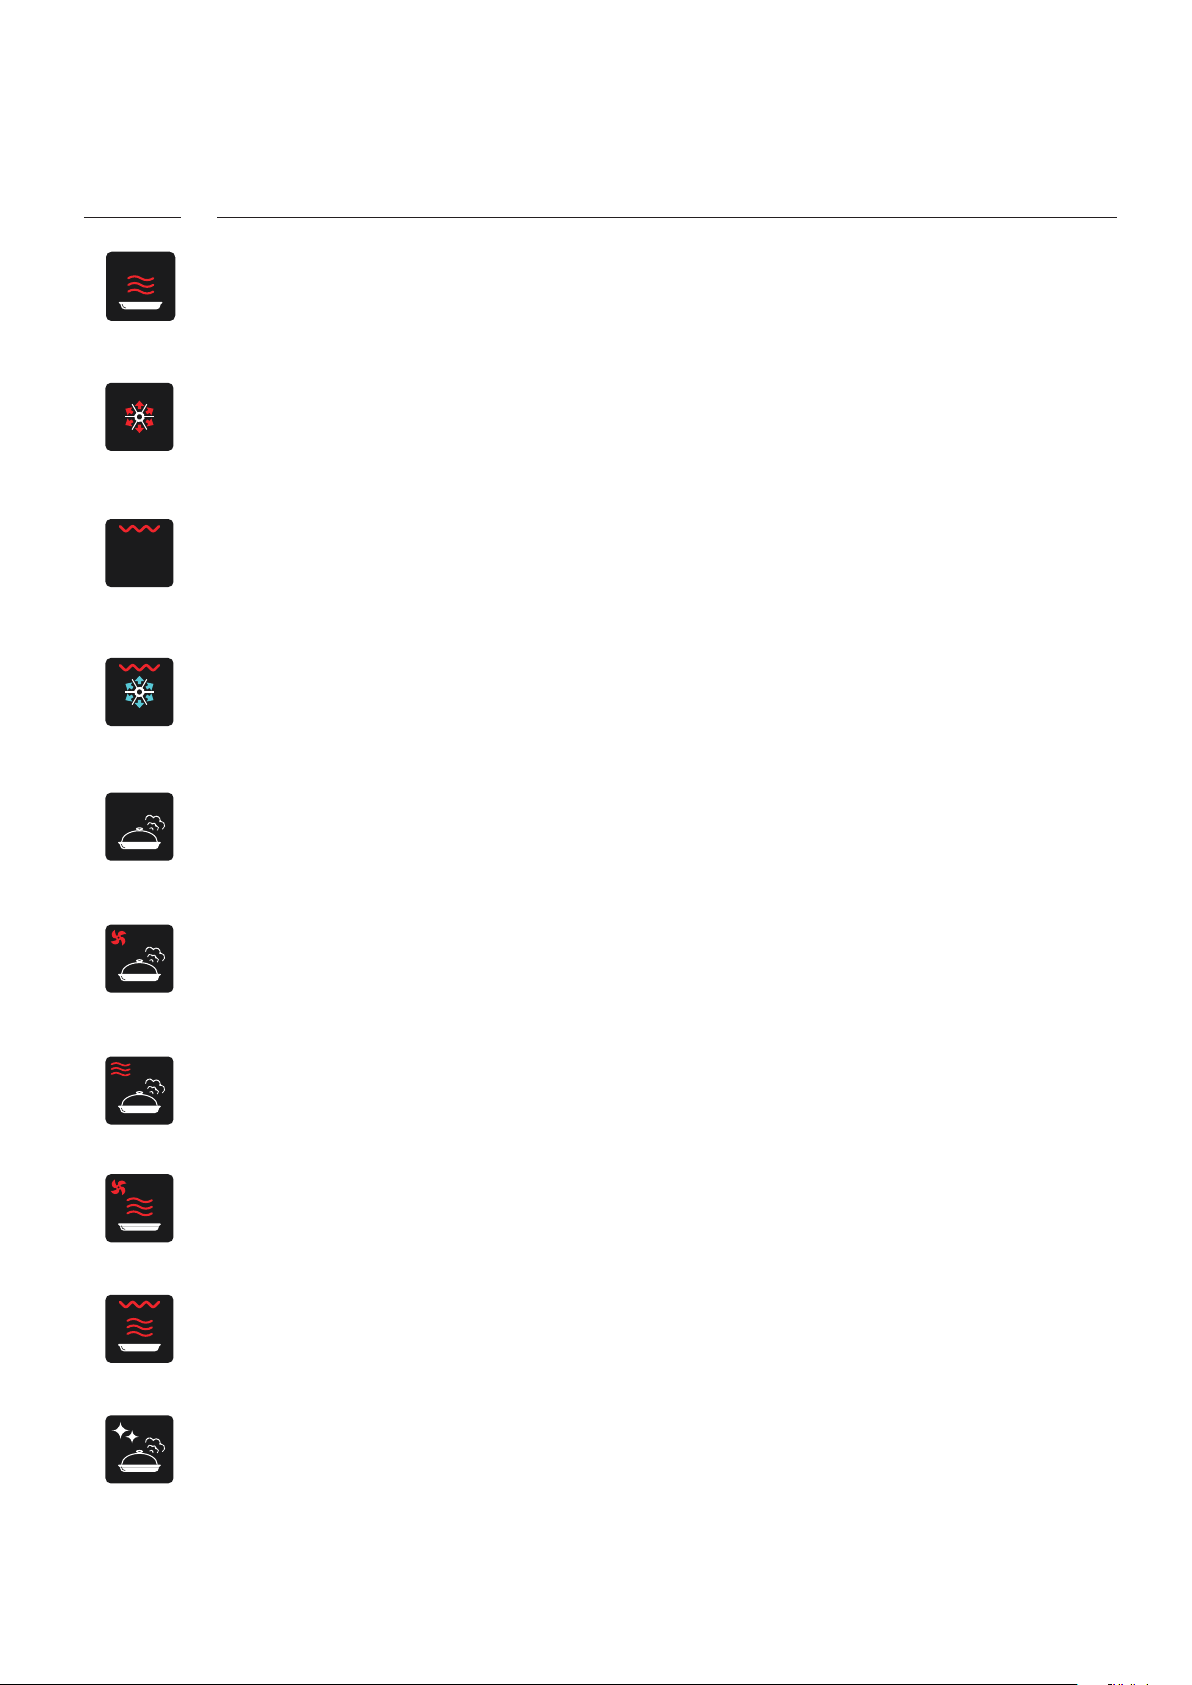
INSTRUCTIONS FOR USE
– Functions list
Microwave
This function is especially suited for quickly reheating and defrosting food and ready meals. It is also
possible to cook vegetables, sh, some cakes; moreover it is useful for softening butter, melting chocolate and defrosting delicate cakes.
Hot air (forced convection)
This function allows to cook at the same time on different levels various dishes without mixing the
relevant smells; useful for lasagna, pizza, croissants, brioches, cakes, pies, etc.
Grill ( with door closed)
This function is indicated for quick and deep grilling, ideal to broil and cook meat in general, llets,
T-bone steaks, sh and also vegetables. Thin foods and bread for toast shall be positioned on the
central area of the grill rack, and in general the thermostat shall be set at 180°C.
Vented Grill
Particularly quick and deep cooking with signicant energy savings, this function is indicated for pork
chops, sausages, pork or mixed skewers, game, gnocchi gratin, etc. Also in this case the thermostat
should be set at 180°C.
Steam
This function allows to recondition sous-vide dishes at low temperature, keeping the original colours
and the uniform smooth texture. Best for cooking vegetables, sh and delicate food items.
Combination steam + convection
Good for cooking in the oven with the advantages of steam. This function allows to reduce the
cooking time while maintaining the vitamins and nutritional properties of food. Best results setting the
oven temperature between 130° and 230°C.
Combination steam + microwave
This function allows to combine the advantages of steam cooking with the speed of microwaves; it
is particularly suited for rice, vegetables, ans, minced meat, mashed potatoes.
Combination convection + microwave
This function is most indicated for cooking roast pork and chicken quickly but without drying out the
food in the end. Time saving can reach 40-50%.
Combination grill + microwave
This function is most indicated for cooking in a short time “family meal” quantities of gratin dishes
(e.g. potatoes and cheese), baked pasta, vegetables with tough texture.
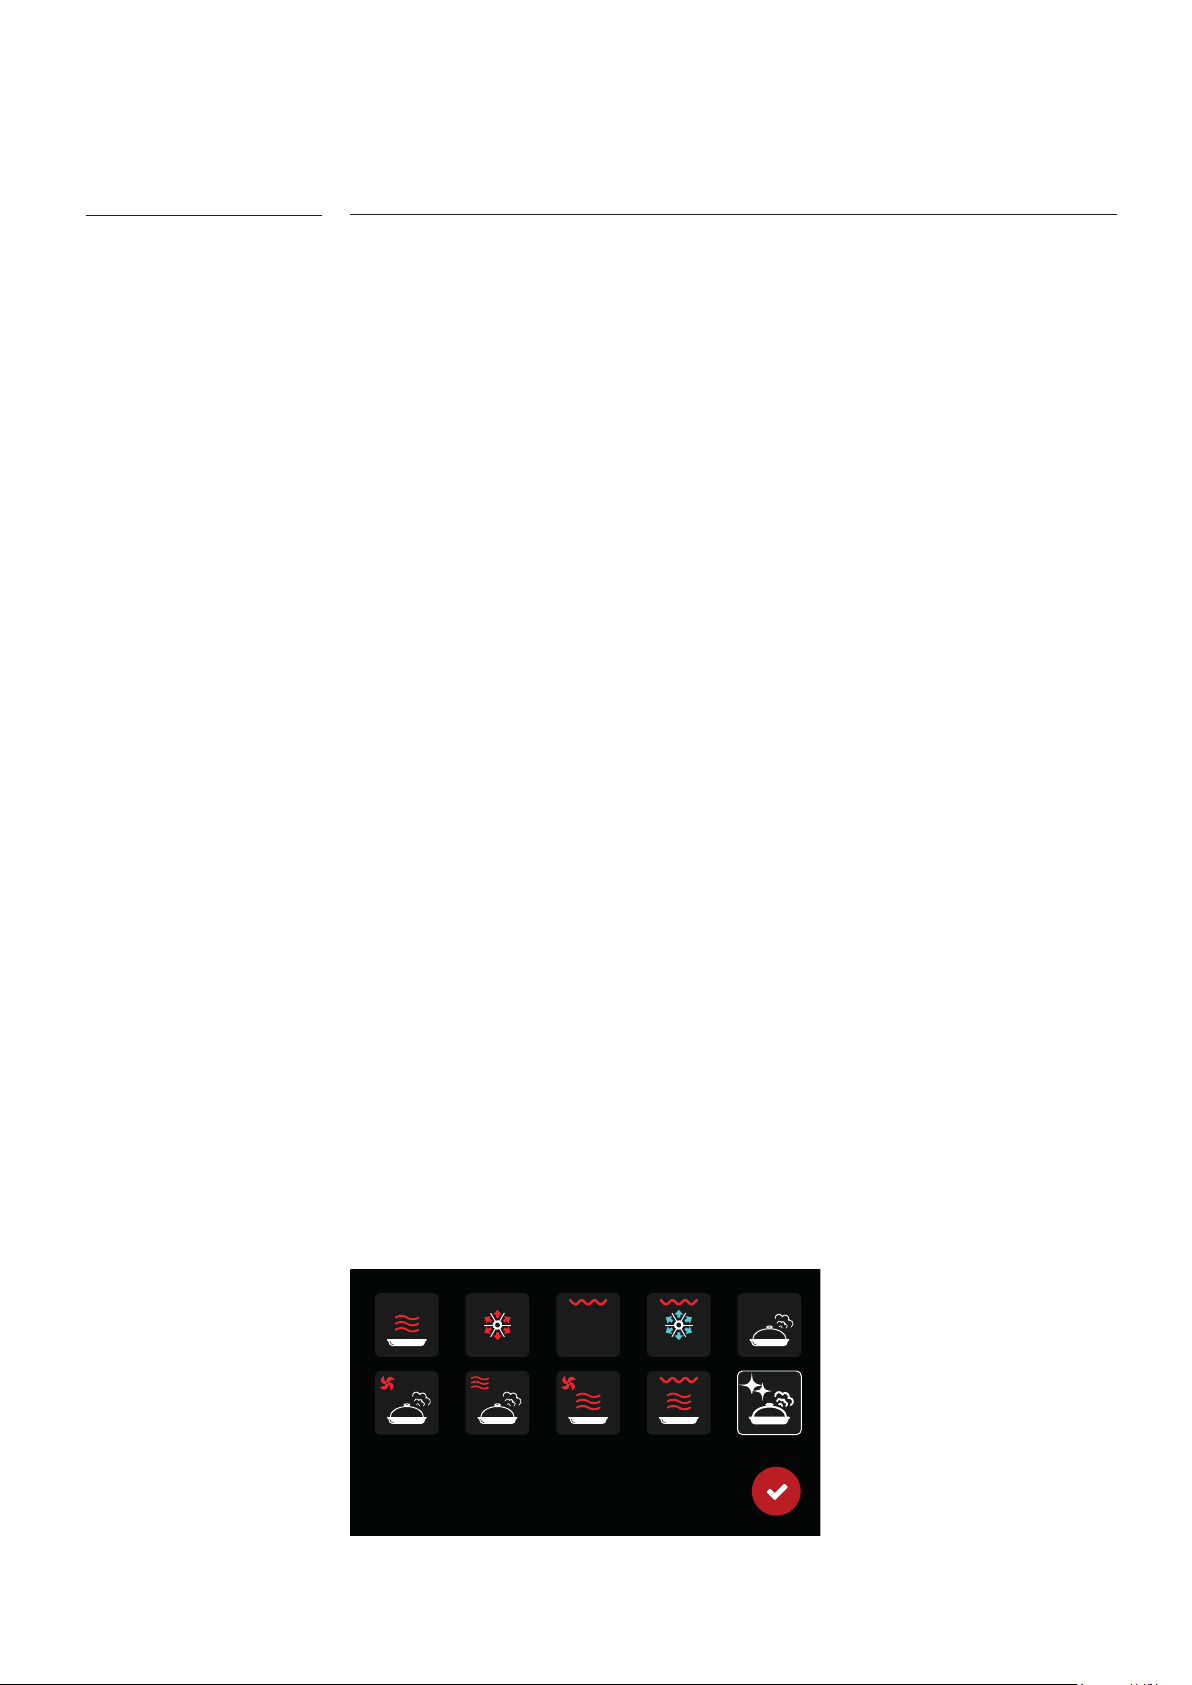
Steam cleaning
This program is specically intended to be used for softening soil that is deposited on the cavity walls, so that cleaning gets simpler without need to use chemicals and abrasive means.
27
Page 28
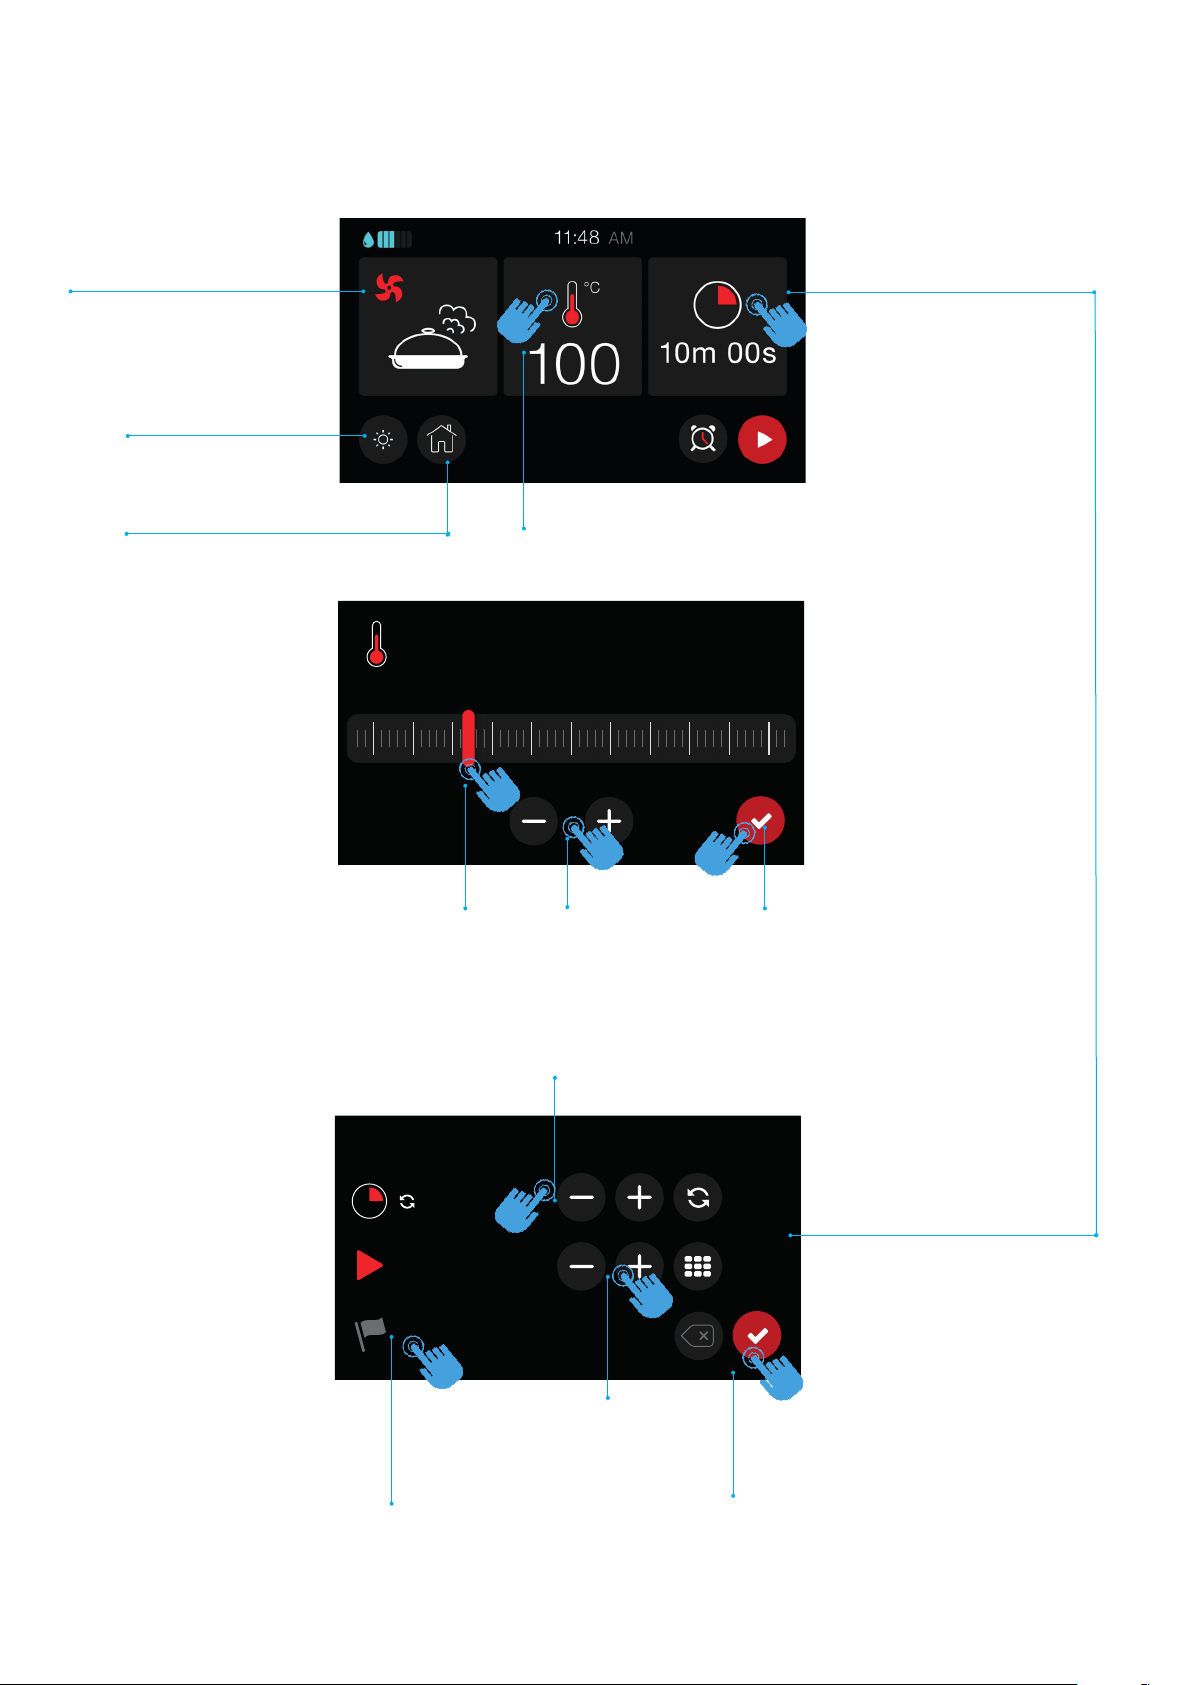
INSTRUCTIONS FOR USE
120
°c
0
– Setting the cooking function
1- Choose the cooking
function
Light (on or off)
Home (Return to home page)
3- Set the cooking time and
the programmed start
2- Set the cooking temperature
50 100150 200250 300
2a - There are three options for
setting the temperature:
- Scrolling the bar
+ or
- With
- With the knob (if present)
-
3a - Set the cooking time
11:48 AM
__:__
__:__
3c - Set the start time
2b - Conrm the selection
(option: conrm by pushing the knob)
3b -Shows the end
of the cooking time
3d - Conrm the setting
28
Page 29
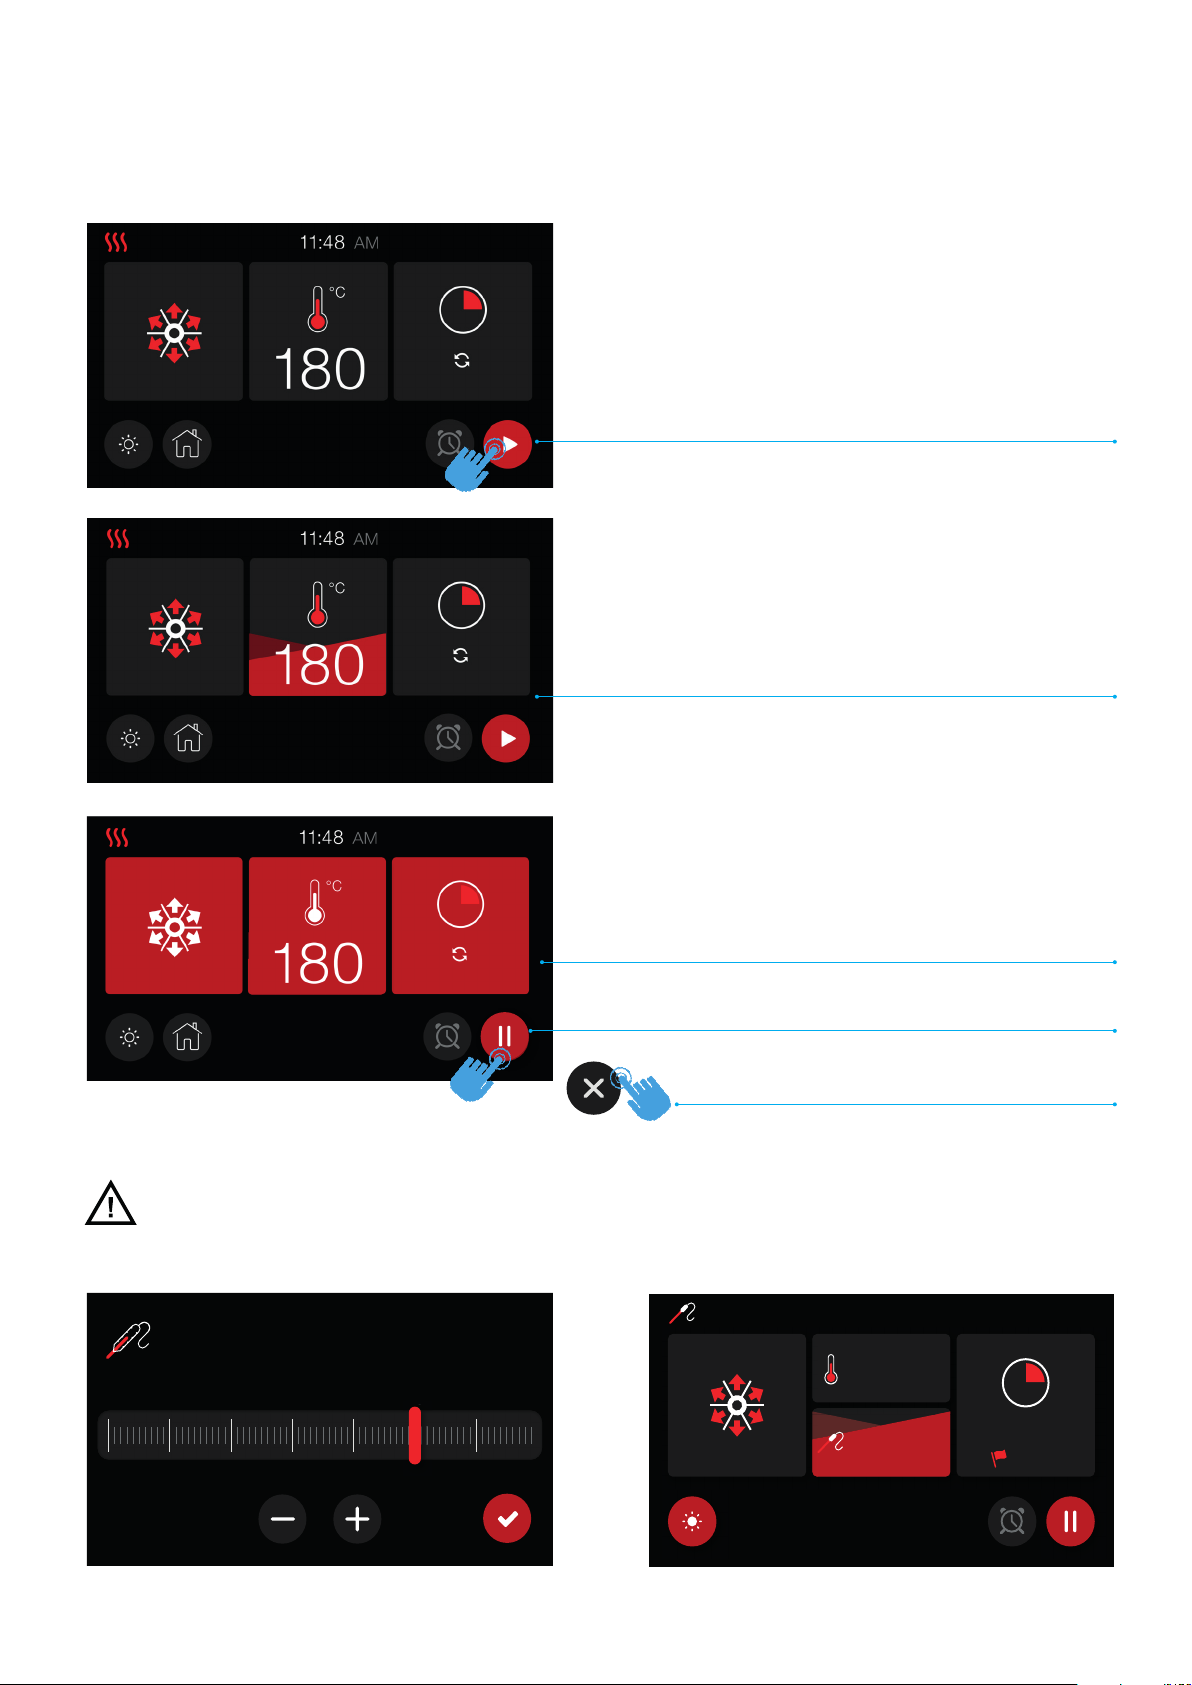
INSTRUCTIONS FOR USE
80
°c
30 40 50 60 70 80 90
800
0
11:48 AM
180
80
°C
°C
61°
9m 15s
12:58
MODALITÀ RISCALDAMENTO CON SONDA
INSTRUCTIONS FOR USE
– Cooking process
– Cooking process
CAVITY SET
Once the cavity has been set (cooking function, tem-
perature and timer), conrm to start the preheating. At
this point the display will switch to the preheating mode
PREHEATING PHASE
There are four levels that allow you to monitor the
preheating process. The red part will gradually increase
to ll the display.
When using the temperature probe the setting range is shown below, and the heating ends when the temperature value set for the probe is reached.
ATTENTION: use only the temperature probe recommended for this oven
PROBE TEMPERATURE SELECTOR
END OF PREHEATING
When the set temperature is reached, the display will
turn red to indicate the end of the preheating phase,
and the start of the cooking phase.
If a cooking time has been set, the oven will start the
count-down and automatically switch off at the end.
In case of no set cooking time it is possible to suspend
the cooking touching the pause button
and then nish it using the stop button
(the display will turn grey as at the beginning)
PREHEATING MODE WITH MEAT PROBE
29
Page 30
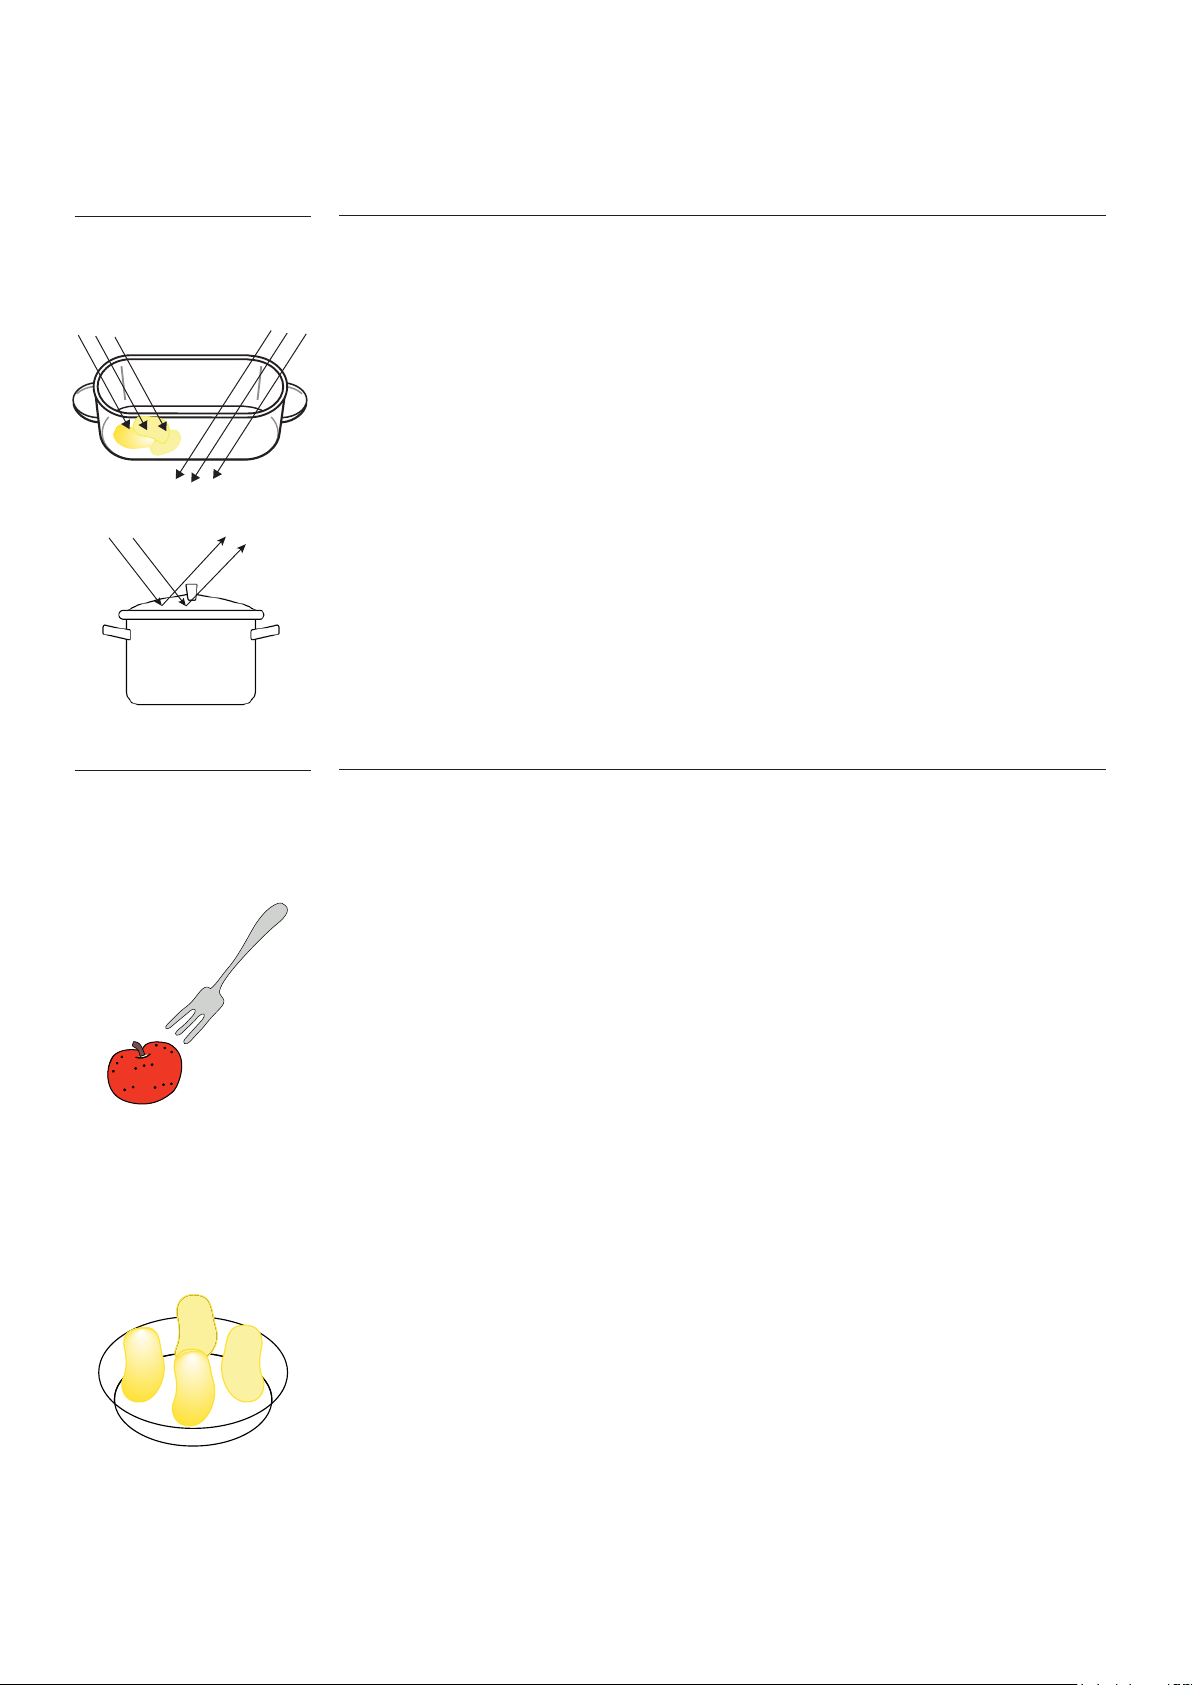
INSTRUCTIONS FOR USE
– Cooking function setting
Microwave operation
Useful hints
How it works
In the oven there is a high-frequency tube (magnetron) that converts electrical energy
into microwaves. These are distributed evenly throughout the oven interior, and are
reected by the metal sides of the oven interior. In order for microwaves to reach
the food, they must be able to pass through the cooking utensil being used. All food
contains moisture molecules which, when subjected to microwave energy, start to
oscillate at high frequency. The friction caused by this vibration creates heat, which rst
starts developing around the outside of the food and then slowly penetrates towards
the centre. The heat is generated in the food itself.
Microwaves can penetrate porcelain, glass, cardboard and plastics, but not metal.
Do not, therefore, use utensils made of metal, or which contain metal, for example in
the form of gold or silver trim. The metal reects the microwaves and this could cause
sparking. The microwaves cannot be absorbed. However, the accessories and racks
supplied with the oven can be used in all operating modes, including microwaves: it
is important not to put metal containers in contact with these accessories.
Advantages
Food can generally be cooked without adding much liquid or oil and grease.
Microwaves stop being produced as soon as the cooking process is interrupted or the
appliance door is opened. When the appliance is in operation, the closed door prevents microwaves escaping from the appliance.
General:
After you switch off the appliance, let the food stand for some minutes (refer to “Microwave Tables: standing time”).
Remove the aluminium foil packaging, metal containers, etc. before you prepare
the food.
Cooking:
If possible, cook food covered with material suitable for use in the microwave. Only
cook food without a cover if you want to keep a crust.
Do not overcook the dishes by setting the power and time too high. The food can dry
out, burn or catch re in some places.
Do not use the appliance to cook eggs in their shells and snails, because they can
burst. With fried eggs, pierce the yolks rst.
Prick food with “skin” or “peel”, such as potatoes, tomatoes, sausages, with a fork several times before cooking so that the food does not burst.
For chilled or frozen food, set a longer cooking time.
Dishes which contain sauce must be stirred from time to time.
Vegetables that have a rm structure, such as carrots, peas or cauliower, must be
cooked in water.
Turn larger pieces after half the cooking time.
If possible, cut vegetables into similar sized pieces If you are cooking a number of
portions of the same type of food (eg. boiled potatoes), arrange the portions in a ring
around the outside of an ovenproof dish to ensure they cook evenly.
Use at, wide dishes.
Do not use cookware made of porcelain, ceramic or earthenware with small holes,
e. g. on handles or unglazed bottoms. Moisture going into the holes can cause the
cookware to crack when it is heated.
Defrosting meat, poultry, sh:
Put the frozen, unwrapped food on a small upturned plate with a container below it, or
on a defrosting rack or plastic sieve so that the defrosting liquid can run off.
Turn the food after half the defrosting time. If possible, divide and then remove the
pieces that have started to defrost.
30
Page 31

INSTRUCTIONS FOR USE
– Cookware / Material
• Ovenproof glass and porcelain (with
no metal components, e. g. Pyrex,
heat-proof glass)
• Non-ovenproof glass and porcelain
1)
• Glass and glass ceramic made of
ovenproof/frost-proof material (e. g.
Arcoam), grill shelf
• Ceramic 2), earthenware 2)
• Heat-resistant plastic up to 200 °C 3)
• Cardboard, paper
• Clinglm
• Roasting lm with microwave safeclosure 3)
Microwave
Defrosting Heating Cooking
●
●
●
●
●
●
●
●
●
--
●
●
●
--
--
●
●
--
●
●
●
--
--
●
Oven/Grill
●
--
●
--
--
--
--
--
• Roasting dishes made of metal, e.
g. enamel, cast iron
• Baking tins, black lacquer or siliconcoated 3)
• Baking tray
• Ready meals in packaging 3)
Ready meals:
Ready meals in metal packaging or plastic trays with metal covers can only be defrosted or heated in the microwave if they are expressively designated as suitable for use
in the microwave.
You must follow the manufacturer’s instructions printed on the packaging (e. g. remove
the metal cover and pierce the plastic lm).
1. With no silver, gold, platinum or metal plating/decorations
2. Without quartz or metal components, or glazes which contain metals
3. You must follow the manufacturer’s instructions
--
--
●
●
--
--
●
●
--
--
●
●
●
●
●
●
31
Page 32
INSTRUCTIONS FOR USE
– Steam cooking
Advantages
Operation
The steam oven has many advantages, it allows to cook in a healthy and savoury way.
Food is cooked by the moist heat generated by the hot water. This means that the
cooking proces happens at not very high temperatures, so that minerals and vitamins
inside the food are not altered. With this process the taste and avour of every food are
perfectly maintained. One important feature is that it is possible to avoid using oils ore
grease for cooking: for this reason steam is the best method to prepare vegetables
and sh, because all nutritional characteristics are preserved. On the other hand, steam is less suited for cooking meat. To be well done meat needs higher temperatures
in order to avoid dispersing the internal juices.
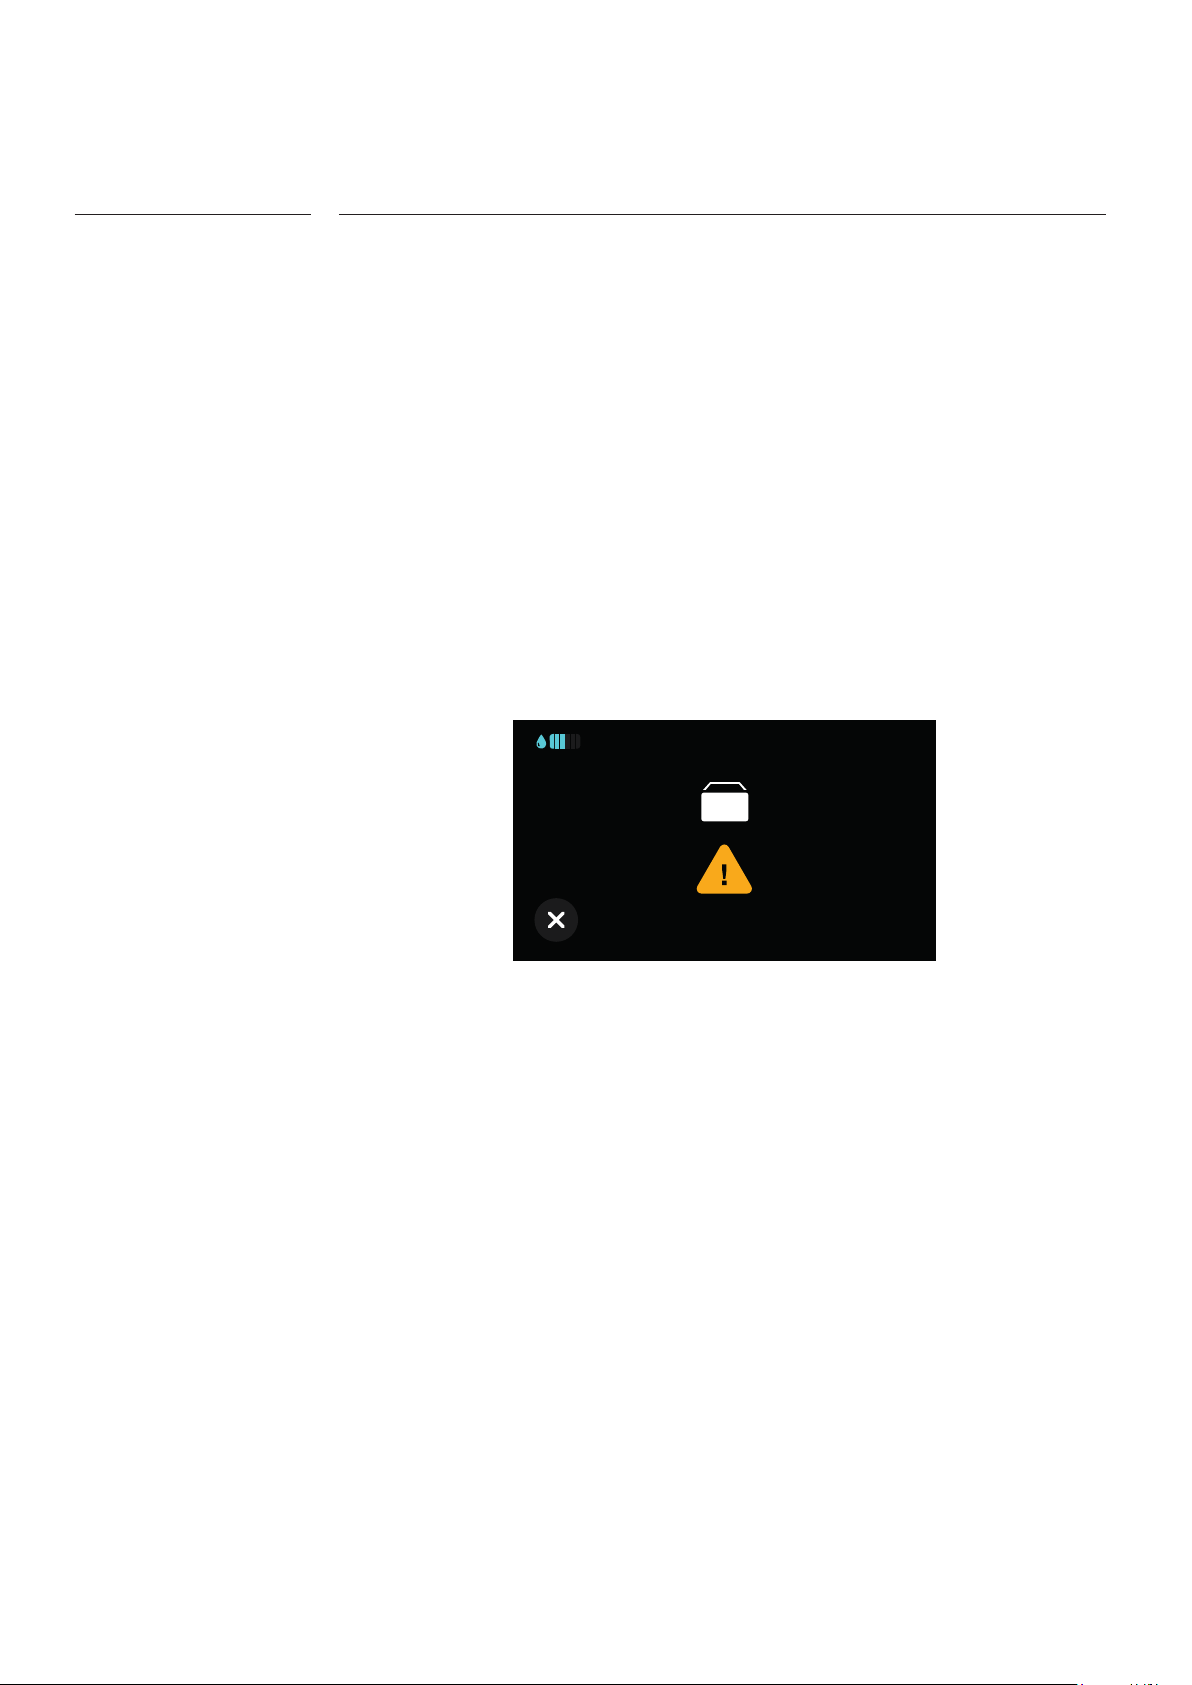
To cook with steam it is necessary to ll the tank at least to the rst segments indicating
the minimum water quantity. Push on the drawer on the right side of the control panel,
so that it is ejected slightly; then pull it out until the stop.Pour in the water using the jug
supplied and look at the icon on the display. When opening the drawer the display
shows:
WARNING!
TANK OPEN
At the same time also the segments relevant to the water level will light up. Only use
cold tap water; never use ltered (demineralised ) or distilled water, mineral water or
other liquids.
• Do not pour water directly inside the boiler in the bottom side of the oven cavity.
• Do not pour ammable or alcoholic liquids into the water tank.
• During tank lling, with the water level increasing, the level indicating segments
light up sequentially; minimum, medium and nally maximum. When the maximum is reached, an acoustic signal is emitted.
• DO NOT POUR ADDITIONAL WATER AFTER THE OVEN HAS SIGNALLED THAT THE TANK
IS FULL.
• WATER IN EXCESS IS DIRECTLY DUCTED INTO THE OVEN CAVITY AND, FROM THERE,
OUTSIDE THE APPLIANCE.
• Remove water from the cavity using a sponge or a cloth.
• After lling the tank push in the drawer until the latch that holds it closed operates:
check that the wording on the display has disappeared.
32
Page 33
CLEANING - CARE - MAINTENANCE
– Cleaning
WARNING!
Stainless steel parts
Cleaning the door gasket
Please refer to the paragraphs about safety.
• Clean the front side of the appliance using a soft cloth soaked in soapy warm
water.
• To clean metallic surfaces use a normal detergent.
• Clean the inside of the oven after every usage. In this way it is possible to remove
dirt and stains more easily.
• Remove stubborn dirt using special oven cleaners.
• After every usage clean the oven accessories and let them dry accurately. Use a
soft cloth soaked in soapy warm water.
• Clean the oven door only with a wet sponge.
• Dry it using a soft cloth.
• Avoid the used of steel wool, acids or abrasive products that could damage the
oven surface.
• clean the control panel using the same precautions.
• Regularly check the door gasket. It is located around the opening of the oven
cavity.
- Do not operate the appliance if the door gasket is damaged.
- Contact an authorised service centre.
• To clean the door gasket please refer to the general instructions about cleaning.
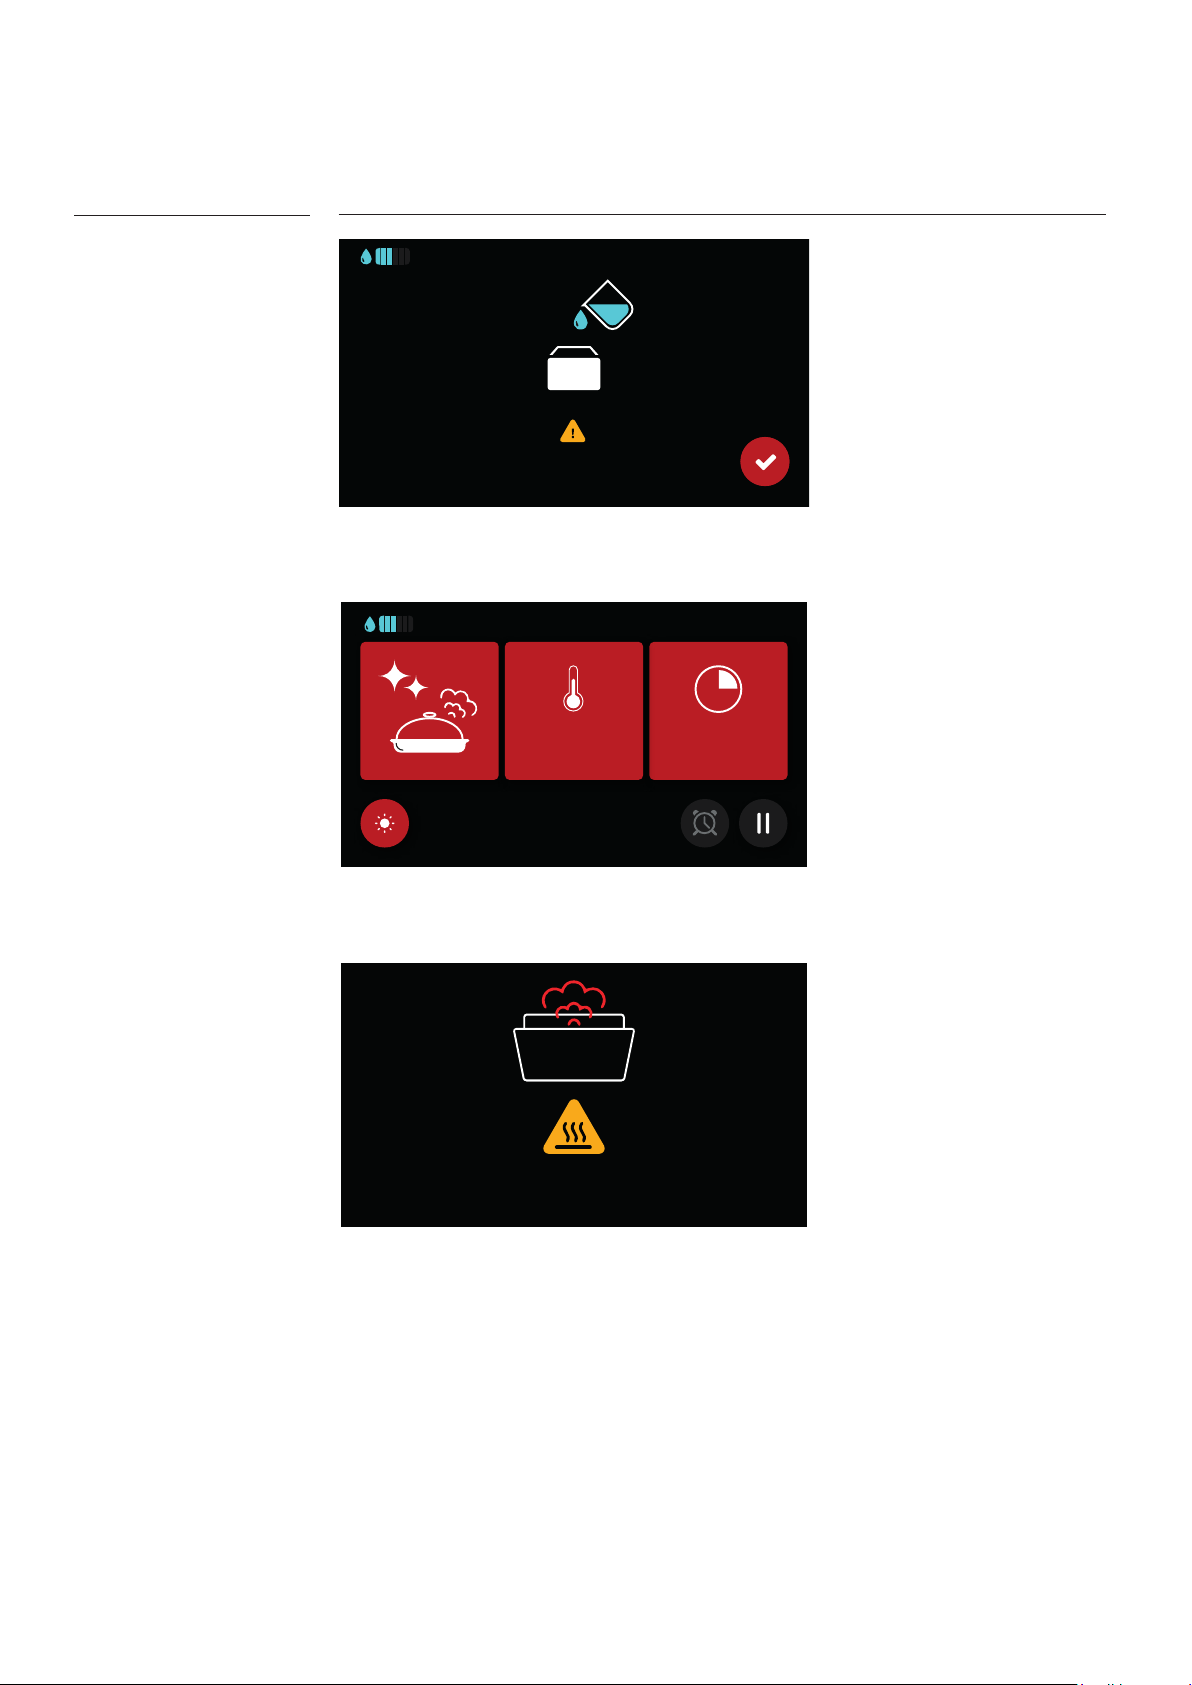
Steam cleaning cycle
1
• This procedure used steam to make the removal of food and grease residues from
the oven easier.
1. Select the function - Steam Cleaning.
2. Fill the tank with the jug supplied.
3. The preset cycle temperature will be 90°C and the duration is 30”.
4. At the end of the cleaning cycle let the appliance cool down.
5. Once cooled, clean the internal surfaces with a cloth.
33
Page 34
CLEANING - CARE - MAINTENANCE
– Cleaning
2
WATER REQUIRED
11:4 8 AM
°C
4
5
9m 30s
90
BE CAREFUL
34
Page 35
CLEANING - CARE - MAINTENANCE
– Emptying and Washing the tank
PM
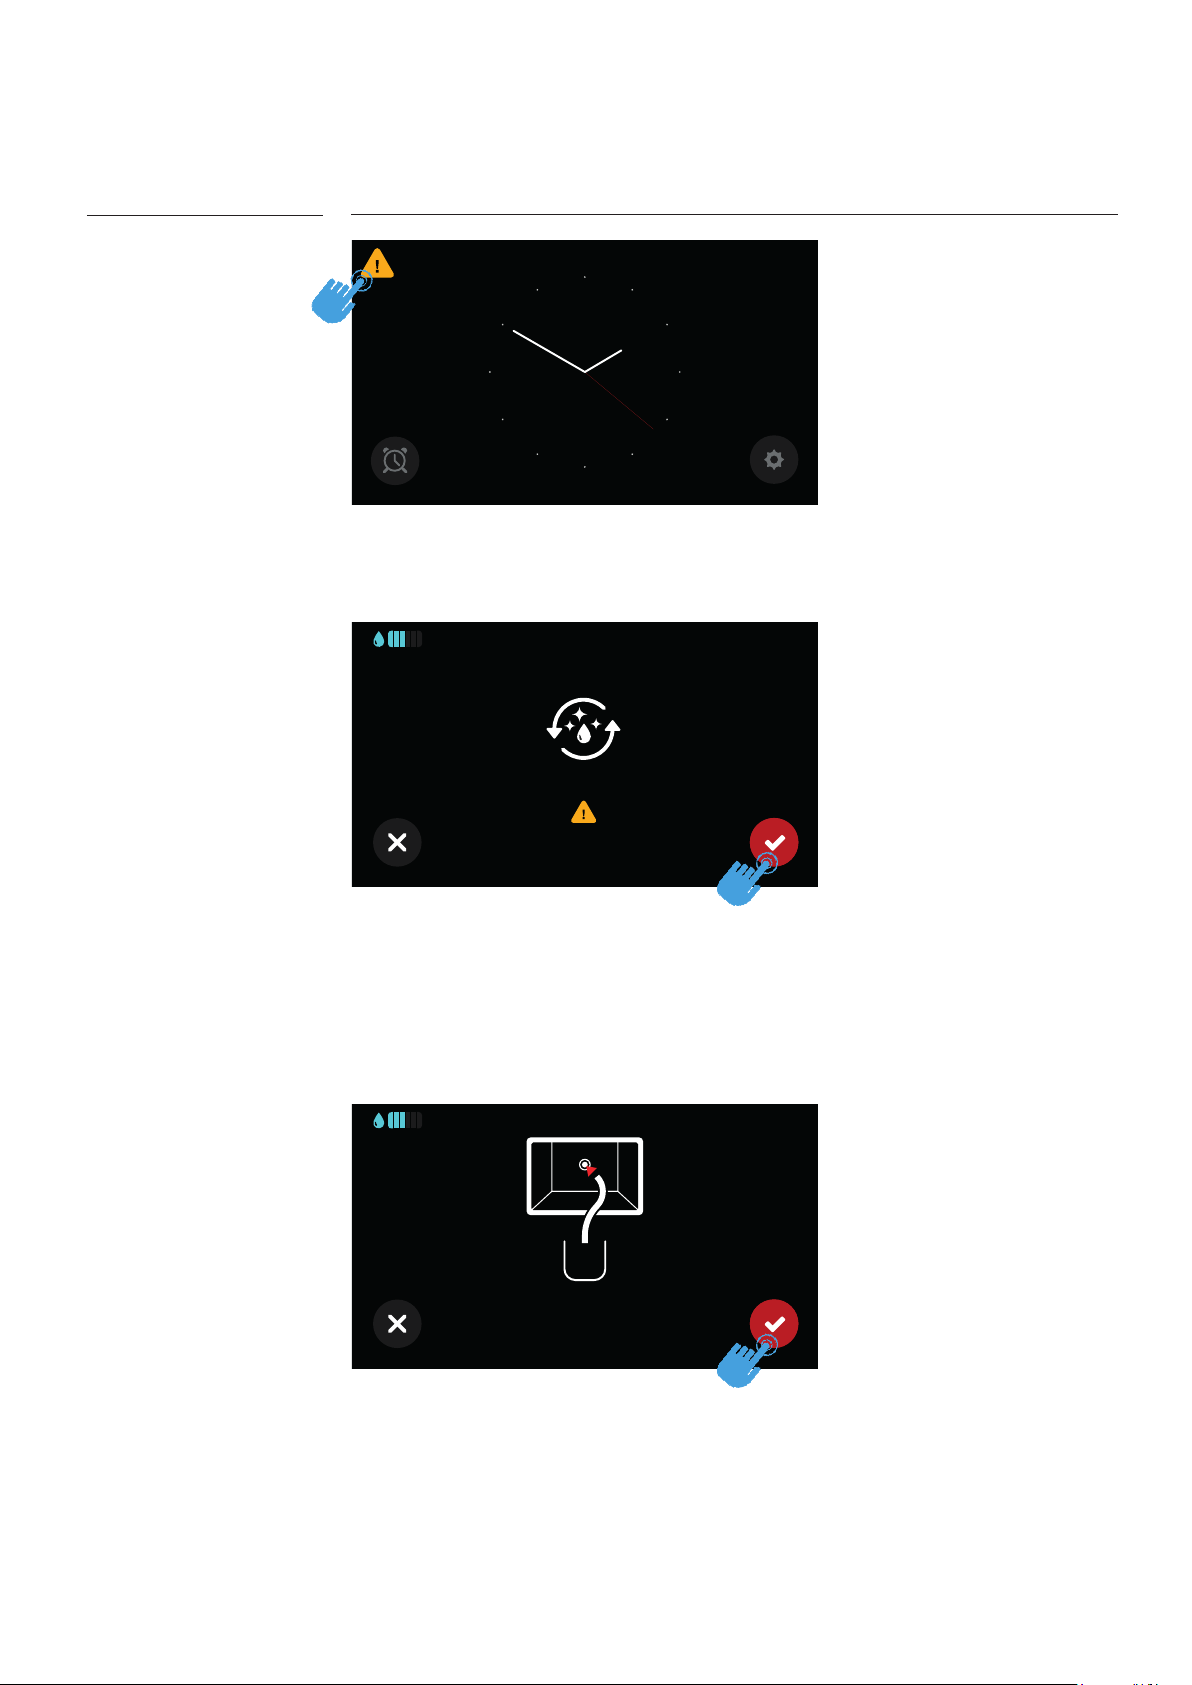
At rst power on, a yellow warning triangle appears on the display.
Opening the door and touching it, the display shows the message:
WASHING CYCLE REQUIRED
If you do not want to perform the washing cycle, touching the X button makes the triangle disappear; it will be possible to perform the washing selecting the relevant button
after opening the settings menu.
If you want to proceed with the washing push the conrmation button and the display
will show:
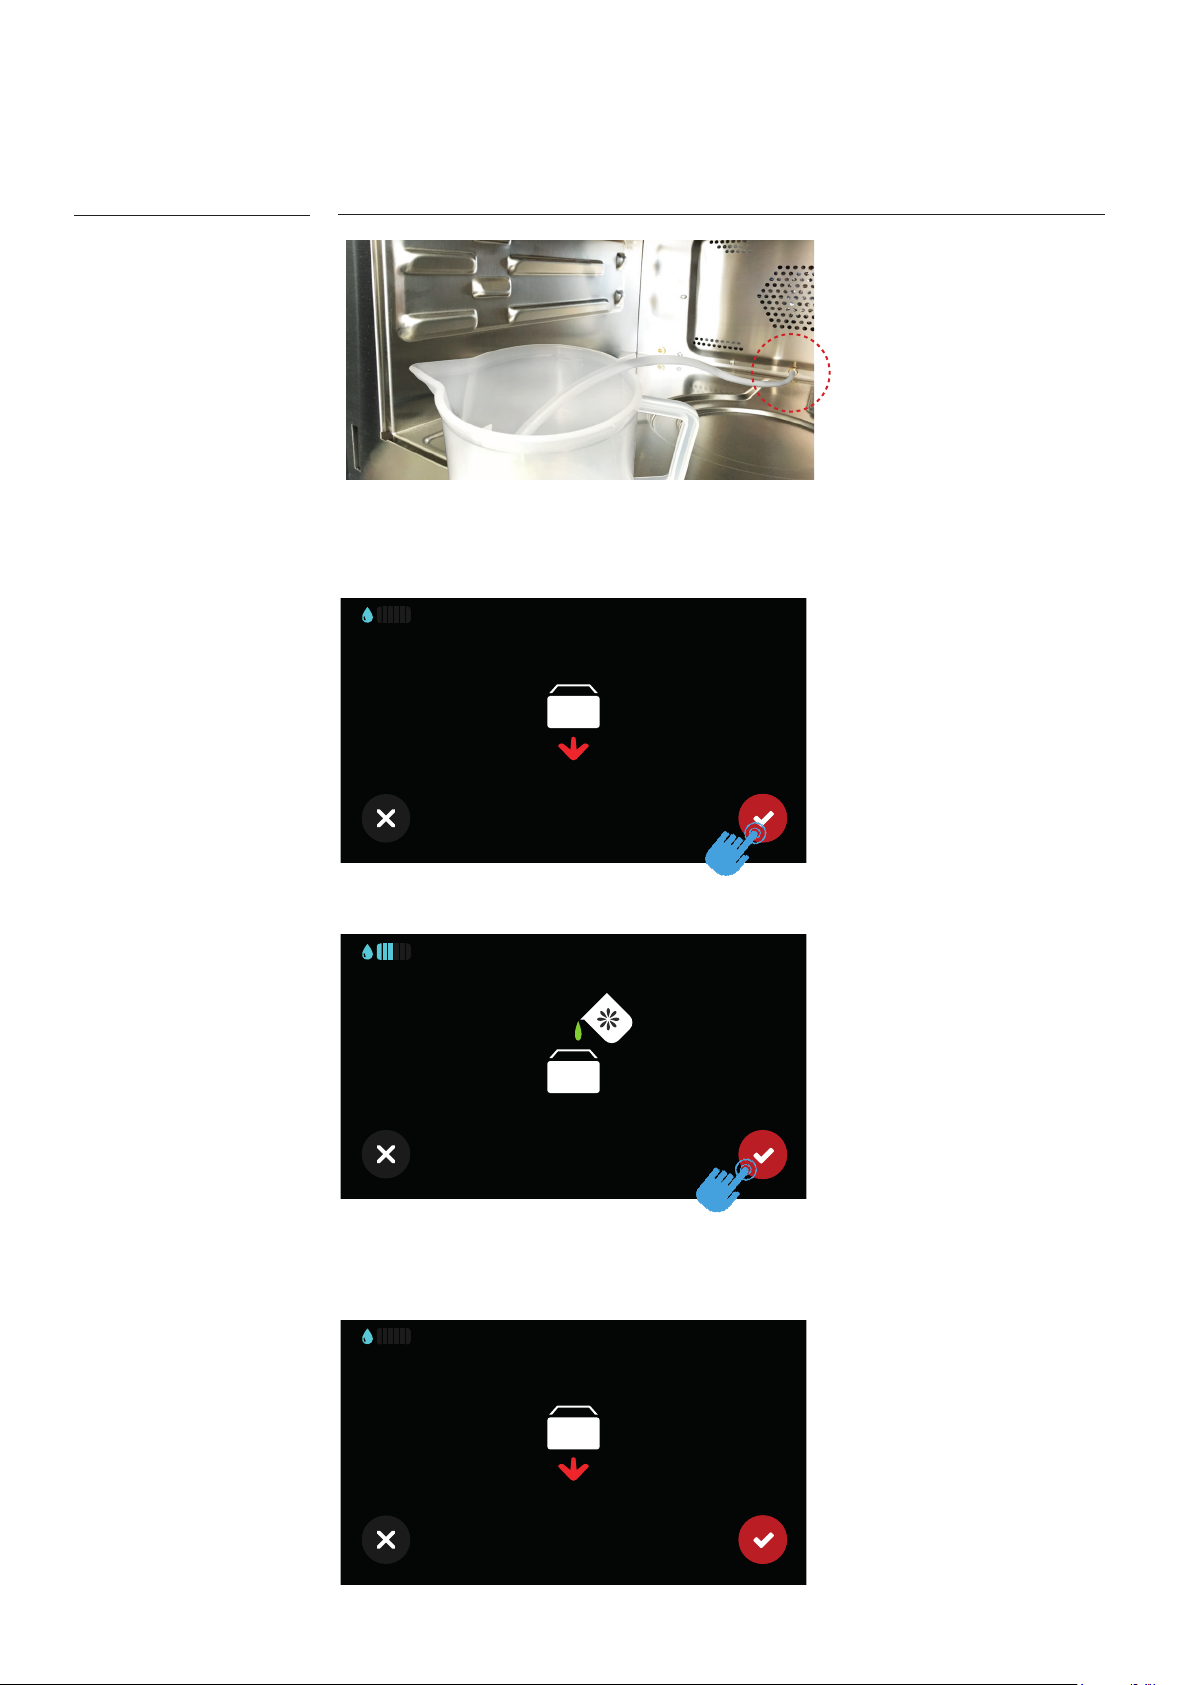
CONNECT PIPE
Next insert the silicon tube (included with the accessories) onto the metal nozzle protruding from the back wall of the cooking cavity under the perforated area.
Insert the other end of the tube into a container having at least 1L capacity (e.g. the
jug supplied in the oven). Then push the conrmation button (the pump begins to operate and starts the emptying).
35
Page 36
CLEANING - CARE - MAINTENANCE
– Emptying and Washing the tank
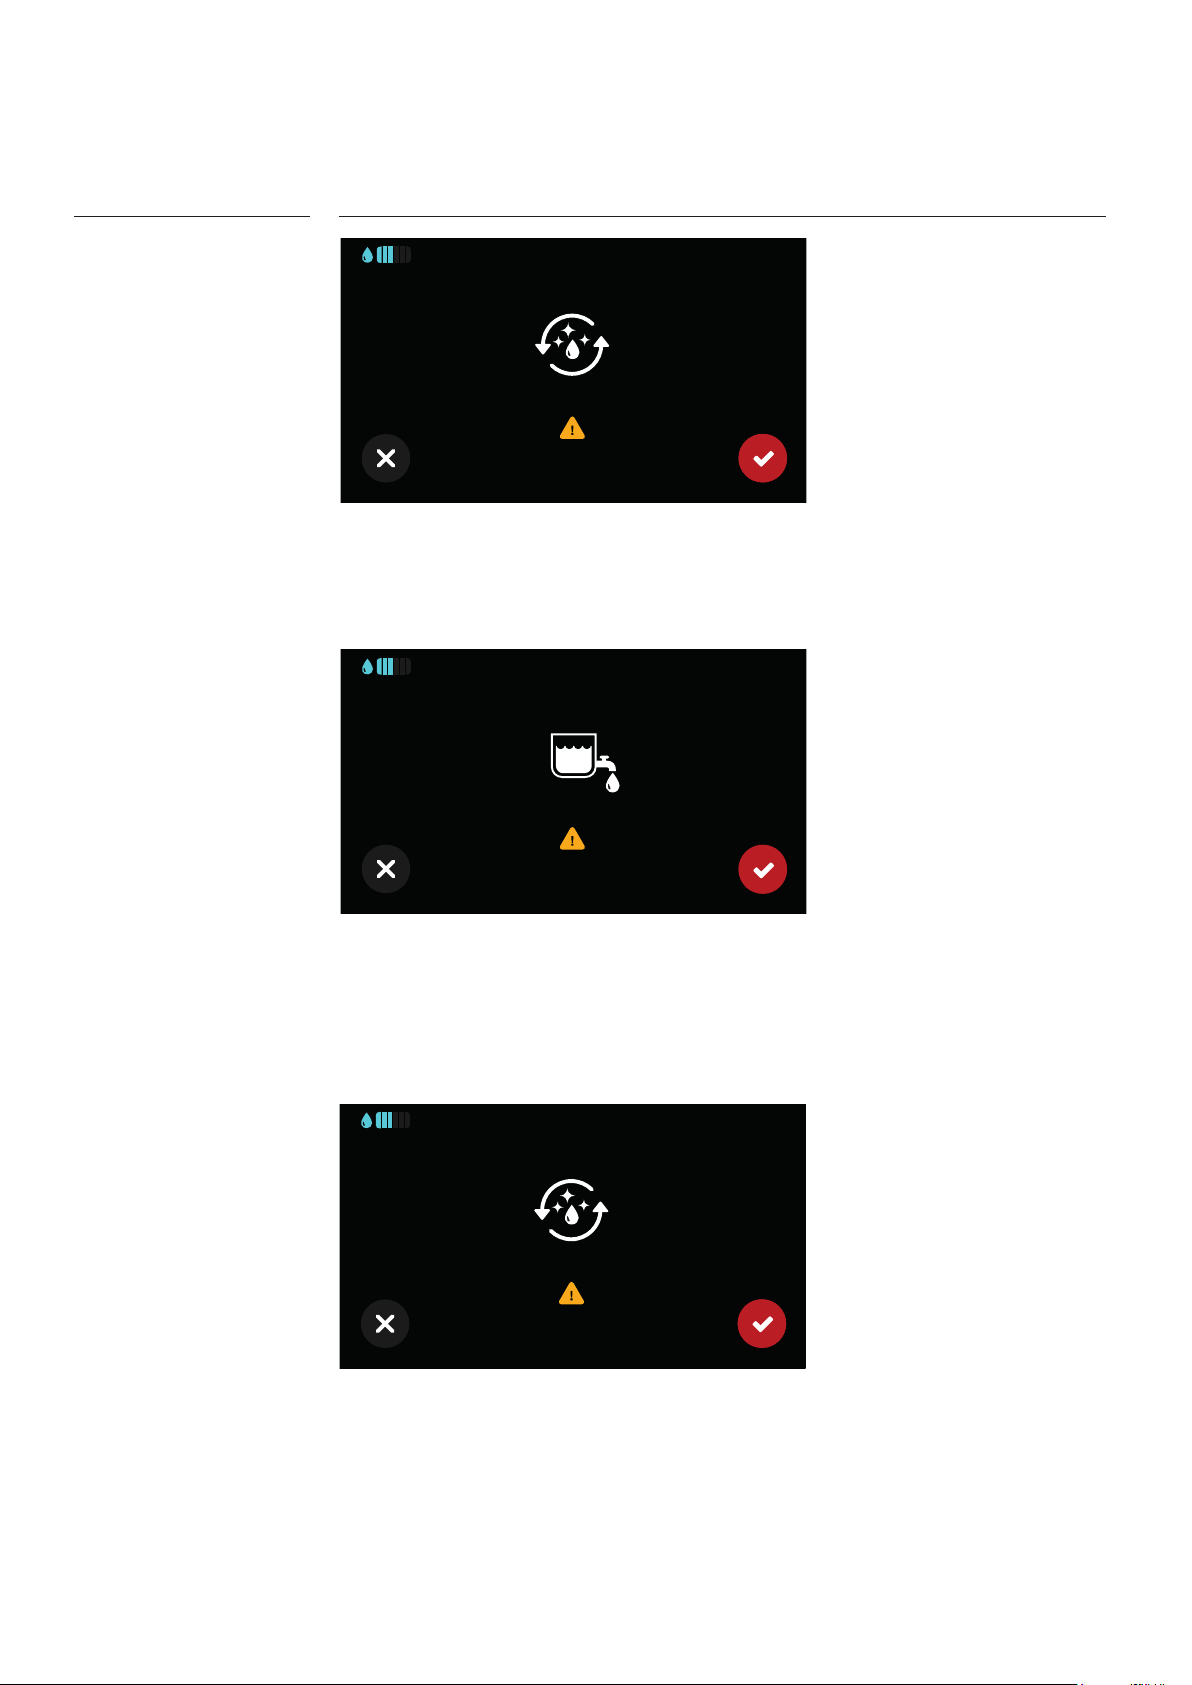
When the tank is empty the display prompts to load the descaling solution (5% citric
acid, or a package of a descaling product for coffee machine or steam iron) for a
complete cleaning use 1L of solution.
LOAD CLE ANER
Opening the drawer and conrming the picture becomes:
LOAD CLE ANER
Pushing the conrmation the pump is restarted and the washing of tank and water circuit is performed. When the tank is empty it is necessary to rinse with water (1L again).
The display shows:
LOAD WATER
36
Page 37

CLEANING - CARE - MAINTENANCE
– Emptying and Washing the tank
Opening again the drawer and conrming, the display shows:
LOAD WATER
Completely ll the tank and conrm to start the pump and begin the nal emptying
operation. At the end (the process will take about 10 minutes) the display shows:
CLEANING END
When the washing has ended, pushing the conrmation button, it will be possible to
start using the appliance normally.
The washing and emptying cycles can be performed at any moment by entering the
relevant menu pushing the settings button (see pag. 23)
37
WASHING
EMPTYING
Page 38
CLEANING - CARE - MAINTENANCE
– Emptying and Washing the tank
Meaning of warnings relevant to the water circuit
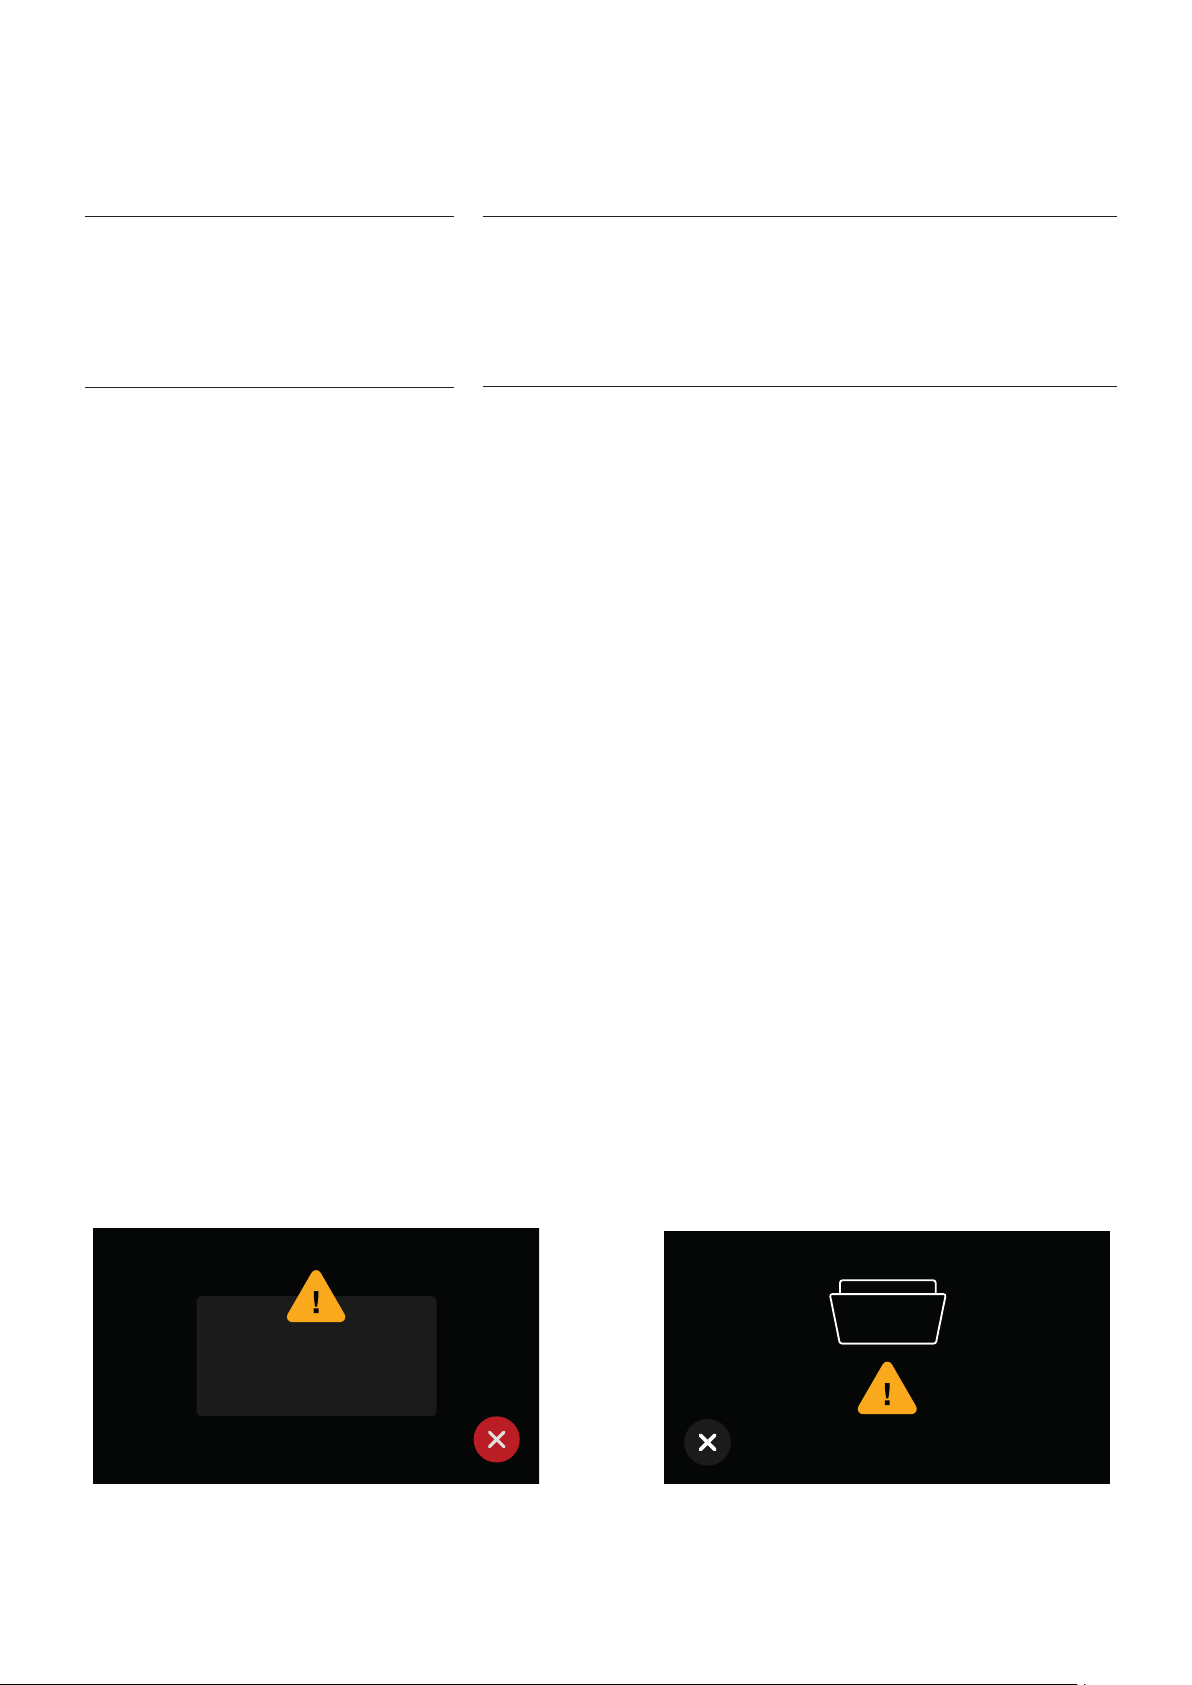
WASHING CYCLE REQUIRED
This warning appears every time the oven is connected to the mains supply.
It is only informative and allows to normally operate the appliance even if the washing
is not performed.
EMP TY ING CYCLE REQUIRED
This warning appears 7 days after the last lling of the tank and invites to empty it to
avoid deterioration of the water quality. It is only informative and allows to normally
operate the appliance even if the emptying is not performed. However it is recommended to empty the tank after every cooking cycle in order to begin the next cooking
with a fresh water load
WASHING CYCLE NEEDED
This warning appears after the boiler has worked for 80 hours (steam and modes combined with steam). From this moment it will be possible to perform only 10 more cooking cycles with steam: then, if the washing is not performed, the operation modes
with steam can be selected but, when trying to start them, an error message will be
displayed and the cooking will not begin.
38
Page 39
AVVISO PROBLEMA
AVVISO PORTA APERTA (CON COTTURA IN CORSO)
PROBLEM SOLVING
– Error messages
System errors
Description
Cavity probe in open circuit
Cavity probe in short circuit
Boiler probe in open circuit
Boiler probe in short circuit
Meat probe in open circuit
Meat probe in short circuit
Overheating
Boiler not heating
The following errors are detected:
The error code syntax is: “E YY X”, where:
YY = error code
x = cavity number when error occurred or ‘ 0 ‘ for general errors
Error ID
00
01
02
03
04
05
08
09
Pump not operating
Emptying error
Washing needed
Tangential fan not working
Communication error
ERROR MESSAGE
error
123456
10
14
15
16
20
DOOR OPEN MESSAGE
(DURING OPERATION)
In case of error disconnect and reconnect the
appliance.
If the error is present again you will need the intervention of an authorized technician
DOOR OPEN
Close the oven door.
39
Page 40

 Loading...