

Page 1
User guide for ILVE
Range Cookers and
Built-In Appliances
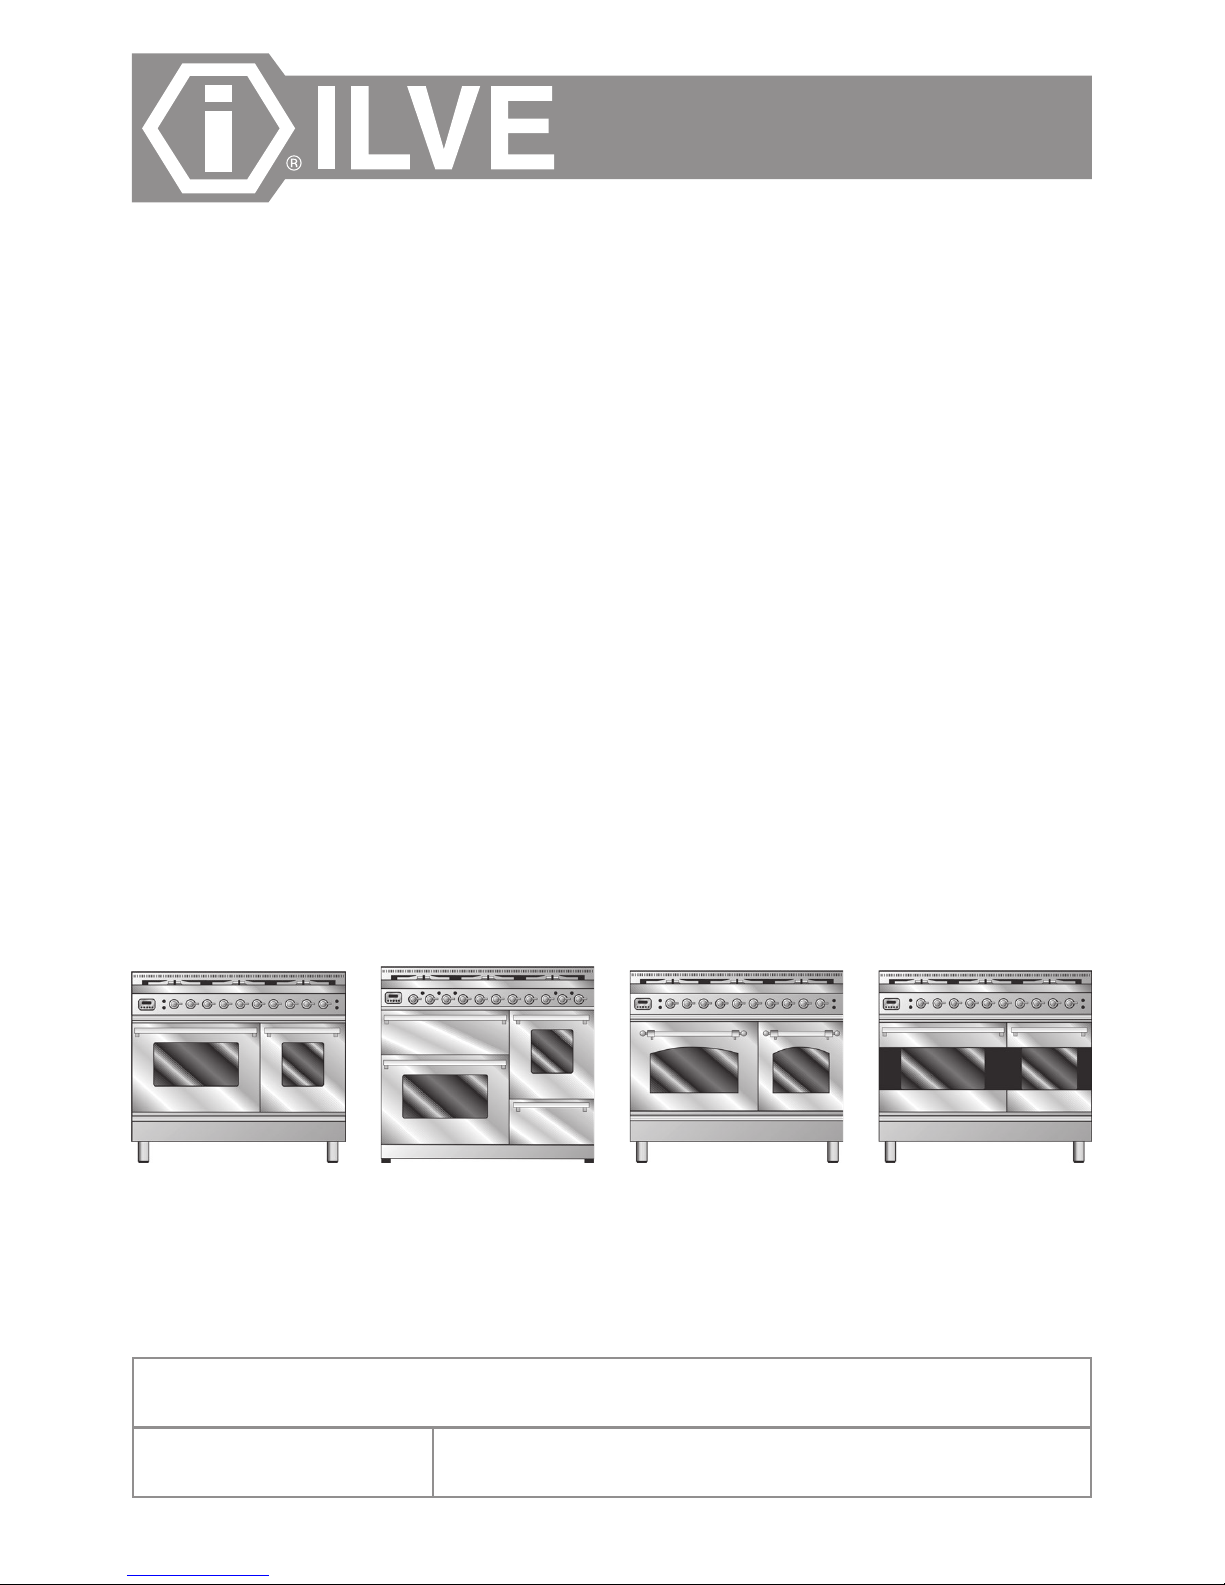
Roma • Milano • Ultimo • Moderna
Appliance details
Serial Number
Date of purchase Retailer
Make a note of these important details here, you will need them for your warranty.
09/2017
Page 2

2
Contents
3 Welcome to the ‘World of ILVE’
3 Warranty
4 Installation and Safety
4 Unpacking Your Appliance
5 Positioning Your Appliance
6 Oven functions in Standard MP and E3 Ovens
7 Getting Started
8 Gas Hobs
8 Induction Hobs
9 Oven Operation - E3 Models
10 Oven Functions Explained
12 Fry Top (also known as Chef Top)
13 Use of the Coup de Feu
13 The XG Grill Compartment (only on XG models)
14 Standard Clock Operation — MP Models
15 Built-In Oven Operation
16 Oven Temperature Guide
18 Frequently Asked Questions
19 Cleaning Tips
Page 3

3
This manual consists of information about ILVE and safety in general but also has sections that are
specic to you and the class of range you have. There are 2 dierent options on most models:
A) E3 Model digital control model (denoted by “E3” on your product code)
B) Standard MP Model (denoted by “MP” on your product code)
There are specic functions and instructions for each one; please use the correct section in the manual.
Welcome to the ‘World of ILVE’
Thank you for purchasing one of ILVE’s beautiful handmade
rangecookers. The name ILVE is renowned worldwide and is
famous for its high-quality cooking appliances.
Based in Venice, Italy ILVE have been building cookers since
1952. The company was formed by two Engineers Eugenio Illoti
and Evelino Berno who indulged their passion for ne food, by
building their rst commercial cooker before developing the
technology for the customers’ homes. In 1982 they passed their
business on to their respective sons who to this day still run the
family owned company.
What Does ILVE mean?
I Industria Industrial
L Lavorazione Standard
V Veneta Venetian
E Elettrodomestici Electrical Appliances
KitchenEX is the sole supplier of ILVE cookers in the UK and
can answer any queries you may have about your product.
Based in Sheeld, KitchenEX can be contacted on
0345 548 3132 or email o[email protected].
Warranty
All ILVE cookers come with a 2-year warranty from date of delivery for parts and
labour. Go to www.ilveappliances.co.uk for more information.
Page 4
4
Installation and Safety
The Installation of ILVE cookers must be carried out by either;
A qualied Gas Safe engineer for dual fuel or gas cookers
OR
A competent person; either recommended by your retailer
or a part P qualied electrician for all electric cookers.
Basic Safety Instructions
Instructions detailing the installation for this range cooker
are in a separate booklet accompanying the cooker.
The cooker is not suitable for use by young children. Keep
young children away from the cooker when in use.
All the control knobs must be in the o position when the
cooker is not in use. If the cooker is not used for extended
periods the gas and the electricity should be switched o or
disconnected.
Do not use ammable liquid near the cooker when it is in
use.
Do not use the cooker if the cable or gas hose is damaged.
Switch the cooker o at the mains before cleaning or
maintaining the cooker.
Do not use the cooker with wet hands or bare feet, or
operate the cooker if not properly installed.
If a fault occurs switch the cooker o and contact KitchenEX
on 0345 548 3132 (if under warranty) or a qualied engineer.
Insist that genuine spare parts are installed to repair the
cooker.
Unpacking Your Appliance
Do not discard any packaging until all parts have been
located.
The cooker rear upstand for the hob is packed within
polystyrene on the top of the cooker.
Cooker legs are in a box within the large oven. Note: The
cooker is heavy and legs should be tted by a minimum of 2
people.
Fry top section is packed and is located in the storage
drawer (fry top models only). The spare set of pan supports
will be tted to the hob top on arrival with these models.
The feet for the fry top are taped to the spatula.
Spare set of jets for LPG conversion are located in the grill
pan.
ILVE cookers are delivered pre-wired, the cable is tucked
inside the lower drawer. Do not connect another cable into
the junction box without disconnecting the pre-wired cable.
Caution When Lifting
Do not lift, pull or drag your cooker by the handles, this
will damage the doors
Cookers are very heavy and should be lifted by a minimum
of 2 persons.
Page 5
5
Positioning Your Appliance
REFER TO MANUFACTURERS INSTALLATION
INSTRUCTIONS BEFORE INSTALLING
The rating plate is on the right hand side of the door frame
when the oven door is opened. This will give the KW rating
for the Gas Safe engineer to install or check the installation
pipe sizing. The main electricity supply must be installed
by a part P qualied electrician In accordance with the IEE
regulations.
The cooker may be installed in a kitchen or open-plan living
space but not in a room with a bath or shower.
The cooker should be positioned in area away from
draughts.
Important Note: ILVE cooker hoods can only be tted
with either 150mm rigid plastic ducting or Aluminium exi
ducting. Plastic exi ducting must not be used under any
circumstance.
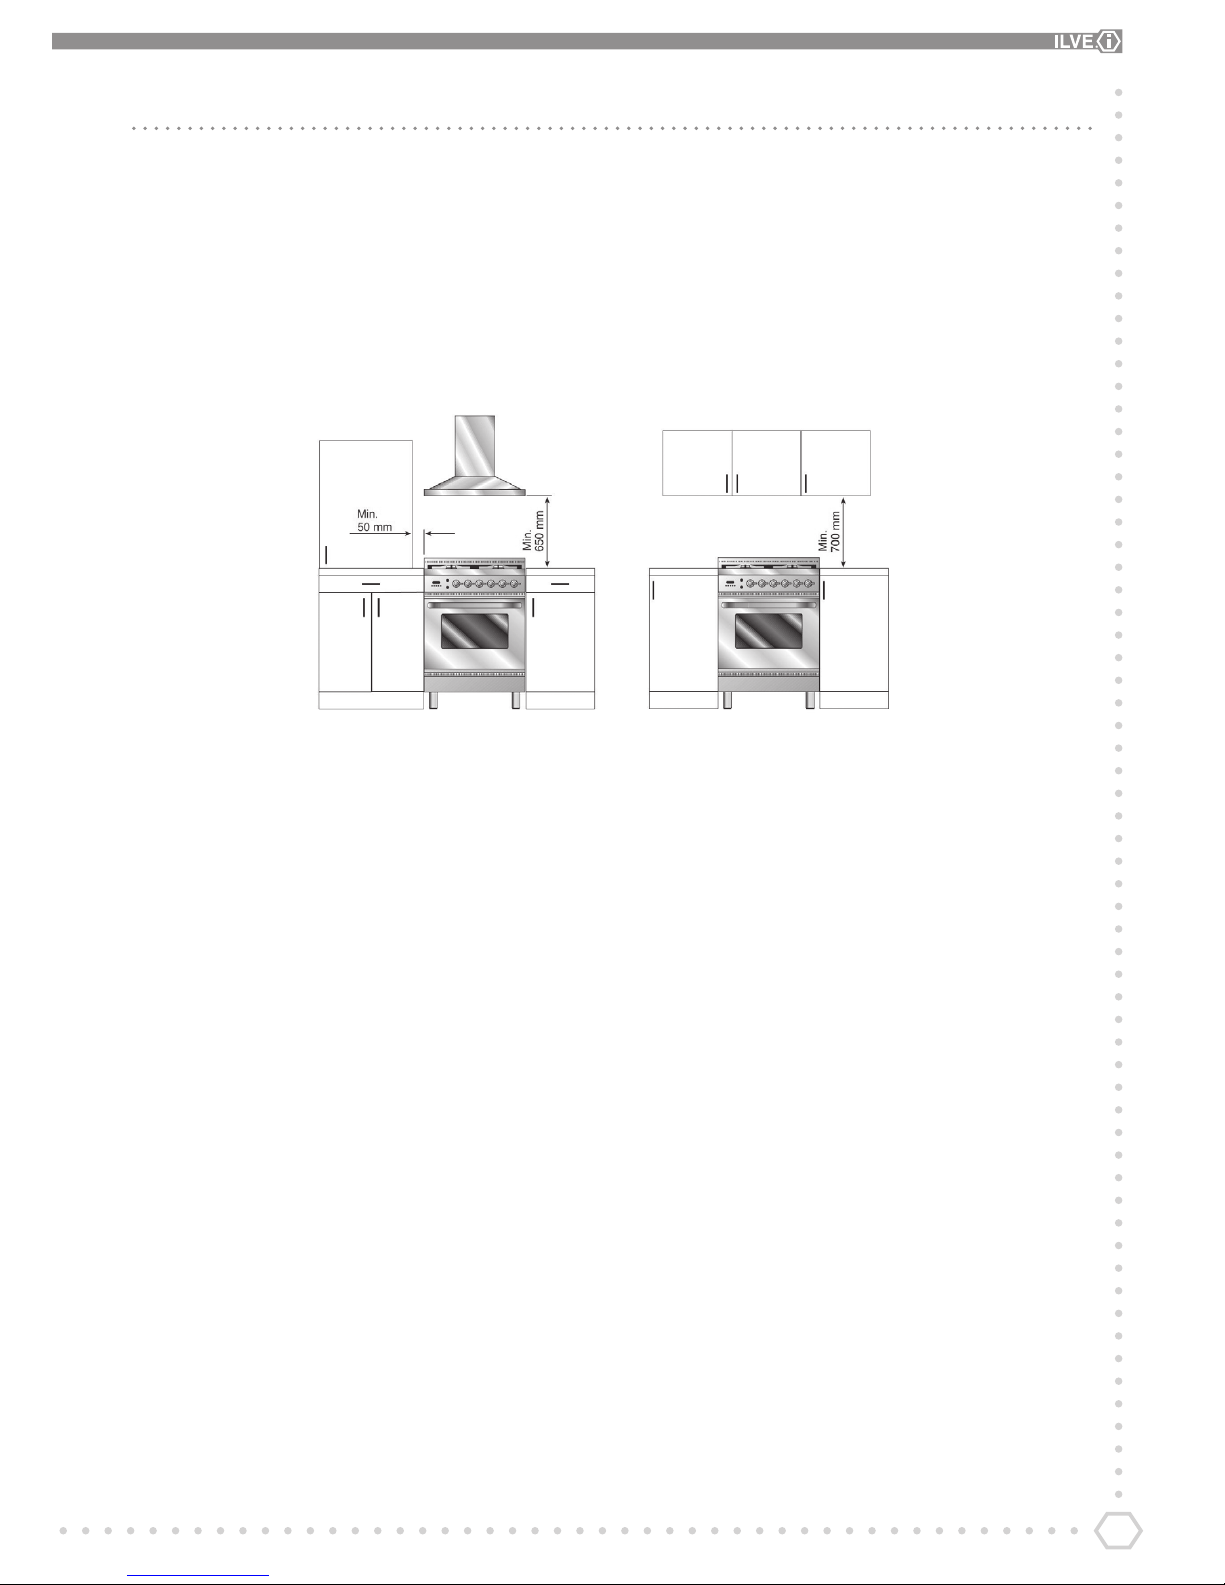
Any shelf, over mantle or cupboard should be 700 mm above
the hob top. Cooker hoods should be set at a minimum of
650mm above the hob. Also, there should be a gap of 50mm
wide on either side of the cooker on or above counter level.
Behind the hob top and to the sides of the hob should be
clear of any combustible material to a height of 400mm.
Kitchen units must not overhang the hob.
Cabinets can be tted ush to the sides of the cooker but
we recommend leaving a small gap to aid cleaning/moving
the appliance.
Adjusting the Height
The cooker comes complete with 4 adjustable feet found in a
box within the main oven.
Standard Models
Legs can be adjusted from 100mm to 160mm to level the
cooker and change the height.
Insert screw into the leg of the cooker and tighten by at least
2 full turns.
Push the screw head through the hole in the chassis.
Slide the leg assemble into the narrow part of the hole and
tighten by turning the leg clockwise.
The height of the leg can be increased by unscrewing the
bottom part.
XG Models
Feet are screwed into threaded holes in each corner of the
underside of the cooker.
The minimum height of an XG cooker is 910mm.
Page 6
6
Oven functions in Standard MP and E3 Ovens
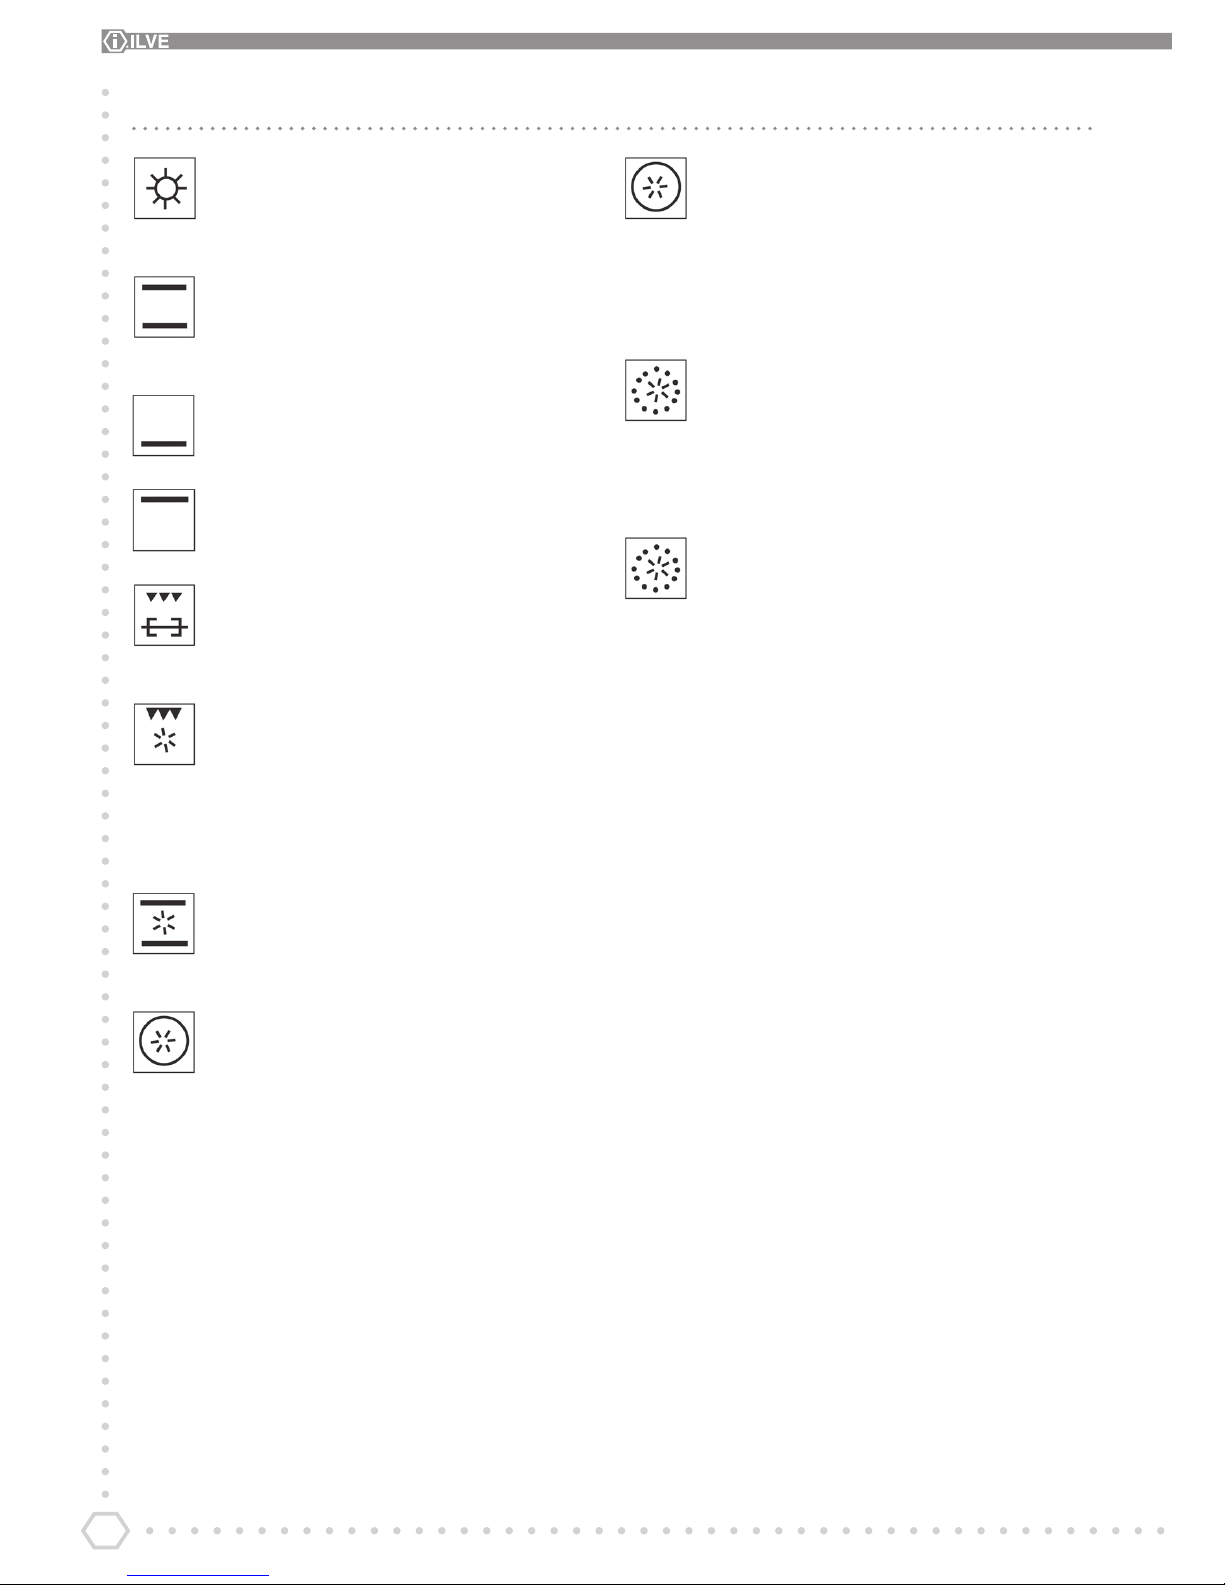
Pizza oven. The element in the bottom heats the
base of the oven with the grill on low to mimic a pizza
oven. This function is particularly suitable for cooking
pizza, focaccia and bread.
Conventional oven. This is the conventional range
cooker setting. The oven gets hot at the top and
bottom and is the correct temperature mid oven. This
function is particularly suited to roasting or baking.
Slow cooker. Use at low temperatures to slow cook
casseroles or at high temperatures for meringues.
This function heats the oven up to 100°C.
Browning oven. Ideal for melting cheese on cottage
pie or shepherds pie.
Standard grill. Use for toasting crumpets or muns.
To cook with the electric grill the thermostat must be
set to a minimum of 180 °C. Option for a rotisserie in
90cm, 40cm and 30cm ovens only.
Fan grill cooking. Use for cooking bacon, sausages
and other meats. To cook with the electric grill the
thermostat must be set to a minimum of 180 °C. Grill
with the pan on the second runner down or grill on
the oven shelf with a grill pan underneath. The food
will brown on both sides with no turning required
making cooking twice as quick.
Roasting oven. Use for roasting vegetables and meat
or baking sh. Ideal for cooking frozen oven chips.
Baking oven. This function allows simultaneous
cooking of dierent dishes; you can cook lasagne,
pizza, croissants and bread, tarts and cakes, etc.
Eco cooking. This function allows you to cook with
considerable energy savings. To take advantage of
this feature, place the dish in the centre of the oven
before starting the ECO function. This cooking cycle
is not recommended for frozen food.
Note: Eco cooking cannot be selected with the meat
probe inserted.
Defrost (only available on MP models). Allows rapid
defrosting of all frozen foods bringing them quickly to
room temperature.
The programmable temperature begins at 200°C,
ensure you lower the temperature before putting food
in to defrost.
Quick start. Pre-heating of oven only, 200ºC to
220ºC. This function speeds up your oven’s preheating.
To use Quick Start, rotate the selector knob until it
is positioned on the symbol (9), then set the desired
temperature with the thermostat knob. Once the
oven has reached the temperature, the thermostat’s
orange light will turn o. At this point set the desired
cooking function with selector knob.
WARNING: the Quick Start function is not suitable
for cooking foods, it is only for quickly pre-heating the
oven.
DO NOT USE THE QUICK START FUNCTION FOR
MORE THAN TWENTY MINUTES.
Page 7
7
Getting Started
The rst operation needed when you switch the cooker on is to
set the clock, the main oven will not operate if the clock isn’t set.
The procedure for each model will vary. See page 14 for MP
model clock settings and page 15 for built-in appliance clock
settings as they dier.
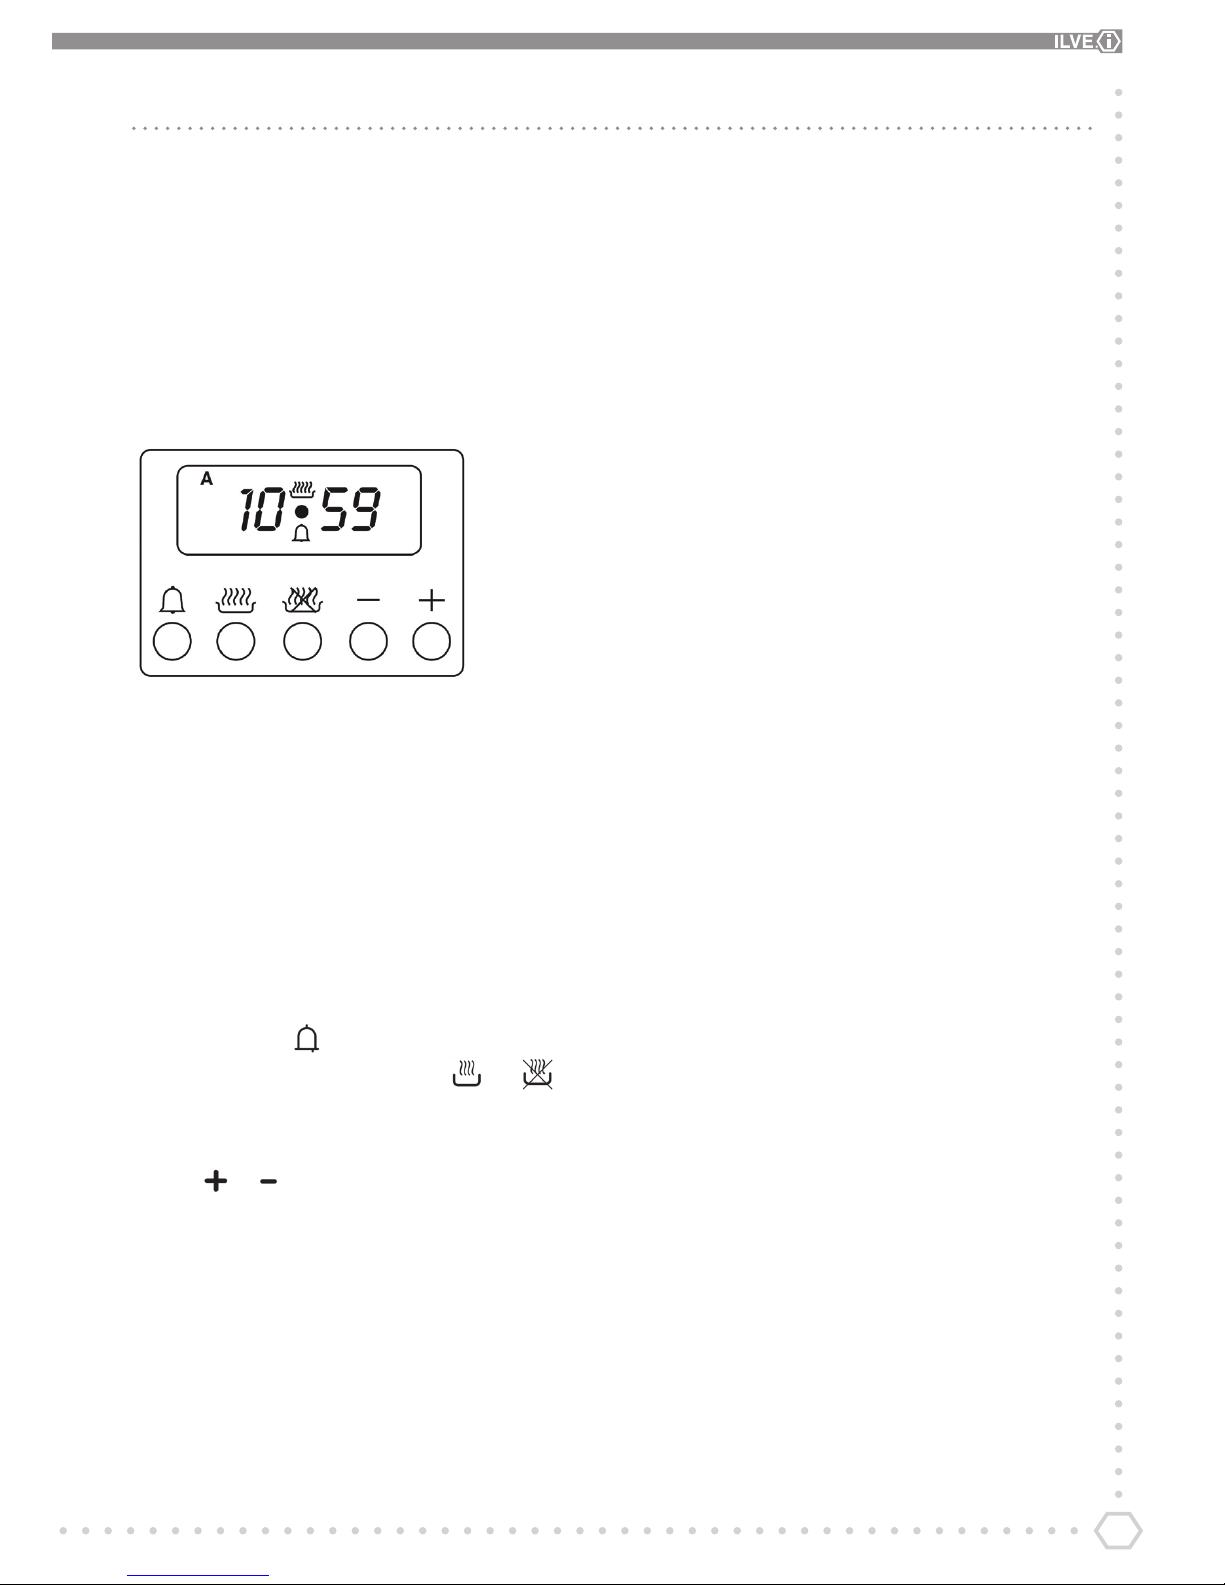
Setting the Clock
The clock is a 24 hour clock and must be set before the main
oven can be operated.
A = Minute minder
B = Auto time Start
C = Auto time end
D = Decrease the selected parameter
E = Increase the selected parameter
A B C D E
To set the clock – E3 Models
When rst switching the cooker on at the isolation switch:
Press bell symbol once, this will stop clock ashing
Hold the two buttons with pan symbols and until
the clock reads HOUR on the display
You now have three seconds to commence next stage
Press or to adjust the display, it will start from 12am
and change to pm after advancing the hours
When your chosen time is reached remove your nger from
the button. The clock will ash for three seconds and then set
Note: Make sure the oven function knob is set to o
Before Cooking in your Ovens
1. Switch oven function selector knobs to Conventional Oven
(position 2). (There will be only one oven function selector
for single oven models.)
2. Set the oven thermostat to 175 °C
3. When the orange neon lights go out, set both oven
selector switches to Standard Grill (position 5)
4. Reset both oven stats to 200 °C
5. When the orange neon lights go out, the small oven can be
switched o as it is now ready for cooking
6. Now set the large oven selector switch to the Baking Oven
(position 8) setting
7. Reset the oven temperature to 225 °C
8. When the orange neon light goes out, the large oven can
be switched o. It is now ready for cooking
By carrying out this procedure all manufacturing residues that
may still be present on the elements and inside of the oven are
burnt away - any odours or smells given o are harmless whilst
doing this process.
Note: The cooling fan will operate at 45 °C to keep the outer
facia and electrics from overheating. It will switch o when the
internal temperature is reduced (thermostatically controlled).
Change °F to °C
Turn the oven on and begin to adjust the temperature so the
screen ashes
Hold in the temperature knob for 8 seconds
Child Lock – Oven
The oven is tted with a safety device that stops undesired or
accidental start-up. To activate the safety lock: with the oven o,
hold down the temperature knob for 3 seconds. A brief warning
sound is emitted and “n–0” appears on the display. In this state,
it is impossible to turn the oven on. To remove this safety lock,
press and hold the temperature knob for 3 seconds.
Child Lock – Induction Hob Top
When the Child Lock is activated all the hob cooking areas are
switched o and cannot be switched on accidentally.
To activate the Child Lock turn the controls for the two back
cooking zones clockwise and hold for a few seconds until ‘L’
appears on the hob top display.
The Child Lock is deactivated by repeating the process in the
same way.
If a knob is turned whilst the Child Lock is activated an ‘L’ will
appear on the display.
Page 8

8
Gas Hobs
Lighting the burners
The symbol above each knob indicates which burner that
knob controls. A ame failure device on each burner acts as
a safety gas cut-o in case the ame is accidentally blown
out or the control knob is inadvertently switched on. (This is a
safety device to prevent young children or pets inadvertently
turning knobs and releasing the gas.) A thermocouple detects
the absence of a ame and stops the supply of gas. The
thermocouple must be heated for a few seconds when the
burner is ignited before the knob is released.
Note: Early ILVE appliances have no thermocouples on the burners.
To light a burner
1. Push and turn the control knob anti-clockwise to the large
ame position. The ignition candle will spark and ignite the gas.
2. Keep the control knob pressed in for 5–10 seconds to
activate the ame failure device, then release the knob.
Adjust the ame between the large and small ame
symbols as required.
Tip: As you push and turn the knob take it all to way around to
the minimum position if the burner is struggling to ignite.
In the event of a power failure the burners can be lit with a
match or gas lighter. The ame failure devices will continue to
function normally.
Assembly of the burners
On the circular burners there are two slots in the alloy burner
bases. The notches on the brass burner ring must be seated
rmly into the base for the gas to ignite and the ame to be
stable. The burners have been designed to function with or
without the burner caps in position. If you wish to keep the caps
like new it is possible to remove them before cooking and then
replace them again afterwards.
If when cleaning it isn’t re assembled correctly the gas will
struggle to pass through the burner holes correctly, resulting in
a yellow/faulty ame which may keep extinguishing and will not
give o as much heat. It could also blacken the base of pans.
Induction Hobs
Safety
Ensure your pan is suitable for induction. The induction does
not work if there is no pan on the hob to be used. This function
also acts as a safety device if the zone is either left on after
cooking or accidentally switched on.
If an error occurs a “U” will appear. The U can also indicate that
a pan is missing or the pan is an unsuitable material.
Power Boost
To operate the power boost turn control knob briey past
number 9. A “P” symbol will appear in the number window. The
power boost will operate for a maximum of 10 minutes before
returning to normal full power.
Induction Ratings
Zone Size Normal Power
Output
Power Boost
Small Zone 1.4 KW 1.85 KW
Medium Zone 1.85 KW 2.5 KW
Large Zone 2.3 KW 3.2 KW
Extra Large Zone 2.4 KW 3.2 KW
Keep Warm Function
This keeps the contents of the pan at a temperature of 65ºC. Turn
the knob clock wise between 0 and 1 a “U” will appear in the
window indicating the food will warm to approximately 65ºC.
Automatic Boil and Reduce Function
This function allows you to bring the sauce pan contents to
boil and then automatically drop the food temperature to a
pre-determined setting, set by you! (To simmer use numbers
between 1–5.)
To activate, turn the control anti-clockwise, then from (0) to the
intended nal position. As soon as the control is turned to the
left, the letter (A) is shown on the display for the area. After it
has been activated you must set a lower power level between 1
and 9 to continue cooking. The zone will work at full power for a
maximum of 10 minutes then reduce to your pre-set setting.
Notes for induction
Always make sure pans are clean. You may scratch the glass
if there is debris on the underside of your pan.
Avoid boiling over sugar based sauces, jams or chutney. If
you do, wipe up immediately otherwise the sugar will chip
the hob surface.
If a fault occurs an “E” will ash on the hob with a number.
The “E” will ash on the hob with the associated error.
Page 9
9
Oven Operation - E3 Models
How to select a function and set a
temperature
1. Turn the function selector knob either way to the desired
function. The green light will illuminate, indicating that
power is on and the clock will be set to that function’s
default temperature.
2. To set the desired temperature (which is displayed in the
window of the clock), turn the temperature selector knob
to left to lower temperature or the right to increase the
temperature from the default setting.
The orange light will go out once the oven has reached
temperature and is ready for use. It is normal for this light
to go on and o during cooking as the elements maintain
the temperature.
3. To turn the oven o, turn the function selector back to zero.
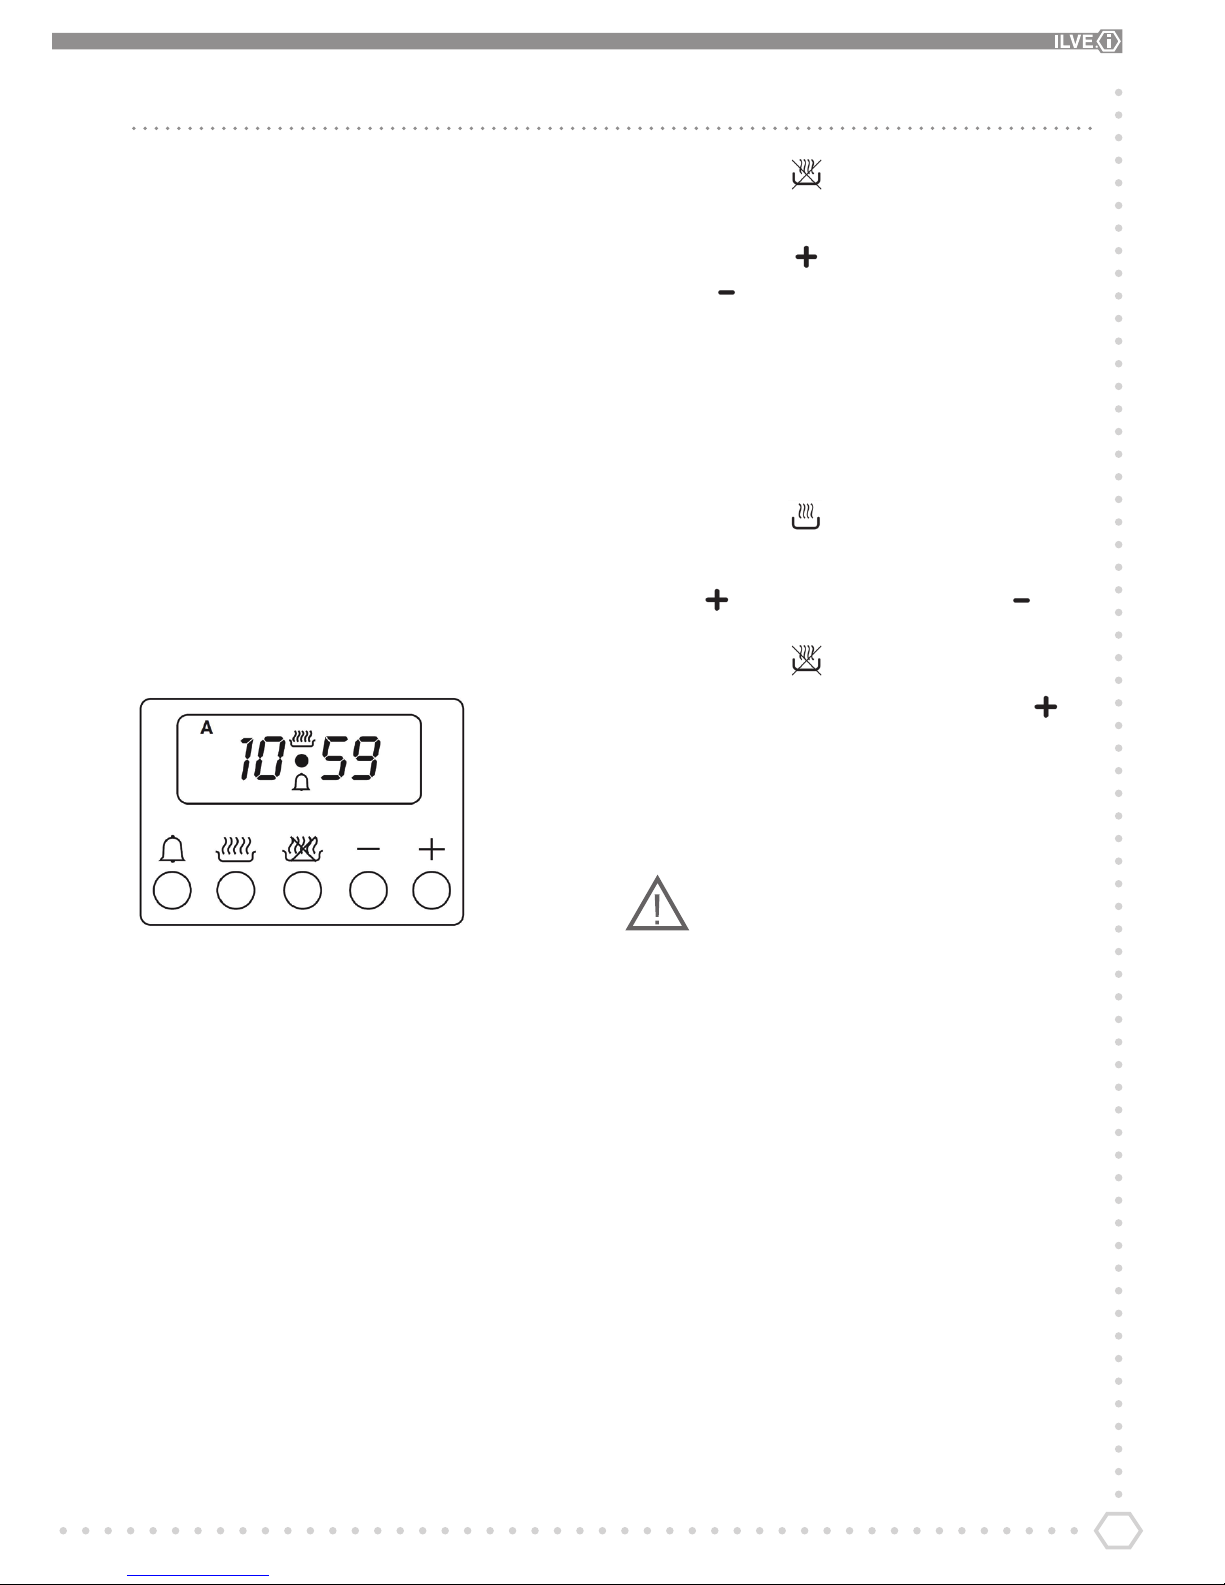
Setting the timer on your oven
A = Minute minder
B = Auto time Start
C = Auto time end
D = Decrease the selected parameter
E = Increase the selected parameter
A B C D E
The clock can be used to time either oven. They must be set
individually, but both can be set for the same time or dierent
times to each other.
To set timer to switch o an oven
Select your desired oven and function
Set temperature
Press timer button once
END will appear in the clock window
Instantly press the button to set an end time. You can
use the button if you go too far
The selected oven switch-o time is now set. (You will see
an arrow pointing to the right in the clock window.)
To Set timer to switch oven on and o
Select your desired oven and function
Set temperature
Press timer button once
ON will appear in the clock window
Press to set the start time. You can press if you
go to far
Press timer button once
END will appear in the clock window. Quickly press to
set the time you would like to oven to turn o
Selected oven is now set. (You will see two arrows pointing
towards a line and way from a line in the clock window.)
To cancel timer - turn oven selector switch o.
Safety notes
Steam may be generated when cooking. As a precaution,
always open the door in two stages. First, partially open
the door by 100mm for a few seconds to allow the steam to
escape, and then open the door fully.
Keep your face and head away from the door when opening.
Never line the oven interior base with foil or oven liners as
they can cause overheating and damage the enamel. Never
cook on the oven base. Always place dishes and trays onto
an oven shelf.
If water escapes from the lower part of the door when
cooking high moisture content food, just open the door
about 100mm once every half hour if possible to equalize air
pressure.
Page 10
10
Oven Functions Explained
Only use the Quick start to heat the oven quickly if you are in a
hurry, and do not operate it for longer than 20 minutes or after it
has reached temperature. Do not use the quick start to cook.
Also remember that the quick start uses more electricity if left
on for prolonged periods of time.
When using the baking oven or roasting oven function, it is
advisable to reduce the oven temperature by up to 20°C if
following a recipe written for a conventional oven. Check the
food often through the latter stages of cooking until you are
used to the cooking times and temperatures, as these functions
are extremely ecient. It is also possible to open the door to
check sponges, on fan settings because the regain of heat is
very quick.
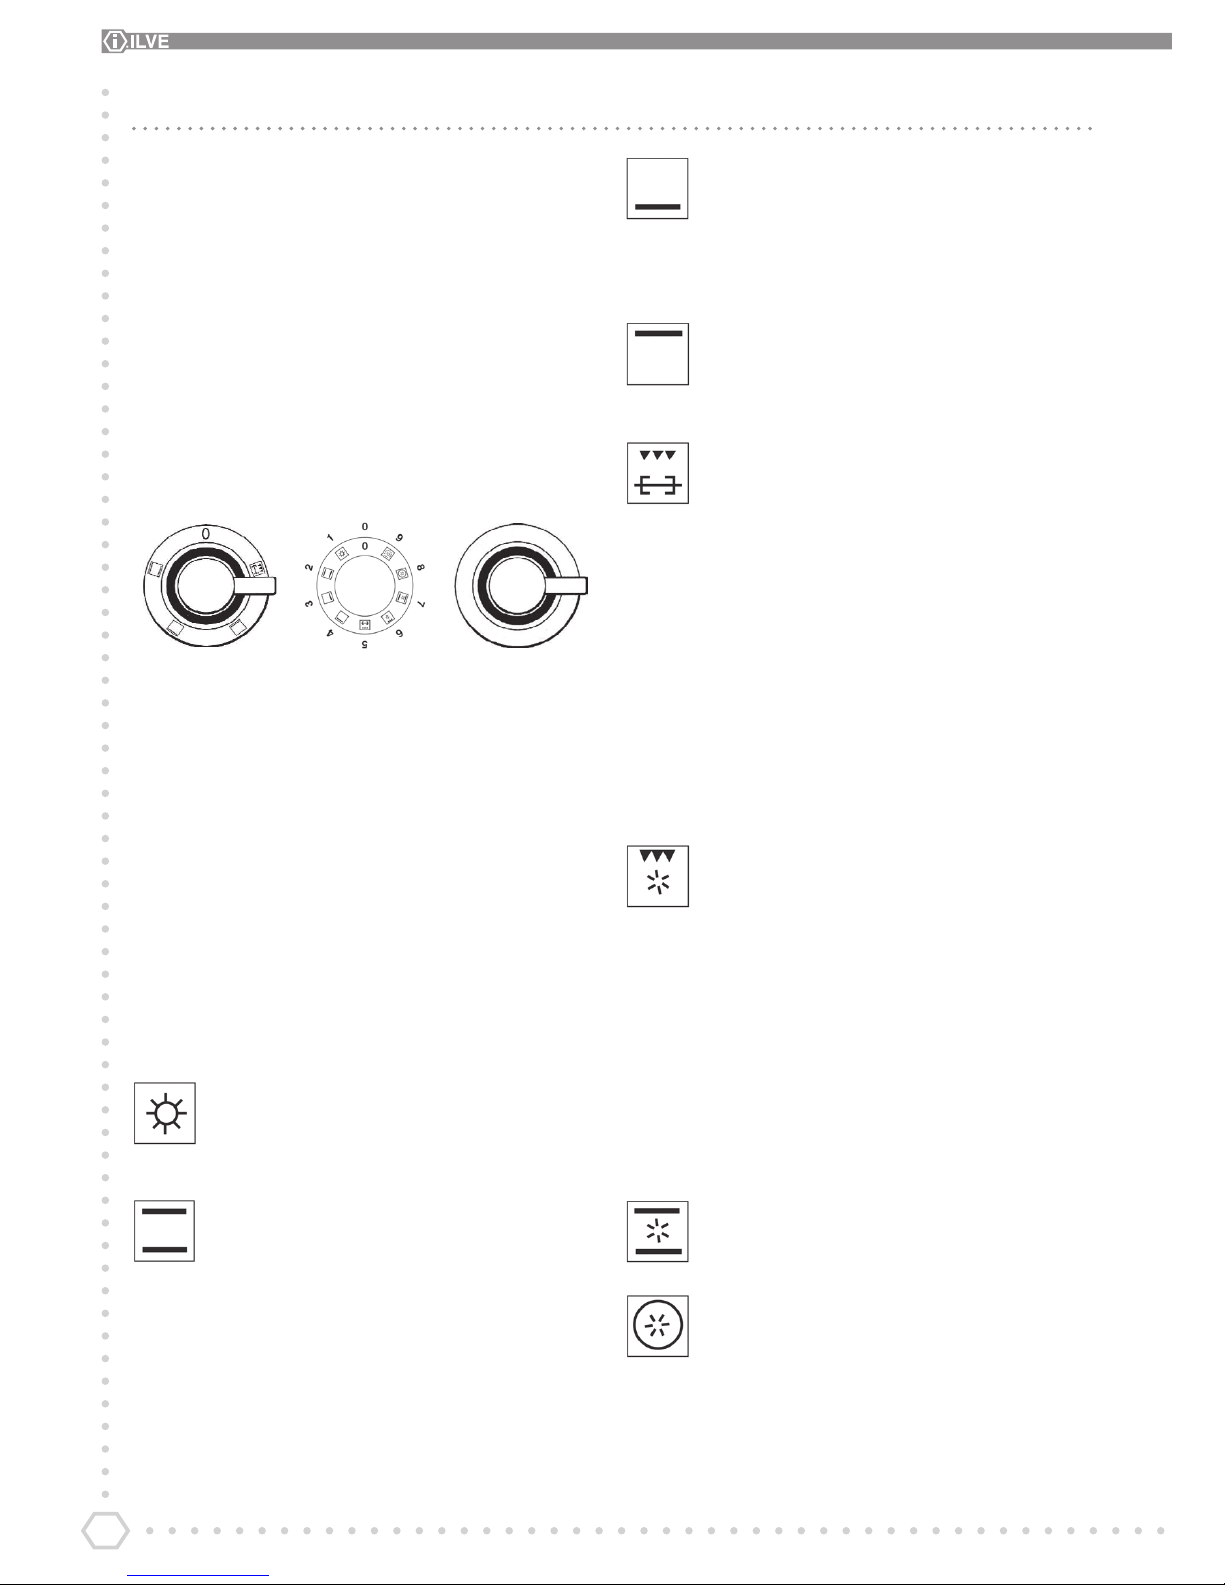
4 function
selector
9 function
selector
Temperature
selector
Oven Interior Lamp
The oven lamp is illuminated for one minute when the function
selector switch is operated. It will then come on again when the
oven gets up to temperature, illuminating the oven for you to
place in the food.
You can also switch the lamp on any time by pushing in the
thermostat button for the oven you need to see into. Again, it
will illuminate for one minute.
9 Function Selector
Pizza Oven. Default temperature setting 300ºC. Cook
mid oven, this setting is ideal for dierent types of
breads or cooking a pizza quickly on a high
temperature.
Conventional Oven. Default temperature setting
180ºC. Ideal for cooking on one shelf. This function
imitates an old-fashioned range, except it is more
ecient. The elements get hot at the top and bottom
of the oven to create the correct temperature in the
centre. This function is ideal for fruit cakes and larger
items such as turkey where the meat needs to cook
for a longer time than usual. This function prevents
the meat drying out over its prolonged cooking time.
Slow Cooker. Default temperature setting 140ºC.
This function is a slow cooker or cool oven up to
140ºC. It is heated by the lower element only. The
Slow Cooker function is ideal for cooking casseroles,
slow roasts and meringues or for proving bread at
30ºC.
Browning Oven. Default temperature setting 140ºC.
The oven is heated by the upper element and is used
for light grilling or browning. Ideal for melting cheese
on cottage pies or pasta dishes.
Standard Grill. Default temperature setting 180ºC.
This function is the same as all grills on all electric
cookers. The only dierence with ILVE grills is that
they are controlled by a thermostat instead of a
regulator.
The grill uses radiant heat to get to temperature.
When the pilot light is on it is grilling.
Set the temperature to warm the element on a low
setting then prepare your food.
Then start grilling. Turn the control gradually up as
the light goes out.
By the time you have reached the highest setting
most foods will be cooked. The only time you let the
light go out is when you want to slow grill your food.
Fan Grill. Default temperature setting 180ºC. This
function makes a standard grill twice as quick by
spinning the heated air all around your food. Unlike
the standard grill you do not need to keep adjusting
the temperature to maintain grilling. For it to work
correctly, grill on the second runner down. Or grill on
an oven shelf with the grill pan underneath. The food
will grill both sides, no need to turn the food hence a
quicker cooking time. Sausages will be ready by the
time you would normally turn them.
Note 1. Be careful not to over grill your food as this
function is deceptively fast form of grilling.
Note 2. You can place the food in the oven without
the need to pre-heat the oven.
Roasting oven. Default temperature setting 180ºC.
This function is also called a Fan Oven.
Baking Oven. Default temperature setting 180ºC.
This function is also called a True Fan Oven. This
setting uses an element hidden behind the rear
panel. The element is a three-turn element, making it
more reliable than most other manufacturers. It works
best when at least two shelves are used or one shelf
with an empty tin on the self not being used. This is
the only function that you can open the door and
check or adjust food when baking, due to a fast
Page 11
11
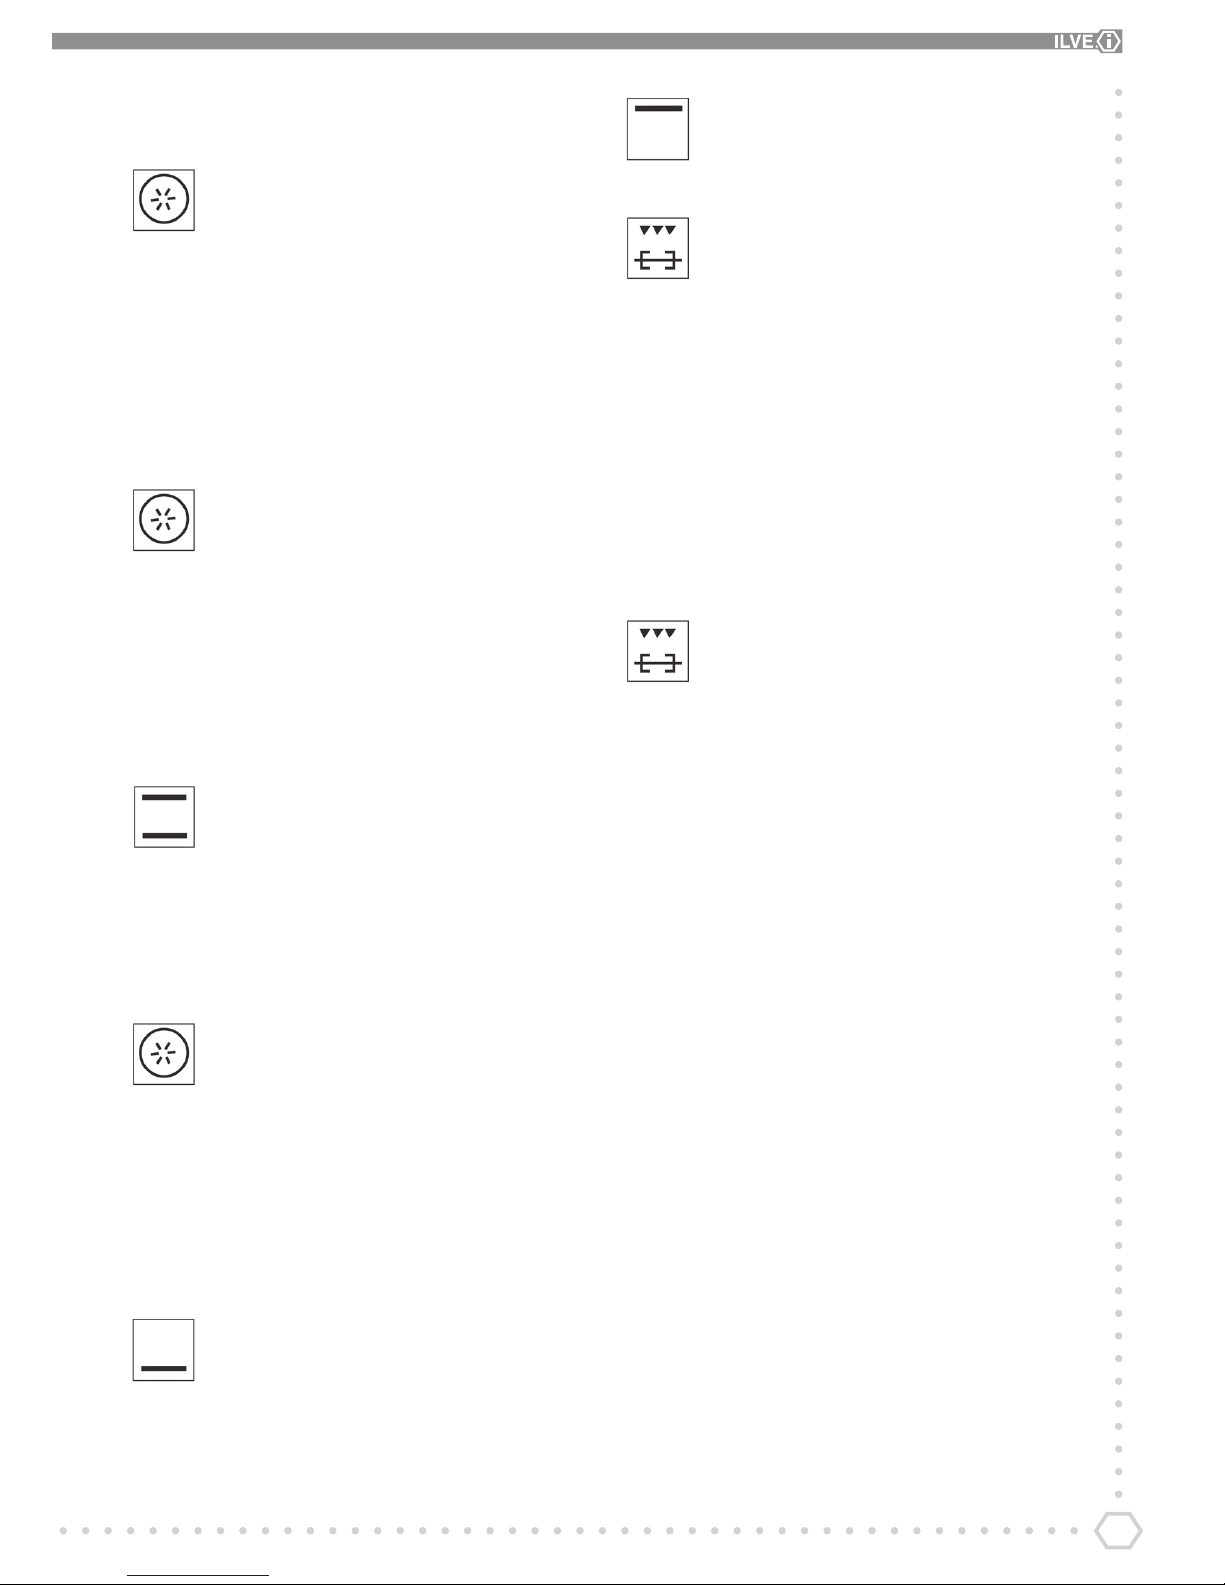
regain heat in the oven. Ideal for bread, cakes, pastry
and baked potatoes.
Eco Cooking. This function brings the temperature
slowly up to the selected temperature in graduations
It is designed to be similar to a slow cooker except it
can be set to higher temperatures. Ideal for braised
meat, baked pasta and delicate pastry.
To Select Eco Cooking
• Select the baking function on the selector switch
• When ON appears on the display hold down
the clock ‘+’ button for about 2 seconds until ECO
appears on the display
• Select temperature control from 30ºC to 250ºC
Quick Start. Default temperature setting 200ºC. This
function is not designed to cook with, it will raise the
oven temperature to 200ºC in approximately 10
minutes. Then you switch to your intended cooking
function. (Do not operate this function for longer
times, than 20 minutes.)
There is no advantage in using this function for low
temperature cooking. Use between 200ºC to 250ºC.
5 Function Selector
Conventional Oven. Default temperature setting
180ºC. Ideal for cooking on one shelf. This function
imitates an old-fashioned range, except it is more
ecient. The elements get hot at the top and bottom
of the oven to create the correct temperature in the
centre. This function is ideal for fruit cakes and larger
items such as turkey where the meat needs to cook
for a longer time than usual. This function prevents
the meat drying out over its prolonged cooking time.
Eco Cooking. This function brings the temperature
slowly up to the selected temperature in graduations.
It is designed to be similar to a slow cooker except it
can be set to higher temperatures. Ideal for braised
meat, baked pasta and delicate pastry.
To Select Eco Cooking
• Select the baking function on the selector switch
• When ON appears on the display hold down
the clock ‘+’ button for about 2 seconds until ECO
appears on the display
• Select temperature control from 30ºC to 250ºC
Slow Cooker. Default temperature setting 140ºC.
This function is a slow cooker or cool oven up to
140ºC. It is heated by the lower element only. The
Slow Cooker function is ideal for cooking casseroles,
slow roasts and meringues or for proving bread at
30ºC.
Browning Oven. Default temperature setting 140ºC.
The oven is heated by the upper element and is used
for light grilling or browning. Ideal for melting cheese
on cottage pies or pasta dishes.
Standard Grill. Default temperature setting 180ºC.
This function is the same as all grills on all electric
cookers. The only dierence with ILVE grills is that
they are controlled by a thermostat instead of a
regulator.
The grill uses radiant heat to get to temperature.
When the pilot light is on it is grilling.
Set the temperature to warm the element on a low
setting then prepare your food.
Then start grilling. Turn the control gradually up as
the light goes out.
By the time you have reached the highest setting
most foods will be cooked. The only time you let the
light go out is when you want to slow grill your food.
Rotisserie. This function works similar to traditional
grilling, It is one of the best ways to cook meat and
poultry. Contrary to what people expect it does not
make a mess of the oven. It self-bastes the meat
dropping the fat into the meat tin below. This makes it
a very healthy way to cook.
Place the oven tray in the bottom shelf position to
catch any drips.
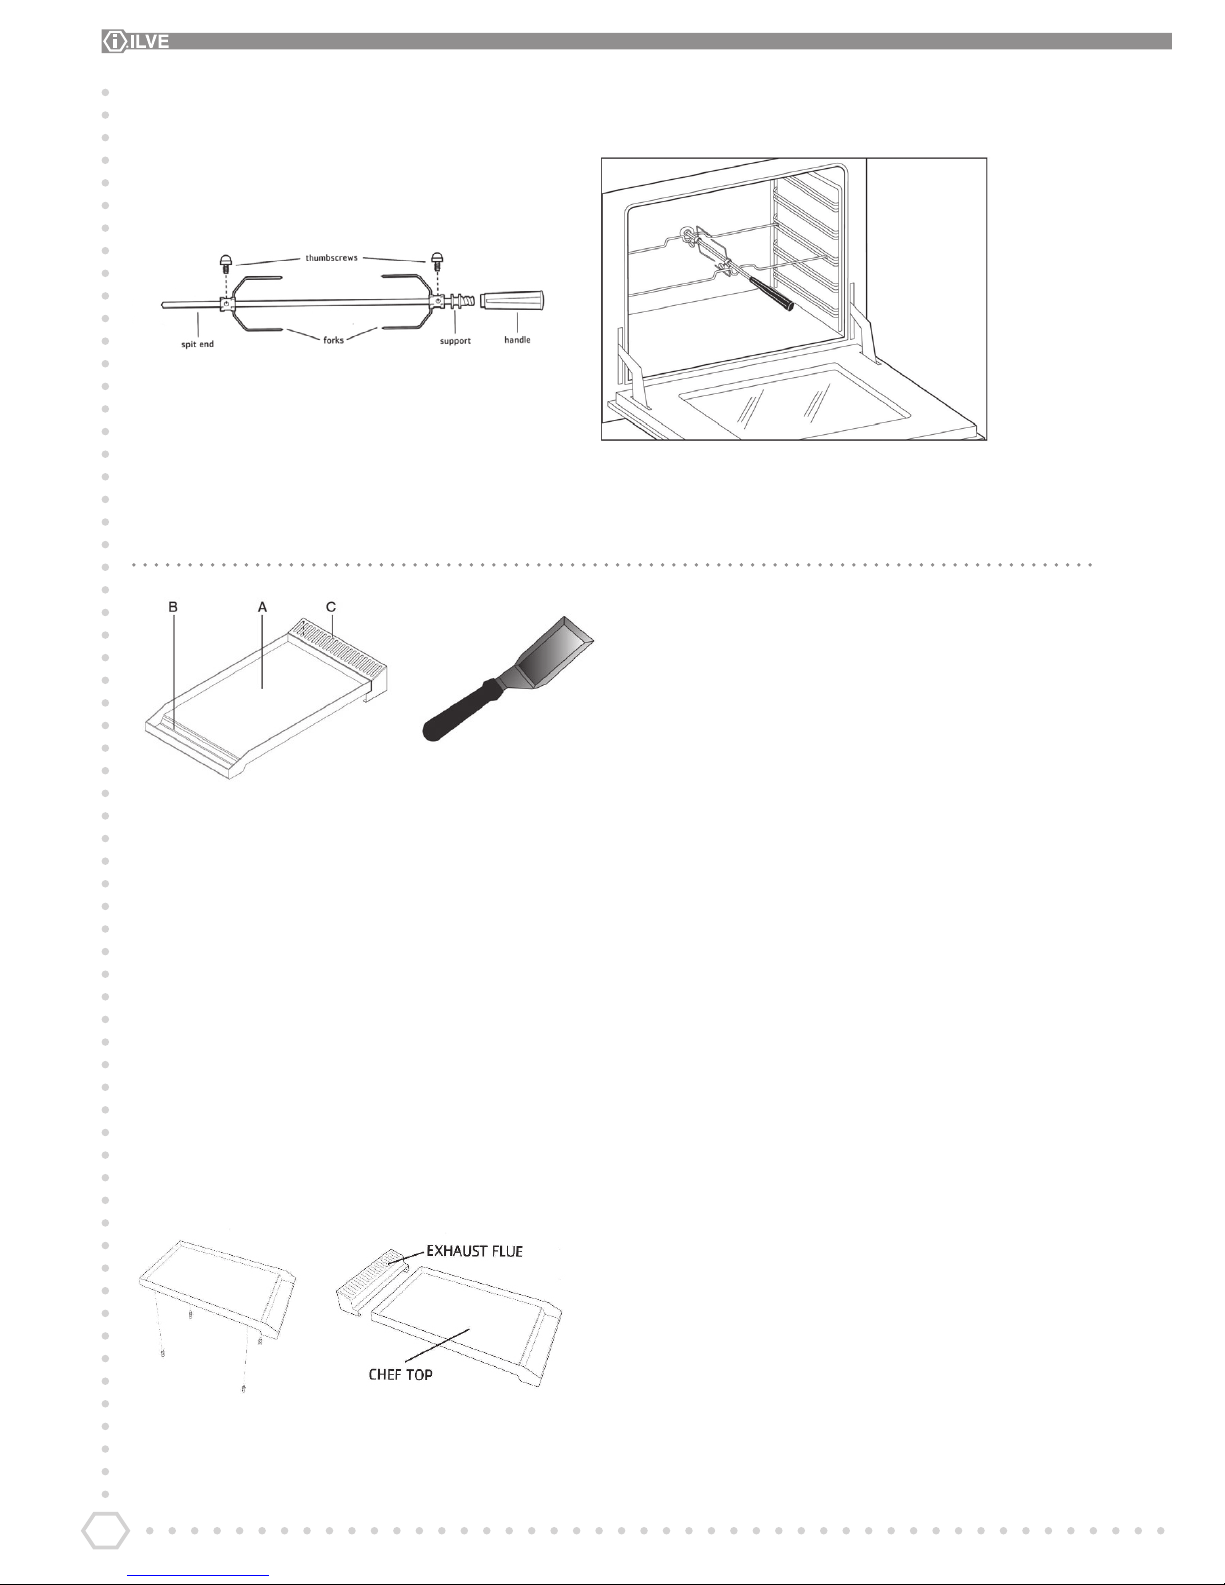
1. Place the wire support shelf into the oven so that
it sits level with the hole at the back of the oven (see
diagram 1).
2. Fit one of the forks onto the spit and tighten the
thumbscrew.
3. Skewer the meat with the spit, ensuring that the
fork rmly pierces and holds the meat. When cooking
poultry, aim for the bone area under the breast.
4. Fit the second fork, again ensuring that the meat is
rmly pierced. For poultry, the fork should enter just
below the thighs. Tighten the thumbscrew into place.
Ensure that the food is well balanced to avoid stress
on the motor drive.
5. Place the spit over the wire support shelf and place
the spit end into the hole in the rear oven wall. Locate
the spit support onto the wire shelf. Remove the
handle. (the handle is used solely for moving the spit)
and close the oven door.
6. Set the oven temperature, as the grill uses radiant
heat you can cook from cold. The glowing of the
element creates the crisp skin on poultry. It also seals
joints of meat.
Page 12
12
diagram 1
Fry Top (also known as Chef Top)
A = cooking area
B = drip tray
C = exhaust ue for combustion fumes
The fry top is manufactured from 8mm thick stainless steel
designed for high heat retention across the plate. The very high
cooking temperature makes the fry top ideal for searing meats
and vegetables and for oriental style recipes. Some suggested
uses include: steaks, burgers, chicken, fish and other meats,
vegetables such as peppers, mushrooms and aubergines, stir
fries, kebabs, toasted sandwiches, naan and pitta breads, fried
and scrambled eggs, griddle cakes, crumpets, English muns
and drop scones.
To assemble the Fry Top
A B
1. Remove the pan supports that cover the elongated sh
burner.
2. Screw the feet into the pre-drilled holes on the underside
of the fry top. The two longest feet go to the rear and the
two shortest go to the front (towards the drip tray). See
image A.
3. Place the enamelled exhaust ue onto the hob surface
towards the rear. See image B.
4. Carefully position the fry top onto the hob, ensuring that it
is seated correctly and resting on the ledge of the exhaust
ue.
Care must be taken when handling the fry top. It is heavy!
To use the Fry Top
The fry top can smoke during use so always turn your extractor
hood on before you start cooking.
1. To light the burner, push in and turn the control knob to
the large flame position. Hold the control knob in for 5–10
seconds after the flame has lit to activate the flame failure
device, before releasing. If the flame extinguishes wait one
minute before attempting to re-ignite.
2. Pre-heat on full power for 5 to 10 minutes.
3. Add the food.
4. Adjust the ame as required.
The fry top is hottest in the central area and cooler at the outer
edges. You can control the cooking temperature by moving the
food to the outer edges after the initial searing, similar to the
way you would use a barbecue.
To avoid excess spitting use the minimum of oil when cooking
on the fry top. A at spatula is supplied for turning and serving
food. It can also be used to remove any food residues at the end
of cooking. The high temperature of the fry top makes plastic
tools unsuitable for use with it. Do not be tempted to move or
turn the food too quickly or often.
Page 13
13
Use of the Coup de Feu
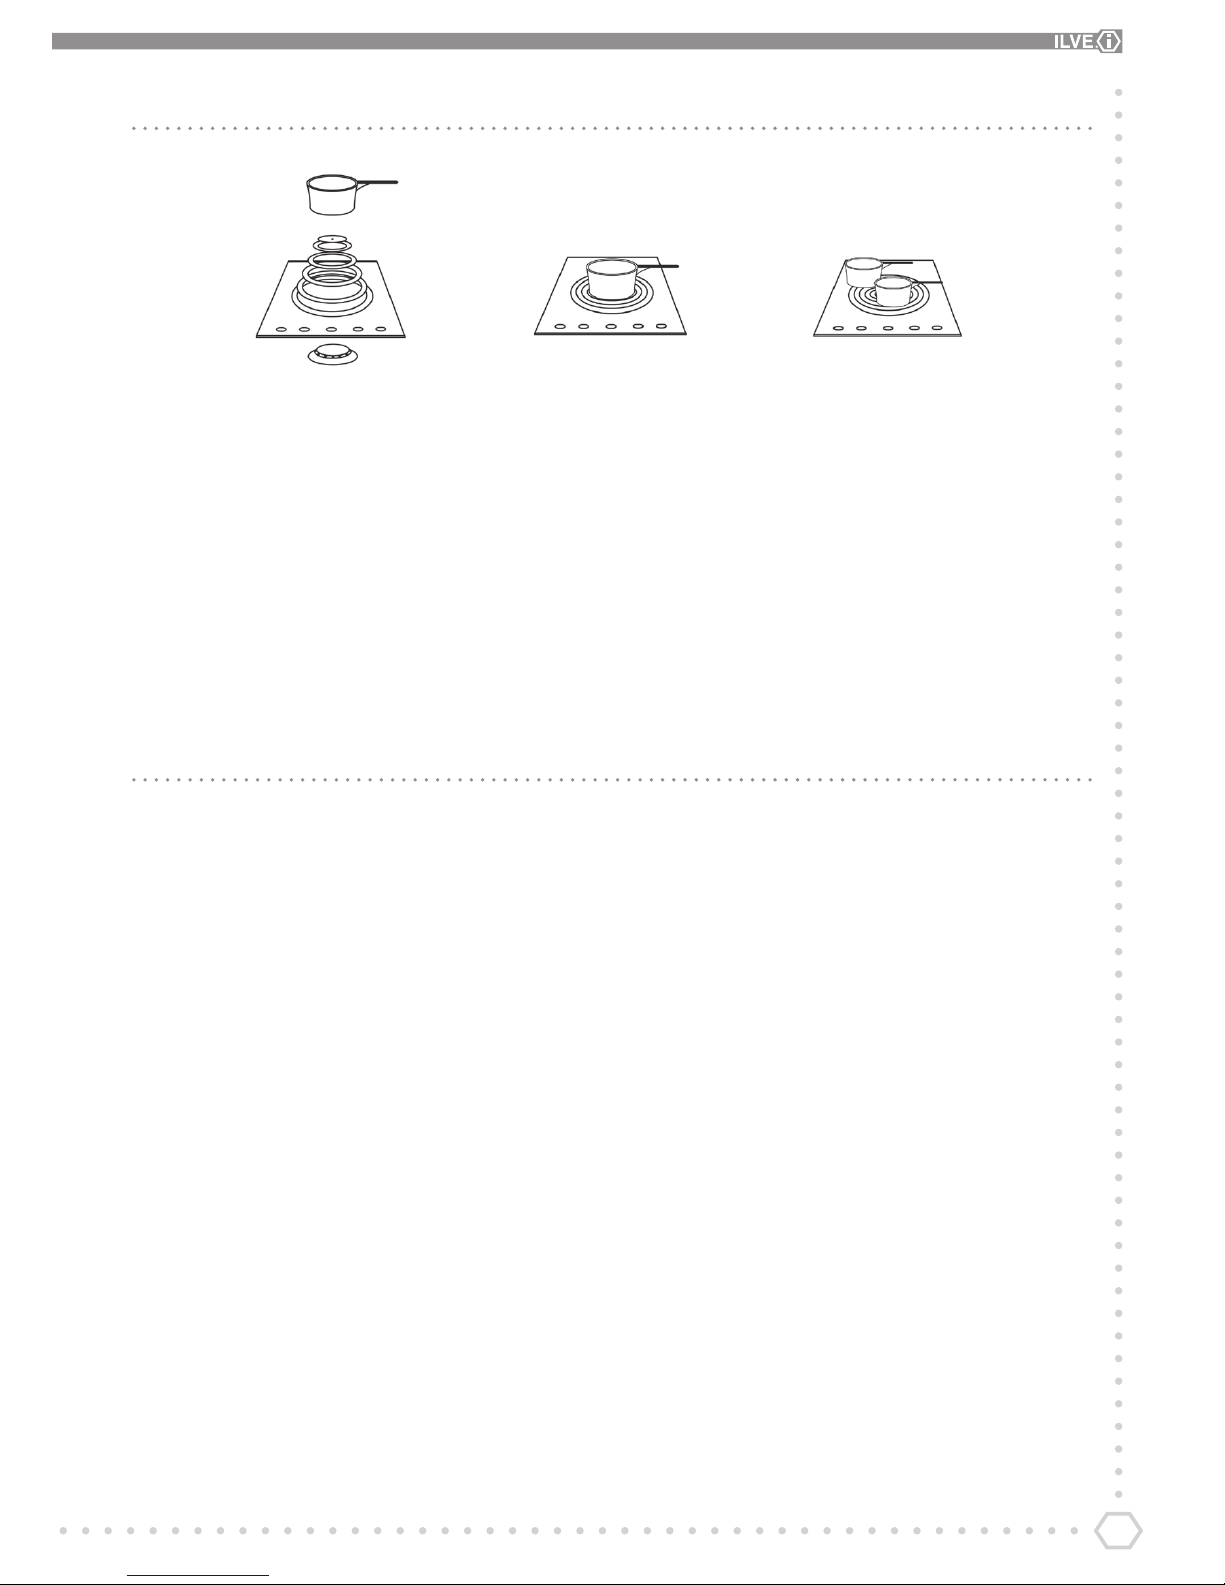
A B C
The large “Coup de feu” solid cast iron plate made of
concentric rings allows you to rest the pan (or several pans)
directly on the surface (g. B, C). The plate is heated by means
of a gas burner (g. A).
The plate is designed to provide a moderately intense heat
which is well distributed over the surface. This is ideal for slow
cooking and particularly for sauces, browning and grilling,
heating dishes or keeping them warm. Switch the burner on 1520 minutes before use to allow the cast iron plate to accumulate
heat. You will then be able to use the plate even when switched
o for a further 10-15 minutes. The middle of the plate is the
area where the highest temperatures are reached whereas the
outer part is cooler. By simply moving the pan from the middle
to the outside of the plate, you can obtain dierent cooking
intensities without regulating the ame. Pan dimensions
permitting, several dishes can be cooked at the same time (g.
C). If necessary it can be used as a handy top, providing ample
space for resting pots and pans.
The XG Grill Compartment (only on XG models)
The powerful 2.45kW grill is designed for use with the
compartment door open. A cooling fan situated behind
the control panel keeps the control knobs at a comfortable
temperature, even when the grill is in use.
The grill compartment is tted with telescopic runners to make
it easier to access your food.
To locate the grill pan onto the runners, simply extend both
runners, then lower the grill pan into place, ensuring that the
vertical pins locate in the hole at each corner of the grill pan
tray.
To use the grill
1. Use the reversible trivet to select the correct height for the
food you wish to grill. Using the trivet at the lowest height
will help to slow down the cooking process.
2. Turn the grill control knob clockwise to 3 or 4 to pre-heat
the grill.
3. Once preheated, keep the grill glowing, to do this make
sure the orange lamp is illuminated when the food is
in place. (The grill only works by the radiant heat from
the element.) Unless you require less heat, it may be
necessary to constantly increase grill temperature control
to maintain grilling
4. To turn o the grill, turn the control knob anti-clockwise
to the “O” o position. At the end of cooking remove
the grill pan for cleaning. If high fat content foods have
been prepared, leave the grill turned on at maximum
temperature for 20 to 50 seconds without the grill pan in
place, this will burn o any fatty residue on the elements
and activate the stay clean liner on the roof of the grill
compartment. Always use oven gloves when handling
the grill pan and turning food. Do not line the grill pan
with aluminium foil, this can cause damage to the enamel
coating and the grill elements.
Page 14
14
Standard Clock Operation — MP Models
The clock is a 24 hour clock and needs to be set before the
main oven can be operated.
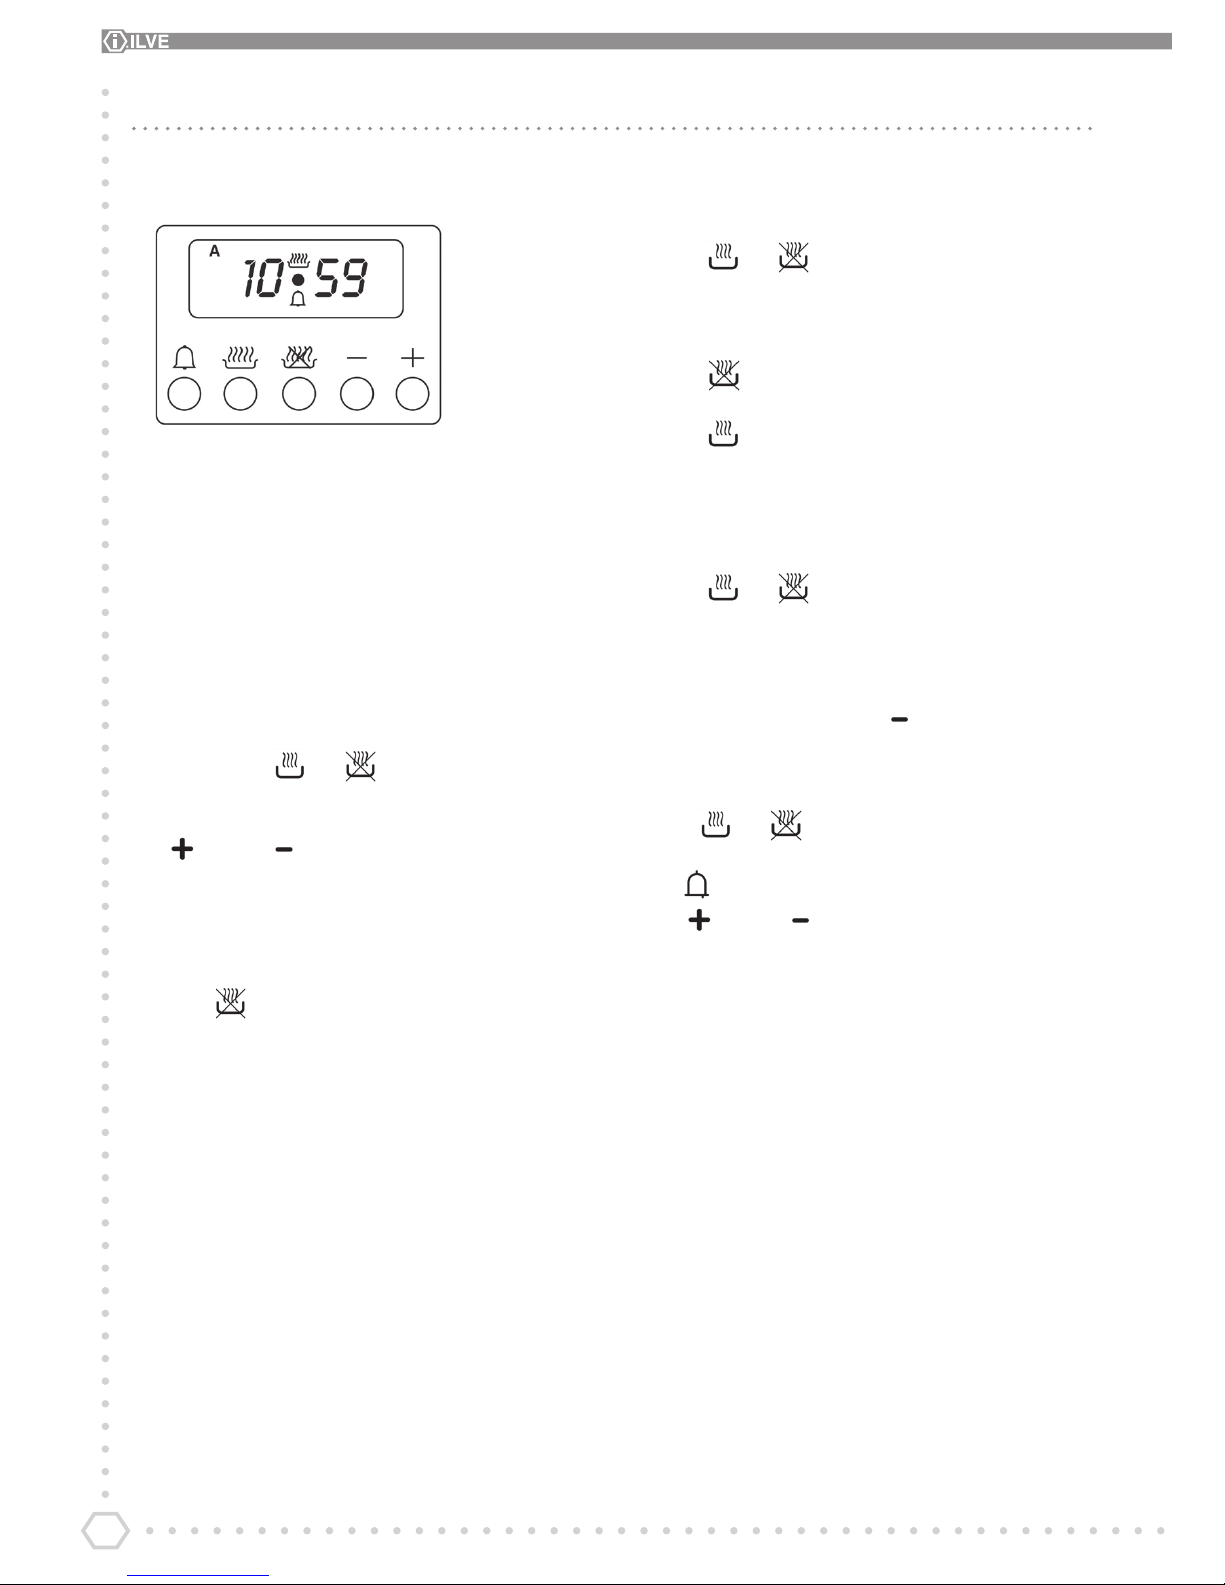
A B C D E
A = Minute minder
B = Auto time Start
C = Auto time end
D = Decrease the selected parameter
E = Increase the selected parameter
To set clock
1. Press buttons and together.
2. When the dot in the middle of the clock ashes press plus
or minus to set the time of day.
3. When the time is set the dot will ash for 3 seconds before
the clock resumes.
To Set oven to auto nish at a chosen time.
1. Press and set the time you require the oven to switch
o.
2. Set 9 function switch and the oven temperature.
3. When the desired time has been reached the oven will
switch o and the clock will bleep for 1 minute.
4. Press and together will set the clock back to
manual.
To set clock to switch on and o.
1. Press and set the time you require the oven to switch
o.
2. Press and set the amount of time you require the food
to cook. (duration time)
3. Set 9 function switch and the oven temperature.
4. When the automatic set time has completed the oven will
switch o and the clock will bleep for 1 minute.
5. Press and together this will set the clock back
to manual.
Notes
By pressing the negative button at any time the clock is
in normal manual mode. The minute minder will bleep the
current setting in volume. Pressing a second time will move
it to another setting (o, low, medium and high).
Press and at any time if the clock has been set
incorrectly. This will return the clock to manual mode.
The button operates the minute minder. Then press the
plus or minus button to set the amount of minutes
required. Press any button to cancel bleep.
Page 15
15
Built-In Oven Operation
The oven functions within a built-in ILVE appliance are the
same as the range cookers. However, the controls dierent. See
below.
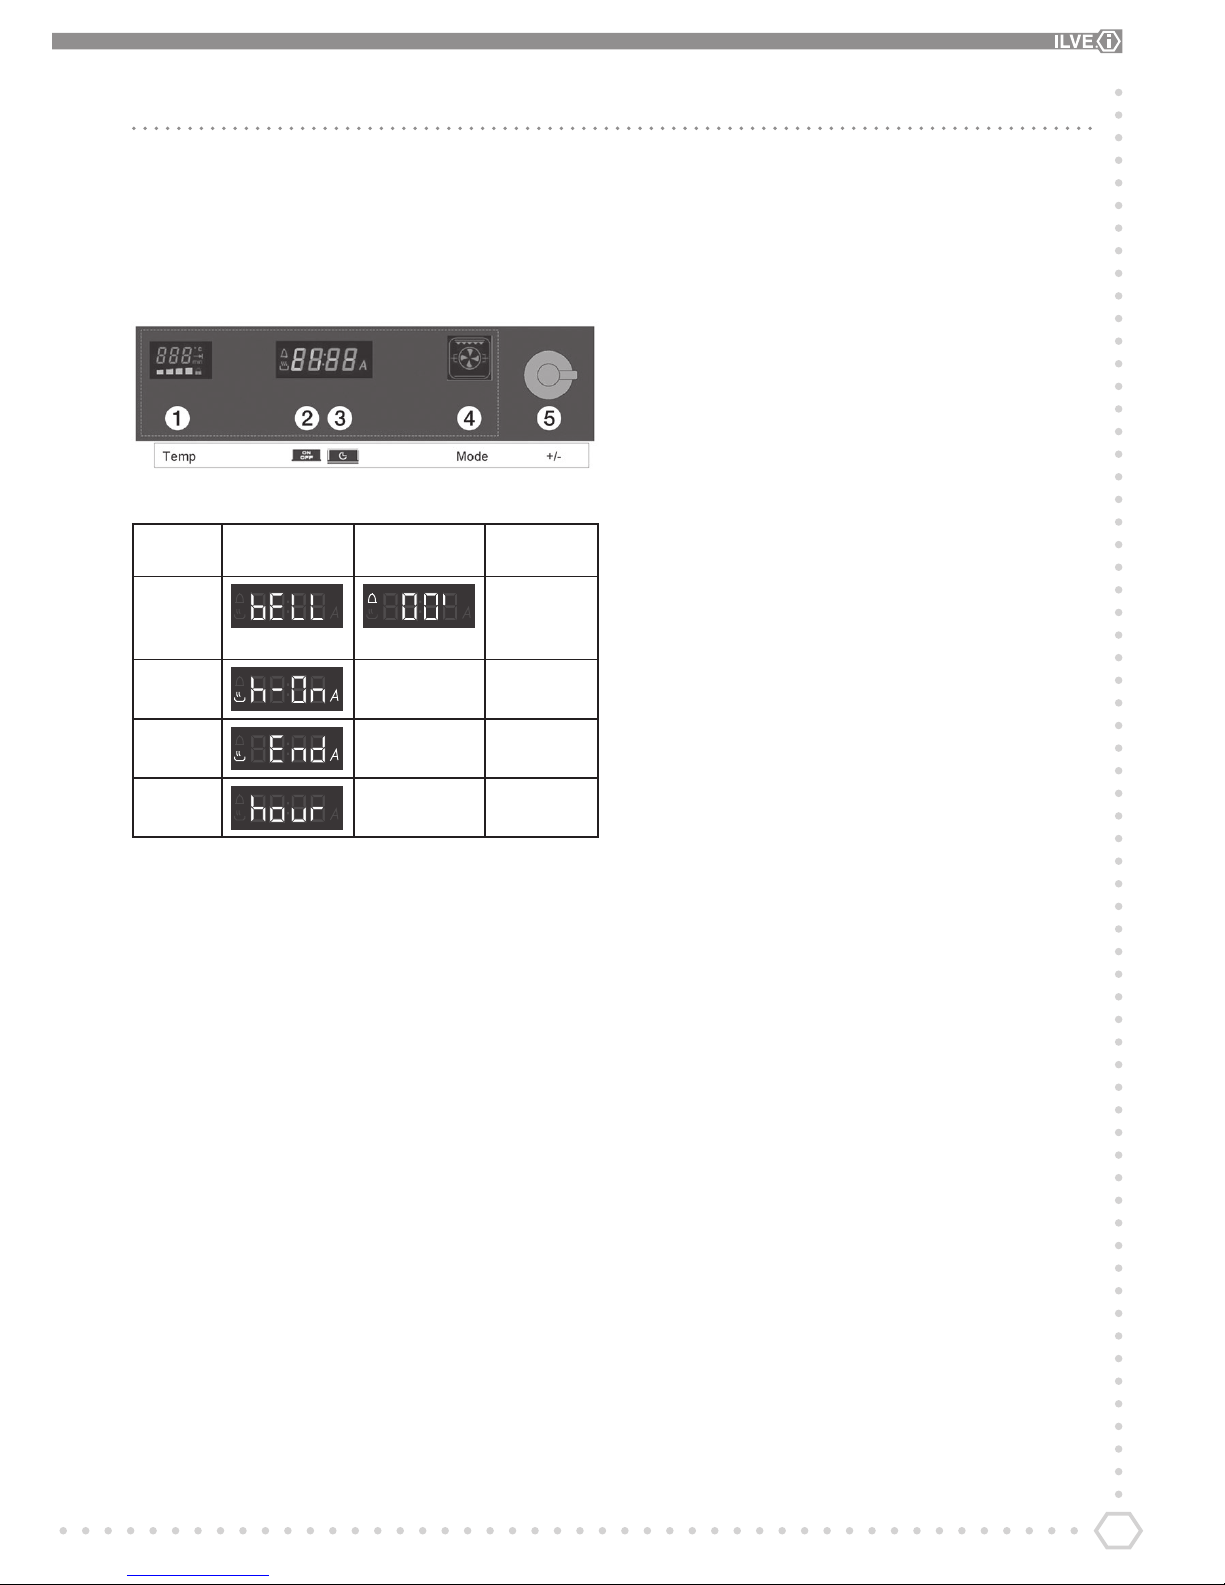
Oven Controls
No Impulses Display after
pressed
Display view after 2
seconds
User action
1 Alarm timer
settings (minute
minder)
2 Current time Start cooking
time settings
3 Start time for
cooking
End cooking
time settings
Hold down
> 4 sec.
Current time Current time
settings (clock)
Display and Functions
1. Temperature display
2. Child lock activation and deactivation
3. Timer
4. Oven Function Selector
5. Temperature selector knob. Turn clockwise to increase
and anti-clockwise to decrease.
Clock Settings
To set the exact time hold down button 3 for at least 4 seconds
and then use knob 5 to adjust the time. The time can be set
also when the oven is in stand-by mode.
Turning the oven on and o
Press button 2, the word “ON” will appear on the clock
display
After two seconds the light inside the oven will turn on and
the functions display will light up
If after one minute no cooking function is selected, the oven
light shuts o; the oven returns to the o position and the
word “OFF” will appear on the display
Press button 2 to shut o the oven while cooking
How to set the cooking temperature
Press button 1 to enable the “cooking temperature” settings
and use knob 5 to select the temperature desired.
The oven will activate 4 seconds after the last setting has been
made. After setting the cooking temperature, press button 1 to
accept the recently modied value.
Child Lock
7 seconds after the general shut o of the oven (obtained using
button 2), the oven will automatically go into Child Lock mode.
This situation will be signalled by the word “n--O” temporarily
appearing on the clock display, and by a ‘lock’ icon permanently
turning on the temperature display.
In order to use the oven the child lock must be disabled by
holding down key 2 for 4 seconds. “n--O” will appear on the
clock display, and the “lock” icon will disappear from the
temperature display.
Once disabled, the child lock will remain blocked until the next
time it is activated, either manually or automatically.
Page 16
16
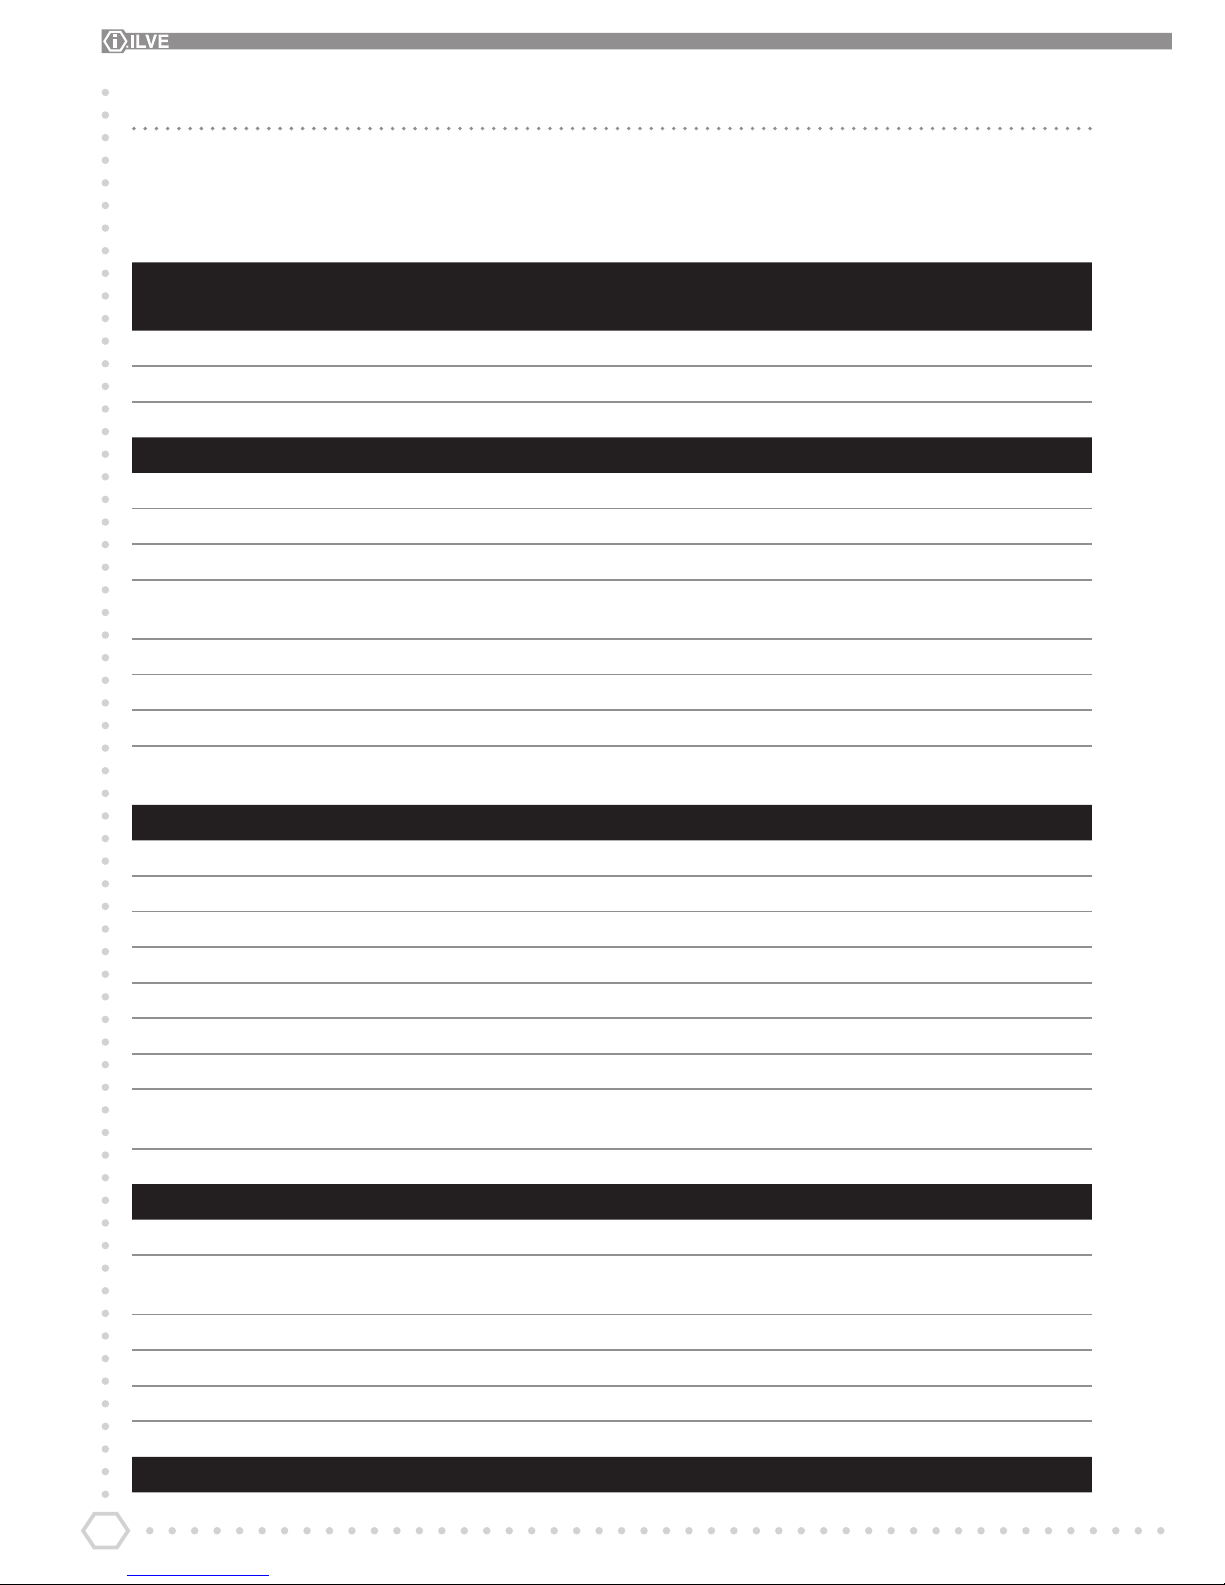
Oven Temperature Guide
These tables are a guide only and food should be checked, that
it is cooked correctly before serving. No two ovens are exactly
the same and people’s tastes dier from person to person.
*Good for E3 Eco setting
**Good for E3 Eco small Oven
Food Conventional
Cooking ºC
Fan cooking ºC Cooking time
Whole sh 180 ** 160 Baking oven* 35–45 mins
Fillets and steaks 180** 160 Baking oven* 15–20 mins
Whole salmon 180** 160 Baking oven* 15 mins per 500g+ 15mins
MEAT
Beef joint - rare 180 160 Roasting Oven 20 mins per 500g + 20 mins
Beef joint — medium 180 160 Roasting Oven 25 mins per 500g + 25 mins
Beef joint — well done 180 160 Roasting Oven 30 mins per 500g + 30 mins
Pork joint with crackling (Loin, leg etc) 220 for 15 min
then 180
200 Roasting Oven 30 mins per 500g + 30 mins
Pork tenderloin, stued 180 160 Roasting oven 30 mins per 500g + 30 mins
Lamb — medium 180 160 Roasting Oven 25 mins per 500g + 25 mins
Lamb — well done 180 160 Roasting Oven 30 mins per 500g + 30 mins
Casseroles 90 to140** 2–6 hours depends
on temperature
POULTRY
Chicken 180 160 Roasting oven 20 mins per 500g + 20 mins
Turkey 2.7–4.5kg 180 160 Roasting Oven 20 mins per 500g + 20 mins
Turkey 4.5–8kg 180 160 Roasting Oven 20 mins per 500g + 20 mins
Duck 180 160 Roasting Oven 15 mins per 500g + 15 mins
Goose 200 180 Roasting Oven 15 mins per mins
GAME
Pheasant 200 180 Roasting oven 40–60 mins
Grouse 200 180 Roasting Oven 35 mins per 500g
including stung
Partridge 200 180 Roasting Oven 40 mins
DESSERTS
Crème Caramel 170 150 Baking Oven 40–50 mins
Rice pudding 140 to150** 120 to 130
Baking oven
2 hours
Soué 180** 160 baking oven* 35 mins
Fruit crumble 180 160 Baking oven 45 mins
Pavlova 150** 130 Baking oven* 1hour
Meringue baskets 100 drop to 30** 90 * drop to 30* 2–4 hours
CAKES AND BISCUITS
Page 17
17
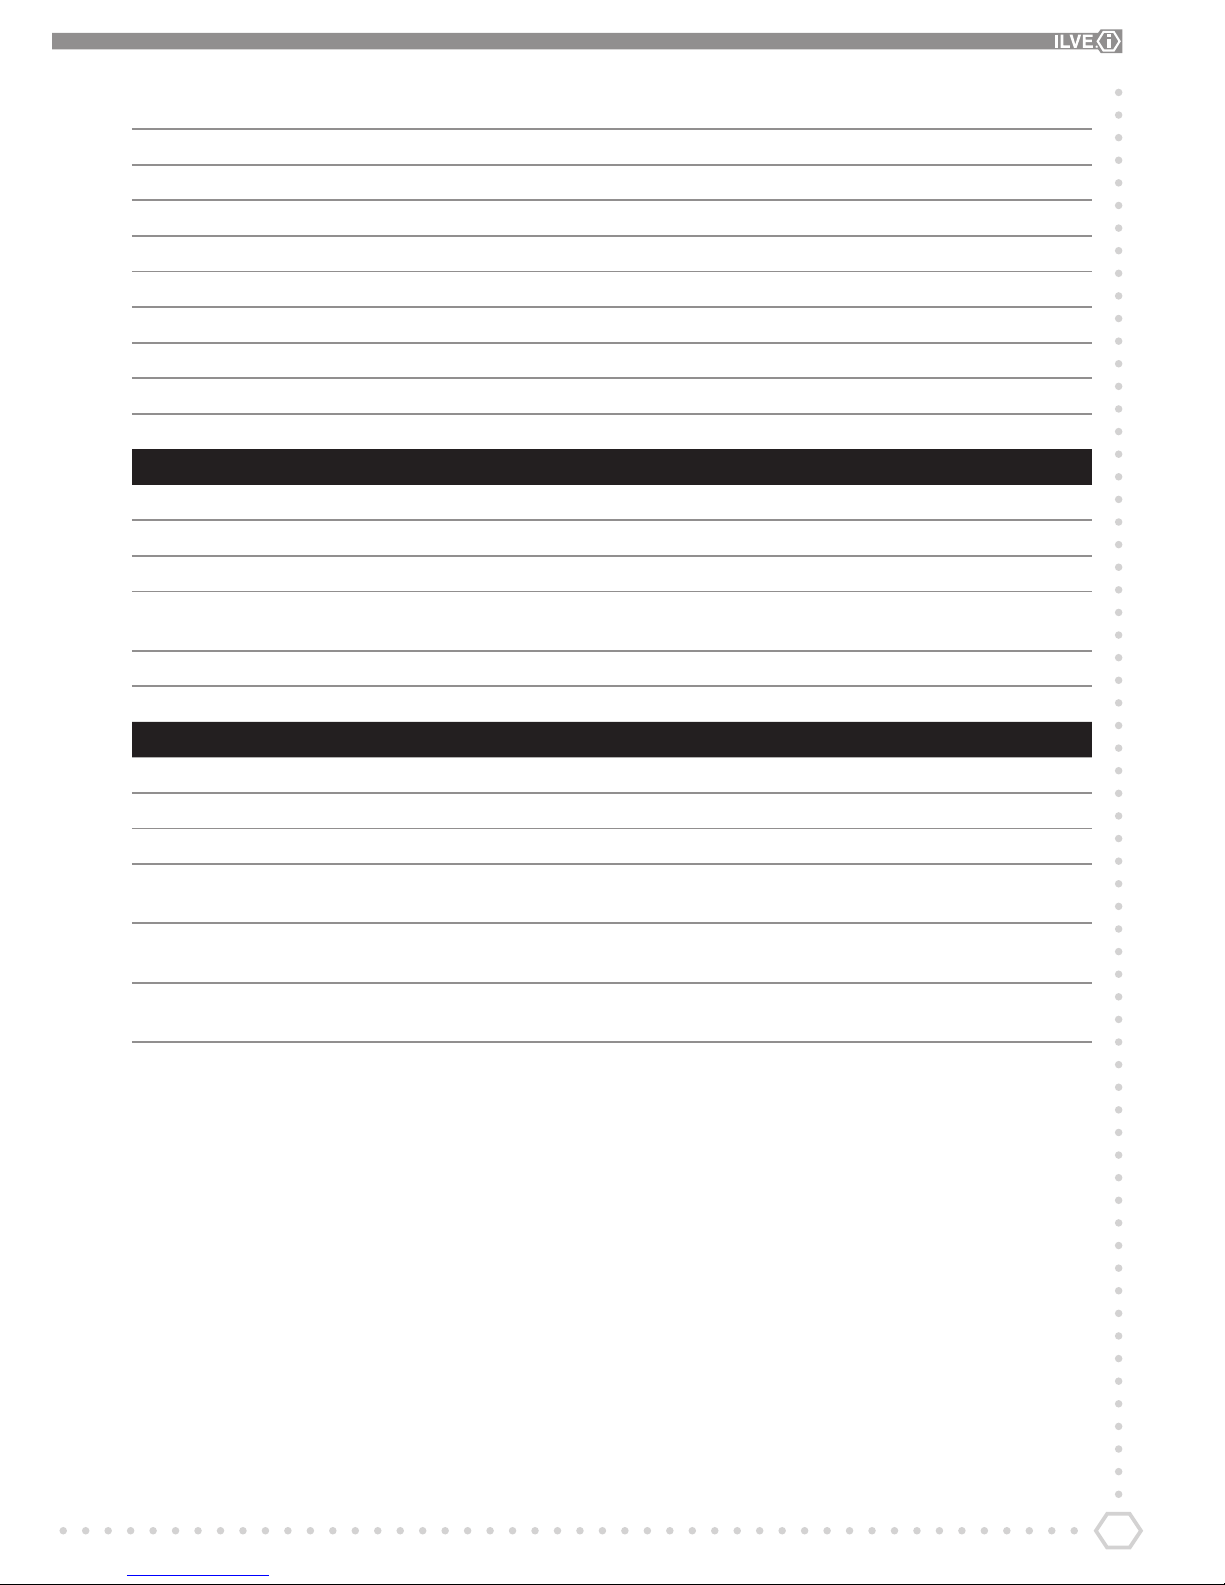
Small cakes 170 160 Baking 15 mins
Victoria sandwich 180 170 Baking 25 mins
Swiss roll V 200 190 Baking 10–12 mins
Scones 230 210 Baking 8–10 mins
Dundee cake 170 160 Baking 2.5 hrs.
Rich fruit cake 20cm 150 130* Baking 3.5–4 hrs
Madeira cake l8cm 180 160 Baking 1hrs
Gingerbread 170 160 Baking 1.5 hrs
Shortbread biscuits 190 180 Baking 15–20 mins
American muns 190 170 Baking 15–20 mins
PASTRY
Short Crust 190 170 Baking Fruit pie 35–40 mins
Rich short crust an 190 210 Baking Bake blind 20–25 mins
Pu or Rough pastry 220 180 Baking Sausage rolls 15–30 mins
Filo 190 170 Baking Tarts individual 10 - 25 mins
Large 40–45 mins
Hot water crust 200 170 Baking Game pie up to 2 hrs
Choux 200 170 Baking
MISCELLANEOUS
Oven Chips 220 210 Roasting 20 mins cool then 5 mins
Roast Potatoes 220 200 Roasting 30–40 mins
Yorkshire Pudding 220–250 220 Baking 20–30 mins
Bread soft crust 200 175 Pizza/
Bread setting
For soft crust 20 mins
Bread hard crust 250 220 Pizza Bread
setting
For hard crust 20 mins
Pizza 300 300 Pizza/
Bread setting
3–5 mins
Page 18

18
Frequently Asked Questions
The oven will not operate
Is there power to the cooker?
Is the automatic programmer set to manual?
Conrm that power is on by checking that the clock is
functioning.
The main oven will not operate manually if the timer
programme is set to automatic mode.
The burners will not ignite
Check there is power to the cooker?
Conrm by checking the clock is functioning.
Are the ignition candles or burner holes blocked?
Check that the ignition candle is clean and the brass burner
holes are dry and free of debris.
Are the brass burner rings seated rmly?
They should engage in the keyway grooves of the alloy
burner skirt.
The burner ignites but goes out
when the knob is released
Does the burner have ame failure devices?
After lighting the burner, keep the knob pressed in for 5-10
seconds to activate the ame failure device.
Make sure the sauce pans are not over sized for the burner
The ignition candles are sparking
continuously
Is the hob wet from cleaning or a boil over?
Turn o the electricity supply and thoroughly dry the burner
components and ignition candles.
Food is cooking too quickly
Are you using a fan function?
When using a fan function you should reduce the cooking
temperature by 20°C, when comparing it to conventional
cooking. Please see the cooking charts for temperatures.
Are you using the Quick start function?
Quick start is not suitable as a cooking function; it is only
for pre-heating the oven. Once the oven has reached
temperature you should change over to your required
cooking function.
Food is not cooking evenly
All fan ovens cook more at the rear right, if you are only
cooking on one shelf.
Either
Batch cook on more than one shelf.
OR
Add an extra shelf with a empty tin roughly the same size,
underneath the shelf you are using to cook.
This will allow the air to circulate correctly through the oven.
Also: On fan ovens you can open the door and turn the baking
without the food sinking. This is due to the fast regain heat of
the oven.
The grill in the oven is slow
Have you selected the correct function?
Check that you have selected the grill function and not the
top element. Remember the grill only grills when the orange
lamp on the facia is illuminated.
The fan continues after the oven is
turned o
The cooling fan will run on intermittently for approximately
30 minutes after the oven is switched o to keep the controls
cool, this is totally normal.
Page 19

19
Condensation forms in the oven
Have you pre-heated the oven?
Condensation is less likely to form when the oven or grill is
pre-heated before use.
Has the food been frozen?
Thawed food always contains more water than fresh food.
The cooker is A rated, this means the oven has to be air
tight. Excess water will nd its way out via the lowest point
sometimes through the door seal, especially when cooking
for a long time especially on temperatures below 180ºC.
Smoke is generated in the oven
Have you selected the right cooking temperature?
Are you cooking high fat content foods? Do you
rarely use the grill?
There may be residue left from a previous cooking session.
Do the oven interior and/or stay clean liners need to be
cleaned?
Remember to reduce the oven temperature by 20°C if using
a fan function with a recipe designed for conventional
cooking.
Use high sided dishes to contain fats and splashes. Clean
the oven interior if necessary.
Remember to remove and clean the grill pan after use.
Leave the grill on for a few minutes after grilling or roasting
to burn o fatty deposits from the oven roof.
If you have been cooking food at low temperatures, the stay
clean liners may TAR. Turn the oven up to 200ºC for one
hour to clear this.
Oven surfaces should be cleaned regularly to prevent build-
up of cooking residues.
The door seal has split or perished
Are you leaving the grill pan or foil at the bottom of the oven?
This may cause the seal to overheat and become brittle.
Have you used caustic oven cleaners on or near the door
seal?
Always remove the grill pan when not in use as it can restrict
airow around the oven.
Contact our spares department for advice and a
replacement seal if necessary. The seal can be changed
easily without booking an engineer visit, by stretching and
engaging the clips in the corners
Cleaning Tips
Always disconnect the electricity supply to the appliance before
any cleaning takes place. Never allow fat or oil to build up on
any surface, particularly on oven bases and oven trays, as this
can lead to permanent staining or the risk of a fat re.
Clean the outside of your cooker with a dish cloth and washing
up water. Dry and bu with a micro bre cloth or an old hand
towel to remove nger prints
Cleaning your gas hob
Do not use any abrasive cleaners on the stainless steel
hotplate.
Wipe with a soft cloth using warm water and washing-up liquid.
Whilst still damp polish dry with a micro bre cloth or old hand
towel.
For stubborn baked-on stains use a non-abrasive stainless steel
cleaner.
Always work in the same direction as the grain of the stainless
steel, rinse well and polish dry.
Pan supports and burner caps are made from cast iron with a
protective coating of acid resistant enamel.
Always allow pan supports and burner caps to cool completely
before immersing in water.
Wipe with a soft cloth using warm water and washing-up liquid.
When placing the pan supports on the hotplate, always ensure
the support with the shortest arms is tted onto the triple ring
wok burner.
Brass burner rings
Use washing up water and a nylon scourer. Rinse well and dry.
After cleaning, ensure that the burner holes are dry and not
blocked with water or soap.
Alloy burner bases
Clean with soaped wire wool. When the entire fat residue has
been removed, polish with brass or metal polish. The more you
polish them the longer they will stay clean.
Page 20

20
When re-assembling the burners, always ensure that the
notches on the brass burner ring are seated rmly into the base
for the gas to ignite and the ame to be stable.
Cleaning your fry top
As the fry top is heavy we recommend that you clean it on the
hob without moving it.
After cooking, allow the fry top to cool until just warm. Use the
spatula provided to remove any cooking residue.
Wipe away any fat in the drip tray with kitchen towel. Clean the
whole surface with warm water and washing-up liquid, using
a stainless steel scourer. Always work with the grain of the
stainless steel.
Some foods with a high salt content (such as bacon) may leave
white marks. For these and other stubborn marks use a cream
cleaner suitable for stainless steel surfaces.
Clean the exhaust ue with a soft cloth, warm water and
washing-up liquid.
Cleaning the Coup de Feu
The hotplate should be cleaned while still warm using the
products normally used in the kitchen for metal surfaces. Rub
with a wire pad, following the direction of the satin nish. Dry
well immediately.
If you do not intend to use the hotplate for long periods, after
normal cleaning apply a thin lm of liquid paran (Vaseline
oil) with a wad of cotton wool. This treatment is necessary to
prevent any formation of surface oxides. When next turning
on the plate you will notice the evaporation of the paran oil
used. This phenomenon will disappear in a few seconds. The
hotplate may sometimes present surface oxidation due to the
presence of humidity, but above all due to lack of use. You are
therefore advised to use it frequently to prevent any oxidation.
Never leave the hotplate damp. If the oxidation phenomenon
still appears, use lightly abrasive paper to remove it, taking care
to rub gently, always in the direction of the plate satin nish.
Do not cook food directly on the plate surface. Always use
suitable containers / cooking equipment.
Fascia, controls
Do not use strong or abrasive cleaning agents or materials on
the controls, fascia panel or coloured cooker surfaces. This can
cause damage to the calibrations and icons and permanently
scratch the surfaces.
Use only well wrung dish cloth and dry with paper towel, micro
bre cloth or hand towel.
Oven interior
The oven base can be cleaned using washing up water or good
quality enamel cleaner. The stay-clean liners can be cleaned by
turning up to 200ºC for one hour or more if necessary.
Glass Doors
Clean with washing up water then use a good quality ceramic
hob cleaner to gain a high gloss nish, this will help keep the
glass stay clean.
Page 21

21
Page 22

22
Page 23

23
Page 24

For support and service
please contact KitchenEX
0345 548 3132
www.kitchenex.co.uk
www.ilveappliances.co.uk
 Loading...