

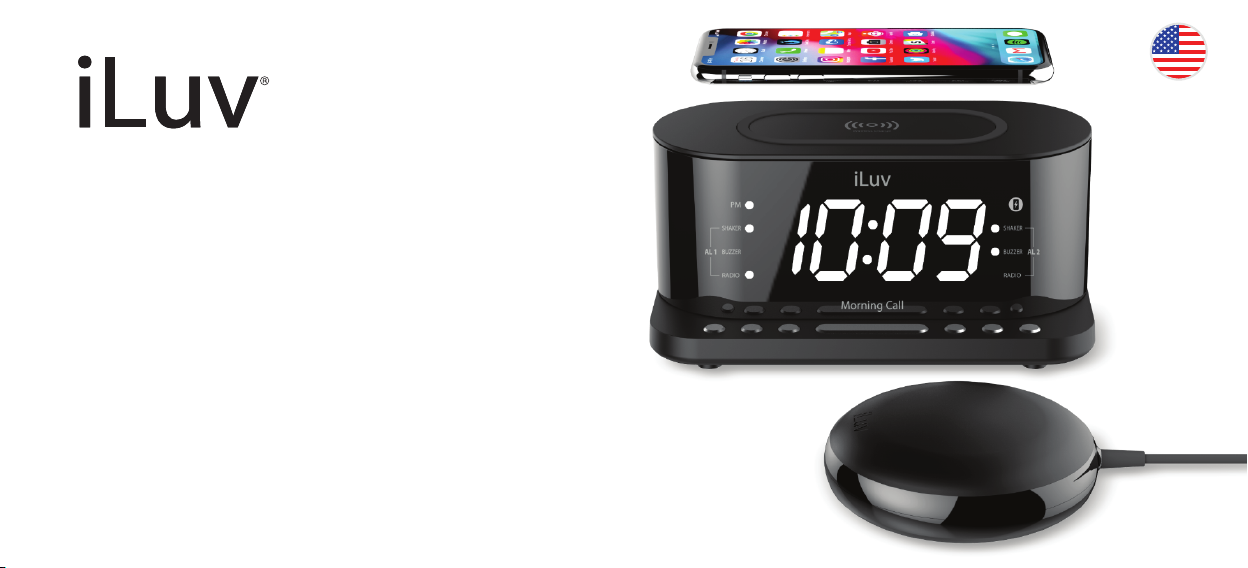
Jumbo White LED Display
Dual Alarm Clock with Qi
Certied Wireless Charging
Station, FM Radio, USB
Charging Port and Bed Shaker
TimeShaker 5Q Wow
English
User Manual
(Ver 1.0)

WARNING AND SAFETY INSTRUCTIONS
1. All the safety and operating instructions should be read before the product is operated
2. The safety and operating instructions should be retained for future reference.
3. All warnings on the product and in the operating instructions should be adhered to.
4. All operating and use instructions should be followed.
5. Use of controls or adjustments or performance other than those specied may result in
hazardous radiation exposure.
6. Do not use this product near water or expose to rain to prevent re or shock hazard, i.e.
bathtub, washbowl, kitchen sink, laundry tub, wet basement, or swimming pool, etc.
7. Cleaning – Unplug this product from the wall outlet before cleaning. Do not use liquid
cleaners or aerosol cleaners. Clean only with a dry cloth.
8. Unplug TimeShaker 5Q Wow during lightning storms or when unused for long periods
of time.
9. When main plug is connected, TimeShaker 5Q Wow is operational. In order to
disconnect TimeShaker 5Q Wow completely, the main plug should be disconnected from
the main socket outlet.
10. Battery should not be exposed to excessive heat, such as sunshine or re.
11. If battery is incorrectly replaced, it may cause explosion. Replace only with the same or
equivalent type.
The lightning ash with
arrowhead symbol,
within an equilateral
triangle, is intended to
alert the user to the
presence of
un-insulated
“dangerous voltage”
within the product’s
enclosure that may be
of sucient magnitude
to constitute a risk of
electric shock to
persons.
CAUTION
RISK OF ELECTRIC SHOCK
DO NOT OPEN
CAUTION TO REDUCE
THE RISK OF ELECTRIC
SHOCK, DO NOT REMOVE
COVER OR BACK. NO
USERSERVICEABLE
PARTS INSIDE. REFER
SERVICING TO QUALIFIED
SERVICE PERSONEL.
!
The exclamation point
within an equilateral
triangle is intended to
alert the user to the
presence of important
operating and
maintenance
(servicing) instructions
in the literature
accompanying the
appliance.
2
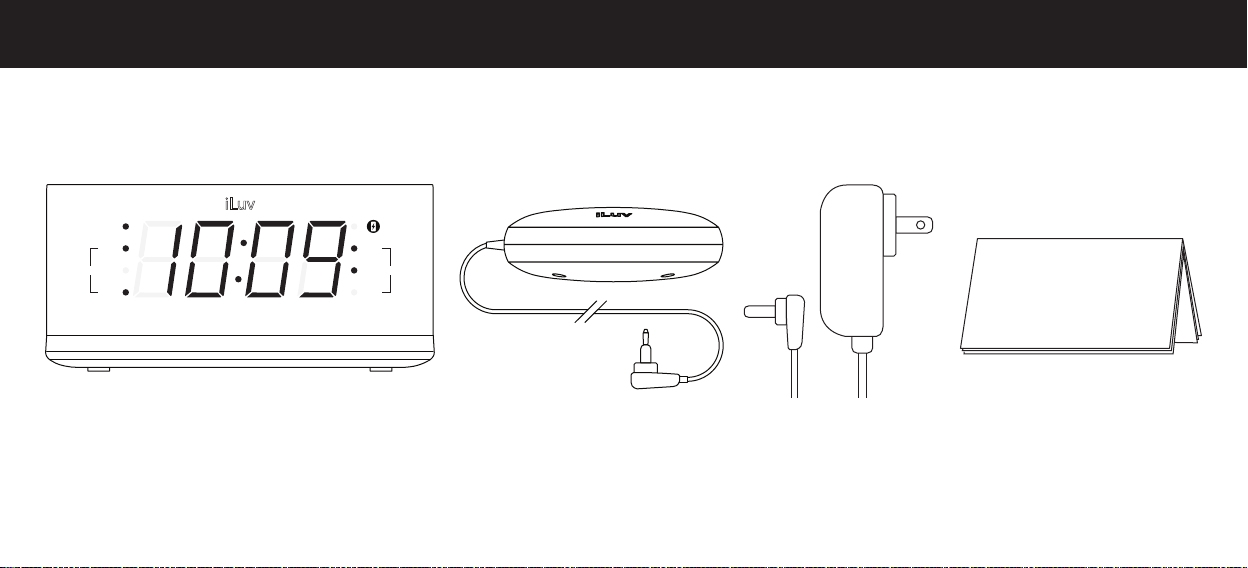
WHAT’S INCLUDED
PM
SHAKER
BUZZER
AL 1
RADIO
Morning Call
SHAKER
BUZZER
RADIO
AL 2
User Manual
TimeShaker 5Q Wow Power AdaptorShaker User Manual
iLuv
3
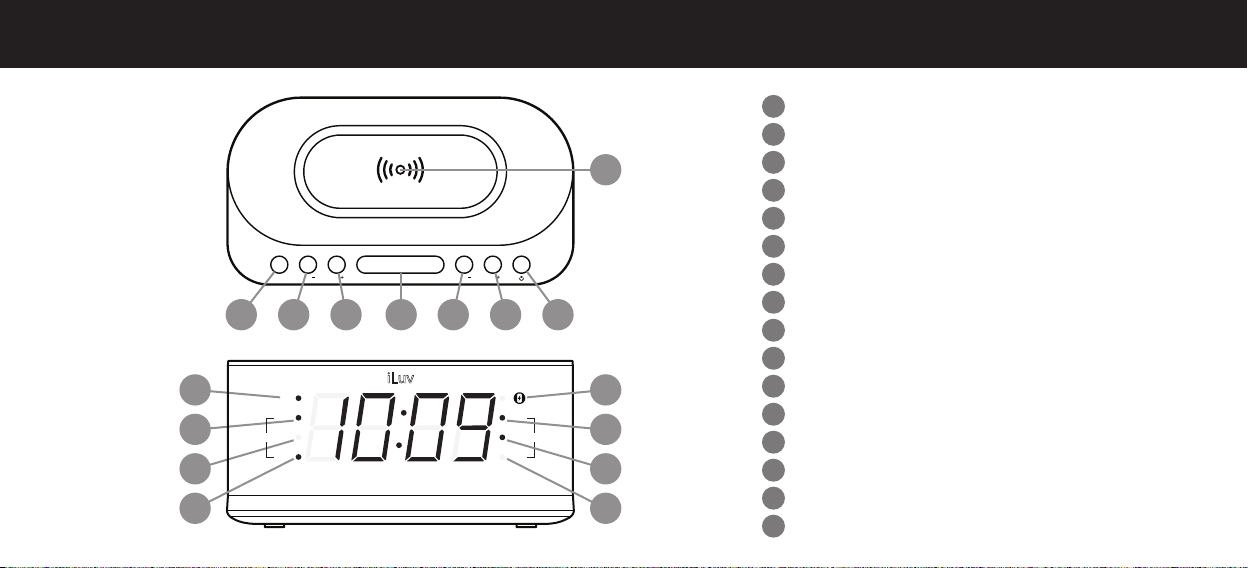
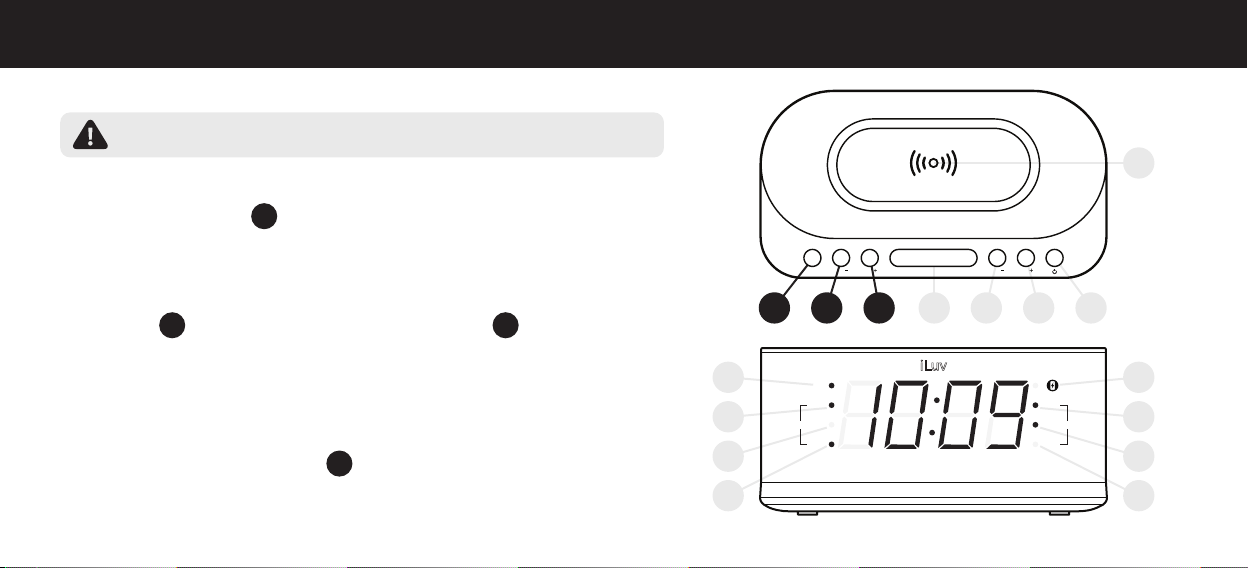
OVERVIEW OF THE PRODUCT
Top
Wireless Charge
3 4 5 6 71 2
SLEEP/DIMMER
SNOOZE
iLuv
Morning Call
RADIO/AL OFF
AL 2AL 1
SHAKER
BUZZER
AL 2
RADIO
Front
9
10
11
12
TIME HOUR MIN
PRESET
TUN TUN VOLVOL
PM
SHAKER
BUZZER
AL 1
RADIO
8
13
14
15
16
1
TIME/PRESET
2
HOUR/TUN-
3
MIN/TUN+
4
SNOOZE/SLEEP/DIMMER
5
ALARM 1/VOLUME-
6
ALARM 2/VOLUME+
7
POWER/RADIO/ALARM OFF
8
WIRELESS CHARGING PAD
9
PM INDICATOR
10
ALARM 1 INDICATOR (SHAKER)
11
ALARM 1 INDICATOR (BUZZER)
12
ALARM 1 INDICATOR (RADIO)
13
WIRELESS CHARGE INDICATOR
14
ALARM 2 INDICATOR (SHAKER)
15
ALARM 2 INDICATOR (BUZZER)
16
ALARM 2 INDICATOR (RADIO)
4
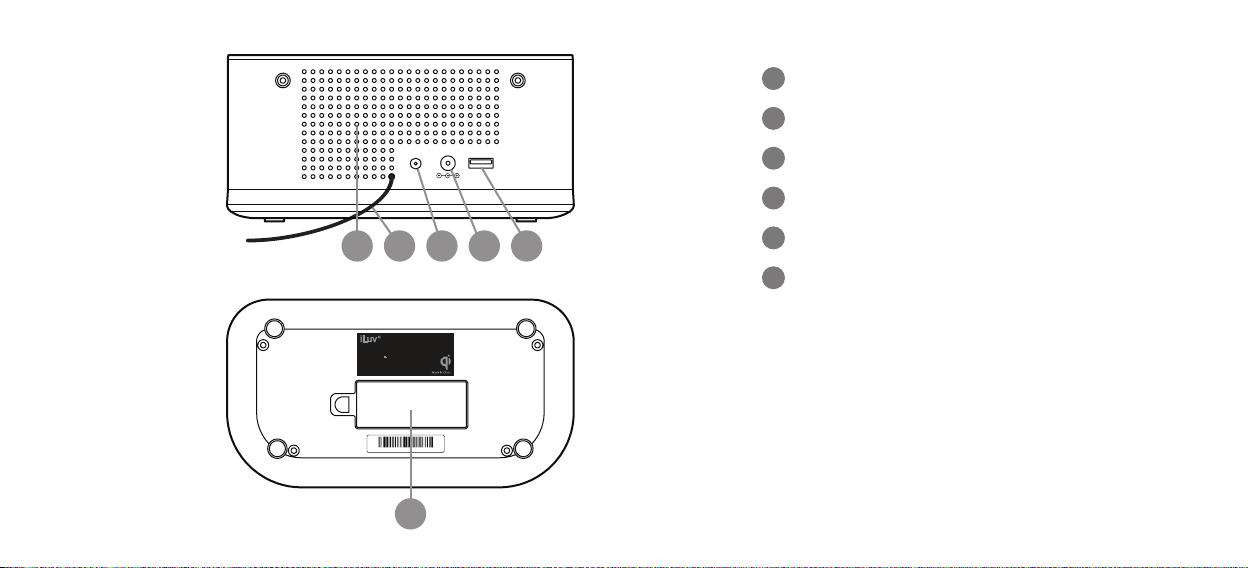
Back
Bottom
TimeShaker 5Q Wow
Jumbo Display Alarm Clock Speaker with
Wireless Charging Station, FM Radio, and Bed Shaker
Model : TimeShaker 5Q Wow
Power : DC 5V 3A
Backup Battery : 2 x AAA
FCC ID : KHKQI1110
iLuv Creative Technology
Designed in New York
eS ri al No.: 1FE00 00 1
17
SPEAKER
18
FM RADIO ANTENNA
USB CHARGINGDC 5V/3ASHAKER
2019 2117 18
19
SHAKER PORT
20
DC POWER INPUT PORT
21
USB CHARGING PORT
22
BATTERY COMPARTMENT
22
5
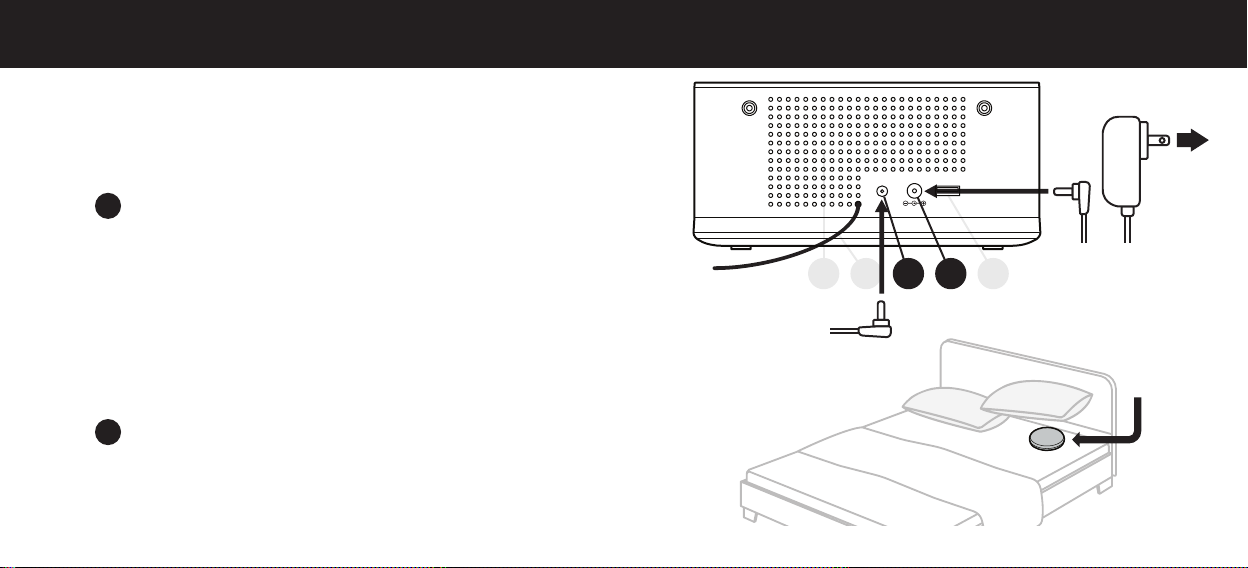
POWERING ON
CONNECTING TO POWER
6
Connect the included AC adapter to the
20
DC PORT located on the back of the
unit and connect the other end to a
working wall outlet.
CONNECTING TO SHAKER
Connect the included shaker to the
1
19
SHAKER PORT located on the back
of the unit.
Store the shaker under the pillow.
2
USB CHARGINGDC 5V/3ASHAKER
2019 2117 18
TIME SETUP
The default time is set at 12:00AM
Wireless Charge
8
1
Press &
HOLD
1
[TIME] to enter the TIME SET-UP
mode.
2
Press
2 3
[HOUR]
to set the hour and
the minute.
(Press &
3
When nished, press
from
HOLD
for faster adjustment)
TIME SET-UP
1
mode.
[TIME]
[MIN]
to set
to conrm and exit
9
10
11
12
TIME HOUR MIN
PRESET
TUN TUN VOLVOL
3 4 5 6 71 2
PM
SHAKER
BUZZER
AL 1
RADIO
SLEEP/DIMMER
SNOOZE
iLuv
Morning Call
RADIO/AL OFF
AL 2AL 1
13
SHAKER
BUZZER
RADIO
AL 2
14
15
16
7

ALARM SETUP
SETTING UP YOUR ALARM:
Alarm Time > Alarm Sound Source > Alarm Sound Volume
(Volume adjust option is only available when setting
the alarm sound source to "RADIO")
Wireless Charge
8
8
1
Entering ALARM SET-UP Mode:
Press & HOLD [AL 1] to enter the
5
ALARM SET-UP
mode. When the display is blinking, you have
successfully entered the
Setting Your Alarm:
2
2
Press
[HOUR]
to set the hour and
the minute. (Press &
5
Press
[AL 1]
to conrm and proceed to your
ALARM SET-UP
HOLD
for faster adjustment)
3
Sound Source setting.
mode.
[MIN]
to set
Alarm
3 4 5 6 71 2
SLEEP/DIMMER
SNOOZE
iLuv
Morning Call
RADIO/AL OFF
AL 2AL 1
13
SHAKER
BUZZER
RADIO
AL 2
14
15
16
TIME HOUR MIN
PRESET
TUN TUN VOLVOL
9
10
11
12
PM
SHAKER
BUZZER
AL 1
RADIO

Selecting Alarm Sound Source :
3
Press
11
BUZZER
11 10 12 10
2
[HOUR]
12 10
or
BUZZER+SHAKER
3
or
RADIO
[MIN]
to select either the
or
or
SHAKER
or
RADIO+SHAKER
your desired alarm source.
5
[AL1]
Press
Setting Wake-up Radio Volume:
3
-1
Press
sound volume from V5 to
to conrm.
2
[HOUR]
3
or
[MIN]
V15
to set wake up
.
(Default Volume Level: V8)
Press
5
[AL 1]
to conrm.
(If you select Radio, the last station selected will be played.)
Once the alarm setting is complete, the alarm will be
4
ready with the corresponding alarm indicator on.
(To set-up Alarm 2, follow the instructions 1-4.
Press [AL 2] to set up Alarm 2
6
)
as
9
10
11
12
TIME HOUR MIN
PRESET
TUN TUN VOLVOL
3 4 5 6 71 2
PM
SHAKER
BUZZER
AL 1
RADIO
Wireless Charge
SLEEP/DIMMER
SNOOZE
iLuv
Morning Call
8
RADIO/AL OFF
AL 2AL 1
13
SHAKER
BUZZER
RADIO
AL 2
14
15
16
9

ENABLE/DISABLE ALARM
10
Please remember to Activate/De-activate the
alarm accordingly. If you turn o the alarm,
you must enable it again for the alarm system
to be activated.
To activate/de-activate your alarms, press the
corresponding [AL 1] and/or [AL 2].
When the / Buzzer or / Radio or
10 14
/ Shaker indicator light is showing, the
5
11 15
6
12 16
alarm is set to ON and will activate at the
scheduled time. If the indicator light is not
showing, the alarm is set to OFF.
9
10
11
12
TIME HOUR MIN
PRESET
TUN TUN VOLVOL
3 4 5 6 71 2
PM
SHAKER
BUZZER
AL 1
RADIO
Wireless Charge
SLEEP/DIMMER
SNOOZE
iLuv
Morning Call
8
RADIO/AL OFF
AL 2AL 1
13
SHAKER
BUZZER
RADIO
AL 2
14
15
16

ALARM SNOOZE/SHUTOFF
1
When the alarm is activated, the corresponding
10 11 12
/ / Alarm 1 or / / Alarm 2
blink on the display.
14 15 16
indicator will
Wireless Charge
8
2
Press [SNOOZE] to temporarily de-activate the
4
alarm. The snooze function will extend your alarm in
increments of 9 minutes.
The corresponding / / Alarm 1 or
14 15 16
/ / Alarm 2 indicator will blink on the display
10 11 12
during the snooze period.
3
To stop the alarm completely, press [ ]. This will
7
de-activate the alarm until the next scheduled alarm.
9
10
11
12
TIME HOUR MIN
PRESET
TUN TUN VOLVOL
3 4 5 6 71 2
PM
SHAKER
BUZZER
AL 1
RADIO
SLEEP/DIMMER
SNOOZE
iLuv
Morning Call
RADIO/AL OFF
AL 2AL 1
13
SHAKER
BUZZER
RADIO
AL 2
14
15
16
11

SLEEP TIMER FUNCTION
12
The Sleep Timer Function allows you to set-up
a timer for the radio to turn-o automatically.
1
To activate the
press [ /RADIO/AL OFF] to turn on the radio.
Press [SLEEP/DIMMER/SNOOZE] as needed to
2
7
4
SLEEP TIMER FUNCTION
,
cycle to the desired timer limit (in minutes):
10, 20, 30, 40, 50, 60, 70, 80, 90 and 00(o).
After your selection, wait 3 seconds to allow the
3
sleep timer function to be set.
9
10
11
12
TIME HOUR MIN
PRESET
TUN TUN VOLVOL
3 4 5 6 71 2
PM
SHAKER
BUZZER
AL 1
RADIO
Wireless Charge
SLEEP/DIMMER
SNOOZE
iLuv
Morning Call
8
RADIO/AL OFF
AL 2AL 1
13
SHAKER
BUZZER
RADIO
AL 2
14
15
16

4
When Set-up is complete, the radio will shut o
automatically depending on your selected timer
setting.
Wireless Charge
8
5
To check the remaining amount of time left,
simply
6
To turn o the SLEEP TIMER FUNCTION,
press
press
4
[SLEEP/DIMMER/SNOOZE] until 00 is
4
[SLEEP/DIMMER/SNOOZE]
displayed. The timer will then be set to "OFF"
3 4 5 6 71 2
SLEEP/DIMMER
SNOOZE
iLuv
Morning Call
RADIO/AL OFF
AL 2AL 1
13
SHAKER
BUZZER
RADIO
AL 2
14
15
16
TIME HOUR MIN
PRESET
TUN TUN VOLVOL
.
9
10
11
12
PM
SHAKER
BUZZER
AL 1
RADIO
13

FM RADIO
14
LISTENING TO YOUR FM RADIO
1
Unravel and extend the antenna to improve the FM
radio signal reception.
2
Press [ /RADIO /AL OFF] to turn the radio on.
3
To adjust the radio frequency, press [TUN-] and
3
[TUN+] respectively.
4
Press & HOLD [TUN-] or [TUN+] to automatically
tune to the next available FM station.
5
To turn the FM radio o, press [ /RADIO /AL OFF].
7
2
2 3
7
9
10
11
12
TIME HOUR MIN
PRESET
TUN TUN VOLVOL
3 4 5 6 71 2
PM
SHAKER
BUZZER
AL 1
RADIO
Wireless Charge
SLEEP/DIMMER
SNOOZE
iLuv
Morning Call
8
RADIO/AL OFF
AL 2AL 1
13
SHAKER
BUZZER
RADIO
AL 2
14
15
16

STORING PRESET RADIO STATIONS
1
Press [ /RADIO /AL OFF] to turn on the radio.
2
Tune to your desired FM Station by pressing or
holding [TUN-] or [TUN+].
3
Press & HOLD [PRESET] until the Preset Mode
7
2
3
1
appears.
4
Toggle through the preset numbers (P01-P10) by
pressing [TUN-] or [TUN+].
5
To program the station to its preset, press
1
[PRESET] to complete the process.
2 3
9
10
11
12
TIME HOUR MIN
PRESET
TUN TUN VOLVOL
3 4 5 6 71 2
PM
SHAKER
BUZZER
AL 1
RADIO
Wireless Charge
SLEEP/DIMMER
SNOOZE
iLuv
Morning Call
8
RADIO/AL OFF
AL 2AL 1
13
SHAKER
BUZZER
RADIO
AL 2
14
15
16
15

LISTENING TO YOUR PRESET STATIONS
16
Preset option is only available when the Radio
is on.
1
Press [ /RADIO /AL OFF] to turn on the radio.
2
Press [PRESET]
7
1
repeatedly until your desired
preset station appears.
(P01 > P02 > P03 > .... > P10)
9
10
11
12
TIME HOUR MIN
PRESET
TUN TUN VOLVOL
3 4 5 6 71 2
PM
SHAKER
BUZZER
AL 1
RADIO
Wireless Charge
SLEEP/DIMMER
SNOOZE
iLuv
Morning Call
8
RADIO/AL OFF
AL 2AL 1
13
SHAKER
BUZZER
RADIO
AL 2
14
15
16

DISPLAY DIMMER
To adjust the brightness, Alarm clock must be
on Stand-by Mode.
1
Press [SLEEP/DIMMER/SNOOZE] to change the
4
brightness level of the display: (Low > High > O)
2
Default setting of the dimmer level is “Low”
9
10
11
12
TIME HOUR MIN
PRESET
TUN TUN VOLVOL
3 4 5 6 71 2
PM
SHAKER
BUZZER
AL 1
RADIO
Wireless Charge
SLEEP/DIMMER
SNOOZE
iLuv
Morning Call
8
RADIO/AL OFF
AL 2AL 1
13
SHAKER
BUZZER
RADIO
AL 2
14
15
16
17

USB CHARGING PORT
To charge other devices such as a smartphone
1
or tablet, connect one end of the USB charging
cable (not included) to the USB charging
port on the back of the main unit.
18
18
The TimeShaker 5Q Wow cannot access the
2
content of the connected device.
3
The USB Charging port is compatible to most
smartphones, tablets, portable speakers,
wireless headphones, wearables, etc.
USB CHARGINGDC 5V/3ASHAKER
2019 2117 18

USING QI WIRELESS CHARGING
IT IS SUGGESTED TO CHARGE YOUR PHONE WITH A WIRED CABLE INSTEAD OF A WIRELESS CHARGER DURING
PHONE SOFTWARE UPDATE. OTHERWISE, CHARGE YOUR PHONE FULLY BEFORE THE PHONE SOFTWARE UPDATE.
Place your Qi enabled smartphone on the center of
8
the
Wireless charging pad
For best connectivity, align your phone with the
alarm clock.
Compatible Products for Wireless Charging:
iPhone X/Xs, iPhone Xs Max, iPhone XR, iPhone 8/8 Plus,
Samsung Galaxy Note 8/5, Galaxy S9/S9+/S8/S8+, S7/S7
Edge, S6 Edge+, S6/S6 Edge, LG V30, Nexus 7/6/5, other
Qi enabled smartphones/tablets and accessories.
PMA wireless charging system is not supported.
.
TIME HOUR MIN
PRESET
Wireless Charge
SLEEP/DIMMER
TUN TUN VOLVOL
SNOOZE
3 4 5 6 71 2
8
RADIO/AL OFF
AL 2AL 1
19

WIRELESS CHARGE INDICATOR
13
Wireless Charging Indicator light is displayed on
the right top corner of the product display.
Refer to the Light status indicators below:
1
O
: Stand-by Mode
2
Solid Blue
3
Blinking Red
*If the charging indicator blinks red:
- Check if your device supports Qi wireless charging
- Place mobile device in center of the Wireless
charging pad
- Remove any protective cases containing magnets,
metal, or materials thicker than 0.12" (3mm)
: Charging
: Abnormal
8
9
10
11
12
TIME HOUR MIN
PRESET
TUN TUN VOLVOL
3 4 5 6 71 2
PM
SHAKER
BUZZER
AL 1
RADIO
Wireless Charge
SLEEP/DIMMER
SNOOZE
iLuv
Morning Call
20
8
RADIO/AL OFF
AL 2AL 1
13
SHAKER
BUZZER
RADIO
AL 2
14
15
16

BATTERY BACKUP OPERATION
BACK-UP BATTERY WILL NOT OPERATE THE CLOCK
1
TimeShaker 5Q Wow is equipped with a timekeeping system that can be powered with two
(2) AAA batteies (not included). The power failure protection circuit will not operate unless
battery is installed.
2
The back-up battery will save all previously programmed settings when normal household
power is interrupted. The back-up battery will not operate the clock's normal functions.
3
Normal operation will resume after the power is restored. You will not need to set-up the
time/alarms/radio if back-up battery is installed correctly.
21

eS rial No .:1FE 0000 1
TimeShaker 5Q Wow
Jumbo Display Alarm Clock Speaker with
Wireless Charging Station, FM Radio, and Bed Shaker
Model : TimeShaker 5Q Wow
Power : DC 5V 3A
Backup Battery : 2 x AAA
FCC ID : KHKQI1110
iLuv Creative Technology
Designed in New York
AAA
AAA
INSTALLING THE BATTERY
22
The back up battery is NOT a secondary source of
power. The function acts as a memory saver for
your settings in case of a disconnection of power.
It is recommended to replace the battery at lease
once a year.
1
Remove the Battery cover.
2
Place two (2) AAA batteries (not included).
3
Place the battery cover back to its original position.
In order to save your settings, do NOT disconnect
the power adaptor when replacing your batteries.
19
TimeShaker 5Q Wow
Jumbo Display Alarm Clock Speaker with
Wireless Charging Station, FM Radio, and Bed Shaker
Model : TimeShaker 5Q Wow
Power : DC 5V 3A
Backup Battery : 2 x AAA
FCC ID : KHKQI1110
iLuv Creative Technology
Designed in New York
eS ri al No.: 1FE00 00 1
22
28

SPECIFICATIONS
Tuner Range
Number of preset radio stations
Amplifier Rated Output Power
AC power adaptor
FM: 87.5 – 108 MHz
10
600mW(RMS)
Input: AC 100-240V, 50/60Hz
Output :DC 5V/2.4A.
COMPLIANCE WITH FCC REGULATION
This device complies with Part 15 of the FCC Rules. Operation is subject to the following two conditions:
(1) this device may not cause harmful interference, and
(2) this device must accept any interference received, including interference that may cause undesired operation.
NOTE: This equipment has been tested and found to comply with the limits for a Class B digital device, pursuant to Part 15 of the FCC Rules. These limits are designed to provide reasonable protection against
harmful interference in a residential installation. This equipment generates, uses and can radiate radio frequency energy and, if not installed and used in accordance with the instructions, may cause harmful
interference to radio communications. However, there is no guarantee that interference will not occur in a particular installation. If this equipment does cause harmful interference to radio or television
reception, which can be determined by turning the equipment off and on, the user is encouraged to try to correct the interference by one or more of the following measures:
- Reorient or relocate the receiving antenna.
- Increase the separation between the equipment and receiver.
- Connect the equipment into an outlet on a circuit different from that to which the receiver is connected.
- Consult the dealer or an experienced radio/TV technician for help.
WARNING Changes or modifications not expressly approved by the party responsible for compliance could void the user's authority to operate the equipment
This equipment complies with FCC radiation exposure limits set forth for an uncontrolled environment. This transmitter must not be co-located or operating in conjunction with any
other antenna or transmitter.This equipment should be installed and operated with minimum distance 20cm between the radiator&your body.
23

CUSTOMER SUPPORT
If you have any question or need support, please contact us by visiting http://support.iLuv.com or call our customer service department at 1-866-807-5946.
 Loading...