

R
L
R
L
L
L
L
L
L
L
Fit Active Jet 5 QSG 115 x 155 mm
English
User
Manual
FITACTJET5BK
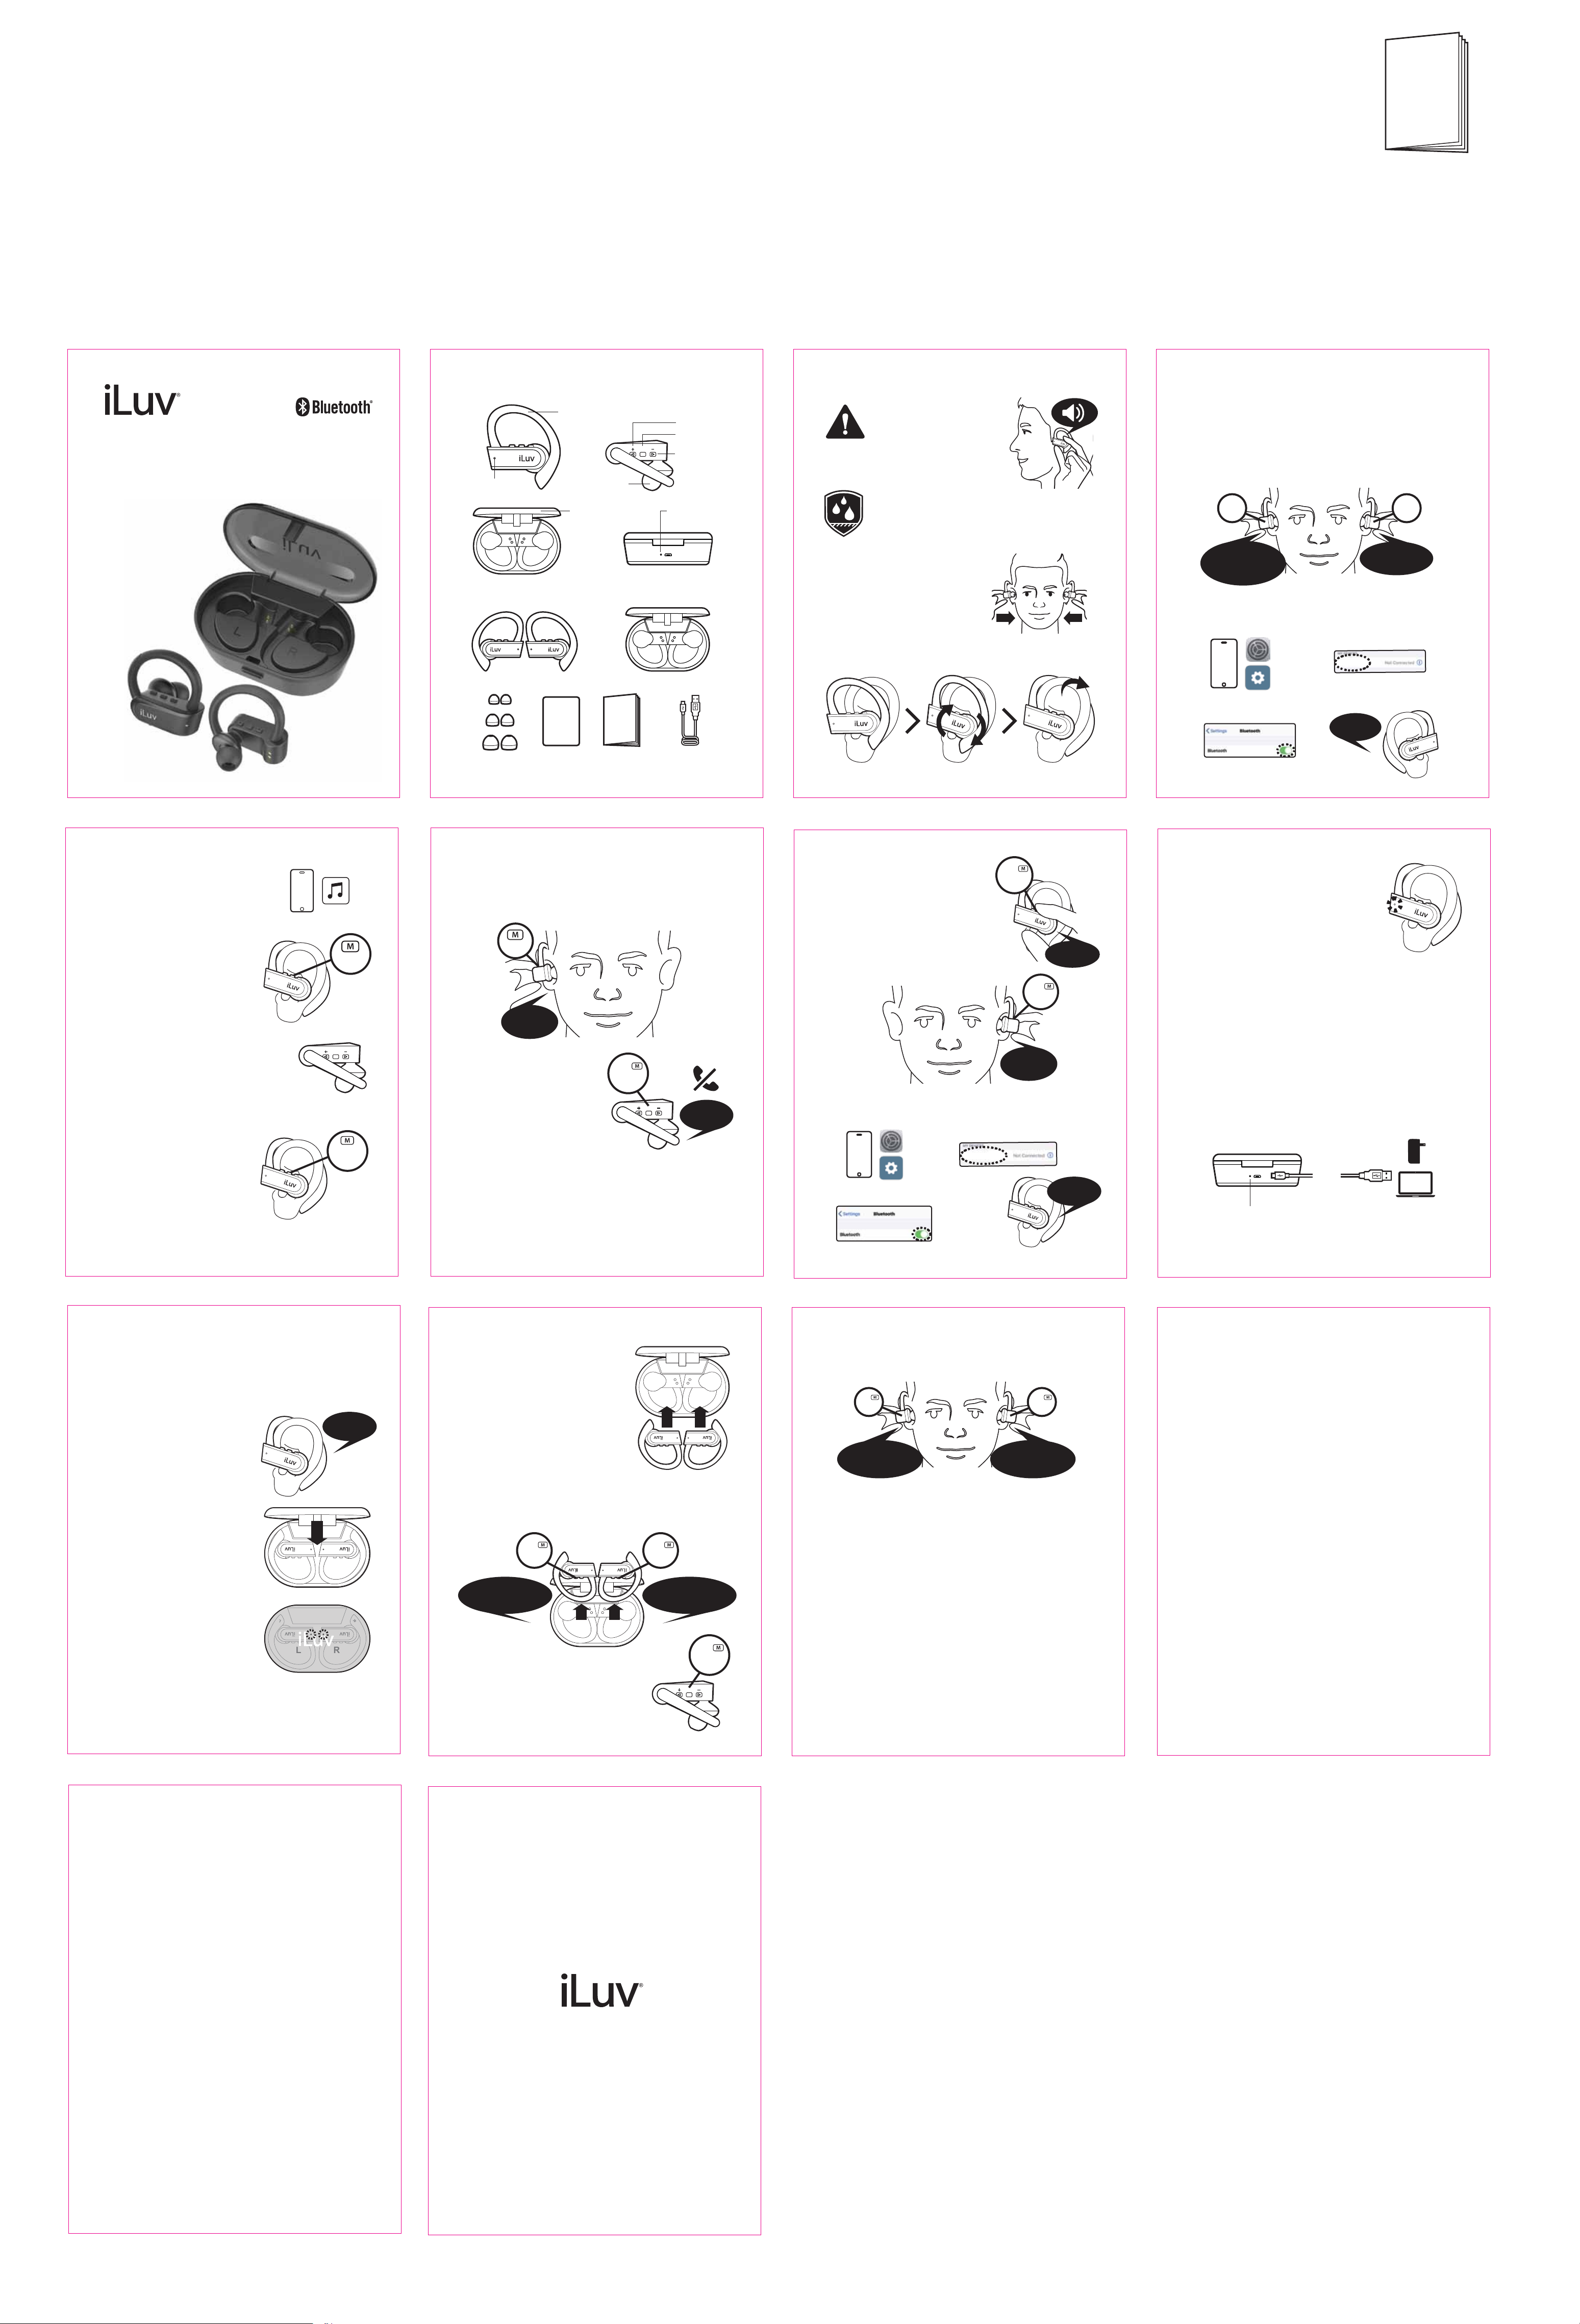
No Wire, True Wireless Stereo In-ear Fitness
Earbuds with Ear Hooks and Charging Case
User Manual
English
Ear Hook
Status LED
L
L R
Ear Tip
Charging storage
case lid
2. What’s Included
Earbuds with ear hooks
S
M
L
3 size ear tips 1st Setup User Manual
1st
Setup
User
Manual
+ Button
Multifunction
M
Charging storage case
Button
- Button
Battery
status LED
L R
Micro USB
charging cable (3 ft)
3. Attention1. Overview of the Product
Please charge the ear-buds rst and wear
FitActive Jet 5 ear-buds since FitActive Jet
5 guides you with voice prompt.
Nano water splash and sweat proof design can
resist water splash and sweat but must not merged
inside water or left on wet place long time.
L
4. Wear Earbuds
FitActive Jet 5 provides a double
locking system of angled in-ear tips
and ear ns for superior comfort and an
active lifestyle. Try dierent eartips for
your comfortable and secure t. Ultra
mini and lightweight design with the similar size of a quarter coin
allows you to wear it for a long time comfortably.
L
L
5. Power On and Pairing
After opening a new package initially, follow these steps. The
right earbud is assigned as the master earbud by default and
connects to left earbud (slave earbud) automatically.
1. To turn on, press multifunction buttons on BOTH earbuds
for 4 seconds
Hold
:04
1. Power on
2. Pairing
3. Pairing successful
4. Please pair to
your device
2. Turn on Bluetooth on your mobile device
a. Go to settings
c. Scan for and select "iLuv
FitActive Jet 5"
d. Voice Prompt: "Pairing
Successful" on right earbud
b. Turn on Bluetooth
32
4
3. Pairing successful
iLuv FitActive Jet 5
Pairing
successful
Hold
:04
1. Power on
2. Pairing
6. Music Playback
1. Once paired, open music app on
your mobile device
2. Click a multifunction button on
either of earbuds to play
3. Click a multifunction button
again to pause
4. Click ‘>’ button to increase volume.
5. Hold ‘>’ button to select next track.
6. Click ‘<‘ button to decrease volume.
7. Hold “<“ button to move to the
beginning of the track. Hold “<“ button
one more time to move to previous
track.
7. Voice Command
1. Double click a multifunction
button on any earbud.
2. Siri on iPhone or Google assistant on Android phone will be
activated.
3. Ask question or command with your voice
Click
M
Double
Click
8. Answer the Call
1. When you receive an incoming call, click a multifunction
button on any earbud to answer the call. You will hear the
sound only from master earbud.
Click
Incoming call
2. Click a multifunction
button again to hang up
3. Hold the multifunction
button for 1 second to
decline when you receive an
Hold
:01
M
di, di
(On master
earbud)
incoming call
9. Mono Earbud
One of two earbuds can be used as a mono earbud at a
time. The other earbud must be powered o. They cannot
be used as two separate mono earbuds at the same time.
1. Hold a multifunction button on
BOTH earbud for 4 seconds to turn
Hold
:04
o power.
2. Hold a multifunction button on
ONE of the earbuds for 4 seconds to
pair. Do not release the button when
you hear "Power on" but release it
after "Pairing".
Power on
Pairing
3. Turn on Bluetooth on your mobile device
a. Go to settings
c. Scan for and select
"iLuv FitActive Jet 5"
iLuv FitActive Jet 5
b. Turn on Bluetooth
d. Voice
Prompt:
“Pairing
successful”
Hold
:04
...
Power off
Pairing
successful
4. Blue light will ash every 5
seconds, indicating that the
Bluetooth is connected successfully.
Play music and enjoy!
5. You can use it as a mono earbud to
answer calls hands free or listen to
music, ideal while driving.
10. C
harging
Charging Case
Charging storage case with 800 mAh not only works as a
portable case but also as a charger which can charge both
earbuds fully 5 times.
1. Insert the smaller end of the
included 3ft Micro USB charging
cable into Micro USB charging
port on the Charging Case
2. Insert the other end of the
Micro USB charging cable
into a USB wall charger or a
USB port on a computer
3ft.
Battery status LED for
Charging Storage case
Red LED: Charging
LED o : Fully charged
Earbuds
High capacity battery of 70 mAh on each earbud gives you
long music playing and talking time. The earbuds can be
charged while they are stored in the charging case.
1. When the batteries of the
earbuds get lower, voice
prompt will say "Battery low"
every 20 seconds.
2. Put the earbuds in the charging
case and close the lid. The
earbuds will turn o automatically
and start charging. The cover
must be closed so that the
earbuds are connected to charging pins securely.
3. While charging, the red LED
indicators on the backside of
charging case will be on.
4. When fully charged. LED will
turn o.
L
L
Battery low
R
L R
R
L R
5
11. Power O/On
When you use the charging Case
1. Put the earbuds in the
charging case and close the
lid. The earbuds will turn o
automatically and start
charging.
L R
L
R
2. Press multifunction buttons on BOTH earbuds for 2 seconds
to turn on the earbuds. The earbuds will connect to the
previously paired phone automatically.
Hold
:04
1. Power on
2. Pairing
3. Pairing successful
4. Pairing successful
Hold
:04
1. Power on
2. Pairing
...
3.
Pairing successful
4.
2. When you take the earbuds out of the charging case,
76
8
3. Can I use the left earbud as a mono earbud?
Yes, one of two earbuds can be used as a mono earbud at a
time. The other earbud must be powered o. They cannot be
used as two separate mono earbuds at the same time.
Hold a multifunction button on BOTH earbud for 4 seconds to
turn o power. Hold a multifunction button on LEFT earbud for
4 seconds to pair. Do not release the button when you hear
“Power on” but release it after “Pairing”. Turn on Bluetooth on
your mobile device and pair with “iLuv FitActive Jet 5”. You can
use it as a mono earbud to answer calls hands free or listen to
music, ideal while driving.
press multifunction button on BOTH earbuds for 4 seconds
to turn on the earbuds. The earbuds will connect to the
previously paired phone automatically.
Hold
:04
1. Power on
2. Pairing
3. …
4. Pairing successful
L
L R
When you use multifunction button
1. Press multifunction button on any
Hold
R
:04
1. Power on
2. Pairing
3. Pairing successful
4. Pairing successful
Hold
:03
M
earbud for 3 seconds to turn o both
Trouble Shooting
1. Sound comes from only one right side earbud when I use it for
hands free talk. Is it normal?
Yes, since only master earbud communicates with your phone,
you hear the sound only from one side of master earbud, which
is right side earbud.
2. After charging earbuds from the charging case, should I
connect them to my phone via Bluetooth again?
No, you don’t need to. When you take them out of charging
case, press multifunction buttons on BOTH earbuds to turn on.
Once they are turned on, they automatically connect to your
previously connected device.
4. What is music play time?
When the earbuds are fully charged, you can play music or talk
up to 3 hours which varies, depending on the music content
and volume. Standby time is up to 20 hours.
Since the charging case can charge both earbuds 5 times, you
can play music up to 15 hours with 5 times of charge.
earbuds.
Register for your warranty
iLuv is committed to your full satisfaction. Please register your
product at iLuv.com so that you can get warranty service.
When you have issues with the product, please check enclosed
manual/troubleshooting rst and contact customer service at
iLuv before you decide to return or make negative review.
Customer Service Contact
Online
Product Registration: http://www.iLuv.com -> “Product Registration”
menu at the bottom Customer Service: http://support.iluv.com
Email
support@iLuv.com
Phone
1-866-807-5946
Mon-Fri: 8:30 AM - 5:30 PM EST
9 1110 12
Inspired in New York. Designed by iLuv®.
We take your privacy seriously. Please visit
https://www.iluv.com/pages/security-privacy-policy for more
information about how we use personal information.
13

NOTE: This equipment has been tested and found to comply with the limits for a
Class B digital device, pursuant to part 15 of the FCC Rules. These limits are
designed to provide reasonable protection against harmful interference in a
residential installation. This equipment generates uses and can radiate radio
frequency energy and, if not installed and used in accordance with the instructions,
may cause harmful interference to radio communications. However, there is no
guarantee that interference will not occur in a particular installation. If this
equipment does cause harmful interference to radio or television reception, which
can be determined by turning the equipment off and on, the user is encouraged to
try to correct the interference by one or more of the following measures:
- Reorient or relocate the receiving antenna.
- Increase the separation between the equipment and receiver.
-Connect the equipment into an outlet on a circuit different from that to which the
receiver is connected.
-Consult the dealer or an experienced radio/TV technician for help
Changes or modifications not expressly approved by the party responsible for compliance
could void the user's authority to operate the equipment. This device complies with Part
15 of the FCC Rules. Operation is subject to the following two conditions:
(1) this device may not cause harmful interference, and
(2) this device must accept any interference received, including interference that may
cause undesired operation.
 Loading...