


NextSeq 500
System Guide
Document # 15046563 v04
May 2018
For Researc h Use Only. Not for use in diagnostic procedure s.
ILLUMINA P ROP RIETARY

NextSeq 500 System Guide
This docume nt a nd its c on tents are proprietary to Illumina, Inc. a nd its a ffiliates ("Illumina ") , and are inte nded sole ly for
the contrac tual use of its custome r in conne ction with the use of the produc t(s) desc ribed herein a nd for no othe r
purpose. This docume nt and its conten ts shall n ot be used or distribu te d f or a ny othe r pu rpose and/or oth erwise
communicate d, disc losed, or reproduce d in any way wha tsoever without the prior written consent of Illum ina. Illumin a
doe s n ot con ve y any lic ense un de r its pa tent, trademark, copyright, or c ommon -law rights nor similar righ ts of a ny th ird
parties by this docume nt.
The instruction s in this documen t must be strictly and explicitly followe d by qualified and properly traine d pe rsonnel in
orde r to ensure the proper and safe use of the product( s) described here in . All of th e conte nts of this docume nt must be
fully rea d a nd unde rstood prior to using suc h product(s) .
FAILURE TO C OM PL ETELY READ A ND EXPLIC ITLY FOLLOW A LL OF THE INSTRUCTION S CON TAINED HEREIN MAY
RESUL T IN DAMAGE TO THE PRODUC T( S), INJURY TO PERS ON S, INC LUDING TO USERS OR OTHERS, AND DAMAGE
TO OTHER PROP ERTY , AND WIL L VOID ANY WA RRA NTY APPLICA BLE TO THE PRODUCT(S) .
ILLUMINA DOES N OT ASSUME A NY LIABILITY ARISING O UT O F THE IMPROPER USE OF TH E PRODUC T( S)
DESC RIBED HEREIN (IN CLUDIN G PARTS THEREO F OR SOFTWA RE) .
© 2018 Illumin a, Inc. All rights re se rve d.
All tra de ma rks a re the property of Illumina, Inc. or their respective own ers. F or specific trademark information , see
www .illumina.com/ company/lega l.h tml.
Document # 15046563 v04
For Researc h Use Only. Not for use in diagnostic procedure s.
ii

NextSeq 500 System Guide
Revision History
Document Date Descri pti on of Change
Material # 2000 6818
Documen t # 15046563
v04
Material # 2000 6818
Documen t # 15046563
v03
Material # 2000 6818
Documen t # 15046563
v02
Material # 2000 1879
Documen t # 15046563
v01
May 2018
March
2018
March
2016
Octobe r
2015
Added support for N extSeq v2.5 rea ge nts.
Updated storage/ sh ipping inf ormation for NextSe q v2.5 Rea ge nt Kits
shippin g flow ce lls at a mbien t temperatu res. N extSeq v2.5 flow c ells
continue to re quire previous storage condition s.
Added informa tion about N e xtSeq v2.5 Re agent Kits requiring softw are
update s to ve rsion 2.2.
Added note regarding mid output kit loading conc entra tion.
Added note regarding sa ving flow c ells.
Added note recomme nding th at high output flow c ells are use d for
system chec ks.
Removed the default user name and pa ssword required to log on to th e
ope rating system. Illumina recommen ds using site-spe cific credentials.
Added informa tion about the Illu mina Proac tive monitoring service in th e
Se le ct Ba se Spac e Configuration section.
Updated RTA v2 software refe renc es to RTA2.
Added sec tion titled Indexing C onside ra tions.
Removed steps to inspec t the flow cell.
Spe cified loading volume and concen tration in the step to Loa d
Libraries onto the Reagent Cartridge .
Spe cified that an equ ivalen t to the recomme nded supplier of N aOC l is a
labora tory-gra de equiv alent.
Added recomm enda tion for a nn ual preven tive mainte na nce se rvic e .
Reorga nize d informa tion in the Ove rview an d Getting Sta rte d c hapters.
Added instruction s f or customizin g system settings.
Removed Live Help instructions from troubleshooting c hapter. This
fe ature wa s re moved from the control software .
15046563 I May 2015 Correc te d desc ription of rese rve d reservoirs on the reagen t c a rtridge.
15046563 H May 2015 Correc te d the volume of Tween 20 in the wash solu tion u se d f or
manu al wash es.
Restruc tured information about system c on figuration options.
Moved inf ormation about Rea l-T ime Ana lysis software to Appendix A.
Document # 15046563 v04
For Researc h Use Only. Not for use in diagnostic procedure s.
iii

NextSeq 500 System Guide
Document Date Descri pti on of Change
15046563 G Fe bruary
2015
Updated software descriptions to N extSe q Con trol Sof twa re v1.4.
• Added man ua l wash options: Quick Wash and Manual Post-Run
Wa sh.
• Added desc ription of run customiza tion fea tures to pu rge
consu ma bles at e nd of run an d to skip pre -ru n chec k c onfirmation .
• Added option to c anc el a nd resta rt a pre -run che ck.
• Added option to e na ble run monitorin g in stan dalon e mode .
• Removed desc ription of off sets file s and pha sin g file s, whic h are no
lon ge r writte n to the run folder.
• Updated sc atter plot imag e to sh ow more ev enly distributed base calls
when using version 1.4 of the syste m software.
• Added desc ription of Run Copy S ervic e.
• Added option to use a custom Index 2 prime r, possible with the
Ne xtS eq 50 0 K it v2. F or more inf ormation, se e
Primers Guide (doc ument # 15 057456)
Updated reagen t prep instruction s f or using the Ne xtS eq 500 Kit v2:
Removed manual steps for loading sodium h ypo chlorite an d dualindexing prime rs to the reagent cartridge. The se rea ge nts a re pref illed in
the v2 rea ge nt ca rtridg e. For more inf ormation, se e the
500/550 Kit v2 Refere nce Gu ide (doc ument # 15058065)
Added Seque ncing Con sumable s se c tion tha t lists kit ve rsions,
compa tible NC S versions, and the na me and part n umber of the
associated kit refere nc e guide .
Updated user-supplie d consum ables to specify uses of N aOC l f or
manu al wash options in troduced in NC S v1.4.
Correc te d the require me nts for c lu ste rs pa ssing filter to no more tha n 1
base call below c hastity in the first 25 cycles.
Added volu me of 120 ml of laboratory-grade water to the Syste m Chec k
instruc tions.
Ne xtS eq C ustom
.
Ne xtS eq
.
15046563 F Se pte mber
2014
15046563 E August
2014
Document # 15046563 v04
Correc te d f eatu re descriptions for N extSe q Con trol Sof twa re v1.3.
Updated URL for Sa fety Data Sheets (SDS ) to
support.illu mina .c om/sds.html.
Updated NextSe q produc t m arkings from ™ to ®.
Updated software descriptions to N extSe q Con trol Sof twa re v1.3:
• Updated de scriptions of the Syste m Customization a nd Software
Updates commands on the Man age Instru me nt sc ree n.
• Updated de scription of the Pre-Run C hec k scre en, which grou ps the
ch ecke d items into 4 e xpa ndable ca tegories.
• Updated the Live Help instru ction s to a cce ss Live Help using th e URL.
The icon on the Hom e scre en is not ava ilable in N C S v1.3.
• Added the on-instrumen t re hybridiza tion proce dure to rehybridize the
Read 1 prim er. Th e option to rehybridize a f low c ell is compatible with
NC S v1.3, or later, a nd requ ires a ne w reagent cartridge and buffe r
ca rtridge.
Added
Ne xtS eq C ustom Primers Gu ide (doc ument # 15057456 )
of additiona l re sources.
For Researc h Use Only. Not for use in diagnostic procedure s.
to list
iv

NextSeq 500 System Guide
Document Date Descri pti on of Change
15046563 D June 2014 Added instruction s to load BP 13 in position #18 of the rea ge nt cartridge
when performing du al-inde xe d runs.
Correc te d c yc le at whic h cluste r de nsity metrics a ppe ar, whic h is c yc le
25.
Correc te d re agent cartridge positions for c ustom prime rs a s position #7
(Rea d 1), #8 (Read 2), a nd #9 ( Index 1).
Added a n ote about potential damage from reloca ting the instrumen t
af ter in sta lla tion. Alwa ys con ta ct your Illumina repre senta tive bef ore
relocating the instrument.
Updated URL for Sa fety Data Sheets (SDS ) to
support.illu mina .c om/sds.ilmn.
15046563 C April 2014 Update d software descriptions to N extSeq Con trol Sof twa re v1.2 a nd
RTA v2.1:
• Added recipe na me NextSe q Mid for use with the NextSe q 500 Mid
Output Kit.
• Removed instru ction s to a dd NaOCl to the buffer wash cartridge for a
manu al wash .
• Correc te d N aOC l volu me to 3 ml for position 28 o f the rea ge nt
ca rtridge, which is re quired for th e au tomatic post-run wash.
• Noted that long run names appea r in a sc rolling field on th e Run
Se tup sc reen .
• Noted that RTA v2 does not a pply phasing a nd pre phasing correc tions
to index re ads.
• Added desc ription of log file s to list of f ile s used for troubleshooting.
• Added instru ction s f or emptying a fu ll spen t re a ge nts containe r du ring
a run.
• Added desc ription of recipe folde rs, including location of custom
rec ipes.
• Added desc ription of therma l c hec ks for fan s a nd therm al probes.
Document # 15046563 v04
For Researc h Use Only. Not for use in diagnostic procedure s.
v

NextSeq 500 System Guide
Document Date Descri pti on of Change
15046563 B F ebrua ry
2014
15046563 A January
2014
Updated software descriptions to N extSe q Con trol Sof twa re v1.1:
• Added sea rch f eatu re on Run Setup scre en to filte r list of a va ilable
runs.
• Added that ava ila ble recipes include NextSeq High or NextSeq Mid,
depen din g on f low c ell type.
• Noted that software updates in clude license agree me nt, re le ase
notes, a nd list of software to be updated.
• Added desc ription of the RAID error m essage.
• Noted that an Exit button closes NSSan d re sta rts NCS auto ma tic ally
at end of a syste m chec k.
Added reagent storage dura tion of u p to 1 wee k a t 4°C.
Updated reagen t c a rtridge label for reservoir #10 to Loa d Libra ry Here.
Updated user-supplie d consum ables list to spec ify 3%–6% sodium
hypochlorite and list a supplier catalog num ber.
Updated in structions for pre pa rin g a 0.06% dilution of Na OC l for
instrumen t washe s, whic h inc lu des a reduc tion in volume to 2 ml and a
3%–6% starting conc entra tion.
Added illustrations to show good and ba d c lip position on the flow c ell.
Updated the Rea l-Time Ana lysis cha pte r to include an overvie w of RTA
v2, the output folde r struc ture , and the base calling process.
Updated troublesh ooting c ha pte r to include RTA v2 e rrors and in clude
Run Pa ra me ters.xml in the list of trouble shooting files.
Initial re le ase.
Document # 15046563 v04
For Researc h Use Only. Not for use in diagnostic procedure s.
vi

Table of Contents
Chapter 1 Overview 1
Introduction 1
Additional Resources 1
Instrument Components 2
Sequencing Consumab les Overview 4
Chapter 2 Getting Started 8
Starting the Instrument 8
Customize System Settings 8
Customize Run Settings 9
User-Supplied Consumables and Equipment 10
Chapter 3 Sequencing 12
Introduction 12
Sequencing Workflow 13
Prepare the Reagent Cartridge 13
Prepare the Flow Cell 14
Prepare Libraries for Sequencing 15
Set Up a Sequencing Run 15
Monitor Run Progress 21
Automatic Post-Run Wash 23
Chapter 4 Maintenance 24
Introduction 24
Perform a Manual Wash 24
Software Updates 26
Shut Down the Instrument 27
Appendix A Troubleshooting 29
Introduction 29
Troubleshooting Files 29
Resolve Automatic Check Errors 30
Spent Reagents Container is Full 31
Rehybridization Workflow 31
Custom Recipes and Recipe Folders 33
System Check 33
RAID Error Message 35
Configure System Settings 35
Appendix B Real-Time Analysis 38
Real-Time Analysis Overview 38
Real-Time Analysis Workflow 39
Sequencing Outp ut Files 42
Document # 15046563 v04
For Researc h Use Only. Not for use in diagnostic procedure s.
vii

NextSeq 500 System Guide
Flow Cell Tiles 42
Output Folder Structure 45
Index 47
Technical Assistance 50
Document # 15046563 v04
For Researc h Use Only. Not for use in diagnostic procedure s.
viii

Chapter 1 Overview
Introduction 1
Additional Resources 1
Instrument Components 2
Sequencing Consumab les Overview 4
Introduction
The Illumina®NextSeq™500 system combines the power of high-throughput sequencing with the simplicity
of a desktop sequencing instrument.
Features
u High-throughp ut sequencing—The NextSeq 500 enables sequencing of exomes, whole genomes, and
transcriptomes and supports TruSeq®and Nextera®libraries.
u Flow cell types—Flow cells are available in configurations for high output and mid output. Each flow cell
type is kitted with a compatible prefilled reagent cartridge.
u Real-Time Analysis (RTA)—Integrated analysis software performs on-instrument data analysis, which
includ es image analysis and base calling. The NextSeq uses an implementation of RTA called RTA v2,
which includes important architecture and feature differences. For more information, see
Analysis
u BaseSpace
on p age 38.
®
integration—The sequencing workflow is integrated with BaseSpace, the Illumina genomics
computing environment for data analysis, storage, and collaboration. For instruments configured for
BaseSpace, library information and run parameters are specified on the BaseSpace Prep tab. Runs that
were set up in BaseSpace appear on the instrument interface during run setup. As the run progresses,
output files are streamed in real time to BaseSpace or BaseSpace Onsite.
Real-Time
Additional Resources
The following d ocumentation is available for download from the Illumina website.
Resource Descri pti on
Ne xtS eq Syste m Site Prep Guide
(document # 15045113)
Ne xtS eq Syste m Safe ty and
Complianc e Guide (document #
15046564)
RFID Rea de r - Mode l # TR-001-44
User Gu ide (doc um ent # 15041950)
Den aturing and Diluting Libraries for
the NextSe q Syste m (docu me nt #
15048776)
Ne xtS eq C ustom Primers Gu ide
(document # 15057456)
BaseS pa ce help
(h elp.basespac e.illumina.com)
Visit the NextSeq 500 support page on the Illumina website for access to documentation, software
downloads, online training, and frequently asked questions.
Provide s spec ifications for laboratory spac e, e le ctrical requ ire me nts, a nd
en vironmenta l c onsidera tions.
Provide s informa tion a bout opera tiona l safety c onside rations, complian ce
statements, an d instrume nt la be ling.
Provide s informa tion a bout the RFID reader in th e instrumen t, complia nce
ce rtific ations, and sa fe ty considera tions.
Provide s instructions for denaturin g and diluting prepa red libraries for a
seque ncing run, and pre pa ring a n optiona l PhiX control. This step applies to
most library types.
Provide s informa tion a bout using c ustom seque nc in g primers in pla ce of
Illumina seque nc in g primers.
Provide s informa tion a bout using Base Space®an d a va ilable analysis option s.
Document # 15046563 v04
For Researc h Use Only. Not for use in diagnostic procedure s.
1

NextSeq 500 System Guide
Instrument Components
The NextSeq 500 system includes a touch screen monitor, a status bar, and 3 compartments.
Figure 1 Instr ument Components
A Imaging compartment—Holds the flow cell during a sequencing run.
B Touch screen monitor—Enables on-instrument configuration and setup using the control software interface.
C Status bar—Indicates instrument status as processing (blue), requires attention (orange), ready to sequence
(green), or when a wash is due within the next 24 hours (yellow).
D Buffer compartment—Holds the buffer cartridge and the spent reagents container.
E Reagent compartment—Holds the reagent cartridge.
Imaging Compartment
The imaging compartment houses the stage, which includes three alignment pins for positioning the flow cell.
After loading the flow cell, the imaging compartment d oor closes automatically and moves components into
position.
Reagent and Buffer Compartments
Setting up a sequencing run on the NextSeq 500 requires access to the reagent compartment and buffer
compartment to load run consumables and empty the spent reagents container.
Document # 15046563 v04
For Researc h Use Only. Not for use in diagnostic procedure s.
2

NextSeq 500 System Guide
Figure 2 Reagent and Buffer Compart ments
A Reagent compartment door—Encloses the reagent compartment with a latch under the lower-right corner
of the door. The reagent compartment holds the reagent cartridge. Reagents are pumped through the
sippers and fluidics system, and then to the flow cell.
B Reagent cartridge—The reagent cartridge is a prefilled single-use consumable.
C Buffer cartridge—The buffer cartridge is a prefilled single-use consumable.
D Spent reagents container—Spent reagents are collected for disposal after each run.
E Buffer compartment door—Encloses the buffer compartment with a latch under the lower-left corner of the
door.
NextSeq Software
The instrument software includes integrated applications that perform sequencing runs.
u NextSeq Control Software (NCS)—The control software guides you through the steps to set up a
sequencing run.
u Real-Time Analysis (RTA) software—RTA performs image analysis and base calling during the run. The
NextSeq 500 uses RTA v2, which includes imp ortant architecture and feature differences from earlier
versions. For more information, see
Real-Time Analysis
on p age 38.
Status Icons
A status icon in the top-right corner of the control software interface screen signals any change in conditions
during run setup or during the run.
Status
Icon
Status N ame Descri pti on
Sta tus OK System is norma l.
Proce ssing System is proce ssing.
Wa rning A warning has occurred.
Wa rnings do not stop a run o r require action before proceeding.
Error An error ha s occ urre d.
Errors re quire ac tio n before procee ding with the run .
When a change in condition occurs, the icon blinks to alert you. Select the icon to view a description of the
condition. Select Ack nowledge to accept the message and Close to close the dialog box.
Document # 15046563 v04
For Researc h Use Only. Not for use in diagnostic procedure s.
3

NextSeq 500 System Guide
Power Button
The power button on the front of the NextSeq turns on power to the instrument and instrument comp uter.
The power button performs the following actions depending on the state of instrument power.
Power State Act ion
Instrume nt power is
off
Instrume nt power is
on
Instrume nt power is
on
Brie fly pre ss the button to tu rn on the power.
Brie fly pre ss the button to tu rn off the power. A dialog box a ppe a rs on the scree n to c onfirm a normal
instrumen t shutdown.
Pre ss and hold the powe r bu tton f or 10 sec on ds to cau se a hard shutdown of th e instrument a nd
instrumen t c om puter.
Use this method to turn off the in strument only if the instrume nt is unre sponsive.
NOTE
Turning off the instrument during a sequencing run ends the run immediately. Ending a run is final. Run
consumables cannot be reused and sequencing data from the run is not saved.
Sequencing Consumables Overview
Contents and Storage
The sequencing consumables required to run the NextSeq are provided separately in a single-use kit. Each
kit includes one flow cell, a reagent cartridge, a buffer cartridge, and library dilution buffer. When you receive
NextSeq 500 Kit:
u Do not open the white foil packages until instructed to do so.
u Promptly store components at the indicated temperatures to ensure proper performance.
u Store cartridges so that the pack age labels face up.
Cons umabl e Quanti ty Storage Temp erature Descri pti on
Reagen t C artridge 1 -25°C to -15°C Conta in s c lu ste ring a nd se quen cing rea ge nts
Buf fe r C artridge 1 15°C to 30°C Conta in s buffe r and wash solution
HT1 1 -25°C to -15°C Hybridiza tion Buffe r
Flow Cell 1 2°C to 8°C * Single-use flow ce ll
*Shi pped at room t emperature for NextSeq v2. 5 Re agents k it s
Reagents are sensitive to light. Store the reagent cartridge and buffer cartridge in a dark location away from
light.
The flow cell, reagent cartridge, and buffer cartridge use radio-frequency identification (RFID) for accurate
consumable tracking and compatibility.
All other kits include dual-index sequencing primers and NaOCIin the prefilled cartridge. No additional steps
are req uired.
Kit Compatibility Labeling
Kit components are labeled with color-coded indicators to show compatibility between flow cells and reagent
cartridges. Always use a compatible reagent cartridge and flow cell. The buffer cartridge is universal.
Document # 15046563 v04
For Researc h Use Only. Not for use in diagnostic procedure s.
4

NextSeq 500 System Guide
Each flow cell and reagent cartridge is lab eled High or Mid. Always check the label when you prepare
consumables for a run.
Kit Type Mark ing on Label
High Output Kit C om pon ents
Mid Output Kit C om pon ents
Flow CellOverview
Figure 3 Flow Cell Cartridg e
A Lane pair A—Lanes 1 and 3
B Lane pair B—Lanes 2 and 4
C Flow cell cartridge frame
The flow cell is a glass-based substrate on which clusters are generated and the sequencing reaction is
performed. The flow cell is encased in a flow cell cartridge.
The flow cell contains 4 lanes that are imaged in pairs.
u Lanes 1 and 3 (lane pair A) are imaged at the same time.
u Lanes 2 and 4 (lane pair B) are imaged when imaging of lane pair A is complete.
Although the flow cell has 4 lanes, only a single library or set of pooled libraries is sequenced on the flow cell.
Libraries are loaded onto the reagent cartridge from a single reservoir and transferred automatically to the
flow cell to all 4 lanes.
Each lane is imaged in small imaging areas called tiles. For more information, see
Flow Cell Tiles
on p age 42.
Document # 15046563 v04
For Researc h Use Only. Not for use in diagnostic procedure s.
5

NextSeq 500 System Guide
Reagent Cartridge Overview
The reagent cartridge is a single-use consumable with RFIDtracking and foil-sealed reservoirs that are
prefilled with clustering and sequencing reagents.
Figure 4 Reagent Cartridge
The reagent cartridge includes a d esignated reservoir for load ing prepared libraries. After the run begins,
libraries are transferred automatically from the reservoir to the flow cell.
Several reservoirs are reserved for the automatic p ost-run wash. Wash solution is pumped from the buffer
cartridge to the reserved reservoirs, through the system, and then to the spent reagents container.
WARNING
This set of reagents contains potentially hazardous chemicals. Personal injury can occur through inhalation,
ingestion, skin contact, and eye contact. Wear protective equipment, including eye protection, gloves, and
laboratory coat appropriate for risk of exposure. Handle used reagents as chemical waste and discard in
accordance with applicable regional, national, and local laws and regulations. For additional environmental,
health, and safety information, see the SDS at support.illumina.com/sds.html.
Reserved Reservoirs
Figure 5 Numbered Reservoirs
Document # 15046563 v04
For Researc h Use Only. Not for use in diagnostic procedure s.
6

NextSeq 500 System Guide
Posit ion Descri pti on
7, 8, a nd 9 Reserved for optional c ustom prime rs
10 Load libraries
For information about custom primers, see
NextSeq Custom Primers Guide (document # 15057456)
.
Removable Reservoir in Position #6
The prefilled reagent cartridge includes a denaturation reagent in position 6 that contains formamide. To
facilitate safe disposal of any unused reagent after the sequencing run, the reservoir in position 6 is
removable. For more information, see
Remove Used Reservoir from Position #6
on p age 19.
Buffer Cartridge Overview
The buffer cartridge is a single-use consumable containing three reservoirs that are prefilled with buffers and
wash solution. The contents of the buffer cartridge are sufficient for sequencing one flow cell.
Figure 6 Buffer Cartridge
Document # 15046563 v04
For Researc h Use Only. Not for use in diagnostic procedure s.
7

Chapter 2 Getting Started
Starting the Instrument 8
Customize System Settings 8
Customize Run Settings 9
User-Supplied Consumables and Equipment 10
Starting the Instrument
Turn on the power toggle switch to the I (on) position.
Figure 7 Po wer Swit ch Located on Back o f Inst rument
1 Press the power button above the reagent compartment. The p ower button turns on the instrument
power and starts the integrated instrument computer and software.
Figure 8 Po wer Button Located on Front of I nst rument
2 Wait until the operating system has finished loading.
The NextSeq Control Software (NCS) launches and initializes the system automatically. After the
initialization step is complete, the Home screen op ens.
3 If your system has been configured to require login credentials, wait for the system to load, and then log
on to the operating system. If necessary, consult your facility administrator for the user name and
password.
Customize System Settings
The control software includes customizable system settings for start-up options, input preferences, audio
settings, and instrument name.
Document # 15046563 v04
For Researc h Use Only. Not for use in diagnostic procedure s.
8

NextSeq 500 System Guide
Select Start-Up Option
1 From the Manage Instrument screen, select System Customization.
2 Select from the following start-up options:
u Select Kiosk Mode to use the control software interface in full screen.
u Select Windows Mode to allow access to Windows on the instrument computer. Interaction with the
software interface, such as button location, is likely to be altered in this mode.
3 Select Save to save settings and advance the screen.
Set Input Option and Audio Indicator
1 From the Manage Instrument screen, select System Customization.
2 Select the Use on-screen keyboard checkbox to activate the on-screen k eyboard for input to the
instrument.
3 Select the Play audio checkbox to turn on audio indicators for the following events.
u Upon instrument initialization
u When a run is started
u When certain errors occur
u When user interaction is required
u When a run has finished
4 Select Save to save settings and advance the screen.
Customize Instrument Identification
1 From the Manage Instrument screen, select System Customization.
2 To assign a preferred image for your instrument, select Browse and navigate to the image.
3 In the Nick Name field, enter a preferred name for the instrument.
4 Select Save to save settings and advance the screen.
The image and name appear at the upper-left corner of each screen.
Customize Run Settings
The control software includes customizable settings for run setup preferences and purging of unused
reagents.
Set Run Setup Options
1 From the Manage Instrument screen, select System Customization.
2 Select Save to advance to Run Customization.
3 Select the Use Advanced Load Consumables checkbox to enable the option to load all run consumables
from a single screen.
4 Select the Skip Pre-Run Check Confirmation checkbox to start sequencing automatically after a
successful automatic check.
5 Select Save to save settings and exit the screen.
Document # 15046563 v04
For Researc h Use Only. Not for use in diagnostic procedure s.
9

NextSeq 500 System Guide
Set Automatic Purge Option
1 From the Manage Instrument screen, select System Customization.
2 Select Save to advance to Run Customization.
3 Select the Purge Consumables at End of Run checkb ox to purge unused reagents from the reagent
cartridge to the spent reagents container automatically after each run.
NOTE
Purging consumables automatically adds additional time to the workflow.
4 Select Save to save settings and exit the screen.
User-Supplied Consumables and Equipment
The following consumables and equipment are used on the NextSeq 500.
User-Supplied Consumables for Sequencing Runs
Cons umabl e Sup pli er Purpos e
1 N NaOH
(sodiu m hydroxide )
200 mM Tris-H C l, pH7 Gene ral lab supplier Library den atura tion
Alcohol wipes, 70% Isopropyl
or
Etha nol, 70%
La b tissue, low-lint VWR, ca ta log#21905 -026
Gene ral lab supplier Library den atura tion, dilu ted to 0.2N
VWR, ca ta log#95041 -714
(or equivalent)
Gene ral lab supplier
(or equivalent)
Flow cell c le a ning and genera l purpose
Flow cell c le a ning
User-Supplied Consumables for Instrument Maintenance
Cons umabl e Sup pli er Purpos e
Na OC l, 5%
(sodiu m hypochlorite)
Twe e n 20 Sigma -A ldrich , c a talog # P7949 Wa shing th e instrume nt using man ua l
Wa te r, laboratory-grade Ge nera l lab supplier Wa shing the instrument (ma nu al wash)
Sigma -A ldrich , c a talog # 239305
(or la boratory-grade equivale nt)
Wa shing th e instrume nt using th e
manu al post-run wash ; diluted to 0.12%
wash options; dilu ted to 0.05%
Guidelines for Laboratory-Grade Water
Always use laboratory-grade water or deionized water to perform instrument proced ures. Never use tap
water. Use only the following grades of water or equivalents:
u Deionized water
u Illumina PW1
u 18Megohms (MΩ) water
u Milli-Q water
u Super-Q water
u Molecular biology grade water
Document # 15046563 v04
For Researc h Use Only. Not for use in diagnostic procedure s.
10

NextSeq 500 System Guide
User-Supplied Equipment
Item Source
Fre ezer, -25°C to -15°C , frost-fre e Gene ral lab supplier
Ice bucke t Gene ral lab supplier
Refrigera tor, 2°C to 8°C Gene ral lab supplier
Document # 15046563 v04
For Researc h Use Only. Not for use in diagnostic procedure s.
11

Chapter 3 Sequencing
Introduction 12
Sequencing Workflow 13
Prepare the Reagent Cartridge 13
Prepare the Flow Cell 14
Prepare Libraries for Sequencing 15
Set Up a Sequencing Run 15
Monitor Run Progress 21
Automatic Post-Run Wash 23
Introduction
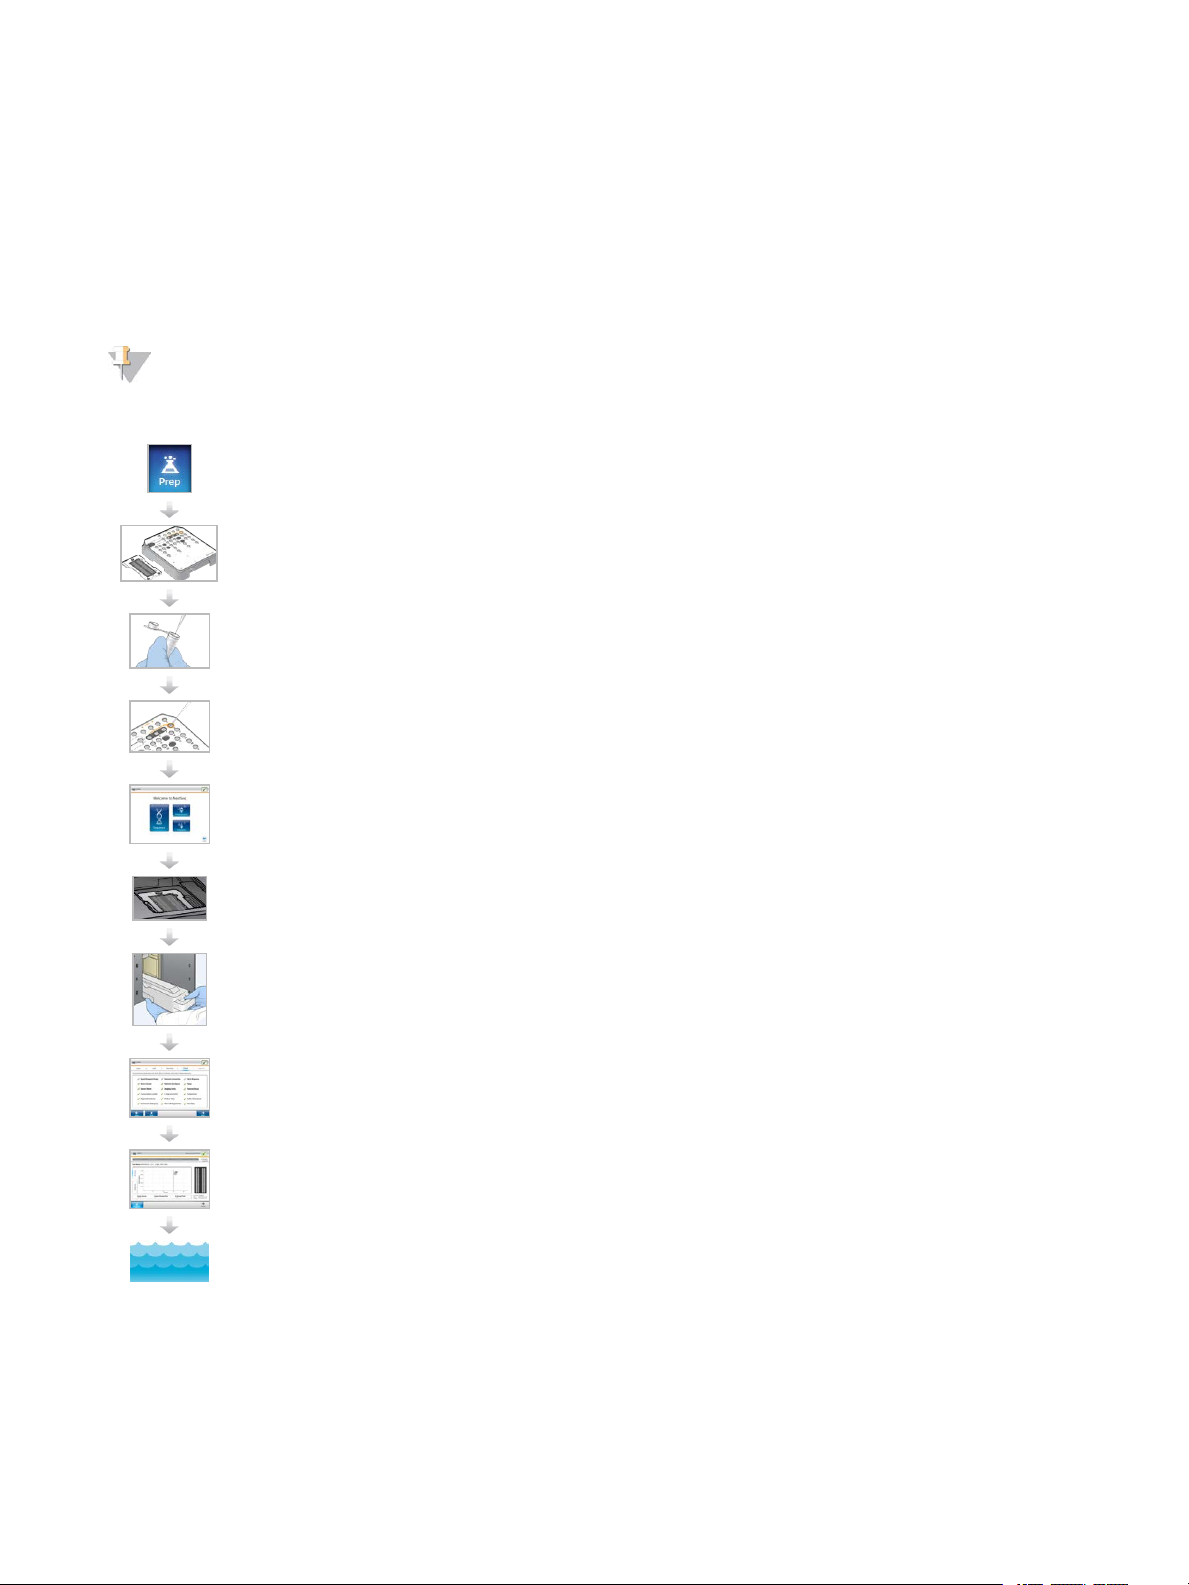
To perform a seq uencing run on the NextSeq 500, prep are a reagent cartridge and flow cell, and then follow
the software prompts to set up and start the run. Cluster generation and sequencing are performed oninstrument. After the run, an instrument wash begins automatically using components already loaded on the
instrument.
Cluster Generation
During cluster generation, single DNA molecules are bound to the surface of the flow cell, and then amplified
to form clusters.
Sequencing
Clusters are imaged using 2-channel sequencing chemistry and filter combinations specific to each of the
fluorescently labeled chain terminators. After imaging of a tile on the flow cell is complete, the next tile is
imaged. The process is repeated for each cycle of sequencing. Following image analysis, the software
performs base calling, filtering, and quality scoring.
Monitor run progress and statistics from the control software interface, from the Run tab on BaseSpace, or
from a networked comp uter using the Sequencing Analysis Viewer (SAV) software. See
Viewer
on p age 22.
Sequencing Analysis
Analysis
As the run progresses, the control software automatically transfers base call (BCL) files to BaseSpace or the
specified output location for secondary analysis.
Several analysis method s are available depending on your application. For more information, see the
BaseSpace help (help.basespace.illumina.com)
.
Sequencing Run Duration
Sequencing run duration depends on the number of cycles performed. The maximum run length is a p airedend run of 150 cycles each read (2 x 150), plus up to 8 cycles each for 2 index read s.
For expected durations and other system specifications, visit the NextSeq 500 specifications page on the
Illumina website.
Number of Cycles in a Read
In a sequencing run, the number of cycles performed in a read is 1 more cycle than the number of cycles
analyzed. For example, a paired-end 150-cycle run performs reads of 151-cycles (2 × 151) for a total of 302
cycles. At the end of the run, 2 x 150 cycles are analyzed. The extra cycle is required for phasing and
Document # 15046563 v04
For Researc h Use Only. Not for use in diagnostic procedure s.
12
NextSeq 500 System Guide
prephasing calculations.
Sequencing Workflow
When using NextSeq v2.5 Reagents kit, make sure the NextSeq Control Software is version 2.2, or newer,
before beginning preparation of samples or consumables. For sub sequent software upd ates, make sure the
instrument is upd ated prior to preparing consumables for the NextSeq 500 workflow.
NOTE
NextSeq ControlSoftware Version 2.2 is required to read NextSeq v2.5 RFID.
Make sure that you complete all steps in the NextSeq 500 workflow in the specified order.
For conf igurations using Illumina Base Spac e or Ba se Spac e Onsite : Set up the run on the BaseS pace Prep
tab. S ee the
Pre pare a n ew re agent cartridge : thaw a nd in spe ct.
Pre pare a n ew flow ce ll: bring to room tempera ture, unwrap, a nd in spe ct.
BaseS pa ce help ( help.ba se spa ce.illumina.com)
.
Den ature and dilute libraries (doe s n ot apply to a ll libra ry types). See
Ne xtS eq Syste m (docu me nt # 15048776)
Load the libra ry dilution onto the rea ge nt cartridge in reservoir #10.
From th e software inte rfa ce, se le ct Sequenc e to begin the run setu p steps.
Load the flow c e ll.
Empty an d re load the spent reagents con ta iner.
Load the buffe r c artridge and reage nt cartridge.
Revie w run parameters and automa tic che ck results. Selec t Start.
Mon itor the run from the control software interface , from the Run tab on Base Space , or from a ne tworked
compu ter using Se quen cing Analysis Vie we r.
.
Den aturing and Diluting Libraries for the
An instrumen t wash begins automatica lly whe n sequ enc ing is c omplete.
Prepare the Reagent Cartridge
1 Remove thereagent cartridge from -25°C to -15°C storage.
Document # 15046563 v04
For Researc h Use Only. Not for use in diagnostic procedure s.
13

NextSeq 500 System Guide
2 Thaw in a room temperature water b ath untilthawed (~60 minutes). Do not submerge the cartridge.
3 Gently tap on the bench to dislodge water from the base, and then dry the base.
NOTE
[Alternate method] Thaw reagents overnight at 2°C to 8°C. Reagents require a minimum of 18 hours to
thaw. At this temperature, reagents are stable up to 1 week.
4 Invert the cartridge 5 times to mix reagents.
5 Inspect positions 29, 30, 31, and 32 to make sure that reagents are thawed .
6 Gently tap on the bench to reduce air bubbles.
WARNING
This set of reagents contains potentially hazardous chemicals. Personal injury can occur through
inhalation, ingestion, skin contact, and eye contact. Wear protective equipment, including eye
protection, gloves, and laboratory coat appropriate for risk of exposure. Handle used reagents as
chemical waste and discard in accordance with applicable regional, national, and local laws and
regulations. For additional environmental, health, and safety information, see the SDS at
support.illumina.com/sds.html.
Prepare the Flow Cell
1 Remove a new flow cell package from 2°C to 8°C storage.
2 Set the unwrapped flow cell package aside at room temperature for 30 minutes.
NOTE
If the foil package is intact, the flow cell can remain at room temperature up to 12 hours. Avoid repeated
cooling and warming of the flow cell.
3 Remove the flow cell from the foil package.
Figure 9 Remo ve from Fo il Package
4 Open the clear plastic clamshell p ackage and remove the flow cell.
Document # 15046563 v04
For Researc h Use Only. Not for use in diagnostic procedure s.
14

NextSeq 500 System Guide
Figure 10 Remov e from Clamshell Packag e
5 Clean the glass surface of the flow cell with a lint-free alcohol wipe. Dry the glass with a low-lint lab tissue.
Prepare Libraries for Sequencing
The library volume and loading concentration differ depending on the version of NCS you are running.
Cont rol Soft war e Versi on Library Volume Library Concentr at ion
NC S v1.3, or later 1.3 ml 1.8 pM
NC S v1.2, or ea rlier 3 ml 3 pM
Denature and Dilute Libraries
Denature and dilute your libraries to a loading volume of 1.3 ml and a loading concentration of 1.8pM for high
output kits and 1.5 pM for mid output kits. In practice, loading concentration can vary depending on library
preparation and quantification method s. For instructions, see the
Libraries Guide (document # 15048776)
.
NextSeq System Denature and Dilute
Load Libraries onto the Reagent Cartridge
1 Clean the foil seal covering reservoir #10 labeled Load Library Here using a low-lint tissue.
2 Pierce the seal with a clean 1 ml pipette tip.
3 Load 1.3 ml of prepared 1.8 pM libraries into reservoir #10 labeled Load Library Here. Avoid touching the
foil seal as you dispense the libraries.
Figure 11 Load Libraries
Set Up a Sequencing Run
1 From the Home screen, select Sequence.
The Sequence command opens the imaging compartment door, releases consumables from a previous
run, and opens the series of run setup screens. A short delay is normal.
Document # 15046563 v04
For Researc h Use Only. Not for use in diagnostic procedure s.
15

NextSeq 500 System Guide
If the instrument is configured for BaseSpace, you are prompted to log in to BaseSpace. If the instrument
is configured for standalone mode, the next step is loading the flow cell.
Log in to BaseSpace
1 Enter your BaseSpace user name and password.
2 Select Next.
Load the Flow Cell
1 Remove the used flow cell from a previous run.
2 Align the flow cell over the alignment pins and place the flow cell on the stage.
Figure 12 Load the Flow Cell
3 Select Load.
The door closes automatically, the flow cell ID appears on the screen, and the sensors are checked.
4 Select Next.
Empty the Spent Reagents Container
1 Remove the spent reagents container and discard the contents in accordance with applicable
standards.
Document # 15046563 v04
For Researc h Use Only. Not for use in diagnostic procedure s.
16

NextSeq 500 System Guide
Figure 13 Remov e the S pent Reagents Cont ainer
NOTE
As you remove the container, place your other hand underneath for support.
WARNING
This set of reagents contains potentially hazardous chemicals. Personal injury can occur through
inhalation, ingestion, skin contact, and eye contact. Wear protective equipment, including eye
protection, gloves, and laboratory coat appropriate for risk of exposure. Handle used reagents as
chemical waste and discard in accordance with applicable regional, national, and local laws and
regulations. For additional environmental, health, and safety information, see the SDS at
support.illumina.com/sds.html.
2 Slide the empty spent reagents container into the buffer compartment until it stops. An audib le click
indicates that the container is in position.
Figure 14 Load the Empt y Spent Reagents Container
Document # 15046563 v04
For Researc h Use Only. Not for use in diagnostic procedure s.
17

NextSeq 500 System Guide
Load the Buffer Cartridge
1 Remove the used buffer cartridge from the upper compartment.
2 Slide a new buffer cartridge into the buffer compartment until it stops.
An audible click indicates that the cartridge is in position, the buffer cartridge ID appears on the screen,
and the sensor is checked.
Figure 15 Load the Buffer Cartridge
3 Close the buffer compartment door, and select Next.
Load the Reagent Cartridge
1 Remove the used reagent cartridge from the reagent compartment. Dispose of unused contents in
accordance with applicable standards.
WARNING
This set of reagents contains potentially hazardous chemicals. Personal injury can occur through
inhalation, ingestion, skin contact, and eye contact. Wear protective equipment, including eye
protection, gloves, and laboratory coat appropriate for risk of exposure. Handle used reagents as
chemical waste and discard in accordance with applicable regional, national, and local laws and
regulations. For additional environmental, health, and safety information, see the SDS at
support.illumina.com/sds.html.
NOTE
To facilitate safe disposal of unused reagent, the reservoir in position 6 is removable. For more
information, see
2 Slide the reagent cartridge into the reagent compartment until the cartridge stops, and then close the
reagent compartment door.
Remove Used Reservoir from Position #6
on page 19.
Document # 15046563 v04
For Researc h Use Only. Not for use in diagnostic procedure s.
18

NextSeq 500 System Guide
Figure 16 Load Reagent Cartridg e
3 Select Load.
The software moves the cartridge into position automatically (~30 seconds), the reagent cartridge ID
appears on the screen, and the sensors are checked.
4 Select Next.
Remove Used Reservoir from Position #6
1 After you have removed the
cover over the slot next to position #6.
Figure 17 Remov able P osit ion #6
A Protective rubber cover
B Position #6
2 Press down on the clear plastic tab and push towards the left to eject the reservoir.
3 Dispose of the reservoir in accordance with applicable standards.
used
reagent cartridge from the instrument, remove the protective rubber
Specify Run Parameters
The steps on the Run Setup screen differ b ased on system configuration:
u BaseSpace or BaseSpace Onsite—The Run Setup screen lists runs that were set up using the
BaseSpace Prep tab. If the intended run does not app ear on the Run Setup screen, make sure that the
run is marked for sequencing in BaseSpace.
u Standalone—The Run Setup screen includes fields for defining run parameters.
Select Available Run (BaseSpace Configuration)
1 Select a run name from the list of available runs.
Use the up and down arrows to scroll through the list or enter a run name in the Search field.
Document # 15046563 v04
For Researc h Use Only. Not for use in diagnostic procedure s.
19

NextSeq 500 System Guide
2 Select Next.
3 Confirm run parameters.
u Run Name—Name of the run as assigned in BaseSpace.
u Library ID—Name of the pooled libraries as assigned in BaseSpace.
u Recipe—Name of the recipe, either NextSeq High or NextSeq Mid depending on the reagent
cartridge used for the run.
u Read Type—Single Read or Paired End.
u Read Length—Number of cycles for each read.
u [Optional] Custom Primers, if applicable.
4 [Optional] Select the Edit icon to change run parameters. When finished, select Save.
u Run parameters—Change the number of read s or number of cycles per read.
u Custom primers—Change the settings for custom primers. For more information, see
Custom Primers Guide (document # 15057456)
u Purge consumables for this run—Change the setting to purge consumab les automatically after the
.
NextSeq
current run.
5 Select Next.
Enter Run Parameters (Standalone Configuration)
1 Enter a run name of your preference.
2 [Optional] Enter a library ID of your preference.
3 From the Recipe drop-down list, select a recipe. Only compatible recipes are listed.
4 Select a read type, either Single Read or Paired End .
5 Enter the number of cycles for each read in the sequencing run.
u Read 1—Enter a value up to 151 cycles.
u Read 2—Enter a value up to 151 cycles. This value is typically the same number of cycles as Read 1.
u Index 1—Enter the number of cycles required for the Index 1 (i7) primer.
u Index 2—Enter the number of cycles required for the Index 2 (i5) primer.
The control software confirms your entries using the following criteria:
u Total cycles do not exceed the maximum cycles allowed
u Cycles for Read 1 are greater than the 5 cycles used for template generation
u Index Read cycles do not exceed Read 1 and Read 2 cycles
6 [Optional] If you are using custom primers, select the checkbox for the primers used. For more
information, see
u Read 1—Custom primer for Read 1.
u Read 2—Custom primer for Read 2.
u Index 1—Custom primer for Index 1.
u Index 2—Custom primer for Index 2.
NextSeq Custom Primers Guide (document # 15057456)
.
7 [Optional] Select the Edit icon to change run parameters. When finished, select Save.
u Output folder location—Change the output folder location for the current run. Select Browse to
navigate to a network location.
u Purge consumables for this run—Change the setting to purge consumab les automatically after the
current run.
u Use run monitoring for this run—Change the setting to use run monitoring in BaseSpace.
Document # 15046563 v04
For Researc h Use Only. Not for use in diagnostic procedure s.
20

NextSeq 500 System Guide
8 Select Next.
Review Automated Check
The software performs an automated check of the system. During the check, the following indicators appear
on the screen:
u Gray checkmark —The check has not b een performed yet.
u Progress icon—The check is in progress.
u Green checkmark—The check passed.
u Red X —The check did not pass. For any items that d o not p ass, an action is required before you can
proceed. See
Resolve Automatic Check Errors
on p age 30.
To stop an automated check in progress, select the icon in the lower-right corner. To restart the check,
select the icon. The check resumes at the first incomplete or failed check.
To view the results of each individual check within a category, select the icon to expand the category.
Start the Run
When the automated check is complete, select Start. The sequencing run begins.
To configure the system to start the run automatically after a successful check, see
Set Run Setup Options
on p age 9.
Monitor Run Progress
1 Monitor run progress, intensities, and quality scores as metrics app ear on the screen.
Figure 18 Sequencing Run Pro gress and Metrics
A Run progress—Shows the current step and number of cycles completed for each read. The progress
bar is not proportional to the run rate of each step. Use the time remaining in the upper-right corner to
determine actual duration.
B Q-Score—Shows the distribution of quality scores (Q-scores). See
C Intensity—Shows the value of cluster intensities of the 90thpercentile for each tile. Plot colors indicate
each base: red is A, green is C, blue is G, and black is T. Colors match base indicators used in the
Sequencing Analysis Software (SAV).
D Cluster Density (K/mm²)—Shows the number of clusters detected for the run.
Quality Scoring
on page 41.
Document # 15046563 v04
For Researc h Use Only. Not for use in diagnostic procedure s.
21

NextSeq 500 System Guide
E Clusters Passing Filter (%)—Shows the percentage of clusters passing filter. See
Clusters Passing Filter
on page 41.
F Estimated Yield (Gb)—Shows the number of bases projected for the run.
G Flow cell image—Shows the current process on each lane pair. One lane pair is imaging when the other
lane pair is in a chemistry step.
NOTE
After you select Home, it is not possible to return to view run metrics. However, run metrics are accessible on
BaseSpace or viewable from a standalone computer using the Sequencing Analysis Viewer (SAV).
Cycles for Run Metrics
Run metrics appear at different points in a run.
u During the cluster generation steps, no metrics appear.
u The first 5 cycles are reserved for template generation.
u Run metrics appear after cycle 25, includ ing cluster density, clusters passing filter, yield, and quality
scores.
Data Transfer
Depending on the analysis configuration selected, an icon appears on the screen d uring the run to indicate
the data transfer status.
Status Illumina
Base Sp ace
Conn ecte d
Base Sp ace
Onsit e
Stand al one
Ins trument
Conn ecte d and transfe rrin g
data
Disc onne cted
If data transfer is interrupted during the run, data are stored temporarily on the instrument computer. When
the connection is restored, data transfer resumes automatically. If the connection is not restored before the
run ends, manually remove data from the instrument computer before a subsequent run can begin.
Run Copy Service
The NextSeq System Software Suite includes a Run Copy Service. RTA v2 req uests the service to copy files
from a source location to a destination location and the service processes copy requests in the order
received. If an exception occurs, the file is requeued for copy based on the number of files in the copy queue.
Sequencing Analysis Viewer
The Sequencing Analysis Viewer software shows sequencing metrics generated during the run. Metrics
appear in the form of plots, graphs, and tables b ased on data generated by RTA and written to InterOp files.
Metrics are updated as the run progresses. Select Refresh at any time during the run to view updated
metrics. For more information, see the
Sequencing Analysis Viewer User Guide (part # 15020619)
.
Document # 15046563 v04
For Researc h Use Only. Not for use in diagnostic procedure s.
22

NextSeq 500 System Guide
The Sequencing Analysis Viewer is included in the software installed on the instrument computer. You can
also install Sequencing Analysis Viewer on another computer linked to the same network as the instrument to
monitor run metrics remotely.
Automatic Post-Run Wash
When the sequencing run is complete, the software initiates an automatic post-run wash using the wash
solution provided in the buffer cartridge and NaOCl provided in the reagent cartridge.
The automatic post-run wash tak es approximately 90 minutes. When the wash is complete, the Home b utton
becomes active. Seq uencing results remain visible on the screen during the wash.
After the Wash
After the wash, the sippers remain in the down position to prevent air from entering the system. Leave the
cartridges in place until the next run.
Document # 15046563 v04
For Researc h Use Only. Not for use in diagnostic procedure s.
23

Chapter 4 Maintenance
Introduction 24
Perform a Manual Wash 24
Software Updates 26
Shut Down the Instrument 27
Introduction
Maintenance procedures include manual instrument washes and system software updates when available.
u Instrument washes—An automatic post-run wash after each sequencing run maintains instrument
performance. However, a manual wash is required periodically under certain conditions. See
Manual Wash
u Software updates—When an updated version of the system software is available, you can install the
on p age 24.
update automatically through a connection to BaseSpace or manually after downloading the installer from
the Illumina website. See
Software Updates
on p age 26.
Preventive Maintenance
Illumina recommends that you schedule a preventive maintenance service each year. If you are not under a
service contract, contact your Territory Account Manager or Illumina Technical Support to arrange for a
billable preventive maintenance service.
Perform a
Perform a Manual Wash
Manual washes are initiated from the Home screen. Wash options include the Quick Wash and the Manual
Post-Run Wash.
Was h Types Descri pti on
Quick Wash
Dur at ion: 20 mi nut es
Manual Pos t-Run Was h
Dur at ion: 90 mi nut es
A manual wash requires the reagent wash cartridge and buffer wash cartridge provided with the instrument,
and a used flow cell. A used flow cell can be used up to 20 times for instrument washes.
Figure 19 Reagent Was h Cartridge and Buffer Wash Cartridg e
Flushes the system with a user-supplied wash solution of laboratory-grade water and
Twe e n 20 ( buffer wash cartridge).
Required eve ry 14 da ys tha t th e instrumen t is idle or afte r a shutdown.
Flushes the system with a user-supplied wash solution of laboratory-grade water and
Twe e n 20 ( buffer wash cartridge) and 0.12% sodium h ypoch lorite(rea gent wash
ca rtridge).
Required if the au tomatic post-run wash was not performe d.
Document # 15046563 v04
For Researc h Use Only. Not for use in diagnostic procedure s.
24

NextSeq 500 System Guide
Prepare for a Manual Post-Run Wash
Us er-Sup p lied Consumables Vol ume and D es cr ipt ion
• Na OC l 1 ml, diluted to 0.12%
• 100% Twee n 20
• La bora tory-gra de wa te r
NOTE
Always use a fresh dilution of NaOCl prepared within the last 24hours. If you make a volume larger than 1ml,
store the remaining dilution at 2°C to 8°C for use within the next 24 hours. Otherwise, discard the remaining
dilution of NaOCl.
1 Combine the following volumes in a microcentrifuge tube to result in 1 ml 0.12% NaOCl:
u 5% NaOCl (24µl)
u Laboratory-grade water (976 µl)
2 Invert the tub e to mix.
3 Add 1 ml of 0.12% NaOCl to the reagent wash cartridge. The correct reservoir is equivalent to position
#28 on the prefilled cartridge.
Loade d onto the rea ge nt wa sh ca rtridge (po sition #28)
Used to make 125 m l 0.05% Twee n 20 w ash solution
Loade d onto the buf fe r wash c a rtridge (cen ter reservoir)
Figure 20 Load NaOCl
4 Combine the following volumes to result in a 0.05% Tween 20 wash solution:
u 100% Tween 20 (62 µl)
u Laboratory-grade water (125 ml)
5 Add 125 ml wash solution to the center reservoir of the buffer wash cartridge.
6 Select Perform Wash, and then select Manual Post-Run Wash.
Prepare for a Quick Wash
Us er-Sup p lied Consumables Volume and Descri pti on
• 100% Twee n 20
• La bora tory-gra de wa te r
Used to make 40 ml 0.05% Tween 20 wash solution
Loade d onto buffe r wash ca rtridge (c ente r re se rvoir)
1 Combine the following volumes to result in a 0.05% Tween 20 wash solution:
u 100% Tween 20 (20 µl)
u Laboratory-grade water (40 ml)
2 Add 40 ml wash solution to the center reservoir of the buffer wash cartridge.
3 Select Perform Wash, and then select Quick Wash.
Document # 15046563 v04
For Researc h Use Only. Not for use in diagnostic procedure s.
25

NextSeq 500 System Guide
Load a Used Flow Cell and the Wash Cartridges
1 If a used flow cell is not present, load a used flow cell. Select Load, and then select Next.
2 Remove the spent reagents container and discard the contents in accordance with applicable
standards.
WARNING
This set of reagents contains potentially hazardous chemicals. Personal injury can occur through
inhalation, ingestion, skin contact, and eye contact. Wear protective equipment, including eye
protection, gloves, and laboratory coat appropriate for risk of exposure. Handle used reagents as
chemical waste and discard in accordance with applicable regional, national, and local laws and
regulations. For additional environmental, health, and safety information, see the SDS at
support.illumina.com/sds.html.
3 Slide the empty spent reagents container into the buffer compartment until it stops.
4 Remove the used buffer cartridge from the previous run, if present.
5 Load the buffer wash cartridge containing wash solution.
6 Remove the used reagent cartridge from the previous run, if present.
7 Load the reagent wash cartridge.
8 Select Next. The prewash check begins automatically.
Start the Wash
1 Select Start.
2 When the wash is complete, select Home.
After the Wash
After the wash, the sippers remain in the down position to prevent air from entering the system. Leave the
cartridges in place until the next run.
Software Updates
Software updates are packaged in a software bund le called the System Suite, which includes the following
software:
u NextSeq Control Software (NCS)
u NextSeq recipes
u RTA2
u NextSeq Service Software (NSS)
u Sequencing Analysis Viewer (SAV)
u BaseSpace Broker
You can install software updates automatically using an internet connection or manually from a network or
USB location.
u Automatic updates—For instruments connected to a network with internet access, an alert icon
appears on the Manage Instrument button on the Home screen when an update is available.
Document # 15046563 v04
For Researc h Use Only. Not for use in diagnostic procedure s.
26

NextSeq 500 System Guide
u Manual updates—Download the System Suite installer from the NextSeq 500 support page on the
Illumina website.
Automatic Software Update
1 Select Manage Instrument.
2 Select Software Update.
3 Select Install the upd ate already downloaded from BaseSpace.
4 Select Update to begin the update. A dialog box opens to confirm the command.
5 Follow the prompts in the installation wizard:
a Accept the licensing agreement.
b Review the release notes.
c Review the list of software included in the update.
When the upd ate is complete, the control software restarts automatically.
NOTE
If a firmware update is included, an automatic restart of the system is required after the firmware is updated.
Manual Software Update
1 Download the System Suite installer from the Illumina website and save it to a network location.
Alternatively, copy the software installation file to a portable USB drive.
2 Select Manage Instrument.
3 Select Software Update.
4 Select Manually install the update from the following location.
5 Select Browse to navigate to the location of the software installation file, and then select Update.
6 Follow the prompts in the installation wizard:
a Accept the licensing agreement.
b Review the release notes.
c Review the list of software included in the update.
When the upd ate is complete, the control software restarts automatically.
NOTE
If a firmware update is included, an automatic restart of the system is required after the firmware is updated.
Shut Down the Instrument
1 Select Manage Instrument.
2 Select System Power Options.
3 Select Shut Down.
The Shut Down command safely shuts down the software and turns off instrument power. Wait at least
60 seconds before turning on the instrument again.
Document # 15046563 v04
For Researc h Use Only. Not for use in diagnostic procedure s.
27

NextSeq 500 System Guide
CAUTION
Do not
relocate the instrument. Moving the instrument improperly can affect the optical alignment and
compromise data integrity. If you have to relocate the instrument, contact your Illumina representative.
Document # 15046563 v04
For Researc h Use Only. Not for use in diagnostic procedure s.
28

Appendix A Troubleshooting
Introduction 29
Troubleshooting Files 29
Resolve Automatic Check Errors 30
Spent Reagents Container is Full 31
Rehybridization Workflow 31
Custom Recipes and Recipe Folders 33
System Check 33
RAID Error Message 35
Configure System Settings 35
Introduction
For technical questions, visit the NextSeq 500 sup port pages on the Illumina website. The support pages
provide access to documentation, downloads, and frequently asked questions.
Log in to your MyIllumina account for access to support bulletins.
For run quality or performance problems, contact Illumina Technical Support. See
page 50.
Consider sharing a link to the run summary in BaseSp ace with Illumina Technical Support to facilitate
troub leshooting.
Technical Assistance
on
Troubleshooting Files
An Illumina Technical Support representative might req uest copies of run-specific or scan-specific files to
troub leshoot issues. Typically, the following files are used for troubleshooting.
Key Fil e Fold er Des crip tion
Run information file
(RunInfo.xml)
Run parameters file
(RunPa rameters.xml)
RTA configu ration file
(RTAC onfiguration.xml)
Inte rOp files (*.bin) Inte rOp Binary reporting f iles used for Seque nc in g Ana lysis Viewe r.
Log file s Log s Log f iles desc ribe eac h step pe rformed by the instrument for e ach cycle,
Error log file s
(* ErrorLog* .txt)
Global log file s
(* GlobalLog*.tsv)
La ne log f ile s
(* La neL og*.txt)
Root folde r Contains the following informa tion:
• Run na me
• Nu mbe r of cyc le s in the run
• Nu mbe r of cyc le s in e a ch re ad
• Whether the read is an indexed read
• Nu mbe r of swaths and tile s on the flow cell
Root folde r Contains informa tio n abou t ru n para me ters a nd run com pon ents.
Informa tion inc ludes the RFID, seria l number, pa rt n umber, a nd expiration
date.
Data\ Intensities Contains the RTA configu ration settings for th e run.
The RTAC on figuration.xml file is crea te d a t the beginn in g of the run.
Inte rOp files are upda te d throu gh out the run.
an d list software and firmw are v ersion s u sed with the run. The file named
[In strumentN a me ]_Curren tH ardware.csv lists the serial numbers of
instrumen t c om pon ents.
RTALogs Log of RTA errors.
Error log file s a re update d whene ve r a n error occ urs.
RTALogs Log of a ll RTA events.
Global log file s a re update d throughout the run.
RTALogs Log RTA proce ssing events.
La ne log f ile s are upda te d throu ghout the run.
Document # 15046563 v04
For Researc h Use Only. Not for use in diagnostic procedure s.
29

NextSeq 500 System Guide
RTA Errors
To troubleshoot RTA errors, first check the RTA error log, which is stored in the RTALogs folder. This file is not
present for successful runs. Include the error log when reporting issues to Illumina Technical Sup port.
Resolve Automatic Check Errors
If errors occur during the automatic check, use the following recommended actions to resolve the error.
If a pre-run check fails, the reagent cartridge RFID is not locked and can be used for a subsequent run.
However, the RFID is locked after the foil seals have been pierced.
Syst em C hecks R ecommend ed Acti on
Doors Closed Make sure tha t the compa rtment doors a re close d.
Consu ma bles Loa ded Consumable sensors do not re gister. Make sure that eac h consu ma ble is properly
loa de d.
On the run setup screens, selec t Bac k to retu rn to th e loading step, a nd repe at run
setup.
Required Softwa re Critic al c omponen ts of the software are missing.
Instrume nt Disk Spac e The instrument hard drive doe s not h ave sufficient disk spac e to pe rform a run. It is
Ne twork C on ne ction The ne twork c onne ction ha s been inte rrupted. C he ck network status and the physic al
Ne twork Disk Spac e Either the BaseSpace acc ou nt is full or the network server is fu ll.
Pe rform a ma nua l software update to re store all software componen ts.
possible that data from a pre vious run did n ot transfe r.
Clea r ru n data from the instrumen t h ard drive.
ne twork conne ction .
Temperature Re commende d Action
Tempe rature Conta ct Illumina Te chnical Support.
Tempe rature Se nsors Conta c t Illumina Tec hn ic al S upport.
Fa ns Conta c t Illumina Tec hn ic al S upport.
Imagi ng Sy stem Recomme nded Act ion
Imagin g Limits Conta c t Illumina Tec hn ic al S upport.
Z Steps-a nd-Se ttle Contact Illum ina Tec hnic al S upport.
Bit Error Rate C on tact Illum ina Tec hnic al S upport.
Flow Cell Registra tion It is possible that th e flow c ell is not properly seated.
Reagent Deliv er y Recommend ed Act ion
Valve Response Conta c t Illumina Tec hn ic al S upport.
Pump Conta c t Illumina Tec hn ic al S upport.
Buf fe r Mec han ism Contac t Illumina Tec hnica l Support.
Spe nt Re agents Empty Empty the spent reagents con tainer and reload the empty con ta iner.
• On the run setup screen s, selec t Bac k to retu rn to the flow c ell step. The ima ging
compa rtment door opens.
• Unlo ad and reload the flow c e ll to make sure tha t it is sea te d properly.
Document # 15046563 v04
For Researc h Use Only. Not for use in diagnostic procedure s.
30

NextSeq 500 System Guide
Spent Reagents Container is Full
Always begin a run with an empty spent reagents container.
If you begin a run without emptying the spent reagents container, system sensors trigger the software to
pause the run when the container is full. System sensors cannot pause a run during clustering, paired-end
resynthesis, or the automatic p ost-run wash.
When the run pauses, a dialog box opens with options to raise the sippers and emp ty the full container.
Empty Spent Reagents Container
1 Select Raise Sipp ers.
2 Remove the spent reagents container and discard the contents app ropriately.
3 Return the empty container to the buffer compartment.
4 Select Continue. The run resumes automatically.
Rehybridization Workflow
A rehybridization run might be necessary if metrics generated during the first few cycles show intensities
below 2500. Some low-diversity libraries can show intensities below 1000, which is expected and cannot be
resolved with rehybridization.
NOTE
The End Run command is final. The run cannot be resumed, run consumables cannot be reused, and
sequencing data from the run are not saved.
When you end a run, the software performs the following steps before the run ends:
u Places the flow cell in a safe state.
u Unlocks the flow cell RFID for a later run.
u Assigns a rehybridization expiration d ate to the flow cell.
u Writes the run logs for completed cycles. A delay is normal.
u Bypasses the automatic post-run wash.
When you start a rehybridization run, the software performs the following steps to perform the run:
u Creates a run folder based on a unique run name.
u Checks that the flow cell rehybridization date has not expired.
u Primes reagents. A d elay is normal.
u Skips the clustering step.
u Removes the previous Read 1 primer.
u Hybridizes a fresh Read 1 primer.
u Continues through Read 1 and the remainder of the run based on specified run parameters.
Points to End a Run for Rehybridization
Later rehybridization is possible only if you end the run at the following points:
Document # 15046563 v04
For Researc h Use Only. Not for use in diagnostic procedure s.
31

NextSeq 500 System Guide
u After cycle 5—Intensities app ear after template registration, which requires the first 5 cycles of
sequencing. Although it is safe to end a run after cycle 1, ending after cycle 5 is recommended. Do not
end a run during cluster generation.
u Read 1 or Index 1 Read—End the run
saved for later rehybridization after p aired-end resynthesis begins.
before
paired-end resynthesis b egins. The flow cell cannot be
Required Consumables
A rehybridization run requires a new NextSeq reagent cartridge and buffer cartridge regardless of when the
run was stopped.
End the Current Run
1 Select End Run. When prompted to confirm the command, select Yes.
2 When promp ted to save the flow cell, select Yes. Saving the flow cell does not ensure that the current run
will be salvageable. Note the expiration date for rehybridization.
3 Remove the saved flow cell and set aside at 2°C to 8°C until you are ready to set up the rehyb ridization
run.
NOTE
You can store the flow cell up to 7 days at 2°C to 8°C in the plastic clamshell case
package. For best results, rehybridize the saved flow cell within 3 days.
without
the desiccant
Perform a Manual Wash
1 From the Home screen, select Perform Wash.
2 From the Wash Selection screen, select Manual Post-Run Wash. See
24.
NOTE
If you have not removed the reagent cartridge and buffer cartridge from the stopped run, you can use them
for the manual wash. Otherwise, perform the manual wash with the reagent wash cartridge and buffer wash
cartridge.
Perform a Manual Wash
on p age
Set Up a New Run on the BaseSpace Prep Tab
1 If the instrument is configured for BaseSpace or BaseSpace Onsite, set up a new run on the Prep tab
using the same parameters as the original run.
TIP
Click the Pools tab, select the appropriate Pool ID to retain the previous run settings, and then assign a
unique name for the new run.
Set Up a Run on the Instrument
1 Prepare a new reagent cartridge.
2 If the saved flow cell was stored , allow it to reach room temperature (15–30 minutes).
3 Clean and load the saved flow cell.
Document # 15046563 v04
For Researc h Use Only. Not for use in diagnostic procedure s.
32

NextSeq 500 System Guide
4 Remove the spent reagents container and discard the contents app ropriately, and then reload the
empty container.
5 Load the new buffer cartridge and reagent cartridge.
6 From the Run Setup screen, select from the following options:
u BaseSpace or BaseSpace Onsite—Select the run and confirm run parameters.
u Standalone—Enter the name of the run and specify the same parameters as the original run.
7 Select Next to proceed to the pre-run check and start the run.
Custom Recipes and Recipe Folders
Do not modify original recipes. Always make a copy of the original recipe with a new name. If an original
recipe is modified, the software updater can no longer recognize the recipe for later updates, and newer
versions are not installed.
Store custom recipes in the appropriate recipe folder. Recipe folders are organized as follows.
Custom
High—Customized recipes used with a high-output kit.
Mid—Customized recipes used with a mid-output kit.
High—Original recipes used with a high-output kit.
Mid—Original recipes used with a mid-output kit.
Wash—Contains the manual wash recipe.
System Check
A system check is not required for normal operation or instrument maintenance. However, an Illumina
Technical Sup port representative might ask you to perform a system check for troubleshooting purposes.
NOTE
If an instrument wash is due, perform the wash before starting a system check.
Starting a system check automatically closes the control software and launches the NextSeq Service
Software (NSS). The service software launches and opens to the Load screen, which is configured to use the
advanced loading option.
Figure 21 Available Sy stem Checks
Document # 15046563 v04
For Researc h Use Only. Not for use in diagnostic procedure s.
33

NextSeq 500 System Guide
Inactive checkb oxes on the Select screen indicate tests that require assistance from an Illumina field
representative.
Perform a System Check
1 From the Manage Instrument screen, select System Check. When prompted to close the control
software, select Yes.
2 Load the consumables as follows:
a If a used flow cell is not already on the instrument, load a used flow cell.
NOTE
Illumina recommends using a high output flow cell for system check purposes.
b Empty the spent reagents container and return it to the instrument.
c Load the buffer wash cartridge containing 120 ml laboratory-grade water in the center reservoir.
d Load the reagent wash cartridge. Make sure that the reagent wash cartridge is empty and clean.
3 Select Load. The software moves the flow cell and reagent wash cartridge into position. Select Next.
4 Select Next. The system check begins.
5 [Optional] When the system check is complete, select View next to the check name to view the values
associated with each check.
6 Select Next. The system check report opens.
7 Select Save to save the report to a zipped file. Navigate to a network location to save the file.
8 When finished, select Exit.
9 When promp ted to close the service software and restart the control software, select Yes. The control
software restarts automatically.
Motion Checks
Syst em C heck Descrip tion
BSM Checks the gain a nd distanc e of the Bottle Straw Mechanism ( BSM) to confirm tha t the module
is w orkin g properly.
FC LM & FAM Chec ks the gain and distan ce of the Flow Cell L oa d Mec ha nism (FCL M) an d F lu id Automa tion
Module (FAM) to confirm tha t the modu le s a re working properly.
Sta ge Te sts C hec ks the travel limits and performa nce of the XY -sta ge and 6 Z-stages, 1 for each camera .
Optics Check
Syst em C heck Descrip tion
Flow Cell
Registration
Measure s flow ce ll tilt on an optic al plan e, te sts ca me ra functiona lity, tests the ima ging modu le ,
an d verifies registration of the flow cell in th e correc t imagin g position.
Document # 15046563 v04
For Researc h Use Only. Not for use in diagnostic procedure s.
34

NextSeq 500 System Guide
Fluidics Checks
Syst em C heck Descrip tion
Valve Response Checks the ac curacy of the valv e and pu mp move me nts, and tests the pump syringe ran ge of
movem ent.
Pre ssure Decay Che cks th e lea k ra te of a sealed fluidic s syste m, which c on firms that the flow cell is properly
mou nted in the sequ enc ing position.
Flow Rate Chec ks the func tiona lity of the bubble sensors, which a re use d to de te ct the prese nce of air in
the reagen t line s. Measures th e flow ra tes to ch eck for occ lusions or leaks.
Thermal Checks
Syst em C heck Descrip tion
Fa ns Chec ks the speed of system f ans in pulse per minute (P PM) to c on firm th at fan s a re functionin g.
Fa ns tha t a re not functionin g return a negative valu e.
Thermal Probes C hec ks th e avera ge tempe rature of ea ch thermal se nsor. The rma l sensors that a re not
func tioning return a negative value.
RAID Error Message
The NextSeq computer is equipped with 2 hard drives. If a hard drive begins to fail, the system generates a
RAID error message and suggests that you contact Illumina Technical Support. Usually, a hard drive
replacement is required.
You can proceed with the run setup steps and normal op eration. The purpose of the message is for
scheduling service in advance to avoid interruptions in normal instrument operation. To proceed , select
Acknowledge and then Close.
Configure System Settings
The system is configured during installation. However, if a change is required or if the system has to be
reconfigured, use the system configuration options.
u Network Configuration—Provides op tions for IP address settings, domain name server (DNS) address,
computer name, and domain name.
u BaseSpace Configuration—Provides options for analysis methods, including BaseSpace, BaseSpace
Onsite, standalone mode, and run monitoring in BaseSpace, and settings for a default BaseSpace login
and instrument health reporting.
Set Network Configuration
1 From the Manage Instrument screen, select System Configuration.
2 Select Network Configuration.
3 Select Obtain an IP address automatically to obtain the IP address using DHCP server.
NOTE
Dynamic Host Configuration Protocol (DHCP) is a standard network protocol used on IP networks for
dynamically distributing network configuration parameters.
Document # 15046563 v04
For Researc h Use Only. Not for use in diagnostic procedure s.
35

NextSeq 500 System Guide
Alternatively, select Use the following IP address to connect the instrument to another server manually as
follows. Contact your network administrator for the ad dresses specific to your facility.
u Enter IP address. The IP address is a series of 4 numbers separated by a dot, similar to
168.62.20.37, for example.
u Enter the subnet mask , which is a subdivision of the IP network.
u Enter the default gateway, which is the router on the network that connects to the internet.
4 Select Obtain a DNS server address automatically to connect the instrument to the domain name server
associated with IP address.
Alternatively, select Use the following DNS server addresses to connect the instrument to the domain
name server manually as follows.
u Enter the preferred DNS add ress. The DNS address is the server name used to translate domain
names into IP addresses.
u Enter the alternate DNSaddress. The alternate is used if the preferred DNS cannot translate a
particular domain name to an IP address.
5 Select Save to advance to the Computer screen.
NOTE
The instrument computer name is assigned to the instrument computer at the time of manufacture. Any
changes to the computer name can affect connectivity and require a network administrator.
6 Connect the instrument computer to a domain or a workgroup as follows.
u For instruments connected to the internet—Select Member of domain, and then enter domain name
associated with the internet connection at your facility. Domain changes require an administrator user
name and password.
u For instruments not connected to the internet—Select Memb er of work group, and then enter a work
group name. The work group name is unique to your facility.
7 Select Save.
Set BaseSpace Configuration
1 From the Manage Instrument screen, select System Configuration.
2 Select BaseSpace Configuration.
3 Select from the following options to sp ecify a location where data are transferred for subsequent analysis.
u Select BaseSpace to send sequencing data to Illumina BaseSpace. [Optional] Select the Output
Folder checkbox, select Browse, and navigate to a secondary network location to save BCL files in
addition to BaseSpace.
u Select BaseSpace Onsite. In the Server Name field, enter the full path to your BaseSp ace Onsite
server. [Optional] Select the Outp ut Folder checkbox, select Browse, and navigate to a secondary
network location to save BCL files in add ition to the BaseSpace Onsite server.
u Select Standalone instrument to save data to a network location only. Select Browse and navigate to
a preferred network location. The control software generates the output folder name automatically.
u [Optional] Select Use Run Monitoring to monitor the run using visualization tools on BaseSpace. A
BaseSpace login and internet connection is required .
4 Select Save to advance to the BaseSpace screen.
5 If you selected BaseSpace or BaseSp ace Onsite, set the BaseSpace parameters as follows.
u Enter a BaseSpace User Name and Password to register the instrument with BaseSpace.
Document # 15046563 v04
For Researc h Use Only. Not for use in diagnostic procedure s.
36

NextSeq 500 System Guide
u Select Use default login and byp ass the BaseSpace login screen to set the registered user name and
password as the default login. This setting bypasses the BaseSpace screen during run setup.
6 Select Send instrument health information to Illumina to enable the Illuminia Proactive monitoring service.
The name of the setting in the software interface might be different from the name in this guide,
depending on the version of NCS in use.
With this setting turned on, instrument performance data are sent to Illumina. This data helps Illumina
troub leshoot more easily and detect potential failures, enabling proactive maintenance and maximizing
instrument uptime. For more information on the benefits of this service, see
Note (document # 1000000052503)
.
Illumina Proactive Technical
This service:
u Does not send sequencing data.
u Requires that the instrument be connected to a network with internet access.
u Requires that the instrument be connected to BaseSpace Sequence Hub.
NOTE
This option is not available for BaseSpace Onsite Sequence Hub.
u Is turned on by default. To opt out of this service, disable the Send instrument health information to
Illumina setting.
7 Select Save.
Document # 15046563 v04
For Researc h Use Only. Not for use in diagnostic procedure s.
37

Appendix B Real-Time Analysis
Real-Time Analysis Overview 38
Real-Time Analysis Workflow 39
Sequencing Outp ut Files 42
Flow Cell Tiles 42
Output Folder Structure 45
Real-Time Analysis Overview
The NextSeq 500 uses an implementation of Real-Time Analysis (RTA) software called RTA2. RTA2 runs on
the instrument computer and extracts intensities from images, performs base calling, and assigns a quality
score to the base call. RTA2 and the control software communicate through a web HTTP interface and
shared memory files. If RTA2 is terminated, processing does not resume and run data are not saved.
NOTE
Demultiplex performance is not calculated. Therefore, the Index tab in Sequencing Analysis Viewer (SAV)is
not populated.
RTA2 Inputs
RTA2 requires the following input for processing:
u Tile images contained in local system memory.
u RunInfo.xml, which is generated automatically at the beginning of the run and provides the run name,
number of cycles, whether a read is ind exed, and the number of tiles on the flow cell.
u RTA.exe.config, which is a software configuration file in XML format.
RTA2 receives commands from the control software about the location of RunInfo.xml and whether an
optional output folder is specified.
RTA v2 Output Files
Images for each channel are passed in memory as tiles. Tiles are small imaging areas on the flow cell defined
as the field of view by the camera. From these images, the software produces output as a set of qualityscored base call files and filter files. All other files are supp orting output files.
Fil e Ty pe Descri pti on
Base call file s Eac h tile that is ana lyzed is inc lu ded in a n aggregated base call ( *.bcl) file for e a ch lan e and for
ea ch cyc le . The aggregated ba se ca ll file con tains the base call a nd associated qua lity sc ore f or
every cluste r in that la ne.
Filter files Each tile produc es filte r informa tion that is aggregated into 1 f ilter (*.filter) file for eac h lan e. The
filter file specifie s whe ther a cluster passes filte rs.
Cluster loca tion files C luster loca tion (*.loc s) files contain the X,Y coordin ates for eve ry cluster in a tile. A cluster
loc ation f ile is generated for e ach lan e durin g template gen eration.
Base call inde x f iles A base ca ll index (*.bci) file is produc ed for e ach la ne to prese rve the origin al tile information. The
index file contains a pair of values for e ach tile, which are tile number and number of cluste rs f or
tha t tile.
Output files are used for downstream analysis in BaseSpace. Alternatively, use bcl2fastq conversion software
for FASTQ conversion and third-party analysis solutions. NextSeq files require bcl2fastq v2.0, or later. For the
latest version of bcl2fastq, visit the NextSeq downloads p age on the Illumina web site.
Document # 15046563 v04
For Researc h Use Only. Not for use in diagnostic procedure s.
38

NextSeq 500 System Guide
RTA v2 provides real-time metrics of run quality stored as InterOp files. InterOp files are a binary output
containing tile, cycle, and read-level metrics, and are required to view real-time metrics using the Sequencing
Analysis Viewer (SAV). For the latest version of SAV, visit the SAV downloads page on the Illumina website.
Error Handling
RTA2 creates log files and writes them to the RTALogs folder. Errors are recorded in an error file in *.tsv file
format.
The following log and error files are transferred to the final output destination at the end of processing:
u *GlobalLog*.tsv summarizes important run events.
u *LaneNLog*.tsv lists processing events for each lane.
u *Error*.tsv lists errors that occurred during a run.
u *WarningLog*.tsv lists warnings that occurred during a run.
Real-Time Analysis Workflow
Template ge nera tion M aps c luster loca tions.
Registration and in tensity
extrac tion
Phasing correc tion Correc ts the effe cts of phasing a nd pre phasing.
Base calling Determine s a ba se call for e ve ry cluster.
Quality scoring Assigns a qu ality score to e ve ry base call.
Records th e loc ation of ea ch c lu ste r on the flo w c e ll and de termin es a n inte nsity value for
ea ch cluster.
Template Generation
The first step in the RTAworkflow is template generation, which defines the position of each cluster in a tile
using X and Y coordinates.
Template generation requires image data from the first 5 cycles of the run. After the last temp late cycle for a
tile is imaged, the template is generated.
NOTE
To detect a cluster during template generation, there must be at least 1 base other than G in the first 5
cycles. For any index sequences, RTA v2 requires at least 1 base other than G in the first 2 cycles.
The template is used as a reference for the subsequent step of registration and intensity extraction. Cluster
positions for the entire flow cell are written to cluster location (*.locs) files, 1 file for each lane.
Registration and Intensity Extraction
Registration and intensity extraction begin after template generation.
u Registration aligns images produced over every subsequent cycle of imaging against the template.
u Intensity extraction determines an intensity value for each cluster in the template for a given image.
If registration fails for any images in a cycle, no base calls are generated for that tile in that cycle. Use the
Sequencing Analysis Viewer (SAV)software to examine thumbnail images and identify images that failed
registration.
Document # 15046563 v04
For Researc h Use Only. Not for use in diagnostic procedure s.
39

NextSeq 500 System Guide
Phasing Correction
During the sequencing reaction, each DNA strand in a cluster extends by one base per cycle. Phasing and
prephasing occurs when a strand becomes out of p hase with the current incorporation cycle.
u Phasing occurs when a base falls behind.
u Prephasing occurs when a base jumps ahead.
Figure 22 Phasing and Prephasing
A Read with a base that is phasing
B Read with a base that is prephasing.
RTA2 corrects the effects of phasing and prephasing, which maximizes the data quality at every cycle
throughout the run.
Base Calling
Base calling determines a base (A, C, G, or T) for every cluster of a given tile at a specific cycle. The NextSeq
500 uses 2-channel sequencing, which requires only 2 images to encode the data for 4 DNAbases, 1 from
the red channel and 1 from the green channel.
Intensities extracted from an image compared to another image result in 4 distinct populations, each
corresponding to a nucleotide. The base calling process determines to which population each cluster
belongs.
Figure 23 Visualization of Cluster Intensities
Document # 15046563 v04
For Researc h Use Only. Not for use in diagnostic procedure s.
40

NextSeq 500 System Guide
Table 1 Base Calls in 2-Channel Sequencing
Base Red Channel Green Channel Res ul t
A 1 (on ) 1 ( on) Clusters th at show inte nsity in both the red and gree n ch annels.
C 1 (on) 0 (o ff ) Clusters that show inte nsity in the red chan ne l only.
G 0 (off) 0 (off) Clu ste rs th at sh ow no inte nsity at a known cluster loc ation .
T 0 (off) 1 (on) Clusters that show inte nsity in the gree n chan ne l only.
Clusters PassingFilter
During the run, RTA2 filters raw data to remove reads that do not meet the data quality threshold.
Overlapping and low-quality clusters are removed.
For 2-channel analysis, RTA2 uses a population-based system to determine the chastity of a base call.
Clusters pass filter (PF) when no more than 1 base call in the first 25 cycles has a chastity of < 0.63. Clusters
that do not pass filter are not base called.
Indexing Considerations
The process for base calling index reads differs from base calling during other reads.
Index reads must begin with at least 1 base other than G in either of the first 2 cycles. If an Index Read begins
with 2 base calls of G, no signal intensity is generated. Signal must be present in either of the first 2 cycles to
ensure demultiplexing performance.
To increase demultiplexing robustness, select index sequences that provide signal in at least 1 channel,
preferably both channels, for every cycle. Following this guideline avoids index combinations that result in only
G bases at any cycle.
u Red channel—A or C
u Green channel—A or T
This base calling p rocess ensures accuracy when analyzing low-plex samples.
Quality Scoring
A quality score, or Q-score, is a prediction of the probability of an incorrect base call. A higher Q-score
implies that a base call is higher quality and more likely to be correct.
The Q-score is a compact way to communicate small error probab ilities. Q(X) represents quality scores,
where Xis the score. The following table shows the relationship between the quality score and error
probability.
Q-Score Q(X) Error Prob ab ili ty
Q40 0.0001 ( 1 in 10,000)
Q30 0.001 (1 in 1,000)
Q20 0.01 (1 in 100)
Q10 0.1 ( 1 in 10)
NOTE
Quality scoring is based on a modified version of the Phred algorithm.
Quality scoring calculates a set of predictors for each base call, and then uses the predictor values to look up
the Q-score in a quality table. Quality tables are created to provide optimally accurate quality predictions for
runs generated by a specific configuration of sequencing platform and version of chemistry.
Document # 15046563 v04
For Researc h Use Only. Not for use in diagnostic procedure s.
41

NextSeq 500 System Guide
After the Q-score is determined, results are recorded in the base call files.
Sequencing Output Files
Fil e Ty pe Fi le Descri pti on, Locat ion, and Name
Base call file s Ea ch tile analyze d is included in a ba se ca ll file, aggregated in 1 f ile for e ach lane , for e ach cycle. The
aggregated file contains the base call a nd enc ode d quality score for eve ry c lu ste r for that la ne.
Data\ Intensities\Ba se Calls\ L00[X]—File s a re store d in 1 folder for eac h lan e.
[C yc le ].bc l.bgzf , where [Cycle] represents the cycle number in 4 digits. Base call file s are com pressed
using bloc k gzip compression.
Base call inde x f ile For e a ch lan e, a bin ary in de x file lists the origina l tile information in a pair of value s for e ach tile, which
are tile number and number of cluste rs f or the tile .
Base call inde x f iles are cre ated the first time a base call file is create d for th at la ne.
Data\ Intensities\Ba se Calls\ L00[X]—File s a re store d in 1 folder for eac h lan e.
s_[Lane ].bc i
Cluster loca tion files For e ach tile, the XY coordin ates for eve ry cluster are aggregate d into 1 cluster loc a tion file for eac h
lane . Cluster loca tio n file s are the resu lt of templa te gene ration .
Data\ Intensities\L00[ X] —Files are store d in 1 folder for eac h lan e.
s_[lane].loc s
Filter files The filte r f ile spe cifies wh ethe r a cluster passed filters. Filter information is aggregate d into 1 filte r file
for eac h lan e and read.
Filter files a re generated at c ycle 26 using 25 c yc le s o f data .
Data\ Intensities\Ba se Calls\ L00[X]—File s a re store d in 1 folder for eac h lan e.
s_[lane].filter
Inte rOp files Binary reporting f ile s used for Seque nc in g Ana lysis View er (S AV). InterOp file s a re update d throughout
the run .
Inte rOp folder
RTA configu ration file Cre ated at th e beginnin g of th e run, th e RTA con figuration file lists settings for th e run.
Run information file Lists th e run name, n umber of cycles in each rea d, whe ther the rea d is an inde xed re ad, a nd the
Thumbna il files A thumbna il ima ge for eac h color cha nnel ( red a nd green) for tile s 1, 6, a nd 12 from all ca me ras, top
[Root folder] , RTAC onfigura tion.xml
numbe r of swaths and tiles on the flow ce ll. The run info f ile is crea te d a t the beginning of the run.
[Root folder] , RunIn fo.xml
an d bottom su rfa ces, a t e ve ry cyc le during ima ging.
Thumbna il_Images\L 00[X] \ C[X.1]—File s are stored in 1 folder for eac h lane an d 1 subf older for e a ch
cycle.
s_[lane]_[ tile]_[ chann el].jpg—In the file name , the tile is represented with a 5-dig it number tha t
indicates surfa c e, swath, camera, an d tile. F or more informa tion, see
Thumbna il Image Na ming
on page 45.
Tile Numbe ring
on page 44 a nd
Flow Cell Tiles
Tiles are small imaging areas on the flow cell defined as the field of view by the camera. The total number of
tiles depends on the number of lanes, swaths, and surfaces that are imaged on the flow cell, and how the
cameras work together to collect the images.
u High-output flow cells have a total of 864 tiles.
u Mid-output flow cells have a total of 288 tiles.
Document # 15046563 v04
For Researc h Use Only. Not for use in diagnostic procedure s.
42

NextSeq 500 System Guide
Table 2 Flow Cell Tiles
Flow Cell Component
La ne s 4 4 A lan e is a physic a l c han ne l with dedicate d input a nd output ports.
Surfa ces 2 2 The flow ce ll is imaged on 2 surfac e s, the top a nd bottom. The top
Swath s per lane 3 1 A swath is a column of tiles in a lan e.
Ca mera segme nts 3 3 Th e instrument uses 6 cameras to image the flow cell in 3 seg me nts
Tiles per swath per
ca me ra segme nt
Total tile s imaged 864 288 The total number of tile s e qu als lan es × su rfa ces × swaths × came ra
Hi gh
Output
12 12 A tile is the area on the flow cell tha t th e ca me ra see s as 1 ima ge .
Mid
Output
Descri pti on
surf ace of 1 tile is imaged, then the bottom surfac e of the sam e tile is
ima ge d before moving to the ne xt tile.
for eac h lan e.
segme nts× tile s per swath per segment.
Lane Numbering
Lanes 1 and 3, called lane pair A, are imaged at the same time. Lanes 2 and 4, called lane pair B, are imaged
when imaging of lane pair A is complete.
Figure 24 Lane Numbering
A Lane Pair A—Lanes 1 and 3
B Lane Pair B—Lanes 2 and 4
Swath Numbering
Each lane is imaged in 3 swaths. Swaths are numbered 1–3 for high output flow cells.
Figure 25 Swat h Numbering
Document # 15046563 v04
For Researc h Use Only. Not for use in diagnostic procedure s.
43

NextSeq 500 System Guide
Camera Numbering
The NextSeq 500 uses 6 cameras to image the flow cell.
Cameras are numb ered 1–6. Cameras 1–3 image lane 1. Cameras 4–6 image lane 3. After lanes 1 and 3 are
imaged, the imaging module moves on the X-axis to image lanes 2 and 4.
Figure 26 Camer a and Segment Numbering (High output flow cell shown)
Tile Numbering
There are 12 tiles in each swath of each camera segment. Tiles are numbered 01–12, regard less of swath
number or camera segment, and represented in 2 digits.
Figure 27 Tile Numbering
The complete tile number includes 5 digits to represent the location, as follows:
u Surface—1 represents the top surface; 2 represents the bottom surface
u Swath—1, 2, or 3
u Camera—1, 2, 3, 4, 5, or 6
u Tile—01, 02, 03, 04, 05, 06, 07, 08, 09, 10, 11, or 12
Example: Tile number 12508 indicates top surface, swath 2, camera 5, and tile 8.
The complete 5-digit tile number is used in the file name of thumbnail images and emp irical phasing files. For
more information, see
Sequencing Output Files
on p age 42.
Document # 15046563 v04
For Researc h Use Only. Not for use in diagnostic procedure s.
44

NextSeq 500 System Guide
Thumbnail Image Naming
A thumbnail image for each color channel (red and green) for tiles 1, 6, and 12 are generated from all
cameras, top and bottom surfaces, at every cycle during imaging. Thumbnail files are generated in the JPG
file format.
Each image is named with the tile number as indicated by the following naming convention, which always
begins with s_:
u Lane—1, 2, 3, or 4
u Tile—A 5-digit tile number, which indicates surface, swath, camera, and tile
u Channel—Red or green
Example: s_3_12512_green.jpg, which indicates lane 3, top surface, swath 2, camera 5, tile 12, and the
green channel.
Output Folder Structure
The control software generates the output folder name automatically.
Data
Intensities
BaseCalls
L001—Base call files for lane 1, aggregated in 1 file per cycle.
L002—Base call files for lane 2, aggregated in 1 file per cycle.
L003—Base call files for lane 3, aggregated in 1 file per cycle.
L004—Base call files for lane 4, aggregated in 1 file per cycle.
L001—An aggregated *.locs file for lane 1.
L002—An aggregated *.locs file for lane 2.
L003—An aggregated *.locs file for lane 3.
L004—An aggregated *.locs file for lane 4.
Images
Focus
L001—Focus images for lane 1.
L002—Focus images for lane 2.
L003—Focus images for lane 3.
L004—Focus images for lane 4.
InterOp—Binary files used by Sequencing Analysis Viewer (SAV).
Logs—Log files describing operational steps.
Recipe—Run-specific recipe file named with reagent cartridge ID.
RTALogs—Log files describing analysis steps.
Thumbnail_Images—Thumb nail images for tiles 1, 6, and 12 in each swath at every cycle.
RTAComplete.xml
Document # 15046563 v04
For Researc h Use Only. Not for use in diagnostic procedure s.
45

NextSeq 500 System Guide
RTAConfiguration.xml
RunInfo.xml
RunNotes.xml
RunParameters.xml
Document # 15046563 v04
For Researc h Use Only. Not for use in diagnostic procedure s.
46

Index
A
advanced loading option 9
analysis
output files 42
analysis, primary
signal purity 41
avatar name 9
B
base call files 42
base calling 40
indexing considerations 41
BaseSpace 1
login 16
transfer icons 22
BaseSpace configuration 19
buffer cartridge 7, 18
buffer compartment 2
C
camera numbering 44
chastity filter 41
cluster location
files 42
template generation 39
clusters passing filter 41
compatibility
RFID tracking 6
components
buffer compartment 2
imaging compartment 2
reagent compartment 2
status bar 2
configuration settings 35
consumables
buffer cartridge 7
flow cell 5
instrument maintenance 10
laboratory-grade water 10
reagent cartridge 6
sequencing runs 10
wash consumables 24-25
control software 3
customer support 50
customization 9
cycles in a read 13
D
data transfer
activity icons 22
run copy service 22
documentation 1, 50
E
empirical p hasing 40
errors
probability 41
errors and warnings 3
F
filter files 42
flow cell
alignment pins 16
cleaning 14
image file naming 45
imaging 44
lane numbering 43
lane pairs 5
overview 5
packaging 14
rehybridization 31
swath number 43
tile numbering 44
tiles 42
types 1
flow cell compartment door 15
folder location 20
formamide, position 6 19
H
help
documentation 1
help, technical 50
I
icons
errors and warnings 3
status 3
Illumina Proactive monitoring service 37
imaging compartment 2
Document # 15046563 v04
For Researc h Use Only. Not for use in diagnostic procedure s.
47

NextSeq 500 System Guide
imaging, 2-channel seq uencing 40
indexing considerations 41
instrument
configuration settings 35
power button 4
start up 8
instrument maintenance
consumables 10
instrument name, customizing 9
instrument wash 24
intensities 40
InterOp files 29, 42
L
laboratory-grade water guidelines 10
lane numbering 43
lane pairs 43
locs files 42
M
maintenance, preventive 24
manage instrument
customization 9
shut down 27
metrics
base calling 40
cluster density cycles 22
intensity cycles 22
O
Q
Q-scores 41
quality tab les 41
R
RAID error message 35
read length 12-13
reagent cartridge
overview 6
preparation 13
reservoir #28 25
reagent compartment 2
reagents
proper disposal 18
Real-Time Analysis software 1, 3
results 42
rehybridization, Read 1 31
RTA v2
termination 38
RTAv2
overview 38
run copy service 22
run duration 12
run metrics 21
run parameters
BaseSpace mode 19
edit parameters 19
standalone mode 20
run setup , advanced option 9
RunInfo.xml 29, 42
online training 1
output files 42
output files, sequencing 42
P
passing filter (PF) 41
phasing, prephasing 40
Phred algorithm 41
post-run wash 23
power button 4, 8
power switch 8
pre-run check 21
pre-run check errors 30
preventive maintenance 24
primer rehybridization 31
purge consumables 10
Document # 15046563 v04
For Researc h Use Only. Not for use in diagnostic procedure s.
S
sequencing
user-supplied consumables 10
Sequencing Analysis Viewer 12
sequencing workflow 39
shutting down the instrument 27
sodium hypochlorite, wash 25
software
automatic update 27
configuration settings 35
image analysis, base calling 3
initialization 8
instrument setup 9
manual update 27
on-instrument 3
run duration 12
48

NextSeq 500 System Guide
spent reagents
container full 31
disposal 16, 26
standalone configuration 20
status alerts 3
status bar 2
swath numbering 43
system check 33
system user name and password 8
T
technical assistance 50
template generation 39
thumbnail images 42
tile numbering 44
troub leshooting
contact options 29
low quality metrics 31
pre-run check 30
run-specific files 29
spent reagents container 31
system check 33
run metrics 21
sequencing 39
sodium hypochlorite 25
spent reagents 16
standalone mode 20
U
updating software 26
user-supplied consumables 10
user name and password 8
W
wash
automatic 23
manual wash 24
user-supplied consumables 24
wash components 24
workflow
advanced loading option 9
BaseSpace login 16
BaseSpace mode 19
buffer cartridge 18
flow cell 16
flow cell compartment door 15
flow cell p reparation 14
indexing considerations 41
overview 13
pre-run check 21
reagent cartridge 13, 18
run duration 12
Document # 15046563 v04
For Researc h Use Only. Not for use in diagnostic procedure s.
49

Technical Assistance
For technical assistance, contact Illumina Technical Support.
Web sit e:
Email :
Illumina Customer Support Telephone Numbers
Region Toll Free Regional
North Ameri ca
Austr al ia
Austr ia
Belgi um
Chi na
Denmark
Finland
France
Germany
Hong Kong
Ireland
Italy
Japan
Netherl ands
New Zealand
Norway
Singap ore
Spain
Swed en
Switzerl and
Taiwan
Uni ted Kingdom
Other countri es
www .illumina.com
techsupport@ illum ina.com
+1.800.809.4566
+1.800.775.688
+43 800006249 +43 19286540
+32 80077160 +32 34002973
400.066.5835
+45 80820183 +45 89871156
+358 800918363 +358 974790110
+33 805102193 +33 170770446
+49 8001014940 +49 8938035677
800960230
+353 1800936608 +353 016950506
+39 800985513 +39 236003759
0800.111.5011
+31 8000222493 +31 207132960
0800.451.650
+47 800 16836 +47 21939693
+1.800.579.2745
+34 911899417 +34 800300143
+46 850619671 +46 200883979
+41 565800000 +41 800200442
008066517 52
+44 8000126019 +44 2073057197
+44.1799.534000
Safety data sheets (SDSs)—Available on the Illumina web site at support.illumina.com/sds.html.
Product documentation—Available for download in PDF from the Illumina website. Go to
support.illumina.com, select a product, then select Documentation & Literature.
Document # 15046563 v04
For Researc h Use Only. Not for use in diagnostic procedure s.
50

Document # 15046563 v04
Ill umina
5200 Il lumina Way
San Diego, Ca li forni a 92122 U.S .A .
+1. 800. 809. ILMN (4566)
+1. 858. 202. 4566 (outside Nort h A meric a)
techsupport @il lum ina.com
www .i ll umi na.com
For Researc h Use Only. Not for use in diagnostic procedure s.
© 2018 Illum ina, Inc. All righ ts reserved.
 Loading...