

Page 1
User’s Guide for Model ITWFV678 v2096-01
Page 2

IMPORTANT SAFETY
INSTRUCTIONS
• Read these Instructions.
• Keep these Instructions.
• Heed all Warnings.
• Follow all instructions.
• Do not use this apparatus near water.
• Clean only with a dry cloth.
• Do not block any ventilation openings.
Install in accordance with the
manufacturer’s instructions.
• Do not install near any heat sources such
as radiators, heat registers, stoves, or
other apparatus (including ampliers) that
produce heat.
• Do not defeat the safety purpose of the
polarized or grounding - type plug. A
polarized plug has two blades with one
wider than the other. A grounding type
plug has two blades and a third grounding
prong. The wide blade or the third prong
are provided for your safety. When the
provided plug does not t into your outlet,
consult an electrician for replacement of
the obsolete outlet.
• Protect the power cord from being walked
on or pinched particularly at plugs,
convenience receptacles, and the point
where they exit from the apparatus.
• Only use attachments/accessories
specied by the manufacturer.
• Unplug this apparatus during lightning
storms or when unused for long periods
of time.
• Refer all servicing to qualied service
personnel. Servicing is required when
the apparatus has been damaged in any
way, such as power-supply cord or plug
is damaged, liquid has been spilled or
objects have fallen into the apparatus, the
apparatus has been exposed to rain or
moisture, does not operate normally, or
has been dropped.
• Use only with a cart, stand, tripod,
bracket, or table specied by the
manufacturer, or sold with
the apparatus. When a
cart is used, use caution
when moving the cart/
apparatus combination to
avoid injury from tip-over.
BATTERY WARNINGS
• WARNING: Do not ingest battery,
Chemical Burn Hazard.
• If the remote control supplied with this
product contains a coin/button cell
battery and the coin/button cell battery is
swallowed, it can cause severe internal
burns in just 2 hours and can lead to
death.
• Keep new and used batteries away from
children. If the battery compartment does
not close securely, stop using the product
and keep it away from children.
• If you think batteries might have been
swallowed or placed inside any part of the
body, seek immediate medical attention.
• CAUTION: Danger of explosion if battery is
incorrectly replaced. Replace only with the
same or equivalent type.
• WARNING: There is a danger of explosion
if you attempt to charge standard Alkaline
batteries in the unit. Only use rechargeable
NiMH batteries.
• Battery shall not be exposed to excessive
heat such as sunshine, re, or the like.
• Do not mix old and new batteries.
• Completely replace all old batteries with
new ones.
• Do not mix alkaline, standard (carbonzinc), or rechargeable (ni-cad, ni-mh, etc)
batteries.
• Batteries should be recycled or disposed
of as per state and local guidelines.
2
Page 3

SAFETY WARNINGS
• WARNING: To prevent re or shock
hazards, do not expose this unit to rain
or moisture.
• Clean only with a dry cloth. Do not clean
with liquid cleaners or damp cloth.
• Do not use with devices that should not be
used unsupervised.
• CAUTION: TO REDUCE THE RISK OF
ELECTRIC SHOCK, USE ONLY INDOORS.
• Do not use in a bathroom or other location
where it may come into contact with water
or splashing.
• WARNING: Where the mains plug
or appliance coupler is used as the
disconnect device, such disconnect
device shall remain readily operable.
• Risk of electric shock. Grounding
continuity must be maintained.
• Only use with the included power supply
or a UL/ETL certied power supply of the
same specications.
WARNING: This product can
expose you to chemicals including
lead, which is known to the State of
California to cause cancer and birth
defects or other reproductive harm.
For more information go to: www.
P65Warnings.ca.gov This product
meets and complies with all Federal
regulations.
FCC WARNINGS
WARNING: To assure continued operation,
follow the attached installation instructions and
use only shield cables when connecting to
other devices. Changes or modications not
expressly approved by the party responsible for
compliance could void the user’s authority to
operate the equipment.
NOTE: This equipment has been tested
and found to comply with the limits for a
Class B digital device, pursuant to Part 15
of the FCC Rules. These limits are designed
to provide reasonable protection against
harmful interference in a residential installation.
This equipment generates, uses, and can
radiate radio frequency energy and, if not
installed and used in accordance with the
instructions, may cause harmful interference
to radio communications. However, there is
no guarantee that interference will not occur
in a particular installation. If this equipment
does cause harmful interference to radio or
television reception, which can be determined
by turning the equipment off and on, the user is
encouraged to try to correct the interference by
one or more of the following measures:
• Reorient or relocate the receiving antenna.
• Increase the separation between the
equipment and receiver.
• Connect the equipment into an outlet on
a circuit different from that to which the
receiver is connected.
• Consult the dealer or an experienced
radio/TV technician for help.
3
Page 4

TABLE OF CONTENTS
Introduction
Features – 5
Includes – 5
Overview
Speaker Controls & Inputs – 6
Control Functions – 7
Connection/Alexa Indicator
Light – 7
Overview
Remote Control – 8
Wall Mount Bracket Installation – 9
Setup
1. Power – 10
2. Alexa App – 11
3. iLive Wi-Fi App – 11
4. Connect to Wi-Fi – 12
5. Link Your Amazon Account – 15
6. Things to Try with Alexa – 17
iLive Wi-Fi App
Music Player Screen – 18
Menu Screen – 19
Device List Screen – 20
Multi-room Play – 21
Multi-channel Play with Multiple
Speakers – 21
Internet Music Services – 22
Spotify Connect
Listen Out Loud with Spotify
Connect – 23
Other Ways to Play
Connecting HDMI – 24
Optical Input – 24
Aux In (Stereo RCA Inputs) – 24
Line In – 26
Troubleshooting
Troubleshooting Guide – 27
Customer Support
Contact Information – 28
International Support – 28
Warranty Information – 28
4
Page 5

INTRODUCTION
Make your home smar ter with the Wireless 2.1 Sound Bar with Amazon Alexa. Link
Amazon Alexa with the speaker and ask Alexa to play music, read the news, check
weather, control your smart home and more. Pair up to 6 speakers together on
Wi-Fi for whole home audio or connect it to your TV for seamless integration with
your entertainment center.
Features
» Voice-activated Amazon Alexa cloud-based voice service
» Multi-room and multi-user capable
» Free iLive Wi-Fi app download
» Built-in Wi-Fi
» 2 Built-in microphones for far-eld voice recognition
» 37” length
» HDMI Input (ARC supported)
» Optical Audio Input
» RCA Stereo Audio Input (Aux In)
» 3.5mm Audio Input (Line In)
» Remote with pre-installed CR 2025 battery
Includes
» AC/DC power adapter
» RCA Stereo Audio cable
» Wall Mounting hardware and instructions
» User’s guide
» Warranty
Speci cations, software updates, and third par ty content are subject to change without prior notice.
5
Page 6
OVERVIEW
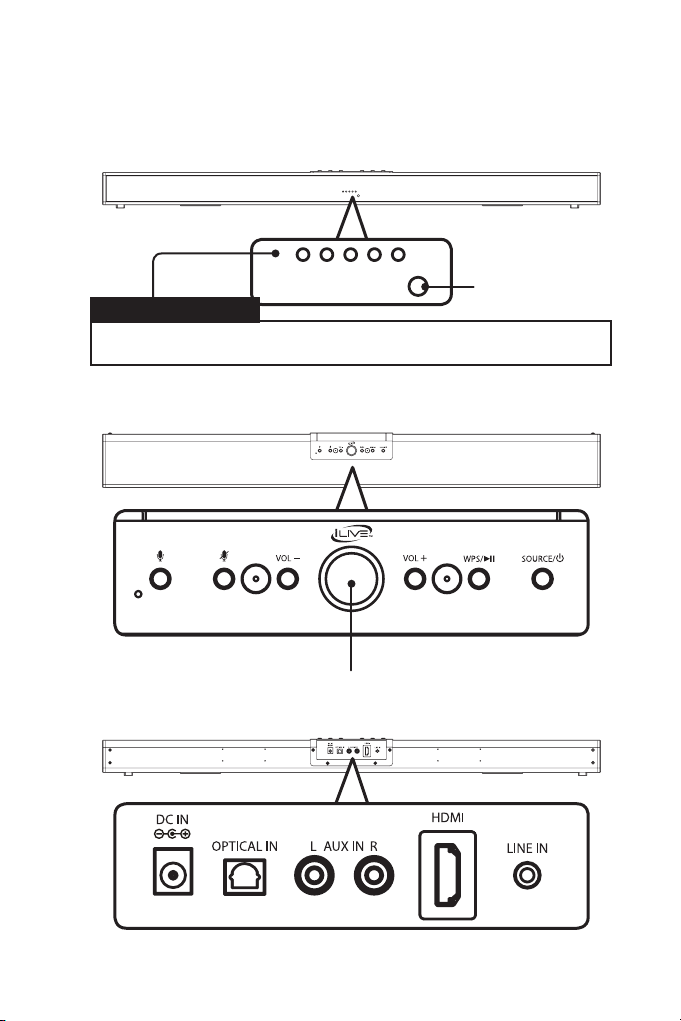
Speaker Controls & Inputs
Front
Mode Indicator Lights
Power Standby
Red Light
Top
Wi-Fi
White Light
Optical
Orange Light
HDMI
Yellow Light
IR Remote Sensor
Aux /Line I n
Green Light
Rear
Connection/Alexa Indicator Light
6
Page 7
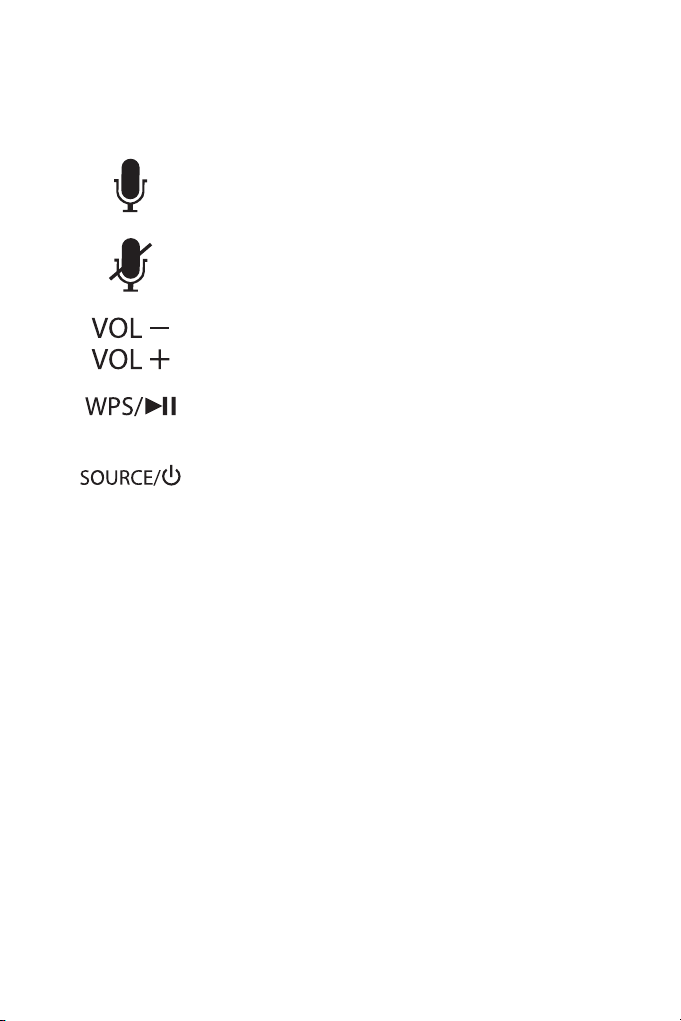
Control Functions
» Press to activate Amazon Alexa and say a command. You
can also just say, “Alexa..”, within range of the speaker’s
microphones.
» Press to mute the microphones and disable Amazon Alexa.
Press and hold for 10 seconds to reset the speaker.
» Press to adjust the volume up or down. You can also ask
Alexa to set the volume level by saying, “Alexa, set volume
to...”
» In Wi-Fi Mode (white Mode LED), press and hold to begin
connecting to a Wi-Fi network.
Short press to play or pause audio playing in the iLive app.
» Press and hold to power the speaker ON or OFF.
Press to switch between Wi-Fi and Aux modes.
Connection/Alexa Indicator Light
» Alexa Indicators
No Light - Amazon Alexa standing by
Alternating Light & Dark Blue - Amazon Alexa listening/responding
Red - Amazon Alexa and microphones muted
» Connection Indicators
Flashing White (fast) - Connecting to Wi-Fi
No Light - Wi-Fi Standby Mode (Mode Indicator Light will display white for Wi-Fi)
7
Page 8

OVERVIEW
Remote Control
Press to powe r ON/OFF.
Press to mute audio.
Press to select Wi-Fi Mode.
Press to select Optical Audio
Press to select HDMI Mode.
Press to select Aux In Mode.
Press to select Line In Mode.
Music/Movie/Dialog
Press to select equalizer prole.
Skip Back/Fwd
Press to skip the selected track.
Press to play or pause the
Power
Mute
WiFi
Optical
Mode.
HDMI
Aux
Line In
Play/Pause
selected track
Volume −/+
Battery CompartmentBattery Replacement Diagram
8
Page 9
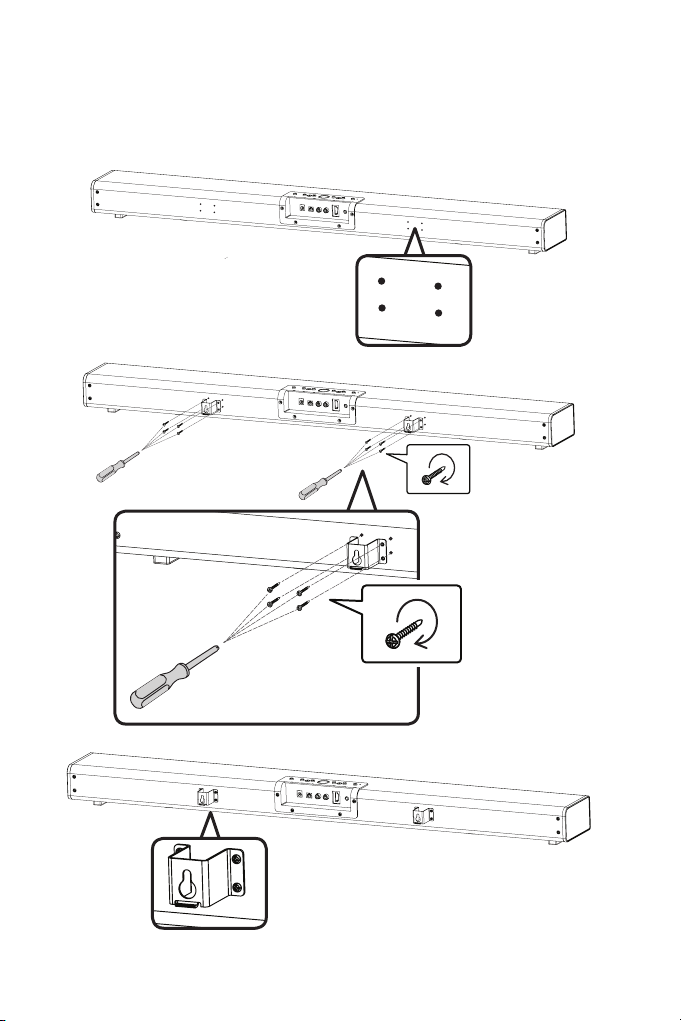
Wall Mount Bracket Installation
Step 1
Find the mounting bracket holes on the
rear of the sound bar, 4 per side.
Step 2
Using a
sc r ew dri ver,
attach the
mounting
brackets to the
sound bar.
Installation Complete
9
Page 10

SETUP
1. Power
Use an AC/DC Power adapter (included) to connect to a standard wall outlet.
DC Power port on the rear of the sound bar
10
Page 11

2. Alexa App
Download the Ama zon Alexa app to your device by scanning the appropriate QR
code below or search for the Amazon Alexa app in the Google Play™ Store, or
Apple App Store
®
.
AppleAndroid
The Ama zon Alexa app connects your sound bar to Alexa’s voice ser vices. It’s
also where you can see an over view of your requests and manage your contacts,
lists, news, music, and settings.
Once downloaded, open the Alexa app and log into your Amazon account. If you
do not already have an Amazon account, choose “Create a new Amazon account”
and enter the requested info. Once logged in, the app will prompt you for setup.
You cannot use Alexa Voice Services if you aren’t logged into a n Amazon
accou nt. The speaker mus t be in Wi-Fi Mod e/Clou d Play to use Alexa
Voice Services.
3. iLive Wi-Fi App
Download the iLive app to your device by scanning the QR codes below or search
for the iLive Wi-Fi app in the G oogle Play™ Store, or Apple App Store
®
.
AppleAndroid
The iLive Wi-Fi app lets you play music and audio from streaming services like
Spotif y, iHeartRadio and others. It also controls the speaker’s other functions,
such as Multi-room play, Multi-channel play, etc.
Note: This app is designed for mobile devices onl y, such as
smartphones or Wi-Fi enabled tablets. It is not available for use on
regular desktop or laptop computers.
11
Page 12

SETUP
4. Connect to Wi-Fi
To use the sound bar’s Wi-Fi features, the sound bar and your mobile device
must both be connected to a Wi-Fi network. T he app will guide you through the
proces s, follow the on-screen instructions and have your network password ready.
After the initial connection, the speaker will remember the Wi-Fi network and
automatically connect to it when it is in Wi-Fi Mode. If the speaker should become
disconnected or will not connect normally, repe at the steps below.
Initial Wi-Fi Connection
Note: If you have a dual band wireless router, be sure to connect to the 2.4GHz
band, not the 5GHz band.
1. Press and hold the Power button to power on the sound bar. A voice will
announce, “Power On, Wi-Fi Mode”. Following this, you’ll hear a chime and the
voice will announce, “Entering Setup Mode”. It may take the speaker a minute or
two to run through this process, please be patient.
2. The speaker is now ready for setup. Open the iLive Wi-Fi app on your device
and press “Search”, then “Add Device” (Image A, B, below).
A. B.
12
Page 13

3. From the drop down menu, select the ITWFV678 speaker, then press “Connect
Speaker” (Image C, below).
4. The app will direct you to your mobile device’s Wi-Fi Settings Menu to connect
directly to the speaker. Press “Settings” (Image D, below) to go to your mobile
device’s Wi-Fi settings menu, then select ITWFV678_XXXX and return to the app
when you are connected.
Setup inst ruct ions continued on the nex t page.
C. D.
13
Page 14

SETUP
4. Connect to Wi-Fi
Initial Wi-Fi Connection (continued)
5. Once you have returned to the app, select your Wi-Fi network/router and enter
the password, then press “Continue”. This will connect your mobile device and
the speaker to your Wi-Fi (Image E, below).
6. The app will display its progress as it congures the speaker and your Wi-Fi
network. When this is complete, a voice will announce the successful connection
and the Connection LED will turn off. Press “Next” to proceed to Amazon
Alexa Setup (Image F, below).
E. F.
14
Page 15

5. Link Your Amazon Account
1. When the Wi-Fi connection is complete, the app will prompt you to link the
speaker with the Amazon Alexa app on your device (Image G, below). If you do
not have the Amazon Alexa app on your device, refer to the instructions
on pg. 11. NOTE: If you do not want to login to your Amazon account and link
Alexa to the speaker at this time, press “Cancel”. You can complete it later by
following the steps on the next page.
2. Enter your Amazon account information to complete setup and begin using
Amazon Alexa with your speaker (Image H, below).
G. H.
15
Page 16

SETUP
5. Link Your Amazon Account
Amazon Alexa Manual Setup
1. From the Music Player Screen, swipe right to access the Menu Screen (Image I,
below).
2. Select Amazon Alexa from the list (Image J, below).
3. Sign into your Amazon account when prompted.
I. J.
Swipe right
for Menu
Screen
16
Page 17

6. Things to Try with Alexa
Note: Amazon A lexa Voice Ser vices are only accessib le whe n the sound
bar is in Wi-Fi M ode, also known as Cloud Play. The Mode Indicator Light
will shine white when it is in Wi-Fi Mode.
Now that you’re connected, try interacting with Alexa. Start by saying “Alexa,”
followed by a command or question. Here are some examples:
» “Alexa, tell me a joke.”
» “Alexa, what’s in the news?”
» “Alexa, what can you do?”
While the speaker is on (in Wi-Fi mode) and the Connection LED is white, Alexa is
in standby mode, awaiting a command or que stion from you. All you need to do
is say “Alexa...”, within range of the speaker’s microphones and she will respond.
When Alexa is listening and re sponding to your commands, the Connection LED
on the speaker will change from white to blue. You can also press the
the spea ker to manually activate Alexa.
You can mute Alexa and disable the microphones by pressing the
Connection LED will change to red while muted. In this mode, the speaker’s audio
functions will still work normally.
Setting Time Zone & Location
To get the most accurate information from Alexa for things like weather, movie
times, etc. you need to make sure your current location is correct. Alexa should
automatically sync to your location and time zone, however, if you encounter
problems, you can manually adjust your location/time zone from the Alexa App
» Open the Alexa App and press the
Alexa Devices > ITWFV678 > Device Location.
Menu icon on the Home page, then select
button on
button. The
17
Page 18

ILIVE WI-FI APP
Music Player Screen
1
Swipe right for
Menu Screen
3
2
Swipe right
for Device
Menu
4
5
1. Music Directory
2. Connection Mode
3. Repeat/Shufe
4. Volume
5. Play Controls
18
Page 19

Menu Screen
1
2
3
4
5
6
1. Search
Search for songs, albums and artists.
2. Favorites
Open songs, artists, albums, or
stations that you have saved.
3. My Music
Open music that is stored on your
mobile device.
4. Internet Music Services
Available third-party music apps.
5. Cloud Play (Wi-Fi)
Press to enable Wi-Fi Mode
(MUST BE ON TO USE ALEX A).
6. Audio Inputs
Select different audio input sources.
19
Page 20

ILIVE WI-FI APP
Device List Screen
1
2
3
1. Add Device
Add more speakers to the list of
available devices.
2. Speaker Settings
Rename a speaker, set preset
stations, and nd additional
information on a speaker.
4
3. Audio Channel
Press to set audio channels for the
speaker: L / R / LR (lef t/right/stereo).
4. Play All
Play music on all connected
speakers.
20
Page 21

Multi-room Play
Using Wi-Fi, users can pair up to six multi-room speakers throughout their home
for multi-room audio. Place speakers in any room and use the app to play music
from the speaker of your choice. You can play dif ferent songs from different
speakers, set individual volume levels, or you can link all of the speakers to play
the same song.
Use the iLive Wi-Fi app along with any of the following iLive products: ISWFV387,
ISWF476, ISWF576 ISWF776, ITWF V678 (this unit), ICWFV428, IKBFV378.
Multi-mode
» In the Device List, press and hold a device icon for two seconds, then drag
towards another device to link the speakers together.
Solo-mode
» Press and hold the device icon, then drag downwards past the dotted line.
Multi-channel Play with Multiple Speakers
You can use two or more speakers in one room for a surround sound effect by
setting the Audio Channel selector to “LR” (stereo) for all of the speakers.
You can also use two speakers at once for stereo play by setting the Audio
Channel selector to “L” and “R” for the “left” and “right” speaker respectively.
21
Page 22

ILIVE WI-FI APP
Internet Music Services
The iLive Wi-Fi app suppor ts and can play songs from Spotify, iHear tRadio, and
others. Similar to the setup process for Alexa, some of these third-party ser vices
will prompt you to log in and link your account with the iLive Wi-Fi app so that it
can access media you already have saved with that se rvice.
22
Page 23

SPOTIFY CONNECT
Listen Out Loud with Spotify Connect
1. Connect your ITWFV678 to your wi network.
2. Open up the Spotify app on your phone, tablet or laptap using the same Wi-Fi
network.
3. Play a song and select Devices Available.
4. Select your ITWFV678 and start listening.
Licences
The Spotify Sof tware is subject to third party licenses found here:
www.spotify.com/connect/third-party-licenses.
23
Page 24

OTHER WAYS TO PLAY
Connecting HDMI
Requires a HDMI cable (not included) and a device that supports HDMI.
Use with Audio Return Channel (ARC) to connect to a compatible audio receiver
with a standard HDMI cable, no stereo or optical audio cable s will be ne eded.
Note: ARC may not support surround sound (5.1) or other audio with more than
two channels (2.0). Need to use HDMI cable with 1.4 or higher which can suppor t
ARC.
1. Using an HDMI cable, connect the HDMI input on the television to the HDMI
output on your external media player, streaming, or gaming device.
2. Press the Source button to switch to the connected input HDMI.
Optical Input
Requires: An audio source with an Optical Audio Output and a Digital Optical
Audio Cable (included).
1. Using a Digital Optical Audio Cable, connect the Optical Output on your audio
source (TV, amplier, etc.) to the Optical Input on the sound bar
2. Power ON the sound bar and press Optical on the remote or Source on the
sound bar to select Optical/SPDIF Mode. A voice will announce the source mode
and the indicator will turn orange.
3. On the connected audio source (TV, amplier, etc.), make sure the audio settings
are set to PCM or Optical Audio.
4. Audio played through the connected audio source (TV, amplier, etc.) should now
be heard through the speakers.
Important tips for optical audio:
» Use the correct toslink cable and make sure that it is rmly seated in both source
and sound bar sockets.
» Optical audio output is activated from the audio source (a red light should be
visible from the toslink socket). It may be labeled SPDIF in the setting menu of
the source.
» The optical output source should be set to output PCM and not Dolby Digital.
Aux In (Stereo RCA Inputs)
Requires RCA stereo audio cable (not included). When conne cting an RCA stereo
audio cable (Red/White), match the colored plugs to their corresponding ports.
1. Connect the RCA stereo audio cable to the Aux Inputs on the sound bar and the
audio outputs on a television or other audio source.
2. Power ON the sound bar and press Source on the sound bar or Aux/Line In on
the remote to select Aux In Mode. A voice will announce the source mode and the
indicator will turn green.
3. Audio played through the television or other source should now be heard through
the speakers.
24
Page 25

25
Page 26

OTHER WAYS TO PLAY
Line In
Requires a 3.5mm audio cable (not included).
» Power on the speaker, then press the Power/Source button again to select
Line In Mode, indicated by a solid green LED light and a voice prompt.
» Connect a 3.5mm audio cable to the 3.5mm Line In on the sound bar and the
audio output/headphone jack on an audio device.
» Audio played through the connected device will now be heard through the
speakers. Use the controls on the connected device to play, pause, or skip
selected tracks.
26
Page 27

TROUBLESHOOTING
Troubleshooting Guide
If you are experiencing dif cult y with your speaker, consult the guide below for a
list of possible problems and solutions.
PROBLEM POSSIBLE SOLUTION
Cannot complete
Wi-Fi network setup
Intermittent audio/Audio
doesn’t play
White noise/Speaker will
not function properly
» Make sure the sound bar has power.
» Make sure you are connecting to the correct
Wi-Fi network.
» If using a dual band wireless router, be sure to
use the 2.4GHz band.
» Be sure to enable Wi-Fi on your mobile device.
» Test your internet connection by loading/reloading
a web page. If you cannot load the page, you
may need to restart your router.
» Uninstall then reinstall the app, power the speaker
OFF, then ON, and restart setup.
» Make sure the volume on the sound bar and your
connected device is turned up to an audible level.
» Interference or weak Wi-Fi signal may be
interrupting reception (possible sources could be
microwaves, cell phone signals, etc.). Move the
system to another location to test.
» Stop other applications that may be streaming
media from the internet.
» Power the sound bar OFF, then ON again.
» Hold down the
the speaker.
button for 10 seconds to reset
27
Page 28

CUSTOMER SUPPORT
Sustain for Tomorrow
Contact Information
Website: www.iLiveElectronics.com
Email Support: prodinfo@dpiinc.com
Email Parts: partsinfo@dpiinc.com
Phone Support: 1-888-999-4215
Warranty Information
For Warranty Information and the most
up-to-date version of this User’s Guide,
go to www.iLiveElectronics.com.
International Support
To download this User’s Guide in English, Spanish, or French, or to get answers to
frequently asked questions, visit the support section at:
www.iLiveElectronics.com
Para descargar este Manual del Usuario en inglés, español y francés, o para
obtener respuestas a preguntas frecuentes, visite la se cción de apoyo en:
www.iLiveElectronics.com
Pour télécharger ce guide de l’utilisateur en anglais, espagnol ou français, ou pour
obtenir des réponses à des questions fréquemment posées, consultez la rubrique:
www.iLiveElectronics.com
Made
Green
Copyright © 2018 Digital Products International (DPI, Inc.)
Amazon, Alexa and all related logos are trademarks of Amazon.com, Inc. or its afliates.
All other trademarks appearing herein are the property of their respective owners.
Protect for Today
28
 Loading...