

Page 1
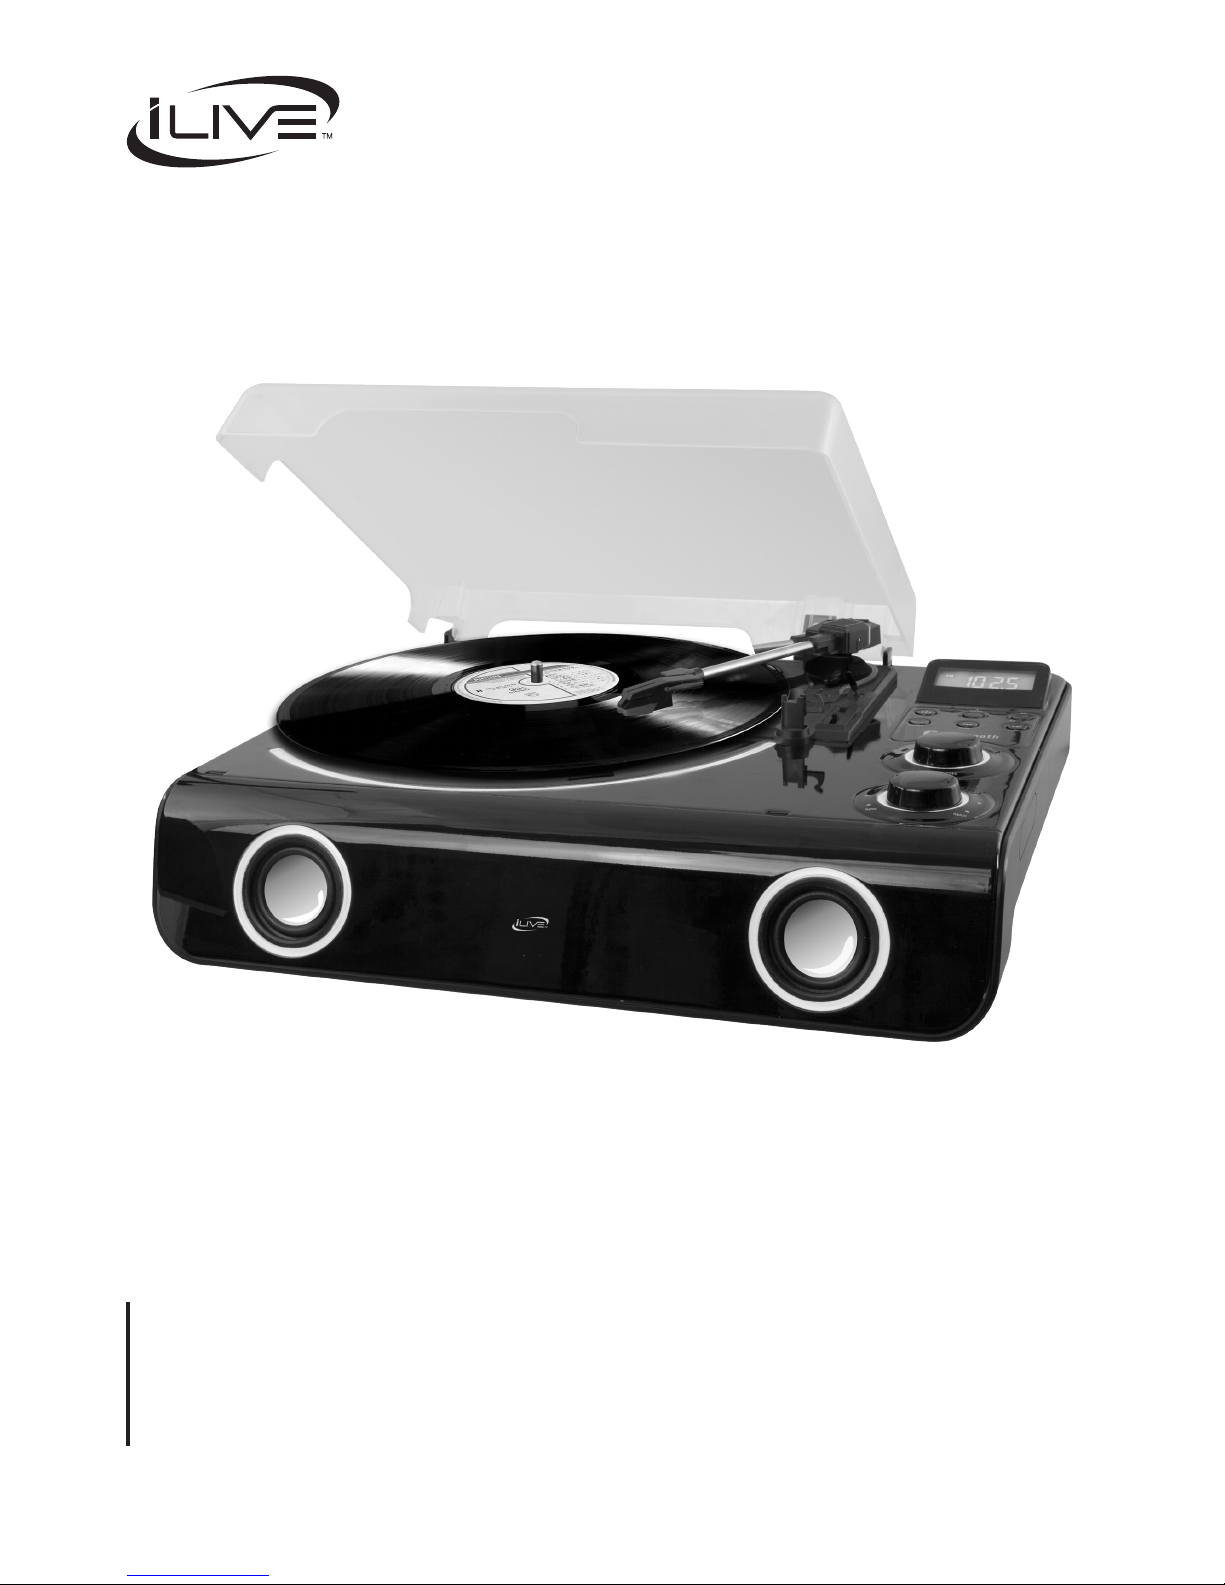
All-in-one Turntable
with Bluetooth, Radio & Stereo Speakers
User’s Guide for Model ITTB775 v1339-01
For the most up-to-date version of this User’s Guide, go to www.iLiveElectronics.com
Page 2

2
Warnings and Precautions
Important Safety Instructions
• Read these Instructions.
• Keep these Instructions.
• Heed all Warnings.
• Follow all instructions.
• Do not use this apparatus near water.
• Clean only with a dry cloth.
• Do not block any ventilation openings. Install in accordance
with the manufacturer’s instructions.
• Do not install near any heat sources such as radiators, heat
registers, stoves, or other apparatus (including ampliers) that
produce heat.
• Do not defeat the safety purpose of the polarized or grounding
- type plug. A polarized plug has two blades with one wider
than the other. A grounding type plug has two blades and a
third grounding prong. e wide blade or the third prong are
provided for your safety. When the provided plug does not t
into your outlet, consult an electrician for replacement of the
obsolete outlet.
• Protect the power cord from being walked on or pinched
particularly at plugs, convenience receptacles, and the point
where they exit from the apparatus.
• Only use attachments/accessories specied by the
manufacturer.
• Unplug this apparatus during lightning storms or when unused
for long periods of time.
• Refer all servicing to qualied service personnel. Servicing is
required when the apparatus has been damaged in any way,
such as power-supply cord or plug is damaged, liquid has been
spilled or objects have fallen into the apparatus, the apparatus
has been exposed to rain or moisture, does not operate
normally, or has been dropped.
• Use only with a cart, stand, tripod, bracket,
or table specied by the manufacturer, or
sold with the apparatus. When a cart is used,
use caution when moving the cart/apparatus
combination to avoid injury from tip-over.
Page 3

Customer Support: 1-888-999-4215
3
Warnings and Precautions
FCC Warnings
Warning: Changes or modications to this unit not expressly
approved by the party responsible for compliance could void the
user’s authority to operate the equipment.
NOTE: This equipment has been tested and found to comply
with the limits for a Class B digital device, pursuant to Part
15 of the FCC Rules. These limits are designed to provide
reasonable protection against harmful interference in a
residential installation. This equipment generates, uses, and can
radiate radio frequency energy and, if not installed and used in
accordance with the instructions, may cause harmful interference
to radio communications. However, there is no guarantee that
interference will not occur in a particular installation. If this
equipment does cause harmful interference to radio or television
reception, which can be determined by turning the equipment off
and on, the user is encouraged to try to correct the interference
by one or more of the following measures:
• Reorient or relocate the receiving antenna.
• Increase the separation between the equipment and receiver.
• Connect the equipment into an outlet on a circuit dierent
from that to which the receiver is connected.
• Consult the dealer or an experienced radio/TV technician
for help.
Additional Warnings and Precautions
• CAUTION: TO PREVENT ELECTRIC SHOCK, MATCH
WIDE BLADE OF PLUG TO WIDE SLOT, FULLY INSERT.
• Caution and marking information is located at the rear or
bottom of the apparatus.Objects lled with liquids, such as
vases, shall not be placed on the apparatus.
Mains plug is used as disconnect device and it should
remain readily operable during intended use. In order to
disconnect the apparatus from the mains completely, the mains
plug should be disconnected form the mains socket outlet
completely.
• WARNING: To reduce the risk of re or electric shock, do not
expose this apparatus to rain, moisture, dripping, or splashing.
CAUTION: Use of controls or adjustments or performance of
procedures other than those specied may result in hazardous
radiation exposure.
• WARNING: Changes or modications to this unit not
expressly approved by the party responsible for compliance
could void the user’s authority to operate the equipment.
• WARNING: Do not place this unit directly onto furniture
surfaces with any type of so, porous, or sensitive nish. As
with any rubber compound made with oils, the feet could
cause marks or staining where the feet reside. We recommend
using a protective barrier such as a cloth or a piece of glass
between the unit and the surface to reduce the risk of damage
and/or staining.
• WARNING: This product may contain chemicals known
to the State of California to cause birth defects, or other
reproductive harm (California Prop 65). Wash hands after
handling.
• This product meets and complies with all Federal Regulations.
Page 4

4
Introduction & Setup � � � � � � � � � � � � � � � � � � � � � � � � � � � � � � � � � � � � � � � � � � � � � � � � � � � � � � � � � � � � � � � � � � � � � � � � � � � � � � � � � � � � � �5
Features
Power
Includes
Orientation � � � � � � � � � � � � � � � � � � � � � � � � � � � � � � � � � � � � � � � � � � � � � � � � � � � � � � � � � � � � � � � � � � � � � � � � � � � � � � � � � � � � � � � � � � � � � � �6
Main Features
Rear Inputs
Controls
Operation � � � � � � � � � � � � � � � � � � � � � � � � � � � � � � � � � � � � � � � � � � � � � � � � � � � � � � � � � � � � � � � � � � � � � � � � � � � � � � � � � � � � � � � � � � � � � � � � �8
Playing a Record
Connecting Devices to the Turntable � � � � � � � � � � � � � � � � � � � � � � � � � � � � � � � � � � � � � � � � � � � � � � � � � � � � � � � � � � � � � � � � � � � � � 10
Pairing a Bluetooth Device
Playing Audio Wirelessly
Using the Aux In (3.5mm Audio Input)
Connecting to External Systems � � � � � � � � � � � � � � � � � � � � � � � � � � � � � � � � � � � � � � � � � � � � � � � � � � � � � � � � � � � � � � � � � � � � � � � � � � 11
RCA Audio Output
Company Information � � � � � � � � � � � � � � � � � � � � � � � � � � � � � � � � � � � � � � � � � � � � � � � � � � � � � � � � � � � � � � � � � � � � � � � � � � � � � � � � � � � 12
Contact Information
Warranty
International Support
Green Initiative
Table of Contents
Page 5
Customer Support: 1-888-999-4215
5
DC IN
AUX OUT
R L
AUX IN
Includes
• AC/DC power adapter
Features
• 8 inch, 3 speed turntable plays 33 1/3, 78, and
45 rpm records
• Supports Bluetooth
• Wireless range: 60 feet
• Built-in FM radio with up to 20 memory presets
• Aux In 3.5mm audio input
• Built-in speakers
• RCA stereo audio outputs
• LED lighting
• Negative LCD display with blue backlight
• DC power input:
requires an AC/DC power adapter (included)
Introduction & Setup
Power
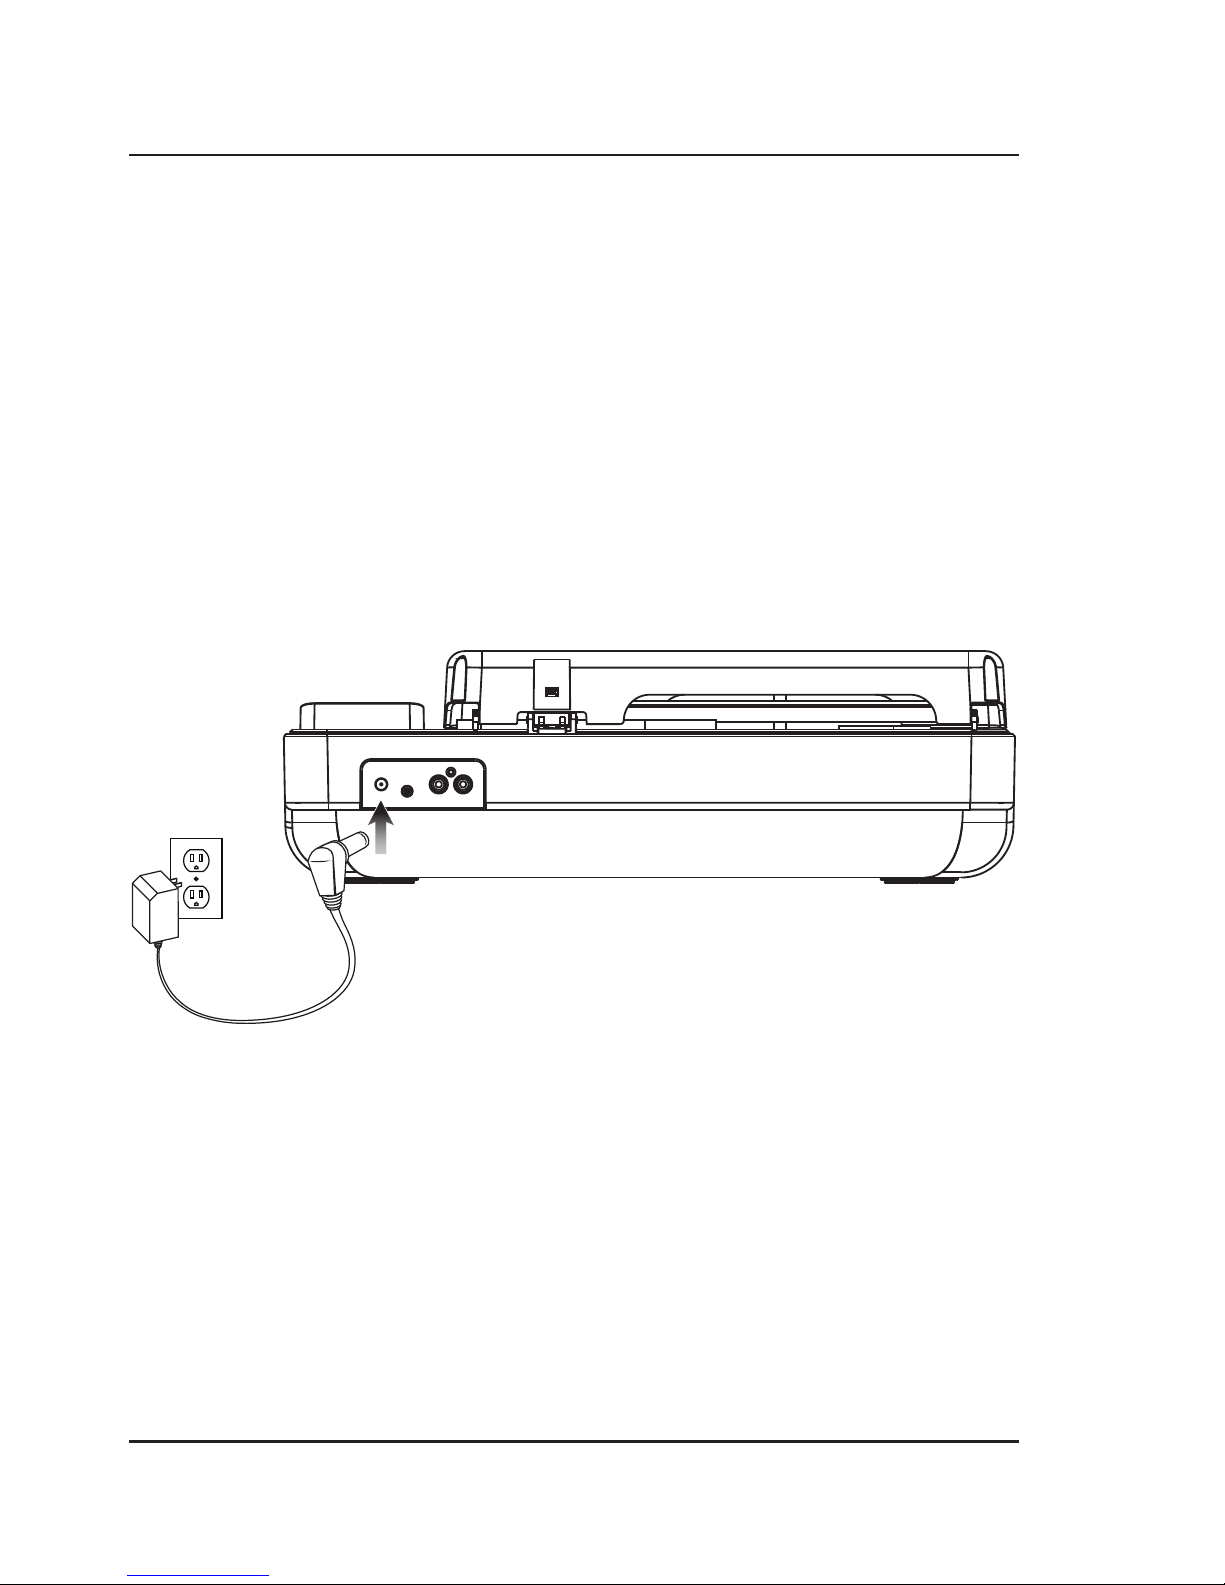
Plug the small end of the power cord into the DC Input on the back of the unit, and the large plug into a standard wall
power outlet.
Page 6
6
B
T
TUN
MEM
TUN
M
LIGHTS
PAIR
A
U
X
F
M
P
H
O
N
O
F
U
N
C
T
I
O
N
MIN MAX
M
A
S
T
E
R
V
O
L
U
M
E
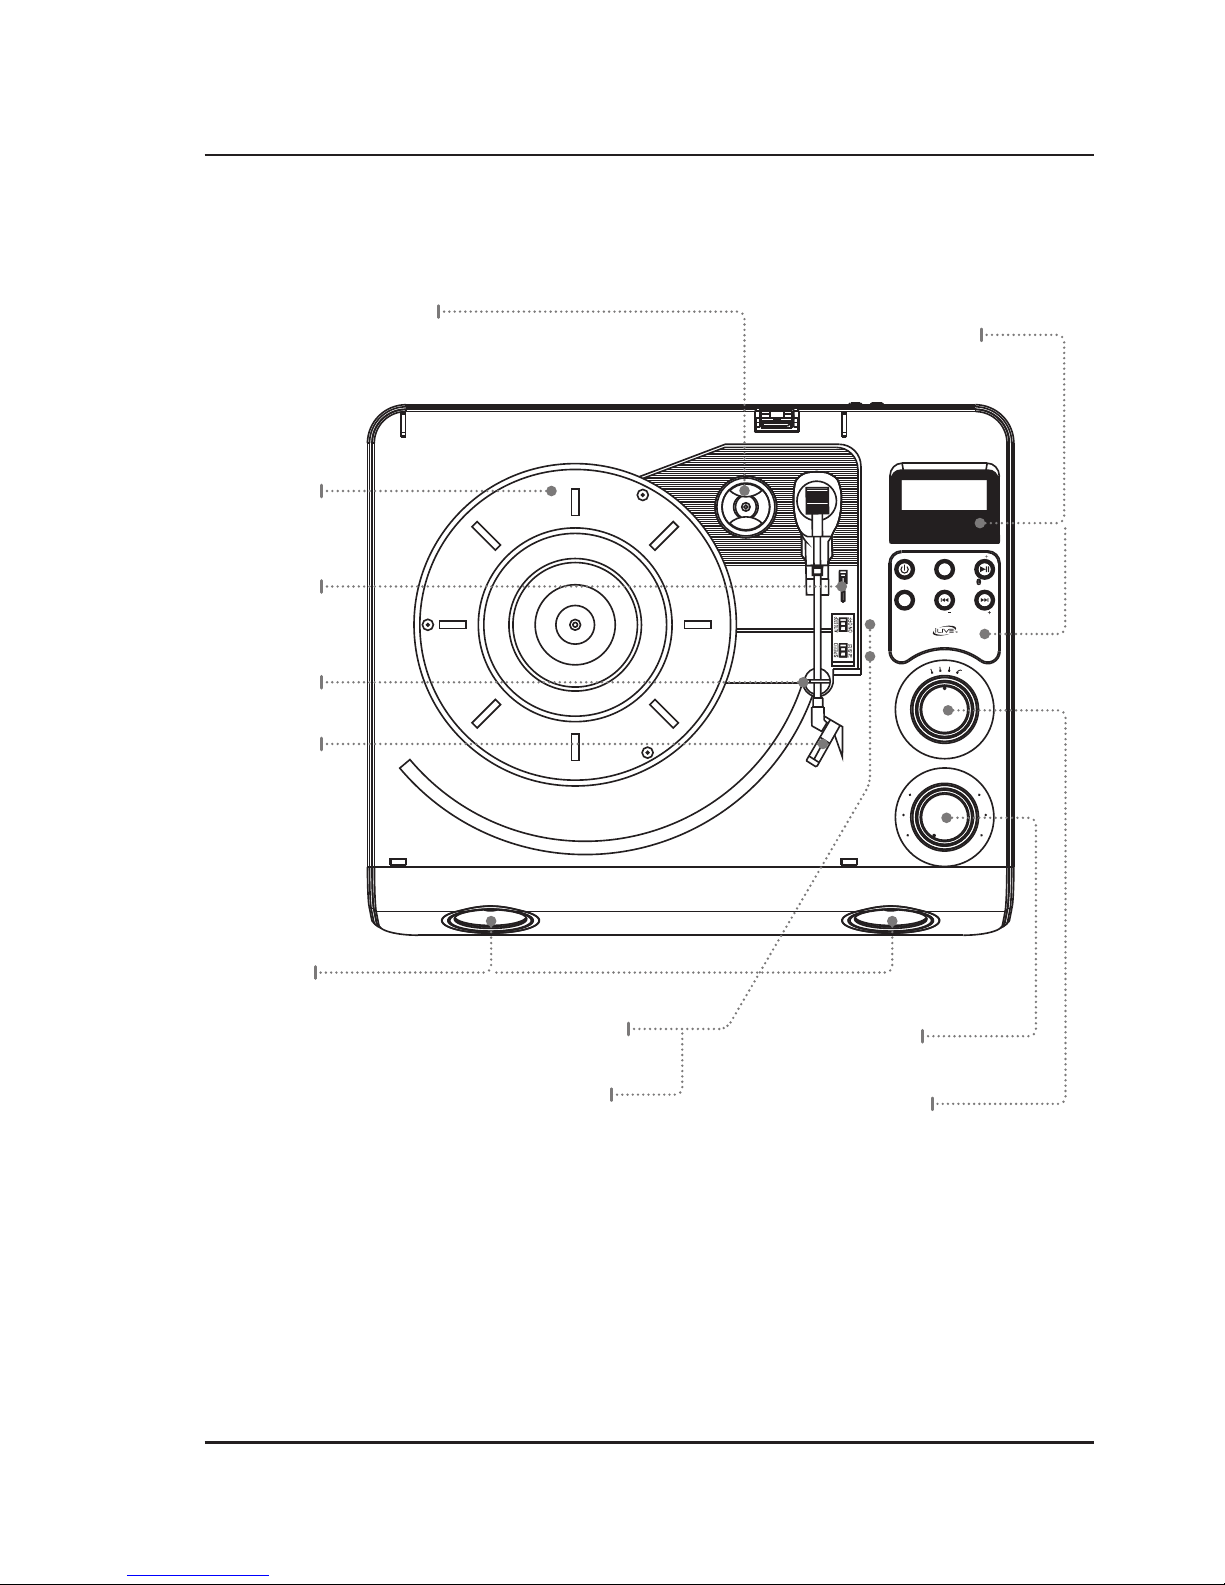
Orientation
Master Volume
Speakers
Function
Turn dial to
switch between
dierent function
modes.
Tone Arm
& Stylus
Record
Speed
Choose 33, 45, or
78, depending on
the type of record
to be played.
Auto Stop
Select ON or OFF.
Tone Arm
Lock
Turntable
Tone Arm
Lift Switch
45 rpm Record Adapter
Display & Controls
Main Features
Page 7
Customer Support: 1-888-999-4215
7
TUN
MEM
TUN
M
LIGHTS
PAIR
X
F
M
P
H
O
N
O
DC IN
AUX OUT
R L
AUX IN
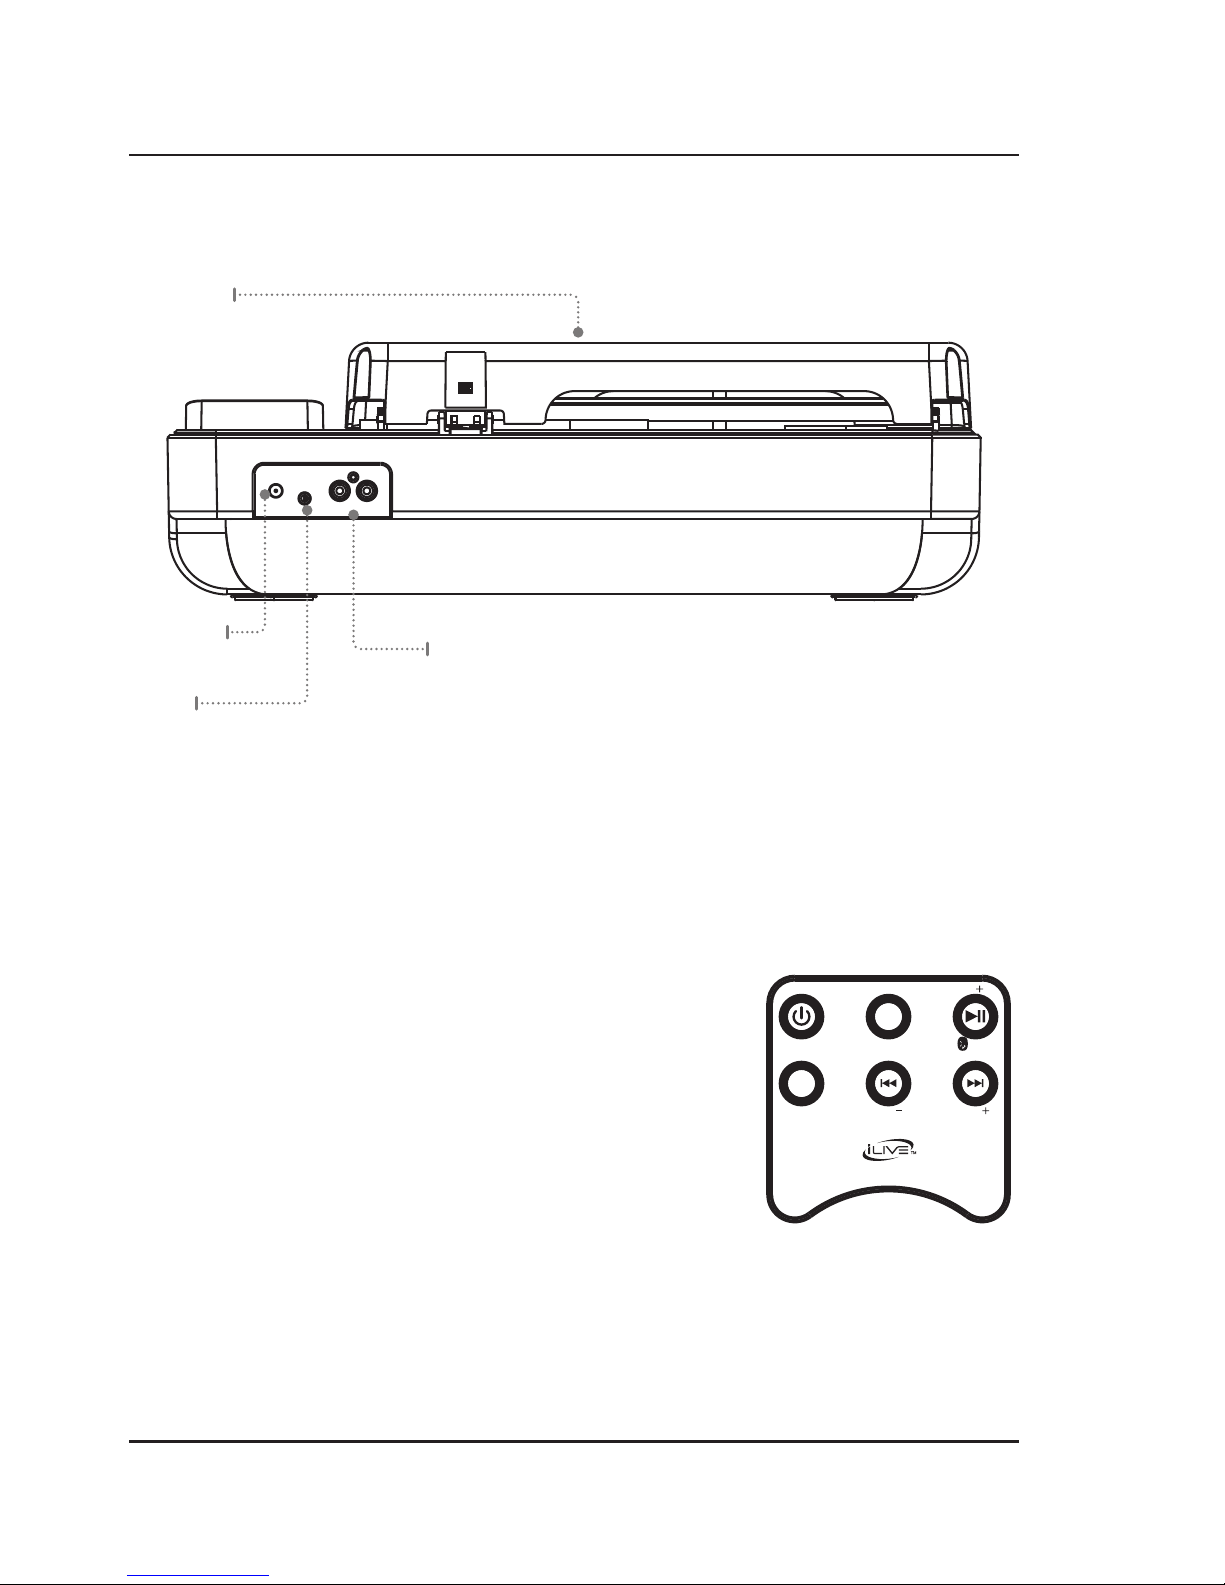
Aux In
Dust Cover
Rear Inputs
Controls
Power
Press to power the unit ON or OFF.
M+/Play/Pause/Pair
Press to cycle FM Memory Presets.
Press to play/pause an
audio track.
Press and hold to begin pairing to
a Bluetooth device.
Mem
Press to begin programming FM
memory presets.
Lights
Press to activate LED light eects.
Skip Rev/Tun -
Press to skip back an audio track.
In FM Mode, press to adjust down
for FM tuning.
Skip Fwd/Tun +
Press to skip ahead an audio track.
In FM Mode, press to adjust up for
FM tuning.
DC Power
Input
Audio Output
Connect to send audio signal
to an external source.
Page 8
8
Operation
Playing a Record
It is recommended that you use extreme care when manipulating the tone arm, stylus, and other components of this
turntable. These parts are very sensitive and can easily break or become damaged if they are carelessly handled.
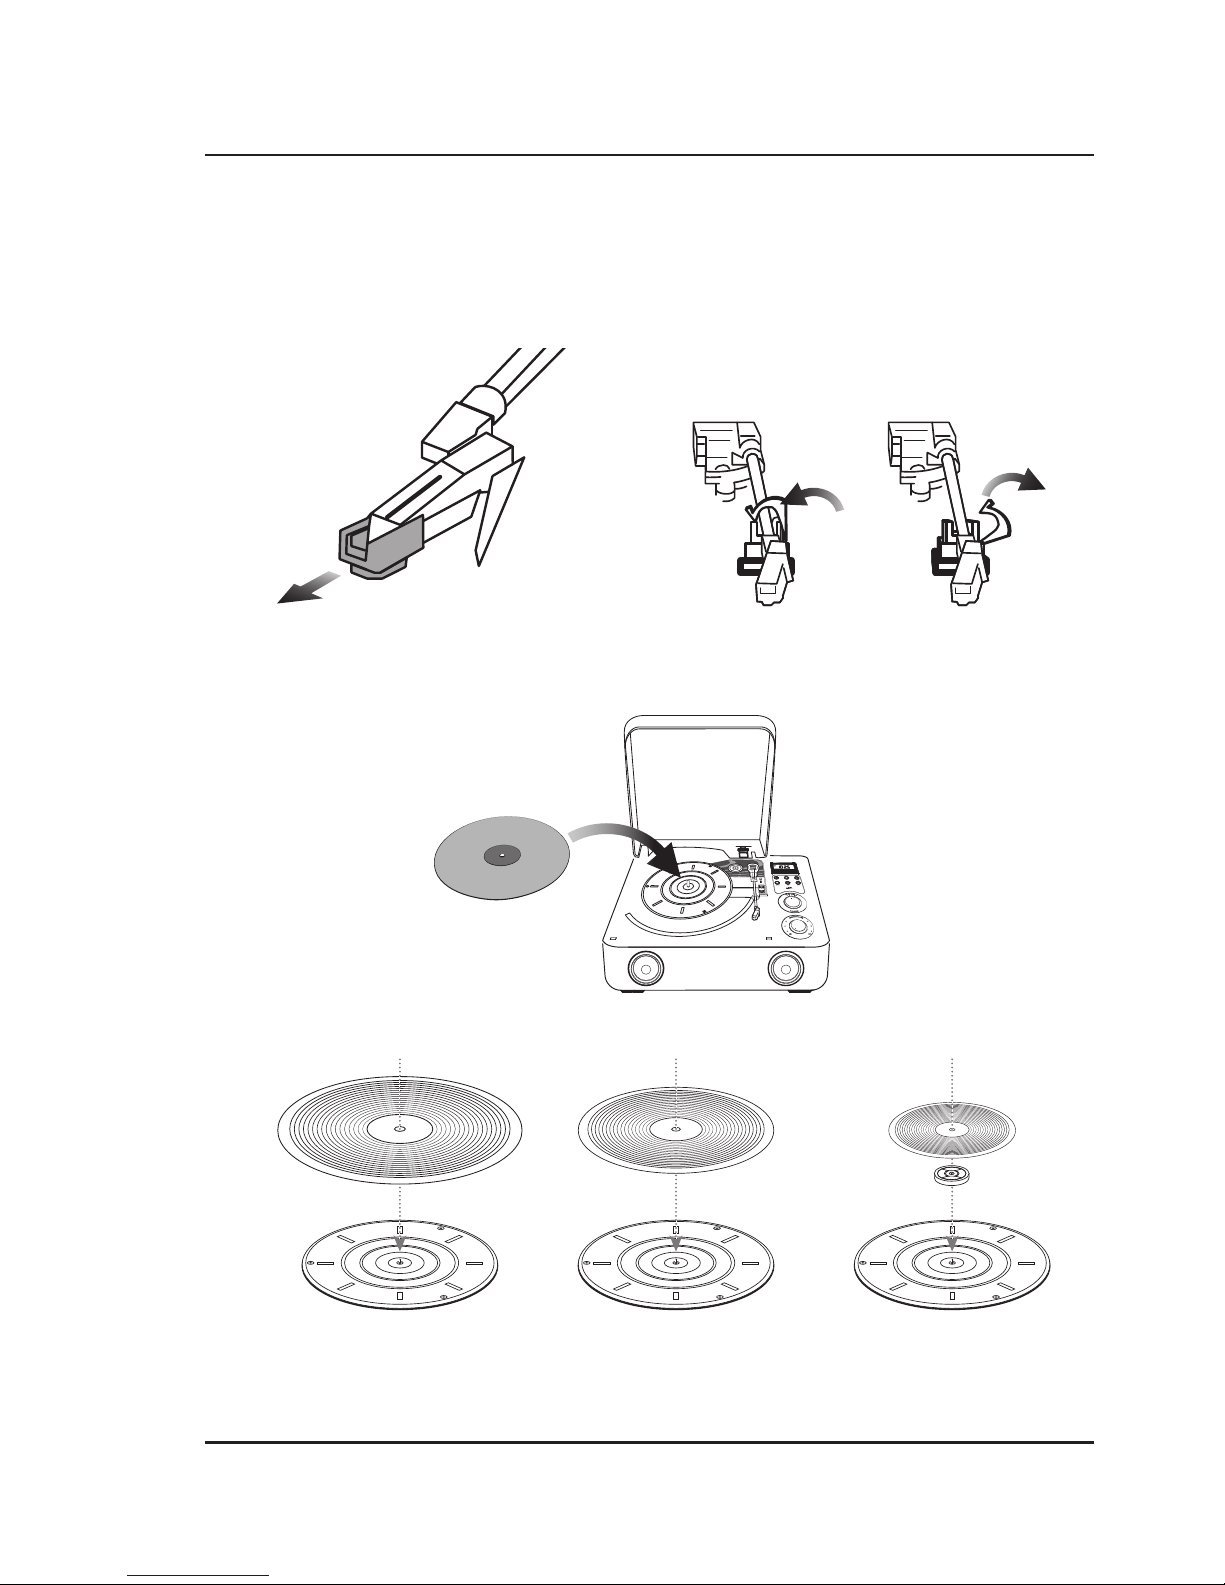
1. Set the Source Dial to Phono.
2. Lift open the turntable dust cover, remove the shroud that protects the stylus, and release the lock that holds
the Tone Arm in place in it’s resting position.
3. Select the correct turntable speed based on the type of record you wish to play, and place the record on the
turntable. If you are playing a 45 rpm record, use the included adapter and place it between the turntable
and the record.
33 1/3 rpm
12in diameter
78 rpm
10in diameter
45 rpm & adapter
7in diameter
Lock Unlock
Page 9

Customer Support: 1-888-999-4215
9
4. Use the Tone Arm Lift Switch to raise the Tone Arm from its catch.
5. Using your hand, gently swing the Tone Arm into the desired location over the record. The turntable will start
spinning as the Tone Arm is moved into position.
6. Use the Tone Arm Lift Switch to safely lower the stylus onto the record.
Using the Lift Switch instead of your hand will reduce the chance of accidentally damaging the record or the stylus.
7. Slide the Auto Stop Switch to ON to enable the Auto Stop feature. When the record is finished playing, it will
automatically stop the turntable. Use the Lift Switch to raise the stylus off of the record, and gently return the
Tone Arm to the catch by hand.
Note: Some records place their Auto Stop area outside of the range of this unit. In these cases, the record will stop
playing before the last track is reached. Set the Auto Stop Switch to OFF and use the Tone Arm Lift Switch to safely
raise the stylus off the record when the end of the record has been reached.
8. When not in use, secure and lock the Tone Arm in its resting position and replace the protective shroud over
the stylus. This will minimize the risk of accidental damage to these sensitive parts.
Page 10
10
Pairing a Bluetooth Device
1. Set the Function Dial to BT and press and hold the Play/Pause/Pair button.
The pairing indicator will flash blue quickly. When pairing, remain within 3 feet of the unit.
2. Using the controls on your Bluetooth device, search for and select ITTB775 in your Bluetooth settings to pair.
If your device requests a password, enter the default password 0 0 0 0 .
Refer to the user’s manual for your specific device for instructions on pairing and connecting Bluetooth devices.
3. When successfully paired and connected, an audible chime will sound and the Pairing Indicator on the
display will stop flashing.
After initial pairing, the unit will stay paired unless unpaired manually by the user or erased due to a reset of the
device. If your device should become unpaired or you find it is unable to connect, repeat the above steps or press &
hold the Play/Pause/Pair button again.
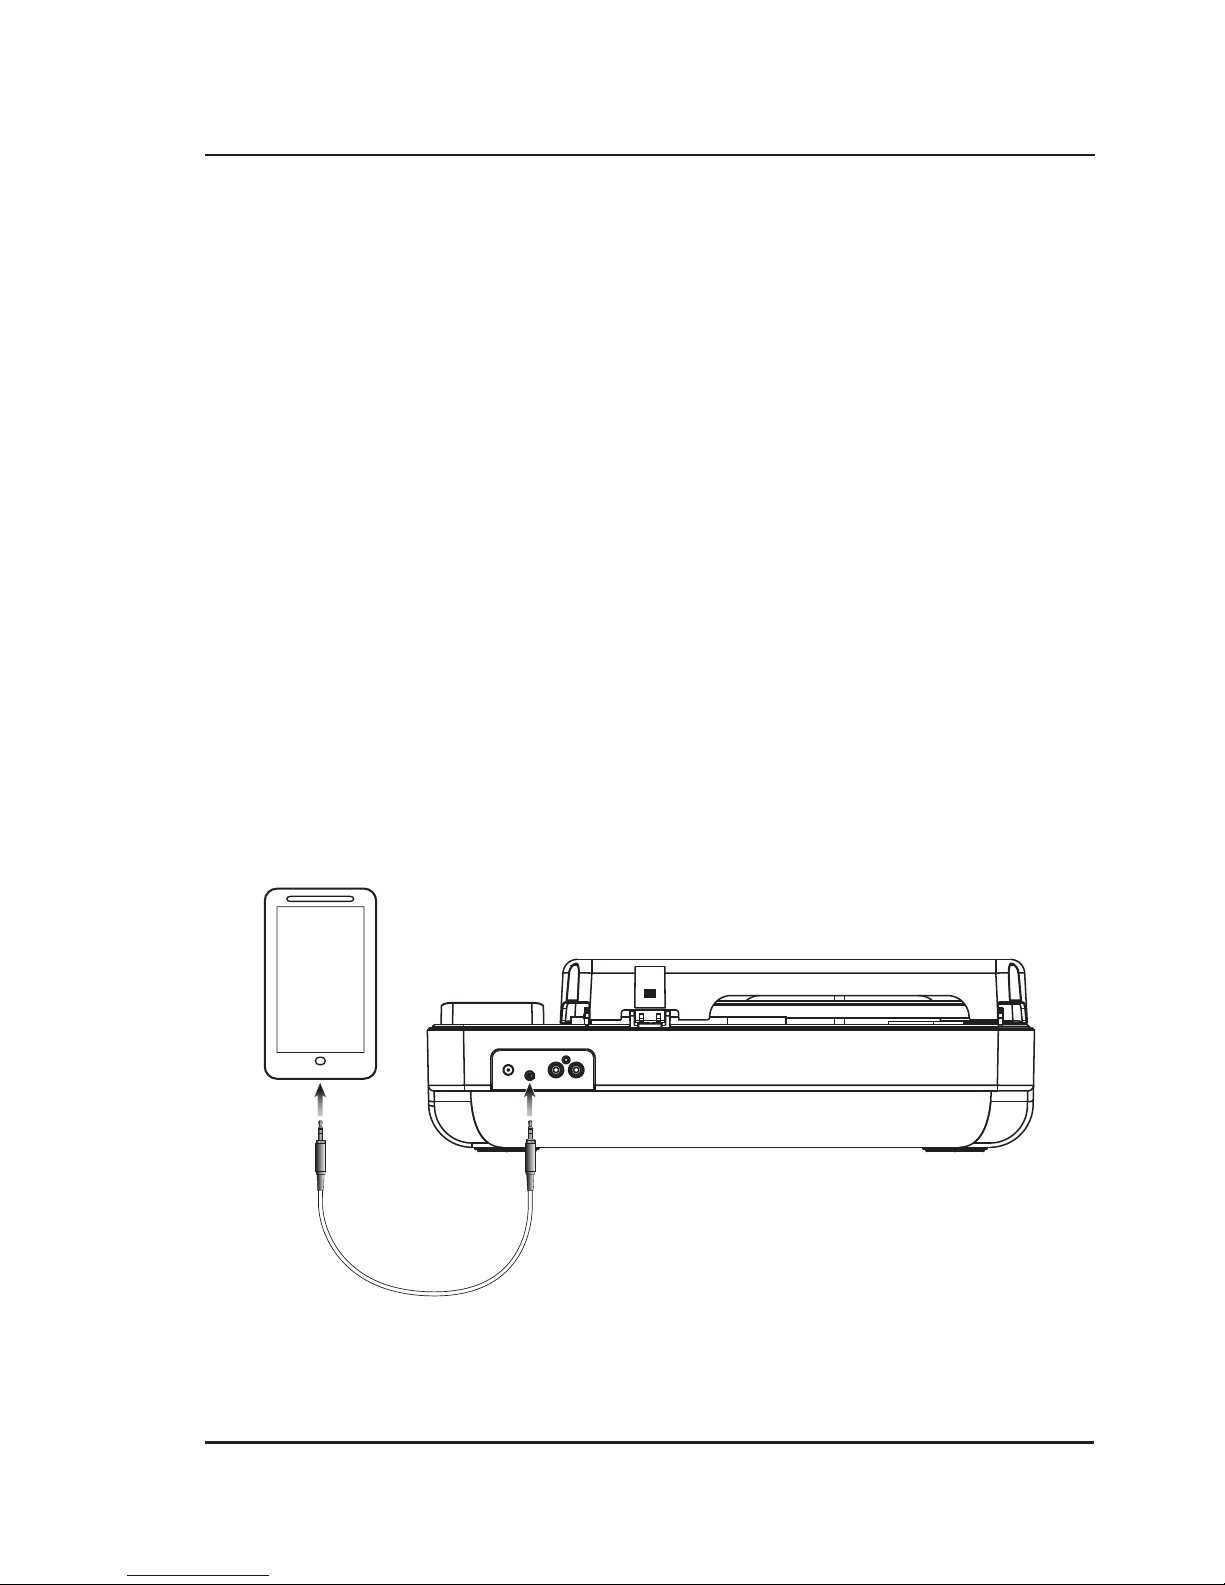
Using the Aux In (3.5mm Audio Input)
Requires 3.5 mm audio input cable (not included).
1. Plug a 3.5 mm audio input cable into the Aux In on the unit and the audio output/headphone output on an
MP3 Player or other audio source.
2. Set the Function Dial to Aux and use the controls on your connected music player to select and play audio.
3. Audio played through the connected device will now be heard through the speakers.
Connecting Devices to the Turntable
DC IN
AUX OUT
R L
AUX IN
Playing Audio Wirelessly
1. After pairing to a Bluetooth device, use the controls on your connected Bluetooth Device to
select a track.
2. Play, pause or skip a selected track using the controls on the connected Bluetooth Device or the controls on
the turntable.
3. Audio played through the connected Bluetooth device will now be heard through the speakers.
Page 11
Customer Support: 1-888-999-4215
11
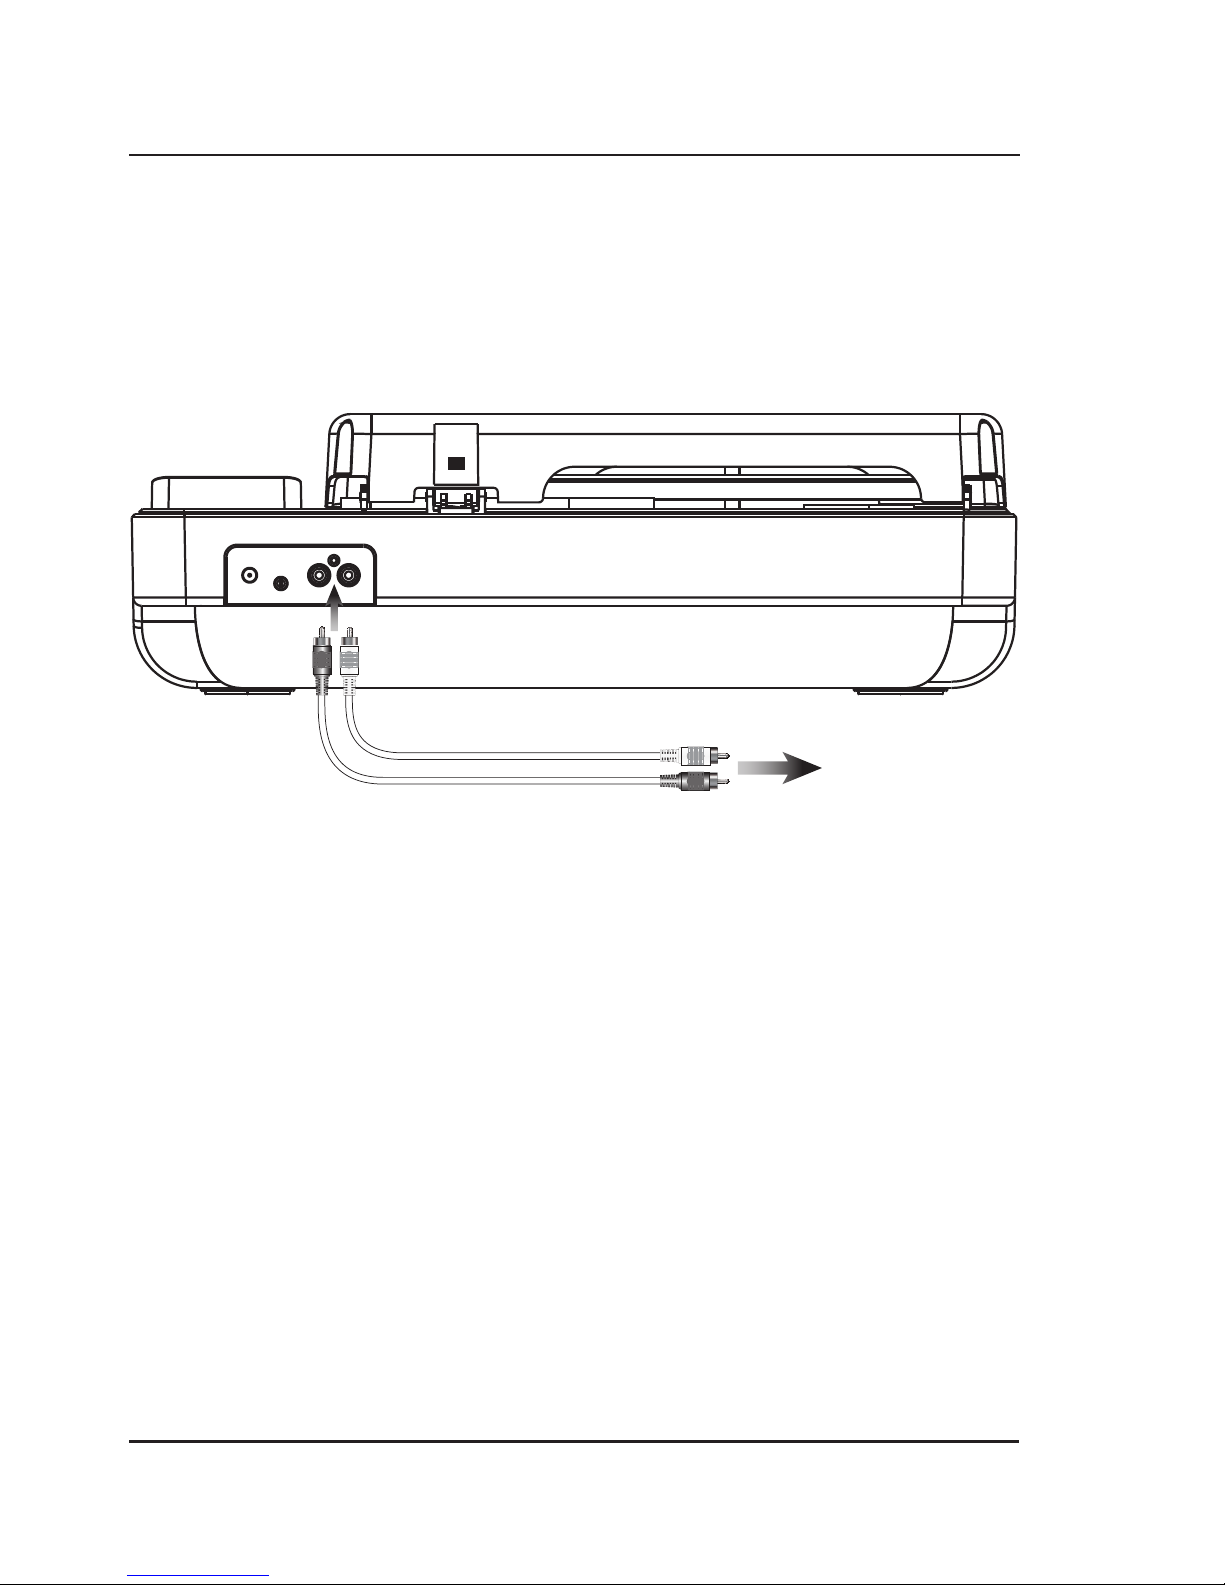
RCA Audio Output
Requires RCA audio cables (red/white, not included). Use to connect the turntable to an external stereo, television, or
other source.
1. Connect RCA audio cables to the RCA Audio Output on the back of the turntable, and to the
audio input of an external stereo system.
2. Adjust the external stereo system to accept input from the turntable.
3. Audio played through the turntable will now be heard through the connected stereo system.
Connecting to External Systems
DC IN
AUX OUT
R L
AUX IN
To Audio Inputs
on external system
Page 12

12
International Support
To download this User’s Guide in English, Spanish, and French, or to get answers to frequently asked questions, visit
the support section at: www.iLiveElectronics.com
Para descargar este Manual del Usuario en inglés, español y francés, o para obtener respuestas a preguntas frecuentes,
visite la sección de apoyo en: www.iLiveElectronics.com
Pour télécharger ce guide de l’utilisateur en anglais, espagnol ou français, ou pour obtenir des réponses à des
questions fréquemment posées, consultez la rubrique d’assistance sur: www.iLiveElectronics.com
Contact Information
Website: www.iLiveElectronics.com
Email Support: [email protected]
Email Parts: [email protected]
Phone Support: 1-888-999-4215
Warranty
For Warranty Information and the most up-to-date version of this User’s Guide, go to:
www.iLiveElectronics.com
Company Information
Protect for Today
Sustain for Tomorrow
Made
Green
Copyright © 2015 Digital Products International (DPI, Inc.) All other trademarks appearing herein are the property of
their respective owners. Specifications are subject to change without notice.
 Loading...