

Page 1
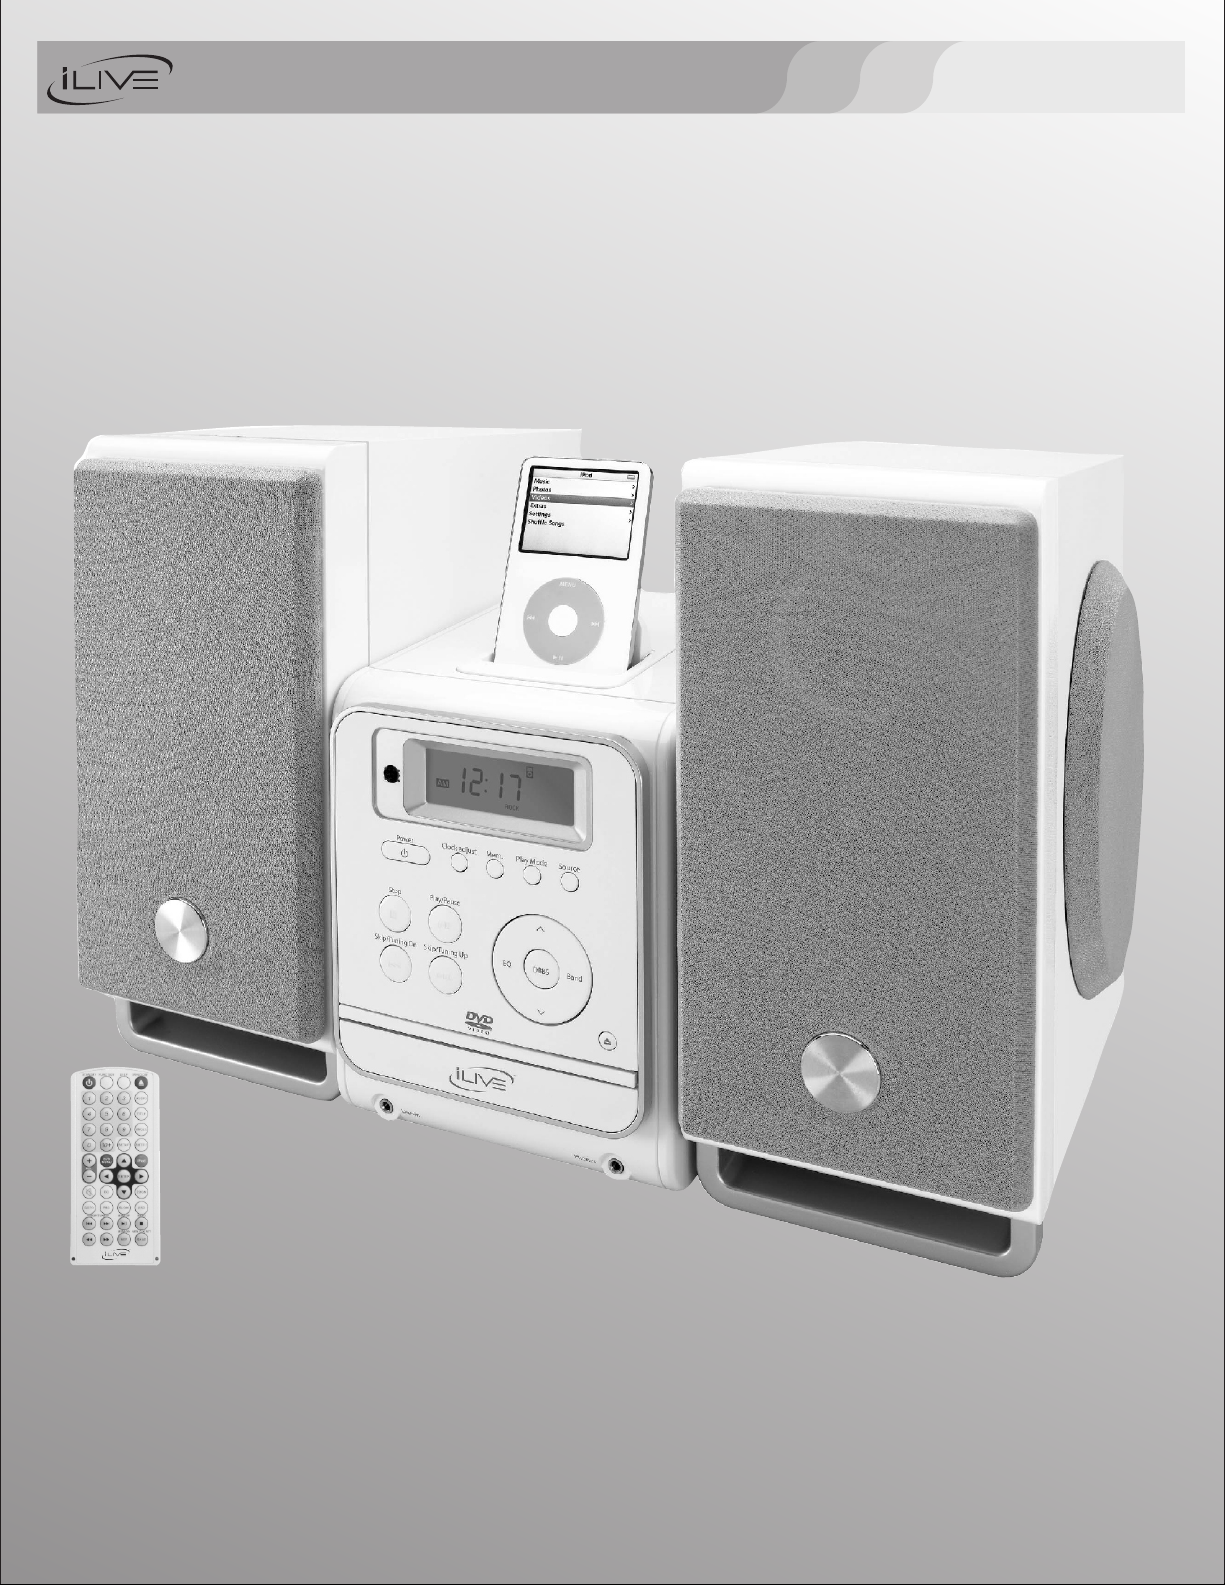
TM
INSTRUCTION MANUAL
M A N U A L D E I N S T R U C C I O N E S / M O D E D ' E M P L O I
iHMD8816DT-E1
MODEL#
iPod not included.
iPod is trademark of Apple Computer, Inc. registered in the U.S. and other countries.
Page 2
WARNINGS AND PRECAUTIONS
TO PREVENT FIRE OR SHOCK HAZARDS, DO NOT EXPOSE THIS UNIT TO RAIN
OR MOISTURE.
This symbol, located on back or bottom of the unit, is intended to alert the
user to the presence of uninsulated “dangerous voltage” within the
product's enclosure that may be of sufficient magnitude to constitute a risk
of electric shock to persons.
This symbol, located on the back or bottom of the unit, is intended to alert
the user to the presence of important operating and maintenance
(servicing) instructions in the literature accompanying the appliance.
This product utilizes a Class 1 laser to read Compact Discs. This laser
Compact Disc Player is equipped with safety switches to avoid exposure
when the CD door is open and the safety interlocks are defeated. Invisible
laser radiation is present when the CD Player's lid is open and the system's
interlock has failed or been defeated. It is very important that you avoid
direct exposure to the laser beam at all times. Please do not attempt to
defeat or bypass the safety switches.
Any use of the controls or an adjustment to the procedures other than those
specified herein may result in hazardous radiation.
CAUTION:
HEATING OR COOKING APPARATUS BENEATH THE UNIT.
CAUTION:
PLUG TO WIDE SLOT, FULLY INSERT.
TO REDUCE THE RISK OF ELECTRIC SHOCK, DO NOT R EMOVE COVER (OR
BACK). THERE ARE NO USER-SERVICEABLE PARTS INSIDE. PLEASE REFER
ANY SERVICING TO QUALIFIED SERVICE PERSONNEL.
WARNING: Changes or modifications to this unit not expressly approved by the party
responsible for compliance could void the user's authority to operate the equipment.
NOTE: This device complies with Part 15 of the FCC Rules. Operation is
subject to the folllowing conditions: 1)The device may not cause
harmful interference, and 2) This device must accept any interference
received, including interference that cause undesired operation.This
equipment has been tested and found to comply with the limits for a Class B digital
device, pursuant to Part 15 of the FCC Rules. Receiver complies with Part 15 of
FCC rules when manufactured. These limits are designed to provide reasonable
protection against harmful interference in a residential installation. This equipment
generates, uses, and can radiate radio frequency energy and, if not installed and
used in accordance with the instructions, may cause harmful interference to radio
communications. however, there is no guarantee that interference will not occur in
a particular installation. If this equipment does cause harmful interference to radio
or television reception, which can be determined by turning the equipment off and
on, the user is encouraged to try to correct the interference by one or more of the
following measures:
Reorient or relocate the receiving antenna.
Increase the separation between the equipment and receiver.
Connect the equipment into an outlet on a circuit different from that to which
the receiver is connected.
Consult the dealer or an experienced radio/TV technician for help.
NOTE TO CATV SYSTEM INSTALLER: This reminder is to call the CATV system
installer's attention to Section 820-40 of the NEC which provides guidelines for proper
grounding and, in particular, specifies that the cable ground shall be connected to the
grounding system of the building, as close to the point of cable entry as practical.
TO R EDUCE THE R ISK O F FIR E, D O NOT PLA CE ANY
TO PREVENT ELECTRIC SHOCK, MATCH WIDE BLADE OF
Special Note
When placin g your unit on a lacquered or natural finish, protect your
furniture with a clo th or other protective material.
ADVERTENCIAS Y PRECAUCIONES
PARA RE DUCIR EL RIE SGO DE INC ENDIOS O DE SACUDIDAS ELÉCTRICA S, NO
EXP ONGA EST E APARATO A LA LLUVIA O A LA HUMEDAD.
Este símbolo, localizado detrás o en la parte de abajo de la unidad, indica la
presencia de "tensiones peligrosas" sin aislar en el interior de la caja del producto
que pueden ser de suficiente magnitud como para constituir un riesgo de
sacudida eléctrica para las personas.
Este símbolo, situado en la parte posterior o el fondo de la unidad, es
intencionada para alertar al usuario sobre la presencia de las instrucciones
importantes del funcionamiento y del mantenimiento (mantenimiento) en la
literatura que acompaña la aplicación.
Este producto utiliza un láser de Clase 1 para reproducir discos compactos. Este
reproductor de discos compactos láser posee interruptores de seguridad que
impiden la exposición a los rayos láser cuando la puerta del disco compacto está
abierta y cuando los dispositivos de seguridad han sido anulados. Hay radiación
láser invisible cuando la tapa del reproductor de discos compactos está abierta y
cuando el sistema de seguridad falla o es anulado. Evite la exposición directa a
los rayos láser. Por favor no intente anular o eludir los interruptores de seguridad.
Usted puede recibir una radiación peligrosa si utiliza los botones o aplica los procedimientos
de manera diferente a la que ha sido indicada en este documento.
APARATO DE CALEFACCIÓN O PARA COCINAR DEBAJO DE LA UNIDAD.
ATENCIÓN:
HOJA MÁS ANCHA DEL ENCHUFE EN LA RANURA CORRESPONDIENTE DE LA TOMA Y
EMPUJE HASTA EL FONDO.
PARA REDUCIR EL RIESGO DE SACUDIDAS ELÉCTRICAS, NO RETIRE LA TAPA (O LA PARTE
POSTERIOR) DEL APARATO. DENTRO DEL APARATO NO HAY PARTES QUE PUEDAN SER
REPARADAS POR EL USUARIO. LOS TRABAJOS DE REPARACIÓN DEBEN SER
EFECTUADOS POR PERSONAL DE SERVICIO CALIFICADO.
ADVERTENCIA: El usuario puede perder el derecho de utilizar este aparato si efectua
cambios o modificaciones que no han sido expresamente aprobados por la autoridad
responsable.
NOTA: Este dispositivo se conforma con la parte 15 de las reglas de la FCC. La
operación está conforme a las condiciones siguientes:
1) El dispositivo puede que no cause interferencia dañosa, y
2) Este dispositivo debe aceptar cualquier interferencia recibida,
incluyendo interferencia que cause la operación indeseada.
sido probado y ha demostrado cumplir con los límites establecidos para los aparatos
digitales de Clase B, de acuerdo con el Apartado 15 de las Normas de la FCC.
receptor se forma de laparte 15 en las reqlas FCC cuando fabricado.
sido designados para proveer una protección razonable contra las interferencias
perjudiciales en una instalación residencial. Este equipo genera, utiliza y puede irradiar
energía radioeléctrica y, si no se instala y utiliza de acuerdo con las instrucciones,
puede causar interferencias perjudiciales en las radiocomunicaciones. Sin embargo,
no existe garantía de que no se produzcan interferencias en una instalación en
particular. Si este aparato causa interferencias en la recepción de radio o de
televisión, lo que puede determinarse desconectando y conectando el aparato, se
recomienda tratar de corregir la interferencia de la siguiente manera:
Vuelva a orientar la antena o cambie su lugar de instalación.
Aumente la separación entre el equipo y el receptor.
Conecte el equipo a una toma de corriente cuyo circuito no sea el mismo que
aquél al que ha conectado el receptor.
Consulte al concesionario o a un técnico de radio/televisión con experiencia.
NOTA PARA LA PERSONA QUE INSTALE EL SISTEMA CATV: Se ha incluído este
recordatorio para llamar la atención de quien instale el sistema CATV, con respecto al articulo
820-40 de la NEC, que entrega directivas de guía para realizar una conexión adecuada a tierra
y, en particular, especifíca que el cable de puesta a tierra debe ser conectado al sistema de
conexión a tierra del edificio, lo más cerca del punto de entrada del cable como sea posible.
PARA REDUCIR EL RIESGO DE INCENDIO, NO COLOQUE NINGÚN ATENCIÓN:
PARA EVITAR UNA DESCARGA ELÉCTRICA, INTRODUZCA LA
Este equipo ha
El
Estos límites han
Nota Especial
Cuando coloque la unidad sobre un mueble con acabado laqueado o natural, proteja su
mueble con un paño u otro material protector.
AVERTISSEMENT ET PRÉCAUTIONS
POUR PRÉVENIR TOUT RISQUE D'INCENDIE OU D'ÉLECTROCUTION, NE PAS EXPOSER
CET APPAREIL À LA PLUIE OU À L'HUMIDITÉ.
Ce symbole, situé dérrière ou dessous de l' appareil, est destiné à avertir l'usager
de la présence d'une "tension dangereuse" non isolée dans le boîtier de l'appareil,
dont l'intensité pourrait être suffisante pour constituer un risque d' électrocution
pour les personnes.
Ce symbole, situé sur le dos ou le fond de l'unité, est prévu pour alerter
l'utilisateur à la présence des instructions importantes de fonctionnement et
d'entretien (entretien) dans la littérature accompagnant l'appareil.
Ce produit lit des disques compacts à l'aide d' un laser de Catégorie 1. Ce lecteur
de disques compacts possède des interrupteurs de sécurité qui protègent les
individus contre les rayons laser lorsque la porte du disque compact est ouverte et
lorsque les dispositifs de sécurité sont annulés. Ce produit émet des rayons laser
lorsque le couvercle du compartiment à disques est ouvert et lorsque le système
de sécurité est en panne ou est annulé. Évitez l'exposition directe aux rayons laser.
S'il-vous-plaît, n'essayez pas d' annuler ou de contourner les interrupteurs de
sécurité.
Vous pourriez subir des radiations dangereuses si vous utilisez les commandes ou si
vous appliquez les procédures d'une manière différente de celle indiquée dans ce mode
d'emploi.
ATTENTION:
AUCUN APPAREIL DE CHAUFFAGE OU DE CUISINE SOUS L'APPAREIL.
ATTENTION:
LAME LA PLUS LARGE DE LA FICHE DANS LA BORNE CORRESPONDANTE DE LA
PRISE ET POUSSER JUSQU'AU FOND.
POUR PRÉVENIR TOUT RISQUE D'ÉLECTROCUTION, NE RETIREZ PAS LE COUVERCLE
(OU LA PARTIE POSTÉRIEURE) DE L'APPAREIL. VOUS NE DEVEZ PAS RÉPARER DES
PIÈCES SE TROUVANT À L' INTÉRIEUR DE L'APPAREIL. LES RÉPARATIONS DOIVENT
ÊTRE EFFECTUÉES PAR DU PERSONNEL QUALIFIÉ.
AVERTISSEMENT: Tout changement ou modification apporté(e) à cet appareil sans
autorisation, peut entraîner l’interdiction d’utilisation de ce dernier.
REMARQUE: Ce dispositif est conforme à la partie 15 des règles de FCC.
L'opération est sujette aux conditions suivre :
1)The peut ne pas causer l'interférence nocive, et
2) ce dispositif doit accepter n'importe quelle interférence reçue, y
compris l'interférence qui causent l'opé ration peu désirée.Cet appareil a été
testé et il a été constaté qu'il respecte les limites fixées pour les appareils numériques
de la Catégorie B, par la Section 15 des Normes FCC. Le récepteur est conforme á la
partie 15 de réqles de FCC une fois construit.Ces limites ont été fixées afin de fournir
une protection raisonnable contre les interférences nocives dans un logement
résidentiel. Cet appareil produit, utilise et peut émettre de l'énergie radioélectrique et,
s'il n'est pas installé et utilisé suivant le mode d'emploi, il peut produire des
interférences nocives sur les radiocommunications. Cependant, il peut y avoir des
interférences nocives dans des logements particuliers. Si l'appareil produit des
interférences sur la réception radio ou télévision (ce qu'on peut constater lorsqu'on
débranche ou lorsqu'on raccorde celui-ci), nous vous recommandons de corriger ce
problème de la manière suivante:
Réorientez l'antenne ou changez l'appareil de place.
Séparez davantage l'appareil du récepteur.
Branchez l'appareil à une prise de courant faisant partie d'un circuit différent de
celui auquel est branché le récepteur.
Consultez le vendeur ou un technicien de radio/télévision expérimenté.
NOTEZ À L'INSTALLATEUR DE SYSTÈME DE CATV: Ce rappel doit attirer l'attention de
l'installateur de système de CATV sur la section 820-40 de NEC qui fournit des directives pour
fondre approprié et, en particulier, indique que le au sol de câble sera relié au système au sol du
bâtiment, comme près du point d'entrée de câble comme pratique.
POUR REDUIRE LES RISQUES D'INCENDIE, N' INSTALLEZ
POUR ÉVITER LES CHOCS ÉLECTRIQUES, INTRODUIRE LA
Note Spéciale
En plaçant votre unité sur une finition laquée ou normale, protégez vos meubles avec un
tissu ou autre protecteur matériel.
Servi ce Inf orm ati on
2122 Car r S t. St. lou is
(314) 621 -28 81
Visit u s a t
E-mai l C ust ome r Servi ce at
custo mer ser vic e@i liv e.n et
www.iLi ve. net
- 1 -
Page 3
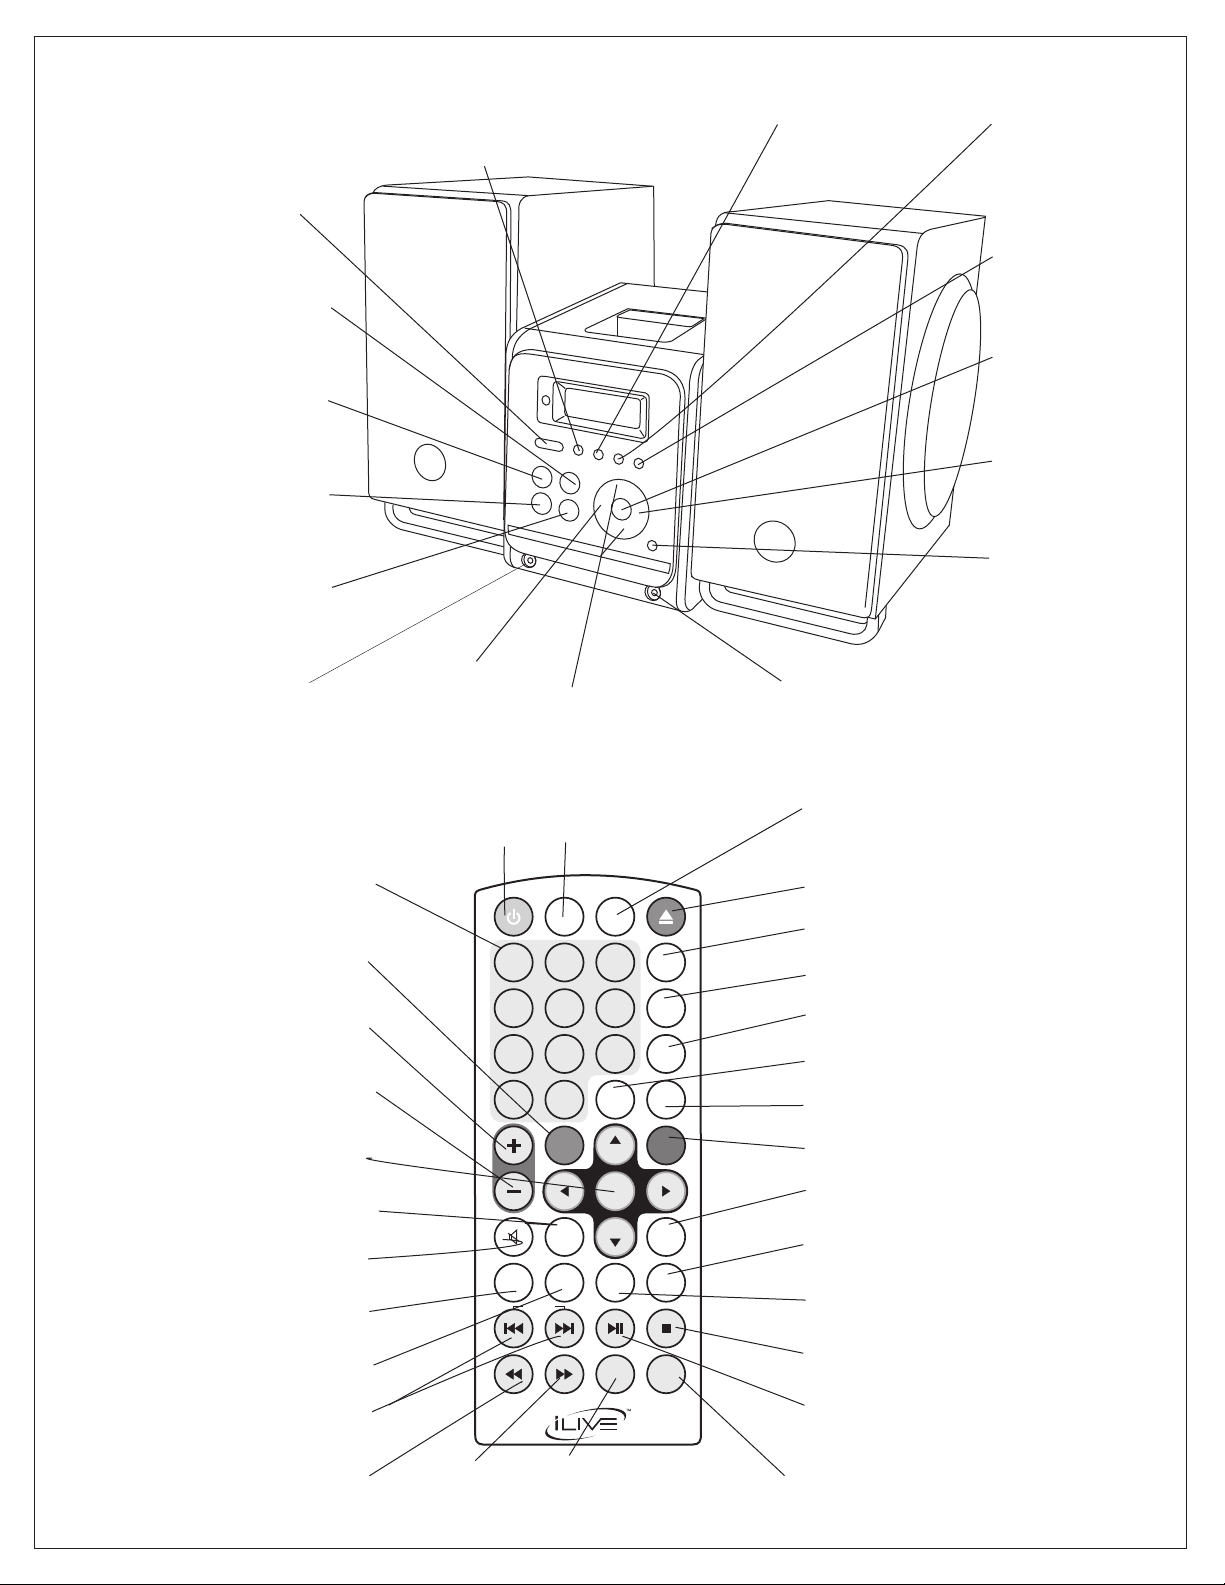
LOCATION OF FEATURES / UBICACION DE LOS BOTONES / EMPLACEMENT DES BOUTONS
MAIN UNIT/
Unidad Principal/
Unité Principal
SKIP/TUNING BUTTON
BOTÓN SKIP/TUNING
BOUTON SKIP/TUNING
POWER BUTTON
BOTÓN POWER
BOUTON POWER
PLAY/PAUSE BUTTON
BOTÓN PLAY/PAUSE
BOUTON PLAY/PAUSE
STOP/BAND BUTTON
BOTÓN STOP/BAND
BOUTON STOP/BAND
SKIP/TUNING BUTTON
BOTÓN SKIP/TUNING
BOUTON SKIP/TUNING
HEADPHONE JACK
TOMA DE AURICULARE
PRISE DES CASQUE
SET/MEMORY/CLOCK ADJUST BUTTON
BOTÓN SET/MEMORY/CLOCK ADJUST
BOUTON SET/MEMORY/CLOCK ADJUST
FUNCTION BUTTON
BOTÓN FUNCTION
BOUTON FUNCTION
VOLUME CONTROL
BOTÓN VOLUME
BOUTON VOLUME
MEMORY DN BUTTON
BOTÓN MEMORY DN
BOUTON MEMORY DN
LINE IN JACK
TOMA DE AURICULARES
PRISE DES CASQUES
SLEEP BUTTON
BOTÓN SLEEP
BOUTON SLEEP
TIMER BUTTON
BOTÓN TIMER
BOUTON TIMER
EQ BUTTON
BOTÓN EQ
BOUTON EQ
iPod BUTTON
BOTÓN iPod
BOUTON iPod
OPEN BUTTON
BOTÓN OPEN
BOUTON OPEN
REMOTE CONTROL
Control Remoto/
Télécommande
NUMERICAL
NUMÉRICO/NUMÉRIQUE
DVD MENU
MENÚ DE DVD/MENU DE DVD
VOLUME UP
VOLUMEN ARRIBA/VOLUME EN HAUT
VOLUME DN
VOLUMEN ABAJO/VOLUME VERS LE BAS
ENTER
ENTER/ENTREZ
MUDO/MUET
IR Á /ALLER A
PROG/PROG
SKIP/TUNE
SALTAR/SINTONIZAR / SAUTER/ACCORDER
REWIND
ATRASAR/RETARDER
SEMI APAGADO/SEMI ÉTEINT
EQ
STANDBY
EQ/EQ
MUTE
GOTO
PROG
ADELANTAR/AVANCER
FAST FWD
STANDBY
1 2
4
7
0
VOL
SKIP/TUNE
FUNCTION
FUNCIÓN/FONCTION
FUNCTION
5
8
10+
DVD
MENU
EQ
PROGGOTO
MEM-DN/REPEAT
MEM-ABAJO/REPETICIÓN
MEM-VERS LE BAS/RÉPÉTITION
DISP
3
6
9
SETUP
ENTER
SLOW
MEM-UP
MEM-DN
- 2 -
OPEN/CLOSE
AUDIO
TITLE
ANGLE
SUBTITLE
iPod
ZOOM
OSD
BAND
MEM/CLK SET
RANDREPEAT
DISPLAY
EXHIBICIÓN/EXPOSITION
OPEN/CLOSE
ABRIR/CERRAR / OUVRIR/FERMER
AUDIO
AUDIO/ AUDIO
TITLE
TÍTULO/TITRE
ANGLE
ÁNGULO/ANGLE
SETUP
AJUSTES/AJUSTEMENTS
SUBTITLE
SUB-TÍTULO/SOUS-TITRE
iPod
IPOD/IPOD
ZOOM
ENFOCAR/FOCALISER
OSD (On-Screen Display)
OSD/OSD
SLOW
LENTO/LENT
STOP/BAND
PARAR/BANDA / ARRÊTER/BANDE
PLAY/PAUSE/MEM-UP
TOCAR/PAUSAR/MEM-ARRIBA / JEU/PAUSE/MEM-EN HAUT
MEM/CLK SET/ RAND
MEM/AJUSTE DE RELOJ/AL AZAR
MEM/AJUSTEMENT D'HORLOGE/AU HASARD
Page 4
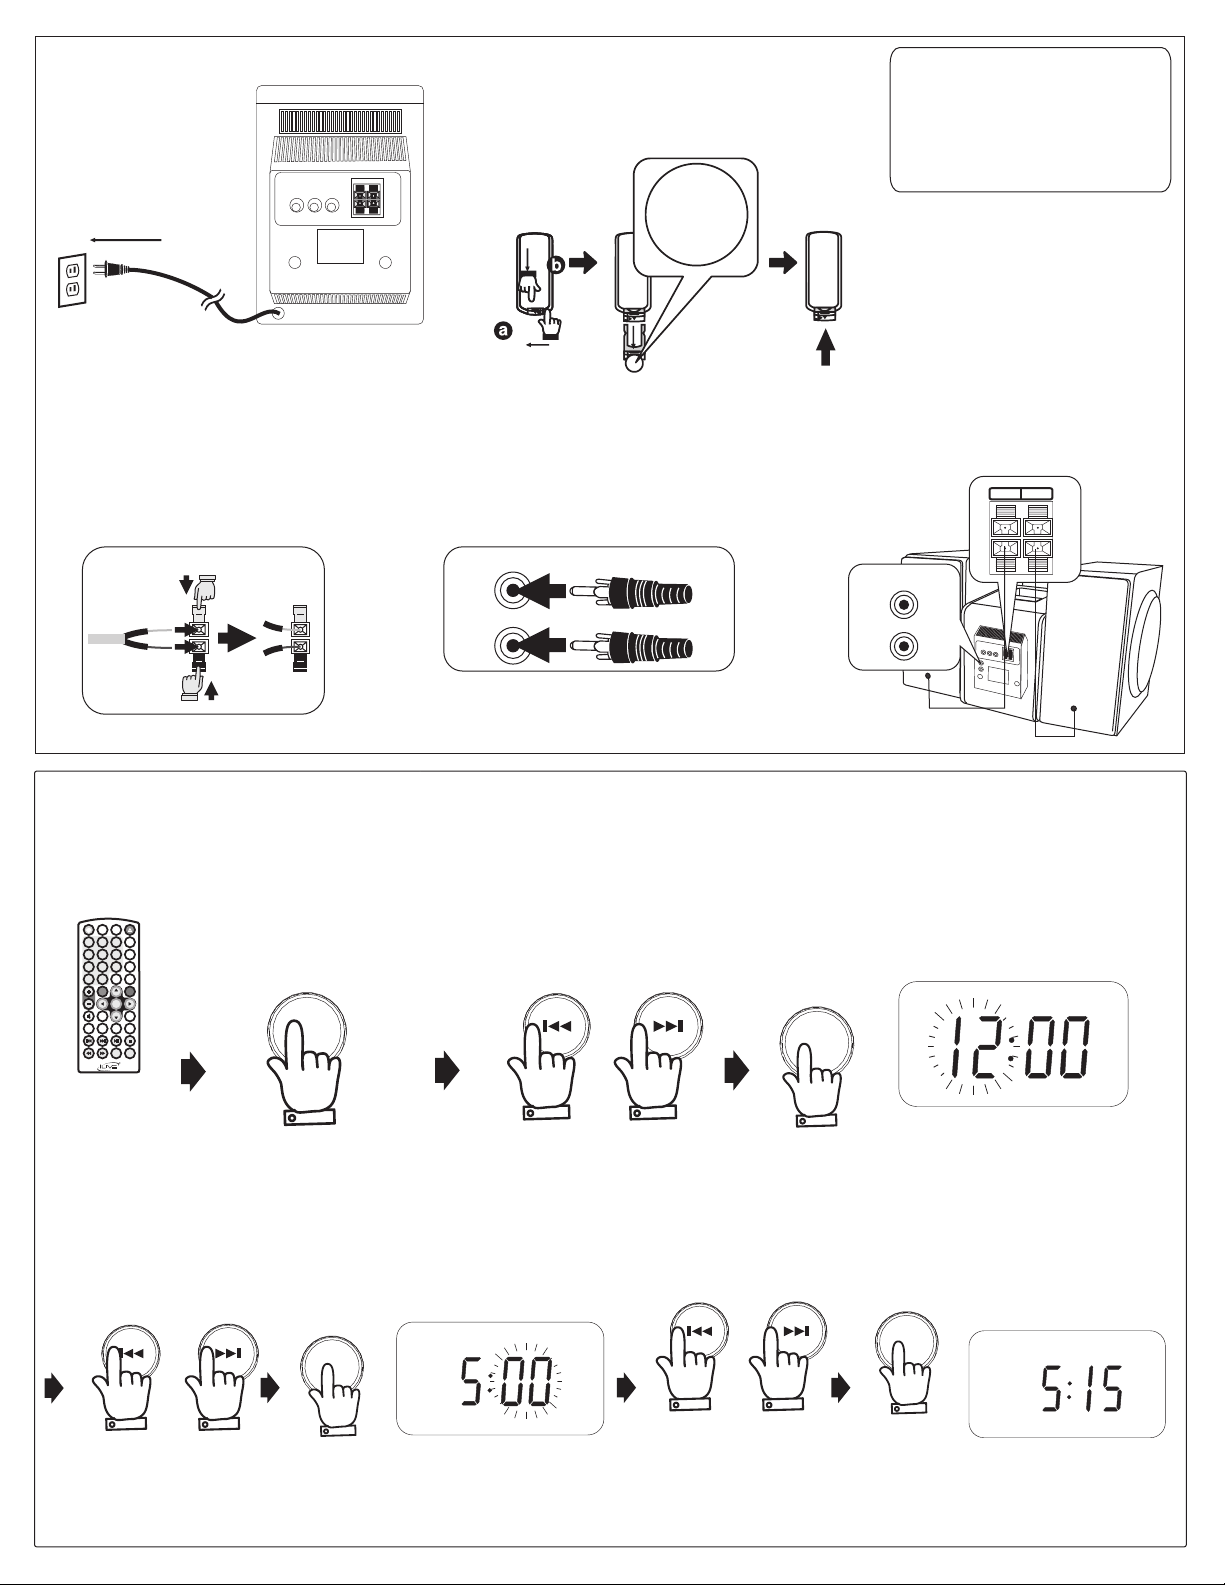
POWER SOURCES / FUENTES DE ALIMENTACIÓN / SOURCES D’ALIMENTATION
BATTERIES / PILAS / PILES
+
120V AC/60 HZ
NOTE:
CONNECTING THE SPEAKERS / PARA CONECTAR LOS ALTAVOCES / POUR BRANCHER LES ENCEINTES
LITHIUM BATTERY
CR2025
+
LITHIUM BATTERY
CR2025
3V
3V
WARNING: Danger of explosion if batteries are
incorrectly replaced. Replace only with the same
or equivalent type.
ADVERTENCIA: Peligro de exploción si pilas son puestas
incorrectamente. Reemplace solo con el mismo tipo o uno
equivalente.
AVERTISSEMENT: Danger d'explosion lorsque la batterie
n'est pas remplacée correctement. Remplacer uniquement
avec des batteries identiques ou d'un type équivalent.
NOTE: You may need to remove a protective covering
from the remote's battery compartment before using the
remote. The button cell battery contains mercury. Do not
put in the trash. Recycle or dispose as hazardous waste.
NOTA: Necesitará quitar la capa protectora del compartimento de
la pila del control remoto antes de usar el control remoto. La pila
célula tipo botón contiene mercurio, no la tire a la basura.
Recíclela ó deséchela como residuo peligroso.
REMARQUE: Vous aurez besoin d' enlevez l' enveloppe
protectrice du compartiment de la pile de la télécommande avant
d' u tiliser la télécommande. La pile cellule type bouton contient du
mercure, ne la jetez pas à la poubelle. Veuillez la recyclé ou jeté
comme déchet dangereux.
R
L
CONNECTING THE SPEAKER WIRES:
WOOFER
R
L
WOOFER
R
L
SETTING THE TIME (POWER OFF MODE) / FIJANDO LA HORA DEL RELOJ / EN FIXENT L' HEURE DE L' HORLOGE
1
FUNCTION
OPEN/CLOSE
STANDBY
DISP
AUDIO
3
1 2
TITLE
5
4
6
ANGLE
9
8
7
SUBTITLE
SETUP
10+
0
DVD
CH
iPod
MENU
VOL
ENTER
CH
ZOOM
OSD
SLOWEQWIDEGOTO
BAND
MEM-UP
SKIP/TUNE
MEM/CLK SET
MEM-DN
RANDREPEAT
1
Set / Memory
Clock Adjust
PRESS AND HOLD
PRESIONE Y MANTENGA
APPUYER ET MAINTENIR L'APPUI
SKIP/TUNING
2
OR
TO SELECT 24 HR OR 12 HR
PARA SELECCIONAR 24 HORAS O 12 HORAS
POUR CHOISIR 24 HEURES OU 12 HEURES
Set / Memory
Clock Adjust
3
4
TO ADJUST HOUR
PARA AJUSTAR HORA
POUR AJUSTER L'HEURE
SKIP/TUNING
OR
SKIP/TUNING
Set / Memory
Clock Adjust
5 6 7
OR
TO ADJUST MINUTE
PARA AJUSTAR MINUTO
POUR AJUSTER LA MINUTE
- 3 -
Set / Memory
Clock Adjust
Page 5

2
LISTENING TO THE RADIO
ESCUCHA DE LA RADIO
ÉCOUTE DE LA RADIO
FUNCTION
OPEN/CLOSE
STANDBY
DISP
AUDIO
3
1 2
4
7
0
VOL
TITLE
5
6
ANGLE
9
8
SUBTITLE
SETUP
10+
DVD
CH
iPod
MENU
ENTER
CH
ZOOM
OSD
SLOWEQWIDEGOTO
BAND
MEM-UP
SKIP/TUNE
MEM/CLK SET
MEM-DN
RANDREPEAT
1 2
POWER
FUNCTION
Function
i-Pod
FM
RADIO
MHz
STOP / BAND
3
SELECT RADIO
SELECCIONE RADIO
SELECTIONNER LA RADIO
SKIP/TUNING
4
OR
5
Function
VOLUME
i-Pod
PRESS AND HOLD TO SCAN TO
THE NEXT AVAILABLE CHANNEL.
PRESIONE Y MANTENGA PARA ESCANEAR
AL SIGUIENTE CANAL DISPONIBLE.
APPUYER ET MAINTENIR L'APPUI POUR SCANNER
JUSQU'AU PROCHAIN CANAL DISPONIBLE.
TO IMPROVE RECEPTION
PARA MEJORAR LA RECEPTIÓN
POUR AMÉLIORER LA RÉCEPTION
PROGRAM RADIO STATIONS / PROGRAME LAS ESTACIÓNES DE RADIO / PROGRAMME STATIONS PAR RADIO
SKIP/TUNING
RADIO
SET/MEMORY/CLOCK ADJ.
1 2
FM
MHz
OR
PRESS AND HOLD
PRESIONE Y MANTENGA
APPUYER ET MAINTENIR L'APPUI
PRESET EQ BUTTON
BOTÓN PRESET EQ
BOUTON PRESET EQ
CLASSIC/JAZZ
ROCK/POP
FM:
FM
SELECT AM/FM
SELECCIONE AM/FM
SELECTIONNER AM/FM
Function
AM:
STANDBY
1 2
4
7
0
VOL
SKIP/TUNE
FUNCTION
OPEN/CLOSE
DISP
AUDIO
3
TITLE
5
6
ANGLE
9
8
SUBTITLE
SETUP
10+
DVD
CH
iPod
MENU
ENTER
CH
ZOOM
OSD
SLOWEQWIDEGOTO
BAND
MEM-UP
MEM/CLK SET
MEM-DN
RANDREPEAT
SKIP/TUNING
3
SET/MEMORY/CLOCK ADJ.
4
OR
TO CHOOSE THE CHANNEL
PARA ELEGIR EL CANAL
POUR CHOISIR LE CANAL
(REPEAT STEPS 1-4 TO PROGRAM UP TO 10 FM AND 10 AM.)
(REPITA PASOS 1-4 PARA PROGRAMAR LA RADIO CON HASTA 10.
(REPETER LES ETAPES 1 A 4 POUR PROGRAMMER JUSQU'À 10 STATIONS FM ET 10 AM.)
PROGRAM PLAY/PROGRAM REVIEW
Jouer la Station Programmé/ Réviser la Station Programmé
MEMORY
PLAY/PAUSE/MEM UP
REPEAT/MEM DN
OR
(ST)
FM
RADIO
MEM
MHz
Tocar las Estacíones Programadas/Revisar las Estacíones Programadas
- 4 -
Page 6

LISTENING TO A CD / ESCUCHANDO UN DISCO COMPACTO Ó CD / ÉCOUTE D’UN DISQUE COMPACT OU CD
PLAY MODES / MODOS DE REPRODUCCIÓN / MODES DE LECTURE
3
FUNCTION
Function
1
INSERT
CD
i-Pod
2
3
This unit plays CD, CD-R and CD-RW discs. Note: CD-R/CD-RW discs must first
be finalized.
Este aparato reproduce discos CD, CD-R y CD-RW.
tienen que haber terminado de tocar.
Cet appareil lit des disques CD, CD-R et CD-RW. Remarque: Les disques CDR/CD-RW auront fini.
4
Nota: Los discos CD-R/CD-RW
OR
5
DOWN
Function
i-Pod
Page 7

DVD PLAYBACK / REPRODUCCIÓN DEL DVD / LECTURE DU DVD
4
1
2
2
Open CD tray insert
DVD and close
3
14:14
DVD
001
4
REMOTE CONTROL FEATURES
Press "Next" to
advance to the next
chapter
Presione "next" para
avanzar al próximo
capítulo
Appuyez "next" pour avancer
au prochain chapitre
Press "Pre" to go to
the previous chapter
Presione "Pre" para ir al
capítulo anterior
Appuyez "Pre" pour aller au
chapitre précédent
Press "Play/Pause" to start the
movie and pause it in the middle of
play
Presione "Play/Pause" para empezar la
pelicula y pause la en el medio de que se
está tocando
Appuyez "Play/Pause" pour commencer le film et pour
faire une pause il au milieu du jeu
Press "Stop" to stop the
movie from playing
Presione "Stop" para parar la
película
Appuyez "Stop" pour arrêter le film
Press "TITLE" to
return to main menu
Presione "TITLE" para
regresar al menú
principal
Appuyez "TITLE" pour retourner
au menu principal
Press "ZOOM"
repeatedly to zoom
in
Presione "ZOOM"
repetidamente para
hacer zumbido adentro
Appuyez "ZOOM" pour
bourdonner à plusieurs
reprises dedans
Press "GoTo" to go to
the chapter you wold
like
Presione "GoTo" para is al
capítulo deseado
Appuyez
"GoTo" pour allez au
chapitre vous wold comme
NEXT
PREVIOUS GOTO ZOOM
PLAY/PAUSE STOP
TITLE
Page 8

DVD SET MENU OPTIONS/ Opciones de Menú Ajustes/ Placez Les Options De Menu
5
EN:
Various features of the player can be adjusted in the Setup Menu:
- Press the SETUP button.
- Setup Menu appears.
-Highlight the desired icon. Press the ENTER button to activate the setting sub
menu.
SP:
Varias características del tocador puede ser ajustado en el menú
de Ajusted:
-
Presione el botón de Ajustes
-
El menú de Ajustes aparecerá
-
Subraye el ícono deseado. Presione el botón ENTER para activar
los ajusted del sub-menú.
FR:
De divers feautures du joueur peuvent être ajustés dans le menu
d'installation :
-
Serrez pour installer le bouton
-
Le menu d'installation apparaîtra
-
Accentuez l'icône désirée. Appuyez sur le bouton de ENTER pour activer le
menu de sous-marin d'arrangement.
Language
EN:
Enter this menu to setup another
language in the OSD display, DVD disc
subtitle, DVD disc audio and DVD disc
Start Menu. Press the SETUP button.
Highlight "Language." Language sub
menu appears.
Using the DIRECTION KEYS, highlight
the desired item and press the ENTER
button. Highlight the desired item.
Press the ENTER button to confirm.
Press the SETUP button to save the
setting and exit.
Video Output Selection
EN:
Enter this menu to setup the Video
setting. Press the SETUP button.
Navigate DIRECTION KEYS to
highlight "Video." Video sub menu
appears.
Highlight the desired item and press
the ENTER button.
Highlight the desired item.
Press the ENTER button to confirm.
Press the SETUP button to save the
setting and exit.
Language
Video
Misc
Language
Video
Misc
Language
Video
Misc
Language
Video
Misc
Language
Video
Misc
Language
Video
Misc
Language
Video
Misc
OSD Menu
Subtitle
Audio
DVD menu
OSD Menu
Subtitle
Audio
DVD menu
OSD Menu
Subtitle
Audio
DVD menu
OSD Menu
Subtitle
Audio
DVD menu
OSD Menu
Subtitle
Audio
DVD menu
Aspect Ratio
Smart Picture
Aspect Ratio
Smart Picture
Idioma
SP:
Incorpore este menú para
: English
ajustar otro idioma en el
: English
subtítulo de la exhibición de
: English
OSD, del disco de DVD, audio
: English
del disco de DVD y menú del
comienzo del disco de DVD.
Presione el botón SETUP.
Destaque el "Idioma." el
menú secundario de la
English
lengua aparece.
Français
Español
Con los botones de
DIRECTION, destaque el
artículo deseado y presione
el botón del ENTER.
Destaque el artículo
: English
deseado. Presione el botón
English
de ENTER para confirmar.
French
Presione SETUP el botón
Spanish
Auto
para ahorrar el ajuste y la
Off
salida.
: English
: English
English
French
Spanish
: English
: English
: English
English
French
Spanish
Selección de Salida de Video
SP:
Incorpore este menú para setup
: 4:3 PS
: Standard
el ajuste video. Presione los
botones de SETUP. Navegue los
botones de DIRECTION para
subrayar el "Video." El menú
secundario video aparece.
Destaque el artículo deseado y
presione el botón de ENTER.
4:3 PS
Destaque el artículo deseado.
4:3 LB
Presione el botón de ENTER
16:9
para confirmar. Presione el
botón SETUP para guardar el
ajuste y la salida.
Language
Video
Misc
Language
Video
Misc
Language
Video
Misc
Language
Video
Misc
Language
Video
Misc
Language
Video
Misc
Language
Video
Misc
OSD Menu
Subtitle
Audio
DVD menu
OSD Menu
Subtitle
Audio
DVD menu
OSD Menu
Subtitle
Audio
DVD menu
OSD Menu
Subtitle
Audio
DVD menu
OSD Menu
Subtitle
Audio
DVD menu
Aspect Ratio
Smart Picture
Aspect Ratio
Smart Picture
Langue
FR:
Écrivez ce menu pour installer une
: English
: English
autre langue acoustique dans le
: English
sous-titre d'affichage d'OSD, de
: English
disque de DVD, de DVD disque et
menu de début de disque de DVD.
Serrez SETUP le bouton. Accentuez
La "Langue." le menu secondaire de
English
langue apparaît.
Français
Español
En utilisant les boutons de
DIRECTION, accentuez l'article
désiré et appuyez sur le bouton de
ENTER. Accentuez l'article désiré.
Appuyez sur le bouton de ENTER
: English
pour confirmer. Serrez SETUP le
English
French
bouton pour sauver l'arrangement
Spanish
et la sortie.
Auto
Off
: English
: English
English
French
Spanish
: English
: English
: English
English
French
Spanish
Choix De Rendement Visuel
FR:
: 4:3 PS
Écrivez ce menu pour installer
: Standard
l'arrangement visuel. Serrez les
boutons SETUP. Navigate les boutons
de DIRECTION pour accentuer la
"Video." Le menu secondaire visuel
apparaît.
Désiré et appuyez sur le bouton de
ENTER de l'article d'Accentuez. Désiré
4:3 PS
de l'article d'Accentuez. Appuyez sur le
4:3 LB
bouton de ENTER versent le
16:9
confirmateur. Serrez SETUP que le
bouton versent le l'arrangement de
sauver et la sortie de La.
Language
Video
Misc
Language
Video
Misc
Language
Video
Misc
Language
Video
Misc
Language
Video
Misc
Language
Video
Misc
Language
Video
Misc
OSD Menu
Subtitle
Audio
DVD menu
OSD Menu
Subtitle
Audio
DVD menu
OSD Menu
Subtitle
Audio
DVD menu
OSD Menu
Subtitle
Audio
DVD menu
OSD Menu
Subtitle
Audio
DVD menu
Aspect Ratio
Smart Picture
Aspect Ratio
Smart Picture
: English
: English
: English
: English
English
Français
Español
: English
English
French
Spanish
Auto
Off
: English
: English
English
French
Spanish
: English
: English
: English
English
French
Spanish
: 4:3 PS
: Standard
4:3 PS
4:3 LB
16:9
Language
Video
Misc
Aspect Ratio
Smart Picture
: 4:3 PS
Standard
Vivid
Cool
Personal
EN:
The aspect ratio of the picture can be varied in line with the features
available on the TV in use.
4:3 Letter Box
Allows you to view movies in their
original aspect ratio. The entire frame of
the movie will be displayed on screen
but will occupy a smaller portion of the
screen.
16:9 Widescreen
When you connect to a widescreen TV
(16:9), this setting will allow the original
aspect ratio to be displayed.
4:3 Pan Scan
The image will fit the screen. The left
and right edges of the image may be
cut off from the screen.
Language
Video
Misc
Aspect Ratio
Smart Picture
: 4:3 PS
Standard
Vivid
Cool
Personal
SP:
El cociente de aspecto del cuadro se puede variar en
línea con las características disponibles en la TV en
uso.
La caja de letra de 4:3
permite que usted visión
películas en su cociente
de aspecto original. El
marco entero de la
película será exhibido en
la pantalla pero ocupará
una porción más pequeña
de la pantalla.
Widescreen 16:9
Cuando usted conecta con una
TV de pantalla ancha (16:9),
este ajuste permitirá que el
cociente de aspecto original sea
exhibido.
L a exploración de Pan de 4:3
La imagen cabrá la pantalla. Los
bordes izquierdos y derechos de
la imagen se pueden cortar de la
pantalla.
- 7 -
Aspect Ratio
Language
Smart Picture
Video
Misc
FR:
L'allongement de l'image peut être changé en conformité
avec les dispositifs disponibles sur la TV en service.
La boîte de lettre de 4:3
vous permet de regarder des
films dans leur allongement
original. L'armature entière du
film sera affichée sur l'écran
mais occupera une plus petite
partie de l'écran
Widescreen 16:9
Quand vous vous reliez à a
widescreen TV (16:9), cet
arrangement permettra à
l'allongement original d'être
montré.
Le balayage de Pan de 4:3
L'image adaptera l'écran. Les
bords gauches et droits de l'image
peuvent être découpés de l'écran.
: 4:3 PS
Standard
Vivid
Cool
Personal
Page 9

Misc
EN:
Enter this menu to setup the Misc
setting. Press SETUP button Highlight
"Misc", Misc sub menu appears.
Highlight the desired item and press
ENTER Highlight the desired item.
Press ENTER button to confirm. Press
SETUP button to save the setting and
quit.
1) Use Default settings, Choose to
reset the system to the Default
settings.
2) Divx registration, show the
Registration code and the factory
website.
Language
Video
Misc
Language
Video
Misc
Language
Video
Misc
Language
Video
Misc
Use Default Settings
Screen Saver
Use Default Settings
Screen Saver
Use Default Settings
Screen Saver
Use Default Settings
YES NO
Use Default Settings
Screen Saver
Misceláneo
SP:
Misceláneo Incorpore
: Off
este menú para poner el
ajuste de Audio. Presione
el botón SETUP. Subraye
el "Audio", menú
secundario audio aparece
Destaque el artículo
: Off
deseado y la prensa el
botón ENTER. Destaque
el artículo deseado.
Presione el botón ENTER
para confirmar. Presione
el botón SETUP para
: Off
guardar el ajuste y para
parar.
1) Utilize los ajustes
iniciales, elija re-formar
el sistema a los ajustes
iniciales.
Off
On
2) Registración Divx,
demustra el código de
resgistración y la página
Web.
LISTENING TO YOUR iPod/ ESCUCHANDO SU iPod/ ÉCOUTER VOTRE iPod
6
There are different brackets for your
iPod depending on the size and the
iPod you have.
Hay diferentes soportes de iPod
dependiendo en el tamaño y e;
iPodque usted tenga.
Il y a différents supports pour son
iPod en dépendant dans la tailla
de l'iPod que vous avez
FUNCTION
OPEN/CLOSE
STANDBY
DISP
NOTE: You can use the remote
AUDIO
3
1 2
TITLE
5
4
6
that came with the unit to control
ANGLE
9
8
7
the iPod functions.
SUBTITLE
SETUP
10+
0
DVD
CH
iPod
MENU
VOL
ENTER
CH
ZOOM
NOTA: Usted puede utilizar el
OSD
SLOWEQWIDEGOTO
BAND
MEM-UP
SKIP/TUNE
control que viene con la unidad
MEM/CLK SET
MEM-DN
RANDREPEAT
para las funciones del iPod.
NOTE: Vous pouvez utiliser le
contrôle qui vient avec l'unité
pour les fonctions de l'iPod.
VOLUME
UP
OR
6
DOWN
SKIP/SEARCH
OR
POWER OFF
1
PAUSE:
PAUSA:
FAIRE UNE PAUSE:
PLAY/PAUSE
2
TO CANCEL:
CANCELAR:
ANNULER:
PLAY/PAUSE
Divers
FR:
Language
Video
Misc
Language
Video
Misc
Language
Video
Misc
Language
Video
Misc
Use Default Settings
Screen Saver
Use Default Settings
Screen Saver
Use Default Settings
Screen Saver
Use Default Settings
YES NO
Use Default Settings
Screen Saver
: Off
: Off
: Off
Off
On
Écrivez ce menu pour installer
l'arrangement audio. Serrez le
bouton SETUP. Accentuez
l'"Audio", menu secondaire
audio apparaît.
Accentuez l'article désiré et la
pression le bouton ENTER.
Accentuez l'article
désiré.Appuyez le bouton
ENTER pour confirmer. Serrez
le bouton SETUP pour sauver
l'arrangement et pour
stopper.
1) Utilize les ajustements
initiaux, choisis de réformer
le système aux ajustements
initiaux.
2) Enregistrement Divx,
demustra le code de
resgistración et la page Web.
• Brackets 2-4 is used for different size iPods
• Bracket 1 - is for iPod mini
• Bracket 5- is for iPod nano
POWER ON
3
iPod
Function
4
TO STOP
i-Pod
5
Use Default Settings
Language
Screen Saver
Video
Misc
Use Default Settings
Language
Screen Saver
Video
Misc
Use Default Settings
Language
Screen Saver
Use Default Settings
Video
YES NO
Misc
Use Default Settings
Language
Screen Saver
Video
Misc
PLAY/PAUSE
: Off
: Off
: Off
Off
On
VIEWING YOUR iPod VIDEO FROM A EXTERNAL DEVICE
/MIRANDO SU VIDEO iPod CON UN APARATO EXTERNO
/VISIONNEMENT DE VOTRE iPod À LÀIDE D' UN DISPOSITIF EXTERNE
Video Out
1
VIDEO IN
Video cable
2
LISTENING TO OTHER PORTABLE AUDIO DEVICES
/ESCUCHANDO OTROS APARATOS DE AUDIO
7
/ ÉCOUTER VOTRE D'AUTRES DISOSITIFS AUDIO
POWER OFF
1
VOL
VOL
2
LINE IN JACKLINE OUT JACK
POWER ON
3
PRESET EQ BUTTON
BOTÓN PRESET EQ
BOUTON PRESET EQ
EQ
POWER ON
3
NOTE: You must use the portable devices controls in this mode. The remote will not work for these devices.
NOTA: Usted debe utilizar los controles de los aparatos portátiles en este modo. El control no trabajará con estos aparatos.
NOTE: Vous deve utilizier le télécommande du portatile apparetous en est mode. Le télécommande non tramarà qui le apparetous.
FUNCTION
4
6:30
AM
i-Pod
Function
- 8 -
AUX
iPod
4
Function
i-Pod
5
PLAY/PAUSE
5
UP
OR
DOWN
VOLUME
Function
CLASSIC/JAZZ
ROCK/POP
PRESET EQ BUTTON
BOTÓN PRESET EQ
BOUTON PRESET EQ
EQ
Function
CLASSIC/JAZZ
ROCK/POP
i-Pod
i-Pod
Page 10

8
LISTENING AND CHARGING YOUR iPod shuffle
ESCUCHANDO Y CARGANDO SU iPod SHUFFLE
En ÉCOUTANT Et ENCHARGEANT SON iPod SHUFFLE
1. Plug your iPod shuffle into the
USB port for charging.
2. Use included Line-in cord to
connect your shuffle to Line-in
Jack on the unit .
3. Press the FUNCTION button
until you see AUX on the LCD.
4. Start playing your music using
the control on the iPod shuffle.
Note:
Only the Volume can be controlled
by the unit or the remote control.
Note:
Shuffle can be charged and played
at the same time by inserting it in
the port and connected to the LINE
IN.
1. Conecte su iPod shuffle en su
porte entrada de USB para
cargarlo.
2. Utilize el cable de ENTRADA
incluido para conectar su shuffle
al gato de entrada en la unidad.
3. Presione el botón FUNCTION
hasta que usted vea AUX en el
LCD.
4. Comienze a tocar su música
utilizando el control en el iPod
shuffle.
Nota:
Solo el volumen puede ser
controlado en la unidad o el control
remoto.
Nota:
Shuffle puede ser cargado y
tocado a la misma vez al colocarlo
en el porte de entrada y
conectandolo en el gato de
entrada.
1. Reliez son iPod shuffle dans son port
entrée d'USB pour le charger.
2. Utilize le câble d'ENTRÉE inclus pour
relier son shuffle au chat d'entrée
dans l'unité.
3. Pressez le bouton FUNCTION
jusqu'à ce que vous voyiez AUX dans
le LCD.
4. Comienze à toucher sa musique en
utilisant le contrôle dans l'iPod
shuffle.
Note:
Seulement le volume peut être contrôlé
dans l'unité ou le contrôle éloigné.
Note:
Shuffle peut être chargé et être touché
la même fois en le plaçant dans le port
d'entrée et en le reliant dans le chat
d'entrée.
Charging your iPod shuffle
Cargando su iPod shuffle
Tocando su iPod shuffle
1
SETTING TIMER (POWER OFF MODE)
FIJAR EL CONTADOR DE TIEMPO DE LA COCINA
9
RÉGLAGE DU TEMPORISATEUR DE CUISINE
TIMER
1
TIMER
2
TIMER ON
3
0:00
TIMER
6
PRESS AND HOLD
TIMER OFF
SKIP/CLOCK/TUNING
7
0:00
OR
USB Port for iPod shuffle
(Modo Apagado)
(Puissance Outre De Mode)
SKIP/CLOCK/TUNING
OR
TIMER
8
TIMER
4
TIMER OFF
14:00
Playing your iPod shuffle
En chargeant son iPod shuffle
En touchant son iPod shuffle
2
TIMER ON
LINE OUT JACK
3
FUNCTION
Function
SKIP/CLOCK/TUNING
5
LINE IN JACK
i-Pod
14:00
OR
SKIP/CLOCK/TUNING
9
OR
TIMER
10
4
Note:
VOLUME
UP
OR
10
OR
DOWN
Sleep Timer/
TEMPORIZADOR PARA DORMIR /
MINUTERIE D' ARRÊT
SLEEP
90,80,70---,10
Press Repeatedly to set or turn off
FUNCTION
OPEN/CLOSE
STANDBY
DISP
AUDIO
3
1 2
TITLE
5
4
6
ANGLE
9
8
7
SUBTITLE
SETUP
10+
0
DVD
CH
iPod
MENU
VOL
ENTER
CH
ZOOM
OSD
SLOWEQWIDEGOTO
BAND
MEM-UP
SKIP/TUNE
MEM/CLK SET
MEM-DN
RANDREPEAT
Note: The timer can wake to radio, CD, or DVD, it depends on what was playing and timer set when turned off.
Press the TIMER button to turn the timer on.
- 9 -
Page 11

CARE AND MAINTENANCE / CUIDADO Y MANTENIMIENTO / SOINS ET ENTRETIEN
GENERAL / GENERAL / GÉNÉRALE
L
A
C
I
M
E
H
C
•
Use a soft, clean cloth moistened
with plain, luke-warm water to
clean the exterior of the unit.
Utilice un paño suave ligeramente
humedecido en agua tibia para limpiar
el exterior de la unidad.
Utilisez un chiffon doux et propre imbibé d'eau
tiède pour nettoyer l'extérieur de l'appareil.
Never use solvents such as benzene
•
or other strong chemical cleaners
since these could damage the unit's finish.
No use ningún solvente como benzole u otros
limpiadores químicos fuertes, ya que pueden
dañar el acabado de la unidad.
N'utilisez jamais des solvants comme le benzène ou
d'autres produits de nettoyage chimiques puissants
car ils peuvent endommager l'apprêt de l'appareil.
TROUBLESHOOTING GUIDE / GUÍA DE RESOLUCIÓN DE PROBLEMAS / EN CAS DE PROBLÈMES
PROBLEM SOLUTION
No sound is heard.
My iPod Shuffle won’t play Line-in Cord is not
POSSIBLE CAUSE
GENERAL
Power is not on.
VOLUME Control is set
to minimum.
Mute is on.
Speakers not connected
properly.
Station has not been
tuned properly.
FM reception is weak.
Wrong function is
selected.
attached
iPod Shuffle is not
plugged into the
USB Port
Press the POWER button.
Adjust the VOLUME
Control.
Press Mute on remote.
Connect the speakers
properly.
Tune statio n properly.
Extend the FM cord.
Press the FUNCTION
button to the radio
position.
Attach Line-in Cord to the
Music system as well as
your iPod Shuffle.
Connect your iPod
Shuffle to the USB Port.
PROBLEMA SOLUCIÓN
CAUSA POSIBLE
GENERAL
No hay sonido.
Mi iPod Shuffle no toca.
El aparato está apagado
El botón VOLUME está en
mínimo
Mudo esta prendido
Los Auriculares no están
conectado correctamente.
No ha sintonizado en
una estación
correctamente.
Recepción FM débil.
Ha seleccionado la
función equivocada.
Los cables de Entrada
no están adjuntos.
iPod Shuffle no está
conectado en el porte
de USB.
Presione el botón POWER
Ajuste el botón VOLUME.
Presione Mudo en el control
remoto
Conecte los auriculares
apropiadamente.
Sin tonice en una
est ación c orrect amente.
Extienda el cable FM.
Presione el botón de la
FUNCTION a la posición
de radio.
Conecte el cable de Línea
de Entrada al sistema de
música al igual que al ipod
Shuffle.
iPod Shuffle n'est pas relié
dans le port d'USB.
It is important that no liquid
•
reaches the inside of the unit.
No permita que entre líquido dentro de
la unidad.
Ne versez pas du liquide à l'intérie
ur de 'appareil.
PROBLÈME SOLUTION
Il n’y a pas de son. L’appareil est éteint.
Mon iPod Shuffle ne
touche pas.
CAUSE PROBABLE
GENERAL
Le bouton VOLUME est sur MIN.
La Sourdine est activée.
Orateurs non reliés
correctement.
Vous n’avez pas réglé
sur une station
correctement.
Faible réception FM.
Vous avez sélectionné
une autre fonction.
Les câbles d'Entrée ne
sont pas joints.
Conecte su iPod Shuffle
a su porte de USB.
Appuyer sur la touche
POWER (Alimentation).
Réglez le bouton VOLUME.
Appuyer sur Mute (Sourdine)
sur la télécommande.
Reliez les haut-parleurs
correctement.
Rég lez sur une sta tion
cor rectem ent.
Déployez le câble FM.
Appuyez sur le bouton de
FUNCTION dans la
position par radio.
Reliez le câble de Ligne
d'Entrée au système de
musique tout comme al
ipod Shuffle.
Reliez son iPod Shuffle à
son port d'USB.
- 10 -
Pr int ed in Chi na / Impri mi do en Chi na / Im prim é en Chi ne
 Loading...