

Page 1
IC3
ICR6307DT
INSTRUCTION MANUAL
Page 2

Warnings and Precautions
TO PREVENT FIRE OR SHOCK HAZARDS, DO NOT EXPOSE
THIS UNIT TO RAIN OR MOISTURE.
This symbol, located on back or bottom of the unit, is intended to alert the
user to the presence of uninsulated “dangerous voltage” within the product’s
enclosure that may be of sufcient magnitude to constitute a risk of electric
shock to persons.
This symbol, located on back or bottom of the unit, is intended to alert the
user to the presence of important operating and maintenance (servicing)
instructions in the literature accompanying the appliance.
Any use of the controls or an adjustment to the procedures other than those
specied herein may result in hazardous radiation.
CAUTION: TO PREVENT ELECTRIC SHOCK, MATCH WIDE
BLADE OF PLUG TO WIDE SLOT, FULLY INSERT.
To reduce the risk of electric shock, do not remove cover (or back). There are
no user-serviceable parts inside. Please refer any servicing to qualied service
personnel.
WARNING: Changes or modications to this unit not expressly approved by
the party responsible for compliance could void the user’s authority to operate
the equipment.
NOTE: This equipment has been tested and found to comply with the limits
for a Class B digital device, pursuant to Part 15 of the FCC Rules. These limits
are designed to provide reasonable protection against harmful interference in
a residential installation. This equipment generates, uses, and can radiate radio
frequency energy and, if not installed and used in accordance with the instructions, may cause harmful interference to radio communications. However, there
is no guarantee that interference will not occur in a particular installation. If
this equipment does cause harmful interference to radio or television reception, which can be determined by turning the equipment off and on, the user is
encouraged to try to correct the interference by one or more of the following
measures:
• Reorient or relocate the receiving antenna.
• Increase the separation between the equipment and receiver.
• Connect the equipment into an outlet on a circuit different from that to which
the receiver is connected.
• Consult the dealer or an experienced radio/TV technician for help.
2
Page 3

Features
1
10
11
12
13
14
2
3
4
5
6
7
8
15
16
17
18
19
20
21
22
23
9
3
Page 4

Features Dened
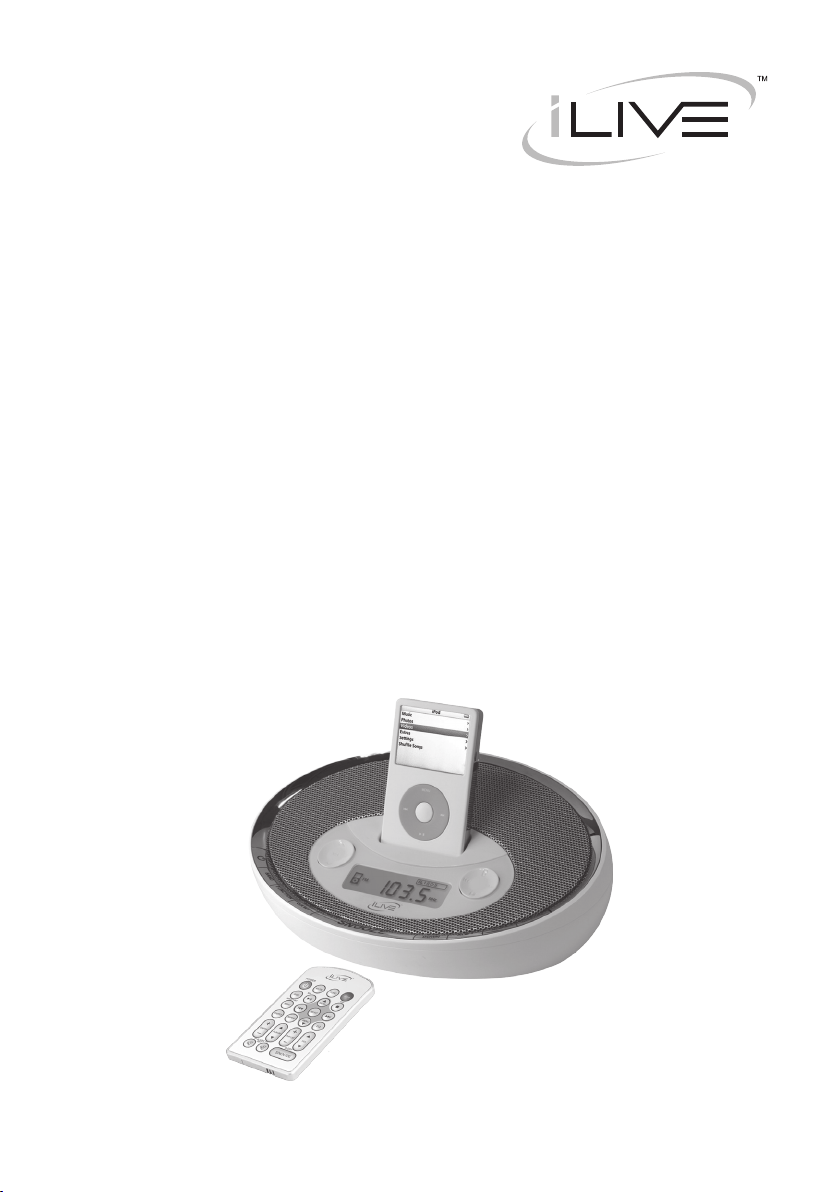
1 iPod Docking Station Connect your iPod, iPod mini, or iPod nano.
2 VOLUME Press the up arrow to increase the volume, and the down arrow to decrease volume.
3 POWER Press the POWER button to turn the radio off or on.
4 BAND Press the BAND button to switch between AM or FM radio stations.
5 FUNCTION Press the FUNCTION button to switch between radio and line-in control.
6 EQ Press the EQ button to switch equalizer modes between Classical, Jazz, Rock, and Pop.
7 AC Cord (120V / 60 Hz) The attached AC (Alternating Current) Cord provides power to the player.
8 Battery Back-Up (2 - AAA Batteries) The Battery Back-Up will save the clock and alarm settings in
case of a power outage. The display will not be active without AC Power. (batteries not included)
9 FM Antenna The FM Wire Antenna provides exibility and range when adjusting the FM reception.
An AM Antenna is built into the player.
10 Prev/Search Press the Prev/Search button to decrease the radio frequency, or to decrease the clock time
when adjusting the clock.
11 IPOD Press the IPOD button to power on an iPod and enable control through the player.
12 Next/Search Press the Next/Search button to increase the radio frequency, or to increase the clock time
when adjusting the clock.
13 PLAY/PAUSE/M-UP Press the PLAY/PAUSE/M-UP button to play or pause an iPod, or to cycle up
through the preset radio stations.
14 DISPLAY In radio mode press the display button to switch between viewing the time or the radio
frequency.
15 ALM 2 Use the ALM 2 button to view and adjust the alarm 2 time, and to set alarm 2 to buzzer, radio,
or iPod.
16 ALM 1 Use the ALM 1 button to view and adjust the alarm 1 time, and to set alarm 1 to buzzer, radio,
or iPod.
17 MEM/CLK SET Press the MEM/CLK SET button to program a radio station into the presets, or to
adjust the clock.
18 SNOOZE / Sleep Press the SNOOZE button to delay the alarm for ve minutes after the alarm sounds.
Press the Sleep button to set the player to turn off after 10 - 90 minutes.
19 LCD Display View the Time, AM Indicator, iPod Indicator, and Radio Frequency through this Liquid
Crystal Display.
20 Video Out Plug the yellow connector of an AV Cord in the Video Output to send a video signal from a
Video iPod to a source (TV) with a Video Input.
21 AUX-Out Use the Line-Out jack to connect the player to external speakers.
22 Line-In Use the line-in jack to connect an iPod shufe or other audio device to the player.
23 DIMMER Toggle the DIMMER switch between HI and LO to adjust the brightness of the LCD Dis-
play.
4
Page 5

Peripherals
24
WARNING: Danger of explosion
if batteries are incorrectly installed.
Replace only with the same or
equivalent type.
The button cell battery contains
mercury. Do not put in the trash,
instead recycle or dispose of as
hazardous waste
30
25
26
27
28
29
Buttons that are not dened in the Peripherals section, are dened in the Features section.
iPod Inserts
Model # iPod Capacity
iPod (third generation)
iPod mini 3 4GB and 6GB
iPod
iPod with color display
iPod nano 8 1GB, 2GB, and 4GB
iPod with video
iPod nano (second generation) 11 2GB, 4GB, and 8GB
1 10GB, 15GB, 20GB
2 30GB and 40GB
4 20GB and U2 Special Edition
5 40GB
6 20GB, 30GB, and U2 Special Edition
7 40GB
9 30GB
10 60GB and 80GB
31
32
33
34
5
Page 6

Peripheral Dened
24 MUTE Press the MUTE button to decrease the volume entirely.
25 DISPLAY In radio mode press the DISPLAY button to switch between viewing the time or the radio
frequency.
26 MEM/CLK SET, MENU Press the MEM/CLK SET button to program a radio station into the presets,
or to adjust the clock. Press the MENU button to enter the menu on an iPod.
27 SHUFFLE Press the SHUFFLE button to randomly play songs on an iPod.
28 CHAPTER Press up on the CHAPTER button to increase the chapter number, or press down on the
CHAPTER button to decrease the chapter number.
29 ALBUM Press up on the ALBUM button to increase the album number, or press down on the ALBUM
button to decrease the album number.
30 iPOD/BAND Press the iPOD/BAND button to power on an iPod and enable control through the player,
or press the iPod/Band button, with the radio function on, to switch between AM and FM frequencies.
31 STOP Press the STOP button to stop a song on an iPod.
32 Navigation Controls/SELECT Use the Navigation Controls to move through an iPod menu system.
Press the SELECT button to select a song, photo, or video on your iPod.
33 REPEAT Press the REPEAT button to switch between REPEAT 1, REPEAT ALL, or Off.
34 PLAYLIST Press up on the PLAYLIST button to cycle up through the playlists on an iPod, or press
down on the PLAYLIST button to cycle down through the playlists on an iPod.
Operations
Setting the Clock
a. Press and hold the CLK SET button.
b. Press the Next/Search and Prev/Search buttons to toggle between 12HR and 24HR
time, and press the CLK SET button to select either option.
c. Press the Next/Search button to cycle up through the hours, or press the Prev/Search
button to cycle down through the hours. Press the CLK SET button to select the
hour.
d. Press the Next/Search button to cycle up through the minutes, or press the Prev/
Search button to cycle down through the minutes. Press the CLK SET button to
select the minute, and nish setting the time.
continued
6
Page 7

Operations
Setting the Alarm
a. Press the ALM 1 button.
b. Press and hold the ALM 1 button.
c. Press the Next/Search button to cycle up through the hours, or press the Prev/Search
button to cycle down through the hours. Press the ALM 1 button to select the hour.
d. Press the Next/Search button to cycle up through the minutes, or press the Prev/
Search button to cycle down through the minutes. Press the ALM 1 button to select
the minute.
e. Press the Next/Search button to cycle up through the different alarm modes ( Radio,
Buzzer, or iPod ). After a mode is selected press the ALM 1 button to nish setting
the alarm.
• This operation also applies to setting alarm two.
Viewing Video or Photos from your iPod on an External Device
a. Using a video cable, connect an external device such as a TV to the Video Out port
on the player.
b. Insert your iPod with video or photo capabilities into the iPod Docking Station with
the appropriate insert.
c. You will now be able to control your iPod from the player’s control panel. Using
the PLAY/PAUSE, NEXT/SEARCH, and PREV/SEARCH buttons you can move
from one video or photograph to the next, play, and pause.Connecting Other
Digital Audio Devices
a. Use a line-in cord to connect an iPod shufe or other audio device to the line-in
port.
b. Press the FUNCTION button to activate the line-in.
c. The iPod shufe or other audio device will now play through the speakers of the
player.
7
Page 8

Service Information
Address 2116 Carr Street, St. Louis MO, 63106
Phone 1-314-621-2881
Fax 1-314-588-1805
Email customerservice@ilive.net
Website www.ilive.net
To download this Instruction Manual in English, Spanish, or French
visit the Support section at
www.ilive.net.
iPod is a trademark of Apple Inc., registered in the U.S. and other countries. TruBass, SRS, and the SRS logo are trademarks of SRS Labs, Inc. All
other trademarks appearing herein are the property of their respective owners. All products subject to change without notice. © 2007 DPI, Inc.
Para descargar este manual de
instrucción en inglés, español, o
francés visite la sección de la ayuda en www.ilive.net.
Pour télécharger ce manuel
d’instruction en anglais, espagnol,
ou le Français visitez la section de
soutien à www.ilive.net.
 Loading...