

Page 1

Clock Radio Docking System
User Guide
ICP360
ICP360 User GuideCustomer Helpline Number: 0844 481 5000
1
Page 2

Welcome
Congratulations on purchasing this Colour Changing Clock Radio for iPhone and iPod.
You can now listen to your iPod or iPhone, or other external device, through your
clock radio’s stereo speakers. You can also listen to FM radio or use the built in alarm,
all in an attractive colour changing case.
Please read the warning section on page 12 carefully before using your clock radio.
You should have
Clock radio with dock for iPod
iPod brackets (5)
AC/DC adaptor
You may also need
• 2x AAA batteries
Need something else?
There are a wide range of accessories and other products that can be ordered direct to your door
from ASDA. For more information see www.asda.com
2
ICP360 User Guide
Page 3

Title
Contents
Clock Radio Docking System
Setup
Everyday use
Safety instructions
Compatibility information
Warnings
Support
01
02
03
04
05
06
07
ICP360 User GuideCustomer Helpline Number: 0844 481 5000
ICP360 User Guide
3
3
Page 4

01
TitleYour Colour Changing Clock Radio for iPhone and iPod
Dock for
iPhone/iPod
Time/Bass
Press to activate
the bass boost.
With the clock radio
powered off, press and
hold to set the clock.
Source
Press to switch
between FM, iPod,
and LINE IN modes.
Standby
Press to switch the
clock radio off or on.
Preset (-/+)
AL1, AL2
Press to switch
between saved
radio stations.
With the clock radio
powered off, press
and hold to set alarm
1 or alarm 2. Press to
activate alarm 1 or 2
to wake to iPod, FM
radio, or the buzzer.
Dim/Mem
Press repeatedly to
adjust the brightness
of the display. In FM
mode, press and hold
to save the current
station to the clock
radio’s memory.
Press to have the clock
Colour
radio cycle through all
colors. Press again to
pause on the current
color. Press a third time
to turn the internal
lights off.
4
Volume
Press to adjust
the volume.
ICP360 User Guide
Snooze/Sleep
After the alarm sounds,
press to delay the
alarm for an additional
9 minutes. With the
clock radio powered
on, press repeatedly to
set the sleep timer.
Press to play or pause a
Play/Pause
docked iPhone or iPod.
Skip/Search
Press to skip between
tracks on a docked
iPhone or iPod. Press
and hold to search
the current track on a
docked iPhone or iPod.
Press to tune the radio
when in radio mode.
Page 5

Reset
DC power input
Line input
Video output
LCD display
ICP360 User GuideCustomer Helpline Number: 0844 481 5000
5
Page 6
02
Setup
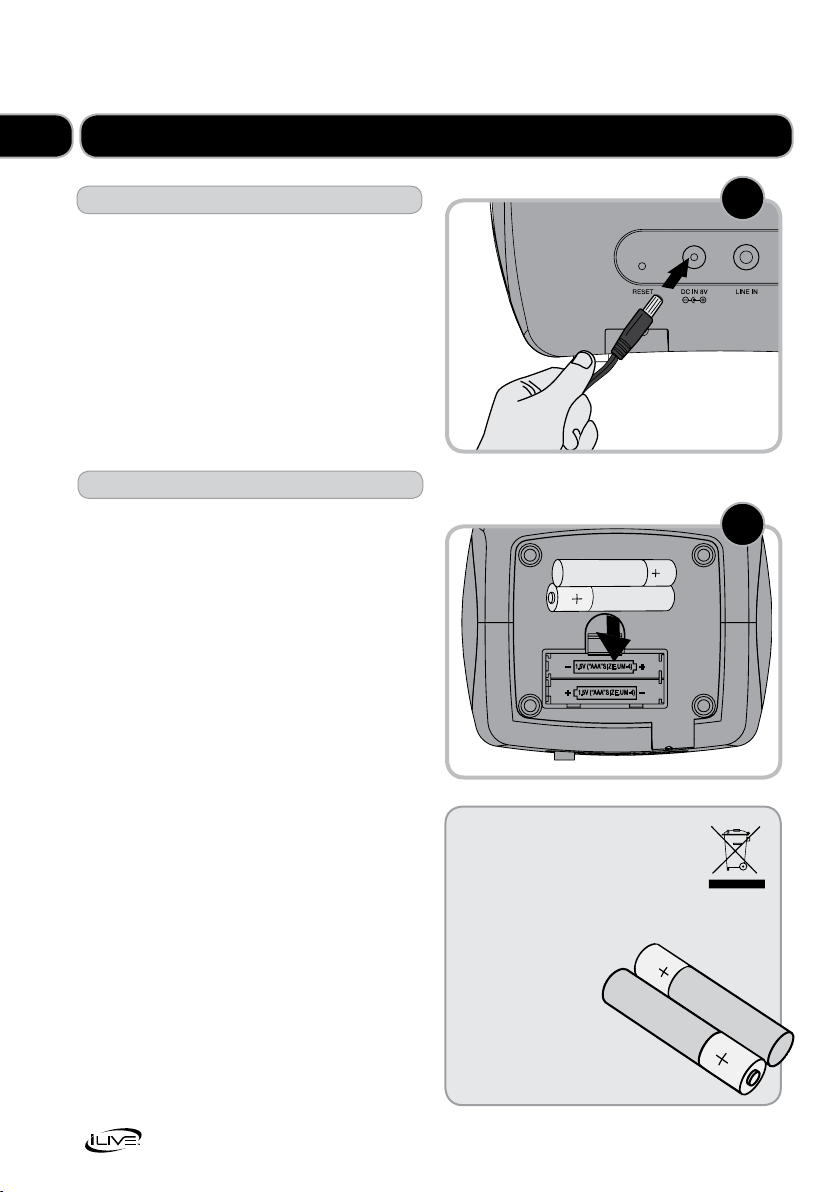
Setting up your radio
1 Plug one end of the included AC/DC
power adapter into the DC POWER
INPUT on the back of your clock radio.
Plug the other end into a standard
power socket.
Back up batteries
2 Insert 2 AAA batteries (not supplied)
into the bottom of your clock radio
as shown – ensure that the positive
(+) and negative (-) symbols on the
batteries match the symbols inside
the battery compartment
Please be aware that the unit cannot be
run using only batteries. The batteries
will ensure your settings are saved if you
disconnect the clock radio from its power
source for a short period of time.
1
2
Note:
Battery disposal
Please always dispose of batteries at
a suitable recycling point.
6
ICP360 User Guide
Page 7
Everyday use
03
Setting the time
1 Press the
the unit off.
2 Press and hold the TIME/BASS button.
3 While holding the TIME/BASS button
Press the
4 Still holding the TIME/BASS button press
the
5 Release the TIME/BASS button to set
the time.
Setting the Alarm
1 Press the
the clock radio off.
2 Press and hold the AL1 or AL2 button.
3 While holding the AL1 or AL2 button
press the
4 Still holding the AL1 or AL2 button press
the
5 Release the AL1 or AL2 button to set
the adjusted alarm time.
STANDBY button to power
button to adjust the hour.
button to adjust the minute.
STANDBY button to turn
button to adjust the hour.
button to adjust the minute.
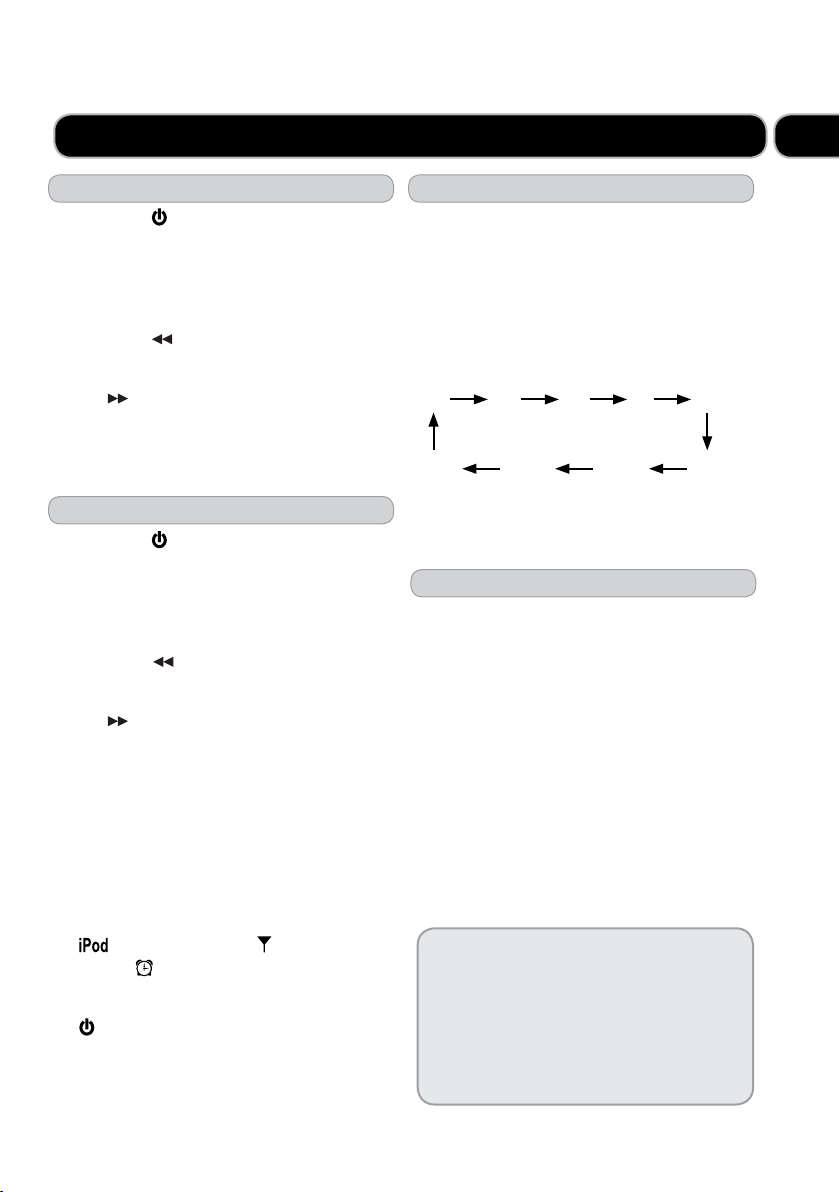
Setting the sleep timer
The sleep timer automatically turns the unit
off after a certain time.
1 While the unit is on, press the SNOOZE
button and “
2 Press the SNOOZE button repeatedly to
select the desired sleep time as below:
90
10
3 The unit will automatically turn off once
it counts down the sleep time
Dimming the Clock Screen
1 Press the DIM/MEM button to
reduce the brightness of the screen.
2 Press it again to reduce the
brightness to its lowest level.
3 Press it again to increase
the brightness.
90” appears on the display.
80 70
20 30
60
50
40
6 To set the second alarm repeat steps
2 -5 above pressing the other alarm
(AL1 or AL2) button.
7 Press the AL1 or AL2 button repeatedly
to set that alarm to wake to iPod/iPhone
, wake to FM radio , wake to
buzzer
8 After the alarm sounds, press the
alarm off.
, or to turn the alarm off.
STANDBY button to turn the
Note:
Snooze
You can stop the Alarm sounding by pressing
the SNOOZE button. The Alarm will sound
again in 9 minutes.
ICP360 User GuideCustomer Helpline Number: 0844 481 5000
7
Page 8
03
Everyday use
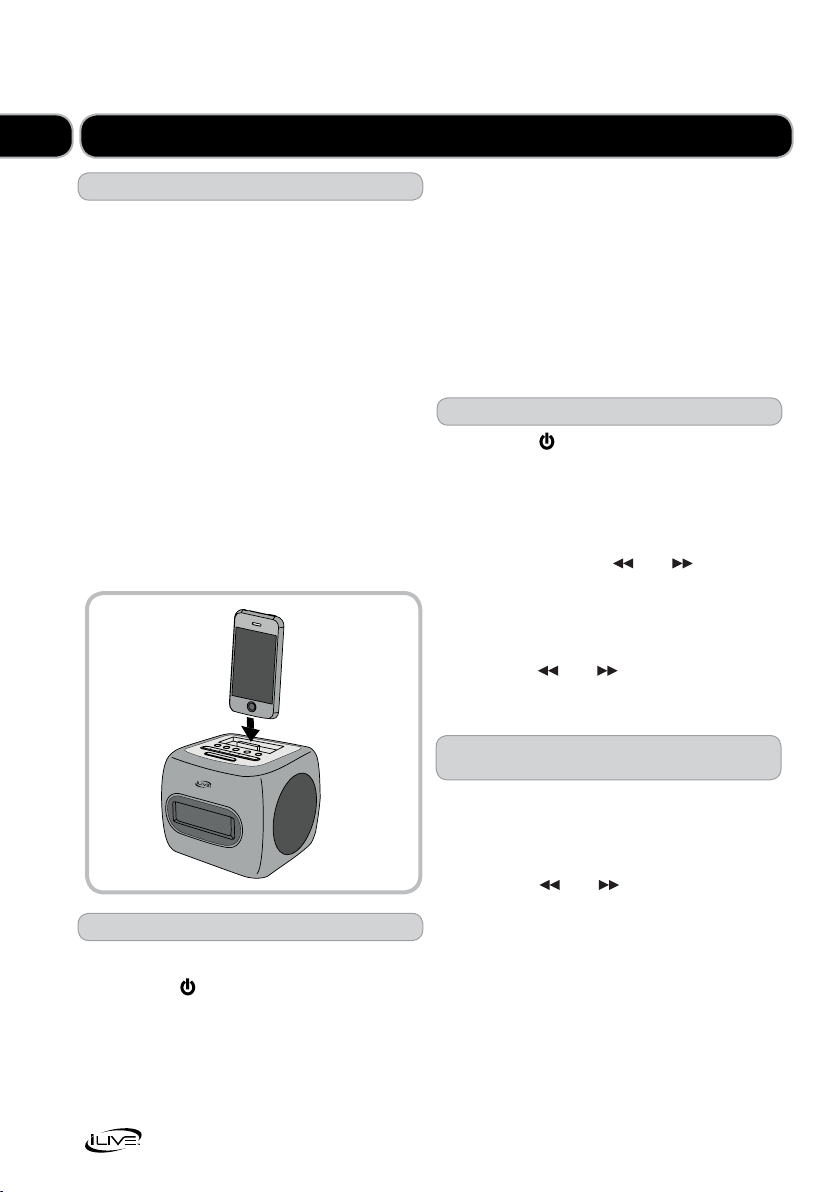
Docking an iPod or iPhone
1 Locate the numbered Bracket that
fits the iPod that will be docked.
Each included Bracket has a number
on it, indicating which iPod model
that bracket is compatible with.
See the chart on page 11 for further details
on compatible iPods and iPhones.
2 Snap the Bracket into place over the
iPod connector in the Docking Station.
All Brackets will only fit one way onto
the Dock.
3 Connect the iPod to the iPod connector
inside the Docking Station. Once an iPod
is connected to the Docking Station, the
unit will charge the docked iPod.
4 Press the Play/Pause Symbol button
to play and pause the docked iPod.
5 Press the Skip/Search/Tuning symbol
buttons to skip songs.
There are a range of other functions you
can use whilst playing your iPod, please
see page 4 for more details.
Tuning the FM Radio
1 Press the
STANDBY button to turn
the unit on.
2 Press the SOURCE button to switch
the unit to FM radio mode.
3 Press and hold the
and buttons to
tune the FM radio. The alarm clock will
automatically stop tuning when it finds
a station.
4 Press the
and buttons once to
fine tune the station.
Saving FM Radio Stations
to the Unit’s Memory
1 After tuning the FM radio to the desired
station, press and hold the DIM/MEM
button for 3 seconds.
Playing an iPod or iPhone
1 Dock an iPod onto the unit.
2 Press the
STANDBY button
to turn the unit on.
3 Press the SOURCE button to switch
the unit to iPod mode.
8
ICP360 User Guide
2 Press the
and button to adjust
the radio memory slot “P01” etc.
You can save up to 20 stations
3 Press the DIM/MEM button
to save the current radio station
to the selected memory slot.
Press the PRESET (-/+) buttons to cycle
through saved FM radio stations.
Page 9
Advanced use
04
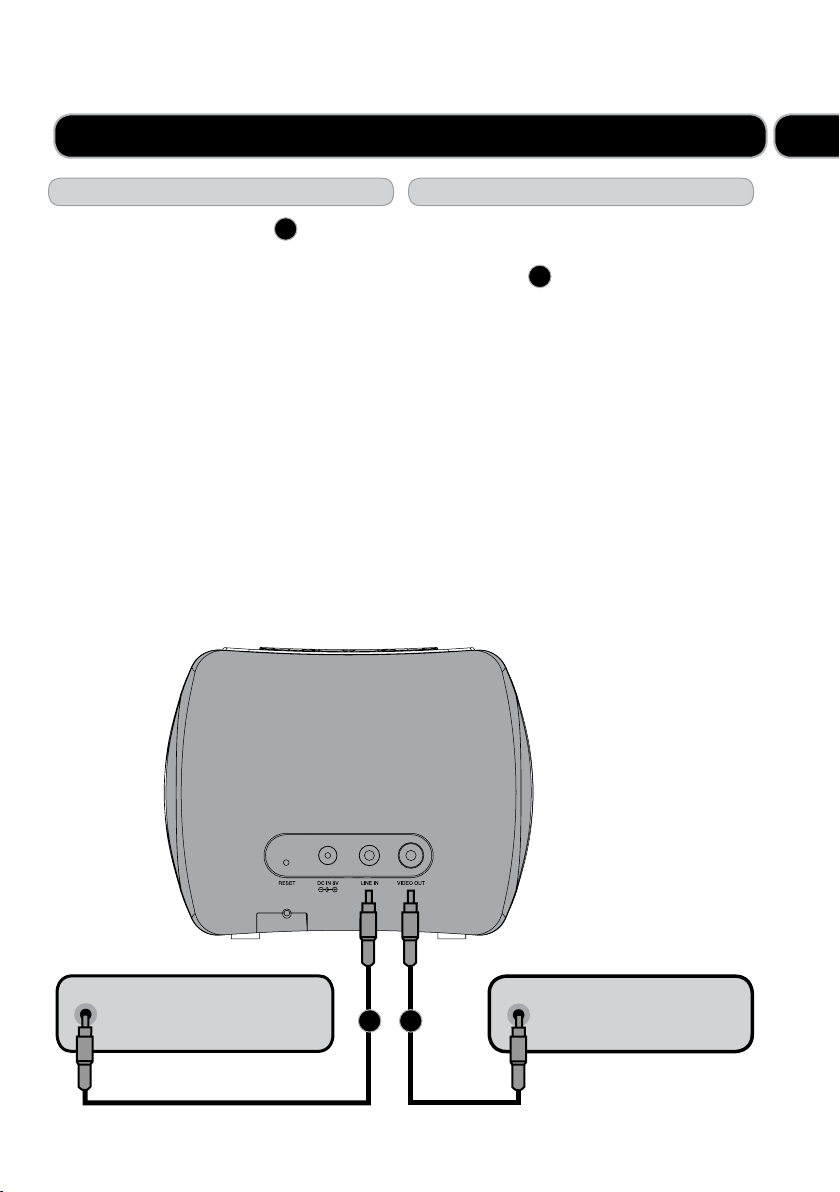
Connecting an external device
1. Use a 3.5mm line in cable
A
(available
at ASDA, see www.asda.com for more
details) to connect an MP3 player or other
audio source to the LINE IN on
the clock radio as shown below
2. Press the POWER button to power
the clock radio on as shown below.
3. Press the SOURCE button to switch
the clock radio to LINE IN mode.
“LINE IN” will appear on the display.
4. Audio played through the
connected MP3 player or other
audio source will now play through
the clock radio’s speakers.
Playing video through your TV
1. Connect a television to the
VIDEO OUT on your Clock radio using
video cable
B
(available at ASDA,
see www.asda.com for more details)
as shown below
2. Follow the instructions for Docking
an iPod or iPhone and Playing an
iPod or iPhone.
3. Make sure the docked iPhone or
iPod’s TV out option is turned on.
4. Adjust the connected television to
the correct input setting.
5. Video played through the docked
iPhone or iPod will now play on the
connected television.
External device
A B
Television
ICP360 User GuideCustomer Helpline Number: 0844 481 5000
9
Page 10
05
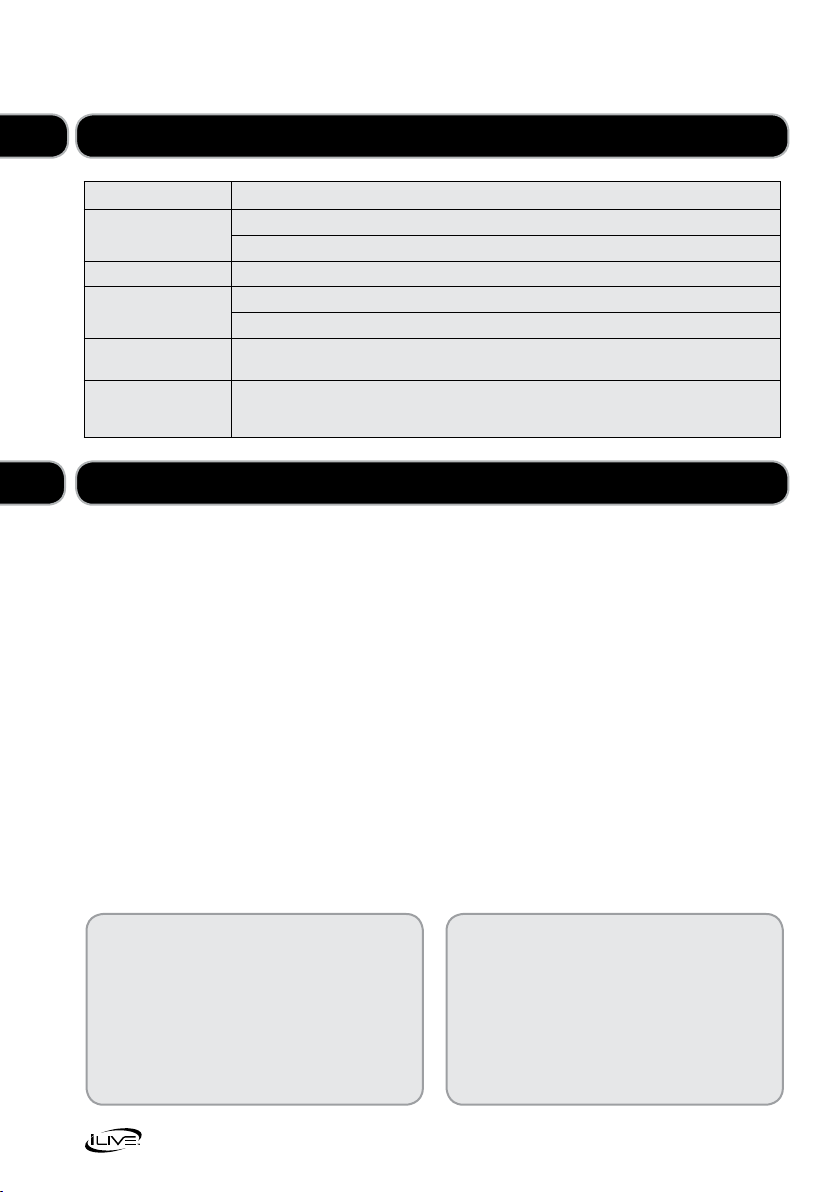
Troubleshooting
Problem What to do
No power Check that the power is switched on at the wall.
Check if the power cord is properly connected to the power outlet.
No sound Check that the volume control is NOT at minimum setting.
Radio channel
reception is poor
Function disturbed If none of the above solutions work, try switching off and unplugging your music system,
TFT display is frozen
(or partially frozen) with
a mosaic like pattern
06
Maintenance
Adjust the antenna location and position to obtain the best signal reception.
Tune to the correct radio channel frequency.
leaving it for two minutes and then switching it back on again.
ESD (electrostatic discharge) due to contact with the TFT screen frame.
Disconnect the unit from the power supply and then reconnect.
1 Do not use harsh or abrasive cleaning
agents or solvents.
2 Do not attempt to disassemble
your product.
3 Do not paint your product.
4 Do not drop, throw or try to bend
your product.
5 Do not expose your product to open
flames or lit tobacco products.
Need extra help?
Don’t worry we’re just the other end of the
phone. If you’re experiencing problems using
your new product, before returning it to the
retailer just call 0844 481 5000.
Monday - Friday 9am - 8pm, Saturday 9am - 5pm
Sunday 11am - 4pm. Calls charged at local rates.
10
ICP360 User Guide
Need something else?
Loving your new iLive Clock Radio? ASDA has a
wide variety of electrical and other products that
are available either instore or online.
For more information visit your local store
or find us online at www.asda.com
Page 11
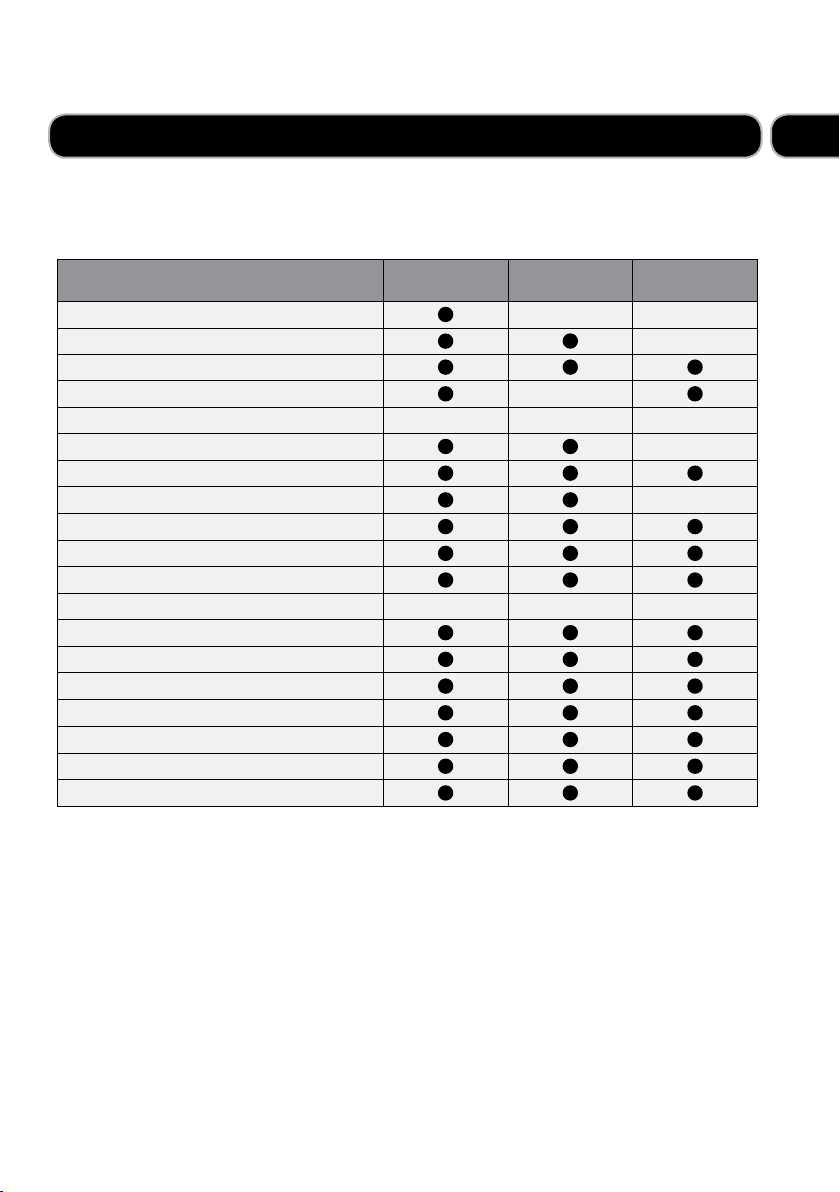
Compatibility information and Chart
Please note: For additional iPod brackets, please contact customer service.
Contact information for customer service can be found on the back page of
the instruction manual.
07
iPod and iPhone model Play and charge
compatibility
iPod mini 4GB 6GB
iPod 4th generation 20GB, 40GB
iPod 4th generation (colour display) 20GB 30GB
iPod 4th generation (colour display) 40GB 60GB
iPod shuffle 1st & 2nd generation 512MB 1GB
iPod nano 1st generation 1GB 2GB 4GB
iPod 5th generation (video) 30GB 60GB 80GB
iPod nano 2nd generation (aluminium) 2GB 4GB 8GB
iPod classic 80GB, 160GB (2007), 120GB 160GB (2009)
iPod nano 3rd generation (video) 4GB 8GB
iPod touch 1st generation 8GB 16GB 32GB
iPhone 4 16GB 32GB
iPhone 4GB 8GB 16GB
iPhone 3G 8GB 16GB
iPhone 3GS 16GB 32GB
iPod nano 4th generation (video) 8GB 16GB
iPod touch 2nd generation 8GB 16GB 32GB 64GB
iPod touch 3rd generation 32GB 64GB
iPod nano 5th generation (video camera) 8GB 16GB
Included bracket Video out
10
10
8
10
8
10
13
14
12
12
12
8
14
14
8
compatibility
ICP360 User GuideCustomer Helpline Number: 0844 481 5000
11
Page 12
08
Warnings
This product was designed and manufactured
to meet strict quality and safety standards.
There are, however, some operation
precautions that you should be aware of:
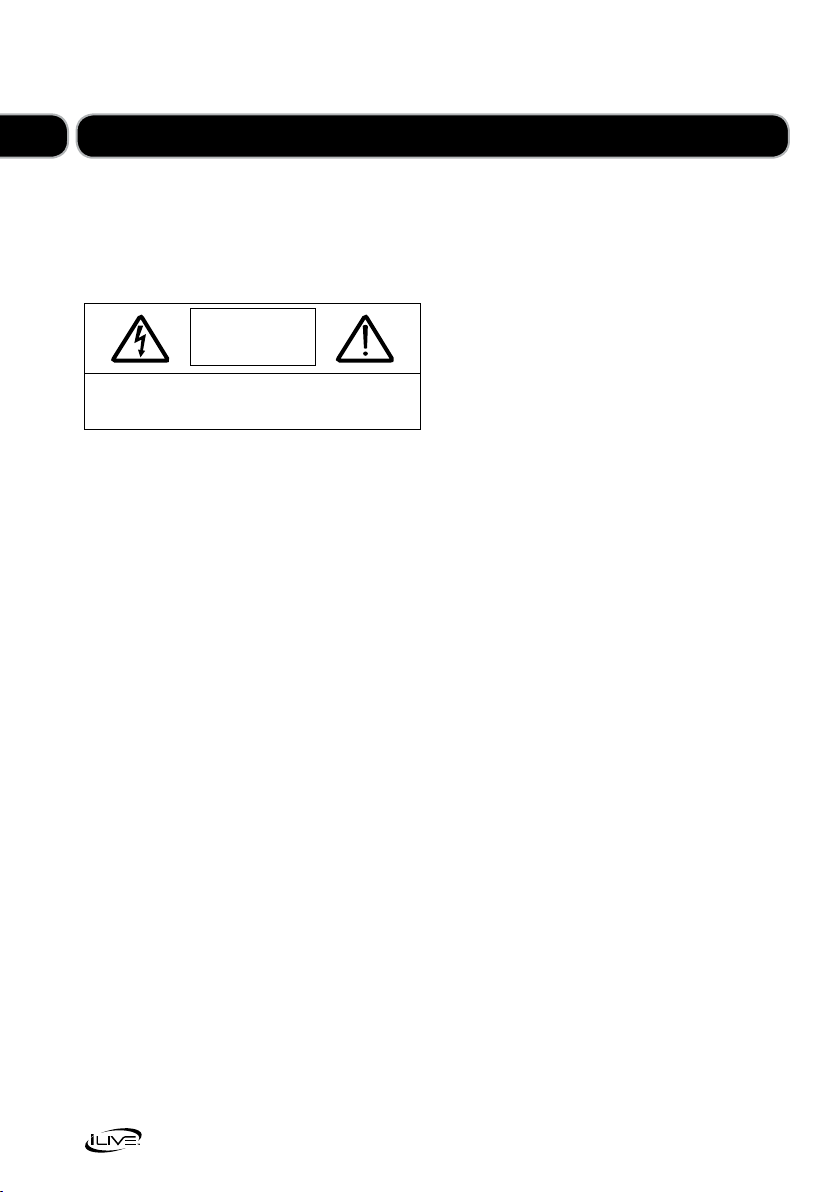
CAUTION
RISK OF ELECTRIC SHOCK
DO NOT OPEN
CAUTION: TO REDUCE THE RISK OF ELECTRIC SHOCK, DO NOT
REMOVE COVER (OR BACK). NO USER SERVICEABLE PARTS INSIDE.
REFER SERVICING TO QUALIFIED SERVICE PERSONNEL.
• Read all warnings.
• Follow all instructions.
• Check the mains voltage stated on
the mains adaptor rating plate
corresponds to the local electricity
supply, if it doesn’t, return the product
to the store where you bought it.
• Unwind and straighten the adaptor
cord before use.
• Place the product on a firm and
level surface.
• Turn off the appliance during
thunder storms.
• To completely disconnect this product
from the mains, disconnect the AC/DC
adapter from the wall socket outlet.
The AC/DC adapter is used to completely
interrupt the power supply to the unit
and must be easily operable by the user.
• The unit should be used in a moderate
climate.
• The name plate is located on the bottom
of the unit.
• Remove the adaptor from the outlet,
when the product is unused for a long
period of time and during thunderstorms.
• Clean only with a dry cloth, unplug
the outlet before cleaning. Do not
use aggressive cleaners as these will
damage the surface.
• Only use attachments/accessories
specified by the manufacturers.
• Do not locate the appliance or batteries
in the vicinity of a heat source or in
direct sunlight. Do not place a naked
flame source on or near this product.
• Do not attempt to open the cabinet
or remove any covers. If the power
adapter or its lead becomes damaged,
it must be replaced with an adapter
of the same type and rating.
• Repairs must only be performed by
the manufacturer or its service agent
or similarly qualified person.
• Do not immerse the main unit,
the power adapter or any accessories
in water or any other liquid.
• Do not expose this product to
dripping or splashing or stand
any vessel containing liquid on
or near this product.
• Keep at least 5mm around the unit for
sufficient ventilation.
• Ventilation should not be impeded,
please ensure that your unit is not
covered by curtains, table cloths,
other fabrics or papers.
• Battery should not be exposed to
excessive heat such as sunshine, fire, or
the like.
12
ICP360 User Guide
Page 13
Support
09
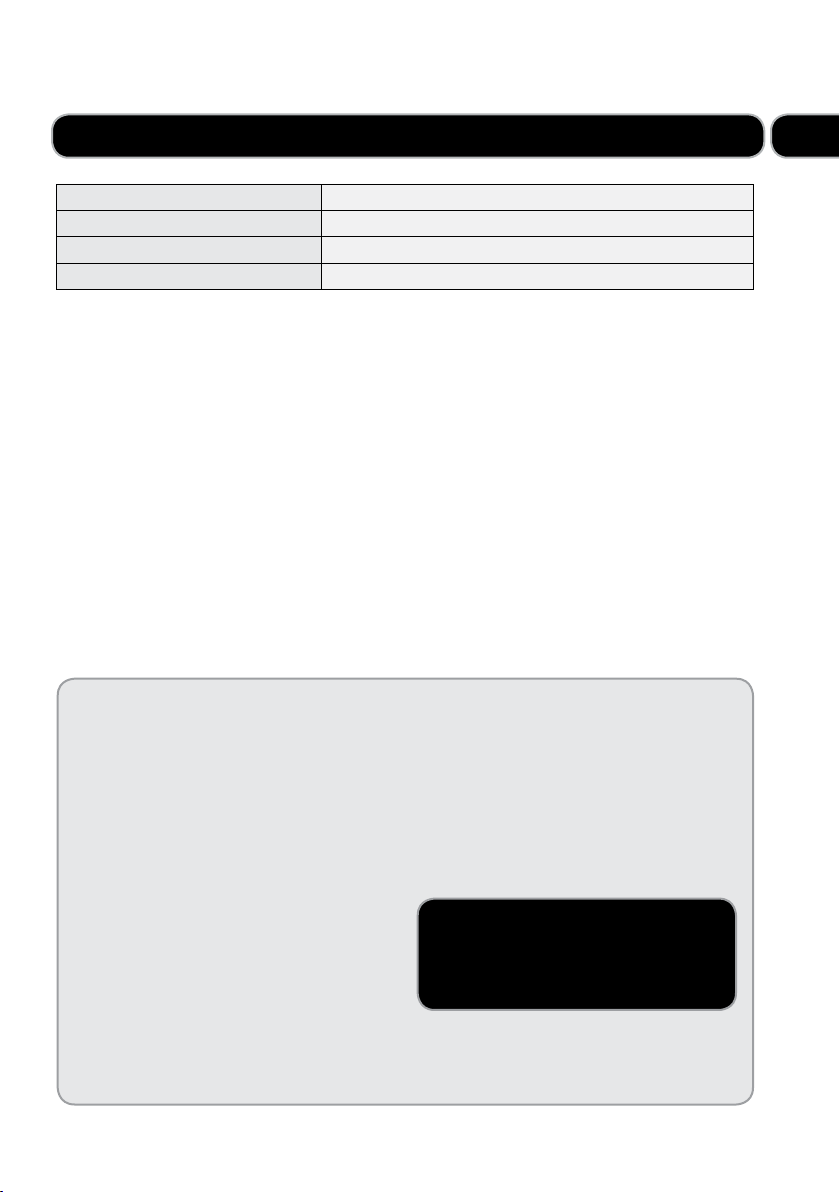
AC/DC adaptor
Secondary voltage
Rating of speaker
Standby power consumption
AS190-080-BI150
DC 8V/1.5A
8 OHM / 2WS
<2W
28 day no quibble refund
If you’re not delighted by your product, simply bring it back within 28 days for a no quibble refund.
Don’t forget to include all of the item’s original components (for example remote control or power
cable) and packaging along with your receipt or other proof of purchase.
Free 1 year guarantee
All our electrical items are covered by a full 1 year ASDA guarantee from the day you buy it. In the
unlikely event that your product is faulty or you are simply struggling to set it up, don’t worry, here’s
what you should do:
1 First call our Customer Helpline as they may
be able to help you with the problem.
2 If the problem can’t be resolved, you will
receive a reference number.
3 Take the reference number along with the
item, all its components and your receipt
to your nearest store for a full refund.
This does not affect your statutory rights.
Customer Helpline
0844 481 5000
Monday - Friday 9am - 8pm, Saturday 9am - 5pm
Sunday 11am - 4pm. Calls charged at local rates.
ICP360 User GuideCustomer Helpline Number: 0844 481 5000
13
Page 14

© 2010 Digital Products International (DPI, Inc.) | All other trademarks appearing herein are
the property of their respective owners. Specifications are subject to change without notice
Manufactured for Asda Stores Ltd,
Asda House, Southbank, Great Wilson Street, Leeds. LS11 5AD.
This symbol on the product or in the instructions means that your electrical and
electronic equipment should be disposed at the end of its life separately from your
household waste. There are separate collection systems for recycling in the EU.
For more information, please contact the local authority or your retailer where you
purchased the product.
14
ICP360 User Guide
 Loading...