

Page 1

INSTRUCTION MANUAL
FOR 90 SERIES BUILT-IN
OVEN 750SKMP
Page 2
OPEN 24
/
7
ILVE ACCESSORIES ONLINE SHOP
For a wide range of coee machines, pods, and other ILVE
accessories at the click of a button shop.ilve.com.au
Page 3
DEAR CUSTOMER,
We thank you and con-gratulate you on your choice. This new carefully designed product,
manufactured with the highest quality mate-rials, has been carefully tested to satisfy all your
cooking demands.We would therefore request you to read and follow these easy instructions which
will allow you to obtain excellent results right from the start,
ILVE
IMPORTANT: The oven’s data plate is accessible even with the oven fully installed. The plate is
visible simply by opening the door. Always quote the details from it to identify the appliance when
ordering spare parts.The appliance becomes very hot during use. Take great care not to touch the
heating elements inside the oven.
THIS APPLIANCE IS CONCEIVED FOR DOMESTIC USE ONLY. THE
MANUFACTURER SHALL NOT IN ANY WAY BE HELD RESPONSIBLE FOR
WHATEVER INJURIES OR DAMAGES ARE CAUSED BY INCORRECT
INSTALLATION OR BY UNSUITABLE, WRONG OR ABSURD USE.
THIS APPLIANCE IS NOT INTENDED FOR USE BY PERSONS (INCLUDING
CHILDREN OVER THE AGE OF 8) WITH REDUCED PHYSICAL, SENSORY OR
MENTAL CAPABILITIES, OR LACK OF EXPERIENCE AND KNOWLEDGE,
UNLESS THEY HAVE BEEN GIVEN SUPERVISION OR INSTRUCTION CONCERNING
USE OF THE APPLIANCE BY A PERSON RESPONSIBLE FOR THEIR SAFETY.
CHILDREN SHOULD BE SUPERVISED TO ENSURE THAT THEY DO NOT PLAY WITH
THE APPLIANCE.
DO NOT PLACE TIN FOIL, PANS OR SIMILAR IN CONTACT WITH THE INNER
BASE OF THE OVEN TO COOK. THE HEATING ACTION OF THE LOWER
RESISTANCE CAUSES THE LOWER PART OF THE OVEN TO OVERHEAT,
LEADING TO DAMAGE AND EVEN SERIOUS CONSEQUENCES (FIRE RISK) ALSO
TO THE UNIT IN WHICH THE OVEN IS IN-STALLED.
Page 4

-
KEEP CHILDREN UNDER AGE 8 AWAY, UNLESS CONSTANTLY SUPERVISED.
-
CHILDREN MAY NOT PERFORM CLEANING AND MAINTENANCE
UNSUPERVISED.
-
DO NOT USE HARSH ABRASIVE CLEANERS OR SHARP METAL SCRAPERS TO
CLEAN THE OVEN DOOR GLASS SINCE THEY CAN SCRATCH THE SURFACE,
WHICH MAY RESULT IN SHATTERING OF THE GLASS.
CONTENTS
First use 3
Self-cleaning panel 3
Control panel 4
Instructions for use:
- conventional cooking 5
- fan cooking 5
- grill cooking 6
Thermostat 6
Electronic timer 6
Light replacement 8
Removing the oven door 9
INSTALLATION INSTRUCTIONS
Flush fitting 9
Electrical connections 9
Technical features 10
Dimensions 11
RESPECT FOR THE ENVIRONMENT
The documentation provided with this oven has been printed
on chlorine free bleached paper or re-cycled paper to show
respect for the environment.The packaging has also been
designed to avoid environmental impact. Packaging material
is ecological and can be re-used or recycled. By recycling
the packaging,you will help save raw materials as well as
reducing the bulk of domestic and industrial waste.
Page 5
THE FIRST TIME YOU USE THE OVEN
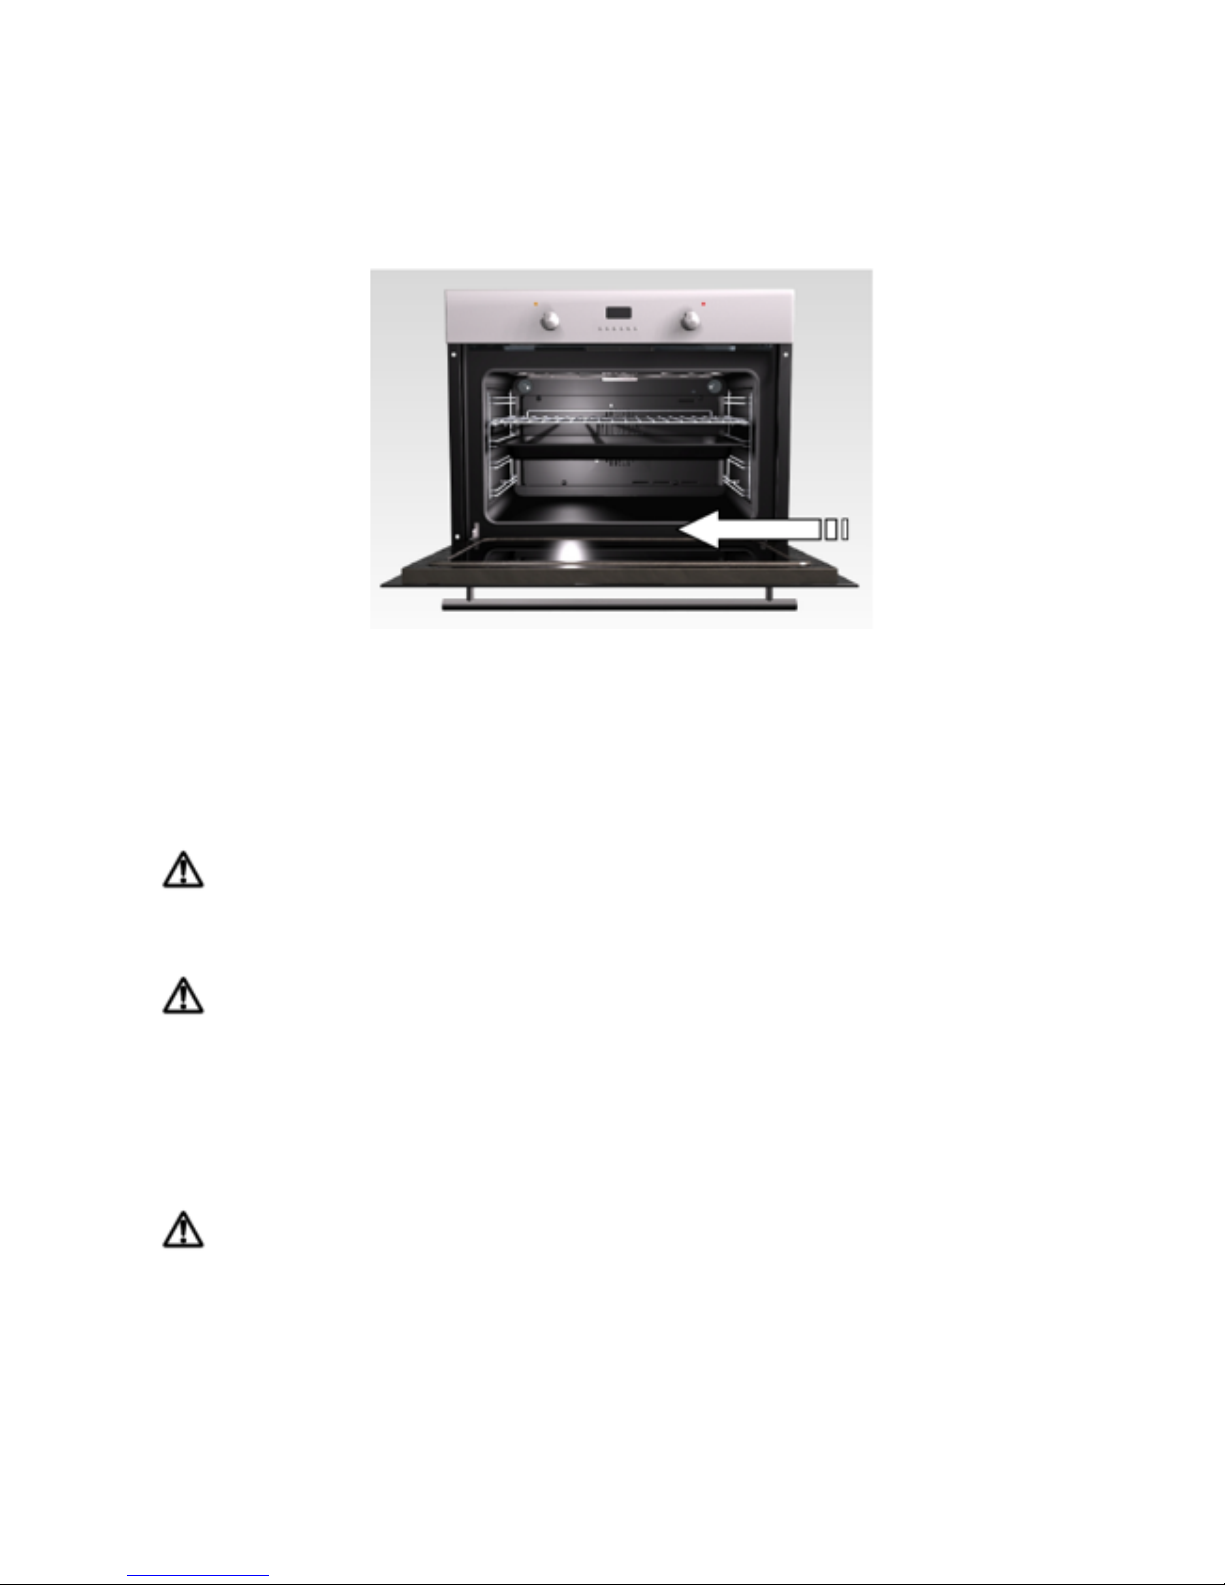
Clean the oven thoroughly with soapy water and rinse well. To remove the lateral frames
from smooth walled ovens, proceed as shown in the figure.Operate the oven for about 30
minutes at maximum temperature to burn off all traces of grease which might otherwise
create unpleasant smells when cooking.
Important:
As a safety precaution,before cleaning the oven,always disconnect the plug from the
power socket or the power cable from the oven. Do not use acid or alkaline substances to
clean the oven (lemon juice,vinegar, salt, tomatoes etc.).Do not use chlorine based
products, acids or abrasive products to clean the painted surfaces of the oven.
DO NOT USE STEAM CLEANERS TO CLEAN THE OVEN.
SELF-CLEANING CATALYTIC PANELS
Our smooth walled ovens can be fitted with
self-cleaning panels to cover the inside walls.These
special panels are simply hooked on to the walls
before the side frames are fitted. They are coated in
a special, micro porous catalytic enamel which
oxidises and gradually vaporises splashes of grease
and oil at cooking temperatures above 200° C.If the
oven is not clean after cooking fatty foods, operate
the empty oven for 60 minutes (max.) at maximum
temperature .Never wash or clean self-cleaning
panels with abrasive, acid, or alkaline products.
Page 6

CONTROL PANEL FUNCTIONS
FUNCTION SYMBOL SON THE SELECTOR
Oven light (stays on while oven is in use).
Bottom heating element. Thermostat setting from 50°C to MAX.
Top and bottom heating elements. Thermostat setting from 50°C to MAX.
Top and bottom heating elements with fan. Thermostat setting from 50°C to
MAX.
Circular heating element with fan. Thermostat setting from 50°C to MAX.
Fan for defrosting. Thermostat setting at 0°C.
Bottom heating element with fan. Thermostat setting from 50°C to MAX.
Double top heating element with fan (large area grill).Thermostat setting from
50°C to 200°C.
Double top heating element (large area grill). Thermostat setting from 50°C to
200°C.
Top heating element (small,low power grill). Thermostat setting from 50°C to
200°C.
Bottom heating element + Circular heating element with fan. Thermostat setting
from 50°C to MAX.
Page 7

INSTRUCTIONS FOR USE
CONVENTIONAL COOKING
Conventional cooking use stop and bottom heat to cook a single
dish.Place the food in the oven only once cooking temperature has
been reached, i.e.when the heating indicator goes out.If you want to
increase top or bottom temperature towards the end of the cooking cycle, set the
temperature control to the right position.It is advisable to open the oven door as little as
possible during cooking.
FAN COOKING
For this type of cooking a fan positioned at the back allows
the circulation of hot air inside the oven, creating uniform
heat. In this way cooking is more rapid than conventional
cooking. It isa suitable method for cooking dishes on more
than one shelf, especially when the food is of different types (fish, meat etc.)
DEFROSTING
By selecting one of the fan cooking functions and setting the thermostat to zero,
the fan allows cold air to circulate inside the oven. In this way frozen food can be
rapidly defrosted.
It is not essential to pre-heat the oven, but you are advised to do so when cooking
pastries.
Page 8

GRILL COOKING
Use the grill to grill or brown foods.Some ovens may be equipped with an
electric motor, spit and skewers for turning on the spit. Place the shelf with
the food to be cooked in the 1 st or 2nd position from the top. Pre-heat the
oven for 5 minutes. Turn the thermostat to a temperature between 50° and 200°.
COOLING FAN
The fan is positioned on the upper part of the oven and create a circle of cooling air on the
inside of the furniture and through the door of the oven.It is turned on when the
temperature of the outer shell of the oven reaches 60°C.By switching on the oven with the
thermostat at 200°C the fan starts work-ing after approx.10 min.It is turned off when the
temperature of the outer shell of the oven descends under 60°C.By switching off the oven
with the thermostat at200°C the fan stops work-ing after approx. 30 min.
THERMOSTAT
Use the thermostat to set the cooking temperature you need. The thermostat
can be adjusted from 50° to 250° C.
ALARM TIMER
You can set this timer to sound a buzzer after 0 to 60 minutes of cooking. First
turn the knob fully clockwise, then turn it back to the desired alarm time.
COOKING TIMER
First, turn the cooking selector to the required cooking function, and the
thermostat to the desired cooking temperature.Then, to set end of cooking
time, turn the cooking timer to the right and to the desired time. First turn the
knob fully clockwise, then turn it back to the desired alarm time. A buzzer
sounds at the end of the timed cooking period, and the oven switches itself
off.To set only the start of cooking, turn the cooking timer to the left to the
symbol.
Page 9

6 KEY ELECTRONIC TIMER
Setting the clock
Press the duration key and the end of cooking key simultaneously, then press
the +/- keys to set time.
MANUAL OPERATION
To start cooking with out setting end of cooking time, press the
manual key
SETTING ONLY THE DURATION OF COOKING IN SEMI-
SETTING ONLY THE END OF COOKING TIME IN SEMI-AUTOMATIC MODE
To set the end of cooking time, press the end of cooking key and press the +/- keys to
set the time at which you want the oven to switch off. A buzzer sounds when the clock reaches the
set time, and the oven switches itself off.Turn the thermostat and selector knobs back to 0position
and press the manual key.
FULLY AUTOMATIC OPERATION
To set the end of cooking time, press the duration key and press the +/- keys to set
the duration of cooking. Press the end of cooking key and press the +/- keys to set
the time at which you want the oven to switch off.When you finish setting these times, the AUTO
symbol flashes and the buzzer sounds. Press any key to silence it.
ALARM TIMER
Press the alarm timer key and press the +/- keys to set the required duration of cooking. The
buzzer sounds when the cooking time ends. Press any key to silence it.
PROGRAMMING ERRORS
You cannot program in a cooking period which starts earlier than the time displayed on the clock. If
you try to do so, the buzzer sounds and the AUTO symbol flasher. Simply change the duration or
cooking time to correct the error.
CANCELLING A COOKING PROGRAMME
To cancel a cooking programme, simply press the manual key.
Page 10

REPLACING THE OVEN LIGHT IMPORTANT:
The oven light must have these precise features:
a)
it must be able to resist high temperatures (up to 300°C)
b)
power supply: see V/Hz indicated on data plate.
c)
power 25W.
d)
E 14 connection.
Before proceeding, disconnect the appliance from the power line
to avoid the possibility of electric shock.
-
to prevent damage, place a tea cloth in the oven-unscrew the glass
cover of the light
-
unscrew the old light bulb and replace it with the new one
-
put back the glass cover and remove the tea cloth
-
connect the appliance to the main electricity supply
REMOVING THE OVEN DOOR
The oven door can be removed quickly and easily. To do so, proceed as follows:
-
Open the door fully.-
Page 11

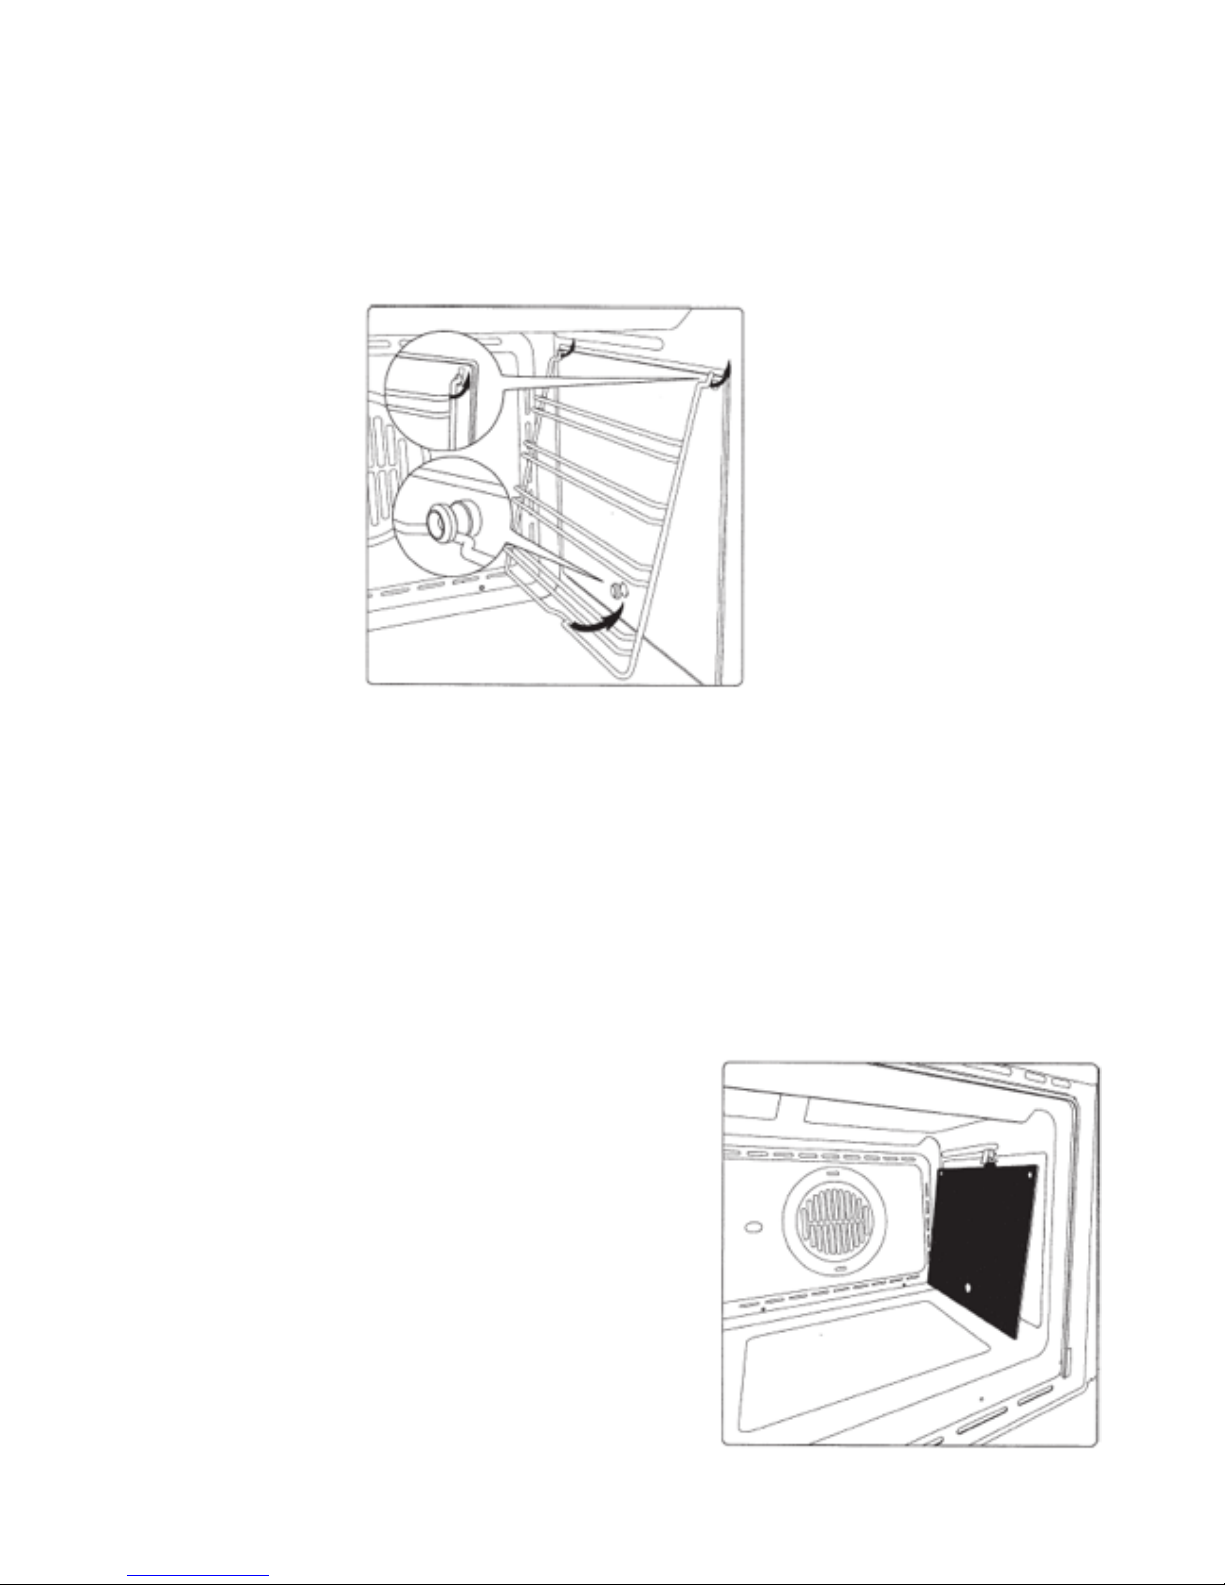
-
Lift the two levers shown in fig.
-
Close the door as far as the first stop (caused by the raised levers).
-
Lift the door upwards and outwards to remove it from its mountings.To replace fit the door, fit the
hinges in their mountings and lower the two levers.
INSTALLATION INSTRUCTIONS
Flush fitting
The oven can be installed under a work top or in a cooking column. Figure shows the installation
dimensions. Make sure that surrounding materials are heat resistant. Align the oven centrally with
respect to the sidewalls of the units surround-ing it and fix it in place with the screws and Allen
screws provided.
ELECTRICAL CONNECTIONS
Before connecting the oven to the mains power supply,make sure that:
-
The supply voltage corresponds to the specifications on the data plate on the front of the oven.
-
The mains supply has an efficient earth (ground) connection complying with all applicable laws
and regulations. Correct earthing (grounding) is a legal requirement.The power cable should
never reach a temperature 50° C above ambient temperature at any point along its length.If a
fixed appliance is not provided with a power cable and plug, or some other device permitting it to
be disconnected from the mains electricity supply, with a gap between the contacts big enough
to guarantee class over voltage protection, then such a device must be fitted to the power supply
in compliance with the regulations governing electrical installations.The socket or switch must be
easily reachable with the oven fully installed.
N.B. The manufacturer de-clines all responsibility for damage or injury if the above instructions and
nor-mal safety precautions are not respected.
The manufacturer declines all responsibility for possible inaccuracies contained in this pamphlet,
due to printing or copying errors. We reserve the right to make on our own products those changes
to be considered necessary or useful, without jeopardising the essential characteristics.
Page 12

Page 13

Page 14

Warranty Card
Eurolinx Pty Limited A.B.N. 50 001 473 347
trading as ILVE (“ILVE”)
Oce:
48-50 Moore Street, Leichhardt N.S.W 2040
Post:
Locked Bag 3000, Annandale, N.S.W 2038
P: 1300 856 411
WARRANTY REGISTRATION
Your ongoing satisfaction with your ILVE
product is important to us. We ask that you
complete the enclosed Warranty Registration
Card and return it to us so that we have a
record of the ILVE products you purchased.
Alternatively you can register on line (see
registration card for details)
PRIVACY
ILVE respects your privacy and is committed
to handling your personal information
in accordance with the National Privacy
Principles and the Privacy Act 1988 (Cth). A
copy of the ILVE Privacy Policy is available at
www.ilve.com.au. ILVE will not disclose any
personal information set out in the Warranty
Registration Card (“Personal Information”)
without your consent unless required by:
1. law;
2. any ILVE related company;
3. any service provider which provide services
to ILVE or assist ILVE in providing services
(including repair and warranty services) to
customers. Our purpose in collecting the
Personal Information is
to keep a record of the ILVE product
purchased by you, in order to provide a
better warranty service to you in the unlikely
event that there is a problem with your ILVE
product. ILVE may contact you at any one
or more of the address, email address or
telephone numbers set out in the Warranty
Registration Card. Please contact ILVE on
1300 694 583 should you not wish to be
contacted by ILVE.
WARRANTY
1. Warranty
ILVE warrants that each ILVE product will
remain, for a period of twenty four (24)
months computed from the date of purchase
of the ILVE product, free from defects
arising in the manufacture of the ILVE
product (“Warranty”). Except for consumer
guarantees set out in the Competition
and Consumer Act 2010 (Cth) (“Act”), ILVE
does not make any further warranties or
representations in relation to ILVE products.
2. What is not Covered by the Warranty.
The Warranty does not apply if an ILVE
product is defective by a factor other than a
defect arising in the manufacture of the ILVE
product, including but not limited to:
ilve.com.au
(a) damage through misuse (including failure
to maintain, service or use with proper care),
neglect, accident or ordinary wear and
tear (including deterioration of parts and
accessories and glass breakage);
(b) use for purpose for which the ILVE product
was not sold or designed;
(c) use or installation which is not in
accordance with any specied instructions for
use or installation;
(d) use or operation after a defect has
occurred or been discovered;
(e) damage through freight, transportation or
handling in transit (other than when ILVE is
responsible);
(f ) damage through exposure to chemicals,
dusts, residues, excessive voltage, heat,
atmospheric conditions or other forces or
environmental factors outside the control or
ILVE;
(g) repair, modication or tampering by the
purchaser or any person other than ILVE, an
employee of ILVE or an authorised ILVE service
contractor;
(h) use of parts, components or accessories
which have not been supplied or specically
approved by ILVE.
(i) damage to surface coatings caused by
cleaning or maintenance using products not
recommended in the ILVE product handbook
provided to the purchaser upon purchase of
the ILVE product;
(j) damage to the base of an electric oven due
to items having been placed on the base of
the oven cavity or covering the base, such as
aluminium foil (this impedes the transfer of
heat from the element to the oven cavity and
can result in irreparable damage); or
(k) damages, dents or other cosmetic
imperfections not aecting the performance
of the ILVE in respect of an ILVE product
purchased as a “factory second” or from
display.
The Warranty does not extend to light globes
used in ILVE products.
Customers must retain proof of purchase in
order to be eligible to make a warranty claim in
respect of an ILVE product.
6. Claiming under the Warranty
Customers will bear the cost of claiming
under this Warranty unless ILVE determines
the expenses are reasonable, in which case
the customer must claim those expenses by
providing written evidence of each expense to
ILVE at the address on the Warranty
Registration Card.
Page 15

3. Domestic Use
Each ILVE product is made for domestic use.
This Warranty may not extend to ILVE products
used for commercial purposes; under those
circumstances the warranty period is limited to 3
month.
4. Time for Claim under the Warranty
You must make any claim under this Warranty
within twenty eight (28) days after the occurrence
of an event which gives rise to a claim pursuant
to the Warranty, by booking a service call on the
telephone number below.
5. Proof of Purchase
Customers must retain proof of purchase in order
to be eligible to make a warranty claim in respect
of an ILVE product.
6. Claiming under the Warranty
Customers will bear the cost of claiming under this
Warranty unless ILVE determines the expenses
are reasonable, in which case the customer
must claim those expenses by providing written
evidence of each expense to ILVE at the address
on the Warranty Registration Card.
7. Statutory Rights
(a) These terms and conditions do not a ect your
statutory rights.
(b) The limitations on the Warranty set out in this
document do not exclude or limit the application
of the
consumer guarantees set out in the Act or any
other
equivalent or corresponding legislation in the
relevant
jurisdiction where to do so would:
(i) contravene the law of the relevant jurisdiction;
or
(ii) cause any part of the Warranty to be void.
(c) ILVE excludes indirect or consequential loss
of any kind (including, without limitation, loss of
use of the
ILVE product) and (other than expressly provided
for in these terms and conditions) subject to all
terms,
conditions and warranties implied by custom,
the general law, the Act or other statute.
IMPORTANT!
All warranty service calls must be booked via
the customer care department. The team can
be contacted on 1 300 85 64 11 option 1 or
customercare@eurolinx.com.au
Service is delivered through a network of
Service Agents. If the Appliance is located
outside our normal Service Area of our agents
you, t he Customer will need to bear the cost
of travel outside that area.
If you are unable to provide proof of purchase,
the fault is not covered under warranty
or the product is found to be working to
specication you may be required to bear the
full cost of the service visit
01072016
Warranty Card continued
ilve.com.au
4ILVE Operating Manual
Please complete and send to ILVE at: REPLY PAID 83617
LEICHHARDT NSW 2040
Last Name: First Name:
Address:
State: Postcode: Email:
Home Phone: Mobile:
Purchase Date: / /
(Please attach proof of purchase to validate warranty)
MODEL NUMBER
SERIAL NUMBER
(if you cannot locate the serial number please call ILVE on 1300 85 64 11)
1
2
3
4
WARRANTY REGISTRATION CARD
01012013
01072016
Warranty Card tear off
Page 16

Australia National Telephone Number 130 0 MYILVE (694 583) New Zealand Telephone Number 0508 458 369
ILVE showrooms are open daily from 9am-5pm and Saturdays 10am-4pm
ilve.com.au
NSW & ACT (Head Ofce)
48-50 Moore Street
Leichhardt
F 02 8569 4699
VIC & SA
1211 Toorak Road
Camberwell
F 03 9809 2155
QLD
1/42 Cavendish Road
Coorparoo
F 07 3397 0850
WA & NT
Unit 10/55 Howe Street
Osborne Park
F 08 9201 9188
TAS (Crisp Ikin)
3 Pear Avenue
Derwent Park, 7009
P 03 6272 7386
New Zealand
PO Box 11.160
Sockburn Christchurch
F 03 344 5906
 Loading...