

Page 1

182088
SUFFIX
NO:
El
INSTRUCTION MANUAL
Contents
Warnings & Precautions 3
Important Safety Instructions 4
In
the Box & Features : · 5
Powering the Unit 6
Docking an iPod 7
Playing an iPod 8
Setting the Clock 9
Connecting to a Stereo System using the Aux Output 10
Connecting to an Audio Player using the Aux Input
Location
Service information 16
of
Controls and Control Definitions 12-15
11
Page 2

Page 3
Warnings
and
Precautions
TO PREVENT FIRE
OR
RAIN
This symbol, locatedonbackorbottomofthe unit, is
intended to alert the user to the presence
"dangerous voltage" within the product's enclosure that
beofsufficient magnitude to constitute a risk
may
electric shock to persons.
This symbol, located
intended to alert the user to the presence
operating and maintenance (servicing) instructions in
the literature accompanying the appliance.
MOISTURE.
on
OR
SHOCK HAZARDS, DO NOT EXPOSE THIS UNIT TO
of
uninsulated
of
backorbottomofthe unit, is
of
important
CAUTION: TO PREVENT ELECTRIC SHOCK,
MATCH WIDE
FULLY INSERT.
To
reduce the riskofelectric shock, do not remove
cover (or back). There are no user-serviceable parts
inside. Please refer any servicing to qualified service
personnel.
WARNING: Changes
not expressly approved
compliance could void the user's authority to operate
the equipment.
BLADEOFPLUG TO WIDE SLOT,
or
modifications to this unit
by
the party responsible for
NOTE: This equipment has been tested
comply with the limits for a Class B digital device,
pursuant to Part
are designed to provide reasonable protection against
harmful interference in a residential installation. This
equipment generates, uses, and can radiate radio
frequency energy and,
accordance with the instructions, may cause harmful
interference to radio communications. However, there
is no guarantee that interference will not occur in a
particular installation.
harmful interference to radio
which can
off
and on, the user is encouraged to
interference
• Reorient
• Increase the seI?aration between the equipment and
receiver.
• Connect the equipment into an outlet
different from that to which the receiver is
connected.
• Consult the dealer
technician for help.
15ofthe
be
determinedbyturning the equipment
by
oneormoreofthe following measures:
or
relocate the receiving antenna.
FCC
Rules. These limits
if
not
installed and used in
If
this equipment does cause
or
television reception,
or
an experienced
and
found to
try
to correct the
on
a circuit
radiorrv
WARNING: Danger
control's batteries are incorrectly installed. Replace
only with the same
of
explosionifthe remote
or
equivalent battery.
WARNING: The remote control's button cell battery
Do
not
contains mercury.
or
recycle
WARNING: Use
may
the unit is displaying erratic behavior move
any fluorescent lighting, as it
disposeofas hazardous waste .
of
cause interference regarding useofthe remote.
putinthe trash, instead
this unit near fluorescent lighting
away
from
may
be the cause.
If
3
Page 4
!!!!portant
Safety
Instructions
1.
Read Instructions - All
instruction should be
is
operated.
2. Retain Instructions -
ing instruction should be retained for future
reference.
3. Heed Warnings - All warning
and in the operating instructions should be
adhered
to.
4. Follow insttuctions - All operating anduse
instructions should be followed.
5. Cleaning - Unplug this product from
wall outlet before cleaning. Do not use liquid
cleaners or aerosol cleaners. Use a
for cleaning.
6. Attachments - Do
recommended by
they may cause hazards.
7. Water and Moisture - Do not use this product
near water - for example,
bowl, kitcben sink, or laundry tub; in a wet basement, or
near
a swimming pool, and
8. Accessories - Do not place this product onan
unstable
carl,
stand
product may
or adult,
only with a
recommended by the manufacturer,
the product. Any mounting
follow
should use a
by the manufacturer.
9. Aproductandcart combination should be
moved with
and uneven
cart combination
fall,
and serious damage
carl,
the manufacturer's instructions. and
IDOUDting
care.
surfaces may cause the appliance and
the
safety and operating
read
before
the
product
The
safety and operat-
on
the
product
the
damp cloth
not
use attachments not
the
product manufacturer as
near
a bath tub, wash
the
like.
tripod, bracket, or table. The
causing serious injury to a child
stand, tripod, bracket, or table
Quick stops, excessive force,
to
accessory
overturn.
to
the
of
the
product should
recommended
product. Use
or
sold with
the other). This plug will
only one
way.
unsble
reversing the plug.
to
fit,
obsolete outlet. Do not defeat
of
the
Alternate Warnings - This product
with a
having a third (grounding) pin. This plug will
only
is a safety feature.Ifyou
plug into
replace your obsolete outlet. Do not defeat
safety purpose
13.
Power-Cord Protection - Power supply
should be routed so that they
walked on or pinched by items placed upon or
against
at plugs, convenience receptacles, and point
where they exit
14.
Protective Attachment Plug - The product
is equipped with an attachment plug having
overload protection. This
Insttuction Manual for replacement or resetting
of
protective device.Ifreplacement
required, be sure the service technician has used
a replacement plug specified by the manufacturer
that
has the same overload protection as the
original plug.
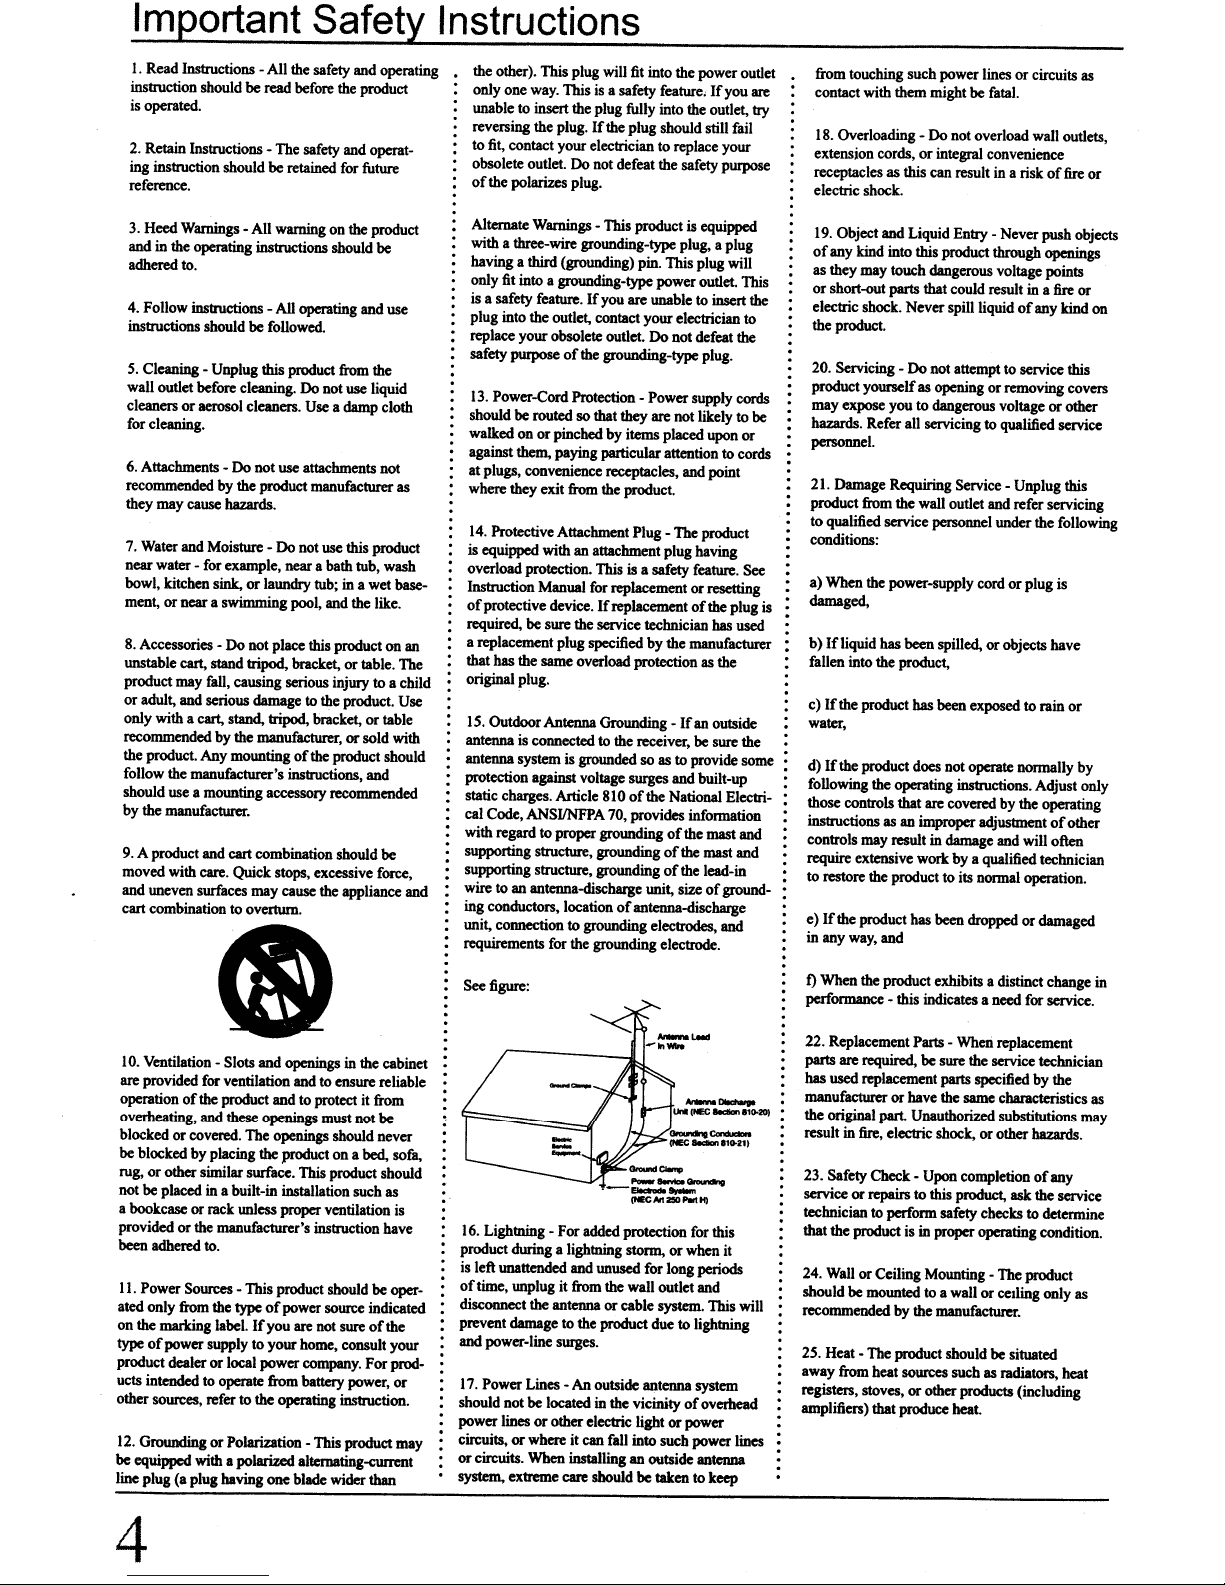
15. Outdoor Antenna Grounding -
antenna is
antenna system
protection against voltage surges and built-up
static charges. Article
cal Code, ANSIINFPA
with regard to
supporting structure, grounding
supporting structure, grounding
wire
ing cooduetors, locationofantenna-discharge
UDit,
requirements for the grounding electrode.
Thisisa safety feature.Ifyou
to
insert
contact your electriciantoreplace your
polarizes plug.
three-wire grounding-type plug, a plug
fit
into a grounding-type power outlet.
the
outlet, contact your electrician
of
them,
paying particular attentiontocords
connectedto the receiver,
is
proper
toanantenna-discharge
connectiontogrounding electrodes,
fit
into the power outlet
the plug fully into
If
the plug should still fail
the grounding-type plug.
from
the product.
grounded
810ofthe National Electri-
70, provides information
groundingofthe mast and
the
the safety
is
are
unsbletoinsert
are
not likely to
is a safety feature. See
of
Ifanoutside
so
as to provide
of
the mastand
of
the lead-in
UDit,
size
outlet,
purpose
equipped
the
plug is
be
sure the
of
ground-
and
are
try
This
the
to
the
cords
be
some
from touching such power lines or circuits as
contact with them might be fatal.
18. Overloading - Do not overload wall outlets,
extension cords, or integral convenience
receptacles as
electric shock.
19.
Object and Liquid Entry - Never push objects
of
any kind into this product through openings
as they may touch dangerous voltage points
or short-out parts that could result in a
electric shock. Never spill liquid
the product.
20. Servicing - Do not attempt to service this
product yourself as opening or removing covers
may expose you to dangerous voltage or other
hazards. Refer all servicing
personnel.
21.
Damage Requiring Service - Unplug this
product from
to qualified service personnel under
conditions:
a) When
damaged,
b)
If
fallen into the product,
c)
If
the
water,
d)
If
following
those
instructions as an improper
controls
require extensive work by a qualified technician
to restore the product to its normal operation.
e)
If
the
in any
this can result in a risk
to
qualified service
the wall outlet and refer servicing
the power-supply cord or plug is
liquid has
the
been
spilled, orobjects have
product
has
been
exposed to rain or
product does
the
controls that
may
product has
way,
and
DOt
operating insttuctions. Adjust only
result in damage and will often
operate normally
are
covered by theoperating
adjUSUDentofother
been
dropped
of
fire
fire
of
any kind
the following
or damaged
or
or
on
by
10. Ventilation - Slots
are
provided
operation
overheating,
blocked or covered.
be blocked by placing
rug, or othersimilar surface. This product should
not be placed
a bookcase or rack unless
provided or the manufacturer's instruction have
been
II.
ated only from the typeofpower
on the marking label.
type
product dealer or local power
ucts intended to operate
other sources, refer to
12.
be
line plug (aplug having one blade wider
of
adhered
Power Sources -This product should be
of
power supply to your home, consult your
Grounding or Polarization - This product may
equipped with a polarized alternating-current
and
for
ventilation andtoensure reliable
the product
and
in
a built-in installation such as
to.
openings
and
these
openings must notbe
The
openings should never
the
product on a bed,
proper
in
the
to protect it from
ventilation
source
If
you
are
not
sure
company.
from battery power. or
the operating insttuction.
cabinet
sam.
is
oper-
indicated
of
the
For prod-
than
See
figure:
16.
Lightning - For
product during a lightning storm, or
is
left unattended and unused for long periods
of
time, unplug it
disconnect
prevent damage to
and
power-line surges.
17.
Power Lines - An outside antenna system
should
DOl
lines
power
circuits, or where it can fall into such power lines
or
circuits.
system, extreme care should be taken to keep
added
protection for this
from
the
be located in the vicinityofoverhead
orother electric light orpower
When
the wall outlet and
antenna orcable system. This will
the product due to lightning
installing an outside antenna
wben
it
1)
When
the
performance - this indicates a
22. Replacement Parts - When replacement
parts
has used replacement parts specified bythe
manufacturer or have
the
result
23. Safety Check - Upon completion
service or
technician
that the product
24.
should be mountedtoa wallorcetling only as
recommended
25. Heat -The product should be situated
away
registers, stoves, or other
amplifiers)
product exhibits a distinct change in
are
required,
be
origins) part. Unauthorized substitutions may
in
fire,
electric shock, or otherhazards.
repairs
to this product, ask the service
to
perform safety checks to determine
isinproper operating condition.
Wall
or Ceiling Mounting - The product
by the manufacturer.
from
heat sources such as radiators, heat
that produce heat.
need
for service.
sure
the service technician
the
same
characteristics as
products (including
of
any
4
Page 5

In
the
• IS208B
.•
iPod Docking Brackets
• Remote Control, Remote
Battery included
• Documentation
Box
Features
• Certified iPod Connector installed for
iPod docking
• Recharge Circuit for iPod/mini/nano/
photo/video
• Includes docking brackets to fit iPod
players
• Controls Connected iPod
• Digital Volume Control
• Aux-In Jack for Shuffle and other
Audio Players, 3.5mm type
• Aux-Out Jack, 3.5mm type
• See-Through LCD Display
• AC: Built-inAC Line Cord
• Uses 2 x
Time Back-Up, Batteries (not included)
• Full-Feature Remote Control
"AAA"
Batteries for Clock
5
Page 6

Powering_t_he_U_n_it
AC
120V
....
60Hz·
_
Battery
Batteries
apower
Removing the Remote Control's Battery
Information
power
outage.
for
Back-up
only.
Battery
back-up
will save
c=:>
OPEN
the
clock
There is a dangerofexplosion
the remote control's batteries are
incorrectly installed. Replace
only with the same
battery.
timesincase
or
equivalent
of
if
6
Page 7

Docking
1.
Locate the numbered Bracket that fits the iPod that will be docked.
an
iPod
Each includedBracket has a number on
it,
indicating which iPodmodel that
bracket is compatible with. See the separate bracket chart page to identify which
bracket is needed.
2. Snap the Bracket into place over the iPod connector in the Docking Station.
Al/
Brackets will onlyfit one way onto the Dock.
or
When inserting an iPodnano (first
secondgeneration), slide the Dock
connection on the unit so that it matches the opening on the iPodnano (first
second generation).
3. Connectthe iPod to the iPod connector inside the Docking Station.
__
W
'N._.'_·_~_~'A.,_
•.·__
.~O·_'OW_
••
·N'.'
~_'
.~_N
•••_.__
._.
,_._.~__·,~_~._·~~,~
__
•
M~~
_ _
'N
__
~_~·_.
__
Once an iPod is connected to the Docking Station, the unit will play and charge
the docked iPod.
iPod
or
~'·M·A.·_'.
__
".'_
~
Y Bracket
Docking Station
7
Page 8

Playing
1.
Connect an iPod to the Docking
Station. (See "Docking an iPod" on
page
2.
Press the StandbylPlaylPause
Button to tum the unit on.
3.
Press the StandbylPlaylPause
Button
iPod.
4.
Press the Volume
or decrease the volume
5.
Press the NextlUp and PrevlDn to
skip tracks. Press and hold the Next!
Up
individual tracks.
6.
Press the
an
iPod
7)
to begin playing the docked
Buttons
and PrevlDn to search through
EQ
Button
to cycle through .
to increase
of
the unit.
e_
e
[=1
=1]
~.~
~~U
- -
(0)
OJ
..
the preset equalizer settings on the
unit (Rock, Classic, Jazz,
7.
Press the
Playlists Buttons on the remote
to navigate through the chapters,
albums, or playlists on a docked iPod.
8.
Press the
A Button, and Select Button on the
remote to navigate the iPod's menu
and make selections.
9.
Press the Shuffle
remote to
10.
Press the
remote once to repeat the current
audio track and twice to repeat an
Chapter,
Menu
tum
Repeat
Album, or
~ Button,
Button
the shuffle option on.
Button on the
or
Pop).
Menu
on the
8
Page 9

Setting the Clock
1.
Hold the StandbylPlaylPause
Button to tum the unit off.
2.
Press and hold the
until the display flashes.
3.
Press the NextlUp and PrevlDn
Buttons to select
clock. Press the
4. Press the NextlUp and PrevlDn
Buttons to adjust the hour. Press the
Clk
Set
Button
5.
Press the NextlUp and PrevlDn
Buttons to adjust the minute. Press
the
Clk
Set Button to set the adjusted
time.
Clk
Set
Button
12
or 24 Hour
Clk
Set Button.
to set the hour.
~.-.H
...•....•·•..••.
•.•••
.•.
~.":"
..•...
;A.···+
..·
.•.....•.
·~.O.
-.;
~·
.•.
·leI.UO
.....;...
_:'~»_:;:<
9
Page 10

Connecting to a Stereo System using the Aux
When connecting two products using an RCA Cable, match the coloredports with
the same coloredconnection. (Red to Red, White to White,
1.
Plug one endofa 3.5 nun Cable (not included) or a 3.5 mm to RCA Cable (not
included) into the AUX (Auxiliary)
2.
Plug the other endofthe 3.5 nun Cable into the audio input/line input on a television or stereo system.
3.
Set the television or stereo system to the appropriate audio input channel.
4. Press the Standby/Play/Pause Button to turn the unit on.
5.
Audio played from the unit will now be heard on the connected television or stereo
system.
Output
on the unit.
and
Out~J~~"
Yellow to Yellow)
3.5mm Cable
10
Composite
RCACable
if.(.....
__
't_e_l_ev_l_·
S_io_n
__
r--------
3.5mm Cable Stereo System
J
....
Page 11

Connecting to an Audio Player using the Aux
Inp_ut
When connecting two products using an RCA Cable, match the coloredports with
__
the same colored connection. (Red to Red, White to White,
1.
Plug one end
included) into the AUX
2.
Plug the other endofthe 3.5 mm Cable into the audio output/headphone output on
._----~
ofa
3.5 mm Cable (not included)ora 3.5 mm - RCA Cable (not
(Auxiliary)
Input
on the unit.
~,
and
YellowtoYellow)
an Mp3 Player or OtherAudio Source .
••.....•..........•..................•................................•..•.............•.....•..........•..•...•....••.
3.
Press the StandbylPlaylPause Button to
~~~,_~
4. Remove any docked iPod's from the Docking Station.
_-"..__
5.
__
~
__
~.~W~_A
~·__·_,~__~
~
~·__,~·~
~
__
~~_,.
,~·
__
"""
...
·_w~~~,_,~~~
__
,~
Audio played from the Mp3 Player or OtherAudio Source will now be heard on
turn
~_~_~
- ..............•...........................................................•................•...............................•...........
the unit on. .
·.
••
__
~
~_..~,__~~.o_~~.·_~m
"~~
·~
·_W_'_M.·.~
__
~.~_
the unit.
If
connecting to the headphone outputofan
controls
may
need
to be adjusted
for
optimalsound.
audio source, the source svolume
·_,·~·.W_',·_m~_.'.'·.,_~<~·_y_
,~~·"~__~·
__
3.5mmCable
Composite
RCA Cable
F~::"":'!-
3.5mm Cable (
OtherAudio Source
Mp3 Player J
1
Page 12

Location
1
................................
2 .
of
Controls
..........................
3
....................
4
8
7
............................................
9
10
12
Page 13

Control Definitions
1
CLK
Set Button
With the unit powered off, press and hold the
2 Volume Buttons
Press the Volume Buttons to
tum
the units volume upordown.
3 NextlUp and PrevlDn Buttons
Press the NextlUp and Prev/Dn Buttons to skip to the next media file,orpress and hold the Next/Up
and Prev/Dn Buttons to search forward through
When
setting the clock, press the NextlUp and Prev/Dn Buttons to adjust the hour and minute.
4 StandbylPlaylPause Button
Press the StandbylPlaylPause Button to turn the unit
playorpause a docked iPod.
5
EQ
(Equalizer) Button
Press the
EQ
Button to choose between Rock, Classic, Jazz, and Pop equalizer settings.
6 Docking Station
Use the Dock as a connection foraniPod.
7 Battery Compartment
The
Battery Compartment serves only as a power back up for the clock.Ittakes two
(not included).
CLK
Set Button to set the time.
an
individual audioorvideo file on a docked iPod.
off
and on. Press the StandbylPlaylPause Button to
AAA
batteries
8 LCD Display
The
LCD
Display shows the time and general unit functions.
9 Aux (Auxiliary)
Use the Aux Input to play audio from the unit on a connected televisionorstereo system.
10
Aux (Auxiliary)
Use the
Aux
Input
Output
Output to play audio,onthe unit, from a connected Mp3 playerorother audio source.
13
Page 14

Location
of
Controls
...........................................................
.
~'"
~LI'y=
.-11
.:>
@. e
:;;::::::::::::···:::·:·:·:::·:·::<~5·
.'
eLK'SET
.1~
.15.··..··..
·····
..
·················8e8···
He
:HRJMINDN~
. :
..
·G
.••
(;.>.8···
•..
·.>.~HRlMINUP
.
·8
.(5'"
~.-
......•.....
.................................
···
..
···
..·..
····
..·..
19
20
·····~1
P.
~~.
16
..............................
17:':'\.::::~/j'-:i~:>·."~.,,,
18
.'~;·J'~~·*5:·
··,8
.
,~:<'~p~'ir;r'
··\1.,.I,JCC· .
,;,;:'",',
'
~~\,:~~.',:~~;".~-
.'
" ''.'J'-
~
',~{,.'"
:
,.
..
~:
~6.
27
14
Page 15

Control Definitions
11
StandbylPlaylPause
Press the StandbylPlay/Pause Button to
play or pause a docked iPod.
EQ
12
(Equalizer)
Press the EQ Button to choose between Rock, Classic, Jazz, and Pop equalizer settings.
13 Stop
Press the Stop Button to stop media from an iPod.
Button
Button
tum
the unit
off
and on. Press the Standby/PlaylPause Button to
Menu/eLK
14
Set
Button
Press the Menu/CLK Set Button cycle back through a docked iPod's menus. With the unit powered off,
press and hold the Menu/CLK Set Button to set the time.
HRIMIN
15
Press the HRIMIN
DN
and PrevlDn
Button
ON
and PrevlDn Button to skip to the previous media file,orpress and hold the
HR/MIN ON and PrevlDn Button to search backwards through an individual audio or video file
docked iPod. When setting the clock, press the
HRIMIN
ON
and PrevlDn Button to adjust the hour and
minute.
16
Repeat
Press the Repeat Button to
tum
the repeat option,onthe docked iPod,
off
or on. Press the Repeat But-
ton once to repeat the current audio track and twice to repeat an entire album or playlist.
17
Chapter
Button
Press the Chapter Buttons to cycle through movie chapters on a docked iPod.
....
18 Playlist
.....................••..•...•
Button
......••
.•...
Press the Playlist Buttons to cycle through playlists on a docked iPod.
Mute
19
Button
Press the Mute Button to mute the unit's volume.
20 Volume
Press the Volume Buttons to
Button
tum
the units volume up or down.
on
a
21
Menu.
Button
Press the Menu • Button to navigate through a docked iPod.
22 Sleep
Button
Press the Sleep Button continually to set the sleep timer between10and 90 minutes, in ten minute
increments.
23
HRIMINUPand
NextfUp
Button
Press the HRIMIN UP and Next/Up Button to skip to the next media file, or press and hold the HRIMIN
UP and Next/Up Button to search forward through an individual audioorvideo file on a docked iPod.
When setting the clock, press the
24 Select
Button
HRIMIN UP and Next/Up Button to adjust the hour and minute.
Press the Select Button to make selections on a docked iPod.
25
Shuffle
Press the Shuffle Button to tum the shuffle option, on the docked iPod,
Menu'"
26
Button
Button
off
or on.
Press the Menu ... Button to navigate through a docked iPod.
27
Album
Button
Press the Album Buttons to cycle through albums on a docked iPod.
"
Page 16

/~
iLIV--
')TM
("'llIIlIIII
------------.
Service Information
Address 2116 Carr Street, St. Louis MO, 63106
Phone
Fax 1-314-588-1805
Email
Website www.ilive.net
1-314-621-2881
customerservice@ilive.net
To
download this Instruction Manual in English, Spanish, or French
visit the Support section at
www.ilive.net.
~
2007 DPI, Inc. iPod not included.
logo are trademarksofSRS Labs, Inc. All other trademarks appearing herein are the propertyoftheir respective owners.
iPod
Para descargar este manual de
instrucci6n en ingles, espanol,
frances visite la secci6n de la ayuda en www.ilive.net.
is a trademarkofApple Inc., registered in the U.S. and other countries. TruBass, SRS and the SRS
Pour telecharger ce manuel
d'instruction en anglais, espagnol,
0
ouIeFranlYais
soutien
Ii www.ilive.net.
visitez la section de
Page 17

IS208B
iPod Model
101
iPod
®
~;Pod
o
~
o
I~I
o
[~I
o
~
mini
4GB
6GB
4th
generation
20GB
;Pod
4th
generation
40GB
;Pod
4th
generation (color display)
20GB
30GB
;Pod
4th
generation (color display)
40GB
60GB
iPod
shuffle
1st
generation
512MB
1GB
Play
Compatibility
& Charge
•
e
e
•
e
Included
Bracket
0
G
0
G
iPod
nanD
1st
;
~;POd
o 5th generation (video)
~;POd
o 5th generation (video)
@
~
~
[I
"'"
®
[I"'"
®
[[;T;J]
generation
1GB
2GB
4GB
30GB
60GB
80GB
iPod
nanD
2nd
generation (aluminum)
2GB
4GB
8GB
iPod
shuffle
2nd generation
1GB
II
;Pod
d."k
80GB
II
;Pod
d"o,
160GB
iPod
4GB
nanD
8GB
@ 3rd generation (video)
o
•
e
•
•
•
•
e
e
0
C
e
0
C
e
D
;Pod""h
8GB
4GB
16GB
8GB
0
O;PhO",
0
e
~
Page 18

IS208B
Compatibility information
See manual for information on specific brackets that are included with
this unit, as well as for detailed information on using the video out function with compatible iPods.
Please note: For additional iPod brackets, please contact customer
service. Contact information for customer service can be found on the
of
back page
the instruction manual.
and
Chart
Compatibility Chart
Page 19

li-
EI
fabricante garantiza este productoalcomprador inicial contra todo defecto de material y de fabricacion, bajo condiciones
pOI'
nomlales,
fabricanteIeproporcionani partes solo a los productos reparados enelDepartamentodeServicios de iLive en St. Louis,MOy .
I
costos de envio tienen que ser pagados
I
EI
fabricante acepta, a su discrecion duranteelperiodo de vigencia de esta garantia. reparar todo defecto de material 0 de fabricaci6n
ala
verificacion del defecto 0 del mal funcionamiento del aparato y prueba mostrandoelnlllnero de modelo de iLive enelrecibo
original de compras con
Para obtener este servicio, envie su unidad asegurada y con
EI
fabricante decidira reparar 0 reemplazar el producto garantizado sin costo adicional.
NOTA: Esta garantia no cubre ningun producto danado
comercial
a medios extemos como DVD, discos compactos, discos de larga duracion, cintas
envio
del
secundarias, previstas, imprevistas. especiales)
iPods no son cubierto
Esta garantia no cubre los dallos que resulten de la utilizacion
voltaje inapropiada
Esta garantia no cubre las unidades fabricadas nuevamente, los productos vendidos TAL CUAL
Esta garantia es valida unicamente en Estados Unidos y confiere derechos legales especificos. lJsted puede tener otros derechos
que varian de Estado a Estado.
NOTA: Para los productos que contienen memoria intema para almacenar musica, informacion, etc., la cantidad de memoria que
su sistema operativo reporta puede variaI' segun la memoria que este aparato indica.
IMPORTANTE:
SULTE
un periodo de 90 dias a partir delafecha de compra inicial. Un
0 reemplazar el producto defectuoso
la
Embll,Jelaunidad en una caja de carton resistente, con relleno protector.
•
• Adjunte una copia de su recibo de venta para verificar
• lncluya su nombre, direccion y numero de
0 modificacionde0 a cualquier parte del producto, incluyendola antena. Esta garantia
producto para su reparacion.EIfabricante no es responsable, bajo ninguna circunstancia, de perdidas (directas, indirectas,
pOl'
esta garantia.
0 de un intento de reparacion realizado
NO
ESTA
ENVIE
GARANTIA
Garantia Limitada 90 Dias
allO
par
el cliente en anticipo desplles de 90 dias.
par
fecha.
PARA
elmismo
2116
CARR
0
de
ESTE
PRODUCTOALNEGOCIOENQUELOCOMPRO
OBTENER
INFORMACIONES
producto sin costo adicional. Esta reparacion 0 reemplazo esta sujetal
el
transporte PAGADO POR ADELANTADO
Consumer
STREET,
teh~fono.
pOI'
causasdefuerza mayor. mala utilizacion. negligencia, accidente, abuso, uso
danos que resulten
Service
ST.
LOUIS,
de0pOI'elusodeeste producto.
0 del mantenimiento incorrecto, de la conexion a una fuente de
pOI'
personalnoautorizado
MO
la
fecha de compra del producto.
y/o
AL
RESPECTO.
en partes comenzando del dia de compra.
a:
63106
no
aparatosdememoria ni tampocoelcosta
pOl'elfabricante , St. Louis, MO.
cubre tampoco los danos causados
0 productos de liquidacion.
PARA
REPARACION.
EI
de
CON-
Garantie Limitee 90 Jours
Le constructeur garantitceproduit:'l I'acheteur initial contre tout defautdemateriel et de fabrication,enconditions normales. pour une
de
90 jours
:'I
periode
pieces seulement pour
doivent etre payes par
Le constructeur accepte
remplacerIeproduit defectueux parIememe produit sans frais. Celte reparation ouceremplacement sera effectue moyennant la
verification
vente original date en montrantle numero
Pour obtenir
Le
REMARQlJE: Celte garantie ne couvre pas les produits endommages par cause de force majeure, mauvaise utilisation. negligence,
accident. mauvais traitement, utilisation commerciale ou modification de ou
I'antenne. Celte garantie ne couvre pas non plus les dommages causes aux medias exterieurs tels que des DVD. disques compacts,
albums. cassettes
pas tenu responsable des pertes (directes, indirectes, secondaires, prevues. imprevues. speciales) ou des dommages qui decoulent de ou
en raison de I'utilisation de
iPods
Son1exclus
source de tension inadequate ou des reparations effectuees par
Cette garantie ne couvre pas les produits fabriques
Celte garantie n'est valable qu'aux Etats-Unis et vous confere des droits legaux specifiqlles.
des lois etatiques.
REMARQUE: Pour les produits qui contiennent memoire interne pour stocker de la musique, information, etc., la quantite de memoire
que votre systeme
IMPORTANT:
POUR
du
constructeur choisira de reparer ou de remplacer tout produit garanti. sans frais.
ne
sont pas couverture par cette garantie.
de
OBTENIR
compteI' deladate d'achat initial du produit.Unan
@
Ie
centre commercial service par produits de iLive:'lStLouis, MOlS.LetravaJl et les honoraires de S&H
Ie
client apres 90-days,:'I I'avance.
iI
son choix, pendant la duree de cette garantie, de reparer tout dUaut de materiel etdefabrication ou
dUaut ou du mauvais fonctionnement de l'appareil etlapresentation d'une preuve d'achat danslaforme
ce
service, envoyezIeproduit assure, avec fret
• Emballez votre produit dans une boite
• Joignez une copie de votre re9u de ventes pour verification de la date d'achat du produit.
• Indiquez votre nom. adresse et numero de telephone.
et/ou appareils
ce
produit.
cette garantie les defauts pouvant survenir parlasuite de I'utilisation et de I'entretien anormaux,duraccordement il une
d'
exploitation rapporte peut varier selonlamemoire que cet appareil indique.
N'ENVOYEZ
DES
PASCEPRODUITAUmtTAILLANT
INFORMATIONS
de
type de iLive.
2116
de
memoire niIecOlli
SlJR LES
PAYE
CARR
Consumer
STREET,
de
carton rembourree.
d'envoi du produit poursareparation. En aucun cas,Ieconstructeurnesera
dll
:'I
nouveau ou les produits vendus TEL QUELS ou produits liquides.
SERVICES
sur des parties de jour d'achat. Le constructeur fournira des
D' AVANCE
Service
ST. LOUIS,MO63106
personnel
FOlJRNIS.
:'I:
iI
quelque part que ce soit de ces produits, y compris
non
autorise parIeconstructeur,
VOllS
pOllvez avoir d'autres droits en vertu
POUR
REPARATION. L1SEZ CETTF:
SI.
Louis. MO.
de
d'un
re9u de
GARANTIE
~
116
CARR
STREET•ST.
LOUIS, MO
631_06•TEL
314-621-2~~
I·
_FAX:
314-588-1805
Page 20

,~'"
C
Lly=
The manufacturer warrants this product to the original purchaser to be free from defects in
material and workmanship, under normal conditions, for a period
I original purchase.
The manufacturer agrees,
material or workmanship or to furnish an equal productinexchange without charge. Such
repair or replacementissubjecttoverificationofthe defect or malfunction and proof
purchase as confinned by showing iLive Model number on original dated sales receipt.
To
obtain service, return the unit insured and freight PREPAID to:
• Pack the unit in a well-padded, sturdy carton.
•.
Enclose a copyofyour sales receipt to verify the dateofpurchase.
• Include your name, address and phone number.
Limited
at
its option during the warranty period, to repair any defect in
2116
CARR STREET, ST. LOUIS,
90 Day
Consumer Service
Warranty
MO
63106
of
90 days from date
of
of
The manufacturer will elect
NOTE: This warranty does not cover any product which has been subject to damage due
of
to an act
to, any partofthe product, including the antenna. Damagetoexternal media such as DVD,
CD,
LP,
the unit for warranty repair. Under no circumstances shall the manufacturer be liable for
any loss (direct, indirect, incidental, foreseen, unforeseen, special or consequential) or for
any damage arising out of, or in connection with, the useofthis product.
iPods are not covered under this warranty.
This warranty does not cover damage due to improper operation or maintenance,
connection
manufacturer, St. Louis, MO.
This warranty does not cover re-manufactured units, product sold AS
product.
This warranty
also have other rights which vary from state to state.
God, misuse, neglect, accident, abuse, commercial use, or modification of, or
tape and/or memory devices are not covered nor is the cost incurred in shipping
to
improper voltage supply, or attempted repait by anyone other than the
is
valid only in the United States and grants specific legal rights.
to
repair or replace properly warrantied product freeofcharge.
IS
or closeout
You
may
NOTE: For products that contain internal memory for storage
amountofmemory your operating system reports may vary from the stated memory
this device.
IMPORTANT NOTICE: DO NOT RETURN THIS UNIT
I
STORE
SERVICE INSTRUCTIONS.
II
I
1I6 CARR
L:
FOR
SERVICE. INSTEAD,
STREET·
iPod is a trademarkofApple Inc..registeredinthe U.S. and other countries.
ST. LOUIS, MO
FOLLOW
63106'
TEL: 314-62\-2881' FAX: 314-588-1805
of
music, data, etc., the
TO
THE
THE
ABOVE WARRANTY
of
RETAIL
~
 Loading...