

Page 1

USER INSTRUCT ION MANUAL
ACR-3580
Alarm Clock Radio
Instruction Manual
(Read before proceeding)
1
Page 2
USER INSTRUCT ION MANUAL
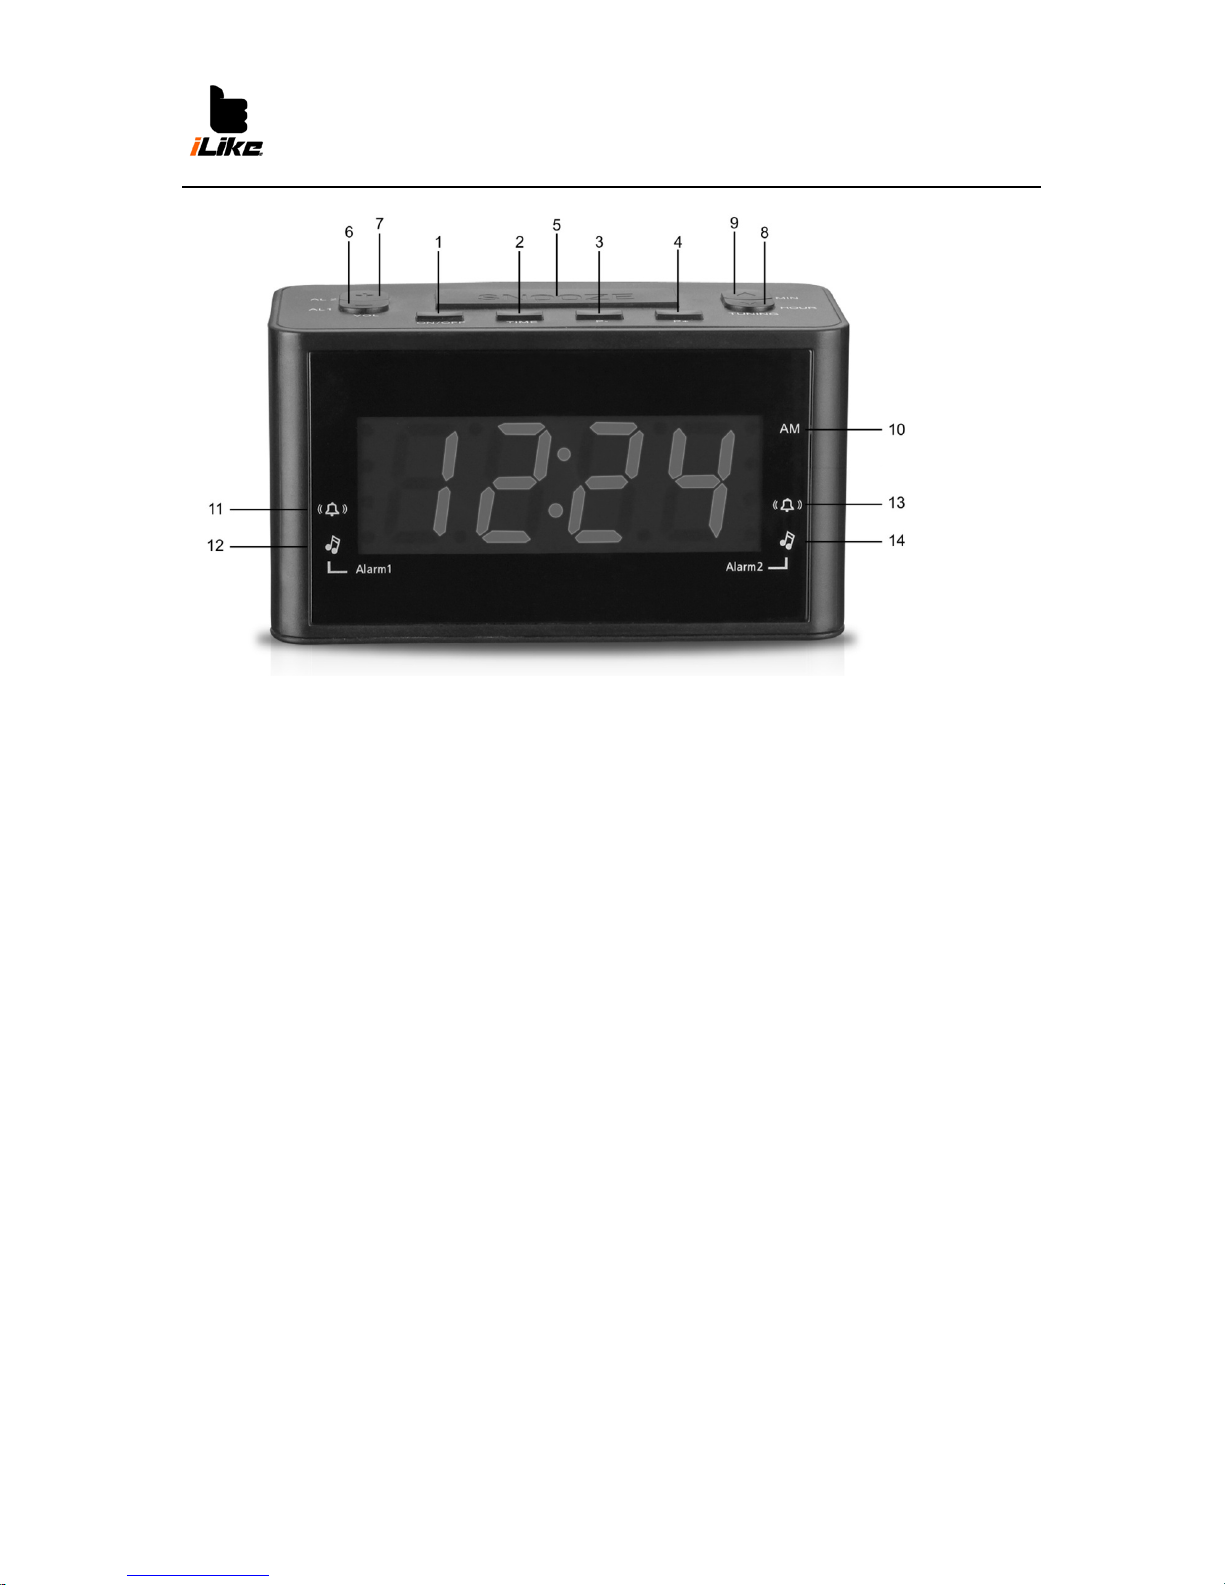
1. ON/OFF: To turn unit on/off or switch AM/FM mode
2. TIME: Setting the clock
PRESET: Memorization
3. P-: PRESET-
4. P+: PRESET+
5. SLEEP: To fall asleep with the radio
SNOOZE: Interval alarm repetition
DIMMER: To set the display brightness HIGH/LOW
6.— Volume down
ALARM I
7.+ Volume up
ALARM 2
8. HR.: Hour setting
∨Tuning down
9. MIN.: Minute setting
∧Tuning up
10. AM radio indicator
11. ALARM I wake to buzzer indicator
12. ALARM I wake to radio indicator
13. ALARM 2 wake to buzzer indicator
14. ALARM 2 wake to radio indicator
2
Page 3

USER INSTRUCT ION MANUAL
TURNING ON/OFF THE UNIT
In standby mode, press “ON” button once to turn the FM radio on or switch to AM band. In radio mode,
long press “OFF” button for 1-2 seconds to turn the radio off.
SETTIN G TH E TIME
1. In standby mode, press and hold “T IME” button, the dis play will f lash. Set the tim e with “HR” hour s
and/or “MIN” minutes
2. Press “TIME” button again to confirm
NOTE:
- If during the adjustment time no key is activated in around 4 seconds, the current display will b e
automatically stored.
LISTENING TO THE RADIO
When the unit is ON, the corresponding Indicator lights up
Manual search
1. Adjust the volume by “—” Volume down or “+” Volume up to the desired level.
2. Choose your radio station with -Tuning down or + Tuning up.
Automatic search
Press and hold “∨” Tuning down or “∧” Tuning up for 2 seconds . The autom atic sear ch locates str ong
stations. A station with a we ak
signal can be set manually by repeatedly pressing -Tuning down or + Tuning up.
To enhance radio reception ability:
FM: Extend the wire antenna or move another proper position.
AM: Rotate the unit horizontally for optimum reception or move to another proper place.
Preset stations
This unit can store 10 FM and 10 AM stations.
Long press and hold the “PRESET” button for around 4 seconds to start AUTO SCAN of radio station
Manual storage:
1. Select a radio station manually or in automatic search.
2. Press and hold the “PRESET” button for around 1 second. 'P 01' blinks on the screen.
3. Press “P-“ or “P+” to select a channel.
4. Press the “PRESET” button to save it
5. Repeat steps 1-4 to store other stations
Listen to station presets
Press the “PRESET” button “P 01” blinks on the screen
Press “PRESET” repeatedly to select your desired channel
You can also press “P-“ or “P+” to select your desired channel
SETTING THE ALARM AND THE ALARM MODE
3
Page 4
USER INSTRUCT ION MANUAL
1. In standby mode, press “ALARM 1” button to select the source of wake up to buzzer or rad io, the
corresponding indicator lights up. and the display blinks.
2. Press “HR” and/or “MIN” to set the time of wake up.
3. Press “ALARM 1” button to confirm
Note: Same procedure applies for “Alarm 2” with “ALARM 2” button.
STOPPING THE ALARM
1-Alarm repetition
Press “SNOOZE” The alarm stops and will sound again 9 minutes later.
2-Alarm stop
Press “OFF” or “ALARM I” button. The alarm will sound again the next day at the same time
3-Alarm Cancellation
In standby mode, press “ALARM 1” button repeatedly to cancel the alarm permanently. The alarm
indicator lights off
Note: Same procedure applies for “Alarm 2” with “ALARM 2” button.
SLEEP FUNCTION
To fall asl eep with th e radio , press “ON” button once t o turn th e unit on, t hen pres s “SLEEP” button to
select 90-80-70-60-50-40-30-20-10-OFF m inutes of listening. The unit will a utomatically turn off after
the specified time
To cancel the sleep function, press the “SLEEP” time to OFF
TECHNICAL SPECIFICATIONS
POWER SUPPLY: AC 230V~50Hz VDE plug
DC 3V 2x1.5V, battery type AAA size (not provided) for back up.
RADIO FREQUENCY : FM 87.5-108MHz
AM 522-1620kHz
DIMENSION: 148(L) x 63(W) x 82(H) mm
MORE INFORMATION
CAUTION: To reduce the risk of electric shock, do not open the device, there is no
party inside for the user. Refer all servicing to qualified personnel.
The lightning with the arrow symbol in the triangle is a warning sign alerting the user to
"dangerous voltage" inside the unit.
The exclamation point in the triangle is a warning sign alerting the user of important instructions
accompanying the product.
4
Page 5

USER INSTRUCT ION MANUAL
IMPORTANT
- The use of apparatus in moderate climates.
-The Marking plate is located at the bottom of the device.
- Make sure to have a minimum distance of 5 cm around the unit for sufficient ventilation.
- Ensure that the ventilation openings is not covered with items such as newspapers, tablecloths,
curtains, etc.
- Do not place naked flame sources, such as lighted candles on the apparatus.
- Do not expose this appliance to dripping or splashing water.
- Do not place objects filled with liquids, such as glass, vase on the device.
- Do not throw batteries into fire! Respect the environment when disposing of used batteries.
- Batteries should not be exposed to excessive heat such as sunshine, fire or other similar heat source.
- The power plug is used as a disconnect device and must be easily accessible. To be completely
disconnected from the power, the plug of the appliance should be disconnected completely. The socket
must not be obstructed and should be easily accessible during intended use.
- Under the influence of fast transient and / or electrostatic electric phenomenon, the product may
malfunction and the user must perform a power reset of the device
If in the future, you need to get rid of this product, please note that Waste electrical products
should not be disposed of with household waste. Recycling facilities exist. Check with your municipality
or ask your dealer for advice. (Directive for Waste Electrical and Electronic Equipment)
5
Page 6

Felhasználói kézikönyv
ACR-3580
Rádiós ébresztőóra
(Olvassa el használat előtt)
Letölthető PDF formátum: http://hu.akai-atd.com/hasznalati-utasitas
1
Page 7

Felhasználói kézikönyv
1. ON/OFF: Készülék ki/bekapcsolása vagy AM/FM mód váltás.
2. TIME: Idő
PRESET: Tárolás
3. P-: Léptetés-
4. P+: Léptetés+
5. SLEEP: Ébresztés leállítása
SNOOZE: Ismétlődő ébresztés bekapcsolása
DIMMER: Kijelző fényének beállítása magas (HIGH)/alacsony (LOW)
6.— Hangerő le
Ébresztő 1
7.+ Hangerő fel
Ébresztő 2
8. HR.: Óra beállítás
∨Hangolás le
9. MIN.: Perc beállítás
∧ Hangolás fel
10. AM rádió kijelző
11. Ébresztő 1 berregés kijelző
12. Ébresztő 1 rádió kijelző
13. Ébresztő 2 berregés kijelző
14. Ébresztő 2 rádió kijelző
2
Page 8

Felhasználói kézikönyv
Ki és bekapcsolás
Készenléti állapotban nyomja meg az "ON" gombot, hogy kapcsolja az FM rádiót, vagy átválthat az AM
hullámsávra. Rádió ü zemmódban nyomja meg hosszan az "OFF" gombot 1-2 másodpercig a rádió
kikapcsolásához.
Idő beállítása
1. Készenléti állapotban nyomja meg és tartsa lenyomva a "TIME" gombot, amíg a kijelző villogni
kezd. Állítsa be az időt: "HR" óra és / vagy a "MIN" perc.
2. Nyomja meg a "TIME" gombot még egyszer.
Megjegyzés:
- Ha a beállítás során az idő nincs beállítva kb. 4 másodpercig, a kijelző automatikusan leáll.
Rádió hallgatása
A készüléket az ON gomb megnyomásával kapcsolhatja be, ilyenkor a kijelző világítani kezd.
Kézi csatornakeresés
1. Keresse meg a kívánt állomást a Léptetés – vagy Léptetés + gombokkal.
2. Állítsa be a hangerőt a kívánt szintre.
Automatikus csatornakeresés
Nyomja meg és tartsa 2 mp-ig a “∨” Hangolás le vagy “∧” Hangolás fel gombot. A készülék megkeresi a
legerősebb állomások jelét. Az állomások finomhangolását a – Hangolás le vagy + Hangolás fel
gombokkal végezheti el.
A rádió optimális használata érdekében:
FM: Húzza ki teljesen az antennát, vagy forgassa másik pozícióba.
AM: Forgassa el a készüléket vízszintesen, vagy tegye át másik helyre.
Tárolható állomások
A készülék 10 FM és 10 AM állomást képes tárolni.
Nyomja meg és tartsa a “PRESET” gombot 4 mp-ig, hogy a készülék automatikusan eltár olja a talált
csatornákat.
Kézi tárolás:
1. Végezzen kézi vagy automata csatornakeresést.
2. Nyomja meg és tartsa a “PRESET” gombot 1 mp-ig. Ekkor 'P 01' villog a kijelzőn.
3. Válassza ki a “P-“ vagy “P+” gombokkal a kívánt csatornát.
4. Nyomja meg a “PRESET” gombot a mentéshez.
5. Ismételje meg az 1-4 lépéseket a többi csatorna tárolásához.
3
Page 9

Felhasználói kézikönyv
A tárolt csatornák lejátszása
Nyomja meg a “PRESET” gombot, “P 01” felvillan a kijelzőn.
Nyomja meg ismételten a “PRESET” gombot a csatornák kiválasztásához.
Válasszon csatornát a “P-“ vagy “P+” gomb megnyomásával.
Ébresztés és ébresztő mód beállítása
1. Készenléti állapotban nyomja meg a z “ALARM 1” gom bot, válassza ki, hog y berregés vagy rádió
legyen az ébresztés, a kiválasztott mód világítani kezd a kijelzőn.
2. Nyomja meg a “HR” és/vagy “MIN” gombokat az idő beállításához.
3. Nyomja meg az “ALARM 1” gombot az elfogadáshoz.
Megjegyzés: Ezzel a módszerrel használja az “Alarm 2” és “ALARM 2” gombokat is.
Ébresztés leállítása
1-Ébresztés ismétlése
Nyomja meg a “SNOOZE” gombot, az ébresztő leáll és 9 perc múlva újraindul.
2-Ébresztés leállítása
Nyomja meg az “OFF” vagy “ALARM 1” gombot. Az ébresztő leáll, de másnap ugyanebben az
időpontban elindul.
3-Ébresztés törlése
Nyomja meg az “ALARM 1” gombot még egyszer. A kijelzőn a lámpa kialszik.
Megjegyzés: Ugyanez az eljárás vonatkozik az “Alarm 2” és “ALARM 2” gombokra is.
Automatikus kikapcsolás funkció
Kapcsolja be a rádiót (vagy bekapcsolt állapotban) nyomja meg a “SLEEP” gombot és válassza ki
(90-80-70-60-50-40-30-20-10), hogy hány perc után kapcsoljon ki a készülék. A készülék
automatikusan kikapcsol a megadott idő után.
A kikapcsolás törléséhez nyomja meg a “SLEEP” gombot és válassza az OFF lehetőséget.
Technikai jellemzők
Áramellátás: AC 230V~50Hz VDE csatlakozó
DC 3V 2x1.5V AAA elem (nem tartozék!).
Frekvencia tartományok: FM 87.5-108MHz
AM 522-1620kHz
Méretek: 148(L) x 63(W) x 82(H) mm
4
Page 10

Felhasználói kézikönyv
Egyéb információ
Figyelem: Az áramütés kockázatának csökkentése érdekében, ne nyissa fel a
készüléket, a javítást bízza a szakszervizre.
Ez egy figyelmeztető jel a készüléken, jelentése: a készülékben feszültség található.
A felkiáltó jel a háromszögben figyelmezteti a vásárlót a fontos információkra.
FONTOS
- A készüléket normál hőmérsékleti körülmények között használja.
- Győződjön meg róla, hogy a készülék szellőzése megfelelő.
- A szellőzőnyílásokat nem takarja el különböző anyagokkal, pl. újságpapír, terítő.
- Nem helyezzen nyílt lángot, pl. égő gyertyát a készülékre.
- Ne tegye ki közvetlen víz hatásának.
- Ne helyezzen a készülékre folyadékkal töltött edényt, pl. pohár, kancsó, váza.
- Az elemeket ne dobja tűzbe! Gondoskodjon a használt elemek környezetbarát kezeléséről.
- Az elemeket ne tegye ki hőhatásnak, pl. erős napfény, nyílt láng vagy egyéb hőforrás.
- A készülék tápkábele elérhető helyen legyen, az áramtalanításhoz a csatlakozót teljesen ki kell húzni
a konnektorból.
A használt készülék elektronikai hulladéknak minősül, ne keverje háztartási hulladékok közé.
Mindig vegye figyelembe az aktuális környezetvédelmi és hulladékgazdálkodási szabályokat.
5
Page 11

USER INSTRUCT ION MANUAL
ACR-3580
RADIOBUDZIK
INSTRUKCJA OBSŁUGI
(Przeczytaj zanim rozpoczniesz użytkowanie)
1
Page 12

USER INSTRUCT ION MANUAL
OPIS DZIAŁANIA
1. ON/OFF: włączenie/wyłączenie lub zmiana trybu FM/AM
2. TIME: ustawienie zegara
PRESET: programowanie stacji radiowych
3. P-: zaprogramowana stacja radiowa -
4. P+: zaprogramowana stacja radiowa +
5. SLEEP: zasypianie z radiem
SNOOZE: przerwa pomiędzy powtarzającymi się alarmami dla funkcji drzemki
DIMMER: ustawienie jasności wyświetlacza HIGH/LOW
6. -: Zmniejszenie głośności
ALARM 1
7. +: Zwiększenie głośności
AL AR M 2
8. HR: ustawien ie god zi n y
∨: strojenie w dół
9. MIN: ustawienie minuty
∧: strojenie w górę
10. AM: kontrolka pasma AM
11. ALARM 1: kontrolka budzenia brzęczykiem
12. ALARM 1: kontrolka budzenia radiem
13. ALARM 2: kontrolka budzenia brzęczykiem
14. ALARM 2: kontrolka budzenia radiem
2
Page 13

USER INSTRUCT ION MANUAL
WŁĄCZANIE/WYŁĄCZANIE URZĄDZENIA
W trybie czuwania naciśnij przycisk ON, aby włączyć radio FM lub zmienić na pasmo AM. W trybie
radia przytrzymaj przycisk OFF przez 1-2 sekundy, aby je wyłączyć.
USTAWIANIE CZASU
1. W trybie czuwania przytrzymaj przycisk TIME, wyświetlacz zacznie migać. Ustaw godzinę
przyciskiem HR i/lub minutę przyciskiem MIN.
2. Ponownie naciśnij przycisk TIME, aby zatwierdzić.
Uwaga:
- jeśli w trakcie ustawiania czasu żaden przycisk nie zostanie naciśnięty przez ok. 4 sekundy, aktualne
ustawienie zostanie automatycznie zapisane.
SŁUCHANIE RADIA
Gdy urządzenie jest włączone, zapali się odpowiednia kontrolka.
Ręczne strojenie
1. Ustaw poziom dźwięku przyciskiem - lub + na wybranym poziomie.
2. Rozpocznij strojenie stacji radiowej przyciskiem ∨ lub ∧.
Automatyczne strojenie
Przytrzymaj przycisk ∨ lub ∧ przez 2 sekundy. Rozpocznie się skanowanie stacji radiowych o
najsilniejszym sygnale. Stacje o słabym sygnale mogą zostać ustawione ręcznie przyciskiem
∨ lub ∧.
Aby polepszyć odbiór stacji radiowych:
FM: Przedłuż długość przewodu antenowego lub zmień lokalizację.
AM: Obracaj urządzeniem w poziomie lub zmień lokalizację.
Programowanie stacji radiowych
Urządzenie może zapisać w pamięci 10 stacji FM i 10 stacji AM.
Przytrzymaj przycisk PRESET przez ok. 4 sekundy, aby rozpocząć automatyczne skanowanie stacji.
Ręczne programowanie:
1. Wybierz ręcznie lub automatycznie stację radiową
2. Przytrzymaj przycisk PRESET przez ok. 1 sekundę. Napis “P 01” pojawi się na ekranie.
3. Naciśnij przycisk P- lub P+, aby wybrać kanał.
4. Naciśnij przycisk PRESET, aby zapisać stację radiową w pamięci urządzenia.
5. Powtórz kroki 1-4, aby zapisać więcej stacji radiowych.
Słuchanie zaprogramowanych stacji radiowych
Naciśnij przycisk PRESET, napis “P 01” pojawi się na ekranie.
Naciskaj PRESET, aby wybrać zapisaną stację radiową.
Możesz również wybrać stację radiowa przyciskami P- lub P+.
3
Page 14

USER INSTRUCT ION MANUAL
USTAWIANIE ALARMU ORAZ TRYBU ALARMU
1. W trybie czuwania naciśnij przycisk ALARM 1, aby wybrać metodę budzenia brzęczykiem lub
radiem, odpowiednia kontrolka pojawi się na wyświetlaczu, który zacznie migać.
2. Naciśnij przycisk HR i/lub MIN, aby ustawić czas budzenia.
3. Naciśnij przycisk ALARM 1, aby zatwierdzić.
Uwaga: Taka sama procedura dotyczy ustawienia drugiego alarmu.
ZATRZYMYWANIE ALARMU
1. Powtarzanie alarmu
Naciśnij przycisk SNOOZE. Alarm zostanie zatrzymany i uruchomi się ponownie 9 minut później.
2. Zatrzymanie alarmu
Naciśnij przycisk OFF lub ALARM 1. Alarm uruchomi się ponownie następnego dnia o tej samej
godzinie.
3. Anulowanie alarmu
W trybie czuwania naciskaj przycisk ALARM 1, aby całkowicie usunąć alarm. Kontrolka alarmu
zgaśnie.
Uwaga: Taka sama procedura dotyczy ustawienia drugiego alarmu.
FUNKCJA SLEEP
Aby zasnąć z włączonym radiem naciśnij przycisk ON, aby włączyć urządzenie. Następnie naciśnij
przycisk SLEEP, aby ustawić czas działania radia w przedziale 90-80-70-60-50-40-30-20-10-OFF.
Urządzenie automatycznie wyłączy się po wybranym czasie. Aby anulować funkcję, ustaw czas w
pozycji OFF.
SPECYFIKACJA TECHNICZNA
ZASILANIE: AC: 230V~50Hz wtyczka VDE
DC: 3V 2x1.5V, bateria AAA (brak w zestawie) do podtrzymania.
CZĘSTOTLIWOŚĆ RADIA: FM 87.5-108MHz
AM 522-1620kHz
WYMIARY: 148(L) x 63(W) x 82(H) mm
INFORMACJE DODATKOWE
UWAGA: Nie otwieraj obudowy urządzenia, aby zmniejszyć ryzyka porażenia
prądem. Wewnątrz urządzenia nie ma żadnych elementów wymagających obsługi przez użytkownika.
Naprawy proszę powierzyć jedynie wykwalifikowanym pracownikom serwisu.
Symbol błyskawicy ze strzałką w trójkącie jest ostrzeżeniem przed niebezpiecznym napięciem
występującym wewnątrz urządzenia.
Symbol wykrzyknika w trójkącie informuje użytkownika o ważnych instrukcjach dotyczących
użytkowania urządzenia.
4
Page 15

USER INSTRUCT ION MANUAL
INSTRUKCJE BEZPIECZEŃSTWA
- Produkt przeznaczony jest do użytku w klimacie umiarkowanym.
- Tabliczka znamionowa znajduje się na spodzie urządzenia.
- Zapewnij przestrzeń 5 cm dookoła urządzenia dla prawidłowej wentylacji.
- Upewnij się, że otwory wentylacyjne nie są zakryte żadnymi przedmiotami.
- Nie umieszczaj otwartych źródeł ognia na urządzeniu, np. zapalone świece.
- Nie narażaj urządzenia na kapanie lub zachlapanie.
- Nie umieszczaj przedmiotów wypełnionych cieczą na urządzeniu, np. wazon.
- Nie wrzucaj ogniw do ognia! Chroń środowisko podczas usuwania zużytych baterii.
- Baterie nie powinny być narażone na działanie wysokiej temperatury, np. słońce, ogień, itp.
- Wtyczka sieciowa powinna być łatwo dostępna. Aby całkowicie odłączyć urządzenie od zasilania,
należy wyjąć wtyczkę z gniazda zasilania.
- Pod wpływem zakłóceń i/lub zjawiska elektrostatycznego, urządzenie może działać nieprawidłowo. W
celu przywrócenia prawidłowego działania należy odłączyć zasilanie i włączyć ponownie.
Proszę pamiętać, że zużytych urządzeń elektrycznych nie należy wyrzucać razem z
odpadami domowymi. Informacje o możliwości utylizacji należy uzyskać u władz lokalnych lub
sprzedawcy (Dyrektywa o zużytym sprzęcie elektrycznym i elektronicznym)
5
Page 16

Uživatelská příručka
ACR-3580
Radiobudík
(Před použitím si pečlivě přečtěte návod)
Návod k obsluze je možné stáhnout ve formátu PDF: akai-atd.com
1
Page 17

Uživatelská příručka
1. ON/OFF: Zapnutí/vypnutí zařízení nebo přepínání mezi režimem AM/FM rádio.
2. TIME: Čas
PRESET: Pamět
3. P-: Program dolů
4. P+: Program nahoru
5. SLEEP: Zastavení buzení
SNOOZE: Zapnutí opakovaného buzení
DIMMER: Nastavení jasu displeje vysoký(HIGH)/slabý (LOW)
6.— Hlasitost dolů
Budík 1
7.+ Hlasitost nahoru
Budík 2
8. HR.: Nastavení hodín
∨ Ladění dolů
9. MIN.: Nastavení minut
∧ Ladění nahoru
10. AM radio
11. Budík 1 bzučák
12. Budík 1 radio
13. Budík 2 bzučák
14. Budík 2 radio
2
Page 18

Uživatelská příručka
Zapnutí/Vypnutí
V pohotovostním režimu stiskněte tlačítko "ON" na zapnutí FM radia, nebo na přepínání pásma FM/AM.
Stisknutím tlačítka "OFF" do 1-2 sekund v režimu „Radio” vypněte radio.
Nastavení času
1. V pohotovostním režimu stiskněte a podržte tlačítko "TIME", dokud nežačne čas na displeji
blikat. Nastavte čas: "HR" hodiny a /nebo "MIN" minuty.
2. Stiskněte znovu tlačítko "TIME"
Poznámka:
Při nastavování času máte k dispozici přibližně 4 sekund, v opačném případě bude režim
nastavování času zrušen.
Poslech radia
Zapněte přístroj tlačítkem "ON", pak začne svítit displej.
Ruční ladění stanic
1. Vyhledejte zvolenou stanici pomocí tlačítek P – alebo P + .
2. Nastavte úroveň hlasitosti.
Automatické ladění stanic
Stiskněte a na několík sekund podržte tlačítko “∨” (Ladění dolů) nebo “∧” (Ladění nahoru). Zařízení
vybere a naladí frekvence právě poslouchané stanice s nejsilnějsím signálem. Ladění stanic můžete
provádět pomoci tlačítek – (Ladění) dolů nebo +( Ladění nahoru).
Zlepšení příjmu:
FM: Citlivosť přijmi zlepšete úplným vytažením drátové FM antény.
AM: Optimální příjem si zajistíte horizontálním natočením radiobudíkem.
Uložení rádiových stanic do paměti
Zařízení dokáže uložit 10 FM a 10 AM rozlasových stanic radia.
Stiskněte a podržte tlačítko “PRESET” do 4 sek und, pak se nalezena stanice uloží autom aticky do
paměti.
Manuální ukládaní:
1. Udělejte manuální nebo automatické vyhledaní rozhlasových staníc.
2. Stiskněte a podržte tlačítko ”PRESET” do 1 sekunda. Tehdy na displeji začne blikat 'P 01'.
3. Vyberte si zvolenou stanice pomoci tlačítek “P-“ vagy “P+”.
4. Stiskněte tlačítko “PRESET” pro uložení.
5. Pro uložení ostatných rádiových stanic opakujte si kroky 1.- 4.
3
Page 19

Uživatelská příručka
Přehrávání uložených rozhlasových staníc
Stiskněte tlačítko “PRESET”, “P 01” se zobrazí na displeji.
Pro vybíraní stanic opakovaně stiskněte tlačítko se symbolem “PRESET”.
Zvolte si stanici stisknutím tlačítka “P-“ nebo “P+”
Nastavení budíka
1. V pohotovostním režimu stiskněte tlačítko “ALARM 1” a vyberte si požadovný typ bu zení zvuk ovým
signálem nebo poslechu rozhlasovou stanici. Zvolený režim začne svitit na displeji.
2. Stiskněte tlačítko “HR” a/nebo “MIN” pro nastavení času.
3. Stiskněte tlačítko “ALARM 1” pro ak c eptova ní.
Poznámka: Nahoru uvedenou metodou můžete používat i tlačítka “Alarm 2” a “ALARM 2”
Zastavení budíka
1-Opakovaní buzení
Stiskněte tlačítko “SNOOZE”, buzení přestane a opět se spustí po přibližně 9 minutách.
2-Zastavení budíka
Stiskněte tlačítko “OFF” nebo “ALARM 1” Buzení přestane, ale druhý den se spustí ve stejném čase.
3-Zrušení budíka
Stiskněte tlačítko znovu “ALARM 1” . Indikátor buzení z displeje zm izí.
Poznámka: Stejna metoda se vztahuje i na tlačítka “Alarm 2” a “ALARM 2”
Funkce automatického vypnutí
Zapněte radio (nebo v zapnutém stavu), pak stiskněte tlačítko “SLEEP” a vyberte si nastavený čas
(90-80-70-60-50-40-30-20-10), který rádio automaticky vypne
Pro vypnutí stiskněte tlačítko “SLEEP” a zvolte si opci “OFF”.
Technické údaje
Napájení: AC 230V~50Hz VDE konektor
DC 3V 2x1.5V AAA baterie (balení neobsahuje!).
Rozh.pásmo Frekvencie: FM 87.5-108MHz
AM 522-1620kHz
Rozměry: 148(L) x 63(W) x 82(H) mm
4
Page 20

Uživatelská příručka
Důležité informáce
Výstraha: Aby nedošlo k úrazu elektrickým proudem , neotevírejte kryt (ani zadní
část) . Uvnitř nejsou žádné uživatelů opravitelné součástky . Opravu přenechejte na
autorizovaný servis
Symbol blesku se šipkou v rovnostranném trojúhelníku má upozornit uživatele na přítomnost
neizolovaného nebezpečného napětí uvnitř přístroje.
Vykřičník v rovnostranném trojúhelníku má upozornit uživatele na přítomnost důležitých
provozních a údržbových ( servisních ) pokynů v literatuře přiložené k výrobku.
Bezpečnostní upozornění
- Přístroj používejte pouze při normální teplotě okolí.
- Umožněte dostatečné proudění vzduchu kolem zařízení. aby nedošlo k jeho přehřívaní.
- Otvo ry nezakrývejte položením přístroje na lůžko koberce nebo podobnou pólech.
- Nepoužívejte zapálené svíčky v blízkosti přístroje.
- Nedávejte žádné tekutiny na přístroj.
- Abyste předešli riziku požáru nebo úrazu elektrickým proudem, nepokládejte na přístroj nádoby
naplněně tekutinou (např. vázy).
- Baterie nenabíjejte, nerozebírejte a nechádžte do ohně.
- Nepokládejte baterie v blízkosti zdroje tepla.
-Připojte zařízení do snadno dostupné elektrické zásuvky. V případe výskytu jakýchkoli nestandardních
odchálok v provozu jej okamžitě odpojte od elektrické sítě.
Tento symbol znamená, že zařízení s tímto symboli by nemělo být likvidováný jako
běžný kom unální odpad. Chcete-li likvidovat výrobek nebo baterie, prosím, vyhledejte vhodné
sběrné systém y nebo zařízení pro recykláci.
5
Page 21

Uživateľská príručka
ACR-3580
Rádiobudík
(Pred použitím si pozorne prečítajte návod)
Návod na obsluhu je možné stiahnuť vo formáte PDF: akai-atd.com
1
Page 22

Uživateľská príručka
1. ON/OFF: Zapnutie/vypnutie zariadenia alebo prepínan ie m ed zi režimom AM/FM rádio.
2. TIME: Čas
PRESET: Pamäť
3. P-: Program nadol
4. P+: Program nahor
5. SLEEP: Zastavenie budenia
SNOOZE: Zapnutie opakovaného budenia
DIMMER: Nastavenie jasu displeja vysoký(HIGH)/slabý (LOW)
6.— Hlasitosť nadol
Budík 1
7.+ Hlasitosť nahor
Budík 2
8. HR.: Nastavenie hodín
∨ Ladenie nadol
9. MIN.: Nastavenie minút
∧ Ladenie nahor
10. AM rádio
11. Budík 1 bzučiak
12. Budík 1 rádio
13. Budík 2 bzučiak
14. Budík 2 rádio
2
Page 23

Uživateľská príručka
Zapnutie/Vypnutie
V pohotovostnom režime stlačte tlačidlo "ON" na zapnutie FM rádia, alebo na prepínanie pásma
FM/AM. Stlačením tlačidla "OFF" do 1-2 sekúnd v režime „Radio” vypnite rádio.
Nastavenie času
1. V pohotovostnom režime stlačte a podržte tlačidlo "TIME", až kým nezačne čas na displeji
blikať.. Nastavte čas: "HR" hodiny a /alebo "MIN" minúty.
2. Stlačte znova tlačidlo "TIME"
Poznámka:
Pri nastavovaní času máte k dispozícii približne 4 sekúnd, v opačnom prípade bude režim
nastavovania času zrušený.
Počúvanie rádia
Zapnite prístroj tlačidlom "ON", potom začne svietiť displej.
Ručné ladenie staníc
1. Vyhľadajte zvolenú stanicu pomocou tlačidiel P – alebo P + .
2. Nastavte úroveň hlasitosti.
Automatické ladenie staníc
Stlačte a na niekoľko sekúnd podržte tlačidlo “∨” (Ladenie nadol) alebo “∧” (Ladenie nahor). Zariadenie
vyberie a naladí frekvenciu práve počúvanej stanice s najsilnejším signálom. . La denie staníc m ôžete
vykonávať pomocou tlačidiel – (Ladenie) nadol alebo +( Ladenie nah or ).
Skvalitnenie príjmu:
FM: Citlivosť príjmu zlepšite úplným vytiahnutím drôtovej FM antény.
AM: Optimálny príjem si zabezpečíte horizontálnym natočením rádiobudíka.
Uloženie rádiových stanic do pamäte
Zariadenie dokáže uložiť 10 FM a 10 AM rozhlasových staníc rádia.
Stlačte a podržte tlačidlo “PRESET” do 4 sekúnd, a potom sa najdená stanica uloží autom aticky do
pamäte.
Manuálne ukladanie:
1. Urobte manuálne alebo automatické vyhľadanie rozhlasových staníc.
2. Stlačte a podržte tlačidlo ”PRESET” do 1 sekunda. Vtedy na displeji začne blikať 'P 01'.
3. Vyberte si zvolenú stanicu pomocou tlačidiel “P-“ vagy “P+”.
4. Stlačte tlačidlo “PRESET” pre uloženie.
5. Pre uloženie ostatných rádiových staníc opakujte si kroky 1.- 4.
3
Page 24

Uživateľská príručka
Prehrávanie uložených rozhlasových staníc
Stlačte tlačidlo “PRESET”, “P 01” sa zobrazí na displeji.
Pre vyberanie staníc opakovane stlačte tlačidlo so symbolom “PRESET”.
Zvolte si stanicu stlačením tlačidla “P-“ alebo “P+”
Nastavenie budíka
1. V pohotovostnom režime stlačte tlačidlo “ALARM 1” a vyberte si požadovný typ budenia zv ukovým
signálom alebo počúvanou rozhlasovou stanicou, Zvolený režím začne svietiť na displeji.
2. Stlačte tlačidlo “HR” a/alebo “MIN” pre nastavenie času.
3. Stlačte tlačidlo “ALA RM 1” pre akceptovanie.
Poznámka: Hore uvedenou metódou môžete použivať aj tlačidlá “Alarm 2” a “ALARM 2”
Zastavenie budíka
1-Opakovanie budenia
Stlačte tlačidlo “SNOOZE”, budenie prestane a opäť sa spustí po približne 9 minútach.
2-Zastavenie budíka
Stlačte tlačidlo “OFF” alebo “ALARM 1” Budenie prestane, ale druhý deň sa spustí v tom istom čase.
3-Zrušenie budíka
Stlačte tlačidlo znova “ALARM 1 ” . Indikátor budenia z displeja zmizne.
Poznámka: Tá istá metóda sa vzťahuje aj na tlačidlá “Alarm 2” a “ALARM 2”
Funkcia automatického vypnutia
Zapnite rádio (alebo v zapnutom stave), potom stlačte tlačidlo “SLEEP” a vyberte si nastavený čas
(90-80-70-60-50-40-30-20-10), ktorý rádio automaticky vypne
Pre vypnutie stlačte tlačidlo “SLEEP” a zvoľte si opciu OFF.
Technické údaje
Napájanie: AC 230V~50Hz VDE konektor
DC 3V 2x1.5V AAA batérie (balenie neobsahuje!).
Rozh.pásmo Frekvencie: FM 87.5-108MHz
AM 522-1620kHz
Rozmery: 148(L) x 63(W) x 82(H) mm
4
Page 25

Uživateľská príručka
Dôležité informácie
Výstraha: Aby nedošlo k úrazu elektrickým prúdom, neotvárajte kryt (ani zadnú časť).
Vnútri nie sú žiadné použivateľom opraviteľné súčiastky. Opravu prenechajte na
autorizovaný servis
Symbol blesku so šípkou v rovnostrannom trojuholníku má upozorniť používateľa
na prítomnosť neizolovaného nebezpečného napätia vnútri prístroja..
Výkričník v rovnostrannom trojuholníku má upozorniť používateľa na prítomnosť dôležitých
prevádzkových a údržbových (servisných) pokynov v literatúre priloženej k výrobku.
Bezpečnostné upozornenia
- Prístroj používajte iba pri norm álnej teplote ok olia..
- Umožnite dostatočné prúdenie vzduchu okolo zariadenia, aby nedošlo k jeho prehrievaniu.
- Otvory nikdy nezakrývajte položením prístroja na lôžko, koberce alebo podobnú polochu.
- Nepoužívajte zapálené sviečky v blízkosti prístroja.
- Nedávajte žiadne tekutiny na prístroj.
- Aby ste predišli riziku požiaru alebo úrazu elektrickým prúdom, na zariadenie neklaďte nádoby
naplnené kvapalinou (napr. vázy).
- Batérie nenabíjajte, nerozoberajte a nechádžte do ohňa
- Neklaďte batérie v blízkosti zdroja tepla.
-Zariadenie pripojte do ľahko dostupnej elektrickej zásuvky. V prípade výskuty akýchkoľvek
neštandardných odchálok v prevádzke ho okamžite odpojte od elektrickej siete.
Tento symbol znamená, že zariadenie s t ýmto s ym b o lmi by nemalo byť likvidované ako
bežný komunálny odpad. Ak chcete likvidovať v ýrobok alebo batérie, prosím, vyhľadajte vhodné
zberné systémy alebo zariadenia pre recykláciu.
5
 Loading...