

A9
EN A9 Robot Vacuum Cleaner
FR Aspirateur robot A9


Table of Contents
Important Safety Instructions ................................................................................ 4
Explanation of Symbols ......................................................................................... 5
Intended Use ........................................................................................................... 5
Tips .......................................................................................................................... 5
List of Accessories ................................................................................................. 6
Product Description ............................................................................................... 6
Robot .................................................................................................................. 6
Dustbin ............................................................................................................... 7
ElectroWall ......................................................................................................... 7
Charging Dock .................................................................................................... 8
Remote Control .................................................................................................. 8
Before First Use ...................................................................................................... 9
Operation ................................................................................................................. 10
Charging ............................................................................................................. 10
Basic Operation Modes ...................................................................................... 12
Cleaning Modes ................................................................................................. 13
Setting a Cleaning Schedule .............................................................................. 15
ElectroWall ........................................................................................................ 16
APP Download and Connection ............................................................................ 17
Downloading the App ......................................................................................... 17
Starting the App ................................................................................................. 17
Cleaning and Maintenance .................................................................................... 20
Cleaning and Maintenance Schedule ................................................................ 20
ILIFE Customer Service ...................................................................................... 20
Cleaning the Robot ............................................................................................ 21
Cleaning/Replacing the Side Brushes ............................................................... 21
Cleaning/replacing the Main Brush .................................................................... 22
Cleaning the Dustbin ......................................................................................... 23
Cleaning the High Performance Filter ................................................................ 24
Troubleshooting ..................................................................................................... 24
FCC - Supplier’s Declaration of Conformity ........................................................ 29
Canada IC Notice
Specifications
................................................................................................... 30
........................................................................................................ 30
EN
For more detailed information,
visit: www.iliferobot.com
3

IMPORTANT SAFETY INSTRUCTIONS
EN
When using electrical appliance, basic precautions should always be followed,
including the following:
READ ALL INSTRUCTIONS BEFORE
USING THIS APPLIANCE
• WARNING -
a) Do not leave appliance when plugged in. Unplug from outlet when not in use and
before servicing.
b) Do not use outdoors or on wet surfaces.
c) Do not allow to be used as a toy. Close attention is necessary when used by or
near children.
d) Use only as described in this manual. Use only manufacturer’s recommended
attachments.
e) Do not use with damaged cord or plug. If appliance is not working as it should, has
been dropped, damaged, left outdoors, or dropped into water, return it to a service
center.
f) Do not pull or carry by cord, use cord as a handle, close a door on cord, or pull
cord around sharp edges or corners. Do not run appliance over cord. Keep cord
away from heated surfaces.
g) Do not unplug by pulling on cord. To unplug, grasp the plug, not the cord.
h) Do not handle plug or appliance with wet hands.
i)
moving parts.
k) Turn off all controls before unplugging.
l)
areas where they may be present.
• CAUTION -
servicing.
• Do not pick up anything that is burning or smoking, such as cigarettes,
matches, or hot ashes.
•
• Always insert batteries correctly with regard to polarity (+ and –) marked
on the battery and the product.
• Exhausted batteries should be immediately removed from product and
properly disposed.
SAVE THESE INSTRUCTIONS
4

Explanation of Symbols
This product is for indoor use only.
Alternating current (AC).
Direct current (DC).
VI
BC
Regulations).
Intended Use
• This product is intended for household use only. It is not intended for
commercial use.
• This product is intended to be used in dry indoor areas only.
Tips
• Stop the robot promptly if error occurs during cleaning. Before using the
• Roll up carpet tassels and make sure curtains and table cloths are not in
EN
•
detect the height difference. To avoid falls, set up the electrowall
physical harms such as tripping.
•
the robot.
•
• Do not put any objects in the main brush holder. To ensure smooth rotation
of the main brush, remove dust, batting and hair winding around it.
5

List of Accessories
EN
Robot x 1
L
Left side brush x 2
Electrowall x 1
Charging dock x 1 Remote control x 1
R
Right side brush x 2
High performance
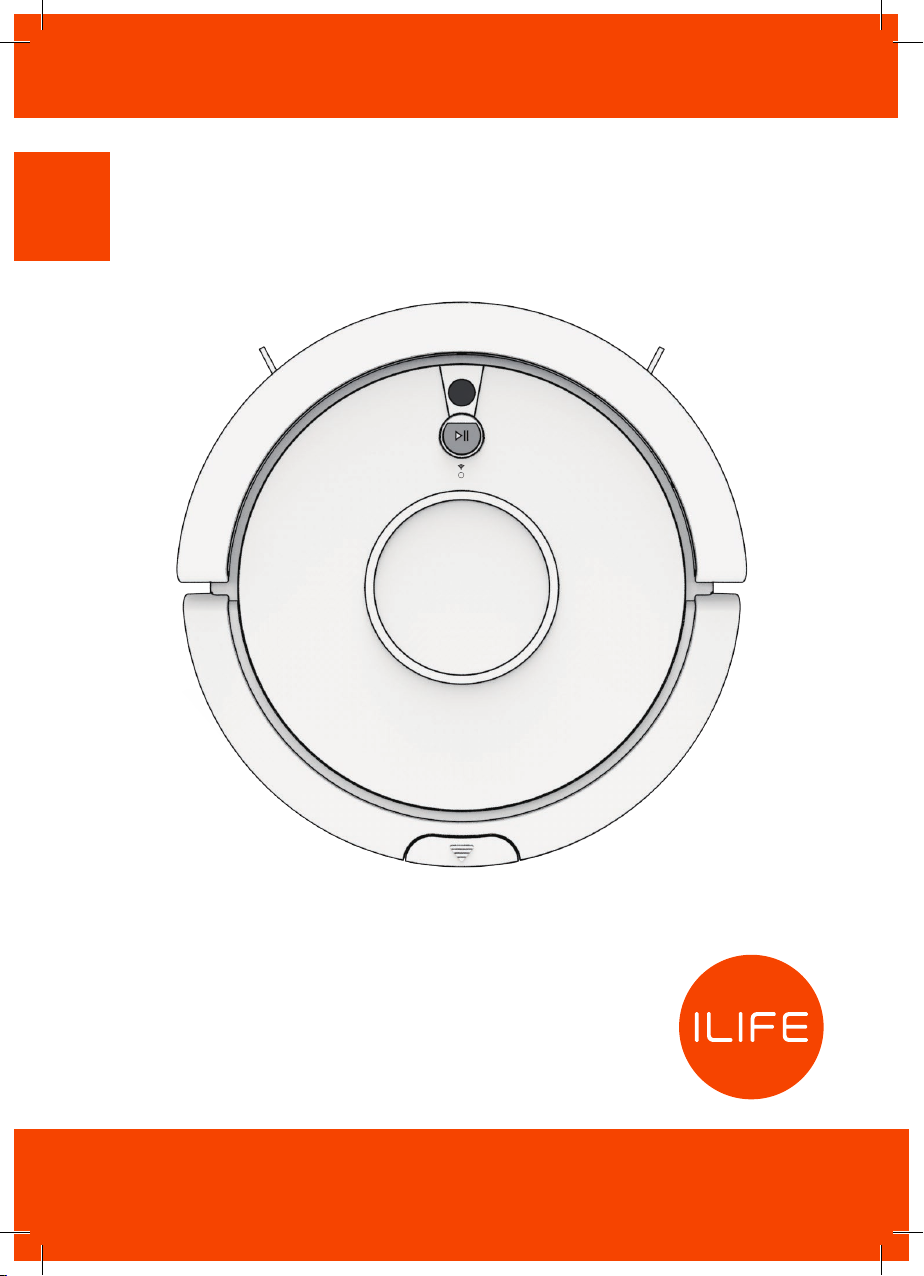
Product Description
Robot
Adapter x 1
AAA battery x 2 AA battery x 2
Rubber brush x 1
Cleaning comb
x 1
Bumper
Camera
Start/Pause button with indicator
WiFi indicator
Instruction
manual x 1
Quick start
guide x 1
Power socket
6
Dustbin
Dustbin release button
ON/OFF switch
Cliff sensor

Dustbin
Dustbin release button
Dustbin cover
Isolation bracket
EN
Dustbin
ElectroWall
Power switch
Power indicator
Signal transmitter
Battery compartment
7
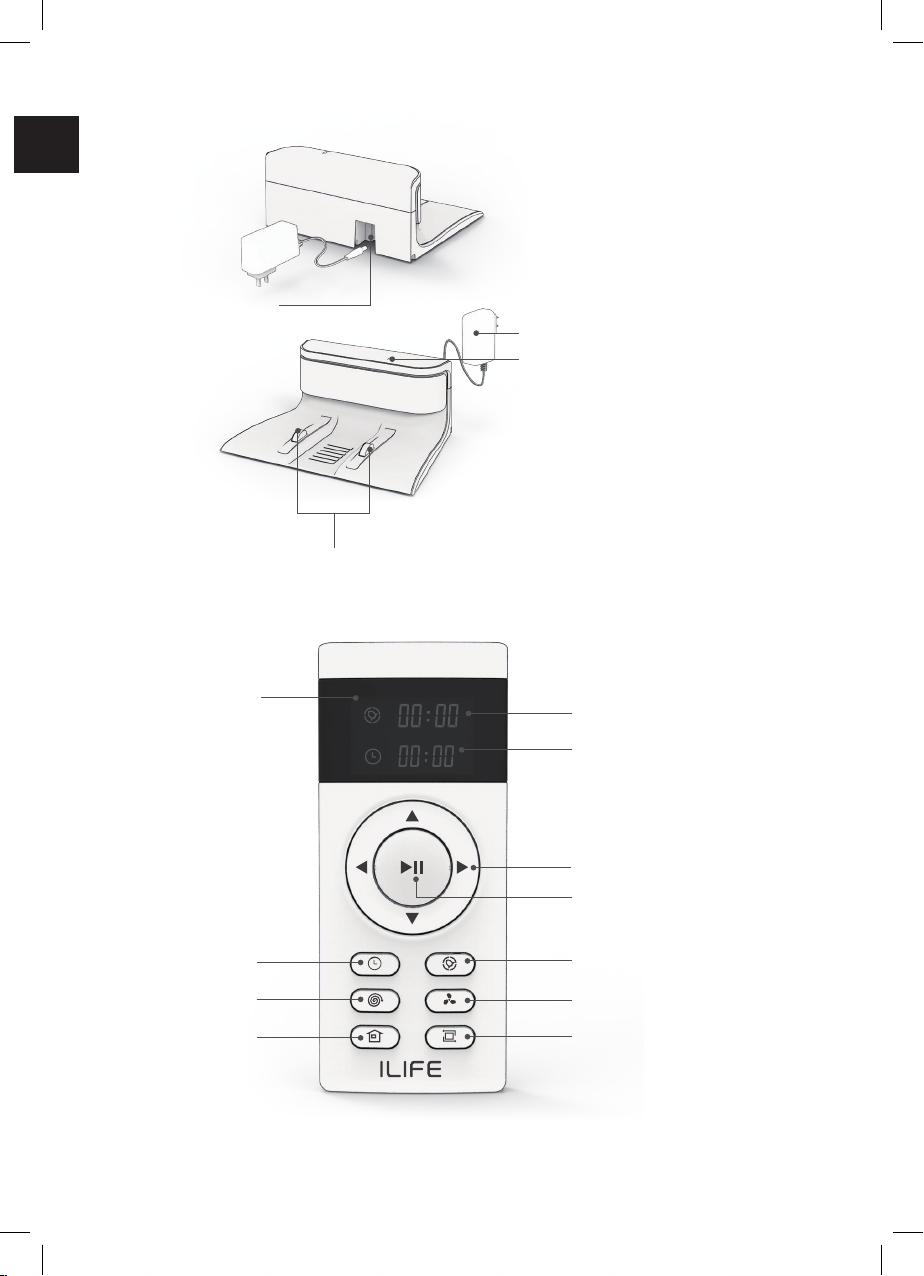
Charging Dock
EN
Power socket
Remote Control
Adapter
Power supply indicator light
Charging pads
Display
Clock
Spot mode
HOME
(Auto charge)
Schedule time indicator
Local time indicator
Direction button
Start/pause button
Schedule
MAX mode
Edge mode
NOTICE - The direction buttons cannot be used during a cleaning cycle.
8

Before First Use
DANGER - Keep any packaging materials away from children – these materials
are a potential source of danger, e.g. suffocation.
• Check the robot and accessories for transport damages.
• Before connecting the robot to the power supply, check that the power
supply voltage and current rating corresponds with the power supply
details shown on the adapter’s rating label.
• Install the AAA batteries in the remote control.
• Install the AA batteries in the electrowall.
• Install the side brushes and the main brush.
NOTICE - Ensure to install the left and the right side brush onto their respective
pins (yellow - left, blue - right).
EN
5
Choosing the Main Brush
The robot has two main brush types to choose from:
Rubber brush (pre-installed)
2 in 1 main brush
NOTICE - For brush replacement instructions, refer to the “Cleaning and
Maintenance” chapter.
6
9

Operation
EN
Charging
Automatic Charging
In the AUTO mode, the robot comes back to the charging dock automatically
when the battery runs low.
• Place the charging dock against the wall. Ensure there are no obstacles or
• Connect the adapter’s plug to the charging dock’s socket. Connect the
adapter’s power plug to the power supply. The power supply indicator
lights up green.
3.2(1m)
10
3.2(1m)
6.5(2m)

• Set the robot’s ON/OFF switch to I
green. After 25 seconds of start-up, the start/pause button fades in and
out.
• Press the HOME button on the remote control to allow the robot to dock
itself and start automatic charging.
Manual Charging
• Connect the adapter’s plug to the robot’s power socket.
EN
• Connect the adapter’s power plug to the power supply. The start/pause
1
2
• After 25 seconds of start-up, charging starts. The start/pause button
NOTICE - When charging in the manual mode, the robot cannot perform the
scheduled automatic cleaning. Charge the robot in the automatic
charging mode whenever possible.
11

Basic Operation Modes
To enter the operation modes, set the ON/OFF switch to I position.
EN
Select Mode
Select mode allows you to choose the operating mode of the robot.
• To enter the select mode, press the start/pause button. The start/pause
button’s indicator fades in and out.
Auto Cleaning Mode
• To start the auto cleaning mode, press the start/pause button. The
start/pause button’s indicator lights up and the robot starts operation.
Sleep Mode
NOTICE - The sleep mode can be initiated only by the start/pause button on the
robot.
NOTICE - The sleep mode can be initiated only when the robot is in the select
mode.
• To enter the sleep mode, press and hold the start/pause button on the
robot for 3 seconds. The start/pause button goes off.
• To exit the sleep mode, press the start/pause button on the robot. The
robot goes back to the select mode. The start/pause button fades in and
out.
Mode Indicator
Mode Start/pause button status
Select Mode The start/pause button fades in and out.
Auto Cleaning Mode The start/pause button is constantly on.
Sleep Mode The start/pause button is off.
12

Cleaning Modes
NOTICE -
the “Basic Operation Modes” chapter).
Auto Cleaning Mode
The default cleaning mode. The robot plans a path and cleans along a zigzag
pattern. During cleaning, the robot detects and cleans areas that have been
missed.
• To start the auto cleaning mode, press the start/pause button.
Spot Mode
EN
with concentrated dust and debris.
• To start the spot mode, press the spot mode button.
13

Edge Mode
Use for dirty areas around the walls. The robot moves forward until it detects the
EN
wall. It goes around the edges of the walls once, then stops the operation.
• To start the edge mode, press the edge mode button.
MAX Mode
Use for heavily soiled areas. The robot cleans the whole area with increased
suction power.
• To start the MAX mode, press the MAX mode button.
14

Setting a Cleaning Schedule
The robot features a schedule mode. It allows to pre-set an automatic cleaning
session.
NOTICE - Before setting the schedule/local time, ensure the product is in the
select mode (see the “Basic Operation Modes” chapter). Aim the
remote control at the product while setting the schedule/local time.
NOTICE - When choosing the settings, ensure the robot beeps when pressing the
Setting the Local Time
• Press the clock button. The local
• Press the up or down button to set
the local time hour.
• To go to minutes setting, press the
right direction button. The local
• Press the up or down button to set
the local time minutes.
• To save the local time settings, press
the clock button.
EN
Setting the Scheduled Time
NOTICE - The robot operates in the AUTO mode when switched on by the pre-set
schedule.
• Press the schedule button. The
schedule hour indicator starts
• Press the up or down buttons to set
the schedule hour.
• To go to minutes setting, press the
right direction button. The schedule
• Press the up or down buttons to set
the schedule minutes.
• To save the schedule time settings, press the schedule button.
15

Canceling the Scheduled Time
NOTICE - To cancel the scheduled time, you can also switch off the robot.
EN
•
• Press the up or down buttons to set the schedule time to “00:00”. Press
the schedule button.
ElectroWall
The electrowall creates an invisible barrier that the robot cannot cross.
Use the electrowall to stop the robot from entering the restricted area.
• Switch the power switch of the electrowall to the ON position.
The power indicator lights up green.
• Place the electrowall on the outside of the area you want to restrict
(e.g. the doorway). Ensure the FORBIDDEN AREA marking on the
electrowall faces towards the restricted area.
9.1' (3 m)
NOTICE - The maximum range of the electrowall is 9.1' (3 m).
- Ensure the power switch is facing the ceiling and the signal transmitter
is facing towards the opening you want to block.
•
Switch off the electrowall after the finished cleaning session.
16

APP Download and Connection
Downloading the App
The robot can be controlled by the “ILIFE Robot” app. Scan the QR code to install
the app on your iOS or Android device.
Starting the App
1 2 3
Set a password
New password (min. 6 characters)
Reenter new password
My robot
EN
Make cleaning easier Make life better
Email address
Verication code Get vericatin cade
Quick registration
Already have an account? Login now
• Open the app.
• Insert your mobile phone
email address. Tap on
“ ”.
•
code.
• Tap on “Quick
registration”.
Login
• Enter the new
password.
• Tap on “Login”.
Hi, good to see you again
Begin your cleaning journey~
Add a robot
• Tap on “Add a robot”.
17

4 5 6
EN
Add a robot
A series robot vacuum
A9
Select Wi-Fi
Off
To see available networks, turn Wi-Fi on.
To improve location accuracy, system apps and
services can still scan for Wi-Fi networks. you
can change this in scanning settings.
Wi-Fi preferences
?
Connecting to home WiFi
Choose a WiFi network
Enter WiFi passwork
Note: Robot can’t connect to 5G WiFi
Next
• Choose your robot.
• Switch on the WiFi. NOTICE - The robot is not 5G
7 8 9
Preparing to find a network
Turn on power switch on the side of the
main body. (Note: Don’t place main body
on charging dock)
Robot already switched on
Next
• Set the ON/OFF
switch to I position.
• Mark the “Robot
already switched
on
• Tap on “Next”.
•
•
Preparing to find a network
Press and hold for 3 seconds and you
will hear a buzz. Don’t release until voice
announcement says “Starting WiFi Paring
Mode.” WiFi light starts blinking once robot
enters AP mode.
No voice announcement. Retry previous steps.
“Start WiFi pairing” already announced
Next
Press and hold the start/
pause button on the
robot for 3 seconds.
The robot beeps.
Mark the “Starting WiFi
paring mode already
announced
•
Tap on “Start connecting”.
Wi-Fi compatible.
• Choose the WiFi network.
• Enter the WiFi password.
• Tap on “Next”.
Preparing to find a network
Robot WiFi: Robot-XXXX Settings
Note:
Select “Robot-XXXX” connection. Enter
Default password: 123456789. Return to
Current page and press “Start connecting”.
Start connecting
• Tap on “Settings”.
18

10 11
Robot-B4A6
Signal strength Excellent
Encryption type WPA2 PSK
Cancel
Searching a network...
EN
123456789
Show advanced options
CANCEL CONNECT
• Select "Robot-XXXX" connection.
Enter default password: 123456789
Return to APP.
•
Tap on "Start connecting".
•
12 13
Connected
Connected
45%
Don’t move App to background
• Wait until the
connection is
completed.
My robot
ILIFE robot vacuum
Status: Online
Name your robot
ILIFE robot vacuum
Completed
• Set your robot’s
name.
• Tap on “Completed”
• The robot is
connected and
ready to use.
19

Cleaning and Maintenance
EN
WARNING - To prevent electric shock, unplug the robot/charging dock before
cleaning.
WARNING -
Never hold the robot under running water.
Cleaning and Maintenance Schedule
Accessory Cleaning Replacements
Main unit Once a week
Dustbin After each use
Once a week (twice a week
for a pet-owning household)
Main brush
Side brushes Once a week As needed
Once a week (twice a week
for a pet-owning household)
ILIFE Customer Service
To purchase the accessories, contact the ILIFE Customer Service:
1-800-631-9676 (Toll free for USA & Canada)
+86-75521005927 (Outside USA & Canada)
Monday-Friday from 9:00 AM - 5:00 PM CST
Email: support@iliferobot.com
Once every two
months
As needed
20

Cleaning the Robot
• To clean, wipe with a soft, slightly moist cloth.
• Never use corrosive detergents, wire brushes, abrasive scourers, metal or
sharp utensils to clean the product.
Cleaning/Replacing the Side Brushes
• Use two hands to pull off each side brush.
• Pull or cut away hair from the side brushes and the pins.
EN
5
• Clean the side brushes with a soft cloth.
6
21

Cleaning/Replacing the Main Brush
• Press the brush compartment cover notches. Lift the cover (Fig. 1).
EN
• Take out the brush from the brush compartment (Fig. 2).
• Remove the dirt and hair using the cleaning comb (Fig. 3).
1 2 3
2
1
• Place the main brush back in the brush compartment (Fig. 4).
• Close the brush compartment cover (Fig. 5).
54
1
22
2

Cleaning the Dustbin
• Press the dustbin release button. Remove the dustbin from the
robot (Fig. 1).
• Pull up the dustbin cover to open the dustbin (Fig. 2).
• Empty the dust and debris into trash. Be careful not to empty any dustbin
parts (Fig. 3).
EN
1
2
3
• Remove the isolation bracket (Fig. 4).
• Clean the isolation bracket and the dustbin with the cleaning comb (Fig. 5).
• Rinse the isolation bracket with water and let dry.
4
5
• Reinsert the isolation bracket.
• Close the dustbin.
• Reinsert the dustbin into the robot.
23

Cleaning the High Performance Filter
•
EN
cover (Fig. 1).
•
•
1
•
compartment.
2
1
2
Troubleshooting
NOTICE -
Never hold the robot under running water.
Problems Solutions
Make sure the main power switch is in
•
the ON position.
Make sure the battery is fully charged.
The robot cannot operate normally.
•
If the problem persist, turn off the power
•
switch and then turn it back on.
The robot stopped cleaning
suddenly.
24
Check if the battery has enough
•
electricity.
Check if the robot is malfunctioning and
•
showing the red light.
If the problem persist, turn off the power
•
switch and then turn it back on.

Problems Solutions
After loading,the robot will rotate to
•
obtain and plan the best cleaning route
sometimes,which is a normal cleaning
The robot repeatedly rotates.
status.
Check if the side wheels and nose
•
wheel are working properly.Clean the
entangled dirt and hair regularly by
cleaning comb.
When Max mode is activated, the
•
sound will increase accordingly.
The noisy is seriously when the
robot is cleaning.
Check if any obstacle are blocking the
•
suction inlet.
Check if the nose wheel has abnormal
•
noise.
Make sure the main power switch is in
•
the ON position.
Make sure the scheduled time has
•
been set correctly.
The robot will automatically synchronize
•
The schedule cleaning is always
invalid.
the phone's clock after opening the
ILIFE APP,but the schedules cleaning
time still valid .
Cleaning schedules are erased when
•
power switch is turned off or the
electricity of the robot is exhausted.The
valid cleaning schedule must be reset
via the app or the remote control.
EN
The robot cannot return to the
Charging Dock.
Please put the Charging Dock in a
•
empty place such as the living room.
Do not place articles within the area 1m
•
on the left and right and 2m in the front .
Clean the charging pins regularly.
•
Ensure the robot is started from the
•
Charging Dock.After starting the auto
mode, do not switch to other cleaning
modes in the cleaning progress.
25

Problems Solutions
EN
The robot cannot return to the
Charging Dock.
The robot found the charging dock,
but could not recharge normally.
Ensure that the robot is not stopped
•
midway, otherwise it will return to the
last starting point and stop after the
cleaning is finished.
• When the robot is near the Charging
Dock, it will return more quickly.
However, if the Charging Dock is
located far away, robot will need more
time to return. Please be patient as it
works its way back.
•
Check if the indicator on the Charging
Dock lights up. If not, contact the ILIFE
service center to repair or replace the
Charging Dock.
Ensure to install the left and right side
•
brush on to their respective pins.
(yellow-left,blue-right.)
Clean the charging pins regularly with
•
a dry cloth.
Check if you can hear a beep when
•
robot is docked onto the Charging Dock.
If not, contact the ILIFE service center
to repair or replace the Charging Dock.
The main brush does not rotate
normally.
Suction power is weak.
26
Check if the main brush is entangled by
•
the hair and dirt,remove the hair and
dirt by the cleaning comb.
Check if the main brush and brush
•
cover have been installed properly.
Check if any obstacle are blocking the
•
suction inlet.
Empty and clean the dustbin regularly.
•
Clean the filters with a vacuum cleaner
•
or a cleaning comb.
If the filters are wet due to water or
•
other liquid on the floor,please replace
the new filter .

Problems Solutions
Check if the voice switch is turn off in
•
The voice of the robot is invalid or
the voice is fragmentary.
the app.
If the voice is invalid after turn on voice
•
switch in the app,contact the ILIFE
service center to repair.
Replace the batteries (2 AAA) in the
•
remote control.
Make sure the robot is turned on and
•
The remote control does not work.
fully charged.
Ensure the robot is in the select mode
•
before setting the schedule/local time.
Make sure the remote control is within
•
range (13 ft/4 m) of robot.
Replace the batteries (2 AA) in the
•
electrowall.
Make sure the power switch of the
•
electrowall is in the ON position and
The electrowall does not work.
the light of signal transmitteris fade in
and out.
Check the FORBIDDEN AREA marking
•
on the electrowall faces towards the
restricted area,and ensure the robot is
working in the WORKING AREA.
EN
The robot cannot connect to a
Wi-Fi network.
You cannot control the robot with
Amazon Alexa.
Make sure your Wi-Fi router supports
•
the 2.4GHz ; the 5GHz band is not
supported.For more detailed information,
please visit: www.iliferobot.com .
Check if there are any Internet
•
connection problems.
Check whether you have installed the
•
Amazon Alexa app onto your smart
device and enabled “ILIFE Robot” Skill
in the Amazon Alexa app.
Make sure the Robot is connected to
•
the network.
Make sure you are using correct Alexa
•
voice-commands.
27

Problems Solutions
EN
You cannot control The robot with
Amazon Alexa.
Voice Announcement Solution
Left brush stuck, please remove and
clean.
The “ILIFE Robot” Skill for Alexa is
•
currently only available in English.
Remove and clean the left side brush
Clean the left side pin.
.
Right brush stuck, please remove
and clean.
Left wheel stuck, please rotate and
clean.
Right wheel stuck, please rotate and
clean.
Please inspect and tap bumper to
Remove and clean the right side brush
Clean the right side pin.
Scroll and clean the left side wheel
Depress the wheel to inspect for foreign
Scroll and clean the right side wheel
Depress the wheel to inspect for foreign
Check and clean the bumper.
Contact the service center:
1-800-631-9676
(Toll free for USA & Canada)
• Fan motor issue, please contact
customer service.
+86-75521005927
(Outside USA & Canada)
Monday-Friday
from 9:00 AM - 5:00 PM CST
Email: support@iliferobot.com
Cliff sensors blocked, please wipe
them.
Nose wheel issue, please remove
and clean.
Check and clean the cliff sensor.
Check and clean the nose wheel.
Suspended, please put back on
ground.
stable ground.
Trapped, please put in an open
area.
stable ground in an open area.
Gyro issue, please restart vacuum. Restart the robot.
Please unplug the power cord.
Pull out the charging plug. Restart the
robot.
.
.
.
Low power, please charge now. Charge the robot
NOTICE - If the solution does not help, restart the robot. If the problem persists,
contact the service center.
28

FCC - Supplier’s Declaration of Conformity
2AO2M-A581
Responsible Party Shen Zhen ZhiYi Technology Co.,
U.S. Contact Information Email: support@iliferobot.com
Telephone Number
FCC Compliance Statement
1.
the following two conditions:
(1) this device may not cause harmful interference, and
(2) this device must accept any interference received, including
interference that may cause undesired operation.
2.
FCC Compliance Statement
digital device, pursuant to part 15 of the FCC Rules. These limits are designed
to provide reasonable protection against harmful interference in a residential
energy and, if not installed and used in accordance with the instructions, may
cause harmful interference to radio communications. However, there is no
guarantee that interference will not occur in a particular installation. If this
1-800-631-9676 (Toll free for USA & Canada)
Monday-Friday from 9:00 AM - 5:00 PM CST
EN
try to correct the interference by one or more of the following measures:
• Reorient or relocate the receiving antenna.
•
•
which the receiver is connected.
•
29

Canada IC Notice
• This device contains licence-exempt transmitter(s)/receiver(s) that comply
EN
with Innovation, Science and Economic Development Canada’s licence-
(1) this device may not cause interference, and
(2) this device must accept any interference, including interference that
may cause undesired operation of the device.
•
set forth for an uncontrolled environment.
• This Class B digital apparatus complies with Canadian CAN ICES-3(B) /
NMB-3(B) standard.
Power input:
Power output: , 0.6 A
Battery type: Lithium battery
Charging time: approx. 300 mins
Operation time on a full charge: approx. 110 mins
Dustbin capacity:
Net weight: 6.85 lb (3.1 kg).
Dimensions (W x H x D): 12.6 x 3 x 13 in (32 x 7.6 x 33 cm)
30


ILIFE Customer Service
Customer Service Number:
1-800-631-9676 (Toll free for USA & Canada)
+86-75521005927 (Outside USA & Canada)
Monday-Friday from 9:00 AM - 5:00 PM CST
Email: support@iliferobot.com Made in China
 Loading...