Ik Multimedia Uno Synth USER MANUAL

TRUE ANALOG SYNTHESIZER

USER MANUAL

English

TRUE ANALOG SYNTHESIZER

USER MANUAL

UNO Synth

Table of Contents

English

1


Table of Contents

2


Introduction

4


In the box

4


Register your UNO Synth

5


Precautions

5


1 – Installation and setup

7


2 – Turning the unit ON/OFF - Calibration process

9


3 – Overview

10


4 – Front panel interface

11


4.1 – Sound Editor

12


4.1.1 – Oscillator Row

12


4.1.2 – Filter Row

13


4.1.3 – Envelope Row

14


4.1.4 – LFO Row

14


4.2 – Master Section

15


4.2.1 – Display

15


4.2.2 – Tempo Knob

16


4.2.3 – Volume Knob

16


4.2.4 – Data Buttons

16


4.2.5 – Preset Button

16


4.2.6 – Octave

16


4.2.7 – Glide

16


4.2.8 – Scale

16


4.2.9 – Delay Time and Mix

17


4.2.10 – Alternate Functions

17


4.2.11 – Arpeggiator and Sequencer

18


4.2.12 – Transport Functions

18


4.3 – Performance controls

18


4.3.1 – Performance Buttons

19


4.3.2 – Keyboard / 16 Step Buttons

19


4.3.3 – HOLD Button

20


5 – Presets

21


5.1 – Loading a Preset

21


5.2 – Store a Preset

21


5.3 – Factory Presets

22


6 – The Arpeggiator

23


7 – The Sequencer

25


7.1 – Step Recording

25


7.2 – Real-Time Recording

27

2

Contents

UNO Synth


7.3

– Step Edit Recording

28


7.4

– Deleting a sequence

29


7.5

– Sequencer Length and Direction

29


7.6

– Keyboard Priority

29

8 – MIDI Implementation

30


8.1

– General

30


8.2

– Control External Devices with UNO Synth

30


8.3

– Control UNO Synth from External Devices

30


8.4

– Connecting UNO Synth to a computer via MIDI

30


8.5

– Connecting UNO Synth to a computer via USB

31


8.6

– Setting the MIDI Channel

31


8.7

– Setting the Sync Mode

31


8.8

– MIDI Soft Thru

31

8.9

– MIDI Interface Mode

31


8.10 – MIDI Implementation Chart

32

9 – Specifications

36

10 – Troubleshooting

38

11 – Support

39


11.1 – User Area

39

3

Contents

UNO Synth

Introduction

Thank you for purchasing UNO Synth.

In the box

Your package contains:

UNO Synth

USB cable

4 AA Batteries

MIDI cables

Quick Start Guide

Registration Card

4

Introduction

UNO Synth

Register your UNO Synth

By registering, you can access technical support, activate your warranty and receive free JamPoints™ which will be added to your account. JamPoints™ allow you to obtain discounts on future IK purchases! Registering also keeps you informed of all the latest software updates and IK products.

Register at: www.ikmultimedia.com/registration

Precautions

Locations

Using the unit in the following locations can result in a malfunction.

In direct sunlight

Location of extreme temperature or humidity

Excessively dusty or dirty locations

Locations of excessive vibration

Close to magnetic fields

Power Supply

Please use only the USB cable provided with the unit, and connect the same cable to a correct USB port in the device or power adapter.

UNO synth works with both Ni-MH and Alkaline. Ni-MH batteries are tested to last about 4 hours of continuous use, while Alkaline batteries last about 3 hours of continuous use.

Interference with other electrical devices

Radios and televisions placed nearby may experience reception interference. Operate the unit at a suitable distance from radios and televisions.

Handling

To avoid breakage, do not apply excessive force to the knobs and capacitive controls.

Care

If the exterior becomes dirty, wipe it with a clean and dry cloth. Do not use liquid cleaners such as benzene or thinner, or cleaning compounds of flammable polishes.

Keep this manual

After read, please keep this manual for later reference.

Keep foreign matter out of your unit

Never set any container with liquid in it near this unit. If liquid gets into the unit, it could cause a breakdown, fire, or electrical shock.

5

Introduction

UNO Synth

Be careful not to let metal objects get into the equipment. If something does slip into the unit, unplug the USB cable, then contact your nearest IK Multimedia dealer or the store where the equipment was purchased.

Specification subject to change

The information contained in this manual is believed to be correct at the time of printing. However, IK Multimedia reserves the right to change or modify any of the specifications without notice or obligation to update existing units.

6

Introduction

UNO Synth

1 – Installation and setup

Please note: To prevent malfunction and equipment failure, always turn down the volume and turn off all the units before making any connections.

UNO Synth can be powered by the USB bus or by internal AA batteries.

USB: When connected to an USB host (MAC, Windows), all the required power is typically provided by the host. If the connected host is not capable to provide the required power, batteries may be needed (for example, using an iOS device with a camera connection kit).

IMPORTANT: If the power switch is set to the Battery position but USB power is connected, note that the low battery “BAT” indicator will not appear on the display when the batteries reach a low level. But the unit will still be under battery power and will eventually shut off. Set the switch to the USB position to avoid this..

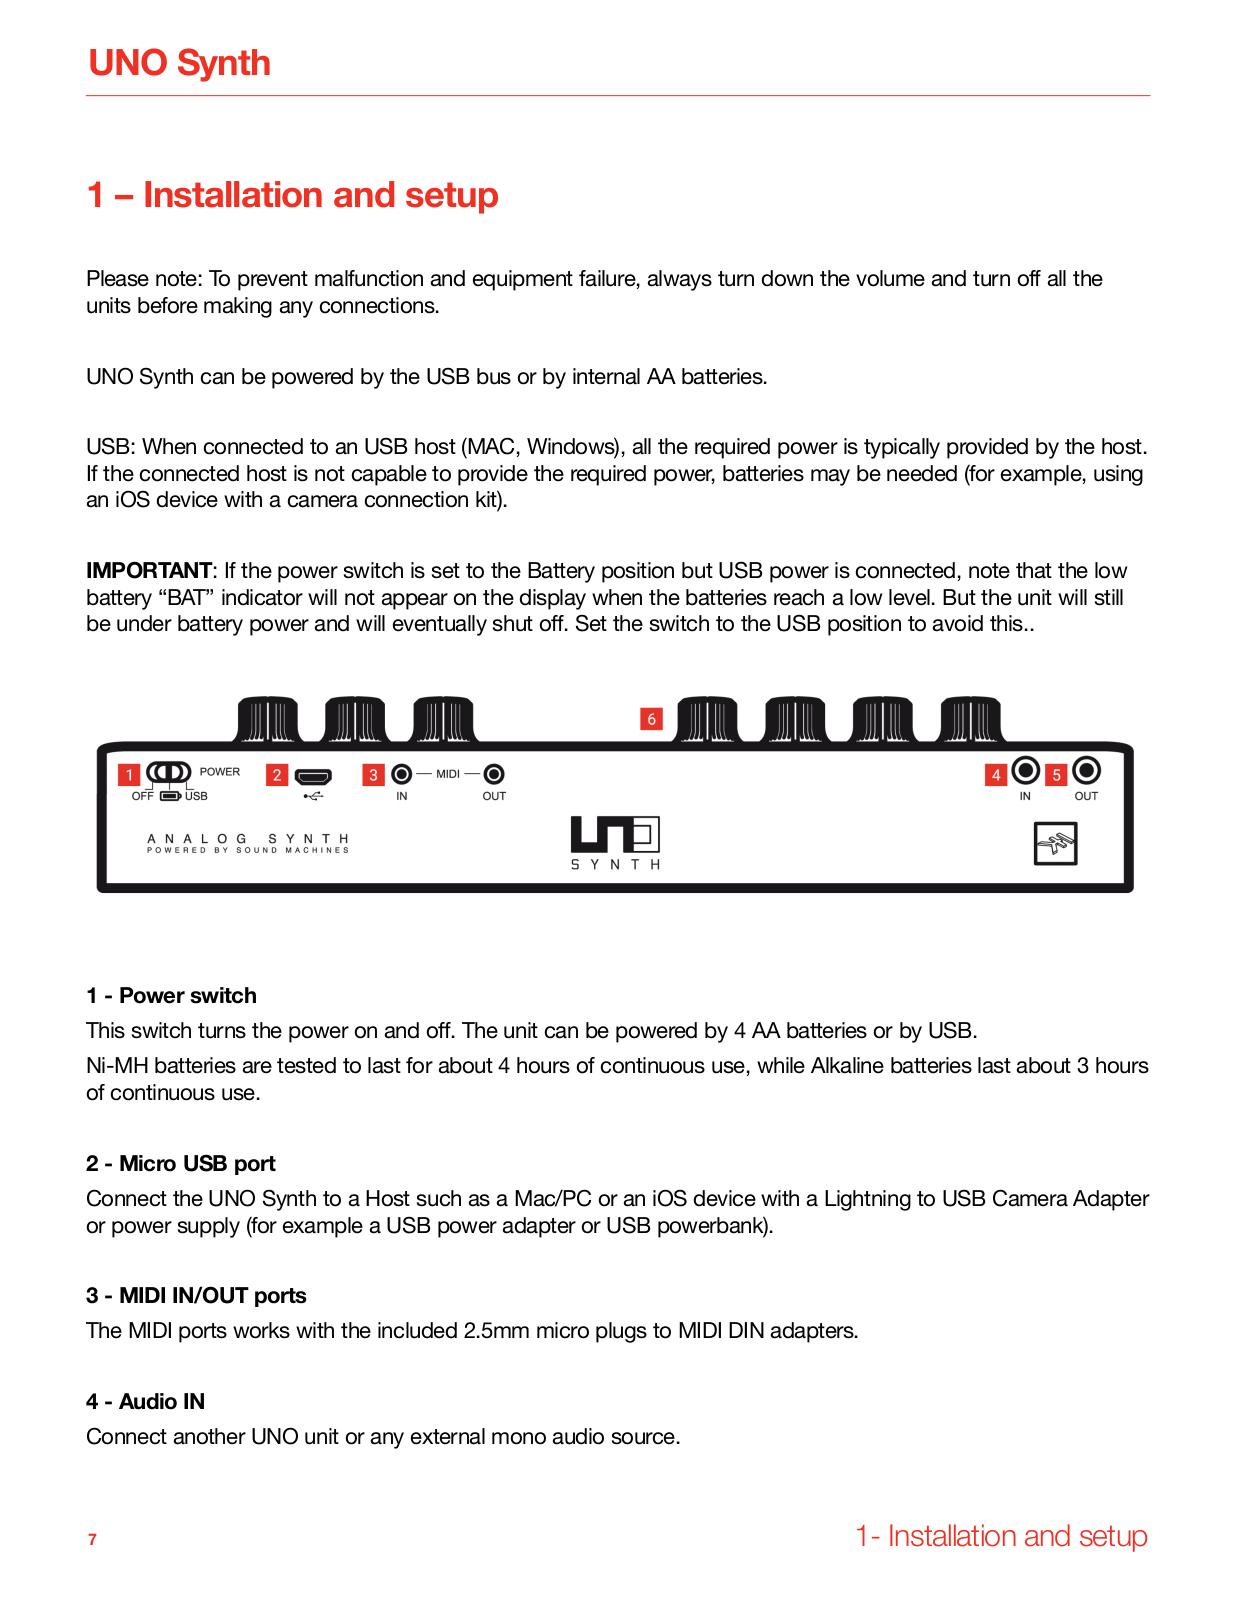
1 - Power switch

This switch turns the power on and off. The unit can be powered by 4 AA batteries or by USB.

Ni-MH batteries are tested to last for about 4 hours of continuous use, while Alkaline batteries last about 3 hours of continuous use.

2 - Micro USB port

Connect the UNO Synth to a Host such as a Mac/PC or an iOS device with a Lightning to USB Camera Adapter or power supply (for example a USB power adapter or USB powerbank).

3 - MIDI IN/OUT ports

The MIDI ports works with the included 2.5mm micro plugs to MIDI DIN adapters.

4 - Audio IN

Connect another UNO unit or any external mono audio source.

7

1- Installation and setup

UNO Synth

5 - Audio OUT

Connect the UNO Synth output to an external amp, mixer or audio interface or to your headphones with stereo mini-plug here.

6 - Knobs Behavior

UNO Synth knob behavior uses “Absolute Mode” by default. This means that the knob value is recalled using the absolute value of the position of the knob when edited (i.e.: turn a pot and the value jumps immediately from the stored value to the edited value).

The other 2 modes are Pass-Through and Relative. In Pass-Through Mode, turning the knob has no effect until after the edited value equals the preset value (or “passes through” the stored value). In Relative Mode, the changes are relative to the stored setting and the full value range of the knob is not available until either the minimum or maximum value and the respective lower or upper limit of the knob’s travel is reached.

8

1- Installation and setup

UNO Synth

2 – Turning the unit ON/OFF - Calibration process

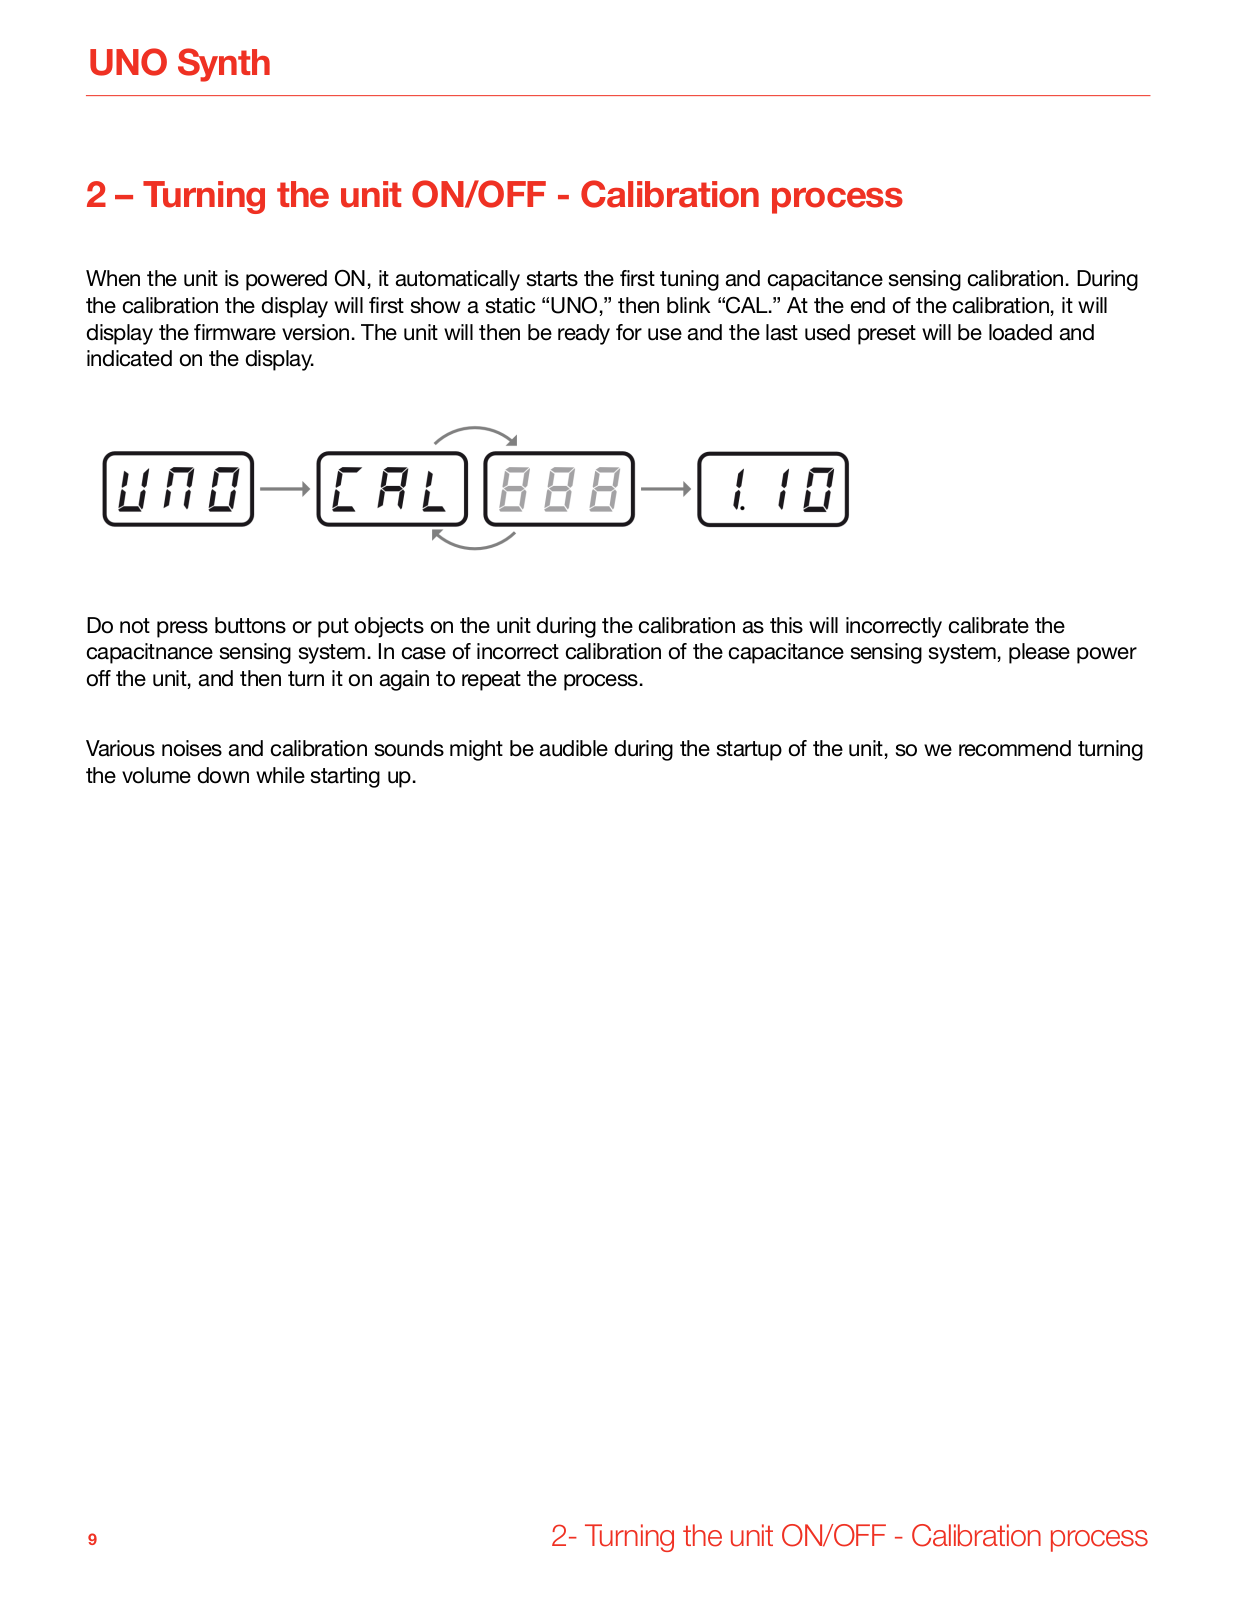
When the unit is powered ON, it automatically starts the first tuning and capacitance sensing calibration. During the calibration the display will first show a static “UNO,” then blink “CAL.” At the end of the calibration, it will display the firmware version. The unit will then be ready for use and the last used preset will be loaded and indicated on the display.

Do not press buttons or put objects on the unit during the calibration as this will incorrectly calibrate the capacitnance sensing system. In case of incorrect calibration of the capacitance sensing system, please power off the unit, and then turn it on again to repeat the process.

Various noises and calibration sounds might be audible during the startup of the unit, so we recommend turning the volume down while starting up.

9

2- Turning the unit ON/OFF - Calibration process

UNO Synth

3 – Overview

UNO synth is a powerful and portable monophonic synthesizer with features that change the meaning of “complete instrument” for the price range. It is an instrument that will become known for its sound and flexibility, ready for creative artists that need inspiration.

Raw, warm, tight and everything in-between, this monophonic beast is the first of its kind thanks to the easy and powerful analog architecture and the complex digital controls. The synth architecture provided by Sound Machines based on the IK Multimedia design presents an analog audio path with a digitally-controlled engine with these features:

2 analog oscillators per voice with continuously variable wave shapes including triangle, saw and square with pulse width modulation

Noise generator

2-pole analog multimode filter that can be set to LP, HP and BP with overdrive

2 digital envelopes, one for the filter and one for the amplitude

1 digital LFO with sine, triangle, saw up, saw down, square, random and sample-and-hold shapes

5 performance buttons for instant musical articulations

A 10-mode arpeggiator

A powerful 3-mode sequencer with parameter sequencing and parameter step recording

A digital delay

Capacitance sensing keyboard with smart scale capabilities

Audio input to connect another UNO unit or any audio source

20 factory presets and 80 user presets

Fully MIDI controllable

10

3 – Overview

Ik Multimedia Uno Synth USER MANUAL

UNO Synth

4 – Front panel interface

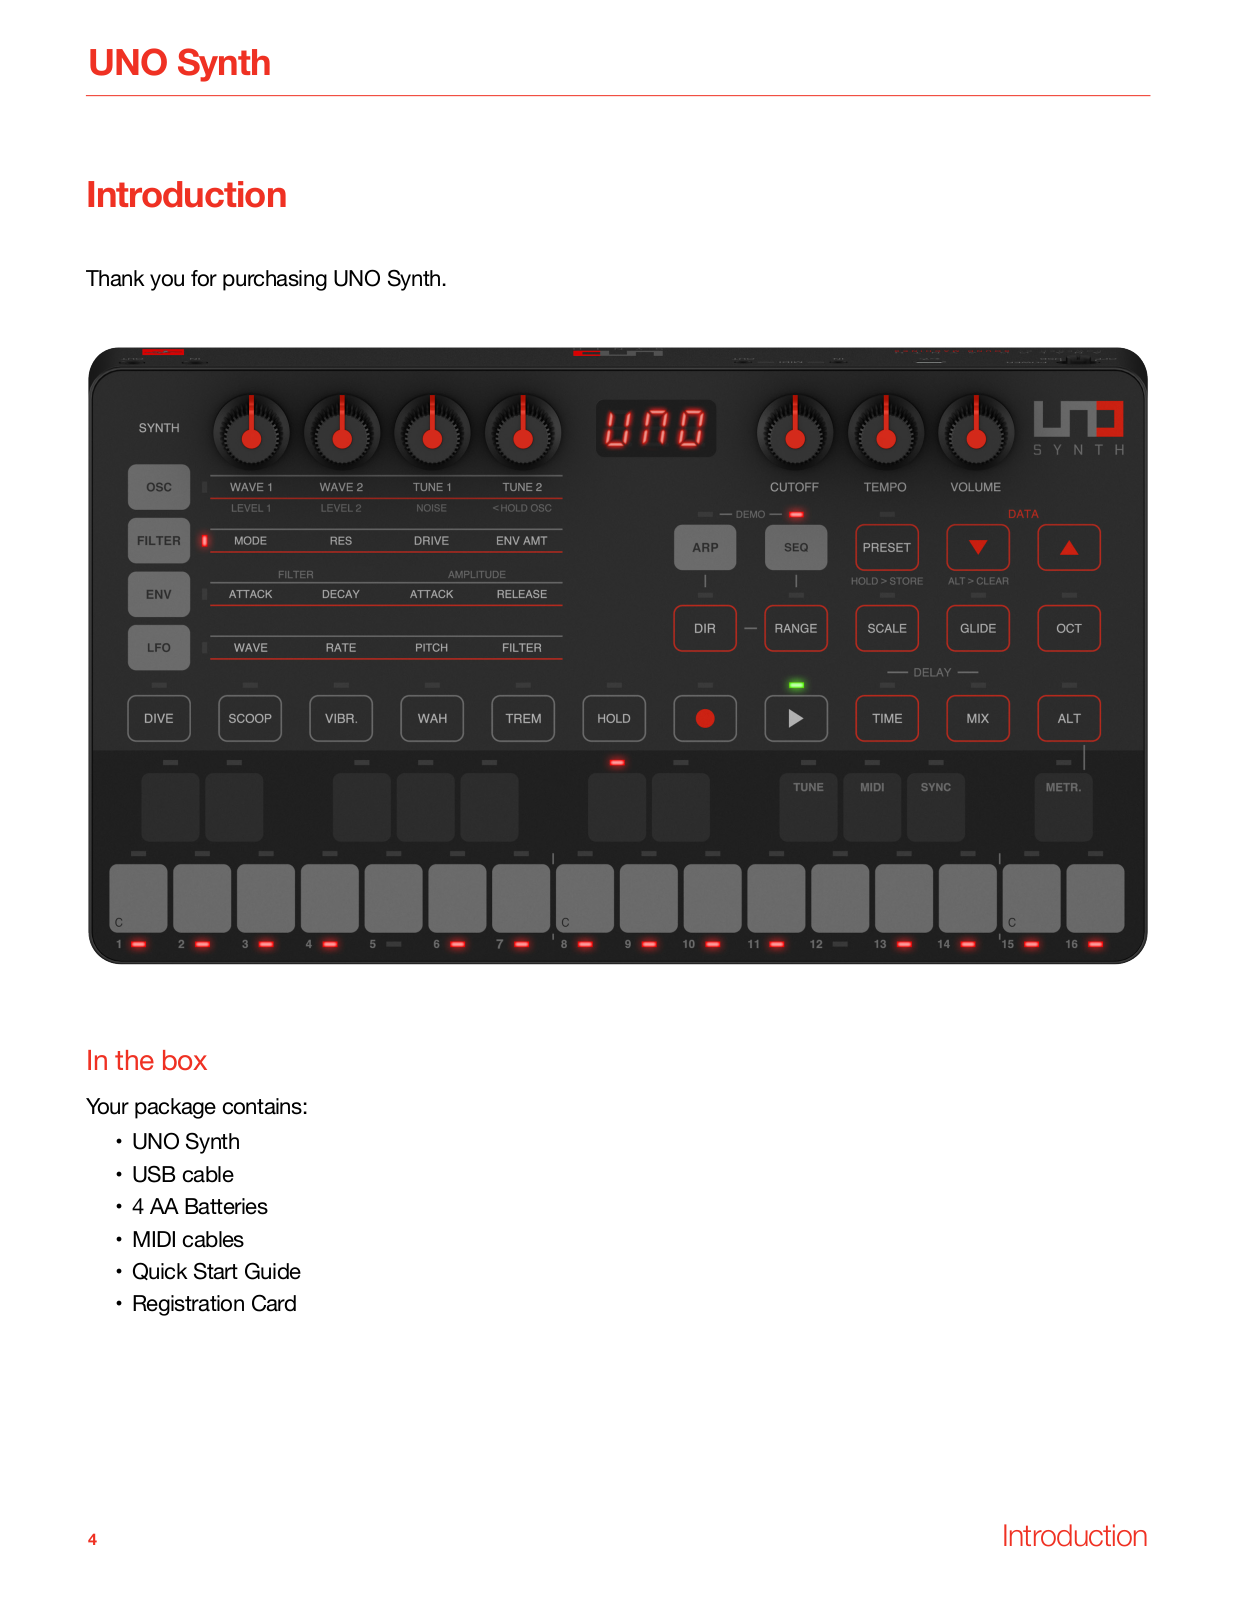
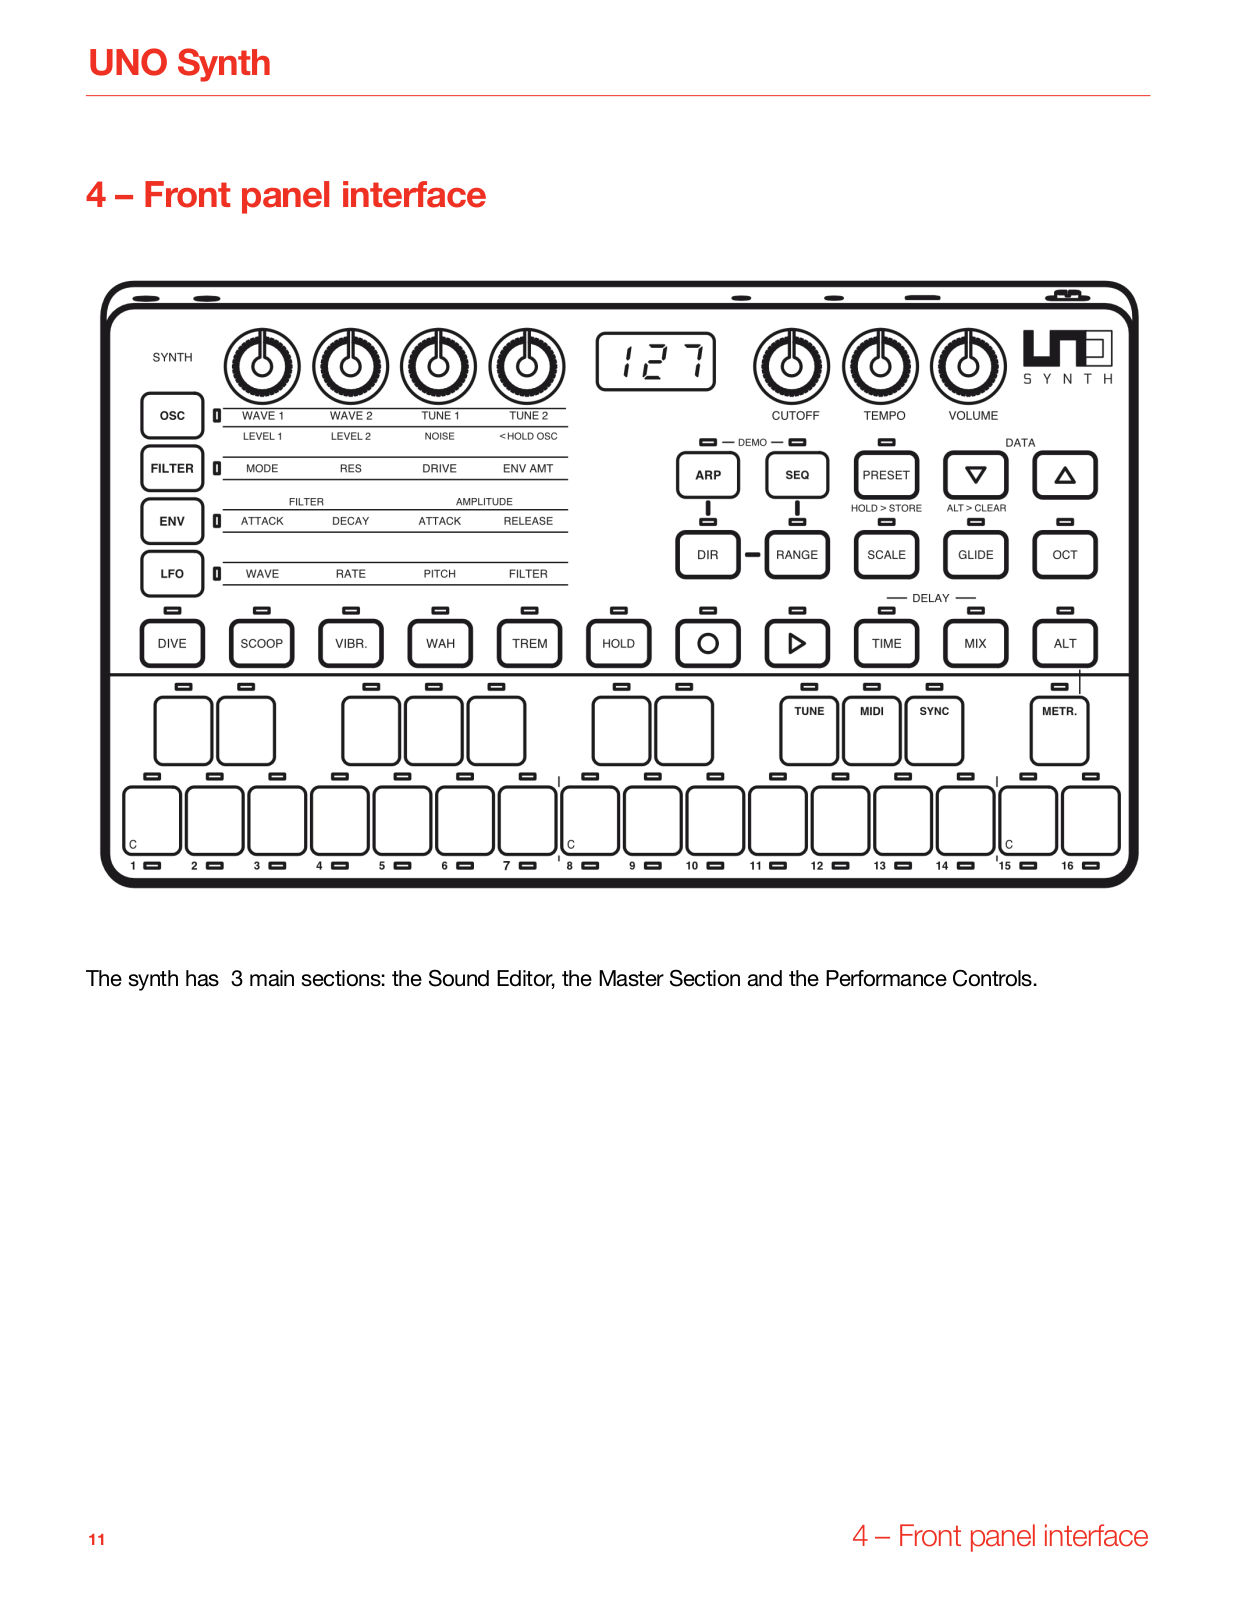
The synth has 3 main sections: the Sound Editor, the Master Section and the Performance Controls.

11

4 – Front panel interface

UNO Synth

4.1 – Sound Editor

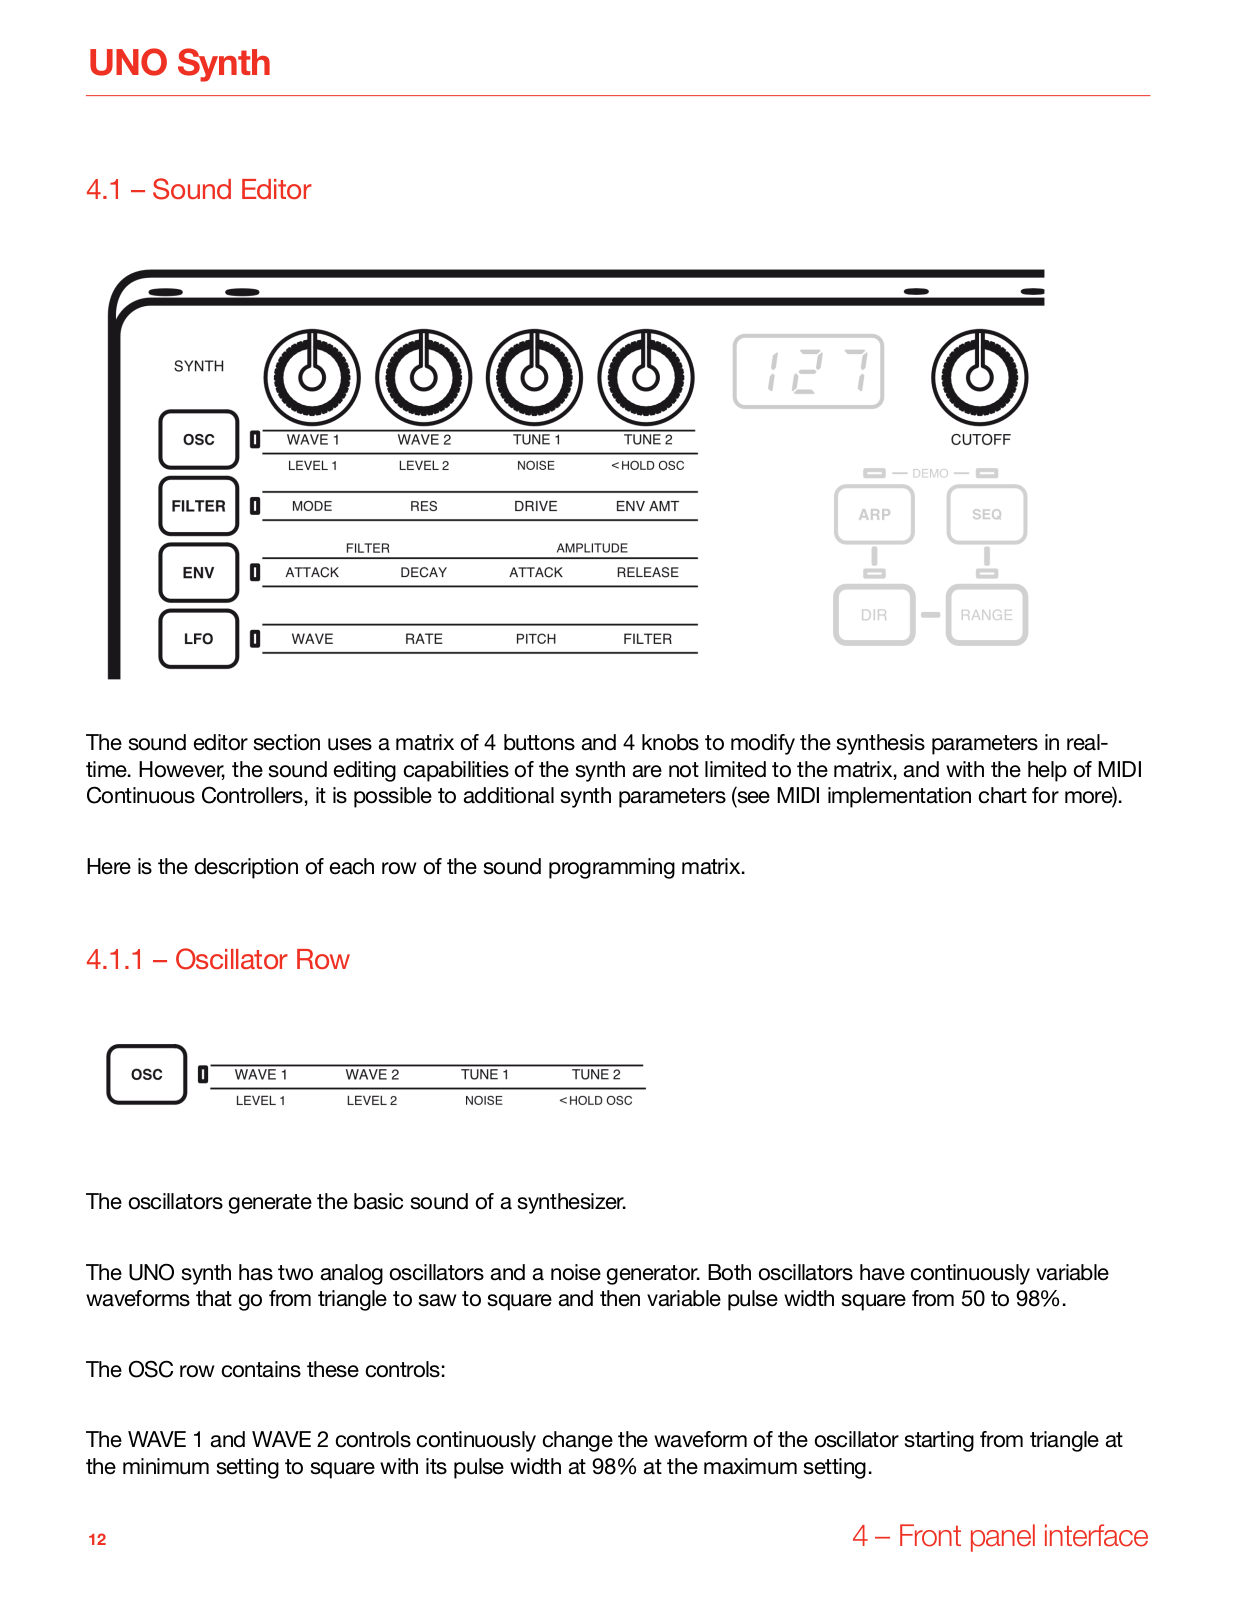
The sound editor section uses a matrix of 4 buttons and 4 knobs to modify the synthesis parameters in realtime. However, the sound editing capabilities of the synth are not limited to the matrix, and with the help of MIDI Continuous Controllers, it is possible to additional synth parameters (see MIDI implementation chart for more).

Here is the description of each row of the sound programming matrix.

4.1.1 – Oscillator Row

The oscillators generate the basic sound of a synthesizer.

The UNO synth has two analog oscillators and a noise generator. Both oscillators have continuously variable waveforms that go from triangle to saw to square and then variable pulse width square from 50 to 98%.

The OSC row contains these controls:

The WAVE 1 and WAVE 2 controls continuously change the waveform of the oscillator starting from triangle at the minimum setting to square with its pulse width at 98% at the maximum setting.

12

4 – Front panel interface

UNO Synth

To change the tuning of the oscillators, a semitone and detune control for each oscillator is available. The controls are labeled TUNE 1 and TUNE 2. From the center position of the knob, detune the oscillator +/- 100 cents. Then at the outer extremes, the tune adjustment switches to quantized semitones to transpose the oscillator.

To adjust the levels of OSC1, OSC2 and the noise generator, hold the OSC button for 1 second unitl the OSC LED starts blinking. Now the knobs adjust the volumes for OSC1, OSC2 and Noise.

The oscillator tuning is digitally controlled. The tuning is updated at startup and then automatically during moments of inactivity. You can also tune the oscillators manually by pressing the ALT+TUNE buttons.

4.1.2 – Filter Row

The filter colors the sound of the oscillators in a synthesizer.

The UNO filter is a 2-pole multimode filter. It filters from the cutoff frequency at 12dB per octave.

The UNO Synth has a dedicated filter cutoff knob. Turning CUTOFF is the most immediate and effective ways to change the sound.

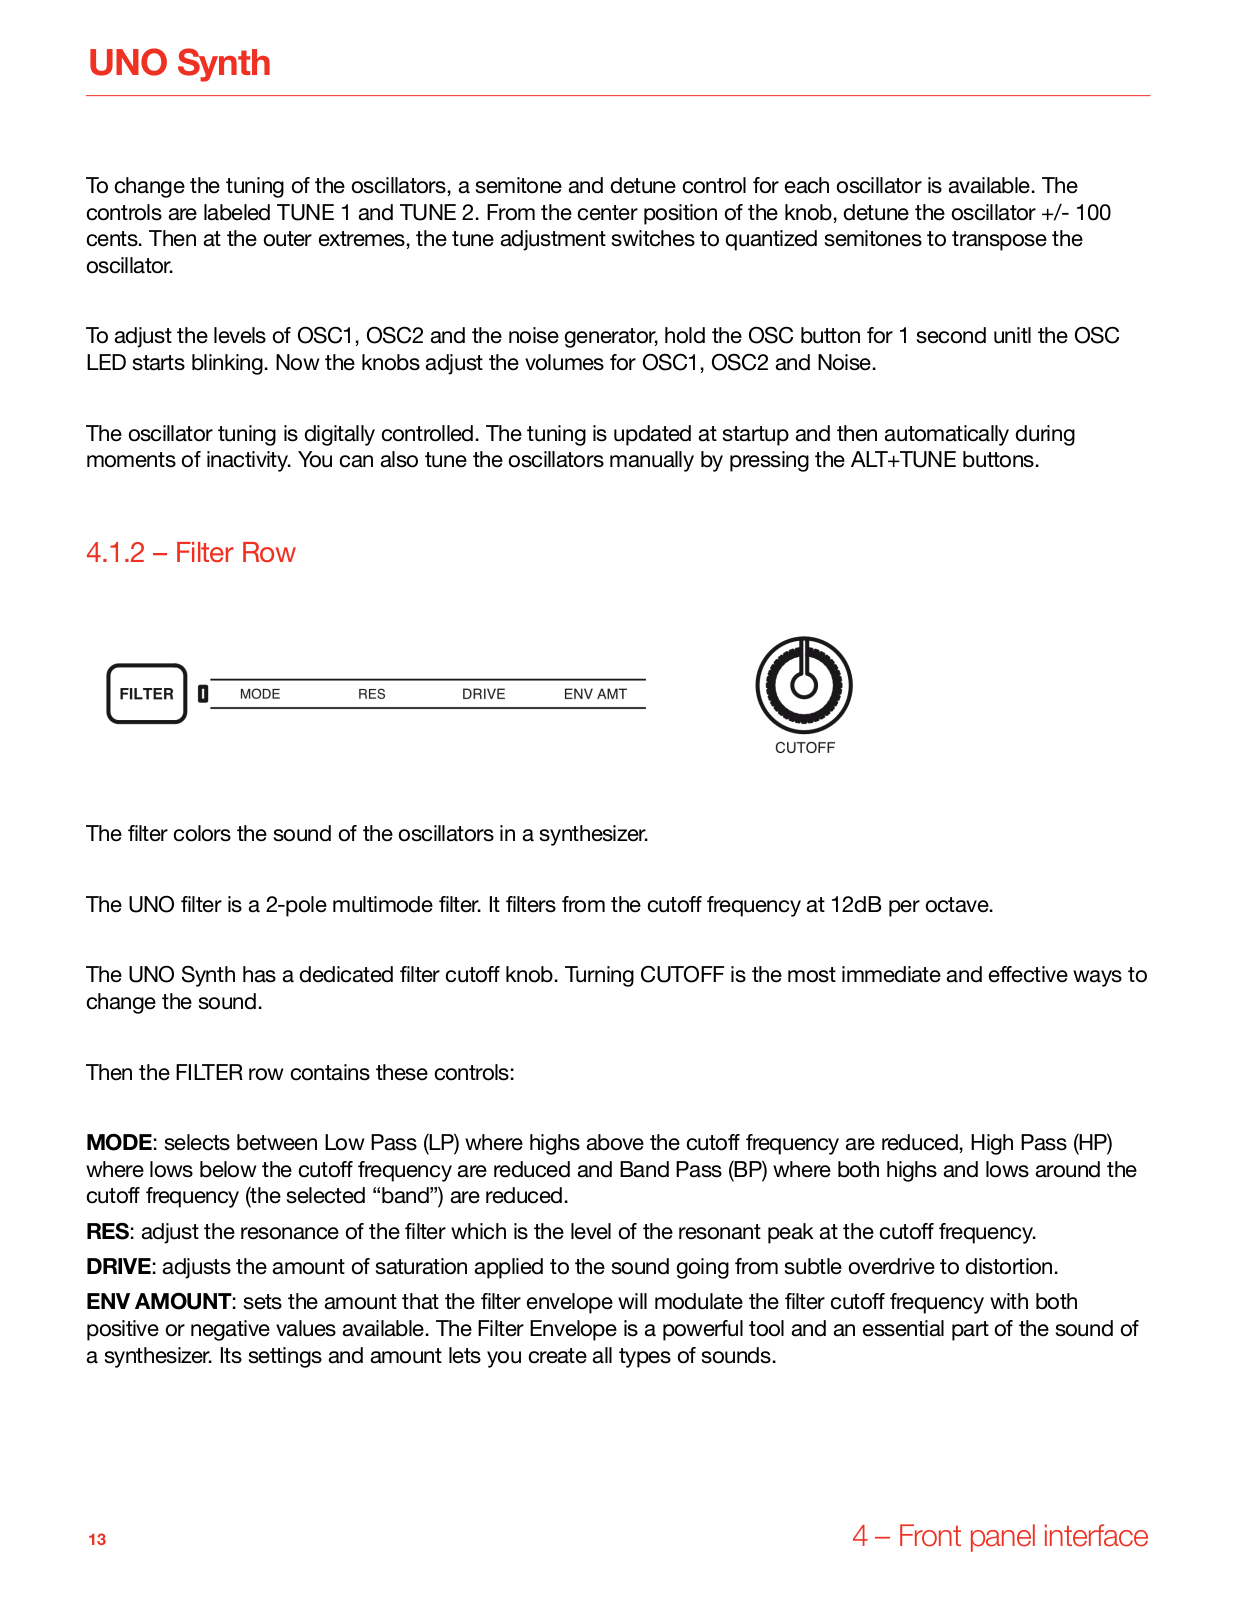
Then the FILTER row contains these controls:

MODE: selects between Low Pass (LP) where highs above the cutoff frequency are reduced, High Pass (HP) where lows below the cutoff frequency are reduced and Band Pass (BP) where both highs and lows around the cutoff frequency (the selected “band”) are reduced.

RES: adjust the resonance of the filter which is the level of the resonant peak at the cutoff frequency. DRIVE: adjusts the amount of saturation applied to the sound going from subtle overdrive to distortion.

ENV AMOUNT: sets the amount that the filter envelope will modulate the filter cutoff frequency with both positive or negative values available. The Filter Envelope is a powerful tool and an essential part of the sound of a synthesizer. Its settings and amount lets you create all types of sounds.

13

4 – Front panel interface

UNO Synth

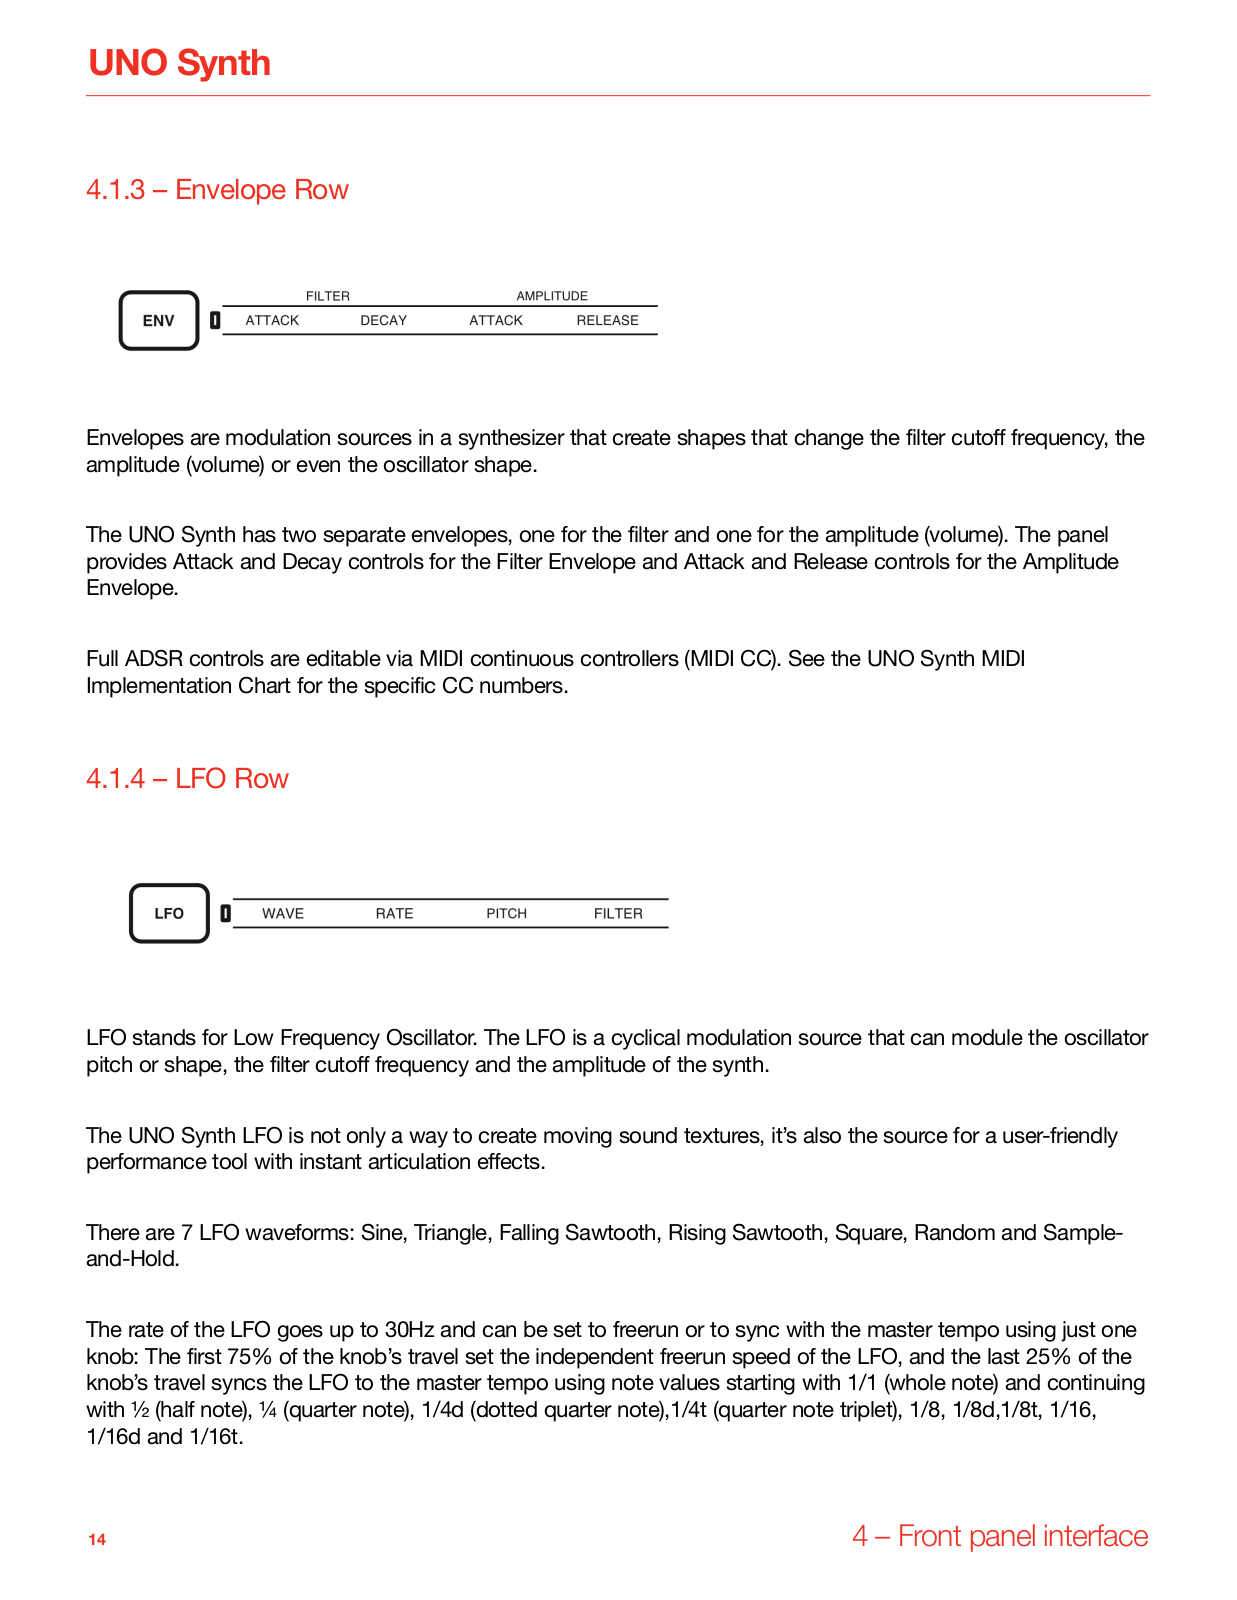
4.1.3 – Envelope Row

Envelopes are modulation sources in a synthesizer that create shapes that change the filter cutoff frequency, the amplitude (volume) or even the oscillator shape.

The UNO Synth has two separate envelopes, one for the filter and one for the amplitude (volume). The panel provides Attack and Decay controls for the Filter Envelope and Attack and Release controls for the Amplitude Envelope.

Full ADSR controls are editable via MIDI continuous controllers (MIDI CC). See the UNO Synth MIDI Implementation Chart for the specific CC numbers.

4.1.4 – LFO Row

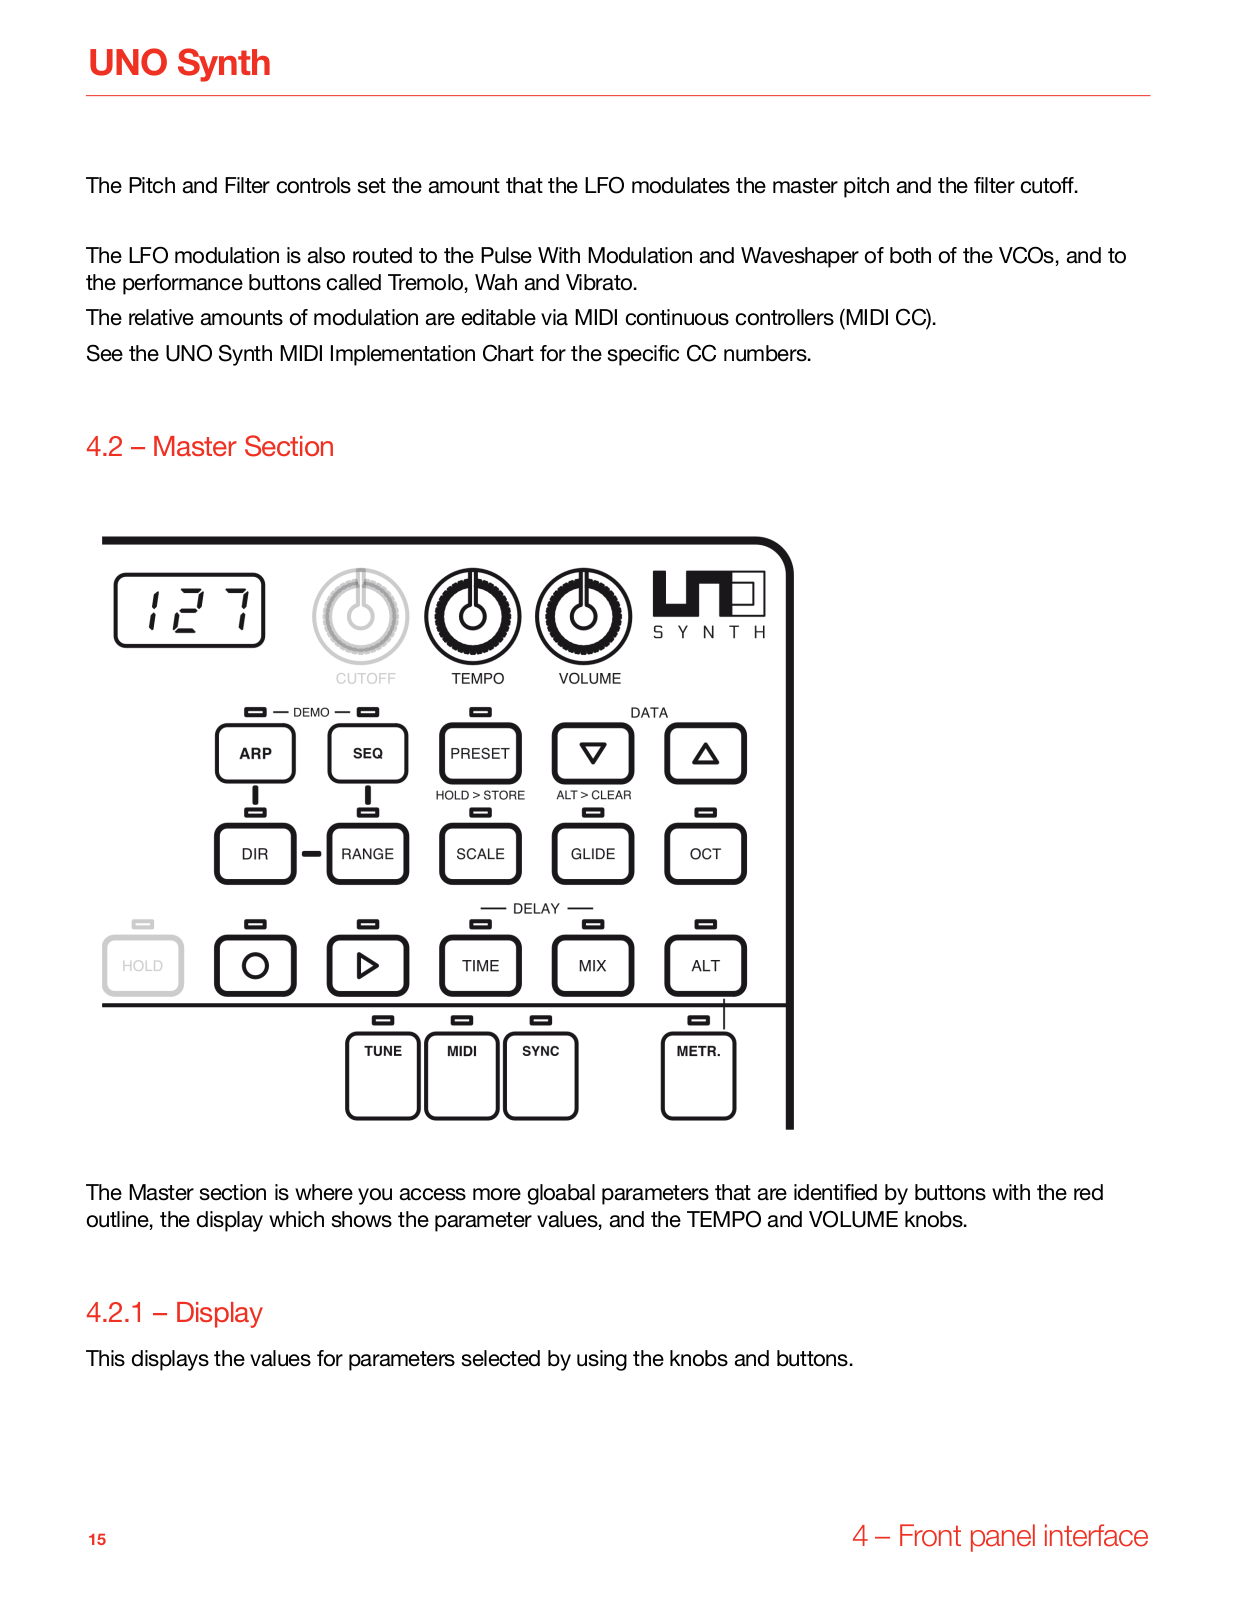
LFO stands for Low Frequency Oscillator. The LFO is a cyclical modulation source that can module the oscillator pitch or shape, the filter cutoff frequency and the amplitude of the synth.

The UNO Synth LFO is not only a way to create moving sound textures, it’s also the source for a user-friendly performance tool with instant articulation effects.

There are 7 LFO waveforms: Sine, Triangle, Falling Sawtooth, Rising Sawtooth, Square, Random and Sample- and-Hold.

The rate of the LFO goes up to 30Hz and can be set to freerun or to sync with the master tempo using just one knob: The first 75% of the knob’s travel set the independent freerun speed of the LFO, and the last 25% of the knob’s travel syncs the LFO to the master tempo using note values starting with 1/1 (whole note) and continuing with ½ (half note), ¼ (quarter note), 1/4d (dotted quarter note),1/4t (quarter note triplet), 1/8, 1/8d,1/8t, 1/16, 1/16d and 1/16t.

14

4 – Front panel interface

UNO Synth

The Pitch and Filter controls set the amount that the LFO modulates the master pitch and the filter cutoff.

The LFO modulation is also routed to the Pulse With Modulation and Waveshaper of both of the VCOs, and to the performance buttons called Tremolo, Wah and Vibrato.

The relative amounts of modulation are editable via MIDI continuous controllers (MIDI CC). See the UNO Synth MIDI Implementation Chart for the specific CC numbers.

4.2 – Master Section

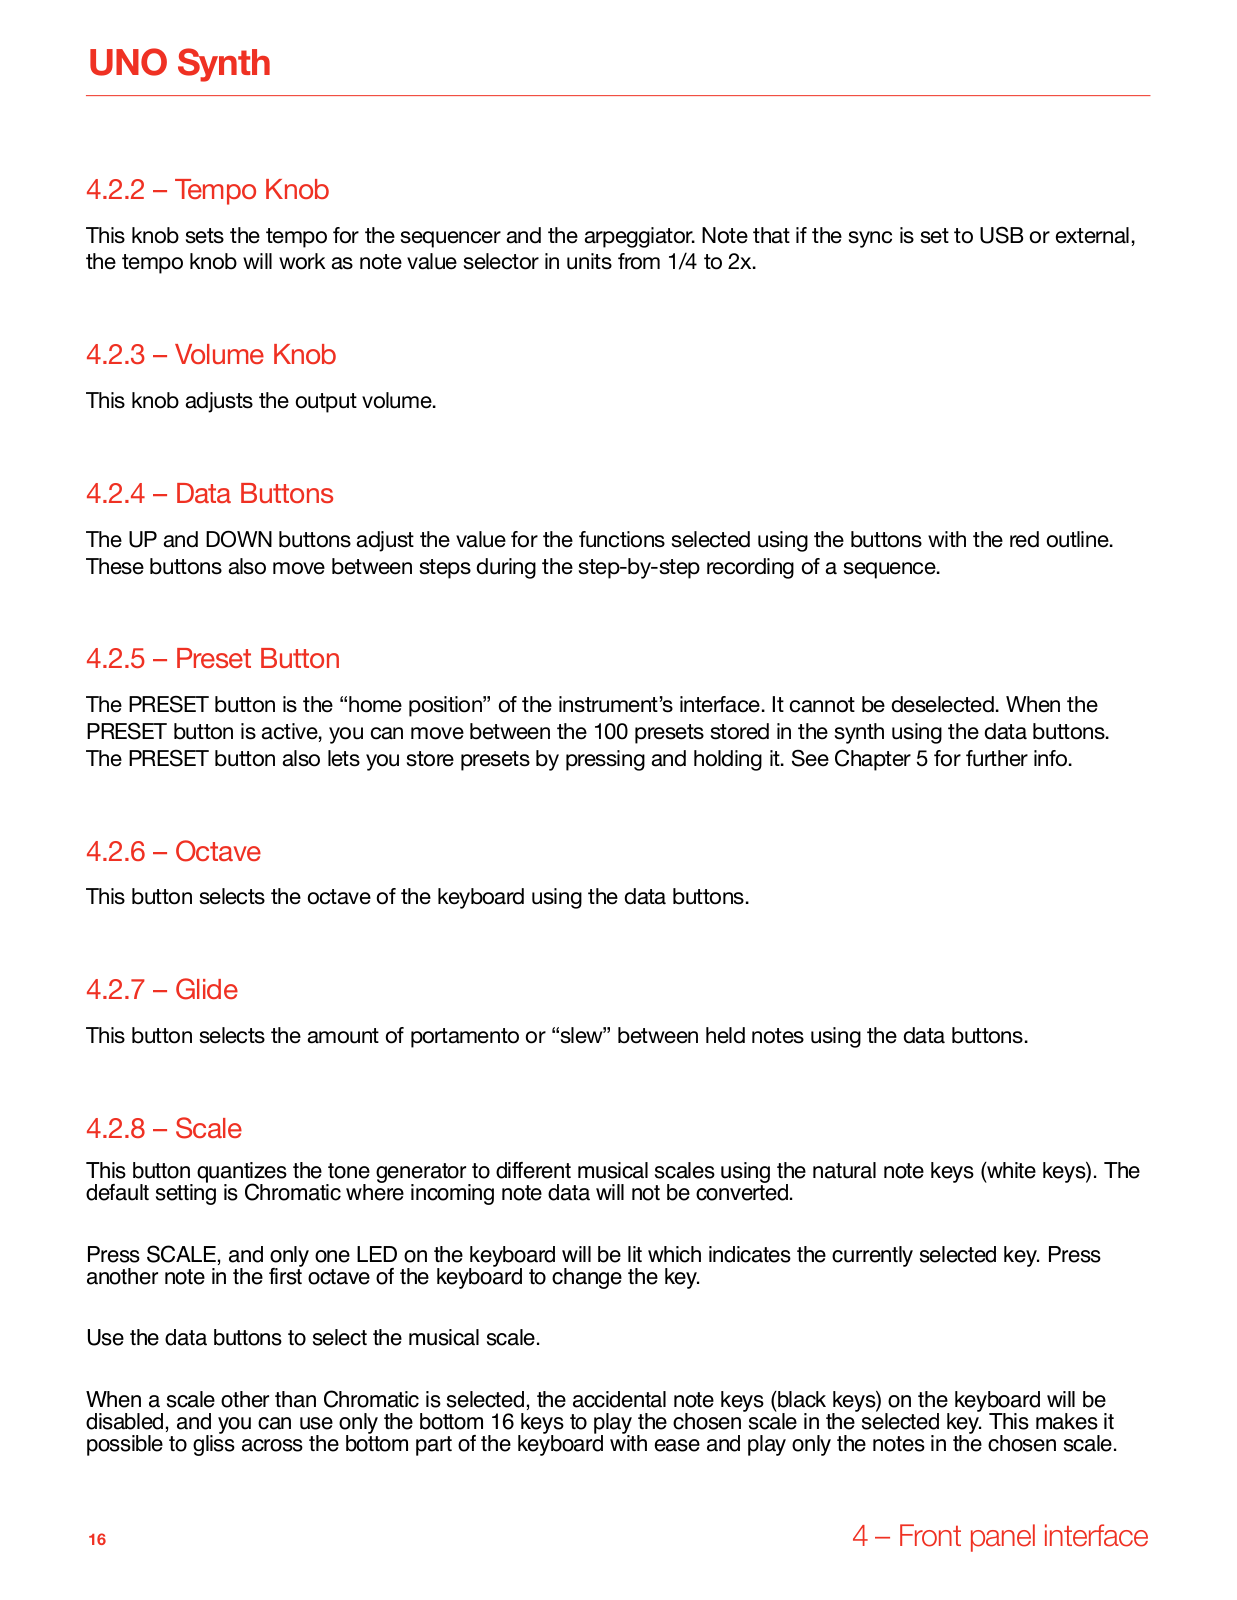
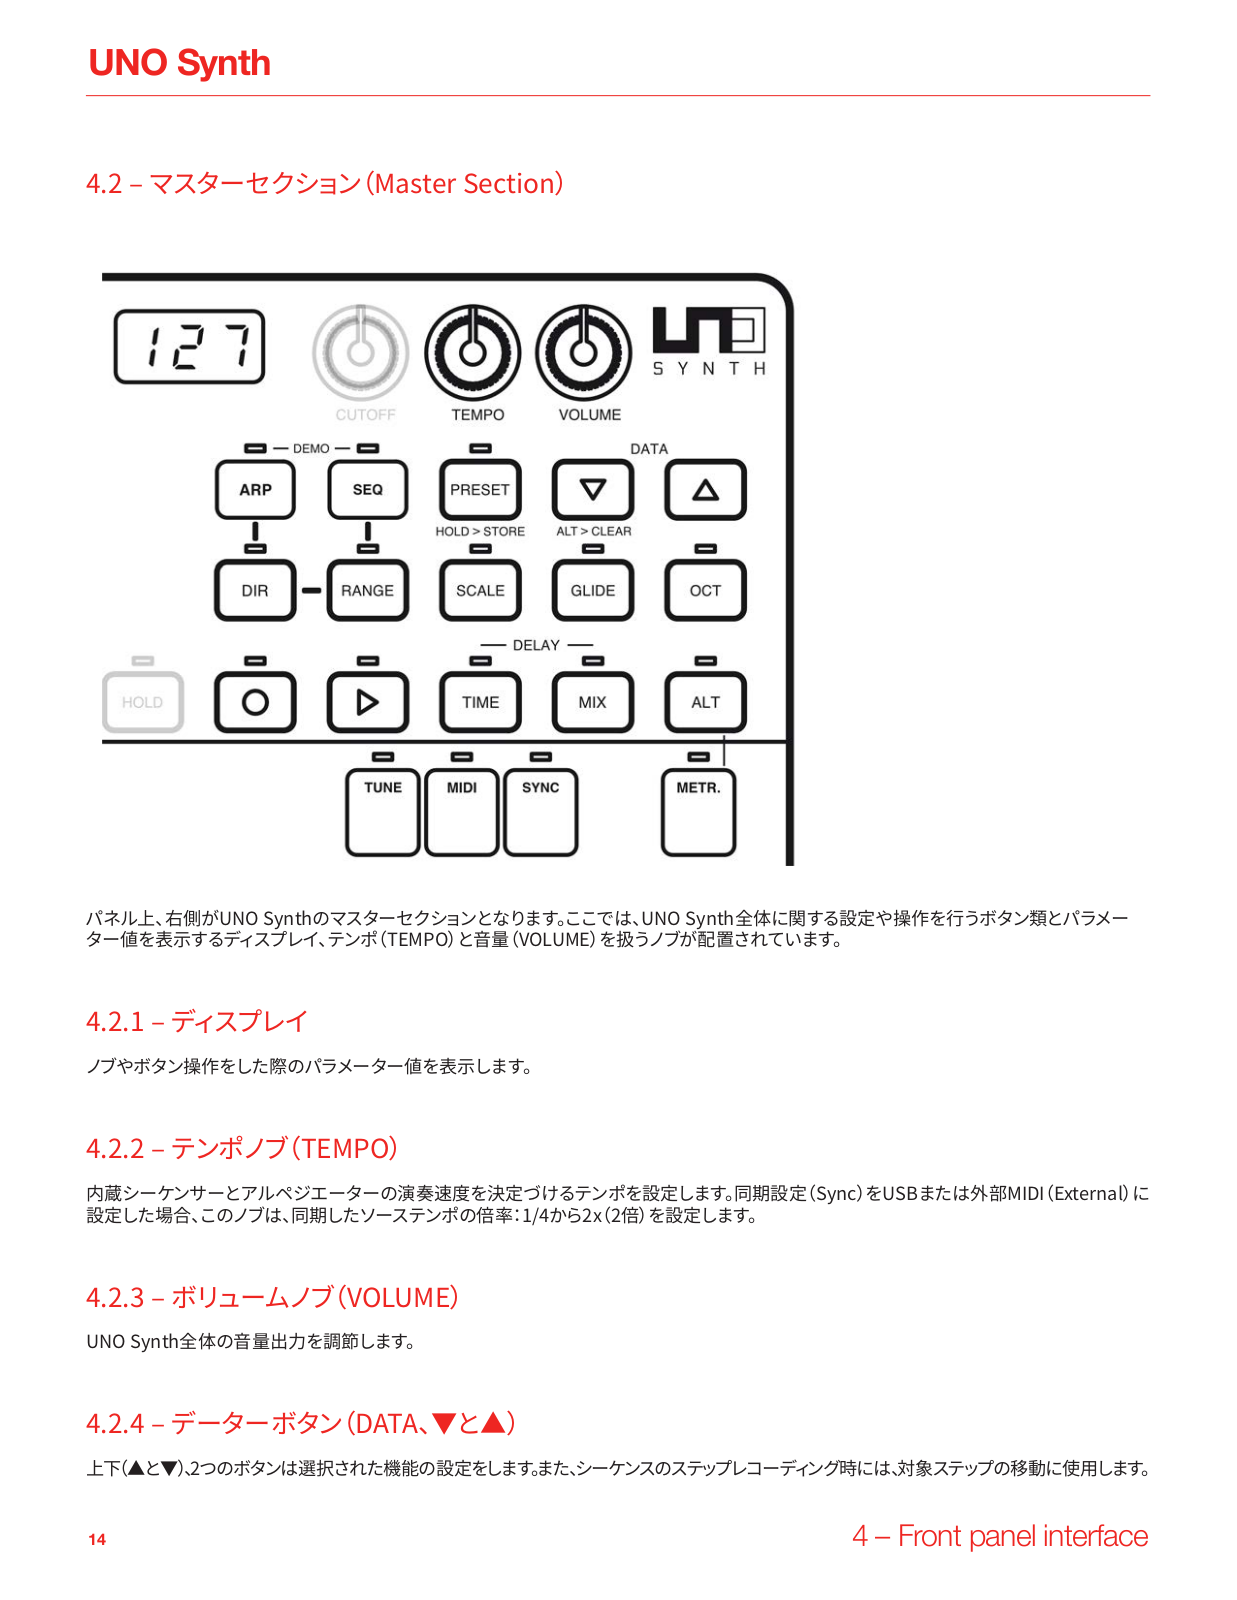
The Master section is where you access more gloabal parameters that are identified by buttons with the red outline, the display which shows the parameter values, and the TEMPO and VOLUME knobs.

4.2.1 – Display

This displays the values for parameters selected by using the knobs and buttons.

15

4 – Front panel interface

UNO Synth

4.2.2 – Tempo Knob

This knob sets the tempo for the sequencer and the arpeggiator. Note that if the sync is set to USB or external, the tempo knob will work as note value selector in units from 1/4 to 2x.

4.2.3 – Volume Knob

This knob adjusts the output volume.

4.2.4 – Data Buttons

The UP and DOWN buttons adjust the value for the functions selected using the buttons with the red outline. These buttons also move between steps during the step-by-step recording of a sequence.

4.2.5 – Preset Button

The PRESET button is the “home position” of the instrument’s interface. It cannot be deselected. When the PRESET button is active, you can move between the 100 presets stored in the synth using the data buttons. The PRESET button also lets you store presets by pressing and holding it. See Chapter 5 for further info.

4.2.6 – Octave

This button selects the octave of the keyboard using the data buttons.

4.2.7 – Glide

This button selects the amount of portamento or “slew” between held notes using the data buttons.

4.2.8 – Scale

This button quantizes the tone generator to different musical scales using the natural note keys (white keys). The default setting is Chromatic where incoming note data will not be converted.

Press SCALE, and only one LED on the keyboard will be lit which indicates the currently selected key. Press another note in the first octave of the keyboard to change the key.

Use the data buttons to select the musical scale.

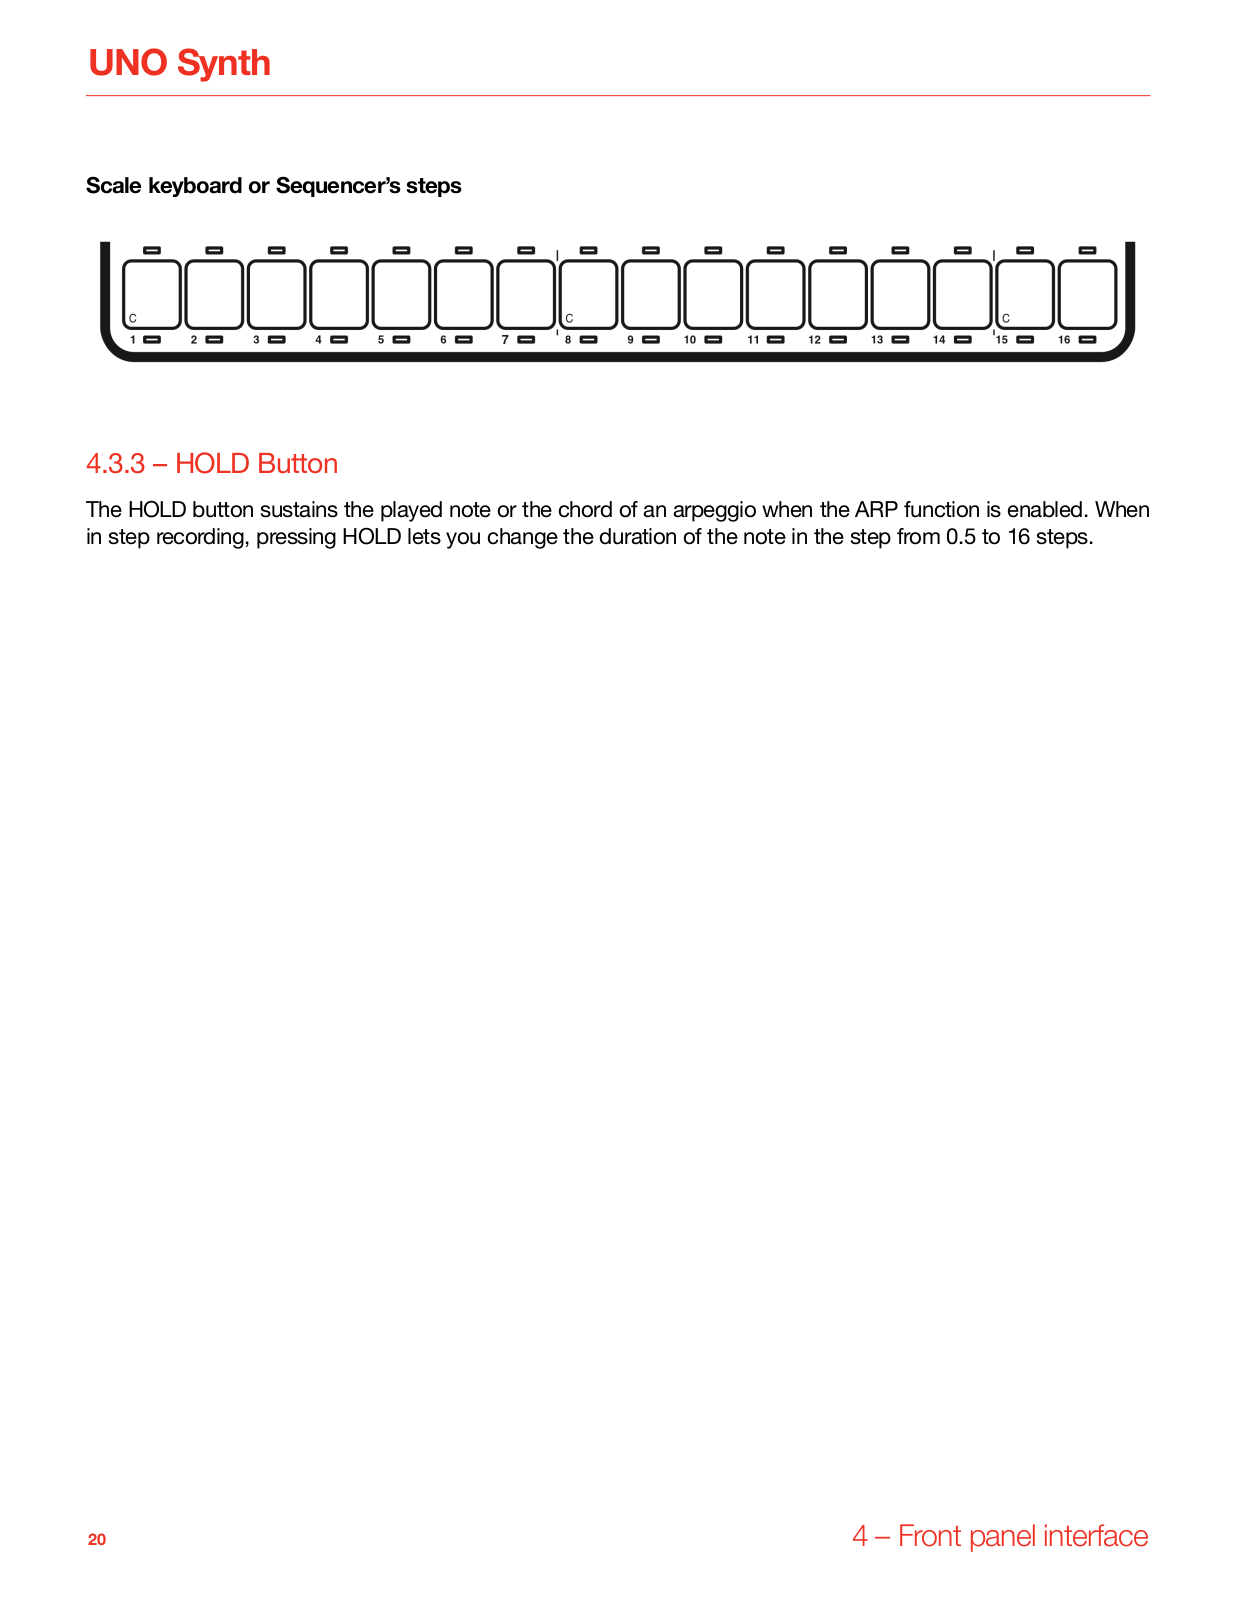
When a scale other than Chromatic is selected, the accidental note keys (black keys) on the keyboard will be disabled, and you can use only the bottom 16 keys to play the chosen scale in the selected key. This makes it possible to gliss across the bottom part of the keyboard with ease and play only the notes in the chosen scale.

16

4 – Front panel interface

UNO Synth

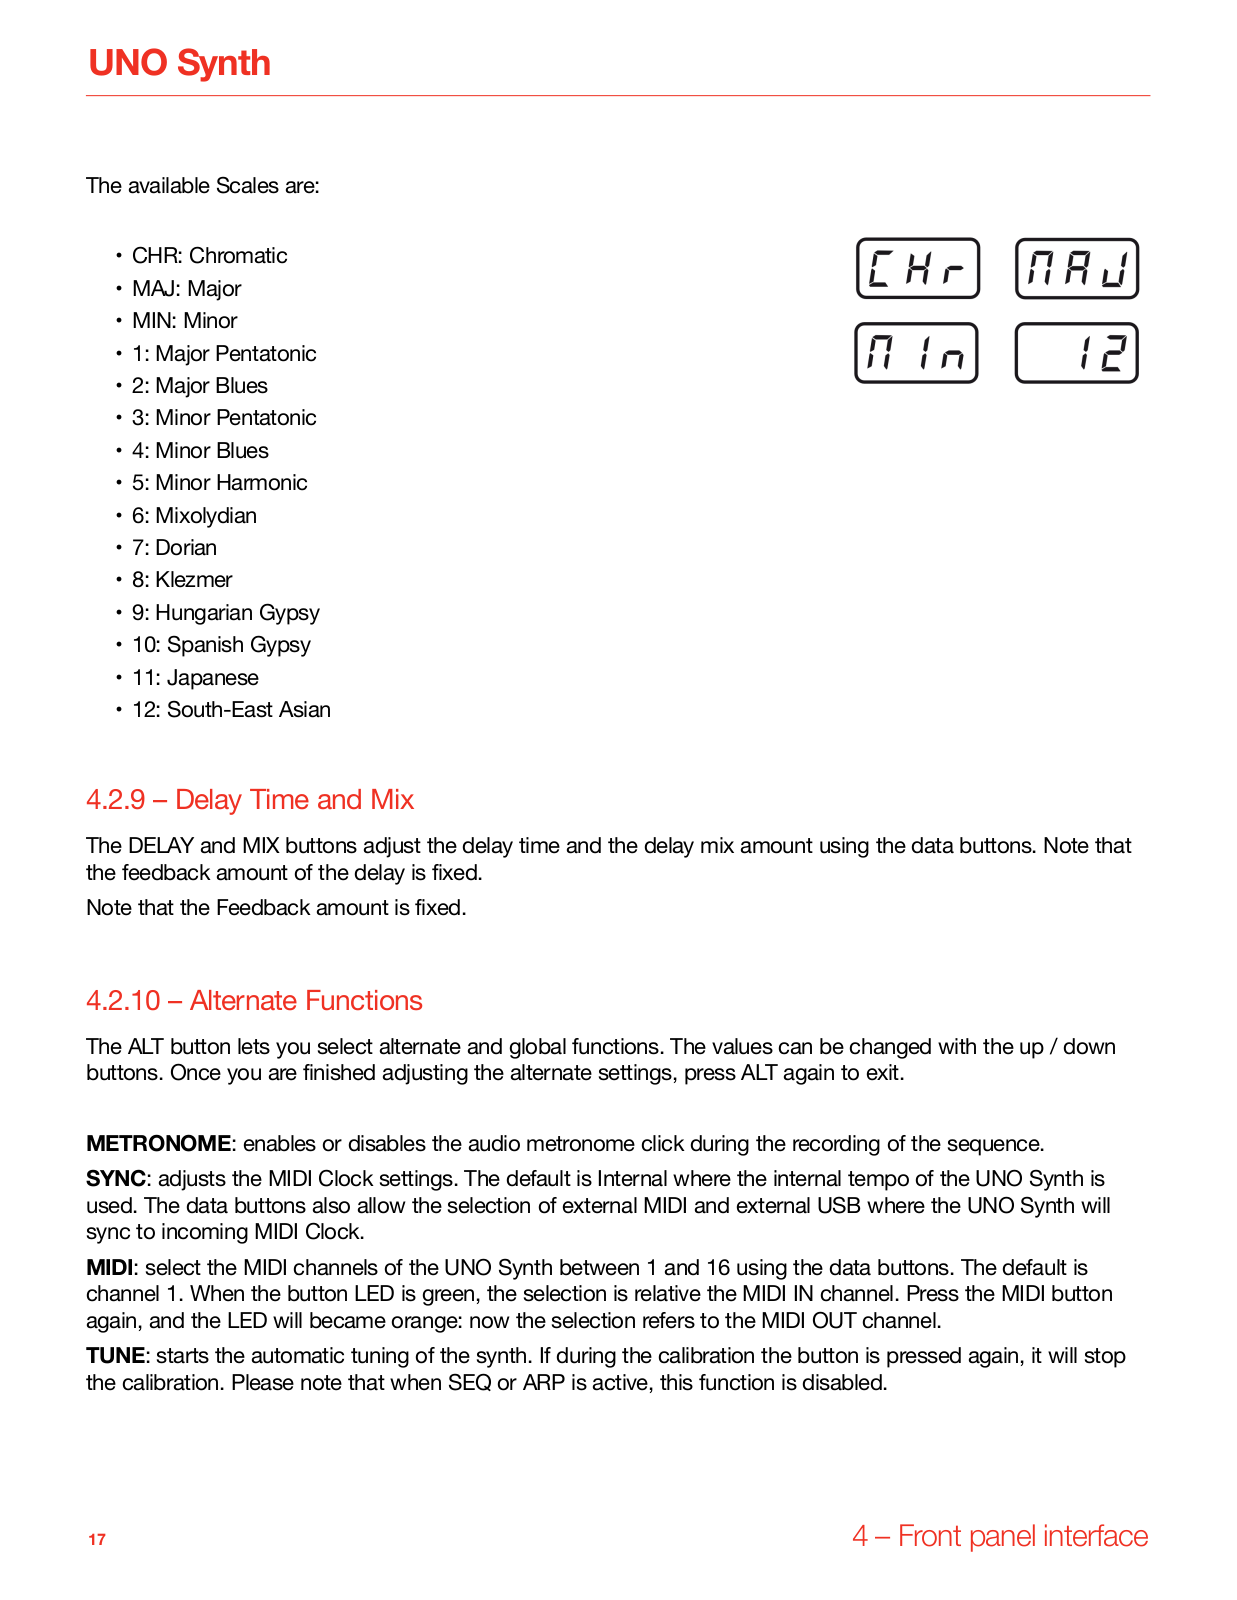
The available Scales are:

CHR: Chromatic

MAJ: Major

MIN: Minor

1: Major Pentatonic

2: Major Blues

3: Minor Pentatonic

4: Minor Blues

5: Minor Harmonic

6: Mixolydian

7: Dorian

8: Klezmer

9: Hungarian Gypsy

10: Spanish Gypsy

11: Japanese

12: South-East Asian

4.2.9 – Delay Time and Mix

The DELAY and MIX buttons adjust the delay time and the delay mix amount using the data buttons. Note that the feedback amount of the delay is fixed.

Note that the Feedback amount is fixed.

4.2.10 – Alternate Functions

The ALT button lets you select alternate and global functions. The values can be changed with the up / down buttons. Once you are finished adjusting the alternate settings, press ALT again to exit.

METRONOME: enables or disables the audio metronome click during the recording of the sequence.

SYNC: adjusts the MIDI Clock settings. The default is Internal where the internal tempo of the UNO Synth is used. The data buttons also allow the selection of external MIDI and external USB where the UNO Synth will sync to incoming MIDI Clock.

MIDI: select the MIDI channels of the UNO Synth between 1 and 16 using the data buttons. The default is channel 1. When the button LED is green, the selection is relative the MIDI IN channel. Press the MIDI button again, and the LED will became orange: now the selection refers to the MIDI OUT channel.

TUNE: starts the automatic tuning of the synth. If during the calibration the button is pressed again, it will stop the calibration. Please note that when SEQ or ARP is active, this function is disabled.

17

4 – Front panel interface

UNO Synth

4.2.11 – Arpeggiator and Sequencer

These are the controls for the Arpeggiator and Sequencer.

ARP: activates the arpeggiator SEQ: activates the sequencer

DIR: When the ARP button is active, the DIRection button lets the data buttons set the order in which the held notes are arpeggiated. There are 10 different arpeggiator modes. When the SEQ button is active, the DIRection button lets the data buttons move between 3 sequence playback modes: Forward, Backward and ForwardBackward.

RANGE: when the ARP button is active, the Range button lets the data buttons set the range of the arpeggiator in octaves with a range of 1 to 4. When the SEQ button is active, the Range button lets the data buttons set the Range of the sequence between 1 and 16 steps

4.2.12 – Transport Functions

The transport functions are part of the sequencer. They work only when the sequencer is active.

PLAY: starts and stops the sequencer.

REC: pressed alone enables step recording of the sequencer, pressed with PLAY activate the real-time recording of the sequence, and pressed with ALT activate the Step-Edit recording.

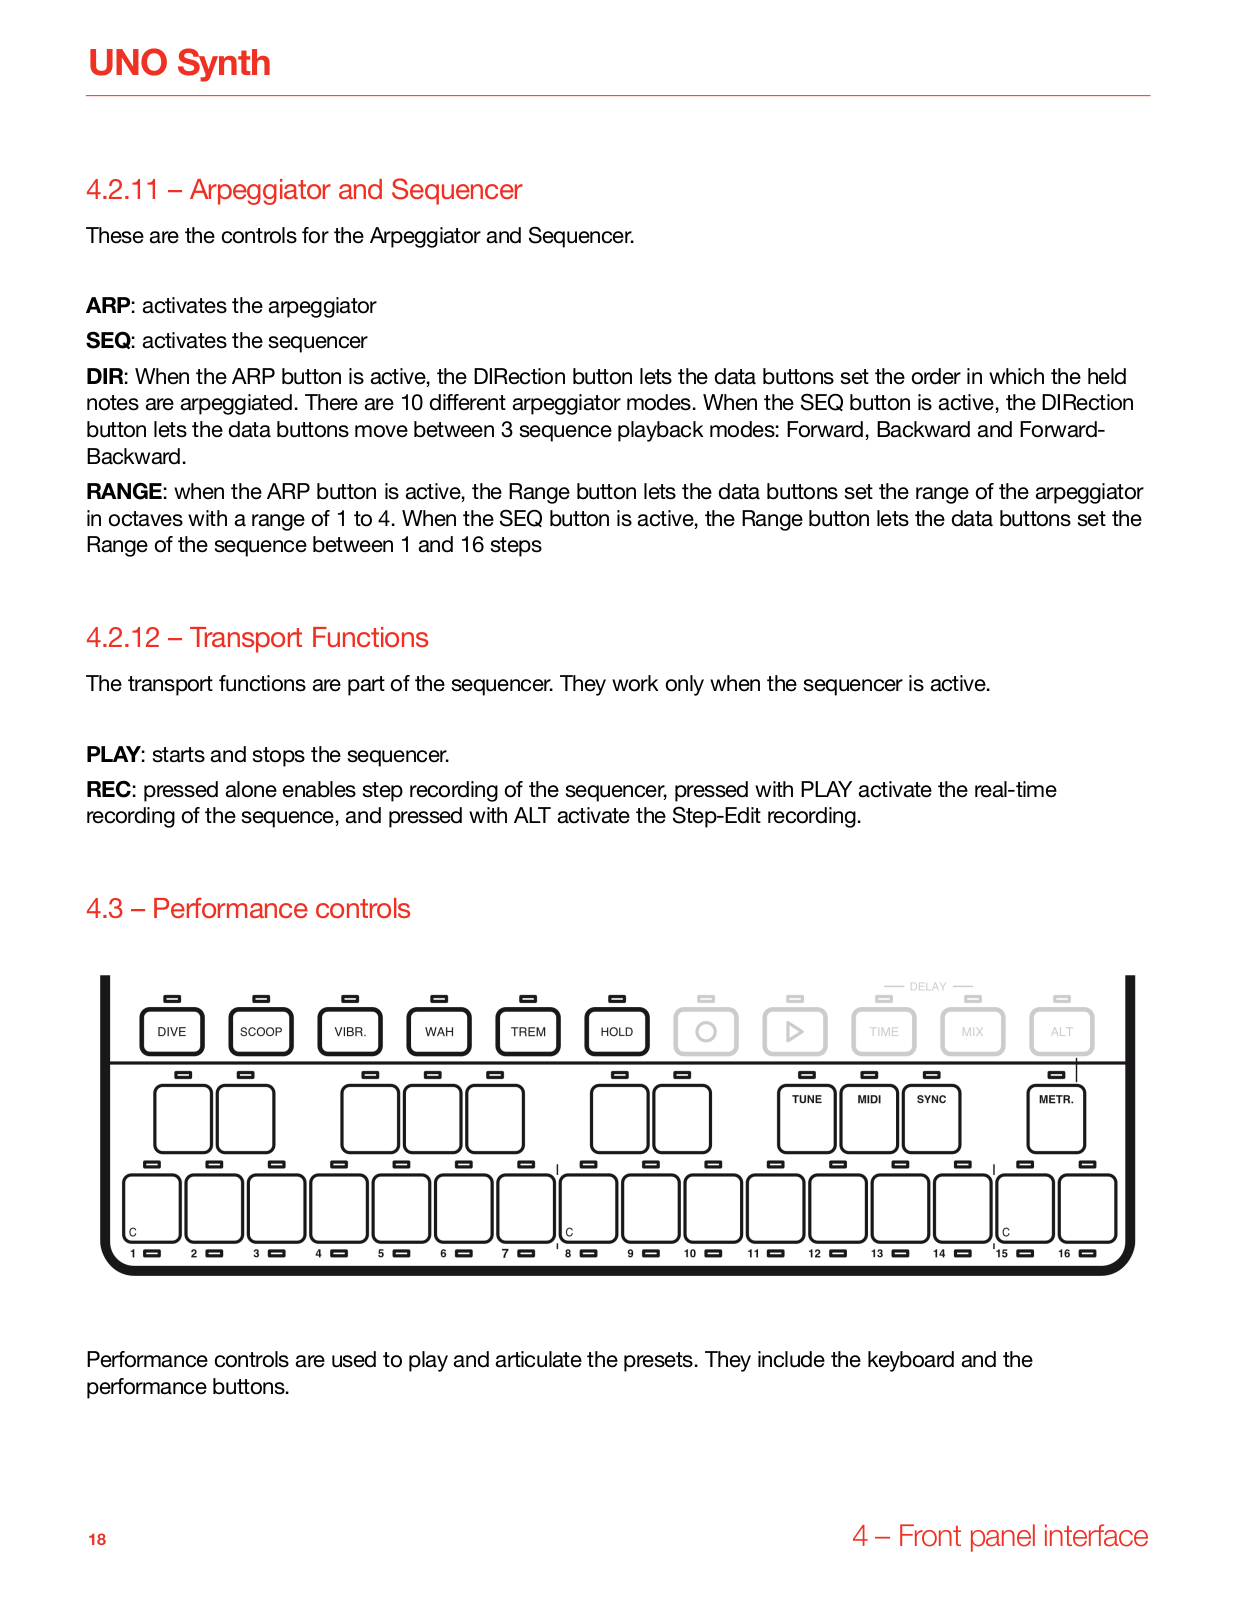
4.3 – Performance controls

Performance controls are used to play and articulate the presets. They include the keyboard and the performance buttons.

18

4 – Front panel interface

UNO Synth

4.3.1 – Performance Buttons

The performance buttons provide instant musical articulations that can be used with live playing or while the arpeggiator or sequencer are running. Note that the LFO drives the Vibrato, Wah and Tremolo effects. So the selected LFO waveform and rate in the LFO row affects the behavior of these performance buttons.

The amount of modulation for the performance buttons is editable via MIDI continuous controllers (MIDI CC).

The buttons are:

VIB: bipolar oscillator pitch modulation for musical vibrato. The vibrato rate and wave shape are set in the LFO section.

WAH: filter modulation for wah wah-style timbral changes. The wah wah rate and wave shape are set in the LFO section.

TREM: negative amplitude modulation of the VCA for tremolo. The tremolo rate and wave shape are set in the LFO section.

DIVE: applies the filter envelope decay to oscillator pitch with a range of 2 semitones to create a bend down to the played pitch.

SCOOP: applies the negative filter envelope decay to oscillator pitch with a range of 2 semitones to create a bend up to the played pitch.

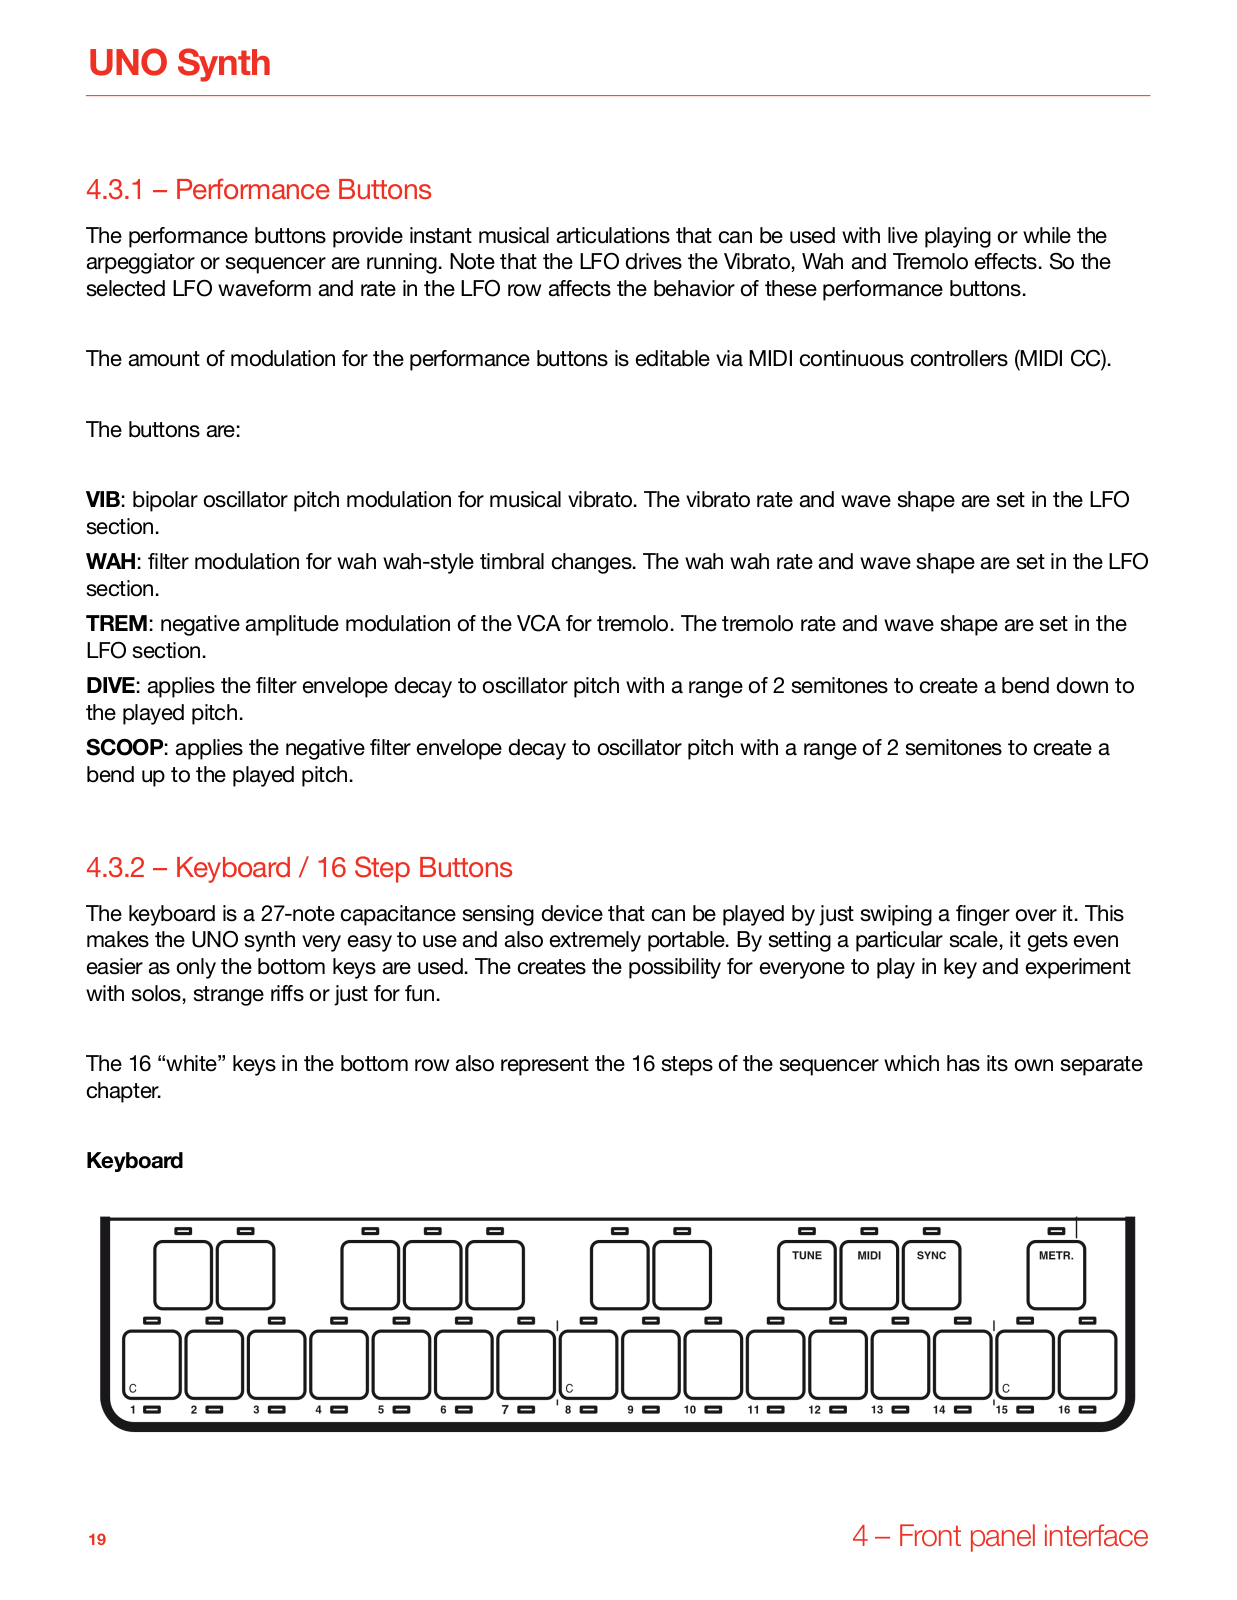
4.3.2 – Keyboard / 16 Step Buttons

The keyboard is a 27-note capacitance sensing device that can be played by just swiping a finger over it. This makes the UNO synth very easy to use and also extremely portable. By setting a particular scale, it gets even easier as only the bottom keys are used. The creates the possibility for everyone to play in key and experiment with solos, strange riffs or just for fun.

The 16 “white” keys in the bottom row also represent the 16 steps of the sequencer which has its own separate chapter.

Keyboard

19

4 – Front panel interface

UNO Synth

Scale keyboard or Sequencer’s steps

4.3.3 – HOLD Button

The HOLD button sustains the played note or the chord of an arpeggio when the ARP function is enabled. When in step recording, pressing HOLD lets you change the duration of the note in the step from 0.5 to 16 steps.

20

4 – Front panel interface

UNO Synth

5 – Presets

UNO Synth contains 100 presets, each with its own sequence and settings.

The first 20 presets are factory, meaning that it is not possible to overwrite them. Also, the first 20 presets are used for the DEMO.

The demo it is the perfect way to discover the powerful feature of the UNO synth simply by listening. To activate the demo, press ARP and SEQ simultaneously.

5.1 – Loading a Preset

Every time the UNO synth is powered up, the last preset selected is loaded.

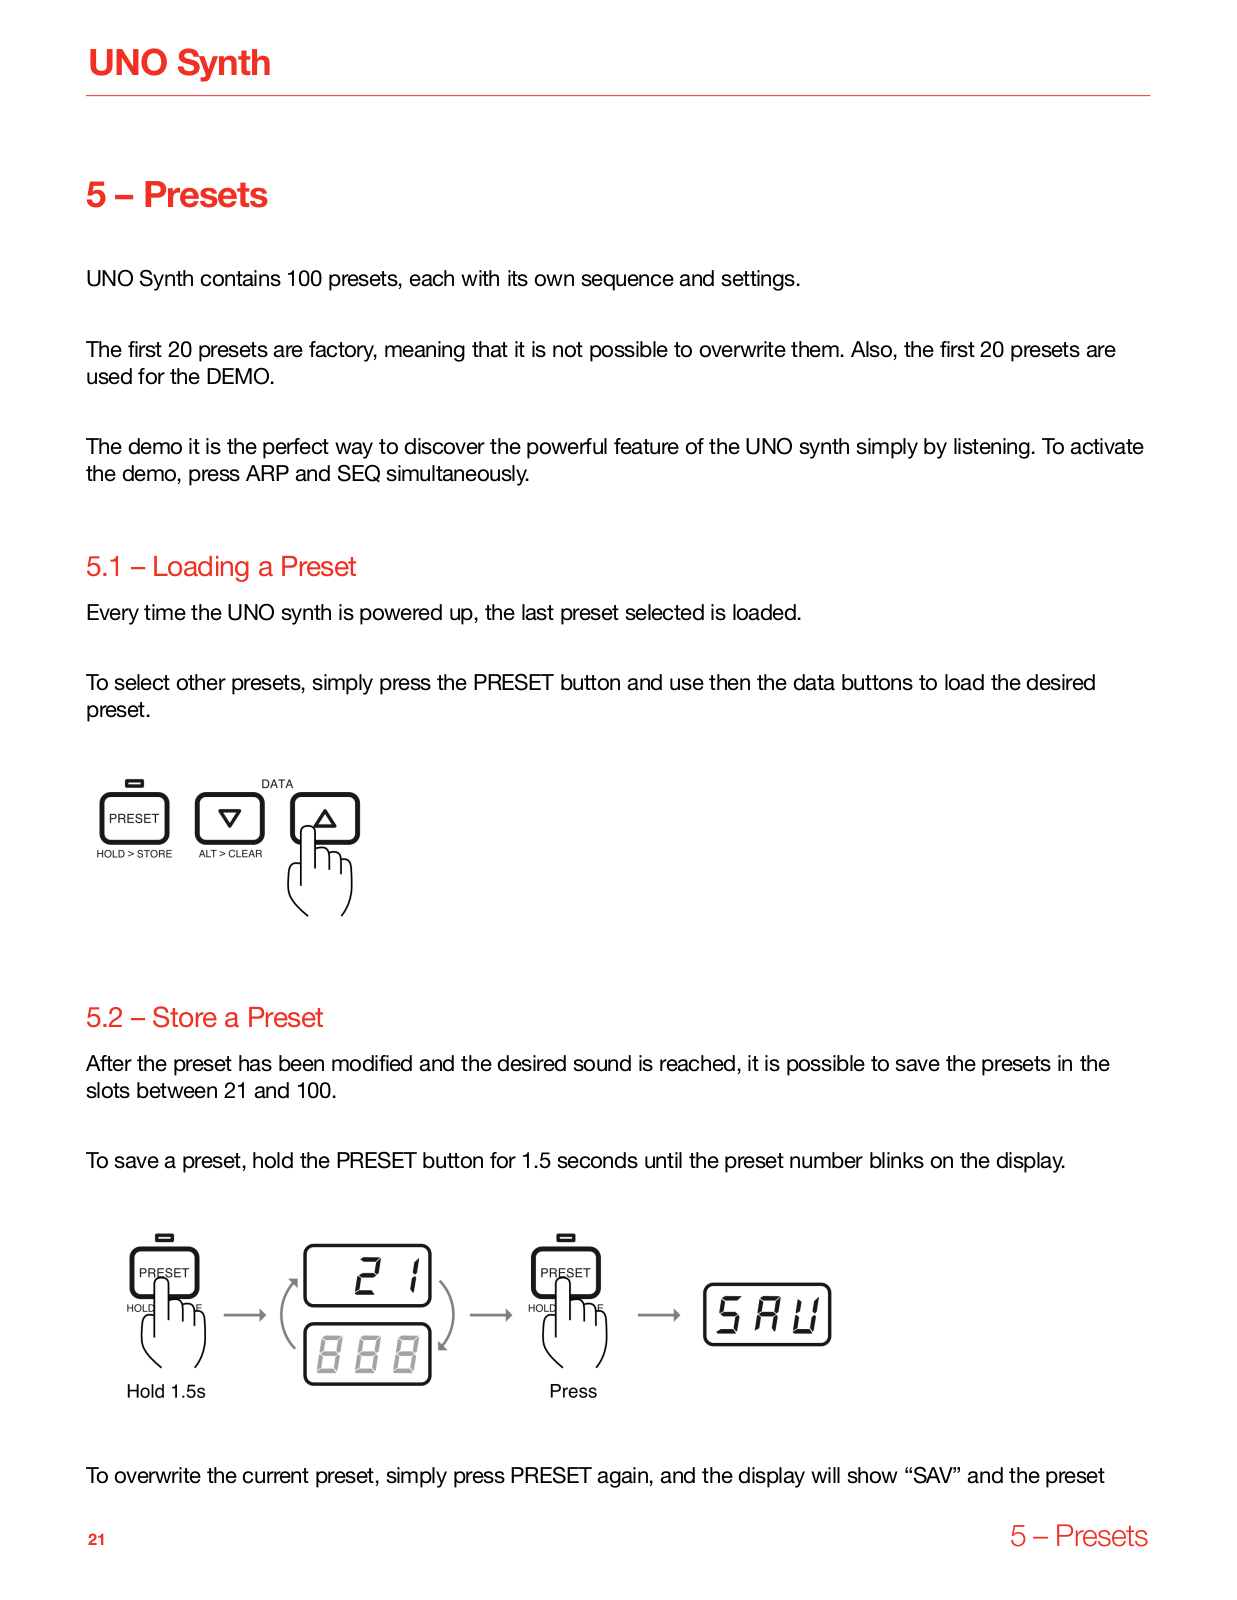
To select other presets, simply press the PRESET button and use then the data buttons to load the desired preset.

5.2 – Store a Preset

After the preset has been modified and the desired sound is reached, it is possible to save the presets in the slots between 21 and 100.

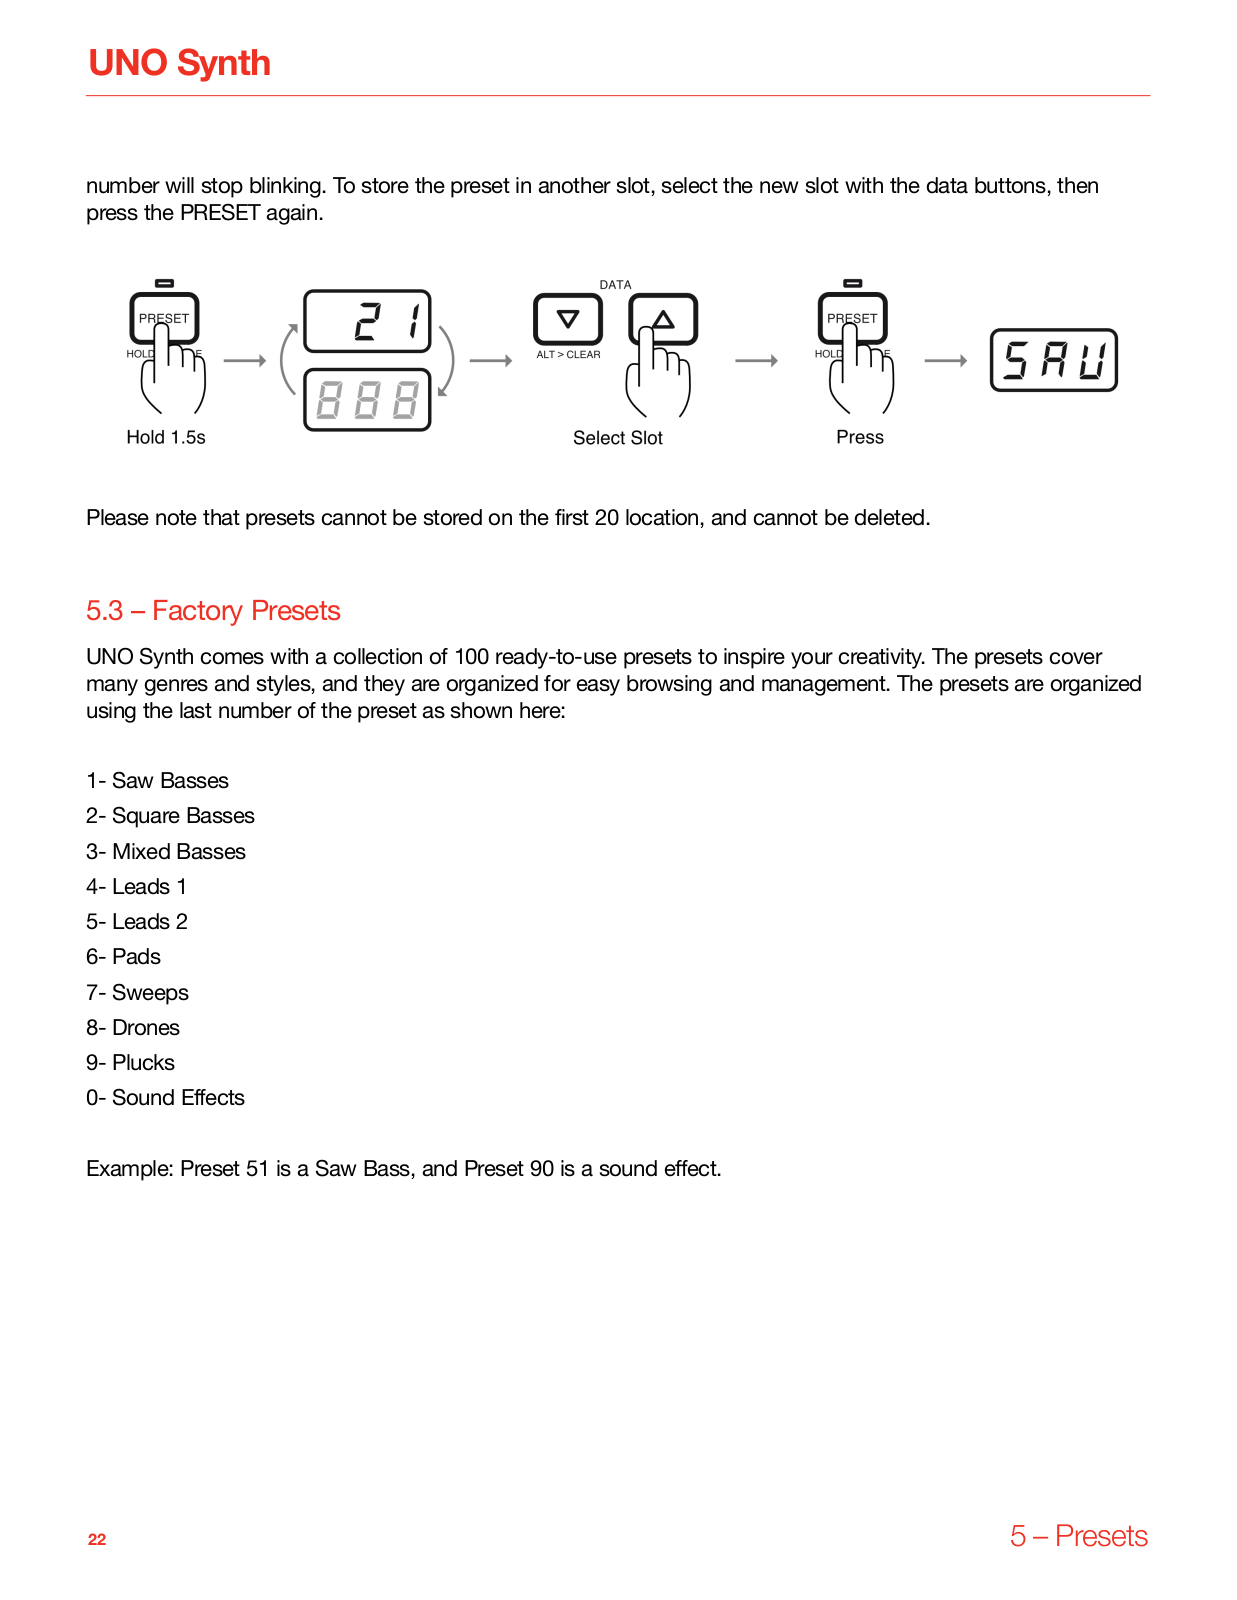
To save a preset, hold the PRESET button for 1.5 seconds until the preset number blinks on the display.

To overwrite the current preset, simply press PRESET again, and the display will show “SAV” and the preset

21

5 – Presets

UNO Synth

number will stop blinking. To store the preset in another slot, select the new slot with the data buttons, then press the PRESET again.

Please note that presets cannot be stored on the first 20 location, and cannot be deleted.

5.3 – Factory Presets

UNO Synth comes with a collection of 100 ready-to-use presets to inspire your creativity. The presets cover many genres and styles, and they are organized for easy browsing and management. The presets are organized using the last number of the preset as shown here:

1- Saw Basses

2- Square Basses

3- Mixed Basses

4- Leads 1

5- Leads 2

6- Pads

7- Sweeps

8- Drones

9- Plucks

0- Sound Effects

Example: Preset 51 is a Saw Bass, and Preset 90 is a sound effect.

22

5 – Presets

UNO Synth

6 – The Arpeggiator

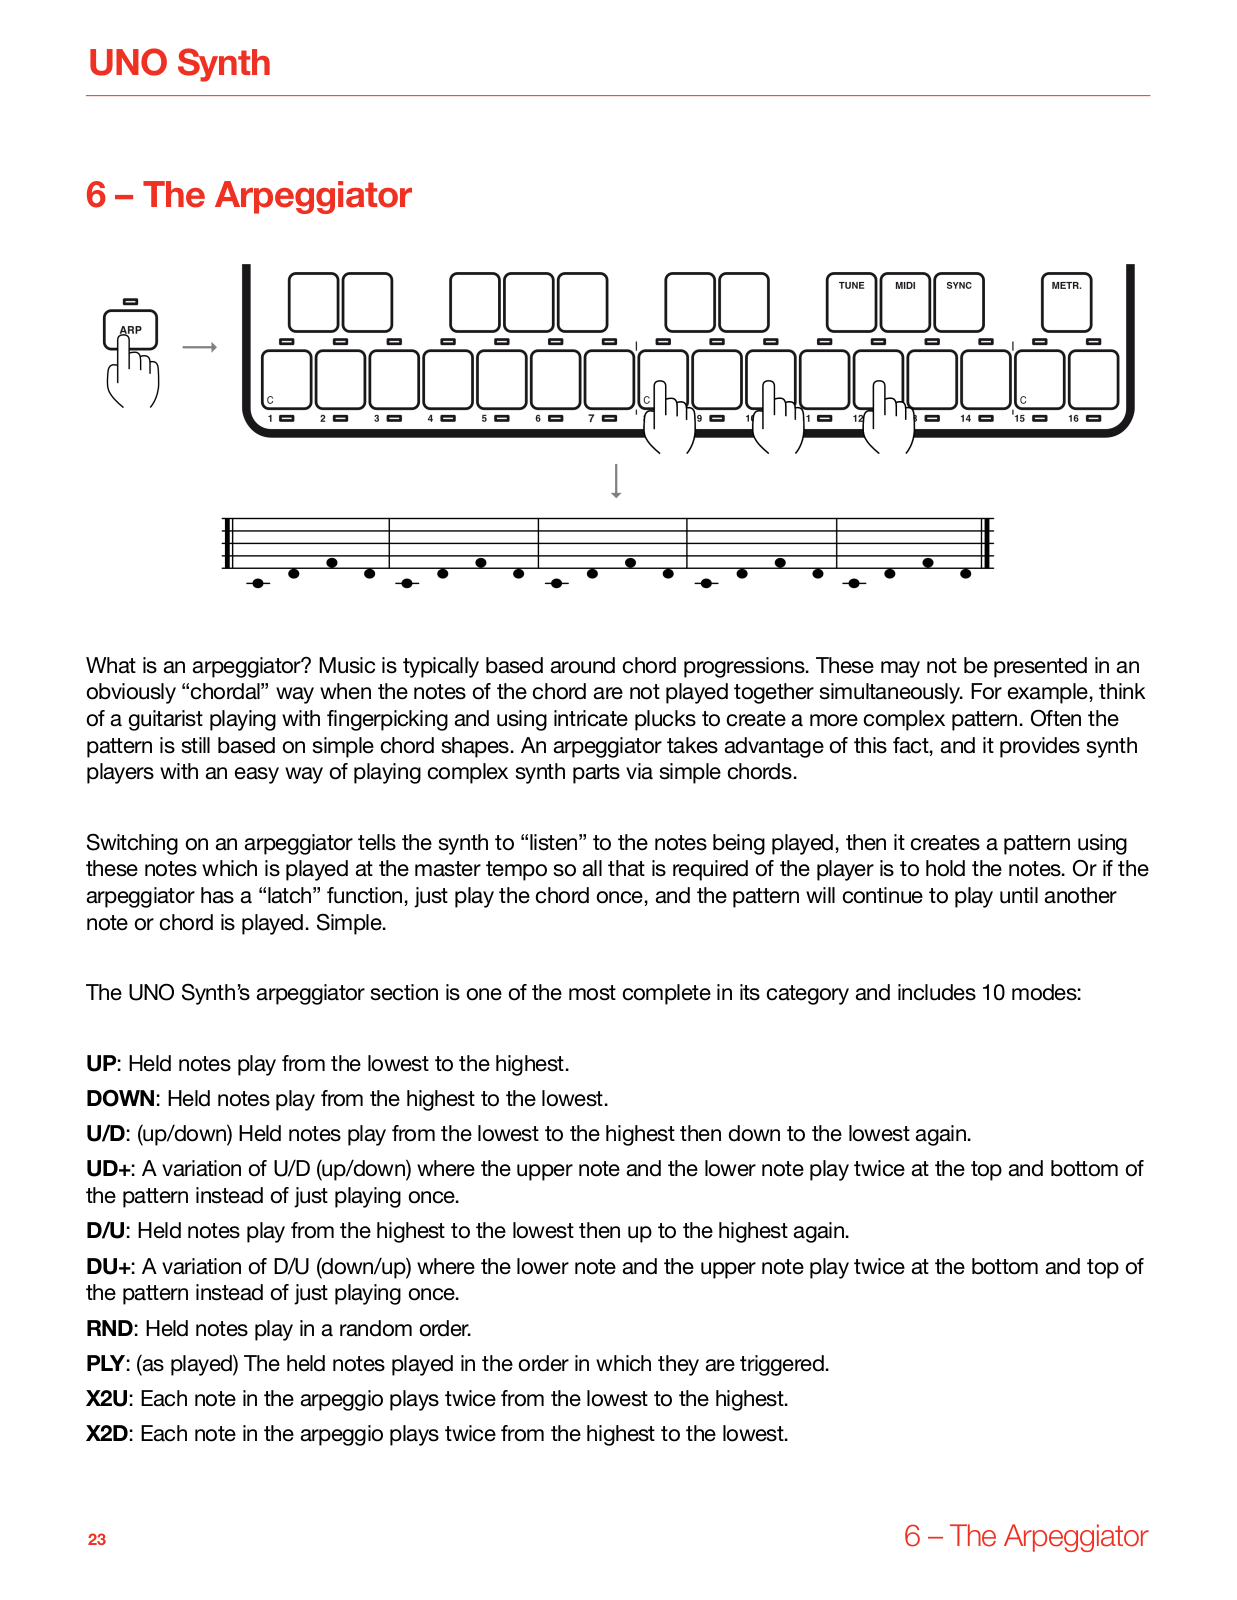
What is an arpeggiator? Music is typically based around chord progressions. These may not be presented in an obviously “chordal” way when the notes of the chord are not played together simultaneously. For example, think of a guitarist playing with fingerpicking and using intricate plucks to create a more complex pattern. Often the pattern is still based on simple chord shapes. An arpeggiator takes advantage of this fact, and it provides synth players with an easy way of playing complex synth parts via simple chords.

Switching on an arpeggiator tells the synth to “listen” to the notes being played, then it creates a pattern using these notes which is played at the master tempo so all that is required of the player is to hold the notes. Or if the arpeggiator has a “latch” function, just play the chord once, and the pattern will continue to play until another note or chord is played. Simple.

The UNO Synth’s arpeggiator section is one of the most complete in its category and includes 10 modes:

UP: Held notes play from the lowest to the highest. DOWN: Held notes play from the highest to the lowest.

U/D: (up/down) Held notes play from the lowest to the highest then down to the lowest again.

UD+: A variation of U/D (up/down) where the upper note and the lower note play twice at the top and bottom of the pattern instead of just playing once.

D/U: Held notes play from the highest to the lowest then up to the highest again.

DU+: A variation of D/U (down/up) where the lower note and the upper note play twice at the bottom and top of the pattern instead of just playing once.

RND: Held notes play in a random order.

PLY: (as played) The held notes played in the order in which they are triggered. X2U: Each note in the arpeggio plays twice from the lowest to the highest. X2D: Each note in the arpeggio plays twice from the highest to the lowest.

23

6 – The Arpeggiator

Loading...
+ 54 hidden pages